

Page 1

Operator Guide
5222/5227
Your document management partner.
Printer
Page 2
When ordering supplies or requesting service for your
copier, you will need to provide the model and serial
number of your machine.
Please take a moment to enter your model and serial
numbers here.
MODEL NUMBER: __________________________
SERIAL NUMBER: __________________________
To order supplies, call: ( )
To request service, call: ( )
Information Statement:
Layout and contents of this document are based on
the information available at the time of th is CD-ROM
production.
Customer Vision® -
Our commitment to your
complete satisfaction
Important:
Please read and understand this manual prior to using it. Pay special attention to the Safety In formation.
Parts of this manual are subject to change without prior notice. In no event will the company be liable for
direct, indirect, special, incidental, or consequential damages as a re sult of handling or operating the
machine.
Trademarks:
Microsoft ™, Windows™, and MS-DOS™ are registered trademar ks of Microsoft Corporation.
PostScript™ is a registered trademark of Adobe Systems Incorporated.
Other product names used herein are for identification purposes only and might be trademarks of their
respective companies. We disclaim any and all rights in those areas.
As an Energy Star Partner, Lanier Worldwide, Inc. has
determined that this product meets the Energy Star
guidelines for energy efficiency.
© Lanier Worldwide, Inc. 1999 November
Printed in the U.S.A.
Page 3

Table of Contents
Introduction
Connecting to the Printer ...........................................................................1-1
Printer Requirements .....................................................................1-1
Connecting the Printer to the Host Using Parallel Interface Cable ........1-2
Connecting the Printer Using the Network Interface Board 185 ...........1-3
Printer Drivers for this Printer .........................................................1-6
Operation Panel ........................................................................................1-8
Message Display ........................................................................... 1-9
Online and Offline ...................................................................................1-10
Printer Configuration
Configuring the Printer for the Network .......................................................2-1
Table of Contents
Installing Printer Driver
Auto Run .................................................................................................3-1
Installing by Auto Run ..................................................................3-1
Software and Utilities Included on the CD-ROM ............................................ 3-3
Installing the PCL 6/5e Printer Driver ........................................................... 3-4
Windows 95/98 - Installing the PCL 6/5e Printer Driver ......................3-4
Windows NT 4.0 - Installing the PCL 6/5e Printer Driver ....................3-5
Windows 3.1x - Installing the PCL 6/5e Printer Driver ........................ 3-6
Installing the PostScript Printer Driver..........................................................3-8
Windows 95/98 - Installing the PostScript Printer Driver ....................3-8
Windows NT 4.0 - Installing the PostScript Printer Driver ...................3-8
Windows 3.1x - Installing the PostScript Printer Driver ...................... 3-9
Using Adobe PageMaker Version 6.0 or 6.5 ............................................... 3-11
Macintosh..............................................................................................3-12
Macintosh - Installing the PostScript Printer Driver ..........................3-12
Setting Up the PPD File ................................................................ 3-13
Setting Up Options ...................................................................... 3-13
Uninstalling the Printer Driver
Uninstalling the PCL 6/5e Printer Driver .......................................................4-1
Windows 95/98 - Uninstalling the PCL 6/5e Printer Driver ..................4-1
Windows NT 4.0 - Uninstalling the PCL 6/5e Printer Driver .................4-1
Windows 3.1x - Uninstalling the PCL 6/5e Printer Driver ....................4-2
Uninstalling the PostScript Printer Driver......................................................4-3
Windows 95/98 - Uninstalling the PostScript Printer Driver ................4-3
Windows NT 4.0 - Uninstalling the PostScript Printer Driver ...............4-3
Windows 3.1x - Uninstalling the PostScript Printer Driver ................... 4-4
Macintosh - Uninstalling the PostScript Printer Driver .........................4-4
Setting Up Printer Driver
PCL 6/5e - Accessing the Printer Properties.................................................. 5-1
Windows 95/98 - Accessing the Printer Properties ............................ 5-1
Windows NT 4.0 - Accessing the Printer Properties ...........................5-2
i
Page 4

Table of Contents
Windows 3.1x - Accessing the Printer Setting Dialog Box .................. 5-3
PostScript - Setting Up for Printing ............................................................. 5-5
Windows 95/98 - Accessing the Printer Properties ........................... 5-5
Windows NT 4.0 - Accessing the Printer Properties .......................... 5-6
Windows 3.1x - Accessing the Printer Setting Dialog Box .................. 5-7
Macintosh - Setting Up for Printing ................................................. 5-9
Canceling a Print Job...............................................................................5-10
Windows 95/98 - Canceling a Print Job ........................................5-10
Windows NT 4.0 - Canceling a Print Job ........................................5-10
Windows 3.1x - Canceling a Print Job ............................................5-11
Macintosh - Canceling a Print Job ..................................................5-12
Troubleshooting
Error and Status Messages ........................................................................ 6-1
Error and Status Messages on the Message Display Panel ................. 6-1
Getting Printer Information over the Network ................................... 6-5
Printer Does Not Print ..............................................................................6-11
Additional Printing Problems .....................................................................6-14
Using the Control Panel
Adjusting Printer Features ......................................................................... 7-1
Printer Features Menu ................................................................... 7-1
Accessing the Main Menu ......................................................................... 7-4
Making Printer Settings with the Operation Panel ......................................... 7-5
Proof Print Menu ...................................................................................... 7-6
Proof Print Parameters .................................................................. 7-6
Job Control Menu .................................................................................... 7-7
Job Control Parameters ................................................................. 7-7
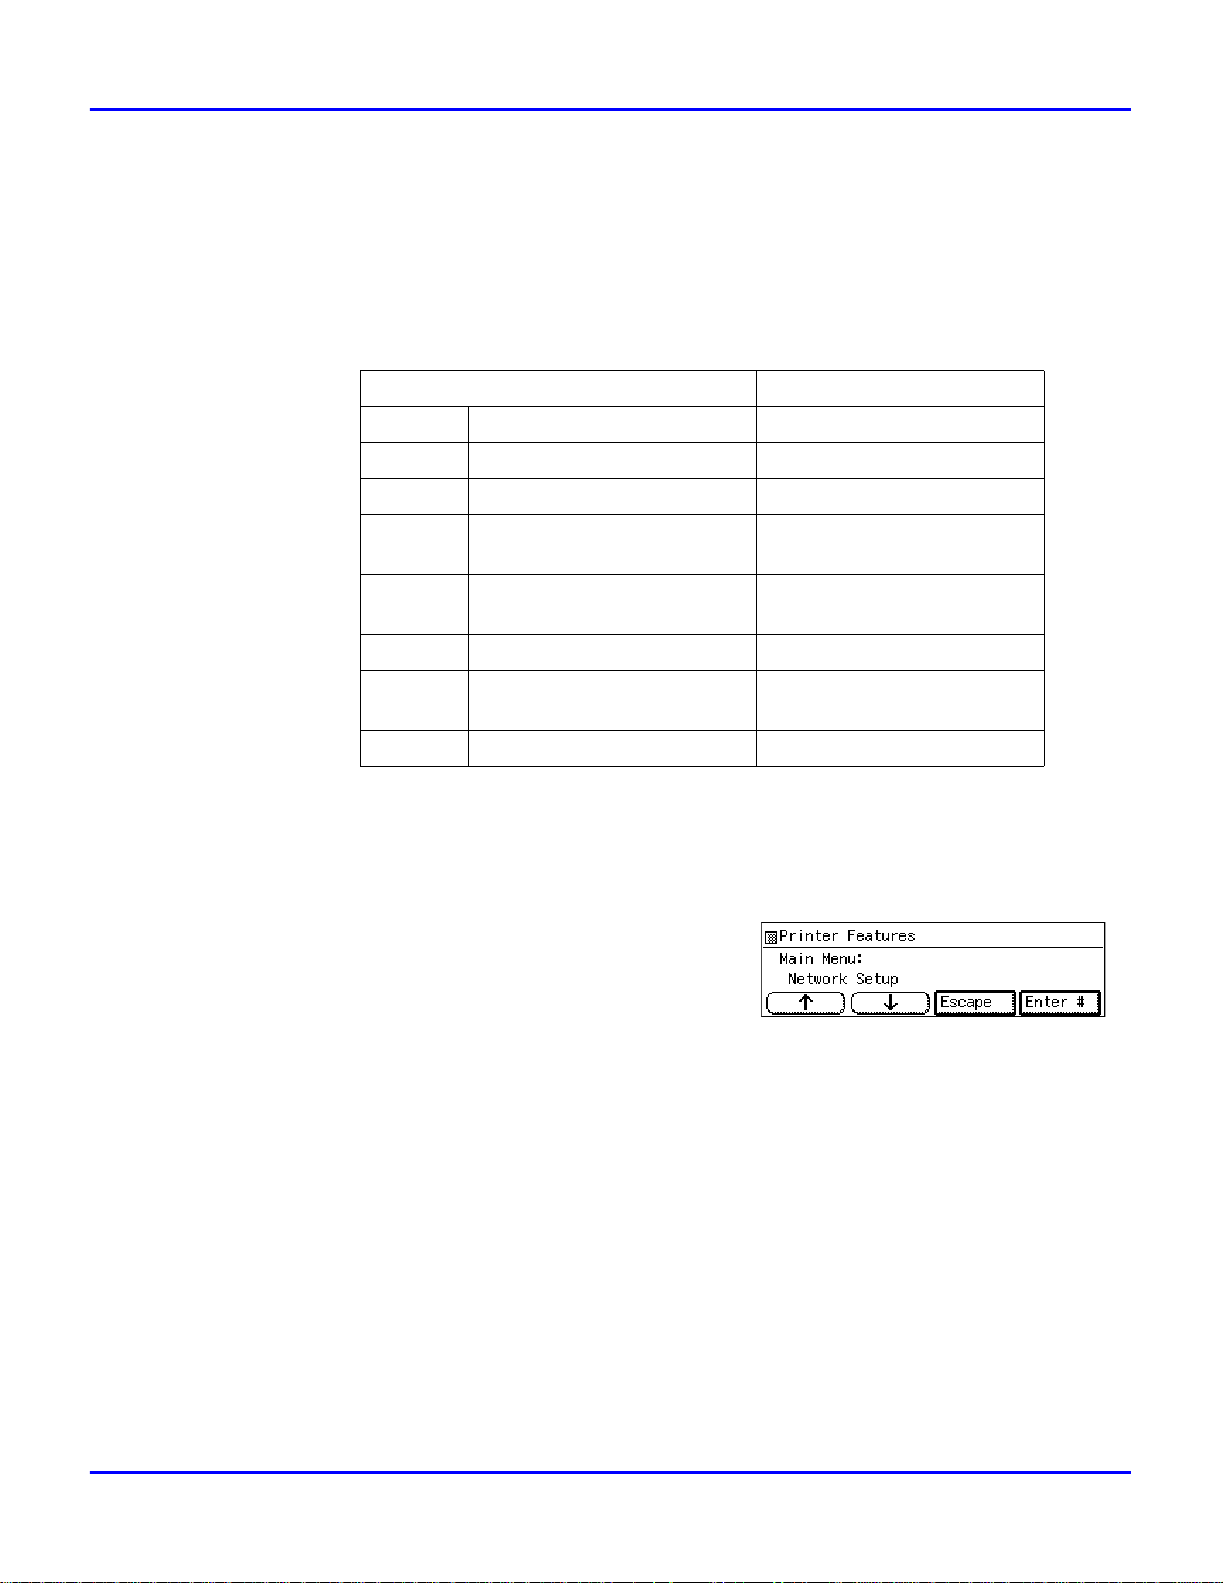
Network Setup Menu...............................................................................7-10
Maintenance Menu ..................................................................................7-11
Maintenance Parameters .............................................................7-11
List Print Menu .......................................................................................7-12
List Print Parameters ....................................................................7-12
Specifying the Custom Paper Size for the Bypass Tray.................................7-13
Printer Condition .....................................................................................7-15
Printing with the Operation Panel ..............................................................7-16
Using the Proof Print ....................................................................7-16
PostScript3 Kit Type185
Installable Options.................................................................................... 8-1
Setting Up Options ....................................................................... 8-1
Printing a Document ................................................................................. 8-3
Collate, Staple, Print Mode ............................................................ 8-6
Proof Print ................................................................................... 8-8
Specifications
Specifications .......................................................................................... 9-1
Memory Capacity and Printer Function........................................................ 9-2
Agency Certifications ............................................................................... 9-3
Index
Index of Scanner Topics..............................................................................I-1
Warranty
New Machine Warranty and Limitation of Liability .......... inside back cover
ii
Page 5

Introduction
Chapter 1
Page 6

Chapter Overview
This Chapter covers:
•“Printer Requirements” on page 1-1
•“Connecting the Printer to the Host Using Parallel Interface Cable” on page 1-2
•“Connecting the Printer Using the Network Interface Board 185” on page 1-3
•“Printer Drivers for this Printer” on page 1-6
•“Message Display” on page 1-9
Introduction
Page 7
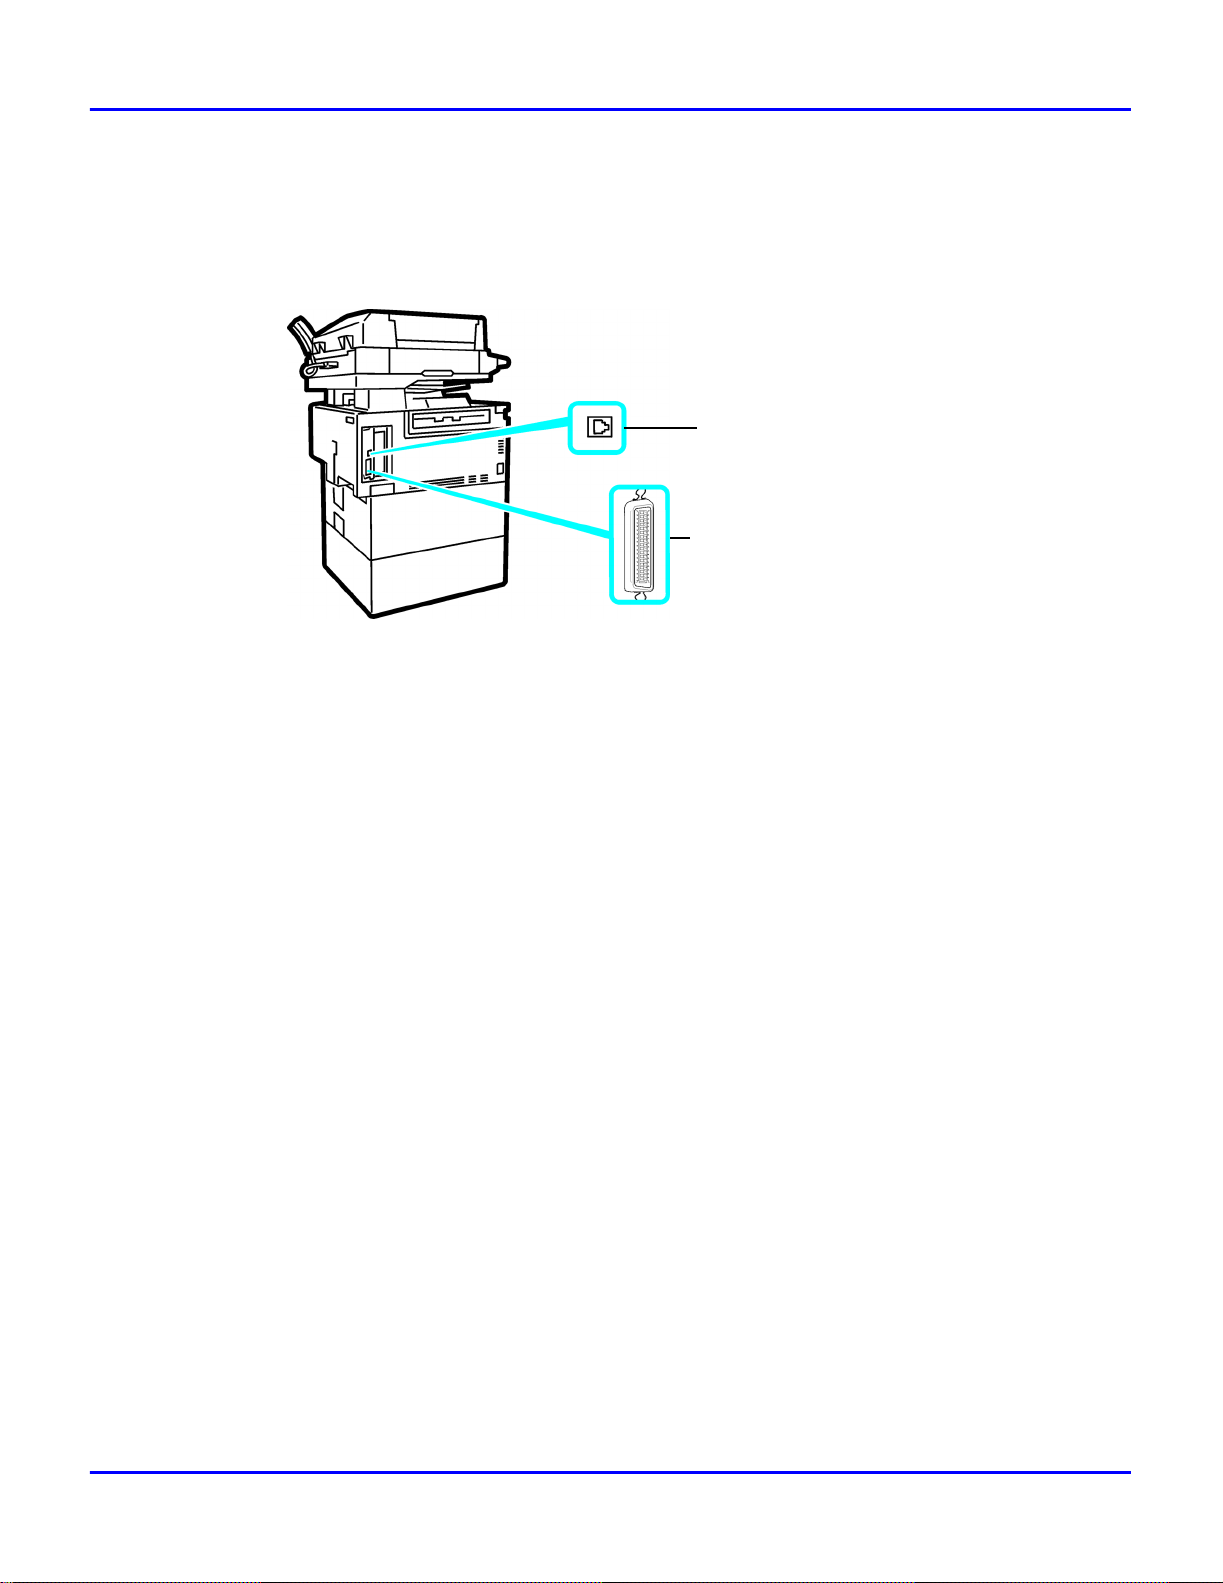
Connecting to the Printer
Confirm that the shape and the position of the connector are as shown in the illustration.
Connecting to the Printer
Parallel Port
10BASE-T/100BASE-TX
Printer Requirements
Requirements
Before using the printer, confirm that all the environmental and electrical requirements have been
met. Connect the unit to your host computer using the para llel port, optional Network Interface
Board 185, or both.
Confirm that all the cable s, conn ectors, and electr ical outle ts necess ary to att ach the pr inter to your
host computer or network are present.
The interface cable is not supplied in the box. It is your responsibility to provide the
•
interface cable appropriate for the computer that you are using.
Parallel Cable Requirements
Connect the printer to your host computer using a parallel port. The parallel cable to connect the
printer to the host computer is not include d with the printer.
The printer’s parallel interface is a standard bidirectional interface. It requires a standard 36-pin
parallel cable complian t with IEEE 1284 and a paralle l port available on the host computer.
Do not use a parallel cable that is longer than 3 meters (10 feet).
•
Introduction 1 - 1
Page 8
Connecting to the Printer
Network Cable Requirements
The optional Network Interfac e Board 185 can be inst alled to allow direct connection to an
Ethernet network.
The Network Interface Board supports 10BASE-T or 100BASE-TX connections.
You can use the machine in the following network environments:
•
•
Client Windows 95, 98, NT 4.0, 3.1x, Macintosh (optional
Driver PCL 6/5e, PostScript 3
File Server NetWare 3.x, NetWare 4.x, NetWare 5
Protocol TCP/IP, IPX/SPX, NetBEUI, AppleTalk
With the Windows NT4.0 by the computer based x86 only.
Under the Windows 95/98/NT 4.0 only.
Using the appropriate networ k management sof t wa re and printer driver .
Attaching the machine to a networks computer set up as a server.
PostScript 3 Kit Type 185 is required)
In a mixed network environment, the protocol switches automatically.
Consult your network administra tor before connecting your machine to a network.
•
In a 100BASE-TX environment, be sure to use properly shielded and grounded cable
•
(STP, Category/Type5) for the connection to your host computer (and/or HUB) in order
to meet FCC and EMC Directive 89/336/EEC emission guidelines.
Connecting the Printer to the Host Using Parallel Interface Cable
Use a parallel int erface cable compliant with I EEE 1284 (supplied by you) to conne ct your printer
to the host computer.
Follow these steps to connect the printe r to your host computer.
Confirm that you have the correct c able.
1
Confirm that both the machine and the host compute r are turned off.
2
Plug the 36-pin end of the paralle l cable into the parallel port at the right side of the back
3
cover of the machine.
Squeeze the wire clips on each side of the connector together until they snap into place. The
4
clips hold the cabl e secu rel y in place.
Plug the other end of the parallel cable into the computer's parallel port.
5
1 - 2 Introduction
Page 9
Connecting to the Printer
TAHX010E
Connecting the Printer Using the Network Interface Board 185
Connect the printer to the network usi ng the Network Interface Board 185.
Follow these steps to connect the printe r.
Confirm that you have the correct c able.
1
Confirm that the machine is turne d of f.
2
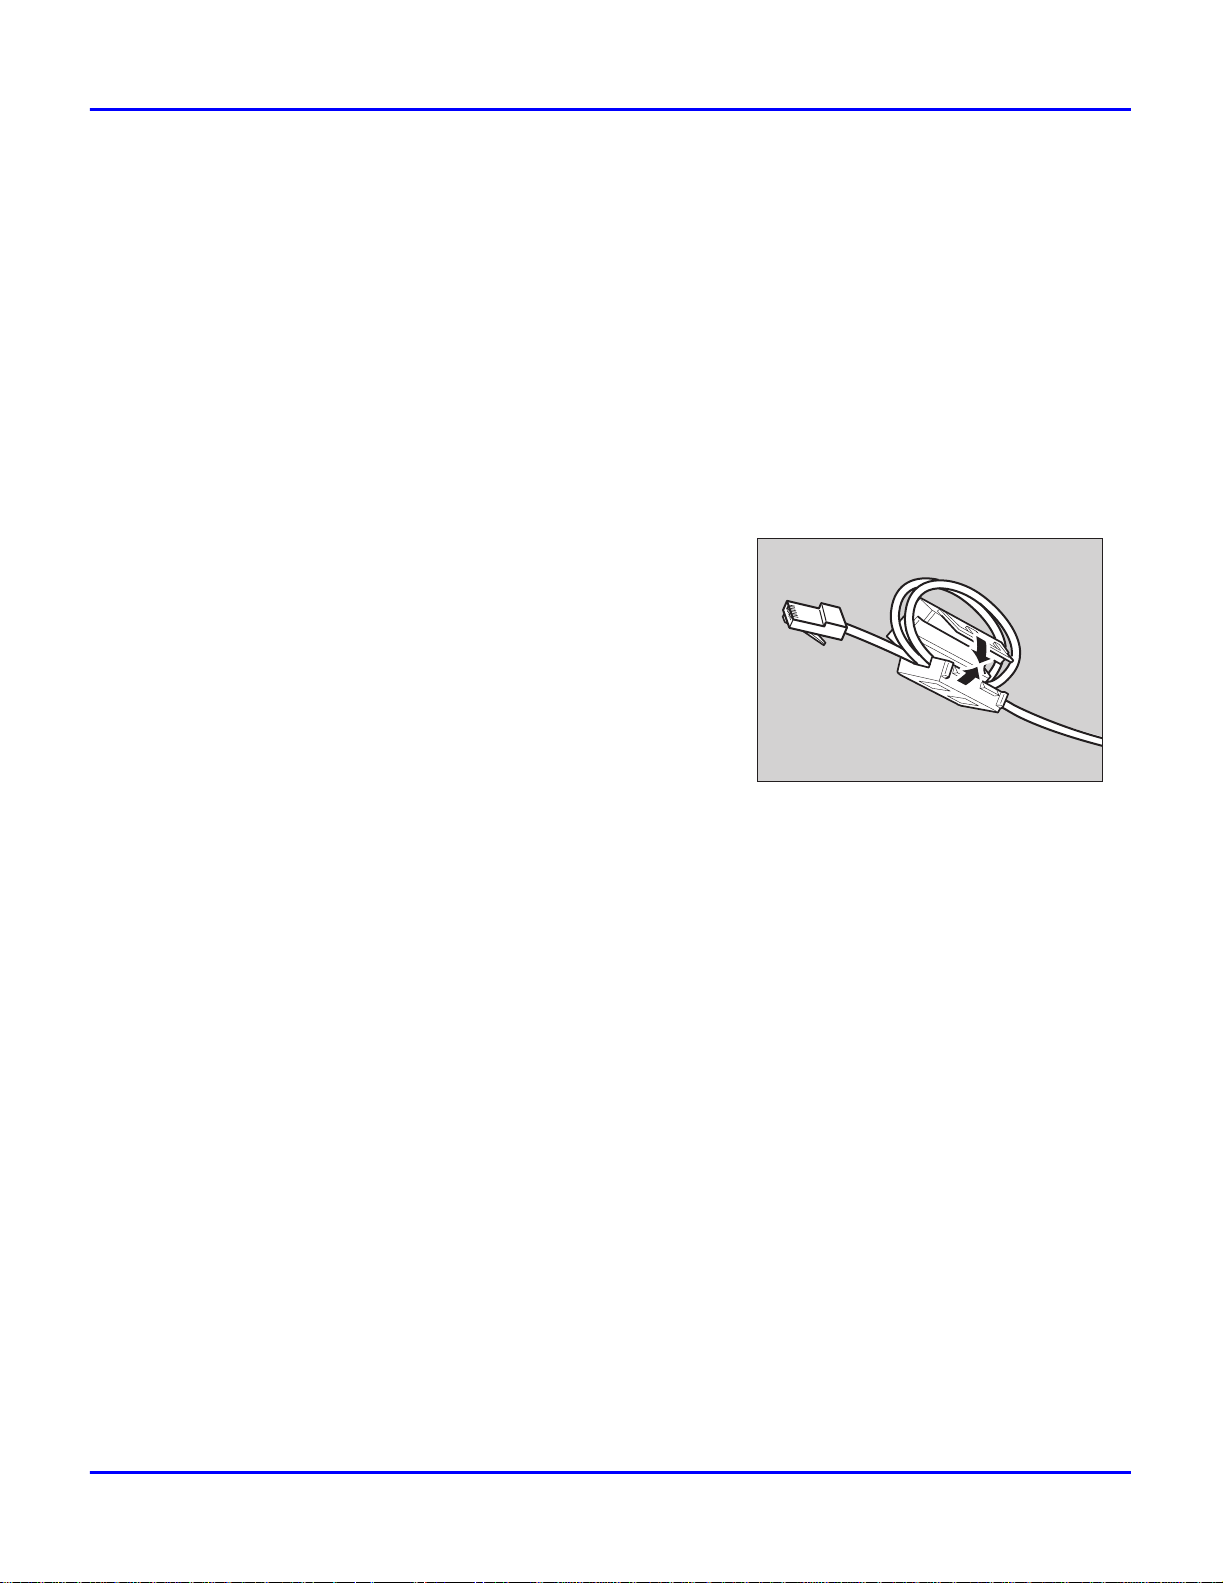
Loop the network cable. The loop should be about 10cm (4”) from the end of the cable on
3
the end closest to the printer.
Attach the ferrite core to the loop.
4
Attach the network cable to the 10BASE-T/100BASE-TX port on the machine.
5
Confirm that the cable is connected to the 10BASE-T/100BASE-TX port.
•
Do not conn ect the cab le int o the fax p ort.
•
Connect the other end of the cable into the network.
6
Introduction 1 - 3
Page 10
Connecting to the Printer
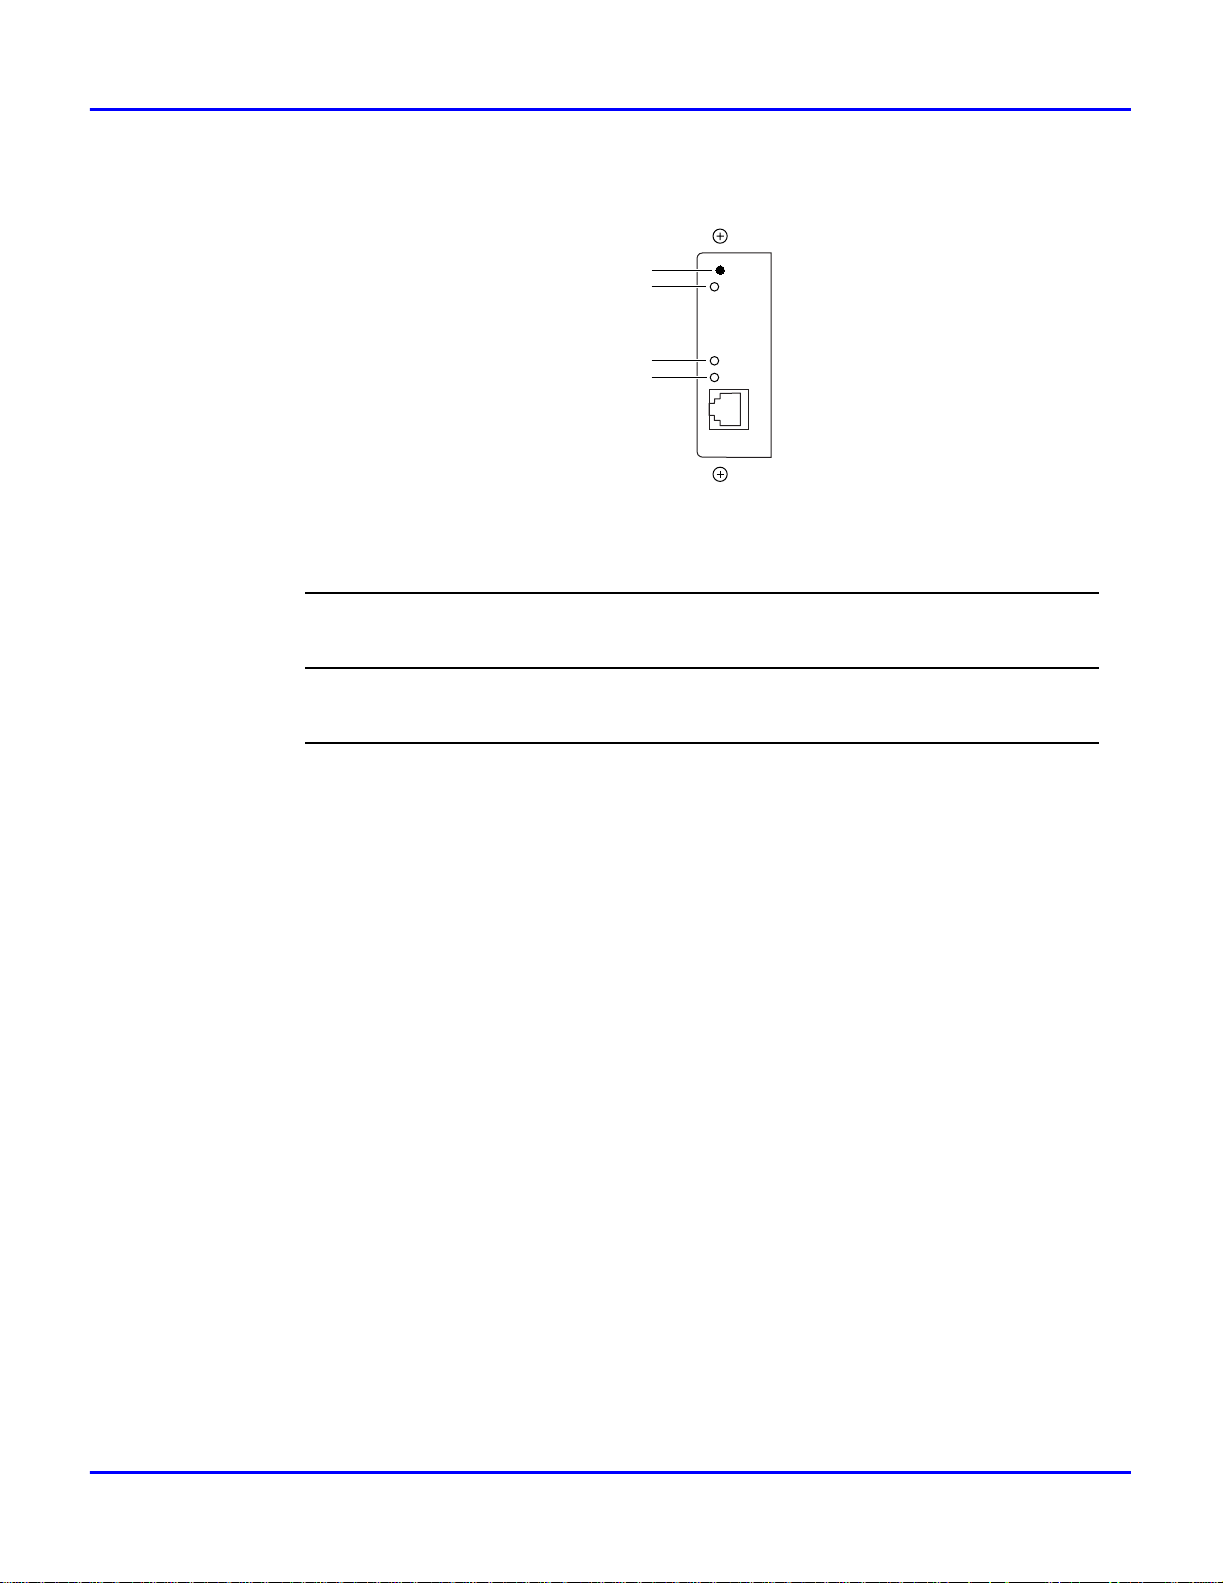
Button and Indicators on the Network Interface Board
1 Button:
Press this button fo r m o re than 2 seconds to print “Network Configuration Page”. Press this button more than 5
seconds to print “System Log Information”.
2 Indi c at o r (orang e):
Stays on while the network interface board i s w orking.
1
2
3
4
3 Indicato r (g ree n ):
Stays on while 100BASE-TX is working. Stays off while 10BASE-T is working.
4 Indicato r (g ree n ):
Stays on while the machine is in a network environment.
Features of the Printer
This printer is designed especially for office workgroups, both for shared usage within network
environment, and for one-to-one usage by being connected directly to your computer.
High Productivity
As this printer comes with a 27 pages per minute (ppm) engine and offers a variety of paper
handling options, handling documents will be more efficient. Proof print function is one of the
supporting feature for making multiple original printing which allows you to confirm that the
document prints as expected before printing many.
Optional Printer Hard Disk Type 185 is required.
Versatile Paper Handling Options
This printer offe rs both versatile input and output paper handling options. Input capacity can be
raised to 3,100 with the optional paper bank (PS420) and the bypass tray (Bypass Tray Type 270)
to reduce the inconvenience of reloading paper. For an output device, collating and stapling
capability is availab le with the optional finisher (SR720).
Optional Printer Feature Expander Type 185 (32MB or 64MB) or Printer Hard Disk Type 185 is
required.
1 - 4 Introduction
Page 11

Connecting to the Printer
Variety of Paper Media Support
Standard Tra y 2 and optional Bypass Tray Type 270 support variety of paper media such as thick
paper, transparency and some envelops.
For more information on supported paper and other media, see “Copy Reference”.
Network Connectivity
Your printer is network ready with the optional network interface board.
Network Utility
PRINTER MANAGER, software consisting of Administration and Client versions, is provided.
With this software, multiple print devices can be utilized effectively together on a network. This
software offer s several convenient functions such as parallel pri nting and recovery printing.
For the name of the PRINTER MANAGER you use, see the “Operating Instructions” for the
Network Interface Board which is included in the CD-ROM.
Introduction 1 - 5
Page 12
Connecting to the Printer
Major Specifications
Printing Speed
Engine Resolution 600dpi / 300dpi resolution
Printer Language PCL 5e, PCL 6
Memory 16MB
Interface 10BASE-T or 100BASE-TX <FmSymbol>¥ 1
*1 Printing speed depends on machine
*2 Option
Printer Drivers for this Printer
Printing requires inst allation of a printer driver for your operating system. The following drivers
are included in the CD-ROM that comes with this machine.
1
22/27ppm (A4<IconCo1>K, 8
11"<IconCo1>L, simplex)
22ppm (A4<IconCo1>K, 8
11"<IconCo1>L, duplex)
Enhanced resolution with edge smoothing
Adobe PostScript Level 3
Max. up to 80MB
IEEE1284 <FmSymbol>¥ 1
/2" <FmSymbol>¥
1
/2" <FmSymbol>¥
Printer Language PCL 5e PCL 6 PostScript 3
Operating system
Windows 95 X X W
Windows 98 X X S
Windows 3.1x X X S
Windows NT 4.0 X X X
Macintosh X
1 - 6 Introduction
Page 13

Connecting to the Printer
PCL Printer Drivers
Printer drivers allow the compute r to communicate with the printer via a printer language. Two
kinds of PCL printer drivers, PCL 6 and PCL 5e, are included in the CD-ROM that comes with
this machine. We recommend the PCL 6 as your first choice. However, some of your applications
might require the installa tion of the PCL 5e printer driver . In this case, you might configure to
install and print by using PCL 5e in addition to the PCL 6.
Adobe PostScript Printer Drivers and PPD Files
The Adobe PostScript printer dri vers and the PPD files are included in the CD-ROM that comes
with this unit. Adobe PostScript printer driver allows the computer to communicate with the
printer by means of a printe r langua ge. The PPD files allow the printer driver to enable the printer
specific functions .
Introduction 1 - 7
Page 14

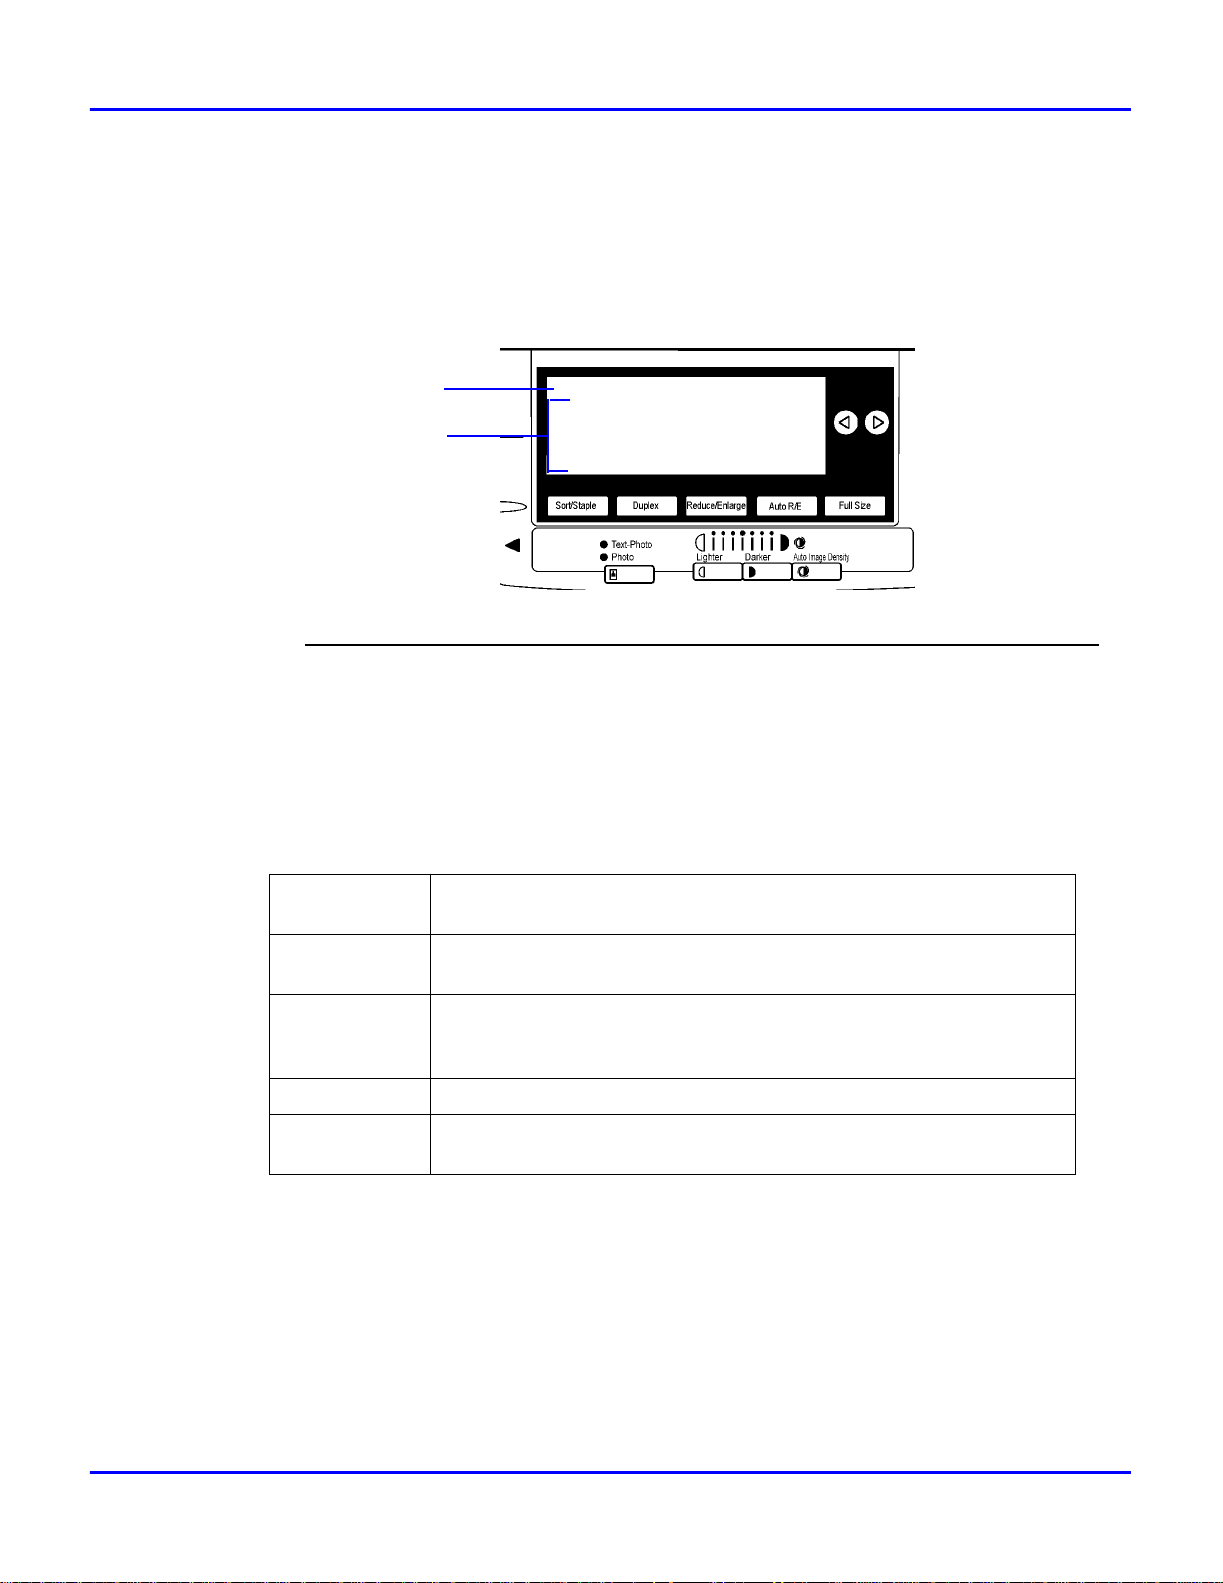
Operation Panel
Operation Panel
This panel display is for instal led Facsimile and Printer .
1 {User Tools} key:
1 2 3 4 5
6
7 8 9 10
Press to change the default settings and conditions to meet your r equirements.
2 Error Indicator:
Lights up whenever a printer error occurs. A message describ ing the cause of the error also appears on the panel
display.
3 Panel Display:
Shows the operation status, error messages, and function menus. Press selection keys to sel ect the function on the
pane l displ ay.
4 Cursor keys
Pres eith er arrow to move the cursor in the message display
5{Energy Saver} key:
Press this key for about 1 second to switch to and from Energy Saver mode.
6 Operation Switch:
Press this switch t o turn the power o n (the On indicator ligh ts up). To turn the p o w er off, pr ess this switch again
(the On indi cator goes off ).
7 Number keys
8 Function keys:
Press to change the functions (Copy, Facsimile, Printer) shown on the panel display. To use the printer function,
press the {
9 Data In Indicator:
Shows if a pri nt job is being sent from the host computer. If the indicator is blinking, a job is being sent. If the
indicator stays on the data is printing.
Printer
} key.
10 On Line Indicator:
Stays on whi le the printer is online.
1 - 8 Introduction
Page 15
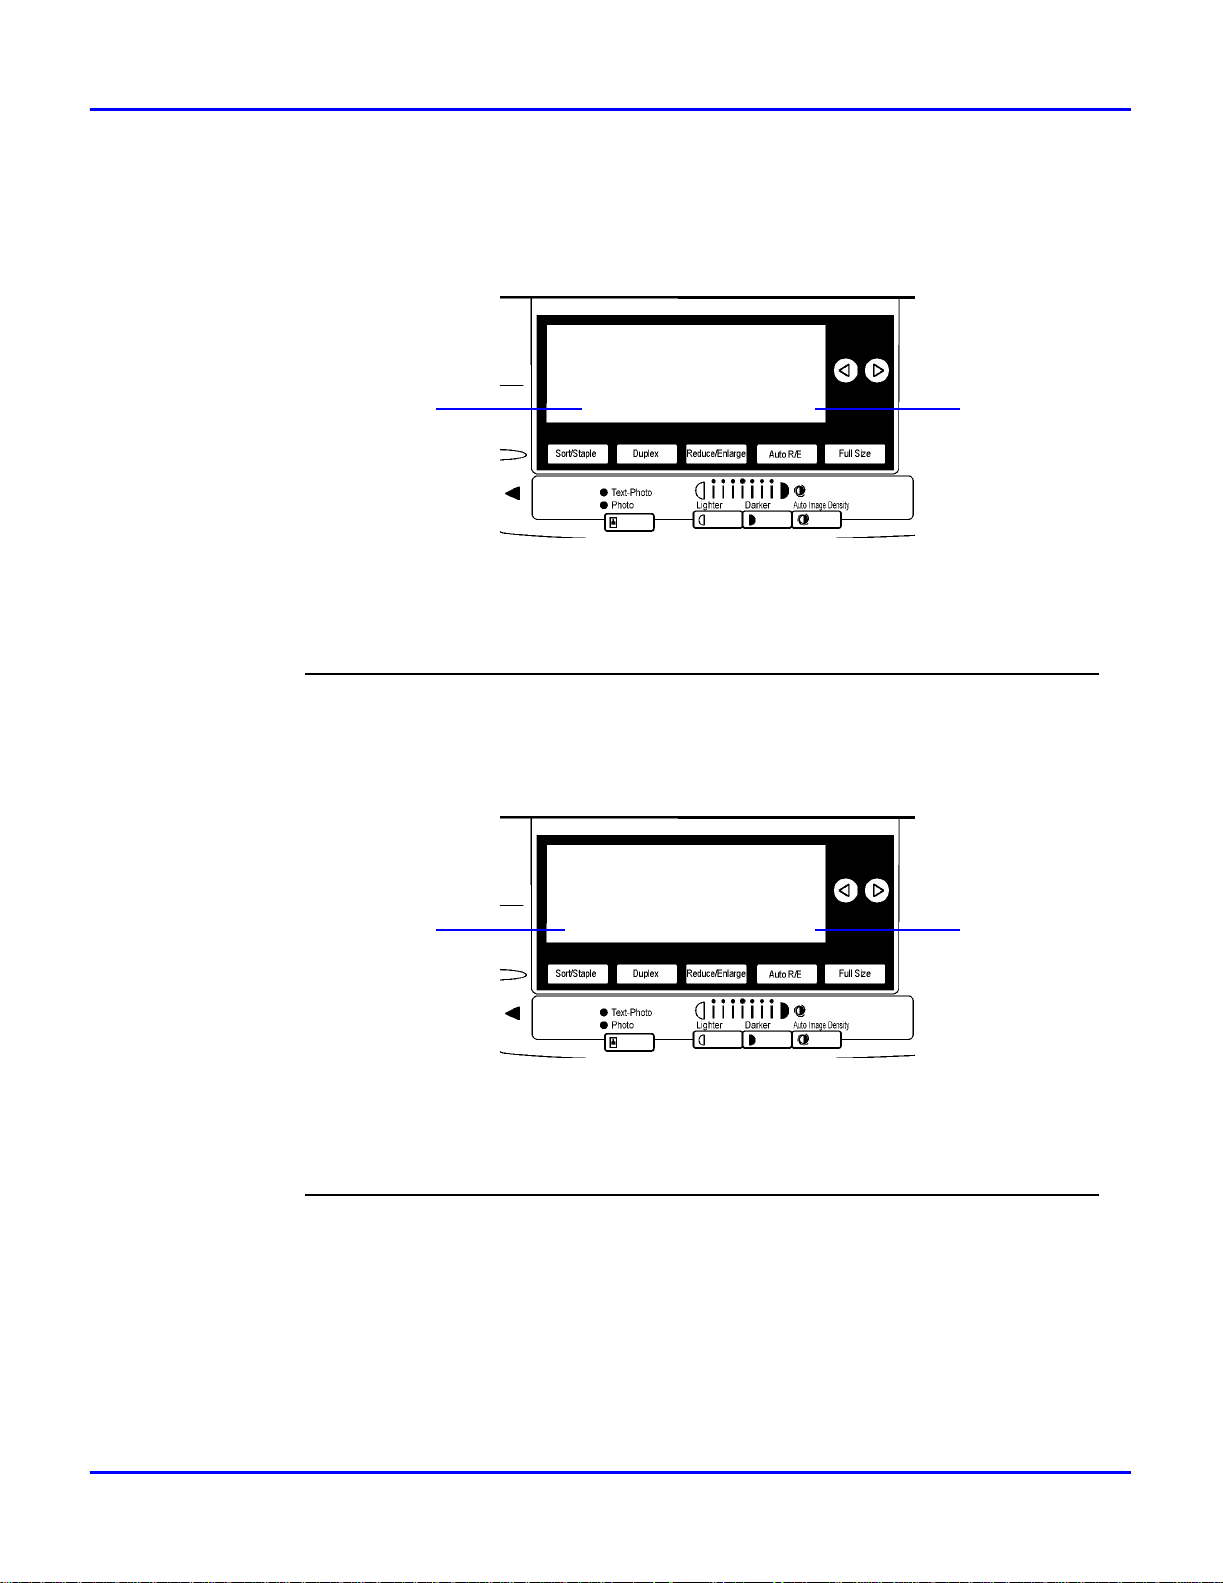
Message Display
The Message Display shows operational status, error messages, and function menus.
Do not apply a strong shock or a force of about 30N (about 3kgf) or more to the panel
•
display. Otherwise, the display might be damaged.
Operation Panel
1
2
1 Operation and Error Messages are displayed.
2 Cursor keys.
Items can be selected or specified. These keys correspond to t he keys that are in th e bottom line of the di splay.
The selected item is highlighted on the panel display.
•
Basic Key Operations
The following table shows basic key operations.
[Enter #]
[Escape]
key Press this key to set the function or numeric value, and the
previous display appears.
key Press this key to cancel the function or numeric value, and the
previous display appears.
Ready Q’ty: 1
Auto 11x17 8 1/2x14 8 1/2 x 11
Select with < >
100%
[Up and Down
keys
Arrow]
[Cancel]
[Exit]
Introduction 1 - 9
key Press this key to cancel the function, and previous display appears.
key Press this key to set the function or numeric value, and normal
If all functions cannot be displayed, press these keys to switch to
the previous or next page.
Increase or decrease the counter on the display panel.
display screen appears.
Page 16
Online and Offline
Online and Offline
Online
Online is the state in which the printer can receive data from the computer.
1[Job Reset] key:
Press this key when the printer is online to cancel the current print job.
1
(Job Reset) (Online)
2
2[Online] key:
Press this key to change the online status, the printer offline conditi ons.
Offline
Offline is a state in which the printer cannot receive data from the computer.
12
1 [Form Feed] key:
Press this key when the printer is offline to print out all the data left in the printer's input buffer.
2[Online] key:
Press this key to change the online status, the printer offline conditi ons.
(FormFeed) (Online)
1 - 10 Introduction
Page 17

Chapter 2
Printer Configuration
Page 18

Chapter Overvie w
This chapter covers:
•“Configuring the Printer for the Network” on page 2-1
•“Subnet Mask” on page 2-5
•“Gateway Address” on page 2-5
•“Access Control Address and Access Control Mask” on page 2-5
Printer Configuration
Page 19
Configuring the Printer for the Network
Configuring the Printer for the Network
After installi ng the optional network inte rface card, configure it for the network using the printer's
Control Panel.
The following table shows the operat ion panel se ttings and their default settings. These are
included in the “Main Menu”.
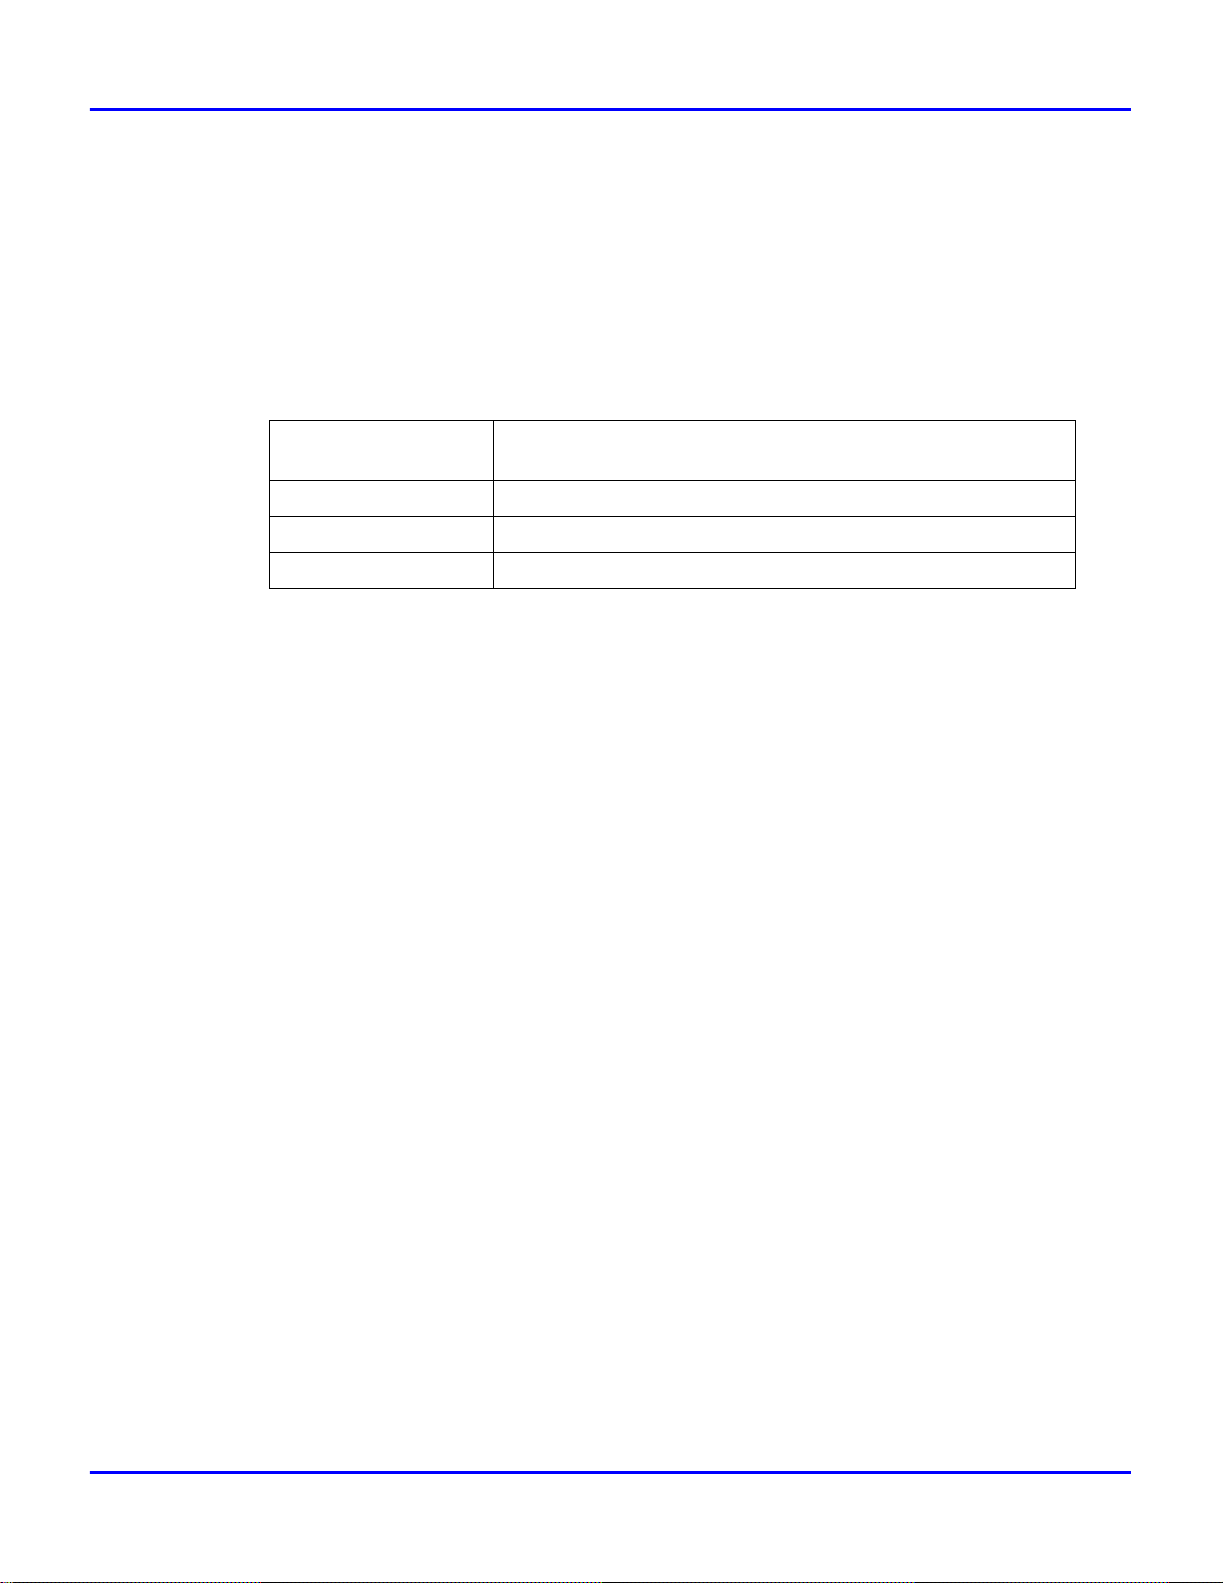
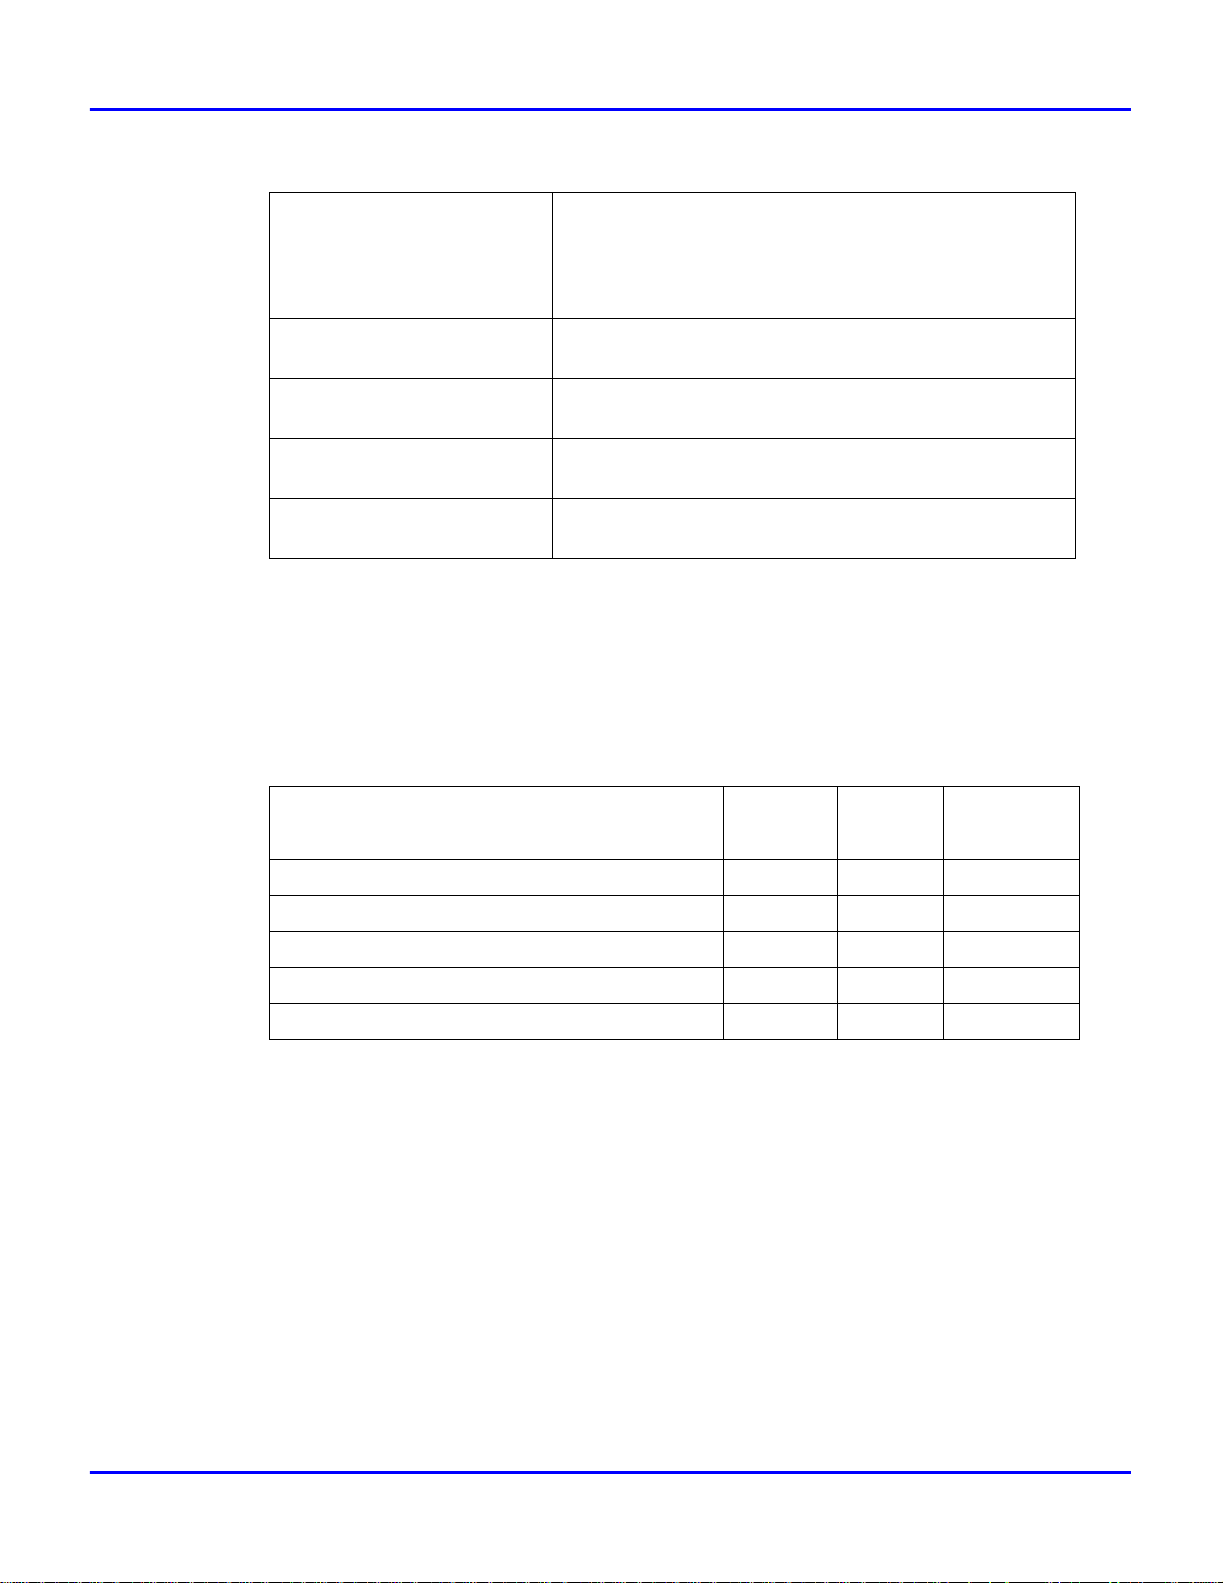
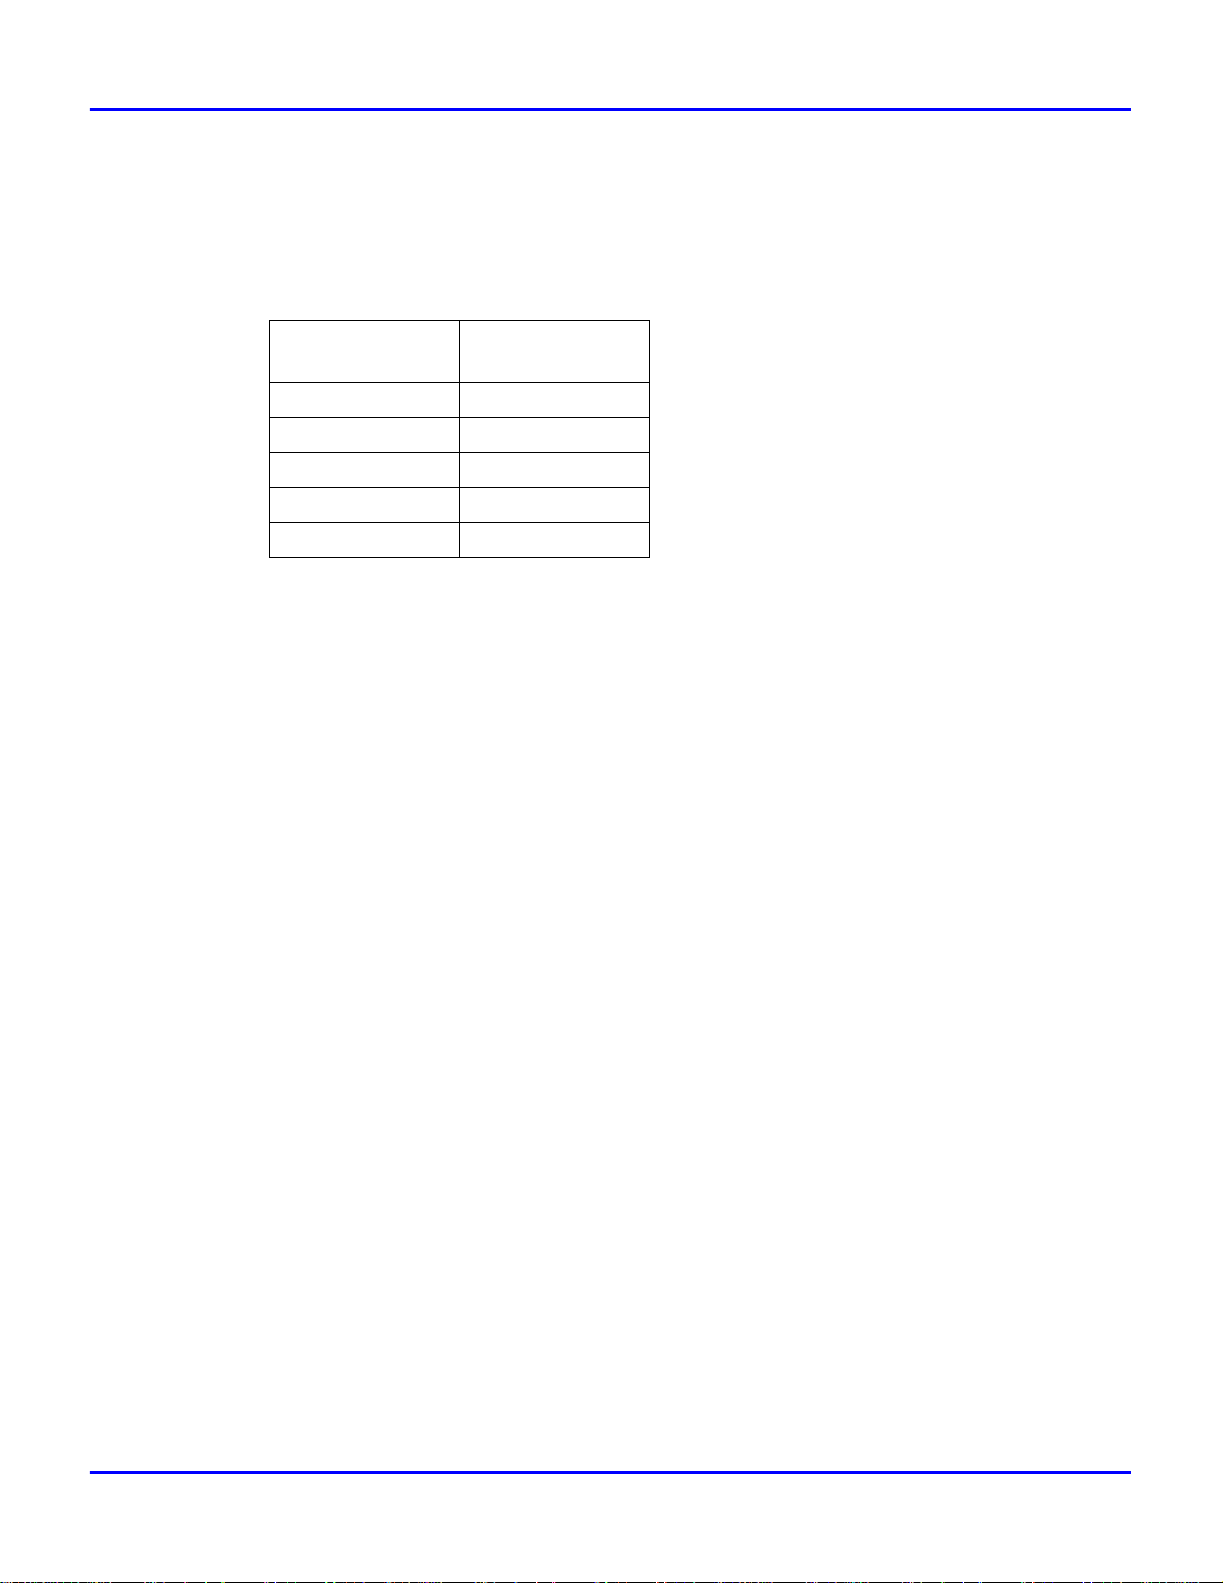
Items Default
32 IP Address 011.022.033.044
33 Subnet Mask 000.000.000.000
34 Gateway Address 000.000.000.000
35 Access Control
(Access Control Address)
36 Access Mask
(Access Control Mask)
37 Network Boot None
38 Frame Type(NW)
(Frame Type NetWare)
39 ActiveProtocols All Active
Press [User Tools].
1
Press [4] on the number keys.
2
Press the Up or Down Arrow keys until the
3
following message appears.
Press [Enter #].
4
000.000.000.000
000.000.000.000
Auto Select
Printer Configuration 2 - 1
Page 20
Configuring the Printer for the Network
Select the protocol you want to use. You can select one of the items on the following table.
5
Menu item on the
panel display
All Active
(Default Setting)
None
TCP/IP Only X
NetWare Only X
TCP/IP & NetW X X
ATalk Only X
TCP/IP & ATalk X X
NetWare & ATalk X X
TCP & ATK &
NW
NetBEUI only X
TCP/IP & NB X X
NetBEUI & NetW X X
TCP & NB & NW X X X
Active Protocol
TCP/IP N etWare AppleTalk NetBEUI
XXXX
XXX
NetBEUI & ATalk X X
TCP & NB & ATK X X X
NB & NW &
ATalk
XXX
Note: <IconSt1>' means that this protocol is active.
Blank cell means that this protocol is not active.
You should not select protocols that are not used on your network.
If you want to select AppleTalk, you should install the optional PostScript kit
T ype 185.
1. Press
the Up or Down Arrow keys
until
the following message appears.
2. Press
[Enter #]
.
The current settings appear on the
panel display.
3. Press
the Up or Down Arrow keys
until
the protocol you want to use appears.
4. Press
[Enter #]
.
The actual procedure may differ depending on the protocol you use. If you use
2 - 2 Printer Configuration
Page 21
Configuring the Printer for the Network
011 . 022 . 033 . 044
Byte 1 Byte 2 Byte 3 Byte 4
TCP/IP, you should assign the IP Address to your printer.
To get the IP Address for your printer, contact your network administrator.
•
The IP Address is shown by B yte on the panel
•
display.
1. Press
the Up or Down Arrow keys
until
the following message appears.
2. Press
[Enter #]
.
The current Byte 1 of the IP Address
appears on the panel display.
3. Use
the Up or Down Arrow keys
to
specify the IP Address.
4. Press
[Enter #]
.
The current Byte 2 of the IP Address
appears.
5. Use
the Up or Down Arrow keys
to
specify the Byte 2 of the IP Address.
Repeat steps 3 and 4 to specify the rest of the IP Address.
6. Press
[Enter #]
to register the IP
Address you specified.
If you use TCP/IP, you should assign the
6
“Subnet Mask” and “Gateway Address”
following the same procedure for spec if ying the IP Address.
7
8
Printer Configuration 2 - 3
If you use TCP/IP, set the “Access Control” and “Access Mask” following the same
procedure for specifying the IP Address, if necessary.
If you use TCP/IP, you can make settings for “Network Boot”.
You can select how to assign the printer's address using the computer. Select one of the
•
items on the following table.
Menu item on the
panel display
ARP + PING <IconSt1>'
ARP & RARP <IconSt1>' <IconSt1>'
ARP & BOOTP <IconSt1>' <IconSt1>'
ARP&RARP&BO
OTP
ARP+ING RARP_TFTP BOOTP DHCP
<IconSt1>' <IconSt1>' <IconSt1>'
Available method
Page 22
Configuring the Printer for the Network
Menu item on the
panel display
None (Default
Setting)
RARP + TFTP X
BOOTP X
RARP & BOOTP X X
DHCP X
You should set up your server, if you want to use “RARP + TFTP”, “BOOTP”, o r
•
“DHCP”.
ARP+ING RARP_TFTP BOOTP DHCP
Available method
1. Press the Up or Down Arrow keys
until the following message appears.
2. Press
The current setting appears on the panel
display.
[Enter #]
.
3. Press the Up or Down Arrow keys
until the method you want to use
appears.
4. Press
If you use NetWare, select the frame type for NetWare.
9
Select one of the items below if necessary.
•
•
•
•
•
1. Press
[Enter #]
Auto Select (Default)
Ethernet 802.3
Ethernet 802.2
Etherne t II
Ethernet SNAP
Note: Usually, you can use the default setting (“Auto Select”). With “Auto
Select”, the frame type detected by the pr inter fi rst is a dopted. If your networ k can
use more than two frame types, the pr inter may fail to select the co rr ect fram e
type. In this case, select the appropriate frame type.
the Up or Down Arrow keys
.
until
the following message appears.
2. Press
[Enter #]
.
2 - 4 Printer Configuration
Page 23
Configuring the Printer for the Network
The current setting appears on the panel
display.
3. Press
the Up or Down Arrow keys
until
the frame type you want to use
appears.
4. Press
Exit from the setup menu to the available function settings.
10
1. Press
2. Press
3. Press
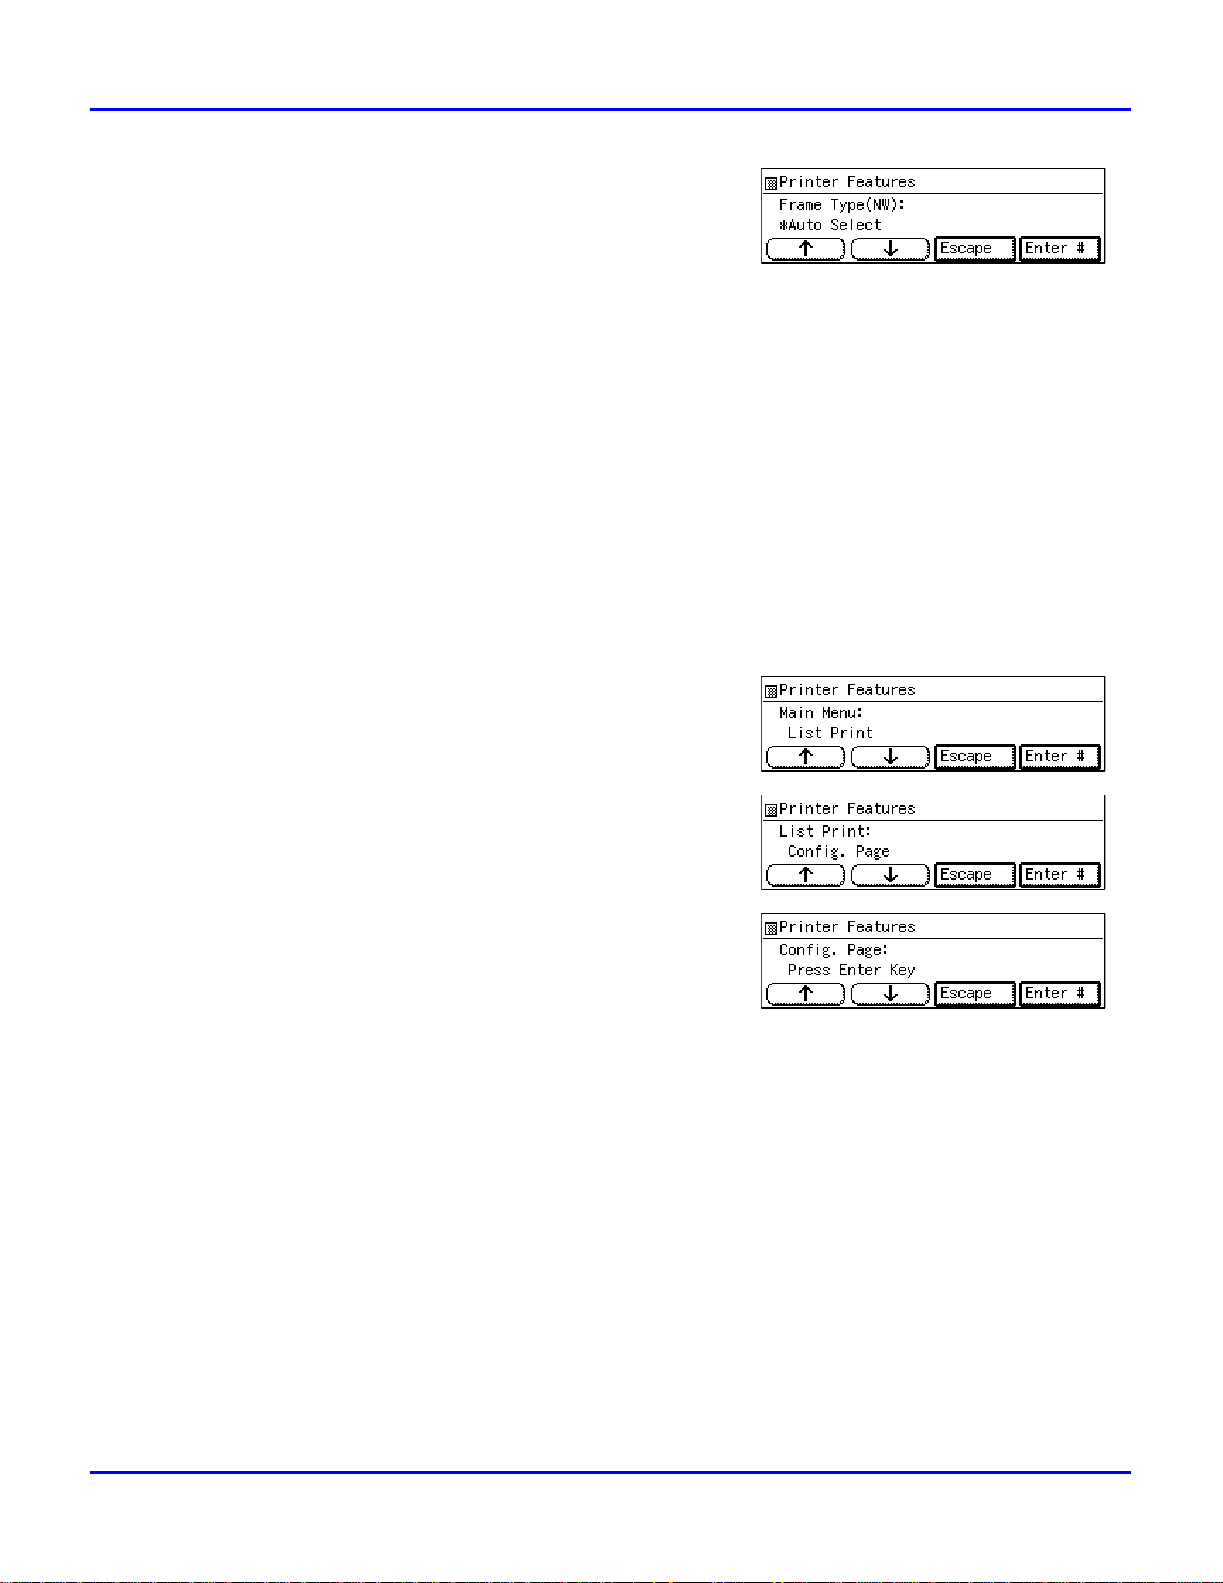
When printing a configuration pa ge, confirm of your printer's configuration.
11
1. Press {
[Enter #]
[Escape]
[Escape]
[Exit]
.
User Tools
.
.
.
}.
2. Press {4} on the number keys.
3. Press
the Up or Down Arrow keys
to
display “List Prin t ”, and then press
[Enter #]
.
4. After confirming that “Config. Page”
is displayed, press
[Enter #]
.
5. Press
Confirm of your printe r's configuration by printing
a configuration page.
[Enter #]
.
Subnet Mask
A number used to mathematically "mask" or hide IP Address on the network by eliminating those
parts of the address that are alike for all the machines on the network.
Gateway Address
A gateway is a connection or interchange point that connects two networks. A gateway address is
for the router or host computer used as a gateway.
T o get the addresses, contact your network administra tor.
•
Access Control Address and Access Control Mask
Access Control Address and Access Control Mask are used to control the IP Address that have
access to the computer used for printing, with the IP Address. If it is not necessary for you to
control the access rights, select “0.0.0.0”.
Printer Configuration 2 - 5
Page 24
Configuring the Printer for the Network
When the Access Control Address settings coincide with the masked result of the IP
•
Address of the comput er , print jobs fr om tha t IP Addr ess can be acc epted by th e n etwork
interface board.
For example, if you assign 192.168.15.16 as the Access Control Address to the network
•
interface board, the combination of the Access Control Mask and IP Address that can
have access are as follows. (xxx: for any numerical value)
Access Co ntrol
Mask
0. 0. 0. 0 XXX.XXX.XXX.XXX
255. 0. 0. 0 192.XXX.XXX. XXX
255.255. 0. 0 192.1 68.XXX.XXX
255.255.2 55. 0 192.168. 15. XXX
255.255.255.255 192.168. 15. 16
IP Address that
have access
2 - 6 Printer Configuration
Page 25

Chapter 3
Installing Printer Drive r
Page 26

Chapter Overview
This Chapter covers:
•“Auto Run” on page 3-1
•“Software and Utilities In cluded on the CD-ROM” on page 3-3
•“Installing the PCL 6/5e Printer Driver” on page 3-4
•“Installing the PostScript Printer Driver” on page 3-8
•“Using Adobe PageMaker Version 6.0 or 6.5” on page 3-11
•“Macintosh” on page 3-12
Installing Printer Driver
Page 27

Auto Run
Auto Run
You can install the printer driver by using Auto Run.
Auto Run is available for the following operating systems:
Windows 95/98
•
Windows NT 4.0
•
If your system is Windows 3.1x or Macintosh, see information on inst alli ng t he pri nter dri ver.
See “Windows 95/98 - Installing the PCL 6/5e Printer Driver” on page 3-4.
See “Windows 3.1x - Installing the PCL 6/5e Printer Driver” on page 3-6.
See “Macintosh - I nstalling the PostScript Prin ter Driver” on page 3-12.
Before starting this installation, close all documents and appl ications. In a network
•
environment, confirm that users who are logged on are disconnected. Be sure to do
this when it will create the least interference with other users.
After installing a printer driver, you must restart the computer.
•
If your system is Windows NT 4.0, installing a printer driver requir es Full Control
•
access permission. Members of the Administrators, Server Operators, Print
Operators, and Power Users groups have Full Control permission by default. When
you install a printer driv er, log on under Full Control permission.
If your system uses W indows NT 4.0 and Service Pack 4 is installed, you might not
•
install the PCL 6/5e printer driver using Auto Run. In this case, use [Add Printer
Wizard] in the [Printers] window to install the printer driv er or insta ll Service Pack 5
in the computer before instal ling the printer driver.
Auto Run might not automatically work with certain OS settings. In this case, start
•
"SETUP.EXE" to install printer driver on the root.
If you want to cancel Auto Run, insert the CD-ROM while pressing the {SHIFT} key
•
until your computer finis hes acce ssing the CD-ROM.
Using the Shared Printer on Windows NT 4.0 for Windows 95/98 Client
If you want to sha re the printe r on Windows NT 4.0, you must n ot insta ll t he printe r dri ver using
Auto Run. Install the printer driver of the Windows 95/98 for alternate driver.
For more information on installing the printer driver as an alternate driver: See “Uninstalling
the PCL 6/5e Printer Driver” on page 4-1.
Installing by Auto Run
Follow these steps to install the printer driver on Windows 95/98/NT 4.0.
Never have two versions of the same printer driver installed on your system at the same
•
time. When upgrading to a new version of the printer dr iver, uninstall the old version,
and then install the new one. For more informati on on uninstalli ng the print er driver and
software, see “Uninstalling the PCL 6/5e Printer Driver” on page 4-1.
Installing Printer Driver 3 - 1
Page 28

Auto Run
If the "plug and play" function is sta rted by Auto Run, click
•
Hardw are Found]
ROM.
[New Hardware Found]
system version of the Wi ndows 95/98.
The appropriate language name is used in the CD-ROM folder: ENGLISH (English),
•
DEUTSCH (German), FRANCAIS (French), ITALIANO (Italian), ESPANOL
(Spanish), NEDRLNDS (Dutch), NORS K ( Norwegian), DANSK (Danish), SVENSKA
(Swedish), POLSKI (Polish) , P ORTUGUS (Portuguese), SUOMI (Finn ish), MAGYAR
(Hungarian), CESKY (Czechoslovakian)
Close all applicat ions that are currently running.
1
Insert the CD-ROM in the CD-ROM drive.
2
Follow the instruct ions on the screen.
3
Restart your computer after installation is complete.
4
You should set up the options with the printer driver.
5
dialog box or
[Device Driver Wizard]
or
[Devic e D riv er Wizard]
[Cancel]
, and then insert the CD-
appears depending on the
of the
[New
3 - 2 Installing Printer Driver
Page 29

Software and Utilities Included on the CD-ROM
Software and Utilities Included on the CD-ROM
Agfa Font Manager
Helps you to install new fonts, or organize and manage fonts already installed on your system.
PRINTER MANAGER FOR ADMINISTRATOR
A utility for the system administr ator to manage printers on the network.
For the name of the PRINTER MANAGER FOR ADMINISTRATOR you use, see the “Operating
Instruction” for the optional Ne twork Interface Board which is on the CD-ROM.
See the PRINTER MANAGER FOR ADMINISTRATOR Online Help for details on using the
PRINTER MANAGER FOR ADMINISTRATOR.
PRINTER MANAGER FOR CLIENT
A utility for users to manage their own print jobs on the network.
For the name of the PRINTER MANAGER FOR CLIENT you use, see the “Operating
Instruction” for the optional Ne twork Interface Board which is included in the CD-ROM.
See the PRINTER MANAGER FOR CLIENT Online Help for details on using the
•
PRINTER MANAGER FOR CLIENT.
Multidirect Print
A utility for printing on a "Peer-to-Peer" network.
For more information on Multidirect Print, see the “Operating Instructions” for the
•
optional Network Interface Board which is inc luded in the CD-ROM.
PortNavi
A utility that helps you to use network printers effectively. It is useful in environments where two
or more network printers are used.
For more information on PortNavi, see the “Supplement” for the Network Interfa ce
•
Board which is included in the CD-ROM.
Acrobat Reader
A utility that allows you to read PDF (Portable Document Format).
Documentation on using the printer is included on the CD-ROM in PDF format.
•
Installing Printer Driver 3 - 3
Page 30

Installing the PCL 6/5e Printer Driver
Installing the PCL 6/5e Printer Driver
Windows 95/98 - Installing the PCL 6/5e Printer Driver
Installing the Printer Driver
Install the driver in accordance with the steps explained. See “Installing by Auto Run” on page
3-1.
Setting Up Options
When setting up options, you should access the Printer Properties from Windows. You
•
cannot access the Printer Properties from an application.
Click
1
The
•
Click the icon of the printer you want to use. On the
2
[Properties]
Click the
3
Select any options you have installed from the
4
Click
5
on the task bar, point to
[Start]
[Printers]
[Accessories]
.
[OK]
window appears.
.
tab.
[Settings]
, and then click
[Options]
[File]
group.
[Printers]
menu, click
.
3 - 4 Installing Printer Driver
Page 31

Installing the PCL 6/5e Printer Driver
Windows NT 4.0 - Installing the PCL 6/5e Printer Driver
Installing the Printer Driver
If your system uses Wi ndows NT 4.0 and Servic e Pack 4 is installed, you might not
•
install the PCL 6/5e printer driver using Auto Run. In this case, use
Wizard]
the computer before install the printer driver.
Install the driver in accordance with the steps explained in “Installing by Auto Run” on
•
page 3-1.
If you want to share the printer on Windows NT 4.0, you must not install the
•
printer driver using Auto Run. In this case, cancel Auto Run and insta ll the
printer driver using
When prompted for Windows NT 4.0 alternate driver location, specify the following
•
folder in the CD-ROM.
PCL 5e:
\DRIVERS\PCL5E\NT4\(Language)\DISK1\
PCL 6:
\DRIVERS\PCL6\NT4\(Language)\DISK1\
When prompted for Windows 95/98 alternate driver location, specify the following
•
folder in the CD-ROM.
PCL 5e:
\DRIVERS\PCL5E\WIN95_98\(Language)\DISK1\
PCL 6:
\DRIVERS\PCL6\WIN95_98\(Language)\DISK1\
in the
[Printers]
window to i nstall the printer driver or install Service Pack 5 in
[Add Printer Wizard]
in the
[Printers]
window .
[Add Printer
Installing Printer Driver 3 - 5
Page 32

Installing the PCL 6/5e Printer Driver
Setting Up Options
Changing the setting of the printe r requ ires Full Control access permission. Members of the
Administrators, Server Operators, Print Operators, and Power Users groups have Full Control
permission by default. When you set up options, log on under Full Control permission.
When setting up options, you should access the Printer Properties from Win dows. You cannot
access the Printer Properties from an application.
Click [Start] on the task bar, poin t to [Settings], and then click [Printers].
1
The [Printers] window appears.
•
Click the icon of the printer you want to use. On the [File] me nu, click
2
[Properties].
Click the [Accessories] tab.
3
Select any options you have installed from the [Options] group.
4
Click [OK].
5
Windows 3.1x - Installing the PCL 6/5e Printer Driver
Installing the Printer Driver
W e recommend you to install the PCL 5e printer driver on your W indows 3.1x system. Under
Windows 3.1x system, you might get some unexpected print results with the PCL 6 printer driver.
Close all the applications that are currently running.
1
Insert the CD-ROM in the CD-ROM drive.
2
From [Program Ma nager], click [Run] on the [File] menu.
3
In the [Run] window, click [Browse].
4
Select the CD-ROM drive in the [Drives:] list.
5
Open [PCL5E] or [PCL6].
6
Open [WIN31].
7
Open the folder of the language you use.
8
Open [DISK1].
9
3 - 6 Installing Printer Driver
Page 33

Installing the PCL 6/5e Printer Driver
Double-click “SETUP.EXE”.
10
Follow the instruct ions on the screen.
11
Setting Up Options
When setting up options, you should access the Printer Setting dialog box from Wind ows. You
cannot access the Printer Setting dialog box from an application.
From the
1
Double-click the
2
In the
3
Click
4
Click the
5
•
Select any options you have installed from the
6
Click
7
Click
8
[Main]
[Installed Printer s:]
[Setup]
[Accessories]
The
[Options]
[OK]
[Close]
group of
[Printers]
.
group appears.
to close the Printer Setting dia log box.
to close the
[Program Manager]
icon.
list, click the name of the printer you want to set up.
tab.
[Printers]
dialog box.
, double-click
[Options]
group.
[Control Panel]
.
Installing Printer Driver 3 - 7
Page 34

Installing the PostScript Printer Driver
Installing the PostScript Printer Driver
Windows 95/98 - Installing the PostScript Printer Driver
Installing the Printer Driver
Install the dr ive r in accord a n ce w ith the s tep s exp lai n ed in “Installing by Auto Run” on page 3-1.
Setting Up Options
When setting up opt ions, you should access the [Device Options] tab from Windows. You cannot
set up options when accessing the [Device Options] tab from an application.
Click [Start] on the task bar, poin t to [Settings], and then click [Printers].
1
The [Printers] window appears.
•
Click the icon of the printer you want to use. On the [File] me nu, click
2
[Properties].
Click the [Device Options ] tab.
3
The [Installab le option s ] gr oup app ears.
•
From the [Installable options] box, select the option you have installed.
4
The current setting is displ ayed in the [C hange settings for:] list .
•
Use the [Cha nge setting for:] list to select the appropriate setting for the selected option.
5
Click [Apply] to apply the settings you made.
6
After making all settings you want, click [OK].
7
Windows NT 4.0 - Installing the PostScript Printer Driver
Installing the Printer Driver
Install the driver in accordance with the steps explained in “Installing by Auto Run” on page 3-1.
Setting Up Options
Changing the setting of the printe r requ ires Full Control access permission. Members of the
Administrators, Server Operators, Print Operators, and Power Users groups have Full Control
permission by default. When you set up options, log on under Full Control permission.
When setting up options, you should access the Printer Properties from Windows. You cannot set
up options when accessing the Printer Properties from an application.
3 - 8 Installing Printer Driver
Page 35

Installing the PostScript Printer Driver
Click
1
The
•
Click the icon of the printer you want to use. On the
2
[Properties]
Click the
3
Use the
4
Click
5
on the task bar, point to
[Start]
[Printers]
[Device Se t tin gs ]
[Installab le Options ]
to close the Printer Propertie s.
[OK]
window appears.
.
tab.
[Settings]
group to specify the options.
, and then click
[File]
Windows 3.1x - Installing the PostScript Printer Driver
Installing the Printer Driver
Close all the applications that are currently running.
1
Insert the CD-ROM in the CD-ROM drive.
2
[Printers]
menu, click
.
From the
3
In the
4
Select the CD-ROM drive in the
5
Open
6
Open
7
Open the folder of the language you use.
8
Open
9
Double-click “SETUP.EXE”.
10
Follow the instruct ions on the screen.
11
Setting Up Options
From the
1
[Program Manager]
window , click
[Run]
.
[PS]
.
[Main]
.
group of
[WIN31]
[DISK1]
, click
[Browse]
[Drives:]
[Program Manager]
[Run]
.
from the
list.
menu.
[File]
, double-click
[Control Panel]
.
Double-click the
2
Installing Printer Driver 3 - 9
[Printers]
icon.
Page 36

Installing the PostScript Printer Driver
In the
3
Click
4
Click the
5
Use the
6
Click
7
Click
8
[Installed Printer s:]
[Setup]
[Features]
The
•
[Printer Features]
[Printer Features]
to close the Printer Setting dia log box.
[OK]
[Close]
.
tab.
to close the
list, click the name of the printer you want to set up.
group appears.
group to specify the options.
[Printers]
dialog box.
3 - 10 Installing Printer Driver
Page 37

Using Adobe PageMaker Version 6.0 or 6.5
Using Adobe PageMaker Version 6.0 or 6.5
If you use the printer under Windows 95/98/NT 4.0 with Adobe PageMaker, you need to copy
the PPD file to the PageMaker folder.
The PPD file is the file with extension ". ppd". It is in the folder
•
“\PS\WIN95_98\(Language)\DISK1\” on the CD-ROM.
The [WIN95_98] folder, inside the [PS] folder is for the Windows 95/98 operating
•
system. Use the folder at thi s leve l th at is appr opriate for the operati ng sys tem you ar e
using.
The third folder, "(Language)" may be substituted by appropriate language name.
•
Copy this file to the PageMaker folder.
•
For the PageMaker 6.0 default installation, the folder is "C:\PM6\RSRC\PPD4", and
•
for the PageMaker 6.5 default installation, the directory is
"C:\PM65\RSRC\USENGLISH\PPD4". The "USENGLISH" may be different,
depending on your language selection.
For more information on the langua ge name, see “Installing by Auto Run” on page 3-
•
1.
Installing Printer Driver 3 - 11
Page 38

Macintosh
Macintosh
Macintosh - Installing the PostScript Printer Driver
It is necessary to install a printer driver and a PPD file to print from a Macintosh.
Follow these steps to install a printer driver and a PPD file into a Macintosh using a system 7.1
or later operating system.
You cannot use LaserWriter 8.5.0 or later with Mac OS 8.1 or later until you do the
•
following procedure. Copy the “PrintingLib” file from the
[Syst em Fol der ]
installing the PostScri pt printer driver, drag the “PrintingLib” file from your desktop
back into the
If you forgot to copy the “PrintingLib” file, please reinstall the Macintosh operating
•
system again.
Insert the CD-ROM in the CD-ROM drive.
1
to your desktop before inst alling th e PostScript printe r driver. After
[Extensions]
folder.
[Extensions]
folder in
Double-click the CD-ROM icon.
2
Double-click the
3
Double-click the fo lder of the language you use.
4
Open
5
6
7
8
9
10
11
12
[DISK1]
Follow the instruct ions on the screen.
Move the “PrintingLib” file from your desktop back to
Double-click
Double-click
Double-click the CD-ROM icon on the deskt op.
Double-click
Click and drag the PPD file into
and double-click the installer icon.
[Extensions]
[Printer Descriptions]
[DISK1]
folder.
[PS]
.
.
in the folder of the language you use.
[Printer Descriptions]
[Extensions]
.
in
[System Folder]
.
Click and drag the “Proo f Print ” file into
13
[System Folder]
Restart the Macintosh.
14
3 - 12 Installing Printer Driver
.
[Printer Descriptions]
in
[Extensions]
in
Page 39

Setting Up the PPD File
Confirm that the printer is connected to an AppleTalk network before performing the following
procedure.
On the [Apple] menu, select [Chooser].
1
Click the [Adobe PS] ic on.
2
In the [Select a PostScript P r inte r :] list, click the name of the printer you want to use.
3
Click [Create].
4
Click the printer you want to use, and then click [Select].
5
The PPD file is set up , and the [ Ado be PS] icon appears at the left of the printer name in
•
the list. Next, make the option settings, or close the [Chooser] dialog box.
Setting Up Options
Macintosh
On the [Apple] menu, select [Chooser].
1
Click the [Adobe PS] ic on.
2
In the [Select the PostScript Printer:] list, click the name of the printer you want to use,
3
and then click [Setup].
Click [Configure].
4
A list of options appears.
•
Select the option you want to set up and select the appropriate setting for it.
5
If the option you want to set up is not displayed, the PPD file might not be set up
•
correctly. Check the name of the PPD file shown in the dialog box.
Click [OK].
6
The list of options closes.
•
Click [OK].
7
The [Chooser] dialog box appears.
•
Close the [Chooser] dialog box.
8
Installing Printer Driver 3 - 13
Page 40

Macintosh
Notes:
3 - 14 Installing Printer Driver
Page 41

Chapter 4
Uninstalling the Printer
Driver
Page 42

Chapter Overview
This Chapter covers:
•“Windows 95/9 8 - Uninstalling the PCL 6/5e Printer Driver” on
page 4-1
•“Windows NT 4.0 - Uninstalling the PCL 6/5e Printer Driver” on
page 4-1
•“Windows 3.1x - Uninstalling the PCL 6/5e Printer Driver” on page 4-
2
•“Windows 95/9 8 - Uninstalling the PostScript Printer Driver” on
page 4-3
•“Windows NT 4.0 - Uninstalling the PostScript Printer Driver” on
page 4-3
•“Windows 3.1x - Uninstalling the PostScript Printer Driver” on
page 4-4
•“Macintosh - Uninstalling the PostScript Printer Driver” on page 4-4
Uninstalling the Printer Driver
Page 43

Uninstalling the PCL 6/5e Printer Driver
Uninstalling the PCL 6/5e Printer Driver
This section describes how to uninst all the printer driver. The actual procedure may differ
depending on your operating system.
Follow the appropriate procedure.
Windows 95/98 - Uninstalling the PCL 6/5e Printer Driver
Close all the applications that are currently running.
1
Click
2
The
•
Click the icon of the printer you want to remove.
3
On the
4
A confirmation dialog box appears.
•
Click
5
on the task bar, point to
[Start]
[Printers]
[File]
[Yes]
window appears.
menu, click
to uninstall the printer driver.
[Delete]
[Settings]
.
, and then click
Windows NT 4.0 - Uninstalling the PCL 6/5e Printer Driver
Uninstalling the printe r driver requires Full Control access Permission. Memb ers of the
Administrators, Server Operators, Print Operators, and Power Users groups have Full
Control permission by default .
When you uninstall a printer driver, log on under Full Control permissio n.
Close all the applications that are currently running.
1
[Printers]
.
Click
2
The
•
Click the icon of the printer you want to remove.
3
On the
4
A confirmation dialog box appears.
•
Click
5
Uninstalling the Printer Driver 4 - 1
on the task bar, point to
[Start]
[Printers]
[File]
[Yes]
window appears.
menu, click
to uninstall the printer driver.
[Delete]
[Settings]
.
, and click
[Printers]
.
Page 44

Uninstalling the PCL 6/5e Printer Driver
Windows 3.1x - Uninstalling the PCL 6/5e Printer Driver
Close all applicat ions that are currently running.
1
Insert the CD-ROM in the CD-ROM drive.
2
From
3
4
5
6
7
8
9
10
11
12
13
[Program M anager]
In the
Select the CD-ROM drive in the
Open
Open
Open the folder of the language you use.
Open
Double-click “UNSETUP.EXE”.
Click
Click
Follow the instruct ions on the screen.
window , click
[Run]
[PCL5E]
[WIN31]
[DISK1]
.
[OK]
.
[OK]
or
.
.
[PCL6]
.
, select
[Browse]
[Run]
[Drives:]
from the
.
list.
[File]
menu.
If you are asked if you want to restart Windows, select
14
If you are not asked, restart Windows after completing the uninstallation.
•
4 - 2 Uninstalling the Printer Driver
[Resta rt W indows Now]
.
Page 45

Uninstalling the PostScript Printer Driver
Uninstalling the PostScript Printer Driver
This section describes ins tructions for uninstalling the PostScript printer driver. The actual
procedure may differ dep ending on your operating system.
Follow the appropriate one of the following procedures below.
Windows 95/98 - Uninstalling the PostScript Printer Driver
Close all applicat ions that are currently running.
1
Click
2
The
•
Click the icon of the printer you want to remove.
3
On the
4
A confirmation dialog box appears.
Click
5
on the task bar, point to
[Start]
[Printers]
[File]
[Yes]
window appears.
menu, click
to uninstall the printer driver.
[Delete]
[Settings]
.
, and then click
Windows NT 4.0 - Uninstalling the PostScript Printer Driver
Uninstalling the printe r driver requires Full Control access Permission. Memb ers of the
Administrators, Server Operators, Print Operators, and Power Users groups have Full
Control permission by default . When you unin stall a printer driver, log on under Full
Control permission.
Close all applicat ions that are currently running.
1
2
Click
on the task bar, point to
[Start]
[Settings]
, and then click
[Printers]
[Printers]
.
.
The
•
Click the icon of the printer you want to remove.
3
On the
4
•
Click
5
Uninstalling the Printer Driver 4 - 3
[Printers]
[File]
A confirmation dialog box appears.
[Yes]
window appears.
menu, click
to uninstall the printer driver.
[Delete]
.
Page 46

Uninstalling the PostScript Printer Driver
Windows 3.1x - Uninstalling the PostScript Printer Driver
Open
1
2
3
4
5
[Control Panel]
Double-click the
Select the printer you want to delet e and click
A confirmation dialog box appears.
•
Click
Click
to uninstall the printer driver.
[Yes]
[Close]
to close the
.
[Printers]
icon.
[Printers]
[Remove]
dialog box.
Macintosh - Uninstalling the PostScript Printer Driver
Drag the “AdobePS” file inside the
1
[Trash]
Drag the “Proof Print” file inside the
2
[Extensions]
.
folder in
[System Folder]
[Extensions]
[Printer Descriptio ns ]
to
folder in
[Trash]
.
[System Folder]
folder in the
.
to
4 - 4 Uninstalling the Printer Driver
Page 47

Chapter 5
Setting Up Printer Driver
Page 48

Chapter Overview
This chapter co vers :
•“Windows 95/98 - Accessing the Printer Properties” on page 5-1
•“Windows NT 4.0 - Accessing the Printer Properties” on page 5-2
•“Windows 3.1x - Accessing the Printer Setting Dialog Box” on page 5-
3
•“Windows 95/98 - Accessing the Printer Properties” on page 5-5
•“Windows NT 4.0 - Accessing the Printer Properties” on page 5-6
•“Windows 3.1x - Accessing the Printer Setting Dialog Box” on page 5-
7
•“Macintosh - Setting Up for Printing” on page 5-9
•“Windows 95/98 - Canceling a Print Job” on page 5-10
•“Windows NT 4.0 - Canceling a Print Job” on page 5-10
•“Windows 3.1x - Cancel ing a Print Job” on page 5-11
•“Macintosh - Canceling a Print Job” on page 5-12
Setting Up Printer Driver
Page 49

PCL 6/5e - Accessing the Printer Properties
PCL 6/5e - Accessing the Printer Properties
Windows 95/98 - Accessing the Printer Properties
There are two methods you can use to open the Printer Properties.
Making Printer Default Settings
T o make the printer default settings, first open the Printer Properties from the [Printers] window.
Click [Start] on the task bar, point to [Settings], and then click [Printers].
1
The [Printers] window appears.
•
Click the icon of the printer whose default settings you want to change.
2
On the [File] menu, click [Properties].
3
The Printer Properties appears.
•
Set desired settings and click [OK].
4
Making Printer Settings From an Application
To make the printer settings for a specific application, open the Printer Properties from that
application. The following example describes how to make settings for the WordPad application
that comes with Windows 95/98.
The actual procedures you should fol low to open the Printer Properties may differ
•
depending on the application. For details, see the documentation that comes with the
application you are using.
When you use some applications, the driver's initial default settings of the applications
•
might be applied over the printer driver' s setting.
Any settings you make in the following procedure are valid for the current application
•
only.
On the [File] menu, click [Print].
1
The [Print] dialog box appears.
•
From the [Name:] list, select the printer you want to use, and then click
2
[Properties].
The Printer Properties appears.
•
Set desired settings and click [OK].
3
Click [OK] to start your printing.
4
Setting Up Printer Driver 5 - 1
Page 50

PCL 6/5e - Accessing the Printer Properties
Windows NT 4.0 - Accessing the Printer Properties
Making Printer Default Settings - Printer Properties
Changing the settings of the printer requires Full Control access permission. Members of the
Administrators, Server Operators, Print Operators, and Power Users groups have Full Control
permission by default. When you set up options, log on under Full Control permission.
Click [Start] on the task bar, poin t to [Settings], and then click [Printers].
1
The [Printers] window appears.
•
Click the icon of the printer whose default setting you want to change.
2
On the [File] menu, click [Properties].
3
The Printer Properties appears.
•
Set desired setti ngs and click [OK].
4
Settings you make here are used as the default settings for all applications.
•
Making Printer Default Settings – Default Document Properties
Changing the settings of the printer requires Full Control access permission. Members of the
Administrators, Server Operators, Print Operators, and Power Users groups have Full Control
permission by default. When you set up options, log on under Full Control permission.
Click [Start] on the task bar, poin t to [Settings], and then click [Printers].
1
The [Printers] window appears.
•
Click the icon of the printer whose default settings you want to change.
2
On the [File] menu, click [Docu m ent Defaults ] .
3
The Default Document Properties appears.
•
Set desired setti ngs and click [OK].
4
Settings you make here are used as the default settings for all applications.
•
Making Printer Settings From an Application
T o make the printer settings for a specific application, open the Document Properties from that
application. The following example describes how to make settings for the WordPad application
that comes with Windows NT 4.0.
The actual procedures you should follow to open the Document Properties may differ
•
depending on the application. For details, see the documentation that comes with the
application you are using.
Any settings made in the following procedur e are valid for the current application only.
•
5 - 2 Setting Up Printer Driver
Page 51

PCL 6/5e - Accessing the Printer Properties
On the
1
The
•
From the
2
[Properties]
The Document Properties appears.
•
Set desired setti ngs and click
3
Click
4
menu, click
[File]
dialog box appears.
[Print]
[Name:]
.
to start your printing.
[OK]
list, select the printer you want to use, and then click
[Print]
[OK]
.
.
Windows 3.1x - Accessing the Printer Setting Dialog Box
There are two methods you can use to open the Printer Setting dialog box.
Making Printer Default Settings
To make the printer default settings, open the Printer Setting dialog box from
1
From
[Program M anager]
, open the
[Main]
group.
[Contr o l Pa ne l]
.
Double-click
2
Double-click the
3
In the
4
5
6
7
Making Printer Settings from an Application
T o make the printer settings for a specific application, open the Printer Setting dialog box from
that application. The following example describes how to make settings for the Write application
that comes with Windows 3.1x.
[Installed Printer s:]
Click
[Setup]
Set desired setti ngs and click
Click
[Close]
The actual procedures you should fol low to open the Printer Setting dialog box may
•
differ depending on the application. For details, see the documentation that comes with
the application you are using.
When you use some applications, the driver's initial default settings of the applications
•
might be applied over the printer driver' s setting.
Any settings you make in the following procedure are valid for the current application
•
only.
[Control Panel]
[Printers]
.
to close the
.
icon.
list, click the name of the printer you want to set up.
.
[OK]
[Printers]
dialog box.
Setting Up Printer Driver 5 - 3
Page 52

PCL 6/5e - Accessing the Printer Properties
On the
1
The
•
From the
2
If the printer you want to use is not specified as the default printer, click
•
Printer:]
Click
3
The Printer Setting dialog box appears.
•
Set desired setti ngs and click
4
Click
5
Start your printing.
6
menu, click
[File]
[Print Setup]
[Printer]
[Options]
to close the
[OK]
group, select the printer you want to use.
, and then find the printer you want to use in the list box.
.
[Print Se tu p]
dialog box appears.
[OK]
[Print Setup]
.
.
dialog box.
[Specific
5 - 4 Setting Up Printer Driver
Page 53

PostScript - Setting Up for Printing
Windows 95/98 - Accessing the Printer Properties
There are two methods you can use to open the Printer Properties.
Making Printer Default Settings
T o make the printer default settings, first open the Printer Properties from the [Printers] window.
Click [Start] on the task bar, poin t to [Settings], and then click [Printers].
1
The [Printers] window appears.
•
Click the icon of the printer whose default settings you want to change.
2
On the [File] menu, click [Properties].
3
The Printer Properties appears.
•
PostScript - Setting Up for Printing
Set desired setti ngs and click [OK].
4
Making Printer Settings from an Application
To make the printer settings for a specific application, open the Printer Properties from that
application. The following example describes how to make settings for the WordPad application
that comes with Windows 95.
The actual procedures you should fol low to open the Printer Properties may differ
•
depending on the application. For details, see the documentation that comes with the
application you are using.
When you use some applications, the driver's initial default settings of the applications
•
might be applied over the printer driver' s setting.
Any settings you make in the following procedure are valid for the current application
•
only.
On the [File] menu, click [Print].
1
The [Print] dialog box appears.
•
From the [Name:] box, select the printer you want to use, and then click [Properties].
2
The Printer Properties appears.
•
Set desired setti ngs and click [OK].
3
Click [OK] to start your printing.
4
Setting Up Printer Driver 5 - 5
Page 54

PostScript - Setting Up for Printing
Windows NT 4.0 - Accessing the Printer Properties
Making Printer Default Settings - Printer Properties
Changing the settings of the printer requires Full Control access permission. Members of the
Administrators, Server Operators, Print Operators, and Power Users groups have Full Control
permission by default. When you set up options, log on under Full Control permission.
Click [Start] on the task bar, poin t to [Settings], and then click [Printers].
1
The [Printers] window appears.
•
Click the icon of the printer whose default settings you want to change.
2
On the [File] menu, click [Properties].
3
The Printer Properties appears.
•
Set desired setti ngs and click [OK].
4
Settings you make here are used as the default settings for all applications.
•
Making Printer Default Settings - Default Document Properties
Changing the settings of the printer requires Full Control access permission. Members of the
Administrators, Server Operators, Print Operators, and Power Users groups have Full Control
permission by default. When you set up options, log on under Full Control permission.
Click [Start] on the task bar, poin t to [Settings], and then click [Printers].
1
The [Printers] window appears.
•
Click the icon of the printer whose default settings you want to change.
2
On the [File] menu, click [Docu m ent Defaults ] .
3
The Default Document Properties appears.
•
Set desired setti ngs and click [OK].
4
Settings you make here are used as the default settings for all applications.
•
5 - 6 Setting Up Printer Driver
Page 55

PostScript - Setting Up for Printing
Making Printer Settings from an Application
T o make the printer settings for a specific application, open the Document Properties from that
application. The following example describes how to make settings for the WordPad application
that comes with Windows NT 4.0.
The actual procedures you should follow to open the Document Properties may differ
•
depending on the application. For details, see the documentation that comes with the
application you are using.
Any settings made in the following procedur e are valid for the current application only.
•
On the [File] menu, click [Print].
1
The [Print] dialog box appears.
•
From the [Name:] box, select the printer you want to use, and then click [Properties].
2
The Document Properties appears.
•
Set desired setti ngs and click [OK].
3
Click [OK] to start your printing.
4
Windows 3.1x - Accessing the Printer Setting Dialog Box
There are two methods you can use to open the Printer Setting dialog box.
Making Printer Default Settings
T o make the printer default settings, open the Printer Setting dialog box from [Control Panel].
From [Program Ma nager], open the [Main] group.
1
Double-click [Control Panel].
2
Double-click the [Printers] icon.
3
In the [Installed Printers:] box, click the name of the printer you want to set up.
4
Click [Setup].
5
Set desired setti ngs and click [OK].
6
Click [Close] to close the [Printers] dialog box.
7
Setting Up Printer Driver 5 - 7
Page 56

PostScript - Setting Up for Printing
Making Printer Settings from an Application
T o make the printer settings for a specific application, open the Printer Setting dialog box from
that application. The following example describes how to make settings for the Write application
that comes with Windows 3.1x.
The actual procedures you should fol low to open the Printer Setting dialog box may
•
differ depending on the application. For details, see the documentation that comes with
the application you are using.
When you use some applications, the driver's initial default settings of the applications
•
might be applied over the printer driver' s setting.
Any settings you make in the following procedure are valid for the current application
•
only.
On the [File] menu, click [Print Setup].
1
The [Print Setup] dialog box appears.
•
From the [Printer] group, select the printer you want to use.
2
If the printer you want to use is not specified as the default printer, click [Specific
•
Printer:], and then find the printer you want to use in the list box.
Click [Options].
3
The Printer Setting dialog box appears.
•
Set desired setti ngs and click [OK].
4
Click [OK] to close the [Print Setup] dialog box.
5
Start your printing.
6
5 - 8 Setting Up Printer Driver
Page 57

Macintosh - Setting Up for Printing
Making Paper Settings from an Application
Open the file you want to print.
1
PostScript - Setting Up for Printing
On the
2
3
[AdobePS Page Setup]
Confirm that the printe r you want to use is shown in the
4
If your printer is now shown in the
•
list of available printer s.
The actual appearance of the Page Setup depends on the application you are using. See
•
the documentation that comes with your Macintosh for details.
From the
5
Set desired setti ngs and click
6
Setting up for Printing from an Application
Open the file you want to print.
1
On the
2
The Printer Settings appears.
•
menu, click
[File]
[Paper:]
menu, click
[File]
[Page Setup]
appears.
box, select the paper size.
[OK]
.
[Print]
.
[Format for:]
.
[For mat f o r :]
box, use the pop-up menu to display a
box.
Confirm that your printe r is selected in the
3
Set desired setti ngs and click
4
Setting Up Printer Driver 5 - 9
[Print]
.
[Printer:]
box.
Page 58

Canceling a Print Job
Canceling a Print Job
Windows 95/98 - Canceling a Print Job
Double-click the pr inter icon on the task bar.
1
This opens a window that shows all the pri nt jobs that are currently queued for pri nting.
•
Check the current status of the job you want to cancel.
Click the name of the job you want to cancel so that it is highlighted.
2
On the
3
Press the printer's
4
The message appears on the panel display indicating that the print job is being cancelled.
[Document]
You can also open th e print job queue window by double-cl icking the printer icon in the
•
[Printers]
When your printer is being shared by multiple computers, be careful not to accidentally
•
cancel someone else's print job.
You cannot stop printing the data that has already been processed internally by the
•
printer. Because of this, printing might continue for a few pages after you press
Reset]
A print job that contains a large volume of data might take considerable time to stop.
•
It takes about 5 minutes to reset the print job, after 5 minutes the printer returns to the
•
ready condition.
.
menu, click
window .
[Job Reset]
[Cancel Printing]
key.
Windows NT 4.0 - Canceling a Print Job
Double-click the pr inter icon on the task bar.
1
.
[Job
This opens a window that shows all the pri nt jobs that are currently queued for pri nting.
•
Check the current status of the job you want to cancel.
Click the name of the job you want to cancel so that it is highlighted.
2
On the
3
Press the printer's
4
5 - 10 Setting Up Printer Driver
[Document]
You can also open th e print job queue window by double-cl icking the printer icon in the
•
[Printers]
The message appears on the pa nel displ ay indic ating that th e pri nt job is bein g cancelle d.
•
menu, click
window .
[Job Reset]
[Cancel]
key.
.
Page 59

When your printer is being shared by multiple computers, be careful not to accidentally
•
cancel someone else's print job.
You cannot stop printing data that has already been processed internally by the printer.
•
Because of this, printing might continue for a few pages after you press
A print job that contains a large volume of data might take considerable time to stop.
•
It takes about 5 minutes to reset the print job, after 5 minutes the printer returns to the
•
ready condition.
Windows 3.1x - Canceling a Print Job
Canceling a Print Job
[Job Reset]
.
In the
1
Click the name of the job you want to cancel so it is highlighted.
2
On the
3
Click
4
Press the printer's
5
The message appears on the panel display indicating that the print job is being cancelled.
[Main]
This opens a window that shows all the prin t jobs that are currently queued for printing.
•
[Close]
When your printer is being shared by multiple computers, be careful not to accidentally
•
cancel someone else's print job.
You cannot stop printing data that has already been processed internally by the printer.
•
Because of this, printing might continue for a few pages after you press
A print job that contains a large volume of data might take considerable time to stop.
•
It takes about 5 minutes to reset the print job, after 5 minutes the printer returns to the
•
ready condition.
group, double-click the
[Document]
menu, click
to close the dialog box.
[Job Reset]
[Print Manager]
[Delete D oc ument]
key.
icon.
.
[Job Reset]
.
Setting Up Printer Driver 5 - 11
Page 60

Canceling a Print Job
Macintosh - Canceling a Print Job
1
2
3
Double-click the pr inter icon on the desktop.
This opens a window that shows all the pri nt jobs that are currently queued for pri nting.
•
Check the current status of the job you want to cancel.
Click the name of the job you want to cancel so that it is highlighted.
Click the pause icon, and then click the trash icon.
Press the printer's
4
The message appears on the pa nel displ ay indic ating that th e pri nt job is bein g cancelle d.
•
When your printer is being shared by multiple computers, be careful not to accidentally
•
cancel someone else's print job.
You cannot stop printing data that has already been processed internally by the printer.
•
Because of this, printing might continue for a few pages after you press
A print job that contains a large volume of data might take considerable time to stop.
•
It takes about 5 minutes to reset the print job, after 5 minutes the printer returns to the
•
ready condition.
[Job Reset]
key.
[Job Reset]
.
5 - 12 Setting Up Printer Driver
Page 61

Troubleshooting
Chapter 6
Page 62

Chapter Overview
This chapter co vers:
•“Error and Status Messages” on page 6-1
•“Printer Does Not Print” on page 6-11
•“Additional Printing Problems” on page 6-14
Troubleshooting
Page 63

Error and Status Messages
Error and Status Messages on the Message Display Panel
This section describes ins tructions for error and status message of the printer function. To use the
printer function, press [Printer].
Messages Description Comments
Add Staples The stapler is empty. Replace the staple refill with a
new one.
Error and Status Messages
Cannot Output
To Selected Tray
Dup. Unit In Use
Please Wait
Error 1 An error with the optional RAM
Error 2 An error with the parallel
Error 3 An error with the NV-RAM has
Error 4 An error with the DIMM has
The paper can not be printed to
the output tray that you
selected.
AD370 (duplex unit) is used by
the other application.
has occurred.
interface board has occurred.
occurred.
occurred.
The paper is printed to another
tray that selected by printer.
Wait until the other application
finished to use AD370 (duplex
unit).
Turn the printer power off and
on. If the message appears
again, contact your sales or
service representative.
Turn the printer power off and
on. If the message appears
again, contact your sales or
service representative.
Turn the printer power off and
on. If the message appears
again, contact your sales or
service representative.
Turn the printer power off and
on. If the message appears
again, contact your sales or
service representative.
Error 5 An error with the HDD has
occurred.
Error 6 An error with the Resident font
ROM has occurred.
Error 7 An error with the ASIC has
occurred.
Troubleshooting 6 - 1
Install the HDD again. If the
message appears again,
contact your sales or service
representative.
Turn the printer power off and
on. If the message appears
again, contact your sales or
service representative.
Turn the printer power off and
on. If the message appears
again, contact your sales or
service representative.
Page 64

Error and Status Messages
Messages Description Comments
Error 30711 AD370 (duplex unit) cannot be
used.
Error 30721 PS420 (paper feed unit) cannot
be used.
Error 30722 Tray 1 cannot be used. Another tray is used to print.
Error 30723 Tray 2 cannot be used. Another tray is used to print.
Error 30724 Tray 3 cannot be used. Another tray is used to print.
Error 30725 Tray 4 cannot be used. Another tray is used to print.
Error 30740 The staple tray of SR720
(finisher) cannot be used.
Another tray is used to print.
Contact your sales or service
representative.
Another tray is used to print.
Contact your sales or service
representative.
Contact your sales or service
representative.
Contact your sales or service
representative.
Contact your sales or service
representative.
Contact your sales or service
representative.
Another tray is used to print.
Contact your sales or service
representative.
Error 30743 The shift tray cannot be used. Another tray is used to print.
Contact your sales or service
representative.
Error 30744 SR720 (finisher) cannot be
used.
Error 40711 SR370 (duplex unit) cannot be
used.
Error 40740 The staple tray of SR720
(finisher) cannot be used.
Error 40744 SR720 (finisher) cannot be
used.
Error Bypass
xx
Error: Finisher
SC###
Finisher In Use
Please Wait
Bypass Tray is out of paper.
xx: Paper Size
An error with SR720 (finisher)
has occurred.
SR720 (finisher) is used by the
other application.
Another tray is used to print.
Contact your sales or service
representative.
Press
[Job Reset]
sales or service representative.
Press
[Job Reset]
sales or service representative.
Press
[Job Reset]
sales or service representative.
Load paper of the indicated
paper size into the bypass tray.
Turn the printer power off and
on. If the message appears
again, contact your sales or
service representative.
Wait until the other application
finished to use SR720
(finisher).
. Contact your
. Contact your
. Contact your
Form Feeding... Doing form feed. Wait for a while.
6 - 2 Troubleshooting
Page 65

Error and Status Messages
Messages Description Comments
Load Bypass
xx
Load Tray **
xx
Load ***
XX
No Files Exist There is no proof print file. Specify correct proof print file.
Offline Printer is offline. The printer
Printing... Doing print job. Wait for a while.
Processing... Print data is being processed. Wait for a while.
Processing...
Please Wait
The bypass tray is out of
paper.
xx: Paper Size
There is out of paper.
**: Number Tray
xx: Paper Size
There is no paper tray of the
indicated.
***: Paper Type
XX: Paper Size
cannot accept or print out
data.
The user tries to print the Proof
Print data while writing the
data to HDD.
Load paper of the indicated
paper size into the bypass tray.
Load paper of the indicated
paper size into the paper tray.
Load paper onto the tray of the
indicated.
See “Deleting a Proof Print
File” on page 7-17.
If you want to put the printer
online, press the
Wait until the printer returns to
the ready condition.
[Online]
.
Ready The printer is ready for
printing.
Remove Paper
from Duplex Unit
Remove Paper
from Staple Tray
Remove Paper
Shift Tray
There is still paper in AD370
(duplex unit).
There is paper in the stack unit
of SR720 (finisher).
The shift tray of SR720
(finisher) is full.
—
Remove paper from AD370
(duplex unit).
Remove paper from the stack
unit of SR720 (finisher).
Remove the paper from the
output tray before it becomes
full. If you leave paper in the
output tray, it can cause a
paper misfeed.
Remove paper from the SR720
(finisher) tray.
Remove the paper from the
output tray before it becomes
full. If you leave paper in the
output tray, it can cause a
paper misfeed.
Troubleshooting 6 - 3
Page 66

Error and Status Messages
Messages Description Comments
Remove Paper
Standard Tray
Remove Paper
1Bin Tray
Reset Duplex
Unit Correctly
Resetting Job... Resetting Print job. Wait for while.
Reset Tray XX
Correctly
The standard output tray is full. Remove paper from the output
tray.
Remove the paper from output
tray before it becomes full. If
you leave paper in the output
tray, it can cause a paper
misfeed.
The PT270 (1bin tray) is full. Remove the paper from the
PT270 (1bin tray).
Remove the paper from the
output tray before it becomes
full. If you leave paper in the
tray, it can cause a paper
misfeed.
The AD370 (duplex unit) is not
set correctly.
There is no paper tray, or Tray
XX is not set correctly.
This message appears only for
the default tray. See “Job
Control Parameters” on page 7-
7.
Set the AD370 (duplex unit)
correctly.
Set the tray correctly.
Setting Changed
Cannot Print
Waiting... Printer is waiting for the next
Warming Up... The printer is now preparing for
The paper feed unit setting has
been changed, and the proof
print failed.
data to print.
printing.
Configure the paper feed unit
correctly, and try again.
Wait for a while.
Wait until the printer is warmed
up.
Note: If you cannot solve the problem by taking above actions, turn the main
power swi tch off and then b ack on ag ain . If this does no t clear the erro r me s sag e,
write down the error message, and contact your sales or service representative.
6 - 4 Troubleshooting
Page 67

Getting Printer Information over the Network
Printer Current Status
You can check the printer's current status using the "Telnet (mshell)".
mshell
Use status co mm an d.
Messages Description Resolution
Add Staples The staple is empty. Replace the staple refill with a
Add Toner The printer is out of toner. Replace a new toner bottle.
Error and Status Messages
new one.
Call Service
Power Off On
Call Service
SC_XXX
Close Bridge Unit
Cover
Close Finisher
Cover
Close Interchange
Unit Cover
Close Right Cover The right cover of the printer is
Close R-Cover at
Paper Tray
Close Upper Right
Cover
Dup. Unit In Use
Please Wait
The Service Code or SC
number identifies the failure.
The Service Code or SC
number identifies the failure.
The cover of Bridge Unit Type
270 is open.
The cover of SR720 (finisher)
is open.
The Interchange Unit Type 280
cover is open.
open.
Lower right cover 1 or 2 is
open.
The upper right cover is open. Close the upper right cover.
AD370 (duplex unit) is used by
the other application.
Contact your sales or service
representative.
Turn the printer off and on. If
the message appears again,
contact your sales or service
representative.
Close the cover of Bridge Unit
Type 270.
Close the cover of SR720
(finisher).
Close the interchange unit
cover.
Close the right cover of the
printer.
Close lower right cover 1 or 2.
Wait until the other application
finished to use AD370 (duplex
unit).
Energy Saver 1 In Energy Save Mode level 1. Press the operation key or send
a job from the computer to turn
the power on.
Energy Saver 2 In Energy Save Mode level 2. Press the operation key or send
a job from the computer to turn
the power on.
Error 30711 AD370 (duplex unit) cannot be
used.
Troubleshooting 6 - 5
Another tray is used to print.
Contact your sales or service
representative.
Page 68

Error and Status Messages
Messages Description Resolution
Error 30721 PS420 (paper feed unit) cannot
be used.
Error 30722 Tray 1 cannot be used. Another tray is used to print.
Error 30723 Tray 2 cannot be used. Another tray is used to print.
Error 30724 Tray 3 cannot be used. Another tray is used to print.
Error 30725 Tray 4 cannot be used. Another tray is used to print.
Error 30740 The staple tray of SR720
(finisher) cannot be used.
Error 30743 The shift tray cannot be used. Another tray is used to print.
Another tray is used to print.
Contact your sales or service
representative.
Contact your sales or service
representative.
Contact your sales or service
representative.
Contact your sales or service
representative.
Contact your sales or service
representative.
Another tray is used to print.
Contact your sales or service
representative.
Contact your sales or service
representative.
Error 30744 SR720 (finisher) cannot be
used.
Error 40711 AD370 (duplex unit) cannot be
used.
Error 40740 The staple tray of SR720
(finisher) cannot be used.
Error 40744 SR720 (finisher) cannot be
used.
Finisher In Use
Please Wait
Load Bypass xx Bypass Tray is out of paper.
Load Tray ** xx There is out of paper.
SR720 (finisher) is used by the
other application.
xx : Paper Size
** : Tray Number
xx : Paper Size
Another tray is used to print.
Contact your sales or service
representative.
Press
[Job Reset]
your sales or service
representative.
Press
[Job Reset]
your sales or service
representative.
Press
[Job Reset]
your sales or service
representative.
Wait until the other application
finished to use SR720
(finisher).
Load paper of the indicated
paper size into the bypass tray.
Load paper of the indicated
paper size into the paper tray.
. Contact
. Contact
. Contact
6 - 6 Troubleshooting
Page 69

Error and Status Messages
Messages Description Resolution
Load *** xx There is no paper tray of the
indicated.
*** : Paper Type
xx : Paper Size
Low On Toner The toner bottle is almost
empty.
Misfeed:{location}
Open Front Cover
Offline Printer is offline. The printer
Ready The printer is ready for
Remove Misfeed
from Duplex Unit
Remove Misfeed
From Finisher
Remove Paper
from Duplex Unit
There is a misfeed in the
printer.
cannot accept or print out
data.
printing.
There is a misfeed in AD370
(duplex unit).
There is a misfeed in SR720
(finisher).
There is still paper in AD370
(duplex unit).
Load paper onto the tray of the
indicated.
Prepare a new toner bottle. If
the image density is too light,
replace the old toner bottle
with a new one.
Remove the misfed paper from
{location}.
If you want to put the printer
online, press
—
Remove the misfed paper from
AD370 (duplex unit).
Remove the misfed paper from
SR720(finisher).
Remove the paper from AD370
(duplex unit).
Remove paper from the output
tray before it becomes full. If
you leave paper in the output
tray, it can cause a paper
misfeed.
[Online]
.
Remove Paper
Shift Tray
Remove Paper
from Staple Tray
Troubleshooting 6 - 7
The shift tray of SR720
(finisher) is full.
There is still paper in the staple
tray of SR720 (finisher).
Remove paper from the shift
tray of SR720 (finisher).
Remove paper from the output
tray before it becomes full. If
you leave paper in the tray, it
can cause a paper misfeed.
Remove paper from the staple
tray of SR720 (finisher).
Remove paper from the output
tray before it becomes full. If
you leave paper in the output
tray, it can cause a paper
misfeed.
Page 70

Error and Status Messages
Messages Description Resolution
Remove Paper
Standard Tray
Remove Paper
1Bin Tray
Reset Duplex Unit
Correctly
Reset Fusing Unit
Correctly
Reset PCU
Correctly
The standard output tray is full. Remove paper from the
standard output tray
Remove paper from the output
tray before it becomes full. If
you leave paper in the output
tray, it can cause a paper
misfeed.
The PT270 (1bin tray) is full. Remove the paper from the
PT270 (1bin tray).
Remove the paper from the
output tray before it becomes
full. If you leave paper in the
output tray, it can cause a
paper misfeed.
AD370 (duplex unit) is not set
correctly.
There is no fusing unit, or the
fusing unit is not installed
properly.
There is no Photo Conductor
Unit Type 270, or Photo
Conductor Unit Type 270 is
not installed properly.
Set AD370 (duplex unit)
correctly.
Contact your sales or service
representative.
Contact your sales or service
representative.
Reset Tray XX
Correctly
Warming Up... The printer is now preparing for
There is no paper tray, or Tray
XX is not set correctly.
This message appears only for
the default tray. See “Job
Control Parameters” on page 7-
7.
printing.
Printer Configuration
You can check the printer configur ation using the "mshell".
mshell
Use info com m an d.
Item Description
Input Tray
No.
Name
Page Size
Status
ID number of the paper tray
Name of the paper tray
Paper size loaded in the paper tray
Current status of the paper tray
*1
Set the tray correctly.
Wait until the printer is warmed
up.
*2
*3
6 - 8 Troubleshooting
Page 71

Item Description
Output Tray
No..
Name
Status
Emulation
No.
Name
Version
Program No Entries
ID number of the output tray
Name of the output tray
Current status of the output tray
ID number of the emulation used which the printer
Name of the emulation used which the printer
Version of the emulation
Note: “*” (asterisk) is displayed with the current setting.
Regarding *1–*5, see the attache d tab les .
*1 Input Tray: Name
Name Description
Tray 1 Tray 1
Tray 2 Tray 2
Error and Status Messages
*4
*5
Tray 3 PS400, PS420, PS440 (upside)
Tray 4 PS440 (downside)
Bypass Tray Bypass Tray
*2 Input Tray: Page Size
Paper Size Description
A3(297 x 420) A3
B4 JIS(257 x 364) B4
A4(210 x 297) A4
A4(297 x 210) A4
B5 JIS(182 x 257) B5
B5 JIS(257 x 182) B5
A5(148 x 210) A5
A5(210 x 148) A5
A6(105 x 148) A6
11 x 17 Ledger
8 1/2 x 14 Leger
8 1/2 x 11 Letter
11 x 8 1/2 Letter R
7 1/4 x 10 1/2 Executive
10 1/2 x 7 1/4 Executive
Troubleshooting 6 - 9
Page 72

Error and Status Messages
Paper Size Description
5 1/2 x 8 1/2 Statement
8 1/2 x 5 1/2 Statement
8 1/4 x 13
8 1/2 x 13 Foolscap
8 x 13 8" x 13"
4 1/8 x 9 1/2 Com10 Env.(4.125" x 9.5")
3 7/8 x 7 1/2 Monarch Env.(3.875" x 7.5")
C6 Env(114 x 162) C6 Env.(114 x 162mm)
C5 Env(162 x 229) C5 Env.(162 x 229mm)
DL Env(110 x 220) DL Env.(110 x 220mm)
8K(267 x 390) 8K
16K(195 x 267) 16K
16K(267 x 195) 16K
1
/4" x 13"
8
FRE Custom Paper Size
*3 Input Tray: status
Status Description
Normal Normal
NoTray There is no paper tray.
PaperEnd There is no paper in the paper tray.
*4 Output Tray: Name
Name Description
Standard Tray Standard tray
Internal 1Bin Tray Output tray (upside)
Finisher Tray SR720 tray
Shift Unit Tray Shift tray
*5 Output Tray: status
Status Description
Normal Normal
Paper Exist Paper exists in output tray.
6 - 10 Troubleshooting
Page 73

Printer Does Not Print
Possible Cause Solutions
Is the power on? If not, confirm that the cord is securely plugged into the
Printer Does Not Print
power outlet and the machine.
Turn on the machine power.
Does the On Line
indicator stay on?
Does the Error indicator
stay red?
Is the paper set? Load paper into the paper tray.
Is your specified paper
size correct?
Is your specified paper
type correct?
Can you print a
configuration page?
Is the network cable
between the machine
and your computer
connected securely?
If not, press
Press {
If not, check the error message on the panel display and
take the required action.
Set the specified paper in any of the input trays.
Adjust the paper size dial to match the size and feed
direction of the paper in the paper tray.
Set the specified paper in any of the input trays.
Adjust the paper type to use the operation panel.
If you cannot print a configuration page, it probably
indicates printer malfunction. You should contact your
sales or service representative.
If you can print a configuration page but cannot get the
printer to print when you issue a print command from your
computer, it probably means there is a problem with your
computer.
Also keep it in mind that large, complex data might take
long time for printer process.
Connect the network cable correctly. If there are any
connectors or screws, confirm they are fastened securely.
Printer
[Online]
}.
to make it light up.
Are you using a correct
network cable?
Did you connect the
interface cable after
turning on the main
switch?
Troubleshooting 6 - 11
The type of network cable you should use depends on your
computer. Be sure to use the correct one. See“Connecting
to the Printer” on page 1-1
If the cable is damaged or worn, replace it with new one.
Confirm of connecting the interface cable before turning on
the main switch.
Page 74

Printer Does Not Print
Possible Cause Solutions
If you print using the
PostScript driver in a
network, data is
received by the printer,
but is not printed.
If you print using the
PostScript driver,
printing does not start
or is interrupted.
Windows 95/98
On the
[Advanced]
and
Windows NT 4.0
Open the
[PostScript O pt ions]
Before Each job:]
Windows 3.1x
Click the
From
The data is cleared when the Job Timeout period is
exceeded.
Windows 95/98
Set a longer
of the Printer Properties.
Windows NT 4.0
Set a longer
tab of the Printer Properties.
Windows 3.1x
Set a longer
of the Printer Setting dialog box.
A PostScript error might occur if there is not enough
memory in the printer, or there are errors in the print data
sent to the printer.
Print a configuration page to configure the memory size
and confirm the memory size is max or not.
If the memory size is max, increasing the memory may
solve this problem. You should contact your sales or
service representative..
[PostScript]
and then clear both
[Send CTRL+D after job]
[Advanced]
[PostScript]
[Protocol Options]
tab of the Printer Properties, click
[Send CTRL+D before job]
.
tab of the Printer Properties. From
, select
and
[Send CTRL-D After Each job:]
tab of the Printer Setting dialog box.
, select
[Job Timeout]
[Job Timeout]
[Job Timeout]
for both
[No]
.
[None]
period with the
period with the
period with the
[Send CTRL-D
.
[PostScript]
[Device Settings]
[PostScript]
tab
tab
The print job might be reset. Do the following.
Confirm that you have selected the correct printer driver.
Try printing again.
Set a longer Wait Timeout.
Windows 95/98
Set a longer
of the Printer Properties.
Windows NT 4.0
Set a longer
tab of the Printer Properties.
Windows 3.1x
Set a longer
of the Printer Setting dialog box.
Macintosh
You can specify a longer
printer's operation panel. See “Making Printer Settings
with the Operation Panel” on page 7-5
6 - 12 Troubleshooting
[Wait Timeout]
[Wait Ti meout]
[Wait Timeout]
period with the
period with the
period with the
[I/O Timeout]
period on the
[PostScript]
[Device Settings]
[PostScript]
tab
tab
Page 75

Possible Cause Solutions
Printer Does Not Print
Is the Data In indicator
blinking or lit after
starting the print job,
when using the PCL
printer?
The following procedure describes the printer port settings.
Windows 95/98
1. Click
[Start]
, point to
2. Click the icon of the printer. Next, on the
3. Click the
[Details]
If not, the data is not being sent to the printer, or the
printer may be resetting the print job because there was a
long delay in receiving the data from the computer.
If the printer is using "I/O Timeout"
Increase the value of the "I/O Timeout" setting of the
"System" menu of the "Job Control". See “Making Printer
Settings with the Operation Panel” on page 7-5
If your machine is connected to the computer using the
parallel cable
Confirm that the printer port settings are correct. For a
parallel port connection, port LPT1 or LPT2 should be set.
For more information on the printer port settings, see the
Note after this table.
Network Connection
Contact your network administrator.
[Settings]
, and then click
[File]
tab.
[Printers]
.
menu, click
[Properties]
.
4. Check the
[Print to the following port:]
list to confirm the correct port is
selected.
Windows NT 4.0
1. Click
[Start]
, point to
2. Click the icon of the printer. Next, on the
3. Click the
[Port]
tab.
[Settings]
, and then click
[File]
4. Confirm that the correct port is selected.
Windows 3.1x
[Control Panel]
1. On
, double-click the
[Printers]
2. Confirm that this printer is specified as the default printer.
3. Click
4. Check the
Macintosh
1. Click
2. Confirm that
[Connect]
[Ports]
.
list to confirm the correct port is selected.
[Apple Menu]
[Ethernet]
, point to
[Control Panels]
is selected in the
[connect via:]
[Printers]
menu, click
.
[Properties]
icon.
, and then select
list.
.
[Apple Talk]
.
Troubleshooting 6 - 13
Page 76

Additional Printing Problems
Additional Printing Problems
Problem Action
It takes a long time for the
printer to start printing.
It takes too much time to
complete the print job.
Windows 95/98, NT 4.0 :
The computer doesn't
recognize the installed
printer options.
Windows 3.1x:
The print job can't be sent.
The machine might be in Energy Saver mode or Low
Power mode, which requires more time for warming
up and resuming the print job. If you can't wait,
change the settings of Low Power, Shift Time and
Low Power Timer.
The data is so large or complex that it takes time to
process it.
If the Data In indicator is blinking, the data processing
is being done.
Just wait until it is finished.
If the connection to the printer is not bi-directional,
the computer does not recognize the installed printer
options.
Setting of the options might not be specified correctly.
In this case, specify which options you have installed
using the printer driver.
For more information on the setting options with
installing the printer driver. See “Installing the PCL 6/
5e Printer Driver” on page 3-4 and, “Installing the
PostScript Printer Driver” on page 3-8
The memory buffer might be full. Remove the check
mark from the
the time out setting longer.
[Use Print Manager]
check box, or make
6 - 14 Troubleshooting
Page 77

Chapter 7
Using the Control Panel
Page 78

Chapter Overvie w
This Chapter covers:
•“Proof Print Menu” on page 7-6
•“Job Control Menu” on page 7-7
•“Network Setup Menu” on page 7-10
•“Maintenance Menu” on page 7-11
•“List Print Menu” on page 7-12
•“Specifying the Custom Paper Size for the Bypass Tray” on page 7-13
•“Printer Condition” on page 7-15
•“Printing with the Operation Panel” on page 7-16
Using the Control Panel
Page 79

Adjusting Printer Features
This section describes the inf ormation on adjusting the printer settings using the System
Settings and the Printer Featur es menus.
After using [User Tools], be sure to return to Printer mode.
•
The settings are not canceled even if the operation switch is turned off or the
•
[Escape] key is pressed.
For more information on specifying the network system, see “Configuring the Printer for the
Network” on page 2-1.
Printer Features Menu
There are 5 menu items in the “Printer Features” menu.
Proof Print
•
Job Control
•
Network Setup
•
Maintenance
•
List Print
•
You can select functions in following table.
Adjusting Printer Features
Using the Control Panel 7 - 1
Page 80

Adjusting Printer Features
Category Function Menu
Proof Print Print File
Job Control Paper Input Tray Priority
Delete File
Show Error Log
Tray Locking
Bypass Size
Print Quality Edge Smoothing
Resolution
Toner Saving
System Print PS Errors
I/O Timeout
I/O Buffer
PCL Menu Orientation
Network Setup IP Address
Subnet Mask
Gateway Address
Access Control
Access Mask
Network Boot
Frame Type(NW)
ActiveProtocols
Maintenance
See“Maintenance
Menu” on page 711
Restart Printer
Menu Reset
Hex Dump
Form Lines
Font Source
Font Number
Point Size
Font Pitch
Symbol Set
7 - 2 Using the Control Panel
Page 81

Category Function Menu
Adjusting Printer Features
List Print
See “List Print
Parameters” on
page 7-12
Config. Page
Menu List
PCL Font List
PS Font List
Disk Directory
Using the Control Panel 7 - 3
Page 82

Accessing the Main Menu
Accessing the Main Menu
Confirm that the printe r is offline. If not, take the printer offline.
1
Press [
2
Notes:
User Tools]
panel display.
The “Main Menu” has the following five menus, which can be displayed one by one using
the Up or Down Arrow keys.
Proof Print
•
Job Control
•
Network Setup
•
Maintenance
•
List Print
•
•
[Down Arrow]
•
[Up Arro w ]
After making the printer's settings, be sure to return to the previous menu by
•
pressing
After making the printer's settings, press
•
condition.
The revised setti ng s are not can cel ed ev en if the mac h ine p ow er is tur ne d off.
•
and press [4] on the number key to display the “Main Men u” on the
: Press to go to the next page.
: Press to go back to the previous page.
[Escape]
.
[Online]
to return to the ready
7 - 4 Using the Control Panel
Page 83

Making Printer Settings with the Operation
Panel
Making Printer Settings with the Operation Panel
Press {
1
Press {4} on the number keys.
2
Search for the desired menu with
3
Press
4
Search for the desired menu with
5
Press
6
If necessary, repeat steps 5 and 6 until you complete the desired settings.
7
User Tools
The desired menu appears.
•
[Enter #]
The desired menu or parameter appears.
•
“p” shown in front of a item indicates that the item is currently selected.
•
[Enter #]
The specifi ed item ap pe ars.
•
•
[Escape]
[Enter #]
}.
[Down Ar r o w]
.
[Down Arrow]
.
: Press to return to the previous menu. If you press this key before pressing
, the adjusted data is can ce le d.
or
[UP Arro w ]
or
[UP A r row]
keys.
keys.
Using the Control Panel 7 - 5
Page 84

Proof Print Menu
Proof Print Menu
There are 3 menus in the “Proof Print” menu.
Proof Print Parameters
Print File
•
Delete File
•
Show Error Log
•
For more information on “Proof Print”, see “Using the Proof Print” on page 7-16.
•
Proof Print
Menu Description
Print File Select a proof print file and print it.
Delete File Select a proof print file and delete it.
Show Error Log Show the error log in the proof print job.
7 - 6 Using the Control Panel
Page 85

Job Control Menu
There are 4 menus in the “Job Control” menu.
Paper Input
•
Print Quality
•
System
•
PCL Menu
•
Job Control Parameters
Paper Inpu t
Menu Description
Tray Priority You can specify the default tray. The tray selection specified with the
Job Control Menu
printer driver overrides the one specified here. In DOS printing, the
tray specified here is used, when no tray is specified for a print job.
Tray1, Tray2, Tray3, Tray4
Default:
Only the installed trays appear on the panel display.
It is recommended that you load paper having the size and direction
you frequently use in the tray selected with the “Tray Priority”.
Tray1
Tray Locking If you use several different kinds of paper, you can lock a tray to
prevent printing on wrong paper. When you want to use the locked
tray, specify it using the printer driver.
None, Tray1, Tray2, Tray3, Tray4
Default:
Only the installed trays appear on the panel display.
You cannot lock multiple trays at once.
When a locked tray is specified using the printer driver, the printer
does not search for any other tray.
Bypass Tray You can specify the paper size for the bypass tray.
Default:
width: 90mm (3.53") to 297mm (11")
length:148mm (5.83") to 432mm (17")
Print Quality
Menu Description
Edge
Smoothing
You can specify whether the Edge Smoothing feature is enabled.
On
Off
Default:
If "Edge Smoothing" is "On", "Toner Saving" is ignored even if it is
"On".
None
A4 (Metric version), 8
On
1
/2“ x 11" (Inch version)
Using the Control Panel 7 - 7
Page 86

Job Control Menu
Menu Description
Resolution You can specify the print resolution in dots per inch.
600 dpi (PCL 5e, PCL 6, PS)
300 dpi (PCL 5e, PS)
Default:
The resolution specified with the printer driver overrides the one
specified here.
Toner Saving You can specify whether or not the Toner Saving feature is enabled.
Off
On
Default:
If "Edge Smoothing" is "On", "Toner Saving" is ignored even if it is
"On".
600 dpi
Off
System1/
System2/
PCL Menu 1/
2
Menu Description
Print PS
Errors
I/O Timeout You can specify how many seconds the printer should wait before
2
Menu Description
I/O Buffer You can specify the size of the I/O Buffer. Normally it is not
You can specify whether the PS error sheet should be printed out.
Off
On
Default:
ending a print job. If data from other ports often appear in the middle
of your print job, you should increase the timeout value.
15 seconds, 30 seconds, 60 seconds, 180 seconds, 300 seconds
Default:
necessary to change this setting.
16KB, 32KB, 64KB, 128KB, 256KB, 512 KB,
Default:
2
Off
30 seconds
32KB
Menu Description
Orientation You can specify the page orientation.
The tray selection specified with the printer driver overrides the one
specified here.
Portrait
Landscape
Default:
Form Lines You can specify the number of lines per page.
5-128
Default: 64 (Metric version), 60 (Inch version)
7 - 8 Using the Control Panel
Portrait
Page 87

Job Control Menu
Menu Description
Font Source You can specify the location of the default font.
Internal
Download
Default:
When you select “Download”, you can select only downloaded fonts
on the RAM.
Font Number You can specify the ID for the default font you want to use.
1 to 52 (for Internal)
1 to N (for Download source)
Default:
“N” depends on how many fonts you have downloaded.
Internal
0
PCL Menu 2/
Menu Description
Point Size You can specify the value for the point size you want to
Font Pitch You can specify the number of characters per inch you
Symbol Set You can specify the set of print characters for the selected
2
use for the selected font.
4.00 to 999.75 by 0.25
Default:
This setting is effective only for a variable-space font.
want to use for the selected font.
0.44 to 99.99 by 0.01
Default:
This setting is effective only for a fixed-space font.
font. The available options are as follows.
Roman-8, Win L1, Win L2, Win L5, Win 3.0, Legal, ISO
L1, ISO L2, ISO L5, ISO 4, ISO 6, ISO 11, ISO 15, ISO 17,
ISO 21, ISO 60, ISO 69, PC-8, PC-850, PC-852, PC-8 D/
N, PC8-TK, VN Math, VN US, VN Intl, MS Publ, Pifont,
Desktop, Math-8, PS Text, PS Math
Default:
12.00
10.00
Roman-8
Using the Control Panel 7 - 9
Page 88

Network Setup Menu
Network Setup Menu
For more information on “Network Setup”, see “Configuring the Printer for the Network” on
page 2-1.
Network Setup
Menu Description
IP Address You can specify the IP Address.
Default:
Subnet Mask You can specify the Subnet Mask.
Default:
All zero
All zero
Gateway
Address
Access
Control
Access Mask You can specify the Access Mask.
Network
Boot
Frame
Type(NW)
ActiveProtoc
ols
You can specify the Gateway Address.
Default:
You can specify the Access Control Address.
Default:
Default:
You can specify the Network Boot of TCP/IP.
None, RARP + TFTP, BOOTP, RARP & BOOTP, DHCP, ARP + PING,
ARP & RARP, ARP & BOOTP, ARP&RARP&BOOTP
Default:
You can specify the Fream Type of Netware.
Auto, Ethernet II, Ethernet 802.3, Ethernet 802.2, Ethernet SNAP
Default:
You can specify the Active Protocols.
All Active, None, TCP/IP Only, NetWare Only, TCP/IP & NetW, ATalk
Only, TCP/IP & ATalk, NetWare & ATalk, NetBEUI & ATalk, TCP &
NW & ATK, NetBEUI only, TCP/IP & NB, NetBEUI & NetW, TCP & NB
& NW, NetBEUI & ATalk, TCP & NB & ATK, NB & NW & ATalk
Default:
All zero
All zero
All zero
None
Auto
All Active
7 - 10 Using the Control Panel
Page 89

Maintenance Menu
There are 3 menus in the “Maintenance” Menu.
Restart Printer
•
Menu Reset
•
Hex Dump
•
Maintenance Parameters
Restart P rinter
Menu Description
Restart Printer You can restart the printer.
Menu Reset
Menu Description
Maintenance Menu
Menu Reset You can reset the menu settings to the factory default except "I/O
Buffer" and "Network Setup" settings.
Hex Dump
Menu Description
Hex Dump You can choose to print the Hex Dump or not. With this feature
"On", all data sent to the printer is printed in hexadecimal character
representation.
On
Off
Default:
Off
Using the Control Panel 7 - 11
Page 90

List Print Menu
List Print Menu
There are 5 menus in the “List Print” Menu.
List Print Parameters
List Print
Config. Page
•
Menu List
•
PCL Font List
•
PS Font List
•
Disk Directory
•
Menu Description
Config. Page You can print the current configuration of the printer. For more
information on printing a configuration page, see “Printer Condition”
on page 7-15.
Menu List You can print the Menu List which shows the function menu of this
printer.
PCL Font List You can print a list of the installed PCL font.
PS Font List You can print a list of the installed PS font.
Disk Directory You can print a list of the HDD directory.
7 - 12 Using the Control Panel
Page 91

Specifying the Custom Paper Size for the By-
pass Tray
Specifying the Custom Paper Size for the Bypass Tray
Press {
1
Press {4} on the number keys.
2
Press
3
[Enter #]
Press
4
[Enter #]
Press
5
[Enter #]
User Tools
[Up A r row]
.
[Up Arrow]
.
[Up Arrow]
.
}.
or
[Down Arrow] keys
or
[Down Arrow] keys
or
[Down Arrow] keys
until “Job Control” appears, and then press
until “Paper Input” appears, and then press
until “Bypass Size” appears, and then press
Specifying the standard size.
6
1. After confirming that “Standard Size” is displayed, press
2. Press
Specify the Cu stom Size.
7
1. Press
Using the Control Panel 7 - 13
[Up Arrow]
then press
[Up Arrow]
[Enter #]
[Down Arrow]
or
.
[Down Arrow]
or
keys until “Custom Size” is displayed, and
until “Custom Size” is displayed, press
[Enter #]
.
Page 92

Specifying the Custom Paper Size for the Bypass Tray
[Enter #].
2. Press [Up Arrow] or [Down Arrow] to set the vertical value, and then press
[Enter #].
The vertical size and horizontal size are described as follow.
•
1
1
2
1 Horizontal size
•
2 Vertical size
•
3. Press [Up Arrow] or [Down Arrow] to set the horizontal value, and then press
[Enter #].
7 - 14 Using the Control Panel
Page 93

Printer Condition
W e recommend that you print the configuration page and check its settings, before changing
settings of your machine.
The following example describe s how to print a Configuration Page.
Printer Condition
Press {
1
Press {4} on the number keys.
2
Press
3
After confirming that, “Config. Page” on display, press
4
User Tools
[Up Arrow]
The following message appears on the panel display.
•
You can specify the Pr int List items on th e pa nel di splay.
•
The following message appears on the panel display.
•
}.
or
[Down Arrow]
until “List Print” appears, and then press
[Enter #]
[Enter #]
.
.
Press
5
Using the Control Panel 7 - 15
[Enter #]
This starts printing the configuration page.
•
.
Page 94

Printing with the Operation Panel
Printing with the Operation Panel
Using the Proof Print
Use this function to prin t only one printi ng of a mult iple print job . The othe r printings a re save d on
the optional hard disk. The saved job can be printed f rom the machine's operation panel.
T o use this function, the optional hard disk must be installed.
•
If the application has a collate option, confirm that it is not selected before sending a
•
print job. By default, proof print jobs a re aut omatically collated by the printer driver. If
the collate option is selected from the application print dialog box, more printings than
intended may be printed.
Y ou can i dentif y the f ile y ou want to print by the User IDs and the ti me whe n the job was
•
stored.
The actual number of pages the printer can save depends on the contents of the print
•
images. As an example, the printer can sa ve up to 30 jobs or 2,0 00 pages. It depends on
the data volume.
If the first pr inting of th e proof p rint file is not what you expe cted and you do no t want to
•
print the remain ing printings, delete the proof print file using the operation panel. If you
print the remaining printings of the proof print file, the job in the printer is deleted
automatically.
Printing a Proof Print File
Press the {User Tools} key of the machine's operation panel.
1
Press {4} on the number keys.
2
After confirming that “Proof Print ” is displayed, press [Enter #].
3
After confirming that “Print File” is displayed, press [Enter #].
4
7 - 16 Using the Control Panel
Page 95

Printing with the Operation Panel
5
6
7
Press
[Up Arrow]
[Enter #]
•
Press
•
Press
.
The following message appears on the panel display.
[Up Arrow]
You can set the number up to 999.
[Enter #]
or
[Down Arrow]
or
[Down Arrow]
.
to display a file you want to print, and then press
to set the number of copy printings.
Deleting a Proof Print File
If the printed documen t is not what you expected, you can delete the proof print file. You can then
revise it and print again until the settings become OK.
Press the {
1
Press {4} on the number keys.
2
After confirming that “Proof Print” is on the display, press
3
Press
4
User Tools
[Up Arrow]
} key of the machine's operation panel.
or
[Down Arrow]
until “Delete File” appears, and then press
[Enter #]
.
[Enter #]
.
Using the Control Panel 7 - 17
Page 96

Printing with the Operation Panel
5
6
7
Press
[<FmSymbol>Ø]
press
[Enter #]
The following message appears on the panel display.
•
Press
[Enter #]
Press
[Enter #]
This starts deleting a proof pri nt file after the following message appears on the panel
•
display.
.
.
.
or
[<FmSymbol>¦]
to display the file you want to delete, and then
Checking the E rror L o g
1
Press the {
2
Press {4} on the number keys.
3
After confirming that “Proof Print” is displayed, press
4
7 - 18 Using the Control Panel
User Tools
} key of the machine's operation panel.
[Enter #]
.
Page 97

Printing with the Operation Panel
5
Press
[Up Arrow]
[Enter #]
•
.
The following message appears on the panel display.
or
[Down Arrow]
until “Show Error Log” appears, and then press
Using the Control Panel 7 - 19
Page 98

Printing with the Operation Panel
Notes:
7 - 20 Using the Control Panel
Page 99

Chapter 8
PostScript3 Kit Type185
Page 100

Chapter Overvie w
This chapter covers:
•“Setting Up Options” on page 8-1
•“Collate, Staple, Prin t Mode” on page 8-6
•“Proof Pr int” on page 8-8
PostScript3 Kit Type185
 Loading...