

Page 1
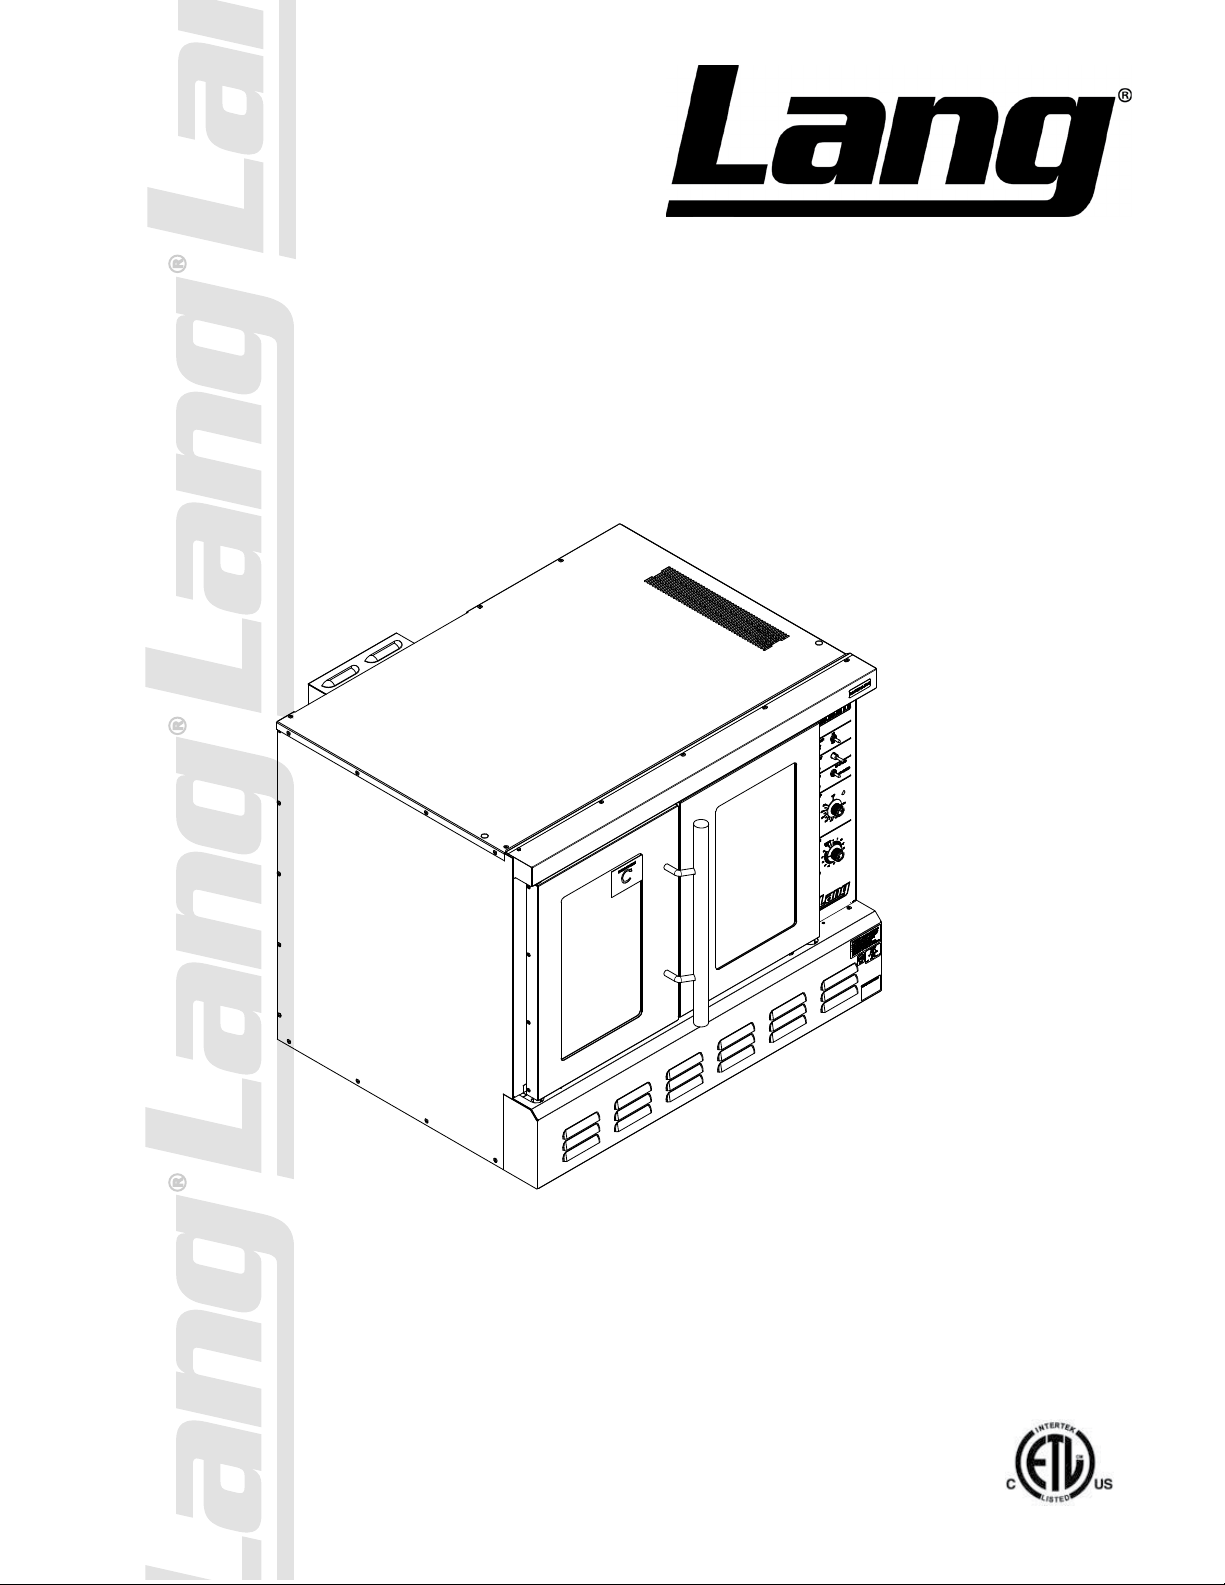
GAS FULL SIZE
COMPUTERIZED
CONVECTION OVEN
GCOF-T
Installation and
Operation
Instructions
2M-W1349 Rev. A 10/27/15
GCOF-T
Page 2
SAFETY SYMBOL
These symbols are intended to alert the user to the presence of
important operating and maintenance instructions in the manual
accompanying the appliance.
DO NOT STORE OR USE GASOLINE OR OTHER FLAMMABLE VAPORS AND LIQUIDS IN
INSTRUCTIONS TO BE FOLLOWED IN THE EVENT USER SMELLS GAS. THIS
INFORMATION SHALL BE OBTAINED BY CONSULTING YOUR LOCAL GAS SUPPLIER.
AS A MINIMUM, TURN OFF THE GAS AND CALL YOUR GAS COMPANY AND YOUR
AUTHORIZED SERVICE AGENT. EVACUATE ALL PERSONNEL FROM THE AREA.
IMPROPER INSTALLATION, ADJUSTMENT, ALTERATION, SERVICE OR MAINTENANCE
CAN CAUSE PROPERTY DAMAGE, INJURY OR DEATH. READ THE INSTALLATION,
OPERATION & MAINTENANCE INSTRUCTIONS THOROUGHLY BEFORE INSTALLING OR
WARNING, TO REDUCE THE RISK OF ELECTRICAL SHOCK, DO NOT REMOVE
CONTROL PANEL. NO USER-SERVICABLE PARTS INSIDE.
REPAIRS SHOULD BE DONE BY AUTHORIZED SERVICE PERSONNEL ONLY.
FOR YOUR SAFTEY
THE VICINTIY OF THIS OR ANY OTHER APPLIANCE.
POST IN PROMINENT LOCATION
WARNING
SERVICING THIS EQUIPMENT.
WARNING
RISK OF FIRE OR ELECTRIC SHOCK
DO NOT OPEN
NOTICE
Using any part other than genuine Lang factory supplied parts relieves the manufacturer of all
liability.
Lang reserves the right to change specications and product design without notice. Such
revisions do not entitle the buyer to corresponding changes, improvements, additions or
replacements for previously purchased equipment.
Due to periodic changes in designs, methods, procedures, policies and regulations,
the specications contained in this sheet are subject to change without notice. While
Lang exercises good faith efforts to provide information that is accurate, we are not
responsible for errors or omissions in information provided or conclusions reached as a
result of using the specications. By using the information provided, the user assumes all risks
in connection with such use.
MAINTENANCE AND REPAIRS
Contact your local dealer for service or required maintenance. Please record the model number, serial
number, voltage and purchase & Installation Information in the area below and have it ready when you
call to ensure a faster service.
Model No.:
Serial No.:
Voltage:
Purchased From:
Location:
Purchase
Date:
2M-W1349, GCOF-T Gas Full Size Convection Oven
1-Phase
or 3 Phase:
Installed Date:
2
Page 3

PROBLEMS, QUESTIONS or CONCERNS
Before you proceed consult you authorized Lang service agent directory
or
Call the Lang Technical Service Department at 314-678-6315.
TABLE OF CONTENTS
Specications . . . . . . . . . . . . . . . . . . . . . . . . . . . . . 4
Equipment Description . . . . . . . . . . . . . . . . . . . . . . . . 5
Unpacking . . . . . . . . . . . . . . . . . . . . . . . . . . . . . . . 6
Installation
Leg Installation . . . . . . . . . . . . . . . . . . . . . . . . . . 7
Leg Pad Adapter Installation . . . . . . . . . . . . . . . . . . . 8
Stacking the Oven . . . . . . . . . . . . . . . . . . . . . . . . . 9
Flu Installation . . . . . . . . . . . . . . . . . . . . . . . . . . . 9
Ventilation & Clearence . . . . . . . . . . . . . . . . . . . . . . 10
Electrical Connection . . . . . . . . . . . . . . . . . . . . . . .10
Gas Connection . . . . . . . . . . . . . . . . . . . . . . . . . . 11
Gas Conversions . . . . . . . . . . . . . . . . . . . . . . . . .12
Initial Start-Up
Pre-Power On . . . . . . . . . . . . . . . . . . . . . . . . . . . 13
Power On . . . . . . . . . . . . . . . . . . . . . . . . . . . . . 13
General Operation & Programming
Control Panel . . . . . . . . . . . . . . . . . . . . . . . . . . .14
Typical Operation Sequence . . . . . . . . . . . . . . . . . . .14
Hints & Suggestions . . . . . . . . . . . . . . . . . . . . . . . . 15
Loading . . . . . . . . . . . . . . . . . . . . . . . . . . . . . .15
Maintenance
Cleaning . . . . . . . . . . . . . . . . . . . . . . . . . . . . . . 16
Troubleshooting
Symptoms / Possible Causes / Test . . . . . . . . . . . . . . . . 17
Wiring Diagram
2M-W1349, GCOF-T Gas Full Size Convection Oven
120VAC . . . . . . . . . . . . . . . . . . . . . . . . . . . . . . 18
Exploded View & Parts List . . . . . . . . . . . . . . . . . . . . . 20-25
NOTICE ServiceonthisoranyotherLangappliancemustbeperformedbyqualiedper-
sonnel only. Consult your Lang Authorized Service Agent Directory.
You can call our tech service number 314-678-6315
or visit our website www.langworld.com for the service agent nearest you.
3
Page 4
W D
H
15.1”
384mm
2.5”
54mm
GAS
CONNECTION
2.5”
54mm
GAS
CONNECTION
IL2354
Front View Side View Top View
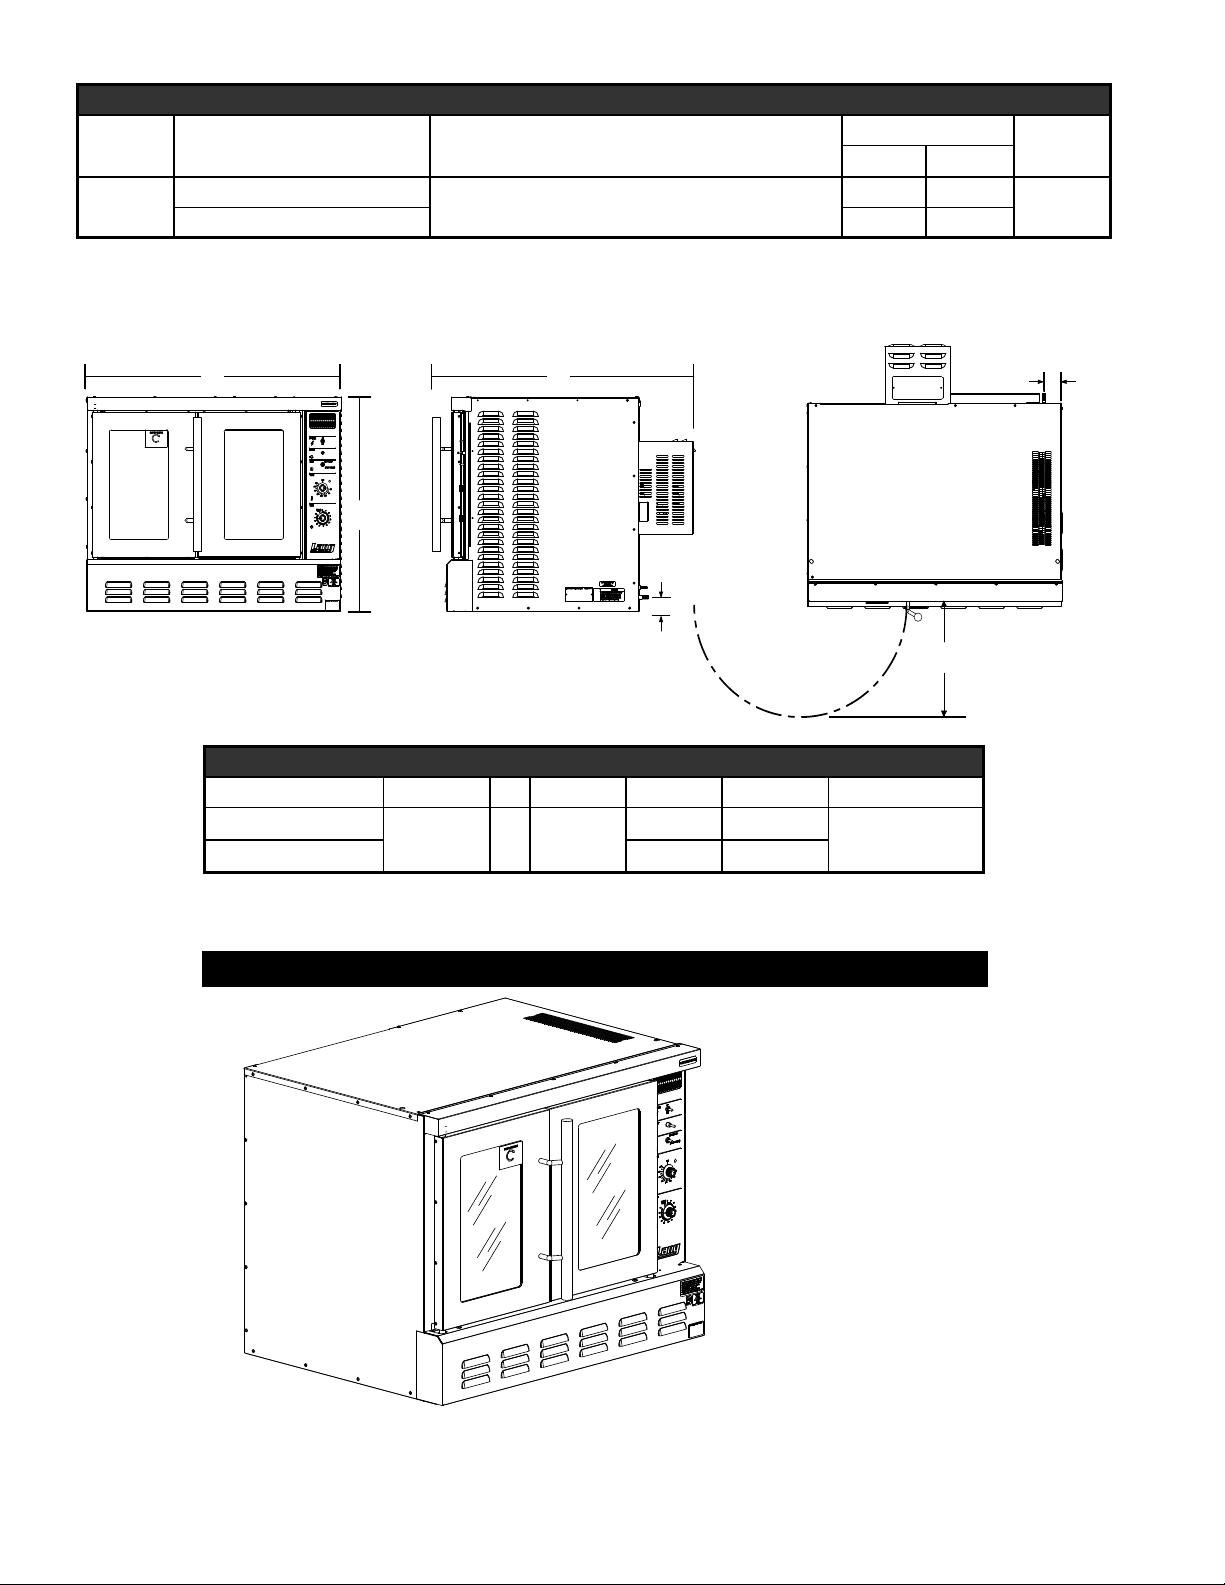
Model Height x Width x Depth
GCOF-T
32” x 40.2” x 40.5”
812mm x 1021mm x 1029mm
SPECIFICATIONS
Clearance from combustible surface
(without optional stand)
Weight
Installed Shipping
Freight
Class
Side:6” (154mm), Back:6” (154mm), Floor:6” (154mm) 70
ELECTRICAL & GAS SPECIFICATIONS
CURRENT MODEL VOLTS AC Hz. AMPS NAT. PROPANE BURNER INPUT
GCOF-T-NAT
X
115 60 7.1
GCOF-T-LP X
FEATURES & BENIFITS
Interior Light
Accu-Temp Controls
Dual Speed Fan
One hand door opening
5 Racks
55000
2M-W1349, GCOF-T Gas Full Size Convection Oven
IL2355
4
Page 5
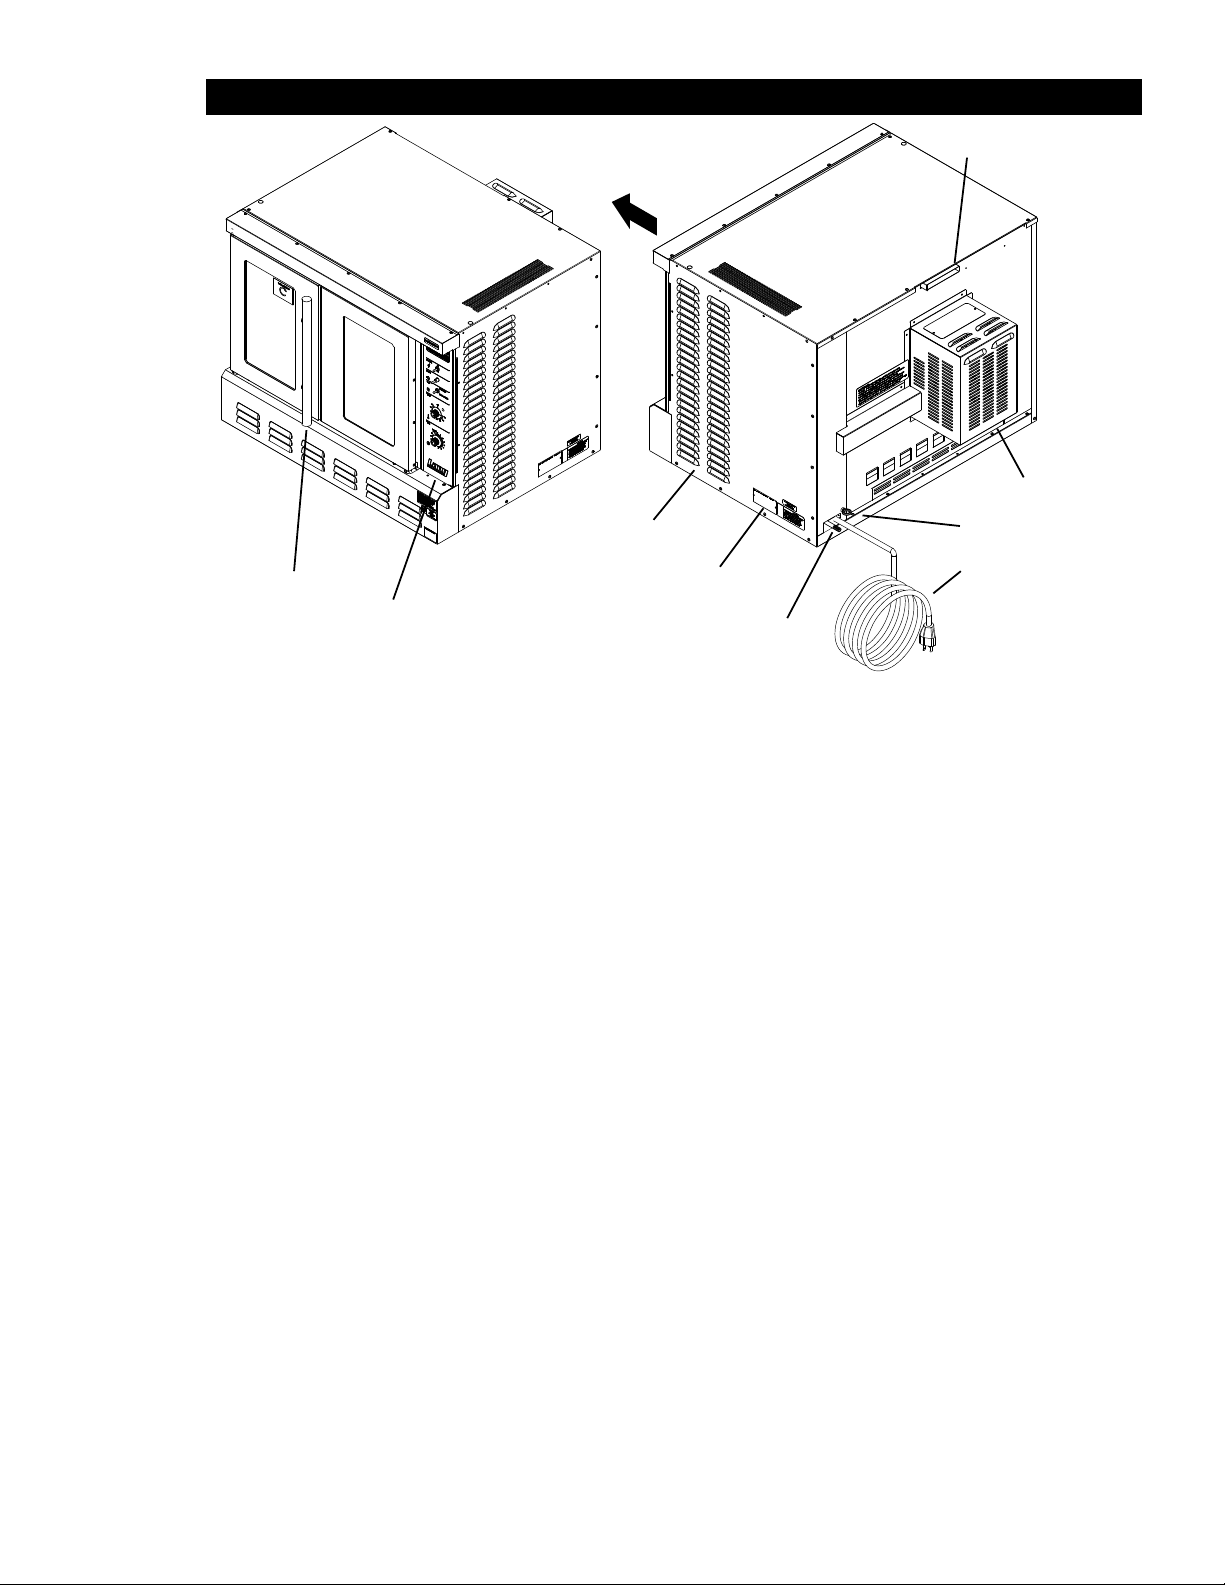
EQUIPMENT DESCRIPTION
Vent
Front
Motor
Wall Anchor
Power Cord
IL2353
Handle
Side Vent
Nameplate
Controls
Gas Inlet
Exterior Construction
The oven exterior dimensions are listed in the Specication Section. The Top, Front, Back, and Sides
are constructed of heavy duty 430 stainless steel, with an attractive No. 4 nish.
The ovens simultaneous-opening heavy duty doors come standard with double pane windows.
The door handle is constructed of Stainless Steel and Phonolic Tubing.
The oven cavity is insulated with high temperature insulation for efciency and reduced heat loss.
Interior Construction
The GCOF oven cavity dimensions are 29” (72.5 cm) Wide, 20” (50.84 cm) High, 21” (53.38 cm) Deep.
The interior of the oven is constructed of porcelainized stainless steel.
Operation
The GCOF-T ovens are forced air convection ovens with a vented oven cavity.
The air is driven by a 1/3 HP fan motor.
Controls
Easy to use manual control knobs.
Solid state temperature sensing and controls.
Pulse and two-speed fan.
Technical
The GCOF-T has electronic ignition and requires a 120V single-phase connection.
2M-W1349, GCOF-T Gas Full Size Convection Oven
Floor space required is 46” (116.84 cm) wide, 46.5” (118.11 cm) deep.
The oven weighs 500 lbs.
Contact the factory for correct orice sizes when installing oven above 4000 ft.
NOTICE The nameplate is on side of the oven right of the control panel.
The oven voltage, wattage, serial number, wire size, and clearance
specicationsareonthedataplate.Thisinformationshould
be carefully read and understood before proceeding with the
installation.
5
Page 6
CAUTION
UNPACKING
Receiving the Oven
Upon receipt, check for freight damage, both visible and concealed.
Visible damage should be noted on the freight bill at the time of delivery and
signed by the carrier’s agent. Concealed loss or damage means it does not
become apparent until the merchandise has been unpacked. If concealed
loss or damage is discovered upon unpacking, make a written request for
inspection by the carrier’s agent within 15 days of delivery. All packing
material should be kept for inspection. Do not return damaged merchandise
to Star Manufacturing Company. File your claim with the carrier.
Location
Prior to un-crating, move the oven as near to its intended location as practical. The crating will help
protect the unit from the physical damage normally associated with moving it through hallways and
doorways.
Un-crating
The oven will arrive completely assembled inside a wood frame and strapped to a skid. Cut the
straps and remove the wood frame.
The oven can now be removed from the skid.
EACH UNIT WEIGHS 500 LBS. FOR SAFE HANDLING, INSTALLER SHOULD
OBTAIN HELP AS NEEDED, OR EMPLOY APPROPRIATE MATERIALS HANDLING EQUIPMENT (SUCH AS A FORKLIFT, DOLLY, OR PALLET JACK)
TO REMOVE THE UNIT FROM THE SKID AND MOVE IT TO THE PLACE OF
INSTALLATION.
ANY STAND, COUNTER OR OTHER DEVICE ON WHICH OVEN WILL BE
LOCATED MUST BE DESIGNED TO SUPPORT THE WEIGHT OF THE OVEN.
SHIPPING STRAPS ARE UNDER TENSION AND CAN SNAP BACK WHEN CUT.
2M-W1349, GCOF-T Gas Full Size Convection Oven
6
Page 7
INSTALLATION
Rear
Support Assy
Front
Front
Support Assy
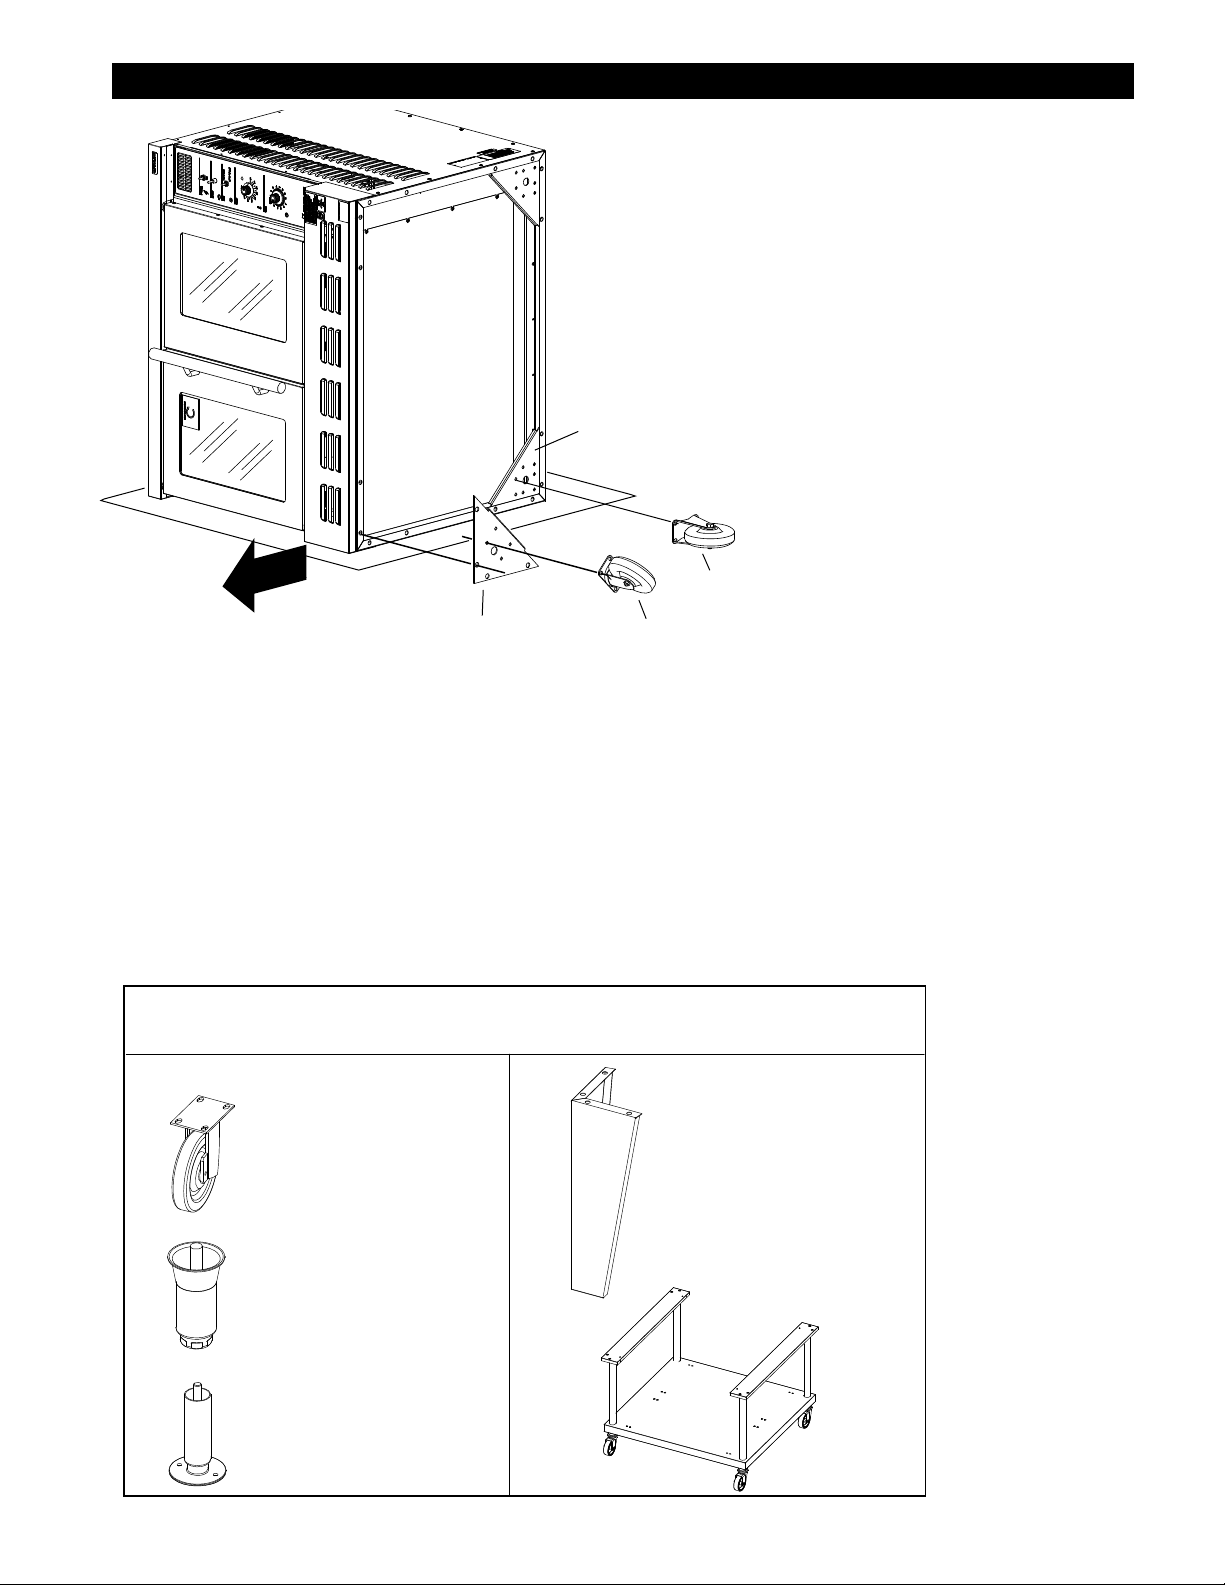
Above: typical leg and caster installation.
Below: accessory options, legs, casters & equipment carts sold
separately. Follow installation instructions with the each specic kit.
Swivel
Caster
Leg Installation
Legs are available separately for both the
single and double deck installations. Single
deck installations require a 27-inch leg or
equipment cart. Double deck installations
require 6-inch legs or casters. All these are
available separately.
Place some cardboard on the ground and
with assistance carefully lay the unit on its
side, as shown here.
The adjustable feet may be screwed in
or out as necessary to level the oven. A
torpedo level placed on an oven rack will
assist in leveling the oven.
Double-Stack Ovens
To install the 6-inch legs, adj. feet or casters
on the lower unit, follow the Leg Pad
instructions in the following section or in the
instructions included with the leg pads.
Caster
IL2356
Single Oven
To install 27” legs or cart to your unit, place
the unit laying on its side (as shown here)
onto a piece of cardborad. Be sure to read
all instructions & follow the instructions
provided with the kit.
27” Leg Installation
With unit in position, fasten the two legs to the front left & rear left corner pads then to the oven using the four
5/16 inch bolts provided in the leg kit. See leg pad adapter illustration to dermine differences between front & rear
support assemblies.
Lift the oven onto its two legs and block the right side up using one of the 27-inch legs set upside down in the
center right side of the oven body. Install the third 27-inch leg onto the oven body on the control side rear. Gently
lift the oven to remove the temporary support leg & install it on the last rear corner.
Accessory Options
Stacked Units
Caster Sets
2M-W1349, GCOF-T Gas Full Size Convection Oven
6” Adj. Leg Sets
Single Units
27” Leg Set
(marine also)
27” Equipment Cart
6” Adj. Bolt Down Leg Sets
(marine only)
IL1525
7
Page 8
INSTALLATION cont.
Leg Pad Adapter
OVEN FRONT
D
A
E
E
B
E
E E E E
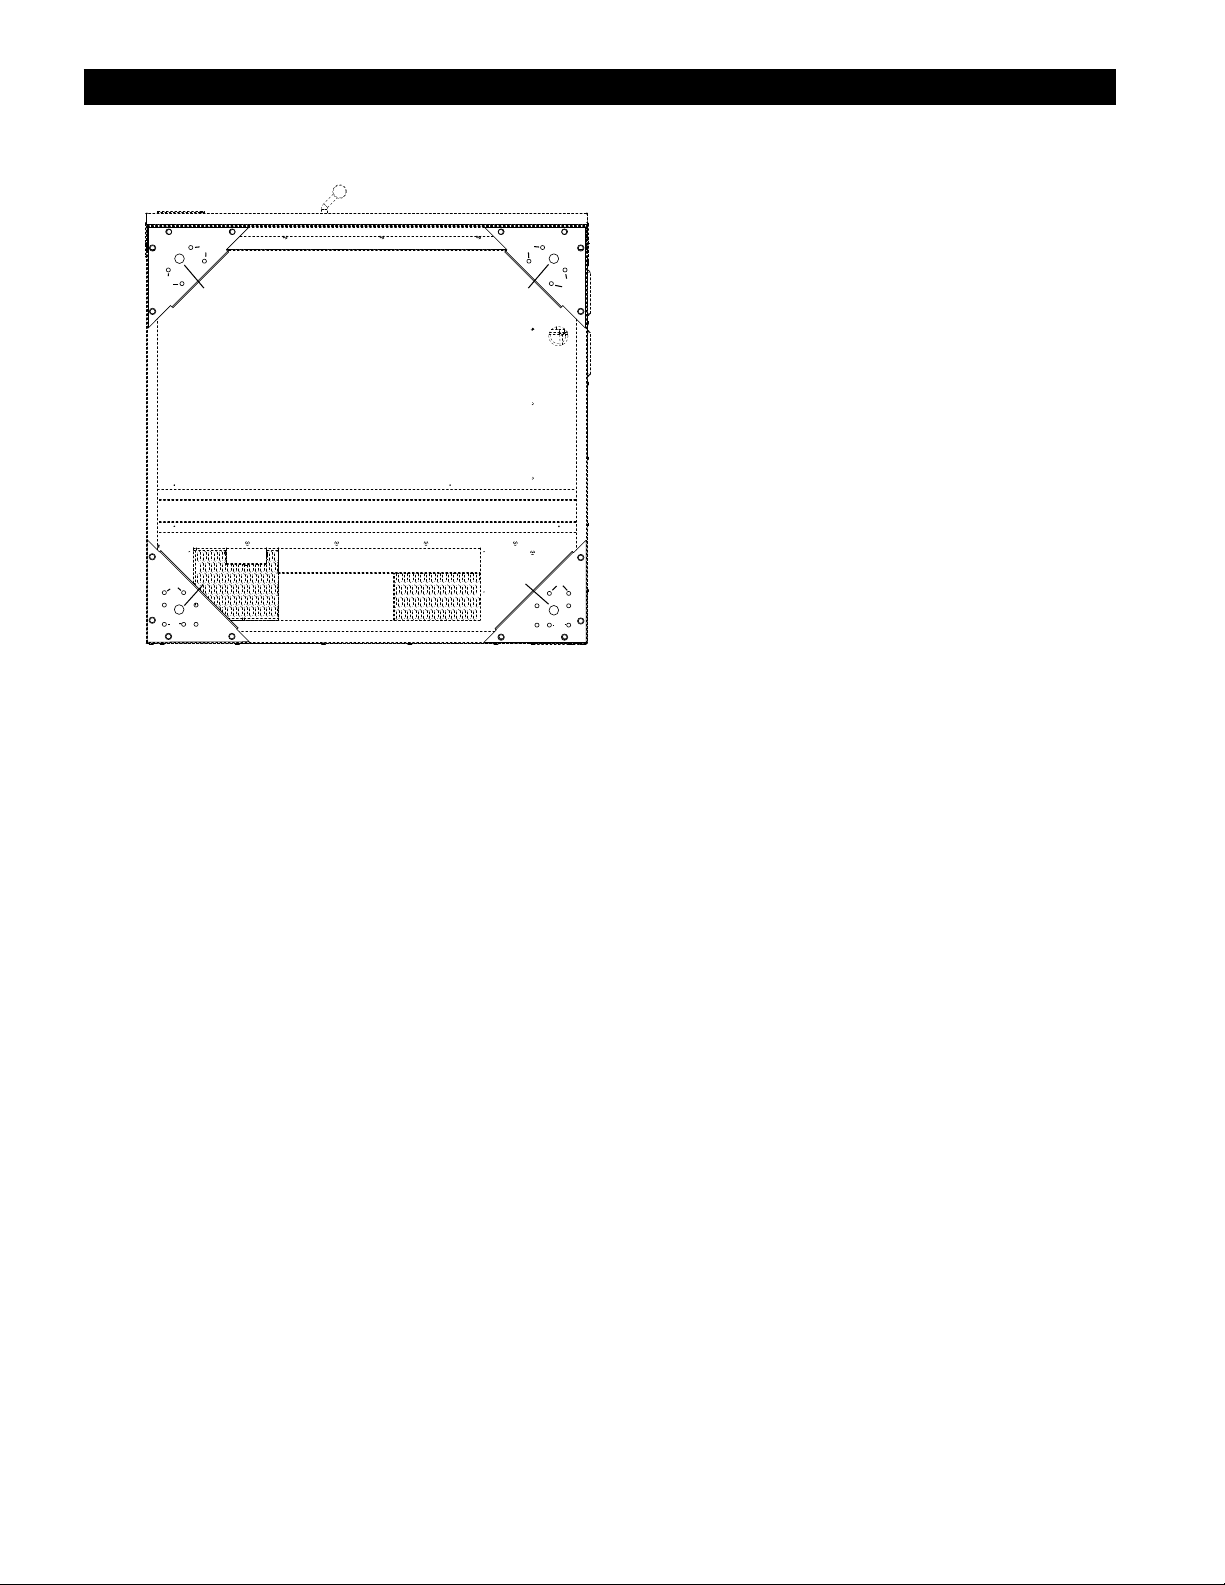
Above: Bottom on unit showing the placement of the leg adapters
and their hole assignment.
D D D
A A
C
OVEN BOTTOM
C
B
IL1523
C
C
B
B
and the other set will create a right rear adapter.
Install four 5/16-inch bolts through the caster base and the adapter holes labeled “B” then install 5/16-inch nuts with
lock washers and at washers.
Adapter to Oven Installation:
Gently tip the oven onto its back. Place the front leg adapter into the front corers of the oven. The holes without
the threaded inserts face the front of the oven and the ange on the adapter points toward the bottom of the oven.
The edge of the leg adapter with the threaded insert slips under the ange on the oven side, while the edge without
the inserts sits on top of the threaded angle on the oven front.
Install two 3/8-inch bolts with lock washers and at washers through the front holes “D” in the leg adapter and into
the threaded inserts on the oven.
Thread one 3/8-inch bolt with lock washer and at washer into the rear threaded hole labeled “E” on each of the leg
adapters.
The forward threaded hole on the front leg adapter does not get a bolt installed.
Place the rear leg adapters into the rear corners of the oven so that the adapter is under the ange of the oven side
and back.
NOTE: If installing a caster place the adapter on the oven so that the casters roll forward.
Install for 3/8-inch bolts with lock washers and at washers through the holes labeled “E” in the ange of the oven
and into the threaded inserts of the leg adapter.
Identify the front and rear leg adapters (the front
adapters have two threaded inserts, the rear has
four). The leg adapters are included with each specic
accessory kit.
A
Leg to Adapter Installation:
E
Install the leg’s threaded stud through the hole in the
adapter labeled “C” with the bent ange of the adapter
facing away from the leg.
Screw the 3/4-inch nut supplied in the adapter kit
onto the leg stud and tighten. Secure to oven using
hardware provided.
Caster to Adapter Installation:
Place the swivel caster against the front leg pad
adapter with the ange of the adapter
E
facing away from the caster.
Install the four 5/16 inch bolts through the caster base
and the adapter holes labeled “A” then install the 5/16
E
inch nuts with washer and lock washers.
Place the rigid casters against the rear leg adapter with
the ange of the adapter facing away from the caster.
Align the caster to the holes in the adapter labeled “B”.
NOTE: There are two sets of “B” holes set at 90° from
the each other. One set will create a left rear adapter
2M-W1349, GCOF-T Gas Full Size Convection Oven
8
Page 9
INSTALLATION cont.
Flue Adapter
Stacking the Ovens
Remove all the plug buttons from the top of the lower oven.
Remove the stacking kit from the oven compartment of one oven and install the 1 1/4-inch plastic bushing into
the top of the lower oven.
Tip the top oven backwards and install two 3/8-inch socket head bolts, found in the stacking kit, into the two front
leg holes that match the holes in the top of the lower oven. Install the socket head bolts with the heads of the bolt
pointing away from the oven.
Lift the top oven and gently set on top of the lower oven so that the heads of the socket head bolts nest into the
holes in the top of the lower oven.
NOTE: Each unit must have separate electrical connections
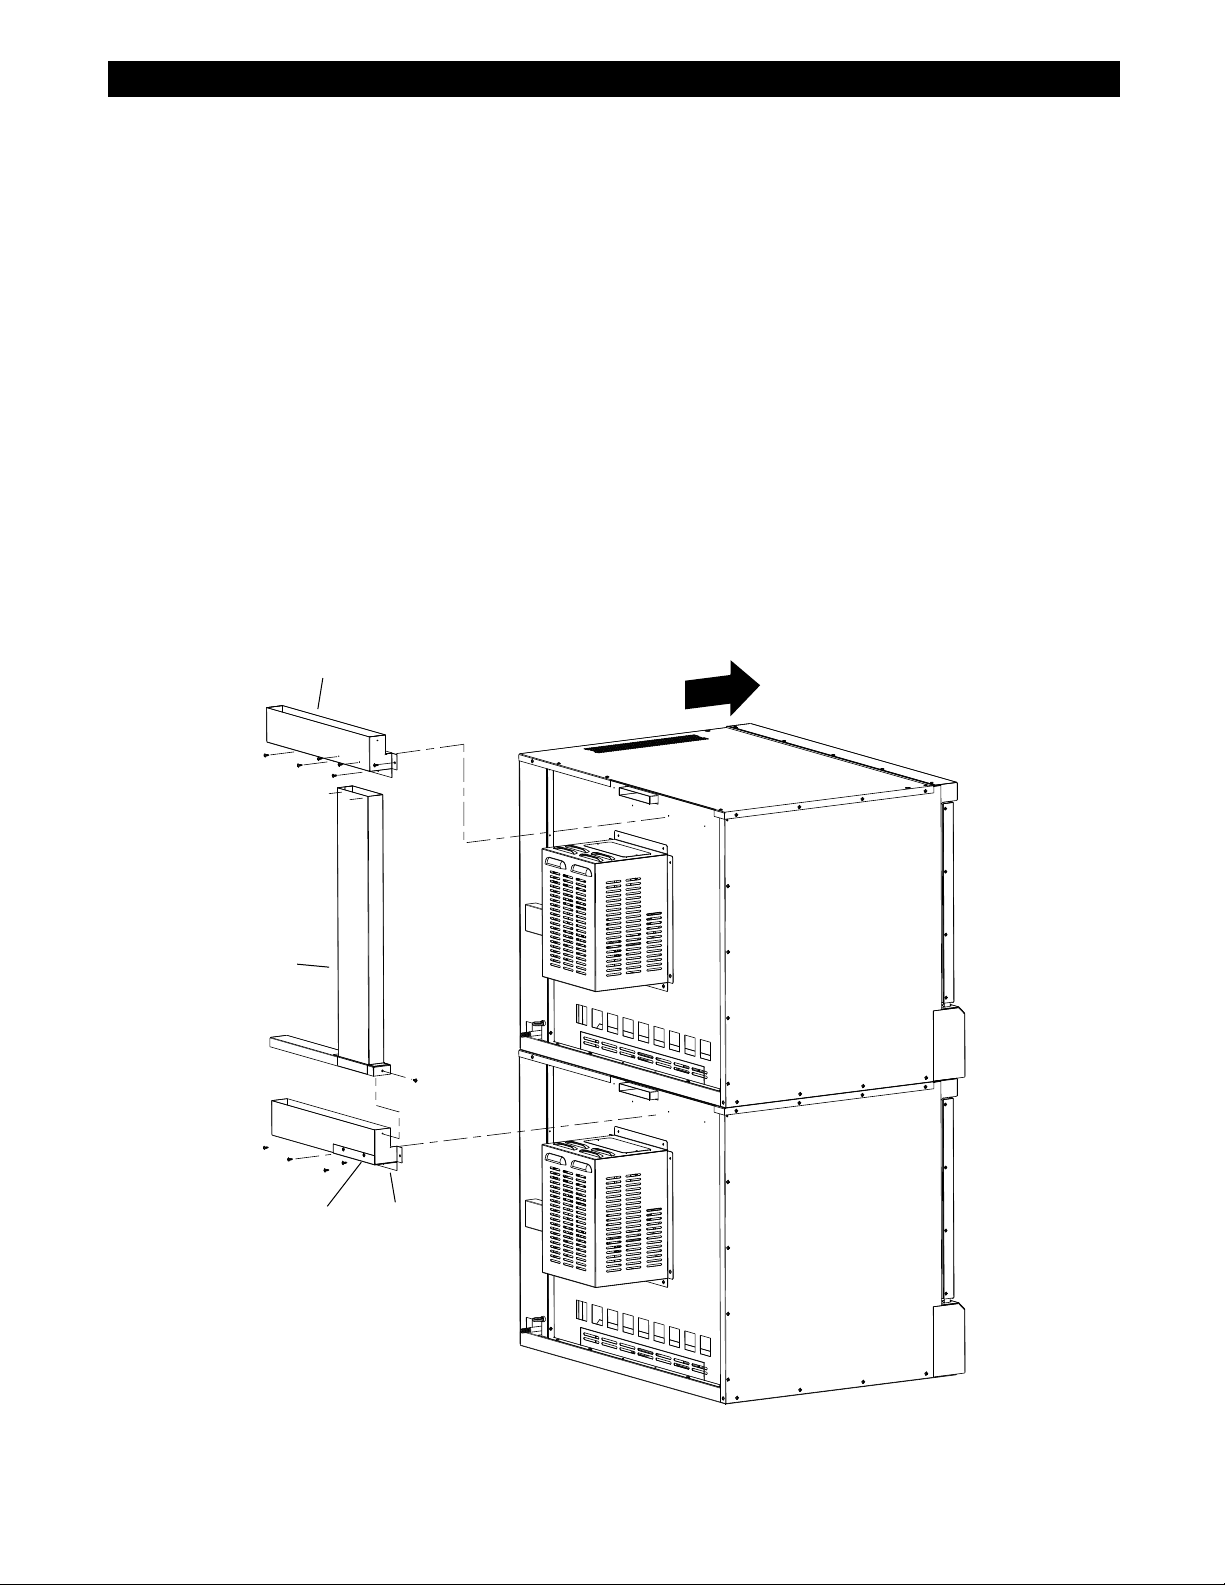
Flue Installation (9Q-GCOFT-FLUEXT Optional Kit)
A ue extension must be installed on the stacked set as shown below.
The extension directs the heat of the lower unit away from the motor of the upper unit. Without this installed, the
upper unit can experience problems including premature motor failure.
The ovens may now be set into position. Be careful if sliding the ovens, they are not designed to slide over
cracks or obstructions in the oor.
Flue
Extension
2M-W1349, GCOF-T Gas Full Size Convection Oven
Cover
Front
Flue
Adapter
IL2509
9
Page 10
INSTALLATION continued
Ventilation and Clearances
Standard minimum clearance from combustible construction is as follows.
4” from side
4” from back
6” from oor
• These ovens may be set directly, without legs, on a curbed base or non-combustible oor.
• If the oven is set without legs on a non-combustible oor or a curbed base, maintain a 4-inch back
clearance.
• If the oven is set directly against a non-combustible back wall, maintain a 4-inch clearance to the
oor.
• Do not install the oven closer than 4 inches from another oven on the right hand side
(control panel side).
• Do not install the oven closer than 12 inches from an uncontrolled heat source (char broiler etc.) on
the right side.
• Keep the area free & clear of combustible material, and do not obstruct the ow of combustion or
ventilation air.
• The installation of any components such as a vent hood, grease extractors, and/or re extinguisher
systems, must conform to the applicable nationally recognized installation standards.
THIS APPLIANCE IS EQUIPPED WITH A 3-PRONG (GROUNDING)
PLUG FOR YOUR PROTECTION AGAINST SHOCK HAZARD AND
MUST BE PLUGGED DIRECTLY INTO A PROPERLY GROUNDED
WARNING
3-PRONG FROM THE PLUG.
Electrical Connection
The electrical connection must be made in accordance with local codes or in the absence of local codes
with NFPA No. 70, latest edition (in Canada use: CAS STD. C22.1).
The electrical service entrance is provided by a cord and plug located at the oven back directly behind
the control compartment.
Each oven requires a 115-volt grounded supply and 7.1 amps.
Supply wire size must be large enough to carry the amperage load for the number of ovens being
installed. Wire size information can be found on the oven data plate.
2M-W1349, GCOF-T Gas Full Size Convection Oven
NOTICE: THE INSTALLATION OF THIS UNIT MUST CONFORM TO
APPLICABLE NATIONAL, STATE, AND LOCALLY RECOGNIZED
INSTALLATION STANDARDS.
NOTICE: THE INSTALLATION OF ANY COMPONENTS SUCH AS A VENT
HOOD, GREASE EXTACTORS, FIRE EXTINGUISHER SYSTEMS,
MUST CONFORM TO THEIR APPLICABLE NATIONAL, STATE AND
LOCALLY RECOGNIZED INSTALLATION STANDARDS.
10
Page 11
INSTALLATION continued
Gas Connection
This appliance is manufactured for use with the type of gas indicated on the data plate.
Contact the factory if the gas type does not match that which is on the data plate.
All gas connections must be in accordance with local codes and comply with the National Fuel Gas Code
ANSI Z223.1 latest edition.
An internal gas pressure regulator is located inside the control compartment.
Gas must be delivered to the appliance regulator at less than 1/2 pound of pressure and less than 1/2-inch
water column pressure drop.
The internal regulator is preset at the factory, however, due to gas pressure variations from area to area; it
may be necessary to make minor adjustments to the regulator to provide the manifold pressure indicated on
the data plate. This should be 5 inches water column for natural gas and
10-inch water column for propane. A 1/8-inch NPT tap is provided on the main manifold for checking regulator
pressure. Access the main manifold by removing the bottom trim piece below the oven doors.
When replacing the 1/8-inch plug in the main manifold a joint sealant that is resistant to the action of liquid
petroleum gas must be used.
The supply piping must be of sufcient size to provide 55,000 BTU/hr per oven. A 1/2-inch NPT connection is
provided at the rear of the oven directly behind the control compartment. Connect each oven separately.
A gas shut off valve must be installed to the oven(s) and located in an accessible area.
This appliance and its individual shutoff valve must be disconnected from the gas supply piping system during
any pressure testing of that system at test pressures in excess of 1/2 PSGI and the appliance must be isolated
from the gas supply piping system by closing its individual manual shutoff valve during any pressure testing of
the gas supply system at test pressures equal to or less than 1/2 PSIG.
Test for gas leaks. Use a commercial leak detector or a soap and water solution.
CONVECTION OVENS INSTALLED WITH CASTERS MUST HAVE THE
FOLLOWING: A CONNECTOR THAT COMPLIES WITH THE STANDARD
FOR CONNECTORS FOR MOVABLE GAS APPLIANCES ANSI Z21.69
LATEST EDITION, A QUICK DISCONNECT THAT COMPLIES WITH THE
WARNING
STANDARD FOR QUICK DISCONNECT DEVICES FOR USE WITH GAS
FUEL, ANSI Z21.141 LATEST EDITION, A TETHER OR OTHER MEANS
TO LIMIT APPLIANCE MOVEMENT WITH OUT RELIANCE ON THE GAS
SUPPLY PIPING. SECURELY ATTACH THE TETHER TO THE EYEBOLT
PROVIDED AT THE REAR OF THE APPLIANCE.
2M-W1349, GCOF-T Gas Full Size Convection Oven
11
Page 12
INSTALLATION continued
Gas Conversions
1. Disconnect oven from power and gas.
2. Remove bottom trim piece from oven (2 hex head bolts and 1 Phillips screw).
3. Remove side panel from oven.
4. Disconnect black manifold pipe from 3/8” aluminum pipe at the furrel nut.
5. Remove two Phillips screws holding black manifold pipe to oven.
6. Remove black manifold pipe from oven.
7. Remove both burner orices from manifold and replace with new orices,
making sure to apply pipe thread compound.
8. Remove two Phillips screws holding pilot assembly to oven.
9. Remove pilot assembly from oven.
10. Remove ¼” aluminum pipe from pilot assembly.
11. Remove pilot orice and replace with new pilot orice.
12. Re-attach ¼” aluminum pipe to pilot assembly.
13. Re-attach pilot assembly to oven.
14. Re-install black manifold assembly to oven, making sure that the orice goes into the
burner tubes.
15. Re-attach 3/8” aluminum pipe to black manifold assembly.
16. Remove the seal screw from the combination gas valve.
17. Remove the adjustment screw and spring from the combination valve.
18. Insert new spring into the valve and adjustment screw.
19. Re-connect oven to power and gas and check for leaks using a soap solution.
20. Adjust gas pressure to correct water column (5”NG, 10”LP).
21. Install new seal screw provided in kit and afx “Caution” sticker to the visible side of
the combination valve.
22. Re-install bottom trim piece and side panel.
2M-W1349, GCOF-T Gas Full Size Convection Oven
NOTICE Kits designed to accommodate ovens from sea level to 5000 feet.
Contactfactoryfororicesizesoninstallationsabove5000feet.
NG to LP LP to NG
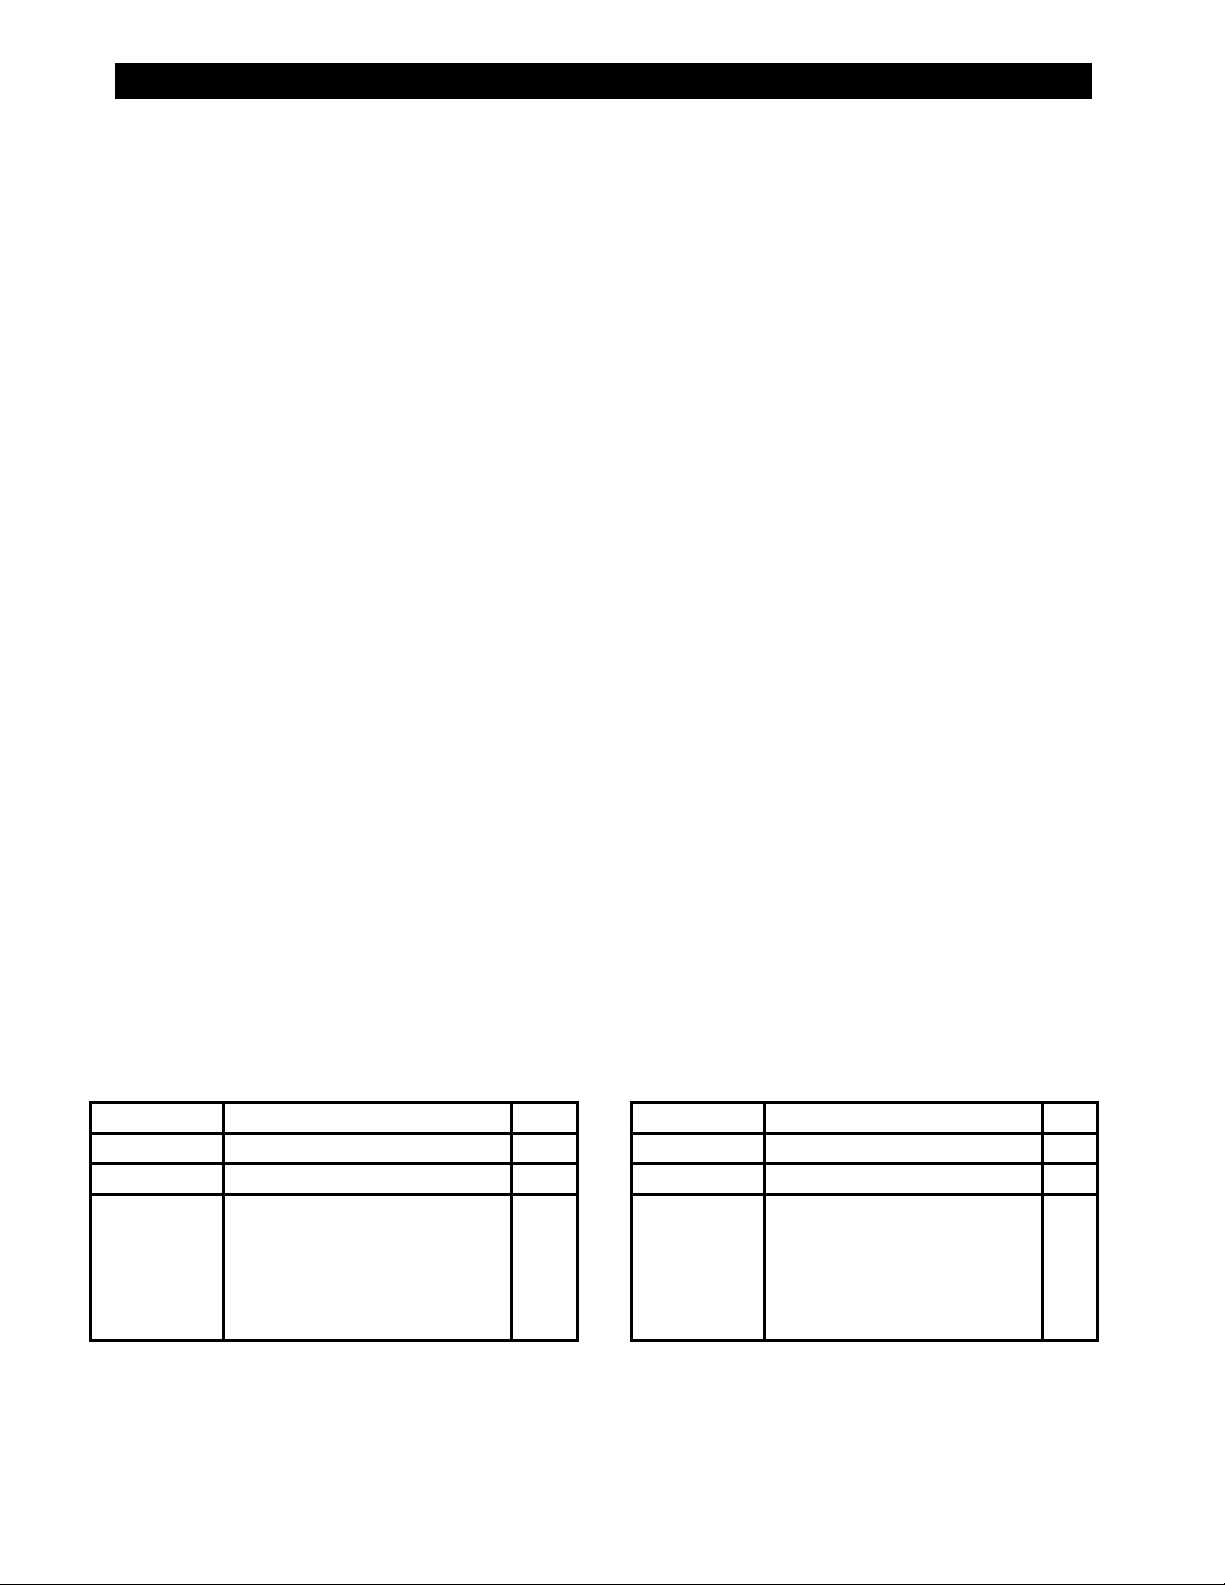
Part No. Description Qty. Part No. Description Qty.
2A-80401-05 Pilot Orice, Drilled .010 1 2A-80401-10 Pilot Orice, Drilled .018 1
Y9-80400-14 Main Burner Orice, Drilled #53 2 Y9-80400-13 Main Burner Orice, Drilled #43 2
2V-80505-11
Combination Gas Valve Spring,
Includes:
1.
Spring 1. Spring
2.
Seal Screw 2. Seal Screw
3.
Caution Sticker 3. Caution Sticker
1 2V-80505-16
12
Combination Gas Valve Spring,
Includes:
1
Page 13
INITIAL START UP
Pre-Power On
After the oven is installed and connected to power, prior to turning on, verify the following:
• The doors open and close freely.
• All racks are in the oven correctly.
• All packing materials have been removed from the inside of the oven.
• All power and gas connections are tight.
Power On
The pilot burner is electronically ignited. When the oven power switch is turned On the pilot will light.
There is a lockout safety feature on the spark ignition module. If, during the initial start-up, the pilot does not
light within 30 seconds the module will turn off all gas to the pilot burner. To reset the spark module, turn Off
the power switch for 10 seconds then turn the switch back On. This may need to be repeated several times
during the initial start-up until gas is present at the pilot burner.
NOTICE Duringtherstfewhoursofoperationyoumaynoticeasmallamount
of smoke coming off the oven, and a faint odor from the smoke. This is
normalforanewovenandwilldisappearaftertherstfewhoursofuse.
BEFORE LIGHTING USE A SOAP AND WATER SOLUTION TO TEST ALL
JOINTS FOR GAS LEAKS.
WARNING
2M-W1349, GCOF-T Gas Full Size Convection Oven
13
Page 14
General Operation & Programming
ACCU-TEMP
Convection ovens constantly circulate air over and around the product. This strips away the thin layer of moisture
and cool air from around the product allowing heat to penetrate more quickly.
Cooking times can be shortened and cooking temperatures can be reduced.
To convert standard deck oven recipes, reduce the temperatrue 50° degrees and the time by 25%.
Make minor adjustments as necessary.
Always weigh your product. This will give you a more consistent size, color and quality.
Check the product near the end of the initial cooking.
Do not open the oven door during baking, as this will change the baking characteristics of the oven and make it
difcult to determine a nal program.
If the product is overdone on the outside and underdone on the inside, reduce the baking temperature.
If the product is pulling away from the edge of the pan, the temperature is too high or the cooking time too long.
A convection oven is a mechanical piece of equipment. The
same control settings will always give the same results. If
the results vary, problems may be because of changes in
the product preparation.
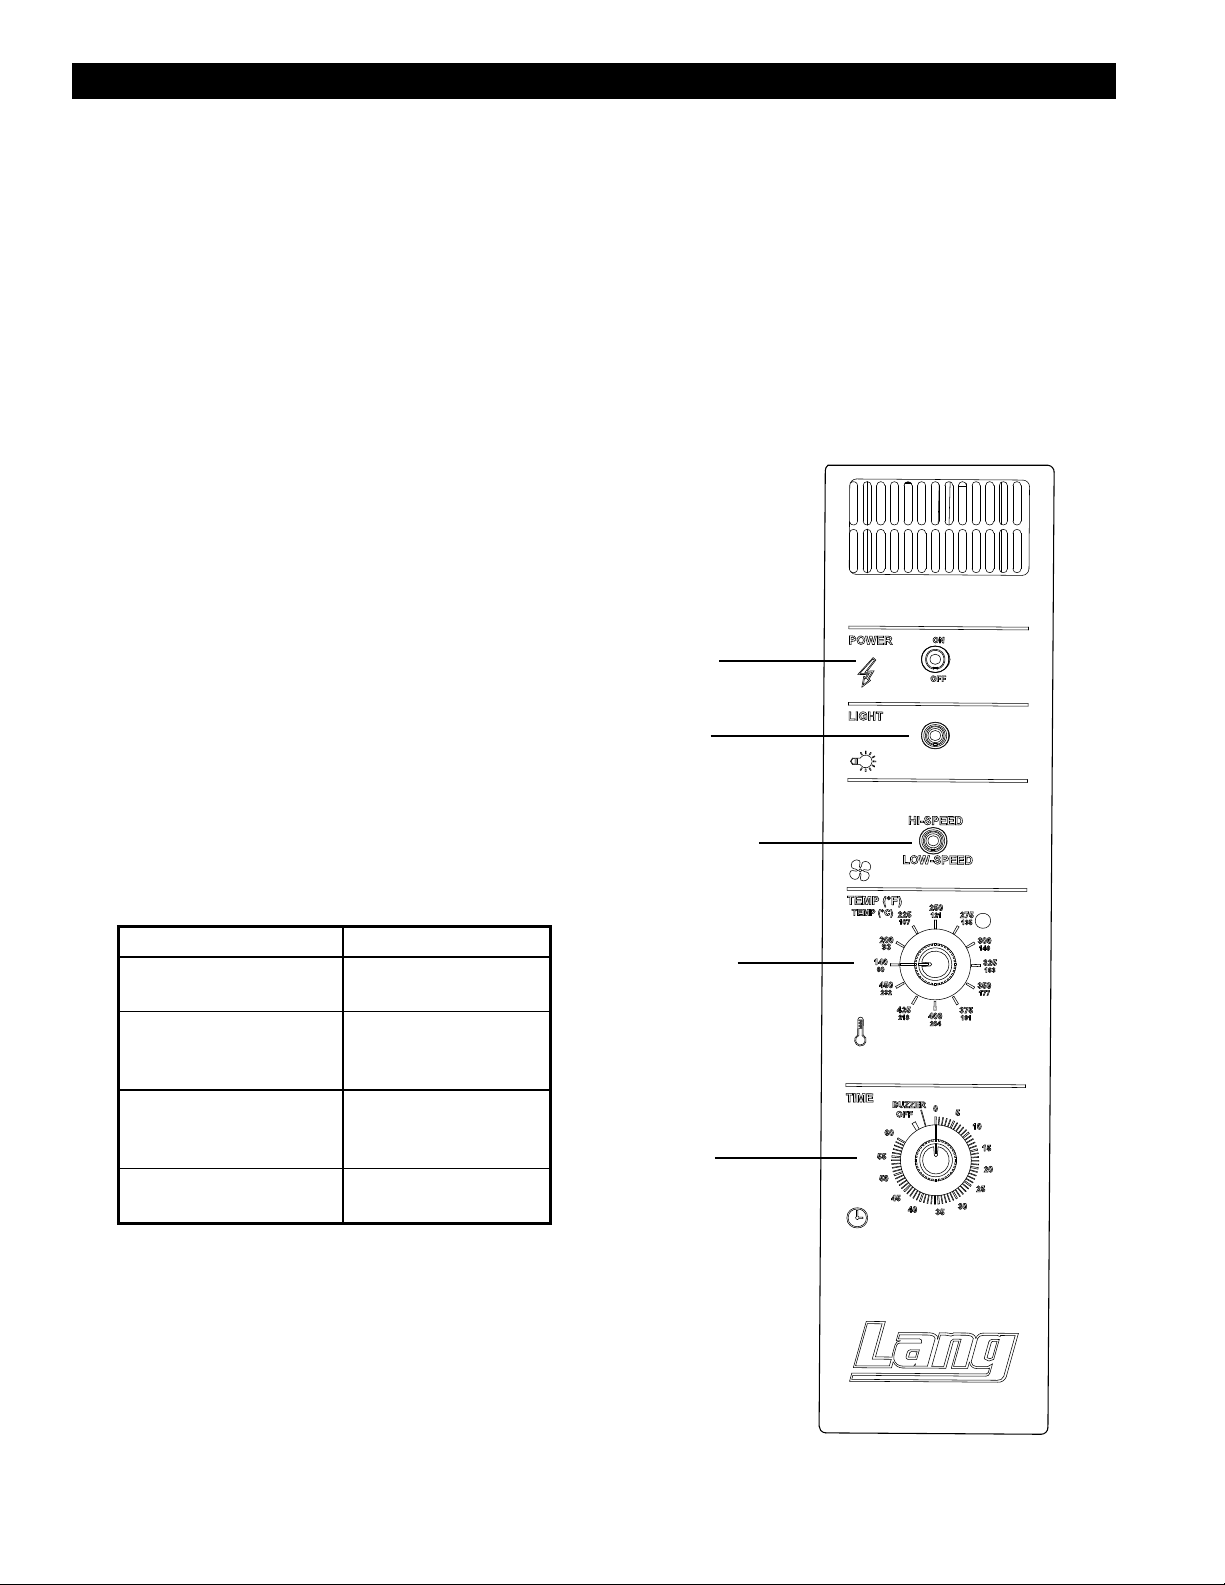
GCOF-T Control Panel
The control panel consists of the following items.
Detailed operational descriptions are given later this
section.
Power: Turns the oven on and off
Light: Turns the ovens lights on and off
Hi/Low Speed Fan: Dual speed switch.
Toggles the fan between high & low speed.
Temperature Control: Allows temperature to be set in a
range from 140°F to 450°F
Timer: Electronic on-hour timer with continuous beeper,
Power
Light
Hi/Low
Speed Fan
2M-W1349, GCOF-T Gas Full Size Convection Oven
Typical Operation Sequence
Action Result
Turn Power Switch to ON
Adjust temperature, between
140°F & 450°F and allow 20
minutes for preheating
Open oven door and insert
product, set timer up to 60
minutes.
Timer beeps continuously
when done.
Control panel heat call
light comes on.
Oven begins heating
Timer begins counting
down.
Product should now be
done.
Temperature
Control
Timer
ACCU-TEMP
IL2236
14
Page 15
General Operation & Programming cont.
Hints & Suggestions
Convection ovens constantly circulate air over and around the product. This strips away the thin layer of
moisture and cool air from around the product allowing heat to penetrate more quickly.
Cooking times can be shortened and cooking temperatures can be reduced.
To convert standard deck oven recipes, reduce the temperature 50 degrees and the time by 25%. Make
minor adjustments as necessary.
The lower the oven temperature the more even the bake.
Always weigh your product. This will give you a more consistent size, color and quality.
Check the product near the end of the initial cooking cycle by turning on the oven light and looking
through the oven door windows.
Do not open the oven doors during baking as this will change the baking characteristics of the oven and
make it difcult to determine a nal program.
If the product is overdone on the outside and underdone on the inside, reduce the baking temperature.
If the product is pulling away from the edge of the pan, the temperature is too high or the cooking time
too long.
The convection is a mechanical piece of equipment. The same control settings will always give the
same results. If the results vary, problems may be because of product preparation.
Opening the vent will to allow mositure to escape the cooking chamber during part or all of the cooking
process. This will allow a more crispy product, example: french fries, sh, crispy crusts. Close the vent
for dough products like cinnamon rolls, breads. This is something to experiment with to determine what
is best for your specic menu.
Loading
Here are some things to remember when loading your oven.
• When loading and unloading the oven, stage products and racks so the oven door is opened for the
least amount of time.
• Be sure that racks are level within the oven.
• Bent or warped pans can greatly affect the evenness of the cook or bake.
• If using baker’s parchment, be sure the parchment does not blow over the product. That will create
an uneven bake.
• Load each shelf evenly. Spaces should be maintained equally between the pan and oven walls, front
and back.
• Do not overload pan’s this will create an uneven bake.
• For best baking results, load the oven from the center out during random loading.
ALWAYS KEEP THE AREA NEAR THE APPLIANCE FREE FROM
KEEP FLOOR IN FRONT OF EQUIPMENT CLEAN AND DRY. IF
2M-W1349, GCOF-T Gas Full Size Convection Oven
CAUTION
COMBUSTIBLE MATERIALS.
SPILLS OCCUR, CLEAN IMMEDIATELY, TO AVOID THE DANGER OF
SLIPS OR FALLS.
15
Page 16
MAINTENANCE
• Oven interiors should be wiped down daily and thoroughly cleaned weekly using warm water and mild
detergent. DO NOT use caustic cleaners.
• The appliance should be thoroughly checked at six-monthly intervals by a qualied technician
(heating unit, mechanical stability, corrosion...) with particular emphasis on all control and safety
devices.
CLEANING
• Always start with a cold oven.
• The stainless exterior can easily be cleaned using stainless steel cleaner.
• Always follow the cleaner manufacturer’s instructions when using any cleaner.
• Care should be taken to prevent caustic cleaning compounds from coming in contact with the fan wheel.
• The oven racks, rack slides, may be cleaned outside the oven cavity using oven cleaner.
• Using any harsh chemicals will result in the removal of the ETC coating and etching of the
porcelain below it. The oven interior should only be cleaned using a mild soap and a non metal scouring pad.
DO NOT use caustic cleaners.
• Always apply stainless steel cleaners when the oven is cold and rub in the direction of the metal’s grain.
KEEP WATER AND SOLUTIONS OUT OF CONTROLS. NEVER SPRAY OR
HOSE CONTROL CONSOLE, ELECTRICAL CONNECTIONS, ETC.
WARNING
MOST CLEANERS ARE HARMFUL TO THE SKIN, EYES, MUCOUS
MEMBRANES AND CLOTHING. PRECAUTIONS SHOULD BE TAKEN TO
WEAR RUBBER GLOVES, GOGGLES OR FACE SHIELD AND PROTECTIVE
CAUTION
CLOTHING.
CAREFULLY READ THE WARNING AND FOLLOW THE DIRECTIONS ON THE
LABEL OF THE CLEANER TO BE USED.
NEVER LEAVE A CHLORINE SANITIZER IN CONTACT WITH STAINLESS
STEEL SURFACES LONGER THAN 10 MINUTES. LONGER CONTACT CAN
CAUSE CORROSION.
2M-W1349, GCOF-T Gas Full Size Convection Oven
16
Page 17
Troubleshooting
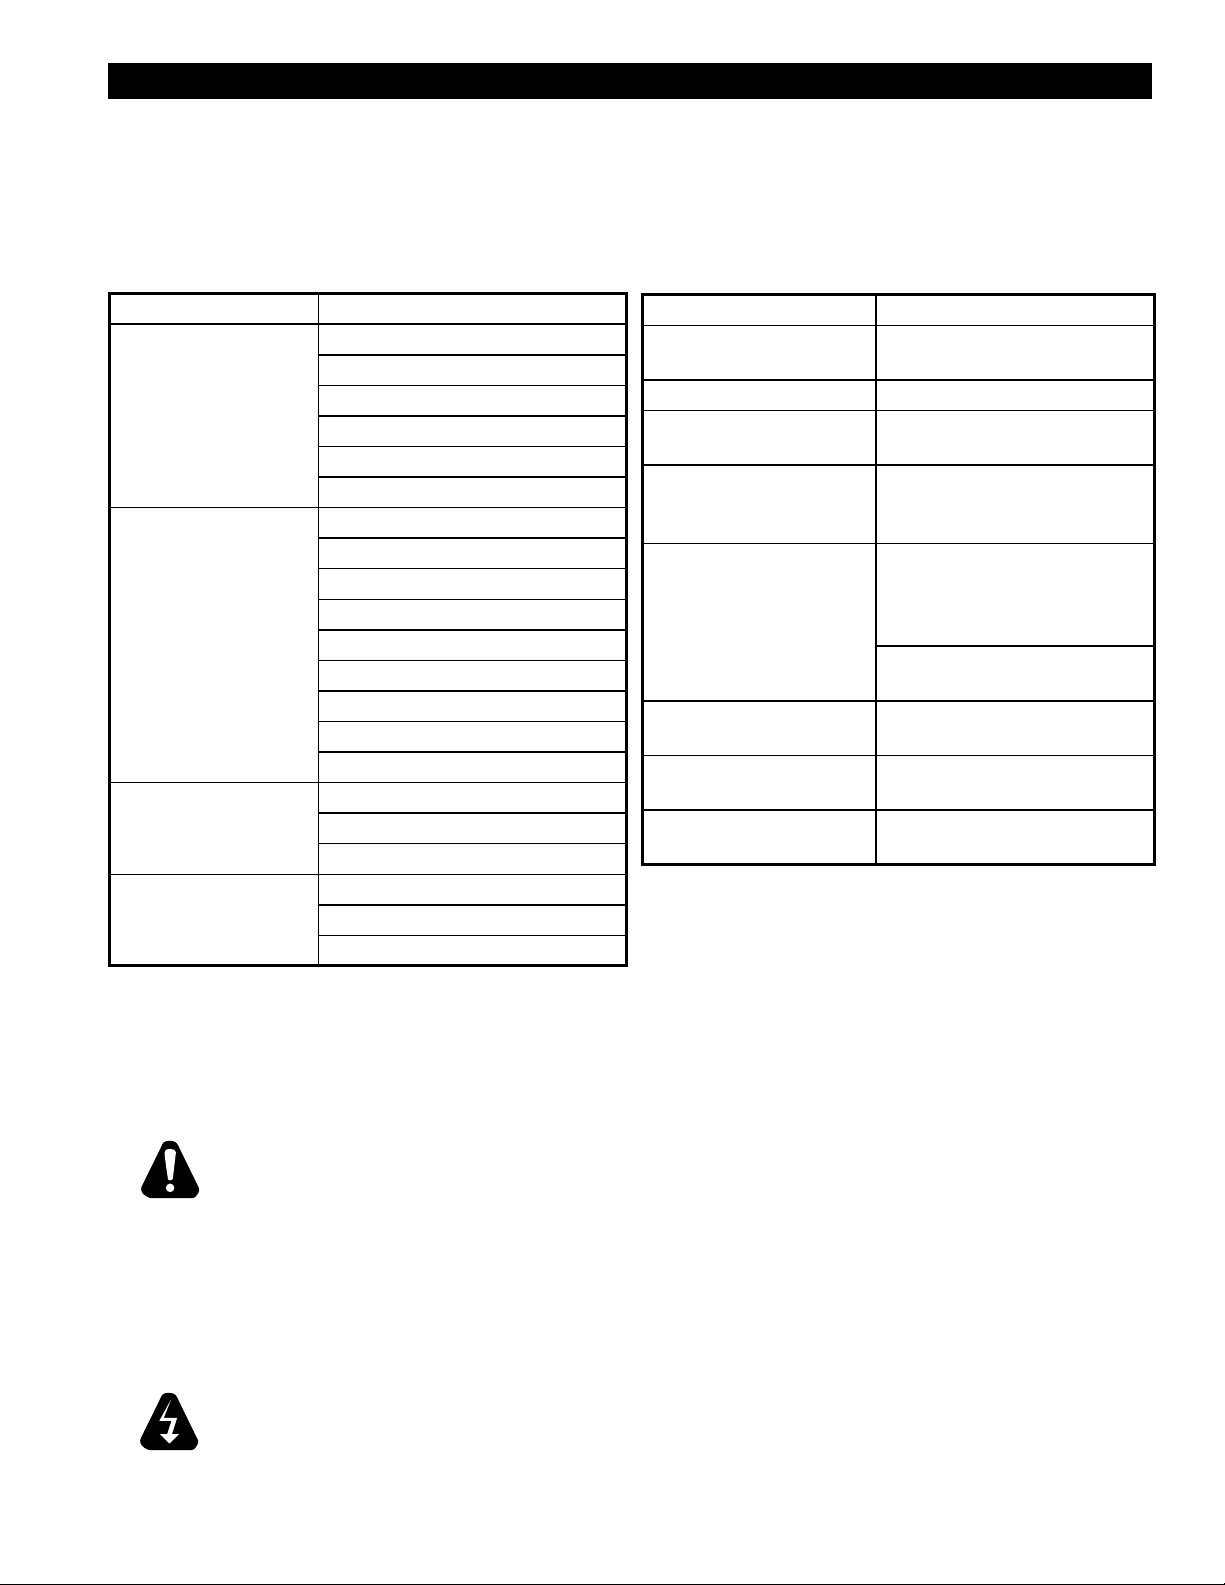
Symptoms & Possible Causes
The following are charts of Symptoms and Possible Causes to aid in diagnosing faults with your unit.
Refer to the symptoms column to locate the type of failure then to the Possible Cause for the items to be checked.
To test for a possible cause refer to test to identify test procedures. Test indicated with an “*” should be done by a
Lang factory authorized service representative.
SYMPTOM POSSIBLE CAUSE
Power indicator is not lit. No power to cord outlet
Oven unplugged from outlet
Failed power cord or plug
Failed power switch
Failed indicator light
Failed pilot ignition
Oven will not heat Power Switch is not “ON”
Failed Pilot ignition
Failed 12-position switch
Failed Probe
Failed Contactor
Failed Centrifugal switch in Motor
Failed Motor
Failed Over-temperature Thermostat
Failed Valve
Product burning Product is cooked too long
Failed 12-position switch
Failed probe
Product under done Product is not cooking long enough
Failed 12-position switch
Failed probe
Possible Cause TEST
Product is cooked too long No test available, operational
condition
Failed Probe Check probe for proper resistance*
Failed Valve Remove the wires and check for
continuity across the coil*
Failed Centrifugal switch in
Motor
Failed Motor contactor Remove the wires from the
Failed Motor Conrm that motor is getting
Failed or disconnected safety
thermostat
Failed Spark Module Conrm that Spark Module is
Remove the wires and check for
continuity across them while motor
is turning*
contactor coil and check for
continuity across the contactor coil
connection*
Ensure the contactor moveable
points move freely up and down*
correct voltage*
Check across the thermostat
connectors for continuity*
getting proper voltage*
NOTICE If an item on the list is followed by an asterisk (*), the work should be done by
a Lang factory authorized service representative.
USE OF ANY REPLACEMENT PARTS OTHER THAN THOSE SUPPLIED BY
LANG OR THEIR AUTHORIZED DISTRIBUTORS CAN CAUSE BODILY INJURY
CAUTION
2M-W1349, GCOF-T Gas Full Size Convection Oven
TO THE OPERATOR AND DAMAGE TO THE EQUIPMENT AND WILL VOID ALL
WARRANTIES.
NOTICE ServiceonthisoranyotherLangappliancemustbeperformedbyqualied
personnel only. Consult your Lang Authorized Service Agent Directory. You
can call our tech service number 314-678-6315 or visit our website
www.langworld.com for the service agent nearest you.
BOTH HIGH AND LOW VOLTAGES ARE PRESENT INSIDE THIS APPLIANCE
WHEN THE UNIT IS PLUGGED/WIRED INTO A LIVE RECEPTACLE. BEFORE
WARNING
REPLACING ANY PARTS, DISCONNECT THE UNIT FROM THE ELECTRIC
POWER SUPPLY.
17
Page 18
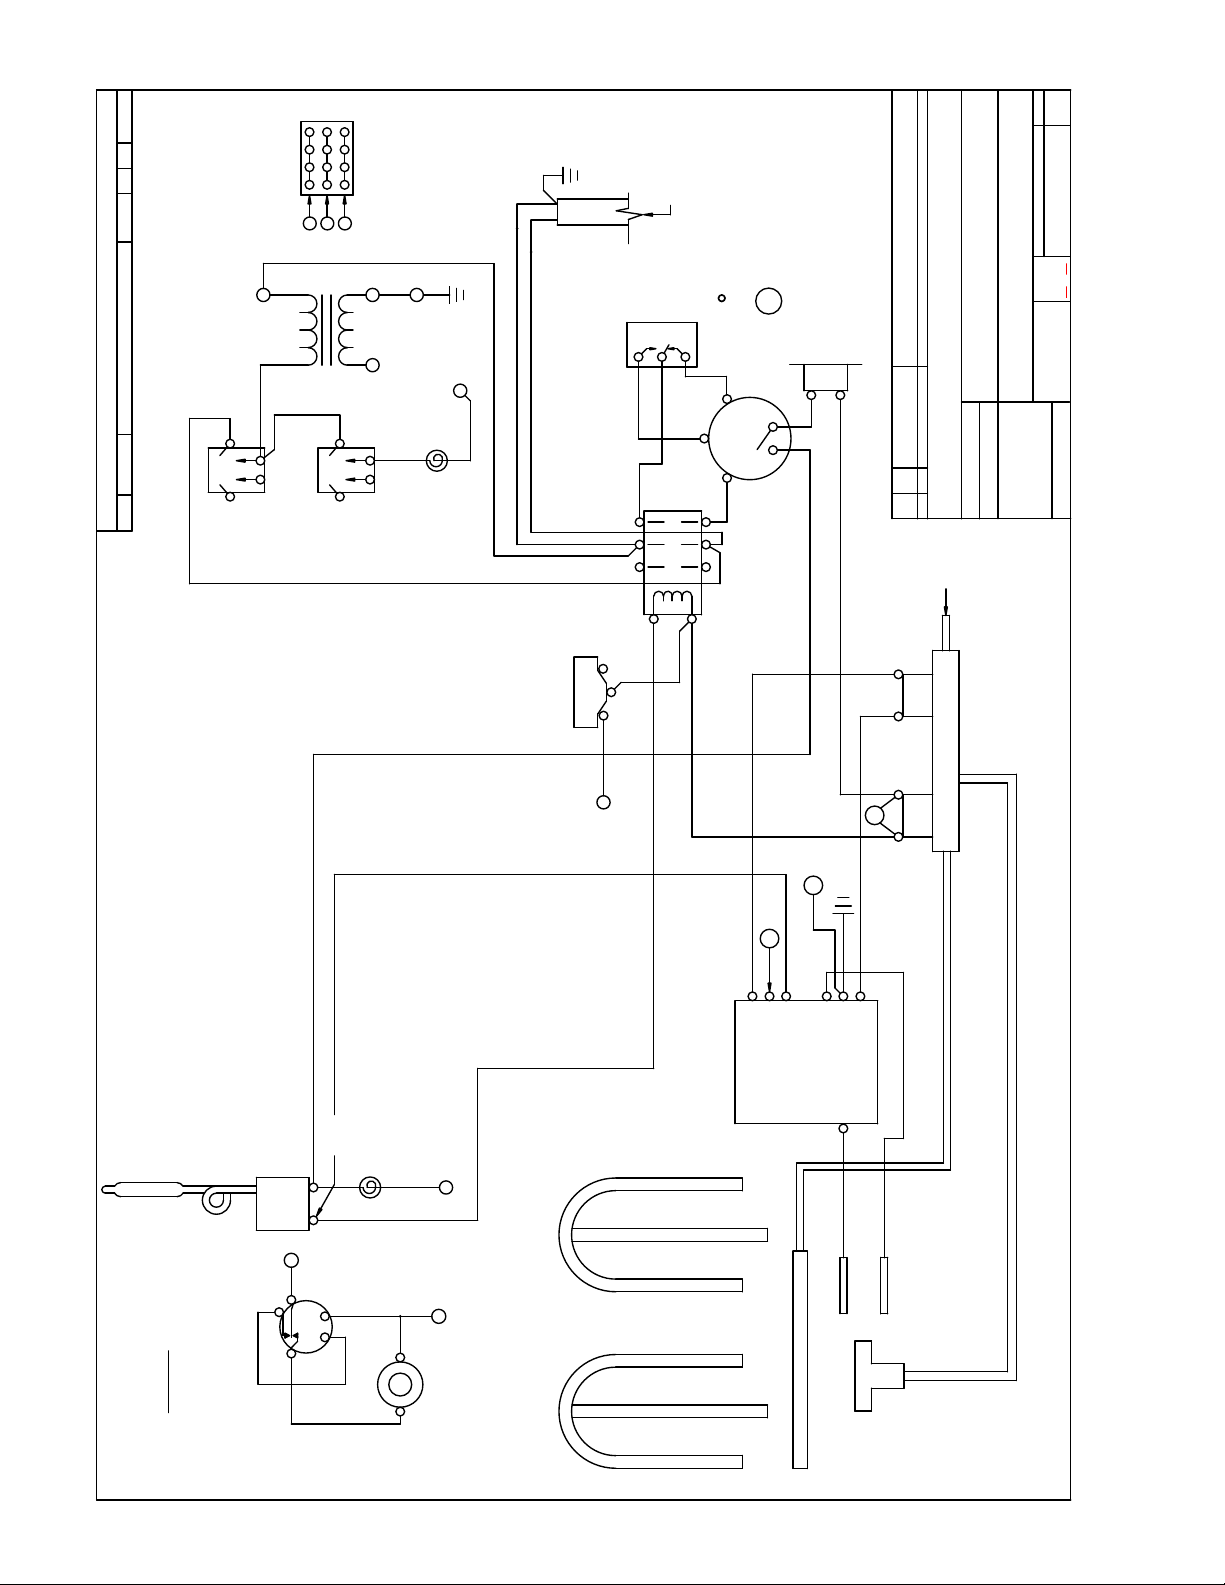
REVISION BLOCK
ECN NO.REV DESCRIPTION DR: DATEMFG ENG
SWITCH
POWER
GRN
12 POSITION
TERMINAL BLOCK
D
C
B
24
SWITCH
G
C D
B
LIGHT
OVEN
120VAC
B
120
LIGHTS
WHT
W
B
SUPPLY
POWER
CORD
16/3 120V
BLK
BLUE
PLUG
NEMA
5-15
DRAWING NUMBER REV
61111-122-1
= WIRE NUT
L
RED
T9
BLACK
T7-T4
M
P1
S = SNUBBER 100V
DISC-STAT
HI-LIMIT
CREATED BY STUART R. CARTIER
TITLE:
LANG MANUFACTURING
12-14-94
PART NUMBERQTY ITEM DESCRIPTION / MATERIAL
DATE:
DR: SRC
W/D GCOF-T
DATE:
FD 12-14-94
CK:
2 - SPEED
SWITCH
LO
HI
120VAC
.X ± .05
.XX ± .03
TOLERANCES
ANGLES
± 1/64
FRACTIONS DECIMALS
SHEET
1 1
NEXT HIGHER ASSY.
.XXX ± .015
± .5°
UNLESS OTHERWISE SPECIFIED
DIMENSIONS ARE IN INCHES
OF
N/A
SCALE:
"HEAT"
FROM
CONTROL
NCC
NO
DOOR SWITCH
G
NC C NO
24
S
GAS
COMBINATION VALVE
L
MV PV
2M-W1349, GCOF-T Gas Full Size Convection Oven
G
C
PVTHMV
MODULE
IGNITION
24VAC
24VAC
FROM MODULE
HEAT LIGHT
TSTAT
D
SENSE
HIGH
GND
VOLTAGE
GND
- T
CONTROL
C
SENSE
PILOT
TIMER
BUZZER
G
SPARK
18
Page 19

2M-W1349, GCOF-T Gas Full Size Convection Oven
19
Page 20
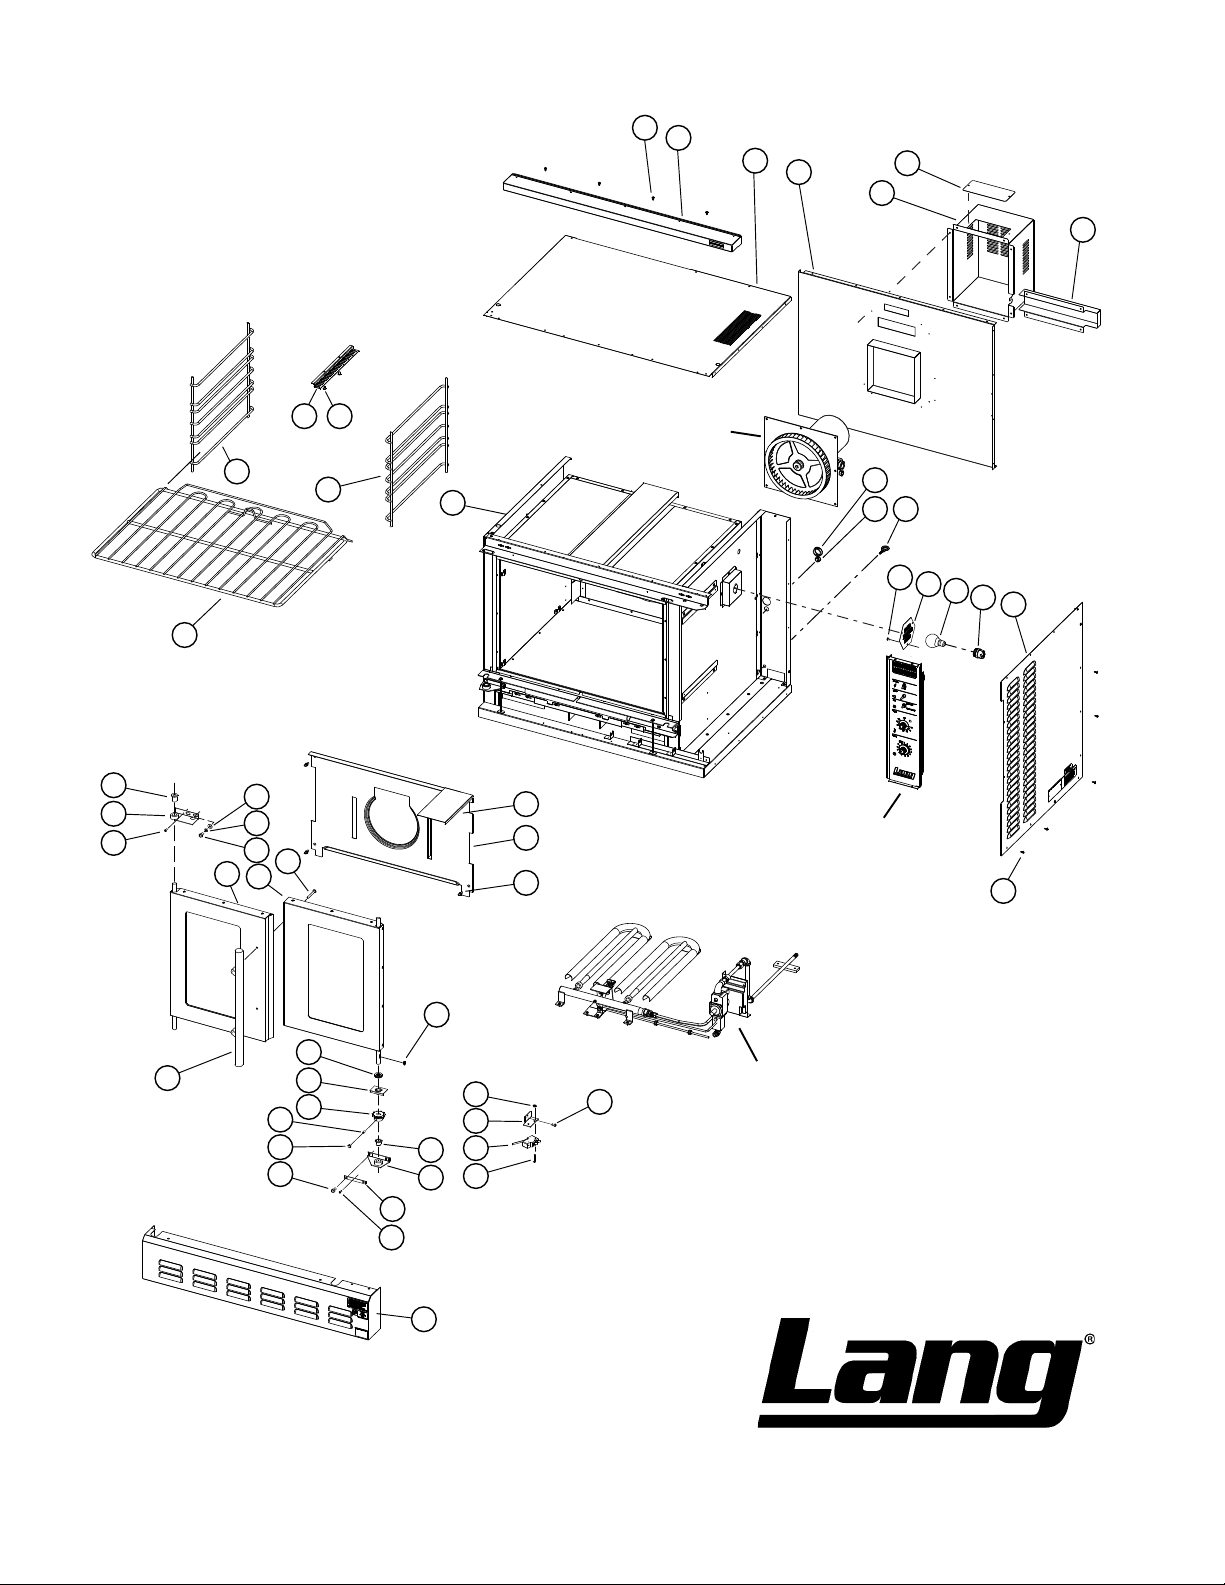
1
2
3
4
6
5
7
43
42
26
45
37
46
41
40
25
38
39
46
1147
44
16
17
See Detail B
8
9 10
See Detail A
11
12
13
14
15
2M-W1349, GCOF-T Gas Full Size Convection Oven
18
1
36
23
24
25
20
21
22
27
26
35
29
28
19
30
31
32
33
See Detail C
34
SK2534 Rev. - 9/22/2011
20
Page 21
PARTS LIST October 27, 2015, Rev. A
Fig No Part No Qty Description
1 2C-20103-02 58 SCRW SM PLT 10 X .5 PHLSL
2 Q9-GCCO-235-4 1 TOP PANEL ASSY
3 Q9-GCCO-179-9 1 BODY TOP STD
4 Q9-GCCO-113-1 1 FIREWALL, REAR SPOT
5 Q9-ECCO-W10 1 ELEMENT ACCESS COVER
6 Q9-ECCO-119-2 1 REAR BOX ENCLOSURE
7 Q9-ECCO-W12 1 REAR WIREWAY
8 2K-70801-02 2 SNAP BUSH 1 3/8 SB1375-16
9 2K-70801-04 5 SNAP BUSH 3/4 SB750-10
10 2C-20119-01 1 EYEBLTFORGD/SHLDR1/4-20X1
11 2C-20109-04 2 SCRW THD MS SS 10-32X3/8
12 Q9-GCCO-431 1 LIGHT RING - CORRECTIONAL
13 2S-31603-09 1 LAMPS INC 120V 40W
14 2E-31602-04 1 LAMP SKT SNAP-IN WHT
15 Q9-GCCO-179-8 1 RH BODY SIDE
16 Q9-GCCO-224-3 1 BAFFLE VANE
17 Q9-GCCO-224 1 BAFFLE REAR
18 2C-20112-02 4 SCRWSHLDRTHUM 1/4-20X1/2
19 2C-71802-01 1 KEY WOODRUFF 3/16 X 5/8
20 2C-20201-15 5 WSHR FLT 960-C-1016 PLTD
21 Q9-50312-67 1 PIVOT BEARING ASSY
22 2P-73000-03 1 SST SPRKT40B11 5/8 BORE
23 2C-20105-04 1 SCRW SET 1/4-20X1/2
24 2C-20301-07 1 NUT ACORN 1/4-20 PLTD
25 2C-20111-07 14 SCRW SCKTHD 5/16-18X5/8
26 2C-20115-01 78 SCRW S/S 8-32X1/2 P/H S/T
27 Q9-GCCO-185-4 2 HINGE BRACKET RETAINER
28 Q9-50312-41 1 BEARING BRACKET ASSY, LEFT & RIGHT
29 2P-70201-06 2 BRNZBRFLN5/8IDX3/4ODX5/8
30 2C-20301-10 2 NUT HEX 6-32 PLTD
31 Q9-ECCO-145-1 1 MICRO SWITCH BRACKET
32 2E-30301-02 1 SWITCH, MICRO
33 2C-20101-17 2 SCRW RND MS 6-32X1 PLTD
34 2C-20102-12 2 SCRW PHD ST 10-32X3/8
35 Q9-GCCO-233-2 1 BOTTOM PANEL ASSY
36 2R-50312-W1 1 DOOR HANDLE ASSY - S/S
37 Q9-50312-W44 1 LH DOOR ASSY S/S E/GCCO W
38 Q9-50312-43 1 RH DOOR ASSY E/GCCO
39 2C-20101-10 2 SCRW THD MS 1/4-20X2 1/4
40 2C-20204-06 14 WSHR S/S 5/16 SPLIT LOCK
2M-W1349, GCOF-T Gas Full Size Convection Oven
41 2C-20203-03 20 WSHR FLT SS 5/16 USS
42 Q9-ECCO-139-4 2 ADJUSTER PLATE
43 2P-70201-07 2 BRNZ BR FLN 5/8IDX3/4ODX1
44 Q9-GCCO-179-10 1 BODY SIDE LH GCCO
45 2B-50200-20 5 RACK ECCO/GCCO OVEN
46 2B-50200-93 2 RACK SLIDE 11 POS
47 Q9-50312-34-1 1 PROBE COVER ECOF-T
NI Q9-50312-02 2 DOOR CHAIN AND TURNBUCKEL
NI 2M-61111-122-1 AR WIRING DIAGRAM GCOF-T
Model: GCOF-T CONVECTION OVEN MAIN ASSY
21
Page 22
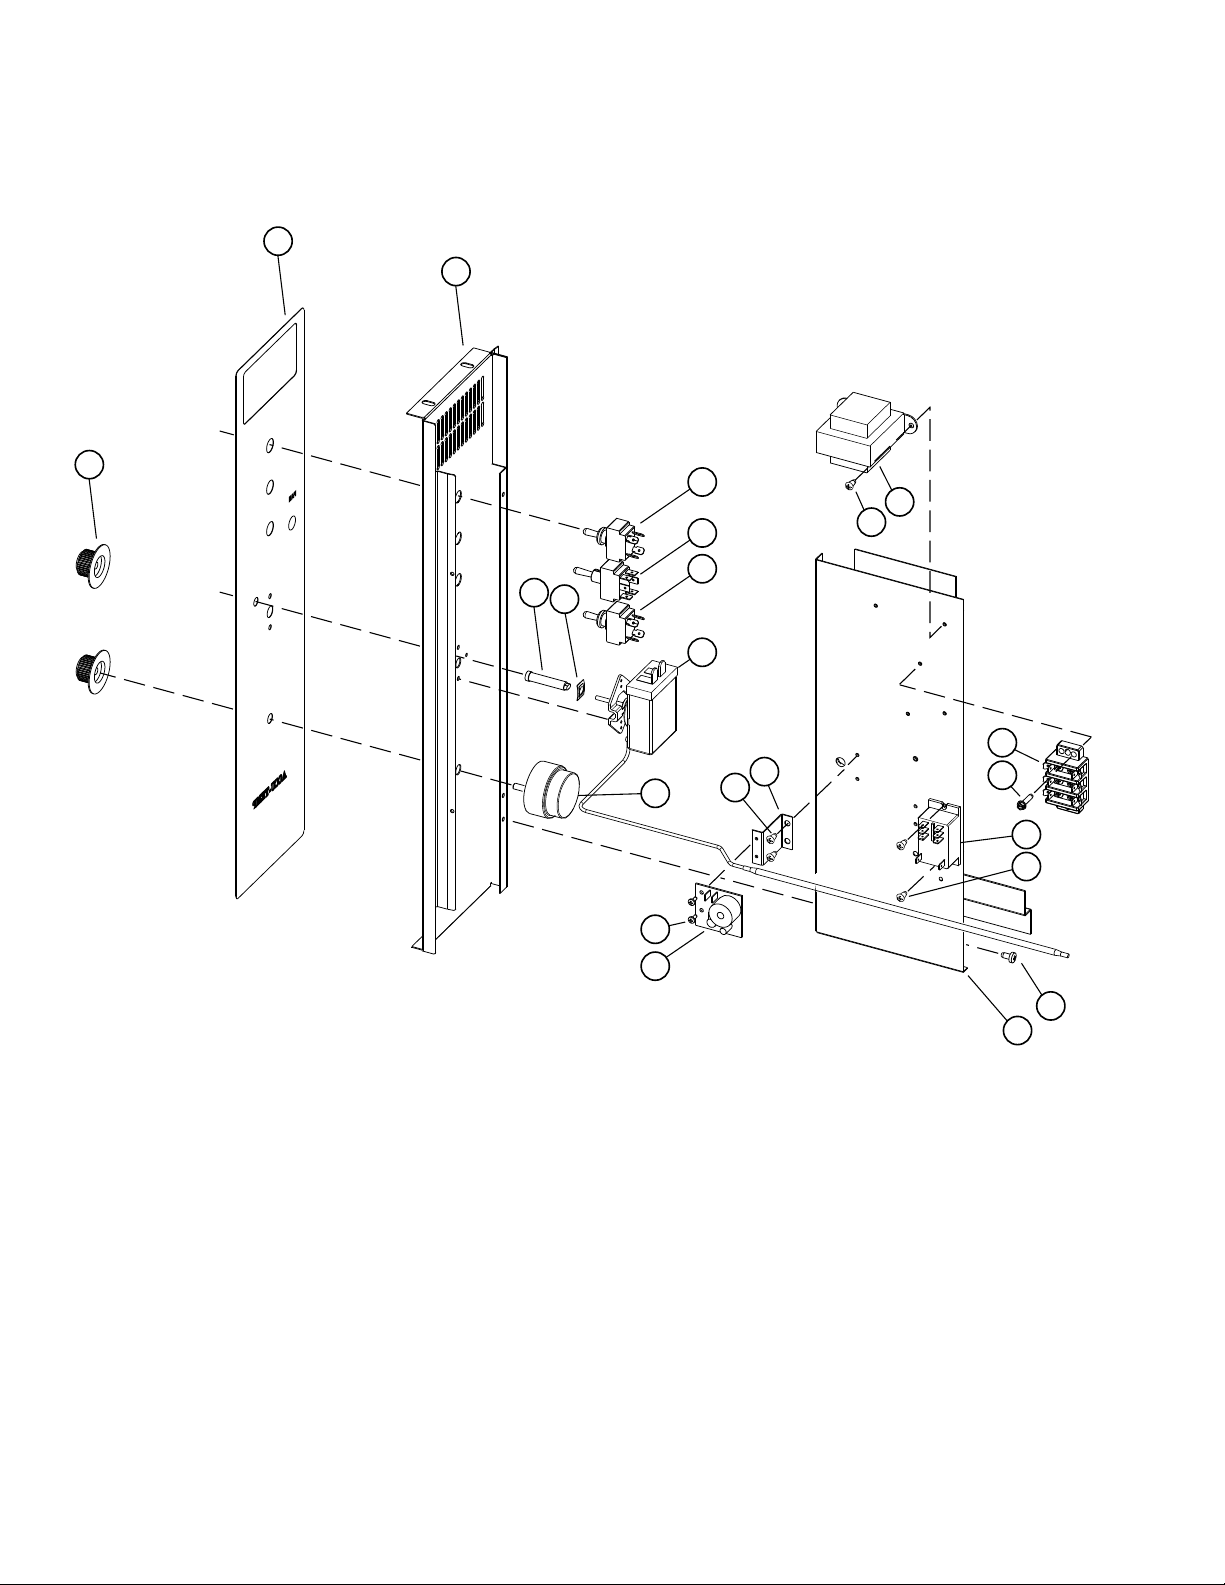
2
3
1
6
7
12
13
4
5
4
8
10
9
11
11
14
15
16
19
17
11
2M-W1349, GCOF-T Gas Full Size Convection Oven
18
DETAIL A
GCOF-T Control Panel Assy
22
SK2535
Page 23
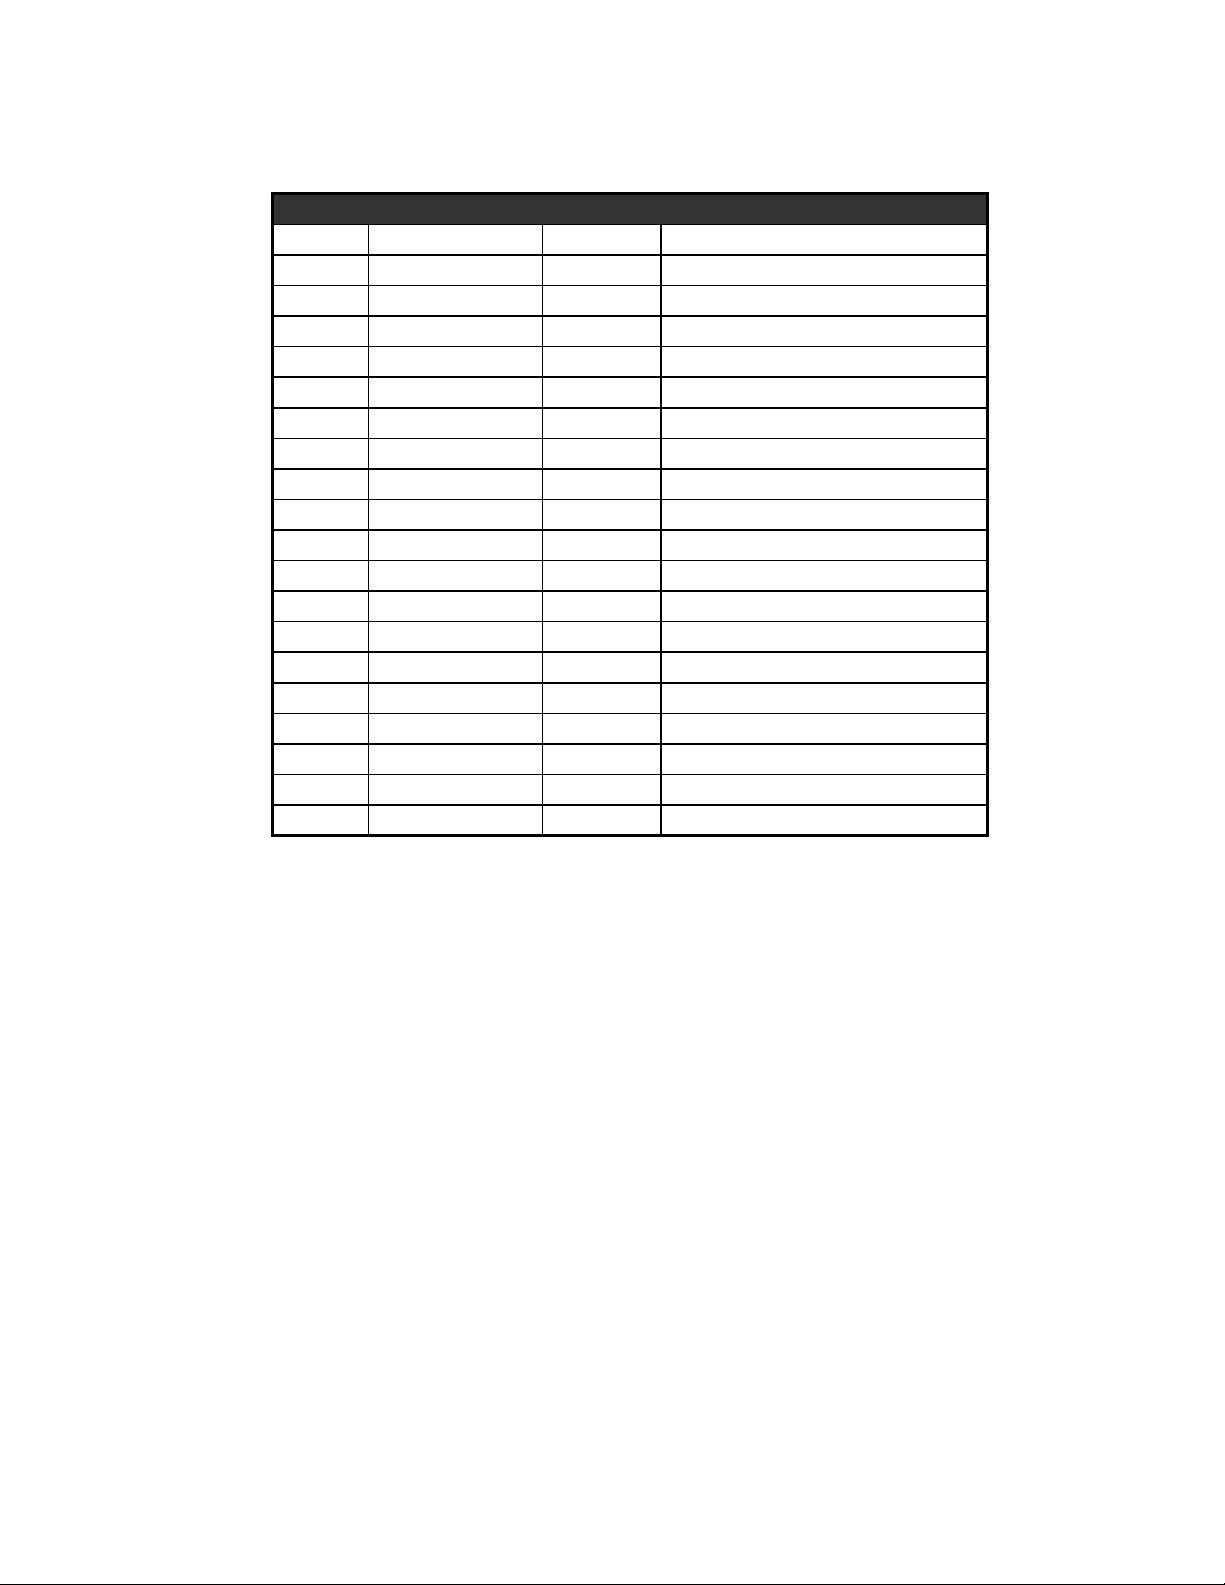
PARTS LIST October 27, 2015, Rev. A
Detail A: GCOF-T Control Panel Assy
Fig No. Part Number Quantity Description
1 2R-70701-28 2 KNB BLK 1/4BUSH2SETSCW@90
2 2M-60301-101-1 1 PNEL LBEL ECOF/GCOF
3 Q9-50312-131-2 1 SPOT PANEL GCOF-T
4 2E-30303-06 2 SWT TOG ON-ON DPDT BLK
5 2E-30303-16 1 SWT TOG ON-ON BLK MOM
6 2J-31601-07 1 PILOT LT 28V 6 LEAD WHT
7 2C-20602-03 2 TINNERMAN 3SCLIP 5/16
8 2T-30402-27 1 STAT ADJ 450 DEG 48 PILOT
9 PS-60101-W4 1 ELEC. TIMER KIT, 1HR-24V
10 2C-20102-08 6 SCRW PHD ST 8-32X.375
11 Q9-GCCO-355 1 BUZZER BOARD MOUNT
12 2C-20103-06 2 SCRW SM PLT 6 X 3/8 PHL
13 2J-30802-04 1 BUZZER ELEC 24V AC PIEZIO
14 2E-31400-07 1 XFORMR120-208-240/24V40VA
15 2E-30501-02 1 TRM STRP 3 POLE W/PUSH ON
16 2C-20102-05 2 SCRW HXHD ST 8-32X.75
17 2E-30701-05 1 CONTC 2POLE 30A 24VAC P &
18 2C-20102-12 4 SCRW PHD ST 10-32X3/8
19 Q9-GCCO-350-3 1 SPOT COMPNT MT GCCO
2M-W1349, GCOF-T Gas Full Size Convection Oven
23
Page 24
C
15
8
7
11
3
9
6
5
4
3
2
1
12
13
14
16
4
17
18
19
DETAIL B
20
31
30
33
32
29
28
27
24
34
DETAIL
2M-W1349, GCOF-T Gas Full Size Convection Oven
21
22
23
25
26
24
Page 25
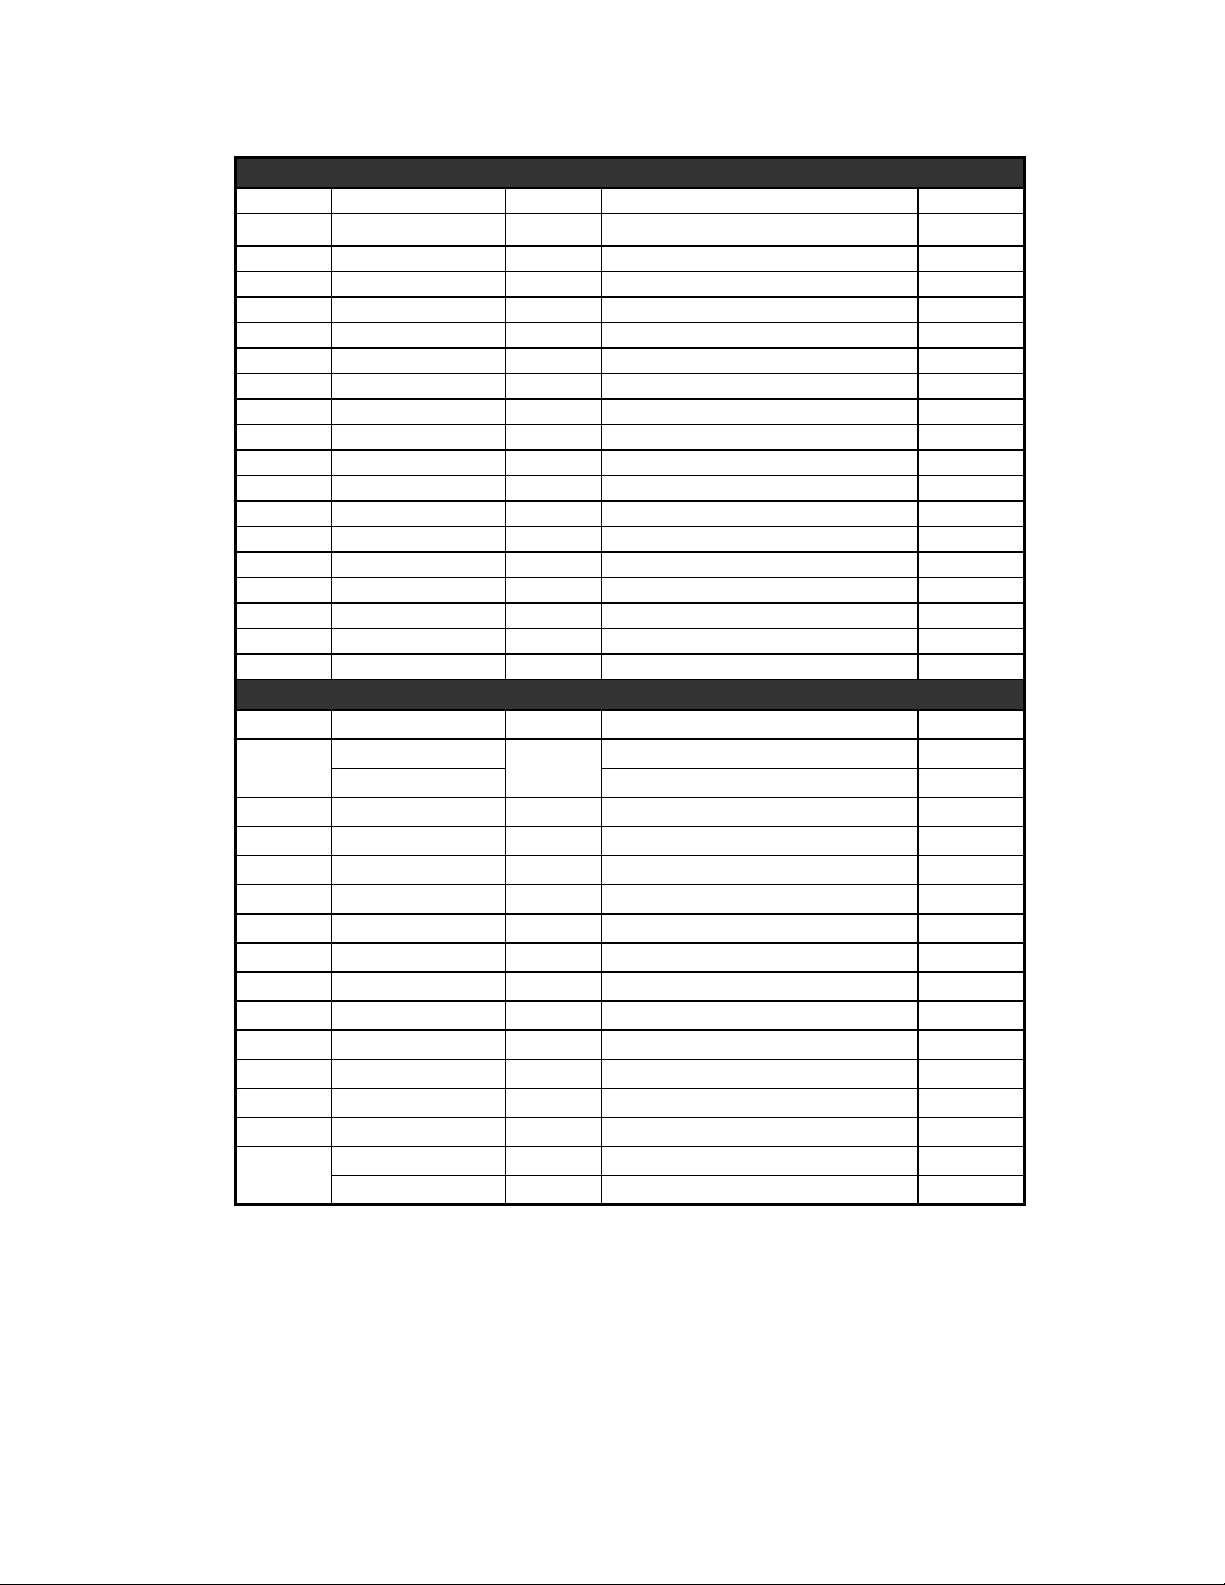
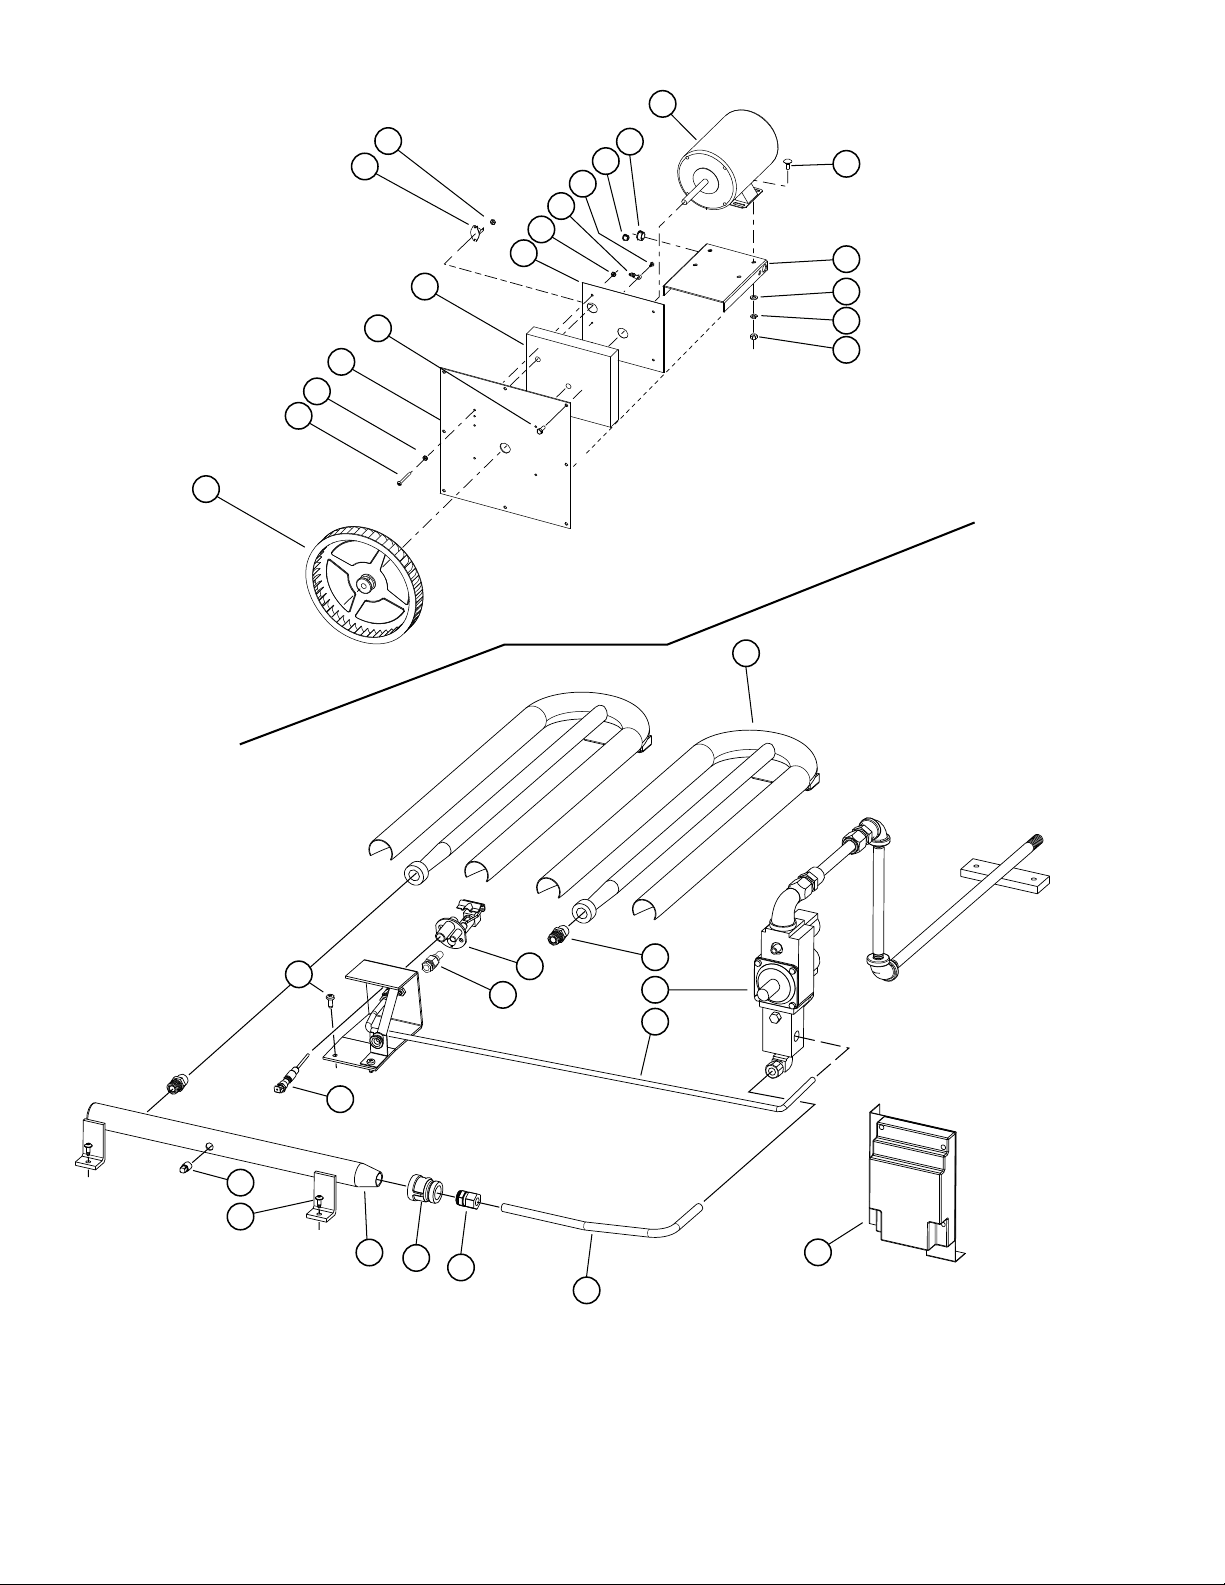
PARTS LIST October 27, 2015, Rev. A
Detail B: GCOF-T Motor Assy
Fig No. Part Number Quantity Description Application
1 2U-71500-05 1 BLOWER WHEEL ECCO/GCCO
2 2C-20101-42 4 SCRW THD MS 10-24X2 PLTD
3 2C-20301-09 12 NUT HEX 10-24 PLTD
4 Q9-ECCO-168 1 MOTOR MOUNT WELD
5 2C-20111-02 8 SCRW HXHD CAP 1/4-20X3/4
6 2H-ECCO-172 1 MOTOR INSULATION
7 2T-30401-09 1 STAT FXD 500 DEG OPEN
8 2C-20301-10 2 NUT HEX 6-32 PLTD
9 Q9-GCCO-167 1 MOTOR SHIELD
11 2C-31900-03 1 CABLE STRAPS 3/16X7
12 2C-20103-02 13 SCRW SM PLT 10 X .5 PHLSL
13 2K-70801-01 1 SNAP BUSH 7/16 SB437-5
14 2K-70801-04 3 SNAP BUSH 3/4 SB750-10
15 2U-30200-35 1 MTR 1/3HP115V60HZW/SWT2SP
16 2C-20118-01 4 SCRW CARRAGE PLT 5/16X.75
17 2C-20201-09 4 WSHR PLT 5/16 FLAT SAE
18 2C-20202-08 4 WSHR PLT 5/16 LOCK SPLIT
19 2C-20301-06 4 NUT HEX 5/16-18 PLTD
Detail C: GCOF-T Gas Components
20 Q9-GCCO-257-W1 2 BURNER WELD ASSEMBLY
21
22 2V-80505-10 1 COMB VALVE
23 Q9-GCCO-322 1 PILOT TUBE
24 2J-80201-14 1 PILOT LT BRNR HRZTL JHNSN
25 2J-80300-08 1 SPRK IGN CNTRL GCCO
26 Q9-GCCO-263-1 1 TUBE ‘A’
27 2K-70101-05 1 BRAS TBE UNON 3/8NPTM-3/8
28 2K-70310-01 1 BELL RDUC 1/2-3/8BLK IRN
29 2K-80100-07 1 MANIFOLD FOR GCCO GAS
30 2C-20115-06 6 SCRW S/S 8-32X1/2 T/H S/T
31 2K-70308-01 1 PIPE PLUG REG 1/8 NPT BLK
32 2E-41100-07 1 SENSOR FLAME PROBE GCCO
33 2C-20102-14 4 SCRW THD ST 10-32X1/2
34
Y9-80400-13
Y9-80400-14 ORIFICE SPUD .0595 #53 LP
2A-80401-04 1 PILOT BURNER ORIFICE .021 NAT
2A-80401-05 1 PILOT BURNER ORIFICE .010 LP
ORIFICE SPUD .0890 #43 NAT
2
2M-W1349, GCOF-T Gas Full Size Convection Oven
25
Page 26

2M-W1349, GCOF-T Gas Full Size Convection Oven
26
Page 27

2M-W1349, GCOF-T Gas Full Size Convection Oven
27
Page 28

STAR INTERNATIONAL HOLDINGS INC. COMPANY
Star - Holman - Lang - Wells - Bloomeld - Toastmaster
10 Sunnen Drive, St. Louis, MO 63143 U.S.A.
(314) 678-6303
www.star-mfg.com
 Loading...