

Page 1
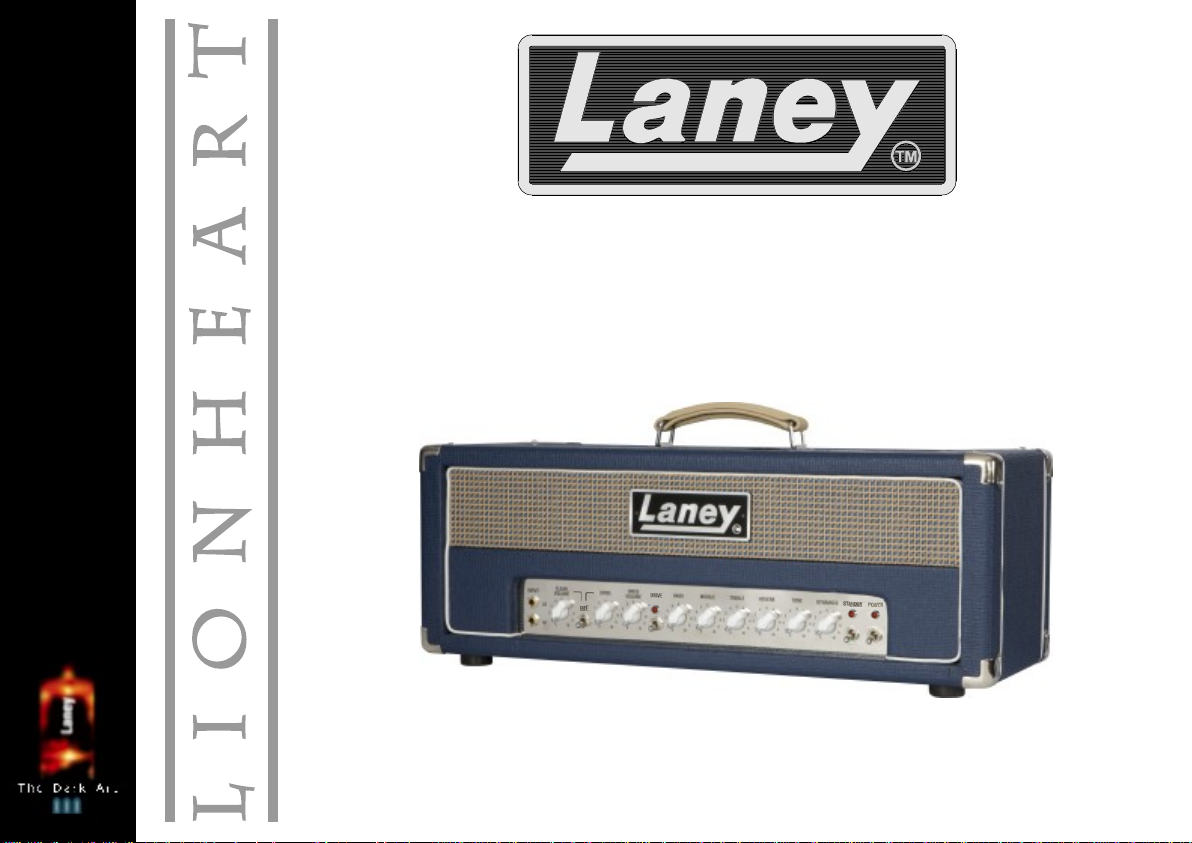
ALL TUBE
‘CLASS A’
L50H
OPERATING INSTRUCTIONS - 1.2
HERITAGE AMPLIFIER
LANEY AMPLIFICATION
www.laney.co.uk
Page 2
IMPORTANT SAFETY INSTRUCTIONS
L50H
1. Read these instructions.
2. Keep these instructions safe.
3. Heed all warnings.
4. Follow all instructions.
5. Do not use this apparatus near water.
6. Clean only with a dry cloth.
7. Do not block any of the ventilation openings. Install in accordance with manufacturer’s instructions.
8. Do not install near any heat sources such as radiators, heat registers, stoves or other apparatus (including amplifiers) that produce heat.
An apparatus with Class I construction shall be connected to a mains socket outlet with a protective connection. Do not defeat the safety purpose of the
9.
polarized or grounding-type plug.
prong. The wide blade or third prong is provided for your safety. If the provided plug does not fit into your outlet, consult an electrician for replacement of the
obsolete outlet.
10. Protect the power cord from being walked on or pinched, particularly at plugs, convenience receptacles, and the point they exit from the apparatus.
11. Only use attachments/accessories provided by the manufacturer.
12. Use only with a cart, stand, tripod, bracket, or table specified by the manufacturer, or sold with the apparatus. When a cart is used, use caution when
moving the cart/apparatus combination to avoid injury from tip-over.
The mains plug or appliance coupler is used as the disconnect device and shall remain readily operable. The user should allow easy access to any
13.
mains plug, mains coupler and mains switch used in conjunction with this unit thus making it readily operable.
or when unused for long periods of time.
14. Refer all servicing to qualified service personnel. Servicing is required when the apparatus has been damaged in any way, such as when power-supply
cord or plug is damaged, liquid has been spilled or objects have fallen into the apparatus, the apparatus has been exposed to rain or moisture, does not
operate normally, or has been dropped.
15. Never break off the ground pin. Connect only to a power supply of the type marked on the unit adjacent to the power supply cord.
16. If this product is to be mounted in an equipment rack, rear support should be provided.
17. Note for UK only: If the colours of the wires in the mains lead of this unit do not correspond with the terminals in your plug‚ proceed as follows:
a) The wire that is coloured green and yellow must be connected to the terminal that is marked by the letter E‚ the earth symbol‚ coloured green or
coloured green and yellow.
b) The wire that is coloured blue must be connected to the terminal that is marked with the letter N or the colour black.
c) The wire that is coloured brown must be connected to the terminal that is marked with the letter L or the colour red.
18.This electrical apparatus should not be exposed to dripping or splashing and care should be taken not to place
objects containing liquids, such as vases, upon the apparatus.
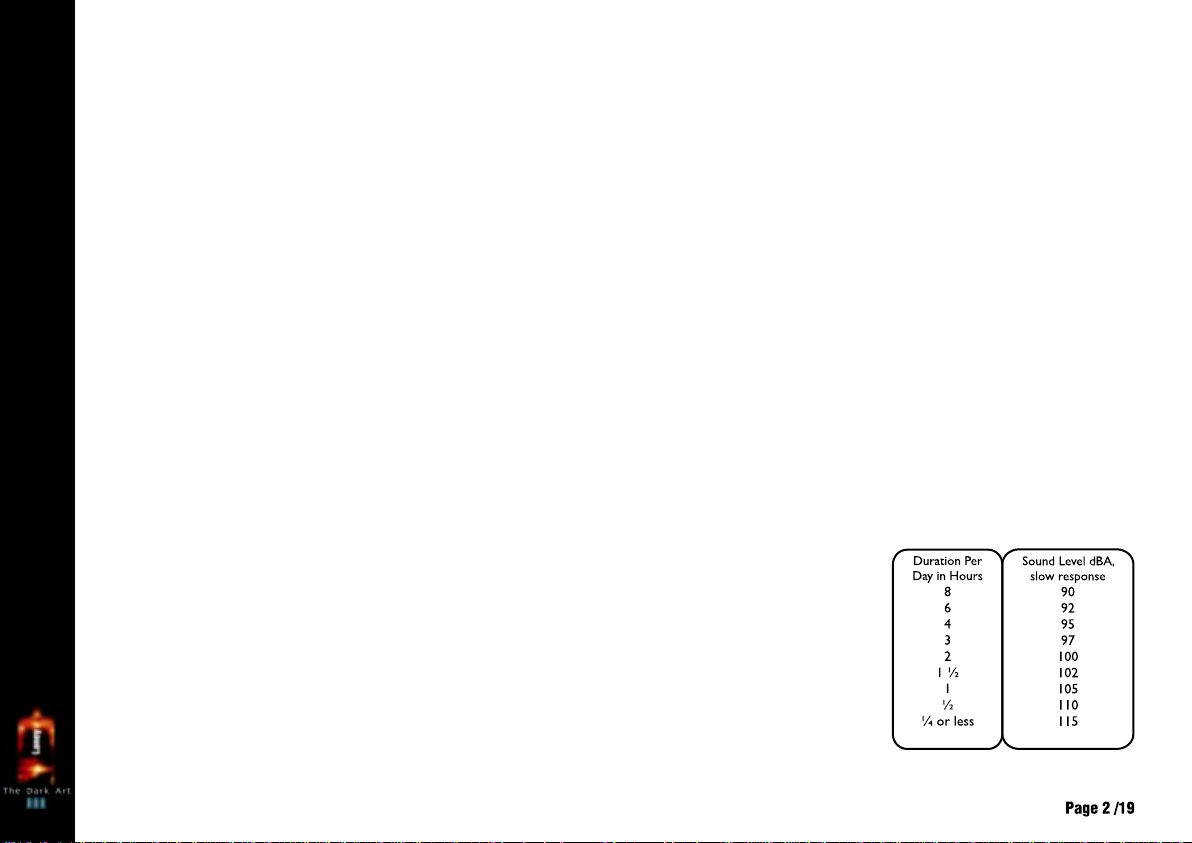
19. Exposure to extremely high noise levels may cause a permanent hearing loss. Individuals vary considerably in
susceptibility to noise-induced hearing loss, but nearly everyone will lose some hearing if exposed to sufficiently
intense noise for a sufficient time.
The U.S. Government’s Occupational Safety and Health Administration (OSHA) has specified the following
permissible noise level exposures: According to OSHA, any exposure in excess of the above permissible limits could
result in some hearing loss. Earplugs or protectors to the ear canals or over the ears must be worn when operating
this amplification system in order to prevent a permanent hearing loss, if exposure is in excess of the limits as set
forth above. To ensure against potentially dangerous exposure to high sound pressure levels, it is recommended that
all persons exposed to equipment capable of producing high sound pressure levels such as this amplification system
be protected by hearing protectors while this unit is in operation.
WARNING: When using electrical products, basic cautions should always be followed, including the following:
A polarized plug has two blades with one wider than the other. A grounding type plug has two blades and a third grounding
Unplug this apparatus during lightning storms
SAVE THESE INSTRUCTIONS
Page 3
INSTRUCTIONS IMPORTANTES DE SECURITE - FRANÇAIS
L50H
1. Lire ces instructions
2. Gardez ce manuel pour de futures références.
3. Prétez attention aux messages de précautions de ce manuel.
4. Suivez ces instructions.
5. N’utilisez pas cette unité proche de plans d’eau.
6. N’utilisez qu’un tissu sec pour le nettoyage de votre unité.
7. N’obstruez pas les systèmes de refroidissement de votre unité et installez votre unité en fonction des instructionsde ce manuel.
8. Ne positionnez pas votre unité à proximité de toute source de chaleur.
9. Un appareil avec la construction de la classe I sera relié à une sortie de douille de forces à un raccordement protecteur. Connectez toujours votre unité
sur une alimentation munie de prise de terre utilisant le cordon d’alimentation fourni.
10. Protégez les connecteurs de votre unité et positionnez les cablages pour éviter toutes déconnexions accidentelles.
11. N’utilisez que des fixations approuvées par le fabriquant.
12. Lors de l’utilsation sur pied ou pole de support, assurez dans le cas de déplacement de l’ensemble enceinte/support de prévenir tout basculement
intempestif de celui-ci.
13. Les forces branchent ou le coupleur d'appareils est utilisé pendant que le dispositif de débranchement et restera aisément fonctionnel. L'utilisateur
devrait permettre l'accès facile à toutes les forces prise, à forces coupleur et à commutateur de forces utilisé en même temps que cette unité le rendant de
ce fait aisément fonctionnel. Débranchez cet appareil pendant la foudre donne l' assaut à ou si inutilisé pendant de longues périodes.
14. Seul un technicien agréé par le fabriquant est à même de réparer/contrôler votre unité. Celle-ci doit être contrôlée si elle a subit des dommages de
manipulation, d’utilisation ou de stockage (humidité,…).
15. Ne déconnectez jamais la prise de terre de votre unité.
16. Si votre unité est destinée a etre montée en rack, des supports arriere doivent etre utilises.
17. Note pour les Royaumes-Unis: Si les couleurs de connecteurs du cable d’alimentation ne correspond pas au guide de la prise secteur, procédez comme
suit:
a) Le connecteur vert et jaune doit être connectrer au terminal noté E, indiquant la prise de terre ou correspondantaux couleurs verte ou verte et
jaune du guide.
b) Le connecteur bleu doit être connectrer au terminal noté N, correspondnat à la couleur noire du guide.
c) Le connecteur marron doit être connectrer au terminal noté L, correspondant à la couleur rouge du guide.
18. Cet équipement électrique ne doit en aucun cas être en contact avec un quelconque liquide et aucun objet contenant un liquide, vase ou autre ne
devrait être posé sur celui-ci.
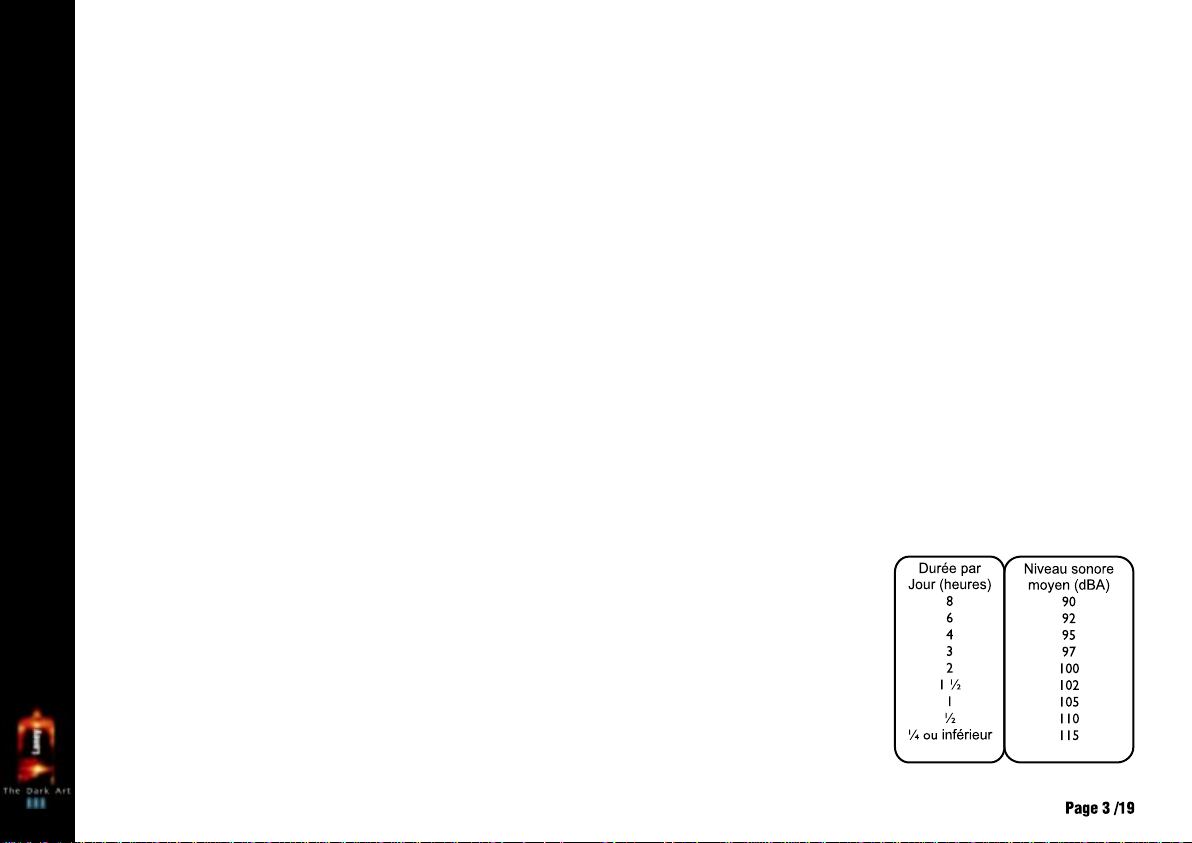
19. Une exposition à de hauts niveaux sonores peut conduire à des dommages de l’écoute irréversibles. La
susceptibilité au bruit varie considérablement d’un individu à l’autre, mais une large majorité de la population
expériencera une perte de l’écoute après une exposition à une forte puissance sonore pour une durée prolongée.
L’organisme de la santé américaine (OSHA) a produit le guide ci-dessous en rapport à la perte occasionnée:
D’après les études menées par le OSHA, toute exposition au delà des limites décrites ce-dessus entrainera des
pertes de l’écoute chez la plupart des sujets. Le port de système de protection (casque, oreilette de filtrage,…) doit
être observé lors de l’opération cette unité ou des dommages irréversibles peuvent être occasionnés. Le port de ces
systèmes doit être observé par toutes personnes susceptibles d’être exposées à des conditions au delà des limites
décrites ci-dessus.
ATTENTION: L’utilisation de tout appareil électrique doit être soumise aux precautions d’usage incluant:
Page 4

WICHTIGE SICHERHEITSHINWEISE - DEUSCH
L50H
1. Lesen Sie sich diese Anweisungen durch.
2. Bewahren Sie diese Anweisungen auf.
3. Beachten Sie alle Warnungen.
4. Befolgen Sie alle Anweisungen.
5. Setzen Sie dieses Gerät nicht in der Nähe von Wasser ein.
6. Reinigen Sie es nur mit einem trockenen Tuch.
7. Blockieren Sie keine der Lüftungsöffnungen. Führen Sie die Installation gemäß den Anweisungen des Herstellers durch.
8. Installieren Sie das Gerät nicht neben Wärmequellen wie Heizungen, Heizgeräten, Öfen oder anderen Geräten (auch Verstärkern), die Wärme erzeugen.
9. Ein Apparat mit Aufbau der Kategorie I wird an einen Hauptleitungseinfaßungsanschluß mit einem schützenden Anschluss angeschlossen.
Beeinträchtigen Sie nicht die Sicherheitswirkung des gepolten Steckers bzw. des Erdungssteckers. Ein gepolter Stecker weistzwei Stifte auf, von denen einer breiter
ist als der andere. Ein Erdungsstecker weist zwei Stifte und einen dritten Erdungsstift auf.Der breite Stift bzw. der dritte Stift dient Ihrer Sicherheit. Sollte der
beiliegende Stecker nicht in Ihre Steckdose passen, wenden Sie sich bitte an einen Elektriker, um die ungeeignete Steckdose austauschen zu lassen.
10. Schützen Sie das Netzkabel, sodass niemand darauf tritt oder es geknickt wird, insbesondere an Steckern oder Buchsen und ihren Austrittsstellen aus dem Gerät.
11. Verwenden Sie nur die vom Hersteller erhältlichen Zubehörgeräte oder Zubehörteile.
12. Verwenden Sie nur einen Wagen, Stativ, Dreifuß, Träger oder Tisch, der den Angaben des Herstellers entspricht oder zusammen mit dem Gerät verkauft wurde.
Wird ein Wagen verwendet, bewegen Sie den Wagen mit dem darauf befindlichen Gerät besonders vorsichtig, damit er nicht umkippt und möglicherweise jemand
verletzt wird.
13. Die Hauptleitungen verstopfen, oder Gerätekoppler wird während die Trennung Vorrichtung benutzt und wird bereitwillig funktionell bleiben. Der Benutzer sollte
einfachen Zugang zu allen möglichen Hauptleitungen Stecker, zu den Hauptleitungen Koppler und zum Hauptleitungen Schalter erlauben, der in Verbindung mit dieser
Maßeinheit benutzt wird, die folglich ihn bereitwillig funktionell bildet. Trennen Sie diesen Apparat während der Blitzstürme oder wenn unbenutzt, für lange
Zeitabschnitte.
14. Lassen Sie sämtliche Wartungsarbeiten von qualifizierten Kundendiensttechnikern durchführen. Eine Wartung ist erforderlich, wenn das Gerät in irgendeiner Art
beschädigt wurde, etwa wenn das Netzkabel oder der Netzstecker beschädigt wurden, Flüssigkeit oder Gegenstände in das Gerät gelangt sind, das Gerät Regen oder
Feuchtigkeit ausgesetzt wurde, nicht normal rbeitet oder heruntergefallen ist.
15.Der Erdungsstift darf nie entfernt werden. Schließen Sie nur an die Stromversorgung der Art an, die am Gerät neben dem Netzkabel angegeben ist.
16. Wenn dieses Produkt in ein Geräte-Rack eingebaut werden soll, muss eine Versorgung über die Rückseite eingerichtet werden.
17. Hinweis – Nur für Großbritannien: Sollte die Farbe der Drähte in der Netzleitung dieses Geräts nicht mit den Klemmen in Ihrem Stecker übereinstimmen, gehen Sie
folgendermaßen vor:
a) Der grün-gelbe Draht muss an die mit E (Symbol für Erde) markierte bzw. grüne oder grün-gelbe Klemme angeschlossen werden.
b) Der blaue Draht muss an die mit N markierte bzw. schwarze Klemme angeschlossen werden.
c) Der braune Draht muss an die mit L markierte bzw. rote Klemme angeschlossen werden.
18. Dieses Gerät darf nicht ungeschützt Wassertropfen und Wasserspritzern ausgesetzt werden und es muss darauf
geachtet werden, dass keine mit Flüssigkeiten gefüllte Gegenstände, wie z. B. Blumenvasen, auf dem Gerät abgestellt
werden.
19. Belastung durch extrem hohe Lärmpegel kann zu dauerhaftem Gehörverlust führen. Die Anfälligkeit für durch Lärm
bedingten Gehörverlust ist von Mensch zu Mensch verschieden, das Gehör wird jedoch bei jedem in gewissem Maße
geschädigt, der über einen bestimmten Zeitraum ausreichend starkem Lärm ausgesetzt ist. Die US-Arbeitsschutzbehörde
(Occupational and Health Administration, OSHA) hat die folgenden zulässigen Pegel für Lärmbelastung festgelegt:
Laut OSHA kann jede Belastung über den obenstehenden zulässigen Grenzwerten zu einem gewissen Gehörverlust
führen. Sollte die Belastung die obenstehenden Grenzwerte übersteigen, müssen beim Betrieb dieses
Verstärkungssystems Ohrenstopfen oder Schutzvorrichtungen im Gehörgang oder über den Ohren getragen werden, um
einen dauerhaften Gehörverlust zu verhindern. Um sich vor einer möglicherweise gefährlichen Belastung durch hohe
Schalldruckpegel zu schützen, wird allen Personen empfohlen, die mit Geräten arbeiten, die wie dieses
Verstärkungssystem hohe Schalldruckpegel erzeugen können, beim Betrieb dieses Geräts einen Gehörschutz zu tragen.
ACHTUNG: Beim Einsatz von Elektrogeräten müssen u.a. grundlegende Vorsichtsmaßnahmen befolgt werden:
Page 5
INSTRUCCIONES IMPORTANTES PARA SU SEGURIIDAD - ESPAÑOL
L50H
1. Lea estas instrucciones.
2. Guarde estas instrucciones.
3. Haga caso de todos los consejos.
4. Siga todas las instrucciones.
5. No usar este aparato cerca del agua.
6. Limpiar solamente con una tela ceca.
7. No blacker ninguna de las salida de ventilación. Instalar de acuerdo a las instrucciones del fabricante.
8. No instalar cerca de ninguna Fuentes de calor come radiators, estufas, hornos u otros aparatos (incluyendo amplificadores) que produzcan calor.
9. Un aparato con la construcción de la clase I será conectado con un enchufe de zócalo de las cañerías con una conexión protectora. No retire la patilla
protectora del enchufe polarizado o de tipo “a Tierra”. Un enchufe polarizado tiene dos puntas, una de ellas más ancha que la otra. Un enchufe de tipo “a Tierra” tiene dos
puntas y una tercera “a Tierra”. La punta ancha (la tercera ) se proporciona para su seguridad. Si el enchufe proporcionado no encaja en su enchufe de red, consulte a un
electricista para que reemplaze su enchufe obsoleto.
10. Proteja el cable de alimentación para que no sea pisado o pinchado, particularmente en los enchufes, huecos, y los puntos que salen del aparato.
11. Usar solamente añadidos/accesorios proporcionados por el fabricante.
12. Usar solamente un carro, pie, trípode, o soporte especificado por el fabricante, o vendido junto al aparato. Cuando se use un carro, tenga cuidado al mover el conjunto
carro/aparato para evitar que se dañe en un vuelco. No suspenda esta caja de ninguna manera
13. Las cañerías tapan o el acoplador de la aplicación se utiliza mientras que el dispositivo de la desconexión y seguirá siendo fácilmente operable. El usuario debe
permitir el acceso fácil a cualquier cañería enchufe, a las cañerías acoplador y al interruptor de las cañerías usado conjuntamente con esta unidad así que lo hace
fácilmente operable. Desenchufe este aparato durante tormentas del relámpago o cuando es inusitado por períodos del tiempo largos.
14. Para cualquier reparación, acuda a personal de servicio cualificado. Se requieren reparaciones cuando el aparato ha sido dañado de alguna manera, como cuando el
cable de alimentación o el enchufe se han dañado, algún líquido ha sido derramado o algún objeto ha caído dentro del aparato, el aparato ha sido expuesto a la lluvia o la
humedad, no funciona de manera normal, o ha sufrido una caída.
15. Nunca retire la patilla de Tierra. Conecte el aparato sólo a una fuente de alimentación del tipo marcado al lado del cable de alimentación.
16. Si este producto va a ser enracado con más equipo, use algún tipo de apoyo trasero.
17. Nota para el Reino Unido solamente: Si los colores de los cables en el enchufe principal de esta unidad no corresponden con los terminales en su enchufe‚ proceda
de la siguiente manera:
a) El cable de color verde y azul debe ser conectado al terminal que está marcado con la letra E‚ el símbolo de Tierra (earth)‚ coloreado en verde o en verde y amarillo.
b) El cable coloreado en azul debe ser conectado al terminal que está marcado con la letra N o el color negro.
c) El cable coloreado en marrón debe ser conectado al terminal que está marcado con la letra L o el color rojo.
18. Este aparato eléctrico no debe ser sometido a ningún tipo de goteo o salpicadura y se debe tener cuidado para no poner
objetos que contengan líquidos, como vasos, sobre el aparato.
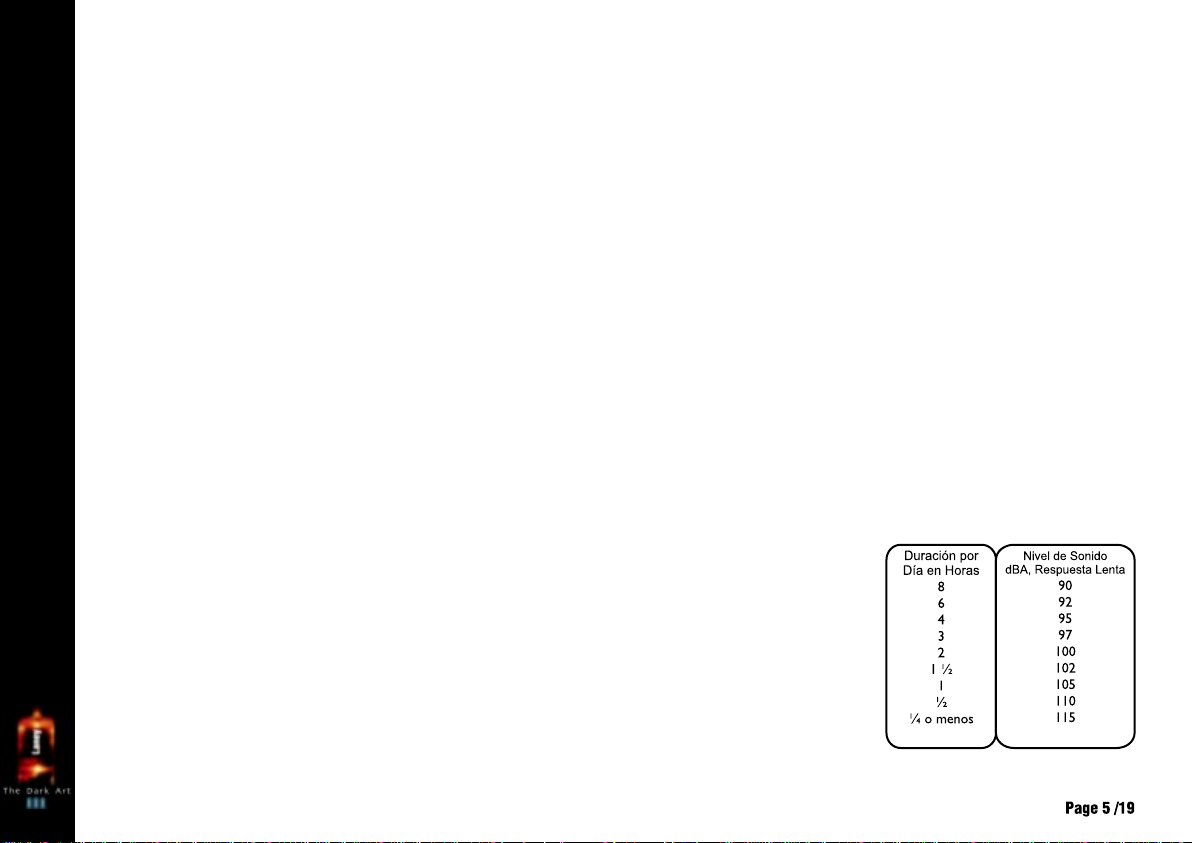
19. La exposición a altos niveles de ruido puede causar una pérdida permanente en la audición. La susceptibilidad a la
pérdida de audición provocada por el ruido varía segúnla persona, pero casi todo el mundo perderá algo de audición si se
expone a un nivel de ruido suficientemante intenso durante un tiempo determinado. El Departamento para la Salud y para la
Seguridad del Gobierno de los Estados Unidos (OSHA) ha especificado las siguientes exposiciones al ruido permisibles:
De acuerdo al OSHA, cualquier exposición que exceda los límites arriba indicados puede producir algún tipo de pérdida
en la audición. Protectores para los canales auditivos o tapones para los oídos deben ser usados cuando se opere con este
sistema de sonido para prevenir una pérdida permanente en la audición, si la exposición excede los límites indicados más
arriba. Para protegerse de una exposición a altos niveles de sonido potencialmente peligrosa, se recomienda que todas las
personas expuestas a equipamiento capaz de producir altos niveles de presión sonora, tales como este sistema de
amplificación, se encuentren protegidas por protectores auditivos mientras esta unidad esté operando.
CUIDADO: Cuando use productos electrónicos, debe tomar precauciones básicas, incluyendo las siguientes:
Page 6
L50H
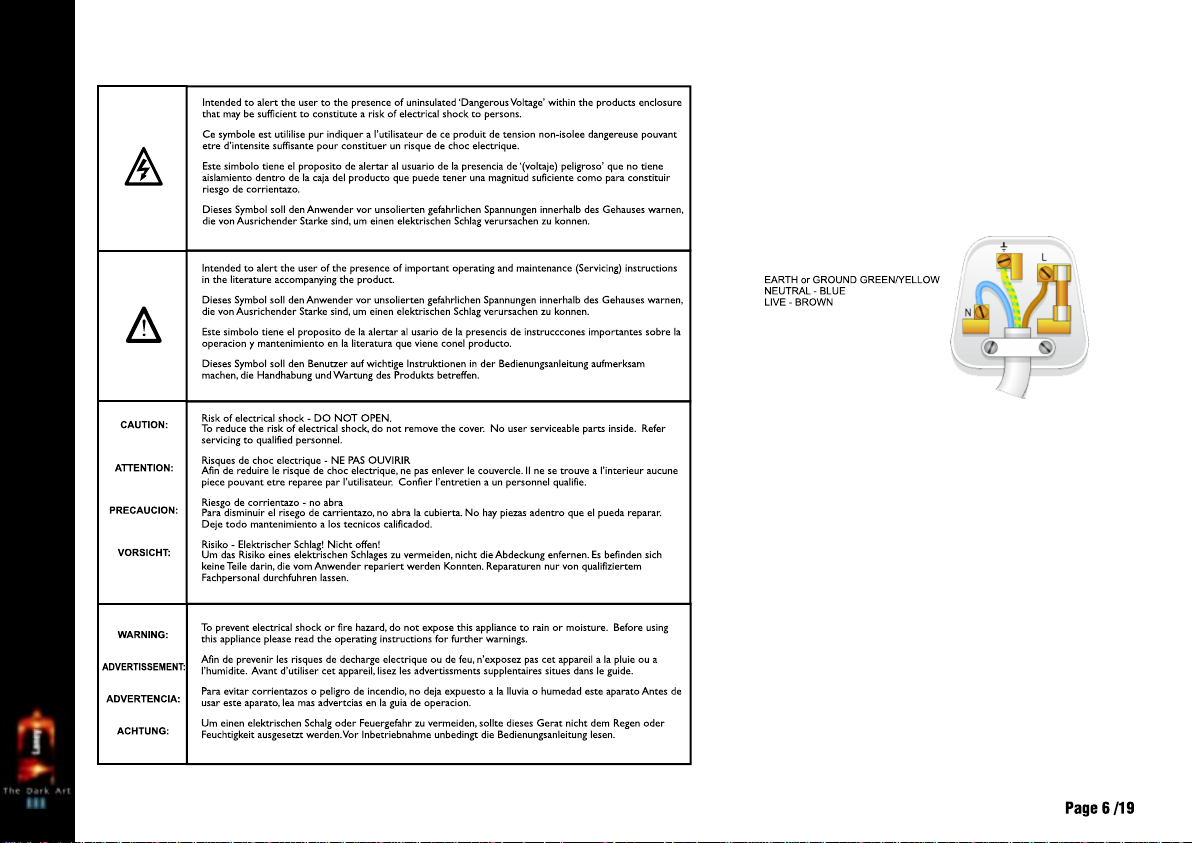
After unpacking your amplifier check that it is factory fitted with a
three pin ‘grounded’ (or earthed) plug. Before plugging into the
power supply ensure you are connecting to a grounded earth outlet.
If you should wish to change the factory fitted plug yourself, ensure
that the wiring convention applicable to the country where the
amplifier is to be used is strictly conformed to. As an example in
the United Kingdom the cable colour code for connections are as
follows.
NOTE
This manual has been written for easy access of information. The
front and rear panels are graphically illustrated, with each control
and feature numbered. For a description of the function of each
control feature, simply check the number with the explanations
adjacent to each panel.
Your Laney amplifier has undergone a thorough two stage, predelivery inspection, involving actual play testing.
When you first receive your Laney guitar amplifier, follow these
simple procedures:
(i) Ensure that the amplifier is the correct voltage for the
country it is to be used in.
(ii) Connect your instrument with a high quality shielded
instrument cable. You have probably spent considerable money
on your amplifier and guitar - don’t use poor quality cable,
it won’t do your gear justice.
Please retain your original carton and packaging so in the unlikely
event that some time in the future your amplifier should require
servicing you will be able to return it to your dealer securely
packed.
Care of your Laney amplifier will prolong it’s life.....and yours!
Page 7
L50H
OPERATING INSTRUCTIONS
Page 8
L50H
OPERATING INSTRUCTIONS
INTRODUCTION
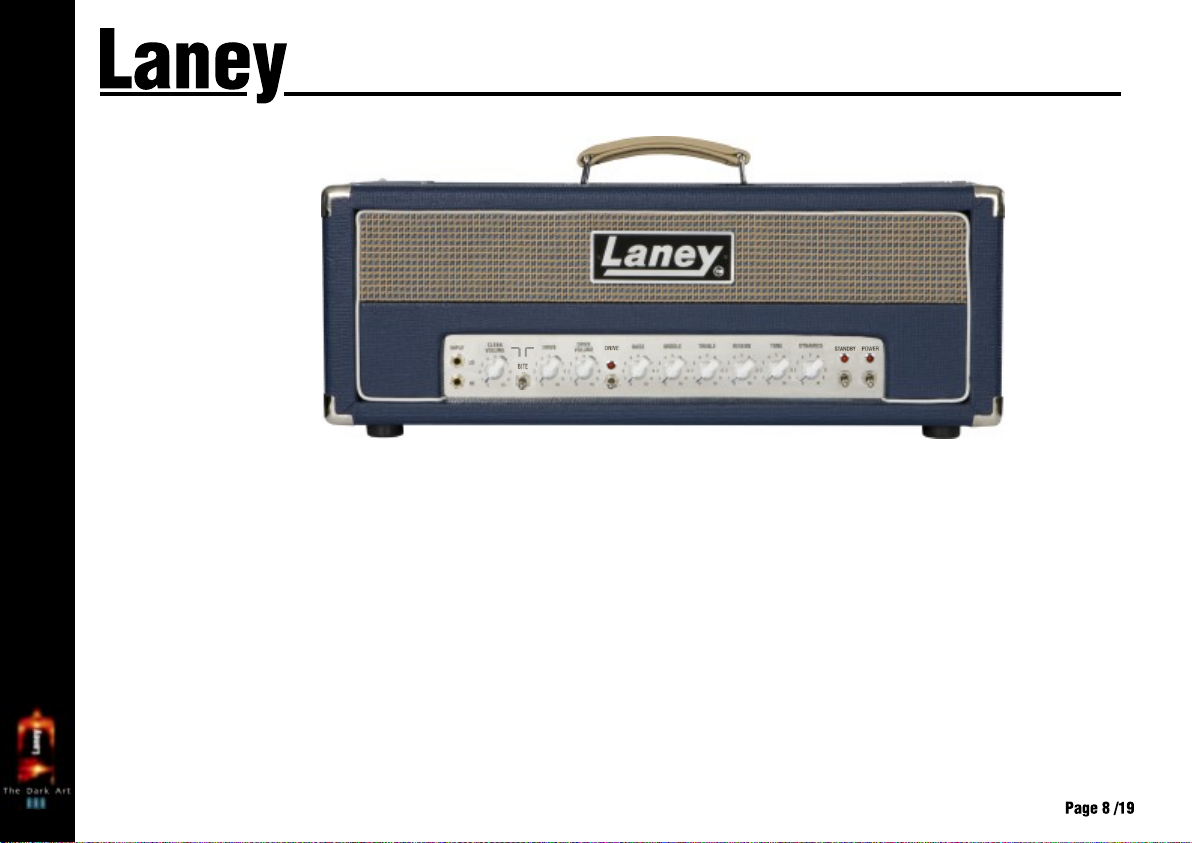
The Dark Art: In an age where guitar players have developed an unhealthy fascination with preamp distortion, the fabled sound of a tube
power amp being pushed hard has almost passed into history. Until now that is!
The L50H's hand wired 50W Class A Single Ended output stage oozes classic, warm tube tones: The harder you drive it, the better it
sounds. Plus with enough gain for contemporary tones, it also has a mean, spiteful side to it as well – making it ideal for any style of playing.
Utilising 5 EL34 output tubes, the L50H provides pure Class A tone at high volume levels. Combined with a Laney Lionheart L412 cabinet,
the sound will blow you away.
Every Lionheart product is extensively play tested by experienced guitarists before being shipped to our customers. Only when the unit is
finished to our complete satisfaction is it assigned its own unique build number which is then hand stamped onto the rear mounted plaque.
Your L50H should give you years of trouble-free amplification, however please take time to read this manual and familiarise yourself with
the controls as it will allow you to get the best from your amplifier. We hope you enjoy using your L50H as much as we enjoyed designing
and making it.
Best wishes from all at Laney
Page 9

L50H
OPERATING INSTRUCTIONS
A 50W SINGLE ENDED TRUE CLASS A AMPLIFIER
The new L50H uses well proven preamplifier topology from the existing Lionheart range. However the output stage and power supply are totally new and original to
Laney. The design was evolved in-house from the basics of ideal guitar amplification regardless of cost or technology/material barriers.
This gave birth to a design with its routes in vintage amplification with added contemporary features.
Guitar amplification was born from single ended class A tube radio set designs. These were made very simple to keep costs as low as possible. Power ranges only went
up to about 5 Watts with a single tube. Adding more tubes would only increase the power proportionally i.e. two tubes 10 Watts, 3 tubes 15 Watts and so on.
Guitarists soon wanted more volume and this gave birth to the modern day class A/B push pull amplifier designs. This had the wonderful advantage that, by using two
tubes instead of one, four times the power could be obtained and efficiencies were much higher so lower cost power supplies could be used. This appealed to
manufacturers and became the standard for most mass produced amplifiers with power outputs greater than 5 Watts.
However in the strive to get more power at reduced costs many of the inherent sonic advantages of single ended designs were conveniently forgotten.
The Lionheart range goes back to those original single ended designs and develops them in the way engineers would have liked to, at the time, had cost and materials
not been the overriding factors. The new L50H takes this to extremes that could only have been dreamt of at the time. The L50H amplifier uses pure class A single
ended topology with no less than five parallel specially selected and matched EL34B-STR tubes each delivering 10 Watts.
In pure class A the amplifier requires full power continuously so the power supply and output transformers have to be several times the size to cope with the
continuous power delivery. This does have the advantage that when sudden changes in volume are required they can be handled both instantaneously and continuously
without needing to request more or less current from the power supply. The overall effect of this is amazing transient response throughout the sonic spectrum.
A further significant advantage is the inherent distortion products produced in single ended class A designs. These are mostly low, even order harmonics which always
sound musically correct. Modern push pull designs cancel out even harmonics leaving odd ones which do not generally sound good. The overall effect is that the class A
single ended design sounds warmer and tonally more natural.
Since the single ended Class A output produces mainly pleasing distortion products, very little feedback is required to achieve good performance. A big side benefit of
this is a dramatic improvement in transient distortion and the addition of a natural soft low order harmonic clipping. This gives the amplifier much greater perceivable
headroom and peak power. However the low feedback levels used require a massive ultra wide bandwidth output transformer to avoid adding unwanted distortion
products anywhere within sonic range.
The number of tubes, massive toroidal power supply, and special output transformer all add up to an expensive power amplifier several times the cost of an equivalent
class A/B design.
Play the L50H class A design, teamed up with the matching Lionheart L412 or LT-212 to deliver sound in an airy, almost three dimensional, way that is totally intoxicating.
We think you will agree; a small price to pay for musical perfection.
Page 10
L50H
OPERATING INSTRUCTIONS
1 2 3 4 5 6 7 8 9 10 11 12 13 14 15
16 17 18
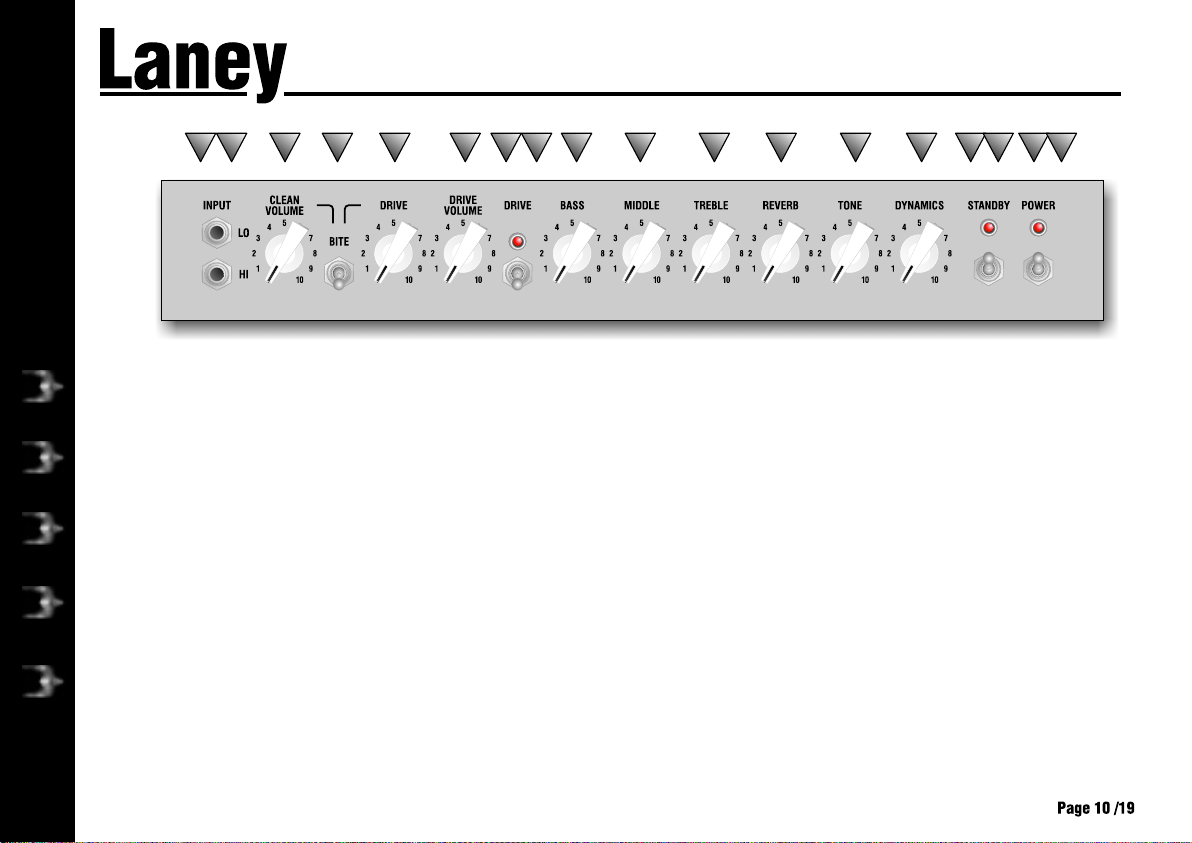
FRONT PANEL CONTROLS
1
2
3
4
5
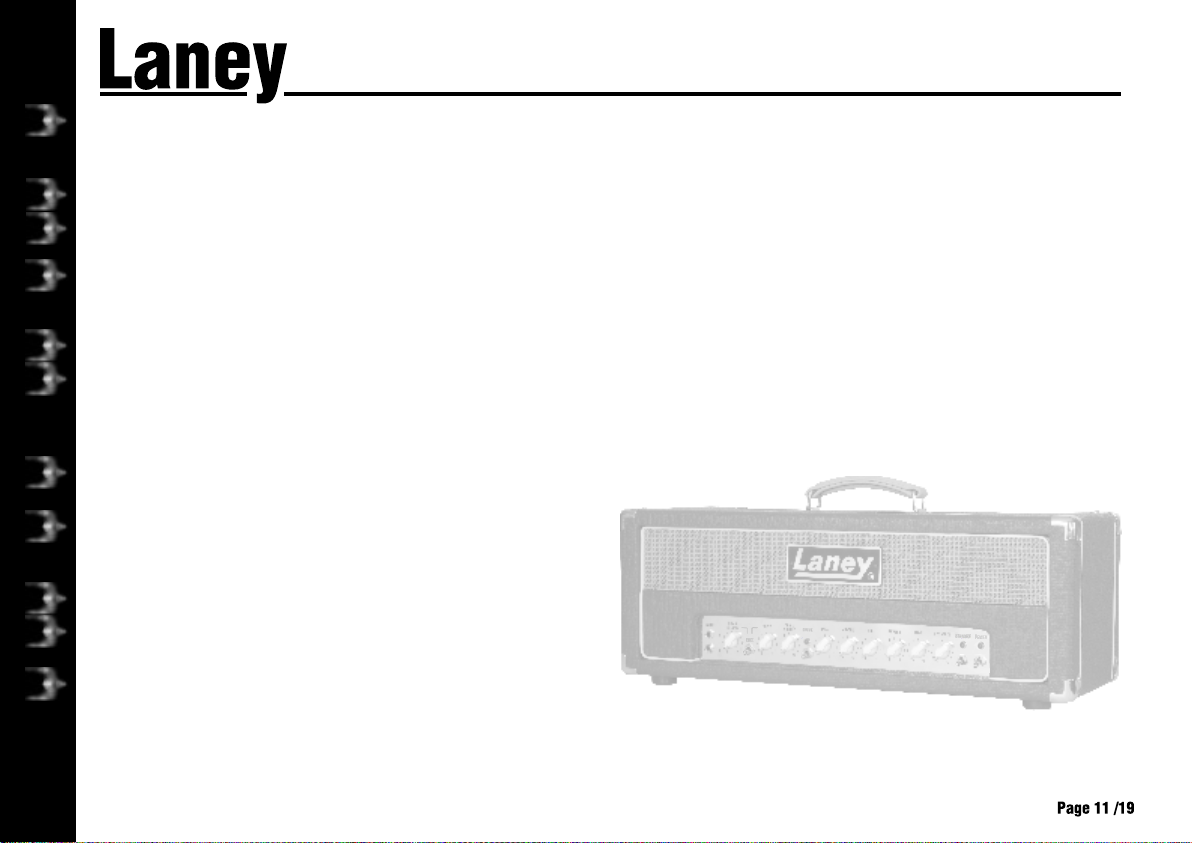
HI INPUT: 'Hi' stands for high gain. This input is designed for the connection of lower output level guitars making it well suited to single
coiled or low gain humbucker type pickups. Using high output pickups into this input may cause some musical input colouration and
compression. However this may be just what you are looking for so please try both of the inputs to find your perfect sound.
LO INPUT: 'Lo' stands for low gain. This input is designed for the connection of higher output guitars where input colouration and
compression are not desired. It can also be used with lower output pickups for extremely clean sounds. Please try both inputs to find your
ideal sound.
CLEAN VOL: Sets how loud the clean channel is. Try cranking it up a little to drive the power tubes harder for that real retro sound and
feel that only a quality tube amplifier can deliver. Now use your guitar volume to control the amount of distortion. (Wind it up for distortion,
back it off a little for clean).
BITE: This switch in the off position gives a full sound with deep bass. However many high output guitars can sound muddy and unfocussed.
Switching on the ‘Bite’ tightens up the bottom end giving a much clearer punchier sound. Please experiment with this control whatever guitar
you are using to find your ideal sound. (This switch works to differing amounts on both Clean and Drive channels) (Switch up to enable).
DRIVE: Sets the level of tube preamplifier drive or how dirty your sound is. This control should be used in conjunction with the Drive
Volume (6). Setting low levels of gain with high levels of volume will give a clean preamplifier sound with tube output stage overdrive. Setting
a medium drive level and medium Drive Volume will give a nice crisp bluesy lead tone, again with the ability to drive the output stage at higher
Drive Volume settings. Setting a high level on the Drive control and a low setting on the Drive Volume will give you a punchy hard rock lead
tone. Having set the Drive and Drive Volume controls to your desired sound try backing off your guitar volume and tone controls for lots of
other cool sounds. Good tube amplifiers have the unique ability to produce a wide range of sounds by using only your guitar controls, playing
weight and style.
Page 11
L50H
OPERATING INSTRUCTIONS
9-11
12
13
14
15
16
17
18
6
7
8
DRIVE VOL: Sets how loud the 'Drive' channel is. It is useful to experiment with drive levels and drive volumes. If you want a very open, warm
and semi overdriven sound try reducing the amount of drive and increasing the drive volume. This reduces pre-amp gain but pushes the power
amp section and makes it work harder giving you a very desirable level of power amp distortion which is a very pleasing "retro" style sound.
DRIVE LED: This LED will illuminate when the Drive channel is activated with the Drive switch (8) or the included Laney FS2 remote footswitch.
DRIVE SWITCH: Switch up to enable the 'Drive' channel. (This switch must be in the ON (up) position in order for the drive to be switched
remotely via a footswitch).
BASS, MIDDLE, TREBLE: These are a traditional set of passive tone controls. Passive controls have the advantage of always sounding
musical at any of their settings mainly due to their unique interactive nature. This gives players a more natural set of tools to create their ideal
sound. (Try them all set at midway (5) as a good starting point).
REVERB: Controls how loud the built in reverb sounds. The reverb in the L50H is a bespoke Laney-designed digital reverb.
TONE: The tone control works in a similar fashion to the Tone control you probably have on your guitar except that it uniquely works at the other
end of the amplification chain. This has the ability to not only control the overall top end response but also reduce upper end harmonics on the
output stage and preamplifier overdrive sounds. This will give you bright cutting sounds at high settings and smooth rounded sounds at lower settings.
Both the Tone and Dynamics controls depend greatly on the speaker cabinet connected to the amplifier. (Midway (5) is a good starting point).
DYNAMICS: This allows control over the response of the amplifier at lower frequencies. Turning this control clockwise gives a looser low end,
while lower settings provide a tighter response. The optimum setting is dependant on the speaker cabinet used. (Midway (5) is a good starting point).
STANDBY SWITCH: Disconnects the main HT voltage from the tubes but keeps the tubes warm so that they are ready to go instantly.
Switch to standby for short breaks when you don't want to wait for the tubes to warm up again. With the switch in the 1 (up) position, the amp
is in play mode, while 0 (down) allows the amp to warm up.
STANDBY LED: This LED will be lit when the amplifier is in play mode.
POWER SWITCH: Main power switch for the unit. Tube amplifiers take between 30 seconds to 2 minutes to warm up and be ready to play
after switching on, this is normal. Use in conjunction with the standby switch to prolong tube life. To turn on, flip the switch to 1 (up).
POWER LED: This LED will be lit when the amplifier is switched on. (Always switch off and disconnect the power cord when not in use).
Page 12
LZ B12 3 4
L50H
~220V/~230V
OPERATING INSTRUCTIONS
T5A L 250V
~120V~100V
T2A L 250V
~240V
1
2
3
4
1
2
3 4
5
7
6
8
9
REAR PANEL CONTROLS
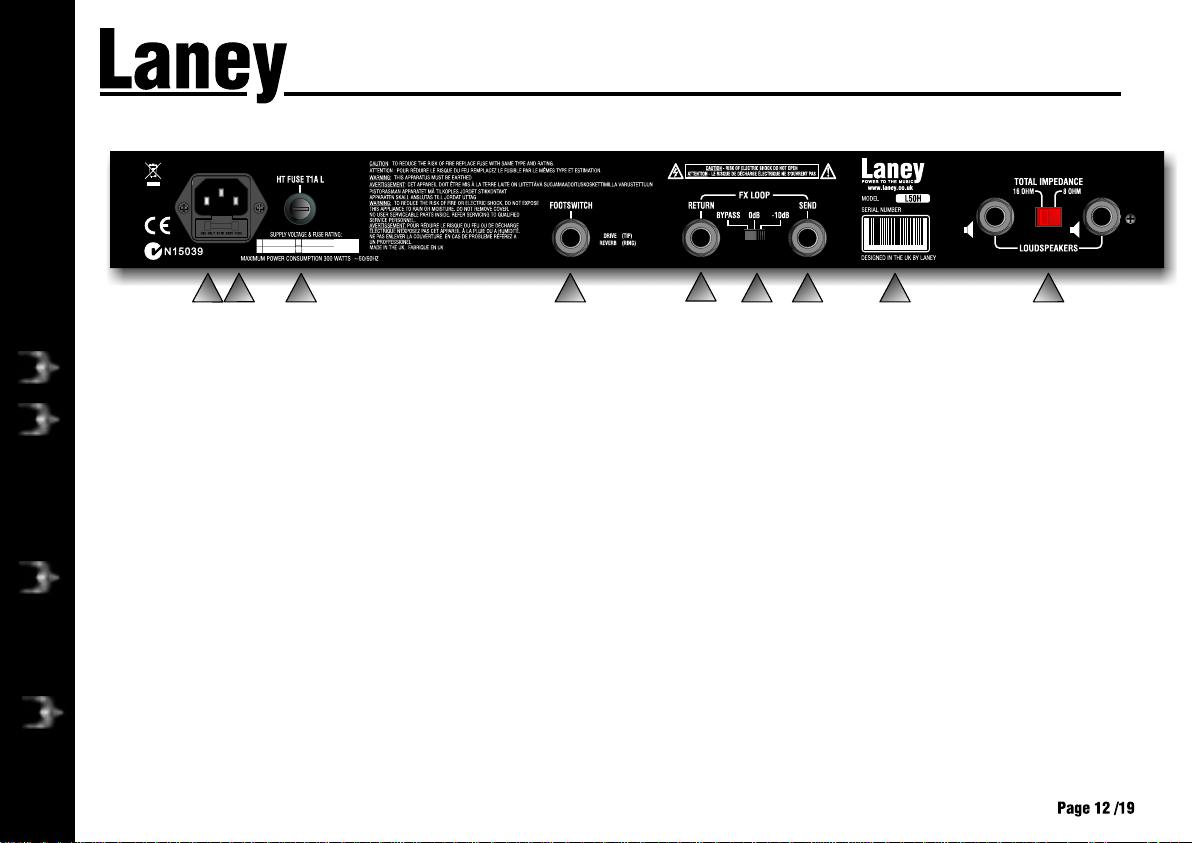
POWER INLET SOCKET: Connect to your power source. Make sure the voltage indicated on the rear panel is correct for your
country!
POWER FUSE: This drawer contains the main safety fuse for the unit. The fuse protects the amplifier from damage in the event of a fault
by disconnecting the mains power supply. USE ONLY THE CORRECT SIZE AND RATING OF FUSE AS SPECIFIED ON THE PANEL. If a
fuse blows or fails and a replacement of the same size and rating is installed which in turn blows, the amplifier has suffered a malfunction
and needs immediate service from a qualified technician. DO NOT TRY USING A FUSE OF HIGHER RATING - Using a fuse that is too
large in current rating may cause serious, irreparable damage to the amplifier and presents a serious fire hazard. The mains fuse ratings are
detailed in the Specifications section at the rear of this manual, as well as printed on the rear of the amplifier. There is a spare fuse located
in the fuse drawer of the mains power inlet in the event of a failure.
HT FUSE: This fuse disconnects the high voltage DC power to the tubes within the amplifier in the event of a fault. USE ONLY THE
CORRECT SIZE AND RATING FUSE AS SPECIFIED ON THE PANEL. If a fuse blows or fails and a replacement of the same size and rating
is installed and it in turn blows, the amplifier has suffered a malfunction. At this point check the output tubes and replace faulty ones if
required. Should tubes not be the problem refer the amplifier to a qualified technician. DO NOT TRY A FUSE OF HIGHER RATING Using a fuse that is too large in current rating may cause serious, irreparable damage to the amplifier. Fuses are designed to protect, do not
take chances.
FOOTSWITCH SOCKET: Provided for the connection of the included Laney FS2 footswitch. This allows you to remotely switch
between the clean/drive channel and switch the built in Reverb On/Off. In order to use the footswitch, set the Drive Switch to ON.
Page 13
L50H
OPERATING INSTRUCTIONS
5
6
7
8
9
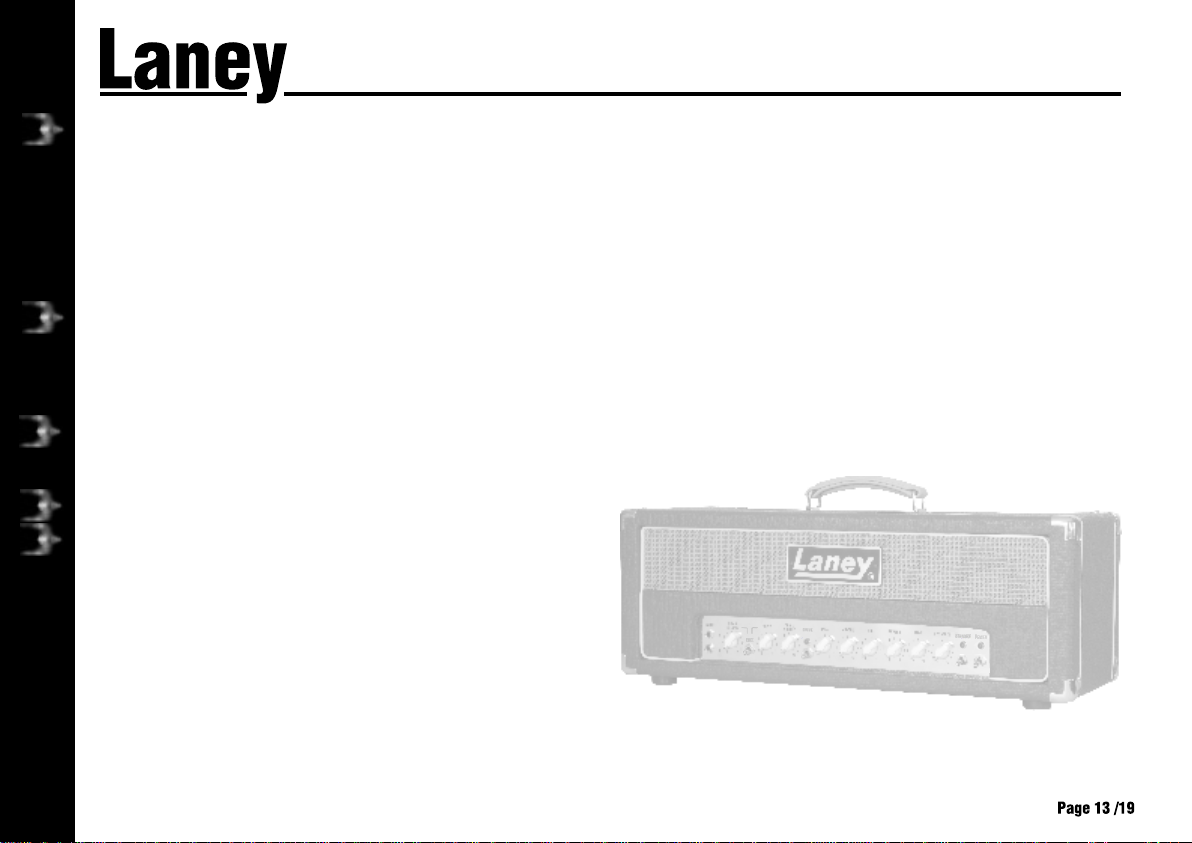
FX RETURN: A 1/4" mono jack socket for the connection of the output of an external FX unit. The effects loop allows you to connect
external effects such as tremolos, chorus and delays to your amplifier. The signal leaves the amplifier via the Send socket and comes back
from the effects via the Return socket. With no jacks inserted, the Send and Return signals are linked. Use the output level control on your
FX to control how loud the FX return signal sounds. Some Effects are better suited to being between the guitar and amplifier input - these
are foot pedal types/distortion/wah pedals etc. Rack mount effects will work better in the FX loop on the amplifier rear. Stomp boxes are
normally designed for small signals such as a guitar output whereas rack mount FX are designed for the higher signal level obtained from an
FX send.
The FX Return can also be used as a slave in for the power amp. As it is an insert type, this will mute the preamp signal.
FX LOOP SWITCH: Selects the FX Loop mode of operation:
! Bypass - Removes the FX Loop from the signal path.
! 0 dBu - For connection of FX units with a 0dBu nominal output level.
! -10 dBu - For connection of FX units with a -10dBu nominal output level. As this is intended for devices with a lower output level, this
switch increases the gain of the FX Loop by 10dB.
FX SEND: 1/4" mono jack socket for connection to the input of an external FX unit. A insert type effects loop allows you to connect
external effects such as tremolos, chorus and delays to your amplifier. This can also be used as a line out for connection to another power
amp slave input or for recording.
SERIAL NO: Displays the model and serial number of the unit.
LOUDSPEAKER SOCKETS: Use to connect an 8-16 ohm extension cabinet. Set the switch to the socket for your desired impedance.
Try the L50H into a matching Laney Lionheart L412 cabinet for the perfect tonal combination. Please note mismatched impedance will
reduce the amplifiers performance and in extreme cases may cause damage to your amplifier. Never operate any tube amplifier without a
load connected: serious irreparable damage may occur.
Lionheart products use only the best available build techniques and components to produce that perfect sound. This includes the
loudspeakers which are selected for their tonal quality. Because these speakers are hand made, using vintage style materials which are
acknowledged to give the best guitar sounds, they will take several hours of playing to settle down to their optimum sound.
Page 14
L50H
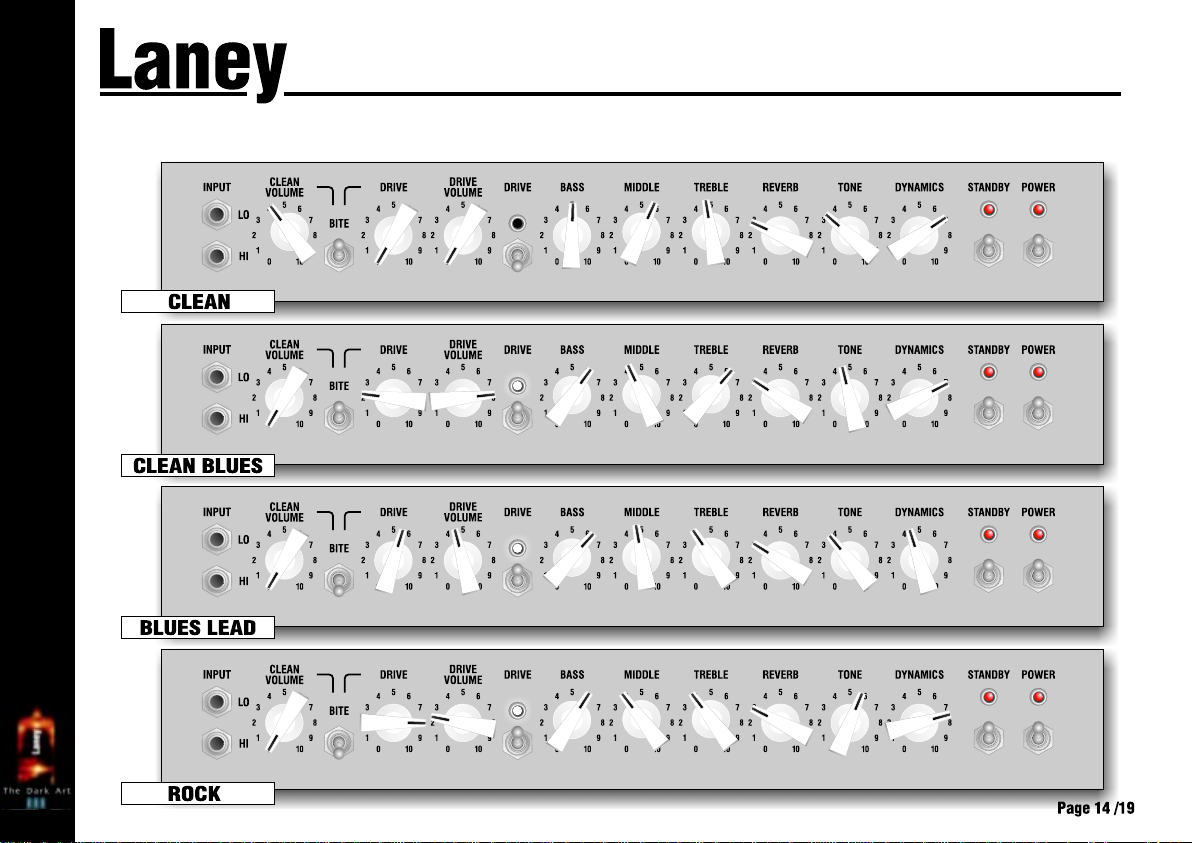
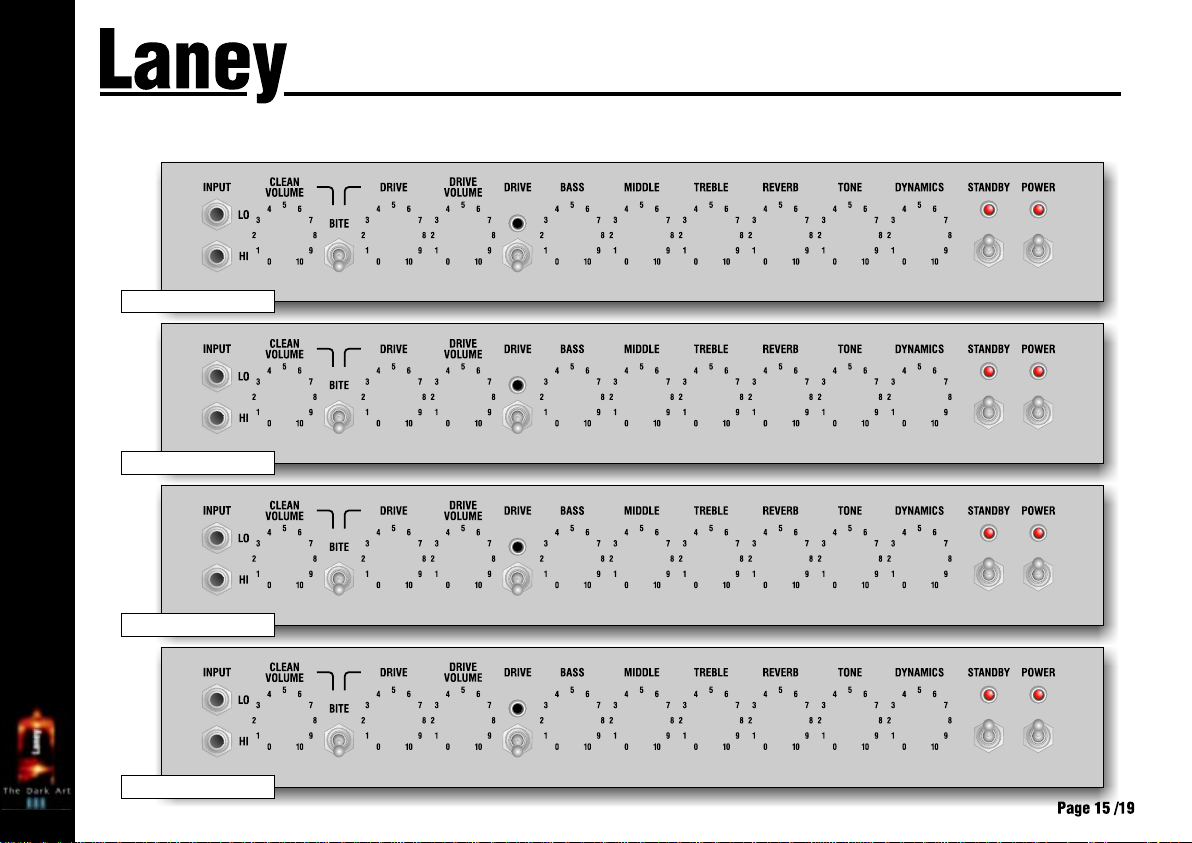
QUICK START SETTINGS - suggestions only, experiment!
OPERATING INSTRUCTIONS
Page 15
L50H
USER SETTINGS - Store your own cool sounds
OPERATING INSTRUCTIONS
Page 16
L50H
Tube Type
V1-3
ECC83/12AX7
V4-8
EL34
OPERATING INSTRUCTIONS
TUBE AMPLIFIER SURVIVAL TIPS
Tube amplifiers generally sound much warmer/sweeter than solid state transistor amplifiers but they also need a little more respect due to the fragile glass
tubes. The L50H uses three 12AX7 preamp tubes, and five EL34 output tubes which should give you years of trouble free service, however like all tube amps;
it is important to treat it with a certain amount of care. Use the following steps as a guide for how to take care of your amplifier:
! Use the Standby switch to allow the tubes to warm up before being connected to high voltages. This will prolong the life of the tubes.
! Take care when moving the amplifier. Tubes are fragile glass components, they can easily be damaged if thrown in and out of transit vans.
! Make sure the impedance of your cabinets matches the setting on your amplifier. Improper impedance matching will result in reduced output power
and compromised sound at best, and amplifier failure/shortened tube life at worst.
! Allow the amplifier to warm up to room temperature before switching it on: the sudden thermal shock can crack a cold glass tube enclosure, plus any
moisture is bad news around high voltage electronics.
! After playing, allow the amplifier to cool down before moving. Hot tubes are more fragile than cool ones.
! Always use good quality loudspeaker cables: instrument cables are not capable of handling the load requirements of the loudspeaker and can short out.
Replacing Tubes
A tubes life expectancy is based upon a number of factors which include operating temperature, how hard and how often it is played, vibration due to travel,
etc. Tubes should be changed in your amplifier if you notice any deterioration in your amplifiers sound or performance. Otherwise, they need not be changed
at any regular interval.
Typical problems with preamp tubes can be crackly noise, hiss, hum, and microphony. If they fail or exhibit reduced performance, preamp tubes can simply be
swapped out with no further action required.
Typical output tube problems can be blown HT fuse, sound lacking in punch, sound lacking extreme highs or low, and low level hum. The output tubes can be
replaced singly if you replace them with the exact same type AND grade as factory fitted, otherwise they should be replaced as a matched set.
To change a tube firstly switch off and unplug the amplifier from the mains supply. Wait for the tubes to cool down. Remove the rear protective grille held in
place with four screws. Preamp tubes are protected with a screen can; to remove, gently push down and twist the can anti clockwise and then pull up. The
tube can now be gently pulled out. Output tubes have a spring retainer which grips the base of the tube; push down on this with one hand, whilst gently
rocking the tube with the other to remove. Take care when inserting the new tube in to make sure all pins are correctly aligned.
The user should not attempt to service this product. Please refer all servicing to qualified service personnel.
Page 17
LZB12 34
LZB12 34
LZB123 4
LZB123 4
LZB123 4
L50H
OPERATING INSTRUCTIONS
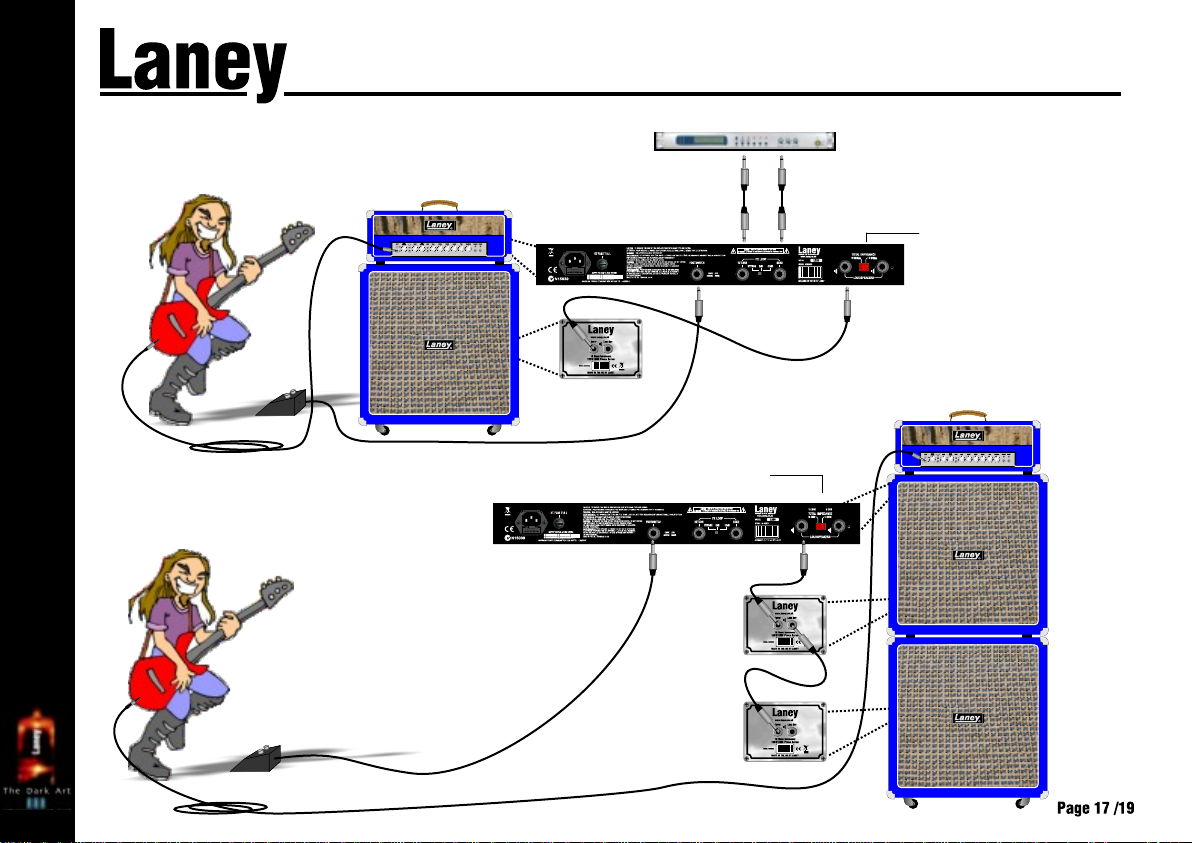
L50H CONNECTIONS WITH FX
L50H WITH
EXTENSION CABINETS
FX Controller
Output
T5A L 250V
~120V~100V
~220V/~230V
T2A L 250V
~240V
POWER TO T HE MUSIC
T5A L 250V
~120V~100V
~220V/~230V
T2A L 250V
~240V
Input
16 Ohms
8 Ohms
POWER TO T HE MUSIC
POWER TO T HE MUSIC
Page 18
L50H
OPERATING INSTRUCTIONS
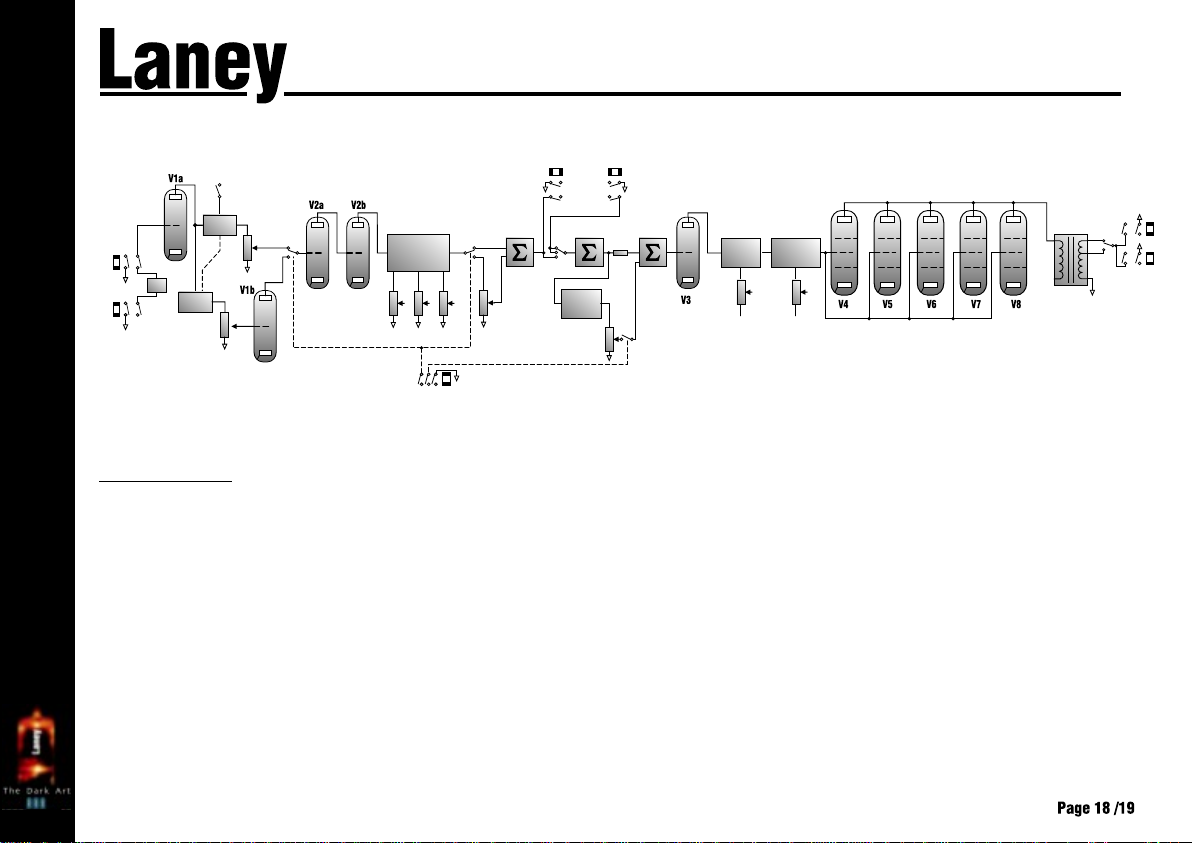
BLOCK DIAGRAM
FX RETURN
DRIVE
FX SEND
REVERB
REVERB
LEVEL
TONE
DYNAMICS
8/16 OHM
SWITCH
HI INPUT
LO INPUT
PAD
BITE
DRIVE
BITE
BITE
CLEAN
VOLUME
BASS
EQ
MID
TREBLE
FOOTSWITCH
VOLUME
General Notes
Amplifier connection: In order to avoid damage, it is advisable to establish and follow a pattern for turning on and off your
equipment. With all system parts connected, turn on source equipment, tape decks, cd players, mixers, effects processors etc.
BEFORE turning on your guitar amplifier. Many products have large transient surges at turn on and off which can cause damage to
your speakers. By turning on your guitar amplifier LAST and making sure its Volume controls are set to minimum any transients
from other equipment will not reach your loudspeakers. Wait until all system parts have stabilised; usually a couple of seconds.
Allow the tubes to warm up before activating the Standby switch (usually between 30 seconds - 2 mins).
Similarly when turning off your system always switch to Standby first or turn down the Volume controls on your guitar amplifier
and then turn off its power before turning off other equipment.
Cables: never use shielded or microphone cable for any speaker connections as this will not be substantial enough to handle the
amplifier load and could cause damage to your amplifier system.
Caution: These professional loudspeaker systems are capable of generating very high sound pressure levels. Use care with placement
and operation to avoid exposure to excessive levels that can cause permanent hearing damage. (Refer to guidelines on page 2).
Servicing: The user should not attempt to service these products. Refer all servicing to qualified service personnel.
Page 19
L50H
SPECIFICATIONS
OPERATING INSTRUCTIONS
Supply Voltage: Factory Pre-set Option
~100V, ~120V, ~220V/~230V, ~240V 50/60Hz
Mains Fuse:
(~220V/~230V - 240V = T2A L 250V)
(~100V - 120V = T5A L 250V)
HT Fuse:
T1A L
Power Consumption:
300W
Output Power Rating:
50W
FX Loop:
Insert type, switchable - Bypass, 0dBu, -10dBu (nominal)
Loudspeaker outputs:
8/16 Ohms sockets with switch
EQ:
Passive Bass, Middle and Treble
Tone Boost & Cut (Active on top end of signal)
Dynamics (Active on lower end of signal)
Bite Switch
Input Impedance:
1MOhm
Size:
240*678*250 (H*W*D)
Unit Weight:
21.5 Kg (Shipping Weight 23.0 Kg)
SPECIAL FEATURES
Pure Single Ended Class A Valve tone.
Gold plated PCB's and Jacks, Hi and Low Gain Inputs.
Sealed gold contact relays used in signal switching for minimum effect to your sound.
Laney Designed Reverb.
Oversized power supplies and output transformers for that big powerful sound and long term reliability.
The best available specially selected tubes throughout, (5*EL34 Power Tube, 3*ECC83/12AX7 Preamp Tubes).
Birch plywood cabinet construction for optimum sound quality and road worthiness.
This product conforms to the requirements of the following European Regulations, Directives & Rules: CE Mark (93/68/EEC), Low Voltage (2006/95/EC), EMC (2004/108/EEC),
RoHS (EU2002/95/EC), WEEE (EU2002/96/EC)
In order to reduce environmental damage, at the end of its useful life, this product must not be disposed of along with normal
household waste to landfill sites. It must be taken to an approved recycling centre according to the recommendations of the WEEE
(Waste Electrical and Electronic Equipment) directive applicable in your country.
Page 20

POWER TO THE MUSIC
LANEY AMPLIFICATION
www.laney.co.uk
In the interest of continued product development, Laney reserves the right to amend product specification without prior notification.
 Loading...