

LandXcape LX792 operation manual

Owner’s Manual
EN
P09
Benutzerhandbuch
Mode d’emploi
Manuale d’uso
Manual del propietario
Gebruikershandleiding
Instrukcja obsługi
Felhasználói kézikönyv
Manual utilizator
Návod k použití
Návod na použitie
Manual de utilizador
Kullanıcı el kitabı
Navodila za uporabo
D
F
I
ES
NL
PL
HU
RO
CZ
SK
PT
TR
SL
P22
P37
P51
P64
P78
P91
P105
P119
P131
P144
P158
P172
P185
LX790 LX791 LX792
LX793 LX794 LX795

Original instructions EN
Originalbetriebsanleitung D
Notice originale F
Istruzioni originali I
Manual original ES
Oorspronkelijke gebruiksaanwijzing NL
Instrukcja oryginalna PL
Eredeti használati utasítás HU
Instrucţiuni originale RO
Původní návod k používání CZ
Pôvodný návod na použitie SK
Manual original PT
Orijinal işletme talimatı TR
Izvirna navodila SL
3 4
127 8
9 10
11
12
13
14
15
6
5
16
18 19
17
20
21
22 23 24
A
C
B
DD
E2 F
E1
G
H
I
J
K1
K3
K2
1
2
L
M
N
O1
P
O2
Q1

2 2
1
Q2
Q3
Q5Q4

1. Product Safety
1.1 General & Additional Safety Instruction
WARNING: Read all safety warnings and all instructions.
Failure to follow the warnings and instructions may result in
electric shock, fire and/or serious injury.
Carefully read the instructions for the safe operation of the
machine.
Save all warnings and instructions for future reference.
• This appliance is not intended for use by persons (including
children) with reduced physical, sensory or mental capabilities, or
lack of experience and knowledge, unless they have been given
supervision or instruction concerning use of the appliance by a
person responsible for their safety.
• Children should be supervised to ensure that they do not play with
the appliance.
• The appliance is only to be used with the power supply unit
provided with the appliance.
IMPORTANT
READ CAREFULLY BEFORE USE
KEEP FOR FUTURE REFERENCE
SAFE OPERATION PRACTICES
Training
a) Read the instructions carefully. Make sure you understand the
instructions and be familiar with the controls and the proper use of
the appliance;
b) Never allow people unfamiliar with these instructions or children
to use the appliance. Local regulations can restrict the age of the
operator;
c) The operator or user is responsible for accidents or hazards
occurring to other people or their property.
Preparation
a) Ensure the correct installation of the boundary wire as instructed.
b) Periodically inspect the area where the appliance is to be used and
remove all stones, sticks, wires, bones, and other foreign objects.
c) Periodically visually inspect to see that the blades, blade bolts
and cutter assembly are not worn or damaged. Replace worn or
damaged blades and bolts in sets to preserve balance.
d) On multi-spindle appliances, take care as rotating one blade can
cause other blades to rotate.
e) WARNING! The lawnmower shall not be operated without the guard
in place.
OPERATION
1. GENERAL
a) Never operate the appliance with defective guards, or without
safety devices, for example deflectors, in place.
b) Do not put hands or feet near or under rotating parts. Keep clear of
the discharge opening at all times.
c) Never pick up or carry an appliance while the motor is running.
d) Operate the disabling device from the appliance.
- Before clearing a blockage;
- Before checking, cleaning or working on the appliance.
e) It is not permitted to modify the original design of robotic
lawnmower. All modifications are made at your own risk.
f) Start robotic lawnmower according to the instructions. When the
power key is switched on, make sure you keep your hands and
feet away from the rotating blades. Never put your hands and feet
under the mower.
g) Never lift up robotic lawnmower or carry it when the power key is
switched on.
h) Do not let persons who do not know how robotic lawnmower
works and behaves use the mower.
i) Do not put anything on top of robotic lawnmower or its charging
station.
j) Do not allow robotic lawnmower to be used with a defective blade
disc or body. Neither should it be used with defective blades,
screws, nuts or cables.
k) Always switch off robotic lawnmower when you do not intend to
use the mower. Robotic lawnmower can only start when the power
key is switched on and the correct PIN code has been entered.
l) Keep your hands and feet away from the rotating blades. Never
place your hands or feet close to or under the body when robotic
lawnmower is in operation.
m) To avoid using the machine and its peripherals in bad weather
conditions especially when there is a risk of lightning.
n) Not to touch moving hazardous parts before these have come to a
complete stop.
o) For machines used in public areas, that warning signs shall be
placed around the working area of the machine. They shall show
the substance of the following text:
WARNING!
machine! Supervise children!
2. ADDITIONALLY WHEN THE APPLIANCE IS OPERATING
AUTOMATICALLY
a) Do not leave the machine to operate unattended if you know that
there are pets, children or people in the vicinity.
MAINTENANCE AND STORAGE
When the mower is turned upside down the power key must
always be switched off.
The power key should be switched off during all work on the
mower’s underframe, such as cleaning or replacing the blades.
a) Keep all nuts, bolts and screws tight to be sure the appliance is in
safe working condition.
b) Inspect the robotic lawnmower each week and replace worn or
damaged parts for safety.
c) Check especially that the blades and blade disc are not damaged.
Replace all blades and screws at the same time if necessary so
that the rotating parts are balanced.
d) Ensure that only replacement cutting means of the right type are
used.
e) Ensure that batteries are charged using the correct charger
recommended by the manufacturer. Incorrect use may result in
electric shock, overheating or leakage of corrosive liquid from the
battery.
f) In the event of leakage of electrolyte flush with water/neutralizing
agent, seek medical help if it comes into contact with the eyes etc.
g) Servicing of the appliance should be according to manufacturers’
instructions.
Recommendation
To connect the machine and/or its peripherals only to a supply circuit
protected by a residual current device (RCD ) with a tripping current of
not more than 30 mA.
Automatic lawnmower! Keep away from the
EN 9
Residual risks
To avoid injuries, wear protective gloves when replacing the blades.
2. Information on the Landxcape
TM
Transport
The original packaging should be used when transporting robotic
lawnmower over long distances.
To safely move from or within the working area:
a) Press the STOP button to stop the mower.
You select the four digit PIN code when you start the mower for the
first time.
b) Always switch off robotic lawnmower if you intend to carry the
mower.
c) Carry the mower by the handle at the front under the mower. Carry
the mower with the blade disc away from the body.
Safety Warnings for battery pack inside the tool
a) Do not dismantle, open or shred battery pack.
b) Do not short-circuit a battery pack. Do not store battery
packs haphazardly in a box or drawer where they may shortcircuit each other or be short-circuited by conductive
materials.
other metal objects, like paper clips, coins, keys, nails, screws or
other small metal objects, that can make a connection from one
terminal to another. Shorting the battery terminals together may
cause burns or a fire.
c) Do not expose battery pack to heat or re. Avoid storage in
direct sunlight.
d) Do not subject battery pack to mechanical shock.
e) In the event of battery leaking, do not allow the liquid to
come into contact with the skin or eyes. If contact has been
made, wash the affected area with copious amounts of water
and seek medical advice.
f) Seek medical advice immediately if a cell or battery pack
has been swallowed.
g) Keep battery pack clean and dry.
h) Battery pack gives its best performance when it is operated
at normal room temperature (20 °C ± 5 °C).
i) When disposing of battery packs, keep battery packs of
different electrochemical systems separate from each
other.
j) Recharge only with the charger specied by Landxcape
Do not use any charger other than that specically provided
for use with the equipment. A charger that is suitable for one
type of battery pack may create a risk of re when used with
another battery pack.
k) Do not use any battery pack which is not designed for use
with the equipment.
l) Keep battery pack out of the reach of children.
m) Retain the original product literature for future reference.
n) Dispose of properly.
When battery pack is not in use, keep it away from
TM
.
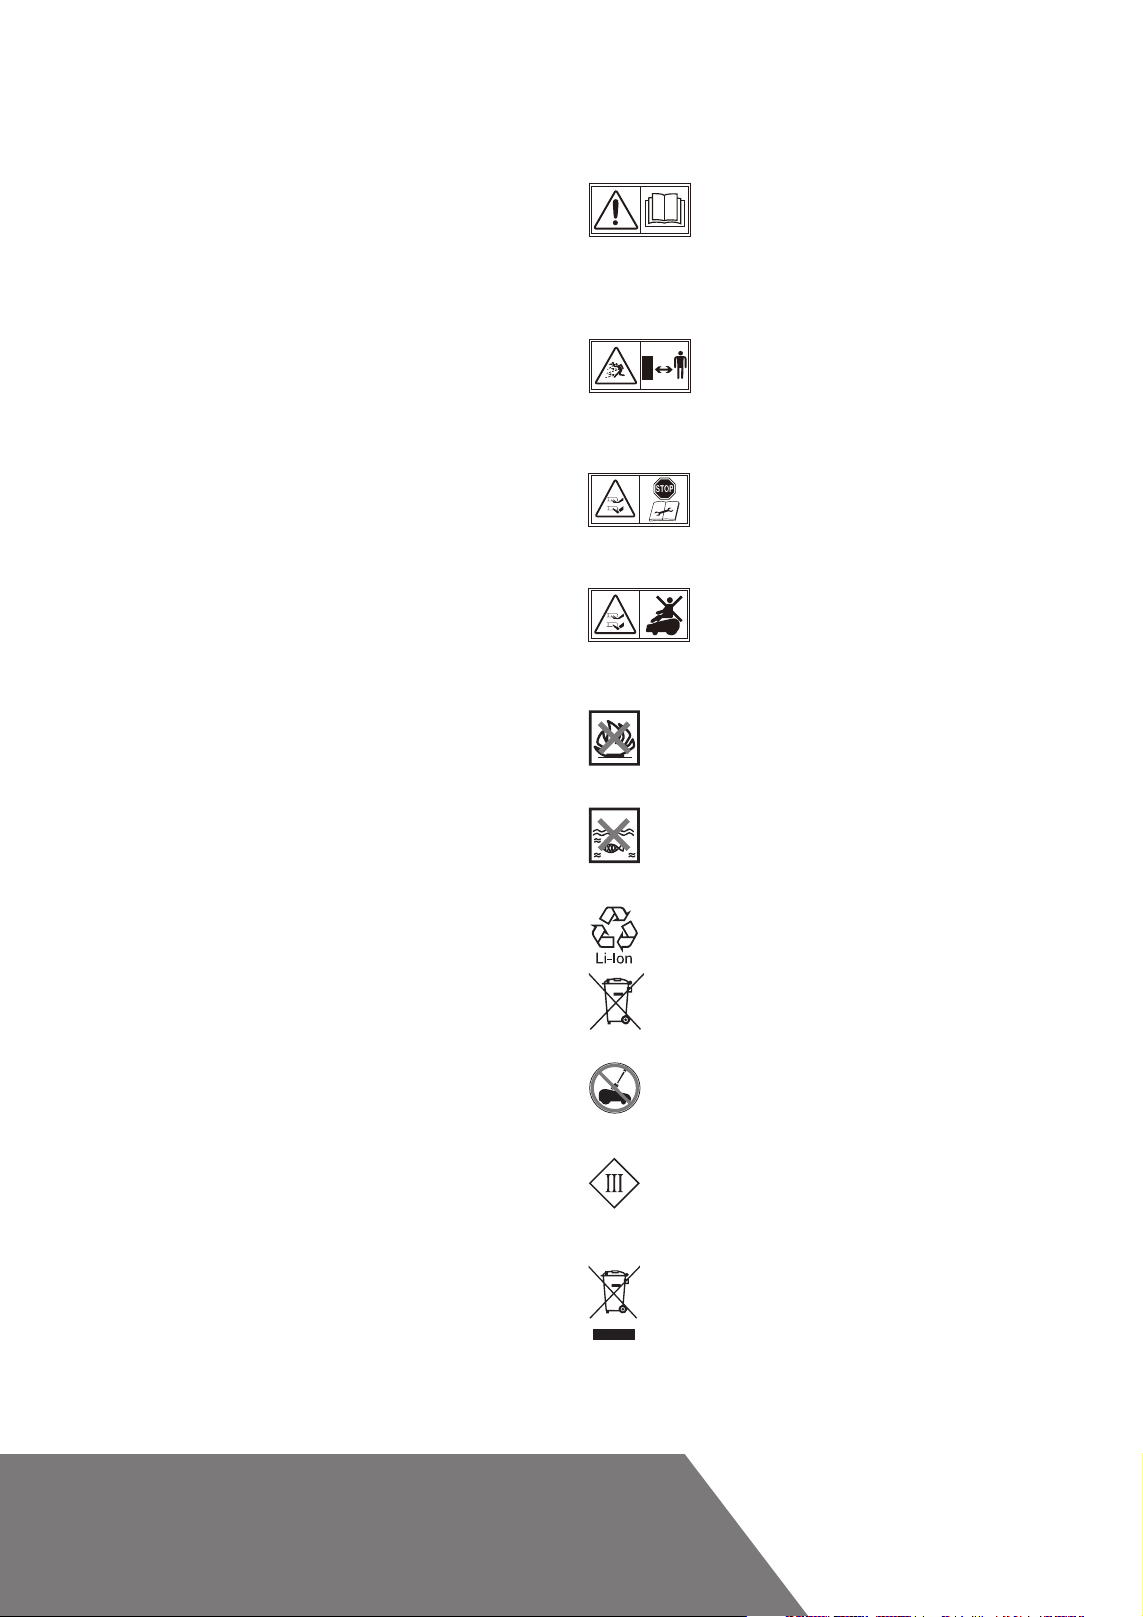
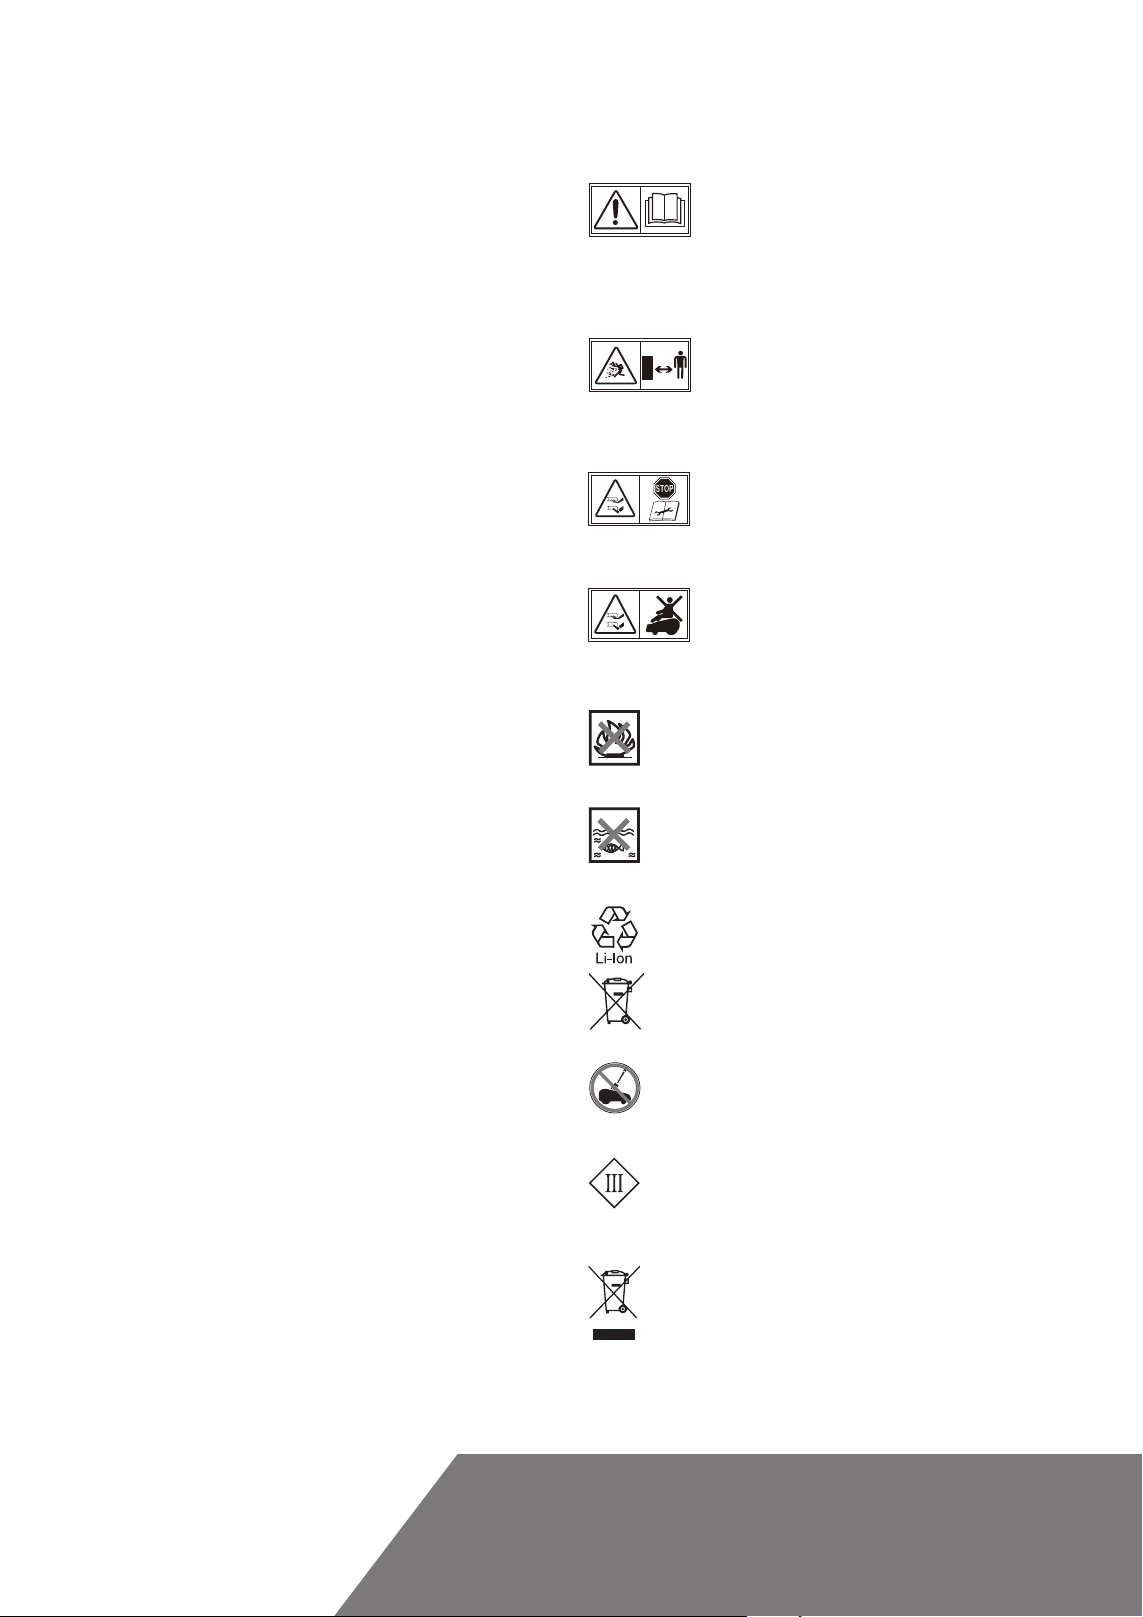
WARNING - Robotic lawnmower can be dangerous if
incorrectly used.
Read through the Operator’s manual carefully and
understand the content before using your robotic
lawnmower.
WARNING - Keep a safe distance from the machine
when operating.
WARNING – Operate the disabling device before
working on or lifting the machine.
WARNING - Do not ride on the machine.
Do not burn
Do not expose to rain or water.
Do not dispose of batteries. Return exhausted
batteries to your local collection or recycling point.
Do not wash the machine with a high pressure
washer
Class III appliance
Waste electrical products must not be disposed of
with household waste. Please recycle where facilities
exist. Check with your local authorities or retailer for
recycling advice.
EN10

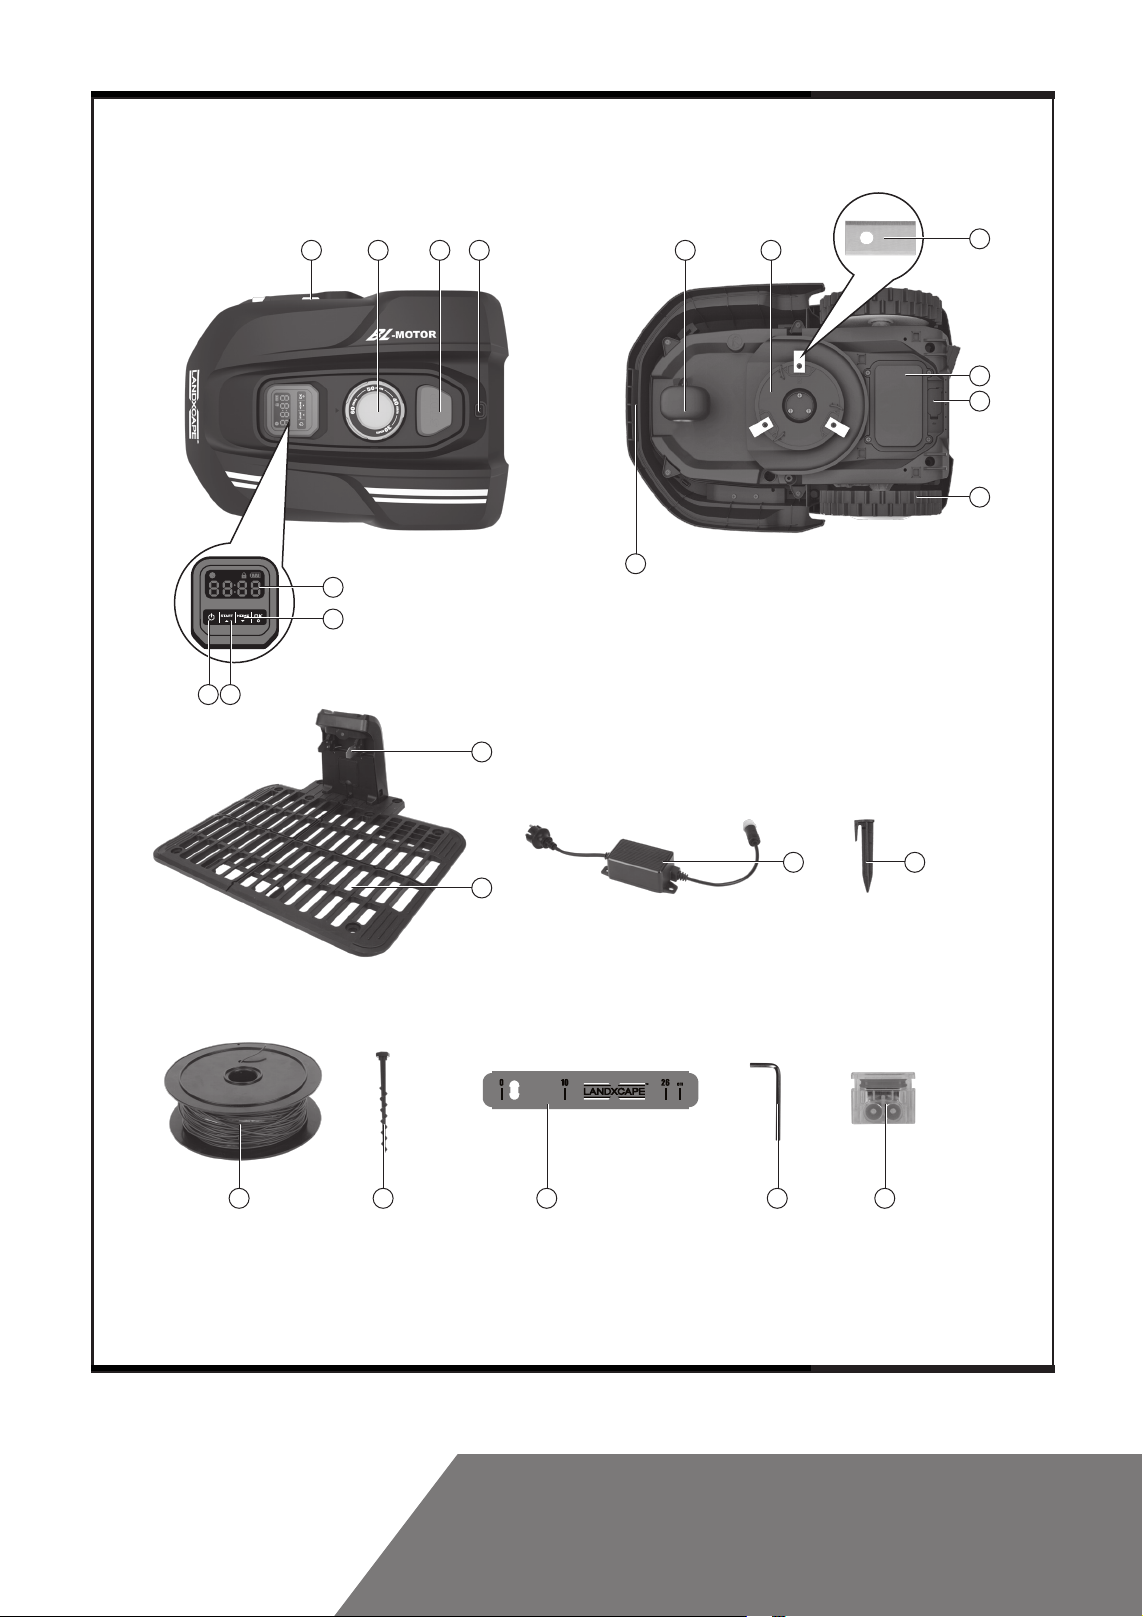
2. Component List
1. STOP BUTTON
2. CUTTING HEIGHT ADJUSTMENT KNOB
3. ON/OFF KEY
4. START KEY
5. HOME BUTTON
6. DISPLAY
7. CHARGING STRIPS
8. RAIN SENSOR
9. FRONT WHEEL
10. BLADE TURNING DISC
11. CUTTING BLADE
12. BATTERY PACK
13. USB PORT
14. REAR DRIVING WHEEL
15. HANDLE
16. CONTACT PINS
17. CHARGING BASE
18. POWER ADAPTER
19. WIRE PEGS
20. BOUNDARY WIRE
21. CHARGING BASE FIXING NAILS
22. BOUNDARY WIRE DISTANCE GAUGE
23. HEX KEY
24. CONNECTOR
Not all the accessories illustrated or described are included in standard delivery.
EN 11
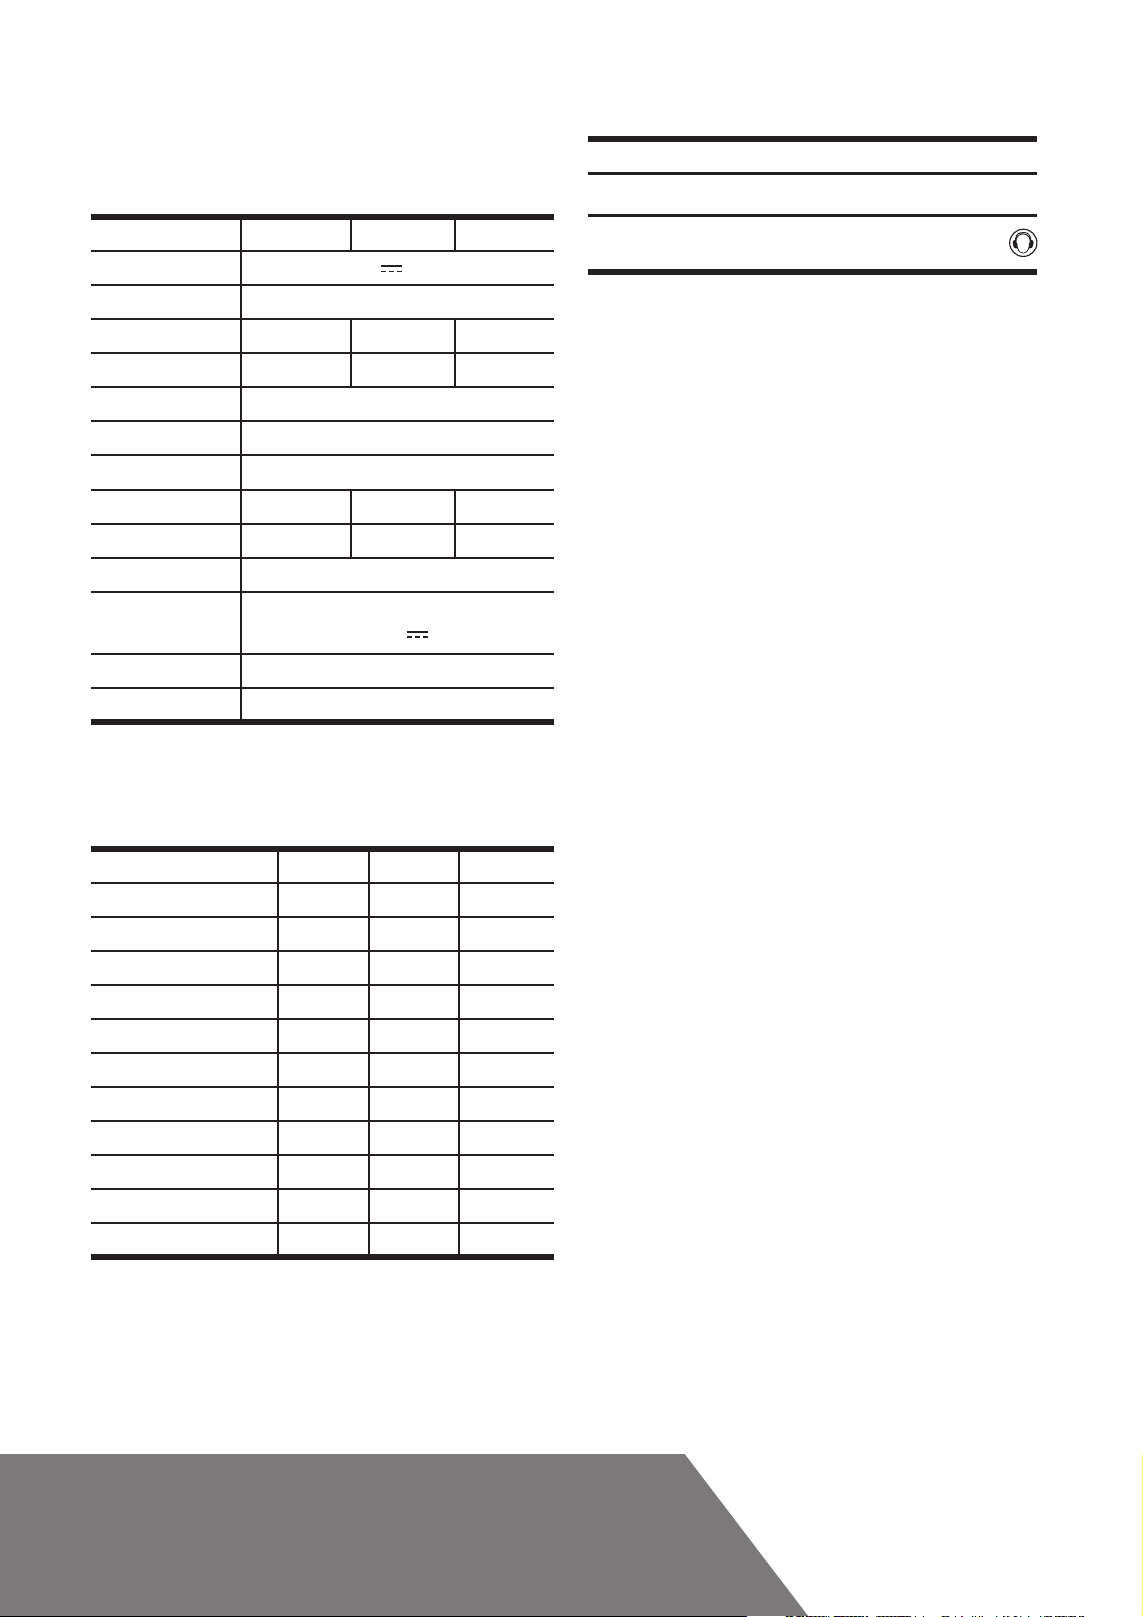
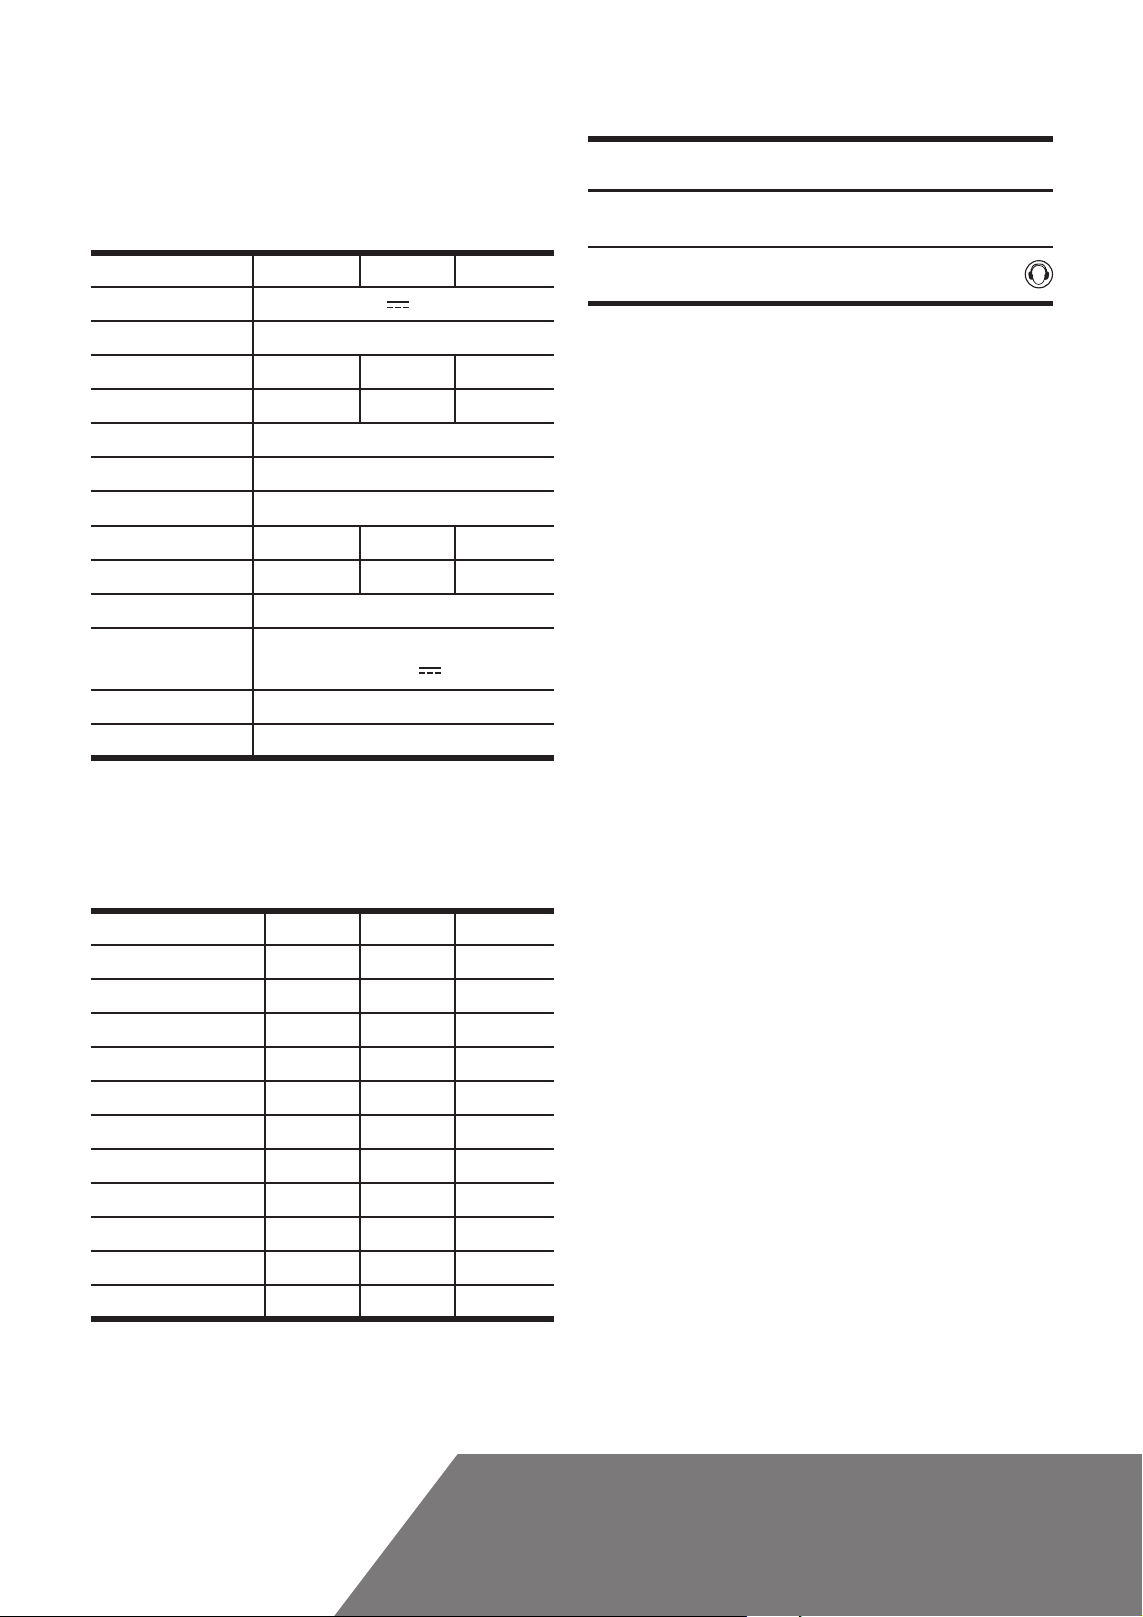
3. Technical data and noise data
Noise data
3.2
3.1 Technical data
Type LX790 LX791 LX792 LX793 LX794 LX795 (790-799 - designation
of machinery, representative of Robotic Lawn mower)
LX790 LX792 LX791 LX793 LX794 LX795
Rated voltage 20V
No load speed 2800/min
Cutting area 600m
Cutting diameter 16cm 18cm 18cm
Cutting height 30-60mm
Cutting height positions
Battery type Lithium-ion
Battery model LA0001 LA0002 LA0001
Charging time approx. 1.3hrs 2hrs 1.3hrs
Charger model LA8001 / LA8002
Charger rating
Machinery weight 8.4kg
Protection degree III
2
Input: 100-240V~50/60Hz, 38W,
Output: 20V
Max.*
900m
4
2
, 1.5A
700m
2
A weighted sound pressure LpA = 44.2dB (A), K
= 64.2dB (A) K
A weighted sound power
Wear ear protection when
sound pressure is over
A degree of noise from the machine is not avoidable. Route noisy work
is to be licensed and limits for certain periods. Keep rest periods and
they may need to restrict the working hours to a minimum. For their
personal protection and protection of people working nearby, an appropriate hearing protection shall be worn.
L
wA
= 0.4dB(A)
PA
= 0.4dB(A)
wA
80dB(A)
Intended Use
The garden product is intended for domestic lawn mowing. It is designed to mow often, maintaining a healthier and better looking lawn
than ever before. Depending on the size of your lawn, your Landxcape
may be programmed to operate at any time or frequency. It is impossible for digging, sweeping or snow cleaning.
TM
*Voltage measured at no load. Initial battery voltage reaches maximum
of 20 volts. Nominal voltage is 18 volts.
Accessories
LX790 LX792 LX791 LX793 LX794 LX795
Screw 9 9 9
Charging base 1 1 1
Charging base fixing nails 7 7 7
Boundary wire 150m 180m 150m
Wire pegs 210 250 210
Hex key 1 1 1
Boundary wire distance gauge
Blade
Connector
Battery pack (LA0001/ LA0002)
Charger (LA8001 / LA8002)
We recommend that you purchase genuine accessories listed in the
above list from the same store that sold you the tool. Refer to the
accessory packaging for further details. Store personnel can assist you
and offer advice.
2 2 2
9 9 9
2 2 2
1 1 1
1 1 1
EN12
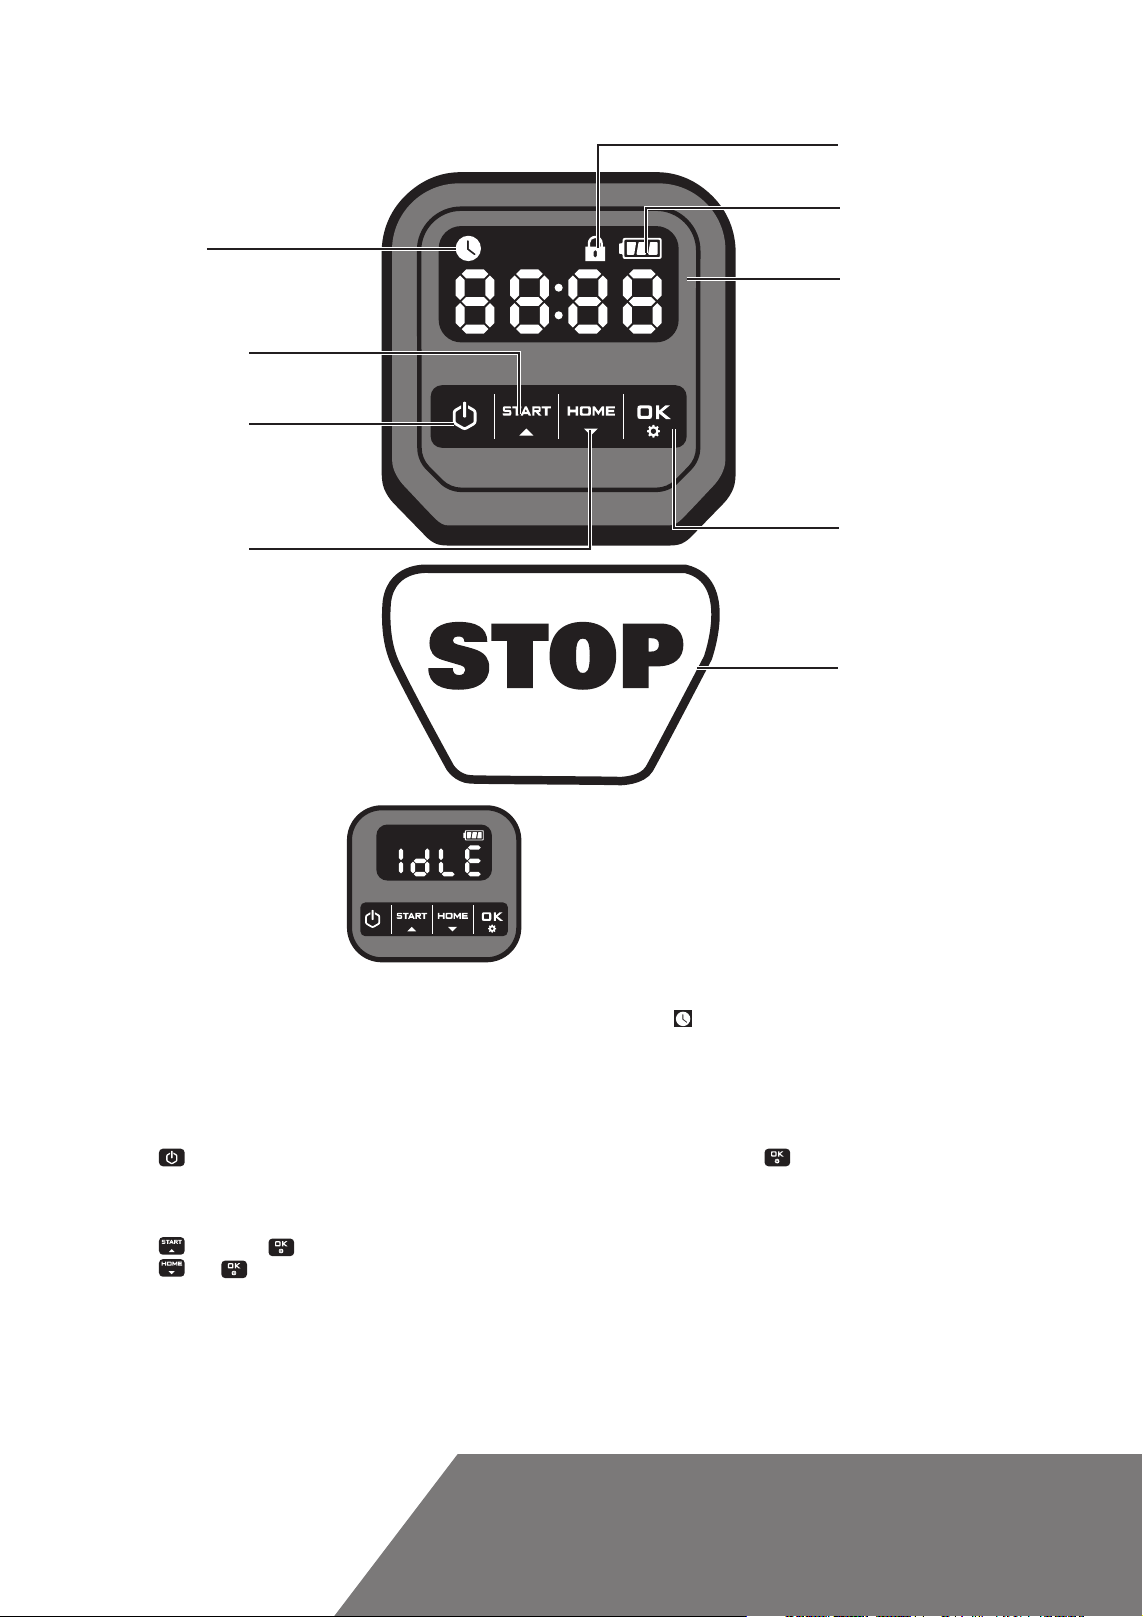
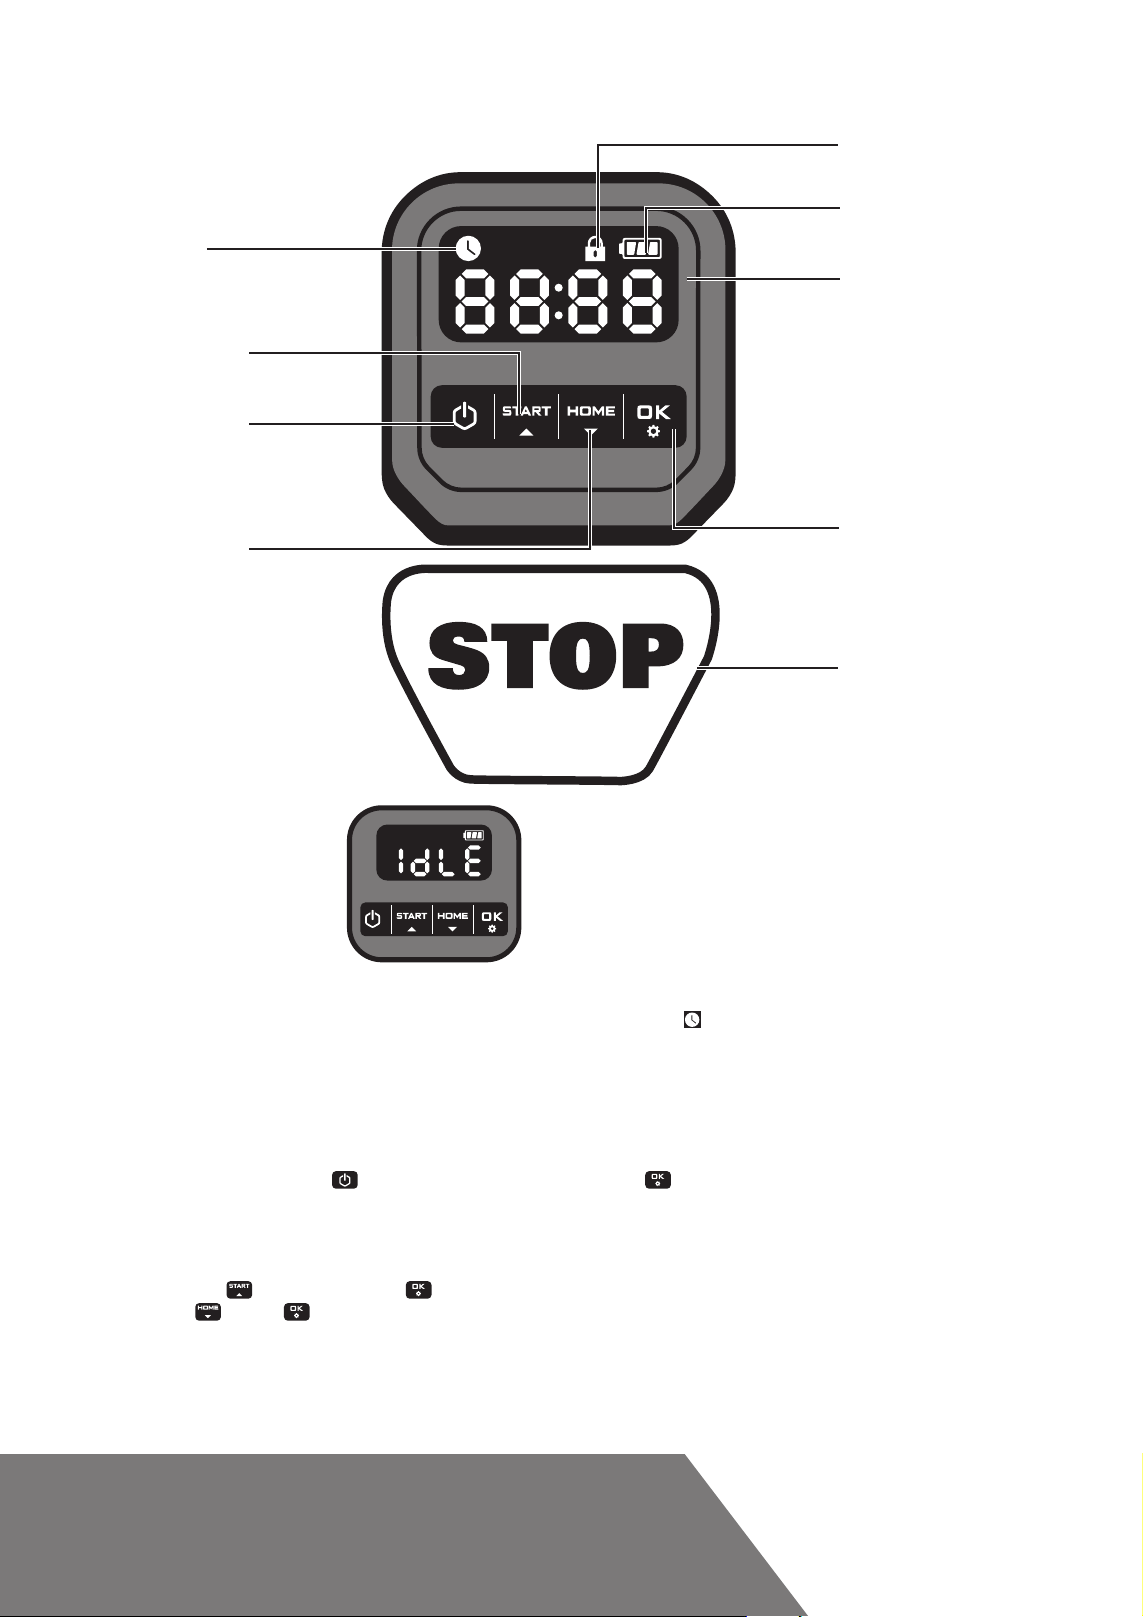
4. Control panel
Working time
START
Starts mowing/
Selects up
POWER ON/OFF
Turns Landxcape
and off
TM
on
LOCK
BATTERY CAPACITY
DISPLAY
Displays the state of your setting
HOME
Confirms any setting
Sends Landxcape to its
charging base during
operation with the blades
rotating to cut grass
OK
on the way home and
activates charging/Selects
down
STANDBY PAGE:
Landxcape
TM
is not in the
working hours.
SLEEP PAGE:
The icon is displayed.
Landxcape
TM
is fully charged and is
STOP
Stops Landxcape
operation
TM
not in the working hours.
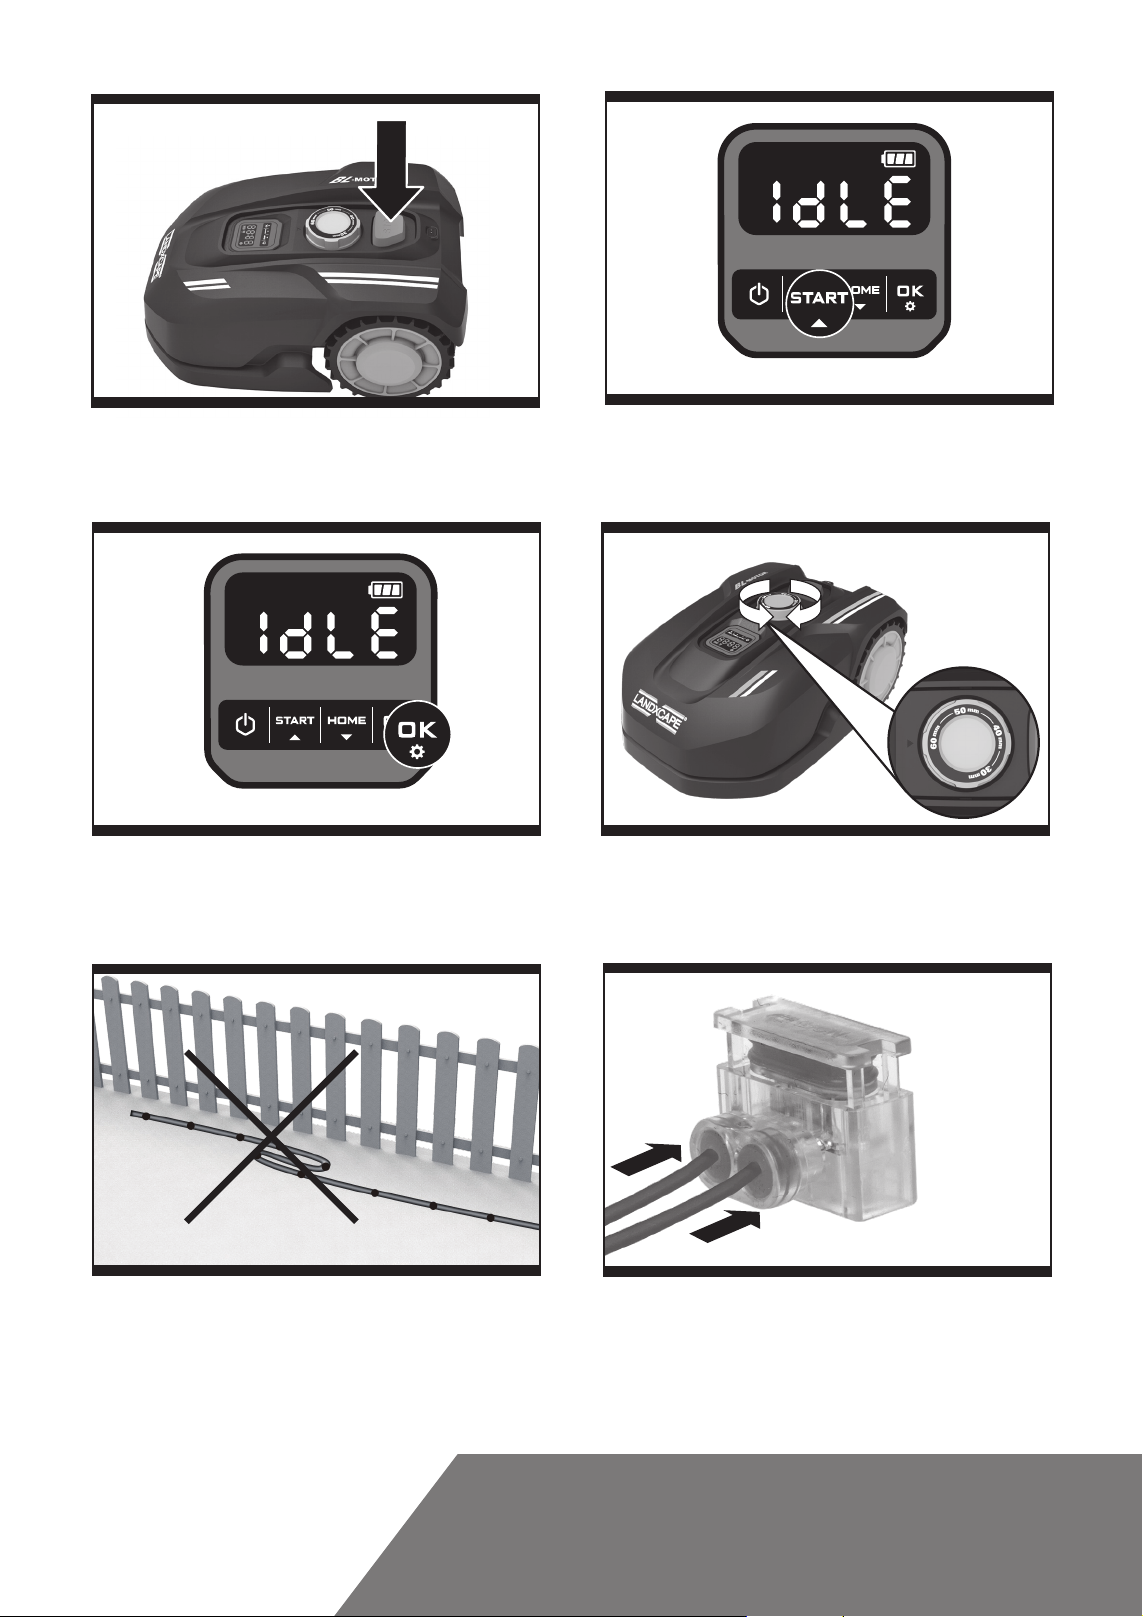
Start
1) After the boundary wire installation, you can start using LandxcapeTM (Please refer to Installation Guide for boundary wire installation).
2) Press
blinking. (The PIN code can be changed, please refer to “Setting” in the Installation Guide).
NOTE:
Landxcape
3) Press
4) Press
Landxcape
Landxcape
until LandxcapeTM turns on. For the first use, input the default PIN code 0000 by pressing for four times when the number 0 is
Landxcape
TM
will turn off if it does not receive any input within 30 seconds after it is turned on. If you enter wrong PIN code three times,
TM
will raise the alarm “di-di” and then turn off.
, then press to start mowing.
then to make LandxcapeTM go to the charging base, with the blades rotating to cut grass on the way home.
TM
will work continuously until reaching low battery power level and then it will return to the charging base. Once charging is complete,
TM
will automatically resume mowing or it stay in the charging base according to the mowing schedule.
during
When Landxcape
NOTE:
TM
turns on, all lights on the display will be illuminated and then turn off. Check if there is any light damaged. It is
recommended to shield the display with your hand when the outdoor light gets too strong.
EN 13
5. Understanding Your Landxcape
Congratulations on your new purchase of LandxcapeTM and welcome
to the care-free life of automatic mowing. In the following, we want to
help you to better understand how your Landxcape
TM
thinks.
TM
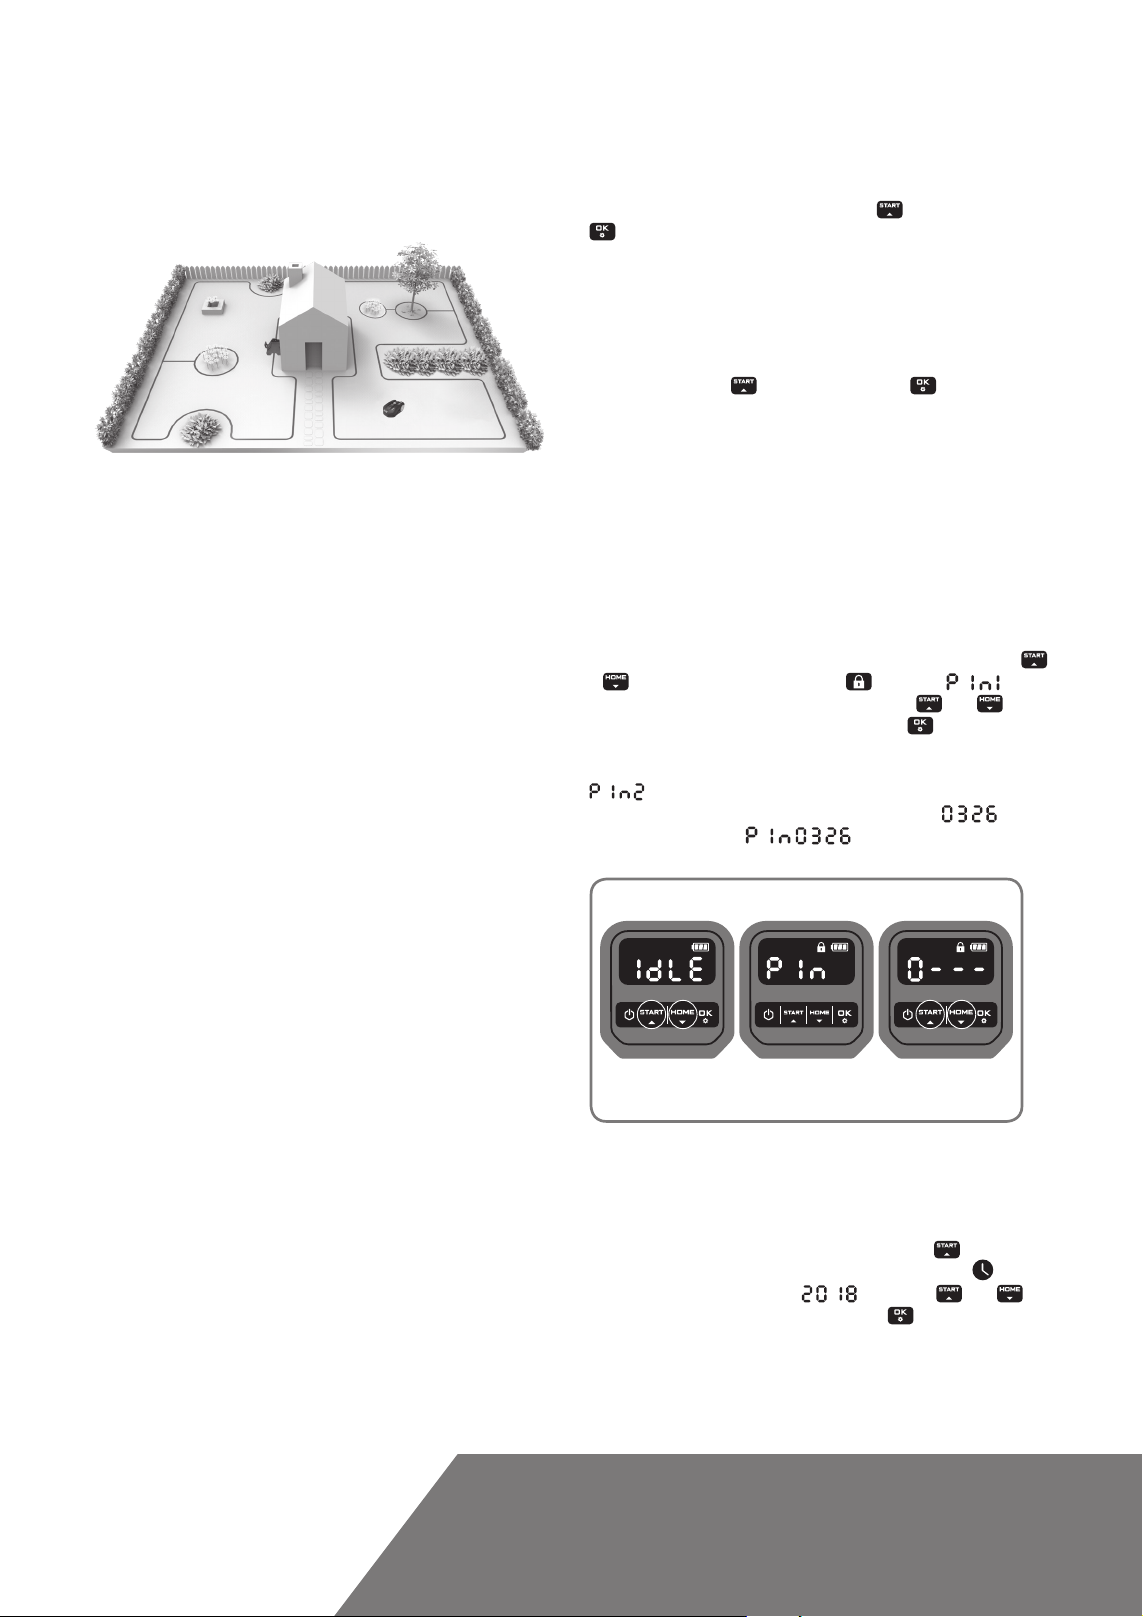
5.1 How does my LandxcapeTM know what
to mow?
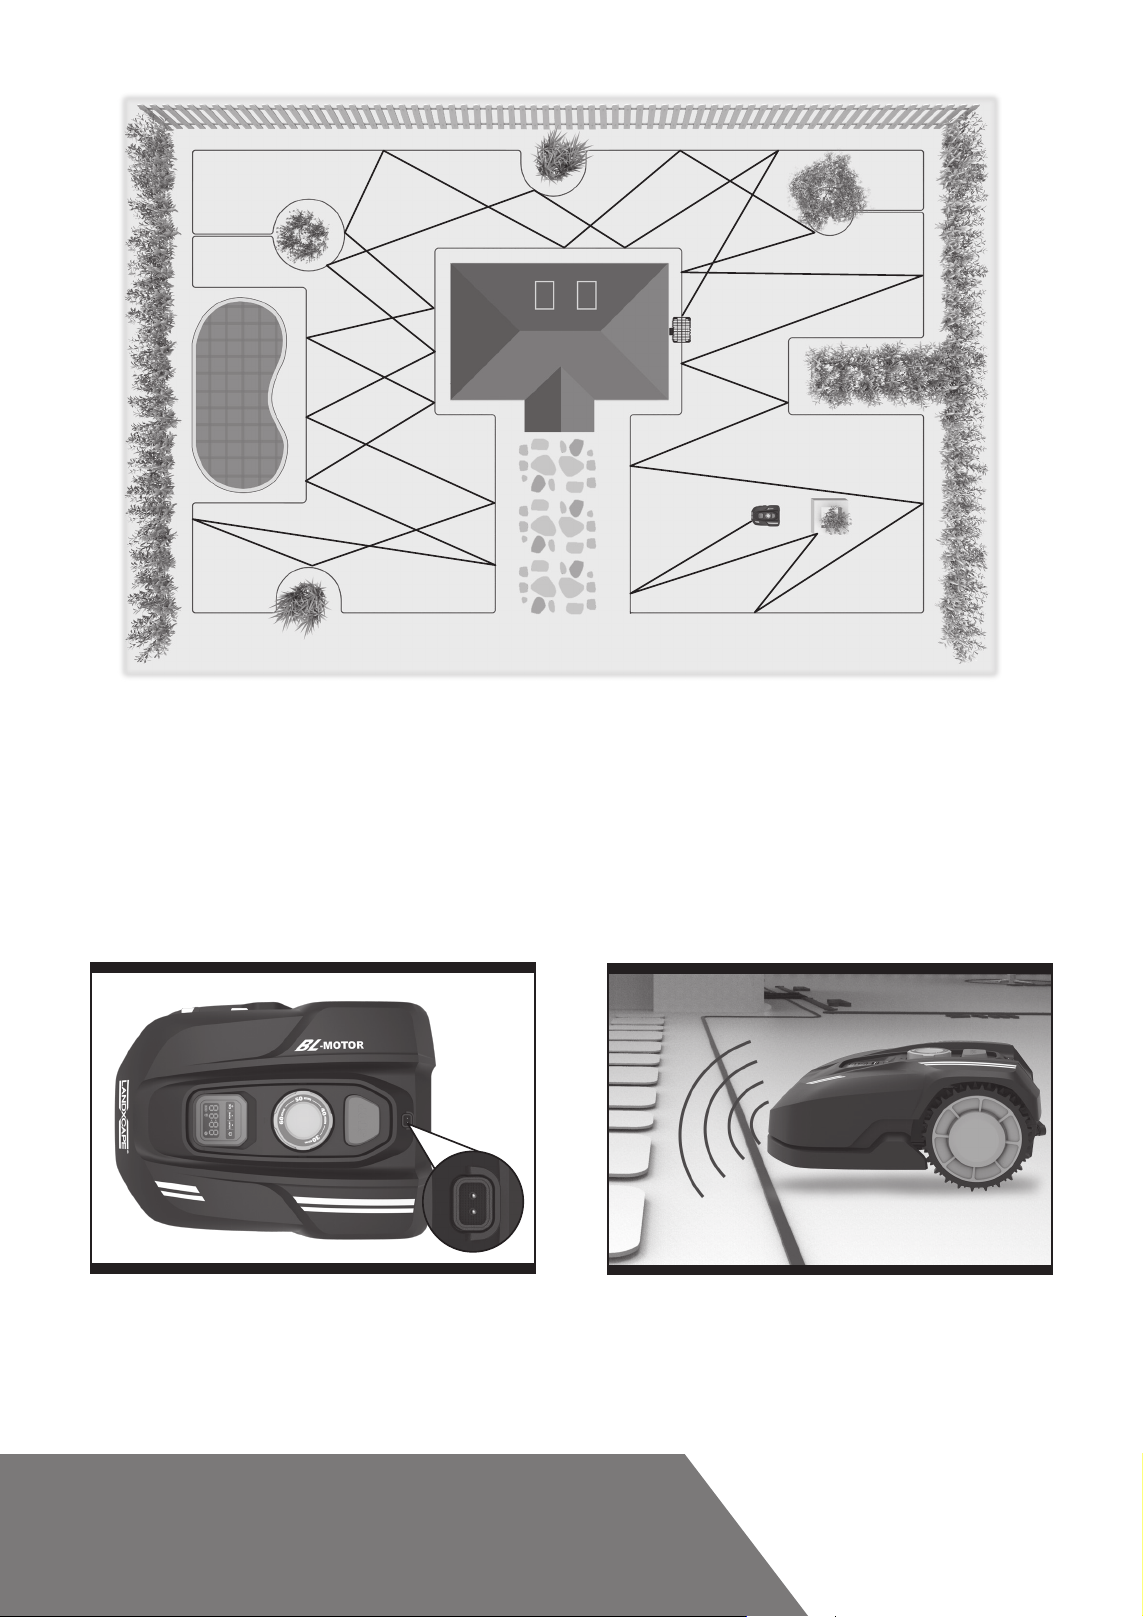
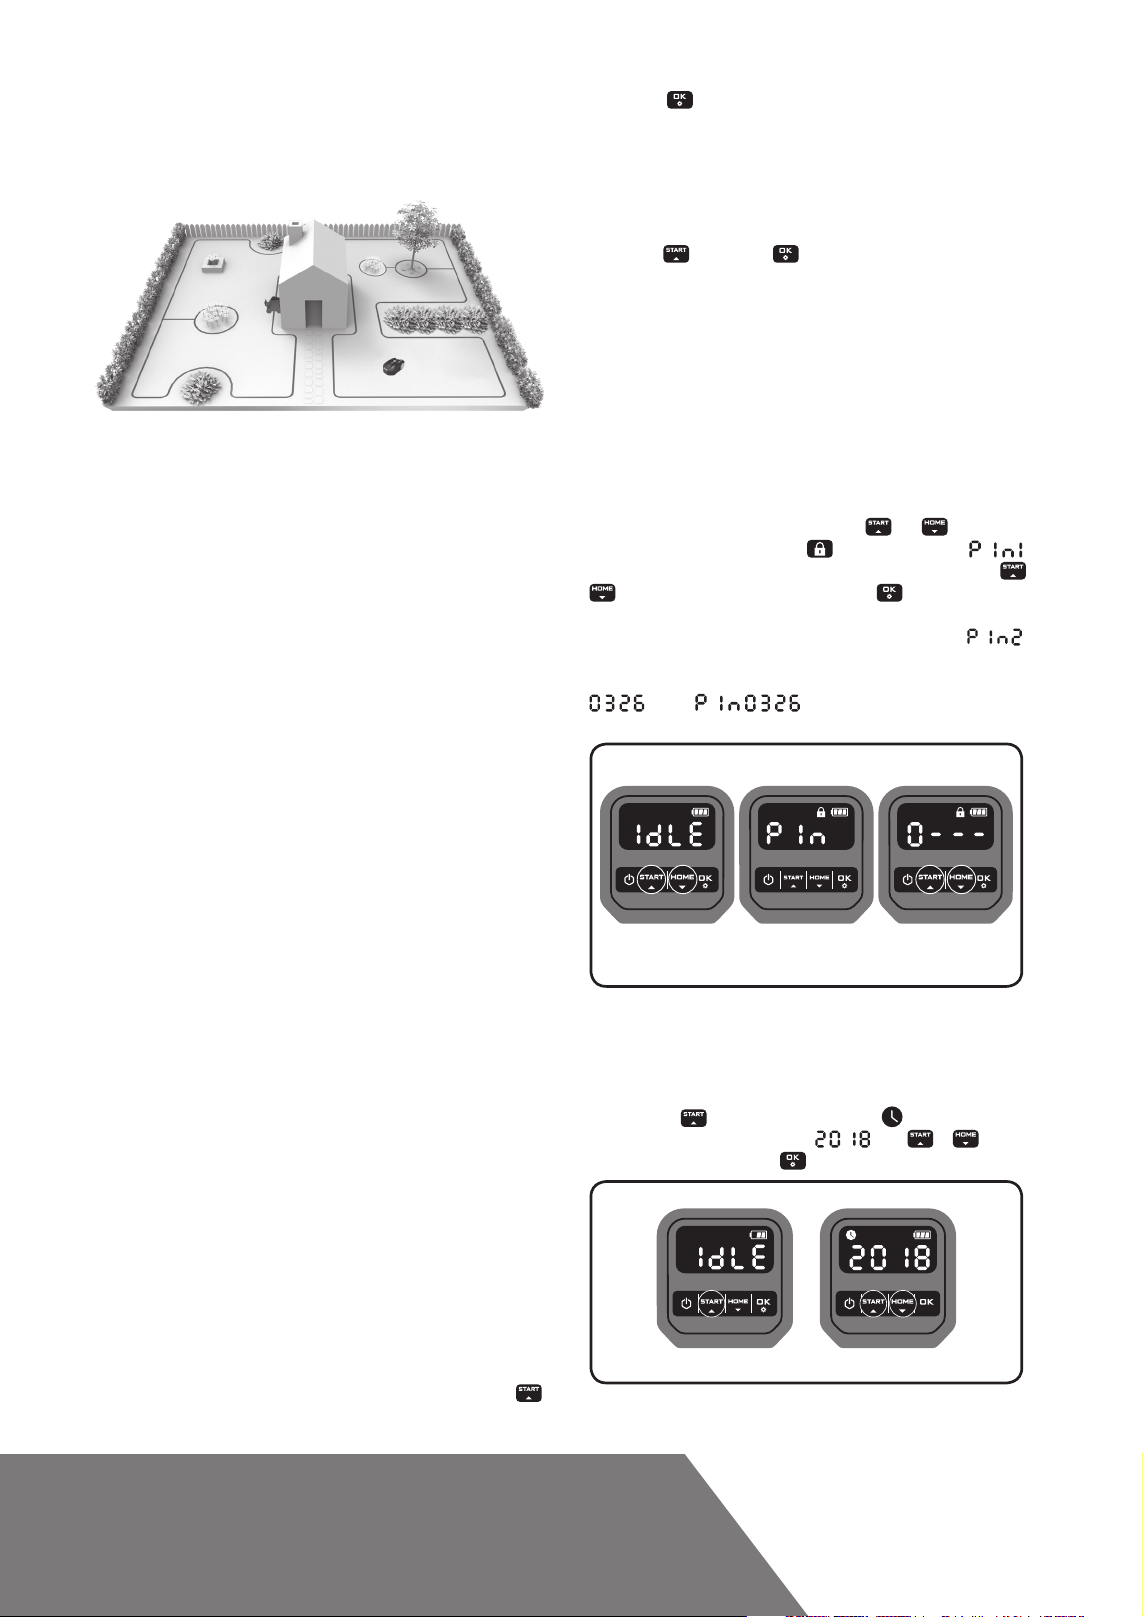
LandxcapeTM chooses its direction at random. It will make sure your
entire lawn is evenly mowed without leaving unattractive mowing paths
(See Fig. A).
5.2 How does my LandxcapeTM know where
to go?
Your LandxcapeTM is made to work on its own. LandxcapeTM knows
when it needs to go to its charging base to charge, can sense when it is
raining, can stop itself if it senses a problem, and knows to stop, draw
back, and turn around when it bumps into something blocking its path.
Landxcape
rotating if it is lifted off the ground to prevent an accident.
TM
will also automatically stop its blade turning disc from
, then press . If you would like
press the STOP button on top of the mower.
If
LandxcapeTM senses something is wrong, it will display a fault message
on the display. For information on these messages, refer to the Error
Messages.
the user within 20 minutes.
To resume:
• Press
• Now Landxcape
LandxcapeTM will turn off if it does not receive any input from
, then press
TM
will begin to mow!
LandxcapeTM to stop mowing, simply
5.3 Setting
First please set the height to a desired grass level after cut and you can
do the program setting manually.
NOTE: When doing the program setting manually, Landxcape
enter the standby page if it does not receive any input from the user
within 30 seconds.
(1) Change PIN code
To change the PIN code, keep pressing both
same time for 5 seconds. The icon
be rolling flashing. After that, the first number will be blinking, use
to select the number you want and press to confirm. The next
number will be blinking. Use the same method to complete other numbers.
For example, the new PIN code is set to be 0326. After that, “
will be rolling flashing and the first number will be blinking again. Use the
same method to input the new PIN code you set just now (in this example,
). Then “ ” will be rolling flashing on the display.
Your PIN code has been changed successfully.
and buttons at the
will be blinking, and “ ” will
TM
will
or
”
A. Finding the Charging Base
When your Landxcape
follow the boundary wire in an anti-clockwise direction back to its
charging base. Landxcape
the boundary wire twice a week. By default, Landxcape
the boundary wire every Monday and Friday after it is powered on.
B. Rain sensors
Landxcape
LandxcapeTM to stop mowing and follow the boundary wire back to its
charging base (See Fig. B).
LandxcapeTM will resume mowing after passing the delay time. The
default delay time is 180mins.
When the rain sensors are wet,
base. When the rain sensors are dry,
time countdown. If you want to exit from the rain delay, dry the sensor
area, and perform a power cycle by operating the on/off key. After the
power cycle has been performed, you can operate again.
C. Sensing the boundary wire
Landxcape
uses sensors at its front to detect it. (See Fig. C)
D. Starting and stopping while mowing (See Fig. D, E1, E2)
To start mowing, press the on/off key and input the PIN code. Press
TM
is equipped with a rain sensor which detects rain and tells
TM
always obeys the border set by the boundary wire and
TM
needs to recharge, it will stop mowing and
TM
is pre-programmed to mow the grass near
LandxcapeTM returns to its charging
LandxcapeTM will begin the delay
TM
will mow near
Only for reference
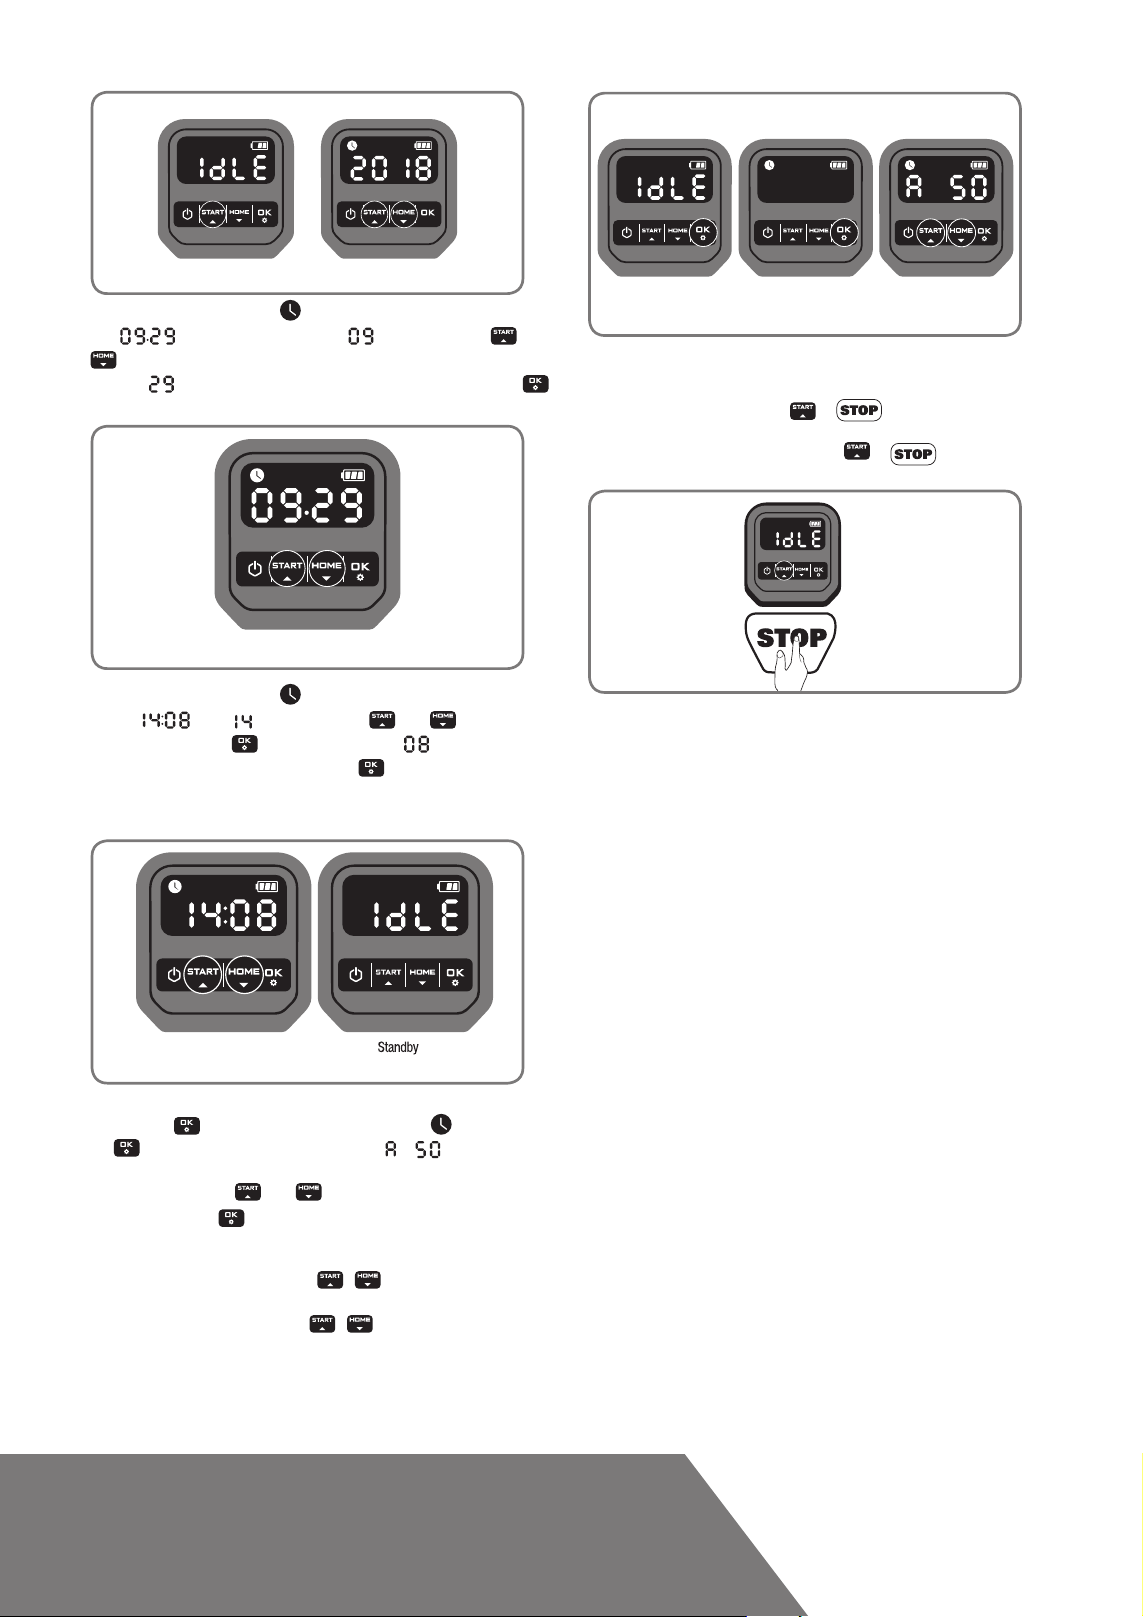
(2) Set year, date and time
Set year, date and time are compulsory setting items. If you don’t set these
items, it will influence the schedule time in the following setting. These
items should be set in the order of year, date and time. For the year setting,
keep pressing
blinking on the display, for example,
the year you want. Then press
Only for reference
for 3 seconds until the icon and a number are
. Use or to select
to confirm to finish the year setting.
EN14
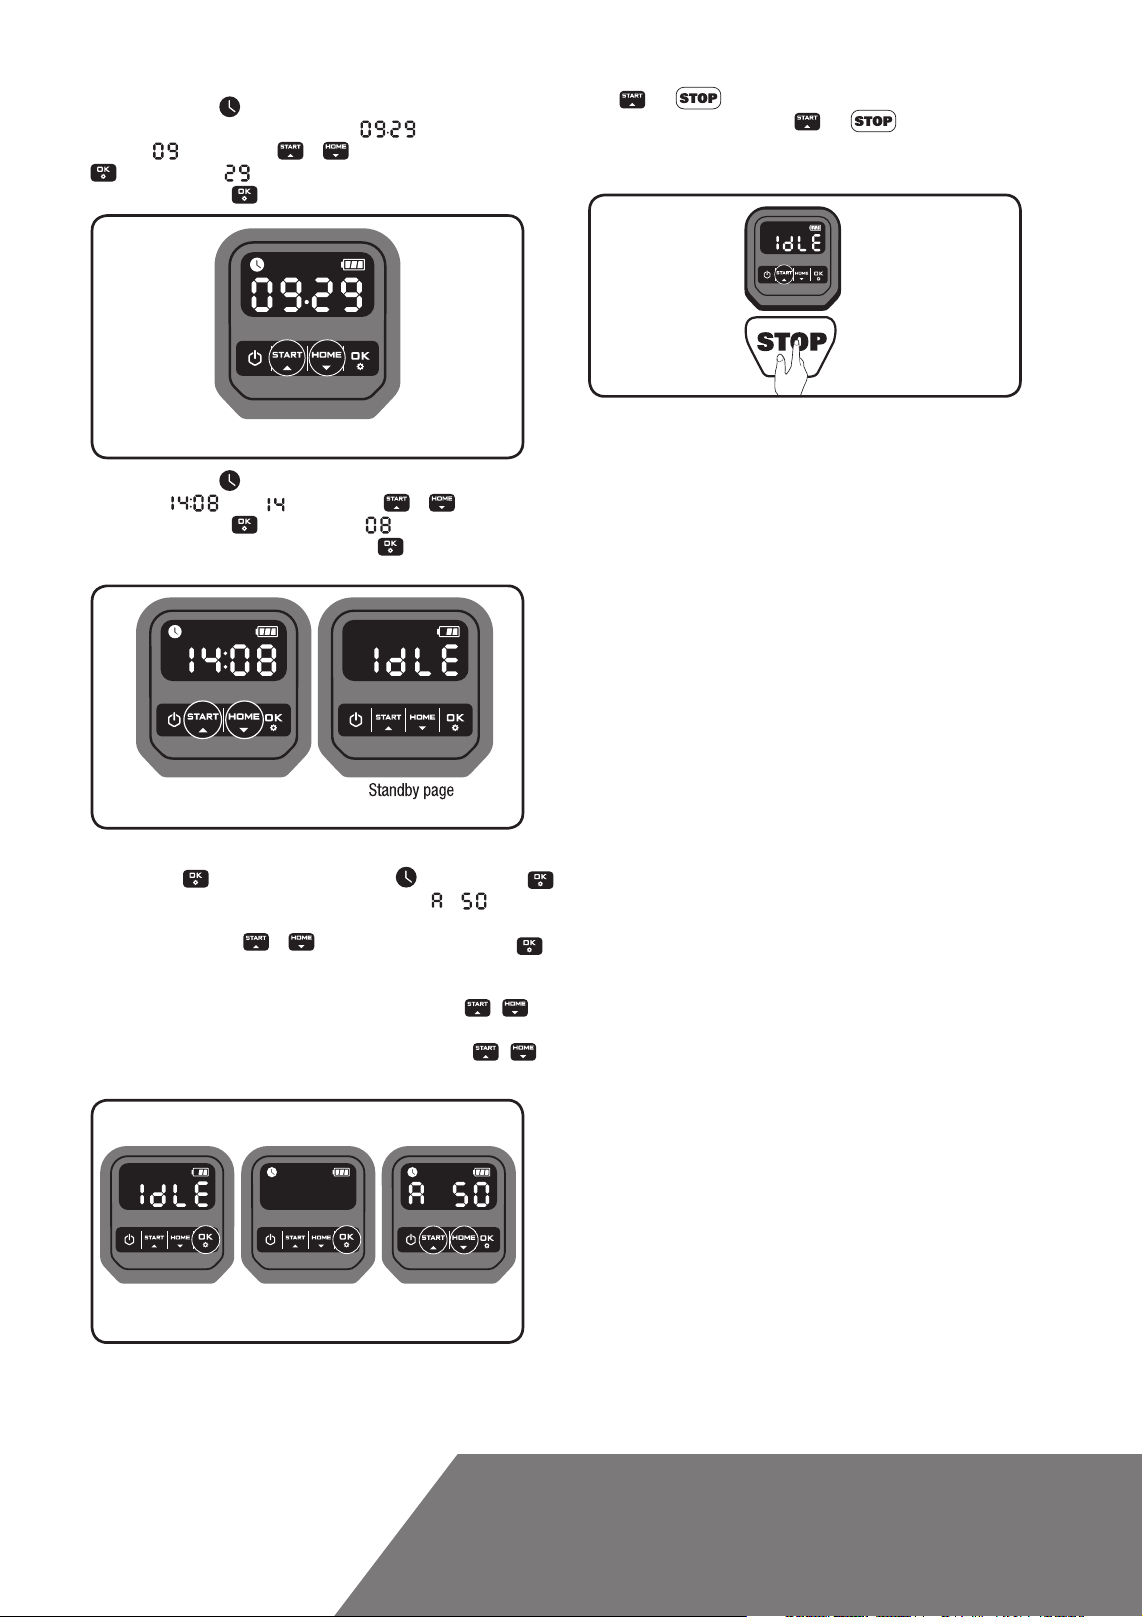
Meanwhile, the icon will be flashing again and a number will be
displayed to indicate the date, for example,
29. When
is flashing, use or to select the number and press
, meaning September
to confirm. Then will be flashing. Use the same method to select
the number and press
to confirm to finish the date setting.
Only for reference
Meanwhile, the icon
for example,
the number and press
same method to select the number and press
time setting is completed and Landxcape
will be flashing and the time will be displayed,
. When is blinking, use or to to select
to confirm. Then will be blinking, use the
to confirm. Now the
TM
will enter the standby page.
both
and buttons at the same time until a ding sound is heard.
For example, keep pressing both
your Landxcape
TM
will start mowing from 14:05.
and buttons at 14:05, and
Only for reference
5.4 How efficiently will my LandxcapeTM
mow the grass?
Mowing times are different for every lawn depending on the factors
mentioned below. Gradually adjust the time you allow Landxcape
mow each day until you find the most suitable setting.
Your Landxcape
TM
is capable of mowing areas of different sizes,
although this depends on various factors, such as:
• Species of grass in your lawn and its growth rate
• Sharpness of the cutting blades
• Humidity
• Surrounding temperature
• Amount of obstacles in your Lawn
TM
to
Only for reference
(3) Set work area
Keep pressing
for 3 seconds. When the icon is blinking, press
. A number will be blinking on the display, for example, , which is
the lawn area. The working time will be automatically set according to the
size of your garden. Use
to confirm. Then Landxcape
or to set the lawn area, and press
TM
will enter the standby page.
NOTE: When the number displayed is less than 200, the area will be
adjusted in increments / decrements of 50m
2
each time the / is
pressed. If the number displayed reaches 200 or bigger, the area will be
adjusted in increments / decrements of 100m
2
each time the /
is pressed.
Only for reference
(4) Change default start time
The default start time of 9:00 can be changed to anytime by keep pressing
Unlike most other mowers,
LandxcapeTM uses a side charging system,
which is able to cut the surrounding grass as much as possible. The holes
on the bottom of the charging base allow the grass to grow through the
base to help disguise it and create an elegant appearance.
Landxcape
starting your Landxcape
the height no more than 9 cm with your manual lawnmower. Then, set the
cutting height of your Landxcape
TM
’s cutting height can be adjusted between 3cm-6cm. Before
TM
for the first time, you should cut the grass to
TM
to its maximum setting (6cm) for its
first time mowing. (See Fig. F)
Your LandxcapeTM will cut best in dry weather. Wet grass can build up
on the blade turning disc and within the motor, and can also cause
loose traction and slippage while working.Your Landxcape
lightning storms. In case of a lightning storm, protect Landxcape
unplugging the charging base, disconnecting the boundary wire, and
making sure Landxcape
Your Landxcape
TM
TM
is not allowed to charge.
loves mowing grass and requires the cutting blades
to be kept in good condition to cut at its best. Landxcape
TM
is afraid of
TM
TM
can do most
by
things by itself, but will sometimes need your help to prevent damage
to itself.
• Never let Landxcape
• Remove or prevent access to obstacles that Landxcape
TM
travel over gravel.
TM
could
accidentally climb on and damage its blade turning disc.
• Remove all debris and foreign objects from your lawn.
6. Boundary Wire Basics
6.1. Pegging the Boundary Wire
Use the boundary wire distance gauge to set the correct distance
between the wire and the border of your lawn (more than 26cm).This
EN 15
is the recommended distance. The provided distance gauge ensures
proper installation.
If your neighbor also uses a Landxcape
TM
, keep a spacing of at least 1
metre between your boundary wire and your neighbor’s.
The boundary wire must outline the intended mowing area
Your Landxcape
exactly.
TM
will become confused by extra bends or
coils of boundary wire that are not part of its mowing area (See Fig.
G). If there is excess boundary wire after the mowing area has been
outlined, cut it off and store this additional wire in a separate location.
It is important to leave the necessary length where it connects to the
charging base so it can be connected and still remain buried.
6.2 Burying the Boundary Wire
If you are planning to bury the boundary wire, it is recommended to first
peg it down. This allows you to easily change the layout if necessary before
burying the wire. When the boundary wire installation is complete, have
LandxcapeTM follow and check the path by pressing and . This
allows your
While observing
boundary wire to ensure
the charging station. Confirm that
LandxcapeTM to adjust to its new environment. .
LandxcapeTM you can easily make alterations to the
LandxcapeTM's trouble-free tracking when locating
LandxcapeTM docks in the charging
station successfully, and bury the wire if desired.
6.3 Joining the boundary wire
If you want to extend and splice the boundary wire, use a connector.
The connector is waterproof and provides optimal connection.
Insert both wire ends in any two of the three holes of the connector.
Insert the wires fully until both wire ends are visible on the other side of
the connector. (See Fig. H) Press the connector together by using a pair
of pliers. (See Fig. I, J)
WARNING!
It is not recommended to simply splice the boundary
wire with insulating tape or use a screw terminal block for
connection. A broken circuit may occur after a period of time as soil
moisture can oxidize the wire.
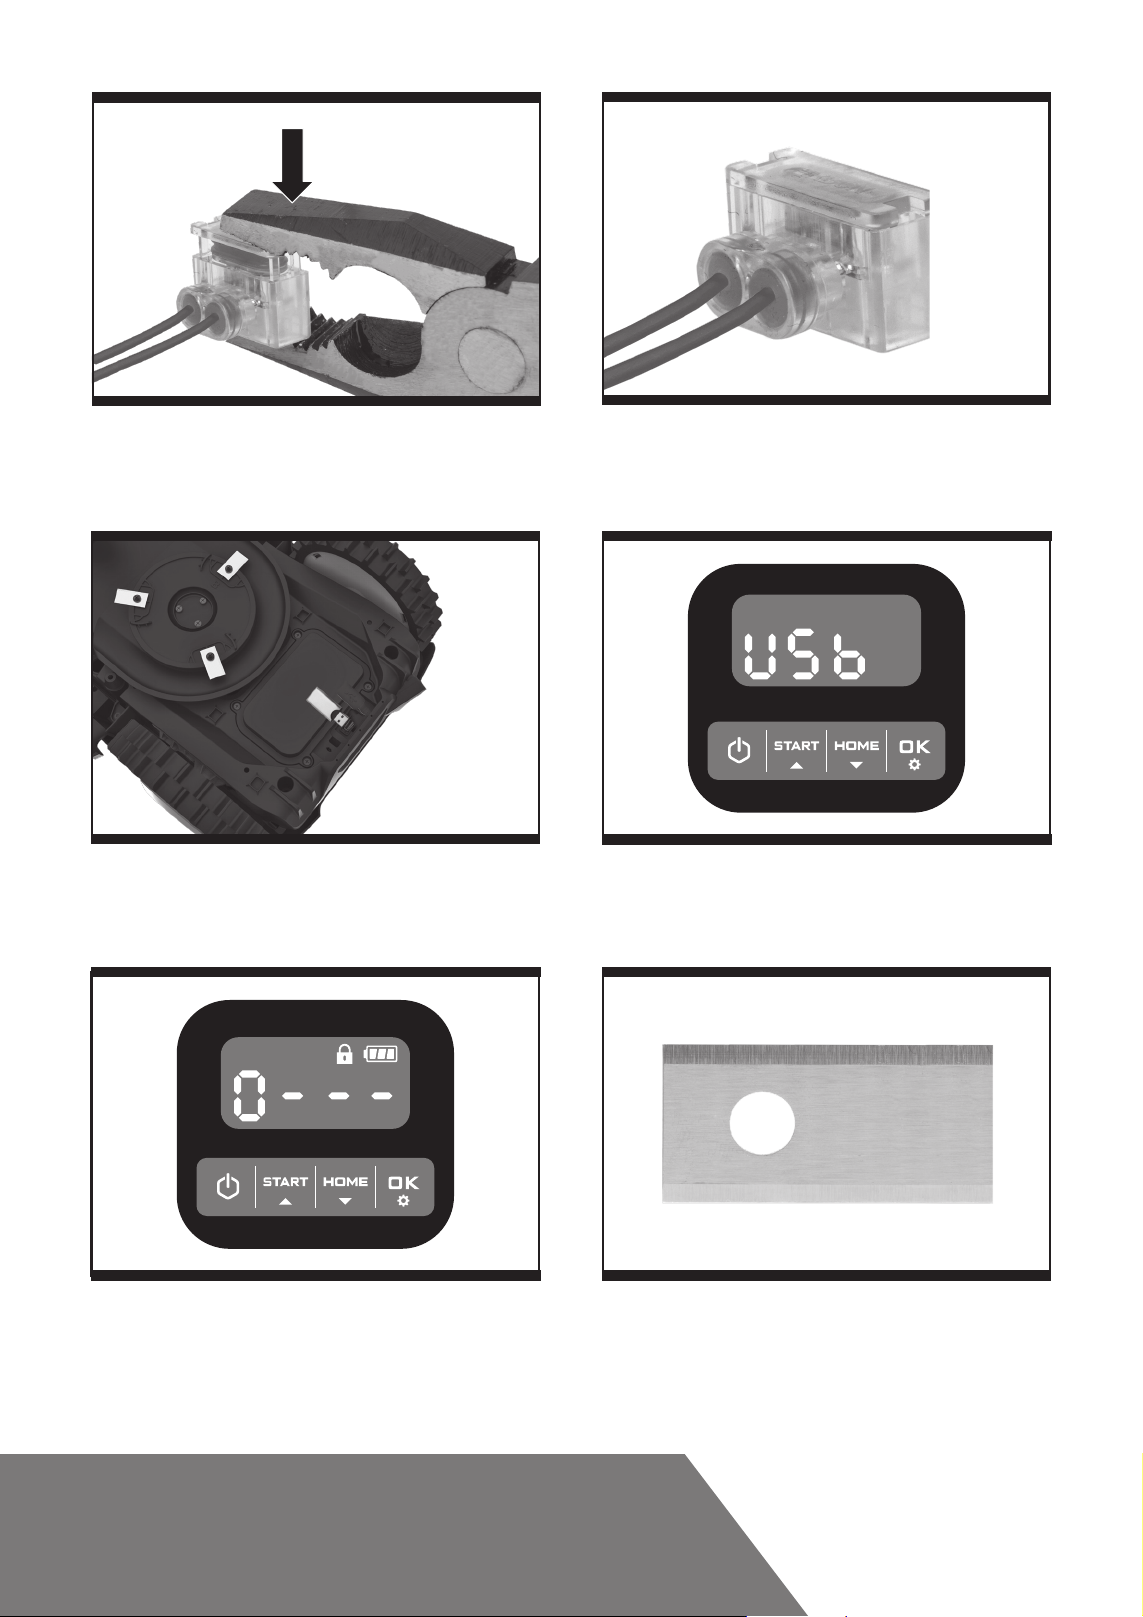
7. Software update
The software can be updated when new versions become available.
The latest software can be downloaded from our website
www.landxcape-robotics.com.
Update via USB. See below for download and installation instructions:
(1) Locate the latest software version at: www.landxcape-robotics.
com. Save the file to an empty
Delete any other files on the drive and check the format. If the drive
is not formatted in
NOTE:
the software update is downloaded as a zipped file. You will
need to unzip or extract it before proceeding.
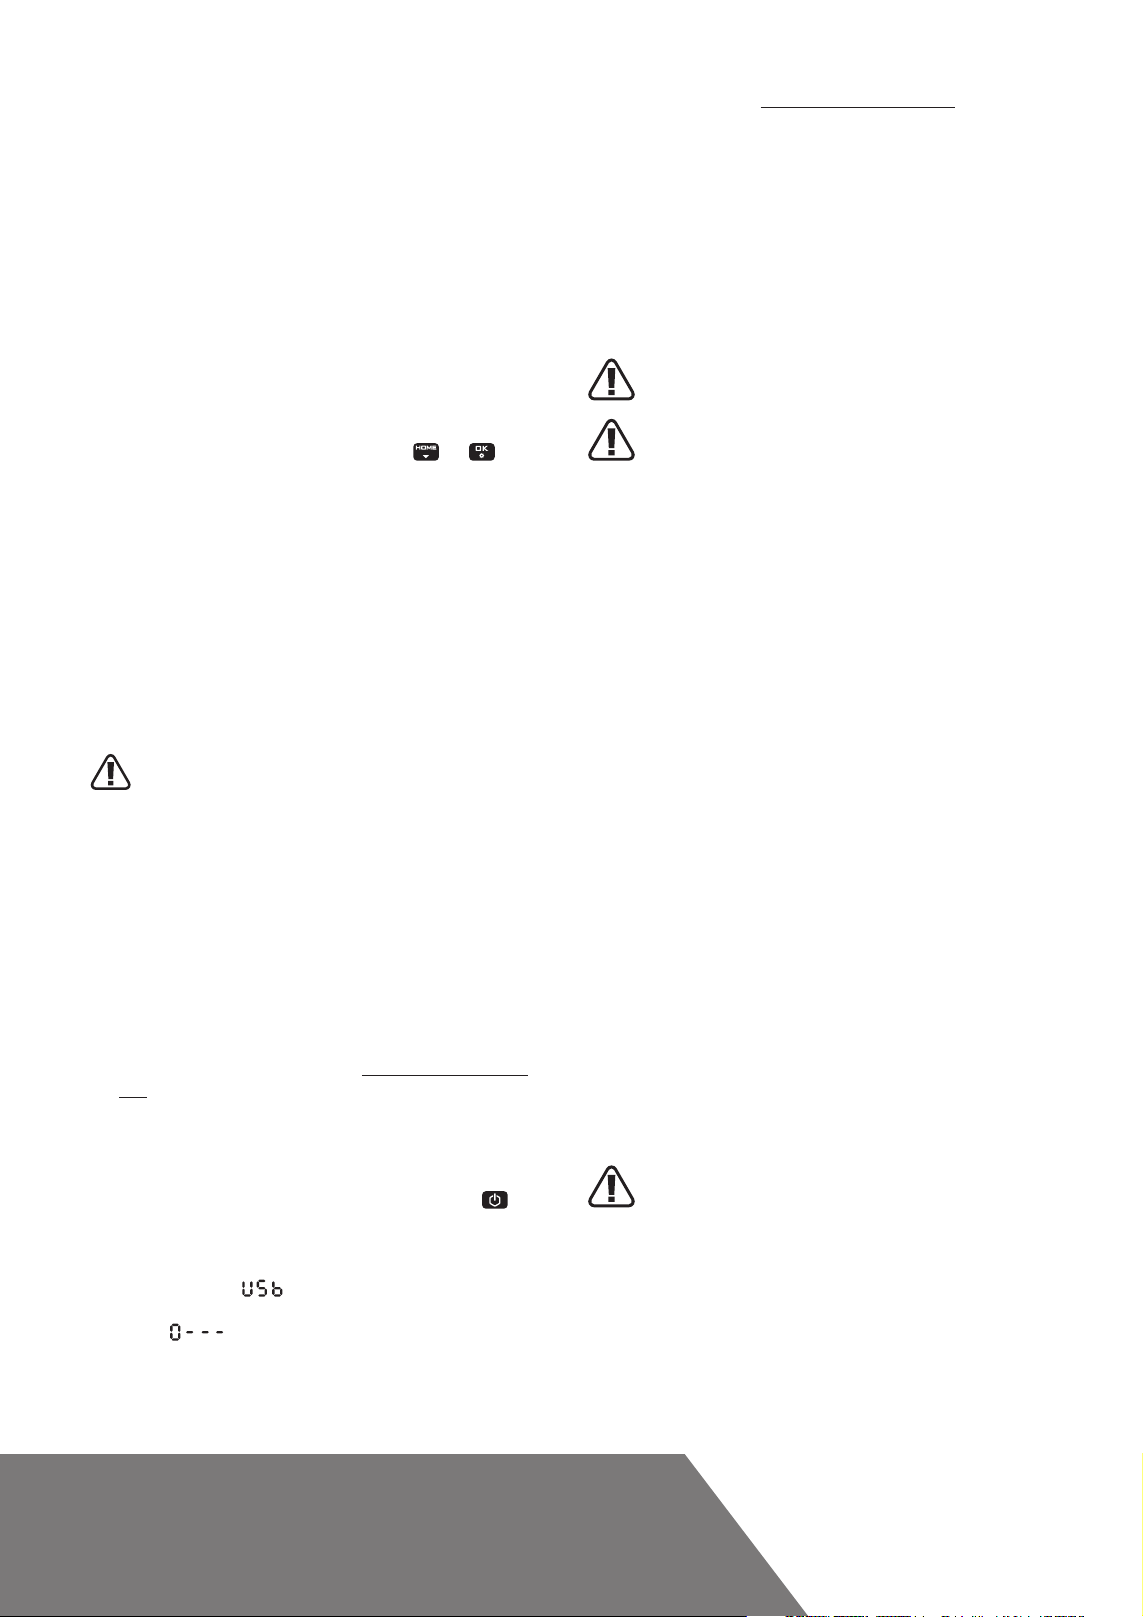
(2) Place Landxcape
off your Landxcape
(3) Insert the USB drive (flash drive) in the port. (See Fig. K1)
(4) Turn Landxcape
TM
the display shows “
, please reformat the drive.
FAT32
TM
on a secure and level surface. Press to turn
TM
.
on. The update will begin automatically. Wait until
” (See Fig. K2), then remove the USB drive
(flash drive) and tightly close the protective cover. When the display
shows “
”, the update is complete and LandxcapeTM will enter
the PIN page.
The manual included with your Landxcape
software at the time of production. Some new features/functions in the
new version may not exist in the manual. If you found some settings not
formatted USB (flash drive).
FAT32
TM
is based on the default
in the manual, please visit www.landxcape-robotics.com to download
the latest manual.
8. Maintenance
Your LandxcapeTM works hard and needs to be cleaned and checked
from time to time. Some parts will require replacement as they become
worn. Never use your Landxcape
Switch off the machine before carrying out any service or maintenance.
Here's how to take care of your Landxcape
8.1 Keep it sharp
WARNING: Before cleaning, adjusting, or replacing the
blades, turn your Landxcape
gloves.
WARNING: When fitting new blades, make sure you
replace ALL the blades. Always use new screws when
fitting blades. This is important to ensure blade retention and
balance the blade turning disc. Failure to use new screws could
cause serious injury.
Landxcape
TM
does not cut grass like other mowers. Its cutting blades
are razor sharp on 2 edges and rotate in both directions for maximum
cutting capacity (See Fig. L). Each blade of your
cutting edges. The blade turning disc will make forward and reverse
rotation at random to use both cutting edges and minimize the
frequency of replacing the blades. Each cutting blade will last up to
2 months when it is programmed to mow everyday. Always check to
see if the blades are chipped or damaged and replace them if they
are. When the cutting blades are dull and worn out, they should be
replaced with the spare blades provided with your
blades are also available at your nearest
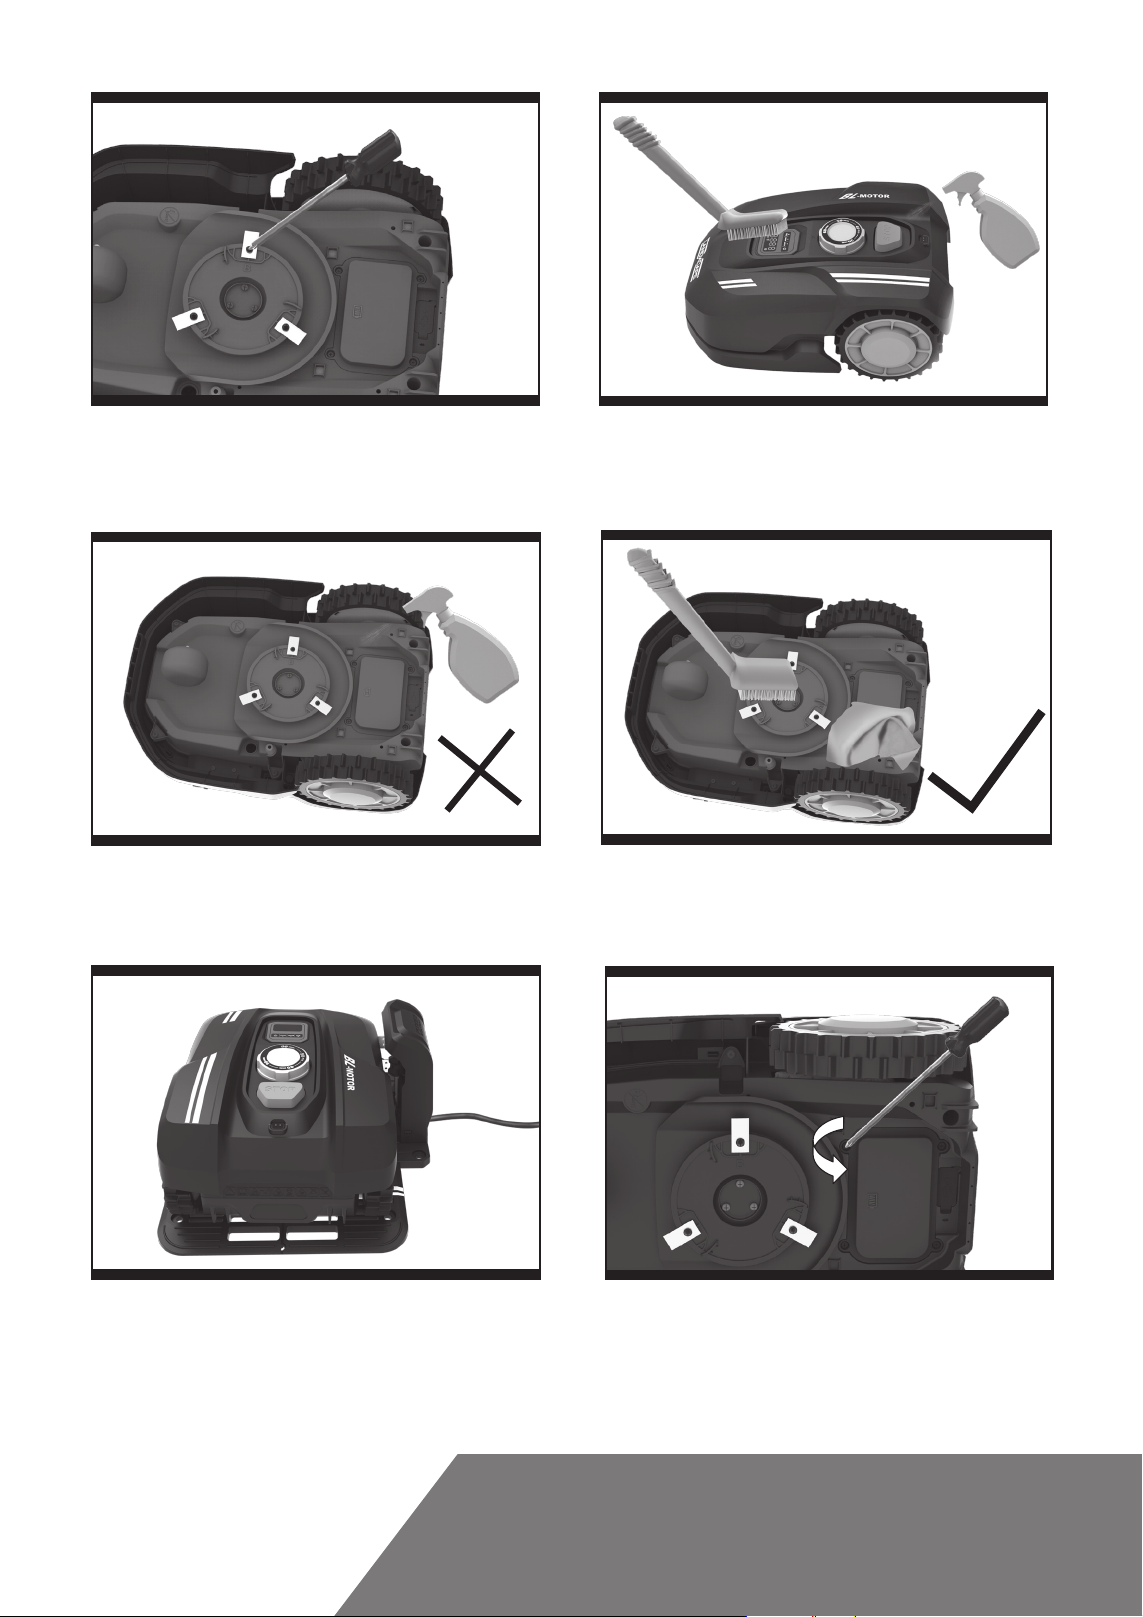
A. Replace the Blades
After some time, usually every season, your Landxcape
will need to be replaced. When replacing the blades, make sure to
replace ALL of them at the same time. You can replace them with one
of the spare blade kits and extra blade screws supplied with your
Landxcape
TM
.
Before attempting to replace your Landxcape
power off and put on protective gloves and follow these steps:
1. Gently flip Landxcape
2. Remove the battery cover and remove the battery.
3. Take the screws off the blades with a screwdriver. (See Fig. M)
4. Firmly screw on the new blades.
5. Refit the battery and the battery cover.
IMPORTANT: After screwing the blade to the blade disc, make
sure the blade is able to spin freely.
8.2 Keep it clean
WARNING: Before cleaning, turn your LandxcapeTM OFF.
Put on protective gloves before cleaning the blade
turning disc and do not rinse or flush with water.
A. Cleaning the body
Your Landxcape
TM
will live a much happier and longer life if it is
cleaned regularly. Although, since your Landxcape
machine, you will need to take care when cleaning.
hose, high pressure washers and do not pour running water on
your Landxcape
TM
It is best to use a spray bottle filled with water.
.
When cleaning the machine body, use a soft brush or clean cloth and
avoid using solvents or polishes (See Fig. N). Lastly, remove all build
TM
with defective main switch.
TM
.
TM
OFF and put on protective
LandxcapeTM retailer.
TM
over.
Landxcape
TM
LandxcapeTM. Spare
TM
’s Blades
TM
’s blades, turn the
TM
is an electric
DO NOT use a
has 2
EN16

up of grass clippings and debris.
We recommend using a fine grade emery cloth to clean the contacts.
B. Cleaning the Underside
Again, it is important that you power Landxcape
protective gloves before touching the blade turning disc
First, flip your Landxcape
TM
upside down to expose its underside. Here
TM
OFF and
wear
.
you will see the blade disc, the chassis, and the front wheel and driving
wheels. Clean everything thoroughly with a soft brush or moist rag.
WARNING:
NEVER clean the underside of Landxcape
TM
with
running water. Component damage can occur. (See Fig. O1,
O2)
Rotate the blade disc to ensure it rotates freely. Check the blades spin
freely around the fixing screws. Remove any obstructions.
IMPORTANT: Remove any lodged debris so that it does not cause
a crack in the blade disc. Even the tiniest crack can decrease
your Landxcape
TM
's mowing output.
C. Clean the contact pins and the charging strips
Clean the contact pins located on the charging base and the charging
strips located on Landxcape
grass clippings or debris around the contact pins and charge strips
periodically to ensure Landxcape
8.3 Battery life
The heart of Landxcape
the battery, make sure it is fully charged and kept in a cool dry place.
The recommended Landxcape
NOTE:
between 0-55
0
C.
The life-span of Landxcape
TM
using a cloth. Remove any built up
TM
successfully charges each time.
TM
is its 20V Li-Ion battery. For proper storage of
TM
operation temperature is
TM
’s battery depends on various factors,
such as:
• The length of the mowing season in your region
• Amount of hours Landxcape
TM
mows per day
• Battery maintenance during storage
8.5 Replacing the battery
WARNING: Power off before attempting any adjustment,
replacement or repair.
Before replacing the blades, turn your Landxcape
TM
OFF and put on
protective gloves.
If you need to replace the battery, follow these steps:
1. Gently turn your Landxcape
TM
upside down.
2. Remove the screws on the battery cover. Remove the battery cover.
(See Fig. Q1)
3. Lift out the old battery carefully. Press the latch and release the
connectors. (See Fig. Q2)
Do not pull by the cables. Hold the connectors and release the
NOTE:
latch.
4. Connect a new original battery by attaching the connectors until
they click into position. (See Fig. Q3, Q4)
5. Fit the battery as shown. (See Fig. Q5) Place the cover back in its
position and tighten the screws.
Landxcape
TM
can be charged manually without the boundary
wire.
1. Connect the charging base to a suitable power supply. The
green light on the charging base will turn on.
2. Manually dock Landxcape
Landxcape
3. The green light on the charging base will be flashing.
Landxcape
8.4 Winter hibernation
Your Landxcape
hibernate. So even though it is troublesome, we recommend storing
your Landxcape
TM
is powered off. (See Fig. P)
TM
will begin to charge.
TM
will live longer and healthier if it is allowed to
TM
in your shed or garage during the winter.
Before you prepare your Landxcape
recommend you:
• Thoroughly clean your Landxcape
• Fully charge the battery and remove it from Landxcape
TM
into the charging base while
TM
for winter hibernation, we
TM
TM
• Turn power off
To maximize the battery life, fully charge the battery and remove it from
Landxcape
TM
before storage during winter.
WARNING: Protect the underside of LandxcapeTM from
water. NEVER store Landxcape
TM
upside down outdoors.
The boundary wire can be left in the ground but its ends should be
protected, such as placed in a tin can with grease. If the charging base
is left outside for the winter, leave the boundary wire connected.
When bringing Landxcape
NOTE:
TM
back to work after winter
hibernation, make sure the charging strips and contact pins are clean.
EN 17
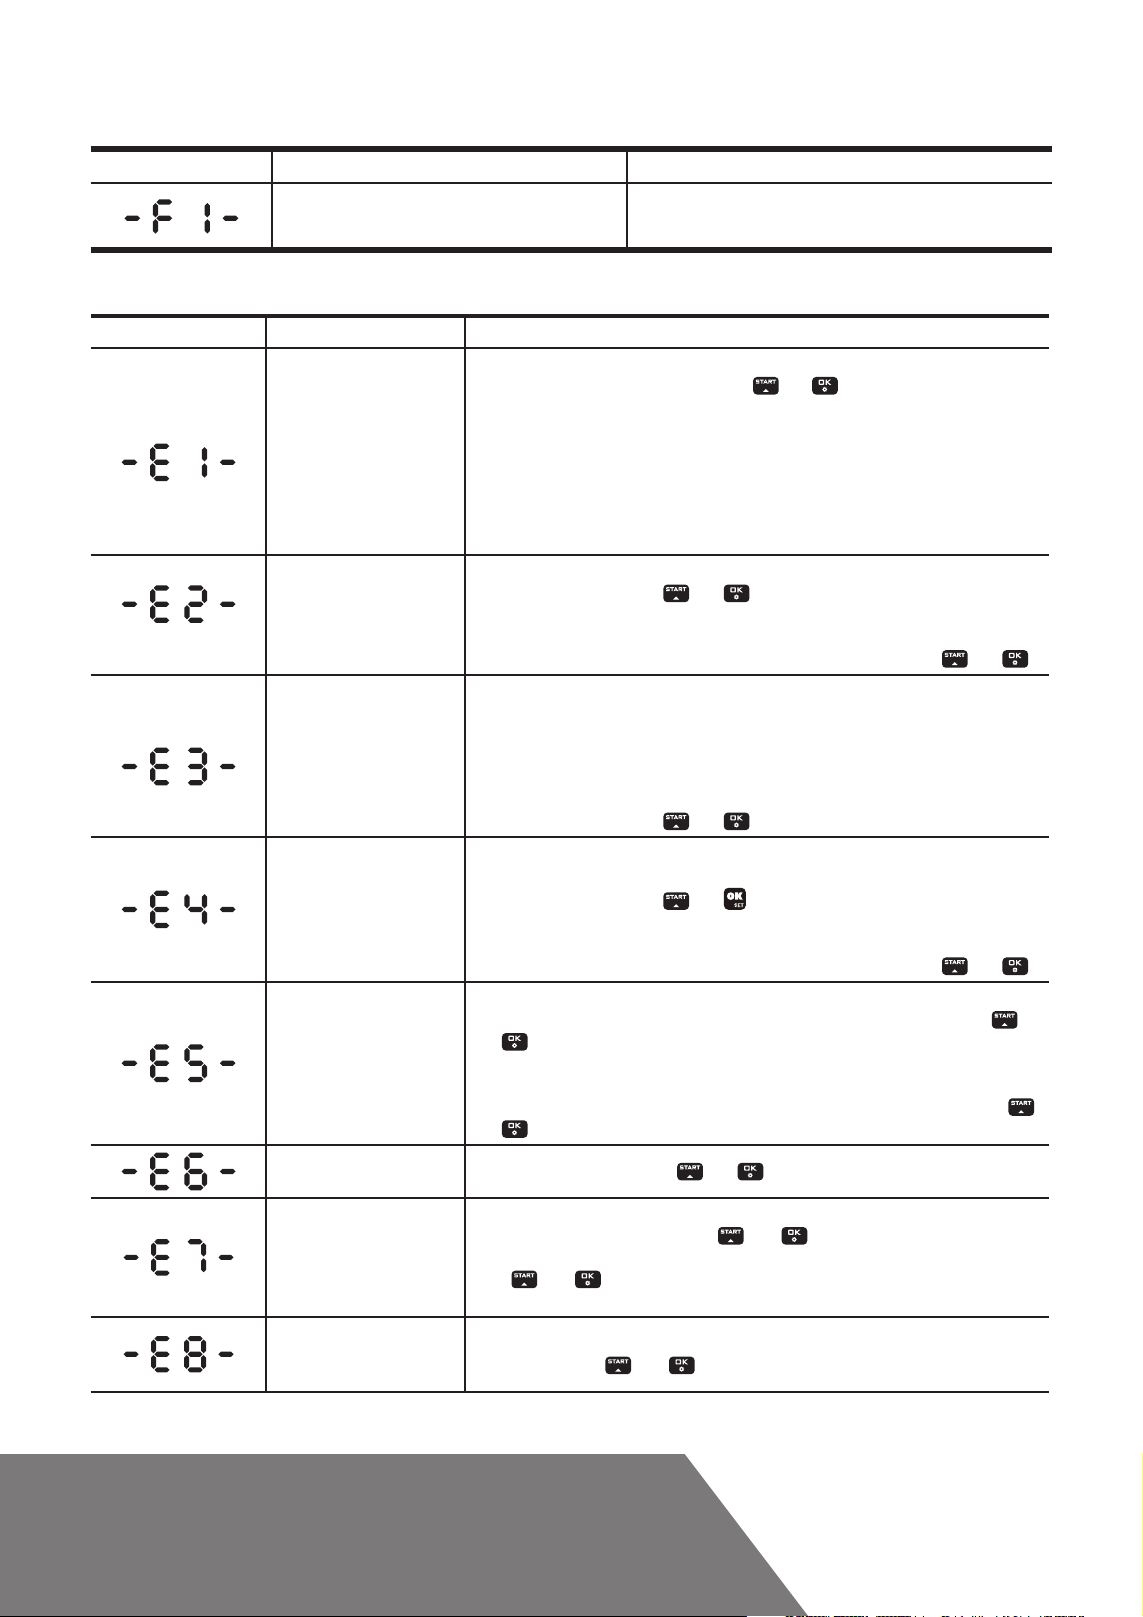
9. Function Messages
Display Message Action
Rain delay activated. No action is required.
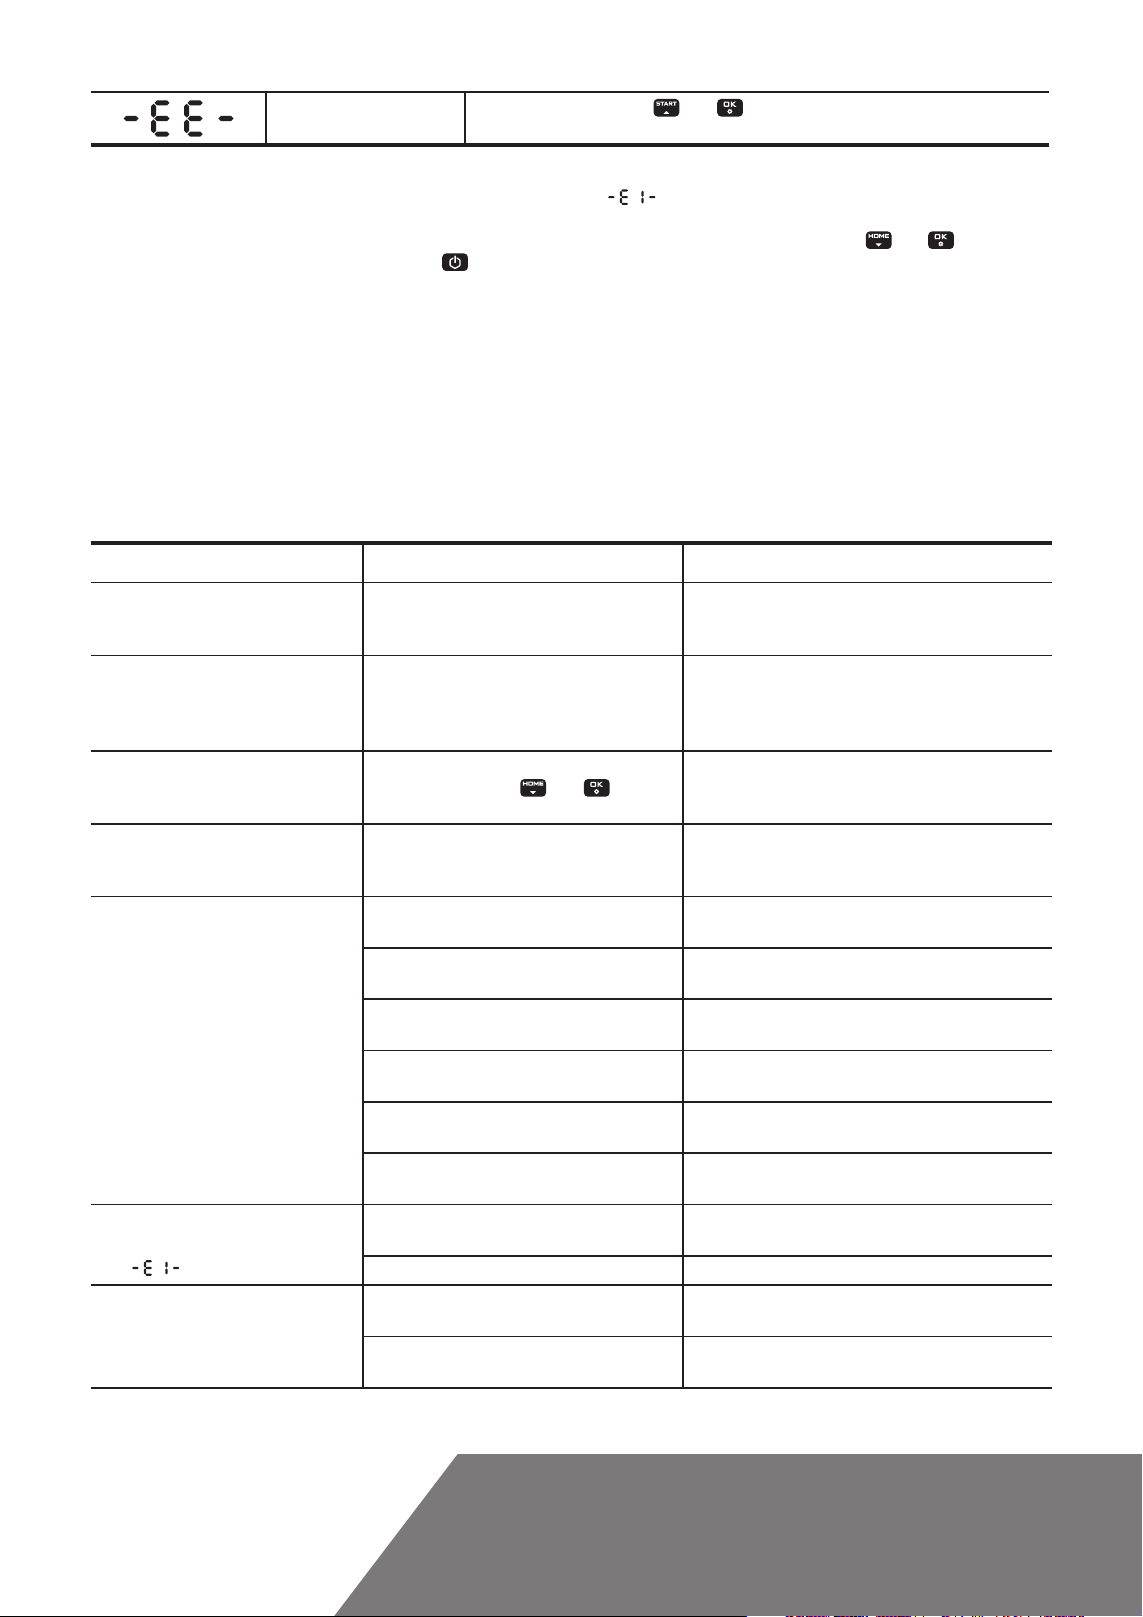
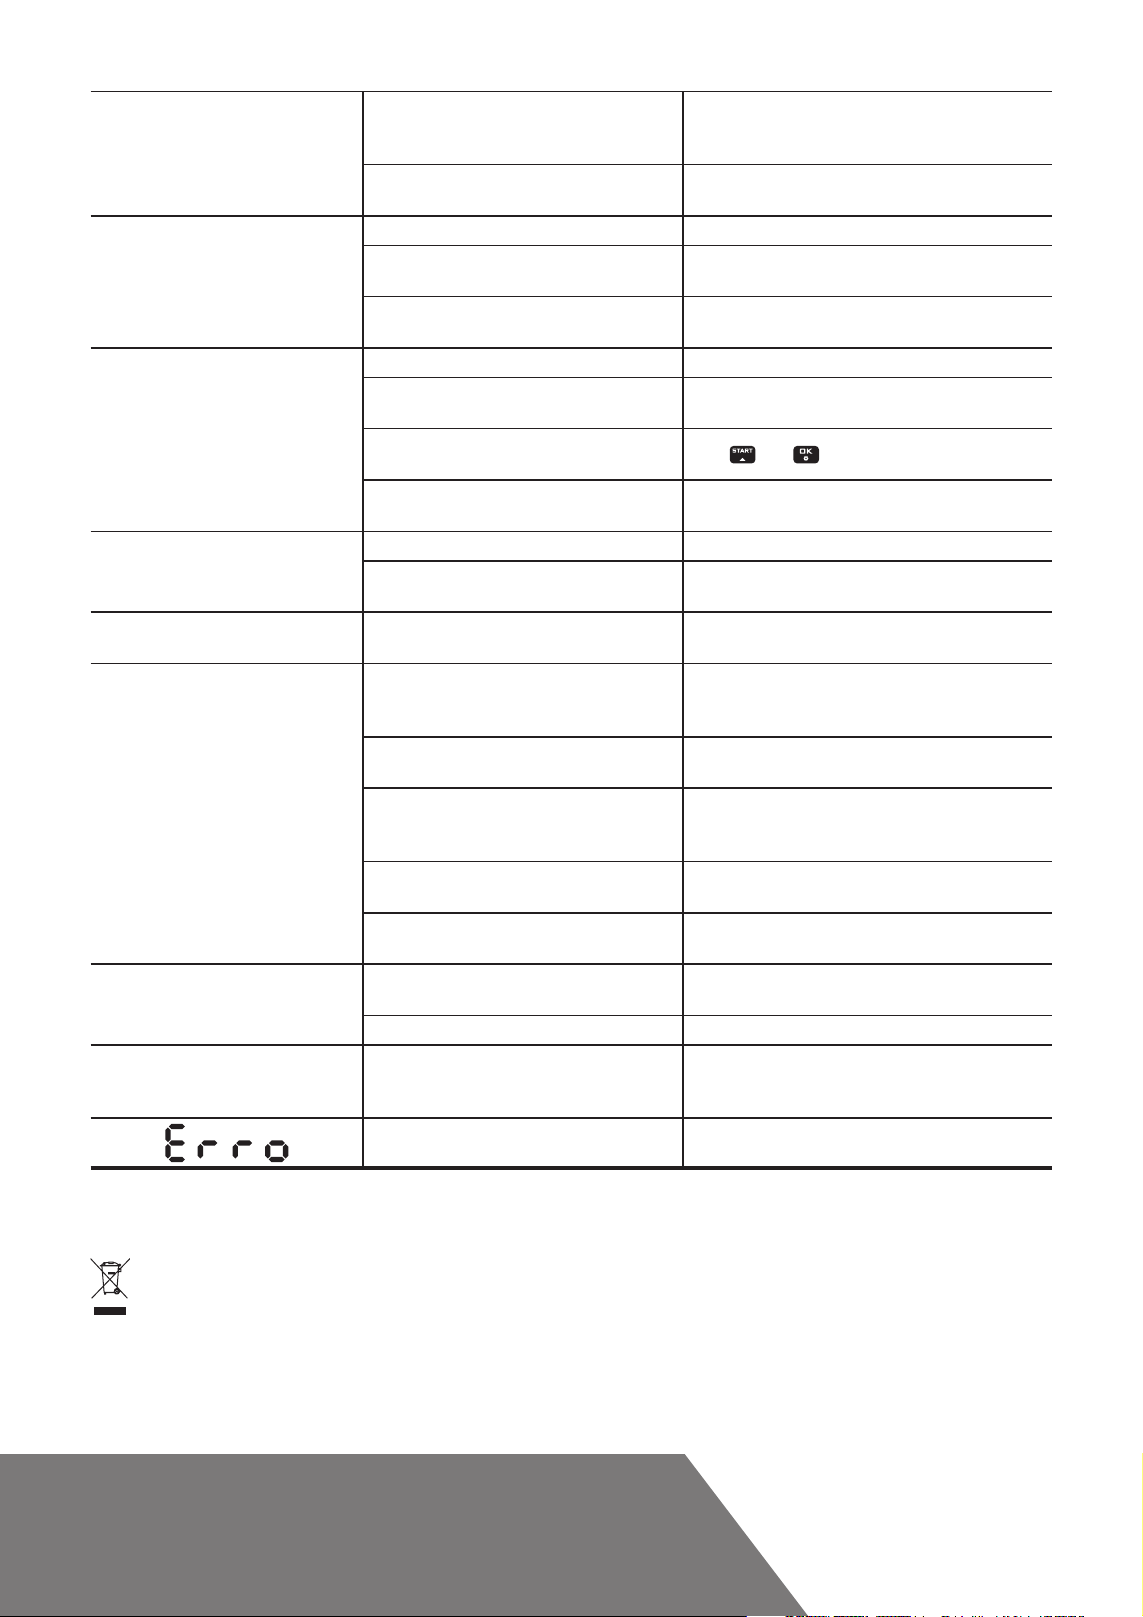
10. Error Messages
Display Cause Action
LandxcapeTM is outside
working area.
Wheel motor blocked
Blade disc blocked
LandxcapeTM is trapped.
LandxcapeTM is lifted up.
LandxcapeTM is upside
down.
Battery error
It takes too long for
LandxcapeTM to go back to
the charging base.
1. If
LandxcapeTM is actually outside its territory: turn
inside its territory. Turn
2. If
LandxcapeTM is inside its territory, check if the LED on the charging base is green. If not,
LandxcapeTM on. Press then .
LandxcapeTM off, take
LandxcapeTM
verify that the charging base is properly connected to the charger and that the charger is
connected to a suitable power supply. If they are properly connected, the boundary wires are
clamped incorrectly and must be reversed.
3. If the LED light on the charging base turns on red, confirm that the boundary wire is well
connected to the clamps on the charging base. If the problem persists, check that the boundary
wire hasn’t been cut.
TM
1. Turn Landxcape
2. Turn Landxcape
3. If the error message is still displayed, turn power off; turn Landxcape
check if there’s anything preventing the wheels from rotating.
4. Remove any obstruction, turn Landxcape
1. Turn Landxcape
2. Turn Landxcape
off; take LandxcapeTM to an area free of obstacles.
TM
on. Press then .
TM
upright, turn power on. Press then .
TM
off.
TM
upside down and check if there’s anything preventing the blade disc to
TM
upside-down and
rotate.
3. Remove any obstruction.
4. Turn Landxcape
height;
5. Turn Landxcape
1. Turn Landxcape
2. Take Landxcape
3. Turn Landxcape
4. If the error message is still displayed; turn power off; turn Landxcape
Check if there is anything preventing the wheels from rotating.
5. Remove any obstruction, turn Landxcape
1. Turn Landxcape
2. Take Landxcape
TM
upright and take it to an area with short grass or adjust the cutting
TM
on. Press then .
TM
off;
TM
to an area in your lawn free of obstacles obstacles.
TM
on. Press then .
TM
upright, turn power on. Press then .
TM
off.
TM
to a lawn area clear of obstacles, turn LandxcapeTM on. Press
TM
upside-down.
then .
3. If the error message is still displayed: turn LandxcapeTM off, turn LandxcapeTM upsidedown and check if there’s anything preventing the front wheels from rotating.
4. Remove any possible object, turn Landxcape
then
.
Turn Landxcape
TM
upright. Press then .
TM
upright, turn LandxcapeTM on. Press
1. Check the battery temperature. If the temperature is too high, wait until the
temperature has cooled down. Press
then .
2. If the error message is still displayed, replace a new battery. Restart LandxcapeTM.
Press
then .
3. If the error repeatedly occurs, try to change the working schedule.
Manually dock LandxcapeTM in the charging base for charging. After LandxcapeTM is
fully charged, Press
then .
EN18
Error unknown.
TM
Restart Landxcape
. Press then . If the error message is still displayed,
contact a service agent for help.
NOTES
• Before turning power on, always return Landxcape
Landxcape
TM
is sitting over the boundary wire when turned on.
• If for any reason—i.e. a party, children playing...—you want to park your Landxcape
will go to its charging base and stay there. Press
TM
to its territory. If not, “ ” will be displayed. This message is also displayed when
TM
in the charging base: Press then . LandxcapeTM
to turn LandxcapeTM off.
• If an error repeatedly occurs in the same area of your lawn, you might have a problem with the boundary wire. Please refer to the Installation
Guide and check your set up with its help.
• If your lawn is divided in two separate areas connected by a corridor less than 1m, one of which is not provided with the charging base: when
Landxcape
• If Landxcape
battery . If the problem is still not resolved, please contact a Landxcape
• Do not wash your Landxcape
TM
runs out of charge, take it manually to the charging base, the charge process will start.
TM
runs abnormally once in a while, please try to restart it. If the problem is not resolved, try to removing and reinstalling the
TM
with a high pressure washer. This could cause damage to the battery or the machine.
TM
service agent for help.
11. Troubleshooting
If your LandxcapeTM does not work correctly, follow the troubleshooting guide below. If the issue persists, contact your Dealer.
Symptom Cause Action
The LED light on the charging base does
not turn on.
There is no power.
Red light turns on the charging base. The boundary wire isn’t connected.
LandxcapeTM turns on, but the blade
disc does not move.
Landxcape
TM
vibrates.
LandxcapeTM is searching for the charging
base (unless you press
then button to
make it go to the charging base)
Blades may be damaged. Check condition of
the blade disc.
TM
Landxcape
does not work enough hours per
day.
Mowing area is too big.
Blades are dull.
Grass is being cut unevenly.
The cutting height is too low for the length of
the grass.
Grass or other object has wrapped around the
blade disc.
There is a build-up of grass in the blade disc or
motor frame box.
Your Landxcape
TM
is inside its territory
and the boundary wire is connected.
And “
“ is displayed.
The boundary wire ends are clamped
incorrectly.
The boundary wire is broken. Repair damaged boundary wire with connectors.
Poor connection caused by debris on the
The charging time is far more than the
rated charging time.
charging strip.
The charging protection program has activated
due to high temperature.
Check the charging base is connected properly to the
charger and the charger is connected to a suitable
power supply.
Check that the boundary wire has been connected
correctly to the charging base.
Check there are no breaks in the boundary wire, especially
in the wire ends.
TM
This is normal. Landxcape
needs to recharge, the
blade disc does not rotate while it is searching for the
charging base automatically.
Check the blades, and replace them if damaged.
Remove debris and foreign objects from the blades
and blade disc.
Add more hours to the scheduled mowing time.
Try decreasing the size of the mowing area or adding
more hours to the mowing time.
Change all the blades and screws in order to balance
the blade disc.
Raise the cutting height and then gradually lower.
Check the blade disc and remove the grass or other
object.
Make sure the blade disc rotates easily. If need be, you
may take off the blade disc and remove the debris.
Reverse the boundary wire ends.
Clean the contact pins located on the charging base
and the charging strip on Landxcape
TM
using a cloth.
Place the charging base in a shady area or wait until
the temperature has cooled down.
EN 19
The mower does not charge.
Landxcape
TM
is starting to have shorter
run-times between charges.
Landxcape
TM
is not operating at the
correct time.
TM
Landxcape
cannot correctly dock
with the charging base.
The green light on the charging base
turns on before charging is complete.
Landxcape
wire. Landxcape
area within a boundary wire zone.
Landxcape
TM
runs outside the boundary
TM
does not mow an
TM
reverses or rotates
erratically near the boundary wire.
Landxcape
TM
wheels skid or damage
lawn.
TM
Landxcape
exits the boundary wire
due to high speed when going down a
hill.
Check the power cord is connected properly to the
There is no power.
charger and the charger is connected to a suitable
power supply.
Landxcape
manually charging.
TM
does not operate correctly while
Refer to manual charging in Section 8.3.
Something is clogging in the blade disc. Take off the blade disc and clean it.
The grass is too high and too thick.
Landxcape
TM
is shaking heavily.
Check the Blade Disc and blades, remove debris and
foreign objects from the blades and Blade Disc.
Check the blade disc and blades, remove debris and
foreign objects from the blades and blade disc.
The clock is not set to the correct time. Set the clock to the correct time, refer to Section 5.3.
TM
Programmed cutting times for Landxcape
are not correct.
Landxcape
TM
is manually docked in the
charging base.
The battery does not charge as its temperature
rises above 55
O
C in hot weather.
Environmental influences. Restart Landxcape
Poor connection caused by debris on the
charging strip.
The charging base is overheated.
The boundary wire of another Landxcape
or another robotic mower is positioned too
closely.
The boundary wire has been installed with
tight corners.
In wet conditions, the boundary wire electric
signal may leak were wire has been joined or
repaired.
There is boundary wire electric signal leakage
due to broken insulation.
The cutting area is larger than the allowable
cutting area for Landxcape
Foreign obstacles, such as twigs and branches
may be lodged under Landxcape
TM
.
TM
.
Change the time settings for the mower to start and
stop.
Press
then .
Wait until the battery has cooled down.
TM
.
Clean the contact pins located on the charging base
and the charging strip on Landxcape
TM
Place the charging base in a shady area or wait until
the temperature has cooled down.
TM
Ensure your Landxcape
TM
boundary wire has at least
1m of space between the neighboring boundary wire.
Check the boundary wire to ensure the corners are
smooth.
Check boundary wire joints. Insulate to provide a fully
waterproof connection.
Repair damaged boundary wire insulation with
connectors.
Reduce the cutting area or use Landxcape
larger allowable cutting area.
Remove foreign objects from underside of
LandxcapeTM.
using a cloth.
TM
with a
The lawn is too wet. Wait until lawn has dried.
The boundary wire is placed on a slope
steeper than 17% (10°).
Reposition the boundary wire away from slopes that
are steeper than 17% (10°). Please refer Installation
Guide for details.
Software update failure occurs. Try again according to section “Software update”.
Environmental Protection
Waste electrical products should not be disposed of with household waste. Please recycle where facilities exist. Check with your Local
Authority or retailer for recycling advice.
EN20

Declaration of Conformity
We,
Positec Germany GmbH
Grüner Weg 10, 50825 Cologne, Germany
Declare that the product,
Description Robotic Lawn mower
Type LX790 LX791 LX792 LX793 LX794 LX795 (790-799 - designation of machinery, representative of Robotic Lawnmower) (Year, article
number and month of serial number are placed on the back page. The complete serial number is clearly stated on the enclosure of
lawnmower) with battery charger LA8001 / LA8002 and charging base LA3000
Function Cutting grass
Complies with the following Directives,
2006/42/EC, 2014/30/EU, 2014/35/EU, 2011/65/EU, 2000/14/EC amended by 2005/88/EC, 2014/53/EU
2000/14/EC amended by 2005/88/EC
- Conformity Assessment Procedure as per Annex V
- Measured Sound Power Level 64.2dB (A)
- Declared Guaranteed Sound Power Level 65 dB (A)
The notified body involved
Name: Intertek Testing & Certification Ltd. (notified body 0359)
Address: Cleeve Road, Leatherhead, Surrey, KT22 7SB United Kingdom
Certification No. : 181000479SHA-V1
Standards conform to,
EN 60335-1:2012+A11+A13:2017, EN 50636-2-107:2015+A1:2018, EN 60335-2-29:2004+A2:2010,
EN 62233:2008, EN ISO 3744:2005, EN 55014-1:2017, EN 55014-2:2015,EN 61000-3-2:2014,
EN 61000-3-3:2013, EN 61558-1:2005+A1:2009, EN 61558-2-16:2009+A1:2013, EN 303 447 V1.1.1
The person authorized to compile the technical file,
Name Marcel Filz
Address Positec Germany GmbH, Grüner Weg 10, 50825 Cologne, Germany
2019/04/22
Allen Ding
Deputy Chief Engineer, Testing & Certification
Positec Technology (China) Co., Ltd.
18, Dongwang Road, Suzhou Industrial
Park, Jiangsu 215123, P. R. China
EN 21
1. Produktsicherheit
1.1 Allgemeine Sicherheitshinweise für
Elektrowerkzeuge
WARNUNG: Lesen Sie alle Sicherheitshinweise und
Anweisungen.
Sicherheitshinweise und Anweisungen können elektrischen Schlag,
Brand und/oder schwere Verletzungen verursachen.
Lesen Sie die Bedienungsanleitung zum sicheren Betrieb des
Gerätes aufmerksam durch.
Bewahren Sie alle Sicherheitshinweise und Anweisungen für die
Zukunft auf.
• Dieses Gerät ist nicht zur Verwendung durch Personen
(einschließlich Kindern) vorgesehen, die über reduzierte körperliche
Eignung, Wahrnehmung oder geistige Fähigkeiten, Mangel an
Erfahrung und Wissen verfügen, sofern diese Personen nicht
von einer verantwortlichen Person beaufsichtigt oder in der
Verwendung des Gerätes unterwiesen wurden.
• Kinder sollten grundsätzlich beaufsichtigt werden, damit sie nicht
mit dem Gerät spielen.
• Das Gerät darf nur mit dem mitgelieferten Netzteil verwendet werden.
WICHTIG
VOR GEBRAUCH BITTE SORGFÄLTIG
DURCHLESEN UND FÜR WEITERE FRAGEN AUFBEWAHREN
Sicherer Betrieb
Training
a) Die Anweisungen aufmerksam durchlesen. Machen Sie sich mit
den Bedienelementen und dem vorschriftsmäßigen Gebrauch des
Rasenmähers vertraut.
b) Niemals Kindern oder mit diesen Anweisungen nicht vertrauten
Personen erlauben, den Rasenmäher zu benutzen. Nationale
Vorschriften können das Alter der Bedienperson möglicherweise
beschränken.
c) Bedenken Sie, dass der Bediener oder Benutzer bei Unfällen
oder Gefährdungen anderer Personen oder deren Eigentum die
Verantwortung trägt!
Vorbereitung
a) Stellen Sie sicher, dass das Begrenzungskabel gemäß den
Anweisungen verlegt wird.
b) Inspizieren Sie die Gegend, in der die Ausrüstung eingesetzt
werden soll, gründlich und entfernen Sie alle Objekte, die durch die
Maschine aufgeschleudert werden könnten.
c) Überprüfen Sie in regelmäßigen Abständen, ob Messer,
Messerschrauben und Schneidbalken abgenutzt oder beschädigt
sind. Abgenutzte Messer und Schrauben nur im ganzen Satz
auswechseln, um Unwuchten zu vermeiden.
d) Achten Sie darauf, dass bei Geräten mit mehreren Klingen ein
Klingensatz durch den anderen in Rotation versetzt werden kann.
e) WARNUNG! Der Rasenmäher darf nicht betrieben werden, wenn
der Schutz nicht angebracht ist.
Betrieb
1. Allgemeine Sicherheitshinweise
a) Betreiben Sie das Gerät niemals mit defektem Schutz oder ohne
installierte Sicherheitsvorrichtungen, wie etwa Deflektoren;
b) Hände und Füße nicht in die Nähe oder unter rotierende Teile
bringen. Halten Sie sich stets von der Austrittsöffnung fern.
c) Niemals den Rasenmäher bei laufendem Motor anheben oder
Versäumnisse bei der Einhaltung der
tragen.
d) Betätigen Sie die Deaktivierungseinrichtung des Geräts,
– vor dem Beseitigen einer Verstopfung;
– vor dem Überprüfen, Reinigen oder Arbeiten am Gerät.
e) Der ursprüngliche Zustand des Landxcape
werden. Alle Änderungen erfolgen auf eigene Verantwortung.
f) Starten Sie den Roboter-Rasenmäher gemäß Anweisungen. Wenn
der Netzschalter eingeschaltet ist, stellen Sie sicher, dass Sie Ihre
Hände und Füße von den drehenden Messern entfernt halten.
Bringen Sie Ihre Hände und Füße niemals unter den Rasenmäher.
g) Heben Sie den Roboter-Rasenmäher niemals an bzw. tragen Sie
ihn nicht, wenn der Netzschalter eingeschaltet ist.
h) Erlauben Sie niemandem, der sich mit den Funktionen und
Verhaltensmustern des Landxcape
benutzen.
i) Keine Gegenstände auf den LandxcapeTM oder seine Ladestation legen.
j) Wenn der Messerteller oder das Gehäuse defekt ist, darf der
Landxcape
für defekte Messer, Schrauben, Muttern oder Kabel.
k) Schalten Sie den Roboter-Rasenmäher stets aus, wenn dieser
nicht verwendet wird. Der Roboter-Rasenmäher kann nur starten,
wenn der Netzschalter eingeschaltet ist und der korrekte PIN-Code
eingegeben wurde.
l) Halten Sie Hände und Füße von den rotierenden
Rasenmäherklingen fern. Halten Sie mit Ihren Händen und Füßen
stets einen sicheren Abstand zum Gehäuse ein, solange der
Rasenmäher in Betrieb ist.
m) Vermeiden Sie die Nutzung der Maschine und deren
Peripheriegeräten bei schlechtem Wetter, besonders wenn die
Gefahr eines Blitzschlags.
n) Berühren Sie sich bewegende gefährliche Teile nicht, bevor diese
vollständig zum Stillstand gekommen sind.
o) Bei Maschinen, die in öffentlichen Bereichen verwendet werden,
müssen diese Warnschilder um den Arbeitsbereich der Maschine
angebracht werden. Sie sollen den Inhalt des folgenden Textes zeigen:
2. HINWEIS ZUM AUTOMATIKBETRIEB DES ROBOTERS
a) Den Landxcape
sich Personen – besonders Kinder – oder Haustiere in der Nähe
aufhalten.
WARTUNG UND LAGERUNG
Der Netzschalter muss bei allen Arbeiten am Unterbau des
Rasenmähers ausgeschaltet werden, beispielsweise bei der
Reinigung oder beim Wechseln der Messer.
a) Stellen Sie den festen Sitz aller Schrauben, Muttern und Bolzen
sicher, um zu gewährleisten, dass sich der Rasenmäher in einem
betriebssicheren Zustand befindet.
b) Den Landxcape
beschädigte oder verschlissene Teile austauschen.
c) Messer und Messerteller besonders sorgfältig auf Schäden
untersuchen. Bei Bedarf alle Messer und Schrauben gleichzeitig
austauschen, um eine Unwucht der rotierenden Teile zu vermeiden.
d) Verwenden Sie beim Austausch nur Original Messer.
e) Verwenden Sie zum Laden des Akkus nur das vom Hersteller
empfohlene Ladegerät. Eine nicht den Hinweisen entsprechende
Verwendung kann zu einem Stromschlag, zur Überhitzung oder
zum Auslaufen der Batterieflüssigkeit führen.
f) Tritt Batterieflüssigkeit aus, beseitigen Sie sie mit Wasser und
einem neutralen Reinigungsmittel. Kommt sie mit Augen etc. in
TM
nicht in Betrieb genommen werden. Das gleiche gilt
WARNUNG! Automatischer Rasenmäher! Halten Sie sich von der
Maschine fern! Beaufsichtigen Sie Kinder!
TM
niemals unbeaufsichtigt verwenden, wenn
WARNUNG! Wenn der Rasenmäher umgedreht wird, muss der
Netzschalter stets ausgeschaltet werden.
TM
einmal pro Woche kontrollieren und eventuell
TM
darf nicht modifiziert
TM
nicht auskennt, den Mäher zu
DE22
Kontakt, suchen Sie sofort einen Arzt auf.
g) Warten Sie den Roboter nach den Anweisungen des Herstellers.
Empfehlung
Schließen Sie die Maschine und/oder deren Peripheriegeräte nur an
einen Speisestromkreis an, der über einen Fehlerstromschutzschalter
(RCD) mit einem Auslösestrom von nicht mehr als 30 mA verfügt.
Restrisiken
Um Verletzungen zu vermeiden, tragen Sie beim Wechseln der Klingen
Schutzhandschuhe.
1.2 Informationen zum Landxcape
WARNUNG–Rasenmähroboter können bei
unsachgemäßer Verwendung gefährlich sein.
Lesen Sie die Bedienungsanleitung sorgfältig durch
und verstehen Sie deren Inhalt, bevor Sie Ihren
Rasenmähroboter betreiben.
TM
Transport
Für längere Transporte legen Sie den Landxcape
Originalverpackung.
Für einen sicheren Transport vom oder innerhalb des Arbeitsbereichs:
a) Drücken Sie die STOP -Taste, um den Mäher zu stoppen.
Sie wählen den vierstelligen PIN aus, wenn Sie den Mäher das
erste Mal benutzen.
b) Schalten Sie den Roboter-Rasenmäher immer aus, wenn Sie
diesen tragen möchten.
c) Den Mäher an seinem Griff vorne unten tragen. Halten Sie den
Messerteller beim Tragen des Mähers vom Körper weg.
Sicherheitshinweise bezüglich des Akkus im Werkzeug
a) Zellen bzw. Akku nicht zerlegen, öffnen oder zerdrücken.
b) Akku nicht kurzschließen. Akkus nicht wahllos in einer
Schachtel oder Schublade aufbewahren, wo sie einander
kurzschließen oder durch andere leitfähige Materialien
kurzgeschlossen werden könnten.
des Akkus ist dieses von Metallgegenständen, wie etwa
Büroklammern, Münzen, Nägeln, Schrauben oder anderen kleinen
Metallgegenständen fernzuhalten, wo sich die Batterieklemmen
berühren können. Das Kurzschließen der Batterieklemmen kann
Verbrennungen bzw. einen Brand verursachen.
c) Zellen bzw. Akkus nicht Hitze oder Feuer aussetzen. Lagerung
in direktem Sonnenlicht vermeiden.
d) Akku nicht mechanischen Stößen aussetzen.
e) Im Fall, dass Flüssigkeit aus dem Akku austritt, darf diese
nicht in Kontakt mit der Haut oder den Augen kommen. Sollte
dies dennoch geschehen, den betroffenen Bereich sofort
mit viel Wasser spülen und einen Arzt aufsuchen.
f) Beim Verschlucken einer Zelle oder eines Akkus muss sofort
ein Arzt herangezogen werden.
g) Akku sauber und trocken halten.
h) Akkus funktionieren bei normaler Zimmertemperatur (20 °C
± 5 °C) am besten.
i) Beim Entsorgen von Akkus sollten Akkus mit verschiedenen
elektrochemischen Systemen voneinander getrennt
gehalten werden.
j) Nur mit dem von Landxcape
auaden. Kein Ladegerät verwenden das nicht ausdrücklich
für den Gebrauch mit dem Gerät vorgesehen ist. Ein
Ladegerät, das für eine bestimmte Art von Akku geeignet
ist, kann bei Verwendung mit einem anderen Akku eine
Brandgefahr darstellen.
k) Keinen Akku verwenden der nicht für den Gebrauch mit dem
Gerät vorgesehen ist.
l) Akkus von Kindern fernhalten.
m) Die originalen Produktunterlagen zum späteren
Nachschlagen aufbewahren.
n) Ordnungsgemäß entsorgen.
TM
bezeichneten Ladegerät
TM
am besten in die
Bei Nichtverwenden
WARNUNG- Halten Sie einen Sicherheitsabstand
wenn der Roboter-Rasenmäher in Betrieb ist.
WARNUNG – Betätigen Sie die
Deaktivierungsvorrichtung, bevor Sie am Gerät
arbeiten oder die Maschine anheben.
WARNUNG – RASENMÄHROBOTER darf nicht als
Transportmittel missbraucht werden.
Nicht im Feuer entsorgen
Vor Regen und Feuchtigkeit schützen
Akku nicht in den Haushaltsmüll geben. Bringen
Sie den leeren Akku zu Ihrer lokalen Sammel- oder
Recyclingstelle.
Waschen Sie das Gerät nicht mit einem
Hochdruckreiniger.
Gerät der Klasse III
Elektroprodukte dürfen nicht mit dem normalen
Haushaltsmüll entsorgt werden, sondern sollten nach
Möglichkeit zu einer Recyclingstelle gebracht werden.
Ihre zuständigen Behörden oder Ihr Fachhändler
geben Ihnen hierzu gerne Auskunft.
DE 23

2. Komponenten
1. STOPPTASTE
2. DREHKNOPF ZUM EINSTELLEN DER SCHNITTHÖHE
3. EIN/AUS-TASTE
4. START-TASTE
5. HOME-TASTE
6. ANZEIGE
7. LADESTREIFEN
8. REGENSENSOR
9. VORDERRAD
10. MESSERTELLER
11. MESSER
12. AKKU
13. USB-SCHNITTSTELLE
14. HINTERES ANTRIEBSRAD
15. GRIFF
16. KONTAKTSTIFTE
17. LADESTATION
18. NETZTEIL
19. HERINGE
20. BEGRENZUNGSKABEL
21. LADESTATION-BEFESTIGUNGSSCHRAUBEN
22. BEGRENZUNGSKABEL-ABSTANDLEHRE
23. INBUSSCHLÜSSEL
24. VERBINDUNGSSTÜCK
Abgebildetes oder beschriebenes Zubehör gehört teilweise nicht zum Lieferumfang.
DE24
3.Technische Daten und
Geräuschentwicklung
3.1 Technische Daten
Typ LX790 LX791 LX792 LX793 LX794 LX795 (790-799 - Bezeichnung
der Maschine, repräsentiert den Rasenmähroboter)
LX790 LX792 LX791 LX793 LX794 LX795
900m
Max.*
2
700m
2
Nennleistung 20V
Leerlaufdrehzahl 2800/min
Schneidebereich 600m
Schnittbreite 16cm 18cm 18cm
Schnitthöhe 30-60mm
Schnitthöhenverstellung 4
2
3.2 Informationen über lärm
L
= 44.2dB (A)
Gewichteter Schalldruck
Gewichtete Schallleistung
Tragen Sie einen Schallschutz bei
einem Schalldruck über
Eine gewisse Geräuschentwicklung der Maschine ist unvermeidlich. Die
Durchführung geräuschintensiver Arbeiten benötigt eine Zulassung und
muss in bestimmten Zeiten eingeschränkt werden. Halten Sie Ruhephasen ein und beschränken Sie die Arbeitsstunden auf ein Minimum.
Zu Ihrem eigenen Schutz und den von Personen, die sich in der Nähe
befinden, muss ein geeigneter Gehörschutz getragen werden.
pA
K
= 0.4dB(A)
PA
L
= 64.2dB (A)
wA
K
= 0.4dB(A)
wA
80dB(A)
Batterietyp Lithium-ion
Akkumodell LA0001 LA0002 LA0001
Ladezeit Ca. 1.3hrs 2hrs 1.3hrs
Ladegerätmodell LA8001 / LA8002
Leistung des Ladegeräts
Gewicht 8.4kg
Schutzklasse III
*Spannung ohne Arbeitslast gemessen. Die anfängliche Akkuspannung
erreicht maximal 20 Volt. Die Nennspannung liegt bei 18 Volt.
Eingang: 100-240V~50/60Hz, 38W,
Ausgang: 20V
, 1.5A
Zubehörteile
LX790 LX792 LX791 LX793 LX794 L X795
Schrauben 9 9 9
Ladestation 1 1 1
Fixierungsnägel für Ladestation
Begrenzungskabel
7 7 7
150m 180m 150m
Bestimmungsgemäßer Gebrauch
Dieses Produkt ist bestimmt für das Rasenmähen im privaten Bereich.
Er ist zum häufigen Mähen bestimmt – er hält Ihren Rasen gesund und
dieser wird gepflegter aussehen als je zuvor. Je nach Größe des Rasens
kann der Landxcape
ebigen Zeit und mit jeder beliebigen Frequenz uneingeschränkt arbeitet.
Es ist nicht zum Graben, Reinigen oder Schneeräumen konzipiert.
TM
so programmiert werden, dass er zu jeder beli-
Heringe
Inbusschlüssel
Begrenzungskabel Abstandslehre
Messer
Verbindungsstück
Akkupack (LA0001/ LA0002)
Lader (LA8001 / LA8002)
Wir empfehlen Ihnen, sämtliche Zubehörteile beim selben Fachhändler
zu beziehen, bei dem Sie auch Ihr Elektrowerkzeug oder Gartengerät
gekauft haben. Weitere Informationen finden Sie auf der Verpackung
der Zubehörteile. Auch Ihr Fachhändler berät Sie gerne.
210 250 210
1 1 1
2 2 2
9 9 9
2 2 2
1 1 1
1 1 1
DE 25
4. Bedienfeld
Arbeitszeit
START
Mähvorgang starten /
Aufwärts
Ein-/Ausschalten
Schalten Sie
Landxcape
aus.
TM
ein oder
Verrieglung
Akkukapazität
Anzeige
Zeigt den Status Ihrer
Einstellung an
HOME
Wenn Sie Landxcape
TM
Bestätigt die jeweilige
Einstellung
während des Betriebs
zur Ladestation bringen,
drehen sich die Messer
OK
undschneiden auf dem
Heimweg noch Gras.
Aktivieren Sie Aufladen/
wählen Sie herunter.
STANDBY:
Landxcape
Arbeitszeit.
TM
ist nicht in der
RUHEZUSTAND:
Das Symbol
Landxcape
TM
ist voll aufgeladen
wird angezeigt.
STOPP
Landxcape
stoppen
TM
beim Betrieb
und nicht in der Arbeitszeit.
Start
1) Nach der Installation des Begrenzungskabels können Sie den LandxcapeTM verwenden (Informationen zum Verlegen des Begrenzungskabels
finden Sie im Installationsleitfaden).
2) Drücken Sie zuerst power on/off
viermal drücken, wenn die Zahl 0 blinkt. (Der PIN-Code kann geändert werden. Weitere Informationen finden Sie unter „Einstellungen“ in der
Installationsanleitung)
HINWEIS:
Landxcape
TM
wird automatisch ausgeschaltet, wenn keine Eingabe innerhalb 30 Sekunden nach dem Einschalten empfangen wird.
Wenn Sie dreimal einen falschen PIN-Code eingeben, wird der Alarm „di-di“ ausgelöst und Landxcape
3) Drücken Sie auf
4)
Drücken Sie und dann , um LandxcapeTM zur Ladestation zu bringen, wobei sich die Messer drehen undschneiden auf dem Heimweg noch Gras.
, drücken Sie dann auf , um mit dem Mähen zu beginnen.
Der LandxcapeTM wird kontinuierlich arbeiten, bis der Akku schwach ist. Anschließend fährt er zurück zur Ladestation. Sobald der Ladevorgang
beendet ist, wird der Landxcape
HINWEIS:
Wenn Landxcape
TM
eingeschaltet wird, werden alle Lichter der Anzeige angemacht und dann ausgemacht. Prüfen Sie, ob irgendein Licht
beschädigt ist. Es wird empfohlen, die Anzeige mit Händen abzuschirmen, wenn die Umgebung zu hell ist.
. Geben Sie bei der ersten Verwendung den voreingestellten PIN-Code 0000 ein, indem Sie
TM
wird dann automatisch ausgeschaltet.
TM
gemäß Zeitplan den Mähvorgang automatisch fortsetzen oder in der Ladestation bleiben.
DE26
5. Wissenswertes zu Ihrem
Landxcape
Herzlichen Glückwunsch zum Kauf Ihren neuen LandxcapeTM und
willkommen in der komfortablen Welt des automatischen Mähens.
Nun möchten wir Ihnen zeigen, wie Ihr Landxcape
„denkt“.
5.1 Wie weiß mein LandxcapeTM, wo er
mähen soll?
Der LandxcapeTM wählt seine Richtung nach dem Zufallsprinzip.
Dadurch sorgt das Gerät dafür, dass der Rasen gleichmäßig gemäht
wird und keine auffälligen Mähspuren entstehen (Siehe Abb. A).
5.2 Wie weiß mein LandxcapeTM, wohin er
fahren soll?
Ihr LandxcapeTM kann völlig selbstständig arbeiten. Der LandxcapeTM
weiß, wann er zu seiner Ladestation zurückkehren muss, um
aufgeladen zu werden. Er erkennt einsetzenden Regen und kann selbst
stoppen, wenn er ein Problem erkennt. Er weiß auch, wie er anhält,
zurückfährt und dann umdreht, wenn sein Weg durch ein anderes
Objekt blockiert wird. Der LandxcapeTM stoppt auch die Messerteller
automatisch, sobald er angehoben wird, um Unfällen vorzubeugen.
TM
TM
funktioniert und
vorgegebenen Grenzen; dazu setzt er spezielle Sensoren an seiner
Vorderseite ein. (Siehe Abb. C).
D. Beim Mähen stoppen und wieder starten (Siehe Abb. D, E1, E2)
Um mit dem Mähen zu beginnen, drücken Sie die EIN/AUS-Taste und
geben Sie den PIN-Code ein. Drücken Sie auf
. Wenn Sie den LandxcapeTM beim Mähen stoppen möchten, drücken
Sie einfach die Zugangstaste am Oberteil.
Falls der Landxcape
Display ausgeben. Für Informationen zu Fehlermeldungen, siehe
Fehlermeldungen. Und der Landxcape
Benutzer innerhalb von 20 Min. keine Rückmeldung erhält.
Betrieb wieder aufnehmen:
• Drücken Sie auf , drücken Sie dann auf
• Der LandxcapeTM beginnt jetzt mit dem Mähen!
TM
erkennt, wird er eine Fehlermeldung auf dem
TM
schaltet sich aus, wenn er vom
, drücken Sie dann auf
5.3 Einstellungen
Stellen Sie zuerst die gewünschte Grashöhe nach dem Abschneiden
ein. Sie können das Programm manuell einstellen.
HINWEIS: Landxcape
manuell eingestellt und keine Eingabe vom Benutzer innerhalb 30
Sekunden vorgenommen wird.
(1) PIN-Code ändern
Halten Sie zum Ändern des PIN-Codes 5 Sekunden lang beide Tasten
&
gleichzeitig gedrückt. Das Symbol blinkt und “ ” blinkt
rollend. Danach blinkt die erste Stelle. Benutzen Sie
wählen Sie die gewünschte Ziffer, und drücken Sie
Die nächste Stelle blinkt. Auf derselben Weise wählen Sie die anderen
Stellen. Der neue PIN-Code lautet beispielsweise 0326. Danach blinkt „
“ rollend und die erste Stelle blinkt erneut. Auf derselben Weise
geben Sie den neuen PIN-Code ein (von diesem Beispiel
der Anzeige blinkt dann „
geändert.
TM
ruft die Standby-Seite auf, wenn das Programm
oder , und
zur Bestätigung.
). Auf
“. Ihr PIN-Code wird erfolgreich
A. Ladestation finden
Wenn Ihr LandxcapeTM aufgeladen werden muss, stoppt er das Mähen
und folgt dem Begrenzungskabel gegen den Uhrzeigersinn zurück zur
Ladestation. Der LandxcapeTM ist vorprogrammiert, um das Gras entlang
des Begrenzungskabels einmal wöchentlich zu mähen. Standardmäßig
mäht Landxcape
Begrenzungskabels.
B. Regensensor
Der LandxcapeTM hat einen Regensensor auf der Seite, der Regentropfen
registriert und den Landxcape
und den Begrenzungsdraht entlang zurück zur Ladestation zu folgen.
(Siehe Abb. B)
Der Landxcape
fortsetzen; die standardmäßige Verzögerungszeit beträgt 180 Minuten.
Sollten die Regensensoren nass werden, so kehrt der Landxcape
zurück in seine Docking-Station. Wenn die Regensensoren trocken
sind, beginnt Landxcape
Wenn Sie eine Regenverzögerung beenden möchten, trocknen Sie
den Sensorbereich und führen Sie einen Leistungszyklus über den
Hauptschalter durch. Wenn der Leistungszyklus durchgeführt wurde; Sie
können das Gerät daher wieder in Betrieb nehmen.
C. Begrenzungskabel erkennen
Der Landxcape
TM
jeden Montag nach dem Einschalten in der Nähe des
TM
anweist, mit dem Mähen aufzuhören
TM
wird das Mähen nach Ablauf der Verzögerungszeit
TM
TM
mit dem Countdown der Verzögerungszeit.
TM
hält sich grundsätzlich an die vom Begrenzungskabel
Nur als Referenz
(2) Stellen Sie Jahr, Datum und Uhrzeit ein
Die Einstellung von Jahr, Datum und Uhrzeit ist obligatorisch. Wenn
Sie diese Elemente nicht einstellen, beeinflusst dies die Zeitplanung
in der folgenden Einstellung. Diese Elemente sollen in der Reihenfolge
von Jahr, Datum und Uhrzeit eingestellt werden. Halten
Jahreseinstellung 3 Sekunden lang gedrückt, bis das Symbol
Zahl auf der Anzeige blinken, z. B.
wählen Sie das gewünschtes Jahr. Drücken Sie
Jahreseinstellung zu bestätigen und beenden.
. Verwenden oder
Sie für die
und eine
anschließend, um die
DE 27
Nur als Referenz
Gleichzeitig blinkt das Symbol erneut und das Datum wird angezeigt,
z. B.
, d.h. 29 . September. Wenn blinkt, verwenden oder
wählen Sie die Ziffer und drücken Sie zur Bestätigung. Dann blinkt
die Ziffer
. Auf derselben Weise wählen Sie die Ziffer und drücken
zur Bestätigung der Einstellung vom Datum.
Nur als Referenz
Gleichzeitig blinkt das Symbol und die Uhrzeit wird angezeigt, zum
Beispiel
Ziffer und drücken Sie
oder wählen Sie die Ziffer und drücken Sie
die Zeiteinstellung abgeschlossen und Landxcape
. Wenn blinkt, verwenden oder wählen Sie die
zur Bestätigung. Wenn blinkt, verwenden
zur Bestätigung. Damit ist
TM
öffnet die Standby-
Seite.
Nur als Referenz
(3) Stellen Sie den Arbeitsbereich ein
Drücken Sie
Sie
3 Sekunden lang. Wenn das Symbol blinkt, drücken
. Auf der Anzeige blinkt eine Ziffer, z. B. , also der
Rasenbereich. Die Arbeitszeit wird automatisch an die Größe Ihres Gartens
angepasst. Verwenden
ein und drücken Sie
oder stellen Sie den Rasenbereich
zur Bestätigung. Dann wird LandxcapeTM die
Standby-Seite aufrufen.
HINWEIS: Wenn die angezeigte Anzahl weniger als 200 beträgt, wird
der Bereich bei jedem Drücken von
/ in Schritten von 50m2
angepasst. Wenn die angezeigte Zahl 200 oder mehr erreicht, wird
die Fläche bei jedem Drücken des
/ in Schritten von 100m2
angepasst.
Nur als Referenz
(4) Änderung der voreingestellten Startzeit
Die voreingestellten Startzeit von 9:00 Uhr kann jederzeit geändert
werden, indem Sie beide Tasten
& gleichzeitig gedrückt
halten, bis ein Ding-Ton zu hören ist.
Drücken Sie beispielsweise beide Tasten
und Ihr Landxcape
Nur als Referenz
TM
beginnt um 14:05 Uhr zu mähen.
& um 14:05 Uhr,
5.4 Wie gut mäht der LandxcapeTM das
Gras?
Die Mähzeiten sind für jeden Rasen unterschiedlich, abhängig von den
nachfolgend erwähnten Faktoren. Experimentieren Sie ein wenig mit
der Zeit, die Sie Ihrem Landxcape
Sie die perfekte Vorgabe gefunden haben.
Ihr Landxcape
TM
kann Flächen unterschiedlicher Größen mähen;
die exakte Fläche hängt natürlich von verschiedenen Faktoren ab –
beispielsweise:
• Art und Wachstumsgeschwindigkeit des Rasens
• Schärfe der Messer
• Feuchtigkeit
• Umgebungstemperatur
• Art und Anzahl der Hindernisse im oder auf dem Rasen
Anders als viele andere Mäher verwendet der LandxcapeTM ein seitliches
Ladesystem, sodass viel umliegendes Gras geschnitten werden kann.
Zusätzlich ermöglichen Löcher auf der Unterseite der Ladestation,
dass das Gras hindurch wachsen kann und zu einem eleganten
Erscheinungsbild beiträgt.
Die Schnitthöhe des Landxcape
einstellen. Bevor Sie Ihren Landxcape
das Gras mit Ihrem Handrasenmäher bis zu einer Höhe von höchstens 9
cm abschneiden. Stellen Sie dann die Schnitthöhe Ihres Landxcapes auf
seinen maximalen Wert (6 cm) ein, wenn Sie zum ersten Mal mähen. (Siehe
Abb. F)
Ihr LandxcapeTM mäht am besten bei trockenem Wetter. Ihr LandxcapeTM
mag kein feuchtes Gras, da sich dieses am Messerteller und am Motor
sammeln kann; zusätzlich kommt der Landxcape
Untergrund nur mühsam vorwärts und kommt leichter ins Rutschen.
Ihr Landxcape
TM
fürchtet Gewitter. Schützen Sie den LandxcapeTM
TM
täglich zum Mähen zugestehen, bis
TM
lässt sich zwischen 3 und 6 cm
TM
zum ersten Mal starten, sollen Sie
TM
auf feuchtem
DE28
bei Gewittern, indem Sie den Stecker der Ladebasis ziehen,
das Begrenzungskabel trennen und dafür sorgen, dass sich der
Landxcape
Ihr Landxcape
Messer stets in gutem Zustand halten. Der Landxcape
Menge Dinge ganz allein erledigen – allerdings benötigt er manchmal
Ihre Hilfe, damit er sich nicht selbst verletzt.
• Lassen Sie den Landxcape
• Entfernen oder blockieren Sie Hindernisse, an denen der
Landxcape
beschädigen könnte.
• Befreien Sie Ihren Rasen von sämtlichen Abfällen und
Fremdkörpern.
6.
TM
nicht aufladen darf.
TM
liebt Rasenmähen; vor allem dann, wenn Sie seine
TM
niemals über Kies fahren.
TM
aus Versehen hochklettern und seine Messerscheibe
Grundlegendes zum
TM
kann eine
Begrenzungskabel
6.1 Begrenzungskabel abstecken
Mit der Begrenzungskabel-Abstandlehre schaffen Sie den richtigen
Abstand zur Rasenkante (mehr als 26cm). Dies ist ein empfohlener
Abstand. Sorgen Sie mit der mitgelieferten Abstandlehre für die
richtigen Entfernungen.
Falls Ihr Nachbar ebenfalls einen Landxcape
Abstand von mindestens 1m zwischen Ihrem Begrenzungskabel und
dem des Nachbarn einhalten.
Das Begrenzungskabel muss die Fläche, die gemäht werden
soll, exakt umschließen.
wenn er auf zusätzliche Biegungen oder Windungen des Grenzkabels
stößt, die nicht zur Mähfläche gehören (Siehe Abb. G). Wenn nach dem
Umschließen der Mähfläche noch Begrenzungskabel übrig sein sollte,
schneiden Sie das überschüssige Stück ab und lagern es separat.
Vergessen Sie aber nicht, beim Abschneiden ein kleines Stück zum
Anschluss an die Ladebasis zu verschonen, damit der Anschluss
möglich ist, ohne wieder einen Teil des Kabels ausgraben zu müssen.
Ihr Landxcape
6.2 Begrenzungskabel eingraben
Wenn Sie das Begrenzungskabel eingraben möchten, es wird empfohlen,
dass Sie zuerst den Begrenzungsdraht im Rasen festpflocken, damit Sie
gegebenenfalls leicht Anpassungen vornehmen können. Wenn Sie den
Begrenzungsdraht fertig installiert haben, wird empfohlen, dass Sie den
Landxcape
und
Umgebung gewöhnen.
Wenn Sie zusehen, wie der Landxcape
Sie anschließend Änderungen an der Route des Begrenzungsdrahts
vornehmen, um für ein störungsfreies Verfolgen des Begrenzungsdrahts
durch den Landxcape
Es wird sichergestellt, dass er erfolgreich mit der Ladestation arbeitet, bevor
der Begrenzungsdraht eingegraben wird.
TM
bitten, dem Begrenzungsdraht zu folgen, indem Sie auf
drücken. Dadurch kann sich der LandxcapeTM an seine neue
TM
zu sorgen, wenn dieser die Ladestation ansteuert.
6.3 Zusammenfügen des
Begrenzungskabels
Verwenden Sie eine Verbindung, wenn das Begrenzungskabel
verlängert und zusammengefügt werden soll. Dies ist wasserdicht und
garantiert eine verlässliche elektrische Verbindung.
Geben Sie beide Kabelenden in eines der drei Löcher der Verbindung.
Stellen Sie sicher, dass die Drähte vollständig in der Verbindung
TM
nutzt, müssen Sie einen
TM
kommt durcheinander,
TM
die Ladestation ansteuert, können
stecken, sodass beide Enden sichtbar sind am durchsichtigen Ende auf
der anderen Seite der Verbindung. (Siehe Abb. H) Verwenden Sie eine
Zange, um den Knopf oben auf der Verbindung vollständig hinein zu
drücken (Siehe Abb. I, J)
WARNHINWEIS:
Begrenzungskabel einfach mit Isolierband zu verbinden, oder
ein Schraubendstück als Verbindung zu verwenden. Feuchtigkeit aus
dem Boden kann das Kabel oxidieren lassen und dies kann nach einer
Weile zu einer Unterbrechung des Stromkreises führen.
Es wird nicht empfohlen, das
7. Softwareaktualisierung
Ihre LandxcapeTM -Software kann aktualisiert werden, wenn neue
Versionen verfügbar sind. Die aktuellste Software kann auf unserer
Webseite www.landxcape-robotics.com heruntergeladen werden.
Über USB aktualisieren. Siehe unten hinsichtlich des Downloads sowie
Installierungsanweisungen:
(1) Sie finden die aktuellste Software unter: www.landxcape-robotics.
com. Speichern Sie die Datei auf einem leeren,
USB-Stick. Entfernen Sie bitte alle restlichen Dateien von dem
USB-Stick und überprüfen Sie das Format. Wenn der USB-Stick
nicht entsprechend formatiert ist, bitte reformatieren Sie ihn.
ACHTUNG:
gestellt. Bitte entpacken Sie die Datei, bevor Sie fortfahren.
(2) Stellen Sie den Landxcape
Ihr Landxcape
(3) Führen Sie den USB-Stick (USB-Massenspeicher) in die
Schnittstelle ein. (Siehe Abb. K1)
(4) Schalten Sie Ihr Landxcape
Warten Sie, bis „
Sie dann das USB-Laufwerk (Flash-Laufwerk) und schließen Sie
die Schutzabdeckung fest. Wenn „
Update abgeschlossen und die PIN-Seite wird geöffnet.
Das beiliegende Handbuch basiert auf der Standardsoftware in der
Massenproduktion. Einige neue Merkmale/Funktionen der neuen
Version sind in dem Handbuch möglicherweise nicht vorhanden.
Wenn Sie Einstellungen finden, die im Handbuch nicht vorhanden
sind, besuchen Sie www.landxcape-robotics.com, um das aktuellste
Handbuch herunterzuladen.
Das Software-Update wird als ZIP-Datei zur Verfügung
TM
TM
aus.
auf einen sicheren. Schalten Sie
TM
ein. Das Update beginnt automatisch.
“ angezeigt wird (siehe Abb. K2), entfernen
“ angezeigt wird, ist das
FAT32
formatierten
8. Wartung
Ihr LandxcapeTM muss hin und wieder überprüft werden. Der
Landxcape
ordentliche Reinigung oder einen Austausch von Verschleißteilen.
Verwenden Sie niemals Ihren Landxcape
defekt ist.
Schalten Sie die Maschine aus, ehe Sie jegliche Reparatur- oder
Wartungsarbeiten ausführen.
In Folgenden möchten wir Ihnen erklären, wie Sie Ihren neuen
Landxcape
Pflege zukommen lassen, die er verdient.
8.1 Immer schön scharf
Ihren Landxcape
TM
arbeitet hart und verdient daher von Zeit zu Zeit eine
TM
, wenn der Ein/Aus Schalter
TM
am besten an sein neues Umfeld gewöhnen und ihm die
WARNUNG: Bevor Sie den LandxcapeTM reinigen,
einstellen oder die Messer auswechseln, schalten Sie
TM
AUS und ziehen Sie Schutzhandschuhe an.
DE 29

WARNUNG: Beim Austausch der Messer Wechseln Sie bei
einem Austausch unbedingt grundsätzlich alle Messer
auf einmal. Verwenden Sie beim Fixieren der Messer stets neue
Schrauben. Das ist wichtig, um den Klingenhalt sicherzustellen
und die Klingendrehscheibe auszuwuchten. Falls Sie keine
neuen Schrauben verwenden, kann dies zu schweren
Verletzungen führen.
Der Landxcape
TM
schneidet Gras nicht wie andere Rasenmäher.
Seine Messer sind an 2 Kanten rasiermesserscharf und wirbeln zum
perfekten Schnitt in beide Richtungen (Siehe Abb. L). Jedes Messer
Ihres Landxcape
TM
ist mit 2 Schneiden ausgestattet. Die rotierenden
Klingen macht willkürliche Vor- und Rückwärtsbewegungen, damit
beide Seiten der Klingen genutzt werden. Dadurch kann die Häufigkeit
beim Wechseln der Schneidklinge minimiert werden. Die einzelnen
Messer halten bis zu 2 Monate, wenn täglich gemäht wird. Schauen Sie
immer nach, ob die Messer angeschlagen oder anderweitig beschädigt
sind; falls ja, wechseln Sie die Messer aus. Wenn die Messer stumpf
und verschlissen sind, sollten sie durch die Ersatzmesser ersetzt
werden, die mit Ihrem Landxcape
erhalten Sie auch beim Landxcape
TM
geliefert wurden. Ersatzmesser
TM
-Händler in Ihrer Nähe.
Grasreste und sonstige Rückstände gründlich entfernt werden.
B. Unterseite reinigen
Nicht vergessen, ganz wichtig: Schalten Sie den Landxcape
TM
,
ziehen Sie Schutzhandschuhe über, bevor Sie den Messerteller
berühren!
Drehen Sie zuerst Ihren Landxcape
TM
um, so dass die Unterseite
exponiert wird. Nun sehen Sie den Messerteller, den umgebenden
Motorgehäuserahmen sowie die Vorderräder und Antriebsräder.
Reinigen Sie alles gründlich mit einer weichen Bürste oder mit einem
feuchten Lappen.
WARNUNG:
Landxcape
Reinigen Sie NIEMALS die Unterseite des
TM
s mit fließendem Wasser. Es können Schäden an
den Komponenten auftreten. (Siehe Abb. O1, O2)
Drehen Sie das Schneidrad um sicherzustellen, dass es frei
dreht. Prüfen Sie, dass sich die Klingen problemlos um die.
Befestigungsschrauben drehen. Beseitigen Sie alle Hindernisse.
WICHTIG: Entfernen Sie sämtliche (auch die kleinsten)
Rückstände, damit es nicht zu Rissen in der Messerscheibe
kommt. Auch der winzigste Riss kann die Mähleistung Ihres
Landxcape
TM
beeinträchtigen.
A. Messer austauschen
Nach einer Weile (normalerweise einmal pro Saison) müssen
die Messer Ihres Landxcape
TM
komplett ausgewechselt werden.
Tauschen Sie also unbedingt immer alle Messer auf einmal aus.
Zum Austausch können Sie einen der Ersatzmessersätze und
die zusätzlichen Messerschrauben verwenden, die mit Ihrem
Landxcape
Vor dem Austausch der Messer schalten Sie den Landxcape
TM
geliefert wurden.
TM
unbedingt ab und ziehen Schutzhandschuhe über! Dann führen Sie
diese Schritte aus:
1. Drehen Sie den Landxcape
TM
sanft auf den Rücken.
2. Entfernen Sie die Batterieabdeckung und entnehmen Sie den
Akku.
3. Lösen Sie die Messerschrauben mit einem Schlitz- oder
schraubendreher. (Siehe Abb. M)
4. Schrauben Sie die neuen Messer gut fest.
5. Setzen Sie den Akku ein, und bringen Sie die Batterieabdeckung
wieder an.
WICHTIG: Überzeugen Sie sich nach dem Verschrauben der
Messer, dass sich diese frei drehen lassen.
8.2 Sauber halten
WARNUNG: Bevor Sie Ihren LandxcapeTM reinigen,
schalten Sie ihn AUS. Ziehen Sie Schutzhandschuhe über,
bevor Sie die Messerscheibe reinigen; nutzen Sie dazu kein
fließendes Wasser.
A. Gehäuse reinigen
Ihr Landxcape
Sie ihn regelmäßig reinigen. Da Ihr Landxcape
Elektrogerät ist, müssen Sie beim Reinigen mit einer gewissen
Sorgfalt vorgehen -
Hochdruckreiniger bzw. ertränken Sie Ihren Landxcape
mit fließendem Wasser;
gefüllten Sprühflasche. Reinigen Sie das Kunststoffgehäuse mit einer
weichen Bürste oder einem Tuch, verzichten Sie auf Lösungsmittel
und Polituren (Siehe Abb. N). Achten Sie gut darauf, dass sämtliche
TM
fühlt sich deutlich wohler und lebt länger, wenn
TM
im Grunde ein
verwenden Sie deshalb KEINEN Schlauch oder
greifen Sie am besten zu einer mit Wasser
TM
nicht
C. Kontakte und Ladestreifen reinigen
Reinigen Sie die Kontakte an der Ladestation und den Ladestreifen
am Landxcape
und sonstige Rückstände rund um die Kontakte und Ladestreifen
regelmäßig, damit sich der Landxcape
TM
mit einem Tuch. Entfernen Sie sämtliche Grasreste
TM
stets problemlos aufladen
kann.
8.3 Akkulaufzeit und -haltbarkeit
Das Herzstück des LandxcapeTM ist sein 20V-Lithiumbatterie. Stellen
Sie sicher, dass der Akku vollständig aufgeladen und an einem kühlen,
trockenen Ort aufbewahrt wird.
HINWEIS:
zwischen 0-55
Die empfohlene Betriebstemperatur des Landxcape
o
C.
Die Lebenserwartung des Landxcape
TM
-Akkus hängt von
TM
liegt
unterschiedlichen Faktoren ab; beispielsweise:
• Dauer der Schönwettersaison (der „Mähsaison“) an Ihrem
Wohnort.
• Landxcape
TM
-Arbeitsstunden pro Tag
• Art und Weise der Akkulagerung
TM
Landxcape
kann ohne das Begrenzungskabel manuell
aufgeladen werden.
1. Schließen Sie die Ladestation an eine geeignete
Stromversorgung an. Die grüne Lampe der Ladestation
erleuchtet grün.
2. Docken Sie den Landxcape
während der Landxcape
3. Die grüne LED auf der Ladestation blinkt, der Landxcape
TM
TM
manuell an die Ladestation an,
ausgeschaltet ist (siehe Abb. P).
TM
beginnt mit dem Ladevorgang.
8.4 Überwintern
Ihr LandxcapeTM lebt länger und gesünder, wenn Sie ihm einen
wohlverdienten Winterschlaf gönnen. Obwohl der Landxcape
zäher Bursche ist, sollten Sie ihm im Winter einen Platz im Schuppen
oder in der Garage zugestehen.
Bevor Sie Ihren Landxcape
noch Folgendes erledigen:
• Reinigen Sie Ihren Landxcape
TM
in den Winterschlaf entlassen, sollten Sie
TM
gründlich.
TM
ein
DE30
 Loading...