

Page 1

®
Pick-up Pulverizer
Operator’s and Parts Manual
PPD Series 10’ through 20’
PPO Series 10’ through 20’
LANDOLL CORPORATION
1900 North Street
Marysville, Kansas 66508
(785) 562-5381
800-428-5655 ~ WWW.LANDOLL.COM
1098rev0813 5K804
Page 2

5K804
Page 3

○○○○○○○○○○○○○○○○○○○○○○○○○○○○○○○○○○○○○○○○○○○○○○○○○○○
PICK-UP PULVERIZERS
CONTENTS
Introduction ..................................................................................................................................... 3
Location Reference ................................................................................................................ 3
Parts Ordering ........................................................................................................................ 3
Safety Suggestions ........................................................................................................................ 4
Safety Signs ............................................................................................................................ 4
Safety Sign Location .............................................................................................................. 5
Operating Instructions .................................................................................................................... 6
Warning Light Assembly ................................................................................................................. 7
Tire Track Remover Assembly ....................................................................................................... 8
PPD Model Pulverizers - Machine Specifications .................................................................. 9
Optional Equipment ................................................................................................................ 9
Repair Parts ........................................................................................................................ 10
Frame & Roller Assembly - 10’ through 16’ Machines ................................................. 10
Frame & Roller Assembly - 18’ through 20’ Machines ................................................. 12
Three Point Hitch .......................................................................................................... 14
Scrapers........................................................................................................................ 16
Light Kit ......................................................................................................................... 18
Tire Track Remover ...................................................................................................... 19
PPO Model Pulverizers......................................................................................................... 23
Index ...................................................................................................................................... 28
Page I
5K804
Page 4

5K804
Page 5

INTRODUCTION
Your Brillion Pulverizer is built with the best materials and workmanship available. It has been designed
to give years of trouble-free operation. Proper care and operation will insure that you receive the
service and long life built into this machine.
Study this manual carefully before attempting to operate the machine. If items in the manual are not
understood, contact your local Brillion dealer.
This safety alert symbol is used to call your attention to
instructions concerning your personal safety. It is found on your
machine and in this manual. It is important to pay attention the the
precautions indicated and to be alert to the possiblility of personal
injury or death.
Federal law requires you to explain the safety and operating
instructions furnished with this machine to all employees before they
are allowed to operate the machine. These instructions must be
SAFETY ALERT
SYMBOL
repeated to the employees at the beginning of each season. Be sure
to observe and follow these instructions for your own and your
employee’s safety.
Location Reference
Right hand, left hand, and forward designations are determined by standing behind the machine and
facing the direction it will travel during field operation.
Parts Ordering
When ordering parts for this machine, include the
complete model number and serial number. Refer to the
nameplate located on the right side of the 3-point hitch.
Please read and record this number upon taking delivery
of this machine. See Figure 1.
Pulverizer Model No. _______________________
Serial Number ____________________________
Date Purchased __________________________
Be sure to read the Warranty Form which is provided.
Figure1
Return the proper portion of the Warranty Form for
recording at the factory.
Page 3
5K804
Page 6

SAFETY SUGGESTIONS
Investigation has shown that nearly one-third of all farm accidents are caused by careless use of
machinery. You can do your part in improving safety by observing the following suggestions. Insist
that all people working with you or for you abide by them.
1. Do not stand between tractor and implement when attaching or detaching implement, unless neither
are moving.
2. Do not allow anyone to ride on tractor or machine.
3. Lower machine to ground when not in use.
4. Use support stand so that machine will not roll when unhitched from tractor.
5. Do not transport at speeds over 20 MPH.
6. When transporting machine, avoid sudden stops or sharp turns because the weight of the machine
may cause the operator to lose control of the tractor.
7. When transporting the machine on a road or highway, use adequate warning symbols, reflectors,
lights and slow moving vehicle signs as required.
8. Securely block machine when working on or under it to prevent injury in case of hydraulic failure or
inadvertent lowering by another person.
SAFETY WARNING SIGNS
The “WARNING” signs illustrated on this page are placed on the machine to warn of hazards.
“The warnings found on the sign are for your personal safety and those around you.” Their locations
on the machine are shown on the following page. OBSERVE THESE WARNINGS!
Keep these signs clean so they can be observed readily. Wash with soap and water or cleaning
solution as required.
Replace “WARNING” signs should they become damaged, painted over or if they are missing.
When replacing decals, clean the machine surface thoroughly using soap and water or cleaning
solution to remove all dirt and grease.
Figure 2A
CAUTION
MOVING MACHINES CAN CAUSE INJURY. KEEP AWAY!
1. DO NOT STAND OR WALK IN FRONT OF TRACTOR WHEN IT IS
MOVING FORWARD.
2. DO NOT STAND OR WALK BETWEEN TRACTOR & IMPLEMENT
WHEN EITHER OR BOTH ARE MOVING.
3. DO NOT STAND OR WALK BEHIND IMPLEMENT WHEN IT IS BEING
BACKED UP.
4. DO NOT RIDE OR ALLOW OTHERS TO RIDE ON TRACTOR OR
IMPLEMENT.
5. BLOCK IMPLEMENT TO PREVENT MOVEMENT WHEN UNHITCHED
FROM TRACTOR.
8J309
1
1. 8J309 - Decal, “Caution” list
2. 528934 - Decal, Reflective Amber
3. 528933 - Decal, Reflective Red
2
3
1098ev401
Page 4
5K804
Page 7

Decal Locations
2
5
1
3
5
4
6
1. 8J309 - “Caution” Decal
2. 528938 - Orange Stripe
3. 528933 - Red Reflector
4. 528934 - Yellow Reflector (on frontside of decal plate)
5. 4K103 - Brillion Decal
6. 2P151 - SMV with bracket
Figure 2B
1098rev0813 Page 5 5K804
Page 8

OPERATION
Securely block machine when working on or under it to prevent injury in case of hydraulic
failure or inadvertent lowering by another person.
This pulverizer is designed to be mounted to tractors with a category II 3-point hitch. Clevis pins (with
1 1/8” dia.) are provided for attaching to the tractor’s lower links. Fasten to upper tractor link securely
with a 1" pin.
When operating, keep support stand locked up in raised position. To park the pulverizer, lower it to a
level surface; then set and fix the support stand all the way down.
After the first 1 - 2 hours of use, check over all fasteners to insure that they remain tight. Periodic
checks should be made thereafter.
1098ev401
Page 6
5K804
Page 9

Red LED Lamp
1098rev0813 Page 7 5K804
Amber LED Lamp
Amber LED Lamp
LED Warning
Lights Harness
Flasher Control
Module
7Pin/4Pin
WP Harness
When plugging in the LED 7-pin connector:
1) Make sure the tractor has a good clean receptacle, free of dirt and corrosion.
2) Make sure the 7-pin connector is inserted ALL the way in. With tighter fitting pins, operator
may think the connector is all the way in, but really isn’t.
3) Make sure the tractor receptacle cover latches over the keyway on the 7-pin connector to hold
the connector in place.
If an operator plugs in the 7-pin connector, but the lights do not seem to work right, check the above
items to make sure there is a good connection with the 7-pin connector.
Page 10

LED Lamp Placement Dimensions
1098rev0813 Page 7A 5K804
96”
64”
48”
32”
5 7/8”
Red Lamp
Light Module
C
L
Light Module and Bracket
Red Lamp
Bracket
Light Module
Light Module Bracket
Locknut, 1/4-20
Screw, 1/4-20 X 1-1/2
Page 11

LED Lamp and Harness Installation
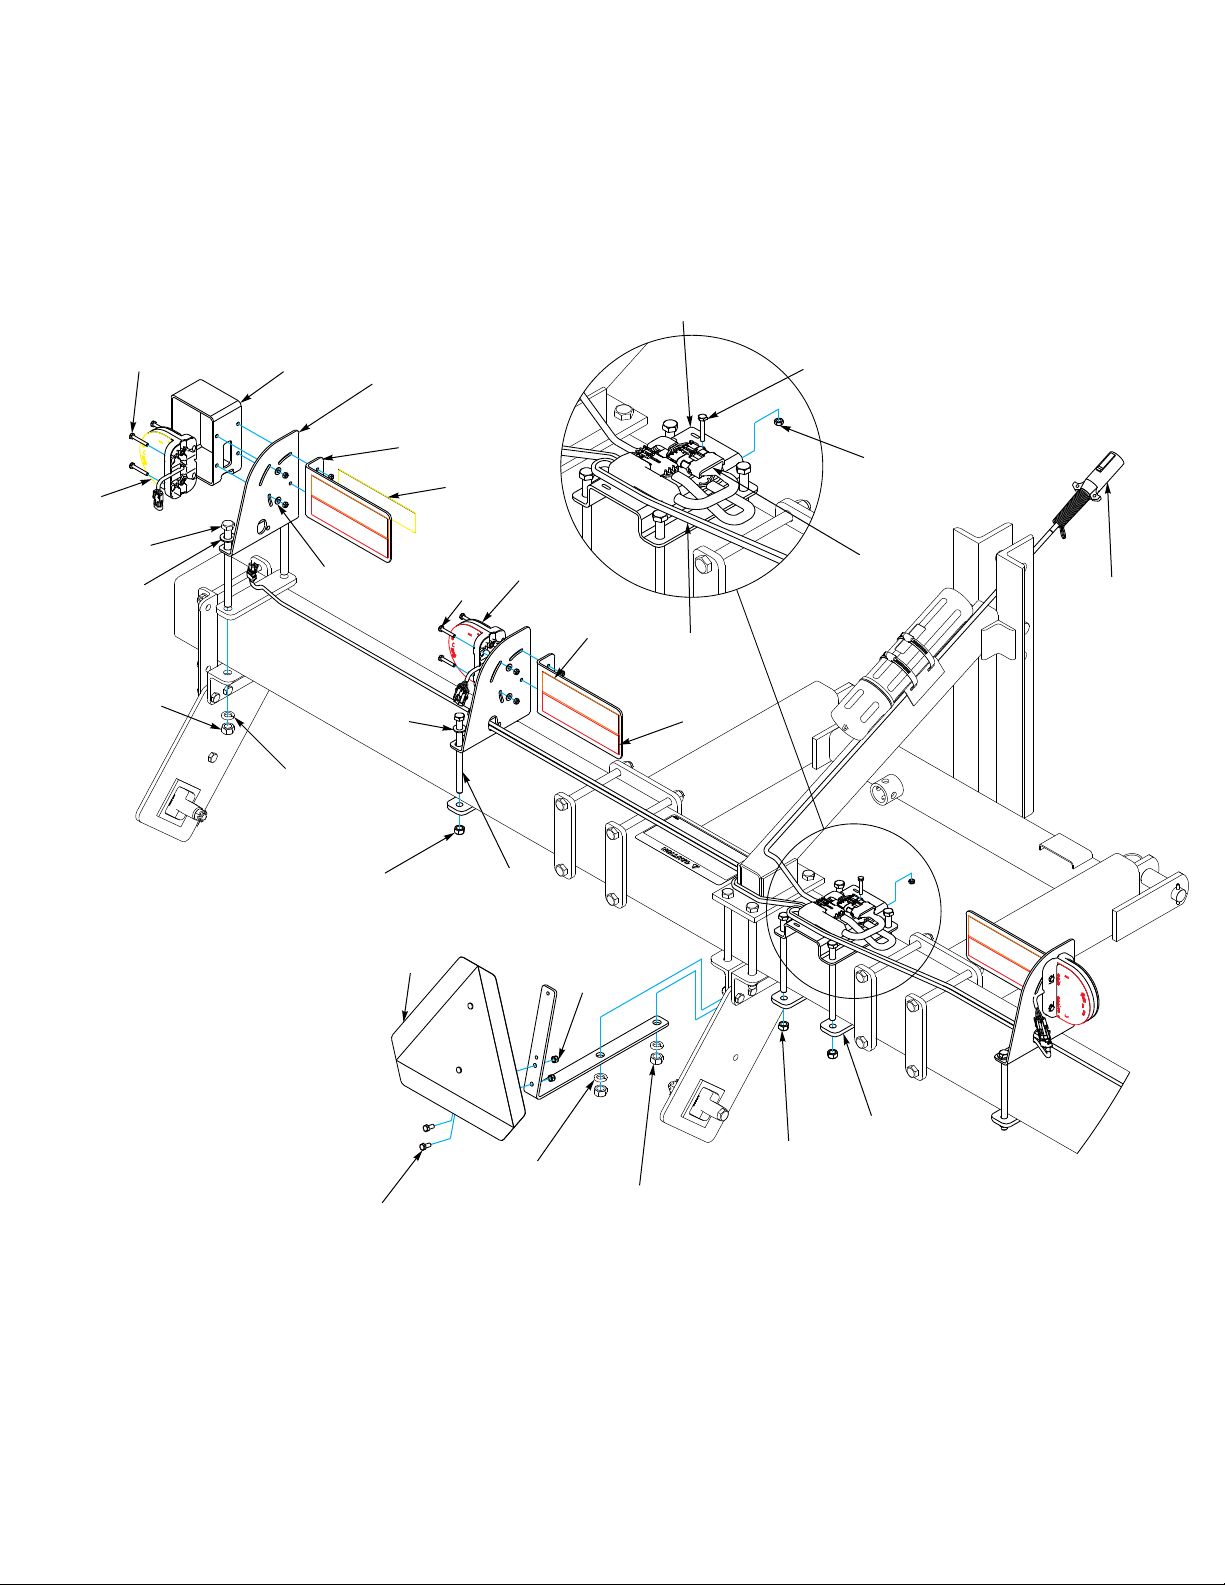
1. Install the inner Light Brackets on the frame tube, approximately 32” from the center of the
frame. Place a Strap under the frame and secure Light Brackets with 1/2-13 X 7-1/2 Screws,
Washers and Locknuts. See pages 7A and 7C.
2. Install the outer Light Brackets on the frame tube using existing Bearing Hanger Hardware.
3. Place the Amber LED’s inside the Light Shields and attach to the outer Light Bracket using 1/420 X 1-3/4 Screws, then attach the Decal Plate to the opposite side of the Light Bracket and
secure with Washers and Locknuts.
4. Attach the Red LED’s to the inner Light Brackets using 1/4-20 X 1-1/2 Screws, then attach the
Decal Plate to the opposite side of the Light Bracket and secure with Washers and Locknuts.
5. Install the Light Module under the Light Module Bracket using two 1/4-20 X 1-1/2 Screws and
Locknuts. Then attach the Light Module Bracket to the frame approximately 5 7/8” right of the center of the
frame using 1/2-13 X 7-1/2 Screws, Washers and Locknuts. See page 7A
6. Attach the 7 pin harness to the Light Module. Route the harness along the frame and to the
front of the 3 point Hitch.
7. Layout the LED Lamp Harness. Note that the cords are marked “Left” and “Right”.
Attach the harness to the Light Module.
8. Route the left 2 plug cord along the top of the left side frame, going through both Light
Brackets. Attach the cord into the Amber LED, repeat for the right side.
9. Route the left 3 plug cord along the top of the left side frame, through the Red LED Light
Bracket. Attach the cord into the Red LED, repeat for the right side.
10. Secure both harnesses with tie straps, making sure to leave enough slack to allow the
machine to raise and lower. Bundle and secure any excess cord with tie straps.
11. Raise and lower machine to check for proper clearance, adjust accordingly.
Important: All wires must be firmly attached to machine frame members, so they don’t sag or
become torn loose by field debris. Use the cable and hose ties provided.
1098rev0813 Page 7B 5K804
Page 12

LED Warning Light Installation
Light Module Bracket
Screw,1/4-20 X 1-3/4
Amber
LED
Screw,
5/8-11 X 8
Washer,5/8
Nut,5/8-11
Light
Shield
Washer,1/4
Washer,1/2
Lock Washer,5/8
Locknut,1/2-13
Light
Bracket
Decal Plate
Screw,
1/4-20 X 1-1/2
Red
LED
Screw,
1/2-13 X 7-1/2
Screw,
1/4-20 X 1-1/2
Locknut,1/4-20
Light
Module
7 Pin
Harness
Lamp
Harness
SMV
Lock Washer,5/8
Screw,5/16-18 X 3/4
1098rev0813 Page 7C 5K804
Locknut,
5/16-18
Strap
Locknut,1/2-13
Locknut,5/8-11
Page 13

5” Strap
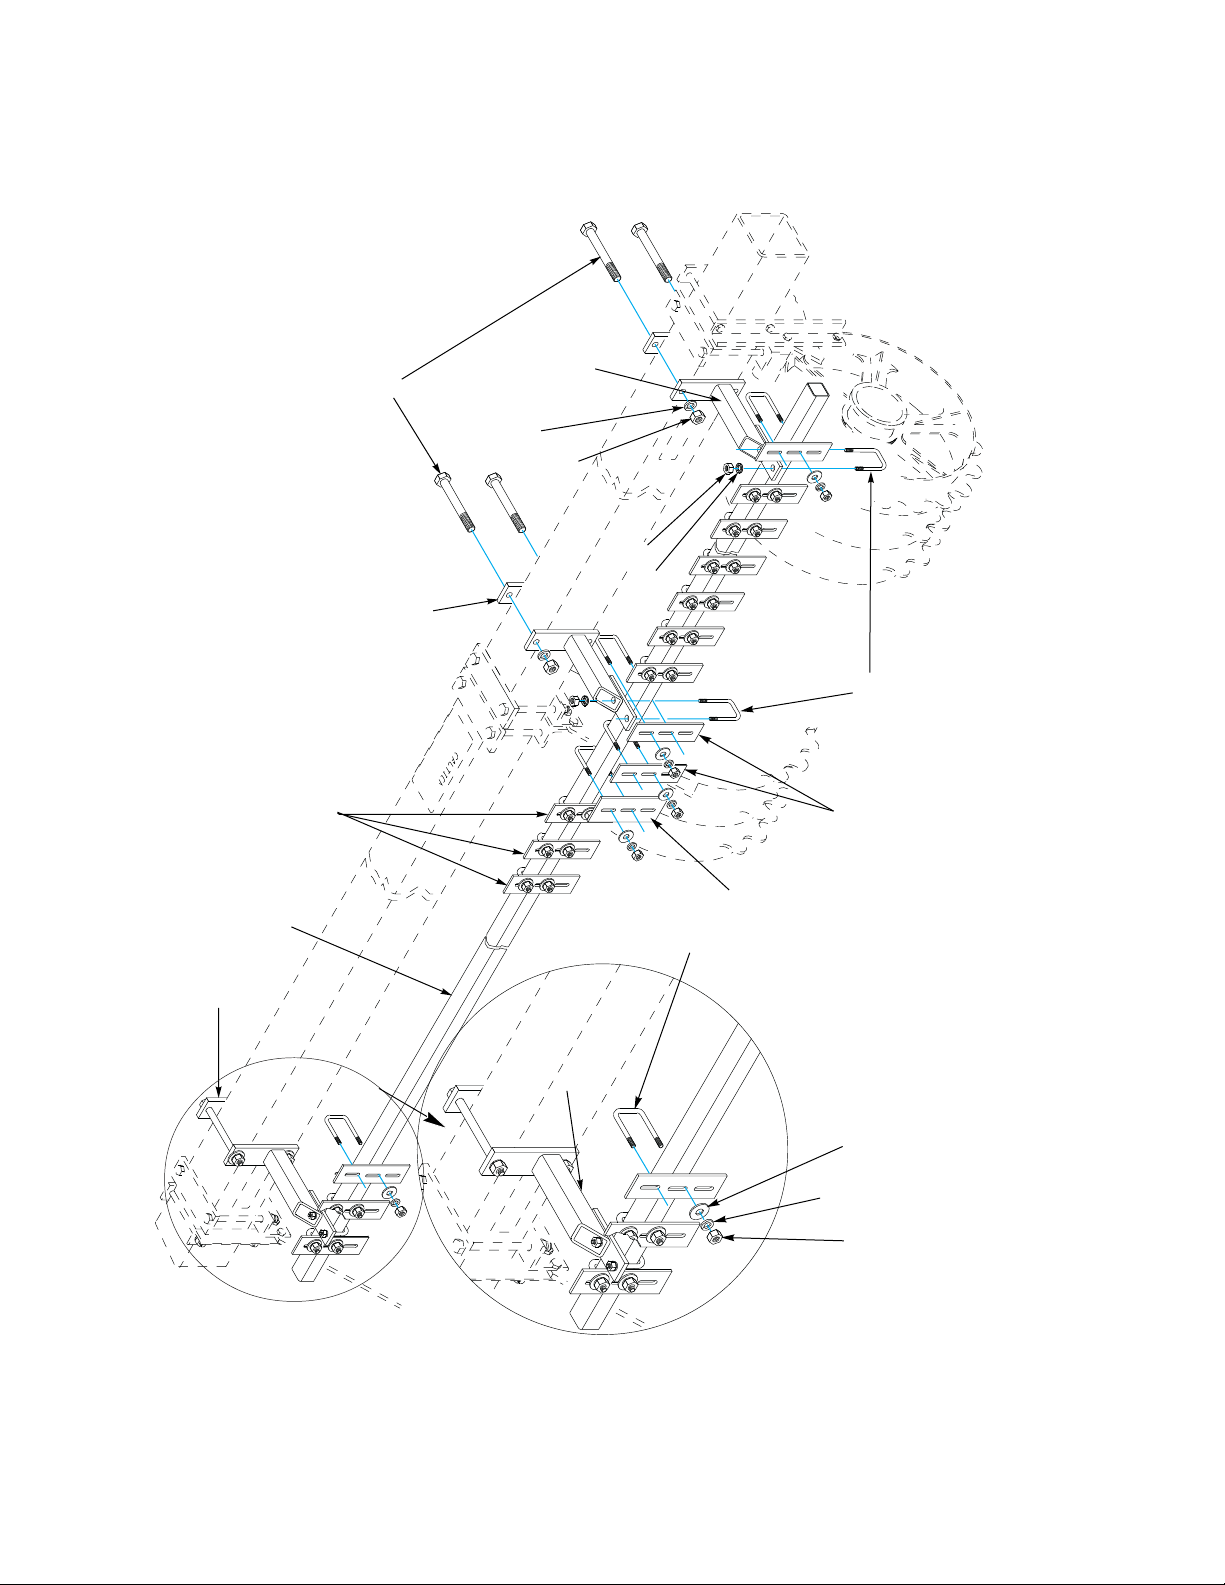
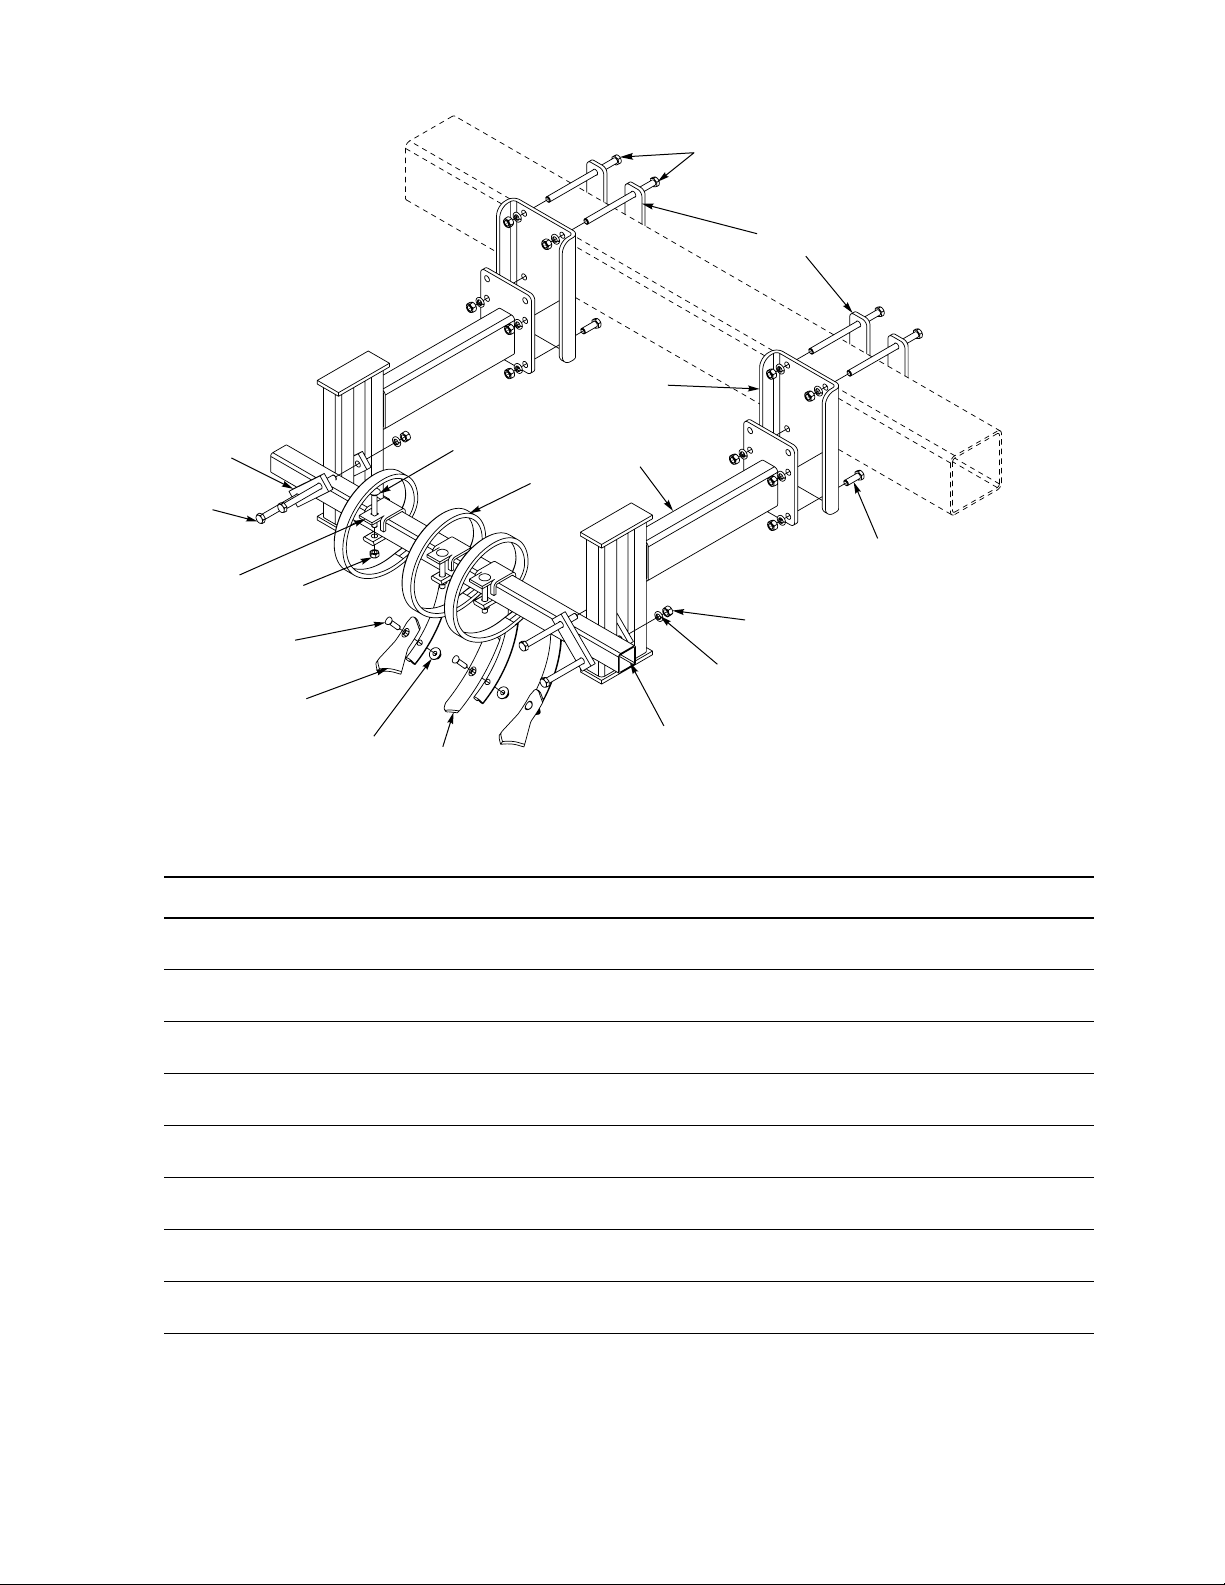
Centered behind each tractor tire, attach a set of Channel Adapters to the Pulverizer frame using the 8” Straps and
½” X 8” Bolts, Lockwashers, and Hex Nuts. Ensure that the Channel Adapter end with four holes is downward.
Prior to inserting the bottom 8” Bolts line up the S-Tine bracket with the four lower holes on the Channel Adapter.
Attach with 8” Bolts and Hex Nuts. The 1 ½ Screws, Lockwashers and Nuts are inserted in the two bottom holes.
Tighten all fasteners at this time.
Attach Tooth bar Tubes to the S-Tine Brackets using 5” Straps and ½” X 6” Bolts, Lockwashers, and Nuts. Tighten
all fasteners at this time.
Locate and install S-Tines as needed to cover tractor tire tracks.
Attach the Duckfoot and Reversible Points to the S-Tines using the Cultivator Bolts and 3/8” Flange Nuts. The
suggested pattern is to use the Reversible Point on center tine and Duckfoot Points on each side. If needed,
additional tines may be purchased and installed.
Check for interference between tractor tires and S-Tines. If this occurs, the Tooth Bar Tubes can be mounted
behind rearmost vertical member on the S-Tine brackets.
Screw
½”-13 X 6”
7/16”-14
Lock Nut
Cultivator
Bolt
Channel
Adapter
S-Tine
Bracket
ASSEMBLY OF THE 5K977 TIRE TRACK REMOVER KIT
Screw
½”-13 X 8”
Clamp
Screw
7/16”-14 X 3 ½”
Screw
½”-13 X 1½”
½”-13
Hex Nut
½” Lockwasher
8” Strap
Duckfoot
Point
3/8”-16
Flange Nut
Reversible
Point
Tooth Bar
Tube
1098rev1212 Page 8 5K804
Page 14

○○○○○○○○○○○○○○○○○○○○○○○○○○○○○○○○○○○○○○○○○○○○○○○○○○
PPD PULVERIZERS
MACHINE SPECIFICATIONS
(Subject to Change without Notification)
Model Designation:
Basic model is denoted by “PPD” -
The number following indicates the rolling width.
(example: PPD10 - 10’ Pickup Pulverizer with ductile wheels)
Basic Machine Specifications:
Rolling Transport No. 20” Ductile Axle Approximate
Model Width Width Wheels Wheel Style Size Weight (Lbs.)
PPD-10 10’ 11’ 30 8J001 4” 1568
PPD-12 12’ 13’ 2” 36 8J001 4” 1792
PPD-14 14’ 15’ 2” 42 8J001 4” 2016
PPD-16 16’ 17’ 2” 48 8J001 4” 2386
PPD-18 18’ 19’ 2” 54 9J808 4 1/2” 2769
PPD-20 20’ 21’ 2” 60 9J808 4 1/2” 3026
Pickup Pulverizer with Ductile wheels.
Frame: 3/8” Wall Tubing
Hitch: Category II 3 Point
OPTIONAL EQUIPMENT
Scraper Kits:
5K753 for PPD-10 .......................................................................................................... 121#
5K754 for PPD-12 .......................................................................................................... 137#
5K755 for PPD-14 .......................................................................................................... 152#
5K756 for PPD-16 .......................................................................................................... 168#
5K757 for PPD-18 .......................................................................................................... 196#
5K758 for PPD-20 .......................................................................................................... 212#
5K977 Tire Track Remover Kit ...................................................................................................213#
1098rev401
Page 9
5K804
Page 15

Table provided for general use.
NOTES:
Page 16
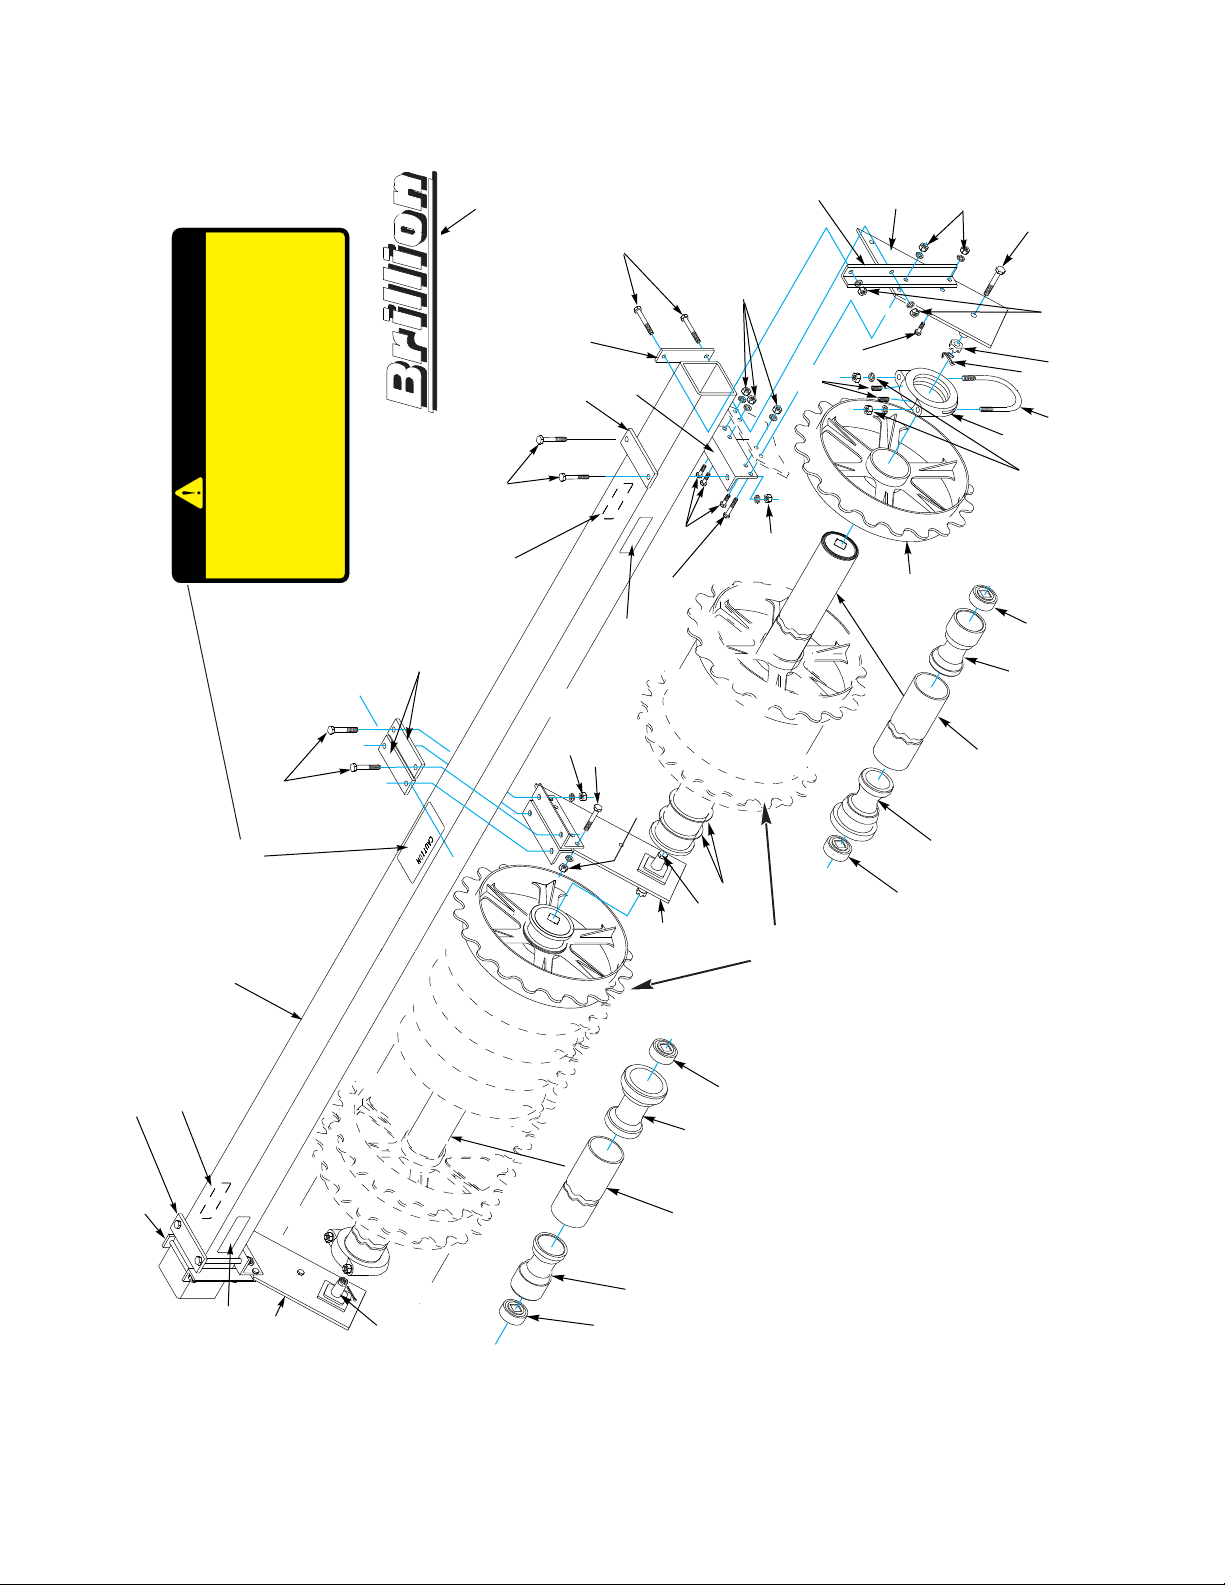
36
24
8J309
25
15
12,13
20
12, 13
CAUTION
KEEP OTHERS AWAY.
OR IMPLEMENT.
UNHITCHED FROM TRACTOR.
MACHINE OR PARTS ARE IN MOTION.
1. KEEP AWAY FROM MOVING TRACTORS OR IMPLEMENTS.
2. DO NOT RIDE OR ALLOW OTHERS TO RIDE ON TRACTOR
3. BLOCK IMPLEMENT TO PREVENT MOVEMENT WHEN
MOVING MACHINES CAN CAUSE INJURY. KEEP AWAY!
33
1
4. KEEP ALL GUARDS AND SHIELDS IN PLACE WHILE
30
29
27
28
26
11
30
26
35
32
19,
31
7
34
28
19, 31
32
3
12, 13
17
18
10
9
12
13
6
4
12, 13
5
8
6
23
22
2
28
29
1098ev401
35
6
5
3
4
34
21
16
Page 10
6
5K804
Page 17

FRAME & ROLLER ASSEMBLY
MACHINES WITH 4" OUTSIDE DIAMETER PIPE AXLE (10’ thru 16’ Machines)
Index
No. Part # Description Qty. Weight (lbs.)
1 5K726 Frame Tube, 10’ 1 306.9
5K727 Frame Tube, 12’ 1 361.8
5K728 Frame Tube, 14’ 1 416.8
5K729 Frame Tube, 16’ 1 471.7
2 9J028 Wheel and Axle Assembly (10’ Machines) 2 485.0
8J069 Wheel and Axle Assembly (12’ Machines) 2 599.0
8J068 Wheel and Axle Assembly (14’ Machines) 2 671.0
9J027 Wheel and Axle Assembly (16’ Machines) 2 788.0
3 9C062 Pipe Axle Assembly, 10’ w/ bearings 2 60.0
8C986 Pipe Axle Assembly, 12’ w/ bearings 2 69.0
1D138 Pipe Axle Assembly, 14’ w/ bearings 2 78.0
3D199 Pipe Axle Assembly, 16’ w/ bearings 2 87.0
4 9C014 Outer Bearing Housing 2 8.7
5 9C015 Inner Bearing Housing 2 9.7
6 9C016 Bearing 4 1.7
7 8J001 Wheel, 20” Ductile Notched
30, 36, 42, 48 28.0
8 9J277 Spacer Ring 4 .2
9 9C031 Axle Clamp, 4” 2 3.7
10 9D673 U-Bolt, 1/2” 2 .7
11 2D535 Set Screw, 1/2” 4 12 1C109 Lockwasher, 1/2” 22 13 1C390 Nut, 1/2” 22 -
- 8J998 L.H. End Bracket Assembly (items 15-20) 1 15.0
15 8J996 L.H. End Bracket 1 13.5
16 9D669 Straight Axle Mount 4 .9
17 4D529 Slotted Nut 3 .1
18 2C864 Cotter Pin 3 19 1B166 Lockwasher 11 20 9D864 Drilled Bolt, 3 1/2” Long 2 .9
- 8J999 R.H. End Bracket Assembly (items 21 & 16-20) 1 15.0
21 8J997 R.H. End Bracket 1 13.5
- 8J993 Center Bracket Assembly (items 22, 23 & 16-19) 1 22.0
22 8J994 Center Bracket 1 14.0
23 9D866 Drilled Bolt, 6” Long 1 .6
24 3K318 Angle 2 5.4
25 1J696 Bolt, 1/2” x 7 1/2” 4 .4
26 8C527 Capscrew, 1/2” x 1 1/2” 8 .1
27 8J099 Angle 4 5.3
28 3K321 Strap 6 2.8
29 3K320 Strap 2 1.7
30 7D040 Bolt, 5/8” x 8” 8 .8
31 1C392 Nut, 5/8” Hex 8 .1
32 5D051 Capscrew, 1/2” x 1 3/4” 6 .1
33 8J309 Decal, Caution List 1 34 2J430 Decal, Red Reflective 2 35 2J431 Decal, Amber Reflective 2 36 4K103 Decal, Brillion (2 3/4” x 16 3/4”) 4 -
1098rev10-13-05
Page11
5K804
Page 18
8J309
CAUTION
29
37
23
24
32, 33
32, 33
32, 33
32, 33
27
28
25
15
13
31
14
KEEP OTHERS AWAY.
OR IMPLEMENT.
1. KEEP AWAY FROM MOVING TRACTORS OR IMPLEMENTS.
2. DO NOT RIDE OR ALLOW OTHERS TO RIDE ON TRACTOR
MOVING MACHINES CAN CAUSE INJURY. KEEP AWAY!
3. BLOCK IMPLEMENT TO PREVENT MOVEMENT WHEN
34
1
UNHITCHED FROM TRACTOR.
MACHINE OR PARTS ARE IN MOTION.
4. KEEP ALL GUARDS AND SHIELDS IN PLACE WHILE
29
36
25
30
21,
31
8
9
10,
11
7
27
35
4
21, 30
31
3
16
5
26
22
6
19
20
32,
33
2
36
23
1098ev401
6
5
3
35
4
15
Page 12
5K804
Page 19
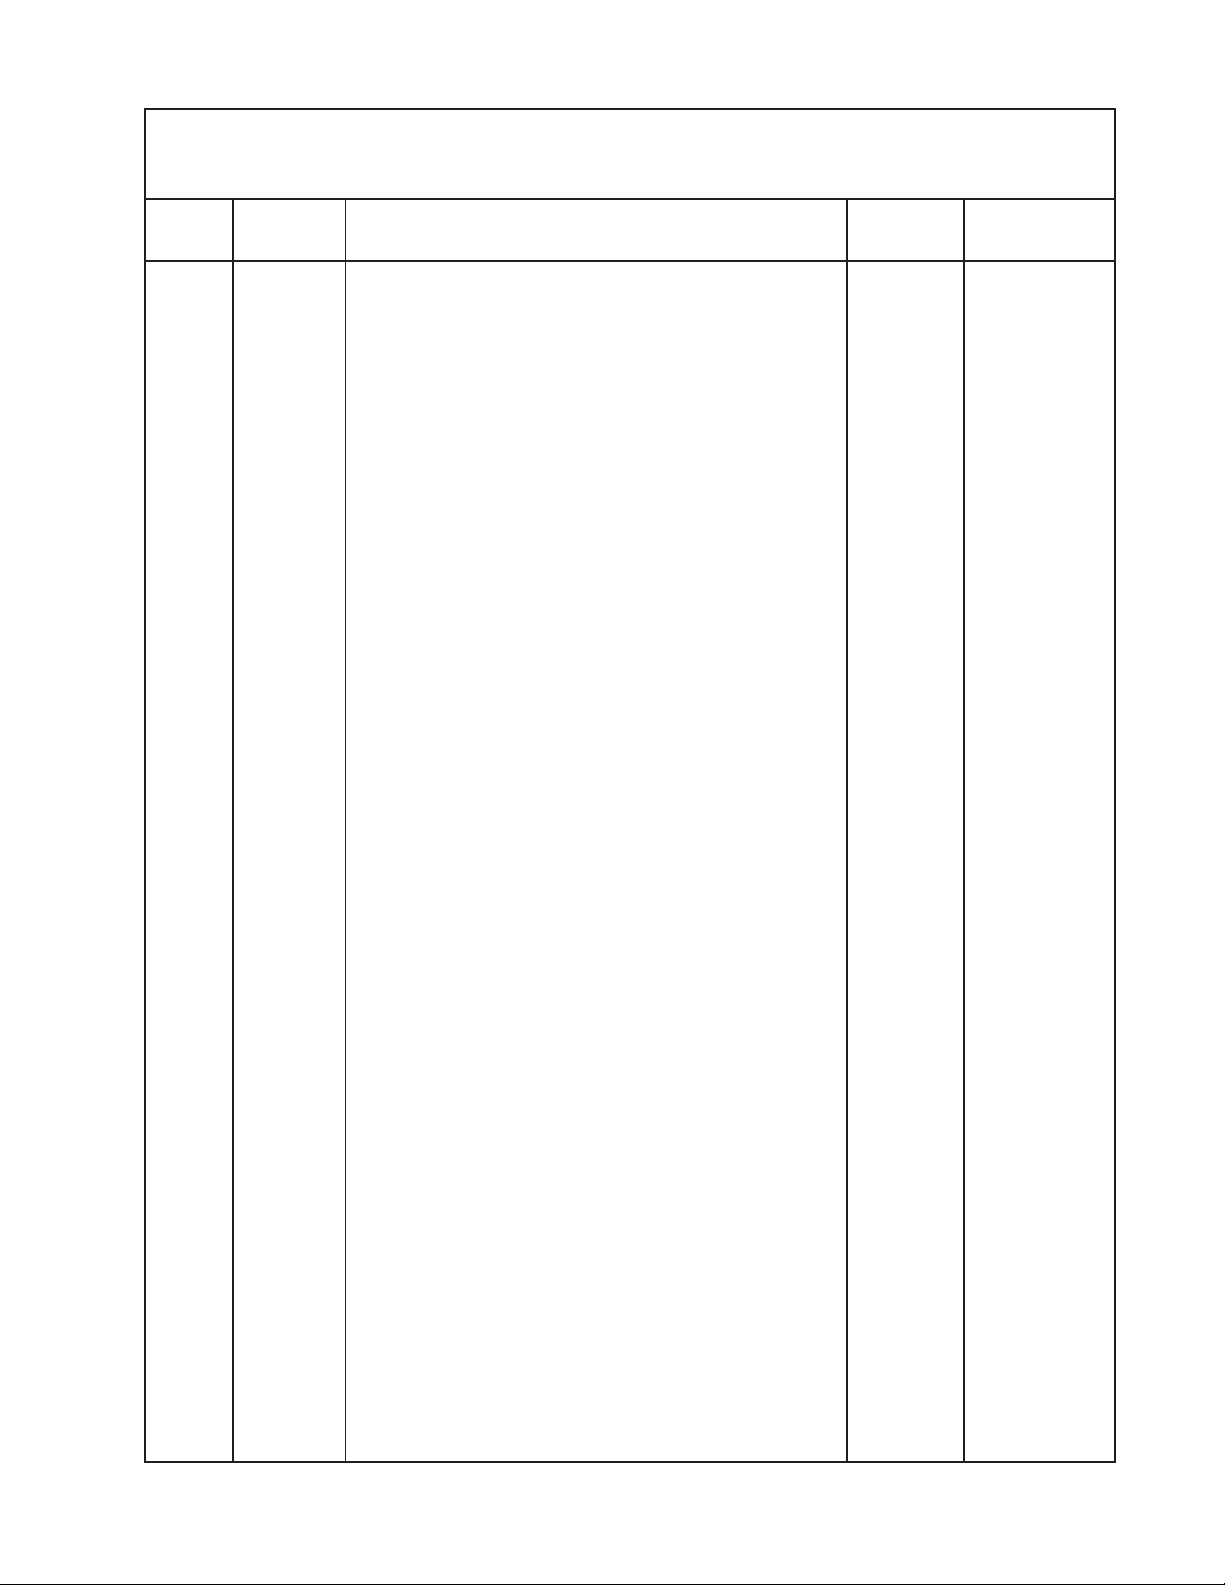
FRAME & ROLLER ASSEMBLY
MACHINES WITH 4 1/2" OUTSIDE DIAMETER PIPE AXLE (18’ thru 20’ Machines)
Index
No. Part # Description Used Weight
1 5K730 Frame Tube, 18’ 1 531.3
5K731 Frame Tube, 20’ 1 586.2
2 3K323 Wheel and Axle Assembly (18’ Machines) 2 932.0
5K744 Wheel and Axle Assembly (20’ Machines) 2 1033.0
3 3J186 Shaft Assembly, 18’ Machines 2 139.0
3J185 Shaft Assembly, 20’ Machines 2 151.9
4 9C129 Stub Shaft Mounting 2 13.54
5 5D038 Inner Bearing Housing 2 10.3
6 9C016 Bearing 4 1.7
7 9J808 Wheel, 20” Ductile Notched 24, 30 28.0
8 0A087 Axle Clamp, 4 1/2” 2 3.7
9 1C290 U-Bo lt, 7 /16” 2 .7
10 1C314 Lo ckwasher, 7/16” 22 11 1C179 Nu t, 7/16” 22 12 2J417 Bearing [2J516] and Housing [2J515] 2 4.7
13 2J516 Bearing 2 2.2
14 2J515 Bearing Housing 2 2.5
15 9J004 Plate 2 13.5
16 9J007 Center Bracket Assembly 1 22.0
17 9J006 Center Bracket 1 14.0
18 9D669 Straight Axle Mount 4 .9
19 4D529 Slotted Nut 3 .1
20 2C864 Cotter Pin 3 21 1B166 Lockwasher 11 22 3J860 Drilled Bolt, 2 .9
23 3K318 Angle 2 5.4
24 1J696 Bolt, 1/2” x 7 1/2” 4 .4
25 8C527 Capscrew, 1/2” x 1 1/2” 8 .1
26 8J099 Angle 4 5.3
27 3K321 Strap 6 2.8
28 3K320 Strap 2 1.7
29 7D040 Bolt, 5/8” x 8” 8 .8
30 1C392 Nut, 5/8” Hex 8 .1
31 5D051 Capscrew, 1/2” x 1 3/4” 6 .1
32 1C109 Lo ckwash er, 1/2 ” 26 33 1C390 Nut, 1/2” Hex 26 34 8J309 Decal, Caution List 1 35 2J430 Decal, Red Reflective 2 36 2J431 Decal, Amber Reflective 2 37 4K103 Decal, Brillion (2 3/4” x 16 3/4”) 4 -
1098rev10-13-05
Page 13
5K804
Page 20
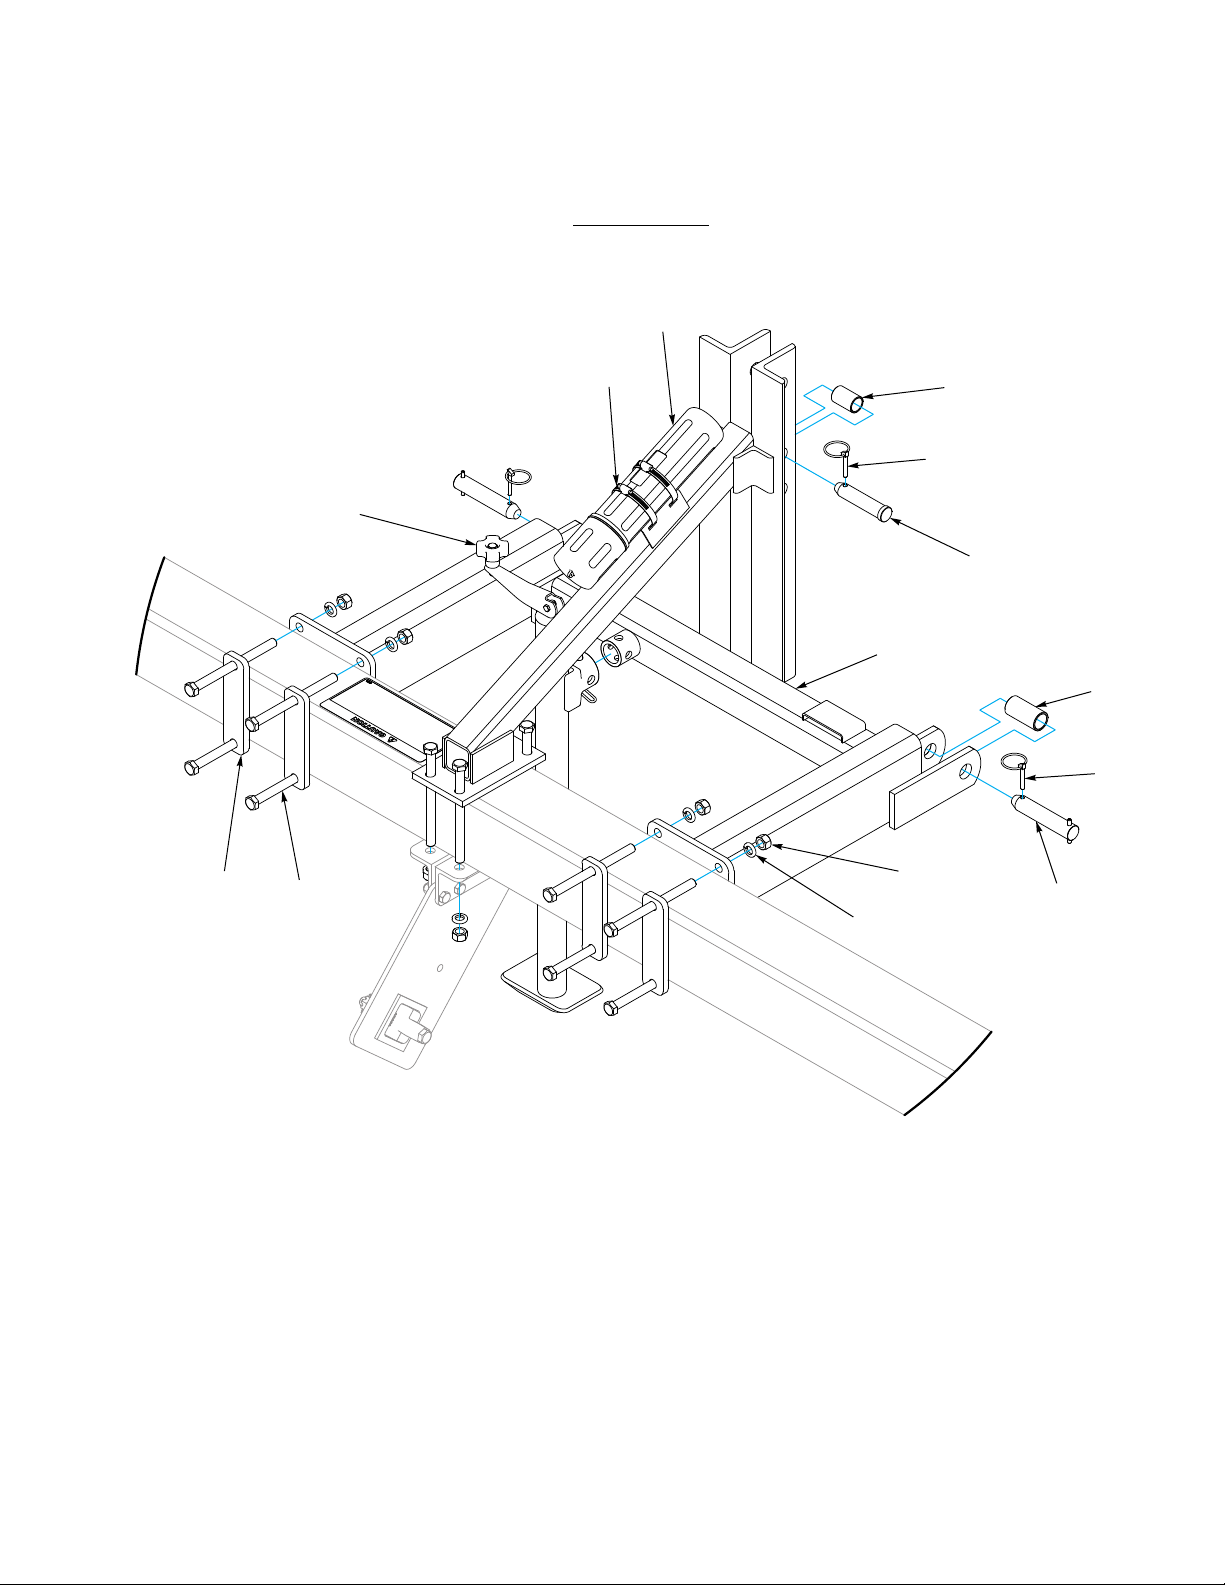
3 Point Hitch
10
11
9
1
8
7
6
12
3
13
2
3
5
4
PP10-20 Rep3PtHitch
1098rev0813 Page 14 5K804
Page 21

3 Point Hitch
1098rev0813 Page 15 5K804
ITEM PART NUMBER DESCRIPTION QTY.
1 5K736 3 POINT HITCH 1
2 5D158 SLEEVE 2
3 5D110 KLIK PIN 1/4 X 1 -1/4 3
4 5D156 PIN ASSEMBLY 1-1/8 X 5-3/4 2
5 1-512-010007-11 NUT, HEX 5/8-11 GR2 ZP 8
6 1-861-010034-15 WASHER, LKG, HLCL SPR, 5/8 8
7 1-654-010059-21 SCREW, HEX CAP, 5/8-11UNC X 8 GR5 8
8 3K321 STRAP 4
9 4J867 DRAWBAR JACK 1
10 1-116-010019 BOX, MANUAL STORAGE 1
11 105-0093 HOSE CLAMP 4-1/2 IDEAL #5264 2
12 5D157 SLEEVE 1
13 6D529 CLEVIS PIN, 1.0 X 4.5 1
Page 22
2
4
5
6
9
8
3
7
15
10
1
11
3
2
15
12
13
14
1098ev401
Page 16
5K804
Page 23
SCRAPERS
Index Weight
No. Part # Description Qt’y. (Lbs.)
- 5K753 Scraper Kit (10’Machines) 1 121.0
5K754 Scraper Kit (12’Machines) 1 137.0
5K755 Scraper Kit (14’Machines) 1 152.0
5K756 Scraper Kit (16’Machines) 1 168.0
5K757 Scraper Kit (18’Machines) 1 196.0
5K758 Scraper Kit (20’ Machines) 1 212.0
1 9J056 Scraper Tube - 124” 1 31.5
9J057 Scraper Tube - 148” 1 37.6
9J058 Scraper Tube - 172” 1 43.7
9J059 Scraper Tube - 196” 1 49.8
3K699 Scraper Tube - 220” 1 55.9
4K653 Scraper Tube - 244” 1 62.0
2 5K752 Scraper Bracket 3 7.7
3 3K321 Strap 3 2.8
4 7D040 Machine Bolt, 5/8” x 8” 6 .8
5 1B166 Lockwasher, 5/8” 6 6 1C392 Nut, 5/8-11-NC 6 .1
7 5D921 U-Bolt,
1/2” x 3 1/4” Deep - 1/2-13 NC x 1” Thrd 3.5
8 1C109 Lockwasher, 1/2” 6 9 1C390 Nut, 1/2-13 NC 6 .1
10 8J079 Center Scraper 1 1.9
10’ 12’ 14’ 16’ 18’ 20’
11 8J015 U-Bolt,
3/8” x 3” Deep - 3/8-16 NC x 1” Thrd. 32 38 44 50 56 62 .2
12 1C182 Washer, 3/8” STD. 64 76 88 100 112 124 13 1C183 Lockwasher, 3/8” 64 76 88 100 112 124 14 1C277 Nut, 3/8-16 NC 64 76 88 100 112 124 15 8J014 Scraper 30 36 42 48 54 60 1.3
1098rev401
Page 17
5K804
Page 24
2
10
5
6
9
7
REAR
4
3
1
8
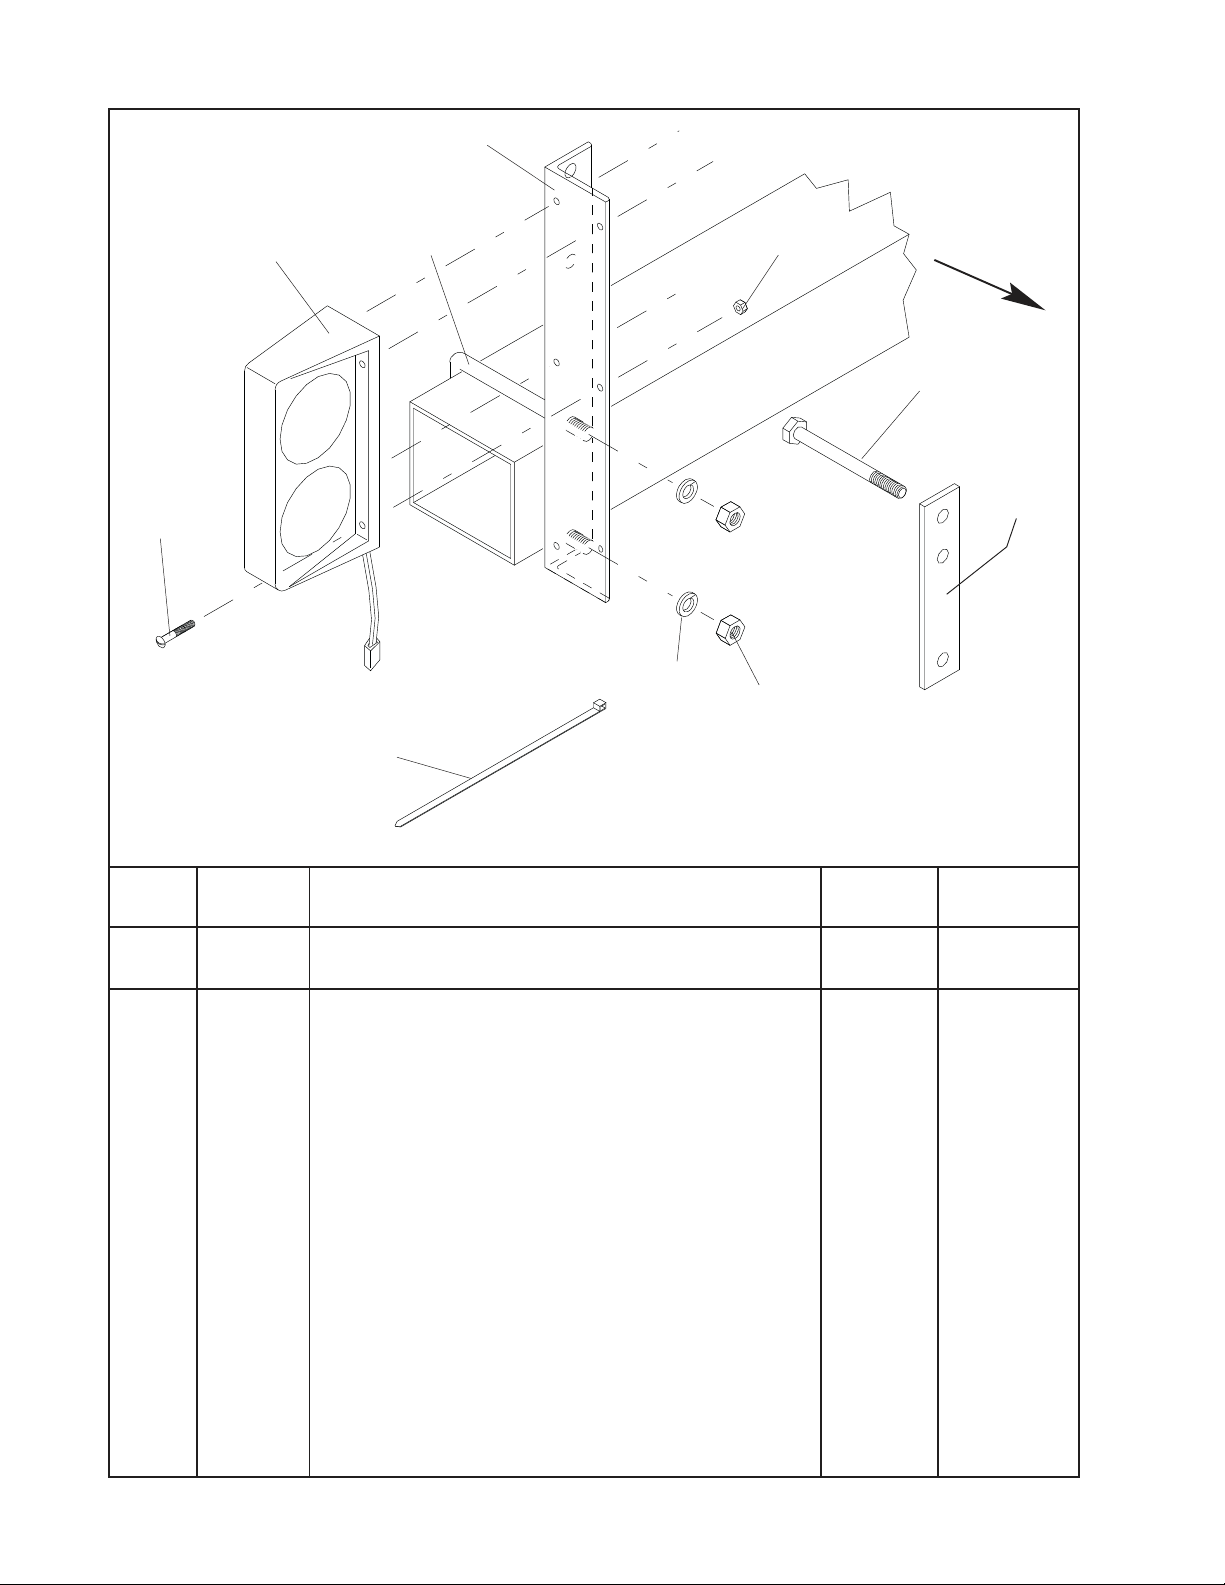
4K910 LIGHT KIT
Index Weight
No. No. Description Q’ty. (Lbs.)
1 4K772 Dual Lamp, L.H. 1 2.0
4K773 Dual Lamp, R.H. 1 2.0
2 4K908 Angle 2 4.9
3 4K854 Strap (18’-20’ Machines) 2 1.0
4 5C124 Machine Bolt, 1/2” x 7” (18’-20’ Machines) 4 .6
5 3J561 Ubolt, 1/2” (10’-16’) 2 .9
6 1C109 Lockwasher, 1/2” 4 7 1C390 Nut, 1/2-13 NC Hex 4 8 4K782 Machine Screw, 1/4” x 1 1/4” 8 9 6J150 Locknut, 1/4” Flanged 8 -
10 3J615 Cable Tie 10 11 4K780 Wishbone Harnes - 10’ (not shown) 1 2.0
12 4K781 Ag. Harness - 20’ (not shown) 1 4.0
07/31/2013 and Prior
1098rev0813
Page 18
5K804
Page 25

Table provided for general use.
NOTES:
Page 26
LED Warning Lights
4
7
8
21
22
24
10
23
13
15
11
16
12
25
5
14
5
6
9
26
2
27
3
1
18
20
17
23
19
1098rev0813 Page 18A 5K804
24
15
Page 27

LED Warning Lights - 08/01/2013 and After
1098rev0813 Page 18B 5K804
ITEM PART NUMBER DESCRIPTION QTY.
1 178514 HARNESS, 7 PIN/4 PIN WP, 10’ 1
2 178513 HARNESS, LAMP 66 X 138 1
3 174437 MODULE, AG FLASHER CONTROL 1
4 178530 BRACKET, MODULE MNT, 6IN 1
5 1-654-010047-08 SCREW HX CP, 1/4-20UNCX1-1/2 G5 10
6 1-512-010005-01 NUT, HEX SLFLKG GRB 1/4-20 18
7 1-654-010047-09 SCREW HX CP, 1/4-20UNCX1-3/4 G5 8
8 174436 LAMP, AG AMBER SINGLE LED 2
9 174437 LAMP, AG RED SINGLE LED 2
10 178534 TUBE, LIGHT SHIELD, 5 X 7 2
11 164698 BRACKET LIGHT MOUNT 4
12 164697 PLATE CONSPICUITY DECAL MOUNT 4
13 1-861-010032-06 WASHER, FLAT 1/4 N ZP/CD 8
14 1-654-010055-20 SCREW, HXCP 1/2-13UNC X 7-1/2 GR5 8
15 1-512-010005-09 NUT, HEX SLFLKG, 1/2-13 GRB 8
16 1-861-010032-14 WASHER, FLAT 1/2” N ZP/CD 4
17 3K320 STRAP 4
18 2P151 SMV W/BRACKET 1
19 1-654-010049-03 SCREW HX CP 5/16-18UNC X 3/4 GR5 2
20 104032 NUT, HX SLF-LKG W/MYL 5/16-18 2
21 1-654-010059-21 SCREW, HEX CAP, 5/8-11UNC X 8 GR5 8
22 1-861-010032-18 WASHER, FLAT 5/8N ZP/CD 4
23 1-861-010034-15 WASHER, LKG, HLCL SPR, 5/8 8
24 1-512-010007-11 NUT, HEX 5/8-11 GR2 ZP 8
25 528934 REFLECTOR - YELLOW 2
26 528938 STRIPE, ORANGE 4
27 528933 REFLECTOR - RED 4
28 3J615 CABLE TIE - 28” (NOT SHOWN) 12
29 105-0228 TYWRAP 8IN LG TY-5272MX (NOT SHOWN) 12
Page 28
11
16
10
7
6
13
14
4
2
5
15
1
3
12
17
9
8
18
5K977 Wheel Track Remover Kit
ITEM PART NUMBER DESCRIPTION QTY
1 1J887 S-TINE, 10mm X 32mm 6
2 7D014 DUCKFOOT POINT 4
3 2J155 HEAVY DUTY REVERSIBLE POINT 2
4 7D728 CULTIVATOR BOLT 6
5 5J616 FLANGE LOCK NUT 3/8-16 6
6 1-654-010055-17 SCREW,HEX CAP,1/2-13UNCX6 GR5 8
7 5J358 STRAP (5”) 8
8 1-861-010034-13 WASHER, LKG HLCL SPR, 1/2 32
9 1-512-010007-09 NUT, HEX 1/2-13 ZP 32
10 3K320 STRAP (8”) 8
11 174888 CHANNEL, ADAPTER 4
12 9J474 BRACKET 4
13 1J834 CLAMP 6
14 101988 NUT,HEXSLF-LKG 7/16-14 GRB 6
15 2J241 SCREW 7/16-14NCX3-1/2RDHD SQNK 6
16 2P158 HHCS, 1/2-13 X 8, GR5, ZP 16
17 1-654-010055-03 SCREW,HEX CAP, 1/2-13UNCX1-1/2 8
18 5K975 TOOTH BAR TUBE 2
1098rev1212 Page 19 5K804
Page 29
○○○○○○○○○○○○○○○○○○○○○○○○○○○○○○○○○○○○○○○○○○○○○○○○○○
PPO PULVERIZERS
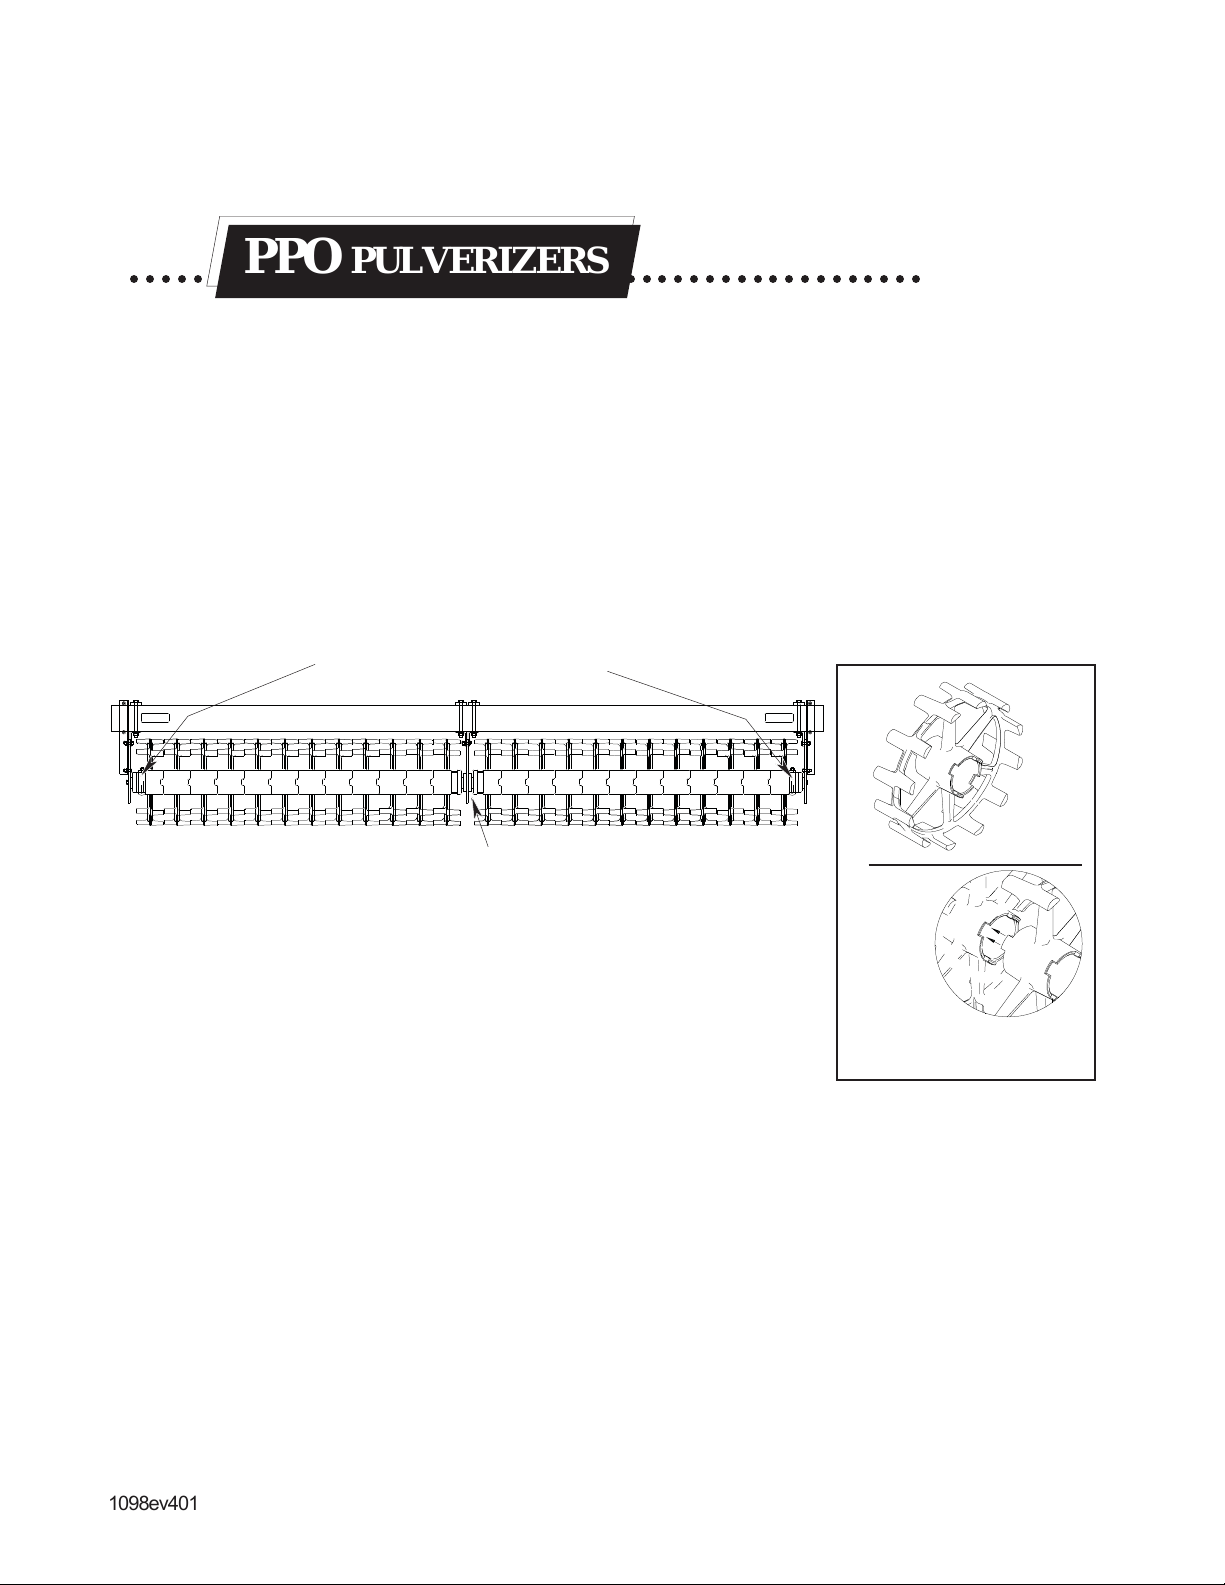
SPECIAL NOTE ON OPTIMIZER MODELS
Position Axle Clamps to outside
ends & opposite Center Bearing
Center Bearing
The above diagram shows typical wheel gang positioning of optimizer model
pulverizers using optimizer wheels. Position of axle clamps is toward the
outside end of the machine. Also, it is especially important that fit of
wheels on the shaft remains tight. Wear and damage can result from
wheels that do not fit tightly against one another. Make frequent checks
to insure that close fit remains intact. If wheels have jostled apart,
adjustment is made by loosening and moving the clamp until the wheels
are tightly in place. Then retighten clamp.
6K353
Male &
female
ends
must
mate
and
remain
in close contact.
Optimizer
Wheel
1098ev401
Page 20
5K804
Page 30

CONTENTS
Introduction ......................................................................................................................................... 3
Location Reference ...................................................................................................................... 3
Parts Ordering ..............................................................................................................................3
Safety Suggestions ................................................................................................................................... 4
Safety Signs ..................................................................................................................................4
Decal Location (Also See below for additional decal) ................................................................. 5
Operating Instructions .............................................................................................................................. 6
Warning Light Assembly ........................................................................................................................... 7
Tire Track Remover Assembly .................................................................................................................. 8
Machine Specifications ........................................................................................................................... 23
Optional Equipment .................................................................................................................... 23
Repair Parts .............................................................................................................................. 24
Frame Assembly ............................................................................................................ 24
Wheel and Axle Assembly .............................................................................................. 26
Three Point Hitch .......................................................................................... See page 14
Light Kit ......................................................................................................... See page 18
Tire Track Remover ...................................................................................... See page 19
Index ....................................................................................................................................................28
1098rev401
Page 21
5K804
Page 31
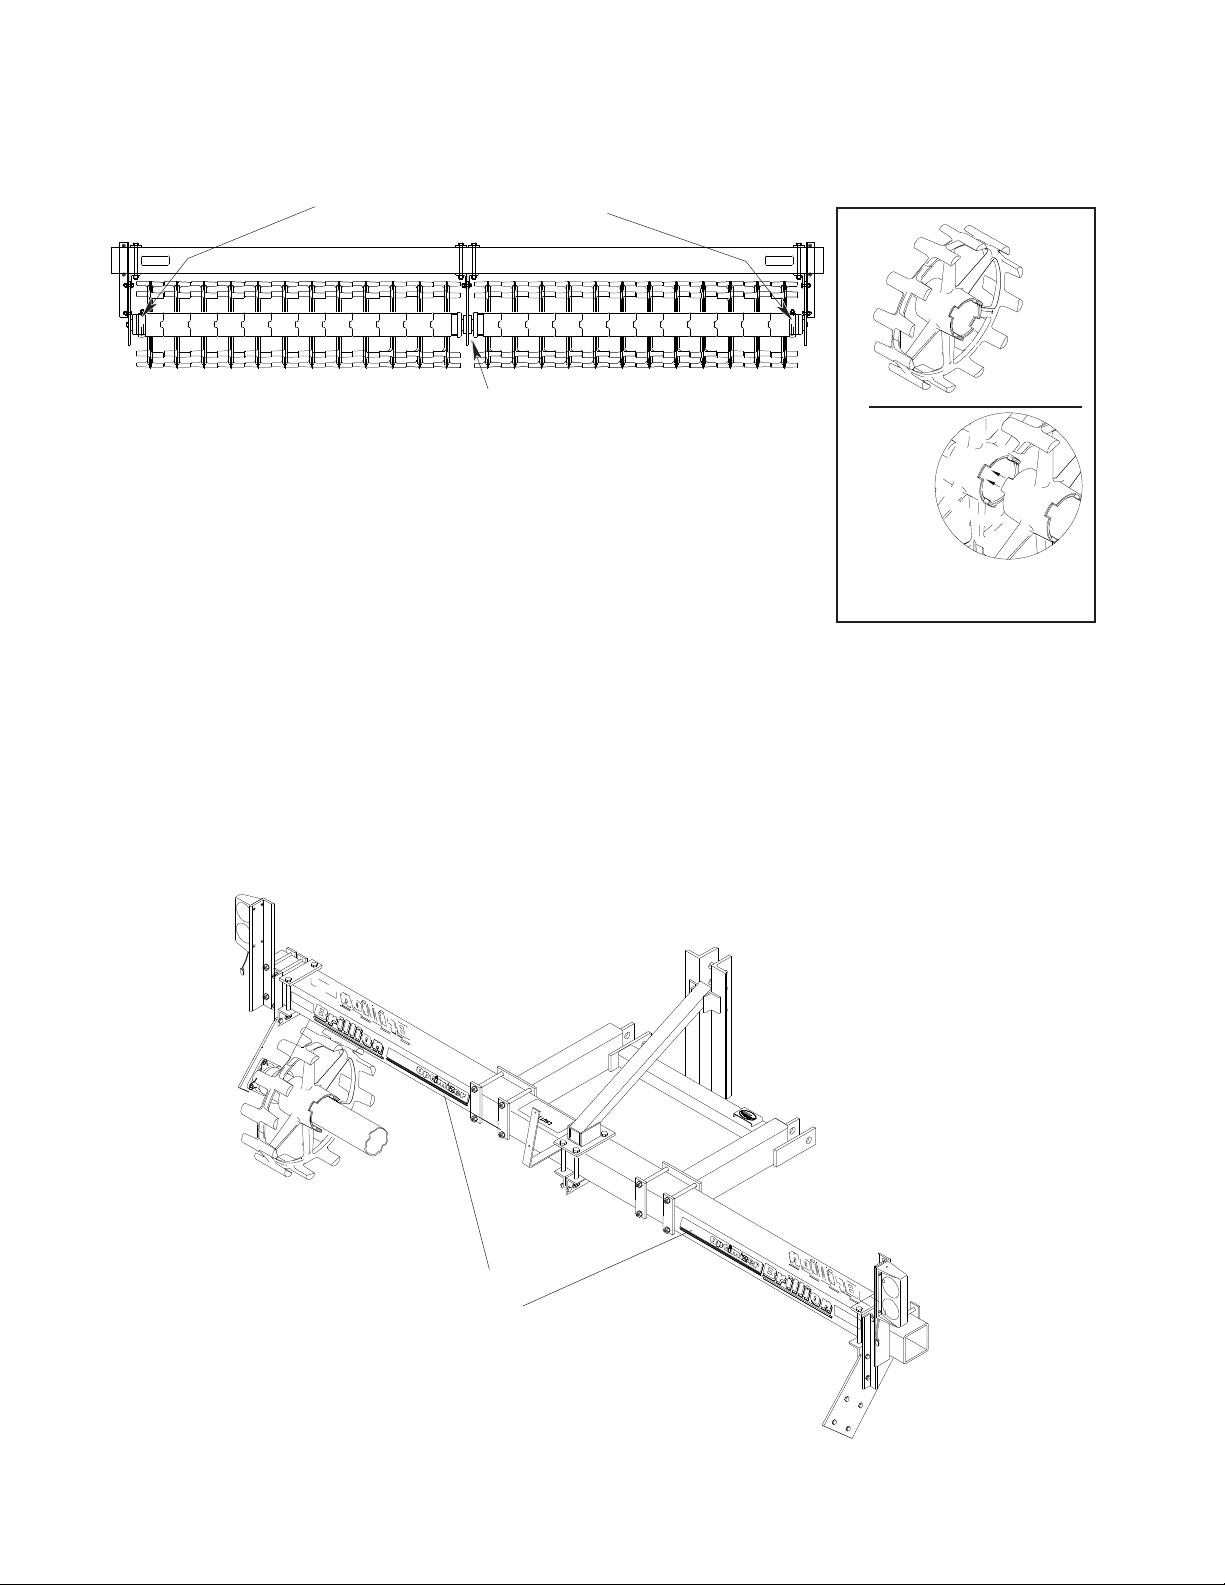
SPECIAL NOTE ON OPTIMIZER MODELS
Position Axle Clamps to outside
ends & opposite Center Bearing
Center Bearing
The above diagram shows typical wheel gang positioning of optimizer model
pulverizers using optimizer wheels. Position of axle clamps is toward the
outside end of the machine. Also, it is especially important that fit of
wheels on the shaft remains tight. Wear and damage can result from
wheels that do not fit tightly against one another. Make frequent checks
to insure that close fit remains intact. If wheels have jostled apart,
adjustment is made by loosening and moving the clamp until the wheels
are tightly in place. Then retighten clamp.
6K353
Optimizer
Wheel
Male &
female
ends
must
mate
and
remain
in close contact.
DECAL LOCA TION
ADDITIONAL OPTIMIZER DECAL:
6K657 - “OPTIMIZER”
1098ev401
Page 22
5K804
Page 32

MACHINE SPECIFICATIONS - PPO Models - (Subject to Change without Notification)
Model Designation:
Basic model is denoted by “PPO” -
The number following indicates the rolling width.
(example: PPO10 - 10’ Pickup Pulverizer with Optimizer wheels)
Basic Machine Specifications:
Rolling Transport Total No. 20” Optimizer Axle Approximate
Model Width Width Wheels Wheel Style Size Weight (Lbs.)
PPO-10 10’ 11’ 0” 20 (18) 6K353 & (2) 6K354 4 1/2” 1653
PPO-12 12’ 13’ 2” 24 (20) 6K353 & (4) 6K354 4 1/2” 1997
PPO-14 14’ 15’ 2” 28 (24) 6K353 & (4) 6K354 4 1/2” 2253
PPO-16 16’ 17’ 2” 32 (28) 6K353 & (4) 6K354 4 1/2” 2607
PPO-18 18’ 19’ 2” 36 (32) 6K353 & (4) 6K354 4 1/2” 2921
PPO-20 20’ 21’ 2” 40 (36) 6K353 & (4) 6K354 4 1/2” 3216
Frame: 3/8” Wall Tubing
Pickup Pulverizer with Optimizer wheels.
Hitch: Category II 3 Point
OPTIONAL EQUIPMENT
5K977 Tire Track Remover Kit ...................................................................................................213#
1098rev401
Page 23
5K804
Page 33

Table provided for general use.
NOTES:
Page 34
CAUTION
WHEN IT IS MOVING FORWARD.
IMPLEMENT WHEN EITHER OR BOTH ARE MOVING.
IS BEING BACKED UP.
IMPLEMENT.
MOVING MACHINES CAN CAUSE INJURY. KEEP AWAY!
1. DO NOT STAND OR WALK IN FRONT OF TRACTOR
2. DO NOT STAND OR WALK BETWEEN TRACTOR &
3. DO NOT STAND OR WALK BEHIND IMPLEMENT WHEN IT
4. DO NOT RIDE OR ALLOW OTHERS TO RIDE ON TRACTOR OR
FROM TRACTOR.
5. BLOCK IMPLEMENT TO PREVENT MOVEMENT WHEN UNHITCHED
8J309
31
23
24
22
30
19
20
27, 28
27, 28
18
9
20
7, 25
21
26
31
29
24
30
22
11
7, 25
20, 27, 28
26
13
14
26
17
21
27, 28
5
6
1
4
7
11
26
27, 28
16
33
32
15
2
27, 28
1098ev401
Page 24
5K804
Page 35
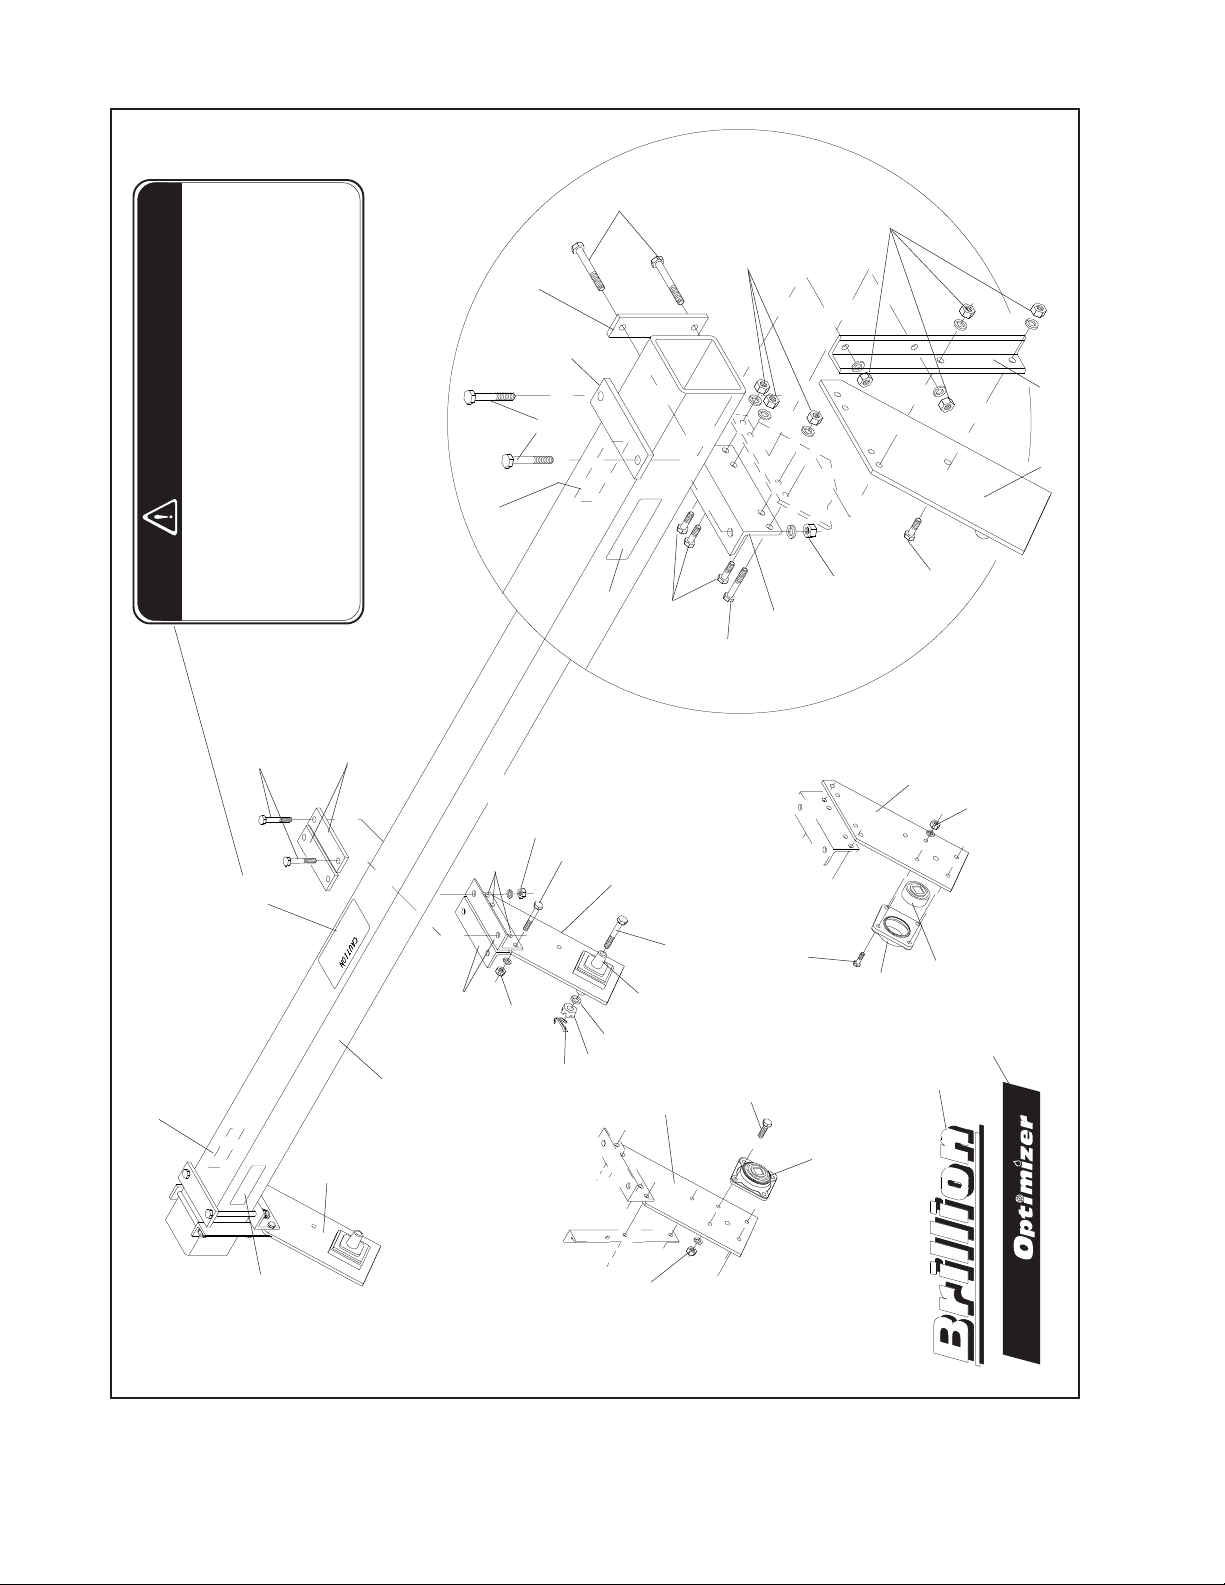
FRAME TUBE with BRACKET ASSEMBLIES
OPTIMIZERS WITH 4 1/2" OUTSIDE DIAMETER PIPE AXLE
Index
No. Part # Description Used Weight
1 5K726 Frame Tube, 10’ 1 306.9
5K727 Frame Tube, 12’ 1 361.8
5K728 Frame Tube, 14’ 1 416.8
5K729 Frame Tube, 16’ 1 471.7
5K730 Frame Tube, 18’ 1 531.3
5K731 Frame Tube, 20’ 1 586.2
2 8J998 L.H. End Bracket Assembly (items 3-8) 1 15.0
3 8J996 L.H. End Bracket 1 13.5
4 9D669 Straight Axle Mount 4 .9
5 4D529 Slotted Nut 3 .1
6 2C864 Cotter Pin 3 7 1B166 Lockwasher 11 8 9D864 Drilled Bolt, 5/8” x 3 1/2” Long 2 .9
9 8J999 R.H. End Bracket Assembly (items 10 & 4-8) 1 15.0
10 8J997 R.H. End Bracket 1 13.5
11 9J004 Plate 2 13.5
12 9J007 Center Bracket Assembly (items 13, 14, & 4-7) 1 22.0
13 9J006 Center Bracket 1 14.0
14 3J860 Drilled Bolt, 5/8” x 7 1/2” Long 2 .9
15 2J417 Bearing & Housing 2 4.7
16 2J516 Bearing 2 2.2
17 2J515 Bearing Housing 2 2.5
18 3K318 Angle 2 5.4
19 1J696 Bolt, 1/2” x 7 1/2” 4 .4
20 8C527 Capscrew, 1/2” x 1 1/2” 8 .1
21 8J099 Angle 4 5.3
22 3K321 Strap 4 2.8
23 3K320 Strap 2 1.7
24 7D040 Bolt, 5/8” x 8” 8 .8
25 1C392 Nut, 5/8” Hex 8 .1
26 5D051 Capscrew, 1/2” x 1 3/4” 6 .1
27 1C109 Lo ckwash er, 1/2 ” 26 28 1C390 Nut, 1/2” Hex 26 29 8J309 Decal, Caution List 1 30 2J430 Decal, Red Reflective 2 31 2J431 Decal, Amber Reflective 2 32 4K103 Decal, Brillion (2 3/4” x 16 3/4”) 4 33 6K657 Decal, Optimizer 2 -
1098rev401
Page 25
5K804
Page 36
10
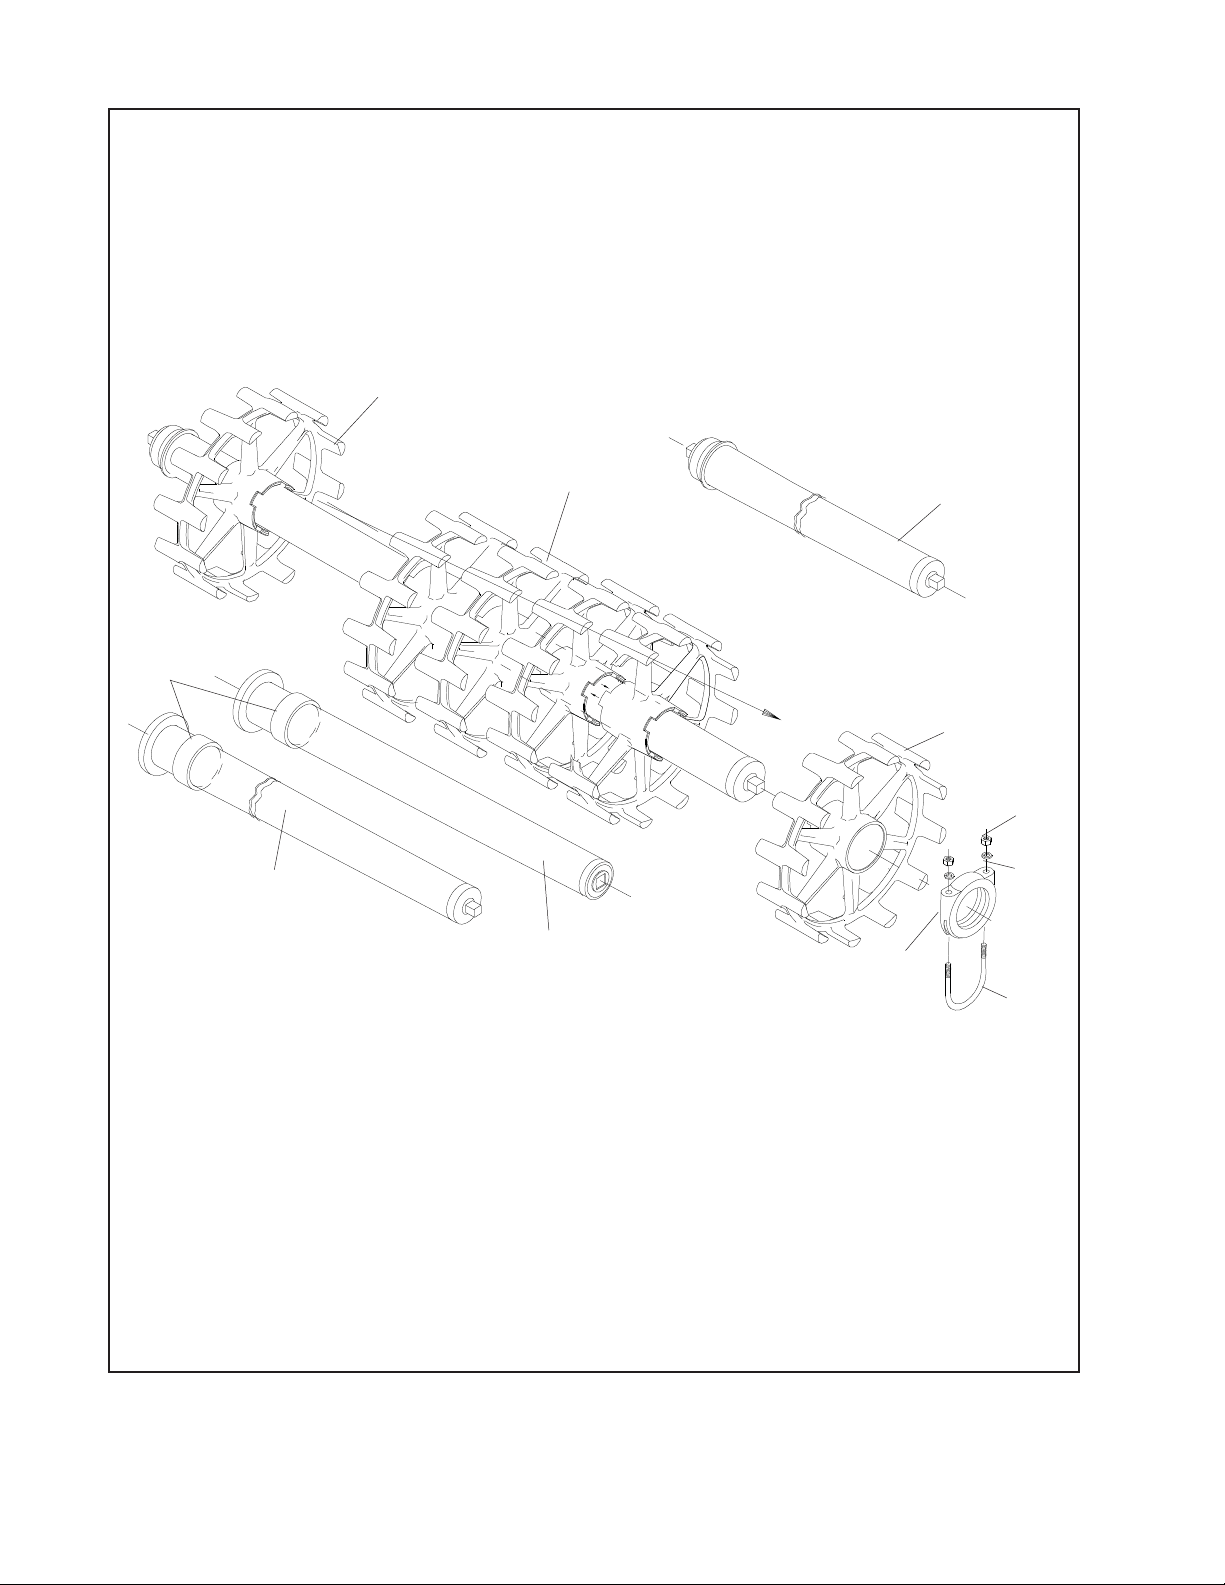
OPTIMIZER MODELS WITH
20” OPTIMIZER WHEELS (P0T)
5
4
1
5
9
3
2
6
8
7
1098ev401
Page 26
5K804
Page 37
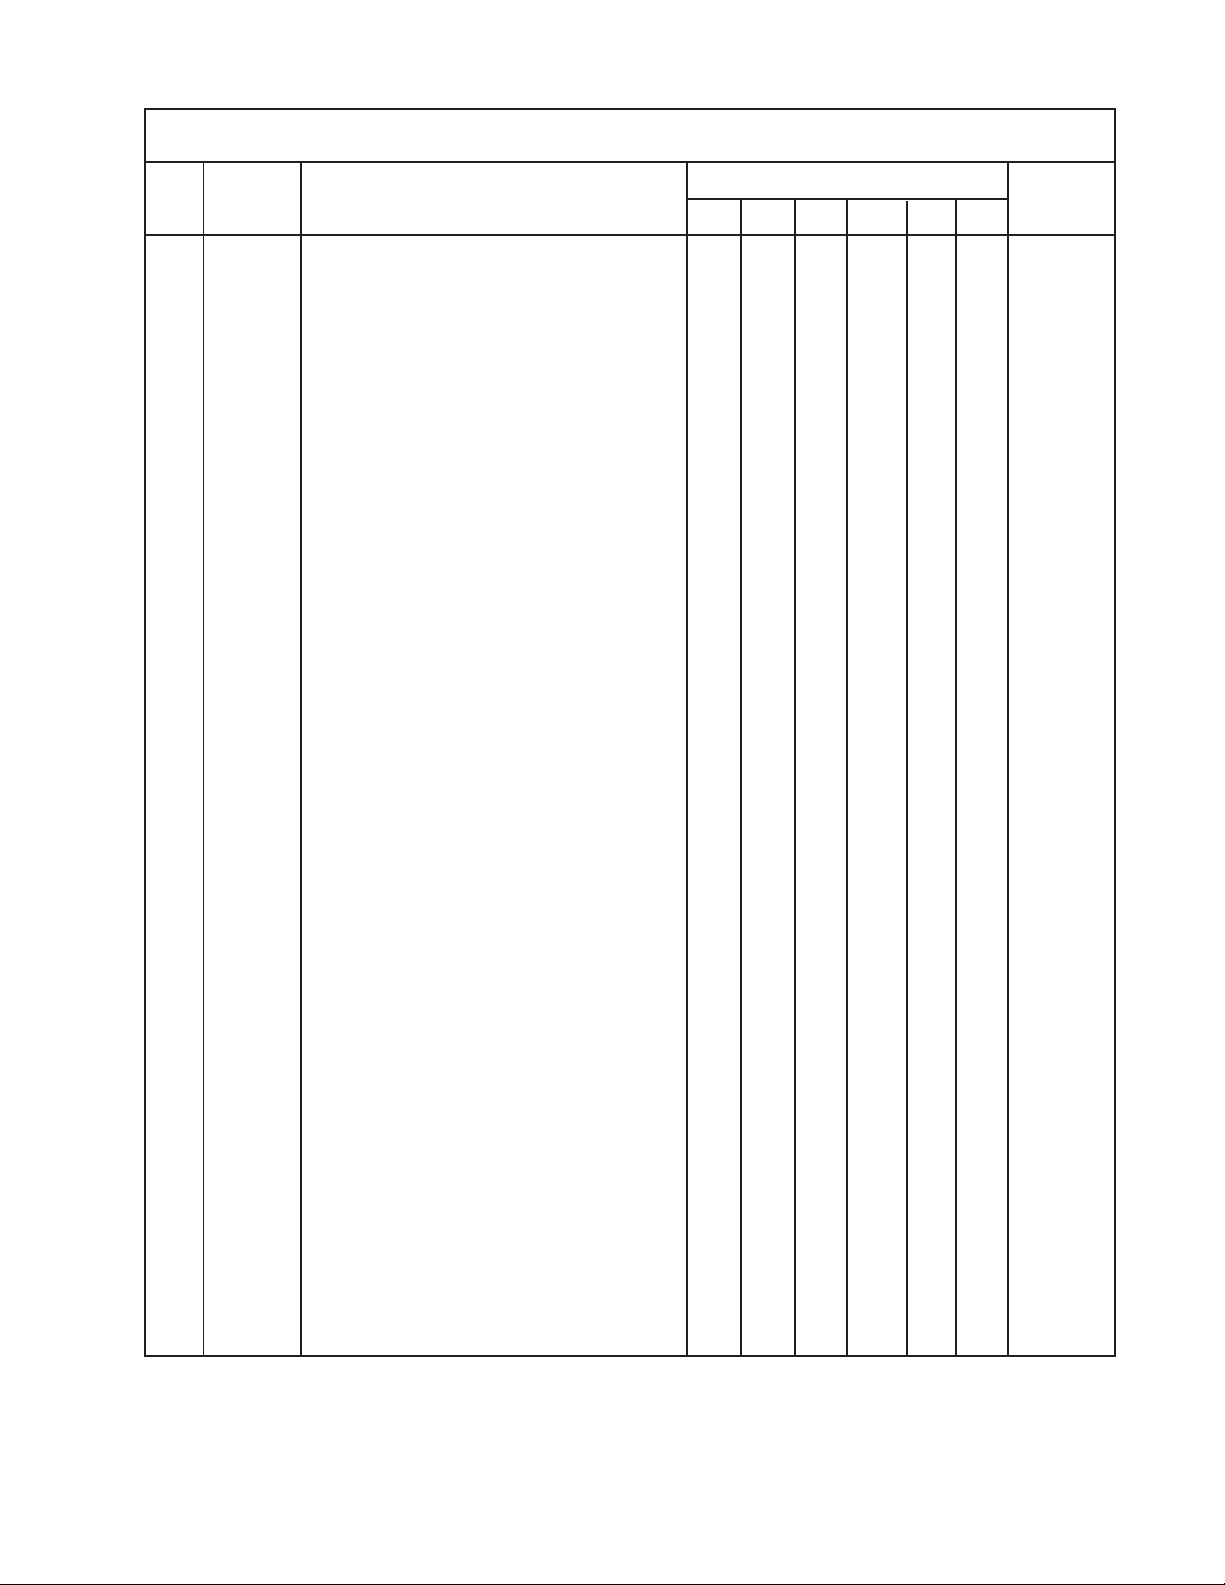
OPTIMIZER MODELS WITH 20" OPTIMIZER WHEELS (POT)
Index Part No. Used Per Machine
No. No. Description 10’ 12' 14' 16' 18’ 20’ Weight
* 6K481 Wheel & Axle Assembly 1 1112
6K485 Wheel & Axle Assembly 2 678
6K488 Wheel & Axle Assembly 2 787
6K490 Wheel & Axle Assembly 2 896
6K492 Wheel & Axle Assembly 2 1019
6K494 Wheel & Axle Assembly 2 1128
1 2J374 Pipe Axle Assem. w/ stub shafts 100000 135
2 1K324 Pipe Axle Assem. w/ brngs. 0 2 0000 92
1K325 Pipe Axle Assem. w/ brngs. 002000 103
1K326 Pipe Axle Assem. w/ brngs. 000200 114
3 3J186 Pipe Axle Assem. w/ brng. & stub shaft 000020 139
3J185 Pipe Axle Assem. w/ brng. & stub shaft 000002 151.9
4 6K353 Optimizer Wheel
(4 1/2” dia. bore) 18 20 24 28 32 36 49
5 6K354 Optimizer End Wheel (4 1/2” dia. bore) 244444 45
6 0A087 Axle Clamp, 4 1/2" 1 2 2 2 2 2 4.3
7 1C290 U-Bolt, 7/16" 1 2 2 2 2 2 .5
8 1C314 Lock Washer, 7/16" 2 4 4 4 4 4 9 1C179 Nut, 7/16 ” 244444 -
10 6K484 Spacer Ring 0 2 2 2 2 2 1.0
1098rev401
Page 27
5K804
Page 38

INDEX
Part Index Page
No. No. No.
A
0A087 08 13
06 25
B
1B166 05 17
09 15
19 11
21 13
07 23
C
1C109 06 18
06 19
08 17
12 11
32 13
27 23
1C179 11 13
09 25
1C182 12 17
1C183 13 17
1C277 14 17
1C290 09 13
07 25
1C314 10 13
08 25
1C390 05 19
07 18
09 17
13 11
33 13
28 23
1C392 06 17
10 15
30 13
31 11
25 23
1C675 04 19
2C864 18 11
20 13
06 23
5C124 04 18
5C392 11 19
8C527 25 13
26 11
20 23
8C986 03 11
9C016 06 11
Part Index Page
No. No. No.
06 13
9C031 09 11
9C062 03 11
9C129 04 13
9C182 04 11
9C183 05 11
D
1D138 03 11
2D535 11 11
3D199 03 11
4D529 17 11
19 13
05 23
5D051 31 13
32 11
26 23
5D110 05 15
5D156 07 15
5D157 06 15
5D158 03 15
5D202 05 13
5D921 07 17
6D529 04 15
7D014 14 19
7D040 04 17
08 15
29 13
30 11
24 23
7D728 15 19
9D669 16 11
18 13
04 23
9D673 10 11
9D864 20 11
08 23
9D866 23 11
J
1J696 10 19
24 13
25 11
19 23
2J155 13 19
2J374 01 25
2J417 12 13
15 23
2J430 34 11
35 13
Part Index Page
No. No. No.
30 23
2J431 35 11
36 13
31 23
2J515 14 13
17 23
2J516 13 13
16 23
3J185 03 13
03 25
3J186 03 13
03 25
3J561 05 18
3J615 10 18
3J860 22 13
14 23
4J700 12 19
4J867 02 15
5J080 09 19
5J082 08 19
5J358 02 19
5J616 16 19
6J150 09 18
8J001 07 11
8J014 15 17
8J015 11 17
8J068 02 11
8J069 02 11
8J079 10 17
8J099 26 13
33 11
21 23
8J309 34 13
29 23
8J993 - 11
8J994 22 11
8J996 15 11
03 23
8J997 21 11
10 23
8J998 - 11
02 23
8J999 - 11
09 23
9J004 15 13
11 23
9J006 17 13
13 23
9J007 16 13
12 23
9J027 02 11
1098ev401
Page 28
5K804
Page 39

Part Index Page
No. No. No.
Part Index Page
No. No. No.
Part Index Page
No. No. No.
9J028 02 11
9J029 11 15
9J056 01 17
9J057 01 17
9J058 01 17
9J059 01 17
9J277 08 11
9J474 01 19
9J808 07 13
K
1K324 02 25
1K325 02 25
1K326 02 25
3K318 23 13
24 11
18 23
3K320 07 19
28 13
29 11
23 23
3K321 03 17
27 13
28 11
22 23
3K323 02 13
3K699 01 17
4K103 36 11
37 13
32 23
4K653 01 17
4K772 01 18
4K773 01 18
4K780 11 18
4K781 12 18
4K782 08 18
4K854 03 18
4K908 02 18
5K726 01 11
01 23
5K727 01 11
01 23
5K728 01 11
01 23
5K729 01 11
01 23
5K730 01 13
01 23
5K731 01 13
01 23
5K736 01 15
5K737 - 11
5K738 - 11
5K739 - 11
5K740 - 11
5K741 - 13
5K742 - 13
5K744 02 13
5K752 02 17
5K753 - 17
5K754 - 17
5K755 - 17
5K756 - 17
5K757 - 17
5K758 - 17
5K975 03 19
6K353 04 25
6K354 05 25
6K481 * 25
6K485 * 25
6K484 10 25
6K488 * 25
6K490 * 25
6K492 * 25
6K494 * 25
6K657 33 22
1098rev401
Page 29
5K804
Page 40

5K804
Page 41

Page 42

Equipment from Landoll Corporation is built to exacting
standards ensured by ISO 9001:2008 registration at all
Landoll manufacturing facilities.
Pick-up Pulverizer
Operator’s and Parts Manual
PPD Series 10’ through 20’
PPO Series 10’ through 20’
Re-Order Part Number 5K804rev0813
LANDOLL CORPORATION
1900 North Street
Marysville, Kansas 66508
(785) 562-5381
800-428-5655 ~ WWW.LANDOLL.COM
®
Copyright 2013. Landoll Corporation - Author Tech Comm Bill
“All rights reserved, including the right to reproduce this material or portions thereof in any form.”
1098rev0813 5K804
 Loading...