

Landmann triton 4 Assembly And Operating Manual
Assembly and operating manual
Version: 12960/61/62/63
D
ateD: #2014
e
Dition: 01/14er

2
10
5
4
18
18
9
11
13
1
7
8
8
19
19
20
22
25
26
21
3
6
12
15
14
17
2
24
22
A
B
18x M4 x 10 16x M6 x 12
6x M5 x 10 2x M4 x 6
C
D

3
Table of contents
Operational elements ............................................................................................................................... 4
Function ..................................................................................................................................................... 5
Utilisation .................................................................................................................................................. 5
Intended use .......................................................................................................................................................... 5
Improper use ......................................................................................................................................................... 5
Guarantee claims and warranty .............................................................................................................. 5
Safety instructions .................................................................................................................................... 5
Definition of terms used ....................................................................................................................................... 5
General safety instructions ................................................................................................................................... 6
Residual risks ......................................................................................................................................................... 6
Assembly ................................................................................................................................................... 8
Connecting and disconnecting the gas cylinder ..................................................................................... 8
Parts and tools needed ......................................................................................................................................... 8
Before starting ...................................................................................................................................................... 9
Connecting the gas cylinder ................................................................................................................................. 9
Disconnecting the gas cylinder ............................................................................................................................ 9
Operation ................................................................................................................................................ 10
Starting up the barbecue ................................................................................................................................... 10
Igniting the burners ............................................................................................................................................ 10
Switching off the barbecue ................................................................................................................................ 11
Cleaning ................................................................................................................................................... 11
Barbecue .............................................................................................................................................................. 11
Gas system ........................................................................................................................................................... 11
Maintenance ............................................................................................................................................ 12
Barbecue .............................................................................................................................................................. 12
Gas system ........................................................................................................................................................... 12
Environmental information and disposal measures............................................................................. 12
Troubleshooting ...................................................................................................................................... 13
Specifications .......................................................................................................................................... 14
Accessories (optional) ............................................................................................................................. 14
Assembly ................................................................................................................................................. 15
4
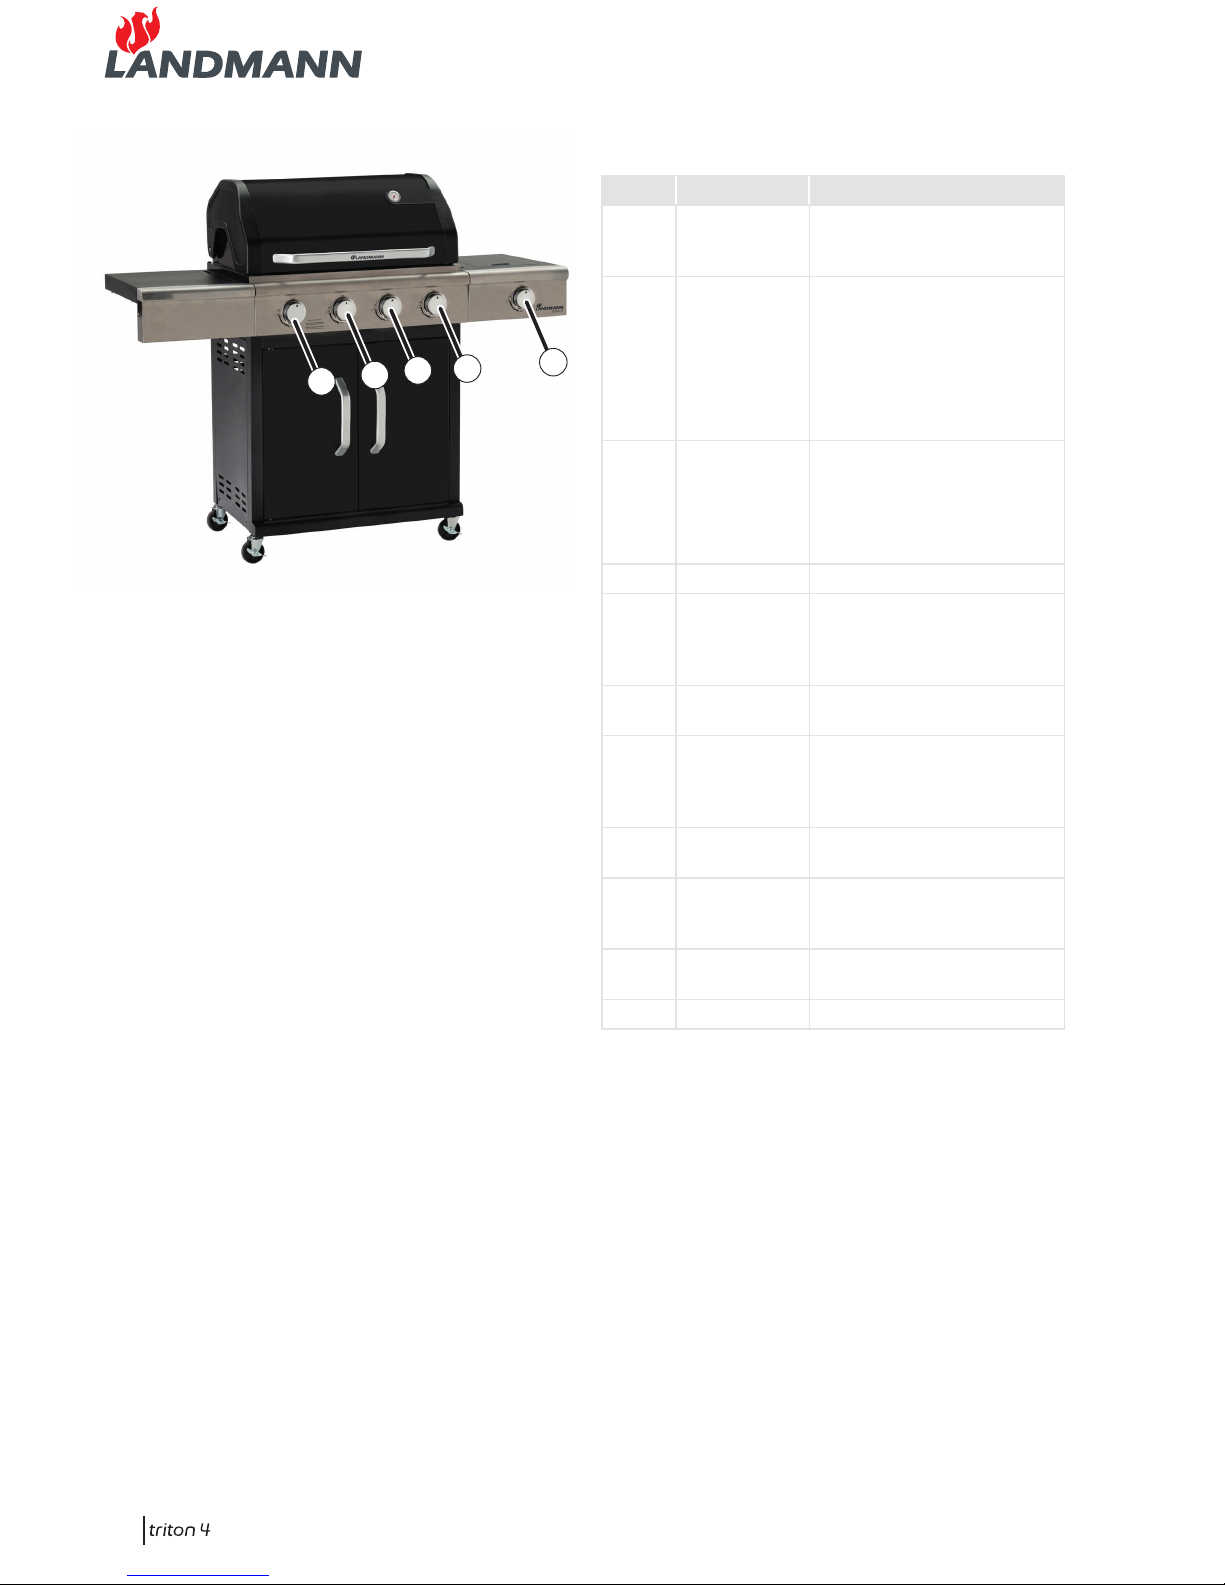
Operational elements
Item * Designation Function
A Integra-
ted Piezo
ignition
Ignite the gas that flows
into the burner when the
flame regulator is open.
B Flame regu-
lator for the
grill unit
Feeds gas into the burner
on the grill unit (press,
set to "large flame"
and keep depressed).
After ignition, adjust
the heat input for each
burner side (turn).
C Sidebuner
Feeds gas into the side burner (press, set to „large flame“ and keep depressed).
After ignition, set
heat input (turn).
G0 Gas cylinder Fuel container
G1 Cylinder
valve
Cut off safety device;
open gas supply (turn
anti-clockwise) and close (turn clockwise).
G2 Cylinder
valve thread
Gas cylinder - pressure
regulator connection
G3 Coupling
nut pressure
regulator
Connect the pressure regulator to the gas cylinder
(turn anti-clockwise) and
disconnect (turn clockwise).
G4 Pressure
regulator
Reduce gas pressure
G5 Pressure
regulator
connection
Pressure regulator - gas
hose connection
G6 Hose clamp Attach the pressure regula-
tor - gas hose connection
G7 Gas hose Supplies gas to the burner
B
B
B
B
C

5
Safety instructions
Definition of terms used
The following pictograms and signal words are used
in these instructions to point out hazards and important information:
Safety instructions
Pictogram and
signal word
Note on ...
Danger
... a possible danger that can
result in severe personal injury
or damage to property if the
stated measures are not taken.
Application instructions
Pictogram Note on ...
... a useful function or tip.
!
... Danger of confusion; the symbol points to an easily visible
part of the component.
Function
When the cylinder valve (G1) and flame regulator are
open, the gas flows through the gas hose (G7) and
the flame regulator into the burner.
Press in the flame regulator (B) to activate the integrated Piezo ignition (A) and a spark is produced at
the burner spark plug.
Regulate or interrupt the gas supply (= heat output)
to the corresponding burner using the flame regulator (B).
Utilisation
Proper use
This is a gas barbecue that is intended for outdoor
use. The intended use comprises the exclusive use for
cooking barbecue food in compliance with all instructions in this manual.
This barbecue is intended for private use only.
Improper use
Any other use or application beyond the intended
purpose is not permitted. This applies in particular to
the following reasonably foreseeable types of improper use:
• Do not operate the barbecue with charcoal or fuel
other than liquid gas (propane/butane).
• Do not use the barbecue as a heating appliance.
• Do not use the barbecue to heat materials and
substances other than barbecue food.
Guarantee claims and warranty
Your Landmann barbecue left the factory in a technically flawless condition.
For this reason, in addition to your statutory warranty claims LANDMANN also offers an extended 5 year
quality and durability warranty against the stainless
steel burner rusting through.
Any warranty and guarantee claims shall be rendered
void in the event of improper use of the barbecue or
the use of non-approved fuels. Discolouration, rusting
or slight deformation of parts exposed directly to the
flames (cooking grill, hotplate, burner, burner cover,
etc.) do not impair the function of the barbecue and,
as such, do not form a basis for any claims.
Please retain your receipt in case you need to make a
warranty claim.

6
Residual risks
Danger: Hot surfaces and parts
During operation some parts of the barbecue can
become very hot, particularly those close to the
grill unit and the lid..
Possible consequences:
• Severe burns from touching parts near the grill
unit.
• Fire or smoldering fire if flammable materials
or substances are near the barbecue.
Precautions prior to barbecuing:
• When setting it up, make sure that
– there are not, and will not be, any flamma-
ble materials or substances nearby. Minimum distance to flammable materials or
substances: 2 m overhead and 1 m to the
side. Distance to flame-resistant materials
or substances, e.g. walls: at least 0.25 m.
– that the barbecue is positioned firmly on
a sufficiently large area. It must not be
moved during operation.
Precautions while barbecuing:
• Wear barbecue mittens.
• Never leave the barbecue unattended. Take
particular care to ensure that children and
pets are kept away from the barbecue.
General safety instructions
Failure to observe the following basic safety measures
can result in severe injury to persons and substantial
damage to property:
• Use the barbecue only in line with the intended
use.
• Never use the barbecue if it is visibly damaged.
• Never modify the barbecue's technology. Only Use
original spare parts from Landmann.
• Use only accessories that are expressly authorised
for this barbecue (see the "Accessories" chapter;
if in doubt please contact our customer service
department).
• Only use the barbecue outdoors in a well ventilated area and above ground level (i.e. not in
depressions below ground level).
• Never leave the barbecue unattended when in
use. Take particular care to ensure that children
and persons with physical or mental disabilities
are kept away from the barbecue. They may not
be able to identify the dangers correctly.
• Always wear barbecue mittens when using the
barbecue.
• Small parts may be lethal if swallowed. Note that
there is a danger of suffocation if the respiratory
tract is covered by packing foil.

7
Danger: Gas is highly flammable
Liquid gas is highly flammable and explosive.
Possible consequences:
• Serious injury to persons or damage to property if escaping or accumulated gas ignites in an
uncontrolled manner.
Precautions:
• Exclusively use the barbecue outdoors and
ensure that the area is well-ventilated.
• Protect the gas cylinder and the gas hose from
direct sunlight and other sources of heat (max.
50°C). Take particular care to ensure that the
gas hose does not touch any part of the hot
barbecue.
• Close the valve of the gas cylinder immediately
after finishing to use the barbecue.
• When connecting the gas cylinder, make sure
that there are no sources of ignition within a
5 m radius.
Important note: to avoid the risk of spark-over,
do not to light naked flames, do not smoke
and do not actuate the switches of electric
devices (appliances, lights, door bells, etc.).
• Before each use, make sure that all gas connections are sealed and intact.
If necessary, replace the gas hose if required to
do so to comply with local legislation.
The barbecue must not be used if the connections for the gas supply are porous or defective. This also applies, for example, to hoses or
fittings that are blocked with insects, as this
can result in a dangerous flashback.
• When igniting the gas flame do not bend over
the barbecue, as deflagration can occur if gas
has accumulated in the fire bowl.
For the same reason, never re-ignite immediately if the flame goes out, instead:
– Turn the flame regulators (4 x B and C) to
"Off" to interrupt the supply of gas.
– Wait for 3 minutes to ensure that any accu-
mulated gas has dissipated.
– Then re-ignite the burners (see chapter
"Operation").
Danger: Gas displaces oxygen
Liquid gas is heavier than oxygen. Therefore it
settles on the ground and displaces the oxygen
at that level.
Possible consequences:
• Suffocation resulting from a lack of oxygen if
the concentration of gas is allowed to rise to a
certain extent.
Precautions:
• Exclusively use the barbecue outdoors in a well
ventilated area and above ground (i.e. not in
areas that are below ground level).
• Close the valve of the gas cylinder immediately
after finishing to use the barbecue.
• If the barbecue is not going to be used for a
prolonged period, cut off the supply from the
gas cylinder and store properly:
– Fit the gas cylinder valve with a cap nut and
safety cap.
– Do not store the gas cylinder in rooms
below ground level, in or near stairways,
hallways or passages and thoroughfares
between buildings.
– Always store gas cylinders upright, even if
they are empty!

8
Assembly
Here are a few tips to help you assemble your barbecue quickly and successfully:
• Check that no parts are missing by placing all of
the individual parts on an empty table (subject to
minor technical changes).
• If, despite careful factory checks, a component
should be missing, please contact our customer
service department (see last page). We will immediately attend to your request.
• To assemble the barbecue, all you need is a medium-sized screwdriver.
• Only use tools that are intact and suitable for the
job at hand. Worn or unsuitable tools will not
allow you to tighten the bolts sufficiently, but will
damage them to the extent that they can no longer be turned.
• Always fit all connecting elements (screws, nuts,
bolts, et cetera) as shown in the illustrations. If you
misplace a connecting element, replace it with an
appropriate part. Only by doing this can you ensure that the construction is strong and safe.
• Be sure to follow the instructions in the specified
order!
• Even if you are not experienced at DIY, assembly
does not generally take longer than one hour.
•
The illustrations showing the assembly steps are
at the end of this manual.
Connecting and disconnecting
the gas cylinder
Parts and tools needed
• 17 mm spanner (open-ended spanner, WAF 17)
• Gas cylinder
Common camping gas cylinder, fill weight 4,5, 7 or
15 kg, (e.g. grey camping propane gas cylinder).
These are available at DIY shops or from liquid gas
suppliers.
• Leak indicator
You can locate any leaks in the gas system using a
leak detector. This can be purchased at DIY shops
or liquid gas suppliers. Please follow the operating
instructions of the leak detector.
The following parts are included in delivery. They
comply with the standards applicable in the country
to which they have been supplied by Landmann.
• Gas hose (pre-assembled)
-approved hose of a sufficient length (max. 1.5
m) to allow for kink-free assembly.
• Pressure regulator (already attached to the gas
hose)
Preset and
-approved pressure regulator, max.
1.5 kg/h, operating pressure 28-30/37 mbar, suitable for the gas cylinder used.
Permitted gas cylinder sizes
4,5 kg: Ø 240mm x 340mm
7 kg: Ø 256mm x 495mm
15 kg: Ø 318mm x 580mm
 Loading...