

Page 1

封面图
封面图
Français p. 24
Español p. 47
ASSEMBLY, CARE AND USE INSTRUCTIONS
READ CAREFULLY
IMPORTANT:
RETAIN THESE INSTRUCTIONS FOR FUTURE REFERENCE
Pantera 1.0/ 2.0
Item No.: 42262
Item No.: 42263
MODEL 42262/ 42263
Questions, problems, missing parts? Before returning to your retailer, call our customer
service department at: 1-800-321-3473 8:00 AM - 5:00 PM (EST) English Only,
or Email CustomerService@landmann-usa.com
This appliance is for
Outdoor use only.
This is not a
commercial appliance.
5005544
Page 2

2
Table of Contents
Important Safety Information ..............................3-4
Liquid Propane (LP) Safety Information .................5
Package Contents ...............................................6-7
Preparation ............................................................. 8
Assembly Instructions .......................................8-13
Connecting Gas Cylinder ....................................14
Operation .........................................................14-15
Care and Maintenance ......................................... 16
Cooking Methods and Grilling Tips ...................... 17
Troubleshooting and Replacement Parts ........18-22
Warranty ............................................................... 23
Assembler/Installer
This instruction manual contains important information necessary for the proper assembly and safe use of this
appliance. Read and follow all warnings and instructions before assembling and using this appliance.
Leave these instructions with the consumer.
Technical Characteristics
42262 Heat Input: 12000BTU/H
42263 Heat Input: 6500BTU/H X 2
Category: Pressure regulated propane
Fuel: 16.4 OZ. disposable propane cylinders
Regulator: Landmann part #PT0068
Consumer/User
Follow all warnings and instructions when using this appliance.
Keep these instructions for future reference.
If you smell gas:
1. Shut off gas to the appliance.
2. Extinguish any open flame.
3. Open lid.
4. If odor continues, keep away from the
appliance and immediately call your gas
supplier or your fire department.
5. Failure to follow these instructions could result
in explosion, or burn hazard which could cause
property damage, personal injury or death.
1. DO NOT store or use gasoline or other flammable
liquids or vapour in the vicinity of this or any other
appliance.
2. An LP (liquid propane) gas cylinder not connected
for use should not be stored in the vicinity of this or
any other appliance.
3. This grill is FOR OUTDOOR USE only and shall
not be used in a building, garage, under overhangs
or any other enclosed area.
4. DO NOT leave a lit grill unattended. Keep children
and pets away from the grill at all times.
5. This appliance is for Outdoor use only. This is
not a commercial appliance.
Page 3
3
• Make sure to follow all assembly instructions
carefully. Improper assembly of this grill may be
dangerous.
• NEVER use charcoal, lighter fluid, gasoline, kerosene
or alcohol to ignite this grill.
• NEVER use charcoal briquettes or lighter fluid in a
gas grill.
• DO NOT move grill while it is lit.
• When igniting the grill or cooking, DO NOT lean over
the open grill.
• Always open the grill lid slowly and carefully as heat
trapped inside the grill can cause severe burns.
• DO NOT place hands or fingers at edge of the firebox
and the lid when the lid is open or the grill is hot.
• Keep children and pets away from the grill when in
use. Accessible parts may be very hot.
• DO NOT attempt to disconnect the gas regulator
and hose assembly or any gas fitting while your grill
is operating.
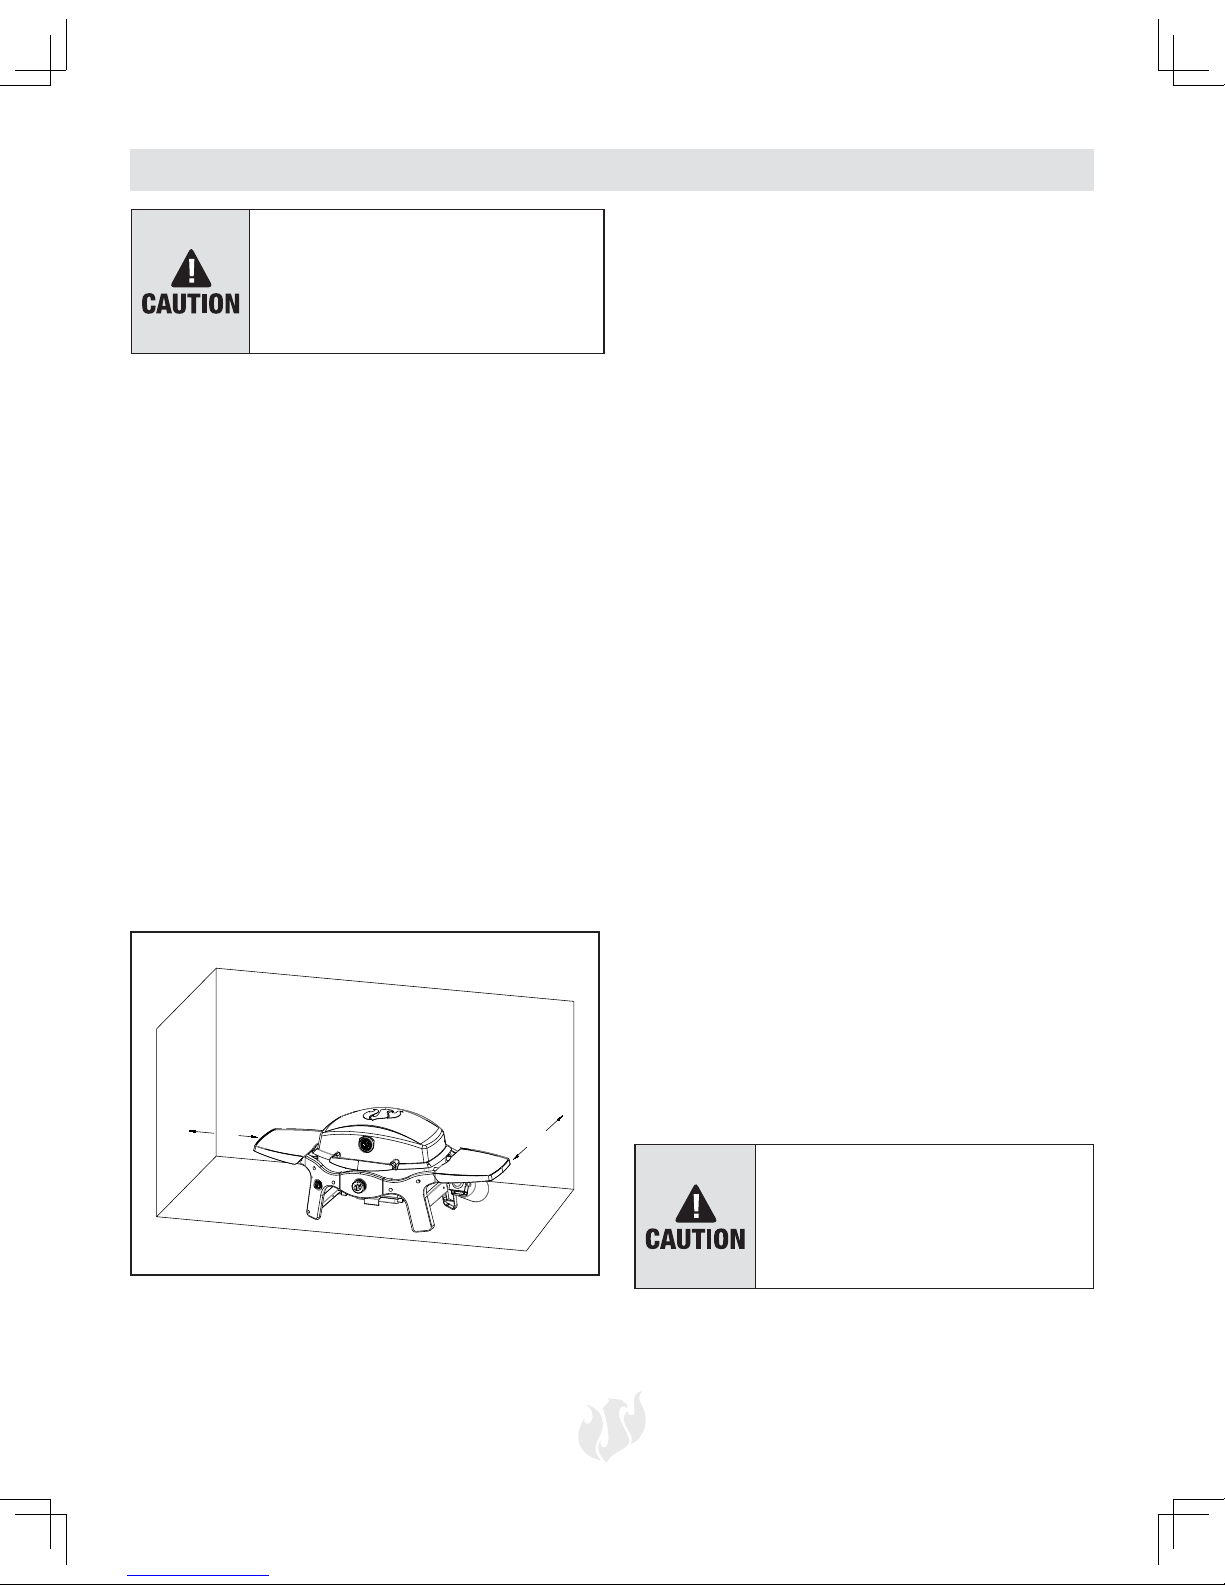
• This grill SHOULD NOT be located under any
overhead unprotected combustible construction.
Always allow at least 24” from the top, bottom, back
and 24” from the sides of the grill (see below).
• This grill is an outside appliance and SHOULD
NOT be operated in a building, garage, or any other
enclosed area.
• DO NOT obstruct the flow of combustion and
Important Safety Information
Warnings and Cautions contained in this
instruction manual may result in serious
bodily injury or death, or may result in
a fire or explosion causing damage to
property.
ventilation air. Keep the ventilation openings of the
cylinder enclosure free and clear of debris.
• Should the burners go out while the grill is in
operation, turn all gas valves off. Open the lid and
wait five minutes before attempting to relight the
grill, using the lighting instructions.
• Keep this grill clear and free from combustible
material, gasoline and other flammable vapors and
liquids.
• NEVER store an extra or disconnected liquid
propane cylinder under or near this grill.
• Always use heat-resistant barbecue mitts or gloves
when operating the grill.
• DO NOT leave a hot grill unattended or move it
during operation.
• This grill is not intended to be used in or installed
on recreational vehicles, boats, portable trailers, or
in any moving location.
• DO NOT put a grill cover or anything flammable on
the grill while the grill is in operation or is hot.
• Storage of an outdoor cooking gas appliance
indoors is permissible only if the cylinder is
disconnected and removed from the outdoor
cooking gas appliance.
• When the grill is not in use, make sure the gas is
turned • OFF at the supply cylinder.
• Cylinders must be stored outdoors and out of the
reach of children. Cylinder must not be stored in a
building, garage or other enclosed areas.
• Always inspect the gas supply metal hose before
every use. If the metal hose shows any signs of
abrasions or cuts, DO NOT use the grill. The metal
hose must be replaced before using again.
• Always check the burners and venturi tubes for
insects and insect nests. A clogged tube can lead
to a fire beneath the grill.
• Always check the connections for leaks each time
you connect and disconnect the LP gas supply
cylinder.
• DO NOT enlarge the valve orifices or burner
ports when cleaning the valves or burners.
The pressure regulator and metal
hose assembly supplied with this grill
must be used. Any requirements for a
replacement regulator and metal hose
assembly must be made through the
manufacturer, LANDMANN-USA.
24"
24"
Page 4
4
Important Safety Information
• If you see, smell or hear hissing of gas escaping
from the LP gas cylinder, move away from the
LP gas cylinder. DO NOT attempt to correct the
problem yourself and call the fire department.
• If a grease fire occurs, turn • OFF the burner and
leave the lid closed until the fire is out.
• DO NOT alter this grill in any manner. Any alteration
automatically voids the warranty.
• DO NOT use the grill in high wind situations.
The LP gas supply cylinder to be used must be
constructed and marked in accordance with
the Specification for LP Gas Cylinders of the
U.S. Department of Transportation (DOT) or the
National Standard of Canada, CAN/CSB-b339
(Cylinders, Spheres, and Tubes for transportation
of Dangerous Goods).
Portable LP gas grills require a fuel delivery system
which is comprised of a regulator and an L.P. gas
supply cylinder.
To avoid the possibility of tipping over the grill, NEVER
place more than 5 pounds on the side table.
Be sure to tighten all hardware (screws, nuts, bolts,
etc.) several times a year and before each grilling
season
NEVER leave cooking food unattended. Continually
observing the food will help in maintaining an even
temperature, conserve fuel, improve the food’s flavor
and lessen flare-ups.
Set up for Grilling
1. Release lid by undoing Velcro strap
2. Install grease cup
3. Attached propane cylinder
4. Ready for grilling
Prepare for transporting
1. Make sure grill is cool
2. Remove propane cylinder
3. Remove & clean grease cup
4. Secure lid with Velcro strap
5. Ready for transport
Caution: If transporting in a vehicle make sure to
use plastic or a tarp underneath the grill in case of
any grease or oil leaks.
A fire causing death or serious
injury may occur if the following is
not followed exactly:
NEVER store or use gasoline or other
volatile substances in the vicinity
of this grill. NEVER store a spare
propane cylinder in the vicinity of
this grill, or in the vicinity of another
potential heat source.
DO NOT store spare gas cylinder in
or near grill.
Place dust cap on cylinder valve outlet
whenever the cylinder is not in use.
Install only the type of dust cap on
cylinder valve outlet that is provided
with the cylinder valve. Other types of
caps or plugs may result in leakage of
propane.
This product contains chemicals
known to the State of California to
cause cancer and birth defects or
other reproductive harm.
State of California Proposition 65 Warnings
Page 5

5
Liquid Propane (LP) Safety Information
General Information
• This grill is design certified by ETL for use with 16.4
ounce disposable propane cylinders.
• This grill CANNOT be converted to natural gas.
DO NOT attempt to convert this grill to a different
gas type.
Safety Information
• LP gas has an odor similar to natural gas.
• LP gas is heavier than air and leaking gas may collect
in low areas and resist dispersion.
• LP gas cylinders should not be dropped or handled
roughly.
• DO NOT use a damaged LP gas cylinder. A dented
or rusty LP gas cylinder or an LP gas cylinder with
a damaged valve which may be hazardous and
should be replaced with a new cylinder immediately.
• ALWAYS close the cylinder valve after use.
• ALWAYS close the cylinder valve when disconnecting
the regulator.
• ALWAYS treat possible empty LP gas cylinders with
the same care as a full LP gas cylinder. There may
still be gas pressure inside a possible empty LP gas
cylinder.
• NEVER store or transport an LP gas cylinder where
the temperature can reach 125° F (52° C).
• Keep LP gas cylinders away from children and pets.
• DO NOT store disconnected LP gas cylinders in a
building, garage or other enclosed areas.
• If the LP gas cylinder is kept in the grill between uses,
make sure to keep both the grill and the cylinder in
an outdoor area with good ventilation.
• ALWAYS leak test the LP gas cylinder connection to
the regulator when ever changing LP gas cylinders.
Important
The United States LP gas appliance installation must
conform with local codes and ordinances. In the
absence of local codes, appliance installation must
conform with either the National Fuel Gas Code, ANSI
Z223.1/NFPA54, Natural Gas and Propane Appliance
code, CSA B149.1, or Propane Storage and Handling
Code, B149.2, as applicable. For Canada, installation of
this grill must comply with local codes and/or Standard
CSA-B149.2 (Propane Storage and Handling Code).
Please review the below guidelines and safety information when using Liquid Propane (LP) gas.
Page 6

6
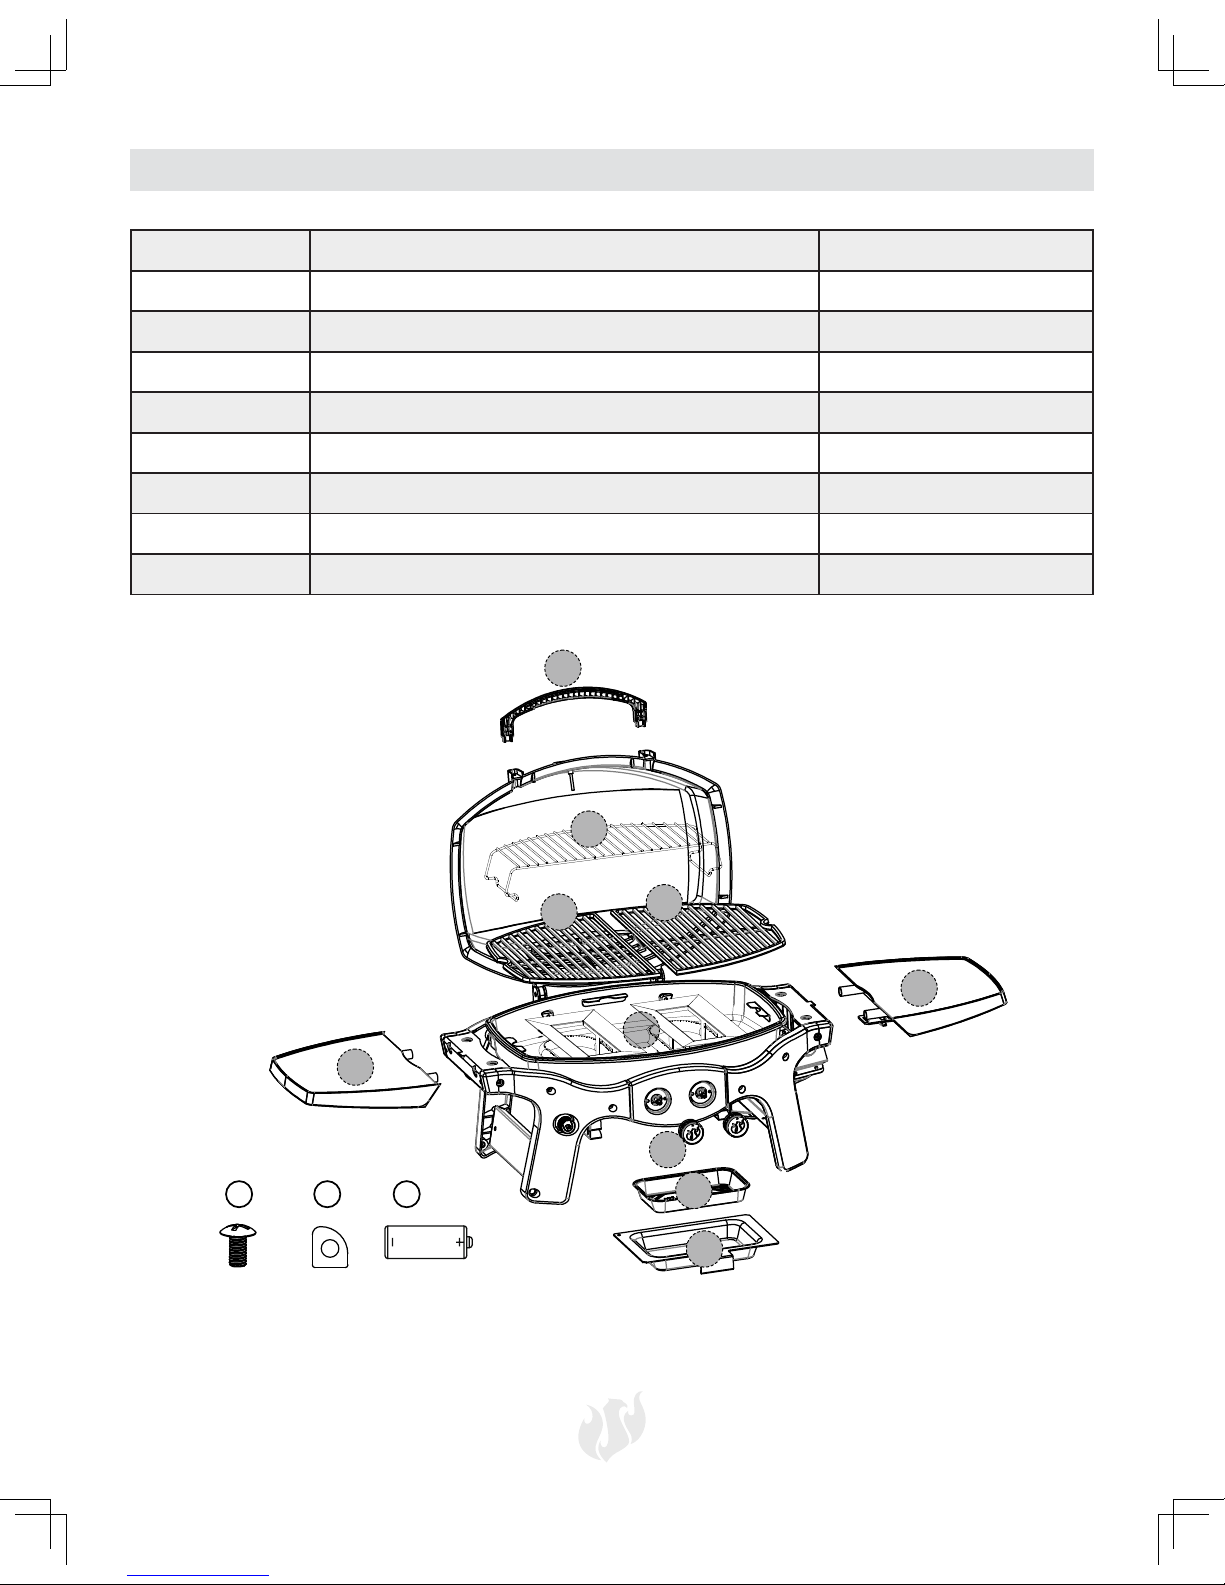
42262 Package Contens
Par t Description Quantity
1 Handle 1
2 Cooking Grate 2
3 Grill 1
4 Side Shelf 2
5 Control Knob 1
6 Aluminum Grease Tray Liner 1
7 Grease Tray 1
6
3
2
2
4
4
7
5
1
M5x10 2x
2x AA 1x
A B C
Page 7
7
42263 Package Contens
Par t Description Quantity
1 Handle 1
2 Warming rack 1
3 Cooking Grate 2
4 Grill 1
5 Side Shelf 2
6 Control Knob 2
7 Aluminum Grease Tray Liner 1
8 Grease Tray 1
3
3
5
5
7
8
4
2
6
1
M5x10 2xA2x AA 1x
B C
Page 8
8
Preparation
Before beginning assembly of this grill, please remove all packing material and verify that all of the assembly
parts are included (see Package Contents on pages 6 and 7). If any part is missing or damaged, DO NOT
attempt to assemble the product.
Estimated assembly time: A couple minutes.
Tools Needed: Phillips Head screw driver.
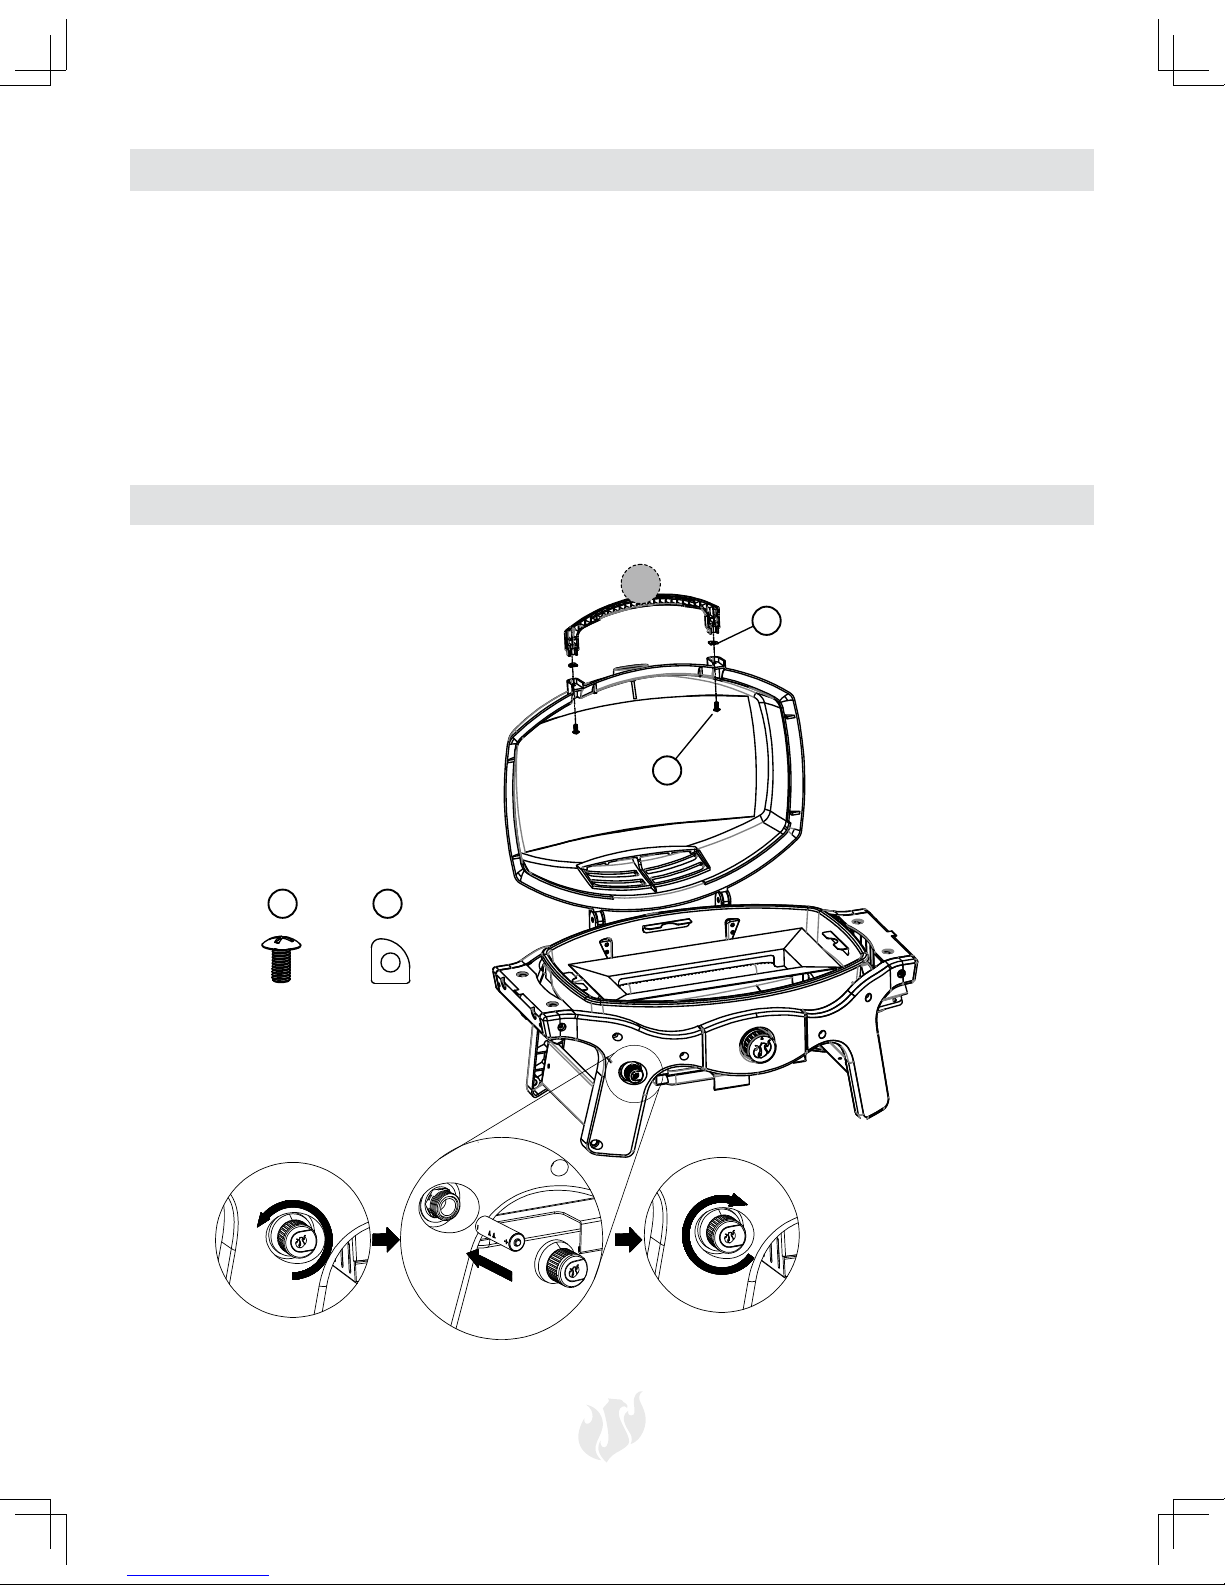
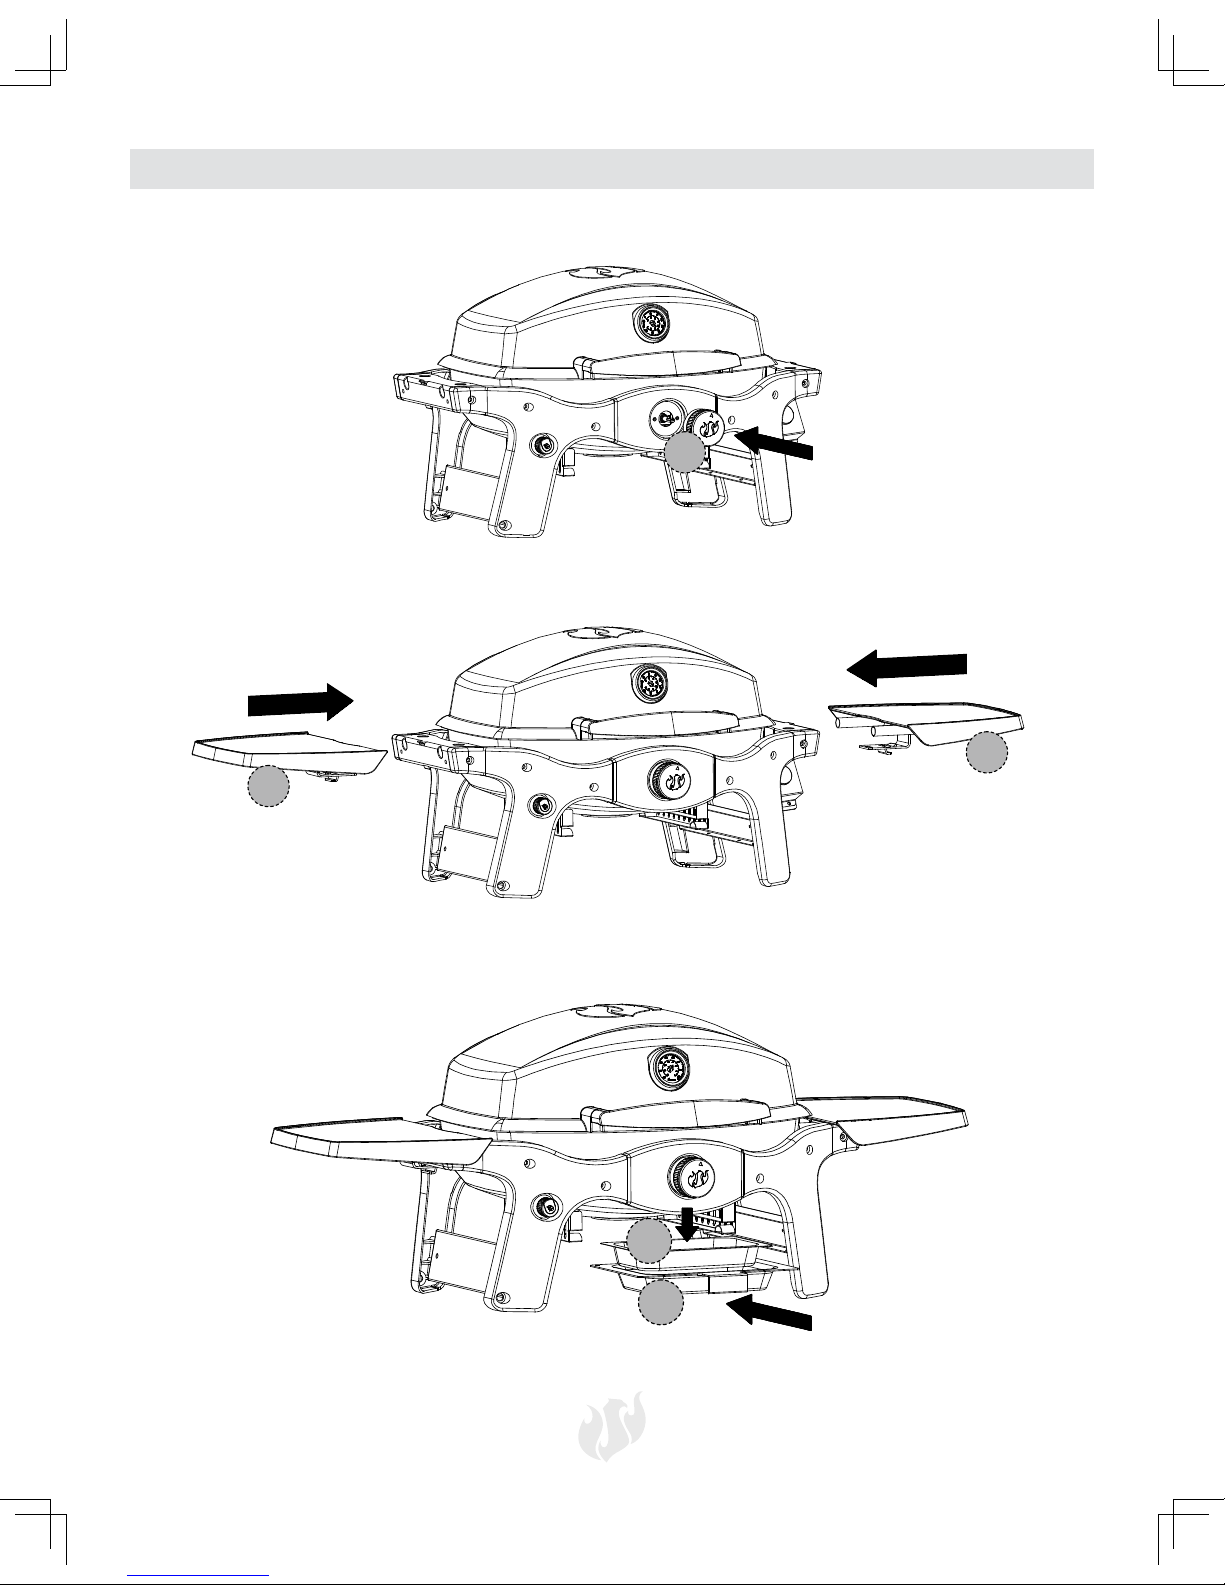
42262 Assembly Instructions
Step 1
1
M5x10 2x
+
-
A
A
B
B
Page 9
9
42262 Assembly Instructions
Step 2
Step 3
5
5
4
4
6
7
Step 4
Page 10
10
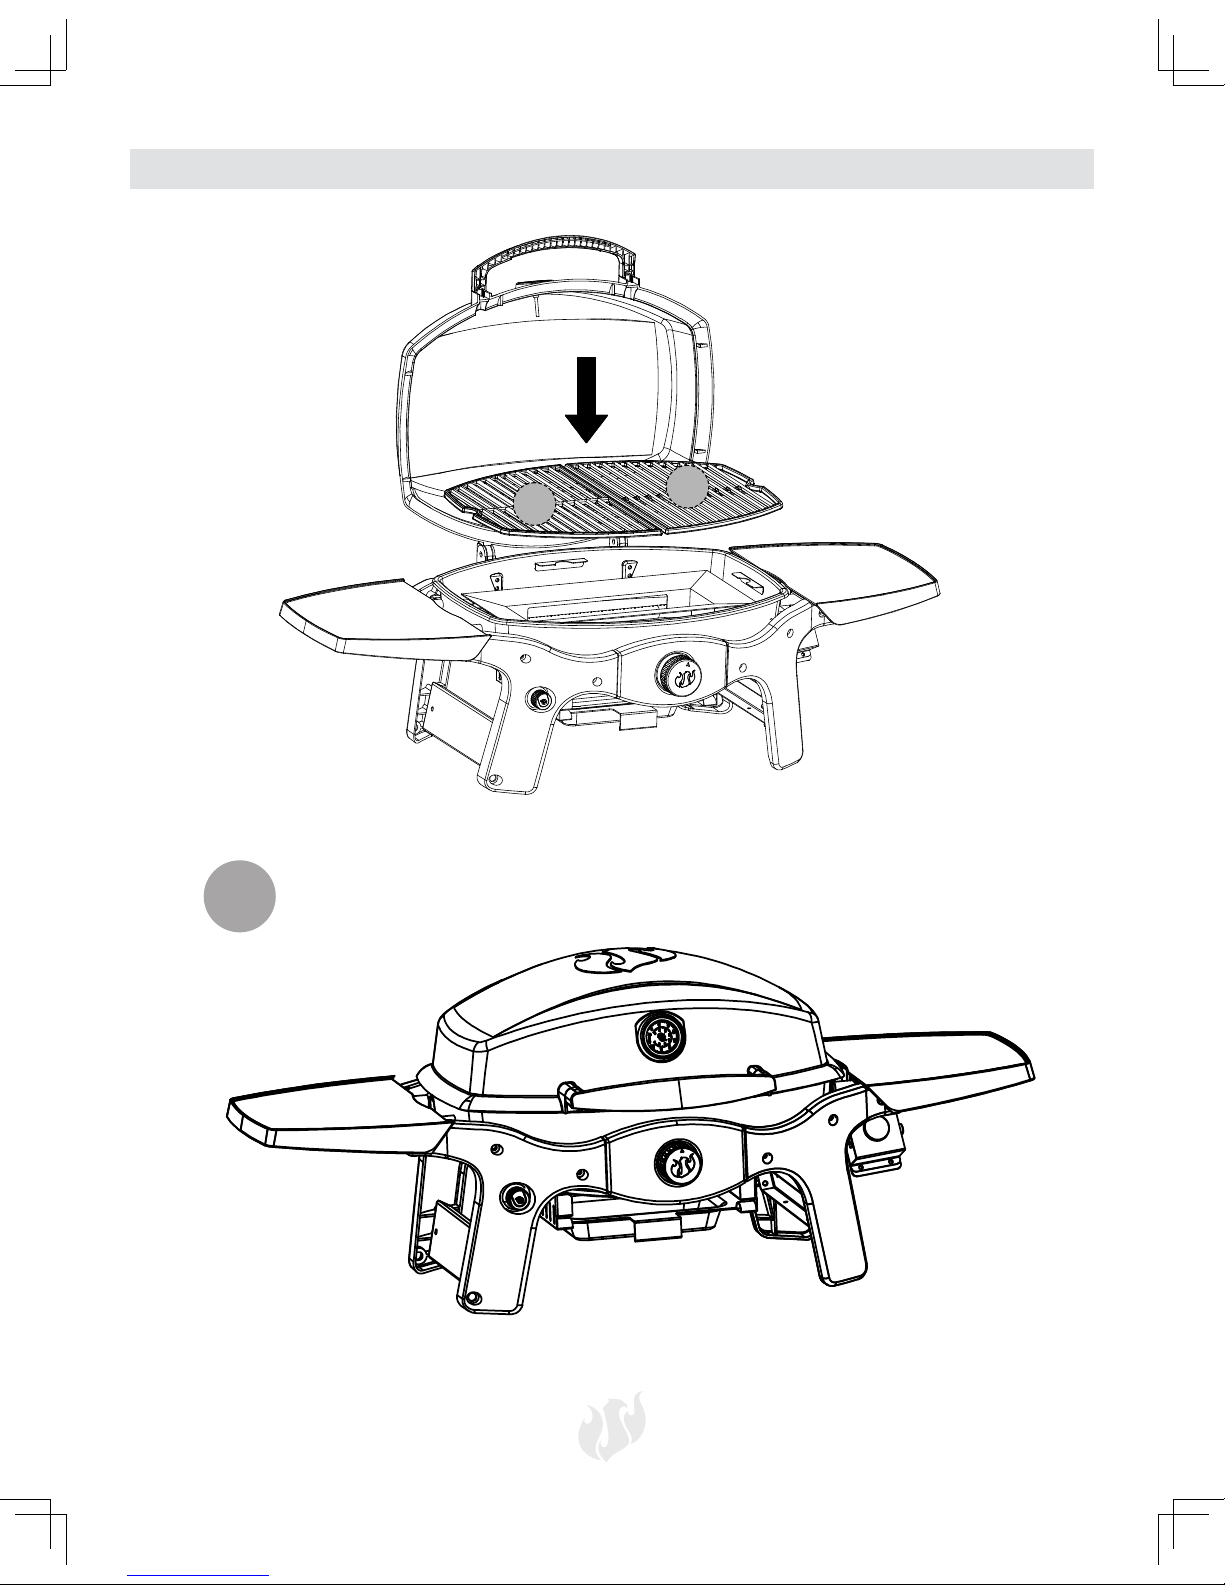
Step 5
42262 Assembly Instructions
3
6
7
2
2
封面图
Page 11

11
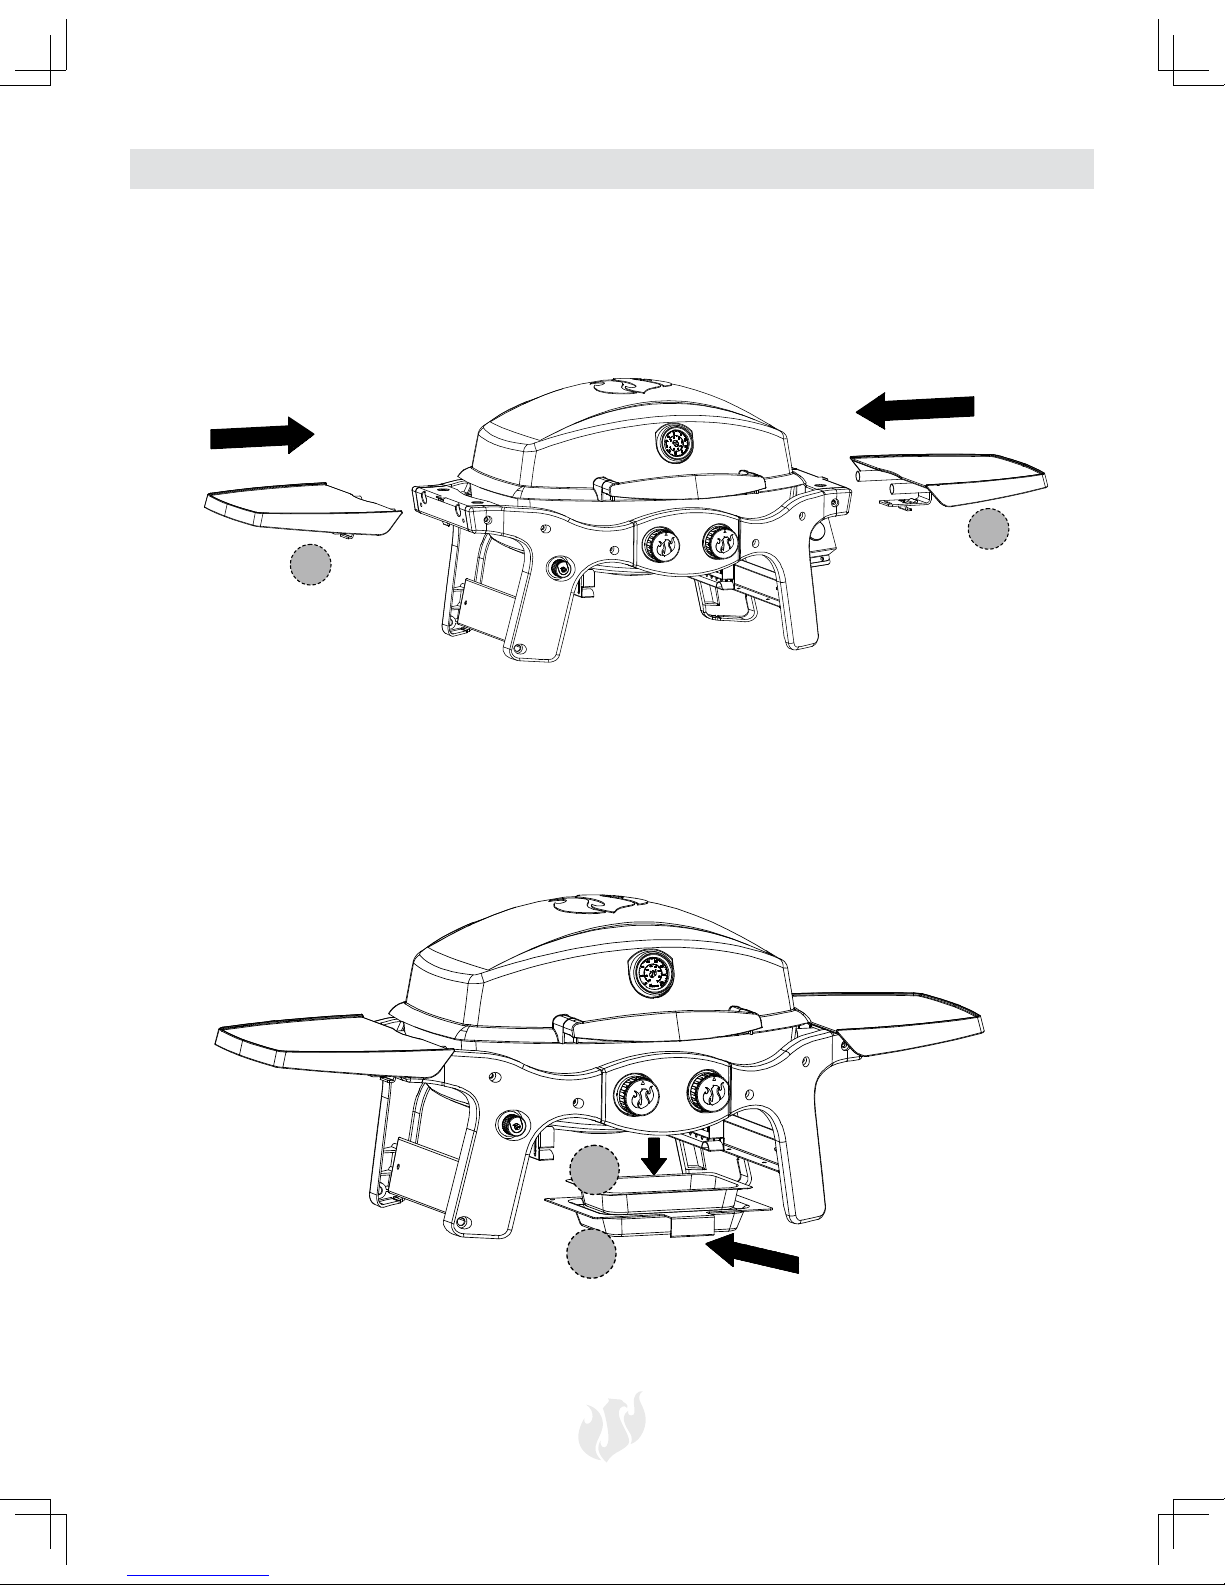
42263 Assembly Instructions
Step 1
Step 2
1
M5x10 2x 2x
+
-
A
A
B
B
6
Page 12
12
Step 3
Step 4
42263 Assembly Instructions
6
5
5
8
7
Page 13

13
Step 5
42263 Assembly Instructions
3
2
8
7
3
封面图
Page 14
14
Connecting Gas Cylinder Operation
Installing 16.4 ounce disposable propane cylinder
NOTE: Your portable Pantera is set up from factory to
use a 16.4 ounce disposable propane cylinder.
Before attaching propane cylinder make sure the
control knob is in the OFF position.
Remove plastic cap from top of propane cylinder and
screw cylinder into regulator hand tight.
1. Disconnect the propane cylinder from the regulator
valve when the grill is not in use.
2. DO NOT obstruct the flow of combustion air and
ventilation air to the grill.
Use only the gas specified.
Keep the grill on a level surface.
Keep the grease cup empty at start up.
Checking for Leaks
1. Make 2-3 oz. of leak solution by mixing one part
liquid dishwashing soap with three parts water.
2. Make sure the control knob is in the OFF position.
3. Spray some solution on the tank valve up to the
valve connection.
4. Inspect the solution at the connections for bubbles.
If no bubbles appear, the connection is secure.
5. If bubbles appear, you have a leak. Go to step 6.
6. Disconnect the regulator from the tank and
reconnect. Make sure the connection is tight and
secured.
7. Retest with solution.
8. If “growing” bubbles appear do not use or move
the LP cylinder. Contact an LP gas supplier or your
fire department!
To prevent fire or explosion hazard
when testing for a leak:
1. ALWAYS perform the 'leak test'
before lighting the grill and each
time the cylinder is connected for
use.
2. DO NOT smoke or allow other
sources of ignition in the area while
conducting a leak test.
3. Conduct the leak test outdoors in a
well-ventilated area.
4. DO NOT use matches, lighters or a
flame to check for leaks.
5. DO NOT use grill until all leaks have
been stopped. If you are unable to
stop a leak, disconnect the propane
supply, call for gas appliance service
or your local propane gas supplier.
Failure to follow the five-minute
waiting period may result in an
explosive flare-up, which can cause
serious bodily injury or death.
DO NOT lean over the open grill
when lighting.
Prior to the first use, it is important to clean your grill
with heat. This will clean the internal parts by burning
off any residue and odor from the manufacturing
process. To perform this cleaning, operate the grill
for approximately 15-20 minutes at the highest heat
setting with the cooking lid closed.
IMPORTANT
Please read these instructions before attempting to
light the grill.
lighting instruction
1. Read all instruction before lighting.
2. Open lid during lighting.
3. Push in and turn the desired control knob to the
HIGH position, then press and hold the electronic
igniter button until the flame ignites.
4. If ignition does not occur in 5 seconds, turn the
burner control off, wait 5 minutes, and repeat the
lighting procedure.
5. To extinguish the burner, push in the control knob
and turn clockwise to the OFF position.
Always remove gas cylinder and grease cup before
transporting or storing grill.
Page 15

15
Operation
Failure to open the lid before igniting may result
in an explosive flare-up, which can cause serious
bodily injury or death.
Match Lighting
1. Strike and place a long wooden match or use a long butane lighter and pass through the spaces in the
cooking grates near the ports on the burner.
2. Push and turn the control knob counterclockwise to the “Max” position.
3. If ignition does not occur in 5 seconds, turn the burner control off, wait 5 minutes, and repeat the lighting
procedure.
4. To extinguish the burner, push in the control knob and turn clockwise to the OFF position.
Moving and Storage
Caution: A collision with the grill, as with any metal object, could cause injury. Use care when moving a portable
gas grill.
Moving the grill:
DO NOT move the grill while it is lit or hot, or with objects on the cooking surface or side tables.
Remove propane cylinder.
Secure lid with velcro strap.
Clean and remove the grease tray before moving the grill to prevent spills.
Move the side shelves to the upright position.
Move with the grill slowly, DO NOT run while moving the grill.
After moving the grill:
Check all gas connections for leaks that could occur from the movement. Check the venturi tube to be sure it is
still over the orifice.
Steps to follow before storing grill:
Clean the grill, including the grease tray. For outdoor use only. If the grill is stored indoors, detach the cylinder
outdoors. If left outdoors, remove the cylinder and cover the grill for protection from the weather. Grill covers may
be purchased from a grill dealer or manufacturer.
Shutting Off the Grill
Caution: DO NOT touch hot grill parts with your bare hands! You must use protective gloves. Be certain the
disposable cylinder is disconnected when the grill is placed in storage. Turn the control knob to OFF position.
Page 16

16
GoodFlame
Y
ellow
LightBlue
2in.(5cm)
Blue
Y
ellow
LightBlue
Blue
BadFlame
DO NOT line firebowl or grease tray
with aluminum foil.
Do not allow drippings or food residue
to remain on the heat tents or grease
tray. Clean regularly to ensure proper
cooking performance.
Please use the following guidelines to keep your grill
clean and looking new. Before any cleaning, make
sure the control knob is in the OFF position and grill is
cool to the touch.
Cleaning the Outside of the Grill
Use a mild detergent and hot water solution to clean
the outside of the grill. Clean thoroughly with the hot
soapy water solution. Rinse with water and allow to
completely dry.
Cleaning the Inside of the Grill
For safety and efficiency, it is important to remove any
debris or excess grease that may accumulate inside
the grill.
• Wipe off the inner lid with a paper towel to prevent
grease build up.
• For the stainless steel heat tents, clean residue off
with wire brush or a flat scraper.
• Remove the grease cup and empty into a suitable
container. Then wipe with a paper towel to remove
excess grease.
Grease cup
The grease cup is located below the grill. Throw away
the aluminum grease cup liner after each use and then
replace it with a new one (Landmann item #42278).
Note: Allow the grease cup to cool before attempting
to clean.
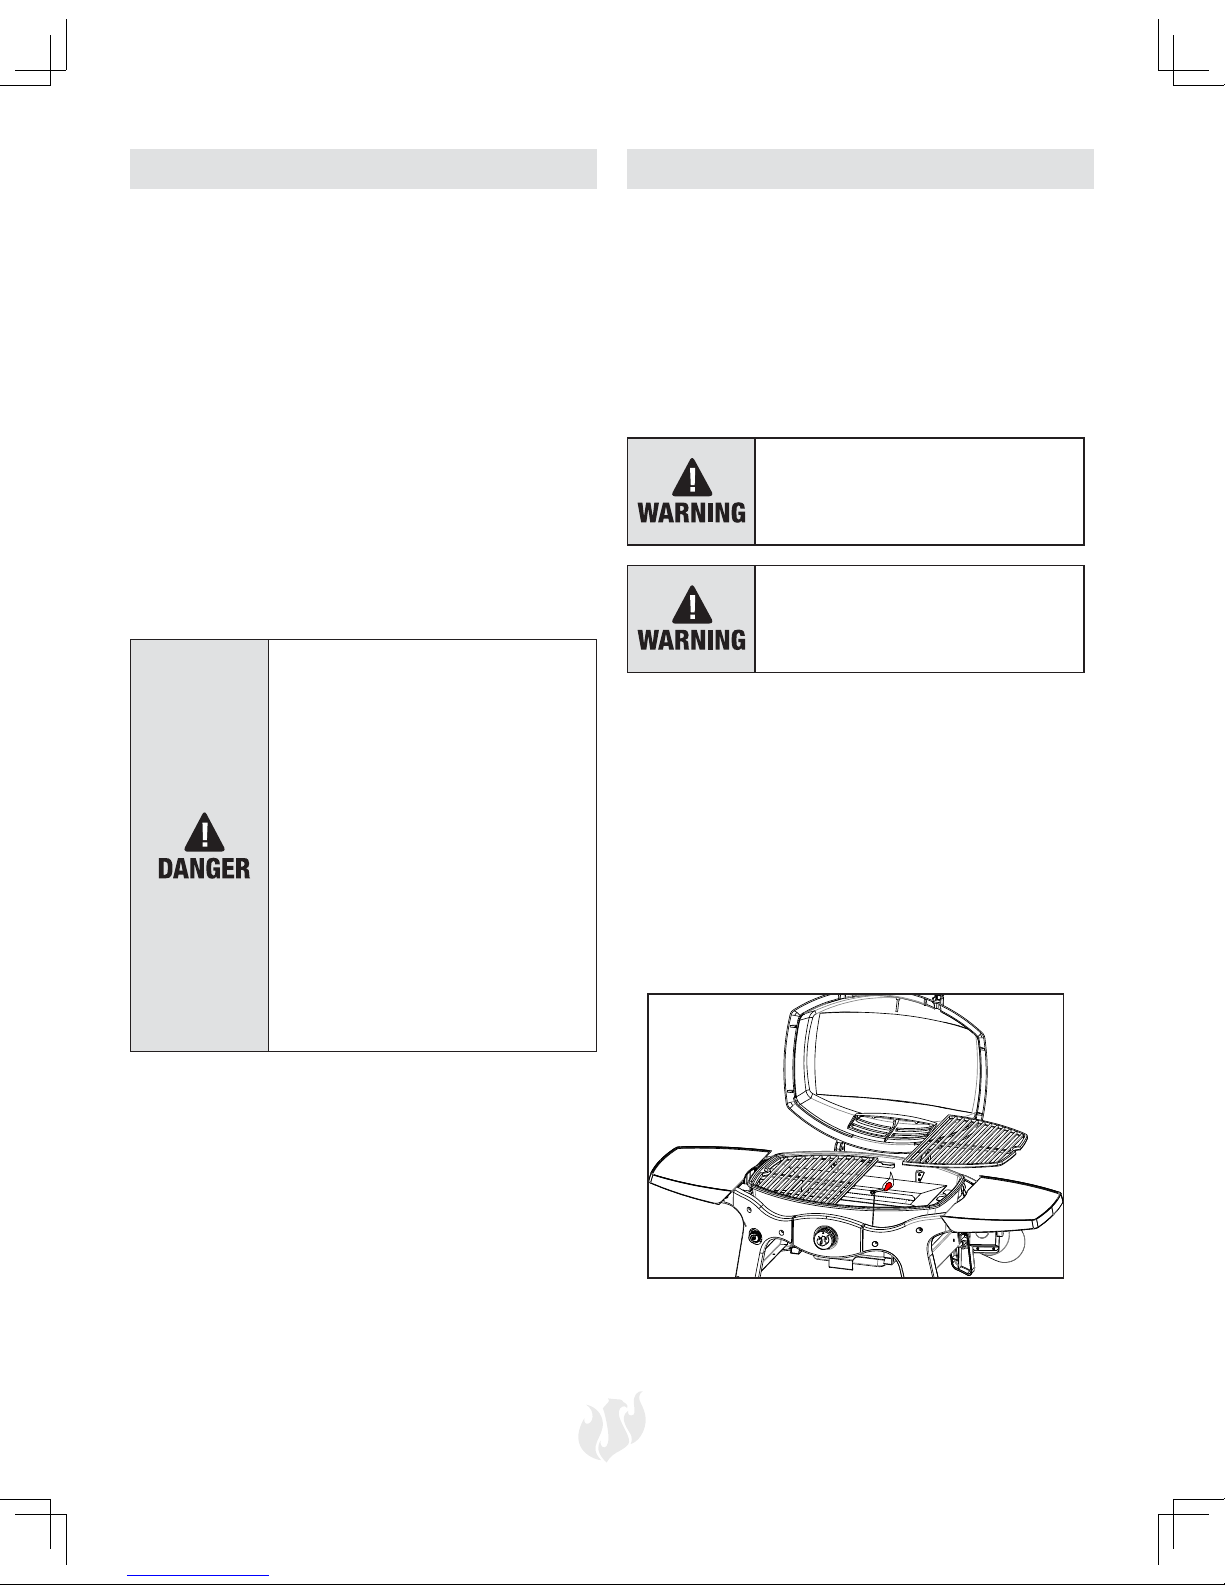
Checking the Flame
The flame coming out of the burner should be a blue
/yellow combination and between one to two inches
tall (see diagram above).
To Remove Burner
Make sure the control knob is in the OFF position.
1. Remove the igniter wire from the igniter.
2. Open grill lid and remove cooking grates.
3. Using a 2 pt Phillips screwdriver, loosen the
screws holding the burner in place. Note: This is a
screw/ nut combination so make sure to hold the
nut while removing the screw.
4. Slide the burner out of the firebox.
To clean burner
• Make sure all burner ports are clear of any clogs.
Tip: Use a pin or paper clip to unclog.
• Make sure the burner is free of any damage. If
damage is found, replace the burner.
• Make sure the end of the burner and primary air
screen are clear from insect nests, dirt, or debris.
Important: Do not leave the grill outside during
inclement weather unless it is covered (cover sold
separately). Rain water can collect inside of the grill, or
in the drip tray if left uncovered. if the drip tray is not
cleaned after use and the grill is left uncovered, the
drip tray will fill with water causing grease and water
to spill. We recommend cleaning and storing the drip
tray after ever use.
Cooking Grates:
The cooking grates can be cleaned immediately after
cooking is completed and after turning off the grill.
Wear a barbecue mitt and scrub the cooking grates
with a damp cloth. If the grill is allowed to cool down,
cleaning the grates will be easier if removed from the
grill and cleaned with a mild detergent.
Caution: All cleaning and maintenance should be done
only when the grill is cool & with the fuel supply turned
off at the cylinder. Disposable propane cylinders
should be detached from the grill during cleaning.
If using a bristle brush to clean cooking
surfaces make sure no loose bristles
remain on the cooking surface as they
may attach to food.
Care and Maintenance
Page 17

17
Cooking Methods And Grilling Tips
Before Grilling
• Make sure that the food items are completely thawed before grilling.
• With the grill lid closed, heat the grill on high for 5-10 minutes.
• DO NOT lift the lid during the preheating process.
• The preheating process with high heat is necessary to brown and seal juices of the food.
• For high-fat meat and poultry, trim excess fat from meats and shorten the preheat time. Both will help reduce
flare-ups from dripping grease.
• Lightly oil the cooking grates when cooking low-fat meat, fish or poultry. Beware that using too much oil can
cause a gray ash to deposit on the food.
During Grilling
• The temperature gauge on the lid indicates the cooking temperature inside the grill.
• Turn foods only once if possible. Juices are lost when meat is turned several times.
• Turn meat just when the juices begin to appear on the surface.
• Avoid puncturing or cutting the meat to test doneness. This allows the juices to escape.
• Add sauces only during the last 10 minutes of cooking to avoid burning the sauce.
• The doneness of the meat will be controlled by the type of meat, the size, shape and thickness of the meat, the
heat setting or method, and the length of time on the grill.
• Cooking time will be longer with an open grill hood.
• Allow for more cooking time on cold and windy days, or at higher altitudes. In reverse, allow for less cooking
time in extremely hot weather.
• Grilling conditions may require adjustments of the burners to obtain and maintain the correct cooking temperatures.
• Use tongs for turning and handling meat instead of a fork, to avoid losing the meat juices.
• If a flare up occurs, turn the control knob to the OFF position and move the food to another area of the cooking
grate. After flames subside, relight the burners using the lighting instruction in this manual.
• NEVER use water to extinguish flame on a gas grill.
Page 18
18
Troubleshooting
DO NOT spray
water on the gas
flames- this could
damage the grill
Problem Cause Solution
Grill will not light.
1. Propane cylinder gas level is low.
2. Igniter battery is not properly installed
or battery needs to be replaced.
3. Spider webs or insect nest in venturi.
4. Burner ports, orifices have blockage.
5. “Match lighting” may be necessary.
6. Connections to the igniter are loose.
7. No spark shows at igniter tip.
1. Replace propane cylinder.
2. Properly install or replace igniter battery.
3. Clean venturi.
4. Clean the components.
5. “Match lighting” light grill per this manual’s instructions.
6. Reconnect or replace wiring to igniter.
7. Replace igniter.
Flame will not stay
lit.
1. Propane cylinder gas level is low.
2. Burner is not properly installed or
dirty.
1. Replace Propane cylinder.
2. Reinstall burner properly and clean out
any debris.
Flame is low, irregular or noisy.
1. Propane cylinder gas level is low.
2. Burner ports may be clogged.
3. Grill may be in an area that is too
windy.
4. There are obstructions such as grease
debris, or insects in air inlets.
1. Replace propane cylinder.
2. Check and clean the burner ports.
3. Wait until wind subsides to continue.
4. Clean burner air inlets of obstructions.
Excessive flare-ups
1. Flare-up are normally caused by excessive fat from meat being grilled.
2. Grill is dirty.
3. The cooking temperature may be too
high.
4. Lid is closed.
5. Food is overcooked or burnt.
6. Firebox and grease cup are full of
grease
1. Trim fat from meat being grilled.
2. Make sure grill is clean.
3. Keep flame on low.
4. Keep the lid up when grilling to avoid
excessive flare-ups.
5. Move food to another area of the grill
until flames subside.
6. Clean firebox and grease cup.
Grill does not get hot
enough.
1. Propane cylinder gas level is low. 1. Replace propane cylinder.
Page 19

19
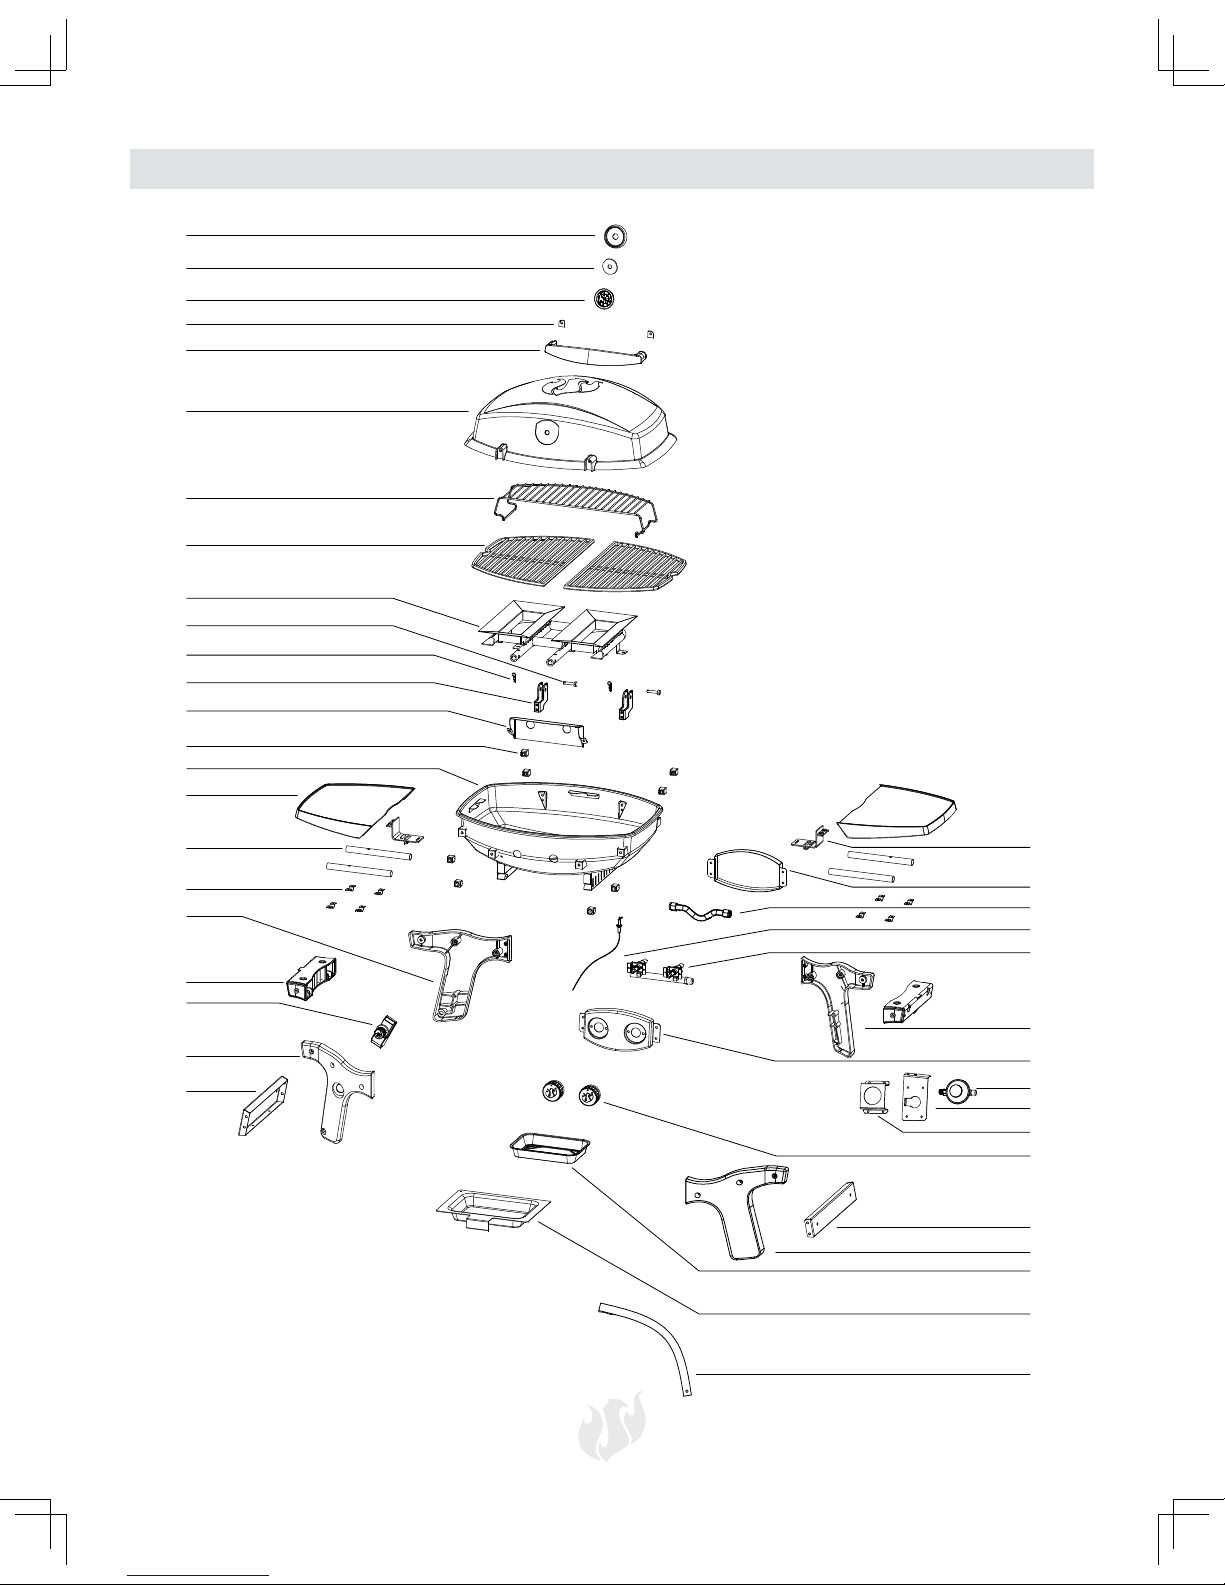
42262 Replacement Parts
AC
AE
AF
AG
AJ
AK
AL
AM
AN
AQ
AR
AS
AT
AU
BJ
BG
BF
BE
BD
BC
BA
AZ
AY
AW
AA
BI
BH
AH
AI
42262 Spare Part For Sales Service
AX
AB
AO
AP
BB
BK
AD
AV
BL
Page 20

20
42262 Replacement Part List
Part Description QTY Part #
AA Temperature Gauge
Bezel
1 PT0129
AB Insulating Spacer 1 PT0124
AC Temperature Gauge 1 PT0046
AD Lid Handle Spacer 2 PT0023
AE Lid Handle 1 PT0003
AF Grill Lid 1 PT0005
AG Cooking Grate 2 PT0047
AH Burner & Heat Tent
Assy
1 PT0048
AI Lid Hinge Pin 2 PT0130
AJ Locking “R” Pin 2 PT0131
AK Lid Hinge Bracket 2 PT0049
AL Heat Shield 1 PT0050
AM Heat Insulated Pad 8 PT0051
AN Grill Firebowl 1 PT0102
AO Side Shelf 2 PT0053
AP Side Shelf Rod 4 PT0054
AQ Side Shelf Rod Bracket 8 PT0055
AR Left Rear Leg 1 PT0056
AS Top Brace 2 PT0057
AT Ignitor 1 PT0058
AU Left Front Leg 1 PT0059
AV Bottom Left Brace 1 PT0060
AW Grill Strap 1 PT0061
AX Grease Tray 1 PT0062
AY Aluminum Grease Tray
Liner
1 PT0063
AZ Right Front Leg 1 PT0064
BA Bottom Right Brace 1 PT0065
BB Control Knob 1 PC0145
BC Regulator Bracket A 1 PT0066
BD Regulator Bracket B 1 PT0067
Part Description QTY Part #
BE Regulator 1 PT0068
BF Control Panel 1 PT0069
BG Right Rear Leg 1 PT0070
BH Manifold & Valve Assy 1 PT0071
BI Electrode & Wire 1 PT0100
BJ Flex Tube 1 PT0101
BK Back Panel 1 PT0072
BL Side Shelf Lock 2 PT0073
Parts not shown
Instruction Manual 1 PT0074
Hardware Pack 1 PT0075
Page 21
21
42263 Replacement Parts
AC
AD
AE
AG
AH
AJ
AK
AL
AM
AN
AQ
AR
AS
AT
AU
BJ
BG
BE
BD
BC
BA
AZ
AY
AA
BI
BH
AI
42263 Spare Part For Sales Service
AX
AB
AO
AP
BB
BM
AF
AV
BF
BK
AW
BL
Page 22

22
42263 Replacement Part List
Part Description QTY Part #
AA Temperature Gauge
Bezel
1 PT0129
AB Insulating Spacer 1 PT0124
AC Temperature Gauge 1 PT0046
AD Lid Handle Spacer 2 PT0023
AE Lid Handle 1 PT0003
AF Grill Lid 1 PT0005
AG Warming rack 1 PT0076
AH Cooking Grate 2 PT0047
AI Burner & Heat Tent
Assy
1 PT0125
AJ Lid Hinge Pin 2 PT0130
AK Locking “R” Pin 2 PT0131
AL Lid Hinge Bracket 2 PT0049
AM Heat Shield 1 PT0126
AN Heat Insulated Pad 8 PT0051
AO Grill Firebowl 1 PT0099
AP Side Shelf 2 PT0053
AQ Side Shelf Rod 4 PT0054
AR Side Shelf Rod Bracket 8 PT0055
AS Left Rear Leg 1 PT0056
AT Top Brace 2 PT0057
AU Ignitor 1 PT0058
AV Left Front Leg 1 PT0059
AW Bottom Left Brace 1 PT0060
AX Grill Strap 1 PT0061
AY Grease Tray 1 PT0062
AZ Aluminum Grease Tray
Liner
1 PT0063
BA Right Front Leg 1 PT0064
BB Bottom Right Brace 1 PT0065
BC Control Knob 2 PC0145
BD Regulator Bracket A 1 PT0066
Part Description QTY Part #
BE Regulator Bracket B 1 PT0067
BF Regulator 1 PT0068
BG Control Panel 1 PT0127
BH Right Rear Leg 1 PT0070
BI Manifold & Valve Assy 1 PT0128
BJ Electrode & Wire 1 PT0100
BK Flex Tube 1 PT0101
BL Back Panel 1 PT0072
BM Side Shelf Lock 2 PT0073
Parts not shown
Instruction Manual 1 PT0074
Hardware Pack 1 PT0075
Page 23

23
Warranty
This Propane Gas Grill is warranted to be free of defects in material and workmanship when properly assembled,
used in a normal outdoor setting and cared for as directed in these instructions for the below time periods from
the date of the original retail purchase.
10 years - Lid
5 years - Cooking grates
2 years - All other parts
This warranty does not cover rust, fading, peeling damage or issues related to neglect, abuse, accident, misuse,
misapplication, improper assembly, transportation damages, commercial use or ANY modifications made to this
product.
Repair labor is not covered. This warranty is the only warranty offered and is in lieu of all other warranties, whether
expressed or implied, which includes implied warranty, merchandising or use for a particular purpose.
All replacement parts that meet the warranty requirements will be shipped at no charge via the discretion of
the manufacturer (ground shipments, US Mail, UPS or FedEx). Any special handling charges (i.e. Second Day,
overnight, etc.) will be the responsibility of the consumer.
All warranty claims apply only to the original purchaser and require a proof of purchase verifying the purchase date.
Do not return parts without first obtaining a return authorization number from our customer service department.
Our customer service department can be reached at 1-800-321-3473 8:00 AM - 5:00 PM (EST) English Only, or
Email CustomerService@landmann-usa.com
Please note for the United States, that some state states do not allow the exclusion or limitation of incident or
consequential damages or limitations on how long an implied warranty lasts, so the above limitations or exclusions
may not apply to you. This warranty gives you specific legal rights and you may also have other legal rights which
may vary from state to state.
Landmann USA, Inc.
7405 Graham Rd
Fairburn, Ga 302130
www.landmann-usa.com
Page 24

封面图
封面图
LIRE ATTENTIVEMENT
LES INSTRUCTIONS DE MONTAGE,
D'ENTRETIEN ET D'UTILISATION
IMPORTANT :
CONSERVER CES INSTRUCTIONS POUR S'Y RÉFÉRER
ULTÉRIEUREMENT
Pantera 1.0/ 2.0
Réf. art. : 42262
Réf. art. : 42263
MODÈLE 42262/ 42263
Des questions, des problèmes, des pièces manquantes? Avant de retourner chez le revendeur, contacter notre
service après-vente au: 1-800-321-3473 de 8h00 à 17h00 (EST) (anglais uniquement), ou envoyer un courriel à:
CustomerService@landmann-usa.com
Cet appareil est conçu
pour une utilisation en
extérieur uniquement.
Il ne s'agit pas d'un
appareil commercial.
5005544
Page 25

25
Table des matières
Informations de sécurité importantes..............26-27
Informations de sécurité relatives au propane liq-
uide (PL) ...............................................................28
Étendue des fournitures ..................................29-30
Préparation ........................................................... 31
Instructions de montage .................................31-36
Raccordement de la bouteille de gaz ...................37
Fonctionnement ..............................................37-38
Entretien et maintenance .....................................39
Méthodes et conseils de cuisson ......................... 40
Dépannage et pièces de rechange .................41-45
Garantie ................................................................ 46
Monteur/installateur
Ces instructions de service contiennent des informations importantes nécessaires pour le montage correct et l'utili-
sation sûre de cet appareil. Lire et respecter tous les avertissements et instructions avant de monter et d'utiliser cet
appareil.
Laisser ces instructions au client.
Caractéristiques techniques
42262 Apport thermique: 12000BTU/h
42263 Apport thermique: 6500BTU/h x 2
Catégorie: propane à pression régulée
Combustible: bouteilles jetables de propane 16,4 onces
Régulateur: Pièce Landmann #PT0068
Client/utilisateur
Respecter tous les avertissements et instructions lors de l'utilisation de cet appareil.
Conserver ces instructions pour s'y référer ultérieurement.
Si une odeur de gaz est perçue:
1. Couper le gaz qui alimente l'appareil.
2. Éteindre toute flamme nue.
3. Ouvrir le couvercle.
4. Si l'odeur persiste, se tenir à l'écart de l'appareil
et appeler immédiatement le fournisseur de gaz
ou les pompiers.
5. Tout manquement au respect de ces
instructions peut entraîner une explosion
ou un risque de brûlure qui peut engendrer
des dommages matériels, des blessures
corporelles ou la mort.
1. NE PAS entreposer ou utiliser de l'essence ou tout
autre liquide ou vapeur inflammable à proximité de
cet appareil ou tout autre appareil.
2. Il est interdit d'entreposer une bouteille de gaz au
PL (propane liquide) non raccordée pour l'utilisation
à proximité de cet appareil ou de tout autre appareil.
3. Ce gril est destiné à une UTILISATION EN
EXTÉRIEUR uniquement et ne doit pas être utilisé
dans un bâtiment, un garage, sous des surplombs
ou toute autre zone fermée.
4. NE PAS laisser un gril allumé sans surveillance.
Tenir les enfants et les animaux à distance du gril en
toutes circonstances.
5. Cet appareil est conçu pour une utilisation en
extérieur uniquement. Il ne s'agit pas d'un appareil
commercial.
Page 26

26
• Veiller à suivre scrupuleusement toutes les
instructions de montage. Un montage incorrect de
ce gril peut se révéler dangereux.
• NE JAMAIS utiliser de charbon, d'essence à
briquets, d'essence, de kérosène ou d'alcool pour
allumer ce gril.
• NE JAMAIS utiliser des briquettes de charbon ou de
l'essence à briquets dans un gril au gaz.
• NE PAS déplacer le gril lorsqu'il est allumé.
• NE PAS se pencher au-dessus du gril ouvert lors de
l'allumage ou de la cuisson.
• Toujours ouvrir le couvercle du gril lentement et avec
précaution car la chaleur emprisonnée dans le gril
peut engendrer de graves brûlures.
• NE PAS placer les mains ou les doigts sur le bord du
foyer et du couvercle lorsque ce dernier est ouvert
ou que le gril est chaud.
• Tenir les enfants et les animaux à distance du gril
lors de l'utilisation. Des pièces accessibles peuvent
être brûlantes.
• NE PAS tenter de débrancher l'assemblage de
régulateur de gaz et de tuyau ou tout autre raccord
de gaz lorsque le gril est en service.
• IL EST INTERDIT de placer ce gril sous une
construction combustible suspendue non protégée.
Toujours respecter une distance minimale de 24"
par rapport au bas, au haut et à l'arrière et de 24"
par rapport aux côtés du gril (voir ci-dessous).
Informations de sécurité importantes
Les avertissements et mises en garde
contenus dans ces instructions de service
peuvent entraîner de graves blessures
corporelles ou la mort, ou peuvent
engendrer un incendie ou une explosion
responsable de dommages matériels.
• Ce gril est un appareil d'extérieur et NE DOIT PAS
être exploité dans un bâtiment, un garage ou toute
autre zone fermée.
• NE PAS obstruer le flux d'air de combustion et
de ventilation. Garder les orifices de ventilation du
corps de la bouteille dégagés et exempts de débris.
• Si les brûleurs devaient s'éteindre lorsque le gril est
en service, fermer toutes les valves de gaz. Ouvrir
le couvercle et attendre cinq minutes avant de
tenter de rallumer le gril en utilisant les instructions
d'allumage.
• Garder ce gril dégagé et exempt de matériau
combustible, d'essence ou d'autres vapeurs et
liquides inflammables.
• NE JAMAIS entreposer une bouteille de propane
liquide supplémentaire ou débranchée sous ou à
proximité de ce gril.
• Toujours utiliser des gants ou des maniques
thermorésistant(e)s pour barbecue lors de
l'exploitation du gril.
• NE PAS laisser un gril chaud sans surveillance et
ne pas le déplacer pendant l'exploitation.
• Ce gril n'est pas destiné à être utilisé dans ou
installé sur des véhicules de loisir, des bateaux,
des remorques mobiles ou tout autre emplacement
mobile.
• NE PAS placer une housse de protection pour gril
ou tout autre objet inflammable sur le gril lorsqu'il
est en service ou qu'il est chaud.
• L'entreposage d'un appareil de cuisson d'extérieur
à l'intérieur est permis uniquement si la bouteille
est débranchée et retirée de l'appareil de cuisson
au gaz d'extérieur.
• Lorsque l'appareil n'est pas utilisé, s'assurer que le
gaz est COUPÉ sur la bouteille d'alimentation.
• Les bouteilles doivent être entreposées à l'extérieur
et hors de portée des enfants. La bouteille ne doit
pas être entreposée dans un bâtiment, un garage
ou d'autres zones fermées.
L'assemblage de régulateur de pression
et de tuyau métallique fourni avec ce
gril doit être utilisé. Toute demande
d'assemblage de régulateur et de
tuyau métallique de rechange doit être
effectuée par l'intermédiaire du fabricant,
LANDMANN-USA.
24"
24"
Page 27

27
Informations de sécurité importantes
• Toujours inspecter le tuyau métallique d’alimentation
en gaz avant chaque utilisation. Si le tuyau
métallique présente des signes d’abrasion ou de
coupure, NE PAS utiliser le gril. Le tyau métallique
doit être remplacé avant de réutiliser l’appareil.
• Toujours contrôler l’absence d’insectes et de nids
d’insectes sur les brûleurs et les tubes de venturi.
Un tube obstrué peut entraîner un incendie sous le
gril.
• Toujours vérifier l’absence de fuites sur les
raccordements à chaque raccordement et
débranchement de la bouteille d’alimentation en
gaz PL.
• NE PAS élargir les orifices des valves ou des
brûleurs lors du nettoyage des valves ou des
brûleurs.
• Si un sifflement de gaz s'échappant de la bouteille
de gaz PL est vu, entendu ou senti, s'écarter de la
bouteille de gaz PL. NE PAS tenter de résoudre le
problème soi-même, et appeler les pompiers.
• Si un feu de graisse se déclare, ÉTEINDRE le
brûleur et laisser le couvercle fermé jusqu'à ce que
le feu s'éteigne.
• NE PAS modifier ce gril de quelque façon que ce
soit. Toute modification annule automatiquement
la garantie.
• NE PAS utiliser le gril dans des conditions de vent
fort.
La bouteille d'alimentation en gaz PL à utiliser
doit être construite et marquée conformément
à la spécification relative aux bouteilles de gaz
PL du Ministère américain des transports (DOT)
ou de la Norme nationale canadienne CAN/
CSB-b339 (bouteilles, sphères et tubes pour le
transport de marchandise dangereuse).
Les grils au gaz PL mobiles requièrent un système
d'alimentation en combustible constitué d'un
régulateur et d'une bouteille d'alimentation en gaz PL.
Pour éviter toute possibilité de renversement du gril,
NE JAMAIS placer plus de 5 livres (2 270 g) sur la
table latérale.
S'assurer de serrer toutes les pièces (vis, écrous,
boulons, etc.) plusieurs fois par an et avant chaque
saison d'utilisation du gril
NE JAMAIS laisser de la nourriture en train de cuire
sans surveillance. Surveiller en permanence la
nourriture aide à maintenir une température constante,
à économiser du combustible, à améliorer la saveur
des aliments et à limiter les flambées soudaines.
Installation pour griller des aliments
1. Débloquer le couvercle en détachant la bande Velcro
2. Installer le récupérateur de graisse
3. Brancher la bouteille de propane
4. Gril prêt pour griller des aliments
Préparation au transport
1. S'assurer que le gril est froid
2. Retirer la bouteille de propane
3. Retirer et nettoyer le récupérateur de graisse
4. Bloquer le couvercle avec la bande Velcro
5. Gril prêt pour le transport
Attention: en cas de transport dans un véhicule,
s'assurer d'utiliser du plastique ou une bâche sous
le gril, au cas où de la graisse ou de l'huile coule.
Un incendie entraînant la mort
ou des blessures graves peut se
déclarer si les points suivants
ne sont pas scrupuleusement
respectés:
NE JAMAIS entreposer ou utiliser de
l'essence ou toute autre substance
volatile à proximité de ce gril. NE
JAMAIS entreposer une bouteille de
propane de rechange à proximité de
ce gril ou à proximité de toute autre
source potentielle de chaleur.
NE PAS entreposer de bouteilles de
gaz de rechange dans ou à proximité
du gril.
Placer un capuchon anti-poussière sur
la valve de la bouteille lorsqu'elle n'est
pas utilisée. Installer uniquement le type
de capuchon anti-poussière fourni avec
la valve de la bouteille sur la sortie de
la valve de la bouteille. Les autres types
de capuchons ou bouchons peuvent
entraîner une fuite de propane.
Ce produit contient des substances
chimiques reconnues par l'État de
Californie comme causes de cancers, de
malformations congénitales ou autres
troubles de l'appareil reproducteur.
Avertissements de la Proposition 65 de
l'État de Californie
Page 28

28
Informations de sécurité relatives au propane liquide (PL)
Informations générales
• La conception de ce gril est certifiée par ETL pour
une utilisation avec des bouteilles de propane
jetables de 16,4onces.
• Ce gril NE PEUT PAS être converti pour le gaz naturel.
NE PAS tenter de convertir ce gril pour un type de
gaz différent.
Informations de sécurité
• L'odeur du gaz PL est similaire à celle du gaz naturel.
• Le gaz PL est plus lourd que l'air et du gaz qui fuit
peut s'accumuler dans des zones basses et résister
à la dispersion.
• Les bouteilles de gaz PL ne doivent pas être laissées
déposées ou manipulées brusquement.
• NE PAS utiliser une bouteille de gaz PL endommagée.
Une bouteille de gaz PL cabossée ou rouillée ou une
bouteille de gaz PL avec une valve endommagée
peut être dangereuse et doit être immédiatement
remplacée par une nouvelle bouteille.
• TOUJOURS fermer la valve de la bouteille après
utilisation.
• TOUJOURS fermer la valve de la bouteille lors du
débranchement du régulateur.
• TOUJOURS manipuler les bouteilles de gaz PL
potentiellement vides avec autant de précaution
qu'une bouteille de gaz PL pleine. De la pression
de gaz peut être encore présente à l'intérieur d'une
bouteille de gaz PL potentiellement vide.
• NE JAMAIS entreposer ou transporter une bouteille
de gaz PL dans un endroit où la température peut
atteindre 125°F (52°C).
• Tenir les bouteilles de gaz PL à l'écart des enfants et
des animaux.
• NE PAS entreposer des bouteilles de gaz PL
débranchées dans un bâtiment, un garage ou d'autres
zones fermées.
• Si la bouteille de gaz PL est conservée dans le gril
entre les utilisations, s'assurer de conserver à la fois
le gril et la bouteille dans une zone à l'extérieur avec
une bonne ventilation.
• TOUJOURS effectuer un test de fuites sur le raccord
entre la bouteille de gaz PL et le régulateur lors du
remplacement des bouteilles de gaz PL.
Important
L'installation de l'appareil au gaz PL des États-Unis doit
être conforme aux règlements et ordonnances locaux.
En l'absence de règlements locaux, l'installation de
l'appareil doit être conforme soit au National Fuel Gas
Code, ANSI Z223.1/NFPA54, soit au Natural Gas and
Propane Appliance code, CSA B149.1, soit au Propane
Storage and Handling Code, B149.2, si applicable. Pour
le Canada, l'installation de ce gril doit être conforme
aux règlements locaux et/ou à la norme CSA-B149.2
(Propane Storage and Handling Code).
Examiner les directives et consignes de sécurité ci-dessous lors de l'utilisation du gaz au propane
liquide (PL).
Page 29

29
42262 Étendue des fournitures
Pièce Description Quantité
1 Poignée 1
2 Grille de cuisson 2
3 Gril 1
4 Tablette latérale 2
5 Bouton de commande 1
6
Revêtement de bac récupérateur de graisse en alu-
minium
1
7 Bac récupérateur de graisse 1
6
3
2
2
4
4
7
5
1
M5x10 2x
2x AA 1x
A B C
Page 30

30
42263 Étendue des fournitures
Pièce Description Quantité
1 Poignée 1
2 Grille de maintien au chaud 1
3 Grille de cuisson 2
4 Gril 1
5 Tablette latérale 2
6 Bouton de commande 2
7
Revêtement de bac récupérateur de graisse en alu-
minium
1
8 Bac récupérateur de graisse 1
3
3
5
5
7
8
4
2
6
1
M5x10 2xA2x AA 1x
B C
Page 31

31
Préparation
Avant de commencer le montage de ce gril, retirer l'intégralité de l'emballage et vérifier que toutes les pièces
de montage sont incluses (voir Étendue des fournitures, p. 6 et 7). Si une pièce manque ou est endommagée,
NE PAS tenter de monter le produit.
Temps de montage estimé: quelques minutes.
Outils requis: tournevis Phillips Head.
42262 Instructions de montage
Étape 1
1
M5x10 2x
+
-
A
A
B
B
Page 32

32
42262 Instructions de montage
Étape 2
Étape 3
5
5
4
4
6
7
Étape 4
Page 33

33
Étape 5
42262 Instructions de montage
3
6
7
2
2
封面图
Page 34

34
42263 Instructions de montage
Étape 1
Étape 2
1
M5x10 2x 2x
+
-
A
A
B
B
6
Page 35

35
Étape 3
Étape 4
42263 Instructions de montage
6
5
5
8
7
Page 36

36
Étape 5
42263 Instructions de montage
3
2
8
7
3
封面图
Page 37

37
Raccordement de la bouteille de gaz Fonctionnement
Installation de la bouteille de propane jetable
16,4onces
NOTE: le Pantera mobile est réglé en usine pour utiliser
une bouteille de propane jetable de 16,4onces.
Avant de fixer la bouteille de propane, s'assurer que le
bouton de commande est en position OFF (arrêt).
Retirer le capuchon en plastique du haut de la bouteille
de propane et visser fermement le cylindre dans le
régulateur à la main.
1. Débrancher la bouteille de propane de la valve du
régulateur lorsque le gril n'est pas utilisé.
2. NE PAS obstruer le flux d'air de combustion et d'air
de ventilation vers le gril.
Utiliser uniquement le gaz spécifié.
Garder le gril sur une surface plane.
Garder le récupérateur de graisse vide au démarrage.
Contrôle des fuites
1. Préparer une solution pour fuites de 2 à 3 onces en
mélangeant une dose de liquide vaisselle avec trois
doses d'eau.
2. S'assurer que le bouton de commande est en
position OFF (arrêt).
3. Pulvériser de la solution sur la valve du réservoir
jusqu'au raccord de la valve.
4. Inspecter si la solution fait des bulles sur les raccords.
Si aucune bulle n'apparaît, le raccord est sûr.
5. Si des bulles apparaissent, une fuite est présente.
Aller à l'étape 6.
6. Débrancher le régulateur du réservoir et le rebrancher.
S'assurer que le raccord est serré et sûr.
7. Réitérer le test avec la solution.
8. Si des bulles «grandissantes» apparaissent, ne pas
utiliser ou déplacer la bouteille de PL. Contacter un
fournisseur de gaz PL ou les pompiers!
Pour éviter tout risque d'incendie ou
d'explosion lors du test de fuites:
1. TOUJOURS effectuer le «test de fuites»
avant l'allumage du gril et à chaque fois que
la bouteille est raccordée pour utilisation.
2. NE PAS fumer ou permettre d'autres
sources d'allumage dans la zone lors de
la réalisation d'un test de fuites.
3. Effectuer le test de fuites à l'extérieur,
dans une zone bien ventilée.
4. NE PAS utiliser d'allumettes, de briquets ou
une flamme pour vérifier l'absence de fuites.
5. NE PAS utiliser le gril avant que toutes les
fuites aient été colmatées. Si le colmatage
d'une fuite est impossible, débrancher
l'alimentation en propane, appeler un
service pour appareils au gaz ou le
fournisseur local de gaz propane.
Tout manquement au respect de la
période de cinq minutes d'attente
peut entraîner une flambée explosive,
qui peut causer de graves blessures
corporelles ou la mort.
NE PAS se pencher au-dessus du
gril ouvert lors de l'allumage.
Avant la première utilisation, il est important de nettoyer
le gril avec de la chaleur. Cela va nettoyer les pièces
internes en brûlant les résidus ou les odeurs issus du
processus de fabrication. Pour effectuer ce nettoyage,
exploiter le gril pendant environ 15 à 20 minutes au
réglage de chaleur maximal avec le couvercle de
cuisson fermé.
IMPORTANT
Lire ces instructions avant de tenter d'allumer le gril.
Instructions d'allumage
1. Lire toutes les instructions avant l'allumage.
2. Ouvrir le couvercle pendant l'allumage.
3. Enfoncer et tourner le bouton de commande
souhaité en position HIGH (haut), puis appuyer sur
le bouton de l'allumeur électronique et le maintenir
jusqu'à ce que la flamme s'allume.
4. Si l'allumage ne s'effectue pas dans les 5secondes,
désactiver la commande du brûleur, attendre 5
minutes et réitérer la procédure d'allumage.
5. Pour éteindre le brûleur, enfoncer le bouton de
commande et le tourner dans le sens horaire en
position OFF (arrêt).
Toujours retirer la bouteille de gaz et le récupérateur
de graisse avant
de transporter ou d'entreposer le gril.
Page 38

Fonctionnement
Tout manquement à ouvrir le couvercle avant l'allumage peut entraîner une flambée
explosive, qui peut causer de graves blessures corporelles ou la mort.
Allumage avec une allumette
1. Craquer et placer une longue allumette en bois ou utiliser un long briquet au butane et passer à travers les
espaces dans les grilles de cuisson près des orifices sur le brûleur.
2. Enfoncer et tourner le bouton de commande dans le sens antihoraire en position «Max».
3. Si l'allumage ne s'effectue pas dans les 5secondes, désactiver la commande du brûleur, attendre 5 minutes
et réitérer la procédure d'allumage.
4. Pour éteindre le brûleur, enfoncer le bouton de commande et le tourner dans le sens horaire en position OFF
(arrêt).
Déplacement et entreposage
Attention: une collision avec le gril ou avec un quelconque objet métallique peut engendrer des blessures. Être
vigilant lors du déplacement d'un gril au gaz mobile.
Déplacement du gril:
NE PAS déplacer le gril lorsqu'il est allumé ou chaud, ou lorsque des objets se trouvent sur la surface de cuisson
ou les tables latérales.
Retirer la bouteille de propane.
Bloquer le couvercle avec la bande Velcro.
Nettoyer et retirer le bac récupérateur de graisse avant de déplacer le gril pour éviter tout renversement.
Mettre les tablettes latérales en position verticale.
Se déplacer doucement avec le gril, NE PAS courir lors du déplacement du gril.
Après le déplacement du gril:
Contrôler l'absence de fuites sur tous les raccords de gaz qui pourraient résulter du mouvement. Contrôler le tube
de venturi pour s'assurer qu'il est toujours sur l'orifice.
Étapes à suivre avant d'entreposer le gril:
Nettoyer le gril, y compris le bac récupérateur de graisse. Pour utilisation en extérieur uniquement. Si le gril est
entreposé à l'intérieur, débrancher la bouteille et la laisser à l'extérieur. Si le gril est laissé à l'extérieur, retirer la
bouteille et couvrir le gril pour le protéger contre les intempéries. Les housses de protection pour grils peuvent
être achetées auprès d'un revendeur ou d'un fabricant de grils.
Arrêt du gril
Attention: NE PAS toucher les parties brûlantes du gril à mains nues! Utiliser impérativement des gants de
protection. S'assurer que la bouteille jetable est débranchée lorsque le gril est entreposé. Tourner le bouton de
commande en position OFF (arrêt).
Page 39

39
GoodFlame
Y
ellow
LightBlue
2in.(5cm)
Blue
Y
ellow
LightBlue
Blue
BadFlame
NE PAS tapisser le foyer ou le bac
récupérateur de graisse de papier
aluminium.
Ne pas laisser de gouttes ou de résidus
alimentaires sur les tentes de chaleur
ou le bac récupérateur de graisse.
Nettoyer régulièrement pour assurer
une performance de cuisson correcte.
Utiliser les directives suivantes pour garder le gril
propre et conserver son aspect neuf. Avant chaque
nettoyage, s'assurer que le bouton de commande
est en position OFF (arrêt) et que le gril est froid au
toucher.
Nettoyage de l'extérieur du gril
Utiliser une solution de détergent doux et d'eau
chaude pour nettoyer l'extérieur du gril. Nettoyer
soigneusement avec la solution d'eau savonneuse
chaude. Rincer à l'eau et laisser sécher complètement.
Nettoyage de l'intérieur du gril
Pour la sécurité et l'efficacité, il est important de
retirer tous les débris ou excès de graisse qui peuvent
s'accumuler à l'intérieur du gril.
• Essuyer le couvercle intérieur avec de l'essuie-tout
pour prévenir l'accumulation de graisse.
• Pour les tentes de chaleur en acier inoxydable,
nettoyer les résidus avec une brosse métallique ou
un grattoir plat.
• Retirer le récupérateur de graisse et le vider dans
un récipient adapté. Essuyer ensuite avec de
l'essuie-tout pour retirer l'excès de graisse.
Récupérateur de graisse
Le récupérateur de graisse est situé sous le gril.
Jeter le revêtement en aluminium du récupérateur de
graisse après chaque utilisation et le remplacer par un
nouveau (article Landmann #42278).
Note: laisser refroidir le récupérateur de graisse avant
de tenter de le nettoyer.
Contrôle de la flamme
La flamme sortant du brûleur doit être une combinaison
de bleu et de jaune et doit mesurer entre un et deux
pouces (voir diagramme ci-dessus).
Retirer le brûleur
S'assurer que le bouton de commande est en position
OFF (arrêt).
1. Retirer le fil d'allumage de l'allumeur.
2. Ouvrir le couvercle du gril et retirer les grilles de
cuisson.
3. À l'aide d'un tournevis Phillips 2pt, dévisser les vis
qui maintiennent le brûleur en place. Note: il s'agit
d'une combinaison vis/écrou; s'assurer donc de
tenir l'écrou lors du dévissage de la vis.
4. Glisser le brûleur hors du foyer.
Nettoyer le brûleur
• S'assurer que tous les orifices du
brûleur sont exempts d'obstructions.
Conseil: utiliser une épingle ou un trombone pour
retirer les obstructions.
• S'assurer que le brûleur est exempt de dommages.
Si un dommage est détecté, remplacer le brûleur.
• S'assurer que l'extrémité du brûleur et le filtre à
air primaire sont exempts de nids d'insectes, de
poussière ou de débris.
Important: ne pas laisser le gril à l'extérieur en cas
de mauvais temps s'il n'est pas couvert (housse de
protection vendue séparément). L'eau de pluie peut
s'accumuler à l'intérieur du gril, ou dans l'égouttoir s'il
est laissé non couvert. Si l'égouttoir n'est pas nettoyer
après utilisation et que le gril est laissé non couvert,
l'égouttoir se remplit d'eau, entraînant une fuite de
graisse et d'eau. Nous recommandons de nettoyer et
d'entreposer l'égouttoir après chaque utilisation.
Grilles de cuisson:
Les grilles de cuisson peuvent être nettoyées
immédiatement après la cuisson et après avoir éteint
le gril. Porter un gant spécial barbecue et récurer les
grilles de cuisson avec un chiffon humide. Si le gril
est laissé à refroidir, le nettoyage des grilles est plus
simple si elles sont retirées du gril et nettoyées avec
un détergent doux.
Attention : l'intégralité du nettoyage et de la
maintenance doit être effectuée uniquement lorsque
le gril est froid et avec l'alimentation en combustible
coupée sur la bouteille. Les bouteilles de propane
jetables doivent être débranchées du gril pendant le
nettoyage.
Si une brosse à poils est utilisée pour nettoyer
les surfaces de cuisson, s'assurer qu'aucun
poil détaché ne reste sur la surface de travail,
car ils peuvent coller aux aliments.
Entretien et maintenance
Page 40

40
Méthodes et conseils de cuisson
Avant de faire griller des aliments
• S'assurer que les aliments sont complètement décongelés avant de les faire griller.
• Avec le couvercle du gril fermé, chauffer le gril à une puissance élevée pendant 5 à 10 minutes.
• NE PAS soulever le couvercle pendant le processus de préchauffage.
• Le processus de préchauffage à chaleur élevée est nécessaire pour faire dorer et sceller les jus des aliments.
• Pour la viande et la volaille très grasses, enlever l'excédent de gras de la viande et réduire le temps de
préchauffage. Ces deux mesures aident à réduire les flambées de graisse qui goutte.
• Huiler légèrement les grilles de cuisson lors de la cuisson de viande, poisson ou volaille pauvre en graisse. Tenir
compte du fait qu'une utilisation excessive d'huile peut engendrer un dépôt de cendre grise sur la nourriture.
Pendant la cuisson
• La jauge de température sur le couvercle indique la température de cuisson à l'intérieur du gril.
• Retourner les aliments une seule fois si possible. Les jus sont perdu lorsque la viande est retournée plusieurs
fois.
• Retourner la viande juste quand les jus commencent à apparaître à la surface.
• Éviter de piquer ou de couper la viande pour tester la cuisson. Cela entraîne l'écoulement des jus.
• Ajouter des sauces uniquement au cours des 10 dernières minutes de cuisson pour éviter qu'elles ne brûlent.
• La cuisson de la viande dépend du type de viande, de la taille, de la forme et de l'épaisseur de la viande, du
réglage ou de la méthode de chauffe et de la durée sur le gril.
• Le temps de cuisson est plus long lorsque la hotte du gril est ouverte.
• Prolonger le temps de cuisson lorsqu'il fait froid et qu'il y a du vent, ou à des altitudes plus élevées. À l'inverse,
réduire le temps de cuisson lorsqu'il fait extrêmement chaud.
• Les conditions de grillade peuvent requérir des ajustements des brûleurs pour obtenir et maintenir les bonnes
températures de cuisson.
• Utiliser des pinces pour tourner et manipuler la viande et non une fourchette pour éviter de perdre les jus de la
viande.
• Si une flambée se produit, tourner le bouton de commande en position OFF (arrêt) et déplacer les aliments sur
une autre zone de la grille de cuisson. Une fois que les flammes se sont atténuées, rallumer les brûleurs à l'aide
des instructions d'allumage décrites dans ces instructions de service.
• NE JAMAIS utiliser de l'eau pour éteindre une flamme sur un gril au gaz.
Page 41

41
Dépannage
NE PAS pulvériser
d'eau sur les
flammes de
gaz - cela peut
endommager le gril
Problème Cause Solution
Le gril ne s'allume
pas.
1. Le niveau de gaz de la bouteille de
propane est faible.
2. La batterie de l'allumeur n'est pas
correctement installée ou la batterie
doit être remplacée.
3. Toiles d'araignées ou nids d'insectes
dans le venturi.
4. Les orifices du brûleur sont obstrués.
5. Un «allumage avec une allumette »
peut être nécessaire.
6. Les raccordements de l'allumeur sont
desserrés.
7. Aucune étincelle ne s'allume à la
pointe de l'allumeur.
1. Remplacer la bouteille de propane.
2. Installer correctement ou remplacer la
batterie de l'allumeur.
3. Nettoyer le venturi.
4. Nettoyer les composants.
5. Allumer le gril selon l'«allumage avec une
allumette » décrit dans ces instructions
de service.
6. Rebrancher ou remplacer le câblage de
l'allumeur.
7. Remplacer l'allumeur.
La flamme ne reste
pas allumée.
1. Le niveau de gaz de la bouteille de
propane est faible.
2. Le brûleur n'est pas installé correctement ou est sale.
1. Remplacer la bouteille de propane.
2. Réinstaller le brûleur correctement et
nettoyer les débris.
La flamme est faible,
irrégulière ou bruyante.
1. Le niveau de gaz de la bouteille de
propane est faible.
2. Les orifices du brûleur peuvent être
obstrués.
3. Le gril peut être placé dans une zone
trop exposée au vent.
4. Des obstructions telles que des
débris de graisse ou des insectes
sont présentes dans les arrivées d'air.
1. Remplacer la bouteille de propane.
2. Contrôler et nettoyer les orifices du
brûleur.
3. Attendre que le vent faiblisse pour continuer.
4. Nettoyer les obstructions présentes
dans les arrivées d'air du brûleur.
Flambées excessives 1. Les flambées sont normalement dues
à un excès de graisse de la viance en
train de cuire.
2. Le gril est sale.
3. La température de cuisson peut être
trop élevée.
4. Le couvercle est fermé.
5. Les aliments sont trop cuits ou brûlés.
6. Le foyer et le récupérateur de graisse
sont remplis de graisse
1. Enlever le gras de la viande en train de
cuire.
2. S'assurer que le gril est propre.
3. Maintenir la flamme basse.
4. Laisser le couvercle ouvert lors de la
cuisson pour éviter les flambées excessives.
5. Déplacer les aliments sur une autre
zone du gril jusqu'à ce que les flammes
s'atténuent.
6. Nettoyer le foyer et le récupérateur de
graisse.
Le gril ne chauffe
pas suffisamment.
1. Le niveau de gaz de la bouteille de
propane est faible.
1. Remplacer la bouteille de propane.
Page 42

42
42262 Pièces de rechange
AC
AE
AF
AG
AJ
AK
AL
AM
AN
AQ
AR
AS
AT
AU
BJ
BG
BF
BE
BD
BC
BA
AZ
AY
AW
AA
BI
BH
AH
AI
42262 Spare Part For Sales Service
AX
AB
AO
AP
BB
BK
AD
AV
BL
Page 43

43
42262 Liste des pièces de rechange
Pièce Description Qté Pièce #
AA Collerette de jauge de
température
1 PT0129
AB Entretoise isolante 1 PT0124
AC Jauge de température 1 PT0046
AD Entretoise de poignée
du couvercle
2 PT0023
AE Poignée du couvercle 1 PT0003
AF Couvercle du gril 1 PT0005
AG Grille de cuisson 2 PT0047
AH Assemblage de
brûleur et tente de
chaleur
1 PT0048
AI Goupille de charnière
du couvercle
2 PT0130
AJ Goupille de
verrouillage « R »
2 PT0131
AK Support de charnière
du couvercle
2 PT0049
AL Écran thermique 1 PT0050
AM Tapis thermo-isolant 8 PT0051
AN Foyer du gril 1 PT0102
AO Tablette latérale 2 PT0053
AP Baguette de tablette
latérale
4 PT0054
AQ Support de baguette
de tablette latérale
8 PT0055
AR Pied arrière gauche 1 PT0056
AS Renfort supérieur 2 PT0057
AT Allumeur 1 PT0058
AU Pied avant gauche 1 PT0059
AV Renfort inférieur
gauche
1 PT0060
AW Sangle du gril 1 PT0061
AX Bac récupérateur de
graisse
1 PT0062
Pièce Description Qté Pièce #
AY Revêtement de bac
récupérateur de
graisse en aluminium
1 PT0063
AZ Pied avant droit 1 PT0064
BA Renfort inférieur droit 1 PT0065
BB Bouton de commande 1 PC0145
BC Support de régulateur A1 PT0066
BD Support de régulateur B1 PT0067
BE Régulateur 1 PT0068
BF Panneau de
commande
1 PT0069
BG Pied arrière droit 1 PT0070
BH Assemblage de valve
et collecteur
1 PT0071
BI Électrode et fil 1 PT0100
BJ Tube flexible 1 PT0101
BK Panneau arrière 1 PT0072
BL Verrou de tablette
latérale
2 PT0073
Pièces non illustrées
Instructions de service 1 PT0074
Pack matériel 1 PT0075
Page 44

44
42263 Pièces de rechange
AC
AD
AE
AG
AH
AJ
AK
AL
AM
AN
AQ
AR
AS
AT
AU
BJ
BG
BE
BD
BC
BA
AZ
AY
AA
BI
BH
AI
42263 Spare Part For Sales Service
AX
AB
AO
AP
BB
BM
AF
AV
BF
BK
AW
BL
Page 45

45
42263 Liste des pièces de rechange
Pièce Description Qté Pièce #
AA Collerette de jauge de
température
1 PT0129
AB Entretoise isolante 1 PT0124
AC Jauge de température 1 PT0046
AD Entretoise de poignée
du couvercle
2 PT0023
AE Poignée du couvercle 1 PT0003
AF Couvercle du gril 1 PT0005
AG Grille de maintien au
chaud
1 PT0076
AH Grille de cuisson 2 PT0047
AI Assemblage de
brûleur et tente de
chaleur
1 PT0125
AJ Goupille de charnière
du couvercle
2 PT0130
AK Goupille de
verrouillage « R »
2 PT0131
AL Support de charnière
du couvercle
2 PT0049
AM Écran thermique 1 PT0126
AN Tapis thermo-isolant 8 PT0051
AO Foyer du gril 1 PT0099
AP Tablette latérale 2 PT0053
AQ Baguette de tablette
latérale
4 PT0054
AR Support de baguette
de tablette latérale
8 PT0055
AS Pied arrière gauche 1 PT0056
AT Renfort supérieur 2 PT0057
AU Allumeur 1 PT0058
AV Pied avant gauche 1 PT0059
AW Renfort inférieur
gauche
1 PT0060
AX Sangle du gril 1 PT0061
Pièce Description Qté Pièce #
AY Bac récupérateur de
graisse
1 PT0062
AZ Revêtement de bac
récupérateur de
graisse en aluminium
1 PT0063
BA Pied avant droit 1 PT0064
BB Renfort inférieur droit 1 PT0065
BC Bouton de commande 2 PC0145
BD Support de régulateur A1 PT0066
BE Support de régulateur B1 PT0067
BF Régulateur 1 PT0068
BG Panneau de com-
mande
1 PT0127
BH Pied arrière droit 1 PT0070
BI Assemblage de valve
et collecteur
1 PT0128
BJ Électrode et fil 1 PT0100
BK Tube flexible 1 PT0101
BL Panneau arrière 1 PT0072
BM Verrou de tablette
latérale
2 PT0073
Pièces non illustrées
Instructions de service 1 PT0074
Pack matériel 1 PT0075
Page 46

46
Garantie
Ce barbecue au gaz propane est garanti exempt de défauts de matériaux et de fabrication s'il est assemblé
correctement, utilisé dans un environnement extérieur et entretenu comme indiqué dans ces instructions pour les
périodes de temps mentionnées ci-dessous, à compter de la date de l'achat au détail d'origine.
10 ans - couvercle
5 ans - grilles de cuisson
2 ans - toutes les autres pièces
Cette garantie ne couvre pas les dommages dus à la corrosion, la décoloration, l'écaillement ou les problèmes liés
à la négligence, une utilisation abusive, un accident, une utilisation incorrecte, une application non conforme, un
montage incorrect, des dommages de transport, une utilisation commerciale ou TOUTE modification apportée à
ce produit.
Les coûts de main d'œuvre pour la réparation ne sont pas couverts. Cette garantie est la seule garantie offerte et
remplace toutes les autres garanties, implicites ou explicites, ce qui inclut la garantie tacite, le merchandising ou
l'utilisation à une fin particulière.
Toutes les pièces de rechange qui satisfont les exigences de garantie seront expédiées sans frais à la discrétion
du fabricant (expéditions par voie terrestre, US Mail, UPS ou FedEx). Les frais de traitement spéciaux (par ex. le
lendemain ou surlendemain) seront à la charge du client.
Toutes les réclamations en garantie s'appliquent uniquement à l'acheteur original et requièrent une preuve de
l'achat certifiant la date d'achat. Ne pas renvoyer de pièces sans avoir au préalable obtenu un numéro d'autorisation
de retour de notre service après-vente.
Notre service après-vente peut être contacté au: 1-800-321-3473 de 8h00 à 17h00 (EST) (anglais uniquement),
ou par courriel à: CustomerService@landmann-usa.com
Noter que pour les États-Unis, certains états n'autorisent pas l'exclusion ou la limitation des dommages accidentels
ou consécutifs ou des limitations de la durée d'une garantie tacite, les limitations ou exclusions susmentionnées
ne s'appliquent donc pas dans ce cas. Cette garantie vous confère des droits légaux spécifiques, et vous pouvez
également disposer d'autres droits légaux qui peuvent varier d'un état à l'autre.
Landmann USA, Inc.
7405 Graham Rd
Fairburn, Ga 302130
www.landmann-usa.com
Page 47

封面图
封面图
LEER DETENIDAMENTE LAS INSTRUCCIONES DE MONTAJE,
MANTENIMIENTO Y USO
IMPORTANTE:
GUARDE ESTAS INSTRUCCIONES PARA CONSULTAS FUTURAS
Pantera 1.0/ 2.0
Nº de art.: 42262
Nº de art.: 42263
MODELO 42262/ 42263
¿Preguntas, problemas, piezas que faltan? Antes de volver a la tienda, llame a nuestro servicio de atención al cliente:
1-800-321-3473 de 8:00 a 17:00 h, sólo en inglés, o envíe un e-mail a CustomerService@landmann-usa.com
Este aparato sólo
debe utilizarse en
exteriores.
Este aparato no está
diseñado para uso
comercial.
5005544
Page 48

48
Índice general
Información importante de seguridad .............49-50
Información de seguridad sobre propano
líquido (LP) ............................................................51
Contenido del embalaje ..................................52-53
Preparación .......................................................... 54
Instrucciones de montaje ................................54-59
Conexión de la bombona de gas ......................... 60
Funcionamiento ...............................................60-61
Cuidados y mantenimiento ..................................62
Métodos de cocción y consejos para asar a la
parrilla ................................................................... 63
Solución de problemas y piezas de repuesto ....63-68
Garantía ............................................................... 69
Montador/instalador
El manual de instrucciones contiene información importante necesaria para el montaje correcto y el uso seguro del
aparato. Lea y siga todas las advertencias e instrucciones antes de montar y utilizar el aparato.
Entregue estas instrucciones al consumidor.
Características técnicas
42262 Aporte térmico: 12000BTU/H
42263 Aporte térmico: 6500BTU/H X 2
Categoría: Propano regulado a presión
Carburante: Bombonas de propano desechables de 189 ml
Regulator: Landmann pieza #PT0068
Consumidor/usuario
Siga todas las advertencias e instrucciones al utilizar el aparato.
Guarde estas instrucciones para consultas futuras.
Si huele a gas:
1. Corte el gas del aparato.
2. Apague cualquier llama abierta.
3. Abra la tapa.
4. Si el olor persiste, manténgase alejado del
aparato y llame inmediatamente a la empresa
que le suministra el gas o a los bomberos.
5. El incumplimiento de esta advertencia de
peligro podría provocar incendios, explosiones
o quemaduras que podrían causar daños
materiales, lesiones personales o incluso la
muerte.
1. NO guarde ni utilice gasolina u otros líquidos o
vapores inflamables cerca de éste o cualquier otro
aparato.
2. Una bombona de gas LP (propano líquido) que no
esté conectada para ser usada no debe guardarse
cerca de éste o cualquier otro aparato.
3. Esta parrilla sólo DEBE USARSE EN EXTERIORES
y no dentro de un edificio, garaje, bajo voladizos o
cualquier otra área cerrada.
4. NO deje la parrilla sin vigilancia. Mantenga la parrilla
fuera del alcance de los niños en todo momento.
5. Este aparato sólo debe utilizarse en exteriores.
Este aparato no está diseñado para uso
comercial.
Page 49

49
• Siga detenidamente todas las instrucciones de
montaje. Un montaje incorrecto de la parrilla puede
resultar peligroso.
• No use NUNCA carbón de leña, líquido encendedor,
gasolina, queroseno o alcohol para encender esta
parrilla.
• No use NUNCA briquetas de carbón o líquido
encendedor en una parrilla de gas.
• NO mueva la parrilla mientras esté encendida.
• Cuando encienda la parrilla o cocine, NO se incline
sobre la parrilla abierta.
• Abra siempre la tapa de la parrilla lentamente y
con cuidado, ya que el calor atrapado dentro de la
parrilla puede causar quemaduras graves.
• NO coloque las manos o los dedos en el borde
del fogón y la tapa cuando la tapa esté abierta o la
parrilla esté caliente.
• Mantenga la parrilla fuera del alcance de los niños
cuando la esté usando. Las partes expuestas
pueden estar muy calientes.
• NO intente desconectar el conjunto de regulador
de gas y manguera o cualquier accesorio de gas
mientras la parrilla esté funcionando.
• Esta parrilla NO DEBERÍA estar colocada debajo de
ninguna estructura combustible sin protección. Deje
siempre por lo menos 24" de espacio con respecto
a la parte superior, inferior y trasera y 24" a los lados
de la parrilla (ver abajo).
Información importante de seguridad
Lo expuesto en las advertencias y
precauciones contenidas en este manual
de instrucciones puede ocasionar lesiones
corporales graves o incluso la muerte,
o puede provocar un incendio o una
explosión que cause daños materiales.
• Esta parrilla es un aparato para exteriores y NO
DEBERÍA usarse en un edificio, garaje o cualquier
otra área cerrada.
• NO obstruya el flujo de aire de combustión y
ventilación. Mantenga las aberturas de ventilación
del recipiente de la bombona libres y sin residuos.
• Si los quemadores se apagan mientras la parrilla
está en funcionamiento, apague todas las válvulas
de gas. Abra la tapa y espere cinco minutos
antes de volver a encender la parrilla, usando las
instrucciones de encendido.
• Mantenga esta parrilla limpia y libre de materiales
combustibles, gasolina y otros vapores y líquidos
inflamables.
• NUNCA guarde una bombona de propano líquido
extra o desconectada debajo o cerca de esta
parrilla.
• Utilice siempre manoplas o guantes de barbacoa
resistentes al calor cuando utilice la parrilla.
• NO deje una parrilla caliente sin supervisión ni la
mueva cuando esté funcionando.
• Esta parrilla no está diseñada para usarse
o instalarse en vehículos recreativos, botes,
remolques portátiles o en cualquier lugar en
movimiento.
• NO coloque una cubierta ni nada inflamable en la
parrilla mientras esté en funcionamiento o caliente.
• Un aparato de gas de cocina para exteriores sólo
puede guardarse en interiores si se desconecta la
bombona y se retira del aparato de gas de cocción
para exteriores.
• Cuando la parrilla no esté en uso, asegúrese de
que el gas esté apagado (OFF) en la bombona de
suministro.
• Las bombonas deben guardarse en el exterior y
fuera del alcance de los niños. La bombona no debe
guardarse en un edificio, garaje o áreas cerradas.
• Inspeccione siempre la manguera metálica
de suministro de gas antes de cada uso. Si la
manguera de metal muestra signos de abrasión o
cortes, NO use la parrilla. Sustituya la manguera
metálica antes de usarla de nuevo.
24"
24"
Page 50

50
Información importante de seguridad
• NO agrande los orificios de las válvulas ni
los orificios del quemador cuando limpie las
válvulas o los quemadores.
• Si usted ve, huele u oye silbidos de gas saliendo
de la bombona de gas LP, aléjese de la misma. NO
intente corregir el problema usted mismo y llame a
los bomberos.
• Si se produce un fuego por grasa, apague (OFF)
el quemador y deje la tapa cerrada hasta que se
apague el fuego.
• NO altere esta parrilla de ninguna manera. Cualquier
alteración anula automáticamente la garantía.
• NO use la parrilla en caso de que haga mucho
viento.
La bombona de suministro de gas LP que se
vaya a utilizar debe estar construida y marcada
de acuerdo con la normativa para bombonas de
gas LP de EE. UU. Departamento de Transporte
(DOT) o la Norma Nacional de Canadá, CAN/
CSB-b339 (Bombonas, Esferas y Tubos para el
transporte de Mercancías Peligrosas).
Las parrillas portátiles de gas LP requieren un sistema
de suministro de combustible compuesto por un
regulador y una bombona de suministro de gas L. P.
Para evitar la posibilidad de que vuelque la parrilla,
NUNCA coloque más de 2,5 Kg sobre la mesa lateral.
Apriete bien todo el equipo (tornillos, tuercas, pernos,
etc.) varias veces al año y antes de cada temporada
de barbacoa.
No deje NUNCA sin supervisión la comida que se esté
cocinando sobre la parrilla. La observación continua
de los alimentos ayudará a mantener una temperatura
uniforme, conservar el combustible, mejorar el sabor
de los alimentos y evitar que se reaviven las llamas.
Preparación para asar a la parrilla
1. Retire la tapa quitando la cinta de velcro
2. Coloque la bandeja recogegrasas
3. Conecte la bombona de propano
4. Listo para asar a la parrilla
Preparación para el transporte
1. Asegúrese de que la parrilla se ha enfriado
2. Retire la bombona de propano
3. Retire y limpie la bandeja recogegrasas
4. Cierre la tapa asegurándola con la cinta de velcro
5. Listo para transportar
Precaución: Si la transporta en un vehículo,
asegúrese de usar plástico o una lona debajo de la
parrilla en caso de cualquier fuga de grasa o aceite.
Si no se observan las instrucciones
siguientes puede producirse un
incendio que cause la muerte o
lesiones graves:
No guarde ni use NUNCA gasolina
u otras sustancias inflamables cerca
de esta parrilla. No guarde NUNCA la
bombona de gas de repuesto cerca
de esta parrilla o de cualquier otra
posible fuente de calor.
NO guarde una bombona de gas LP de
repuesto debajo o cerca del aparato.
Coloque la tapa antipolvo en la salida de
la válvula de la bombona siempre que
la bombona no esté en uso. Instale sólo
el tipo de tapa antipolvo en la salida de la
válvula de la bombona que se suministra
con dicha válvula. El uso de otro tipo de
tapas o tapones puede ocasionar fugas de
propano.
Este producto contiene sustancias
químicas conocidas en el Estado de
California por ser cancerígenas y causar
defectos congénitos u otros daños
reproductivos.
Advertencias de la Propuesta 65 del Estado
de California
Se debe utilizar el regulador de presión
y la manguera metálica suministrada
con esta parrilla. Cualquier pedido de
conjunto de regulador y manguera
metálica de repuesto debe hacerse a
través del fabricante, LANDMANN-USA.
Page 51

51
Información de seguridad sobre propano líquido (LP)
Información general
• Esta parrilla es un diseño certificado por ETL para
usar con bombonas desechables de propano de
189 ml.
• Esta parrilla NO SE PUEDE usar con gas natural.
NO intente manipular esta parrilla para usar un tipo
de gas diferente.
Instrucciones de seguridad
• El gas LP tiene un olor similar al del gas natural.
• El gas LP es más pesado que el aire y el gas que
gotea puede acumularse en áreas bajas y resistir la
dispersión.
• Las bombonas de gas LP no deben dejarse caer o
manipularse bruscamente.
• NO use bombonas de gas LP defectuosas. Una
bombona de gas LP abollada u oxidada o una
bombona de gas LP con una válvula dañada que
pueda ser peligrosa y deba ser reemplazada por una
nueva inmediatamente.
• Cierre SIEMPRE la válvula de la bombona después
de su uso.
• Cierre SIEMPRE la válvula de la bombona al desconectar
el regulador.
• Trate SIEMPRE Las posibles bombonas de gas LP
vacías con el mismo cuidado que las bombonas
llenas. Todavía puede haber presión de gas dentro
de una bombona de gas LP posiblemente vacía.
• No guarde ni transporte NUNCA una bombona de
gas LP si la temperatura puede alcanzar los 125° F
(52° C).
• Mantenga las bombonas de gas LP fuera del alcance
de niños y mascotas.
• NO guarde bombonas de gas LP desconectadas en
un edificio, garaje u otras áreas cerradas.
• Si la bombona de gas LP se mantiene en la parrilla
cuando no se use, asegúrese de mantener tanto la
parrilla como la bombona en un área al aire libre con
buena ventilación.
• Compruebe SIEMPRE que la conexión entre la
bombona de gas y el regulador no presente fugas
cada vez que cambie la bombona de gas LP.
Importante
La instalación de aparatos de gas LP en Estados
Unidos debe cumplir los códigos y reglamentos
locales. En ausencia de códigos locales, la instalación
del aparato debe cumplir el Código Nacional de Gas
de Combustible, ANSI Z223.1/NFPA54, el Código de
Aparatos de Gas Natural y Propano, CSA B149.1, o
el Código de Almacenamiento y Manipulación de
Propano, B149.2, según corresponda. Para Canadá,
la instalación de esta parrilla debe cumplir los
códigos locales y/o la Norma CSA-B149.2 (Código de
Almacenamiento y Manipulación de Propano).
Revise las siguientes directivas e información de seguridad cuando utilice gas propano líquido (LP).
Page 52

52
42262 Contenido del embalaje
Pieza Descripción Cantidad
1 Mango 1
2 Rejilla para asar 2
3 Parrilla 1
4 Bandeja lateral 2
5 Botón regulador 1
6 Inserto de aluminio para bandeja recogegrasas 1
7 Bandeja recogegrasas 1
6
3
2
2
4
4
7
5
1
M5x10 2x
2x AA 1x
A B C
Page 53

53
42263 Contenido del embalaje
Pieza Descripción Cantidad
1 Mango 1
2 Parrilla de conservación de calor 1
3 Rejilla para asar 2
4 Parrilla 1
5 Bandeja lateral 2
6 Botón regulador 2
7 Inserto de aluminio para bandeja recogegrasas 1
8 Bandeja recogegrasas 1
3
3
5
5
7
8
4
2
6
1
M5x10 2xA2x AA 1x
B C
Page 54

54
Preparación
Antes de comenzar el montaje de esta parrilla, retire todo el material de embalaje y verifique que todas las
piezas estén incluidas (consulte el Contenido del embalaje en las páginas 6 y 7). Si falta alguna pieza o está
dañada, NO intente montar el producto.
Tiempo estimado de montaje: Un par de minutos.
Herramientas necesarias: Destornillador de estrella de Phillips.
42262 Instrucciones de montaje
Paso 1
1
M5x10 2x
+
-
A
A
B
B
Page 55

55
42262 Instrucciones de montaje
Paso 2
Paso 3
5
5
4
4
6
7
Paso 4
Page 56

56
Paso 5
42262 Instrucciones de montaje
3
6
7
2
2
封面图
Page 57

57
42263 Instrucciones de montaje
Paso 1
Paso 2
1
M5x10 2x 2x
+
-
A
A
B
B
6
Page 58

58
Paso 3
Paso 4
42263 Instrucciones de montaje
6
5
5
8
7
Page 59

59
Paso 5
42263 Instrucciones de montaje
3
2
8
7
3
封面图
Page 60

60
Conexión de la bombona de gas Funcionamiento
Instalación de bombona de gas propano desechable
de 189 ml
NOTA: La parrilla portátil Pantera viene ajustada de
fábrica para usarse con una bombona de gas propano
desechable de 189 ml.
Antes de fijar la bombona de propano, asegúrese de
que el botón regulador esté en la posición OFF.
Quite la tapa de plástico de la parte superior de la
bombona de propano y enrósquela en el regulador
apretando con la mano.
1. Desconecte la bombona de propano de la válvula
reguladora cuando la parrilla no se esté usando.
2. NO obstruya el flujo de aire de combustión y
ventilación a la parrilla.
Use sólo el gas especificado.
Mantenga la parrilla sobre una superficie nivelada.
Mantenga vacía la bandeja recogegrasas durante
la puesta en funcionamiento.
Control de fugas
1. Prepare unos 20 gramos de solución para fugas
mezclando una parte de jabón líquido para
lavavajillas con tres partes de agua.
2. Asegúrese de que el botón regulador está en la
posición OFF.
3. Rocíe parte de la solución en la válvula del tanque
hasta la conexión de la válvula.
4. Observe la solución en las conexiones para ver si
se han formado burbujas. Si no aparecen burbujas,
la conexión es segura.
5. Si aparecen burbujas, significa que hay una fuga.
Ir al paso 6.
6. Desconecte el regulador del tanque y vuélvalo a
conectar. Asegúrese de que la conexión esté bien
apretada y asegurada.
7. Vuelva a probar con la solución.
8. Si aparecen más burbujas, no use ni mueva la
bombona de LP. Póngase en contacto con su
proveedor de gas LP o con los bomberos.
Para prevenir el peligro de explosión o
incendio cuando se realice la prueba de
fugas:
1. Compruebe SIEMPRE posibles fugas antes
de encender la parrilla y cada vez que se
conecte la bombona para su uso.
2. NO fume ni permita otras fuentes de ignición
en el área cuando esté comprobando una
posible fuga.
3. Compruebe las posibles fugas en el exterior,
en un área bien ventilada.
4. NO use cerillas, encendedores o una llama
para comprobar si hay fugas.
5. NO use la parrilla hasta que se hayan solucionado
todas las fugas. Si no puede detener una fuga,
desconecte el suministro de gas propano, llame
al servicio técnico de aparatos de gas o a su
proveedor local de gas propano.
Si no se esperan los cinco minutos
pertinentes se puede producir una
pequeña explosión, lo que puede causar
lesiones corporales graves o la muerte.
NO se incline sobre la parrilla abierta
al encenderla.
Antes del primer uso, es importante limpiar la parrilla
con calor. Así se limpiarán las partes internas quemando
cualquier residuo u olor del proceso de fabricación. Para
llevar a cabo esta limpieza, ponga en funcionamiento la
parrilla durante aprox. 15-20 minutos a la temperatura
más alta con la tapa de cocción cerrada.
IMPORTANTE
Lea estas instrucciones antes de intentar encender la
parrilla.
Instrucciones de encendido
1. Lea todas las instrucciones antes de encender la
parrilla.
2. Abra la tapa durante el encendido.
3. Presione y gire el botón regulador deseado a
la posición HIGH (fuego alto), luego presione y
mantenga presionado el botón de encendido
electrónico hasta que la llama se encienda.
4. Si la ignición no se produce en 5 segundos, cierre la
válvula, espere 5 minutos y repita el procedimiento
de encendido.
5. Gire el regulador a la posición de apagado y luego
presione y gire el mando a la posición OFF.
Retire siempre la bombona de gas y la bandeja
recogegrasas
antes de transportar o guardar la parrilla.
Page 61

61
Funcionamiento
Si no se abre la tapa antes de la ignición se puede producir una pequeña explosión, lo
que puede causar lesiones corporales graves o la muerte.
Encendido con cerillas
1. Encienda y coloque un fósforo largo de madera o use un encendedor largo de butano y páselo a través de
los espacios en la rejilla cerca de los orificios en el quemador.
2. Apriete y gire el botón regulador hacia la izquierda a la posición “Max”.
3. Si la ignición no se produce en 5 segundos, cierre la válvula, espere 5 minutos y repita el procedimiento de
encendido.
4. Gire el regulador a la posición de apagado y luego presione y gire el mando a la posición OFF.
Cómo mover y guardar el aparato
Cuidado: Una colisión con la parrilla, así como con cualquier objeto metálico podría causar lesiones. Lleve
cuidado al mover una parrilla de gas portátil.
Mover la parrilla:
NO mueva la parrilla mientras esté encendida o caliente, o con objetos en la superficie de cocción o mesas
laterales.
Retire la bombona de propano.
Cierre la tapa asegurándola con la cinta de velcro
Limpie y quite la bandeja recogegrasas antes de mover la parrilla para prevenir derrames.
Ponga las bandejas laterales en posición recta.
Mueva la parrilla lentamente, NO corra mientras esté moviendo la parrilla.
Despues de mover la parrilla:
Revise todas las conexiones de gas en busca de fugas que puedan ocurrir por el movimiento. Revise el tubo de
Venturi para asegurarse de que aún está sobre el orificio.
Pasos a seguir antes de guardar la parrilla:
Limpie la parrilla, incluyendo la bandeja recogegrasas. Sólo para uso en exteriores. Si se almacena en interiores,
se deberá desmontar la bombona y dejarla al aire libre. Si se deja en el exterior, quite la bombona y cubra la parrilla
para protegerla de la intemperie. Las cubiertas para parrilla pueden comprarse en una tienda especializada o a
través del fabricante.
Desconectar la parrilla
Cuidado: ¡NO toque las partes de la parrilla calientes con las manos desnudas! Utilice guantes protectores.
Asegúrese de que la bombona desechable esté desconectada cuando vaya a guardarla. Ponga el botón regulador
en la posición OFF.
Page 62

62
GoodFlame
Y
ellow
LightBlue
2in.(5cm)
Blue
Y
ellow
LightBlue
Blue
BadFlame
NO coloque papel de aluminio ni en el
fogón ni en la bandeja recogegrasas.
No permita que goteos o residuos de
comida permanezcan en las chapas
térmicas o en la bandeja recogegrasas.
Limpie regularmente para asegurar un
buen rendimiento de cocción.
Utilice las siguientes pautas para mantener su parrilla
limpia y con un aspecto nuevo. Antes de cualquier
limpieza, asegúrese de que el botón regulador esté en
la posición OFF y la parrilla esté fría.
Limpieza de la parrilla por fuera
Use un detergente suave y una solución de agua
caliente para limpiar el exterior de la parrilla. Limpie a
fondo con la solución de agua caliente y detergente.
Aclare con agua y deje que se seque por completo.
Limpieza de la parrilla por dentro
Por motivos de seguridad y eficacia, es importante
eliminar cualquier residuo o exceso de grasa que
pueda acumularse dentro de la parrilla.
• Limpie la tapa interior con papel de cocina para
evitar que se acumule grasa.
• Para las chapas térmicas de acero inoxidable,
limpie los residuos con un cepillo de alambre o un
rascador plano.
• Quite la bandeja recogegrasas y vacíela en un
recipiente adecuado. Pase después un papel de
cocina para eliminar el exceso de grasa.
Bandeja recogegrasas
La bandeja recogegrasas está colocada debajo de
la parrilla. Tire a la basura el inserto de aluminio de
la bandeja recogegrasas después de cada uso y
reemplácelo con uno nuevo (Landmann ref. #42278).
Nota: Deje que la bandeja recogegrasas se enfríe
antes de limpiarla.
Control de fugas
La llama que sale del quemador debe ser tener una
combinación de color azul/amarillo y medir entre una
y dos pulgadas de alto (ver diagrama arriba).
Quitar el quemador
Asegúrese de que el botón regulador esté en la
posición OFF.
1. Retire el cable de encendido del dispositivo de
encendido.
2. Abra la tapa de la parrilla y quite las rejillas para asar.
3. Utilice un destornillador Phillips del 2 para soltar los
tornillos que sujetan el quemador. Nota: Se trata de una
combinación de tornillo y tuerca, así que asegúrese de
sujetar la tuerca mientras quita el tornillo.
4. Deslice el quemador sacándolo del fogón.
Limpiar el quemador
• Asegúrese de que todos los orificios del
quemador estén libres de obstrucciones.
Consejo: Utilice un alfiler o un clip para desatascar.
• Asegúrese de que el quemador no esté dañado.
Si encuestra algún daño, reemplace el quemador.
• Asegúrese de que el extremo del quemador y la
rejilla de aire primario estén limpios de nidos de
insectos, suciedad o restos.
Importante: No deje la parrilla expuesta a la intemperie
a menos que esté cubierta (la cubierta se vende por
separado). El agua de lluvia puede acumularse dentro
de la parrilla, o en la bandeja de goteo si se deja al
descubierto. Si la bandeja de goteo no se limpia
después de su uso y la parrilla se deja al descubierto, la
bandeja de goteo se llenará de agua, haciendo que la
grasa y el agua se derramen. Recomendamos limpiar
y guardar la bandeja de goteo después de cada uso.
Rejillas para asar:
Las rejillas de cocción se pueden limpiar
inmediatamente después de cocinar y de apagar la
parrilla. Use un guante de barbacoa y friegue las rejillas
para asar con un paño húmedo. Si se deja enfriar la
parrilla, será más fácil limpiar las rejillas si se retiran de
la parrilla y se limpian con un detergente suave.
Cuidado: Toda la limpieza y el mantenimiento deben
hacerse sólo cuando la parrilla esté fría y con el
suministro de combustible apagado en la bombona.
Las bombonas de propano desechables deben
separarse de la parrilla durante la limpieza.
Si utiliza un cepillo de cerdas para limpiar
las superficies de cocción, asegúrese
de que no queden cerdas sueltas en la
superficie de cocción, ya que pueden
adherirse a los alimentos.
Cuidados y mantenimiento
Page 63

63
Métodos de cocción y consejos para asar a la parrilla
Antes de asar a la parrilla
• Asegúrese de que los alimentos estén completamente descongelados antes de asar.
• Con la tapa de la parrilla cerrada, caliente la parrilla a fuego alto durante 5-10 minutos.
• NO levante la tapa durante el proceso de precalentamiento.
• El proceso de precalentamiento a fuego alto es necesario para dorar y adherir los jugos del alimento.
• Para la carne de ave y carne con alto contenido de grasa, recorte el exceso de grasa de las carnes y acorte el
tiempo de precalentamiento. Ambos ayudarán a reducir las chispas de grasa que gotean.
• Engrase ligeramente las rejillas para asar cuando cocine carne, pescado o aves de corral con poca grasa. Tenga
en cuenta que el uso de demasiado aceite puede causar que se deposite una ceniza gris en los alimentos.
Mientras se asa a la parrilla
• El indicador de temperatura de la tapa indica la temperatura de cocción dentro de la parrilla.
• Dele la vuelta a los alimentos sólo una vez si es posible. Los jugos se pierden al dar la vuelta a la carne varias
veces.
• Dele la vuelta a la carne sólo cuando los jugos empiecen a aparecer en la superficie.
• Evite pinchar o cortar la carne para comprobar la cocción. Esto hace que los jugos se evaporen.
• Añada las salsas sólo durante los últimos 10 minutos de cocción para evitar quemar la salsa.
• La cocción de la carne se controlará según el tipo de carne, el tamaño, la forma y el grosor de la carne, el
proceso o método de asado y la duración del tiempo en la parrilla.
• El tiempo de cocción será más largo con la tapa de la parrilla abierta.
• Deje más tiempo de cocción en días fríos y ventosos, o a mayor altitud. A la inversa, deje menos tiempo de
cocción en climas extremadamente calurosos.
• Las condiciones de asado a la parrilla pueden requerir ajustes de los quemadores para obtener y mantener las
temperaturas de asado correctas.
• Use pinzas para voltear y manipular la carne en lugar de un tenedor, para evitar perder los jugos de la carne.
• Si se producen llamas, gire el botón regulador a la posición OFF y mueva el alimento a otra área de la rejilla.
Una vez apagadas las llamas, vuelva a encender los quemadores usando las instrucciones de encendido de
este manual.
• NUNCA use agua para apagar las llamas en una parrilla de gas.
Page 64

64
Solución de problemas
NO rocíe agua
sobre las llamas de
gas, ya que podría
dañar la parrilla.
Problema Causa Solución
La parrilla no se
enciende.
1. El nivel de gas de la bombona de propano es bajo.
2. La batería del encendedor no está instalada correctamente o es necesario
cambiarla.
3. Telarañas o nidos de insectos en el
tubo de Venturi.
4. Los orificios del quemador están
atascados.
5. Puede ser necesario encender con
cerillas.
6. Las conexiones al dispositivo de encendido están flojas.
7. No hay chispas en la punta del dispositivo de encendido.
1. Reemplace la bombona de propano.
2. Instale o sustituya correctamente la
batería del dispositivo de encendido.
3. Limpie el tubo de Venturi.
4. Limpie los componentes.
5. Encienda la parrilla con cerillas conforme a este manual de instrucciones.
6. Vuelva a conectar o cambie el cable
que va al dispositivo de encendido.
7. Reemplace el dispositivo de encendido.
La llama no permanece encendida.
1. El nivel de gas de la bombona de propano es bajo.
2. El quemador no está instalado correctamente o está sucio.
1. Reemplace la bombona de propano.
2. Vuelva a instalar el quemador correctamente y limpie cualquier resto.
La llama está baja,
es irregular o hace
ruido.
1. El nivel de gas de la bombona de propano es bajo.
2. Puede que los orificios del quemador
estén atascados.
3. Puede que la parrilla esté en un área
con demasiado viento.
4. Hay obstrucciones como restos de
grasa o insectos en las entradas de
aire.
1. Reemplace la bombona de propano.
2. Compruebe y limpie los orificios del
quemador.
3. Espere hasta que el viento se calme antes de seguir.
4. Limpie las entradas de aire del quemador para desatascarlas.
Exceso de chispas
con llama
1. El chisporroteo lo causa normalmente
un exceso de grasa en la carne que
se está asando.
2. La parrilla está sucia.
3. Puede que la temperatura de cocción
sea excesiva.
4. La tapa está cerrada.
5. La comida se ha asado demasiado o
se ha quemado.
6. El fogón y la bandeja recogegrasas
están llenos de grasa.
1. Recorte la grasa de la carne que se
esté asando.
2. Asegúrese de que la parrilla esté limpia.
3. Mantenga la llama a fuego bajo.
4. Mantenga la tapa abierta cuando esté
asando para evitar el exceso de chispas.
5. Mueva la comida a otra parte de la parrilla hasta que desaparezcan las llamas.
6. Limpie el fogón y la bandeja recogegrasas.
La parrilla no se calienta lo suficiente.
1. El nivel de gas de la bombona de propano es bajo.
1. Reemplace la bombona de propano.
Page 65

65
42262 Piezas de repuesto
AC
AE
AF
AG
AJ
AK
AL
AM
AN
AQ
AR
AS
AT
AU
BJ
BG
BF
BE
BD
BC
BA
AZ
AY
AW
AA
BI
BH
AH
AI
42262 Spare Part For Sales Service
AX
AB
AO
AP
BB
BK
AD
AV
BL
Page 66

66
42262 Lista piezas de repuesto
Pieza Descripción Cantidad Pieza #
AA Bisel para medidor
de temperatura
1 PT0129
AB Separador de
aislamiento
1 PT0124
AC Medidor de
temperatura
1 PT0046
AD Separador de mango
de tapa
2 PT0023
AE Mango de tapa 1 PT0003
AF Tapa de parrilla 1 PT0005
AG Rejilla para asar 2 PT0047
AH Conjunto de
quemador y chapa
térmica
1 PT0048
AI Perno para bisagra
de tapa
2 PT0130
AJ Perno de bloqueo
"R"
2 PT0131
AK Soporte de bisagra
de tapa
2 PT0049
AL Escudo térmico 1 PT0050
AM Relleno con
aislamiento térmico
8 PT0051
AN Cuenco de fuego de
la parrilla
1 PT0102
AO Bandeja lateral 2 PT0053
AP Barra para bandeja
lateral
4 PT0054
AQ Soporte para barra
de bandeja lateral
8 PT0055
AR Pata trasera
izquierda
1 PT0056
AS Refuerzo superior 2 PT0057
AT Dispositivo de
encendido
1 PT0058
AU Pata delantera
izquierda
1 PT0059
Pieza Descripción Cantidad Pieza #
AV Refuerzo inferior
izquierdo
1 PT0060
AW Correa de parrilla 1 PT0061
AX Bandeja
recogegrasas
1 PT0062
AY Inserto de aluminio
para bandeja
recogegrasas
1 PT0063
AZ Pata delantera
derecha
1 PT0064
BA Refuerzo inferior
derecho
1 PT0065
BB Botón regulador 1 PC0145
BC Soporte del
regulador A
1 PT0066
BD Soporte del
regulador B
1 PT0067
BE Regulador 1 PT0068
BF Panel de control 1 PT0069
BG Pata trasera derecha 1 PT0070
BH Conjunto de
distribuidor y
válvula
1 PT0071
BI Electrodo y cable 1 PT0100
BJ Tubo flexible 1 PT0101
BK Panel trasero 1 PT0072
BL Fijación bandeja
lateral
2 PT0073
Piezas no mostradas
Manual de
instrucciones
1 PT0074
Paquete de
hardware
1 PT0075
Page 67

67
42263 Piezas de repuesto
AC
AD
AE
AG
AH
AJ
AK
AL
AM
AN
AQ
AR
AS
AT
AU
BJ
BG
BE
BD
BC
BA
AZ
AY
AA
BI
BH
AI
42263 Spare Part For Sales Service
AX
AB
AO
AP
BB
BM
AF
AV
BF
BK
AW
BL
Page 68

68
42263 Lista piezas de repuesto
Pieza Descripción Cantidad Pieza #
AA Medidor de
temperatura bisel
1 PT0129
AB Separador de
aislamiento
1 PT0124
AC Medidor de
temperatura
1 PT0046
AD Separador de
mango de tapa
2 PT0023
AE Mango de tapa 1 PT0003
AF Tapa de parrilla 1 PT0005
AG Parrilla de
conservación de
calor
1 PT0076
AH Rejilla para asar 2 PT0047
AI Conjunto de
quemador y chapa
térmica
1 PT0125
AJ Perno para bisagra
de tapa
2 PT0130
AK Perno de bloqueo
"R"
2 PT0131
AL Soporte de bisagra
de tapa
2 PT0049
AM Escudo térmico 1 PT0126
AN Relleno con
aislamiento
térmico
8 PT0051
AO Cuenco de fuego
de la parrilla
1 PT0099
AP Bandeja lateral 2 PT0053
AQ Barra para bandeja
lateral
4 PT0054
AR Bisagra para barra
de bandeja lateral
8 PT0055
AS Pata trasera
izquierda
1 PT0056
AT Refuerzo superior 2 PT0057
AU Dispositivo de
encendido
1 PT0058
Pieza Descripción Cantidad Pieza #
AV Pata delantera
izquierda
1 PT0059
AW Refuerzo inferior
izquierdo
1 PT0060
AX Correa de parrilla 1 PT0061
AY Bandeja
recogegrasas
1 PT0062
AZ Inserto de aluminio
para bandeja
recogegrasas
1 PT0063
BA Pata delantera
derecha
1 PT0064
BB Refuerzo inferior
derecho
1 PT0065
BC Botón regulador 2 PC0145
BD Soporte del
regulador A
1 PT0066
BE Soporte del regu-
lador B
1 PT0067
BF Regulador 1 PT0068
BG Panel de control 1 PT0127
BH Pata trasera dere-
cha
1 PT0070
BI Conjunto de dis-
tribuidor y válvula
1 PT0128
BJ Electrodo y cable 1 PT0100
BK Tubo flexible 1 PT0101
BL Panel trasero 1 PT0072
BM Fijación bandeja lat-
eral
2 PT0073
Piezas no mostradas
Manual de
instrucciones
1 PT0074
Paquete de hardware
1 PT0075
Page 69

69
Garantía
Esta parrilla de gas propano ofrece garantía si se monta correctamente sin que surjan defectos en el material y la
calidad , si se usa al aire libre en un ambiente normal y se cuida como se indica en estas instrucciones para los
siguientes períodos de tiempo a partir de la fecha de compra original.
10 años - Tapa
5 años - Rejillas para asar
2 años - Todas las demás piezas
Esta garantía no cubre oxidación, decoloración, daños por desconchado o problemas relacionados con
negligencia, abuso, accidente, mal uso, aplicación incorrecta, montaje incorrecto, daños de transporte, uso
comercial o CUALQUIER modificación hecha a este producto.
El trabajo de reparación no está cubierto. Esta garantía es la única que se ofrece y sustituye a todas las demás
garantías, ya sean expresas o implícitas, lo que incluye garantía implícita, merchandising o uso para un propósito
en particular.
Todas las piezas de repuesto que cumplan con los requisitos de garantía se enviarán sin cargo a discreción del
fabricante (envíos terrestres, US Mail, UPS o FedEx). Cualquier cargo por trato especial (es decir, segundo día,
noche, etc.) correrá a cargo del consumidor.
Todos los derechos de garantía sólo se aplican al comprador original y requieren un comprobante de compra
que verifique la fecha de compra. No devuelva las piezas sin obtener primero un número de autorización de
devolución de nuestro servicio de atención al cliente.
Puede contactar con nuestro servicio de atención al cliente en el: 1-800-321-3473 de 8:00 a 17:00 h, sólo en
inglés, o enviando un e-mail a CustomerService@landmann-usa.com
Tenga en cuenta para los Estados Unidos, que algunos estados no permiten la exclusión o limitación de incidentes
o daños derivados o limitaciones en cuanto a la duración de una garantía implícita, por lo que puede que las
limitaciones o exclusiones no se le puedan aplicar a usted. Esta garantía le otorga derechos legales específicos y
usted también puede tener otros derechos legales que pueden variar de un estado a otro.
Landmann USA, Inc.
7405 Graham Rd
Fairburn, Ga 302130
www.landmann-usa.com
 Loading...