

Lancaster CONSOLE SIDEBOARD Assembly Instructions Manual

LANCASTER - CONSOLE SIDEBOARD ASSEMBLY INSTRUCTIONS
Thank you for purchasing the CONSOLE SIDEBOARD.
Please read the instructions carefully to ensure safe operation of the product.
Page 1 of 18
Batch No : PO# 2759
Colour : Bianco Oak / Lancaster Grey
Size:
(W)1117 x (D)350 x (H)820mm
V1 4/18
Page 2 of 18
This product is intended for a maximum weight of 25kgs and drawer load capacity 5kg each.
Do not exceed this weight.
Due to the size of this product we recommend that is assembled in the room intended for use.
When you ready to start, make sure that you have the right tools, plenty of space and a clean, dry area for
assembly
Unwrap all packaging materials and place the components on top of the carton box or not on a clean floor to
prevent it from scratching.
Check the pack and make sure you have all the parts listed.
Ensure that this product is fully assembled as illustrated before use.
Check all screws or bolts are tightened and inspect regularly.
This product should only be used on firm, level ground.
Keep small parts out of reach of children.
Make sure the legs remain in contact with the ground.
Tools not included.
DO NOT use power tools to construct this product.
DO NOT tighten screw until fully assembled.
DO NOT over tighten screw or bolts.
DO NOT use this product if parts are missing, damage or worn.
DO NOT stand or sit on this sideboard.
We recommend the use of the wall safety bracket provided for safety reasons. N.B. Wall fixings suitable for a
solid wall are included although the wall plug provided may not be suitable for other type of walls such as hollow
walls. Fixings suitable for your wall type must be obtained separately..
If in doubt please consult a qualified trade person. Warning: Always ensure the area to be drilled is free from
hidden electrical wires, water and gas pipes.
It is essential that this unit is fixed to a wall with the fixings provided.
Never use scourers, abrasives or chemical cleaners.
To clean wipe with a sponge and soapy water. Do not use solvent based cleaners or detergents as they
can bleach or damage the product.
V1 4/18
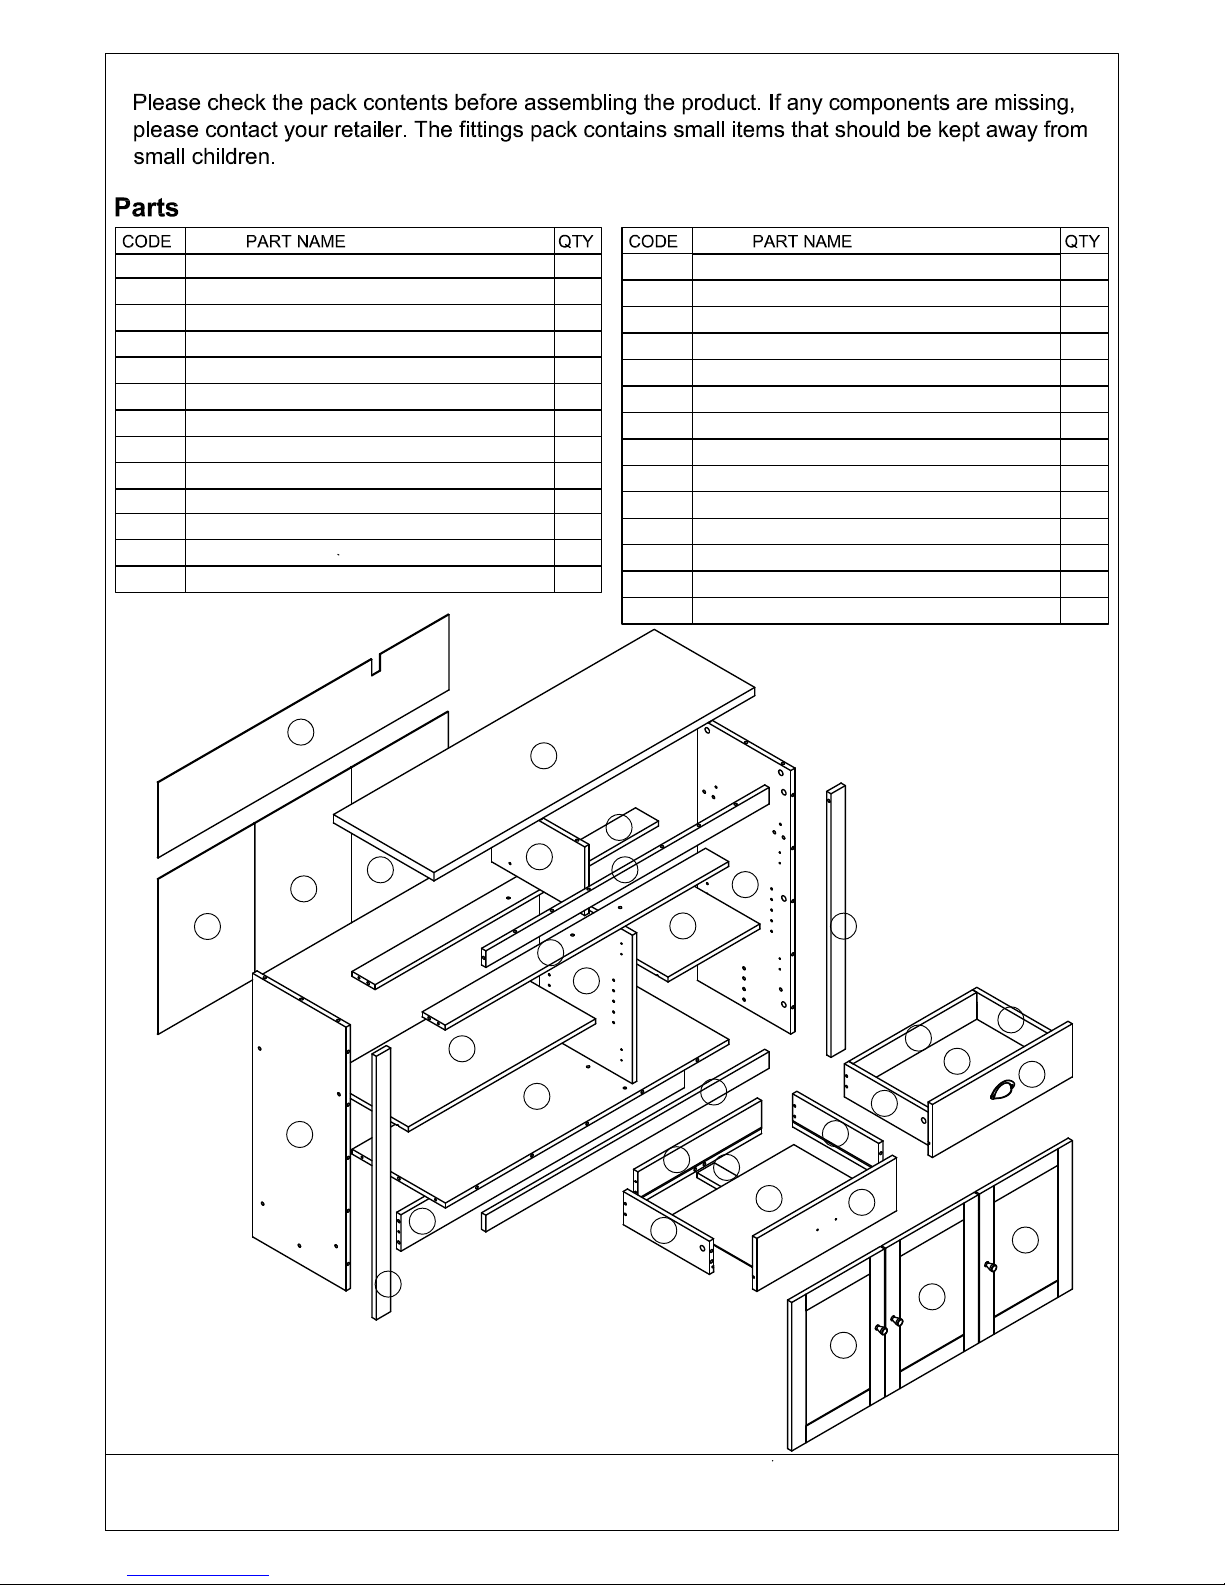
Side Panel (L) (15 x 325 x 795mm)A 1
B
Side Panel (R) (15 x 325 x 795mm)
1
C
Top Panel (25 x 350 x 1117mm)
1
D
Centre Panel (Top) (15 x 324 x 207mm)
1
E
Bottom Panel (15 x 325 x 987mm)
1
F
Centre Panel (Bottom) (15 x 324 x 448mm)
1
G
Front Bar (15 x 80 x 987mm)
1
H
Rear Bar (15 x 80 x 987mm)
1
I
Shelf (L) (15 x 295 x 652mm)
1
N
Support Panel (Bottom) (15 x 50 x 986mm)
1
O
Bar Support (15 x 110 x 987mm)
1
P
Drawer Front (L) (15 x 160 x 487)
1
Q
Drawer Front (R) (15 x 160 x 487)
Door (L) (15 x 323 x 448mm)
1
R
1
S
Door (M) (15 x 323 x 448mm)
1
T
Door (R) (15 x 323 x 448mm)
1
U
Drawer Side (L) (15 x 100 x 300mm)
2
Page 3 of 18
C
Y
Y1
Y1
Y1
A
R
S
T
P
Z
U
V
X
W
Q
Z
U
V
W
L
J
B
G
D
H
I
E
F
M
N
O
K
V
Drawer Side (R) (15 x 100 x 300mm)
2
W
Drawer Back (15 x 100 x 431mm)
2
X
Drawer Support (15 x 60 x 285mm)
2
J
K
L
Shelf (r) (15 x 295 x 320mm)
1
Front Panel (L) (15 x 50 x 795mm)
1
Front Panel (R) (15 x 50 x 795mm)
1
M
Support Panel (Top) (15 x 50 x 986mm)
1
Y
Back Panel (2.5 x 227 x 1013mm)
1
Y1
Back Panel (2.5 x 337 x 468mm)
3
Z
Drawer Bottom (2.5 x 294 x 440mm)
2
V1 4/18
5
3
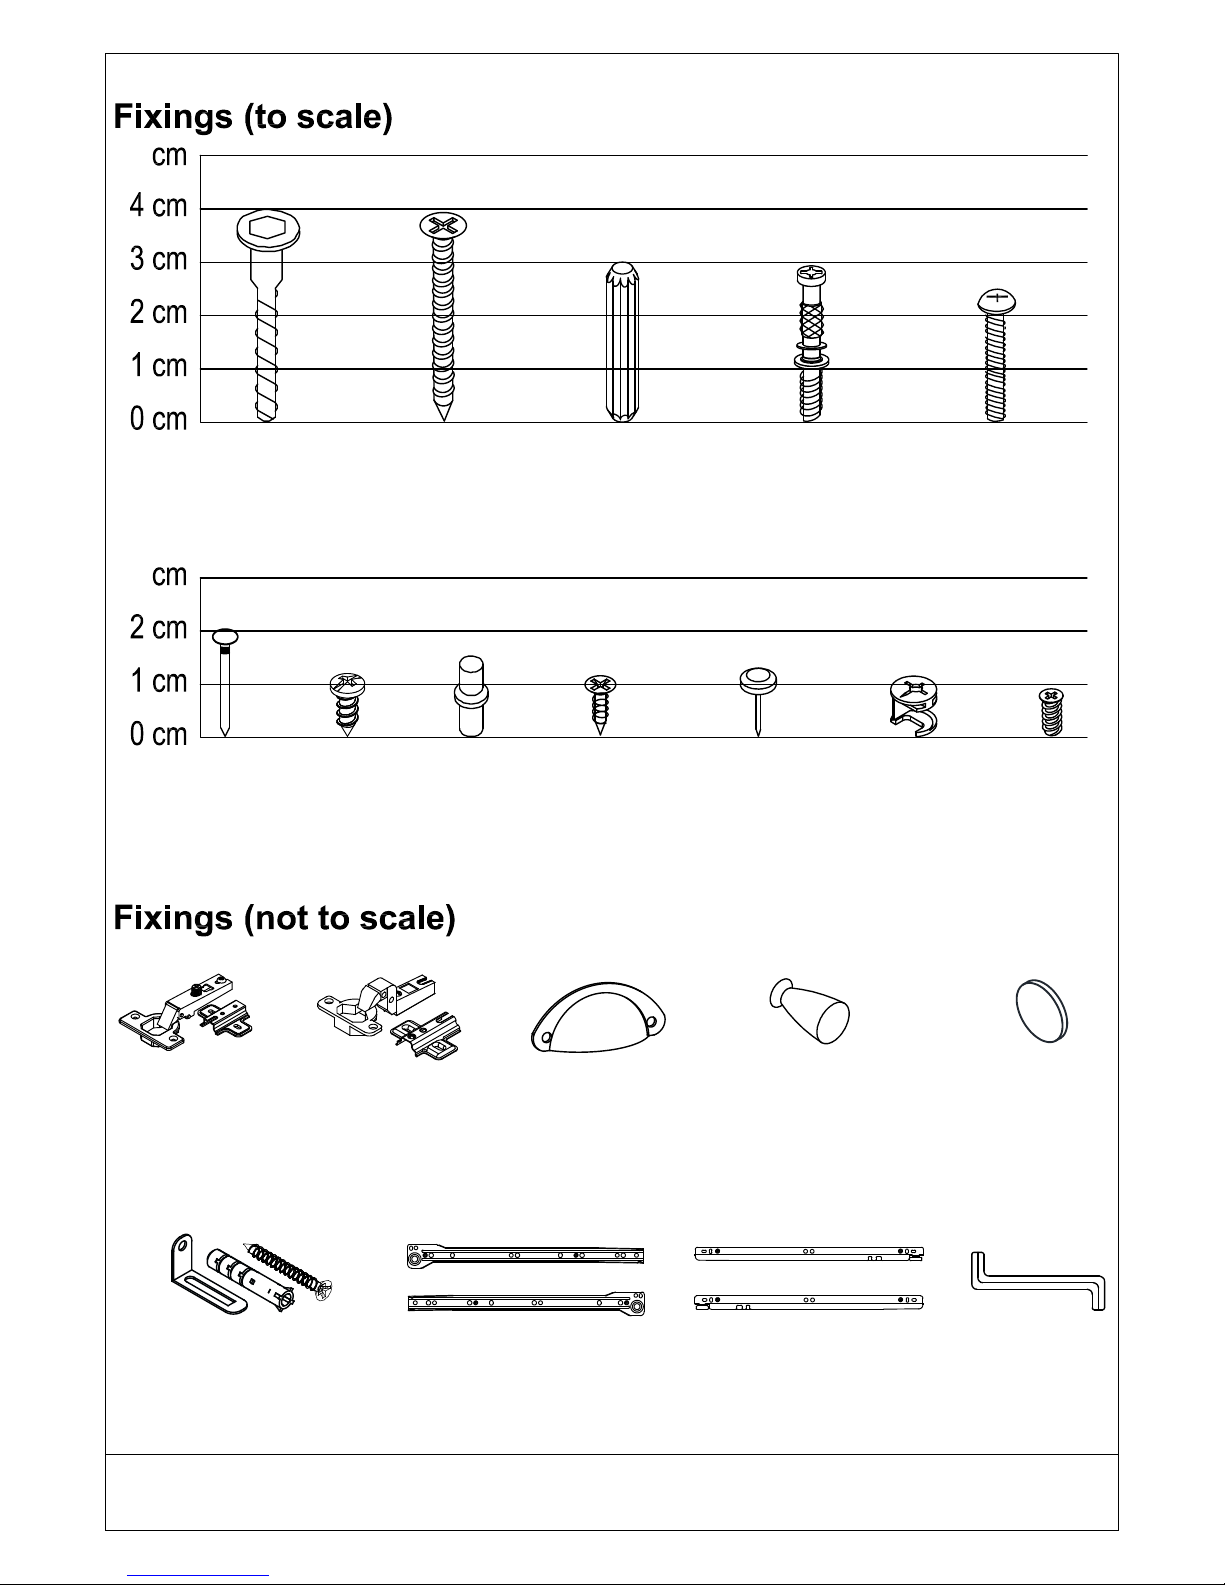
3x
p
Knob Metal Handle
(64hole mm)
2x
s
Drawer Slide
(300 mm)
2x
t
Drawer Slide
(300 mm)
1x
u
Allen Key
M4
16x
a
Unitar Screw
D6.3 x 40mm
8x
b
CSK Screw
M4.7 x 38mm
38x
c
Wooden Dowel
D8 x 30mm
34x
i
Csk Screw
M3.5 x 15mm
3x
e
Handle Screw
M4 x 22mm
23x
d
Minifix Bolt
M5 x 29mm
66x
f
Nail Pin
(26mm)
5x
j
Nail Leg
5 x 8 x 13.5mm
23x
k
Minifix Cam
D15 x 12mm
8x
l
Euro Screw
D6 x 9mm
8x
h
Shelf
Support
D5 mm
Page 4 of 18
2x
o
Pocket Handle
(64hole mm)
10x
q
Round Sticker
(D-19mm)
4x
g
Tapping
Screw
M6 x 1/2mm
1Sets
r
L-Mounting Bracket +
Wall Plug + M4 x 38mm
2 sets
m
Hinges
1/4”
4 sets
n
Hinges
7/8”
V1 4/18

STEP 1
Parts Required
Qty
Panel (A)
1
Panel (B)
1
Panel (D)
1
Panel (E)
1
Panel (F)
1
Parts Required
Qty
Panel (G)
1
Panel (H)
1
Panel (M)
1
Panel (O)
1
Panel (U)
2
Parts Required
Qty
Panel (V)
2
Panel (X)
2
36 x
c
X2
A
B
D
E
X2
X2
F
G
H
O
M
X
U
V
c
c
c
c
c
c
c
c
c
c
c
c
Page 5 of 18
V1 4/18
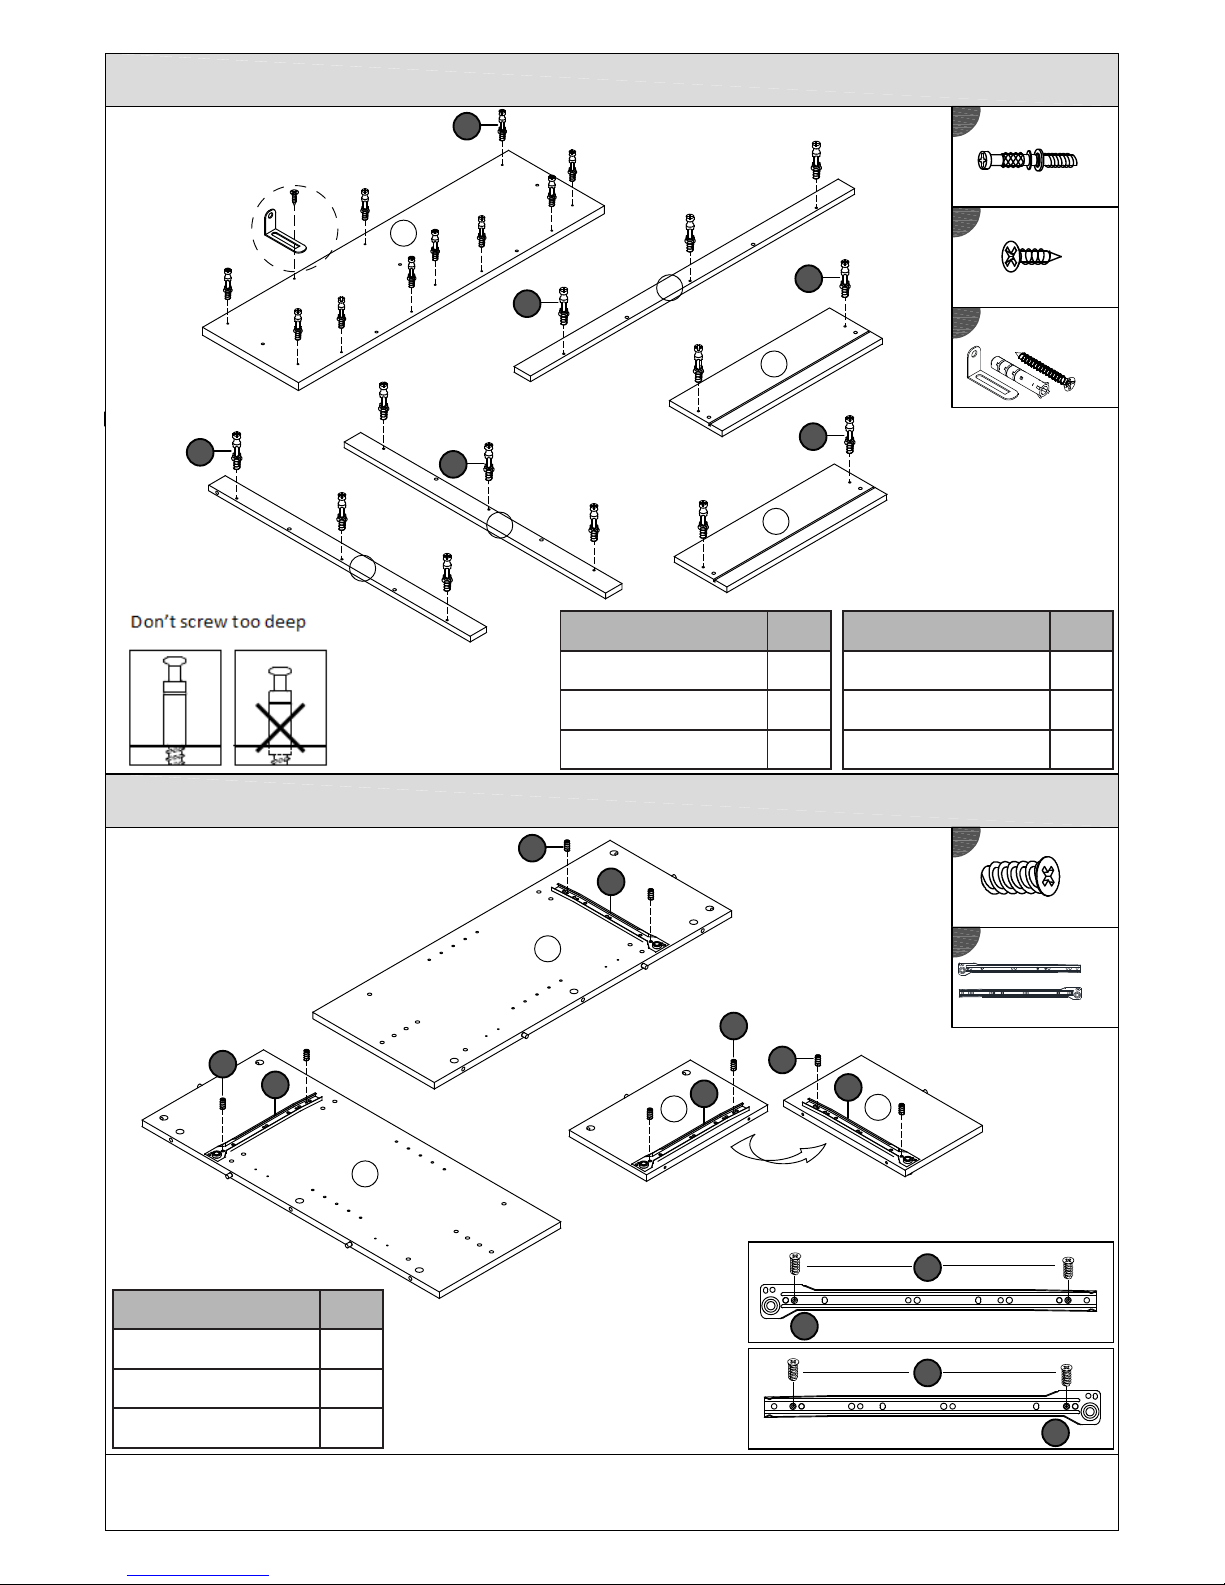
STEP 2
STEP 3
8 x
l
2 x
s
t
s
s
t
Parts Required
Qty
Panel (C)
1
Panel (K)
1
Panel (L)
1
Parts Required
Qty
Panel (N)
1
Panel (P)
1
Panel (Q)
1
23 x
d
r
L- Mounting Bracket +
Wall Plug + M4 x 38mm
1 Sets
1 x
i
C
d
N
P
Q
L
K
d
d
d
d
d
Parts Required
Qty
Panel (A)
1
Panel (B)
1
Panel (D)
1
(CL) (CR)
(CR)
(CL)
B
A
D
D
t
l
l
l
l
s
s
s
s
Page 6 of 18
V1 4/18
 Loading...