

Page 1
Skrócona instrukcja obsługi |QIG
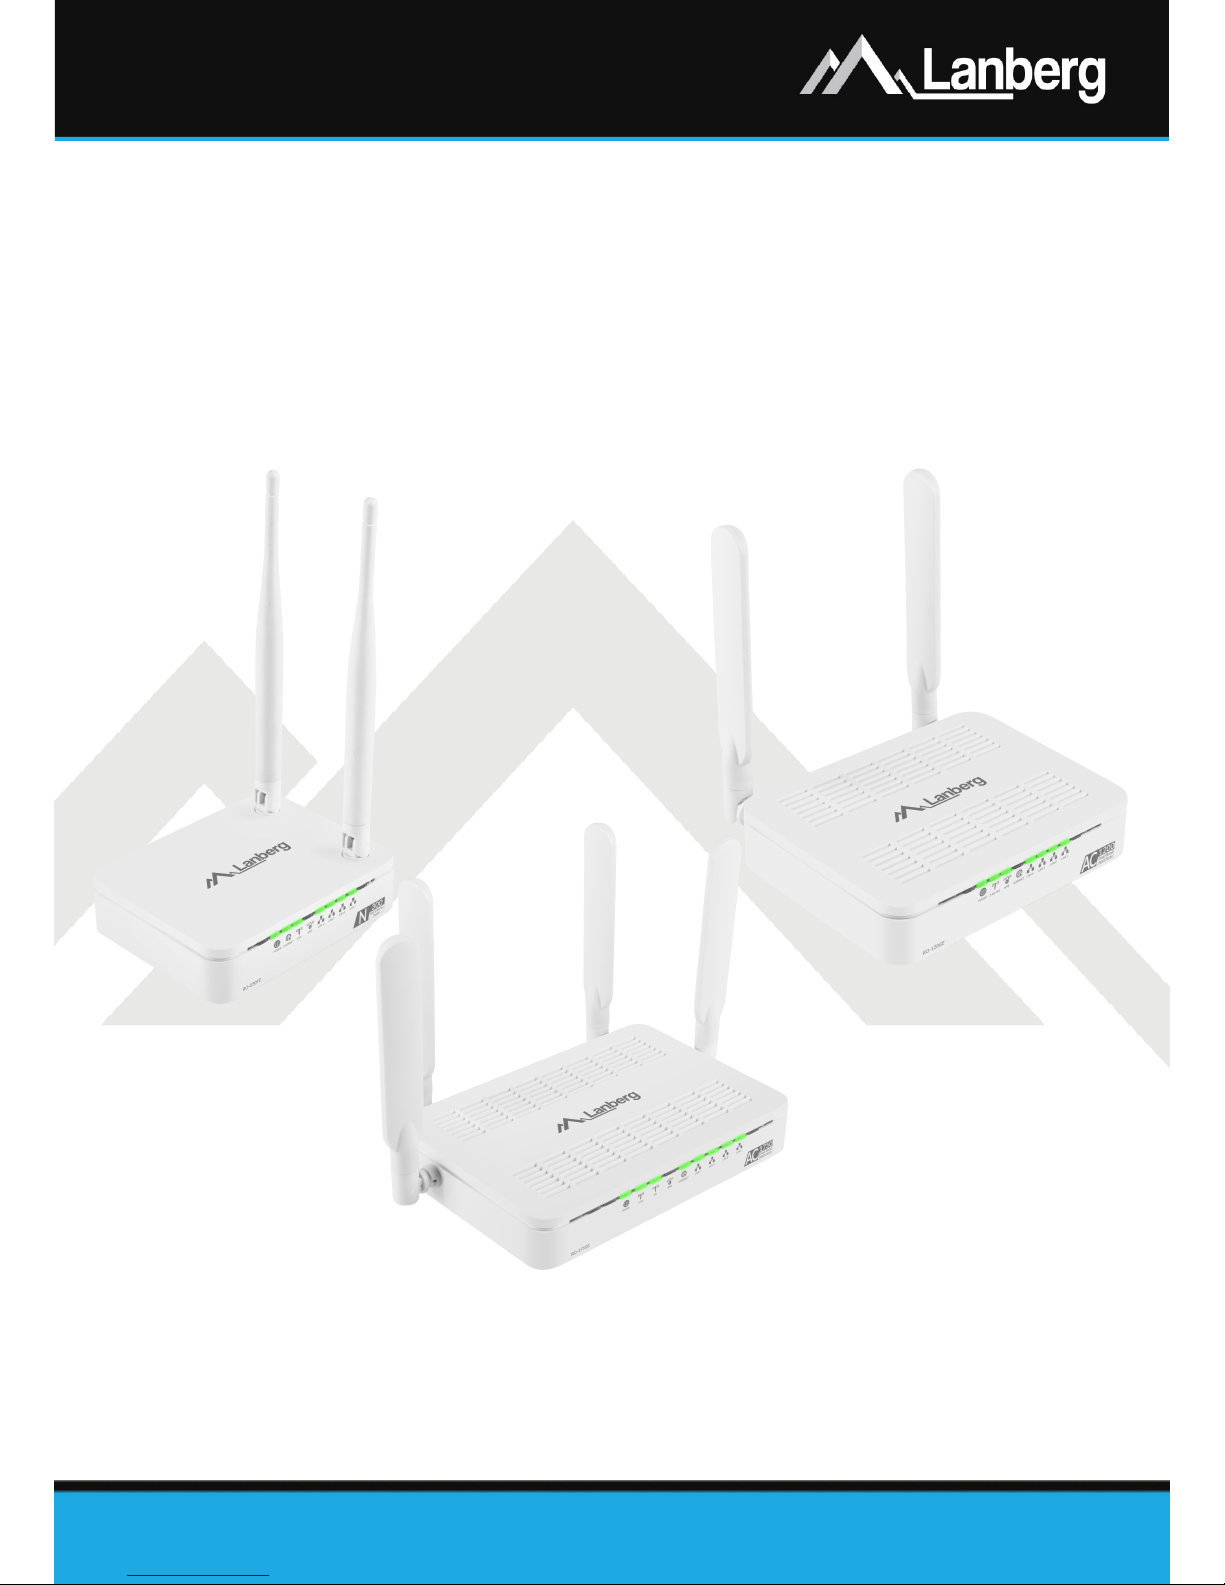
Routery szerokopasmowe
Broadband routers
WERSJA | VERSION: 2018/05
PL | EN
E-mail: [email protected] | [email protected]
www.lanberg.pl | www.lanberg.eu
Lanberg © 2015-2018
Routery szerokopasmowe
– seria RO
Broadband routers
– RO series
Page 2
Skrócona instrukcja obsługi |QIG
Routery szerokopasmowe
Broadband routers
WERSJA | VERSION: 2018/05
PL | EN
E-mail: [email protected] | [email protected]
www.lanberg.pl | www.lanberg.eu
Lanberg © 2015-2018
Ten produkt jest zgodny z przepisami Unii
Europejskiej (UE) dotyczącymi bezpieczeństwa i
środowiska. Wymienione w poniższej instrukcji
wyroby zostały dopuszczone do obrotu na terenie
UE uzyskując certyfikat deklaracji zgodności Unii
Europejskiej, który jest zgodny z zasadniczymi
wymaganiami oraz innymi stosownymi
postanowieniami poniższych dyrektyw oraz, że
zastosowano niżej wymienione normy
zharmonizowane.
This product complies with the European Union (EU) safety and environmental regulations. The products listed in
this manual are authorized in the EU by obtaining a European Union Declaration of Conformity which complies with
the essential requirements and other relevant provisions of the following directives and that the following
harmonized standards apply.
Deklaracja zgodności (CE) znajduje się na stronie | The Declaration of Conformity (CE) is on the page:
www.lanberg.pl | www.lanberg.eu
UWAGA: Użycie symbolu WEEE (przekreślony kosz) oznacza, że niniejszy produkt nie może być traktowany jako
odpad domowy. Prawidłowa utylizacja zużytego sprzętu pozwala uniknąć zagrożeń dla zdrowia ludzi i środowiska
naturalnego, wynikających z możliwej obecności w sprzęcie niebezpiecznych substancji, mieszanin oraz części
składowych, a także niewłaściwego składowania i przetwarzania takiego sprzętu. Zbiórka selektywna pozwala także
na odzyskiwanie materiałów i komponentów, z których wyprodukowane było urządzenie. W celu uzyskania
szczegółowych informacji dotyczących recyklingu niniejszego produktu należy skontaktować się z punktem
sprzedaży detalicznej, w którym dokonano zakupu, lub organem władzy lokalnej. Użycie symbolu RoHS oznacza, że
produkt został wyprodukowany zgodnie z europejską normą RoHS. Jej celem jest zmniejszenie ilości substancji
niebezpiecznych, przenikających do środowiska z odpadów elektrycznych i elektronicznych. Użycie symbolu CE
oznacza, że produkt jest bezpieczny oraz zgodny z wymaganiami i normami UE.
NOTE: The use of the WEEE symbol (crossed out bin symbol) means that this product cannot be treated as
household waste. Proper disposal of used equipment avoids risks to human health and the environment, resulting
from the possible presence of hazardous substances, mixtures and components in the equipment, as well as,
improper storage and processing of such equipment. Selective collection also allows you to recover materials and
components, from which the device was manufactured. For more information about the recycling of this product,
please contact the retail outlet, where the product was purchased, or request information from the local authority.
The use of the RoHS symbol means, that this particular product is manufactured in accordance with the European
RoHS standard. Main goal of this norm, is to reduce the amount of hazardous substances getting into the
environment, resulting from electrical and electronic waste. The use of the CE symbol means that the product is
safe and compliant with EU standards and requirements.
Page 3

Skrócona instrukcja obsługi |QIG
Routery szerokopasmowe
Broadband routers
E-mail: [email protected] | [email protected]
www.lanberg.pl | www.lanberg.eu
Lanberg © 2015-2018
WERSJA | VERSION: 2018/05
PL | EN
ZAWARTOŚĆ | CONTENT
Polski
English
str. 4
p. 18
Page 4

Skrócona instrukcja obsługi
Routery szerokopasmowe
PL | EN
E-mail: [email protected]
www.lanberg.pl
Lanberg © 2015-2018
4 | 32
1) Ważne zalecenia wstępne i informacje dotyczące użytkowania routerów
szerokopasmowych
1.1) Wprowadzenie
ZACHOWAJ TĘ INSTRUKCJĘ – Niniejszy zbiór zaleceń oraz instrukcji obsługi routerów szerokopasmowych
marki Lanberg, z wyszczególnieniem obsługiwanych poniżej modeli:
• RO-030FE
• RO-120GE
• RO-175GE
zawiera dane logistyczne, techniczne, instrukcje i przepisy, których należy przestrzegać oraz dostosować się
do nich podczas transportu, montażu, użytkowania i serwisowania produktów. Nie należy korzystać z
urządzenia przed uważnym przeczytaniem i dostosowaniem się do wszystkich informacji oraz zaleceń
dotyczących bezpieczeństwa zawartych w instrukcji obsługi. Zachowaj tą instrukcję do jej wykorzystania w
późniejszych celach. Wszelkie zdjęcia, rysunki zawarte w instrukcji mają charakter poglądowy.
UWAGA: W celu uzyskania najbardziej aktualnej wersji tej instrukcji, proszę odwiedzić naszą witrynę
internetową pod adresem www.lanberg.pl.
1.2) Zawartość opakowania
• Bezprzewodowy router szerokopasmowy (RO-030FE; RO-120GE; RO-175GE),
• Skrócona instrukcja obsługi,
• Kabel krosowy (Ethernet) RJ-45 1.5m:
Model RO-030FE: 4-żyłowy,
Model RO-120GE, RO-175GE: 8-żyłowy,
• Zasilacz:
Model RO-030FE: AC 100V - 240V, 50Hz / 60Hz, 0.2A, DC 12V, 0.5A,
Model RO-120GE: AC 100V - 240V, 50Hz / 60Hz, 0.4A, DC 12V, 1.0A,
Model RO-175GE: AC 100V - 240V, 50Hz / 60Hz, 0.7A, DC 12V, 1.5A.
UWAGA: Zawartość opakowania, w tym routerów i jego poszczególnych elementów może różnić się w
zależności od konkretneg o modelu.
Page 5
Skrócona instrukcja obsługi
Routery szerokopasmowe
PL | EN
E-mail: [email protected]
www.lanberg.pl
Lanberg © 2015-2018
5 | 32
2) Znaczenie poszczególnych elementów oraz procedura konfiguracji routera
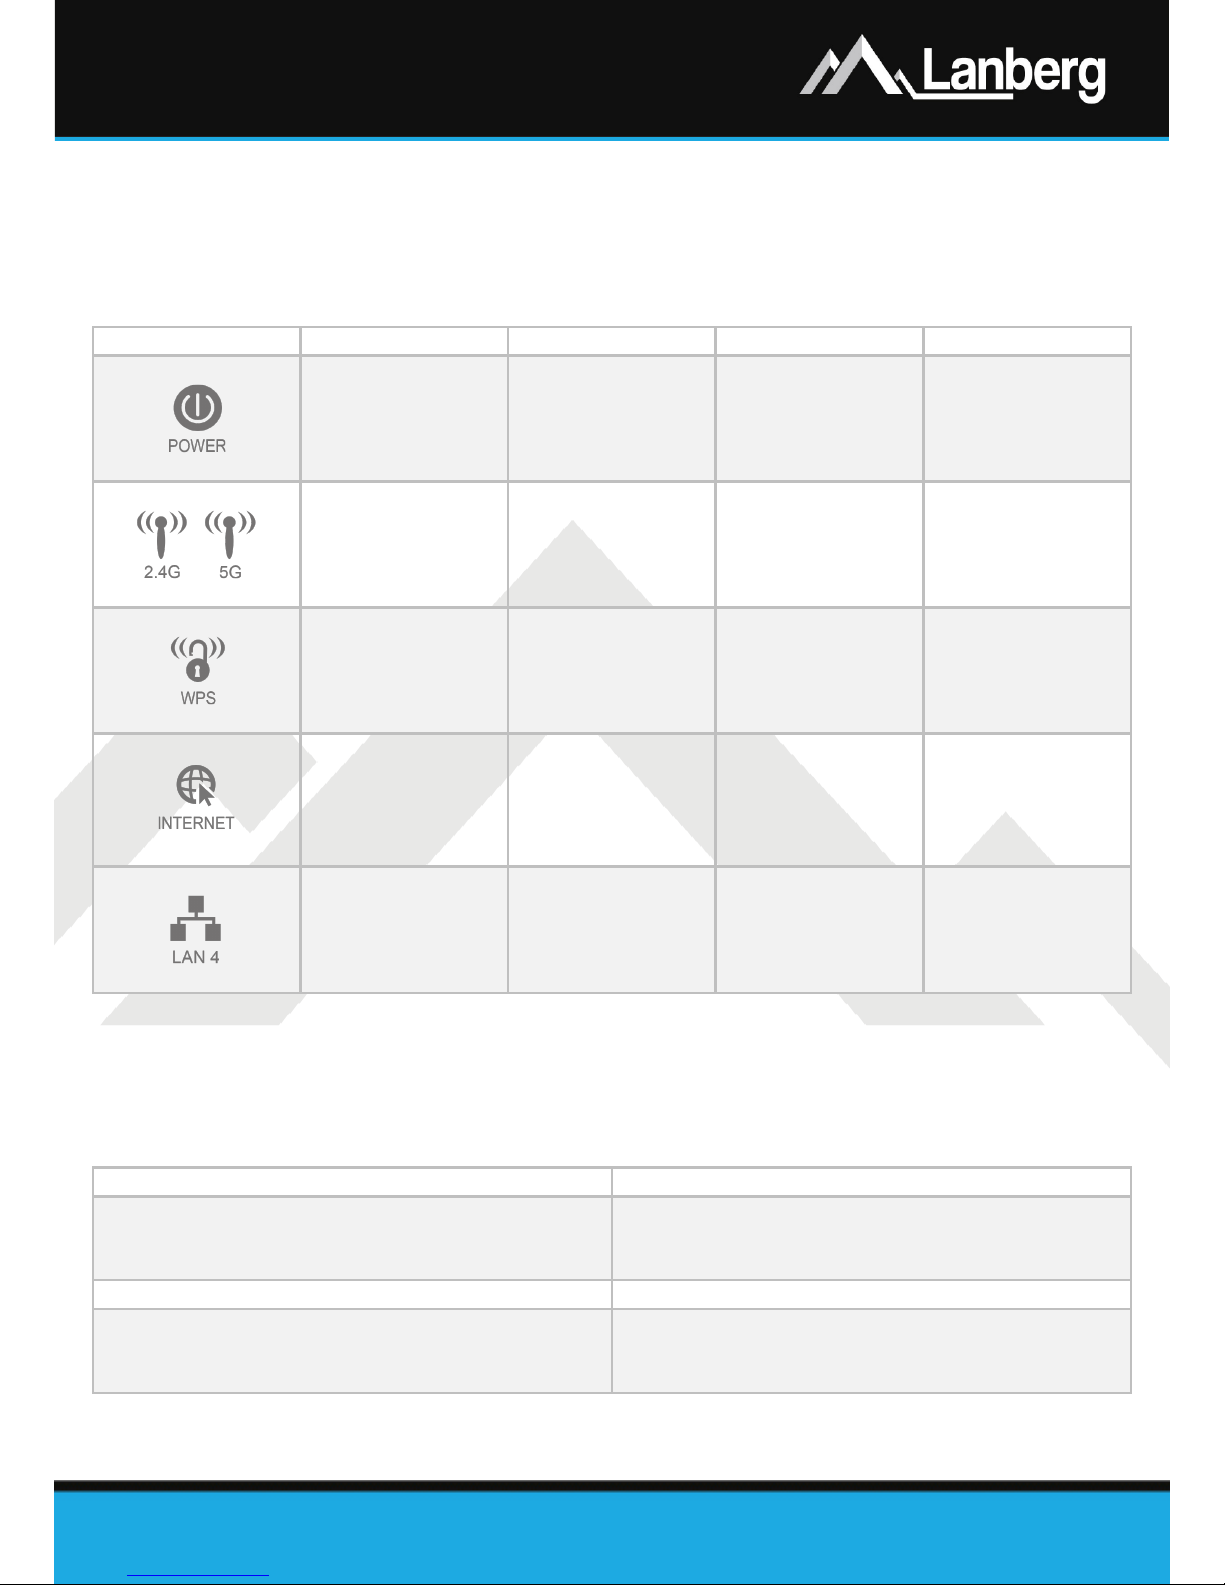
2.1) Znaczenie elementów diod LED
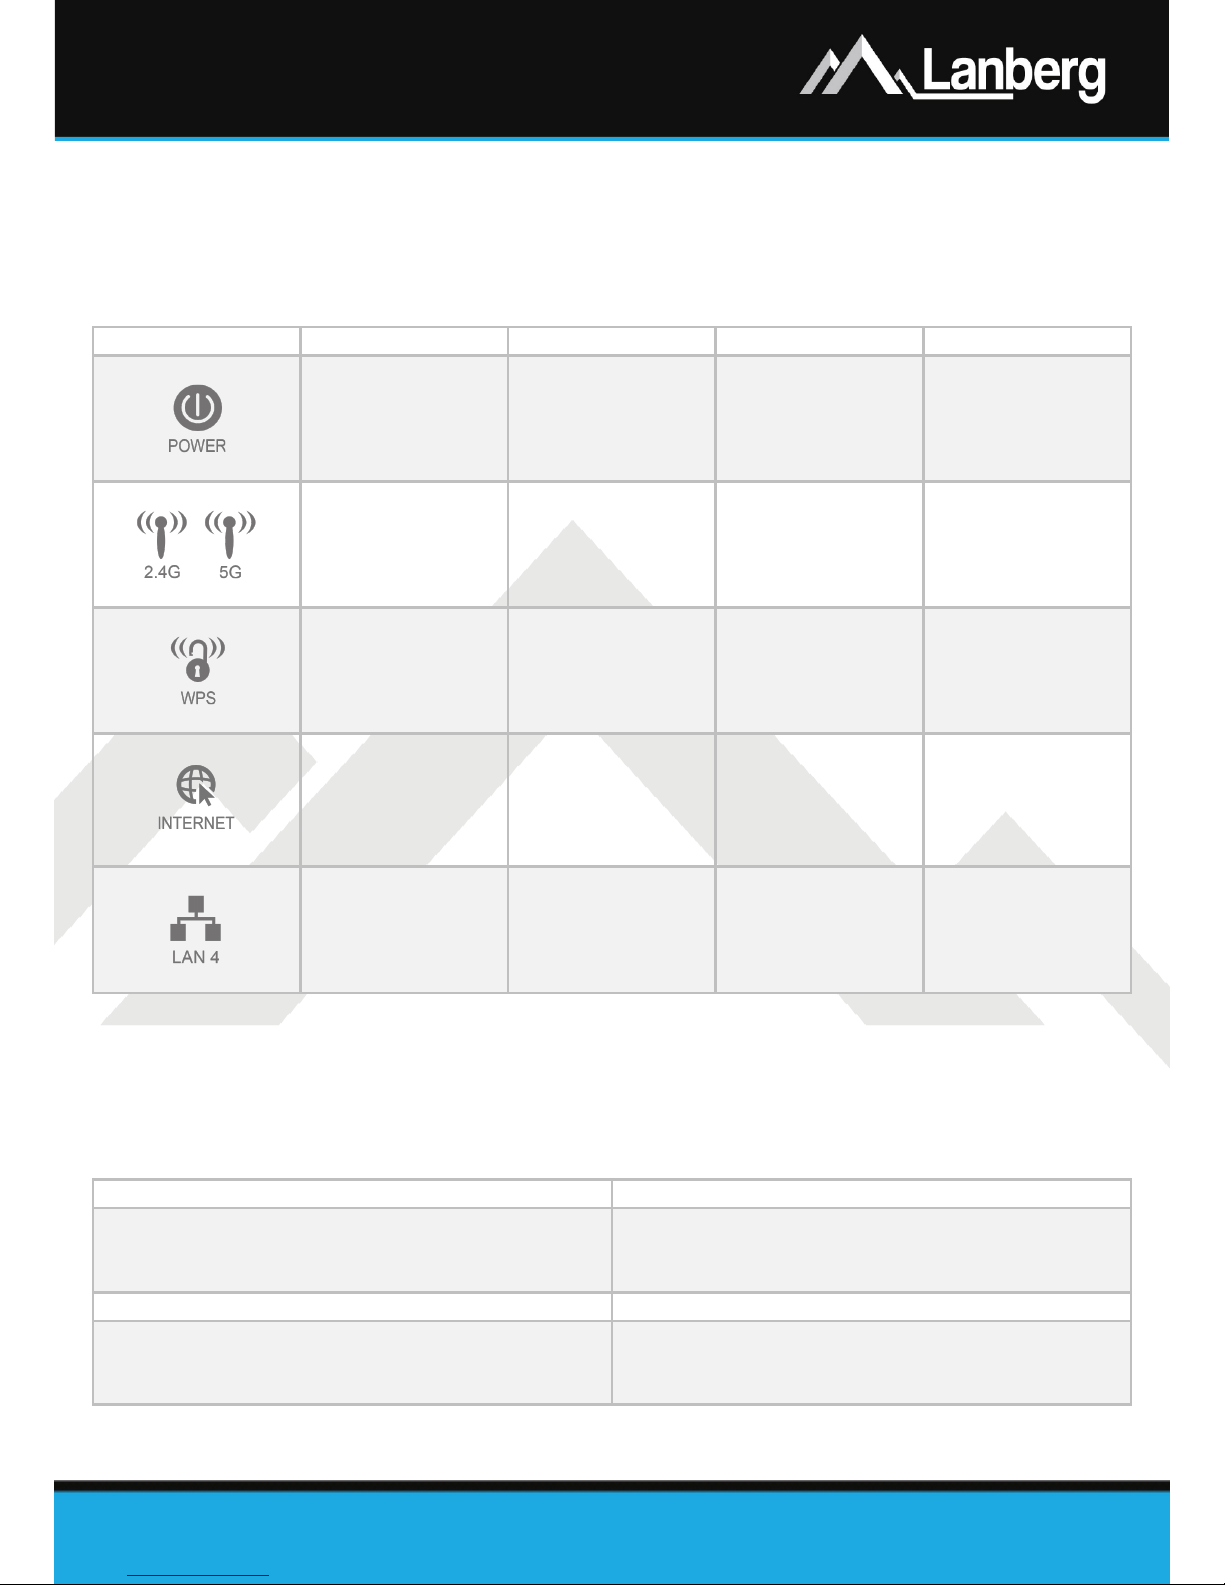
Bezprzewodowy szerokopasmowy router Lanberg zawiera na przedniej stronie obudowy zielone diody LED.
Ich liczba oraz znaczenie może się różnić w zależności od posiadanego modelu. Poniżej znajduje się
objaśnienie każdej diody niezależnie od modelu.
Wygląd
Znaczenie
Dioda świeci
Dioda miga
Dioda nie świeci
Zasilanie
Urządzenie jest
gotowe
Urządzenie jest
uruchamiane
Urządzenie jest
wyłączone
Sieć Wi-Fi -
Trwa odbieranie
/ wysyłanie
danych
Sieć Wi-Fi jest
wyłączona
Funkcja WPS -
Urządzenie czeka
na sparowanie
(WPS) w ciągu 2
minut
Funkcja WPS nie
jest
uruchomiona
Port Internet
(WAN)
Sieć Internet jest
podłączona
Trwa odbieranie
/ wysyłanie
danych
Sieć Internet nie
jest podłączona
Port lokalny
(LAN)
Urządzenie
lokalne jest
podłączone
Trwa odbieranie
/ wysyłanie
danych
Urządzenie
lokalne nie jest
podłączone
2.2) Elementy oraz przyciski na obudowie routera oraz ich funkcje / właściwości
Bezprzewodowy szerokopasmowy router Lanberg zawiera szereg elementów oraz przycisków na obudowie
routera. Ich liczba oraz znaczenie może się różnić w zależności od posiadanego modelu. Poniżej znajduje się
objaśnienie każdego elementu niezależnie od modelu.
Element
Opis / funkcja / właściwości
Anteny
• Model RO-030FE: 2 stałe anteny 5dBi, 50Ω, 2.4G
• Model RO-120GE: 2 stałe anteny 5dBi, 50Ω, 2.4/5G
• Model RO-175GE: 4 stałe anteny 5dBi, 50Ω, 2.4/5G
Przełącznik zasilania ON/OFF
Włącza (ON) lub wyłącza (OFF) urządzenie
Gniazdo zasilania
• Model RO-030FE: DC 12V, 0.5A
• Model RO-120GE: DC 12V, 1.0A
•
Model RO-175GE: DC 12V, 1.5A
Page 6
Skrócona instrukcja obsługi
Routery szerokopasmowe
PL | EN
E-mail: [email protected]
www.lanberg.pl
Lanberg © 2015-2018
6 | 32
Porty LAN
Pozwalają podłączyć bezpośrednio do 4 urządzeń w
sieci lokalnej do urządzenia
• Model RO-030FE: 4 porty 100Mbps
• Model RO-120GE, RO-175GE: 4 porty 1000Mbps
Port Internet (WAN)
Pozwala podłączyć router do sieci operatora (ISP)
• Model RO-030FE: 1 port 100Mbps
• Model RO-120GE, RO-175GE: 1 port 1000Mbps
Przycisk WPS
Naciśnij przycisk przez co najmniej 3 pełne sekundy,
w celu uruchomienia funkcji WPS. Dioda WPS zacznie
migać. Na urządzeniu końcowym (np. karta sieci
bezprzewodowej lub wzmacniaczu zasięgu lub
urządzeniu IoT) zainicjuj funkcję WPS (np. naciśnij
ten sam przycisk). Pamiętaj, aby wykonać to w ciągu
2 minut od momentu włączenia WPS na routerze.
Przycisk Wi-Fi
Naciśnij przycisk przez co najmniej 3 pełne sekundy,
w celu uruchomienia / wyłączenia sieci Wi-Fi.
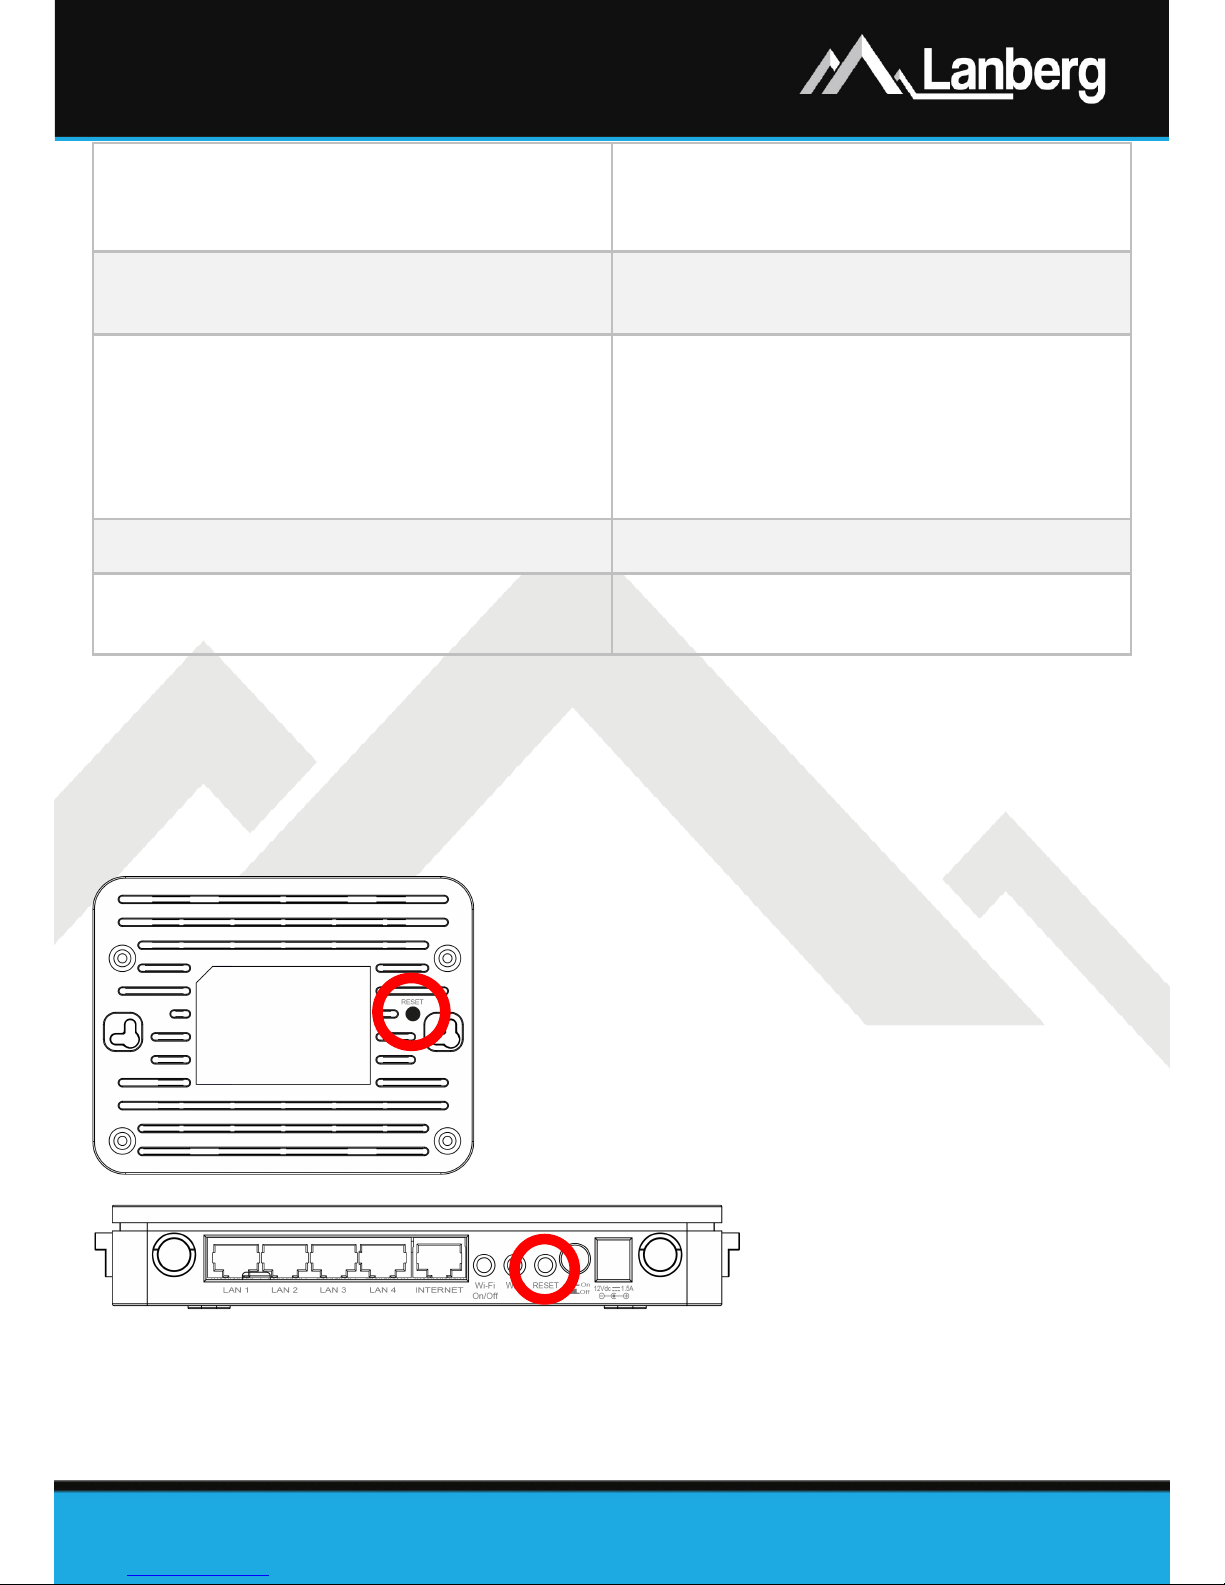
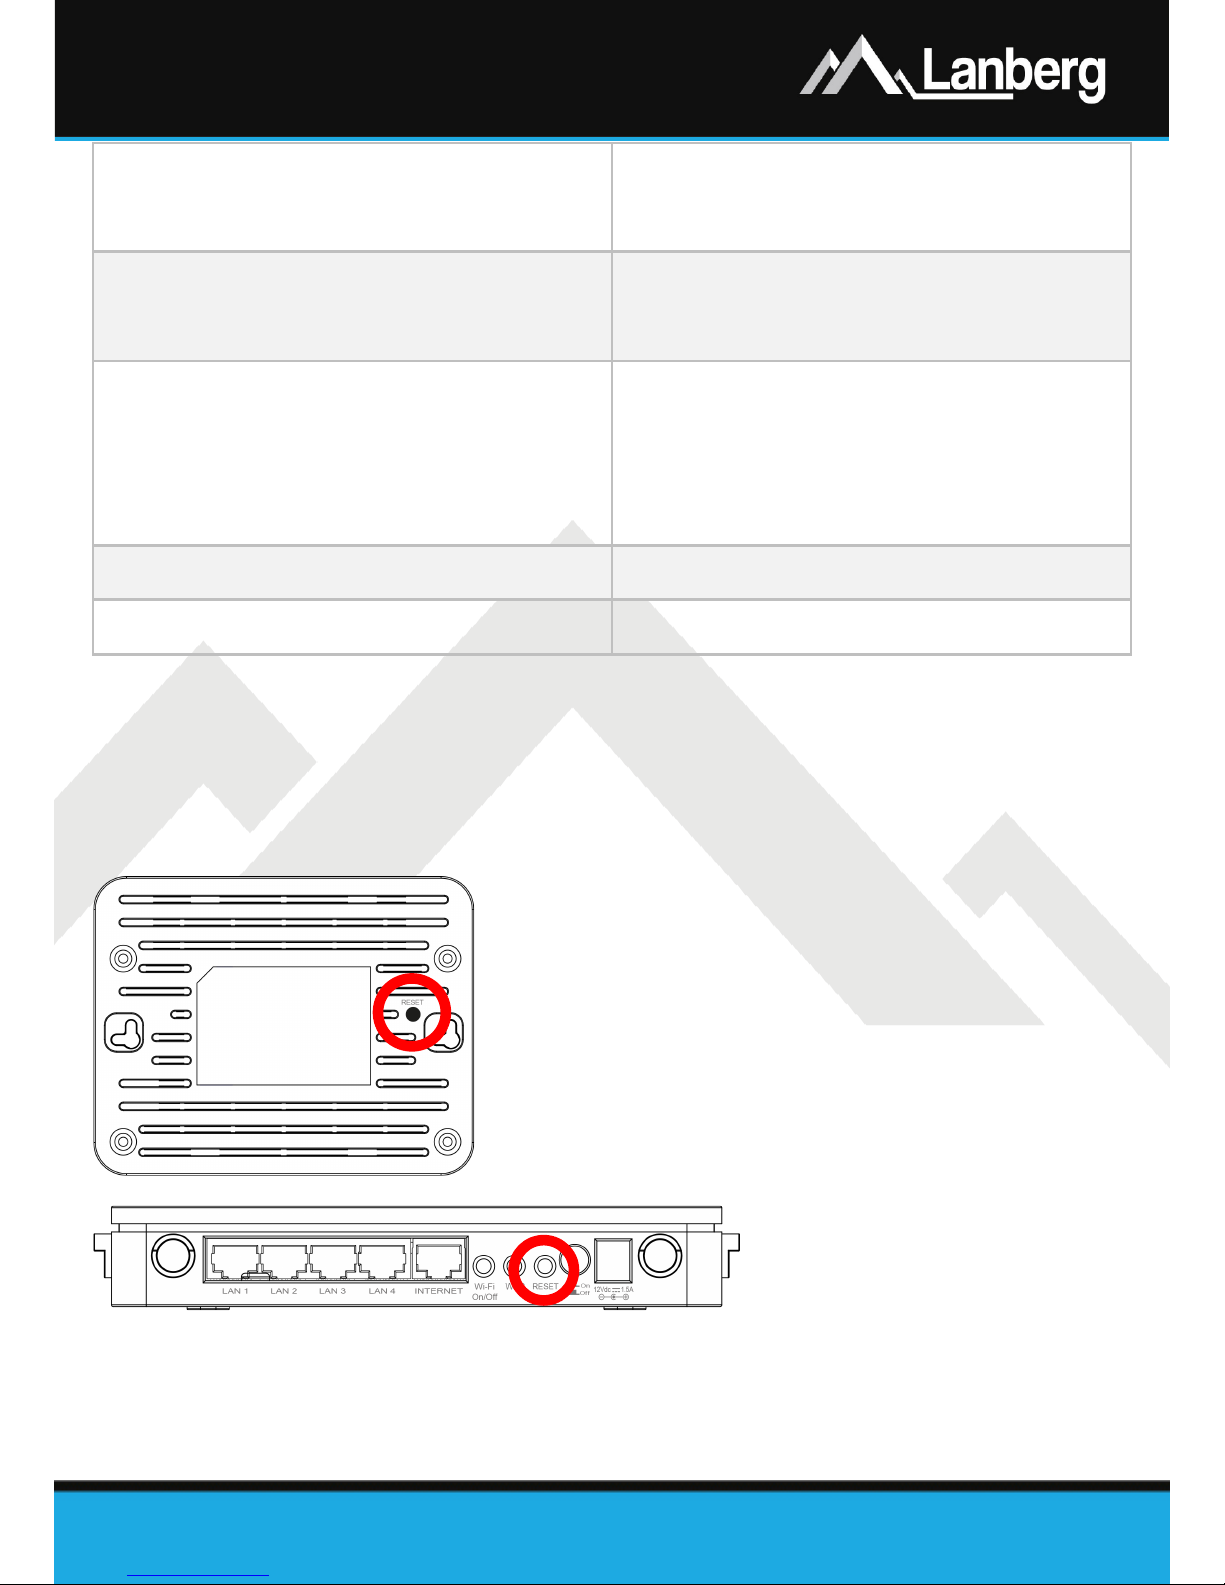
Przycisk reset
Naciśnij przycisk przez co najmniej 6 pełnych sekund,
w celu przywrócenia urządzeniu domyślnych
ustawień.
3) Podłączanie routera, urządzeń do niego i jego resetowanie oraz konfiguracja
3.1) Resetowanie do ustawień fabrycznych routera Lanberg
W zależności od modelu, przycisk reset znajduje si ę:
• Modele RO-030FE, RO-120GE: pod spodem urządzenia,
• Model RO-175GE: z tyłu urządzenia,
W celu zresetowania urządzenia do ustawień fabrycznych, wciśnij przycisk przez co najmniej 6 sekund.
Następnie odłącz lub wyłącz na około 15 sekund zasilanie oraz podłącz lub włącz je z powrotem.
Page 7
Skrócona instrukcja obsługi
Routery szerokopasmowe
PL | EN
E-mail: [email protected]
www.lanberg.pl
Lanberg © 2015-2018
7 | 32
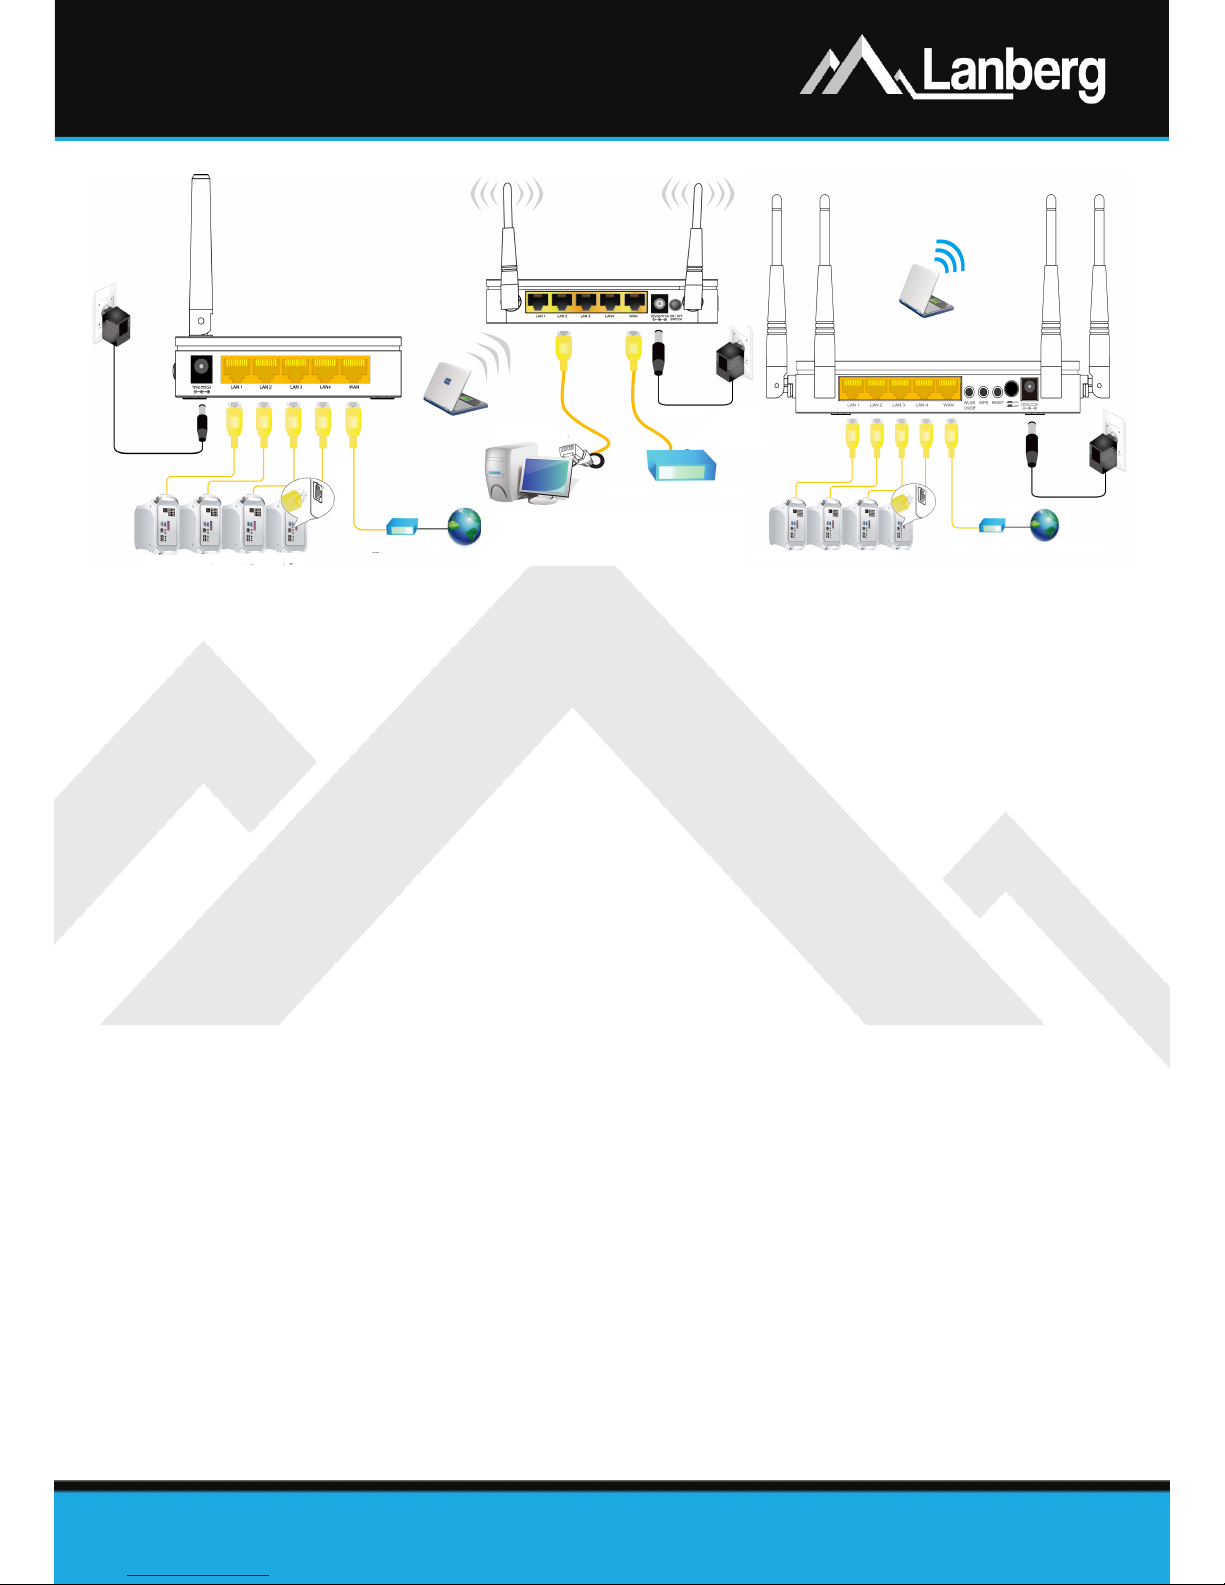
3.2) Podłączanie i uruchamianie routera szerokopasmowego Lanberg
Krok 1) Podłącz jedną końcówkę kabla krosowego (Ethernet) RJ-45 do portu internetowego (WAN)
znajdującego się na routerze, a jego drugą końcówkę do modemu kablowego / xDSL / urządzenia
Twojego dostawcy internetowego (ISP),
Krok 2) Podłącz jedną końcówkę kabla krosowego (Ethernet) RJ-45 do jednego z portów lokalnych (LAN)
znajdujących się na routerze, a jego drugą końcówkę do urządzenia końcowego (np. komputer PC,
laptop),
Krok 3) Podłącz zasilanie, wkładając końcówkę wtyczki zasilacza routera do jego gniazda zasilania
(oznaczonego wartością Vdc oraz A) znajdującego się na obudowie. Następnie zmień pozycję
przycisku zasilania na pozycję ON (wciśnięty przycisk) – Modele RO-120GE oraz RO-175GE.
3.3) Wstępna konfiguracja ustawień sieciowych urządzenia końcowego
Przed rozpoczęciem do pierwszej podstaw owej konfiguracji routera szerokopasmowego Lanberg należy
skonfigurować urządzenie końcowe (np. takie jak komputer czy laptop) tak, aby uzyskiwało automatyczny
adres IP oraz serwer DNS z serwera DHCP routera.
UWAGA: W przypadku braku połączenia z routerem lub w dalszych etapach konfiguracji trybów jego pracy
może zdarzyć się sytuacja w której usługa serwera DHCP, odpowiedzialna za przydzielanie adresów IP
urządzeniom podłączonych do sieci lokalnej, zostanie wyłączona (zależnie od trybu pracy routera).
Wówczas konieczne jest ustawienie statycznego adresu IP urządzenia końcowego (np. komputera). Należy
zaznaczyć flagi „Użyj następująceg o adresu IP:” wpisując niewykorzystany adres IP z sieci lokalnej i maskę
podsieci (zazwyczaj „255.255.255.0”) oraz zaznacz „Użyj następujących adresów serwerów DNS:” wpisując
IP serwera DNS dostawcy internetowego lub dostawcy rozwiązań DNS (np. „8.8.8.8”).
Page 8
Skrócona instrukcja obsługi
Routery szerokopasmowe
PL | EN
E-mail: [email protected]
www.lanberg.pl
Lanberg © 2015-2018
8 | 32
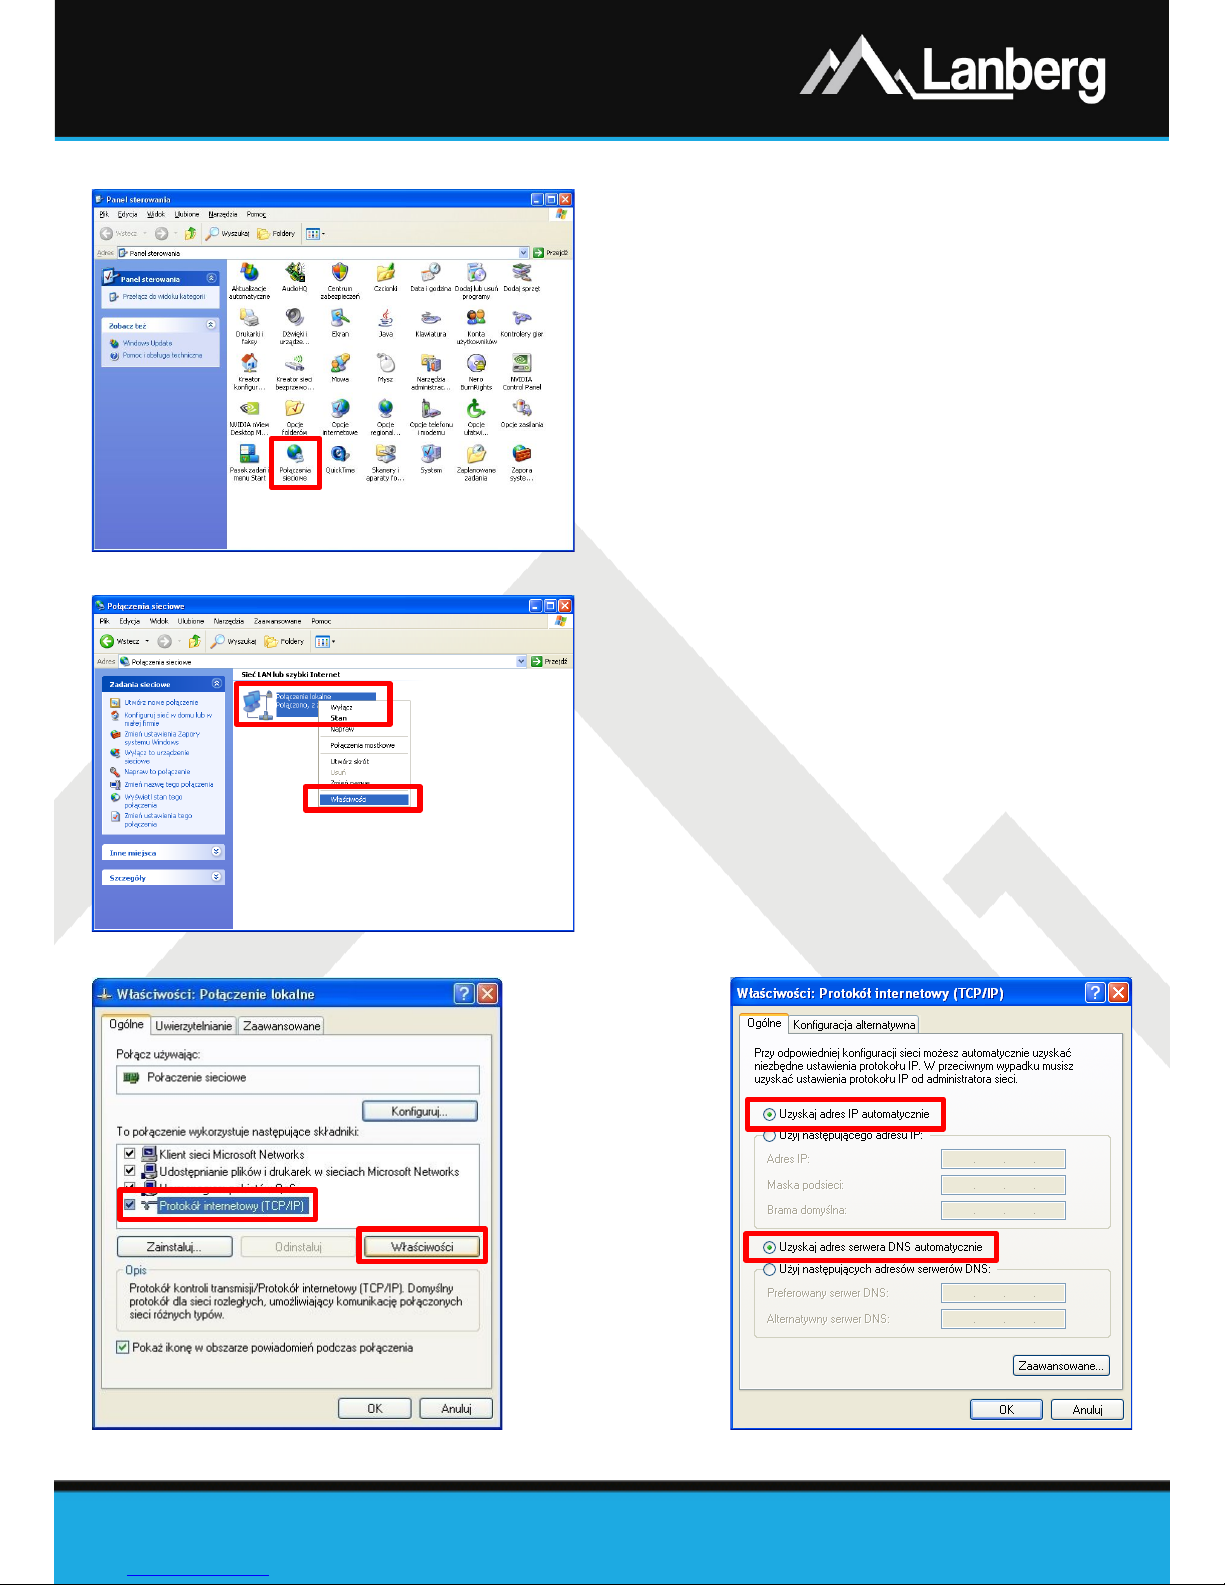
3.3.1) Windows 98/ME/2000/XP
Krok 1) Naciśnij na „Start” „Panel sterowania”. Po
otwarciu nowego okna, naciśnij podwójnie lewym
przyciskiem myszy „Połączenia sieciowe”,
Krok 2) Naciśnij prawym przyciskiem myszy na
„Połączenie lokalne”, a następnie z rozwijalnej
listy wybierz „Właściwości”,
Krok 3) Z now o otwartego okna, zaznacz wiersz „Protokół
internetowy (TCP/IP)” naciskając lewym
przyciskiem myszy na nim, a następnie naciśnij
lewym przyciskiem myszy na przycisk
„Właściwości”,
Krok 4) Z nowo otwartego okna, zaznacz flagi „Uzyskaj
adres IP automatycznie” oraz „Uzyskaj adres
serwera DNS automatycznie” naciskając lewym
przyciskiem myszy, a następnie naciśnij „OK”,
Krok 5) W celu bieżącego informowania o statusie
połączenia podczas jego inicjowania, na
poprzednim oknie naciśnij lewym flagę „Pokaż
ikonę w obszarze powiadomień podczas
połączenia”.
Page 9
Skrócona instrukcja obsługi
Routery szerokopasmowe
PL | EN
E-mail: [email protected]
www.lanberg.pl
Lanberg © 2015-2018
9 | 32
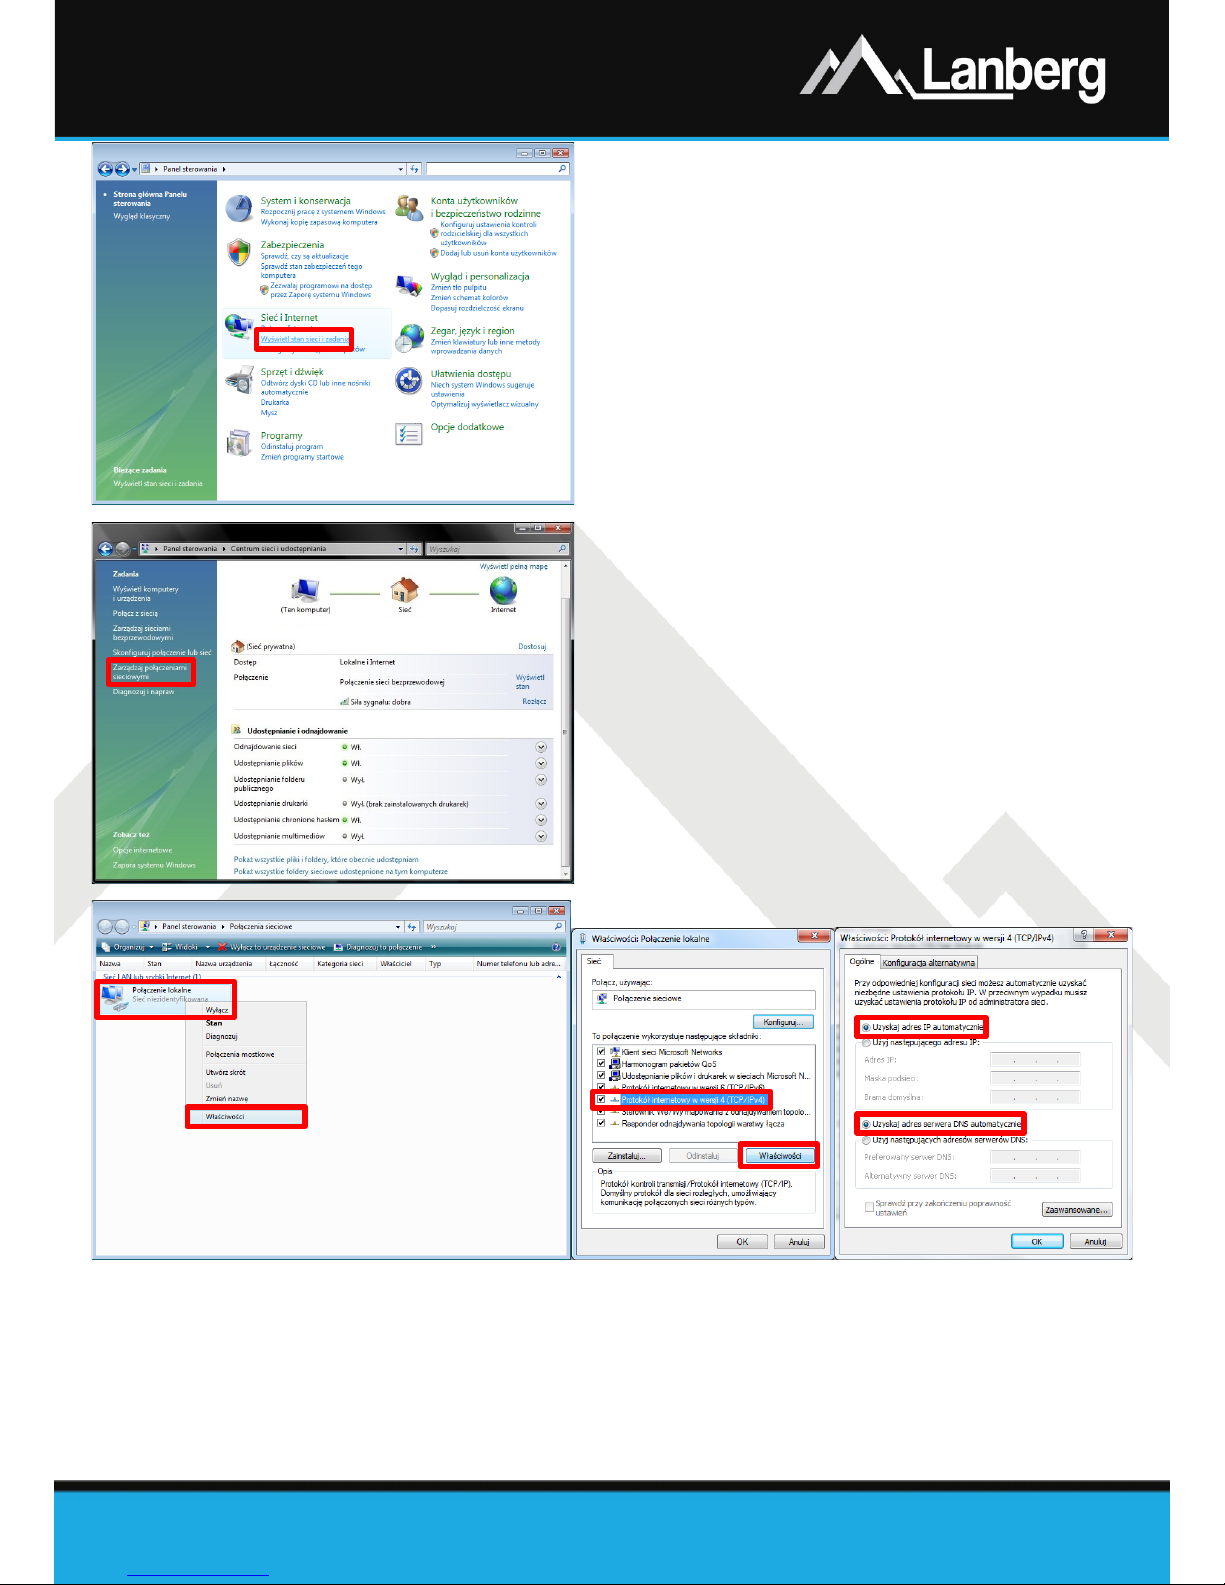
3.3.2) Windows Vista
Krok 1) Naciśnij na „Start” „Panel sterowania”
„Wyświetl stan sieci i zadania”,
Krok 2) Po przejściu do nowej sekcji, naciśnij lewym
przyciskiem myszy po lewej stronie okna na
„Zarządzaj połączeniami sieciowymi”,
Krok 3) Po przejściu do nowej sekcji, naciśnij prawym
przyciskiem myszy na „Połączenie lokalne”, a
następnie z rozwijalnej listy wybierz
„Właściwości”,
Krok 4) W zależności o bieżących ustawień
bezpieczeństwa, na ekranie może pojawić się
informacja "Kontrola konta użytkownika".
Naciśnij "Kontynuuj", aby kontynuować,
Krok 5) Z nowo otwartego okna, zaznacz wiersz „Protokół
internetowy w wersji 4 (TCP/IPv4)” naciskając
lewym przyciskiem myszy na nim, a następnie
naciśnij lewym przyciskiem myszy na przycisk
„Właściwości”,
Krok 6) Z nowo otwartego okna, zaznacz flagi „Uzyskaj
adres IP automatycznie” oraz „Uzyskaj adres
serwera DNS automatycznie” naciskając lewym
przyciskiem myszy, a następnie naciśnij „OK”.
Page 10
Skrócona instrukcja obsługi
Routery szerokopasmowe
PL | EN
E-mail: [email protected]
www.lanberg.pl
Lanberg © 2015-2018
10 | 32
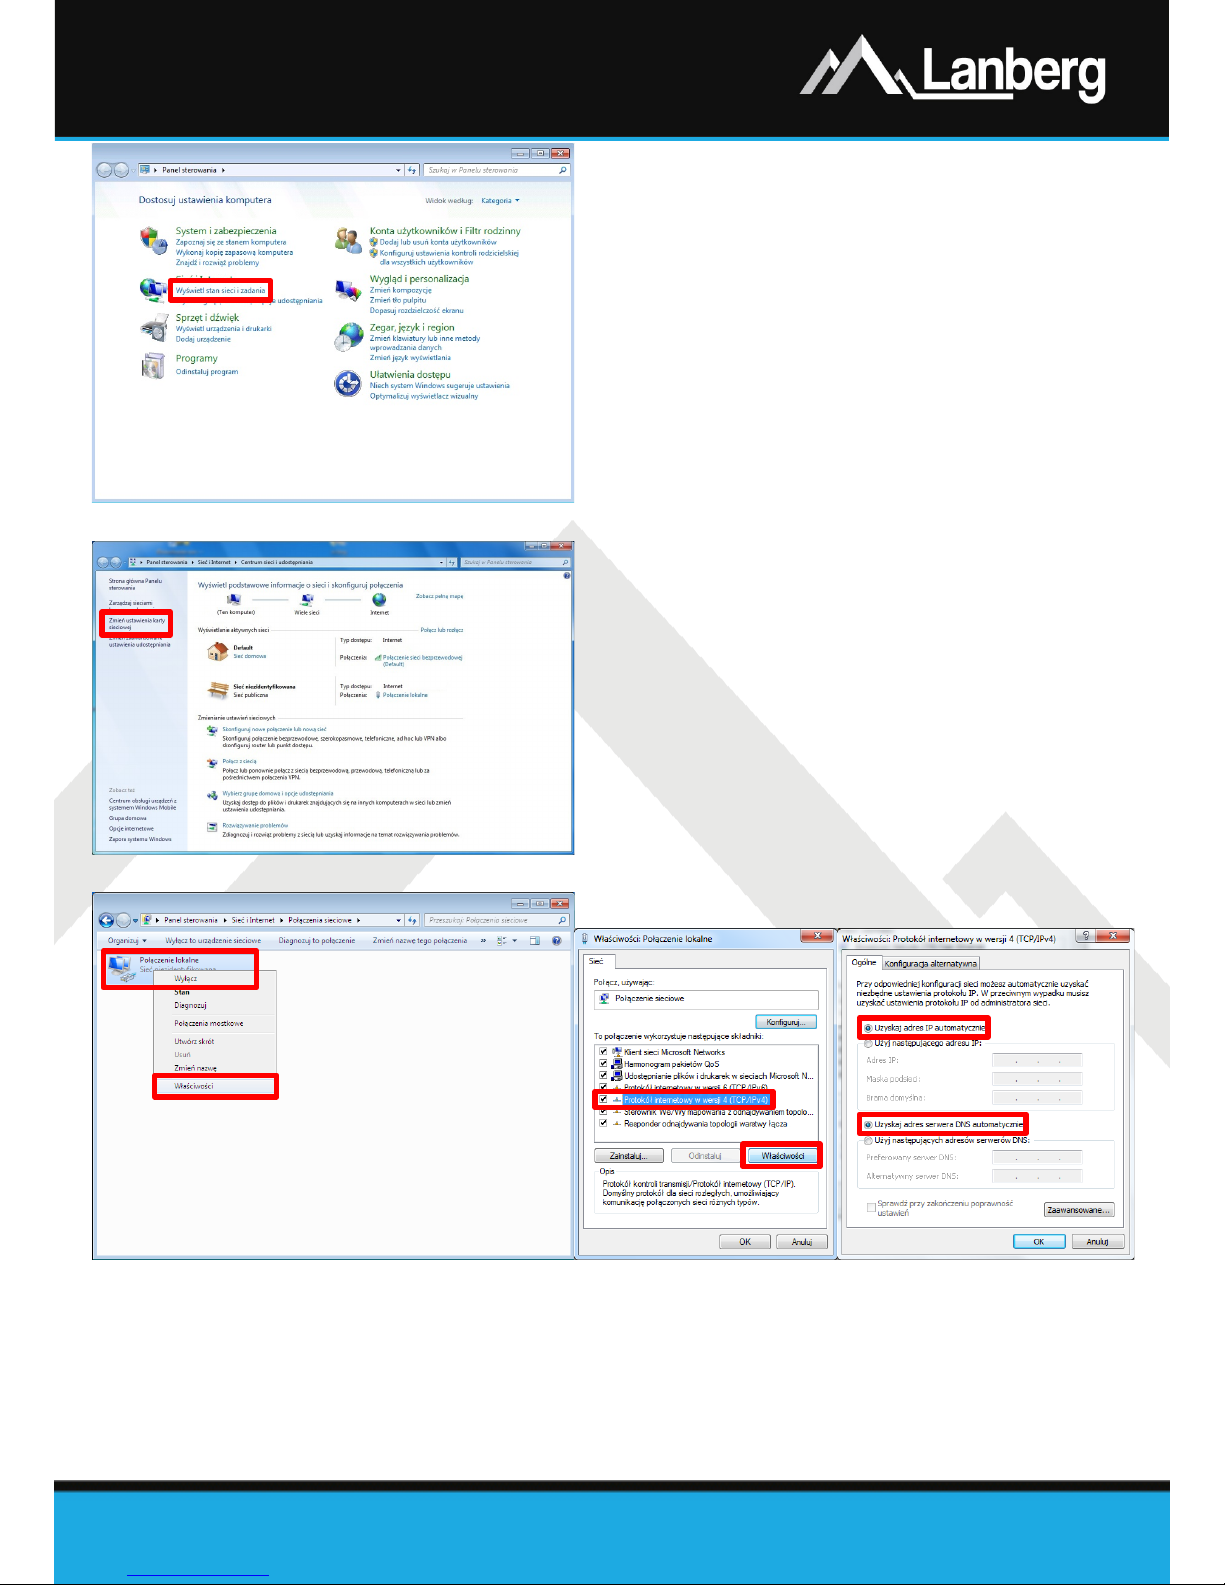
3.3.3) Windows 7/8/8.1/10
Krok 1) Naciśnij na „Start” „Panel sterowania”
„Wyświetl stan sieci i zadania” w przypadku
Windows 7. W przypadku pozostałych systemów
naciśnij prawym przyciskiem myszy na ikonę sieci
na (dolnym) pasku Windows po prawej stronie, a
następnie z listy rozwijalnej wybierz "Otwórz
Centrum sieci i udostępniania",
Krok 2) Po przejściu do sekcji, naciśnij lewym przyciskiem
myszy po lewej stronie okna na „Zmień
ustawienia karty sieciowej”,
Krok 3) Po przejściu do nowej sekcji, naciśnij prawym
przyciskiem myszy na „Połączenie lokalne”, a
następnie z rozwijalnej listy wybi erz
„Właściwości”. W zależności o bieżących ustawień
bezpieczeństwa, na ekranie może pojawić się
informacja "Kontrola konta użytkownika".
Naciśnij "Kontynuuj", aby kontynuować,
Krok 4) Z nowo otwartego okna, zaznacz wiersz „Protokół
internetowy w wersji 4 (TCP/IPv4)” naciskając
lewym przyciskiem myszy na nim, a następnie
naciśnij lewym przyciskiem myszy na przycisk
„Właściwości”,
Krok 5) Z nowo otwartego okna, zaznacz flagi „Uzyskaj
adres IP automatycznie” oraz „Uzyskaj adres
serwera DNS automatycznie” naciskając lewym
przyciskiem myszy, a następnie naciśnij „OK”.
Page 11
Skrócona instrukcja obsługi
Routery szerokopasmowe
PL | EN
E-mail: [email protected]
www.lanberg.pl
Lanberg © 2015-2018
11 | 32
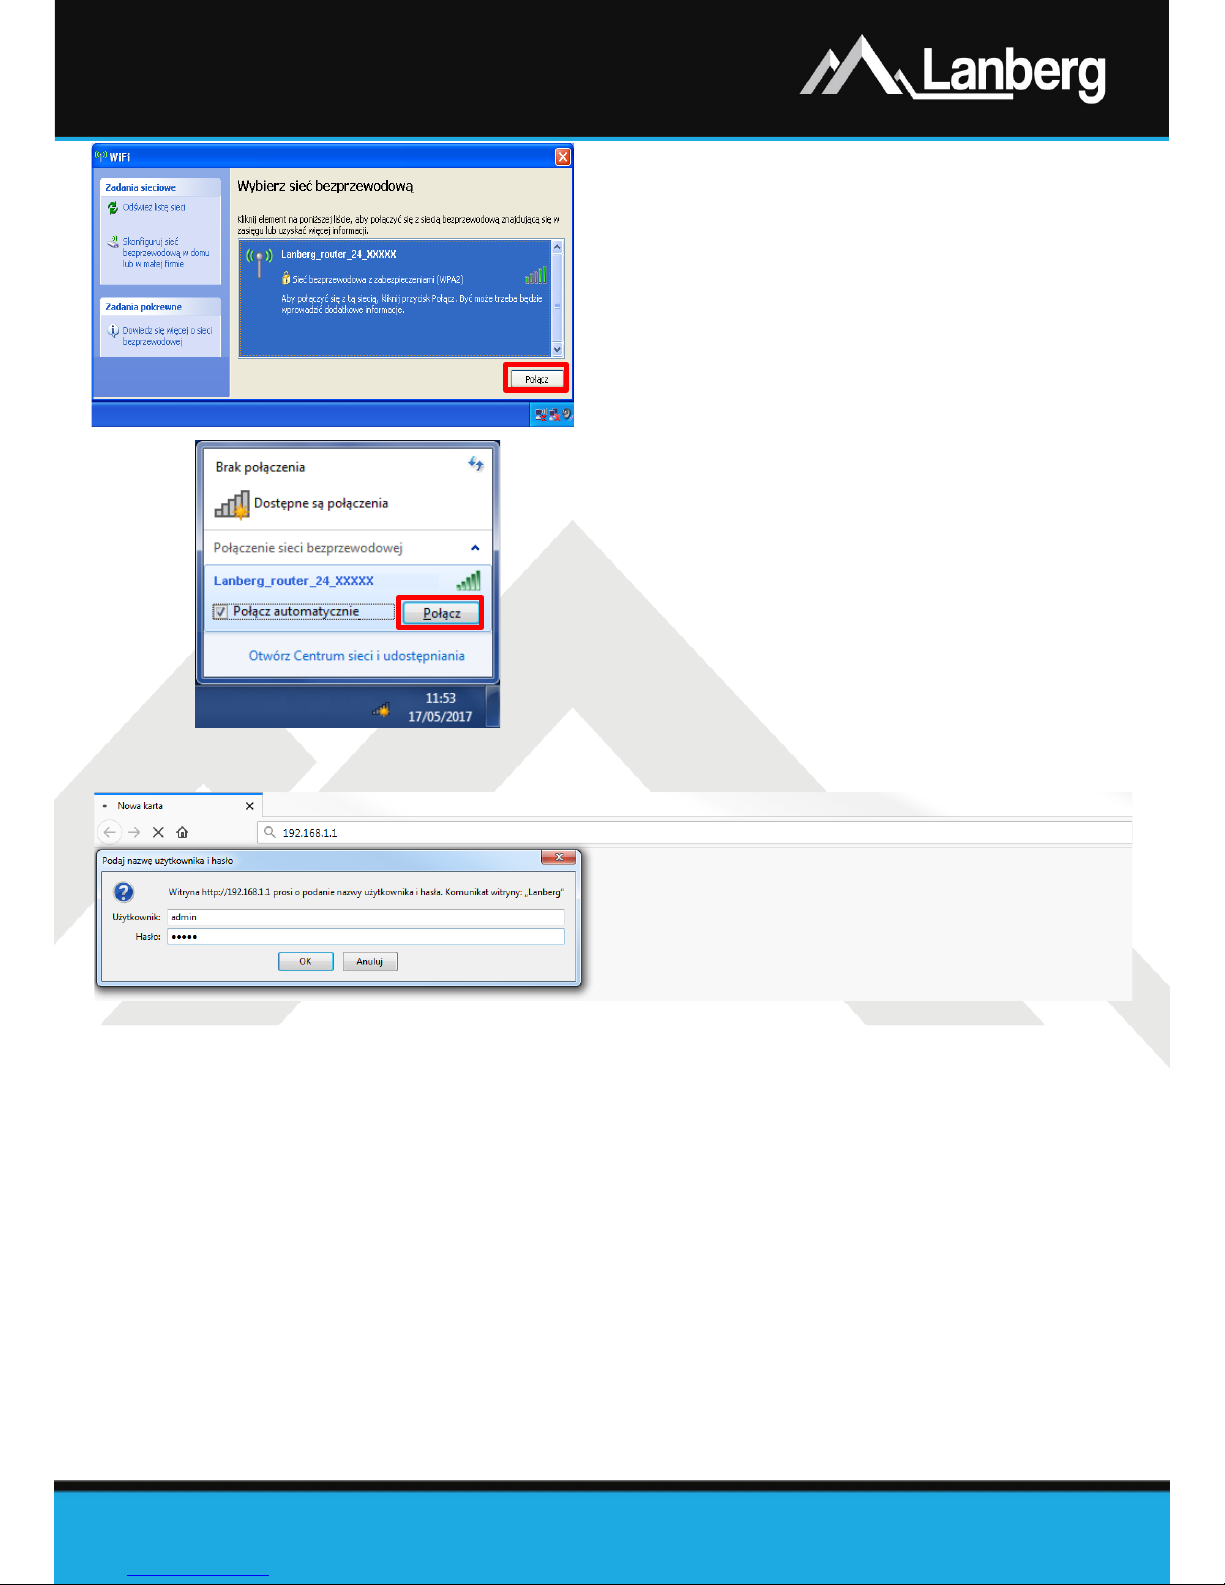
3.4) Nawiązywanie bezprzewodowego
połączenia z routerem Lanberg
Krok 1) Naciśnij dwukrotnie na ikonę sieci
bezprzewodowej na komputerze i wyszukaj sieć
bezprzewodową "Lanberg_router_24_XXXXX" w
przypadku wymaganego połączenia na
częstotliwości 2.4GHz lub
"Lanberg_router_50_XXXXX" na 5GHz. XXXXX
oznacza 5 ostatnich znaków adresu MAC karty
sieciowej Wi-Fi routera,
Krok 2) W zależności od systemu operacyjnego, naciśnij
przycisk „Połącz” lub naciśnij prawym przyciskiem
myszy na nazwie sieci bezprzewodowej,
wymienionej wyżej i naciśnij raz lewym
przyciskiem myszy na „Połącz”
Krok 3) W przypadku pojawienia się prośby o podanie
hasła, wprowadź klucz zabezpieczeń sieci Wi-Fi do
której się łączysz i naciśnij „Enter”. Domyślna
wartość klucza to „L@@n&3rG” (bez
cudzysłowów).
3.5) Konfiguracja pracy (Internetu / interfejsu WAN) routera szerokopasmowego
Lanberg
Krok 1) Na dowolnym urządzeniu stacjonarnym lub przenośnym podłączonym do portu LAN routera,
otwórz przeglądarkę internetową, a następnie wpisz adres IP routera w polu adresu
internetowego przeglądarki i naciśnij „Enter” na klawiaturze. Domyślnym adresem jest
„192.168.1.1”,
Krok 2) Zostanie uruchomione okienko do logowania. Wprowadź nazwę użytkownika „admin” oraz hasło
„admin”, a następnie zatwierdź czynność, naciskając przycisk „Enter”.
Page 12
Skrócona instrukcja obsługi
Routery szerokopasmowe
PL | EN
E-mail: [email protected]
www.lanberg.pl
Lanberg © 2015-2018
12 | 32
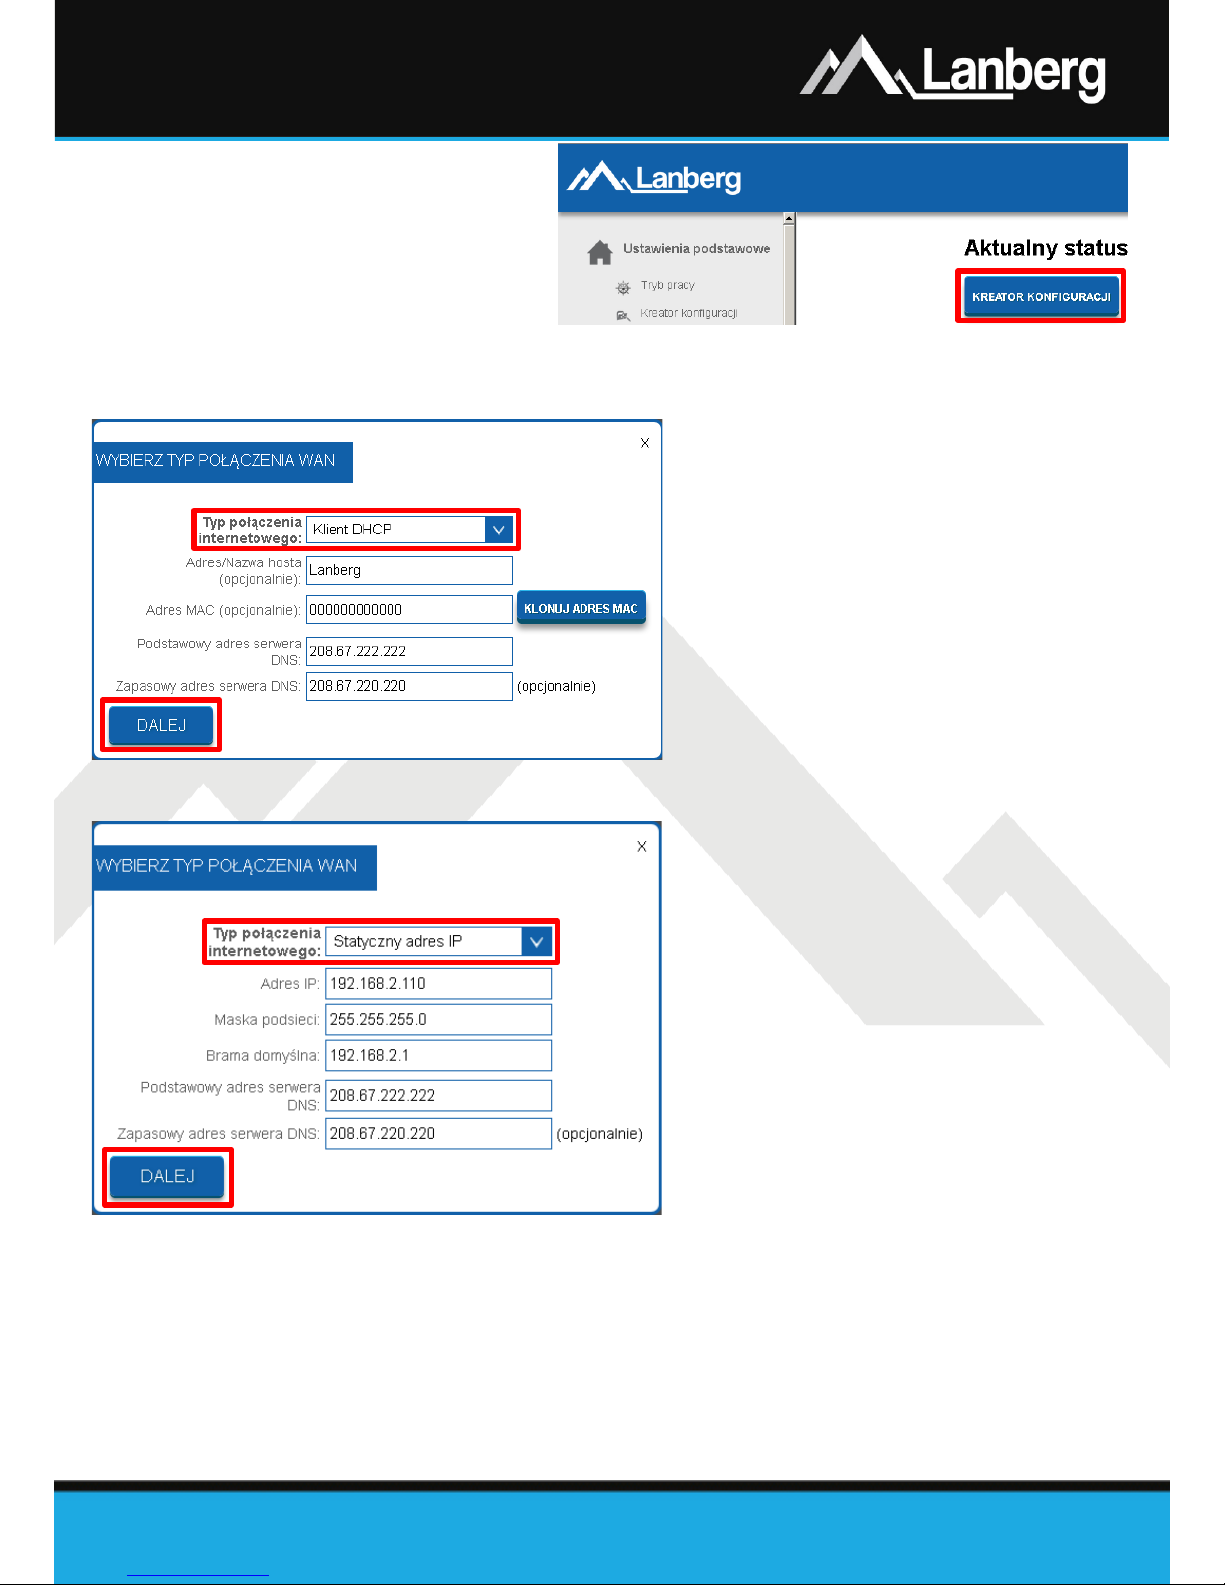
W przypadku potrzeby
skonfigurowania jednego z trybów
połączenia internetowego (WAN):
DHCP, Statyczny adres IP, PPPoE,
PPTP, L2TP (3.5.1 – 3.5.5), naciśnij
przycisk „Kreator konfiguracji”.
3.5.1) Konfiguracja interfejsu WAN routera w trybie DHCP
Krok 1) Z nowo otwartego okna, z rozwijalnej
listy „Typ połączenia internetowego”
wybierz wpis „Klient DHCP”,
Krok 2) W przypadku, jeśli Twój usługodawca
internetowy filtruje dostęp do jego sieci
po oczekiwanym adresie MAC, wpisz tą
wartość w polu „Adres MAC”,
Krok 3) Naciśnij przycisk „Dalej”,
Krok 4) Dalsza część konfiguracji (Wi-Fi) opisana
jest w punkcie 3.5.11.
3.5.2) Konfiguracja interfejsu WAN routera w trybie statycznego adresu IP
Krok 1) Z nowo otwartego okna, z rozwijalnej
listy „Typ połączenia internetowego”
wybierz wpis „Statyczny adres IP”,
Krok 2) Uzupełnij wartość pola „Adres IP”,
wpisując adres IP na którym router
będzie dostępny na interfejsie WAN.
Uzupełnij również pole „Maska podsieci”
na wartość zgodną z zdefiniowaną na
interfejsie WAN. Tak samo postąp przy
polu „Brama domyślna”. Uzupełnij
„Podstawowy adres serwera DNS”,
wpisując adres IP serwera tłumaczącego
nazwy domen na adresy IP.
Możesz dodatkowo wypełnić pole
„Zapasowy adres serwera DNS”
o dodatkowy adres IP, aby zapobiec utracie usługi translacji nazw domenowych w przypadku
niepowodzenia komunikacji z podstawowym serwerem DNS,
Krok 3) Naciśnij przycisk „Dalej”,
Krok 4) Dalsza część konfiguracji (Wi-Fi) opisana jest w punkcie 3.5.11.
Page 13
Skrócona instrukcja obsługi
Routery szerokopasmowe
PL | EN
E-mail: [email protected]
www.lanberg.pl
Lanberg © 2015-2018
13 | 32
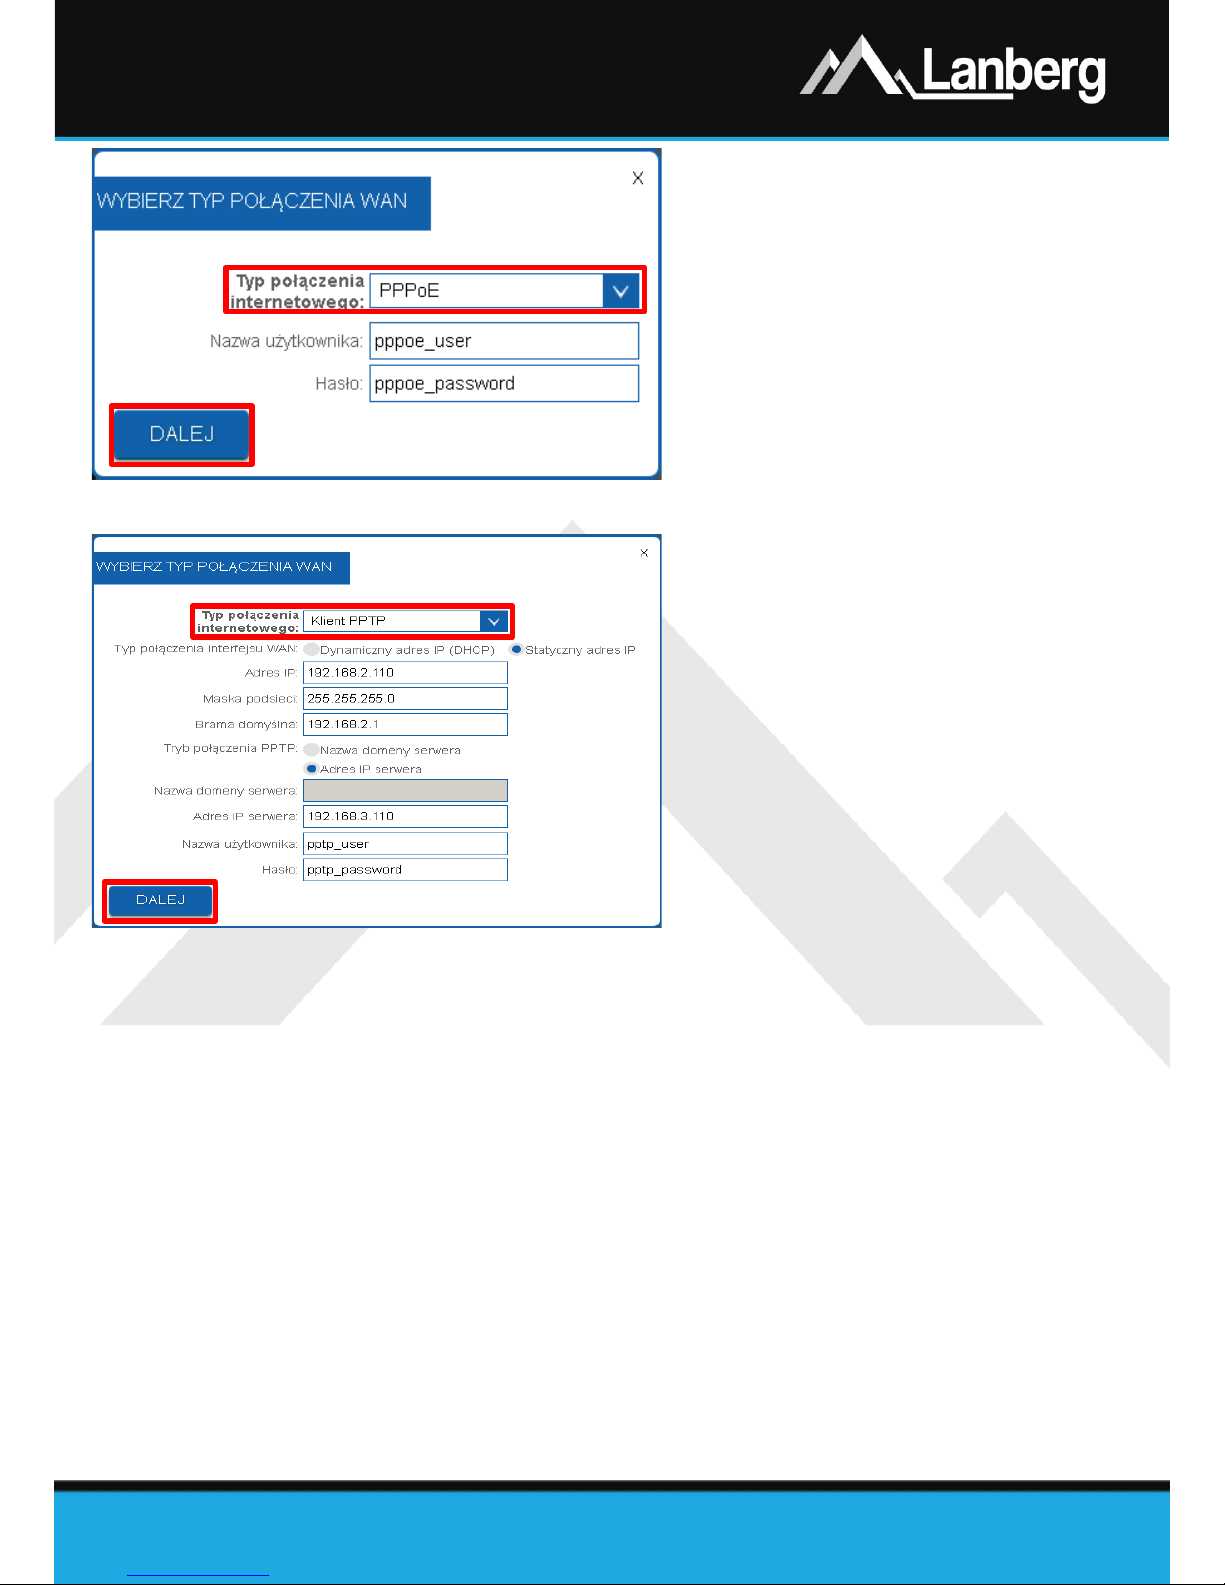
3.5.3) Konfiguracja interfejsu WAN
routera w trybie PPPoE
Krok 1) Z nowo otwartego okna, z rozwijalnej
listy „Typ połączenia internetowego”
wybierz wpis „PPPoE”,
Krok 2) Uzupełnij wartość pola „Nazwa
użytkownika”, oraz „Hasło” otrzymane
od usługodawcy internetowego,
Krok 3) Naciśnij przycisk „Dalej”,
Krok 4) Dalsza część konfiguracji (Wi-Fi) opisana
jest w punkcie 3.5.11.
3.5.4) Konfiguracja interfejsu WAN routera w trybie klienta tunelu PPTP
Krok 1) Z nowo otwartego okna, z rozwijalnej
listy „Typ połączenia internetowego”
wybierz wpis „Klient PPTP”,
Krok 2) W zależności od zdefiniowanej sieci dla
interfejsu WAN routera, wybierz
automatyczną konfigurację interfejsu
WAN w polu „Typ połączenia interfejsu
WAN” zaznaczając „Dynamiczny adres IP
(DHCP)” lub w przypadku konieczności
ręcznych ustawień wybierz „Statyczny
adres IP”, uzupełniając po tym
dodatkowo pola „Adres IP”, „Maska
podsieci” oraz „Brama domyślna” dla
interfejsu WAN routera,
Krok 3) Następnie, w zależności czy urządzenie końcowe do którego ma być zestaw ione połączenie tunelu
VPN po protokole PPTP z routerem Lanberga posiada zmienny lub stały adres IP, ustaw
odpowiednio wartość pola „Tryb połączenia PPTP” na „Nazwa domeny serwera” w przypadku,
gdy urządzenie końcowe posiada zmienne IP oraz swój unikalny identyfikator w postaci domeny
przyznanej przez usługę DDNS lub „Adres IP serwera” jeśli urządzenie końcowe posiada stały
adres IP. Brak spełnienia jednego z wymienionych warunków może skutkować problemami z
zestawieniem tunelu VPN. Następnie uzupełnij pola „Nazwa domeny serwera” lub „Adres IP
serwera” oraz „Nazwa użytkownika” i „Hasło”,
Krok 4) Naciśnij przycisk „Dalej”,
Krok 5) Dalsza część konfiguracji (Wi-Fi) opisana jest w punkcie 3.5.11.
Page 14
Skrócona instrukcja obsługi
Routery szerokopasmowe
PL | EN
E-mail: [email protected]
www.lanberg.pl
Lanberg © 2015-2018
14 | 32
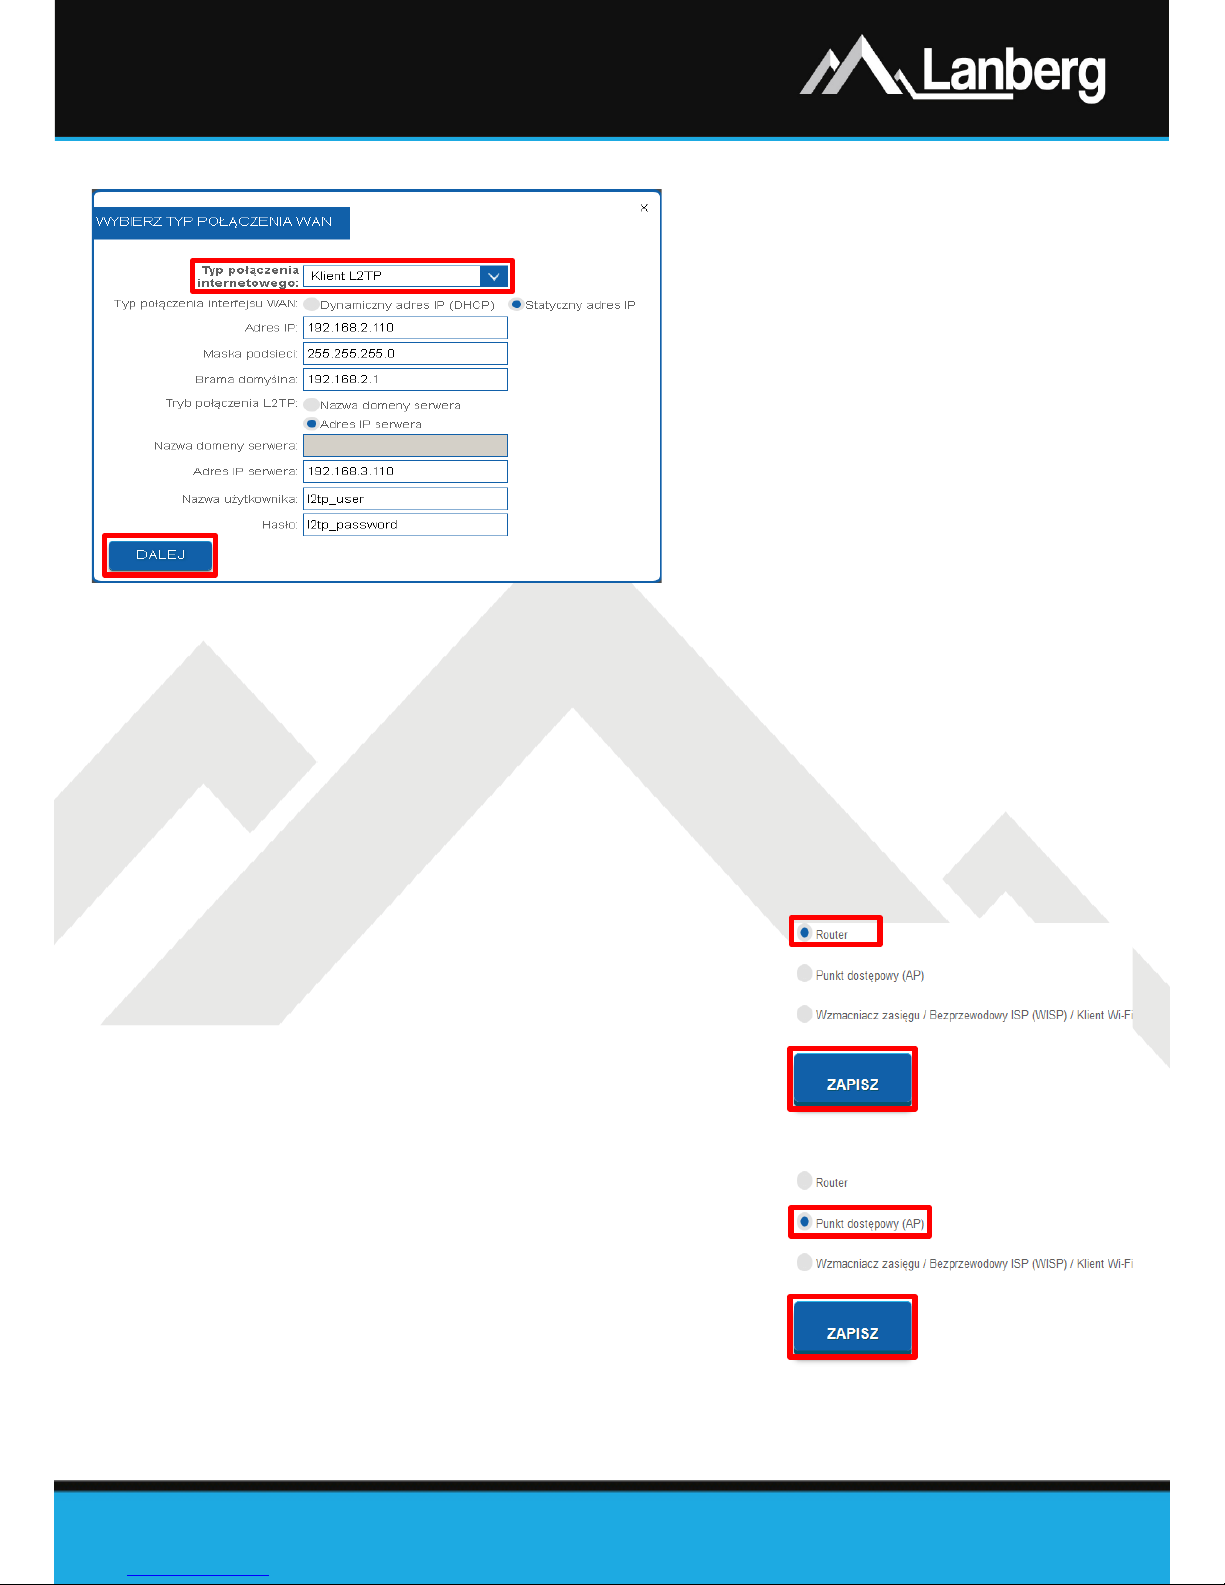
3.5.5) Konfiguracja interfejsu WAN routera w trybie klienta tunelu L2TP
Krok 1) Z nowo otwartego okna, z rozwijalnej
listy „Typ połączenia internetowego”
wybierz wpis „Klient L2TP”,
Krok 2) W zależności od zdefiniowanej sieci dla
interfejsu WAN routera, wybierz
automatyczną konfigurację interfejsu
WAN w polu „Typ połączenia interfejsu
WAN” zaznaczając „Dynamiczny adres IP
(DHCP)” lub w przypadku konieczności
ręcznych ustawień wybierz „Statyczny
adres IP”, uzupełniając po tym
dodatkowo pola „Adres IP”, „Maska
podsieci” oraz „Brama domyślna” dla
interfejsu WAN routera,
Krok 3) Następnie, w zależności czy urządzenie końcowe do którego ma być zestawione połączenie tunelu
VPN po protokole L2TP z routerem Lanberga posiada zmienny lub stały adres IP, ustaw
odpowiedni o wartość pola „Tryb połączenia L2TP” na „Nazwa domeny serwera” w przypadku,
gdy urządzenie końcowe posiada zmienne IP oraz swój unikalny identyfikator w postaci domeny
przyznanej przez usługę DDNS lub „Adres IP serwera” jeśli urządzenie końcowe posiada stały
adres IP. Brak spełnienia jednego z wymienionych warunków może skutkować problemami z
zestawieniem tunelu VPN. Następnie uzupełnij pola „Nazwa domeny serwera” lub „Adres IP
serwera” oraz „Nazwa użytkownika” i „Hasło”,
Krok 4) Naciśnij przycisk „Dalej”,
Krok 5) Dalsza część konfiguracji (Wi-Fi) opisana jest w punkcie 3.5.11.
3.5.6) Konfiguracja urządzenia w trybie routera
Krok 1) Na lewym wielopoziomowym menu rozwiń
„Ustawienia podstawowe”, a następnie naciśnij na
podsekcję „Tryb pracy”,
Krok 2) Z listy do wyboru możliwych trybów pracy
urządzenia, zaznacz flagę „Router”, a następnie
naciśnij przycisk „Zapisz”. Do ok. 30 sekund router
zastosuje nowe ustawienia.
3.5.7) Konfiguracja urządzenia w trybie
punktu dostępowego (AP)
Krok 1) Na lewym wielopoziomowym menu rozwiń
„Ustawienia podstawowe”, a następnie naciśnij na
podsekcję „Tryb pracy”,
Krok 2) Z listy do wyboru możliwych trybów pracy
urządzenia, zaznacz flagę „Punkt dostępowy (AP)”, a
następnie naciśnij przycisk „Zapisz”. Do ok. 30
sekund router zastosuje nowe ustawienia.
Page 15
Skrócona instrukcja obsługi
Routery szerokopasmowe
PL | EN
E-mail: [email protected]
www.lanberg.pl
Lanberg © 2015-2018
15 | 32
UWAGA: Usługa serwera DHCP zostanie wyłączona, a dostęp do sekcji WAN zostanie ukryty. Może
wystąpić również sytuacja w której urządzenie (np. komputer) może dalej pamiętać poprzednią udzieloną
dzierżawę od serwera DHCP i związane z nim ustawienia. W takim przypadku zalecane jest użycie
następujących komend w wierszu poleceń:
• W przypadku systemu operacyjnego Windows „ipconfig /release”, a następnie „ipconfig /renew”,
• W przypadku systemu operacyjnego Linux, mogą różnić się od siebie w zależności od dystrybucji
wydania „dhclient -r” lub „dhcpcd -k”, a następnie „dhclient” lub „dhcpcd”.
•
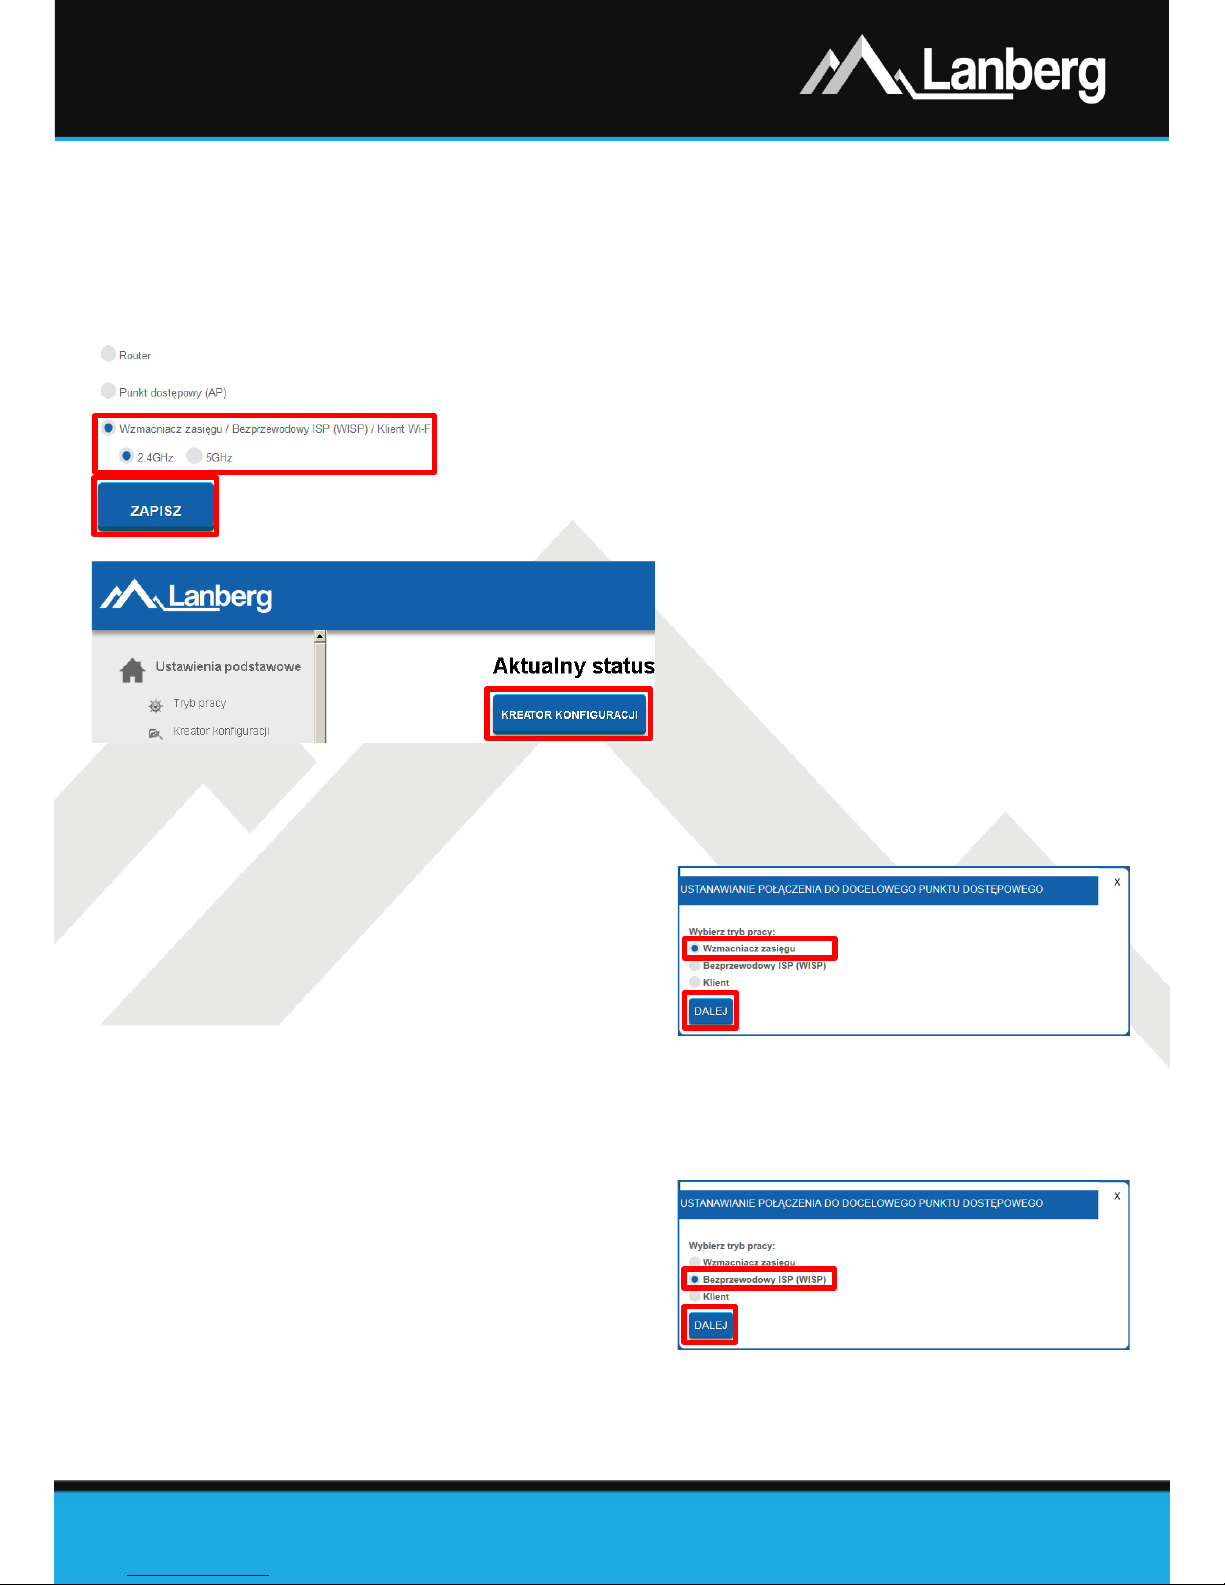
W przypadku potrzeby skonfigurowania jednego z trybów połączenia
internetowego (WAN): Klient, WISP, Wzmacniacz sygnału (3.5.8 – 3.5.10):
Krok 1) Na lewym wielopoziomowym menu rozwiń
„Ustawienia podstawowe”, a następnie
naciśnij na podsekcję „Tryb pracy”,
Krok 2) Z listy do wyboru możliwych trybów pracy
urządzenia, zaznacz flagę „Wzmacniacz
zasięgu / Bezprzewodowy ISP (WISP) / Klient
Wi-Fi”, a następnie wybierz poniżej po jakiej
częstotliwości „2.4GHz” lub „5GHz” router ma
łączyć się po sieci bezprzewodowej do
docelowego urządzenia oraz naciśnij przycisk
„Zapisz”. Do ok. 30 sekund router zastosuje nowe ustawienia,
Krok 3) Po przeładowaniu strony urządzenia, naciśnij przycisk „Kreator konfiguracji”.
3.5.8) Konfiguracja urządzenia w trybie wzmacniacza zasięgu
Krok 1) Z nowo otwartego okna, wybierz typ
połączenia internetowego zaznaczając
flagę „Wzmacniacz zasięgu”,
Krok 2) Naciśnij przycisk „Dalej”,
Krok 3) Dalsza część konfiguracji (Wi-Fi) opisana
jest w punkcie 3.5.12. Sprawdź
adnotację nr. 1,
Krok 4) Dalsza część konfiguracji połączenia routera z docelowym punktem dostępowym poprzez sieć Wi-
Fi opisana jest w punkcie 3.5.13.
3.5.9) Konfiguracja urządzenia w trybie bezprzewodowego ISP (WISP)
Krok 1) Z nowo otwartego okna, wybierz typ
połączenia internetowego zaznaczając
flagę „Bezprzewodowy ISP (WISP)”,
Krok 2) Naciśnij przycisk „Dalej”,
Krok 3) Dalsza część konfiguracji (Wi-Fi) opisana
jest w punkcie 3.5.12,
UWAGA: Dostęp do sekcji WAN zostanie ukryty.
Krok 4) Dalsza część konfiguracji połączenia routera z docelowym punktem dostępowym poprzez sieć Wi-
Fi opisana jest w punkcie 3.5.13.
Page 16
Skrócona instrukcja obsługi
Routery szerokopasmowe
PL | EN
E-mail: [email protected]
www.lanberg.pl
Lanberg © 2015-2018
16 | 32
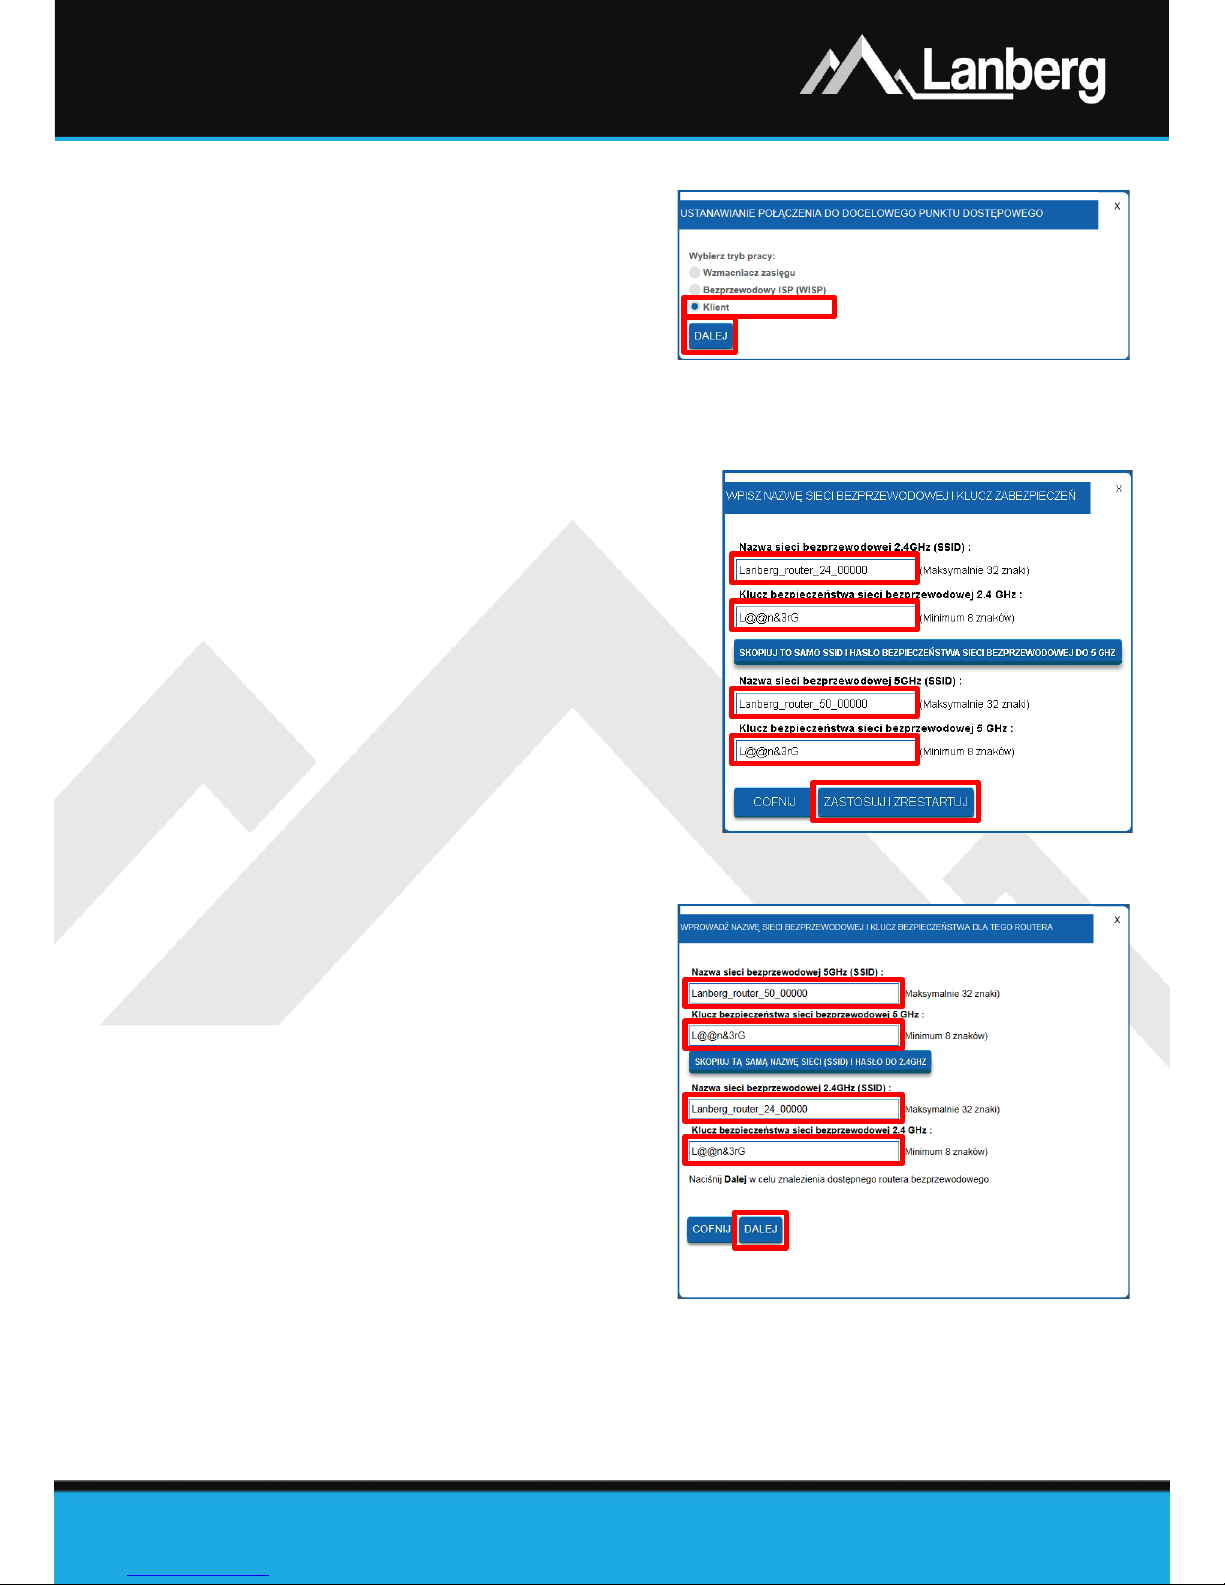
3.5.10) Konfiguracja urządzenia w trybie klienta
Krok 1) Z nowo otwartego okna, wybierz typ
połączenia internetowego zaznaczając
flagę „Tryb klienta”,
Krok 2) Naciśnij przycisk „Dalej”. Do ok. 30
sekund router zastosuje nowe
ustawienia. Sprawdź adnotację nr. 1,
Krok 3) Dalsza część konfiguracji połączenia
routera z docelowym punktem dostępowym poprzez sieć Wi-Fi opisana jest w punkcie 3.5.13.
3.5.11) Konfiguracja sieci bezprzewodowej (Wi-Fi) routera – Router / AP
Krok 1) W nowej sekcji ustal nazwę rozgłaszanej sieci
bezprzewodowej (SSID) dla częstotliwości
2.4GHz w polu „Nazwa sieci
bezprzewodowej 2.4GHz (SSID)” oraz Twoje
prywatne hasło do tej sieci w polu „Klucz
bezpieczeństwa sieci bezprzewodowej 2.4
GHz”,
Krok 2) Tylko modele RO-120GE, RO-175GE -
dokładnie te same czynności powtórz dla
analogicznych pól dotyczących częstotliwości
5GHz, ustalając nazwę rozgłaszanej sieci
bezprzewodowej (SSID) oraz hasło jako
klucza bezpieczeństwa,
Krok 3) Naciśnij przycisk „Zastosuj i zrestartuj”. Do ok. 30 sekund router zastosuje nowe ustawienia.
3.5.12) Konfiguracja sieci bezprzewodowej (Wi-Fi) routera – Wzmacniacz
zasięgu / WISP / Klient
Krok 1) W nowej sekcji ustal nazwę rozgłaszanej
sieci bezprzewodowej (SSID) dla
częstotliwości 2.4GHz w polu „Nazwa
sieci bezprzewodowej 2.4GHz (SSID)”
oraz Twoje prywatne hasło do tej sieci
w polu „Klucz bezpieczeństwa sieci
bezprzewodowej 2.4 GHz”,
Krok 2) Tylko modele RO-120GE, RO-175GE -
dokładnie te same czynności powtórz
dla analogicznych pól dotyczących
częstotliwości 5GHz, ustalając nazwę
rozgłaszanej sieci bezprzewodow ej
(SSID) oraz hasło jako klucza
bezpieczeństwa,
Krok 3) Naciśnij przycisk „Dalej”. Do ok. 30 sekund router zastosuje nowe ustawienia.
Page 17
Skrócona instrukcja obsługi
Routery szerokopasmowe
PL | EN
E-mail: [email protected]
www.lanberg.pl
Lanberg © 2015-2018
17 | 32
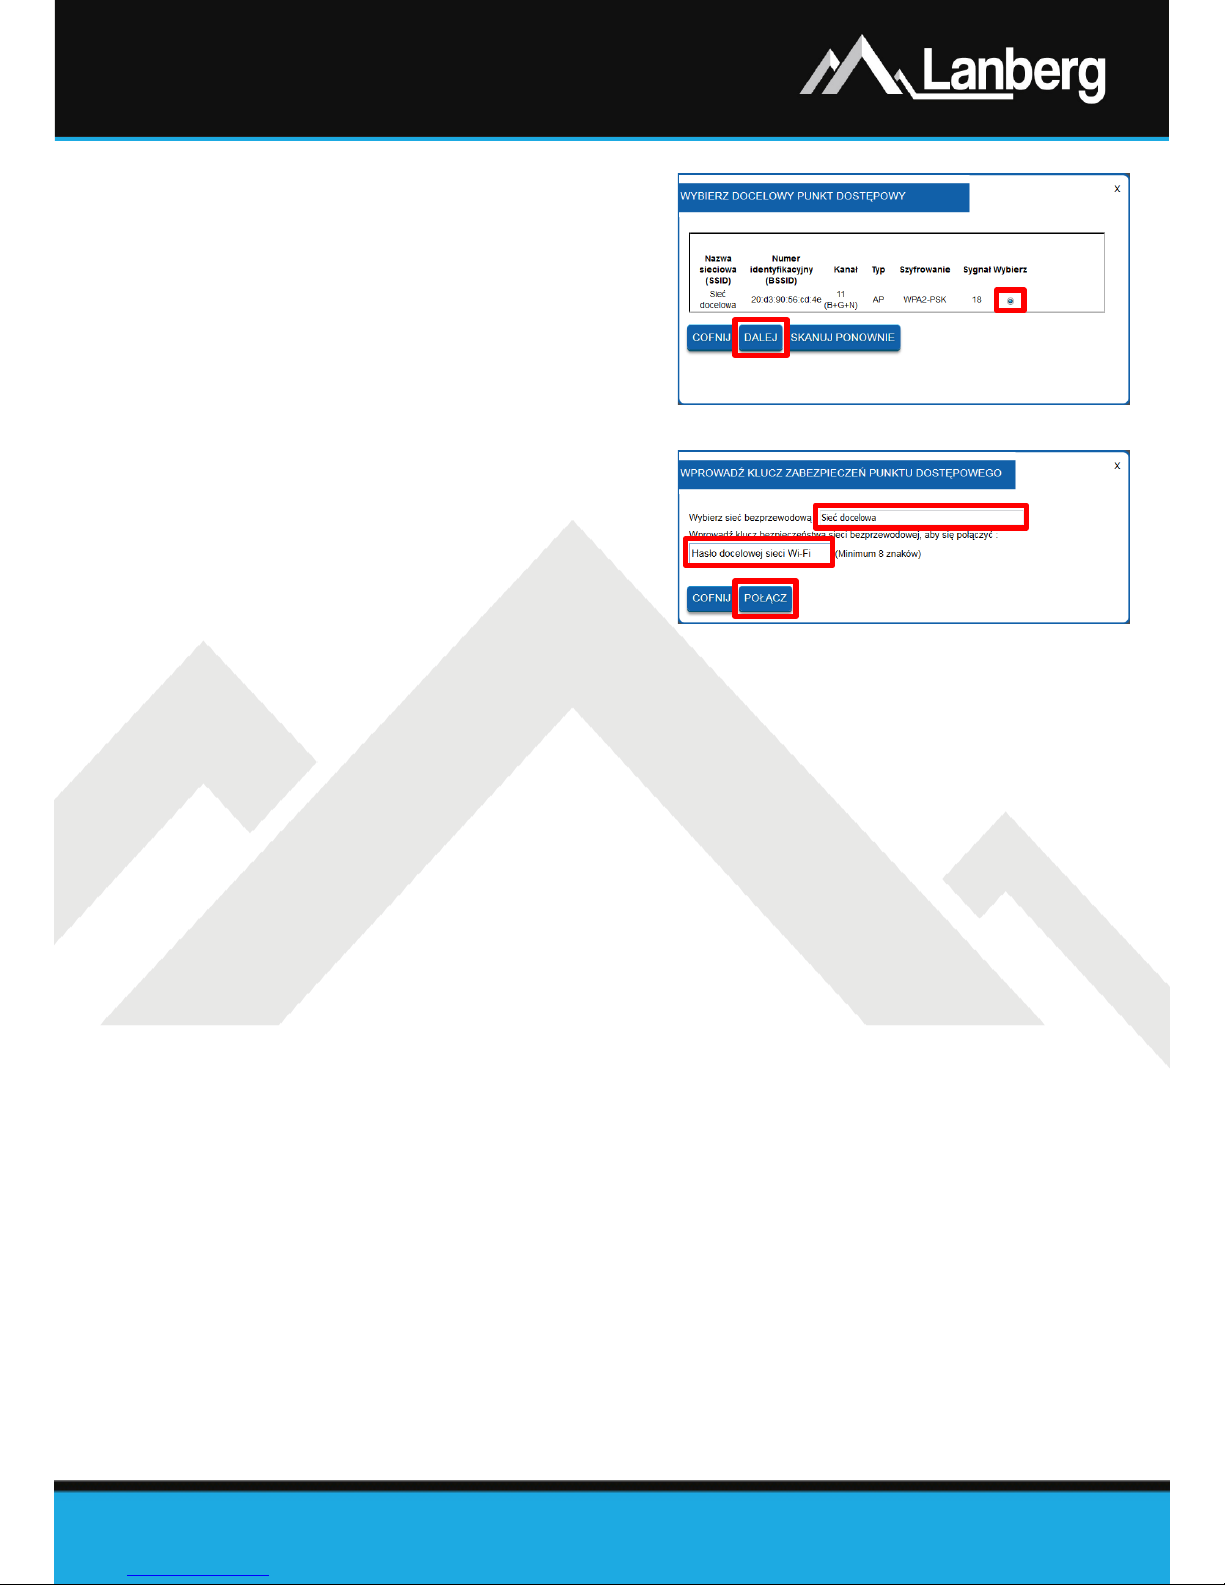
3.5.13) Konfiguracja połączenia Wi-Fi routera z docelową siecią
bezprzewodową
Krok 1) Z nowo pojawionego się okna, wybierz
docelową sieć bezprzewodową do
której chcesz połączyć router,
zaznaczając flagę w kolumnie „Wybierz”
oraz następnie naciskając przycisk
„Dalej”,
Krok 2) W przypadku, jeśli docelowa sieć jest
zabezpieczona, w 2 polu wpisz aktualne hasło do docelowej sieci Wi-Fi z którą chcesz połączyć
router. Naciśnij przycisk „Połącz”.
Nastąpi próba połączenia,
Krok 3) Jeśli połączenie powiedzie się to naciśnij
przycisk „Zrestartuj teraz”. Do ok. 30
sekund router zastosuje nowe
ustawienia.
ADNOTACJA NR. 1: Usługa serwera DHCP zostanie wyłączona, a dostęp do sekcji WAN zostanie ukryty. Jeśli
urządzenie końcowe (np. komputer) straci połączenie z routerem, to należy ustawić statyczny adres IP
komputera na taki, który będzie znajdować się w tej samej sieci co router oraz nie będzie przypisany do
innego urządzenia.
Page 18

Quick Installation Guide
Broadband routers
PL | EN
E-mail: [email protected]
www.lanberg.eu
Lanberg © 2015-2018
18 | 32
1) Important pre-recommendations and information regarding broadband routers usage
1.1) Introduction
PLEASE KEEP THIS MANUAL – set of recommendations and user manuals for broadband routers, detailing
the models supported below:
• RO-030FE
• RO-120GE
• RO-175GE
contains logistics and technical data, instructions and regulations that must be adapted and followed
during transport, assembly, use and maintenance of above mentioned products. Do not use the device
before carefully reading and adhering to all the information and safety precautions contained in the user’s
manual. Keep this manual for later use. All photos, drawings contained in the manual are for reference
only.
NOTE: For the most up-to-date version of this manual, please visit our website at www.lanberg.eu.
1.2) Contents of the package
• Wireless broadband router (RO-030FE; RO-120GE; RO-175GE),
• Quick installation guide,
• Crossover cable (Ethernet) RJ-45 1.5m:
RO-030FE model: 4-wire,
RO-120GE, RO-175GE model: 8-wire,
• Power supply:
RO-030FE model: AC 100V - 240V, 50Hz / 60Hz, 0.2A, DC 12V, 0.5A,
RO-120GE model: AC 100V - 240V, 50Hz / 60Hz, 0.4A, DC 12V, 1.0A,
RO-175GE model: AC 100V - 240V, 50Hz / 60Hz, 0.7A, DC 12V, 1.5A.
NOTE: The contents of the packaging, including routers and its individual elements may vary depending on
the particular model.
Page 19
Quick Installation Guide
Broadband routers
PL | EN
E-mail: [email protected]
www.lanberg.eu
Lanberg © 2015-2018
19 | 32
2) The importance of individual elements and router configuration procedure
2.1) LEDs and their meaning
Lanberg’s wireless broadband router has, on the front panel, multiple green LEDs. Their number and
meaning may vary depending on your model. Below displayed table contains explanation of each LED
regardless of the router model.
LED
Meaning
Solid LED
Blinking LED
LED is turned off
Power
Device is turned
on and ready to
use
Device is turning
on
Device is turned
off
Wi-Fi network -
Data
transmission /
reception is in
progress
Wi-Fi network is
turned off
WPS feature -
Device is waiting
to be paired with
(using WPS)
within 2 minutes
WPS feature is
not connected
Wide area
network port
(WAN)
Internet network
is connected
Data
transmission /
reception is in
progress
Internet network
is disconnected
Local area
network port
(LAN)
Local device is
connected
Data
transmission /
reception is in
progress
Local device is
disconnected
2.2) Router elements, buttons and their features / properties
Lanberg’s wireless broadband router contains a number of elements and buttons. Their number and
meaning may vary depending on your model. Below displayed table contains explanation of each element
or button regardless of the router model.
Element
Description / features / properties
Antennas
• RO-030FE model: 2 fixed antennas 5dBi, 50Ω, 2.4G
• RO-120GE model: 2 fixed antennas 5dBi, 50Ω, 2.4/5G
• RO-175GE model: 4 fixed antennas 5dBi, 50Ω, 2.4/5G
ON/OFF power switch
Use it to turn the device (ON) or (OFF)
Power socket
• RO-030FE model: DC 12V, 0.5A
• RO-120GE model: DC 12V, 1.0A
• RO-175GE model: DC 12V, 1.5A
Page 20
Quick Installation Guide
Broadband routers
PL | EN
E-mail: [email protected]
www.lanberg.eu
Lanberg © 2015-2018
20 | 32
LAN port(s)
Allows you to directly connect up to 4 devices within
local network to the router
• RO-030FE model: 4 x 100Mbps ports
• RO-120GE, RO-175GE model: 4 x 1000Mbps ports
Internet port (WAN)
Allows you to connect your router to internet
provider’s (ISP) network
• RO-030FE model: 1 x 100Mbps port
• RO-120GE, RO-175GE model: 1 x 1000Mbps port
WPS button
Press and hold the button for at least 3 full seconds
to activate the WPS function. The WPS LED will start
to blink. Turn the WPS feature on the end device
(e.g. wireless network card, wireless range extender
or wireless IoT device), by pressing a similar WPS
button (if available). Make sure to do so, within 2
min. of turning on the WPS feature of your router.
Wi-Fi button
Press and hold the button for at least 3 full seconds
to turn the Wi-Fi on / off.
Reset button
Press and hold the button for at least 6 full seconds
to restore the device to the default settings.
3) Connecting and configuring your router and devices connected to it
3.1) Resetting Lanberg’s router(s) its default factory settings
Depending on the router model, the reset button is located:
• RO-030FE, RO-120GE model: underneath the device,
• RO-175GE model: at the back of the device,
To reset the device, press and hold the Reset button for at least 6 seconds. Then disconnect or turn off the
power for at least 15 seconds and then connect the router’s power back or turn it back on.
Page 21
Quick Installation Guide
Broadband routers
PL | EN
E-mail: [email protected]
www.lanberg.eu
Lanberg © 2015-2018
21 | 32
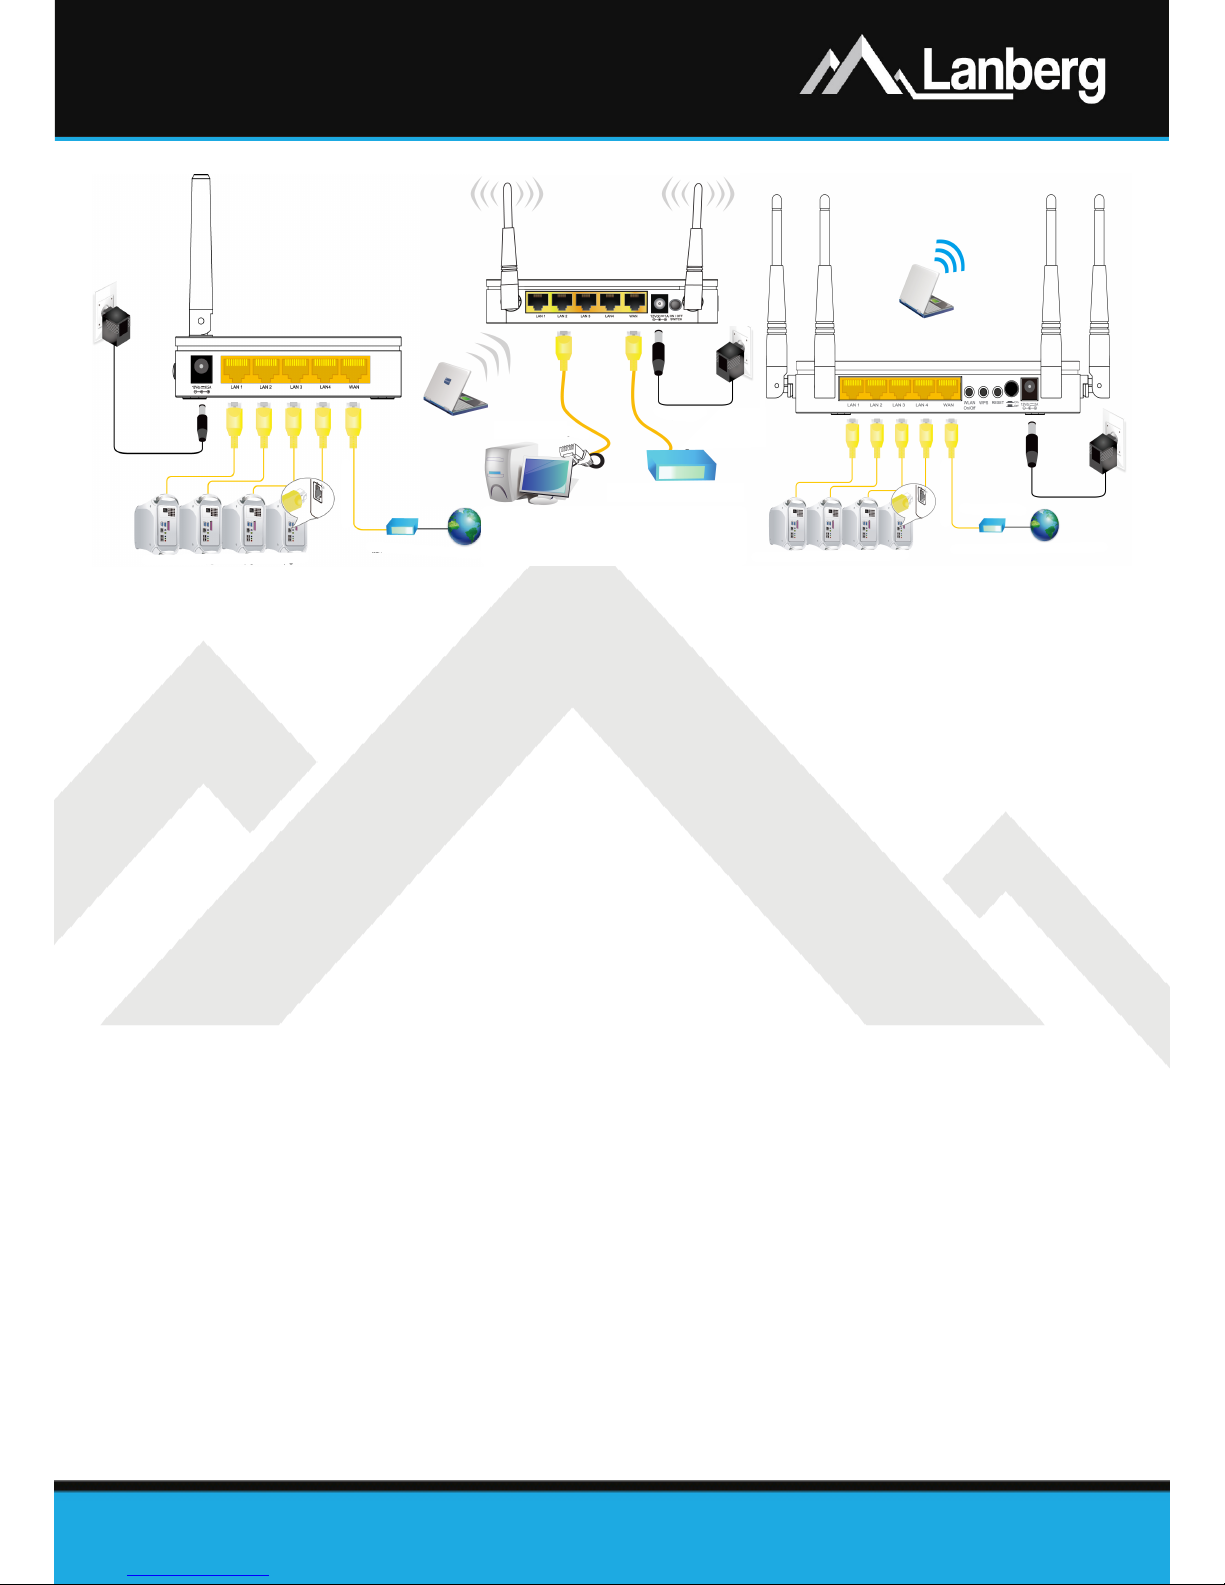
3.2) Connecting and turning Lanberg’s broadband router on
Step 1) Connect one end of RJ-45 crossover (Ethernet) cable to the WAN port located on the router, and
its other end to the cable modem / xDSL / user’s internet provider (ISP) device,
Step 2) Connect one end of RJ-45 crossover (Ethernet) cable to one of the LAN ports located on the router
and its other end to the user’s end device (e.g. PC, laptop etc.),
Step 3) Connect the power by inserting the end of the router's power adapter plug into its power outlet
(labeled Vdc and A respectively) located at the back of router. To turn the device on, change the
position of the power switch button to ON (button pressed) –RO-120GE and RO-175GE models.
3.3) Initial configuration of network settings of the user’s end device
Before proceeding to the first basic configuration of the Lanberg’s broadband router, first you must
configure the end device (such as PC or laptop), so that it will obtain an automatic IP address and DNS
server from the router's DHCP server.
NOTE: If ther e is no connection with the router or in further stages of device’s operation modes
configuration, there may be a situation in which the DHCP server service, responsible for assigning IP
addresses to customer’s end devices connected to the local network, will be turned off (dependi ng on the
current router's operation mode). In that case it is necessary to set the static IP address of the end device
(on PC / laptop etc.). Then select the flags "Use the following IP address:" by entering unused IP address
from the local netw ork and the subnet mask (usually „255.255.255.0”) and select option „Use the following
DNS server addresses:” by entering the IP address of your Internet service provider (ISP) or a known DNS
solution provider (e.g. „8.8.8.8”).
Page 22
Quick Installation Guide
Broadband routers
PL | EN
E-mail: [email protected]
www.lanberg.eu
Lanberg © 2015-2018
22 | 32
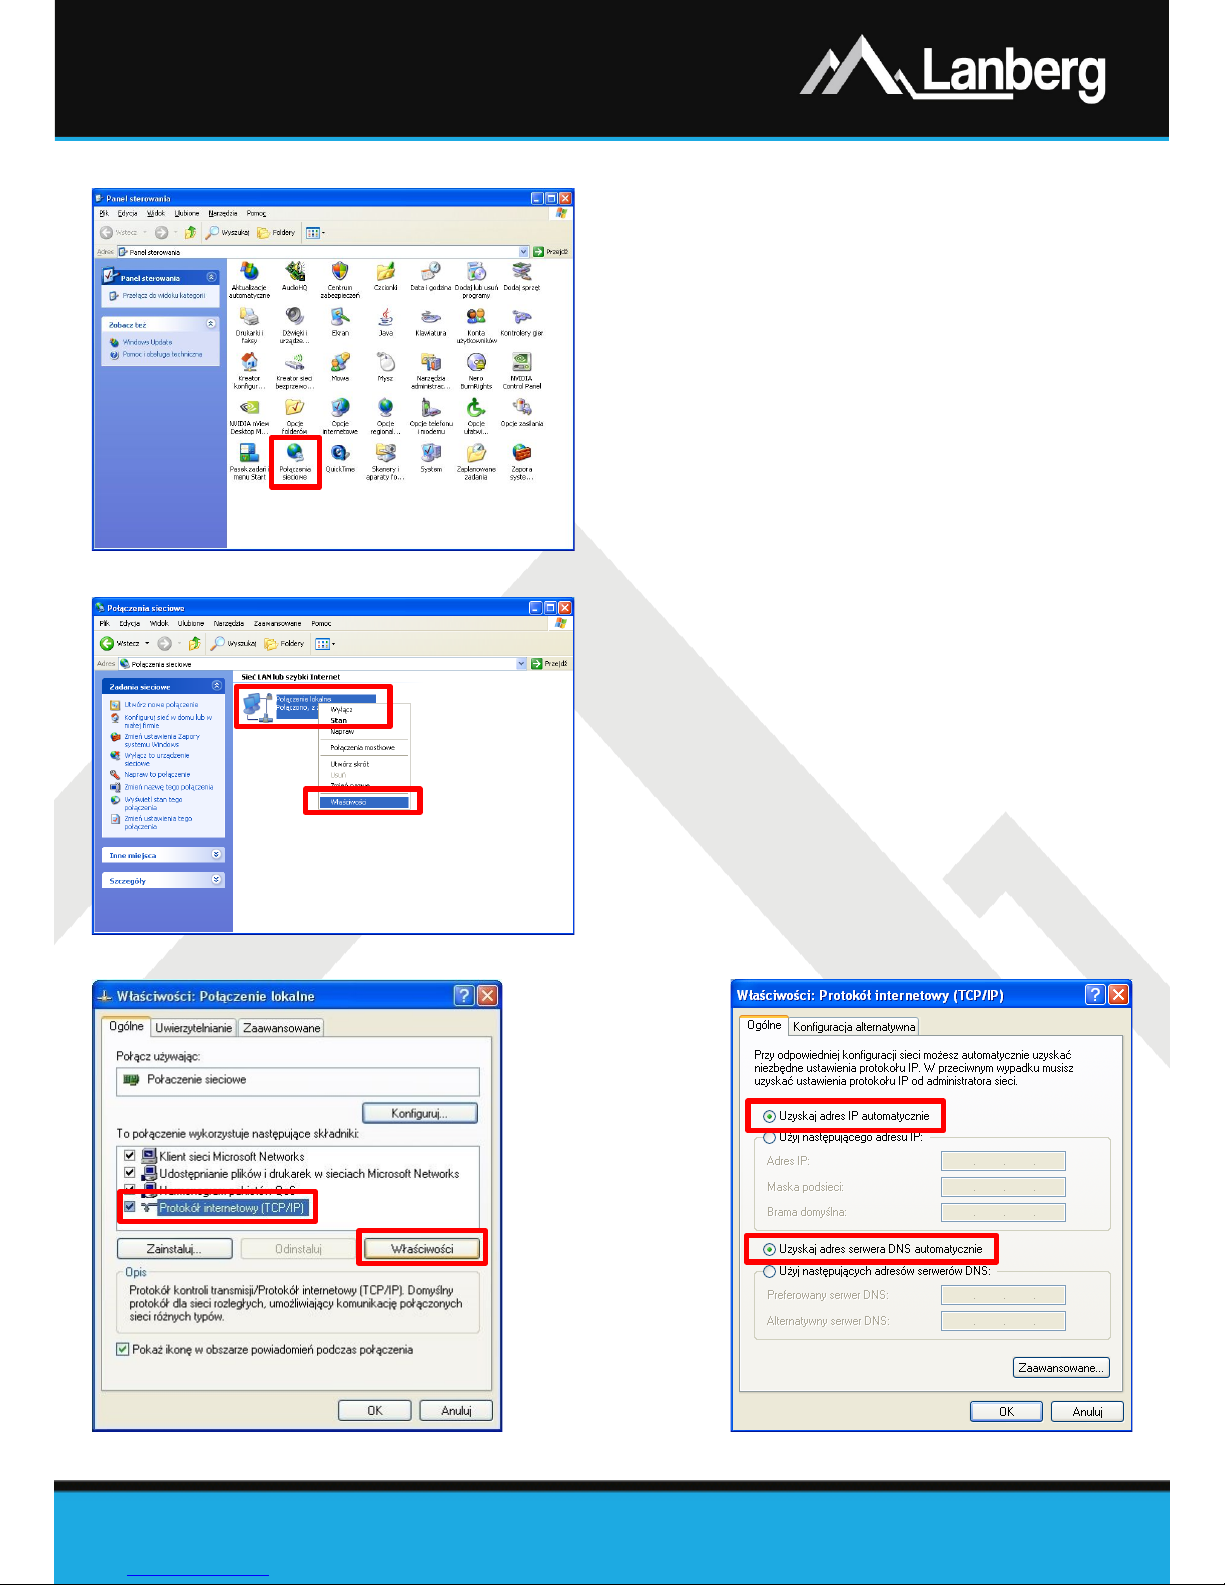
3.3.1) Windows 98/ME/2000/XP
Step 1) Press „Start” „Control panel”. After new
window will open, press left mouse button twice
on „Network Connections”,
Step 2) Press the right mouse button on „Local Area
Connection”, then from the drop-down list, select
„Properties”,
Step 3) On the newly opened window select verse
„Internet Protocol (TCP/IP)” by pressing left
mouse button and then left click the button
„Properties”,
Step 4) On the newly opened window select flags „Obtain
an IP Address automatically” and „Obtain DNS
server address automatically” by left clicking,
then next choose „OK” button,
Step 5) In order to receive updates regarding the
connection status during its initialization, left click
on the previous window the following flag „
Show
icon in notification area when connected”.
Page 23
Quick Installation Guide
Broadband routers
PL | EN
E-mail: [email protected]
www.lanberg.eu
Lanberg © 2015-2018
23 | 32
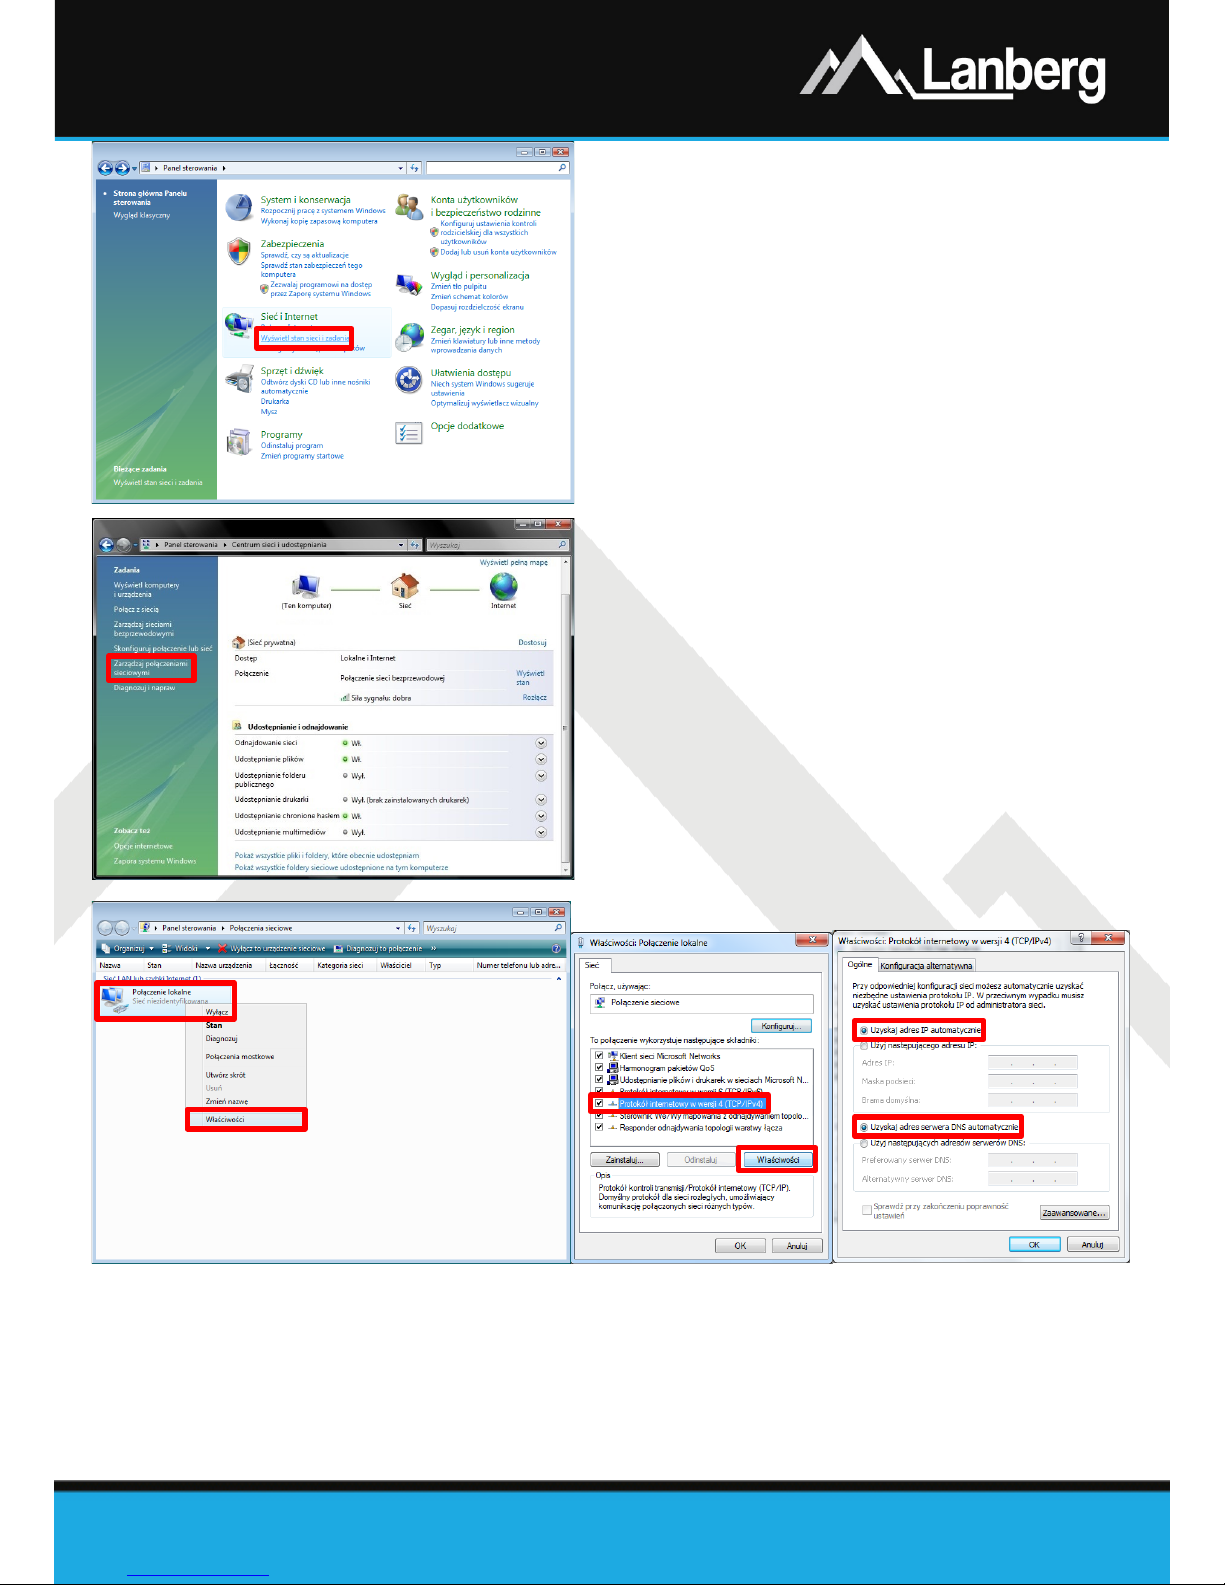
3.3.2) Windows Vista
Step 1) Press „Start” „Control panel” „View
network status and tasks”,
Step 2) After proceeding to the new section, click using
left mouse button, on the left side of the window
the following option „Manage network
connections”,
Step 3) After proceeding to the new section, press right
mouse button on „Local Area Connection”, then
from the drop-down list, select „Properties”,
Step 4) Depending on the current PC’s security options,
the message "User Account Control" may appear
on the screen. Press "Continue
to proceed,
Step 5) On the newly opened window, select verse
„Internet Protocol Version 4 (TCP/IPv4)” by
pressing left mouse button, and then left click on
the button „Properties”,
Step 6) On the newly opened window, select the flags
„Obtain an IP Address automatically” and
„Obtain DNS server address automatically” by
pressing the left mouse button and then press
„OK” button.
Page 24
Quick Installation Guide
Broadband routers
PL | EN
E-mail: [email protected]
www.lanberg.eu
Lanberg © 2015-2018
24 | 32
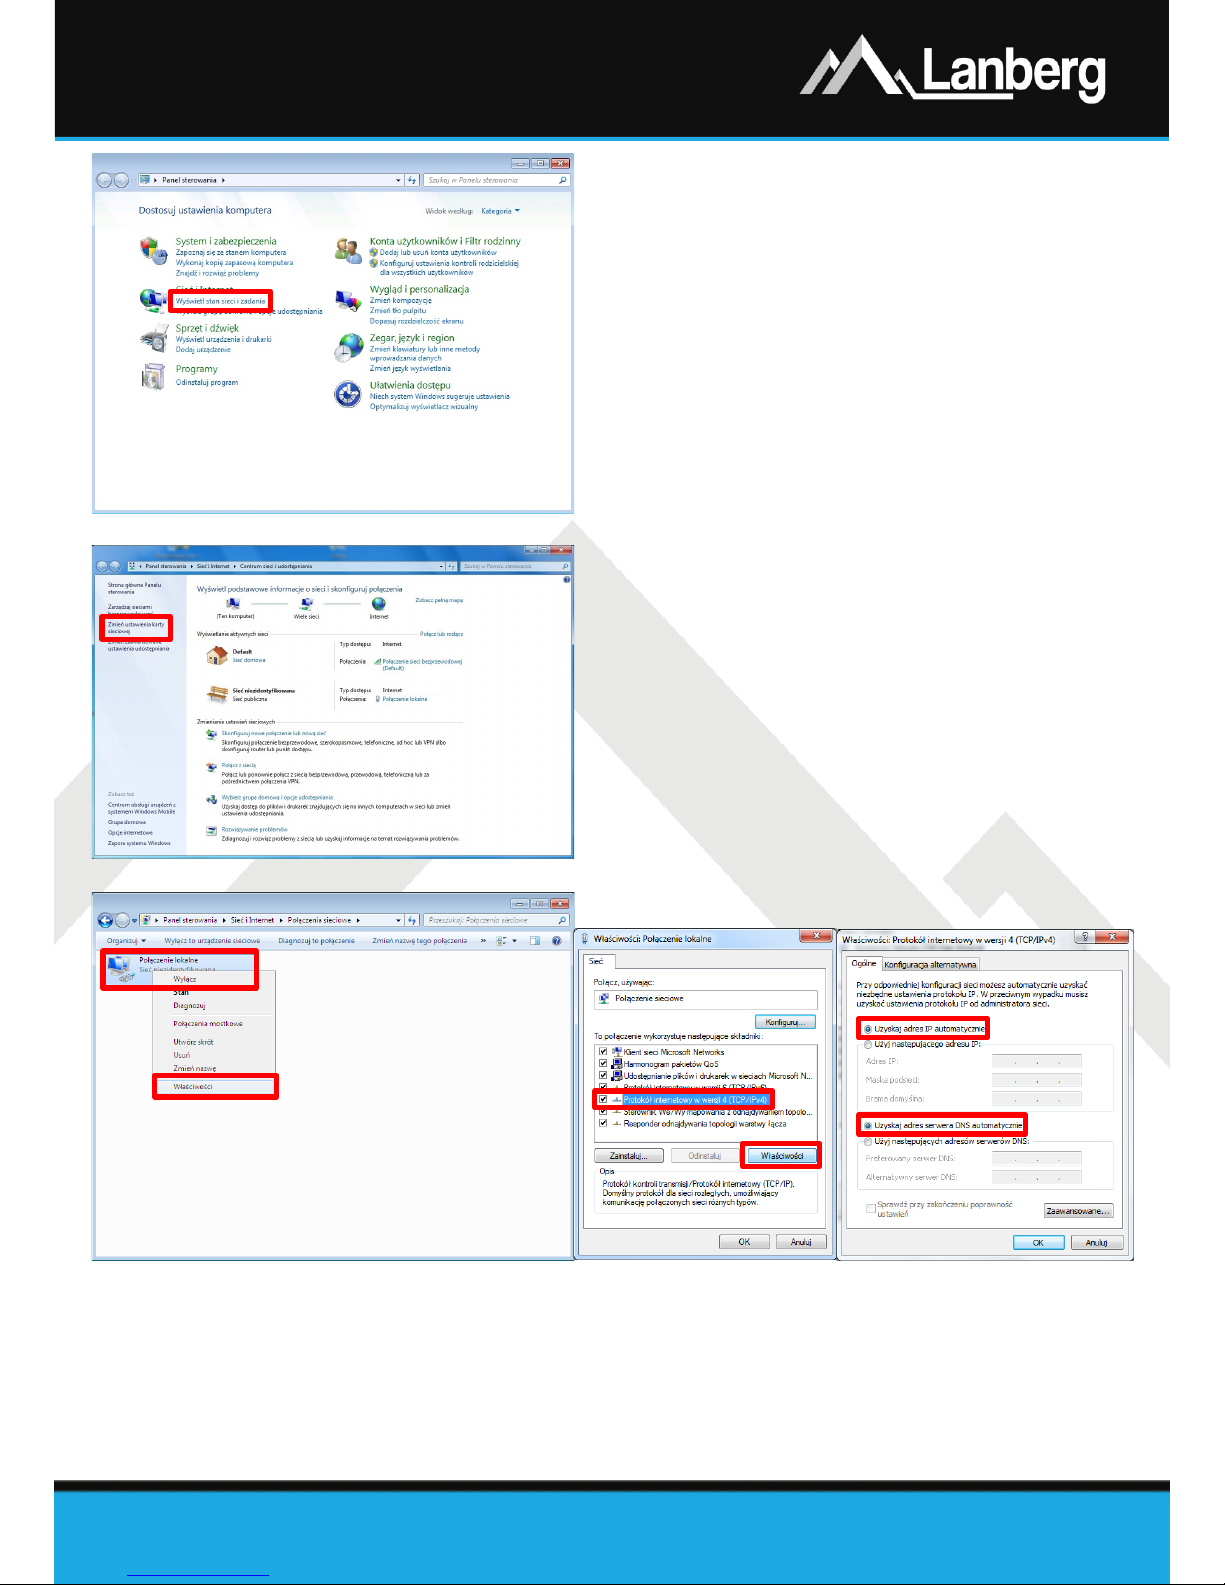
3.3.3) Windows 7/8/8.1/10
Step 1) Press „Start” „Control panel” „View
network status and tasks” for Windows 7. For
other operating system version, right-click on the
network icon on the bottom Windows bar on the
right, and then from the drop-down list select
"Open Network and Sharing Center ",
Step 2) After proceeding to the next section, left click, on
the left side of window „Change adapter
settings”,
Step 3) After proceeding to the next section, press using
right mouse button on „ Local Area Connection”,
then from the drop-down list, select „Properties”.
Depending on the current security settings "User
Account Control" may appear on the screen. Press
"Continue", to proceed,
Step 4) On the newly opened window, select verse
„Internet Protocol Version 4 (TCP/IPv4)” by
pressing left mouse button, and then left click on
the button „Properties”,
Step 5) On the newly opened window, select the flags
„Obtain an IP Address automatically” and „
Obtain DNS server address automatically” by
pressing the left mouse button and then press
„OK” button.
Page 25
Quick Installation Guide
Broadband routers
PL | EN
E-mail: [email protected]
www.lanberg.eu
Lanberg © 2015-2018
25 | 32
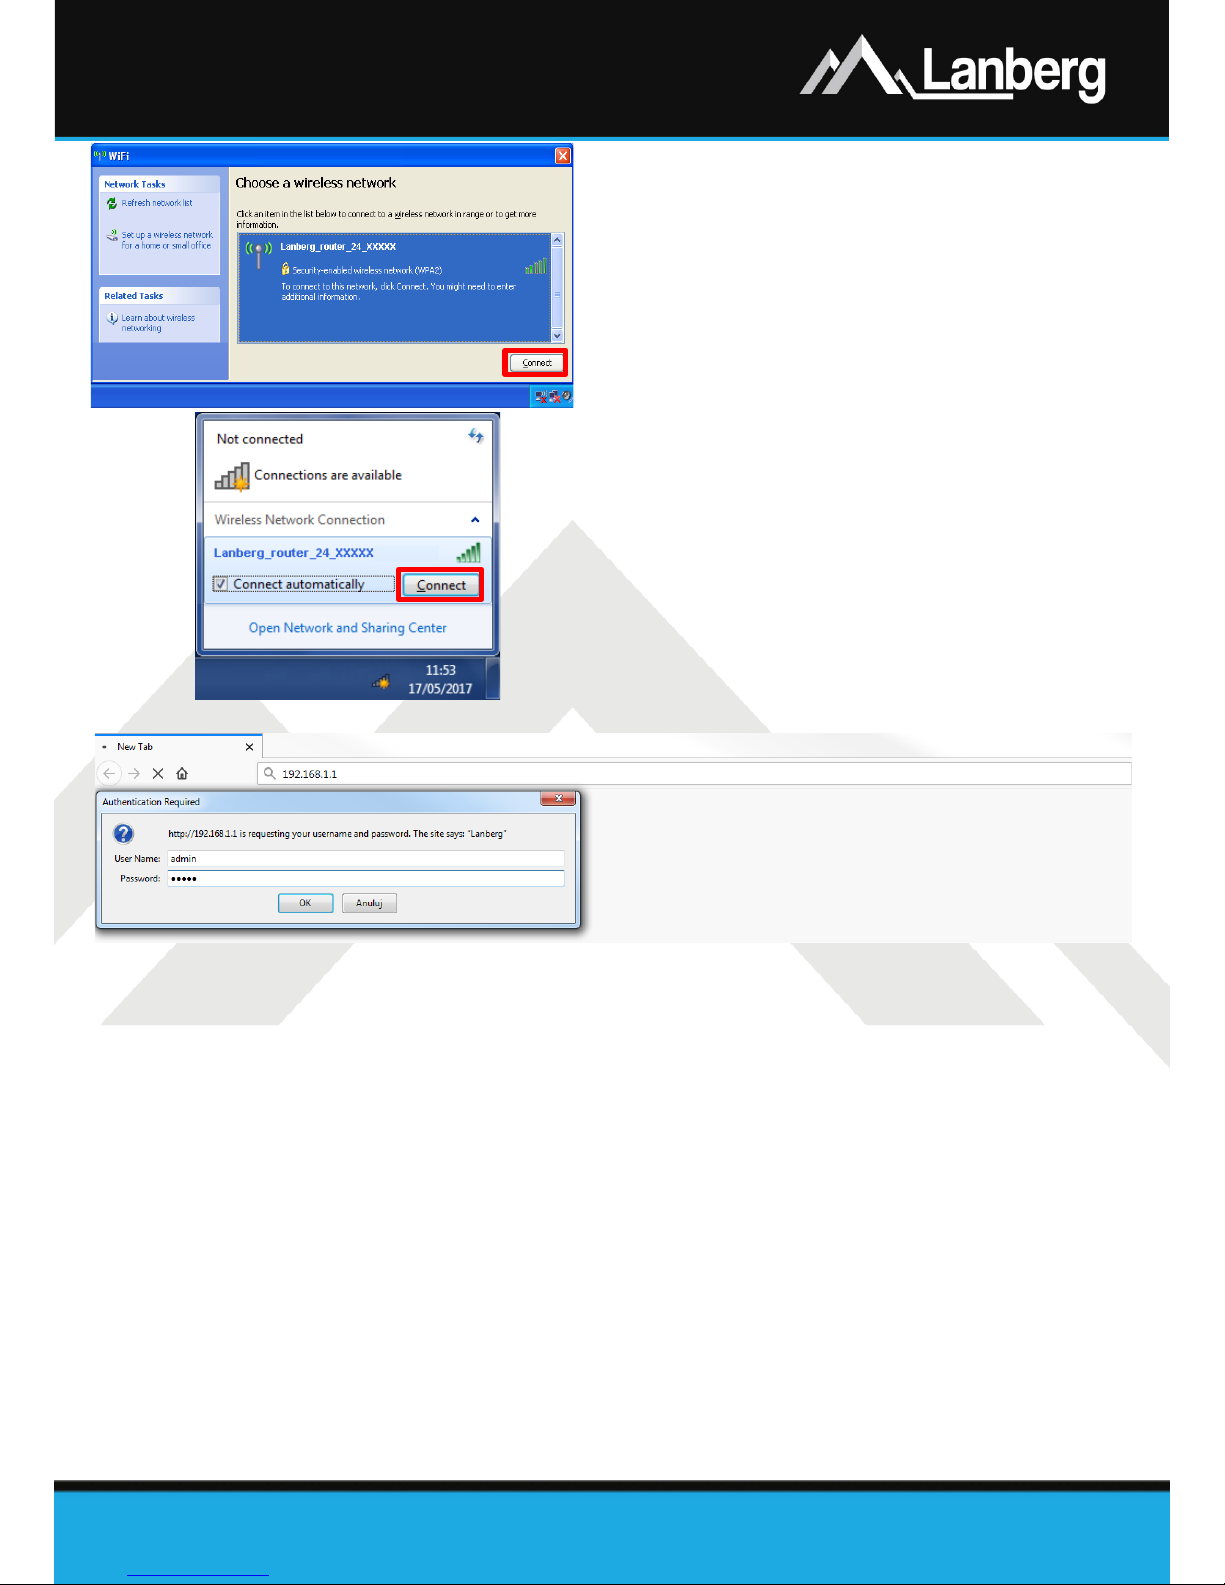
3.4) Establishing a wireless connection
using Lanberg’s router
Step 1) Press twice on the wireless network icon on the
computer and search for the wireless network
"Lanberg_router_24_XXXXX" for the required
connection on 2.4GHz band or
"Lanberg_router_50_XXXXX" on 5GHz band.
XXXXX indicates the last 5 characters of the MAC
address of the router's Wi-Fi network adapter,
Step 2) Depending on the operating system, press the
„Connect” button or press the right mouse button
on the wireless network name mentioned above
and press the left mouse button once on the
„Connect” to select it,
Step 3) If you are prompted for a password, enter the Wi-
Fi network security key you are connecting to and
press „Enter”. The default key value is
„L@@n&3rG” (without the quotes).
3.5) Lanberg’s broadband router (Internet / WAN interface) configuration
Step 1) Open a web browser, on any stationary or portable device connected to the LAN port of the route,
then enter the IP address of the router in the internet browser's address field and press „Enter”
on the keyboard. The default address is „192.168.1.1”,
Step 2) The login window will launch. Enter the username „admin” and the password „admin”, and then
confirm this action by pressing the „Enter” button.
Page 26
Quick Installation Guide
Broadband routers
PL | EN
E-mail: [email protected]
www.lanberg.eu
Lanberg © 2015-2018
26 | 32
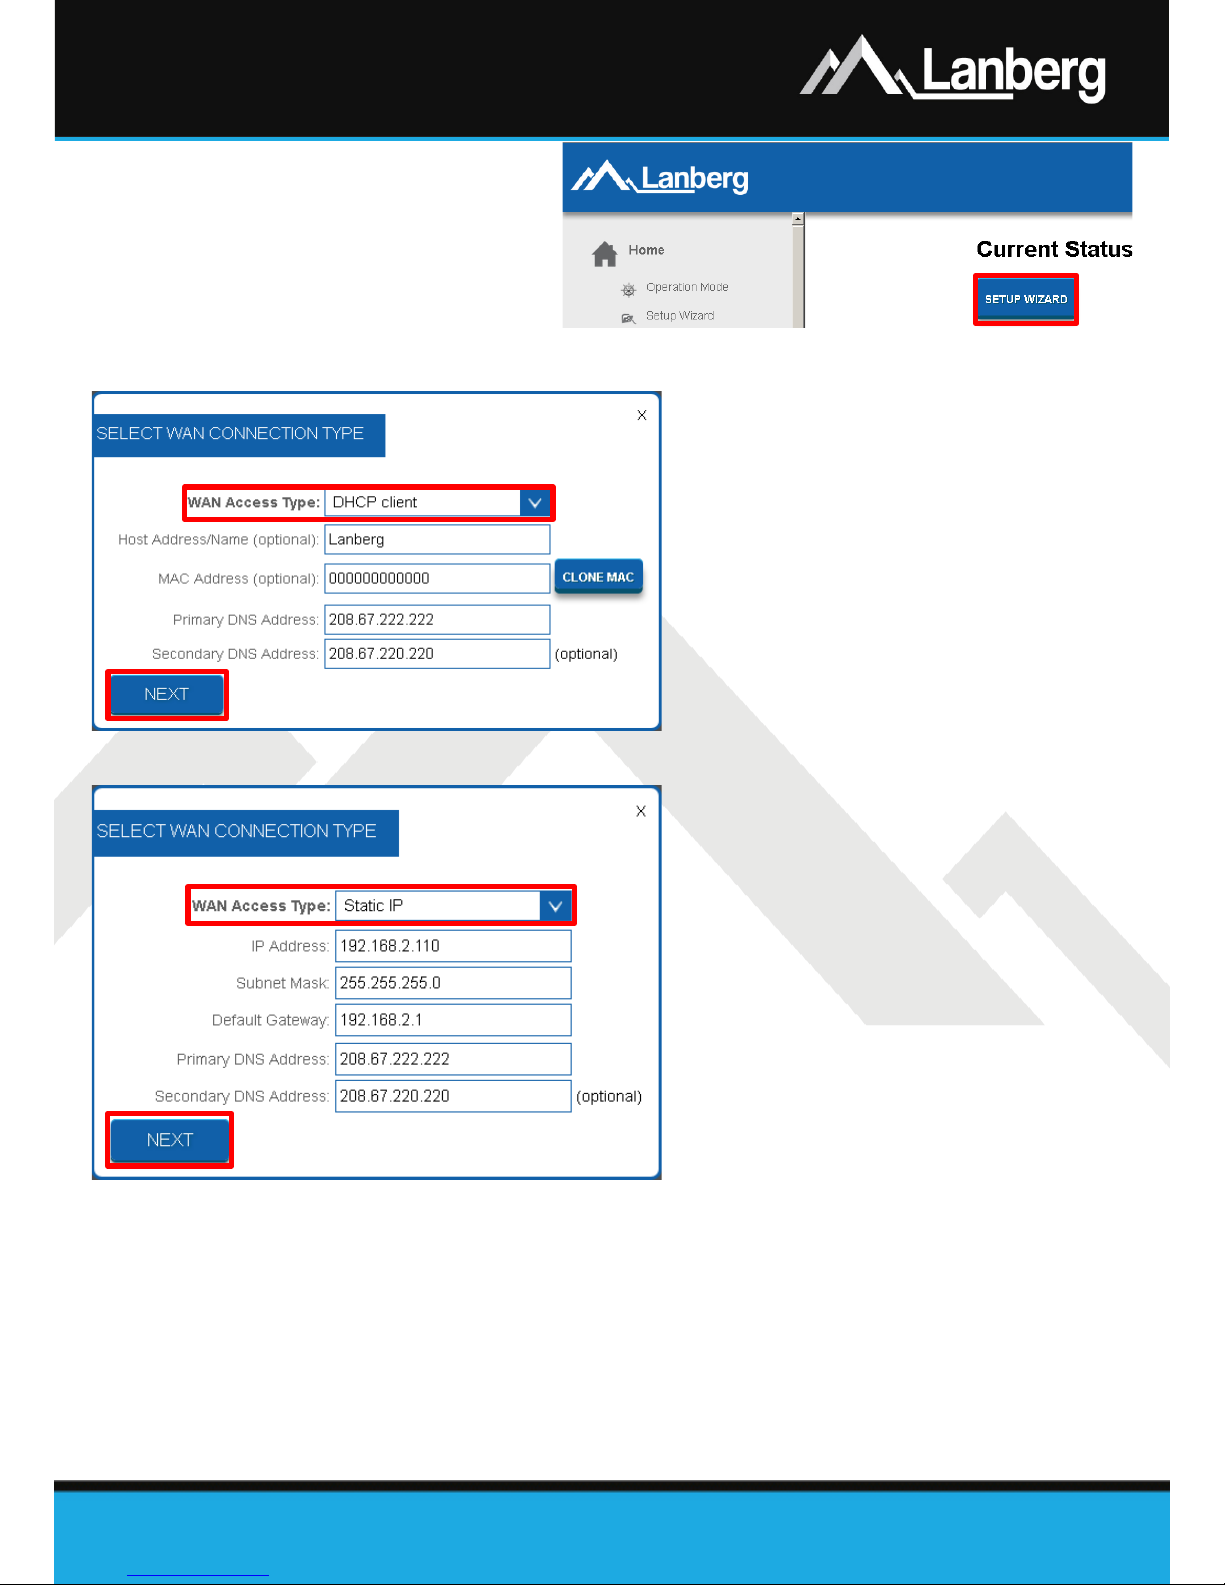
If you need to configure one of
following Internet connection
(WAN) modes: DHCP, Static IP
address, PPPoE, PPTP, L2TP (3.5.1 -
3.5.5), press the „Setup Wizard”
button.
3.5.1) WAN interface setup of the router in DHCP mode
Step 1) On newly opened window, select the
entry „DHCP client” from the „WAN
Access Type” drop-down list,
Step 2) If your Internet provider (ISP) filters the
access to the network using the expected
MAC address, enter this value in the
„MAC address” field,
Step 3) Press „Next” button,
Step 4) Further part of the configuration (Wi-Fi)
is described in 3.5.11 section.
3.5.2) WAN interface setup of the router in the static IP address mode
Step 1) On newly opened window, select the
entry „Static IP” from the „WAN Access
Type” drop-down list,
Step 2) Input the value of the „IP Address” field
by entering the IP address on which the
router will be available on the WAN
interface. Complete „Subnet Mask” and
„Default Gateway” value fields as well,
so they are compatible with the values
defined on the WAN interface. Next fill in
„Primary DNS Address” field, by entering
the IP address of the server translating
domain names into IP addresses. You can
additionally complete the field
„Secondary DNS Address” with an additional IP address in case of communication failure with the
primary DNS server,
Step 3) Press „Next button”,
Step 4) Further part of the configuration (Wi-Fi) is described in 3.5.11 section.
Page 27
Quick Installation Guide
Broadband routers
PL | EN
E-mail: [email protected]
www.lanberg.eu
Lanberg © 2015-2018
27 | 32
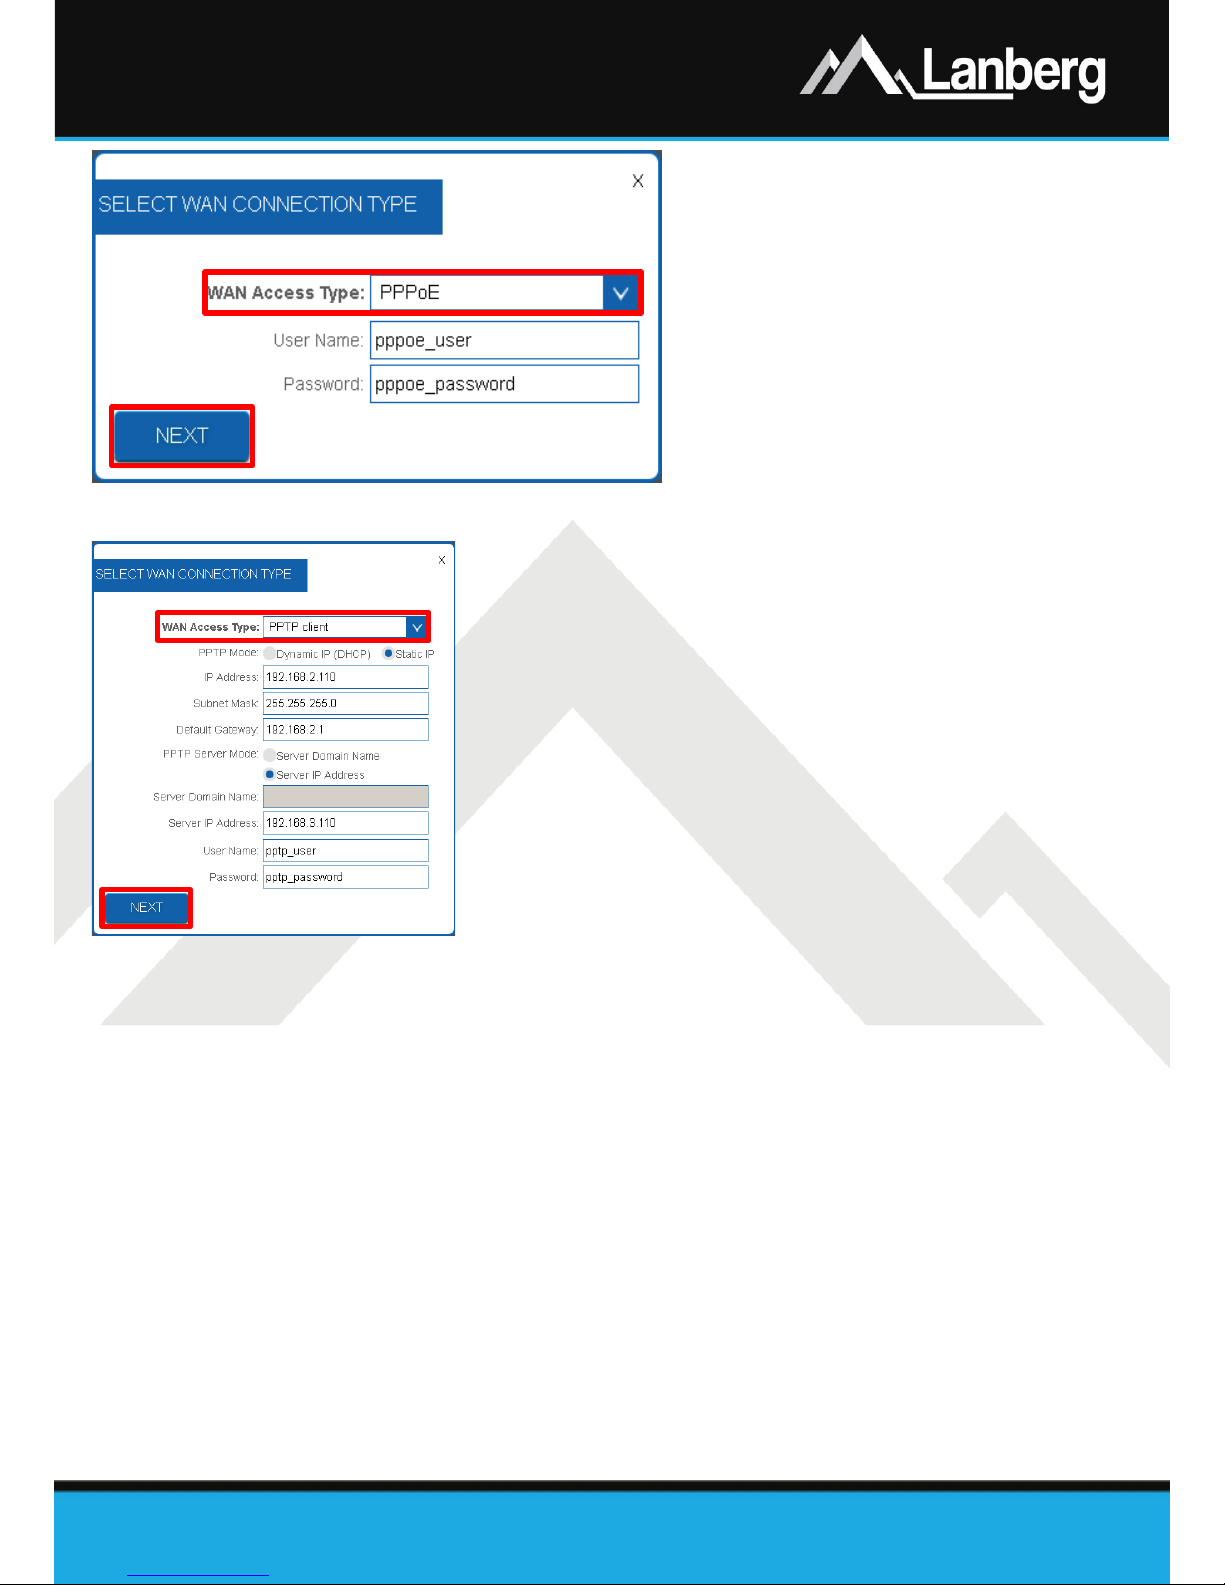
3.5.3) WAN interface setup of the
router in PPPoE mode
Step 1) On newly opened window, select the
entry „PPPoE” from the „WAN Access
Type” drop-down list,
Step 2) Input the value of the „User Name” and
„Password” fields, received from your
ISP,
Step 3) Press „Next” button,
Step 4) Further part of the configuration (Wi-Fi)
is described in 3.5.11 section.
3.5.4) WAN interface setup of the router in the client mode of PPTP VPN
Step 1) On newly opened window, select the entry „PPTP client” from the
„WAN Access Type” drop-down list,
Step 2) Depending on the defined network for the WAN interface of the
router, select the automatic configuration of the WAN interface in
the field „PPTP Mode” by selecting „Dynamic IP (DHCP)” or in the
case of manual settings sel ect „Static IP”, additionally completing
the following fields „IP Address”, „Subnet Mask” and „Default
Gateway”, as well, for the WAN interface of the router,
Step 3) Next, depending on if the customer end device, to which the VPN
tunnel connection is to be established using the PPTP protocol with
Lanberg’s router, has a variable or fixed IP address, please set the
„PPTP Server Mode” field to „Server domain name” if applicable
customer end device has an variable IP address and its unique
identifier in the form of a domain granted by the DDNS service or
„Server IP Address” if the client’s end device has a fixed IP address.
Failure to meet one of these conditions may result in problems with the VPN tunneling setup. To
proceed further, fill in the fields „Server Domain Name” or „Server IP Address” and „User Name”
and „Password”,
Step 4) Press „Next” button,
Step 5) Further part of the configuration (Wi-Fi) is described in 3.5.11 section.
Page 28
Quick Installation Guide
Broadband routers
PL | EN
E-mail: [email protected]
www.lanberg.eu
Lanberg © 2015-2018
28 | 32
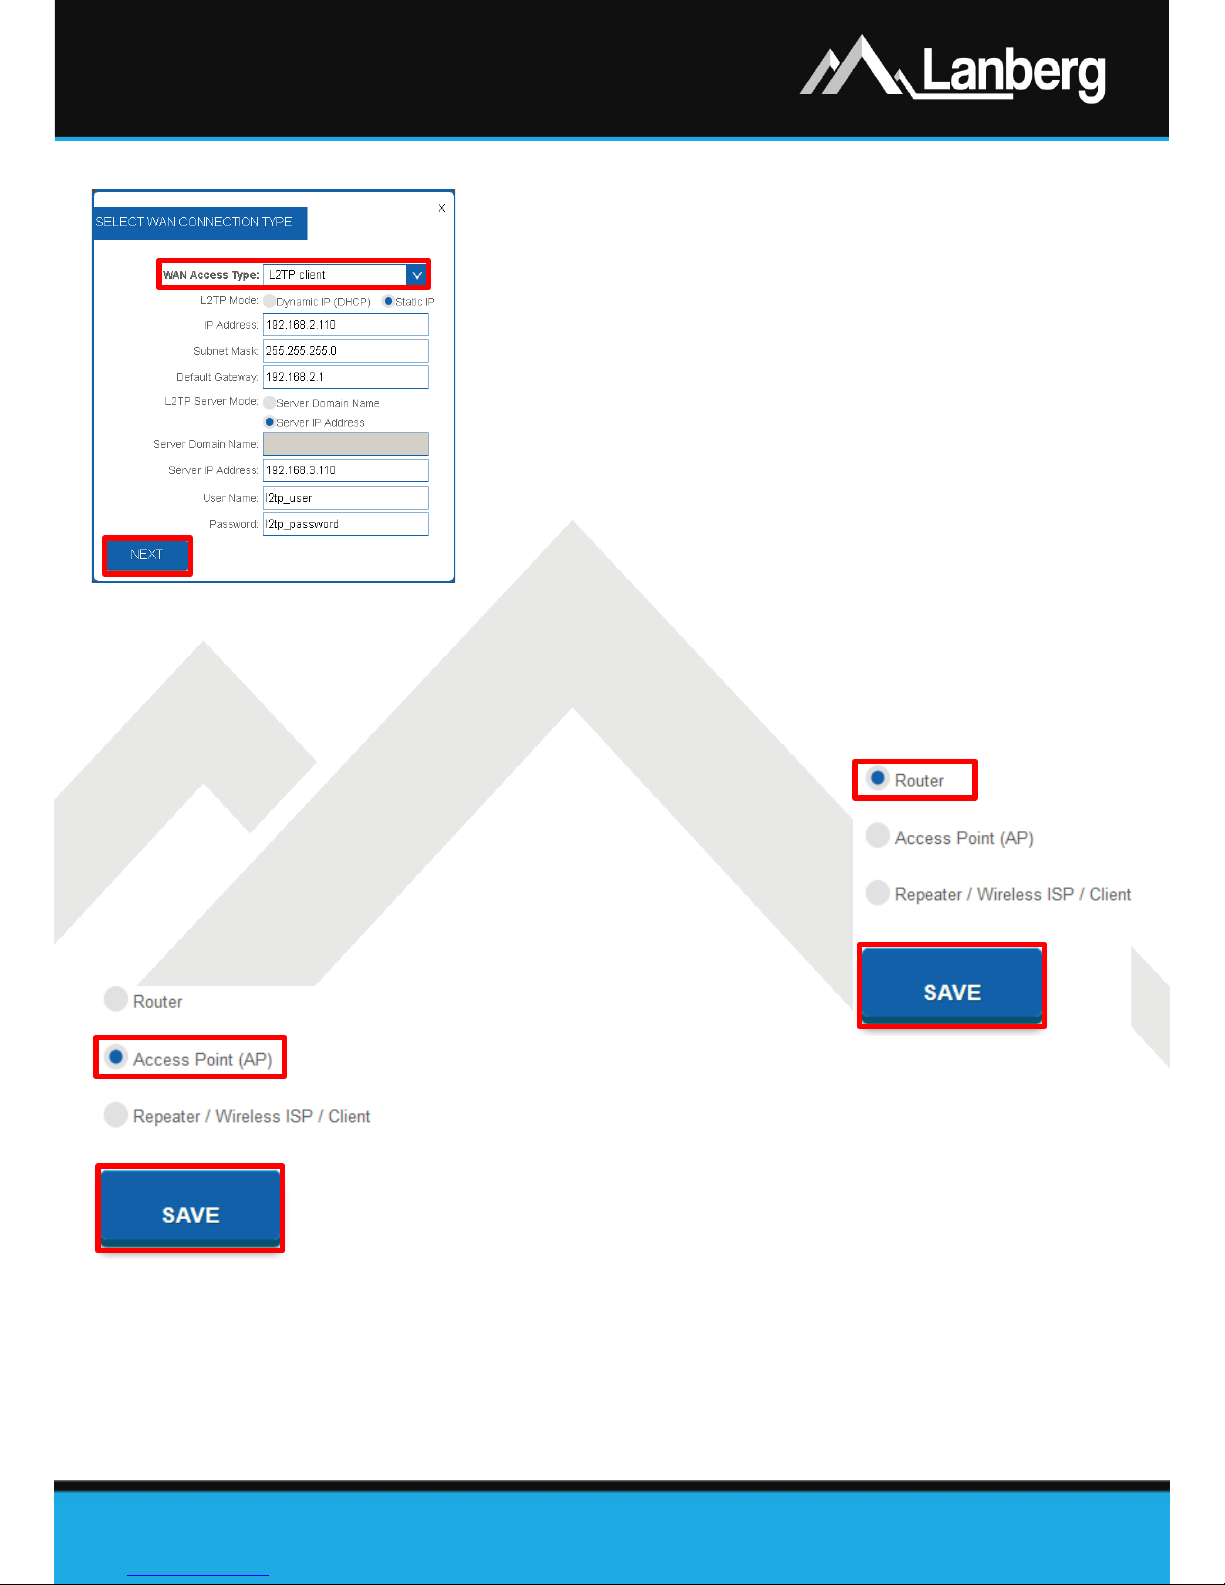
3.5.5) WAN interface setup of the router in the client mode of L2TP VPN
Step 1) On newly opened window, select the entry „L2TP client” from the
„WAN Access Type” drop-down list,
Step 2) Depending on the defined network for the WAN interface of the
router, select the automatic configuration of the WAN interface in
the field „L2TP Mode” by selecting „Dynamic IP (DHCP)” or in the
case of manual settings sel ect „Static IP”, additionally completing
the following fields „IP Address”, „Subnet Mask” and „Default
Gateway”, as well, for the WAN interface of the router,
Step 3) Next, depending on if the customer end device, to which the VPN
tunnel connection is to be established using the L2TP protocol with
Lanberg’s router, has a variable or fixed IP address, please set the
„L2TP Server Mode” field to „ Server domain name” if applicable
customer end device has an variable IP address and its unique
identifier in the form of a domain granted by the DDNS service or
„Server IP Address” if the client’s end device has a fixed IP address.
Failure to meet one of these conditions may result in problems with the VPN tunneling setup. To
proceed further, fill in the fields „Server Domain Name” or „Server IP Address” and „User Name”
and „Password”,
Step 4) Press „Next” button,
Step 5) Further part of the configuration (Wi-Fi) is described in 3.5.11 section.
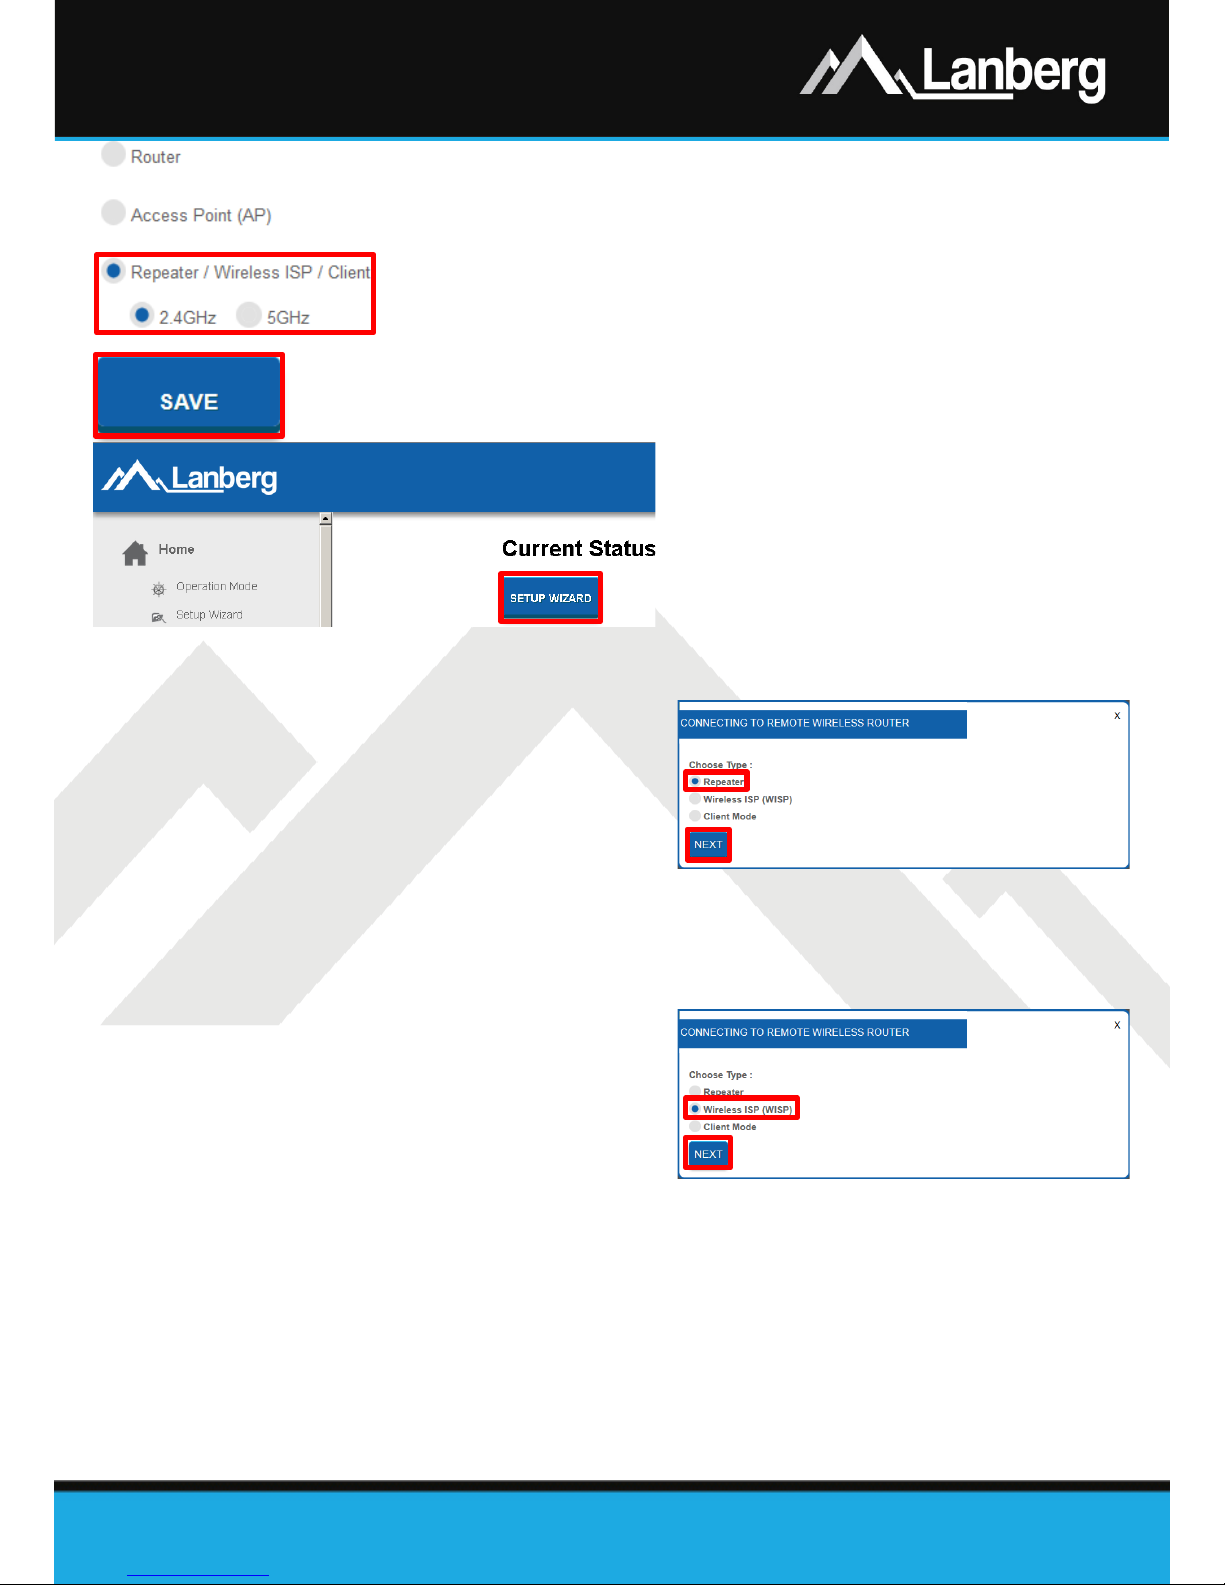
3.5.6) Router mode setup of the device
Step 1) On the left multilevel menu, expand the „Home” drop-
down list, and then click on the following sub-section
„Operation Mode”,
Step 2) From the select list of device’s possible operation modes,
select the flag „Router”
and then press the „Save”. The
router will apply the new settings in approx. 30 seconds.
3.5.7) Access point (AP) mode
setup of the device
Step 1) On the left multilevel menu, expand the „Home” drop-down list, and
then click on the following sub-section „Operation Mode”,
Step 2) From the select list of device’s possible operation modes, select the flag
„Access Point (AP)”
and then press the „Save”. The router will apply
the new settings in approx. 30 seconds.
NOTE: The DHCP server service will be disabled and access to the WAN section
will be hidden. There may also be a situation in which the device (e.g. a computer)
can still remember the previous granted lease from the DHCP server and related to it settings. In this case,
it is recommended to use the following commands on the command line:
• For the Windows operating system „ipconfig /release”, then „ipconfig /renew”,
• For the Linux operating system, those commands may differ from each other depending on the release
distribution of „dhclient -r” or „dhcpcd -k”, followed by „dhclient” or „dhcpcd”.
Page 29
Quick Installation Guide
Broadband routers
PL | EN
E-mail: [email protected]
www.lanberg.eu
Lanberg © 2015-2018
29 | 32
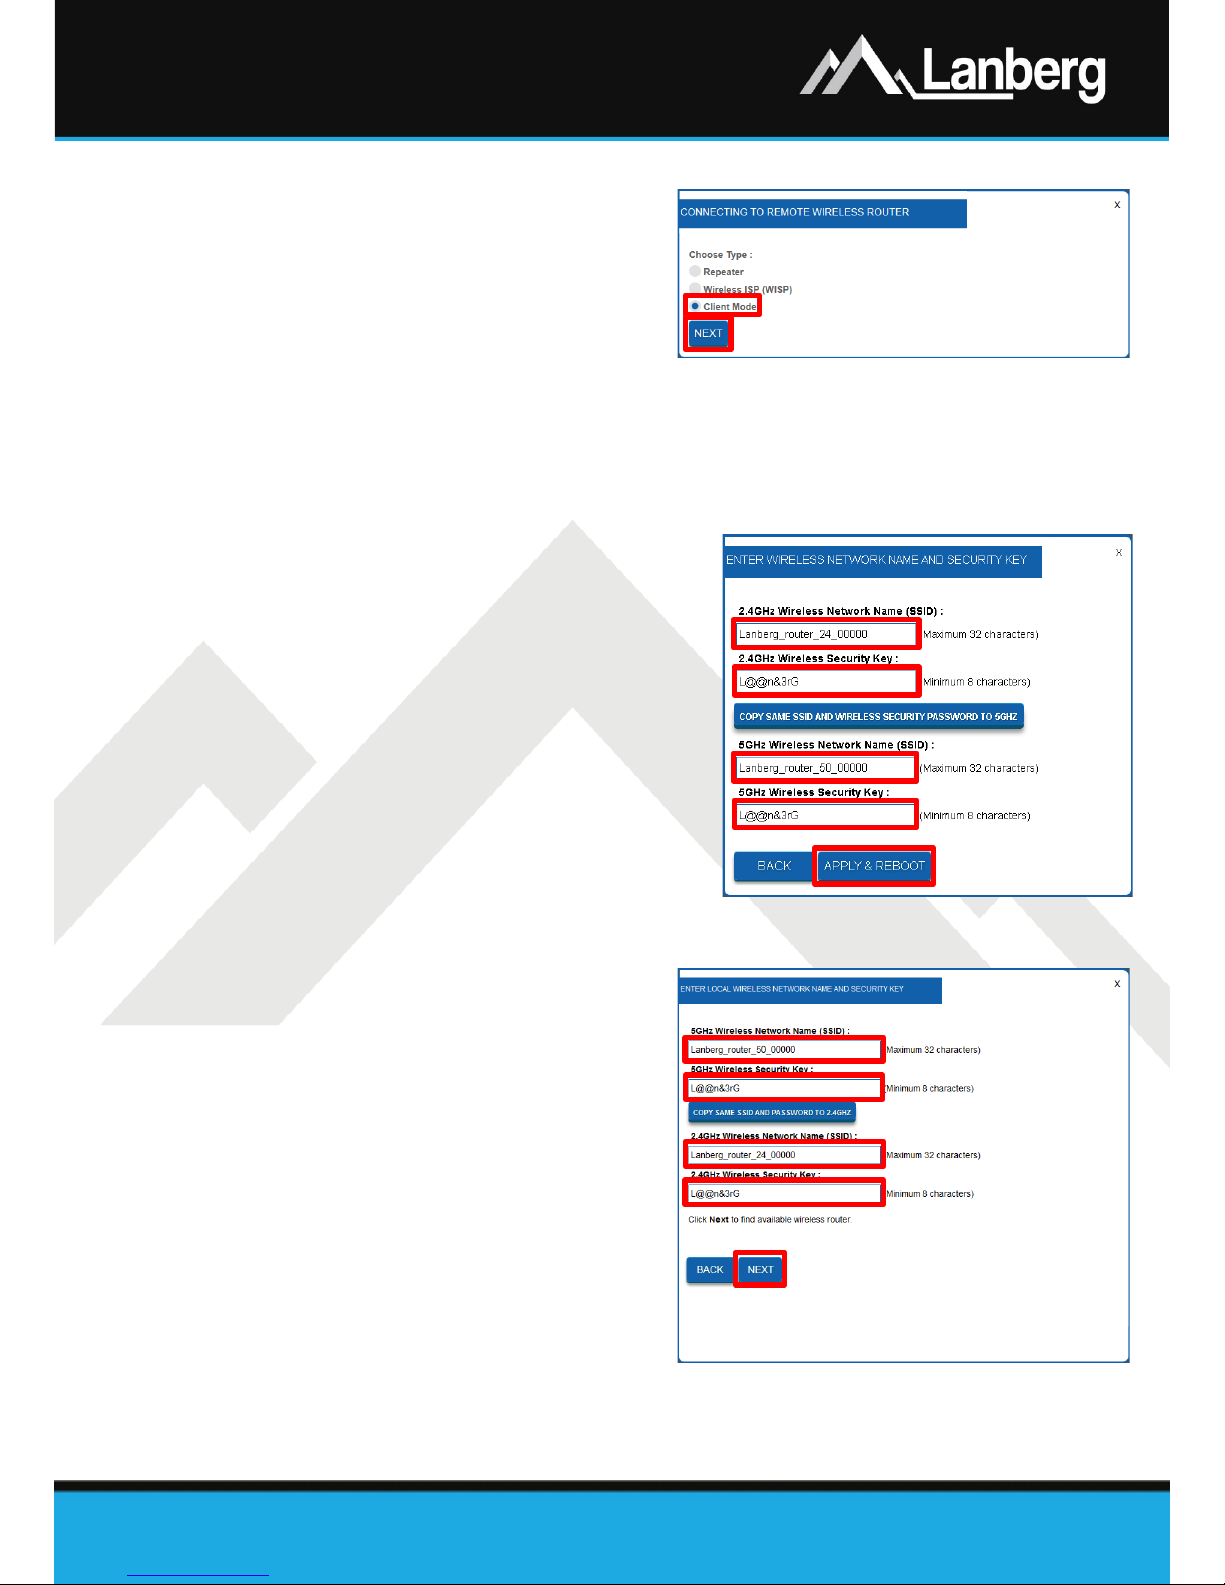
If you need to configure one of the Internet connection modes (WAN):
Client, WISP, Repeater (3.5.8 - 3.5.10):
Step 1) On the left multilevel menu, expand the „Home”
drop-down list, and then click on the following subsection „Operation Mode”,
Step 2) From the select list of device’s possible operation
modes, select flag „Repeater / Wireless ISP / Client”,
then choose below on what frequency „2.4GHz” or
„5GHz” router is to connect to wireless network to the
target device and press „Save”. The router will apply
new setti ngs in approx. 30 seconds,
Step 3) After the device window is reloaded, press the „Setup Wizard”.
3.5.8) Repeater mode setup of the device
Step 1) On the newly opened window select the
internet connection type by choosing
the „Repeater” flag,
Step 2) Press „Next” button,
Step 3) Further part of the configuration (Wi-Fi)
is described in 3.5.12 section. Please
refer to annotation no. 1,
Step 4) Further part of configuration of connection of the router with the target access point via the Wi-Fi
network is described in 3.5.13 section.
3.5.9) Wireless ISP (WISP) mode setup of the device
Step 1) On the newly opened window select
the internet connection type by
choosing the „Wireless ISP (WISP)”
flag”,
Step 2) Press „Next” button,
Step 3) Further part of the configuration (Wi-Fi)
is described in 3.5.12 secti on,
NOTE: Access to the WAN section will be hidden.
Step 4) Further part of configuration of connection of the router with the target access point via the Wi-Fi
network is described in 3.5.13 section.
Page 30
Quick Installation Guide
Broadband routers
PL | EN
E-mail: [email protected]
www.lanberg.eu
Lanberg © 2015-2018
30 | 32
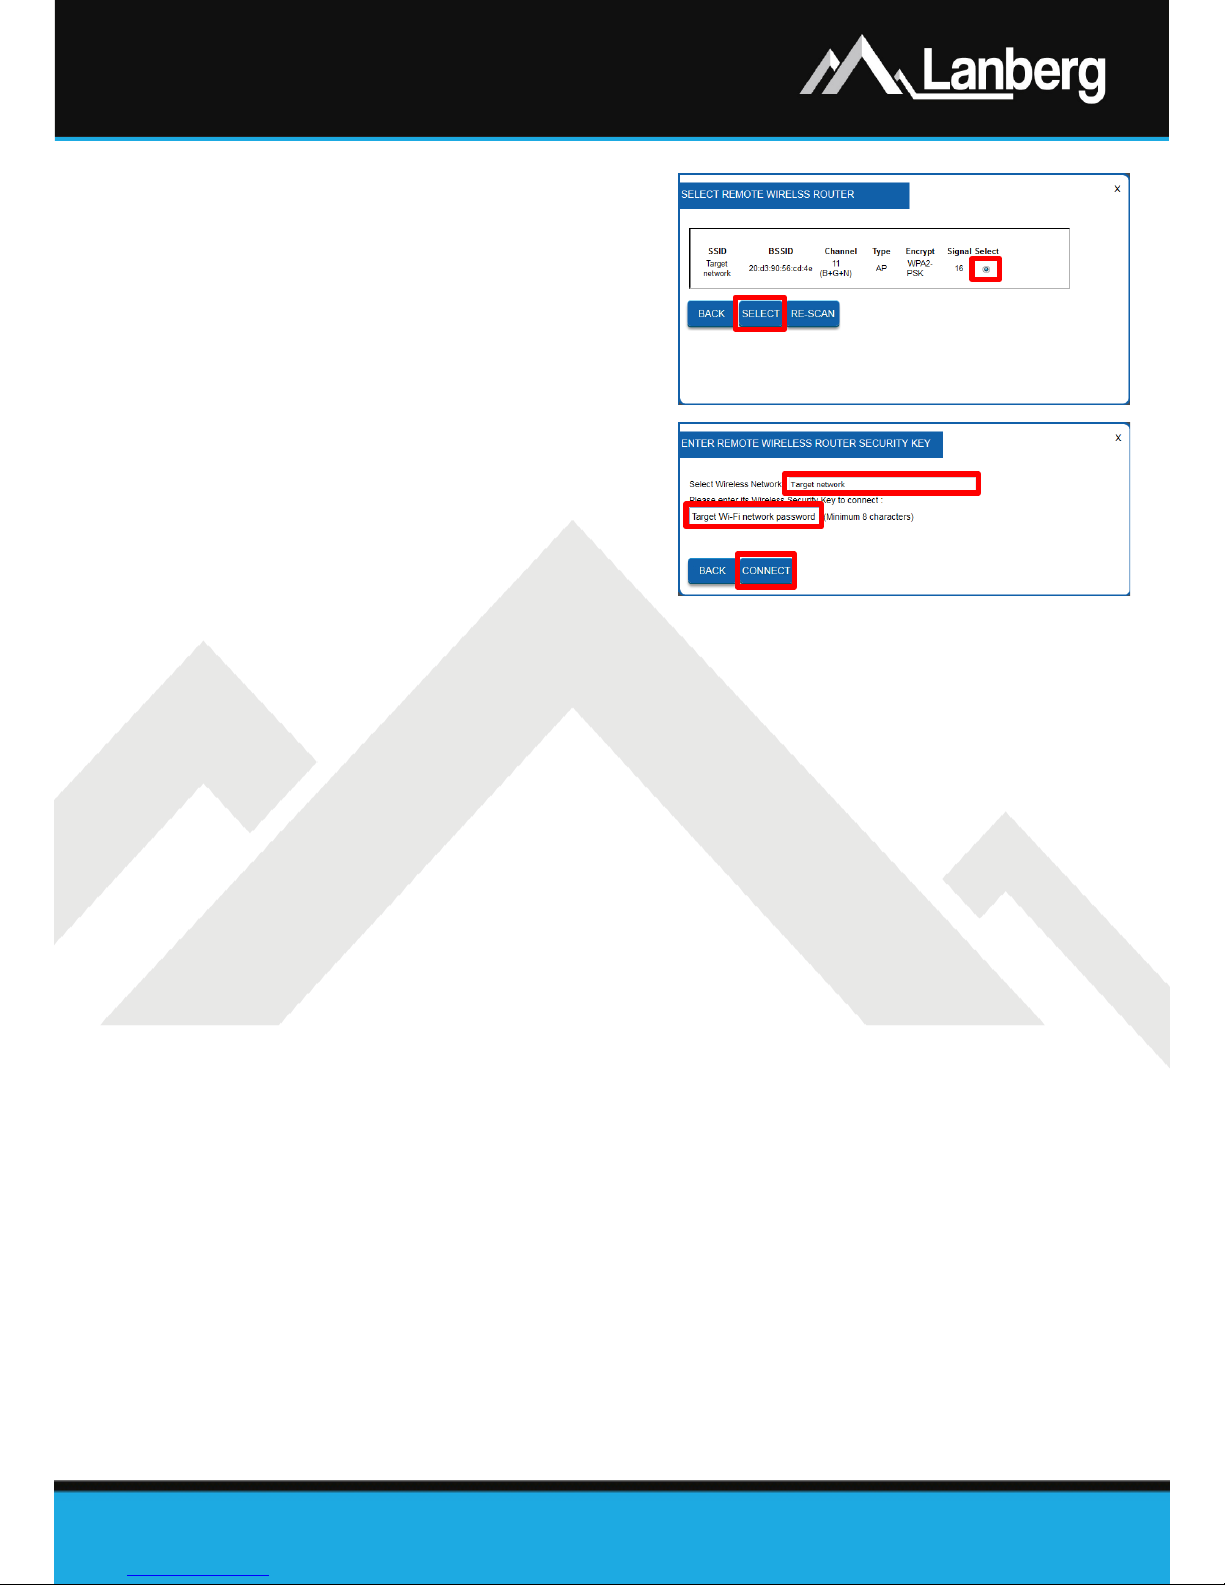
3.5.10) Client mode setup of the device
Step 1) On the newly opened window select the
internet connection type by choosing
the „Client Mode”,
Step 2) Press „Next” button. The router will
apply the new settings in approx. 30
seconds. Please refer to annotation no.
1,
Step 3) Further part of configuration of connection of the router with the target access point via the Wi-Fi
network is described in 3.5.13 section.
3.5.11) Configuration of the wireless network (Wi-Fi) of the router – Router /
AP
Step 1) In the new section, set the name of the
broadcasted wireless network (SSID) for
2.4GHz band in the „2.4GHz Wireless
Network Name (SSID)” field and your private
password for this network in the „2.4 GHz
Wireless Security Key” field,
Step 2) Only RO-120GE, RO-175GE models - Repeat
exactly the same steps for 5GHz wireless
band fields by setting the wireless broadcast
name (SSID) and password as the security
key,
Step 3) Press „Apply & Reboot” button. The router
will apply the new settings in approx. 30
seconds.
3.5.12) Configuration of the wireless network (Wi-Fi) of the router – Repeater
/ WISP / Client
Step 1) In the new section, set the name of the
broadcasted wireless network (SSID) for
2.4GHz band in the „2.4GHz Wireless
Network Name (SSID)” field and your
private password for this network in the
„2.4 GHz Wireless Security Key” field,
Step 2) Only RO-120GE, RO-175GE models -
Repeat exactly the same steps for 5GHz
wireless band fields by setting the
wireless broadcast name (SSID) and
password as the security key,
Step 3) Press „Next” button. The router will
apply the new settings in approx. 30
seconds.
Page 31
Quick Installation Guide
Broadband routers
PL | EN
E-mail: [email protected]
www.lanberg.eu
Lanberg © 2015-2018
31 | 32
3.5.13) Wi-Fi connection configuration of the router with the target wireless
network
Step 1) On the newly opened window, select
the target wireless network to which
you want to connect the router, by
marking the flag in the „Select” column
and then pressing the „Select” button,
Step 2) If the target network is secured, please
input in 2nd field the current password
for the target Wi-Fi network with which
you want to connect the router. Then
press the „Connect”. You will attempt
to connect,
Step 3) If the connection is successful, press the
button „Reboot Now”. The router will
apply the new settings in approx. 30
seconds.
ANNOTATION NO. 1: The DHCP server service will be disabled and access to the WAN section will be
hidden. If the customer’s end device (e.g. a PC / Laptop) loses connection with the router, set the
computer's static IP address to one that will be in the same network as the router and will not be assigned
to any other device.
Page 32

Skrócona instrukcja obsługi |QIG
Routery szerokopasmowe
Broadband routers
E-mail: [email protected] | [email protected]
www.lanberg.pl | www.lanberg.eu
Lanberg © 2015-2018
WERSJA | VERSION: 2018/05
PL | EN
ZAWARTOŚĆ | CONTENT
Polski
English
str. 4
p. 18
 Loading...