

Page 1

WaterLink
El futuro del análisis del agua
L’avenir de l’analyse de l’eau
nSp
Touch
The Future of Water Testing
®
Compatible with Android® and iOS® devices
Compatible con dispositivos Android® y iOS
Compatible avec les appareils Android® et iOS
For Code/ Para el código / Pour les codes 3580/3581/3582
®
®
Page 2

2
Page 3

SETUP
BEFORE FIRST USE
¬ Fully charge battery using the Spin Touch USB cable and adapter plug in AC
outlet.
¬ Ensure your Spin Touch has the latest fi rmware:
1. Download and install the WaterLink
http://softwarecenter.lamotte.com/.
2. Plug meter into the computer with the provided USB cable and launch
WaterLink
®
Connect application from the Start Menu.
3. Any fi rmware updates will automatically be applied to the meter.
METER
1. The meter can be powered from an AC outlet, a computer or the internal battery.
2. Use the USB cable and the adapter to plug the meter into an AC outlet.
3. Use the USB cable to connect the meter to the USB port of a computer.
CHARGE THE BATTERY
1. Use the USB cable and the adapter to plug the meter into an AC outlet or use the
USB cable (included) with a car charger (not included) to charge the battery. (Anker
PowerDrive 2, DC 12/24V, 5V = 4.8A, Part Number A2310 recommended.)
2. The battery icon on the screen will show the battery status. Charge the battery until
the battery indicator is full.
FIRMWARE UPDATES
Occasionally, the fi rmware in the Spin Touch will require updates. To do so:
1. Visit
2. Plug the Spin Touch into the computer using the included USB cable.
3. Open the WaterLink
Once the update is complete, it is safe to close WaterLink
After updating fi rmware it is recommended that the Alignment Procedure on page 15 be
performed.
http://softwarecenter.lamotte.com/ and download the WaterLink® Connect
application for Windows.
®
Connect desktop application and wait for the update to
complete.
®
Connect application for Windows® at
®
Connect and unplug the lab.
SETUP PC CONNECTION DEVICE CONNECTION
PC CONNECTION
When the WaterLink® Spin Touch® is connected to a computer via USB, the onboard
touchscreen becomes disabled and operation of the lab is performed using the WaterLink
Connect application for Windows
softwarecenter.lamotte.com/
from the Spin Touch can be transferred to a water analysis program such as WaterLink
Solutions
™
.
®
. This application is available for free at http://
. Via the WaterLink® Connect desktop application, results
®
DEVICE CONNECTION
The WaterLink® Spin Touch® supports connections to a Windows® based PC (over USB) and
to Android and iOS mobile devices (via Bluetooth).
3
®
Page 4

CONNECTING VIA USB
Using the provided USB cable, the WaterLink® Spin Touch® can be connected to a Windows®
based PC. Before connecting a meter via USB, download and install the free WaterLink
Connect Windows
WaterLink
will be disabled and operation of the meter is performed using the WaterLink
application. LaMotte off ers robust water analysis programs as well, such as WaterLink
Solutions
™
more about LaMotte software products at
®
®
application from http://softwarecenter.lamotte.com. When the
Spin Touch® is connected to the PC via USB, the onboard touch screen controls
®
Connect
, to collect test results and off er detailed treatment recommendations. Learn
http://softwarecenter.lamotte.com.
DEVICE CONNECTION
CONNECTING VIA BLUETOOTH
The WaterLink® Spin Touch® is capable of connecting to a Bluetooth enabled device, such
as a phone or tablet. The Spin Touch is also compatible with a LaMotte Bluetooth Printer
[Code 5-0066]. Other Bluetooth printers are not supported.
Transferring results over Bluetooth to a mobile device requires that a mobile app is
installed on the device and an active account for the associated software program. For
example, with an active WaterLink
mobile app on a phone or tablet, results can be transferred from the meter into the
application. Mobile apps for LaMotte software products are available from iTunes (for
iOS devices) and Google Play (for Android devices). Learn more about LaMotte software
products at
http://softwarecenter.lamotte.com.
To transfer results from the WaterLink
app:
1. Log into the LaMotte software product mobile app.
2. Search for a customer or Site record. You may need to create one before you can
begin testing.
3. Start a Water Test in the mobile app.
4. Perform a water test from the Spin Touch onboard touchscreen normally. The Spin
Touch and the Bluetooth enabled mobile device will connect automatically.
5. When the connection is available the
dim, the meter and device are not connected. Tap the
mobile app.
Whenever the
appears on the touch screen the Spin Touch is capable of connecting
to the Mobile Bluetooth Printer (Code 5-0066). The
connected and dim when not connected.
The Spin Touch cannot connect to both mobile device and the printer at one time. (See the
Save, Print and Send, page 9)
®
Solutions™ account and the WaterLink® Solutions™
®
Spin Touch® to a LaMotte software product mobile
will light on the touch screen. When the is
to transfer results to the
button will be highlighted when
®
®
USING BLUETOOTH LOW ENERGY
The WaterLink® Spin Touch® will automatically connect to the nearest Bluetooth enabled
phone or tablet or printer. It is not necessary to pair the Spin Touch to the Bluetooth
enabled device. Barriers to wireless signals can reduce the range of wireless devices.
The WaterLink Spin Touch will work best if there are no walls between it and the receiving
devices.
4
Page 5
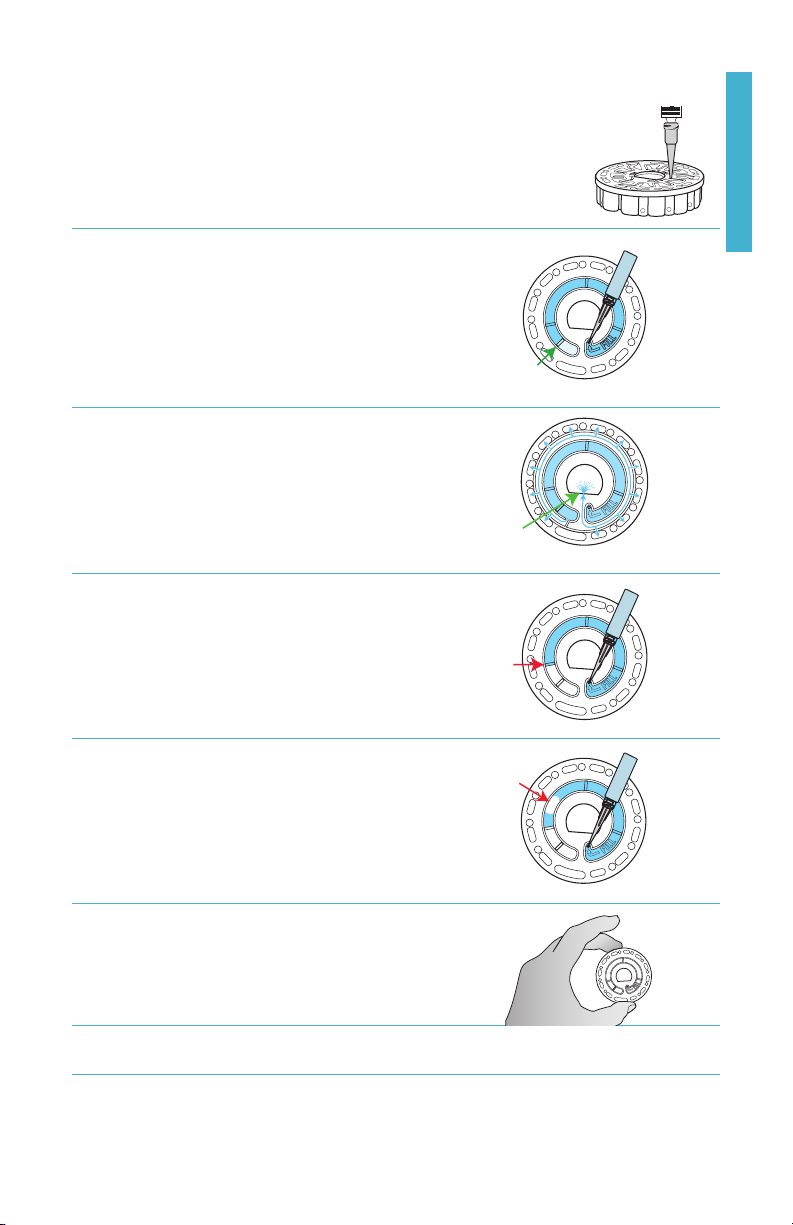
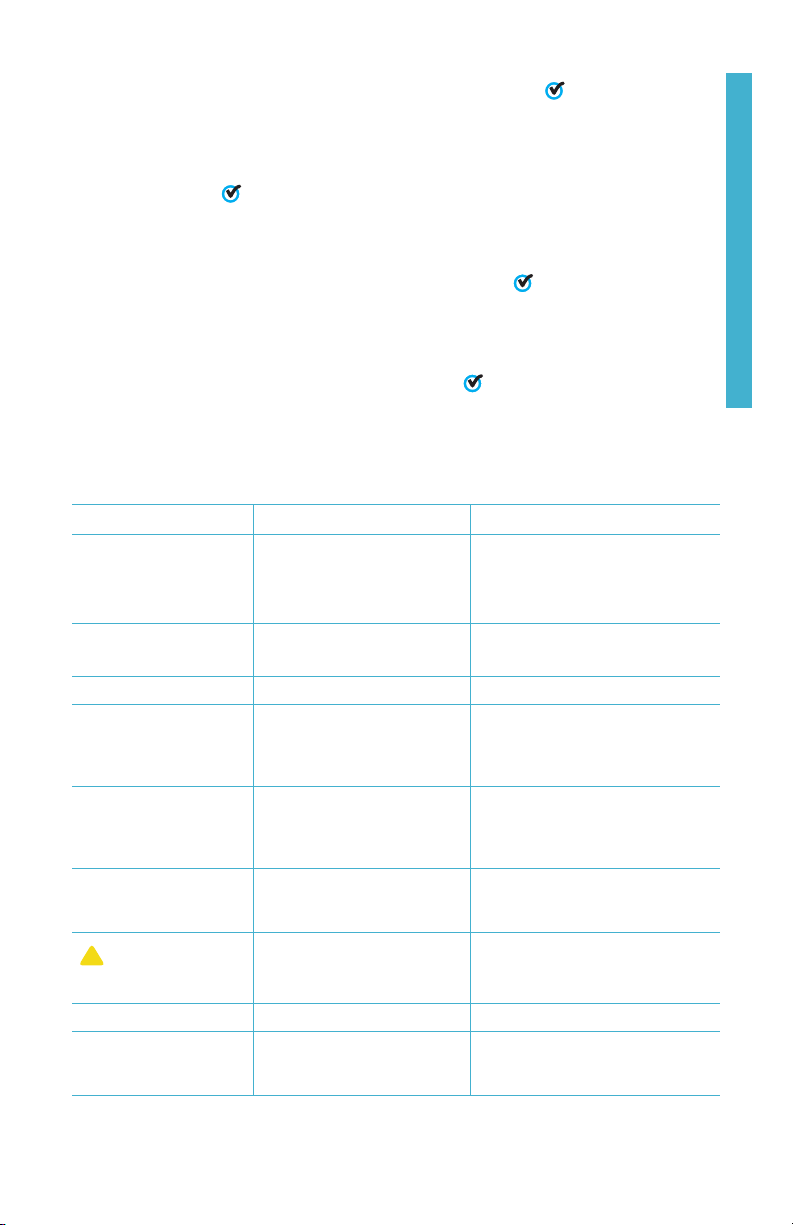
FILLING: Single-Use Disks
When the syringe is placed in the water sample, and the plunger is
pulled all the way up, the syringe will hold more than enough water
sample to adequately fi ll the disk. Hold the syringe vertically and
insert the tip into the fi ll hole in the disk. Press the plunger slowly and
smoothly to fi ll the disk.
1. Fill the disk using slow, even pressure. The
sample water will fi ll the spaces between
the baffl es in a counterclockwise order.
Each space will fi ll from the bottom to the
top. Sample water should be added until the
sample water in the fourth chamber fi lls to the
top of the chamber slightly past the embossed
fi ll line. It is OK to fi ll slightly past the fi ll line.
Correct Fill
(Fill line)
2. Do not overfi ll the disk. If the disk is overfi lled,
sample water will fl ow out of the overfl ow
hole in the center of the disk. The disk is not
leaking. Dry the disk and run the test.
Over
Filled
(Dry disk before placing in meter)
3. Do not under fi ll the disk. If the disk is under
fi lled, the reagent chambers will not fi ll entirely
and results will be inaccurate.
Under
Filled
FILLING
4. Do not introduce air bubbles into the disk.
The reagent chambers will not fi ll entirely
Air
Bubble
and results will be inaccurate. As soon as a
bubble starts to form, pull back on the plunger
to draw the bubble out of the disk. Begin the
fi lling process again.
5. Wet disks should be dried thoroughly with a
lint free wipe. The disk should be handled by
the edges.
6. Disks should be fi lled and used within 10 minutes. They cannot be fi lled ahead of
time.
For fi lling and troubleshooting tips go to:
www.lamotte.com/spin
5
Page 6

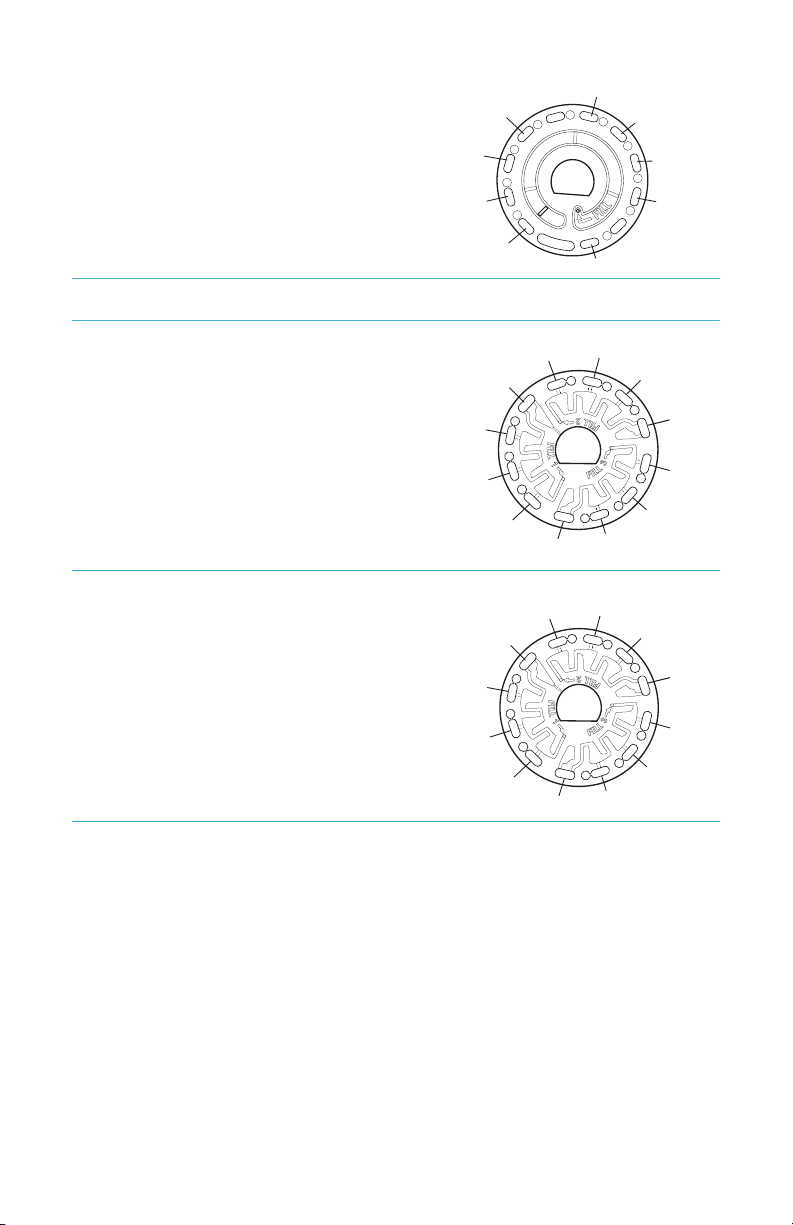
FILLING: Multiple-Use Disks
When the syringe is placed in the water sample, and the plunger is
pulled all the way up, the syringe will hold more than enough water
sample to adequately fi ll the disk. Hold the syringe vertically and
insert the tip into the fi ll hole in the disk. Press the plunger slowly and
FILLING
smoothly to fi ll the disk..
1. Fill any unused section of the disk using slow, even
pressure. Add the sample water until the Blank
Chamber is full and the Over Flow Chamber is partially
fi lled.
2. Do not overfi ll the disk. If the disk is overfi lled, sample
water will fl ow out of the vent hole in the center of the
disk. The disk is not leaking. Dry the disk and run the
test.
3. Do not under fi ll the disk. If the disk is under fi lled, the
blank chamber will not be full. The reagent chambers
will not fi ll entirely and results will be inaccurate.
Over Flow
Chamber
Blank
Chamber
Over Flow
Chamber
Blank
Chamber
Correct Fill
Over
Filled
(Dry disk before placing in meter)
Blank
Chamber
Under Filled
4. Do not introduce air bubbles into the disk. The reagent
chambers will not fi ll entirely and results will be
inaccurate. As soon as a bubble starts to form, pull
back on the plunger to draw the bubble out of the disk.
Begin the fi lling process again.
Air Bubble
5. Wet disks should be dried thoroughly with a lint free
wipe. Handle the disk by the edges. Between tests
store the disk on a fl at surface. Do not agitate a
partially fi lled disk to avoid leaking and contamination.
Partially used disks should be discarded at the end of
the day.
6. Disks should be fi lled and used within 10 minutes. They cannot be fi lled ahead of
time.
For fi lling and troubleshooting tips go to: www.lamotte.com/spin
6
Page 7

GENERAL OPERATING PROCEDURES
METER
When a fi lled disk is placed in the chamber and the lid is closed, the meter spins at high
speed to distribute the sample to the test wells. Next the meter slows to maximize the
pumping action of the stainless steel mixing beads as the reagents mix with the sample
water. Each reaction is then read at the proper time and wavelength for that reagent
system.
The button located in the lower center of the top of the meter turns the
instrument on and off .
The Blue indicator light of the on/off button indicates the status of the instrument.
Steady blue light – the blue LED will remain steady to indicate that the meter is on and
ready to run a test.
Blinking blue light (three blinks/second) – a test is in progress and the disk is spinning. Do
not open the lid when the disk is spinning.
Care should be taken when closing the lid. Do not slam the lid. Wiring between the lid and
the body of the photometer passes through the hinge. The meter will not run with the lid
open.
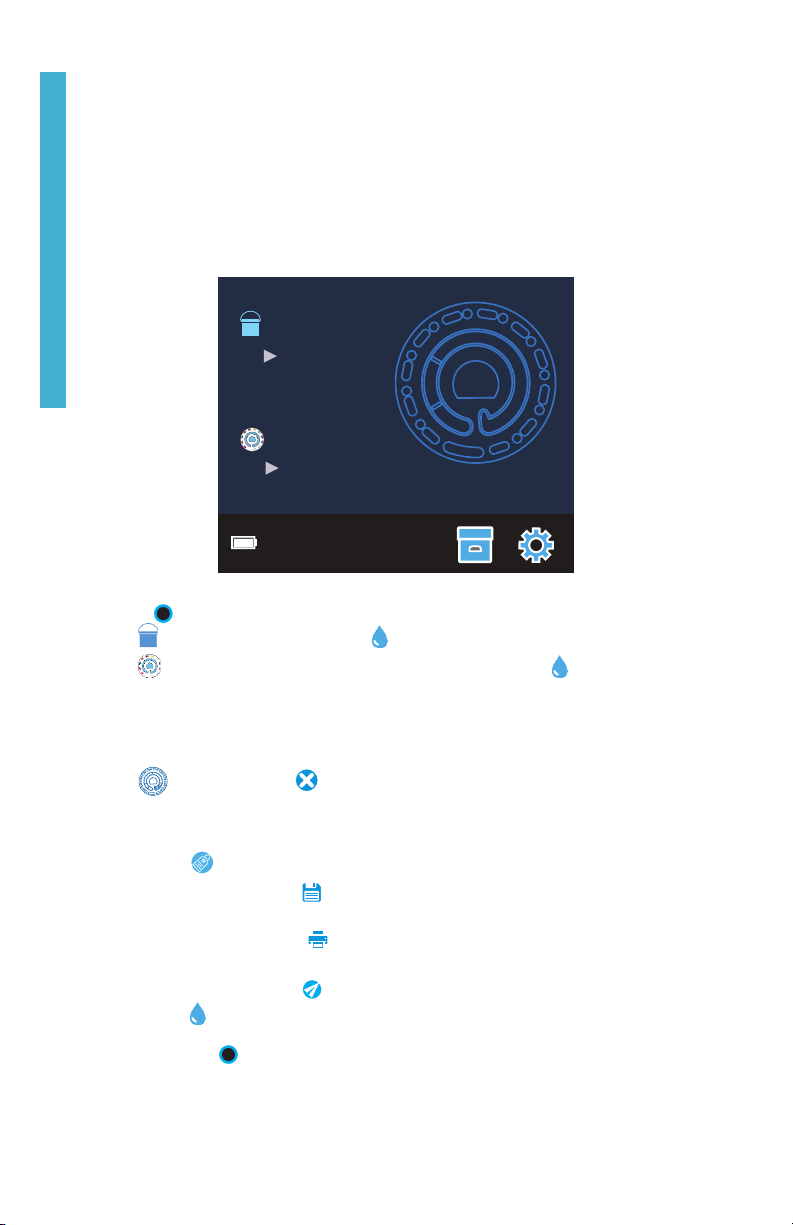
TOUCHSCREEN DISPLAY
When the button is pressed to turn the meter on, the Test Screen will be displayed.
GENERAL OPERATING PROCEDURES
Sanitizer
Selection
Start
Test
SaniƟzer
Disk
Type
Salt
Disk Series
Tap to
Start Test
203
Power/
Battery
Status
The display screen is touch-activated. To make a selection, tap the icon or word on the
screen with a fi ngertip, fi ngernail, pencil eraser, or stylus.
30-Oct-18
12:14 PM
Date &
Time
Test
Settings
History
7
Page 8
¬ Gently wipe smudges from the screen with the Cloth Wipe (3580-WIPE).
¬ Do not touch the screen with a sharp object.
¬ Do not place objects on the screen that will scratch or damage it.
¬ Avoid touching the screen with wet fi ngers.
TESTING
SaniƟzer
Salt
GENERAL OPERATING PROCEDURES
Tap to
Start Test
Disk Series
203
30-Oct-18
12:14 AM
1. Press and hold until the meter turns on.
2. Tap . Select a sanitizer type. Tap to confi rm.
3. Tap
4. Remove a disk from the packaging.
5. Use the syringe (1189) to fi ll the disk with the pool or spa water sample.
6. Insert the disk. Cover the disk with the Universal Disk Cover. Close the lid.
7. Tap
8. The results will be displayed.
9. Choose an option.
. Select a disk series (found on disk packaging). Tap to confi rm.
NOTE: Disk Series are limited by Sanitizer Type selection.
to start test. Tap to cancel the test.
¬ Tap
¬ Tap the highlighted
¬ Tap the hightlighted
¬ Tap the highlighted
¬ Tap
10. Press and hold
NOTE: For water samples over 100 °F (38 °C) subtract 0.3 from pH result or, for the most accurate
result, wait until water sample is below 90 °F (32 °C) to test.
to add a tag.
to save the test results to the test log if Auto Save is
not enabled.
to send the results to the enabled Mobile Bluetooth
Printer.
to send the results to a Bluetooth enabled device.
to return to the Test Screen.
for 2 seconds to turn the meter off .
8
Page 9

SAVE, PRINT, AND SEND TEST RESULTS
Test results can be saved, transferred to the WaterLink Connect mobile app via Bluetooth,
and sent to the Mobile Bluetooth Printer (Code 5-0066).
Test Results
Test Time 05:30:06 30-Oct-2018
FCL - 1.31
TCL - 1.31
CCL - 0.00
PH - 7.8
ALK - 100
HARD - 230
Save
Tagging
Results
CYA - 2
COPPER - 0.1
IRON - 0.1
PHOS - 0
SALT - 489
Print
Results
via
Bluetooth
Transfer
Results
via
Bluetooth
Return
to Test
Screen
Test History Settings
The WaterLink Spin Touch can log test results for 250 water samples in the Test History.
The results for the most recent sample will be located at the top of the list. All results can
be logged automatically or results for an individual sample can be logged after the sample
has been tested.
To turn on automatic logging, tap
and oto return to the test screen. When Auto Save is selected will not be
Tap
highlighted on the Test Results screen.
To manually log results for one sample at a time, Auto-Save Tests must be disabled. If
Auto-Save Tests is disabled
has been run, tap
to save the results for that water sample to the Test History.
A user defi ned identifi cation tag can be assigned to an individual sample result. The tag
can be up to 4 hexadecimal characters. It cannot begin with a zero. To tag a test result,
tap
on the bottom of the Test Results screen and use the buttons to enter up to four
characters. Tap
Results screen. Tap
to erase a character. Tap to save the tag and return to the Test
to return to the Test Results screen without saving the tag. The
tagged result will appear on the Test Results screen and the Test History screen. The tag
will be preceded by “T-“.
on the Test Screen. Tap . Select Auto-Save Tests.
will be highlighted on the Test Results screen. After the test
GENERAL OPERATING PROCEDURES
Test History
12:02A 30-Oct-2018 Salt 401
12:01A 30-Oct-2018 Salt 301
12:00A 30-Oct-2018 T-4650 Chlorine 100
12:00A 30-Oct-2018 Chlorine 300
11:57A 30-Oct-2018 T-ABC7 Chlorine 300
11:49A 30-Oct-2018 Biguanide 400
Select All/
De-Select All
View
Selected
Results
Delete
Selected
Results
History
Settings
Select
Auto Save
9
Home
Go to Top
Scroll up
or down
the test
list by 5
entries
Go to Bottom
Page 10
Logged results are viewed in Test History. Controls for viewing and managing single or
multiple test records are located on the Test History screen. Tap the checkbox next to a
test record to select it, then tap one of the buttons along the bottom to perform an action
with the selected records.
Print or Send Results to a Bluetooth Phone or Tablet
The WaterLink Spin Touch can print to the Mobile Bluetooth Printer or send test results to a
Bluetooth-enabled device such as a phone or a tablet. The highlighted
which function is active. The Spin Touch cannot connect to the printer and connect to a
phone or tablet at the same time.
There are two modes of operation for connecting to the printer and a phone or tablet – Fast
Printer Connect ON and Fast Printer Connect OFF. The default mode is Fast Printer Connect
ON. Fast Printer Connect can be turned on or off from the Bluetooth Menu that is located in
the Settings Menu.
If Fast Printer Connect is ON, the meter will connect immediately to the printer upon
GENERAL OPERATING PROCEDURES
recognizing it. It will also connect to a phone or tablet but priority is given to the printer
connection. The printer will start printing immediately when
in intensity while the printer is printing. Fast Printer Connect should be ON if results will
be printed more frequently than results will be sent to a phone or tablet. It can remain
selected if results will only be sent to a phone or tablet. If Fast Print Connect is ON, and the
printer is on, the printer will have to be turned off before results can be sent to a phone or
tablet.
If Fast Printer Connect is OFF, the meter has the opportunity to connect to a phone or
tablet at all times other than when the printer is actually printing a test. The meter will
connect to the printer only after
seconds while the connection to the printer is being established. The
intensity while the printer is printing. After printing, the meter will automatically reconnect
to the phone or tablet. Fast Printer Connect should be OFF if results will be sent to a phone
or tablet most frequently and printed less often.
has been tapped so printing will be delayed a few
is tapped. The will dim
or will show
will dim in
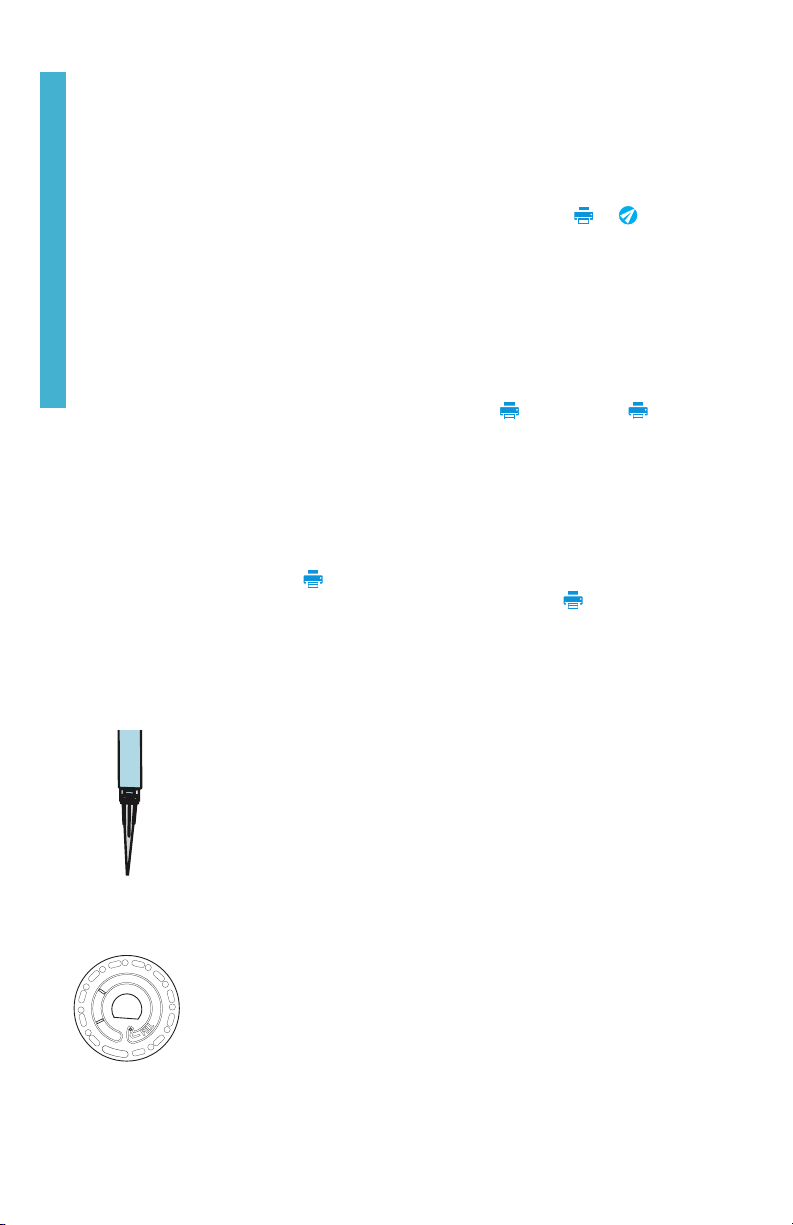
SYRINGE
REAGENT DISK
A plastic 3 mL syringe (Code 1189) is used to fi ll the disks. A precision
tip on the syringe fi ts into the fi ll hole on the disk. The syringe tip should
not be removed from the syringe. Syringes should be cleaned between
water samples. Pump air in and out of the syringe a few times to clear
the previous sample or rinse the syringe with a small amount of the
next water sample before fi lling it with the next sample.
The WaterLink® Spin Touch® uses a disk reagent system. The dried
reagents are packaged in single test amounts in a sealed, polystyrene
disk. Stainless steel mixing beads in the reaction chambers mix the
sample water and the dried reagents. Tests for all factors in the series
are performed at one time. It is not possible to isolate the well for a
single factor and perform a test for one test factor only. Single-use
disks contain reagents for a single series. Multiple-use disks contain
reagents for repetitions of a series. Disks should not be fi lled in the
meter chamber.
10
Page 11
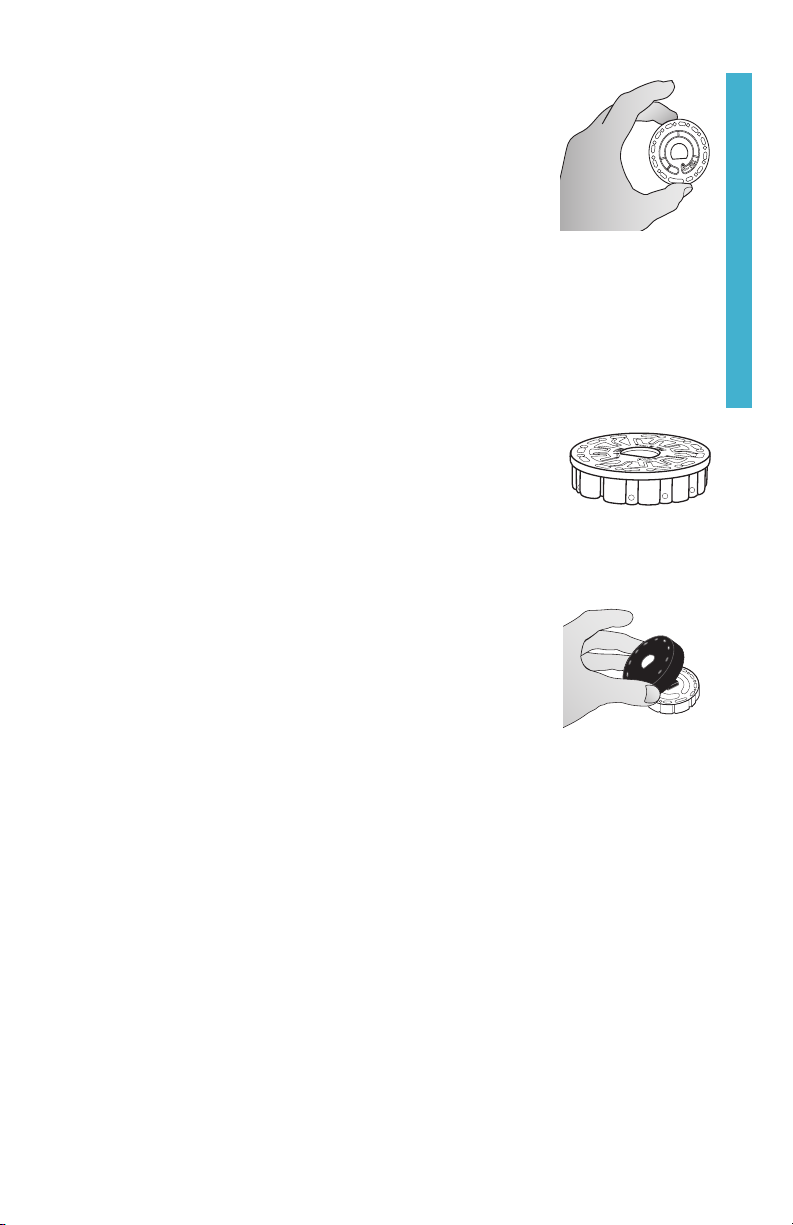
DISK HANDLING
The disk should be handled only by the edges. Avoid touching the
top or bottom of the disk. The light passes through the non-frosted
areas of the disk so these areas must be kept free of smudges and
fi ngerprints. Wet disks should never be placed in the meter. Wet
disks should be dried with a lint free cloth before placing them into
the chamber.
The disk is positioned in the chamber by aligning the D-shaped hole in the center of the
disk over the D-shaped hub in the photometer chamber. The disk should be placed gently
on the hub. There is no need to fi rmly press the disk down onto the hub.
DISK STORAGE
Disks are sensitive to moisture. Avoid opening more packs than are needed. Disks
have a limited shelf life and should not be exposed to the humidity in the air more than
necessary.
Between tests store multiple-use disks fl at. Do not agitate a
partially fi lled disk. It could leak or contaminate unused sections
of the disk. Multiple-use disks that are partially used should be
discarded at the end of the day. Do not transport the meter with a
disk in the chamber.
Store disks at 70-80 °F/21-27 °C. Disks with Salt reagent should be
stored and used at room temperature (68-74 °F/20-23 °C).
DISK COVER
The black disk cover is placed over the disk in the photometer
chamber to reduce interference from stray light. The disk cover is
positioned over the disk by aligning the D-shaped hole in the center
of the disk over the D-shaped hub in the photometer chamber. The
disk cover should be placed gently on the hub. There is no need
to fi rmly press the disk cover down onto the hub. The test will be
aborted if the disk cover is not used.
Only the Universal Disk Cover (Code 1719) that is included with the
WaterLink
®
Spin Touch® can be used with the multi-use disks.
GENERAL OPERATING PROCEDURES
METER CHECK DISK
The Meter Check Disk serves two purposes:
¬ When the Meter Check Disk (MCD) is run as an option from the Disk Series menu, the
values on the display are compared to the values on the chart on the Meter Check
Disk package to determine whether the meter is reporting results in the expected
ranges.
¬ If the Meter Check Disk is inserted in the meter and Rotary Calibration is chosen from
the Settings Menu, the alignment of the hub and disk is evaluated. The results are
analyzed and reported as Pass or Fail.
For use of the Meter Check Disk see page 14.
11
Page 12

USB CABLE
A USB cable connects the Waterlink® Spin Touch® to a Windows®-based PC. When used with
the AC Power Adapter, it connects the meter to an AC outlet.
WARNING: only use the USB cable and wall adapter that are supplied with the kit. Make no
substitutions.
BATTERY
A fully charged battery will last for approximately 150 tests under average conditions. The
battery life will vary based on usage patterns. The meter should be turned off after testing
to prolong the battery life. The standard life cycle of a lithium ion battery is 500 cycles.
The battery will fully charge in approximately 10-12 hours. The battery is designed to be
charged overnight and should be charged indoors only. The battery is rated at 12 V and 8.1
AH capacity. Power the meter from the battery pack or from AC power. The USB cable and
AC adapter are used to plug the meter into an AC outlet. WARNING: only use the AC adapter
GENERAL OPERATING PROCEDURES
supplied with this equipment. Do not substitute.
The battery charge status is indicated by the battery icon on the display. The
battery icon will indicate when the battery charge is full, partial, low, empty or
charging. The empty battery icon will fl ash to indicate that meter should be
connected to AC power source. If the meter continues to be used at low battery
power without connecting it an AC power source, the meter will go into an autoshutdown mode. In this mode the meter will be locked until meter is connected
to an AC source and the battery is charged to a suffi cient voltage.
While charging, the charging battery icon will be displayed. The meter should
remain plugged in until the battery is fully charged. When the battery is
completely charged, the charging icon will change to the full battery icon.
SETTINGS
Tap to enter the SETTINGS menu. Tap to return to the test screen at any time.
Brightness
Date/Time
Set Language
Calibration
Power
Options
Bluetooth
The brightness level of the display can be adjusted from 00 to 10. Tap and
to adjust the brightness. Tap to exit to the Settings menu.
The Year, Month, Day, Format, Hour, Minute, AM/PM can be set. Tap or
to adjust the displayed value. Tap to move to the next value. After the
last value has been chosen (minutes for 24 hour format, AM/PM for 12 hour
format) tap to return to the Settings menu. Tap to exit to the Settings
menu at any time.
There are ten language options – English, French, Italian, Portuguese,
Spanish, Chinese, German, Dutch, Swedish, Turkish. Tap selection. Tap to
exit to the Settings menu.
Tap to run an angle calibration to evaluate the alignment of the hub and disk.
Tap to exit to the Settings menu.
There are three power options: Auto Dim Time, Auto Off Time, and Power. Tap
the options then tap a selection. Tap selection. Tap to exit to the Settings
menu.
There are two Bluetooth options: Bluetooth Enabled and Fast Printer Connect
that are used to transfer and print test results. Tap to exit to the Settings
menu.
12
Page 13
Market Type
Other Settings
Tap to select the market type. Select Pool/Spa. Tap to exit to the Settings
menu.
About…lists the Serial Number, Firmware Version, Bluetooth MAC address,
Bluetooth Version and Test Count. The Test Count shows the number of
complete tests that have been performed over the lifetime of the meter. Tap
to return to the Settings menu.
Ranges Enabled allows the option of having test results that are out of range
of the reagent system displayed in red. The default setting is off .
When Show Market Type is selected, the market type will be displayed on the
Testing Screen. The default setting is OFF. Tap to return to the Settings
menu.
Select Disk Detection to display an error message and abort the test when
improper testing conditions, such as No Disk, No Disk Cover, Used Disk or
Meter Check Disk, are present that would result in inaccurate or no test
results. The default setting is OFF. Tap to return to the Settings menu.
TROUBLESHOOTING
TROUBLESHOOTING GUIDE
Problem Reason Solution
“No Disk, Test Aborted” No disk in chamber
Empty chamber
“No Disk Cover, Test
Aborted”
Disk cover was not used Use disk cover. Select OK. Start test.
Place fi lled disk in chamber. Cover
with disk cover. Select OK. Start test.
Insert fi lled disk. Cover with disk
cover. Select OK. Start test.
GENERAL OPERATING PROCEDURES
“Lid Open, Test Aborted” Lid opened Close lid. Select OK. Start test.
“Used Disk” Reacted disk in chamber Select “Continue” to go to Test
Meter Check Disk Meter Check Disk in chamber
“Source” appears on
test screen instead of
“Sanitizer”
!
on Test History
screen
Range Error Raw data out of range Contact Support
Output Error Decreased light intensity.
instead of reagent disk
Wrong Market Type was chosen Go to Settings. Change Market Type
Meter is using the default blank
due to under fi lled disk or air
bubble.
Possibly dirty lens
Results screen. Select “Abort” to go
to Testing screen and run test with
new disk.
Select “Continue” to go to Test
Results screen. Select “Abort” to go
to Testing screen and run test with
reagent disk.
to Pool/Spa
Solution: Fill disk correctly (see
FILLING)
Clean lens (see CLEANING). Follow
Range Check Procedure. If error
message persists, contact Support.
13
Page 14

High pH results Water sample temperature
MC
Salt results not as
expected
Disk not spinning Lid open, meter not powered
above 100 °F (38 °C) interferes
with pH reagent
Water sample not between
68-74 °F (20-23 °C). Sample
disk temperatures above or
below this will also cause
artifi cially low or high readings
respectively.
on, low battery, disk or disk
cover pressed down too tightly
on hub
GENERAL OPERATING PROCEDURES
Fast electrical transients may
disrupt operation of the Spin
Touch meter
Trouble connecting to
Bluetooth device
Trouble connecting to
computer by USB
Results not printing Printer not on
Bluetooth not enabled
Too many Bluetooth devices
near the meter
Printer power is ON and Fast
Printer Connection is ON
Broken connection Press and hold power button for 1
The Spin Touch will only print
to the Mobile Bluetooth Printer
(Code 5-0066)
For water samples over 100 °F
(38 °C) subtract 0.3 from pH result
or, for the most accurate result, wait
until water sample is below 90 °F
(32 °C) to test
Run salt test with sample water and
disk between 68-74 °F (20-23 °C).
Close lid, power on meter, charge the
battery or plug meter into a stable
power source, remove the disk/disk
cover and place back in the chamber
more gently
Restart the test to resume normal
operation
Enable Bluetooth
Have only one device near the meter
Turn printer power OFF. Or turn Past
Printer Connection OFF.
second.
Turn printer on
Connect to Mobile Bluetooth Printer
(Code 5-0066)
TROUBLESHOOTING WITH THE METER CHECK DISK
Do not attempt to separate the components of the Meter Check Disk (Code 1705). The
Meter Check Disk consists of a disk with a permanently attached cover.
Do not fi ll the Meter Check Disk with water. Water is not used during the meter check
procedure.
Range Check Procedure
The Meter Check Disk is used to verify the performance of a meter. It is not used to
recalibrate the meter. Meters are calibrated at the time of manufacture. The meter is
performing satisfactorily if readings using the Meter Check Disk are within the ranges
provided on the Meter Check Disk pouch. Range specifi cations are specifi c to the disk
identifi ed by the serial number on the pouch. The range specifi cations will vary from disk to
disk. The exact readings from a specifi c disk may vary from meter to meter.
1. Follow the Cleaning procedure on page 20 to clean the light chamber and optic lenses.
2. Tap
3. Tap MCD to select Meter Check Disk.
4. Tap
select Disk Series.
to return to the test screen.
14
Page 15

5. Remove the Meter Check Disk from the foil pouch. DO NOT remove the black cover
from the disk.
6. Insert the Meter Check Disk. Close the lid.
7. Tap
to start test.
8. Results will be displayed.
9. Compare the results on the display to the values on the chart shown on the pouch. If
the results are not within the range shown on the pouch, contact Support.
10. Replace the Meter Check Disk in the foil pouch for storage.
Alignment Procedure
The Meter Check Disk is inserted in the meter and Calibration is chosen from the Settings
Menu to perform an angle calibration which checks the alignment of the hub and disk. The
results are analyzed and reported as Pass or Fail. If the measurements pass, the settings
will be saved. If the analysis fails, contact Support.
1. Follow the Cleaning procedure on page 20 to clean the light chamber and optic lenses.
2. Tap
3. Tap Calibration.
4. Remove the Meter Check Disk from the foil pouch. DO NOT remove the black cover
5. Insert the Meter Check Disk. Close the lid.
6. Tap
7. If the meter is performing satisfactorily, “Angle Calibration Successful” will be
8. Tap
to go to Settings.
from the disk.
Start to begin the meter check procedure.
displayed and the settings will be saved. If the meter is not performing satisfactorily,
“Angle Calibration Unsuccessful. Contact Support.” will be displayed.
to return to the Testing Menu and resume testing.
email: softwaresupport@lamotte.com
phone: 800-344-3100 option 3 | Mon-Fri 9am-5pm EST
HELPFUL HINTS
¬ Do not touch top or bottom of disk. Handle disk by the edge.
¬ Do not fi ll disk while in the meter. Fill disk on clean, dry surface.
¬ Fill the disk on a dark surface to more easily see the sample water.
¬ The disk should not contain any large air bubbles. Air bubbles will result in erroneous
results.
¬ Always use the disk cover.
¬ Only the Universal Disk Cover (Code 1719) can be used with the WaterLink
Touch
®
.
¬ Empty syringe of old sample before fi lling with next sample.
¬ Remove fi lled disk from meter after testing. Do not travel with fi lled disks in meter.
They may leak.
15
®
Spin
Page 16

RANGES AND SPECIFICATIONS
Test Factor Range Test Factor Range
Alkalinity, Total 0–250 ppm Copper 0.0–3.0 ppm
Biguanide 0–70 ppm Cyanuric Acid 5–150 ppm
Biguanide Shock 0–250 ppm Hardness, Calcium 0–800 ppm
Borate 0–80 ppm Iron 0.0–3.0 ppm
Bromine (DPD) 0.00–33.00 ppm pH 6.4–8.6
Chlorine, Free (DPD) 0.00–15.00 ppm Phosphate 0–2000 ppb
Chlorine, Combined 0,00–15.00 ppm Salt 0–5000 ppm
Chlorine, Total (DPD) 0.00–15.00 ppm
Test results that are out of range of the reagent system wil be RED. RED test results may
not be accurate. Go SETTINGS>Other Settings to turn the Ranges Enabled feature OFF.
Copper concentrations over 4 ppm will result in low total hardness results.
Instrument Type Centrifugal Fluidics Photometer
Wavelengths
(interference fi lters)
Display Color Capacitive Touchscreen,
Wavelength Accuracy ±2 nm
Wavelength Bandwidth 10 typical
Photometric Range -2 to 2 AU
Photometric Precision ±0.01 AU at 1.0 AU
Photometric Accuracy ±0.01 AU at 1.0 AU
Sample Chamber Accepts prefi lled disk
Light Source 6 LEDS
Detectors 6 silicon photodiodes
Pre-Programmed Tests Yes, with automatic wavelength selection
Languages English, French, Spanish, German, Dutch, Swedish, Portuguese,
Temperature Operation: 0-50 °C; storage – 40-60 °C
Operation Humidity Range 0- 90 % RH, non-condensing
Communication USB-C, Bluetooth low energy technology (BLE)
Calibration Factory set, fi eld calibration via internet connection
Firmware Internet updateable (New Test, New Test Calibrations, etc.)
Software Android & iOS Apps, DataMate® Web, DataMate®10
Power Requirements USB wall adapter, USB computer connection or internal lithium ion
Battery Type Lithium ion
390 nm, 428 nm, 470 nm, 525 nm, 568 nm, 635 nm
3.5 in, 320 x 240 pixel resolution
Italian, Chinese, Turkish
rechargeable battery
16
Page 17

Minimum Capacity 12 V/2.6 AH
Charge Life Approximately 150 tests
Battery Life Approximately 500 charges
Full Charge 10-12 hours
Water Resistance Rubber over-molded base, rubber USB Port Plug, gasketed display
Electrical Rating Rated voltage (5V), Rated power of input current (1.6 A) at USB C
Auto Off Yes, default 15 (only with battery power)
Power Save Yes, default OFF
Data Logger 250 test results stored for download to PC or transfer by Bluetooth
Certifi cations
and hinge.
EZ-BLE™ PRoC™
Module,
CYBLE-022001-00
RF Radio:
EMC: EU: ETSI EN 301489-1
Safety: EU: EN61010-1:2010
FCC (USA):
Industry
Canada (IC)
Certifi cation:
CE (Europe): Complies with
MIC (Japan): 005-101007
KC (Korea): MSIP-CRM-
US: FCC PART 15 B
CAN ICES-3 (B)/NMB-3(B)
AS/NZS: CSPR 22
AS/NZS: national diff erences
FCC ID:
WAP2001
License IC:
7922A-2001
Directive
1999/5/EC
Cyp-2001
Dimensions 21.6 X 12.4 X 10.4 cm (L X W X H)
8.5 X 4.9 X 4.2 in
Weight 0.79 Kg, 1.74 lb
17
Page 18

ACCESSORIES AND REPLACEMENT PARTS
Description Code
®
WaterLink
Water Sample Bottle (60 mL) 0688
Water Sample Bottle (30 mL) 0689
Syringe with tips (3) 1189-3
Syringe tips (3) 1189-TIP
Cleaning Tissues 0669
Meter Check Disk (North America) 1705
Meter Check Disk (Europe) 1705-EU
Universal Disk Cover 1719
USB Cable 1712
AC Adapter (North America) 1713
AC Adapter (UK) 27252-PAD-UK
Cloth Wipe 3580-WIPE
Mobile Bluetooth Printer 5-0066
WaterLink
WaterLink
WaterLink
WaterLink
WaterLink
WaterLink
Spin Touch® Meter 1715-METER
®
Spin Touch® Counter Mat 3580-MAT
®
Spin Touch® Manual 3580-MN
®
Spin Touch® Quick Guide 3580-QG
®
Spin Touch® Quick Guide 3581-QG
®
Spin Touch® Banner 3580-BAN
®
Spin Touch® Window Decal 3580-DECAL
For available WaterLink
®
Spin Touch® reagent disks, see page 19.
18
Page 19

DISK DESCRIPTIONS
SINGLE USE DISKS
Chlorine/Bromine Disk
(Code 4328)
Free Chlorine
Bromine
Total Chlorine
Total Alkalinity
pH
Salt
Calcium Hardness
Copper
Iron
Cyanuric Acid
Alkalinity
Free Chlorine/
Bromine
Salt
pH
Copper
Calcium
Hardness
Blank
Total
Chlorine
Cyanuric
Acid
Iron
Chlorine/Bromine Plus Phosphate
10 Tests Series Disk
(Code 4329)
Free Chlorine
Bromine
Total Chlorine
Total Alkalinity
pH
Salt
Calcium Hardness
Copper
Iron
Cyanuric Acid
Phosphate
Chlorine/Bromine Plus Borate
10 Tests Series Disk
(Code 4330)
Free Chlorine
Bromine
Total Chlorine
Total Alkalinity
pH
Salt
Calcium Hardness
Copper
Iron
Cyanuric Acid
Borate
Alkalinity
Free Chlorine/
Bromine
Total
Alkalinity
Free Chlorine/
Bromine
Copper
Salt
pH
Copper
Salt
pH
Calcium
Hardness
Blank
Calcium
Hardness
Blank
Total
Chlorine
Cyanuric
Acid
Total
Chlorine
Cyanuric
Acid
Iron
Phosphate
Iron
Borate
NOTE: Colored reagents may be visible in the disk before adding sample water.
NOTE: Disks with Salt reagent should be stored and used at room temperature (68-74 °F/20-23 °C).
19
Page 20
Biguanide Plus Borate Disk
(Code 4331)
Biguanide
Biguanide Shock
Total Alkalinity
pH
Calcium Hardness
Copper
Iron
Borate
Copper
Biguanide
Calcium
Hardness
Biguanide
Shock
Total
Alkalinity
Iron
Borate
MULTIPLE-USE DISKS
Chlorine/Bromine/pH
(Code 4334)
pH
Free Chlorine
Bromine
Total Chlorine
Chlorine/Bromine/pH/Alkalinity
(Code 4335)
pH
Free Chlorine
Bromine
Alkalinity
Total
Chlorine
Free
Chlorine/
Bromine
Alkalinity
Free
Chlorine/
Bromine
Blank
Blank
pH
pH
pH
pH
Blank
pH
Blank
Blank
Free
Chlorine/
Bromine
Total
Chlorine
Free
Chlorine/
Bromine
Alkalinity
Total
Chlorine
Free
Chlorine/
Bromine
Alkalinity
Free
Chlorine/
Bromine
Blank
pH
Blank
pH
MAINTENANCE
CLEANING
The optical system of the WaterLink® Spin Touch® must be kept clean and dry for optimal
performance. Dry the disk with a lint-free wipe before placing it into the chamber to avoid
introducing moisture. For best results, store the instrument in an area that is dry and free
from aggressive chemical vapors. Clean the exterior housing with a damp, lint-free cloth.
Do not allow water to enter the light chamber or any other parts of the meter. To clean the
light chamber and optic lenses, point a can of compressed air into the light chamber and
the lid and blow the pressurized air into the light chamber and lid. Focus the pressurized
air around the LEDs which are the small round lenses positioned at 2:00, 4:00, 6:00, 8:00,
10:00 and 12:00 in the lid. The photodiodes are located on the bottom of the chamber
around the hub. This area must be kept clean and dry. Use a cotton swab dampened with
®
Windex
window cleaner to gently swab the LED and photodiode lenses. Do not use alcohol;
20
Page 21

it will leave a thin residue over the optics when dry.
Remove smudges due to routine use from the touchscreen with the Cloth Wipe
3580-WIPE). Use a cloth dampened with alcohol for more thorough cleaning when
necessary. Do not use Windex
®
window cleaner, or similar cleaners, on the touchscreen.
(Code
REPAIRS
Should it be necessary to return the meter for repair or servicing, pack the meter carefully
in a suitable container with adequate packing material. A return authorization number
must be obtained from LaMotte Company by calling 800- 344-3100, ext. 3 (US only) or
410-778-3100, ext. 3, faxing 410-778-6394, or emailing softwaresupport@lamotte.
com. Often a problem can be resolved over the phone or by email. If a return of the meter
is necessary, attach a letter with the return authorization number, meter serial number, a
brief description of problem and contact information including phone and FAX numbers
to the shipping carton. This information will enable the service department to make the
required repairs more effi ciently.
METER DISPOSAL
Waste Electrical and Electronic Equipment (WEEE)
Natural resources were used in the production of this equipment. This
equipment may contain materials that are hazardous to health and the
environment. To avoid harm to the environment and natural resources, the
use of appropriate take-back systems is recommended. The crossed out
wheeled bin symbol on the meter encourages the use of these systems
when disposing of this equipment.
Take-back systems will allow the materials to be reused or recycled in a
way that will not harm the environment. For more information on approved
collection, reuse, and recycling systems contact local or regional waste
administration or recycling services. Do not incinerate the equipment.
DISK DISPOSAL
The disks cannot be reused. Over time, the water in reacted disks will evaporate. Disks
can be recycled. Warning: Recyclers should check with the local authorities. Some states
may require that no chemical residue remains on the plastic or may not be able to accept
plastic waste with stainless steel mixing beads. Used disks may be returned, at the
customer’s expense, to LaMotte for recycling.
GENERAL INFORMATION
PACKAGING AND RETURNS
Experienced packaging personnel at LaMotte Company assure adequate protection against
normal hazards encountered in transportation of shipments. After the product leaves
the manufacturer, all responsibility for its safe delivery is assured by the transportation
company. Damage claims must be fi led immediately with the transportation company to
receive compensation for damaged goods. Should it be necessary to return the instrument
for repair or servicing, pack the instrument carefully in a suitable container with adequate
packing material. A return authorization number must be obtained from LaMotte Company
by calling 1-800-344-3100 or 1-410-778-3100, ext. 3 or emailing tech@lamotte. com.
Attach a letter with the authorization number to the shipping carton which describes the
kind of trouble experienced. This valuable information will enable the service department to
make the required repairs more effi ciently.
21
Page 22

GENERAL PRECAUTIONS
Read the instruction manual before attempting to set up or use the instrument. Failure to
do so could result in personal injury or damage to the meter. The WaterLink
should not be stored or used in a damp or excessively corrosive environment. Care should
be taken to prevent water or reagents from entering the photometer chamber. Wet disks
should never be put into the photometer chamber.
®
Spin Touch®
SAFETY PRECAUTIONS
Read the safety precautions on the labels of all reagent containers and packaging prior to
use. Safety Data Sheets (SDS) can be found at
information for all LaMotte reagents is available 24 hours a day from the National Poison
Control Center at 1-800-222-1222 or by contacting the 24 hour emergency line for
ChemTel at 1-800-255-3924 (USA, Canada, Puerto Rico). For locations outside of the
North American continent call 813-248-0585 collect.
Ensure that the protection provided by this equipment is not impaired. Do not install or use
this equipment in a manner that is not indicated in this manual.
www.lamotte.com. Additional emergency
LIMITS OF LIABILITY
Under no circumstances shall LaMotte Company be liable for loss of life, property, profi ts,
or other damages incurred through the use or misuse of its products.
CE MARK
The WaterLink® Spin Touch® meter has been independently tested and has earned the
European CE Mark of compliance for electromagnetic compatibility and safety. To view
certifi cates, go to the LaMotte website at
This device complies with Part 15 of the FCC rules. Operation is subject to the following
two conditions (1) This device may not cause harmful interference, and (2) this device
must accept any interference received, including interference that may cause undesired
operation.
Note: This equipment has been tested and found to comply with the limits for a Class B
digital device, pursuant to Part 15 of the FCC Rules. These limits are designed to provide
reasonable protection against harmful interference when the equipment is operated in a
residential environment. This equipment generates, uses, and can radiate radio frequency
energy and, if not installed and used in accordance with the instruction manual, may
cause harmful interference to radio communications. However, there is no guarantee that
interference will not occur in a particular installation. If this equipment does cause harmful
interference to radio or television reception, which can be determined by turning the
equipment off and on, the user is encouraged to try to correct the interference by one or
more of the following measures:
¬ Reorient or relocate the receiving antenna.
¬ Increase the separation between the equipment and receiver.
¬ Connect the equipment into an outlet on a circuit diff erent from that to which the
receiver is connected.
¬ Consult the dealer or an experienced radio/TV technician for help.
www.lamotte.com.
22
Page 23

NSF CERTIFICATION
The NSF/ANSI 50 certifi cation mark on a water quality testing device
(WQTD) used in recreational waters, such as pools and spas, means
that the product was reviewed and certifi ed by NSF International to
meet applicable American National Standards for product design and
performance. NSF tests and re-tests products to confi rm that they comply
with all requirements of certifi cation for performance, accuracy and
operating range. Certifi cation levels of L1, L2, and L3 are possible with L1
being the highest rating. Go to
Test Factor Application
pH Pool 6.4–8.6 L1
Spa/Hot Tub 6.4-8.6 L1
Free Chlorine Pool 0–15 ppm L1
Spa/Hot Tub 0–7 ppm L1
Chlorine,
Combined
Cyanuric Acid Pool 5–50 ppm L1
Other test factors not evaluated by NSF.
www.nsf.org for a current listing of LaMotte NSF certifi ed products.
Go to
See Disk Descriptions (page 19) for NSF Certifi ed Disks.
Pool 0-1 ppm L1
Spa/Hot Tub 0-1 ppm L1
www.nsf.org for more information.
NSF Level
NSF Certifi ed
Range
Accuracy/
Overall
WARRANTY
LaMotte Company warrants this instrument to be free of defects in parts and workmanship
for 2 years from the date of shipment. If it should become necessary to return the
instrument for service during or beyond the warranty period, contact our Technical Service
Department at 1-800-344-3100 or 1-410-778-3100, ext. 3 or softwaresupport@lamotte.
com for a return authorization number or visit
The sender is responsible for shipping charges, freight, insurance and proper packaging to
prevent damage in transit. This warranty does not apply to defects resulting from action
of the user such as misuse, improper wiring, operation outside of specifi cation, improper
maintenance or repair, or unauthorized modifi cation. LaMotte Company specifi cally
disclaims any implied warranties or merchantability or fi tness for a specifi c purpose and
will not be liable for any direct, indirect, incidental or consequential damages. LaMotte
Company’s total liability is limited to repair or replacement of the product. The warranty
set forth above is inclusive and no other warranty, whether written or oral, is expressed or
implied.
To register your meter with the LaMotte Service Department, go to
www.lamotte.com and choose SUPPORT on the top navigation bar.
Serial Number ______________________________________________________
www.lamotte.com for troubleshooting help.
23
Page 24

24
Page 25

CONFIGURACIÓN
ANTES DEL PRIMER USO
¬ Cargue completamente la batería con un cable USB Spin Touch y un adaptador
conectados a una toma de CA.
¬ Asegúrese de que está instalada la última versión de fi rmware de Spin Touch:
1. Descargue e instale la aplicación de escritorio WaterLink
Windows
2. Conecte el medidor al ordenador con el cable USB suministrado y abra la
aplicación de escritorio WaterLink
®
en http://softwarecenter.lamotte.com/.
®
Connect desde el menú Inicio.
3. Se aplicarán automáticamente al medidor las actualizaciones de fi rmware
disponibles.
MEDIDOR
1. El medidor se puede alimentar con una toma de corriente, un ordenador o la batería
interna.
2. Utilice el cable USB y el adaptador para conectar el medidor a una toma de corriente.
3. Utilice el cable USB para conectar el medidor al puerto USB de un ordenador.
CARGA DE LA BATERÍA
1. Use el cable USB y el adaptador para conectar el medidor a una toma de CA o use el
cable USB (incluido) con un cargador de coche (no incluido) para cargar la batería.
(Anker PowerDrive 2, DC 12/24V, 5V = 4.8A, n.
o
pieza A2310 recomendado.)
2. El icono de la batería de la pantalla indicará el estado de la batería. Cárguela hasta que
el indicador señale que está llena.
ACTUALIZACIONES DE FIRMWARE
De vez en cuando hay que actualizar el fi rmware del Spin Touch. Para hacerlo:
1. Visite
2. Conecte el Spin Touch al ordenador usando el cable USB suministrado,
3. abra la aplicación de escritorio WaterLink
Una vez fi nalizada, para mayor seguridad, cierre WaterLink
laboratorio. Tras actualizar el fi rmware se recomienda realizar el Proceso de alineación
descrito en la página 38.
http://softwarecenter.lamotte.com/ y descárguese la aplicación WaterLink®
Connect para Windows.
®
Connect y espere a que fi nalice la
actualización.
®
Connect y desconecte el
®
Connect para
CONFIGURACIÓN
CONEXIÓN AL PC
Cuando se conecta el WaterLink® Spin Touch® a un ordenador a través de USB, la pantalla
táctil del dispositivo se desactiva y el laboratorio se maneja a través de la aplicación
WaterLink
®
Connect para Windows®. Esta aplicación está disponible de forma gratuita en
http:// softwarecenter.lamotte.com/. Mediante la aplicación de escritorio WaterLink®
Connect, se pueden transferir los resultados del Spin Touch a un programa de análisis del
agua como WaterLink
®
Solutions™.
CONEXIÓN A DISPOSITIVO
El WaterLink® Spin Touch® es compatible con conexiones a un PC con Windows® (a través
de USB) y a dispositivos móviles Android e iOS (a través de Bluetooth).
25
CONEXIÓN AL PC
Page 26

CONEXIÓN A TRAVÉS DE USB
Mediante el uso del cable USB suministrado, puede conectarse el WaterLink® Spin Touch® a
un PC con sistema Windows
e instale de forma gratuita la aplicación para Windows
softwarecenter.lamotte.com
de USB, los controles de la pantalla táctil del dispositivo se desactivan y el fotómetro se
maneja a través de la aplicación WaterLink
programas de análisis del agua, como WaterLink
de los análisis y ofrecer recomendaciones detalladas de tratamiento. Obtenga más
información acerca de los productos de software de LaMotte en
lamotte.com
CONEXIÓN A DISPOSITIVO
.
®
. Antes de conectar un fotómetro a través de USB, descargue
®
WaterLink® Connect desde http://
. Cuando se conecta el WaterLink® Spin Touch® al PC a través
®
Connect. LaMotte también ofrece sólidos
®
Solutions™, para recoger los resultados
http://softwarecenter.
CONEXIÓN A TRAVÉS DE BLUETOOTH
El WaterLink® Spin Touch® puede conectarse a un dispositivo con Bluetooth habilitado,
como un teléfono o una tablet. El Spin Touch también es compatible con la impresora
Bluetooth de LaMotte [Código 5-0066]. No es compatible con otras impresoras Bluetooth.
La transferencia de resultados a través de Bluetooth a un dispositivo móvil requiere que
se instale una aplicación móvil en el dispositivo y una cuenta activa para el programa
de software asociado. Por ejemplo, con una cuenta activa de WaterLink
la aplicación móvil WaterLink
®
Solutions™ instalada en un teléfono o una tablet, pueden
transferirse los resultados del fotómetro a la aplicación. Las aplicaciones móviles para los
productos de software de LaMotte están disponibles en iTunes (para dispositivos iOS) y
Google Play (para dispositivos Android). Obtenga más información acerca de los productos
de software de LaMotte en
Para transferir los resultados del WaterLink
http://softwarecenter.lamotte.com.
®
Spin Touch® a la aplicación móvil para
productos de software de LaMotte:
1. Acceda a la aplicación móvil del producto de software LaMotte.
2. Busque un registro de un cliente o de un Sitio. Es posible que tenga que crear uno
antes de comenzar a realizar análisis.
3. Inicie un análisis del agua en la aplicación móvil.
4. Realice un análisis del agua desde la pantalla táctil del Spin Touch del dispositivo
como de costumbre. El Spin Touch y el dispositivo móvil con Bluetooth habilitado se
conectarán automáticamente.
5. Cuando la conexión esté disponible,
sea tenue, el fotómetro y el dispositivo no estarán conectados. Pulse
se iluminará en la pantalla táctil. Cuando
transferir los resultados a la aplicación móvil.
Cuando aparezca
móvil Bluetooth (Código 5-0066). El botón
en la pantalla táctil, el Spin Touch podrá conectarse a la impresora
será brillante cuando esté conectado y
tenue cuando no lo esté.
El Spin Touch no puede conectarse a ambos dispositivos móviles y a la impresora al mismo
tiempo. (Consulte el apartado Guardar, imprimir y enviar, página 31)
®
Solutions™ y
para
USO DE BLUETOOTH DE BAJA ENERGÍA
El WaterLink® Spin Touch® se conectará automáticamente al teléfono, la tablet o la
impresora con Bluetooth habilitado más cercano. No es necesario conectar el Spin Touch
a su dispositivo con Bluetooth habilitado. Las barreras de las señales inalámbricas pueden
reducir el rango de los dispositivos inalámbricos. El WaterLink Spin Touch funcionará mejor
si no hay paredes entre el fotómetro y los dispositivos receptores.
26
Page 27

LLENADO: discos de un solo uso
Cuando se introduce la jeringa en la muestra de agua y el émbolo
está arriba del todo, la jeringa contiene muestra de agua más
que sufi ciente para rellenar bien el disco. Sostenga la jeringa
verticalmente e inserte la punta en el orifi cio de llenado del disco.
Presione el émbolo lenta y suavemente para llenar el disco.
1. Llene el disco ejerciendo lentamente una
ligera presión. La muestra de agua llenará los
espacios entre los separadores en el sentido
contrario a las agujas del reloj. Cada espacio
se llenará de abajo hacia arriba. Añada más
agua de muestra hasta que la cuarta cámara
se llene de agua hasta arriba superando
ligeramente la línea de llenado marcada en
relieve. No pasa nada si se llena sobrepasando
un poco la línea.
2. No llene excesivamente el disco. Si llena el
disco en exceso, la muestra de agua saldrá
por el orifi cio de desbordamiento situado en
el centro del disco. El disco no gotea. Seque el
disco y ejecute el test.
3. No llene el disco por debajo del nivel indicado.
Si llena el disco por debajo del nivel adecuado,
las cámaras de reactivos no se llenarán por
completo y los resultados no serán precisos.
(Linea de
llenado)
Llenado correcto
Llenado
excesivo
(Seque el disco antes de ponerlo en el medidor.)
CONEXIÓN A DISPOSITIVO
Llenado
insuficiente
4. No llene el disco por debajo del nivel indicado.
Si llena el disco por debajo del nivel adecuado,
Cámara
vacía
la cámara vacía no se llenará. Tan pronto
como una burbuja comienza a formarse, tire
hacia atrás del émbolo para sacar la burbuja
del disco. Inicie de nuevo el proceso de
llenado.
5. Seque bien los discos húmedos con un trapo
sin pelusas. Agarre el disco por los bordes.
6. Llene el disco y úselo en los próximos 10 minutos. No llene discos con antelación.
Si quiere obtener consejos sobre llenado y resolución de problemas, visite:
www.lamotte.com/spin
27
Page 28

LLENADO: discos de múltiples usos
Cuando se introduce la jeringa en la muestra de agua y el émbolo está
arriba del todo, la jeringa contiene muestra de agua más que sufi ciente
para rellenar bien el disco. Sostenga la jeringa verticalmente e inserte
LLENADO
la punta en el orifi cio de llenado del disco. Presione el émbolo lenta y
suavemente para llenar el disco.
1. Llene las secciones no utilizadas del disco ejerciendo
lentamente una ligera presión. Añada la muestra de
agua hasta que la Cámara vacía se llene y la Cámara
de fl ujo excesivo se llene parcialmente.
2. No llene excesivamente el disco. Si llena el disco en
exceso, la muestra de agua saldrá por el orifi cio de
purga situado en el centro del disco. El disco no gotea.
Seque el disco y ejecute el test
3. No llene el disco por debajo del nivel indicado. Si llena
el disco por debajo del nivel adecuado, la cámara vacía
no se llenará. Tan pronto como una burbuja comienza
a formarse, tire hacia atrás del émbolo para sacar
la burbuja del disco. Inicie de nuevo el proceso de
llenado.
4. No introduzca burbujas de aire en el disco. Las
cámaras de reactivos no se llenarán por completo y
los resultados no serán precisos. Retire la muestra de
agua con la jeringa y rellene.
Cámara
de flujo
excesivo
Cámara
vacía
Llenado correcto
Cámara
de flujo
excesivo
Cámara
vacía
Llenado excesivo
(Seque el disco antes de ponerlo en el medidor.)
Cámara
vacía
Llenado insuficiente
Burbuja
de aire
5. Seque bien los discos húmedos con un trapo sin
pelusas. Agarre el disco por los bordes. Entre prueba
y prueba almacene el disco sobre una superfi cie
plana. No agite el disco lleno para evitar que gotee y
se contamine. Los discos parcialmente usados deben
descartarse al fi nal del día.
6. Llene el disco y úselo en los próximos 10 minutos. No llene discos con antelación.
Si quiere obtener consejos sobre llenado y resolución de problemas, visite: www.lamotte.com/spin
28
Page 29

PROCEDIMIENTOS DE FUNCIONAMIENTO GENERAL
MEDIDOR
Cuando se coloca un disco lleno en la cámara y se cierra la tapa, el medidor gira a alta
velocidad para distribuir la muestra a los depósitos de prueba. A continuación, el medidor
maximiza la acción de bombeo de las perlas de acero inoxidable al mismo tiempo que los
reactivos se mezclan con el agua de la muestra. Entonces se lee cada reacción a su debido
momento y en la longitud de onda oportuna para ese sistema de reactivos.
El botón situado en la parte central inferior de la parte superior del
medidor enciende y apaga el instrumento.
El indicador luminoso azul del botón de encendido/apagado señala el estado del
instrumento.
Luz azul fi ja: la LED azul permanecerá fi ja para indicar que el medidor está encendido y
listo para realizar un análisis.
Luz azul intermitente (tres parpadeos/segundo): hay un análisis en marcha y el disco está
girando. No abra la tapa cuando el disco esté girando.
Tenga cuidado al cerrar la tapa. No la cierre de golpe. Los cables que conectan la tapa con
el cuerpo del fotómetro pasan por la bisagra. El medidor no funcionará con la tapa abierta.
PANTALLA TÁCTIL
Al pulsar el botón para encender el medidor, se muestra la pantalla Test.
LLENADO
Selección del tipo
de desinfectante
Iniciar
el test
Desinfectante
Sal
Tipo de
disco
Encendidoapagado/
Estado de
la batería
La pantalla se activa al tocarla. Para hacer una selección, pulse el icono o la palabra en
pantalla con la punta de un dedo, una uña, una goma de un lápiz o un lápiz óptico.
¬ Limpie suavemente las manchas de la pantalla con la toallita (3580-WIPE).
Disco
203
30-Oct-18
12:14 PM
Fecha y
hora
29
Pulse para
Iniciar análisis
Historial
de tests
Ajustes
Page 30

¬ No limpie la pantalla con un objeto afi lado.
g
g
g
g
¬ No coloque sobre la pantalla objetos que la puedan rayar o dañar.
¬ Evite tocar la pantalla con los dedos mojados.
ANÁLISIS
Desinfectante
Sal
Pulse para
iniciar análisis
Disco
203
PROCEDIMIENTOS DE FUNCIONAMIENTO GENERAL
1. Mantenga pulsado hasta que se encienda el medidor.
2. Pulse
3. Pulse
Pulse
NOTA: las series de discos están limitadas por la selección del tipo de desinfectante.
4. Extraiga un disco del embalaje.
5. Use la jeringa (1189) para llenar el disco con una muestra de agua de la piscina o spa.
6. Inserte el disco. Cubra el disco con la Cubierta de disco universal. Cierre la tapa.
7. Pulse
8. Aparecerán los resultados en pantalla.
9. Elija una opción.
10. Mantenga pulsado
NOTA: para muestras de agua de más de 100 °F (38 °C) restar 0,3 al resultado del pH o, para un
resultado más preciso, esperar hasta que la muestra de agua esté por debajo de 90 °F (32 °C) para
realizar la prueba.
. Seleccione el tipo de desinfectante. Pulse para confi rmar.
. Seleccione una serie de discos (la encontrará en el embalaje del disco).
para confi rmar.
para iniciar test. Pulse para cancelar test.
¬ Pulse
¬ Pulse
cuando no esté habilitada la opción de Guardado automático.
¬ Pulse
¬ Pulse
habilitado.
¬ Pulse
30-Oct-18
12:14 AM
para añadir una etiqueta.
resaltado para guardar los resultados del análisis en el registro
resaltado para enviar los resultados a la impresora móvil Bluetooth.
resaltado para enviar los resultados al dispositivo con Bluetooth
para regresar a la pantalla Test.
durante 2 segundos para apagar el medidor.
30
Page 31

GUARDAR, IMPRIMIR Y ENVIAR RESULTADOS DEL TEST
Los resultados del test pueden guardarse, transferirse a la aplicación móvil WaterLink
Connect a través de Bluetooth y enviarse a la impresora móvil Bluetooth (Código 5-0066).
Resultados
Tiempo de prueba 05:30:06 04-Jan-2018
FCL - 1,31
TCL - 1,31
CCL - 0.00
PH - 7,8
ALK - 100
HARD - 230
CYA - 2
COPPER - 0,1
IRON - 0,1
PHOS - 0
SAL T- 489
PROCEDIMIENTOS DE FUNCIONAMIENTO GENERAL
Etiquetas
Guardar
los
resultados
Imprimir
resultados
a
través de
Bluetooth
Transferir
esultados a
través de
Bluetooth
los
Volver
a la
pantalla
Test
Ajustes del historial de análisis
El WaterLink Spin Touch puede guardar resultados de test de 250 muestras de agua en
el Historial de tests. Los resultados de la muestra más reciente se situarán en la parte
alta de la lista. Pueden guardarse automáticamente todos los resultados o guardarse los
resultados de una sola muestra después de haberla analizado.
Para activar el guardado automático, pulse
Guardar tests automáticamente. Pulse
está seleccionado el guardado automático, el icono de
resultados del test.
Para guardar manualmente los resultados de una sola muestra cada vez, la función
Guardar análisis automáticamente debe estar desactivada. Si la opción Guardar test
automáticamente está desactivada, el icono de
test. Después de haber realizado el test, pulse
muestra de agua en el Historial de tests.
Se puede asignar una etiqueta de identifi cación defi nida por el usuario al resultado de
una sola muestra. La etiqueta puede tener hasta 4 caracteres hexadecimales. No puede
comenzar con un cero. Para etiquetar el resultado de un análisis, pulse
inferior de la pantalla Resultados del análisis y utilice los botones para introducir hasta
cuatro caracteres. Toque
para borrar un carácter. Pulse para guardar la etiqueta y
volver a la pantalla Resultados del análisis. Pulse
del análisis sin guardar la etiqueta. El resultado etiquetado aparecerá en la pantalla
Resultados del análisis y en la pantalla Historial de análisis. La etiqueta irá precedida por
«T-».
en la pantalla de tests. Pulse . Seleccione
y para regresar a la pantalla de tests. Cuando
no brillará en la pantalla de
brillará en la pantalla de resultados del
para guardar los resultados para dicha
en la parte
para volver a la pantalla Resultados
31
Page 32

Historial
12:02A 30-Oct-2018 Sal 401
12:01A 30-Oct-2018 Sal 301
12:00A 30-Oct-2018 T-4650 Chloro 100
12:00A 30-Oct-2018 Chloro 300
11:57A 30-Oct-2018 T-ABC7 Chloro 300
11:49A 30-Oct-2018 Biguanidas 400
Ir al principio
Subir o bajar
5 entradas
en la lista
de tests
Ir al final
Seleccionar
todos/
Desmarcar
todos
Los resultados guardados se muestran en el Historial de tests. Los controles para
PROCEDIMIENTOS DE FUNCIONAMIENTO GENERAL
visualizar y gestionar uno o varios registros de tests simultáneamente están situados
Borrar los
resultados
seleccionados
Ver los
resultados
seleccionados
Ajustes del
historial
Seleccionar
Guardado
automático
Inicio
en la pantalla Historial de tests. Pulse la casilla situada junto a un registro de test para
seleccionarlo, después pulse uno de los botones situados en la parte inferior para realizar
una acción con los registros seleccionados.
Imprimir o enviar resultados al teléfono o la tablet con Bluetooth
El WaterLink Spin Touch puede imprimir a través de la impresora móvil Bluetooth o enviar
los resultados del test a un dispositivo equipado con Bluetooth, como un teléfono o una
tablet. Los botones brillantes
puede conectarse a la impresora y a un teléfono o una tablet al mismo tiempo.
Hay dos modos de funcionamiento para conectarse a la impresora y a un teléfono o una
tablet: Conexión rápida a impresora ON y Conexión rápida a impresora OFF. El modo que
viene por defecto es Conexión rápida a impresora ON. La Conexión rápida a impresora
puede activarse o desactivarse desde el menú Bluetooth situado en el Menú de Ajustes.
Si la Conexión rápida a impresora está ON, el medidor se conectará automáticamente a la
impresora en cuanto la reconozca. También se conectará al teléfono o la tablet, pero se da
prioridad a la conexión a la impresora. La impresora comenzará a imprimir de inmediato
en cuanto pulse
. El botón atenuará la intensidad mientras la impresora imprime.
La Conexión rápida a impresora debería estar ON si los resultados se van a imprimir con
más frecuencia que con la que se van a enviar al teléfono o la tablet. Puede permanecer
seleccionada si los resultados solo se van a enviar a un teléfono o una tablet. Si la Conexión
rápida a impresora está ON, y la impresora está encendida, deberá apagar la impresora
antes de que los resultados puedan enviarse a un teléfono o una tablet.
Si la Conexión rápida a impresora está OFF, el medidor podrá conectarse a un teléfono o
una tablet en cualquier momento salvo que la impresora esté imprimiendo un test en ese
momento. El medidor se conectará a la impresora únicamente después de que se pulse
, así que la impresión se retrasará unos segundos mientras se establece la conexión
con la impresora. El botón
Después de imprimir, el medidor volverá a conectarse automáticamente con el teléfono o
la tablet. La Conexión rápida a impresora debería estar OFF si los resultados se van a enviar
a un teléfono o tableta con más frecuencia que con la que se van a imprimir.
o mostrarán qué función está activa. El Spin Touch no
atenuará la intensidad mientras la impresora imprime.
32
Page 33

JERINGA
Para rellenar los discos se utiliza una jeringa de 3 ml de plástico
(código 1189). La punta de precisión de la jeringa encaja en el
agujero de rellenado del disco. No se debe extraer la punta de la
jeringa. Se deben limpiar las jeringas entre distintas muestras de
agua. Bombee aire dentro y fuera de la jeringa unas cuantas veces
para limpiar la anterior muestra o aclare la jeringa con una pequeña
cantidad de la siguiente muestra de agua antes de rellenarla con
esta.
DISCO DE REACTIVOS
El WaterLink® Spin Touch® utiliza un sistema de discos reactivos. Los
reactivos secos se envasan en cantidades para tests individuales
en un disco de poliestireno sellado. Unas perlas de acero inoxidable
colocadas en las cámaras reactivas mezclan el agua de la muestra
con los reactivos secos. Así se realizan los tests de todos los factores
de la serie de una vez. No es posible aislar el depósito de un único
factor y realizar un test sólo de dicho factor. Los discos de un solo uso
contienen reactivos para una serie única. Los discos de múltiples usos
contienen reactivos para repetir una serie. No se deben rellenar los
discos en la cámara del medidor.
MANIPULACIÓN DE DISCOS
Maneje el disco por los extremos. Evite tocar la parte superior o
inferior del disco. La luz pasa a través de las zonas no escarchadas
del disco, por lo que hay que mantener estas zonas libres de
manchas y huellas. Nunca se deben poner discos mojados en el
medidor. Habrá que secarlos con un trapo sin pelusas antes de
ponerlos en la cámara.
El disco se coloca en la cámara alineando el agujero con forma de D en el centro del disco
con el eje en forma de D en la cámara del fotómetro. Hay que colocar suavemente el disco
en el eje. No es necesario apretar con fuerza el disco para encajarlo.
PROCEDIMIENTOS DE FUNCIONAMIENTO GENERAL
ALMACENAMIENTO DE DISCOS
Los discos son sensibles a la humedad. Evite abrir más paquetes de los necesarios. Los
discos tienen una vida útil limitada y no conviene exponerlos a la humedad del aire más
de lo necesario.
Entre pruebas, guarde los discos de múltiples usos en
posición horizontal. No agite un disco parcialmente llenado.
Podría tener una fuga o contaminar las secciones sin usar
del disco. Los discos de múltiples usos que se hayan utilizado
parcialmente deberán ser descartados al fi nal del día. No
desplace el medidor con un disco en la cámara.
Almacene los discos a 70 °-80 ° F / 21 °-27 ° C. Los discos
con el reactivo Sal deben guardarse y utilizarse a temperatura
ambiente (68-74 °F/20-23 °C).
33
Page 34

CUBIERTA DEL DISCO
La cubierta negra del disco se coloca sobre el disco en la cámara
del fotómetro para reducir la interferencia de la luz exterior. La
cubierta del disco se coloca sobre este alineando el agujero con
forma de D en el centro del disco con el eje en forma de D en la
cámara del fotómetro. Hay que colocar suavemente la cubierta
del disco en el eje. No es necesario apretar con fuerza la cubierta
del disco para encajarla. La prueba se detendrá si no se coloca la
cubierta del disco.
Únicamente se puede utilizar la Cubierta de disco universal
(código 1719) que se incluye con el WaterLink
los discos de múltiples usos.
®
Spin Touch® con
DISCO DE COMPROBACIÓN DEL MEDIDOR
El Disco de comprobación del medidor cumple dos funciones:
¬ Cuando se procesa el Disco de comprobación del medidor (MCD) como una opción
del menú Serie de discos, los valores en pantalla se comparan con los valores de la
gráfi ca en el envase del Disco de comprobación para determinar si el medidor está
transmitiendo resultados que se ajustan a los intervalos previstos.
PROCEDIMIENTOS DE FUNCIONAMIENTO GENERAL
¬ Si el Disco de comprobación del medidor se inserta en el medidor y se elige
Calibración rotativa en el menú Ajustes, se evalúa la alineación del eje y el disco. Los
resultados se analizan y notifi can como «Correcto» o «Incorrecto».
Para utilizar el Disco de comprobación del medidor, véase la página 38.
CABLE USB
Un cable USB conecta el Waterlink® Spin Touch® a un PC con Windows®. Cuando se utiliza el
adaptador para CA, se conecta el medidor a un enchufe de CA.
ADVERTENCIA: utilice únicamente el cable USB y el adaptador de pared suministrados con
el kit. No lo cambie por otro.
BATERÍA
Una batería totalmente cargada durará unos 150 tests en condiciones normales. La
vida de la batería variará en función de los patrones de uso. Para alargar la vida de
la batería, hay que apagar el medidor después de realizar los análisis. El ciclo de vida
normal de una batería de litio-ión es de 500 ciclos. La batería se cargará por completo en
aproximadamente 10-12 horas. La batería está diseñada para que se cargue durante la
noche y solo se debe cargar en interiores. La batería está clasifi cada como de 12 V y tiene
una capacidad de 8,1 AH. Alimente el medidor desde el pack de la batería o desde una
fuente de CA. El cable USB y el adaptador para CA se utilizan para conectar el medidor a
una toma de CA. ADVERTENCIA: utilice únicamente el adaptador para CA suministrado con
el equipo. No lo cambie.
El estado de carga de la batería se indica a través del icono de la batería de la
pantalla. Dicho icono indicará cuándo la batería está llena, parcialmente llena,
baja, vacía o cargándose. El icono de la batería vacía parpadeará para indicar que
se debe conectar el medidor a una fuente de CA. Si continúa usando el medidor
con la batería baja y sin conectarlo a un enchufe de CA, el medidor pasará a un
modo de apagado automático. En este modo, el medidor se bloqueará hasta que
se conecte a una fuente de CA y la batería se cargue con un voltaje sufi ciente.
Durante la carga, en pantalla se mostrará el icono de la batería cargándose. El
medidor deberá permanecer enchufado hasta que se cargue del todo. Cuando la
batería esté cargada, el icono de carga pasará a ser el icono de batería llena.
34
Page 35

AJUSTES
Pulse para acceder al menú Ajustes. Pulse para regresar a la pantalla Test en
cualquier momento.
PROCEDIMIENTOS DE FUNCIONAMIENTO GENERAL
Brillo
Fecha/Hora Puede ajustar el año, el mes, el día, el formato, la hora, el minuto y AM/
Selección
de idioma
Calibración Pulse para realizar una calibración de ángulo para evaluar la alineación del
Opciones
de
encendido/
apagado
Bluetooth Existen dos opciones de Bluetooth: Bluetooth activado y Conexión rápida a
Tipo de
mercado
El nivel de brillo de la pantalla se puede ajustar de 00 a 10. Pulse
para ajustar el brillo. Pulse para salir del menú Ajustes.
PM. Pulse
siguiente valor. Después de haber elegido el último valor (minutos en el caso
del formato 24 horas, AM/PM en el caso del formato de 12 horas), pulse
para volver al menú Ajustes. Pulse para salir del menú Ajustes en
cualquier momento.
Puede elegir entre diez idiomas: inglés, francés, español, alemán, neerlandés,
sueco, portugués, italiano, turco, y chino. Pulse el que prefi era. Pulse
salir del menú Ajustes.
eje y el disco. Pulse para salir del menú Ajustes.
Existen tres opciones de Encendido/Apagado: Hora de atenuación
automática, Hora de apagado automático y Ahorro de energía. Pulse las
opciones y después elija una. Pulse la que prefi era. Pulse
menú Ajustes.
la impresora, que se usan para transferir e imprimir los resultados del test.
Pulse para salir del menú Ajustes.
Pulse para seleccionar el tipo de mercado. Seleccione Piscina/Spa Pulse
para salir del menú Ajustes.
o para ajustar el valor mostrado. Pulse para pasar al
y
para
para salir del
35
Page 36

Otros
ajustes
Indica el Número de serie, la Versión de fi rmware, la dirección Bluetooth MAC,
la Versión Bluetooth y el Número de pruebas. El Número de pruebas muestra
el número de pruebas completas que se han realizado durante el ciclo de vida
del fotómetro. Pulse para volver al menú Ajustes.
La opción Rangos activados permite obtener los resultados de análisis que se
encuentran fuera del rango del sistema de reactivos mostrados en rojo. Esta
opción está desactivada por defecto.
Cuando se selecciona Mostrar tipo de mercado, en la Pantalla de análisis
aparecerá el tipo de mercado. Por defecto, esta opción está desactivada
(OFF). Pulse
para volver al menú de confi guración.
Seleccione Detección de disco para mostrar un mensaje de error y abortar el
análisis si las condiciones no son las adecuadas. Por ejemplo, si se muestra
un mensaje de No hay disco, No hay cubierta, Disco usado o Disco de
comprobación del fotómetro, los resultados del análisis serían imprecisos o
no se mostrarían. La confi guración predeterminada está desactivada. Pulse
para Volver al menú de confi guración.
RESOLUCIÓN DE INCIDENCIAS
GUÍA DE RESOLUCIÓN DE INCIDENCIAS
Problema Motivo Solución
«Sin disco, prueba
abortada»
«Sin cubierta, prueba
aborta»
No hay ningún disco en la cámara
Cámara vacía
Falta la cubierta del disco Coloque la cubierta del disco.
Coloque un disco lleno en la
cámara. Coloque la cubierta del
disco. Seleccione OK. Inicie el
análisis.
Coloque un disco lleno. Coloque la
cubierta del disco. Seleccione OK.
Inicie el análisis.
Seleccione OK. Inicie el análisis.
«Tapa abierta, prueba
abortada»
«Disco usado» El disco de la cámara ya ha sido
Disco de
comprobación del
medidor
en la pantalla
!
Historial de análisis
Error de rango Datos fuera de rango Contacte con Soporte
Tapa abierta Cierre la tapa. Seleccione OK. Inicie
utilizado
El disco que hay en la cámara es un
disco de verifi cación en lugar de un
disco de reactivos
El fotómetro usa el espacio en
blanco por defecto debido a que
el disco está por debajo del nivel
adecuado o existe una burbuja de
aire.
el análisis.
Seleccione «Continuar» para
acceder a la pantalla de los
resultados del análisis. Seleccione
«Abortar» para acceder a la
pantalla de análisis e iniciar el
análisis con el nuevo disco.
Seleccione «Continuar» para
acceder a la pantalla de los
resultados del análisis. Seleccione
«Abortar» para acceder a la
pantalla de análisis e inicie el
análisis con un disco de reactivos.
Llene el disco correctamente
(consulte LLENADO)
36
Page 37

Error de salida Disminución de la intensidad de la
En la pantalla Test
aparece «Fuente»
en lugar de
«Desinfectante»
Resultados de pH alto Una temperatura de la muestra de
Los resultados de
la sal no son los
esperados
El disco no gira La tapa está abierta, el medidor no
Problemas para
conectarse al
dispositivo Bluetooth
Problemas para
conectar con el
ordenador por USB
No se imprimen los
resultados
luz. Posiblemente la lente esté sucia
Se ha elegido el tipo de mercado
equivocado
agua superior a 100 °F
(38 °C) interfi ere con el reactivo
de pH.
La muestra de agua no está
entre 20-23 °C (68-74 °F). Si
las temperaturas del disco de la
muestra son superiores o inferiores
a este intervalo, provocarán lecturas
artifi cialmente bajas o altas, según
corresponda
está encendido, la batería está baja,
el disco o la cubierta del disco se ha
apretado demasiado al eje
Las perturbaciones transitorias
eléctricas rápidas pueden afectar
al funcionamiento del medidor Spin
Touch
El Bluetooth no está activado
Demasiados dispositivos Bluetooth
cerca del medidor
La impresora está ON y la Conexión
rápida a impresora también está ON.
Conexión interrumpida Mantenga pulsado el botón de
La impresora no está conectada
El Spin Touch solo imprimirá
a través de la impresora móvil
Bluetooth (Código 5-0066).
Limpie la lente (consulte LIMPIEZA).
Siga el Procedimiento de
comprobación de rango. Si persiste
el mensaje de error, contacte con
Soporte.
Vaya a Ajustes. Cambie el tipo de
mercado a Piscina/Spa
Para muestras de agua de más
de 100 °F (38 °C) restar 0,3
al resultado del pH o, para un
resultado más preciso, esperar
hasta que la muestra de agua esté
por debajo de 90 °F (32 °C) para
realizar la prueba
Realice el test con el agua de la
muestra y el disco a entre 20-23 °C
(68-74 °F).
Cierre la tapa, encienda el medidor,
cargue la batería o conecte el
medidor a una fuente estable de
energía, retire el disco o la cubierta
y vuelva a colocarlos en la cámara
más suavemente
Reinicie el test para reanudar el
funcionamiento normal
Activar Bluetooth
Solo hay un dispositivo cerca del
medidor
Desactive la impresora (OFF). O
desactive la Conexión rápida a la
impresora (OFF).
encendido durante 1 segundo
Conecte la impresora
Conecte la impresora móvil
Bluetooth (Código 5-0066)
37
Page 38

RESOLUCIÓN DE INCIDENCIAS CON EL DISCO DE COMPROBACIÓN DEL
p
p
MEDIDOR
No intente separar los componentes del Disco de comprobación del medidor (código
1705). El Disco de comprobación del medidor se compone de un disco con una cubierta
permanente incorporada.
No llene el Disco de comprobación del medidor de agua. No use agua durante el proceso
de comprobación del medidor.
Procedimiento de comprobación de rango
El Disco de comprobación del medidor se usa para verifi car el rendimiento del medidor.
No se usa para recalibrar el medidor. Los medidores se calibran en el momento de su
fabricación. El medidor tiene un rendimiento satisfactorio si las lecturas obtenidas usando
el Disco de comprobación del medidor están dentro de los rangos facilitados en el estuche
del Disco de comprobación del medidor. Las especifi caciones de rango son específi cas
del disco identifi cado mediante el número de serie que aparece en el estuche. Las
especifi caciones de rango variarán de un disco a otro. Las lecturas exactas de un mismo
disco pueden variar de un medidor a otro.
1. Siga el procedimiento de limpieza de la página 44 para limpiar la cámara de luz y las
lentes ópticas.
2. Pulse
3. Pulse MCD para seleccionar Disco de comprobación del medidor.
4. Pulse
5. Retire el Disco de comprobación del medidor del estuche de aluminio. NO retire la
cubierta negra del disco.
6. Inserte el Disco de comprobación del medidor. Cierre la tapa.
7. Pulse para iniciar el test.
8. Aparecerán los resultados en pantalla.
9. Compare los resultados que aparecen en pantalla con los valores del gráfi co que
fi gura en el estuche. Si los resultados no se encuentran dentro del rango indicado en
el estuche, contacte con Soporte.
10. Coloque de nuevo el Disco de comprobación del medidor en el estuche de aluminio
para almacenarlo.
para seleccionar Serie de disco.
para regresar a la pantalla de test.
Procedimiento de alineación
El Disco de calibración del medidor está insertado en el medidor y la calibración se elige
desde el menú Ajustes para realizar una calibración de ángulo que comprueba la alineación
del eje y del disco. Los resultados se analizan y notifi can como «Correcto» o «Incorrecto».
Si las mediciones son correctas, se guarda la confi guración. Si el análisis no es correcto,
póngase en contacto con el servicio técnico.
1. Siga el procedimiento de limpieza de la página 44 para limpiar la cámara de luz y las
lentes ópticas.
2. Pulse
3. Pulse Calibración.
4. Retire el Disco de comprobación del medidor del estuche de aluminio. NO retire la
cubierta negra del disco.
para ir a Ajustes.
38
Page 39

5. Inserte el Disco de comprobación del medidor. Cierre la tapa.
6. Pulse Start para iniciar el procedimiento de calibración del medidor.
7. Si el medidor funciona correctamente, aparecerá en pantalla «Calibración de ángulo
correcta» y se guardarán los ajustes.
Si el medidor no funciona correctamente, aparecerá «Calibración de ángulo
incorrecta. Contacte con el servicio técnico».
8. Pulse para volver al menú Análisis y reanudar el test.
email: softwaresupport@lamotte.com
Teléfono: 800-344-3100, opción 3
Lun-Vie 9 a 17 h (EST)
CONSEJOS ÚTILES
¬ No toque la parte superior ni inferior del disco. Agarre el disco por los bordes.
¬ No llene el disco mientras esté dentro del medidor. Llene el disco sobre una
superfi cie limpia y seca.
¬ Llene el disco sobre una superfi cie oscura para ver más fácilmente el agua de la
muestra.
¬ El disco no debe contener grandes burbujas de aire. Las burbujas de aire pueden
provocar resultados erróneos.
¬ Utilice siempre la cubierta del disco.
¬ Con el WaterLink
universal (código 1719).
¬ Vacíe la jeringa de la muestra anterior antes de llenarla con la siguiente muestra.
¬ Retire el disco lleno del medidor después de realizar el test. No se desplace con
discos llenos en el medidor. Podría derramarse el contenido.
®
Spin Touch® únicamente puede usarse la Cubierta de disco
INTERVALOS Y ESPECIFICACIONES
Factor de prueba Rango Factor de prueba Rango
Alcalinidad, total 0–250 ppm Cobre 0,0–3,0 ppm
Biguanida 0–70 ppm Ácido cianúrico 5–150 ppm
Choque de
biguanidas
Borato 0–80 ppm Hierro 0.0–3,0 ppm
Bromo (DPD) 0,00–33,00 ppm pH 6,4–8,6
Cloro, libre (DPD) 0,00–15,00 ppm Fosfato 0–2000 ppb
Cloro, Combinado 0,00–15,00 ppm Sal 0 – 5000 ppm
Cloro, total (DPD) 0,00–15,00 ppm
Los resultados del análisis que se encuentran fuera del rango del sistema de reactivos se
mostrarán en
Las concentraciones de cobre superiores a 4 ppm darán como resultado una dureza total
baja.
0–250 ppm Dureza, calcio 0–800 ppm
ROJO. Puede que los resultados del análisis en ROJO no sean precisos.
39
Page 40

Tipo de instrumento Fotómetro centrifugador de fl uidos
Longitudes de onda (fi ltros de
interferencia)
Pantalla Pantalla táctil capacitiva,
Precisión de la longitud de onda ±2 nm
Ancho de banda de la longitud
de onda
Intervalo fotométrico -2 a 2 AU
Precisión fotométrica ±0,01 AU en 1,0 AU
Exactitud fotométrica ±0,01 AU en 1,0 AU
Cámara de muestra Acepta disco prellenado
Fuente de luz 6 LEDS
Detectores 6 fotodiodos de silicio
Tests preprogramados Sí, con selección automática de longitud de onda
Idiomas Inglés, francés, español, alemán, neerlandés, sueco, portugués,
Temperatura Funcionamiento: 0-50 °C; almacenamiento – 40-60 °C
Rango de humedad durante el
funcionamiento
Comunicación USB-C, tecnología Bluetooth de baja energía (BLE)
Calibración Ajuste de fábrica, calibración de campo a través de conexión
Firmware Actualizable a través de Internet (nuevas pruebas, nuevas
Software Aplicaciones para Android e iOS, DataMate® Web, DataMate® 10
Requisitos de potencia Adaptador de pared del USB, conexión al ordenador por USB o
Tipo de batería Litio-ión
Capacidad mínima 12 V/2,6 AH
Duración de la carga Unos 150 tests
Vida de la batería Unas 500 cargas
Carga completa 10-12 horas
Resistencia al agua Base sobremoldeada de goma, enchufe de goma en el puerto
Clasifi cación eléctrica Voltaje clasifi cado (5 V), potencia de corriente de entrada (1,6
Apagado automático Sí, por defecto 15 (solo con potencia de batería)
Ahorro de energía Sí, por defecto apagado
Registro de datos Se guardan 250 resultados de tests para descargarlos en un
390 nm, 428 nm, 470 nm, 525 nm, 568 nm, 635 nm
3,5”, resolución 320 × 240 píxeles
10 típica
italiano, chino, turco
0-90 % HR, sin condensación
a Internet
calibraciones de pruebas, etc.)
batería recargable interna de litio-ión
USB, pantalla y bisagras estancas
A) en USB-C
PC o transferirlos por Bluetooth
40
Page 41

Certifi caciones
Dimensiones 21,6 × 12,4 × 10,4 cm (L × An × Al)
Peso 0,79 Kg, 1,74 lb
EZ-BLE™
PRoC™ Module,
CYBLE-022001-00
Industry RF Radio:
EMC: UE: ETSI EN 301489-1
Seguridad: UE: EN61010-1:2010
8,5 × 4,9 × 4,2 pulgadas
FCC (EE. UU.):
Industry
Canada (IC)
Certifi cación:
CE (Europa): Cumple con la
MIC (Japón): 005-101007
KC (Corea): MSIP-CRM-
EE.UU: FCC PART 15 B
CAN ICES-3 (B)/NMB-3(B)
AS/NZS: CSPR 22
AS/NZS: diferencias nacionales
FCC ID:
WAP2001
Licencia IC:
7922A-2001
Directiva
1999/5/EC
Cyp-2001
41
Page 42

ACCESORIOS Y PIEZAS DE REPUESTO
Descripción Código
Medidor WaterLink® Spin Touch
Botella de muestra de agua (60 ml) 0688
Botella de muestra de agua (30 ml) 0689
Jeringa con tres puntas (3) 1189-3
Puntas de jeringa (3) 1189-TIP
Toallitas limpiadoras 0669
Disco de comprobación del medidor (América del norte) 1705
Disco de comprobación del medidor (Europa) 1705-EU
Cubierta de disco universal 1719
Cable USB 1712
Adaptador de CA (América del norte) 1713
Adaptador de CA (Europa) 2252-PAD-EU
Toallita 3580-WIPE
Impresora móvil Bluetooth 5-0066
Tapete para WaterLink® Spin Touch
Manual del WaterLink® Spin Touch
Guía rápida del WaterLink® Spin Touch
Guía rápida del WaterLink® Spin Touch® (Spanish) 3580-QG-SP
Guía rápida del WaterLink® Spin Touch
Guía rápida del WaterLink® Spin Touch® (Spanish) 3581-QG-SP
Cartel del WaterLink® Spin Touch
Pegatina para ventana del WaterLink® Spin Touch
®
®
®
®
®
®
®
1715-METER
3580-MAT
3580-MN
3580-QG
3581-QG
3580-BAN
3580-DECAL
Información sobre los discos reactivos disponibles para el WaterLink® Spin Touch® en la
página 43.
42
Page 43

DESCRIPCIONES DE LOS DISCOS
DISCOS DE UN SOLO USO
Disco de Cloro/Bromo
(Código 4328)
Cloro libre
Bromo
Cloro total
Alcalinidad total
pH
Sal
Dureza del calcio
Cobre
Hierro
Ácido cianúrico
Alcalinidad
total
Cloro libre
bromo
Cobre
Sal
pH
Dureza
del calcio
Vacio
Cloro
total
Ácido
cianúrico
Hierro
Cloro/Bromo más Fosfato
Disco de serie de 10 tests
(Código 4329)
Cloro libre
Bromo
Cloro total
Alcalinidad total
pH
Sal
Dureza del calcio
Cobre
Hierro
Ácido cianúrico
Fosfato
Cloro/Bromo más Borato
Disco de serie de 10 tests
(Código 4330)
Cloro libre
Bromo
Cloro total
Alcalinidad total
pH
Sal
Dureza del calcio
Cobre
Hierro
Ácido cianúrico
Borato
Alcalinidad
total
Cloro libre
Bromo
Alcalinidad
total
Cloro libre
Bromo
Cobre
Sal
pH
Sal
pH
Cobre
Dureza
del calcio
Vacio
Dureza
del calcio
Vacio
Cloro total
Ácido
cianúrico
Cloro
total
Ácido
cianúrico
Hierro
Fosfato
Hierro
Borato
NOTA: Es posible que los reactivos de color se vean en el disco antes de añadir la muestra de agua.
NOTA: Los discos con el reactivo Sal deben guardarse y utilizarse a temperatura ambiente (68-74
°F/20-23 °C).
Disco de Biguanida y Borato
(Código 4331)
Biguanida
Choque de biguanidas
Alcalinidad total
pH
Dureza del calcio
Cobre
Hierro
Borato
Cobre
Biguanida
Dureza
del calcio
Choque de
biguanidas
Alcalinidad
total
Hierro
Borato
pH
Vacio
43
Page 44

DISCOS DE MÚLTIPLES USOS
Cloro/Bromo/pH
(Código 4334)
pH
Cloro libre
Bromo
Cloro total
Cloro
total
Cloro libre
Bromo
Vacio
Cloro libre
Bromo
pH
pH
Vacio
Cloro
total
Cloro
total
Cloro libre
Bromo
Vacio
pH
Cloro/Bromo/pH/Alcalinidad
(Código 4335)
pH
Cloro libre
Bromo
Alcalinidad
Alcalinidad
Cloro libre
Bromo
Vacio
pH
pH
Vacio
Cloro libre
Bromo
Alcalinidad
Alcalinidad
Vacio
pH
Cloro libre
Bromo
MANTENIMIENTO
LIMPIEZA
El sistema óptico del WaterLink® Spin Touch® debe mantenerse limpio y seco para que
funcione correctamente. Seque el disco con un trapo sin pelusas antes de colocarlo en
la cámara para evitar introducir humedad. Para lograr los mejores resultados, guarde el
instrumento en una zona seca y libre de vapores químicos agresivos. Limpie la carcasa
exterior con un paño húmedo sin pelusas. Evite que entre agua en la cámara de luz o en
cualquier otra pieza del medidor. Para limpiar la cámara de luz y las lentes ópticas, apunte
con un bote de aire comprimido a la cámara de luz y la tapa y aplique el aire presurizado
a estas zonas. Dirija el aire presurizado alrededor de las LED, que son las pequeñas lentes
redondas colocadas a las 2:00, 4:00, 6:00, 8:00, 10:00 y 12:00 en la tapa. Los fotodiodos
están situados en la parte inferior de la cámara, alrededor del eje. Esta zona debe
mantenerse limpia y seca. Utilice un bastoncillo humedecido en limpiador de ventanas
®
Windex
para frotar suavemente las lentes LED y de los fotodiodos. No utilice alcohol;
dejará un leve residuo en las lentes al secarse.
Borre las manchas provocadas por el uso rutinario de la pantalla táctil con la toallita
(Código 3580-WIPE). Utilice un paño mojado en alcohol para realizar una limpieza más
profunda, cuando sea necesario. No utilice el limpiador de cristales Windex
similar, en la pantalla táctil.
®
, o un producto
REPARACIONES
Si fuese necesario devolver el medidor para que lo reparen o lo pongan a punto, empaquete
el medidor con cuidado en un envase apropiado y con material de embalaje adecuado.
Debe obtener un número de autorización de devolución de LaMotte Company llamando
al 800- 344-3100, ext. 3 (solo EE. UU.) o al 410-778-3100, ext. 3, fax 410-778-6394, o
44
Page 45

escribiendo a softwaresupport@lamotte.com. A menudo el problema se puede resolver
por teléfono o correo electrónico. En caso de que sea necesaria la devolución, incluya en
el paquete una carta con el número de autorización de la devolución, el número de serie
del medidor, una breve descripción del problema y la información de contacto (incluidos
los números de teléfono y fax). Esta información permitirá que el departamento de
mantenimiento realice las reparaciones necesarias con mayor efi cacia.
ELIMINACIÓN DEL MEDIDOR
Residuos de aparatos eléctricos y electrónicos (RAAE)
Se han utilizado recursos naturales para fabricar este equipo y puede que
contenga materiales peligrosos para la salud y el medio ambiente. Para evitar
perjudicar el medio ambiente y los recursos naturales, se recomienda utilizar los
sistemas de recuperación adecuados. El símbolo del contenedor tachado en el
fotómetro invita a usar estos sistemas a la hora de deshacerse de este equipo.
Los sistemas de recuperación permitirán reutilizar o reciclar los materiales de
forma que no perjudiquen el medio ambiente. Para obtener más información
sobre los sistemas aprobados de recogida, reutilización y reciclaje, póngase en
contacto con la administración de residuos local o regional o con los servicios
de reciclaje. No incinere el equipo.
ELIMINACIÓN DE LOS DISCOS
No se puede reutilizar los discos. Con el tiempo, el agua de los discos con reactivos se
evaporará. Los discos se pueden reciclar. Advertencia: los recicladores deberán consultar
a las autoridades locales. Puede que algunos estados exijan que no queden residuos
químicos en el plástico o que no puedan aceptar residuos de plástico con perlas de acero
inoxidable. Los discos usados se pueden devolver a LaMotte, asumiendo los costes el
cliente, para su reciclaje.
INFORMACIÓN GENERAL
EMBALAJE Y DEVOLUCIONES
El personal experimentado responsable del embalaje en LaMotte Company se asegura
de proteger adecuadamente el producto frente a los riesgos normales que conlleva el
transporte de los envíos. Cuando el producto sale del fabricante, toda la responsabilidad
de una entrega segura está garantizada por la empresa de transportes. Las reclamaciones
por daños deben presentarse de inmediato ante la empresa de transportes para recibir
una compensación por los productos dañados. Si fuese necesario devolver el instrumento
para su reparación o puesta a punto, empaquételo con cuidado en un envase apropiado
y con material de embalaje adecuado. Debe obtener un número de autorización de
devolución de LaMotte Company llamando al 1-800-344-3100 o al 1-410-778-3100,
ext. 3 o escribiendo a softwaresupport@lamotte.com. Incluya en el paquete una carta con
el número de autorización que describa el tipo de problema experimentado. Esta valiosa
información permitirá que el departamento de mantenimiento realice las reparaciones
necesarias con mayor efi cacia.
PRECAUCIONES GENERALES
Lea el manual de instrucciones antes de intentar confi gurar o utilizar el instrumento. No
hacerlo puede conllevar lesiones personales o daños en el medidor. El WaterLink® Spin
®
Touch
no se debe guardar ni utilizar en un entorno húmedo o excesivamente corrosivo.
Conviene tener cuidado para evitar que el agua o los reactivos entren en la cámara del
fotómetro. Nunca se debe poner discos húmedos en la cámara del fotómetro.
45
Page 46

PRECAUCIONES DE SEGURIDAD
Lea las precauciones de seguridad de las etiquetas de todos los envases y embalajes de
reactivos antes de usarlos. Puede consultar las fi chas de datos de seguridad (SDS) en
www.lamotte.com. Puede obtener más información de emergencia sobre los reactivos de
LaMotte las 24 horas del día en el Centro Nacional de Control de Venenos estadounidense
en el 1-800-222-1222 o llamando a la línea de atención 24 horas ChemTel en el
1-800-255-3924 (EE. UU., Canadá, Puerto Rico). Si usted no está en el continente
norteamericano, llame al 813-248-0585.
Compruebe que la protección facilitada por este equipo no esté dañada. No instale ni use
este equipo de una forma distinta a la indicada en este manual.
LIMITACIÓN DE RESPONSABILIDAD
LaMotte Company no será en ningún caso responsable de la pérdida de vidas, propiedades,
benefi cios u otros daños en que se incurra al utilizar o abusar de sus productos.
CUMPLIMIENTO CE
El medidor WaterLink® Spin Touch® ha sido probado de forma independiente y ha obtenido
el marcado CE europeo de cumplimiento de la compatibilidad electromagnética y la
seguridad. Para ver los certifi cados de cumplimiento, visite el sitio web de LaMotte:
lamotte.com
Este dispositivo cumple lo dispuesto en la Sección 15 de las normas de la FCC. La
utilización de este dispositivo está sujeta a las dos condiciones siguientes: (1) el dispositivo
no puede causar interferencias dañinas, y (2) debe aceptar cualquier interferencia recibida,
incluidas las que puedan causar un funcionamiento no deseado.
Nota: se han realizado pruebas en este equipo y se ha comprobado que cumple con los
límites establecidos para los dispositivos digitales de Clase B, de acuerdo con la Sección
15 de las normas de la FCC. Estos límites están diseñados para ofrecer una protección
razonable contra interferencias perjudiciales cuando el equipo funciona en un entorno
residencial. Este equipo genera, utiliza y puede irradiar energía de radiofrecuencia, y si
no se instala y utiliza de conformidad con el manual de instrucciones, puede ocasionar
interferencias dañinas en las radiocomunicaciones. Sin embargo, no se puede garantizar
que no vayan a producirse interferencias en una instalación en particular. Si este equipo
produce interferencias dañinas en la recepción de radio o televisión, lo que se puede
determinar apagando y encendiendo el equipo, se recomienda al usuario que intente
corregir la interferencia realizando una o varias de las siguientes acciones:
¬ Cambiar la orientación o la ubicación de la antena receptora.
¬ Aumentar la distancia entre el equipo y el receptor.
¬ Conectar el equipo a una toma de corriente que esté en un circuito distinto a aquel
¬ Consultar con el distribuidor o con un técnico especializado en radio/TV para obtener
.
en el que esté conectado el receptor.
asistencia.
www.
46
Page 47

CERTIFICACIÓN NSF
La marca de certifi cación NSF/ANSI 50 en un dispositivo de análisis de
calidad del agua (WQTD) utilizado en aguas con fi nes recreativos, como
piscinas y spas, signifi ca que el producto ha sido revisado y certifi cado por
NSF International para cumplir con los Estándares Nacionales Americanos
aplicables para el diseño y rendimiento del producto. NSF analiza varias
veces los productos para confi rmar que cumplen con todos los requisitos
de certifi cación en cuanto a prestaciones, precisión y rango de operación.
Hay distintos niveles posibiles de certifi cación, de L1, L2 y L3, siendo L1 la
califi cación más alta. Visite
www.nsf.org para más información.
Parámetros
analizados Aplicación
pH Piscina 6,4–8,6 L1
Spa/jacuzzi 6,4-8,6 L1
Cloro libre Piscina 0–15 ppm L1
Spa/jacuzzi 0–7 ppm L1
Cloro,
combinado
Ácido cianúrico Piscina 5–50 ppm L1
Otros parámetros no evaluados por NSF.
www.nsf.org para obtener una lista actualizada de los productos LaMotte
Visite
certifi cados por NSF.
Consulte las descripciones de los discos (página 43) para obtener información sobre los
discos certifi cados por NSF.
Piscina 0-1 ppm L1
Spa/jacuzzi 0-1 ppm L1
Rango
certifi cado
NSF
Nivel NSF
Precisión/
General
GARANTÍA
LaMotte Company garantiza que este instrumento está libre de defectos de fabricación
y componentes durante dos años desde la fecha del envío. Si fuese necesario devolver el
instrumento para su mantenimiento durante el periodo de garantía o después, póngase en
contacto con el departamento de Servicio Técnico en el 1-800-344-3100, el 1-410-7783100, ext. 3 o softwaresupport@lamotte.com para obtener un número de autorización
de devolución o visite
incidencias. Al remitente le corresponde asumir los costes de envío, fl ete, seguro y
embalaje seguro para evitar daños durante el transporte. Esta garantía no se aplica a los
defectos resultantes de acciones del usuario, como un uso incorrecto, cableado incorrecto,
manejo sin respetar las especifi caciones, mantenimiento o reparación inadecuados, o
modifi cación no autorizada. LaMotte Company niega específi camente cualquier garantía,
comerciabilidad o idoneidad implícitas para un fi n concreto y no será responsable por
ningún daño directo, indirecto, emergente o consecuente. La responsabilidad total de
LaMotte Company se limita a reparar o cambiar el producto. La garantía estipulada
anteriormente está completa y no existe ninguna otra garantía, ya sea escrita u oral,
expresa o implícita.
Para inscribir su medidor en el departamento de Mantenimiento de LaMotte, visite
lamotte.com
Número de serie ______________________________________________________
y elija SUPPORT en la barra de navegación superior.
www.lamotte.com para consultar la sección de resolución de
www.
47
Page 48

CONFIGURATION
AVANT TOUTE UTILISATION
¬ Recharger entièrement la batterie à l’aide d’un câble USB Spin Touch et d’un
adaptateur connectés à une prise de CA.
¬ Assurez-vous que votre Spin Touch est équipé du dernier fi rmware :
CONFIGURATION
PHOTOMÈTRE
1. Le photomètre peut fonctionner sur prise secteur, la batterie interne ou à partir d’un
2. Utilisez le câble USB et l’adaptateur pour brancher le photomètre sur une prise
3. Utilisez le câble USB pour brancher le photomètre sur le port USB d’un ordinateur.
CHARGEMENT DE LA BATTERIE
1. Utilisez le câble USB et l’adaptateur pour connecter le mesureur à une prise de CA ou
2. L’icône de batterie sur l’écran affi che le statut de la batterie. Chargez la batterie
1. Téléchargez et installez l’application de bureau WaterLink Connect pour
Windows
2. Raccordez le photomètre à l’ordinateur avec le câble USB fourni et lancez
l’application de bureau WaterLink
®
à l’adresse http://softwarecenter.lamotte.com/.
®
Connect à partir du menu de démarrage.
3. Toutes les mises à jour du fi rmware seront automatiquement eff ectuées
sur le photomètre.
ordinateur.
secteur.
utilisez le câble USB (compris) à l’aide d’un chargeur automobile (non compris) pour
recharger la batterie. (Anker PowerDrive 2, DC 12/24V, 5V = 4.8A, n° de pièce A2310
conseillé.)
jusqu’à ce que l’indicateur de batterie soit rempli.
MISES À JOUR DU FIRMWARE
De temps en temps, le fi rmware du Spin Touch nécessite d’être mis à jour. Pour ce faire,
procédez comme suit :
1. Accédez à
WaterLink
http://softwarecenter.lamotte.com/ et téléchargez l’application
®
Connect pour Windows.
2. Branchez le Spin Touch à l’ordinateur à l’aide du câble USB fourni.
3. Ouvrez l’application de bureau WaterLink
®
Connect et patientez jusqu’à ce que la mise
à jour soit terminée.
Une fois la mise à jour terminée, vous pouvez fermer WaterLink
®
Connect en toute sécurité
et débranchez le laboratoire. Une fois le fi rmware mis à jour, il est recommandé d’eff ectuer
la procédure d’alignement décrite page 62.
CONNEXION À UN PC
Lorsque le WaterLink® Spin Touch® est connecté à un ordinateur via USB, l’écran
embarqué est désactivé et l’utilisation du laboratoire s’eff ectue à partir de l’application
WaterLink
softwarecenter.lamotte.com/
résultats du Spin Touch peuvent être transmis à un programme d’analyse de l’eau tel que
WaterLink
CONNEXION À UN PC
®
Connect pour Windows®. Cette application est gratuite et disponible sur http://
. Grâce à l’application de bureau WaterLink® Connect, les
®
Solutions™.
48
Page 49

CONNEXION À UN APPAREIL
Le WaterLink® Spin Touch® peut se connecter à un PC Windows® (via USB) et à des
appareils mobiles Android et iOS (via Bluetooth).
CONNEXION VIA USB
À l’aide du câble USB fourni, vous pouvez connecter le WaterLink® SpinTouch® à un PC
Windows
Windows
lamotte.com
commandes de l’écran tactile embarqué sont désactivées et l’utilisation de l’instrument
s’eff ectue à partir de l’application WaterLink Connect
programmes d’analyse de l’eau puissants, tels que WaterLink
les résultats d’analyse et fournir des recommandations de traitement détaillées. Pour
en savoir davantage sur les produits logiciels LaMotte, accédez à
lamotte.com
CONNEXION VIA BLUETOOTH
Le WaterLink® Spin Touch® peut se connecter à un appareil Bluetooth activé, comme un
téléphone ou une tablette. Le Spin Touch est également compatible avec l’imprimante
Bluetooth LaMotte (code 5-0066). Les autres imprimantes Bluetooth ne sont pas prises en
charge.
Pour transmettre les résultats à un appareil mobile via Bluetooth, vous devez installer
une application mobile sur l’appareil et disposer d’un compte pour le programme logiciel
associé. Par exemple, si vous disposez d’un compte WaterLink
l’application mobile WaterLink
transmettre les résultats de l’instrument à l’application. Les applications mobiles des
produits logiciels LaMotte sont disponibles sur iTunes (pour les appareils iOS) et Google
Play (pour les appareils Android). Pour en savoir davantage sur les produits logiciels
LaMotte, accédez à
Pour transmettre les résultats du WaterLink
produit logiciel LaMotte, procédez comme suit :
Lorsque
Bluetooth mobile (code 5-0066). Le bouton
est établie et pâle lorsqu’aucune connexion n’est établie.
Le Spin Touch ne peut pas se connecter à la fois à un appareil mobile et à l’imprimante.
(Reportez-vous à la section Sauvegarde, impression et envoi, page 55.)
®
. Avant de connecter l’instrument via USB, téléchargez et installez l’application
®
gratuite WaterLink Connect® à l’adresse suivante : http://softwarecenter.
. Lorsque le WaterLink® Spin Touch® est connecté à un PC via USB, les
®
. LaMotte propose également des
®
Solutions™, pour recueillir
http://softwarecenter.
.
®
®
Solutions™ sur un téléphone ou une tablette, vous pouvez
Solutions™ actif et de
http://softwarecenter.lamotte.com.
®
Spin Touch® à une application mobile de
1. Connectez-vous à l’application mobile du produit logiciel LaMotte.
2. Cherchez le dossier d’un client ou d’un site. Vous devrez peut-être en créer un avant
de procéder à l’analyse.
3. Lancez une analyse de l’eau sur l’application mobile.
4. Eff ectuez une analyse de l’eau normalement, à partir de l’écran tactile embarqué
du Spin Touch. Le Spin Touch et l’appareil mobile Bluetooth activé se connectent
automatiquement.
5. Lorsque la connexion est disponible,
l’instrument et l’appareil ne sont pas connectés. Appuyez sur
s’allume sur l’écran tactile. Lorsque est pâle,
pour transmettre les
résultats à l’application mobile.
apparaît sur l’écran tactile, le Spin Touch peut se connecter à l’imprimante
est en surbrillance lorsqu’une connexion
CONNEXION À UN APPAREIL
49
Page 50

UTILISATION DE LA TECHNOLOGIE BASSE CONSOMMATION BLUETOOTH
Le WaterLink® Spin Touch® se connectera automatiquement à l’appareil Bluetooth activé
le plus proche (téléphone ou tablette ou imprimante). Il n’est pas nécessaire d’associer
le Spin Touch à l’appareil Bluetooth activé. Les obstacles aux signaux de réseau sans fi l
peuvent réduire la portée des appareils sans fi l. Le WaterLink Spin Touch fonctionne mieux
si aucun mur ne le sépare des appareils récepteurs.
CONNEXION À UN APPAREIL
50
Page 51

REMPLISSAGE : Disques à usage unique
Lorsque vous plongez la seringue dans l’échantillon d’eau et tirez
complètement le piston, la seringue contient bien assez d’échantillon
d’eau pour remplir le disque correctement. Tenez la seringue verticalement
et insérez l’extrémité dans la cavité de remplissage du disque. Pour remplir
le disque, poussez doucement et lentement le piston.
1. Remplissez le disque d’une pression lente
et uniforme. L’eau d’échantillon remplit les
espaces entre les cloisons dans le sens
inverse des aiguilles d’une montre. Chaque
espace se remplit du bas vers le haut. Versez
de l’eau d’échantillon jusqu’à ce que les quatre
chambres soit remplies jusqu’en haut, juste
au-dessus de la ligne de remplissage en relief.
Ce n’est pas grave si l’eau dépasse légèrement
la ligne de remplissage.
2. Ne remplissez pas trop le disque. Si le disque
est trop rempli, l’eau d’échantillon débordera
de la cavité de débordement située au centre
du disque. Le disque ne fuit pas. Séchez le
disque et lancez le test.
3. Vous devez remplir suffi samment le disque.
Si le disque n’est pas suffi samment rempli,
les chambres de réactifs ne seront pas
entièrement remplies et les résultats seront
inexacts.
Ligne de
remplissage
Remplissage correct
Remplissage
excessif
(Sécher le disque avant de l’insérer dans le photomètre)
Remplissage
insuffisant
REMPLISSAGE
4. Ne créez aucune bulle d’air dans le disque.
Les chambres de réactifs ne seront pas
Bulle d’air
entièrement remplies et les résultats seront
inexacts. Dès qu’une bulle commence à se
former, tirez sur le piston pour tirer la bulle
du disque. Recommencez le processus de
remplissage.
5. Les disques humides doivent être séchés
minutieusement avec une lingette non
pelucheuse. Manipulez le disque en le tenant
par les bords.
6. Une fois le disque rempli, vous devez l’utiliser dans les 10 minutes. Ne remplissez
pas le disque à l’avance.
Pour obtenir des conseils relatifs au remplissage et au dépannage, accédez à :
www.lamotte.com/spin
51
Page 52

REMPLISSAGE : Disques à plusieurs utilisations
Lorsque vous plongez la seringue dans l’échantillon d’eau et tirez
complètement le piston, la seringue contient bien assez d’échantillon
d’eau pour remplir le disque correctement. Tenez la seringue
verticalement et insérez l’extrémité dans la cavité de remplissage du
disque. Pour remplir le disque, poussez doucement et lentement le piston.
REMPLISSAGE
1. Remplissez toutes les sections non utilisées du
disque, d’une pression lente et uniforme. Ajoutez de
l’eau d’échantillon jusqu’à ce que la chambre de blanc
soit remplie et la chambre de débordement le soit
partiellement.
Chambre de
débordement
Chambre
de blanc
Remplissage correct
2. Ne remplissez pas trop le disque. Si le disque est trop
rempli, l’eau d’échantillon débordera de la cavité de purge
Chambre de
débordement
située au centre du disque. Le disque ne fuit pas. Séchez
le disque et lancez le test.
Chambre
de blanc
Remplissage excessif
(Sécher le disque avant de l’insérer dans le photomètre)
3. Vous devez remplir suffi samment le disque. Si le disque
n’est pas assez rempli, la chambre de blanc ne sera
pas pleine. Les chambres de réactifs ne seront pas
entièrement remplies et les résultats seront inexacts.
Chambre
de blanc
Remplissage insuffisant
4. Ne créez aucune bulle d’air dans le disque. Les chambres
de réactifs ne seront pas entièrement remplies et les
résultats seront inexacts. Dès qu’une bulle commence à
se former, tirez sur le piston pour tirer la bulle du disque.
Recommencez le processus de remplissage.
Bulle d’air
5. Les disques humides doivent être séchés minutieusement
avec une lingette non pelucheuse. Manipulez le disque
en le tenant par les bords. Entre deux analyses, stockez
le disque sur une surface plane. N’agitez pas un disque
partiellement rempli afi n d’éviter toute fuite et toute
contamination. Les disques ayant été partiellement
utilisés doivent être jetés à la fi n de la journée.
6. Une fois le disque rempli, vous devez l’utiliser dans les 10 minutes. Ne remplissez
pas le disque à l’avance.
Pour obtenir des conseils relatifs au remplissage et au dépannage, accédez à : www.lamotte.com/spin
52
Page 53

PROCÉDURES GÉNÉRALES DE FONCTIONNEMENT
PHOTOMÈTRE
Lorsqu’un disque rempli est dans la chambre et le couvercle est fermé, le photomètre fait
tourner le disque à grande vitesse pour distribuer l’échantillon dans les compartiments
d’essai. Puis le photomètre ralentit pour optimiser l’action de pompage des billes de
mélange en acier inoxydable lorsque les réactifs se mélangent à l’eau d’échantillon.
Chaque réaction est ensuite lue en fonction du temps et de la longueur d’onde adéquats au
système de réactifs correspondant.
Le bouton situé dans la partie inférieure en haut et au centre du
photomètre permet d’allumer et d’éteindre l’instrument.
Le voyant lumineux bleu du bouton marche/arrêt indique le statut de l’instrument.
Lumière bleue continue : la LED bleue reste allumée en continu et indique que le
photomètre est en marche et prêt pour une analyse.
Lumière bleue clignotante (3 clignotements/seconde) : une analyse est en cours et le
disque tourne. N’ouvrez pas le couvercle lorsque le disque tourne.
Fermez le couvercle avec précaution. Ne le claquez pas. Des câbles passent au niveau de la
charnière entre le couvercle et le corps du photomètre. Le photomètre ne fonctionnera pas
si le couvercle est ouvert.
ÉCRAN TACTILE
Lorsque vous appuyez sur le bouton de mise en marche du photomètre, l’écran de test
s’affi che.
Sélection de
désinfectant
Démarrer
l’analyse
PROCÉDURES GÉNÉRALES DE FONCTIONNEMENT
Désinfectant
Type de
disque
Sel
Disque
Taper pour
Démarrer l’analyse
203
Statut de
la batterie/
alimentation
L’écran s’active au toucher. Pour eff ectuer une sélection, tapez sur l’icône ou le mot sur
l’écran avec le doigt, l’ongle, la gomme d’un crayon ou un stylet.
30-Oct-18
12:14 PM
Date
et heure
Paramètres
Historique
des analyses
53
Page 54

¬ Nettoyez délicatement les taches sur l’écran avec la lingette en tissu (3580-WIPE).
io
¬ Ne touchez pas l’écran avec un objet pointu.
¬ Ne placez aucun objet sur l’écran qui pourrait rayer ce dernier ou l’endommager.
¬ Évitez de toucher l’écran avec les doigts humides.
ANALYSE
Désinfectant
Sel
Disque
203
30-Oct-18
12:14 AM
PROCÉDURES GÉNÉRALES DE FONCTIONNEMENT
1. Appuyez sur jusqu’à ce que le photomètre se mette en marche.
2. Tapez sur
3. Tapez sur
disque). Tapez sur
REMARQUE : Les gammes de disque sont limitées par la sélection du type de
désinfectant.
4. Retirez un disque de son emballage.
5. Utilisez la seringue (1189) pour remplir le disque de l’échantillon d’eau de piscine ou
de spa.
6. Insérez le disque. Couvrez le disque avec la couverture de disque universelle. Fermez
le couvercle.
7. Tapez sur
8. Les résultats s’affi cheront.
9. Choisissez une option.
. Sélectionnez un type de désinfectant. Tapez sur pour confi rmer.
. Sélectionnez une gamme de disque (indiquée sur l’emballage du
pour confi rmer.
pour démarrer l’analyse. Tapez sur pour annuler l’analyse.
Taper pour
Démarrer l’analyse
¬ Appuyez sur
¬ Tapez sur
pour ajouter une étiquette.
en surbrillance pour enregistrer les résultats de l’analyse dans
le journal d’analyse si l’enregistrement automatique n’est pas activé.
¬ Tapez sur
en surbrillance pour envoyer les résultats à l’imprimante
Bluetooth mobile activée.
¬ Tapez sur
en surbrillance pour envoyer les résultats vers un appareil
Bluetooth activé.
¬ Tapez sur
10. Appuyez sur
REMARQUE : Pour les échantillons d’eau de plus de 100 °F (38 °C), soustrayez 0,3 au résultat du pH
ou, pour un résultat plus précis, attendez que la température de l’échantillon d’eau soit en dessous de
90 °F (32 °C) pour eff ectuer l’analyse.
pour revenir à l’écran de test.
pendant 2 secondes pour éteindre le photomètre.
54
Page 55

SAUVEGARDE, IMPRESSION ET ENVOI DES RÉSULTATS D’ANALYSE
r
Les résultats d’analyse peuvent être sauvegardés, transmis à l’application mobile
WaterLink Connect via Bluetooth et envoyés vers l’imprimante Bluetooth mobile (code
5-0066).
Résultats
Temps de test 05:30:06 04-Jan-2018
FCL - 1,31
TCL - 1,31
CCL - 0.00
PH - 7,8
ALK - 100
HARD - 230
CYA - 2
COPPER - 0,1
IRON - 0,1
PHOS - 0
SALT - 489
PROCÉDURES GÉNÉRALES DE FONCTIONNEMENT
Étiquetage
Sauvegarder
les résultats
Impression
des résultats
via Bluetooth
Transmettre
les résultats
via Bluetooth
Revenir
à l’écran
de test
Paramètres de l’historique des analyses
Le photomètre WaterLink Spin Touch peut enregistrer les résultats de 250 analyses dans
l’historique des analyses. Les résultats de l’analyse la plus récente seront affi chés en
haut de la liste. Vous pouvez enregistrer tous les résultats de façon automatique ou les
enregistrer après chaque analyse d’échantillon.
Pour activer l’enregistrement automatique, tapez sur
. Sélectionnez Enregistrement automatique des analyses. Tapez sur , puis sur
pour revenir à l’écran de test. Lorsque l’option Enregistrement auto est sélectionnée,
n’est pas en surbrillance sur l’écran des résultats d’analyse.
Pour enregistrer manuellement les résultats à chaque échantillon, désactivez
l’enregistrement automatique. Lorsque l’option Enregistrement auto n’est pas
sélectionnée,
terminée, tapez sur
est en surbrillance sur l’écran des résultats d’analyse. Une fois l’analyse
pour enregistrer les résultats de l’échantillon dans l’historique des
analyses.
Vous pouvez défi nir une étiquette d’identifi cation et l’attribuer au résultat d’un échantillon.
L’étiquette peut contenir jusqu’à 4 caractères hexadécimaux. Elle ne peut pas commencer
par 0. Pour étiqueter des résultats d’analyse, appuyez sur
résultats d’analyse. Appuyez sur
pour eff acer un caractère. Appuyez sur pour
enregistrer l’étiquette et revenir à l’écran des résultats d’analyse. Appuyez sur
revenir à l’écran des résultats d’analyse sans enregistrer l’étiquette. Le résultat étiqueté
apparaît sur l’écran des résultats d’analyse et sur l’écran de l’historique des analyses.
L’étiquette est précédée de « T- ».
sur l’écran de test. Tapez sur
au bas de l’écran des
pour
55
Page 56

Historique
12:02A 30-Oct-2018 Sel 401
12:01A 30-Oct-2018 Sel 301
12:00A 30-Oct-2018 T-4650 Chlore 100
12:00A 30-Oct-2018 Chlore 300
11:57A 30-Oct-2018 T-ABC7 Chlore 300
11:49A 30-Oct-2018 Biguanide 400
Aller en haut
Faire défiler vers
le haut ou le bas
la liste des
analyses 5 par 5
Aller en bas
Sélectionner
Désélectionner
tout/
tout
Afficher les
résultats
sélectionnés
Supprimer
les résultats
sélectionnés
Paramètres
de l’historique
Sélectionner
Enregistrement
auto
Accueil
Les résultats enregistrés peuvent être consultés dans l’historique des analyses. Les
commandes pour affi cher et gérer les fi chiers d’analyse sont situées sur l’écran de
l’historique des analyses. Pour sélectionner un fi chier d’analyse, cochez la case à côté de
ce dernier en tapant dessus, puis tapez sur l’un des boutons en bas pour eff ectuer une
PROCÉDURES GÉNÉRALES DE FONCTIONNEMENT
action sur les fi chiers sélectionnés.
Impression ou envoi des résultats vers un téléphone ou une tablette Bluetooth
Le photomètre WaterLink Spin Touch peut imprimer les résultats d’analyse à partir de
l’imprimante Bluetooth mobile ou les envoyer vers un appareil Bluetooth activé, comme
un téléphone ou une tablette. La fonction activée est indiquée par la mise en surbrillance
des boutons
téléphone ou tablette en même temps.
Il existe deux modes de connexion de l’appareil à l’imprimante ou à un téléphone ou
tablette : Connexion rapide à l’imprimante ON et Connexion rapide à l’imprimante OFF.
Le mode par défaut est Connexion rapide à l’imprimante ON. La connexion rapide à
l’imprimante peut être activée ou désactivée à partir du menu Bluetooth situé dans le
menu des paramètres.
Si l’option Connexion rapide à l’imprimante est défi nie sur ON, le photomètre se connectera
immédiatement à l’imprimante s’il la détecte. Il se connectera également à un téléphone
ou à une tablette, mais la connexion à l’imprimante est prioritaire. L’imprimante se mettra
en route dès que vous tapez sur
mesure que l’imprimante eff ectuera son travail. L’option Connexion rapide à l’imprimante
doit être défi nie sur ON si vous imprimez les résultats plus souvent que vous ne les envoyez
vers un téléphone ou une tablette. L’option peut rester sélectionnée si vous envoyez les
résultats vers un téléphone ou une tablette. Si l’option Connexion rapide à l’imprimante est
défi nie sur ON et l’imprimante est allumée, vous devez éteindre cette dernière pour pouvoir
envoyer les résultats vers un téléphone ou une tablette.
Si l’option Connexion rapide à l’imprimante est défi nie sur OFF, le photomètre peut se
connecter à un téléphone ou à une tablette tant que l’imprimante n’est pas en cours
d’impression. Le photomètre se connectera à l’imprimante uniquement lorsque vous
taperez sur
que la connexion à l’imprimante s’établisse. L’intensité du bouton
et à mesure que l’imprimante eff ectuera son travail. Une fois l’impression terminée, le
photomètre se reconnectera automatiquement au téléphone ou à la tablette. L’option
Connexion rapide à l’imprimante doit être défi nie sur OFF si vous envoyez les résultats vers
un téléphone ou une tablette plus souvent que vous ne les imprimez.
ou . Le Spin Touch ne peut pas se connecter à une imprimante et à un
. L’intensité du bouton diminuera au fur et à
. Le début de l’impression prendra donc quelques secondes, le temps
diminuera au fur
56
Page 57

SERINGUE
Utilisez une seringue en plastique de 3 mL (code 1189) pour remplir
les disques. L’embout de précision de la seringue est parfaitement
adapté à la cavité de remplissage du disque. Ne retirez pas l’embout
de la seringue. Nettoyez les seringues entre deux échantillons d’eau.
Pompez l’air de la seringue plusieurs fois pour expulser l’échantillon
précédent ou rincez la seringue avec un peu d’eau provenant du
prochain échantillon avant de la remplir avec l’échantillon suivant.
DISQUE DE RÉACTIFS
Le WaterLink® Spin Touch® utilise un système de disques de réactifs.
Les réactifs séchés sont conditionnés en quantité équivalant à
une analyse unique dans un disque de polystyrène scellé. Dans les
chambres de réaction se trouvent des billes de mélange en acier
inoxydable qui mélangent l’eau d’échantillon et les réactifs séchés. Les
analyses de tous les paramètres de la série sont eff ectuées en même
temps. Il est impossible d’isoler le compartiment d’un paramètre
unique et d’eff ectuer l’analyse d’un seul paramètre. Les disques à
usage unique contiennent des réactifs pour une seule série. Les
disques à plusieurs utilisations contiennent des réactifs permettant
de répéter la même série. Ne remplissez pas les disques lorsqu’ils sont
dans la chambre du photomètre.
MANIPULATION DU DISQUE
Manipulez le disque en le tenant par les bords uniquement. Évitez
de toucher le dessus ou le dessous du disque. La lumière traverse
les zones transparentes du disque. Ces zones doivent donc rester
exempt de toute tâche et empreinte de doigt. Ne placez jamais de
disques humides dans le photomètre. Les disques humides doivent
être séchés avec un chiff on non pelucheux avant de pouvoir être
insérés dans la chambre.
Positionnez le disque dans la chambre en alignant l’orifi ce en forme de D situé au centre
du disque avec l’axe en forme de D de la chambre du photomètre. Placez délicatement le
disque sur l’axe. Il n’est pas nécessaire d’appuyer fortement sur le disque pour l’emboîter
sur l’axe.
PROCÉDURES GÉNÉRALES DE FONCTIONNEMENT
STOCKAGE DU DISQUE
Les disques sont sensibles à l’humidité. Évitez d’ouvrir plus de
paquets que nécessaire. Les disques ont une durée de vie limitée et
ne doivent pas être exposés à l’humidité de l’air plus que nécessaire.
Entre deux analyses, stockez les disques à plusieurs utilisations sur une surface
plane. N’agitez pas un disque partiellement rempli. Cela pourrait générer des fuites ou
contaminer les sections non utilisées du disque. Les disques à plusieurs utilisations ayant
été partiellement utilisés doivent être jetés à la fi n de la journée. Ne transportez pas le
photomètre avec un disque dans la chambre.
Stocker les disques entre 70 et 80 ° F / 21 et 27 ° C. Les disques contenant des réactifs de
sel doivent être stockés et utilisés à température ambiante (68-74 °F / 20-23 °C).
57
Page 58

COUVERTURE DU DISQUE
La couverture de disque noire se place sur le disque dans la chambre
du photomètre pour réduire l’interférence de la lumière. Positionnez
la couverture par-dessus le disque en alignant l’orifi ce en forme de
D situé au centre du disque avec l’axe en forme de D de la chambre
du photomètre. Placez délicatement la couverture sur l’axe. Il n’est
pas nécessaire d’appuyer fortement sur la couverture pour l’emboîter
sur l’axe. L’analyse sera annulée si la couverture du disque n’est pas
employée.
Uniquement la couverture de disque universelle (code 1719) fournie
avec le WaterLink
plusieurs utilisations.
®
Spin Touch® peut être utilisée avec les disques à
DISQUE DE VÉRIFICATION DE PHOTOMÈTRE
Le disque de vérifi cation de photomètre a deux objectifs :
¬ Lorsque l’option de disque de vérifi cation de photomètre est exécutée à partir
du menu Disque, les valeurs affi chées peuvent être comparées avec les valeurs
du graphique sur l’emballage du disque de vérifi cation de photomètre afi n de
déterminer si les résultats du photomètre se trouvent dans les plages attendues.
PROCÉDURES GÉNÉRALES DE FONCTIONNEMENT
¬ Si le disque de vérifi cation de photomètre est inséré dans le photomètre et l’option
Étalonnage de l’axe rotatif est sélectionnée dans le menu Paramètres, l’alignement
de l’axe et du disque est évalué. Les résultats sont analysés et qualifi és par
l’indication Réussite ou Échec.
Pour en savoir plus sur l’utilisation du disque de vérifi cation de photomètre, reportez-vous
à la page 62.
CÂBLE USB
Un câble USB permet de brancher le Waterlink® Spin Touch® à un PC Windows®. Lorsque
le câble est utilisé avec l’adaptateur secteur, il permet de brancher le photomètre sur une
prise secteur.
AVERTISSEMENT : utilisez uniquement le câble USB et l’adaptateur mural fournis avec le
kit. Ne le remplacez pas.
BATTERIE
Si la batterie est entièrement chargée, elle permettra d’eff ectuer environ 150 analyses
dans des conditions moyennes. La durée de vie de la batterie varie selon l’utilisation. Le
photomètre doit être éteint après l’analyse pour prolonger la durée de vie de la batterie. Le
cycle de vie standard d’une batterie lithium-ion est de 500 cycles. Le chargement complet
de la batterie s’eff ectue en 10-12 heures environ. La batterie est conçue pour être chargée
pendant la nuit et en intérieur uniquement. La batterie est dotée d’une capacité de 12 V
et 8,1 Ah. Le photomètre fonctionne sur batterie ou sur secteur. Utilisez le câble USB et
l’adaptateur pour brancher le photomètre sur la prise secteur. AVERTISSEMENT : Utilisez
uniquement l’adaptateur secteur fourni avec cet équipement. Ne le remplacez pas.
Le statut de la charge de la batterie est indiqué par l’icône de batterie sur l’écran. L’icône
de batterie indiquera lorsque la batterie est pleine, partiellement pleine, faible, vide ou en
chargement. L’icône de batterie vide clignotera pour indiquer que vous devez brancher le
photomètre à une source d’alimentation secteur. Si vous continuez à utiliser le photomètre
alors que la batterie est faible sans brancher le photomètre à une source d’alimentation
secteur, le mode d’arrêt automatique sera activé. Lorsque ce mode est activé, le
photomètre est verrouillé jusqu’à ce qu’il soit branché à une source d’alimentation
58
Page 59

secteur et la batterie soit suffi samment chargée. Lors du chargement, l’icône de
È
T
chargement de la batterie s’affi che. Le photomètre doit rester branché jusqu’à ce
que la batterie soit entièrement chargée. Une fois la batterie entièrement chargée,
l’icône de chargement sera remplacé par l’icône de batterie pleine.
PARAMÈTRES
Tapez sur
de test à tout moment.
Luminosité Vous pouvez régler le niveau de luminosité de l’écran de 00 à 10. Tapez
pour accéder au menu des paramètres. Tapez sur pour revenir à l’écran
et pour régler la luminosité. Tapez sur X pour quitter le menu
sur
des paramètres.
PROCÉDURES GÉNÉRALES DE FONCTIONNEMENT
Date/Heure Vous pouvez défi nir l’année, le mois, le jour, le format, l’heure, les
Défi nition de la
langue
Étalonnage Tapez pour exécuter un étalonnage de l’angle permettant d’évaluer
Options
d’alimentation
Bluetooth Il existe deux options Bluetooth : Bluetooth activé et Connexion rapide
Marché Tapez pour sélectionner un type de marché. Sélectionnez Piscine/Spa.
minutes, AM/PM. Tapez sur
Tapez sur
réglé la dernière valeur (les minutes pour le format 24 heures, AM/
PM pour le format 12 heures), tapez sur
paramètres. Tapez sur
moment.
Vous pouvez choisir parmi dix langues : anglais, français, espagnol,
allemand, néerlandais, suédois, portugais, italien, chinois, turc. Tapez sur
votre choix. Tapez sur
l’alignement de l’axe et du disque. Tapez sur pour quitter le menu des
paramètres.
Il existe trois options d’alimentation. Veille auto, Extinct. auto., Éco.
énergie et Bluetooth. Tapez sur les options, puis tapez sur votre choix.
Tapez sur votre choix. Tapez sur
à l’imprimante, utilisées pour transmettre et imprimer les résultats
d’analyse. Tapez sur pour quitter le menu des paramètres.
Tapez sur
pour passer à la valeur suivante. Une fois que vous avez
pour quitter le menu des paramètres.
ou pour régler les valeurs affi chées.
pour revenir au menu des
pour quitter le menu des paramètres à tout
pour quitter le menu des paramètres.
pour quitter le menu des paramètres.
59
Page 60

Autres
paramètres
Répertorie le numéro de série, la version du fi rmware, l’adresse MAC
Bluetooth, la version de Bluetooth et le nombre de tests. L’option Nombre
de tests affi che le nombre de tests terminés qui ont été eff ectués au
cours de la durée de vie du photomètre. Tapez sur pour quitter le
menu des paramètres.
L’option Plages activées permet d’affi cher en rouge les résultats
d’analyse qui sont hors des plages du système de réactifs. Par défaut,
l’option est désactivée.
Lorsque l’option Affi cher le marché est sélectionnée, le marché s’affi che
sur l’écran d’analyse. Par défaut, l’option est désactivée. Tapez sur
pour revenir au menu des paramètres.
Sélectionnez Détection de disque pour affi cher un message d’erreur et
abandonner l’analyse si les conditions d’analyse ne sont pas bonnes. Par
exemple, si un message comme Aucun disque, Aucune couverture de
disque, Disque usagé ou Disque de vérifi cation de photomètre s’affi che,
le résultat risque d’être imprécis ou inexistant. Le réglage par défaut est
désactivé. Tapez sur
pour revenir au menu des paramètres.
DÉPANNAGE
GUIDE DE DÉPANNAGE
Problème Raison Solution
« Aucun
disque, test
annulé »
« Pas de
couverture de
disque, test
annulé »
« Couvercle
ouvert, est
abandonné »
« Disque usé » Disque déjà utilisé dans la chambre Sélectionnez « Continuer » pour
Disque pour
vérifi er le
compteur
Aucun disque dans la chambre
Chambre vide
Couverture de disque manquante Utilisez la couverture de disque.
Couvercle ouvert Fermez le couvercle. Sélectionnez OK.
Disque de vérifi cation de photomètre
dans la chambre au lieu d’un disque de
réactifs
Placez un disque rempli dans la
chambre. Placez la couverture du
disque. Sélectionnez OK. Démarrez
l’analyse.
Insérez un disque rempli. Placez la
couverture du disque. Sélectionnez
OK. Démarrez l’analyse.
Sélectionnez OK. Démarrez l’analyse.
Démarrez l’analyse.
accéder à l’écran des résultats
d’analyse. Sélectionnez « Annuler »
pour accéder à l’écran d’analyse et
démarrez l’analyse avec un nouveau
disque.
Sélectionnez « Continuer » pour
accéder à l’écran des résultats
d’analyse. Sélectionnez « Aorterr »
pour accéder à l’écran d’analyse et
démarrez l’analyse avec un disque de
réactifs.
60
Page 61

« Source »
s’affi che sur
l’écran de test
au lieu de «
Désinfectant »
sur l’écran
!
de l’historique
des analyses
Erreur de plage Données brutes hors plage Contactez l’assistance technique
Erreur de
résultat
Résultats de
pH élevé
Résultats de
taux de sel
inattendus
Le disque ne
tourne pas
Problème de
connexion à
un appareil
Bluetooth
Le marché choisi n’est pas le bon Accéder aux paramètres. Choisissez
L’instrument utilise le blanc par défaut,
car le disque n’est pas assez rempli ou
contient une bulle d’air.
Diminution de l’intensité de la lumière.
Lentille éventuellement sale
Une température de l'échantillon d'eau
supérieur à 100°F (38°C) interfère avec le
réactif de pH.
La température de l’eau d’échantillon
n’était pas entre 68 et 74 °F (20 et 23 °C).
Les températures de disque d’échantillon
supérieures ou inférieures à la plage de
température indiquée engendrent des
résultats faussés, respectivement plus
bas ou plus élevés.
Le couvercle est ouvert, le photomètre
n’est pas allumé, la batterie est faible, le
disque ou la couverture du disque sont
trop enfoncés sur l’axe
Des transitoires électriques rapides
peuvent perturber le fonctionnement du
photomètre Spin Touch
La connexion Bluetooth n’est pas activée
Trop d’appareils Bluetooth sont à portée
du photomètre
Piscine/Spa comme marché
Remplissez le disque correctement
(voir REMPLISSAGE)
Nettoyez la lentille (voir NETTOYAGE).
Réalisez la procédure de vérifi cation
de plage. Si le message d’erreur
persiste, contactez l’assistance
technique.
Pour les échantillons d’eau de
plus de 100 °F (38 °C), soustrayez
0,3 au résultat du pH ou, pour un
résultat plus précis, attendez que la
température de l’échantillon d’eau
soit en dessous de 90 °F (32 °C) pour
eff ectuer l’analyse
Eff ectuer l’analyse de sel avec l’eau
d’échantillon et le disque à une
température entre 68 et 74 °F (20
et 23 °C).
Fermer le couvercle, charger la
batterie ou brancher le photomètre à
une source d’alimentation continue,
enlever le disque/la couverture
du disque et le/la replacer dans le
chambre plus délicatement
Redémarrer l’analyse pour reprendre
le fonctionnement normal
Activer la connexion Bluetooth
Un seul appareil doit être à portée du
photomètre
Problème de
connexion à
l’ordinateur via
USB
L’imprimante est allumée et l’option
Connexion rapide à l’imprimante est
activée.
Connexion interrompue Appuyez sur le bouton de mise en
Éteignez l’imprimante ou désactivez
l’option Connexion rapide à
l’imprimante.
marche pendant 1 seconde.
61
Page 62

Les résultats
ne s’impriment
pas
L’imprimante est éteinte
Le Spin Touch imprime uniquement à
partir de l’imprimante Bluetooth LaMotte
(code 5-0066).
Allumez l’imprimante.
Connectez l’imprimante Bluetooth
mobile (code 5-0066).
DÉPANNAGE À L’AIDE DU DISQUE DE VÉRIFICATION DE PHOTOMÈTRE
Ne tentez pas de séparer les composants du disque de vérifi cation de photomètre
(code 1705). Le disque de vérifi cation de photomètre est composé d’un disque et d’une
couverture inséparable.
Ne remplissez pas le disque de vérifi cation de photomètre d’eau. La procédure de
vérifi cation de photomètre ne requiert pas l’utilisation d’eau.
Procédure de vérifi cation de plage
Le disque de vérifi cation de photomètre sert à vérifi er la performance d’un photomètre.
Il ne sert pas à étalonner le photomètre. Les photomètres sont étalonnés en usine. La
performance du photomètre est satisfaisante si les résultats du test eff ectué à l’aide du
disque de vérifi cation de photomètre sont situés dans les plages indiquées sur la pochette
du disque de vérifi cation de photomètre. Les spécifi cations de plage sont propres au
disque identifi é par le numéro de série inscrit sur la pochette. Les spécifi cations de plage
varient d’un disque à l’autre. Les résultats exacts d’un disque donné peuvent varier d’un
photomètre à l’autre.
1. Suivez la procédure de nettoyage indiquée à la page 68 pour nettoyer la chambre
lumineuse et les lentilles optiques.
2. Tapez sur
3. Tapez sur MCD pour sélectionner le disque de vérifi cation de photomètre.
4. Tapez sur
5. Retirez le disque de vérifi cation de photomètre de sa pochette d’aluminium.
N’ENLEVEZ PAS la couverture noire du disque.
6. Insérez le disque de vérifi cation de photomètre. Fermez le couvercle.
7. Tapez sur pour démarrer le test.
8. Les résultats s’affi cheront.
9. Comparez les résultats affi chés avec les valeurs du graphique sur la pochette. Si les
résultats ne sont pas compris dans la plage indiquée sur l’emballage, contactez le
service technique.
10. Remettez le disque de vérifi cation de photomètre dans sa pochette d’aluminium pour
le stocker.
pour sélectionner la gamme de disque.
pour revenir à l’écran de test.
Procédure d’alignement
Une fois le disque de vérifi cation de photomètre inséré dans le photomètre, sélectionnez
Étalonnage dans le menu Paramètres pour eff ectuer un étalonnage de l’angle qui vérifi e
l’alignement de l’axe et du disque. Les résultats sont analysés et qualifi és par l’indication
Réussite ou Échec. Si les mesures sont réussies, les paramètres seront sauvegardés. Si
l’analyse échoue, contactez l’assistance technique.
1. Suivez la procédure de nettoyage indiquée à la page 68 pour nettoyer la chambre
lumineuse et les lentilles optiques.
2. Tapez sur
pour accéder aux paramètres.
62
Page 63

3. Tapez sur Étalonnage.
4. Retirez le disque de vérifi cation de photomètre de sa pochette d’aluminium.
N’ENLEVEZ PAS la couverture noire du disque.
5. Insérez le disque de vérifi cation de photomètre. Fermez le couvercle.
6. Tapez sur Démarrer pour lancer la procédure de vérifi cation du photomètre.
7. Si la performance du photomètre est satisfaisante, le message « Étalonnage de
l’angle réussi » s’affi che et les paramètres seront sauvegardés.
Si la performance du photomètre n’est pas satisfaisante, le message suivant s’affi che
: « Échec de l’étalonnage de l’angle. Contactez l’assistance technique. »
8. Tapez sur
pour revenir au menu Test et reprendre le test.
adresse électronique : softwaresupport@lamotte.com
téléphone : 800-344-3100 option 3
Lu-Ve 9 h - 5 h (fuseau horaire côte est des États-Unis)
CONSEILS
¬ Ne touchez ni le dessus ni le dessous du disque. Manipulez le disque en le tenant par
les bords.
¬ Ne remplissez pas le disque lorsqu’il est dans le photomètre. Remplissez le disque
sur une surface propre et sèche.
¬ Remplissez le disque sur une surface sombre pour distinguer plus facilement l’eau
d’échantillon.
¬ Le disque ne doit contenir aucune grosse bulle d’air. Les bulles d’air provoquent des
résultats erronés.
¬ Utilisez toujours la couverture de disque.
¬ Uniquement la couverture de disque universelle (code 1719) peut être utilisée avec
le WaterLink
¬ Videz la seringue de tout échantillon antérieur avant de la remplir avec l’échantillon
suivant.
¬ Enlevez le disque rempli du photomètre une fois l’analyse terminée. Ne transportez
pas le photomètre avec des disques remplis à l’intérieur. Ces derniers risquent de
fuir.
®
Spin Touch®.
PLAGES ET SPÉCIFICATIONS
Paramètre d’analyse Plage Paramètre d’analyse Plage
Alcalinité totale 0–250 ppm Cuivre 0,0–3.0 ppm
Biguanide 0–70 ppm Acide cyanurique 5–150 ppm
Biguanide choc 0–250 ppm Dureté calcique 0–800 ppm
Borate 0–80 ppm Fer 0.0–3,0 ppm
Brome (DPD) 0,00–33,00 ppm pH 6,4–8,6
63
Page 64

Chlore libre (DPD) 0,00–15,00 ppm Phosphate 0–2000 ppb
Chlore, Combiné 0,00–15,00 ppm Sel 0 – 5000 ppm
Chlore total (DPD) 0,00–15,00 ppm
Les résultats d’analyse hors des plages du système de réactifs seront en ROUGE. Il se peut
que les résultats d’analyse en
ROUGE ne soient pas exacts.
Les concentrations de cuivre supérieures à 4 ppm engendrent des résultats faibles pour la
dureté totale.
Type d’instrument Photomètre centrifuge pour fl uides
Longueurs d’onde
(fi ltres d’interférence)
Écran Écran couleur tactile capacitif, 3,5 pouces, résolution 320 x 240
Exactitude de longueur d’onde ±2 nm
Bande passante de longueur
d’onde
Plage photométrique De -2 à 2 UA
Précision photométrique ±0,01 UA à 1,0 UA
Exactitude photométrique ±0,01 UA à 1,0 UA
Chambre d’échantillon Accepte un disque prérempli
Source de lumière 6 LEDS
Détecteurs 6 photodiodes au silicium
Analyses préprogrammées Oui, avec sélection automatique de longueur d’onde
Langues Anglais, français, espagnol, allemand, néerlandais, suédois,
Température Fonctionnement : 0-50 °C ; stockage : 40-60 °C
Plage d’humidité pour le
fonctionnement
Communication USB-C, technologie basse consommation Bluetooth (BLE)
Étalonnage Confi guré en usine, étalonnage sur site par connexion internet
Firmware Mise à jour via Internet (nouveaux tests, nouveaux étalonnages
Logiciel Applications pour Android et iOS, DataMate® Web, DataMate® 10
Alimentation requise Adaptateur secteur USB, connexion ordinateur USB ou batterie
Type de batterie Lithium-ion
Capacité minimale 12 V/2,6 Ah
Durée de la charge Environ 150 analyses
Durée de vie de la batterie Environ 500 charges
Chargement complet En 10-12 heures
Résistance à l’eau Base recouverte de caoutchouc, port USB en caoutchouc, écran
390 nm, 428 nm, 470 nm, 525 nm, 568 nm, 635 nm
pixels
10 typique
portugais, italien, chinois, turc
0-90 % HR, sans condensation
de test, etc.)
lithium-ion interne rechargeable
et charnières étanches
64
Page 65

Indications électriques Tension nominale (5 V), courant d’entrée nominal (1,6 A) au
Extinction automatique Oui, 15 par défaut (uniquement pour le fonctionnement sur
Économie d’énergie Oui, sur OFF par défaut
Enregistreur de données 250 résultats d’analyse stockés pour leur téléchargement sur PC
Certifi cations
Dimensions 21,6 X 12,4 X 10,4 cm (L X l X H) 8,5 X 4,9 X 4,2 pouces
Poids 0,79 kg, 1,74 livres
niveau de la prise USB C
batterie)
ou leur transmission via Bluetooth
EZ-BLE™ PRoC™
Module,
CYBLE-022001-00
Radio RF :
EMC: EU: ETSI EN 301489-1
Sécurité : UE : EN61010-1:2010
FCC (USA):
Industrie
Canada (IC)
Certifi cation
CE (Europe) : Conforme à la
MIC (Japon) : 005-101007
KC (Corée) : MSIP-CRM-
US: FCC PART 15 B
CAN ICES-3 (B)/NMB-3(B)
AS/NZS: CSPR 22
AU/NZ : diff érences nationales
FCC ID: WAP2001
License IC:
7922A-2001
directive
1999/5/EC
Cyp-2001
65
Page 66

ACCESSOIRES ET PIÈCES DE RECHANGE
Description Code
®
Photomètre WaterLink
Spin Touch
Flacon d’échantillon d’eau (60 mL) 0688
Flacon d’échantillon d’eau (30 mL) 0689
Seringue avec embouts (3) 1189-3
Embouts de seringue (3) 1189-TIP
Lingettes nettoyantes 0669
Disque de vérifi cation de photomètre (Amérique du Nord) 1705
Disque de vérifi cation de photomètre (Europe) 1705-EU
Couverture universelle de disque 1719
Câble USB 1712
Adaptateur secteur (Amérique du Nord) 1713
Adaptateur secteur (Europe) 27252-PAD-EU
Lingette en tissu 3580-WIPE
Imprimante Bluetooth mobile 5-0066
Tapis de comptoir WaterLink
®
Manuel WaterLink
Spin Touch® 3580-MN
Guide d’utilisation rapide WaterLink
Guide d’utilisation rapide WaterLink
Guide d’utilisation rapide WaterLink
Guide d’utilisation rapide WaterLink
Bannière WaterLink
®
Spin Touch
Autocollant pour fenêtre WaterLink
®
®
Spin Touch
®
®
®
Spin Touch
®
Spin Touch® (French) 3580-QG-FR
®
Spin Touch
®
Spin Touch® (French) 3581-QG-FR
®
Spin Touch
®
®
®
1715-METER
3580-MAT
3580-QG
3581-QG
3580-BAN
3580-DECAL
Pour connaître les disques de réactifs WaterLink
la page 67.
66
®
Spin Touch® disponibles, reportez-vous à
Page 67

DESCRIPTIONS DES DISQUES
DISQUES À USAGE UNIQUE
Disque Chlore/Brome
(Code 4328)
Chlore libre
Brome
Chlore total
Alcalinité totale
pH
Sel
Dureté calcique
Cuivre
Fer
Acide cyanurique
Alcalinité
totale
Chlore libre
Brome
Cuivre
Sel
pH
Dureté
calcique
Vide
Chlore
total
Fer
Acide
cyanurique
Chlore/Brome plus Phosphate
Disque de série 10 tests
(Code 4329)
Chlore libre
Brome
Chlore total
Alcalinité totale
pH
Sel
Dureté calcique
Cuivre
Fer
Acide cyanurique
Phosphate
Chlore/Brome plus Borate
Disque de série 10 tests
(Code 4330)
Chlore libre
Brome
Chlore total
Alcalinité totale
pH
Sel
Dureté calcique
Cuivre
Fer
Acide cyanurique
Borate
Alcalinité
totale
Chlore libre
Brome
Alcalinité
totale
Chlore libre
Brome
Cuivre
Sel
pH
Cuivre
Sel
pH
Dureté
calcique
Blank
Dureté
calcique
Blank
Chlore
total
Fer
Phosphate
Acide
cyanurique
Chlore
total
Fer
Borate
Acide
cyanurique
REMARQUE : Les réactifs colorés peuvent être visibles dans le disque avant l’ajout de l’eau
d’échantillon.
REMARQUE : Les disques contenant des réactifs de sel doivent être stockés et utilisés à empérature
ambiante (68-74 °F/20-23 °C).
67
Page 68

Disque Biguanide plus Borate
(Code 4331)
Biguanide
Biguanide choc
Alcalinité totale
pH
Dureté calcique
Cuivre
Fer
Borate
Cuivre
Biguanide
Dureté
calcique
Biguanide
choc
Alcalinité
totale
Fer
Borate
DISQUES À PLUSIEURS UTILISATIONS
Chlore/Brome/pH
(Code 4334)
pH
Chlore libre
Brome
Chlore total
Chlore/Brome/pH/Alcalinité
(Code 4335)
pH
Chlore libre
Brome
Alcalinité
ENTRETIEN
Chlore
total
Chlore libre
Brome
Alcalinité
Chlore libre
Brome
Vide
pH
Vide
pH
pH
Vide
Chlore libre
Brome
pH
Vide
pH
Vide
Chlore
total
Chlore libre
Brome
Alcalinité
Chlore
total
Chlore libre
Brome
Alcalinité
Vide
Chlore libre
Brome
Vide
pH
pH
NETTOYAGE
Le système optique du WaterLink® Spin Touch® doit être propre et sec en permanence pour
assurer une performance optimale. Séchez le disque avec une lingette non pelucheuse
avant de l’insérer dans la chambre afi n d’éviter d’introduire toute humidité. Pour de
meilleurs résultats, stockez l’instrument dans un endroit sec et à l’abri de vapeurs
chimiques corrosives. Nettoyez l’extérieur du logement avec une lingette non pelucheuse
humide. Ne laissez pas d’eau pénétrer dans la chambre lumineuse ni aucune autre partie
du photomètre. Pour nettoyer la chambre lumineuse et les lentilles optiques, dirigez
une bombe à air comprimé vers la chambre lumineuse et le couvercle et ventilez-y l’air
comprimé. Visez particulièrement la zone autour des LED, les petites lentilles rondes
situées à 2:00, 4:00, 6:00, 8:00, 10:00 et 12:00 dans le couvercle. Les photodiodes se
trouvent sur le dessous de la chambre, autour de l’axe. Cette zone doit être toujours propre
et sèche. Servez-vous d’un coton-tige imbibé de produit à vitre Windex
délicatement les lentilles des LED et des photodiodes. N’utilisez pas d’alcool, car une fois
sec, ce dernier laisse un fi n résidu sur les lentilles.
68
®
pour nettoyer
Page 69

Enlever les tâches engendrées par l’utilisation quotidienne sur l’écran tactile avec la
lingette en tissu (code 3580-WIPE). Utilisez un chiff on imbibé d’alcool pour un nettoyage
plus intensif lorsque nécessaire. N’utilisez pas le produit nettoyant Windex
produit semblable, sur l’écran tactile.
®
, ni aucun autre
RÉPARATIONS
Si vous devez renvoyer le photomètre pour réparation ou révision, emballez-le avec
précaution dans un contenant approprié dont le matériau est adapté. Vous devez obtenir
un numéro d’autorisation de retour auprès de LaMotte Company en appelant au 800344-3100, ext. 3 (États-Unis uniquement) ou au 410-778-3100, ext. 3, par fax au 410778-6394, ou en envoyant un courriel à softwaresupport@lamotte.com. Généralement,
les problèmes peuvent être résolus par téléphone ou par courriel. S’il est nécessaire de
renvoyer le photomètre, joignez-y une lettre contenant le numéro d’autorisation de retour,
le numéro de série du photomètre, une brève description du problème et vos coordonnées,
y compris vos numéros de téléphone et de fax. Ces informations permettront au service
technique d’eff ectuer les réparations plus effi cacement.
ÉLIMINATION DU PHOTOMÈTRE
Déchets d’équipements électriques et électroniques (DEEE)
Des ressources naturelles ont été utilisées pour la production de cet
équipement. Cet équipement peut contenir des matériaux dangereux
pour la santé et l’environnement. Pour éviter de nuire à l’environnement
et aux ressources naturelles, il est recommandé d’employer les systèmes
de reprise appropriés. Le symbole de poubelle sur roues barrée d’une
croix apposé sur l’instrument encourage à utiliser ces systèmes lors de
l’élimination de cet équipement.
Les systèmes de reprise permettent aux matériaux d’être réutilisés
ou recyclés d’une manière qui ne soit pas nocive à l’environnement.
Pour obtenir davantage d’informations sur les systèmes de collecte, de
réutilisation et de recyclage approuvés, contactez les autorités locales
ou régionales responsables des déchets ou les services de recyclage.
N’incinérez pas l’équipement.
ÉLIMINATION DU DISQUE
Les disques ne peuvent pas être réutilisés. Au fi l du temps, l’eau dans les disques utilisés
s’évaporera. Les disques peuvent être recyclés. Avertissement : Pour le recyclage,
informez-vous auprès des autorités locales. Certains États peuvent exiger que le plastique
ne présente aucun résidu chimique ou ne sont peut-être pas en mesure d’accepter les
déchets plastiques contenant des billes de mélange en acier inoxydable. Les disques
utilisés peuvent être retournés, aux frais du client, à l’entreprise LaMotte pour recyclage.
INFORMATIONS GÉNÉRALES
EMBALLAGE ET RETOURS
Le personnel de LaMotte Company possède une grande expérience en emballage et
garantit une protection adéquate contre les dangers usuels du transport de marchandise.
Une fois que le produit a quitté l’usine, l’entière responsabilité de sa livraison en toute
sécurité est prise en charge par l’entreprise de transport. Les réclamations pour
endommagement doivent être directement déposées auprès de l’entreprise de transport
69
Page 70

afi n de recevoir une compensation pour les biens endommagés. Si vous devez renvoyer
l’instrument pour réparation ou entretien, emballez-le avec précaution dans un contenant
approprié dont le matériau d’emballage est adapté. Vous devez obtenir un numéro
d’autorisation de retour auprès de LaMotte Company en appelant au 1-800-344-3100 ou
au 1-410-778-3100, ext. 3, ou en envoyant un courriel à softwaresupport@lamotte.com.
Joignez au colis une lettre contenant le numéro d’autorisation et une description du type
de problème rencontré. Ces informations précieuses permettront au service technique
d’eff ectuer les réparations plus effi cacement.
PRÉCAUTIONS GÉNÉRALES
Consultez le mode d’emploi avant toute tentative de confi guration ou d’utilisation de
l’instrument. Dans le cas contraire, vous risqueriez de vous blesser ou d’endommager
le photomètre. Le WaterLink
environnement humide ou excessivement corrosif. Veillez à ne pas laisser d’eau ni de
réactifs pénétrer dans la chambre du photomètre. N’insérez aucun disque humide dans la
chambre du photomètre.
®
Spin Touch® ne doit être ni stocké ni utilisé dans un
MESURES DE SÉCURITÉ
Avant toute utilisation, consultez les mesures de sécurité inscrites sur les étiquettes des
récipients et des emballages contenant les réactifs. Des fi ches de données de sécurité
sont disponibles (SDS) sur le site
supplémentaires sur tous les réactifs LaMotte sont disponibles 24 h/24 auprès du Centre
national antipoison au 1-800-222-1222 ou au numéro d’urgence ChemTel 1-800-2553924 (USA, Canada, Puerto Rico). Pour les pays en dehors de l’Amérique du Nord, appelez
le 813-248-0585 en PCV.
Assurez-vous que la protection de l’équipement n’est pas compromise. N’installez et
n’utilisez jamais l’équipement d’une façon qui ne soit pas indiquée dans le manuel.
www.lamotte.com. En cas d’urgence, des informations
LIMITES DE RESPONSABILITÉ
En aucun cas, LaMotte Company ne saurait être tenue pour responsable en cas de
décès, de perte de propriété, de perte de profi ts ou de tout autre dommage engendré par
l’utilisation ou l’utilisation impropre de ses produits.
CONFORMITÉ CE
Le photomètre WaterLink® Spin Touch® a été testé de façon indépendante et a reçu la
marque de conformité européenne CE relative à la compatibilité électromagnétique et à
la sécurité. Pour consulter les certifi cats de conformité, accédez au site Web de LaMotte :
www.lamotte.com.
Cet appareil est conforme à la Partie 15 des réglementations de la FCC. Son
fonctionnement est soumis aux deux conditions suivantes : (1) cet appareil ne peut
provoquer aucune interférence nuisible et (2) cet appareil doit accepter toute autre
interférence reçue, y compris les interférences pouvant entraîner un fonctionnement non
désiré.
Remarque : Ce matériel a été testé et déclaré conforme aux limites applicables aux
appareils numériques de classe B, conformément à la Partie 15 des réglementations
de la FCC. Ces limites ont pour objectif de fournir une protection raisonnable contre les
interférences nuisibles quand l’appareil est utilisé dans un environnement résidentiel. Cet
appareil génère, utilise et émet de l’énergie d’ondes radio et peut, en cas d’installation ou
d’utilisation non conforme au mode d’emploi, engendrer des interférences nuisibles au
niveau des communications radio. Toutefois, il n’est pas garanti qu’aucune interférence
ne se produise dans une installation particulière. Si cet appareil cause des interférences
70
Page 71

nuisibles à la réception des signaux de radio ou de télévision, ce qui peut être déterminé
en allumant et en éteignant l’équipement, l’utilisateur est invité à essayer de corriger cette
interférence à l’aide des mesures suivantes :
¬ Modifi er l’orientation de l’antenne réceptrice ou la déplacer.
¬ Augmenter la distance séparant l’équipement du récepteur.
¬ Brancher l’appareil sur un circuit diff érent de celui du récepteur.
¬ Contacter le revendeur ou un technicien radio/TV qualifi é pour obtenir de l’aide.
CERTIFICATION NSF
La marque de certifi cation NSF/ANSI 50 sur un instrument d’analyse de la
qualité de l’eau utilisé dans des eaux de plaisance, comme les piscines et
spas, indique que le produit a été examiné par NSF International et certifi é
conforme aux normes américaines applicables en matière de conception
et de performance de produit. NSF teste et reteste des produits pour
confi rmer qu’ils sont conformes à toutes les exigences de certifi cation
en matière de performance, de précision et de plage de fonctionnement.
Les niveaux de certifi cation sont L1, L2 et L3, L1 étant le meilleur niveau.
Accédez à
Paramètre
testé Application
pH Piscine 6,4–8,6 L1
Chlore libre Piscine 0–15 ppm L1
Chlore, combiné Piscine 0-1 ppm L1
Acide
cyanurique
Autres paramètres non évalués par NSF.
Accédez à
Reportez-vous aux descriptions des disques (page 67) pour les disques certifi és NSF.
www.nsf.org pour obtenir la liste actuelle des produits LaMotte certifi és NSF.
www.nsf.org pour plus d’informations.
Niveau NSF
Plage certifi ée
NSF
Spa/Jacuzzi 6,4-8,6 L1
Spa/Jacuzzi 0–7 ppm L1
Spa/Jacuzzi 0-1 ppm L1
Piscine 5–50 ppm L1
Précision/
Général
GARANTIE
LaMotte Company garantit que cet instrument est exempt de défauts matériaux et de
fabrication pendant 2 ans à partir de la date d’expédition. S’il s’avérait nécessaire de
renvoyer l’instrument au service technique pendant ou au-delà de la période de garantie,
contactez notre service technique au 1-800-344-3100 ou 1-410-778-3100, ext. 3 ou par
courriel à softwaresupport@lamotte.com afi n d’obtenir un numéro d’autorisation de retour
ou accédez au site Web
L’expéditeur est responsable des frais d’envoi, du transport, de l’assurance et de
l’emballage adéquat du produit afi n que ce dernier soit protégé contre les dommages qui
pourraient survenir durant le transport. La garantie ne s’applique pas aux défauts résultant
de l’action de l’utilisateur, telle qu’une utilisation impropre, un branchement incorrect,
un fonctionnement hors spécifi cations, un entretien ou une réparation inappropriés, ou
www.lamotte.com pour obtenir de l’aide relative au dépannage.
71
Page 72

une modifi cation non autorisée. LaMotte Company décline expressément toute garantie
implicite de qualité marchande ou de convenance à une fi n particulière et ne pourra en
aucun cas être tenue pour responsable de tout dommage consécutif, accessoire, indirect
ou direct. La responsabilité totale de LaMotte Company est limitée à la réparation et au
remplacement du produit. La garantie énoncée ci-avant est inclusive et aucune autre
garantie, écrite ou orale, n’est expresse ou implicite.
Pour inscrire votre photomètre auprès du service technique LaMotte accédez à
www.lamotte.com et cliquez sur SUPPORT dans la barre de navigation.
Numéro de série _____________________________________________________
Water Testing Leader Since 1919
Líder en análisis del agua desde 1919
Leader en analyse d’eau depuis 1919
Compatible with iPhone 6 Plus,
iPhone 6, iPhone 5s, iPhone 5c,
iPhone 5, iPad Air 2, iPad Air, iPad
mini 3, iPad mini 2, iPad mini, and
iPad (4th generation).
Compatible with Android devices.
WaterLink® and DataMate® are
registered trademarks of LaMotte
Company.
Disk US Patent No. 8,734,734
FCl US Patent No. 8,987,000
FCl EU Patent No. EP2784503 A1
TCl US Patent No. 8,993,337
LaMotte Company
Chestertown, MD 21620 USA
PO Box 329
410-778-3100
www.waterlinkspintouch.com
Compatible con iPhone 6 Plus,
iPhone 6, iPhone 5s, iPhone 5c,
iPhone 5, iPad Air 2, iPad Air, iPad
mini 3, iPad mini 2, iPad mini y iPad
(4.ª generación).
Compatible con dispositivos Android.
WaterLink® y DataMate® son marcas
registradas de LaMotte Company.
Patente US del disco n.º 8.734.734
Patente US del FCl n.º 8.987.000
Patente UE del FCl n.º EP2784503 A1
Patente US del TCl n.º 8.993.337
Compatible avec les appareils iPhone
6 Plus, iPhone 6, iPhone 5s, iPhone
5c, iPhone 5, iPad Air 2, iPad Air, iPad
mini 3, iPad mini 2, iPad mini et iPad
4e génération.
Compatible avec les appareils
Android.
WaterLink® et DataMate® sont des
marques enregistrées de LaMotte
Company.
Brevet de disque USA nº 8 734 734
Brevet FCI USA nº 8 987 000
Brevet FCl UE nº EP2784503 A1
Brevet TCI USA nº 8 993 337
3580-MN 06.05.19 EN_SP_FR
 Loading...