

Page 1
Page 2

OVERVIEW WATERLINK® 3 EXPRESS
PROFESSIONAL IN-STORE LAB
The compact waterproof WaterLink® 3 Express colorimeter measures
15 different pool and spa tests using unit dose vials (UDVs) for the most
important test factors such as Free Chlorine, Total Chlorine, Bromine,
pH, Calcium Hardness, Alkalinity, Cyanuric Acid, Copper, Iron, Nitrate
and Borate. This innovative colorimeter is easy-to-use with the foilsealed UDV reagent system that has the precise amount of reagent
needed to run the tests. LaMotte chemists developed Unit Dose Vials
(UDVs) specifically for the in-store pool and spa analyst who desired
similar precision to current water labs but without the time consuming
procedures and range limitations on test strips.
This precise in-store lab is simple to use, just add the pool or spa water
sample using the pre-calibrated 3 mL pipettor to the sealed vials which
contain all the reagents needed for each test. The vials are inverted,
placed in the colorimeter chamber and the results are ready in an
instant. A complete set of tests can be completed in less than 4 minutes.
Later in the season, if metals tests are omitted, testing times can be
reduced to 2 minutes. When completed, the vials are thrown out and the
next test is started.
With all the necessary reagents in disposable vials, there’s no time
wasted in test preparation or cleanup. Since there are no tubes to clean
for future testing, overall time savings are doubled. The margin for error
is also significantly reduced since the user no longer has to measure
reagents and the simple-to use pre-calibrated pipettor saves time by
adding the correct amount of water sample to the vials.
This versatile new colorimeter allows analyst to measure other tests
such as Biguanide, Biguanide Shock, Phosphate and Manganese using
either liquid reagents or TesTabs
®
tablet reagents. The ability to run
these test only improves the retailer’s expertise in resolving water quality
issues and allows them to measure all their tests on one complete instore lab. Another bonus allows the English text on the meter to convert
to Spanish, French, Italian and Portuguese.
The WaterLink
®
3 Express colorimeter digitally displays the test results
and the user-friendly push-button system permits easy forward/reverse
scrolling through the test series along with sending the test results into
the DataMate 10.0 software program (sold separately). The test data
is sent through the USB connection from the colorimeter into the PC
loaded with the DataMate 10.0 software that analyzes the information
and recommends products along with treatment instructions.
Page 3

CONTENTS
General Information
Packaging and Delivery 4
General Precautions 4
Safety Precautions 4
Limits of Liability 5
Warranty 5
Specifications 6
EPA Compliance 7
CE Compliance 7
IP67 Certification 7
General Operating Procedures
The Keypad 8
The Display & The Menus 8
UDV Sample Holder 8
Setting up the WaterLink® 3 Express Lab
Setting Up the Colorimeter Lab for the
Chlorine & Bromine UDV Series
Colorimeter 9
Meter Set up with DataMate Software 9
UDV Racks 9
Counter Mat 10
Unit Dose Vials 10
Testing with the WaterLink® 3 Express Lab
Chlorine and Bromine UDV Series 10
Trouble Shooting 12
Other Series 12
Phosphate 13
Biguanide 15
Biguanide (Hydrogen Peroxide) Shock 17
Manganese 19
Setting up the WaterLink® 3 Express Colorimeter
Run PC Link 21
Absorbance 21
Setting the Clock 21
Setting the Data Logger 22
Setting the Power Save 22
Setting the Backlight Time 22
Selecting a Language 23
Battery
Battery Operation 24
Battery Replacement 25
Maintenance
Cleaning 25
Repairs 25
Meter Disposal 26
UDV Disposal 26
Accessories & Replacement Parts 27
Page 4

GENERAL INFORMATION
PACKAGING & DELIVERY
Experienced packaging personnel at LaMotte Company assure adequate
protection against normal hazards encountered in transportation of
shipments. After the product leaves the manufacturer, all responsibility for
its safe delivery is assured by the transportation company. Damage claims
must be filed immediately with the transportation company to receive
compensation for damaged goods.
Should it be necessary to return the instrument for repair or servicing, pack
instrument carefully in a suitable container with adequate packing material.
A return authorization number must be obtained from LaMotte Company
by calling 1-800-344-3100, ext. 2 or emailing tech@lamotte.com. Attach a
letter with the authorization number to the shipping carton which describes
the kind of trouble experienced. This valuable information will enable the
service department to make the required repairs more efficiently.
GENERAL PRECAUTIONS
Before attempting to set up or operate this instrument it is important to read
the instruction manual. Failure to do so could result in personal injury or
damage to the equipment.
The WaterLink
wet or corrosive environment. Care should be taken to prevent water or
reagent chemicals from wet colorimeter tubes from entering the colorimeter
chamber. Wipe colorimeter tubes with soft cloth before placing into
colorimeter chamber.
®
3 Express Colorimeter should not be stored or used in a
NEVER PUT WET TUBES IN COLORIMETER.
SAFETY PRECAUTIONS
Read the labels on all LaMotte reagent containers prior to use. Some
containers include precautionary notices and first aid information. Certain
reagents are considered hazardous substances and are designated with
a * in the instruction manual. Material Safety Data Sheets (MSDS) can be
found at www.lamotte.com. Read the MSDS before using these reagents.
Additional emergency information for all LaMotte reagents is available 24
hours a day from the Poison Control Center listed in the front of the phone
book or by contacting the 24 hour emergency line for ChemTel 1-800-2553924 (USA, Canada, Puerto Rico); locations outside the North American
Continent 813-248-0585 (call collect). Be prepared to supply the name and
four-digit LaMotte code number found on the container label or at the top
of the MSDS or in the contents list of the procedure. LaMotte reagents are
registered with a computerized poison control information system available
to all local poison control centers.
Keep equipment and reagent chemicals out of the reach of young children.
4
Page 5

LIMITS OF LIABILITY
Under no circumstances shall LaMotte Company be liable for loss of life,
property, profits, or other damages incurred through the use or misuse of its
products.
WARRANTY
LaMotte Company warrants this instrument to be free of defects in parts
and workmanship for 2 years from the date of shipment. If it should
become necessary to return the instrument for service during or beyond
the warranty period, contact our Technical Service Department at 1-800344-3100, ext. 2 or tech@lamotte.com for a return authorization number or
visit www.lamotte.com for troubleshooting help. The sender is responsible
for shipping charges, freight, insurance and proper packaging to prevent
damage in transit. This warranty does not apply to defects resulting from
action of the user such as misuse, improper wiring, operation outside of
specification, improper maintenance or repair, or unauthorized modification.
LaMotte Company specifically disclaims any implied warranties or
merchantability or fitness for a specific purpose and will not be liable for any
direct, indirect, incidental or consequential damages. LaMotte Company’s
total liability is limited to repair or replacement of the product. The warranty
set forth above is inclusive and no other warranty, whether written or oral, is
expressed or implied.
5
Page 6

SPECIFICATIONS
INSTRUMENT TYPE: Colorimeter
Readout 160 x 100 backlit LCD, 20 x 6 line graphical
display
Wavelengths 428 nm, 525 nm, 568 nm, 635 nm
Wavelength Accuracy ±2% FS
Readable Resolution Determined by reagent system
Wavelength Bandwidth 10 nm typical
Photometric Range –2 to +2 AU
Photometric Precision ± 0.001 AU at 1.0 AU
Photometric Accuracy ±0.005 AU at 1.0 AU
Sample Chamber Accepts 25 mm diameter flat-bottomed test
tubes, 10 mm square UDV cuvettes, 16 mm COD
test tubes
Light Sources 4 LEDs
Detectors 4 silicon photodiodes with integrated
interference filters
Pre-Programmed Tests YES, with automatic wavelength selection
Languages English, Spanish, French, Portuguese, and
Italian
USB Port Mini B
Power Requirements USB wall adapter or USB computer connection
or lithium ion rechargeable battery
Battery Charge Life: Approximately 380 tests with
backlight on to 1000 tests with backlight off.
Electrical Ratings Provided on nameplate label
Waterproof IP67 with USB port plug in place
Dimensions (LxWxH) 3.5 x 7.5 x 2.5 inches, 8.84 x 19.05 x 6.35 cm
Weight 13 oz, 362 g (meter only)
6
Page 7

EPA COMPLIANCE
The WaterLink® 3 Express Colorimeter is an EPA-Accepted instrument.
EPA-Accepted means that the instrument meets the requirements for
instrumentation as found in test procedures that are approved for the
National Primary Drinking Water Regulations (NPDWR) or National Pollutant
Discharge Elimination System (NPDES) compliance monitoring programs.
EPA-Accepted instruments may be used with approved test procedures
without additional approval.
CE COMPLIANCE
The WaterLink® 3 Express Colorimeter has earned the European CE Mark
of Compliance for electromagnetic compatibility and safety. The Declaration
of Conformity for the WaterLink® 3 Express Colorimeter is available at www.
lamotte.com.
IP67 CERTIFICATION
The Waterproof WaterLink® 3 Express meets IP67 standards for protection
against dust and immersion only when the USB port plug is in place.
Documentation is available at www.lamotte.com.
7
Page 8
GENERAL OPERATING PROCEDURES
THE KEYPAD
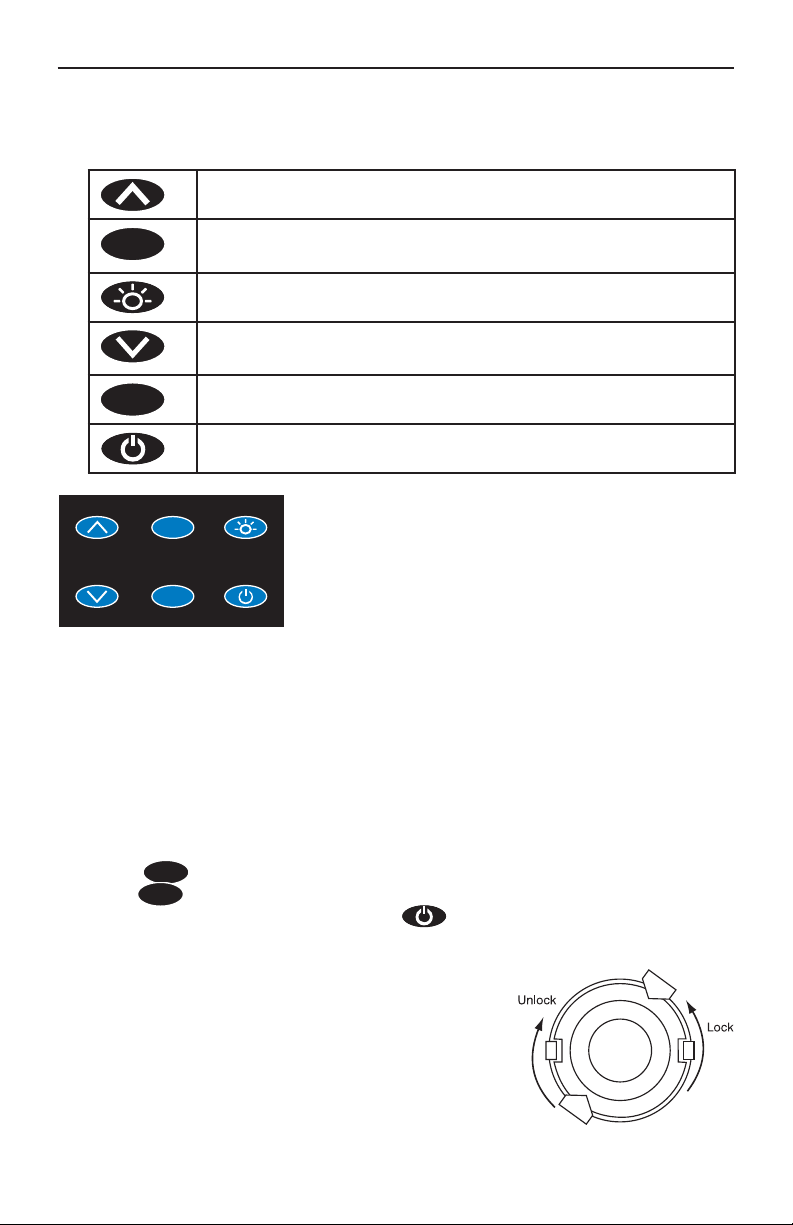
The keypad has 6 buttons which are used to perform specific tasks.
This button will scroll up through a list of menu selections.
ENTER
The button is used to select choices in a menu viewed in
the display.
This button controls the backlight on the display.
This button will scroll down through a list of menu
selections.
EXIT
This button exits to the previous menu.
This button turns the meter on or off.
ENTER
EXIT
THE DISPLAY & THE MENUS
The display has a header line at the top and a footer line at the bottom. The
header displays the title of the current menu. The footer line displays the
time and the date, the data logger status and the battery status. The menu
selection window is in the middle of the display between the header and the
footer. Some of the menus are looping menus. The top and bottom menus
are connected in a loop. Scrolling down past the bottom of the menu will
lead to the top of the menu. Scrolling up past the top of the menu will
lead to the bottom of the menu. A black bar will indicate the menu choice.
Pressing
bar. The
ENTER
will select the menu choice that is indicated by the black
EXIT
button allows an exit or escape from the current menu and a
return to the previous menu. Pressing at any time will turn the meter
off.
UDV SAMPLE HOLDER
Position the UDV Adapter (Code 1724) so that
the notches in the adapter fit around the posts on
the chamber. Turn the adapter counterclockwise
until the arrows are at the top and bottom of the
chamber and the adapter is locked in place. Turn
the adapter clockwise to unlock the adapter and
remove it from the chamber.
8
Page 9

SETTING UP THE WATERLINK® 3 EXPRESS LAB
SETTING UP THE COLORIMETER LAB FOR THE
CHLORINE AND BROMINE SERIES
The Chlorine and Bromine Series use Unit Dose Vial (UDV) reagents. The
powder reagents are packaged single test amounts in square plastic vials
with foil tops. The UDV chamber adapter, which is shipped in the meter
chamber, is used with these reagent systems. (The Other Series uses
various forms of reagent systems. The reactions are read in a round glass
tube and the UDV adapter must be removed from the meter chamber)
COLORIMETER
Remove the colorimeter and USB cable from the box. Save this box for 1.
shipping purposes if needed in the future.
If using the meter as an in-store water analysis lab, use the USB 2.
connector cable. The colorimeter must be connected to the computer
by the USB cable to transfer data to the DataMate™ PC software
program.
METER SET UP WITH DATAMATE SOFTWARE
Follow this procedure to send data from the Waterlink 3 Express colorimeter
into the DataMate software program.
Turn the WaterLink 3 Express Colorimeter OFF.1.
Setting up the WaterLink
®
3 Express Lab
Plug the USB cable mini connector into the back of the WaterLink 3 2.
Express Colorimeter.
Plug the larger USB cable type A connector into the computer USB 3.
port. The colorimeter will automatically turn ON once the USB cable is
connected to the computer and the colorimeter.
In the Programs section on your computer open the DataMate (Dmate) 4.
software program and click “Meter Setup” on the Home Screen.
In the DataMate Comport Setup Wizard window, select the WaterLink 3 5.
Express option, then click NEXT button.
The DataMate software program will now display “Meter Found”.6.
Click “Finish” to save the settings.7.
The WaterLink 3 Express colorimeter is now ready to transfer test 8.
results to the DataMate software program.
UNIT DOSE VIAL (UDV) RACKS
Remove the components of the white plastic racks from the packaging 1.
and attach the grid portion by flipping up the four sides from the base.
Do not add the middle grid. Only one grid is actually needed since this 2.
will allow the UDVs to slide into the rack more easily when filling.
9
Page 10

WaterLink® 3 Express COUNTER MAT
Place the colorimeter on the left side of the counter mat, then place both
racks on the mat. Insert the UDVs (Unit Dose Vials) for each test factor into
the corresponding row.
NOTE: The timing sequence for Unit Dose Vials color development on the
counter mats is very important. Note that the test for free chlorine should be
read immediately.
UNIT DOSE VIALS (UDVS)
Each box contains 100 UDVs (20 pouches of 5 each) for one specific 1.
test factor. Remove one pouch from each box for tests to be conducted
over the next 24 hours.
Avoid opening more pouches than you need for one day. Some UDVs 2.
have a limited shelf life and should not be exposed to the humidity in
the air more than necessary. A foil storage bag with a desiccant packet
is included that can extend the shelf life to several days.
Open pouches by tearing them, or cutting them with scissors, 3.
3 Express Lab
®
horizontally across the top, then remove the group of 5 UDVs.
Place each set of individual UDVs in the rack directly behind their 4.
respective test factor as noted on the counter mat.
TESTING WITH THE WATERLINK® 3 EXPRESS LAB
CHLORINE & BROMINE UDV SERIES
Press 1. briefly to turn the meter on.
Press 2. or to scroll to CHLORINE SERIES or BROMINE
Testing with the WaterLink
SERIES.
Press 3.
ENTER
to select CHLORINE SERIES or BROMINE SERIES.
Insert the pipettor into the pool or spa water sample to be tested. 4.
Slowly extract the pool or spa water sample that will be measured.
The first vial will be the “Blank”. An empty vial containing 3 mL of pool 5.
or spa water sample will be used to clear the colorimeter memory and
prepare it for the series of tests. Press the plunger to dispense the
water sample into the BLANK vial.
Insert the Blank vial into the meter chamber. 6.
Use the pipettor to slowly dispense 3 mL of sample water in each UDV 7.
(Unit Dose Vial) from right to left. If testing the full series, the Borate
UDV will be filled first. If Borate or Nitrate are not to be tested, fill the
Iron UDV with sample water. (The Bromine test can be performed using
Free or Total Chlorine UDVs.)
TIP: Press the pipettor tip through the foil with your finger. Always gently
break the seal of the UDV with the tip of the pipettor and slowly release the
10
Page 11

sample without inserting the tip much beyond the foil opening. If reagent
does get on the tip, rinse off the tip before proceeding to the next test.
TIP: When water sample is dispensed too rapidly, air bubbles could
develop and result in high results. Try inverting the vial again or tapping it
on a firm surface to dislodge the bubbles.
Continue filling the UDVs from right to left, finishing with Free Chlorine. 8.
The vials must be filled with the pool or spa water sample from right
to left and read from left to right to allow for proper color development
time.
Press 9.
ENTER
to select BLANK Vial. Press
ENTER
again to read blank.
BLANK DONE will appear on the display. The colorimeter is now ready
to test for Free Chlorine.
NOTE: The lid does not need to be closed when testing with UDVs.
Remove the Blank vial. 10.
Invert the Free Chlorine UDV 3 times to mix. Finger protectors are 11.
included to avoid stains and to protect individuals with sensitive skin
while mixing the UDVs.
NOTE: If clumps of powder are lodged in the corner of the UDV, tap the
vial on the counter then invert again. Should water get on the outside of
the UDV, wipe the UDV with a dry cloth before inserting it into the meter
chamber.
Testing with the WaterLink
®
3 Express Lab
Insert the Free Chlorine UDV into the colorimeter chamber. Press
ENTER
to take a measurement and proceed to the next test. Record result.
NOTE: When using the colorimeter with the DataMate computer
program, the UDV must remain in the chamber until after the button is
pushed and the test result appears on the colorimeter screen. Once the
next test name appears the UDV can be removed and replaced with the
next UDV and
ENTER
can be pressed. This process should be done until
all of the tests have been performed.
NOTE: To BACK UP while in the middle of a test series press
or
which will scroll through the Test Sequence.
Remove the Free Chlorine UDV. Continue testing from left to right, 12.
inverting each vial 3 times before placing it into the meter. Finish testing
on the right with the Borate UDV. Press
EXIT
to go back to the Main
Menu or to turn meter off.
NOTE: Individual UDV Tests
The WaterLink® 3 Express meter is designed to provide accurate results
when all of the UDV tests are run in sequence. To run an individual test for
a selected test factor, wait the specified time listed on the counter mat after
adding the sample before mixing and measuring the test result. Invert the
UDV 3 times then place it in the meter chamber. If clumps of powder are
lodged in the corner, tap the vial on the counter then invert.
11
Page 12

UDV TROUBLESHOOTING
High Chlorine/Bromine - High sanitizer levels may cause the DPD powder 1.
in the UDV to bleach out to a colorless or near colorless solution. A dilution
procedure can be used to determine the approximate level of sanitizer.
Note: At high sanitizer levels, chloramines could break through into the Free
Chlorine test, the pH UDV may turn purple and the Alkalinity UDV may turn
yellow.
High Copper - Copper at levels above 1.0 ppm may cause the Hardness 2.
test to read low.
Low Alkalinity - Algaecide treatments above recommended levels may lower 3.
the alkalinity results. Make sure the color has been allowed to develop for
1.5 minutes.
Cyanuric Acid - Since Cyanuric Acid tests are temperature dependent, the 4.
best results are obtained when sample temperatures are between 70 and
80 degrees. Below this range, results may read high, while in temperatures
above the range they may read low.
3 Express Lab
pH Purple - As noted under High Chlorine/Bromine above, sanitizer levels 5.
®
beyond 10 ppm can turn the pH reaction purple.
Hardness - Be sure to allow the Hardness color to develop for at least one 6.
minute, but read the result before five minutes expire. High Copper or low
pH levels can significantly reduce the expected hardness result.
OTHER SERIES
The Other Series uses various forms of reagent systems. The reactions are
read in a round glass tube (0290) so the UDV adapter must be removed
Testing with the WaterLink
from the meter chamber (See page 8). To perform one test in the series,
press
or to scroll to the desired test factor, press ENTER, and
then follow the test instructions to scan a blank and a reacted sample.
To run multiple tests in the series, insert the blank tube containing the
sample water and press ENTER to select BLANK vial. The meter will only
need to be blanked once at the beginning of the series. Press or
to scroll from one test factor to the next and follow the individual test
instructions to react and scan a reacted sample.
12
Page 13

PHOSPHATE- STRIP
CODE 3021-H-6
QUANTITY CONTENTS CODE
®
50 Strips Insta-TEST
1 Test tube, plastic, with cap 0106
Algae is probably the most annoying water problem in outdoor pools
because it is unsightly and difficult to destroy. Algae multiplies so rapidly,
that by the time the human eye can notice it there are billions of algae cells
in the pool. Phosphate is a nutrient for algae. Some phosphates come from
natural sources such as rivers, lakes, oceans or mined rock. Other sources
of phosphate include fertilizer, organic debris such as leaves and grass,
and some pool chemicals.
Phosphate containing compounds, such as sequestering agents, are
added to swimming pools as phosphonates. Algae can not use this
combined form of phosphate until it is eventually broken down by chlorine
to the ortho-phosphate form. Algae thrive on ortho-phosphate so this
is the form of phosphate that concerns pool owners. The greater the
concentration of ortho-phosphate, the more the algae flourishes and the
more resistant it becomes to sanitizers. If ortho-phosphate is removed from
the pool it is harder for algae to grow.
APPLICATION: Swimming pools
RANGE: 0 – 1000 ppb
INTERFERENCES: Copper (5 ppm or greater), ferric iron, arsenate and
Low Range Phosphate Strips 3021
silica will interfere.
Testing with the WaterLink
®
3 Express Lab
NOTE: The Natural Chemistry
®
PHOS-TEST strip can be used for this test.
13
Page 14

PHOSPHATE PROCEDURE
Remove the UDV Adapter (1724) from the meter chamber. (See page 8)
Press and briefly hold 1.
to turn the meter on.
Press 2. to scroll to Other Series.
Press 3.
Press 4.
Press 5.
ENTER
to select Other Series.
to scroll to Phosphate.
ENTER
to select Phosphate.
Rinse a clean, glass test tube (0290) with sample water. Fill to the 10 6.
mL line with the sample.
Insert tube into chamber, close lid and press 7.
ENTER
to select BLANK
vial.
NOTE: If a blank has been scanned previously in the same type of
tube, the meter will not require that a blank be scanned.
3 Express Lab
®
Remove the tube from the colorimeter.8.
Rinse a clean plastic test tube (0106) with sample water. Fill to the 10 9.
mL line with the sample.
Remove one Phosphate LR Test Strip (3021) from the vial. Gently 10.
bend strip in half (do not fold) with pads facing inward. Place strip
inside test tube cap.
Cap tube and slowly invert 5 times. In one complete inversion, the 11.
tube will be turned cap down and then right side up. The air bubble will
move slowly to the bottom of the tube and back again to the cap end.
Five inversions should take about 15 seconds.
Testing with the WaterLink
Remove the cap and test strip from the plastic tube (0106). Pour the 12.
reacted sample into a glass tube (0290). Cap.
Immediately insert tube into chamber, close lid and select SCAN 13.
SAMPLE. Record result as ppb Phosphate.
Follow the next test procedure to test the next test factor in the series, 14.
press
or to select another test in the series, press
escape to a previous menu, or press to turn the meter off.
NOTE: The Natural Chemistry
®
PHOS-TEST strip can be used for this test.
Follow the instructions above.
14
EXIT
to
Page 15

BIGUANIDE
CODE 4044
QUANTITY CONTENTS CODE
2 X 60 mL Biguanide Indicator 3994-H
1 Pipet, plastic, 1.0 mL 0354
Biguanide is a non-chlorine, non-bromine chemical sanitizer. It is more
stable than chlorine or bromine and has little chemical odor. Biguanide is an
effective bacteriacide but, unlike chlorine and bromine, it does not destroy
organic contaminants. Therefore, hydrogen peroxide is added to biguanide
pools on a regular basis to eliminate organic contaminants. The optimum
recommended level of biguanide is 30 to 50 ppm.
APPLICATION: Swimming pools
RANGE: 0–70 ppm Biguanide
INTERFERENCES: The only interfering substances that are likely to be
encountered in pool water are oxidized manganese.
Testing with the WaterLink
®
3 Express Lab
15
Page 16

BIGUANIDE PROCEDURE
Remove the UDV Adapter (1724) from the meter chamber. (See page 8)
Press and briefly hold 1.
to turn the meter on.
Press 2. to scroll to Other Series.
Press 3.
Press 4.
Press 5.
ENTER
to select Other Series.
to scroll to Biguanide.
ENTER
to select Biguanide.
Rinse a clean, glass test tube (0290) with sample water. Fill to the 10 6.
mL line with the sample.
Insert the tube into the chamber. Press 7.
ENTER
to select BLANK Vial.
NOTE: If a blank has been scanned previously in the same type of
tube, it is not necessary to scan a blank again.
Remove the tube from colorimeter. 8.
3 Express Lab
®
Use the 1.0 mL pipet (0354) to add 2.0 mL of Biguanide Indicator 9.
(3994). Cap and invert three times to mix.
Wait 1 minute.10.
Insert the tube into chamber. Close lid. 11.
Select 12. SCAN SAMPLE. Record result as ppm Biguanide
Follow the next test procedure to test the next test factor in the series, 13.
press
or to select another test in the series, press
escape to a previous menu, or press to turn the meter off.
Testing with the WaterLink
EXIT
to
16
Page 17

BIGUANIDE (HYDROGEN PEROXIDE) SHOCK
CODE 4045
QUANTITY CONTENTS CODE
30 mL *Hydrogen Peroxide Reagent #1 *6452-G
100 *Hydrogen Peroxide LR Tablets *6454A-J
1 Tablet Crusher 0175
1 Pipet, glass 0342
*WARNING: Reagents marked with an * are considered to be potential
health hazards. To view or print a Material Safety Data Sheet (MSDS) for
these reagents go to www.lamotte.com. To obtain a printed copy, contact
LaMotte by e-mail, phone or fax.
Large quantities of hydrogen peroxide shock are added to a swimming pool
to “shock” it. Shocking breaks down waste products and re-establishes
a positive level of sanitizer. While many types of shock can be used with
chlorine or bromine pools, only hydrogen peroxide shock can be used to
shock biguanide pools.
APPLICATION: Swimming pools
RANGE: 0–300 ppm Hydrogen Peroxide Shock
INTERFERENCES: Manganese may interfere and should be removed
before analysis
Testing with the WaterLink
®
3 Express Lab
17
Page 18

BIGUANIDE SHOCK PROCEDURE
Remove the UDV Adapter (1724) from the meter chamber. (See page 8).
Press and briefly hold 1.
to turn the meter on.
Press 2. to scroll to Other Series.
Press 3.
Press 4.
Press 5.
ENTER
to select Other Series.
to scroll to Biguanide Shock.
ENTER
to select Biguanide Shock.
Rinse a clean, glass test tube (0290) with sample water. Fill to the 10 6.
mL line with the sample.
Insert the tube into the chamber. Press 7.
ENTER
to select BLANK Vial.
NOTE: If a blank has been scanned previously in the same type of
tube, it is not necessary to scan a blank again.
Remove the tube from colorimeter and add 4 drops of *Hydrogen 8.
3 Express Lab
®
Peroxide Reagent #1 (6452). Cap and mix.
Add one *Hydrogen Peroxide LR Tablet (6454A). Crush tablet with 9.
Tablet Crusher (0175). Cap and mix for 30 seconds. Solution will turn
pink if hydrogen peroxide is present. Wait 5 minutes for full color
development.
At the end of 5 minute waiting period, mix, insert tube into chamber, 10.
close lid and select SCAN SAMPLE. Record result as ppm Biguanide
Shock.
Follow the next test procedure to test the next test factor in the series, 11.
press
Testing with the WaterLink
escape to a previous menu, or press to turn the meter off.
or to select another test in the series, press
EXIT
to
18
Page 19

MANGANESE
CODE 3658-SC
QUANTITY CONTENTS CODE
2x60 mL *Hardness Buffer Reagent *4255-H
30 mL *Manganese Indicator Reagent *3956-G
15 mL *Sodium Cyanide, 10% *6565-E
1 Pipet, 0.5 mL, plastic 0369
1 Pipet, 1.0 mL, plastic 0354
*WARNING: Reagents marked with an * are considered to be potential
health hazards. To view or print a Material Safety Data Sheet (MSDS) for
these reagents go to www.lamotte.com. To obtain a printed copy, contact
LaMotte by e-mail, phone or fax.
Manganese may be present in source water, especially water from private
wells. In a swimming pool, manganese can cause purple to brownish black
staining or purple water. The problem may not be visible until chlorine is
added. Corrosion of stainless steel, which contains manganese, can also
increase manganese levels.
APPLICATION: Swimming pools
RANGE: 0.00–0.70 ppm Manganese
INTERFERENCES: None.
Testing with the WaterLink
®
3 Express Lab
19
Page 20

MANGANESE PROCEDURE
Remove UDV Adapter (1724) from the meter chamber. (See page 8)
Press and briefly hold 1. to turn the meter on.
Press 2.
Press 3.
Press 4.
Press 5.
to scroll to Other Series.
ENTER
to select Other Series.
to scroll to Manganese.
ENTER
to select Manganese.
Rinse a clean, glass test tube (0290) with sample water. Fill to the 10 6.
mL line with the sample.
Insert the tube into the chamber. Press 7.
ENTER
to select BLANK Vial.
NOTE: If a blank has been scanned previously in the same type of
tube, it is not necessary to scan a blank again.
Remove tube from colorimeter. Use the 1.0 mL pipet (0354) to add 2.0 8.
3 Express Lab
®
mL (two measures) of *Hardness Buffer Reagent (4255). Swirl to mix.
Add 2 drops of *Sodium Cyanide, 10% (6565). Cap and mix.9.
Use the 0.5 mL pipet (0369) to add 0.5 mL of *Manganese Indicator 10.
Reagent (3956). Cap and mix.
Immediately insert tube into chamber, close lid and select 11. SCAN
SAMPLE. Record result as ppm Manganese.
Follow the next test procedure to test the next test factor in the series, 12.
press
or to select another test in the series, press
escape to a previous menu, or press to turn the meter off.
Testing with the WaterLink
EXIT
to
20
Page 21

SETTING UP THE WATERLINK® 3 EXPRESS
COLORIMETER
RUN PC LINK (UNAVAILABLE AT THIS TIME)
The meter may be interfaced with any Windows-based computer by using
a program designed to receive the data when the Logging function is
enabled. The meter program will store test information and results in a data
base. To transfer data from the meter to a computer, plug the smaller end
of the USB cable (USB mini B connector) into the meter and the large end
of the USB cable (USB Type A connector) into a USB port on a computer.
The PC software program has to be designed to receive the test data when
in the Logging function is being used. Currently, the DataMate™ software
program does not have this ability to receive the data through the Logging
function.
ABSORBANCE
The calibrations for the tests in each sequence have been factory set. The
absorbance mode is used by technicians during the manufacture of the
meter. It should not be necessary to access the absorbance mode during
normal operation of the WaterLink
SETTING THE CLOCK
Setting the clock allows the correct time and date stamp to be stored with
each reading in the data logger.
®
3 Express.
Setting up the WaterLink
Press 1. briefly to turn the meter on.
Press 2.
Press 3.
Press 4.
to scroll to Setup.
ENTER
to select Setup. Press or to scroll to Set Clock.
ENTER
to select Set Clock. The date is displayed as month-day-
year. The time is displayed as hours: minutes: seconds AM/PM. Press
or to the appropriate character and press
ENTER
to select.
The cursor will move to the next character. Select all characters in the
same manner. This is a scrolling menu.
Press 5.
Press 6.
ENTER
to select the final character.
EXIT
to go back to the Main Menu or to turn meter off.
21
®
3 Express Colorimeter
Page 22

SETTING THE DATA LOGGER
The default setting for the data logger is disabled. When enabled, the meter
will log the last 500 data points. This function may be helpful when used
in the field. The counter in the center bottom of the display will show how
many tests have been logged. The display will show 500+ when the data
logger has exceeded 500 points and the data points are being overwritten.
The meter will log the following data: test name, test result, time of test and
date of test.
Press and briefly hold 1.
to turn the meter on.
Press 2. to scroll to Logging.
Press 3.
ENTER
to select Logging. Press
ENTER
to display the last data
point and the time that it was logged.
Press 4.
Press 5.
Press 6.
or to scroll to the desired setting.
ENTER
to save the selection.
EXIT
to go back to the Main Menu or to turn meter off.
SETTING THE POWER SAVE
The power saving auto shutoff feature will turn the meter off when a button
has not been pushed for a set amount of time. The Power Save function is
factory set at disable.
Press and briefly hold 1.
to turn the meter on.
Press 2. to scroll to Setup.
Press 3.
ENTER
to select Setup. Press or to scroll to Set PWR
Save.
Press 4.
ENTER
to select Set PWR Save. Press or to scroll to
the desired setting.
Press 5.
Press 6.
3 Express Colorimeter
®
ENTER
to save the selection.
EXIT
to go back to the Main Menu or to turn meter off.
SETTING THE BACKLIGHT TIME
The backlight illuminates the display for enhanced viewing. If Button Control
is chosen the backlight button on the key pad will act as an on/off switch
and the backlight will remain on or off when the meter is being used. When
one of the other settings—10, 20 or 30 seconds—is chosen, the display will
be illuminated for the specified amount of time after any button is pressed.
The backlight feature uses a significant amount of power. The longer the
backlight is on, the more frequently the battery will have to be charged if the
USB/Wall adapter is not being used. This feature has been factory set at 10
Setting up the WaterLink
seconds.
22
Page 23

Press and briefly hold 1. to turn the meter on.
Press 2.
Press 3.
to scroll to Setup.
ENTER
to select Setup. Press or to scroll to Set
Backlight Time.
Press 4.
ENTER
to select Set Backlight Time. Press or to scroll
to the desired setting.
Press 5.
Press 6.
ENTER
to save the selection.
EXIT
to go back to the Main Menu or to turn meter off.
SELECTING A LANGUAGE
There are five languages available : English, Spanish, French, Portuguese
and Italian.
Press and briefly hold 1.
to turn the meter on.
Press 2. to scroll to Setup.
Press 3.
ENTER
to select Setup. Press or to scroll to Select
Language.
Press 4.
ENTER
to select Select Language. Press or to scroll to
the desired setting.
Press 5.
Press 6.
ENTER
to save the selection.
EXIT
to go back to the Main Menu or to turn meter off.
Setting up the WaterLink
NOTE: If the meter unintentionally switches to another language, use the
procedure above to reset the meter to the desired language. For example,
to reset the meter to English:
Press and briefly hold 1.
Press 2. three times. Press
Press 3.
Press 4.
Press 5.
six times. Press
ENTER
and the language will change back to English.
EXIT
to go back to the Main Menu or to turn meter off.
to turn the meter on.
ENTER
.
ENTER
.
23
®
3 Express Colorimeter
Page 24

BATTERY
BATTERY OPERATION
The meter may be operated on battery power, using a USB computer
adapter or USB computer connection. If using the meter as an in-store
water analysis lab, use the USB computer cable.
To charge the battery from a computer, plug the smaller end of the USB
cable (USB mini B connector) into the meter and the larger end of the USB
cable (USB Type A connector) into a USB port on the computer. Reinsert
the USB port plug after charging if using battery power.
To charge the battery with the USB wall adapter, plug the smaller end of
the USB cable (USB mini B connector) into the meter and the larger end of
the USB cable (USB Type A connector) into the wall adapter. Plug the wall
adapter into an AC outlet. Reinsert the USB port plug after charging if using
battery power.
The battery icon will show no bars and flash when the unit first turns on.
Then the indicator will indicate the battery status by showing 0, 1, 2, 3 or 4
bars.
It will take 5 hours to fully charge a low battery. The battery icon will flash
when the battery is charging. The battery icon will show four bars and stop
flashing when it is fully charged. The charging circuit will automatically
switch to a float charge when the battery is fully charged. The charger may
remain connected. Some computers will NOT supply power to their USB
ports during standby operation. The USB wall adapter will charge the unit
continuously.
The battery icon will show no bars and continuously flash if the battery is
getting low but the unit will still operate normally. A “Low Battery” message
on the status bar of the display will replace the time when the battery
voltage is too low for proper operation and accuracy may be degraded. A
“Shutdown Low Batt” message on the display will appear for a few seconds
before the power is switched off when the battery is too low to operate the
unit.
To extend the battery life:
Shut down the unit with the power switch when not taking •
measurements or use the power save option to have the unit
automatically turn off after 5 minutes.
Store the unit in a cool dry place.•
Fully charge the battery before storing the unit for extended periods of •
time.
Limit backlight use. The unit consumes 3X normal power with the •
backlight on.
Set the backlight time option to 10 seconds, or select “Button Control” •
and keep the backlight off.
24
Page 25

BATTERY REPLACEMENT
The lithium-ion battery used in this unit should last for many years with
normal use. When it no longer powers the unit long enough to meet testing
requirements it will need to be replaced. Lithium-ion batteries that are
properly charged and stored do not usually lose all capacity; they just have
less capacity after hundreds of charge cycles. This unit uses a custom
battery assembly. The water resistant housing of this meter should not be
opened by the user.
Battery Troubleshooting Chart
PROBLEM REASON SOLUTION
Flashing
Low battery. Readings
are reliable.
Charge battery or use
USB wall/computer
adapter.
“Low Battery” Battery voltage is very
low. Readings are not
reliable.
“Shut Down Low
Batt” Shut Down
Battery is too low to
operate the unit.
Charge battery or use
USB wall/computer
adapter.
Charge battery or use
USB wall/computer
adapter.
MAINTENANCE
CLEANING
Clean the exterior housing with a damp, lint-free cloth. Do not allow water
to enter the light chamber or any other parts of the meter. To clean the
light chamber and optics area, point a can of compressed air into the light
chamber and blow the pressurized air into the light chamber. Use a cotton
swab dampened with Windex
®
window cleaner to gently swab the interior of
the chamber. Do not use alcohol; it will leave a thin residue over the optics
when dry.
REPAIRS
Should it be necessary to return the meter for repair or servicing, pack the
meter carefully in a suitable container with adequate packing material. A
return authorization number must be obtained from LaMotte Company
by calling 800-344-3100, ext. 2 (US only) or 410-778-3100, ext. 2, faxing
410-778-6394, or emailing tech@lamotte.com. Often a problem can be
resolved over the phone or by email. If a return of the meter is necessary,
attach a letter with the return authorization number, meter serial number, a
brief description of problem and contact information including phone and
FAX numbers to the shipping carton. This information will enable the service
department to make the required repairs more efficiently.
25
Page 26

METER DISPOSAL
Waste Electrical and Electronic Equipment (WEEE)
Natural resources were used in the production of this equipment. This
equipment may contain materials that are hazardous to health and the
environment. To avoid harm to the environment and natural resources, the
use of appropriate take-back systems is recommended. The crossed out
wheeled symbol on the meter encourages the use of these systems when
disposing of this equipment.
Take-back systems will allow the materials to be reused or recycled in a
way that will not harm the environment. For more information on approved
collection, reuse, and recycling systems contact local or regional waste
administration or recycling services.
UDV DISPOSAL
Since the vials are heat sealed with foil lids they cannot be reused for new
tests. One way to recycle the vials is to keep a bowl or bucket of soapy
water nearby for placement of used vials. At the end of the day, drain the
used batch over a sink and allow to dry overnight. The next day place them
in your plastic recycling bin or rinse and use as an extra sample blank tube.
Warning: Recyclers should check with the local authorities since some
states may require that no chemical residue or foil remains on the plastic.
26
Page 27

ACCESSORIES AND REPLACEMENT PARTS
*Free Chlorine UDV (100 Tests) Code 4311-J
*Total Chlorine UDV (100 Tests) Code 4312-J
pH UDV (100 Tests) Code 4310-J
*Calcium Hardness UDV (100 Tests) Code 4309-J
Total Alkalinity UDV (100 Tests) Code 4318-J
Cyanuric Acid UDV (100 Tests) Code 4313-J
Copper UDV (100 Tests) Code 4314-J
*Iron UDV (100 Tests) Code 4315-J
Nitrate UDV (100 Tests) Code 4321-J
Borate UDV (100 Tests) Code 4322-J
Empty UDV Cuvettes (10 Per Bag) Code 29653-10
Phosphate (Strip) Reagent System (6 Bottles) Code 3021-H-6
Biguanide Reagent System Code 4044
*Biguanide (Hydrogen Peroxide) Shock
Reagent System
*Manganese Reagent System Code 3858-SC
Colorimeter Tubes, 10 mL, glass, with caps (set of six) Code 0290-6
*WARNING: Reagents marked with * are considered to be potential health
hazards. To view or print a Material Safety Data Sheet (MSDS) for these
reagents go to www.lamotte.com. To obtain a printed copy, contact LaMotte
by e-mail, phone or fax.
Code 4045
27
Page 28

PO Box 329 • Chestertown • MD • 21620
800-344-3100 • f 410-778-6394 • www.lamotte.com/pool
63574-03 1.26.11
 Loading...