

Page 1
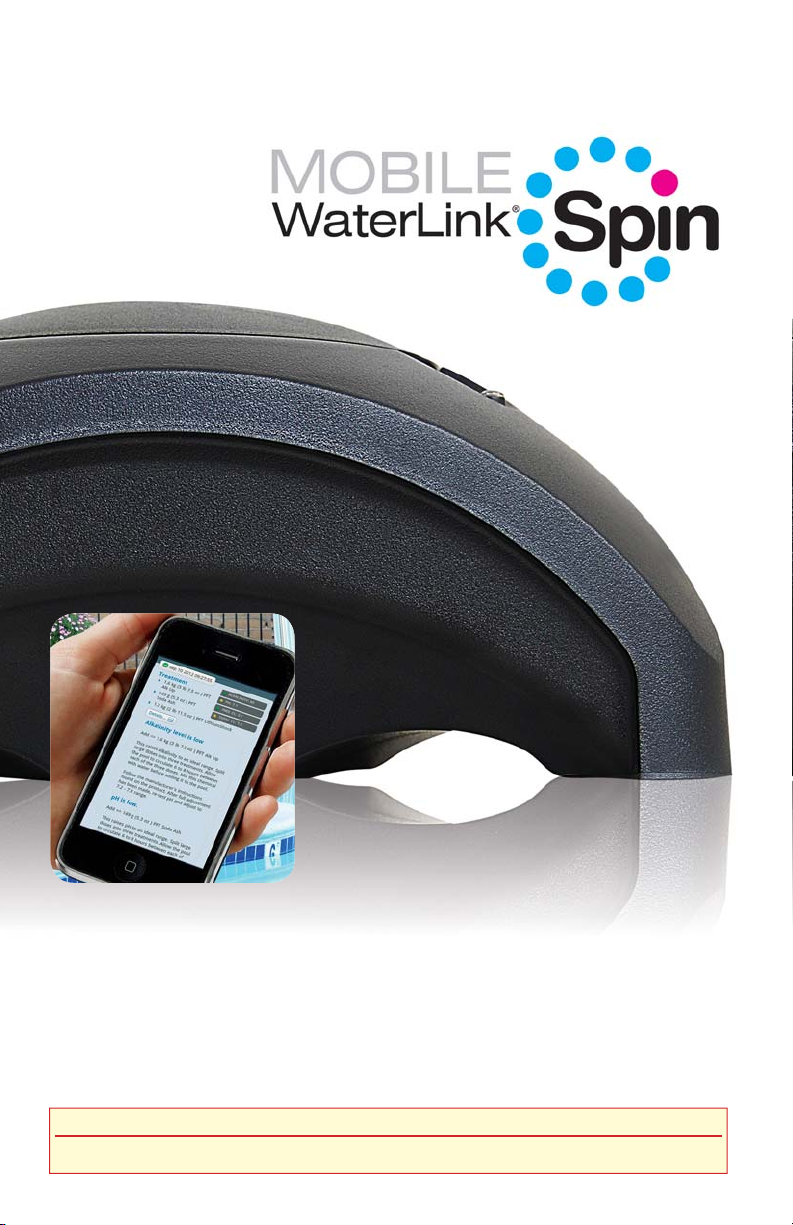
A MOBILE Spin on
Precision Water Analysis
Code 3577
Go to www.lamotte.com/spin for:
Instructional videos • Testing Tips • Software Updates • Registering your meter
1
Page 2
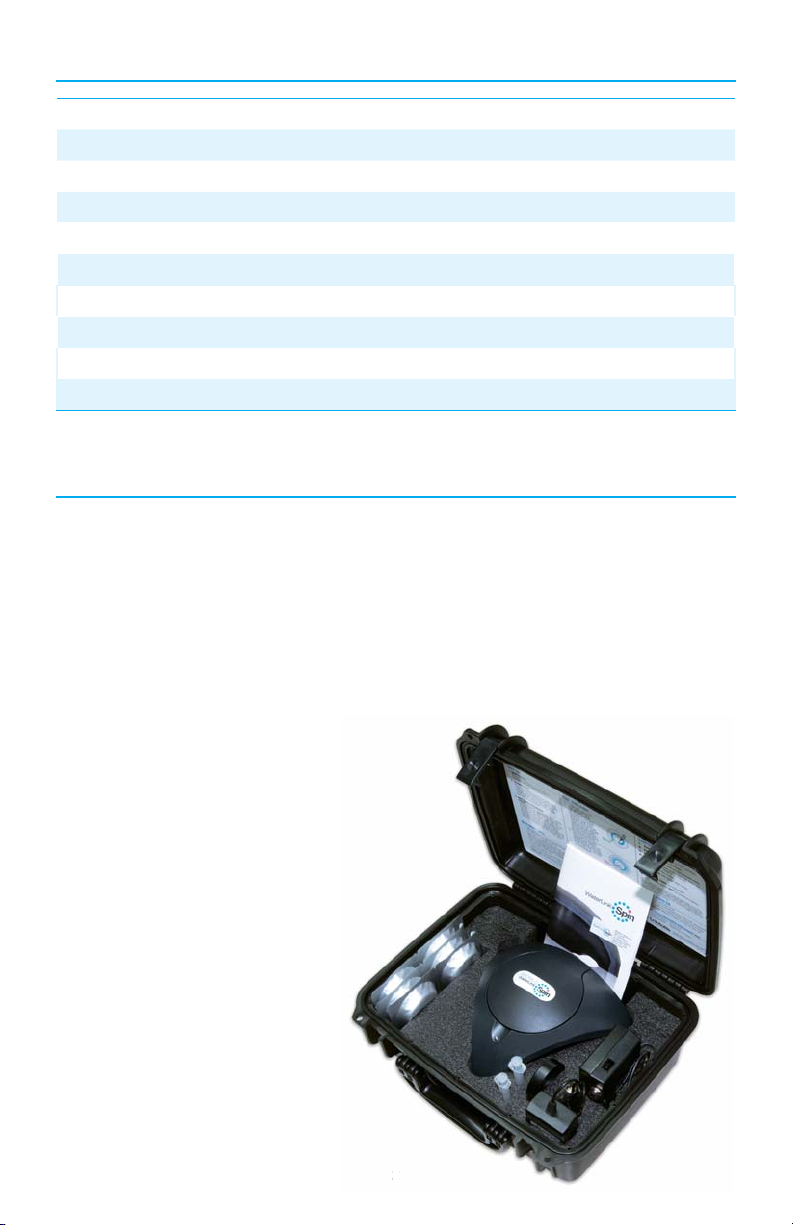
CONTENTS
Mobile WaterLink Spin Photometer w/ Bluetooth
Syringe, 3 mL, plastic, w/tips (3) Code 1189-3
Disk Cover Code 1718
USB Cable, 6 ft Code 1711
Troubleshooting Disk Code 4330-BLANK
Calibration Check Disk Code 1703
Battery Pack Code 3577-BP
Battery Charger Code 3577-CHARGER
Mobile WaterLink Spin Quick Start Lid Label Code 3577-QG
Mobile WaterLink Spin Manual Code 3577-MN
OVERVIEW
The Mobile WaterLink® Spin Bluetooth® photometer measures 12 important
pool and spa test factors such as Free Chlorine, Total Chlorine, Bromine,
Total Alkalinity, pH, Calcium Hardness, Copper, Iron, Cyanuric Acid, Borate,
Biguanide, and Biguanide Shock.
Pool or spa water is added to a unique WaterLink® Spin reagent disk designed
specifi cally for the service professional. Each sealed reagent disk contains the
precise amount of reagents needed to run a complete series of tests. The disk
is placed in the WaterLink
tests are completed.
The Mobile WaterLink
photometer communicates the
results wirelessly via Bluetooth®
to the service professional’s
smartphone or tablet device.
The service professional does
not have to view color reactions
using color comparators, waste
time mixing liquid reagents,
and save time with increased
accuracy.
®
Spin photometer and in just 60 seconds all of the
®
Spin
2
Page 3

SPECIFICATIONS
Test Factors Range
Free Chlorine 0.00 – 15.00 ppm
Total Chlorine 0.00 – 15.00 ppm
Bromine 0.00 – 33.00 ppm
Total Alkalinity 0 – 250 ppm
pH 6.6 – 8.6
Calcium Hardness 0 – 1200 ppm
Copper 0.0 – 3.0 ppm
Iron 0.0 – 3.0 ppm
Cyanuric Acid 5 – 150 ppm
Borate 0 – 60 ppm
Biguanide 0 – 70 ppm
Biguanide Shock 0 – 250 ppm
Wavelengths
428 nm, 525 nm, 568 nm, 635 nm
(interference fi lters)
Wavelength Accuracy ±2 nm
Wavelength Bandwidth 10 typical
Photometric Range -2 to 2 AU
Photometric Precision ±0.01 AU at 1.0 AU
Photometric Accuracy ±0.01 AU at 1.0 AU
Sample Chamber Accepts prefi lled disk
Light Source 4 LEDS
Detectors 4 silicon photodiodes
Pre-Programmed Tests Yes, with automatic wavelength selection
USB Port Mini B, USB 2
Battery Pack Type: Nickel metal hydride battery
Minimum Capacity: 12 V/2200 mAh
Charge Life: Approximately 150 tests
Battery Life: Approximately 500 charges
Full Charge: 4 hours
3
Page 4

Bluetooth
Category Country Standard
Radio USA FCC Part 15 Subpart B:
2008 Class B
FCC CRF Title 47 Part 15
Subpart C
FCC ID: T9J-RN42
Europe ETSI EN 301 489-1 V1.8.1
ETSI EN 301 489-1 V2.1.1
ETSI EN 308 328 V1.7.1
Canada IC RSS-210 low power
comm. device
Cert # 6514A-RN42
EMC USA FCC CFR47 Part 15
subclass B
Europe EN 55022 Class B radiated
EN61000-4-2 ESD immunity
EN61000-4-3 radiated fi eld
EN61000-4-6 RF immunity
EN61000-4-8 power
magnetic immunity
Bluetooth BQB
LISTED
B014867-SPP and DUN
profi les
Env RoHS RoHS compliant
Dimensions 21.6 X 22.9 X 11.4 cm
8.5 X 9.0 X 4.5 in (L X W X H)
Weight 705 g (25 oz)
Patent Pending
4
Page 5

GENERAL OPERATING PROCEDURES
METER
When a fi lled disk is placed in the chamber and the lid is closed, the meter
spins at high speed to distribute the sample to all 11 wells and to ensure that
the water empties from the center chamber. Next the meter slows to maximize
the pumping action of the stainless steel mixing beads as the reagents mix
with the sample water. Each reaction is then read at the proper time and
wavelength for that reagent system.
The Blue indicator light indicates the status of the instrument. It is located
below the thumb hole on the meter housing.
Steady blue light – after an initial blinking sequence the blue LED will remain
steady to indicate that the meter is connected to the power source and is
ready to run a test.
Blinking blue light (three blinks/second) – a test is in progress and the
disk is spinning. Do not open the lid when the disk is spinning.
Blinking blue light (one blink/second) – low battery
Care should be taken when closing the lid. Do not slam the lid. Wiring
between the lid and the body of the photometer passes through the hinge. The
meter will not run with the lid open.
SYRINGE
A plastic 3 mL syringe (Code 1189) is used to fi ll the disks. A precision tip
on the syringe fi ts into the fi ll hole on the disk. The syringe tip should not
be removed from the syringe. Syringes should be cleaned between water
samples. Pump air in and out of the syringe a few times to clear the previous
sample or rinse the syringe with a small amount of the next water sample
before fi lling it for testing.
DISKS
The WaterLink Spin uses a disk reagent system. The dried reagents are
packaged in single test amounts in a sealed, polystyrene disk. Stainless steel
mixing beads in the reaction chambers mix the sample water and the dried
reagents.
Chlorine/Bromine and Biguanide Disks
There are two disk series – Chlorine/Bromine and Biguanide. Each disk
includes a set of reagents for the series. Tests for all factors in the series are
performed at one time. It is not possible to isolate the well for a single factor
and perform a test for one test factor only.
5
Page 6

CHLORINE/BROMINE DISK:
Free Chlorine/
Bromine
Total Chlorine
Total Alkalinity
pH
Calcium Hardness
NOTE: Samples suspected of having high levels of chlorine,
Copper
Iron
Calcium Hardness,
High Range
Cyanuric Acid
Borate
Calcium
Hardness
Copper
Free Chlorine/
Bromine
Calcium
Hardness,
High Range
pH
Tot a l
Chlorine
Blank
Tot a l
Alkalinity
Cyanuric
Acid
Iron
Borate
above 15 ppm, should be pretested with a Wide Range pH/Total
Chlorine Test Strip (2987-G). Samples with high chlorine concentrations will bleach out the chlorine
reagent in the disk and cause false low results.
BIGUANIDE DISK:
Biguanide
Biguanide Shock
Total Alkalinity
pH
Iron
Calcium Hardness,
High Range
Borate
Calcium Hardness
Copper
Biguanide
Calcium
Hardness
Calcium
Hardness,
High Range
Biguanide
Shock
Tot a l
Alkalinity
Iron
Borate
Copper
pH
Blank
Filling
The 3 mL syringe (Code 1189) is used to fi ll the disk with the sample water.
When the syringe is placed in the pool or spa sample, and the plunger is
pulled all the way up, the syringe will hold more than enough sample water to
adequately fi ll the disk. The syringe is held vertically and the tip is inserted into
the fi ll hole on the disk. The plunger is pressed slowly and smoothly to fi ll
the disk.
Three baffl es in the disk ensure that the disk fi lls properly
with less chance of bubbles. The sample water will fi ll the
spaces between the baffl es in a counter-clockwise order.
Each space will fi ll from the bottom to the top. Sample
water should be added until the sample water in the space
after the third baffl e fi lls the top of the space to the
embossed fi ll line.
The disk should not contain any large air bubbles. Air
bubbles will result in erroneous results. The disk should
not be overfi lled. If the disk is over fi lled, sample water
will fl ow out of the overfl ow hole in the center of the disk.
The disk is not leaking.
6
Correct Fill
(Fill line)
Over
Filled
Correct Fill
Over Filled
Page 7

Do not under fi ll the disk. If the disk is underfi lled, the
reagent chambers will not fi ll entirely and results will
be inaccurate.
Under
Filled
Wet disks should be dried thoroughly with a lint free wipe.
Disks should be fi lled and used within 10 minutes. They
cannot be fi lled ahead of time.
Under Filled
For fi lling and troubleshooting tips go to:
www.lamotte.com/spin
Handling
The disk should be handled only by the edges.
Avoid touching the top or bottom of the disk. The
light passes through the non-frosted areas of the disk
so these areas must be kept free of smudges and
fi ngerprints. Wet disks should never be placed in the
meter. Wet disks should be dried with a lint-free cloth
before placing them into the chamber.
The disk is positioned in the chamber by aligning the D-shaped hole in the
center of the disk over the D-shaped hub in the photometer chamber. The disk
should be placed gently on the hub. There is no need to fi rmly press the disk
down onto the hub.
Storage
Disks are sensitive to moisture. Avoid opening more packs than are needed.
Disks have a limited shelf life and should not be exposed to the humidity in the
air more than necessary.
DISK COVER
The black disk cover is placed over the disk in the
photometer chamber to reduce interference from stray
light. The disk cover is positioned over the disk by
aligning the D-shaped hole in the center of the disk over
the D-shaped hub in the photometer chamber. The disk
cover should be placed gently on the hub. There is no
need to fi rmly press the disk cover down onto the hub.
TROUBLESHOOTING DISK
A Troubleshooting Disk (Code 4330-BLANK) is included. Keep this disk. Do not
discard or fi ll this disk. If you call for technical support, you may be instructed
to use this disk as part of the troubleshooting process.
CALIBRATION CHECK DISK
The Calibration Check Disk (Code 1703) is used to verify the performance of
the meter. See the Calibration Check Disk instructions for more information.
7
Page 8

USB CABLE
The USB cable is provided for connecting the Mobile Waterlink® Spin to a
Windows®-based PC.
BATTERY PACK
A fully charged battery will last for approximately 150 tests under average
conditions. The blue light on the Spin will blink once per second to indicate
a low battery. When a low battery is fi rst indicated, the remaining power
is enough for approximately 5 more tests. The battery will fully charge in
approximately 4 hours. The standard life cycle of a nickel metal hydroxide
battery is 500 cycles.
The battery life will vary based on usage patterns. The meter can be used
when the battery pack is connected to an AC outlet. The battery should be
turned off after testing to prolong the battery life. The battery pack is rated at
12 V and 2200 mAh capacity.
BATTERY CHARGER
Plug the battery charger into an AC outlet. The LED on the battery charger will
be green. Plug the battery charger into the battery pack. The LED will be red.
When the battery is fully charged the LED will remain green.
DEVICE CONNECTION
The Mobile WaterLink Spin wireless photometer uses Bluetooth wireless
technology to allow communication between the photometer and an android
smartphone or tablet. Download the WaterLink
®
Spin app for smartphone
or tablet from the appropriate app marketplace. A USB cable is included for
optional connection to a Windows-based PC.
8
Page 9

SET UP
DISKS
1. Each box contains 50 disks for one series, either the chlorine/bromine series
or the biguanide series. Remove a disk from the packaging as needed.
2. Avoid opening more packages than you need. Disks have a limited shelf life
and should not be exposed to the humidity in the air more than necessary.
METER
The battery must be charged before the fi rst use.
3. Plug the battery charger into an AC outlet. The LED on the battery charger will
be green.
4. Plug the battery charger into the battery pack. The LED will be red.
5. When the battery is fully charged the LED on the battery pack will be
green.
6. Disconnect the battery charger from the battery pack.
7. Disconnect the battery charger from the wall socket.
8. Connect the battery pack to the meter.
9. Press the button on the battery pack to turn the meter on.
10. Begin testing.
NOTE: The meter can be used when the battery pack is connected to the battery
charger when it is plugged into an AC outlet.
APPLICATION
The WaterLink Spin app must be downloaded and installed to a smartphone or
tablet to operate the device. The WaterLink Spin app supports two modes for
testing: “Offl ine” and “Connected to a Water Analysis Program.” This setting can
be toggled on the Settings Tab of the WaterLink Spin app by unchecking the
“Connect to Water Analysis Program” checkbox for offl ine mode.
Currently, Android smartphones and Tablets are supported.
Offl ine
1. Follow the instructions for connecting the device via Bluetooth
2. On the Controls Tab, select a Test Series from the dropdown at the top.
3. Tap the Spin button
4. Results will be displayed in the white box on the right hand side of the screen
NOTE: Test results are not saved when running in Offl ine mode
Connected to a Water Analysis Program
1. Follow the instructions for connecting the device via Bluetooth
2. On the Controls Tab, log in to the water analysis program
9
Page 10

3. Locate a customer in the program
4. If required select a pool or spa to test
5. Press the “Spin” button
NOTE: if using a water analysis program other than WaterLink DataMate
Web, the URL for the program on the Settings tab of the WaterLink Spin
app may need to change.
BLUETOOTH CONNECTION
Barriers to wireless signals can reduce the range of wireless devices. The
Mobile WaterLink Spin will work best if there are no walls between it and the
receiving device.
1. Open WaterLink Spin app.
2. Go to the “settings” tab.
3. Tap “select meter” button to open the select meter popup.
4. Tap your meter if it is listed. If not, tap “scan for devices”. Select your meter
from the list of detected devices
5. If prompted to enter a code, enter ‘1234’
TESTING
1. Remove a chlorine/bromine or biguanide disk from the package.
2. Use the syringe (1189) to fi ll the disk with the pool or spa water. Add water
until the water column reaches the fi ll line on the disk.
3. Insert the disk into the meter.
4. Cover the disk with the black disk cover (1718).
5. Close the lid.
6. Press SPIN TEST button in the app.
MAINTENANCE
CLEANING
The optical system of the Waterlink Spin must be kept clean and dry for
optimal performance. Dry the disk with a lint-free wipe before placing it into the
chamber to avoid introducing moisture. For best results store the instrument in
an area that is dry and free from aggressive chemical vapors.
Clean the exterior housing with a damp, lint-free cloth. Do not allow water
to enter the light chamber or any other parts of the meter. To clean the light
chamber and optic lenses, point a can of compressed air into the light
chamber and the lid and blow the pressurized air into the light chamber and
10
Page 11

lid. Focus the pressurized air around the LEDs which are the small round
lenses positioned at 12:00, 3:00, 6:00, 9:00 in the lid. The photodiodes are
located on the bottom of the chamber around the hub. This area must be kept
clean and dry. Use a Q-tip dampened with Windex
®
window cleaner to gently
swab the LED and photodiode lenses. Do not use alcohol; it will leave a thin
residue over the optics when dry.
REPAIRS
Should it be necessary to return the meter for repair or servicing, pack the
meter carefully in a suitable container with adequate packing material. A return
authorization number must be obtained from LaMotte Company by calling 800344-3100, ext. 2 (US only) or 410-778-3100, ext. 2, faxing 410-778-6394, or
emailing tech@lamotte.com. Often a problem can be resolved over the phone
or by email. If a return of the meter is necessary, attach a letter with the return
authorization number, meter serial number, a brief description of problem and
contact information including phone and FAX numbers to the shipping carton.
This information will enable the service department to make the required
repairs more effi ciently.
METER DISPOSAL
Waste Electrical and Electronic Equipment (WEEE)
Natural resources were used in the production of this equipment. This
equipment may contain materials that are hazardous to health and the
environment. To avoid harm to the environment and natural resources, the use
of appropriate take-back systems is recommended. The crossed out wheeled
symbol on the meter encourages the use of these systems when disposing of
this equipment.
Take-back systems will allow the materials to be reused or recycled in a
way that will not harm the environment. For more information on approved
collection, reuse, and recycling systems contact local or regional waste
administration or recycling services.
DISK DISPOSAL
The disks cannot be reused for new tests. Over time, the water in reacted disks
will evaporate. Disks may be placed in a recycling bin. Warning: Recyclers
should check with the local authorities since some states may require that no
chemical residue remains on the plastic.
11
Page 12

TROUBLESHOOTING
SOFTWARE TROUBLESHOOTING GUIDE
Problem Reason Solution
No Device Connected Spin meter has not been
paired via Bluetooth, or
the pairing was lost by
leaving Bluetooth range
Device does not appear
Meter is not powered on Power on the meter
in the list of Bluetooth
devices
Connection Lost Bluetooth pairing with
the Spin device was
lost.
Disc not spinning Lid open, meter not
powered on, low battery,
disk or disk cover
pressed down too tightly
on hub
Unexpected Results Did not use disk cover Place the disk cover
NaN Results Calculation of results
failed, likely due to
unstable connection
with the meter
Unexpected low
Chlorine results
High chlorine
concentrations will
bleach chlorine, and
other reagents
Re-Pair the spin device
to the phone or tablet
Re-Pair the spin device
to the phone or tablet,
or relaunch the app
Close lid, power on
meter, charge the
battery or plug meter
into a stable power
source, remove the
disk/disk cover and
place back in the meter
more gently
on the disk and close
the lid
Power cycle the meter,
then re-pair it to the app
Check sample with
chlorine test paper
(Code 2987)
12
Page 13

HELPFUL HINTS
» Pair the device to the phone, then leave the device on for the duration
of the day for reliable, consistent pairing. Turning the meter off and on
frequently can cause connection issues between the device and the
paired phone or tablet.
» High Chlorine/Bromine - High sanitizer levels may cause the DPD
reagents in the disk to bleach out to a colorless or near colorless
solution. Wide Range pH/Total Chlorine Test Strips (2987-G) capable
of testing high concentrations of chlorine can be used to determine the
approximate level of sanitizer. Note: At high sanitizer levels, chloramines
could break through into the Free Chlorine test, the pH reaction may
turn purple and the Alkalinity reaction may turn yellow.
» High Copper - Copper at levels above 1.0 ppm may cause the
Hardness test to read low.
» Low Alkalinity - Algaecide treatments above recommended levels may
lower the alkalinity results.
» Cyanuric Acid - Since Cyanuric Acid tests are temperature dependent,
the best results are obtained when sample temperatures are between
70 and 80 degrees. Below this range, results may read high, while in
temperatures above the range they may read low.
» pH Purple - As noted under High Chlorine/Bromine above, sanitizer
levels beyond 10 ppm can turn the pH reaction purple.
» Low Hardness - High Copper, low pH and salt can signifi cantly reduce
the expected hardness results. For precise Hardness results in sample
water containing salt choose the Chlorine Generator product from the
Sanitizer drop down bar in the water analysis program.
Go to
www.lamotte.com/spin for:
• Instructional videos
• Testing Tips
• Software Updates
• Registering Your Meter
13
Page 14

ACCESSORIES AND REPLACEMENT PARTS
Chlorine/Bromine Series Disks, 50/pk Code 4330-H
Biguanide Series Disks, 50/pk Code 4331-H
Syringe, 3 mL, plastic, w/tip (3) Code 1189
Syringe Tips (3) Code 1189-TIP
Disk Cover Code 1718
USB Cable, 6 ft Code 1711
Wide Range pH/Total Chlorine Test Strips Code 2987-G
Cleaning Tissues, Lint-free Wipes, (280) Code 0669
Troubleshooting Disk Code 4330-BLANK
Calibration Check Disk Code 1703
Battery Pack Code 3577-BP
Battery Charger Code 3577-CHARGER
GENERAL INFORMATION
PACKAGING & RETURNS
Experienced packaging personnel at LaMotte Company assure adequate
protection against normal hazards encountered in transportation of shipments.
After the product leaves the manufacturer, all responsibility for its safe delivery
is assured by the transportation company. Damage claims must be fi led
immediately with the transportation company to receive compensation for
damaged goods.
Should it be necessary to return the instrument for repair or servicing, pack
the instrument carefully in a suitable container with adequate packing material.
A return authorization number must be obtained from LaMotte Company by
calling 1-800-344-3100 or 1-410-778-3100, ext. 2 or emailing tech@lamotte.
com. Attach a letter with the authorization number to the shipping carton which
describes the kind of trouble experienced. This valuable information will enable
the service department to make the required repairs more effi ciently.
GENERAL PRECAUTIONS
Read the instruction manual before attempting to set up or use the instrument.
Failure to do so could result in personal injury or damage to the meter.
The WaterLink Spin should not be stored or used in a damp or corrosive
environment. Care should be taken to prevent water or reagents from entering
the photometer chamber. Wet disks should never be put into the photometer
chamber.
14
Page 15

SAFETY PRECAUTIONS
Read the safety precautions on the labels of all reagent containers and
packaging prior to use. Material Safety Data Sheets (MSDS) can be found at
www.lamotte.com. Additional emergency information for all LaMotte reagents
is available 24 hours a day from the Poison Control Center listed in the front
of the phone book or by contacting the 24 hour emergency line for ChemTel
at 1-800-255-3924 (USA, Canada, Puerto Rico). For locations outside of the
North American continent call 813-248-0585 collect.
LIMITS OF LIABILITY
Under no circumstances shall LaMotte Company be liable for loss of life,
property, profi ts, or other damages incurred through the use or misuse of its
products.
WARRANTY
LaMotte Company warrants this instrument, battery charger and battery
pack to be free of defects in parts and workmanship for 2 years from the
date of shipment. If it should become necessary to return the instrument
for service during or beyond the warranty period, contact our Technical
Service Department at 1-800-344-3100 or 1-410-778-3100, ext. 2 or tech@
lamotte.com for a return authorization number or visit
www.lamotte.com for
troubleshooting help. The sender is responsible for shipping charges, freight,
insurance and proper packaging to prevent damage in transit. This warranty
does not apply to defects resulting from action of the user such as misuse,
improper wiring, operation outside of specifi cation, improper maintenance or
repair, or unauthorized modifi cation. LaMotte Company specifi cally disclaims
any implied warranties or merchantability or fi tness for a specifi c purpose and
will not be liable for any direct, indirect, incidental or consequential damages.
LaMotte Company’s total liability is limited to repair or replacement of the
product. The warranty set forth above is inclusive and no other warranty,
whether written or oral, is expressed or implied.
To register your meter with the LaMotte Service Department, go to
www.lamotte.com and choose SUPPORT on the top navigation bar.
Serial Number _________________________________________________
15
Page 16

Water Testing Leader Since 1919
PO Box 329 • Chestertown • Maryland • 21620 • USA
800-344-3100 • 410-778-3100 • www.lamotte.com/mobilespin
16
3577-MN 02.07.14
 Loading...