

Page 1

Fresh Water
Aquaculture
Test Kit Instruction Manual
Code 3633-04
Code 3634-04
Page 2

o
WARNING! This set contains chemicals
that may be harmful if misued. Read
cautions on individual containers
carefully. Not to be used by children
except under adult supervision.
Page 3

This booklet provides step-by-step detailed instructions for the Code 3633-04 and
Code 3634-04 test kits. It is important to review these instructions thoroughly
attempting to perform the tests by the short-form instructions contained in the case lid.
To order individual reagents or test kit components, use the specifi ed code number.
before
Testing Hints / Reagent Care ........................................................ 4
Analytical Technique ..................................................................... 5
General Safety Information ........................................................... 6
Test Methods ................................................................................. 7
Test Procedures
Introduction ......................................................................................... 9
Alkalinity ............................................................................................. 10
Ammonia Nitrogen ............................................................................. 11
Carbon Dioxide .................................................................................. 14
Chloride ............................................................................................. 15
Dissolved Oxygen .............................................................................. 17
Hardness ............................................................................................ 22
Nitrite Nitrogen ................................................................................... 24
pH ....................................................................................................... 25
Kit Diagrams ................................................................................. 26
Page 4
TESTING HINTS / REAGENT CARE
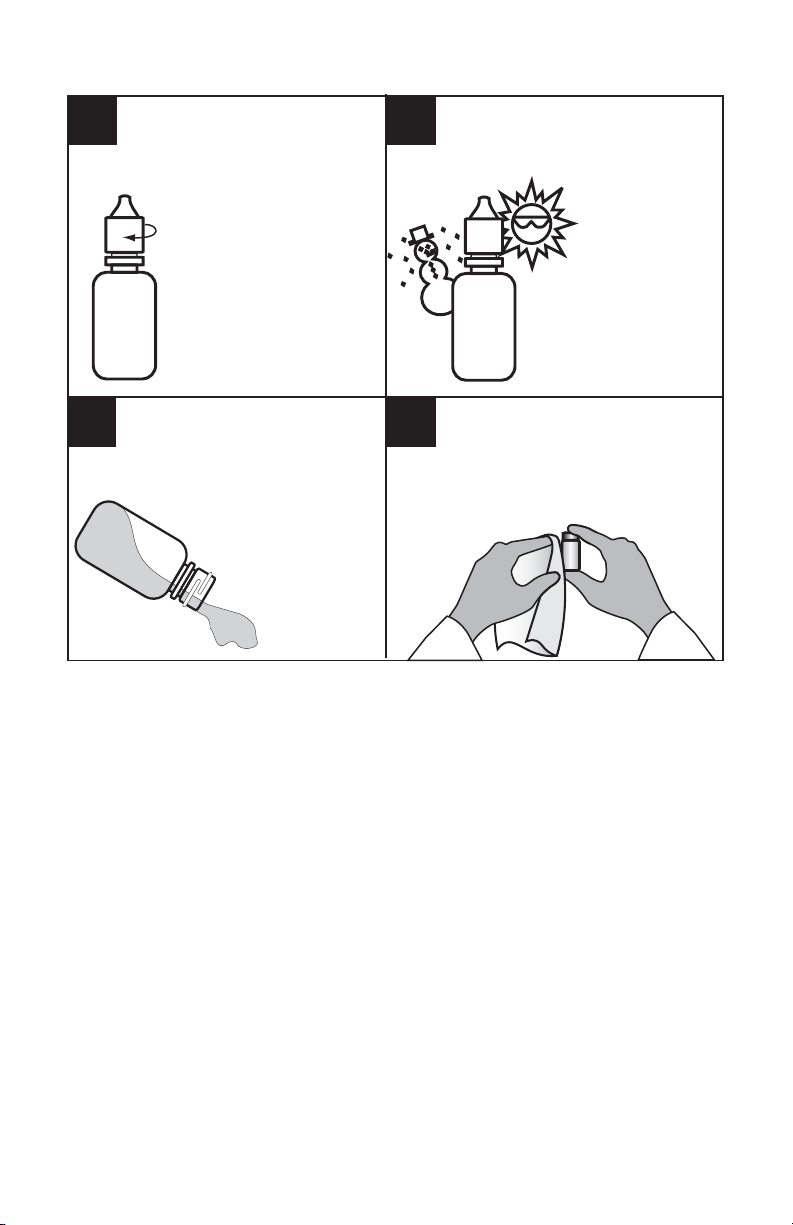
12
Tightly close all reagent
containers immediately
after use. Be sure not to
interchange caps and
pipets from different
containers.
Wipe up any reagent chemical
34
spills, liquid or powder, as
soon as they occur.
Refer to label and
accompanying MSDS at
www.lamotte.com
for proper reagent
disposal.
Avoid prolonged exposure
of equipment and reagents
to direct sunlight. Protect
reagents and
components
from extreme
heat and cold.
Use care when dispensing or
handling all reagents. Some
reagents also may cause
permanent stains if spilled.
4
Page 5
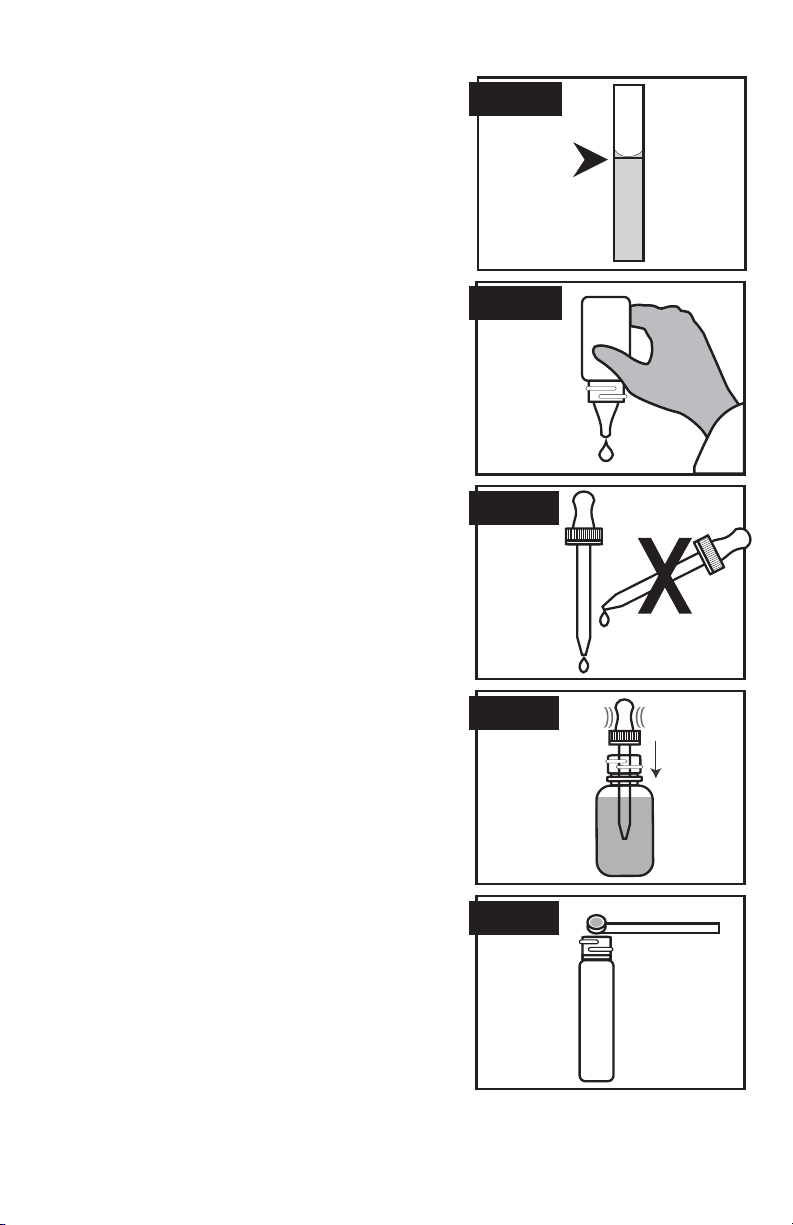
ANALYTICAL TECHNIQUE
1. Clean glassware is a must for accurate results.
Thoroughly rinse test tubes before and after
each test. Caps and stoppers should also be
cleaned after each use.
2. Use test tube caps, not your fi ngers, to cover test
tubes and fl asks during shaking or mixing.
3. When adding sample to calibrated test tube, be
sure vial is fi lled to the appropriate mark. The
bottom of the liquid (meniscus) should be level
with the desired mark. (Figure 1)
4. When dispensing reagents from bottles fi lled
with dropper plug and cap, be sure to hold
bottle vertically and gently squeeze to dispense
the appropriate number of uniform drops.
(Figure 2)
5. For those reagents to be added with the screwcap
pipet assemblies
enclosed, remove polyseal cap
on bottle and replace with the screwcap pipet.
NOTE: Place the polyseal caps back on the
reagent bottles for longer periods of storage. Be
sure that both pipet assemblies and polyseal caps
are thoroughly cleaned before placing on bottles
to avoid contamination.
6. When dispensing reagents from pipets, hold
pipet vertically to assure uniform drop size. This
is extremely important when performing drop
count titrations. (Figure 3)
7. To fi ll pipets, squeeze rubber bulb and immerse
into reagent. Release bulb to fi ll. (Figure 4)
8. To accurately dispense powdered reagents with
spoon, tap spoon on edge of reagent container
to remove excess reagent. (Figure 5)
9. When performing tests that include Octa-Slide
Comparators, the comparator should be
positioned between the operator and non-direct
sunlight. This allows the light to enter through
the
light-diffusing screen at the back of the
comparator for optimum
color comparison.
Figure 1
Figure 2
Figure 3
Figure 4
Figure 5
5
Page 6
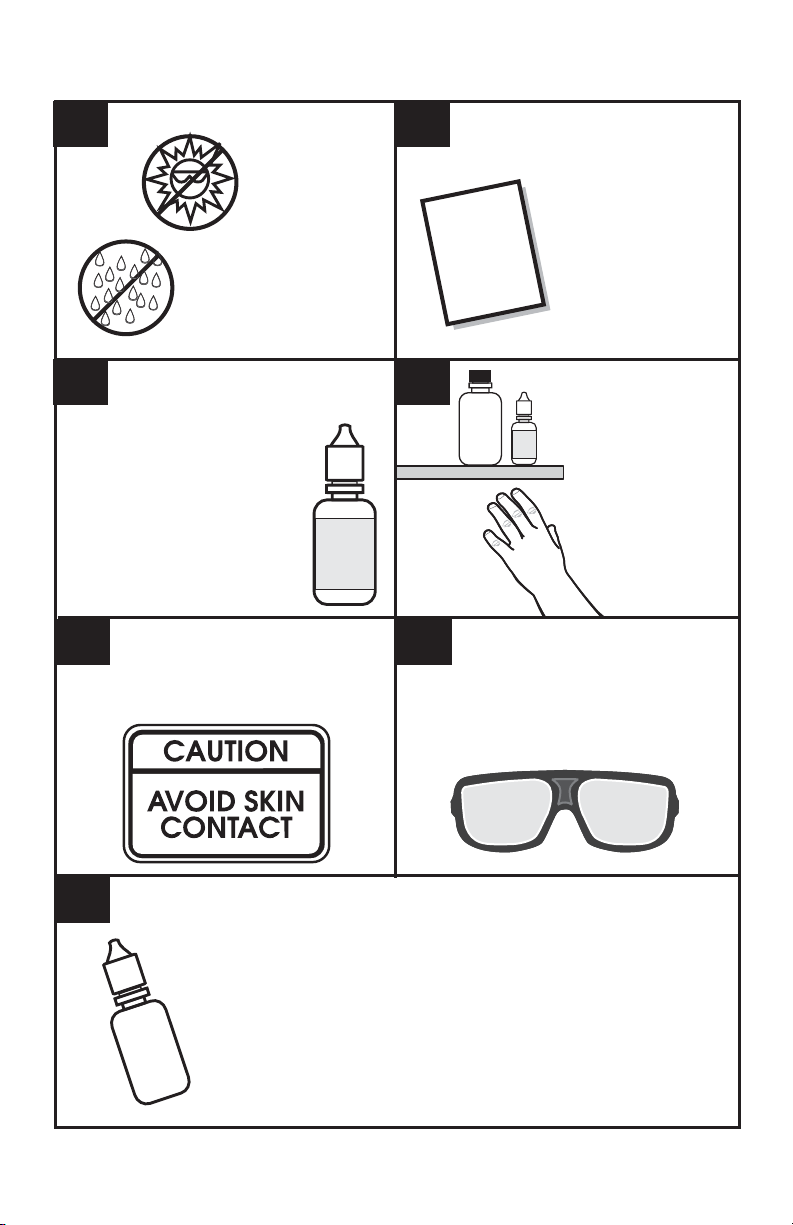
GENERAL SAFETY PRECAUTIONS
12
Store the test kit in a
cool dry area.
34
Read the labels on all reagent
bottles. Note warnings and
fi rst aid information.
Reagents marked with a * on
instructions are considered
possible health hazards.
Avoid contact between reagent
chemicals and skin, eyes, nose,
and mouth. Wear safety glasses when
65
Read all instructions and note
precautions before performing
the test procedure.
Read all Material
Safety Data Sheets
Material
Safety
(MSDS)
Data
at www.lamotte.com.
Sheet
Keep all
equipment
and reagent
chemicals
out of the
reach of
young children.
performing test procedures.
7
6
In the event of an accident or suspected poisoning, immediately call
the Poison Center phone number in the front of your local telephone
directory or call a physician. Additional information for all LaMotte
reagents is available in the United States, Canada, Puerto Rico, and
the US Virgin Islands from Chem-Tel by calling 1-800-255-3924.
For other areas, call 813-248-0585 collect to contact Chem-Tel’s
International access number. Each reagent can be identifi ed by
the four digit number listed on the upper left corner of the
reagent label, in the contents list and in the test procedures.
Page 7

TEST METHODS
This test kit uses two basic analytical procedures common to fi eld test kits. A brief
explanation of each follows:
COLORIMETRIC: OCTA-SLIDE 2 VIEWER
In a visual colorimetric test, a sample is treated with reagent(s) to produce a color
reaction, generally in proportion to the amount of test factor present. The sample color
is then compared against color standards representing known concentrations of the
factor being tested over a specifi c range.
Hold the Octa-Slide 2
123
Viewer so that non direct light enters
through the back of
the viewer.
Match sample color
4
to color standard.
Record results.
The calibrated test tubes (0106) included in this kit may be used to perform dilutions
for the Ammonia Nitrogen and Nitrite Nitrogen tests. Distilled or deionized water is
needed to perform dilutions.
The following table provides a quick reference guide for dilutions of various
proportions. Once the dilution is prepared, use this diluted sample to perform the test,
and multiply the result by the dilution factor to obtain the actual concentration.
Insert Octa-Slide 2
Bar into the
Octa-Slide 2
Viewer (1101).
Note:
If sample color is between two standards, the midpoint
is taken as the result.
If the sample is darker than the highest standard, a
dilution may be performed on a fresh sample, and the
test repeated to bring the concentration within range.
DILUTIONS
Insert test tube
containing reacted
sample into the
Octa-Slide 2
Viewer (1101).
Sample Size Distilled Water to
Bring to 10 mL
5.0 mL 5.0 mL 2
2.5 mL 7.5 mL 4
Dilution Factor
7
Page 8
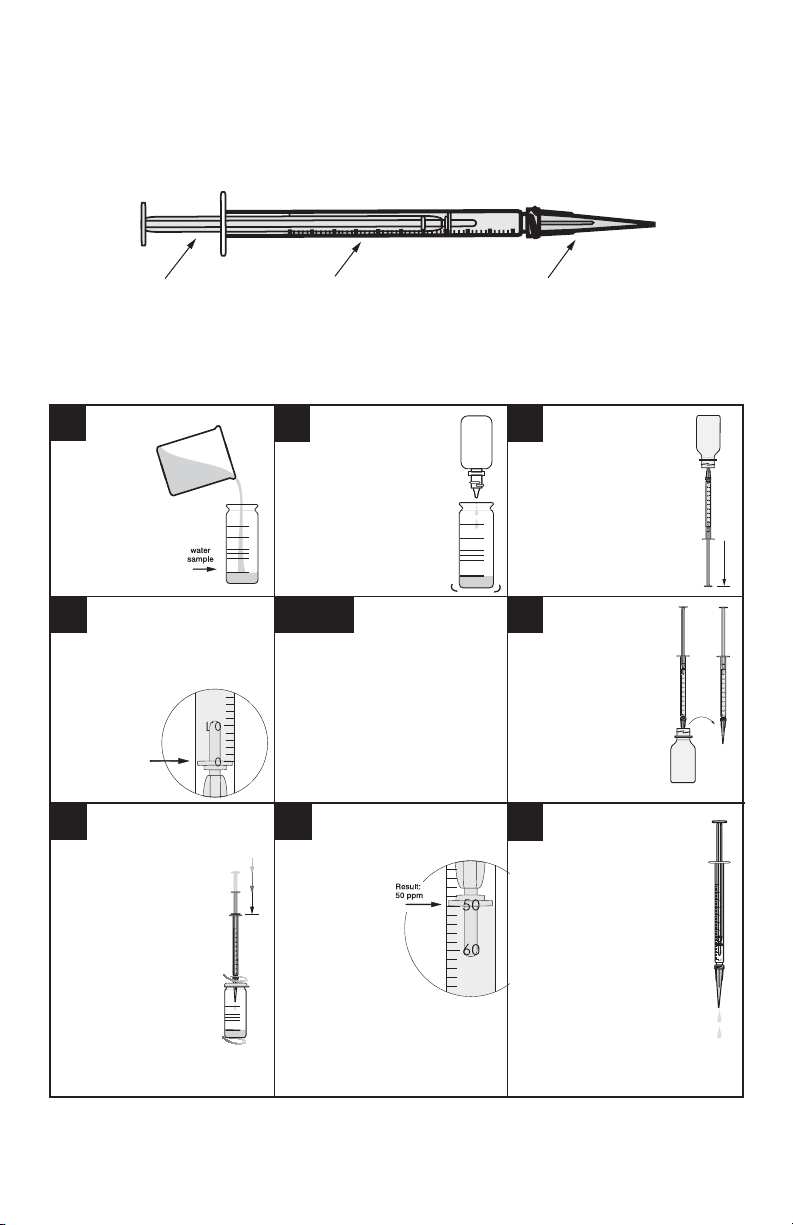
TITRIMETRIC: DIRECT READING TITRATOR
In a titrimetric method, titrating solution (or titrant) is added to a treated sample
until a color change occurs. The volume of titrant required to reach this endpoint is
proportional to the concentration of the factor being tested. Direct Reading Titrators
provide results directly in the appropriate concentration for the test - no counting of
drops, no calculations.
1.0
0.9
0.8
0.7
0.6
0.5
0.4
0.3
0.2
0.1
0
Plunger Barrel Adapter Tip
The Titrator consists of a plastic barrel, a plastic plunger, and a plastic adapter tip. The
adapter tip reduces the size of the drops that are dispensed, increasing the precision of
the test results. DO NOT remove the plunger or adapter tip from the Titrator.
12 3
Fill the test
tube to the
appropriate
line with
sample water.
To fi ll Titrator, slowly
4
withdraw the plunger
until the bottom of the
plunger is
opposite
the zero
mark on
the scale.
6
Add reagents
as specifi ed
in the instructions
for the individual
test method. Cap
with the special test
tube cap. Mix by
swirling gently.
I If small air
Note:
bubbles appear in
the barrel, expel them by
partially fi lling the barrel
and pumping the
solution back into
reagent container.
titration
the
Repeat
until bubble disappears.
7
Insert the Titrator
into the center hole
of the test tube
cap. While gently
swirling tube, add
titrating solution
one drop at a time
until the desired
color changes occur.
Read the test
result directly
from the scale
where the large
ring on the Titrator
meets the Titrator barrel.
Follow individual
test instructions.
Depress the
Titrator plunger
to expel air. Insert
Titrator into the
plastic fi tting of
the titrating
solution bottle
and invert.
5
Turn the bottle
right-side-up
and remove the
Titrator.
8
When testing is
complete, discard
titrating solution in
Titrator. Do not return
the titrant to the
reagent bottle. Rinse
Titrator and titration
tube thoroughly. Do
not remove the plunger
or the adapter tip from
the Titrator.
8
Page 9
TEST PROCEDURES
INTRODUCTION
Proper control of water quality is an essential part of successful aquaculture operation.
Immediate test results provided by on-site water analysis equipment can confi rm a healthy
environment, or give early warning signals for required treatment.
1. Develop a routine testing schedule.
2. Keep records! Historical data is extremely important if treatments are required. Note
environmental conditions, fi sh activity, feeding habits, etc.
3. Observe fi sh to note any particular behavior or feeding rates, as this may be a sign
of stress.
4. Stable characteristics, such as alkalinity and hardness, do not have to be tested as
frequently as ones that fl uctuate, such as ammonia nitrogen, nitrite nitrogen, pH,
dissolved oxygen and temperature. Keep in mind that these factors fl uctuate throughout
the day and in some cases are interdependent.
5. Be alert to sudden changes in one factor, as it may be a clue to perform further analysis.
9
Page 10

Alkalinity
DESCRIPTION CODE
*BCG/MR Indicator *2311-EG-E
*Alkalinity Titration Reagent B *4493DR-H
Test Tube, 5-10-12.9-15-20-25 mL, glass, w/cap 0608
Direct Reading Titrator, 0-200 Range 0382
*WARNING: Reagents marked with an * are considered to be potential health hazards.
To view or print a Material Safety Data Sheet (MSDS) for these reagents go to
www.lamotte.com. To obtain a printed copy, contact LaMotte by e-mail, phone or fax.
The Direct Reading Titrator is calibrated in terms of total alkalinity expressed as parts
per million (ppm) Calcium Carbonate (CaCO3). Each minor division on the Titrator
scale equals 4 ppm CaCO3.
ALKALINITY TEST PROCEDURE
1
Fill the test
tube (0608)
to the 5 mL
line with the
sample water.
4
Fill Direct
Reading
Titrator
(0382) with
*Alkalinity
Titration
Reagent B
(4493DR).
23
Add 4 drops
of *BCG-MR
Indicator
(2311-EG).
5
Insert the Titrator
into the center hole
of the test tube cap.
Cap and
mix.
Solution
will turn blue-green.
6
While gently
swirling the tube,
slowly press the
plunger to titrate
until blue-green
color changes
to pink.
7
Read the test result
directly from the
scale where the large
ring on the Titrator
meets the Titrator barrel.
Record Total Alkalinity as ppm
Calcium Carbonate (CaCO3).
10
8
NOTE: If the plunger tip reaches
the bottom line on the scale (200
ppm) before the endpoint color
change occurs, refi ll the Titrator and
continue the titration.
When recording the test result,
be sure to include the value of
the original amount of reagent
dispensed (200 ppm).
Page 11

Ammonia Nitrogen
DESCRIPTION CODE
Ammonia Nitrogen Reagent #1 4797LWT-G
*Ammonia Nitrogen Reagent #2 *4798WT-G
Test Tube, 2.5-5-10 mL, plastic, w/cap 0106
Octa-Slide 2 Viewer 1101
Ammonia Nitrogen Octa-Slide 2 Bar, 0.2-3.0 ppm 3438-01
*WARNING: Reagents marked with an * are considered to be potential health hazards.
To view or print a Material Safety Data Sheet (MSDS) for these reagents go to
www.lamotte.com. To obtain a printed copy, contact LaMotte by e-mail, phone or fax.
11
Page 12

AMMONIA NITROGEN TEST PROCEDURE
1
Fill a test tube
(0106) to the
5 mL line
with the water
sample.
4
Wait 1 minute.
1
MINUTE
78
Wait 5 minutes.
5
MINUTES
2
5
Add 4 drops
of Ammonia
Nitrogen
Reagent #1
(4797WT).
Add 12 drops
of *Ammonia
Nitrogen
Reagent #2
(4798WT).
Insert Ammonia
Nitrogen
Octa-Slide 2
Bar (3438-01)
into the Octa Slide 2 Viewer
(1101).
3
Cap and mix.
6
Cap and mix.
9
Insert test tube
into Octa-Slide 2
Viewer (1101).
10
12
Match sample color
to color standard.
Record as
Ammonia
Nitrogen.
11
To express results as Unionized Ammonia
(NH3), multiply the test result by 1.2:
Unionized Ammonia (NH3) =
ppm Ammonia Nitrogen (NH3-N) x 1.2
To express results as Ionized Ammonia (NH4+),
multiply the test result by 1.3:
Ionized Ammonia (NH4+) =
ppm Ammonia Nitrogen (NH3-N) x 1.3
Page 13

AMMONIA IN AQUARIUMS
Ammonia in water occurs in two forms: toxic unionized ammonia (NH3) and the
relatively non-toxic form, ammonium ion (NH
forms as ammonia-nitrogen (NH3-N) to give the total ammonia-nitrogen concentration
+
). This test method measures both
4
in water. The actual proportion of each compound depends on temperature, alkalinity,
and pH. A greater concentration of unionized ammonia is present when the pH value
and salinity increase.
1. Consult the table below to fi nd the percentage that corresponds to the temperature,
pH and salinity of the sample.
2. To express the test result as ppm Unionized Ammonia Nitrogen (NH3-N), multiply the
total ammonia-nitrogen test result by the percentage from the table.
3. To express the test result as ppm Ionized Ammonia Nitrogen (NH4-N), subtract the
unionized ammonia nitrogen, determined in Step 2, from the total ammonia-nitrogen.
Percentage of Free Ammonia as (NH3) in Freshwater1 (FW)
and Seawater2 (SW) at varying pH and temperature.
10°C 15°C 20°C 25°C
pH FW1 SW2 FW SW FW SW FW SW
7.0 0.19 0.27 0.40 0.55
7.1 0.23 0.34 0.50 0.70
7.2 0.29 0.43 0.63 0.88
7.3 0.37 0.54 0.79 1.10
7.4 0.47 0.68 0.99 1.38
7.5 0.59 0.459 0.85 0.665 1.24 0.963 1.73 1.39
7.6 0.74 0.577 1.07 0.836 1.56 1.21 2.17 1.75
7.7 0.92 0.726 1.35 1.05 1.96 1.52 2.72 2.19
7.8 1.16 0.912 1.69 1.32 2.45 1.90 3.39 2.74
7.9 1.46 1.15 2.12 1.66 3.06 2.39 4.24 3.43
8.0 1.83 1.44 2.65 2.07 3.83 2.98 5.28 4.28
8.1 2.29 1.80 3.32 2.60 4.77 3.73 6.55 5.32
8.2 2.86 2.26 4.14 3.25 5.94 4.65 8.11 6.61
8.3 3.58 2.83 5.16 4.06 7.36 5.78 10.00 8.18
8.4 4.46 3.54 6.41 5.05 9.09 7.17 12.27 10.10
8.5 5.55 4.41 7.98 6.28 11.18 8.87 14.97 12.40
1
Freshwater data from Trussel (1972).
2
Seawater values from Bower and Bidwell (1978). Salinity for Seawater values = 34 ppt at an
ionic strength of 0.701 m.
FOR EXAMPLE:
A fresh water sample at 20°C has a pH of 8.5 and the test result is 1.0 ppm as total
Ammonia-Nitrogen.
1. The percentage from the table is 11.18% (or 0.1118).
2. 1 ppm total Ammonia-Nitrogen x 0.1118 = 0.1118 ppm Unionized AmmoniaNitrogen
3. Total Ammonia-Nitrogen 1.0000 ppm
Unionized Ammonia-Nitrogen - 0.1118 ppm
Ionized Ammonia-Nitrogen = 0.8882 ppm
13
Page 14

Carbon Dioxide
DESCRIPTION CODE
*Phenolphthalein Indicator, 1% *2246-E
*Carbon Dioxide Reagent B *4253DR-H
Direct Reading Titrator, 0-50 Range 0380
Test Tube, 5-10-12.9-15-20-25 mL, glass, w/cap 0608
*WARNING: Reagents marked with an * are considered to be potential health
hazards. To view or print a Material Safety Data Sheet (MSDS) for these reagents go
to lamotte.com. To obtain a printed copy, contact LaMotte by e-mail, phone or fax.
CARBON DIOXIDE TEST PROCEDURE
1
Fill the test tube
(0608) to the
20 mL line
with the
sample water.
water
sample
3
Fill Direct Reading
Titrator (0382) with
Carbon Dioxide
Reagent B
(4253DR).
6
Read the test result
directly from the
scale where the large
ring
on the Titrator
meets the Titrator
barrel. Record as
Carbon Dioxide.
Result:
40 ppm
Note:
For best results, test
a freshly obtained
sample, and avoid
splashing or prolonged
contact with air.
4
Insert the
Titrator into
the center
hole of the
test tube cap.
NOTE:
The Titrator is calibrated in terms
of carbon dioxide expressed as
ppm Free CO2. Each minor division
on the Titrator scale equals 1.0
ppm CO2.
2
Add 2 drops of
Phenolphthalein
Indicator, 1%
(2246). If sample
turns red, no free
carbon dioxide is
present. If sample
is cololess,
proceed to Step 3.
5
While gently
swirling the
tube, slowly
press the
plunger to
titrate until a
faint pink color
develops and
persists for 30
seconds.
14
Page 15

Chloride
DESCRIPTION CODE
*Chloride Reagent #1 *4504-E
*Chloride Reagent #2 *4505DR-H
*Phenolphthalein Indicator, 1% *2246-E
*Sulfuric Acid, 0.5N *6090-E
Direct Reading Titrator, 0-200 Range 0382
Test Tube, 5-10-12.9-15-20-25 mL, glass, w/cap 0608
*WARNING: Reagents marked with an * are considered to be potential health hazards.
To view or print a Material Safety Data Sheet (MSDS) for these reagents go to
www.lamotte.com. To obtain a printed copy, contact LaMotte by e-mail, phone or fax.
The Titrator is calibrated in terms of chloride expressed as ppm Cl_. Each minor division
on the Titrator scale equals 4.0 ppm Cl_.
HIGH CHLORIDE AND SALINITY READINGS
For high chloride and salinity readings the sample must be carefully diluted to bring it
within a practical range for titration. Dilutions of 1 to 20 or 1 to 100 are recommended.
(For example: 1 mL of sample water is diluted to a total of 20 mL with distilled water.
This is a 1 to 20 dilution.) Titration tube is then fi lled to 15 mL line with diluted
sample, and the titration is performed as described. The Titrator reading is multiplied
by the appropriate conversion factor given below for parts per million (ppm), parts per
thousand (ppt), or percent (%) Chloride.
1 to 20 DILUTION
ppm chloride
ppt chloride
% chloride
1 to 100 DILUTION
ppm chloride
ppt chloride
% chloride
Titrator Reading x 20
=
Titrator Reading x 0.02
=
Titrator Reading x 0.002
=
Titrator Reading x 100
=
Titrator Reading x 0.1
=
Titrator Reading x 0.01
=
To convert parts per thousand (ppt) Chloride to parts per thousand (ppt) Salinity use
the following formula:
ppt salinity = (1.805 x ppt chloride ) + 0.03
15
Page 16

CHLORIDE TEST PROCEDURE
123
Fill the test tube
(0608) to the
15 mL line
with the
sample water.
4
Cap and swirl
to mix.
Solution will
turn yellow.
78
While gently
swirling the
tube, slowly
press the
plunger to
titrate until
yellow color
changes from
yellow to orange
or orange-red.
Add one drop of
Phenolphthalein
Indicator, 1%
(2246). If sample
turns pink, add
*Sulfuric Acid,
0.5N (6090) one
drop at a time,
mixing after each
drop, until pink
color disappears.
5
Fill Direct
Reading
Titrator (0382)
with *Chloride
Reagent #2
(4505DR).
Read the test result directly
from the
ring
Titrator barrel. Record as ppm
Chloride.
scale where the large
on the Titrator meets the
Add 3 drops
of *Cloride
Reagent #1
(4504).
6
Insert the
Titrator into
the center
hole of the
test tube cap.
NOTE: If the plunger tip reaches the bottom line on the scale (200 ppm) before
the endpoint color change occurs, refi ll the Titrator and continue the titration.
When recording the test results be sure to include the value of the original amount
of reagent dispensed (200 ppm).
16
Page 17

Dissolved Oxygen
DESCRIPTION CODE
*Manganous Sulfate Solution *4167-G
*Alkaline Potassium Iodide Azide Reagent *7166-G
*Sulfuric Acid, 1:1 *6141WT -G
Sodium Thiosulfate, 0.025N 4169-H
Starch Indicator Solution 4170PS-G
Direct Reading Titrator, 0-10 Range 0377
Test Tube, 5-10-12.9-15-20-25 mL, glass, w/cap 0608
Pipet, plain, plastic, w/cap 0392
Water Sampling Bottle, 60 mL, glass 0688-DO
†
*WARNING: Reagents marked with an * are considered to be potential health hazards.
To view or print a Material Safety Data Sheet (MSDS) for these reagents go to
www.lamotte.com. To obtain a printed copy, contact LaMotte by e-mail, phone or fax.
The Titrator is calibrated in terms of Dissolved Oxygen expressed as ppm Dissolved
Oxygen. Each minor division on the Titrator scale equals 0.2 ppm Dissolved Oxygen.
†Included in Code 3633-04.
17
Page 18

DISSOLVED OXYGEN TEST PROCEDURE
Part 1 - Collecting the Water Sample
12
Rinse the Water
Sampling Bottle
(0688-DO) with
the sample water.
Tightly cap the bottle, and
submerge it to the desired depth.
3
Remove the cap and allow
the bottle to fi ll.
4
Tap the sides of the bottle to
dislodge any air bubbles.
56
Retrieve the bottle
and make sure that
no air bubbles are
Replace the cap while the
bottle is still submerged.
trapped inside.
18
Page 19

Part 2 - Adding the Reagents
NOTE: Be careful not to introduce air into the sample while adding
the reagents.
12
Immediately add 8
drops of *Manganous
Sulfate Solution (4167)
Remove the
cap from the
bottle.
and Add 8 drops of
*Alkaline Potassium
Iodide Azide (7166).
3
Cap the bottle and mix by
inverting several times.
A precipitate will form.
56
Add 8 drops of
*Sulfuric Acid, 1:1
(6141WT).
NOTE: At this point the sample has been “fi xed” and contact between the
sample and the atmosphere will not affect the test result. Samples may be
held at this point and titrated later.
4
Allow the precipitate
to settle below the
shoulder of the bottle.
Cap and gently invert the bottle
to mix the contents until the
precipitate and the reagent have
totally dissolved. The solution
will be clear
yellow to
orange if the
sample contains
dissolved oxygen.
19
Page 20

Part 3 - The Titration
12
0
0
0.1
Fill the titration tube
(0608) to the 20 mL line
with the fi xed sample.
Cap the tube.
0.1
0.2
0.2
Depress plunger of
0.3
0.3
0.4
0.4
the Titrator (0377).
0.5
0.5
0.6
0.6
0.7
0.7
0.8
0.8
0.9
0.9
1.0
1.0
3
Insert the Titrator into
the plug in the top of the
*Sodium Thiosulfate,
0.025N (4169) titrating
solution.
0
1
.
0
0
2
.
3
.
0
0
4
.
5
.
0
0
.
6
7
.
0
0
8
.
9
.
0
0
1
.
4
Invert the bottle and
slowly withdraw the
plunger until the large
ring on the plunger is
opposite the zero (0)
line on the scale.
NOTE: If small air bubbles appear in the titrator barrel, expel them by
partially fi lling the barrel and pumping the titration solution back into the
reagent container. Repeat until bubble disappears.
5
Turn the bottle
upright and remove
the Titrator.
0
0.1
0.2
0.3
0.4
0.5
0.6
0.7
0.8
0.9
1.0
0
0.1
0.2
0.3
0.4
0.5
0.6
0.7
0.8
0.9
1.0
NOTE: If the sample
is a very pale yellow,
go to Step 9.
1.0
0.9
0.8
0.7
0.6
0.5
0.4
0.3
0.2
0.1
0
20
continued . . .
Page 21

67
Insert the tip of the Titraror
into the opening of the
titration tube cap.
Slowly depress the
plunger to dispense the
titrating solution until
the yellow-brown color
changes to a very pale
yellow. Gently swirl the
tube during the titration
to mix the contents.
89
Carefully remove the
Titrator and cap. Do
not disturb the Titrator
plunger.
Add 8 drops of Starch
Indicator Solution
(4170WT). The sample
should turn blue.
1110
Cap the titration tube.
Insert the tip of the
Titrator into the opening
of the titration tube cap.
Read the test result directly from the scale
12
where the large ring on the Titrator meets
the Titrator barrel. Record as ppm Dissolved
Oxygen. Each minor division on the Titrator
scale equals 0.2 ppm.
Continue titrating until the blue
color disappears and the solution
becomes colorless.
NOTE: If the plunger ring
reaches the bottom line on
the scale (10 ppm) before the
endpoint color change occurs,
refi ll the Titrator and continue
the titration. Include
of the original
reagent dispensed
when recording the test result.
the value
amount of
(10 ppm)
NOTE: When testing is complete, discard the
titrating solution in the Titrator. Rinse Titrator
and titration tube thoroughly. DO NOT remove
plunger or adapter tip.
21
Page 22

Hardness
DESCRIPTION CODE
*Hardness Reagent #5 *4483-E
Hardness Reagent #6 Solution 4485-E
Hardness Reagent #7 4487DR-H
Test Tube, 5-10-12.9-15-20-25, glass, w/cap 0608
Direct Reading Titrator, 0-200 Range 0382
Pipet, 0.5 mL, plastic 0353
*WARNING: Reagents marked with an * are considered to be potential health hazards.
To view or print a Material Safety Data Sheet (MSDS) for these reagents go to
www.lamotte.com. To obtain a printed copy, contact LaMotte by e-mail, phone or fax.
The Titrator is calibrated in terms of Total Hardness expressed as parts per million (ppm)
Calcium Carbonate (CaCO3). Each minor division on the Titrator scale equals
4 ppm CaCO3.
ANALYSIS OF HARDNESS IN SALT WATER
When sea and estuarine waters containing very high levels of mineral salts are to be tested,
the sample must be diluted before titration. This test set is supplied with a calibrated pipet
for perforning the simple, convenient dilution described below:
1
Use the 0.5 mL
pipet (0353) to
add 0.5 mL of the
salt water to the
test tube (0608).
2
Fill the test tube
to the 12.9 mL
line with distilled
water (a 1 to
25.8 dilution).
3
Follow Steps 2 through
9 under Hardness Test
procedure. Multiply
reading by 25.8. Record
as ppm Total Hardness
CaCO3.
22
Page 23

HARDNESS TEST PROCEDURE
123
Add 5 drops
Fill the test tube
(0608) to the
12.9 mL line
water
sample
of *Hardness
Reagent #5
(4483).
with the
sample water.
4
5
Cap and swirl
to mix.
Solution will
Add 5 drops
of *Hardness
Reagent #6
Solution (4483).
turn red if
hardness is
present.
If solution is
blue, there is
no
measureable amount
of hardness.
78
While gently
Insert the Titrator
into the center hole
of the test tube cap.
swirling the tube,
0
0.1
0.2
slowly press the
0.3
0.4
0.5
0.6
plunger to titrate
0.7
0.8
0.9
1.0
until red color
changes to clear
blue.
0
0.1
0.2
0.3
0.4
0.5
0.6
0.7
0.8
0.9
1.0
Cap and
swirl to mix.
6
1.0
0.9
0.8
60
80
0.7
0.6
0.5
0.4
0.3
0.2
0.1
0
Fill Direct Reading
Titrator (0382) with
Hardness Reagent 7
(4487DR).
9
Result:
60 ppm
Read
the test
result
directly
from the
scale where the large ring
on the Titrator meets the
Titrator barrel. Record as
ppm T otal Hardness
(CaCO3).
23
Page 24

Nitrite Nitrogen
DESCRIPTION CODE
*Mixed Acid Reagent *V -6278-H
*Color Developing Reagent *V-6281-D
Spoon, 0.1 g, plastic 0699
Test Tube, plastic, w/cap 0106
Dispenser Cap 0692
Octa-Slide 2 Viewer 1101
Nitrite Nitrogen Octa-Slide 2 Bar, 0.05-0.8 ppm 3437-01
*WARNING: Reagents marked with an * are considered to be potential health hazards.
To view or print a Material Safety Data Sheet (MSDS) for these reagents go to
www.lamotte.com. To obtain a printed copy, contact LaMotte by e-mail, phone or fax.
NOTE: Place Dispenser Cap (0692) on *Mixed Acid Reagent (V-6278-H). Save this
cap for refi ll reagents.
1
Fill a test tube
(0106) to the
2.5 mL line
with the water
sample.
4
78
Cap and mix
by inverting
for one minute.
Insert test tube
into Octa-Slide 2
Viewer (1101).
23
Dilute to the
5mL line with
*Mixed Acid
Reagent
(V-6278).
5
MINUTES
Match sample color
to color standard.
Record results as
ppm Nitrite
Nitrogen.
Wait 5
minutes.
5
Use the 0.1 g
spoon (0699)
to add 0.1 g
of
*Color
Developing
Reagent
(V-6281).
6
Insert NitriteNitrogen OctaSlide 2
Bar
(3437-01) into
the Octa-Slide 2
Viewer (1101).
9
To convert to
multiply results by 3.3.
Record as ppm
Nitrite-N (NO3-N)
ppm Nitrite (NO
Nitrite,
Nitrite.
x 3.3 =
-)
2
24
Page 25

†
pH
DESCRIPTION CODE
*Wide Range Indicator *2218-G
Test Tube, plastic, w/cap 0106
Octa-Slide 2 Viewer 1101
Wide Range pH Octa-Slide 2 Bar, 5.0-10.0 3483-01
*WARNING: Reagents marked with an * are considered to be potential health hazards.
To view or print a Material Safety Data Sheet (MSDS) for these reagents go to
www.lamotte.com. To obtain a printed copy, contact LaMotte by e-mail, phone or fax.
†Included in Code 3633-03 only.
12 3
Fill a test tube
(0106) to the
10 mL line
with the water
sample.
Insert Wide Range
4
pH Octa-Slide 2
Bar (3483-01)
into the Octa Slide 2 Viewer
(1101).
Add 8 drops
of *Wide Range
pH Indicator
(2218).
5
Insert test tube
into Octa-Slide 2
Viewer (1101).
Cap and mix.
Match sample color
6
to color standard.
Record as pH.
25
Page 26

4170
PS-G
6141
WT-G
7166-G
4167-G
-DO
0688
0377
0382
0380
3633-04
4169-H
4505DR-H
4253DR-H
0106
0382
0699
6090-E
2246-E
0106
4487DR-H
1066
V-6281-D
4504-E
0382
0353
4493DR-H
V-6278-H
4485-E
0608
4483-E
0608
2311-EG-E
V-6278-H
26
1101
3438-01 3437-01
3483-01
0106
0106 0106
0106 01060106
4798
WT-G
2218-G
4797
WT-G
0688
Page 27

0353
0382
0380
0382
0382
3634-04
0699
4487
4253
4493
4505
V-
6281
DR-H
DR-H
DR-H
DR-H
-D
0692
V-
4485
2246
-E
2311
-EG
6090
-E
6278
-H
-E
-E
V-
4483
-E
0608
0608
4504
-E
6278
-H
1101
3437-01
3438-01
0106
0106
0106
4798
WT-G
0688
4797
WT-G
27
Page 28

LaMOTTE COMPANY
Helping People Solve Analytical Challenges
PO Box 329 • Chestertown • Maryland • 21620 • USA
800-344-3100 • 410-778-3100 (Outside USA) • Fax 410-778-6394
Visit us on the web at www.lamotte.com
63633-04 4/12
 Loading...