

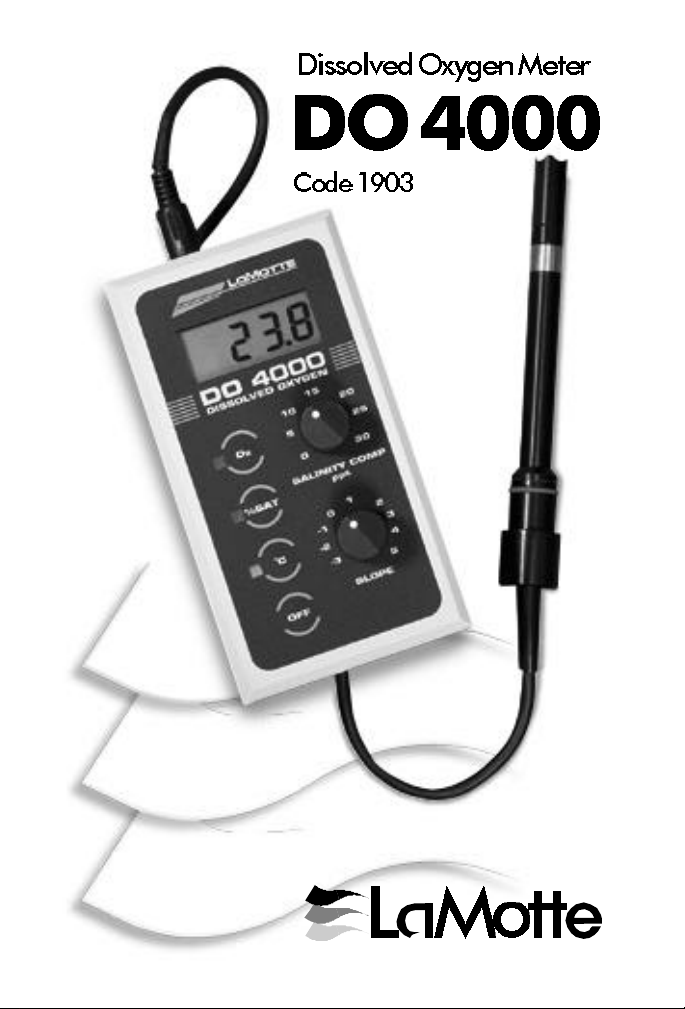
Page 1
Page 2

2
Page 3

TABLE OF CONTENTS
Page
Spec i fi ca tions ......................................................................................... 4
Dis solved Ox y gen Ba sics........................................................................ 5
DO Me ter Ba sics.................................................................................... 7
As sem bling the Probe............................................................................ 8
Po lar iza tion............................................................................................. 9
Ini tial/Re place ment Probe Cal i bra tion................................................ 10
Cal i bra tion ........................................................................................... 11
Zero Cal i bra tion................................................................................... 15
Testing.................................................................................................. 16
Trou ble shooting.................................................................................... 18
Me ter Care ........................................................................................... 19
Cleaning the Probe.............................................................................. 20
War ranty In for ma tion.......................................................................... 21
Parts & Ac ces sories.............................................................................. 22
3
Page 4

SPECIFICATIONS
MEASUREMENTS
1. Oxygen concentration expressed in parts per million (ppm) of O
2
2. Oxygen concentration expressed as percent (%) of oxygen saturation
3. Temperature expressed as °C
RANGE (for Specified Accuracy)
1. 0 to 19.99 ppm O
2
2. 0 to 199% saturation
3. 0 to 40°C
PRECISION
1. 0.01 ppm for O2 concentration
2. 1% for water saturation
3. 0.01°C for temperature
ACCURACY
1. For Oxygen Concentration 5% of reading or 0.10 ppm (whichever is
greater) when taken within 5°C of the calibration point temperature
2.
For Temperature ±0.5°C
RESPONSE TIME
90% of final readings within 45 seconds, except at extreme
temperatures
SIZE AND WEIGHT
Case: 150 x 80 x 45 mm (5t x 3c x 1n in.)
0.33 kg (n lb)
Probe: 15.5 mm diameter x 120 mm (a” dia x 6g”)
0.10 kg (c lb)
POWER REQUIREMENTS
Maximum requirement of 100 mW
Source: Internal - Battery, Type 1604A (9 volt)- replaceable or
Nickel/Cadmium rechargeable with built in charge regulator
External - Wall type AC adapter rated at 9VDC/50mA
(minimum) with 3.5 mm jack, “tip positive” polarity (LaMotte
Code #1708)
4
Page 5

DISSOLVED OXYGEN BASICS
Oxygen, in the form of a gas, is a major component of air. Humans,
plants, and animals use this oxygen to respire, or breathe. Gaseous
oxygen also occurs in the water, where aquatic life uses it to respire.
Oxygen in water is often called dissolved oxygen.
Dissolved oxygen is vital to the survival of aquatic organisms. Naturally
present, dissolved oxygen enters water when plants photosynthesize or
through dispersion. When plants, particularly algae, photosynthesize,
sunlight is converted into needed chemical energy, releasing oxygen into
the water. Dispersion, the exchange of oxygen between the atmosphere
and water, can be aided by wind and wave action. Oxygen can also be
mechanically introduced into the water by use of an aerator.
Once in the water, oxygen is consumed in several ways, including the
respiration of plants and animals and the oxidation, or chemical
breakdown, of dead and decaying plants and animals. In extreme cases
all available oxygen may be used in the decomposition process, so no
oxygen is left for respiration, and the plants and animals eventually
suffocate.
Dissolved oxygen can be measured as the concentration of oxygen
present in the water (mg/L or ppm oxygen), or as the percent of oxygen
actually in the water as compared to the maximum amount the water
can hold. This is referred to as percent (%) saturation. The level at
which water is saturated is dependent upon several factors, but two of
the most important are temperature and salinity. As the temperature of
the water decreases, its ability to hold oxygen increases. Likewise, as
salinity levels decrease the saturation level increases.
Dissolved oxygen levels are vital in many areas, but they are of
particular concern to aquaculturists, environmental analysts and
wastewater treaters, who must constantly monitor levels in the water.
For aquaculturists, dissolved oxygen can be the difference between a
healthy, profitable crop of fish, and disaster. If sufficient levels of
dissolved oxygen are not maintained fish growth can be hindered, the
fish may be more susceptible to infectious diseases, or they may even
suffocate. Many aquaculture systems use aerators, especially at night
when DO levels are lower, to ensure sufficient oxygen for a healthy
crop.
Environmental analysts are also concerned with dissolved oxygen levels.
This test is one of the most important for determining the ability of a
pond, lake, or other body of water to support life. It is also used as part
of the biochemical oxygen demand (BOD) test to determine the
pollution level of the water.
5
Page 6

The dissolved oxygen test is also important to operators of waste water
facilities, both at the operation site and in the lab. Dissolved oxygen
levels are monitored at the wiers, and before the water leaves the plant
after being dechlorinated. In the laboratory the dissolved oxygen test is
used to analyze the BOD of the water.
DO METER BASICS
A voltage is applied across the electrodes of the Dissolved Oxygen
probe. Silver ions are oxidized at the anode producing silver chloride
and electrons. Oxygen is reduced at the cathode accepting electrons and
producing hydroxide ions. The current generated by the chemical
reactions is conducted through the filling solution. This current is
proportional to the oxygen concentration and is converted by the meter
to a dissolved oxygen reading.
The DO 4000 provides a digital readout of oxygen concentration in
mg/L or ppm, or percent (%) saturation. The meter compensates for
temperature and salinity which can effect the dissolved oxygen reading.
Built-in thermistors automatically provide a readout in degrees
centigrade (°C). Salinity levels from 0 to 30 parts per thousand (ppt) are
set with the “Salinity Comp” knob. An altitude correction can be
determined by consulting the Altitude Chart on page 13.
6
Page 7
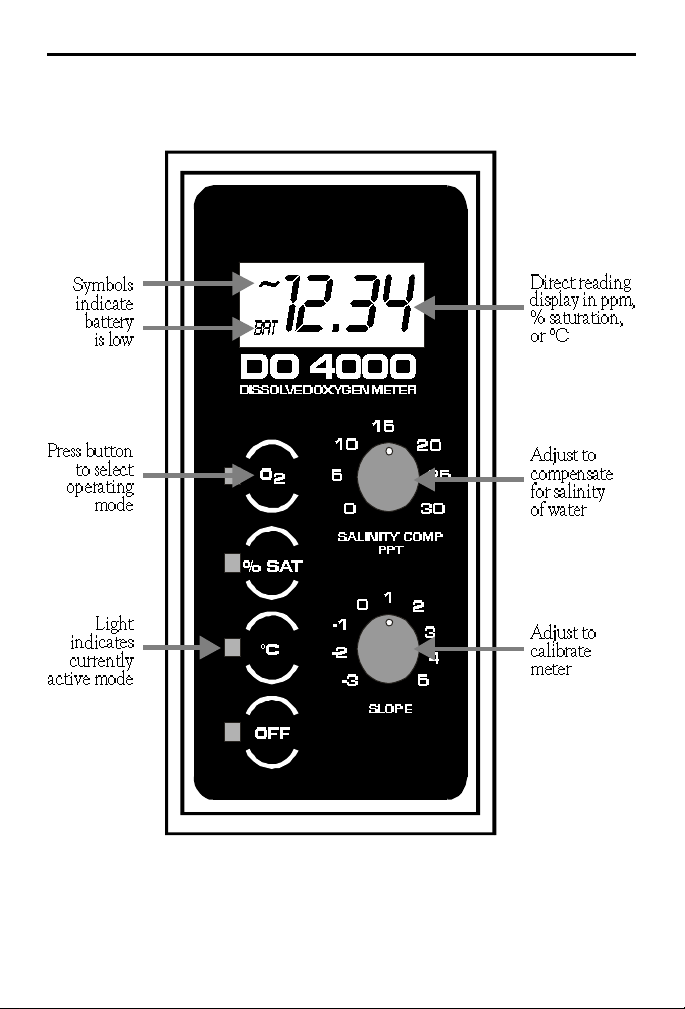
FUNCTIONS OF THE DO 4000 METER
7
Page 8
ASSEMBLING THE PROBE
GOOD PRACTICE GUIDELINES
Keep the membrane wet at all times. Between readings the probe can be
stored with the tip in a beaker of deionized water. For longer periods,
the probe should be stored in the protective sheath. The sponge insert
in the tip of the sheath should be dampened with distilled water.
MEMBRANE REPLACEMENT
1. Hold the probe in a vertical position. Carefully unscrew the
membrane module.
2. Holding the new membrane module in a vertical position with the
threaded end up, fill with DO Filling Solution (2787).
3. Keeping the module in a vertical position, carefully screw the
module onto the probe, allowing excess filling solution to escape
through the screw thread. After assembly inspect the membrane.
Make sure no air bubbles are present and the membrane is not
creased.
8
Page 9

POLARIZATION
Polarization is the term used to describe when the probe has reached
equilibrium, and is able to produce stable, reliable measurements. For
the probe to be polarized, voltage must continually be applied to the
probe, allowing the oxygen reaction to proceed. When voltage stops, the
reaction no longer continues and the probe is no longer considered
polarized. When either ppm or %SAT is selected on the meter, a voltage
is automatically applied across the electrodes, but the reading is not
accurate until the 15 minute “warm up” time has elapsed. The DO4000
has a constant polarization feature, which allows a small voltage to be
continuously applied to the probe, even when the meter is turned off,
eliminating the 15 minute warm up time. To select the constant
polarization option, set the small button between the connectors to the
OUT position. Since it does use power to keep the probe constantly
polarized, it is recommended this feature not be used if there will be a
span of several hours between measurements.
Do not leave probe polarized for prolonged periods of time
(overnight). Prolonged use will cause membrane fouling and require
more frequent anode cleaning.
9
Page 10

INITIAL/REPLACEMENT PROBE CALIBRATION
A precalibration procedure must be performed on a new meter and
probe or each time a new probe is attached to the meter. After the
precalibration procedure has been performed, the meter should be
calibrated following one of the calibration procedures on pages 11-14.
1. Assemble probe.
2. Attach the probe to the meter with the arrow on the connector
facing upward.
3. Set the salinity and slope knob to zero. Set the constant polarization
button to the out position. Wait 30 minutes.
4. Place the probe several inches above a container of water. The probe
must be calibrated in humid, not dry, air.
5. Press the "% SAT" button. Adjust the slope knob until the display
reads 100%. If the slope knob is between -1 to 1, the meter is ready
to use. Proceed to the section in the manual on testing.
6. If the slope knob is not within -1 to 1 range, set the slope knob back
to zero and continue with Steps 7-10.
7. For meters with serial numbers 375 or higher (meter case has two
holes on the side to access potentiometers), remove hole plug from
the Slope Adjustment Pot.
For meters with serial numbers 0-374 (meter case has one hole on
the side), remove the 4 screws and remove the case.
8. Turn the meter so that is aligned like the diagram on page 15. The
potentiometer, on the circuit board, closest to the probe jack at the
bottom of the meter, is the Slope Adjustment Potentiometer. Be sure
to identify the correct potentiometer before making any adjustments.
9. Adjust the Slope Adjustment Potentiometer with a slotted screw
driver (1/8” or smaller) until the meter reads approximately 100%.
10. Replace the hole plug or case. Use the slope knob to set the meter
display to exactly 100%. The meter is now ready to use. Proceed to
the CALIBRATION section.
10
Page 11

CALIBRATION
The DO 4000 should be recalibrated daily using one of the following
methods to account for changing environmental conditions. For most
accurate results, calibrate as close to the temperature of the sample to be
tested as possible. DO NOT CALIBRATE WITH THE SHEATH
ON.
The saturated air calibration is easiest and generally considered to be a
very accurate and reliable procedure. Alternative methods are listed on
pages 12-16.
NOTE: If the DO 4000 has not been set on the constant polarization
mode, set constant polarization button to out position on top of meter
and wait 15 minutes before calibrating.
SATURATED AIR (RECOMMENDED PROCEDURE)
NOTE: It is very important that the membrane be completely dry
before starting air calibration. Vigorously shake the probe several times
to remove water droplets from the membrane. However, calibration
must be done in humid not dry air!
1. Hold the probe several inches above water surface.
2. Set “SALINITY COMP” knob to 0. Press “%SAT” button to turn
the meter on. Wait for display to stabilize.
3. Adjust the “SLOPE” control until display reads 100. The meter is
now calibrated for use. Turn off constant polarization unless meter is
to be used again shortly.
NOTE: If readings are erratic, or the meter can not be calibrated
see Troubleshooting on page 18.
11
Page 12

SATURATED WATER USING A CALIBRATION CHART
The saturated water calibration using a chart requires more careful
aeration and assumes the water is saturated after 15 minutes of
aeration. An aquarium pump or other bubbling equipment can be
used to aerate the sample. It is important the sample be saturated. If
bubbling equipment is not available, the sample can be vigorously
stirred with a magnetic stirrer for 2 hours.
1. Fill a 1 liter beaker with distilled or deionized water.
2. Aerate sample for approximately 15 minutes. Press the °C button to
turn the meter on. Record the temperature.
3. Use the Solubility In Water chart to determine the solubility of
oxygen at the sample temperature.
4. Use the Altitude correction chart to determine the altitude
correction factor.
5. Multiply the oxygen concentration (Step 3) by the altitude
correction factor (Step 4) to obtain the oxygen concentration of the
sample.
EXAMPLE: Sample temperature is 25°C; pressure is 642 mm Hg.
8.263 x 0.84 = 6.94 ppm O
2
6. Set “SALINITY COMP” and “SLOPE” knobs on meter to zero.
7. Keeping probe at an angle, slowly immerse the probe at least 3.5"
into the aerated sample. Tap the probe gently against the side of the
beaker to remove air bubbles.
8. Press “O2” button. Wait for reading to stabilize. Adjust the “slope”
knob until display reads concentration of the sample as determined
in Step 5.
NOTE: If readings are unstable, stir more rapidly to avoid oxygen
starvation at the membrane.
9. The meter is now calibrated and ready for use. See Testing on page
16 for instructions.
12
Page 13

SOLUBILITY OF OXYGEN IN WATER
°C O
2
°C O
2
°C O
2
°C O
2
0.0 14.621 13.0 10.537 26.0 8.113 39.0 6.515
1.0 14.216 14.0 10.306 27.0 7.968 40.0 6.412
2.0 13.829 15.0 10.084 28.0 7.827
3.0 13.460 16.0 9.870 29.0 7.691
4.0 13.107 17.0 9.665 30.0 7.559
5.0 12.770 18.0 9.467 31.0 7.430
6.0 12.447 19.0 9.276 32.0 7.305
7.0 12.139 20.0 9.092 33.0 7.183
8.0 11.843 21.0 8.915 34.0 7.065
9.0 11.559 22.0 8.743 35.0 6.950
10.0 11.288 23.0 8.578 36.0 6.837
11.0 11.027 24.0 8.418 37.0 6.727
12.0 10.777 25.0 8.263 38.0 6.620
ALTITUDE CORRECTION
Altitude
feet
Pressure
mm Hg
Correction
Factor
Altitude
feet
Pressure
mm Hg
Correction
Factor
-500 773 1.02 5000 642 0.84
0 760 1.00 6000 619 0.81
500 747 0.98 7000 596 0.78
1000 734 0.96 8000 572 0.75
2000 708 0.93 9000 548 0.72
3000 682 0.90 10,000 525 0.69
4000 666 0.88
Tables derived from Standards Methods For The Examination of Water And
Wastewater, 17th Ed.
13
Page 14

SATURATED WATER USING A WINKLER TITRATION
The saturated water method using a Winkler titration to check the
oxygen level is limited by the accuracy the titration.
1. Fill a 1 liter beaker with distilled or deionized water. Adjust
temperature of the sample to approximately 25°C. Press the °C
button to turn the meter on. Record the temperature.
2. Aerate sample for 15 minutes.
NOTE: An aquarium pump or other bubbling equipment can be
used to aerate the sample.
3. Remove aerator from beaker. Determine dissolved oxygen level using
a Winkler Titration. Record reading. Repeat titration for a total of
three results. Use the average of the results as the dissolved oxygen
reading of the sample.
NOTE: LaMotte Company offers a dissolved oxygen kit using an
azide modification of the Winkler Titration. Order as code #7414 or
code #5860 (all liquid reagents).
4. Set “SALINITY COMP” and “SLOPE” knobs on meter to zero.
5. Keeping probe at an angle, slowly lower at least 3.5” into the aerated
sample. Tap the probe gently against the side of the beaker to
remove air bubbles. Press “°C” button. Stir sample continuously.
NOTE: If reading is unstable, stir more rapidly with probe.
6. Press “O2” button. Wait for reading to stabilize. Adjust the “slope”
knob until display reads concentration of the sample as determined
in Step 3.
14
Page 15

ZERO CALIBRATION
Dissolved Oxygen meters often include a zero point calibration
procedure. Generally the most common source of zero point drift is
filling solution contamination. There are two methods to correct this
problem. The recommended method is to change the filling solution
(see Membrane Replacement page 8). The second method is to calibrate
out the error caused by the contamination. Calibrating out the error not
only overlooks the source of the problem but leads to errors especially
significant when testing very low oxygen solutions.
Use this zero calibration only when contamination of the filling solution
is suspected.
ZERO CHECK
1. Add 0.1 g spoon (0699) of Sodium Sulfite (3970) and several
crystals of Cobalt Chloride (3971) to about 100 mL of tapwater. Mix
thoroughly. Wait one minute.
2. Select “ppm” on meter to turn the meter on. Immerse probe in
solution and allow reading to stabilize. A reading of 0.1 ppm or more
could indicate significant contamination and require a filling
solution change.
3. With probe still in the Zero Oxygen solution prepared in Step 1,
remove hole plug on side of meter and adjust the “Zero Current
POT” with a slotted screw driver (1/8" or smaller) until meter reads
0.00 ppm.
15
Page 16

TESTING
The DO 4000 has a constant polarization feature, which eliminates the
15 minute warm-up time between periodic use. If the meter has not
been set on this function, set constant polarization button to OUT
position on top of meter and wait 15 minutes before testing. For more
information on the constant polarization feature, see page 9. This
feature allows readings to be taken after the meter has been turned off
without waiting for the 15 minute warm-up time.
TEMPERATURE
1. Press “°C” button to turn the meter on.
2. Lower probe vertically at least 3.5" into sample. Swirl until display
stabilizes.
NOTE: It may take a minute or so for the display to stabilize (if
temperature is very low or very high).
3. Record reading as degrees Centigrade (°C).
4. Press “OFF” button.
DISSOLVED OXYGEN READING
1. Press “O2” button to turn the meter on.
2. Set the “SALINITY COMP” knob to the salinity of the sample
water.
3. Keeping probe at an angle, slowly lower at least 3.5" into sample.
Tap probe against side of beaker to remove air bubbles. Stir solution
gently with probe until display stabilizes. If testing deeper water,
gently raise and lower probe several times to remove air bubbles.
Continue to raise and lower to avoid oxygen starvation at the
membrane.
NOTE: It may take a minute or so for the display to stabilize. If
readings are erratic, see Troubleshooting on page 18.
4. Record reading as ppm Dissolved Oxygen.
5. Press “OFF” button and turn off constant polarization unless meter
is to be used again shortly.
16
Page 17

PERCENT SATURATION READING
1. Press “%SAT” button to turn meter on.
2. Set the Salinity Compensation knob to the salinity of the sample
water.
3. Keeping probe at an angle, slowly lower at least 3.5” into sample.
Tap probe against the side of the beaker to remove air bubbles. Stir
solution gently with probe until display stabilizes. If testing deeper
water, gently raise and lower probe several times to remove air
bubbles. Continue to raise and lower to avoid oxygen starvation at
the membrane.
If readings are erratic see Troubleshooting on page 18.
4. Record reading as percent (%) Saturation.
5. Press “OFF” button and turn off constant polarization unless meter
is to be used again shortly.
17
Page 18

TROUBLESHOOTING
If dissolved oxygen readings appear erratic or unusual, there are several
things which can be checked.
1. Check that the BAT Low indicator is not on. The temperature
function will be the first function to be affected by a low battery.
Replace the battery as soon as possible.
2. There may not be enough sample flowing over the membrane. Try
stirring the sample faster or steadier. Do not stir fast enough to cause
bubbles or splashing.
3. Check the connection between the probe and the meter.
4. The probe may be fouled. Look closely at the membrane; if it looks
dirty or wrinkled it should be replaced. See Cleaning the Probe on
page 20.
5. If calibration is not successful after following Step 4, adjust the
“Slope adjustment pot” according to instructions on page 15.
18
Page 19

METER CARE
CONNECTING THE PROBE
If it is necessary to remove probe from the meter, reconnect the probe
with the arrow on the probe connector facing up. See diagram below for
the proper connection to the meter.
REPLACING THE BATTERY
When “BAT” appears on the display, the battery should be changed.
The DO 4000 uses a type 1604A (9 volt) replaceable or rechargeable
Nickel/Cadmium battery.
1. Use a #1 Phillips head screwdriver to remove the four screws on
back of the meter case.
2. Gently lift back panel from meter.
3. Lift battery from bottom of meter. Remove battery from connector.
4. Snap new battery onto connector.
5. Lower the new battery back into the meter.
6. Replace back panel. Replace screws. Wait 15 minutes for the DO
4000 to repolarize after replacing the battery.
AC ADAPTER
An AC adapter is available for use with the DO 4000 (order LaMotte
Code 1708). See diagram below for the proper connection to meter.
NOTE: The use of an AC Adapter other than the one supplied by
LaMotte Company may damage the meter and will void the meter
warranty.
19
Page 20

CLEANING THE PROBE
THE CATHODE
1. Remove membrane cartridge, wipe probe dry.
2. Lay crocus paper on a table or other flat surface.
3. Holding the electrode vertically, gently move the tip over the crocus
paper in a circular motion.
THE ANODE
1. Remove membrane cartridge.
2. Dip a toothbrush in a dilute ammonia solution.
3. Gently rub toothbrush over the silver anode. Continue until the
deposits have been removed.
4. Rinse with deionized water before reassembly.
5. Reassemble the probe. Wait 15 minutes for probe to polarize before
use.
20
Page 21

WARRANTY INFORMATION
PACKAGING AND DELIVERY
Experienced packaging personnel at LaMotte Company assure adequate
protection against normal hazards encountered during shipping. After
the product leaves the manufacturer, all responsibility for its safe
delivery is assured by the transporter. Damage claims must be filed
immediately with the transporter to receive compensation for damaged
goods.
REPAIRS
If it is necessary to return the instrument for repair, contact LaMotte
Company at 1-800-344-3100 for a return authorization number.
INSTRUMENT GUARANTEE
The meter and probe are guaranteed to be free of defects in material and
workmanship for twelve months from original purchase. If in that time
it is found to be defective, it will be repaired without charge, except for
transportation expenses. This guarantee does not cover the batteries.
This guarantee is void under the following circumstances:
• operator’s negligence
• improper application
• unauthorized servicing
NOTE: The use of an AC Adapter other than the one supplied by
LaMotte Company may damage the meter and will void the meter
warranty.
LIMITS OF LIABILITY
Under no circumstances shall LaMotte Company be liable for loss of
life, property, profits or other damages incurred through the use or
misuse of their products.
21
Page 22

REPLACEMENT PARTS & ACCESSORIES
DESCRIPTION CODE
DO probe & cable 1913
Membrane replacement package
1914
(includes 2787-G & 3 membrane cartridges)
DO Filling Solution, 30 mL 2787-G
Spoon, 0.1g 0699
Double Magnetic Stirrer 1776
AC Adapter, 9 volt 1708
Dissolved Oxygen Kit, Winkler Titration 7414
Dissolved Oxygen Kit, Winkler Titration, Liquid Acid Version 5860
Deionized Water (*-G, 30 mL; -L, 500 mL; -N, 3800 mL) 5115-*
Beaker, 1 liter, glass 2-2027
Sodium Sulfite, 5g 3970-C
Cobalt Chloride, 5g 3971-C
22
Page 23

Page 24

LaMOTTE COM PANY
Helping Peo ple Solve An a lyt i cal Challenges
PO Box 329 ♦ Chestertown ♦ Mary land ♦ 21620 ♦ USA
800-344-3100 ♦ 410-778-3100 (Out side U.S.A.) ♦ Fax 410-778-6394
®
Visit us on the web at www.lamotte.com
1/02
 Loading...