

Page 1
4/09 62067
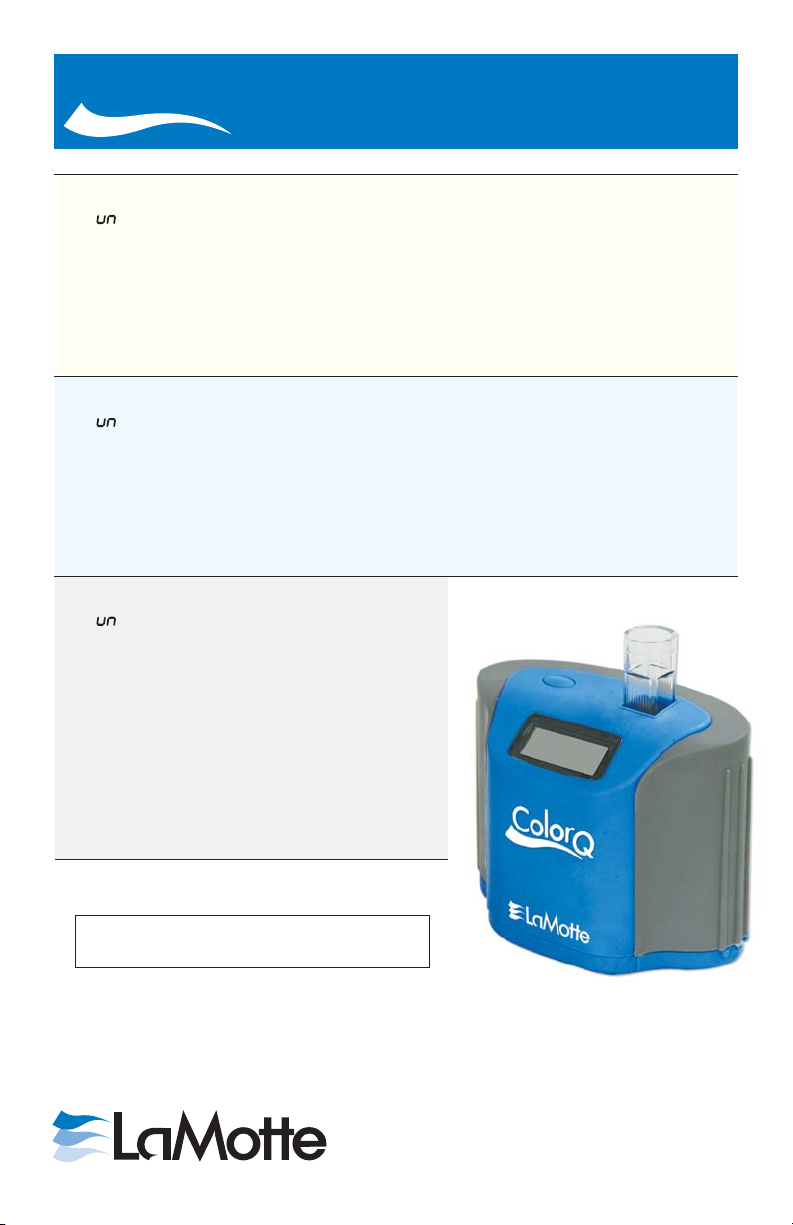
Color
!
Insert tubes into ColorQ with line and arrow facing forward.
!
s
” “ = Shade meter from bright sunlight. Press/Hold button to turn off.
!
If unit should auto-off during testing rinse and fill one tube to Blank and return
to testing.
!
Brush and rinse all tubes promptly after use.
!
Allow tubes to dry before returning to case.
english
!
Replace reagent caps securely.
!
Use only LaMotte replacement reagents.
!
Insertar el tubo en el ColorQ recto.
!
” “ = apartar el aparato de los rayos del sol. Presionar/mantener el botón
s
para apagar.
!
Si el aparato se auto-apaga durante el test, llenar un tubo para el Blanco y
volver al análisis.
!
Enjuagar y limpiar todos los tubos adecuadamente después del uso.
español
!
Permitir que los tubos se sequen antes de volver a usarlos.
!
Cerrar correctamente los reactivos.
!
Introduire le ColorQ droit.
!
s
” “ = Maintenir l’appareil à l’ombre.
Appuyer le bouton off pour l’eteindre.
!
Si l'appareil s'éteint automatiquement refaire
un blanc et reprendre l'analyse.
!
Essuyer et nettoyer tous les tubes
correctement après l'usage.
français
!
Permettre que les tubes se sechent bien
avant de les réutiliser.
!
Ferrer correctement les reactifs.
!
Utilisez des réactifs LaMotte pour rechanger
uniquement.
Q
Pro 9-PLUS
Order Code 2067
WARNING! This set contains chemicals that may be harmful
if misused. Read cautions on individual containers carefully.
Not to be used by children except under adult supervision.
PO Box 329 • Chestertown • Maryland • 21620 • USA
800-344-3100 • 410-778-3100 • 410-778-6394
www.lamotte.com
Page 2

BLANK (CALIBRATION)
1
bLA
LA
Color
Q
1. Fill sample bottle. Replace cap.
Eng
2. Fill clean tube to the 5mL line
3. Insert tube into ColorQ as shown.
4. Press button to turn meter on. When “bLA” appears press button to “Blank” the meter,
and go to Free Chlorine (FCL). Remove tube.
1. Llenar la botella con la muestra. Taparla.
Es
2.
Llenar un tubo limpio hasta la línea de los 5 mL con la muestra de agua.
3. Insertar el tubo en el Color Q como se muestra en las imágenes.
4. Apretar el botón para encender el equipo. Cuando “bLA” aparece apretar el botón
para registrar el blanco “Blank” en el aparato; ir al cloro libre (FCL). Quitar el tubo.
with water sample.
1. Remplir la bouteille avec l'échantillon. Fermer la bouteille.
Fr
2.
Remplissez jusqu'à la ligne des 5ml, un tube propre comportant l'échantillon d'eau.
3. Mettre le tube dans le Color Q comme est expliqué dans les images.
4. Appuyez le bouton pour allumer le Color Q. Quand “bLA” aparaît appuyez le bouton
pour enregistrer le blanc “Blank” dans l'appareil. Aller au chlore (FCL). Enlever le tube.
* Reagent is a potential health hazard. Read MSDS at www.lamotte.com. or on MSDS CD.
* Los reactivos son peligrosos para la salud. Leer MSDS en www.lamotte.com.
* Les Reactifs sont dangereux pour la santé. reactivos son peligrosos. Lire MSDS en www.lamotte.com.
2
Page 3
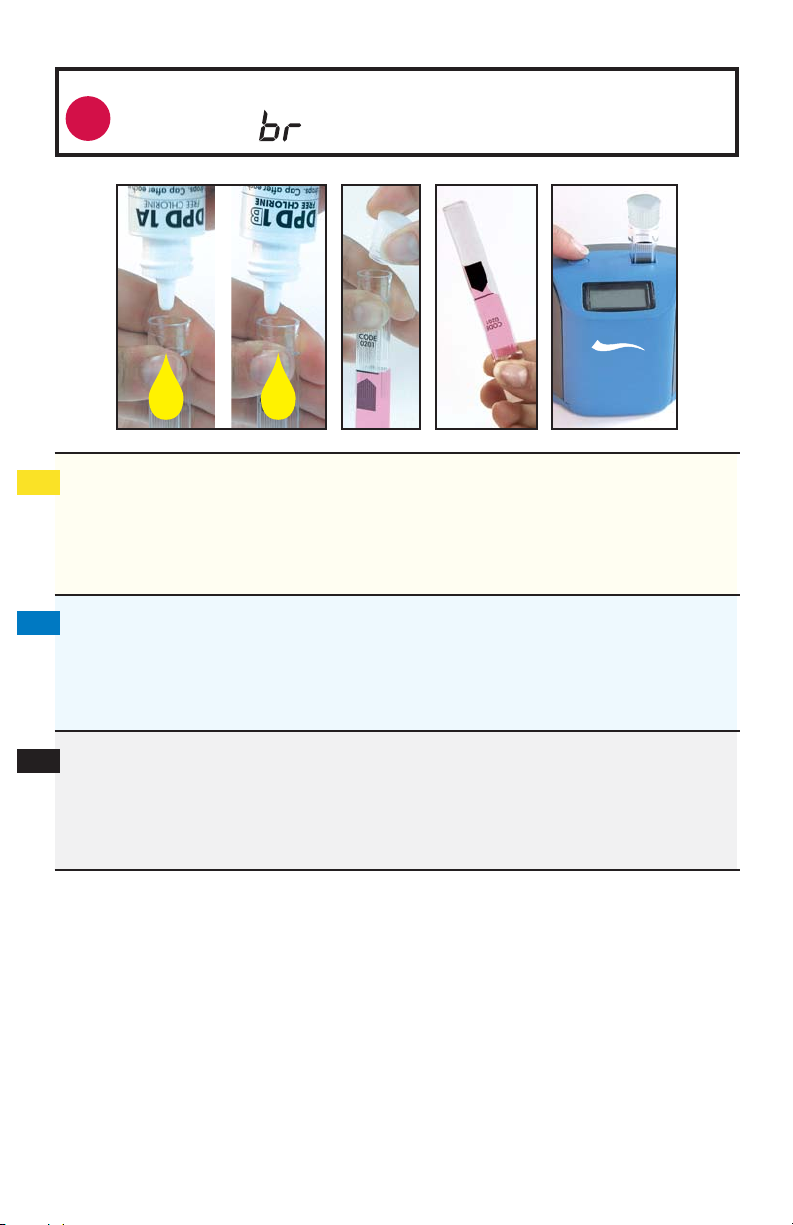
FREE CHLORINE/BROMINE
2
fcl
5 5
/
+
ColorQ Range: 0-10 ppm free chlorine, 0-22 ppm bromine
DPD 1A - Code P-6740-H
*DPD 1B - Code P-6741-H
FCL
Color
Q
1. Add 5 drops of and 5 drops of to same tube.
Eng
2. Cap and mix. Insert tube into ColorQ.
3. Press button to read “FCL” Free Chlorine. NOTE: To read as Bromine, press button past
“FCL”and“tCL”to“br”.
4. Press button to go to “tCL” Total Chlorine.
1. Añadir 5 gotas de y 5 gotas de en el mismo tubo.
Es
2. Cerrar y mezclar. Insertar el tubo en el Color Q.
3. Apretar el botón hasta leer “FCL” Cloro Libre. NOTA: Para medir Bromo,
presionar el botón pasando por “FCL” y “tCL” hasta “br”.
4. Quitar el tubo. Presionar el botón hasta ir a “tCL” Cloro Total.
1. Ajouter 5 gouttes et 5 gouttes dans le même tube.
Fr
2. Fermer et mélanger. Mettre le tube dans le Color Q.
3. Appuyez le bouton jusqu'à lire “FCL” Chlore Libre. NOTE: Pour mesurer
le Brome, appuyez le bouton en passant par “FCL” et “tCL” jusqu'à “br”.
4. Appuyer le bouton et aller jusqu'à “tCL” Chlore Total. Enlever le tube.
DPD 1A DPD 1B
Remove tube.
DPD 1A DPD 1B
DPD 1A DPD 1B
3
Page 4
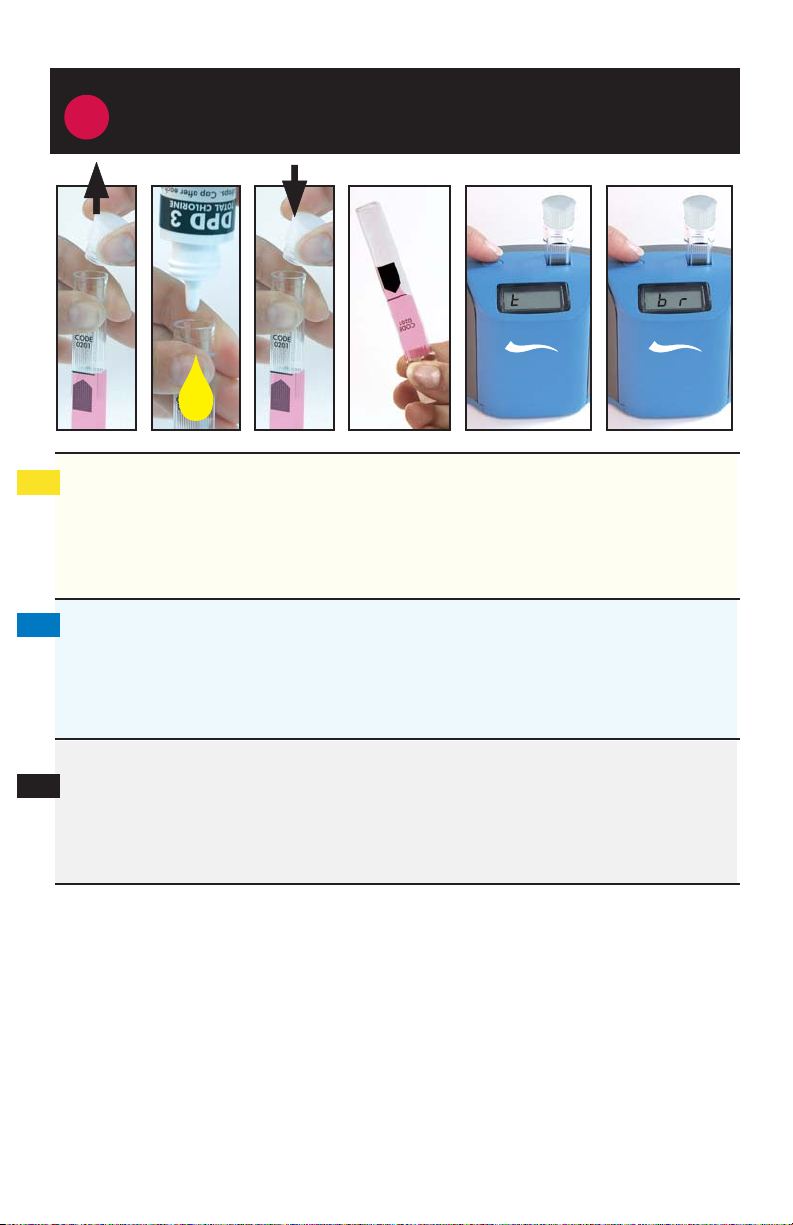
TOTAL CHLORINE
ColorQ Range: 0-10 ppm total chlorine.
*DPD3-CodeP-6743-H
3
b
cl
5
1. Remove cap from reacted FCL (Free Chlorine) tube.
Eng
2. Add 5 drops of to the tube.
3. Cap and mix. Insert tube into ColorQ.
4. Press button to read “tCL” Total Chlorine.
5. Press button past “br” to “PH”. Remove tube.
1. Quitar el tapón del tubo donde ha reaccionado el FCL (Cloro Libre).
Es
2. Añadir 5 gotas de al tubo.
3. Tapar y mezclar. Insertar el tubo en el Color Q.
4. Presionar el botón para leer “tCL” Cloro Total.
5. Presionar el botón p
DPD 3
DPD 3
asandro por “br“hasta “PH“. Quitas el tubo.
cl
Color
Color
Q
Q
1. Enlever le bouchon où a réagit le FCL (Chlore Libre).
Fr
2. Ajouter 5 gouttes de dans le tube.
3. Boucher et melanger. Mettre le tube dans le Color Q.
4. Appuyer le bouton jusqu'à lire “tCL” Chlore Total.
5. Appuyer le buton en passant pas br jusquà PH . Enlever le tube.
DPD 3
““ “ “
4
Page 5

pH
4
pH
5
ColorQ Range: 6.5-8.5
pH - Code 7037-H
ph
Color
Q
1. Fill a clean tube to the 5mL line
Eng
2. Add 5 drops of .
3. Cap and mix. Insert tube into ColorQ.
4. Press button to read “PH” pH. Remove tube.
Llenar un tubo limpio hasta la línea de los 5 mL con la muestra de agua.
1.
Es
2. Añadir 5 gotas de .
3. Tapar y mezclar. Insertar el tubo en el Color Q.
4. Presionar el botón para leer “PH” pH. Quitar el tubo.
Remplissez jusqu'à la ligne des 5ml, un tube propre comportant l'échantillon d'eau.
1.
Fr
2. Remplir avec 5 gouttes du reactif de .
3. Fermer le bouchon et melanger.
4. Appuyer le bouton et lire “PH” pH. Enlever le tube.
pH
pH
with water sample.
pH
Introduire le tube dans le ColorQ.
5
Page 6

ALKALINITY
5
aly
5
1. Press button to go to “ALY” Total Alkalinity.
Eng
2. Fill a clean tube to the 5mL line
3. Add 5 drops of .
4. Cap and mix. Insert tube into ColorQ.
5. Press button to read “ALY” Total Alkalinity. Remove tube.
1. Presionar el botón hasta ir a “ALY” Alcalinidad Total.
Es
Llenar un tubo limpio hasta la línea de los 5 mL con la muestra de agua.
2.
3. Añadir 5 gotas de .
4. Tapar y mezclar. Insertar el tubo en el ColorQ.
5. Presionar el botón para leer “ALY” Alcalinidad Total. Quitar el tubo.
ALK
ALK
with water sample.
ColorQ Range: 0-250 ppm
*ALK - Code 7038-H
aly
Color
Q
1. Appuyer le bouton jusqu'à lire “ALY” Alcalinité Total.
Fr
Remplissez jusqu'à la ligne des 5ml, un tube propre comportant l'échantillon d'eau.
2.
3. Ajouter 5 gouttes de reactif .
4. Ferrer et melanger. Introduire le tube dans le ColorQ.
5. Appuyer le bouton jusqu'à lire “ALY” Alcalinité Total. Enlever le tube.
ALK
6
Page 7

CALCIUM HARDNESS
* CH1 - Code 7042-H for use with ver
CH2 - Code 7041-H
6
ch
+
5
1. Press button to go to “CH” Calcium Hardness.
Eng
2. Fill a clean tube to the 5mL line
3. Add 5 drops of and to same tube.
4. Cap and mix. Insert tube into ColorQ.
5. Press button to read “CH” Calcium Hardness. Remove tube.
CH1 CH2
5
with water sample.
ColorQ Range: 0-700 ppm
1.40 or greater
ch
Color
Q
1. Presionar el botón hasta ir “CH” Dureza Cálcica.
Es
Fr
Llenar un tubo limpio hasta la línea de los 5 mL con la muestra de agua.
2.
3. Añadir 5 gotas de y al mismo tubo.
4. Tapar y mezclar. Insertar el tubo en el ColorQ.
5. Presionar el tubo para leer “CH” Dureza Cálcica. Quitar el tubo.
1. Appuyer le bouton jusqu'à lire “CH” Dureté Cálcique.
Remplissez jusqu'à la ligne des 5ml, un tube propre comportant l'échantillon d'eau.
2.
3. Remplir 5 gouttes et dans le même tube.
4. Fermer et mélanger. Introduire le tube dans le ColorQ.
5. Appuyer le bouton jusqu'à lire “CH” Dureté Calcique.
Enlever le tube.
CH1 CH2
CH1 CH2
7
Page 8

CYANURIC ACID (STABILIZER)
7
cya
1
1. Press button to go to “CYA” Cyanuric Acid.
Eng
2. Fill a clean tube to the 5mL line
3. Add 1 tablet. Crush with tablet crusher. Cap.
4. Invert 3 times to mix. Allow the tube to sit for TWO minutes.
5. Invert once to mix. Insert into ColorQ.
6. Press button to read “CYA” Cyanuric acid. Remove tube.
CYA
with water sample.
ColorQ Range: 0-125 ppm
*CYA - Code 6996A-J
2
cya
Color
Q
1. Presionar el botón hasta ir a CYA .
Es
Fr
Llenar un tubo limpio hasta la línea de los 5 mL con la muestra de agua.
2.
3. Añadir una pastilla de Acido Cianúrico ( ). Deshacer con el aplastador.
4. Invertir 3 veces el tubo. Permitir que el tubo repose durante DOS minutos.
5. Invertir una vez para mezclar. Introducir el tubo en el Color Q.
6. Presionar el botón para leer “CYA” Ácido Cianúrico. Quitar el tubo.
1. Appuyer le bouton jusqu'à CYA .
Remplissez jusqu'à la ligne des 5ml, un tube propre comportant l'échantillon d'eau.
2.
3. Ajouter une pastille d'acide cyanurique ( ). Moudrez avec la écraseur.
4. Fermer et melanger le tube 3 fois. Laisser le tube reposer pendant DEUX minutes.
5. Melange une fois à nouveau et introduire le tube dans le Color Q.
6. Appuyer le bouton jusqu'à lire “CYA” Ácide Cyanurique. Retirez le tube.
“ ” Ácido Cianúrico
CYA
“ ” Ácide Cyanurique
CYA
8
Page 9

COPPER
8
cOP
1
1. Press button to go to “COP” Copper.
Eng
2. Fill a clean tube to the 5mL line
3. Add 1 tablet. Crush with tablet crusher. Cap.
4. Invert 3 times to mix. Allow tube to sit for TWO minutes.
5. Insert into ColorQ.
6. Press button to read “COP” Copper. Remove tube.
COP BCA
Invert 1 times to mix.
with water sample.
ColorQ Range: 0-4 ppm
*Copper - Code 3808A-J
2
cOP
Color
Q
1. Presionar el botón e ir a “COP” Cobre.
Es
2. Llenar un tubo limpio hasta la línea de los 5mL con la muestra de agua.
3. Añadir 1 pastilla . Romper con la varilla. Tapar.
4. Invertir 3 veces para mezclar.
5. Insertar en el ColorQ.
Invertir 1 veces para mezclar.
6. Presionar el botón para leer “COP” Cobre. Quitar el tubo.
1. Appuyez sur le bouton jusqu'à ce que “COP” Cuivre apparaisse.
Fr
2. Remplissez jusqu'à la ligne des 5ml, un tube propre comportant l'échantillon d'eau.
3. Ajoutez une tablette . Triturez avec le triturateur de tablette CAP.
4. Secouez trois fois pour mélanger.
5. Introduisez dans le ColorQ.
Secouez 1 fois pour mélanger.
6. Appuez sur le bouton jusqu'à ce que “COP” Cuivre apparaisse. Retirez le tube.
COP BCA
Permitir que el tubo repose durante DOS minutos.
COP BCA
Laisser le tube reposer pendant DEUX minutes.
9
Page 10

IRON
9
i
1
1.Pressbuttontogoto“Ir”Iron.
Eng
2. Fill a clean tube to the 5 mL line with water sample.
3. Add 1 Tablet. Crush with tablet crusher.
4. Cap. Invert 3 times to mix. Insert into ColorQ.
5. Press button to read “Ir” Iron. Remove tube.
1. Presionar el botón para ir a “Ir” Hierro.
Es
2. Llenar un tubo limpio hasta la línea de los 5 mL con la muestra de agua.
3. Añadir 1 pastilla . Romper con la varilla.
4. Tapar. Invertir 3 veces para mezclar. Insertar en el ColorQ.
5. Presionar el botón para leer “Ir” Hierro. Quitar el tubo.
IRON
IRON
ColorQ Range: 0-3 ppm
*Ir - Code 3725A-J
i
Color
Q
1. Appuez sur le bouton jusqu'à ce que “Ir” Fer apparaisse.
Fr
2. Remplissez jusqu'à la ligne des 5ml, un tube propre comportant l'échantillon d'eau.
3. Ajoutez une tablette . Triturez avec le triturateur de tablette CAP.
4. Secouez trois fois pour mélanger. Introduisez dans le ColorQ.
5. Appuez sur le bouton jusqu'à ce que “Ir” Fer apparaisse. Retirez le tube.
IRON
10
Page 11

BIGUANIDE
Biguanide Test Solution - Code 3919-G
10
5
1. Press button to go to “bi 9” Biguanide.
Eng
2. Fill a clean tube to the 5 mL line with water sample.
3. Add 5 drops of .
4. Cap and mix. Insert tube into ColorQ.
5. Press button to read “bi 9” Biguanide. Remove tube.
1. Presionar el botón para ir a “bi 9” Biguanida (Biguanide).
Es
2. Llenar un tubo limpio hasta la línea de los 5 mL con la muestra de agua.
3. Añadir 5 gotas de .
4. Cerrar y mezclar. Insertar el tubo en el ColorQ.
5. Presionar el botón para leer “bi 9” Biguanida (Biguanide). Quitar el tubo.
BIGUANIDE TEST SOLUTION
BIGUANIDE TEST SOLUTION
ColorQ Range: 0-70 ppm
Color
Q
1. Appuez sur le bouton jusqu'à ce que “bi 9” Biguanide apparaisse.
Fr
2.
Remplissez jusqu'à la ligne des 5ml, un tube propre comportant l'échantillon d'eau.
3. Ajoutez 5 gouttes de
4. Secouez trois fois pour mélanger. Introduisez dans le ColorQ
5. Appuez sur le bouton jusqu'à ce que “bi 9” Biguanide apparaisse. Retirez le tube.
NOTE: Optional Reagents Sold Separately.
BIGUANIDE TEST SOLUTION.
11
Page 12

BIGUANIDE SHOCK PEROXIDE)
11
b5h
ColorQ Range: 0-160 ppm
Biguanide Shock - Code 6930A-J
1
1. Press button to go to “b S h” Biguanide Shock.
Eng
2. Fill a clean tube to the 5 mL line with water sample.
3. Add 1 Tablet. Crush with tablet crusher.
4. Cap. Invert 3 times to mix. Allow tube to sit for TWO minutes.
5. Invert once to mix. Insert into ColorQ.
6. Press button to read “b S h” Biguanide Shock. Remove tube.
7. Press button to return to blank meter or hold button until OFF is displayed.
SHOCK
2
Color
Q
1. Presionar el botón para ir a “b S h” Biguanida Shock.
Es
2. Llenar un tubo limpio hasta la línea de los 5 mL con la muestra de agua.
3. Añadir 1 pastilla de . Romper con la varilla.
4. Tapar. Invertir 3 veces hasta mezclar. Permitir que repose durante DOS minutos.
5. Invertir una vez para mezclar. Insertar en el ColorQ.
6. Presionar el botón para leer “b S h” Biguanida Shock (Biguanide Shock).
Quitar el tubo.
7. Presionar el botón para volver a hacer el blanco o apretar el botón hasta que
aparezca OFF en la pantalla.
1. Appuez sur le bouton jusqu'à ce que “bsh” Biguanide Shock apparaisse.
Fr
2. Remplissez jusqu'à la ligne des 5ml, un tube propre comportant l'échantillon d'eau.
3. Ajoutez 1 tablette de . Triturez avec le triturateur de tablette cap.
4. CAP. Secouez trois fois pour mélanger. Laissez reposer 2 minutes.
5. Secouez une fois pour mélanger. Introduisez dans le ColorQ.
6. Appuez sur le bouton jusqu'à ce que “bsh” Biguanide Shock apparaisse.
Retirez le tube.
7. Appuyez sur le bouton pour une nouvelle messure ou jusqu'à ce qu'il s'eteigne.
NOTE: Optional Reagents Sold Separately.
SHOCK
SHOCK
12
 Loading...