

Page 1

WA TER SAM PLER – FLUSHING STYLE
L
Mott
CODE 1060
QUANTITY CONTENTS CODE
1 Water Sampling Bottle Body 1080
3 Test Tubes, glass 0829
1 Rod, w/Stopper 1059
1 Sounding Weight 1068
1 Center Plug, w/Inlet Tube 1089
2 Stoppers, cork 0658
IN TRO DUC TION
This device is designed for use in the field and is a simplified water
sampler. The sample is collected in a removable inner chamber which is
overflowed ten times to insure a representative sample. Samples may be
taken at a controlled depth by using a calibrated line. Attaching the two
pound weight to the bottom of the sampling device insures rapid descent
and minimizes the amount of drift due to currents. More weight should be
attached to the sampling device in strong currents.
It is necessary to maintain a position directly over the Water Sampler
when lowering it so that it remains in an upright position. This permits
the displacement of all of the air in the sampler so that it will fill
completely.
It should be noted that the bubbles of air displaced from the sampler will
be observed downstream.
Page 2
PRO CE DURE
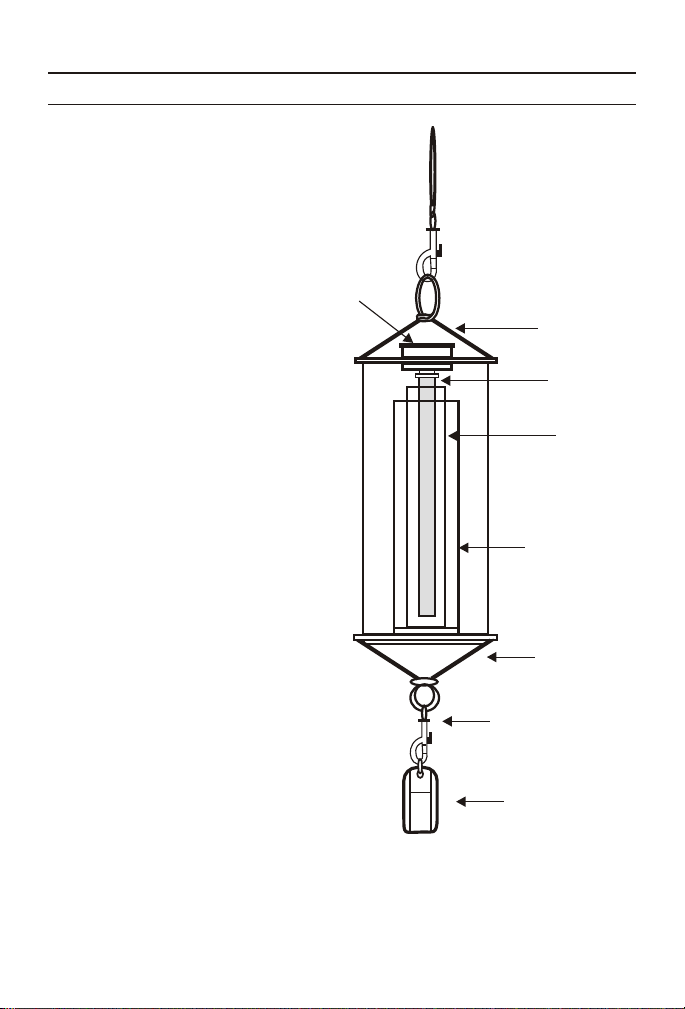
CENTER
PLUG
INNER
CHAMBER
WEIGHT
TEST
TUBE
INLET
TUBING
BOTTOM
BRIDLE
SNAP
CLAMP
TOP
BRIDLE
A. COLLECTING A WATER SAMPLE
1. Re move the plas tic
cen ter plug with in let
tub ing at tached. In sert a
test tube (0829), with the
stop per re moved, into
the in ner cham ber of the
cyl in der.
2. Re place the plas tic
cen ter plug and make
sure the in let tub ing is in
the test tube.
3. At tach the two pound
weight (1068) to the
bot tom bri dle of the
sam pler by the snap
clamp.
4. At tach the snap clamp
on the cal i brated line to
the top bri dle of the
sam pler.
5. Quickly lower the wa ter
sam pler to the de sired
depth and leave un til full.
This can be de ter mined
when the bub bles from
the dis placed air in the
sam pler cease to ap pear.
This usu ally takes from
3-5 min utes.
6. Care fully re trieve the
wa ter sam pler.
7. Re move the plas tic
cen ter plug to ex pose the
test tube in the in ner
cham ber.
8. Care fully re trieve the test tube from the cham ber us ing the rod with
stop per (1059).
9. If a dissolved oxygen test is to be performed on this sample, proceed
immediately to Part B.
Page 3

B. COLLECTING A DISSOLVED OXYGEN WATER SAMPLE
The dissolved oxygen test is performed with reagents furnished in
LaMotte’s Dissolved Oxygen Kits, Code 7414 or 5860.
*WARNING: Reagents marked with an * are considered to be potential health
hazards. To view or print a Material Safety Data Sheet (MSDS) for these
reagents go to www.lamotte.com. To obtain a printed copy, contact LaMotte by
e-mail, phone or fax.
1. Remove the rod with stopper from the test tube.
2. To the sample, add 8 drops of *Manganous Sulfate Solution (4167)
and 8 drops of *Alkaline Potassium Iodide Azide (7166).
3. Stopper the tube and gently mix by inverting.
4. Allow the test tube to stand undisturbed until the precipitate settles
two inches below the top of the tube.
5. Use a 1.0 g spoon (0697) to add one measure of *Sulfamic Acid
Powder (6286), or add 8 drops of *Sulfuric Acid, 1:1 (6141WT). Cap
the test tube and mix until the precipitate has completely dissolved.
Contact of the water sample with air will not affect it now. By following
instructions provided with the Dissolved Oxygen Kit, the “fixed” sample
may either be titrated in the field or returned to the laboratory for final
titration.
C. TAKING SOUNDINGS WITH THE GRADUATED LINE
The two pound weight can be used for taking soundings. Attach the
weight to the graduated line by the snap clamp and lower it into the water.
Measure the depth at which the sounding lead strikes the bottom. The
line is graduated in meters with every fifty meters marked by a plastic
band.
Page 4

LaMOTTE COM PANY
Helping Peo ple Solve An a lyt i cal Chal lenges
PO Box 329 • Chestertown • Mary land • 21620 • USA
800-344-3100 • 410-778-3100 (Out side U.S.A.) • Fax 410-778-6394
Visit us on the web at www.lamotte.com
®
2/10
 Loading...