

Page 1

ColiQuant MF
L
Mott
Code 3-0035
Quantity Contents
2 Coliscan® MF, 20 mL bottle
20 Droppers, 3 mL, sterile
20 Dishes, with pads and lids, sterile
5 Pads, white
20 Membrane filter pads, with grid, sterile
1 Filter Apparatus with syringe, sterile
1 ColiQuant MF Manual
5 ColiQuant MF Colony Color Guide
Coliscan MF is a registered trademark of Micrology Laboratories LLC
Needed but not in cluded:
• Sterile collection container
• Sterile dilution water (if sample size is less than 10 mL)
• Sterile forceps
• Gloves
Stor age Conditions
Coliscan MF should be placed in the freezer (2 – 6°C) as soon as it is received.
Coliscan MF can be refrozen if it has been thawed and not been used. Coliscan MF
should be thawed at room temperature. Bottles may also be thawed for same day use
by standing the bottles in warm water until the contents become liquid. Coliscan MF
will keep for 6 weeks in the refrigerator or 12 months in the freezer.
Safety
• Coliscan MF is non-toxic. Additional information for all LaMotte reagents is
available in the United States, Canada, Puerto Rico, and the US Virgin Islands
from Chem-Tel by calling 1-800-255-3924. For other areas, call
813-248-0585 collect to contact Chem-Tel’s International access number.
• Read the entire manual before performing any tests.
• Wear safety glasses and protective gloves when appropriate.
Page 2

• Wash hands thoroughly after performing tests. Avoid placing hands in contact
with eyes or mouth. Do not eat, drink, or apply cosmetics during testing or
clean up.
• Follow the general safety guidelines for your organization.
• Dispose of used dishes in the proper manner.
• Wipe tabletops and work areas after each use with disinfectant, such as a 1:10
dilution of household bleach.
• Testing by students: Ensure a safe field-testing experience by using the
following: safety glasses for each student, clean pail or bucket for washing
hands, jug of clean water for washing hands, soap (biodegradable if possible),
towels, protective gloves, eye wash bottle, first aid kit.
• Keep used Petri dishes taped shut and out of the reach of small children and
animals.
• Be sure that students understand the danger of treating reagents casually or
endangering others through “horseplay”.
ColiQuant MF Method
Coliscan MF (membrane filter) medium is a nutrient liquid formulation which uses two
color producing chemicals, one for the detection of the enzyme glucuronidase
(produced by E. coli strains but not by general coliforms) and one for the detection of
galactosidase (produced by all coliforms, including E. coli). A liquid sample
containing E. coli and other coliforms is passed through a membrane filter to leave
individual bacteria cells on the membrane filter. The filter is then placed on a pad
soaked with the Coliscan MF medium. When incubated at a suitable temperature, the
cells will grow into colony forming units (CFU) on the surface of the filter. If coliform
(including E. coli) colonies are present, they will produce the enzyme galactosidase,
which will react with its specific color producing substrate in the medium and a water
insoluble pink pigment will color the colony. If E. coli colonies are present, they will
also produce the enzyme glucuronidase, which will react with its specific color
producing substrate in the medium and a water insoluble teal-green pigment will
color the colony. However, since E. coli produces both galactosidase and
glucuronidase, those colonies will be a combination of teal-green and pink pigments
and will appear as some shade of blue-purple.
3
Col lecting a Wa ter Sam ple
1. Remove the cap of the collection bottle. Do not touch the neck of the bottle or the
inside of the cap.
2. If you are testing stream water, face upstream while holding the bottle 5 to 6
inches below the surface.
3. When the bottle has filled, replace the cap.
4. The test can be done at the site or water samples may be collected in sterile
collection containers and transported back to the testing site. Water samples kept
for more than one hour before testing should be kept on ice or refrigerated.
5. Do not reuse the sample collection bottle without sterilizing.
2
Page 3
150mL
100
150mL
100
50
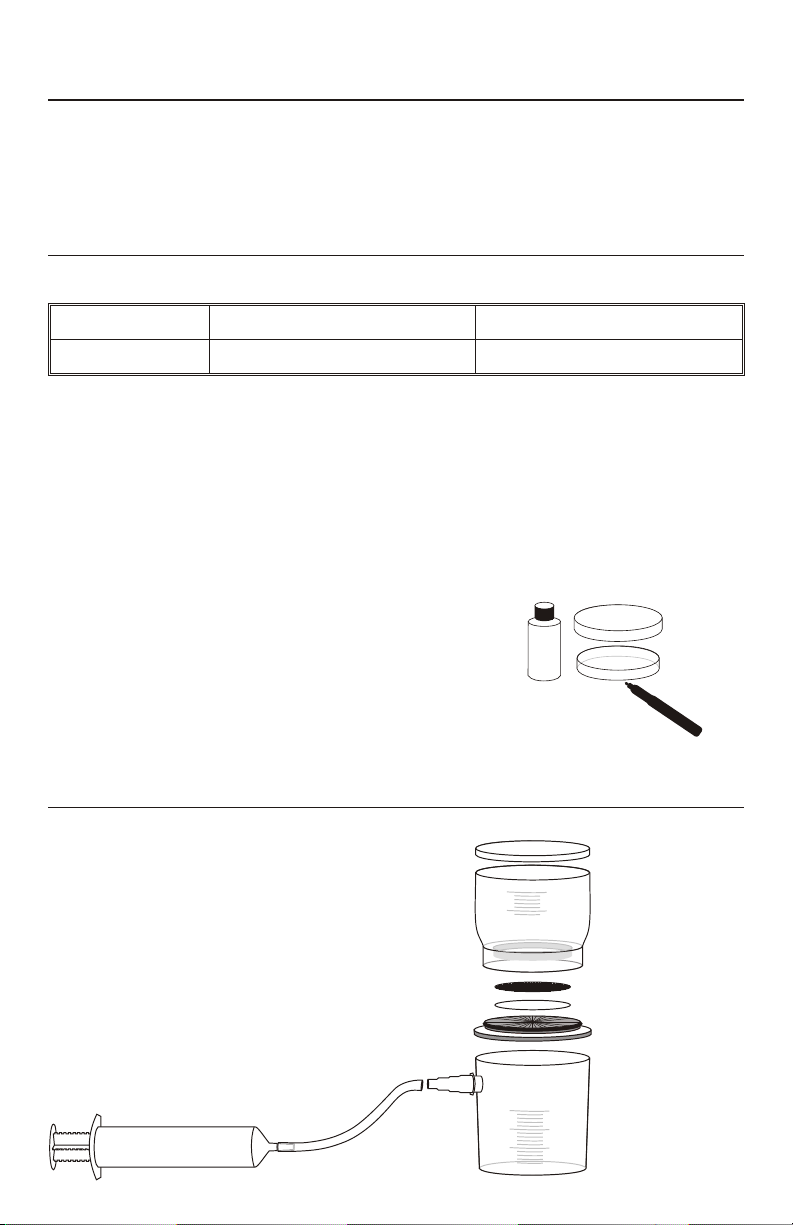
A - Apparatus Lid
B - Funnel
D - Filter Holder with O ring
F - Collection Container
I - Barrel
H - Plunger
J - Tubing
E - (Membrane Filter)
C - (White Pad)
G - Adapter
Pro ce dure
Smaller diameter
Contains Clear
Media Film
Lid
Bottom
1. Thaw a bottle of Coliscan MF overnight at room temperature. (2 mL of Coliscan
MF is required for each sample to be tested). Bottles may also be thawed for
same day use by standing the bottles in warm water until the contents become
liquid.
Sample Collection and Dilution
2. Collect the water sample according to the chart below.
Environmental river, lake, pond, stream, ditch 1.0 to 5.0 mL
Drinking water well, municipal, bottled 100 mL
Generally, use 100 mL for samples suspected of having very low coliform levels such
as drinking water. Use 1.0 to 5.0 mL for samples suspected of having moderate
amounts of coliform, such as environmental samples (rivers, ponds, streams, lakes or
ditches). Samples that are less than 10 mL will need to be diluted with 10 – 20 mL of
a sterile diluent before filtering.
For optimum results, the sample should be collected within two hours before filtering.
If this is not possible, the sample may be refrigerated or kept on ice for up to 24
hours.
3. Use a permanent marker or wax pencil to
label a dish with pad with the sample information.
4. Use the sterile 3 mL dropper to add 2mL of
Coliscan MF to the pad in the dish. Cover the
dish with a lid.
Set up filter apparatus
5. Remove the sterile filter apparatus from the packaging.
3
Page 4

6. Remove the funnel and lid (A & B) from the apparatus. Use a clean forceps to
place a white, sterile pad (C) on the filter holder section (D) within the circle
guides.
7. Open a sterile membrane filter envelope. Use clean forceps to remove the
membrane filter (E) from the pack. Carefully separate the membrane filter from
the top and bottom protective backings. Do not tear or damage filter.
8. Place the membrane filter, grid side up, on top of the white pad.
9. Replace the funnel and lid on the filter holder section. Push the funnel down onto
the filter holder section until it is fully and evenly seated. This will seal the
connection and hold the membrane filter and white pad firmly in place.
10. Push the plunger (H) all the way into the barrel (I) of the syringe. Then attach the
tubing (J) from the syringe to the adapter (G) on the side of the collection
container (F).
Filter the sample
11. Swirl the water sample container to mix the contents.Remove the apparatus lid
from the funnel. Pour the water sample into the funnel.
If the sample size is less than 10 mL, add 10-20 mL of sterile diluent to the
funnel before attaching the syringe. Then add the sample and swirl the
apparatus gently to mix the sample and the diluent. Attach the syringe.
NOTE: The diluent is used to distribute the sample more evenly over the
surface of the membrane filter during filtration. The amount of diluent should
not be included in the final calculation. Use only the amount of the original
sample size in the calculation.
12. Pull the syringe plunger out, nearly to the end of the barrel, to create a vacuum.
The water sample will be pulled through the membrane filter. Any
microorganisms that are present will be deposited on the surface of the
membrane filter.
NOTE: Larger water samples may not be completely filtered with a single pull of
the plunger. To complete the filtration, carefully remove the tubing and syringe
from the adapter on the side of the filter apparatus. Push the plunger all the way
into the barrel of the syringe. Reattach the tube to the apparatus and pull out the
plunger.
13. When the entire water sample has passed through the membrane filter, remove
the tubing and syringe. Carefully remove the funnel from the apparatus.
14. Use clean forceps to lift the membrane filter from the filter holder section of the
apparatus. Place the membrane filter, grid side up, on top of the pad in a
4
Page 5

prepared dish. Make sure that there are no air bubbles between the filter and the
General Coliform colonies
per mL (CFU/mL)
# Colonies
Amount of sample used
=
E. Coli or Fecal Coliform
Colonies per mL (CFU/mL)
# Colonies
Amount of sample used
=
E. Coli or Fecal Coliform
Colonies per 100mL
(CFU/100mL)
# Colonies x 100
Amount of sample used
=
pad. Cover the dish with a lid. Tape the lid to the dish bottom with clear tape.
Incubation
15. Incubate the dish in a warm place or in an incubator. If using an incubator,
incubate at 35°C for 18-24 hours. If an incubator is not used, place the dish in a
place that will be at constant, warm temperature. Do not place it in direct sunlight
or over a direct heat source, radiator, furnace duct etc. The dish may be placed
near one of these sources or in a warm spot in a kitchen. Allow 24-48 hours for
growth to begin. Once growth has begun, incubate for an additional 24 hours
for complete growth.
16. Once the incubation is complete, count the colonies. Colonies are normally
reported as Colony Forming Units (CFU) per 100 mL of water. Refer to the
ColiQuant MF Colony Color Guide.
Interpretation of Results
17. To determine the result as E. coli or Fecal Coliform, count the blue colonies.
Disregard any light-blue, blue-green or white colonies. Refer to the ColiQuant
MF Colony Color Guide.
To report the result in terms of E. coli or Fecal Coliform per mL of water: Divide
the number of colonies by the original sample size
To report the results in terms of E. coli or Fecal Coliform per 100 mL of water: Multiply
the number of colonies by 100. Then divide by the original sample size. (Most states
use this measurement to report water quality results.)
18. To determine the result as General Coliforms count the number of pink to red
colonies.
To report the result in terms of General Coliforms per mL of water: Divide the number
of colonies by the original sample size
5
Page 6

To report the results in terms of General Coliforms per 100 mL of water: Multiply the
Total Coliform Colonies
per mL (CFU/mL)
# Colonies
Amount of sample used
=
Total Coliform Colonies
per 100mL (CFU/100mL)
# Colonies x 100
Amount of sample used
=
General Coliform colonies
per 100mL (CFU/100mL)
# Colonies X 100
Amount of sample used
=
number of colonies by 100. Then divide by the original sample size.
19. To determine the result as Total Coliforms count the number of dark
purple/blue and pink to red colonies.
To report the result in terms of Total Coliforms per mL of water: Divide the number of
colonies by the original sample size
To report the results in terms of Total Coliforms per 100 mL of water: Multiply the
number of colonies by 100. Then divide by the original sample size.
20. If there are more than 80 CFU (colonies) of one color, the result should be
recorded as Too Numerous To Count (TNTC). If the E. coli colony count is less
than 80, even though there are more than 80 total colonies of all colors and
types the E. coli may be counted and reported. Record TNTC for coliforms or
non-coliforms that are present at greater than 80 CFU.
21. Presence/Absence
The presence of at least one dark blue/purple or pink/red colony at least 0.5 mm
in diameter indicates the sample is total coliform positive. The presence of at least
one blue/purple colony indicates the sample is positive for E. coli. The presence
of at least one pink/red colony indicates the sample is positive for general
coliforms.
Clean up
Empty the filtered water from the collection container (F) into a sink. Clean the funnel
before the next use by rinsing with alcohol. The white filter pads (C) and the funnel (B)
can be sterilized by microwaving for 1-2 minutes. Dry the funnel with a clean paper
towel before microwaving. Place the white filter pads on a clean paper towel to
microwave. The white filter pads should be saved and reused.
6
Page 7

Dis posal
Any materials containing living or viable microbes should be disinfected or sterilized
before being discarded. Before disposal in normal trash, treat the test kit components
in one of the following ways:
• Pour one tablespoon of undiluted household bleach in the dish. Wait 10
minutes. Place the dish in a waterproof bag. Discard in trash.
• Place the dish in a large pan. Cover with water. Boil for 45 minutes. Discard in
trash. (Warning: May cause unpleasant odors.)
• Place the dish in a sealed ovenproof bag and heat in a 300°F oven for 45
minutes. Discard in trash. (Warning: May cause unpleasant odors.)
• Place dish in a pressure cooker and cook at 15 pounds for 15 minutes.
Discard in trash. (Warning: May cause unpleasant odors.)
Hints
Apparatus
The equipment supplied with this kit – bottles, dishes, droppers, pads and apparatus is sterile. Take care that it remains sterile. Do not touch the inside of dishes, bottle
necks or inside of caps, or tips of droppers with fingers.
Coliscan MF
• Coliscan MF is non-toxic before it is inoculated. It can be stored safely in a
freezer with food.
• Coliscan MF can be refrozen if it has been thawed and not used.
• Coliscan MF can be stored in the freezer for up to 12 months.
• Coliscan MF will keep for 6 weeks in the refrigerator or two weeks at room
temperature.
• Coliscan MF should be thawed at room temperature overnight. Bottles may
also be thawed for same day use by standing the bottles in warm water until
the contents become liquid.
• Coliscan MF contains dissolved solids that may settle out. Shake the bottle
vigorously to suspend the solids and allow it to stand for several minutes to let
air bubbles dissipate before using it.
• If Coliscan MF is contaminated and growth is evident in the bottle, do not use
it. If contamination is present, growth will usually be apparent throughout the
contents of the bottle, not just on the bottom, and shaking will not make solids
disappear.
7
Page 8

Interpretation of Results
• Non-fecal coliforms are widely distributed in nature, being found both as
naturally occurring soil organisms, and in the intestines of warm-blooded
animals and humans. Fecal coliforms, such as E. coli, are coliforms found
naturally only in the intestines of warm-blooded animals and humans. The
presence of fecal coliforms is therefore the result of some form of fecal
contamination from either animal or human.
• Be aware of animals, like ducks or geese, which may be upstream from where
the sample was taken because their feces will increase the E. coli and coliform
count temporarily, therefore, the results will not reflect the true nature of the
water quality.
• Proper application of the Coliscan MF filtration method will result in accurate
results. Therefore, if the results indicate dangerously contaminated water,
contact your local health department for help in performing an official
assessment of the water quality.
• Water containing E. coli should not be used for drinking water. Contact your
local health department for guidelines regarding E. coli and coliforms in
recreational water.
• Most standard counts are reported as CFU/100mL of water
• Check your state water quality guidelines (see references).
Sample Dilution
• Samples with large coliform concentrations may have to be diluted to bring the
number of colonies into a practical range. The target range should be between
20 and 80 colonies. Below 20 colonies the results will not be significant.
Colonies greater than 80 will be too numerous to count (TNTC).
• Samples that are less than 10 mL will need to be diluted with 10-20 mL of a
sterile diluent before filtering. Samples can be diluted with 1% peptone water
or Butterfield Phosphate Buffer if they are available. Sterile water from a
medical supply company or pharmacy or boiled, cooled tap water is also
acceptable.
Back ground of Wa ter Testing
In 1972, the U.S. public was concerned about the pollution in our nation’s water.
Congress responded by passing the Federal Water Pollution Control Act
Amendments, also known as, the Clean Water Act of 1972. The goal of the Act was
to protect human health by preventing water pollution. Water pollution comes in
many forms and from many sources. The U.S. Environmental Protection Agency (EPA
or USEPA) manages the water quality standards program, recommends water quality
criteria and works with states to develop standards for different water use, such as
beach swimming areas, rarely used swimming areas, offseason swimming areas, or
fish and wildlife habitat.
2
Water can be contaminated or polluted with disease causing organisms (pathogens).
When people swim in these waters, they can get sick with ear or skin infections,
respiratory infections, or intestinal infections. The pathogens responsible for these
diseases can be bacteria (Cholera), viruses (Hepatitis A), or parasites (Giardia and
8
Page 9

Cryptosporidium) that live in the gastrointestinal tract and are shed into the water
through the waste (feces) of warm-blooded animals. However, analyzing for all
possible pathogens is impractical. It is difficult, time consuming, and expensive. The
EPA recommends using indicator organisms, such as fecal bacteria, as indirect
evidence of the possible presence of pathogens in water.2 The two most important
fecal bacteria indicators are E. coli and Enterococcus. We will discuss the use of E.
coli as it relates to the USEPA standards for water pollution.
2
Escherichia coli (E. coli) is the United States Environmental Protection Agency’s
(USEPA) most commonly recommended indicator of fecal contamination in fresh
waters. It is present in high numbers in the gastrointestinal tracts of warm-blooded
animals (humans, dogs, bears, cows, ducks, geese) and therefore provides a sensitive
measure of fecal pollution. Researchers have found that its presence in water is often
associated with water borne illness outbreaks actually caused by the other pathogens
mentioned above. E. coli do not live long in water so that their presence indicates a
fairly recent contamination event (up to 48 hours).
The current EPA water quality standard for E. coli relates to approximately 8
gastrointestinal illnesses per 1,000 swimmers. This is considered an acceptable level
of disease for people who come in contact with the tested water. If the indicator counts
are measured above the standard acceptable level, then the risk of becoming infected
from that water source is unacceptably high. In the past fecal coliforms were used as
the indicator for water standards with maximum allowable counts of 200 FC(fecal
coliforms) per 100 mL.2
Coliform bacteria are members of the family Enterobacteriaceae, which are gram
negative, non-spore forming rods that ferment the sugar lactose to produce gas and
acid. E. coli is a genus (Escherichia) and species (coli) in the total coliform group. It is
also a fecal coliform (FC), a smaller subset of total coliforms. Fecal coliforms are
defined as coliforms that can grow at 44.5°C, which is too hot for most of the other
coliforms. Fecal coliforms live in the gastrointestinal tract of warm-blooded animals,
such as dogs, cats, birds, mammals, and people. E. coli belongs to both groups of
bacteria that are reported in water quality studies; E. coli is a fecal coliform (FC) and a
total coliform (TC).
3
New guidelines from the USEPA recommend E. coli or Fecal Coliform standards that
vary with the potential human exposure to the water. For example, during summer on
a lake which allows swimming and water skiing, the standards will be stricter than
during the winter on that same lake or if it was a rarely used swimming area. Each
state works with the EPA to determine the best standards that apply to their water
bodies. Refer to the EPA document, “Bacterial Water Quality Standards for
Recreational Waters (Freshwater and Marine Waters)-Status Report” at this website:
www.epa.gov/waterscience/beaches/local/statreptac.pdf for more specific
standards from your state.
2
Normal testing for E. coli cannot determine the source of the contamination (e.g.
animal vs. human), since it is present in all warm-blooded mammals. Drinking water
is often drawn from rivers, lakes, streams, and other reservoirs open to non-point
source or point source pollution. Water company scientists measure fecal coliform
bacteria, in addition to dissolved oxygen, pH, temperature, and turbidity to determine
water quality. High levels of fecal coliform or E. coli have caused closures of shellfish
beds, beaches, and other recreational water sources. Point source pollution may be
caused by septic systems, municipal sewage discharges, animal feed operations,
farms, and boaters discharging wastes. Non-point source pollution from E. coli may
be related to runoff of fecal waste from the land after a heavy rainfall. For example, in
urban areas, E. coli runoff occurs from runoff of pet feces in the park or on the street
into creeks, rivers, streams, lakes, or groundwater. E. coli levels in urban storm water
9
Page 10

can reach as high as 100,000/100 mL. E. coli levels reaching over 27,000/100 mL
were found in an area where gulls routinely roost in Milwaukee.
Reducing bacterial water pollution involves a whole community working together.
State, Federal, and Local Water agencies, EPA, community leaders, teachers,
students, neighbors, farmers, chemical companies- everybody must work together to
plan a best management strategy for your community. Additional tools are available
under Resources to make an action plan. Education programs show the impact of
individual behaviors on public health and water quality and create a culture for
change.
Def i ni tions
CFU: colony-forming units or colonies or cells, one CFU is larger than a
period(.), can be seen without magnification, and may contain more
than 10,000 individual bacterial cells, all clones of the original
bacterial cell
E. coli
(Esch e richia coli):
those bacteria which grown as dark blue/purple colonies on the
Coliscan® plate as a result of the production of both glucuronidase
and galactosidase enzymes. These bacteria are of fecal origin.
To tal Coliforms: those bacteria which make up the sum of the E. coli (blue/purple
colonies) + other coliforms. The other coliforms will appear as
pink/magenta colonies because they produce galactosidase, but
NOT glucuronidase. Species of the genera Citrobacter,
Enterobacter, Escherichia, and Klebsiella are the main groups of
coliform bacteria.
Non-Coliforms: bacteria that form colonies that are not blue/purple or
pink/magenta on Coliscan® medium and are not considered to be
of fecal origin. They live naturally in soil and water.
Patho gen: disease causing microbe
Nonpoint
source pol lu tion
(NPS):
pollution that cannot be traced to a single point, such as an outlet
or pipe, because it comes from many individual places or a
widespread area (typically urban, rural, and agricultural runoff, acid
mine drainage).
Point source
pol lu tion (PS):
pollution that can be traced to a single point source, such as a pipe
or culvert (Example: industrial and wastewater treatment plant, and
certain storm water discharges).
Pol lu tion: contaminants in the air, water, or soil that cause harm to human
health or the environment.
10
Page 11

Ref er ences
Many EPA webpages are valuable resources
1
www.epa.gov/waterscience/beaches/technical.html#tech
Beach and recreational water quality monitoring and reporting handbook; How to
design and implement community water quality monitoring program
2
www.epa.gov/waterscience/beaches/local/statreptac.pdf
Bacterial water quality standards adopted by states for marine and fresh water
recreational and fish and wildlife use
www.epa.gov/owow/monitoring/volunteer
Volunteer monitoring programs: fact sheets, methods, newsletter, national directory of
volunteer monitoring programs, and much more
www.epa.gov/maia/html/fecal.html
What can you do about fecal water contamination?
www.alabamawaterwatch.org
More than a decade of experience in monitoring Alabama water bodies for pollution
3
www.micrologylabs.com/html/education_ideas.html
Microbiology for Everyone, Jonathan N. Roth – many science fair ideas, lab activities
order booklet at
4
USEPA 1997. Volunteer Stream Monitoring: A Methods Manual. EPA 841-B-97-003
pgs 180-184.
www.ccme.ca/sourcetotap/ecoli.html
Canadian Council of Ministers of the Environment E. coli fact sheet and what
individuals can do to help avoid contaminating our water supply.
Ad di tional Re sources
Protecting Our Watershed (LaMotte product code 5-0093)
Community Action Package How to Manage water pollution, teacher guide, activity
notebook, posters to help students pinpoint problems, handy tote bag
GREEN Standard Water Monitoring Kit (LaMotte product code 5848)
This kit will identify 9 different test factors, such as dissolved oxygen, pH, phosphate,
turbidity, temperature that contribute to water pollution
Leaf Pack Experiments Stream Ecology Kit (LaMotte product code 5946)
Water quality kit for studying living aquatic macroinvertebrates
11
Page 12

L
Mott
LaMotte Com pany
PO Box 329 • Chestertown • MD • 21620
800-344-3100 • 410-778-3100 • fax 410-778-6394 • www.lamotte.com
63-0035 8.04
 Loading...