

Page 1

Model S/DuoSoft
with Octa-Slide 2
water quality
DEMO OUTFIT
AT 38/40
Page 2

o
Page 3

Table of Contents
Safety Information .................................................................... 4
Testing Hints ............................................................................. 4
Analytical Technique ...................................................................... 5
Water Softeners ......................................................................... 6
Introduction .................................................................................... 6
Instructions for Use
Procedure A - Use of the Softeners ................................................. 7
Procedure B - Replacing the Media in the Softeners ....................... 8
Procedure C - Regenerations of the Media .................................... 9
Total Hardness Test .................................................................. 10
Soap Demonstration ................................................................. 11
Precipitation Demonstration ..................................................... 12
pH Test ...................................................................................... 13
Iron Test .................................................................................... 14
Optional Test Kit Modules
Nitrate-Nitrogen ............................................................................ 15
Free Available Chlorine; Total Residual Chlorine
& Combined Chlorine ................................................................. 16
TDS ............................................................................................... 17
Replacement Parts .................................................................... 19
Page 4
Safety Information
Read the instruction manual thoroughly to familiarize yourself with the test procedures before you begin.
Make note of any precautions in the instructions.
Read the labels on all LaMotte reagent containers prior to use. Some containers include precautionary notices
and fi rst aid information. Certain reagents are considered hazardous substances and are designated with a * in
the instruction manual. Material Safety Data Sheets (MSDS) are available at www.lamote.com. Read the MSDS
before using these reagents. Additional emergency information for all LaMotte reagents is available 24 hours
a day from the Poison Control Center listed in the front of the phone book. Be prepared to supply the name and
four-digit LaMotte code number found on the container label or at the top of the MSDS. LaMotte reagents are
registered with a computerized poison control information system available to all local poison control centers.
Keep equipment and reagent chemicals out of the reach of young children.
Protect Yourself and Equipment: Use Proper Analytical Techniques
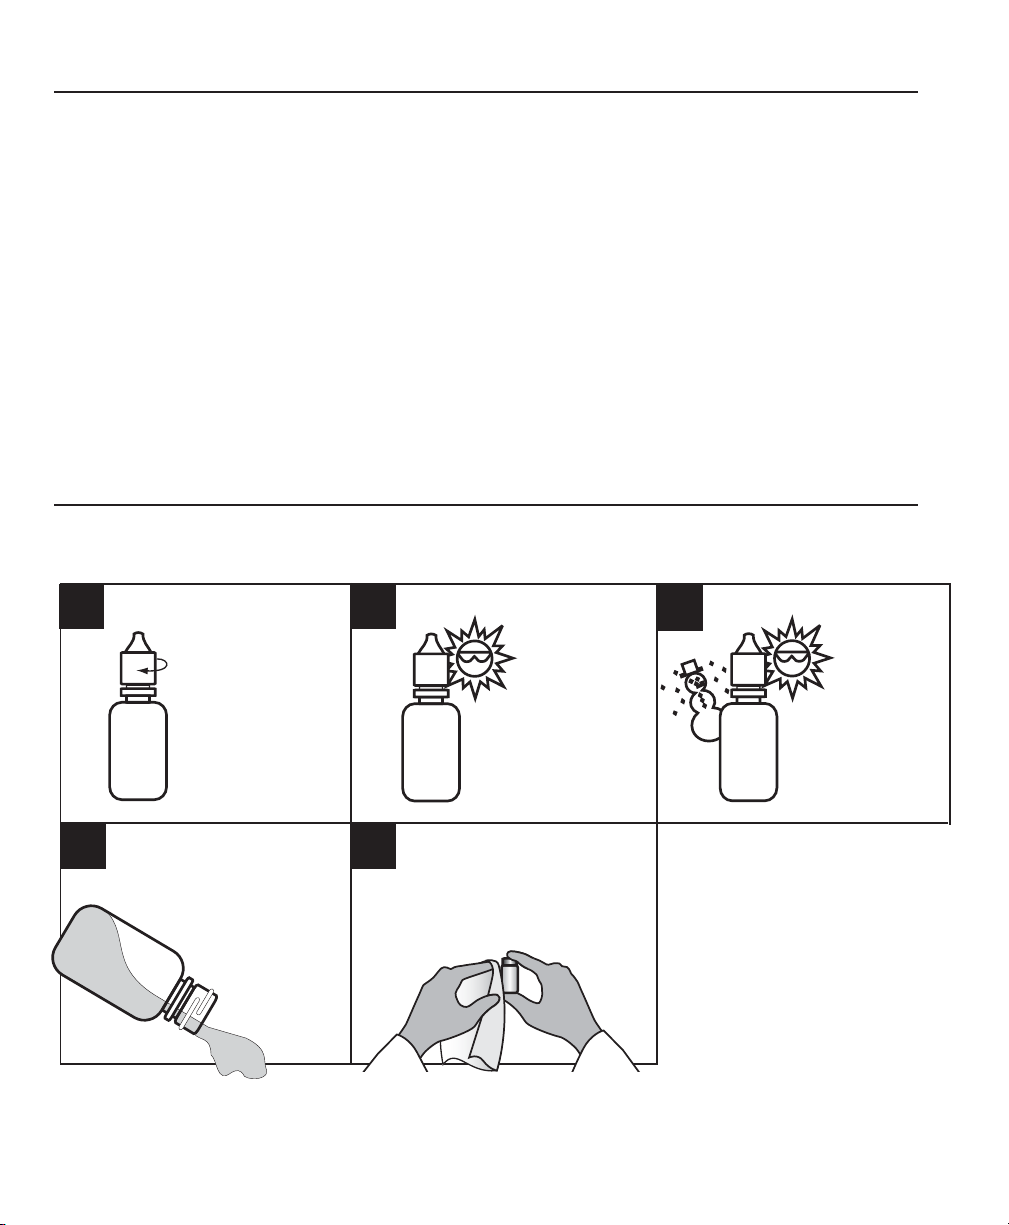
Testing Hints
1. 2. 3.
Tightly close all
reagent containers
immediately after
use. Be sure not to
interchange caps and
pipets from
containers.
different
Avoid
prolonged
exposure of
equipment
and reagents
to direct
sunlight.
Protect reagents and
components from
extreme
heat and cold.
Wipe up any reagent chemical
4. 5.
spills, liquid or powder, as soon
as they occur. Refer to
label and accompanying
MSDS for proper
reagent disposal.
4
Use care when dispensing or
handling all reagents due to safety
reasons. Some
chemicals also may cause
permanent stains if spilled.
Page 5
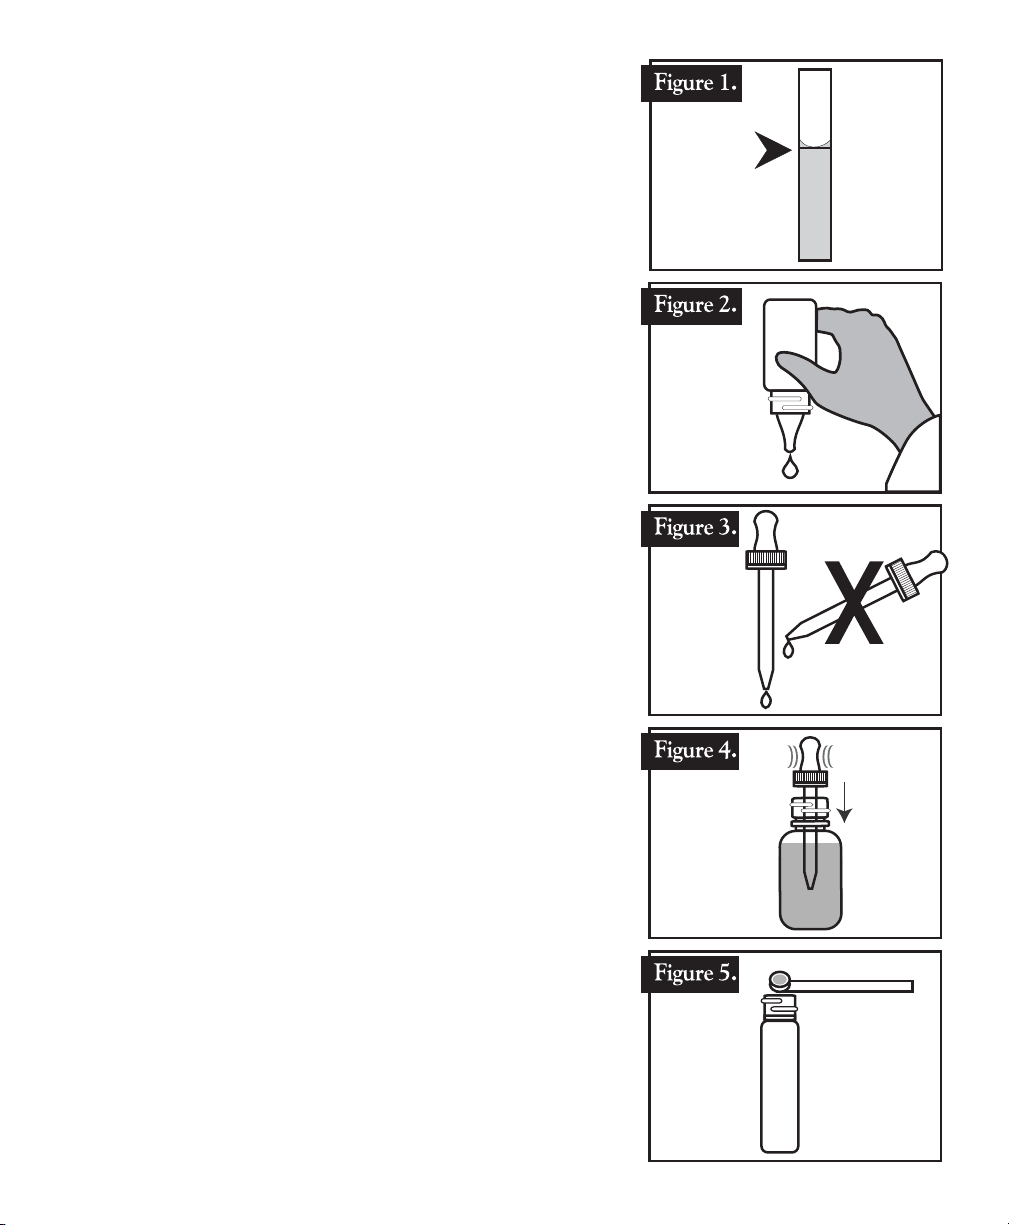
ANALYTICAL TECHNIQUE
1. Clean glassware is a must for accurate results. Thoroughly rinse
test tubes before and after each test. Caps and stoppers should
also be cleaned after each use.
2. Use test tube caps or stoppers, not your fi ngers, to cover test
tubes and fl asks during shaking or mixing.
3. When adding sample to calibrated test tube, be sure vial is fi lled
to the appropriate mark. The bottom of the liquid (meniscus)
should be level with the desired mark. (Figure 1)
4. When dispensing reagents from bottles fi lled with dropper plug
and cap, be sure to hold bottle vertically and gently squeeze to
dispense the appropriate number of uniform drops. (Figure 2)
5. For those reagents to be added with the screwcap pipet assemblies
enclosed, remove polyseal cap on bottle and replace with the
screwcap pipet.
NOTE: Place the polyseal caps back on the reagent bottles for
longer periods of storage. Be sure that both pipet assemblies
and polyseal caps are thoroughly cleaned before placing on
bottles to avoid contamination.
6. When dispensing reagents from pipets, hold pipet vertically
to assure uniform drop size. This is extremely important when
performing drop count titrations. (Figure 3)
7. To fi ll pipets, squeeze rubber bulb and immerse into reagent.
Release bulb to fi ll. (Figure 4)
8. To accurately dispense powdered reagents with spoon, tap
spoon on edge of reagent container to remove excess reagent.
(Figure 5)
9. When performing tests that include Octa-Slide 2 Comparators,
the comparator should be positioned between the operator and
non-direct sunlight. This allows the light to enter through the
light-diffusing screen at the back of the comparator for optimum
color comparison.
5
Page 6
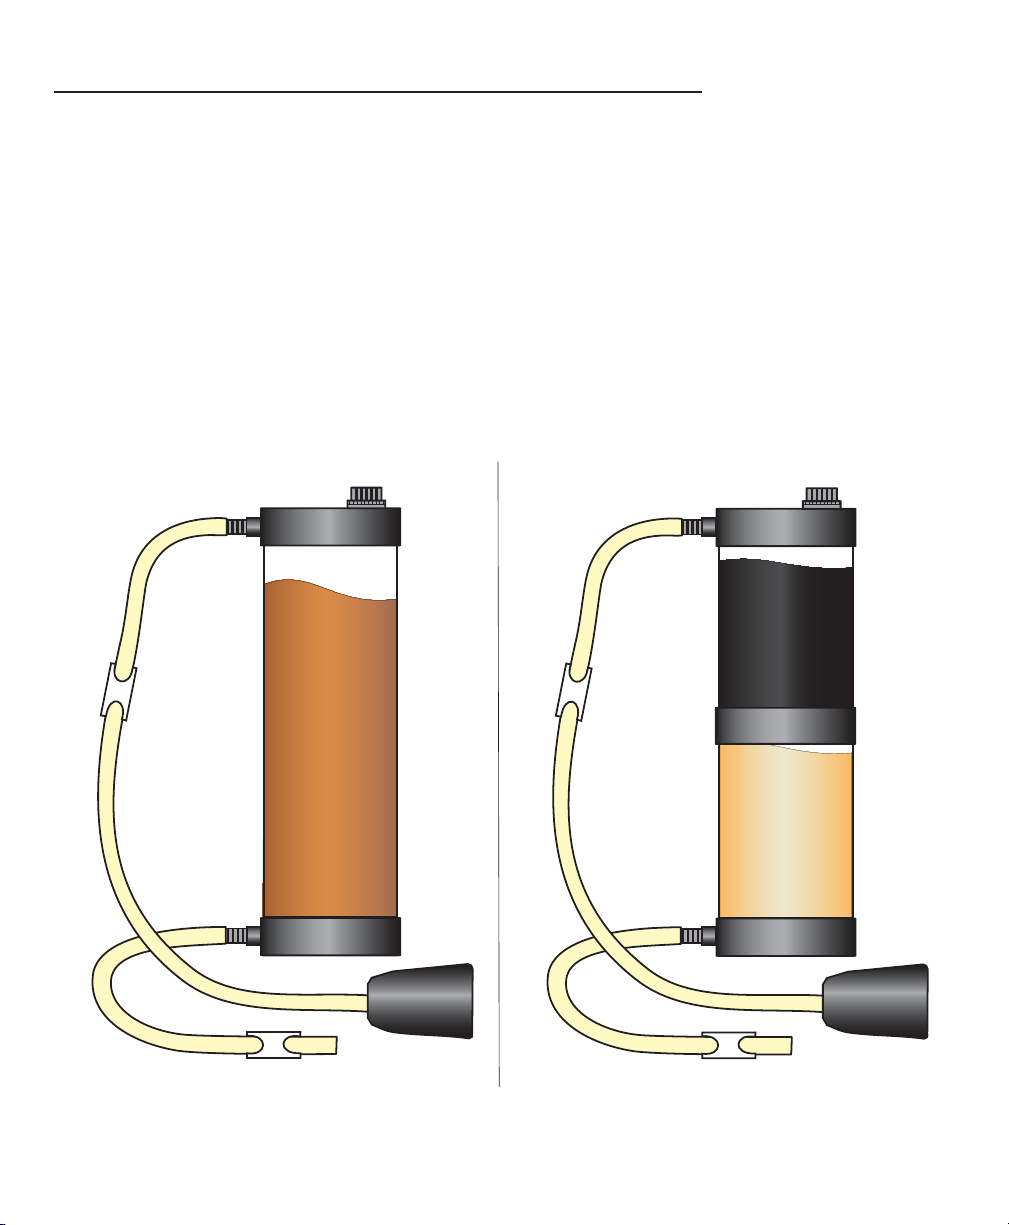
Model S and DuoSoft Softeners
INTRODUCTION
The Model S and the DuoSoft Water Softeners are designed to produce high quality softened
water. As water passes through the Model S chamber, the resin column causes scale-forming
calcium and magnesium ions to be exchanged for non-scale-forming sodium ions. When the
resin is exhausted it must be replaced or regenerated. Inexpensive resin refi ll packages are available,
or the original resin can be regenerated by chemical treatment.
In the DuoSoft, water passes through both chambers and will be treated by both types of media.
The two chambers of the DuoSoft may be easily fi lled with the media of choice for specifi c
problem water.
NOTE: These softeners DO NOT yield water suitable for drinking .
READ INSTRUCTIONS BEFORE USE.
OUTLET
HOSE
INLET
HOSE
CLAMP
CLAMP
PLUG
CHAMBER
FAUCET
ADAPTER
OUTLET
HOSE
INLET
HOSE
CLAMP
CLAMP
PLUG
TOP
CHAMBER
BOTTOM
CHAMBER
FAUCET
ADAPTER
6
Page 7
Instructions for Use
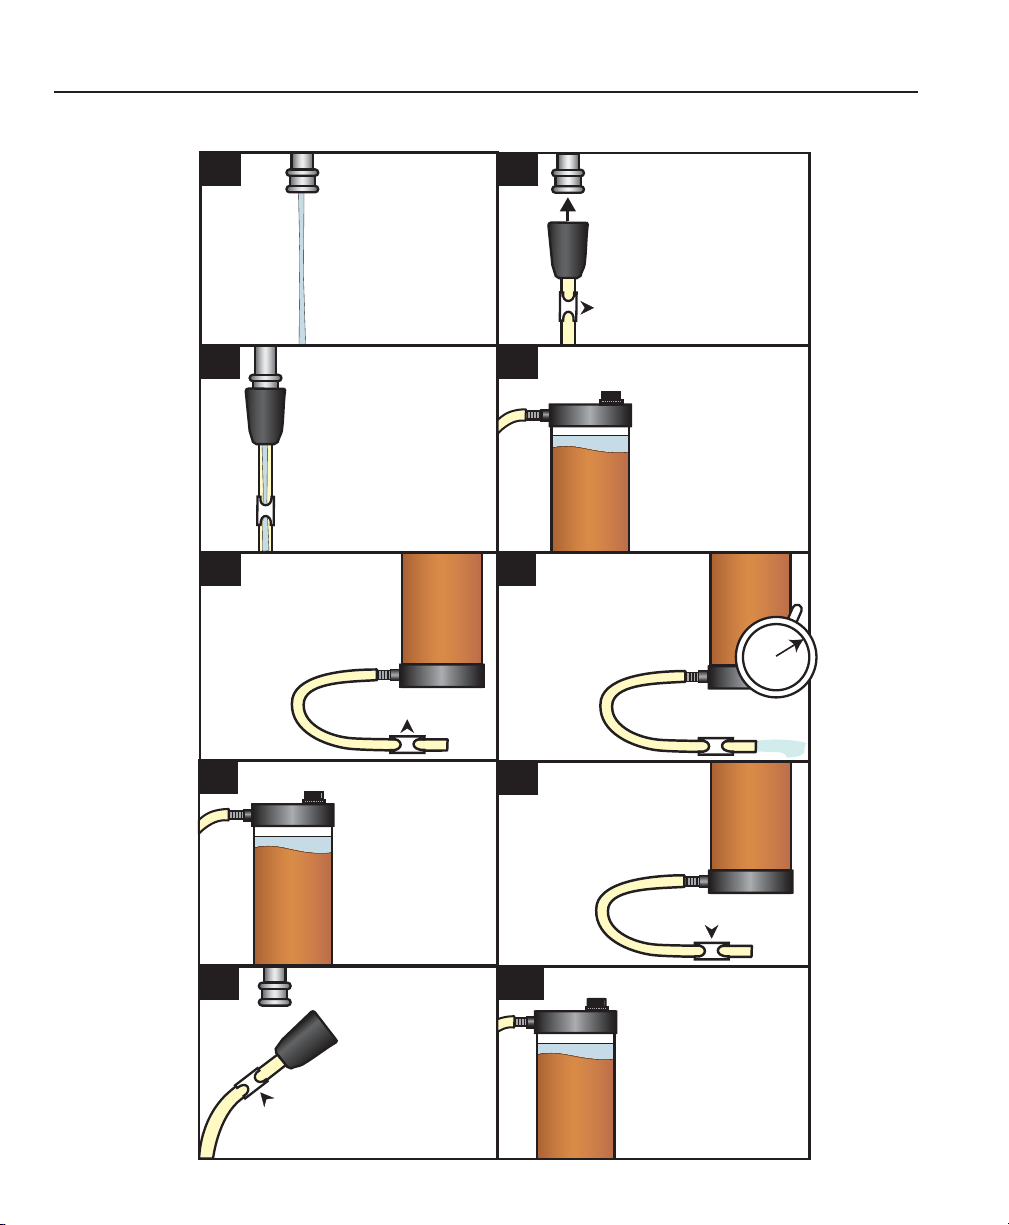
PROCEDURE A — Use of the Softeners
1. 2.
Allow water to
run from faucet
briefl y to visually
gauge pressure.
3. 4.
SLOWLY turn on faucet
and adjust the fl ow of
water into softener until
the stream of water is
about 1/8” in diameter.
Maintain a gentle fl ow
to prevent excessive
pressure in the adapter.
5. 6.
Unclamp outlet
hose at bottom
of softener.
Attach adapter
on inlet hose
to faucet. Fully
open clamp on
inlet hose.
Fill chamber
until a 1” layer
of water is
visible over
the media.
Let effl uent run
to waste for about
3 minutes to wash
out residue from
the previous
sample.
3
minutes
7.
Adjust fl ow to
maintain the 1”
layer of water
over the media.
9. 10.
When softener
is disconnected
from faucet,
clamp inlet hose.
8.
After enough
softened water has
been collected, turn
off faucet and clamp
outlet hose
.
If softener will be
stored unused for
any length of time,
keep a 1” layer of
water over resin
column to prevent
drying and cracking.
7
Page 8
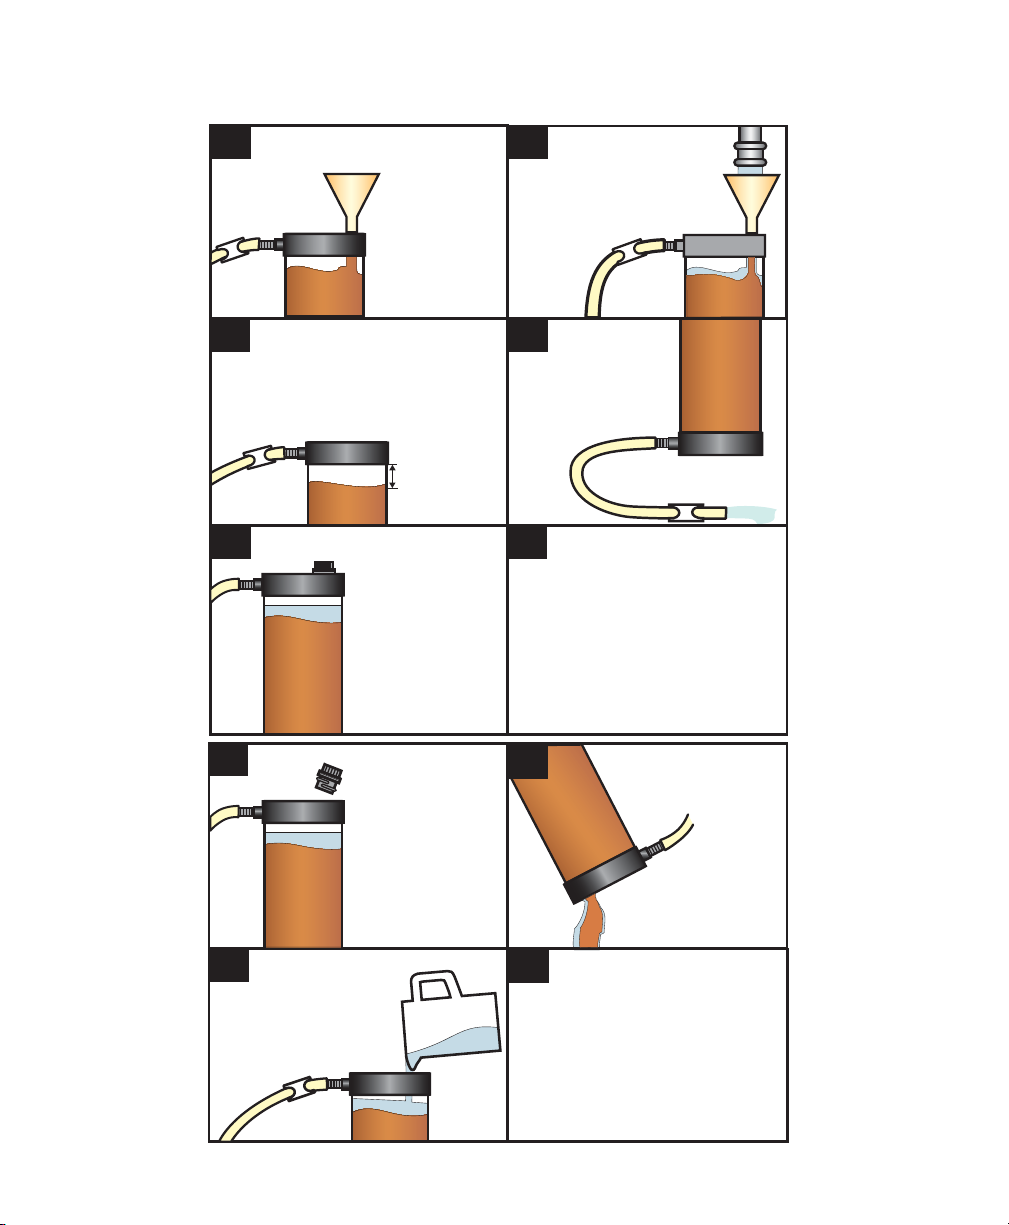
PROCEDURE B — Replacing the Media in the Softeners
1. 2.
With the aid
of a funnel,
add the fresh
media to the
column.
3. 4.
Continue adding media to the
column until the resin is about 2”
from the top of the column.
2”
ADDITIONREMOVAL
5. 6.
Clean threaded
area completely
and replace the
black plug in the
top of column.
Tap water may be
added to the media in
the funnel to facilitate
fi lling of the column.
Allow excess water
to drain from outlet
hose.
DuoSoft Unit
To add the media in the bottom
chamber, turn unit upside down and
repeat Addition Steps 1-5. When
media has been added to both
chambers, proceed with Procedure A.
When using carbon media, it is
suggested that it be used in the top
chamber.
1.
To replace media,
remove black plug
from the top of
dispenser.
3. 4.
By adding more
water to the column and
shaking, the remaining
media can be easily
removed.
2.
To remove the media in the bottom
chamber, turn unit upside down and
repeat Removal Steps 1-3. To add
new media, follow Addition Steps
1-5 for both chambers.
Unclamp outlet hose
and turn softener
upside down.
Allow exhausted
media and water to
run to waste.
DuoSoft Unit
8
Page 9

PROCEDURE C — Regeneration of Media
Follow manufacturers’ instructions for regeneration of media. Cation exchange resin may be regenerated in the
following manner. NOTE: Due to build up of air pressure, it is not possible to regenerate both chambers of the
DuoSoft unit at the same time. Follow steps 1-8 to regenerate top chamber, then see step 9 to regenerate bottom
chamber.
1. 2.
Prepare salt
solution by
dissolving about
½ pound of salt
(sodium chloride)
in 1 quart of
water.
3. 4.
Clamp
outlet tube.
Add salt solution
until top chamber
is completely
full.
5. 6.
Unclamp outlet tube
and allow salt solution
to run to waste.
Remove black
plug from top
of softener.
Allow to stand for
about 30 minutes.
30
MINUTES
Clean threaded
area completely
and replace black
plug in top of
softener.
7.
Attach adapter
to faucet.
For the DupSoft unit; turn unit upside down and repeat steps 1-8.
9.
8.
Wash resin with
approximately
1 gallon of tap water.
9
Page 10

Total Hardness
Total Hardness of a water supply generally represents the total concentration of Calcium and Magnesium ions
expressed as Calcium Carbonate (CaCO3). Other ions may contribute, however, they are usually present in
insignifi cant quantities. Hard waters may form scale on plumbing fi xtures, consume excessive quantities of
soap, and leave deposits of fi lm on glassware, fabrics, etc. Excessive hardness may be removed by various
treatment methods.
*WARNING: Reagents marked with an * are considered to be potential health hazards. To view or print a
Material Safety Data Sheet (MSDS) for these reagents go to www.lamotte.com. To obtain a printed copy,
contact LaMotte by e-mail, phone or fax.
TEST PROCEDURE
1. 2. 3.
Thoroughly rinse
the
sample tube
(4488) with the
water to
be tested.
10
1
20
Fill the sample
tube (4488)
to the desired
line** with the
sample water.
4. 5. 6.
Add either
1 Hardness
Reagent #6
Tablet (4484)
or 5 drops of
*Hardness
Reagent #6
(4485).
1
0
1
2
0
Swirl to mix.
10
1
20
10
1
20
7. 8.
Counting the
number of drops
and swirling
between drops, add
Hardness Reagent #7
(4487WT) one drop
at a time until the red
color changes to clear
1
0
1
2
0
blue.
Multiply the number of drops used in Step 7 as follows:
Tube fi lled to upper line: each drop equals 10 ppm Hardness as CaCO
Tube fi lled to middle line: each drop equals 1 gpg Hardness as CaCO
Tube fi lled to lower line: each drop equals 20 ppm Hardness as CaCO
10
1
20
1
0
1
2
0
Add 5 drops
of *Hardness
Reagent #5
(4483).
Swirl to mix.
3
3
3
** When the tube is fi lled to upper line. Each drop of Hardness Reagent #7 is equal to 10 ppm.
When the tube is fi lled to middle line. Each drop of Hardness Reagent #7 is equal to 1gpg.
When the hardness level is over 200 ppm, fi ll to lower line. Each drop of Hardness Reagent #7 is equal to 20 ppm.
10
Page 11
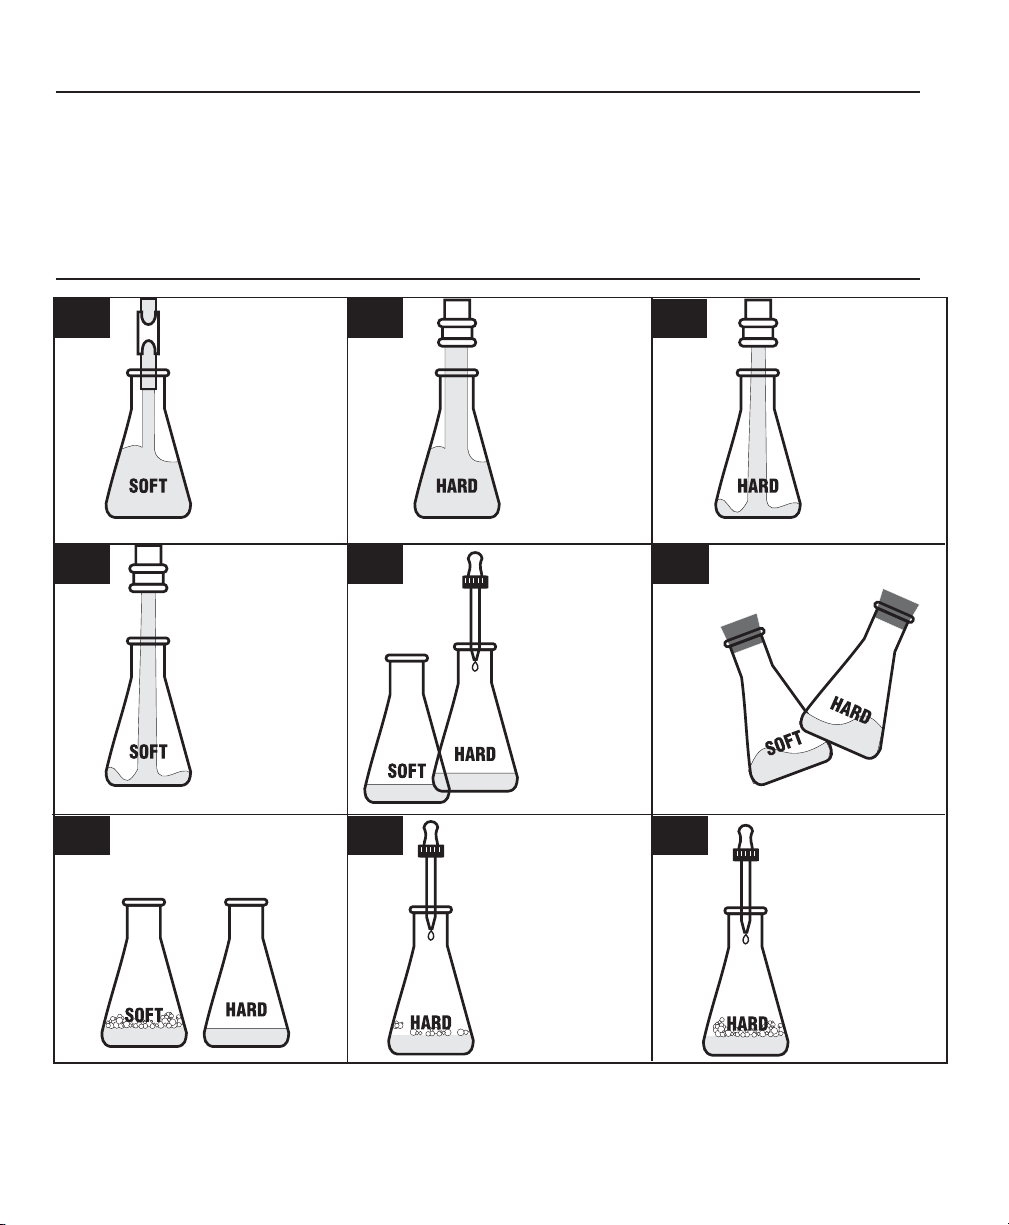
Soap Demonstration
Calcium and Magnesium ions present in a water supply are the principle contributors to the total hardness.
Hard water tends to consume excessive quantities of soap and forms curds and deposits on glassware, fabrics, etc.
*WARNING: Reagents marked with an * are considered to be potential health hazards. To view or print a
Material Safety Data Sheet (MSDS) for these reagents go to www.lamotte.com. To obtain a printed copy,
contact LaMotte by e-mail, phone or fax.
TEST PROCEDURE
1. 2. 3.
Thoroughly rinse
the “SOFT”
water fl ask (0453)
with
softened water.
Thoroughly rinse
the “HARD”
water fl ask (0452)
with
untreated water.
4. 5. 6.
With the pipet
Fill the “SOFT” fl ask
(0453) with softened
water to the same
level.
7. 9.8.
A thick lather will form
in the softened water.
(0392), add 4
drops of *Soap
Reagent #4
(4767) to each
fl ask.
Continue to add
*Soap Reagent #4
(4767), one drop at a
time, to the untreated
“HARD” water, shake
periodically
until a lather forms.
Count the number
of drops added.
Fill the “HARD”
fl ask (0452) with
untreated water
until the bottom
surface is covered
with a layer of
water about ½”
deep.
Cap and shake
the fl ask.
Extremely hard water
may require 30, 40,
or even 60 drops of
*Soap
Reagent #4 to
produce a lasting
lather.
11
Page 12

Precipitation Demonstration
Again, Calcium and Magnesium ions are the major contributors to water hardness. The chemical reagents in this
demonstration pull the Calcium and Magnesium ions out of solution to form a cloudy precipitate in hard water.
The water that has been run through the ion exchange column has had these ions removed, therefore, the sample
should remain clear.
NOTE: This portion of the AT-38/40 Water Quality Demo Kit is ONLY a visual demonstration illustrating the
removal of Calcium and Magnesium ions from tap water after treatment by the ion exchange process. The
results should not be interpreted beyond the intent of the demonstration.
*WARNING: Reagents marked with an * are considered to be potential health hazards. To view or print a Material Safety Data Sheet (MSDS) for these reagents go to www.lamotte.com. To obtain a printed copy, contact
LaMotte by e-mail, phone or fax.
TEST PROCEDURE
1. 2. 3.
Thoroughly rinse the
“SOFT”
water Demo Tube
(0298) with
softened water.
Thoroughly rinse the
“HARD”
water Demo Tube
(0297) with
untreated water.
4. 5. 6.
Fill the “HARD”
Demo tube (0297)
to the line with
untreated water.
Add 7 drops of
*Precipitation
Reagent A
(4542WT)
to each tube.
7. 9.8.
Cap and mix.
Add 7 drops of
*Precipitation
Reagent B
(4543WT)
to each tube.
Fill the “SOFT”
Demo tube (0298)
to the line with
softened water.
Cap and mix.
Place tubes in the
Precipitation Rack (0879)
and allow the tubes to
stand for
5 minutes.
Heavy
Precipitate
Remains
clear
12
Page 13

pH Test
Simply, the term pH can be considered to be an “index” of the amount of hydrogen ions present in a substance.
This “index” can be used to quickly identify the acid, neutral, or alkaline (basic) nature of water. On the scale
of 0.0 to 14.0, 7.0 is considered to be neutral, acidic water is less than 7.0, and basic or alkaline water is greater
than 7.0. Water that is acidic in nature may cause corrosion of plumbing and equipment while alkaline water
may contribute to scale buildup. Neutralization by various methods is used to correct pH for proper operation of
equipment.
pH measurement may be made electronically with a pH meter or as below with a colorimetric method. The pH
indicator used is a mixture of dyes that produces a specifi c color at various pH levels.
*WARNING: Reagents marked with an * are considered to be potential health hazards. To view or print a Material Safety Data Sheet (MSDS) for these reagents go to www.lamotte.com. To obtain a printed copy, contact
LaMotte by e-mail, phone or fax.
Use of the Octa-Slide 2 Viewer
The Octa-Slide Viewer should be held so non-direct light enters through the back of the Viewer. Slide the OctaSlide 2 Bar into the Viewer. Insert the reacted sample into the top of the Viewer. Match the color of the reaction
to the color standards.
TEST PROCEDURE
1. 2. 3.
Insert Wide
Range pH OctaSlide 2 Bar
(3483-01)
into the OctaSlide 2 Viewer
(1101).
4. 5. 6.
Cap and mix.
Fill a test tube
(0106) to the
5 mL line
with the water
sample.
Insert test tube
into
Octa-Slide 2
Viewer.
Add 8 drops of
*
Wide Range pH
Indicator
(2218).
Match sample
color to a color
standard.
Record as pH.
13
Page 14
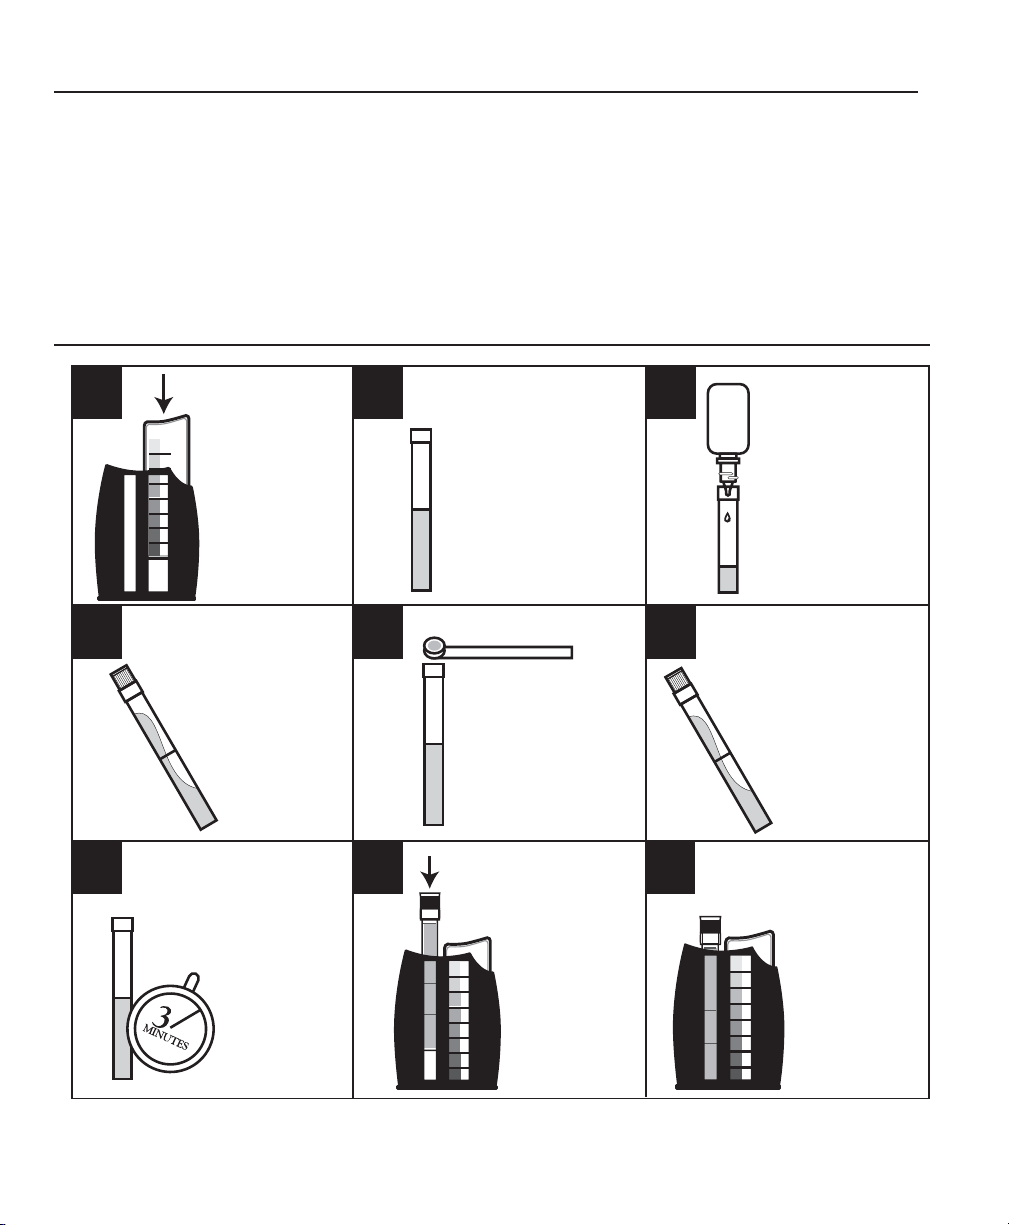
Iron Test
Most natural waters contain iron, varying from trace to very large amounts in various forms. In the dissolved
state (ferrous), iron water is often colorless. Upon exposure to air, or an oxidized state, ferrous iron will undergo
a chemical reaction to the suspended (ferric) state causing discoloration, staining, and possibly an objectionable taste. Several methods are available for iron removal, the selection of which is dependent upon the state in
which it exists.
*WARNING: Reagents marked with an * are considered to be potential health hazards. To view or print a Material Safety Data Sheet (MSDS) for these reagents go to www.lamotte.com. To obtain a printed copy, contact
LaMotte by e-mail, phone or fax.
TEST PROCEDURE
1. 2. 3.
Insert Iron OctaSlide 2 Bar
(4448-01) into
the
Octa-Slide 2
Viewer (1101).
Fill a test tube
(0106) to the
5 mL line
with the water
sample.
4. 5. 6.
Cap and mix.
7. 9.8.
Wait 3 minutes.
Use the 0.05g
spoon (0696)
to add 0.05g of
*Iron Reagent #2
(4451).
Insert test tube
into
Octa-Slide 2
Viewer.
Add 5 drops of
*Iron Reagent #1
(4450).
Cap and gently
shake to dissolve
powder.
Match sample color
to a color standard.
Record as ppm Iron.
14
Page 15

Optional AT Kit Test Modules
Nitrate-Nitrogen • CODE 4-3004-01
Nitrogen is essential for plant growth, but the presence of excessive amounts in water supplies presents a major
pollution problem. Nitrogen compounds may enter water as nitrates or be converted to nitrates from agricultural
fertilizers, sewage, industrial and packing house wastes, drainage from livestock feeding areas, farm manures,
and legumes.
*WARNING: Reagents marked with an * are considered to be potential health hazards.
To view or print a Material Safety Data Sheet (MSDS) for these reagents go to www.lamotte.com. To obtain a
printed copy, contact LaMotte by e-mail, phone or fax.
TEST PROCEDURE
1. 2. 3.
Insert NitrateNitrogen
Octa-Slide 2 Bar
(3494-01)
into the OctaSlide 2 Viewer
(1101).
Fill a test tube
(0106) to the
5 mL line
with the water
sample.
4. 5. 6.
Cap and mix
until tablet
disintegrates.
Add one *
CTA TesTab
(NN-3703).
Immediately slide
the test tube into the
Protective Sleeve
(0106-FP).
Nitrate
#2
Add one
*
Nitrate
#1
Tablet
(2799A).
Cap and mix for
two minutes
disintegrate the tablet.
to
Wait 5 minutes. Remove
7. 9.8.
the tube from the protective
sleeve. NOTE: Nitrate
#2 CTA Tablets
(NN-3703) are sensitive
to UV light. If
testing indoors,
there is no
to use the
Protective
in this procedure.
need
Sleeve
Insert test tube
into
Octa-Slide 2
Viewer.
Match sample color
to a color standard.
Record as ppm
Nitrate-Nitrogen.
To convert to
Nitrate,
multiply the
results by 4.4.
15
Page 16

Chlorine • CODE 4-3006-01
Water for cities and communities is usually sanitized. Even waters that come from clean sources, protected
watersheds, reservoirs, and deep wells are commonly sanitized to assure safety. Chlorine is most commonly
used because it is effective against a wide range of microorganisms, its cost is low, and the methods of applying
it have been well developed.
*WARNING: Reagents marked with an * are considered to be potential health hazards. To view or print a Material Safety Data Sheet (MSDS) for these reagents go to www.lamotte.com. To obtain a printed copy, contact
LaMotte by e-mail, phone or fax.
TEST PROCEDURE
Free Available Chlorine
1. 2. 3.
Insert DPD
Octa-Slide 2 Bar
(3401-01) into
the OctaViewer
Slide 2
(1101).
Fill a test tube
(0106) to the
10 mL line
with the water
sample.
Add one
*
Chlorine DPD
#1R Tablet
(69999A).
4. 5.
Cap and mix
until tablet
dissolves.
Insert test tube into
Octa-Slide 2 Viewer.
6.
Total Residual Chlorine & Combined Chlorine
8.
Insert DPD
Octa-Slide 2 Bar
(3401-01) into
the OctaViewer
Cap and mix
until tablet
disintegrates.
Slide 2
(1101).
9.
11.10. 12.
Add one
*
Chlorine DPD
#3 Tablet (6905)
to the sample
from Step 6.
Insert test tube into
Octa-Slide 2 Viewer.
Match sample color
to a color
Record
Free
Available
Chlorine.
Match sample color
to a color
Record
Total
Residual
Chlorine.
standard.
ppm
standard.
ppm
7.
Retain this
sample if
Total Residual
and Combined
Chlorine are to
be determined.
(Steps 8-12)
16
Page 17

TDS • CODE 5-0080 • Dual Range TDS Pocketester
BEFORE FIRST USE: Soak electrodes for a few minutes in alcohol to remove oils.
CALIBRATION
(To Be Done Once a Month)
Use a calibration standard between 200 ppm and 1,900 ppm for low range testing.
Use a calibration standard between 1,900 ppm and 7,000 pm for high range testing.
See page 20 for suggested standards.
Pour ½” to 1”
1. 2. 3.
of a Calibration
Standard into 2
containers, and
tap or deionized
water into a third
container.
4. 5. 6.
Turn the meter on, and wait
several minutes
to allow the
display to stabilize.
Open battery compartment lid (end
with lanyard loop). The two white
buttons are Increment (INC) and
Decrement (DEC) calibration keys.
Press in INC or DEC keys to
adjust reading to match the
calibration standard value.
After 3 seconds without a key press,
the display fl ashes 3 times, then
shows “ENT”. The tester
accepts calibration value; returns to
measurements mode.
Rinse electrode
in water. Then
rinse in fi rst container of
standard, then dip into
the second.
Replace battery cap.
Rinse the electrode in the
water and proceed with
test procedure.
SETTING THE TDS FACTOR
This tester lets you select a TDS factor of 0.4 to 1.0. The preset TDS factor of 0.7 is recommended.
1. Open battery compartment. With meter on, press HOLD key, then press the INC key. (INC key is inside
battery compartment).
2. Press the INC or DEC keys to adjust the TDS factor.
3. After 3 seconds without a key press, the display fl ashes 3 times, then shows “ENT”. Tester accepts TDS
factor and returns to measurement mode.
4. Replace battery cap.
17
Page 18

PROCEDURE
1. 2. 3.
Remove the cap.
Press ON/OFF
button to turn on.
Dip the electrode end
into the test solution.
Make sure the sensor is
fully covered. Stir once.
Let the reading stabilize.
4. 5. 6.
7.
Allow time for
the Automatic
Temperature
Compensation to
correct the
readings for
solution
temperature
changes.
Replace the cap.
Note the reading once
the display stabilizes.
If the solution is
above the range of the
TDSTestr, the
display will show:
You can replace the electrode module at the
fraction of the cost of a new Testr. When the
to calibrate or gives fl uctuating readings in calibration standards,
the electrode.
1. With dry hands, grip the ribbed Testr collar with electrode facing you.
Twist the collar counter clockwise. Save the ribbed Testr collar and
O-ring for later use.
2. Pull the old electrode module away from the Testr.
3. Align the four tabs on the new module so they match the four slots
on the Testr. Caution: Take care to align pins carefully. Bent or broken
pins will cause the meter to malfunction.
4. Gently push the module onto the slots to seat in position. Push the
smaller O-ring fully onto the new electrode module. Push the collar
over the module and thread it onto place by fi rmly twisting it clockwise.
Press the ON/OFF
button to turn off Testr.
Note: Testr will
automatically shut
off after 8.5
minutes of
non-use.
Testr fails
you need to change
HOLD FUNCTION: Press HOLD key to freeze display. Press HOLD again to release.
MAINTENANCE: To improve performance, clean the stainless steel electrodes by periodically rinsing them
in alcohol for 10-15 minutes. Replace all 4 batteries if the display becomes faint or disappears, or if the readings
are unstable. If drift is detected while electrodes are continuously exposed to solution for longer than one hour,
allow electrode to fully dry off periodically.
CHANGING BATTERIES: Open the battery compartment lid. Remove old batteries and replace with fresh
ones noting polarity as shown in the battery compartment. Recalibrate Testr after battery change.
18
Page 19

Replacement Parts
Model AT-38 & AT-40
To order individual reagents or test components, use the specifi ed code number.
CODE DESCRIPTION CODE DESCRIPTION
1002 Model S Softener (AT-38)
*2218-G *pH, Wide Range Reagent, 25mL 1022 DuoSoft Softener (AT-40)
*4767-H *Soap Reagent #4, 60 mL 1028 DirectFLO Duo-Soft Softener
*4767-L *Soap Reagent #4, 500mL 0879 Precipitation Rack, acrylic
*4483WT-H *Hardness Reagent #5,60mL 0392 Pipet, plain, plastic, w/cap
*4483-L *Hardness Reagent #5, 500 mL 0670 Stopper, rubber, #6, for fl asks
4484-J Hardness Reagent #6 Tablets. 100 0655 Stopper, rubber, #3, for Hardness tube
4487WT-H Hardness Reagent #7, 60 mL 0651
*4542WT-H *Precipitation Reagent A, 60 mL 0106 Test Tube, plastic, w/cap
*4542-L *Precipitation Reagent A, 500 mL 1101 Octa-Slide 2 Viewer
*4543WT-H *Precipitation Reagent B, 60 mL 3483-01 Wide Range, pH Octa-Slide 2 Bar, 5-10
*4543-L *Precipitation Reagent B, 500 mL *4450-G *Iron Reagent #1, 25 mL
0452 Flask, 250 mL, “HARD”, w/cap *4451-S *Iron Reagent #2 Powder, 4.5g
0453 Flask, 250 mL, “SOFT”, w/cap 0696 Spoon, 0.05g
0297 Test Tube, “HARD”, 15 x 120 mm, w/cap 4448-01 Iron Octa-Slide 2 Bar, 0.5-10 ppm
0298 Test Tube, “SOFT”, 15 x 120 mm, w/cap 2-2011 150 mL beaker
4488 Test Tube, Hardness, w/cap
*4485WT-H *Hardness Reagent #6, 60 mL
*4485-L *Hardness Reagent #6, 500 mL
*WARNING: Reagents marked with an * are considered
to be potential health hazards. To view or print a
Material Safety Data Sheet (MSDS) for these reagents
go to www.lamotte.com. To obtain a printed copy, contact
LaMotte by e-mail, phone or fax.
Stopper, rubber 00, for Precipitation tubes
19
Page 20

Replacement Parts
for Optional Test Modules
To order individual reagents or test components, use the specifi ed code number.
CODE DESCRIPTION
*2799A-NN3703ABX *Nitrate #1 Tablet (50) and *Nitrate #2 Tablet (50)
0106 Test tubes, plastic, 2.5, 5 & 10 mL, w/caps (2)
0106-FP Protective Sleeve
3494-01 Nitrate-Nitrogen Octa-Slide 2 Bar, 0–15 ppm
*6905A-6999ABOX *Chlorine DPD #1R Tablet (50) and *Chlorine DPD #3R Tablet (50)
0106 Test Tube, Plastic, 2.5, 5 & 10 mL, w/caps (2)
3401-01 Chlorine Octa-Slide 2 Bar, 0.2–3.0 ppm
6354-L Conductivity Standard, 1413 μmhos/cm (990 ppm TDS), 500 mL
6418-L Conductivity Standard, 6,668 μmhos/cm (4,668 ppm TDS), 500 mL
*WARNING: Reagents marked with an * are considered to be potential health hazards. To view or print a
Material Safety Data Sheet (MSDS) for these reagents go to www.lamotte.com. To obtain a printed copy,
contact LaMotte by e-mail, phone or fax.
20
Page 21

21
Page 22

blank
Page 23

blank
Page 24

PO Box 329 • Chestertown • MD • 21620
800-344-3100 • 410-778-3100 • f 410-778-6394
www.lamotte.com
64-3015-WT-01 7.14
 Loading...