

Page 1
1
2020t/i
Turbidity Meter
Medidor de turbidez
Turbidimètre
Code/ Código 1974-T/1974-I
1
Page 2

CONTENTS
GENERAL INFORMATION
∆ Packaging and Delivery ......................................................................................... 4
∆ General Precautions ..............................................................................................4
∆ Safety Precautions................................................................................................. 4
∆ Limits of Liability .................................................................................................... 4
∆ Specifi cations ......................................................................................................... 4
∆ Statistical & Technical Defi nitions .................................................................... 6
∆ Contents and Accessories .................................................................................... 7
∆ EPA Compliance ......................................................................................................8
∆ ISO Compliance .......................................................................................................8
∆ CE Compliance ........................................................................................................ 8
∆ IP67 Compliance ....................................................................................................8
∆ Warranty ................................................................................................................... 8
∆ Register Your Meter ............................................................................................... 8
COMPUTER CONNECTION
∆ Output ....................................................................................................................... 8
∆ Computer Connection ........................................................................................... 9
BATTERY/AC OPERATION ................................................................................................. 9
TURBIDITY
∆ What is Turbidity? ................................................................................................10
∆ How is Turbidity Measured? ...............................................................................10
∆ Turbidity Units .......................................................................................................11
∆ Taking Turbidity Water Samples .......................................................................12
∆ Sample Dilution Techniques ..............................................................................13
OPTIONS & SETUP
∆ Factory Default Settings.....................................................................................13
∆ Turbidity Options
Selecting a Turbidity Calibration Curve ....................................................... 14
Selecting Turbidity Units................................................................................. 16
∆ Averaging ................................................................................................................18
∆ Setting Clock .........................................................................................................19
∆ Setting Power Save ..............................................................................................21
∆ Setting Backlight Time ........................................................................................22
∆ Selecting Language .............................................................................................24
∆ PC Link ....................................................................................................................25
DATA LOGGING .................................................................................................................25
2
Page 3

CALIBRATION & ANALYSIS
∆ Calibration ..............................................................................................................27
Turbidity Standards ......................................................................................... 27
Tubes ................................................................................................................... 27
Turbidity Calibration Procedure .................................................................... 27
∆ Analysis without Blanking Procedure ..............................................................32
∆ Analysis with Blanking Procedure ...................................................................33
∆ Dilution Procedure ...............................................................................................36
∆ Preparation of Turbidity-Free Water ................................................................36
∆ Testing Tips ............................................................................................................38
TROUBLESHOOTING GUIDE
∆ Troubleshooting ....................................................................................................39
∆ Stray Light ..............................................................................................................39
GENERAL OPERATING INFORMATION
∆ Overview..................................................................................................................40
∆ The Keypad .............................................................................................................40
∆ The Display and Menus .......................................................................................40
∆ Negative Results ...................................................................................................42
∆ Tubes and Chambers ...........................................................................................42
MAINTENANCE
∆ Cleaning ..................................................................................................................43
∆ Repairs ....................................................................................................................43
∆ Meter Disposal ......................................................................................................43
Refer to the Quick Start Guide for simplifi ed Calibration and Analysis procedures.
Refer to the Testing Guide for detailed Calibration and Analysis procedures for improving
the accuracy of low range turbidity measurements.
3
Page 4

Refer to the Quick Start Guide for simplifi ed Calibration and Analysis procedures.
Refer to the
Testing Guide for detailed Calibration and Analysis procedures for improving
the accuracy of low range turbidity measurements.
GENERAL INFORMATION
PACKAGING AND DELIVERY
Experienced packaging personnel at LaMotte Company assure adequate protection
against normal hazards encountered in transportation of shipments.
After the product leaves LaMotte Company, all responsibility for safe delivery is assured
by the transportation company. Damage claims must be fi led immediately with the
transportation company to receive compensation for damaged goods.
GENERAL PRECAUTIONS
READ THE INSTRUCTION MANUAL BEFORE ATTEMPTING TO SET UP OR OPERATE THE METER.
Failure to do so could result in personal injury or damage to the meter. The meter should
not be used or stored in a wet or corrosive environment. Care should be taken to prevent
water from wet tubes from entering the meter chamber.
NEVER PUT WET TUBES IN THE METER.
SAFETY PRECAUTIONS
*WARNING: Reagents marked with an * are considered to be potential health hazards. To
view or print a Safety Data Sheet (SDS) for these reagents go to www.lamotte.com.
Search for the four digit reagent code number listed on the reagent label, in the contents
list or in the test procedures. Omit any letter that follows or precedes the four digit code
number.
For example, if the code is 4450WT-H, search 4450. To obtain a printed copy, contact
LaMotte by email, phone or fax.
Emergency information for all LaMotte reagents is available from Chem-Tel: (US, 1-800255-3924) (International, call collect, 813-248-0585).
Ensure that the protection provided by this equipment is not impaired. Do not install or use
this equipment in a manner that is not indicated in this manual.
LIMITS OF LIABILITY
Under no circumstances shall LaMotte Company be liable for loss of life, property, profi ts,
or other damages incurred through the use or misuse of their products.
SPECIFICATIONS - 2020t/i
Mode Nephelometric Ratiometric Attenuation
Unit of Measure
2020t
Unit of Measure
2020i
Range 0-100 NTU/FNU
NTU, ASBC, EBC NTU, NTRU, ASBC, EBC NTU, AU, ASBC, EBC
NTU, FNU, ASBC, EBC NTU, FNRU, ASBC, EBC NTU, FAU, ASBC,
0-1,750 ASBC
0-25 EBC
0-1,000 NTRU/FNRU
0-17,500 ASBC
0-250 EBC
EBC
0-2,000 AU/FAU
0-70,000 ASBC
0-1,000 EBC
4
Page 5

Resolution 0–10.99 NTU/FNU: 0.01
NTU/FNU,
11.0–100.0 NTU/FNU: 0.1
NTU/FNU
Accuracy 0-2.5 NTU/FNU:
±0.05 NTU/FNU,
2.5-100 NTU/FNU: ±2%
Detection Limit 0.05 NTU/FNU 0.05 NTRU/FNRU 10 AU/FAU
Reproducibility 0.02 NTU/FNU or 1% 0.02 NTRU/FNRU or 1% 1%
Range Selection Automatic
Light Source 2020t: Tungsten lamp 2300 °K ±50 °K, 2020i: IR LED 860 nm ±10 nm,
spectral bandwidth 50 nm
Detector 2020t: Photodiode, centered at 90° and 180°, maximum peak 400-600 nm
2020i: Photodiode, centered at 90° and 180°
Response Time: <2 seconds
Signal Averaging: Yes
Sample Chamber: Accepts 25 mm fl at-bottomed test tubes
Sample: 10 mL in capped tube
Display: Graphic Liquid Crystal Display with Backlight
Software: Auto Shut-off : 5, 10, 30 min, disabled
Calibration: Field adjustable, blank and 1 point
Data Logging: 500 points
Languages: English, Spanish, French, Portuguese, Italian, Chinese, Japanese (Kana)
0–10.99 NTRU/FNRU: 0.01
NTRU/FNRU, 11.0–109.9
NTRU/FNRU: 0.1 NTRU/
FNRU,
110–1000 NTRU/FNRU: 1
NTRU/FNRU
0-2.5 NTRU/FNRU:
±0.05 NTRU/FNRU,
2.5-100 NTRU/FNRU: ±2%,
100-1000 NTRU/FNRU:
±3%.
0–2000 AU/FAU:
1 AU/FAU
0-2000 AU/FAU:
±10 AU/FAU or 6%
whichever is greater
Temperature: Operation: 0–50 °C; Storage: -40–60 °C
Operation
Humidity Range:
Auto Shut-off : 5, 10, 30 min, disabled
Power Source: USB wall adapter, USB computer connection or Lithium ion rechargeable
Battery: Charge Life: Approximately 380 tests with backlight on to 1000 tests with
Electrical Ratings: Rated voltage (5V), Rated power of input current (1.0A) at mini-USB input
Data Logger: 500 test results stored
Waterproof: IP67 with USB port plug in place.
Dimensions: (W x L x H) 8.84 x 19.05 x 6.35 cm; 3.5 x 7.5 x 2.2 inches
0–90 % RH, non-condensing
battery
backlight off . (Signal averaging disabled).
Battery Life: Approximately 500 charges.
port
5
Page 6

Certifi cations:
Weight: 362 g, 13 oz (meter only)
USB Interface: mini B
CE Mark Safety: Low Voltage Directive (2006/95/EC)
IEC 61010-1:2001, EN 601010-1:2001,
2nd edition
EU EMC: EMC Directive (2004/108/EC)
EN 61326-1:2006, EN 61000-4-2:1995
including A1:1998 and A2:2001, EN
61000-4-3:2002, EN 61000-4-4:2004,
EN 61000-4-5:1995 including A1:2001,
EN 61000-4-6:1996 and A1:2001, EN
61000-4-11:2004, EN 55011:2007, IEC
61000-3-2:2005, EN 61000-3-2:2006,
IEC 61000-3-3:1994, EN 61000-3-3:1995
including A1:2001 and A2:2005
US EMC CFR 47, Part 15 Subpart B:2007
CAN EMC ICES-003, Issue 4, February 2004
AU/NZ EMC AU/NZ: CISPR 11:2004
STATISTICAL & TECHNICAL DEFINITIONS RELATED TO PRODUCT
SPECIFICATIONS
Method Detection Limit (MDL): “The method detection limit (MDL) is defi ned as the
minimum concentration of a substance that can be measured and reported with 99%
confi dence that the analyte concentration is greater than zero and is determined from
analysis of a sample in a given matrix containing the analyte.”
Horwitz once stated, ‘In almost all cases when dealing with a limit of detection or limit of
determination, the primary purpose of determining that limit is to stay away from it.’”
Accuracy: Accuracy is the nearness of a measurement to the accepted or true value.3
The accuracy can be expressed as a range, about the true value, in which a measurement
occurs (i.e. ±0.5 ppm). It can also be expressed as the % recovery of a known amount of
analyte in a determination of the analyte (i.e. 103.5 %).
Resolution: Resolution is the smallest discernible diff erence between any two
measurements that can be made.
4
For meters this is usually how many decimal places are
displayed. (i.e. 0.01). Note that the resolution many change with concentration or range. In
some cases the resolution may be less than the smallest interval, if it is possible to make a
reading that falls between calibration marks. A word of caution, that resolution has very little
relationship to accuracy or precision. The resolution will always be less than the accuracy
or precision but it is not a statistical measure of how well a method of analysis works. The
resolution can be very, very good and the accuracy and precision can be very bad! This is not
a useful measure of the performance of a test method.
Repeatability: Repeatability is the within-run precision.
set up to clean up. Generally, one run occurs on one day. However, for meter calibrations, a
single calibration is considered a single run or data set, even though it may take 2 or 3 days.
Reproducibility: Reproducibility is the between-run precision.
Detection Limit (DL): The detection limit (DL) for the 2020t/i is defi ned as the minimum
value or concentration that can be determined by the meter, which is greater than zero,
independent of matrix, glassware, and other sample handling sources of error. It is the
detection limit for the optical system of the meter.
1
Note that, “As Dr. William
5
A run is a single data set, from
6
2
6
Page 7

1
CFR 40, part 136, appendix B
2
Statistics in Analytical Chemistry: Part 7 – A Review, D. Coleman and L Vanatta, American Laboratory, Sept 2003, P.
31.
3
Skoog, D.A., West, D. M., Fundamental of Analytical Chemistry, 2nd ed., Holt Rinehart and Winston, Inc, 1969, p. 26.
4
Statistics in Analytical Chemistry: Part 7 – A Review, D. Coleman and L Vanatta, American Laboratory, Sept 2003, P.
34.
5
Jeff ery G. H., Basset J., Mendham J., Denney R. C., Vogel’s Textbook of Quantitative Chemical Analysis, 5th ed.,
Longman Scientifi c & Technical, 1989, p. 130.
6
Jeff ery G. H., Basset J., Mendham J., Denney R. C., Vogel’s Textbook of Quantitative Chemical Analysis, 5th ed.,
Longman Scientifi c & Technical, 1989, p. 130
CONTENTS & ACCESSORIES
2020t Kit
EPA Version/
Code 1974-T
2020i Kit
ISO Version/
Code 1974-I
Contents Code Code
2020t/i Turbidimeter
0 NTU Standard, 60 mL 1480 1480
1 NTU Standard, 60 mL 1441
10 NTU/FNU Standard, 60 mL 1442 1447
100 FNU Standard, 60 mL 1444
Water Sample Bottle, 60 mL 0688 0688
Test Tubes, with Caps 0260 (6) 0260 (6)
Cable, USB 1720 1720
USB Wall Adapter 1721 1721
2020t/i Manual 1974-MN 1974-MN
2020t/i Quick Start Guide 1974-QG 1974-QG
2020t/i Testing Guide 1974-TG 1974-TG
Accessories
Code Description
0260-6 Test tubes, with Caps
1446 1 FNU Standard, 60 mL (ISO)
1443 100 NTU Standard, 60 mL (EPA)
6195-H Formazin Standard Solution, 4000 NTU, 60 mL
3-0038 Replacement Chamber
0943 Syringe, 60 mL, plastic
2-2097 Filters, 0.1 micron, Pack of 50
5-0132 Car Charger
7
Page 8

EPA COMPLIANCE
The 2020t meter meets or exceeds EPA design specifi cations for NPDWR and NPDES
turbidity monitoring programs as specifi ed by the USEPA method 180.1.
ISO COMPLIANCE
This 2020i meter meets or exceeds ISO design criteria for quantitative methods of turbidity
using optical turbidimeters as specifi ed by ISO 7027.
CE COMPLIANCE
This device complies with Part 15 of the FCC rules. Operation is subject to the following
two conditions (1) This device may not cause harmful interference, and (2) this device
must accept any interference received, including interference that may cause undesired
operation.
Note: This equipment has been tested and found to comply with the limits for a Class A
digital device, pursuant to Part 15 of the FCC Rules. These limits are designed to provide
reasonable protection against harmful interference when the equipment is operated in a
commercial environment. This equipment generates, uses, and can radiate radio frequency
energy and, if not installed and used in accordance with the instruction manual, may cause
harmful interference to radio communications. Operation of this equipment in a residential
area is likely to cause harmful interferences in which case the user will be required to
correct the interference at his own expense.
IP67 COMPLIANCE
The 2020t/i meets IP67 standards for protection against dust and immersion only when
the USB port plug is in place. Documentation is available at www.lamotte.com.
WARRANTY
LaMotte Company warrants this instrument to be free of defects in parts and workmanship
for 2 years from the date of shipment. If it should become necessary to return the
instrument for service during or beyond the warranty period, contact our Technical
Service Department at 1-800-344-3100 for a return authorization number or visit
www.lamotte.com for troubleshooting help. The sender is responsible for shipping
charges, freight, insurance and proper packaging to prevent damage in transit. This
warranty does not apply to defects resulting from action of the user such as misuse,
improper wiring, operation outside of specifi cation, improper maintenance or repair, or
unauthorized modifi cation. LaMotte Company specifi cally disclaims any implied warranties
or merchantability or fi tness for a specifi c purpose and will not be liable for any direct,
indirect, incidental or consequential damages. LaMotte Company’s total liability is limited
to repair or replacement of the product. The warranty set forth above is inclusive and no
other warranty, whether written or oral, is expressed or implied.
REGISTER YOUR METER
To register your meter with the LaMotte Service Department, go to www.lamotte.com and
choose SUPPORT on the top navigation bar.
COMPUTER CONNECTION
OUTPUT
USB
8
Page 9

COMPUTER CONNECTION
USB Type A, USB mini B, Order Cable Code 1720.
BATTERY/AC OPERATION
The 2020t/i may be operated on battery power or using the USB wall adapter or USB
computer connection. If using the meter as a bench top unit, use the wall adapter if
possible to extend the battery life. The meter will remain on when the USB adapter is used.
To charge the lithium ion battery with the wall adapter, plug the smaller end of the USB
cable (USB mini B connector) into the meter and the larger end of the USB cable (USB Type
A connector) into the wall adapter. Plug the wall adapter into an AC outlet. Reinsert the USB
port plug after charging.
To charge the battery from a computer, plug the smaller end of the USB cable (USB mini B
connector) into the meter and the larger end of the USB cable (USB Type A connector) into
a USB port on a computer. Reinsert the USB port plug after charging.
The battery icon will show no bars and fl ash when the unit fi rst turns on. Then the indicator
will indicate the battery status by showing 0, 1, 2, 3 or 4 bars.
It will take 5 hours to fully charge a low battery. The battery icon will fl ash when the battery
is charging. The battery icon will show four bars and stop fl ashing when it is fully charged.
The charging circuit will automatically switch to a fl oat charge when the battery is fully
charged. The charger may remain connected. Some computers will NOT supply power to
the USB ports during standby operation. The wall adapter will charge the unit continuously.
The battery icon will show no bars and continuously fl ash if the battery is getting low but
the unit will still operate normally. A “Low Battery” message on the status bar of the display
will replace the time when the battery voltage is too low for proper operation and accuracy
may be degraded. A “Shutdown Low Batt” message on the display will appear for a few
seconds before the power is switched off when the battery is too low to operate the unit.
To extend the battery life:
• Shut down the unit with the power switch when not taking measurements
or use the power save option to have the unit automatically turn off after 5
minutes.
• Store the unit in a cool dry place.
• Fully charge the battery before storing the unit for extended periods of time.
• Limit backlight use. The unit consumes three times the normal power with the
backlight on. Set the backlight time option to 10 seconds, or select “Button
Control” and keep the backlight off .
Battery replacement: The lithium-ion battery used in this unit should last for many
years with normal use. When it no longer powers the unit long enough to meet testing
requirements it will need to be replaced. Lithium-ion batteries that are properly charged
and stored do not usually lose all capacity; they just have less capacity after hundreds
of charge cycles. This unit uses a custom battery assembly that is only available from
LaMotte Company. Battery replacement must be performed at a LaMotte authorized
repair facility. The water resistant housing of this meter should not be opened by the user.
Contact LaMotte Company by phone (1-800-344-3100) or email (tech@lamotte.com) for
a return authorization number.
9
Page 10

TURBIDITY
WHAT IS TURBIDITY?
Turbidity is an optical property that results when light passes through a liquid sample
and is scattered by particulate matter. The scattering of light results in a change in the
direction of the light passing through the liquid. If the turbidity is low, the particles may
be invisible to the naked eye and much of the light will continue in the original direction.
As the quantity of particles increases in samples with greater turbidity, the light strikes
particles in solution and is scattered backward, sideways and forward. Light scattered by
the particles allows the particles in the solution to be ”seen” or detected just as sunlight
allows dust particles in the air to be seen. At high concentrations, turbidity is perceived as
cloudiness, haze or an absence of clarity. Turbidity is not specifi c to the types of particles in
the sample. The particles may be suspended or colloidal and can have inorganic, organic or
biological origins.
In drinking water, turbidity may indicate a treatment problem or signal conditions with an
increased risk of gastrointestinal diseases. Because pathogens such as Cryptosporidium
and Giardia cause measurable amounts of turbidity, turbidity monitoring can hold the
key to assuring adequate water fi ltration. In 1998, the EPA published the IESWTR (interim
enhanced surface water treatment rule) mandating turbidities in combined fi lter effl uent
should read at or below 0.3 NTU. By doing so, the EPA hoped to achieve a 2 log (99%)
removal of Cryptosporidium. There is presently consideration to lower this to 0.1 NTU. The
trend has been to check the calibration of on-line turbidimeters used to monitor drinking
water with hand-held fi eld units. The optical design and low detection limit of the 2020t/i
allows very accurate readings for such calibrations. Drinking water that is turbid is not
always harmful to human health but does impart an unpalatable appearance.
Turbidity in environmental waters reduces the amount of benefi cial sunlight that reaches
submerged aquatic vegetation, raises surface water temperature, buries eggs and bottom
dwelling creatures, and can carry sediment and pesticides through the water system.
HOW IS TURBIDITY MEASURED?
Turbidity is measured by detecting and quantifying the scattering of light in a solution. The
amount of light that is scattered is infl uenced by particulate properties of color, shape, size
and refl ectivity. Turbidity can be measured by various methods including visual methods
and instrumental methods. Visual methods are more suitable for samples with high
turbidity. Instrumental methods can be used for samples with turbidity at all levels.
Examples of visual methods are the Secchi Disk method and the Jackson Candle method.
The Secchi Disk method is often used in natural waters. A Secchi Disk with black and white
quadrants is lowered into the water until it can no longer be seen. It is then raised until
it can be seen again. The average of these two measurements is known as the “Secchi
Depth”. The Jackson Candle method uses a long glass calibrated tube placed over a
standardized candle. Water is added or removed from the tube until the candle fl ame
becomes indistinct. The height of the water in the tube is measured with a calibrated scale
and is reported as Jackson Turbidity Units (JTU). The lowest level of turbidity that can
accurately be determined with this method is about 25 JTU.
Instrumental methods for measuring turbidity involve a combination of detection angles
and light sources to optimize accuracy in various samples and to meet regulatory
requirements. The 2020t and 2020i turbidimeters off er the option of three calibration
curves for measuring turbidity that is based on the characteristics of the sample.
In the nephelometric mode, which is the default mode, the detector that is located
90-degrees from the light source measures the scattered light from a light beam passing
through a sample. In the 2020t, this confi guration and the tungsten lamp, with a color
temperature of 2,200–3,000 °K, meet the requirements of EPA method 180.1. The 2020i,
10
Page 11

which has an IR LED light source at 860 nm, uses the 90-degree detector to meet the
requirements of the ISO 2027 Standard. The nephelometric mode is best used for meeting
regulatory requirements on samples, such as drinking water, that are in the range of 0.00
to 40.00 Nephelometric Turbidity Units (NTU) for the 2020t or 0.00 to 10.00 Formazin
Nephelometric Units (FNU) for the 2020i. A signal averaging option improves the stability
of readings on low turbidity samples.
The ratiometric mode is typically used for natural waters and storm waters, or other
samples in the 0 – 1000 NTU/FNU range, to minimize interference from color in the
sample. The ratiometric mode takes readings from both the 90-degtree detector and the
180 degree detector. Results are reported as Nephelometric Turbidity Ratio Units (NTRU,
2020t) or Formazin Nephelometric Ratio Units (FNRU, 2020i).
In the attenuation mode, the detector is located 180-degrees from the light source. It
measures the attenuation of the light beam due to absorption and scatter. This mode
is best used to measure samples with high turbidity levels in the range of 40 – 2000
Attenuation Units (AU, 2020t) or Formazin Attenuation Units (FAU, 2020i).
TURBIDITY UNITS
Traditionally, turbidimeters designed for use in the United State were made to the
specifi cations of EPA Method 180.1. This method defi ned the NTU, nephelometric turbidity
unit, as a unit that measured turbidity in the range of 0 – 40 NTU using a nephelometer.
According to the EPA a nephelometer was a turbidimeter that measures turbidity with
a 90° detector. If a sample had a turbidity that was greater than 40 NTU, a dilution was
necessary to bring the sample into the 0 – 40 NTU range. Today, many turbidimeters have
additional detectors which increase the range of the turbidity measurement, eliminate
interferences and generally improve the performance. Currently, many turbidimeters
are capable of measuring above 40 NTU by using detectors other than a 90° detector.
Even though they may use a 180° detector, which does not meet the defi nition of a
nephelometer, the results are often be reported as NTU.
Since the position of the detector and the light source is important information to include
when reporting and comparing turbidity results, there has recently been an eff ort by the
ASTM to use turbidity units which include this information. For EPA compliant meters,
measurements made with a 90° degree detector and an incandescent white light source
are reported as Nephelometric Turbidity Units (NTU). When an attenuation measurement
is made with a 180°detector, using the same light source, the results are reported as
Attenuation Units (AU). If a ratio of the measurements from both detectors is used to
calculate the turbidity, the results are reported in Nephelometric Turbidity Ratio Units
(NTRU).
ISO Method 7027, which specifi es an 860 nm light source, reports results in four turbidity
units. When the 90° degree detector is used, the results are reported as Formazin
Nephelometric Units (FNU). With an attenuation measurement made with a 180° detector,
the results are reported as Formazin Attenuation Units (FAU). And results that are a ratio
of measurements from the two angles are reported in Formazin Nephelometric Ratio
Units (FNRU). It is also possible to report the readings from each of the three ISO modes in
Nephelometric Turbidity Units (NTU).
It should be noted that all units are numerically equivalent if the meters are calibrated to
formazin. The units diff erentiate which detector and light source was used to make the
measurement. For example, 1 NTU = 1 AU = 1 NTRU = 1 FNU =1 FAU = 1 FNRU.
11
Page 12

Each turbidity calibration mode has a default unit:
Nephelometric Mode: NTU (2020t) or FNU (2020i)
Ratiometric Mode: NTRU (2020t) or FNRU (2020i)
Attenuation Mode: AU (2020t) or FAU (2020i)
The meter will permit the user to choose to report results in any of the other available
calibration units (NTU, FNU, AU, FAU, NTRU or FNRU) other than the default unit. It also
allows the brewing industry to check process water in the nephelometric mode and choose
to have results reported in American Society of Brewing Chemists (ASBC) or European
Brewery Convention (EBC) units.
Acronyms Defi nitions Notes
NTU Nephelometric
Turbidity Units
FNU Formazin
Nephelometric Units
Incandescent white light between
400 and 600 nm, 90° detection,
2020t
IR LED (usually) 860 nm, bandwidth
less than 60 nm, 90° detection,
2020i
Regulatory
Method
EPA 180.1
ISO 7027
AU Attenuation Units Incandescent white light between
FAU Formazin Attenuation
Units
NTRU Nephelometric
Turbidity Ratio Units
FNRU Formazin
Nephelometric Ratio
Units
ASBC American Society of
Brewing Chemists
EBC European Brewery
Convention
For more information see ASTM 07726-4 Standard Guide for the Use of Various Turbidimeter Technologies for the
Measurement of Turbidity in Water.
400 and 600 nm, 180° detection,
2020t
IR LED (usually) 860 nm, bandwidth
less than 60 nm, 180° detection,
2020i
Incandescent white light between
400 and 600 nm, 90° and 180°
detection, 2020t
IR LED (usually) 860 nm, bandwidth
less than 60 nm, 90° and 180°
detection, 2020i
2020t/i Not applicable
2020t/i Not applicable
Not applicable
ISO 7027
EPA 180.1
Not applicable
TAKING TURBIDITY WATER SAMPLES
Clean plastic or glass containers may be used for turbidity samples. Ideally, samples should
be tested soon after collection and at the same temperature as when collected.
12
Page 13

SAMPLE DILUTION TECHNIQUES
If a test result is out of the range of the meter, as indicated by an over range message
on the display, the sample must be diluted and retested.The following table gives quick
reference guidelines for dilutions of various proportions.
Amount of Sample
10 mL 0 mL 1
5 mL 5 mL 2
2.5 mL 7.5 mL 4
1 mL 9 mL 10
0.5 mL 9.5 mL 20
Deionized Water to Bring Final
Volume to 10 mL Multiplication Factor
All dilutions are based on a fi nal volume of 10 mL, so several dilutions will require small
volumes of the water sample. Graduated pipets should be used for all dilutions. If
volumetric glassware is not available, dilutions can be made with the colorimeter tube. Fill
the tube to the 10 mL line with the sample and then transfer it to another container. Add
10 mL volumes of deionized water to the container and mix. Transfer 10 mL of the diluted
sample to the colorimeter tube and follow the test procedure. Repeat the dilution and
testing procedures until the result falls within the range of the calibration. Multiply the test
result by the dilution factor. For example, if 10 mL of the sample water is diluted with three
10 mL volumes of deionized water, the dilution factor is four. The test result of the diluted
sample should be multiplied by four.
OPTIONS & SET UP
FACTORY DEFAULT SETTINGS
Settings that have user options have been set at the factory to default settings.
The factory default settings are:
Turbidity Calibration Curve Nephelometric (N)
Turbidity Units Default
Turbidity Measurement Turbidity-No Blank (NB)
Averaging Disabled
Date Format MM-DD-YYYY
Power Save 5 minutes
Backlight 10 seconds
Language English
13
Page 14
TURBIDITY OPTIONS
Three calibration curves are available: Nephelometric, Ratiometric and Attenuation. For
the 2020t, Nephelometric is the default calibration curve and the available units are NTU,
NTRU, ASBC and EBC. For the 2020i, Nephelometric is the default calibration curve and the
available units are FNU, NTU, FNRU, ASBC and EBC for the 2020i.
The 2020t in Nephelometric mode with the default NTU units should be used for testing
public drinking water for compliance with the EPA 180.1 rule.
Once a calibration curve and turbidity units have been selected, they will remain selected
until the calibration curve and turbidity units are changed by performing the following
procedures.
SELECTING A TURBIDITY CALIBRATION CURVE
Three calibration curves are available: Nephelometric, Ratiometric and Attenuation. The
default calibration curve is Nephelometric. The calibration curve should be chosen that
suits the type of sample being tested.
Nephelometric
Mode:
Ratiometric
Mode:
Attenuation
Mode:
Ratiometric methods typically minimize color interference.
The 2020t in Nephelometric mode with the default NTU units should be used for testing
public drinking water for compliance with the EPA 180.1 rule.
The Nephelometric mode will be used in the example. To change the calibration curve:
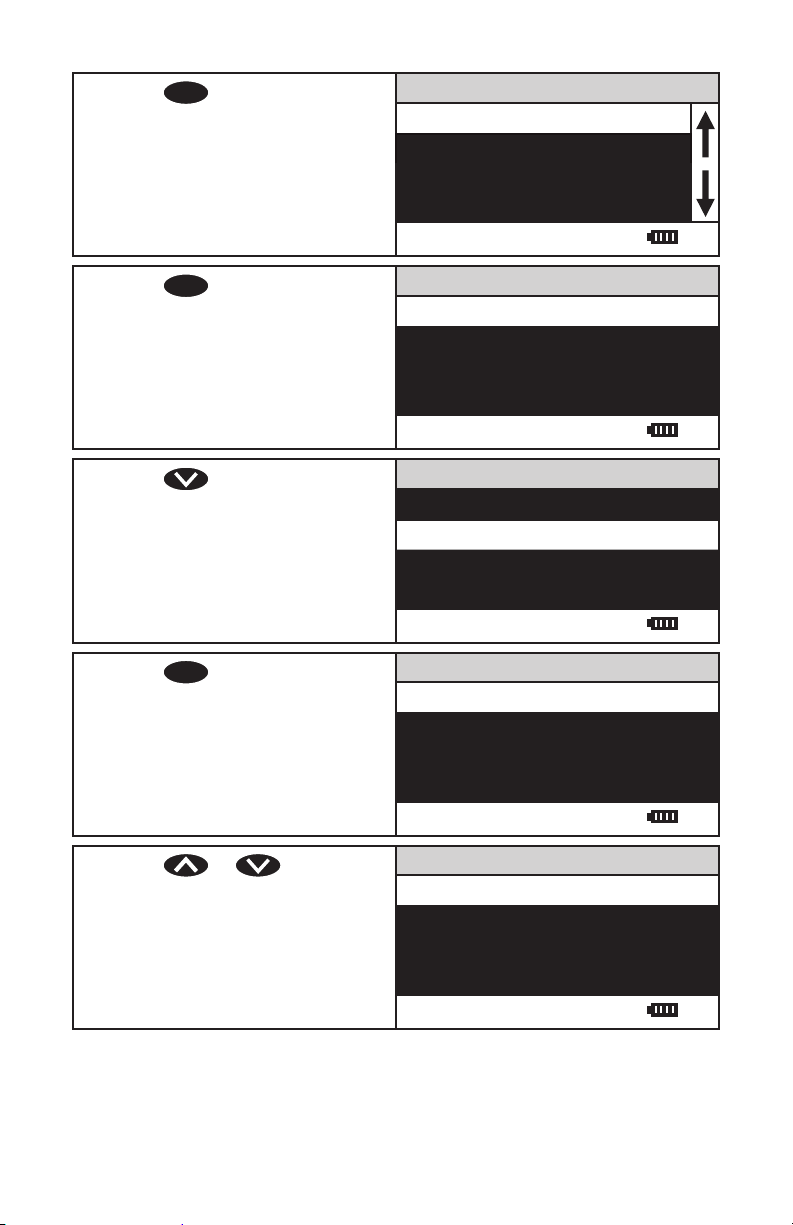
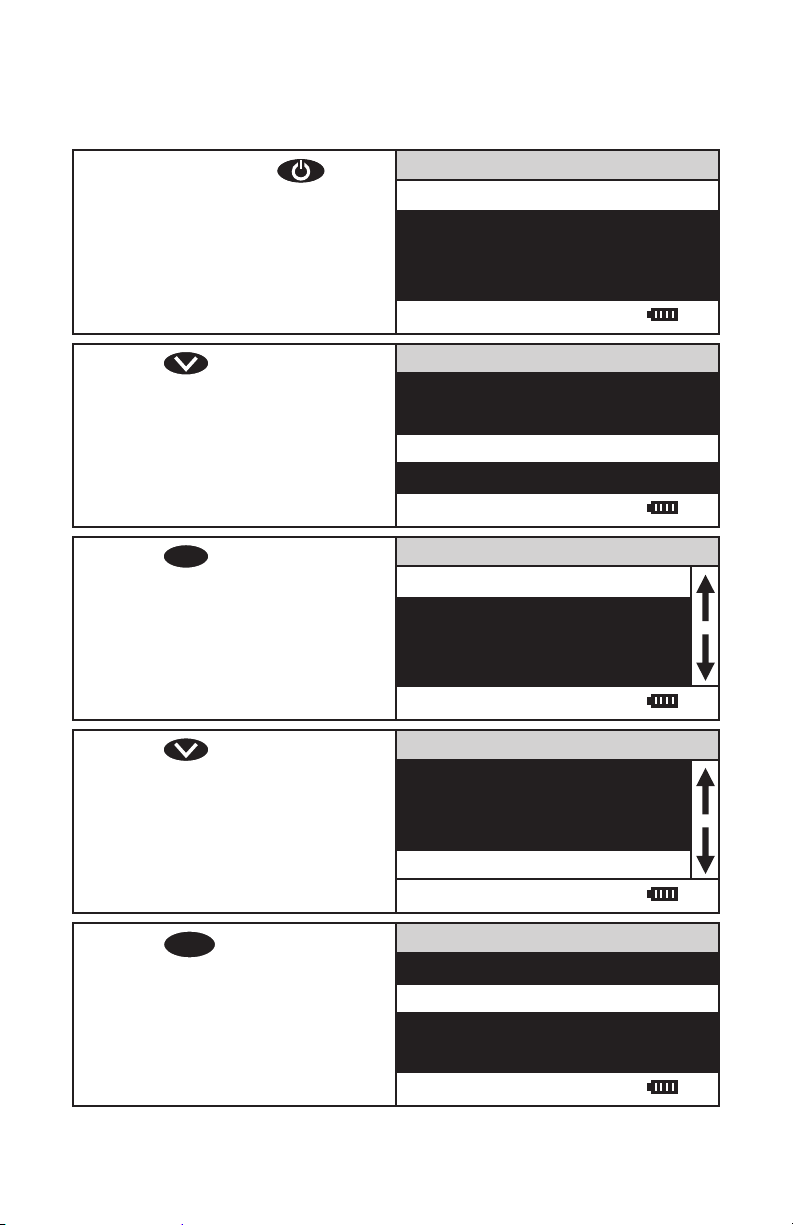
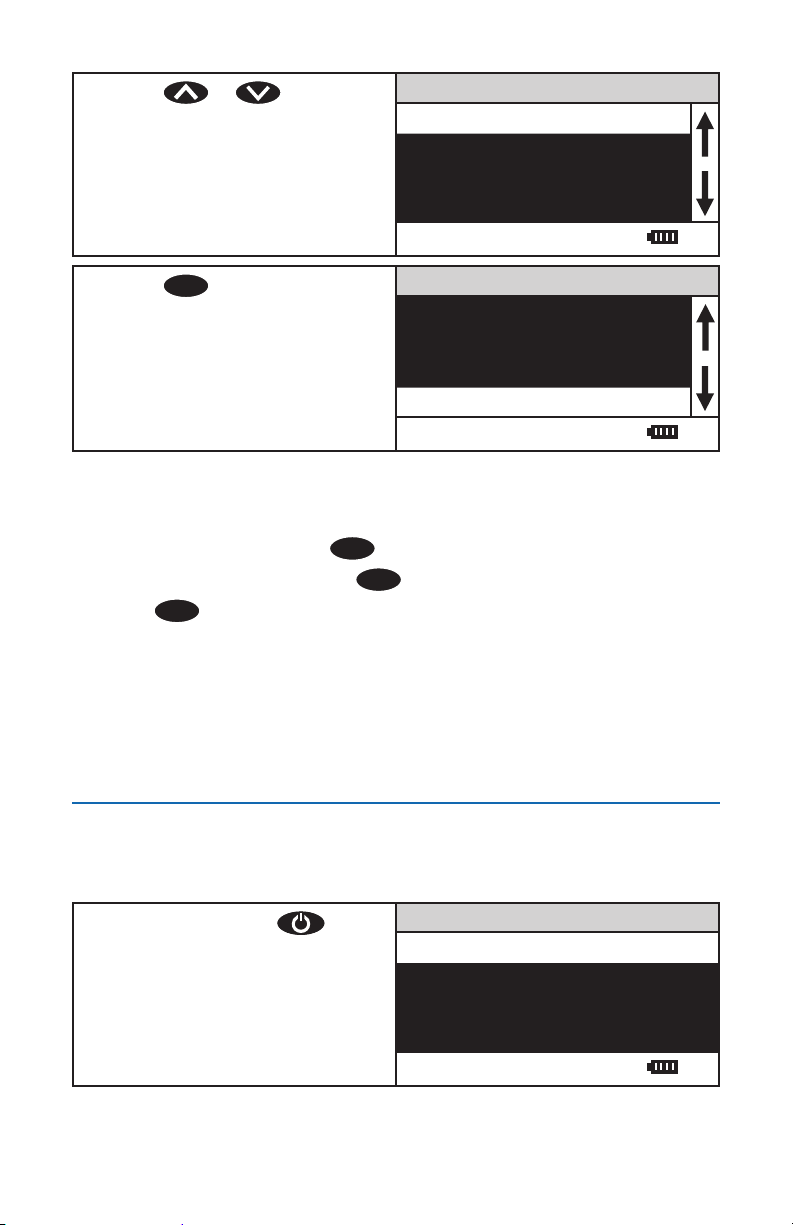
1. Press and briefl y hold to
turn the meter on. The LaMotte
logo screen will appear for about
3 seconds and the Main Menu will
appear.
2. Press to scroll to Options.
90° Detector 0 – 100 NTU/FNU Range, for Drinking Water
90° and 180°
Detectors
180° Detector 0 – 2000 NTU/AU/FAU Range, for High
Samples
0 – 1000 NTU/NTRU/FNRU Range, for
Drinking Water, Natural Water
Samples, Storm Water Samples, and Colored
Samples
Turbidity Samples
Main Menu
Measure
Data Logging
Options
12:00:00 001/500
Main Menu
Measure
Data Logging
Options
12:00:00 001/500
14
Page 15
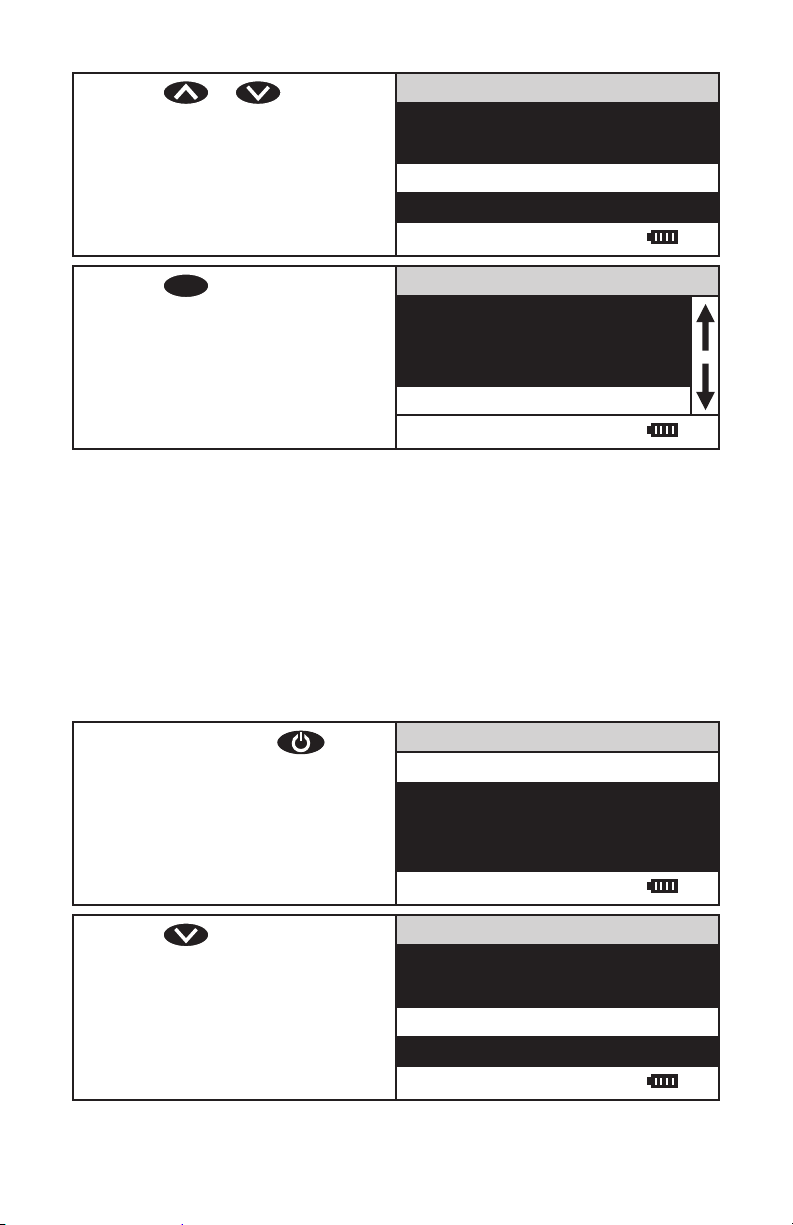
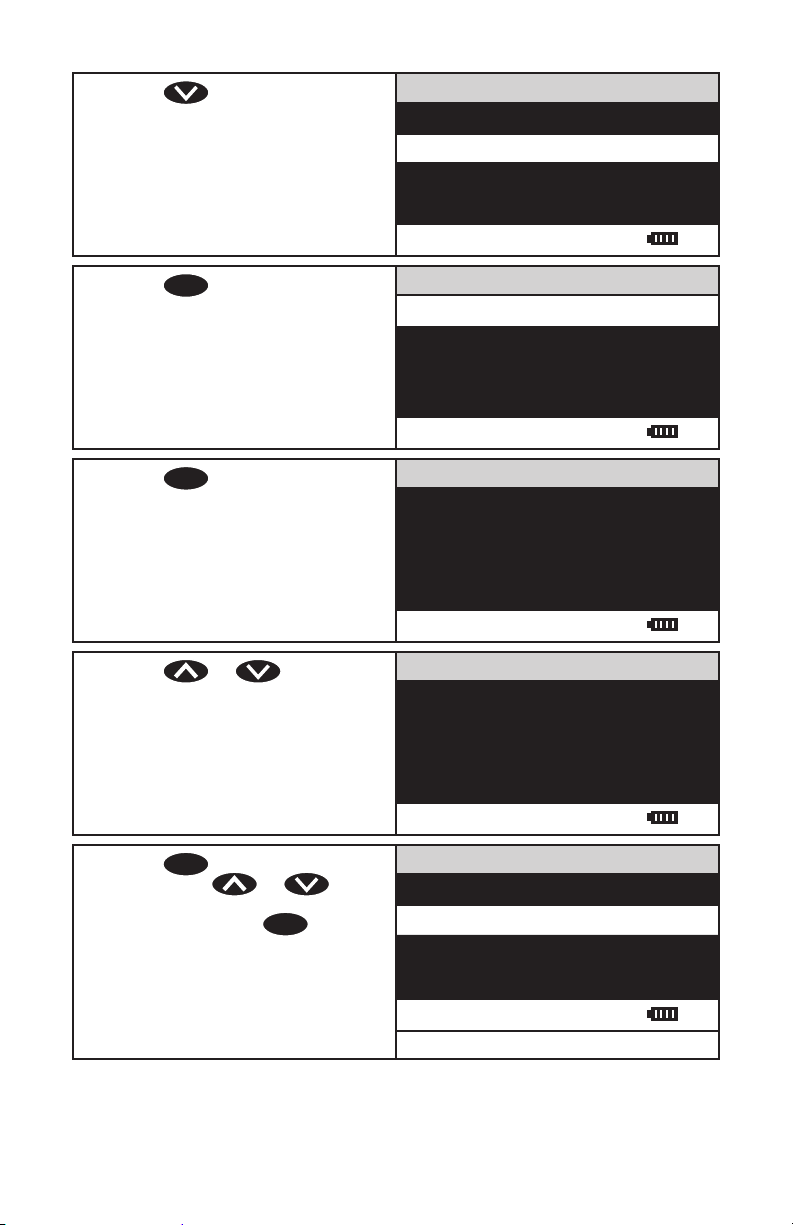
3. Press
ENTER
to select Options.
Options Menu
Turbidity Options
Averaging
Set Clock
Set PWR Save
12:00:00 001/500
4. Press
Options.
ENTER
to select Turbidity
Turbidity Calibration
Turbidity Options
Turbidity Units
12:00:00 001/500
5. Press
Calibration.
ENTER
to select Turbidity
Nephelometric NTU
Turbidity Calibration
Ratiometric NTRU
Attenuation AU
12:00:00 001/500
6. Scroll to the desired calibration
option.
Nephelometric NTU
Turbidity Calibration
Ratiometric NTRU
Attenuation AU
12:00:00 001/500
NOTE: Stablcal® standards below 50 NTU should not be used to calibrate the 2020t/i. The
diluent has a diff erent refractive index than traditional formazin standards and will aff ect
the results.
7. Press
ENTER
to save the selection.
The screen will display Storing... for
about 1 second and return to the
Options menu. Press
EXIT
to a previous menu.
to return
Options Menu
Turbidity Options
Averaging
Set Clock
Set PWR Save
12:00:00 001/500
15
Page 16
SELECTING TURBIDITY UNITS
The results for each calibration curve will be reported in the default units for that
calibration curve unless diff erent units are chosen. The default unit is shown after the
calibration curve name. The default units are:
Calibration Curve Default Unit
2020t Nephelometric NTU (Nephelometric Turbidity Units)
Ratiometric NTRU (Nephelometric Turbidity Ratio Units)
Attenuation AU (Attenuation Units)
2020i Nephelometric FNU (Formazin Nephelometric Units)
Ratiometric FNRU (Formazin Nephelometric Ratio Units)
Attenuation FAU (Formazin Attenuation Units)
It is possible to choose to have the results reported in an alternative unit instead of the
default unit for each mode. When ASBC (American Society of Brewing Chemists) and EBC
(European Brewery Convention) units are desired the Nephelometric calibration curve
should be used.
For the 2020t, the available units are: NTU, NTRU, AU, ASBC, EBC
For the 2020i, the available units are: FNU, NTU, FNRU, FAU, ASBC, EBC
NTRU, AU, FNU, FNRU and FAU are numerically equivalent to NTU. The units diff erentiate
which detector and light source was used to make the measurement. See page 12 for the
defi nition of turbidity units.
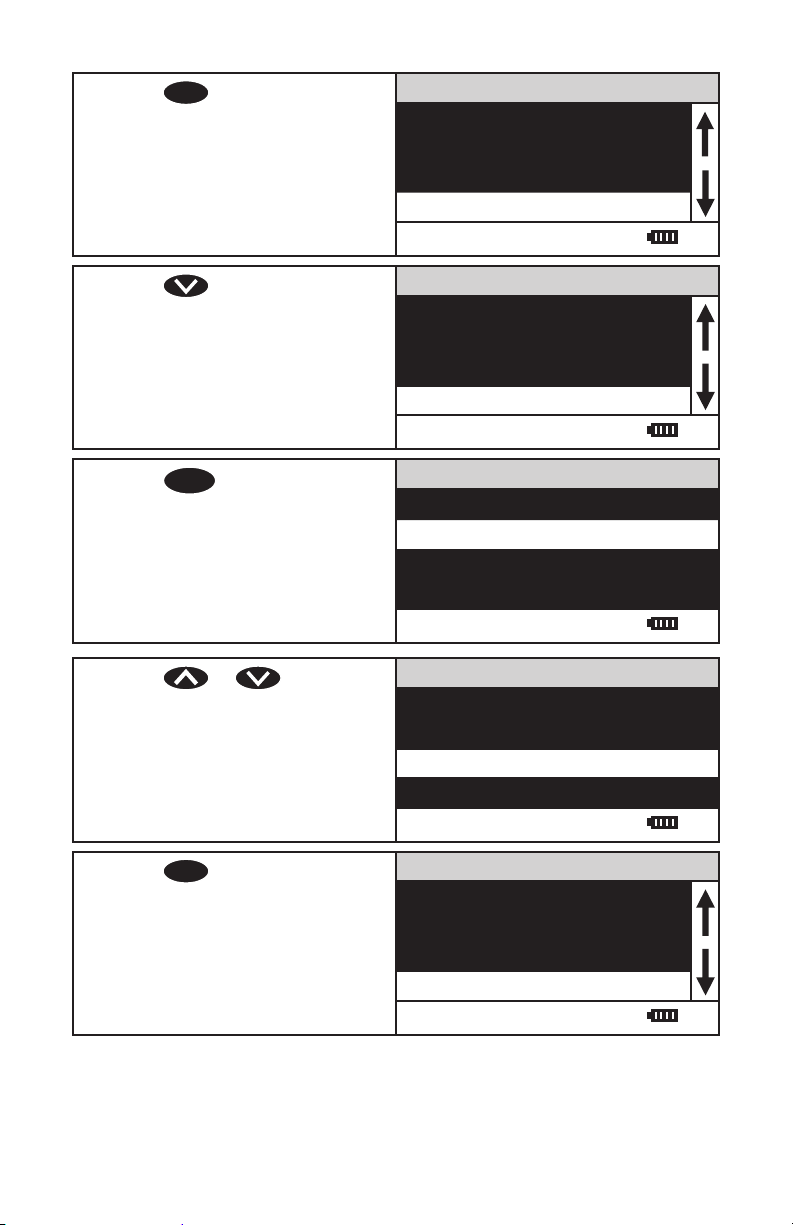
1. Press and briefl y hold to
turn the meter on. The LaMotte
logo screen will appear for about
3 seconds and the Main Menu will
appear.
2. Press to scroll to Options.
Main Menu
Measure
Data Logging
Options
12:00:00 001/500
Main Menu
Measure
Data Logging
Options
12:00:00 001/500
16
Page 17
3. Press
ENTER
to select Options.
Options Menu
Turbidity Options
Averaging
Set Clock
Set PWR Save
12:00:00 001/500
4. Press
ENTER
to select Turbidity
Options.
5. Press to scroll to Turbidity
Units.
6. Press
ENTER
to select Turbidity Units.
7. Press or to scroll to
the desired units.
Turbidity Options
Turbidity Calibration
Turbidity Units
12:00:00 001/500
Turbidity Options
Turbidity Calibration
Turbidity Units
12:00:00 001/500
Set Turbidity Units
Default
NTU
ASBC
EBC
12:00:00 001/500
Set Turbidity Units
Default
NTU
ASBC
EBC
12:00:00 001/500
17
Page 18
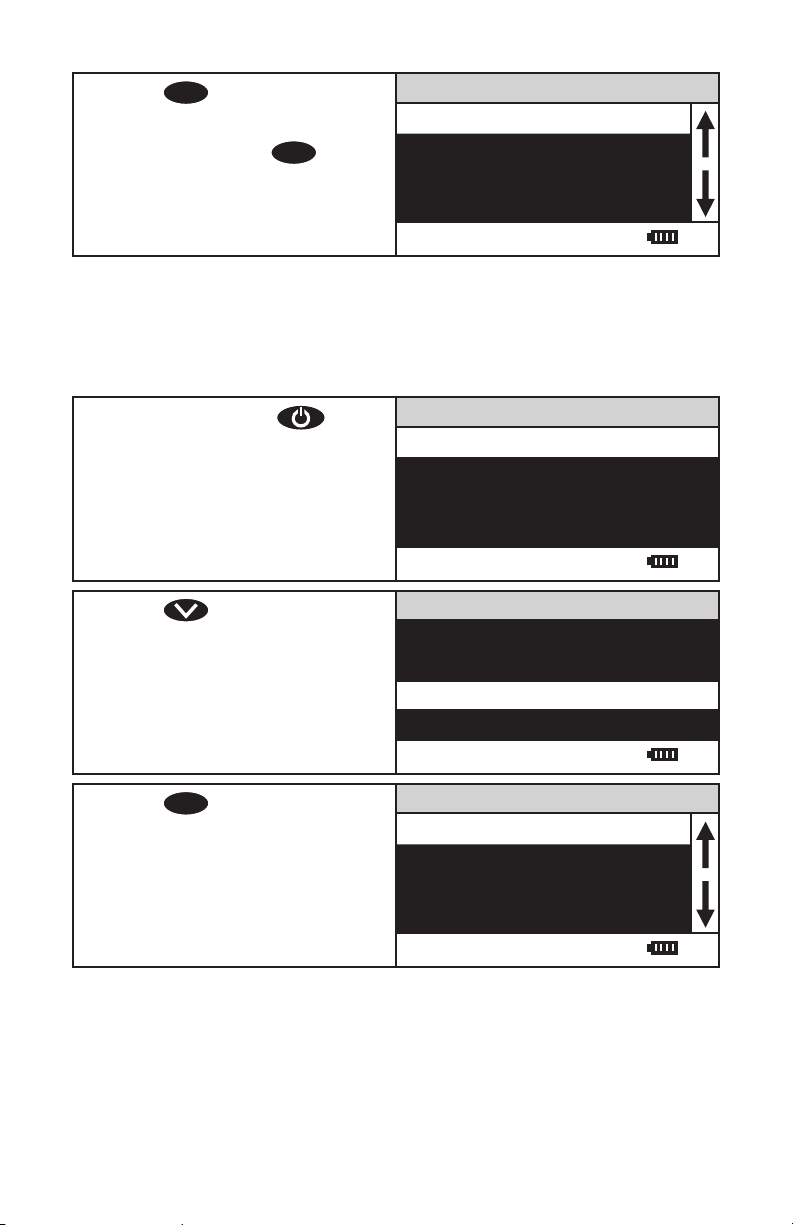
8. Press
ENTER
to save the selection.
The screen will display Storing... for
about 1 second and return to the
Options menu. Press
EXIT
to a previous menu.
to return
Turbidity Options
Averaging
Set Clock
Options Menu
Set PWR Save
12:00:00 001/500
AVERAGING
The averaging option allows the user to average multiple readings. This option will improve
the accuracy of samples with readings that may tend to drift with time. When the two, fi ve
or ten measurement option has been selected the fi nal average is displayed. The default
setting is Disabled. To change the setting:
1. Press and briefl y hold to
turn the meter on. The LaMotte
logo screen will appear for about
3 seconds and the Main Menu will
appear.
2. Press to scroll to Options.
3. Press
ENTER
to select Options.
Main Menu
Measure
Data Logging
Options
12:00:00 001/500
Main Menu
Measure
Data Logging
Options
12:00:00 001/500
Options Menu
Turbidity Options
Averaging
Set Clock
Set PWR Save
12:00:00 001/500
18
Page 19
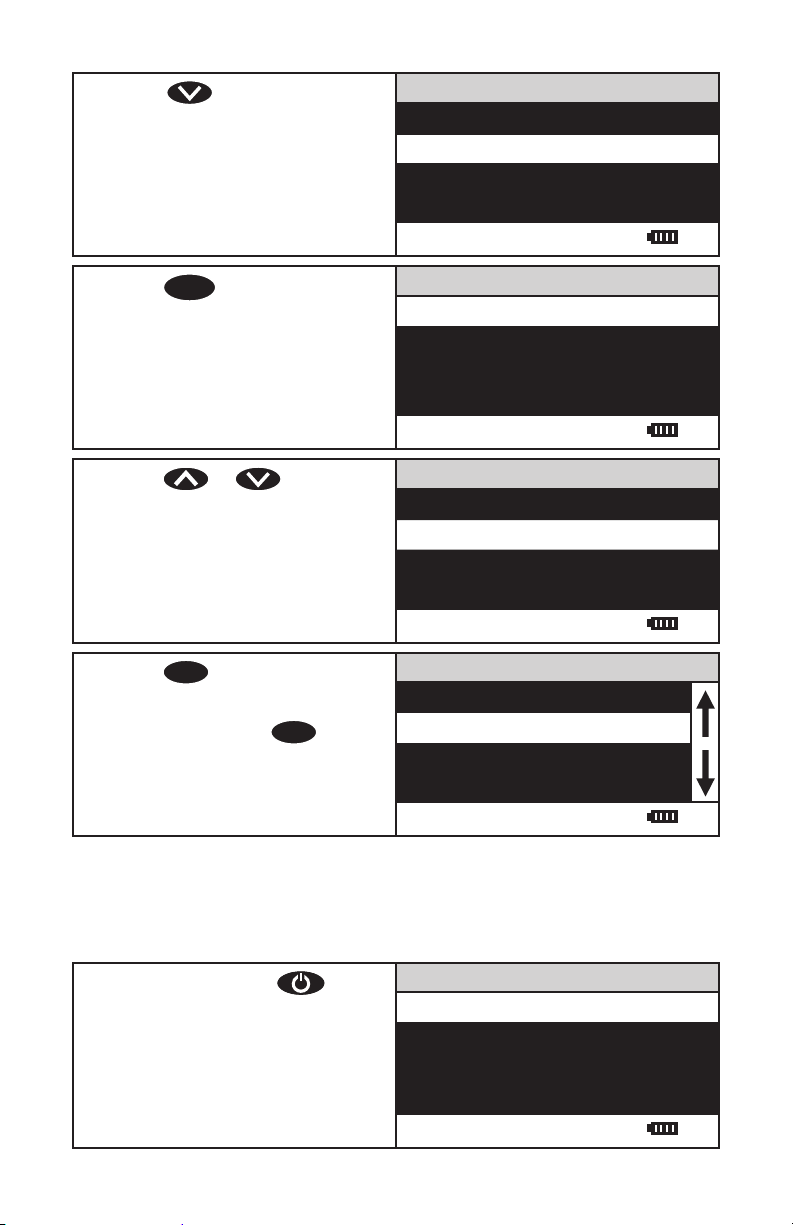
4. Press to scroll to
Averaging.
Options Menu
Turbidity Options
Averaging
Set Clock
Set PWR Save
12:00:00 001/500
5. Press
ENTER
to select Averaging.
Averaging Menu
Disabled
2 Measurements
5 Measurements
10 Measurements
12:00:00 001/500
6. Press or to scroll to
the desired option.
Disabled
Averaging Menu
2 Measurements
5 Measurements
10 Measurements
12:00:00 001/500
7. Press
ENTER
to save the selection.
The screen will display Storing... for
about 1 second and return to the
Options menu. Press
EXIT
to a previous menu.
to return
Turbidity Options
Averaging
Set Clock
Options Menu
Set PWR Save
12:00:00 001/500
NOTE: When the Averaging option is enabled, more time will be required to display a reading
and more power will be used.
SETTING THE CLOCK
1. Press and briefl y hold to
turn the meter on. The LaMotte
logo screen will appear for about
3 seconds and the Main Menu will
appear.
Main Menu
Measure
Data Logging
Options
12:00:00 001/500
19
Page 20
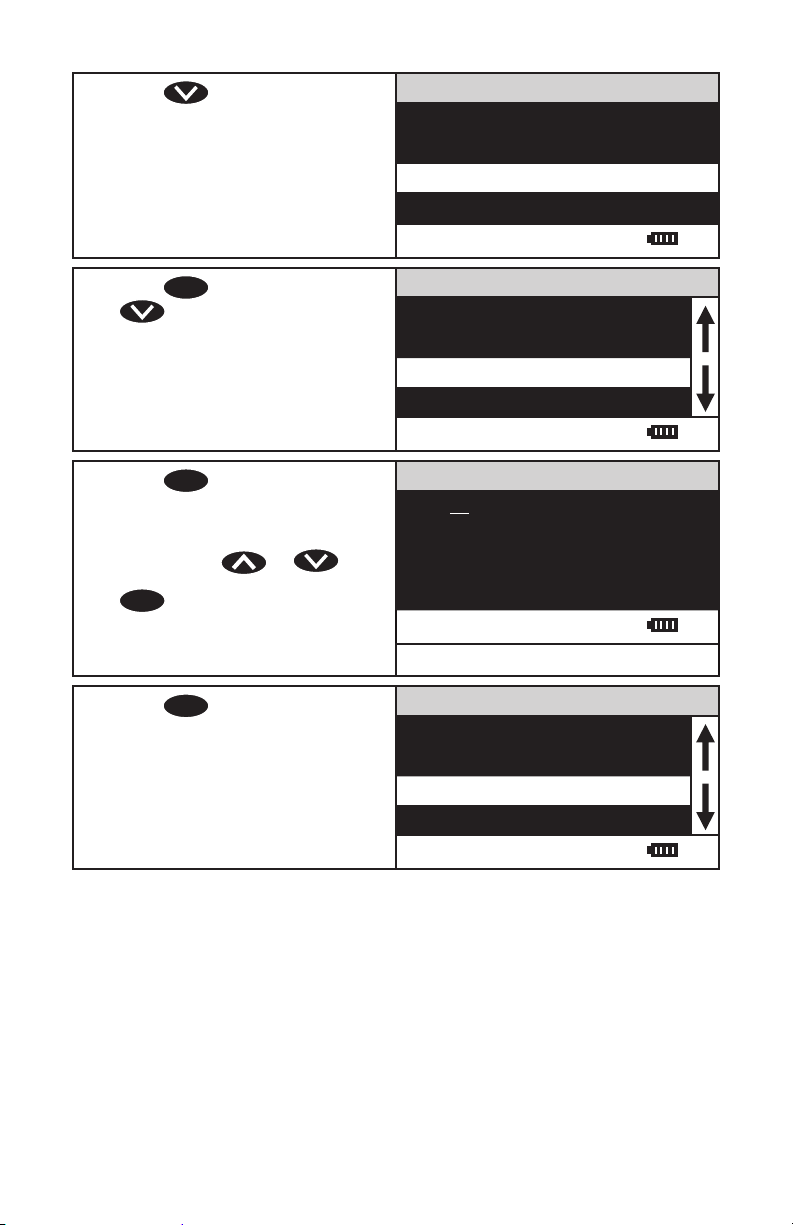
2. Press to scroll to Options.
Main Menu
Measure
Data Logging
Options
12:00:00 001/500
3. Press
ENTER
to select Options. Press
to scroll to Set Clock.
4. Press
ENTER
to select Set Clock.
The date is displayed as monthday-year. The time is displayed as
hours:minutes:seconds
AM/PM. Press
or to
the appropriate character and press
ENTER
to select. The cursor will
move to the next character. Set all
characters in the same manner. This
is a scrolling menu.
5. Press
ENTER
to select the fi nal
character. The time and date will be
saved and the screen will return to
the Options Menu.
Options Menu
Turbidity Options
Averaging
Set Clock
Set PWR Save
12:00:00 001/500
Set Time
Date: 07-09-2018
Time: 02:09:08 PM
12:00:00 001/500
Options Menu
Turbidity Options
Averaging
Set Clock
Set PWR Save
12:00:00 001/500
20
Page 21
SETTING POWER SAVE
The power saving Auto Shutoff feature will turn the meter off when a button has not been
pushed for a set amount of time. The default setting is 5 minutes. To change the setting:
6. Press and briefl y hold to
turn the meter on. The LaMotte
logo screen will appear for about
3 seconds and the Main Menu will
appear.
7. Press to scroll to Options.
8. Press
ENTER
to select Options.
9. Press to scroll to Set PWR
Save.
Main Menu
Measure
Data Logging
Options
12:00:00 001/500
Main Menu
Measure
Data Logging
Options
12:00:00 001/500
Options Menu
Turbidity Options
Averaging
Set Clock
Set PWR Save
12:00:00 001/500
Options Menu
Turbidity Options
Averaging
Set Clock
Set PWR Save
12:00:00 001/500
10. Press
ENTER
to select PWR Save.
Auto Shutoff
Disable
5 Minutes
15 Minutes
30 Minutes
12:00:00 001/500
21
Page 22
11. Press or to scroll to
desired setting.
Auto Shutoff
Disable
5 Minutes
15 Minutes
30 Minutes
12:00:00 001/500
12. Press
ENTER
to save the selection.
The screen will display Storing... for
about 1 second and return to the
Options Menu.
Turbidity Options
Averaging
Options Menu
Set Clock
Set PWR Save
12:00:00 001/500
SETTING THE BACKLIGHT TIME
The backlight illuminates the display for enhanced viewing. If Button Control is chosen the
backlight button on the key pad will act as an on/off switch and the backlight will remain on
or off when the meter is being used. When one of the other settings – 10, 20 or 30 seconds
– is chosen, the display will be illuminated for the specifi ed amount of time after any button
is pressed. As a precaution, the backlight will not illuminate during turbidity measurements
to avoid interference from stray light.
NOTE: The backlight feature uses a signifi cant amount of power. The longer the backlight is
on, the more frequently the battery will have to be charged if the USB/Wall Charger is not
being used.
1. Press and briefl y hold to
turn the meter on. The LaMotte
logo screen will appear for about
3 seconds and the Main Menu will
appear.
Measure
Data Logging
Options
Main Menu
2. Press to scroll to Options.
12:00:00 001/500
Main Menu
Measure
Data Logging
Options
12:00:00 001/500
22
Page 23
3. Press
ENTER
to select Options.
Options Menu
Averaging
Set Clock
Set PWR Save
Set Backlight Time
12:00:00 001/500
4. Press to scroll to Set
Backlight Time.
5. Press
ENTER
to select Set Backlight
Time.
6. Press or to scroll to
desired setting.
Options Menu
Averaging
Set Clock
Set PWR Save
Set Backlight Time
12:00:00 001/500
Backlight Time
Button Control
10 Seconds
20 Seconds
30 Seconds
12:00:00 001/500
Backlight Time
Button Control
10 Seconds
20 Seconds
30 Seconds
12:00:00 001/500
7. Press
ENTER
to save the selection.
The screen will display Storing... for
about 1 second and return to the
Options Menu.
Options Menu
Averaging
Set Clock
Set PWR Save
Set Backlight Time
12:00:00 001/500
23
Page 24
SELECTING A LANGUAGE
There are seven languages available in the 2020t/i: English, Spanish, French, Portuguese,
Italian, Chinese, and Japanese (Kana).
1. Press and briefl y hold to
turn the meter on. The LaMotte
logo screen will appear for about
3 seconds and the Main Menu will
appear.
2. Press to scroll to Options.
3. Press
ENTER
to select Options.
4. Press to scroll to Select
Language.
Main Menu
Measure
Data Logging
Options
12:00:00 001/500
Main Menu
Measure
Data Logging
Options
12:00:00 001/500
Options Menu
Turbidity Options
Averaging
Set Clock
Set PWR Save
12:00:00 001/500
Options Menu
Set Clock
Set PWR Save
Set Backlight Time
Select Language
12:00:00 001/500
5. Press
Language.
ENTER
to select to Select
Select Language
English
Spanish
French
Portuguese
12:00:00 001/500
24
Page 25
6. Press or to scroll to
desired language.
Select Language
English
Spanish
French
Portuguese
12:00:00 001/500
7. Press
ENTER
to select desired
language. The screen will
momentarily display, Storing...for
about 1 second and return to the
Options Menu.
Set Clock
Set PWR Save
Set Backlight Time
Options Menu
Select Language
12:00:00 001/500
NOTE: If the meter unintentionally switches to another language, use the procedure above
to reset the meter to the desired language. For example, to reset the meter to English:
1. Turn the meter on.
2. Press down arrow twice. Press
3. Press down arrow six times. Press
4. Press
ENTER
.
ENTER
.
ENTER
.
PC LINK
Run PC Link is used in the manufacturing of the meter. This menu is not for use by the
operator in the fi eld.
DATA LOGGING
The default setting for the data logger is enabled. The meter will log the last 500 data
points. The counter in the center bottom of the display will show how many data points
have been logged. The display will show 500+ when the data logger has exceeded 500
points and the data points are being overwritten.
1. Press and briefl y hold to
turn the meter on. The LaMotte
logo screen will appear for about
3 seconds and the Main Menu will
appear.
Main Menu
Measure
Data Logging
Options
12:00:00 001/500
25
Page 26
2. Press to scroll to Data
Logging.
Main Menu
Measure
Data Logging
Options
12:00:00 001/500
3. Press
4. Press
ENTER
to select Data Logging.
ENTER
to display the last data
point and the time that it was logged.
5. Press or to scroll
through the data points in the log.
6. Press
EXIT
menu. Press
to return to the Logging
or to
scroll to disable the logging options or
erase the log. Press
ENTER
to select
the option. The screen will display
Storing... for about 1 second and
return to the Logging Menu.
Logging
Display Test Log
Enable Logging
Disable Logging
Erase Log
12:00:00 001/500
Record Number 2
Turbidity - WB (N)
655 AU
12:26:58 PM 08-03-2018
12:00:00 001/500
Record Number 1
Turbidity - WB (R)
95.4 NTU
12:26:44 PM 08-03-2018
12:00:00 001/500
Logging
Display Test Log
Enable Logging
Disable Logging
Erase Log
12:00:00 001/500
26
Page 27

CALIBRATION & ANALYSIS
CALIBRATION
Turbidity Standards
Only use AMCO or formazin standards with the 2020t/i. StablCal® standards below 50 NTU
should not be used to calibrate the 2020t/i .The diluent used in the StablCal
has a diff erent refractive index than traditional formazin standards and will aff ect the
results. The concentration of the calibration standard should be similar to the expected
concentrations of samples that will be tested. The standard should never be poured from
the tube back into the bottle. The standards will not have the same turbidity value in all
three modes.
The following standards are available from LaMotte Company:
Mode Units Nephelometric (N) Nephelometric (N) Ratiometric (R) Ratiometric (R)
Meter
Code 1480 0 NTU 0 FNU 0 NTRU 0 FNRU
Code 1441 1 NTU - 1 NTRU Code 1446 - 1 FNU - 1 FNRU
Code 1442 10 NTU - 10 NTRU
Code 1447 - 10 FNU - 10 FNRU
Code 1444 - 100 FNU - 100 FNRU
Standards may vary slightly from lot to lot for the ratiometric mode. Standard values for
the nephelometric mode and ratiometric mode are located on the standard bottle label.
Use the value on the turbidity standard bottle label as the target value when calibrating
the meter in the nephelometric mode and the ratiometric mode. Standards for calibration
in the attenuation mode should be prepared from Formazin.
2020t 2020i 2020t 2020i
Tubes
Use turbidity tubes (0260) that are free of scratches and imperfections in the light zone
between the bottom of the tube and the fi ll line. Discard scratched tubes. When reading
very low turbidity samples, do not use tubes or caps that have been used previously with
high turbidity samples. See page 38 for additional information.
Turbidity Calibration Procedure
The default calibration curve is nephelometric as indicated by (N) in the Menu bar. The
default units are NTU (2020t) and FNU (2020i). Other calibration curve options are
ratiometric and attenuation. The ratiometric calibration curve is indicated by (R) and the
attenuation calibration curve is indicated by (A). A user calibration should be performed for
each mode with standards that are appropriate for the meter and range.
For the most accurate results, a user calibration should be performed over the smallest
range possible. Use a calibration standard that, along with the blank, brackets the range
of the samples that will be tested. For example, if the samples that are to be tested are
expected to be below 1 NTU, more accurate results will be obtained by calibration with a
blank and a 1 NTU standard as opposed to a blank and a 10 NTU standard.
The number of measuring ranges for each mode varies.
®
standards
CALIBRATION
27
Page 28
Mode Nephelometric (N) Ratiometric (R) Attenuation (A)
Ranges 0-11 NTU/FNU
10-110 NTU/FNU
0-11 NTRU/FNRU
10-110 NTRU/FNRU
100-510 NTRU/FNRU
500-1000 NTRU/FNRU
0-1010 AU/FAU
1000-2000 AU/FAU
Each range can be calibrated with one point per range plus a blank. New calibration points
will replace old calibration points independently for each range. If one range is recalibrated,
CALIBRATION
the meter will retain the old calibration data for the other ranges. It is recommended that
the meter be calibrated for each range that will be used. The value of the standards chosen
for the calibration should not be at the extremes of the ranges. The meter is auto-ranging
and will automatically select the appropriate range for the sample being tested.
It is recommended that the meter be calibrated daily.
A 2020t in the nephelometric mode with NTU standards will be used in the following
examples.
1. Press and briefl y hold to
turn the meter on. The LaMotte
logo screen will appear for about
3 seconds and the Main Menu will
appear.
2. Press
ENTER
to select Measure.
3. Press to scroll to Turbidity -
With Blank.
4. Press
ENTER
to select Turbidity -
With Blank.
Main Menu
Measure
Data Logging
Options
12:00:00 001/500
Measure Menu (N)
Turbidity - No Blank
Turbidity - With Blank
12:00:00 001/500
Measure Menu (N)
Turbidity - No Blank
Turbidity - With Blank
12:00:00 001/500
Turbidity WB (N)
Scan Blank
Scan Sample
12:00:00 001/500
28
Page 29
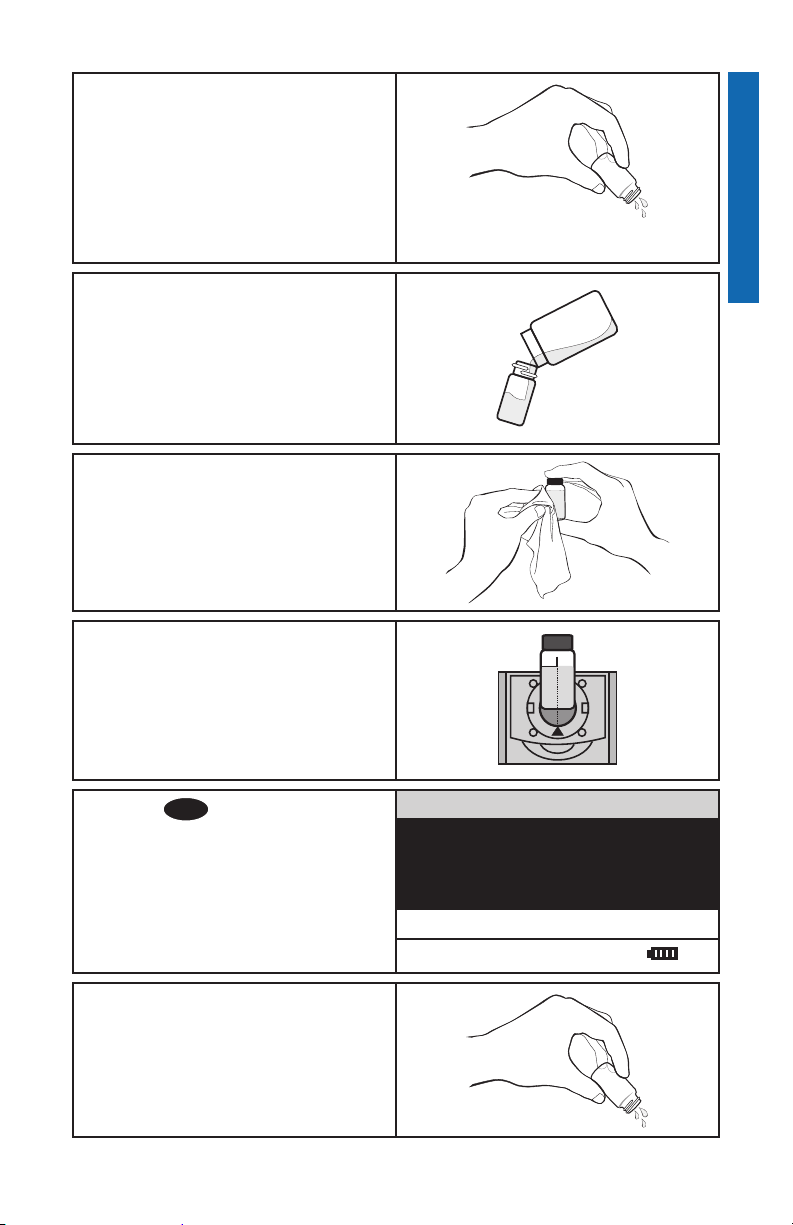
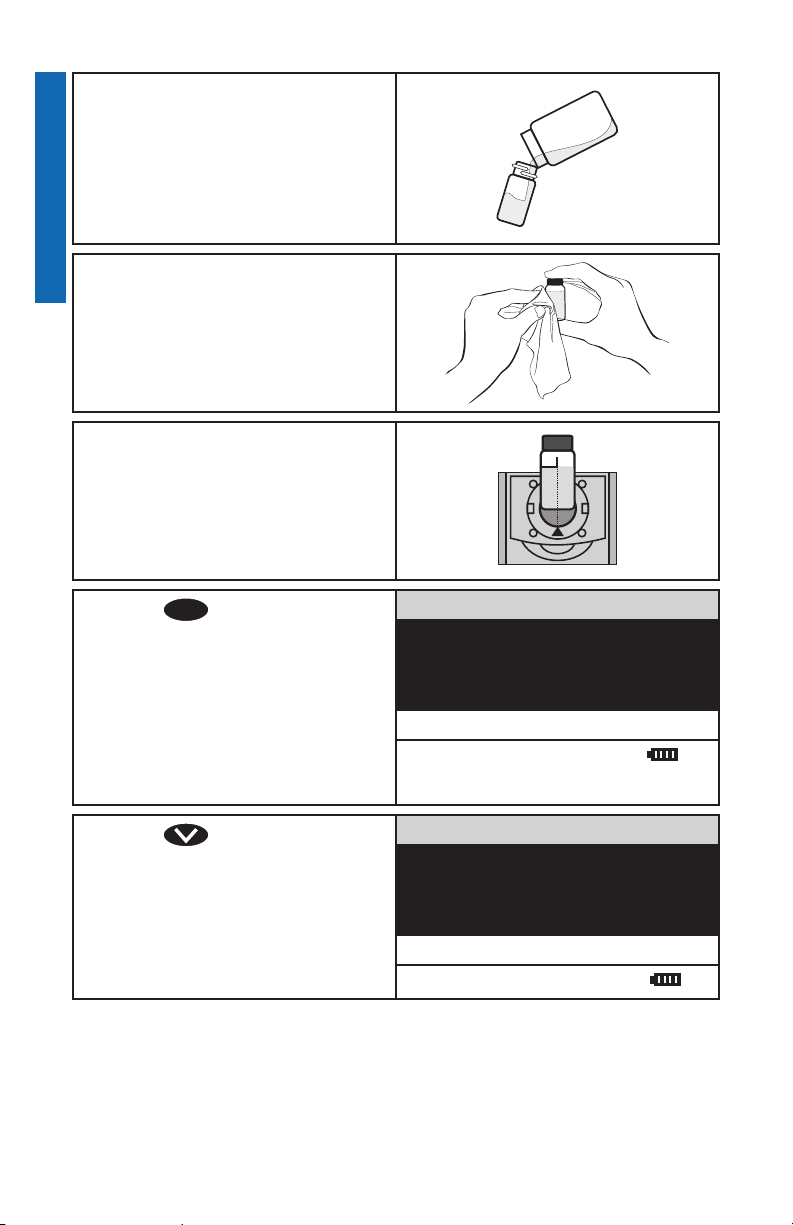
5. Rinse a clean tube (0260) three
times with the blank. If samples are
expected to read below 1 NTU the
meter should be blanked with a 0
NTU Primary Standard or prepared
turbidity-free (<0.1 NTU) water. For
the most accurate results, use the
same tube for the blank and the
sample.
6. Fill the tube to the fi ll line with the
blank. Pour the blank down the inside
of the tube to avoid creating bubbles.
Cap the tube.
7. Wipe the tube thoroughly with a lintfree cloth.
8. Open the meter lid. Insert the tube
into the chamber. Align the index line
on the tube with the index arrow on
the meter. Close the lid.
CALIBRATION
9. Press
ENTER
to select Scan Blank
and scan the blank. The screen
will display Blank Done for about
1 second and then return to the
Turbidity - With Blank Menu.
10. Rinse a clean tube (0260), or the
same tube, three times with the
turbidity standard.
Turbidity WB (N)
Scan Blank
Scan Sample
12:00:00 001/500
29
Page 30
11. Fill the tube to the fi ll line with the
turbidity standard. Pour the standard
down the inside of the tube to avoid
creating bubbles. Cap the tube.
CALIBRATION
12. Wipe the tube thoroughly with a lintfree cloth.
13. Open the meter lid. Insert the tube
into the chamber. Align the index line
on the tube with the index arrow on
the meter. Close the lid.
14. Press
15. Press to scroll to Calibrate.
ENTER
and scan the standard. The screen
will display Reading for about 1
second. The result will appear on the
screen.
“Overrange” will be displayed if
the reading is out of range. Dilute
the sample or select a mode that
is appropriate for the range of the
sample.
to select Scan Sample
Turbidity WB (N)
0.99 NTU
Scan Blank
Scan Sample
12:00:00 001/500
Turbidity WB
0.99 NTU
Scan Sample
Calibrate
12:00:00 001/500
30
Page 31

16. Press
ENTER
A reverse font (light background
with dark characters) will appear
to indicate that the reading can be
adjusted.
to select Calibrate.
Turbidity WB
CALIBRATION
0.99 NTU
Scan Sample
Calibrate
12:00:00 001/500
17. Press or to scroll to
the concentration of the standard,
1.00 in the example. Use the value
on the turbidity standard bottle label
as the target. Note: The allowable
adjustment is ±25%. If the allowable
adjustment limit is reached,
“overrange” wil be displayed.
18. Press
19. Press
ENTER
menu choices will be off ered, Set
Calibration and Factory Setting.
and save the calibration. Press
Factory Setting to revert to the
factory calibration. The meter will
momentarily display Storing... and
return to the Turbidity-Without Blank
menu. The calibration has now been
saved and the meter can be used for
testing. The standard should never be
poured from the tube back into the
bottle.
to select Calibrate. Two
ENTER
to select Set Calibration
or to scroll and select
Turbidity WB (N)
1.00 NTU
Scan Sample
Calibrate
12:00:00 001/500
Calibrate Menu (N)
1.00 NTU
Set Calibration
Factory Setting
12:00:00 001/500
Turbidity WB
Scan Blank
Scan Sample
12:00:00 001/500
NOTE: For the greatest accuracy during the calibration procedure, be sure that after the
meter is blanked and the blank is scanned as a sample, the reading is 0.00. If not, reblank
the meter and scan the blank again until it reads 0.00. When scanning the calibration
standards as the sample, scan the calibration standard three times removing the tube
from the chamber after each scan and reinserting the tube in the chamber with the same
orientation. The readings should be consistent. Use the last consistent reading to calibrate
the meter. If the readings are not consistent, avoid using an aberrant reading to calibrate
the meter.
31
Page 32

ANALYSIS WITHOUT BLANKING PROCEDURE
To obtain the most accurate results the meter should be blanked before measuring a
sample. The blanking step is not as critical for samples above 10 NTU. The meter should
always be blanked before reading samples below 10 NTU.
1. Press and briefl y hold to
turn the meter on. The LaMotte
logo screen will appear for about
3 seconds and the Main Menu will
appear.
2. Press
ENTER
to select Measure.
ANALYSIS WITHOUT BLANKING PROCEDURE
3. Press
ENTER
to select Turbidity - No
Blank.
4. Rinse a clean tube (0260) three times
with the sample.
Main Menu
Measure
Data Logging
Options
12:00:00 001/500
Measure Menu (N)
Turbidity - No Blank
Turbidity - With Blank
12:00:00 001/500
Turbidity NB (N)
Scan Blank
Scan Sample
12:00:00 001/500
5. Fill the tube to the fi ll line with the
sample. Pour the sample down the
inside of the tube to avoid creating
bubbles. Cap the tube.
32
Page 33

6. Wipe the tube thoroughly with a lintfree cloth.
7. Open the meter lid. Insert the tube
into the chamber. Align the index line
on the tube with the index arrow on
the meter. Close the lid.
ANALYSIS WITHOUT BLANKING PROCEDURE ANALYSIS WITH BLANKING PROCEDURE
8. Press
ENTER
and scan the sample. The screen will
display Reading for about 1 second.
The result will appear on the screen.
to select Scan Sample
10.22 NTU
Scan Blank
Scan Sample
12:00:00 001/500
Turbidity NB (N)
ANALYSIS WITH BLANKING PROCEDURE
To obtain the most accurate results the meter should be blanked before measuring a
sample. The blanking step is not as critical for samples above 10 NTU. The meter should
always be blanked before reading samples below 10 NTU.
1. Press and briefl y hold to
turn the meter on. The LaMotte
logo screen will appear for about
3 seconds and the Main Menu will
appear.
2. Press
ENTER
to select Measure.
Measure
Data Logging
Options
12:00:00 001/500
Turbidity - No Blank
Turbidity - With Blank
Main Menu
Measure Menu (N)
12:00:00 001/500
33
Page 34

3. Press to scroll to Turbidity -
With Blank.
Measure Menu (N)
Turbidity - No Blank
Turbidity - With Blank
4. Press
ENTER
to select Turbidity -
With Blank.
ANALYSIS WITH BLANKING PROCEDURE
5. Rinse a clean tube (0260) three
times with the blank. If samples are
expected to read below 1 NTU the
meter should be blanked with a 0
NTU Primary Standard or prepared
turbidity-free (<0.1 NTU) water. For
the most accurate results, use the
same tube for the blank and the
sample.
6. Fill the tube to the fi ll line with the
blank. Pour the blank down the inside
of the tube to avoid creating bubbles.
Cap the tube.
7. Wipe the tube thoroughly with a lintfree cloth.
Turbidity WB (N)
Scan Blank
Scan Sample
12:00:00 001/500
34
Page 35

8. Open the meter lid. Insert the tube
into the chamber. Align the index line
on the tube with the index arrow on
the meter. Close the lid.
ANALYSIS WITH BLANKING PROCEDURE
9. Press
ENTER
to select Scan Blank
and scan the blank. The screen
will display Blank Done for about
1 second and then return to the
Turbidity - With Blank menu.
10. Rinse a clean tube (0260), or the
same tube, three times with the
sample.
11. Fill the tube to the fi ll line with the
sample. Pour the standard down the
inside of the tube to avoid creating
bubbles. Cap the tube.
12. Wipe the tube thoroughly with a lintfree cloth.
Turbidity WB (N)
Scan Blank
Scan Sample
12:00:00 001/500
13. Open the meter lid. Insert the tube
into the chamber. Align the index line
on the tube with the index arrow on
the meter. Close the lid.
35
Page 36

14. Press
NOTE: The meter will remember the last scanned blank reading. It is not necessary to scan
a blank each time the test is performed. To use the previous blank reading, instead of
scanning a new one, scroll to Scan Sample and proceed. For the most accurate results, the
meter should be blanked before each test and the same tube should be used for the blank
and the reacted sample.
DILUTION PROCEDURES
ANALYSIS WITH BLANKING PROCEDURE
If a sample is encountered that is more than 2000 NTU or FNU, a careful dilution with
0 NTU/FNU or very low turbidity water will bring the sample into an acceptable range.
However, there is no guarantee that halving the concentration will exactly halve the NTU or
FNU value. Particulates often react in an unpredictable manner when diluted.
Turbidity-Free Water
The defi nition of low turbidity and turbidity-free water has changed as fi lter technology
has changed and nephelometric instruments have become more sensitive. At one time
turbidity-free water was defi ned as water that had passed through a 0.6 micron fi lter.
Now 0.1 micron fi lters are available and higher purity water is possible. Water that has
been passed through a 0.1 micron fi lter could be considered particle free and therefore
turbidity free, 0 NTU water. Turbidity is caused by scattered light. Therefore, low turbidity
water is water without any particles that scatter a measurable amount of light. But water
that passed through a 0.1 micron fi lter may still have detectable light scatter with modern
instruments. This light scattering can be the result of dissolved molecules or sub-micron
sized particles that can not be fi ltered out of the water. Because there may still be a small
amount of scattered light from dissolved molecules, high purity water is often called low
turbidity water and assigned a value of 0.01 or 0.02 NTU. However, because this water is
used as a baseline to compare to sample water, the diff erence between the sample and the
low turbidity or turbidity-free water will be the same whether it is called 0.00 NTU or 0.02
NTU. For design simplicity the 2020t/i uses the term turbidity-free water and the value of
0.00 NTU.
ENTER
and scan the sample. The screen will
display Reading for about 1 second.
The result will appear on the screen.
“Overrange” will be displayed if
the reading is out of range. Dilute
the sample or select a mode that
is appropriate for the range of the
sample.
to select Scan Sample
0.99 NTU
Scan Blank
Scan Sample
12:00:00 001/500
Turbidity WB (N)
PREPARATION OF TURBIDITY-FREE WATER
A 0 NTU/FNU Standard (Code 1480) is included with the meter. Accessories are available
for preparing turbidity-free water for blanking the meter and dilution of high turbidity
samples.
The preparation of turbidity-free water requires careful technique. Introduction of
foreign matter will aff ect the turbidity reading. A fi ltering device with a special membrane
fi lter is used to prepare turbidity-free water. The fi lter, fi lter holder and syringe must be
conditioned by forcing at least two syringes full of deionized water through the fi ltering
apparatus to remove foreign matter. The fi rst and second rinses should be discarded.
Turbidity-free water as prepared with the following procedure may be stored in the dark
at room temperature in a clean glass bottle with a screw cap and used as required. The
storage container should be rinsed thoroughly with fi ltered deionized water before fi lling.
The water should be periodically inspected for foreign matter in bright light.
36
Page 37

1. Remove the plunger from the syringe
(0943). Attach a fi lter (2-2097) to the
bottom of the syringe.
2. Pour approximately 50 mL of
deionized water into the barrel of
the syringe. Insert the plunger. Exert
pressure on the plunger to slowly
force the water through the fi lter.
Collect water in the clean storage
container. Rinse walls of the container
then discard this rinse water.
3. Remove the fi lter from the syringe.
Remove the plunger from the barrel.
(This step is required to prevent
rupturing the fi lter by the vacuum
that would be created when the
plunger is removed.)
4. Replace the fi lter and repeat step 2
for a second rinse of the syringe and
storage container.
5. Remove the fi lter from the syringe.
Remove the plunger from the
barrel. Replace the fi lter and fi ll the
syringe with approximately 50 mL of
deionized water. Filter the water into
the storage container and save this
turbidity-free water.
37
Page 38

6. Repeat Step 5 until the desired
amount of turbidity-free water has
been collected.
TESTING TIPS
1. Samples should be collected in a clean glass or polyethylene container.
2. Samples should be analyzed as soon as possible after collection.
3. Gently mix sample by inverting before taking a reading but avoid introducing air
bubbles.
4. For the most precise results, follow the recommended procedure for wiping a fi lled
tube before placing it in the meter chamber. Invert tube very slowly and gently three
times to mix the sample. Surround the tube with a clean, lint-free cloth. Press the
cloth around the tube. Rotate the tube in the cloth three times to assure that all areas
of the tube have been wiped. Place tubes in the chamber with the same orientation
each time.
5. Discard tubes that have signifi cant scratches and imperfections in the light pass
zones. (Central zone between bottom and fi ll line).
6. When reading very low turbidity samples, do not use tubes or caps that have been
used previously with high turbidity samples.
7. Use the averaging option for low level measurements of turbidity.
8. The meter should be placed on a surface that is free from vibrations. Vibrations can
cause high readings.
9. Turbidity readings will be aff ected by electric fi elds around motors.
10. Carbon in the sample will absorb light and cause low readings.
11. Excessive color in a sample will absorb light and cause low readings. The user should
verify if a certain level of color will cause a signifi cant error at the level of turbidity
being tested. Use of the Ratiometric calibration curve is recommended for highly
colored samples.
12. Observe shelf life recommendations for turbidity standards.
13. Do not use silicone oil on tubes when testing turbidity with the
2020t/i.
14. When testing at low concentrations use the same tube for the blank and the sample.
15. Always insert tube into the meter chamber with the same amount of pressure and to
the same depth.
16. Occasionally clean the chamber with a damp lint-free wipe, followed by a Windex
dampened wipe. A clean chamber and tubes are essential for reliable results.
17. For the greatest accuracy during the calibration procedure, be sure that after the
meter is blanked and the blank is scanned as a sample, the reading is 0.00. If not,
reblank the meter and scan the blank again until it reads 0.00. When scanning the
calibration standards as the sample, scan the calibration standard three times
removing the tube from the chamber after each scan. The readings should be
®
38
Page 39

consistent. Use the last consistent reading to calibrate the meter. If the readings are
not consistent, avoid using an aberrant reading to calibrate the meter.
18. Calibrate the meter daily.
19. Calibrate the meter with a standard that is closest to the expected range of the
sample being tested. For example, if the sample is expected to be less than 1.0
NTU, calibrate with a 1.0 NTU standard and a blank (0 NTU standard). If the sample
is expected to be around 2 NTU also calibrate with the 1.0 NTU standard but if the
sample is expected to be around 8 NTU calibrate with a 10 NTU standard. If the
sample is expected to be over 30 – 40 NTU it is recommended that the meter be
calibrated with a 100 NTU standard.
20. To maintain a consistent lamp temperature, do not turn the meter on and off when
analyzing samples.
TROUBLESHOOTING GUIDE
TROUBLESHOOTING
PROBLEM REASON SOLUTION
“Blank?” Sample is reading lower
Flashing
“Low Battery” Battery voltage is very low.
“Shut Down Low Batt”
Shut Down
“Over range” Sample is outside of
than the blank.
Low battery. Readings are
reliable.
Readings are not reliable.
Battery is too low to
operate the unit.
acceptable range.
With samples of very low
concentration reblank or
record as zero. On samples of
higher concentration reblank
and read again.
Charge battery or use USB
wall/computer charger.
Charge battery or use USB
wall/computer charger.
Charge battery or use USB
wall/computer charger.
Dilute sample and test again.
“Error1” High readings with 90° and
Unusually large negative
or positive readings when
performing calibration
180° detectors.
Incorrect standards used to
calibrate meter.
Dilute sample by at least 50%
and retest.
Use fresh 0.0 standard in
clean tube. Recalibrate meter.
STRAY LIGHT
The accuracy of readings on the 2020t/i should not be aff ected by stray light. Make
sure that the sample compartment lid is always fully closed when taking readings. The
backlight will interfere with turbidity readings. The meter will temporarily disable the
backlight while turbidity measurements are being taken.
39
Page 40

GENERAL OPERATING INFORMATION
OVERVIEW
The 2020t/i is a portable, microprocessor controlled, direct reading nephelometer. Turbidity
is measured directly according to EPA Method 180.1 or ISO Method 7027, or is calculated
ratiometrically by using a combination of the two measurements. It has a graphical liquid
crystal display and six button keypad. These allow the user to select options from the menu
driven software, to directly read test results or to review stored results of previous tests in
the data logger. The menus can be displayed in seven diff erent languages.
The 2020t/i uses a state of the art, multi-detector optical confi guration that assures long
term stability of calibrations, high precision and accuracy and low detection limits. All
readings are determined by digital signal processing algorithms, minimizing fl uctuations
in readings and enabling rapid, repeatable measurements. The microprocessor and optics
enable a dynamic range and auto-ranging over several ranges. Energy effi cient LED light
sources are used for ISO turbidity. EPA turbidity uses a tungsten fi lament light source that
meets or exceeds EPA specifi cations and is designed for a uniform light spot image and
stable output.
A USB wall adapter, USB computer connection or lithium battery powers the 2020t/i.
GENERAL OPERATING INFORMATION
The operation of the 2020t/i is controlled by the menu driven software and user interface. A
menu is a list of choices. This allows a selection of various tasks for the 2020t/i to perform,
such as, scan blank and scan sample. The keypad is used to make menu selections that are
viewed on the display.
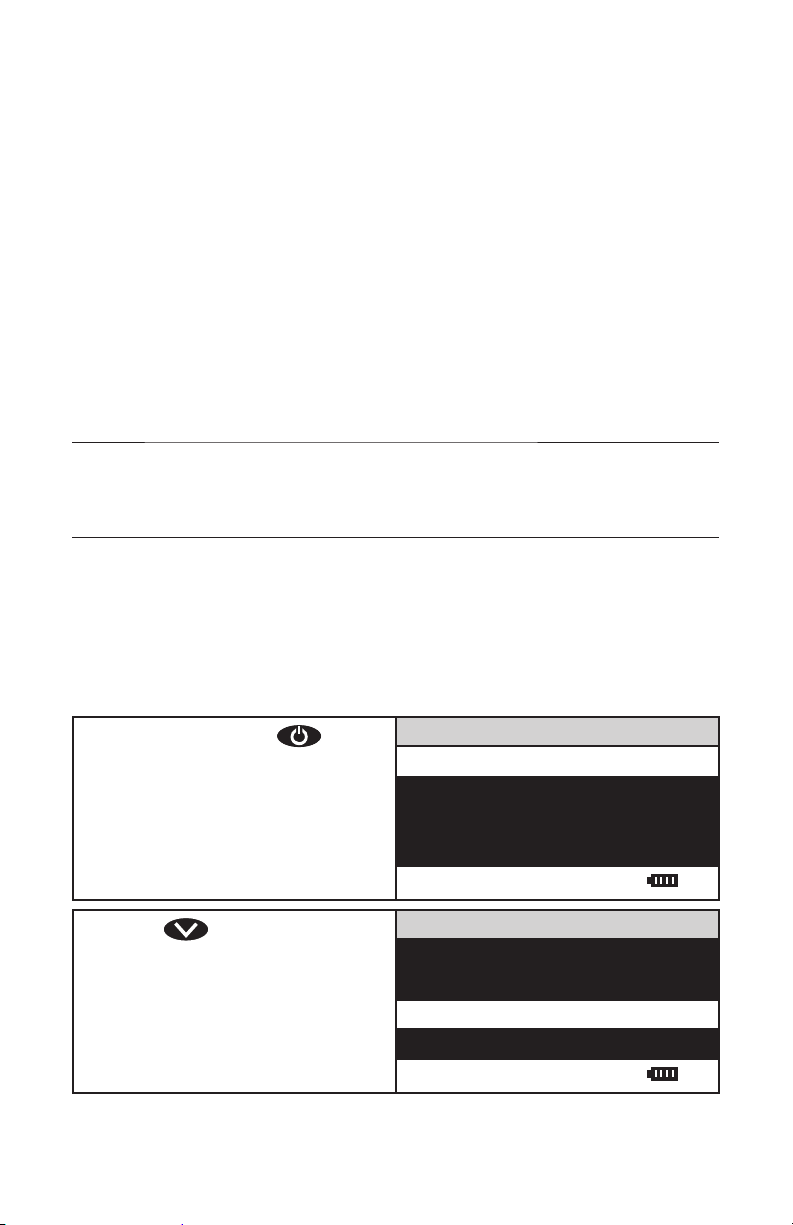
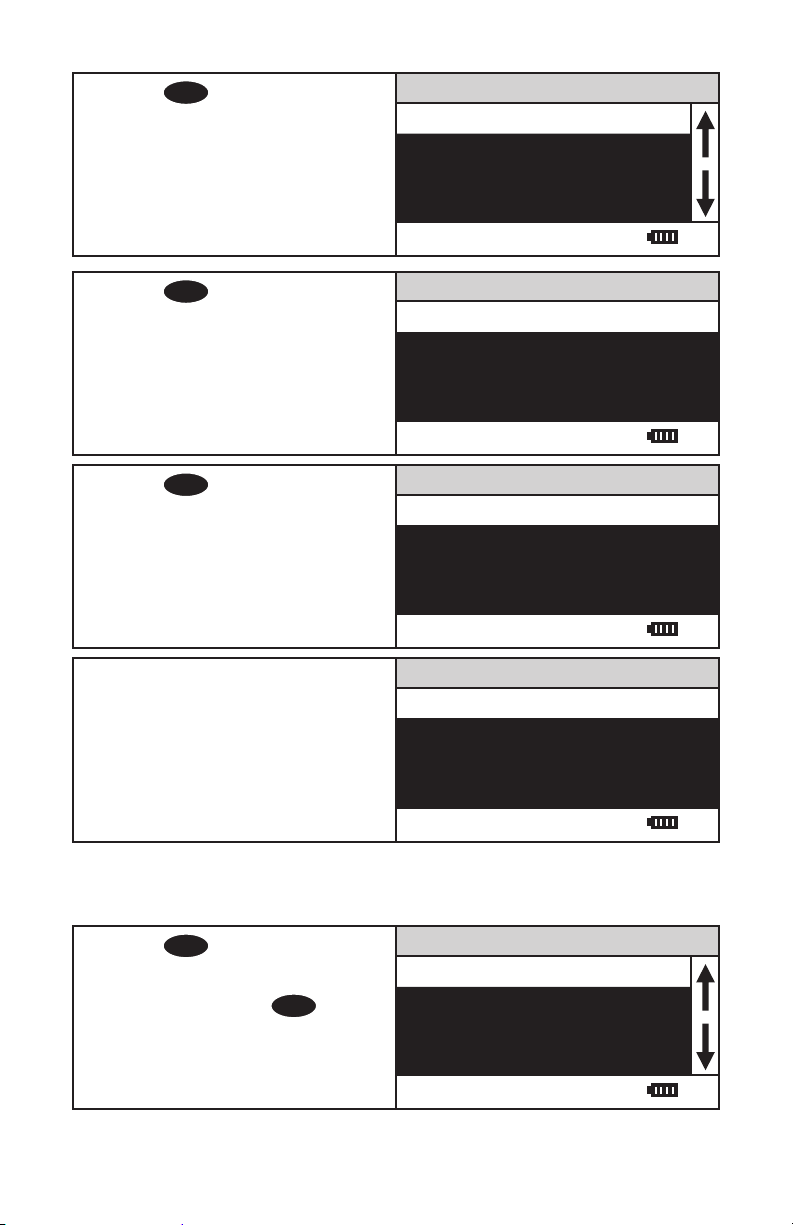
THE KEYPAD
This button will scroll up through a list of menu selections.
ENTER
The button is used to select choices in a menu viewed in the display.
This button controls the backlight on the display.
This button will scroll down through a list of menu selections.
EXIT
This button exits to the previous menu.
This button turns the meter on or off .
ENTER
EXIT
THE DISPLAY & MENUS
The display allows menu selections to be viewed and selected. These selections
instruct the 2020t/i to perform specifi c tasks. The menus are viewed in the display
using two general formats that are followed from one menu to the next. Each menu
is a list of choices or selections.
40
Page 41

The display has a header line at the top and a footer line at the bottom. The header
displays the title of the current menu. The footer line displays the time and the date,
the data logger status and the battery status. The menu selection window is in the
middle of the display between the header and the footer.
The menu selection window displays information in two general formats. In the fi rst
format only menu selections are displayed. Up to 4 lines of menu selections may be
displayed. If more selections are available they can be viewed by pressing the arrow
buttons
to scroll the other menu selections into the menu selection
window. Think of the menu selections as a vertical list in the display that moves up
or down each time an arrow button
is pressed. Some menus in the
2020t/i are looping menus. The top and bottom menu choices are connected in a
loop. Scrolling down past the bottom of the menu will lead to the top of the menu.
Scrolling up past the top of the menu will lead to the bottom of the menu.
Header
Main Selection Window
Footer
First Choice
Second Choice
Third Choice
Another
12:00:00 001/500
And Another
And So On
Menu Title
A light colored bar will indicate the menu choice. As the menu is scrolled through,
ENTER
the light colored bar will highlight diff erent menu choices. Pressing the
button
will select the menu choice that is indicated by the light colored bar.
In the second format the menu choice window takes advantage of the graphical
capabilities of the display. Large format graphic information, such as test results or
error messages or the LaMotte logo is displayed. The top two lines of the display are
used to display information in a large, easy to read format. The menus work in the
same way as previously described but only two lines of the menu are visible at the
bottom of the display.
Header
Message or Result Window
Menu
Title
Result or Message
Another
Main Selection Window
And Another
Footer
12:00:00 001/500
And So On
Last Choice
41
Page 42

As described previously, the
EXIT
button allows an exit or escape from the current
menu and a return to the previous menu. This allows a rapid exit from an inner menu
EXIT
to the main menu by repeatedly pushing the
button. Pushing at any
time will turn the 2020t/i off .
The display may show the following messages:
Battery Status
More choices are available and can be viewed by scrolling up and/or down
through the display.
Header
Footer
Identifi es the current menu and information on calibration curves and
reagent systems if applicable.
In the data logging mode the number of the data point is displayed and the
total number of data points in the memory will be shown. The footer also
shows current time and battery status
NEGATIVE RESULTS
There are always small variations in readings with analytical instruments. Often these
variations can be observed by taking multiple readings of the same sample. These
normal variations will fall above and below an average reading. Repeated readings on a
0.00 sample might give readings above and below 0.00. Therefore, negative readings are
possible and expected on samples with concentrations at or near zero. This does not mean
there is a negative concentration in the sample. It means the sample reading was less
than the blank reading. Small negative readings can indicate that the sample was at or
near the detection limit. A large negative reading, however, is not normal and indicates a
problem. Some instruments are designed to display negative readings as zero. In this type
of instrument, if the meter displayed zero when the result was actually a large negative
number there would be no indication that a problem existed. For this reason, the 2020t/i
displays negative numbers for turbidity.
TUBES AND CHAMBERS
The 2020t/i uses a specifi c tube (Code 0260).
The handling of the tubes is of utmost importance. Tubes must be clean and free from lint,
fi ngerprints, dried spills and signifi cant scratches, especially the central zone between the
bottom and the sample line.
Scratches, fi ngerprints and water droplets on the tube can cause stray light interference
leading to inaccurate results when measuring turbidity. Scratches and abrasions will aff ect
the accuracy of the readings. Tubes that have been scratched in the light zone through
excessive use should be discarded and replaced with new ones.
Tubes should always be washed on the inside and outside with mild detergent prior to use
to remove dirt or fi ngerprints. The tubes should be allowed to air-dry in an inverted position
to prevent dust from entering the tubes. Dry tubes should be stored with the caps on to
prevent contamination.
After a tube has been fi lled and capped, it should be held by the cap and the outside
surface should be wiped with a clean, lint-free absorbent cloth until it is dry and smudgefree. Handling the tube only by the cap will avoid problems from fi ngerprints. Always set the
clean tube aside on a clean surface that will not contaminate the tube. It is imperative that
the tubes and light chamber be clean and dry. The outside of the tubes should be dried with
a clean, lint-free cloth or disposable wipe before they are placed in the meter chamber.
42
Page 43

Tubes should be emptied and cleaned as soon as possible after reading a sample to
prevent deposition of particulates on the inside of the tubes. When highly accurate results
are required, reduce error by designating tubes to be used only for very low turbidity and
very high turbidity testing.
Variability in the geometry of the glassware and technique are the predominate cause
of variability in results. Slight variations in wall thickness and the diameter of the tubes
may lead to slight variations in the test results. To eliminate this error the tubes should be
placed in the chamber with the same orientation each time.
Chambers which have been scratched through excessive use should be discarded and
replaced with a new one.
MAINTENANCE
CLEANING
Clean the exterior housing with a damp, lint-free cloth. Do not allow water to enter the light
chamber or any other parts of the meter. To clean the light chamber and optics area, point
a can of compressed air into the light chamber and blow the pressurized air into the light
chamber. Use a cotton swab dampened with Windex
interior of the chamber. Do not use alcohol; it will leave a thin residue over the optics when
dry.
REPAIRS
Should it be necessary to return the meter for repair or servicing, pack the meter carefully
in a suitable container with adequate packing material. A return authorization number
must be obtained from LaMotte Company by calling 800-344-3100 (US only) or 410778-3100, faxing 410-778-6394, or emailing tech@lamotte.com. Often a problem can
be resolved over the phone or by email. If a return of the meter is necessary, attach a
letter with the return authorization number, meter serial number, a brief description of
problem and contact information including phone and FAX numbers to the shipping carton.
This information will enable the service department to make the required repairs more
effi ciently.
®
window cleaner to gently swab the
METER DISPOSAL
Waste Electrical and Electronic Equipment (WEEE)
Natural resources were used in the production of this equipment. This equipment may
contain materials that are hazardous to health and the environment. To avoid harm to
the environment and natural resources, the use of appropriate take-back systems is
recommended. The crossed out wheeled bin symbol on the meter encourages the use of
these systems when disposing of this equipment.
Take-back systems will allow the materials to be reused or recycled in a
way that will not harm the environment. For more information on approved
collection, reuse, and recycling systems contact local or regional waste
administration or recycling services.
43
Page 44

44
Page 45

ÍNDICE
INFORMACIÓN GENERAL
∆ Embalaje y entrega .............................................................................................47
∆ Precauciones generales ....................................................................................47
∆ Precauciones de seguridad ..............................................................................47
∆ Limitación de responsabilidad ...................................................................... 47
∆ Especifi caciones ...................................................................................................48
∆ Defi niciones técnicas y estadísticas ..............................................................49
∆ Contenido y accesorios .......................................................................................50
∆ Conformidad EPA .................................................................................................51
∆ Conformidad ISO .................................................................................................51
∆ Conformidad CE ...................................................................................................51
∆ Conformidad IP67 ...............................................................................................51
∆ Garantía ..................................................................................................................51
∆ Registre su fotómetro .........................................................................................52
CONEXIÓN AL ORDENADOR
∆ Salida .......................................................................................................................52
∆ Conexión al ordenador ........................................................................................52
FUNCIONAMIENTO CON FUENTE DE ALIMENTACIÓN CA / BATERÍA .....................52
TURBIDEZ
∆ ¿Qué es la turbidez?............................................................................................53
∆ ¿Cómo se mide la turbidez?..............................................................................54
∆ Unidades de turbidez ..........................................................................................54
∆ Toma de muestras de agua para analizar la turbidez .................................56
∆ Técnicas de disolución de muestras................................................................56
OPCIONES Y CONFIGURACIÓN
∆ Confi guración de fábrica por defecto ..............................................................57
∆ Opciones de turbidez
Selección de una curva de calibración de turbidez ................................. 57
Selección de unidades de turbidez .............................................................. 57
∆ Promediano ...........................................................................................................62
∆ Ajuste reloj .............................................................................................................63
∆ Ajuste de ahorro energético ..............................................................................64
∆ Ajuste del tiempo de retroiluminación ............................................................66
∆ Selección de idioma .............................................................................................67
∆ Enlace al PC ...........................................................................................................69
REGISTRO DE DATOS ......................................................................................................69
45
Page 46

CALIBRACIÓN Y ANÁLISIS
∆ Calibración .............................................................................................................71
Estándares de turbidez ................................................................................... 71
Tubos ................................................................................................................... 71
Procedimiento de calibración de la turbidez ............................................. 71
∆ Análisis sin procedimiento de blanco ..............................................................76
∆ Análisis con procedimiento de blanco ............................................................77
∆ Procedimiento de disolución .............................................................................80
∆ Preparación de agua sin turbidez ....................................................................81
∆ Consejos de análisis ............................................................................................82
GUÍA DE RESOLUCIÓN DE INCIDENCIAS
∆ Resolución de incidencias ..................................................................................84
∆ Dispersión de luz ..................................................................................................84
INFORMACIÓN GENERAL DE FUNCIONAMIENTO
∆ Información general ............................................................................................85
∆ El teclado ................................................................................................................85
∆ La pantalla y los menús ......................................................................................86
∆ Resultados negativos .........................................................................................87
∆ Tubos y cámaras ...................................................................................................87
MANTENIMIENTO
∆ Limpieza .................................................................................................................88
∆ Reparaciones.........................................................................................................88
∆ Eliminación del fotómetro ..................................................................................89
Consulte la Guía de inicio rápido para procedimientos de calibración y análisis
simplifi cados.
Consulte la Guía de análisis para procedimientos de calibración y análisis detalladas con el
fi n de mejorar la precisión de las mediciones de turbidez de rango bajo.
46
Page 47

Consulte la Guía de inicio rápido para procedimientos de calibración y análisis
simplifi cados.
Consulte la
el fi n de mejorar la precisión de las mediciones de turbidez de rango bajo.
Guía de análisis para procedimientos de calibración y análisis detalladas con
INFORMACIÓN GENERAL
EMBALAJE Y DEVOLUCIONES
El personal experimentado responsable del embalaje en LaMotte Company se asegura
de proteger adecuadamente el producto frente a los riesgos normales que conlleva el
transporte de los envíos.
Cuando el producto sale de LaMotte Company, la responsabilidad de una entrega segura
está garantizada por la empresa de transportes. Las reclamaciones por daños deben
presentarse de inmediato ante la empresa de transportes para recibir una compensación
por los productos dañados.
PRECAUCIONES GENERALES
LEA EL MANUAL DE INSTRUCCIONES ANTES DE INTENTAR CONFIGURAR O UTILIZAR EL
FOTÓMETRO. No hacerlo puede conllevar lesiones personales o daños al fotómetro. No use
ni guarde el fotómetro en un entorno húmedo o corrosivo. Conviene tener cuidado para
evitar que el agua de los tubos húmedos entre en la cámara del fotómetro.
NO COLOQUE NUNCA TUBOS HÚMEDOS EN EL FOTÓMETRO.
PRECAUCIONES DE SEGURIDAD
*ADVERTENCIA: los reactivos marcados con un * se consideran riesgos potenciales para
la salud. Si quiere ver o imprimir una fi cha de datos de seguridad (SDS) de estos reactivos,
visite www.lamotte.com.
Busque el código reactivo de cuatro dígitos que aparece en la etiqueta del reactivo, en la
lista de contenido o en los procedimientos de análisis. Omita cualquier letra que siga o
anteceda al código de cuatro dígitos.
Por ejemplo, si el código es 4450WT-H, busque 4450. Para obtener una copia impresa,
contacte con LaMotte por correo electrónico, teléfono o fax.
Puede obtener información para casos de emergencia sobre todos los reactivos de
LaMotte en el teléfono: (EEUU, 1-800-255-3924) (Internacional, a cobro revertido, 813248-0585).
Compruebe que la protección facilitada por este equipo no esté dañada. No instale ni use
este equipo de una forma distinta a la indicada en este manual.
LIMITACIÓN DE RESPONSABILIDAD
En ningún caso será LaMotte Company responsable de la pérdida de vidas, propiedades,
benefi cios u otros daños en que se incurra al utilizar o abusar de sus productos.
47
Page 48

ESPECIFICACIONES - 2020t/i
Modo Nefelométrico Ratiométrico Atenuación
Unidad de medida
2020t
Unidad de medida
2020i
Rango 0-100 NTU/FNU
Resolución 0–10.99 NTU/FNU: 0.01
Precisión 0-2.5 NTU/FNU:
Límite de
detección
Reproducibilidad 0,02 NTU/FNU o 1 % 0,02 NTRU/FNRU o 1 % 1%
Selección de rango Automática
Fuente de luz 2020t Lámpara de tungsteno 2300 °K ±50 °K, 2020i: LED IR 860 nm ±10 nm,
Detector: 2020t Fotodiodo, centrado a 90° y 180°, nivel máximo 400-600 nm
Tiempo de
respuesta:
Promediador de
señal
Cámara de
muestra:
Muestra: 10 ml en tubo tapado
Pantalla: Pantalla gráfi ca de cristal líquido con retroiluminación
Software: Auto Apagado: 5, 10, 30 min, calibración desactivada:
Idiomas: inglés, español, francés, portugués, italiano, chino y japonés (kana).
NTU, ASBC, EBC NTU, NTRU, ASBC, EBC NTU, AU, ASBC, EBC
NTU, FNU, ASBC, EBC NTU, FNRU, ASBC, EBC NTU, FAU, ASBC,
0-1,750 ASBC
0-25 EBC
NTU/FNU,
11.0–100.0 NTU/FNU: 0.1
NTU/FNU
±0.05 NTU/FNU,
2.5-100 NTU/FNU: ±2%
0,05 NTU/FNU 0,05 NTRU/FNRU 10 AU/FAU
ancho de banda espectral con 50 nm
2020t/i: Fotodiodo, centrado a 90° y 180°
<2 segundos
Sí
Acepta tubos de ensayo de fondo plano y 25 mm de diámetro
Campo ajustable, en blanco y 1 punto
Registro de datos: 500 puntos
0-1,000 NTRU/FNRU
0-17,500 ASBC
0-250 EBC
0–10.99 NTRU/FNRU: 0.01
NTRU/FNRU, 11.0–109.9
NTRU/FNRU: 0.1 NTRU/
FNRU,
110–1000 NTRU/FNRU: 1
NTRU/FNRU
0-2.5 NTRU/FNRU:
±0.05 NTRU/FNRU,
2.5-100 NTRU/FNRU: ±2%,
100-1000 NTRU/FNRU:
±3%.
EBC
0-2,000 AU/FAU
0-70,000 ASBC
0-1,000 EBC
0–2000 AU/FAU:
1 AU/FAU
0-2000 AU/FAU:
±10 AU/FAU or 6%
el que sea mayor
Temperatura: Funcionamiento: 0-50 °C; almacenamiento: -40-60 °C
Rango de
humedad durante
el funcionamiento
Auto Apagado: 5, 10, 30 min, desactivado
Fuente de
alimentación:
0-90 % HR, sin condensación
Adaptador de pared USB, conexión al ordenador por USB o batería recargable
interna de litio-ión
48
Page 49

Batería Duración de la carga: Aproximadamente 380 pruebas con la retroiluminación
Clasifi caciones
eléctricas:
Registro de Datos: 500 resultados de pruebas almacenados
Impermeable: IP67 con conector de puerto USB en su sitio.
Dimensiones: (An x L x Al) 8,84 × 19,05 × 2,5 cm, 3,5 x 7,5 x 2,2 pulgadas
Certifi caciones:
Peso: 362 g, 13 oz (solo el fotómetro)
Interfaz USB: Mini B
activada y hasta 1000 pruebas con la retroiluminación apagada.
(Promediador de señal desactivado). Vida de la batería: Unas 500 cargas.
voltaje clasifi cado (5 V), potencia de corriente de entrada (1,0A) en puerto
miniUSB.
CE Mark Safety: Low Voltage Directive (2006/95/EC)
IEC 61010-1:2001, EN 601010-1:2001,
2nd edition
EU EMC: EMC Directive (2004/108/EC)
EN 61326-1:2006, EN 61000-4-2:1995
including A1:1998 and A2:2001, EN
61000-4-3:2002, EN 61000-4-4:2004,
EN 61000-4-5:1995 including A1:2001,
EN 61000-4-6:1996 and A1:2001, EN
61000-4-11:2004, EN 55011:2007, IEC
61000-3-2:2005, EN 61000-3-2:2006,
IEC 61000-3-3:1994, EN 61000-3-3:1995
including A1:2001 and A2:2005
US EMC CFR 47, Part 15 Subpart B:2007
CAN EMC ICES-003, Issue 4, February 2004
AU/NZ EMC AU/NZ: CISPR 11:2004
DEFINICIONES ESTADÍSTICAS Y TÉCNICAS RELACIONADAS CON LAS
ESPECIFICACIONES DE PRODUCTO
Límite de detección de método (MDL) : «El límite de detección del método (MDL) se defi ne
como la concentración mínima de una sustancia que puede medirse y notifi carse con una
fi abilidad del 99 % de que la concentración de analito es superior a cero y se determina a
partir del análisis de una muestra en una matriz concreta que contiene el analito».
en cuenta que, tal y como declaró el Dr. William Horwitz una vez, «En casi todos los casos
en los que se trata un límite de detección o de determinación, el objetivo principal de
determinar dicho límite es mantenerse alejado de él».
2
Precisión : la precisión es la proximidad de una medición al valor aceptado o verdadero.3
La precisión puede expresarse como un rango, en torno al valor verdadero, en el que se
produce una medición (es decir, ±0,5 ppm). También puede expresarse como el porcentaje
de recuperación de una cantidad conocida de analito en una determinación del analito (es
decir, 103,5 %).
Resolución : la resolución es la diferencia discernible más pequeña entre dos mediciones
cualesquiera que se puedan hacer.
4
En el caso de los fotómetros, esta suele ser la cantidad
de decimales que se muestran (es decir, 0,01). Tenga en cuenta que la resolución cambia
con la concentración o el rango. En algunos casos la resolución puede ser menor que
el intervalo más pequeño, si es posible hacer una lectura que se sitúe entre las marcas
de calibración. Una pequeña advertencia: esa resolución tiene muy poca relación con la
exactitud o la precisión. La resolución siempre será menor que la exactitud o precisión,
49
1
Tenga
Page 50

pero no es una medida estadística de lo bien que funciona un método de análisis. ¡La
resolución puede ser muy, muy buena y la exactitud y precisión pueden ser muy malas!
Esta no es una medida útil del rendimiento de un método de prueba.
Repetitividad : la repetitividad es la precisión dentro de la serie.
5
Una serie es un
único conjunto de datos, desde la puesta en marcha hasta la limpieza. Generalmente,
le ejecución de una serie se realiza en un día. Sin embargo, para las calibraciones de
fotómetros, una sola calibración se considera una sola serie o conjunto de datos, aunque
pueda tardar 2 o 3 días.
Reproducibilidad: la reproducibilidad es la precisión entre series.
6
Límite de detección (DL) : el límite de detección (DL) para 2020t/i se defi ne como el valor
o la concentración mínimos que pueden ser determinados por el fotómetro, que es mayor
que cero, independientemente de la matriz, el cristal y otras fuentes de error en el manejo
de muestras. Es el límite de detección para el sistema óptico del fotómetro.
1
CFR 40, parte 136, anexo B
2
Statistics in Analytical Chemistry: Part 7 – A review, D. Coleman y L Vanatta, American Laboratory, sept. 2003, P. 31.
3
Skoog, D.A., West, D. M., Fundamental of Analytical Chemistry, 2nd ed., Holt Rinehart and Winston, Inc, 1969, p. 26.
4
Statistics in Analytical Chemistry: Part 7 – A review, D. Coleman y L Vanatta, American Laboratory, sept. 2003, P. 34.
5
Jeff ery G. H., Basset J., Mendham J., Denney R. C., Vogel’s Textbook of Quantitative Chemical Analysis, 5th ed.,
Longman Scientifi c & Technical, 1989, p. 130.
6
Jeff ery G. H., Basset J., Mendham J., Denney R. C., Vogel’s Textbook of Quantitative Chemical Analysis, 5th ed.,
Longman Scientifi c & Technical, 1989, p. 130
CONTENIDO Y ACCESORIOS
Kit 2020t
Versión EPA
Código 1974-T
Índice Código Código
2020t/i Turbidímetro
Estándar 0 NTU, 60 ml 1480 1480
Estándar 1 NTU, 60 ml 1441
Estándar 10 NTU/FNU, 60 ml 1442 1447
Estándar 100 FNU, 60 ml 1444
Botella de muestra de agua, 60 ml 0688 0688
Tubos de ensayo, con tapones 0260 (6) 0260 (6)
Cable, USB 1720 1720
Adaptador de pared USB 1721 1721
Manual 2020t/i 1974-MN 1974-MN
Guía de inicio rápido 2020t/i 1974-QG 1974-QG
Guía de análisis 2020t/i 1974-TG 1974-TG
Kit 2020i
Versión ISO
Código 1974-I
50
Page 51

Accesorios
Código Descripción
0260-6 Tubos de ensayo, con tapones
1446 Estándar 1 FNU, 60 ml (ISO)
1443 Estándar 100 NTU, 60 ml (EPA)
6195-H Solución estándar de formacina, 4000 NTU, 60 ml
3-0038 Cámara de repuesto
0943 Jeringa, 60 mL, el plastico
2-2097 Filtros, 0,1 micras, paquete de 50
5-0132 Cargador para coche
CONFORMIDAD EPA
El fotómetro 2020t cumple o supera las especifi caciones de diseño de la EPA para los
programas de control de turbidez NPDWR y NPDES según lo especifi cado por el método
180.1 de la USEPA.
CONFORMIDAD ISO
Este fotómetro 2020i cumple con los criterios de diseño de métodos cuantitativos de la
turbidez utilizando tubidímetros ópticos, según se contempla en la ISO 7027.
CONFORMIDAD CE
Este dispositivo cumple lo dispuesto en la Parte 15 de las normas FCC. El funcionamiento
está sujeto a las dos condiciones siguientes: (1) este dispositivo no puede causar
interferencias graves; y (2) este dispositivo debe aceptar cualquier interferencia recibida,
incluyendo interferencia que pueda ocasionar un funcionamiento no deseado.
Nota: Este equipo ha sido analizado y se confi rma que cumple los límites de dispositivo
digital de Clase A, conforme a la Parte 15 de las normas FCC. Estos límites están diseñados
para proporcionar una protección razonable contra interferencias graves cuando el equipo
está funcionando en un entorno comercial. Este equipo genera, usa y puede emitir energía
de radiofrecuencia y, en caso de no estar instalado o de no usarse conforme al manual
de instrucciones, puede ocasionar graves interferencias en las radiocomunicaciones. Es
probable que el funcionamiento de este equipo en un área residencial cause interferencias
perjudiciales, en cuyo caso el usuario deberá corregir la interferencia por su propia cuenta.
CONFORMIDAD IP67
El 2020t/i cumple la norma IP67 para la protección frente a polvo e inmersión solo cuando
el conector de puerto USB está en su sitio. La documentación está disponible en www.
lamotte.com.
GARANTÍA
LaMotte Company garantiza que este instrumento está libre de defectos en las piezas
y la calidad durante dos años desde la fecha del envío. Si fuese necesario devolver el
instrumento para su mantenimiento durante el periodo de garantía o después, póngase en
contacto con el departamento de Servicio Técnico en el 1-800-344-3100 para obtener un
número de autorización de devolución o visite www.lamotte.com para consultar la sección
de resolución de incidencias. Al remitente le corresponde asumir los costes de envío,
fl ete, seguro y embalaje seguro para evitar daños durante el transporte. Esta garantía
no se aplica a los defectos resultantes de acciones del usuario como el uso incorrecto,
51
Page 52

el cableado incorrecto, el manejo sin respetar las especifi caciones, el mantenimiento
o la reparación inadecuados, o la modifi cación no autorizada. LaMotte Company niega
específi camente cualquier garantía, comerciabilidad o idoneidad implícitas para un
fi n concreto y no será responsable por cualquier daño directo, indirecto, incidental o
consecutivo. La responsabilidad total de LaMotte Company se limita a reparar o cambiar
el producto. La garantía estipulada anteriormente está completa y no existe ninguna otra
garantía, ni escrita ni oral, expresa o implícita.
REGISTRE SU FOTÓMETRO
Para inscribir su medidor en el departamento de Mantenimiento de LaMotte, visite
www.lamotte.com y elija SUPPORT en la barra de navegación superior.
CONEXIÓN AL ORDENADOR
SALIDA
USB
CONEXIÓN AL ORDENADOR
USB tipo A, USB mini B, Código de pedido del cable 1720.
FUNCIONAMIENTO BATERÍA/CORRIENTE ALTERNA
El 2020t/i puede utilizarse con batería, a través de un adaptador USB de pared o a través
de una conexión USB al ordenador. Si utiliza el fotómetro como unidad de sobremesa,
use el adaptador de pared, si es posible, para prolongar la vida de la batería. El fotómetro
permanecerá encendido mientras esté usando el adaptador USB.
Para cargar la batería con el adaptador de pared, conecte el extremo más estrecho del
cable USB (conector USB mini B) al fotómetro y el extremo más grande al cable USB
(conector USB tipo A) al adaptador de pared. Conecte el adaptador de pared a una toma de
corriente. Introduzca de nuevo el conector de puerto USB tras la carga.
Para cargar la batería desde un ordenador, conecte el extremo más estrecho del cable USB
(conector USB mini B) al fotómetro y el extremo más grande del cable USB (conector USB
tipo A) al puerto USB del ordenador. Introduzca de nuevo el conector de puerto USB tras la
carga.
El icono de la batería no mostrará ninguna barra de estado y parpadeará cuando la unidad
se encienda por primera vez. A continuación el indicador mostrará el estado de la batería
con 0, 1, 2, 3 o 4 barras.
Cargar por completa una batería baja tarda 5 horas. El icono de la batería parpadeará
cuando la batería esté cargándose. El icono de la batería mostrará cuatro barras y
dejará de parpadear cuando esté completamente cargada. El circuito de carga cambiará
automáticamente a carga de fl otación cuando la batería esté completamente cargada.
El cargador puede seguir conectado. Algunos ordenadores NO suministran corriente
a sus puertos USB durante el modo standby. El adaptador de pared cargará la unidad
continuamente.
El icono de la batería no mostrará ninguna barra y parpadeará continuamente si la batería
está agotándose, pero la unidad seguirá funcionando con normalidad. El mensaje de
«Batería baja» en la barra de estado de la pantalla reemplazará la hora cuando el voltaje
de la batería sea demasiado bajo para funcionar correctamente y la precisión pueda verse
mermada. El mensaje de «Apagado por batería baja» aparecerá en pantalla durante
unos segundos antes de que se desconecte la unidad cuando el voltaje de la batería sea
demasiado bajo para funcionar.
52
Page 53

Para prolongar la vida de la batería:
• Desconecte la unidad mediante el interruptor cuando no esté tomando
medidas o use la opción de ahorro energético para que la unidad se apague
automáticamente transcurridos 5 minutos.
• Guarde la unidad en un lugar fresco y seco.
• Cargue la batería completamente antes de almacenar la unidad durante
periodos de tiempo prolongados.
• Limite el uso de la retroiluminación, La unidad consume 3 veces más potencia
de lo normal con la retroiluminación activada. Fije la opción de tiempo de
retroiluminación a 10 segundos o seleccione “Control por botón” y mantenga
la retroiluminación desactivada.
Cambio de batería : La batería de litio-ión usada en esta unidad debería durar muchos
años con un uso normal. Cuando deje de conectar la unidad el tiempo sufi ciente para
cumplir los requisitos de análisis, será necesario reemplazarla. Las baterías de litioión que se cargan y se almacenan correctamente no suelen reducir su capacidad; solo
tienen una menor capacidad tras cientos de ciclos de carga. Esta unidad utiliza una
batería especial que solo está disponible en LaMotte Company. El cambio de batería
debe realizarse en un centro de reparación autorizado de LaMotte. El usuario no debe
abrir la carcasa impermeable del fotómetro. Contacte con LaMotte Company por teléfono
(1-800-344-3100) o correo electrónico (tech@lamotte.com) para solicitar un número de
autorización de devolución.
TURBIDEZ
¿QUÉ ES LA TURBIDEZ?
La turbidez es una propiedad óptica que resulta cuando la luz pasa a través de una
muestra líquida y se dispersa por la materia de partículas. La dispersión de la luz provoca
un cambio en la dirección de la luz que pasa a través del líquido. Si la turbidez es baja,
las partículas pueden ser invisibles a simple vista y gran parte de la luz continuará en la
dirección original. A medida que la cantidad de partículas aumenta en las muestras con
mayor turbidez, la luz incide sobre las partículas en solución y se dispersa hacia atrás,
hacia los lados y hacia delante. La luz dispersada por las partículas permite que las
partículas de la solución sean «visibles» o se detecten de la misma manera que la luz solar
permite que las partículas de polvo en el aire se vean. A altas concentraciones, la turbidez
se percibe como nubosidad, neblina o ausencia de claridad. La turbidez no es específi ca
de los tipos de partículas en la muestra. Las partículas pueden estar suspendidas o ser
coloidales, y pueden tener orígenes inorgánicos, orgánicos o biológicos.
En el agua potable, la turbidez puede indicar un problema de tratamiento o condiciones de
señal con un mayor riesgo de enfermedades gastrointestinales. Debido a que patógenos
como el criptosporidio y la giardia causan cantidades mensurables de turbidez, el control
de la turbidez puede ser la clave para asegurar una adecuada fi ltración del agua. En 1998,
la EPA publicó la norma IESWTR (norma de tratamiento de agua de superfi cie mejorada
provisional) que autoriza la turbidez en los efl uentes de fi ltración combinada a mostrar
valores iguales o inferiores a 0,3 NTU. Al hacerlo, la EPA esperaba obtener una eliminación
de 2 registros (99 %) del criptosporidio. Actualmente se está considerando la posibilidad
de reducirla a 0,1 NTU. La tendencia ha sido verifi car la calibración de los turbidímetros en
línea utilizados para controlar el agua potable con unidades de campo portátiles. El diseño
óptico y el bajo límite de detección del 2020t/i permiten lecturas muy precisas para dichas
calibraciones. El agua potable turbia no siempre es perjudicial para la salud humana, pero
53
Page 54

ofrece una apariencia desagradable.
La turbidez en las aguas ambientales reduce la cantidad de luz solar benefi ciosa que
llega a la vegetación acuática sumergida, eleva la temperatura de las aguas superfi ciales,
entierra los huevos y las criaturas que habitan en el fondo, y puede transportar sedimentos
y pesticidas a través del sistema de agua.
¿CÓMO SE MIDE LA TURBIDEZ?
La turbidez se mide detectando y cuantifi cando la dispersión de la luz en una solución. La
cantidad de luz que se dispersa está infl uenciada por las propiedades de las partículas
relativas a color, forma, tamaño y refl ectividad. La turbidez puede medirse de varias
maneras, incluyendo métodos visuales y métodos instrumentales. Los métodos visuales
son más adecuados para muestras con alta turbidez. Los métodos instrumentales pueden
utilizarse para muestras con turbidez a todos los niveles.
Algunos ejemplos de métodos visuales son el método del disco de Secchi y el método de
la vela de Jackson. El método del disco de Secchi se utiliza a menudo en aguas naturales.
Un disco de Secchi con cuadrantes blancos y negros se introduce en el agua hasta que ya
no puede verse. Luego se eleva hasta que se puede ver de nuevo. La media de estas dos
mediciones se conoce como «profundidad de Secchi». El método de la vela de Jackson
utiliza un largo tubo calibrado de vidrio colocado sobre una vela estándar. Se añade o se
quita agua del tubo hasta que la llama de la vela se vuelve borrosa. La altura del agua en el
tubo se mide con una escala calibrada y convertida a unidades de turbidez Jackson (JTU).
El nivel más bajo de turbidez que puede determinarse con precisión con este método es de
aproximadamente 25 JTU.
Los métodos instrumentales para medir la turbidez implican una combinación de ángulos
de detección y fuentes de luz para optimizar la precisión en varias muestras y cumplir los
requisitos normativos. Los turbidímetros 2020t y 2020i ofrecen la opción de tres curvas de
calibración para medir la turbidez basada en las características de la muestra.
En el modo nefelométrico, que es el modo predeterminado, el detector que se encuentra
a 90º de la fuente de luz mide la luz dispersa de un haz de luz que pasa a través de una
muestra. En el 2020t, esta confi guración y la lámpara de tungsteno, con una temperatura
de color de 2.200-3.000 °K, cumplen los requisitos del método 180.1 de la EPA. El 2020i,
que tiene una fuente de luz LED IR a 860 nm, utiliza el detector de 90° para cumplir los
requisitos de la norma ISO 2027. El modo nefelométrico se utiliza mejor para cumplir los
requisitos normativos de las muestras, como el agua potable, que se sitúan en el rango
de 0,00 a 40,00 Unidades de Turbidez Nefelométrica (NTU) para 2020t o de 0,00 a 10,00
Unidades de Turbidez Nefelométrica de formacina (FNU) para 2020i. Una opción de
promediador de señal mejora la estabilidad de las lecturas en muestras de baja turbidez.
El modo ratiométrico se utiliza normalmente para aguas naturales y aguas pluviales,
u otras muestras en el rango de 0 - 1000 NTU/FNU, para minimizar la interferencia del
color en la muestra. El modo ratiométrico toma lecturas tanto del detector de 90° como
del detector de 180°. Los resultados se indican como Unidades del ratio de turbidez
nefelométrica (NTRU, 2020t) o Unidades del ratio de formacina nefelométrica (FNRU,
2020i).
En el modo de atenuación, el detector se encuentra a 180° de la fuente de luz. Mide la
atenuación del haz de luz debido a la absorción y dispersión. Este modo se utiliza mejor
para medir muestras con altos niveles de turbidez en el rango de 40 - 2000 unidades de
atenuación (AU, 2020t) o unidades de atenuación de formacina (FAU, 2020i).
UNIDADES DE TURBIDEZ
Tradicionalmente, los turbidímetros diseñados para uso en Estados Unidos se fabricaban
según las especifi caciones del método 180.1 de la EPA. Este método defi nió la NTU, unidad
de turbidez nefelométrica, como una unidad que mide la turbidez en el rango de 0 - 40 NTU
54
Page 55

mediante un nefelómetro. Según la EPA, un nefelómetro era un turbidímetro que mide la
turbidez con un detector de 90°. Si una muestra tenía una turbidez superior a 40 NTU, era
necesaria una disolución para llevar la muestra al rango de 0 a 40 NTU. Hoy en día, muchos
turbidímetros tienen detectores adicionales que aumentan el rango de medición de la
turbidez, eliminan interferencias y, por lo general, mejoran el rendimiento. Actualmente,
muchos turbidímetros son capaces de medir por encima de 40 NTU utilizando detectores
que no sean de 90°. Aunque pueden utilizar un detector de 180°, que no cumple con la
defi nición de nefelómetro, los resultados a menudo se indican como NTU.
Dado que la posición del detector y de la fuente de luz es información importante a incluir
cuando se arrojan y comparan los resultados de turbidez, recientemente ha habido
un esfuerzo por parte de la ASTM para usar unidades de turbidez que incluyan esta
información. Para los fotómetros que cumplen con la EPA, las mediciones realizadas con
un detector de 90° y una fuente de luz blanca incandescente se indican como Unidades
de Turbidez Nefelométrica (NTU). Cuando se realiza una medición de atenuación con
un detector de 180°, utilizando la misma fuente de luz, los resultados se indican como
Unidades de Atenuación (UA). Si se utiliza un ratio de las mediciones de ambos detectores
para calcular la turbidez, los resultados se presentan en Unidades del ratio de turbidez
nefelométrica (NTRU).
El método ISO 7027, que especifi ca una fuente de luz de 860 nm, arroja resultados en
cuatro unidades de turbidez. Cuando se utiliza el detector de 90°, los resultados se
presentan como Unidades de formacina nefelométrica (FNU). Con una medición de
atenuación realizada con un detector de 180°, los resultados se presentan como Unidades
de atenuación de formacina (FAU). Y los resultados que son una relación de medidas desde
los dos ángulos se presentan en Unidades del ratio de formacina nefelométrica (FNRU).
También es posible presentar las lecturas de cada uno de los tres modos ISO en Unidades
de turbidez nefelométrica (NTU).
Debe tenerse en cuenta que todas las unidades son numéricamente equivalentes si los
fotómetros están calibrados con formacina. Las unidades diferencian qué detector y
fuente de luz se utilizaron para realizar la medición. Por ejemplo, 1 NTU = 1 AU = 1 NTRU =
1 FNU =1 FAU = 1 FNRU.
Cada modo de calibración de turbidez tiene una unidad predeterminada:
Modo nefelométrico: NTU (2020t) o FNU (2020i)
Modo radiométrico: NTRU (2020t) o FNRU (2020i)
Modo de atenuación: AU (2020t) o FAU (2020i)
El fotómetro le permitirá al usuario elegir la presentación de resultados en cualquiera
de las otras unidades de calibración disponibles (NTU, FNU, AU, FAU, NTRU o FNRU) que
no sean la unidad predeterminada. También permite a la industria cervecera verifi car el
agua de proceso en el modo nefelométrico y elegir que los resultados se presenten en
las unidades de la Sociedad Americana de Químicos de la Cerveza (American Society of
Brewing Chemists, ASBC) o de la Convención Europea de Cerveceros (European Brewery
Convention, EBC).
55
Page 56

Acrónimos Defi niciones Notas Método normativo
NTU
FNU
AU
FAU
NTRU
FNRU
ASBC
EBC
Para obtener más información, consulte la Guía de la norma ASTM 07726-4 sobre el uso de diversas tecnologías de
turbidímetros para la medición de la turbidez en el agua.
Unidades de turbidez
nefelométrica
Unidades de formacina
nefelométrica
Unidades de
atenuación
Unidades de
atenuación de
formacina
Unidades del ratio de
turbidez nefelométrica
Unidades del ratio
de formacina
nefelométrica
American Society of
Brewing Chemists
(Sociedad Americana
de Químicos de la
Cerveza)
Convención europea
de cerveceros
Luz blanca incandescente entre
400 y 600 nm, detección de 90°,
2020t
LED IR (normalmente) 860 nm,
ancho de banda inferior a 60 nm,
detección 90°, 2020i
Luz blanca incandescente entre
400 y 600 nm, detección de 180°,
2020t
LED IR (normalmente) 860 nm,
ancho de banda inferior a 60 nm,
detección 180°, 2020i
Luz blanca incandescente entre
400 y 600 nm, detección de 90° y
180°, 2020t
LED IR (normalmente) 860 nm,
ancho de banda inferior a 60 nm,
detección 90° y 180°, 2020i
2020t/i No procede
2020t/i No procede
EPA 180.1
ISO 7027
No procede
ISO 7027
EPA 180.1
No procede
TOMA DE MUESTRAS DE AGUA PARA ANALIZAR LA TURBIDEZ
Para las muestras de turbidez pueden utilizarse recipientes limpios de plástico o vidrio.
Lo ideal sería que las muestras se analizaran poco después de la recogida y a la misma
temperatura que cuando se recogieron.
TÉCNICAS DE DISOLUCIÓN DE MUESTRAS
Si el resultado de la prueba está fuera del rango del fotómetro, como indica un mensaje en
pantalla de rango sobrepasado, la muestra debe diluirse y volverse a analizar. La siguiente
tabla ofrece una guía de consulta rápida para realizar disoluciones en varias proporciones.
Cantidad de muestra
10 mL 0 mL 1
5 mL 5 mL 2
2,5 mL 7,5 mL 4
1 mL 9 mL 10
0,5 mL 9,5 mL 20
Agua desionizada para que el
volumen fi nal sea de 10 mL Factor de multiplicación
56
Page 57

Todas las disoluciones se basan en un volumen fi nal de 10 mL, de modo que varias
disoluciones requerirán menos cantidad de muestra de agua. Las pipetas graduadas se
usan para todas las disoluciones. Si el cristal volumétrico no está disponible, puede realizar
las disoluciones con el tubo del colorímetro. Llene el tubo hasta la línea de 10 mL con la
muestra y traspáselo a otro recipiente. Añada volúmenes de 10 mL de agua desionizada al
recipiente y mezcle. Traspase 10 mL de la muestra diluida al tubo del colorímetro y siga el
procedimiento de análisis. Repita los procedimientos de disolución y análisis hasta que el
resultado se encuentre dentro del rango de calibración. Multiplique el resultado del análisis
por el factor de disolución. Por ejemplo, si se diluyen 10 mL de agua de muestra con tres
volúmenes de 10 mL de agua desionizada, el factor de disolución es cuatro. El resultado de
la prueba de muestra diluida debe multiplicarse por cuatro.
OPCIONES Y CONFIGURACIÓN
CONFIGURACIÓN DE FÁBRICA POR DEFECTO
La confi guración que tiene opciones de usuario se ha ajustado de fábrica a la confi guración
por defecto.
La confi guración de fábrica por defecto es la siguiente:
Curva de calibración de turbidez Nefelométrico (N)
Unidades de turbidez Por defecto
Medición de turbidez Turbidez - Sin blanco (NB)
Promediano Desactivado
Formato de fecha DD-MM-AAAA
Ahorro de energía 5 minutos
Retroiluminación 10 segundos
Idioma Inglés
OPCIONES DE TURBIDEZ
Hay tres curvas de calibración disponibles: nefelométrica, ratiométrica y de atenuación.
Para el 2020t, la nefelométrica es la curva de calibración por defecto y las unidades
disponibles son NTU, NTRU, ASBC y EBC. Para el 2020i, la nefelométrica es la curva de
calibración por defecto y las unidades disponibles son FNU, NTU, FNRU, ASBC y EBC.
El 2020t en modo nefelométrico con las unidades NTU por defecto se debe utilizar para
analizar el agua potable pública para el cumplimiento de la norma 180.1 de la EPA.
Una vez seleccionadas la curva de calibración y las unidades de turbidez, estas
permanecerán seleccionadas hasta que se cambien la curva de calibración y las unidades
de turbidez mediante los siguientes procedimientos.
SELECCIÓN DE UNA CURVA DE CALIBRACIÓN DE TURBIDEZ
Hay tres curvas de calibración disponibles: nefelométrica, ratiométrica y de atenuación.
La curva de calibración por defecto es la nefelométrica. Debería elegirse la curva de
calibración que se ajuste al tipo de muestra que se está analizando.
57
Page 58

Modo
nefelométrico:
Modo
radiométrico:
Detector de 90° Rango 0 – 100 NTU/FNU, para muestras de
agua potable
Detectores 90°
y 180°
Rango 0 – 1000 NTU/NTRU/FNRU, para
muestras de agua potable y agua natural,
muestras de agua pluvial y muestras
coloreadas
Modo de
atenuación:
Detector de 180° Rango 0 – 2000 NTU/AU/FAU, para muestras
con alta turbidez
Por lo general los métodos ratiométricos reducen las interferencias de color.
El 2020t en modo nefelométrico con las unidades NTU por defecto se debe utilizar para
analizar el agua potable pública para el cumplimiento de la norma 180.1 de la EPA.
El modo nefelométrico se usará en el ejemplo. Para cambiar la curva de calibración:
1. Mantenga pulsado brevemente
para encender el fotómetro. La
pantalla con el logotipo de LaMotte
aparecerá durante aprox. 3 segundos
y se mostrará el Menú Principal.
2. Pulse para desplazarse por
Opciones.
3. Pulse
ENTER
para seleccionar
Opciones.
Menú Principal
Medir
Registro de Datos
Opciones
12:00:00 001/500
Menú Principal
Medir
Registro de Datos
Opciones
12:00:00 001/500
Menú Opciones
Opciones de turbidez
Promediano
Ajustar reloj
Confi g. ahorro energ.
12:00:00 001/500
58
Page 59

4. Pulse
ENTER
Opciones de turbidez.
para seleccionar
Opciones de turbidez
Calibración turbidez
Unidades de turbidez
12:00:00 001/500
5. Pulse
ENTER
Calibración turbidez.
para seleccionar
Nefelométrica NTU
Calibración turbidez
Nadiometrica NTRU
Atenuación AU
12:00:00 001/500
6. Desplácese hasta la opción de
calibración deseada.
Nefelométrica NTU
Calibración turbidez
Nadiometrica NTRU
Atenuación AU
12:00:00 001/500
NOTA: los estándares Stablcal® por debajo de 50 NTU no deben usarse para calibra
el 2020t/i. El diluyente tiene un índice de refracción diferente al de los estándares
tradicionales de formacina y afectará los resultados.
7. Pulse
ENTER
para guardar la
selección. En pantalla aparecerá
Almacenando.... durante
aproximadamente 1 segundo y
regresará al menú Opciones. Pulse
EXIT
para regresar a un menú
anterior.
Opciones de turbidez
Promediano
Ajustar reloj
Confi g. ahorro energ.
12:00:00 001/500
Menú Opciones
SELECCIÓN DE UNIDADES DE TURBIDEZ
Los resultados para cada curva de calibración se presentarán en las unidades por defecto
para esa curva de calibración, salvo que se seleccionen unidades diferentes. La unidad
por defecto se muestra después del nombre de la curva de calibración. Las unidades por
defecto son:
Curva de calibración Unidad por defecto
2020t Nefelométrica NTU (Unidades de turbidez nefelométrica)
Ratiométrica NTRU (Unidades del ratio de turbidez nefelométrica)
De atenuación AU (Unidades de atenuación)
59
Page 60

2020i Nefelométrica FNU (Unidades de formacina nefelométrica)
Ratiométrica FNRU (Unidades del ratio de formacina nefelométrica)
De atenuación FAU (Unidades de atenuación de formacina)
Es posible seleccionar que los resultados se presenten en una unidad alternativa en lugar
de en la unidad predeterminada para cada modo. Cuando se desean unidades American
Society of Brewing Chemists (Sociedad Americana de Químicos de la Cerveza) y EBC
(Convención europea de cerveceros) se debe utilizar la curva de calibración nefelométrica.
Para el 2020t, las unidades disponibles son: NTU, NTRU, AU, ASBC, EBC
Para el 2020i, las unidades disponibles son: FNU, NTU, FNRU, FAU, ASBC, EBC
NTRU, AU, FNU, FNRU y FAU equivalen numéricamente a NTU. Las unidades diferencian
qué detector y fuente de luz se utilizaron para realizar la medición. Consulte la página 56
para la defi nición de las unidades de turbidez..
1. Mantenga pulsado brevemente
para encender el fotómetro. La
pantalla con el logotipo de LaMotte
aparecerá durante aprox. 3 segundos
y se mostrará el Menú Principal.
2. Pulse para desplazarse por
Opciones.
3. Pulse
ENTER
para seleccionar
Opciones.
Menú Principal
Medir
Registro de Datos
Opciones
12:00:00 001/500
Menú Principal
Medir
Registro de Datos
Opciones
12:00:00 001/500
Menú Opciones
Opciones de turbidez
Promediano
Ajustar reloj
Confi g. ahorro energ.
12:00:00 001/500
60
Page 61

4. Pulse
ENTER
Opciones de turbidez.
para seleccionar
Opciones de turbidez
Calibración de turbidez
Unidades de turbidez
12:00:00 001/500
5. Pulse para desplazarse por las
Unidades de turbidez.
6. Pulse
ENTER
para seleccionar
Unidades de turbidez.
7. Pulse o para
desplazarse por las unidades
deseadas.
8. Pulse
ENTER
para guardar la
selección. En pantalla aparecerá
Almacendando.... durante
aproximadamente 1 segundo y
regresará al menú Opciones. Pulse
EXIT
para regresar a un menú
anterior.
Opciones de turbidez
Calibración turbidez
Unidades de turbidez
12:00:00 001/500
Unidades Turbidez
Defecto
NTU
ASBC
EBC
12:00:00 001/500
Unidades Turbidez
Defecto
NTU
ASBC
EBC
12:00:00 001/500
Menú Opciones
Opciones de turbidez
Promediano
Ajustar reloj
Confi g. ahorro energ.
12:00:00 001/500
61
Page 62

PROMEDIANO
La opción de romedio permite al usuario promediar múltiples lecturas. Esta opción mejora
la precisión de las muestras cuya lectura podría tener tendencia a derivar con el tiempo. Al
elegir las opciones de dos, cinco o diez mediciones, se muestra la media fi nal. Esta opción
está desactivada por defecto. Para cambiar la confi guración:
1. Mantenga pulsado brevemente
para encender el fotómetro. La
pantalla con el logotipo de LaMotte
aparecerá durante aprox. 3 segundos
y se mostrará el Menú Principal.
2. Pulse para desplazarse por
Opciones.
3. Pulse
ENTER
para seleccionar
Opciones.
4. Pulse para desplazarse por
Promediano.
Menú Principal
Medir
Registro de Datos
Opciones
12:00:00 001/500
Menú Principal
Medir
Registro de Datos
Opciones
12:00:00 001/500
Menú Opciones
Opciones de turbidez
Promediano
Ajustar reloj
Confi g. ahorro energ.
12:00:00 001/500
Menú Opciones
Opciones de turbidez
Promediano
Ajustar reloj
Confi g. ahorro energ.
12:00:00 001/500
5. Pulse
Promediano.
ENTER
para seleccionar
Menú Promediano
Inhabilitado
2 Medidas
5 Medidas
10 Medidas
12:00:00 001/500
62
Page 63

6. Pulse o para
desplazarse por la opción deseada.
Menú Promediano
Inhabilitado
2 Medidas
5 Medidas
10 Medidas
12:00:00 001/500
7. Pulse
ENTER
para guardar la
selección. En pantalla aparecerá
Almacenando.... durante
aproximadamente 1 segundo y
regresará al menú Opciones. Pulse
EXIT
para regresar a un menú
anterior.
Opciones de turbidez
Promediano
Ajustar reloj
Confi g. ahorro energ.
12:00:00 001/500
Menú Opciones
NOTA: cuando la opción de Promediano está activada, se necesitará más tiempo para
mostrar una lectura y se consumirá más energía.
AJUSTAR RELOJ
1. Mantenga pulsado brevemente
para encender el fotómetro. La
pantalla con el logotipo de LaMotte
aparecerá durante aprox. 3 segundos
y se mostrará el Menú Principal.
2. Pulse para desplazarse por
Opciones.
Medir
Registro de Datos
Opciones
12:00:00 001/500
Medir
Registro de Datos
Opciones
Menú Principal
Menú Principal
3. Pulse
ENTER
para seleccionar
Opciones. Pulse
desplazarse por Ajustar reloj.
para
12:00:00 001/500
Menú Opciones
Opciones de turbidez
Promediano
Ajustar reloj
Confi g. ahorro energ.
12:00:00 001/500
63
Page 64

4. Pulse
ENTER
para seleccionar Ajustar
reloj. La fecha se muestra como díames-año. La hora se muestra como
horas:minutos:segundos
Establecer la hora
fecha: 07-09-2018
tiempo: 02:09:08 PM
AM/PM. Pulse
o para
seleccionar el carácter apropiado
ENTER
y pulse
El cursor se moverá al siguiente
para seleccionar.
12:00:00 001/500
carácter. Confi gure todos los
caracteres de la misma manera. Se
trata de un menú de desplazamiento.
5. Pulse
ENTER
para seleccionar el
último carácter. Se guardarán la hora
y la fecha, y la pantalla volverá al
Menú Opciones.
Opciones de turbidez
Promediano
Menú Opciones
Ajustar reloj
Confi g. ahorro energ.
12:00:00 001/500
AJUSTE DE AHORRO ENERGÉTICO
La función Auto Apagado para ahorrar energía desconectará el fotómetro cuando el botón
no se haya presionado durante un determinado plazo de tiempo. La confi guración por
defecto es de 5 minutos. Para cambiar la confi guración:
1. Mantenga pulsado brevemente
para encender el fotómetro. La
pantalla con el logotipo de LaMotte
aparecerá durante aprox. 3 segundos
y se mostrará el Menú Principal.
Medir
Registro de Datos
Opciones
Menú Principal
2. Pulse para desplazarse por
Opciones.
12:00:00 001/500
Menú Principal
Medir
Registro de Datos
Opciones
12:00:00 001/500
64
Page 65

3. Pulse
Opciones.
ENTER
para seleccionar
Menú Opciones
Opciones de turbidez
Promediano
Ajustar reloj
Confi g. ahorro energ.
12:00:00 001/500
4. Pulse para desplazarse por
Confi g. ahorro energ.
5. Pulse
ENTER
para seleccionar
Ahorro energético.
6. Pulse o para
desplazarse a la confi guración
deseada.
7. Pulse
ENTER
para guardar la
selección. En pantalla aparecerá
Almacenando.... durante
aproximadamente 1 segundo y
regresará al Menú Opciones.
Menú Opciones
Opciones de turbidez
Promediano
Ajustar reloj
Confi g. ahorro energ.
12:00:00 001/500
Auto Apagado
Inhabilitar
5 Minutos
15 Minutos
30 Minutos
12:00:00 001/500
Auto Apagado
Inhabilitar
5 Minutos
15 Minutos
30 Minutos
12:00:00 001/500
Menú Opciones
Opciones de turbidez
Promediano
Ajustar reloj
Confi g. ahorro energ.
12:00:00 001/500
65
Page 66

AJUSTE DEL TIEMPO DE RETROILUMINACIÓN
La retroiluminación ilumina la pantalla para mejorar la visualización. Si está seleccionado
el Control por botón, el botón de retroiluminacón del teclado actuará como interruptor on/
off y la retroiluminación permanecerá encendida o apagada cuando se esté utilizando el
fotómetro. Cuando uno de los otros ajustes (10, 20 o 30 segundos ) esté seleccionado, la
pantalla se iluminará durante el tiempo especifi cado después de apretar cualquier botón.
Como medida de precaución, la retroiluminación no se iluminará durante las mediciones
de turbidez para evitar la interferencia en la dispersión de luz.
NOTA: la función de retroiluminación usa una cantidad considerable de energía. Cuanto
más tiempo esté activada la retroiluminación, con más frecuencia habrá que cargar la
batería si el adaptador USB/de pared no está en uso.
1. Mantenga pulsado brevemente
para encender el fotómetro. La
pantalla con el logotipo de LaMotte
aparecerá durante aprox. 3 segundos
y se mostrará el Menú Principal..
2. Pulse para desplazarse por
Opciones.
3. Pulse
ENTER
para seleccionar
Opciones.
Menú Principal
Medir
Registro de Datos
Opciones
12:00:00 001/500
Menú Principal
Medir
Registro de Datos
Opciones
12:00:00 001/500
Menú Opciones
Promediano
Ajustar reloj
Confi g. ahorro energ.
Confi g.tpo.luz fondo
12:00:00 001/500
4. Pulse para desplazarse por
Confi g. tpo. luz fondo.
Menú Opciones
Promediano
Ajustar reloj
Confi g. ahorro energ.
Confi g. tpo. luz fondo
12:00:00 001/500
66
Page 67

5. Pulse
ENTER
Confi g. tpo. luz fondo.
para seleccionar
Tiempo de retroiluminación
Botón de Control
10 Segundos
20 Segundos
30 Segundos
12:00:00 001/500
6. Pulse o para
desplazarse a la confi guración
deseada.
Tiempo de retroiluminación
Botón de Control
10 Segundos
20 Segundos
30 Segundos
12:00:00 001/500
7. Pulse
ENTER
para guardar la
selección. En pantalla aparecerá
Almacenando.... durante
aproximadamente 1 segundo y
regresará al Menú Opciones.
Promediano
Ajustar reloj
Confi g. ahorro energ.
Menú Opciones
Confi g. tpo. luz fondo
12:00:00 001/500
SELECCIONE UN IDIOMA
El 2020t/i está disponible en siete idiomas: inglés, español, francés, portugués, italiano,
chino y japonés (kana).
1. Mantenga pulsado brevemente
para encender el fotómetro. La
pantalla con el logotipo de LaMotte
aparecerá durante aprox. 3 segundos
y se mostrará el Menú Principal.
Medir
Registro de Datos
Opciones
Menú Principal
2. Pulse para desplazarse por
Opciones.
12:00:00 001/500
Menú Principal
Medir
Registro de Datos
Opciones
12:00:00 001/500
67
Page 68

3. Pulse
Opciones.
ENTER
para seleccionar
Menú Opciones
Opciones de turbidez
Promediano
Ajustar reloj
Confi g. ahorro energ.
12:00:00 001/500
4. Pulse para desplazarse por
Seleccionar Idioma.
5. Pulse
ENTER
para desplazarse por
Seleccionar Idioma.
6. Pulse o para
desplazarse a el idioma deseado.
7. Pulse
ENTER
para seleccionar
el idioma deseado. En pantalla
aparecerá momentáneamente
Almacenando.... durante
aproximadamente 1 segundo y
regresará al menú Opciones.
Menú Opciones
Ajustar reloj
Confi g. ahorro energ.
Ajuste el tiempo de retroiluminación
Seleccionar Idioma
12:00:00 001/500
Seleccionar Idioma
Inglés
Español
Francés
Portugués
12:00:00 001/500
Seleccionar Idioma
Inglés
Español
Francés
Portugués
12:00:00 001/500
Menú Opciones
Ajustar reloj
Confi g. ahorro energ.
Ajuste el tiempo de retroiluminación
Seleccionar Idioma
12:00:00 001/500
68
Page 69

NOTA: si el fotómetro cambia accidentalmente a otro idioma, use el procedimiento anterior
para resetear el fotómetro al idioma deseado. Por ejemplo, para resetear el fotómetro a
inglés:
1. Encienda el fotómetro.
2. Pulse dos veces la fl echa hacia abajo. Pulse
3. Pulse seis veces la fl echa hacia abajo. Pulse
4. Pulse
ENTER
.
ENTER
ENTER
.
.
ENLACE AL PC
Ejecutar enlace al PC se utiliza para fabricar el fotómetro. Este menú no se usa para el
operador sobre el terreno.
REGISTRO DE DATOS
El ajuste predeterminado del registro de datos está activado. El fotómetro registrará
los últimos 500 puntos de datos. El contador en la parte inferior central de la pantalla
mostrará el número de puntos de datos que se han registrado. La pantalla mostrará
500+ cuando el registro de datos haya superado los 500 puntos y los puntos se datos se
sobrescribirán.
1. Mantenga pulsado brevemente
para encender el fotómetro. La
pantalla con el logotipo de LaMotte
aparecerá durante aprox. 3 segundos
y se mostrará el Menú Principal.
2. Pulse para desplazarse por el
Registro de Datos.
3. Pulse
ENTER
para seleccionar el
Registro de Datos.
Menú Principal
Medir
Registro de Datos
Opciones
12:00:00 001/500
Menú Principal
Medir
Registro de Datos
Opciones
12:00:00 001/500
Registrando
Mostrar pruebas reg.
Habilitas registras
Deshabilitas registras
Borrar registras
12:00:00 001/500
69
Page 70

4. Pulse
ENTER
para visualizar el último
punto de datos y la hora en que se
registró.
Registro número 2
Turbidez - WB (N)
655 AU
12:26:58 PM 08-03-2018
12:00:00 001/500
5. Pulse o para
desplazarse por los puntos de datos
del registro.
6. Pulse
EXIT
para regresar al menú
Registro. Pulse
o
para desplazarse para desactivar
las opciones de registro o borrar
el registro. Pulse
ENTER
para
seleccionar la opción. En pantalla
aparecerá Almacenando.... durante
aproximadamente 1 segundo y
regresará al menú Registrando.
Registro número 2
Turbidez - WB (R)
95.4 NTU
12:26:44 PM 08-03-2018
12:00:00 001/500
Registrando
Mostrar pruebas reg.
Habilitas registras
Deshabilitas registras
Borrar registras
12:00:00 001/500
70
Page 71

CALIBRACIÓN Y ANÁLISIS
CALIBRACIÓN
Estándares de turbidez
Utilice únicamente los estándares AMCO o de formacina con el 2020t/i. Los estándares
StablCal® por debajo de 50 NTU no deben usarse para calibrar el 2020t/i. El diluyente
usado en los estándares StablCal® tiene un índice de refracción diferente al de los
estándares tradicionales de formacina y afectará los resultados. La concentración del
estándar de calibración debería ser similar a la concentración esperada de las muestras
que se van a analizar. El estándar nunca debe volver a verterse desde el tubo a la botella.
Los estándares no tendrán el mismo valor de turbidez en los tres modos.
En LaMotte Company están disponibles los siguientes estándares:
Modo
Unidades Nefelométrico (N) Nefelométrico (N) Ratiométrico (R) Ratiométrico (R)
Fotómetro
Código 1480 0 NTU 0 FNU 0 NTRU 0 FNRU
Código 1441 1 NTU - 1 NTRU Código 1446 - 1 FNU - 1 FNRU
Código 1442 10 NTU - 10 NTRU
Código 1447 - 10 FNU - 10 FNRU
Código 1444 - 100 FNU - 100 FNRU
Los estándares pueden variar ligeramente de lote a lote para el modo ratiométrico. Los
valores estándar para el modo nefelométrico y el modo ratiométrico se encuentran en
la etiqueta estándar de la botella. Utilice el valor de la etiqueta de la botella estándar de
turbidez como el valor objetivo al calibrar el fotómetro en el modo nefelométrico y en el
modo ratiométrico. Los estándares para la calibración en el modo de atenuación deben
prepararse a partir de formacina.
Tubos
Utilice tubos de turbidez (0260) que estén libres de arañazos e imperfecciones en la
zona de luz entre el fondo del tubo y la línea de llenado. Deseche los tubos que presenten
arañazos. Al leer muestras de muy baja turbidez, no utilice tubos o tapones que hayan sido
utilizados previamente con muestras de alta turbidez. Consulte la página 53 para obtener
más información.
Procedimiento de calibración de la turbidez
La curva de calibración por defecto es la nefelométrica, como se indica en el apartado
(N) de la barra de Menú. Las unidades por defecto son NTU (2020t) y FNU (2020i). Otras
opciones de curva de calibración son la ratiométrica y la de atenuación. La curva de
calibración ratiométrica se indica con (R) y la curva de calibración de atenuación con (A).
Se debe realizar una calibración de usuario para cada modo con estándares que sean
apropiados para el fotómetro y el rango.
Para obtener los resultados más precisos posibles, se debe realizar una calibración del
usuario en el rango más pequeño posible. Utilice un estándar de calibración que, junto con
el blanco, abarque el rango de las muestras que se analizarán. Por ejemplo, si se espera
que las muestras que se van a analizar estén por debajo de 1 NTU, se obtendrán resultados
más precisos mediante la calibración con un blanco y un estándar de 1 NTU en lugar de un
blanco y un estándar de 10 NTU.
2020t 2020i 2020t 2020i
CALIBRACIÓN
71
Page 72

El número de rangos de medición para cada modo varía.
Modo Nefelométrico (N) Ratiométrico (R) De atenuación (A)
Rangos 0-11 NTU/FNU
10-110 NTU/FNU
0-11 NTRU/FNRU
10-110 NTRU/FNRU
100-510 NTRU/FNRU
500-1000 NTRU/FNRU
0-1010 AU/FAU
1000-2000 AU/FAU
Cada rango puede calibrarse con un punto por rango más un blanco. Los nuevos puntos
CALIBRACIÓN
de calibración reemplazarán a los puntos de calibración antiguos de forma independiente
para cada rango. Si se recalibra un rango, el fotómetro conservará los datos de calibración
antiguos para los otros rangos. Se recomienda calibrar el fotómetro para cada rango que
se vaya a utilizar. El valor de los estándares elegidos para la calibración no debe situarse
en los extremos de los rangos. El fotómetro es de rango automático y seleccionará
automáticamente el rango apropiado para la muestra que se está analizando.
Se recomienda calibrar el fotómetro diariamente.
En los ejemplos siguientes se utilizará el 2020t en el modo nefelométrico con estándares
NTU.
1. Mantenga pulsado brevemente
para encender el fotómetro. La
pantalla con el logotipo de LaMotte
aparecerá durante aprox. 3 segundos
y se mostrará el Menú Principal.
2. Pulse
ENTER
para seleccionar Medir.
3. Pulse para desplazarse por
Turbidez con blanco.
Menú Principal
Medir
Registro de Datos
Opciones
12:00:00 001/500
Menú Medir (N)
Turbidez sin blanco
Turbidez con blanco
12:00:00 001/500
Menú Medir (N)
Turbidez sin blanco
Turbidez con blanco
12:00:00 001/500
72
Page 73

4. Pulse
ENTER
para seleccionar
Turbidez con blanco.
5. Enjuague un tubo limpio (0260) tres
veces con la muestra de blanco.
Si se espera que la lectura de las
muestras sea inferior a 1 NTU, debe
realizarse una medición de blanco del
fotómetro con un estándar primario
de 0 NTU o prepararse con agua sin
turbidez (<0,1 NTU). Para obtener
los resultados más precisos, use
el mismo tubo para la muestra de
blanco y la muestra.
6. Llene el tubo hasta la línea de
llenado con la muestra de blanco.
Vierta la muestra de blanco por la
pared interior del tubo para evitar la
formación de burbujas. Cierre el tubo.
Turbidez WB (N)
CALIBRACIÓN
Escaneo del blanco
Escaneo de la muestra
12:00:00 001/500
7. Limpie bien el tubo con un paño sin
pelusas.
8. Abra la tapa del fotómetro. Inserte el
tubo en la cámara. Alinee la línea del
índice del tubo con la fl echa del índice
del fotómetro. Cierre la tapa.
73
Page 74

9. Pulse
CALIBRACIÓN
10. Enjuague un tubo limpio (0260),
11. Llene el tubo hasta la línea de llenado
12. Limpie bien el tubo con un paño sin
ENTER
Analizar el blanco y analice la muestra
de blanco. En pantalla aparecerá
Análisis en blanco terminado....
durante aproximadamente 1 segundo
y a continuación regresará al menú
de Turbidez con blanco.
o el mismo tubo, tres veces con la
muestra estándar de turbidez.
con la muestra estándar de turbidez.
Vierta la muestra estándar por la
pared interior del tubo para evitar la
formación de burbujas. Cierre el tubo.
pelusas.
para seleccionar
Turbidez WB (N)
Escaneo del blanco
Escaneo de la muestra
12:00:00 001/500
13. Abra la tapa del fotómetro. Inserte el
tubo en la cámara. Alinee la línea del
índice del tubo con la fl echa del índice
del fotómetro. Cierre la tapa.
14. Pulse
ENTER
Escaneo de la muestra y analice
la muestra estándar. La pantalla
mostrará Leyendo durante
aproximadamente 1 segundo. El
resultado aparecerá en pantalla.
para seleccionar
Turbidez WB (N)
0.99 NTU
Escaneo del blanco
Escaneo de la muestra
12:00:00 001/500
74
Page 75

15. Pulse para desplazarse a
Calibración.
Turbidez WB (N)
CALIBRACIÓN
0.99 NTU
Escaneo de la muestra
Calibración
12:00:00 001/500
16. Pulse
17. Pulse o para
18. Pulse
ENTER
Calibración. Una fuente inversa
(fondo claro con caracteres negros)
aparecerá para indicar que se ha
ajustado la lectura.
desplazarse por la concentración
del estándar, 1,00 en este ejemplo.
Utilice el valor de la etiqueta de
la botella estándar de turbidez
como valor objetivo. Nota: El
ajuste permitido es de ±25 %. Si se
alcanza el límite de ajuste permitido,
aparecerá «superación del margen».
Calibración. Se ofrecerán dos
opciones de menú, Confi g.
calibración y Confi guracion fábrica.
para seleccionar
ENTER
para seleccionar
Turbidez WB (N)
0.99 NTU
Escaneo de la muestra
Calibración
12:00:00 001/500
Turbidez WB (N)
1.00 NTU
Escaneo de la muestra
Calibración
12:00:00 001/500
Calibración (N)
1.00 NTU
Confi g. calibración
Confi guración fábrica
12:00:00 001/500
19. Pulse
ENTER
Confi g. calibración y guarde la
calibración. Pulse
para desplazarse y seleccione
Confi guracion fábrica para volver a
la calibración de fábrica. El fotómetro
mostrará momentáneamente
Almacenando... y regresará al menú
de Turbidez sin blanco de blanco.
Ahora se ha guardado la calibración
y el fotómetro puede usarse para
analizar.
para seleccionar
o
Turbidez WB
Escaneo del blanco
Escaneo de la muestra
12:00:00 001/500
75
Page 76

NOTA: para obtener la máxima precisión posible durante el procedimiento de calibración,
asegúrese de que después de que el fotómetro esté en blanco y la muestra de blanco se
haya analizado como muestra, la lectura sea 0,00. Si no fuera así, vuelva a introducir en el
fotómetro una muestra de blanco y realice de nuevo el análisis hasta que el resultado se
a 0,00. Cuando analice los estándares de calibración como la muestra, analice la muestra
estándar de calibración tres veces retirando el tubo de la cámara después de cada análisis
y vuelva a insertar el tubo en la cámara con la misma orientación. Las lecturas deberían ser
consistentes. Use la última lectura consistente para calibrar el fotómetro. Si las lecturas no
son consistentes, evite usar una lectura anormal para calibrar el fotómetro.
ANÁLISIS SIN PROCEDIMIENTO EN BLANCO
Para obtener los resultados más precisos posibles, el fotómetro debe estar en blanco
antes de analizar una muestra. El paso de poner en blanco el fotómetro no es tan
importante para muestras por encima de 10 NTU. El fotómetro siempre debe estar en
blanco antes de leer muestras por debajo de 10 NTU.
1. Mantenga pulsado brevemente
ANÁLISIS SIN PROCEDIMIENTO EN BLANCO
para encender el fotómetro. La
pantalla con el logotipo de LaMotte
aparecerá durante aprox. 3 segundos
y se mostrará el Menú Principal.
2. Pulse
3. Pulse
ENTER
para seleccionar Medir.
ENTER
para seleccionar
Turbidez sin blanco.
4. Enjuague un tubo limpio (0260) tres
veces con la muestra.
Menú Principal
Medir
Registro de Datos
Opciones
12:00:00 001/500
Menú Medir (N)
Turbidez sin blanco
Turbidez con blanco
12:00:00 001/500
Turbidez NB (N)
Turbidez sin blanco
Turbidez con blanco
12:00:00 001/500
76
Page 77

5. Llene el tubo hasta la línea de llenado
con la muestra. Vierta la muestra por
la pared interior del tubo para evitar la
formación de burbujas. Cierre el tubo.
6. Limpie bien el tubo con un paño sin
pelusas.
7. Abra la tapa del fotómetro. Inserte el
tubo en la cámara. Alinee la línea del
índice del tubo con la fl echa del índice
del fotómetro. Cierre la tapa.
ANÁLISIS SIN PROCEDIMIENTO EN BLANCO ANÁLISIS CON PROCEDIMIENTO EN BLANCO
8. Pulse
ENTER
Analizar muestra y analice la
muestra. La pantalla mostrará
Leyendo durante aproximadamente
1 segundo. El resultado aparecerá en
pantalla.
Se mostrará “Sobre rango” si la
lectura está fuera de rango. Diluya la
muestra o seleccione un modo que
sea apropiado para el rango de la
muestra.
para seleccionar
10.22 NTU
Escaneo del blanco
Escaneo de la muestra
12:00:00 001/500
Turbidez NB (N)
ANÁLISIS CON PROCEDIMIENTO EN BLANCO
Para obtener los resultados más precisos posibles, el fotómetro debe estar en blanco
antes de analizar una muestra. El paso de poner en blanco el fotómetro no es tan
importante para muestras por encima de 10 NTU. El fotómetro siempre debe estar en
blanco antes de leer muestras por debajo de 10 NTU.
1. Mantenga pulsado brevemente
para encender el fotómetro. La
pantalla con el logotipo de LaMotte
aparecerá durante aprox. 3 segundos
y se mostrará el Menú Principal.
Medir
Registro de Datos
Opciones
12:00:00 001/500
77
Menú Principal
Page 78

2. Pulse
ENTER
para seleccionar Medir.
Menú Medir (N)
Turbidez sin blanco
Turbidez con blanco
12:00:00 001/500
3. Pulse para desplazarse por
Turbidez con blanco.
ANÁLISIS CON PROCEDIMIENTO EN BLANCO
4. Pulse
ENTER
para seleccionar
Turbidez con blanco.
5. Enjuague un tubo limpio (0260) tres
veces con la blanco. Si se espera
que la lectura de las muestras sea
inferior a 1 NTU, debe realizarse una
medición en blanco del fotómetro
con un estándar primario de 0
NTU o prepararse con agua sin
turbidez (<0,1 NTU). Para obtener
los resultados más precisos, use
el mismo tubo para el blanco y la
muestra.
Menú Medir (N)
Turbidez sin blanco
Turbidez con blanco
Turbidez WB (N)
Escaneo del blanco
Escaneo de la muestra
12:00:00 001/500
6. Llene el tubo hasta la línea de
llenado con el blanco. Viértalo por la
pared interior del tubo para evitar la
formación de burbujas. Cierre el tubo.
78
Page 79

7. Limpie bien el tubo con un paño sin
pelusas.
8. Abra la tapa del fotómetro. Inserte el
tubo en la cámara. Alinee la línea del
índice del tubo con la fl echa del índice
del fotómetro. Cierre la tapa.
ANÁLISIS CON PROCEDIMIENTO EN BLANCO
9. Pulse
ENTER
para seleccionar
Escaneo del blanco y analice el
blanco. En pantalla aparecerá
blanco terminado.... durante
aproximadamente 1 segundo y a
continuación regresará a Turbidez
con blanco.
10. Enjuague un tubo limpio (0260),
o el mismo tubo, tres veces con la
muestra.
11. Llene el tubo hasta la línea de llenado
con la muestra. Vierta la muestra
estándar por la pared interior del tubo
para evitar la formación de burbujas.
Cierre el tubo.
12. Limpie bien el tubo con un paño sin
pelusas.
Turbidez WB (N)
Escaneo del blanco
Escaneo de la muestra
12:00:00 001/500
79
Page 80

13. Abra la tapa del fotómetro. Inserte el
tubo en la cámara. Alinee la línea del
índice del tubo con la fl echa del índice
del fotómetro. Cierre la tapa.
14. Pulse
ANÁLISIS CON PROCEDIMIENTO EN BLANCO
NOTA: El fotómetro recordará la última lectura de blanco analizada. No es necesario
analizar el blanco cada vez que se realiza el análisis. Para usar la lectura anterior en blanco,
en lugar de analizar una nueva, vaya a Analizar muestra y proceda. Para obtener resultados
lo más precisos posibles, el fotómetro debe estar en blanco antes de cada prueba y debe
usarse el mismo tubo para el blanco y para la muestra de reactivo.
ENTER
Escaneo de la muestra y analice
la muestra. La pantalla mostrará
Leyendo durante aproximadamente
1 segundo. El resultado aparecerá en
pantalla.
Se mostrará “Sobre rango” si la
lectura está fuera de rango. Diluya la
muestra o seleccione un modo que
sea apropiado para el rango de la
muestra.
para seleccionar
0.99 NTU
Escaneo del blanco
Escaneo de la muestra
12:00:00 001/500
Turbidez WB (N)
PROCEDIMIENTO DE DISOLUCIÓN
Si se encuentra una muestra que es superior a 2000 NTU o FNU, una disolución cuidada
con 0 NTU/FNU o agua de muy baja turbidez situará la muestra en un rango aceptable.
Sin embargo, no hay garantía de que la reducción a la mitad de la concentración reduzca
exactamente a la mitad el valor de NTU o FNU. Las partículas a menudo reaccionan de
manera impredecible cuando se diluyen.
Agua sin turbidez
La defi nición de baja turbidez y agua sin turbidez ha cambiado a medida que se ha ido
desarrollando la tecnología de fi ltración y los instrumentos nefelométricos se han vuelto
más sensibles. Hubo una época en la que el agua sin turbidez se defi nía como el agua
que había pasado por un fi ltro de 0,6 micras. Ahora hay disponibles fi ltros de 0,1 micras y
es posible obtener agua de mayor pureza. El agua que ha pasado a través de un fi ltro de
0.1 micras puede considerarse libre de partículas y, por lo tanto, sin turbidez, agua con 0
NTU. La turbidez se ocasiona por la luz dispersa. Por lo tanto, el agua de baja turbidez es
agua sin partículas que dispersan una cantidad mensurable de luz. Pero el agua que pasó
a través de un fi ltro de 0,1 micras aún puede tener una dispersión de luz detectable con
los instrumentos modernos. Esta dispersión de la luz puede ser el resultado de moléculas
disueltas o partículas de tamaño submicra que no pueden ser fi ltradas fuera del agua.
Debido a que todavía puede haber una pequeña cantidad de luz dispersa de moléculas
disueltas, el agua de alta pureza a menudo se denomina agua de baja turbidez y se le
asigna un valor de 0,01 o 0,02 NTU. Sin embargo, debido a que esta agua se utiliza como
línea de base para compararla con el agua de la muestra, la diferencia entre la muestra y
el agua de baja turbidez o sin turbidez será la misma, ya sea que se llame 0,00 NTU o 0,02
NTU. Para simplifi car el diseño, el 2020t/i utiliza el término agua sin turbidez y el valor de
0,00 NTU.
80
Page 81

PREPARACIÓN DE AGUA SIN TURBIDEZ
El fotómetro incluye un estándar 0 NTU/FNU (Código 1480). Accesorios están disponibles
para la preparación de agua sin turbidez para poner en blanco el fotómetro y la disolución
de muestras de alta turbidez.
La preparación de agua sin turbidez requiere una técnica cuidada. La introducción de
materia extraña afectará la lectura de turbidez. Un dispositivo de fi ltración con un fi ltro
de membrana especial se usa para preparar agua sin turbidez. El fi ltro, el soporte del
fi ltro y la jeringa deben acondicionarse forzando al menos dos jeringas llenas de agua
desionizada a través del aparato fi ltrante para eliminar la materia extraña. El primer y
segundo enjuagues deben desecharse. El agua sin turbidez preparada con el siguiente
procedimiento puede almacenarse en la oscuridad a temperatura ambiente en una
botella de vidrio limpia con tapón de rosca y utilizarse según sea necesario. El recipiente
de almacenamiento debe enjuagarse bien con agua desionizada fi ltrada antes de
llenarlo. El agua debe ser inspeccionada periódicamente en busca de materia extraña en
entornos muy luminosos.
1. Retire el émbolo de la jeringa (0943).
Coloque el fi ltro en la parte inferior de
la jeringa.
2. Vierta aproximadamente 50 ml de
agua desionizada en el tambor de
la jeringa. Inserte el émbolo. Ejerza
presión sobre el émbolo para forzar
lentamente el agua a través del fi ltro.
Recoger el agua en el recipiente de
almacenamiento limpio. Enjuague
las paredes del recipiente y luego
deseche el agua de enjuague.
3. Retire el fi ltro de la jeringa. Retire
el émbolo del tambor (Este paso
es necesario para evitar la ruptura
del fi ltro por el vacío que se crearía
cuando se retira el émbolo).
4. Reemplace el fi ltro y repita el
paso 2 para un segundo enjuague
de la jeringa y el recipiente de
almacenamiento.
81
Page 82

5. Retire el fi ltro de la jeringa. Retire
el émbolo del tambor Reemplace
el fi ltro y llene la jeringa con
aproximadamente 50 ml de agua
desionizada. Filtre el agua en el
recipiente de almacenamiento y
guarde el agua sin turbidez.
6. Repita el paso 5 hasta que se haya
recogido la cantidad deseada de agua
sin turbidez.
CONSEJOS DE ANÁLISIS
• Las muestras deben recogerse en un recipiente limpio de vidrio o polietileno.
• Las muestras deben analizarse tan pronto como sea posible después de la
recogida.
• Mezcle suavemente la muestra invirtiéndola antes de tomar una lectura, pero
evite que se formen burbujas de aire.
• Para obtener resultados más precisos, siga el procedimiento recomendado
para limpiar un tubo lleno antes de colocarlo en la cámara del fotómetro.
Invierta el tubo muy lenta y suavemente tres veces para mezclar la muestra.
Envuelva el tubo con un paño limpio y sin pelusas. Presione el paño alrededor
del tubo. Gire tres veces el tubo con el paño para asegurarse de que todas las
áreas del tubo se han limpiado. Coloque los tubos en la cámara con la misma
orientación cada vez.
• Deseche los tubos que tengan arañazos e imperfecciones signifi cativas en las
zonas de paso de luz (zona central entre la línea de fondo y la línea de relleno).
• Al leer muestras de muy baja turbidez, no utilice tubos o tapones que hayan
sido utilizados previamente con muestras de alta turbidez.
• Utilice la opción de promediano para mediciones de bajo nivel de turbidez.
• El fotómetro debe colocarse sobre una superfi cie libre de vibraciones. Las
vibraciones pueden causar lecturas altas.
• Las lecturas de turbidez se verán afectadas por los campos eléctricos
alrededor de los motores.
• El carbón en la muestra absorberá la luz y arrojará lecturas bajas.
• El exceso de color en una muestra absorberá la luz y causará lecturas bajas. El
usuario debe verifi car si un cierto nivel de color causará un error signifi cativo
en el nivel de turbidez que se está analizando. Se recomienda el uso de la curva
de calibración ratiométrica para muestras muy coloreadas.
• Observe las recomendaciones de vida útil para los estándares de turbidez.
• No utilice aceite de silicona en los tubos cuando analice la turbidez con el
2020t/i.
82
Page 83

• Cuando se realizan análisis a bajas concentraciones, utilice el mismo tubo para
el blanco y para la muestra.
• Inserte siempre el tubo en la cámara del fotómetro con la misma presión y a la
misma profundidad.
• Ocasionalmente limpie la cámara con un paño húmedo sin pelusas y a
continuación con un paño húmedo Windex®. Una cámara y tubos limpios son
esenciales para obtener resultados fi ables.
• para obtener la máxima precisión posible durante el procedimiento de
calibración, asegúrese de que después de que el fotómetro esté en blanco y
la muestra de blanco se haya analizado como muestra, la lectura sea 0,00.
Si no fuera así, vuelva a introducir en el fotómetro una muestra de blanco y
realice de nuevo el análisis hasta que el resultado se a 0,00. Cuando analice
los estándares de calibración como la muestra, analice la muestra estándar de
calibración tres veces retirando el tubo de la cámara después de cada análisis.
Las lecturas deberían ser consistentes. Use la última lectura consistente para
calibrar el fotómetro. Si las lecturas no son consistentes, evite usar una lectura
anormal para calibrar el fotómetro.
• Calibre el fotómetro diariamente.
• Calibre el fotómetro con un estándar que esté lo más cerca posible del rango
esperado de la muestra que se está analizando. Por ejemplo, si se espera que
la muestra sea inferior a 1,0 NTU, calibre con un estándar de 1,0 NTU y una
muestra de blanco (estándar de 0 NTU). Si se espera que la muestra esté
alrededor de 2 NTU, calibre también con el estándar de 1,0 NTU, pero si se
espera que la muestra esté alrededor de 8 NTU, calibre con un estándar de 10
NTU. Si se espera que la muestra sea superior a 30 - 40 NTU, se recomienda
calibrar el fotómetro con un estándar de 100 NTU.
• Para mantener una temperatura constante de la lámpara, no encienda ni
apague el fotómetro cuando analice las muestras.
83
Page 84

GUÍA DE RESOLUCIÓN DE INCIDENCIAS
RESOLUCIÓN DE INCIDENCIAS
PROBLEMA CAUSA SOLUCIÓN
¿«En blanco»? La muestra arroja lecturas
Parpadeante
“Batería baja” Voltaje de batería muy bajo.
Apagado “Apagado
batería baja”
“Fuera de rango” La muestra está fuera del
por debajo del blanco.
Batería baja. Las lecturas
son fi ables.
Las lecturas no son fi ables.
La batería es demasiado
baja como para utilizar la
unidad.
rango aceptable.
Con muestras de muy
baja concentración, vuelva
a realizar un análisis en
blanco o regístrelas como
cero. En muestras de mayor
concentración, vuelva a poner
en blanco y realice de nuevo
la lectura.
Cargue la batería o use
un adaptador de pared/
ordenador USB.
Cargue la batería o use
un adaptador de pared/
ordenador USB.
Cargue la batería o use
un adaptador de pared/
ordenador USB.
Disuelva la muestra y realice
el análisis de nuevo.
«Error1» Lecturas altas con
Muchas lecturas
negativas o positivas
poco habituales al
realizar la calibración.
detectores de 90° y 180°.
Se han usado estándares
incorrectos para calibrar el
fotómetro.
Diluya la muestra en al
menos un 50 % y vuelva a
realizar la prueba.
Use un estándar 0.0 reciente
en un tubo limpio. Recalibre
el fotómetro.
DISPERSIÓN DE LUZ
La precisión de las lecturas en el 2020t/i no debe verse afectada por la dispersión de
luz. Asegúrese de que la tapa del compartimento de la muestra está siempre cerrada
cuando realice las lecturas. La retroiluminación interferirá con las lecturas de turbidez. El
fotómetro desactivará temporalmente la retroiluminación mientras se realizan mediciones
de turbidez.
84
Page 85

INFORMACIÓN GENERAL DE FUNCIONAMIENTO
RESUMEN
El 2020t/i es un nefelómetro portátil, controlado por microprocesador y de lectura
directa. La turbidez se mide directamente según el método 180.1 de la EPA o el método
7027 de la ISO, o se calcula ratiométricamente utilizando una combinación de las dos
mediciones. Cuenta con una pantalla gráfi ca de cristal líquido y un teclado con 6 botones.
Esto permite al usuario seleccionar opciones desde el software controlado por el menú,
leer directamente resultados de análisis o revisar resultados almacenados de pruebas
anteriores en el registro de datos. Los menús pueden mostrarse en siete idiomas
diferentes.
El 2020t/i utiliza una confi guración óptica multidetector de última generación que asegura
la estabilidad a largo plazo de las calibraciones, alta precisión y exactitud, y bajos límites
de detección. Todas las lecturas se determinan mediante algoritmos de procesamiento de
señales digitales, minimizando las fl uctuaciones en las lecturas y permitiendo mediciones
rápidas y repetibles. El microprocesador y la óptica permiten un rango dinámico y un rango
automático en varios rangos. Las fuentes de luz LED de bajo consumo se utilizan para la
turbidez ISO. La turbidez de EPA utiliza una fuente de luz con fi lamento de tungsteno que
cumple o excede las especifi caciones de la EPA y está diseñada para una imagen de punto
de luz uniforme y una salida estable.
El 2020t/i funciona a través de un adaptador de pared USB, la conexión al ordenador por
USB o con una batería de litio.
INFORMACIÓN GENERAL DE FUNCIONAMIENTO
El 2020t/i funciona mediante un software controlado por menú y una interfaz de usuario.
Un menú es una lista de opciones. Esto permite seleccionar varias tareas para que las
realice el 2020t/i, como Analizar blanco y analizar una muestra. El teclado se usa para
realizar las selecciones de menú que se van a mostrar en pantalla.
EL TECLADO
Este botón se desplazará hacia arriba por la lista de opciones del menú.
ENTER
EXIT
El botón se usa para seleccionar las opciones del menú que se muestra
en pantalla.
Este botón controla la retroiluminación en la pantalla.
Este botón se desplazará hacia abajo por la lista de opciones del menú.
Este botón regresa al menú anterior.
Este botón enciende o apaga el fotómetro.
ENTER
EXIT
85
Page 86

LA PANTALLA Y LOS MENÚS
La pantalla permite visualizar y seleccionar opciones de menú. Estas opciones ordenan
al 2020t/i realizar tareas concretas. Los menús se muestran en pantalla usando dos
formatos generales que pasan de un menú al siguiente. Cada menú es una lista de
opciones.
En la pantalla aparece un encabezado en la parte superior y un pie de página en la parte
inferior. El encabezado muestra el título del menú actual. El pie de página muestra la hora
y la fecha, el estado del registro de datos y el estado de la batería. La ventana de selección
de menú se encuentra en el centro de la pantalla, entre el encabezado y el pie.
En la ventana de selección de menú aparece información en dos formatos generales. En el
primer formato solo se muestran las opciones de menú. Pueden mostrarse hasta 4 líneas
de opciones de menú. Si hay más opciones disponibles pueden visualizarse pulsando los
botones de las fl echas
ventana de selección de menú. Piense en las opciones de menú como una lista vertical en
la pantalla que se mueve hacia arriba o hacia abajo cada vez que presiona una tecla con
una fl echa
Algunos menús del 2020t/i son menús iterativos. Las opciones
de menú superiores e inferiores están conectadas en un ciclo. Desplazarse hacia abajo
pasando la parte inferior del menú conducirá a la parte superior del menú. Desplazarse
hacia arriba pasando la parte superior del menú conducirá a la parte inferior del menú.
para desplazarse a otras opciones de menú en la
Encabezado
Ventana de selección principal Primera opción
Segunda opción
Tercera opción
Otro
Pie de página
12:00:00 001/500
Y otro
Etc.
Título del menú
Una barra de color claro indicará la opción del menú. A medida que se desplaza por el
menú, la barra de color claro resaltará diferentes opciones de menú. Al pulsar la tecla
ENTER
seleccione la opción del menú que se indica en la barra de color claro.
En el segundo formato, la ventana de opción de menú se benefi cia de la capacidad gráfi ca
de la pantalla. Se muestra información gráfi ca de gran formato, como resultados de
pruebas o mensajes de error o el logotipo de LaMotte. Las dos líneas superiores de la
pantalla se usan para mostrar información en un formato grande y fácil de leer. Los menús
funcionan de la misma forma que se ha descrito anteriormente, pero solo se visualizan dos
líneas del menú en la parte inferior de la pantalla.
86
Page 87

Encabezado
Mensaje o Ventana de
resultados
Ventana de selección principal Y Otro
Pie de página
Resultado o mensaje
Otro
12:00:00 001/500
Etc.
Última opción
Título del menú
Tal y como se ha detallado anteriormente, la tecla
EXIT
permite salir del menú actual
y regresar al menú anterior. Esto facilita una salida más rápida desde un menú interno al
EXIT
Menú Principal pulsando reiteradamente el botón
. Al pulsar en cualquier
momento se apagará el 2020t/i.
La pantalla muestra los siguientes mensajes:
Estado de la batería
Hay más opciones disponibles que pueden visualizarse al desplazarse hacia
arriba o hacia abajo por la pantalla.
Encabezado Identifi ca el menú actual y la información en curvas de calibración y
Pie de página En el modo de registro de datos se muestra el número de puntos de datos
sistemas de reactivos, en su caso.
y aparecerá el número total de puntos de datos en la memoria. El pie de
página muestra también la hora actual y el estado de la batería.
RESULTADOS NEGATIVOS
Siempre hay pequeñas variaciones en las lecturas con instrumentos analíticos. A menudo
estas variaciones pueden observarse tomando múltiples lecturas de la misma muestra.
Estas variaciones normales caerán por encima y por debajo de una lectura promediano.
Las lecturas repetidas en una muestra de 0,00 pueden dar lecturas por encima y por
debajo de 0,00. Por lo tanto, las lecturas negativas son posibles y esperadas en muestras
con concentraciones a o cerca de cero. Esto no signifi ca que haya una concentración
negativa en la muestra. Signifi ca que la lectura de la muestra fue inferior que la lectura
en blanco. Pequeñas lecturas negativas pueden indicar que la muestra se encontraba en
el límite de detección o cerca de él. Una gran lectura negativa, sin embargo, no es normal
e indica un problema. Algunos instrumentos están diseñados para mostrar las lecturas
negativas como cero. En este tipo de instrumento, si el fotómetro mostrara cero cuando el
resultado era en realidad un gran número negativo, no habría indicación de que existe un
problema. Por esta razón, el 2020t/i muestra números negativos de turbidez.
TUBOS Y CÁMARAS
El 2020t/i utiliza un tubo especial (Código 0260).
La manipulación de los tubos es de suma importancia. Los tubos deben estar limpios y
libres de pelusas, huellas, salpicaduras secas y arañazos signifi cativos, especialmente la
zona central entre la parte inferior y la línea de muestra.
87
Page 88

Arañazos, huellas y gotas de agua en el tubo pueden provocar interferencias en la
dispersión de luz y arrojar resultados imprecisos. Las rayadas y abrasiones afectarán la
precisión de las lecturas. Los tubos que presentan rayaduras en la zona de luz por el uso
excesivo deberían desecharse y sustituirse por otros nuevos.
Lave siempre los tubos por dentro y por fuera con detergente suave antes de usarlos para
eliminar la suciedad y las huellas. Deje que se sequen al aire libre en una posición invertida
para evitar que entre polvo en los tubos. Almacene los tubos secos con los tapones para
evitar contaminación.
Después de haber llenado y tapado un tubo, sujételo por el tapón y limpie la superfi cie
exterior con un paño absorbente limpio y libre de pelusas hasta que esté seco y sin
manchas. Manipular el tubo solo por el tapón evitará problemas de huellas. Deje siempre
el tubo limpio apartado sobre una superfi cie limpia que no contamine el tubo. Es
imprescindible que los tubos y la cámara de luz estén limpios y secos. Limpie la parte
exterior de los tubos con un paño limpio y sin pelusas o una bayeta desechable antes de
colocarlos en la cámara del fotómetro.
Vacíe y limpie los tubos en cuanto haya terminado de leer la muestra para evitar la
deposición de partículas en el interior de los tubos. Cuando se requieran resultados de alta
precisión, reduzca el error designando tubos que se usarán solo para análisis de muy baja
turbidez y muy alta turbidez.
La variabilidad en la geometría del cristal y la técnica es la causa principal de variabilidad
en los resultados. Ligeras variaciones en el grosor de la pared y el diámetro de los tubos
pueden conducir a pequeñas variaciones en los resultados del análisis. Para evitar este
error, coloque siempre los tubos en la cámara con la misma orientación.
Deseche las cámaras que presentan arañazos por el uso excesivo y sustitúyalas por otras
nuevas.
MANTENIMIENTO
LIMPIEZA
Limpie la carcasa exterior con un paño húmedo sin pelusas. Evite que entre agua en la
cámara de luz o en cualquier otra pieza del fotómetro. Para limpiar la cámara de luz y el
área de la óptica, apunte con un bote de aire comprimido a la cámara de luz y aplique el
aire presurizado a esta zona. Utilice un bastoncillo humedecido en limpiador de ventanas
Windex® para frotar suavemente el interior de la cámara. No utilice alcohol; dejará un leve
residuo en las lentes al secarse.
REPARACIONES
Si fuese necesario devolver el fotómetro para que lo reparen o lo pongan a punto,
empaquete el fotómetro con cuidado en un envase apropiado y con material de embalaje
adecuado. Debe obtener un número de autorización de devolución de LaMotte Company
llamando al 800- -344-3100 (solo EE. UU.) o al 410-778-3100, fax 410-778-6394, o
escribiendo a tech@lamotte.com. A menudo el problema se puede resolver por teléfono o
correo electrónico. En caso de que sea necesaria la devolución, incluya en el paquete una
carta con el número de autorización de la devolución, el número de serie del fotómetro,
una breve descripción del problema y la información de contacto (incluidos los números de
teléfono y fax. Esta información permitirá que el departamento de mantenimiento realice
las reparaciones necesarias con mayor efi cacia.
88
Page 89

ELIMINACIÓN DEL FOTÓMETRO
Residuos de aparatos eléctricos y electrónicos (RAAE)
Se han utilizado recursos naturales para fabricar este equipo y puede que contenga
materiales peligrosos para la salud y el medio ambiente. Para evitar perjudicar al medio
ambiente y a los recursos naturales, se recomienda utilizar los sistemas de recuperación
adecuados. El símbolo del contenedor tachado en el fotómetro invita a usar estos sistemas
a la hora de deshacerse de este equipo.
Los sistemas de recuperación permitirán reutilizar o reciclar los materiales
de forma que no perjudiquen al medio ambiente. Para obtener más
información sobre los sistemas aprobados de recogida, reutilización y
reciclaje, póngase en contacto con la administración de residuos local o
regional o con los servicios de reciclaje.
89
Page 90

90
Page 91

CONTENU
INFORMATIONS GÉNÉRALES
∆ Emballage et livraison .........................................................................................93
∆ Précautions générales ........................................................................................93
∆ Mesures de sécurité ............................................................................................93
∆ Limites de responsabilité ...................................................................................93
∆ Spécifi cations .......................................................................................................94
∆ Défi nitions statistiques et techniques ...........................................................95
∆ Contenu et accessoires ......................................................................................96
∆ Conformité EPA .....................................................................................................97
∆ Conformité ISO ......................................................................................................97
∆ Conformité CE .......................................................................................................97
∆ Conformité IP67 ...................................................................................................97
∆ Garantie ..................................................................................................................97
∆ Enregistrement de votre turbidimètre ............................................................98
CONNEXION À UN ORDINATEUR
∆ Sortie .......................................................................................................................98
∆ Connexion à un ordinateur .................................................................................98
FONCTIONNEMENT SUR BATTERIE/SECTEUR ..........................................................98
TURBIDITÉ
∆ Qu’est-ce que la turbidité ? ...............................................................................99
∆ Comment la turbidité est-elle mesurée ? ................................................... 100
∆ Unités de turbidité ............................................................................................101
∆ Prélèvement d’échantillons d’eau pour mesures de turbidité ............... 102
∆ Techniques de dilution d’échantillon ............................................................ 102
OPTION ET CONFIGURATION
∆ Réglages d’usine par défaut ........................................................................... 103
∆ Options de turbidité .......................................................................................... 103
Sélection d’une courbe d’étalonnage de la turbidité .............................104
Sélection des unités de turbidité ...............................................................105
∆ Moyenne .............................................................................................................. 108
∆ Réglage horloge ................................................................................................. 110
∆ Réglage énergie ................................................................................................. 111
∆ Réglage de la durée du rétroéclairage ......................................................... 112
∆ Sélection de la langue ...................................................................................... 113
LIAISON PC .................................................................................................................... 115
ENREGISTREMENT DES DONNÉES ........................................................................... 115
91
Page 92

ÉTALONNAGE ET ANALYSE
∆ Étalonnage .......................................................................................................... 117
Étalons de turbidité .......................................................................................117
Éprouvettes......................................................................................................117
Procédure d’étalonnage de la turbidité ....................................................117
∆ Analyse sans procédure de remise à zéro du blanc .................................. 122
∆ Analyse avec procédure de remise à zéro du blanc .................................. 123
∆ Procédure de dilution ....................................................................................... 126
∆ Préparation d’eau sans turbidité ................................................................... 127
∆ Astuces d’analyse .............................................................................................. 128
GUIDE DE DÉPANNAGE
∆ Dépannage .......................................................................................................... 129
∆ Lumière parasite ...............................................................................................130
INFORMATIONS GÉNÉRALES SUR LE FONCTIONNEMENT
∆ Présentation générale ...................................................................................... 130
∆ Informations générales sur le fonctionnement ......................................... 130
∆ Clavier ................................................................................................................... 131
∆ Écran et menus .................................................................................................. 131
∆ Résultats négatifs ............................................................................................. 132
∆ Éprouvettes et chambres ................................................................................ 133
ENTRETIEN
∆ Nettoyage ............................................................................................................ 134
∆ Réparations ........................................................................................................ 134
∆ Élimination du turbidimètre ............................................................................ 134
Reportez-vous au Guide de démarrage rapide pour obtenir les procédures simplifi ées
d’étalonnage et d’analyse.
Reportez-vous au Guide d’analyse pour obtenir les procédures détaillées d’étalonnage et
d’analyse afi n d’améliorer la précision des mesures de turbidité plage basse.
92
Page 93

Reportez-vous au Guide de démarrage rapide pour obtenir les procédures simplifi ées
d’étalonnage et d’analyse.
Reportez-vous au
d’analyse afi n d’améliorer la précision des mesures de turbidité plage basse.
Guide d’analyse pour obtenir les procédures détaillées d’étalonnage et
INFORMATIONS GÉNÉRALES
EMBALLAGE ET LIVRAISON
Le personnel de LaMotte Company possède une grande expérience en emballage et
garantit une protection adéquate contre les dangers usuels du transport de marchandise.
Une fois que le produit a quitté l’entreprise LaMotte, l’entreprise de transport assume
l’entière responsabilité de la livraison en toute sécurité. Les réclamations pour
endommagement doivent être directement déposées auprès de l’entreprise de transport
afi n de recevoir une compensation pour les biens endommagés.
PRÉCAUTIONS GÉNÉRALES
CONSULTEZ LE MODE D’EMPLOI AVANT TOUTE TENTATIVE DE CONFIGURATION OU
D’UTILISATION DE L’INSTRUMENT. Dans le cas contraire, vous risqueriez de vous blesser
ou d’endommager le turbidimètre. L’instrument ne doit pas être utilisé ou stocké dans un
environnement humide ou corrosif. Veillez à ne pas laisser d’eau provenant des éprouvettes
humides pénétrer dans la chambre du turbidimètre.
N’INSÉREZ JAMAIS D’ÉPROUVETTE HUMIDE DANS LE TURBIDIMÈTRE.
MESURES DE SÉCURITÉ
*AVERTISSEMENT : Les réactifs signalés par une astérisque * sont considérés comme
représentant des dangers potentiels pour la santé. Pour affi cher ou imprimer les fi ches de
données de sécurité (SDS) de ces réactifs, accédez à www.lamotte.com.
Cherchez le code à quatre chiff res du réactif indiqué sur l’étiquette du réactif, dans la liste
du contenu ou dans les procédures d’analyse. Ignorez toute lettre précédant ou suivant le
code à quatre chiff res.
Par exemple, si le code est 4450WT-H, tenez compte uniquement de 4450. Pour obtenir
une version imprimée, contactez LaMotte par courriel, téléphone ou fax.
En cas d’urgence, des informations pour tous les réactifs LaMotte sont disponibles auprès
de Chem-Tel : (US 1-800-255-3924) (appel international, en PCV, 813-248-0585).
Assurez-vous que la protection de l’équipement n’est pas compromise. N’installez et
n’utilisez jamais l’équipement d’une façon qui ne soit pas indiquée dans le manuel.
LIMITES DE RESPONSABILITÉ
En aucun cas, LaMotte Company ne saurait être tenue pour responsable en cas de
décès, de perte de propriété, de perte de profi ts ou de tout autre dommage engendré par
l’utilisation ou l’utilisation impropre de ses produits.
93
Page 94

SPÉCIFICATIONS - 2020t/i
Mode Néphélométrique Ratiométrique Atténuation
Unité de mesure
2020t
Unité de mesure
2020i
Plage 0-100 NTU/FNU
Résolution 0–10.99 NTU/FNU:
Précision 0-2.5 NTU/FNU:
Limite de détection 0.05 NTU/FNU 0.05 NTRU/FNRU 10 AU/FAU
Reproductibilité 0.02 NTU/FNU ou
Sélection de plage Automatique
Source de lumière 2020t : lampe au tungstène 2300 °K ±50 °K, 2020i : LED IR 860 nm ±10 nm,
Détecteur 2020t : photodiode, centrée à 90° et 180°, pic maximal 400-600 nm; 2020t/i :
Temps de réponse : <2 secondes
NTU, ASBC, EBC NTU, NTRU, ASBC, EBC NTU, AU, ASBC, EBC
NTU, FNU, ASBC, EBC NTU, FNRU, ASBC, EBC NTU, FAU, ASBC, EBC
0-1,750 ASBC
0-25 EBC
0.01 NTU/FNU,
11.0–100.0 NTU/
FNU: 0.1 NTU/FNU
±0.05 NTU/FNU,
2.5-100 NTU/FNU:
±2%
1 %
bande passante spectrale de 50 nm
photodiode, centrée à 90° et 180°
0-1,000 NTRU/FNRU
0-17,500 ASBC
0-250 EBC
0–10.99 NTRU/FNRU: 0.01
NTRU/FNRU, 11.0–109.9
NTRU/FNRU: 0.1 NTRU/
FNRU,
110–1000 NTRU/FNRU: 1
NTRU/FNRU
0-2.5 NTRU/FNRU:
±0.05 NTRU/FNRU,
2.5-100 NTRU/FNRU: ±2%,
100-1000 NTRU/FNRU:
±3%.
0.02 NTRU/FNRU ou 1 % 1 %
0-2,000 AU/FAU
0-70,000 ASBC
0-1,000 EBC
0–2000 AU/FAU:
1 AU/FAU
0-2000 AU/FAU:
±10 AU/FAU or 6%
selon le plus élevé
Moyenne de
signaux :
Chambre
d’échantillon :
Échantillon : 10 mL en éprouvette fermée
Écran : Écran graphique à cristaux liquides avec rétroéclairage
Logiciel : Arrêt automatique : 5, 10, 30 min, désactivé; Étalonnage : champ ajustable,
Langues : anglais, espagnol, français, portugais, italien, chinois, japonais (kana)
Température : De fonctionnement : 0–50 °C ; de stockage : -40–60 °C
Plage d’humidité
pour le
fonctionnement :
Arrêt automatique : 5, 10, 30 min, désactivé
Oui
Accepte les éprouvettes 25 mm à fond plat
blanc et 1 point;
0–90 % HR, sans condensation
Enregistrement de données : 500 points
94
Page 95

Source
d’alimentation :
Batterie : Durée de la charge : environ 380 analyses avec rétroéclairage et 1000
Indications
électriques :
Enregistreur de
données :
Étanchéité : IP67 avec le capuchon du port USB en place.
Dimensions : (L x l x H) 8.84 x 19.05 x 6.35 cm ; 3.5 x 7.5 x 2.2 pouces
Adaptateur secteur USB, connexion ordinateur USB ou batterie lithium-ion
rechargeable
analyses sans rétroéclairage. (Moyenne de signaux désactivée.) Durée de vie
de la batterie : environ 500 charges.
Tension nominale (5 V), courant d’entrée nominal (1.0 A) au niveau du port
d’entrée mini-USB
500 résultats d’analyse stockés
Certifi cations :
Poids : 362 g, 13 oz (instrument uniquement)
Interface USB : mini B
CE Mark Safety: Low Voltage Directive (2006/95/EC)
IEC 61010-1:2001, EN 601010-1:2001,
2nd edition
EU EMC: EMC Directive (2004/108/EC)
EN 61326-1:2006, EN 61000-4-2:1995
including A1:1998 and A2:2001, EN
61000-4-3:2002, EN 61000-4-4:2004,
EN 61000-4-5:1995 including A1:2001,
EN 61000-4-6:1996 and A1:2001, EN
61000-4-11:2004, EN 55011:2007, IEC
61000-3-2:2005, EN 61000-3-2:2006,
IEC 61000-3-3:1994, EN 61000-3-3:1995
including A1:2001 and A2:2005
US EMC CFR 47, Part 15 Subpart B:2007
CAN EMC ICES-003, Issue 4, February 2004
AU/NZ EMC AU/NZ: CISPR 11:2004
DÉFINITIONS STATISTIQUES ET TECHNIQUES EN RELATION AVEC LES
SPÉCIFICATIONS DU PRODUIT
Limite de détection de la méthode : « La limite de détection de la méthode est défi nie
comme la concentration minimale d’une substance pouvant être mesurée et dont on
puisse dire avec une confi ance de 99 % que la concentration en analyte est supérieure
à zéro et déterminée à partir de l’analyse d’un échantillon dans une matrice donnée
contenant l’analyte. »
cas, lorsque l’on a aff aire à une limite de détection ou à une limite de détermination, le but
principal de la détermination de cette limite consiste à s’en tenir à l’écart.” »
Précision : La précision est la proximité d’une mesure à la valeur acceptée ou vraie.3
La précision peut être exprimée en tant que plage autour de la valeur vraie dans
laquelle s’eff ectue une mesure (par ex., ±0.5 ppm). On peut aussi l’exprimer en tant que
pourcentage de recouvrement d’une quantité connue d’analyte dans une détermination de
l’analyte (par ex., 103.5 %).
Résolution : La résolution est la plus petite diff érence discernable entre deux mesures.
Pour les instruments de mesure, cela correspond habituellement au nombre de décimales
affi chées (par ex., 0.01). La résolution change fortement en fonction de la concentration
1
« Comme l’a déclaré le Dr. William Horwitz, “Dans presque tous les
2
4
95
Page 96

ou de la plage. Dans certains cas, la résolution peut être inférieure au plus petit intervalle
s’il est possible d’eff ectuer une mesure dont le résultat se situe entre les repères
d’étalonnage. Attention, la résolution n’a que peu de lien avec la précision. La résolution
est toujours inférieure à la précision, mais ce n’est pas une mesure statistique du bon
fonctionnement d’une méthode d’analyse. La résolution peut être extrêmement bonne et
la précision extrêmement mauvaise ! Il ne s’agit pas d’une mesure utile de la performance
d’une méthode d’analyse.
Répétabilité : La répétabilité est la précision au sein d’une même série.
5
Une série est un
même ensemble de données, de la confi guration au nettoyage fi nal. En général, une série
s’eff ectue en un jour. Toutefois, pour les étalonnages d’instrument de mesure, chaque
étalonnage est considéré comme une série, ou ensemble de données, unique même s’il
nécessite 2 ou 3 jours.
Reproductibilité : La reproductibilité est la précision entre les séries.
6
Limite de détection : La limite de détection de l’appareil 2020t/i est défi nie comme la
valeur ou la concentration minimale que l’appareil de mesure peut déterminer et qui est
supérieure à zéro, indépendante de la matrice, de la verrerie et des autres sources d’erreur
provenant de la manipulation. Il s’agit de la limite de détection du système optique de
l’instrument de mesure.
1
CFR 40, part 136, appendix B.
2
Statistics in Analytical Chemistry: Part 7 – A Review, D. Coleman and L Vanatta, American Laboratory, Sept 2003, P.
31.
3
Skoog, D.A., West, D. M., Fundamental of Analytical Chemistry, 2nd ed., Holt Rinehart and Winston, Inc, 1969, p. 26.
4
Statistics in Analytical Chemistry: Part 7 – A Review, D. Coleman and L Vanatta, American Laboratory, Sept 2003, P.
34.
5
Jeff ery G. H., Basset J., Mendham J., Denney R. C., Vogel’s Textbook of Quantitative Chemical Analysis, 5th ed.,
Longman Scientifi c & Technical, 1989, p. 130.
6
Jeff ery G. H., Basset J., Mendham J., Denney R. C., Vogel’s Textbook of Quantitative Chemical Analysis, 5th ed.,
Longman Scientifi c & Technical, 1989, p. 130.
CONTENU ET ACCESSOIRES
Kit 2020t
Version EPA/Code 1974-T
Kit 2020i
Version ISO/Code 1974-I
Contenu Code Code
Turbidimètre 2020t/i
Étalon 0 NTU, 60 mL 1480 1480
Étalon 1 NTU, 60 mL 1441
Étalon 10 NTU/FNU, 60 mL 1442 1447
Étalon 100 FNU, 60 mL 1444
Flacon d’échantillon d’eau, 60 mL 0688 0688
Éprouvettes, avec bouchons 0260 (6) 0260 (6)
Câble, USB 1720 1720
Adaptateur secteur USB 1721 1721
Mode d’emploi du turbidimètre
1974-MN 1974-MN
2020t/i
Guide de démarrage rapide du
1974-QG-FR 1974-QG-FR
turbidimètre 2020t/i
Guide d’analyse du turbidimètre
1974-TG-FR 1974-TG-FR
2020t/i
96
Page 97

Accessories
Code Description
0260-6 Éprouvettes, avec bouchons
1446 Étalon 1 FNU, 60 mL (ISO)
1443 Étalon 100 NTU, 60 mL (EPA)
6195-H Solution d’étalon à la formazine, 4000 NTU, 60 mL
3-0038 Chambre de rechange
0943 Seringue, 60 ml, en plastique
2-2097 Filtres 0.1 micron, paquet de 50
5-0132 Chargeur de voiture
CONFORMITÉ EPA
Le turbidimètre 2020t est conforme ou supérieur aux spécifi cations de conception EPA
pour les programmes de contrôle de turbidité NPDWR et NPDES comme spécifi é par la
méthode USEPA 180.1.
CONFORMITÉ ISO
Le turbidimètre 2020t est conforme ou supérieur aux critères de conception ISO pour les
méthodes quantitatives de turbidité utilisant des turbidimètres optiques comme spécifi é
par la norme ISO 7027.
CONFORMITÉ CE
Cet appareil est conforme à la Partie 15 des réglementations de la FCC. Son
fonctionnement est soumis aux deux conditions suivantes : (1) cet appareil ne peut
provoquer aucune interférence nuisible et (2) cet appareil doit accepter toute autre
interférence reçue, y compris les interférences pouvant entraîner un fonctionnement non
désiré.
Remarque : Ce matériel a été testé et déclaré conforme aux limites applicables aux
appareils numériques de classe A, conformément à la Partie 15 des réglementations
de la FCC. Ces limites ont pour objectif de fournir une protection raisonnable contre les
interférences nuisibles quand l’appareil est utilisé dans un environnement commercial.
Cet appareil génère, utilise et émet de l’énergie d’ondes radio et peut, en cas d’installation
ou d’utilisation non conforme au mode d’emploi, engendrer des interférences nuisibles au
niveau des communications radio. L’utilisation de cet appareil dans une zone résidentielle
peut entraîner des interférences nuisibles, lesquelles devront être corrigées aux frais de
l’utilisateur.
CONFORMITÉ IP67
Le turbidimètre 2020t/i est conforme aux normes IP67 relatives à la protection contre
la poussière et l’immersion uniquement lorsque le capuchon du port USB est en place.
Documentation disponible sur www.lamotte.com.
GARANTIE
LaMotte Company garantit que cet instrument est exempt de défauts matériaux et de
fabrication pendant 2 ans à partir de la date d’expédition. S’il s’avérait nécessaire de
renvoyer l’instrument au service technique pendant ou au-delà de la période de garantie,
contactez notre service technique au 1-800-344-3100 afi n d’obtenir un numéro
d’autorisation de retour ou accédez au site Web www.lamotte.com pour obtenir de l’aide
97
Page 98

relative au dépannage. L’expéditeur est responsable des frais d’envoi, du transport, de
l’assurance et de l’emballage adéquat du produit afi n que ce dernier soit protégé contre
les dommages qui pourraient survenir durant le transport. La garantie ne s’applique
pas aux défauts résultant de l’action de l’utilisateur, telle qu’une utilisation impropre,
un branchement incorrect, un fonctionnement hors spécifi cations, un entretien ou une
réparation inappropriés, ou une modifi cation non autorisée. LaMotte Company décline
expressément toute garantie implicite de qualité marchande ou de convenance à une
fi n particulière et ne pourra en aucun cas être tenue pour responsable de tout dommage
consécutif, accessoire, indirect ou direct. La responsabilité totale de LaMotte Company est
limitée à la réparation et au remplacement du produit. La garantie énoncée ci-avant est
inclusive et aucune autre garantie, écrite ou orale, n’est expresse ou implicite.
ENREGISTREMENT DE VOTRE TURBIDIMÈTRE
Pour enregistrer votre turbidimètre auprès du service technique LaMotte accédez à
www.lamotte.com et cliquez sur SUPPORT dans la barre de navigation.
CONNEXION À UN ORDINATEUR
SORTIE
USB
CONNEXION À UN ORDINATEUR
USB type A, USB mini B, câble code 1720.
FONCTIONNEMENT SUR BATTERIE/SECTEUR
Le turbidimètre 2020t/i peut fonctionner sur batterie ou sur secteur avec l’adaptateur
secteur USB ou via la connexion USB à un ordinateur. Si vous vous servez du turbidimètre
en tant qu’appareil principal, utilisez l’adaptateur secteur si possible afi n de prolonger
la durée de vie de la batterie. Le turbidimètre reste allumé lorsque l’adaptateur USB est
employé.
Pour recharger la batterie lithium-ion via l’adaptateur secteur, branchez l’embout le plus
petit du câble USB (prise USB mini B) sur le turbidimètre et l’embout le plus grand du câble
USB (prise USB type A) sur l’adaptateur secteur. Branchez l’adaptateur secteur sur une
prise secteur. Remettez le capuchon du port USB après avoir chargé la batterie.
Pour recharger la batterie à partir d’un ordinateur, branchez l’embout le plus petit du câble
USB (prise USB mini B) sur le turbidimètre et l’embout le plus grand du câble USB (prise
USB type A) sur l’un des ports USB de l’ordinateur. Remettez le capuchon du port USB
après avoir chargé la batterie.
L’icône de la batterie n’affi che d’abord aucune barre et clignote lorsque l’appareil se met en
marche. Puis il indique le statut de la batterie en affi chant 0, 1, 2, 3 ou 4 barres.
La recharge complète d’une batterie faible dure 5 heures. L’icône de la batterie clignote
lorsque la batterie est en chargement. L’icône de la batterie affi che quatre barres et
cesse de clignoter lorsque la batterie est entièrement chargée. Le circuit de charge passe
automatiquement à une charge fl ottante lorsque la batterie est entièrement chargée.
Le chargeur peut rester branché. Certains ordinateurs n’alimentent PAS les ports USB
lorsqu’ils sont en veille. L’adaptateur secteur charge l’appareil en continu.
L’icône de la batterie n’affi che aucune barre et clignote de façon continue si la batterie
est faible, mais l’appareil continue de fonctionner normalement. Un message « Batterie
faible » au niveau de la barre de statut sur l’écran remplace le temps de batterie restante
lorsque la tension de la batterie est trop faible pour un fonctionnement correct et que
98
Page 99

la précision risque d’être altérée. Un message « Arrêt batt. faible » apparaît sur l’écran
quelques secondes avant l’extinction de l’appareil lorsque la batterie est trop faible pour
faire fonctionner ce dernier.
Pour prolonger la durée de vie de la batterie :
• Éteignez l’appareil avec le bouton d’alimentation lorsque vous n’eff ectuez
aucune mesure ou utilisez l’option d’économie d’énergie afi n que l’appareil
s’éteigne automatiquement après 5 minutes d’inactivité.
• Stockez l’appareil dans un lieu sec et frais.
• Chargez complètement la batterie avant de stocker l’appareil pour une longue
période.
• Évitez d’utiliser le rétroéclairage. L’appareil consomme trois fois plus
d’énergie lorsque le rétroéclairage est activé. Confi gurez l’option de durée de
rétroéclairage sur 10 secondes ou sélectionnez « Bouton de commande » et
désactivez le rétroéclairage.
Remplacement de la batterie : La batterie lithium-ion utilisée dans cet appareil dure de
nombreuses années si vous en faites un usage correct. Lorsque la batterie ne parvient
plus à alimenter l’appareil assez longtemps pour satisfaire aux exigences d’analyse,
remplacez-la. Les batteries lithium-ion chargées et stockées correctement ne perdent
pas toute leur capacité, mais seulement une partie au bout de plusieurs centaines de
cycles de chargement. Cet appareil emploie un assemblage de batteries personnalisé,
uniquement disponible chez LaMotte. Le remplacement de la batterie doit être eff ectué
dans une installation de réparation autorisée par LaMotte. Le logement résistant à l’eau de
ce turbidimètre ne doit pas être ouvert par l’utilisateur. Contactez l’entreprise LaMotte par
téléphone (1-800-344-3100) ou par courriel (tech@lamotte.com) pour obtenir un numéro
d’autorisation de retour.
TURBIDITÉ
QU’EST-CE QUE LA TURBIDITÉ ?
La turbidité est une propriété optique qui survient lorsque la lumière traversant un liquide
est dispersée par les particules de matière. La dispersion de la lumière est provoquée
par le changement de direction de la lumière lorsque cette dernière traverse le liquide.
Si la turbidité est faible, les particules peuvent être invisibles à l’œil nu et la plupart de la
lumière continuera sa trajectoire initiale. La quantité de particules est plus importante
dans les échantillons présentant une turbidité plus élevée ; la lumière est alors réfl échie
par les particules présentes dans la solution et dispersée selon plusieurs angles. La lumière
diff usée par les particules permet de « voir » ou de détecter les particules dans la solution,
de même que les rayons du soleil permettent de voir les particules de poussière présentes
dans l’air. Lorsque que le taux de turbidité est élevé, cette dernière est visible sous forme
de trouble, de voile ou d’absence de limpidité. La turbidité n’est pas spécifi que des types
de particule contenus dans l’échantillon. Les particules peuvent être en suspension ou
colloïdes, et peuvent être minérales, organiques ou biologiques.
Dans l’eau de boisson, la turbidité peut indiquer un problème de traitement ou signaler des
conditions de risque accru de maladies gastro-intestinales. Les agents pathogènes tels
que Cryptosporidium et Giardia provoquent des taux de turbidité considérables, il est donc
extrêmement important de surveiller la turbidité afi n d’assurer une fi ltration adéquate de
l’eau. En 1998, l’EPA a publié la règlementation IESWTR (interim enhanced surface water
treatment rule) autorisant dans les effl uents de fi ltration combinée une turbidité inférieure
ou égale à 0.3 NTU. Ainsi, l’EPA souhaitait parvenir à éliminer le Cryptosporidium à 2 log
(99 %). La réduction de cette limite à 0.1 NTU est actuellement en cours de discussion.
99
Page 100

La tendance a été marquée par la vérifi cation de l’étalonnage des turbidimètres en
ligne utilisés pour contrôler l’eau de boisson avec des appareils de terrain portables. La
conception optique et la limite de détection basse du 2020t/i permettent des mesures très
précises pour de tels étalonnages. L’eau de boisson trouble n’est pas toujours nocive pour
la santé humaine, mais elle présente une apparence peu engageante.
La turbidité dans les eaux environnementales réduit la quantité des rayons du soleil
nécessaire à la végétation aquatique, augmente la température de l’eau de surface,
ensevelit les œufs et les organismes benthiques et peut introduire des sédiments et des
pesticides dans le réseau d’eau.
COMMENT LA TURBIDITÉ EST-ELLE MESURÉE ?
On mesure la turbidité en détectant et en quantifi ant la diff usion de la lumière dans une
solution. La quantité de lumière diff usée dépend des propriétés des particules (couleur,
taille, forme et réfl ectivité). De nombreuses méthodes permettent de mesurer la turbidité,
y compris des méthodes visuelles et instrumentales. Les méthodes visuelles conviennent
mieux aux échantillons présentant une forte turbidité, tandis que les méthodes
instrumentales peuvent être utilisées avec des échantillons présentant une turbidité faible
ou forte.
La méthode du disque de Secchi et la méthode de la chandelle de Jackson sont deux
exemples de méthodes visuelles. La méthode du disque de Secchi est souvent utilisée
pour les eaux naturelles : on abaisse un disque de Secchi noir et blanc dans l’eau jusqu’à
ce qu’il disparaisse, puis on le remonte jusqu’à ce qu’il réapparaisse. La moyenne de ces
deux mesures est connue sous le nom de « profondeur de Secchi ». La méthode de la
chandelle de Jackson emploie un long tube de verre placé au-dessus d’une bougie normée.
On ajoute de l’eau dans le tube ou on en enlève jusqu’à ce que la fl amme se trouble. La
profondeur de l’eau dans le tube est mesurée à l’aide d’une échelle calibrée et reportée en
unités de turbidité de Jackson (JTU). La plus faible turbidité mesurable via cette méthode
est d’environ 25 JTU.
Les méthodes instrumentales mesurent la turbidité en alliant angles de détection et
sources de lumière afi n d’optimiser la précision des diff érents échantillons et de satisfaire
aux exigences réglementaires. Les turbidimètres 2020t et 2020i off rent la possibilité
de choisir entre trois courbes d’étalonnage pour mesurer la turbidité, en fonction des
caractéristiques de l’échantillon.
En mode néphélométrique, mode par défaut, le détecteur situé à 90° de la source de
lumière mesure la lumière diff usée à partir d’un faisceau traversant l’échantillon. Dans le
cas du turbidimètre 2020t, cette confi guration et la lampe au tungstène, présentant une
température de couleur de 2200–3000 °K, sont conformes aux exigences de la méthode
EPA 180.1. Le turbidimètre 2020i est équipé d’une source de lumière LED IR de 860 nm et
utilise le détecteur à 90° afi n de répondre aux exigences de la norme ISO 2027. Le mode
néphélométrique est le plus adapté pour répondre aux exigences réglementaires pour
les échantillons, tels que l’eau de boisson, qui se trouvent dans une plage allant de 0.00 à
40.00 NTU (Nephelometric Turbidity Units) pour le turbidimètre 2020t et de 0.00 à 10.00
(Formazin Nephelometric Units) pour le turbidimètre 2020i. Une option de moyenne des
signaux améliore la stabilité des résultats pour les échantillons présentant une faible
turbidité.
Le mode ratiométrique est généralement utilisé pour les eaux naturelles et les eaux de
pluie, ou tout autre échantillon se trouvant dans la plage 0 – 1000 NTU/FNU, car il permet
de réduire les interférences de couleur dans l’échantillon. Le mode ratiométrique utilise
à la fois les mesures du détecteur à 90° et celles du détecteur à 180°. Les résultats
sont exprimés en NTRU (Nephelometric Turbidity Ratio Units) pour le 2020t et en FNRU
(Formazin Nephelometric Ratio Units) pour le 2020i.
En mode d’atténuation, le détecteur est situé à 180° de la source de lumière. Il mesure
100
 Loading...