

Page 1
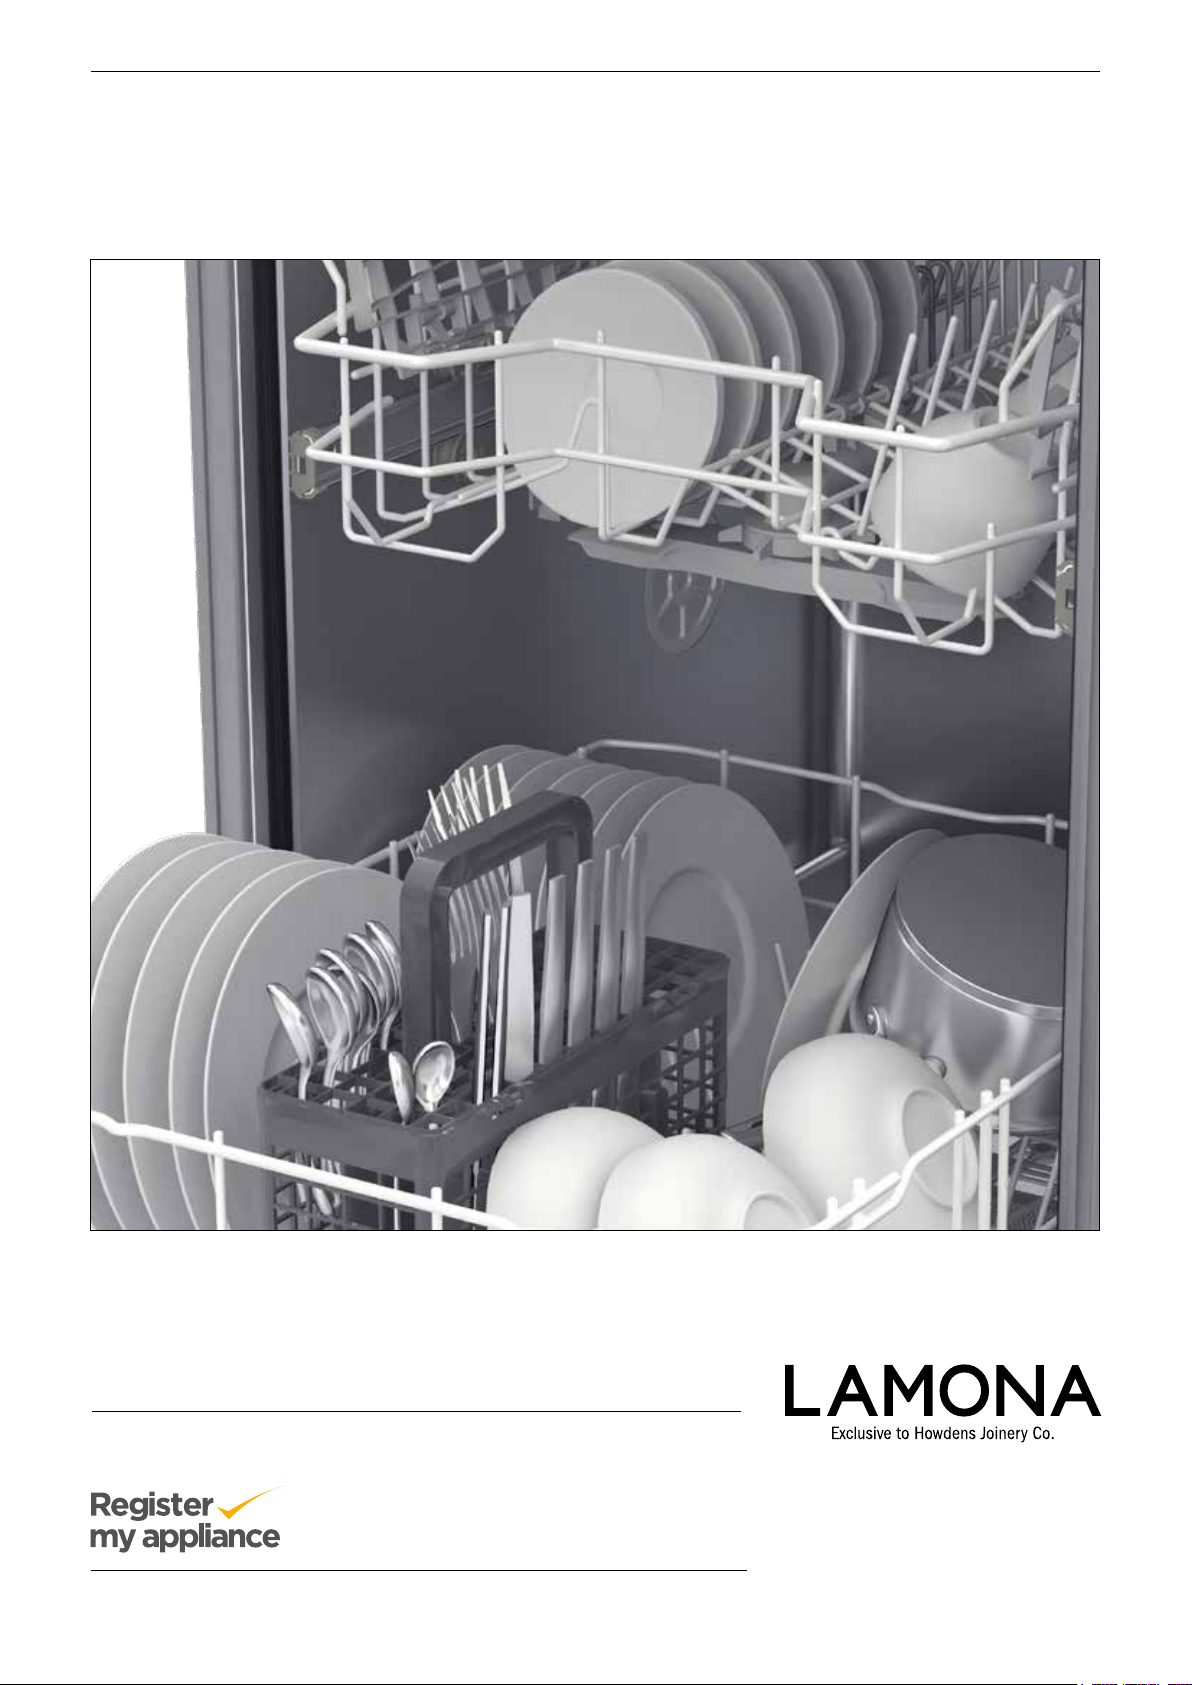
Dishwasher
LAM8303
User Instructions
www.howdens.com/appliance-registration
Page 2
Register your Lamona appliance purchased
from Howdens Joinery to allow us to easily
contact you in the event of important product
updates at:
www.howdens.com/appliance-registration
2
www.howdens.com
Page 3
Welcome
Dear Customer
Congratulations on your choice of dishwasher which
has been designed to give you excellent service.
• Please read these User Instructions to ensure safe
operation of the dishwasher.
• Please keep these instructions in a safe place for
your future reference.
• If you have any questions, or if you are not sure
about any information contained in this booklet
please contact us - details at the end of these
User Instructions
Throughout this manual the following symbols are used.
Warning for hazardous
situations with regard to
life and property.
NOTE: Due to the quality control processes during
production, there may be some water left in your
machine. This does not cause any damage.
Preparation before use: It is recommended that
the dishwasher is operated on the NORMAL 60°C
programme.
This appliance is intended to be used in household
and similar domestic applications where it is used by a
maximum of 8 people.
Warning for
electric shock.
Contents
Safety information
Children and vulnerable people safety.........p.4
General safety.............................p.4
Installation................................p.4
Electrical connection .......................p.4
Water connection ..........................p.4
Installation of dishwasher ...................p.5
Use ......................................p.5
Service ...................................p.5
Disposal of old appliance....................p.5
Disposing of packaging material..............p.5
Compliance ...............................p.5
1 - Before rst use ...........................p.6
Check water hardness ......................p.6
Setting water hardness level .................p.7
Adding dishwasher salt .....................p.7
Setting rinse aid level .......................p.7
Adding rinse aid ...........................p.7
2 - Operating the dishwasher (quick guide) ......p.8
3 - Operating the dishwasher (detailed) .........p.9
Loading the dishwasher .....................p.9
Folding shelves ............................p.9
Upper basket height adjustment (3 positions) .p.10
Spray arms ..............................p.10
Adding the detergent ......................p.10
Choose a programme .....................p.11
Programme the dishwasher ................p.12
Opening the door whilst operating ...........p.13
Programme ends / setting audible warning ...p.13
Unloading the dishwasher ..................p.13
4 - Cleaning the dishwasher ..................p.13
Cleaning the dishwasher ...................p.13
Cleaning the lters ........................p.14
Cleaning the upper and lower spray arms .....p.14
5 - Detergents and use ......................p.15
6 - Before calling for service..................p.16
Trouble shooting guide.....................p.16
Fault codes ..............................p.17
7 - Guarantee...............................p.18
8 - Product che ............................p.19
9 - Technical specications ..................p.19
www.howdens.com
3
Page 4
Safety information
Please read these instructions. The manufacturer is
not responsible if an incorrect installation and use
causes injuries and/or damage. Always keep the
instructions with the dishwasher for future reference.
Electrical connection
WARNING! Risk of re and electric shock.
Children and vulnerable people safety
• This appliance can be used by children aged from 8
years and above and persons with physical, sensory
or mental capabilities or lack of experience and
knowledge if they have been given supervision or
instruction concerning use of the appliance in a safe
way and understand the hazards involved.
• Do not let children play with the appliance.
• Keep all detergents away from children.
• Keep children and pets away from the appliance
door when it is open.
• Cleaning and maintenance shall not be made by
children without supervision.
General safety
This appliance is intended to be used in household and
similar applications, (8 persons maximum).
• The appliance must be earthed.
• Make sure that the electrical information on the
rating plate agrees with the power supply. If not,
contact an electrician.
• Do not use multi-plug adapters and extension cables.
• Avoid damage to the mains plug and mains cable.
Should the mains cable need to be replaced, contact
a LAMONA Authorised Service Agent or a suitably
qualied person.
• Connect the mains plug only at the end of the
installation. Ensure access to the mains plug after
the installation.
• This appliance complies with all relevant
E.U. Directives.
• The appliance has a 13amp plug.
Use fuse: 13amp ASTA (BS 1362).
Water connection (cold water supply)
• Do not change the specication of this appliance.
• The operating water pressure (minimum and
maximum) must be between 0.01 - 1.0Mpa
(0.3 - 1.0 Bar).
• The maximum number of place settings is 10.
• Put knives and cutlery with sharp points in the
cutlery basket with the points down or in a horizontal
position.
• Do not leave appliance door open - trip hazard.
• Before maintenance, switch off the appliance and
disconnect the mains plug from the mains socket.
• Do not use steam cleaners or jet washers to clean
the appliance.
Installation
• Do not install or use a damaged appliance.
• Do not install or use the appliance where the
temperature is less than 0°C.
• Do not kink or damage the hoses during installation.
• Before you connect the ll hose to the appliance;
let some water ow through to ensure all debris is
removed.
• We suggest you connect the ll hose and open
the water valve before pushing the appliance into
position.
• Check for leaks during and after installation and
after rst use.
• If the water inlet hose is damaged, immediately close
the water supply valve and disconnect the mains
plug from the mains socket.
• The appliance is to be connected to the water mains
using the new hose-set supplied with the appliance.
Do not re-use old hose-sets.
• Make sure that the appliance is installed below and
adjacent to safe and solidly xed structures.
4
www.howdens.com
Page 5
Installation of dishwasher
Service
Separate Installation Instructions are provided with
your dishwasher.
Please follow these installation instructions in order
to assemble and install your dishwasher easily and
correctly.
• After unpacking your dishwasher, check for any
possible transportation damage.
• Never install and use a damaged dishwasher. If your
dishwasher is damaged contact your supplier.
• Always have your dishwasher installed by a suitably
qualied person.
• Any repairs or service work on this dishwasher
should only be carried out by a LAMONA Authorised
Service Agent.
• Unauthorised repairs are dangerous and will lead to
the cancellation of your guarantee.
• Make sure the electricity and water connections
are in compliance as stated in the Installation
Instructions.
Use
• Do not sit or stand on the open door.
• Dishwasher detergents are hazardous. Obey the
safety instructions on the detergent packaging.
• Contact the Depot or Helpline for any Service
requirements. We recommend only the use of
original spare parts.
Disposal of old appliance
WARNING! Risk of injury or suffocation.
• Disconnect the appliance from the mains supply.
• Cut off the mains cable and discard it safely.
• Disable the door catch to prevent children and pets
becoming trapped in the appliance.
• Contact local council for safe disposal.
Disposing of packaging material
Packaging materials are dangerous to children
• Keep packaging materials away and out of reach of
children.
• Packaging materials are manufactured from
recyclable materials. Dispose of them properly and
sort in accordance with recycled waste instructions.
• Do not dispose of them with normal domestic waste.
Compliance with WEEE Directive and
Disposal of the Waste Product
• Do not drink the water from the appliance.
• Do not remove the dishes from the appliance
until the programme is completed. There may be
detergent on the dishes.
• The appliance may release hot water if you open the
door while a programme is in operation.
• Do not put ammable products or items that are
wet with ammable products in, near or on the
appliance.
• Caution: If removing dishes before or immediately
after the programme has ended be aware that the
dishes may be hot and hot steam may be released.
www.howdens.com
This product complies with EU WEEE
Directive (2012/19/EU). This product bears
classication symbol for waste electrical and
electronic equipment (WEEE). This product
has been manufactured with high quality
parts and materials which can be reused and are
suitable for recycling. Do not dispose of the waste
product with normal domestic and other wastes at the
end of its service life. Take it to the collection centre for
the recycling of electrical and electronic equipment.
Please contact your local council authority to learn
about these collections.
This appliance complies with all relevant
EU Directives
5
Page 6
1 - Before rst use
1. Check water hardness and set ‘salt’ level.
2. Fill the salt container, (dishwasher salt only).
3. Fill the rinse aid dispenser.
Check water hardness
The dishwasher has a special water softening system
to remove the hardness of the tap water.
Make sure the current setting of water softener agrees
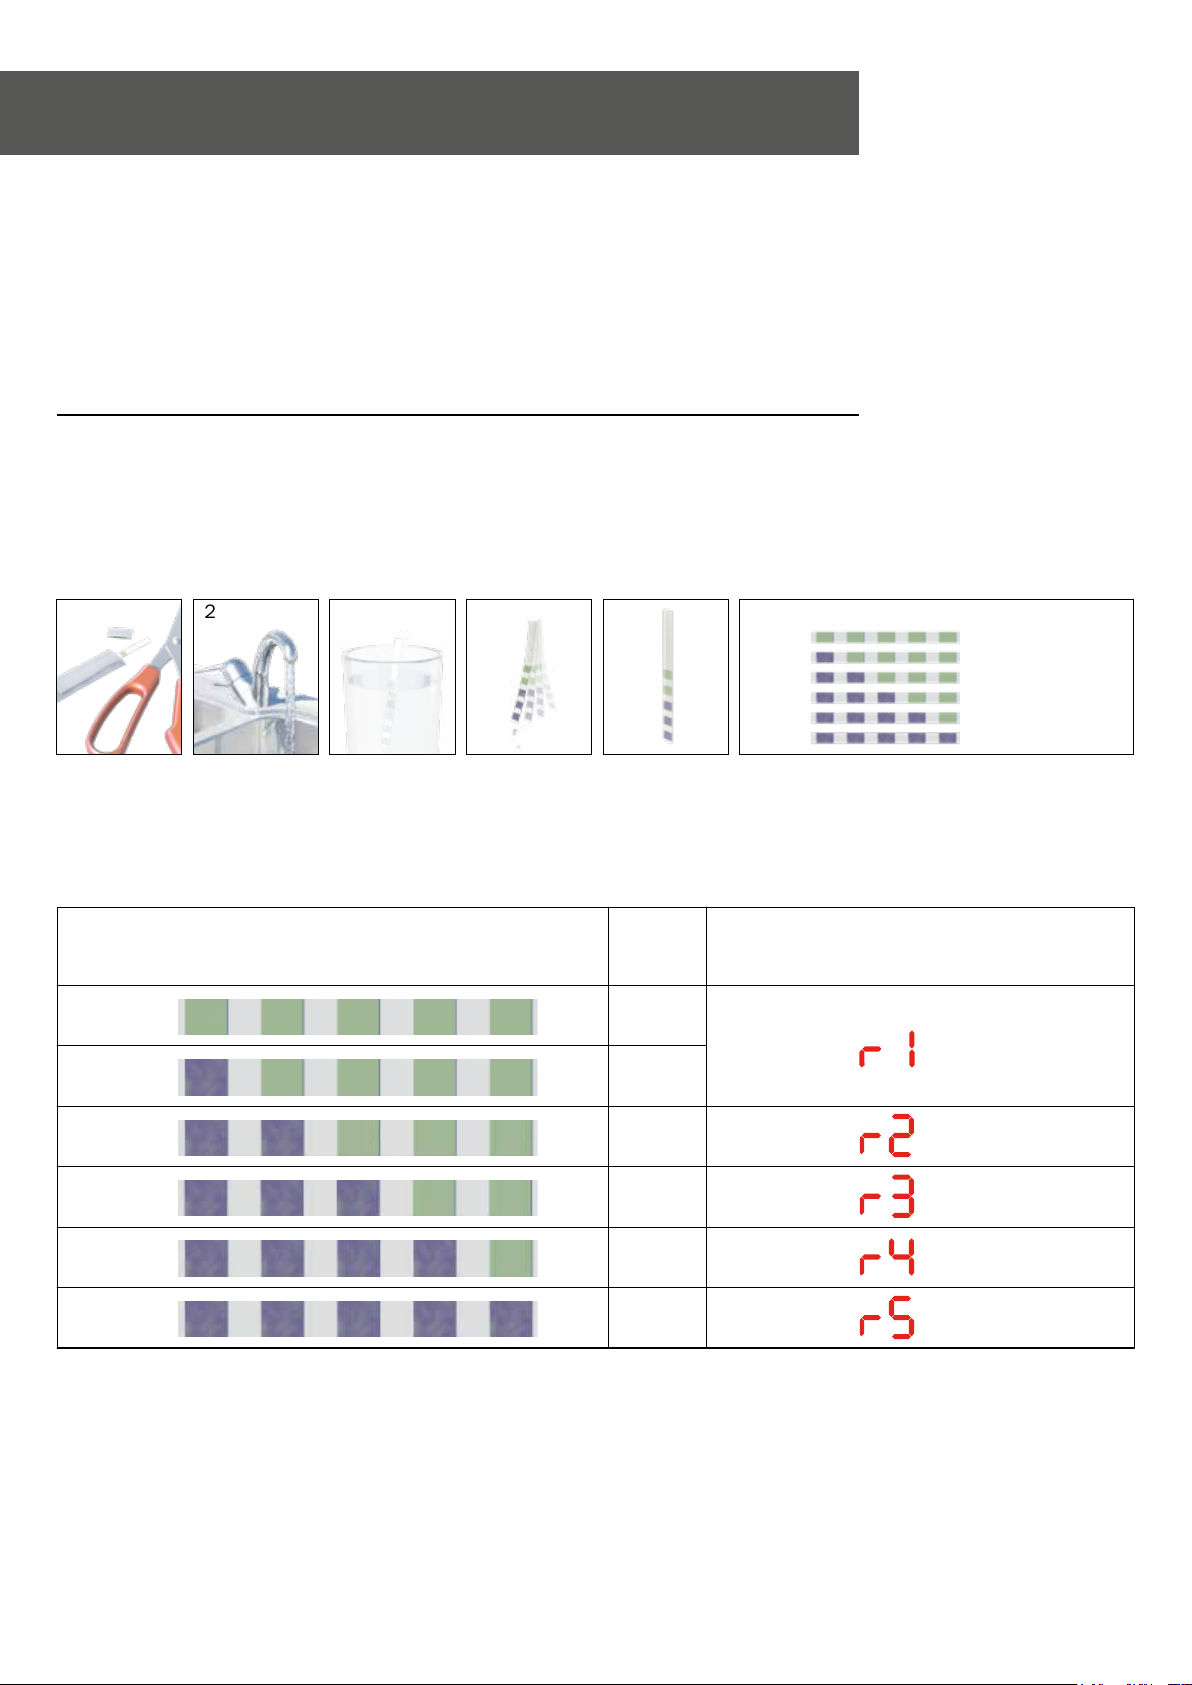
Test strip
Remove the
test strip from
the packet.
21 43
Let the water
ow from your
tap for 1 minute.
1 second
Fill a glass with
tap water and
dip the test strip
into the water
and stir around.
Take the test
strip out of
the water and
shake.
4. To remove any manufacturing residues that may
still be inside the dishwasher, select and run the
NORMAL 60°C programme.
Use a small amount of detergent and do not load
the baskets.
with the hardness of the water supply.
Determine water hardness level by using the test strip
provided.
5
1 minute
Hold for
1 minute.
6
Level 1
Level 2
Level 3
Level 4
Level 5
Level 6
Set the water hardness level of the dishwasher
according to the result shown by the test strip.
No lime
Very low lime content
Low lime content
Medium lime content
High lime content
Very high lime content
Hardness level
Level 1
Level 2
Level 3
Level 4
Level 5
Level 6
If the hardness level of the supply water is below 7°de,
there is no need to use salt in your dishwasher.
Note: If the water hardness level adjustment is set
to level 1, the “No salt warning indicator” will
illuminate continuously although it is not necessary
to use salt. However, if you ll the salt reservoir under
this condition, salt will not be consumed and the salt
indicator will not illuminate.
Water
hardness
°dE
0-5
6-9
10-15
16-19
20-24
25-62
Water hardness programme setting
(If the hardness level of the supply water is above
62°de or if you are using well water, then it is
recommended to use water purication devices and
special lters.)
6
www.howdens.com
Page 7
1
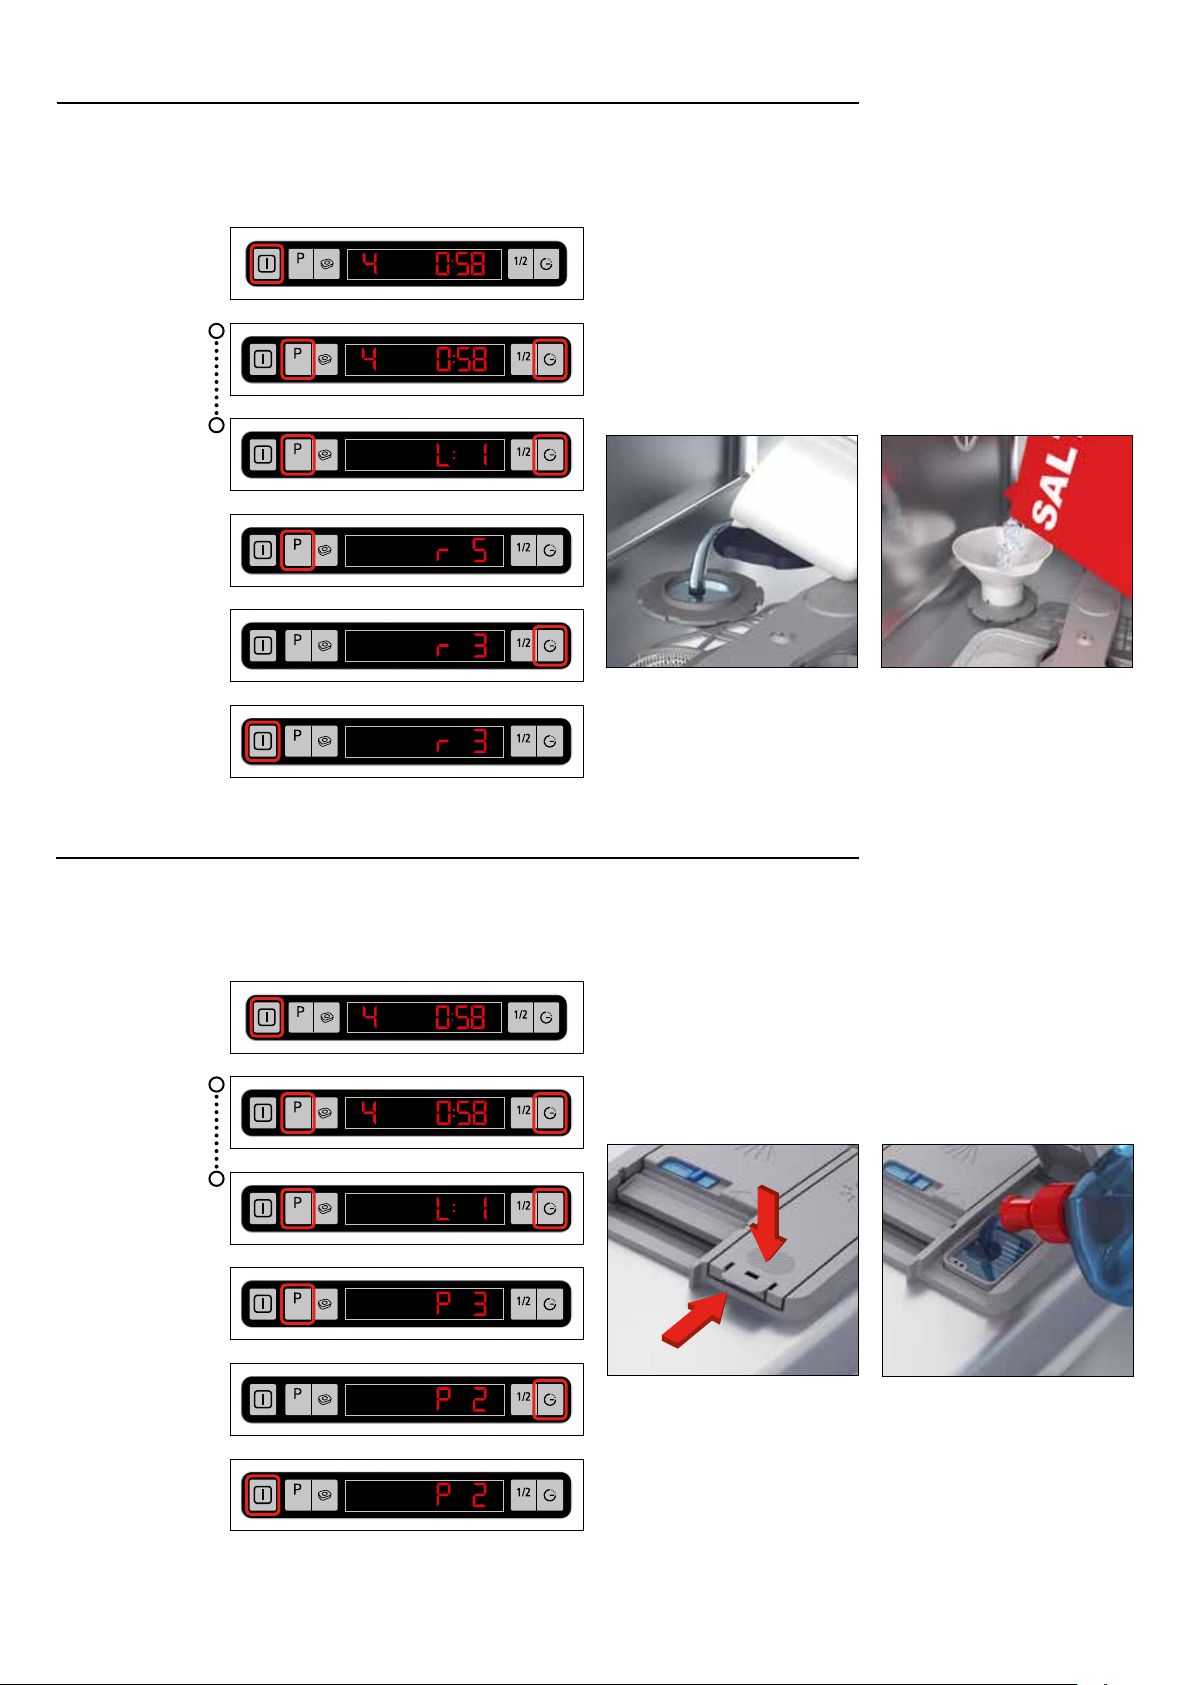
Setting water hardness level / adding dishwasher salt
Setting the correct water hardness programme by adding dishwasher salt to
increase washing efciency and performance.
Switch On
Press and hold
(display counts
down 3,2,1)
Press and
hold until
display shows
Select water
hardness setting
(r...)
Press to select
new water
hardness setting
Switch Off
to save new water
hardness setting
Cancel
3 sec.
Cancel
3 sec.
Cancel
3 sec.
Cancel
3 sec.
Cancel
3 sec.
Cancel
3 sec.
To add the salt, pour one litre of cold water into the salt
Load
container and then completely ll with dishwasher salt.
Some water and salt may spill out of the container. It is
recommended to use a rinse programme or complete
Load
a wash cycle to remove any spilled salt and prevent
possible corrosion.
Load
Load
Load
Load
Setting rinse aid level / adding rinse aid
Rinse aid helps dry the dishes without streaks and stains. It is automatically
released during the hot rinse phase.
Switch On
Press and hold
(display counts
down 3,2,1)
Press and
hold until
display shows
Select rinse
aid setting
(P...)
Press to select new
rinse aid setting
Cancel
3 sec.
Cancel
3 sec.
Cancel
3 sec.
Cancel
3 sec.
Cancel
3 sec.
Load
Load
Load
Load
Load
If there are stains on tableware items after washing
the level must be increased and if there is a blue trace
after wiping them by hand, it must be decreased.
Adjust the setting from the values 0,1,2,3,4 (factory
pre-set, level 3).
2
Switch Off
to save new
rinse aid setting
www.howdens.com
Cancel
3 sec.
Load
7
Page 8
2 - Operating the dishwasher (quick guide)
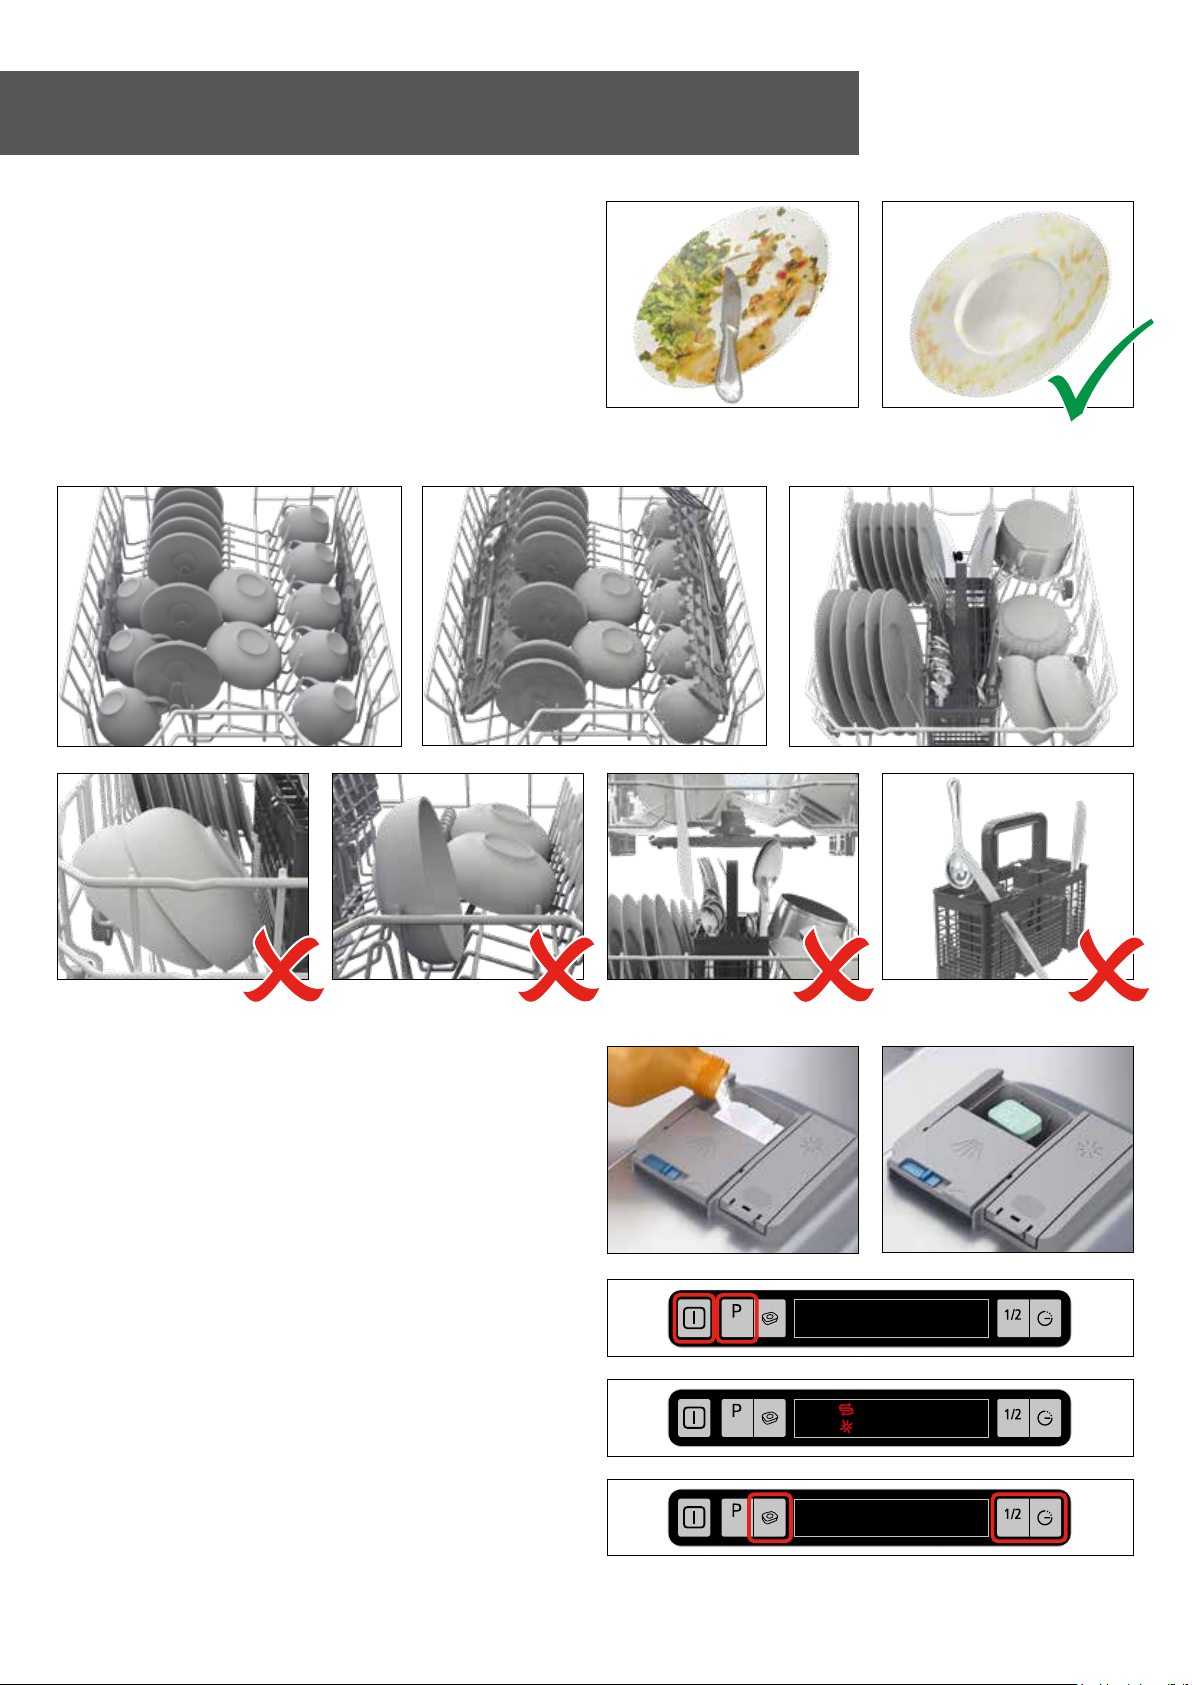
1. Scrape all food waste and debris from plates.
2. Load dishwasher as shown.
Upper basket Upper basket
Lower basket
Cutlery points down.
3. Add detergent - powder or tablet.
4. Turn on and select programme.
5. Check salt and rinse aid - rell if necessary.
6. Select option(s) as required.
7. Close the dishwasher door to start programme.
8
Cancel
3 sec.
Cancel
3 sec.
Cancel
3 sec.
Load
Load
Load
www.howdens.com
Page 9
3 - Operating the dishwasher (detailed)
Loading the dishwasher
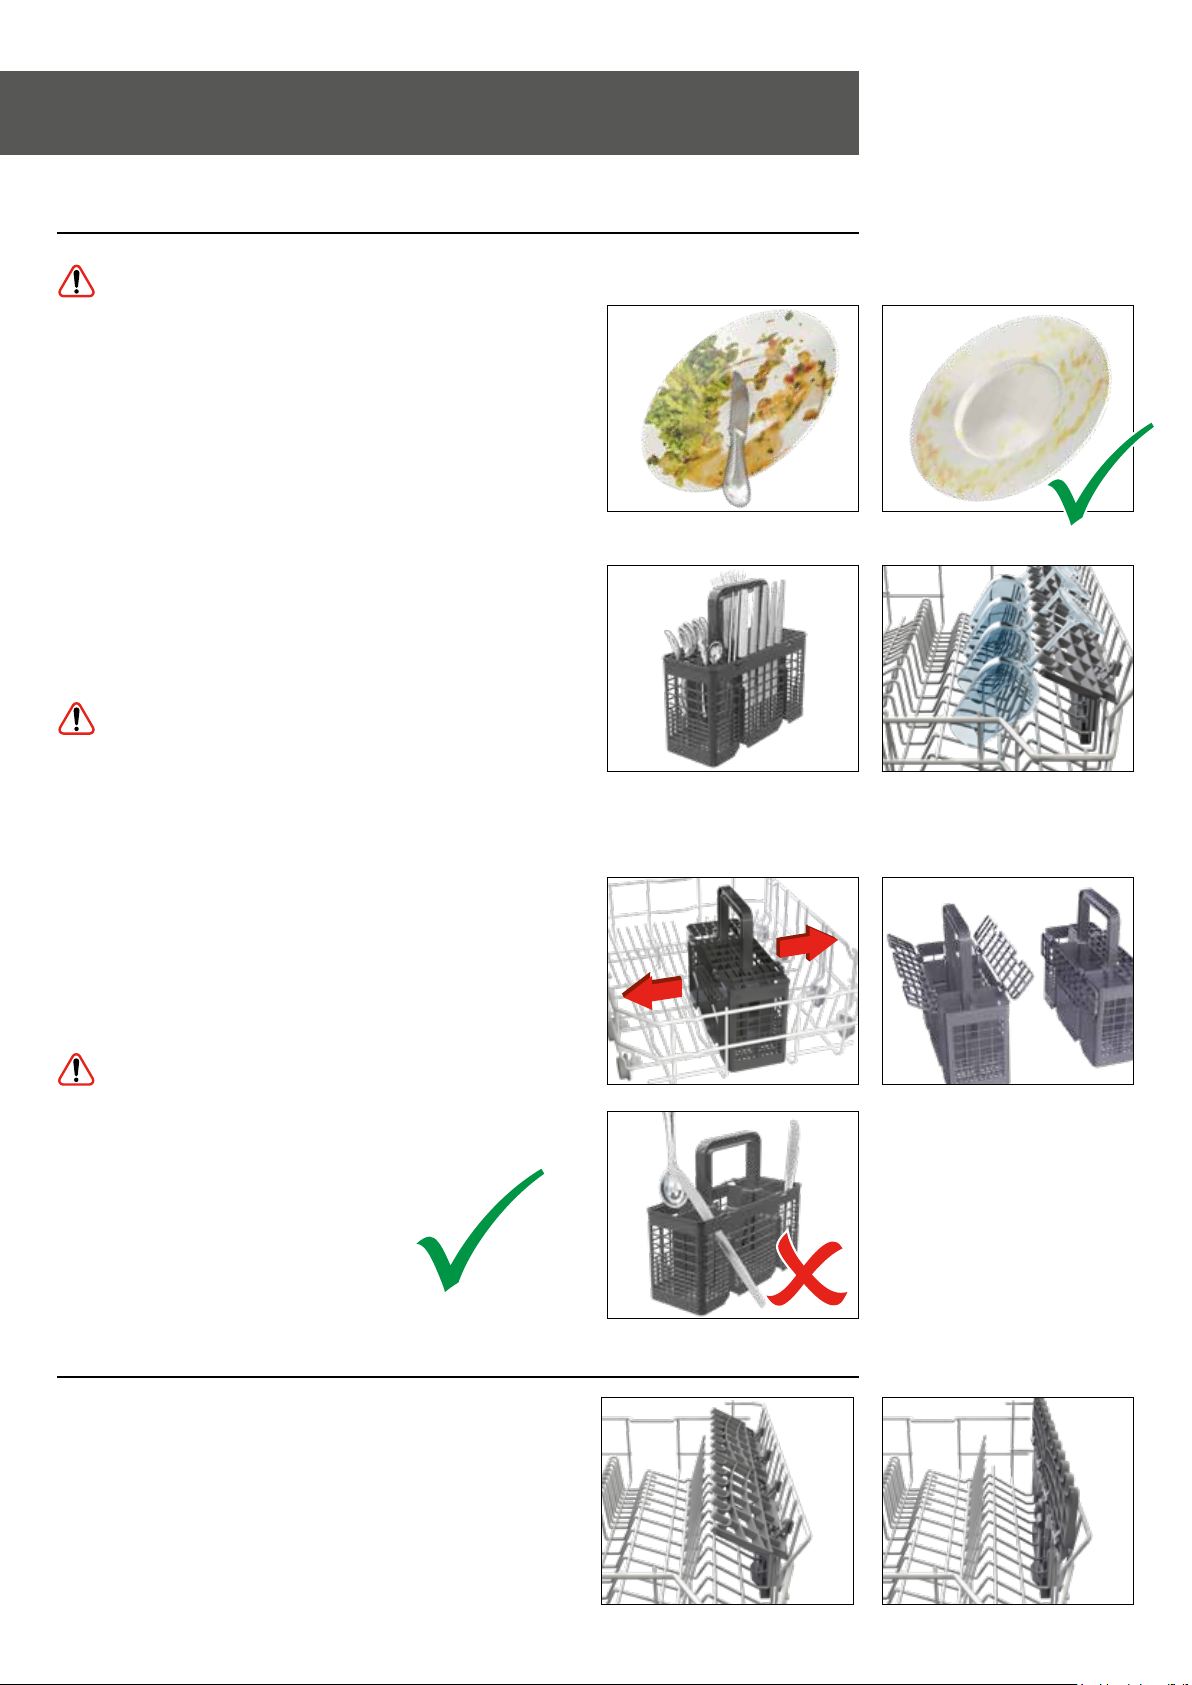
Ensure all items are dishwasher safe.
• Scrape all food waste and debris from plates, (A).
• Place large or heavily soiled items in the lower
basket.
• Place small, light or delicate articles in the upper
basket.
• Place forks, small and medium sized knives and
spoons in the cutlery basket (points down), (B).
• Place tall, narrow items in the middle of the baskets.
• Long-stemmed glasses should lean against the
basket or the support shelves and not against
dishes, (C).
(A)
DO NOT allow tall glasses to rest against each
other because of possible damage during the wash
programme.
• Always arrange saucepans, cups and glasses etc.
upside down.
Cutlery basket
• Move cutlery basket as desired.
• Place sharp or pointed items with points down in the
cutlery basket.
DO NOT allow cutlery to protrude out of the sides
of the cutlery basket.
Note: A fully loaded dishwasher is
more economical, more efcient
and better for the environment.
(B) (C)
Folding shelves
Fold the shelves in the upper basket when you need
more space for larger items, (A) and (B).
www.howdens.com
(A) (B)
9
Page 10
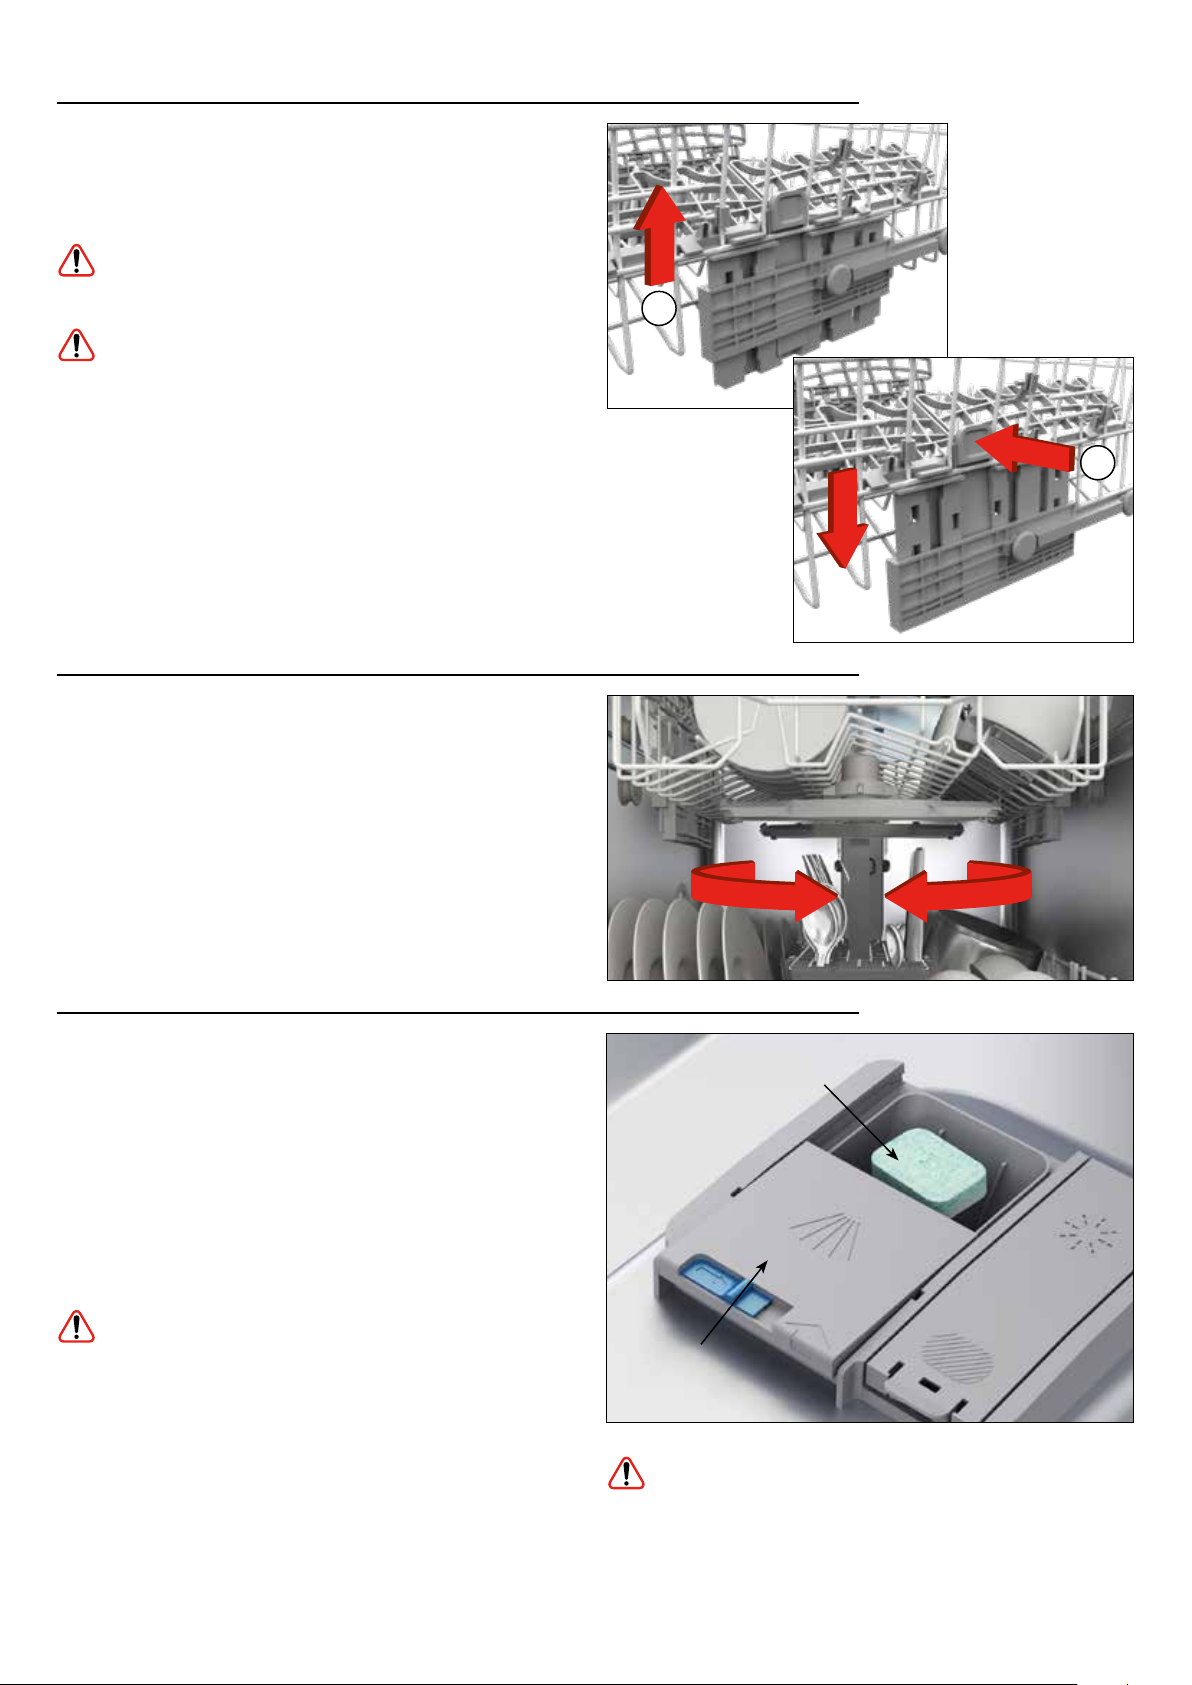
Upper basket height adjustment (3 positions)
To raise the height of the upper basket.
• Hold the upper basket and pull upwards, (A).
• An audible click will be heard.
The height adjustment may not work properly if
the basket is overloaded.
Ensure the basket is level after adjustment.
To lower the height of the upper basket.
• Hold the upper basket and press the adjustment
handles, (B).
• Lower the basket to the desired position.
Spray arms
A
B
• Check that the upper and lower spray arms can
rotate freely,
Adding the detergent
When using tablets
• Place tablet in main container (A).
• Close the container lid (B) and ensure you hear a
clicking sound.
If you are using ‘all in one tablets’, read the
manufacturer’s recommendations in order to
determine where the tablets should be placed inside
the dishwasher.
A
Caution: Never put washing-up liquid in the
dishwasher.
Detergent residues
• Regular use of low temperature washes and/or
short duration programmes can lead to a residue
build up. We recommend running a service wash at
the highest temperature every 2 months with the
dishwasher empty and without detergent.
For full detergent information, see ‘Detergent use’ page.
10
B
When using the tablet function key the time
duration may alter.
www.howdens.com
Page 11
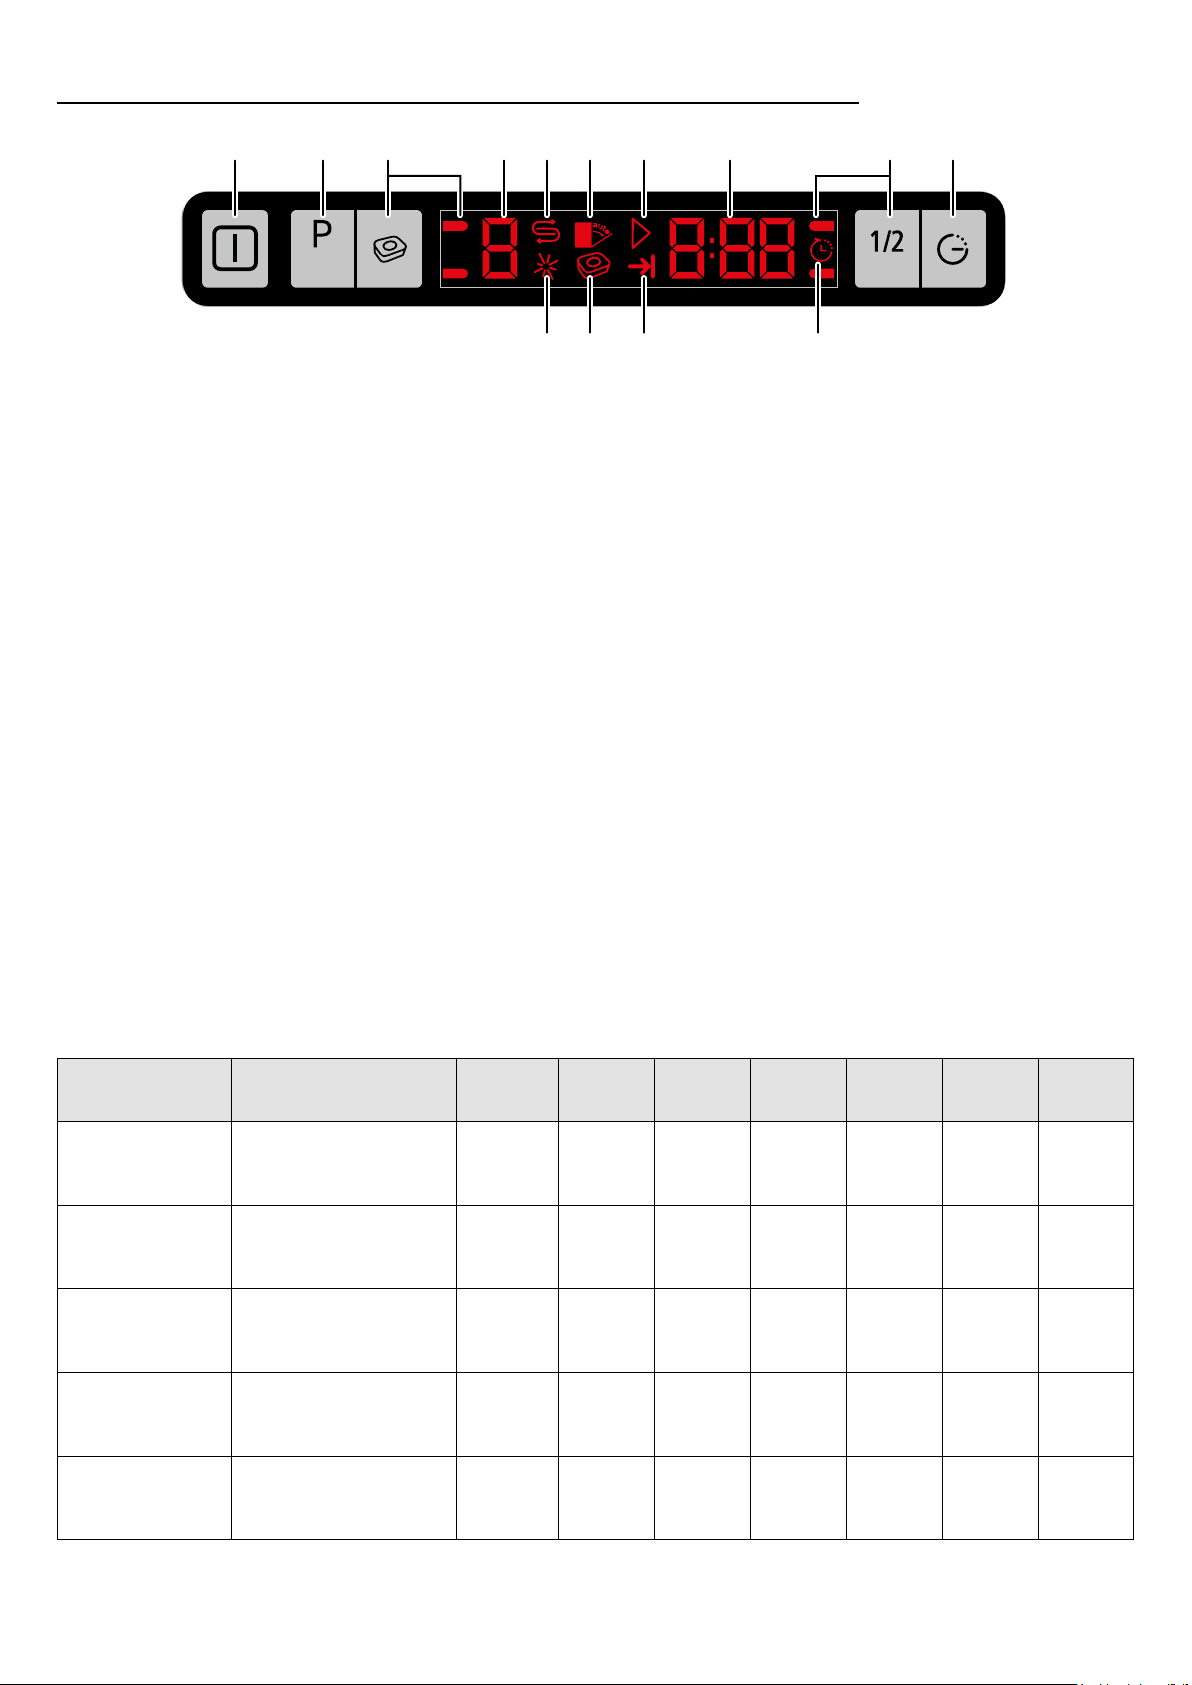
Choose a programme
1 2 3 4 5 6 7
Cancel
3 sec.
1. Power On/Off
Display illuminates when the power is On.
For energy saving, the machine automatically turns off
following the completion of the programme or if the
programme is not started.
2. Programme Selection/Programme Cancel
Press until the desired programme appears.
The programme will start when the dishwasher
door is closed.
To cancel a running programme or
time delay function;
• Open the dishwasher door
• Hold for 3 seconds, (countdown 3-2-1),
until 0:01 is displayed.
• Close the dishwasher door.
• Wait for 2 minutes until the draining process is
completed and an audible warning is heard.
• Power Of f/On and re-programme.
3. Function Keys
All in one tablet.
Half load.
Use the function keys to select tablet or half load
options after selecting the desired programme.
8 3 9
Load
11 101213
4. Programme Indicator
The programme will start when the dishwasher door is
closed.
5. Salt Indicator
Rell salt reservoir when illuminated.
6. Not used
7. Start / Cancel Indicator
8. Programme Time Indicator / Time Delay
Indicator displays the duration of the programme or the
time delay before starting the selected programme.
9. Time Delay - 30 minutes to 24 hours.
Press and select the desired time delay before starting
the selected programme.
10. Time Delay Indicator
Illuminates and ashes when time delay is selected.
11. End of Programme Indicator
Illuminates when the selected programme nishes.
12. Tablet Detergent Function
Illuminates when the tablet function key has been
selected.
13. Rinse Aid Indicator
Rell rinse aid reservoir when illuminated.
Programmes and
temperatures.
P1
ec o* 50°C
P2
INTENSIVE 70°C
P3
DAILY WASH 65°C
P4
NO RMAL 60°C
P5
RAPID 35°C
The consumption values shown in the table were determined under standard conditions. Differences may therefore occur under practical conditions.
*Reference programme for testing institutes. The tests in accordance with EN 50242 must be carried out with a full water softener salt dispenser and a full rinse aid
reservoir, and using the test programme.
www.howdens.com
Cycle selection
information.
Most economical washing
programme for medium
soiled dishes that are
kept waiting.
Heavily soiled dishes,
pots and pans.
Daily wash programme for
normally soiled dishes.
Normally soiled dishes,
fast cleaning.
Lightly soiled dishes
that are scraped or
pre-cleaned.
Degree
of
Soiling
Low -
Medium
Prewash Wash
+ +Medium + 205 10.5
+ +High + 115 14.8 1.28
- +Medium + 120 15 1.18
- +
- +Low - 30 10.4 0.77
Dry
+ 58 10.6 1.12
Time
(mins)
Water
(Litres)
Energy
(Kwh)
0.83
11
Page 12
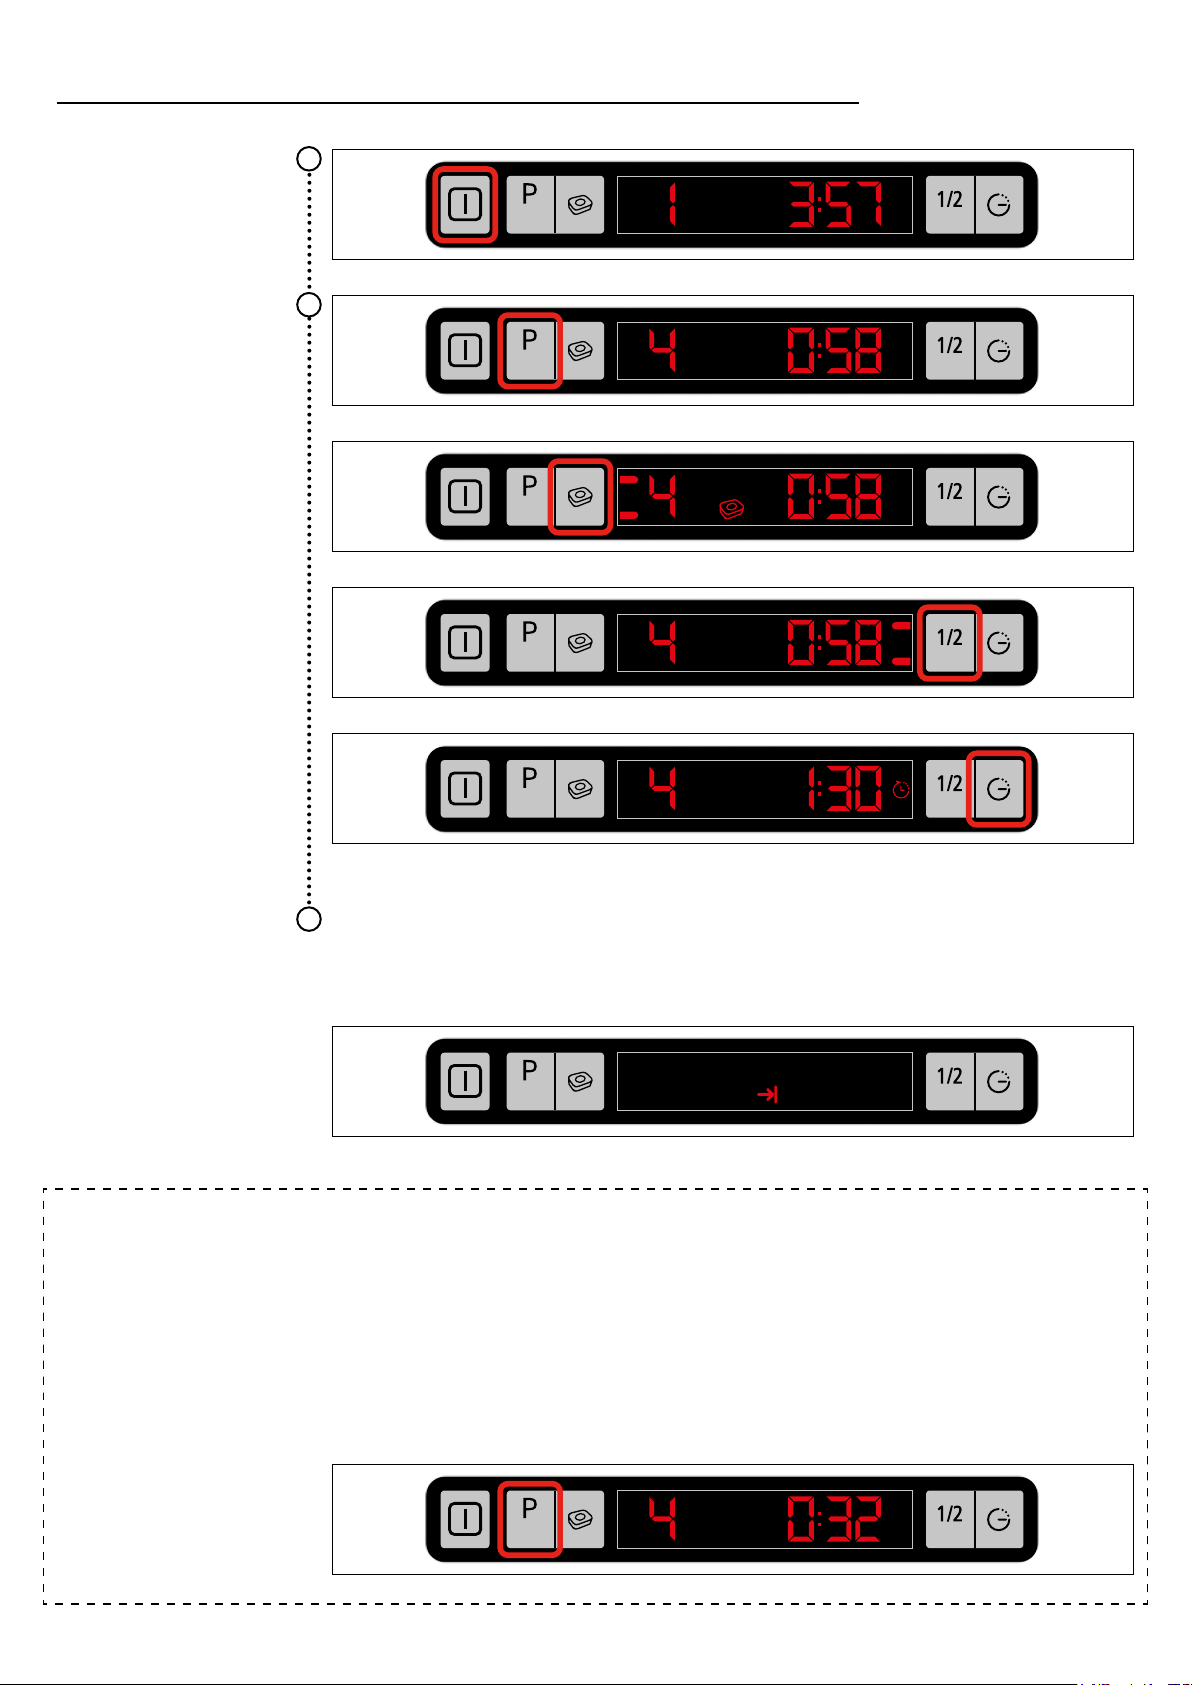
Programme the dishwasher
Power On/Off
Select programme
Option -
Select all in one tablet
Option -
Select
1
/2 load
1
Cancel
3 sec.
Load
2
Cancel
3 sec.
Cancel
3 sec.
Cancel
3 sec.
Load
Load
Load
Option -
Select time delay
30 minutes to
Cancel
3 sec.
24 hours
Close the door
programme
3
will start.
End of programme
indicator
Cancel
3 sec.
To cancel a programme or time delay;
• Open the dishwasher door
• Hold for 3 seconds, (countdown 3-2-1), until 0:01 is displayed.
• Close the dishwasher door.
Load
Load
• Wait for 2 minutes until the draining process is completed and
an audible warning is heard.
• Power Off/On and re-programme.
Cancel
3 sec.
12
Load
www.howdens.com
Page 13
Opening the door whilst operating
If you open the door while a programme is running,
the dishwasher stops immediately. When you close
the door, the dishwasher continues from the point of
interruption.
Caution: Care must be taken when opening the
door, as steam and water will escape.
Caution: Water may be very hot.
Programme ends / setting audible warning
Caution: Just after the dishwasher has started
the selected programme and you want to include
another item to be washed, open the door slowly.
Care must be taken when opening the door, as steam
and water will escape. Load the item and close the
door. The dishwasher will resume operation.
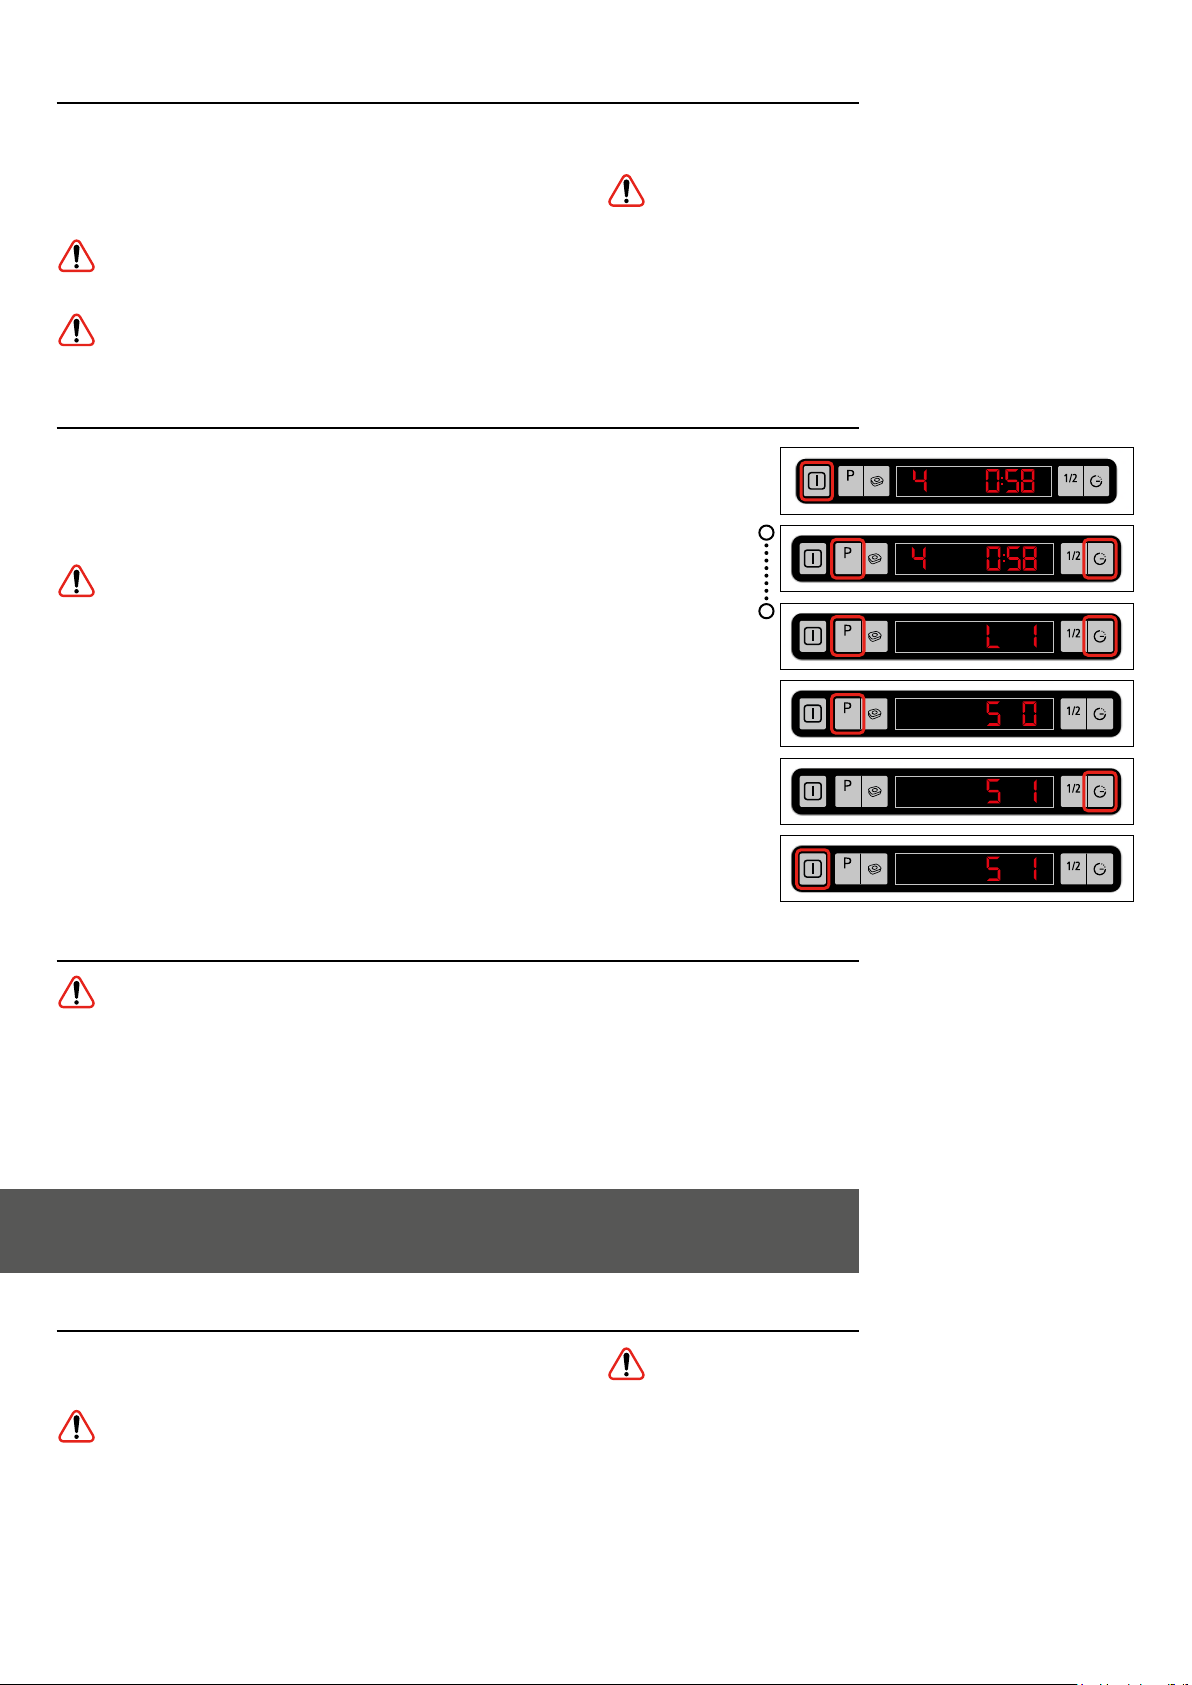
An audio signal with an interval of 10 seconds warns
you to switch your machine off when the selected
washing programme ends. This audio signal warns you
for a duration of 5 minutes and then turns off.
Caution: Care must be taken when opening the
door, as steam may escape.
• Press the ‘On/Off button’ when the programme
has nished. The indicator lights will go off.
• The audio signal has 3 settings ‘off,low,high’ which
can be altered as shown opposite.
Unloading the dishwasher
Caution: Items may be hot.
Switch On
Press and hold
(display counts
down 3,2,1)
Press and
hold until
display shows
Select audible
warning setting
(S...)
Press to select new
audible warning setting
0,1,2 (off,low,high)
Switch Off
to save new audible
warning setting
Cancel
3 sec.
Cancel
3 sec.
Cancel
3 sec.
Cancel
3 sec.
Cancel
3 sec.
Cancel
3 sec.
Load
Load
Load
Load
Load
Load
• Let the tableware cool before you remove from the
dishwasher.
• First remove items from the lower basket, then from
the upper basket.
4 - Cleaning the dishwasher
Cleaning the dishwasher
Normally the occasional use of ‘P2 intensive’ is all that
is necessary to keep the dishwasher internals clean.
Caution: Always switch off the dishwasher.
• Clean the door seal area using a neutral detergent
and damp cloth.
• Clean the control panel area using a slightly damp
cloth.
NOTE: At the end of the programme water may still
remain on the tops of cups/bowls etc. Use a tea towel
or similar to dry.
Caution: Do not use steam cleaners or
jet washers.
If the dishwasher is not going to be used for a long
period of time.
• Switch off.
• Turn off the water supply.
• Clean and leave the door ajar.
www.howdens.com
13
Page 14
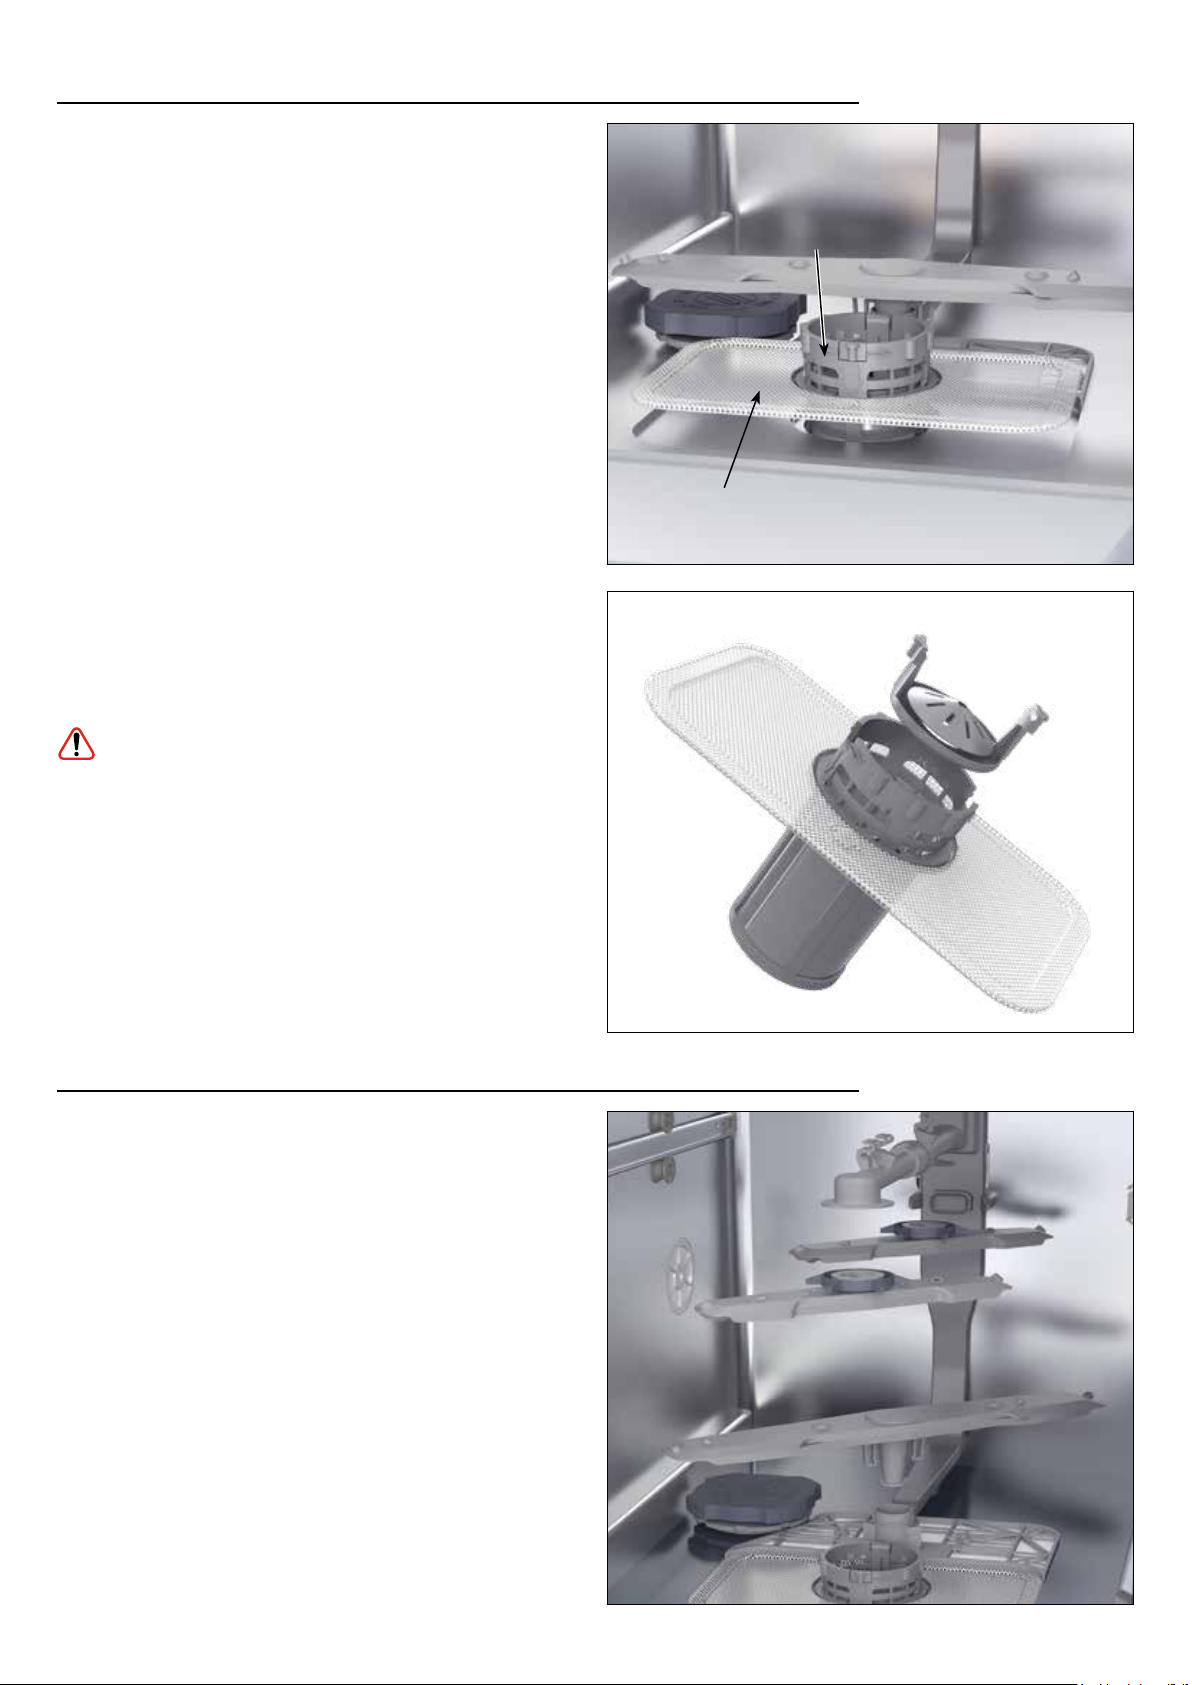
Cleaning the lters (regular cleaning ensures optimum performance)
There are three different lters in your machine.
Main lter
Coarse lter
Micro lter
• Remove lter assembly by turn the micro/coarse
lter anti-clockwise.
• Lift the micro/coarse and main lter out.
• Press the two tongues inwards and pull out the
coarse lter.
• Clean all three lters under running tap water using
a brush.
• Replace the coarse lter into the micro lter.
Ensure the marks align.
• Replace the micro/coarse and main lter.
• Turn micro/coarse lter clockwise until a clicking
sound is heard.
It is important that you t the lters correctly.
Main lter
Micro and
Coarse lter
Coarse lter
Caution: The dishwasher must not be used
without lters.
Incorrect repositioning of the lters will produce
poor washing results.
Cleaning of the lters is vital to ensure correct
operation of the machine.
Clean every 2 weeks.
Cleaning the upper and lower spray arms
Upper spray arms
• Turn the nut clockwise and remove the spray arms.
• Flush away food debris under running water.
• Use a toothpick or similar to remove food debris.
• Replace the spray arm and screw the nut anticlockwise.
Micro lter
Lower spray arm
• Remove the spray arm by releasing the catch and
pulling it upwards.
• Flush away food debris under running water.
• Use a toothpick or similar to remove food debris.
• Replace the spray arm.
14
www.howdens.com
Page 15

5 - Detergents and use
Any brand of powder, gel and all in one tablets that have
been designed for household dishwashers, may be used.
Keep detergents in a cool and dry place and out of the reach of
children.
Detergent must be added to the container before each use.
Detergent overdose may cause scratches on your dishes and
there may be traces of detergent left in your machine.
Three types of detergent are available
• Phosphate and containing chlorine.
• Phosphate containing no chlorine
• Neither containing phosphate nor chlorine
New compact powders are generally phosphate-free. As
phosphates have water softening properties, we suggest you add
salt to the salt container even if the hardness of your water is as
low as a 6 clarke degrees.
In hard water areas if a phosphate free detergent is used, white
marks on the dishes and glasses may be observed. It may be
prevented by increasing the amount of detergent.
Detergents without chlorine have less bleaching effect. Coloured
stains may not be completely removed. This may be prevented by
increasing the amount of detergent, using a programme with a
higher wash temperature or using a detergent with chlorine.
Warning: Two-in-one and three-in-one detergents.
You will obtain the best results from your dishwasher if you use
separate detergent, rinse aid and water-softening salt.
Using three-in-one detergent, softening salt and rinse aid.
These detergents will not give you the same drying performance
that you can obtain by using separate detergent, salt and rinse
aid. To increase the drying performance:
• Put your appliance’s rinse aid setting at “1” and apply rinse
aid. When the rinse aid is used up, add more rinse aid to the
rinse aid dispenser.
• If you use combined detergents with a rinse aid setting higher
than 1, hand contact may leave rainbow-coloured water stains
on the washed items and inside the machine.
• If you use combined detergents without adding salt, lime scale
may form especially on glasses.
• To avoid lime scale formation: Put your appliance’s water
softener setting at “1” and add salt. When the salt is used up,
add more salt to the water softener.
Using two-in-one detergent: Detergent and softening salt.
These detergents do not contain rinse aid so you need to use the
rinse aid setting as described in the manual, making sure that
there is rinse aid in the rinse aid dispenser with every wash and
that you rell the rinse aid dispenser with rinse aid every time it is
empty.
Using two-in-one detergent and rinse aid.
These detergents will not give you the same drying performance
that you can obtain by using separate detergent, salt and rinse
aid. To increase the drying performance:
Detergent manufacturers also produce combined detergents
known as ‘two-in-one’ and ‘three-in-one’.
Two-in-one: These products contain detergent and either rinse
aid or water-softening salt.
Three-in-one: These products contain detergent, rinse aid and
water-softening salt.
In general, you will obtain satisfactory results from combined
detergents only under specic usage conditions. These
detergents contain predetermined amounts of rinse aid and/
or softening salt. This means that you cannot adjust the amount
of water-softening salt and rinse aid required to suit the water
hardness level in your home.
You should bear the following points in mind when using such
detergents:
• Be sure to check the specications of the product you are
using and whether it is a combined product or not.
• Follow the instructions on the packet when using these
products.
• The use of these products at the correct appliance settings
will ensure economical use of salt and/or rinse aid.
• If the detergent is in tablet form, never place these in the
internal section or cutlery basket of the dishwasher. Always
place the tablets in the detergent dispenser of the detergent
holder.
• Put your appliance’s rinse aid setting at “1” and apply rinse
aid. When the rinse aid is used up, add more rinse aid to the
rinse aid dispenser.
• If you use combined detergents with a rinse aid setting higher
than 1, hand contact may leave rainbow-coloured water stains
on the washed items and inside the machine.
• These detergents do not contain softening salt so you need to
use the softening setting as described in the manual, making
sure that there is salt in the water softener with every wash
and that you rell the water softener with salt every time it is
empty.
Important warning.
Should you encounter a problem that has previously never
occurred after you start using these detergents, contact the
detergent manufacturer directly. You will nd contact details on
the packet.
If you stop using this kind of detergent:
• Ensure that the salt and rinse aid dispensers are full.
• Put the water hardness setting at the highest level and run a
wash cycle with the appliance empty.
• After washing while empty, return the water hardness setting
to the correct level for your mains water hardness shown in
the manual.
• Put the rinse aid setting at the correct level.
www.howdens.com
15
Page 16
6 -
Before calling for service/trouble shooting
Before calling the LAMONA Service Line check the
following and trouble shooting guide below.
• Is the machine plugged in and switched on?
• Is the circuit breaker switch on?
• Is the water supply valve turned on?
• Is the dishwasher door closed rmly?
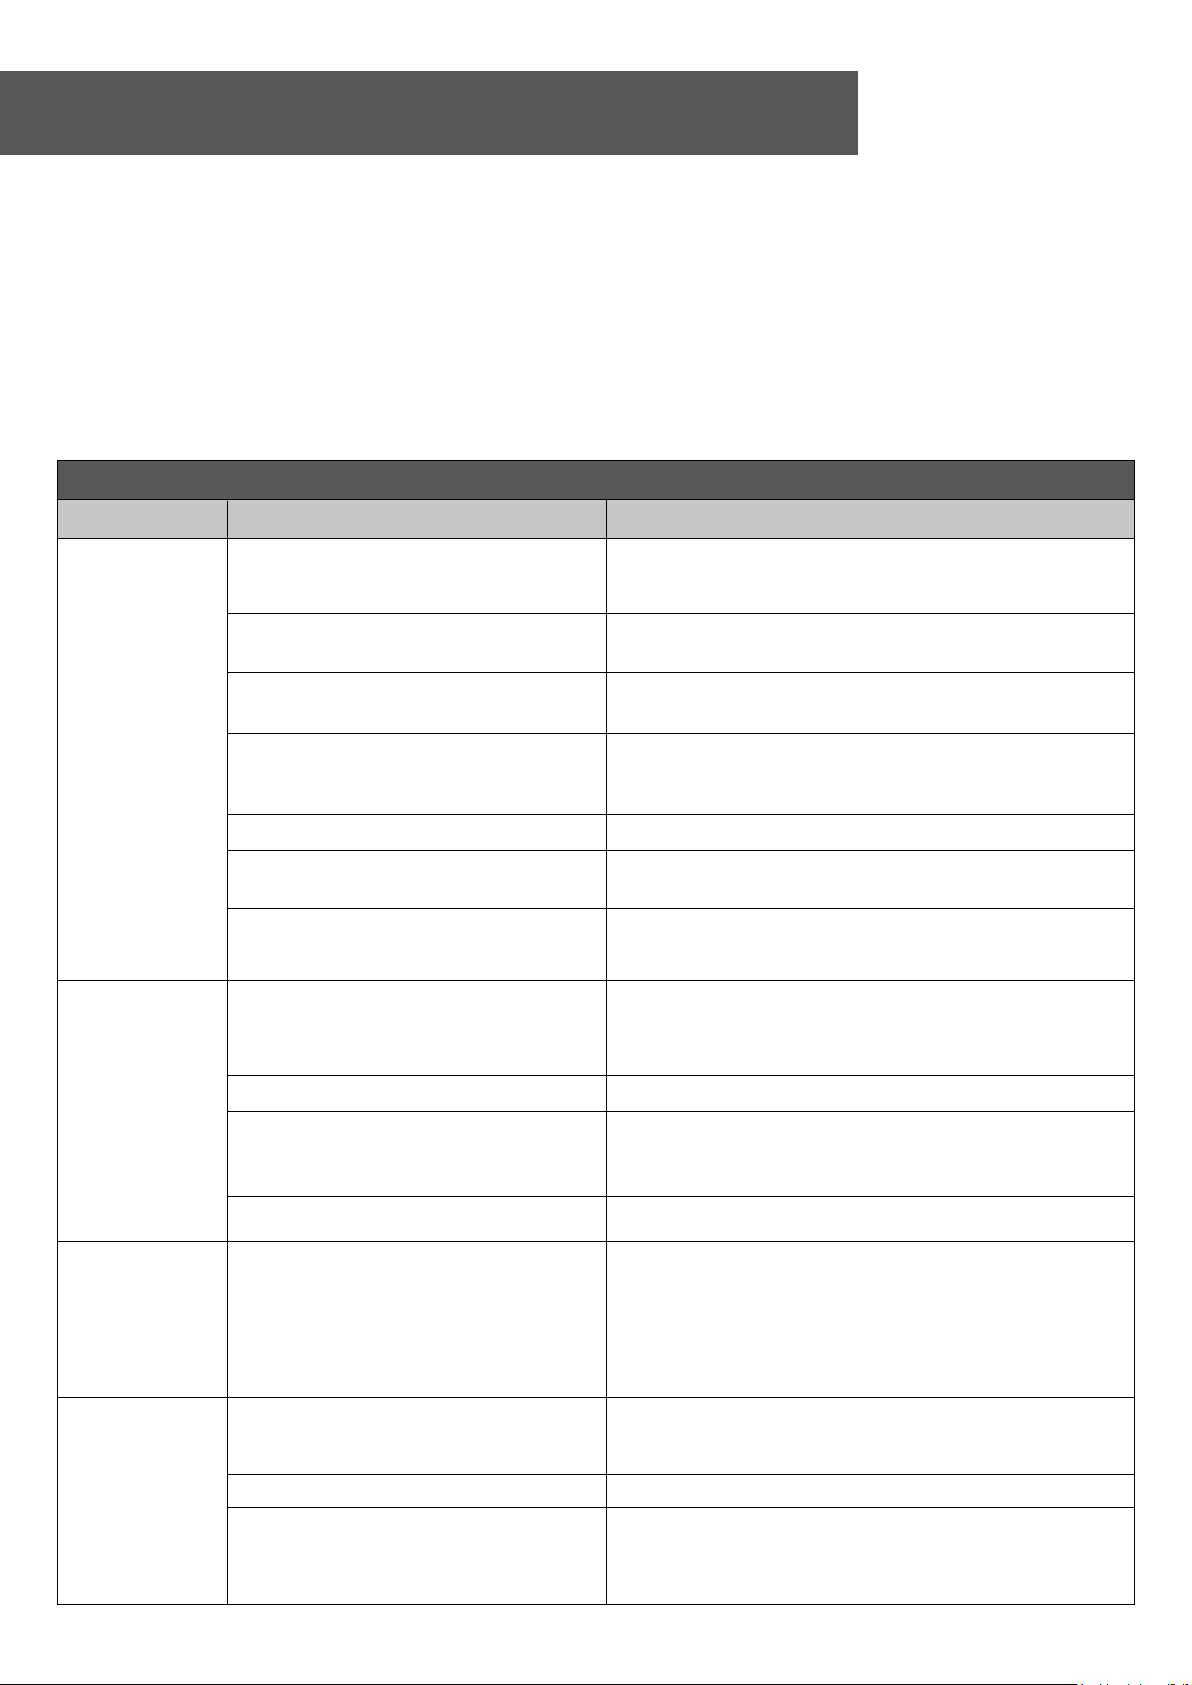
TROUBLE SHOOTING GUIDE
Symptoms
Spotting /
lming /
poor cleaning
results.
Insufcient amount of detergent.
Hard water areas.
Spray arm needs cleaning.
Improper loading.
Insufcient water ll.
Filter system needs cleaning.
Possible causes
• Are the lters clogged?
• Is the detergent dosage and/or rinse aid sufcient?
• Is there enough salt in the water softener?
• Are the spray arms blocked / turning freely?
Solutions
Increase the amount of detergent, especially when washing
full loads or in hard water areas.
Increase water softener dosage. Use additional detergent,
increase rinse agent dosage.
Check the nozzle holes in the spray arms are not blocked with
food debris. Check and clean them periodically.
Follow instructions for use and loading procedures. Place
dishes so that water spray reaches all soiled surfaces. Do not
overcrowd the baskets since this will block the water spray.
Check mains water pressure. Fill hose kinked.
Remove any accumulated food debris. Check and clean lters
periodically.
Small particles
(food or
detergent)
left on items.
Pitting of steel
items.
Dishes not dry.
Over sudsing - pre-washing with a liquid dish
washing detergent.
Water not reaching surfaces, dishwasher
overcrowded.
Insufcient water ll.
Powder detergent stored too long or under
adverse conditions.
Rinse aid supply depleted.
Prolonged contact with salty or high
acidic foods or with undissolved or highly
concentrated detergent.
Improper loading.
Rinse aid supply depleted.
Some plastic dishes and similar products
do not always dry well due to lack of heat
retention.
Rinse items thoroughly before putting them into the
dishwasher to remove dish washing detergent.
Check to be sure water action is not blocked by dishes. Check
lter system for accumulated or deposited food or detergent.
Load dishwasher correctly. Keep lter system clean.
Check mains water pressure. Fill hose kinked.
Use powder detergent within one or two months after
purchase. Open one box at a time. Always close pouring spout
after each use. Store in a cool, dry place.
Add rinse aid to the dispenser.
Remove spots with silver polish. Rewash. Wash soon after
use, or pre-wash items if they will not be washed right away.
Do not overload cutlery basket. Avoid spilling or pouring
detergent directly on atware. Make sure dispenser cup is
properly closed.
Load so that all items are properly tilted for good drainage.
Avoid nesting of dishes and/or silverware.
Add liquid rinse aid.
16
www.howdens.com
Page 17
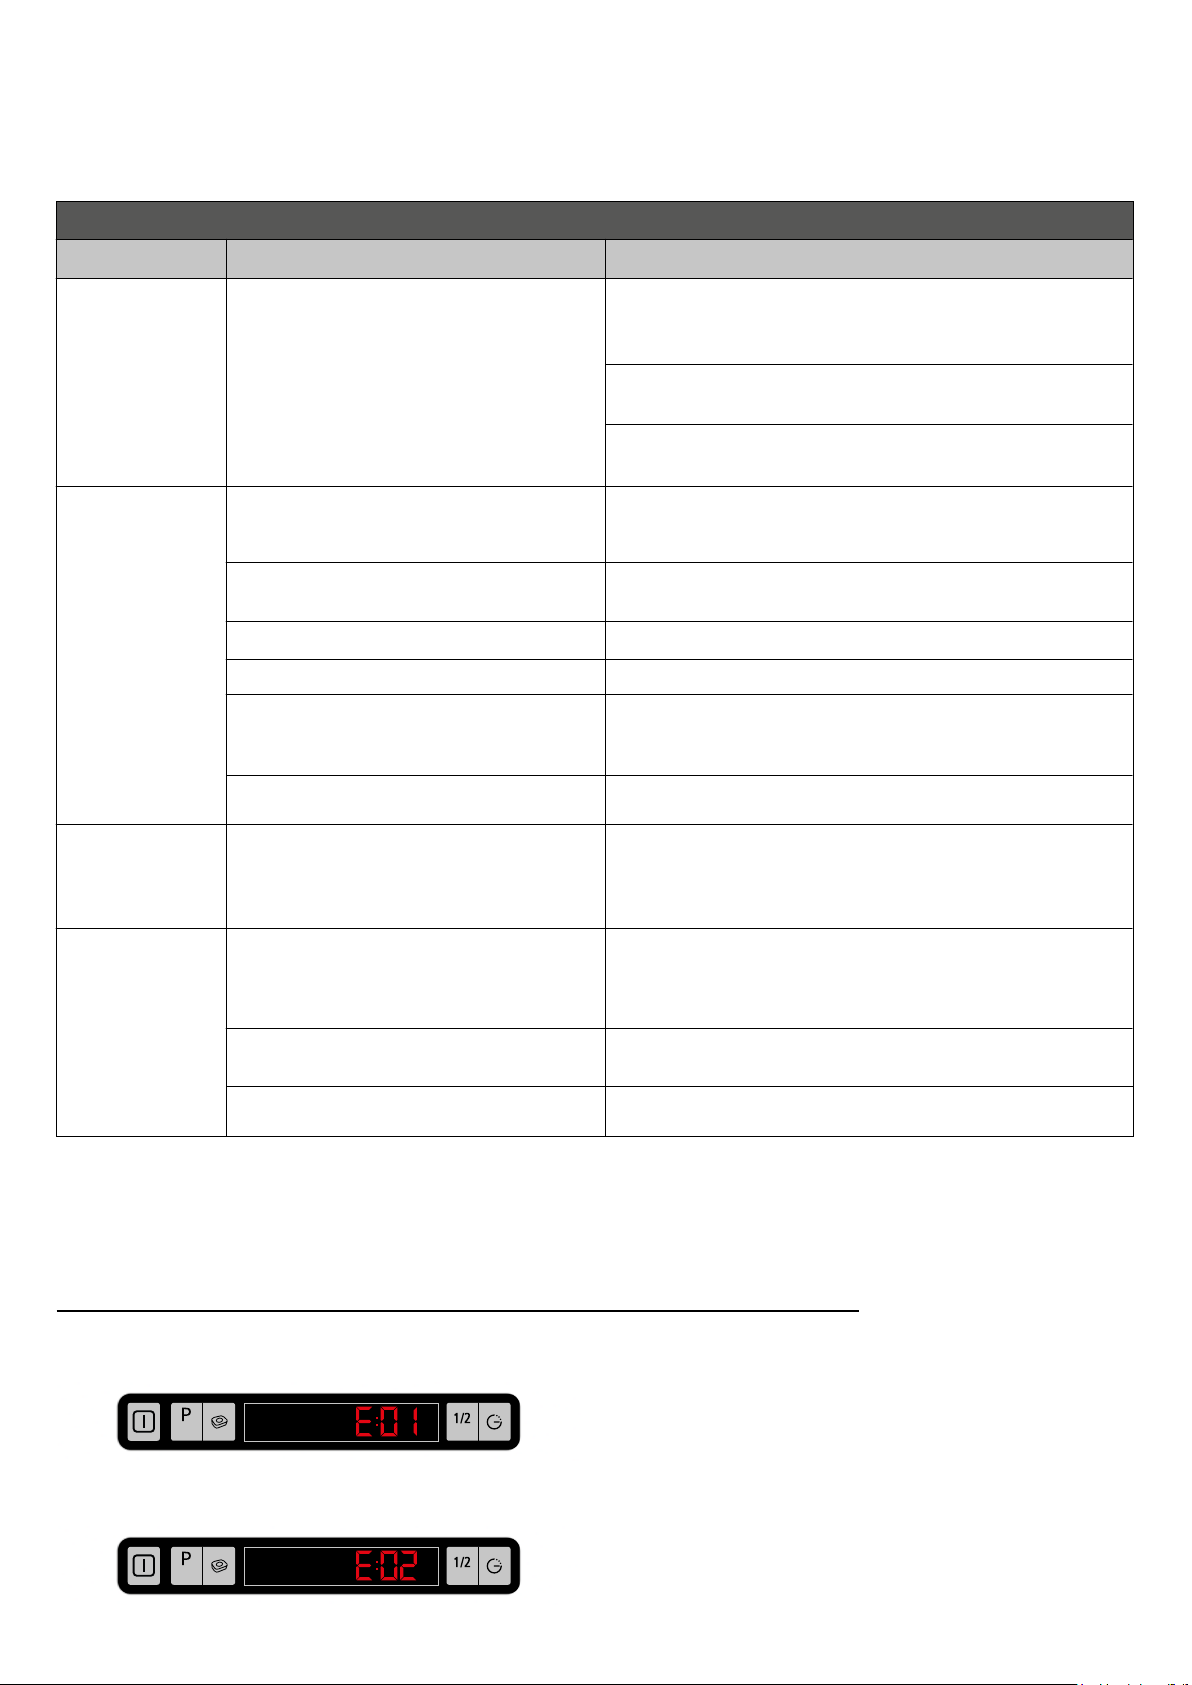
TROUBLE SHOOTING GUIDE
Symptoms
Scratches on
glassware.
Detergent cakes
in detergent
dispenser.
Possible causes
A water or chemical reaction with some
glassware. Usually caused by some
combination of soft or softened water
and alkaline washing solutions reacting
with the glassware. Can be accelerated
by poor rinsing, overloading and excessive
temperature.
If using a powder detergent, there may be
dampness in the dispenser.
If using a gel detergent, the detergent may
be left in dispenser too long before using.
Faulty cover.
Improper loading.
Old detergent.
Tablet not dissolving.
Solutions
The condition may not always be preventable. To minimise the
possibility of etching, use minimum amount of detergent.
Use of the appropriate programme.
Use of a rinse aid may also help.
Make sure dispenser is dry before adding powder detergent.
Start dishwasher immediately.
Start dishwasher soon after adding gel detergent. Do not allow
detergent to dry out in the dispenser.
Do not overll. Cover should close tightly. Check cover for t.
Do not place large items in front part of dishwasher.
Use detergent within one or two months of purchase. To
assure freshness, buy detergent as needed and no more than
one or two at a time. Store in a cool, dry place.
Select longer wash programme.
Chipping and
breakage of
dishes / glasses.
Odour in
dishwasher.
Fault codes
Cancel
3 sec.
Improper loading.
Dishes washed only every two or three days.
A dirty lter system may contribute to a bad
odour.
Using low temperature programmes
constantly.
Load
Load with care following the instructions for use. Place
glassware so it does not touch the other dishes. Remove from
dishwasher carefully.
Use the pre-wash cycle at least once a day until a load
accumulates, or hand rinse dishes before loading the
dishwasher.
Clean lter system.
Run a service wash programme.
Not draining water.
Check drain hose for kinks/blockages.
Internal leak - signs of water.
Turn off at water supply and mains electric.
Call for a Service Engineer.
Cancel
3 sec.
www.howdens.com
Load
No water supply.
Check water valve is on and ll hose is not kinked.
17
Page 18

7 - Guarantee
YOUR GUARANTEE
Product Guarantee Details (UK only)
Your appliance has the benet of a comprehensive manufacturer’s guarantee
which covers the cost of breakdown repairs. (Details of which are shown on your
Proof of Purchase Document).
• Any claim during the period of the guarantee MUST BE ACCOMPANIED BY
THE PROOF OF PURCHASE.
• The product must be correctly installed and operated in accordance with the
manufacturer’s instructions and used for normal domestic purposes.
• This guarantee does not cover accidental damage, misuse or alterations which
are likely to affect the product.
• The guarantee is invalid if the product is tampered with, or repaired by any
unauthorised person.
(The guarantee in no way affects your statutory or legal right)
What to do if you need to report a problem.
Please ensure you have ready:
• The product’s model and serial numbers.
• Howdens Proof of Purchase Document.
• Your full contact details.
Call the Depot number on your Proof of Purchase Document
supplied with the product/kitchen.
or
Call the LAMONA Service Line on 0344 460 0006
18
* Product installed within a domestic kitchen or a non-domestic kitchen
where 8 or fewer people are using the appliance.
Where to nd the model
and serial number on
your machine.
On the right-hand edge
of the door.
www.howdens.com
Page 19
8 - Product che
For electrical household dishwashers (complying Commission Delegated Regulation (EU) No 1059/2010)
Brand ........................................................................................ LAMONA
Model ........................................................................................ LAM8303
Loading Capacity (place settings) .......................................... 10
1
Energy Efciency Class
Annual Energy Consumption (AEc) (kWh) 2 ........................... 237
Energy Consumption (Et) (kWh) in Eco 50 Programme .......0.83
Power Consumption in ‘off-mode’ (Po) (W) ........................... 0.5
Power Consumption in ‘left-on mode’ (Pl) (W) ...................... 1.0
Annual Water Consumption (AWc) (l) 3 .................................. 2940
Drying Efciency Class 4 ......................................................... A
Standard Programme 5 ........................................................... Eco 50
Programme Duration (Tt) (min) in Eco 50 Programme ........ 205
Duration of the left-on mode (Tl) (min) .................................. 5
Noise Level - dB(A) re 1 pW .................................................... 51
Product Type ............................................................................ Fully Integrated
1. Energy efciency class ‘X’ on a scale from D (least efcient) to A+++ (most efcient).
2. Energy consumption ‘X’ kWh per year, based on 280 standard cleaning cycles using cold water ll and the consumption of low power modes.
Actual energy consumption will depend on how the appliance is used.
3. Water consumption ‘X’ litres per year, based on 280 standard cleaning cycles. Actual water consumption will depend on how the appliance is used.
4. Drying efciency class ‘X’ on a scale from G (least efcient) to A (most efcient).
5. Eco 50 is the standard cleaning cycle to which the information in the label and the che relates. This programme is suitable to clean normally
soiled tableware, and it is the most efcient programme in terms of combined energy and water consumption.
........................................................ A+
9 - Technical specications
Compliance to standards and test data / EC
declaration of conformity.
This product complies with the following EU directives;
Development, production and sales stages of this
product comply with the safety rules included in
all pertaining European Community regulations.
2014/35/EU, 2014/30/EU, 93/68/EU, IEC 60436/
DIN. EN 50242
Technical specications may change without prior
notice to improve the quality of the product.
Figures in this manual are schematic and may not
match the product exactly.
Values stated on the markings of the product or in
the printed documents accompanying the product
are obtained in the laboratory on basis of the
relevant standards. Depending on operational and
environmental conditions of the product, these values
may vary.
Load capacity ......................... 10 Place setting
Height ..................................... 820mm
Width ...................................... 448mm
Depth ...................................... 550mm
Net weight .............................. 29.6kg
Supply voltage ....................... 220-240 V ~ 50 Hz
Fuse current ........................... 13 Amp
Total power ............................. 2100 W
Heater power ......................... 1800 W
Drain pump power ................. 30 W
Total current ........................... 10 A
Diameter of plate for;
Upper basket ......................... 25cm maximum
Lower basket ......................... 31cm maximum
www.howdens.com
19
Page 20
Product serial number
MAKING SPACE MORE VALUABLE
Howden Joinery Ltd, First Floor, 40 Portman Square, London, W1H 6LT.
Registered in England 526923
Product information correct at the time of publication in June 2018.
The company has a policy of continuous product development and
reserves the right to change any products and specications given
in this manual. Subject to the Terms and Conditions of Trading,
a copy of the Howdens Joinery Terms and Conditions is available
upon request.
816010A A
 Loading...