

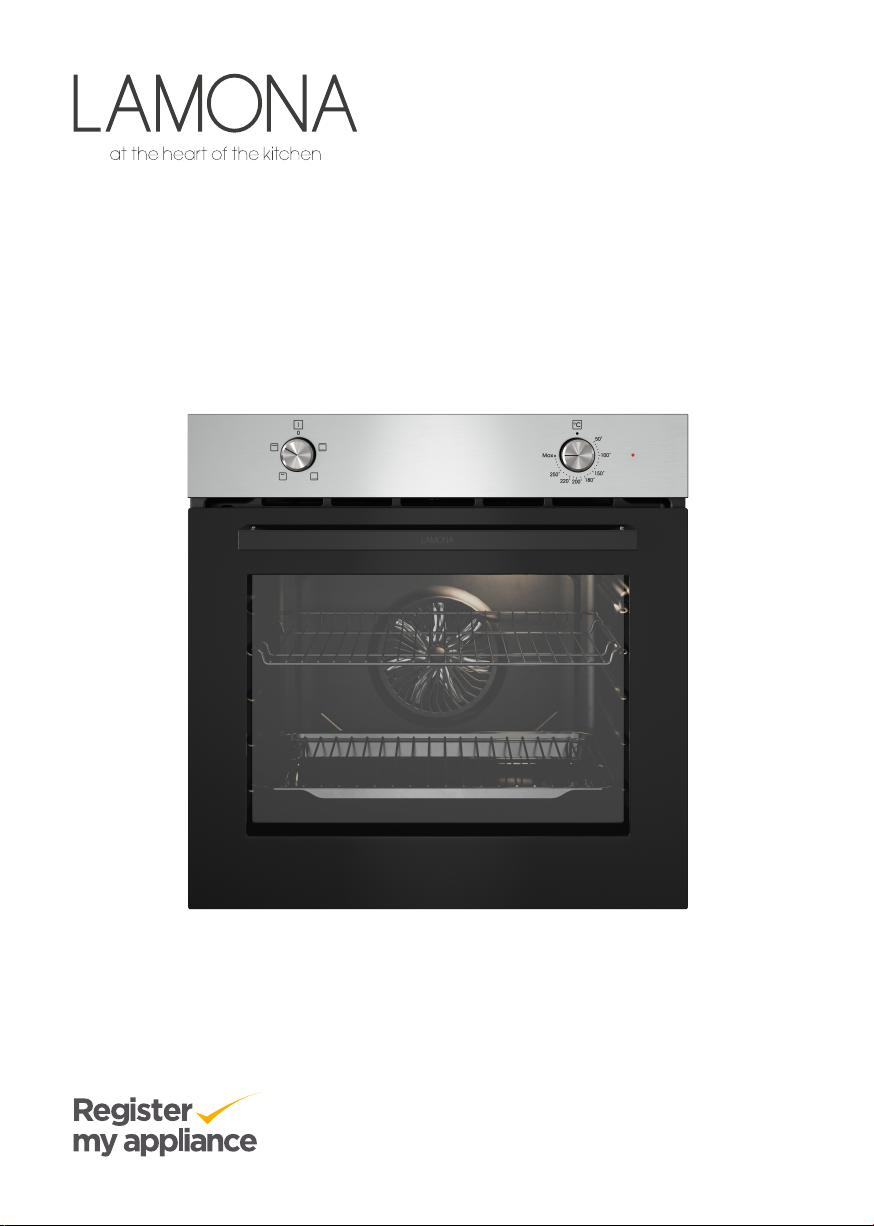
Fan Oven LAM3451
Instructions and Installation
www.howdens.com/appliance-registration
ISSUE v3. 030522

Fan Oven LAM3451
2
www.howdens.com
Instructions and Installation
Welcome
Dear Customer,
Congratulations on your choice of oven.
The user manual will help you use your product quickly
and safely.
• Please read this user manual before installing
and using the oven.
• Always follow the safety instructions.
• Keep this user manual within easy reach for future reference.
• Register your appliance to access a digital copy of your user
manual for future reference.
• Please read any other documents supplied with the product.
Explanation of symbols
Throughout this manual the following symbols are used.
Warning for possible hazards to health
and property.
Warning possibility of an electric shock.
Warning of risk of fire.
Warning of hot surfaces.
Important information or useful usage tips.
Read the user manual.
3

Fan Oven LAM3451
Contents
1. Safety instructions 5
Purpose of usage 5
Child, vulnerable person
and pet safety 6
Electrical safety 6
Transportation safety 7
Installation safety 8
Safety of use 8
Temperature warnings 8
Accessory use 9
Cooking safety 9
Maintenance
and cleaning safety 10
General warnings about
cooking in the oven 11
2. Environmental instructions 12
Waste regulation 12
Package information 12
Future transportation 12
3. Your product 13
Product introduction 13
Product control panel
introduction and usage 14
Oven control 14
Oven operating functions 15
Product accessories 16
Use of product accessories 17
Technical specifications 18
4. First use 19
First cleaning 19
5. How to operate the oven 20
General information
on oven usage 20
Operation of the oven
control unit 20
6. General information
about cooking 22
General warnings about
cooking in the oven 22
Pastries and oven food 22
Meat, fish and poultry 25
Grill 26
7. Maintenance and care 27
General cleaning information 27
Cleaning the accessories 29
Cleaning the control panel 29
Cleaning the inside of the
oven (cooking area) 29
Cleaning the oven door 29
Removing the inner glass
of the oven door 30
Cleaning the oven lamp 31
Replacing the oven lamp 31
8. Troubleshooting 33
9. Your guarantee 34
4
www.howdens.com
Instructions and Installation
1. Safety instructions
• This section contains safety instructions that will help prevent any risks
of personal injuries or material damage.
• If the product is transferred to another person or used second hand,
the operating manual, product labels, other relevant documents and
accessories should be delivered with the product.
• Our company shall not be held responsible for any damage that
may occur as a result of failure to comply with these instructions.
• Failure to comply with these instructions shall render any
warranty void.
Always have the installation and repair work performed by the
•
manufacturer, the Authorised Service or a person specified by
the importer.
Use genuine spare parts and accessories only.
•
Do not attempt to repair or replace any part of the product unless
•
it is clearly specified in the operating manual.
Do not perform technical modifications on the product.
•
Purpose of usage
• This product is designed for home use. It is not suitable for
commercial use.
• Do not use the product in gardens, balconies or other outdoor
environments. The appliance is intended to be used in household
and staff kitchen areas in shops, offices and other working
environments.
• WARNING: This product should be used for cooking purposes only.
It should not be used for different purposes, such as heating
the room.
• The oven can be used to defrost, bake, fry and grill food.
• This product; should not be used for heating, plate heating,
hanging towels or clothes on the handle for drying.
5
Fan Oven LAM3451
Child, vulnerable person and pet safety
• This product can be used by children 8 years of age and older, and
people who are underdeveloped in physical, sensory or mental skills,
or lack of experience and knowledge, as long as they are supervised
or trained about the safe use and hazards of the product.
• Children should not play with the product. Cleaning and user
maintenance should not be performed by children unless there is
someone overseeing them.
• This product should not be used by people with limited physical,
sensory or mental capacity (including children), unless they are kept
under supervision or receive the necessary instructions.
• Children should be supervised to ensure that they do not play with
the product.
• Electrical products are dangerous for children and pets. Children and
pets must not play with, climb on, or enter the product.
• Do not put objects that children may reach on the product.
• WARNING: During use, the accessible surfaces of the product are hot.
Keep children away from the product.
• Keep the packaging materials out of the reach of children. There is a
hazard of injury and suffocation.
• When the door is open, do not put any heavy objects on it or
allow children to sit on it. You may cause the oven to tip over or
damage the door hinges.
• For the safety of children, disconnect the power cable and
make the product inoperable before disposing of the product.
Electrical safety
• Wire the product into a grounded outlet protected by a fuse that
matches the current ratings indicated on the type label. Have the
grounding installation made by a qualified electrician. Do not use
the product without grounding in accordance with local / national
regulations. The electrical connection of the product should be in an
easily accessible place (where it will not be affected by the flame
of the stove). If this is not possible, there should be a mechanism
(fuse, switch, etc.) on the electrical installation to which the product
is connected, in compliance with the electrical regulations and
separating all poles from the network.
• The product must not be wired into the outlet during installation, repair,
and transportation.
6
www.howdens.com
Instructions and Installation
• Do not wire the product into an outlet that is loose, has come out of
its socket, is broken, dirty, oily, with risk of water contact (for example,
water that may leak from the counter).
• Never touch the electrical connection with wet hands! To remove
appliance, do not pull the cord.
• Make sure that the product is securely wired into the outlet
to avoid arcing.
• Wire the product into an outlet that meets the voltage and frequency
values specified on the type label.
• Do not jam the power cord under and behind the product. Do not
put a heavy object on the power cord. The power cord should not be
bent, crushed, and come into contact with any heat source.
• While the oven is operating, its back surface also gets hot. Power cords
must not touch the back surface, connections may be damaged.
• Do not jam the electric cables into the oven door and pass them over
hot surfaces. You may cause the oven to short circuit and catch fire as
a result of the cable melting.
• Use original cable only. Do not use cut or damaged cables or
extension leads.
• If the power cord is damaged, it must be replaced by a manufacturer,
an Authorised Service or a person to be specified by the importer
company in order to prevent possible dangers.
• WARNING: Before replacing the oven lamp, be sure to disconnect the
product from the mains supply to avoid the risk of an electric shock.
Disconnect the product or turn off the fuse from the fuse box.
Transportation safety
• Disconnect the product from the mains before transporting
the product.
• The product is heavy, carry the product with at least two people.
• Do not use the door and / or handle to transport or move the product.
• Do not put other items on the product and carry the product upright.
• When you need to transport the product, wrap it with bubble wrap
packaging material or thick cardboard and tape it tightly. Secure the
product tightly with tape to prevent the removable or moving parts
of the product and the product from damage.
• Check the overall appearance of the product for any damage that
may have occurred during transportation.
7

Fan Oven LAM3451
Installation safety
• Before the product is installed, check the product for any damage.
If the product is damaged, do not install it.
• Do not install the product near heat sources (radiators, stoves, etc.).
• Keep all ventilation ducts open around the product.
• To prevent overheating, the product should not be installed behind
decorative doors.
Safety of use
• Make sure that the product is turned off after each use.
• If you do not use the product for a long time, disconnect it or turn off
the fuse from the fuse box.
• Do not operate defective or damaged product. If any, disconnect
the electricity / gas connections of the product and call the
Authorised Service.
• Do not use the product with the front door glass removed or broken.
• Do not climb on the product to reach anything or for any other reason.
• Do not use the product in situations that may affect your judgment,
such as drug intake and / or alcohol use.
• Flammable objects kept in the cooking area may catch fire. Never
store flammable objects in the cooking area.
• The oven handle is not a towel dryer. When using the product, do not
hang towels, gloves or similar textiles.
• The hinges of the product door move and tighten when opening and
closing the door. When opening / closing the door, do not hold the
part with the hinges.
Temperature warnings
• WARNING: While the product is operating, exposed parts will be hot.
Do not touch the product and heating elements. Children under the
age of 8 should not be brought close to the product without an adult.
• Do not place flammable / explosive materials near the product, as the
edges will be hot while it is operating.
• As steam may be exhaled, keep away while opening the oven door.
The steam may burn your hand, face and / or eyes.
• The product may be hot during use. Do not touch the hot compartments,
the interior parts of the oven, the heating elements, etc.
• When placing food in the hot oven, removing the food, etc. always use
heat resistant oven gloves.
8
www.howdens.com
Instructions and Installation
Accessory use
• It is important that the wire grill and tray are placed properly on
the wire shelves. For detailed information, refer to the section
“Usage of accessories”.
• Accessories can damage the door glass when closing the product
door. Always push the accessories to the end of the cooking area.
Cooking safety
• Be careful when using alcohol in your food. Alcohol evaporates at
high temperatures and may catch fire when exposed to hot surfaces,
causing a fire.
• Food waste, oil, etc. in the cooking area may catch fire. Before cooking,
remove such coarse dirt.
• Food Poisoning Hazard: Do not keep food in the oven for more than
an hour before and after cooking. Otherwise it may cause food
poisoning or diseases.
• Do not heat closed tin cans and glass jars. Built-up pressure may
cause the jar to burst.
• Place the greaseproof paper in a cookware or on the oven
accessory (tray, wire grill, etc.) with food and place it in the
preheated oven. Remove any excessive pieces of greaseproof paper
hanging from the accessory or container to avoid the risk of touching
the oven heating elements. Never use greaseproof paper at an oven
temperature higher than the maximum use temperature specified
on the greaseproof paper you are using. Never place greaseproof
paper on the oven base.
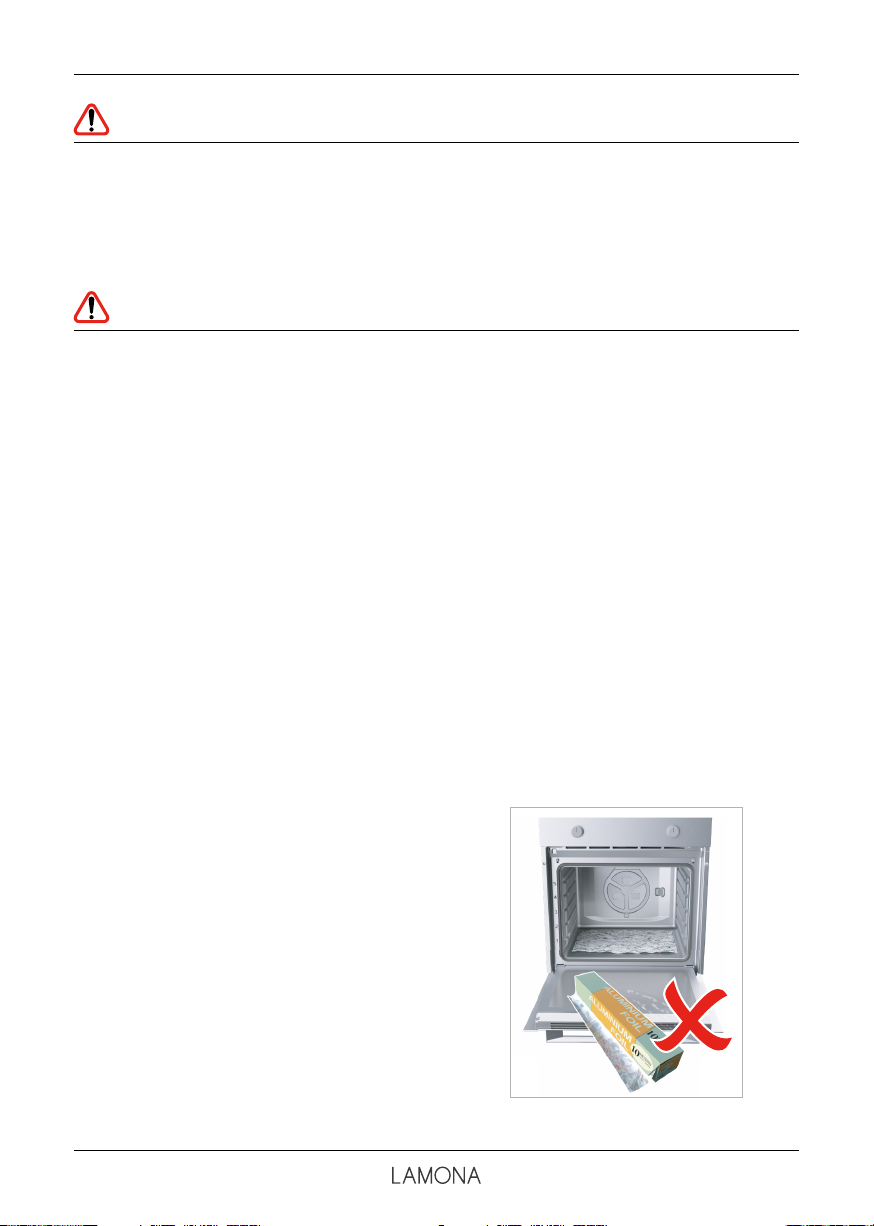
• Do not place baking trays, plates or
aluminium foil directly on the bottom
of the oven. The accumulated heat
can damage the base of the oven.
• Close the oven door during grilling.
Hot surfaces may cause burns!
• Food not suitable for grilling carries
a fire hazard. Grill only food that
is suitable for heavy grill fire. Also,
do not place the food too far in
the back of the grill. This is the hottest
area and fatty foods may catch fire.
9

Fan Oven LAM3451
Maintenance and cleaning safety
• Wait for the product to cool before cleaning the product.
Hot surfaces may cause burns!
• Never wash the product by spraying or pouring water on it!
There is an electric shock hazard!
• Do not clean the product with steam cleaners as this may cause
an electric shock.
• Do not use harsh abrasive cleaners, metal scrapers, wire wool or
bleach materials to clean the oven front door glass / (if present)
oven upper door glass. These materials can cause glass surfaces
to be scratched and broken.
10
www.howdens.com
Instructions and Installation
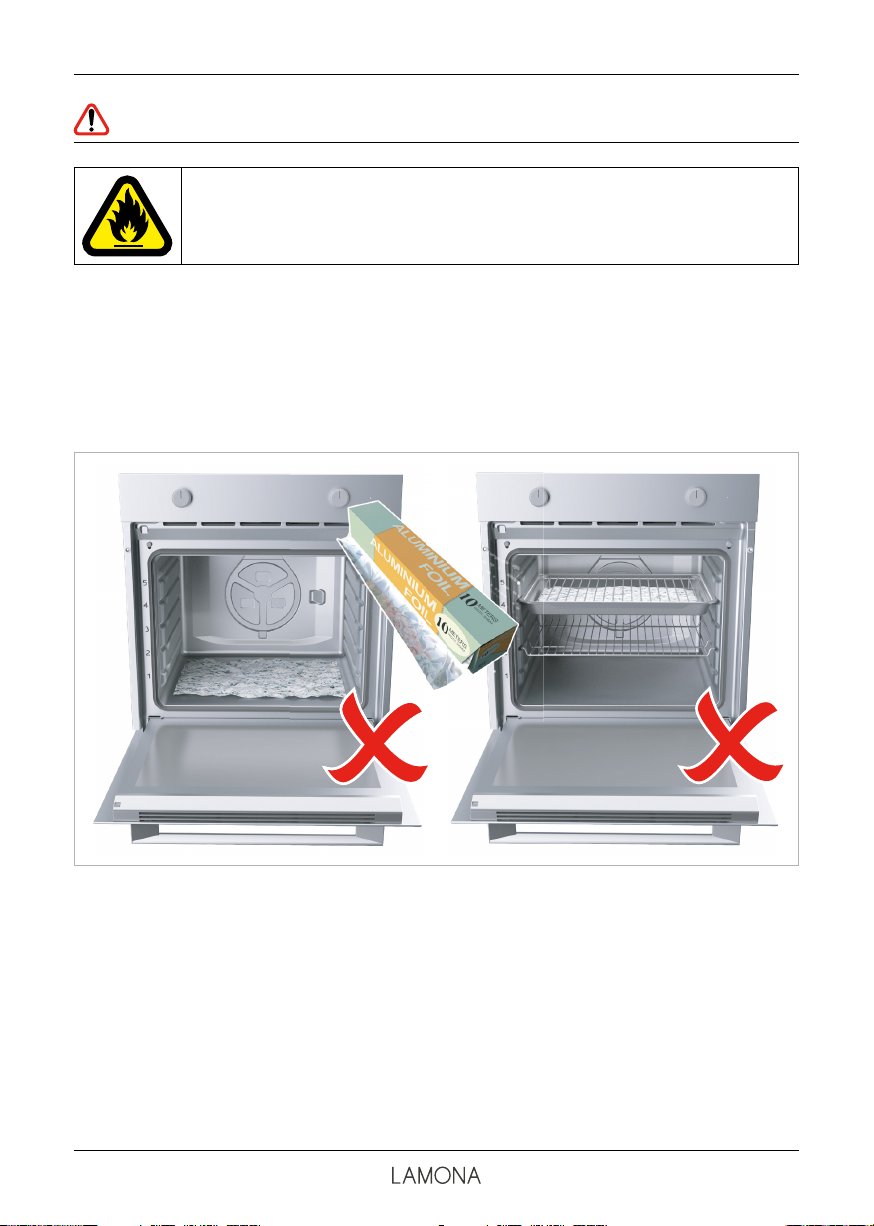
General warnings about cooking in the oven
WARNING! Risk of fire!
• Do not place aluminium foil
or baking trays on the base of
the oven when in use. Heat is
reflected downwards and can
damage the oven and the
cabinets beneath.
• Do not line the grill tray or any
baking trays with aluminium foil.
The reflected heat can damage
the heater.
11

Fan Oven LAM3451
2. Environmental instructions
Waste regulation
Disposing of the old product. Compliance with the WEEE Directive
and disposing of the waste product:
This product complies with EU WEEE Directive (2012/19/EU).
This product bears a classification symbol for waste
electrical and electronic equipment (WEEE).
This product has been manufactured with high quality
parts and materials which can be reused and are suitable
for recycling. Do not dispose of the waste product with
normal domestic and other wastes at the end of its
service life. Take it to the collection centre for the recycling
of electrical and electronic equipment. Please consult your local
authorities to learn about these collection centres. Appropriate disposal
of used appliance helps prevent potential negative consequences for
the environment and human health.
Compliance with RoHS Directive:
The product you have purchased complies with EU RoHS Directive
(2011/65/EU). It does not contain harmful and prohibited materials
specified in the Directive.
Package information
• Packaging materials of the product are manufactured from recyclable
materials in accordance with our National Environment Regulations.
Do not dispose of the packaging materials together with the domestic
or other wastes. Take them to the packaging material collection
points designated by the local authority.
Future transportation
• Keep the product’s original carton and transport the product in it.
Follow the instructions on the carton. If you do not have the original
carton, pack the product in bubble wrap or thick cardboard and
tape it securely.
Check the general appearance of your product for any
damages that might have occurred during transportation.
12
www.howdens.com

3. Your product
Product introduction
10
Instructions and Installation
1
9
8
7
1
Control panel
2
Lamp*
3
Shelves
4
Fan motor
(behind steel plate)
5
Door
6
Handle
7
Bottom heater
(bottom steel plate)
8
Shelf positions
9
Top heater
10
Ventilation holes
* It depends on the
model. Your product
may not have a lamp,
or the type and location
of the lamp may differ
from the illustration.
2
3
4
5
6
13

Fan Oven LAM3451
Product control panel introduction and usage
In this section, you can find the overview and basic uses of the product’s
control panel. There may be differences in images and some features
depending on the type of product.
Oven control
1 2 3
1
Function selection knob
2
Temperature knob
3
Thermostat lamp
Function selection knob
You can select the oven operating
functions with the function selection
knob. Turn left / right from closed
(top) position to select.
Function selection knob
You can select the temperature
you want to cook with the
temperature knob. Turn clockwise
from the closed (top) position
to select.
Temperature indicator
You can understand the oven
interior temperature from
the temperature lamp. The
temperature lamp is located
on the control panel. The
temperature lamp turns on
when the product starts, and the
temperature lamp turns off when
it reaches the set temperature.
When the temperature inside
the oven drops below the set
temperature, the temperature
lamp turns on again.
14
www.howdens.com

Instructions and Installation
Oven operating functions
On the function table; the operating functions you can use in your
oven and the highest and lowest temperatures that can be set for
these functions are shown. The order of the operating modes shown
here may differ from the arrangement on your product.
Function
symbol
* Your product operates in the temperature range specified on the temperature knob.
Function
description
Oven lamp
Operating
with fan
Fan heating
Full grill
Fan assisted
full grill
Temperature
range (°C)
*
*
*
*
*
Description and use
No heater works in the oven. Only the oven
lamp lights up.
The oven is not heated. Only the fan (on the
back wall) operates. Frozen food with granules
is slowly defrosted at room temperature,
cooked food is cooled. The time required to
thaw a whole piece of meat is longer than
the food with grains.
The hot air heated by the fan heater is
distributed equally and rapidly throughout
the oven with the fan. It is suitable for
multi-tray cooking of your food at different
shelf levels.
The large grill on the oven ceiling works.
It is suitable for grilling in large amounts.
The hot air heated by the large grill is quickly
distributed into the oven with the fan. It is
suitable for grilling in large amounts.
15

Fan Oven LAM3451
Product accessories
There are various accessories in your product. In this section, the
description of the accessories and the descriptions of the correct
usage are available.
NOTICE: The trays in your product may be deformed by the effect
of the temperature. This has no effect on the function. Deformation
disappears when the tray cools down.
1. Standard tray
It is used for pastries, frozen
foods and frying large pieces.
2. Wire grill
It is used for frying or placing
the food to be baked, fried
and stewed on the desired shelf.
3. Wire grill in tray
By placing it in the tray
(if provided), it is ensured that
the oils flowing while grilling
are collected in the tray and
thus the contamination of the
oven is prevented.
16
www.howdens.com

Use of product accessories
Instructions and Installation
Cooking shelves
There are 5 levels of shelf position
in the cooking area. You can
also see the order of the shelves
in the numbers on the front frame
of the oven.
5
4
3
2
1
Placing the wire grill on the
cooking shelves
It is crucial to place the wire
grill on the side shelves properly.
The wire grill has one direction
when placing it on the shelf.
While placing the wire grill on the
desired shelf, the open section
must be on the front.
Placing the tray on the
cooking shelves
It is also crucial to place the
trays on the side shelves properly.
The tray has one direction when
placing it on the shelf. While
placing the tray on the desired
shelf, its side designed for holding
must be on the front.
Stopper function of the wire grill
There is a stopper function to
prevent the wire grill from tipping
out of the wire shelf. With this
function, you can easily and safely
take out your food. While removing
the wire grill, you can pull it forward
until it reaches the stopper. You
must pass over the stopper to
remove it completely.
17

Fan Oven LAM3451
Technical specifications
General
Product external dimensions
595mm / 594mm / 567mm
(height / width / depth)
Oven installation dimensions
590 or 600mm / 560mm / min. 550mm
(height / width / depth)
Voltage / frequency 220-240 V ~ 50 Hz
Cable type and cross
Min. H05VV-FG 3 x 1.5 mm
2
section used / suitable for
use in the product
Total power consumption 2.3 kW
Inner lamp type (A) 240 V / 15-25 W / E14 SES / T 300°C
Inner lamp type (B) 25 W, G9, 300°C
Fuse 13A
Oven type Fan oven
Basics: Information on the energy label of electrical ovens is given in accordance
with the EN 60350-1 / IEC 60350-1 standard. Those values are determined under
standard load with bottom-top heater or fan assisted heating (if any) functions.
Energy efficiency class is determined in accordance with the following prioritisation
depending on whether the relevant functions exist on the product or not. 1-Eco fan
heating, 2-Fan Heating, 3-Fan assisted low grill, 4-Top and bottom heating.
Technical specifications may be changed without prior notice
to improve the quality of the product.
Figures in this manual are schematic and may not exactly match
your product.
Values stated on the product labels or in the documentation
accompanying it are obtained in laboratory conditions in
accordance with relevant standards. Depending on operational
and environmental conditions of the product, these values may vary.
18
www.howdens.com

4. First use
Instructions and Installation
Before you start using your
product, it is recommended
to do the following in the
following sections.
First cleaning
1. Remove all packaging
materials.
2. Remove all accessories from
the oven provided within
the product.
3. Turn the product on for
30 minutes and then, turn it off.
This way, residues and layers
that may have remained in the
oven during production are
burned and cleaned.
4. When operating the product,
select the highest temperature
and the operating function that
all the heaters in your product
operate. See “Oven operating
functions”. You can learn how
to operate the oven in the
following section.
Before using the accessories;
Clean the accessories you remove
from the oven with detergent
water and a soft cleaning sponge.
NOTICE: The surface might get
damaged by some detergents
or cleaning materials. Do not use
aggressive detergents, cleaning
powders/creams or any sharp
objects during cleaning.
NOTICE: Smoke and smell may
emit for a couple of hours during
the initial operation. This is quite
normal. Ensure that the room
is well ventilated to remove the
smoke and smell. Avoid directly
inhaling the smoke and the smell
that emits.
5. Wait for the oven to cool.
6. Wipe the surfaces of the
product with a wet cloth or
sponge and dry with a cloth.
19

Fan Oven LAM3451
5. How to operate the oven
General information
on oven usage
Cooling fan
Your product has a cooling fan.
The cooling fan is activated
automatically when necessary
and cools both the front of the
product and the furniture. It
is automatically deactivated
when the cooling process is
finished. Hot air comes out over
the oven door. Do not cover
these ventilation openings with
anything. Otherwise, the oven
may overheat.
The cooling fan continues to
operate during oven operation
or after the oven is turned off
(approximately 20-30 minutes).
If you cook by programming the
oven timer, at the end of the
cooking time, the cooling fan
turns off with all functions. The
cooling fan running time cannot
be determined by the user. It turns
on and off automatically. This is
not an error.
Operation of the
oven control unit
Turning on the oven
When you select a operating
function you want to cook with
using the function selection knob
and set a certain temperature
with using the temperature knob,
the oven starts operating.
Turning off the oven
You can turn the oven off by
turning the function selection
knob and temperature knob to
the off (up) position.
Selecting the temperature
and oven operating function
You can cook by making
the manual control (under
your control) by selecting the
temperature and operating
function specific to your food.
Example:
Oven lighting
The oven lamp is turned on when
the oven starts cooking. In some
models, the lamp is on during
cooking, while in some models
it turns off after a certain time.
If you want the oven lamp to be
lit continuously, select the “Oven
lamp” operating function with
the function selection knob.
20
www.howdens.com

1. Select the operating function
you want to cook using the
function selection knob.
2. Set the temperature you
want to cook using the
temperature knob.
» Your oven will start operating
immediately at the selected
function and temperature, and
the temperature lamp will light
up. When the temperature
inside the oven reaches the set
temperature, the temperature
lamp turns off. The oven does
not switch off automatically
after starting cooking. You have
to control cooking yourself and
turn it off. When your cooking is
completed, turn off the oven by
turning the function selection
knob and the temperature
knob to the off (up) position.
Instructions and Installation
21

Fan Oven LAM3451
6. General information about cooking
This section describes tips on
preparing and cooking your food.
In addition, you can also find
some of the foods tested
as producers and the most
appropriate settings for these
foods. Appropriate oven settings
and accessories for these foods
are also indicated.
General warnings
about cooking in the oven
• While opening the oven
door during or after cooking,
hot-burning steam may
emerge. The steam may burn
your hand, face and / or eyes.
When opening the oven door,
stay away.
• Intense steam generated during
cooking may form condensed
water drops on the interior and
exterior of the oven and on the
upper parts of the furniture due
to the temperature difference.
This is a normal and physical
occurrence.
• The cooking temperature and
time values given for foods
may vary depending on the
recipe and amount. For this
reason, these values are given
as ranges.
• Always remove unused
accessories from the oven
before you start cooking.
Accessories that will remain
in the oven may prevent your
food from being cooked at the
correct values.
• For foods that you will cook
according to your own recipe,
you can reference similar foods
given in the cooking tables.
• Using the supplied accessories
ensures you get the best
cooking performance. Always
observe the warnings and
information provided by the
manufacturer for the external
cookware you will use.
• Cut the greaseproof paper
you will use in your cooking in
suitable sizes to the container
you will cook. Greaseproof
papers that are overflowing
from the container can create
a risk of burns and affect the
quality of your cooking. Use
the greaseproof paper you will
use in the temperature range
specified.
• For good cooking performance,
place your food on the
recommended correct shelf.
Do not change the shelf
position during cooking.
Pastries and oven food
General information
• We recommend using the
accessories of the product
for a good cooking
performance. If you are going
to use an external cookware,
prefer dark, non-sticking and
heat resistant ware.
22
www.howdens.com

Instructions and Installation
• If preheating is recommended
in the cooking table, be sure to
put your food in the oven after
preheating.
• If you are going to cook using
cookware on the wire grill,
place it in the middle of the wire
grill, not near the back wall.
• All materials used in making
pastry should be fresh and at
room temperature.
• The cooking status of the
products may vary depending
on the amount of food and the
size of the cookware.
• The values specified in the
cooking tables are determined
as a result of the tests carried
out in our laboratories. Values
suitable for you may differ from
these values.
• Place your food on
the appropriate shelf
recommended in the cooking
table. Refer to the bottom
shelf of the oven as shelf 1.
Tips for baking cakes
• If the cake is too dry, increase
the temperature by 10°C and
shorten the baking time.
• If the cake is moist, use a small
amount of liquid or reduce the
temperature by 10°C.
• If the top of the cake is burnt,
put it on the lower shelf, lower
the temperature and increase
the baking time.
• If it is cooked well inside but the
outside is sticky, use a smaller
amount of liquid, reduce the
temperature and increase the
cooking time.
Tips for cooking pastries
• If the pastry is too dry, increase
the temperature by 10 ° C and
shorten the cooking time. Wet
the dough sheets with a sauce
consisting of milk, oil, egg and
yoghurt mixture.
• If the pastry is getting cooked
slowly, make sure that the
thickness of the pastry you
have prepared does not
overflow the tray.
• If the pastry is browned on the
surface but the bottom is not
cooked, make sure that the
amount of sauce you will use
for the pastry is not too much
at the bottom of the pastry. For
an even browning, try to spread
the sauce evenly between the
dough sheets and the pastry.
• Bake your pastry in the position
and temperature appropriate
to the cooking table. If the
bottom is still not browned
enough, place it on a bottom
shelf for the next cooking.
23

Fan Oven LAM3451
Cooking table for pastries and oven food
Cooking
Food
Cakes in tray Single tray Standard tray* Fan heating 3 180 30 - 40
Cakes in mould Single tray Cake mould on
Small cakes*** Single tray Standard tray* Fan heating 2 150 25 - 35
Sponge cake*** Single tray Round cake
Cookie Single tray Pastry tray* Fan heating 3 170 20 - 30
Dough pastry Single tray Standard tray* Fan heating 2 180 35 - 45
Rich pastry Single tray Standard tray* Fan heating 3 180 20 - 30
Whole bread Single tray Standard tray* Fan heating 3 200 30 - 40
Lasagna Single tray Glass/metal
Apple pie*** Single tray Round black
Pizza Single tray Standard tray* Fan heating 2 200 - 220 10 - 20
Shortbread
(sweet cookie)***
Preheating is recommended for all food.
* These accessories may not be included with your product. They can be purchased commercially.
** These accessories are not included with your product. They are commercially available accessories.
*** Test Foods - Foods in this cooking table are prepared according to the EN 60350-1 standard to facilitate testing
of the product for control institutes.
Tray
amount
2 trays 2 – Standard tray*
2 trays 2 – Standard tray*
2 trays 1 – Standard tray*
2 trays 2 – Standard tray*
Single tray Standard tray* Fan heating 2 140 15 - 25
2 trays 2 – Standard tray*
Accessory
to be used
wire grill**
4 – Pastry tray*
mould, 26cm in
diameter with
clamp on
wire grill**
4 – Pastry tray*
4 – Pastry tray*
4 – Pastry tray*
rectangular
mould on
wire grill**
metal mould,
20cm in diameter
on wire grill**
4 – Pastry tray*
Operating
function
Shelf
position
Temperature
(ºC)
time
(approx.
in min.)
Fan heating 2 180 30 - 40
Fan heating 2 - 4 140 30 - 45
Fan heating 2 160 30 - 40
Fan heating 2 - 4 170 25 - 35
Fan heating 1 - 4 180 35 - 45
Fan heating 2 - 4 180 20 - 30
Fan heating 2 or 3 200 30 - 40
Fan heating 2 170 50 - 70
Fan heating 2 - 4 140 15 - 25
24
www.howdens.com

Meat, fish and poultry
The key points on roasting
Instructions and Installation
• Seasoning it with lemon juice
and pepper before cooking
all chicken, turkey and large
pieces of meat will increase
cooking performance.
• It takes 15 to 30 minutes more
to cook boned meat than fillet
by roasting.
• You should calculate about
• After the cooking time is over,
leave the meat in the oven for
about 10 minutes. The juice of
the meat is better distributed
to the fried meat and does not
come out when the meat is cut.
• Fish should be placed on a
medium or low level shelf in
a heat resistant plate.
4 to 5 minutes of cooking time
per centimetre of the meat
thickness.
Cooking table for meat, fish and poultry
Food
Steak (whole) /
Roast (1kg)
Lamb’s shank
(1.5 - 2.0kg)
Roasted chicken
(1.8 - 2kg)
Turkey (5.5kg) Single tray Standard tray* Fan heating 1 25 mins. 250/max.
Fish Single tray Wire grill*
Preheating is recommended for all food.
* These accessories may not be included with your product. They can be purchased commercially.
** These accessories are not included with your product. They are commercially available accessories.
Tray
amount
Single tray Standard tray* Fan heating 3 15 mins. 250/max.
Single tray Standard tray* Fan heating 3 15 mins. 250/max.
Single tray Wire grill*
Accessory
to be used
Place one tray
on a lower shelf
Place one tray
on a lower shelf
Operating
function
Fan heating 2 200 - 200 60 - 80
Fan heating 3 200 20 - 30
Shelf
position
Temperature
(ºC)
then, 180 - 190
then, 170
then, 180 - 190
Cooking
time
(approx.
in min.)
60 - 80
110 - 120
150 - 210
25

Fan Oven LAM3451
Grill
Red meat, fish and poultry
meat will quickly turn brown
when grilled, hold a beautiful
crust and do not dry out. Fillet
meats, skewer meats, sausages
as well as juicy vegetables
(tomatoes, onions, etc.) are
particularly suitable for grilling.
General warnings
• Food not suitable for grilling
carries a fire hazard. Grill only
food that is suitable for heavy
grill fire. Also, do not place the
food too far in the back of the
grill. This is the hottest area and
fatty foods may catch fire.
• Close the oven door during
grilling. Never grill with the oven
door open. Hot surfaces may
cause burns!
The key points of the grill
• Prepare foods of similar thickness
and weight as much as possible
for the grill.
• Place the pieces to be grilled
on the wire grill or wire grill tray
by distributing them without
exceeding the dimensions of
the heater.
• Depending on the thickness
of the pieces to be grilled, the
cooking times given in the table
may vary.
• Slide the wire grill or the wire grill
tray to the desired level in the
oven. If you are cooking on the
wire grill, slide the oven tray to
the lower shelf to collect the oils.
The oven tray you are going to
slide should be sized to cover the
entire grill area. This tray may not
be included with the product.
Put some water into the oven
tray for easy cleaning.
Cooking table for grilling
Food
Fish Wire grill 4 - 5 250 20 - 25
Chicken pieces Wire grill 4 - 5 250 25 - 35
Meatball (beef)
12 pieces*
Lamb chop Wire grill 4 - 5 250 20 - 25
Steak - (sliced) Wire grill 4 - 5 250 25 - 30
Veal chop Wire grill 4 - 5 250 25 - 30
Vegetable gratin Wire grill 4 - 5 220 20 - 30
Toast bread* Wire grill 4 250 1 - 3
It is recommended to preheat for 5 minutes for all grilled food.
Turn pieces of food after 1/2 of the total grilling time.
* Grilling for test foods - Foods in this cooking table are prepared according to the EN 60350-1 standard
to facilitate testing of the product for control institutes.
26
Accessory
to be used
Wire grill 4 250 20 - 30
Shelf
position
www.howdens.com
Temperature
(ºC)
Cooking time
(approx. in min.)

7. Maintenance and care
Instructions and Installation
General cleaning
information
General warnings
• Wait for the product to cool
before cleaning the product.
Hot surfaces may cause burns!
• Do not apply the detergents
directly on the hot surfaces. This
may cause permanent stains.
• The appliance shall be
thoroughly cleaned and dried
after each operation. Thus,
food residues shall be easily
cleaned and these residues
shall be prevented from burning
when the appliance is used
again later. Thus, the service life
of the appliance extends and
frequently faced problems are
decreased.
• Do not use steam cleaning
products for cleaning.
• Some detergents or cleaning
agents may damage the
surface. Do not use abrasive
detergents, cleaning powders,
cleaning creams, descalers or
sharp objects during cleaning.
• There is no need for a special
cleaning agent for cleaning
after each use. Clean the
appliance using dish soap,
warm water and a soft cloth
or sponge and dry with a dry
microfibre cloth.
• Be sure to completely wipe
off any remaining liquid after
cleaning and immediately
clean any food splashing
around during cooking.
• Do not wash any component of
your appliance in a dishwasher.
Inox and stainless surfaces
• Do not use acid or chlorinecontaining cleaning agents to
clean stainless or inox surfaces
and handles.
• Stainless or inox surface may
change colour in time. This is
normal. After each operation,
clean with a detergent suitable
for the stainless or inox surface.
• Clean with a soft soapy cloth
and liquid (non-scratching)
detergent suitable for inox
surfaces, taking care to wipe
in one direction.
• Remove lime, oil, starch, milk
and protein stains on the inoxstainless and glass surfaces
immediately without waiting.
Stains may rust under long
periods of time.
Enamelled surfaces
• After each use, clean the
enamel surfaces using
dishwashing detergent, warm
water and a soft cloth or sponge
and dry them with a dry cloth.
• If your product has an easy
steam cleaning function, you
can make easy steam cleaning
for light non-permanent dirt.
27

Fan Oven LAM3451
• For persistent stains, the oven
and grill cleaner recommended
on the website of your product
brand and a non-scratching
scouring pad can be used.
Do not use an external oven
cleaner.
• The oven must cool down for
cleaning in the cooking area.
Cleaning on hot surfaces shall
create both fire hazard and
damage with enamel surface.
Catalytic surfaces
• The side walls in the cooking
area can only be covered with
enamel or catalytic walls. It
varies by model.
• The catalytic walls have a light
matte and porous surface.
The catalytic walls of the oven
should not be cleaned.
• Catalytic surfaces absorb oil
thanks to its porous structure
and start to shine when the
surface is saturated with oil,
in this case it is recommended
to replace the parts.
Glass surfaces
• When cleaning glass surfaces,
do not use hard metal scrapers
and abrasive cleaning
materials. They can damage
the glass surface.
• Clean the appliance using
dishwashing detergent, warm
water and a microfibre cloth
specific for glass surfaces and
dry it with a dry microfibre cloth.
• If there is residual detergent
after cleaning, wipe it with cold
water and dry with a clean and
dry microfibre cloth. Residual
detergent residue may damage
the glass surface next time.
• Under no circumstances should
the dried-up residue on the
glass surface be cleaned off
with serrated knives, wire wool
or similar scratching tools.
• You can remove the calcium
stains (yellow stains) on the glass
surface with the commercially
available descaling agent,
with a descaling agent such as
vinegar or lemon juice.
• If the surface is heavily soiled,
apply the cleaning agent on
the stain with a sponge and
wait a long time for it to work
properly. Then clean the glass
surface with a wet cloth.
• Discolourations and stains on
the glass surface are normal
and not defects.
Plastic parts and painted surfaces
• Clean plastic parts and painted
surfaces using dishwashing
detergent, warm water and a
soft cloth or sponge and dry
them with a dry cloth.
• Do not use hard metal scrapers
and abrasive cleaners. It may
damage the surfaces.
• Ensure that the joints of the
components of the appliance
are not left as damp and with
detergent. Otherwise, corrosion
may occur on these joints.
28
www.howdens.com

Instructions and Installation
Cleaning the accessories
Unless otherwise stated in the user
manual, do not wash the product
accessories in the dishwasher.
Cleaning the control panel
• When cleaning the panels
with knob control, wipe the
panel and knobs with a damp
soft cloth and dry with a dry
cloth. Do not remove the knobs
and gaskets underneath to
clean the control panel. The
control panel and knobs may
be damaged.
• While cleaning the inox
panels with knob control,
do not use inox cleaning
agents around the knobs.
The indicators around the
knobs may be deleted.
• Clean the touch control panels
with a damp soft cloth and dry
with a dry cloth. If your product
has a key lock feature, set the
key lock before performing
control panel cleaning.
Otherwise, incorrect detection
may occur on the keys.
Cleaning the inside of the
oven (cooking area)
Follow the cleaning steps
described in the “General
cleaning information” section
according to the surface types
in your oven.
Cleaning the side walls of the oven
The side walls in the cooking
area can only be covered with
enamel or catalytic walls. It varies
by model. If there is a catalytic wall,
refer to the “Catalytic walls” section
for information.
If your product is a side rack
model, remove the side racks
before cleaning your side walls.
Then complete the cleaning as
described in the “General cleaning
information” section according to
the side wall surface type.
Cleaning the oven door
Do not use harsh abrasive
cleaners, metal scrapers, wire
wool or bleach materials to
clean the oven door and glass.
You can remove your oven door
and door glasses to clean them.
How to remove the doors and
windows is explained in the
sections “Removing the oven
door” and “Removing the inner
glass of the door”. After removing
the door inner glasses, clean them
using a dishwashing detergent,
warm water and a soft cloth or
sponge and dry them with a dry
cloth. Wipe the glass with vinegar
and then rinse it against lime
residues that may occur on the
oven glass.
29

Fan Oven LAM3451
Removing the oven door
1. Open the front door.
2. Open the clips at the hinge
housing on the right and
left hand sides of the front
door by pressing them down
as illustrated in the figure.
Hinge lock (closed position)
Hinge lock (open position)
4. Pull the removed door upwards
to release it from the right and
left hinges and remove it.
To reattach the door, the
procedures applied when
removing it must be repeated
from the end to the beginning,
respectively. When installing
the door, be sure to close the
clips on the hinge socket.
Removing the inner
glass of the oven door
Inner glass of the product’s
front door of may be removed
for cleaning.
1. Open the oven door.
3. Get the oven door to a
half-open position.
30
2. Pull the plastic component,
attached on the upper section
of the front door, towards
yourself by simultaneously
pressing on the pressure points
on both sides of the component
and remove it.
www.howdens.com

Instructions and Installation
3. As shown in the figure, gently lift
1
B
1
.
*
2
towards
the innermost glass
A
and then, remove it by
pulling towards
B
A
1. Innermost glass panel.
2* Inner glass panel (It may not
exist on your product.)
4. If your product has an inner
2
glass
process to detach it
5. The first step of regrouping the
door is to reassemble the inner
glass
edge of the glass to meet the
bevelled edge of the plastic
slot. (If your product has an
inner glass). Inner glass
be attached to the plastic slot
closest to the innermost glass
6. While reassembling the
innermost glass
attention to place the printed
side of the glass on the inner
glass. It is crucial to place the
lower corners of the innermost
glass
plastic slots.
7. Push the plastic component
towards the frame until a ‘click’
sound is heard.
, repeat the same
2
2
. Place the bevelled
1
, pay
1
to meet the lower
.
2
must
1
Cleaning the oven lamp
In the event that the glass door
of the oven lamp in the cooking
area becomes dirty; clean
using dishwashing detergent,
warm water and a soft cloth or
sponge and dry with a dry cloth.
In case of oven lamp failure, you
can replace the oven lamp by
following the sections that follow.
Replacing the oven lamp
General warnings
• To avoid the risk of an electric
shock before replacing the
oven lamp, disconnect the
electrical connector and
wait for the oven to cool. Hot
surfaces may cause burns!
• The oven lamp is a special
electric bulb resistant to 300°C.
Oven lamps can be obtained
from Authorised Services.
• The position of the lamp may
differ from that is shown in
the figure.
• The lamp used in this product
.
is not suitable for use in the
lighting of home rooms. The
purpose of this lamp is to help
the user see food products.
• The lamps used in this product
must withstand extreme
physical conditions such as
temperatures above 50°C.
31

Fan Oven LAM3451
If your oven has a round lamp
1. Disconnect the product from
the electricity.
2. Remove the glass cover by
turning it counterclockwise.
3. If your oven lamp is type
shown in the figure below,
rotate the oven lamp as shown
in the figure and replace it
with a new one. If type B is
a model, pull it out as shown
in the figure and replace it
with a new one.
4. Refit the glass cover.
A
BA
32
www.howdens.com

Instructions and Installation
8. Troubleshooting
Consult the Authorised Service Agent or technician with license or the
dealer where you have purchased the product if you cannot remedy
the trouble although you have implemented the instructions in this
section. Never attempt to repair a defective product yourself.
Oven emits steam when it is in use
• It is normal that steam escapes during operation. ››› This is not a fault.
Water drops occur during cooking
• The vapour that arises during cooking can condense and form water droplets
when it hits cold surfaces of the product. ››› This is not a fault.
Product emits metal noises while heating and cooling
• When the metal parts are heated, they may expand and cause noise.
››› This is not a fault.
Product does not operate
• The mains fuse is defective or has tripped. ››› Check fuses in the fuse box.
If necessary, replace or reset them.
• Product is not wired into the (grounded) socket. ››› Check the electrical connection.
• Buttons/knobs/keys on the control panel do not function. ››› If your product is
equipped with key lock function, key lock may be enabled. Please disable it.
Oven light does not work
• Oven lamp is defective. ››› Replace oven lamp.
• Power is cut. ››› Check if there is power. Check the fuses in the fuse box. If necessary,
replace or reset the fuses.
Oven does not heat
• Might not be set to a certain cooking function and/or temperature. ››› Set the oven to
a certain cooking function and/or temperature.
• Power is cut. ››› Check if there is power. Check the fuses in the fuse box. If necessary,
replace or reset the fuses.
33

Fan Oven LAM3451
9. Your guarantee
Product Guarantee Details (UK and Republic of Ireland only)
Your appliance has the benefit of a comprehensive manufacturer’s
guarantee which covers the cost of breakdown repairs. (Details of
which are shown on your Proof of Purchase Document).
• Any claim during the period of the guarantee
MUST BE ACCOMPANIED BY THE PROOF OF PURCHASE.
• The product must be correctly installed and operated in
accordance with the manufacturer’s instructions and used
for normal domestic purposes.
• This guarantee does not cover accidental damage, misuse or
alterations which are likely to affect the product.
• The guarantee is invalid if the product is tampered with, or repaired
by any unauthorised person. (The guarantee in no way affects your
statutory or legal rights).
What to do if you need to report a problem
Please ensure you have ready:
• The product’s model and serial numbers.
• Howdens Proof of Purchase Document.
• Your full contact details.
Call the Depot number on your Proof of Purchase
Document supplied with the product/kitchen.
or
Call the LAMONA Service Line on:
Within the UK: 0344 460 0006
Within Republic of Ireland: 01525 5703
• Product installed within a domestic kitchen or a non-domestic
kitchen where 8 or fewer people are using the appliance.
Where to find model and serial
number on your appliance.
Spare Parts availability – 10 years
Only fit Genuine Spare Parts
www.lamonaspares.co.uk
34
Open door on panel
just below door seal.
(UK only)
www.howdens.com

Instructions and Installation
Notes
_____________________________________________________________________
_____________________________________________________________________
_____________________________________________________________________
_____________________________________________________________________
_____________________________________________________________________
_____________________________________________________________________
_____________________________________________________________________
_____________________________________________________________________
_____________________________________________________________________
_____________________________________________________________________
_____________________________________________________________________
_____________________________________________________________________
_____________________________________________________________________
_____________________________________________________________________
_____________________________________________________________________
_____________________________________________________________________
_____________________________________________________________________
_____________________________________________________________________
35

Product serial number
(Place sticker here)
REPRISE
Cet appareil
se recycle
À LA LIVRAISON
Howden Joinery Ltd, Thorpe Road, Howden, East Yorkshire, DN14 7PA
Imported in EU by: Houdan Cuisines SAS, Z.A. du Bois Rigault Nord,
1Rue Calmette, 62880 Vendin-le-Vieil, Cedex, France.
Product information correct at the time of publication in March 2022.
The company has a policy of continuous product development and
reserves the right to change any products and specifications given in
this manual. Subject to the Terms and Conditions of Trading, a copy of
the Howdens Terms and Conditions is available upon request.
Copyright © 2022 Howden Joinery Ltd. All rights reserved.
OU
À DÉPOSER
EN MAGASIN
À DÉPOSER
EN DÉCHÈTERIE
OU
 Loading...