

User & Installation Guide
HJA2600
Stainless Steel and Glass
Angled Extractor

Page 2www.howdens.com
CONTENTS
Environmental Note 3
Product information 4
4
Parts List 4
Method of Extraction 5
Installation 6
Hanging Your Extractor 6
Fixing To The Wall 7
Fitting The Glass Canopy 7
Decorative Chimney Fitting 8
Fitting Remote Control Batteries 8
Electrical Connections 9
Operating Your Extractor 10
Extractor Controls 10
Timer Function 10
The Carbon Filters 10
Maintenance 11
General Cleaning 11
Replacement of the Light Bulbs 11
The Grease Filters 11
The Carbon Filters 11
Troubleshooting 12
Your Guarantee 13
Guarantee Conditions 13
Reporting a Fault 13
Contact details 14
Page 3 www.howdens.com
ENVIRONMENTAL NOTE
This appliance is marked according to the European directive 2002/96/EC on Waste Electrical and
Electronic Equipment (WEEE). By ensuring this product is disposed of correctly, you will help prevent
potential negative consequences for the environment and human health, which could otherwise be
caused by inappropriate waste handling of this product.
The symbol on the product, or on the documents accompanying the product, indicates that this appliance
may not be treated as household waste. Instead it shall be handed over to the applicable collection point
for recycling of electrical and electronic equipment.
Disposal must be carried out in accordance with local environmental regulations for waste disposal.
For more detailed information about treatment, recovery and recycling of this product, please contact
your local city oce, your household waste disposal service or the shop where you purchased the product.
• The packaging materials that Lamona uses are environmentally friendly and can be recycled
• Please discard all packaging material with due regard for the environment.
This appliance conforms to the following EEC Directive:
This appliance meets the provisions of the following directives: 89/336/EEC (electromagnetic compatibility),
73/23/EEC (electrical equipment designed for use within certain voltage limits) as amended.
Page 4www.howdens.com
PRODUCT INFORMATION
Keep this book in a handy place for reference; it contains important details on the safe and proper
use of your appliance. Should you sell the extractor please remember to pass the instruction book
on to the new owner.
The extractor is designed to give you the option to extract air by ducting to the outside and away (via
The choice is yours to decide at installation, and both systems are explained in the booklet. We recommend
that you read this booklet thoroughly before attempting to install or operate the extractor.
PARTS IDENTIFICATION
PARTS LIST
1) Upper Telescopic Chimney
2) Lower Teleoscopic Chimney
3) Extractor Body
4) Upper Chimney Bracket
5) Lower Chimney Bracket
6) Ducting Connector
7) Remote Control
8) Canopy Glass
DATA
Power Supply:
230/240v ~ 50Hz
Rating:
370 W
Fuse Rating:
3 A
2 Bulbs
Halogen Lamps 50 W each
1
2
3
4
5
6
7
8
Page 5 www.howdens.com
METHODS OF EXTRACTION
The very best method of cleaning the kitchen of unwanted odours is by connecting the appliance to an
exhaust duct and venting to the outside atmosphere via the ceiling to an exterior wall. (Suitable ducting
kits may be purchased from the store where you bought your extractor.) You do not need a charcoal lter
when using the ducting mode.
Fig 1. Fig 2.
Ducting mode Recirculating mode
(No charcoal lter required) (Charcoal lters required)
REMEMBER: Before drilling or chiselling the ceiling or wall, check for pipes and power cables.
• Ensure the ducting tube is kept as short as possible and with the minimum of bends to permit the
smoothest airow. (Maximum length 3 metres.)
• Ducted air must not be discharged into a ue, which is used for exhausting fumes from appliances
supplied with energy other than electricity.
• Ensure the requirements of the local authorities are adhered to concerning the discharge of exhaust
air.
• Ensure adequate room ventilation is provided when the extractor is used in the same room as
appliances supplied with energy other than electricity.
• Never duct into a hot air ow such as a central heating duct
We strongly advise that all exterior outlets be tted with a non return valve or louvered slatting.
Motor

Page 6www.howdens.com
INSTALLATION
HANGING YOUR EXTRACTOR
IMPORTANT: This instruction must be strictly adhered to. Failure to comply could result in overheating and serious damage to your appliance.
NOTE: It is recommended that the installation is carried out by two people. If access and/or height
-
ing the extractor body to the wall
• Ensure that the wall is capable of supporting the weight of the extractor.
•
from the worktop to the lowest part of the extractor. This can be reduced to a minimum of 700mm
if required.
• Screw in the top two extractor body screws ‘X’ until the screw heads are 2mm away from the wall;
keyhole slots have been provided in the extractor body to hang the unit on the wall.
• The upper chimney bracket should be aligned vertically above the lower bracket (shown) at ceiling
height.
•
the top of the extractor body.
x
x
Fixing Height Above Worktop
Recommended = 750mm
Minimum = 700mm
Page 7 www.howdens.com
FIXING TO THE WALL
•
•
• With the help of an assistant, hang the extractor on to the top screws and secure the hood to the
wall, with the remaining two screws.
• If the extractor is to be ducted out install the wall vent kit and connect the ducting to the ducting
adapter and to the wall vent.
•
motor.
•
•
FITTING THE GLASS CANOPY
• Carefully secure the glass panel to the extractor body using the screws, washers and allen key
supplied as illustrated below.

Page 8www.howdens.com
DECORATIVE CHIMNEY FITTING
• Connect the extractor to the electricity supply.
•
recesses provided on the lower chimney bracket
• Extend the upper chimney section to the ceiling and secure to the upper chimney bracket with the
screws provided.
Chimney Location Chimney Bracket
FITTING AND REPLACING REMOTE CONTROL BATTERIES
•
• Lift the cover to gain access to the battery compartment.
• Fit two LR03 (AAA) batteries as shown, taking care to observe the polarity markings
• Note: Do not mix normal and rechargeable batteries.
• Replace the battery cover.
LR03
AAA
• Remove used batteries if present, and dispose of in a suitable manner.

Page 9 www.howdens.com
ELECTRICAL CONNECTIONS
with at least 3mm contact separation. The isolation switch must be accessible after installation. (See
technical data for fuse rating).
N.I.C.E.I.C. or Corgi who will comply with the I.E.E and any local regulations.
NOTE: The terminology DOUBLE POLE -/+ means that both the live and neutral supplies are switched and
disconnected at the same time.
The terminations labelled SUPPLY are for the connection for the internal house wiring and the
terminations labelled LOAD are for the connection for the appliance.
IMPORTANT: The wires in the mains lead are coloured in accordance with the following code:-
Blue..........Neutral
Brown......Live
As the colours of the wires in the mains lead of this appliance may not correspond with the coloured
markings identifying the terminals in your spur box, proceed as follows;
The wire which is coloured blue must be connected to the terminal which is marked with the letter ‘N’ or
coloured BLACK. The wire which is coloured brown must be connected to the terminal which is marked
with the letter ‘L’ or coloured RED.
Fig 8. (F
used Switch) Fig 9. Wiring Example
FUSE
ON
N
L
L
N
LOAD
SUPPLY
LOAD
SUPPLY
DP
13A 250V~
BLUE
(NEUTRAL)
BROWN
(LIVE)
FUSE
ON

Page 10www.howdens.com
OPERATING YOUR EXTRACTOR
EXTRACTOR CONTROLS
Extractor Controls Remote Control
A) Operates the lights
B) Selects motor speed 1.
C) Selects motor speed 2.
D) Selects motor speed 3.
To use the remote control, point it at the extractor and press the appropriate button.
Select the desired speed using the appropriate button on the extractor or remote
control.
To turn the lights ON or OFF, press button A.
Note: Remove the batteries from remote control if not in use for a long time. Do not mix normal
and rechargeable batteries. When the batteries become weak the remote control may not function
correctly.
TIMER FUNCTION
The extractor has a timer function which enables the fan to remain running for 15 minutes after the timer
has been set.
1. Select the desired speed.
2. Press and hold the same speed button again for approximately 2 seconds, until the light(s)
3.
4
A B C D
D
B C
A
Page 11 www.howdens.com
MAINTENANCE
IMPORTANT: Before cleaning or attempting any type of maintenance, always make sure that the
electric supply is disconnected.
NOTE: The manufacturer declines all liability in cases where the instructions for the appropriate
installation, maintenance and use of the extractor hood are not observed.
If the power supply is cut or damaged in any way, disconnect the extractor from the electricity supply and
call the service number on the rear cover of this booklet.
GENERAL CLEANING
Wipe the external surfaces of the appliance regularly using warm water and a mild detergent. NEVER use
abrasive cleaners.
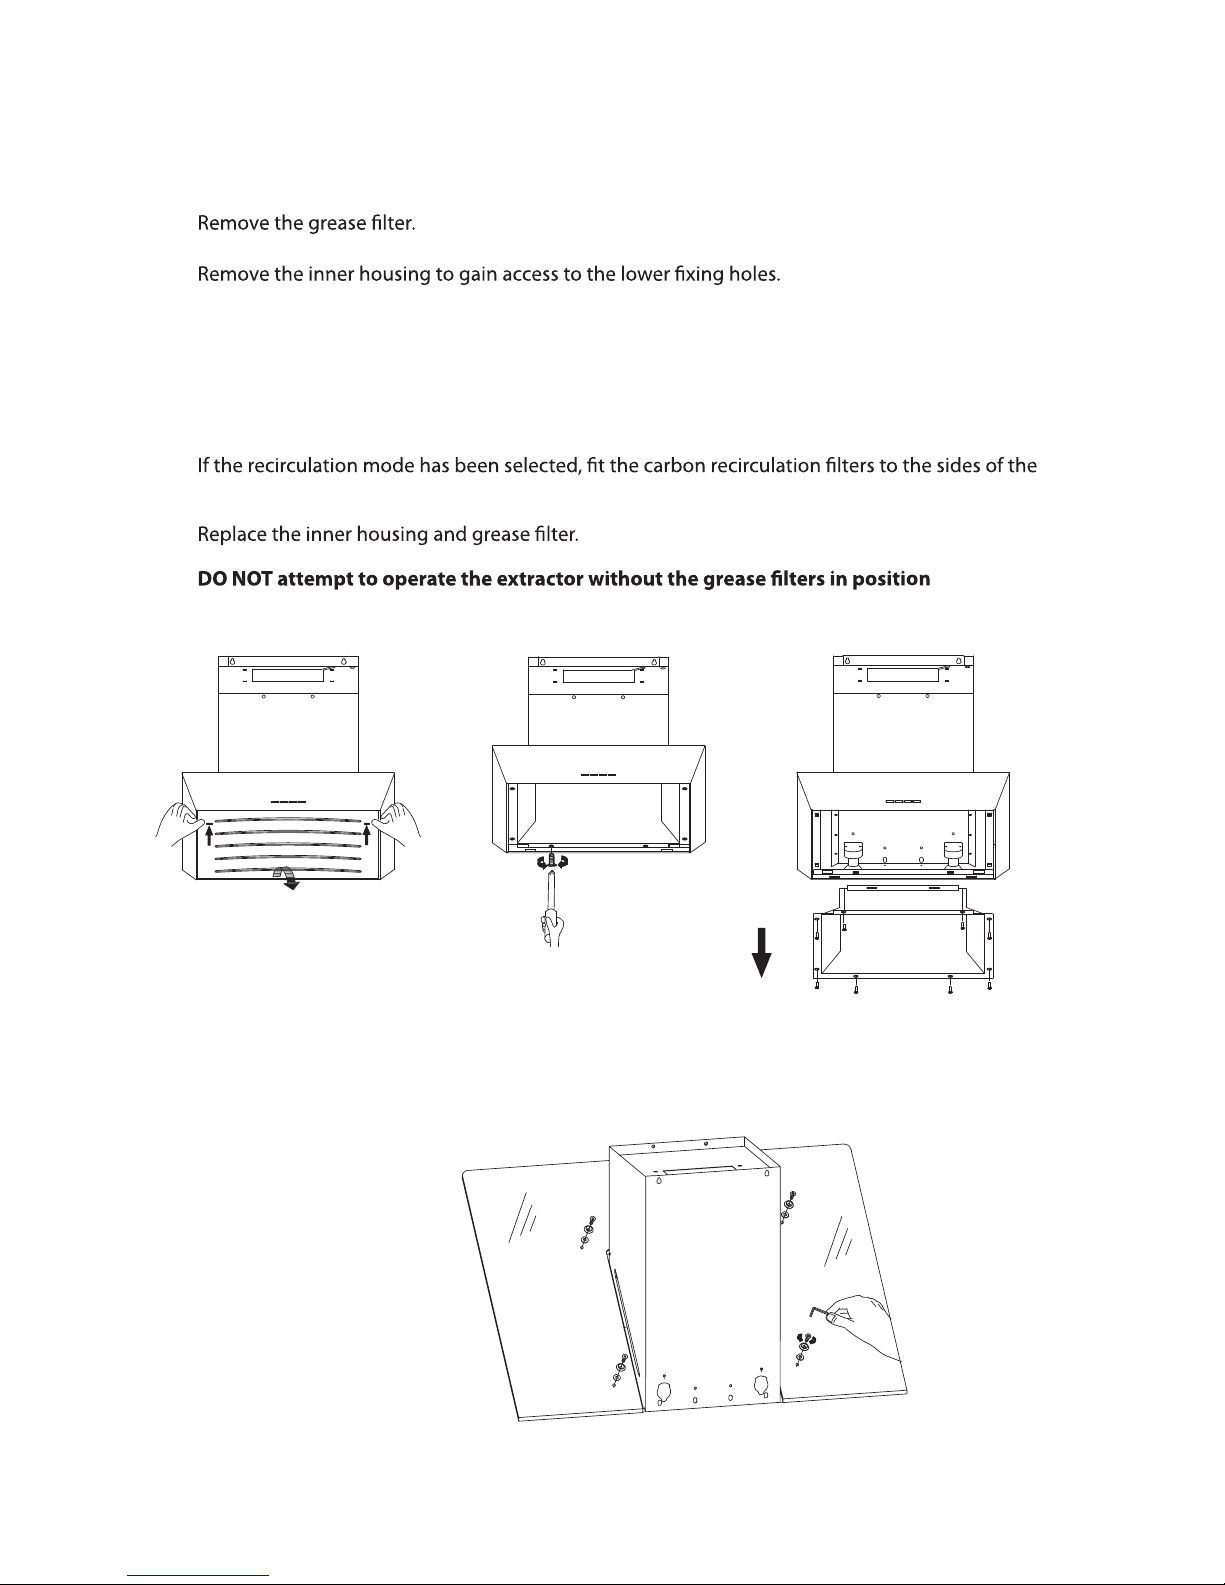
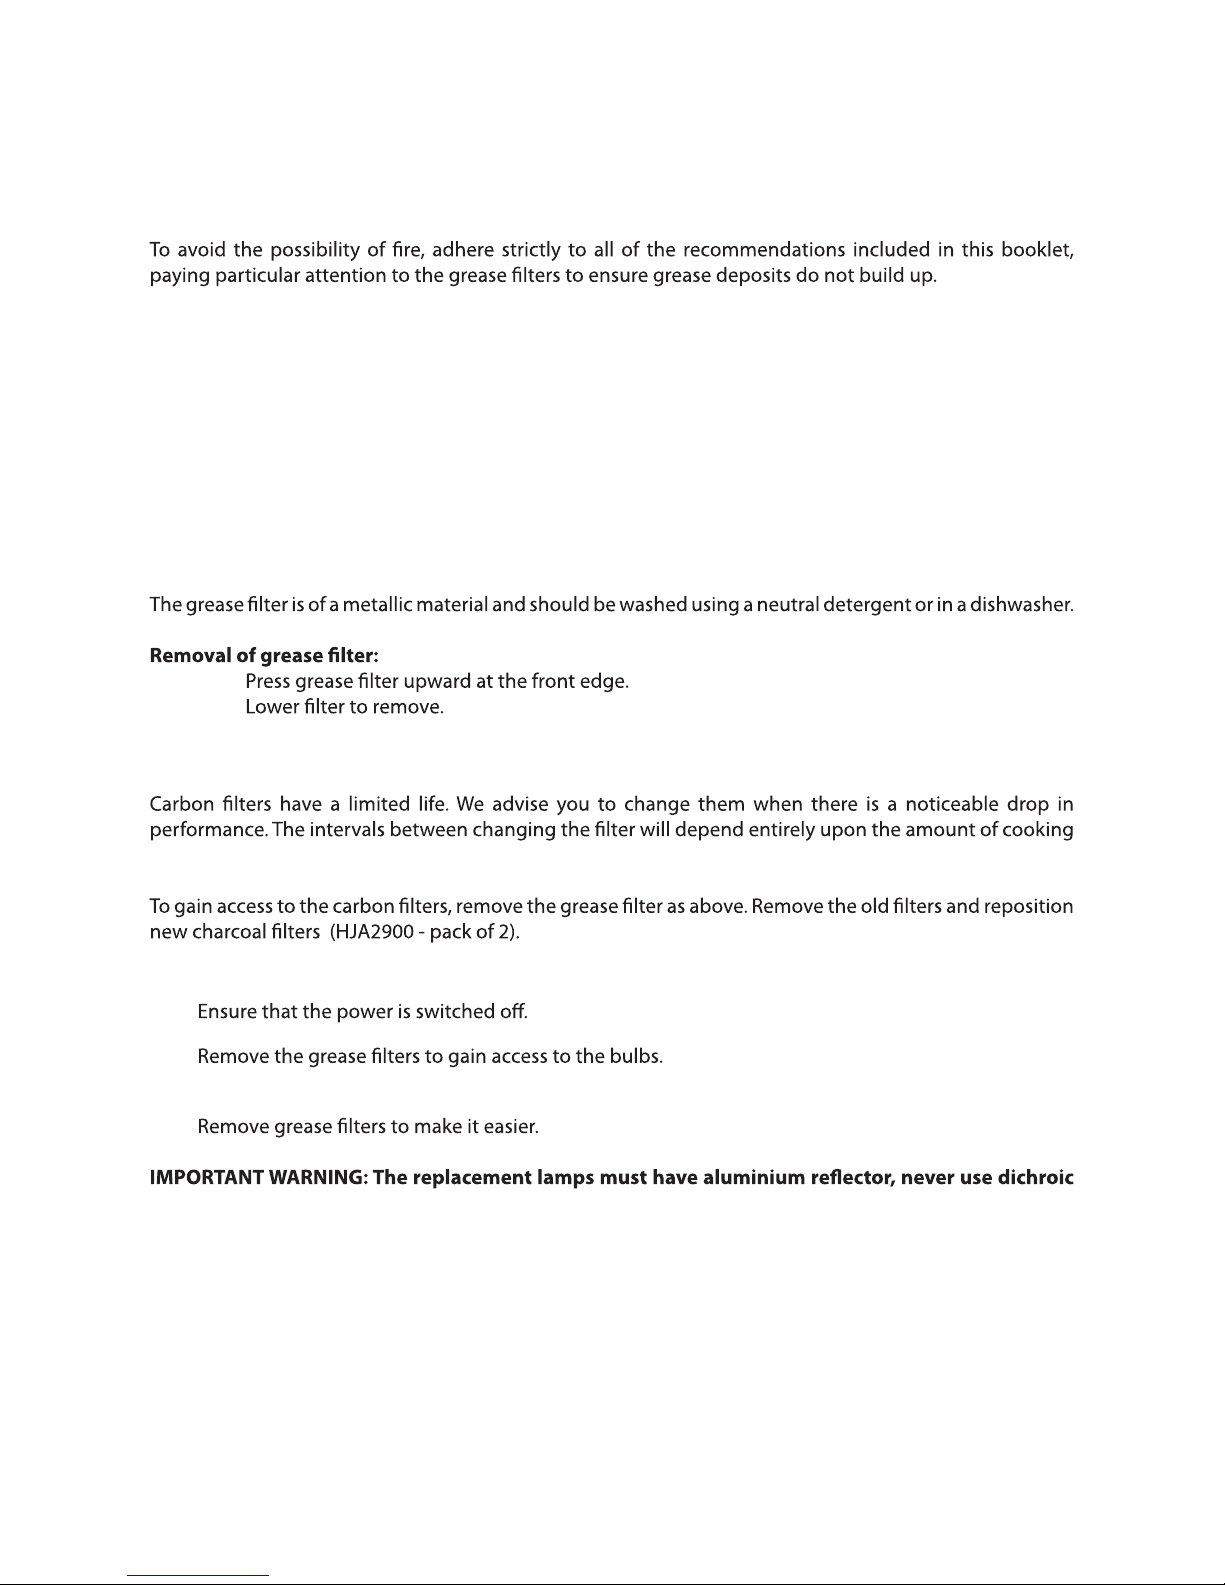
THE GREASE FILTER
1
2
THE CARBON FILTERS
you do, but on average they will last around 6 months.
REPLACING THE LIGHT BULBS
•
•
• Unscrew to remove the lamp and replace it with a new lamp of the same type and wattage.
lamps, to avoid unnecessary overheating on the lamp holders. NOTE: Lamp replacement is not cov-
ered by your guarantee
REPLACING THE BATTERIES IN REMOTE CONTROL
Instructions on replacing batteries can be found on page 8.

Page 12www.howdens.com
TROUBLE SHOOTING
Before you assume the worst, check this simple fault-nding guide to get to the root of the
problem:
Lamps fail to operate?
• A replacement is probably necessary, but rst check that the lamp is correctly tted into its holder.
Remember that the light bulbs are not covered by our guarantee. Remember to disconnect the
mains electricity supply before replacing the lamps. Do not touch the lamps with ngers - use a
suitable cloth.
Motor is on but fan does not seem to be as ecient as usual?
• Check the grease lter. If it has not been cleaned recently, it might be clogged with grease. If this
lter is relatively clean, check carbon lters (if tted). If they have not been replaced for more than
six months, remove and insert new ones. As time goes by, accumulated grease tends to stie the
carbon lters in just the same way as the grease lter, thereby reducing the eciency of both the
fan and the lter itself.
Works normally but cooking smells linger?
• If you’re using the unit in recirculating mode, change the charcoal lter. It may require
replacement.
Appliance does not work at all?
• Check your extractor is switched on at the mains. Next, check there is power to your home by
switching on adjacent lights etc.
Still not working? Call the service
• If, having consulted the above diagnostics and you are still unable to remedy the situation, please
call the service number on the rear cover of this manual.

Page 13 www.howdens.com
YOUR GUARANTEE
Product Guarantee Details (UK only)
YOUR APPLIANCE HAS THE BENEFIT OF A COMPREHENSIVE MANUFACTURER’S GUARANTEE
WHICH COVERS THE COST OF BREAKDOWN REPAIRS. (DETAILS OF WHICH ARE SHOWN ON
YOUR PROOF OF PURCHASE DOCUMENT).
• Any claim during the period of the guarantee (MUST BE ACCOMPANIED BY THE PROOF OF
PURCHASE)
• The product must be correctly installed and operated in accordance with the manufacturer’s
instructions and used for normal domestic purposes.
• This guarantee does not cover accidental damage, misuse or alterations which are likely to aect
the product.
• The guarantee is invalid if the product is tampered with, or repaired by any unauthorised person.
(The guarantee in no way aects your statutory or legal rights)
What to do if you need to report a problem-
Please ensure you have ready:
- The product’s model & serial numbers
- Howdens Proof of Purchase document
- Your full contact details.
Call the Lamona Service Line on 0845 00 60 006

CONTACT DETAILS
Lamona Customer Care
Telephone number (0845) 006 0006.
Lamona operates a policy of continuous improvement and reserves the right to adjust and modify
Issue: 09/2014
 Loading...