


Instruction Manual
LAMI CORPORATION INC.

1
Preface
Thank you for purchasing our 【 】.
This Instruction Manual (document) includes details for safe use of this product.
Please read this document thoroughly before using the product.
Also, carefully store this document for immediate use whenever necessary.
■ Preface P 1
┗ Table of Contents........................................................................................................................................ P
1
■ Precautions Before Use P 2
┣ List of Labels Attached to the Product and Meaning of Symbols............................................................... P 2
┣ Precautions for Handling ............................................................................................................................ P 3
┗ Place for Installation................................................................................................................................... P 4
■ Characteristics and Confirmation of Parts P 5
■ Installation of the Machine P 6
┣ Stand Assembly Method ............................................................................................................................. P 6
┣ Foot Switch Installation Method................................................................................................................. P 6
┣ Power Connection for re-winding Device ................................................................................................. P 6
┗ Fuse Installation Method............................................................................................................................. P 7
■ Name of Each Part P 8
┣ Main Body of Freesia 55C.......................................................................................................................... P 8
┣ Operation Panel........................................................................................................................................... P 9
┗ Foot Switch.................................................................................................................................................. P 10
■ Before Processing Laminate P 11
┗ About Laminate Film................................................................................................................................... P 1
1
■ Cold Laminate Processing P 12
┗ Installation and Processing of Cold Laminate Film..................................................................................... P 12
■ Maintenance P 15
┣ Cleaning of Roller........................................................................................................................................ P 15
┣ Cleaning of paper tube holder...................................................................................................................... P 15
┗ Cover the product with cloth after use......................................................................................................... P 15
■ Troubleshooting P 16
┣ Power does not turn on · machine does not function ................................................................................... P 16
┣ Product malfunctions or power is immediately turned off........................................................................... P 16
┣ Wrinkles are formed in the processing material........................................................................................... P 16
┗ Processing material cannot be inserted · does not come out........................................................................ P 16
■ Others P 17
┣ Product Specifications .................................................................................................................................P 17
┗ Contact......................................................................................................................................................... P 17
Table of Contents

2
Precautions before Use
▼Nameplate label (porting)
▼Rated label
▼Cover switch restriction label
▼Jamming and entangling warning
label
▼Grounding instruction label
Ground connection must be done.
▼Fuse label
▼Emergency stop switch label
▼Tension control label
This document uses symbols to explain the degree of harm and damage caused by incorrect use of the product and to
prevent harm on customers and others or damage on properties.
Warning
If this symbol is neglected and the product is handled incorrectly, serious injury or death may
occur.
Caution
If this symbol is neglected and the product is handled incorrectly, human injury or physical
damage on properties may occur.
This symbol indicates matters to be followed
to avoid injury.
This symbol prohibits disassembly of the
device for safety.
This symbol instructs the user to remove
power plug from the outlet for safety.
This symbol prohibits touching of the
product with wet hands.
This symbol instructs the user to connect
grounding for safety.
This symbol prohibits wetting of the
product by water.
This symbol warns the user about the risk of
hands rolling into the roller.
This symbol shows concern for electric
shock under improper handling.
This symbol shows concern for smoke and
ignition under improper handling.
Meaning of
Symbols
List of Labels Attached to the Product

3
Warning
Power cable included in the product must be used. Do not use power supply not indicated on the product.
Do not place heavy objects on power cable, place cables nearby heating devices, or complex wiring.
Do not process power cable or use damaged power cable.
Accurately insert to the end of electrode.
When inserting power cable, the plug must be held. Excessive bending, twisting or pulling can damage the cable interior
and cause electric shock, fire, and failure.
※ Contact our company or store when power cord is damaged.
Regularly remove power cable from the outlet to clean the root and gap of electrode. Do not insert cable with foreign
substances such as dust attached.
Do not install the product in places with high temperature and humidity or poor ventilation, places with combustible and explosive gas
or poisonous gas, places covered with dust, and on top of easily burnt objects. When installing against a wall, the product should be
placed at least 50cm away from the wall.
Do not approach the product to firearms, high temperature, metals, and easily burnt objects. Do not put liquids into the
machine.
Do not disassemble or remodel the machine.
Do not use the product in abnormal state such as smoke, strange odor, and noise. If such condition is found, immediately
turn off the power switch and remove power cable from the outlet before contacting the store or our company. The product
must never be repaired by the customer for safety purpose.
Caution
Power cable must be removed from the outlet when the product is not used for long time.
Do not insert power cable with wet hands.
Grounding must be connected before connecting power to power cable. Power cable must be removed before grounding
disconnection.
Especially, keep the product away from children.
Do not ride the product or put heavy objects on top.
Do not place the product in unstable places (oscillating place, slanted place, and place with vibration of other
machineries). The product may fall down or over to injure persons nearby.
Avoid direct wind from air conditioner.
Never block the air vent. Blocked air vent can cause failure or fire from accumulation of internal heat.
During operation or insertion of laminate, be careful about clothes such as neck tie and necklace and body parts from entering the
device.
When film glue is attached to the laminate roller, squeeze cloth stained with neutral detergent and wipe out. (※ Do not
clean with benzene, thinner, or sponge.)
Lift the roller for laminate processing.
When the machine is not used, cover with a cloth to keep away from direct light or fluorescent light. Light can result in
rapid degeneration of the laminate roller rubber.
For safety, transport this product after turning the power switch off and removing power cable from the outlet.
Precautions for Handling

4
This device shall be installed in the following places.
●Horizontal and stable place
Use as slanted or in unstable state may result in adverse effects such as paper return.
Also, unexpected accidents can occur.
●Place where exclusive power outlet is available
Do not use power types other than the rated voltage regulated on this Manual.
Grounding and earth leakage breaker must be installed.
●Place with low humidity and sound ventilation
Installation of this product in place with high humidity can result in short circuit or failure.
Avoid outdoor places and places with direct light or air conditioner wind.
●Workability
Secure sufficient space for workability.
Do not install the product too close to walls. If possible, space between the product and wall should be wide
enough to allow human passage.
Place for Installation
1000mm or more
500mm
or
more
500mm or more
500mm or more

5
Characteristics
●Pressure can be adjusted in 8 steps automatically
●Speed of laminate processing can be adjusted step by step
●Rotation and stopping of the roller can be done using foot switch
●Transparent safety cover
Confirmation of Parts
The following parts and documents are included in the main body.
If there is a missing part, contact a nearby business office of our company or store from which the product was
purchased.
`
Freesia-55C main body
Film shaft
Branch paper tube holder (3-inch)
Stand (assembly type)
Foot switch
Instruction Manual
(this document)
Hex wrench
(For paper tube holder)
3 EA
6 EA
Film shaft
Branch paper tube holder (3-inch)
3 EA
4 EA

6
Installation of the Machine
Stand is assembly type. Use hex wrench to install the stand while being careful about left and right directions.
※ ③ with re-winding power switch should be installed on the right stand when looked from the front.
When looked from the front, there is an insertion hole of foot switch at
the center of the right surface.
Convex surface prevents insertion in incorrect direction. Check the
shape of the insertion hole before inserting.
(Excessive force causes damage the part.)
When disconnect the cable, Remover lock by pulling it.
When looked from the front, insert the cable sticking out from the rear
side of the main body into the power insertion hole of the re-winding
device.
※ Do not insert power re-winding device cable into other power
holes. It may cause device failure.
Power Connectio
n for Re
-
Winding Device
Foot Switch Installation Method
Stand Assembly Method
①
M6 screw
(4
EA
x 2
places)
②M6 screw 2 EA
③M6 screw 2 EA
Power switch
Fuse box
Power inlet
Re-Winding device

7
Fuse is placed nearby the power switch on the rear of right surface and power switch of the Re-winding device.
(Spare fuse is only included in the Re-winding device.)
Take out the fuse using flat-head driver to check disconnection of the fuse.
If it is disconnected, replace with a new fuse before supplying power again.
Fuse Installation Method
Power switch
Fuse
Fuse disconnection check
Re-Winding device
Rear-R
ight
Fuse
(spare fuse)
Fuse box
Visually check whether this part is
disconnected

8
Name of Each Part
① Stand
③ Film shaft for under-film
⑤ Front signboard
⑦ Laminate roll
⑨ Film shaft for release liner
⑪ Idle roller (top)
⑬ Re-winding film shaft
② Media holder shaft
④ Idle roller (front)
⑥ Finger jamming prevention cover
⑧ Stay bar (reinforcement bar)
⑩ Laminate film shaft
⑫ Back signboard
.
Main Body of Freesia
-
55C
Right Side of
Main Body

9
LCD Display Panel
RUN
Displayed during laminate processing
STOP
Displayed when laminate processing is stopped
FORWARD
If 【FORWARD】 is shown on the LCD panel, the roller rotates in forward direction.
REVERSE
If 【REVERSE】 is shown on the LCD panel, the roller rotates in reverse direction.
EMEGENCY
When emergency stop button is pressed, 【EMERGENCY】 pops up on the LCD panel.
All functions come to stop. Emergency stop can be released by turning the emergency stop button to the right.
When 【EMERGENCY】 is displayed, only vertical control is allowed for the roller.
One emergency stop switch is placed on left and right sides of the top of the main body.
Rotate the button clockwise to release emergency stop.
Operation Panel
Speed
Forward and reverse rotation of roller
Current status
Thickness

10
Buttons on the operating panel
【℃℃℃℃/℉℉℉℉】 button
This button is not used.
【TEMPERATURE】 button
This button is not used.
【SPEED】 button
Rotational speed of the laminate roller
can be adjusted within 0 ~ 1.9 m/min.
【THICKNESS】 button
This button is not used.
【MEMORY】 button
This button is used during maintenance
to display appropriate mileage
When pressed once, mileage from
previous reset until now is displayed.
(Press 【RUN/STOP】 button while
pressing 【MEMORY】 to reset.)
When pressed once again, total
mileage until now is displayed. (This
cannot be reset)
When pressed again, it returns to the
original display.
【PRESS/RELEASE】 button
【REVERSE】 button
When pressed once, the laminate roller
rotates in reverse direction
When pressed once again, it returns to
forward rotation.
【RUN/STOP】 button
This button starts and stops roller
rotation.
The roller rotates when the button is
pressed with the roller at stop, and the
roller stops when the button is pressed
again.
Caution
Do not operate 2 or more buttons simultaneously.
The following buttons cannot be used on the product.
【℃/℉】 button, 【TEMPERATURE】 button, 【THICKNESS】 button, 【PRESS/RELEASE】 button
This device can be operated by operation panel as well as foot switch included.
Foot Sw
itch
This is button to adjust pressure of
rollers.
Set the value according to the paper
and film to be processed.
: The roller begins to rotate when the foot switch is pressed. (About 2seconds)
: The roller stops rotating when the foot switch is p
ressed
. (
About 2seconds)
:
The roller can up &down when the foot
switch
is pressed (More and 3 seconds)

11
Before Processing Laminate
There are two types of laminate film including 「roll type」 and 「pack type」.
This product uses 「cold roll film」 type.
※ 「Pack type」 and 「hot roll film」 cannot be used.
Thickness (µ)
Thickness of the laminate film is selected according to the use.
Thickness of the cold roll film used by this product ranges from 20 µ to 300 µ.
Paper core holder Size
(Inner Diameter)
Size of installable paper tube differs according to the laminate structure.
This product uses a 3-inch (about 77 mm) paper core holder.
Type of Roll Film
Hot roll film
Apply heat to melt glue and attach the film.
Cold film
Parting paper (release paper) is attached on the surface applied with glue.
Release the film with the Re-winding device and compress with the roller for use.
About Laminate Film
Precautions for Handling Laminate Film
Do not place the laminate film in places with high temperature and humidity.
When lamination is not being done, store the film on the exclusive film shelf or in a box.
Use film appropriate for the laminator.
If a problem is found in the film before use, do not use and contact the store. Reckless use may result in
failure of the laminator.
12
Cold Laminate Processing
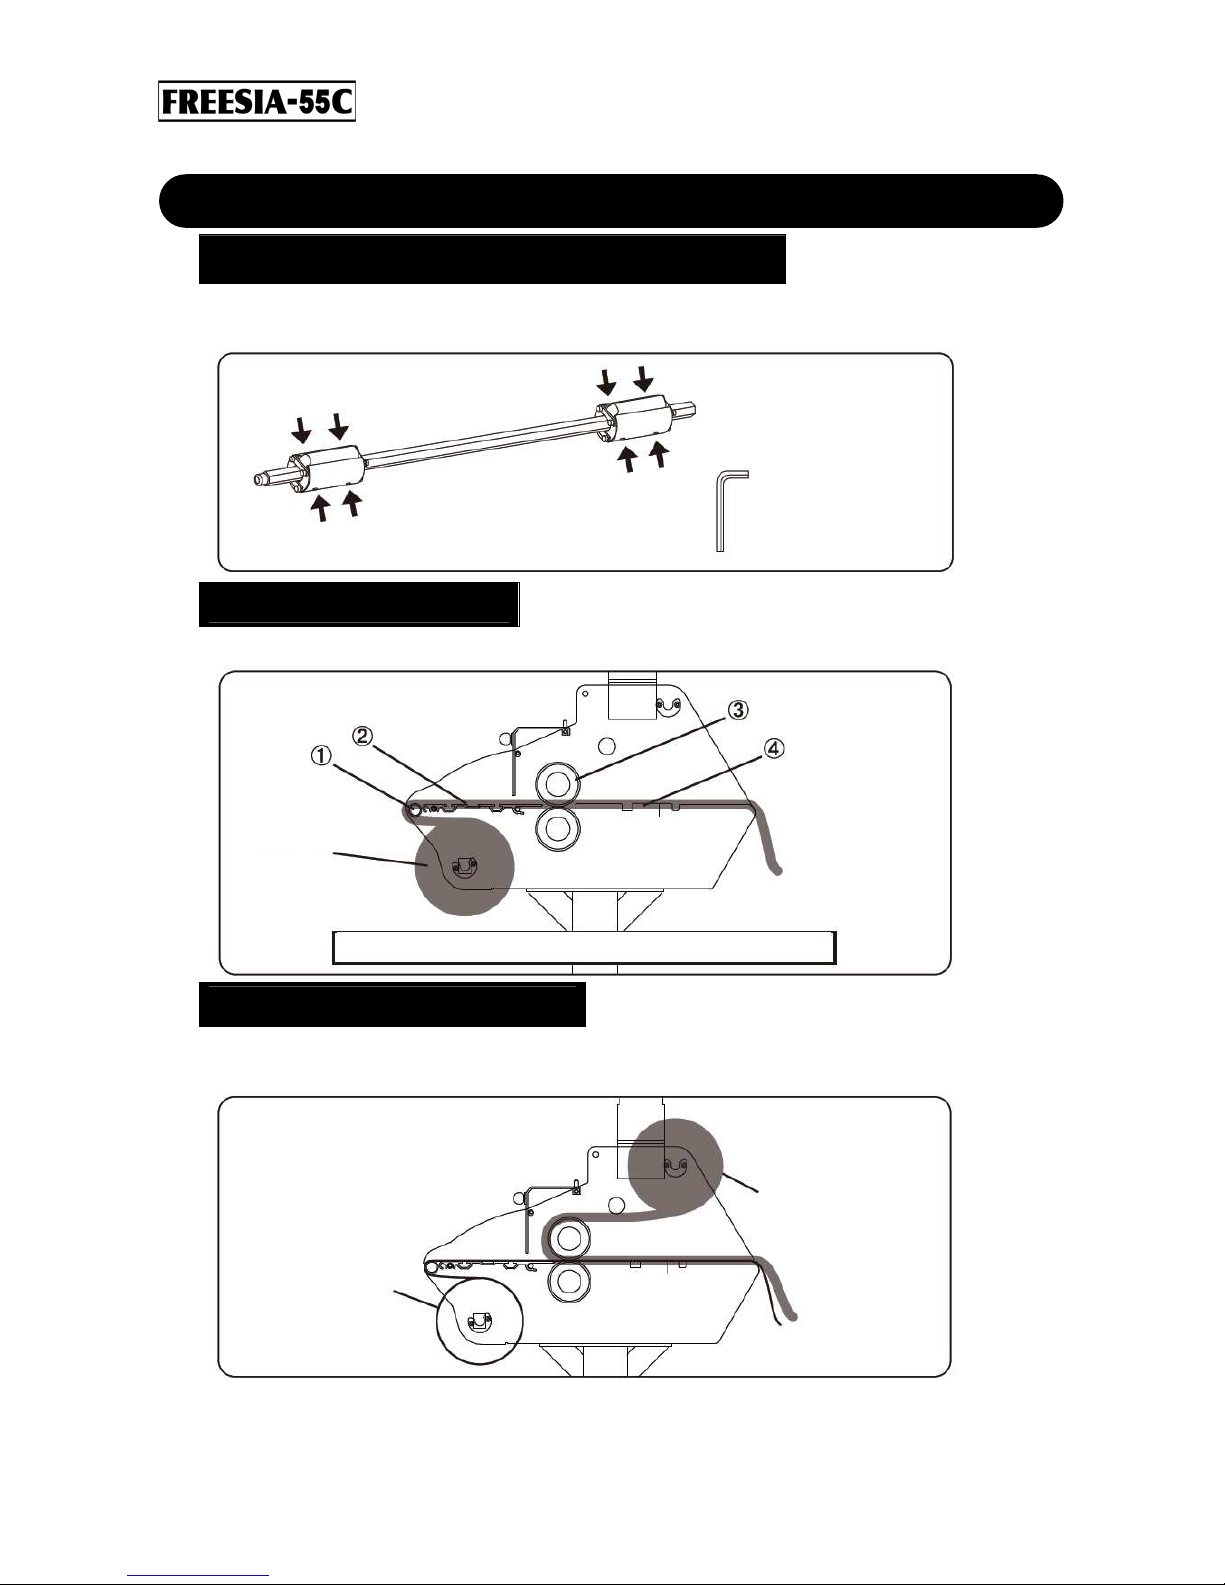
【1】 Install the paper tube holder on the film shaft.
All 6 film shafts are common parts.
Use hex wrench to move or fixate the branch pipe holder.
【2】 Install the under-film.
Refer to the figure below to pass the under-film while laminate roller (top) is lifted.
【3】 Install the laminate film.
Pass the laminate roller through the under roller with the release paper attached and then put down the laminate
roller.
Installation and Processing of C
o
ld Laminate Film
Fixate 4 sides of each
branch pipe holder.
Under-film
Laminate f
ilm
① Idle roller (front)⇒② front signboard⇒③ laminate roll⇒④ back signboard
Under-film
13
Only cut the release paper on the laminate film and rotate the laminate roller until the cross section of the release
paper cut touches the re- winding paper tube.
Here, hold the release paper so that it does not get entangled.
When the release paper touches the re-winding paper tube, attach it using cellophane tape to finish installation.
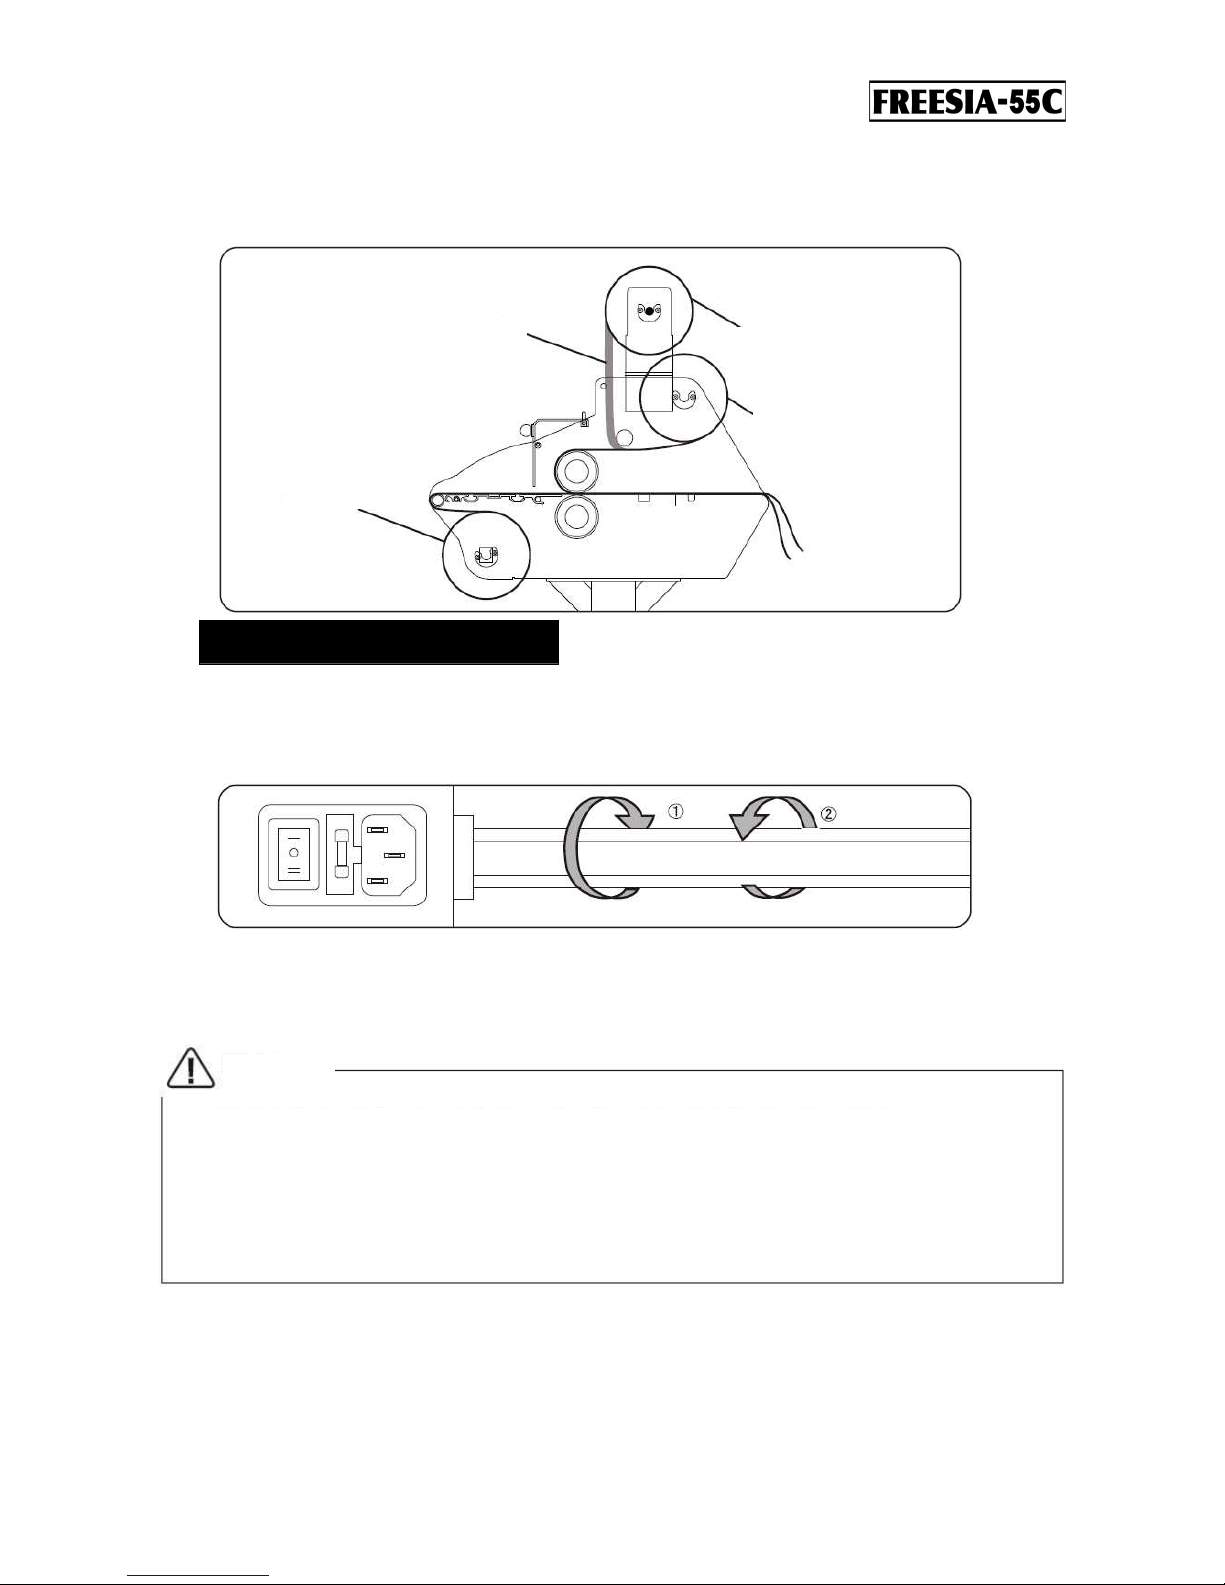
【4】 Use the winding device.
If the optional re-winding device is used, install the device according to the following sequence.
Attach the laminated product to the re-winding paper tube using tape. The motor starts rotating and winding
once the re-winding device switch is turned ON.
The re-winding device switch can be controlled to forward or reverse rotation.
When the switch is turned to ᅳ direction, the re-winding device rotates in direction ①.
When the switch is turned to ○ direction, the re-winding device stops rotation.
When the switch is turned to ᆖ direction, the re-winding device rotates in direction ②.
Caution
The re-winding device (optional) can be winded up to 50 m (about 30 kg).
Standard for the product of our company:
Under-film 【PET 12 µ 1400 mm】
Laminate film 【PVC 80 µ 1350 mm】
Media 【PVC 80 µ 1370 mm】
During cold processing, winding is about 30 kg at 50 m.
Under
-
film
Laminate film
Release liner re-
winding paper
tube.
Release liner

14
【5】 Perform laminate processing.
1 : Use the 【THICKNESS】 button to adjust pressure (gap) according to thickness of processing material
and 【PRESS/RELEASE】 button for up &down of roller
2 : Adjust to the wanted speed using 【SPEED】 button (speed can be adjusted during rotation of the laminate
roller) and press 【RUN/STOP】 button to rotate the laminate roller.
※ Here, the re-winding device for release liner automatically rotates. The re-winding device for final
products is controlled by switch. (Refer to the above for switch operation method)
3 : Insert the script towards the laminate roller for laminate processing.
4 : Cut the processing material using cutter after processing.
5 : After completion of all processing works, use the 【PRESS/RELEASE】 button to lift the laminate roller
and cover with a cloth for storage.
Pap
er tube for re
-
winding release liner
Release
li
ner
Under
-
film
Laminate film
Paper tube for product
Re-winding
After setting the re-
winding
shaft, please turn the shaft
holder cover
【
THICKNESS】 is controlled for thickness of sum of script, thickness of under film and thickness of film

15
Maintenance
This product is composed of many rollers, and they must be cleaned according to usage.
The laminate can be maintained in desirable state by cleaning the rollers.
Clean each roller since rollers have paper scraps and dusts attached.
Cleanly wipe the paper tube holder using soft and dry cloth or wipe the contaminated part using cloth with water
completely squeezed out. Here, applying force on wiping or cleaning with materials other than cloth can rip or damage
the pipe.
After using the product, cover the main body with a large cloth to avoid dusts from entering.
Cover the product with cloth after use
Cleaning of Paper Core
Holder
Cleaning of Roller
Caution
The roller must be stopped when cleaning.
Do not clean the roller using hard objects such as steel wool. They can damage the roller.
Do not apply force on the roller for long time.
Do not clean using thick paper, which is sometimes seen in pack type laminator. Thick paper can block the
device and result in damage or failure.
Likewise, do not clean using thin paper. Paper can roll into the roller and the roller cannot be used.

16
Troubleshooting
The following measures are taken for troubleshooting.
Insert outlet plug and check power switch
This product is used at AC 100V~240V. Make sure that the outlet plug is correctly connected.
Check that the power switch on the back of the main body is turned on.
If power cable is disconnected, it must be replaced. Contact our company or store.
Fuse is disconnected
Replace to a new fuse with identical spec. (Refer to P 8 for installation method.)
If the same symptom continues to occur, contact our company or store.
Heater or light projector is used nearby or long drum (cord reel) is used
If such objects are in use, use power from a different system.
If a drum is used, remove the drum before connecting.
Overload
Motor protection circuit may be functioning.
First remove power supply and wait for 10 seconds before resupplying power.
Abnormal noise from the motor
If an abnormal noise is created by the motor, saw-tooth wheel is damaged or screw is loose.
Contact our company or store.
There is a problem in wiring
Contact our company or store.
PCB malfunctions because of static electricity generated inside the machine
Turn the power off and then turn it on again.
Laminate film and under-film are not installed properly
Refer to P 13 ~ 15 of this document to install them properly.
Tension is too weak
Strengthen tension.
The machine is slanted
Reinstall it on a flat surface.
Is the script too thick?
Thickness of the script that can be processed by this product is 8 mm, including thickness of the film. If a thicker material
is inserted, the roller may not rotate or get damaged. Do not try to process anything thicker than the regulated thickness.
Even if thickness is within 8 mm, do not insert hard materials like metals.
Is film or script rolled into the roller?
If the script remains in the insertion hole, press reverse button to pull the script out. Do not pull it too strong because
excessive pulling can cause failure of the machine.
If the script is not caught in the insertion hole, contact our company or store.
Processing material cannot be inserted
·
does not come out
Wrinkles are formed in the processing material
Product malfunctions or power is immediately turned off
Power does not turn on
·
machine does not function

17
Others
Maximum laminate width
(roller width)
1400 mm
Maximum laminate thickness 8 mm (panel can be processed up to 10 mm)
Size of paper core holder 3 inches
Laminate speed 1.9 m/min
Speed conversion method Digital panel, variable type
Laminate temperature Room temperature
Thickness adjustment
Automatically adjustment
Laminator processing: 60μ•160μ•250μ• 400μ• 800μ
Panel processing : 1.2mm · 1.7mm · 2.3mm · 3mm · 5mm· 8mm
Maximum power consumption AC 100V~240V 100W
Dimensions
(width × length × height)
1838 × 591 × 1196 (mm)
Weight 137 kg
※ Specifications may be changed without notice for improvements.
Contact
Product Specifications
LAMI CORPORATION INC.
81-6-6453-1871
 Loading...