


Page 1
Two- and three-step controller
with hot water support
OPERATING
MANUAL

Page 2
In
dex of
c
ontents
Index of contents
1. What is your new heating controller able to do?......................................................................................2
2. Use as intended .......................................................................................................................................3
3. Safety advices..........................................................................................................................................3
4. Warranty and liability................................................................................................................................3
5. Location of the manuals...........................................................................................................................3
6. The most important features at a glance .................................................................................................4
7. Your heating controller is structured like this ...........................................................................................4
8. Submenu setpoint values.........................................................................................................................6
9. Submenu operating modes......................................................................................................................7
10. Manual change temperature level heating...............................................................................................8
11. Manual hot water loading.........................................................................................................................9
12. Submenu information...............................................................................................................................9
13. Submenu switching times ......................................................................................................................10
14. Submenu time and calendar..................................................................................................................11
15. Submenu relay test ................................................................................................................................11
16. Analog remote control FW-D (optional) .................................................................................................12
17. Digital remote control DFW HZR (optional) ...........................................................................................12
18. DCF radio clock (optional) .....................................................................................................................13
19. Maintenance...........................................................................................................................................13
20. Errors .....................................................................................................................................................13
1. What is your new heating controller able to do?
Your heating controller makes sure, that your home will become even more comfortable. You can define your
individual comfort-temperature for any time. You can exactly control the room temperature and the temperature of your hot water, as you like it. That means: maximum comfort, maximum economy and maximum
environmental protection!
Regardless if you want to control one or two heating circuits or if you want to control the hot water support as
well: your heating specialist chooses the suitable configuration for you. In the commissioning manual he finds
all possible configurations to adjust your heating controller to your building situation in an optimal way.
Attention!
Only use the heating controller after you have read this operating manual! It is absolutely necessary
!
to make yourself familiar with the complete content. If you have any queries or further questions of
handling the controller, please contact the heating specialist or the expert company nearby.
1.1. Two types of the heating controller are available................................................................................3
7.1. The display..........................................................................................................................................4
7.2. Basic information about the menu navigation.....................................................................................5
7.3. Move to a submenu.............................................................................................................................5
7.4. Navigation in a submenu.....................................................................................................................5
7.5. Change of a setpoint value .................................................................................................................5
7.6. Leave a submenu................................................................................................................................5

What is your new
heating
controller
able to do
1.1. Two types of the heating controller are available
LATHERM HZR COMFORT (HZR-C): 8 configurations and 6 relays – for maximum adjustment and regula-
LATHERM HZR EXTENSION CON-
TROLLER (HZR-E):
2. Use as intended
The controller is intended for weather or room-controlled regulation of heaters including hot water support.
Another application is not permissible and is considered as inappropriate. The heating controller corresponds
to the state of the art and the appropriate safety regulations of the Guidelines on Electromagnetic Conformity
(2004/108/EG), the Low Voltage Directive (2006/95/EG) and the harmonized standards DIN EN 60730-1 and
DIN EN 60730-2-9.
The heating controller may only be installed and operated in:
3. Safety advices
Danger to life due to electric shock!
Only trained, competent and authorised persons (electrical technician according to DIN VDE 1000-10
and BGV A3) are allowed to do mounting, electrical installation and commissioning, maintenance and
repair work on the heating controller!
Attention!
4. Warranty and liability
All regulations about warranty and liability are defined in the general terms and conditions of the manufacturer
or in the particular contractual relationship. Warranty and liability claims are generally excluded in these cases:
5. Location of the manuals
The operating and the commissioning manual have to be handed out to the technician before mounting work is
started. They have to be stored in readable condition near to the controller in order to ensure quick access if
needed.
tion comfort.
Up to 7 extension controllers can be connected by eBus to your
heating controller. So you can control up to 8 heating circuits comfortably.
dry, not explosive surrounding areas
closed rooms
rooms with a temperature between 0 °C and + 50 °C
Never bring easily inflammable materials near to the controller!
Protect the controller against humidity, coldness, heat, dust and strong sunlight!
The controller may be damaged, even if it falls down of a low height!
The controller is only allowed to be operated in perfect technical condition. Damages, that affect
safety or the proper functioning of the controller, have to be removed at once from competent and
authorised persons!
if damages result of inappropriate use of the heating controller
if the housing had been opened unauthorised, unauthorised structural modifications or adjustments on the
controller software had been implemented
if the electrical technician had executed mounting or repair work improperly
if safety advices or instructions of the operating or the commissioning manual had been ignored
DANGER
!
Page 3

Page 4
want
Temperature source
(
here
boiler)
Type of heating circu
i
t (here
+
+
OK
esc
Auto
esc
The most important features at a glance
6. The most important features at a glance
You want: Press: On the display appears:
… to change the heating temperature during
daytime (see submenu setpoint values, chapter
… from the starting display one
time the key
8)
… to start your heating one hour earlier in the
morning (see submenu switching times, chap-
… from the starting display four
times the key
ter 13)
… to run your heating in minimal mode during
your holidays (see submenu operating modes,
chapter 9)
… to run your heating independent from switch-
ing times, e.g. if you celebrate a party and
… from the starting display one
time the key
… from the starting display one
time the key
to prevent, that the heating switches off at night
(see submenu manual change of the temperature level, chapter 10)
… to load the hot water storage tank one time,
independent from the switching times (see
… from the starting display two
times the key
submenu manual hot water-load, chapter 11)
7. Your heating controller is structured like this
7.1. The display
Adjustments see chapter 8
Adjustments see chapter 13
Adjustments see chapter 9
Adjustments see chapter 10
Adjustments see chapter 11
AE
CH
Auto
Your heating controller has a clearly arranged display, which indicates information about your heating (e.g.
actual temperatures) and which helps you to adjust values. The starting display appears, when the controller is
properly activated and in operation. This is the basic structure of the starting display (if you or your heating
specialist have chosen other adjustments, different symbols may partly appear):
Temperature
Adjust value
Heating circuit level (here day)
mixer heating circuit)
Day
Possible operating modes
Operating mode indicator
Burner information
Clock
Hot water circuit information
.
esc +
OK
OK
esc
+
OK
+
+
OK
+
OK esc
esc
Your heating
controller
is structured like this
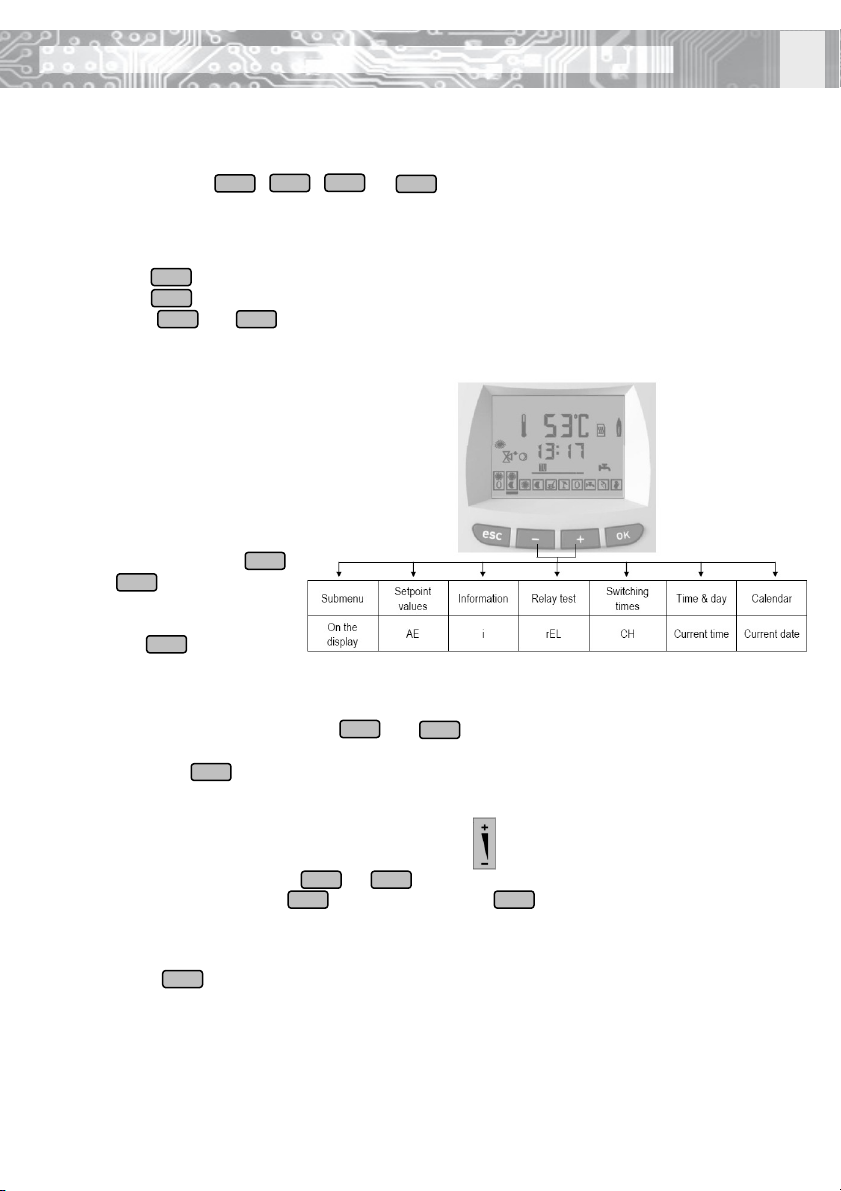
7.2. Basic information about the menu navigation
With these four keys , , and you can easily reach every menu point. With the keys
you can get from the starting menu (an example is shown on the previous page) into every submenu to adjust
several values.
Basically:
7.3. Move to a submenu
Move to a submenu to:
This is how it´s done:
7.4. Navigation in a submenu
7.5. Change of a setpoint value
Adjusted values can be changed, when this symbol appears:
7.6. Leave a submenu
With the key you can return to the main menu from every point without saving a change. When no key
is pressed for 5 minutes, the starting display is automatically reset.
--
the key acknowledges your choice (move to submenu, save a changed value)
the key deletes your choice (leave a submenu, delete an entered value)
the keys and scroll in the menus and change values
--
adjust setpoint values
information display (actual values of temperatures)
relay test (only for the heating specialist)
adjust switching times
adjust time, weekday and date
coming from the starting
display press the keys
--
or until the desired
submenu is displayed
acknowledge your choice with
the key
in a submenu navigate with the keys and until the desired value is displayed (you will find
--
the description to the different values in the following chapters)
press the key to change a value or to acknowledge a choice
change the value with the keys or
adjust the value with the key or delete it with the key
--
Page 5
 Loading...