

Page 1
TECHNICAL MANUAL
WATER PURIFIER
RO400C
RO400C :
RO400CI020 : - With 20L storage tank
RO400CC060 : - With 60L storage tank
RO400CC075 : - With 75L storage tank
RO400CC120 : - With 120L storage tank
RO400CC150 : - With 150L storage tank
Page 2

Manuel Technique OsmsoeurRO400C Version 3 Page 2 / 26
Contents
GENERAL VIEW OF THE APPLIANCE................. ERRORE. IL SEGNALIBRO NON È DEFINITO.
TECHNICAL DATA..................................................... ERRORE. IL SEGNALIBRO NON È DEFINITO.
THANKS......................................................................... ERRORE. IL SEGNALIBRO NON È DEFINITO.
TECHNICAL IMPOSSIBILITIES.......................... ERRORE. IL SEGNALIBRO NON È DEFINITO.
APPLICATION LIMITS IN GLASS WASHINGERRORE. IL SEGNALIBRO NON È DEFINITO.
UNPACKING.................................................................. ERRORE. IL SEGNALIBRO NON È DEFINITO.
CONNECTION.............................................................. ERRORE. IL SEGNALIBRO NON È DEFINITO.
STORAGE TANK CONNECTION ........................... ERRORE. IL SEGNALIBRO NON È DEFINITO.
INSTALLATION / CALIBRATION...................... ERRORE. IL SEGNALIBRO NON È DEFINITO.
MAINTENANCE .......................................................... ERRORE. IL SEGNALIBRO NON È DEFINITO.
TO CLEAN THE GRID................................................ ERRORE. IL SEGNALIBRO NON È DEFINITO.
REPLACING THE FILTERS ...................................... ERRORE. IL SEGNALIBRO NON È DEFINITO.
DESCALING ...............................................................................................................................................................13
PREPARING THE WATER PURIFIER TO STORAGE AND PROTECTING IT AGAINST FREEZING ............15
TROUBLE-SHOOTING TABLE............................................................................................................................16
CONTROL FUNCTIONS ........................................... ERRORE. IL SEGNALIBRO NON È DEFINITO.
TECHNICAL INFORMATION..............................................................................................................................19
PRESSURE SWITCHES RE-INITIALISATION...........................................................................................21
WIRING DIAGRAM.................................................... ERRORE. IL SEGNALIBRO NON È DEFINITO.
EXPLODED VIEW – SPARE PARTS ....................... ERRORE. IL SEGNALIBRO NON È DEFINITO.
DECLARATION OF CONFORMITY ........................................................................................................... 26
General view of the appliance
Page 3

Manuel Technique OsmsoeurRO400C Version 3 Page 3 / 26
Arrivée eau froide = Cold water inlet
Vidange = Drain
Eau traitée = purified water
1. Water purifier RO400C
2. Power cord 230V - 50 Hz
3. Flexible hose for feed water
4. Bracket for drain hose
5. Drain hose
6. 1/4 turn valve
7. Purified water hose
8. Non return valve*
9. T *
10. Storage tank *
11. Machine flexible feed hose
* Only when the water purifier RO400C is used with a storage tank (optional).
The storage tank in the picture is a 20L stainless steel tank. It’s available also 60L, 75L, 120L and 150L (coupled).
Page 4

Manuel Technique OsmsoeurRO400C Version 3 Page 4 / 26
Technical data
Size Height 466 mm
Depht 460 mm
Width 225 mm
Weight 29 kg when supplied
33kg when filled with water
Capacity (water temp. 15°C) 3,1 (+0,4) litres/minute
Total water consumption the double of produced water
Electrical supply 230V, 50Hz, 10A, earthed socket
Total power consumption 530 W
Max. continuous functioning period 24h/24
Sound level < 60 dB (A)
Environmental specifications
- air temperature 2 - 43 °C
- relative humidity 25 - 95 %
Water hardness Maximum 20 °TH – beyond this, provide a water softener
REQUIREMENTS REGARDING FEED WATER TO THE WATER PURIFIER
Inlet Pressure 200 – 1 000kPA (2 – 10 bars)
Capacity 600 l/hour
Temperature 2 à 25 °C
Max. conductivity 2 000 µS/cm
Salt < 1 500 mg/l
Chlorine < 900 mg/l
Turbidity < 1 NFU PH 4 - 10
Calcium : Ca2 + / Magnesium : Mg2 + < 140 mg/l *
Hardness : CACO3 < 200 mg/l *
Iron : Fe2 + < 5 mg/l *
Iron : Fe3 + < 0,3 mg/l *
Manganese : Mn < 0,8 mg/l *
COD-Mn : O2 < 10 mg/l
Heterotrophic Bacteria < 1 000/ml
Coliform Bacteria < 1 000/100 ml
Colibacillus (Escherichia coli) < 100/ 100 ml
* With higher values, it’s necessary a pre-treatment.
Page 5

Manuel Technique OsmsoeurRO400C Version 3 Page 5 / 26
Thanks
Lamber thanks you for the confidence you have shown by buying one of its products.
Your water purifier is conceived to have a long life.
You will find into this manual all necessary information concerning installation, start, functioning, maintenance and repair
of the appliance.
Technical impossibilities
Ø You have to connect the appliance to cold water from 2 to 25°C max.
Ø Water hardness : 20° TH max. – Above 20° TH it is necessary to install a water softener.
Regulate water outlet at 0° TH
Ø Water purifier’s feed water pressure with a capacity of 600 l/h minimum :
2 dynamic bars minimum
10 static bars maximum
Ø Maximum conductivity of the water that you want to treat: 2000 µS/cm.
Ø Ambient temperature of the room: 43°C maximum.
Ø Do not make the distribution line where the purified water exits by copper or galvanized steel, but only by PVC or
stainless steel.
Application limits in glass washing
Ø Champagne flûtes , beer glasses :
The absence of mineral deposits on the glasses prevents bubbles formation and foam stabilisation (possible solution:
use of pre-scored glasses or use of a diamond-point pencil, code SPDCTA, to score the glasses).
Ø Particular drying case:
Rinsing with demineralized water (so with almost complete absence of surface-active product) produces a less good
drying result than with a non-treated water. So it is recommendable to think about a place and a time for baskets
storage. This place for storage of glass baskets should be well ventilated, so to have a good drying for evaporation
Ø Detergents and surface-active products:
Manual dosing is not compatible.
Only a proportional dosing with products suited for purified water is effective.
Tests for dosing should be carried out whatsoever is possible together with the supplier of detergents and rinse aid
additives.
Page 6
Manuel Technique OsmsoeurRO400C Version 3 Page 6 / 26
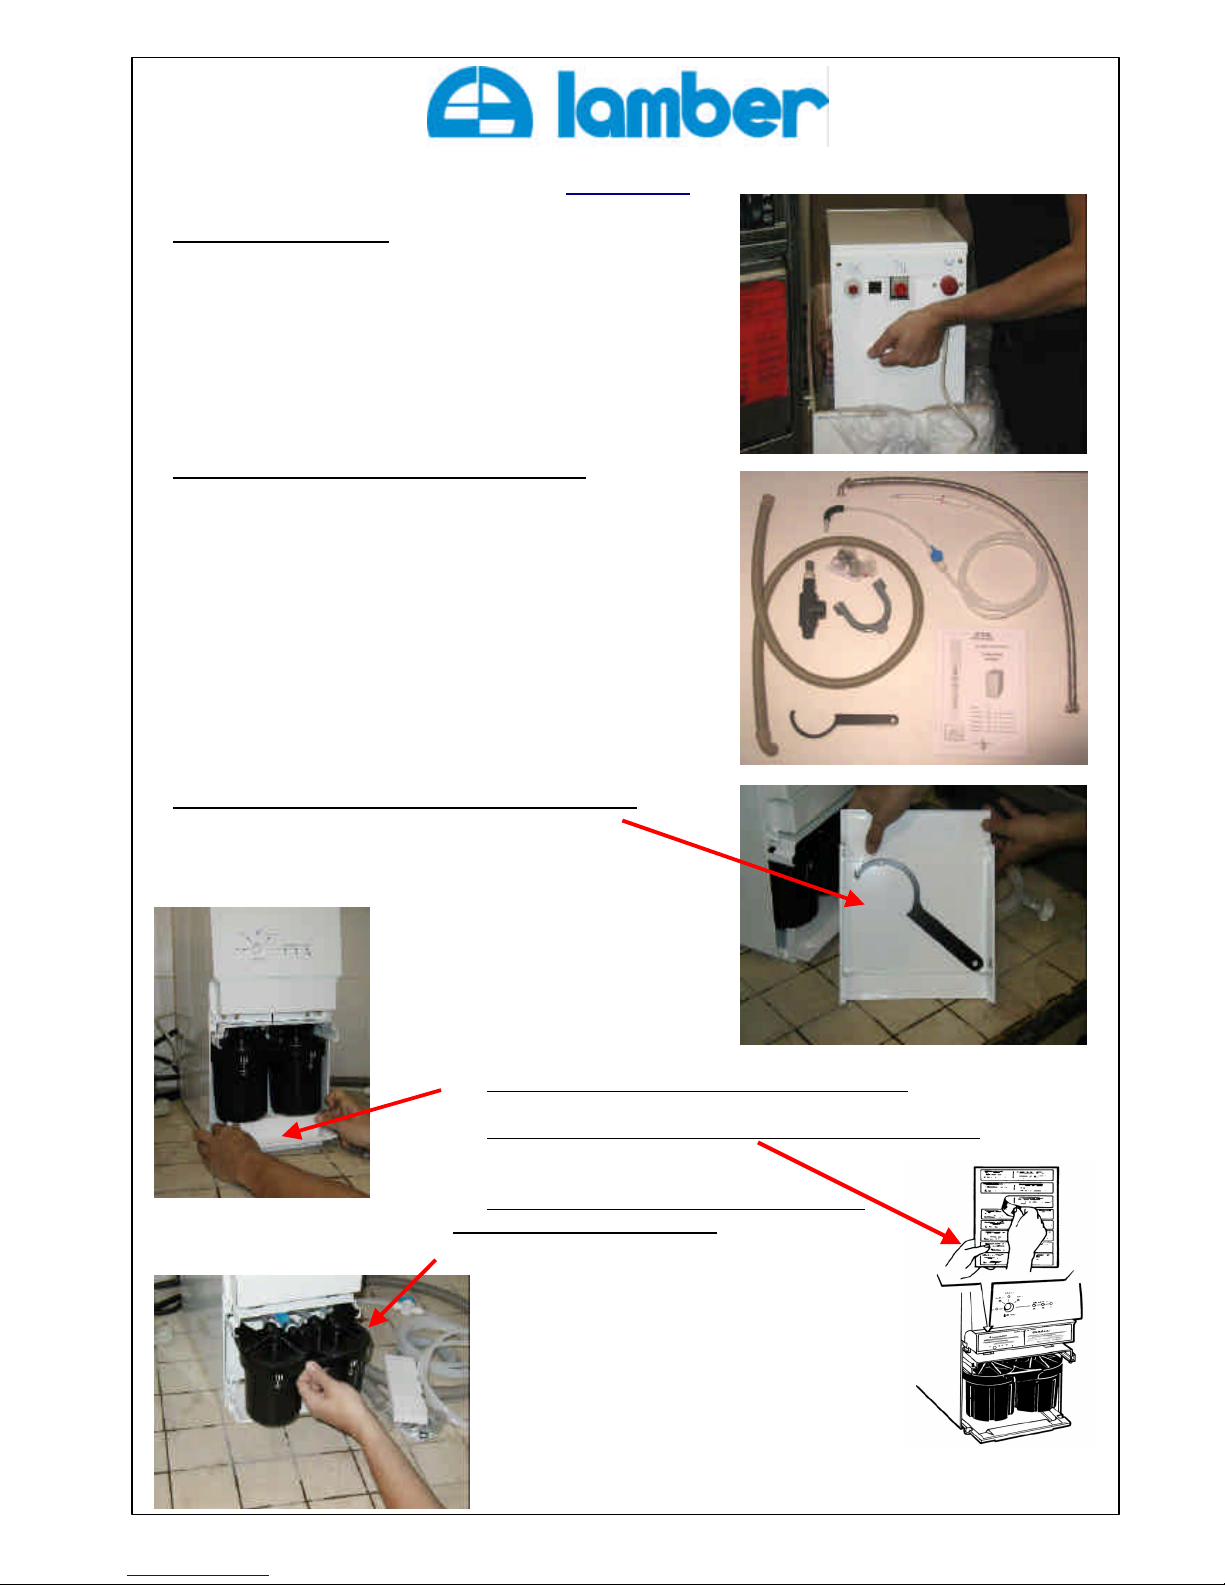
Unpacking
1. Unpack the water purifier
- open the box
- recover the accessories box
- lift out the RO400C by taking it hold from the hand-grip.
2. Open the accessories box and check the equipment
- the technical manual you are reading
- 1 drain hose + bracket
- 1 cold water inlet flexible hose F/FC 20/27 L = 1 m
- 1 purified water hose with non-return valve* and ¼
turn valve
- 1 T for storage tank connection*
- 1 bag with accessories (Union F15/21-M20/27 with
O-ring, drain hose clamp, plastic inserts)
- 1 spanner for filters disassembly.
* Only if RO400C is coupled with a storage tank.
3. Open the lower front cover and place there the spanner.
4. Remove the polyester protection below the filters.
5. Apply the self-adhesive information label to the front part
6. Make the filters slide ahead, then push them
again back till hearing a “click”.
Make sure that nothing obstructs the movement.
Page 7
Manuel Technique OsmsoeurRO400C Version 3 Page 7 / 26
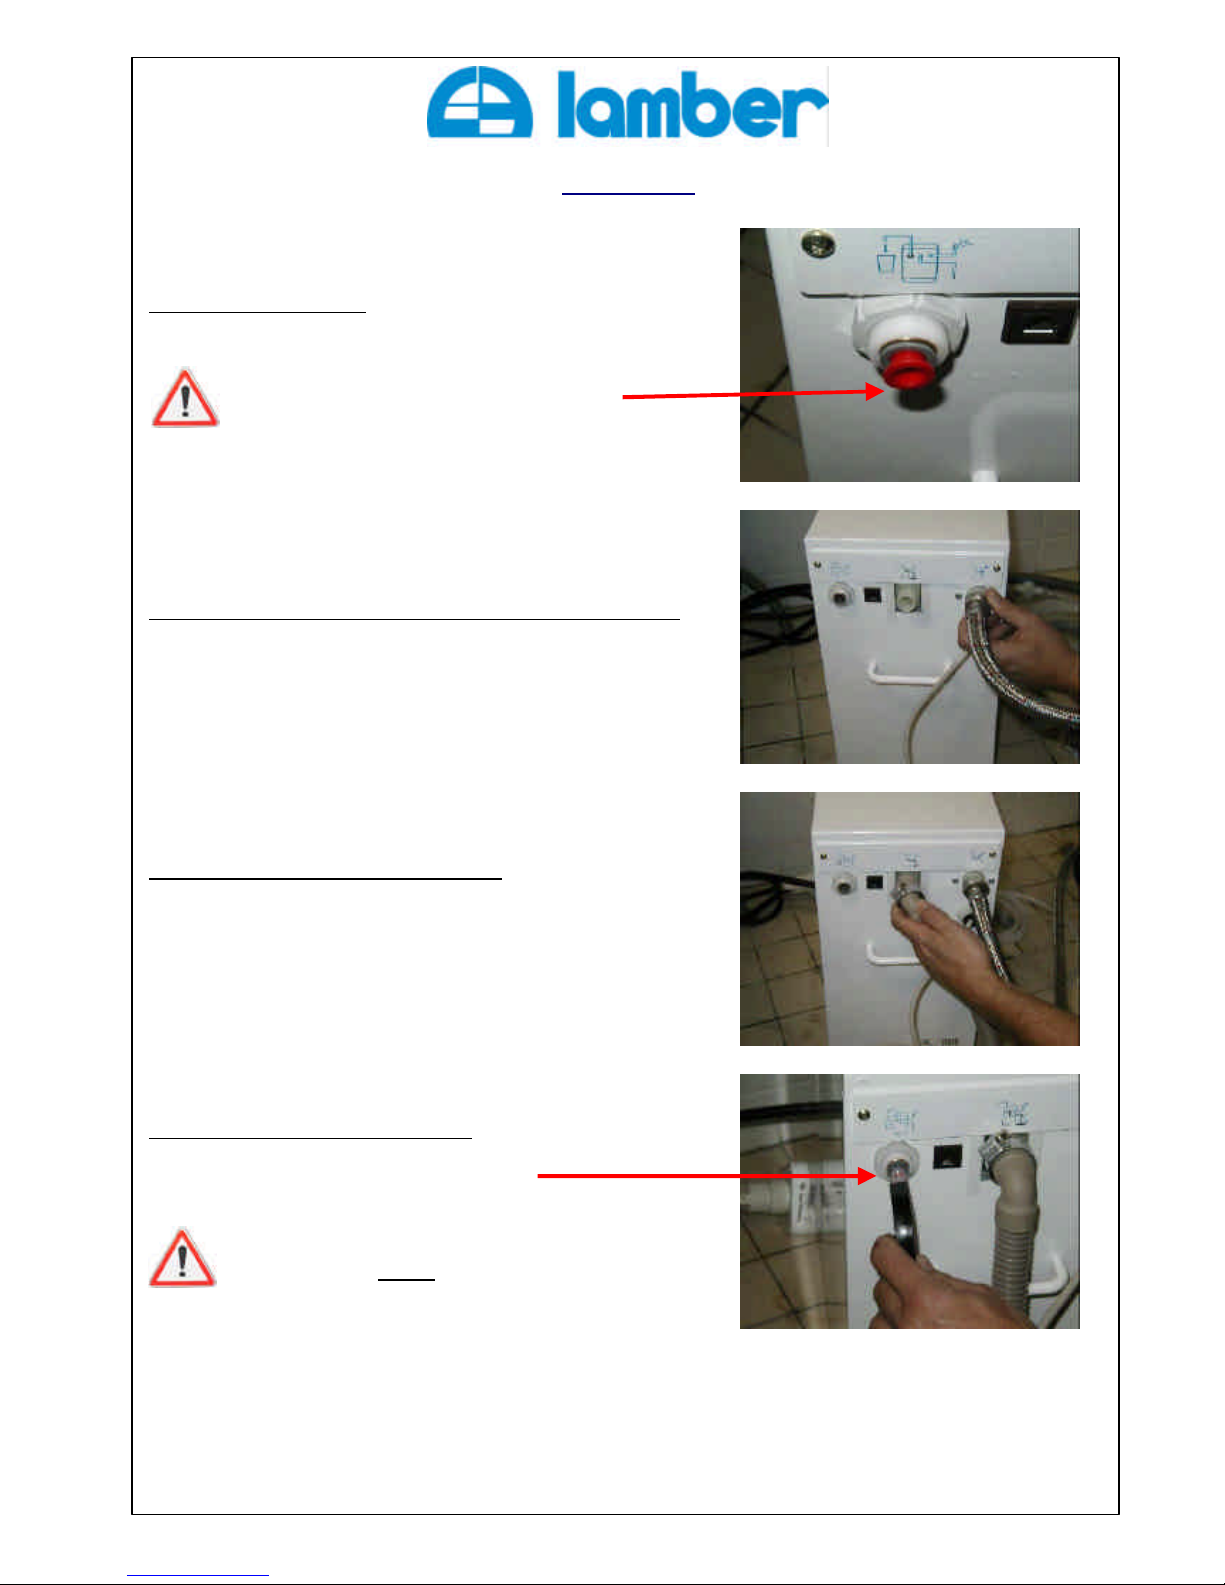
Connection
1. remove the 3 red plugs
ATTENTION : for the purified water outlet,
keep the grey ring pressed while you remove
the red plug.
2. Screw and tighten by hand the cold water inlet flexible hose
3. Place the drain hose by using the clamp
4. Push deeply the purified water hose
The red line has not to be seen anymore
ATTENTION :
Make sure the ¼ turn valve on the
hose is in position closed.
If you don’t use a storage tank, forget the page that follows….
Page 8

Manuel Technique OsmsoeurRO400C Version 3 Page 8 / 26
Storage tank connection
The explanation is here provided with a 20L stainless steel storage tank.
The assembly is the same for all models.
1. Screw the T with teflon on the outlet hose
2. Connect the flexible machine feed hose on the T.
Ø Pressure tanks create a purified water stock always available and assure an optimal preservation
of the purified water quality, safe from ambient air.
Ø The internal membrane ( pre-charged at 2,5 Bar) allows to return the under pressure stocked
water directly, without booster pump
Ø They allow the RO400C to function on longer and less frequent cycles, so to have a water and
energy economy, a longer life of the parts that wear down and a better quality water.
Page 9

Manuel Technique OsmsoeurRO400C Version 3 Page 9 / 26
Installation
Attention :
- Do not connect to electrical supply,
- Make sure the ¼ turn valve is closed,
- Do not carry out any connection on the appliance’s inlet or
on the storage tank.
1. Open the feed water supply, the water purifier
is under hydraulic pressure.
2. Connect it to electrical supply.
3. The water purifier, after a LED test, will flush
(about 30 sec.).
FLUSHING
The flushing operation should be carried out in the following cases:
• the first time RO400C is used ;
• put back on working after storage ;
• after a descaling ;
• after replacing the membrane;
4. When the flushing finishes, disconnect and then
connect the water purifier to electrical supply.
RO400C flushes again for 30 sec.
5. Repeat twice the previous operation to carry out
3 flushing cycles in all.
The water purifier stands-by when green ON/OFF led is lighted up.
CALIBRATION
Calibration of water purifier should only be carried out :
• the first time the RO400C is used;
• if the appliance is moved to a different place (so different inlet water);
• After the membrane has been replaced.
6. Direct the purified water hose to a drain.
Open the purified water valve and within 10 seconds press
“Calibration” button and keep it pressed till “Purification Level”
lights I and II light up and then go out.
After having released the button, the water purifier products
water without any indication of the purification level; this is the
calibration.
7. Let the water flow till when the green «purification level III » light
lights up.
This takes about 10 minutes.
8. When the green «level III » light lights up, close the purified water valve, a
flushing operation will start.
The flushing duration is 1/10 of the water suction time.
3x
Purge
10 mn
Open the purified
water valve.
Hose direct to a
drain
Page 10

Manuel Technique OsmsoeurRO400C Version 3 Page 10 / 26
Installation (continuation)
Test
9. Open the ¼ turn valve of the purified water hose.
10. Check the following lighting up of the lights I, II and III. Phase II is very short.
11. Close the purified water valve.
12. Check the flushing that should last 1/10 of the water suction time.
Check of the water quality
13. Rinse a container and the conductivity meter with purified water while light III is lighted up.
You can buy a conductivity meter by your supplier, Code CORO400C
The measured value must be lower than 50 µS.
Connection during the installation
14a. Without storage tank
Connect the purified water hose to the flexible machine feed
hose by using if necessary the union F15/21-M20/27 (that you can
find inside the accessories bag).
14b. With storage tank
Connect the purified water hose to
the T of the storage tank.
15. Open the ¼ turn valve on the purified water hose.
With a storage tank:
• At the opening of the ¼ turn valve, the storage tank fills itself till a
pressure of 4,5 Bar.
• On duty, RO400C starts functioning when the pressure in the storage tank
goes under 3 Bar.
The end. The water purifier is ready to start working.
Page 11

Manuel Technique OsmsoeurRO400C Version 3 Page 11 / 26
Maintenance
Even if everything has been conceived so that to be forgotten, your water purifier requires a minimal care.
Here is the regular maintenance that RO400C requires so to produce a high quality water:
Information below concern a water purifier that is fed with softened water.
Ø To clean the grid : At every filter replacing (1 or 2).
Ø To replace filter 1 : At least every 6 months or when the water purifier requires it (see “Trouble-
shooting table”).
Ø To replace filter 2 : At least every 6 months, or every 2000 functioning hours, or when the water
purifier requires it (see “Trouble-shooting table”).
Ø Preventive descaling : Every time you replace filter 2.
Ø Curative descaling : If the purified water’s capacity decreases till being half of the original
capacity, even if the preventive descaling has been regularly carried out.
Ø To replace the membrane : If the purified water’s capacity decreases till being half of the original
capacity, even if the curative descaling has been regularly carried out.
Qualified technician only.
Ø Preparation to storage and protection against freezing: If the water purifier will not be used for a long time
(for ex. annual closing). To repeat it every 9 months in case of long non-use.
To clean the grid
The grid ( a coarse filter) is conceived to intercept large particles; it’s located inside the union where you connect the
RO400C’s feed water hose. If the LEDs on the control panel show that the intake pressure is too low, the reason may be
that the grid is clogged.
1. Disconect the appliance from the electrical supply.
2. Unscrew the flexible feed water hose, on the back of the
appliance.
3. Use suitable pliers to grip and remove the grid (picture A).
4. Clean the grid. Then put it back inside the connector.
5. Reconnect the feed water hose to the appliance.
6. Connect the RO400C to the electrical supply.
The water purifier will flush automatically.
Page 12

Manuel Technique OsmsoeurRO400C Version 3 Page 12 / 26
Replacing the filters
Replace the filters when the water purifier requires it (see diagnostic section) and at least once
every 6 months.
1. Disconnect the electrical plug.
2. Pull the filters containers support outwards as far as they will come.
3. Use the filter spanner to unscrew the container of the filter to replace. Bear in mind the container will be full
of water, so hold with the other hand the group to avoid some water to spill.
4. Dry the base under the filters to avoid the flow-stop.
5. Clean the filter container and replace the filter, with label I or II pointing upwards.
6. Make sure the sealing ring is in place in the grooves of the filter container.
7. Refit and tighten the container by hand ; the dot should be between the 2 white lines.
8. Slide the filter containers back into the appliance.
9. Close the front cover and reconnect the electrical plug. Flushing will take place.
Attention : After filter II replacing, you have to reset the water purifier.
The water purifier should be under hydraulic pressure and connected to the electrical
supply and it should not be producing purified water or flushing.
Then press « Calibration » button and keep it pressed until the indicator light for filter
II has gone out (about 5 seconds).
9 8 7 5 4 2 1 3
Page 13

Manuel Technique OsmsoeurRO400C Version 3 Page 13 / 26
Frequency of descaling
Hardness Frequency
< 7 °TH Every 6 months
< 14 °TH Every 3 months
< 20 °TH
Every month
Descaling
In time, the substances which RO400C removes from the water tend to clog the membrane and so to reduce the flow of
pure water.
To prolong the life of the membrane, it has to be descaled (preventive
descaling) periodically. The frequency of preventive descalings depends mainly
on feed water’s hardness.
If a preventive descaling is not enough to restore the original flow of purified
water, it would be better to do a curative descaling.
The correct descaling product for RO400C can be ordered from your dealer. Item : OSMONET
Preventive descaling (about 30 min.)
1. Disconnect the electrical plug. Remove the filters and refit the empty containers.
2. In a bucket mix 200gr of OSMONET with 2,5 litres of lukewarm water. Stir until the powder has dissolved.
3. Disconnect the flexible feed hose, the drain hose and the purified water hose and insert them in the bucket.
4. Connect again the electrical plug. The appliance will flush.
5. Disconnect the electrical plug after 30 seconds or after putting under safety of the water purifier (luck of
pressure)
6. Wait for 2 minutes. The descaling product operate.
7. Repeat 3 times points 4, 5 and 6.
8. Refit the filters and wash the nuts of the flexible feed hose. Reconnect flexible feed hose and drain hose.
9. Repeat 2 times operations 4 and 5 to rinse the water purifier.
10. Wash and reconnect the purified water hose and then reconnect the electrical plug. The water purifier is
ready again to work.
1
3 8
10
3x
4
5 6 9
2x
2
Page 14

Manuel Technique OsmsoeurRO400C Version 3 Page 14 / 26
Curative descaling (about 10 hours)
If a preventive descaling is not enough to restore the original flow of purified water, it’s necessary to do a curative
descaling.
This operation is the last way you have before having to replace the membrane.
Depending on the membrane’s state, the nominal flow won’t be systematically restored (clogged membrane) or (worn
membrane).
1. Shut off the tap for purified water.
2. Disconnect the hose for purified water from the appliance (disconnect before the non-return valve if a storage
tank is installed).
3. Disconnect the electrical plug and then plug it back again to make the appliance switch to flushing mode.
4. Let the water purifier flush.
5. Unscrew the container of filter II as described under “Replacing the filters”.
6. Put 200gr of OSMONET (the descaling agent) into the container. Fill the container almost to the top with
lukewarm water ( 20° to 40°C). Stir until the powder has dissolved (picture A).
7. Screw the container (filled with the descaling solution) into place with the aid of the filters spanner.
8. Open the tap for purified water and let RO400C operate for 45 seconds.
9. While the tap is still open, disconnect the electrical plug. Then close the tap. Don’t touch the water purifier for
10 hours ( for example during the night).
10. At the end of the 10, unscrew the container. Discards its content and rinse it with water.
11. Put a filter II in the container; refit and tighten the container by hand.
12. Connect the electrical plug and let the water purifier finish the flushing operation.
13. Open the tap for purified water and let the water flow for 10 minutes. Then close the tap. The water purifier
flushes for some minutes.
14. Connect the hose for purified water to the appliance ( or the non-return valve if a storage tank is installed).
Page 15

Manuel Technique OsmsoeurRO400C Version 3 Page 15 / 26
Preparing the water purifier for storage and protecting it against
freezing
If you should not use the water purifier for a period longer than 4 months or if it has to be disconnected from water and
electrical supplies for many days, it should be filled with a special product that will keep it in good state.
1. Make sure that the tap is closed and the water purifier is
not flushing.
2. Close the cock on the water supply pipe. Disconnect the
electrical plug, the flexible feed water hose and the
drain hose.
3. Unscrew both filter containers. Remove the 2 filters and
discard them ( they should not be kept for re-use!).
Empty the water from the containers.
4. Reinstall the empty filter containers back in their places.
Make sure that each sealing ring is in place in the groove
on the top edge of each container.
5. In a bucket, mix 2 litres of Preservative Liquid (Code
LCRO400C) with 2 litres water.
6. Put the end of the 2 hoses (feed and drain) into the bucket. Make sure that the end of the feed water hose
remains beneath the surface throughout the operation (picture C).
7. Connect the electrical plug again. RO400C will now automatically pump the mixture inside the appliance. Let the
water purifier suck for 40 seconds, then disconnect the electrical plug. Repeat twice this step.
8. If some mixture remains in the bucket, you can throw it in the wash basin.
RO400C is now ready for storage, for up to nine months.
When the water purifier is to be brought back into use, you must:
• work through all the steps of the full « Flushing » procedure, to remove the preservative liquid.
• install new filters (filter I and filter II).
Page 16

Manuel Technique OsmsoeurRO400C Version 3 Page 16 / 26
Trouble shooting table
light off light on light flashing
Symptoms Possible cause Action to take
Automatic restart
After 3 attempts of automatic restart
(3 min., 20 min., 4 hours), if the
pressure is always too low, the alert
mode will take place.
Waiting for 1st restart (3 min)
LED of Filter 1: short flash / LED stop : long flash
Waiting for 2° restart (20 min)
Flash of Filter 1 LED = LED Flash stop
Waiting for 3° restart (4 hours)
LED of Filter 1 : long flash / LED stop : short flash
Press « Calibration » button to immediately start.
Too low pressure
• Check and increase the feed pressure :
min. 2 Bar - max. 10 Bar
Filter 1 or 2
• Clean the filter containers
• If necessary, replace filter I or II
Clogged grid • Clean the grid
or
before May 2007 :
Activated Aquastop
•
Check that all connections are watertight
• Dry the water inside the base (tilt the purifier
forward if necessary)
Filter 1 / grid • Replace filter 1 and clean the grid
The feed water’s pressure is too low
(lower than 2 Bar)
• Check and increase the feed pressure :
min. 2 Bar - max. 10 Bar
Filtre 2 needs replacing • Replace filter 2.
Reduced water quality
• If the appliance is new and it has never been
calibrated: calibrate the water purifier
• Restart the water purifier (by disconnecting and
then reconnecting the electrical plug) so that the
appliance starts the flushing mode. Repeat the
operation 3 times.
The calibration has not be completed
(probably because the tap has been
closed before the full 10 minutes).
• Restart the appliance by disconnecting and then
reconnecting the electrical plug so to start a
flushing mode.
• AND recalibrate the water purifier.
Conductivity meter
Error in the conductivity meter
• Restart the appliance by disconnecting and then
reconnecting the electrical plug so to start a
flushing mode. Wait for 2 hours. Open the tap and
let the water flow for 2 minutes.
Page 17

Manuel Technique OsmsoeurRO400C Version 3 Page 17 / 26
Trouble shooting table (continuation)
Symptoms Possible cause Action to take
Low water flow Clogged membrane • Descale the membrane. See « Descaling ».
The water purifier
starts working on its
own (briefly, with
closed tap)
Leakage (even very little) between
RO400C and the hoses.
• Check all connections.
The flow of water
from the appliance
is uneven or jerky.
If the temperatur
e is higher than
30°C, the rate of flow will increase to
much.
• Check the water temperature, that should be
lower than 25 °C.
Absence of bubbles
in glasses with fizzy
drinks
The absence of mineral deposits on
the glasses prevents the bubbles. A
little score in the bottom of the
glass is enough to have again the
bubbles.
• Use of pre-scored glasses
• Use of a diamond-
point pencil, code SPDCTA,
to score the glasses.
Bad drying
Rinsing with demineralized water (so
with almost complete absence of
surface-active product) produces a
less good drying result than with a
non-treated water.
• Think about a place and a time for baskets
storage
• The place for storage of glass baskets
should be well ventilated, so to have a good
drying for evaporation
Spots on glasses
Not correct dosing of detergents
and/or rinse aid additives.
Purified water needs less products
for the same action.
• Manual dosing is not compatible.
• Only a proportional dosing with products
suited for purified water is effective.
• Tests for dosing should be carried out
whatsoever is possible with the supplier of
detergents and rinse aid additives.
If the water purifier has shut down automatically, it will have to be restarted by disconnecting and then reconnecting
the electricity.
Page 18

Manuel Technique OsmsoeurRO400C Version 3 Page 18 / 26
Control functions
The water purifier is equipped with some control functions to facilitate the diagnostic in case of trouble.
Displaying of the functioning times
Close the tap for purified water – Press for 3 sec. “Calibration” – Release for 1 sec. – Press again “Calibration” for 1 sec.
The water purifier cannot show a
number of functioning hours lower than
10 hours
Displaying of shutdowns for too low pressure
When the 3 LEDs have switched off at the end of displaying of the
functioning times, press for 1 sec. “Calibration” button.
1 flash = 1 shutdown
Count how many times the LED flashes (max. 255)
Reset the meters to zero
Reset also to zero the meter for the
replacing f filter 2.
•
Press and keep pressed
"Calibration"
button
,
• The diode for filter 2 lights up
, goes out and
then lights up again,
• Release the button.
Page 19

Manuel Technique OsmsoeurRO400C Version 3 Page 19 / 26
S
ituation of the main parts
See the exploded view for more details
1. Membrane
2. High pressure pump
3. Pressure regulator
4. Inlet solenoid valve
5. Drain solenoid valve (flush)
6. Purified water outlet
7. Outlet pressure switch
8. Pressure switch for purified water
9. Conductivity meter
10. Motor
11. PCB board
12. Support for filters
13. Filter 2 – Carbon
14. Filter 1 – Particles
15. Containers
Technical information
Hydraulic circulation
diagram
- Pressostat sortie = Outlet pressure switch
- Pressostat entrée = Inlet pressure switch
- Electrovanne de vidange = Drain
solenoid valve (flush)
- Vidange = Drain
- Electrovanne entrée=Inlet solenoid valve
- Entrée = Inlet
- Sortie eau osmosée=Purified water outlet
- Clapet anti-retour eau osmosée = Non
return valve for purified water
- Régulateur pression = Pressure regulat or
- Pompe haute pression = High pressure
pump
- Préfiltre 1 (particules) = Filter 1
(particles)
- Préfiltre 2 ( charbon) = Filter 2 (carbon)
Page 20

Manuel Technique OsmsoeurRO400C Version 3 Page 20 / 26
Technical information (continuation)
Top and cover disassembling:
1. Unscrew the 2 screws in the upper and back side of RO400C
2. Lift and pull the top.
3. Unscrew the 2 screws in the upper part of the filter compartment
4. Unscrew the 2 screws in the upper and back side of the cover
5. Remove the cover.
PCB board
Anti-trouble filter
Access to Aquastop :
1. Disconnect the 2 hoses that come from the unit
2. Pull the filters containers support outwards, release the 2 limit stops by
pressing them down.
3. Unscrew the 4 screws on the bottom and the 2 screws under the PCB board ;
then remove the plate on the low part of the filter compartment.
Aquastop switch
Page 21

Manuel Technique OsmsoeurRO400C Version 3 Page 21 / 26
Pressure switches re-initialisation
After a PCB board replacing or after a configuration loss or also after a membrane replacing, it could be necessary to
recalibrate the pressure switches’ parameters.
SYMPTOMS :
- The water purifier flushes normally, but it doesn’t start producing water when required.
Or :
- The water purifier goes on producing water without flushing.
Re-initilaisation of inlet pressure switches:
• Disconnect the electrical plug
• Wait for 60 seconds
• Connect again the electrical plug
Re-initialisation of outlet switches: this operation has nothing to do with calibration
• Disconnect RO400C from the electrical supply.
• Disconnect the hose for purified water and open the
¼ turn valve .
• Press « Calibration » button and keep it pressed.
• Connect again Ro400C to the electrical supply,
“Calibration” button is always kept pressed.
• Keep pressed « Calibration » button till when the red
light « Stop » appears.
• Release « Calibration » button and wait for 2 seconds.
• Disconnect RO400C from the electrical supply.
• Connect again the water purifier to the electrical
supply. RO400C tests all its diodes, then flushes
before producing water again.
• Connect again the hose for purified water.
60 s.
60 s.
Disconnect the hose for
purified water and open
the ¼ turn valve.
2
s.
Stop
Page 22

Manuel Technique OsmsoeurRO400C Version 3 Page 22 / 26
Wiring diagram
Page 23

Manuel Technique OsmsoeurRO400C Version 3 Page 23 / 26
Exploded view – Spare parts
Page 24

Manuel Technique OsmsoeurRO400C Version 3 Page 24 / 26
Exploded view – Spare parts (continuation)
Position
Description
Article n°
1
Support
2
Cushion
3
Driving belt
CPRO400C
3B
Dust p
rotection
4
Driving pulley for motor
5
Support for motor
6
Driving pulley for pump
6A
Insulation ring
6B
Protection for pump
6C
Circlips
7
Bracket
8
Drain solenoid valve
(flush)
EVVRO400C
9
Pressure switch
PRRO400C
10
Valve for pressure r
egulation
VRRO400C
11
T for connection
11A
Elbow for connection
12
Conductivity meter
CORO400C
13
Spacer
14
Hose
3/8" 2000 mm
15
Capacitor
CONDRO400
16
Union
17
Motor
230V
MORO400C
18
Sealing ring
11,3 x 2,4
20
Sealing ring
19,2 x 3,0
21
Membrane
Kit MOIRO400
22
Upper flange
22B
Turbine
23
Lower flange
24
Spring
25
Cup for covering
26
Inlet solenoid valve
EVARO400
27
Locking plate
28
Locking ring
29
Sealing ring
169,3 x 5,7
JTPRO400
30
Hose
31
Clamp
33
Insulation plat
e
34
PCB Board
PLRO400C
35
Filter 1 (Particle
) PF1RO400
36
Filters support with springs
KSPFRO400C
37
Sealing ring for filters container
83,0 x 3,0
JTPFRO400
38
Filter container
1507003
-
00/0
39
Filter 2 (Carbon
) PF2RO400
40
Hose
1/4" 2000 mm
41
S
traight union
1/4"
100
Spring (see
rep. 36)
RSPFRO400C
131
Control valve (outlet
)
132
Outlet union
RSRO400C
133
Nut
140
High pressure container
TPRO400C
150
Pump Kit
PORO400C
151
Plug
Page 25

Manuel Technique OsmsoeurRO400C Version 3 Page 25 / 26
Exploded view – Spare parts (continuation)
Position
Description
Article n°
1
Body
2
Handle
3
Cable clamp (Stuffing box)
3B
Protection
for power cord
4
Power cord
5
Top CSRO400C
5A
Sealing ring for top
JCSRO400C
6
Lead-through
8
Control panel
FPRO400C
10
Anti-trouble filter
12
Slide bar
13
Filters cover
PARO400C
14
Base
15
Plate
17
Float
18
Float housing
19
Micro switch
20
Protection for micro switch
21
Button
22
Terminal board
24
Filters spanner
CFRO400C
Position Description Article n°
Not in picture
Connection T for storage tank TRS26
Not in picture
1/4 turn valve VRC3/8
Not in picture
Non-return valve CAR3/8
Not in picture
Descaling / cleaning agent OSMONET
Not in picture
Preservative liquid LCRO400C
Not in picture
Stainless steel storage tank 20 L RSI020
Not in picture
Storage tank 60 L RSC060
Not in picture
Storage tank 75 L RSC075
Not in picture
Storage tank 120 L RSC120
Not in picture
Storage tank 150 L RSC150
Page 26

Manuel Technique OsmsoeurRO400C Version 3 Page 26 / 26
DECLARATION DE CONFORMITE
DECLARATION OF CONFORMITY
Nous déclarons sous notre seule responsabilité que les produits suivants :
We declare, under own responsibility that the followings products :
OSMOSEUR SERIE RO400C
WATER PURIFIER REVERSE OSMOSIS SERIE RO400C
Est conforme aux dispositions de la directive suivante :
- 73/23/CEE et 93/68 "Basse Tension"
Complies with the requirements of the following directive :
- -73/23/EEC and 93/68/EEC "Low Voltage"
Nom, titre du signataire : Serge TOURNIE, Gérant
Name, title of subscriber:
Lieu, date et signature : Gentilly, le 3 Janvier 2005
Place, date and signature :
Année d'apposition du marquage : 1999
Year when : mark was affixed :
 Loading...