


LAMAX X7.1 Naos
Waterproof up to 30 m
Native 2.7K video at 30 fps
Photos at a resolution of 16 MP
WiFi
- 1 -

Safety precautions
1. Do not drop or subject the camera to severe impact and avoid anything which may it
cause physical damage.
2. Do not place the camera near objects that generate magnetic fields, such as magnets or
electric motors. Do not place the camera too close to objects that emit powerful radio
waves, such as antennas. Strong magnetics fields or radio waves may cause damage to
the camera or corrupt the captured video and audio recordings.
3. Do not expose the camera to high temperatures or direct sunlight.
4. Use only high-quality microSDHC and SDXC cards with a speed index of at least Class 10
UHS-I U1. For shooting at a resolution of 4K at 30 fps (fps = frames per second) and 720p
at 240 fps we recommend using UHS-I U3 cards. Slower cards may limit the functionality
of the camera and it may not be able to record in all modes and at all resolutions.
5. Do not place the microSD card near magnetic fields or in places where static electricity
may occur. This will prevent any accidental loss of data.
6. If the device overheats, produces smoke or a suspicious odour whilst charging, im-medi
ately unplug the device and stop charging.
7. When charging, keep the camera out of reach of children. Power cord may cause electric
shock or strangulation. Do not charge unattended.
Introduction
Thank you for purchasing the LAMAX X7.1 Naos action camera. You have acquired a durable
assistant for any situation, that fears no challenge and will reward you with high-quality
recordings. A wide range of accessories are included in the basic package so you can fully
utilize the camera right out of the box. We wish you many wonderful experiences, forever
preserved thanks to your LAMAX action camera.
- 2 -
-

LAMAX X7.1 Naos action camera features
– Integrated 2” LCD display, allowing you to choose the best angle for your shot and play
back your photos and videos.
– Waterproof casing means you can dive to a depth of up to 30 m, making it ideal for scuba
diving and water sports.
– High-quality video at a resolution of 2.7K at 30 fps, Full HD at 60 fps amd HD at 120 fps.
– Wide-angle 170° lens.
– 16 MP photos.
– Wide selection of resolutions for video and photo.
– Time-lapse photo and time-lapse video modes.
– Wide range of accessories included, making it easy to shoot anytime and anywhere.
– Support for microSDHC and microSDXC cards up to 64 GB (U3 cards recommended).
– USB and HDMI connectivity.
– Integrated WiFi for connecting to wireless devices.
– Supplied remote control to control the camera.
– Intuitive and simple connection to PC or smart mobile devices.
- 3 -
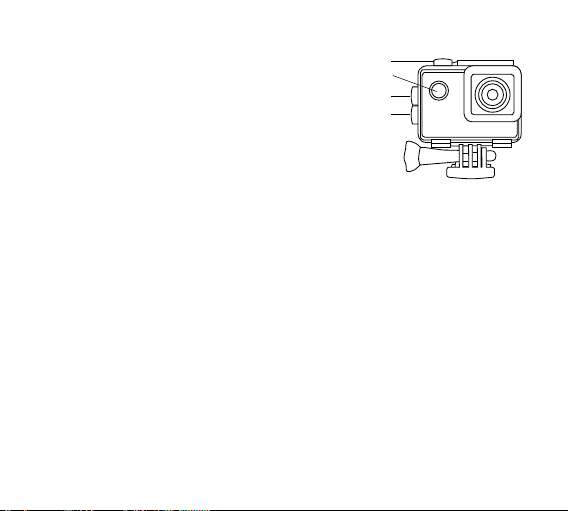
Buttons and camera functions
1. “On/Off” button – this button is located next to the
lens and serves as the “Change mode” button.
2. “Shutter” button – this button is located on the top
of the camera and serves as the “Confirm” button
in the main menu.
3. “Up” button – this button also turns the WiFi
function on and off.
4. “Down” button
Accessories
Remote control
Waterproof case
Pole mount
Frame for mounting without waterproof case
J mount
Fast plug-in
Quick clip mount
Straight self-adhesive mount (2 pcs)
3-axis connector (3 parts)
Tripod adapter
Thread adapter
Universal hook and loop fastener
Replacement 3M pads (2 pcs)
USB cable
Li-ion battery
Replacement door
Cable ties
Microfibre cloth
User Manua
- 4 -
2
1
3
4

Using the LAMAX X7.1 Naos action camera
1. INSERTING THE MICROSDHC CARD
Only insert or remove a microSDHC or SDXC card (U3 recommended) from the microSD card
slot when the camera is switched off and not connected to the computer.
Note: Use only branded microSDHC or SDXC cards. Generic unbranded cards are not
guaranteed to function correctly for data storage.
2. INSTALLING THE BATTERY
a) Open the battery cover by sliding it to one side.
b) Insert the battery (connector end first) into the compartment so that the connectors are
on the correct side.
c) Close the battery cover by reattaching it and sliding it back in place.
3. CHARGING
a) Camera can be charged by connecting to a PC or using the AC adapter.
b) In a vehicle, the camera can be charged sing the cigarette lighter adapter.
c) Whilst charging, you can still shoot video or take photos (except when charging via PC).
d) Camera may also be charged when turned off.
Note: Never charge unattended. If device overheats, produces smoke or suspicious odour
when charging, immediately unplug and stop charging.
4. TURNING THE CAMERA ON AND OFF
a) To turn camera on, press and hold the “On/Off” button for 3-5 seconds.
b) To turn camera off, press and hold the “On/Off” button for 3-5 seconds.
5. SWITCHING MODES AND NAVIGATING THE MENU
Tapping the “On/Off” button toggles between the modes: video / photo / slow motion /
gallery / settings.
- 5 -

6. RECORDING VIDEO
Switch the camera to “video” mode by pressing the “On/Off” button. A camera icon will appear on the upper left corner of the display. To start recording, press the “Shutter” button.
A recording animation appears on the lower left corner of the display and begins to count
down the recording time. To stop recording press the “Shutter” button again.
7. PHOTO MODE
Switch the camera to “photo” mode by pressing the “On/Off” button. A camera icon will
appear on the upper left corner of the display. To take a photo press the “Shutter” button.
There will be a shutter sound and the screen will flash.
- 6 -
-

Settings on the LAMAX X7.1 Naos action camera
Navigate to the settings menu by tapping the “On/Off” button multiple times. Open settings by pressing the “Shutter” button. Navigate through the options using the “Up” and
“Down” buttons. To confirm your selection press the “Shutter” button, or to go back press
the “On/Off” button.
The menu is divided into 5 sections. The first section is for setting the parameters and
modes of the video. The second section is for setting of parameters and modes of the pho
tos. The third and fourth sections are for image settings and other settings. The fifth section
is for exiting the menu.
1. VIDEO SETTINGS
– Video resolution – changes the video resolution. The camera is set by default in the
resolution Full HD (1080p) 60 fps. The 4K resolution is interpolated and best suited for
recording time-lapsed videos.
– Slow motion – when enabled, the camera is recording the video slower than in real time
according to the settings.
– Video time-lapse – when enabled, the camera captures images at preset intervals, al
lowing you to create attractive time-lapse shots.
– Loop recording – when activated, the camera records videos of a predetermined length.
When the memory card is full the most recent recordings are recorded over the oldest
ones.
– Record audio – allows you to shoot video with or without sound.
2. PHOTO SETTINGS
– Photo resolution – changes the photo resolution.
– Self timer – when activated, it creates a time delay between pressing the “Shutter” and
the picture being taken in photo mode.
– Photo time-lapse – when enabled, the camera captures images at preset intervals.
- 7 -
-
-

– Photo burst – when activated, the camera captures the set number of photos in rapid
succession with just a single press of the “Shutter” button.
3. IMAGE SETTINGS
– Image rotation – allows you to rotate the camera image.
– Car mode – when activated, the camera automatically begins recording immediately af
ter it is switched on.
– WiFi – enables / disables WiFi. When enabled, the WiFI network icon is displayed in the
upper right corner.
– LED indication light – enables / disables LED indication light.
– Time stamp – this option enables the date and time to be displayed on the final video
or photo.
– Exposure – adjusts the exposure as needed. The exposure is set from -3 to 3.
– White balance – selects the white balance mode when taking photos or recording videos
depending on the ambient lighting.
– Frequency – allows you to select the frequency in accordance with the frequency of the
grid (on the European continent the network frequency is 50 Hz, in the Americas and
parts of Asia it is 60 Hz).
– LCD off – when activated the screen automatically turns off after a predefined period of
inactivity or whilst recording videos.
– Auto power off – when activated, camera automatically turns off after a selected period
of inactivity.
4. OTHER SETTINGS
– Date / Time – sets the date and time of the camera.
– Language – changes the language of the camera menu.
– Format – formats the inserted card.
Note: Formatting will erase all data on the inserted card.
- 8 -
-

– Factory settings – restores the camera to factory settings.
– Firmware – displays actual version of the firmware installed on the camera.
- 9 -

LAMAX X7.1 Naos action camera parameters
LCD 2 inch
Waterproof Up to 30 m
Lens A+++ HD lens wide-angle lens at 170°
Menu languages
Video resolution options
Video format MP4
Photo format JPG
Video codec H.264
Photo resolution options 16 Mpix, 12 Mpix, 8 Mpix, 5 Mpix
Photo mode Individual / burst / timer and photo time-lapse
Mains frequency 50 Hz / 60 Hz
USB devices Micro USB 2.0
Compatibility storage Micro SDHC up to 64 GB
Connectivity WiFi, micro USB 2.0, HDMI
Battery capacity 900 mAh
Battery life Full HD video at 1080p / about 90 minutes
Time to fully charge cca. 2 hours
Compatible operating systems Windows XP / Vista / 7 / 8 / 10, MacOS
Camera dimensions 59.2 x 41 x 29.8 mm (incl. lens)
Weight 58 g
English, German, Czech, Slovak, Polish, Hungarian,
Lithuanian
4K 30 fps, 2,7K 30 fps, 1080p 60 fps, 1080p 30 fps,
720p 120 fps, 720p 60 fps
- 10 -
WiFi application and connecting the camera and mobile device
The LAMAX X7.1 Naos camera can be operated using the app, which can be downloaded
free of charge for smart devices running Android and iOS (from the app stores Google Play
and the Appstore). You can also download application here:
http://lamax-electronics.com/en/x7-
1-app-app-store
http://lamax-electronics.com/en/x7-
1-app-google-play
Note: App may not be available at the time of launch. We apologise for any inconvenience.
HOW TO CONNECT
1. Turn on the camera’s WiFi in the menu or by pressing “Up” button when the camera is in
the video or photo mode. This is indicated by an icon on the display.
2. Turn on the WiFi on your smartphone or tablet and you should see the network X7.1Naos
(unless you have changed the network name in the camera WiFi settings). To connect to
the network enter the default password “1234567890” without spaces (unless you have
changed the password in the settings).
3. When successfully connected, launch the app and you can now control your camera re
motely via your smart device.
- 11 -
iOS Android
-
Remote control
The camera can be controlled remotely using the remote control which comes as part of
the basic package. The camera connects with remote control automatically.
Full English manual can be downloaded from here:
Die Bedienungsanleitung in Deutsch können Sie von hier runterladen:
Český manuál ke stažení zde:
Slovenský manuál na stiahnutie tu:
Instrukcja obsługi w języku polskim do pobrania tutaj:
Használati útmutató:
Naudojimo instrukcija:
http://lamax-electronics.com/x7-1/manuals
- 12 -
 Loading...