


Early Years Workbench
With built-in storage for tools—and a handy measuring guide printed
on the surface—this sturdy table is ideal for any woodworking project!
Instructions for assembling the workbench are in this guide. You’ll need
a Phillips screwdriver and a standard screwdriver with a thick, wide head.
A
7
⁄16" socket wrench will make the job easier, but is not essential. You
will also need a hammer and nail to make pilot holes.
Before you begin, check the list of hardware and components to make
sure you can identify the pieces. You may also want to have an adjustable
wrench handy during assembly.
What’s Included
©2008 Lakeshore LC104
(800) 428-4414 Ages 3+
www.lakeshorelearning.com
bolts (16)
nuts (16)
screws (26)
table top
bottom shelf
legs (4)
short braces (2)
vise
saw holder
long braces (2)
washers (16)
saw holder
screws (2)
hardware cup
Hardware
Assembling the Workbench
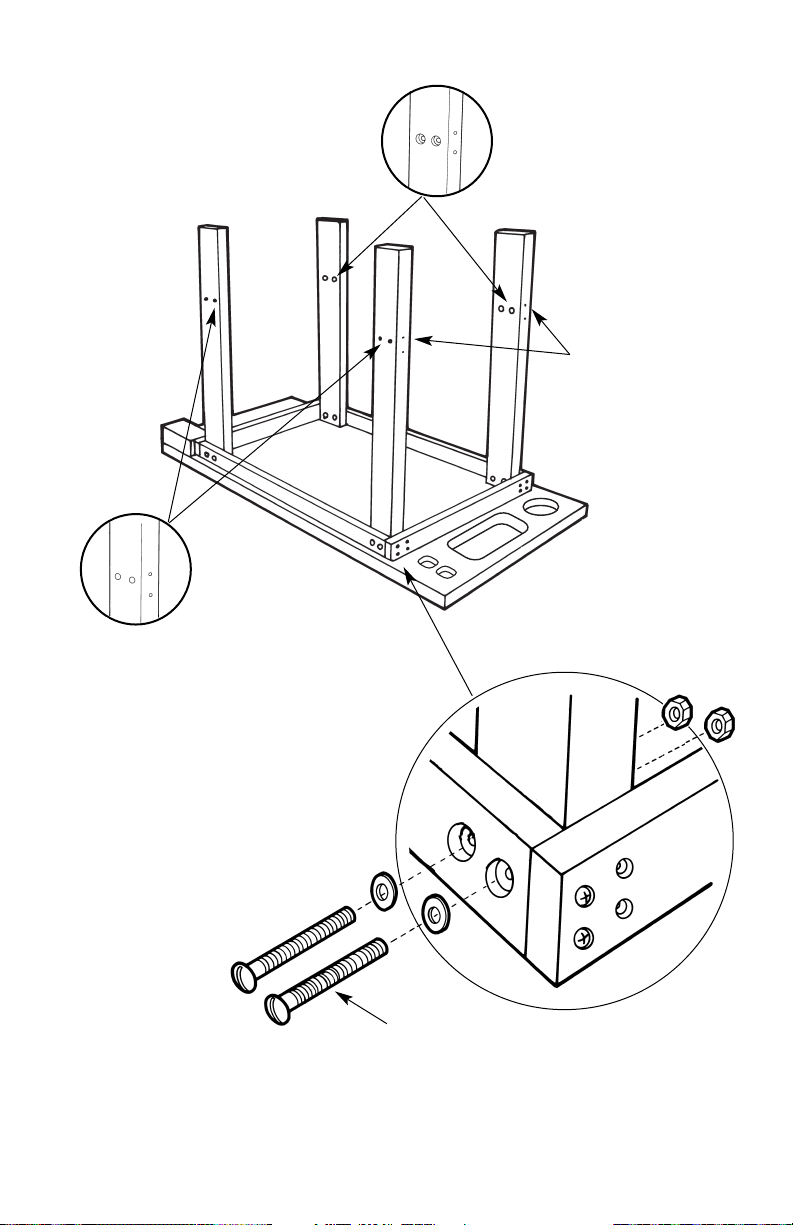
2
Large countersunk
holes face inward.
Medium pilot holes
face outward.
Secure the bolts that
are closest to the
corners first.
Make sure the edges
of the legs are flush
with the frame.
Small holes on
edges face
ends of table.
2. Use 2 bolts, 2 washers, and 2 nuts
to secure each leg. You may want
to use an adjustable wrench for
steps 2 and 3.
Note: Tighten the bolts only until snug. You will tighten them
completely when all the bolts and screws are in place.
1. Set the tabletop upside
down and position the
legs as shown.

3
Important! Make sure these edges
are flush. Push the legs sideways if
needed. (They will “give” a little.)
3. Attach the long braces to the legs. Be sure to tighten the bolts
that are closest to the corners first.
Tighten these
bolts first.

4
4. Attach the short braces.
These edges
must be flush.
Attach the screws
that go into the
long braces first.
Make sure the
edges are flush,
and then attach
the screws that go
into the legs.
5. Use 6 screws to secure the legs to the table top.

5
6. Position the vise on the pre-attached vise block as shown below.
Make sure the left edge is flush with the table. Then, use a hammer
and nail to create four starter holes in the vise block. To do this,
simply tap a nail into the vise block using the holes in the vise as a
guide.
7. Use 4 screws to secure the vise.
Note: You’ll only need to tap the nail once or twice.

6
8. Position the saw holder as shown,
aligning the brackets with the pilot
holes. Use the 2 saw holder screws
to secure the holder.
9. Now it’s time to use a little muscle. Tighten every screw and bolt all
the way in! (A socket wrench will make this task easier.) Once
everything is secure, turn the workbench over.
10. From the side, slide the bottom shelf between the legs and drop it
into place.
Dark panel
faces inside.

11. Insert the hardware cup in the round hole. (The square holes are
designed to hold hammers.)
Important Safety Note:
Woodworking tools are dangerous. Never allow children to use
tools without adult supervision. When children are not using
the workbench, remove the saw, hardware, and other tools
from their holders and store them safely out of children’s reach.
That’s it! Your workbench is complete!
 Loading...