

Lakeland Let's Bake 31575, Let's Bake 31599 Instruction Booklet
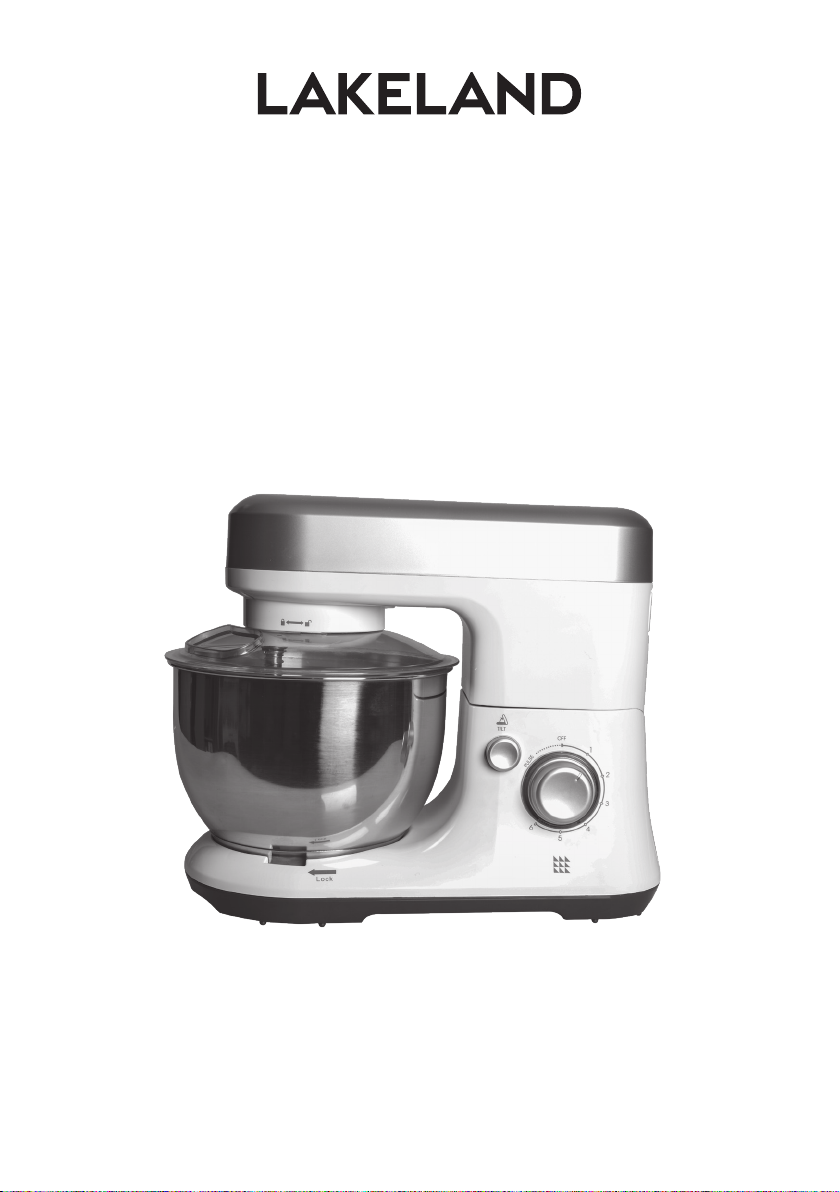
INSTRUCTION BOOKLET
LET’S BAKE STAND MIXER
Model: 31575 (Pink) 31599 (Silver)

LAKELAND LET’S BAKE STAND MIXER
Thank you for choosing the Lakeland Let’s Bake Stand Mixer.
Please take a little time to read this booklet before getting started and keep it in a safe
place for future reference.
The Let’s Bake Stand Mixer is perfect for combining, folding, mixing, whipping and
kneading ingredients for your favourite cakes, bakes, biscuits and breads.
It has three versatile attachments; a dough hook to use on lower speeds for combining dry
ingredients with liquid, and thicker mixtures like bread dough and muffins; a beater to use
on medium speeds to mix cakes, icing and dips; and a whisk to use with higher speeds for
whipping cream, meringues and eggs. The planetary mixing action works at 6 speeds to
ensure even blending and the powerful 650W motor also has a pulse setting. The stainless
steel 3.8 litre bowl has a splatter guard to minimise mess.
Here at Lakeland, our award-winning family-owned business still offers the same excellent
quality, value for money and exceptional customer service as when we founded the
company back in the 1960s.
Our products are hand-picked and thoroughly tested so you can be sure that everything
you purchase will be a pleasure to use for many years to come.
CONTENTS
Product features ............................................................................................................. 3
Safety cautions ............................................................................................................ 4-5
Assembling your Let’s Bake Stand Mixer and using for the first time ........................... 6-7
Instructions for use ......................................................................................................... 8
A guide to speed settings ................................................................................................ 9
Hints and tips ................................................................................................................ 10
Frequently asked questions ........................................................................................... 10
Care and cleaning ........................................................................................................ 11
Electrical connections ................................................................................................... 12
Recycling your electricals .............................................................................................. 12
2
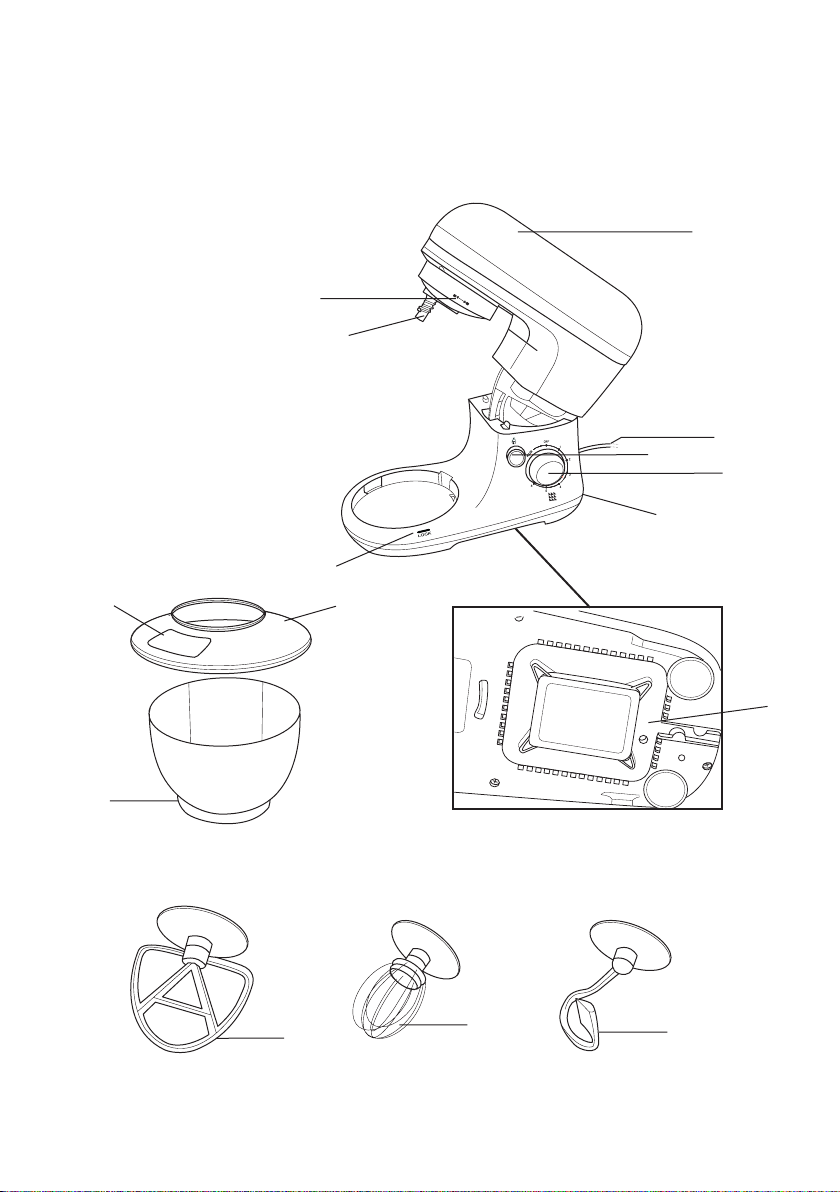
PRODUCT FEATURES
1. Arm
2. Splatter guard lock
3. Attachment lock
4. Cord and plug
5. Tilt button
6. Speed dial
7. Base unit
8. Bowl lock
9. Splatter guard feed hole
10. Splatter guard
11. Mixing bowl
12. Cord storage
13. Beater
14. Whisk
15. Dough hook
9
2
1
3
4
5
6
7
8
10
11
13€
14
12
15
3

SAFETY CAUTIONS
Carefully read all the instructions before using the appliance and keep in a safe place
for future reference. Always follow these safety cautions when using the appliance to
avoid personal injury or damage to the appliance. This appliance should be used only as
described in this instruction book.
• This appliance can be used by children aged from 8 years and
above and persons with reduced physical, sensory or mental
capabilities or lack of experience and knowledge if they have
been given supervision or instruction concerning use of the
appliance in a safe way and understand the hazards involved.
Children shall not play with the appliance. Cleaning and user
maintenance shall not be done by children unless they are older
than 8 and supervised.
• Make sure your electricity supply matches the voltage shown on the appliance.
• Ensure all packaging materials and any promotional labels or stickers are removed from
the appliance before the first use.
• Always inspect the appliance before use for noticeable signs of damage. Do not use if
damaged or has been dropped. In the event of damage, or if the appliance develops a
fault contact the Lakeland customer care team on 015394 88100.
• Do not use this appliance if the lead is damaged. If the lead is damaged it must
be replaced with a special lead. Contact the Lakeland customer care team on
015394 88100.
• Always use the appliance on a dry, level, heat resistant surface.
• Unplug from the mains when not in use and before cleaning. To disconnect, turn the
socket to “off“ and remove the plug from the mains socket.
• Do not use any accessories or attachments with this appliance other than those
recommended by Lakeland.
• To protect against fire, electric shock or personal injury, do not immerse cord, plug or
base in water or other liquids.
• Do not leave the lead hanging over the edge of a kitchen table or worktop. Avoid
contact between the lead and hot surfaces.
• For indoor use only.
• For domestic use only.
• This appliance should be used for preparation of food as described within the
instructions for use that accompany it.
• Always ensure that your hands are dry before removing the plug from the mains
socket. Never pull the plug out of the mains socket by its lead.
• To avoid injury or possible fire, do not cover the appliance when in use.
4

• Do not connect this appliance to an external timer or remote control system.
• An extension cable may be used with care. The electrical rating of the cable should be
at least as great as the appliance. Do not allow the cable to hang over the edge of the
worktop or touch any hot surfaces.
• This appliance complies with the basic requirements of Directives 2014/30/EU
(Electromagnetic Compatibility) and 2014/35/EU (Low Voltage Directive).
• WARNING: A cut off plug inserted into a 13 amp socket is a serious safety (shock)
hazard. Ensure the cut off plug is disposed of safely.
• CAUTION: The plastic bags used to wrap this appliance or the packaging may be
dangerous. To avoid risk of suffocation, keep these bags out of reach of babies
and children. These bags are not toys.
• Do not put your hands or utensils inside the mixing bowl while the stand mixer is on,
to avoid the risk of injury and damage to the appliance. Avoid contact with rotating
parts.
• To add food to the bowl, twist the speed dial to ‘off’ first. If you are using the splatter
guard, add food through the feed hole, pulse the mixer if the attachment is blocking
the feed hole.
• Replace the attachments if they show any signs of damage.
• Never leave the appliance unattended while switched on.
• Do not operate the appliance when empty.
• Do not use the appliance near an oven, hot surface or other source of heat. Use it at
least 10cm away from walls and other surfaces to allow sufficient airflow.
• Make sure the attachments are securely locked into place before switching on
the appliance.
• Do not operate the stand mixer continuously for more than 6 minutes. Allow the motor
to rest for 15 minutes between each use.
5
ASSEMBLING YOUR LET’S BAKE STAND MIXER AND
USING FOR THE FIRST TIME
• Unpack the stand mixer, remove all the packaging materials.
TILT
PRESS
• With one hand on top of the arm press the ‘TILT’ button, and gently raise it.
TWIST
• Remove the attachments from the mixing bowl. Hold the splatter guard with both
hands and twist it anticlockwise to remove it from the arm. It may be stiff the first few
times you do this.
• Hold the bowl with both hands and twist anticlockwise to remove it from the
base unit.
• Before first use, wipe the base unit with a clean damp cloth.
• Wash the attachments, bowl and splatter guard in warm soapy water rinse and dry
thoroughly.
• Make sure that all parts are clean and dry before assembling the product.
• Warning: Do not insert the plug into a socket and turn on the stand mixer before you
have fully assembled it.
• Place the base unit on a flat surface near a socket at least 10cm away from walls and
other surfaces to allow sufficient airflow.
6

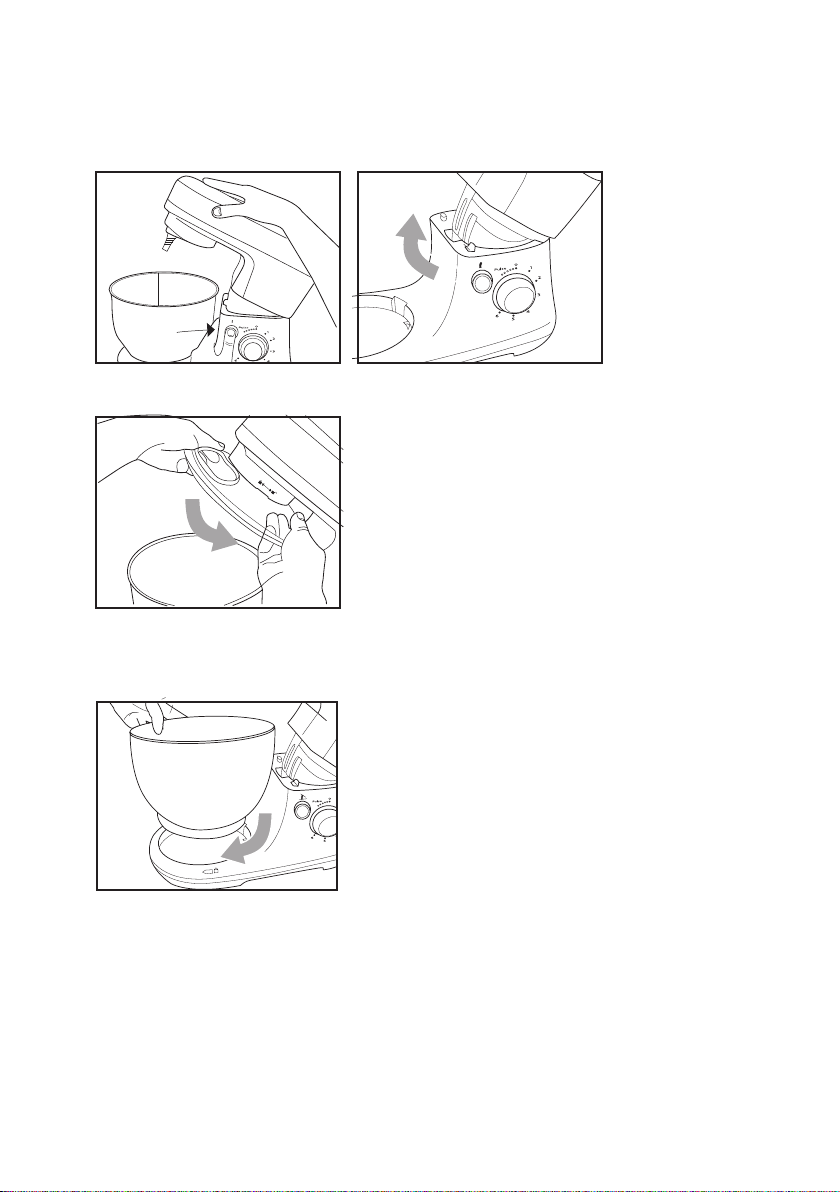
When adding or removing the bowl, splatter guard or attachments the arm
must always be raised. Press the ‘TILT’ button to raise the arm.
Attaching the bowl
• Place the bowl onto the bowl lock, slotting the
tabs around the bottom into the notches inside
the bowl lock. Hold the bowl with both hands and
twist clockwise following the ‘Lock’ arrow, until it
is securely in place.
TABS
Attaching the splatter guard
• You can use the splatter guard when mixing
flour and liquid, to prevent splattering and
flour dusting. For other jobs you may not need
the splatter guard.
• Place the splatter guard, into the splatter guard
lock. Holding it with both hands, line up the
arrow on the splatter guard with the unlock
symbol on the arm. Twist it clockwise towards
the lock symbol to lock it into place.
Adding the attachments
• Select your attachment. Underneath there is a hole
with two notches, line these up with the tabs on
the attachment lock.
• Push the attachment up over the notches, as far as
it will go, then twist the attachment anticlockwise
to lock it into position.
• Make sure the attachment is securely locked
into place.
• Press the ‘TILT’ button and move the arm into the
downward position with your other hand, the
‘TILT’ button will click fully out. The splatter guard
should fit over the bowl.
• The Let’s Bake Stand Mixer is now ready to use.
To remove the attachments
• Push the attachment upwards into the attachment
lock as far as it will go, then twist clockwise to
release.
NOTCHES
UNLOCK
ARROW
TABS
NOTCHES
NOTCHES
7

INSTRUCTIONS FOR USE
The Let’s Bake Stand Mixer is fully interlocked for safety, it won’t switch on unless the arm
is tilted downwards.
• Check the speed dial is in the ‘OFF’ position.
• Plug in and switch on the stand mixer at the socket.
• The light around the speed dial will blink.
• Press the ‘TILT’ button to raise the arm into the upwards position. Add your ingredients
into the mixing bowl.
• Do not operate the appliance when empty. The maximum working capacity is
2 litres (2kg), or 1.2 litres (1.2kg) for heavier ingredients such as flour and water,
or dough.
• Press the ‘TILT’ button to lower the arm into the downwards position, the ‘TILT’ button
will click fully out.
• When you switch on the stand mixer for the first time there may be a slight burning
smell, this is normal for a new appliance and will stop after a few uses.
• To start mixing, twist the speed dial clockwise. Move slowly through the speeds to the
speed you require, the light around the speed dial will be solid when the appliance is
mixing.
• DO NOT put your hands or utensils inside the mixing bowl while the stand mixer is on.
If adding food to the bowl. While the stand mixer is on, twist the speed dial to ‘off’
first. If you are using the splatter guard, add food through the feed hole, pulse the
stand mixer if the attachment is blocking the feed hole.
• If you need to scrape down food from the sides of the bowl, switch off the appliance
and use a spatula.
• Always switch off and unplug the appliance before you attach or remove any of the
attachments.
• Do not operate the stand mixer continuously for more than 6 minutes. Allow the motor
to rest for 15 minutes between each use. Most mixing tasks will take around 3 minutes.
• To stop the stand mixer, twist the speed dial back to ‘OFF’. The stand mixer will
continue to rotate for a few seconds after being switched off. Wait until it has fully
stopped before pressing the ‘TILT’ button to raise the arm and remove the bowl.
8

A GUIDE TO SPEED SETTINGS
The stand mixer has six speeds and a pulse setting; for combining, folding, mixing,
whipping and kneading ingredients for your favourite cakes, bakes, biscuits and breads.
Begin mixing your ingredients on the ’1’ setting, twist the speed dial clockwise to increase
the speed settings one at a time to the speed you require.
Here is a guide to the attachments and the speeds we recommend.
Attachment Speed Use Tips
Dough hook
Beater
Whisk
1-3
1-4
1-6
Use on lower speeds for
combining dry ingredients
with liquid, and thicker
heavier mixtures like
biscuit, scones, bread
dough, pizza bases, pastry
and muffins.
Use on medium speeds
to mix cakes, batter, dips,
icing and to cream butter
or margarine with sugar.
Use for medium to heavy
mixtures.
Use to whisk egg whites,
meringues and cream.
Use for light mixtures.
Turn the speed dial to ‘OFF’
as soon as the mixture has
formed a ball. Press the
‘TILT’ button to raise the arm
into the upwards position.
The mixture can now be
removed using a spatula.
Always use cold ingredients
for short crust pastry.
Butter and margarine should
be at room temperature.
For best results, whisk eggs
at room temperature.
Pulse setting
You can twist and hold the speed dial anticlockwise to the ‘pulse’ position in short 2-3
second bursts to pulse your ingredients.
This will mix them quickly and prevent ‘over-processing’. A couple of pulses is enough to
mix most ingredients.
9
 Loading...