

Lakeland 31794 Instruction Booklet
2
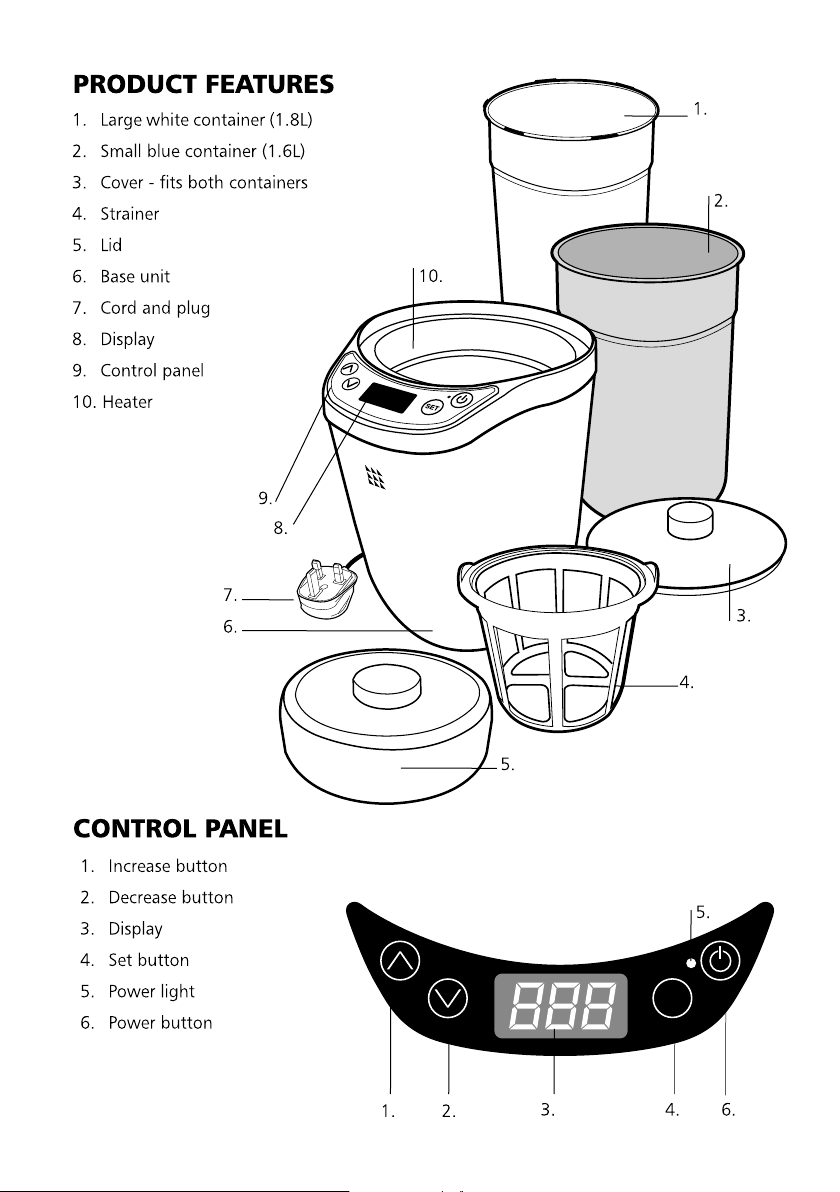
SET
SET
3

SAFETY CAUTIONS
Carefully read all the instructions before using the appliance and keep in a safe place
for future reference. Always follow these safety cautions when using the appliance to
avoid personal injury or damage to the appliance. This appliance should be used only as
described in this instruction book.
• This appliance can be used by children aged from 8 years and
above and persons with reduced physical, sensory or mental
capabilities or lack of experience and knowledge if they have
been given supervision or instruction concerning use of the
appliance in a safe way and understand the hazards involved.
Children shall not play with the appliance. Cleaning and user
maintenance shall not be done by children unless they are older
than 8 and supervised.
• Make sure your electricity supply matches the voltage shown on the appliance.
• Ensure all packaging materials and any promotional labels or stickers are removed from
the appliance before the first use.
• Always inspect the appliance before use for noticeable signs of damage. Do not use if
damaged or has been dropped. In the event of damage, or if the appliance develops a
fault contact the Lakeland customer care team on 0800 444 1500.
• Do not use this appliance if the lead is damaged. If the lead is damaged it must be
replaced with a special lead. Contact the Lakeland customer care team on 0800 444
1500.
• Always use the appliance on a dry, level, heat resistant surface.
• Unplug from the mains when not in use and before cleaning. To disconnect, turn the
socket to “off “and remove the plug from the mains socket.
• Do not use any accessories or attachments with this appliance other than those
recommended by Lakeland.
• To protect against fire, electric shock or personal injury, do not immerse cord, plug or lid
in water or other liquids.
• Do not leave the lead hanging over the edge of a kitchen table or worktop. Avoid
contact between the lead and hot surfaces.
• For indoor use only.
• For domestic use only.
• This appliance should be used for preparation of food as described within the
instructions for use that accompany it.
• Always ensure that your hands are dry before removing the plug from the mains socket.
Never pull the plug out of the mains socket by its lead.
4

• To avoid injury or possible fire, do not cover the appliance when in use.
• Do not connect this appliance to an external timer or remote control system.
• An extension cable may be used with care. The electrical rating of the cable should be
at least as great as the appliance. Do not allow the cable to hang over the edge of the
worktop or touch any hot surfaces.
• This appliance complies with the basic requirements of Directives 04/108/EC
(Electromagnetic Compatibility) and 06/95/EC (Safety of Domestic Electrical Appliances).
• WARNING: A cut off plug inserted into a 13amp socket is a serious safety (shock)
hazard. Ensure the cut off plug is disposed of safely.
• CAUTION: The plastic bags used to wrap this appliance or the packaging may be
dangerous. To avoid risk of suffocation, keep these bags out of reach of babies
and children. These bags are not toys.
• Keep the Multi Yoghurt Maker, plug and cord away from hot ovens, flames and other
hot surfaces.
• Do not move the Multi Yoghurt Maker once it is switched on. Use it away from any
sources of vibration such as washing machines or fridges.
• Only use yoghurt or cheese making ingredients e.g. milk and plain yoghurt with this
product, other food may damage the appliance.
• Do not put your hands or objects other than the containers into the heater while the
Multi Yoghurt Maker is switched on. If yoghurt is spilt inside, make sure the Multi
Yoghurt Maker is turned off and cooled down before wiping with a clean damp cloth.
• Do not use the Multi Yoghurt Maker without the lid or container in place.
• The Multi Yoghurt Maker will become hot whilst in use. Turn off, unplug, and let it cool
down before moving or handling.
• Do not put the base unit in the refrigerator.
• Do not used expired yoghurt, expired milk, flavoured yoghurt, yoghurt with other
ingredients in it, or drinking yoghurt in this appliance, only use fresh ingredients.
• WARNING: Do not keep yoghurt in the refrigerator for more than 4 days after you
have made it.
5

USING YOUR MULTI YOGHURT MAKER
FOR THE FIRST TIME
Unpack the Multi Yoghurt Maker, remove all the packaging materials, including the
transparent film over the control panel.
Before first use, wipe the base unit with a clean, damp cloth.
Wash the containers, lid, cover and strainer in hot, soapy water, rinse and dry thoroughly.
Make sure that all parts are clean and dry before assembling the product.
The Multi Yoghurt Maker is now ready to use.
INSTRUCTIONS FOR USE
Place the Multi Yoghurt Maker on a dry, level surface, away from draughts, heat sources
and appliances which may vibrate e.g. washing machines and fridges.
Just before each use, the container should be sterilised by filling with just boiled water and
then discarding.
1. Plug in and switch on the Multi Yoghurt Maker at the socket. The display will briefly
show ‘888’, then flash ‘C-1’.
2. Add the container and cover, containing your prepared ingredients into the heater.
3. Add the lid.
To set the programme…
The Multi Yoghurt Maker has two programmes:
Programme Temperature Time
C-1 for making plain
yoghurt or soft cheese.
Then strain plain yoghurt to
make Greek-style yoghurt.
C-2 for experimenting with
different ingredients, times
and temperatures.
4. Press the INCREASE and DECREASE buttons to switch between the two
programmes. When you have selected your programme, press the SET button .
If you have selected C-1 the display will show 42°C which is the ideal temperature
for making yoghurt. Press the SET button again and the display will flash ‘08h’.
Press the INCREASE and DECREASE buttons to set the time between 8-12
hours, depending on the type of milk you are using. (see ‘Guide to Timings’ on p8).
6
42°C 8 to 12 hours
25°C to 65°C 1 to 99 hours

If you have selected C-2 the display will flash ’42°C’. Press the INCREASE and
DECREASE buttons to set the temperature between 25-65°C in single degrees. You
can press and hold the buttons to move quickly through the temperatures.
Press the SET button again . The display will flash ’08h’. Press the INCREASE
and DECREASE buttons to set the time between 1-99 hours.
5. To start the programme, press the POWER button and the power light will
illuminate. The display will display the hours, which will count down until your
yoghurt or soft cheese is ready. Do not move the Multi Yoghurt Maker once it is
switched on. When the cycle has finished, the display will show ‘00h’ and the power
light will go out.
6. If you want to cancel the Multi Yoghurt Maker mid cycle, press and hold the
POWER button and the program ‘C-1’ or ‘C-2’ will flash on the display.
You can then reset the Multi Yoghurt Maker again.
7

MAKING PLAIN YOGHURT
Yoghurt makes yoghurt! Yoghurt is a live milk product, which can reproduce itself in
warm conditions. Easy and inexpensive to make at home, all you need is some natural live
yoghurt and milk to get started.
In addition to the Multi Yoghurt Maker, you will need a food thermometer, heat-proof
bowl, pan and whisk.
Once you have tasted your first batch, you can adjust the time setting on the Multi
Yoghurt Maker to suit your taste. The longer the time it is heated, the tarter it will
become. The starter yoghurt you have chosen will also affect the final flavour, try a few
different yoghurts to find which gives the flavour you prefer.
GUIDE TO TIMINGS
Different types of milk take different amounts of time to turn into yoghurt. You will need
to set the time on the Multi Yoghurt Maker according to the milk you use.
Whole milk = 8 hours
Semi-skimmed milk = 10 hours
Skimmed milk = 12 hours
Non-dairy milks will require more time
QUANTITIES REQUIRED
Starter Yoghurt Milk
Large Container (1.8L) 165ml 1485ml
Small Container (1.6L) 150ml 1350ml
Greek Yoghurt (1L) 100ml 900ml
• Turn your Multi Yoghurt Maker on to preheat for a few minutes before you start. Make
sure the containers are removed and the lid is on the Multi Yoghurt Maker.
• Take the starter yoghurt (natural plain live yoghurt) from the fridge so it has time to
warm up closer to room temperature while you are preparing the milk.
• Measure the milk for the container you are using (see above). Add this to a saucepan,
bring to the boil and immediately remove from the heater. Use a whisk to mix the
milk occasionally, - this helps make thicker yoghurt. Then leave to cool down to 32°C
to 43°C. Check with a cooking thermometer to make sure it has cooled to the correct
temperature. Remove any ‘skin’ which has formed on top.
• Measure the starter yoghurt for the container you are using (see above) and gently
whisk into the cooled milk. The fresher the starter the better, so check the ‘Use By’ date.
Take care not to whip or beat the mixture too vigorously - the consistency should be
smooth with no lumps.
• Pour the mixture into the container and add the cover. Place the container inside the
heater and add the lid. It should fit snugly on top.
8

• Turn on the Multi Yoghurt Maker and select C-1, set the time for 8-12 hours depending
on the type of milk you are using.
• Leave the Multi Yoghurt Maker undisturbed until the end of the cycle. Many people find
it convenient to make yoghurt overnight, switching on the machine before they go to
bed. When the Multi Yoghurt Maker has finished the display will show ‘00h’ and the
power light will go out.
• At the end of the cycle, switch off and unplug the Multi Yoghurt Maker. Do not leave
yoghurt in the Multi Yoghurt Maker after the timer has finished. Remove the lid slowly
as condensation forms during heating. Take care, the heater base and the container will
be hot. Use an oven glove or cloth when removing the container.
• There may be a small amount of liquid (whey) on top of the yoghurt in the container.
This is normal. Stir the yoghurt in the container and replace the cover. Put the container
in the refrigerator for at least 3 hours.
• Enjoy as a plain yoghurt or flavour with our serving suggestions.
• WARNING: Do not keep yoghurt in the refrigerator for more than 4 days after you
have made it. Do not use expired milk or expired yoghurt in the Multi Yoghurt Maker,
only use fresh ingredients.
MAKING GREEK-STYLE YOGHURT
Greek style yoghurt has a creamier, thicker texture. Removing the whey creates a healthier
yoghurt with less sugar and a higher protein density.
• To turn the plain yoghurt into Greek-style yoghurt it needs to be strained through the
strainer included.
• The strainer has a capacity of 1 litre so if you only want to make Greek Style Yoghurt,
make plain yoghurt in the quantities in the table on previous page.
• Remove the plain yoghurt from the fridge after cooling for 3 hours.
• Place the strainer inside the large container, pour in the plain yoghurt. Place in the fridge
to strain for 6 hours. The longer you strain the plain yoghurt, the more whey will drain
into the container and the thicker the resulting yoghurt will be.
• After 6 hours you will have Greek-style yoghurt. Enjoy plain, flavour with our serving
suggestions, or use as an ingredient in other recipes.
MAKING SOFT CHEESE
To make a soft ricotta-style cheese, mix 1000ml of whole milk and 50-60ml of lemon juice
in the small blue container.
• Put the container and cover into the heater.
• Add the lid.
• Turn on the Multi Yoghurt Maker and select C-1, set the time for 10 hours.
• Once the appliance has finished, remove the container and place in the refrigerator for
3 hours.
• Place the strainer inside the large container, pour in the mixture. Place in the fridge to
strain for 6 hours.
• Enjoy plain, flavour with herbs, or use as an ingredient in other recipes.
9

A GUIDE TO INGREDIENTS AND HINTS AND TIPS
THE STARTER
• Use unflavoured plain natural yoghurt, the freshest available with a long ‘Use By’ date.
The probiotics in the starter yoghurt are what helps turn the milk into yoghurt.
• If you make yoghurt regularly, save some of the unflavoured yoghurt from your
last batch to start your next. If you do this, ensure you don’t save it too long or the
probiotics can weaken and the yoghurt won’t set. We only recommend doing this for
2-3 batches in a row. Then use a fresh starter.
• Yoghurt with flavouring or fruit in it, or a liquid yoghurt will not work as a starter.
THE MILK
• After boiling your milk, check with a cooking thermometer to make sure it has cooled to
the correct temperature.
• To make thicker yoghurt you can try adding 2 tablespoons of powdered milk to the milk
before boiling. Add more if you would like your yoghurt thicker.
• You can experiment with making yoghurt between 39˚C to 45˚C.
• Yoghurt made with semi skimmed or skimmed milk will have a thinner consistency.
• Yoghurt can be made with other types of milk. You can experiment with evaporated,
goat’s, ewe’s, soya, almond or coconut milk instead of pasturised dairy milk. These milks
will take a longer time to make into yoghurt. Calories, fat content and flavour will vary
with the type of milk chosen.
• If experimenting with untreated goat’s or ewe’s milk, bring to the boil and simmer for 7
minutes before cooling.
• Long-life UHT, evaporated and powdered milk have already been treated and do not
need boiling. Use at room temperature, not straight from the fridge.
THE LOCATION
• Yoghurt will take longer to make in a cool, draughty room. If possible, choose a
draught-free position.
• Movement will cause separation and uneven texture so avoid moving the Multi Yoghurt
Maker when in use and do not place it on top of a source of vibration e.g. fridge or
washing machine.
• Keep the Multi Yoghurt Maker away from heat sources such as ovens and stovetops.
Do not place it on a shelf above a radiator.
• Tempting as it may be, do not lift the cover or disturb the Multi Yoghurt Maker until it
has finished, this will disturb the yoghurt making process.
10

USING YOGHURT IN RECIPES
• Spoon over muesli and drizzle with runny honey.
• Try flavourings such as puréed tinned fruit, chopped nuts, maple syrup or vanilla extract.
Liquid flavourings will dilute the yoghurt.
• Yoghurt makes a cool, creamy accompaniment to savoury dishes like curries and chilli con
carne. Add fresh chopped herbs, garlic, chilli or ground spices such as cumin, turmeric or
coriander.
• Fresh yoghurt makes a smooth base for salad dressings, dips, seafood sauce, cucumber
raita and toppings for jacket potatoes.
BAKING WITH YOGHURT
• You can experiment using yoghurt as a healthy substitute when baking. Low-fat yoghurt
(made with semi skimmed or skimmed milk) can be used to reduce or replace shortening,
oil, butter or sour cream. It adds a creamy texture to your recipes.
• When a recipe calls for butter, replace ½ the butter with half as much yoghurt. For
instance, instead of 1 cup of butter, use ½ cup of butter and ¼ cup of yoghurt.
• When a recipe calls for shortening or oil, replace half the oil with ¾ the amount of
yoghurt. For example, instead of 1 cup oil, use ½ cup of oil and ¾ cup of yoghurt.
• Substitute yoghurt for sour cream in recipes, in the same quantities.
• Yoghurt can even replace some of the water or milk in a recipe. Start by substituting ¼ of
the liquid with yoghurt. The result will be creamier.
11

RECIPES
Pleas note that all spoon measurements are standard metric, so 1 tsp is 5ml and 1 tbsp is
15ml. We recommend using a set of measuring spoons for accurate results.
HONEY NUT MAPLE YOGHURT - Makes 4
Ingredient Quantity
Greek style yoghurt 500g
Natural maple syrup 3 tbsp
Walnut halves 75g
Sunflower seeds 40g
Muesli or granola
Wild honey 3 tbsp
WHAT YOU DO
Mix yoghurt with maple syrup and divide into glasses or bowls. Top with walnuts, sunflower seeds,
muesli or granola. Drizzle with wild honey. Serve immediately.
GREEK STYLE YOGHURT BREAKFAST PARFAIT - Makes 1
TIP: For a treat, make your own pralines by carmelising nuts in a frying pan with maple syrup.
Ingredient Quantity
Greek style yoghurt 150g
Blueberries or fresh berries to taste
Toasted walnuts/almonds/pecans/granola 25g
Honey or agave syrup 2 tbsp, to taste
WHAT TO DO
Spoon yoghurt into a glass or bowl.
Top with blueberries and roasted nuts of your choice or granola. Sweeten with honey or agave.
12
 Loading...