

Lakeland 31793 Instruction Booklet

INSTRUCTION BOOKLET
FOOD DEHYDRATOR
Model: 31793

LAKELAND FOOD DEHYDRATOR
Thank you for choosing the Lakeland Food Dehydrator.
Please take a little time to read this booklet before getting started and keep it in a safe
place for future reference.
You can create your own healthy dried fruit, vegetable and meat snacks with the Lakeland
Food Dehydrator. Make delicious beef jerky, candied peel and ‘sun-dried’ tomatoes, which
are 100% natural with no artificial sweeteners, additives or preservatives.
Create tasty ingredients for cooking like dried mushrooms, tomatoes and herbs to
enhance soups, stews, casseroles and sauces; and dried fruits can be added to home
baking.
Dehydrating is great for preserving and storing seasonal fruit and vegetables all year round
to use in your homemade marmalades, jams and salsas. It preserves and concentrates
natural flavours and aromas, retains nutrients, and gives food a longer shelf life than fresh
produce.
Here at Lakeland, our award-winning family-owned business still offers the same excellent
quality, value for money and exceptional customer service as when we founded the
company back in the 1960s.
Our products are hand-picked and thoroughly tested so you can be sure that everything
you purchase will be a pleasure to use for many years to come.
CONTENTS
Product features .............................................................................................................. 3
Safety cautions .............................................................................................................4-5
Using your Food Dehydrator for the first time ..................................................................6
Instructions for use .........................................................................................................7
A guide to ingredients ..................................................................................................... 8
Hints and tips .............................................................................................................9-11
A guide to temperatures and timings ...................................................................... 12-14
Frequently asked questions ............................................................................................15
Care and cleaning .........................................................................................................16
Electrical connections ................................................................................................... 17
Recycling your electricals ...............................................................................................17
2
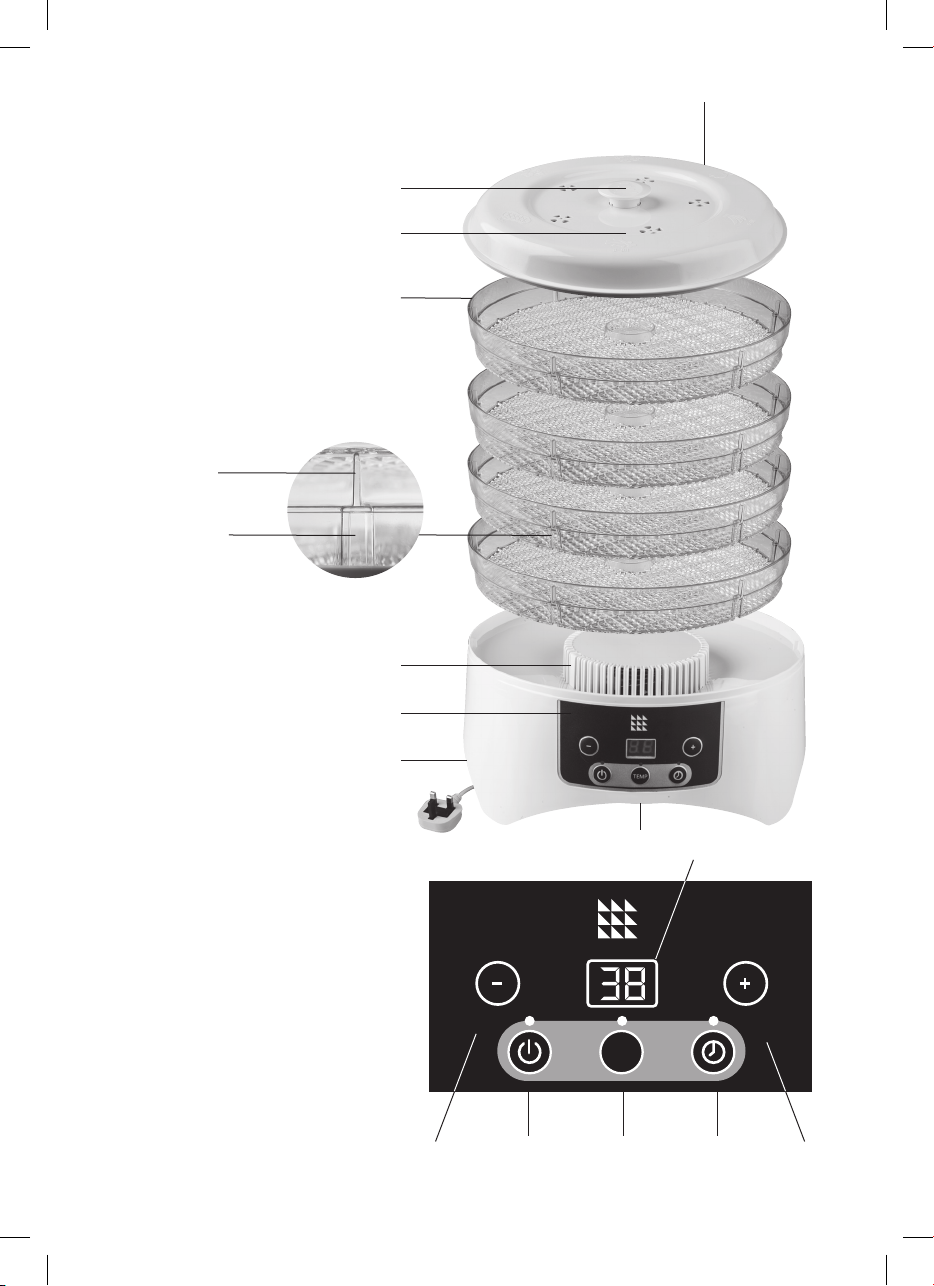
PRODUCT FEATURES
1. Lid
2. Lid handle
3. Air vents
4. Trays
5. Motor
6. Control panel
7. Base unit
8. Cord and plug
Notch
Groove
1.
2.
3.
4.
5.
CONTROL PANEL
1. Display
2. Increase button
3. Time button and light
4. Temperature button
and light
5. Power button and light
6. Decrease button
6.
7.
8.
3.
TEMP
5. 4. 3. 2.6.
1.
3

SAFETY CAUTIONS
Carefully read all the instructions before using the appliance and keep in a safe place
for future reference. Always follow these safety cautions when using the appliance to
avoid personal injury or damage to the appliance. This appliance should be used only as
described in this instruction book.
• This appliance can be used by children aged from 8 years and
above and persons with reduced physical, sensory or mental
capabilities or lack of experience and knowledge if they have
been given supervision or instruction concerning use of the
appliance in a safe way and understand the hazards involved.
Children shall not play with the appliance. Cleaning and user
maintenance shall not be done by children unless they are
older than 8 and supervised.
• Make sure your electricity supply matches the voltage shown on the appliance.
• Ensure all packaging materials and any promotional labels or stickers are removed from
the appliance before the first use.
• Always inspect the appliance before use for noticeable signs of damage. Do not use if
damaged or has been dropped. In the event of damage, or if the appliance develops a
fault contact the Lakeland customer care team on 015394 88100.
• Do not use this appliance if the lead is damaged. If the lead is damaged it must be
replaced with a special lead. Contact the Lakeland customer care team on 015394
88100.
• Always use the appliance on a dry, level, heat resistant surface.
• Unplug from the mains when not in use and before cleaning. To disconnect, turn the
socket to “off “and remove the plug from the mains socket.
• Do not use any accessories or attachments with this appliance other than those
recommended by Lakeland.
• To protect against fire, electric shock or personal injury, do not immerse cord, plug or lid
in water or other liquids.
• Do not leave the lead hanging over the edge of a kitchen table or worktop. Avoid
contact between the lead and hot surfaces.
• For indoor use only.
• For domestic use only.
• This appliance should be used for preparation of food as described within the
instructions for use that accompany it.
• Always ensure that your hands are dry before removing the plug from the mains socket.
Never pull the plug out of the mains socket by its lead.
4

• To avoid injury or possible fire, do not cover the appliance when in use.
• Do not connect this appliance to an external timer or remote control system.
• An extension cable may be used with care. The electrical rating of the cable should be
at least as great as the appliance. Do not allow the cable to hang over the edge of the
worktop or touch any hot surfaces.
• This appliance complies with the basic requirements of Directives 2014/30/EU
(Electromagnetic Compatibility) and 2014/35/EU (Low Voltage Directive).
• WARNING: A cut off plug inserted into a 3 amp socket is a serious safety (shock)
hazard. Ensure the cut off plug is disposed of safely.
• CAUTION: The plastic bags used to wrap this appliance or the packaging may be
dangerous. To avoid risk of suffocation, keep these bags out of reach of babies
and children. These bags are not toys.
• Keep the dehydrator, plug and lead away from hot ovens, flames and other hot
surfaces.
• Do not cover this appliance when in use. The Dehydrator should only be used in a well
ventilated area, at least 30cm away from walls and other surfaces to allow sufficient
airflow.
• Do not use the dehydrator for more than 40 hours. If you have been using the Food
Dehydrator for more than 40 hours, switch off and unplug at the socket. and allow the
appliance to cool down.
5
USING YOUR FOOD DEHYDRATOR FOR THE FIRST TIME
TEMP
Unpack the Food Dehydrator, remove all the packaging materials.
Before first use, wipe the base with a clean damp cloth.
Wash the trays and lid in warm soapy water, rinse and dry thoroughly.
Make sure that all parts are clean and dry before assembling the product.
Warning: Do not insert the plug into an electrical outlet, or turn on the appliance before
you have fully assembled it.
Place the base unit on a flat heatproof surface near a socket. It should only be used in a well
ventilated area, at least 30cm away from walls and other surfaces to allow sufficient airflow.
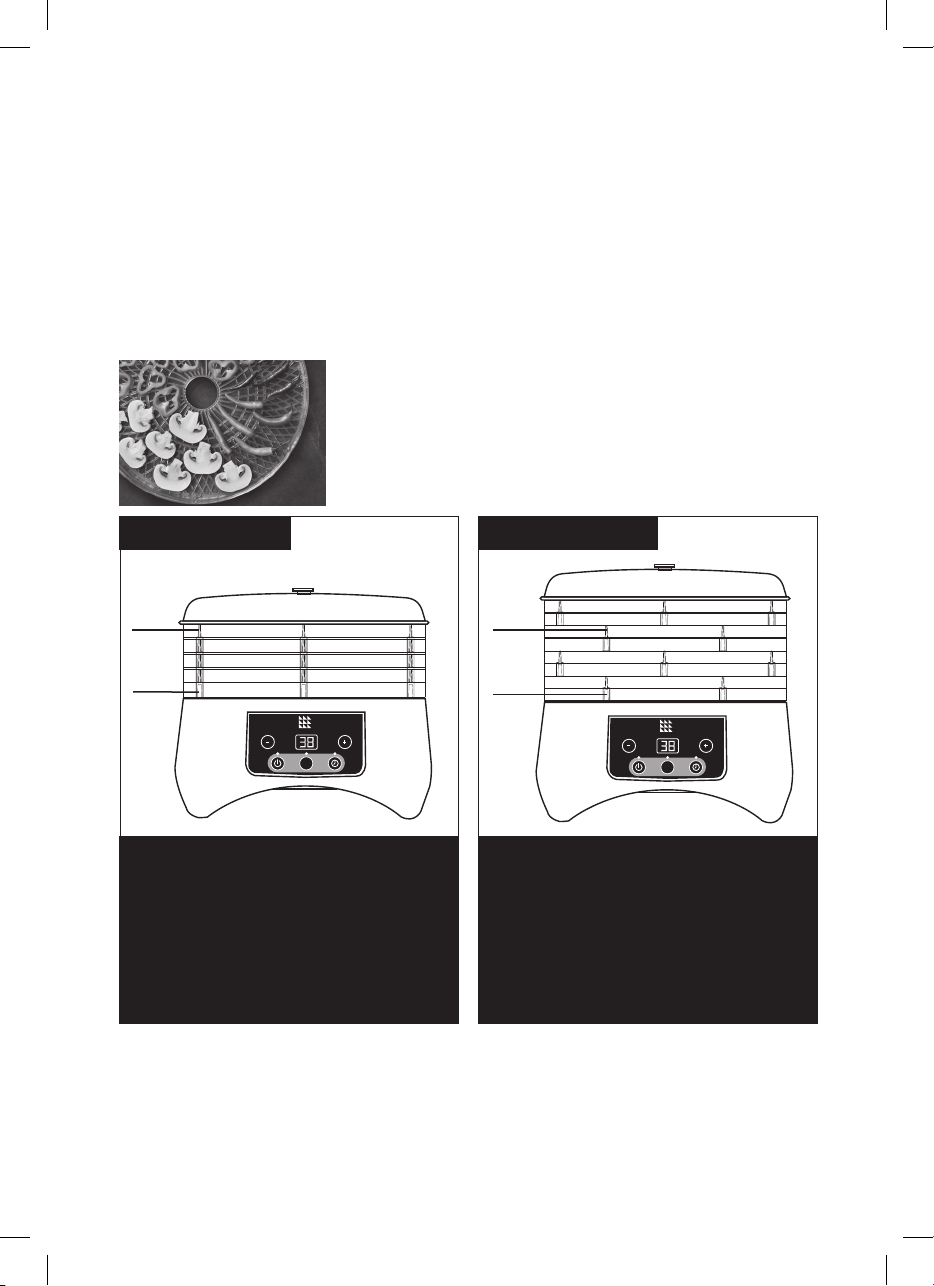
Prepare your food (see A Guide To Temperatures And Timings
on page 11-13), then arrange the food evenly on the trays in
a single layer. Leave the central hole uncovered. There should
be space around the food to allow air to circulate, do not
overload the trays or overlap the food.
Stacked down
Notch Notch
Groove
TEMP
The Food Dehydrator is packed in the box
with the trays stacked down to 20mm
high, you can use them like this when
dehydrating thinner slices of food.
As you stack the trays back onto the base
unit, slot the grooves around the edge of the
tray into the notches on the tray below.
Stacked up
Groove
TEMP
The trays can be stacked up to 36mm
high, for drying thicker pieces of food.
As you stack the trays back onto the base
unit, twist the tray around so they sit on top
of each other and the grooves do not slot
into the notches on the tray below.
The trays can be stacked in any combination. Always add your food to the top trays and
stack empty trays at the bottom.
Place the lid on the top tray.
PLEASE NOTE: All the trays and the lid must be used with the Food Dehydrator for it to
work correctly, even if the trays are empty.
The Food Dehydrator is now ready to use.
6
INSTRUCTIONS FOR USE
TEMP
TEMP
TEMP
TEMP
Plug in and switch on the Food Dehydrator at the socket.
The appliance will beep, the button lights and display will flash briefly and go out.
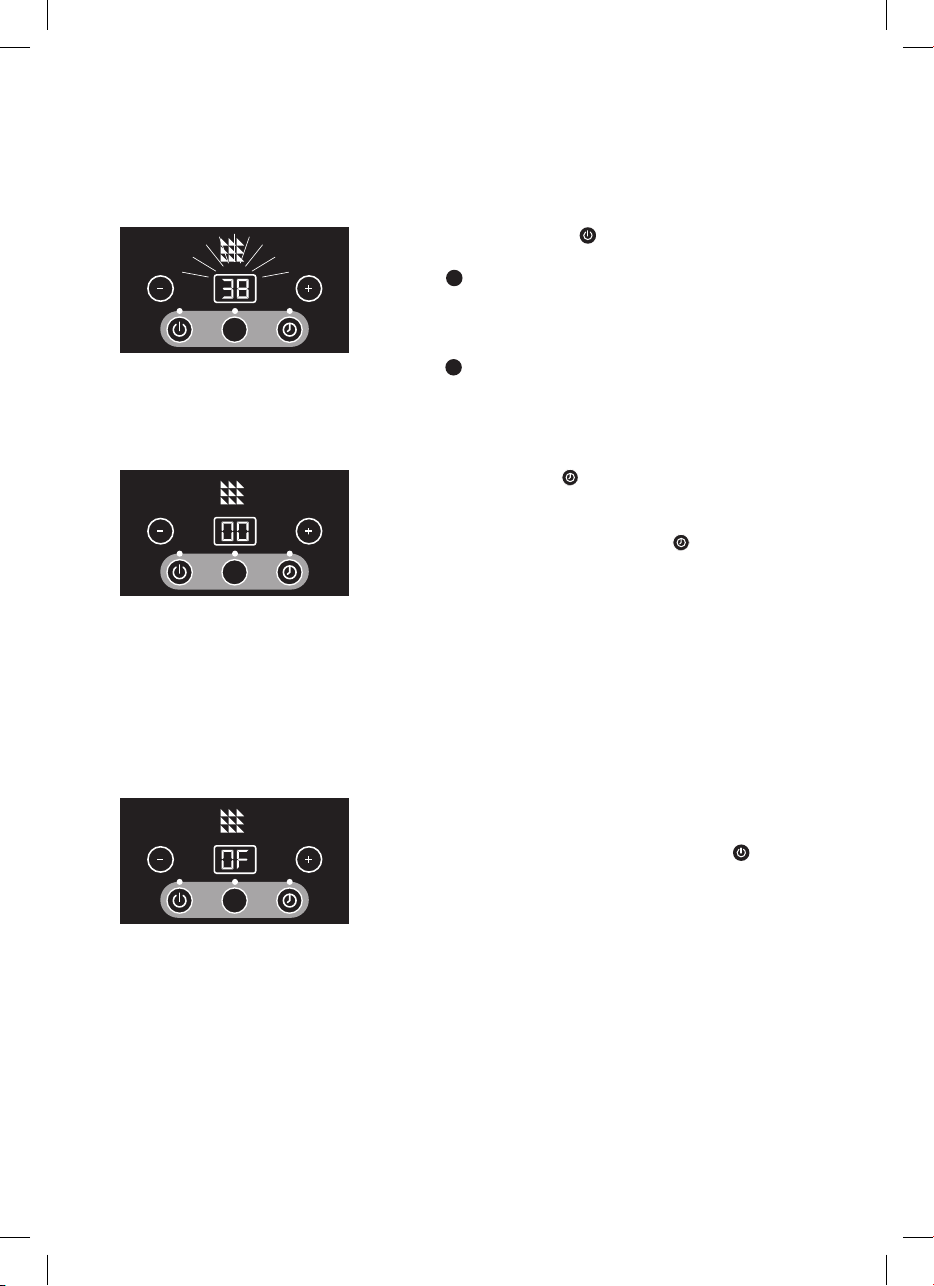
1. Press the POWER button . The fan will start and
the display will show ’38°C’. Press the TEMPERATURE
button , the display will flash ’38°C ’. Adjust the
temperature from 38°C to 68°C, using the + and –
TEMP
TEMP
TEMP
4. Allow the Food Dehydrator to cool completely before removing the trays and food.
WARNING: Take care when handling the trays and food as they may still be hot.
5. Once your food has cooled completely, store it in airtight containers, labelling and
dating the contents. Store in a cool, dark, dry place and check regularly.
Do not eat if the food shows any signs of spoiling.
buttons, it will go up in 10°C increments. When your
temperature is displayed, press the TEMPERATURE
button again to set, the temperature will stop
flashing.
If no buttons are pressed for 5 seconds, the display will
go back to the last temperature setting.
2. Press the TIME button . The display will show ‘00’.
Adjust the time needed to dry your ingredients from 1
– 12 hours by using the + and – buttons, it will go up
in 1 hour increments. Press the TIME button again
to set.
The fan will circulate, heated air through the trays and
draw moisture from your food without cooking.
The display will show your set time and temperature
and alternate between the two, counting down the
hours.
If you notice some pieces of food drying faster than
others, remove and place in an airtight container while
you continue drying.
3. When the drying cycle has finished and your food
is dehydrated, the display will show ‘00’. To turn
off the dehydrator, press the POWER button , the
display will show ‘OF’ and the fan will continue for
approximately 1 minute. Then switch off and unplug
at the socket.
Do not turn off your dehydrator mid cycle, or leave
partially dried food on the trays as it may spoil or
develop bacteria.
7

A GUIDE TO INGREDIENTS
FRUIT
• Dried fruit can be added to breakfast cereal, muesli, natural yoghurt and home baking
such as flapjack and crumbles.
• You can soak the food to rehydrate, to make compotes, fruit sauces, pies or crumbles.
• Eat dehydrated fruit plain as a snack, like apple rings and banana chips.
• Place a cup of dried apple slices in the blender with a cup of water for instant apple sauce.
• Strawberries are perfect for shakes and sundaes.
• Melon and watermelon slices can become candy-like when dried.
• Dehydrate lemon and orange zest, and powder for use in recipes for grated rind.
• Dehydrate grapes to make raisins that taste and plump in recipes better than storebought raisins.
• Dry bananas 5mm thick and dip into a glaze of 100ml honey mixed with 50ml water.
Drain then place on trays and dry. For variety, add a pinch of cinnamon to the glaze
before dipping the bananas.
VEGETABLES
• Dried vegetables such as mushrooms and tomatoes make tasty ingredients in stews,
soups, casseroles and sauces. You can soak them in water first to rehydrate them.
• You can also make vegetable crisps from wafer-thin slices of parsnip, courgette, sweet
potato and aubergine. Dry until brittle, allow to cool then sprinkle with seasoning.
• Prepared vegetables can be dipped in lemon juice for 2 minutes to add a hint of lemon
flavour. This works well for green beans and asparagus.
• Mix dried grated carrot, parsnips, onion, celery, chives and sweet peppers with turmeric
powder and sea salt to make a delicious vegan stock. This makes a delicious base for
soups.
• Dry carrots and parsnips for salads, carrot cake or coleslaw.
• Green beans and peas are best when used in soups, stews or casseroles.
• Make onion powder by drying then either powder or chop in a blender.
• Tomato slices can be used for colour and crunch when crumbled over a salad.
Alternatively, rehydrate them for soups, stews and casseroles. Tomato skins can be
powdered and used as instant soup, sauces and pastes.
8

HINTS AND TIPS
• Drying time is influenced by room temperature, humidity, food type, food size and
quantity. Check your food every hour until it passes the dryness test in ‘A Guide to
Temperature and Timings’.
• For the best flavour and colour, begin with fresh, ripe fruit, vegetables and herbs.
• Use kitchen roll to absorb excess moisture from food before adding it to the Food
Dehydrator.
• The size of the food will affect the drying time. Ensure food is cut into pieces of a similar
size and thickness. Use a food processor for fast, even slicing.
• Dry the same type of foods at the same time – do not mix fruit and vegetables, or
vegetables and meat etc. Stronger flavours can taint other food.
• During the drying process, you can rotate the position of the trays if you find food is
drying unevenly, just keep any empty trays at the bottom.
• Fruit and vegetables with the skin left on will take longer to dry, as the skin prevents
moisture drying out.
• Fruit and vegetables should be dried at 48-58ºC to minimise the loss of heat-sensitive
vitamins A and C. The temperature can be set at 58-68ºC for the first couple of hours of
drying as the temperature of the food will remain lower at the start of the cycle. Then
reduce the temperature.
FRUIT
• Wash fruit thoroughly before drying.
• Remove any bruised or damaged parts, de-seed and peel if needed.
• Slice across the core or chop into equal sizes and place onto the trays.
• To help preserve natural sweetness, vitamins, shelf-life, flavour and colour you can pretreat fruit before drying. Soak your fruit for around 2-5 minutes in 480ml of water and
60ml of fruit juice e.g. pineapple, orange, lemon or lime. Where possible, use the same
fruit juice as the fruit you are soaking e.g. apple juice for apples. Before adding to the
Food Dehydrator, drain the fruit juice and use kitchen roll to absorb any excess moisture.
• Apples, pears, peaches and apricots are better when pre-treated.
• Fruit can be coated in lemon juice to help keep colour of the fruit, for example,
bananas.
• To check fruit for dryness, tear in half, pinch and watch for moisture drops along the
tear. If there is no moisture, it is ready to store.
• Some fruits have a natural protective coating, such as figs, prunes, grapes, blueberries
and cranberries. To dry whole, dip in boiling water first for 1-2 minutes to speed up the
drying process.
• If fruit has been artificially waxed it must be peeled first.
9

VEGETABLES
• Wash vegetables thoroughly before drying.
• Remove any bruised or damaged parts, de-seed and peel if needed.
• Vegetables have a low acid and sugar content which means they have a shorter shelf-life
than dried fruit.
• Choose fresh, crisp, ripe vegetables and dehydrate them straightaway.
• Chop into equal sizes and place onto the trays.
• You can pre-treat vegetables before drying for better results, this will also help them
keep their natural colour while speeding up drying time. Blanch your sliced vegetables in
a covered pan with 2-3cm of boiling water for 3-5 minutes. Steam until vegetables are
heated through and crunchy but not cooked (about a third of the normal cooking time).
Drain and dip in cold water for 3-5 minutes. Before adding to the Food Dehydrator, drain
and use kitchen roll to absorb any excess moisture. We recommend this for vegetables
which are not normally eaten raw, for example asparagus and potatoes.
MEAT
• For making beef jerky, we recommend using lean topside or silverside cuts.
• Trim all visible fat from the meat and place in freezer for an hour or two to partially
freeze. Fat will shorten the shelf life.
• While the meat is in the freezer, prepare the marinade recipe of your choice in a bowl or
ziplock bag, mix well.
• Remove the meat from the freezer and slice 5-8mm strips against the grain for an easy
chew. Cut with the grain for more chew.
• Add the meat to your chosen marinade recipe and leave for 8-24 hours in the
refrigerator.
• When finished, remove from fridge and strain off any excess, pat dry the beef strips with
paper towels before adding to the trays.
• When dehydrated, wrap in kitchen towel to absorb excess fat and extend the shelf life.
• Meat should always be dehydrated at 68ºC to prevent bacterial growth and must
always be cured, marinated or pre-cooked first.
• Once dehydrated, wrap the jerky in kitchen towel to absorb excess fat to extend its
shelf-life.
• Store in ziplock bags, vacuum sealed bags or jars for 7-10 days.
10

HERBS
• Make your own dried herbs by gently rinsing very fresh herbs and shaking off any excess
water. They should be picked before the plant begins to flower.
• Remove dead or discoloured leaves and leave leaves on the stem to dry.
• Lay the herbs loosely on the tray and dry for 2-10 hours. The drying time will vary
according to size and type.
• Herbs should be dried at 38ºC to protect sensitive aromatic oils.
• Once dried, let them cool completely, remove the leaves from the stem and store in an
airtight container, paper bag or glass jar and keep out of sunlight.
• To dry large leafed herbs, such as basil and sage, strip leaves, cut in half across the leaf to
allow air inside the stem and shorten drying time.
• Herbs are dry when they snap and crumble easily. Stems should be brittle and break when
bent.
• To check herbs are dry, place in an airtight container, if condensation appears after a
couple of days, they need more drying.
STORING
• It is better for food to be over-dry than under-dry as moist food is more likely to spoil
during storage.
• Store foods in an airtight, moisture proof container to prevent stickiness and rehydration
caused by humidity.
• Vacuum packing food will extend the shelf-life. Then store in an airtight container which
stops light penetrating.
• Do not store fruit and vegetables in the same container as flavour and moisture may
transfer.
• Do not crush or grind herbs until they are ready to use, as this exposes more surface to
the air allowing loss of flavour. If stored well, they should last up to 12-18 months. Dried
herbs are stronger than fresh, so use conservatively and label clearly so they are easy to
recognise.
11
 Loading...