

Lakeland 19698 Instruction Booklet
INSTRUCTION BOOKLET
ICE CREAM
CONE MAKER
Model: 19698
J18667 Ice Cream Cone Maker Instruction Booklet.indd 1 04/09/2014 10:30

LAKELAND ICE CREAM CONE MAKER
Thank you for choosing the Lakeland Ice Cream Cone Maker.
Please take a little time to read this booklet before you use your machine and keep it in a
safe place for future reference.
This Ice Cream Cone Maker makes delicious wafers and cones for ice creams, sundaes,
and other desserts in a few minutes. You can use the ice cream cone shaper included, or
simply use them flat for sundaes and ice cream sandwiches. You can decorate your cones
with melted chocolate, sugar pieces, cake sprinkles and other treats.
An award winning family-owned business, here at Lakeland we still have the same values
of excellent quality, value for money and exceptional customer care as we did when we
first set up the company in the 1960s.
Our products are carefully selected and rigorously tested to meet our high standards, so
you can be assured that any product you purchase will be easy-to-use and highly durable.
CONTENTS
Product features .............................................................................................................. 3
Safety cautions .............................................................................................................4-5
How to use the Ice Cream Cone Maker for the first time .................................................. 6
Instructions for use ......................................................................................................6-7
A guide to ingredients ..................................................................................................... 8
Adapting your own recipes..............................................................................................8
Hints and tips ..................................................................................................................8
Recipe ............................................................................................................................ 9
Troubleshooting ............................................................................................................ 10
Care and cleaning .........................................................................................................10
Electrical connections .................................................................................................... 11
Recycling your electricals ...............................................................................................11
2
J18667 Ice Cream Cone Maker Instruction Booklet.indd 2 04/09/2014 10:30
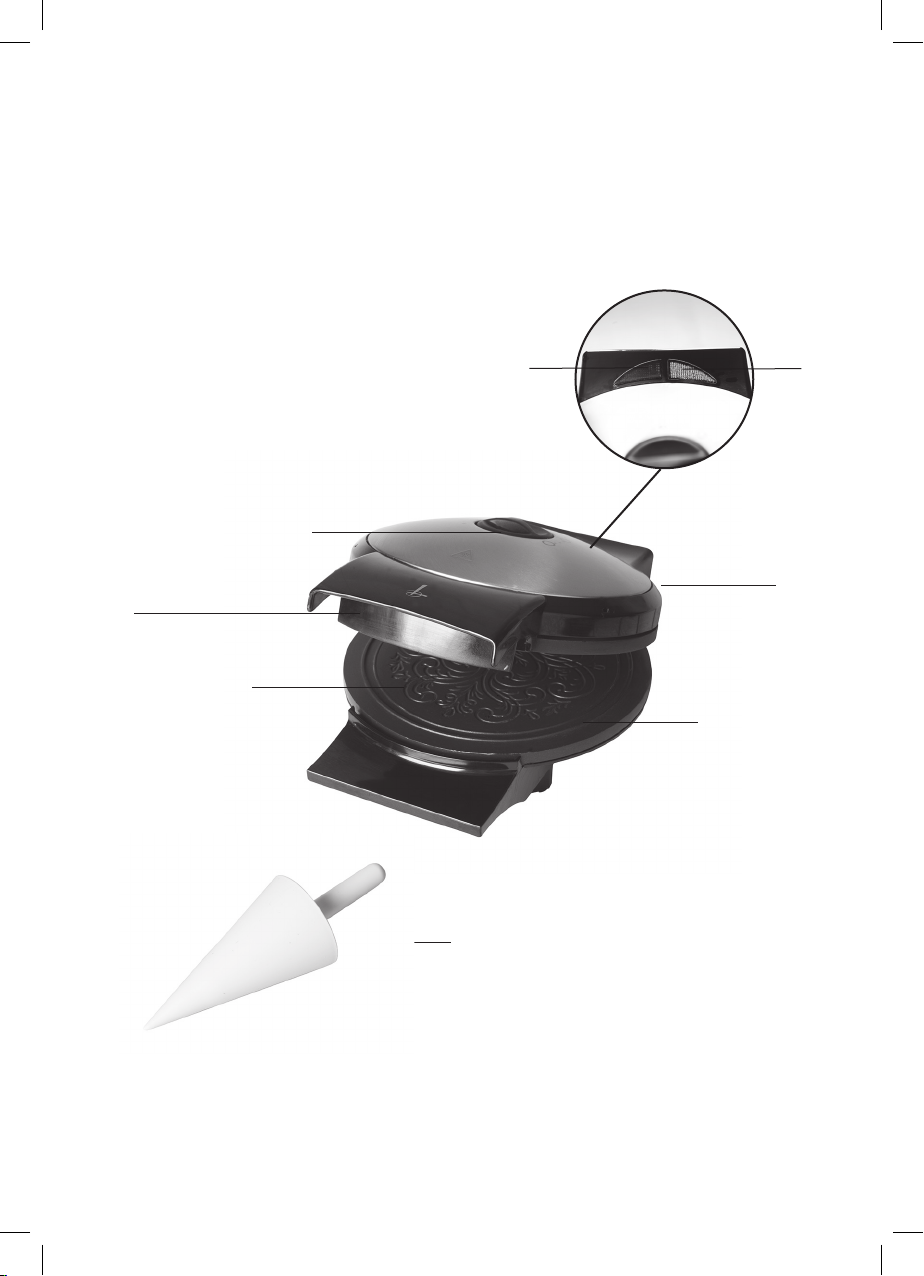
PRODUCT FEATURES
1. Heat control dial
2. Heating light – red when the plates are heating
3. Ready light – green when the cone maker is ready to use
4. Hot plates
5. Hot plate rim
6. Lid handle
7. Cord and plug
8. Cone shaper
1
6
4
2
3
7
5
8
3
J18667 Ice Cream Cone Maker Instruction Booklet.indd 3 04/09/2014 10:30

SAFETY CAUTIONS
Carefully read all the instructions before using the appliance and keep in a safe place
for future reference. Always follow these safety cautions when using the appliance to
avoid personal injury or damage to the appliance. This appliance should be used only as
described in this instruction book.
• Make sure your electricity supply matches the voltage shown on the appliance.
• Ensure all packaging materials and any promotional labels or stickers are removed from
the appliance before the first use.
• Always inspect the appliance before use for noticeable signs of damage. Do not use if
damaged or has been dropped. In the event of damage, or if the appliance develops a
fault contact the Lakeland customer care team on 015394 88100.
• Do not use this appliance if the lead is damaged. If the lead is damaged it must be
replaced with a special lead, contact the Lakeland customer care team on
015394 88100.
• Always use the appliance on a dry, level, heat resistant surface.
• Unplug from the mains when not in use and before cleaning. Allow to cool before
cleaning the appliance. To disconnect, turn the socket to “off “and remove the plug
from the mains socket.
• This appliance is not intended for use by persons (including children) with reduced
physical, sensory or mental capabilities, or lack of experience and knowledge, unless
they have been given supervision or instruction concerning the use of the appliance by
a person responsible for their safety.
• Children should always be supervised to ensure they do not play with this product.
• Do not use any accessories or attachments with this appliance other than those
recommended by Lakeland.
• To protect against fire, electric shock or personal injury, do not immerse cord, plug or
unit in water or other liquids.
• Do not leave the lead hanging over the edge of a kitchen table or worktop. Avoid
contact between the lead and hot surfaces.
• For indoor use only.
• For domestic use only.
• This appliance should be used for preparation of food as described within the
instructions for use that accompany it.
• Always ensure that your hands are dry before removing the plug from the mains socket.
Never pull the plug out of the mains socket by its lead.
• To avoid injury or possible fire, do not cover the appliance when in use.
4
J18667 Ice Cream Cone Maker Instruction Booklet.indd 4 04/09/2014 10:30
• Do not connect this appliance to an external timer or remote control system.
• An extension cable may be used with care. The electrical rating of the cable should be
at least as great as the appliance. Do not allow the cable to hang over the edge of the
worktop or touch any hot surfaces.
• This appliance complies with the basic requirements of Directives 04/108/EC
(Electromagnetic Compatibility) and 06/95/EC (Safety of Domestic Electrical Appliances)
• WARNING: A cut off plug inserted into a 13amp socket is a serious safety (shock)
hazard. Ensure the cut off plug is disposed of safely.
• The temperature of all surfaces marked with this symbol including the hot plates
will be very hot when the appliance is in use. DO NOT TOUCH these surfaces as
possible injury could occur. Only touch the lid handle to open and close
machine, and the heat control dial. Allow to cool completely before handling
this appliance.
• CAUTION: The plastic bags used to wrap this appliance or the packaging may be
dangerous. To avoid risk of suffocation, keep these bags out of reach of babies
and children. These bags are not toys.
• The lid is very heavy and can fall shut. Take care not to trap hands.
5
J18667 Ice Cream Cone Maker Instruction Booklet.indd 5 04/09/2014 10:30
HOW TO USE THE ICE CREAM CONE MAKER
FOR THE FIRST TIME
Before first use, wipe the two hot plates with a cloth rinsed in warm soapy water and then
dry with kitchen paper.
Take a clean sheet of kitchen paper and apply a little vegetable oil to it, gently rub both
hot plates with the oiled kitchen paper. The hot plates have a non-stick coating and will
only need this before first use.
INSTRUCTIONS FOR USE
1. Prepare your batter in advance, make a smooth batter that will coat the back of a
spoon with a smooth thin layer.
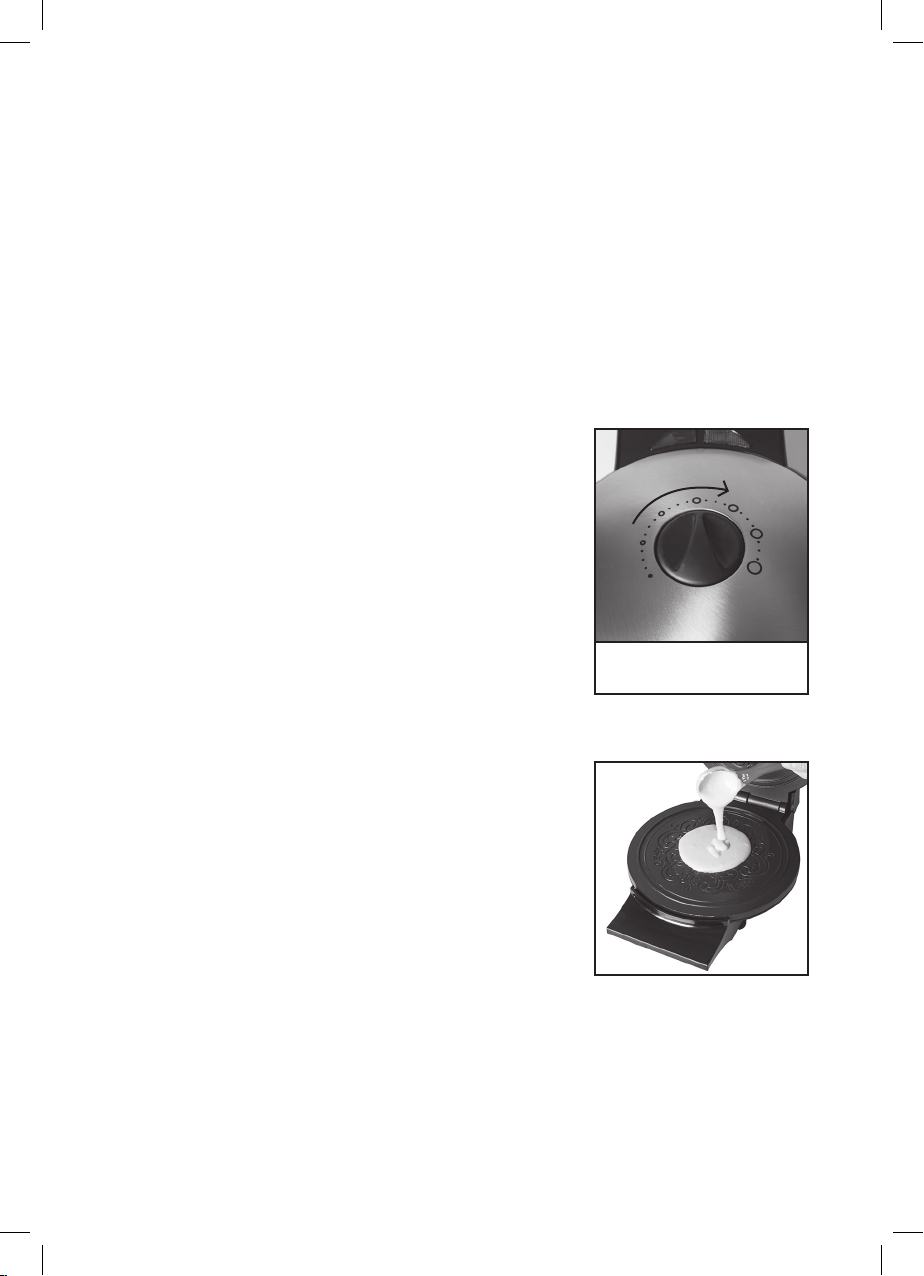
2. Use the heat control dial on top of the lid to select the
heat level you require. This will vary according to your
recipe and the temperature of your mixture. Recipes with
a higher sugar content will brown more quickly. If you are
unsure, we recommend starting with a lower heat and
turning up the dial until your wafer is the colour you would
like. You can quickly lift the lid to check during cooking.
3. Plug the Ice Cream Cone Maker into the socket and switch
it on.
4. The red heating light will illuminate to show the hot plates
are heating to the temperature you have set.
5. When the Ice Cream Cone Maker is ready to use, the
green ready light will illuminate.
6. Use a tablespoon measure to spoon your mixture onto
the hot plate, most recipes will need 2-3 tablespoons of
mixture. Spread the mix quickly in the centre of the hot
plate with a heat resistant non-metal spatula and close
the lid. Excess mixture will be caught in the hot plate rim.
7. Cook for 3-4 minutes. Quickly lift the lid to check if the
wafer is cooked as you would like, if not close the lid
again for another minute.
8. Remove the wafer quickly from machine and lie on a clean
folded tea towel. Use the towel to roll the wafer around
the cone maker and hold until it has cooled down and
will hold its own shape. Carefully remove the cone shaper
to make your next cone.
Turn clockwise to increase
the heat
6
J18667 Ice Cream Cone Maker Instruction Booklet.indd 6 04/09/2014 10:30

WARNING: The wafer will be very hot when you remove it from the hot plate. Remove
it from the hot plate with a spatula and wear oven gloves. The temperature of all
surfaces marked with this symbol including the hot plates will be very hot when the
appliance is in use. DO NOT TOUCH these surfaces as possible injury could occur. Only
touch the lid handle to open and close machine, and the heat control dial. Allow to cool
completely before handling this appliance.
Your cones can then be dipped in melted chocolate and dipped in nuts, sugar sprinkles or
chopped fudge etc. to decorate, then left to set.
Warm wafers can be moulded into the ‘cups’ of a cupcake baking tin, or over the outside
of a small ramekin to make a ‘bowl’ for serving in. They can also be cut into small circles
with a cookie cutter to make flat wafers for ice cream sandwiches.
7
J18667 Ice Cream Cone Maker Instruction Booklet.indd 7 04/09/2014 10:30

A GUIDE TO INGREDIENTS
Only use batter mixtures in the Ice Cream Cone Maker.
Mixtures with a higher sugar content will brown more quickly. So batter recipes which
include sugar, honey or maple syrup will brown nicely. Start cooking these recipes with a
lower heat setting.
You can add different flavourings and spices to your batter, such as vanilla, butter caramel,
cinnamon, cardamom, or nutmeg.
Your cones can then be dipped in melted chocolate and dipped in nuts, sugar sprinkles or
chopped fudge etc. to decorate, then left to set.
ADAPTING YOUR OWN RECIPES
After you have made the recipe supplied you may wish to adapt a few of your
own recipes.
Start by using the recipe in this booklet as a guide.
HINTS AND TIPS
• Use a tablespoon measure, most recipes will need 2-3 tablespoons of mixture.
• Always use heat resistant plastic, nylon, wooden or silicone spatulas – metal utensils will
damage the non-stick coating on the hot plates.
• If the top of your wafer is not as dark as the bottom, press the handles together during
cooking to apply more heat.
• Remove the wafer quickly from the hot plate and shape it before it has cooled. The
lighter the wafer the easier it will be to mould and shape.
• Waffles can be stored in a sealed airtight container for 2-3 days.
• The lid is very heavy and can fall shut. Take care not to trap hands.
8
J18667 Ice Cream Cone Maker Instruction Booklet.indd 8 04/09/2014 10:30
 Loading...