

Lakeland 17892 Plus User Manual
INSTRUCTION
BOOKLET
Breadmaker Plus
MODEL 17892

LAKELAND BREAD MAKER PLUS
Thank you for choosing this Lakeland Bread Maker Plus. Please take a little time to read this booklet
before you use your bread maker and then keep it in a safe place for future reference.
We are sure you will be delighted with the performance and will enjoy many years of baking your
own delicious bread. This Bread Maker makes two sizes of loaf - 700g and 1000g. This allows you
to choose a medium or large loaf depending on your needs. This versatile machine has 12 settings
allowing you to make basic, wholemeal, French and sweet breads as well as excellent cakes, dough
and quick breads. Gluten free bread is easy to make in this machine and there is also a jam
programme to produce delicious jams and marmalades. This model has its own set of electronic
scales for accurate measuring of ingredients, an automatic extra ingredient dispenser and a special
accessory for baking your own baguettes.
An award winning family-owned business, here at Lakeland we still have the same values of
excellent quality, value for money and exceptional customer care as we did when we first set up
the company in the 1960s. Our products are carefully selected and rigorously tested to meet our
high standards, so you can be assured that any product you purchase will be easy-to-use and
highly durable.
CONTENTS
Product Features 4
Safety Cautions 5
The Control Panel and Programmes 7
How to assemble the Bread Maker and using for the first time 16
Instructions for use 16
A guide to ingredients 19
Adapting your own recipes 21
Hints and tips 21
Recipes 22
Programme 1 - BASIC 23
Programme 2 - WHOLEWHEAT 24
Programme 3 - FRENCH 25
Programme 4 - QUICK 26
Programme 5 - SWEET 27
Programme 6 - CAKE 28
Programme 7 - JAM 29
Programme 8 - DOUGH 31
Programme 9 - RAPID BAKE 32
Programme 10 - BAKE 33
Programme 11 - GLUTEN FREE 34
Troubleshooting 35
Care and cleaning 40
Recycling your electricals 40
Electrical connections 41
2 3

PRODUCT FEATURES
1. Viewing window
2. Control panel
3. Housing
4. Lid
5. Removable bread pan with
kneading paddle
6. Removable electronic scale
7. Auto dispenser – ingredient box
8. Auto dispenser – ingredient box drawer
9. Hook
10. Measuring cup
11. Measuring spoon
SAFETY CAUTIONS
Carefully read all the instructions before using the appliance and keep in a safe place for future
reference. Always follow these safety cautions when using the appliance to avoid personal injury or
damage to the appliance. This appliance should be used only as described in this instruction book.
• Make sure your electricity supply matches the voltage shown on the appliance.
• Ensure all packaging materials and any promotional labels or stickers are removed from the
appliance before the first use.
• Always inspect the appliance before use for noticeable signs of damage. Do not use the
appliance if it is damaged or has been dropped. In the event of damage, or if the appliance
develops a fault contact the Lakeland customer care team on 015394 88100.
• Do not use this appliance if the lead is damaged. If the lead is damaged it must be replaced.
Contact the Lakeland customer care team on 015394 88100.
• Always use the appliance on a dry, level, heat resistant surface.
• Unplug from the mains when not in use and before cleaning. Allow to cool before cleaning
the appliance. To disconnect, turn the socket to “off “and remove the plug from the mains
socket.
• This appliance is not intended for use by persons (including children) with reduced physical,
sensory or mental capabilities, or lack of experience and knowledge, unless they have been
given supervision or instruction concerning the use of the appliance by a person responsible
for their safety.
• Children should always be supervised to ensure they do not play with this product.
• Do not use any accessories or attachments with this appliance other than those recommended
by Lakeland.
• To protect against fire, electric shock or personal injury, do not immerse cord, plug or unit in
water or other liquids.
• Do not leave the lead hanging over the edge of a kitchen table or worktop. Avoid contact
between the lead and hot surfaces.
• For indoor use only.
• For domestic use only.
CONTROL PANEL CLOSE UP
4 5
• This appliance should be used for preparation of food as described within the instructions for
use that accompany it.
• Always ensure that your hands are dry before removing the plug from the mains socket. Never
pull the plug out of the mains socket by its lead.
• Do not connect this appliance to an external timer or remote control system.
• An extension cable may be used with care. The electrical rating of the cable should be at least
as great as the appliance. Do not allow the cable to hang over the edge of the worktop or
touch any hot surfaces.

• This appliance complies with the basic requirements of Directives 04/108/EC (Electromagnetic
Compatibility) and 06/95/EC (Safety of Domestic Electrical Appliances)
• WARNING; A cut off plug inserted into a 13amp socket is a serious safety (shock) hazard.
Ensure the cut off plug is disposed of safely.
• The temperature of all surfaces marked with this symbol will be very hot when the
appliance is in use. DO NOT TOUCH these surfaces as possible injury could occur. Allow to cool
completely before handling this appliance.
• CAUTION; The plastic bags used to wrap this appliance or the packaging may be dangerous.
To avoid risk of suffocation, keep these bags out of reach of babies and children. These bags
are not toys.
• Do not operate empty unless the instructions advise otherwise e.g for the first use.
• Do not touch any moving parts whilst in use.
THE CONTROL PANEL AND PROGRAMMES
The Bread Maker does not have a separate on/off switch. Simply plug in and switch on at the
socket. After switching on at the socket the LCD in the display screen will be illuminated (see Fig.1)
and you will hear a beep.
Fig.1
• Do not lift or move the Bread Maker whilst in use.
• Do not cover the Bread Maker or block the air vents in the lid or sides whilst in use.
• Make sure there is plenty of air circulation around the Bread Maker when in use.
• The bread pan will be very hot – always use oven gloves to remove the hot bread pan from
the oven chamber.
• The kneading paddle will be very hot after use, always use an oven glove or cloth when
handling.
• Do not place hands in the oven chamber after the bread pan has been removed as it will be
very hot.
After a few seconds “1000g, 1, MEDIUM, 3:00” appears in the display screen (see Fig.2). This is the
default setting and will appear every time you turn on the machine.
Fig.2
START/STOP
For starting and stopping the selected programme.
To START a programme, press the START/STOP button for approx. 2 seconds. A short beep will be
heard and the two dots in the time display begin to flash. The programme will start.
To STOP a programme, press the START/STOP button for approx. 2 seconds until a beep confirms
that the programme has been switched off.
PAUSE
Press the PAUSE button to interrupt the programme at any time (to add ingredients, stir in flour
that may not be fully mixed in etc). The machine will pause but the setting will be memorised for
10 minutes. The working time will be flashed on the display screen. Press PAUSE again to restart
the programme
LIGHT
A light allows you to check the progress of your loaf. Simply press the LIGHT button once and
the inside of the chamber will be illuminated. The light stays on for 1 minute and will then go
out automatically but you can also turn the light off yourself by pressing the LIGHT button again.
6 7

MENU
The MENU button is used to set your selected programme.
Press the MENU button repeatedly to scroll through the menu – the programmes will show in the
display screen accompanied by short beeps.
Select your programme by pressing the screen repeatedly. When you see the number of the
programme you require together with the programme time – stop pressing. If you go past your
chosen programme, keep pressing the button until the programme number comes round again.
The programmes are as follows:
1. BASIC
Kneading, rising and baking of normal white or brown bread.
2. WHOLE WHEAT
Kneading, rising and baking of whole wheat bread. This setting has a longer preheating time
to allow the grain to swell up and expand. It is not recommended to use the delay function
with this programme.
3. FRENCH
Kneading, rising and baking of French style bread. This setting has a longer rise time and
produces bread with a crisper crust and light texture.
4. QUICK
Kneading, rising and baking loaves made with baking powder or soda such as soda bread or
gingerbreads. Breads made on this setting usually have a denser texture and are smaller.
5. SWEET
Kneading, rising and baking sweet breads such as Brioche, fruit loaves etc.
6. CAKE
This programme is for mixing and baking cakes. You may find that cakes made in the Bread
Maker will be smaller and a little more dense than those baked in your conventional oven.
7. JAM
Excellent jam and marmalade can be made on this setting. The Bread Maker will produce
approx 450g jam or marmalade simply and easily. Ideal for using up smaller quantities of
fruit.
8. DOUGH
Kneading and rising. No bake. You can remove the raw dough and shape into rolls, pizza etc
to cook in the conventional oven. Ideal for producing dough to make into baguettes to cook
in the baguette accessory.
9. RAPID BAKE
Kneading, rising and baking in the shortest time. Loaves made using this programme require
warm water instead of cold. The loaf will be smaller and denser in texture than bread made
on the BASIC programme. It’s the ideal programme if you need a loaf very quickly.
10. BAKE
Baking only – no kneading or rising.
This is usually used in conjunction with the DOUGH programme to allow additional
ingredients to be kneaded into the dough by hand or if you want to remove the kneading
paddle before the loaf is cooked. After completion of the DOUGH programme, remove the
unbaked dough, carefully remove the kneading paddle, reshape the dough, kneading in the
additional ingredients such as nuts, fruit etc, then return dough to bread pan and place back
in the machine. Close the lid and leave the dough to rise for approximately 30 – 40 minutes.
Select BAKE to cook the loaf.
The preset baking time is 60 minutes, however you can adjust the baking time to suit your
own tastes. To adjust the baking time simply press the TIME button and set your own baking
time.
You can also use the BAKE programme to darken crusts if the finished loaf is too light at the
end of your chosen programme. Simply select BAKE and leave the loaf to bake for longer,
taking the loaf out of the machine when you are happy with the colour. Bread can also be
crisped and freshened using the BAKE programme.
11. GLUTEN –FREE
A special programme for those who use gluten- free flours and baking mixes. The dough is
usually more like a muffin batter and is wetter than ordinary doughs.
12. CUSTOM
When you have become very proficient and have mastered the art of bread making you may
wish to change the way the bread maker prepares and cooks your loaf. The CUSTOM function
allows you to set your own timings to produce a loaf to your own specification.
The programme allows you to reset kneading, rising , baking and keep warm times.
The time range for each programmes stage is as follows;
Knead 1: 6 – 14 minutes
Rise 1: 20 – 60 minutes
Knead 2: 5 – 20 minutes
Rise 2: 5 – 120 minutes
Rise 3 0 – 120 minutes
Bake 0 – 80 minutes
Keep warm 0 – 60 minutes
To operate the CUSTOM programme;
1. Press the CYCLE button once. KNEAD1 on the display screen will flash. Press the TIME button
to adjust the minutes, then press CYCLE to confirm the time for this step.
2. Press CYCLE to enter the next step. RISE1 on the display screen will flash. Press theTIME button
to adjust the minutes. Press CYCLE to confirm.
3. Continue as above to set the remaining steps.
4. Press START/STOP to exit the setting.
5. Press START/STOP again to start the programme.
Note. The setting will be memorised for your next use.
8 9

COLOUR
Press the COLOUR button to select LIGHT, MEDIUM or DARK coloured crust. This cannot be used
with the DOUGH or JAM programmes
LOAF SIZE
Press this button to select your loaf size either 1000g or 700g and programme times will vary
according to the loaf size selected. The programme time will be visible on the display screen.
You can select either a 1000g or 700g loaf on these programmes;- BASIC, WHOLE WHEAT, FRENCH,
SWEET, RAPID BAKE
You cannot use the LOAF SIZE button on the following programmes: QUICK, CAKE, JAM, DOUGH,
BAKE, GLUTEN-FREE and CUSTOM.
DELAY FUNCTION
TIME (This enables you to delay the start time)
The maximum delay time is 13 hours. If you want to delay the start time so that the bread cooks
overnight and is ready to eat in the morning :-
POWER FAILURE BACKUP SYSTEM
The Bread maker is equipped with a power failure backup system or memory. If the power system
is interrupted during the course of bread making, the process of making bread will be continued
automatically within 10 minutes, even without pressing the START/STOP button. If the interruption
time exceeds 10 minutes, the memory cannot be kept and you must discard the ingredients in the
bread pan and start again. If the dough has not entered the rising phase when the power supply
breaks off, you can press the START/STOP button directly to continue the programme from the
beginning.
WARNING DISPLAY
If the display screen shows “H HH” after you have pressed the START/STOP button and the machine
beeps continuously the temperature inside is too high. For the JAM and BAKE programmes, open
the lid and let the machine cool down for 10 – 20 minutes.
For other programmes, press the START/STOP button, open the lid and allow the bread maker
to cool down for 10 – 20 minutes. If the display screen shows “LLL” after pressing the START/
STOP button (except the JAM and BAKE programmes) and the machine beeps continuously the
temperature inside is too low. Press the START/STOP button, open the lid and allow the bread
maker to rest for 10 – 20 minutes to return to room temperature.
If the display screen shows “E EO” or “E E1” after the START/STOP button has been pressed the
temperature sensor has developed a fault. Contact Lakeland Customer services for further advice.
Example;
It is 8.30pm and you want your bread ready at 7am the following day – i.e in 10 hours and 30
minutes.
• Select your programme, loaf size and colour.
• Press the TIME button to add the time until 10.30 appears on the display screen. Remember
to include the operation time of your chosen programme.
• Press the START/STOP button to activate the delay function.
• The dots will flash and the numbers will count down to show you the remaining time.
• The bread will be ready for you at 7am.
DO NOT USE THE DELAY TIME WHEN USING INGREDIENTS THAT WOULD SPOIL SUCH AS EGGS,
MILK, CREAM OR CHEESE. NOT SUITABLE FOR GLUTEN FREE AND RAPID BAKE PROGRAMMES.
OTHER FEATURES
KEEP WARM
The Bread Maker will automatically keep the bread warm for 60 minutes after baking. At the end
of the programme the bread maker will beep and the display screen will show 0:00 and KEEP
WARM will flash on the display screen indicating that the machine is in KEEP WARM mode. Press
the START/STOP button to switch off the Bread Maker. The KEEP WARM feature means that bread
can be served warm if preferred and helps to minimise moisture build up if the loaf is not removed
from the Bread Maker immediately after baking.
Note: For best results however, remove the bread as soon as the baking cycle is complete and allow
it to cool on a cooling rack. You may find that the crust becomes crisper if kept on the KEEP WARM
mode after baking.
CONTROL PANEL LOCK FUNCTION
This is a useful feature that prevents the unintentional disruption of the programmes whilst in use.
The control panel can be locked by pressing the CYCLE button and then the COLOUR button.
You will hear 3 beeps and see a key icon on the display screen. Once locked you will be unable to
activate any of the buttons.
The lock can be cancelled by pressing the CYCLE button and then the COLOUR button. You will
hear 3 beeps and the key icon will disappear.
AUTO ADD INGREDIENT FUNCTION
The Bread Maker has an automatic dispenser for adding extra ingredients into the dough at
the correct time during the cycle. This means that ingredients are not over processed and are
distributed evenly. The dispenser drawer is located at the back of the machine. Pull out the
drawer using the handle and then lift out the ingredients box. Add your ingredients such as nuts,
cranberries, raisins, sun dried tomatoes etc, making sure they do not exceed the capacity of the
box and then put the box back in the drawer. Push the drawer back into the Bread Maker, making
sure it is securely locked into place.
The dispenser is not suitable for very small seeds which may fall through the slots in the box and
is not suitable for liquids. The extra ingredients will be automatically poured into the bread pan at
the correct stage in the programme.
You can use the automatic dispenser on these programmes:-
BASIC, WHOLE WHEAT, FRENCH, QUICK, SWEET, CAKE, RAPID BAKE and CUSTOM
10 11
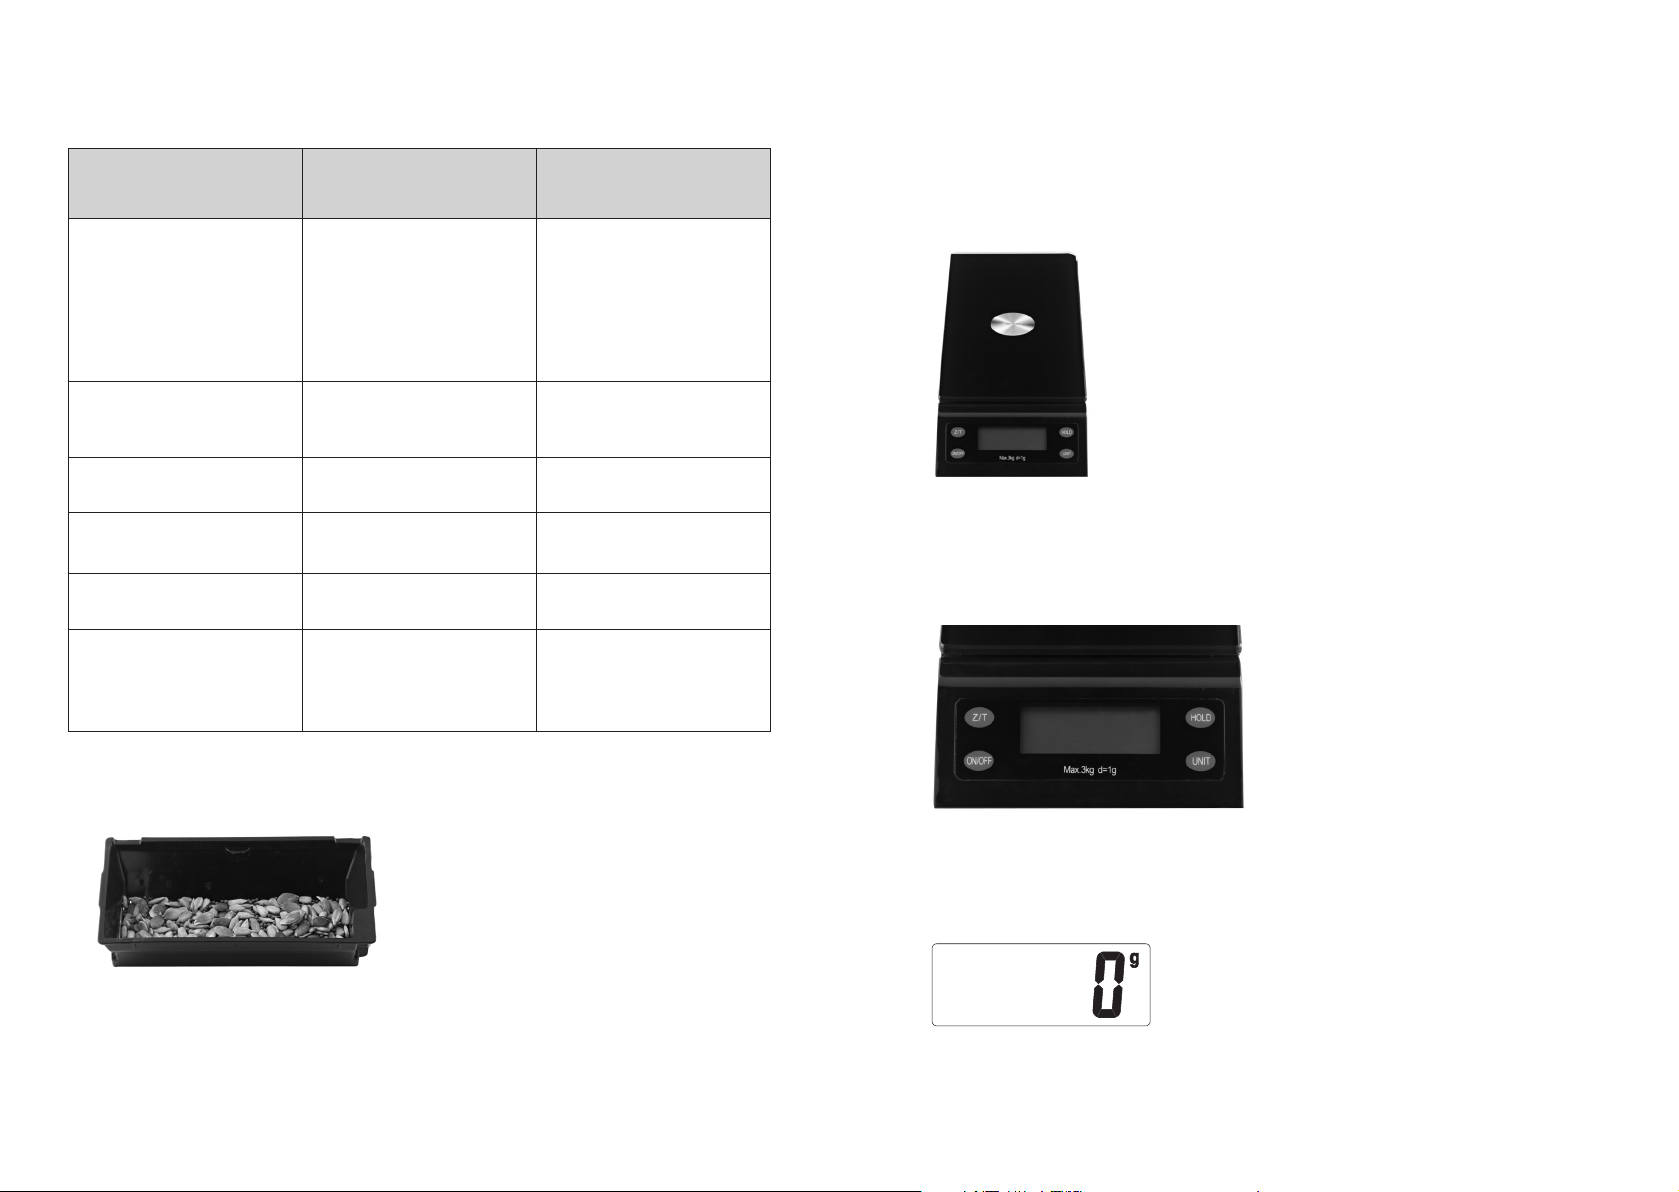
The table below indicates the foods which can and can’t be placed in the dispenser. However, this
is a guide and you may wish to experiment. Do not overfill the ingredient box – make sure you can
close the drawer and lock into place.
ELECTRONIC SCALES
The Bread Maker has its own set of accurate electronic scales which sit conveniently on top of the
machine so they are always to hand. The scales can weigh a max. 3kg load.
Ingredient
Dried cranberries, mixed peel,
candied peel, currants, raisins,
glace cherries, sultanas, large
seeds such as pine nuts,
walnuts, pecan nuts, hazelnuts,
almonds, dried apricots, dried
dates, pumpkin seeds, sun dried
tomatoes(use ready to eat variety)
olives
Small seeds such as sesame,
poppy, small sunflower seeds,
ground almonds, desiccated
coconut.
Chocolate chips, drops or pieces No
Cheese No
Fresh fruit or fruit soaked in syrup,
fruit juices or alcohol, grated
citrus zest.
Herbs (fresh and dried) No
Yes
No
No
Suitable for use in the
automatic dispenser
Comments
Roughly chop foods if large.
Cut up, wash and dry glace
cherries very thoroughly.
If you want to use sun dried
tomatoes or olives in oil you must
make sure they are very well
drained and dried otherwise they
may stick inside the dispenser.
Small seeds may fall through the
gaps in the dispenser. Add these
at the beginning with the other
ingredients.
Chocolate may melt in the
dispenser – add these manually.
Cheese may melt in the dispenser
so add manually with the other
ingredients at the start.
May become stuck to the
dispenser so add manually with
other ingredients at the start.
May not be released as they are
light in weight. May also fall
through gaps in the dispenser.
Add manually with other
ingredients.
The scales are battery operated and require 2 x 1.5v AAA batteries. To fit batteries, turn the scale
over, open the battery cover and position the batteries in the chamber. Replace the battery cover.
Fig.4
To use the scales;
The electronic scales are very accurate and easy to use.
You will see 4 buttons:- (see Fig.5)
Fig.5
Fig.3 Ingredient drawer loaded with ingredients
ON/OFF - Press the ON/OFF button to start – zero is the default setting. (see Fig.6)
Fig.6
12 13

Z/T – this allows you to weigh different ingredients consecutively without removing them from
the scale e.g.
• Put the bread pan or other container on the scale, press Z/T to zero the scale then weigh the
first set of dry ingredients.
• Press the Z/T button to reset the reading to 0
• Add the next ingredients to the correct weight.
• Press the Z/T button to reset the reading to 0
• Continue with your remaining ingredients.
• HOLD – When you press this button the display screen will keep the reading unchanged even
if you have removed the load from the scales. (see Fig.7)
Fig.7
UNIT
Press this button to select “g” or “1b and oz” and “oz” (see Fig.8) Note; The recipes in this
booklet have been written in metric only.
Fig.8
BAGUETTE ACCESSORY
The Bread Maker has a special accessory for baking baguettes. (see recipe on page 33)
To assemble;
Unfold the baking rack frame, and place it on a level surface. (see Fig.9)
Fig.9
1.
2. Remove the baguette pans from their packaging and wash in hot, soapy water, rinse and
dry thoroughly. Wipe a little cooking oil over the non stick surface, wash, rinse and dry
thoroughly. This will help to condition the non stick coating. Fit the pans onto the upper and
lower rungs on the baking rack. (see Fig.10)
3.
Fig.10
4. Remove the bread pan from the Bread Maker – the baguette accessory sits directly inside the
baking chamber.
14 15

HOW TO ASSEMBLE THE BREAD MAKER AND USE FOR THE FIRST TIME
When the bread maker is used for the first time it may emit a slight burning smell when first
switched on. This is completely normal with a new heating element. You will need to operate the
Bread Maker empty for the very first use and it is safe to do so. This will also show you how easy
the Bread maker is to use.
To do this;
1. Wash the bread pan and kneading paddle in hot, soapy water, rinse and dry thoroughly.
2. Place the Bread Maker on a flat, dry, heat-resistant surface.
3. Position the bread pan in the baking chamber holding it at a slight angle and turning it
clockwise until it clicks into place.
4. Fix the kneading paddle onto the drive shaft.
5. Close the lid.
6. Switch on at the socket.
7. The bread maker will beep and the display screen will show the default setting:
“1000g, 1,MEDIUM,3:00”
8. Press the MENU button repeatedly – the programme numbers will scroll through. Stop
pressing at programme number 10, BAKE. If you go past the number you require simply keep
pressing until programme 10, BAKE comes round again.
9. Select programme 10 BAKE (the display screen will show 10 minutes) and press START/STOP.
10. The Bread Maker will begin to count down and you can follow this on the display screen.
Leave the Bread maker to BAKE for the 10 minutes. You may hear some intermittent clicks
during this time.
11. Press the START/STOP button firmly to stop the programme.
12. Open the bread maker and allow to cool completely.
13. Lift out the kneading paddle then remove the bread pan by turning anti clockwise and lifting
out.
14. Wash, rinse and dry the bread pan and kneading paddle again and replace.
You are now ready to make your first loaf
Adding extra ingredients.
You can do this in two ways (or a combination of both)
1. You can add extra ingredients to the bread pan with your basic ingredients. If added at the
start of the programme they will be more finely distributed throughout the mixture and will
not remain whole – they will however add flavour and colour to the dough.
2. Put the extra ingredients such as nuts, cranberries, raisins etc in the auto dispenser – they will
automatically be poured into the machine at the correct time and will remain whole.
OR
3. If using the DOUGH programme you can knead extra ingredients in by hand before shaping
and baking.
Making a loaf – Things to remember
How to put the ingredients into the bread pan; Rub a little margarine or butter onto the kneading
paddle and position onto the drive shaft. This prevents the dough from sticking to the kneading
paddle and assists with removing the paddle from the bread after baking.
• Ensure the ingredients are put into the Bread Maker in the exact order given in the recipe, for
example; (see Fig. 11)
Fig .11
Yeast or soda
Dry ingredients
Water or liquidSalt
INSTRUCTIONS FOR USE
How to measure ingredients
One of the most important steps for making good bread is to use the exact measure of ingredients.
Always use the electronic scales, measuring cup and spoons provided with your Bread Maker.
• Weigh the flour and dry ingredients on the electronic scale for accuracy, unless the recipe tells
you to use spoons.
• Any liquid should be measured with the measuring cup or spoon provided. Observe the level
of the measuring cup at eye level.
• When measuring cooking oil or other liquids, wash, rinse and dry the measuring cup and
spoon thoroughly before measuring any other ingredients.
• When measuring yeast, sugar and salt make sure the spoon is levelled with the back of a
knife – it must not be heaped.
16 17
• First, liquid ingredients – oil, milk, water etc . It is recommended that you also add the salt
now as you can be sure it will be kept separate from the yeast – this is especially important if
you are using the time delay.
• Second, dry ingredients – flour, sugar, milk powder etc. Add the flour gently and make sure
it is evenly distributed over the liquid. If you tip it onto the liquid too fiercely the liquid may
seep up through the flour and affect the action of the yeast. This is particularly important if
you are using the time delay.
• Last, yeast. The yeast must be kept separate from the wet ingredients and salt. Create a small
hole in the dry ingredients using your finger or a spoon and place the yeast in the hole. Make
sure the yeast is fresh – check the use by date.
• Ensure the ingredients are at room temperature unless otherwise stated. Water should be
cold unless the recipe states otherwise. (as in the RAPID BAKE programme)
Select your recipe – it is a good idea to use one of the recipes we have included in this booklet.
The BASIC bread recipe on page 23 is a good recipe to start with. When you are familiar with the
Bread Maker you can use or adapt your own recipes.

1. Add the ingredients to the Bread Maker and auto dispenser ingredient box as recommended
in the recipe.
2. Close the lid.
3. Switch the Bread Maker on. You will hear a beep. The display panel will illuminate and show
the default setting “1000g, 1,MEDIUM,3:00”
4. Press the MENU button repeatedly until the programme you require is reached.
5. Press the LOAF SIZE button to select a 700g or 1000g loaf(where applicable)
6. Press the COLOUR button to select the desired crust colour (LIGHT,MEDIUM or DARK)
7. If you want to delay the time the Bread Maker will start press the TIME button. (for full details
see page 10) Skip this step if you want the Bread Maker to start immediately.
8. Press the START/STOP button firmly for 3 seconds. Once you have pressed the START/STOP
button the Bread Maker will automatically take care of each step of the bread making process
until the loaf is completely cooked. The remaining time and the programme stage will be
visible on the display screen. Check the dough after a few minutes to make sure that all the
flour is incorporated into the dough. Sometimes flour may be left in the corners of the bread
pan. Press the PAUSE button, open the lid and using a non stick spatula simply loosen the
flour so it will be evenly mixed in. Close the lid again and press PAUSE to recommence the
programme.
9. If you have added extra ingredients to the auto dispenser ingredients box they will be added
automatically at the correct stage in the programme.
When the programme is complete you will hear 10 beeps and the display screen will show 0:00
and KEEP WARM will flash on the display screen. The bread will now be automatically kept warm
for 60 minutes if you do not switch the Bread Maker off.
Press the START/STOP button firmly to stop the machine. The default setting will appear in the
display screen “1, 1000g, MEDIUM, 3:00”
Open the lid and using an oven glove, turn the bread pan anti-clockwise and gently pull the pan
straight up out of the machine using the handle. (see Fig.12)
Fig.12
Remember; If you do not stop the Bread Maker and remove your loaf the Bread Maker will
automatically switch to “Keep Warm” mode. Your bread will be kept warm for 60 minutes to
prevent it from becoming soggy. The crust may become crisper depending on how long it is kept
warm.
For best results, remove the bread as soon as the baking cycle is complete and allowing it to cool
on a cooling rack.
A GUIDE TO INGREDIENTS
The major ingredient in bread making is flour, so selecting the right one is the key to a successful
loaf.
Wheat flours
Wheat flours make the best loaves. Wheat consists of an outer husk, often referred to as bran,
and an inner kernel which contains the wheat germ and endosperm. It is the protein within the
endosperm which, when mixed with water forms gluten. Gluten stretches like elastic and the gases
given off by the yeast during fermentation are trapped, making the dough rise.
Strong or Very Strong White Bread flours
These flours have the outer bran and wheat germ removed, leaving the endosperm which is milled
into a white flour. It is essential to use strong or very strong white flour or white bread flour
because this has a higher protein level essential for the development of the gluten. Do not use
ordinary plain white flour or self raising flour for making yeast risen breads in the Bread Maker as
you will not get a good result. There are several brands of white bread flour in the shops – look for
STRONG or BREAD flour on the bag.
Strong or Very Strong Wholemeal or Whole Wheat Bread flours
Wholemeal flours include the bran and wheat germ and have a nutty flavour. Wholemeal flour
gives a courser textured bread. Again look for strong or very strong wholemeal bread flour. If you
make a loaf using all wholemeal flour it will be more dense than white loaves. Wholemeal doughs
rise more slowly which is why there is a special programme on this machine. For a lighter loaf
replace part of the wholemeal flour with white flour.
Loosen the pan as
indicated by the arrow
Granary Strong Bread flours.
A combination of white, wholemeal and rye flours with malted whole wheat grains, which adds
texture and flavour. You can use this on its own or in combination with strong white flour.
Non wheat flours
Other flours such as rye can be used with white and wholemeal bread flours to make traditional
breads like pumpernickel or rye bread. Adding even a small amount can add an interesting tang to
your loaf. Do not use it on its own as the dough will be very sticky and the loaf will be heavy and
very dense. Other grains e.g millet, barley, buckwheat, cornmeal and oatmeal; These grains cannot
be used alone to make bread as they are unsuitable but they can be added in small quantities to
13. Turn the bread pan upside down and gently shake the loaf onto a cooling rack. If the loaf does
not fall out straight away gently loosen the sides of the loaf with a non stick spatula.
14. Leave the loaf to cool for at least 20 – 30 minutes. Sometimes the kneading paddle may
remain in the loaf. If it does, use the hook to remove the paddle from the base of the loaf.
Take care as the kneading paddle will be very hot. Always remove the kneading paddle before
slicing the loaf.
18 19
white bread flour – try replacing 10 -20% of white bread flour with any of these.
Salt
A small quantity of salt is essential for bread making. It helps to develop the dough and gives
flavour. Use fine table salt or sea salt rather than course ground salt which is best kept for sprinkling
on top of hand shaped rolls etc to give a crunchy texture. Low salt substitutes are best avoided as
most do not contain sodium.

• Salt strengthens the gluten structure and makes the dough more elastic.
• Salt inhibits the growth of yeast to prevent over-rising and stops the dough collapsing.
• Take care to add the correct amount as too much salt will kill the yeast or prevent it rising
sufficiently.
ADAPTING YOUR OWN RECIPES
After you have made some of the recipes supplied you may wish to adapt a few of your own
recipes. Start by selecting one of the recipes in this booklet, which is similar to your own and use
this as a guide.
Sweeteners
Use white or brown sugars, honey, malt extract, golden syrup, maple syrup, molasses or treacle.
• Sugar and liquid sweeteners help with the colour of the bread and add a golden colour to the
crust.
• Sugar attracts moisture which improves the keeping quality of the bread.
• Sugar provides food for the yeast. It is not essential as modern types of dried yeast are able to
feed on the natural sugars and starches found in the flour but it will help to make the dough
more active.
• Sweet breads have a moderate level of sugar with the fruit, glaze or icing adding extra
sweetness. Use the SWEET programme for these breads.
• If substituting a liquid sweetener for sugar then the total liquid quantity of the recipe will
need to be reduced slightly.
Fats and oils
A small amount of fat or oil will give a softer crumb and helps to extend the freshness of the loaf.
Use butter, margarine or lard in small quantities. Make sure they are at room temperature and cut
into small pieces so they mix in well. Do not use low fat spreads as they contain up to 40% water
and can affect the overall quantities in your recipe.
Liquid
Some form of liquid is essential. Usually water or milk is used. Water gives a crisper result than
milk. Water can be combined with skimmed milk powder. If using the time delay it important to
use water and skimmed milk powder as ordinary milk will deteriorate if left to stand for too long.
For most programmes you can use water straight from the tap but if using the RAPID BAKE
programmes it needs to be lukewarm.
• On very cold days measure the water and leave to stand at room temperature for 30 minutes
before use.
• If using milk don’t use it straight from the fridge, leave it to stand at room temperature for
30 minutes before use.
• Buttermilk, yoghurt, sour cream and soft cheeses such as Ricotta, cottage or fromage frais can
all be used as part of the liquid content and will give a more moist and tender crumb.
• Eggs can be added to the dough to enrich it. Eggs improve the colour and help to add
structure and stability to the gluten during rising. If you are using eggs reduce the liquid
content accordingly. Place the egg in the measuring cup and top up with liquid to the correct
level for the recipe.
Yeast
All the recipes in this book have been tested using easy blend, fast action yeast which does not
require dissolving in water first, is very easy to use and tends to give better results. It is placed in
a well in the flour where it is kept dry and separate from the liquid until the mixing commences.
• For best results use easy blend, fast action yeast.
• Use only the amount of yeast stated in the recipe. If too much is added it will cause the dough
to spill out over the top of the bread pan.
• Once a sachet of yeast is opened it should be used within 48 hours.
• Always use yeast before its use by date.
• You may also find dried yeast that has been specially designed for use in bread makers.
• Always follow the instructions on the packet.
Read through the following guidelines and be prepared to make adjustments as you go along.
• Make sure you use the correct quantities for the Bread Maker. This Bread Maker has settings
for 1000g and 700g loaves. If using your own recipe books use the quantities given for the
700g and 1000g loaf sizes. Do not use more than 700g of flour and follow the recipe in metric
or imperial – do not mix the two.
• Always add the liquid to the bread pan first. Separate the yeast from the liquid by adding
after the flour.
• Add the flour carefully and spread it over the liquid. If tipped in too fiercely, the liquid may
seep up through the flour and come into contact with the yeast.
• Replace fresh yeast with easy blend dried yeast. Note 6g fresh yeast = 1 teaspoon (5ml) dried
yeast.
• Use skimmed milk powder and water instead of fresh milk of you are delaying the start time.
• If your recipe uses egg, add the egg as part of the total liquid measurement, unless the recipe
states otherwise.
• Keep the yeast separate from the other ingredients in the bread pan until mixing commences.
• Check the consistency of the dough during the first few minutes of mixing. Bread makers do
require a slightly softer dough so you may have to add extra liquid but if you think it needs
more liquid add it slowly a teaspoon at a time so you don’t add too much. The dough should
be wet enough to gradually relax back.
HINTS AND TIPS
• The Bread Maker is not a sealed unit and will be affected by the temperature and humidity of
the day. If it is a very hot day or the machine is used in a hot kitchen, then the bread is likely
to rise more than if it is cold.
• On very cold days let the water from the tap stand at room temperature for 30 minutes before
use. Likewise for ingredients from the fridge.
• Use all the ingredients at room temperature and water from cold unless stated otherwise in
the recipe e. g for the RAPID BAKE programme when you will need to warm the liquid.
• Add the ingredients to the bread pan in the order suggested in the recipe. Keep the yeast dry
and separate from any other liquids added to the pan, until mixing commences.
• Accurate measuring is vital for a successful loaf. Follow either metric or imperial measurements,
do not mix the two. Use the electronic scales, measuring cup and spoon provided.
• Always use fresh ingredients, within their use by date. Perishable ingredients such as milk,
cheese, vegetables and fresh fruits may deteriorate, especially in warm conditions. These
should only be used in breads which are made immediately.
• Do not add too much fat as it forms a barrier between the yeast and flour, slowing down the
action of the yeast, which could give a heavy, dense loaf.
• Cut butter and other fats into small pieces before adding to the bread pan making sure they
are at room temperature – not straight from the fridge.
• Giving the kneading paddle a light coating of oil may make it easier to remove if it bakes into
the loaf.
• You may find that baked loaves may be left with a small patch of unmixed flour, this is quite
normal and can simply be brushed off.
• Bread made in the Bread Maker does not contain preservatives like shop bought bread and so
will not keep for as long.
20 21

RECIPES
• The Bread Maker will make a 700g or 1000g loaf depending on the programme.
• Do not exceed a maximum quantity of 700g flour.
• Use the electronic scale, measuring cup and spoons supplied.
• Follow quantities accurately.
• The recipe charts show the sequence the ingredients are added to the bread pan.
• There is a recipe for each programme except programme 12 CUSTOM.
• The recipes are a guide – you may prefer to make changes as you go along to suit your own
particular tastes.
Programme 1 - BASIC
(auto dispenser can be used with this programme)
BASIC BREAD
This is an excellent basic loaf. You can enrich the bread by adding an egg which will give a delicious
flavour. When using egg remember to include this in the total liquid quantity.
You can add extra ingredients to this basic bread such as nuts, herbs, sun dried tomatoes, olives
etc. (See page 17 Adding additional ingredients.)
Packet bread mixes
• You can use packet bread mixes in your bread maker. The pack should give instructions for
use. Make sure you do not exceed the maximum amount the bread maker can handle.
• Do not use bread mixes with time delay as you cannot separate the yeast from the liquid.
Ingredients
700g loaf – Time: 2 hours 55
mins
1000g loaf – Time: 3 hours
Water 300ml 380ml
Oil 1 ½ tablespoons 1 ½ tablespoons
Salt 1 ½ teaspoons 1 ½ teaspoons
Strong white bread flour 450g 600g
Milk powder 4 teaspoons 5 teaspoons
Caster sugar 1 tablespoon 4 teaspoons
Easy blend yeast 1 ½ teaspoons 1 ½ teaspoons
Ingredients 700g loaf 1000g loaf
Nuts e.g walnuts 25g 30g
Poppy seeds 15g 25g
Cheese, grated 50g 75g
Sunflower seeds 25g 50g
Fennel seeds, caraway seeds,
cumin seeds etc
15g 25g
1. Put the ingredients in the bread pan as above.
2. Close the lid.
3. Press MENU and select programme 1, BASIC
4. Select LOAF SIZE.
5. Select COLOUR.
6. Press START/STOP.
7. At the end of the cycle press START/STOP, lift out the bread pan and turn out the loaf onto a
cooling rack.
22 23

Programme 2 – WHOLEWHEAT
(auto dispenser can be used with this programme)
Programme 3 - FRENCH
(auto dispenser can be used with this programme)
Wholewheat Bread.
This bread uses half wholemeal strong bread flour and half white strong bread flour. You can use
all wholemeal flour but the result will be denser in texture.
Ingredients
700g loaf – Time: 3 hours
32 mins
1000g loaf – Time: 3 hours
40 mins
Water 310ml 380ml
Oil 1 tablespoon 1 tablespoon
Lemon juice 1 tablespoon 1 tablespoon
Salt 2 teaspoons 2 teaspoons
Strong wholemeal bread
flour
420g 500g
Strong white bread flour 80g 100g
Milk powder 4 teaspoons 5 teaspoons
Caster sugar 1 tablespoon 1 tablespoon
Easy blend yeast 1 teaspoon 1 teaspoon
You can add additional ingredients to brown bread – seeds and grains are particularly good. These
can be added at the beginning of the programme with the other ingredients or can be placed in
the auto dispenser (if suitable.. see page 11)
Ingredient 700g loaf 1000g loaf
French Bread.
This is a tasty French style bread with a lighter texture and crisper crust.
French bread is usually made with French bread flour, however it may be difficult to find. This
recipe uses ordinary strong white bread flour and gives excellent results. French bread flour can be
found in some shops and online.
Ingredients
700g loaf – Time: 3 hours
40 mins
1000g loaf – Time: 3 hours
50 mins
Water 310g 400ml
Salt 1 ½ teaspoons 1 ½ teaspoons
Strong white bread flour 450g 600g
Caster sugar 2 teaspoons 2 teaspoons
Easy blend yeast 1 ½ teaspoons 1 ½ teaspoons
1. Put the ingredients in the bread pan as above.
2. Close the lid.
3. Press MENU and select programme 3, FRENCH.
4. Select LOAF SIZE.
5. Select COLOUR.
6. Press START/STOP.
7. At the end of the cycle press START/STOP, lift out the bread pan and turn out the loaf onto
a cooling rack.
Nuts e.g walnuts 25g 30g
Poppy seeds 15g 25g
Cheese, grated 50g 75g
Sunflower seeds 25g 50g
Fennel seeds, caraway seeds,
cumin seeds etc
15g 25g
1. Put the ingredients in the bread pan as above.
2. Close the lid.
3. Press MENU and select programme 2, WHOLEWHEAT.
4. Select LOAF SIZE.
5. Select COLOUR.
6. Press START/STOP.
7. At the end of the cycle press START/STOP, lift out the bread pan and turn out the loaf onto
a cooling rack.
24 25
 Loading...