

Lainox P Series, MG 101 P, ME 061 P User Manual

90024140rev00
Technical service
USER’S MANUAL
EN
CONVECTION OVEN
FOR PASTRY SHOPS
AND BAKERIES
VERSION P
- COMPACT BASIC

2
90024140rev00
CONTENTS
The reproduction or copying of any part of this manual by any means
whatsoever is strictly forbidden unless authorized previously in writing by
the manufacturer.
ALI S.p.A. - 01.10.2004
The manufacturer accepts no liability for any inaccuracies in this manual
attributable to printing or copying errors. We reserve the right to modify
our products as we deem fit, without impairing their basic features.
PAGE
1 • GENERAL REMINDERS 3
2 • POINTS TO REMEMBER 4
3 • DESCRIPTION OF KEYS 5
4 • MANUAL SETTINGS FOR ONE-PHASE COOKING 7
5 • MANUAL SETTINGS FOR COOKING WITH UP TO 9 CYCLES IN SEQUENCE 9
6 • ENTERING AND SAVING A PROGRAM 11
7 • SELECTING AND STARTING A SAVED PROGRAM 13
8 • TEMPORARILY ALTERING A SAVED PROGRAM 14
9 • AUTOMATIC HUMIDITY CONTROL SYSTEM 15
10 • OPERATING DETAILS 16
11 • PRACTICAL ADVICE 17
12 • DAILY CLEANING 18
13 • ROUTINE MAINTENANCE 19
14 • MAJOR SERVICING 19
15 • SELF-DIAGNOSIS AND FAULT IDENTIFICATION 19
P - COMPACT BASIC - Programmable electronics, humidifier, lighting and double-glazed door.
VERSIONS
3
90024140rev00
Repairs may become necessary over time;
these and all major servicing operations
must be performed exclusively by
technicians employed by the manufacturer
or an authorized service centre.
1.1 • Carefully read the directions given in this
manual; they contain important information on
safety during installation, operation and
maintenance.
Keep this manual in a safe place for future
consultation!
1.2 • This appliance must only be used as
specified in the design, i.e. cooking foods.
Any other type of use is improper and
therefore dangerous.
1.3 • Only suitably trained kitchen personnel should
be allowed to use the appliance.
1.4 • The oven must not be left unattended during
operation.
1.5 • There are surfaces of the oven that become
hot during operation. Take care!
1.6 • Ask the installer for information on correct
operation and use of the water softener;
incorrect or incomplete maintenance is at the
origin of the formation of scale, which would
badly damage the oven.
1.7 • Should it become necessary to call out a
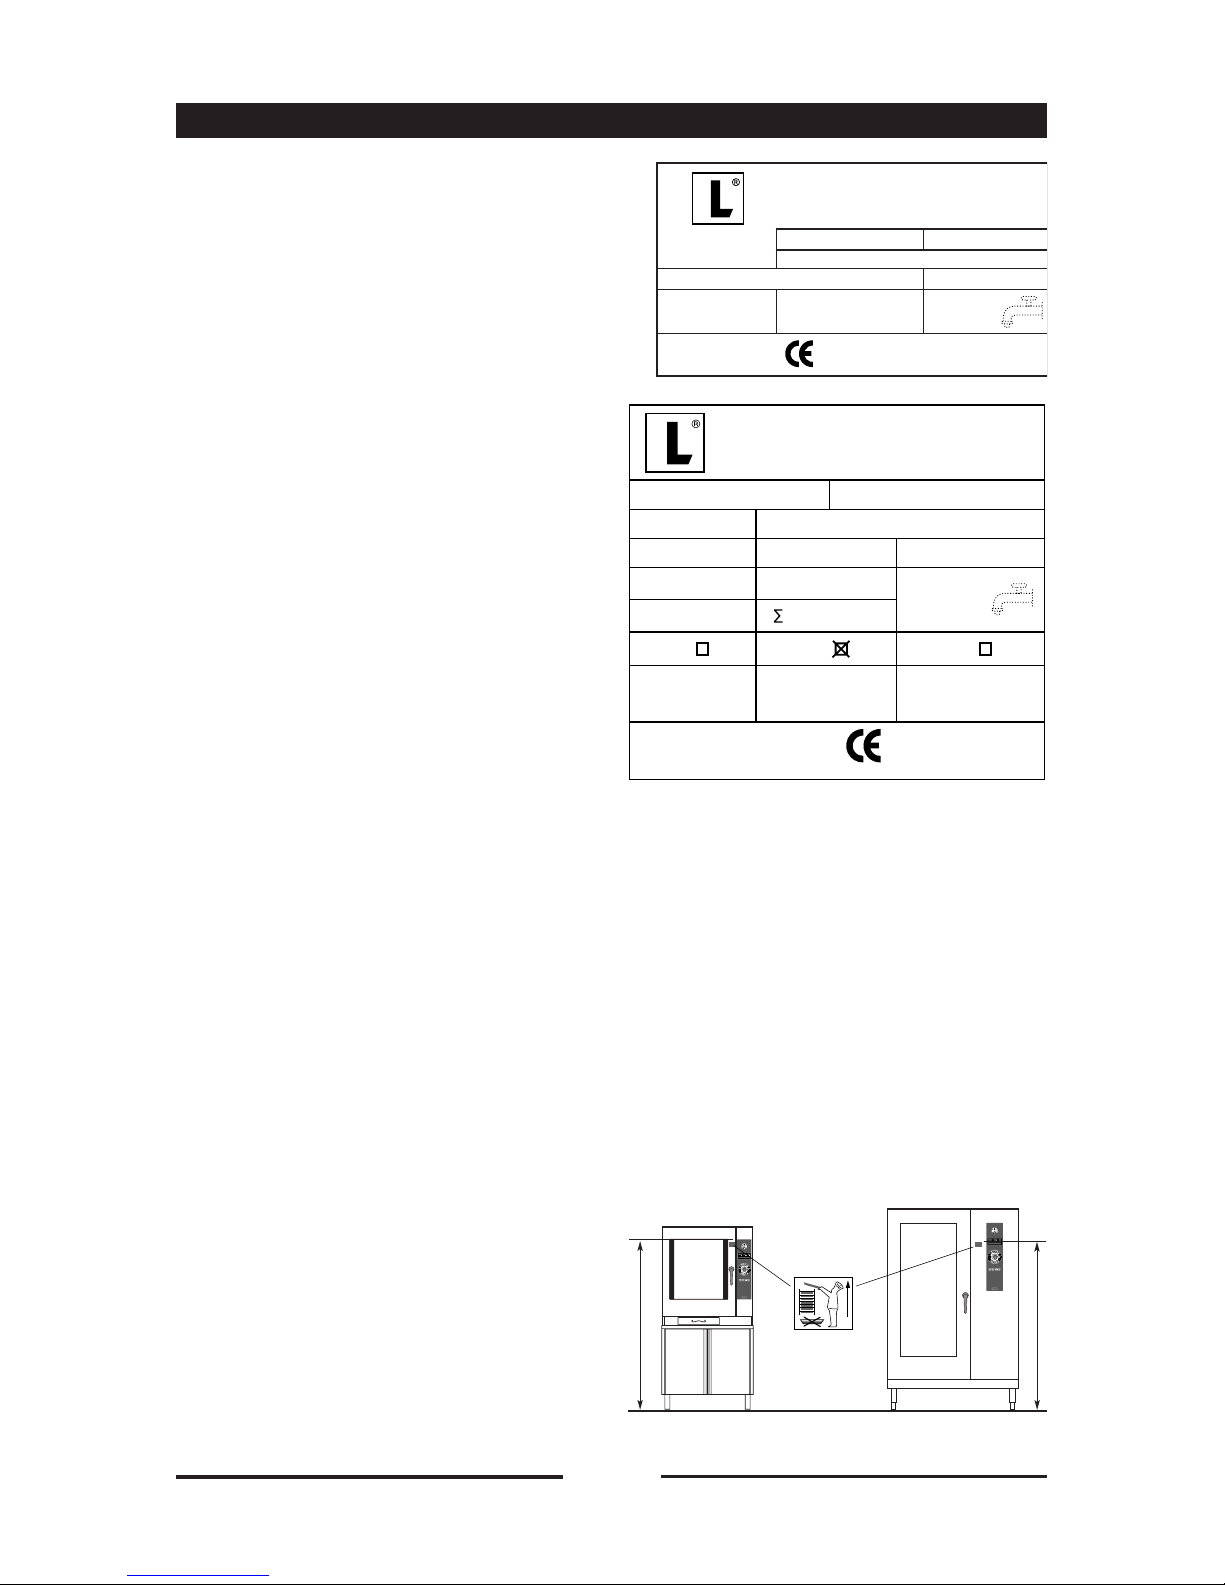
service technician, all essential identification
details of the appliance are shown on the
data plate, located at the right-hand side on
the bottom.
1.8 • Each appliance is equipped with a data plate
identifying the model and its main
specifications. An example is given below of a
dataplate for an electric oven and one for a
gas oven.
1.9 • In the event of technical assistance being
required, the trouble must be described in
as much detail as possible, so that a
service technician will be able straight away
to understand the nature of the problem.
1.10 • In the event of breakdown or faulty operation,
switch off the oven immediately!
1.11 • The room, in which the oven is to operate,
must be well ventilated!
1.12 • Safety sticker
• Maximum height for inserting containers with
liquids
1 • GENERAL REMINDERS
IPX 5
- 03
8 kW
3N AC 400 V
NR xxxxxxxxxx
TYP. ME 061 "P"
kPa
200 - 500
50 Hz
2003
0085
2003
AC 230 V 50 Hz
IT
IPX 5
A3 B13
Qn 18 kW
Cat.
II 2H3+
B23
LX TYP. MG 101 "P" TYP.
NR xxxxxxxxxx
1.00 kW
kPa
200 - 500
P mbar
20; 28-30/37
1600 mm (63 inch)

4
90024140rev00
2.1 • Before any food is cooked in a new oven,
the interior must be thoroughly cleaned
(see “Daily Cleaning”).
2.2 • At the end of the working day, clean the
oven thoroughly inside and out; this will
ensure smooth operation of the appliance
and prolong its useful life.
2.3 • Do not use high pressure water jets
when cleaning the oven!
2.4 • For daily cleaning, use only alkali based
products suitable for the purpose.
Abrasive materials and products should not
be used as they will damage the surfaces.
2.5 • Always switch off the appliance when work
is finished, and shut off all energy supplies
(electricity, water, and gas if connected).
2.6 • Avoid any operation that might cause
cooking salt to be deposited on the steel
surfaces of the oven; if salt is accidentally
spilled, rinse off immediately and
thoroughly.
2.7 • After steam cooking, open the door
carefully to avoid being hit by the rush of
residual steam escaping from the oven.
Failure to observe this warning may be
dangerous for the operator.
2.8 • To ensure safe operation of the oven do
not obstruct the vents or any other
opening in the casing!
Failure to observe basic safety
guidelines may jeopardize the smooth
operation of the oven and expose the
operator to serious danger!
The manufacturer accepts no liability if
the original function of the oven is
altered or there is tampering or failure
to observe the instructions given in the
manuals.
2 • POINTS TO REMEMBER
2.9 • To ensure long term efficiency and
reliability of the oven, scheduled
servicing should be carried out at
least once a year. With this in mind,
customers are recommended to sign a
service agreement.

5
90024140rev00
3 • DESCRIPTION OF KEYS
ON-OFF (KEY 1)
Turns on the control panel, activates selfdiagnosis.
Key light on: appliance ready for use.
Key light off: appliance powered, control panel off.
START-STOP (KEY 16)
START-STOP key: to start and stop cooking in
progress.
• Key light on: START, cooking started.
• Intermittent key light: TEMPORARY STOP
obtained by opening the door or pressing the key
once. Cooking and remaining time are stopped.
Closing the door or pressing key 16 again restarts
cooking.
• Key light off: FINAL STOP obtained by keeping
key 16 pressed for 3 seconds; cooking stops, as if
the time had elapsed.
3.1•OVEN LIGHT KEY (KEY 22)
Pressing this key switches on the oven
light, permitting the operator to check the
progress of the cooking.
3.2
•
RAPID COOLING KEY WITH DOOR
OPEN (KEY 21)
This function is activated only with the oven
door open. Pressing the key activates the
fan, which rapidly lowers the temperature
in the oven to 50 °C. This function is
particularly useful if one cooking operation
at high temperature is to be followed by
another using a much lower temperature,
or when the oven needs cleaning
immediately after a cooking operation (see
“Daily Cleaning”).
3.3•CAVITY VENT KEY
Turning the valve 39 extracts excess
humidity from the cavity.
Vent close
d
Vent ope
n

6
90024140rev00
3 • DESCRIPTION OF KEYS
OPERATIONS
3.4•AUTOMATIC HUMIDITY CONTROL
KEY (KEY 14)
This key also performs the function of a
manual humidifier when pressed with
cooking in progress (key light on).
This function is useful for foods that require
added humidity when cooking. Press the
key and hold for as long as it is wished to
let moisture into the oven, the
corresponding LED will light up for as long
as the key is pressed.
3.5•DELETING A PROGRAM
To delete the content of a cooking program
that has been saved, proceed as follows:
display the program to delete (e.g. 09),
press and hold keys 21 and 22 for 5 sec.
and its content is automatically deleted.
Note: The appliance is fitted with an
automatic system for reducing the cavity
temperature in all cooking modes. If the
temperature exceeds the display setting
by 30°C, the humidifier automatically
directs cold water into the oven and the
temperature is rapidly lowered. This
precludes the possibility that food could
start cooking with too high a temperature
in the oven. In addition, the added
moisture prevents foods from drying up.

7
90024140rev00
OPERATIONS
4 • MANUAL SETTINGS FOR ONE-PHASE COOKING
4.1•SWITCH ON
Press key 1. If a symbol appears in the
fault warning display (display 5-6), refer to
“Self-diagnosis and fault identification”.
Page 19.
4.2
•
SET THE TEMPERATURE
The display shows the actual temperature
in the cavity. Turn knob 25 to set the
temperature (to the right increases, to the
left decreases), which will be shown in the
display.
Note: Approximately 10 sec. after
releasing the knob, the display will revert
to the actual oven temperature.
4.3 • SET THE TIME
The time display 6 shows [ 000 ]. Turn
knob 26:
- to the right to set the cooking time;
- to the left to set infinite time [ Inf ].

8
90024140rev00
STARTING THE COOKING PROGRAM
Place the food in the oven. Refer to the
“Practical Advice” heading for more
information. Page 17.
4.4 •
START
Press key 16 to start cooking: The LED
associated with the key remains
permanently alight.
At this point...
the temperature display indicates the
actual oven temperature.
The time display indicates the time
remaining to complete cooking.
4.5•END OF COOKING
If infinite time has been selected, stop
cooking manually by pressing key 16 for a
few seconds (LED next to key off).
If a cooking time has been entered, a beep
will be generated when the time elapses to
indicate that cooking has terminated (LED
next to key 16 off).
Just open the door to stop the beeping.
Remove the food from the oven, following
the directions given under paragraph 2.7 of
the “Points to remember” heading. Page 4.
Displaying and changing saved values
If, during cooking, it is necessary to check
the settings, press the cooking cycle key,
the displays will blink for 10 sec..
If the values displayed have to be modified,
use the relevant knob or keys.
After approx. 10 sec. the new data are
saved automatically and the displays show
the actual values.
4 • MANUAL SETTINGS FOR ONE-PHASE COOKING
OPERATIONS
 Loading...