

Page 1
En cuisineEn cuisine
FAIT MAISON_LAGRANGE 16/05/11 10:07 Page1
Page 2
1
1.
2.
3.
4.
5.
6.
7.
8.
9.
10.
11.
12.
13.
14.
15.
16.
17.
18.
19.
20.
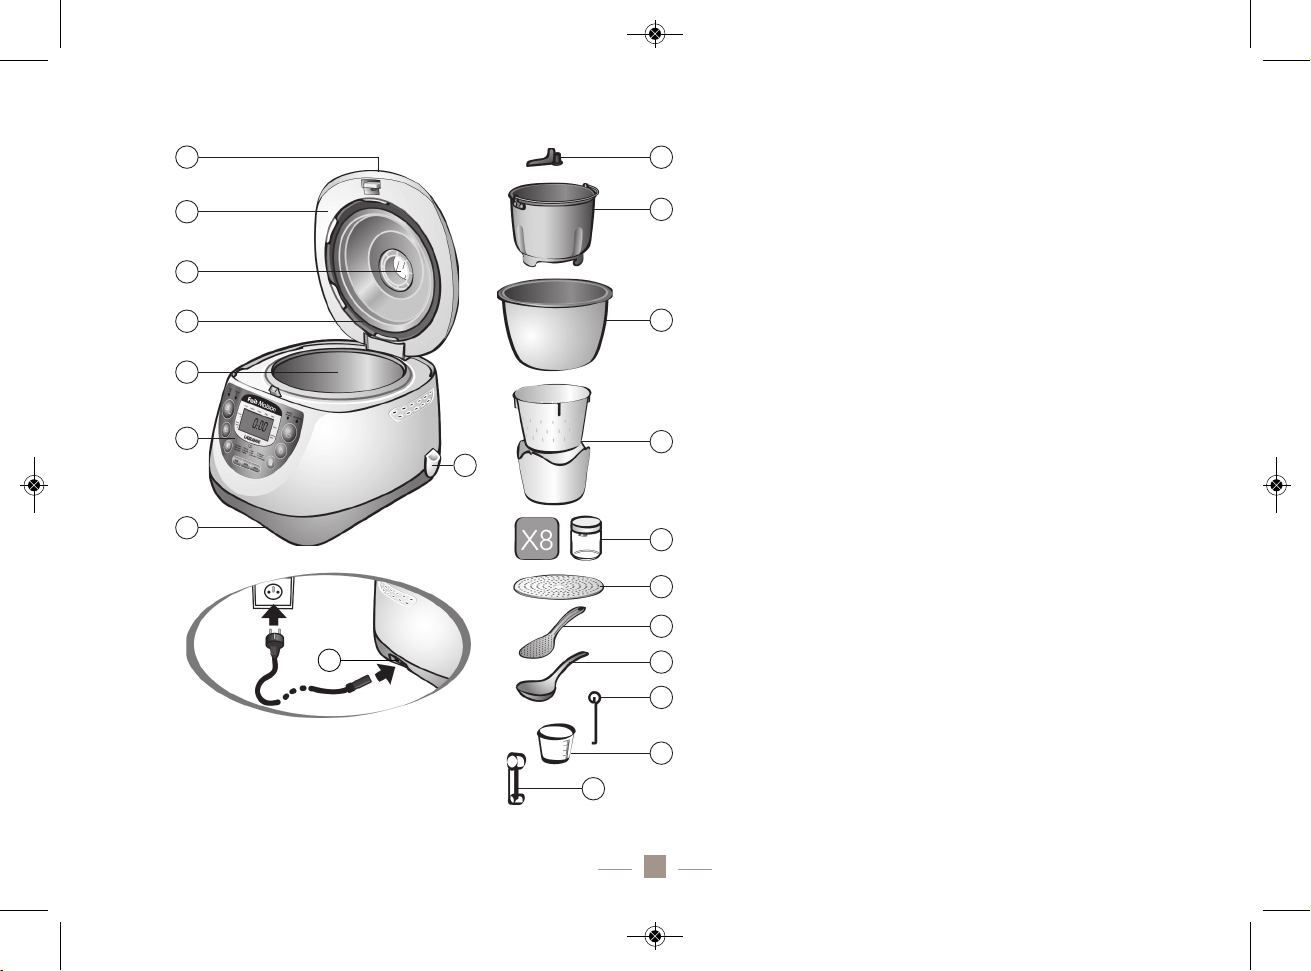
Machine à pain
Ref: 479 001
Fait Maison
Bouton d’ouverture
Couvercle de l’appareil
Hublot-bouchon de contrôle
Joint d’étanchéité
Emplacement pour la cuve
Tableau de bord
Base de l’appareil
Range cuillère
Emplacement de l’alimentation
Pale de pétrissage
Petite cuve à pain
Grande cuve à riz
1 pot et 1 faisselle pour fromage blanc
8 pots de yaourt en verre avec couvercles en plastique
Grille séparatrice pour yaourts
Cuillère à riz
Louche (fromage blanc, confiture…)
Crochet (pour retirer la pale du « pain » après cuisson)
Mesure à riz
Cuillère mesure (cuillère à café/cuillère à soupe)
7
6
8
9
5
3
2
1
4
17
18
19
20
15
16
11
12
13
14
10
®
1
FAIT MAISON_LAGRANGE 16/05/11 10:07 Page3
Page 3
2
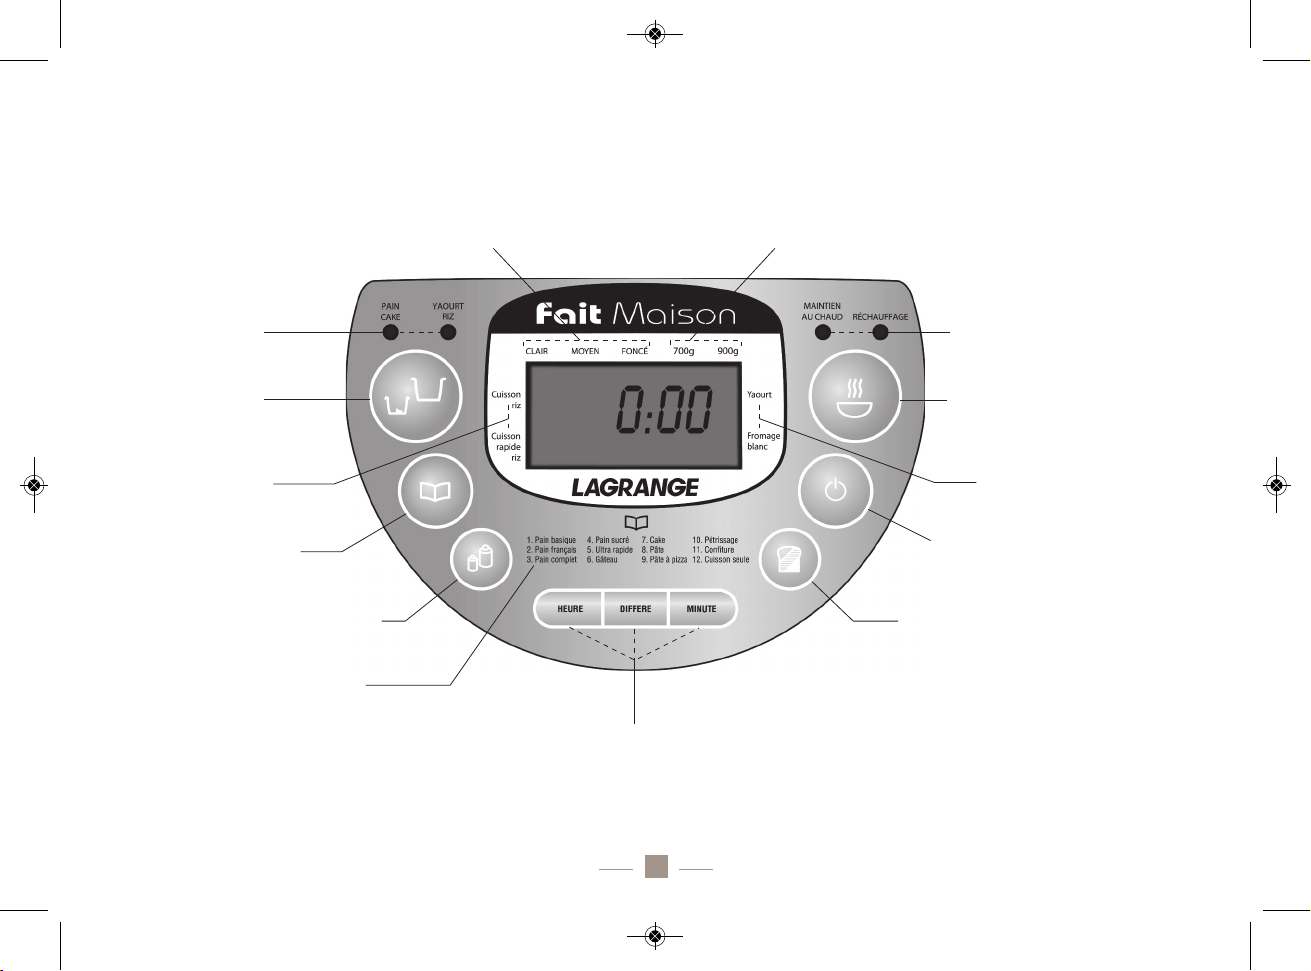
- LE TABLEAU DE BORD --
Sélection de la dorure Sélection du poids
Voyants de sélection
de la cuve
Bouton de sélection
de la cuve
Selection des
programmes riz
réalisables avec
la cuve à riz
Selection des
programmes laitages
réalisables avec
la cuve à riz
Bouton de sélection
des programmes
Bouton de sélection du poids
Boutons de sélection et de réglage du départ différé et de modification
du temps des programmes laitages
Bouton de sélection
de la dorure / température
Bouton départ / arrêt
Bouton de sélection
maintien au chaud
réchauffage
Voyants de sélection
maintien au chaud
/ réchauffage
Liste des programmes pain
®
FAIT MAISON_LAGRANGE 16/05/11 10:07 Page4
Page 4

SOMMAIRE__________________________________________________________________
CARACTERISTIQUES_ _ _ _ _ _ _ _ _ _ _ _ _ _ _ _ _ _ _ _ _ _ _ _ _ _ _ _ _ _ _ _ _ _ _ _ _ _ _ _ _ _ _ _ _ _ _ P. 4
CORDON _ _ _ _ _ _ _ _ _ _ _ _ _ _ _ _ _ _ _ _ _ _ _ _ _ _ _ _ _ _ _ _ _ _ _ _ _ _ _ _ _ _ _ _ _ _ _ _ _ _ _ _ P. 4
ENVIRONNEMENT _ _ _ _ _ _ _ _ _ _ _ _ _ _ _ _ _ _ _ _ _ _ _ _ _ _ _ _ _ _ _ _ _ _ _ _ _ _ _ _ _ _ _ _ _ _ _ P. 4
AVANT D’UTILISER L’APPAREIL _ _ _ _ _ _ _ _ _ _ _ _ _ _ _ _ _ _ _ _ _ _ _ _ _ _ _ _ _ _ _ _ _ _ _ _ _ _ _ _ _ P. 5
CONSEILS PRATIQUES _ _ _ _ _ _ _ _ _ _ _ _ _ _ _ _ _ _ _ _ _ _ _ _ _ _ _ _ _ _ _ _ _ _ _ _ _ _ _ _ _ _ _ _ _ P. 6
LES INGREDIENTS ET TEMPS DE PREPARATION POUR LES PROGRAMMES DE TYPE PAIN _ _ _ _ _ _ _ _ _ _ _ _ _ _
P. 6
LES INGREDIENTS ET TEMPS DE PREPARATION POUR LES PROGRAMMES DE TYPE CONFITURE
_ _ _ _ _ _ __ _ _ _
P. 8
LES INGREDIENTS ET TEMPS DE PREPARATION POUR LES PROGRAMMES DE TYPE RIZ
_ _ _ _ _ _ _ _ _ _ _ _ _ _ _
P. 10
LES INGREDIENTS ET TEMPS DE PREPARATION POUR LES PROGRAMMES DE TYPE YAOURT
_ _ _ _ _ _ _ _ _ _ _ _
P. 11
LES INGREDIENTS ET TEMPS DE PREPARATION POUR LES PROGRAMMES DE TYPE FROMAGE BLANC
_ _ _ _ _ _ _ _
P. 12
MISE EN SERVICE ET UTILISATION _ _ _ _ _ _ _ _ _ _ _ _ _ _ _ _ _ _ _ _ _ _ _ _ _ _ _ _ _ _ _ _ _ _ _ _ _ _ P. 13
1ERE UTILISATION _ _ _ _ _ _ _ _ _ _ _ _ _ _ _ _ _ _ _ _ _ _ _ _ _ _ _ _ _ _ _ _ _ _ _ _ _ _ _ _ _ _ _ _ _ _
P. 13
ENVIRONNEMENT D’UTILISATION
_ _ _ _ _ _ _ _ _ _ _ _ _ _ _ _ _ _ _ _ _ _ _ _ _ _ _ _ _ _ _ _ _ _ _ _ _ _
P. 13
UTILISATION DU TABLEAU DE BORD
_ _ _ _ _ _ _ _ _ _ _ _ _ _ _ _ _ _ _ _ _ _ _ _ _ _ _ _ _ _ _ _ _ _ _ _ _
P. 14
LA REALISATION DE PAIN-BRIOCHE-GATEAU _ _ _ _ _ _ _ _ _ _ _ _ _ _ _ _ _ _ _ _ _ _ _ _ _ _ _ _ _ _ _ _ P. 18
LA REALISATION DE CONFITURE_ _ _ _ _ _ _ _ _ _ _ _ _ _ _ _ _ _ _ _ _ _ _ _ _ _ _ _ _ _ _ _ _ _ _ _ _ _ P. 20
LA REALISATION DE RIZ _ _ _ _ _ _ _ _ _ _ _ _ _ _ _ _ _ _ _ _ _ _ _ _ _ _ _ _ _ _ _ _ _ _ _ _ _ _ _ _ _ _ _ P. 21
LA REALISATION DE YAOURT_ _ _ _ _ _ _ _ _ _ _ _ _ _ _ _ _ _ _ _ _ _ _ _ _ _ _ _ _ _ _ _ _ _ _ _ _ _ _ _ _ P. 22
LA REALISATION DE FROMAGE BLANC _ _ _ _ _ _ _ _ _ _ _ _ _ _ _ _ _ _ _ _ _ _ _ _ _ _ _ _ _ _ _ _ _ _ _ P. 23
GUIDE DE DEPANNAGE _ _ _ _ _ _ _ _ _ _ _ _ _ _ _ _ _ _ _ _ _ _ _ _ _ _ _ _ _ _ _ _ _ _ _ _ _ _ _ _ _ _ _ P. 24
ENTRETIEN _ _ _ _ _ _ _ _ _ _ _ _ _ _ _ _ _ _ _ _ _ _ _ _ _ _ _ _ _ _ _ _ _ _ _ _ _ _ _ _ _ _ _ _ _ _ _ _ _ _ P. 30
CONDITIONS DE GARANTIE _ _ _ _ _ _ _ _ _ _ _ _ _ _ _ _ _ _ _ _ _ _ _ _ _ _ _ _ _ _ _ _ _ _ _ _ _ _ _ _ _ P. 30
RECETTES_ _ _ _ _ _ _ _ _ _ _ _ _ _ _ _ _ _ _ _ _ _ _ _ _ _ _ _ _ _ _ _ _ _ _ _ _ _ _ _ _ _ _ _ _ _ _ _ _ _ _ P. 31
3
FAIT MAISON_LAGRANGE 16/05/11 10:07 Page5
Page 5

4
CARACTERISTIQUES____________________
- Base de l’appareil en thermoplastique
- Tableau de bord électronique avec écran rétro-éclairé
- Signal sonore de fin de préparation
- Cuves et pale en aluminium avec revêtement antiadhésif
- 1 grand pot et faisselle à fromage blanc – contenance 1 litre
- 8 pots de yaourts et grille séparatrice
- Hublot – bouchon de contrôle en plastique
- 230Volts-50Hz-500Watts
Note :
1. La cuve à pain est utilisée pour les programmes pains, pâtes,
gâteaux et confiture.
2. La cuve à riz est destinée aux programmes de cuisson du riz,
des yaourts et du fromage blanc.
3. Le pot et la faisselle sont uniquement utilisés pour la fonction
fromage blanc.
CORDON_____________________________
Il faut examiner attentivement le câble d’alimentation avant toute
utilisation. Si celui-ci est endommagé, il ne faut pas utiliser l’appareil. Le cordon ne doit être remplacé que par
LAGRANGE
,
son service après vente ou une personne qualifiée et agréée par
LAGRANGE
et ce afin d’éviter un danger pour l’usager. Le cordon utilisé est un HO5RN-F 3 G 1 mm².
Ces appareils sont conformes aux directives 2006/95/CE,
2004/108/CE, DEEE 2002/96/CE, RoHs 2002/95/CE et au règle-
ment CE contact alimentaire 1935/2004.
ENVIRONNEMENT__________________
Protection de l’environnement –DIRECTIVE 2002/96/CE
Afin de préserver notre environnement et notre santé, l’élimination en fin de vie des appareils électriques doit se faire selon des
règles bien précises et nécessite l’implication de chacun, qu’il
soit fournisseur ou utilisateur.
C’est pour cette raison que votre appareil, tel que le signale le
symbole apposé sur sa plaque signalétique, ne doit en aucun
cas être jeté dans une poubelle publique ou privée
destinée aux ordures ménagères.
Lors de son élimination, il est de votre responsabilité
de déposer votre appareil dans un centre de collecte
publique désigné pour le recyclage des équipements
électriques ou électroniques. Pour obtenir des informations sur les centres de collecte et de recyclage des appareils
mis au rebut, veuillez prendre contact avec les autorités locales
de votre région, les services de collecte des ordures ménagères
ou le magasin dans lequel vous avez acheté votre appareil.
FR
FAIT MAISON_LAGRANGE 16/05/11 10:07 Page6
Page 6

AVANT D’UTILISER L’APPAREIL____________
Lire attentivement ce mode d’emploi et le conserver
afin de pouvoir le consulter ultérieurement.
•
Toujours dérouler complètement le cordon.
•
Raccorder la prise du cordon à une prise 10/16 A.
•
Si vous devez utiliser une rallonge, utilisez impérativement un
modèle équipé d’une prise de terre et de fils de section égale
ou supérieure à 1 mm².
•
Ne jamais plonger votre appareil dans l’eau.
•
Avant toute manipulation, débrancher et laisser refroidir l’appareil complètement.
•
Ne pas encastrer l’appareil.
•
Toujours bien nettoyer les pièces ayant servies à la préparation
et ce après chaque utilisation.
•
Il convient de surveiller les enfants pour s’assurer qu’ils ne
jouent pas avec l’appareil.
•
Les personnes (y compris les enfants) qui ne sont pas aptes à
utiliser l‘appareil en toute sécurité, soit à cause de leurs capacités physiques, sensorielles ou mentales, soit à cause de leur
manque d‘expérience ou de connaissances, ne peuvent en
aucun cas utiliser l‘appareil sans surveillance ou les instructions
d‘une personne responsable.
•
Vérifier que le câblage de votre installation électrique est compatible avec celui de l’appareil. Il est recommandé de raccorder l’appareil à une installation comportant un dispositif à courant différentiel résiduel ayant un courant de déclenchement
n’excédant pas 30mA.
•
Ces appareils ne sont pas destinés à être mis en fonctionnement au moyen d'une minuterie extérieure ou par un système
de commande à distance séparé.
•
Placer votre appareil sur une surface plane.
•
Ne jamais placer votre appareil sur une surface chaude ni à
proximité d’une flamme.
•
Ne pas laisser votre appareil branché sans l’utiliser.
•
Ne pas déplacer l’appareil lorsqu’il fonctionne.
•
Ne pas faire fonctionner l’appareil dans un espace confiné.
•
Ne jamais recouvrir l’appareil lorsqu’il est en fonctionnement
afin de laisser la chaleur et la vapeur sortir librement de l’appareil. Dans le cas contraire, l’appareil pourrait prendre feu en
entrant en contact avec un matériel combustible.
•
Ne jamais obstruer les grilles d’aération.
•
Ne jamais placer l’appareil sur un autre appareil.
•
Avant de brancher l’appareil, toujours vérifier que la cuve soit
bien en place, mettre tous les ingrédients dans la cuve et fermer l’appareil.
•
Ne jamais utiliser d’accessoires métalliques dans la cuve au
risque de détériorer le revêtement antiadhésif.
•
Ne jamais toucher la cuve à pain ni les pales lorsque l’appareil
est en cours de fonctionnement.
•
Bien se référer aux recettes compatibles en fonction de la taille
du pain et ne jamais dépasser les quantités indiquées pour ces
tailles. La pâte en débordant de la cuve sur l’élément chauffant
pourrait s’enflammer.
•
Ne jamais forcer ni taper sur les bords de la cuve pour la retirer cela peut l’endommager.
•
Ne pas toucher le hublot pendant et juste après le fonctionnement de l’appareil car sa température peut être élevée.
•
En fin de programme, toujours utiliser des gants de cuisine
pour manipuler la cuve ou les parties chaudes de l’appareil.
L’appareil devient très chaud pendant l’utilisation.
•
Toujours faire attention aux projections chaudes et aux jets de
vapeur à l’ouverture du couvercle.
•
Pour votre sécurité, il est recommandé de ne jamais utiliser ou
laisser votre appareil dans un endroit exposé aux intempéries
et à l’humidité.
•
Ne jamais utiliser l’appareil comme chauffage d’appoint, et
5
FAIT MAISON_LAGRANGE 16/05/11 10:07 Page7
Page 7

plus généralement ne pas utiliser l’appareil pour un autre
usage que sa fonction première.
•
Si votre appareil est endommagé ne l’utilisez pas et contactez
le SAV
LAGRANGE
.
•
Pour votre sécurité, n’utilisez que des accessoires et pièces
détachées
LAGRANGE
adaptées à votre appareil.
CONSEILS PRATIQUES __________________
Pour les programmes yaourt et fromage blanc ne jamais placer votre appareil sur une surface en vibration (telle que le
dessus d’un réfrigérateur) ou exposée aux courants d’air.
Laissez votre appareil immobile pendant le processus, ne le
déplacez pas au cours du cycle de fonctionnement au
risque de compromettre la réussite de vos laitages.
LES INGRÉDIENTS ET TEMPS DE PREPARATION POUR
LES PROGRAMMES DE TYPE « PAIN »
La farine
Utilisez de préférence de la farine panifiable ou boulangère car
elle contient plus de gluten qu’une farine classique et donnera
donc plus d’élasticité, de légèreté et de volume à votre pain.
L’utilisation d’une farine T55 est recommandée.
L’utilisation de farines plus lourdes (complètes, seigle) donnera
un pain plus petit, moins levé. Pour un pain plus volumineux,
vous pouvez mélanger de la farine complète avec de la farine
blanche.
Les farines trop fines peuvent faire trop lever le pain. Dans ce
cas, il est recommandé de diminuer la quantité de levure utilisée.
Attention, chaque marque de farine a ses caractéristiques
propres. Il peut être nécessaire d’adapter la recette en fonction
de la farine utilisée.
Les liquides (eau, lait)
L’eau est importante car elle réhydrate et active la levure. C’est le
mélange de la farine avec l’eau qui forme le gluten, nécessaire à
la levée du pain. L’eau doit être utilisée à une température comprise entre 20 et 25°C., mais pour le programme ultra-rapide, il
est conseillé d’utiliser une eau à 45-50°C pour faciliter la levée
rapide du pain.
Pour une recette contenant des œufs, il est préférable de les
mettre avant l’eau.
L’eau peut être remplacée, totalement ou en partie par du lait
frais (ou du lait en poudre dilué dans de l’eau) afin d’obtenir une
belle dorure et un bel aspect de la mie et ainsi augmenter la
saveur du pain. Certaines recettes font appel à l’utilisation de jus
de fruits (pomme, citron, orange) qui augmentent eux aussi la
saveur du pain.
Les matières grasses (huile, beurre)
L’utilisation de matières grasses permet d’obtenir un pain plus
moelleux. Pour un résultat optimal, n’incorporez pas de beurre
chaud et évitez que les matières grasses soient en contact direct
avec la levure car cela ralentirait la levée. Il est recommandé de
couper le beurre en petit morceaux pour une répartition homogène à la préparation.
Les œufs
Les œufs permettent d’obtenir un pain plus riche et rendent la
croûte plus dorée. Si vous utilisez des œufs dans une recette où
ils ne sont pas prévus, réduisez la quantité d’eau en conséquence.
Le sucre
Le sucre est un ingrédient important car il augmente la saveur du
pain et rend la croûte plus dorée. Il permet également de conserver le pain plus longtemps car il absorbe une partie de l’humidi-
6
FAIT MAISON_LAGRANGE 16/05/11 10:07 Page8
Page 8
té. Préférez du sucre blanc ou roux en poudre. Attention, l’utilisation de sucre en morceau peut altérer le revêtement antiadhésif de votre cuve.
Le sel
Le sel permet d’obtenir un pain bien levé et doré. Il augmente la
saveur du pain et régule l’activité de la levure. Ne mettez jamais
trop de sel car cela empêcherait le pain de lever. Ne mettez
jamais le sel en contact direct avec la levure.
La levure
La levure permet la levée du pain. Celle-ci permet un dégagement de gaz qui forme des bulles et allège ainsi la texture du
pain, le rendant plus facile à digérer. Préférez de la levure de boulangerie active déshydratée en sachet, qui se présente sous
forme de petits grains.
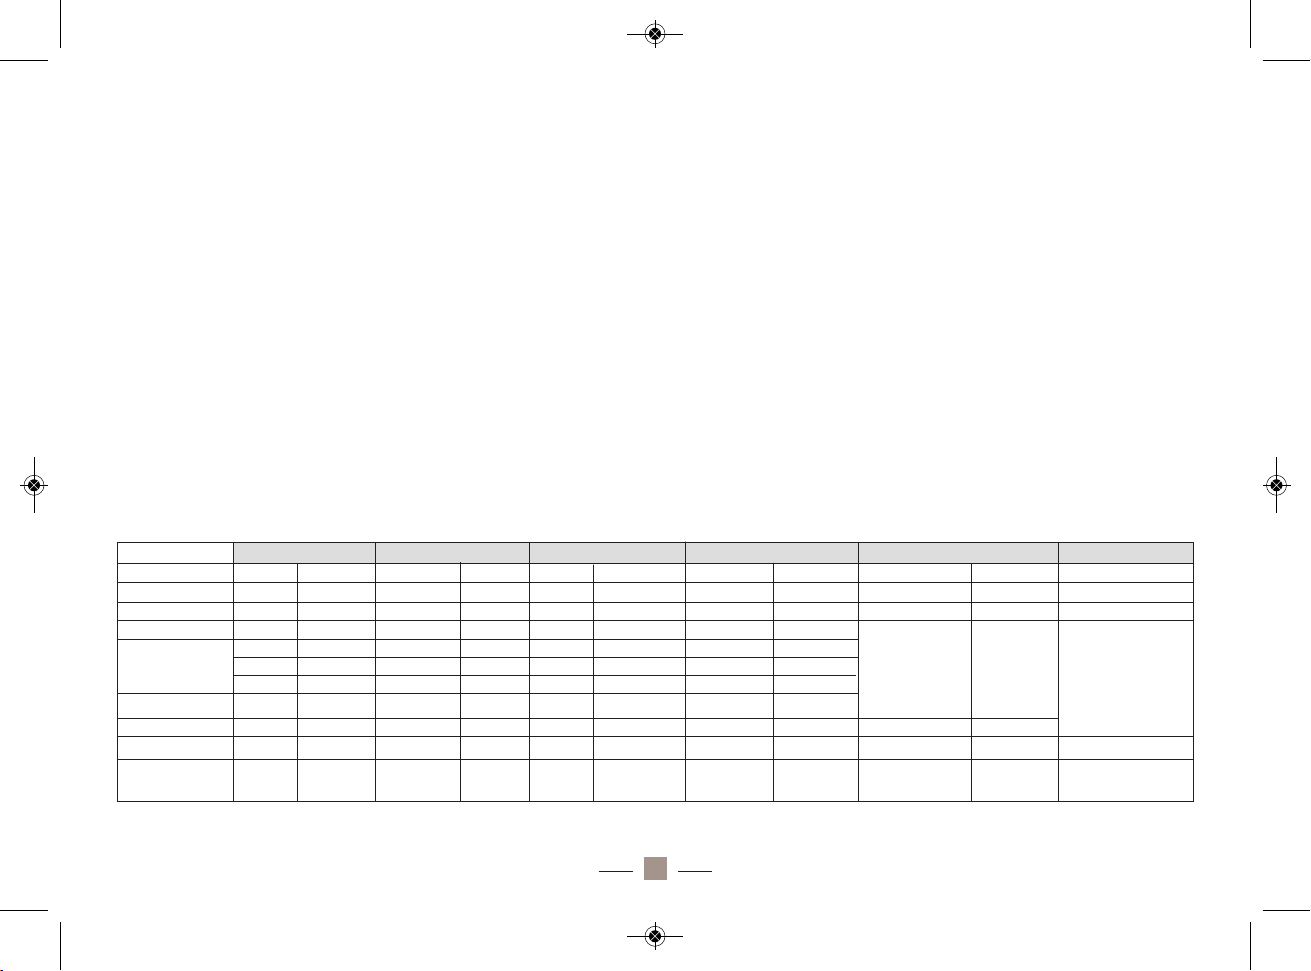
Guide des cycles par programme
Si vous utilisez de la levure fraiche, tenez compte de la relation
d’équivalence suivante : 25g de levure fraiche = 7g de levure
sèche.
Il est indispensable de diluer la levure fraiche dans environ 2
cuillères à soupe d’eau tiède.
Attention à toujours bien vérifier la date de péremption indiquée
sur l’emballage de la levure.
La levure fraiche doit être utilisée, une fois ouverte, sous 48h et
ne jamais être utilisée avec un départ différé de votre appareil.
L’ordre des ingrédients
ATTENTION, pour la réalisation des programmes de type
« pain », l’ordre des ingrédients est essentiel à la réussite de votre
preparation. Cf. paragraphe
La préparation culinaire
page 18
7
1.Pain basique 2.Pain Français 3.Pain complet 4.Pain sucré 5.Pain ultra-rapide 6.Gâteau
700g 900g 700g 900g 700g 900g 700g 900g 700g 900g
02:53 03:00 03:40 03:50 03:32 03:40 02:50 02:55
Pétrissage 1 9 min 10 min 16 min 18 min 9 min 10 min 10 min 10 min
Levée 1 20 min 20 min 40 min 40 min 25 min 25 min 5 min 5 min
Pétrissage 2
5 min 5 min 5 min 2 min 5 min ▼5 min▼5 min 5 min
4 min ▼ 5 min ▼12 min ▼15 min ▼ 8 min 10 min 5 min ▼5 min▼- -
-
5 min 5 min 5 min 5 min 5 min 5 min 10 min 10 min
Levée 2 25 min 25 min 30 min 30 min 35 min 35 min 30 min 30 min
Levée 3 45 min 45 min 50 min 50 min 70 min 70 min 50 min 50 min 11 min 19 min
Cuisson 60 min 65 min 65 min 70 min 55 min 60 min 55 min 60 min 35 min 40 min 65 min
Maintien au
60 min 60 min 60 min 60 min 60 min 60 min 60 min 60 min 60 min 60 min 60 min
chaud
Poids
Temps
0:58 01:15 01:15
12 min 16 min 10 min
FAIT MAISON_LAGRANGE 16/05/11 10:07 Page9
Page 9
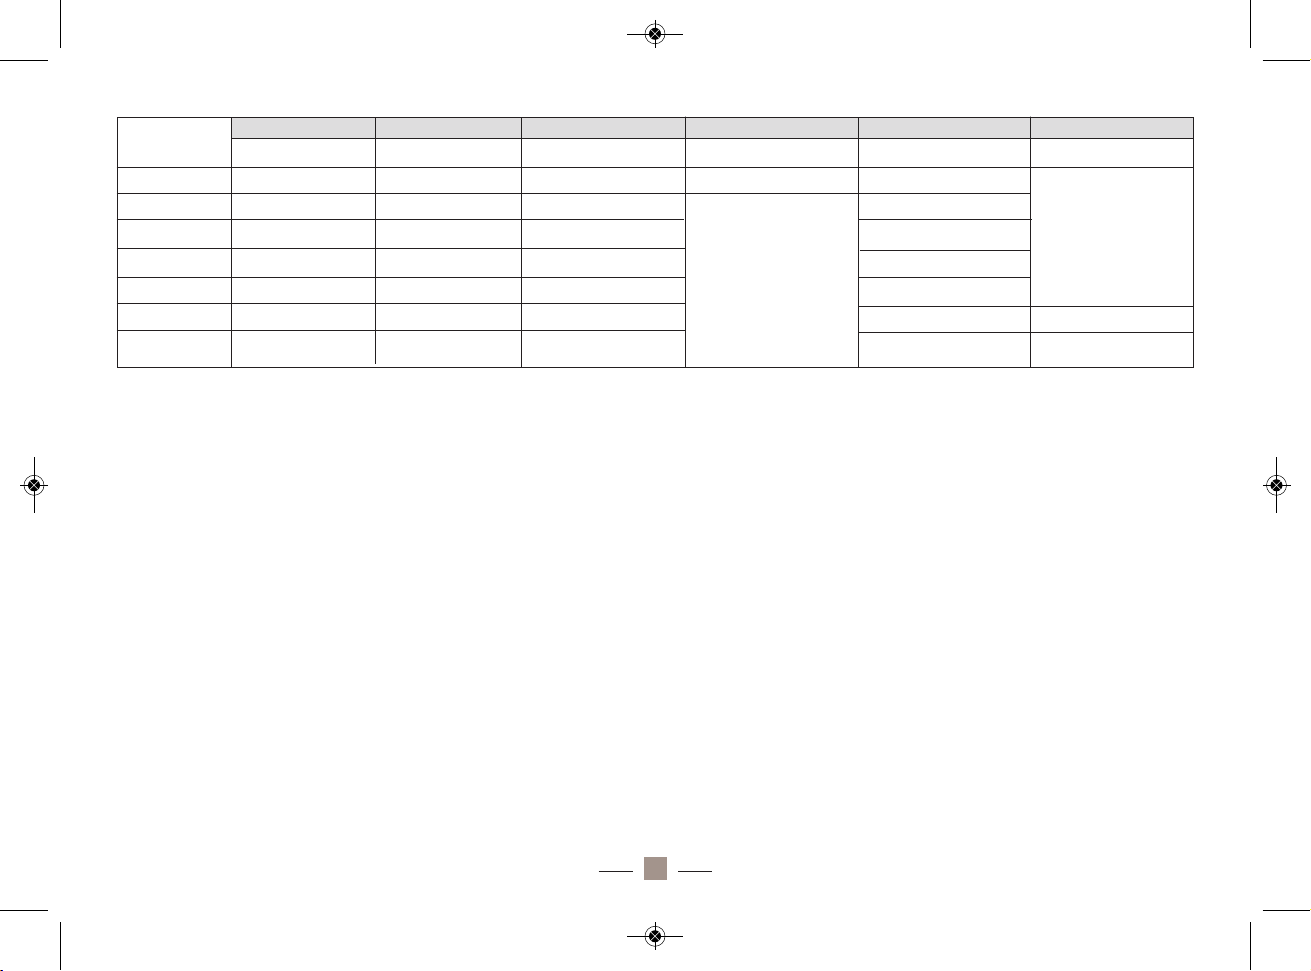
Remarques :
•
Le temps indiqué est en minutes
•
Le « ▼» placé derrière le chiffre indique le moment où le signal
sonore retentit 10 fois pendant 10 secondes, ce qui signifie
que vous pouvez ajouter des ingrédients (le signal retentit à la
fin des temps indiqués).
•
« - » signifie que le cycle indiqué n’existe pas dans ce
programme.
•
A l’issue d’un programme et avant le début du maintien au
chaud (lorsqu’il y en a un), le signal sonore retentit 10 fois.
LES INGRÉDIENTS ET TEMPS DE PREPARATION POUR
LES PROGRAMMES DE TYPE CONFITURE
La confiture est très simple à réaliser à condition de respecter un équilibre subtil entre l'apport de sucre, la teneur en
pectine et l'acidité des fruits qui la composent.
L
es fruits
•
Le choix des fruits a une très grande importance dans la qualité
de la confiture obtenue.
•
Trop mûr, le fruit ne contient pas assez de pectine, un gélifiant
naturel qu'il renferme en plus ou moins grande quantité.
•
S'il est en revanche trop vert, il contient la pectine nécessaire
pour une bonne gélification, mais manque de goût.
•
Il ne faut pas utiliser de produits congelés ou qui ont été
décongelés. Il est donc fortement conseillé d’utiliser des fruits de
saison :
- Printemps : Kiwi, Agrumes, Rhubarbe, Fraises
- Eté : Cerises, Framboises, Myrtilles, Cassis, Groseilles,
M Mûres, Mirabelles, Prunes, Abricots, Pêches, Figues
- Automne : Coings, Potiron, Pommes, Poires, Agrumes
- Hiver : Kiwi, Pommes, Agrumes, Ananas
g
8
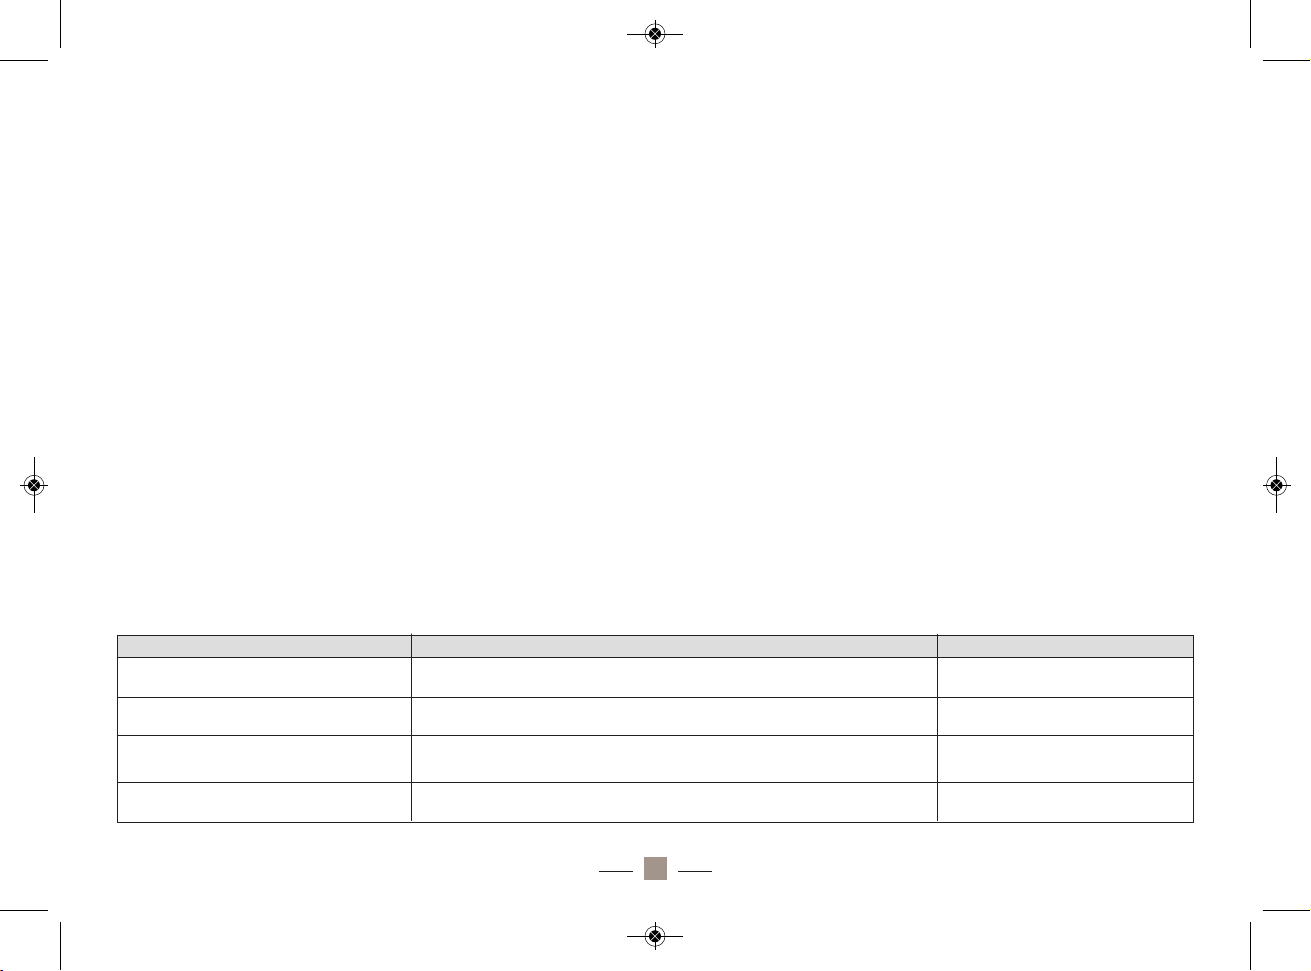
7.Cake 8.Pâte 9.Pâte à pizza 10.Pétrissage 11.Confiture 12.Cuisson seule
01:58 01:30 01:00 00:15 01:20 01:00
Pétrissage 1 7 min 20 min 20 min 15 min -
Levée 1 5 min --
- 15 min
Pétrissage 2 8 min -- - -
Levée 2 28 min 30 min 40 min --
Levée 3 - 40 min - 45 min
Cuisson 70 min - - 20 min 60 min
Maintien au
60 min -- 60 min -
chaud
FAIT MAISON_LAGRANGE 16/05/11 10:07 Page10
Page 10
Le sucre et le gélifiant
•
C'est le sucre, qui permet à la confiture de se conserver. Un
manque de sucre peut entraîner fermentation et moisissure. Si
vous souhaitez des confitures très riches en fruits, il faut alors
tout de même veiller à ne pas descendre en dessous d’une certaine proportion de sucre. Si vos fruits sont bien mûrs et sucrés,
vous pouvez réduire la quantité de sucre au maximum à 600g
pour 1kg de fruits.
•
On peut préparer des confitures avec une grande variété de
sucres : sucre blanc cristallisé, sucre roux,… mais on utilise principalement le sucre cristallisé (pour les fruits contenant assez de
pectine) ou le sucre à confitures, additionné de pectine et d'acide citrique.
•
La pectine est un gélifiant naturel qui permet à la confiture de
« prendre » et donne sa consistance à la gelée. Elle est présente
en grande quantité dans les pépins et les zestes. Ainsi, la pectine est contenue naturellement dans les : agrumes, groseilles,
mûres, pommes, prunes, coings…
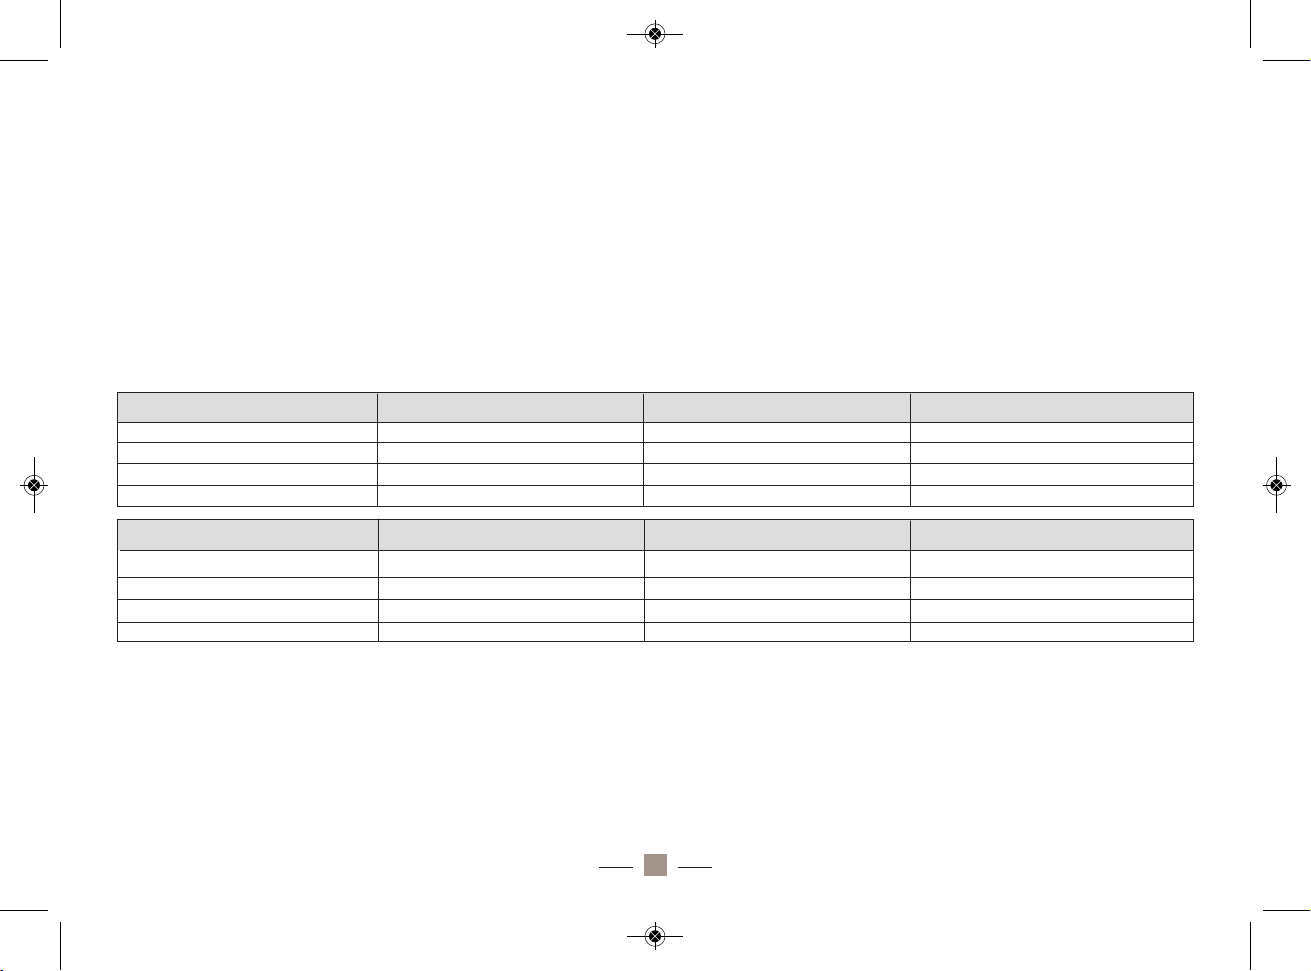
Aide au dosage et au choix des ingrédients
LES INGRÉDIENTS ET TEMPS DE PREPARATION POUR LES PRO
•
Pour les fruits ne contenant pas de pectine (cerises, fraises,
pêches, poires…), on utilise le sucre « spécial confitures » qui en
contient. On peut également utiliser de la poudre de pectine de
pommes ou faire infuser des pépins de pommes enfermés dans
une mousseline. Plus simplement, vous pouvez ajouter une
pomme à votre préparation.
•
L'acidité agit aussi, avec la chaleur, en transformant le sucre des
fruits en glucose. Elle intervient de façon importante dans cet
équilibre propre à la confiture : si les fruits sont peu acides
(coing, kiwi, pêche, poire), il faut ajouter du jus de citron (ou de
groseille) avant la cuisson, sinon des cristaux se formeront à la
surface et dans le corps de la confiture, trop sucrée.
doit être limpide.
L’eau
9
Fruits Sucre Autre ajout
Fraises, framboises, rhubarbe
Sucre cristallisé avec gélifiant
(ou remplacer le gélifiant par une pomme)
Agrumes, groseilles, pommes,
cassis
Sucre cristallisé
Abricots, pêches, poires, figues, Sucre cristallisé avec gélifiant
Jus d’un citron
Kiwis (ou remplacer le gélifiant par une pomme)
Cerises, coings, mûres,
prunes, mirabelles
Sucre cristallisé
Jus d’un citron
FAIT MAISON_LAGRANGE 16/05/11 10:07 Page11
Page 11
LES INGRÉDIENTS ET TEMPS DE PREPARATION POUR
LES PROGRAMMES DE TYPE RIZ
Le riz
Il existe de nombreuses variétés de riz : thaï, basmati, rond, sauvage, complet… Cela vous permettra d’élaborer de nombreuses
recettes. N’oubliez pas de bien rincer le riz avant de le cuire
(environ trois rinçages) pour le débarrasser des impuretés et de
l'amidon et ainsi éviter qu’il ne colle. La dernière eau de rinçage
doit etre limpide.
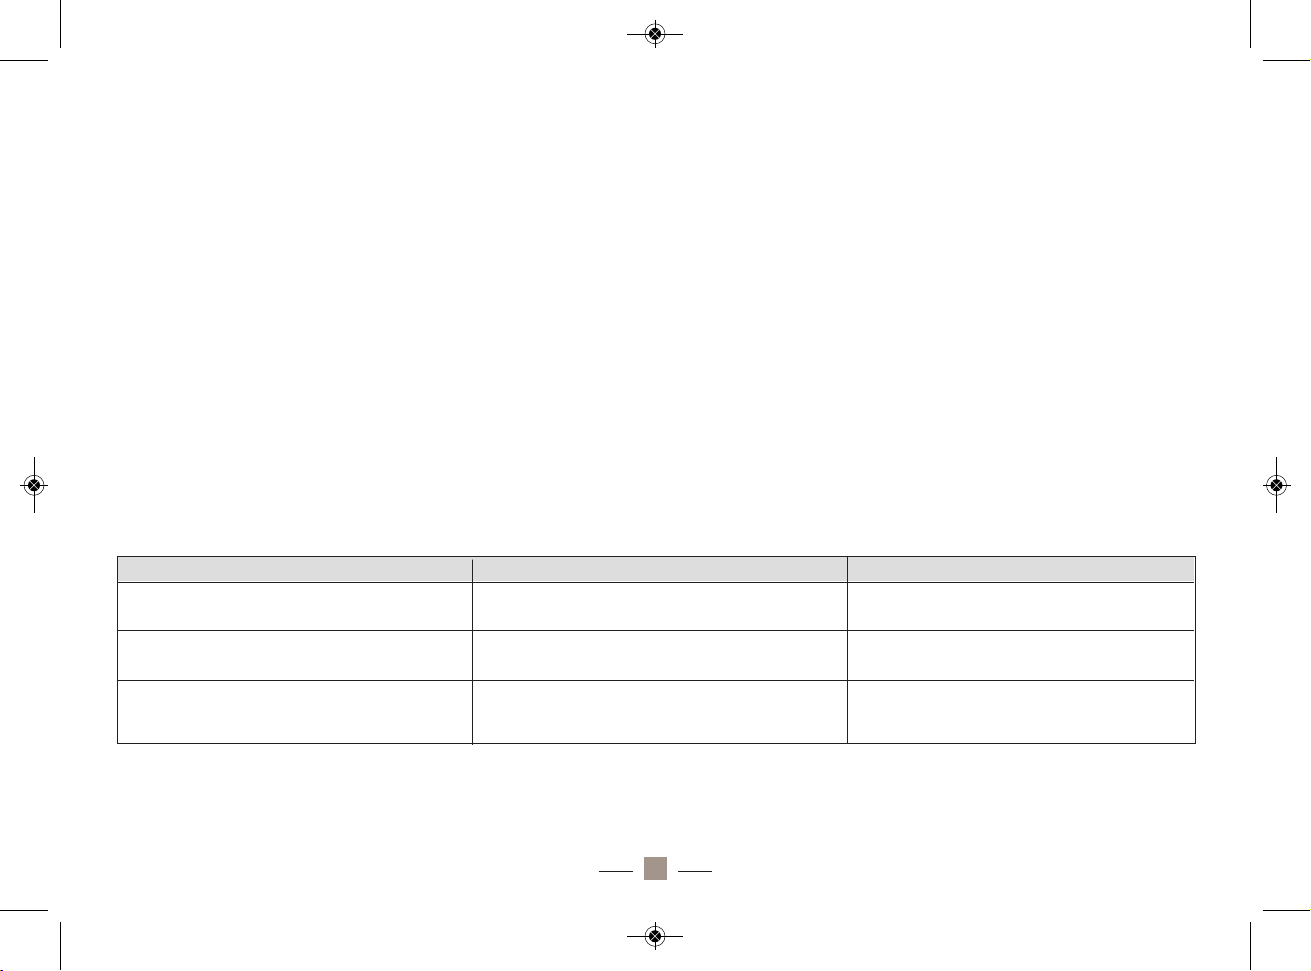
Aide au dosage et au choix des ingrédients
Remarques :
•
Ne jamais mettre le riz thaï à tremper (le rincer seulement), il
cuirait très mal par la suite, contrairement au riz basmati, qui lui,
peut tremper jusqu'à 30 minutes avant cuisson. Ces proportions
sont données pour une cuisson « moelleuse ».
•
Pour une cuisson plus ferme, il convient de réduire légèrement
la proportion d’eau, ou d’ajouter du riz ou des céréales supplémentaires (1/2 mesure à riz par exemple).
L’eau
La quantité d’eau nécessaire est différente suivant le type de riz
que vous utilisez. La capacité d’absorption de l’eau est différente pour chaque riz. Par exemple, le riz complet nécessite un peu
plus d'eau qu'un riz blanc. La mesure sur la cuve est indiquée
pour un riz blanc de type Thaï ou Basmati. Le riz est cuit lorsque
toute l’eau est absorbée et que de petits trous se sont formés à
la surface, entre les grains.
•
Le maintien au chaud peut légèrement assécher le riz cuit ou
les céréales. Dans l’idéal, limitez sa durée à moins de 30 min.
•
Le tableau ci-dessus est approximatif. Il est possible que le riz
ou la céréale que vous utiliserez présente un temps légèrement
différent. Il convient à chacun d’ajuster les proportions en fonction de ses goûts culinaires.
10
Pour 4 personnes
(accompagnement)
Riz Eau Temps
Riz blanc Basmati 2 mesures à riz Niveau 2 de la cuve Environ 20-30 min
Riz blanc thaï 2 mesures à riz Niveau 2 de la cuve Environ 20-30 min
Riz blanc rond (riz gluand) 2 mesures à riz Niveau 2 de la cuve Environ 20-30 min
Riz complet
2 mesures à riz Niveau 2 de la cuve Environ 45 min
2 mesures à riz + 1cs d’huile d’olive
2 mesures à riz
2
1/2
mesures à riz
2
1/2 mesures à riz
Pour 4 personnes
Céréales Eau Temps
(accompagnement)
Couscous Niveau 2 de la cuve Environ 8-10 min (ne pas maintenir au chaud)
Boulgour
Niveau 2 de la cuve Environ 35 min
Blé précuit Niveau 2 de la cuve Environ 15 min
Quinoa
Niveau 2 de la cuve
Environ 35 min
FAIT MAISON_LAGRANGE 16/05/11 10:07 Page12
Page 12
LES INGRÉDIENTS ET TEMPS DE PREPARATION POUR
LES PROGRAMMES DE TYPE YAOURT
Le lait
•
Choisissez de préférence un lait entier ou demi-écrémé longue-
conservation (ces laits ne nécessitent pas d’ébullition)
•
Les laits crus ou pasteurisés (homogénéisé, 2% ou écrémé) doivent être portés à ébullition (il serait dangereux d’utiliser du lait
cru sans le faire bouillir au préalable) puis refroidis et passés
pour éliminer les peaux.
•
Le lait entier permet d’obtenir un résultat plus moelleux et aug-
mente la saveur du yaourt.
•
Pour des yaourts à consistance plus ferme, ajoutez environ 5
cuillères à café de lait en poudre.
•
Comptez 8 heures pour la préparation de yaourts au lait entier,
10 heures pour des yaourts au lait demi-écrémé et 12 heures
pour des yaourts au lait écrémé.
Aide au dosage et au choix des ingrédients
Le ferment
Vous pouvez utiliser plusieurs types de ferment :
• Un yaourt nature du commerce
• Un yaourt issu d’une fabrication précédente (remarque : n’utilisez pas plus de 10 fois un yaourt issu de votre fabrication car
cela diminuera le résultat)
• Un ferment sec lyophilisé (dans ce cas, comptez 2 heures de
plus pour votre préparation)
11
Lait
1 litre de lait entier
1 litre de lait demi-écrémé
1 litre de lait écrémé
Ferment
1 yaourt du commerce
ou 1 yaourt de la fournée précédente
ou 1 sachet de ferment lyophilisé
1 yaourt du commerce
ou 1 yaourt de la fournée précédente
ou 1 sachet de ferment lyophilisé
1 yaourt du commerce
ou 1 yaourt de la fournée précédente
ou 1 sachet de ferment lyophilisé
Temps d’incubation
8 à 10 heures
10 à 12 heures
12 à 14 heures
FAIT MAISON_LAGRANGE 16/05/11 10:07 Page13
Page 13
LES INGRÉDIENTS ET TEMPS DE PREPARATION POUR
LES PROGRAMMES DE TYPE FROMAGE BLANC
Le lait
•
Choisissez de préférence un lait entier ou demi-écrémé longueconservation, ou un lait frais (ces laits ne nécessitent pas d’ébullition)
•
Le lait cru doit être porté à ébullition (il serait dangereux d’utiliser du lait cru sans le faire bouillir au préalable) puis refroidi et
passé pour éliminer les peaux
Utilisation du tableau de bord
Note :
Pour utiliser du lait de ferme, faites le bouillir préalablement
pour éviter toute contamination du lait. Pour cela, faites le monter en
température jusqu’à ébullition, et ceci pendant une minute maximum,
puis laissez-le refroidir à température ambiante.
Le ferment
Vous pouvez utiliser plusieurs types de ferment :
• Un fromage blanc issu du commerce, idéalement de type faisselle (dans le cas d’une faisselle individuelle, vous pouvez ajouter le petit lait)
• Un fromage blanc issu d’une fabrication précédente
(remarque: n’utilisez pas plus de 5 fois du fromage blanc issu de
votre fabrication car cela diminuera le résultat)
• Du petit lait issu d’une fabrication précédente
La présure
Vous pouvez trouver la présure sous forme de compte-gouttes en pharmacie.
12
Lait
Première utilisation (fromage blanc ou petit-suisse issu du commerce)
Lait frais
Lait entier UHT
Lait demi écrémé UHT
Lait cru
1 litre
1 litre
1 litre
1 litre
1 cuillère à soupe ou 1/2 faisselle ou 1 petit-suisse
1 cuillère à soupe ou 1/2 faisselle ou 1 petit-suisse
1 cuillère à soupe ou 1/2 faisselle ou 1 petit-suisse
1 cuillère à soupe ou 1/2 faisselle ou 1 petit-suisse
Ferment
3 gouttes
6 gouttes
3 gouttes
6 gouttes
10 heures
12 heures
14 heures
12 heures
Présure Temps
Régénération (fromage blanc ou petit lait issu de la tournée précédente)
5 fois maximum
Lait frais
Lait entier UHT
Lait demi écrémé
UHT Lait cru
1 litre
1 litre
1 litre
1 litre
2 cuillères à soupe ou 1 faisselle ou 1 verre de petit lait
2 cuillères à soupe ou 1 faisselle ou 1 verre de petit lait
2 cuillères à soupe ou 1 faisselle ou 1 verre de petit lait
2 cuillères à soupe ou 1 faisselle ou 1 verre de petit lait
3 gouttes
6 gouttes
6 gouttes
6 gouttes
8 heures
10 heures
FAIT MAISON_LAGRANGE 16/05/11 10:07 Page14
Page 14

MISE EN SERVICE ET UTILISATION_________
1ère utilisation
• En déballant votre appareil, veillez à enlever soigneusement tous les
éléments de calage.
• Vérifiez que toutes les pièces et accessoires sont présentes et sans
défaut.
• Avant d’utiliser votre appareil, nettoyez bien toutes les pièces (voir
paragraphe “entretien”).
• Sélectionnez le programme « Cuisson seule» voir paragraphe « sélection du programme de cuisson» et laissez le programme tourner à vide
pendant environ 10 minutes.
• Laissez l’appareil refroidir environ 20 minutes puis enlevez la cuve à
pain.
• Nettoyez-la une nouvelle fois.
Environnement d’utilisation
L’appareil est conçu pour travailler de manière optimale dans une fourchette de température. Nous vous conseillons une température de la
pièce comprise entre 15 et 34°C. Une température trop froide sera nocive pour une bonne levée des pâtes. Une température trop élevée sera
nocive pour le goût du pain.
Avant toute opération, vérifiez bien que votre appareil soit débranché. Lors de la mise sous tension de l’appareil, un bip se
fait
entendre, et l’inscription « 0:00 » clignote sur l’écran lumineux
bleu. Cela signifie que l’appareil attend des instructions.
13
FAIT MAISON_LAGRANGE 16/05/11 10:07 Page15
Page 15

Utilisation du tableau de bord
NT TEMPS DE
1. Choix de la cuve
Un premier appui sur le bouton de sélection de la cuve
permettra d’utiliser un programme nécessitant un pétrissage ou un remuage, soit la petite cuve avec pale de pétris-
sage. Il s’agit des programmes (de 1 à 12) du menu visible
sous l’écran, à savoir les programmes « type pain » (pain basique, pain
français, pain complet, pain sucré, pain ultra-rapide, gâteau, cake, pâte,
pâte à pizza, pétrissage, confiture, ou cuisson seule).
Lors de ce premier appui, la LED rouge située sous l’inscription
pain/cake s’éclaire. Par défaut, le programme affiché est le premier de
la liste, soit le « pain basique » avec ses différentes caractéristiques.
Un second appui permet de basculer sur les programmes de cuisson du
riz, cuisson rapide du riz, réalisation de yaourts et réalisation du fromage blanc qui nécessitent quant à eux, la grande cuve à riz. Ils sont situés
à gauche et à droite de l’écran et le choix sera effectué par appuis successifs pour basculer de l’un à l’autre. Une flèche de symbole « » ou « » pointe vers le programme choisi.
Lors de ce second appui, la LED verte située sous l’inscription yaourt/riz
s’éclaire. Par défaut, le programme choisi est celui de cuisson du riz. La
durée du programme est directement affichée à l’écran (ici, 40 minutes).
Remarque : Le bouton « choix de la cuve » est inactif lorsque l’appareil
effectue un programme et ceci pendant toute sa durée.
2. Sélection du programme de cuisson
Une fois la cuve sélectionnée, il faut choisir un programme.
Pour cela, il faut utiliser le bouton de sélection des programmes.
A chaque pression sur le bouton, un nouveau programme
s’affiche sur l’écran LCD et un signal sonore retentit.
Remarque : Pour démarrer un programme, appuyez une fois sur le bou-
ton « départ/arrêt ». Lorsque vous entendez un signal sonore et que le
caractère « : » clignote, cela indique que le programme a commencé.
Par contre, dès que le programme a commencé, vous ne
pou
vez plus
le modifier. Les seuls boutons que vous pourrez utiliser lors du processus de fabrication du pain seront le bouton « Pause » et
« départ/arrêt ». Pour arrêter le programme, maintenez le bouton
« départ/arrêt » appuyé pendant environ 2 secondes. Le signal sonore
indique que le programme est bien arrêté.
Les 12 programmes accessibles lorsque la cuve à pain a été choisie, sont les suivants :
1.Pain basique :
Pétrissage, levée et cuisson classique du pain. Convient
également pour du pain blanc ou brun, agrémenté selon votre souhait
d’épices, d’herbes ou autres ingrédients.
2.Pain français :
Pétrissage, levée et cuisson avec un plus grand temps
de levée. Cuisson d’un pain à la mie alvéolée et légère et avec une croûte croustillante.
3.Pain complet :
Pétrissage, levée et cuisson d’un pain avec farine complète. Ce programme présente un temps de préchauffage plus long, et
le pain obtenu est plus doux et moelleux. Pour de meilleurs résultats, il
n’est pas conseillé d’utiliser un départ différé avec ce programme.
14
à placer en premières pages de l’anglais...
Liquid or humid ingredients
Sugar, salt and flour
Yeast
8
.
9
.
10.
11.
12.
13.
14.
15.
16.
1
7.
1
8.
1
9.
2
0.
Bread Maker
Ref: 479 001
Spoon case
Location of the power supply
Kneading blade
Small bread trough
L
arge rice trough
1
container and 1 strainer for “fromage blanc”
8
glass yoghur t jars with plastic covers
S
eparator grate for yoghurt
R
ice spoon
L
adle (“fromage blanc”, jam, etc.)
H
ook (to remove the kneading blade from the
“
bread” after baking)
R
ice measure
Measuring spoon (teaspoon/tablespoon)
8
9
17
18
19
20
1
5
16
13
14
®
à placer en premières pages de l’anglais...
Yeast
5
.
6
.
7
.
8
.
9
.
1
0.
1
1.
12.
13.
14.
15.
16.
17.
18.
1
9.
2
0.
Bread Maker
Ref: 479 001
S
pace for the trough
C
ontrol panel
B
ase of the appliance
S
poon case
Location of the power supply
Kneading blade
Small bread trough
Large rice trough
1 container and 1 strainer for “fromage blanc”
8 glass yoghur t jars with plastic covers
Separator grate for yoghurt
R
ice spoon
L
adle (“fromage blanc”, jam, etc.)
H
ook (to remove the kneading blade from the
“
bread” after baking)
R
ice measure
M
easuring spoon (teaspoon/tablespoon)
8
9
1
7
1
8
1
9
20
15
1
6
1
2
1
3
1
4
®
▼
▼
FAIT MAISON_LAGRANGE 16/05/11 10:07 Page16
Page 16
4.Pain sucré :
Pétrissage, levée et cuisson d’un pain sucré. Pour réaliser
des recettes avec plus de matières grasses et de sucre (comme la
brioche par exemple). Le pain obtenu est moelleux avec une croûte
croustillante.
5.Ultra-rapide :
Pétrissage, levée et cuisson d’un pain de 700g en un
temps réduit. Le pain obtenu est généralement plus petit et la mie plus
serrée. L’eau utilisée dans les ingrédients devra présenter une température d’environ 48-50°C. Utiliser un thermomètre de cuisine pour effectuer la mesure de température.
6.Gâteau :
Pétrissage et cuisson d’un gâteau sans levure.
7.Cake :
Pétrissage, levée et cuisson d’un cake ou gâteau avec levure.
8.Pâte :
Pétrissage et levée d’une pâte à pain sans cuisson. Ce programme convient aux préparations nécessitant un travail de la pâte avant
cuisson comme la fougasse par exemple. Vous pouvez alors utiliser un
four traditionnel pour la cuisson.
9.Pâte à pizza :
Pétrissage et levée d’une pâte à pizza sans cuisson. Le
temps de levée de la pâte à pizza est plus court que celui de la pâte à
pain. Vous pouvez ensuite mettre en forme votre pâte et utiliser un four
traditionnel pour la cuisson.
10.Pétrissage :
Pétrissage seul d’une pâte quelconque, sans levée ni cuisson. Ce programme est notamment recommandé pour réaliser une pâte
brisée ou sablée avant d’être étalée pour la confection d’une tarte ou
d’une quiche par exemple.
11.Confiture :
Confitures mijotées et marmelades. Les fruits doivent être
préalablement coupés en petits morceaux ou hachés au mixeur avant
de les insérer dans la cuve à pain.
12.Cuisson seule :
Pas de pétrissage, pas de levée, une cuisson uniquement. Ce programme permet notamment de rendre un pain déjà cuit et
refroidi plus croustillant. Vous pouvez ajuster le temps de cuisson et la
température à votre guise.
Les 4 programmes accessibles lorsque la grande cuve a été
sélectionnée sont les suivants :
Cuisson du riz :
cuire du riz sans surveillance en 40 minutes
Cuisson rapide du riz :
cuire du riz sans surveillance en 30 minutes
Yaourts :
Réaliser jusqu’à 8 yaourts à partir d’un litre de lait et d’un fer-
ment.
Fromage blanc :
Obtenir du fromage blanc à partir d’1 litre de lait,
quelques gouttes de présure, et d’un ferment.
3.
Taille du pain
Lorsque vous choisissez un programme pain de type basique, français,
complet, sucré ou ultra-rapide, vous avez la possibilité de choisir entre
2 tailles de pain, à savoir 700 et 900g. Par défaut, l’appareil
se positionne sur 900g. Appuyez sur lebouton de sélection du poids jusqu’à ce que la flèche soit en face du poids
souhaité.
Remarque : le temps de réalisation du pain dépend du poids.
15
à placer en premières pages de l’anglais...
Liquid or humid ingredients
Sugar, salt and flour
Yeast
11.
1
2.
1
3.
1
4.
1
5.
1
6.
1
7.
18.
19.
20.
Bread Maker
Ref: 479 001
S
mall bread trough
L
arge rice trough
1
container and 1 strainer for “fromage blanc”
8 glass yoghur t jars with plastic covers
Separator grate for yoghurt
Rice spoon
Ladle (“fromage blanc”, jam, etc.)
Hook (to remove the kneading blade from the
“bread” after baking)
Rice measure
Measuring spoon (teaspoon/tablespoon)
9
17
18
19
20
15
16
14
®
cc cs
FAIT MAISON_LAGRANGE 16/05/11 10:07 Page17
Page 17
4. Dorure/Température
Lorsque vous choisissez un programme de pain
(basique, français, complet, sucré, ultra-rapide,
gâteau, cake ou cuisson seule), vous pouvez choisir la
température de cuisson qui apportera une dorure plus ou
moins prononcée à votre préparation.
Une flèche de symbole «▲» vous permet de positionner sur l’un des 3
niveaux différents de dorure, entre clair, moyen et foncé. Par défaut, la
position sur moyen est activée.
5. Différé
Si vous souhaitez démarrer le programme plus tard (comme par
exemple pour obtenir votre pain du matin encore tout chaud), vous
pouvez utiliser cette fonction pour différer l’heure de départ. Cette
fonction n’est pas accessible pour les programmes : ultra rapide, gâteau,
cake, pétrissage, confiture, yaourt et fromage. Le temps maximum cumulant le temps de différé et la durée du programme est de 12h.
Note : Pour les programmes yaourts et fromage blanc, le différé ne
fonctionne pas, cependant les boutons de réglage du différé permettent de modifier le temps de préparation qui est initialisé à 8 h. On peut
ainsi choisir (en fonction du type de lait) une durée de préparation
allant de 1h à 15h.
Une fois votre programme choisi, appuyez sur « DIFFERE ». Un bip se fait
entendre et l’écran LCD s’éclaire alors et fait clignoter le temps final avant
la fin du programme. Le temps de réalisation est inclus. Programmez
donc le temps total depuis le moment de la programmation jusqu’à
l’heure souhaitée de fin de préparation. (
Ex : s’il est 20h30 et que vous
souhaitez que votre pain soit prêt à 7h le lendemain matin, programmez 10h30 supplémentaires au programme sélectionné
)
Utilisez alors les boutons « HEURE » et « MINUTE » pour ajuster le temps
souhaité, puis appuyez de nouveau sur « DIFFERE » pour confirmer le
temps saisi, le clignotement s’arrête alors. Pour lancer le décompte du
différé, appuyez sur le bouton « départ/arrêt ». A l’issue du temps de
décalage, le programme débutera automatiquement. Lors de la saisie du
temps, si vous dépassez le temps maximal possible (de 12h), l’écran
réaffiche la durée initiale du programme choisi. Attention, le temps de
décalage affiché représente la durée jusqu’à la fin du programme et non
celle du début du programme. Lorsque votre temps est programmé,
appuyez sur le bouton « départ/arrêt ». « : » clignote pour indiquer que
le programme est bien lancé et débutera après le temps de décalage
choisi.
ATTENTION : Lorsque vous utilisez cette fonction, n’utilisez pas
d’ingrédients rapidement périssables (œufs, lait frais, levure
fraiche, fruits frais, oignons,…).
6. Départ/arrêt
Ce bouton permet de lancer et arrêter le programme choisi. Une fois les paramètres du programme choisi, il suffit
d’appuyer sur ce bouton pour que le programme se lance
avec ou sans départ différé. Un bip court se fait entendre,
l’écran clignote une fois et affiche le temps restant (sauf pour les programmes yaourt et fromage blanc ou s’affiche le temps déjà écoulé) et
la machine commence son programme. A partir de ce moment, tous les
autres boutons deviennent inactifs mis à part celui-ci.
Lorsque l’appareil exécute un programme de pain et que l’appareil
mélange ou pétrit, le symbole apparaît sur l’écran.
Lors d’une levée ou d’une cuisson, le symbole apparaît sur l’écran.
16
??
à placer en premières pages de l’anglais...
Yeast
?
1.
2.
3.
4.
5.
6.
7.
8.
9.
10.
11.
12.
13.
14.
15.
16.
17.
18.
19.
20.
-
THE CONTROL PANEL -- DESCRIPTION OF THE APPLIANCE -
Open button
Cover of the appliance
Control window-plug
Seal
Space for the trough
Control panel
Base of the appliance
Spoon case
Location of the power supply
Kneading blade
Small bread trou gh
Large rice trough
1 container and 1 strainer for “fromage blanc”
8 glass yoghur t jars with plastic covers
Separator grate for yoghurt
Rice spoon
Ladle (“fromage blanc”, jam, etc.)
Hook (to remove the kneading blade from the
“bread” after baking)
Rice measure
Measuring spoon (teaspoon/tablespoon)
8
17
18
1
9
20
15
1
6
11
12
13
14
10
Gilding selection indicator lamp Weight selection indicator lamp
Trough selection
i
ndicator lamp
Trough selection
button
Program me
selection button
W
eight selection button
Buttons for selecting and adjusting the deferred start and the modification
of the dairy produce programme time
L
ist of bread prog rammes
®
Dairy produce
programmes that
can be prepared
with the rice trough
?
à placer en premières pages de l’anglais...
Liquid or humid ingredients
Sugar, salt and flour
Yeast
placer dans l’anglais
1
3.
1
4.
1
5.
1
6.
17.
18.
19.
20.
B
read Maker
Ref: 479 001
1 container and 1 strainer for “fromage blanc”
8 glass yoghur t jars with plastic covers
Separator grate for yoghurt
Rice spoon
Ladle (“fromage blanc”, jam, etc.)
Hook (to remove the kneading blade from the
“bread” after baking)
R
ice measure
M
easuring spoon (teaspoon/tablespoon)
9
17
1
8
1
9
20
15
1
6
®
cc cs
Teaspoon
Tablespoon
Liquid or humid ingredients
Sugar, salt and flour
Yeast
1
0.
1
1.
12.
13.
14.
15.
16.
17.
18.
19.
20.
Kneading blade
Small bread trough
Large rice trough
1 container and 1 strainer for “fromage blanc”
8 glass yoghur t jars with plastic covers
Separator grate for yoghurt
Rice spoon
Ladle (“fromage blanc”, jam, etc.)
H
ook (to remove the kneading blade from the
“bread” after baking)
Rice measure
Measuring spoon (teaspoon/tablespoon)
8
17
18
19
20
15
16
14
Programme
selection button
Weight selection button
List of bread programmes
c
an be prepared
w
ith the rice trough
21
17 Chemin de la Plaine
ZA les Plattes
69390 VOURLES
France
www.lagrange.fr
à
placer en première page pour le français
??
à placer en premières pages de l’anglais...
ingrédients liquides/humides
Sucre, sel, farine
Levure
Liquid or humid ingredients
Sugar, salt and flour
Yeast
placer dans l’anglais
?
1
.
2.
3
.
4.
5.
6.
7.
8
.
9.
10.
11.
12.
1
3.
14.
15.
16.
17.
18.
19.
20.
- THE CONTROL PANEL -- DESCRIPTION OF THE APPLIANCE -
O
pen button
Cover of the appliance
Control window-plug
Seal
Space for the trough
C
ontrol panel
Base of the appliance
Spoon case
Location of the power supply
Kneading blade
S
mall bread trough
Large rice trough
1 container and 1 strainer for “fromage blanc”
8 glass yoghurt jars with plastic covers
Separator grate for yoghurt
Rice spoon
Ladle (“fromage blanc”, jam, etc.)
H
ook (to remove the kneading blade from the
“bread” after baking)
R
ice measure
Measuring spoon (teaspoon/tablespoon)
8
1
7
18
19
20
15
16
11
1
2
13
14
10
G
ilding selection indicator lamp Weight selection indicator lamp
T
rough selection
indicator lamp
T
rough selection
button
Dairy produc e
p
rogrammes that
can be prepared
with the rice trough
Programme
selection button
Weight selection button
Buttons for selecting and adjusting the deferred start and the modification
of the dairy produce programme time
Gilding/temperature
selection button
Start/stop button
W
arming – reheating
selection button
Warming – reheating
selection indicator
lamp
List of bread programmes
®
®
cc cs
D
airy produce
programmes that
can be prepared
w
ith the rice trough
Teaspoon
Tablespoon
21
17 Chemin de la Plaine
ZA les Plattes
69390 VOURL ES
France
www.lagrange.fr
17.
1
8.
19.
20.
à placer en première page pour le français
??
à placer en premières pages de l’anglais...
M
achine à pain
R
ef: 479 001
Louche (fromage blanc, confiture…)
Crochet (pour retirer la pale du « pain » après cuisson)
M
esure à riz
C
uillère mesure (cuillère à café/cuillère à soupe)
18
19
20
Boutons de sélection et de réglage du départ différé et de modification
du temps des programmes laitages
Liste des programmes pain
ingrédients liquides/humides
Sucre, sel, farine
Levure
Liquid or humid ingredients
Sugar, salt and flour
Yeast
placer dans l’anglais
®
?
1
.
2.
3
.
4.
5
.
6.
7
.
8.
9.
10.
11.
1
2.
13.
1
4.
15.
1
6.
17.
18.
1
9.
20.
- THE CONTROL PANEL -- DESCRIPTION OF THE APPLIANCE -
Bread Maker
Ref: 479 001
Open button
Cover of the appliance
Control window-plug
Seal
S
pace for the trough
Control panel
B
ase of the appliance
Spoon case
L
ocation of the power supply
Kneading blade
Small bread trough
L
arge rice trough
1 container and 1 strainer for “fromage blanc”
8
glass yoghurt jars with plastic covers
Separator grate for yoghurt
R
ice spoon
Ladle (“fromage blanc”, jam, etc.)
H
ook (to remove the kneading blade from the
“bread” after baking)
R
ice measure
Measuring spoon (teaspoon/tablespoon)
8
9
1
7
18
19
20
15
16
11
12
13
14
10
Gilding selection indicator lamp Weight selection indicator lamp
Trough selection
i
ndicator lamp
Trough selection
button
D
airy produce
p
rogrammes that
can be prepared
with the rice trough
Programme
s
election button
Weight selection button
Buttons for selecting and adjusting the deferred start and the modification
of the dairy produce programme time
Gilding/temperature
s
election button
Start/stop button
W
arming – reheating
selection button
W
arming – reheating
selection indicator
lamp
List of bread programmes
®
®
cc cs
Dairy produce
programmes that
can be prepared
w
ith the rice trough
Teaspoon
Tablespoon
FAIT MAISON_LAGRANGE 16/05/11 10:07 Page18
Page 18
Lorsque l’appareil passera en mode « maintien au chaud », la LED rouge
correspondante s’allumera en haut à gauche du tableau de bord, et le
symbole apparaîtra à l’écran.
Lorsque l’appareil exécute un programme de cuisson de riz, l’appareil
fera apparaître le symbole lors de l’étape de cuisson et ceci jusqu’à
la fin de cette étape. L’appareil entrera ensuite dans l’étape de maintien
au chaud ; ce même symbole apparaîtra toujours à l’écran et la LED
rouge du « maintien au chaud » s’allumera. Pour arrêter le programme,
appuyez sur le bouton Départ/arrêt pendant environ 2 secondes jusqu’à ce qu’un bip se fasse entendre. Celui-ci confirme que l’appareil est
revenu au point initial. L’écran fait alors réapparaître le programme par
défaut, à savoir soit « pain basique » si la cuve à pain est en place, soit
le programme « cuisson du riz » si la cuve à riz est en place.
7. Maintien au chaud/Réchauffage
Une fois qu’un programme est terminé, l’appareil lancera
automatiquement la fonction « maintien au chaud » sauf
pour les programmes « pâte, pâte à pizza, pétrissage,
confiture, fromage blanc et yaourt ».
Par défaut, ce maintien au chaud s’effectuera pendant 1 heure.
Un appui sur le bouton « Maintien au chaud/Réchauffage » après sélection du programme souhaité, active le programme « maintien au
chaud ». La LED rouge est éclairée et un bip se fait entendre. L’écran
affiche « 0:00 ». Si vous souhaitez couper ce cycle de maintien au chaud
et enlever le pain de la cuve, appuyez sur le bouton « départ/arrêt »
durant 2 secondes.
ATTENTION : Pensez toujours à débrancher l’appareil avant de
manipuler la cuve à pain.
Vous pouvez appuyer sur le bouton « Maintien au
chaud/Réchauffage » pour réchauffer du riz froid de la même manière.
Une fois le riz correctement réchauffé, le programme s’arrêtera automatiquement et un long bip vous signalera la fin du réchauffage.
Note :
- La LED rouge est allumée durant le maintien au chaud
- La LED verte est allumée durant le réchauffage.
Remarque :
- Un programme pain et un appui sur le bouton « maintien au
chaud/Réchauffage » déclenche le programme maintien au chaud
- Un programme riz et un appui sur le bouton « maintien au
chaud/Réchauffage » déclenche le programme réchauffage
17
2
1
17 Chemin de la Plaine
ZA les Plattes
6
9390 VOURL ES
F
rance
www.lagrange.fr
1
7.
18.
19.
2
0.
à placer en première page pour le français
??
à placer en premières pages de l’anglais...
Machine à pain
R
ef: 479 001
Louche (fromage blanc, confiture…)
C
rochet (pour retirer la pale du « pain » après cuisson)
M
esure à riz
Cuillère mesure (cuillère à café/cuillère à soupe)
18
19
20
B
outons de sélection et de réglage du départ différé et de modification
du temps des programmes laitages
Liste des programmes pain
ingrédients liquides/humides
Sucre, sel, farine
L
evure
Liquid or humid ingredients
S
ugar, salt and flour
Yeast
p
lacer dans l’anglais
®
?
1
.
2
.
3.
4.
5
.
6.
7.
8
.
9
.
10.
11.
1
2.
13.
14.
15.
1
6.
17.
18.
1
9.
20.
- THE CONTROL PANEL -- DESCRIPTION OF THE APPLIANCE -
Bread Maker
R
ef: 479 001
O
pen button
C
over of the appliance
Control window-plug
Seal
S
pace for the trough
C
ontrol panel
Base of the appliance
Spoon case
L
ocation of the power supply
Kneading blade
Small bread trough
L
arge rice trough
1
container and 1 strainer for “fromage blanc”
8 glass yoghurt jars with plastic covers
Separator grate for yoghurt
R
ice spoon
Ladle (“fromage blanc”, jam, etc.)
Hook (to remove the kneading blade from the
“bread” after baking)
R
ice measure
Measuring spoon (teaspoon/tablespoon)
8
9
17
18
19
20
15
16
11
12
13
14
10
G
ilding selection indicator lamp Weight selection indicator lamp
T
rough selection
i
ndicator lamp
Trough selection
button
D
airy produce
p
rogrammes that
c
an be prepared
with the rice trough
P
rogramme
selection button
Weight selection button
Buttons for selecting and adjusting the deferred start and the modification
o
f the dairy produce programme time
Gilding/temperature
selection button
S
tart/stop button
W
arming – reheating
s
election button
Warming – reheating
selection indicator
l
amp
L
ist of bread programmes
®
®
cc cs
D
airy produce
programmes that
can be prepared
with the rice trough
T
easpoon
Tablespoon
2
1
17 Chemin de la Plaine
ZA les Plattes
6
9390 VOURL ES
F
rance
www.lagrange.fr
1
7.
18.
19.
2
0.
à placer en première page pour le français
??
à placer en premières pages de l’anglais...
M
achine à pain
Ref: 479 001
Louche (fromage blanc, confiture…)
C
rochet (pour retirer la pale du « pain » après cuisson)
M
esure à riz
Cuillère mesure (cuillère à café/cuillère à soupe)
18
19
20
B
outons de sélection et de réglage du départ différé et de modification
du temps des programmes laitages
Liste des programmes pain
i
ngrédients liquides/humides
Sucre, sel, farine
L
evure
Liquid or humid ingredients
S
ugar, salt and flour
Y
east
p
lacer dans l’anglais
®
?
1
.
2
.
3.
4.
5
.
6
.
7.
8
.
9
.
10.
11.
1
2.
13.
14.
15.
1
6.
17.
18.
1
9.
20.
- THE CONTROL PANEL -- DESCRIPTION OF THE APPLIANCE -
Bread Maker
R
ef: 479 001
O
pen button
C
over of the appliance
Control window-plug
Seal
S
pace for the trough
C
ontrol panel
Base of the appliance
Spoon case
L
ocation of the power supply
Kneading blade
Small bread trough
L
arge rice trough
1
container and 1 strainer for “fromage blanc”
8 glass yoghurt jars with plastic covers
Separator grate for yoghurt
R
ice spoon
Ladle (“fromage blanc”, jam, etc.)
Hook (to remove the kneading blade from the
“bread” after baking)
R
ice measure
Measuring spoon (teaspoon/tablespoon)
8
9
17
18
19
20
15
16
1
1
12
13
14
10
G
ilding selection indicator lamp Weight selection indicator lamp
Trough selection
i
ndicator lamp
Trough selection
button
D
airy produce
p
rogrammes that
c
an be prepared
w
ith the rice trough
P
rogramme
selection button
Weight selection button
Buttons for selecting and adjusting the deferred start and the modification
of the dairy produce programme time
Gilding/temperature
selection button
S
tart/stop button
W
arming – reheating
s
election button
Warming – reheating
selection indicator
l
amp
List of bread programmes
®
®
cc cs
D
airy produce
p
rogrammes that
can be prepared
with the rice trough
T
easpoon
Tablespoon
Liquid or humid ingredients
Sugar, salt and flour
Yeast
7.
8.
9.
10.
11.
12.
1
3.
1
4.
1
5.
1
6.
1
7.
1
8.
19.
20.
Base of the appliance
Spoon case
Location of the power supply
K
neading blade
S
mall bread trough
L
arge rice trough
1
container and 1 strainer for “fromage blanc”
8
glass yoghur t jars with plastic covers
S
eparator grate for yoghurt
Rice spoon
Ladle (“fromage blanc”, jam, etc.)
Hook (to remove the kneading blade from the
“bread” after baking)
Rice measure
Measuring spoon (teaspoon/tablespoon)
8
17
18
19
20
15
16
13
14
Trough selection
button
P
rogramme
s
election button
Weight selection button
L
ist of bread programmes
Dairy produce
programmes that
can be prepared
with the rice trough
FAIT MAISON_LAGRANGE 16/05/11 10:07 Page19
Page 19
LA REALISATION DE PAIN-BRIOCHE-GATEAU______
La préparation de l’appareil
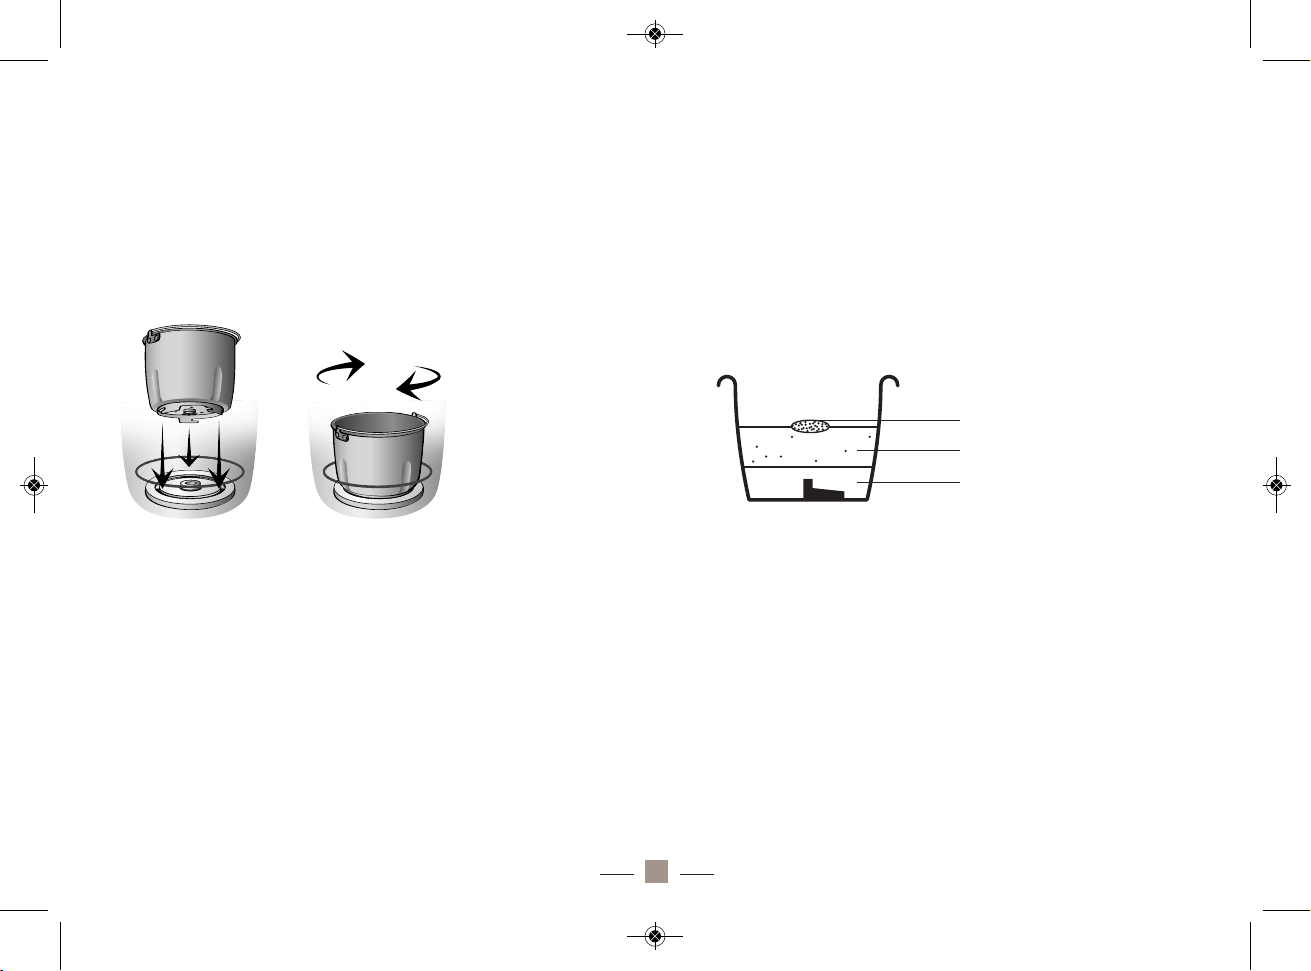
• Placez votre cuve à pain à l’intérieur de l’appareil de façon à
ce qu’ elle soit correctement enclenchée.
• Placez la pale au fond de la cuve, sur la partie prévue à cet effet.
Conseil pratique : vous pouvez remplir le trou de margarine avant de
placer la pale au fond de la cuve. Cela évitera à la pâte de coller à la
pale et de retirer ainsi la pale du pain plus facilement à la fin de la cuisson.
La préparation culinaire
• Placez les ingrédients dans la cuve en suivant l’ordre suivant :
- Ingrédients liquides ou humides (dont eau, huile ou beurre, œufs)
- Sucre, sel et farine
- Levure
• Faites un petit trou avec le doigt dans la farine et placez-y la levure en
prenant garde à ce qu’elle n’entre pas en contact avec les liquides ou le
sel.
• Respectez les quantités indiquées dans les recettes, et ne dépassez
pas les quantités maximales indiquées.
18
ingrédients liquides/humides
Sucre, sel, farine
Levure
Liquid or humid ingredients
Sugar, salt and flour
Yeast
placer dans l’anglais
20.
Measuring spoon (teaspoon/tablespoon)
cc cs
Teaspoon
Tablespoon
-1- 2
--
-1-
--
2
FAIT MAISON_LAGRANGE 16/05/11 10:07 Page20
Page 20

L’exécution d’un programme
• Fermez le couvercle et branchez l’appareil au secteur. Si la cuve est
mal positionnée, l’écran LCD fera apparaître le symbole suivant : ,
qui clignotera lors de l’appui sur le bouton « Départ/arrêt ». Vous devez
alors bien enclencher la cuve pour pouvoir lancer le programme.
• Sélectionnez la cuve appropriée, c’est-à-dire, la cuve à pain.
• Sélectionnez le programme du pain que vous souhaitez réaliser par
appuis successifs sur le bouton de sélection des programmes.
• Sélectionnez la dorure parmi les 3 choix possibles par appuis successifs sur le bouton de sélection de la dorure / température. Par
défaut, la flèche de température est sur la position « moyen ». Ce bouton est inactif pour les programmes « Confiture, pétrissage, pâte, pâte à
pizza ».
• Sélectionnez la taille du pain (700 ou 900g) de votre choix à l’aide du
bouton de sélection du poids. Par défaut, la flèche est sur la position
« 900g ». Ce bouton est inactif pour les programmes « gâteau, cake,
pâte, pâte à pizza, pétrissage, confiture, cuisson »
• Programmez le temps en fonction de l’heure à laquelle vous souhaitez
que votre pain soit prêt (facultatif). (Cf. paragraphe «
Différé
» page 16).
• Appuyez sur le bouton « départ/arrêt » pour lancer le programme. Le
symbole « : » se met à clignoter.
• Pour les programmes « pain basique, pain complet, pain français, rapide, et pain sucré », un signal sonore retentira 10 fois au cours du processus (Cf. tableau «
Guide des cycles par programme
» page 7). Celuici vous permet, selon vos goûts, d’ajouter des ingrédients. Vous pouvez
alors ouvrir le couvercle de l’appareil pour y ajouter des ingrédients
(fruits secs, pépites de chocolat, graines, noix…).
• ATTENTION : Il se peut qu’à l’ouverture du couvercle de la vapeur
s’échappe.
• Une fois le programme terminé, un signal sonore retentira 10 fois. Vous
pouvez alors appuyer sur le bouton « départ/arrêt » pour arrêter le programme.
Si vous ne vous trouvez pas dans la pièce ou que vous n’appuyez pas
sur
le bouton départ/arrêt, le cycle de maintien au chaud se mettra automatiquement en marche pendant 60 minutes.
21
1
7 Chemin de la Plaine
ZA les Plattes
69390 VOURLE S
F
rance
w
ww.lagrange.fr
12.
13.
1
4.
15.
16.
1
7.
1
8.
19.
2
0.
à
placer en première page pour le français
??
à
placer en premières pages de l’anglais...
M
achine à pain
Ref: 479 001
Grande cuve à riz
1 pot et 1 faisselle pour fromage blanc
8
pots de yaourt en verre avec couvercles en plastique
Grille séparatrice pour yaourts
Cuillère à riz
L
ouche (fromage blanc, confiture…)
Crochet (pour retirer la pale du « pain » après cuisson)
Mesure à riz
Cuillère mesure (cuillère à café/cuillère à soupe)
9
17
18
1
9
2
0
1
5
1
6
1
4
B
outon de sélection
d
es programmes
B
outon de sélection du poids
Boutons de sélection et de réglage du départ différé et de modification
du temps des programmes laitages
Bouton de sélection
de la dorure / température
B
outon départ / arrêt
Liste des programmes pain
i
ngrédients liquides/humides
Sucre, sel, farine
Levure
Liquid or humid ingredients
Sugar, salt and flour
Yeast
placer dans l’anglais
®
?
1.
2.
3.
4.
5.
6
.
7.
8
.
9
.
10.
11.
12.
13.
14.
15.
1
6.
17.
18.
19.
20.
- THE CONTROL PANEL -- DESCRIPTION OF THE APPLIANCE -
Bread Maker
R
ef: 479 001
Open button
C
over of the appliance
Control window-plug
Seal
Space for the trough
C
ontrol panel
Base of the appliance
Spoon case
L
ocation of the power supply
Kneading blade
Small bread trough
L
arge rice trough
1
container and 1 strainer for “fromage blanc”
8 glass yoghurt jars with plastic covers
Separator grate for yoghurt
Rice spoon
Ladle (“fromage blanc”, jam, etc.)
Hook (to remove the kneading blade from the
“
bread” after baking)
R
ice measure
Measuring spoon (teaspoon/tablespoon)
8
9
1
7
18
19
2
0
15
1
6
1
1
1
2
1
3
1
4
1
0
Gilding selection indicator lamp Weight selection indicator lamp
Trough selection
i
ndicator lamp
Trough selection
button
Dairy produce
programmes that
can be prepared
with the rice trough
Programme
s
election button
Weight selection button
B
uttons for selecting and adjusting the deferred start and the modification
of the dairy produce programme time
Gilding/temperature
selection button
S
tart/stop button
Warming – reheating
selection button
W
arming – reheating
s
election indicator
lamp
L
ist of bread programmes
®
®
cc cs
cc cs
Dairy produce
p
rogrammes that
c
an be prepared
with the rice trough
Teaspoon
Tablespoon
19
FAIT MAISON_LAGRANGE 16/05/11 10:07 Page21
Page 21

La récupération de la préparation culinaire
• Pour retirer le pain de la cuve, ouvrez le couvercle et utilisez toujours
des gants de cuisine. Tournez la cuve dans le sens contraire des aiguilles
d’une montre pour déverrouiller la cuve et retirez-la de l’appareil.
• ATTENTION : Soyez prudent en manipulant la cuve et le pain car
ils peuvent, tous les deux, être très chauds.
• Avant de retirer le pain de sa cuve, attendez que celle-ci refroidisse.
• Une fois la cuve refroidie, utilisez une spatule (en bois, plastique ou
silicone) pour démouler le pain.
• Placez la cuve à pain à l’envers sur une surface propre et secouez ou
tapotez doucement la cuve jusqu’à ce que le pain tombe sur la surface.
• Laissez le pain refroidir pendant environ 15-30 minutes.
• Avant de trancher votre pain ou votre gâteau, utilisez le crochet pour
retirer la pale. Ne jamais la retirer à mains nues car elle pourrait être
chaude.
• ll est recommandé de trancher le pain avec un couteau électrique ou
un couteau à dents. Un couteau de cuisine (sans dent) provoquerait
une déformation du pain pendant son tranchage.
Note :
Votre pain peut se conserver 3 jours à température ambiante dans un
sachet plastique ou une boîte hermétique, ou 10 jours si vous placez le
sachet ou la boîte au réfrigérateur. Le pain que vous réalisez vousmêmes, ne contient pas de conservateur, c’est pourquoi sa durée de
conservation est plus courte qu’un pain vendu dans le commerce.
LA REALISATION DE CONFITURE ____________
La préparation
• Placez la cuve à pain dans l’appareil, ainsi que la pale de pétrissage.
• Epluchez et coupez les fruits en morceaux.
• Lavez les fruits s’ils ne nécessitent pas d’épluchage préalable.
• Placez les fruits dans la cuve à pain.
• Ajoutez le sucre.
• Ajoutez le gélifiant (une pomme ou pectine déshydratée) pour les
fruits à teneur réduite en pectine (fraises, poires, pêches…) ou utilisez un
sucre « spécial confitures » avec gélifiant.
• Ajoutez un demi-verre d’eau (pour aider la fonte du sucre)
• Ajoutez le jus de citron (pour les fruits pas suffisamment acides)
L’exécution du programme
• Fermez le couvercle et branchez l’appareil au secteur. Si la cuve est
mal positionnée, l’écran LCD fera apparaître le symbole suivant :
qui clignotera lors de l’appui sur le bouton
« Départ/arrêt ». Vous devez alors bien enclencher la cuve pour pouvoir lancer le programme.
• Sélectionnez la cuve appropriée, c’est-à-dire, la cuve à pain.
• Sélectionnez le programme « 11 : confiture » par appuis successifs sur
le bouton de sélection des programmes.
• Appuyez sur le bouton « départ/arrêt » pour lancer le programme. Le
symbole « : » se met à clignoter.
• Une fois le programme terminé, un signal sonore retentira 10 fois. Vous
pouvez alors appuyer sur le bouton « départ/arrêt » pour arrêter le programme.
• Ouvrez le couvercle et testez la consistance en prélevant une cuillère
à soupe du mélange. Faites attention à ne pas vous brûler sur les bords
20
21
17 Chemin de la Plaine
ZA les Plattes
69390 VOURL ES
France
www.lagrange.fr
à placer en première page pour le français
?
?
à placer en premières pages de l’anglais...
Ref: 479 001
ingrédients liquides/humides
Sucre, sel, farine
Levure
Liquid or humid ingredients
S
ugar, salt and flour
Yeast
placer dans l’anglais
?
1.
2.
3
.
4.
5.
6.
7.
8.
9.
10.
1
1.
12.
13.
14.
15.
16.
1
7.
18.
19.
20.
- THE CONTROL PANEL -- DESCRIPTION OF THE APPLIANCE -
Bread Maker
Ref: 479 001
Open button
C
over of the appliance
Control window-plug
Seal
Space for the trough
Control panel
B
ase of the appliance
Spoon case
Location of the power supply
K
neading blade
Small bread trough
Large rice trough
1 container and 1 strainer for “fromage blanc”
8 glass yoghurt jars with plastic covers
Separator grate for yoghurt
R
ice spoon
Ladle (“fromage blanc”, jam, etc.)
Hook (to remove the kneading blade from the
“bread” after baking)
Rice measure
Measuring spoon (teaspoon/tablespoon)
8
9
1
7
1
8
19
20
15
16
11
1
2
13
14
10
G
ilding selection indicator lamp Weight selection indicator lamp
T
rough selection
indicator lamp
Trough selection
button
Dairy produce
programmes that
can be prepared
w
ith the rice trough
Programme
selection button
Weight selection button
B
uttons for selecting and adjusting the deferred start and the modification
of the dairy produce programme time
G
ilding/temperature
selection button
Start/stop button
Warming – reheating
selection button
Warming – reheating
selection indicator
l
amp
List of bread programmes
®
®
cc cs
cc cs
Dairy produce
programmes that
can be prepared
w
ith the rice trough
T
easpoon
Tablespoon
FAIT MAISON_LAGRANGE 16/05/11 10:07 Page22
Page 22

de la cuve ou avec la confiture encore chaude.
• Versez un peu de confiture sur une assiette froide : si la confiture est
bien cuite, elle glisse lentement dans l’assiette et se fige rapidement.
• Si la confiture est trop liquide, c’est souvent parce que la cuisson a
été insuffisante. Il suffit alors de prolonger la cuisson en relançant un
cycle.
La récupération de la préparation culinaire
• A la fin de la cuisson, utilisez la louche pour versez la confiture dans
des pots propres et stérilisés à l’eau bouillante. Fermez les couvercles
immédiatement et posez les pots à l'envers. Laissez refroidir dans cette
position.
• Pour retirer de la cuve, ouvrez le couvercle et utilisez toujours des
gants de cuisine.
Tournez la cuve dans le sens contraire des aiguilles d’une montre pour
déverrouiller la cuve et retirez-la de l’appareil.
• ATTENTION : Soyez prudent en manipulant la cuve car elle peut
être très chaude.
LA REALISATION DE RIZ ____________________
La préparation
• Dosez votre riz grâce à la mesure à riz fournie.
• A titre d’indication, une mesure à riz est suffisante pour deux personnes, mais cela varie en fonction du type de plat envisagé et de l’appétit des personnes.
• Remplissez votre mesure à ras-bord.
• Commencez par laver le riz à l’eau froide et égouttez-le. Ne le lavez
pas dans la cuve, au risque de l’endommager.
• Si vous omettez de le laver, vous aurez une cuisson médiocre et/ou
de la condensation dans l’appareil.
• Placez le riz propre dans la cuve à riz et aplanissez la surface.
• Remplissez d’eau jusqu’à la graduation correspondante, inscrite sur la
cuve. N.B. Le chiffre marqué sur la cuve correspondant au nombre de
mesures de riz. Ex. Pour cuire 6 mesures de riz, mettez le riz lavé dans
la cuve intérieure et remplissez-la d’eau jusqu’à la graduation 6.
• Attention, la quantité minimum est de 2 mesures.
• Si vous souhaitez un riz plus moelleux, ajoutez un peu d’eau supplémentaire et pour un riz ferme, diminuez la quantité d’eau.
• Placez la grande cuve à riz à l’intérieur de l’appareil.
L’exécution du programme
• Fermez le couvercle et branchez l’appareil au secteur. Si la cuve est
mal
positionnée, l’écran LCD fera apparaître le symbole qui
clignotera lors de l’appui sur le bouton « Départ/arrêt ».Vous devez
alors replacer la cuve pour pouvoir lancer le programme.
• Sélectionnez la cuve appropriée, c’est-à-dire, la grande cuve à riz, à
l’aide du bouton de sélection de la cuve.
• Sélectionnez le programme « cuisson riz» ou « cuisson riz rapide» en
21
21
17 Chemin de la Plaine
ZA les Plattes
69390 VOURL ES
France
www.lagrange.fr
19.
2
0.
à placer en première page pour le français
??
à placer en premières pages de l’anglais...
Mesure à riz
Cuillère mesure (cuillère à café/cuillère à soupe)
19
20
B
outons de sélection et de réglage du départ différé et de modification
du temps des programmes laitages
ingrédients liquides/humides
Sucre, sel, farine
Levure
Liquid or humid ingredients
Sugar, salt and flour
Yeast
placer dans l’anglais
®
?
1.
2
.
3.
4
.
5.
6.
7.
8
.
9.
10.
11.
1
2.
13.
14.
15.
1
6.
17.
18.
19.
20.
- THE CONTROL PANEL -- DESCRIPTION OF THE APPLIANCE -
O
pen button
Cover of the appliance
C
ontrol window-plug
Seal
Space for the trough
Control panel
B
ase of the appliance
Spoon case
Location of the power supply
Kneading blade
S
mall bread trough
Large rice trough
1 container and 1 strainer for “fromage blanc”
8 glass yoghurt jars with plastic covers
S
eparator grate for yoghurt
Rice spoon
Ladle (“fromage blanc”, jam, etc.)
Hook (to remove the kneading blade from the
“bread” after baking)
Rice measure
M
easuring spoon (teaspoon/tablespoon)
8
9
17
1
8
19
20
15
16
11
12
13
14
10
Gilding selection indicator lamp Weight selection indicator lamp
Trough selection
indicator lamp
Trough selection
b
utton
D
airy produce
programmes that
can be prepared
with the rice trough
Programme
s
election button
Weight selection button
Buttons for selecting and adjusting the deferred start and the modification
o
f the dairy produce programme time
Gilding/temperature
s
election button
Start/stop button
Warming – reheating
s
election button
Warming – reheating
selection indicator
l
amp
List of bread programmes
®
®
cc cs
cc cs
D
airy produce
programmes that
can be prepared
w
ith the rice trough
Teaspoon
Tablespoon
FAIT MAISON_LAGRANGE 16/05/11 10:07 Page23
Page 23

fonction de votre besoin parmi les 4 programmes possibles (cuisson riz,
cuisson riz rapide, yaourt, fromage blanc,) par appuis successifs sur le
bouton de sélection des programmes.
• Programmez le temps en fonction de l’heure à laquelle vous souhaitez
que votre riz soit prêt (facultatif). (Cf. paragraphe «
Différé
» page 16)
• Attention : n’essayez pas de soulever le bouchon durant la cuis-
son. Vous risqueriez de vous brûler avec la vapeur.
• Appuyez sur le bouton « départ/arrêt » pour lancer le program
me. Le
symbole se met à clignoter.
• La cuisson s’arrête automatiquement lorsque le liquide est absorbé.
La récupération de la préparation culinaire
• Une fois le programme terminé, un signal sonore retentira 10 fois. La
fonction « maintien au chaud » se déclenchera automatiquement et sera
maintenue pendant une heure (Cf. paragraphe
« Maintien au
chaud/réchauffage »
page 17)
• Vous pouvez alors appuyer sur le bouton « départ/arrêt » pour arrêter le programme.
• Débranchez alors l’appareil et laissez l’appareil refroidir.
• ATTENTION : une condensation peut se former sur le hublot de
l’appareil. Lorsque vous ouvrez le couvercle, prenez garde à ne pas
laisser égoutter l’accumulation d’eau dans le riz.
• Retirez le riz après cuisson. Il est prêt à consommer. Retirez-le de la
cuve grâce à la cuillère à riz fournie, qui vous permettra également d’aérer votre riz.
• Vous pouvez réchauffer votre riz si celui-ci a refroidi en appuyant à
nouveau sur le bouton de sélection « maintien au chaud/réchauffage »
(Cf. paragraphe
« Maintien au chaud/réchauffage »
page 17)
LA REALISATION DE YAOURTS ______________
La préparation
• Lavez soigneusement la grande cuve et les pots en verre et stérilisez
celle-ci à l’eau bouillante avant de l’essuyer avec un torchon propre.
• Tous les ingrédients peuvent être achetés en grande surface (ou en
pharmacie, pour le ferment en poudre). Utilisez-les à température
ambiante. Plus la température ambiante est faible, plus il faut prévoir de
temps.
• Mélangez 1 litre de lait avec le ferment choisi (Cf. partie “
Conseils pra-
tiques
” page 11). Si vous utilisez un yaourt, pour un résultat optimal, battez le yaourt seul. Ajoutez un peu de lait et battez de nouveau jusqu’à
l’obtention d’un mélange homogène et lisse.
• Ajoutez ensuite le reste du lait tout en continuant de battre.
• Répartissez le mélange dans les pots en verre.
• Placez la grande cuve à l’intérieur de l’appareil.
• Placez les pots,
sans leurs couvercles
, dans la grande cuve de la
machine. Vous pouvez les disposer sur 2 étages grâce à la grille séparatrice fournie.
L’exécution du programme
• Fermez le couvercle et branchez l’appareil au secteur. Si la cuve est
mal positionnée, l’écran LCD fera apparaître le symbole
qui clignotera lors de l’appui sur le bouton « Départ/arrêt ».
Vous devez alors replacer la cuve pour pouvoir lancer le programme.
• Sélectionnez la cuve appropriée, c’est-à-dire, la grande cuve à riz, à
l’aide du bouton de sélection de la cuve.
• Sélectionnez le programme « yaourt » parmi les 4 possibles (yaourt,
fromage blanc, cuisson riz, cuisson riz rapide) que vous pouvez réaliser
22
21
1
7 Chemin de la Plaine
Z
A les Plattes
69390 VOURL ES
France
www.lagrange.fr
1
7.
18.
19.
2
0.
à placer en première page pour le français
??
à placer en premières pages de l’anglais...
Machine à pain
R
ef: 479 001
Louche (fromage blanc, confiture…)
C
rochet (pour retirer la pale du « pain » après cuisson)
M
esure à riz
Cuillère mesure (cuillère à café/cuillère à soupe)
1
8
19
20
B
outons de sélection et de réglage du départ différé et de modification
du temps des programmes laitages
Liste des programmes pain
ingrédients liquides/humides
Sucre, sel, farine
Levure
Liquid or humid ingredients
Sugar, salt and flour
Yeast
placer dans l’anglais
®
?
1
.
2.
3.
4
.
5
.
6.
7.
8
.
9.
10.
11.
1
2.
13.
14.
1
5.
1
6.
17.
18.
1
9.
20.
- THE CONTROL PANEL -- DESCRIPTION OF THE APPLIANCE -
B
read Maker
Ref: 479 001
O
pen button
Cover of the appliance
Control window-plug
Seal
S
pace for the trough
Control panel
Base of the appliance
S
poon case
L
ocation of the power supply
Kneading blade
Small bread trough
L
arge rice trough
1 container and 1 strainer for “fromage blanc”
8 glass yoghurt jars with plastic covers
S
eparator grate for yoghurt
R
ice spoon
Ladle (“fromage blanc”, jam, etc.)
Hook (to remove the kneading blade from the
“
bread” after baking)
R
ice measure
Measuring spoon (teaspoon/tablespoon)
8
9
17
18
19
20
15
16
11
12
13
14
1
0
G
ilding selection indicator lamp Weight selection indicator lamp
T
rough selection
i
ndicator lamp
Trough selection
b
utton
D
airy produce
p
rogrammes that
can be prepared
with the rice trough
Programme
selection button
Weight selection button
B
uttons for selecting and adjusting the deferred start and the modification
o
f the dairy produce programme time
Gilding/temperature
selection button
S
tart/stop button
W
arming – reheating
selection button
Warming – reheating
s
election indicator
l
amp
L
ist of bread programmes
®
®
c
ccs
Dairy produce
programmes that
can be prepared
with the rice trough
Teaspoon
Tablespoon
2
1
17 Chemin de la Plaine
ZA les Plattes
69390 VOURLES
France
www.lagrange.fr
1
9.
20.
à placer en première page pour le français
??
à placer en premières pages de l’anglais...
Mesure à riz
C
uillère mesure (cuillère à café/cuillère à soupe)
19
20
Boutons de sélection et de réglage du départ différé et de modification
d
u temps des programmes laitages
ingrédients liquides/humides
Sucre, sel, farine
Levure
Liquid or humid ingredients
Sugar, salt and flour
Yeast
placer dans l’anglais
®
?
1.
2.
3.
4
.
5.
6
.
7.
8.
9.
1
0.
11.
12.
1
3.
1
4.
15.
16.
17.
1
8.
1
9.
20.
- THE CONTROL PANEL -- DESCRIPTION OF THE APPLIANCE -
Open button
Cover of the appliance
C
ontrol window-plug
Seal
Space for the trough
Control panel
Base of the appliance
Spoon case
L
ocation of the power supply
Kneading blade
Small bread trough
Large rice trough
1
container and 1 strainer for “fromage blanc”
8 glass yoghurt jars with plastic covers
Separator grate for yoghurt
Rice spoon
L
adle (“fromage blanc”, jam, etc.)
Hook (to remove the kneading blade from the
“
bread” after baking)
Rice measure
Measuring spoon (teaspoon/tablespoon)
8
9
17
18
19
20
1
5
16
11
12
13
14
1
0
Gilding selection indicator lamp Weight selection indicator lamp
Trough selection
indicator lamp
T
rough selection
button
Dairy produce
p
rogrammes that
can be prepared
with the rice trough
P
rogramme
selection button
W
eight selection button
Buttons for selecting and adjusting the deferred start and the modification
of the dairy produce programme time
G
ilding/temperature
selection button
Start/stop button
W
arming – reheating
selection button
Warming – reheating
selection indicator
lamp
List of bread programmes
®
®
cc cs
cc cs
Dairy produce
p
rogrammes that
can be prepared
with the rice trough
Teaspoon
Tablespoon
FAIT MAISON_LAGRANGE 16/05/11 10:07 Page24
Page 24

par appuis successifs sur le bouton de sélection des programmes.
• Programmez le temps de préparation en fonction de vos ingrédients.
(Cf. paragraphe
« Aide au dosage et au choix des ingredients »
page 11)
• Pour les programmes yaourts et fromage blanc, le différé ne fonctionne pas, cependant les boutons de réglage du différé permettent de
modifier le temps de préparation qui est initialisé à 8h. On peut ainsi
choisir (en fonction du type de lait) une durée de préparation allant de
1h à 15h.
Pour cela, appuyez sur différé puis sur heure pour régler votre temps
puis à nouveau sur différé pour valider.
• Appuyez sur le bouton « départ/arrêt » pour lancer le programme. Le
symbole « : » se met à clignoter.
La récupération des yaourts
• Une fois le programme terminé, un signal sonore retentira 10 fois. Vous
pouvez alors appuyer sur le bouton « départ/arrêt » pour arrêter le programme.
• Débranchez alors l’appareil et laissez l’appareil refroidir puis retirez
les pots en verre.
•
ATTENTION : une condensation peut se former sur le hublot de
l’appareil. Lorsque vous ouvrez le couvercle, prenez garde à ne pas
laisser égoutter l’accumulation d’eau dans les yaourts.
• Vissez les couvercles sur les pots en verre et placez-les au réfrigérateur au moins 2H avant de les déguster.
• Conservez vos yaourts au réfrigérateur.
• Ne les conservez pas plus de 8 à 10 jours.
LA REALISATION DE FROMAGE BLANC ________
La préparation
•
Lavez soigneusement la grande cuve, le pot et la faisselle et stérilisezles à l’eau bouillante avant de les essuyer avec un torchon propre ou luimême trempé au préalable dans l’eau bouillante.
•
Tous les ingrédients peuvent être achetés en grande surface ou en
pharmacie. Utilisez-les à température ambiante. Plus la température
ambiante est faible, plus il faut prévoir de temps.
•
Battez votre ferment avant de le mélanger aux autres ingrédients (Cf.
partie ”
Conseils pratiques
” page 12)
•
Dans un petit récipient de la taille d’un bol environ, mélangez le fer-
ment choisi avec un peu de lait.
•
Battez le mélange jusqu’à l’obtention d’un mélange homogène et lisse.
Ajoutez le reste de lait (1L) et battez de nouveau.
•
Ajoutez la présure et remuez délicatement.
•
Placez la grande cuve à l’intérieur de l’appareil.
•
Placez le grand pot et sa faisselle à fromage blanc dans la grande cuve
de la machine. Disposez la faisselle à fromage blanc dans le pot. Les
butées de la faisselle doivent se trouver en bas, dans le creux de la
vague. Placez l’ensemble dans la cuve de l’appareil.
•
Versez le mélange dans le pot à fromage blanc.
L’exécution du programme
• Fermez le couvercle et branchez l’appareil au secteur. Si la cuve est
mal positionnée, l’écran LCD fera apparaître le symbole
qui clignotera lors de l’appui sur le bouton « Départ/arrêt ».
Vous devez alors replacer la cuve pour pouvoir lancer le programme.
23
21
17 Chemin de la Plaine
ZA les Plattes
69390 VOURL ES
France
www.lagrange.fr
19.
20.
à placer en première page pour le français
??
à placer en premières pages de l’anglais...
M
esure à riz
Cuillère mesure (cuillère à café/cuillère à soupe)
1
9
20
Boutons de sélection et de réglage du départ différé et de modification
du temps des programmes laitages
ingrédients liquides/humides
Sucre, sel, farine
Levure
Liquid or humid ingredients
Sugar, salt and flour
Yeast
placer dans l’anglais
®
?
1.
2.
3.
4
.
5.
6.
7.
8
.
9.
10.
11.
1
2.
13.
14.
15.
1
6.
17.
18.
19.
20.
- THE CONTROL PANEL -- DESCRIPTION OF THE APPLIANCE -
Open button
Cover of the appliance
Control window-plug
Seal
Space for the trough
Control panel
B
ase of the appliance
Spoon case
Location of the power supply
Kneading blade
S
mall bread trough
Large rice trough
1 container and 1 strainer for “fromage blanc”
8 glass yoghurt jars with plastic covers
Separator grate for yoghurt
Rice spoon
Ladle (“fromage blanc”, jam, etc.)
Hook (to remove the kneading blade from the
“bread” after baking)
Rice measure
M
easuring spoon (teaspoon/tablespoon)
8
17
18
19
20
15
1
6
11
1
2
1
3
14
10
Gilding selection indicator lamp Weight selection indicator lamp
Trough selection
indicator lamp
Trough selection
b
utton
D
airy produce
programmes that
can be prepared
with the rice trough
Programme
s
election button
Weight selection button
Buttons for selecting and adjusting the deferred start and the modification
o
f the dairy produce programme time
Gilding/temperature
s
election button
Start/stop button
Warming – reheating
s
election button
Warming – reheating
selection indicator
l
amp
List of bread programmes
®
®
cc cs
cc cs
Dairy produce
programmes that
can be prepared
with the rice trough
Teaspoon
Tablespoon
FAIT MAISON_LAGRANGE 16/05/11 10:07 Page25
Page 25

• Sélectionnez la cuve appropriée, c’est-à-dire, la grande cuve à riz, à
l’aide du bouton de sélection de la cuve.
• Sélectionnez le programme « fromage blanc» parmi les 4 possibles
(yaourt, fromage blanc, cuisson riz, cuisson riz rapide) que vous souhaitez réaliser par appuis successifs sur le bouton de sélection des programmes.
• Programmez le temps de préparation en fonction de vos ingrédients.
(Cf. paragraphe «
Aide au dosage et au choix des ingredients
» page 12)
• Pour les programmes yaourts et fromage blanc, le différé ne fonctionne pas, cependant les boutons de réglage du différé permettent de
modifier le temps de préparation qui est initialisé à 8h. On peut ainsi
choisir (en fonction du type de lait) une durée de préparation allant de
1h à 15h.
Pour cela, appuyez sur différé puis sur heure pour régler votre temps
puis à nouveau sur différé pour valider.
• Appuyez sur le bouton « départ/arrêt » pour lancer le programme. Le
symbole « : » se met à clignoter.
La récupération du fromage blanc
• Une fois le programme terminé, un signal sonore retentira 10 fois. Vous
pouvez appuyer sur le bouton « départ/arrêt » pour arrêter le programme.
• Débranchez alors l’appareil et laissez l’appareil refroidir.
• ATTENTION : une condensation peut se former sur le hublot de
l’appareil. Lorsque vous ouvrez le couvercle, prenez garde à ne pas
laisser égoutter l’accumulation d’eau dans le fromage blanc.
• Retirez soigneusement le pot à fromage blanc de la cuve.
• Il est conseillé d’attendre le refroidissement du fromage avant de
l’égoutter.
• Vous pouvez débuter l’égouttage en soulevant et tournant en même
temps la faisselle dans son pot, et ceci jusqu’à enclenchement des
petites butées. La forme de vague vous facilitera la tâche.
• Vous pouvez jeter une partie du petit lait accumulé.
• Poursuivez l’égouttage en mettant votre faisselle en position haute
d’égouttage, dans votre réfrigérateur.
• Le petit lait sera alors stocké dans le pot sous le fromage blanc.
• Selon votre goût, stoppez l’égouttage quand vous le souhaitez : rapidement pour un fromage blanc onctueux et liquide, plus tard pour un
fromage blanc plus consistant.
• Si vous avez laissé égoutter votre fromage blanc trop longtemps, vous
pouvez ajouter du petit lait et le battre pour le rendre plus liquide. Vous
pouvez également laisser tremper le fond de la faisselle dans le petit lait
pour que votre fromage blanc ne « s’assèche » pas plus. En revanche,
n’hésitez pas à éliminer le petit lait au fur et à mesure si vous ne souhaitez pas le conserver.
• Conservez votre fromage blanc au frais, dans un réfrigérateur.
• Ne le conservez pas plus de quelques jours dans le réfrigérateur.
GUIDE DE DÉPANNAGE__________________
Appareil
Coupures de courant :
• Si vous subissez une coupure d’électricité d’au maximum 10 minutes,
votre programme sera mémorisé et repartira automatiquement dès la
reprise du courant sans que vous n’ayez à appuyer sur le bouton
« départ/arrêt ».
• Si la coupure excède 10 minutes, votre programme ne pourra être
mémorisé. Dans ce cas, si le cycle de levée n’a pas commencé vous pouvez relancer le programme en appuyant sur « départ/arrêt ». Toutefois,
si le cycle de levée est dépassé, vous devez impérativement enlever
tous les ingrédients de la cuve et recommencer votre préparation.
24
FAIT MAISON_LAGRANGE 16/05/11 10:07 Page26
Page 26
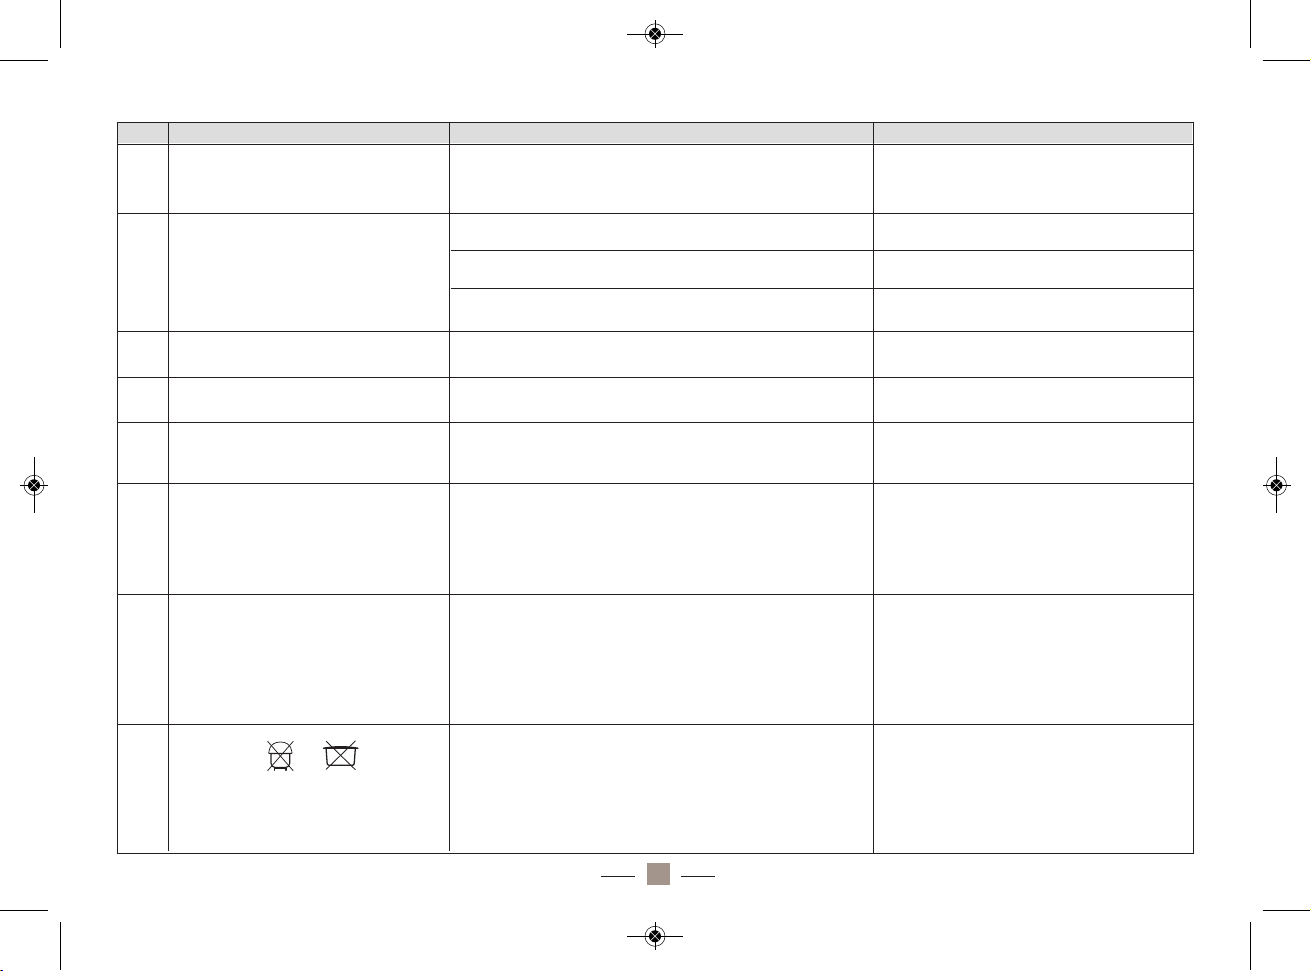
25
1
De la fumée sort des grilles d’aération
en cours de fonctionnement
Des ingrédients peuvent être tombés sur la partie chauffante de l’appareil
Débranchez l’appareil et laissez refroidir.
Nettoyez l’intérieur de l’appareil en prenant soin de ne pas vous brûler.
2
Les éléments ne sont pas mélangés
de manière homogène.
A/ le programme sélectionné n’est pas approprié
Reportez-vous aux recettes adaptées à
l’appareil.
B/ le couvercle a souvent été levé
C/ La pale de pétrissage ne tourne pas suffisamment ou
la densité de la pâte est trop forte.
Faites tournez l’appareil à vide. Si la pâle
tourne anormalement, contactez le SAV.
Ne soulevez pas le couvercle pendant les
cycles de levée
Le moteur tourne mais la pâte n’est
pas pétrie
La cuve est mal positionnée ou la quantité de pâte est
trop importante.
Vérifiez la position de la cuve et les quantités utilisées.
3
4
Votre écran affiche « HHH » après le
démarrage du programme.
La température de la cuve est trop élevée.
Ouvrez le couvercle et laissez la machine
refroidir pendant 10 à 20 minutes.
5
Votre écran affiche « E E0 » ou « E E1 »
après que vous ayez appuyé sur le bouton « départ/arrêt »
Le capteur de température interne est mal réglé
Contactez le service après vente ou une
personne agréée ou qualifiée par
LAGRANGE.
Lors de l’utilisation d’un programme
de type pain, « LLL » clignote à l’écran
et une alarme se fait entendre
Une sonde évalue la température ambiante avant lancement du programme et « LLL » clignote si la température
ambiante est inférieure à -5°C. N.B. Lors de l’utilisation de
la fonction « différé », le contrôle est effectué lors de la
programmation et juste avant le début du programme.
Il suffit d’appuyer sur le bouton
« départ/arrêt » pour interrompre le programme.
6
7
Lors de l’utilisation d’un programme
de type pain, « HHH » clignote à
l’écran et une alarme se fait entendre
Une sonde évalue la température ambiante avant lancement du programme et « LLL » clignote si la température ambiante est inférieure à -5°C. N.B. Lors de l’utilisation
de la fonction « différé », le contrôle est effectué lors de
la programmation et juste avant le début du programme.
Il suffit d’appuyer sur le bouton
« départ/arrêt » pour interrompre le
programme.
8
Le symbole ou
clignote et l’appareil sonne 10 fois
2 solutions : soit la mauvaise cuve est en place, soit la
cuve est mal positionnée. L’appareil le détecte après
appui sur le bouton « départ/arrêt »
Il suffit de mettre la bonne cuve en
place ou de changer le programme en
appuyant sur le bouton de sélection de
la cuve. Vous devez également bien
enfoncer la cuve pour qu’elle s’enclenche.
21
17 Chemin de la Plaine
ZA les Plattes
69390 VOURL ES
France
www.lagrange.fr
13.
14.
15.
16.
17.
18.
19.
20.
à placer en première page pour le français
??
à placer en premières pages de l’anglais...
Machine à pain
R
ef: 479 001
1 pot et 1 faisselle pour fromage blanc
8 pots de yaourt en verre avec couvercles en plastique
Grille séparatrice pour yaourts
Cuillère à riz
Louche (fromage blanc, confiture…)
Crochet (pour retirer la pale du « pain » après cuisson)
Mesure à riz
Cuillère mesure (cuillère à café/cuillère à soupe)
9
17
18
19
20
1
5
16
Bouton de sélection du poids
B
outons de sélection et de réglage du départ différé et de modification
du temps des programmes laitages
Bouton de sélection
de la dorure / température
Liste des programmes pain
ingrédients liquides/humides
Sucre, sel, farine
Levure
Liquid or humid ingredients
Sugar, salt and flour
Yeast
placer dans l’anglais
®
?
1.
2.
3.
4
.
5.
6.
7.
8.
9
.
10.
11.
12.
13.
14.
15.
16.
17.
18.
19.
20.
- THE CONTROL PANEL -- DESCRIPTION OF THE APPLIANCE -
Bread Maker
Ref: 479 001
Open button
Cover of the appliance
Control window-plug
Seal
Space for the trough
Control panel
Base of the appliance
S
poon case
Location of the power supply
Kneading blade
Small bread trough
Large rice trough
1
container and 1 strainer for “fromage blanc”
8 glass yoghurt jars with plastic covers
Separator grate for yoghurt
Rice spoon
Ladle (“fromage blanc”, jam, etc.)
Hook (to remove the kneading blade from the
“bread” after baking)
Rice measure
Measuring spoon (teaspoon/tablespoon)
8
9
17
18
19
2
0
15
16
1
1
12
13
1
4
10
Gilding selection indicator lamp Weight selection indicator lamp
Trough selection
indicator lamp
Trough selection
button
Dairy produce
programmes that
can be prepared
with the rice trough
Programme
selection button
Weight selection button
Buttons for selecting and adjusting the deferred start and the modification
of the dairy produce programme time
Gilding/temperature
s
election button
Start/stop button
Warming – reheating
s
election button
Warming – reheating
selection indicator
lamp
List of bread programmes
®
®
cc cs
cc cs
Dairy produce
programmes that
can be prepared
w
ith the rice trough
Teaspoon
Tablespoon
17 Chemin de la Plaine
ZA les Plattes
69390 VOURL ES
France
www.lagrange.fr
à placer en première page pour le français
??
à placer en premières pages de l’anglais...
ingrédients liquides/humides
Sucre, sel, farine
Levure
Liquid or humid ingredients
Sugar, salt and flour
Yeast
placer dans l’anglais
?
1
.
2.
3.
4
.
5.
6
.
7.
8.
9
.
10.
1
1.
12.
13.
14.
15.
1
6.
17.
1
8.
1
9.
20.
- THE CONTROL PANEL -- DESCRIPTION OF THE APPLIANCE -
O
pen button
Cover of the appliance
C
ontrol window-plug
Seal
S
pace for the trough
C
ontrol panel
Base of the appliance
S
poon case
Location of the power supply
K
neading blade
Small bread trough
Large rice trough
1
container and 1 strainer for “fromage blanc”
8 glass yoghurt jars with plastic covers
S
eparator grate for yoghurt
Rice spoon
Ladle (“fromage blanc”, jam, etc.)
Hook (to remove the kneading blade from the
“
bread” after baking)
Rice measure
Measuring spoon (teaspoon/tablespoon)
8
9
17
18
19
20
15
16
11
12
13
14
10
G
ilding selection indicator lamp Weight selection indicator lamp
T
rough selection
indicator lamp
Trough selection
button
Dairy produce
p
rogrammes that
can be prepared
with the rice trough
Programme
s
election button
W
eight selection button
Buttons for selecting and adjusting the deferred start and the modification
o
f the dairy produce programme time
Gilding/temperature
s
election button
S
tart/stop button
Warming – reheating
s
election button
Warming – reheating
selection indicator
l
amp
List of bread programmes
®
®
cc cs
cc cs
Dairy produce
programmes that
c
an be prepared
with the rice trough
Teaspoon
Tablespoon
No Problème Cause Solution
FAIT MAISON_LAGRANGE 16/05/11 10:07 Page27
Page 27

Pain
26
1
2
Le pain devient trop gros
A/ La levure, la farine, l’eau ou le sucre sont
en trop grande quantité.
Reportez-vous aux recettes adaptées à l’appareil. Vérifiez la consistance de la pâte quand le signal sonore retentit pour l’ajout d’ingrédients. La pâte doit former une boule élastique et légèrement collante. Si la pâte est trop compacte ou sèche, ajoutez une cuillère à
café d’eau. Si la pâte est trop molle ou liquide, ajoutez une cuillère à
soupe de farine.
Réduisez votre quantité de sucre ou de levure si la consistance de
la pâte est bonne.
B/ La température ambiante est trop élevée
Utilisez votre appareil dans un endroit plus frais.
A/ Le couvercle a été levé lors de la levée ou
de la cuisson du pain
B/ La quantité d’eau n’est pas suffisante ou la
quantité de farine est trop importante.
C/ La quantité de levure est insuffisante ou il n’y
en a pas.
D/ Vous avez remplacé le sucre par de l’édulcorant
E/ Le type de farine utilisé n’est pas adapté
F/ La levure utilisée n’est pas adaptée ou a été
mise en contact avec l’eau avant le pétrissage
G/ La température de l’eau n’est pas adaptée
H/ Les ingrédients sont trop chauds ou trop
froids
Ne soulevez jamais le couvercle pendant la levée ou la cuisson.
Levez-le le moins possible pendant les autres phases.
L’eau doit être tiède (environ 27°C) sauf pour le programme Ultra rapide où elle peut monter à 45°C.
Vérifiez la consistance de la pâte quand le signal sonore retentit pour
l’ajout d’ingrédients.La pâte doit former une boule élastique et légèrement collante. Si la pâte est trop compacte ou sèche, ajoutez une
cuillère à café d’eau.
Mettez la quantité de levure indiquée dans votre recette et
ajoutez un peu de levure si nécessaire.
Les édulcorants sont déconseillés, vous pouvez utiliser du
miel ou de la mélasse à la place du sucre.
Utilisez une farine plus légère.
Utilisez de la levure de boulangerie, idéalement sous forme déshydratée instantanée (levure sèche en grains) ou à défaut de la levure
fraiche. Mettez la levure en dernier dans la cuve, par-dessus la farine.
Tous les ingrédients (sauf l’eau) doivent être à température ambiante.
Le pain est trop petit ou n’a pas
monté.
No Problème Cause Solution
FAIT MAISON_LAGRANGE 16/05/11 10:07 Page28
Page 28

27
B/ La quantité d’eau est trop importante ou la
quantité de farine n’est pas suffisante.
C/ Il y a trop de levure
Diminuez légèrement la quantité de levure lors du prochain
essai.
D/ Le type de farine utilisé n’est pas adapté
Utilisez une farine plus légère.
E/ La température de la levure est trop élevée et provoque une levée trop rapide.
Utilisez la levure à une température de 20-25°C environ.
4
Le pain est dur à démouler de la
cuve.
La pâle de pétrissage reste collée sur son axe
dans la cuve à pain car des résidus de préparation se sont glissés entre la pâle et son axe
puis ont cuit.
Tapotez sur le fond de la cuve pour aider la pâle à se
décoller. La prochaine fois, badigeonnez de beurre l’axe
de la pâle avant d’insérer celle-ci.
5
La densité du pain est trop importante.
A/ La quantité de farine est excessive ou
celle d’eau n’est pas assez importante.
Réduisez la quantité de farine ou ajoutez de l’eau.
B/ La quantité de farine complète ou de fruits
est excessive.
Réduisez les ingrédients concernés et ajoutez un peu
de levure.
6
La croûte du dessous du pain
est trop épaisse.
L’eau a été éliminée en trop grande quantité
(pain asséché par en dessous) par un maintien au chaud trop long dans l’appareil.
Sortez le pain de l’appareil avant que le maintien au
chaud ne démarre.
7
Après avoir découpé le pain, le pain
comporte de nombreux trous.
A/ Les quantités d’eau ou de levure sont trop
importantes.
Réduisez les quantités d’eau et/ou de levure.
B/ La température de l’eau est trop élevée.
L’eau doit être tiède (environ 27°C) sauf pour le programme Ultra rapide où elle peut monter à 45°C.
8
La croûte est trop épaisse et la
dorure est trop foncée lors d’un
programme pain ou gâteau avec
beaucoup de sucre.
Certaines recettes ou ingrédients ont un
effet sur la couleur de la dorure du pain qui
deviendra très voire trop foncée à cause de
la grande quantité de sucre
Si la couleur du pain est trop foncée, pressez sur le bouton «départ/arrêt» pour interrompre le programme 5 à 10
minutes avant sa fin programmée. Laissez le pain dans la
cuve, couvercle fermé, pendant 20 minutes avant de le
sortir et de le démouler.
A/ Le couvercle a été levé lors de la levée ou
de la cuisson du pain
Ne soulevez jamais le couvercle pendant la levée ou la
cuisson. Levez-le le moins possible pendant les autres
phases.
Vérifiez la consistance de la pâte quand le signal sonore retentit
pour l’ajout d’ingrédients. La pâte doit former une boule élastique
et légèrement collante. Si la pâte est trop molle ou liquide, ajoutez
une cuillère à soupe de farine.
Le centre du pain s’affaisse au
moment de la cuisson.
3
FAIT MAISON_LAGRANGE 16/05/11 10:07 Page29
Page 29
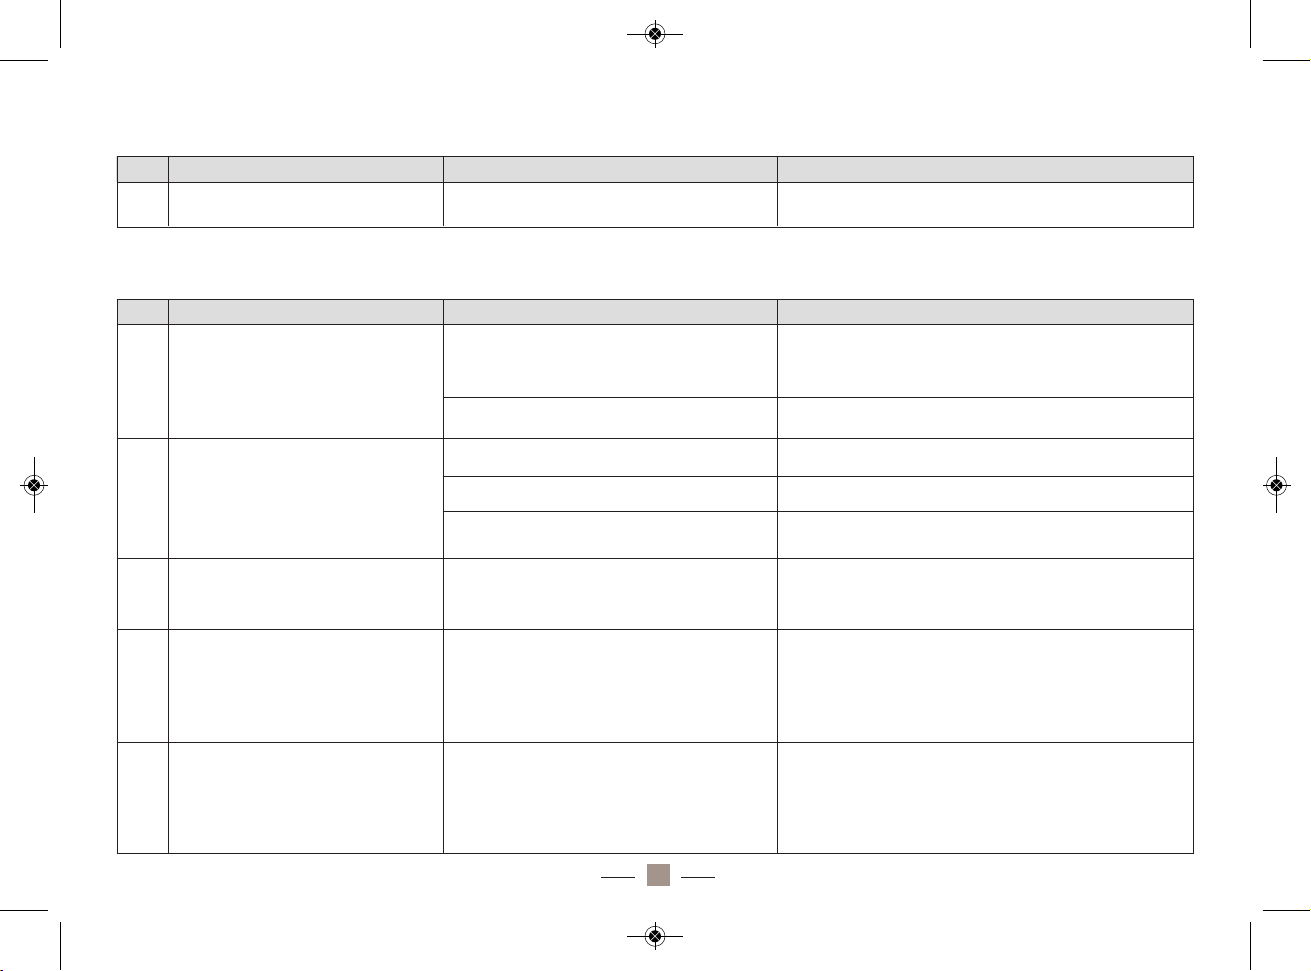
Confiture
Riz
1
La confiture est trop liquide à votre
goût
La confiture manque un peu de cuisson
Relancez un 2ème cycle de cuisson
Le riz cuit obtenu est trop sec ou
trop humide.
A/ Vous n’avez pas ajouté l’eau comme indiqué
en respectant les graduations ou vous avez mal
mesuré le riz.
Mesurez avec soin le riz avec la mesure à riz en plastique et
soyez attentif à respectez la graduation correspondante au
moment d’ajouter l’eau.
B/ La qualité de votre riz à absorber l’eau est différente des riz communs.
Ajuster la quantité d’eau.
A/ La quantité d’eau est excessive.
Pendant la cuisson du riz, du bouillon
passe par les trous de la ventilation.
Réduisez la quantité d’eau.
B/ La quantité de riz est excessive.
C/ Le joint autour du hublot-bouchon est
manquant
Respectez le dosage conseillé.
Vérifiez après nettoyage que toutes les
pièces ont bien été réassemblées.
2
3
Pendant la cuisson du riz, du
bouillon déborde de la cuve
Le joint support de la cuve est manquant.
Vérifiez après nettoyage que toutes les pièces ont bien été
réassemblées.
Il y a un corps étranger sur la plaque chauffante.
Il faut toujours bien nettoyer la plaque chauffante et vérifier
qu’aucun corps étranger n’est présent sur la plaque chauffante ou sur le fond de la cuve.
Le fond du riz fait des grumeaux et le riz
n’est pas cuit correctement (cela peut
arriver pour des quantités supérieures
ou égales à 6 mesures à riz de riz).
Après avoir été placé dans la cuve, le riz n’a
pas été mélangé avec l’eau.
Il est conseillé d’utiliser la cuillère à riz fournie pour mélanger l’eau et le riz avant cuisson.
4
Le temps de cuisson du riz est plus
long que prévu et le riz n’a pas été
cuit correctement.
5
No Problème Cause Solution
No Problème Cause Solution
28
1
FAIT MAISON_LAGRANGE 16/05/11 10:07 Page30
Page 30
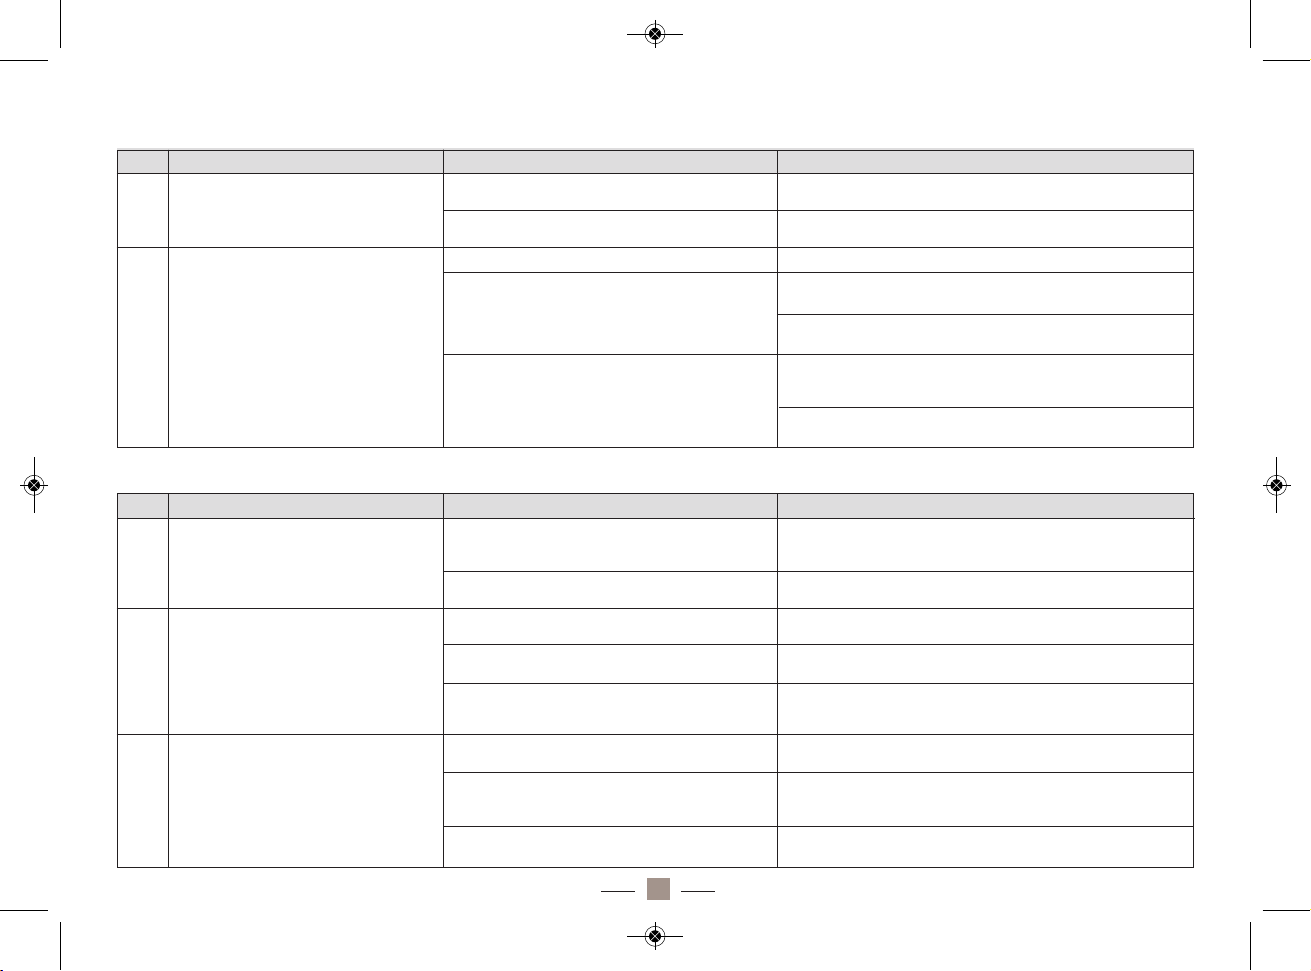
29
Yaourt
Fromage blanc
Les yaourts sont trop liquides
A/ Le ferment ne fonctionne plus
Vous pouvez réutiliser un yaourt obtenu pour une pro-
B/ Le lait est de mauvaise qualité
Ajoutez 1 cuillère de lait en poudre à votre mélange avant
cuisson.
2
C/ Vous avez utilisé du lait demi-écrémé
Utilisez un nouveau ferment et respectez la dose
Il est fortement conseillé d’utiliser du lait entier car les
matières grasses du lait apportent une texture plus compacte et plus onctueuse aux yaourts.
Ajoutez 1 cuillère de lait en poudre à votre mélange avant
cuisson.
1
Les yaourts obtenus présentent une
odeur déplaisante.
A/ Le ferment utilisé n’est plus efficace voire
périmé, ou a été mal conservé.
Utilisez un ferment conservé au frais et acheté récemment pour le ferment en poudre.
B/ La grande cuve et les pots en verre n’ont pas
été stérilisés.
Stérilisez les contenants à l’eau bouillante avant utilisa-
Le fromage blanc obtenu présente
une odeur déplaisante.
B/ La grande cuve, le pot et la faisselle n’ont
pas été stérilisés.
Utilisez un ferment et une présure conservés au frais et
achetés récemment notamment pour le ferment en
Stérilisez les contenants à l’eau bouillante avant utilisation.
2
1
Le fromage blanc est de consistance
trop liquide
A/ Le ferment ne fonctionne plus
B/ Le lait est de mauvaise qualité
Utilisez un nouveau ferment et respectez la dose inscrite
sur la notice.
Vous pouvez réutiliser le fromage obtenu pour une prochaine fournée, en utilisant un lait de meilleure qualité.
Laissez égoutter le fromage blanc un peu plus longtemps
et éliminez le petit lait du pot pour que le fromage ne
trempe pas dedans.
C/ L’égouttage n’est pas suffisant
A/ Le ferment est trop ancien (la régénération ne fonctionne plus)
B/ Le temps de fabrication était trop long
C/ Le mélange n’était pas homogène avant
incubation.
Battez le fromage blanc au fouet ou à la fourchette et changez votre ferment à la fournée suivante
Le fromage blanc est de consistance
granuleuse
Réduisez le temps de fabrication. Pour cela, référez vous au
tableau donné précédemment dans la partie «
Aide au dosa-
ge et au choix des ingredients
» page 12.
Battez bien le ferment avant d’incorporer le lait pour qu’il
n’y ait pas de grumeaux.
3
A/ Le ferment ou la présure utilisé(e) n’est plus
efficace voire périmé(e), ou a été mal conservé(e).
No Problème Cause Solution
No Problème Cause Solution
FAIT MAISON_LAGRANGE 16/05/11 10:07 Page31
Page 31

ENTRETIEN____________________________
ATTENTION : ne jamais plonger la base de l’appareil ni la prise dans
l’eau. Toujours débrancher et laisser refroidir complètement avant
le nettoyage.
Base et couvercle de l’appareil :
Nettoyez-la avec une éponge humide. Séchez bien. N’utilisez pas de tissus ou de produits agressifs ou
abrasifs pour préserver le plastique et sa brillance.
Attention : ne jamais plonger la base de l’appareil dans l’eau. Ne
jamais la mettre au lave-vaisselle.
Petite cuve à pain et grande cuve à riz :
Nettoyez l’intérieur et l’extérieur à l’aide d’une éponge humide. N’utilisez jamais un chiffon, une
éponge ou des produits abrasifs au risque de détériorer le revêtement
antiadhésif. Une cuve doit toujours être parfaitement sèche avant d’être
installée dans l’appareil.
Important : Ne nettoyez jamais vos cuves au lave-vaisselle.
Pale de pétrissage :
Si celle-ci est difficile à ôter de son axe, remplissez
la cuve d’eau chaude et laissez tremper 30 minutes. La pale se retirera
alors facilement pour être nettoyée avec une éponge humide.
Attention : n’utilisez jamais de produits abrasifs ou d’accessoires
métalliques au risque de détériorer le revêtement antiadhésif.
Pots de yaourt en verre :
les pots peuvent passer au lave-vaisselle. Ils
doivent être bien secs avant d’être replacés dans l’appareil.
Couvercles des pots de yaourt en plastique :
Nettoyez-les avec une
éponge humide et un peu de liquide vaisselle.
Pot et faisselle à fromage blanc : après chaque utilisation et après
démoulage du fromage blanc ou consommation de celui ci, faites tremper, si nécessaire, les faisselles et les pots quelques minutes dans de
l’eau chaude additionnée de détergeant et nettoyez les soigneusement.
Remarque : Toujours bien sécher tous les éléments avant de les
repositionner et de les ranger. Rangez l’appareil avec le couvercle
fermé après refroidissement et nettoyage.
CONDITIONS DE GARANTIE______________
Votre appareil est garanti 2 ans.
Pour bénéficier gratuitement d’une année supplémentaire de garantie,
inscrivez-vous sur le site Internet
LAGRANGE
(www.lagrange.fr). La
garantie s’entend pièces et main d’oeuvre et couvre les défauts de fabrication. Sont exclues de la garantie : les détériorations provenant d'une
mauvaise utilisation ou du non respect du mode d’emploi, et les bris par
chute.
CETTE GARANTIE S’APPLIQUE AUX UTILISATIONS DOMESTIQUES, EN
AUCUN CAS AUX UTILISATIONS PROFESSIONNELLES.
La garantie légale due par le vendeur n’exclut en rien la garantie légale
due par le Constructeur pour défauts ou vices de fabrication selon les
articles 1641 et suivants du code Civil. En cas de panne ou dysfonctionnement, adressez-vous à votre revendeur. En cas de défectuosité
technique dans les 8 jours suivant l’achat, les appareils sont échangés.
Après ce délai ils sont réparés par le service-après-vente
LAGRANGE
.
30
FAIT MAISON_LAGRANGE 16/05/11 10:07 Page32
Page 32
RECETTES_____________________________
Abréviations et repères :
cc cuillère à café (5 ml)
cs cuillère à soupe (20 ml)
Programmes de type « pain »
1.
Programme pain basique
Pain blanc
Eau
Beurre
Sel
Lait en poudre
Sucre
Farine à pain (T55)
Levure boulangère
Pain aux noix
RQ : ajoutez les noix après le signal sonore (voir tableau des cycles)
2.
Programme pain français
Pain classique
Pain aux olives
3.
Programme pain complet
Pain complet
700 g
250 ml
15 g
1 cc
20 g
20 g
450 g
6 g
900 g
325 ml
20 g
1 ½ cc
25 g
25 g
580 g
8 g
700 g
250 ml
30 g
1 ½ cc
30 g
450 g
6 g
30 g
900 g
325 ml
35 g
2 cc
35 g
520 g
8 g
40 g
Eau ou lait
Beurre
Sel
Sucre
Farine à pain
Levure boulangère
Noix en morceaux
700 g
230 ml
1 cc
10 g
390g
6 g
1 cs
900 g
300 ml
1 1/3 cc
15g
500 g
7 g
2 cs
Eau
Sel
Sucre
Farine à pain
Levure boulangère
Huile (facultatif)
31
700g
250 ml
1 cc
2 cs
500 g
6 g
2 cs
50 g
50 g
900g
325 ml
2 cc
2 ½ cs
650 g
8 g
2 ½ cs
70 g
70 g
Eau
Sel
Sucre
Farine
Levure boulangère
Huile
Olives vertes
Olives noires
700 g
250 ml
20 g
1 cc
1 cc
200 g
200 g
5 g
900 g
320 ml
30 g
1 ½ cc
1 cc
260 g
260 g
6 g
Eau
Beurre
Sel
Sucre
Farine bise T80
Farine complète
T170
Levure
17 Chemin de la Plaine
ZA les Plattes
69390 VOURLES
France
www.lagrange.fr
??
ingrédients liquides/humides
Sucre, sel, farine
Levure
Liquid or humid ingredients
Sugar, salt and flour
Yeast
placer dans l’anglais
?
16.
17.
18.
19.
20.
Rice spoon
Ladle (“fromage blanc”, jam, etc.)
Hook (to remove the kneading blade from the
“bread” after baking)
Rice measure
Measuring spoon (teaspoon/tablespoon)
Buttons for selecting and adjusting the deferred start and the modification
of the dairy produce programme time
List of bread programmes
cc cs
cc cs
Teaspoon
Tablespoon
FAIT MAISON_LAGRANGE 16/05/11 10:07 Page33
Page 33
Pain intégral
4.
Programme pain sucré
Brioche au miel
Pain sucré aux raisins
5.
Programme pain rapide
6.
Programme gâteau (sans levée)
Gâteau au yaourt nature
Recette simple et rapide à préparer avec les enfants, puisqu’on mesure
en « pots de yaourt »
Gâteau au chocolat
700 g
250ml
1 cc
1 cc
1 ½ cc
1 cs
235g
115 g
70 g
2 cc
900 g
320 ml
1 ½ cc
1 ½ cc
2 cc
1 ½ cs
300g
150 g
90 g
2 ½ cc
Eau
Jus de citron
Sucre
Sel
Huile d’olive
Farine T150
Farine d’épeautre T150
Farine de seigle T130
Levure
700 g
210 ml
20 g
1
1 cc
1 ½ cs
45 g
450 g
4 g
900 g
230 ml
30 g
2
1 cc
2 cs
60 g
520 g
6 g
Lait frais
Beurre
Œufs
Sel
Miel
Sucre
Farine blanche
Levure boulangère
700 g
120 ml
2
2 cs
30 g
1 ½ cc
400 g
50 g
5 g
900 g
190 ml
3
3 cs
45 g
2 cc
520 g
75 g
7 g
Eau
Œufs
Huile
Sucre
Sel
Farine blanche
Raisins secs
Levure boulangère
700 g
250 ml
1 cs
1 cc
1 ½ cc
1 cc
450 g
2 ½ cc
900 g
350 ml
1 ½ cs
1 cc
2 cc
2 cc
550 g
3 ½ cc
Eau
Huile
Jus de citron
Sel
Sucre
Farine T55 ou T65
Levure boulangère
32
1 pot
2
½ pot
2 pots
3 pots
½ sachet
Yaourt nature
Œufs
Huile végétale
Sucre
Farine blanche
Levure
100 ml
2
125 g
120 g
1 sachet
1 pincée
250 g
5 cs
½ sachet
125g
Lait
Œufs
Beurre fondu
Sucre
Sucre vanillé
Sel
Farine blanche
Poudre d’amandes
Levure chimique
Pépites de chocolat
FAIT MAISON_LAGRANGE 16/05/11 10:07 Page34
Page 34
Gâteau aux pommes
Pain d’épices
Démouler immédiatement à la fin de la cuisson et emballer dans de l'aluminium. Il vaut mieux attendre trois jours avant de déguster le pain
d'épices, il n'en sera que meilleur !
7.
Programme cake (avec levée)
Cake au chocolat et au yaourt
Cake aux fruits confits
N.B. Roulez les fruits confits dans un peu de farine.
Ajoutez, les fruits confits et les raisins secs à la fin du premier pétrissage.
3
½ verre
200 g
1 sachet
125 g
½ sachet
3 ou 4
Œufs
Huile végétale
Sucre
Sucre vanillé
Farine blanche
Levure
Pommes
33
10cl
250 g
100 g
1
½ cc
100 g
300 g
50 g
1 sachet
1 cc
1 cc
1 cc
1 cc
1 cs
1 zeste
Lait tiède
Miel liquide
Beurre fondu
Œuf
Bicarbonate de soude
Farine blanche
Farine complète
Cassonade
Levure chimique
Gingembre en poudre
Cannelle en poudre
Muscade
Anis en poudre
Eau de fleur d’oranger
Citron
1 pot
2
110 g
220 g
150 g
150 g
½ sachet
Yaourt nature
Œufs
Beurre
Chocolat fondu
Sucre
Farine blanche
Levure chimique
3
100 g
125 g
1 pincée
1 cs
300 g
1 sachet
100 g
150 g
Œufs battus
Beurre ramolli
Sucre en poudre
Sel
Rhum
Farine T45 ou T55
Levure chimique
Raisins secs
Fruits confits (cerises,
citrons...)
FAIT MAISON_LAGRANGE 16/05/11 10:07 Page35
Page 35
Cake aux olives
`
8.
Pâte
Pâte brisée
N.B. Attendez que le beurre et la farine commence à se mélanger pour
ajouter l’eau et le sel.
Pâte sablée
Pâte à tarte sucrée rapide
Pâte à tarte salée rapide
9.
Pâte à pizza
Lait
Sel
Farine blanche
Levure chimique
Huile
Gruyère râpé
Herbes de Provence
Olives vertes dénoyautées
Olives noires coupées
900g
100 ml
1 ½ cc
250 g
1 sachet
100 ml
50 g
1 ½ cs
70g
70g
200 g
100 g
1 pincée
3 cc
Farine blanche
Beurre ou huile
Sel
Eau froide
125 g
200 g
1
125 g
Beurre mou
Farine blanche
Œuf
Sucre
150 ml
125 g
1 cs
275 g
1 pincée
Eau chaude
Beurre mou
Sucre
Farine blanche
Sel
200 ml
100 ml
300 g
1 pincée
Eau chaude
Huile
Farine
Sel
34
Une pizza
de taille moyenne
210 ml
2 cc
1 cc
1 cc
350 g
180 g
1 cc
Eau
Huile
Sucre
Sel
Farine T55 ou T65
Farine complète T130
Levure boulangère
700g
90 ml
1 cc
230 g
1 sachet
90 ml
45 g
1 cs
50g
50g
FAIT MAISON_LAGRANGE 16/05/11 10:07 Page36
Page 36
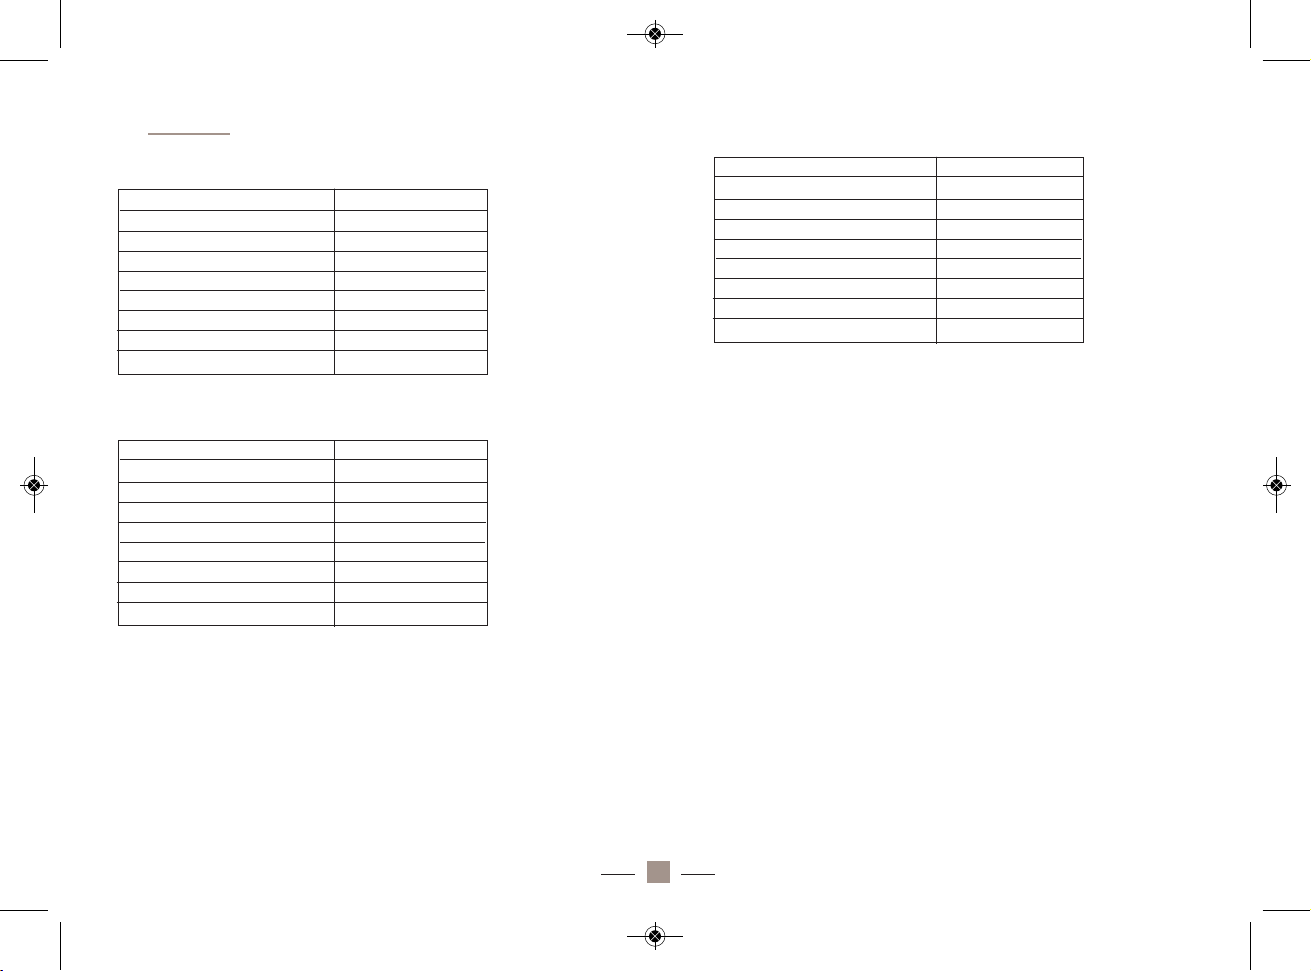
10.
Pétrissage
Baguettes
Brioche tressée
Programme Pétrissage à lancer 2 fois (la brioche lèvera mieux).
Sortez le pâton et divisez-le en 3 parties égales. Formez des boudins et
tressez-les ensemble. Laissez lever 45 minutes à 1 heure.
Dorez à l'œuf battu (vous pouvez également parsemer du sucre perlé
sur le dessus). Cuire 20 à 25 minutes à 180°C.
Fougasse lardons, comté, noix
Sortez la pâte de la cuve à la fin du programme et étalez en ovale. Faites
quatre incisions parallèles en biais sur le dessus. Etirez la pate pour
ouvrir les entailles. Badigeonnez d'huile d'olives et saupoudrez d’herbes
de Provence. Préchauffez le four à 220°, et enfournez 25 minutes jusqu'à
ce qu'elle soit dorée. Laissez refroidir sur une grille, dégustez avec une
bonne salade verte.
Riz au lait
N.B. Ne soyez pas étonné si le riz est liquide à la fin du programme, il va
s'épaissir en refroidissant.
4 baguettes
90 ml
1,5 cs
1 cc
2 cc
2 cc
425 g
180 g
3 ½ cc
Eau
Huile
Jus de citron
Sucre
Sel
Farine T55 ou T65
Farine complète T130
Levure boulangère
1 brioche
110ml
2
50g
25g
1 sachet
1 pincée
275g
½ sachet
Lait
Jaunes d’oeufs
Beurre mou
Sucre
Sucre vanillé
Sel
Farine
Levure de boulanger
+1 œuf pour la dorure
200 ml
2 cs
1 pincée
350 g
1 sachet
80 g
100 g
100 g
1 cc
Eau tiède
Huile d’olive
Sel
Farine
Levure boulangère
Noix
Lardons
Comté râpé
Herbes de Provence (après)
35
FAIT MAISON_LAGRANGE 16/05/11 10:07 Page37
Page 37
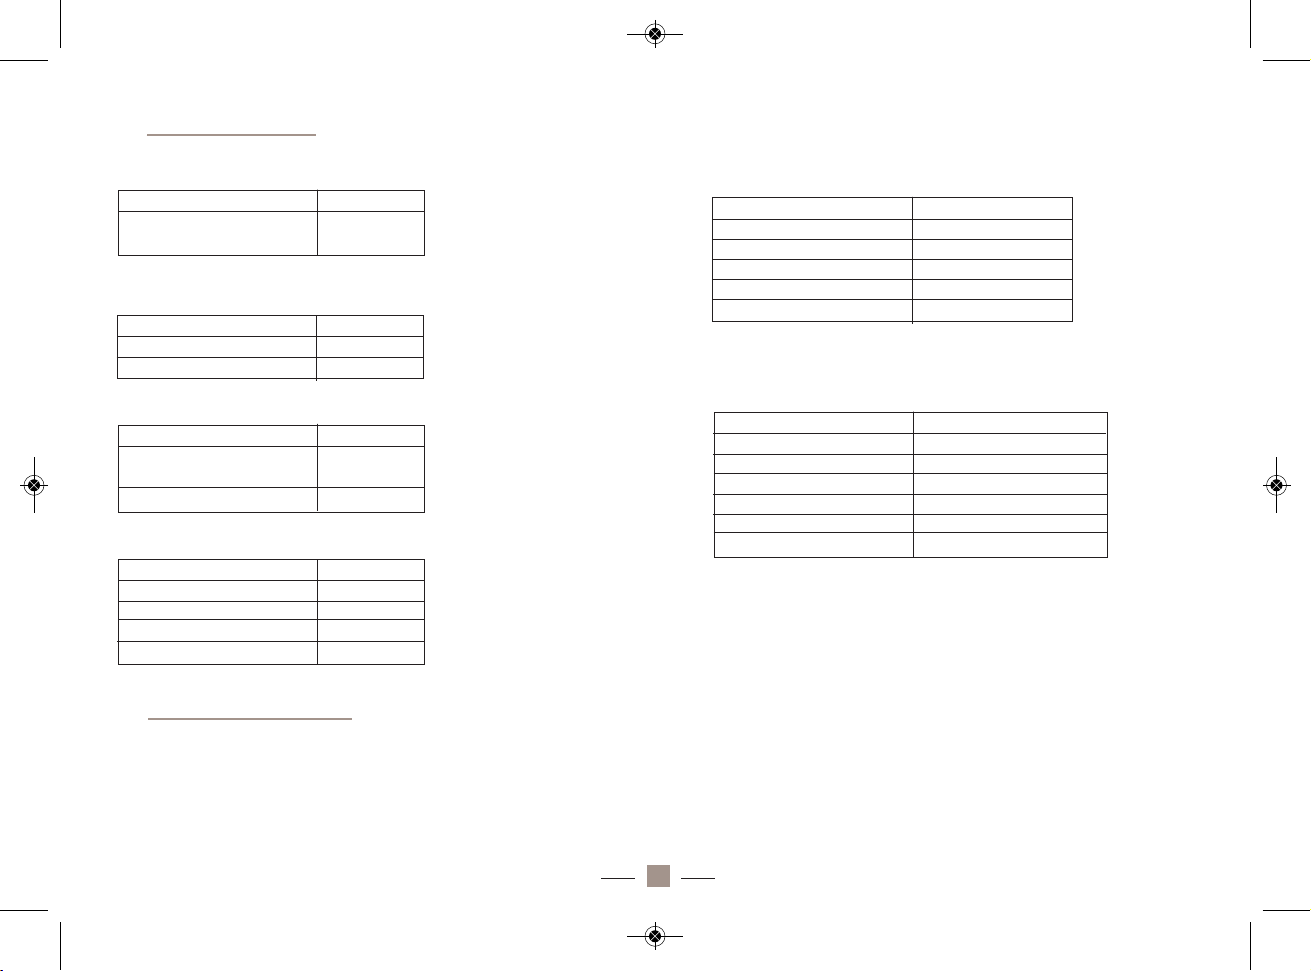
11.
Programme confiture
Confitures de fraises
Confitures de mûres
Confitures d’abricots
Confitures de kiwis
12.
Programme cuisson seule
Vous pouvez utiliser n’importe quelle préparation instantanée du commerce et la faire cuire dans votre FAIT MAISON®.
Recettes à base de riz
Riz pilaf
Riz à sushi
Choisissez un riz rond japonais « spécial sushi ».
Préparez le riz après l’avoir bien lavé en mélangeant le riz avec la quantité
d’eau indiquée. Suivez les instructions données p.18.
Pendant ce temps, préparez l’assaisonnement vinaigré en faisant chauffer le
mélange suivant à feu doux : vinaigre de riz, sucre, sel et alcool de riz.A la
fin de la cuisson du riz, ouvrez le couvercle et laissez le riz reposer 10 min.
Etalez le riz dans un récipient à fond plat non métallique. A l’aide de la spatule à riz, étalez le riz et tranchez-le pour éviter les grumeaux, tout en l’arrosant du mélange vinaigré. Attention le riz ne doit pas être réduit en bouillie,
donc stoppez l’opération dès que le riz est humide et brillant. Aérez le riz
avec les doigts en soulevant celui-ci et en le tournant depuis l’extérieur du
récipient vers l’intérieur (comme lorsque que l’on incorpore des blancs
d’œufs) et ventilez de l’autre main jusqu’à ce qu’il soit tiède. Le riz doit être
brillant, légèrement gluant mais sans grumeau. Conservez-le sous un torchon
humide durant la préparation de vos sushis.
500 g
400 g
Fraises
Sucre cristallisé
avec gélifiant
500 g
400 g
1 cs
Mûres
Sucre cristallisé
Jus de citron
500 g
400 g
1 cs
Abricots
Sucre cristallisé
avec gélifiant
Jus de citron
500 g
1
400 g
1 citron
½ verre
Kiwis
Pomme
Sucre cristallisé
Jus de citron
Eau
Pour 4 personnes
2 mesures
1
50g
1 pincée
niveau 2
Riz basmati ou thaï
Oignon haché
Beurre
Sel
Bouillon de volaille
Pour 1kg de riz à sushi
4 mesures
Niveau 4
100 ml
50 g
2 pincées
2 cs
Riz rond blanc
Eau
Vinaigre de riz
Sucre
Sel
Alcool de riz (Mirin)
36
FAIT MAISON_LAGRANGE 16/05/11 10:07 Page38
Page 38
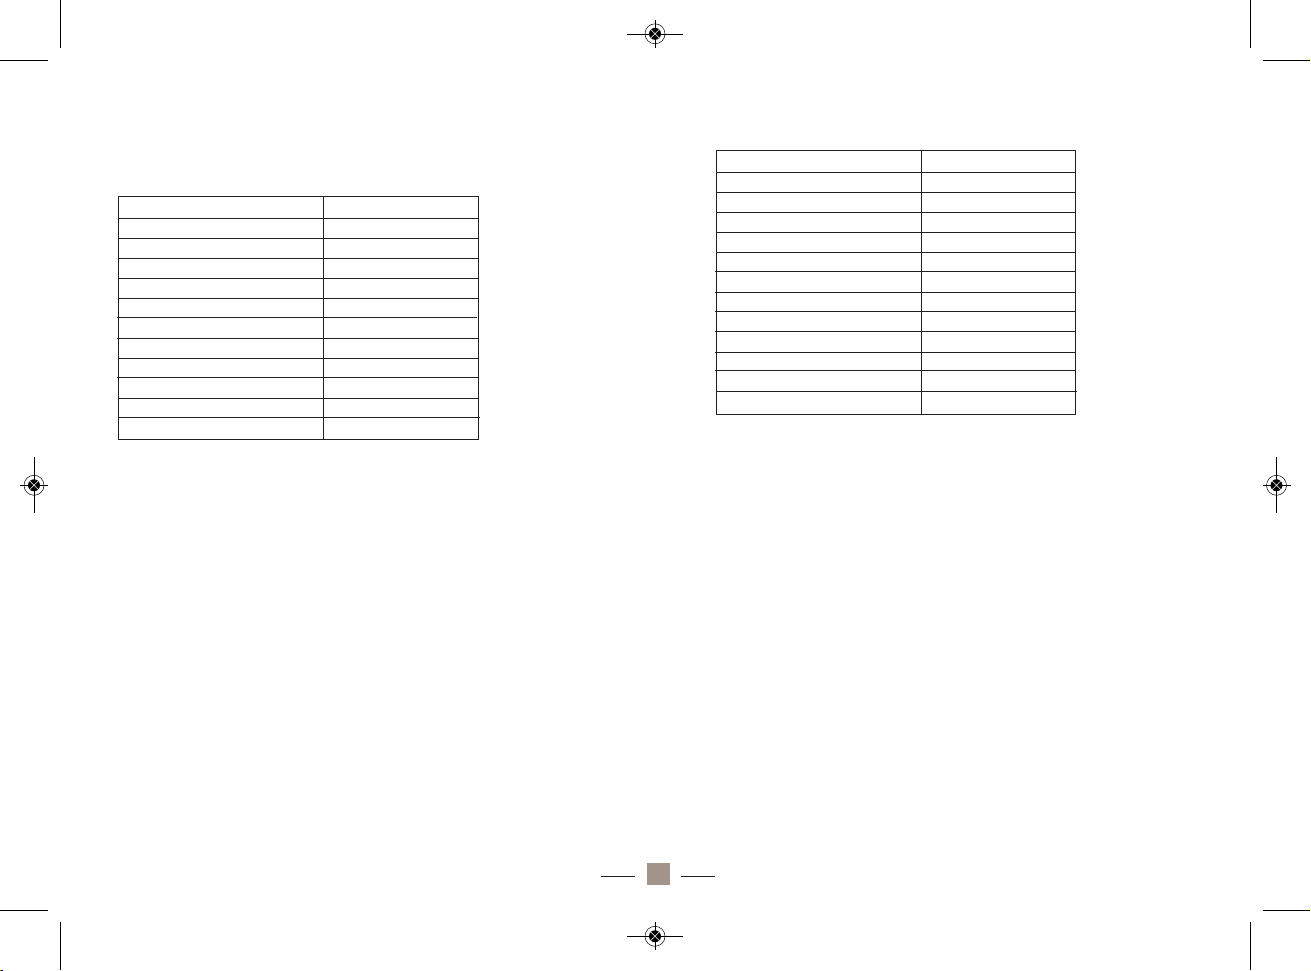
Riz sauté aux crevettes
Choisissez un riz Basmati de préférence
Préparez le riz en mélangeant le riz avec la quantité d’eau indiquée.
Suivez les instructions données p. 18.
Décortiquez les crevettes puis mettez-les au frais.
Emincez l’ail et le gingembre, et faites-les revenir dans l’huile dans une
poêle chaude avec la citronnelle.
A feu doux, ajoutez le poivron coupé en fines lanières. Remuez et couvrez. Laissez cuire 5-10 minutes.
Ajoutez ensuite les crevettes.
Remuez et laissez cuire quelques instants.
Ajoutez le riz cuit et laissez rissoler jusqu’à ce que la cuisson vous
convienne.
Servez bien chaud.
Riz sauté au poulet
Préparez le riz en mélangeant le riz avec la quantité d’eau indiquée.
Suivez les instructions données p. 18 .
Faites chauffer l’huile dans une sauteuse, ajoutez l’échalote et le poulet.
A feu vif, ajoutez le poivre et l’ail et remuez.
Ajoutez la sauce soja, le sucre, et le basilic haché grossièrement.
Enfin ajoutez le riz et mélangez bien.
Saupoudrez de cacahuètes concassées et de noix de cajou, et servez
bien chaud.
Pour 4 personnes
2 mesures
Niveau 2
300 g
2
3
1 cs
2 cs
2 cs
4 cs
2cs
2cs
Riz Basmati
Eau
Crevettes roses cuites
Poivron rouge
Gousses d’ail
Citronnelle émincée
Gingembre frais
Huile
Sauce soja
Jus de citron
Alcool de riz (facultatif)
Pour 4 personnes
2 mesures
Niveau 2
350 g
1
2
5 feuilles
1 pincée
1 cs
2 cs
½ cc
30 g
30 g
Riz Basmati
Eau
Poulet émincé
Echalote émincée
Gousses d’ail
Basilic
Poivre moulu
Huile
Sauce soja
Sucre
Cacahuètes grillées
Noix de cajou
37
FAIT MAISON_LAGRANGE 16/05/11 10:07 Page39
Page 39

Recettes de yaourts
Yaourts sucrés
Vous pouvez soit préparer vos yaourts nature en suivant les conseils du
paragraphe « mise en service » puis ajouter du sucre en poudre, soit
sucrer avant la préparation. Pour cela, ajoutez le sucre en même temps
que le lait et le ferment et battez bien jusqu’à ce que le sucre soit fondu.
Variante : Vous pouvez remplacer le sucre par du sucre vanillé au
moment de la préparation.
Yaourts aux fruits frais
Remarque: si vous utilisez des fruits frais contenant beaucoup d’acidité,
il est conseillé de les ajouter au yaourt après sa préparation. En effet,
l’acidité des fruits peut tuer les ferments et compromettre la préparation
des yaourts.
1 tasse de fruits frais hachés – 4 à 5 cs. (Cuillère à soupe) de sucre
(selon vos goûts) – 1 yaourt nature ou 1 sachet de ferment – 1 litre de
lait
Mélangez le lait et le ferment jusqu’à ce que la consistance soit homogène. Ajoutez les fruits hachés tout en mélangeant. Répartissez le mélange dans les pots.
Yaourts à la confiture
4 cs. de confiture ou de gelée de fruits - 1 yaourt nature ou 1 sachet de
ferment – 1 litre de lait
Faites réchauffer la confiture ou la gelée à feu très doux. Ajoutez le lait
peu à peu, puis ajoutez le ferment. Battez bien jusqu’à ce que la consistance soit homogène. Laissez tiédir puis répartissez le mélange dans les
pots. Si vous utilisez une confiture peu épaisse, vous pouvez la mélanger directement avec le lait sans la réchauffer au préalable.
Yaourts au café
2 cs. de sucre (selon vos goûts) – 1 cs. de café instantané – 1 yaourt
nature ou 1 ferment en sachet – 1 litre de lait
Mélangez 1 yaourt nature ou 1 ferment en sachet à votre café instantané et votre sucre. Battez bien. Ajoutez le lait petit à petit. Mélangez jusqu’à ce que la consistance soit homogène puis répartissez le mélange
dans les pots.
Variante : utilisez du caramel ou du chocolat en poudre à la place du
café.
38
FAIT MAISON_LAGRANGE 16/05/11 10:07 Page40
Page 40

Recettes à base de fromage blanc
Cervelle de canuts (6 pers.)
Cette spécialité Lyonnaise est très simple à réaliser.
1 grande faisselle à base de 1L de lait entier UHT de vache.
1 pot de 20cl de crème fraiche – 200 g d'échalotes - 1/2 botte de ciboulette - 1 botte de persil plat - 1/2 botte de cerfeuil - 1 dl d'huile – 1 dl de
vin blanc sec - sel / poivre
Préparez votre faisselle 48h à l’avance en suivant les instructions de la
notice (comptez une journée ou nuit d’égouttage). Attention votre fromage doit être bien consistant (éliminez un maximum de petit lait).
Lavez et ciselez finement les herbes et les échalotes.
Battez ensemble la crème et le fromage, assaisonnez de sel et poivre
puis ajoutez les autres éléments.
Vous pouvez servir la cervelle de Canuts avec des pommes de terre
bouillies ou cuites dans la braise ou bien tartinée sur du pain.
Tsatziki (6 pers.)
1 grande faisselle à base de 1L de lait entier ou demi écrémé UHT de
vache.
1 cs de crème épaisse - 2 concombres - 1 bouquet de menthe fraiche –
2 gousses d’ail – 1 cs de moutarde – 1 cs d’huile d’olive – Sel et poivre.
Préparez votre faisselle 48h à l’avance en suivant les instructions de la
notice (comptez une journée ou nuit d’égouttage).
Epluchez et épépinez les concombres puis râpez les et faites égoutter
dans une passoire avec du gros sel pendant plusieurs heures.
Battez la faisselle pour obtenir un fromage blanc bien lisse et pas trop
consistant (rajoutez un peu de petit lait si besoin). Ajoutez la crème
fraiche.
Ajoutez au fromage blanc, l’ail préalablement pressé, la menthe finement hachée, la moutarde et l’huile, salez et poivrez.
Pressez le concombre râpé dans un linge pour enlever le restant d’eau.
Enfin, ajoutez le concombre râpé à la préparation.
Fromage blanc battu aux fraises (4 pers.)
1 grande faisselle à base de 1L de lait entier (ou demi écrémé) UHT de
vache.
500g de fraises (400g à mixer / 100 g à couper en morceaux) – 100 g
de sucre en poudre
Préparez votre faisselle 48h à l’avance en suivant les instructions de la
notice (comptez une journée ou nuit d’égouttage).
Battre le fromage blanc à l’aide d’un pied mixeur.
Mixez 400 g de fraises avec 100 g de sucre en poudre. Mettre dans une
casserole sur feu doux avec les 100 g de fraises restant, coupées en morceaux. Laissez compoter mais ne portez pas à ébullition. Quand le coulis nappe la cuillère, laissez refroidir.
Ajoutez au fromage blanc et servez bien frais dans des verrines.
39
FAIT MAISON_LAGRANGE 16/05/11 10:07 Page41
Page 41
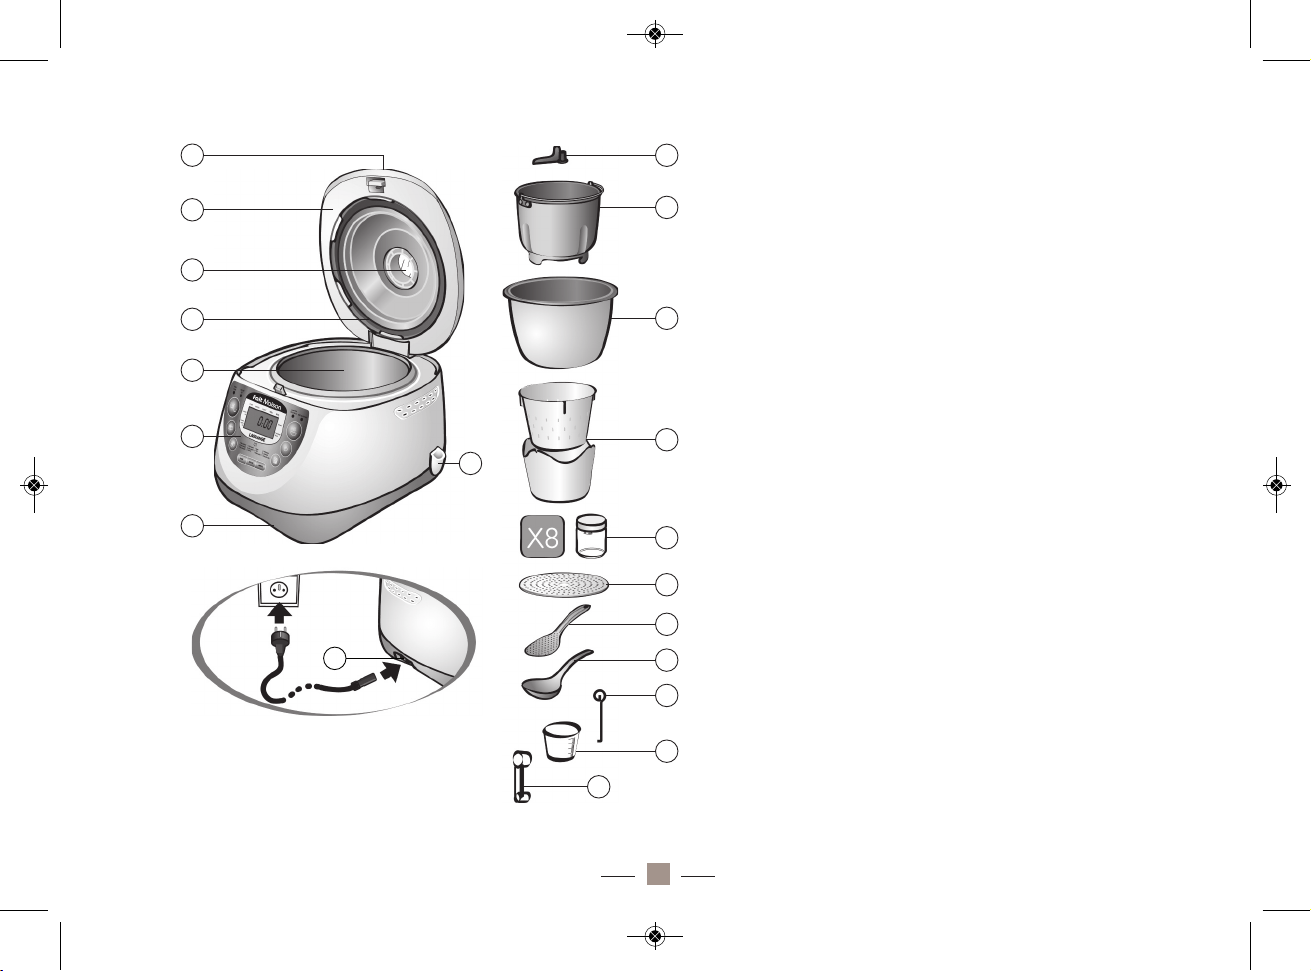
à placer en première page pour le français
1.
2.
3.
4.
5.
6.
7.
8.
9.
10.
11.
12.
13.
14.
15.
16.
17.
18.
19.
20.
Bread Maker
Ref: 479 001
Fait Maison
Open button
Cover of the appliance
Control window-plug
Seal
Space for the trough
Control panel
Base of the appliance
Spoon case
Location of the power supply
Kneading blade
Small bread trough
Large rice trough
1 container and 1 strainer for “fromage blanc”
8 glass yoghurt jars with plastic covers
Separator grate for yoghurt
Rice spoon
Ladle (“fromage blanc”, jam, etc.)
Hook (to remove the kneading blade from the
“bread” after baking)
Rice measure
Measuring spoon (teaspoon/tablespoon)
7
6
8
9
5
3
2
1
4
17
18
19
20
15
16
11
12
13
14
10
®
40
FAIT MAISON_LAGRANGE 16/05/11 10:07 Page42
Page 42
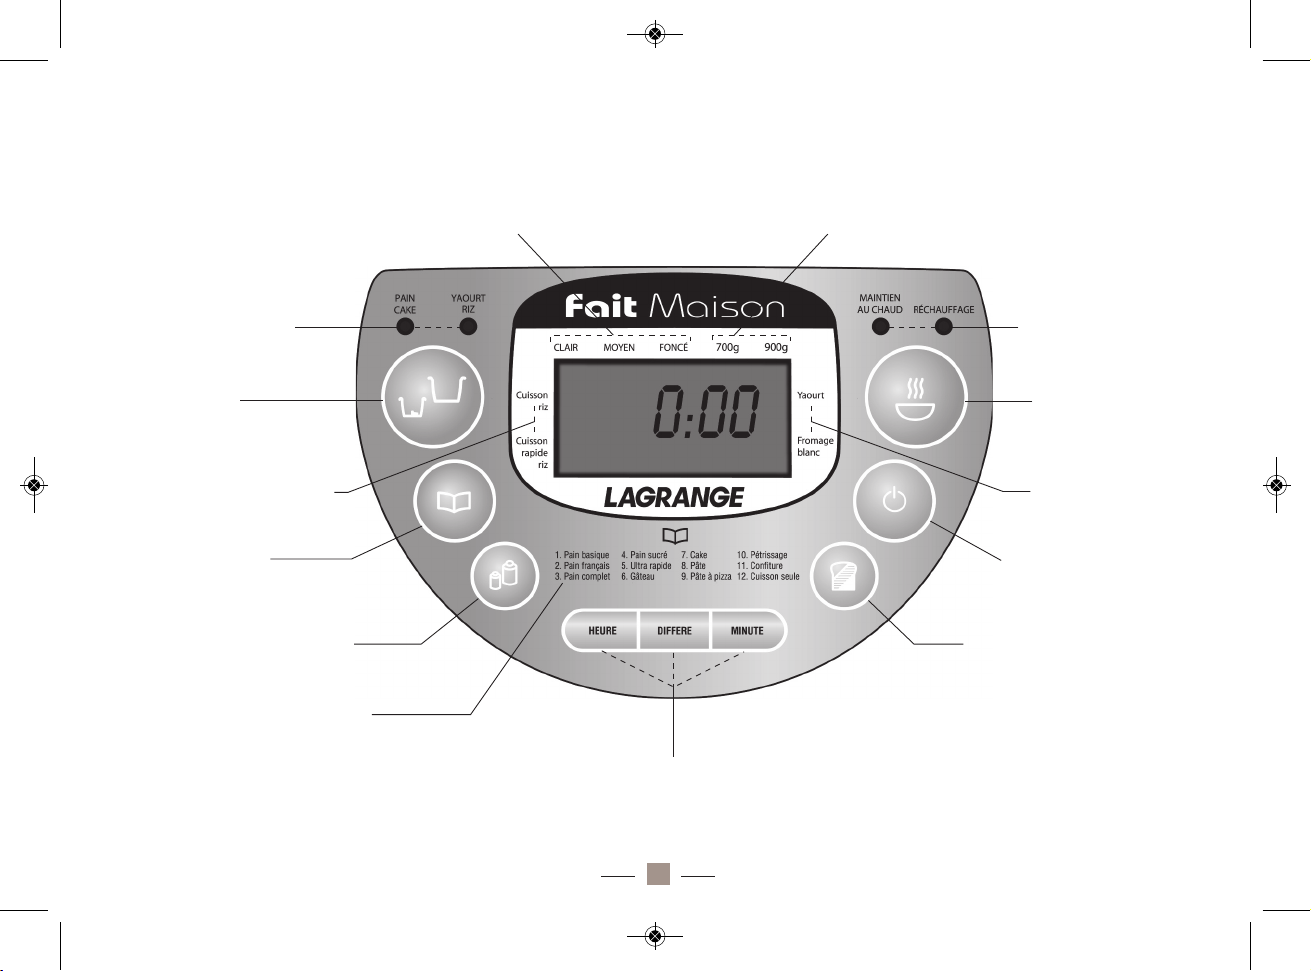
??
?
- THE CONTROL PANEL -- DESCRIPTION OF THE APPLIANCE -
Gilding selection indicator lamp Weight selection indicator lamp
Trough selection
indicator lamp
Trough selection
button
Dairy produce
programmes that
can be prepared
with the rice trough
Programme
selection button
Weight selection button
Buttons for selecting and adjusting the deferred start and the modification
of the dairy produce programme time
Gilding/temperature
selection button
Start/stop button
Warming – reheating
selection button
Warming – reheating
selection indicator
lamp
List of bread programmes
®
Dairy produce
programmes that
can be prepared
with the rice trough
41
FAIT MAISON_LAGRANGE 16/05/11 10:07 Page43
Page 43

TABLE OF CONTENTS_________________________________________________________
CHARACTERISTICS_ _ _ _ _ _ _ _ _ _ _ _ _ _ _ _ _ _ _ _ _ _ _ _ _ _ _ _ _ _ _ _ _ _ _ _ _ _ _ _ _ _ _ _ _ _ _ P. 43
CORD _ _ _ _ _ _ _ _ _ _ _ _ _ _ _ _ _ _ _ _ _ _ _ _ _ _ _ _ _ _ _ _ _ _ _ _ _ _ _ _ _ _ _ _ _ _ _ _ _ _ _ _ _ P. 43
ENVIRONMENT _ _ _ _ _ _ _ _ _ _ _ _ _ _ _ _ _ _ _ _ _ _ _ _ _ _ _ _ _ _ _ _ _ _ _ _ _ _ _ _ _ _ _ _ _ _ _ _ P. 43
BEFORE USING THE APPLIANCE _ _ _ _ _ _ _ _ _ _ _ _ _ _ _ _ _ _ _ _ _ _ _ _ _ _ _ _ _ _ _ _ _ _ _ _ _ __P. 43
PRACTICAL ADVICE _ _ _ _ _ _ _ _ _ _ _ _ _ _ _ _ _ _ _ _ _ _ _ _ _ _ _ _ _ _ _ _ _ _ _ _ _ _ _ _ _ _ _ _ _ _ P. 44
THE INGREDIENTS AND PREPARATION TIME FOR “BREAD” TYPE PROGRAMMES
_ _ _ _ _ _ _ _ _ _ _ _ _ _ _ _ _
P. 44
THE INGREDIENTS AND PREPARATION TIME FOR JAM TYPE PROGRAMMES
_ _ _ _ _ _ _ _ _ _ _ _ _ _ _ _ _ _
P. 47
THE INGREDIENTS AND PREPARATION TIME FOR RICE TYPE PROGRAMMES
_ _ _ _ _ _ _ _ _ _ _ _ _ _ _ _ _ _
P. 48
THE INGREDIENTS AND PREPARATION TIME FOR YOGHURT TYPE PROGRAMMES
_ _ _ _ _ _ _ _ _ _ _ _ _ _ _ _
P. 49
THE INGREDIENTS AND PREPARATION TIME FOR “FROMAGE BLANC” TYPE PROGRAMMES
_ _ _ _ _ _ _ _ __ _ _
P. 50
COMMISSIONING AND USE _ _ _ _ _ _ _ _ _ _ _ _ _ _ _ _ _ _ _ _ _ _ _ _ _ _ _ _ _ _ _ _ _ _ _ _ _ _ _ _ _ P. 51
1ST USE _ _ _ _ _ _ _ _ _ _ _ _ _ _ _ _ _ _ _ _ _ _ _ _ _ _ _ _ _ _ _ _ _ _ _ _ _ _ _ _ _ _ _ _ _ _ _ _ _ _ _ _ _ _ _ _ _ _ _ P. 51
OPERATING ENVIRONMENT _ _ _ _ _ _ _ _ _ _ _ _ _ _ _ _ _ _ _ _ _ _ _ _ _ _ _ _ _ _ _ _ _ __ _ _ _ _ _ _ _ _ _ _ _ _ _ P. 51
USING THE CONTROL PANEL _ _ _ _ _ _ _ _ _ _ _ _ _ _ _ _ _ _ _ _ _ _ _ _ _ _ _ _ _ _ __ _ _ _ _ _ _ _ _ _ _ _ _ _ _ _ _ P. 52
PREPARING BREAD-BUNS-GATEAU
_ _ _ _ _ _ _ _ _ _ _ _ _ _ _ _ _ _ _ _ _ _ _ _ _ _ _ _ _ _ _ _ _ _ _ _ _ P. 56
PREPARING JAM
_ _ _ _ _ _ _ _ _ _ _ _ _ _ _ _ _ _ _ _ _ _ _ _ _ _ _ _ _ _ _ _ _ _ _ _ _ _ _ _ _ _ _ _ _ __ P. 58
PREPARING RICE
_ _ _ _ _ _ _ _ _ _ _ _ _ _ _ _ _ _ _ _ _ _ _ _ _ _ __ _ _ _ _ _ _ _ _ _ _ _ _ _ _ _ _ _ __ P. 59
PREPARING YOGHURT
_ _ _ _ _ _ _ _ _ _ _ _ _ _ _ _ _ _ _ _ _ _ _ _ _ _ _ _ _ _ _ _ _ _ _ _ _ _ _ _ _ _ _ P. 60
PREPARING “FROMAGE BLANC”
_ _ _ _ _ _ _ _ _ _ _ _ _ _ _ _ _ _ _ _ _ _ _ _ _ _ _ _ _ _ _ _ _ _ _ _ _ _ P. 61
TROUBLESHOOTING GUIDE_ _ _ _ _ _ _ _ _ _ _ _ _ _ _ _ _ _ _ _ _ _ _ _ _ _ _ _ _ _ _ _ _ _ _ _ _ _ _ _ _ _ P. 62
MAINTENANCE_ _ _ _ _ _ _ _ _ _ _ _ _ _ _ _ _ _ _ _ _ _ _ _ _ _ _ _ _ _ _ _ _ _ _ _ _ _ _ _ _ _ _ _ _ _ _ _ P. 68
GUARANTEE CONDITIONS _ _ _ _ _ _ _ _ _ _ _ _ _ _ _ _ _ _ _ _ _ _ _ _ _ _ _ _ _ _ _ _ _ _ _ _ _ _ _ _ _ P. 68
RECIPES _ _ _ _ _ _ _ _ _ _ _ _ _ _ _ _ _ _ _ _ _ _ _ _ _ _ _ _ _ _ _ _ _ _ _ _ _ _ _ _ _ _ _ _ _ _ _ _ _ _ _ _ P. 69
42
FAIT MAISON_LAGRANGE 16/05/11 10:07 Page44
Page 44
CHARACTERISTICS_____________________
- Base of the appliance in thermoplastic
- Electronic control panel with backlit screen
- End of preparation audible signal
- Troughs and blades of aluminium with non-stick coating
- 1 large container and strainer for “fromage blanc” – capacity 1 litre
- 8 jars of yoghurt and separator grate
- Control window – plug in plastic
- 230Volts-50Hz-500Watts
Note:
1.The bread trough is used for bread, pastry, gâteaux and jam programmes.
2.The rice trough is designed for rice, yoghurt and “fromage blanc”
cooking programmes.
3.The container and cheese drainer are only used for the “fromage
blanc” function.
CORD________________________________
The power cable must be carefully examined before use. The appliance
must not be used if the cord is damaged. The cord can be replaced only
by
LAGRANGE
, its after sales service or a person qualified and autho-
rised by
LAGRANGE
. This is to avoid danger to the user. The cord used
is HO5RN-F 3 G 1 mm².
These appliances comply with the 2006/95/CE, 2004/108/CE, DEEE
2002/96/CE, RoHs 2002/95/CE directives and the CE food contact
regulations 1935/2004.
ENVIRONMENT________________________
Protection of the environment – DIRECTIVE 2002/96/CE
In order to preserve our environment and our health, the elimination of
electrical appliances at the end of their service life must be done according to very specific rules and requires the involvement
of the supplier as well as the user.
It is for this reason that your appliance, as indicated by
the symbol affixed on the nameplate, must never be
thrown into a public or private dustbin designed for household refuse.
During its elimination, it is your responsibility to leave your appliance at
a public collection centre designed for the recycling of electrical or electronic equipment. To obtain information on collection and recycling
centres of discarded appliances, please contact the local authorities of
your region, the household refuse collection services or the store where
you purchased your appliance.
BEFORE USING THE APPLIANCE__________
Carefully read these instructions and retain them in order to
be able to refer to them subsequently.
• Always uncoil the cord fully.
• Connect the plug of the cord to a 10/16 A socket.
• If you need to use an extension cord, always use a model equipped
with a grounding conductor and wires of section greater than equal to
1 mm².
• Never immerse your appliance in water.
• Before any handling, disconnect the device and let it cool down completely.
• Do not recess the appliance.
• Always clean properly the parts that have been used for the prepa-
43
ENG
FAIT MAISON_LAGRANGE 16/05/11 10:07 Page45
Page 45

ration and do this after every use.
• It is recommended to keep an eye on children to ensure that they do
not play with the appliance.
• Persons (including children) who are not capable of using the appliance safely, either because of their physical, sensorial or mental capacities,
or because of their lack of experience or knowledge, may on no account
use the appliance without supervision or instructions from a responsible
person.
• Check that the wiring of your electrical installation is compatible with
that of the appliance. It is recommended that you connect the appliance to an installation featuring a residual differential current device having
a triggering current of not more than 30mA.
• These appliances are not designed to be operated using an external
timer or by a separate remote control system.
• Place the appliance on a flat surface.
• Never place the appliance on a hot surface or close to a flame.
• Do not leave the appliance connected without using it
• Do not move the appliance when it is operating.
• Do not operate the appliance in a confined space
• Never cover the appliance when it is operating in order to let the heat
and steam come out freely from the appliance. Otherwise, the appliance may catch fire by coming in contract with combustible material.
• Never obstruct the air vents.
• Never place the appliance on top of another appliance.
• Before connecting the appliance, always check that the trough is properly in place; place all the ingredients in the trough and close the
appliance.
• Never use metal accessories in the trough as there is a risk of damaging the non-stick coating.
• Never touch the bread trough or blades when the appliance is operating.
• Refer properly to the compatible recipes in function of the size of
bread and never exceed the quantities indicated for these sizes. Dough
overflowing from the trough onto the heating element may catch fire.
• Never force or tap on the edges of the trough to remove it as this can
damage it.
• Do not touch the window during and just after the operation of the
appliance as its temperature may be high.
• At the end of the programme, always use oven mitts to handle the
trough or hot parts of the appliance. The appliance becomes very hot
during use.
• Always be careful of hot spatters and steam jets when the cover is
opened.
• For your safety, it is recommended never to use or leave your appliance in an area exposed to bad weather and humidity.
• Never use the appliance for back-up heating, and more generally do
not use the appliance for any other purpose than its primary function.
• If your appliance is damaged do not use it and contact the
LAGRANGE
ASS.
• For your safety, use only
LAGRANGE
accessories and spare parts
adapted to the appliance.
PRACTICAL ADVICE____________________
For yoghurt and “fromage blanc”programmes, never place the
appliance on a vibrating surface (such as the top of a refrigerator)
or exposed to air currents. Keep the appliance stationary during
the process, do not move it during the operating cycle at the risk
of jeopardizing the success of dairy products.
THE INGREDIENTS AND PREPARATION TIME FOR “BREAD”
TYPE PROGRAMMES
Flour
Preferably use bread making or bakery flour as it contains more gluten
than standard flour and will thus provide more elasticity, softness and
volume to your bread. The use of T55 flour is recommended.
44
FAIT MAISON_LAGRANGE 16/05/11 10:07 Page46
Page 46

The use of heavier flour (wholemeal, rye) will result in a smaller, less
risen bread. For thicker bread, you can mix wholemeal flour with white
flour.
Flour that is too fine can make the bread rise too much. In this case, it is
recommended to reduce the quantity of yeast used.
Caution: Each flour brand has its own characteristics. It may be necessary to adapt the recipe according to the flour used.
Liquids (water, milk)
Water is important as its rehydrates and activates the yeast. It is the flour
mixed with water that forms the gluten, required for the rising of bread.
Water must be used at a temperature of between 20 and 25°C., but for
the ultra-fast programme, it is recommended to use water at 45-50°C to
facilitate the quick rising of the bread.
For a recipe containing eggs, it is preferable to put them in before the
water.
Water can be replaced, fully or partially by fresh milk (or milk powder
diluted in water) in order to obtain beautiful gilding and a lovely appearance of the fresh breadcrumbs and thereby increase the flavour of the
bread. Certain recipes require the use of fruit juices (apple, lemon, orange) that also increase the flavour of the bread.
Fats (oil, butter)
The use of fats enables to obtain softer bread. For an optimal result, do
not use hot butter and avoid the fats coming into direct contact with the
yeast as this will slow down the rising. It is recommended to cut the butter into small pieces for a homogenous distribution in the preparation.
Eggs
Eggs enable to obtain bread that is richer and make the crust more golden. If you are using eggs in a recipe where they are not planned, reduce the quantity of water as a result.
Sugar
Sugar is an important ingredient as it increases the flavour of the bread
and makes the crust more golden. It also enables to preserve the bread
for longer as it absorbs a part of the humidity. Prefer white sugar or
powdered brown sugar. Caution, the use of diced sugar can damage
the non-stick coating of your trough.
Salt
Salt enables to obtain well risen and golden bread. It increases the flavour of the bread and regulates the activity of yeast. Never put too
much salt as this will prevent the bread from rising. Never put the salt in
direct contact with the yeast.
Yeast
Yeast enables the bread to rise. This also enables a release of gas that
forms bubbles and thus lightens the texture of the bread, making it
easier to digest. Prefer active dried baker’s yeast in packets, which
comes in the form of small grains.
If you are using fresh yeast, take into account the following equivalence
relation: 25g of fresh yeast = 7g of dried yeast.
It is essential to dilute fresh yeast in approximately 2 tablespoons of
warm water.
Be careful to always check the use-by date indicated on the yeast packaging.
Fresh yeast must be used, once opened, within 48h and must never be
used with a deferred start-up of your appliance.
Order of ingredients
CAUTION, for executing “bread” type programmes, the order of ingredients is essential for your preparation to succeed. (Cf. “
Preparing the
dish”
paragraph page 56)
45
FAIT MAISON_LAGRANGE 16/05/11 10:07 Page47
Page 47
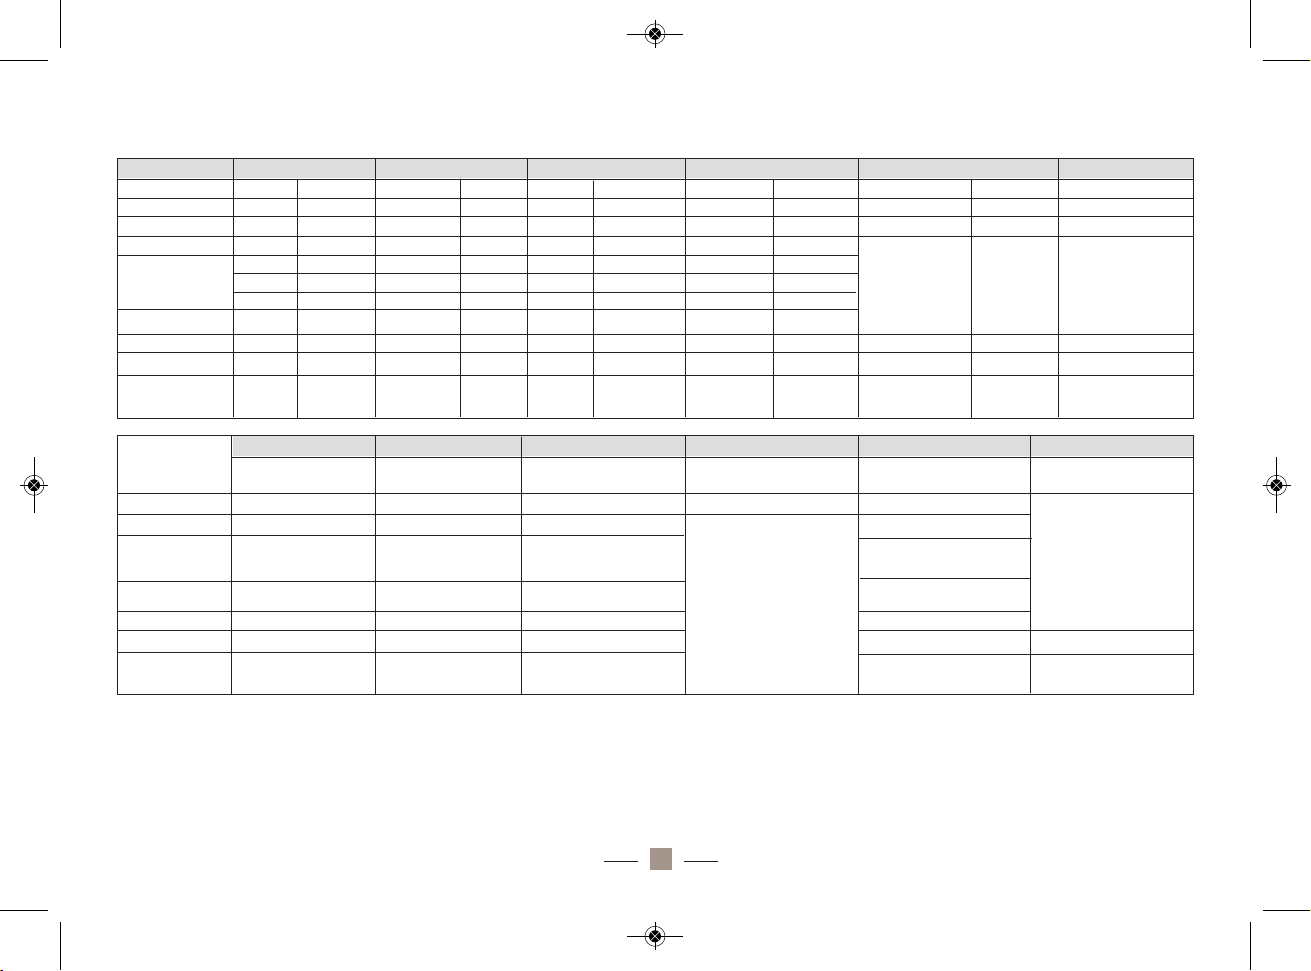
Guide of cycles per programme
Remarks:
• Never put Thai rice for soaking (only rinse it), as it will then cook very
poorly, unlike basmati rice, which can be soaked for up to 30 minutes
before cooking.
• These proportions are given for “tender” cooking. For firmer cooking,
it is recommended to slightly reduce the proportion of water, or to add
rice or additional cereals (1/2 rice measure, for example).
• Warming can slightly dry up the cooked rice or the cereals. Ideally,
limit its duration to less than 30 min.
• The table above is approximate. It is possible that the rice or the
cereal that you will use has a slightly different time. It is recommended
for each one to adjust the proportions in function of their culinary
tastes.
46
1.Basic bread 2.French bread 3.Whole-wheat bread 4.Sweet bread 5.Ultra-fast bread 6.Gâteau
700g 900g 700g 900g 700g 900g 700g 900g 700g 900g
02:53 03:00 03:40 03:50 03:32 03:40 02:50 02:55
Kneading 1 9 min 10 min 16 min 18 min 9 min 10 min 10 min 10 min
Rising 1 20 min 20 min 40 min 40 min 25 min 25 min 5 min 5 min
Kneading 2
5 min 5 min 5 min 2 min 5 min ▼5 min▼5 min 5 min
4 min ▼ 5 min ▼12 min ▼15 min ▼ 8 min 10 min 5 min ▼5 min▼- - -
5 min 5 min 5 min 5 min 5 min 5 min 10 min 10 min
Rising 2
25 min 25 min 30 min 30 min 35 min 35 min 30 min 30 min
Rising 3 45 min 45 min 50 min 50 min 70 min 70 min 50 min 50 min 11 min 19 min
Baking 60 min 65 min 65 min 70 min 55 min 60 min 55 min 60 min 35 min 40 min 65 min
Warming
60 min 60 min 60 min 60 min 60 min 60 min 60 min 60 min 60 min 60 min 60 min
7.Cake 8.Pastry 9.Pizza dough 10.Kneading 11.Jam 12.Baking only
01:58 01:30 01:00 00:15 01:20 01:00
Kneading 1 7 min 20 min 20 min 15 min -
Rising 1 5 min --
- 15 min
Kneading 2
8 min
-- - -
Rising 2 28 min 30 min 40 min -
-
Rising 3 - 40 min - 45 min
Baking 70 min - - 20 min 60 min
Warming 60 min -- 60 min -
Weight
Time
0:58 01:15 01:15
12 min 16 min 10 min
FAIT MAISON_LAGRANGE 16/05/11 10:07 Page48
Page 48
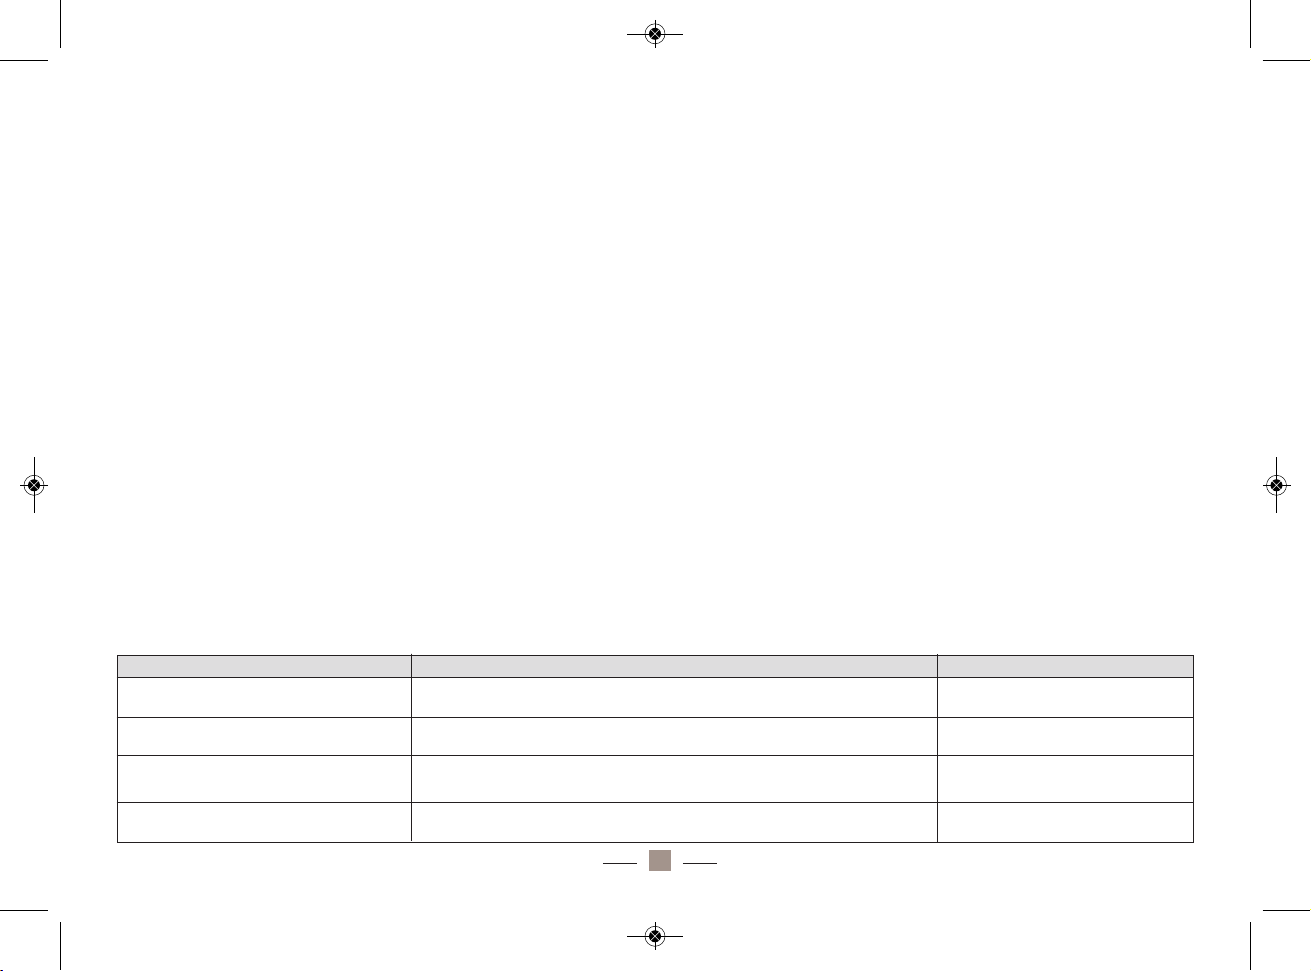
THE INGREDIENTS AND PREPARATION TIME FOR JAM TYPE
PROGRAMMES
Jam is very simple to prepare provided a subtle balance between
the sugar intake, the pectin content and the acidity of fruits comprising it is respected.
Fruits
• The choice of fruits is very important in the quality of the jam obtained
• Too ripe, the fruit does not contain sufficient pectin, a natural gelling
agent that it contains in more or less quantity.
• If, on the other hand, it is too unripe, it contains the pectin required
for good gelling, but lacks taste.
• Frozen products or those that have been thawed must not be used.
It is therefore strongly recommended to use season fruits:
- Spring: Kiwi, Citrus fruits, Rhubarb, Strawberries
- Summer: Cherries, Raspberries, Blueberries, Blackcurrants,
- Redcurrants, Mulberries, Mirabelles, Plums, Apricots,
Peaches, Figs
- Autumn: Quinces, Pumpkin, Apples, Pears, Citrus fruits
- Winter: Kiwi, Apples, Citrus fruits, Pineapples
Assistance in Proportions and choice of ingredients
Sugar and gelling agent
• It is the sugar that enables the jam to be preserved. Lack of sugar can
cause fermentation and mould. If you want jams very rich in fruits, you
must nevertheless not descend below a certain proportion of sugar. If
the fruits are properly ripe and sweet, you can reduce the quantity of
sugar at the most to 600g for 1 kg of fruits.
• Jams can be prepared with a wide variety of sugars: White granulated
sugar, brown sugar, etc. but we mainly use granulated sugar (for fruits
containing sufficient pectin) or jam sugar, added with pectin and citric
acid.
• Pectin is a natural gelling agent that enables the jam to “set” and gives
its jelly consistency. It is present in large quantities in seeds and zests.
Thus, pectin is naturally contained in: Citrus fruits, redcurrants, mulberries, apples, plums, quinces, etc.
• For fruits not containing pectin (cherries, strawberries, peaches,
pears, etc.), we use “special jam sugar” that contains it. We can also use
apple pectin powder or infuse apple seeds wrapped in muslin. More
simply, you can add an apple to the preparation.
• The acidity acts also, along with the heat, by transforming the sugar
from fruits into glucose. It contributes significantly to this equilibrium
specific to the jam: If the fruits are not very sour (quince, kiwi, peach,
pear), lemon juice (or redcurrant) must be added before cooking, otherwise crystals will form at the surface and in the body of the jam, which
will become too sweet.
47
Fruits Sugar Other addition
Strawberries, raspberries, rhubarb
Granulated sugar with gelling agent
(or replace the gelling agent with an apple)
Citrus fruits, redcurrants, apples,
blackcurrants
Granulated sugar
Apricots, peaches, pears, figs, kiwis Granulated sugar with gelling agent Lemon juice
(or replace the gelling agent with an apple)
Cherries, quinces, redcurrants,
plums, mirabelles
Granulated sugar
Lemon juice
FAIT MAISON_LAGRANGE 16/05/11 10:07 Page49
Page 49
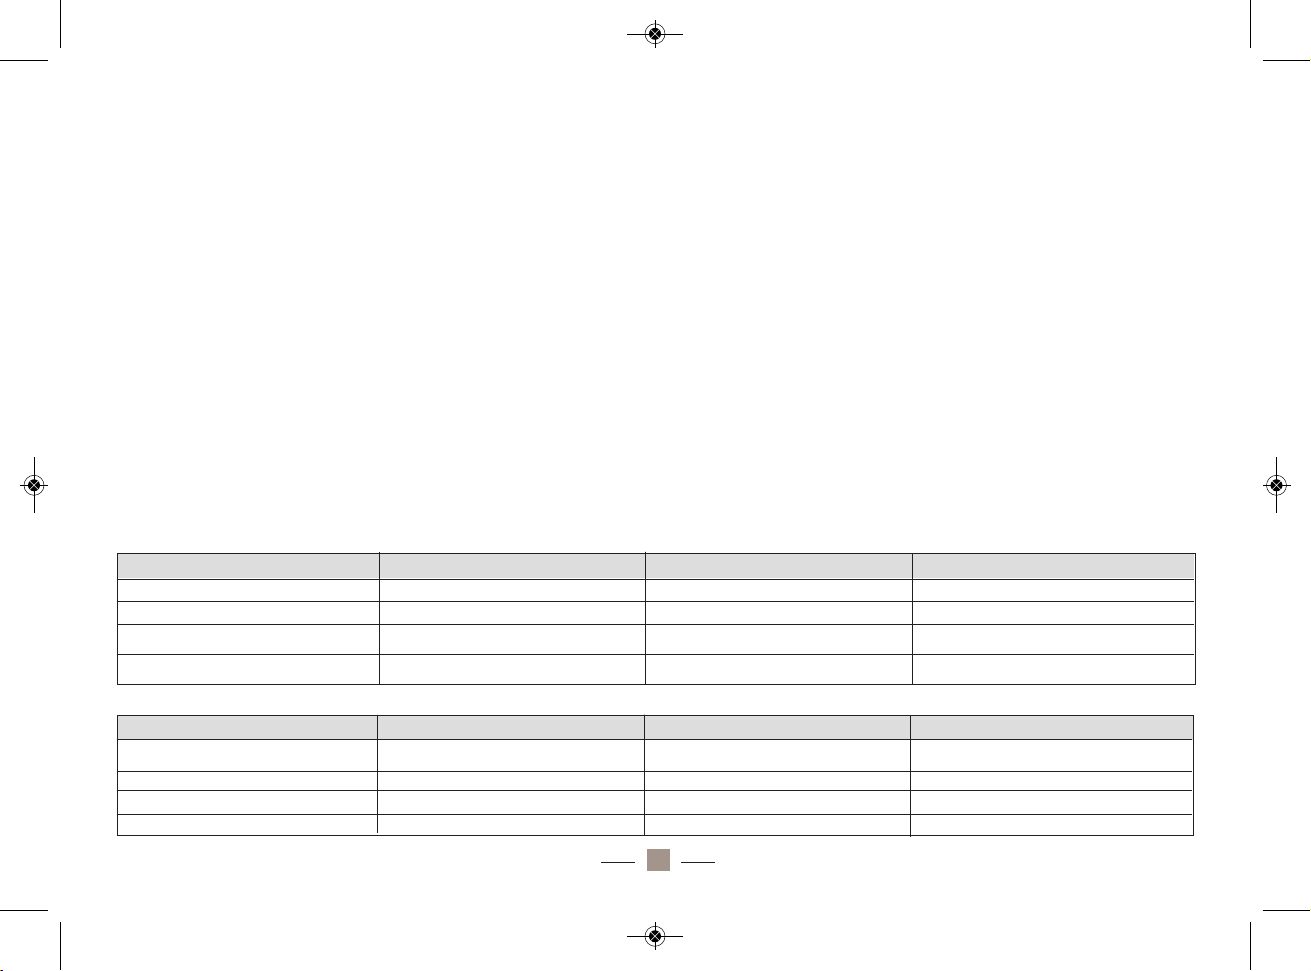
THE INGREDIENTS AND PREPARATION TIME FOR RICE TYPE
PROGRAMMES
Rice
There are many varieties of rice: Thai, basmati, short grain, wild, wholemeal, etc. This will enable you to prepare several recipes.
Remember to properly rinse the rice before cooking it (approximately
three rinsings) to remove impurities and starch from it and thus prevent
it from sticking. The last rinsing water must be clear.
Water
The quantity of water necessary is different depending on the type of
rice that you use. The water absorption capacity is different for each
kind of rice. For example, wholemeal rice requires a little more water
than white rice. The measurement on the trough is indicated for Thai or
Basmati type white rice.
The rice is cooked when all the water is absorbed and small holes form
on the surface, between the grains.
Assistance in Proportions and choice of ingredients
Remarks:
• Never put Thai rice for soaking (only rinse it), as it will then cook very
poorly, unlike basmati rice, which can be soaked for up to 30 minutes
before cooking.
• These proportions are given for “tender” cooking. For firmer cooking,
it is recommended to slightly reduce the proportion of water, or to add
rice or additional cereals (1/2 rice measure, for example).
• Warming can slightly dry up the cooked rice or the cereals. Ideally,
limit its duration to less than 30 min.
• The table above is approximate. It is possible that the rice or the
cereal that you will use has a slightly different time. It is recommended
for each one to adjust the proportions in function of their culinary
tastes.
48
Rice
2 rice measures
2 rice measures
2 rice measures
2 rice measures
Water
Level 2 of the trough
Level 2 of the trough
Level 2 of the trough
Level 2 of the trough
+ ½ rice measure
Time
Approximately 20-30 min
Approximately 20-30 min
Approximately 20-30 min
Approximately 45 min
Cereals
2 ½ rice measures
+ 1 tablespoon of olive oi
l
2 rice measures
2 ½ rice measures
2 ½ rice measures
Water
Level 2 of the trough
Level 2 of the trough
Level 2 of the trough
Level 2 of the trough
Time
Approximately 8-10 min
(do not warm)
Approximately 35 min
Approximately 15 min
Approximately 35 min
For 4 persons (complement)
Basmati white rice
Thai white rice
Short-grain white rice
(glutinous rice)
Wholemeal rice
For 4 persons (complement)
Couscous
Bulgar wheat
Precooked wheat
Quinoa
FAIT MAISON_LAGRANGE 16/05/11 10:07 Page50
Page 50
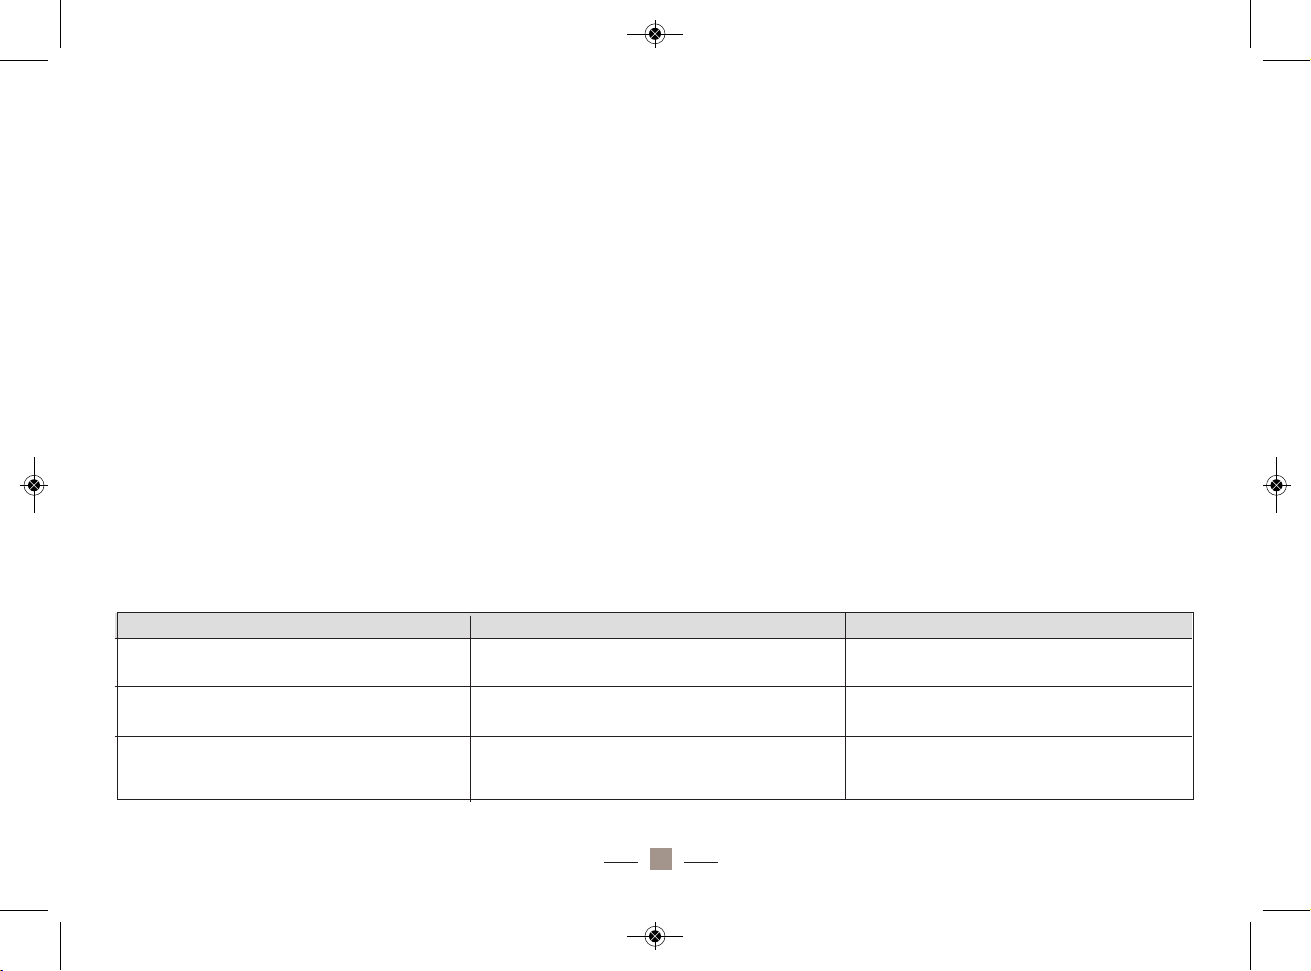
THE INGREDIENTS AND PREPARATION TIME FOR YOGHURT
TYPE PROGRAMMES
Milk
• Preferably select whole milk or semi-skimmed ultra-high temperature
milk (these types of milk do not require boiling)
• Untreated or pasteurised milk (homogenised, 2% or skimmed) must
be boiled (it will be dangerous to use untreated milk without boiling it
beforehand) then cooled and strained to remove skins.
• Whole milk enables to obtain a thicker result and increases the flavour
of the yoghurt.
• Prefer whole milk as it enables to obtain a denser result and increases
• For yoghurts with firmer consistency, add approximately 5 teaspoons
of milk powder.
• Allow 8 hours for the preparation of whole milk yoghurt, 10 hours for
semi-skimmed milk and 12 hours for skimmed milk yoghurt.
Assistance in Proportions and choice of ingredients
Ferment
You can use several types of ferments:
• Natural commercial yoghurt
• Yoghurt from a previous preparation (note: Do not use more than 10
times yoghurt from your preparation as this will lower the result)
• Dry freeze-dried ferment (in this case, allow for 2 more hours for your
preparation)
case of single cheese drainer, you can add whey)
49
Milk
1 litre of whole milk
1 litre of semi-skimmed milk
1 litre of skimmed milk
Ferment
1 commercial yoghurt
or 1 yoghurt from the previous batch
or 1 packet of freeze-dried ferment
1 commercial yoghurt
or 1 yoghurt from the previous batch
or 1 packet of freeze-dried ferment
1 commercial yoghurt
or 1 yoghurt from the previous batch
or 1 packet of freeze-dried ferment
Incubation time
8 to 10 hours
10 to 12 hours
12 to 14 hours
FAIT MAISON_LAGRANGE 16/05/11 10:07 Page51
Page 51
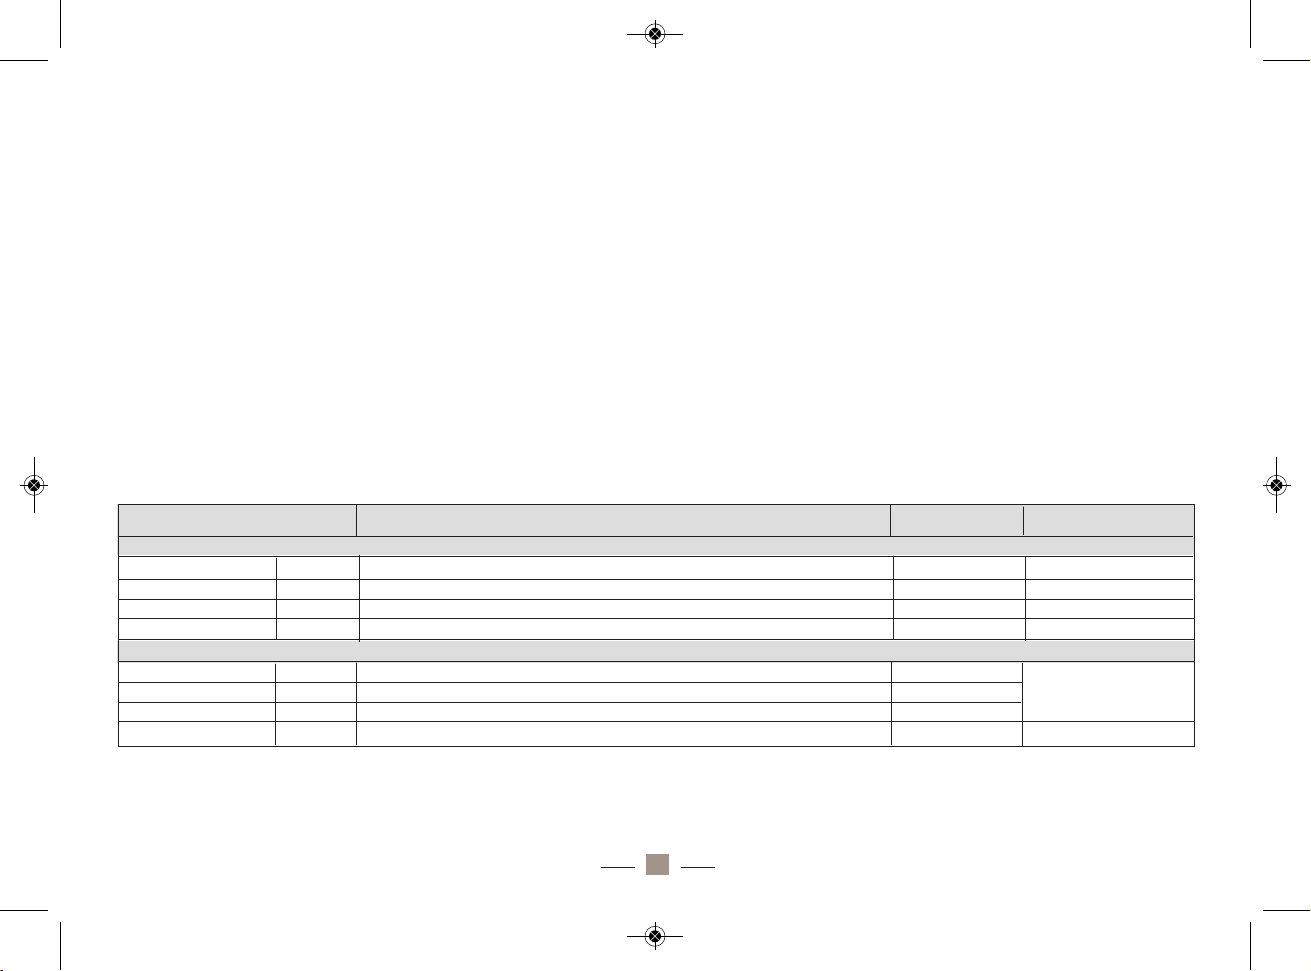
INGREDIENTS AND PREPARATION TIME FOR “FROMAGE
BLANC” TYPE PROGRAMMES
Milk
• Preferably select whole milk or semi-skimmed ultra-high temperature
milk or fresh milk (these types of milk do not require boiling)
• Untreated milk must be boiled (it will be dangerous to use untreated
milk without boiling it beforehand) then cooled to remove the skins
the flavour of the “fromage blanc”
• The quality of milk selected is the main factor that determines the quality of the “fromage blanc” prepared
Note: To use farm milk, boil it beforehand to avoid any contamination
of the milk. To do this, raise its temperature until it boils, and do this for
a
Assistance in Proportions and choice of ingredients
Note:
To use farm milk, boil it beforehand to avoid any contamination of the milk. To do this, raise its temperature until it boils,
and do this for a
maximum of one minute, then let it cool to ambient
temperature.
Ferment
You can use several types of ferments:
• Commercial “fromage blanc”, ideally curd cheese (in the case of single
cheese drainer, you can add whey)
• “fromage blanc” from a previous preparation (note: Do not use more
than 5 times “fromage blanc” from your preparation as this will lower the
result)
• Whey from a previous preparation
Rennet
You can find rennet in the form of a pharmaceutical dropper.
50
Milk
First use (“fromage blanc” or commercial petit-suisse)
Fresh milk
UHT Whole milk
UHT semi-skimmed milk
Untreated milk
1 litre
1 litre
1 litre
1 litre
1 tablespoon or 1/2 cheese drainer or 1 petit-suisse
1 tablespoon or 1/2 cheese drainer or 1 petit-suisse
1 tablespoon or 1/2 cheese drainer or 1 petit-suisse
1 tablespoon or 1/2 cheese drainer or 1 petit-suisse
Ferment
3 drops
6 drops
3 drops
6 drops
10 hours
12 hours
14 hours
12 hours
Rennet Time
Regeneration (“fromage blanc” or whey from the previous round) maximum 5 times
Fresh milk
UHT Whole milk
UHT semi-skimmed milk
Untreated milk
1 litre
1 litre
1 litre
1 litre
2 tablespoons or 1 cheese drainer or 1 glass of whey
2 tablespoons or 1 cheese drainer or 1 glass of whey
2 tablespoons or 1 cheese drainer or 1 glass of whey
2 tablespoons or 1 cheese drainer or 1 glass of whey
3 drops
6 drops
6 drops
6 drops
8 hours
10 hours
FAIT MAISON_LAGRANGE 16/05/11 10:07 Page52
Page 52

COMMISSIONING AND USE______________
1st use
• While unpacking your appliance, make sure that you remove all wedging elements.
• Make sure that all parts and accessories are present and without
defect.
• Before using your appliance, clean all the parts properly (see “maintenance” paragraph).
• Select the “Baking only” programme (refer to the “selecting the baking
programme” paragraph) and let the programme run empty for approximately 10 minutes.
• Let the appliance cool for approximately 20 minutes then remove the
bread trough.
• Clean it once again.
Operating environment
The appliance is designed to operate optimally within a temperature
range. We recommend that you maintain the room temperature between 15 and 34°C. A temperature that is too cold will be detrimental to
a good rising of dough. A temperature that is too high will be detrimental to the taste of the bread.
Operating environment
The appliance is designed to operate optimally within a temperature
range. We recommend that you maintain the room temperature between 15 and 34°C. A temperature that is too cold will be detrimental to
a good rising of dough. A temperature that is too high will be detrimental to the taste of the bread.
Before every operation, check properly that the appliance is dis
connected. When powering on the appliance, a beep will be
heard, and a display reading “0:00” will flash on the blue illuminated screen. This means that the appliance is awaiting instructions.
bread trough.Clean it once again.
sure the tempe
rature.
6.Gâteau: Kneadin
51
FAIT MAISON_LAGRANGE 16/05/11 10:07 Page53
Page 53

Using the control panel
1. Choice of the trough
Pressing the trough selection button once enables to use a
programme requiring kneading or shaking, i.e. the small
trough with the kneading blade. This deals with pro-
grammes of the menu (from 1 to 12) visible under the
screen, i.e. “bread type” programmes (basic bread, French bread,
whole-wheat bread, sweet bread, ultra-fast bread, gâteau, cake, pastry,
pizza dough, kneading, jam, or baking only).
When pressed once, the red LED situated under the bread/cake marking lights up. By default, the programme displayed is the first from the
list, i.e. “basic bread” with its different characteristics.
Pressing the button a second time enables to switch to rice cooking, fast
rice cooking, yoghurt making and “fromage blanc” making programmes
that require the large rice trough. They are situated to the left and to the
right of the screen, and the choice will be made by successively pressing the button to switch from one to the other.
An arrow symbol “ ” or “ ” points to the selected programme.
When pressed a second time, the green LED situated under the yoghurt/rice marking lights up. By default, the programme selected is that
of rice cooking. The duration of the programme is directly displayed on
the screen (40 minutes in this case).
Note: The “choice of trough” button is inactive when the appliance is
executing a programme and it remains so during its entire duration.
2. Selecting the cooking programme
Once the trough is selected, a programme must be selected. To do this, use the programme selection button. Every
time the button is pressed, a new programme is displayed
on the LCD screen and an audible signal sounds.
Note:
To start a programme, press the “start/stop” button once. When
you hear an audible signal and the “:” character flashes, this means that
the programme has started. However, as soon as the programme starts,
you can no longer modify it. The only buttons that you can use during
the bread making process are the “pause” and “start/stop” buttons. To
stop the programme, keep the “start/stop” button pressed for approximately 2 seconds. The audible signal indicates that the programme is
correctly stopped.
The following are the 12 programmes accessible when the
bread rough has been selected:
1.Basic bread: Kneading, rising and traditional baking of bread. Is also
suitable for white or brown bread, adorned according to your wish,
with spices, herbs or other ingredients.
2.French bread: Kneading, rising and baking with a greater rising time.
Baking of a sandwich bread, dimpled and light with a crispy crust.
The following are the 12 programmes accessible when the
3.Whole-wheat bread: Kneading, rising and baking of bread with
wholemeal flour. This programme requires a longer preheating time,
and the bread obtained is softer and tenderer. For better results, it is
not recommended to use a deferred start with this programme.
52
à placer en premières pages de l’anglais...
Yeast
5.
6.
7
.
8
.
9
.
1
0.
1
1.
1
2.
1
3.
1
4.
15.
16.
17.
18.
19.
20.
Bread Maker
Ref: 479 001
S
pace for the trough
C
ontrol panel
B
ase of the appliance
S
poon case
L
ocation of the power supply
K
neading blade
Small bread trough
Large rice trough
1 container and 1 strainer for “fromage blanc”
8 glass yoghur t jars with plastic covers
Separator grate for yoghurt
Rice spoon
Ladle (“fromage blanc”, jam, etc.)
Hook (to remove the kneading blade from the
“
bread” after baking)
R
ice measure
M
easuring spoon (teaspoon/tablespoon)
8
9
17
18
19
20
15
16
12
13
14
®
à placer en premières pages de l’anglais...
Liquid or humid ingredients
Sugar, salt and flour
Yeast
8
.
9
.
1
0.
1
1.
12.
13.
14.
15.
16.
17.
1
8.
1
9.
2
0.
Bread Maker
Ref: 479 001
Spoon case
Location of the power supply
Kneading blade
Small bread trough
Large rice trough
1 container and 1 strainer for “fromage blanc”
8
glass yoghur t jars with plastic covers
S
eparator grate for yoghurt
R
ice spoon
L
adle (“fromage blanc”, jam, etc.)
H
ook (to remove the kneading blade from the
“
bread” after baking)
R
ice measure
M
easuring spoon (teaspoon/tablespoon)
8
9
17
18
19
20
15
16
13
14
®
▼
▼
FAIT MAISON_LAGRANGE 16/05/11 10:07 Page54
Page 54

4.Sweet bread: Kneading, rising and baking of sweet bread. To pre-
pare recipes with more fats and sugar (such as buns for example). The
bread obtained is soft with a crispy crust.
5.Ultra-fast: Kneading, rising and baking of a bread of 700g in a shor-
ter time. The bread obtained is generally smaller and the crumbs more
packed together. The water used in the ingredients will have to be of a
temperature of approximately 48-50°C. Use a cooking thermometer to
measure the temperature.
6.Gâteau: Kneading and baking of a gâteau without yeast.
7.Cake: Kneading, rising and baking of a cake with yeast.
8.Pastry: Kneading, rising but without baking to prepare yeast based
pastries. This programme is suitable for preparations requiring work of
the dough before baking such as flat loaf, for example. You can then
use a traditional oven for the baking.
9.Pizza dough: Kneading, rising of pizza dough without baking. The
rising time for the pizza dough is shorter than that for the bread
dough. You can then shape your dough and use a traditional oven for
baking.
10.Kneading: Only kneading of any dough, without rising or baking.
This programme is particularly recommended for making short crust
pastry or short bread before being spread for making a tart or a
quiche, for example.
11.Jam: Simmered jams and marmalades. The fruits must be cut befo-
rehand into small pieces or chopped in a mixer before incorporating
them into the bread trough.
12.Baking only: No kneading, no rising, only baking. This programme
enables particularly to make an already baked and cooled bread crispier. You can adjust the baking time and the temperature just as you
please.
The following are the 4 programmes accessible when the large
trough has been selected:
Rice cooking: Cook rice without supervision in 40 minutes
Fast rice cooking: Cook rice without supervision in 30 minutes
Yoghurts: Prepare up to 8 yoghurts from one litre of milk and a ferment.
“fromage blanc”: Obtain “fromage blanc” from 1 litre of milk, a few
drops of rennet and a ferment.
53
FAIT MAISON_LAGRANGE 16/05/11 10:07 Page55
Page 55
3. Size of the bread
When you select a basic, French, whole-wheat, sweet
or ultra-fast type bread programme, you have the option
of selecting between 2 bread sizes, i.e. 700 and 900g. By
default, the appliance is set to 900g. Press the weight
selection button until the arrow is facing the desired weight.
Note:
The preparation time of the bread depends on the weight.
4. Gilding/Temperature
When you select a bread programme (basic, French,
whole-wheat, sweet, ultra-fast, gâteau, cake or baking
only), you can select the baking temperature that will pro-
vide a more or less marked gilding to your preparation.
An arrow symbol ”▲” enables you to position on one of the 3 different
levels of gilding, i.e. light, medium, dark. By default, the medium position
is activated.
5. Deferred
If you wish to start the programme later (such as, for example to get your
morning bread still hot), you can use this function to defer the starting
time. This function cannot be accessed for the following programmes:
ultra fast, gâteau, cake, kneading, jam, yoghurt and cheese. The maximum time adding up to the deferred time and the programme duration
is 12h.
Note :
For yoghurt and “fromage blanc” programmes, the delay does
not work. However, the delay adjustment buttons enable to modify the
preparation time which is initialised to 8 h. We can thus select (depending on the type of milk) a preparation time ranging from 1 to 15h.
Once your programme is selected, press “DEFERRED”. A beep is heard
and the LCD screen then lights up and flashes the final time before the
end of the programme. The execution time is included. Thus, programme the total time from the moment of programming until the desired
time at the end of preparation. (E.g.: If it is 20h30 and you want that
your bread must be ready at 7h the next morning, programme an additional 10h30 to the selected programme)
Then, use the “HOUR” and “MINUTE” buttons to adjust the desired time,
then press once again on “DEFERRED” to confirm the time entered, the
flashing then stops. To start the countdown of the delay, press the
“start/stop” button. At the end of the time lag, the programme will automatically start. When entering the time, if you exceed the maximum possible time (by 12h), the screen once again displays the initial duration of
the selected programme. Caution, the time lag displayed represents the
duration until the end of the programme and not that of the start of the
programme. When your time is programmed, press the “start/stop” button. “:” flashes to indicate that the programme has been launched properly and will start after the selected time lag.
CAUTION: When using this function, do not use rapidly perishable
ingredients (eggs, fresh milk, fresh yeast, fresh fruits, onions, etc.).
6. Start/stop
This button is used to start and stop the selected pro-
gramme. Once the programme parameters have been
selected, simply press this button for the programme to
start with or without a deferred start. A short beep is heard, the screen
flashes once and displays the time remaining (except for yoghurt and
«fromage blanc” programmes where the time already elapsed is displayed) and the machine starts its programme. From this moment
onwards, all the other buttons apart from this one become inactive.
When the appliance executes a bread programme and the appliance is
mixing or kneading, the symbol is displayed on the screen.
54
à placer en premières pages de l’anglais...
Liquid or humid ingredients
Sugar, salt and flour
Yeast
placer dans l’anglais
1
4.
1
5.
1
6.
1
7.
1
8.
1
9.
2
0.
Bread Maker
Ref: 479 001
8
glass yoghur t jars with plastic covers
S
eparator grate for yoghurt
R
ice spoon
L
adle (“fromage blanc”, jam, etc.)
Hook (to remove the kneading blade from the
“bread” after baking)
Rice measure
Measuring spoon (teaspoon/tablespoon)
9
1
7
1
8
1
9
20
15
1
6
®
cc cs
Teaspoon
Tablespoon
à placer en premières pages de l’anglais...
Liquid or humid ingredients
Sugar, salt and flour
Yeast
1
1.
12.
13.
14.
15.
16.
17.
1
8.
1
9.
2
0.
Bread Maker
Ref: 479 001
Small bread trough
Large rice trough
1 container and 1 strainer for “fromage blanc”
8
glass yoghur t jars with plastic covers
S
eparator grate for yoghurt
R
ice spoon
L
adle (“fromage blanc”, jam, etc.)
H
ook (to remove the kneading blade from the
“
bread” after baking)
R
ice measure
M
easuring spoon (teaspoon/tablespoon)
9
1
7
1
8
1
9
20
15
1
6
1
4
®
cc cs
??
à placer en premières pages de l’anglais...
?
1.
2
.
3.
4.
5.
6.
7.
8.
9.
10.
11.
12.
13.
14.
15.
16.
17.
18.
19.
20.
- THE CONTROL PANEL -- DESCRIPTION OF THE APPLIANCE -
Open button
Cover of the appliance
Control window-plug
Seal
Space for the trough
Control panel
Base of the appliance
Spoon case
Location of the power supply
Kneading blade
Small bread trou gh
Large rice trough
1 container and 1 strainer for “fromage blanc”
8 glass yoghur t jars with plastic covers
Separator grate for yoghurt
Rice spoon
Ladle (“fromage blanc”, jam, etc.)
Hook (to remove the kneading blade from the
“bread” after baking)
Rice measure
Measuring spoon (teaspoon/tablespoon)
8
17
18
19
20
15
16
11
1
2
1
3
14
10
Gilding selection indicator lamp Weight selection indicator lamp
Trough selection
indicator lamp
Trough selection
button
Program me
selection button
Weight selection button
Buttons for selecting and adjusting the deferred start and the modification
of the dairy produce programme time
List of bread prog rammes
®
D
airy produce
programmes that
can be prepared
with the rice trough
Liquid or humid ingredients
Sugar, salt and flour
Yeast
10.
11.
12.
13.
14.
15.
16.
1
7.
18.
19.
20.
Kneading blade
Small bread trough
L
arge rice trough
1
container and 1 strainer for “fromage blanc”
8
glass yoghur t jars with plastic covers
S
eparator grate for yoghurt
R
ice spoon
L
adle (“fromage blanc”, jam, etc.)
Hook (to remove the kneading blade from the
“bread” after baking)
Rice measure
Measuring spoon (teaspoon/tablespoon)
8
17
18
19
20
15
16
14
Programme
selection button
Weight selection button
List of bread programmes
programmes that
can be prepared
with the rice trough
21
17 Chemin de la Plaine
ZA les Plattes
69390 VOURL ES
France
www.lagrange.fr
1
7.
18.
19.
2
0.
à placer en première page pour le français
??
à placer en premières pages de l’anglais...
Louche (fromage blanc, confiture…)
Crochet (pour retirer la pale du « pain » après cuisson)
M
esure à riz
Cuillère mesure (cuillère à café/cuillère à soupe)
18
19
20
B
outons de sélection et de réglage du départ différé et de modification
du temps des programmes laitages
Liste des programmes pain
ingrédients liquides/humides
Sucre, sel, farine
Levure
Liquid or humid ingredients
Sugar, salt and flour
Yeast
placer dans l’anglais
®
?
1
.
2.
3.
4
.
5.
6
.
7.
8
.
9.
1
0.
11.
12.
1
3.
14.
1
5.
16.
1
7.
18.
19.
2
0.
- THE CONTROL PANEL -- DESCRIPTION OF THE APPLIANCE -
O
pen button
Cover of the appliance
C
ontrol window-plug
Seal
Space for the trough
C
ontrol panel
Base of the appliance
S
poon case
Location of the power supply
K
neading blade
Small bread trough
Large rice trough
1 container and 1 strainer for “fromage blanc”
8 glass yoghurt jars with plastic covers
S
eparator grate for yoghurt
Rice spoon
L
adle (“fromage blanc”, jam, etc.)
Hook (to remove the kneading blade from the
“
bread” after baking)
Rice measure
M
easuring spoon (teaspoon/tablespoon)
8
17
18
19
20
15
1
6
11
12
1
3
14
10
G
ilding selection indicator lamp Weight selection indicator lamp
T
rough selection
indicator lamp
Trough selection
b
utton
D
airy produce
programmes that
can be prepared
w
ith the rice trough
P
rogramme
s
election button
W
eight selection button
B
uttons for selecting and adjusting the deferred start and the modification
o
f the dairy produce programme time
G
ilding/temperature
selection button
S
tart/stop button
Warming – reheating
selection button
Warming – reheating
s
election indicator
l
amp
L
ist of bread programmes
®
®
cc cs
Dairy produce
p
rogrammes that
c
an be prepared
with the rice trough
Teaspoon
Tablespoon
FAIT MAISON_LAGRANGE 16/05/11 10:07 Page56
Page 56
When rising or baking, the symbol is displayed on the screen.
When the appliance switches to “warming” mode, the corresponding
red LED will come on at the top left of the control panel, and the symbol will be displayed on the screen.
When the appliance is executing a rice cooking programme, the
appliance will display the symbol during the cooking stage and until
the end of this stage. The device will then enter the warming stage; this
same symbol will be displayed always on the screen and the red “warming” LED will come on. To stop the programme, press the Start/Stop
button for approximately 2 seconds until a beep is heard. This confirms
that the appliance has returned to the initial point. The screen then once
again displays the default programme, i.e. either “basic bread” if the
bread trough is installed, or the “rice cooking” programme if the rice
trough is installed.
7. Warming/Reheating
Once a programme has ended, the appliance will automatically launch the “warming” function except for the “pas-
try, pizza dough, kneading, jam, “fromage blanc” and yoghurt” programmes.
By default, this warming will be carried out for 1 hour.
Pressing the “Warming/reheating” button after selecting the desired
programme activates the “warming” programme. The red LED is illuminated and a beep is heard. The screen displays “0:00”. If you wish to
cut-off this warming cycle and remove the bread from the trough,
press the “start/stop” button for 2 seconds.
CAUTION: Always disconnect the appliance before handling the
bread trough.
You can press the “Warming/reheating” button to heat cold rice in the
same manner. Once the rice is correctly heated, the programme will
automatically stop and a long beep will indicate the end of reheating.
Note 1 :
- The red LED is illuminated during the warming
- The green LED is illuminated during the reheating.
Note 2 :
- Pressing the “warming/reheating” button in a bread programme triggers the warming programme
- Pressing the “warming/reheating” button in a rice programme triggers
the reheating programme
55
Liquid or humid ingredients
Sugar, salt and flour
Yeast
7
.
8
.
9.
10.
11.
12.
13.
14.
15.
16.
17.
1
8.
1
9.
20.
Base of the appliance
Spoon case
Location of the power supply
Kneading blade
Small bread trough
Large rice trough
1
container and 1 strainer for “fromage blanc”
8
glass yoghur t jars with plastic covers
S
eparator grate for yoghurt
R
ice spoon
L
adle (“fromage blanc”, jam, etc.)
H
ook (to remove the kneading blade from the
“
bread” after baking)
Rice measure
Measuring spoon (teaspoon/tablespoon)
8
17
18
19
20
1
5
16
13
14
T
rough selection
b
utton
Programme
selection button
Weight selection button
List of bread programmes
Dairy produce
programmes that
can be prepared
with the rice trough
21
17 Chemin de la Plaine
ZA les Plattes
69390 VOURL ES
France
www.lagrange.fr
17.
18.
19.
2
0.
à placer en première page pour le français
?
?
à placer en premières pages de l’anglais...
Machine à pain
Ref: 479 001
Louche (fromage blanc, confiture…)
Crochet (pour retirer la pale du « pain » après cuisson)
Mesure à riz
C
uillère mesure (cuillère à café/cuillère à soupe)
1
8
19
20
Boutons de sélection et de réglage du départ différé et de modification
d
u temps des programmes laitages
Liste des programmes pain
ingrédients liquides/humides
S
ucre, sel, farine
Levure
Liquid or humid ingredients
Sugar, salt and flour
Y
east
placer dans l’anglais
®
?
1
.
2.
3.
4.
5.
6
.
7.
8.
9.
10.
11.
12.
13.
14.
15.
16.
1
7.
18.
1
9.
20.
- THE CONTROL PANEL -- DESCRIPTION OF THE APPLIANCE -
Bread Maker
R
ef: 479 001
Open button
Cover of the appliance
C
ontrol window-plug
Seal
Space for the trough
Control panel
Base of the appliance
Spoon case
Location of the power supply
Kneading blade
Small bread trough
Large rice trough
1 container and 1 strainer for “fromage blanc”
8
glass yoghurt jars with plastic covers
Separator grate for yoghurt
Rice spoon
Ladle (“fromage blanc”, jam, etc.)
Hook (to remove the kneading blade from the
“bread” after baking)
Rice measure
Measuring spoon (teaspoon/tablespoon)
8
9
17
18
19
20
15
16
1
1
1
2
13
14
10
Gilding selection indicator lamp Weight selection indicator lamp
Trough selection
indicator lamp
Trough selection
button
Dairy produce
programmes that
c
an be prepared
with the rice trough
Programme
selection button
Weight selection button
Buttons for selecting and adjusting the deferred start and the modification
of the dairy produce programme time
Gilding/temperature
selection button
Start/stop button
Warming – reheating
selection button
W
arming – reheating
selection indicator
lamp
List of bread programmes
®
®
c
ccs
Dairy produce
programmes that
c
an be prepared
with the rice trough
Teaspoon
T
ablespoon
2
1
17 Chemin de la Plaine
ZA les Plattes
69390 VOURL ES
France
www.lagrange.fr
17.
18.
1
9.
20.
à placer en première page pour le français
??
à
placer en premières pages de l’anglais...
M
achine à pain
Ref: 479 001
ait Maison
Louche (fromage blanc, confiture…)
Crochet (pour retirer la pale du « pain » après cuisson)
M
esure à riz
Cuillère mesure (cuillère à café/cuillère à soupe)
18
19
20
Boutons de sélection et de réglage du départ différé et de modification
du temps des programmes laitages
Liste des programmes pain
ingrédients liquides/humides
Sucre, sel, farine
Levure
Liquid or humid ingredients
Sugar, salt and flour
Yeast
placer dans l’anglais
®
?
1.
2.
3.
4.
5
.
6.
7.
8.
9.
1
0.
11.
12.
13.
14.
15.
1
6.
17.
18.
19.
20.
- THE CONTROL PANEL -- DESCRIPTION OF THE APPLIANCE -
Bread Maker
R
ef: 479 001
ait Maison
Open button
C
over of the appliance
Control window-plug
Seal
Space for the trough
Control panel
B
ase of the appliance
Spoon case
Location of the power supply
Kneading blade
Small bread trough
Large rice trough
1 container and 1 strainer for “fromage blanc”
8 glass yoghurt jars with plastic covers
Separator grate for yoghurt
Rice spoon
Ladle (“fromage blanc”, jam, etc.)
H
ook (to remove the kneading blade from the
“bread” after baking)
Rice measure
M
easuring spoon (teaspoon/tablespoon)
8
9
17
18
19
20
15
16
11
12
13
14
10
Gilding selection indicator lamp Weight selection indicator lamp
T
rough selection
indicator lamp
Trough selection
button
Dairy produce
programmes that
can be prepared
with the rice trough
Programme
selection button
Weight selection button
Buttons for selecting and adjusting the deferred start and the modification
of the dairy produce programme time
G
ilding/temperature
selection button
Start/stop button
Warming – reheating
selection button
Warming – reheating
selection indicator
lamp
List of bread programmes
®
®
cc cs
Dairy produce
programmes that
can be prepared
with the rice trough
Teaspoon
Tablespoon
2
1
1
7 Chemin de la Plaine
ZA les Plattes
69390 VOURL ES
France
www.lagrange.fr
1
7.
18.
1
9.
2
0.
à placer en première page pour le français
??
à placer en premières pages de l’anglais...
Machine à pain
R
ef: 479 001
ait Maison
Louche (fromage blanc, confiture…)
C
rochet (pour retirer la pale du « pain » après cuisson)
Mesure à riz
Cuillère mesure (cuillère à café/cuillère à soupe)
18
1
9
2
0
B
outons de sélection et de réglage du départ différé et de modification
d
u temps des programmes laitages
Liste des programmes pain
i
ngrédients liquides/humides
S
ucre, sel, farine
Levure
Liquid or humid ingredients
S
ugar, salt and flour
Yeast
p
lacer dans l’anglais
®
?
1
.
2.
3.
4
.
5
.
6.
7
.
8
.
9.
10.
1
1.
1
2.
13.
14.
1
5.
16.
17.
1
8.
19.
20.
- THE CONTROL PANEL -- DESCRIPTION OF THE APPLIANCE -
B
read Maker
Ref: 479 001
O
pen button
Cover of the appliance
Control window-plug
S
eal
S
pace for the trough
Control panel
Base of the appliance
S
poon case
Location of the power supply
Kneading blade
S
mall bread trough
L
arge rice trough
1 container and 1 strainer for “fromage blanc”
8 glass yoghurt jars with plastic covers
S
eparator grate for yoghurt
Rice spoon
Ladle (“fromage blanc”, jam, etc.)
Hook (to remove the kneading blade from the
“
bread” after baking)
Rice measure
Measuring spoon (teaspoon/tablespoon)
8
9
17
18
19
20
15
16
11
12
13
1
4
10
G
ilding selection indicator lamp Weight selection indicator lamp
T
rough selection
i
ndicator lamp
T
rough selection
b
utton
D
airy produce
programmes that
can be prepared
with the rice trough
Programme
selection button
Weight selection button
B
uttons for selecting and adjusting the deferred start and the modification
o
f the dairy produce programme time
Gilding/temperature
selection button
S
tart/stop button
Warming – reheating
selection button
W
arming – reheating
s
election indicator
l
amp
L
ist of bread programmes
®
®
cc cs
Dairy produce
programmes that
can be prepared
with the rice trough
Teaspoon
T
ablespoon
21
17 Chemin de la Plaine
ZA les Plattes
6
9390 VOURL ES
F
rance
www.lagrange.fr
17.
1
8.
19.
20.
à placer en première page pour le français
??
à placer en premières pages de l’anglais...
Machine à pain
Ref: 479 001
Louche (fromage blanc, confiture…)
C
rochet (pour retirer la pale du « pain » après cuisson)
Mesure à riz
Cuillère mesure (cuillère à café/cuillère à soupe)
1
8
19
20
Boutons de sélection et de réglage du départ différé et de modification
du temps des programmes laitages
Liste des programmes pain
ingrédients liquides/humides
Sucre, sel, farine
Levure
Liquid or humid ingredients
Sugar, salt and flour
Yeast
p
lacer dans l’anglais
®
?
1.
2.
3.
4
.
5.
6.
7.
8.
9.
10.
11.
12.
13.
14.
1
5.
16.
17.
18.
19.
20.
- THE CONTROL PANEL -- DESCRIPTION OF THE APPLIANCE -
B
read Maker
Ref: 479 001
O
pen button
Cover of the appliance
Control window-plug
Seal
Space for the trough
Control panel
Base of the appliance
Spoon case
Location of the power supply
Kneading blade
Small bread trough
L
arge rice trough
1 container and 1 strainer for “fromage blanc”
8 glass yoghurt jars with plastic covers
Separator grate for yoghurt
Rice spoon
L
adle (“fromage blanc”, jam, etc.)
Hook (to remove the kneading blade from the
“bread” after baking)
R
ice measure
Measuring spoon (teaspoon/tablespoon)
8
9
17
18
19
20
15
16
1
1
1
2
13
14
10
Gilding selection indicator lamp Weight selection indicator lamp
Trough selection
indicator lamp
Trough selection
button
Dairy produce
programmes that
can be prepared
w
ith the rice trough
Programme
s
election button
Weight selection button
Buttons for selecting and adjusting the deferred start and the modification
o
f the dairy produce programme time
Gilding/temperature
selection button
Start/stop button
Warming – reheating
s
election button
Warming – reheating
s
election indicator
lamp
List of bread programmes
®
®
cc cs
Dairy produce
programmes that
can be prepared
w
ith the rice trough
Teaspoon
Tablespoon
FAIT MAISON_LAGRANGE 16/05/11 10:07 Page57
Page 57
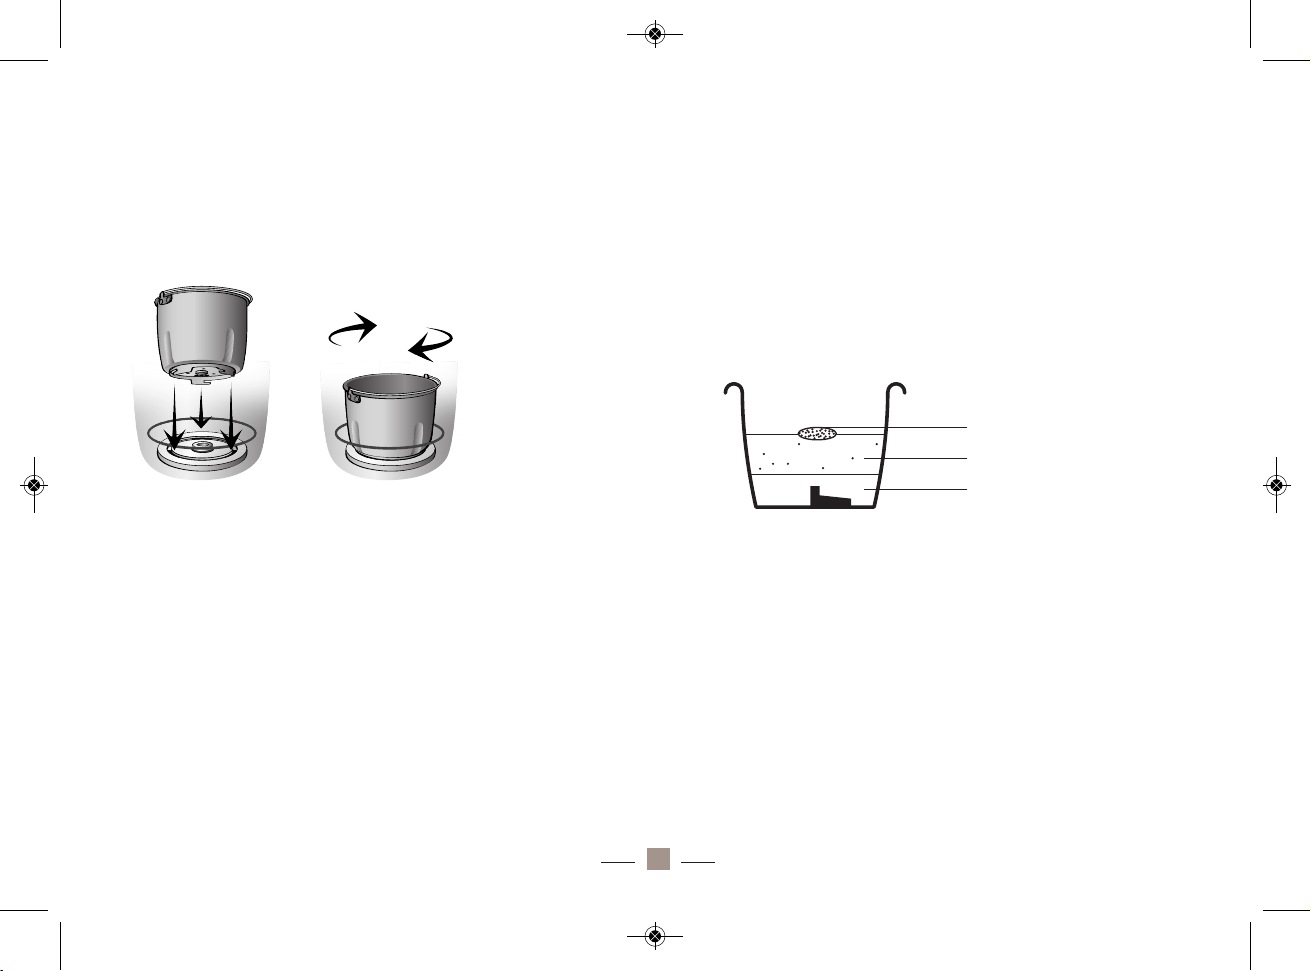
PREPARING BREAD-BUN-GATEAU_________
Preparing the appliance
• Place the bread trough inside the appliance so that it is correctly set.
• Place the blade at the bottom of the trough, on the part provided for
this purpose.
Practical advice: You can fill the hole with margarine before placing the
blade at the bottom of the trough. This will prevent the dough from sticking to the blade and thus make it easier to remove the blade at the end
of baking.
Preparing the dish
• Place the ingredients in the trough by following the order below:
- Liquid or humid ingredients (including water, oil or butter, eggs)
- Sugar, salt and flour
- Yeast
• Make a small hole with your finger in the flour and place the yeast in
it by making sure that it does not come in contact with liquids or salt.
• Respect the quantities indicated in the recipes, and do not exceed the
maximum quantities indicated.
56
Liquid or humid ingredients
Sugar, salt and flour
Yeast
9.
10.
11.
12.
13.
14.
15.
16.
17.
18.
19.
20.
L
ocation of the power supply
Kneading blade
Small bread trough
Large rice trough
1 container and 1 strainer for “fromage blanc”
8 glass yoghurt jars with plastic covers
Separator grate for yoghurt
Rice spoon
Ladle (“fromage blanc”, jam, etc.)
Hook (to remove the kneading blade from the
“bread” after baking)
Rice measure
Measuring spoon (teaspoon/tablespoon)
Programme
selection button
Weight selection button
Buttons for selecting and adjusting the deferred start and the modification
List of bread programmes
Dairy produce
programmes that
can be prepared
with the rice trough
-1- 2
--
-1-
--
2
FAIT MAISON_LAGRANGE 16/05/11 10:07 Page58
Page 58

Executing a programme
• Close the cover and connect the appliance to the mains. If the trough
is incorrectly positioned, the LCD screen will display the following symbol: , which will flash when the “Start/stop” button is pressed. You
must then properly set the trough to be able to launch the programme.
• Select the suitable trough, i.e. the bread trough.
• Select the programme for the bread that you wish to prepare by successively pressing the programme selection button.
• Select the gilding from among the 3 possible choices by successively
pressing the gilding/temperature selection button. By default, the temperature arrow is on the “medium” position. This button is inactive for
the “jam, kneading, pastry, pizza dough” programmes.
• Select the size of the bread (700 or 900g) that you want using the
weight selection button. By default, the arrow is on the “900g” position.
This button is inactive for the “gâteau, cake, pastry, pizza dough, kneading, jam, baking” programmes.
• Programme the duration according to the time when you want your
bread to be ready (optional). (Cf.
“Deferred”
paragraph page 54).
• Press the “start/stop” button to launch the programme. The “:” symbol
starts flashing.
• For the “basic bread, whole-wheat bread, French bread, quick, and
sweet bread” programmes, an audible signal will sound 10 times during
the process (Cf. “
Guide of cycle per programme
” table page 46). This
allows you to add ingredients, according to your taste. You can then
open the cover of the appliance to add ingredients (dry fruits, chocolate chips, seeds, walnuts, etc.).
• CAUTION: Steam may escape when the cover is opened.
• Once the programme is complete, an audible signal will sound 10
times. You can then press the “start/stop” button to stop the programme.
If you are not in the room or if you do not press the start/stop button,
the warming cycle will automatically start for 60 minutes.
2
1
1
7 Chemin de la Plaine
ZA les Plattes
6
9390 VOURLE S
F
rance
www.lagrange.fr
6
.
7
.
8.
9.
10.
11.
12.
13.
14.
1
5.
1
6.
1
7.
18.
1
9.
20.
à placer en première page pour le français
??
à placer en premières pages de l’anglais...
Machine à pain
Ref: 479 001
F
ait Maison
Tableau de bord
B
ase de l’appareil
Range cuillère
Emplacement de l’alimentation
Pale de pétrissage
Petite cuve à pain
Grande cuve à riz
1 pot et 1 faisselle pour fromage blanc
8 pots de yaourt en verre avec couvercles en plastique
G
rille séparatrice pour yaourts
C
uillère à riz
L
ouche (fromage blanc, confiture…)
Crochet (pour retirer la pale du « pain » après cuisson)
M
esure à riz
Cuillère mesure (cuillère à café/cuillère à soupe)
8
9
17
18
19
20
15
16
13
14
Bouton de sélection
de la cuve
Selection des
programmes riz
réalisables avec
la cuve à riz
S
election des
programmes laitages
réalisables avec
la cuve à riz
Bouton de sélection
des programmes
B
outon de sélection du poids
B
outons de sélection et de réglage du départ différé et de modification
d
u temps des programmes laitages
B
outon de sélection
d
e la dorure / température
Bouton départ / arrêt
Bouton de sélection
maintien au chaud
r
échauffage
Liste des programmes pain
ingrédients liquides/humides
Sucre, sel, farine
Levure
Liquid or humid ingredients
Sugar, salt and flour
Yeast
placer dans l’anglais
®
?
1
.
2.
3
.
4
.
5.
6
.
7.
8.
9
.
10.
1
1.
12.
13.
1
4.
15.
16.
1
7.
18.
19.
2
0.
- THE CONTROL PANEL -- DESCRIPTION OF THE APPLIANCE -
Bread Maker
Ref: 479 001
F
ait Maison
O
pen button
Cover of the appliance
C
ontrol window-plug
Seal
S
pace for the trough
C
ontrol panel
Base of the appliance
S
poon case
Location of the power supply
Kneading blade
S
mall bread trough
Large rice trough
1
container and 1 strainer for “fromage blanc”
8
glass yoghurt jars with plastic covers
Separator grate for yoghurt
Rice spoon
L
adle (“fromage blanc”, jam, etc.)
Hook (to remove the kneading blade from the
“
bread” after baking)
Rice measure
M
easuring spoon (teaspoon/tablespoon)
8
9
17
18
19
20
15
16
11
12
13
14
10
Gilding selection indicator lamp Weight selection indicator lamp
Trough selection
i
ndicator lamp
Trough selection
button
D
airy produce
programmes that
can be prepared
w
ith the rice trough
Programme
s
election button
W
eight selection button
Buttons for selecting and adjusting the deferred start and the modification
o
f the dairy produce programme time
Gilding/temperature
selection button
S
tart/stop button
W
arming – reheating
s
election button
W
arming – reheating
selection indicator
lamp
List of bread programmes
®
®
c
ccs
c
ccs
Dairy produce
p
rogrammes that
c
an be prepared
with the rice trough
T
easpoon
T
ablespoon
57
FAIT MAISON_LAGRANGE 16/05/11 10:07 Page59
Page 59

Retrieving the dish
• To remove the bread from the trough, open the cover and always use
oven mitts. Rotate the trough counter clockwise to unlock the trough
and remove it from the appliance.
• CAUTION: Be careful when handling the trough and the bread as
they can both be very hot.
• Before removing the bread from its trough, wait for it to cool down.
• Once the trough has cooled down, use a spatula (of wood, plastic or
silicon) to turn the bread out of the mould.
• Place the bread trough upside down on a clean surface and shake or
gently tap the trough until the bread drops on the surface.
• Let the bread cool down for approximately 15-30 minutes.
• Before cutting your bread or your gâteau, use the hook to remove the
blade. Never remove it with bare hands as it may be hot.
• It is recommended to slice the bread with an electric knife or a bread
knife. A kitchen knife (without teeth) will cause the bread to deform
when slicing it.
Note: The bread can be stored for 3 days at ambient temperature in a
plastic bag or airtight box, or 10 days if you keep the bag or the box in
the refrigerator. The bread that you prepare yourself does not contain
any preservative, that is why its storage life is shorter than bread sold in
shops.
PREPARING JAM_______________________
Preparation
• Place the bread trough in the appliance, along with the kneading
blade.
• Peel and cut the fruits into pieces.
• Wash the fruits if they don’t need to be peeled beforehand.
• Place the fruits in the bread trough.
• Add sugar.
• Add the gelling agent (an apple or dehydrated pectin) for fruits with
low pectin content (strawberries, pears, peaches, etc.) or use “special
jam” sugar with gelling agent
• Add half a glass of water (to help the sugar melt)
• Add lemon juice (for fruits that are not sufficiently sour)
Executing the programme
• Close the cover and connect the appliance to the mains. If the trough
is incorrectly positioned, the LCD screen will display the following symbol: , which will flash when the “Start/stop” button is pressed.
You must then properly set the trough to be able to launch the programme.
• Select the suitable trough, i.e. the bread trough.
• Select the programme “11: jam” by successively pressing the programme selection button.
• Press the “start/stop” button to launch the programme. The “:” symbol
starts flashing.
• Once the programme is complete, an audible signal will sound 10
times. You can then press the “start/stop” button to stop the programme.
• Open the cover and test the consistency by taking a tablespoon
sample of the mixture. Be careful not to burn yourself on the edges of
58
2
1
17 Chemin de la Plaine
ZA les Plattes
69390 VOURLE S
France
www.lagrange.fr
6
.
7.
8
.
9
.
10.
1
1.
12.
1
3.
1
4.
15.
1
6.
17.
1
8.
19.
20.
à placer en première page pour le français
?
?
à placer en premières pages de l’anglais...
Machine à pain
Ref: 479 001
Fait Maison
T
ableau de bord
Base de l’appareil
R
ange cuillère
Emplacement de l’alimentation
Pale de pétrissage
P
etite cuve à pain
Grande cuve à riz
1
pot et 1 faisselle pour fromage blanc
8 pots de yaourt en verre avec couvercles en plastique
G
rille séparatrice pour yaourts
Cuillère à riz
L
ouche (fromage blanc, confiture…)
Crochet (pour retirer la pale du « pain » après cuisson)
M
esure à riz
C
uillère mesure (cuillère à café/cuillère à soupe)
8
9
17
18
19
20
15
16
13
14
Bouton de sélection
d
e la cuve
S
election des
p
rogrammes riz
réalisables avec
l
a cuve à riz
Selection des
programmes laitages
réalisables avec
la cuve à riz
Bouton de sélection
d
es programmes
Bouton de sélection du poids
B
outons de sélection et de réglage du départ différé et de modification
du temps des programmes laitages
B
outon de sélection
d
e la dorure / température
B
outon départ / arrêt
B
outon de sélection
maintien au chaud
réchauffage
L
iste des programmes pain
ingrédients liquides/humides
Sucre, sel, farine
Levure
Liquid or humid ingredients
S
ugar, salt and flour
Y
east
p
lacer dans l’anglais
®
?
1
.
2.
3
.
4.
5.
6
.
7
.
8
.
9.
10.
11.
1
2.
1
3.
1
4.
15.
16.
1
7.
18.
1
9.
2
0.
- THE CONTROL PANEL -- DESCRIPTION OF THE APPLIANCE -
B
read Maker
Ref: 479 001
Fait Maison
O
pen button
C
over of the appliance
Control window-plug
Seal
S
pace for the trough
C
ontrol panel
B
ase of the appliance
S
poon case
Location of the power supply
Kneading blade
Small bread trough
L
arge rice trough
1 container and 1 strainer for “fromage blanc”
8 glass yoghurt jars with plastic covers
S
eparator grate for yoghurt
Rice spoon
Ladle (“fromage blanc”, jam, etc.)
Hook (to remove the kneading blade from the
“bread” after baking)
R
ice measure
M
easuring spoon (teaspoon/tablespoon)
8
9
17
18
19
20
15
16
11
12
13
14
10
G
ilding selection indicator lamp Weight selection indicator lamp
T
rough selection
i
ndicator lamp
Trough selection
b
utton
Dairy produce
programmes that
can be prepared
with the rice trough
Programme
selection button
Weight selection button
Buttons for selecting and adjusting the deferred start and the modification
o
f the dairy produce programme time
Gilding/temperature
selection button
Start/stop button
W
arming – reheating
selection button
Warming – reheating
selection indicator
lamp
List of bread programmes
®
®
cc cs
cc cs
Dairy produce
programmes that
can be prepared
with the rice trough
Teaspoon
Tablespoon
FAIT MAISON_LAGRANGE 16/05/11 10:07 Page60
Page 60

the trough or with the jam that is still hot.
• Pour out a little jam on a cold dish: If the jam is properly cooked, it
gently slides in the dish and congeals rapidly.
• If the jam is too liquid, it is often because the cooking was insufficient.
Simply extend the cooking by restarting a cycle.
Retrieving the dish
• At the end of cooking, use the ladle to pour out the jam into clean jars
sterilised with boiling water. Close the covers immediately and place the
jars upside down. Let them cool in this position.
•To remove the trough, open the cover and always use oven mitts.
Rotate the trough counter clockwise to unlock the trough and remove it
from the appliance.
• CAUTION: Be careful when handling the trough as it can be very
hot.
PREPARING RICE_______________________
Preparation
• Measure out your rice using the rice measure provided.
• For information, one rice measure is sufficient for two persons, but
this varies depending on the type of dish envisaged and the appetite of
persons.
• Fill your measure to the brim.
• Start by washing the rice with cold water and drain it. Do not wash in
the trough as there is a risk of damaging it.
• If you fail to wash it, your cooking will be mediocre and/or there will
be condensation in the appliance.
• Place the clean rice in the rice trough and level the surface. Fill water
up to the corresponding graduation, inscribed on the trough. N.B. The
number marked on the trough corresponds to the number of rice measures. e.g. to cook 6 rice measures, place the washed rice in the inner
trough and fill it with water up to the graduation 6.
• Note that the minimum quantity is 2 measures.
• If you want softer rice, add some more water and for firmer rice, reduce the quantity of water.
• Place the large rice trough inside the appliance.
Executing the programme
• Close the cover and connect the appliance to the mains. If the trough
is incorrectly positioned, the LCD screen will display the sym-
bol that will flash when the “Start/stop” button is pressed. You must
then properly replace the trough to be able to launch the programme.
• Select the suitable trough, i.e. the large rice trough, using the trough
selection button.
• Select the “rice cooking” or “quick rice cooking” programme depen-
59
21
17 Chemin de la Plaine
ZA les Plattes
69390 VOURL ES
France
www.lagrange.fr
19.
2
0.
à
placer en première page pour le français
??
à placer en premières pages de l’anglais...
Mesure à riz
Cuillère mesure (cuillère à café/cuillère à soupe)
19
20
B
outons de sélection et de réglage du départ différé et de modification
du temps des programmes laitages
ingrédients liquides/humides
Sucre, sel, farine
Levure
Liquid or humid ingredients
Sugar, salt and flour
Yeast
placer dans l’anglais
®
?
1
.
2
.
3.
4.
5.
6.
7
.
8.
9.
10.
1
1.
1
2.
13.
14.
1
5.
16.
17.
18.
19.
2
0.
-
THE CONTROL PANEL -- DESCRIPTION OF THE APPLIANCE -
O
pen button
Cover of the appliance
Control window-plug
Seal
Space for the trough
C
ontrol panel
B
ase of the appliance
Spoon case
Location of the power supply
Kneading blade
S
mall bread trough
Large rice trough
1 container and 1 strainer for “fromage blanc”
8 glass yoghurt jars with plastic covers
S
eparator grate for yoghurt
Rice spoon
Ladle (“fromage blanc”, jam, etc.)
H
ook (to remove the kneading blade from the
“bread” after baking)
Rice measure
M
easuring spoon (teaspoon/tablespoon)
8
9
17
18
19
20
15
16
11
12
13
14
1
0
Gilding selection indicator lamp Weight selection indicator lamp
Trough selection
indicator lamp
Trough selection
button
D
airy produce
programmes that
can be prepared
w
ith the rice trough
Programme
s
election button
Weight selection button
Buttons for selecting and adjusting the deferred start and the modification
o
f the dairy produce programme time
Gilding/temperature
selection button
Start/stop button
Warming – reheating
selection button
Warming – reheating
selection indicator
l
amp
L
ist of bread programmes
®
®
cc cs
cc cs
D
airy produce
programmes that
can be prepared
w
ith the rice trough
Teaspoon
Tablespoon
FAIT MAISON_LAGRANGE 16/05/11 10:07 Page61
Page 61

ding on your requirement from among the 4 possible programmes (rice
cooking, quick rice cooking, yoghurt, «fromage blanc”) by successively
pressing the programme selection button
• Programme the duration according to the time when you want your
rice to be ready (optional). (Cf.
“Deferred”
paragraph page 54)
• Caution: Do not try to lift the plug during cooking. You risk bur-
ning yourself with the steam.
• Press the “start/stop” button to launch the programme. The
symbol starts flashing.
• The cooking stops automatically when the liquid is absorbed.
Retrieving the dish
• Once the programme is complete, an audible signal will sound 10
times. The “Warming” function will be automatically activated and will
be maintained for one hour (Cf.
“Warming/Reheating”
paragraph page
55)
• You can then press the “start/stop” button to stop the programme.
• Then disconnect the appliance and let it cool.
• CAUTION: Condensation may form on the window of the applian-
ce. When opening the cover, take care not to let the accumulated
water drip into the rice.
• Remove the rice after cooking. It is ready to eat. Remove it from the
trough using the rice spoon provided, which will also help aerate the
rice.
• You can reheat the rice if it has cooled down by once again pressing
the “Warming/reheating” button (Cf.
“Warming/Reheating”
paragraph
page 55).
PREPARING YOGHURTS_________________
Preparation
• Carefully clean the large trough and the glass jars and sterilise the
trough with boiling water before wiping it with a clean cloth.
• All ingredients can be purchased from a superstore (or from a chemist’s shop for the powdered ferment). Use them at ambient temperature. Higher the ambient temperature, more the time to be provided for.
• Mix 1 litre of milk with the selected ferment (Cf. the practical advice
part page 49). If you use yoghurt, for an optimum result, whisk only the
yoghurt. Add a little milk and whisk once again until a consistent and
smooth mixture is obtained. Then add the rest of the milk while continuing to whisk. Distribute the mixture in the glass jars.
• Place the large trough inside the appliance.
• Place the jars, without their covers, in the large trough of the machine. You can place them on 2 levels thanks to the separator grate provided.
Executing the programme
• Close the cover and connect the appliance to the mains. If the trough
is incorrectly positioned, the LCD screen will display the
symbol that will flash when the “Start/stop” button is pressed. You must
then properly replace the trough to be able to launch the programme.
• Select the suitable trough, i.e. the large rice trough, using the trough
selection button.
• Select the “yoghurt” programme from among the possible 4 (yoghurt,
“fromage blanc”, rice cooking, quick rice cooking) that you can execute
by successively pressing the programme selection button.
• Programme the preparation time according to the ingredients. (Cf.
“Assistance in proportions and choice of ingredients”
paragraph page
49)
• For yoghurt and “fromage blanc” programmes, the delay does not
60
21
17 Chemin de la Plaine
ZA les Plattes
69390 VOURLE S
France
www.lagrange.fr
11.
12.
13.
1
4.
1
5.
1
6.
17.
1
8.
19.
20.
à placer en première page pour le français
??
à placer en premières pages de l’anglais...
Petite cuve à pain
Grande cuve à riz
1 pot et 1 faisselle pour fromage blanc
8 pots de yaourt en verre avec couvercles en plastique
Grille séparatrice pour yaourts
Cuillère à riz
Louche (fromage blanc, confiture…)
Crochet (pour retirer la pale du « pain » après cuisson)
Mesure à riz
C
uillère mesure (cuillère à café/cuillère à soupe)
9
1
7
18
19
20
1
5
16
14
Bouton de sélection
des programmes
B
outon de sélection du poids
Boutons de sélection et de réglage du départ différé et de modification
du temps des programmes laitages
Bouton de sélection
d
e la dorure / température
Bouton départ / arrêt
Liste des programmes pain
ingrédients liquides/humides
Sucre, sel, farine
Levure
Liquid or humid ingredients
Sugar, salt and flour
Yeast
placer dans l’anglais
®
?
1.
2.
3.
4.
5.
6
.
7.
8.
9.
10.
1
1.
1
2.
13.
14.
15.
16.
1
7.
18.
19.
2
0.
- THE CONTROL PANEL -- DESCRIPTION OF THE APPLIANCE -
O
pen button
Cover of the appliance
Control window-plug
Seal
Space for the trough
Control panel
B
ase of the appliance
S
poon case
Location of the power supply
Kneading blade
Small bread trough
Large rice trough
1 container and 1 strainer for “fromage blanc”
8 glass yoghurt jars with plastic covers
Separator grate for yoghurt
R
ice spoon
L
adle (“fromage blanc”, jam, etc.)
Hook (to remove the kneading blade from the
“bread” after baking)
Rice measure
Measuring spoon (teaspoon/tablespoon)
8
9
17
18
19
20
15
16
11
12
1
3
1
4
10
Gilding selection indicator lamp Weight selection indicator lamp
Trough selection
indicator lamp
Trough selection
button
Dairy produce
programmes that
c
an be prepared
with the rice trough
Programme
selection button
Weight selection button
B
uttons for selecting and adjusting the deferred start and the modification
of the dairy produce programme time
Gilding/temperature
s
election button
S
tart/stop button
Warming – reheating
s
election button
Warming – reheating
selection indicator
lamp
L
ist of bread programmes
®
®
cc cs
cc cs
D
airy produce
programmes that
can be prepared
with the rice trough
Teaspoon
Tablespoon
21
17 Chemin de la Plaine
Z
A les Plattes
6
9390 VOURL ES
France
www.lagrange.fr
17.
18.
19.
20.
à placer en première page pour le français
??
à
placer en premières pages de l’anglais...
Machine à pain
Ref: 479 001
ait Maison
Louche (fromage blanc, confiture…)
Crochet (pour retirer la pale du « pain » après cuisson)
Mesure à riz
Cuillère mesure (cuillère à café/cuillère à soupe)
18
19
20
Boutons de sélection et de réglage du départ différé et de modification
du temps des programmes laitages
L
iste des programmes pain
ingrédients liquides/humides
Sucre, sel, farine
Levure
L
iquid or humid ingredients
Sugar, salt and flour
Yeast
placer dans l’anglais
®
?
1.
2.
3.
4.
5.
6.
7
.
8.
9.
10.
11.
1
2.
13.
14.
15.
16.
17.
1
8.
19.
2
0.
- THE CONTROL PANEL -- DESCRIPTION OF THE APPLIANCE -
B
read Maker
Ref: 479 001
ait Maison
Open button
Cover of the appliance
Control window-plug
S
eal
Space for the trough
Control panel
Base of the appliance
Spoon case
L
ocation of the power supply
Kneading blade
Small bread trough
Large rice trough
1 container and 1 strainer for “fromage blanc”
8 glass yoghurt jars with plastic covers
Separator grate for yoghurt
Rice spoon
Ladle (“fromage blanc”, jam, etc.)
Hook (to remove the kneading blade from the
“bread” after baking)
Rice measure
Measuring spoon (teaspoon/tablespoon)
8
9
17
18
1
9
20
15
16
11
12
1
3
1
4
10
Gilding selection indicator lamp Weight selection indicator lamp
Trough selection
indicator lamp
Trough selection
button
Dairy produce
programmes that
can be prepared
with the rice trough
Programme
selection button
W
eight selection button
B
uttons for selecting and adjusting the deferred start and the modification
of the dairy produce programme time
Gilding/temperature
selection button
Start/stop button
Warming – reheating
selection button
Warming – reheating
selection indicator
l
amp
List of bread programmes
®
®
cc cs
Dairy produce
programmes that
can be prepared
with the rice trough
Teaspoon
Tablespoon
FAIT MAISON_LAGRANGE 16/05/11 10:07 Page62
Page 62

work. However, the delay adjustment buttons enable to modify the preparation time which is initialised to 8 h. We can thus select (depending
on the type of milk) a preparation time ranging from 1 to 15h.
Press “Defferred” and “hour” to select the time of preparation and press
“Deffered” again to confirm.
• Press the “start/stop” button to launch the programme. The “:” symbol
starts flashing.
Retrieving the yoghurt
• Once the programme is complete, an audible signal will sound 10
times. You can then press the “start/stop” button to stop the programme.
• Then disconnect the appliance and let the appliance cool then remove the glass jars.
• CAUTION: Condensation may form on the window of the applian-
ce. When opening the cover, take care not to let the accumulated
water drip into the yoghurt.
• Screw on the covers on the glass jars and place them in the refrigerator at least 24h before savouring them.
• Preserve the yoghurts in the refrigerator.
• Do not preserve them for more than 8 to 10 days.
PREPARING FROMAGE BLANC___________
Preparation
• Carefully wash the large trough, the jar and the cheese drainer and sterilise them with boiling water before wiping them with a clean cloth dipped beforehand in boiling water.
• All ingredients can be purchased in superstores or at the chemist's
shop. Use them at ambient temperature. Higher the ambient temperature, more the time to be provided for.
• Whisk the ferment before mixing it with other ingredients (Cf. the practical advice part page 50).
• In a small container of the size of a bowl approximately, mix the selected ferment with a little milk.
• Whisk the mixture until a consistent and smooth mixture is obtained.
Add the rest of the milk (1l) and whisk again.
• Add rennet and gently stir.
• Place the large trough inside the appliance.
• Place the large jar and its “fromage blanc” drainer in the large trough
of the machine. Place the “fromage blanc” drainer in the jar.
• The stops of the cheese drainer must be situated at the bottom, in the
wave trough. Place the assembly in the trough of the appliance. Pour out
the mixture in the “fromage blanc” jar.
Executing the programme
• Close the cover and connect the appliance to the mains. If the trough
is incorrectly positioned, the LCD screen will display the symbol
that will flash when the “Start/stop” button is pressed. You must then
properly replace the trough to be able to launch the programme.
• Select the suitable trough, i.e. the large rice trough, using the trough
selection button.
• Select the ”fromage blanc” programme from among the possible 4
(yoghurt, “fromage blanc”, rice cooking, quick rice cooking) that you
61
21
17 Chemin de la Plaine
ZA les Plattes
69390 VOURLES
France
www.lagrange.fr
11.
12.
13.
14.
1
5.
16.
1
7.
1
8.
19.
20.
à placer en première page pour le français
??
à placer en premières pages de l’anglais...
P
etite cuve à pain
Grande cuve à riz
1 pot et 1 faisselle pour fromage blanc
8 pots de yaourt en verre avec couvercles en plastique
Grille séparatrice pour yaourts
Cuillère à riz
Louche (fromage blanc, confiture…)
Crochet (pour retirer la pale du « pain » après cuisson)
Mesure à riz
Cuillère mesure (cuillère à café/cuillère à soupe)
9
17
18
1
9
20
15
16
14
Bouton de sélection
des programmes
B
outon de sélection du poids
Boutons de sélection et de réglage du départ différé et de modification
du temps des programmes laitages
B
outon de sélection
d
e la dorure / température
Bouton départ / arrêt
Liste des programmes pain
ingrédients liquides/humides
Sucre, sel, farine
Levure
L
iquid or humid ingredients
Sugar, salt and flour
Yeast
placer dans l’anglais
®
?
1.
2.
3.
4.
5.
6.
7.
8
.
9
.
1
0.
11.
12.
13.
1
4.
1
5.
16.
1
7.
18.
19.
20.
- THE CONTROL PANEL -- DESCRIPTION OF THE APPLIANCE -
O
pen button
Cover of the appliance
Control window-plug
Seal
Space for the trough
Control panel
Base of the appliance
Spoon case
Location of the power supply
Kneading blade
S
mall bread trough
L
arge rice trough
1 container and 1 strainer for “fromage blanc”
8 glass yoghurt jars with plastic covers
Separator grate for yoghurt
Rice spoon
L
adle (“fromage blanc”, jam, etc.)
H
ook (to remove the kneading blade from the
“bread” after baking)
R
ice measure
Measuring spoon (teaspoon/tablespoon)
8
9
1
7
1
8
19
20
1
5
1
6
11
12
13
14
1
0
Gilding selection indicator lamp Weight selection indicator lamp
T
rough selection
indicator lamp
T
rough selection
button
D
airy produce
p
rogrammes that
can be prepared
w
ith the rice trough
Programme
selection button
Weight selection button
Buttons for selecting and adjusting the deferred start and the modification
o
f the dairy produce programme time
G
ilding/temperature
s
election button
Start/stop button
Warming – reheating
selection button
Warming – reheating
s
election indicator
lamp
List of bread programmes
®
®
cc cs
cc cs
Dairy produce
programmes that
can be prepared
with the rice trough
Teaspoon
Tablespoon
FAIT MAISON_LAGRANGE 16/05/11 10:07 Page63
Page 63

wish to execute by successively pressing the programme selection button.
• Programme the preparation time according to the ingredients. (Cf.
“
Assistance in proportions and choice of ingredients”
paragraph page
50)
• For yoghurt and “fromage blanc” programmes, the delay does not
work. However, the delay adjustment buttons enable to modify the preparation time which is initialised to 8 h. We can thus select (depending
on the type of milk) a preparation time ranging from 1 to 15h.
Press “Defferred” and “hour” to select the time of preparation and press
“Deffered” again to confirm.
• Press the “start/stop” button to launch the programme. The “:” symbol
starts flashing.
Retrieving “fromage blanc”
• Once the programme is complete, an audible signal will sound 10
times. You can then press the “start/stop” button to stop the programme.
• Then disconnect the appliance and let it cool.
• CAUTION: Condensation may form on the window of the applian-
ce. When opening the cover, take care not to let the accumulated
water drip into the “fromage blanc”.
• Carefully remove the “fromage blanc” jar from the trough.
• You can then start the draining by raising and rotating at the same time
the cheese drainer in its jar until the small stops are engaged.
• The wave shape will make the task easier for you.
• You can throw away a part of the accumulated whey.
• Continue the draining while putting the cheese drainer in high draining
position in the refrigerator.
• The whey will then be stored in the jar under the “fromage blanc”.
Depending on your taste, stop the draining when you want: Quickly for
creamy and liquid “fromage blanc”, later for more consistent “fromage
blanc”.
• If you have left your “fromage blanc” drain for too long, you can add
whey and whisk it to make it more liquid. You can also let the bottom of
the cheese drainer soak in whey so that the “fromage blanc” does not
“dry up” any more. On the other hand, do not hesitate to eliminate the
whey as you go along if you do not wish to preserve it.
• Store the “fromage blanc” in a cool place, in a refrigerator.
• Do not store it for more than a few days in the refrigerator.
TROUBLESHOOTING GUIDE______________
Appliance
Power failures:
• If a power failure of at the most 10 minutes occurs, the programme
will be stored and will automatically restart when the power returns
without you having to press the “start/stop” button.
• If the failure exceeds 10 minutes, the programme cannot be stored. In
this case, if the rising cycle has not started, you can restart the programme by pressing the “start/stop” button. However, if the rising cycle
is exceeded, you must remove all the ingredients from the trough and
restart your preparation.
62
FAIT MAISON_LAGRANGE 16/05/11 10:07 Page64
Page 64

63
1
No Problem Cause Solution
2
3
4
5
6
7
8
Smoke emanates from the air vents
during operation
The ingredients have not been mixed
consistently.
The motor rotates but the dough is
not kneaded
The screen displays “HHH” after the
programme starts.
The screen displays “E E0” or “E E1”
after you have pressed the
“start/stop” button
When using a bread type programme,
“LLL” flashes on the screen and an
alarm is heard
Ingredients may have dropped on the heating section of the
appliance
A/ The selected programme is not suitable
B/ The cover has been lifted often
C/ The kneading blade does not rotate sufficiently or the
density of the dough is too high.
The trough is incorrectly placed or the quantity of dough is
too large.
The trough temperature is too high.
The internal temperature sensor is incorrectly set
A probe assesses the ambient temperature before launching
the programme and “LLL” flashes if the ambient temperature
is less than -5°C.N.B. When using the “deferred” function, the
check is carried out during the programming and just before
the start of the programme.
Disconnect the appliance and let it cool.
Clean the interior of the appliance by taking
care not to burn yourself.
Refer to the recipes adapted to the appliance.
Do not lift the cover during the rising cycles
Let the appliance run empty. If the blade is
rotating abnormally, contact the ASS.
Check the position of the trough and the
quantities used.
Open the cover and let the machine cool
down for 10 to 20 minutes.
Contact the after sales service or a person
authorised or qualified by LAGRANGE.
Simply press the “start/stop” button to interrupt the programme.
When using a bread type programme,
“HHH” flashes on the screen and an
alarm is heard
The or symbols flash
and the appliance rings 10 times
A probe assesses the ambient temperature before launching the programme and “HHH” flashes if the ambient
temperature is greater than 60°C.
N.B. Not valid for Gâteau, jam and only baking programmes.
When using the “deferred” function, the check is carried
out during the programming and just before the start of
the programme.
2 solutions: Either the wrong trough is in place, or the
trough is incorrectly positioned. The appliance detects it
after pressing the “start/stop” button
Simply press the “start/stop” button to
interrupt the programme.
Simply put the correct trough in place or
change the programme by pressing the
trough selection button. You must also properly push in the trough so that it is engaged.
21
17 Chemin de la Plaine
ZA les Plattes
69390 VOURLE S
France
www.lagrange.fr
2.
3.
4.
5.
6.
7.
8.
9.
10.
11.
12.
13.
14.
15.
16.
17.
18.
19.
20.
à
placer en première page pour le français
?
?
à placer en premières pages de l’anglais...
Machine à pain
Ref: 479 001
Couvercle de l’appareil
Hublot-bouchon de contrôle
Joint d’étanchéité
Emplacement pour la cuve
Tableau de bord
Base de l’appareil
Range cuillère
Emplacement de l’alimentation
Pale de pétrissage
Petite cuve à pain
Grande cuve à riz
1 pot et 1 faisselle pour fromage blanc
8 pots de yaourt en verre avec couvercles en plastique
Grille séparatrice pour yaourts
Cuillère à riz
Louche (fromage blanc, confiture…)
Crochet (pour retirer la pale du « pain » après cuisson)
Mesure à riz
C
uillère mesure (cuillère à café/cuillère à soupe)
8
9
17
1
8
19
20
1
5
16
1
2
1
3
14
Voyants de sélection
de la cuve
Bouton de sélection
de la cuve
Selection des
p
rogrammes riz
réalisables avec
l
a cuve à riz
Selection des
programmes laitages
réalisables avec
la cuve à riz
Bouton de sélection
des programmes
Bouton de sélection du poids
Boutons de sélection et de réglage du départ différé et de modification
du temps des programmes laitages
Bouton de sélection
de la dorure / température
Bouton départ / arrêt
Bouton de sélection
maintien au chaud
réchauffage
Voyants de sélection
maintien au chaud
/ réchauffage
Liste des programmes pain
ingrédients liquides/humides
Sucre, sel, farine
Levure
Liquid or humid ingredients
Sugar, salt and flour
Yeast
placer dans l’anglais
®
®
?
1.
2.
3.
4.
5.
6.
7.
8.
9.
10.
11.
12.
13.
14.
15.
16.
17.
18.
19.
20.
- THE CONTROL PANEL -- DESCRIPTION OF THE APPLIANCE -
Bread Maker
Ref: 479 001
Open button
Cover of the appliance
Control window-plug
Seal
Space for the trough
Control panel
Base of the appliance
Spoon case
Location of the power supply
Kneading blade
Small bread trough
Large rice trough
1 container and 1 strainer for “fromage blanc”
8 glass yoghurt jars with plastic covers
Separator grate for yoghurt
Rice spoon
Ladle (“fromage blanc”, jam, etc.)
Hook (to remove the kneading blade from the
“bread” after baking)
Rice measure
Measuring spoon (teaspoon/tablespoon)
8
9
17
1
8
19
20
15
1
6
1
1
12
1
3
1
4
10
Gilding selection indicator lamp Weight selection indicator lamp
Trough selection
indicator lamp
Trough selection
button
Dairy produce
programmes that
can be prepared
with the rice trough
Programme
selection button
Weight selection button
Buttons for selecting and adjusting the deferred start and the modification
of the dairy produce programme time
Gilding/temperature
selection button
S
tart/stop button
Warming – reheating
s
election button
Warming – reheating
selection indicator
lamp
List of bread programmes
®
®
cc cs
cc cs
Dairy produce
p
rogrammes that
can be prepared
w
ith the rice trough
Teaspoon
Tablespoon
2
1
17 Chemin de la Plaine
ZA les Plattes
69390 VOURL ES
France
www.lagrange.fr
15.
1
6.
17.
18.
19.
20.
à placer en première page pour le français
??
à placer en premières pages de l’anglais...
Grille séparatrice pour yaourts
Cuillère à riz
Louche (fromage blanc, confiture…)
C
rochet (pour retirer la pale du « pain » après cuisson)
Mesure à riz
C
uillère mesure (cuillère à café/cuillère à soupe)
9
1
7
18
19
2
0
16
Bouton de sélection du poids
Boutons de sélection et de réglage du départ différé et de modification
du temps des programmes laitages
Bouton de sélection
de la dorure / température
L
iste des programmes pain
ingrédients liquides/humides
Sucre, sel, farine
Levure
Liquid or humid ingredients
Sugar, salt and flour
Yeast
placer dans l’anglais
®
?
1.
2.
3.
4
.
5.
6.
7.
8.
9.
1
0.
11.
12.
13.
14.
15.
16.
17.
1
8.
19.
20.
- THE CONTROL PANEL -- DESCRIPTION OF THE APPLIANCE -
Open button
Cover of the appliance
Control window-plug
Seal
Space for the trough
Control panel
Base of the appliance
Spoon case
Location of the power supply
Kneading blade
Small bread trough
Large rice trough
1 container and 1 strainer for “fromage blanc”
8 glass yoghurt jars with plastic covers
S
eparator grate for yoghurt
Rice spoon
Ladle (“fromage blanc”, jam, etc.)
Hook (to remove the kneading blade from the
“bread” after baking)
Rice measure
Measuring spoon (teaspoon/tablespoon)
8
9
17
18
19
20
15
16
11
12
13
14
10
Gilding selection indicator lamp Weight selection indicator lamp
Trough selection
indicator lamp
Trough selection
button
Dairy produce
programmes that
c
an be prepared
with the rice trough
Programme
selection button
Weight selection button
Buttons for selecting and adjusting the deferred start and the modification
of the dairy produce programme time
Gilding/temperature
selection button
Start/stop button
Warming – reheating
selection button
Warming – reheating
s
election indicator
lamp
List of bread programmes
®
®
cc cs
cc cs
Dairy produce
programmes that
can be prepared
with the rice trough
Teaspoon
Tablespoon
FAIT MAISON_LAGRANGE 16/05/11 10:07 Page65
Page 65
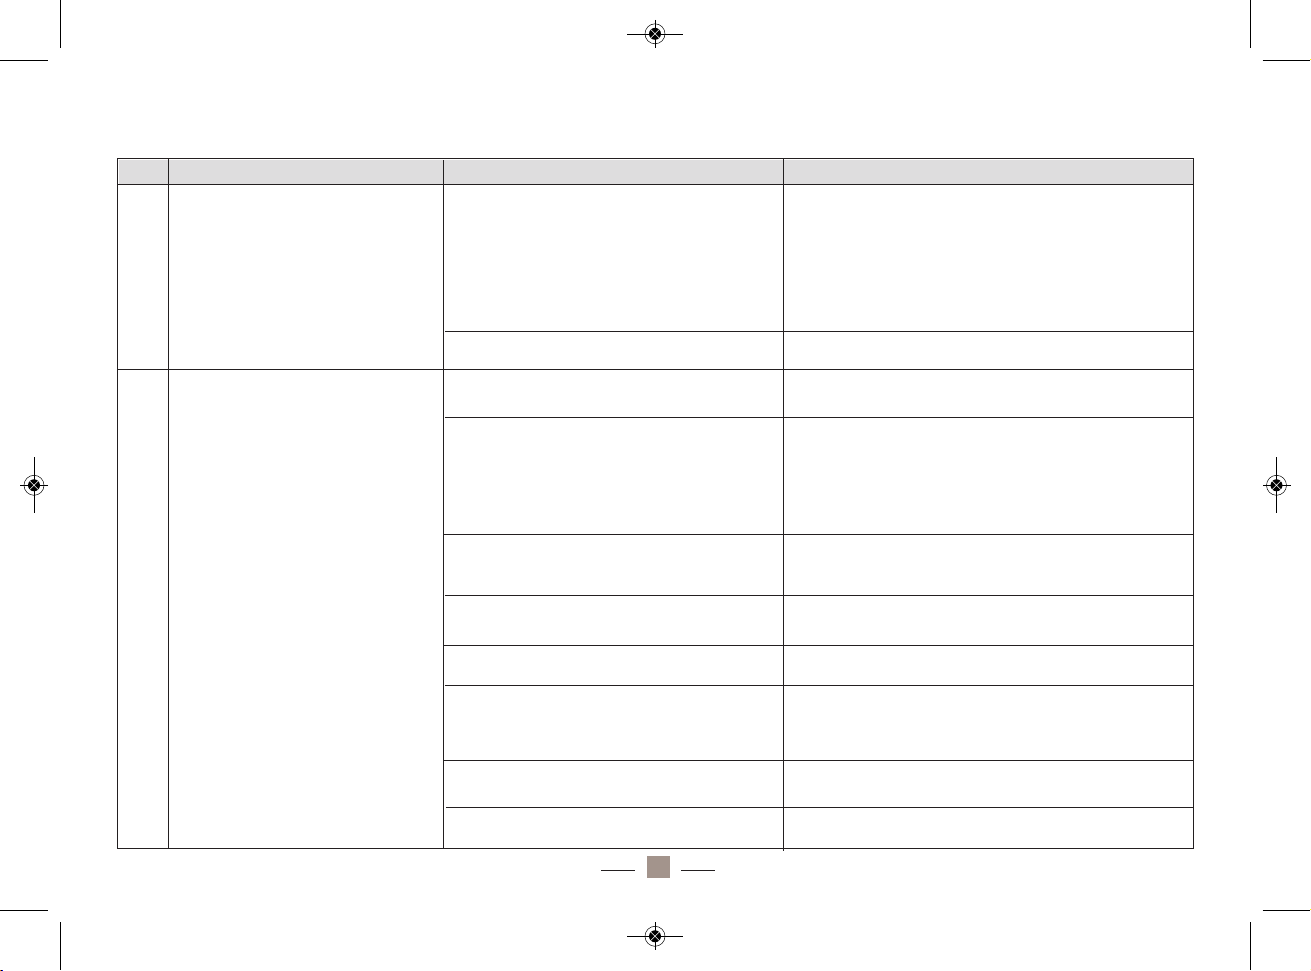
Bread
64
1
2
The bread becomes too thick
The bread is too small or has not
risen.
A/ Yeast, flour, water or sugar are too much.
B/ The ambient temperature is too high
A/ The cover has been lifted during the rising
or the baking of the bread
B/ The quantity of water is not sufficient or the
quantity of flour is too large.
C/ The quantity of yeast is insufficient or there
is no yeast.
Refer to the recipes adapted to the appliance.
Check the consistency of the dough when the audible
signal sounds to add the ingredients.
The dough must form an elastic and slightly sticky ball.
If the dough is too compact or dry, add a teaspoon of
water. If the dough is too soft or liquid, add one tablespoon of flour. Reduce the quantity of sugar or yeast if
the consistency of the dough is good.
Use the appliance in a cooler place.
Never lift the cover during rising or baking. Lift it as less
as possible during the other phases.
Check the consistency of the dough when the audible
signal sounds to add the ingredients.
The dough must form an elastic and slightly sticky ball.
If the dough is too compact or dry, add a teaspoon of
water.
Put the quantity of yeast indicated in your recipe and
add a little yeast if necessary.
Sweeteners are not recommended, you can use honey
or molasses instead of sugar.
Use lighter flour.
Use bakers' yeast, ideally in instant dried form (dry
yeast in grains) or if this is not available, fresh yeast.
Place the yeast last in the trough, on top of the flour.
The water must be warm (approximately 27°C) except
for the Ultra quick programme where it can rise to 45°C.
All ingredients (except water) must be at ambient temperature.
D/ You have replaced sugar with a sweetner
E/ The type of flour used is not suitable
F/ The yeast used is not suitable or has come
in contact with water before kneading
G/ The water temperature is not suitable
H/ The ingredients are too hot or too cold
No Problem Cause Solution
FAIT MAISON_LAGRANGE 16/05/11 10:07 Page66
Page 66

65
4
5
6
7
3
The centre of the bread sags at
the time of baking.
The bread is difficult to turn out of
the trough.
The density of the bread is too
high.
The crust of the bread is too thick.
After having cut the bread, it has
several holes.
The crust is too thick and the gilding is too dark during a bread or
gâteau programme with a lot of
sugar.
Never lift the cover during the rising or baking. Lift it as less
as possible during the other phases.
Verify the consistency of the dough when the audible
signal sounds to add ingredients.The dough must form an
elastic and slightly sticky ball. If the dough is too soft or
liquid, add a tablespoon of flour.
Slightly reduce the quantity of yeast during the next test
Use lighter flour.
Use the yeast at a temperature of approximately 20-25°C.
Tap on the bottom of the trough to help the blade come
off. The next time, brush the shaft of the blade with butter
before inserting it.
Reduce the quantity of flour or add water.
Reduce the concerned ingredients and add a little bit of yeast.
Remove the bread from the appliance before the warming
starts.
Reduce the quantities of water and/or yeast.
The water must be warm (approximately 27°C) except for
the Ultra quick programme where it can rise to 45°C.
If the colour of the bread is too dark, press the
“start/stop” button to interrupt the programme 5 to 10
minutes before its programmed end. Leave the bread in
the trough, cover closed, for 20 minutes before taking it
out and turning it out of the mould.
A/ The cover was lifted during the rising or
baking of the bread
B/ The quantity of water is too large or the
quantity of flour is not sufficient
C/ There is too much yeast
D/ The type of flour used is not suitable
E/ The temperature of yeast is too high and
causes a rising that is too fast
The kneading blade remains stuck on its shaft
in the bread trough as the preparation residues have slipped between the blade and its
shaft and then got burned.
A/ The quantity of flour is too much or water
is not sufficient.
B/ The quantity of wholemeal flour or fruits is
too much.
Too much water was removed (bread dried
up underneath) by warming for too long in
the appliance.
A/ The quantities of water or yeast are too
large.
B/ The water temperature is too high.
Certain recipes or ingredients have an effect
on the colour of the gilding of the bread that
will be become very or even too dark because of the large quantity of sug
8
FAIT MAISON_LAGRANGE 16/05/11 10:07 Page67
Page 67

66
Jam
Rice
1
1
2
3
4
5
The jam is too liquid for your taste
The jam lacks a little cooking
Restart a 2nd cooking cycle
The cooked rice obtained is too
dry or too humid.
During rice cooking, broth passes
through the ventilation holes.
During rice cooking, broth overflows from the trough
There are lumps at the bottom of
the rice and the rice is not correctly cooked (this can happen for
quantities greater than or equal to
6 rice measures of rice).
The rice cooking time is longer
than envisaged and the rice has
not been correctly cooked.
A/ You have not added water as indicated
by respecting the graduations or you have
measured the rice incorrectly.
B/ The quality of rice to absorb water is different from common rices.
A/ The quantity of water is too much.
B/ The quantity of rice is too much.
C/ The seal around the window-plug is missing
The support seal of the trough is missing.
After having been placed in the trough, the
rice was not mixed with water.
There is a foreign body on the heating plate.
Measure the rice carefully with the plastic rice measure
and pay attention to respecting the corresponding graduation at the time of adding water.
Adjust the quantity of water.
Reduce the quantity of water.
Respect the recommended proportions.
Check after cleaning that all parts have been properly
reassembled.
Check after cleaning that all parts have been properly
reassembled.
It is recommended to use the rice spoon provided to
mix the water and the rice before cooking.
Always clean the heating plate properly and verify that
no foreign body is present on the heating plate or at the
bottom of the trough.
No Problem Cause Solution
No Problem Cause Solution
FAIT MAISON_LAGRANGE 16/05/11 10:08 Page68
Page 68
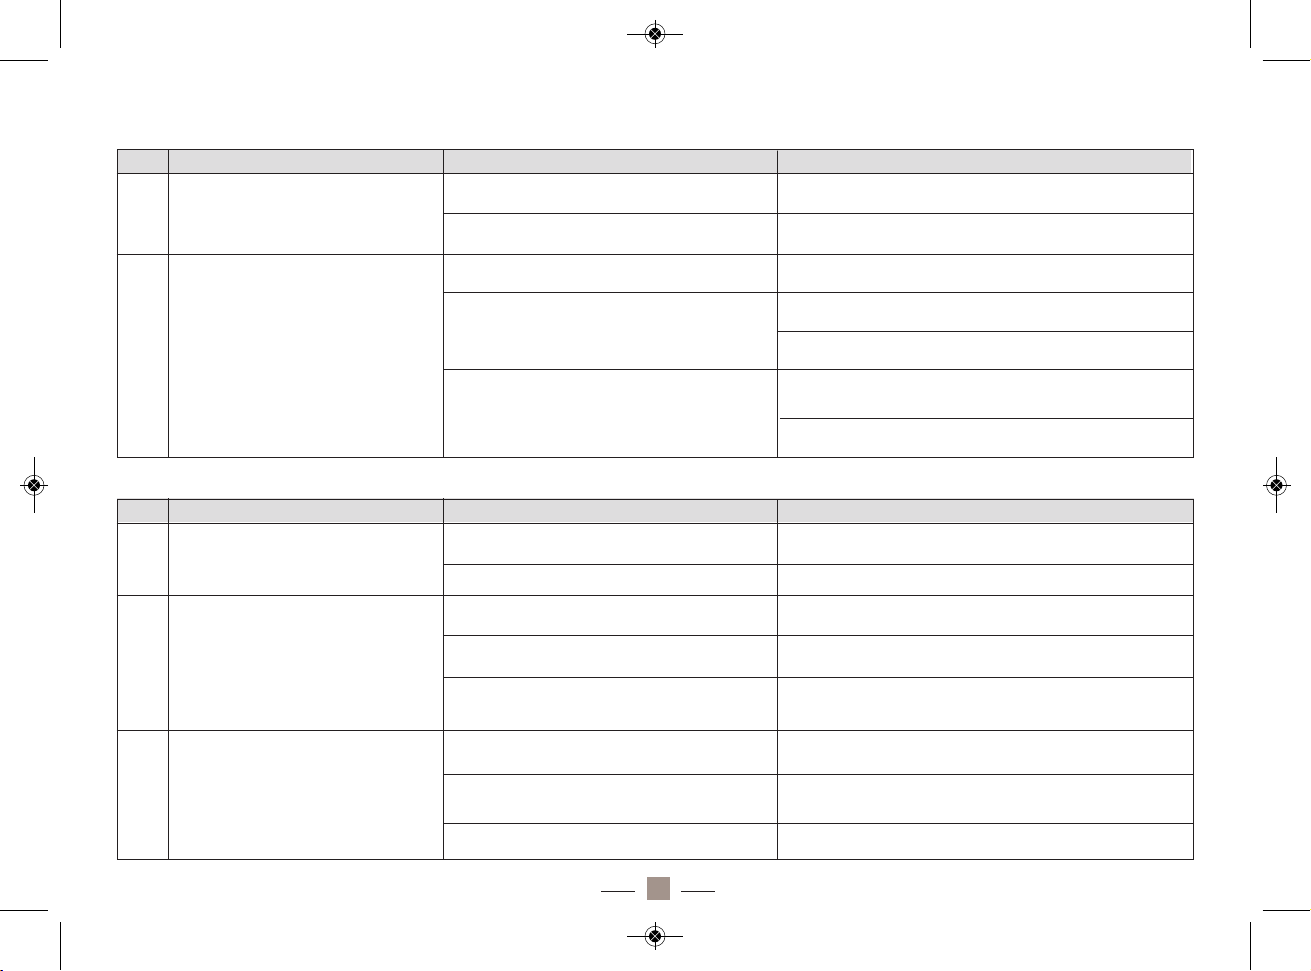
Yoghurt
Fromage blanc
2
1
2
1
3
The yoghurts obtained have an
unpleasant smell.
The yoghurts are too liquid
A/ The ferment used is no longer effective or
even out-of-date, or has been incorrectly stored.
B/ The large trough and the glass jars have not
been sterilised.
A/ The ferment is no longer working
B/ The milk is of poor quality
C/ You have used semi-skimmed milk
Use a ferment kept refrigerated and purchased recently for
powdered ferment.
Sterilise the containers with boiling water before use.
Use a new ferment and respect the measure
You can reuse yoghurt obtained for the next batch, by
using milk of better quality.
Add 1 spoon of milk powder to the mixture before
cooking.
It is strongly recommended to use whole milk as fats from
the milk provide a more compact and creamy texture to
the yoghurts.
Add 1 spoon of milk powder to the mixture before
cooking.
The “fromage blanc” obtained has an
unpleasant smell.
The consistency of “fromage blanc”
is too liquid
The consistency of “fromage blanc” is
grainy
A/ The ferment or rennet used is no longer
effective or is even out-of-date, or has been
incorrectly stored.
B/ The large trough, the jar and the cheese
drainer have not been sterilised.
A/ The ferment is no longer working
B/ The milk is of poor quality
C/ The draining is not adequate
A/ The ferment is too old (the regeneration
is no longer working)
B/ The preparation time was too long
C/ The mixture was not consistent before
incubation.
Use a ferment or rennet kept refrigerated and purchased
recently for powdered ferment.
Sterilise the containers with boiling water before use
Use a new ferment and respect the measure printed in
the instructions.
You can reuse the cheese obtained for the next batch, by
using milk of better quality.
Let the “fromage blanc” drain for a little longer and remove the whey from the jar so that the cheese does not soak
in it.
Beat the “fromage blanc” with a whisk or fork and change
the ferment for the next batch
Reduce the preparation time. To do this, refer to the table
given above in the
“Assistance in proportions and choice
of ingredients”
part on page 50.
Beat the ferment properly before adding milk so that
there are no lumps.
No Problem Cause Solution
No Problem Cause Solution
67
FAIT MAISON_LAGRANGE 16/05/11 10:08 Page69
Page 69

Maintenance_________________________
CAUTION: Never dip the base of the appliance or the plug in water.
Always disconnect and let it cool down completely before cleaning.
Base and cover of the appliance:
Clean with a damp sponge. Dry properly. Do not use aggressive or abrasive cloth or products to preserve
the plastic and its sheen.
Caution: Never dip the base of the appliance in water. Never put it
in a dishwasher.
Large bread trough and large rice trough:
Clean the inside and outside using a damp sponge. Never use a cloth, sponge or abrasive products at the risk of damaging the non-stick coating. A trough must
always be completely dry before being installed in the appliance.
Important: Never clean the troughs in a dishwasher.
Kneading blade:
If this is difficult to remove from its shaft, fill the trough
with hot water and let it soak for 30 minutes. The blade can then be
removed easily to be cleaned with a damp sponge.
Caution: Never use abrasive products or metal accessories at the
risk of damaging the non-stick coating.
Glass yoghurt jars:
The jars can be put in a dishwasher. They have to
be fully dry before being replaced in the appliance.
Covers for plastic yoghurt jars:
Clean them with a damp sponge and
a little dishwashing liquid.
Jar and “fromage blanc” drainer:
After every use and after removal of
“fromage blanc” from the mould or its consumption, soak, if necessary,
the cheese drainers and the jars for a few minutes in hot water added
with detergent and clean them carefully.
Note: Always dry all items properly before repositioning them and
putting them away.
Put away the appliance with the cover closed after cooling and
cleaning.
Guarantee conditions__________________
The appliance is guaranteed for 2 years.
To enjoy an additional year of guarantee, register on the
LAGRANGE
website (www.lagrange.fr). The guarantee includes parts and labour
and covers manufacturing defects. The following are excluded from the
guarantee: Damage resulting from an incorrect use or failure to respect
the operating instructions, and breakage by falling.
THIS GUARANTEE APPLIES TO DOMESTIC USE, AND ON NO ACCOUNT
TO PROFESSIONAL USE.
The legal guarantee owed by the seller in no way excludes the legal guarantee owed by the Manufacturer for faults or manufacturing defects
according to articles 1641 and following of the Civil code. In case of
breakdown or malfunction, contact your reseller. In case of a technical
fault within 8 days following purchase, the appliances will be exchanged. After this period they will be repaired by the
LAGRANGE
after
sales service.
68
FAIT MAISON_LAGRANGE 16/05/11 10:08 Page70
Page 70
RECIPES_______________________________
Abbreviations and references:
cc Teaspoon (5 ml)
cs Tablespoon (20 ml)
“Bread” type programmes
1. Basic bread programme
White bread
Bread with nuts
RK: add the nuts after the audible signal (see table of cycles)
2. French bread programme
Traditional bread
Olive bread
3. Whole-wheat bread programme
Whole-wheat bread
69
700 g
250 ml
15 g
1 cc
20 g
20 g
450 g
6 g
900 g
325 ml
20 g
1 ½ cc
25 g
25 g
580 g
8 g
Water
Butter
Salt
Milk powder
Sugar
Bread flour (T55)
Baker’s yeast
700 g
250 ml
30 g
1 ½ cc
30 g
450 g
6 g
30 g
900 g
325 ml
35 g
2 cc
35 g
520 g
8 g
40 g
Water or milk
Butter
Salt
Sugar
Bread flour
Baker’s yeast
Chopped nuts
700 g
230 ml
1 cc
10 g
390g
6 g
1 cs
900 g
300 ml
1 1/3 cc
15g
500 g
7 g
2 cs
Water
Salt
Sugar
Bread flour
Baker’s yeast
Oil (optional)
700g
250 ml
1 cc
2 cs
500 g
6 g
2 cs
50 g
50 g
900g
325 ml
2 cc
2 ½ cs
650 g
8 g
2 ½ cs
70 g
70 g
Water
Salt
Sugar
Flour
Baker’s yeast
Oil
Green olives
Black olives
700 g
250 ml
20 g
1 cc
1 cc
200 g
200 g
5 g
900 g
320 ml
30 g
1 ½ cc
1 cc
260 g
260 g
6 g
Water
Butter
Salt
Sugar
Dusting T80
Whole-meal T170
Yeast
??
Liquid or humid ingredients
Sugar, salt and flour
Yeast
?
6.
7.
8.
9.
10.
11.
12.
13.
14.
15.
16.
17.
18.
19.
20.
Control panel
Base of the appliance
Spoon case
Location of the power supply
Kneading blade
Small bread trou gh
Large rice trough
1 container and 1 strainer for “fromage blanc”
8 glass yoghur t jars with plastic covers
Separator grate for yoghurt
Rice spoon
Ladle (“fromage blanc”, jam, etc.)
Hook (to remove the kneading blade from the
“bread” after baking)
Rice measure
Measuring spoon (teaspoon/tablespoon)
Trough selection
button
Program me
selection button
Weight selection button
Buttons for selecting and adjusting the deferred start and the modification
of the dairy produce programme time
List of bread programmes
cc cs
Dairy produce
programmes that
can be prepared
with the rice trough
Teaspoon
Tablespoon
FAIT MAISON_LAGRANGE 16/05/11 10:08 Page71
Page 71
Wholemeal bread
4. Sweet bread programme
Honey roll
Sweet raisin bread
5.Quick bread programme
6.Cake programme ( without raising)
Chocolate and yogurt cake
Quick and simple recipe to prepare with children, as it is measured by
“yogurt jars”
Chocolate cake
70
700 g
250ml
1 cc
1 cc
1 ½ cc
1 cs
235g
115 g
70 g
2 cc
900 g
320 ml
1 ½ cc
1 ½ cc
2 cc
1 ½ cs
300g
150 g
90 g
2 ½ cc
Water
Lemon juice
Sugar
Salt
Olive oil
Flour T150
Spelt wheat flour T150
Rye flour T130
Yeast
700 g
210 ml
20 g
1
1 cc
1 ½ cs
45 g
450 g
4 g
900 g
230 ml
30 g
2
1 cc
2 cs
60 g
520 g
6 g
Fresh milk
Butter
Eggs
Salt
Honey
Sugar
Bread flour
Baker’s yeast
700 g
120 ml
2
2 cs
30 g
1 ½ cc
400 g
50 g
5 g
900 g
190 ml
3
3 cs
45 g
2 cc
520 g
75 g
7 g
Water
Eggs
Oil
Sugar
Salt
Bread flour
Dry raisins
Baker’s yeast
700 g
250 ml
1 cs
1 cc
1 ½ cc
1 cc
450 g
2 ½ cc
900 g
350 ml
1 ½ cs
1 cc
2 cc
2 cc
550 g
3 ½ cc
Water
Oil
Lemon juice
Salt
Sugar
Flour T55 or T65
Baker’s yeast
1 pot
2
½ pot
2 pots
3 pots
½ sachet
Plain yogurt
Eggs
Vegetable oil
Sugar
Flour
Yeast
100 ml
2
125 g
120 g
1 sachet
1 pinch
250 g
5 cs
½ sachet
125g
Milk
Eggs
Melted butter
Sugar
Vanilla sugar
Salt
Flour
Almond powder
Baking powder
Chocolate chips
FAIT MAISON_LAGRANGE 16/05/11 10:08 Page72
Page 72
Apple cake
Gingerbread
Turn out of the mould immediately after baking and wrap it in aluminum
foil
It is better to wait for three days before eating the gingerbread, it will
only taste better!
7.Cake programme ( with raising)
Chocolate and yogurt cake
Candied fruit cake
N.B. Roll the candied fruits in some flour.
Add the candied fruits and the dry raisins at the end of the first kneading.
Olive cake
71
3
½ glass
200 g
1 sachet
125 g
½ sachet
3 or 4
Eggs
Vegetable oil
Sugar
Vanilla sugar
Flour
Yeast
Apples
10cl
250 g
100 g
1
½ cc
100 g
300 g
50 g
1 sachet
1 cc
1 cc
1 cc
1 cc
1 cs
1 zest
Warm milk
Liquid honey
Melted butter
Egg
Sodium bicarbonate
White flour
Whole meal
Soft brown sugar
Baking powder
Ginger powder
Cinnamon powder
Nutmeg
Anise powder
Orange-flower water
Lemon
1 pot
2
110 g
220 g
150 g
150 g
½ sachet
Natural yogurt
Eggs
Butter
Melted chocolate
Sugar
Flour
Baking powder
3
100 g
125 g
1 pinch
1 cs
300 g
1 sachet
100 g
150 g
Whipped eggs
Soft butter
Powdered sugar
Salt
Rum
Flour T45 or T55
Baking powder
Dry raisins
Candied fruits
(cherries, lemons, etc.)
700g
90 ml
1 cc
230 g
1 sachet
90 ml
45 g
1 cs
50g
50g
900g
100 ml
1 ½ cc
250 g
1 sachet
100 ml
50 g
1 ½ cs
70g
70g
Milk
Salt
Flour
Baking powder
Oil
Grated Gruyere (cheese)
Herbs of Provence
Pitted green olives
Chopped black olives
FAIT MAISON_LAGRANGE 16/05/11 10:08 Page73
Page 73
8. Pastry
Short crust pastry
N.B. Wait until the butter and flour begin to blend to add water and salt.
Short bread
Quick sweet pie pastry
Quick salty pastry
9. Pizza dough
10. Kneading
Baguettes
Braided bun
+ 1 egg for the gilding
72
200 g
100 g
1 pinch
3 cc
Flour
Butter or oil
Salt
Cold water
125 g
200 g
1
125 g
Soft butter
Flour
Egg
Sugar
150 ml
125 g
1 cs
275 g
1 pinch
Hot water
Soft butter
Sugar
Flour
Salt
200 ml
100 ml
300 g
1 pinch
Hot water
Oil
Flour
Salt
An average size
pizza
210 ml
2 cc
1 cc
1 cc
350 g
180 g
1 cc
Water
Oil
Sugar
Salt
Flour T55 or T65
Whole-meal T130
Baker’s yeast
4 baguettes
90 ml
1.5 cs
1 cc
2 cc
2 cc
425 g
180 g
3 ½ cc
Water
Oil
Lemon juice
Sugar
Salt
Flour T55 or T65
Whole-meal T130
Baker’s yeast
1 bun
110mL
2
50g
25g
1 sachet
1 pinch
275g
½ sachet
Milk
Egg yokes
Soft butter
Sugar
Vanilla sugar
Salt
Flour
Baker’s yeast
FAIT MAISON_LAGRANGE 16/05/11 10:08 Page74
Page 74
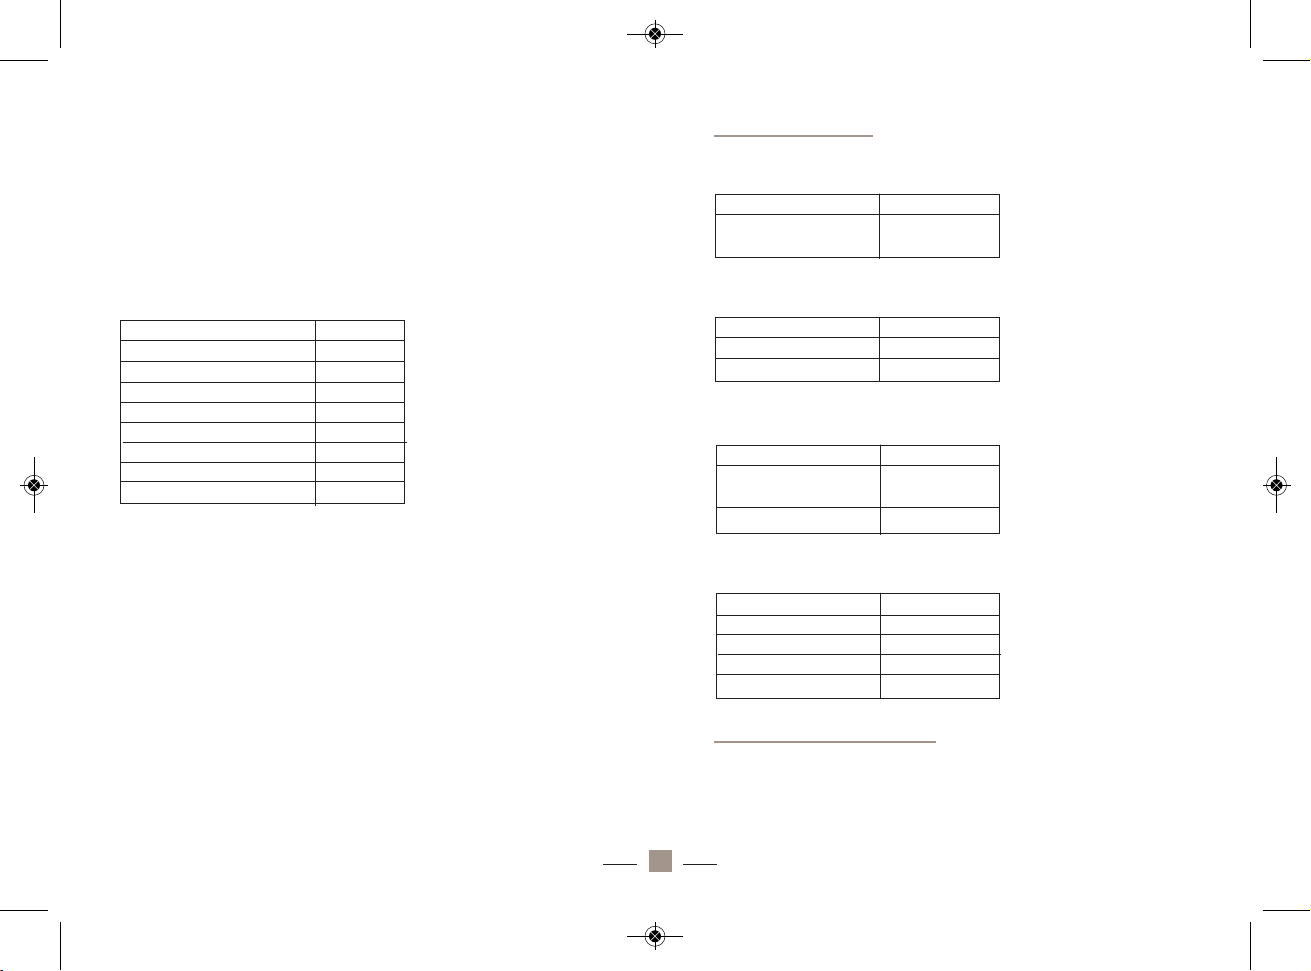
Kneading programme to be run twice (the bun will rise better).
Remove the dough piece and divide it into 3 equal portions. Make
lumps and braid them together.
Let it rise for 45 minutes to 1 hour.
Glaze it with whipped eggs (you can also sprinkle some bead sugar on
top)
Bake for 20 to 25 minutes at 180°C.
Bacon cubes, comté, nuts flat loaf
Remove the dough from the trough at the end of the programme and
spread it into an oval shape. Make four parallel oblique incisions on top.
Stretch the dough to open the slits. Brush it with olive oil and sprinkle
with some herbs of Provence. Preheat the oven at 220°, and bake for 25
minutes until golden brown. Let it cool on a tray; enjoy it with a nice
green salad.
11. Jam programme
Strawberry jam
Mulberry jam
Apricot jam
Kiwi jam
12. Baking only programme
You can use any commercial instant preparation and cook it in your FAIT
MAISON®.
73
200ml
2 cs
1 pinch
350 g
1 sachet
80 g
100 g
100 g
1 cc
Warm water
Olive oil
Salt
Flour
Baker’s yeast
Nuts
Bacon cubes
Grated Comté
Herbs of Provence (later)
500 g
400 g
Strawberries
Granulated sugar
with gelling agent
500 g
400 g
1 cs
Mulberries
Granulated sugar
Lemon juice
500 g
400 g
1 cs
Apricots
Granulated sugar
with gelling agent
Lemon juice
500 g
1
400 g
1 lemon
½ glass
Kiwis
Apple
Granulated sugar
Lemon juice
Water
FAIT MAISON_LAGRANGE 16/05/11 10:08 Page75
Page 75
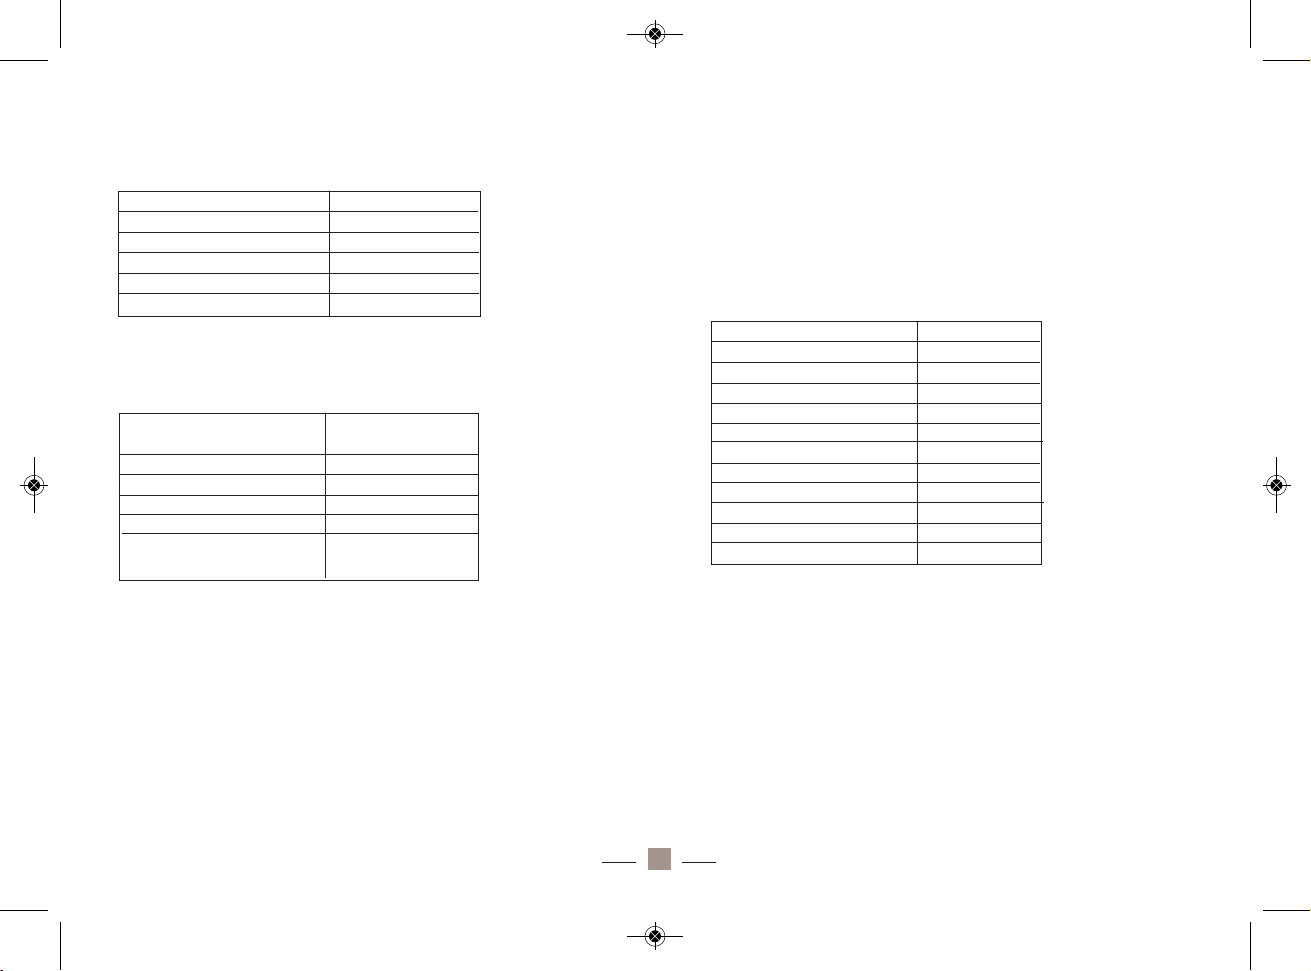
Rice based recipes
Pilau rice
Sushi rice
Select a round grain Japanese rice “sushi special”.
Prepare the rice after having washed it well by mixing the rice with the
quantity of water indicated. Follow the instructions given on page 44.
Meanwhile, prepare the vinegar seasoning by heating the following mixture over low heat: Rice vinegar, sugar, salt and rice wine
When the rice has been cooked, open the lid and let the rice settle for
10 min.
Spread the rice in a non metallic flat base container.
Using a rice paddle spread the rice and split it to avoid lumps, while
sprinkling it with vinegar mixture.
Note that the rice must not be reduced to pulp; therefore stop the operation as soon as the rice is humid and shiny. Aerate the rice using your
fingers by lifting it and turning it over from the outside of the container
towards the inside (as when the egg whites are folded in) and fan it with
the other hand until its warm. The rice must be shiny, slightly sticky but
without lumps. Keep it aside under a wet cloth while your sushi gets
ready.
Sautéed prawn rice
Preferably select Basmati rice
Prepare the rice by mixing it with the quantity of water indicated. Follow
the instructions given on page 44.
Clean the prawns then keep them aside in a cool place.
Chop some garlic and ginger, and brown them in oil in a hot frying pan
with the lemongrass. Over low heat, add the finely shredded peppers.
Stir and cover. Let it cook for 5-10 minutes.
Then add the prawns. Stir and let it cook for a while. Add the cooked
rice and let fritter until ready. Serve hot.
74
For 4 persons
2 measures
1
50g
1 pinch
2 glasses
Basmati or Thai rice
Chopped onion
Butter
Salt
Chicken broth
For 1kg of
sushi rice
4 measures
4 measures
100 ml
50 g
2 pinches
2 cs
White round grain rice
Water
Rice vinegar
Sugar
Salt
Rice wine (Mirin)
For 4 persons
2 measures
Level 2
300 g
2
3
1 cs
2 cs
2 cs
4 cs
2cs
2cs
Basmati rice
Water
Cooked prawns
Red pepper
Cloves of garlic
Thinly sliced lemon grass
Fresh ginger
Oil
Soy sauce
Lemon juice
Rice wine (optional)
FAIT MAISON_LAGRANGE 16/05/11 10:08 Page76
Page 76

Sautéed chicken rice
Prepare the rice by mixing it with the quantity of water indicated. Follow
the instructions given on page 49.
Heat some oil in a frying pan; add the shallot and the chicken.
Over high heat, add the pepper and garlic and stir.
Add the soy sauce, sugar, and coarsely chopped basil.
Finally add the rice and mix well.
Sprinkle the crushed peanuts and cashew nuts, and serve hot.
Yoghurt recipes
Sweet yogurt
You could either prepare natural yogurt following the advice of the
“commissioning” paragraph then add some powdered sugar, or sweeten before the preparation. To do this, add the sugar at the same time
as milk and ferment and beat well until the sugar has dissolved.
Alternative method: You could replace the sugar by vanilla sugar when
preparing.
Yoghurt with fresh fruits
Note: If you are using fresh fruits containing a lot of acidity, it is recommended to add them to the yoghurt after its preparation. In fact, the acidity of fruits can kill the ferments and spoil the yoghurt preparation.
1 cup of fresh chopped fruits – 4 to 5 cs. (Tablespoon) of sugar (according to taste) – 1 natural yogurt or 1 sachet of ferment – 1 litre of milk
Mix the milk and the ferment until you have a uniform consistency. Add
the chopped fruits while mixing. Divide the mixture into jars.
Jam yoghurts
4 cs. of jam or fruit jelly - 1 natural yogurt or 1 sachet of ferment – 1 litre
of milk
Heat the jam or jelly on very slow fire Add the milk little by little, then
add the ferment. Beat well until you have a uniform consistency. Let it
cool down then divide the mixture into jars.
If you are using jam that is not very thick, you could directly mix it with
the milk without heating it beforehand.
Coffee yoghurts
2 cs. of sugar (according to taste) – 1 cs. of Instant coffee– 1 natural
yoghurt or 1 sachet of ferment– 1 litre of milk
Mix 1 natural yogurt or 1 sachet of ferment with instant coffee and
sugar. Beat well. Add the milk little by little. Mix until you have uniform
consistency then divide the mixture into the jars.
Alternative method: Use caramel or chocolate powder instead of coffee.
75
For 4 persons
2 measures
Level 2
350 g
1
2
5 leaves
1 pinch
1 cs
2 cs
½ cc
30 g
30 g
Basmati rice
Water
Sliced chicken
Chopped shallot
Cloves of garlic
Basil
Ground pepper
Oil
Soy sauce
Sugar
Roasted peanuts
Cashew nuts
FAIT MAISON_LAGRANGE 16/05/11 10:08 Page77
Page 77

“Fromage blanc” based recipes
“Cervelle de Canuts” (Soft cheese spread) (6 pers.)
This speciality of Lyons is very simple to prepare.
1 big cheese drainer with a base of 1l of UHT cow milk.
1 jar of 20cl of fresh cream – 200 g shallots- 1/2 bunch of chives
- 1 bunch of flat parsley - 1/2 bunch of chervil - 1 dl of oil – 1 dl
of dry white wine – salt/pepper
Prepare your cheese drainer 48h in advance by following the instructions (allow one day or night for draining). Note that your cheese must
be thick (remove as much whey as possible).
Wash and finely snip the herbs and the shallots.
Beat together the cream and the cheese, season with salt and pepper
then add the other ingredients.
You can serve the “cervelle de Canuts” with boiled or pot roasted potatoes or spread on bread.
Tsatziki (6 pers.)
1 big cheese drainer with a base of 1l of whole or semi-skimmed UHT
cow milk.
1 cs of thick cream - 2 cucumbers - 1 bunch of fresh mint – 2 cloves of
garlic – 1 cs of mustard – 1 cs of olive oil – Salt and pepper.
Prepare your cheese drainer 48h in advance by following the instructions (allow one day or night for draining).
Peel and deseed the cucumbers then grate them and drain in a strainer
with coarse salt for many hours.
Beat the cheese drainer to obtain smooth “fromage blanc” and not too
thick (add some whey if required). Add the fresh cream.
Add to the “fromage blanc”, the clove crushed beforehand, the finely
chopped mint, the mustard and the oil, then season with salt and pepper.
Squeeze the grated cucumber in a cloth to remove the remaining water.
Finally, add the grated cucumber to the preparation.
Strawberry whisked “fromage blanc” (4 pers.)
1 large cheese drainer with a base of 1l of whole or semi-skimmed UHT
cow milk.
500g of strawberries (400g to mix / 100 g to cut into pieces) – 100 g of
powdered sugar
Prepare your cheese drainer 48h in advance by following the instructions (allow one day or night for draining).
Beat the “fromage blanc” with a foot mixer.
Mix 400 g of strawberries with 100 g of powdered sugar. Put in a saucepan on low heat with the remaining 100 g of strawberries cut into
pieces. Let it stew but do not let it boil. When the coulis glazes the
spoon, let it cool.
Add it to the “fromage blanc” and serve fresh in glass bowls.
76
FAIT MAISON_LAGRANGE 16/05/11 10:08 Page78
Page 78
17 Chemin de la Plaine
ZA les Plattes
69390 VOURLES
France
www.lagrange.fr
FAIT MAISON_LAGRANGE 16/05/11 10:08 Page80
 Loading...