

La germania LUGF03-60-S User Manual
MODEL
LUGF03-60-S
32
Part no: W2005
Revision E - 2008
LUGF03-60-S
UPRIGHT COOKER
Installation instructions
User instructions
This cooker is approved for use with Natural and Propane gases
Leave instructions with the owner

Contents
Contents 2-3
Important information 4-5
❍ Introducing your new cooker
❍ Notes on disposal
❍ Before connecting your new cooker
❍ Safety considerations
Installation instructions 6-7
❍ Statutory regulations
❍ Gas supply
❍ Electrical supply
❍ Instructions
❍ Vertical clearances
❍ Overhead clearances
❍ Side clearances to vertical surface
❍ Installation
Electrical & gas connection 8-9
❍ Electrical connection
❍ Gas regulator
❍ If using a flexible connection
❍ If using a copper connection
❍ Gas connection
❍ Gas inlet position - Nat Gas & LPG
❍ Gas inlet with different leg heights - mm
❍ Energy consumption
❍ Test the operation of the cooker before leaving
❍ Warrant warning
❍ For service to this appliance
Support legs 10
Anti-tilt restraint 11
Upstand installation 12
Cooktop operation 13-14
❍ Control panel layout
❍ Minute minder
❍ First time use
❍ Cooktop burners operation
❍ Cooktop burner adjustments
❍ Ventilation
❍ Use of cooktop burners
2
31
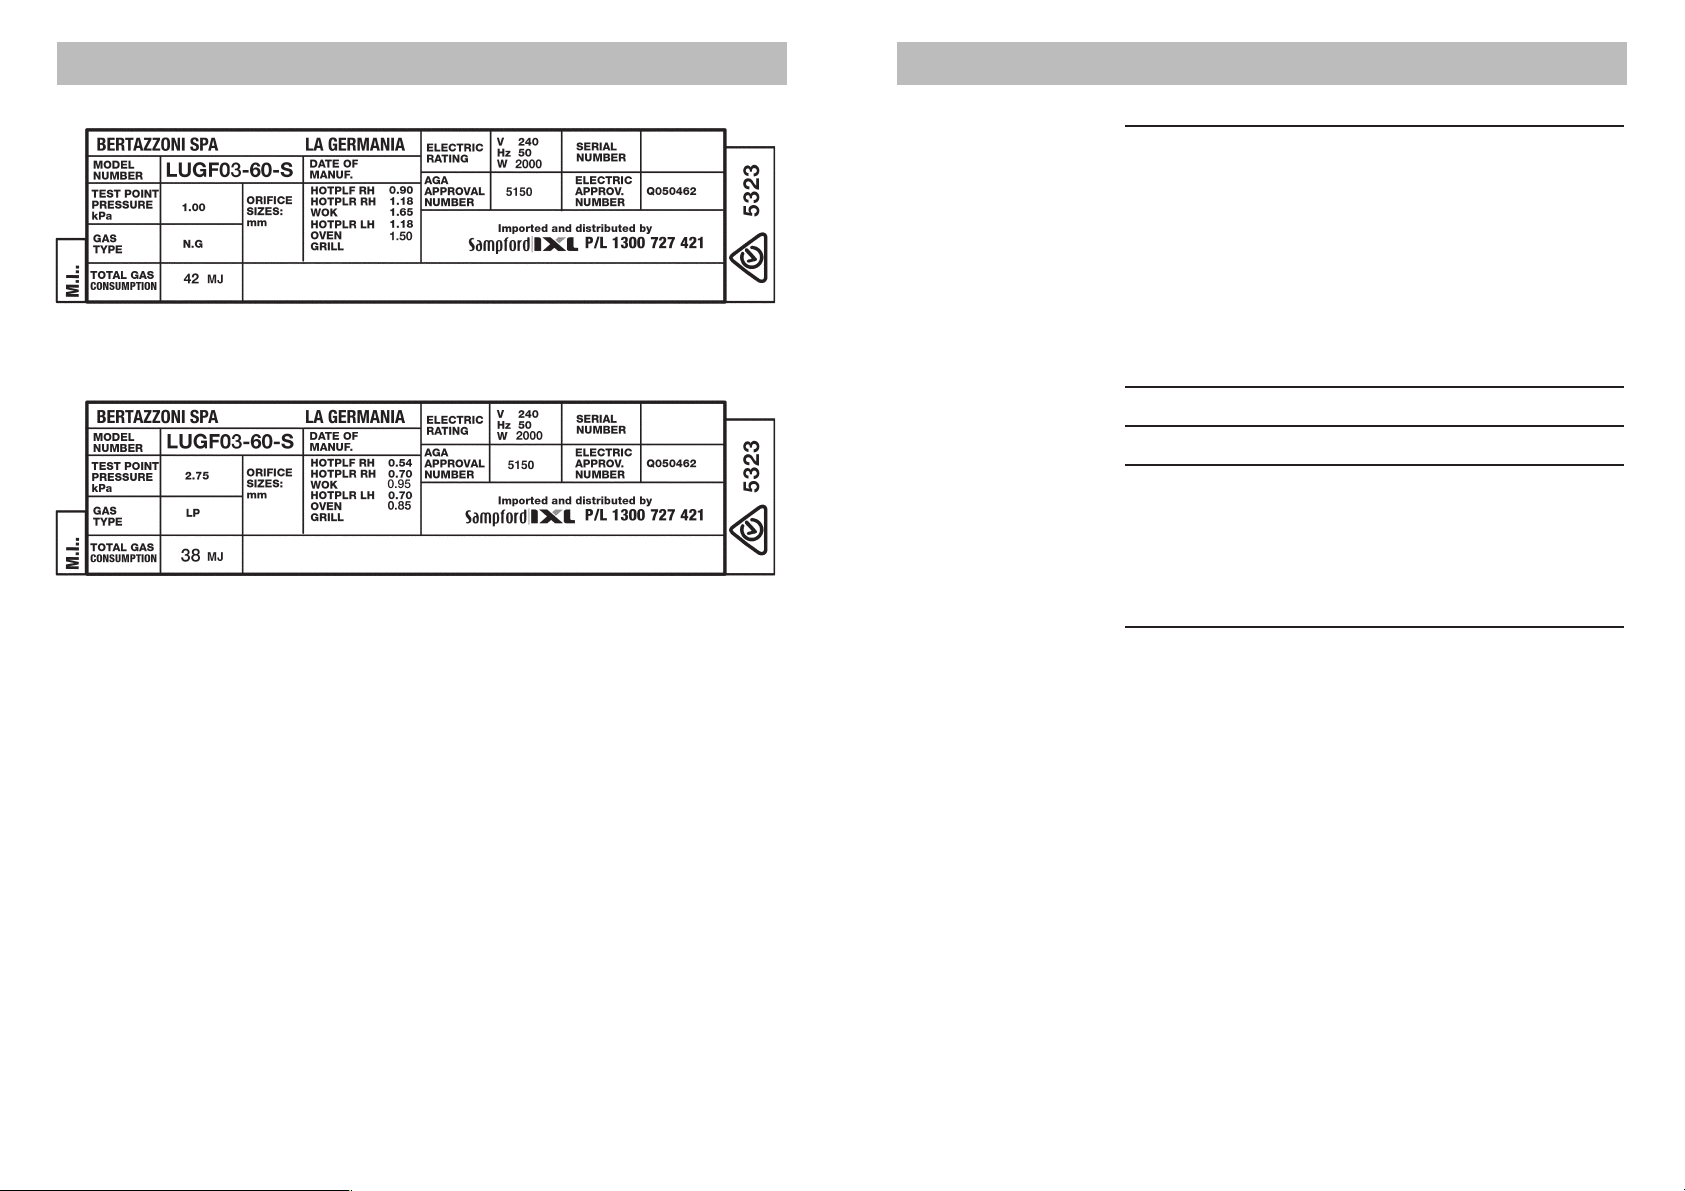
Data plate - Nat Gas
Data plate - LP Gas
Oven/Grill operation 15-17
❍ Accessories
❍ First time use
❍ Shelf positions
❍ Thermostat operation
❍ Cooling fan operation
❍ Temperature settings
❍ Automatic ignition
❍ Manual ignition
❍ Cooking tips
Cooking chart 18-19
Trouble shooting guide 20-21
Cleaning 22-23
❍ Cleaning cooktop
❍ Cleaning oven interior
❍ Cleaning oven shelf supports
❍ Cleaning oven glass door
❍ Replacing the oven light
Service information 24-30
❍ To remove glass lid (for cookers fitted with glass lid)
❍ To remove upstand (for cookers fitted with an upstand)
❍ Access to under hob area
❍ To replace the gas control valves or gas manifold
❍ To replace the minute minder
❍ To replace the thermostat
❍ To remove side panels
❍ To remve oven door
❍ To replace oven thermocouple
❍ To replace electronic ignition box
❍ To replace the oven electronic ignition module
❍ To clean or replace the oven burner injector
❍ To clean or replace a cooktop burner injector
❍ To replace a cooktop burner electronic spark electrode
❍ To replace the oven door inner glass panel
❍ To replace the oven door outer glass panel
❍ To replace the oven door hinges
❍ To replace the fan motor
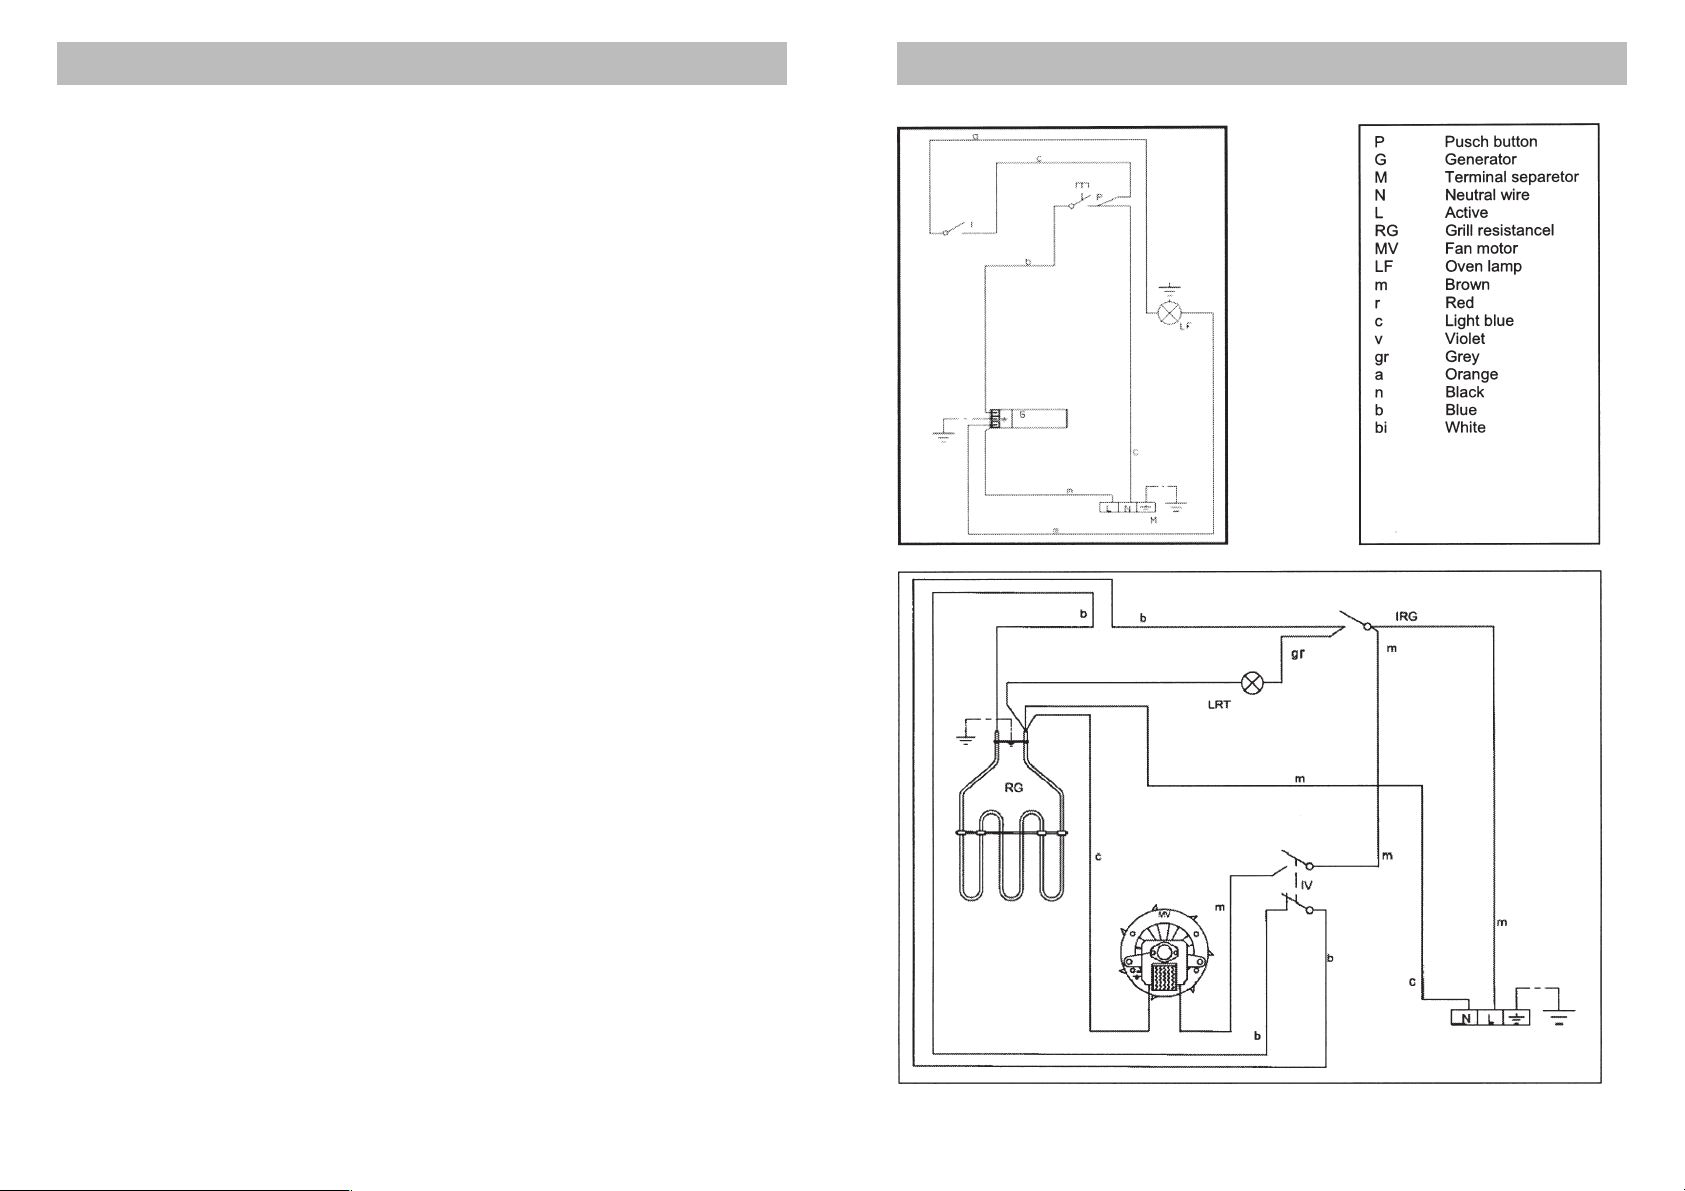
❍ Wiring diagrams
❍ Data plates (Nat Gas & LP Gas)
30
3
Important information
Service information
We thank you and congratulate you on your choice.
This carefully designed product, manufactured with the highest
quality materials, has been carefully tested to satisfy all your
cooking demands.
We therefore request that you read and follow these easy
instructions which will allow you to obtain excellent results right
from the start.
The cooker is supplied with a stainless steel upstand. An optional
glass lid can be ordered from your supplier.
This cooker features a gas hotplate containing 4 hotplate burners,
including one wok burner positioned front left, ‘one touch’
electronic ignition to all burners and a minute minder. The fan
gas oven is fitted with an electric grill element positioned against
the roof of the oven and self cleaning oven linings.
The cooker’s data plate is accessible even with the cooker fully
installed. It is positioned on the inside of the oven door, centre
bottom. A copy of the data plate is also reproduced on page 30
of this booklet. Always quote the details from it to identify the
appliance when ordering spare parts or requesting a service.
Notes on disposal
❍ Old appliances still have some residual value. An
environmentally friendly method of disposal will ensure that
valuable raw materials can be recovered and used again.
❍ Before you dispose of your old appliance, make sure that it
has been rendered inoperable.
❍ Your new cooker was protected by suitable packaging while
it was on its way to you. All materials used for this purpose
are environmentally friendly and suitable for recycling. Please
make a contribution to protecting the environment by
disposing of the packaging appropriately.
Wiring diagrams
Before connecting your new cooker
❍ Before using your new cooker, please read these ‘Instructions
for Use’ carefully. They contain important information
concerning your personal safety as well as on use and care
of the cooker.
❍ Please keep the operating and installation instructions in a
safe place; this important documentation may also be of use
to a possible subsequent owner.
❍ Do not use the cooker if it is damaged in any way.
❍ Installation and connection of the cooker should be
performed according to the instructions and connection
diagram provided, and should be entrusted to a licensed
specialist. In the event of a damage that occurs as a result of
4
A copy of these diagrams is situated on the back panel of the cooker.
29

28
2. Remove the inner glass panel as per heading ‘To replace the
oven door inner panel.
3. Undo 3 screws at the bottom of the door to release the inner
door frame.
4. Remove the outer glass panel.
5. Replace the glass panel and reassemble in reverse order.
To replace oven door hinges
Remove oven door as per heading ‘To remove the oven door’.
1. Place oven door, glass side down, on a even horizontal
surface.
2. Remove the oven door inner panel as per the heading ‘To
remove the oven door inner glass panel” up to point 2.
3. Remove the 2 retaining screws which secure each hinge to
the oven door inner panel.
4. Replace hinge(s) and secure with the 2 retaining screws.
5. Reassemble the door in reverse order.
6. Ensure that both hinge levers are placed in the upwards
vertical position and relocate the hinges in the oven frame.
Swing the levers back to the horizontal position and close
the door.
To replace the fan motor
1. Pull cooker forward and remove the cooker rear cover by
undoing 4 phillips head screws, 2 top and 2 bottom.
2. Undo electrical connectors and earth wire to fan motor.
3. Undo the 3 phillips head retaining screws securing the fan
motor to the rear outside of the oven.
4. Replace motor.
5. Reassemble in reverse order.
Do not spray aerosols in
vicinity of this appliance
while it is operation.
Where this appliance is
installed in a marine
environment or in
caravans, for safety
reasons it shall not be used
as a space heater.
This appliance is not
intended for use by
persons (including
children) with reduced
physical, sensory or
mental capabilities, or lack
of experience and
knowledge, unless they
have been given
supervision or instruction
concerning use of the
appliance by a person
responsible for their safely.
Children should be
supervised to ensure that
they so not play with the
appliance.
Warning: Accessible parts
will become hot when in
use. To avoid burns or
scalds children should be
kept away.
Warning: In order to
prevent accidental tipping
of the appliance, for
example by a child
climbing onto the oven
door, the stabilising means
must be installed. Refer to
the instructions for
installation.
improper connection, the warranty will be void.
❍ Our appliances meet the applicable safety regulations for
electrical appliances, Repairs may be performed only by
customer service engineers trained by the manufacturer.
Inexpert repairs may entail serious injury to you, the user.
Safety considerations
❍ Never leave the appliance unattended when cooking with
fat or oil. It could ignite if overheated.
❍ In case of a defect, switch off at the mains.
❍ Do not clean the oven with steam or high pressure cleaners.
❍ Ensure that the power cord does not get caught in the hot
oven door. The plastic insulation could melt.
❍ Do not use loose greaseproof paper in the oven (e.g. when
heating the oven). The paper could be drawn to the fan and
damage the fan and the element.
❍ Do not insert a baking sheet or aluminium foil sheet at the
bottom of the oven. A heat build-up could result and cooking
times and temperatures could change or enamel could be
damaged.
❍ Do not use loose greaseproof paper in the oven (e.g. when
heating the oven). The paper could be drawn to the fan and
damage the fan and the element.
❍ Do not pour water on the hot oven floor. Damage to enamel
could result.
❍ Always place a baking tray below a roast to prevent juices
from dripping on the oven lining.
❍ Do not place heavy items on the oven door when open as
this may result in damage to the door hinges.
❍ To ensure correct cooking the oven door must close properly.
Keep the door sealing surfaces clean at all times.
5
 Loading...