

Lafayette Tenera Auto-Lift, Tenera Continuum, Tenera Sure-Lift Installation Instructions Manual

Sheer Shadings
Installation Instructions
• Auto-Lift™
• Continuum™
• Specialty Shapes
• Sure-Lift™
*Click BACK on any page to return to the Table of Contents*

Installation Instructions
Tenera™ Sheer Shadings
Tenera Installation Instructions 2
Auto-Lift
™
BACK

Radio Frequency FCC Compliance:
This device complies with Part 15 of the FCC Rules. Operation is subject to the following two conditions:
(1) This device may not cause harmful interference, and
(2) This device must accept any interference received, including interference that may cause undesired operation.
This equipment has been tested and found to comply with the limits for a Class B digital device, pursuant to Part 15 of the FCC Rules. These limits are
designed to provide reasonable protection against harmful interference in a residential installation. This equipment generates, uses and can radiate radio
frequency energy and, if not installed and used in accordance with the instructions, may cause harmful interference to radio communications. However,
there is no guarantee that interference will not occur in a particular installation. If this equipment does cause harmful interference to radio or television
reception, which can be determined by turning the equipment off and on, the user is encouraged to try to correct the interference by one or more of the
following measures:
■ Reorient or relocate the receiving antenna.
■ Increase the separation between the equipment and receiver.
■ Connect the equipment into an outlet on a circuit different from that to which the receiver is connected.
■ Consult the dealer or an experienced radio/TV technician for help.
Any changes or modifications not expressly approved by the party responsible for compliance could void the user’s authority to operate the equipment.
BACK
Tenera Installation Instructions 3
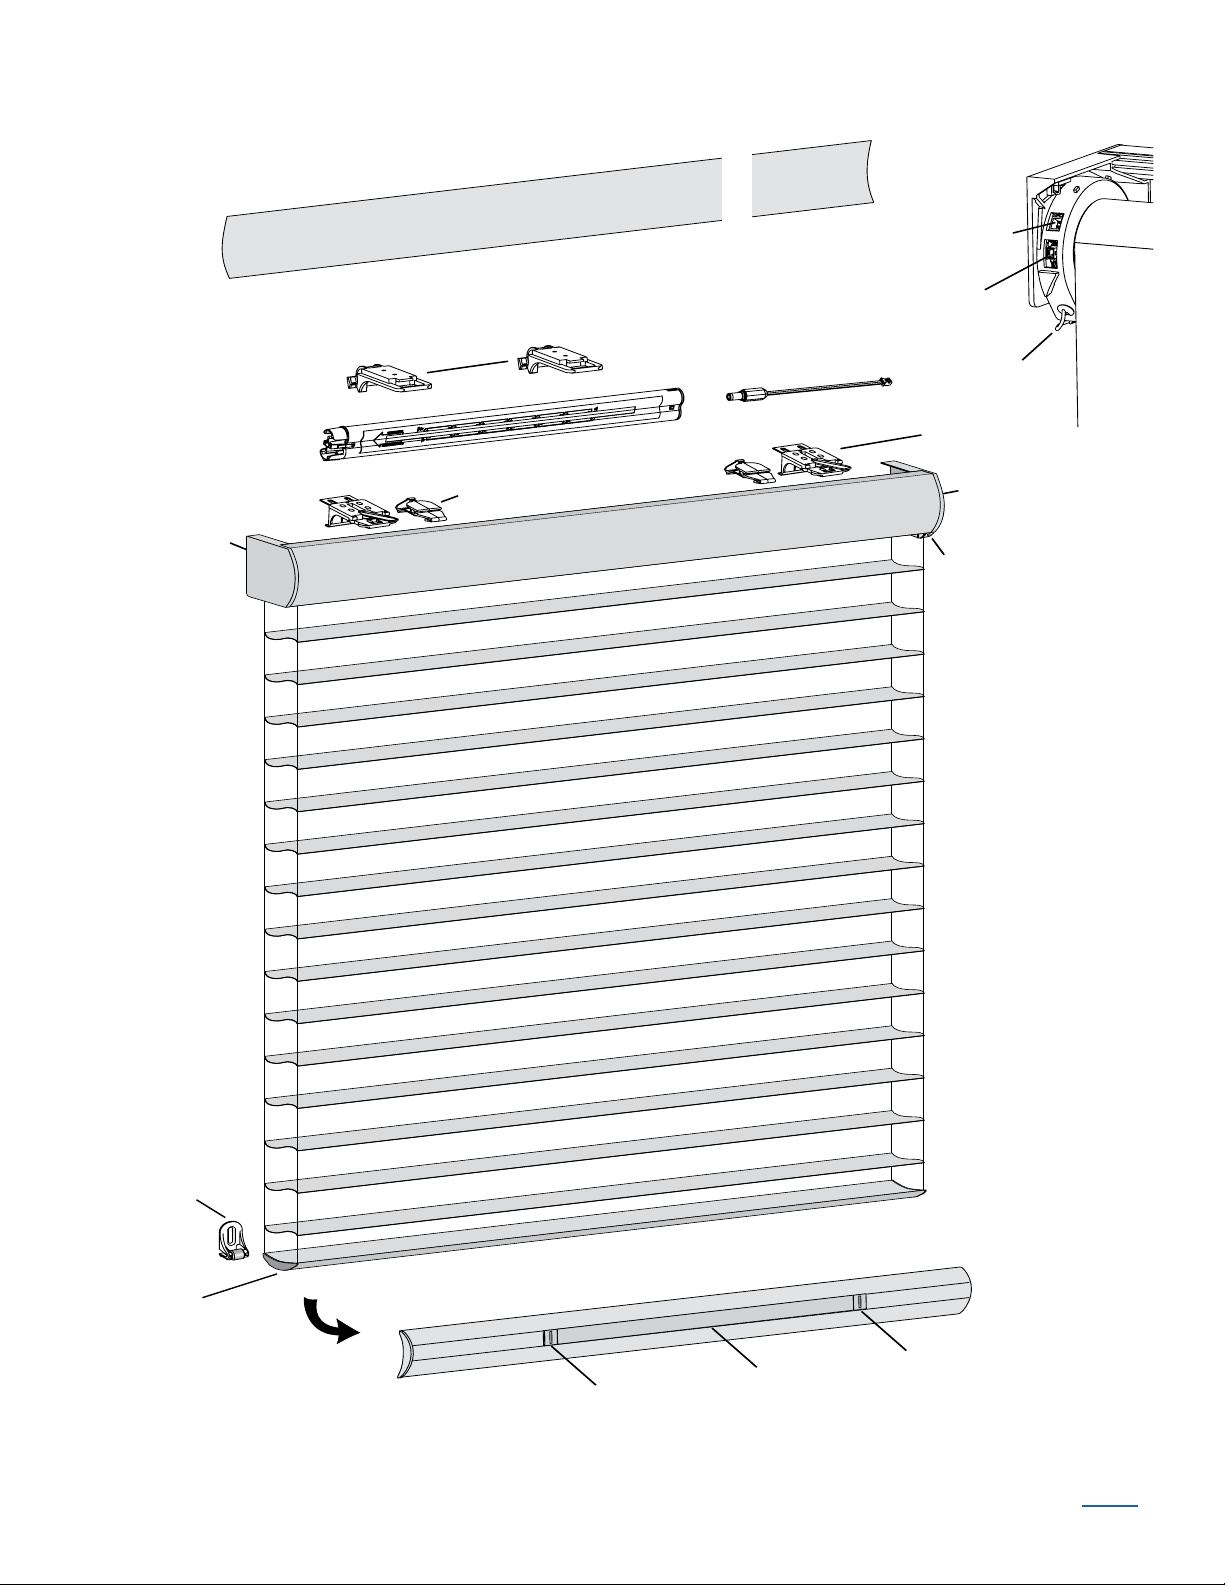
Product View
Back/Dust Cover
Headrail
Headrail
End Cap
End Cap
Magnetic
Hold-Down
Bracket
(Optional)
Installation
Bracket
Top Limit
Bottom Rail
Balance Weight
Weight
Clip
Weight
Clip
Back of
Motor
Cartridge
2-Pin Port
(Power)
3-Pin
Port
Antenna
Battery
Wand
Battery Wand
Clips
Battery Wand
Cable
Manual Control
Button and
Infrared Eye
Tenera Installation Instructions 4
BACK
Thank you for purchasing sheer window shadings. With proper installation, operation, and care,
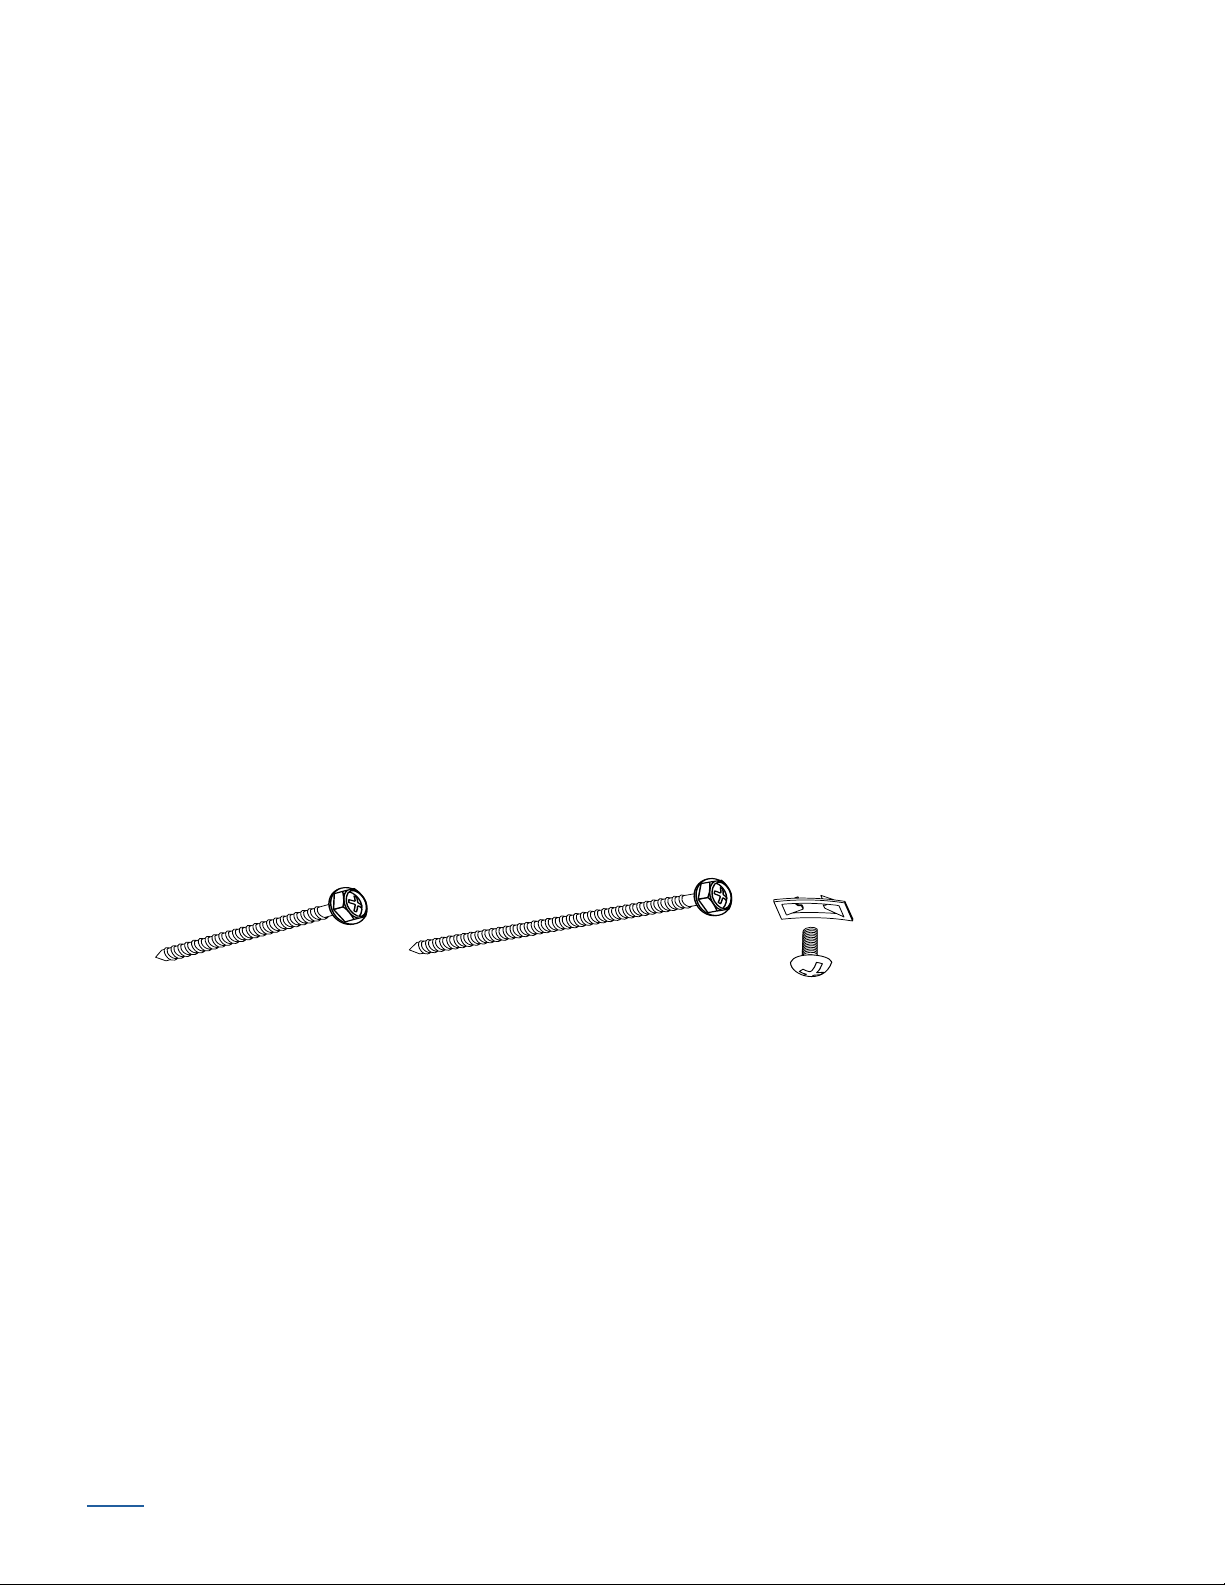
#6 x 11/2"
Hex Head Screw
(Provided)
Longer #6 Hex Head Screw
for Use with Spacer Blocks
(Not Provided)
Speed Nut
and Screw
(Provided with Each
Extension Bracket)
your new shadings will provide years of beauty and performance. Please thoroughly review this
instruction booklet before beginning the installation. For information regarding operation and
programming, refer to the guide included with your remote control.
Tools and Fasteners Needed
■ Flat blade and Phillips screwdriver
■ Level (laser level is recommended)
■ Measuring tape and pencil
■ Pliers
■ Power drill,
3
/32" drill bit, and 1/4" hex driver
■ Scissors (heavy-duty)
In addition, you will need fasteners designed to work with your specific mounting surface(s).
1
■ #6 Hex Head Screws (Provided). Two 1
/2" screws are provided per installation bracket.
■ Longer Hex Head Screws (Not Provided). If using spacer blocks, use #6 screws long
enough for a secure attachment.
■ Speed Nuts and Screws (Provided). Extension brackets come with screws and speed nuts.
■ Drywall Anchors (Not Provided). Use drywall anchors when mounting into drywall.
BACK
Tenera Installation Instructions 5
Installation Overview
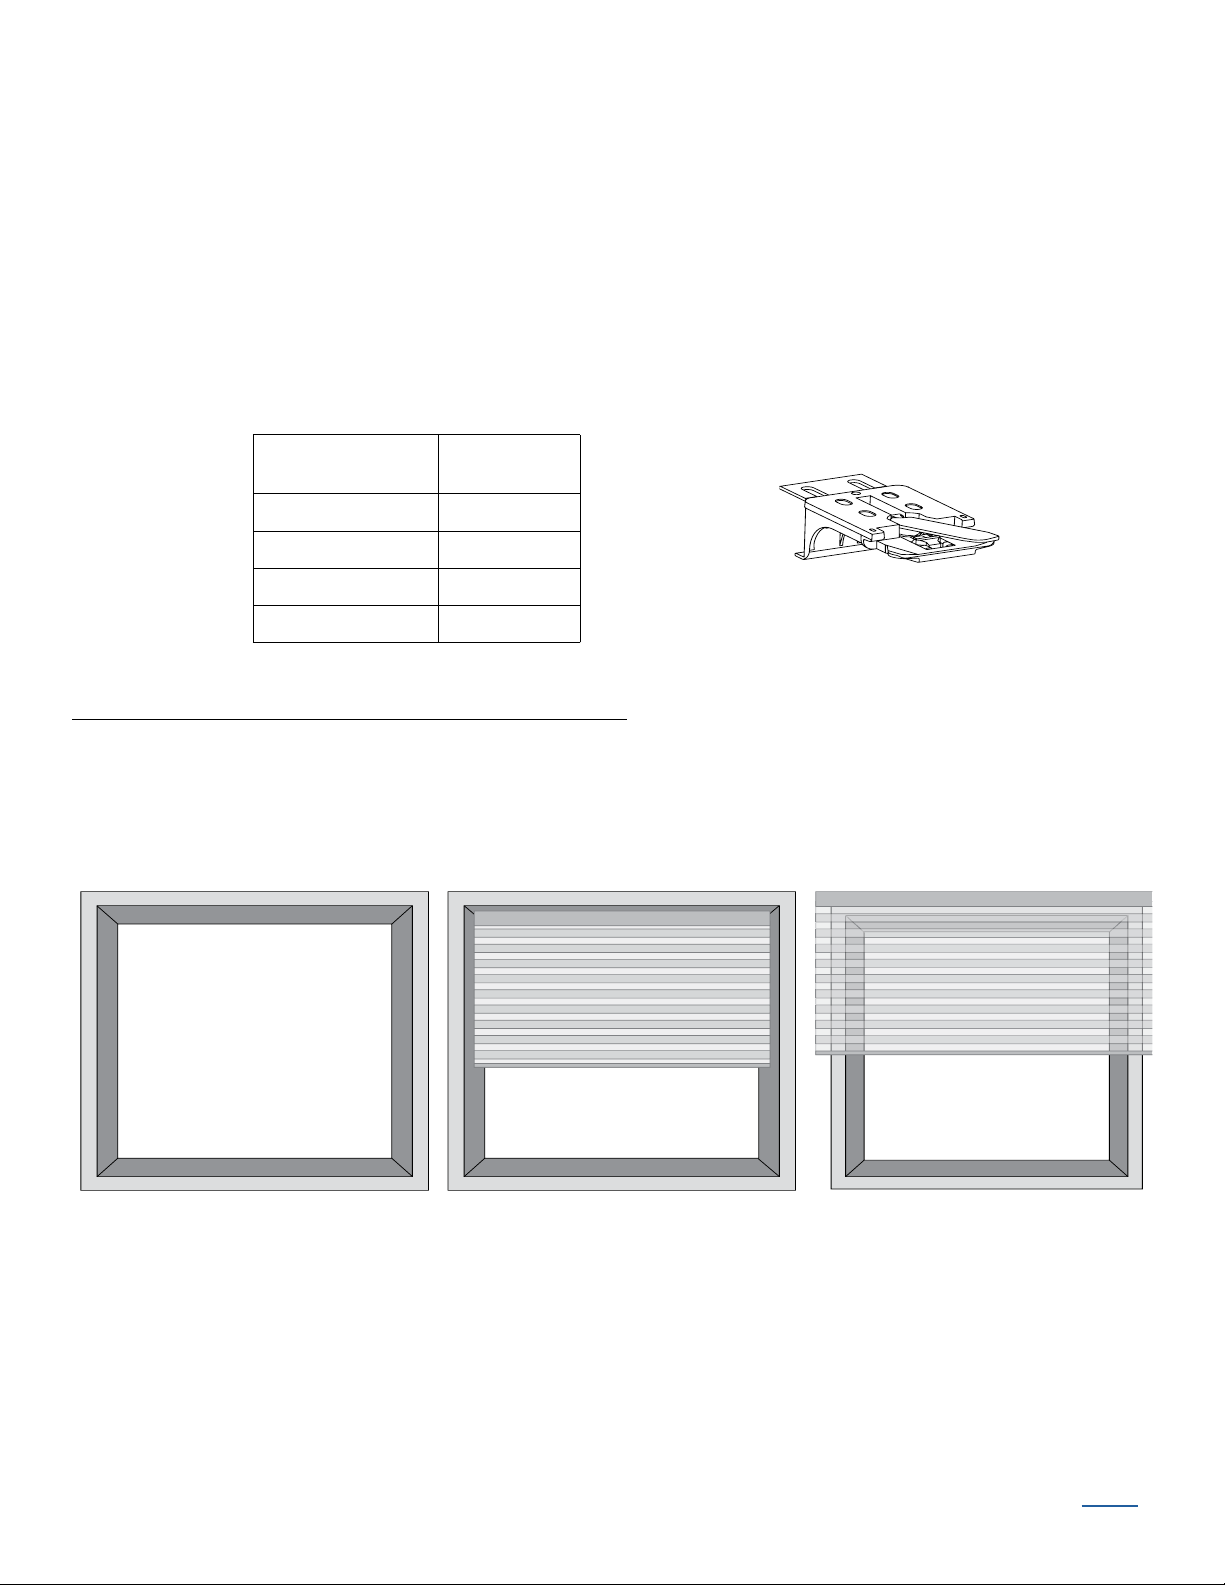
Installation
Bracket
Inside Mount
Shading fits within
window opening.
Collectively, the sill and
jambs are called the
“window casement.”
Molding
Head Jamb
Sill
Jamb Jamb
Outside Mount
Shading mounts outside
window opening.
To install your shading, you will need to perform the following three steps:
STEP 1: Install the Brackets
STEP 2: Install the Shading
STEP 3: Connect the Power Source
STEP 1 — Install the Brackets
■ Your order will include the correct number of installation brackets for your shading width, as
shown in the table below.
Width
12" – 36" 2
1
/8" – 79" 3
36
1
/8" – 96" 4
79
1
/8" – 120" 5
96
Brackets
Required
Mounting Types and Window Terminology
If the installation brackets are mounted correctly, the rest of the installation process follows very
easily. To prepare for this important first step, review the mounting types and basic window
terminology illustrated below.
Tenera Installation Instructions 6
BACK
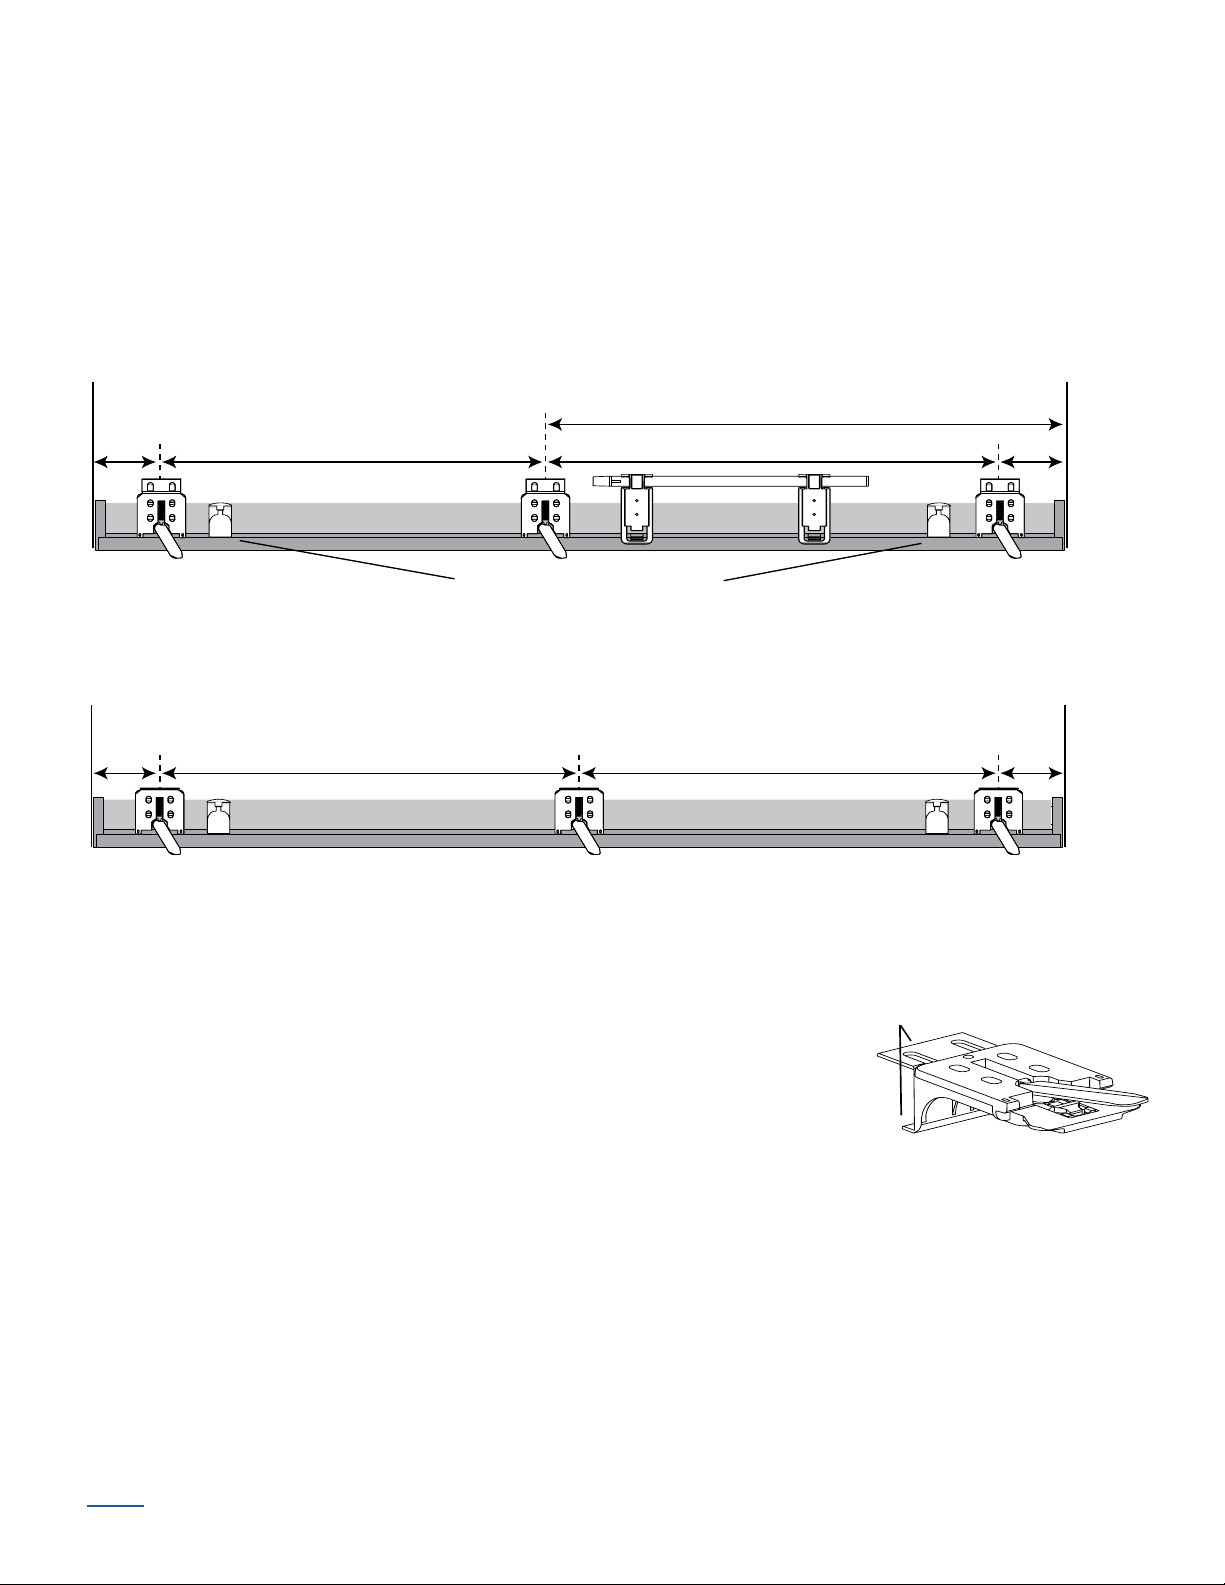
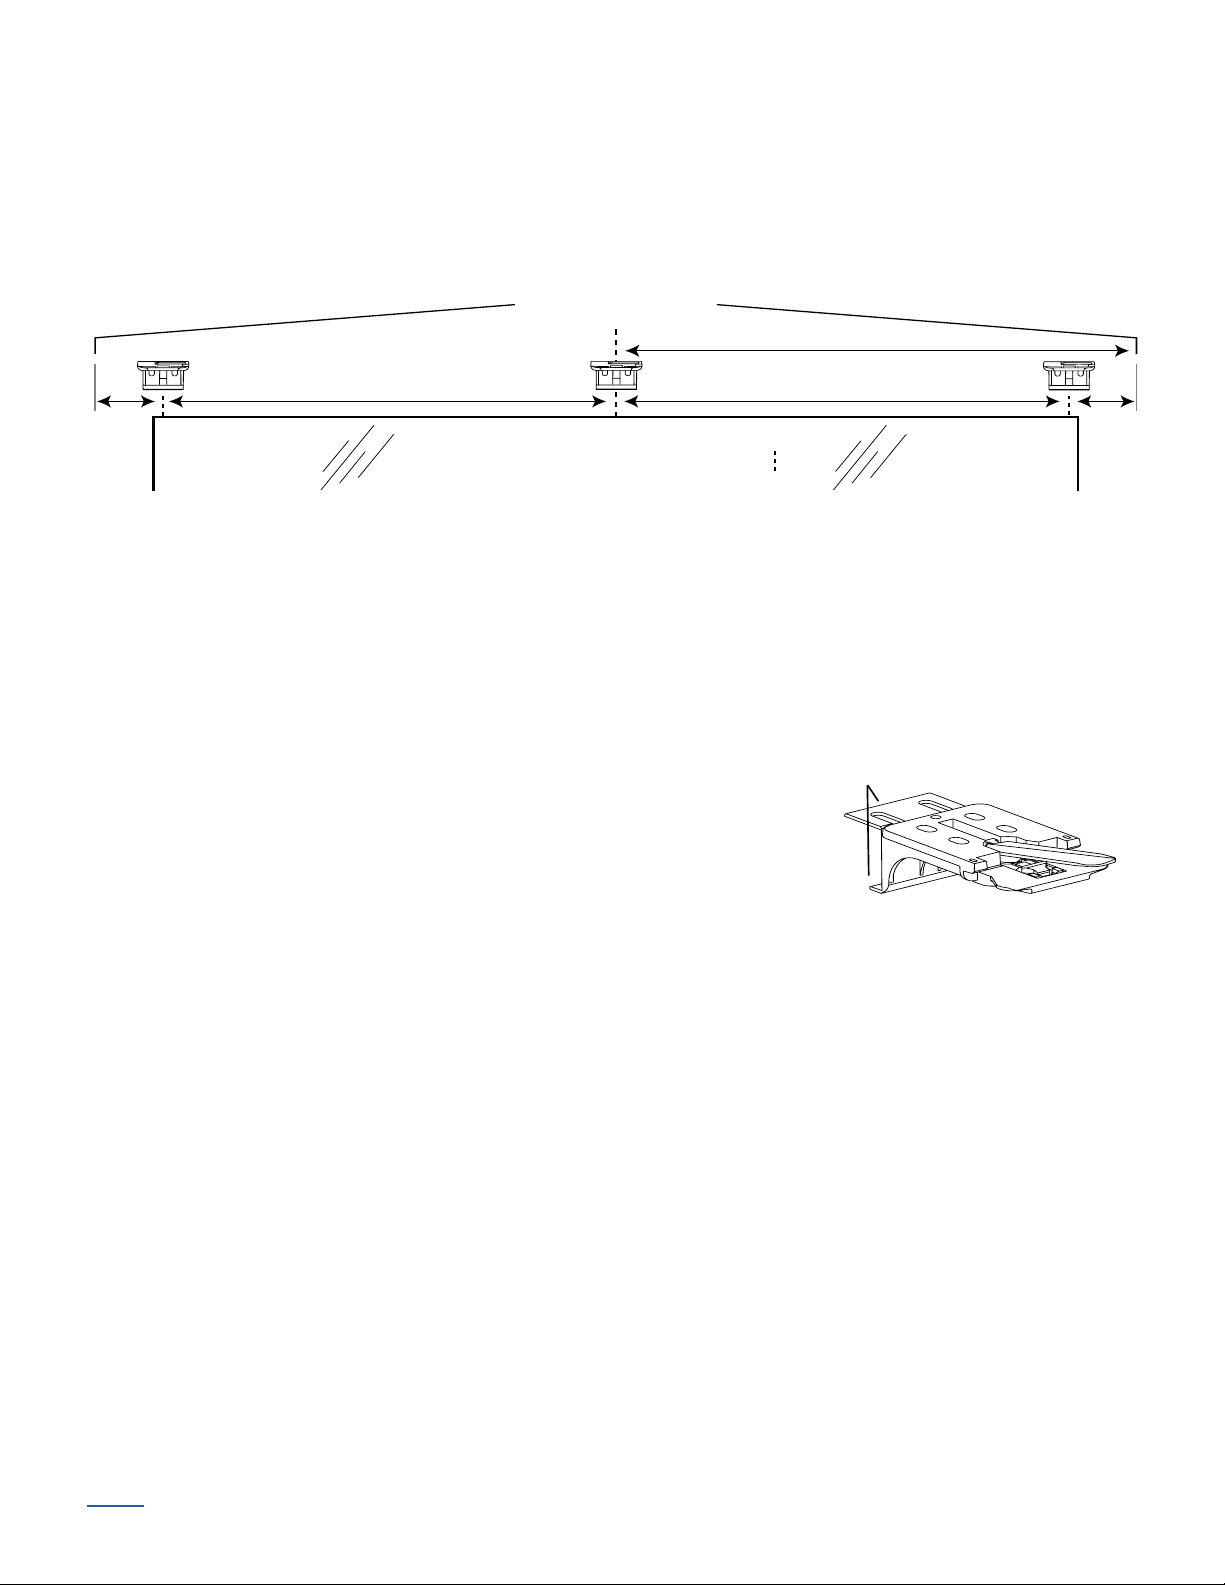
Mount the Installation Brackets — Inside Mount
Shadings with Battery Wand
Motor
Side
JambJamb
Top limits should be equal
distance from the ends of headrail.
18" Minimum for Battery Wand
Shadings with Optional Satellite Battery Pack or DC Power Supply
Motor
Side
Jamb
Jamb
2"
Space Evenly Space Evenly
2"
2"
Space Evenly Space Evenly
2"
Top View
Installation Bracket
Removable Tabs
■ Measure and mark end bracket locations 2" in from each jamb.
➤ If more than two installation brackets are required (see table on page 3), mark the
location of additional bracket(s) spaced evenly between the two end bracket locations.
Mount into wood whenever possible. Allow a minimum of 18" from the motor side
for the battery wand.
■ Determine whether or not to remove any tabs from the installation brackets.
BACK
➤ If using a back cover, use pliers to remove both tabs from the installation brackets.
➤ If using a battery wand without a back cover, leave both tabs
on the brackets. The top tab ensures that there is clearance
for the wand.
➤ If using a satellite battery pack or DC power supply without a
back cover, use pliers to remove the top tab.
➤ Save any removed top tabs for use as shims when needed.
Tenera Installation Instructions 7

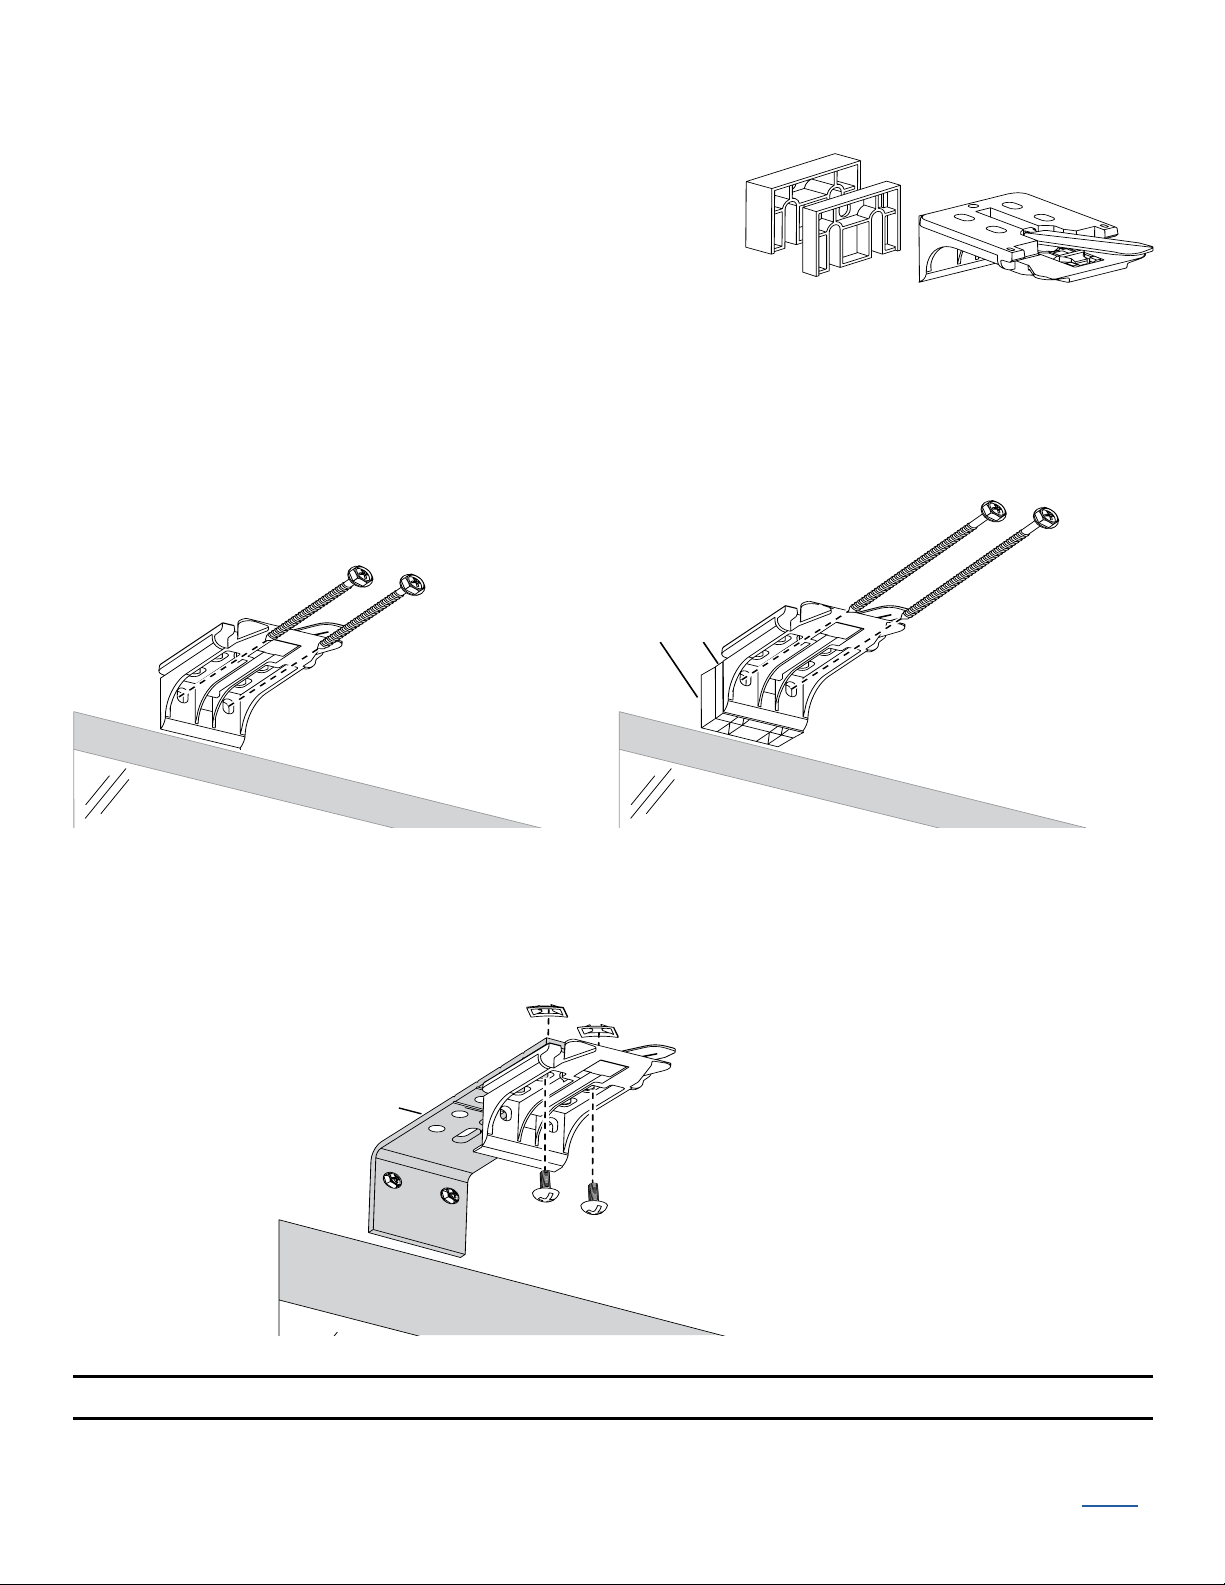
■ Choose which set of holes works best in your application.
Minimum
Depth
See Chart
2" – 3"
Installation
Bracket
Back
Cover
Bracket
Remove tab if using a satellite
battery pack or DC power supply.
Mark the screw holes.
➤ The minimum depth required for mounting is 2" with a
battery wand and a back cover.
1
"
/
4
➤ Minimum depth is 1
and
with a satellite battery pack
back cover.
➤ Refer to the chart below for fully recessed depth
requirements.
Fully Recessed
Mounting Depths
Battery Wand & Back Cover 4"
Satellite Battery Pack or DC Power
Supply & Back Cover
Headrail
1
/2"
3
IMPORTANT: The front edges of the installation brackets must be level and aligned.
WARNING: Failure to properly align the brackets could result in the headrail
releasing from the brackets.
3
■ Drill the screw holes using a
/32" drill bit.
IMPORTANT: Use drywall anchors when mounting into drywall.
■ Use a level to check that the mounting surface is level. If necessary, you can shim the
brackets using the top tabs that were removed from the brackets.
■ If you ordered a back cover, attach the back cover brackets to
the installation brackets.
➤ If a satellite battery pack or DC power supply is used, first
remove the top tab from the back coverbracket.
➤ Snap the prongs on the back cover brackets into the
holes on the back of the installation brackets.
■ Attach the installation brackets using the screws provided.
IMPORTANT: Do not overtighten the screws. Check to ensure the lever can be moved
easily side to side. If the lever is not moving easily, loosen the screws in
increments until it can be moved easily.
Proceed to “STEP 2 — Install the Shading”
Tenera Installation Instructions 8
1
/8 of a turn
BACK
Mount the Installation Brackets — Outside Mount
Headrail End Marks
Window Opening
Motor
Side
18" Minimum for Battery Wand
Space Evenly
Space Evenly
2"
2"
Installation Bracket
Removable Tabs
■ Center the headrail over the window opening at the desired height. Use a pencil to lightly
mark each end of the headrail.
➤ Alternatively, measure the width of the headrail and use that width to mark the headrail
end points over the window opening.
■ Mark 2" in from each of the headrail end marks.
➤ If more than two installation brackets are required (see table on page 3), mark the
location of additional bracket(s) spaced evenly between the two end bracket locations.
Mount into wood whenever possible. Allow a minimum of 18" from the motor side
for the battery wand.
■ Use pliers to break off both removable tabs from the installation
brackets.
➤ Save any removed top tabs for use as shims when needed.
■ Center the installation/extension brackets on your marks and
mark the location of the screw holes.
➤ The top of the installation brackets should be aligned and
level at the desired height
of the shading.
➤ If using extension brackets, center an extension bracket on your marks and mark the
location of the screw holes.
➤ A minimum 1" flat vertical surface is required to mount the installation or extension
brackets.
CAUTION: The rear of the brackets or spacer blocks must be flush against a flat mounting
surface. Do not mount brackets on curved molding.
■ Drill the screw holes using a
IMPORTANT: Use drywall anchors when mounting into drywall.
BACK
3
/32" drill bit.
Tenera Installation Instructions 9
■ Attach the installation brackets using the screws provided.
1
/2"
1
/4"
Spacer Blocks
No Spacer Blocks
Spacer Blocks
Longer
Screws
1
/4"
1
/2"
Speed Nuts
Extension
Bracket
IMPORTANT: If using a battery wand, use a
minimum of one
1
/2" and one 1/4" spacer blocks per
installation bracket to provide the clearance required
for the battery wand and battery wand bracket.
➤ The solid side of the spacer blocks faces the
mounting surface.
➤ Attach the spacer blocks with the installation bracket using two screws long enough for
secure mounting.
1
➤ Use a maximum of three
/2" spacer blocks per installation bracket.
➤ If using extension brackets, attach them to the mounting surface. Then attach an
installation bracket to the underside of each extension bracket using the provided screws
and speed nuts.
Proceed to “STEP 2 — Install the Shading”
Tenera Installation Instructions 10
BACK

Mount the Installation Brackets — End Mount
Installation Bracket
Removable Tabs
Installation
Bracket
Back
Cover
Bracket
Remove tab if using a satellite
battery pack or DC power supply.
Extension
Bracket
Speed
Nuts
Minimum Mounting
Surface Width
Installation
Bracket
End mount the headrail when conventional mounting techniques will not work — for example, in
an arched window opening.
■ Use pliers to break off both removable tabs from the
installation brackets.
■ If you ordered a back cover, attach the back cover brackets to the installation bracket.
➤ If a satellite battery pack or DC power supply is used,
first remove the top tab from the back coverbracket.
➤ Snap the prongs on the back cover brackets into the
holes on the back of the installation brackets.
■ Mount extension brackets to each side of the opening at the desired height of the shading.
➤ The mounting surface must be vertical and flat, not
part of an arched curve.
➤ Minimum mounting surface width with a built-in
battery wand is 2
➤ Minimum mounting surface width with a satellite
battery pack or DC power supply is 1
■ Attach the installation brackets to the extension
brackets using the provided screws and speednuts.
Proceed to “STEP 2 — Install the Shading”
1
/8".
1
/2".
BACK
Tenera Installation Instructions 11
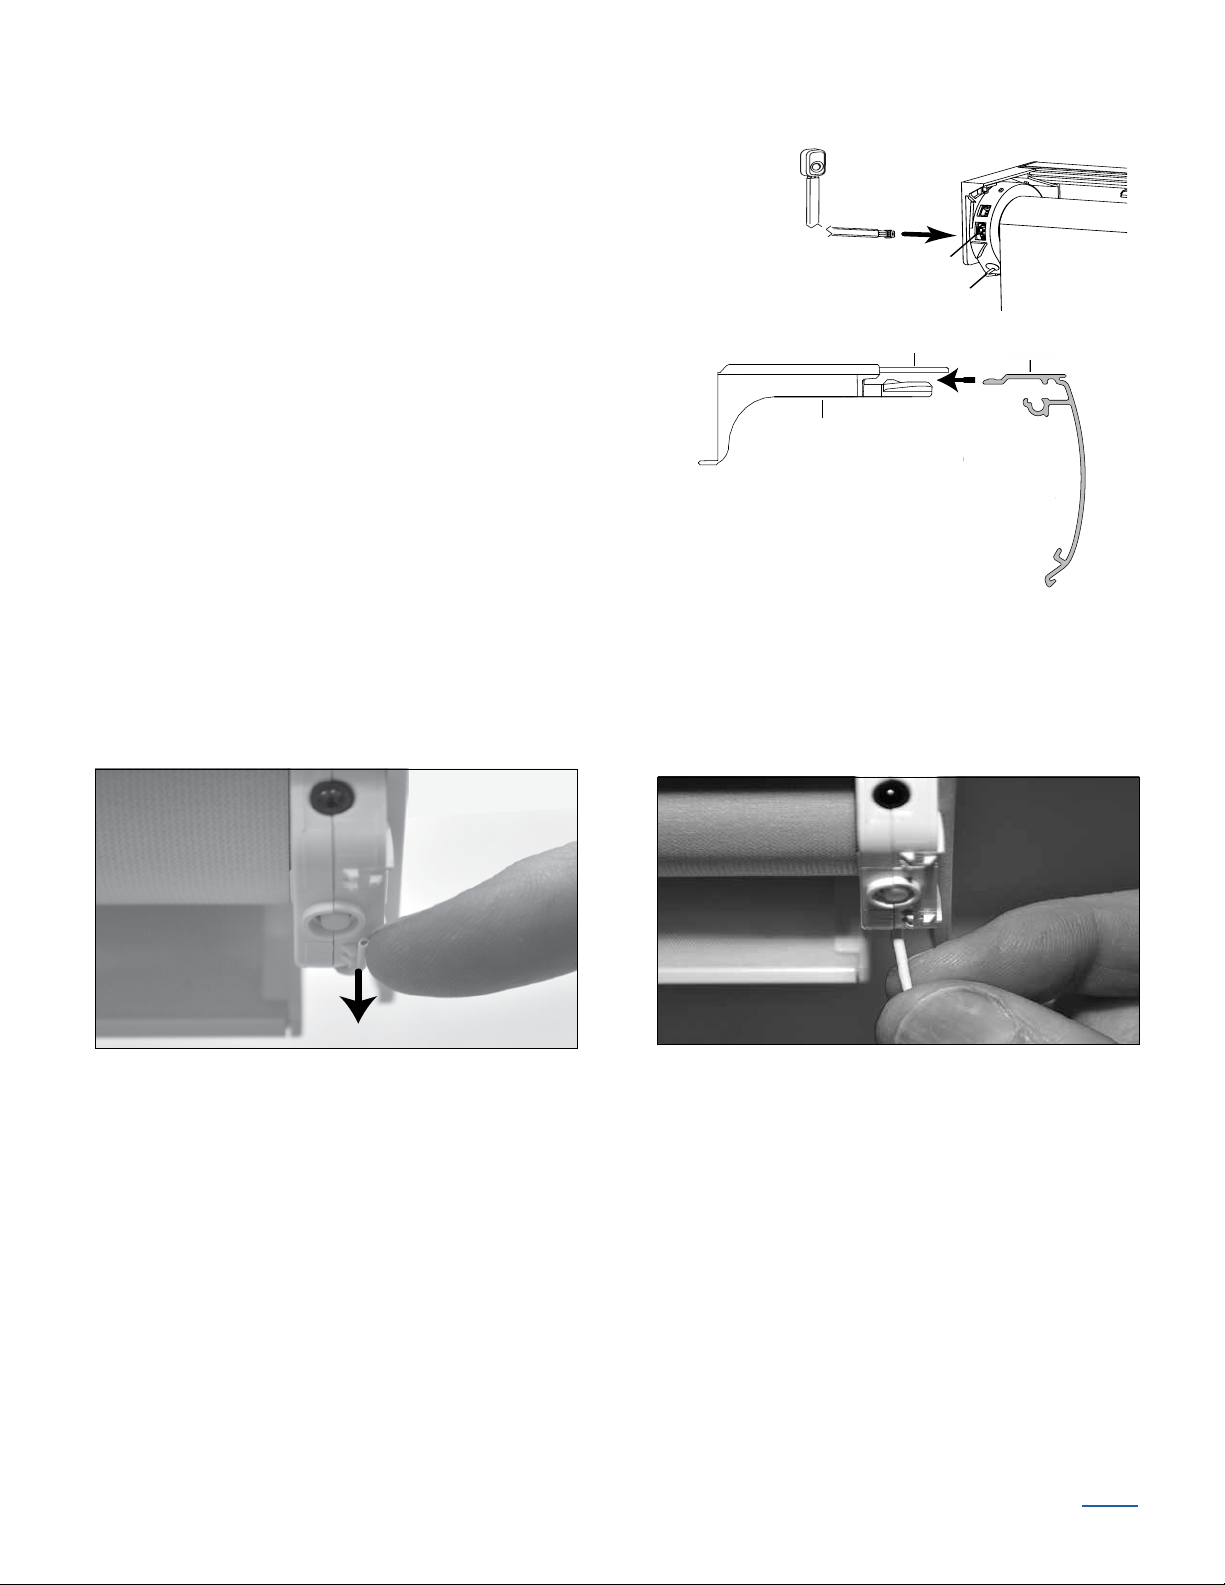
STEP 2 — Install the Shading
3-Pin Port
Antenna
Back
of Shading
Headrail
Installation
Bracket
Lever
Slide the Headrail
between the Lever
and the Bracket.
Headrail
de
the H
eadra
il
ween the Lever
the Br
acke
t.
CAUTION: Take care when handling the antenna wire
attached to the motor cartridge. Do not cut or remove
this antenna.
■ If you have an external eye, plug it into the 3-pin port
on the back of the shading. Be sure the plug is oriented
correctly. Do not force the connection.
■ Position the shading so that the front
(coloredfabric) faces you.
■ Slide the headrail into the installation
brackets so the edge of the headrail
is between the lever and the bracket,
as shown.
■ Firmly push the headrail into each bracket until it clicks
and the lever snaps to the right side of the bracket.
IMPORTANT: Carefully pull on the headrail at each bracket to ensure it is installed securely.
Enhance the Antenna Reception
■ Carefully unsnap the antenna from its storage position on the motor cartridge and form it to
hang straight down from the shading. This helps increase the signal range for the remote.
Tenera Installation Instructions 12
BACK
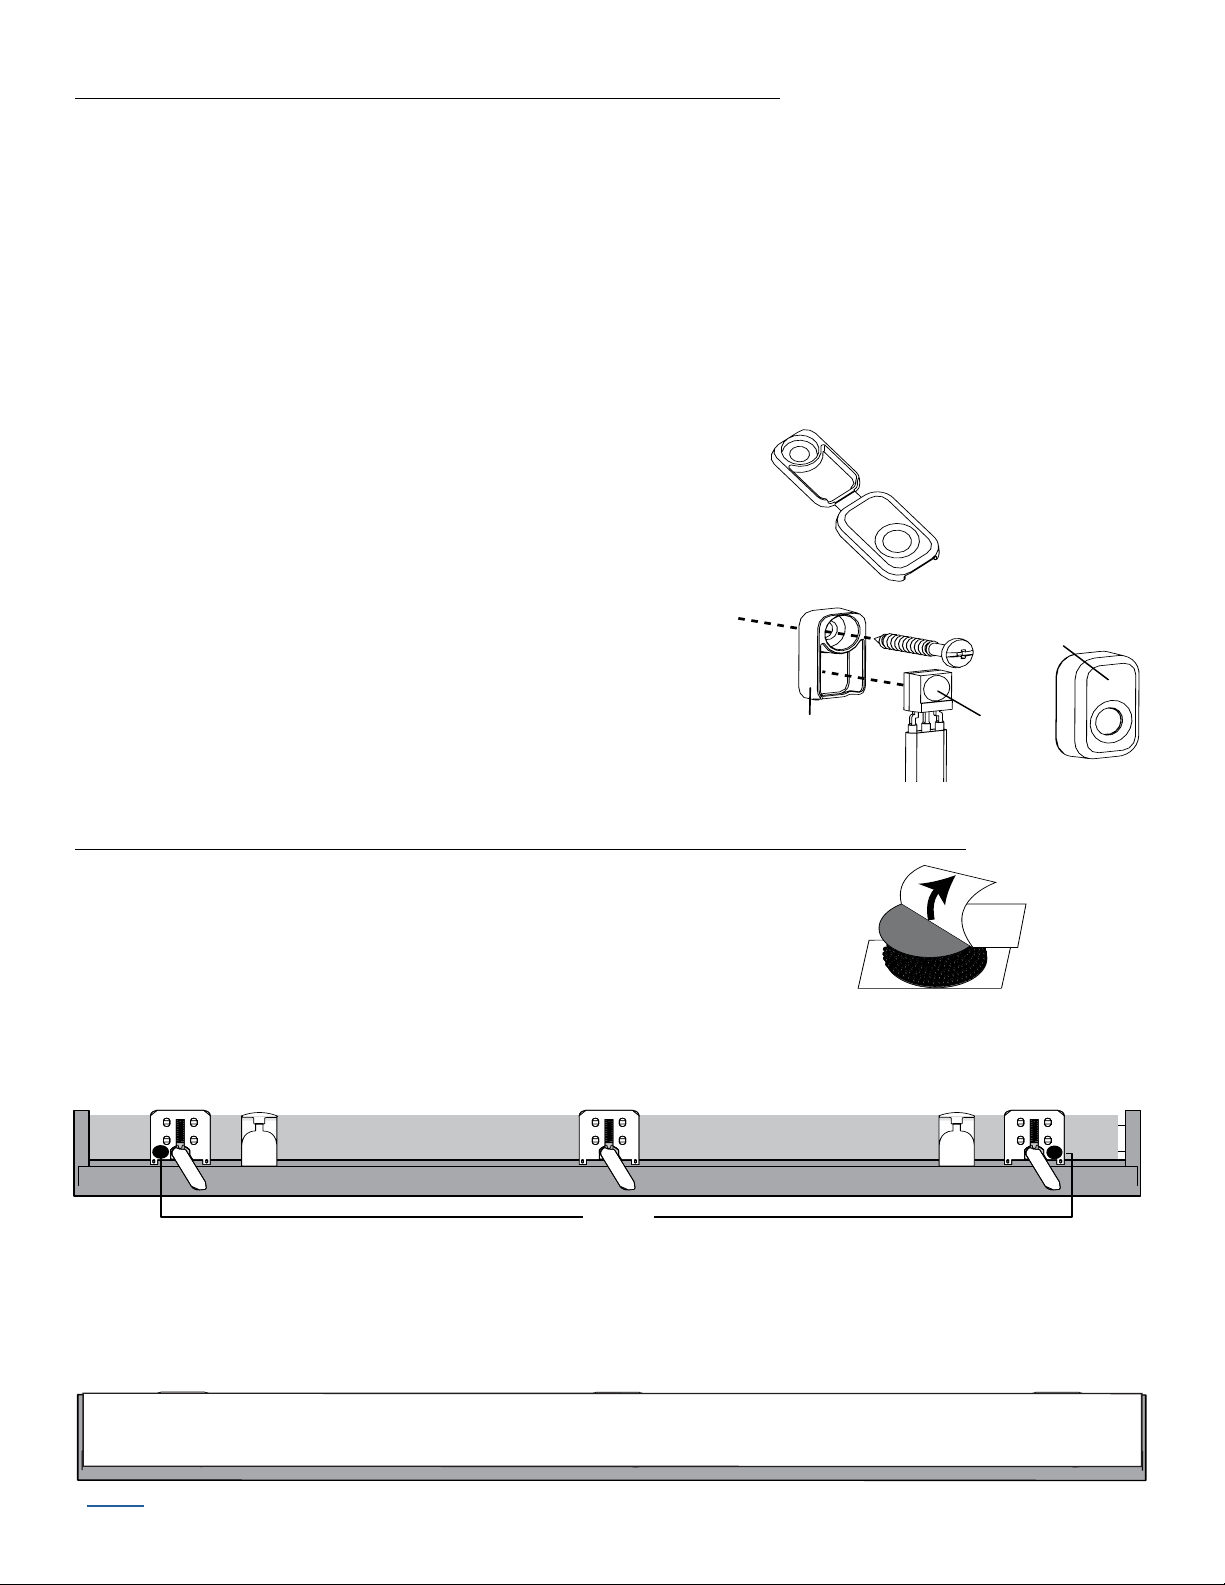
If You Have an Optional External Eye (Infrared Only)...
Back
Cover
Snap-On
Front Cover
Snap-On
Front Cover
Back
Cover
Infrared
Eye
External Eye With Snap-On Cover
Remove
Paper
Backing
Overhead View — No Dust Cover
Dots
Overhead View — No Dust Cover
Dots
Dust Cover Installed
The plastic of the external eye can be painted. Do not paint the infrared eye.
CAUTION: Handle the external eye carefully to avoid damaging the infrared eye. Do not touch or
push the infrared eye.
■ Choose a location where the infrared signal from the remote is not obstructed. Check that the
wire is not caught or pinched in the brackets or headrail.
IMPORTANT: For infrared operation, do not mount the external eye in direct sunlight or bright,
focused light from halogen or fluorescent light fixtures, track lighting, spotlights, or neon lights.
■ Break off the back cover from the snap-on front cover.
■ Place the back cover at the desired location.
■ Mark the screw hole.
3
■ Drill the screw hole using a
■ Attach the back cover using the screw provided.
/32" drill bit.
■ Place the infrared eye into the back cover with the eye
facing out.
■ Snap on the front cover with the hole placed over the infrared eye.
If You Have an Optional Dust Cover (For Outside Mount Shadings)...
The dust cover is used to protect the top of the headrail from exposure to
dust on outside mounted shadings.
■ Cut the dust cover to desired width.
■ Remove the paper backing on one side of the hook and loop fastener dots.
■ Apply the dots to the installation brackets on each end of the shading
■ Remove the remaining paper backing from the dots.
■ Center the dust cover over the top of the shading, above the previously placed dots.
.
■ Press the dust cover down onto the dots.
BACK
Tenera Installation Instructions 13
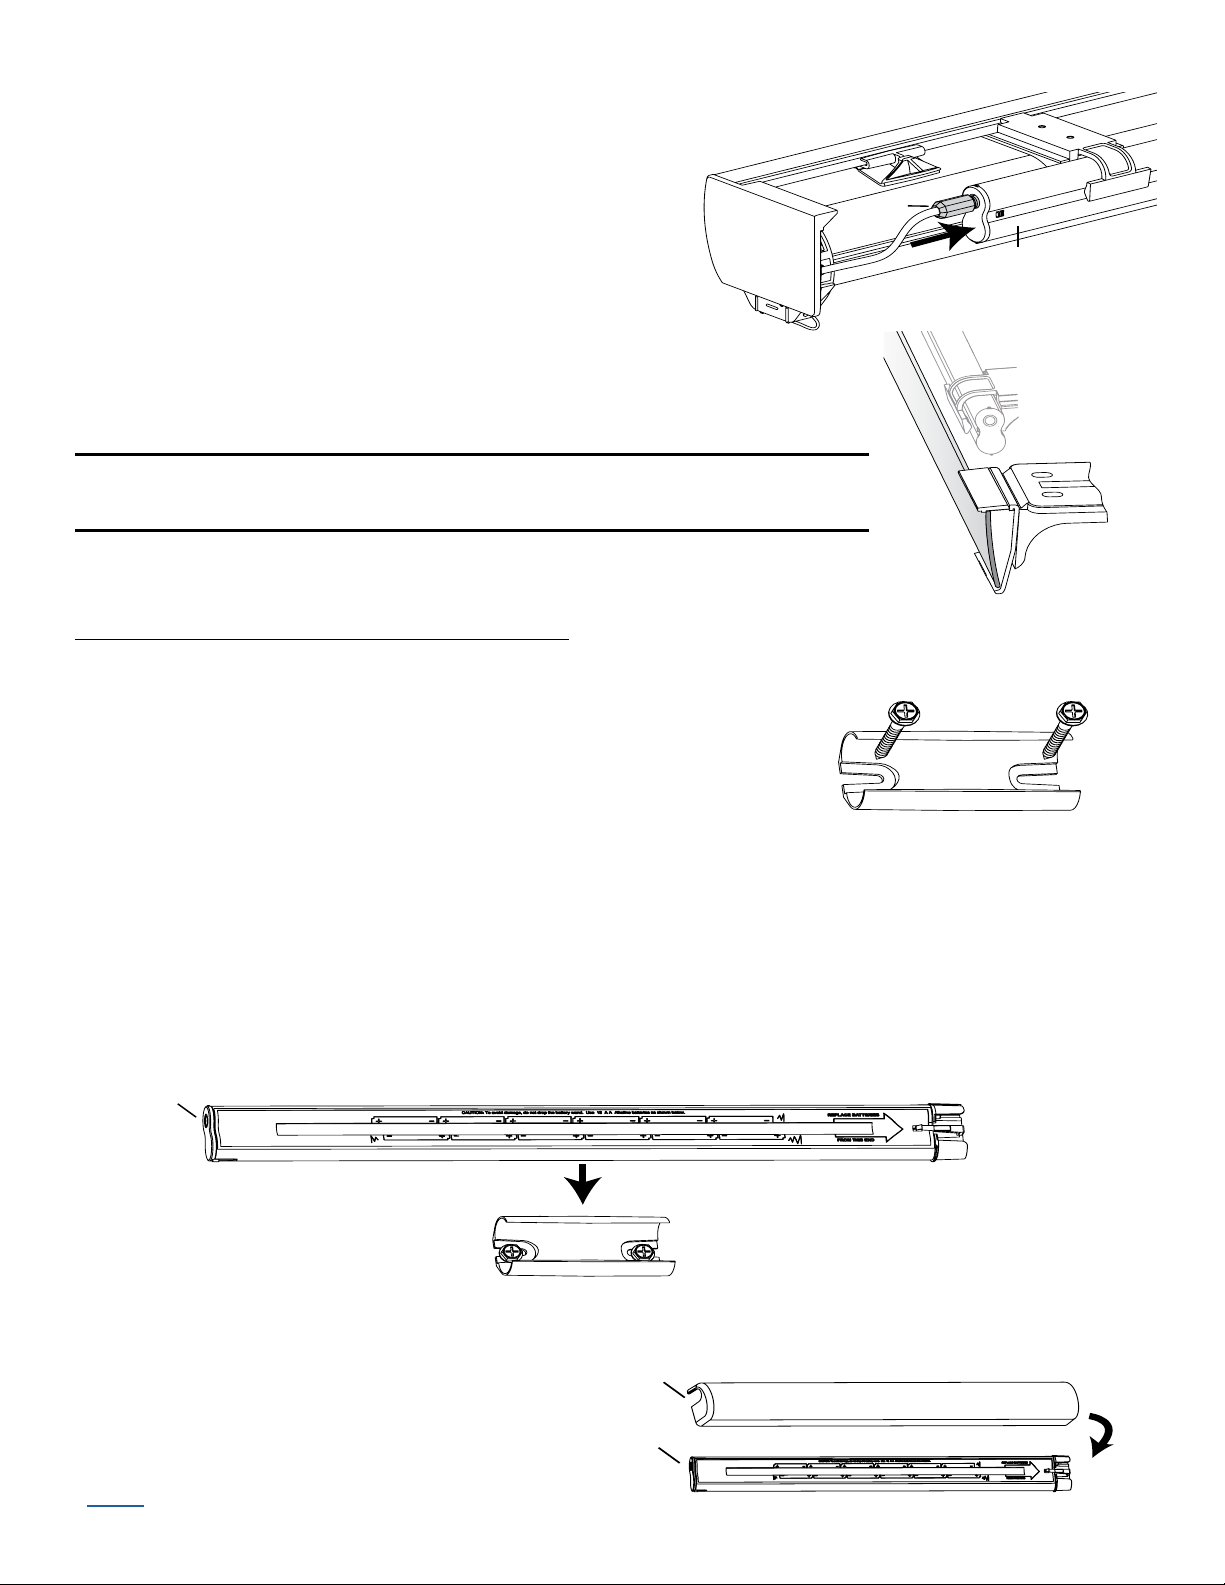
STEP 3 — Connect the Power Source
Tab
Slot
Cap
Latch
Battery
Wand
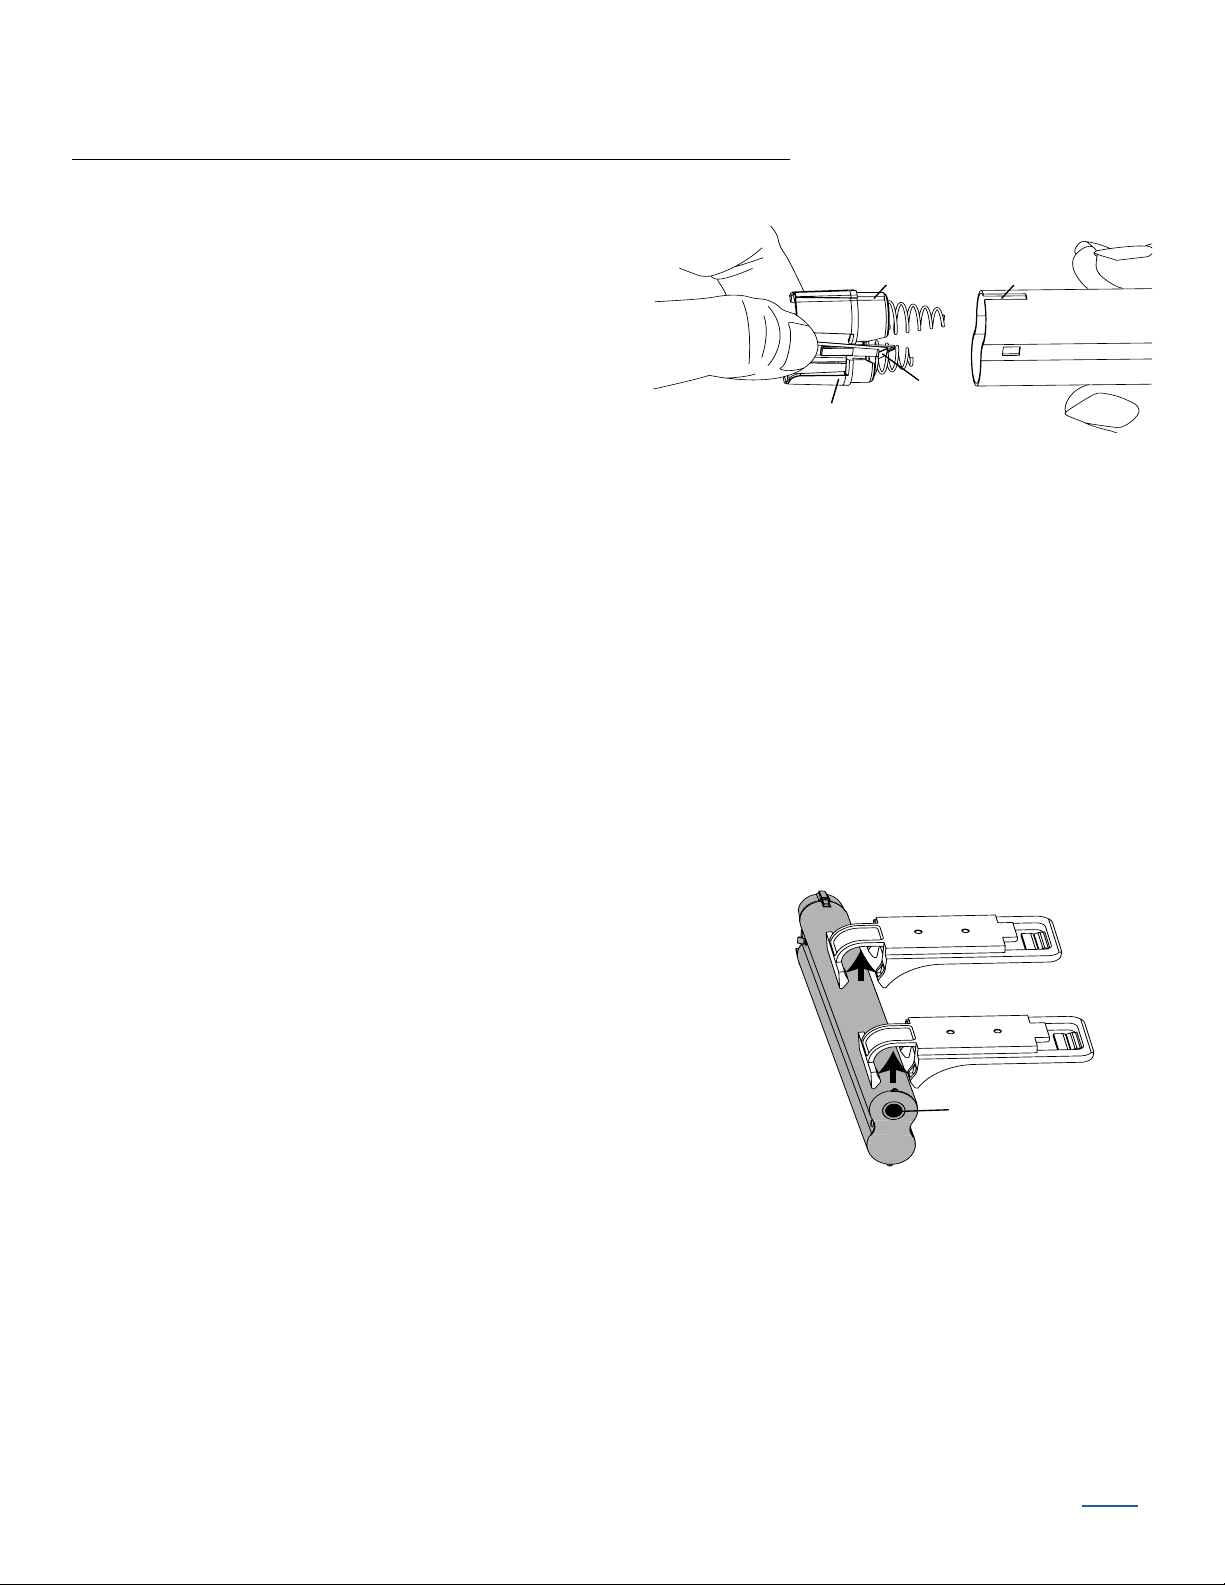
Squeeze
Place the socket
toward the motor end.
If You Have a Battery Wand or Satellite Battery Pack...
Install the Batteries into the Battery Wand
■ Squeeze the cap latch to release thecap.
■ Remove the cap from the battery wand.
■ Install the batteries according to the
instructions on the battery wand label.
➤ AA alkaline batteries are recommended
for use with Battery-Powered shadings. These will provide approximately one year
of operation, depending on usage. Lithium and rechargeable batteries are not
recommended.
■ Replace the cap.
➤ Align the tab with the end of the wand.
➤ Press the cap on until it latches.
IMPORTANT: If you have a satellite battery pack, proceed to “Mount the Satellite Battery
Pack”
Mount the Battery Wand into theBattery Wand Clips
■ Place the battery wand with its socket toward the motor
end of the shading.
■ Push the battery wand straight up into the battery wand
clips until it snaps into place. Check to make sure the
battery wand is secure.
CAUTION: Be sure the cables do not become pinched
by the battery wand clips during installation. Damage or
overheating of components could result.
Tenera Installation Instructions 14
BACK
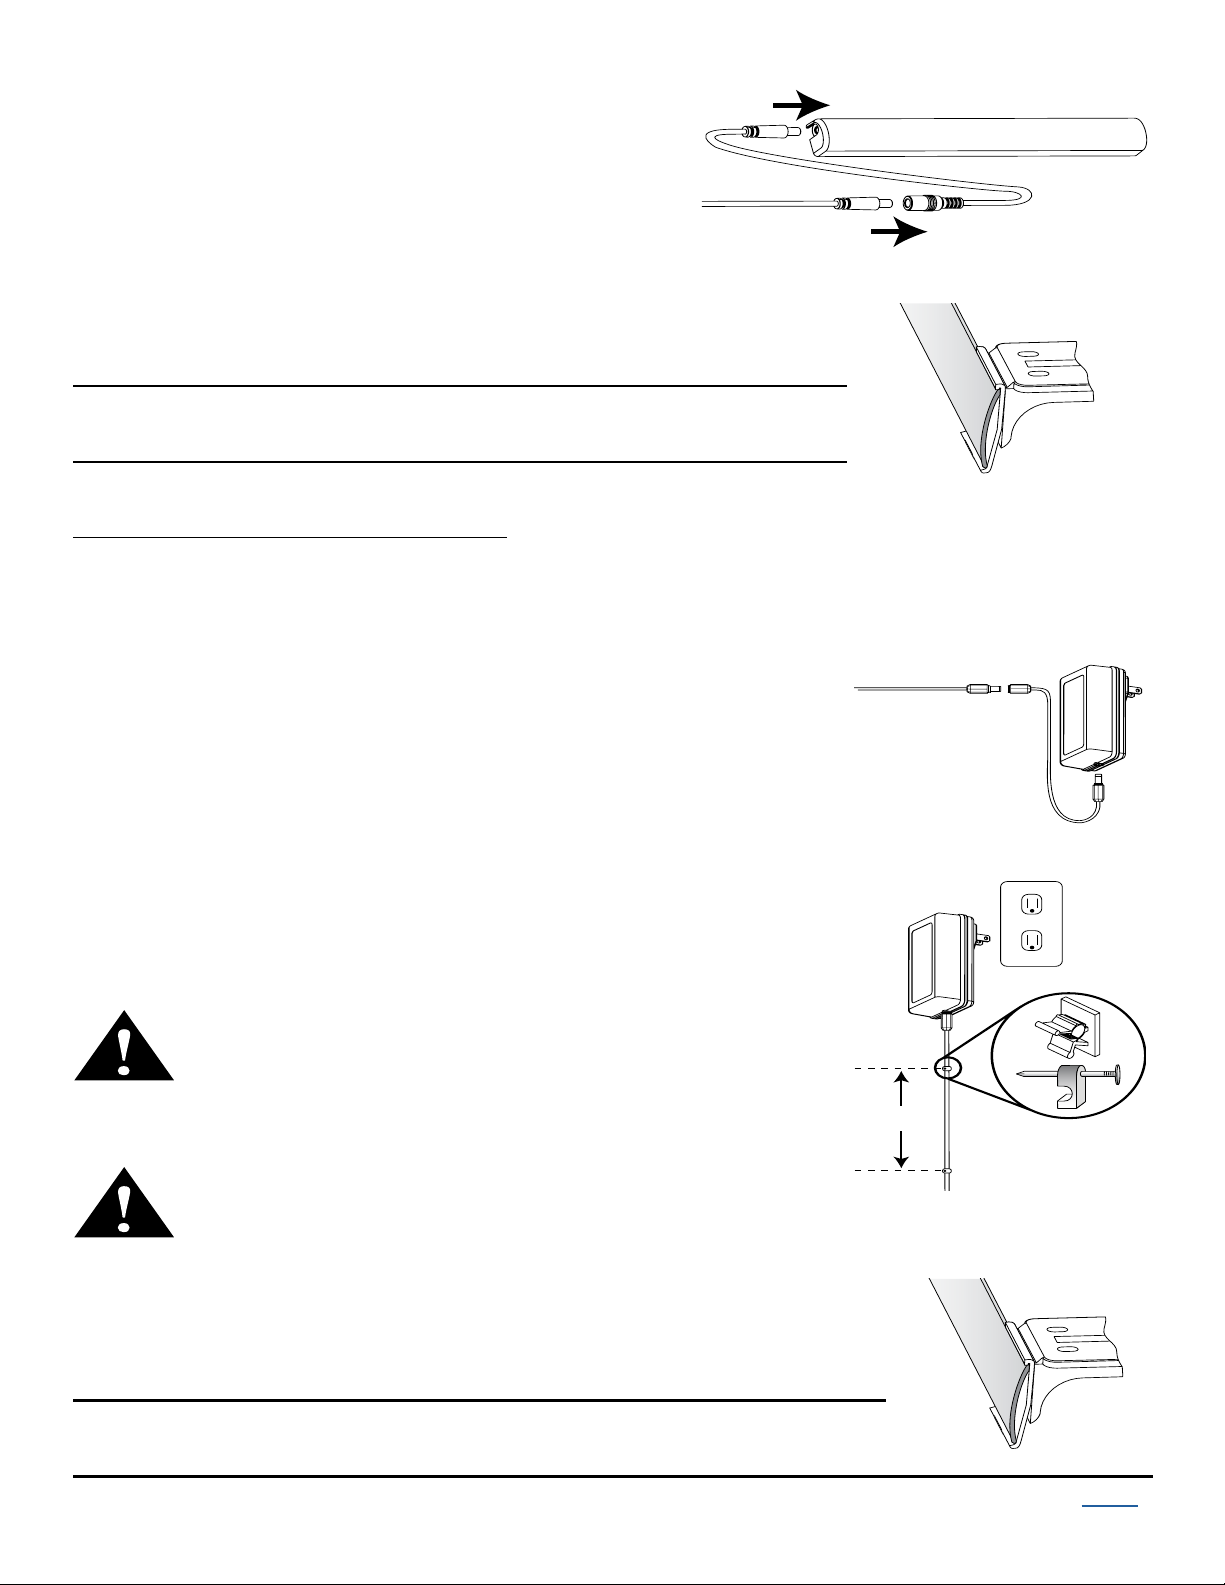
Plug the Power Cable into the Battery Wand
Power
Cable
Battery
Wand
Back
Cover
Battery Wand
Wall Mount Bracket
Socket
Battery Wand Cover
Socket
Slot
■ From the back of the shading headrail, connect the
power cable (from the motor side) into the socket
on the battery wand.
Install the Back Cover (Optional)
■ If using a back cover, install it into the back cover brackets,
as shown.
Proceed to “Attach Magnetic Hold-Down Brackets (Optional)” or
“Operate the Shading”
If You Have a Satellite Battery Pack...
Mount the Satellite Battery Pack
■ Decide where you want to mount the bracket. A satellite
battery pack may be mounted in any orientation.
■ Mark the screw holes.
■ Drill the screw holes using a
3
/32" drill bit.
■ Remove the backing from the double-sided tape. Press the bracket into place.
■ Attach the bracket using the screws provided.
■ Position the battery wand so the power cable is easily connected to the socket.
■ Snap the battery wand into the bracket.
BACK
■ Replace the cover with the slot aligned
to the socket in the battery wand.
Tenera Installation Instructions 15
■ Plug the power cable from the shading into
Battery Wand Cover
Extension
Cable
Power Cable
from Shading
Back
Cover
Back
Cover
Battery Wand
Power Cable
from Shading
Extension
Cable
DC Power
Supply
Plug
15" (Max)
Power
Supply
Wire Retainer
Back
Cover
Back
Cover
Battery Wand
the extension cable.
■ Plug the other end of the extension cable
into the socket in the battery wand.
Install the Back Cover (Optional)
■ If using a back cover, install it into the back cover brackets,
as shown.
Proceed to “Attach Magnetic Hold-Down Brackets (Optional)” or
“Operate the Shading”
If You Have a DC Power Supply...
Connect the Power Supply
■ Plug the power cable from the shading into the extension cable.
■ Plug the other end of the extension cable into the DC power
supply.
■ Plug the DC power supply into a standard outlet.
■ Secure the power supply cable using wire retainers (not
■ Space the wire retainers approximately 15" apart along the
Install the Back Cover (Optional)
■ If using a back cover, install it into the back cover brackets,
supplied). If hiding the cable behind the shading, make sure
it does not impede the operation of theshading.
power supply cable, as shown.
WARNING: Keep cords and small parts out of the
reach of children. They can wrap cords around their
necks and STRANGLE. They can also put small
parts in their mouths and CHOKE.
WARNING: Electric shock and/or a fire hazard may
occur, if not properly installed.
as shown.
Proceed to “Attach Magnetic Hold-Down Brackets (Optional)” or
“Operate the Shading”
Tenera Installation Instructions 16
BACK
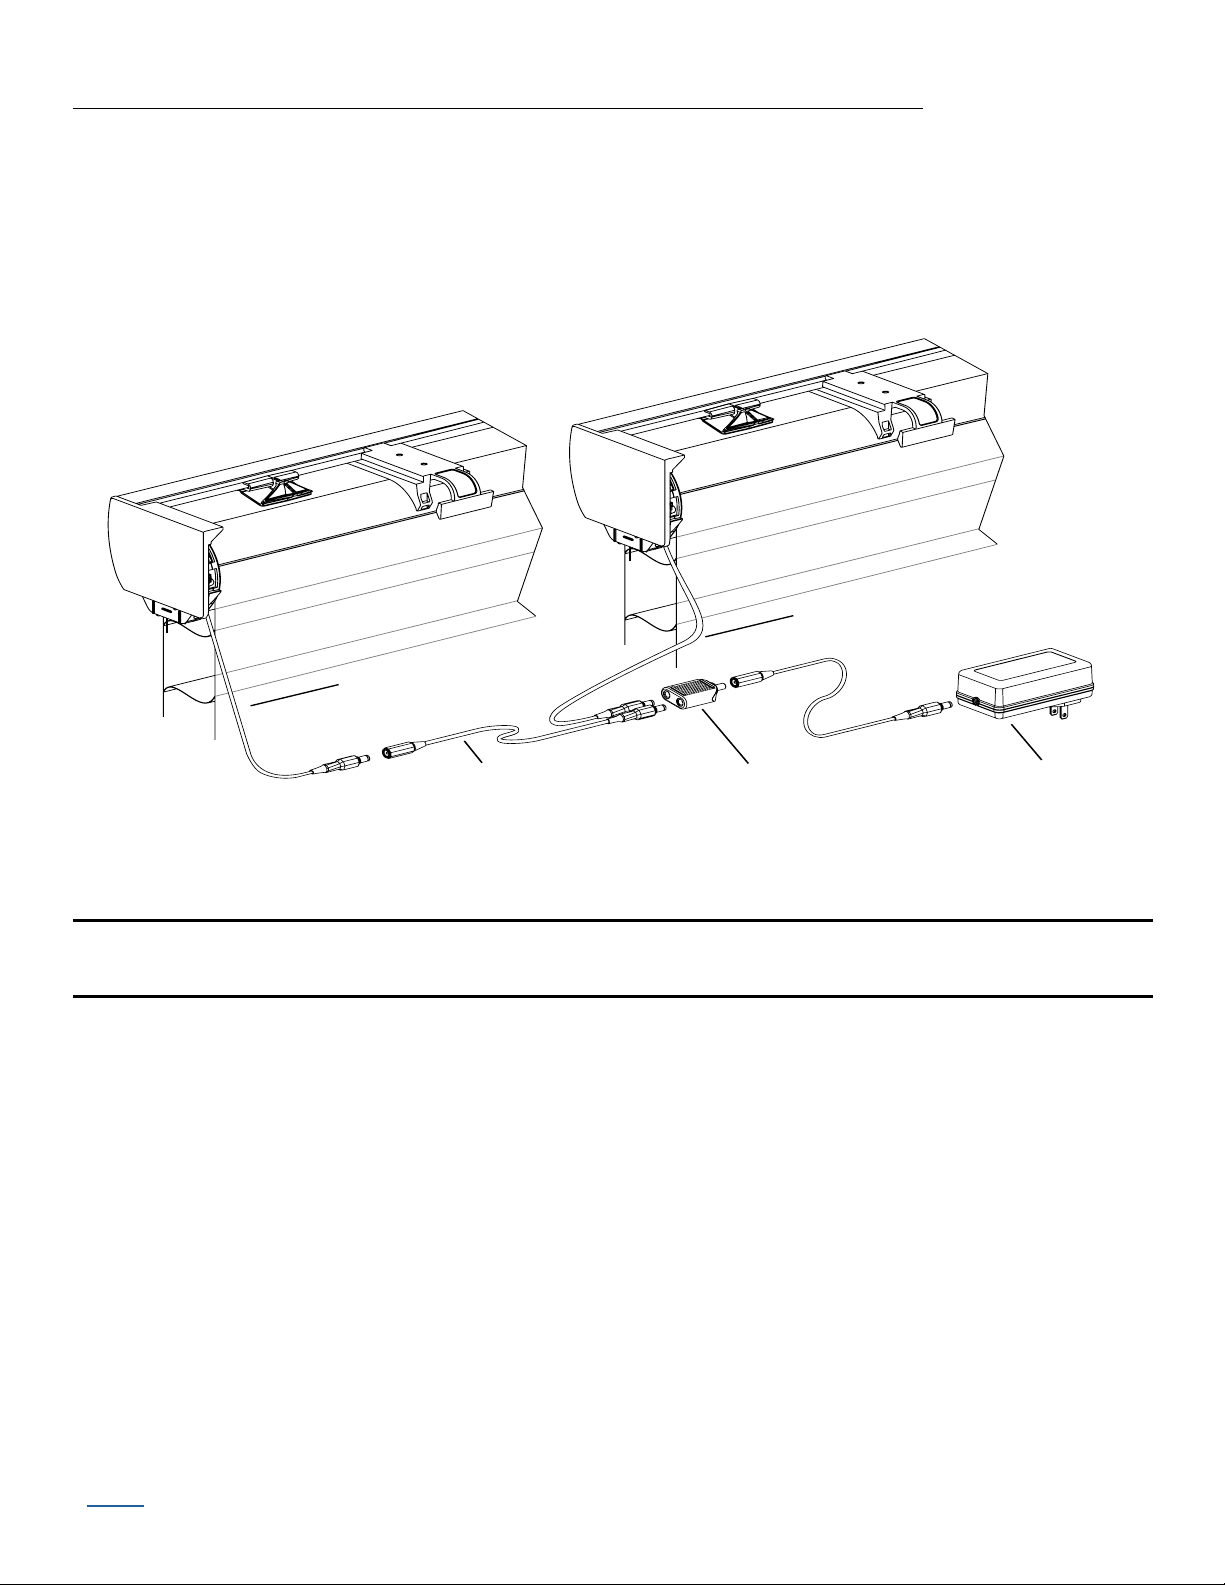
If You Have a DC Power Supply with Daisy-Chain Connections...
Power Cable
from Shading
Power Cable
from Shading
Extension Cable Connector
DC Power Supply
The daisy-chain feature allows up to three Battery-Powered shadings to be powered by a
single DC power supply. However, each shading has its own receiver eye and can operate
independently. The daisy-chain feature is only available with the DC power supply option.
■ Route the power cables from each shading to the connector, using an extension cable, if
necessary.
■ Plug an extension cable into the connector and the DC power supply. Two extension cables
and two connectors are used for three shadings.
Proceed to “Attach Magnetic Hold-Down Brackets (Optional)” or
“Operate the Shading”
BACK
Tenera Installation Instructions 17
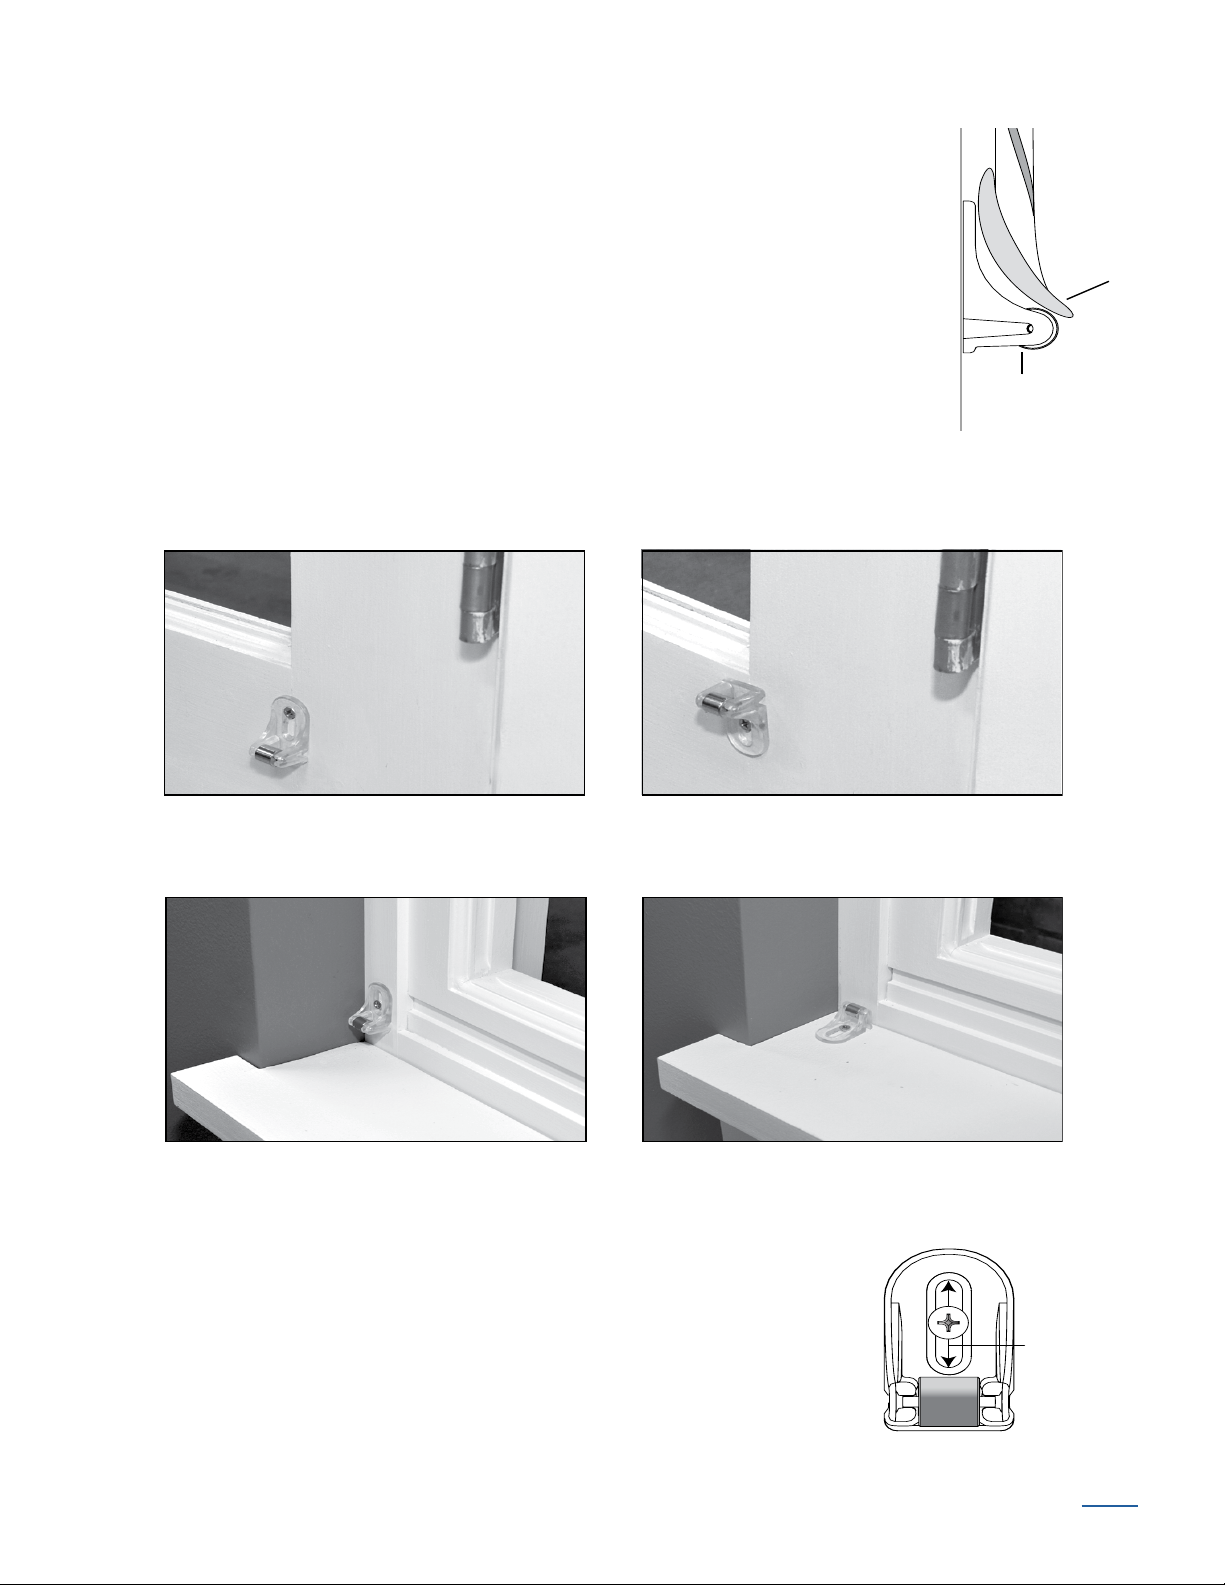
Attach Magnetic Hold-Down Brackets (Optional)
Hold-Down
Bracket
Bottom
Rail
Outside Mount
Preferred Alternate
Inside Mount
Preferred Alternate
Adjust the
bracket
using the
channel.
■ Lower the shading, keeping the vanes closed.
■ Place the magnetic hold-down brackets onto the bottom rail just inside
the end caps, oriented as shown.
■ Hold the brackets while opening and closing the vanes. (It may be
necessary to have someone assist you.) Adjust the brackets to the best
overall position.
■ Mark the screw locations using one of the mounting options shown
below.
➤ The screw should be placed in the middle of the channel. This will allow for adjustment.
■ Drill the screw holes using a
■ Attach the hold-down brackets to the mounting surface using
the screws provided.
■ If necessary, adjust the bracket position using the channel for
bestoperation.
Tenera Installation Instructions 18
3
/32" drill bit.
BACK
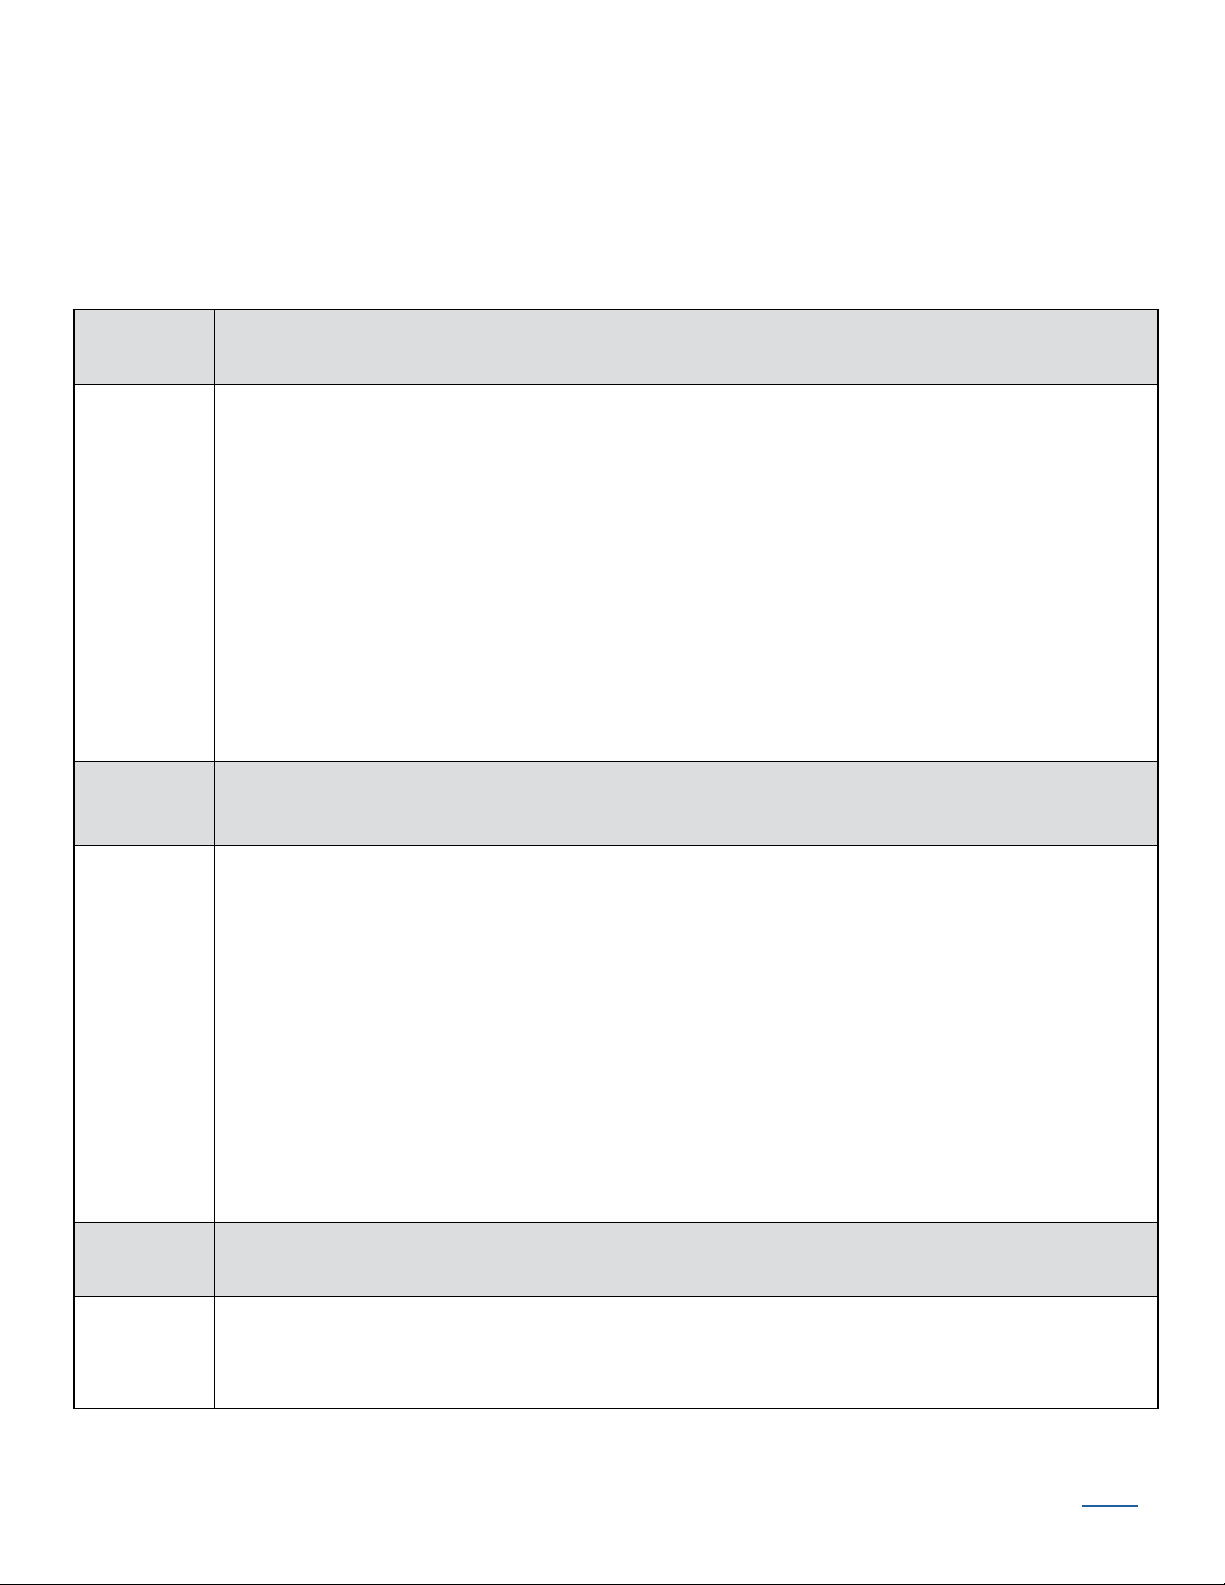
Operate the Shading
Remote Control
Guide
Battery-Powered
Cellular Shades and
Sheer Shadings
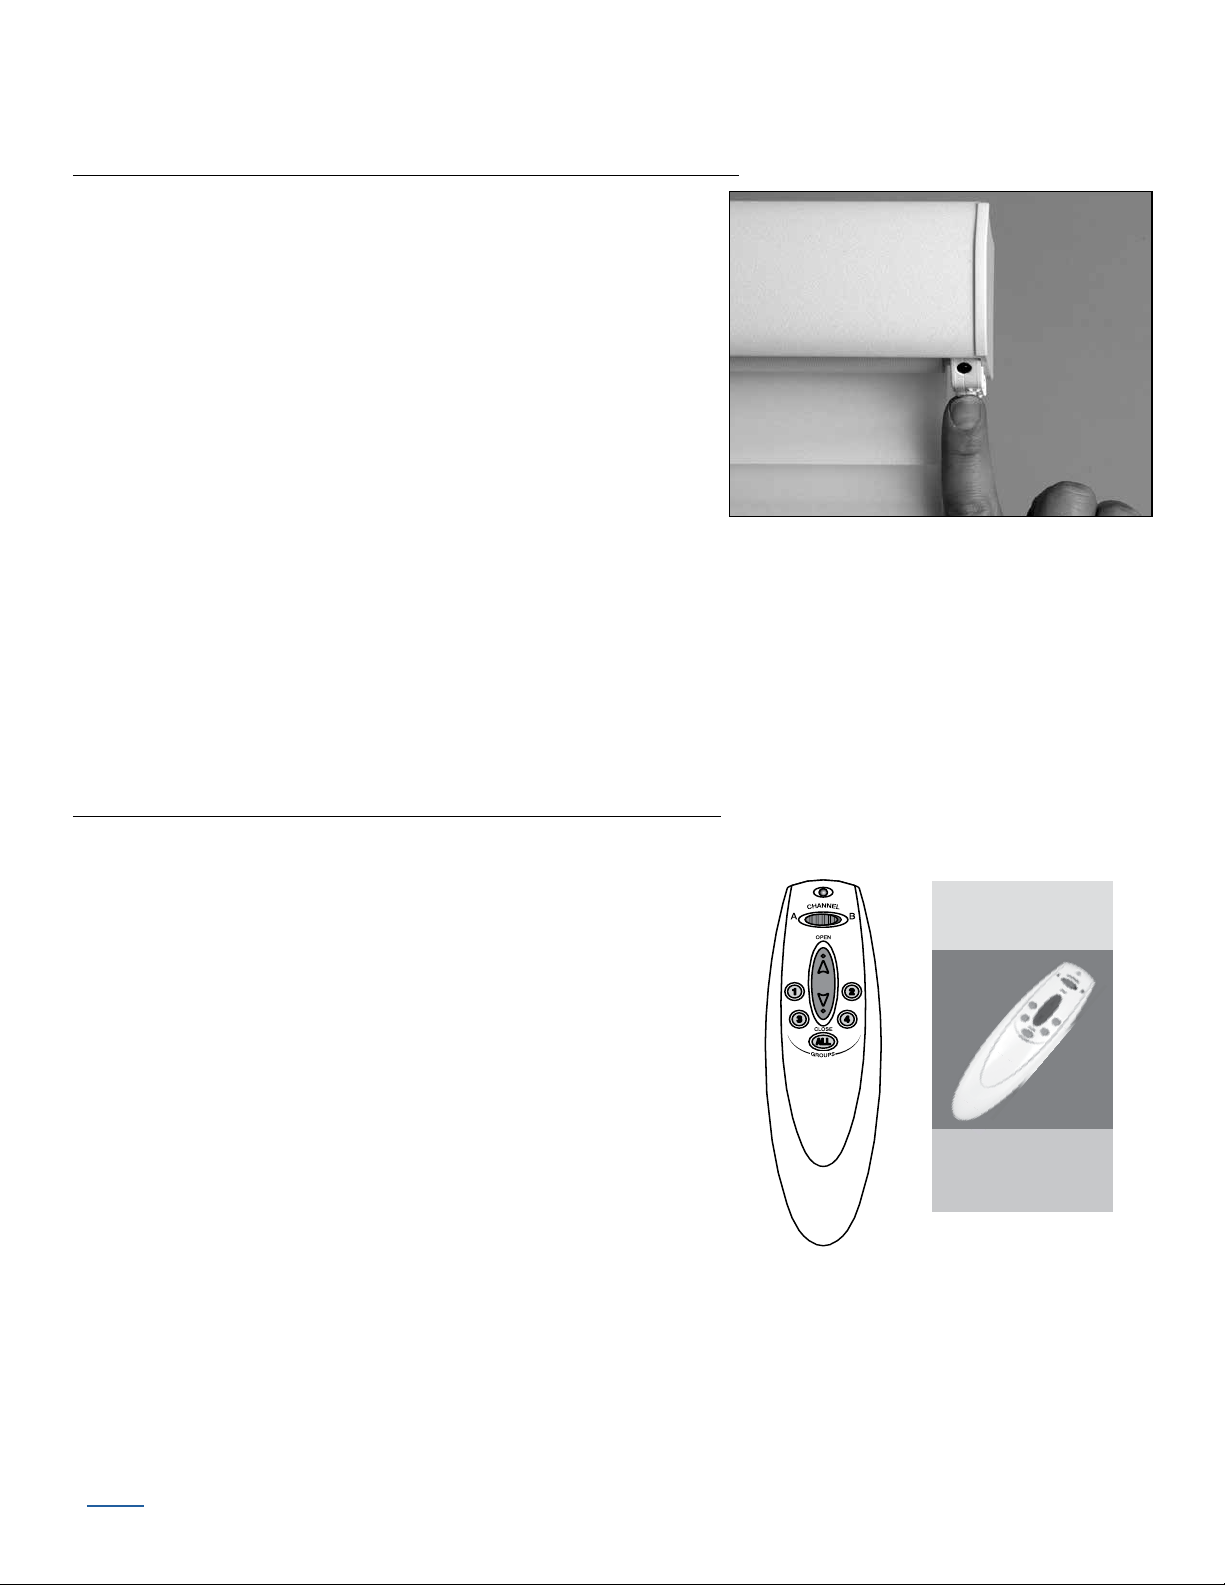
Test the Shading Using the Manual Control Button
Testing the shading with the manual control button will
allow you to ensure that the motor and power source are
working correctly.
■ Press the manual control button on the bottom of the
motor side end cap to test operation. If the shading
does not operate, see “Resetting the Shading” or
refer to “Troubleshooting”
➤ Press the button to alternately lower, stop, and
raise the shading.
CAUTION: When raising the shading for the first time, observe how the fabric rolls up into
the headrail. It should roll up evenly. If the bottom rail is not level or the shading starts to
rub against either window jamb, immediately press the manual control button to stop the
shading. See “Adjust the Bottom Rail Weight”
Further Operation and Programming Information
Remote Operation
For information regarding operation and programming of
the remote control, refer to your Remote Control Guide.
BACK
Tenera Installation Instructions 19

Alternate Push-Button Programming Method (Professional Installation Only)
To Add a Shading to a Group:
■ Press and hold the manual control button located at the window covering or on the
external eye.
■ While continuing to press the manual control button, press the desired group number
button, then press the UP ▲ button on the remote.
■ The window covering will move slightly to indicate it has been assigned to a group.
To Remove a Shading from a Group:
■ Press and hold the manual control button located at the window covering or on the
external eye.
■ While continuing to press the manual control button, press the desired group number
button, then press the DOWN ▼ button on the remote.
■ The window covering will move slightly to indicate it has been removed from that group.
Tenera Installation Instructions 20
BACK

Resetting the Shading
If you need to reset the limits:
Basic Reset
■ Press and hold the manual control button for 6+ seconds. The shading moves slightly up
and down once to indicate that it has been reset. Release the button.
■ Press and release the manual control button to close the shading completely. This sets the
lower motor limit.
■ Press and release the manual control button again to open the shading completely. This sets
the upper motor limit.
Factory Reset (Professional Installation Only)
To clear all stops, erase all radio frequency (RF) programming, and reset the shading to
factorydefault:
■ Press and hold the manual control button for 12+ seconds. The shading moves slightly up
and down twice to indicate that it has been reset. Release the button.
■ Press and release the manual control button to close the shading completely. This sets the
lower motor limit.
■ Press and release the manual control button again to open the shading completely. This sets
the upper motor limit.
NOTE: Both upper and lower motor limits have been reset. However, any intermediate stop
position is still cleared; and all RF programming has been erased and will need to be set
up again.
BACK
Tenera Installation Instructions 21
Troubleshooting
If your shading is not operating correctly:
■ First review the guide that came with your remote control.
■ Refer to the following troubleshooting procedures for specific solutions for your shading.
Problem The shading will not fit into the installation brackets.
Solution Check that the installation brackets are level and aligned. Adjust and/or shim to
level, if necessary.
Be sure the heads of the mounting screws are flush against the installation
bracket.
Make sure that the shading fabric is not caught between the installation bracket
and the headrail.
Check that the headrail is completely inserted into the installation brackets. See
“STEP 2 — Install the Shading”
Problem The shading is not responding to the remote.
Solution. Check that the batteries in the wand or satellite battery pack are correctly
inserted andarefresh.
Check that the battery wand, satellite battery pack, or DC power supply is
securely connected to the power cable and the cables are not pinched or caught
in the headrail or installation brackets.
Reset the shading. See “Resetting the Shading”
See the Remote Control Guide for operating or programming troubleshooting
solutions.
Problem The vanes do not open when the shading is first operated.
Solution Open and close the shading several times to help open the vanes. If necessary,
gently pull down on the bottom rail.
Tenera Installation Instructions 22
BACK
Problem The bottom rail does not raise or lower completely, or its location when fully
lowered has changed over time.
Solution The batteries may be low in the wand or satellite battery pack. Replace the
batteries.
Check that the battery wand, satellite battery pack, or DC power supply is
securely connected to the power cable and the cables are not pinched or caught
in the headrail or installation brackets.
Check that there is clearance between the ends of the shading and the window
casement on inside mounts.
Check if the fabric rolls up evenly into the headrail. If not, see “Adjust the Bottom
Rail Weight”
Reset the stop positions. See “Resetting the Shading”
See the Remote Control Guide for operating or programming troubleshooting
solutions.
Problem Adjacent shadings do not roll up evenly.
5
Solution It is considered normal if the roll-up on both shadings is within
/16" of each
other. If one shading rolls up tighter than another, lower and raise both shadings
several times.
Reset the shading. See “Resetting the Shading”
Check that the shading fabric is not catching on any brackets or components.
Check that the fabric winds evenly and does not rub against the headrail. If
uneven, see “Adjust the Bottom Rail Weight”
For a more exact roll-up, use the intermediate stop feature to set a specific
height. See the Remote Control Guide for operating or programming
troubleshooting solutions.
Problem The shading raises or lowers unevenly or the bottom rail isuneven when fully
raised.
Solution Check that the headrail and installation brackets are level and aligned in the
window. Level the headrail by shimming the installation brackets, if necessary.
Make sure that the shading fabric is not caught between the installation bracket
and the headrail.
Adjust the bottom rail weight. See “Adjust the Bottom Rail Weight”
BACK
Tenera Installation Instructions 23
 Loading...