

Lafayette parasol Installation Instructions Manual
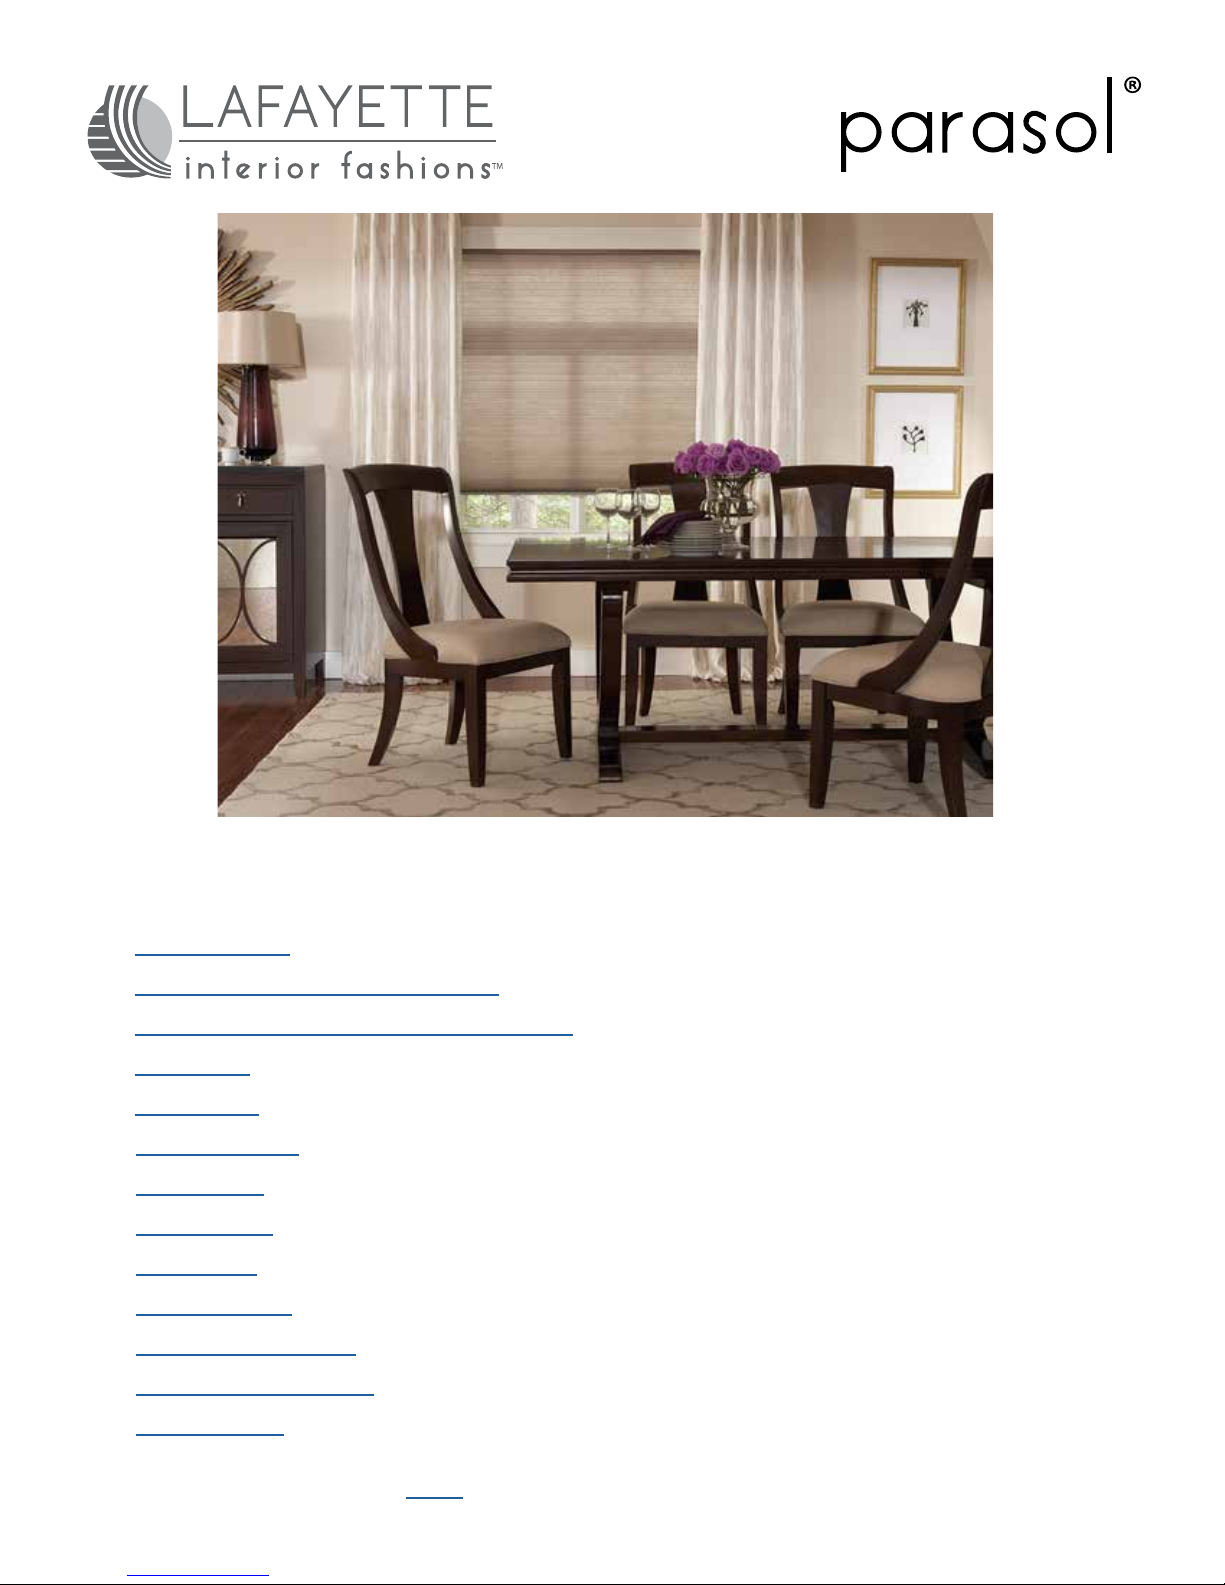
Cellular Shades
Installation Instructions
• Accu-Rise™
• Angles and Specialty Shapes
• Arches, Circles and Quarter Circles
• Assure™
• Auto-Lift®
• Continuum™
• Cord Lock
• Glissade™
• Sidelights
• SkyFrame™
• SkyLite™ Manual
• SkyLite w/ Auto-Lift
• SlideArch™
*Click BACK on any page to return to the Table of Contents*
Installation Instructions
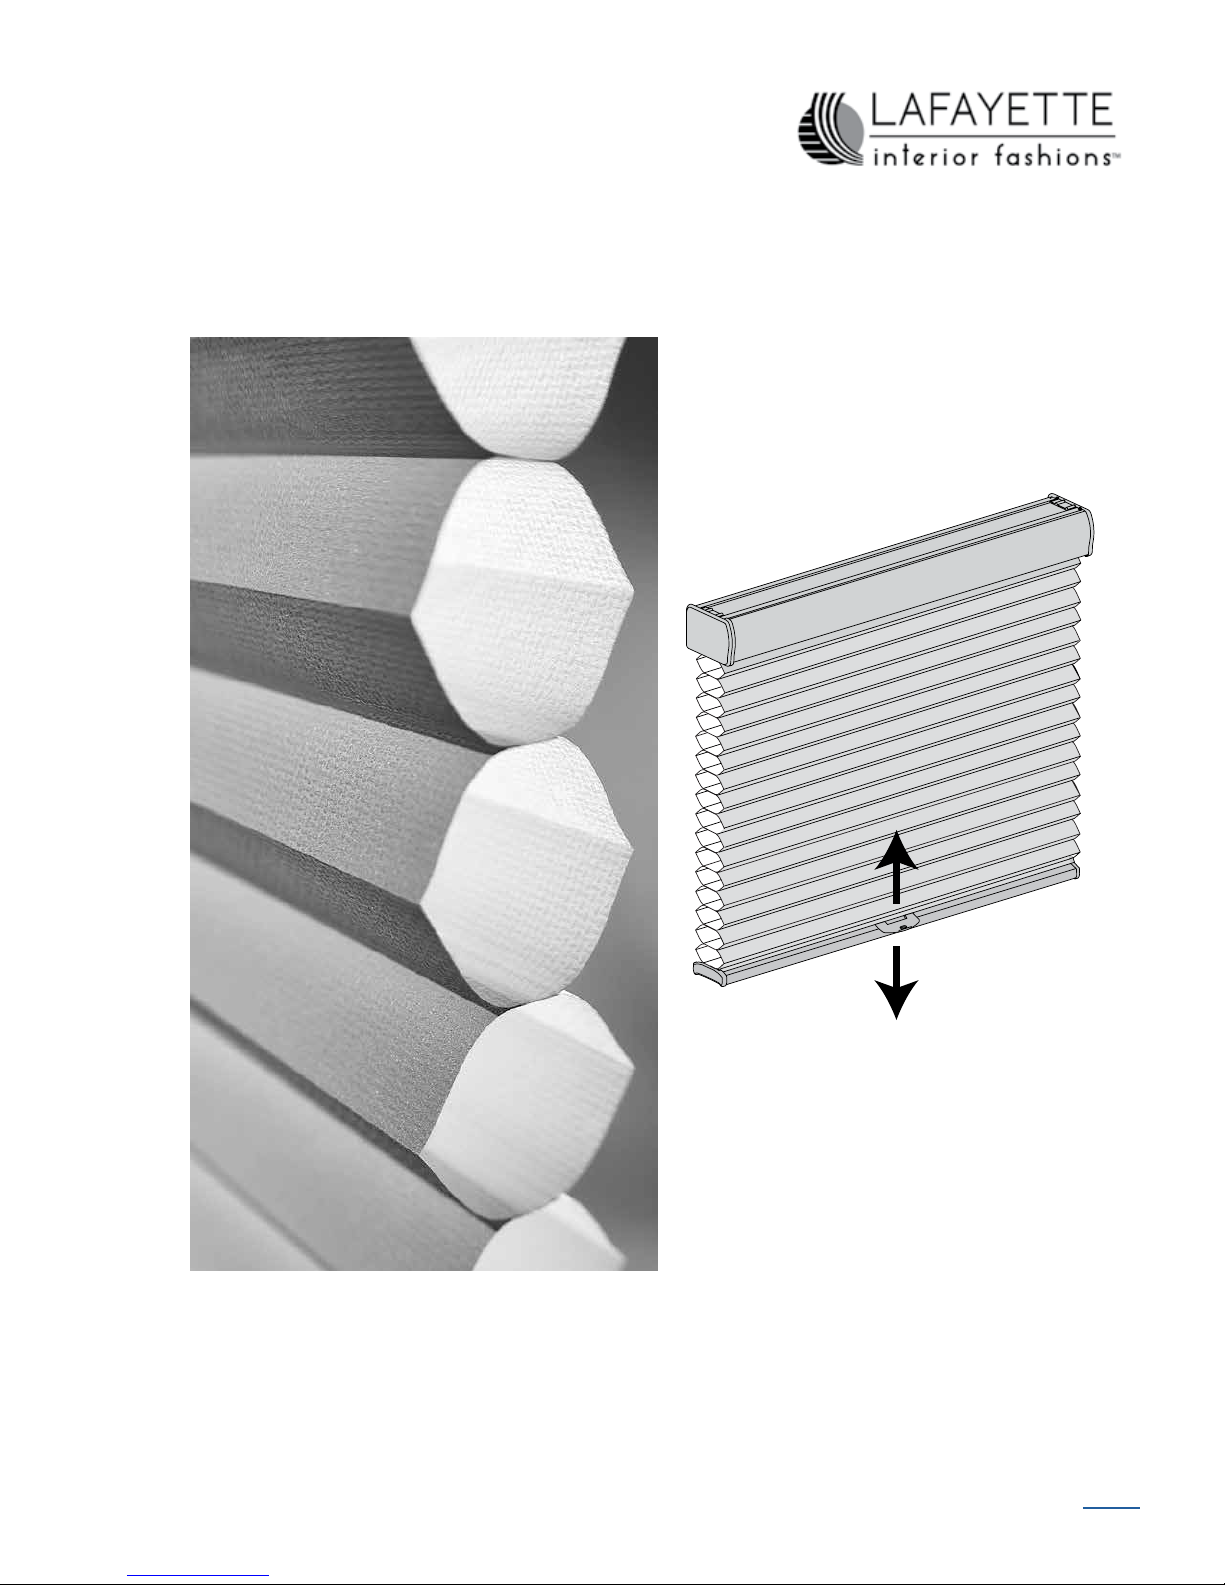
Parasol Cellular Shades
Operating System
Parasol Installation Instructions 2
Accu-Rise
™
BACK
Middle
Rail
Bottom
Rail
Installation
Brackets
Handle
Headrail
Not Shown:
Bottom-Up/Top-Down Shade
Standard
Bottom-Up
Shade
Day/Night
Shade
Product View
BACK
Parasol Installation Instructions 3
Thank you for purchasing cellular shades. With proper installation, operation, and care, your new
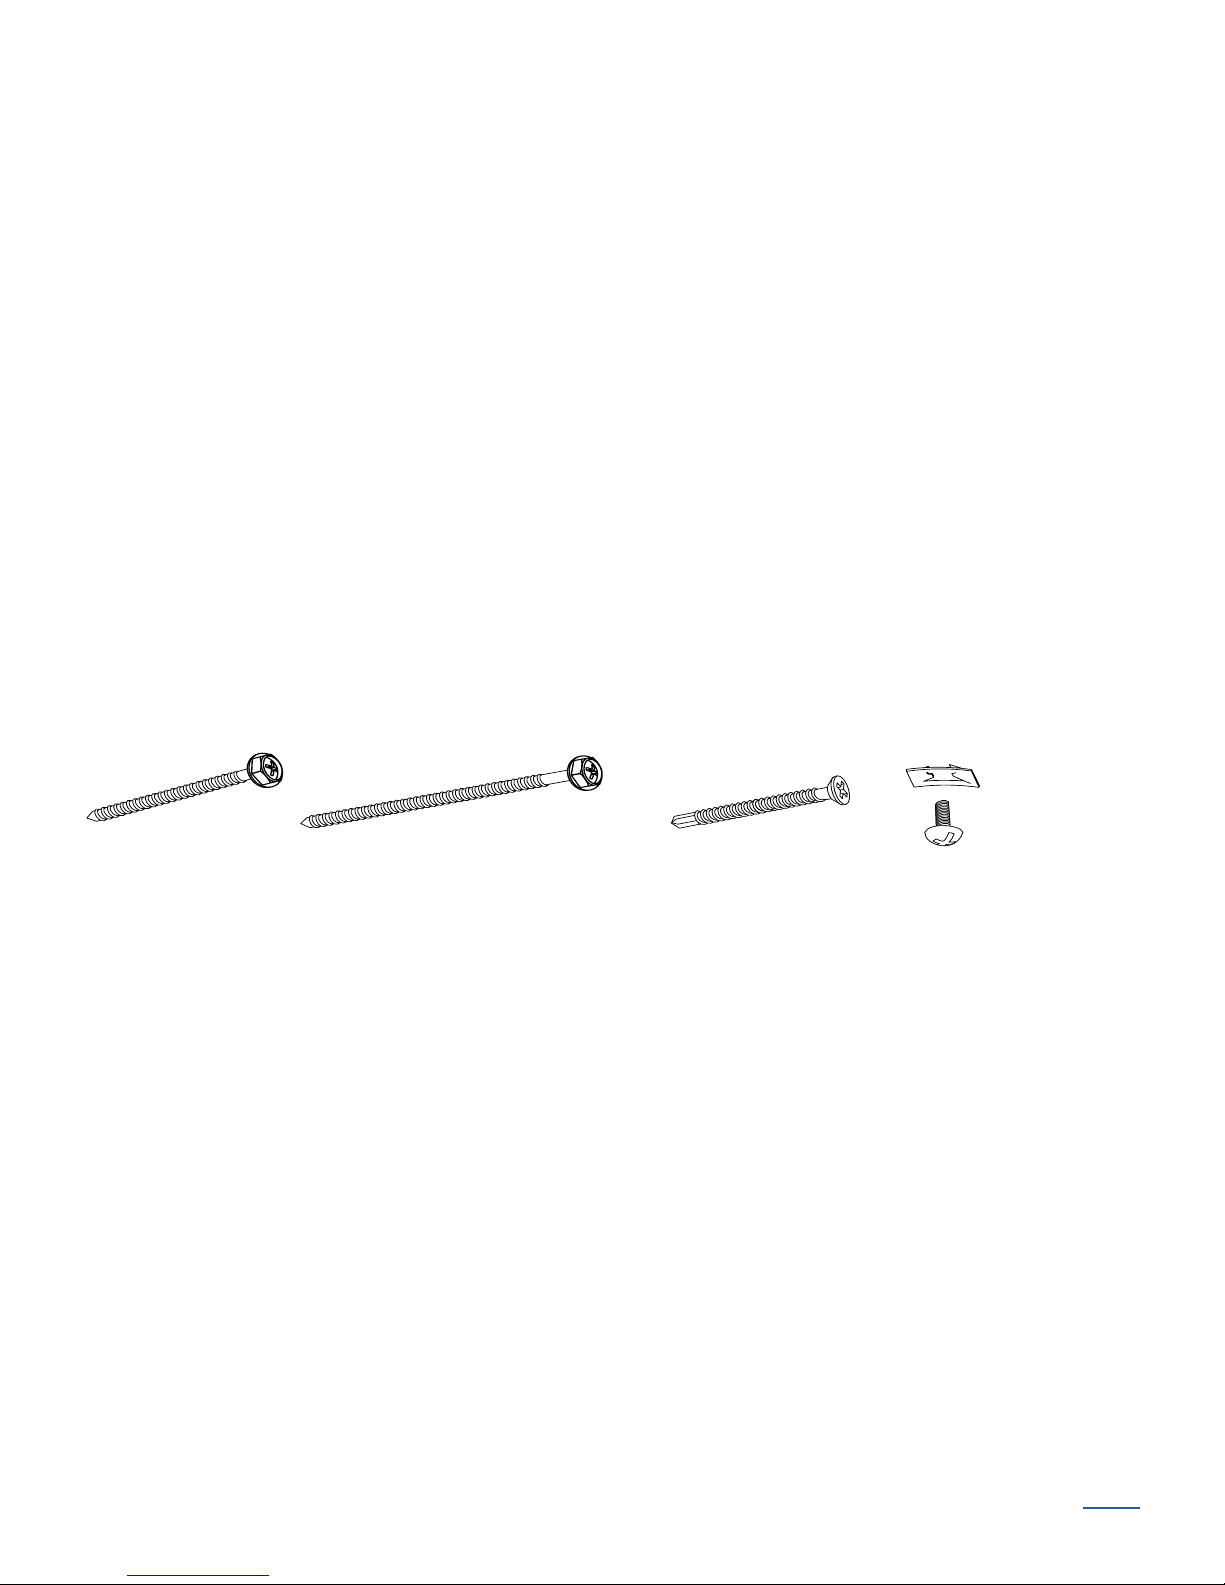
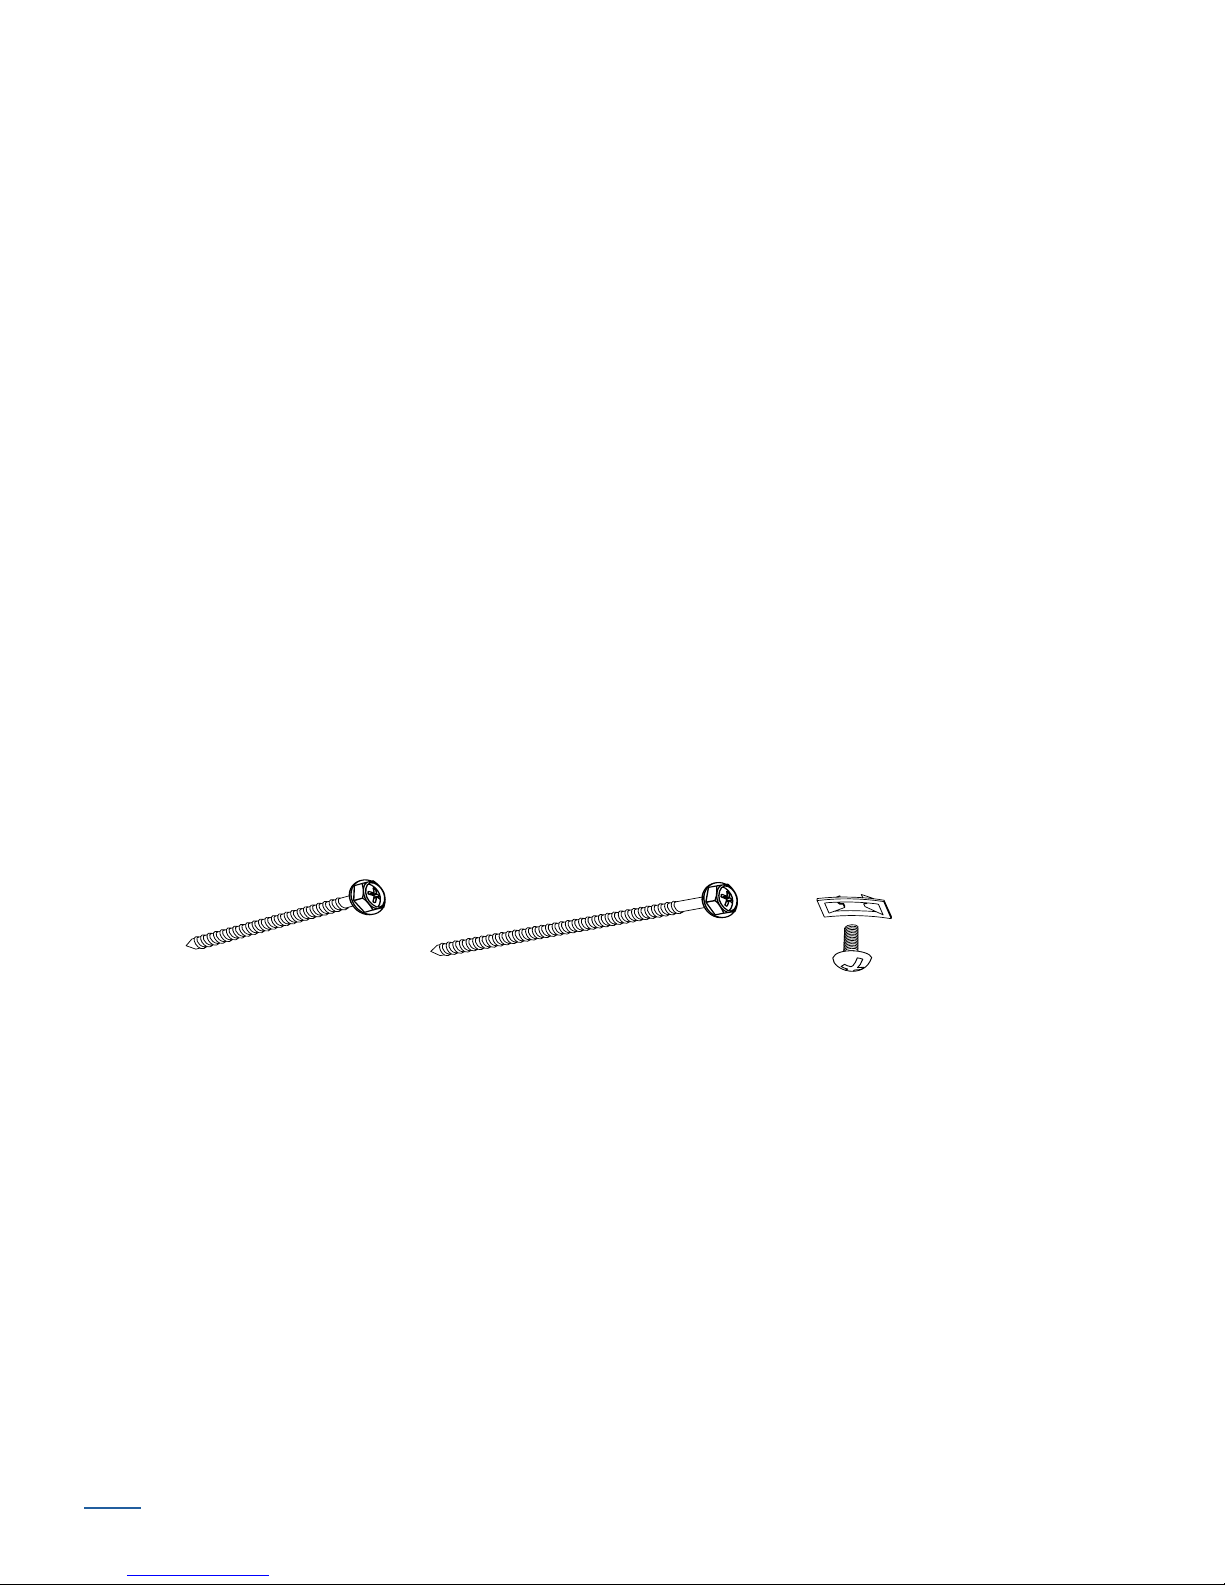
Speed Nut
and Screw
(Provided with Each
Extension Bracket)
#6 x 11/2"
Hex Head Screw
(Provided)
Longer #6 Hex Head Screw
for Use with Spacer Blocks
(Not Provided)
#6 Flat Head Screw
for Use with Common
Headrail End Mounts
(Provided)
shades will provide years of beauty andperformance. Please thoroughly review this instruction
booklet before beginning the installation.
Tools and Fasteners Needed
■ Flat blade and Phillips screwdriver ■ Level (laser level is recommended)
■ Measuring tape and pencil ■ Power drill,
1
/4" hex driver
In addition, you will need fasteners designed to work with your specific mounting surface(s).
1
■ #6 Hex Head Screws (Provided). Two 1
/2" screws are provided per installation bracket.
■ Longer #6 Hex Head Screws (Not Provided). If using spacer blocks, use #6 screws long
enough for a secure attachment.
■ #6 Flat Head Screws (Provided). If end mounting the shade, use two 1
installation bracket.
■ Speed Nuts and Screws (Provided). Extension brackets come with speed nuts and screws.
3
/32" drill bit, and
1
/2" screws per
■ Drywall Anchor (Not Provided). Use drywall anchors when mounting into drywall.
Parasol Installation Instructions 4
BACK

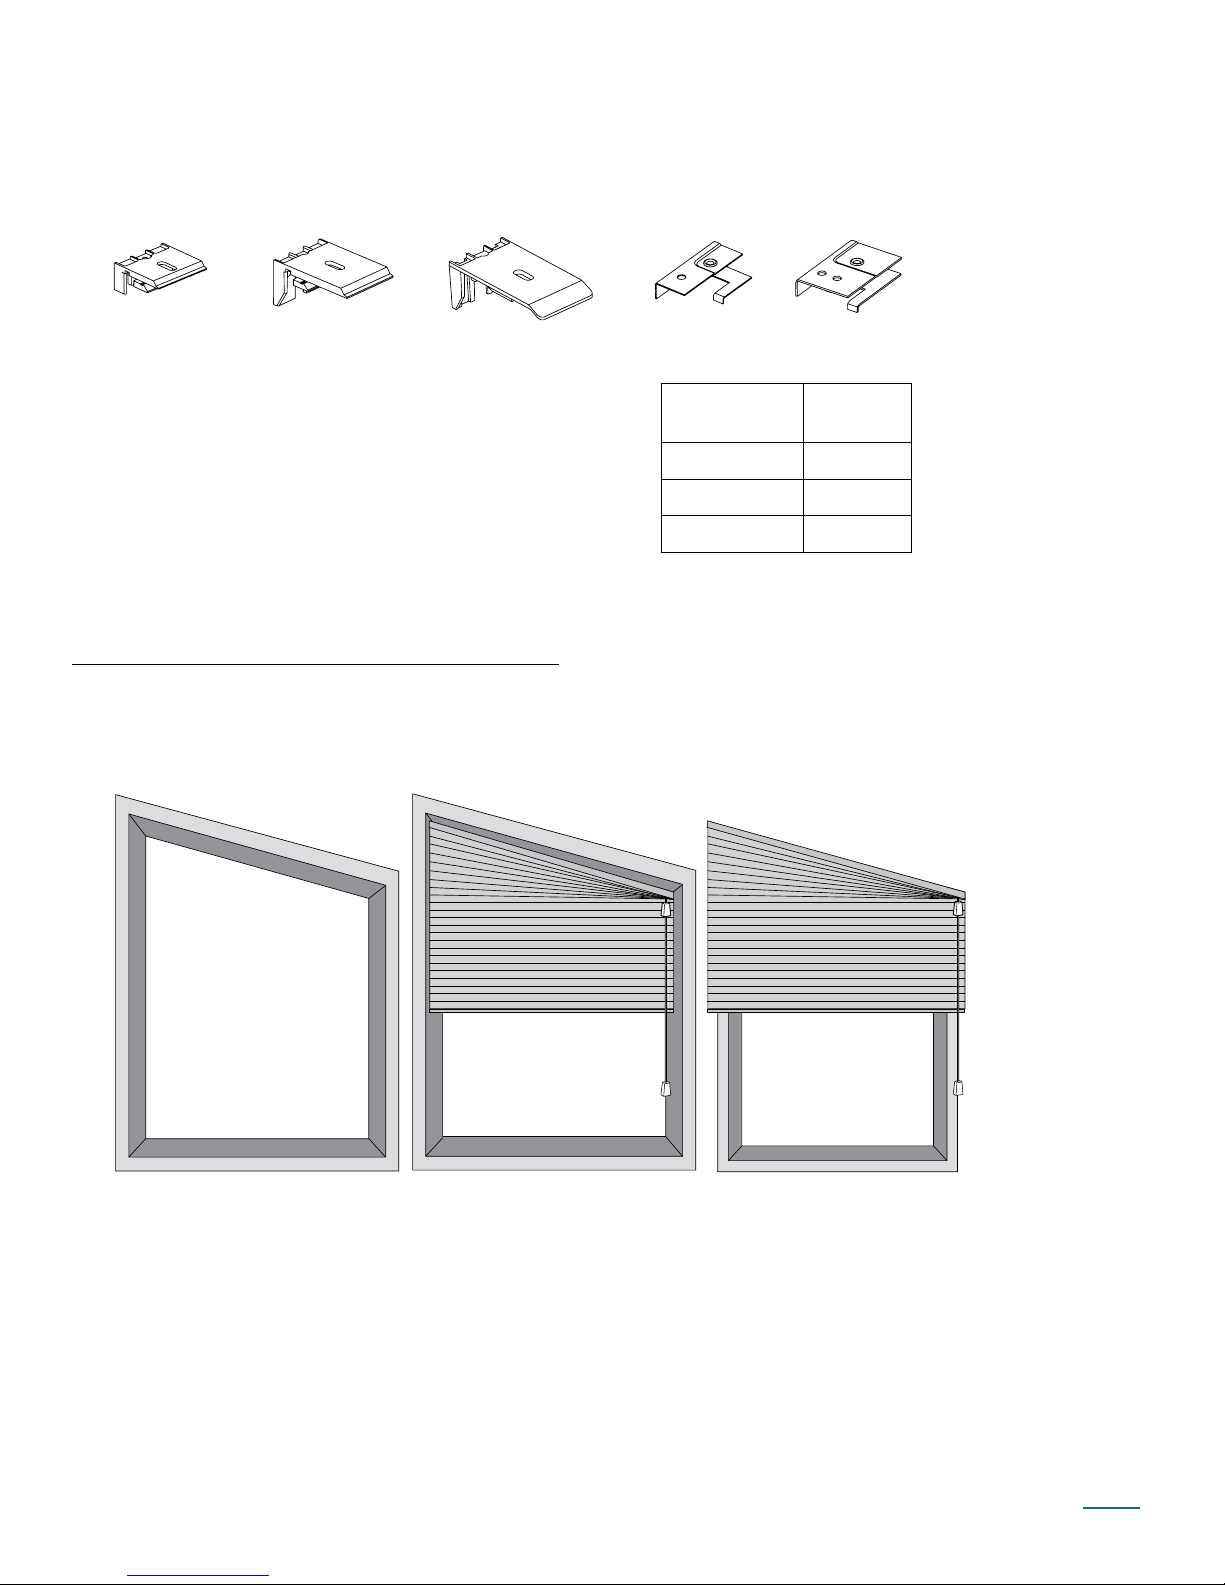
Installation Overview
1¼"
Installation
Bracket
3
∕8" and ¾"
Installation
Bracket
1¼"
End Mount
Brackets
3
∕8" and ¾"
End Mount
Brackets
Outside Mount
Shade mounts outside
window opening.
Inside Mount
Shade fits within
window opening.
Collectively, the sill and
jambs are called the
“window casement.”
Molding
Head Jamb
Sill
Jamb Jamb
■ Your order will include the correct number of installation brackets for your shade width, as
shown in the table.
Brackets
Required
➤ There are two sizes of installation brackets, one for
3
/8" and 3/4" pleat sizes and a larger one for the 1
pleat size.
➤ For end mounts, only two brackets are used up to the
maximum width of 72".
1
/4"
Shade
Width
12" – 36" 2
1
/8" – 72" 3
36
1
/8" – 108" 4
72
1
/8" – 120" 5
108
Mounting Types and Window Terminology
If the installation brackets are mounted correctly, the rest of the installation process follows very
easily. To prepare for this important first step, review the mounting types and basic window
terminology illustrated below.
BACK
Parasol Installation Instructions 5
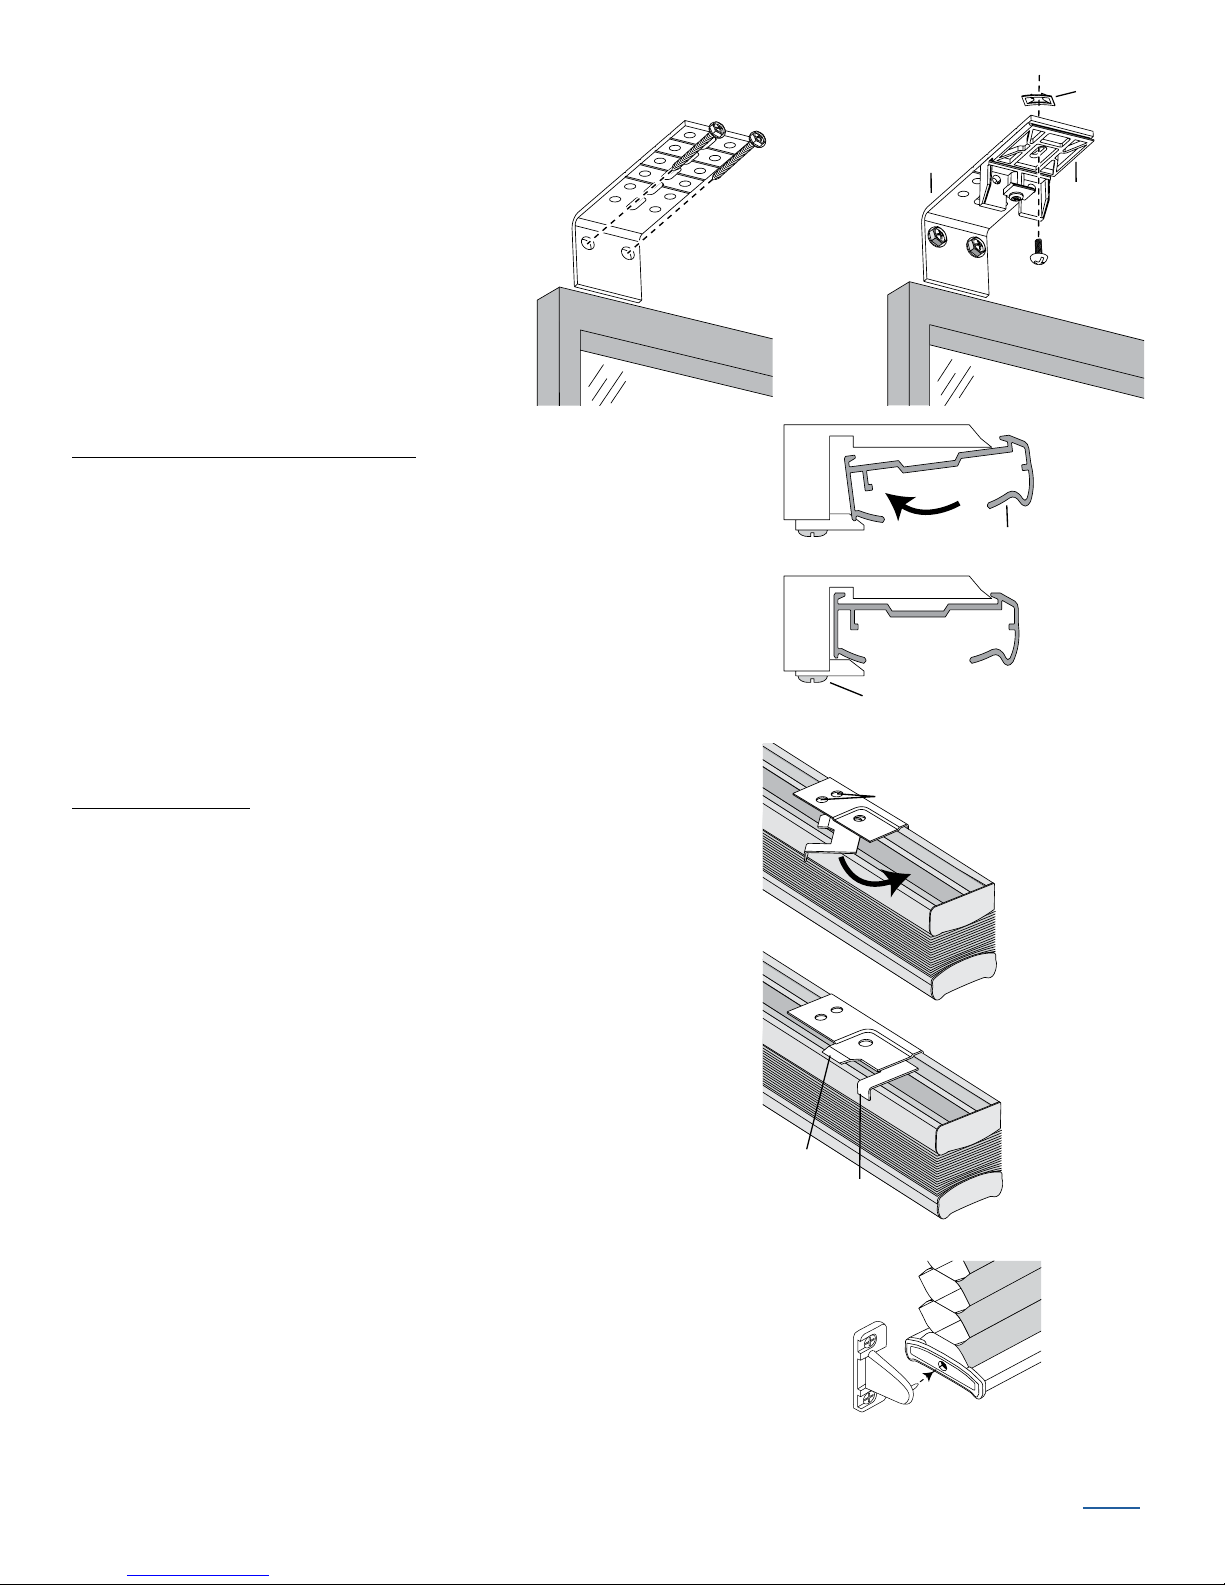
Mount the Installation Brackets — Inside Mount
2" Space Evenly
Jamb Jamb
Space Evenly
2"
See Depth
Chart
Use Center Hole
When Depth Permits
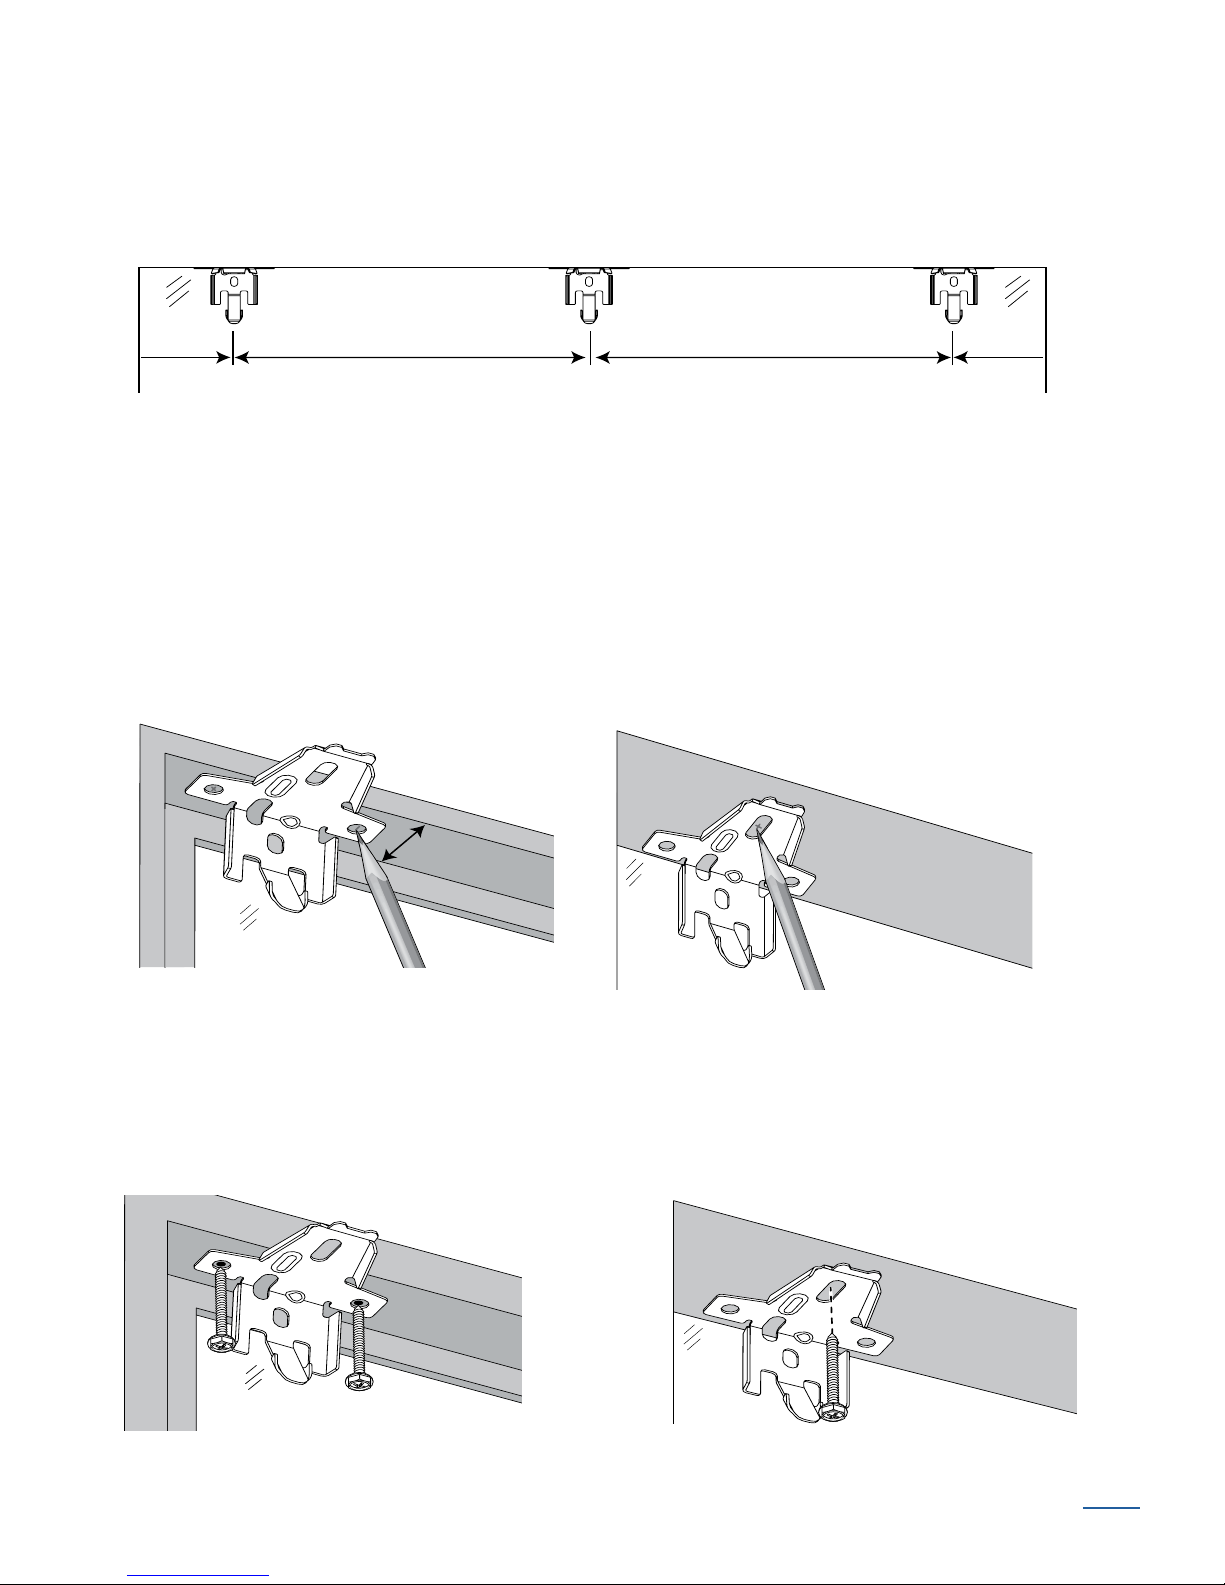
■ Measure 2" from each jamb for bracket location.
➤ If more than two installation brackets came with your order, space additional bracket(s)
evenly between the two end brackets and mark their location. Mount into wood
whenever possible.
■ Center the brackets on yourmarks, then mark the screw holes.
➤ The minimum casement depth for mounting the installation brackets is
the winged screwholes with the shallow mounting depths.
➤ The minimum casement depth for a fully recessed mount is 2
1
size; and 3" for 1
/4" pleat size. Mark the center screw hole when depth permits.
1
/2". Mark both of
1
/4" for 3/8" and 3/4"pleat
IMPORTANT: The front edges of the brackets must be level and aligned to each other.
■ Drill the screw holes using a
3
/32" drill bit.
CAUTION: Use drywall anchors when mounting into drywall.
■ Use a level to check that the mounting surface is level. Shim the brackets if necessary.
■ Attach the installation brackets using the screws provided.
Parasol Installation Instructions 6
BACK
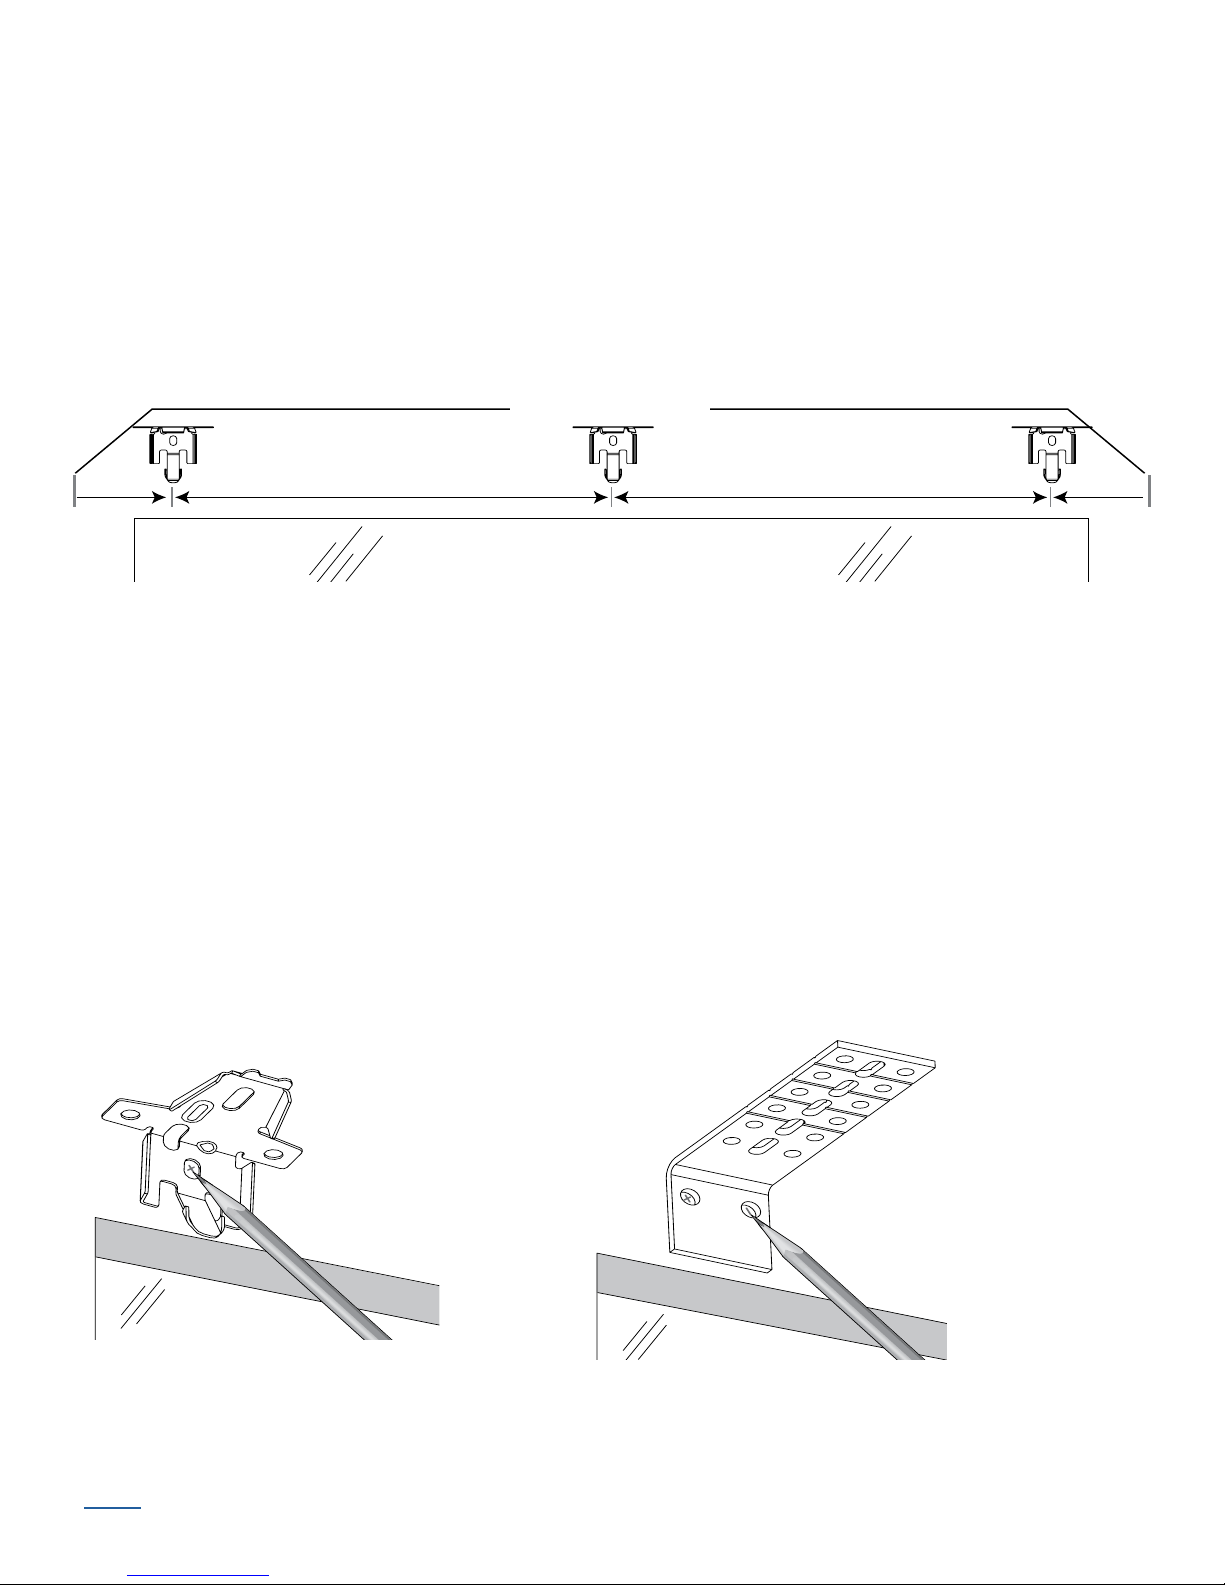
Mount the Installation Brackets — Outside Mount
2"
2"
Space EvenlySpace Evenly
Headrail End Marks
Window Opening
■ Center the headrail over the window opening at the desired height. Use a pencil to lightly
mark each end of the headrail on the mounting surface.
➤ Alternatively, measure the width of the headrail and use that width to mark the headrail
end points over the window opening.
■ Mark 2" from each end of the headrail.
➤ If more than two installation brackets came with your order, space additional bracket(s)
evenly between the two end brackets and mark theirlocation. Mount into wood
whenever possible.
■ Center the installation brackets on your marks and mark where to drill the screw holes.
➤ A minimum flat vertical surface of 1
1
/4" for installation brackets or extension brackets
isrequired.
➤ The top of the installation brackets or extension brackets should be at the desired height.
The brackets should be level andaligned.
➤ When using extension brackets, mark two screw holes per bracket.
CAUTION: The rear of the brackets must be flush against a flat mounting surface. Do
not mount brackets oncurved molding.
■ Drill the screw holes using a
CAUTION: Use drywall anchors when mounting into drywall.
BACK
3
/32" drill bit.
Parasol Installation Instructions 7
■ Attach the installation or extension brackets using the screws provided.
Spacer
Blocks
1
1
/
2
"
Speed
Nut
Extension
Bracket
IMPORTANT: The front edges of the installation brackets must be level and aligned to
each other.
■ If using spacer blocks, first attach the installation
bracket to the
1
/2" spacer block before stacking
additional spacer blockstogether.
➤ Insert the legs of the installation bracket into the
tabs on thespacer block.
➤ Then rotate the installation bracket back.
■ Attach the spacer block/installation bracket
to a flat vertical mounting surface with a
#6mounting screw long enough for asecure
installation.
1
➤ A maximum of 1
/2" of spacer blocks per
installation bracket is recommended.
➤ The top of the spacer blocks should be at the
desired shade height.
IMPORTANT: The front edges of the installation
brackets must be level and aligned to each other.
IMPORTANT: Use drywall anchors when mounting
into drywall.
■ If using extension brackets, attach an installation
bracket to the underside of each extension bracket
using theprovided screws and speed nuts.
Parasol Installation Instructions 8
BACK
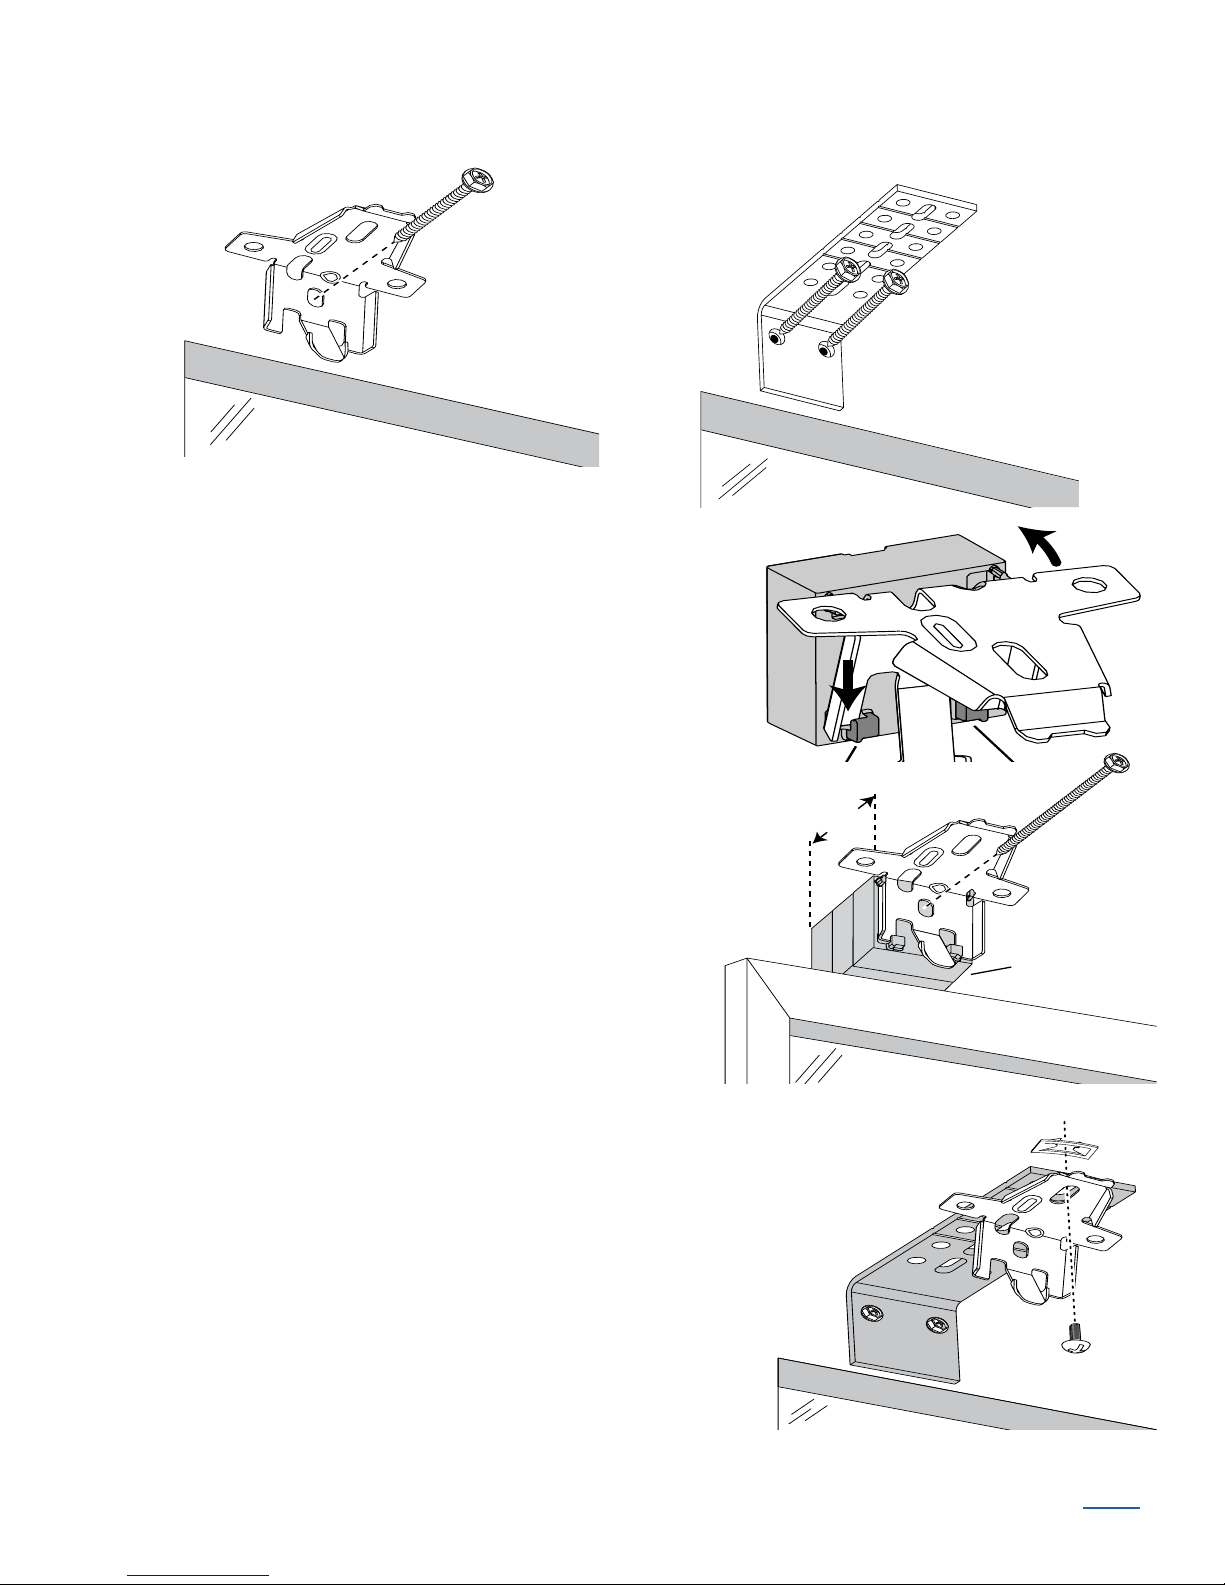
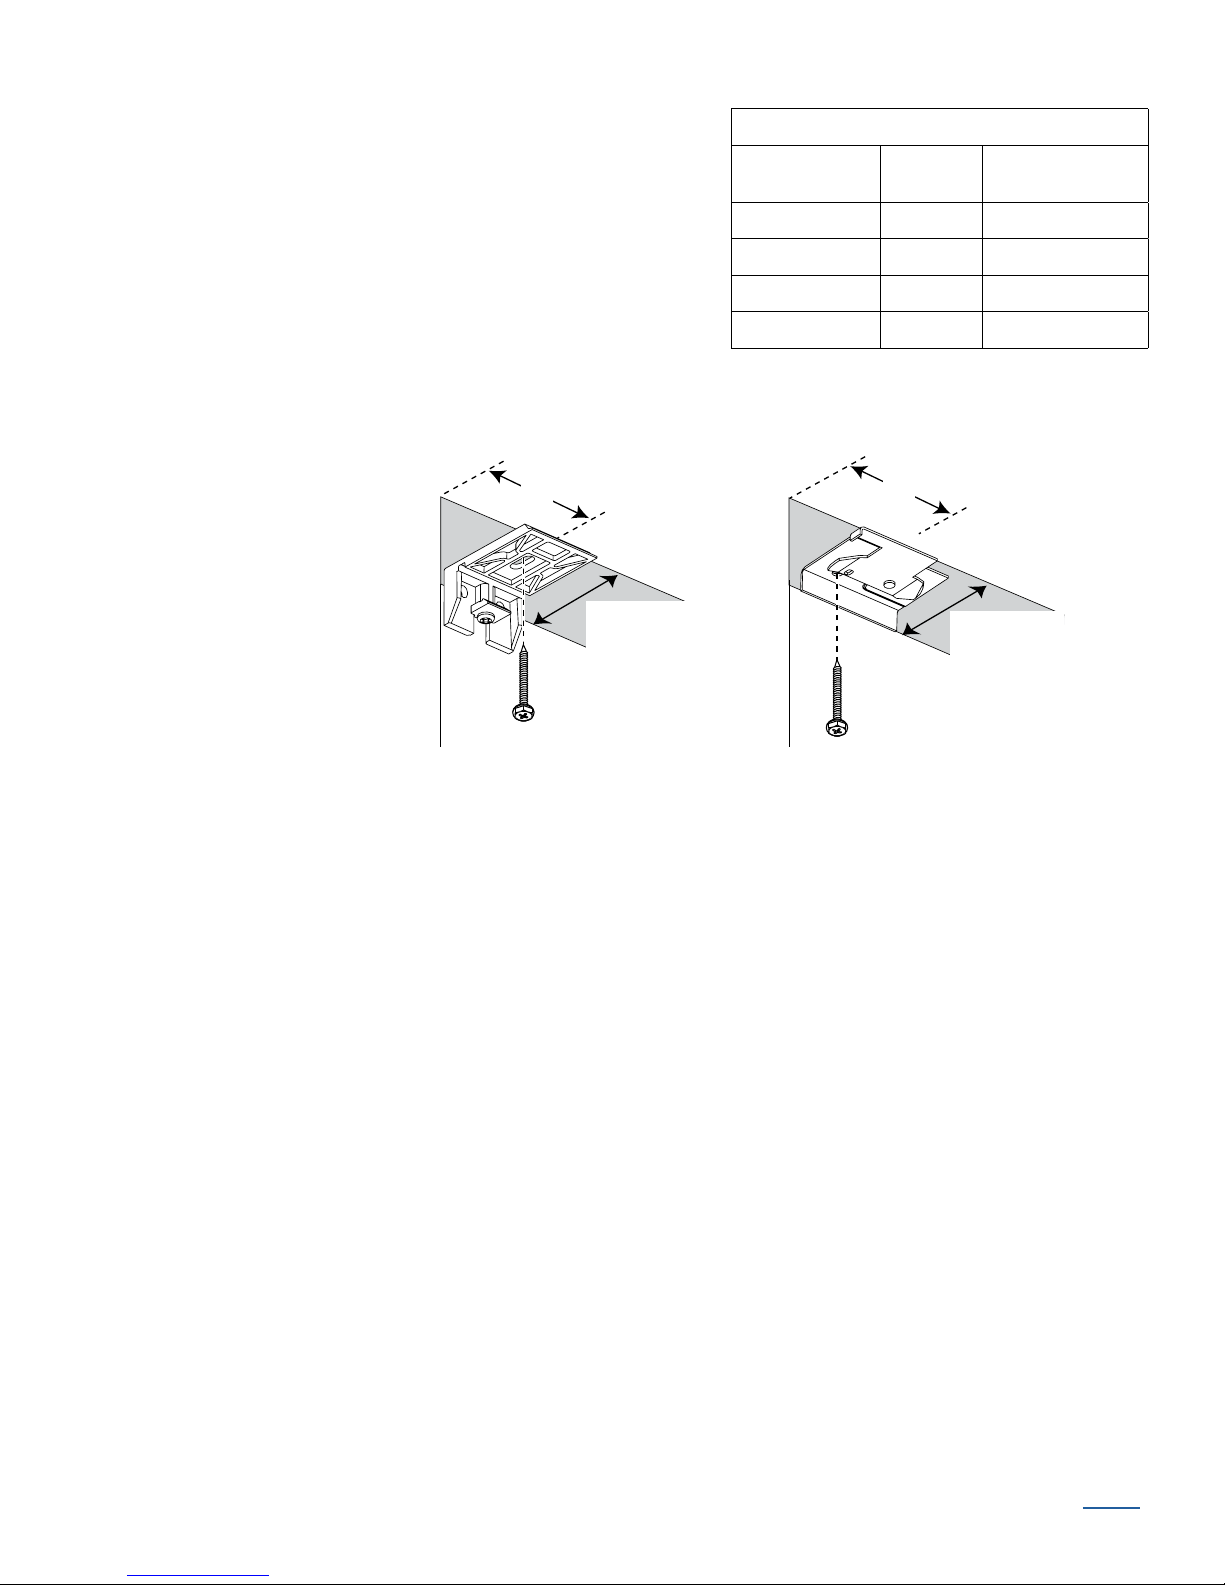
Mount the Installation Brackets — EndMount
11/4"
Minimum
Ordered
Shade
Height
11/4"
Minimum
Ordered
Shade
Height
End mount the headrail when conventional mounting techniques will not work — for example, in
an arched window opening.
■ Position the end mount brackets so that the top of the attached installation brackets equal
the ordered height of the shade.
CAUTION: Both brackets must be installed at the
same depth and height.
■ Mark both screw holes.
➤ The mounting surface must be vertical and flat, not
part of an archedcurve.
➤ Minimum mounting depth is 1
3
/8" pleat sizes . Minimum mounting depth for a
fullyrecessed end mount is 2
1
/4" for 3/4" and
3
/8" for 3/4" and 3/8"
pleat sizes.
➤ Minimum mounting depth is 2" for 1
1
/4" pleat size.
Mininum mounting depth for a fully recessed end
mount is 3" for 1
■ Drill the holes using a
1
/4" pleat size.
3
/32" drill bit.
■ Attach the end mount installation brackets usingthe flat head
screwsprovided.
CAUTION: Drywall mounting is not recommended.
IMPORTANT: For instructions on installing an
arch over a rectangular shade, see the installation,
instructions that came with your arch shade.
BACK
Parasol Installation Instructions 9
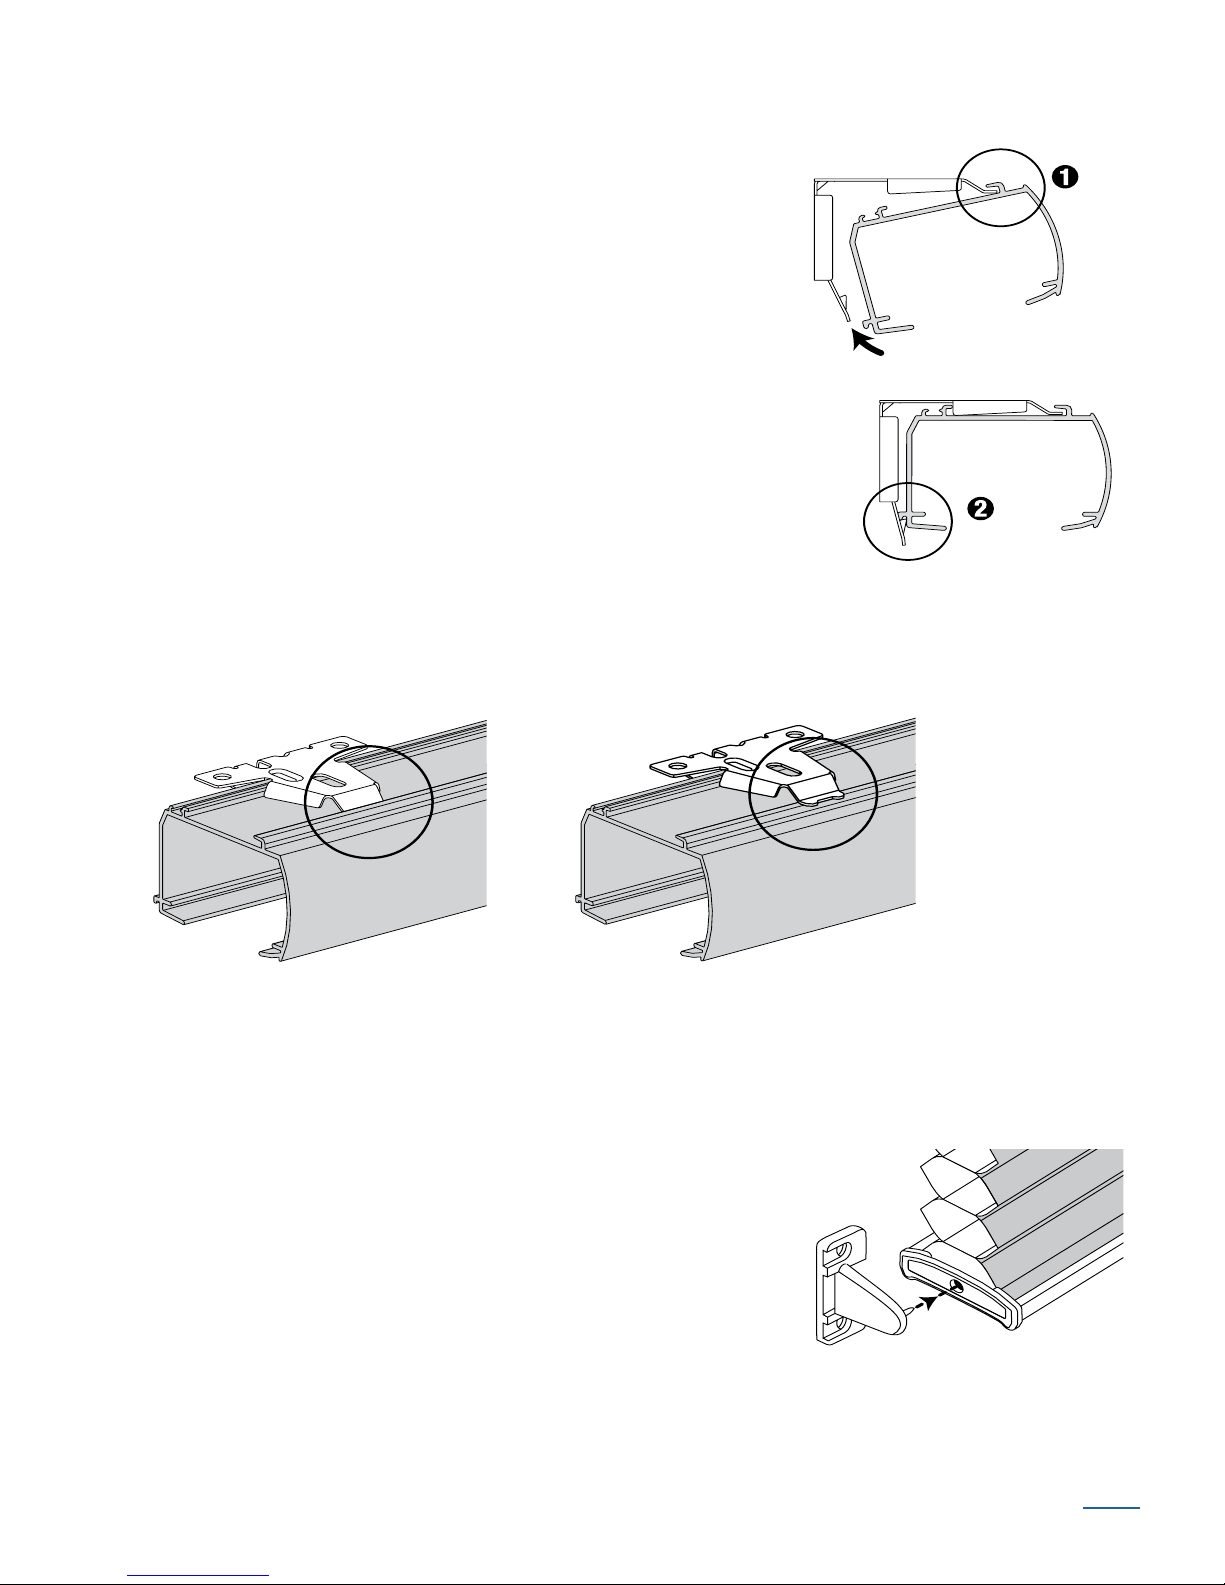
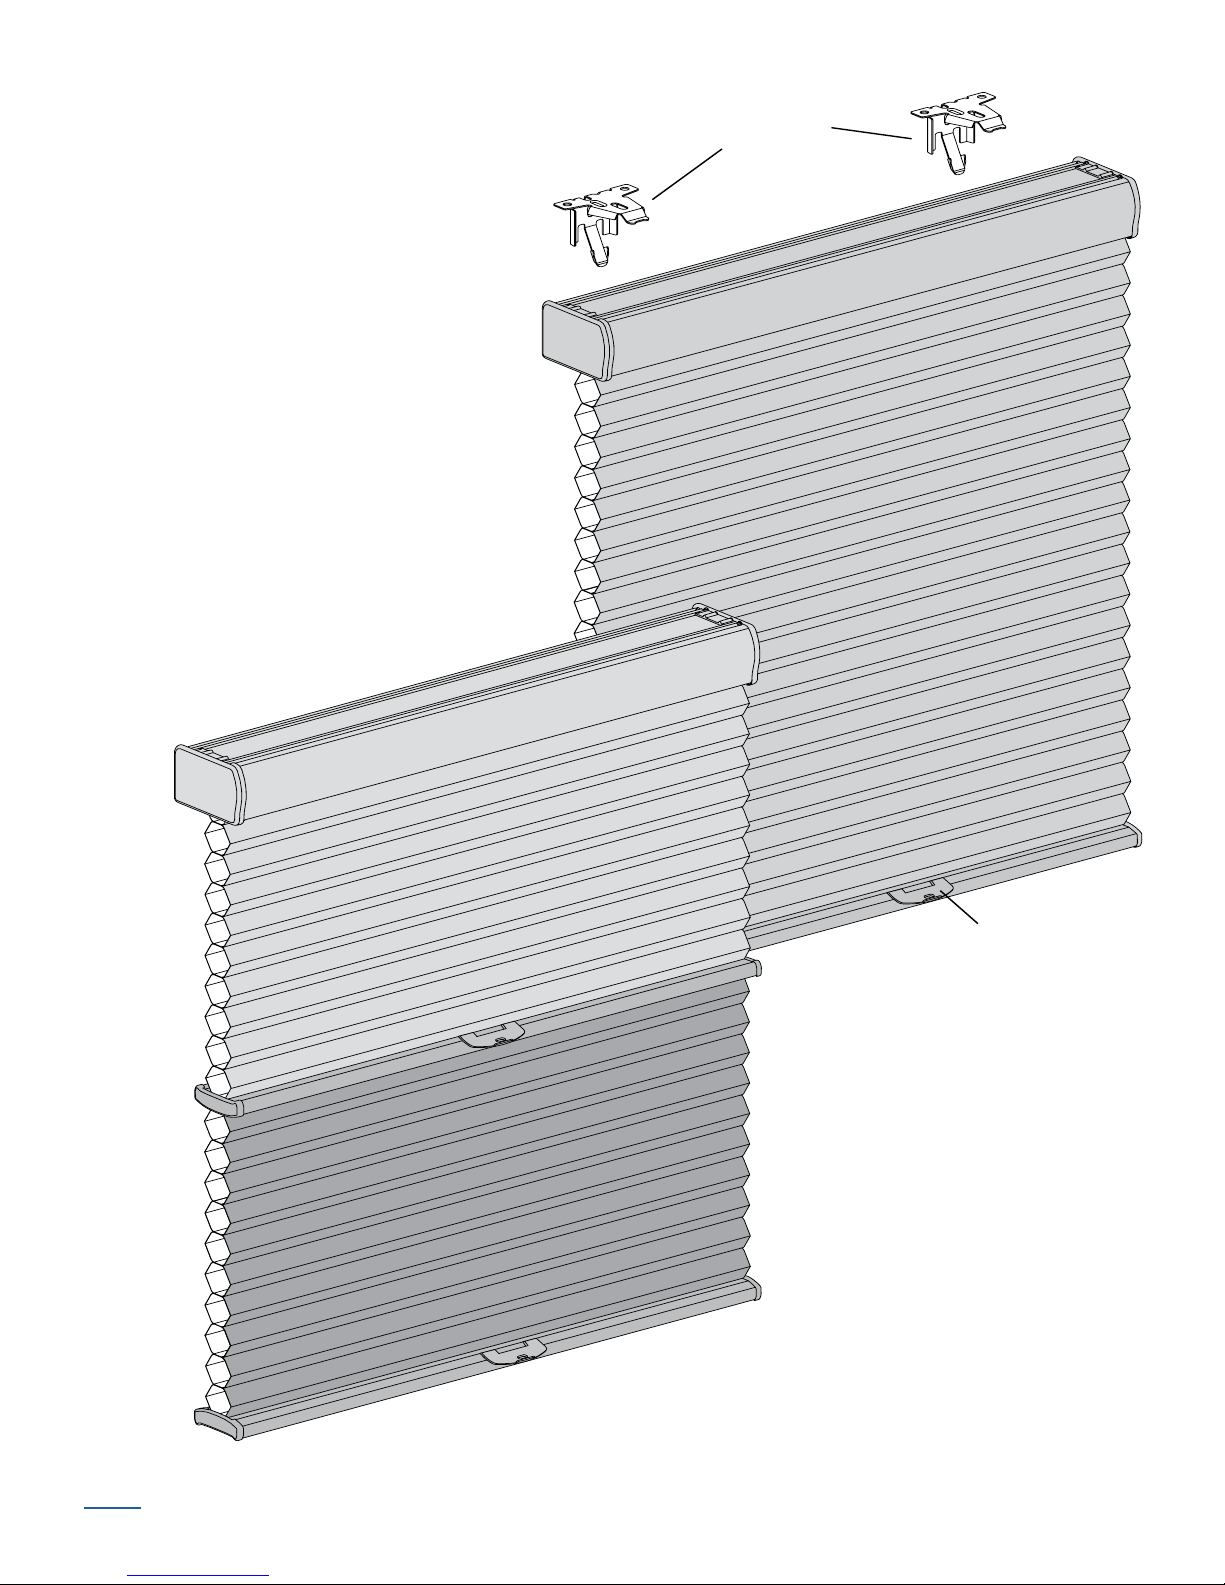
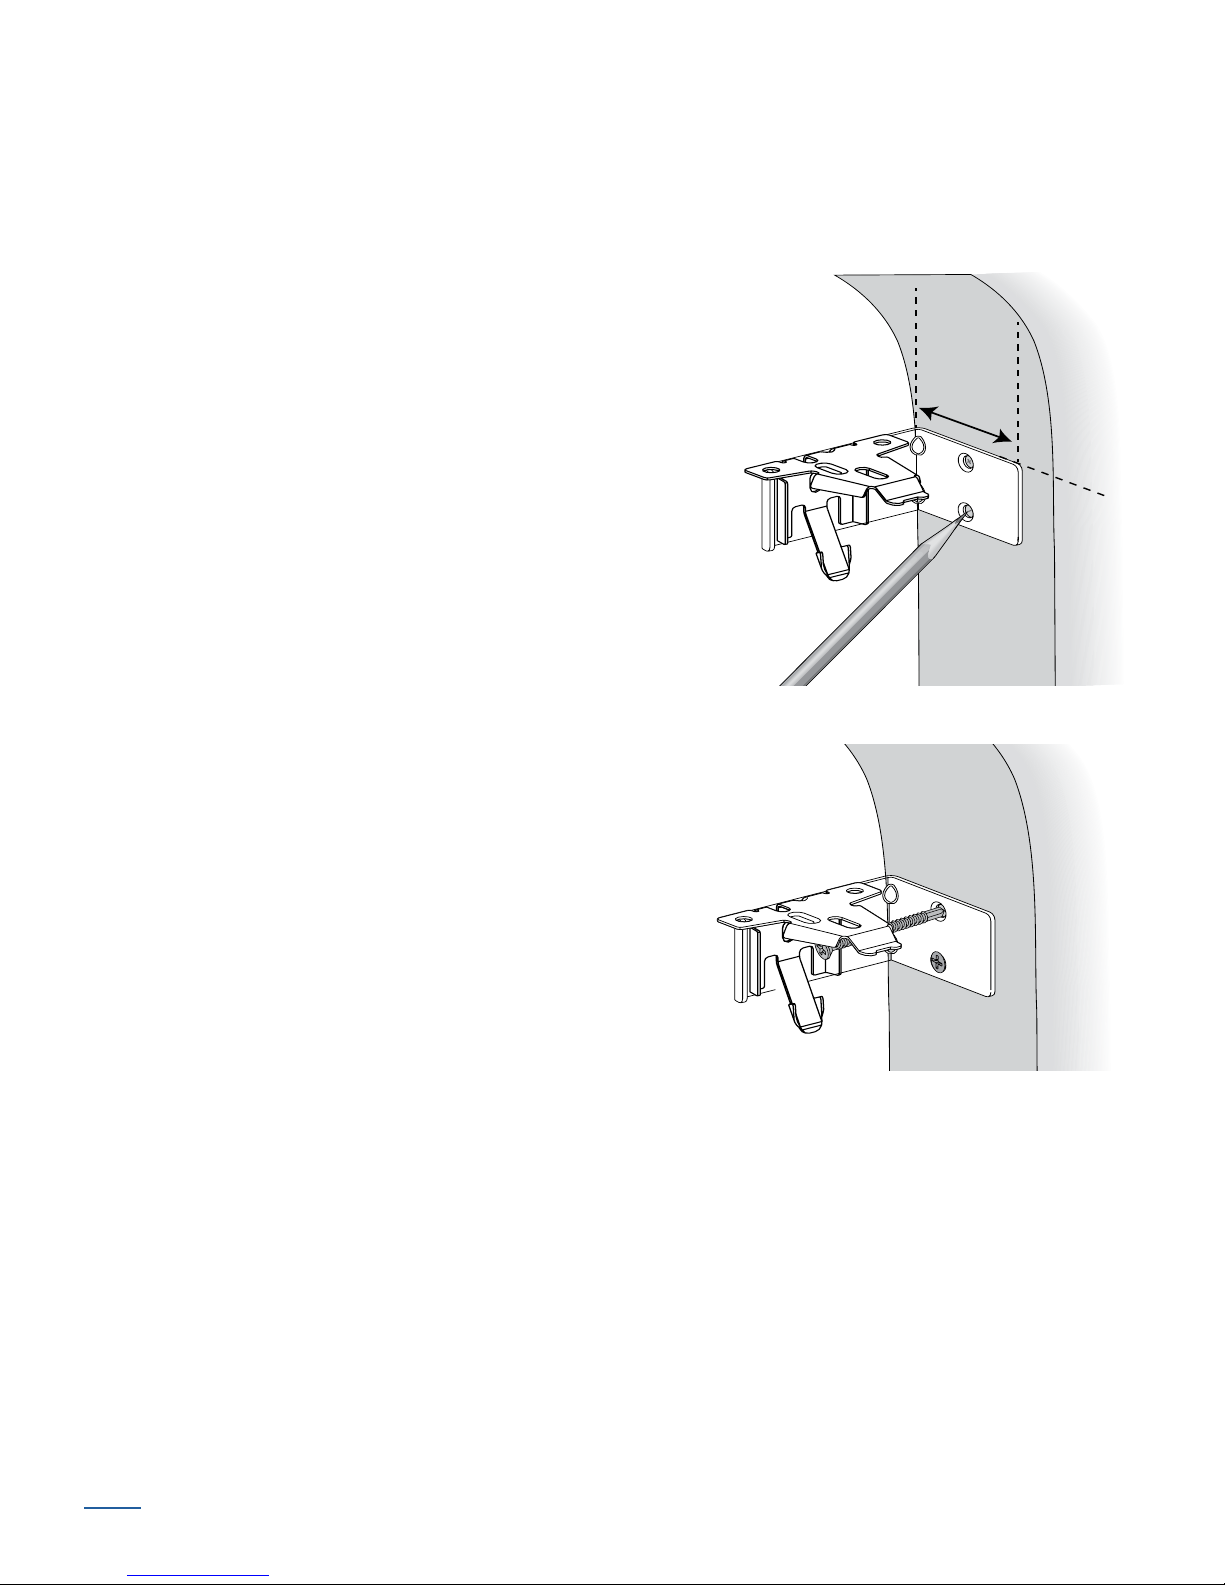
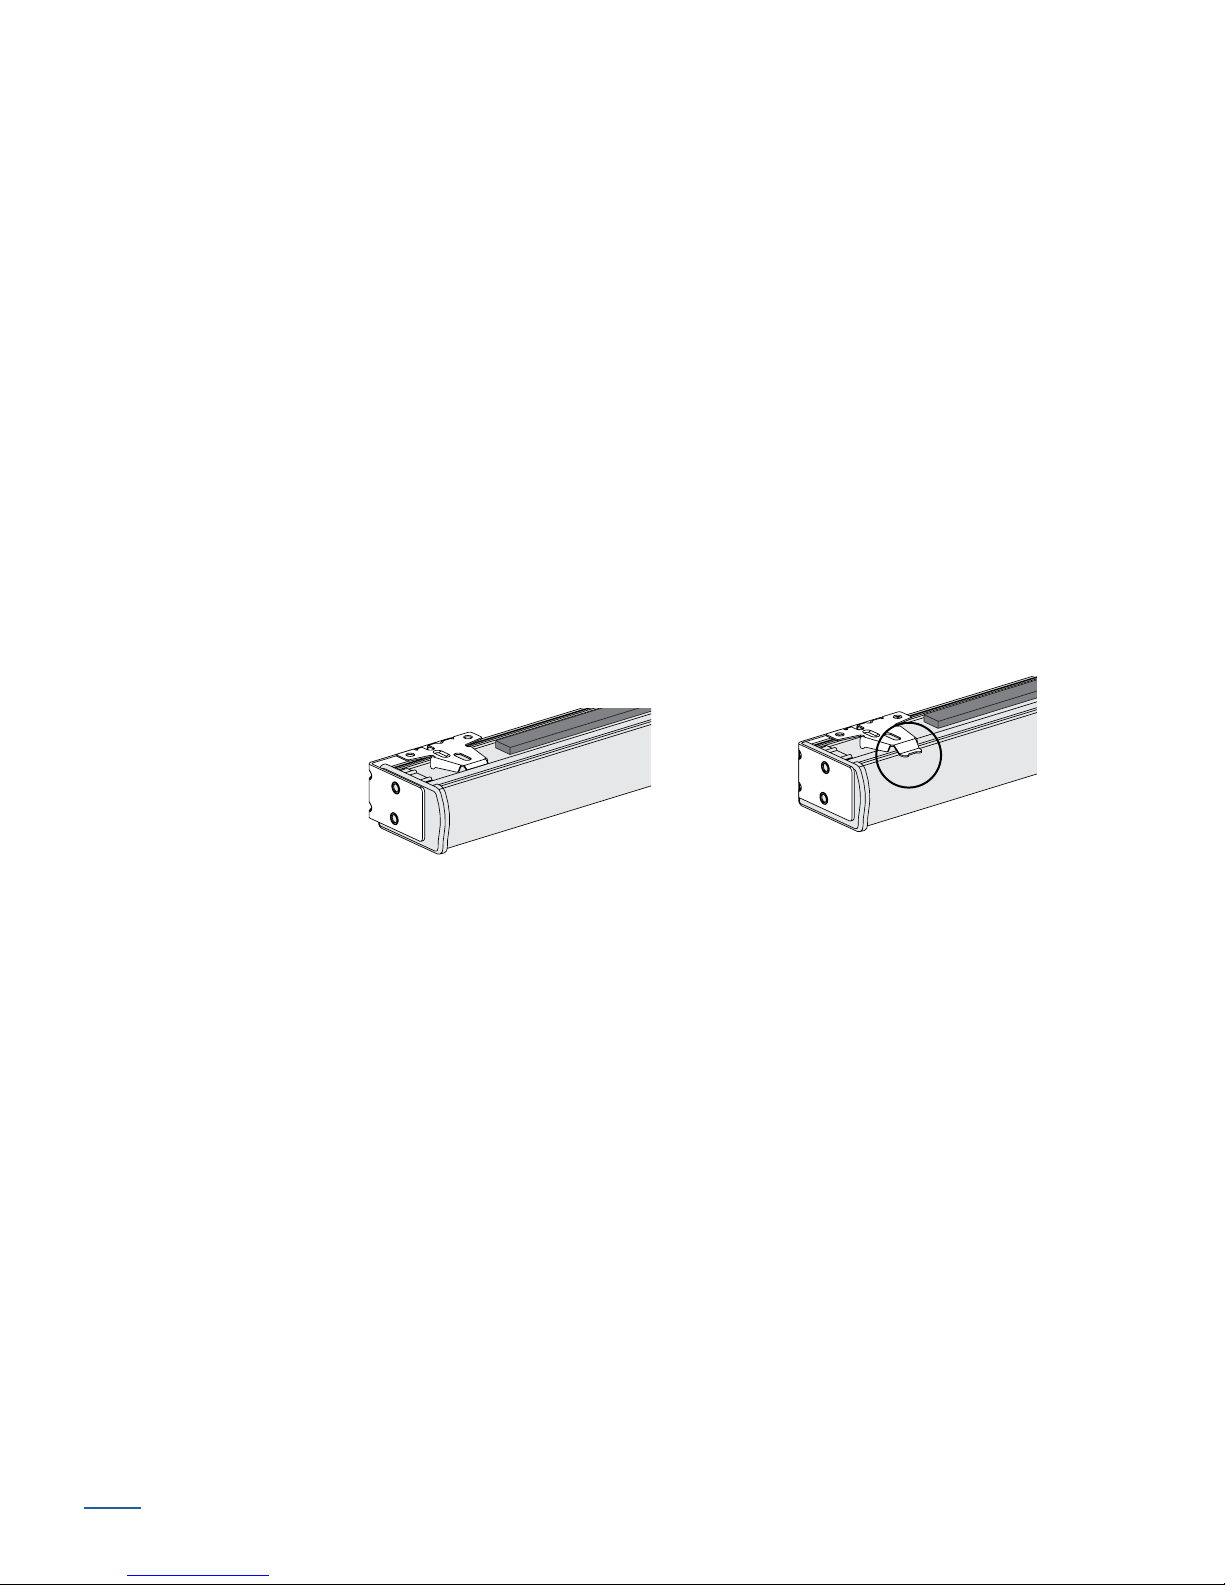
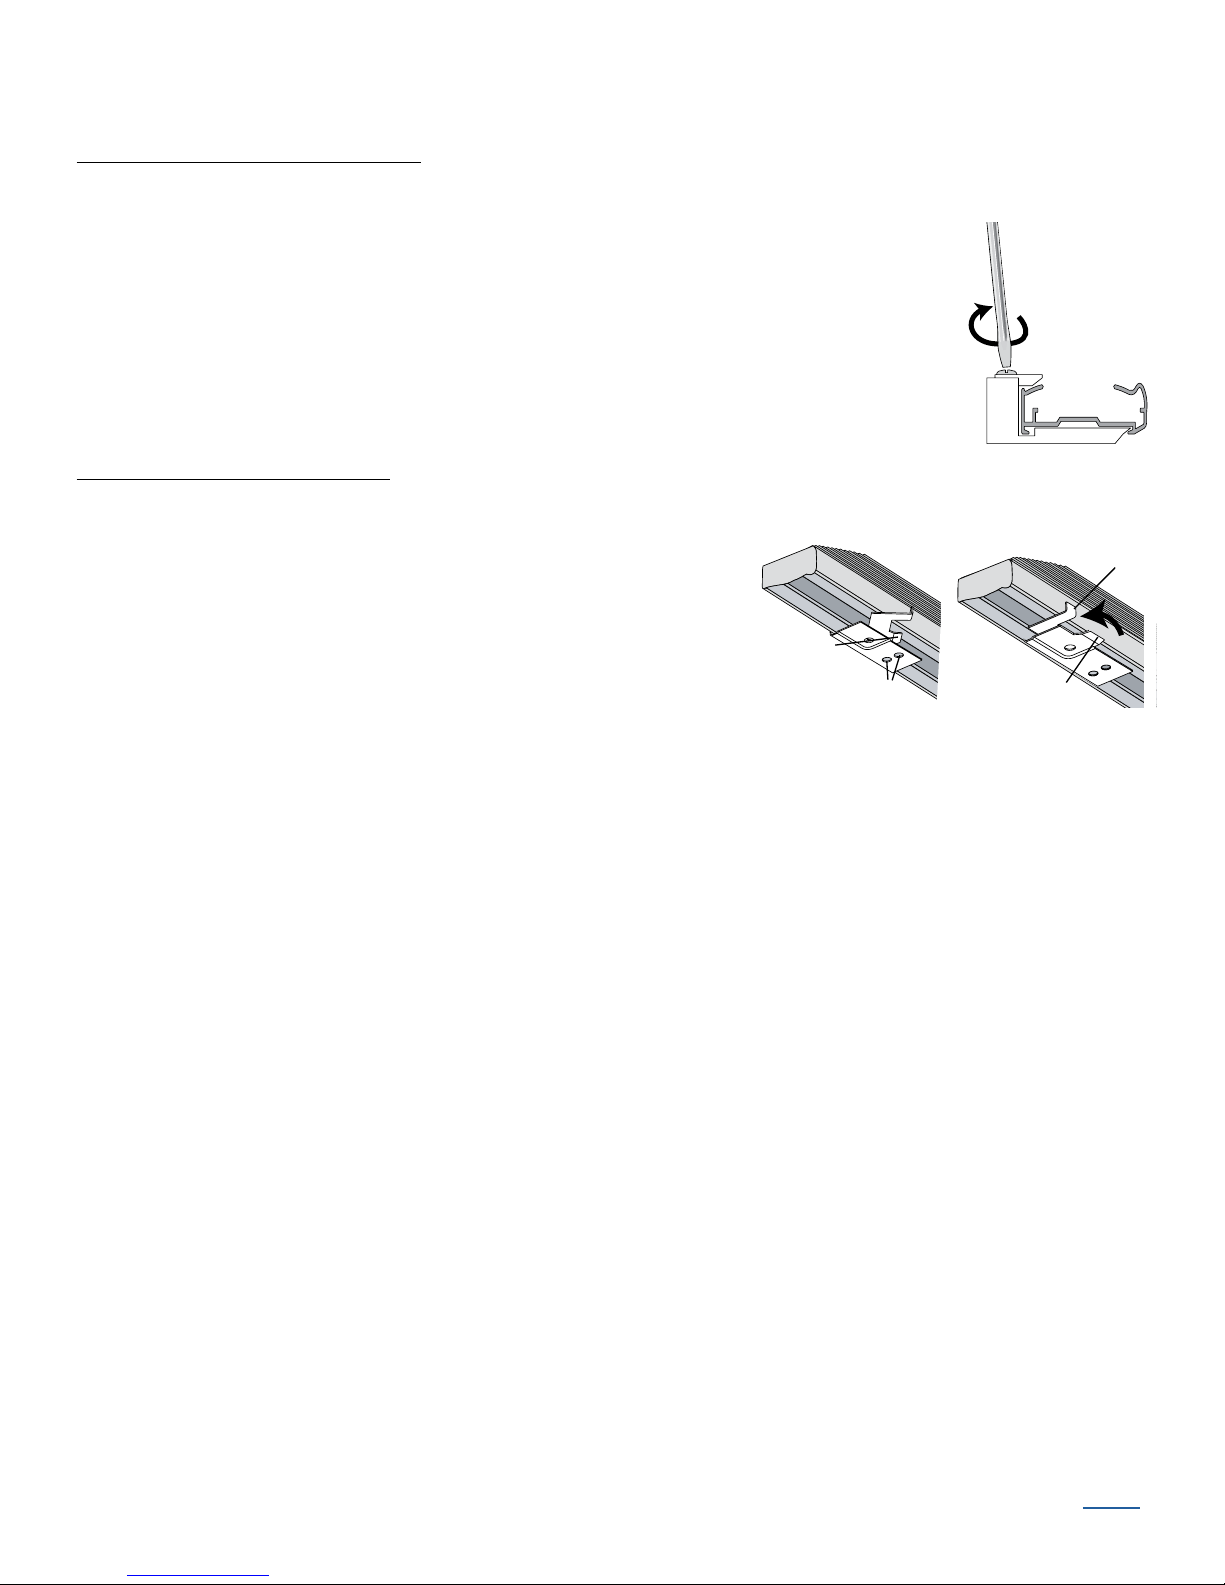
Install the Shade
The back of the headrail
snaps into the bracket.
The front of the bracket
fits under the groove.
Headrail
Bracket
Snap
in Place
Good Bad
■ Fit the front channel on top of the headrail onto the
front lip of the installation brackets.
■ Push the headrail up and back until it snaps into
place.
■ Check to ensure the headrail is securely in the
brackets.
➤ Check that the bottom of the headrail is snapped
into the base of each bracket.
➤ Check that the front lip of each bracket is in the
front channel of the headrail.
➤ If any brackets are not installed correctly, release
the shade and reinstall. See “Removing the Shade
(If Necessary)” on page12.
Attach Hold-Down Brackets (Optional)
Hold-down brackets provide stability and prevent swaying by securing the bottom rail (often used
in French door applications). Hold-down brackets can only be used on outside mountshades.
■ Lower the shade and place the pins from the hold-down
brackets into the bottom rail end caps.
■ On the mounting surface, mark the screw holes.
■ Drill the screw holes using a
3
/32" drill bit.
➤ Check that the brackets are level and aligned.
■ Attachthe hold-down brackets to the mounting surface using the screws provided.
Parasol Installation Instructions 10
BACK

Install the Handle(s)
Handle
Middle
Rail
Front of
Shade
Bottom-Up/Top-Down
and Day/Night Shades
Handle
Bottom Rail
Pocket
Underside of Bottom Rail
Allen
Wrench
Key
Lower
Raise
Using the handle provides touch of finger ease and convenient
shade operation.
IMPORTANT: For shades over 60" wide, two handles will be
provided. Space these handles evenly across the rail.
■ Attach the handle at the center of the bottom rail.
➤ Hook the prongs of the handle onto the lip of the
bottom rail.
➤ Rotate the handle down until it snaps onto the
bottomrail.
■ If your shade has a middle rail, attach the other
handle at the center of the middle rail. To identify
the middle rail, see “Product View” on page 75.
IMPORTANT: With
Bottom-Up/Top-Down and
Day/Night shades, attach the middle rail handle
upside-down, as shown.
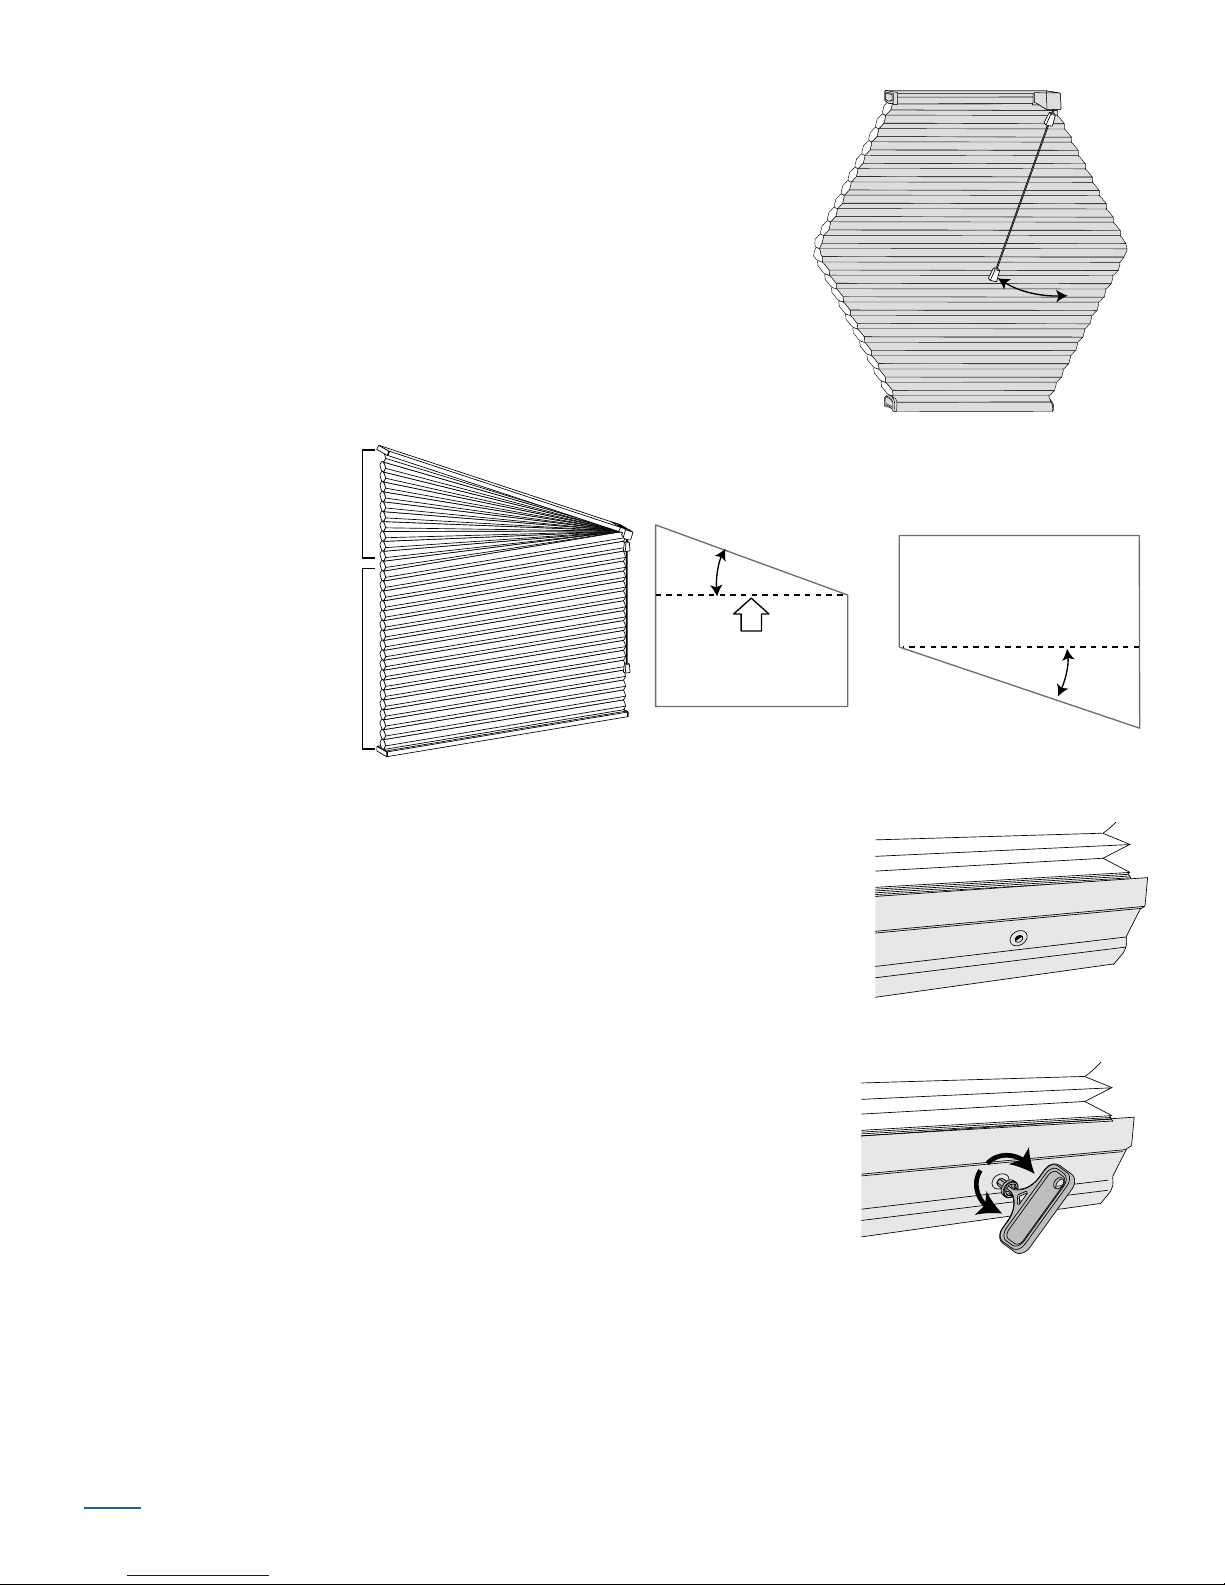
Level the Bottom Rail (If Necessary)
■ Lift the bottom rail to locate the pockets on the underside
of the rail.
■ Gently pull down on the bottom rail to fully insert the
Allen wrench key into the pocket. The key is fully inserted
when the ring on the key abuts to the pocket.
➤ Lift up the bottom rail slightly before turning the Allen
wrench key. Turn the key clockwise to raise that side of
the bottom rail, or counter-clockwise to lower it.
7
/64"
➤ One quarter turn of the key equals approximately
IMPORTANT: The Allen wrench key must be fully
■ Adjust the end pockets first. Then adjust any additional
BACK
inserted to avoid stripping the mechanism. Do not pull
down on the bottom rail while turning the key.
pockets as necessary to maintain equal tension across
the bottom rail.
1
/4".
Parasol Installation Instructions 11
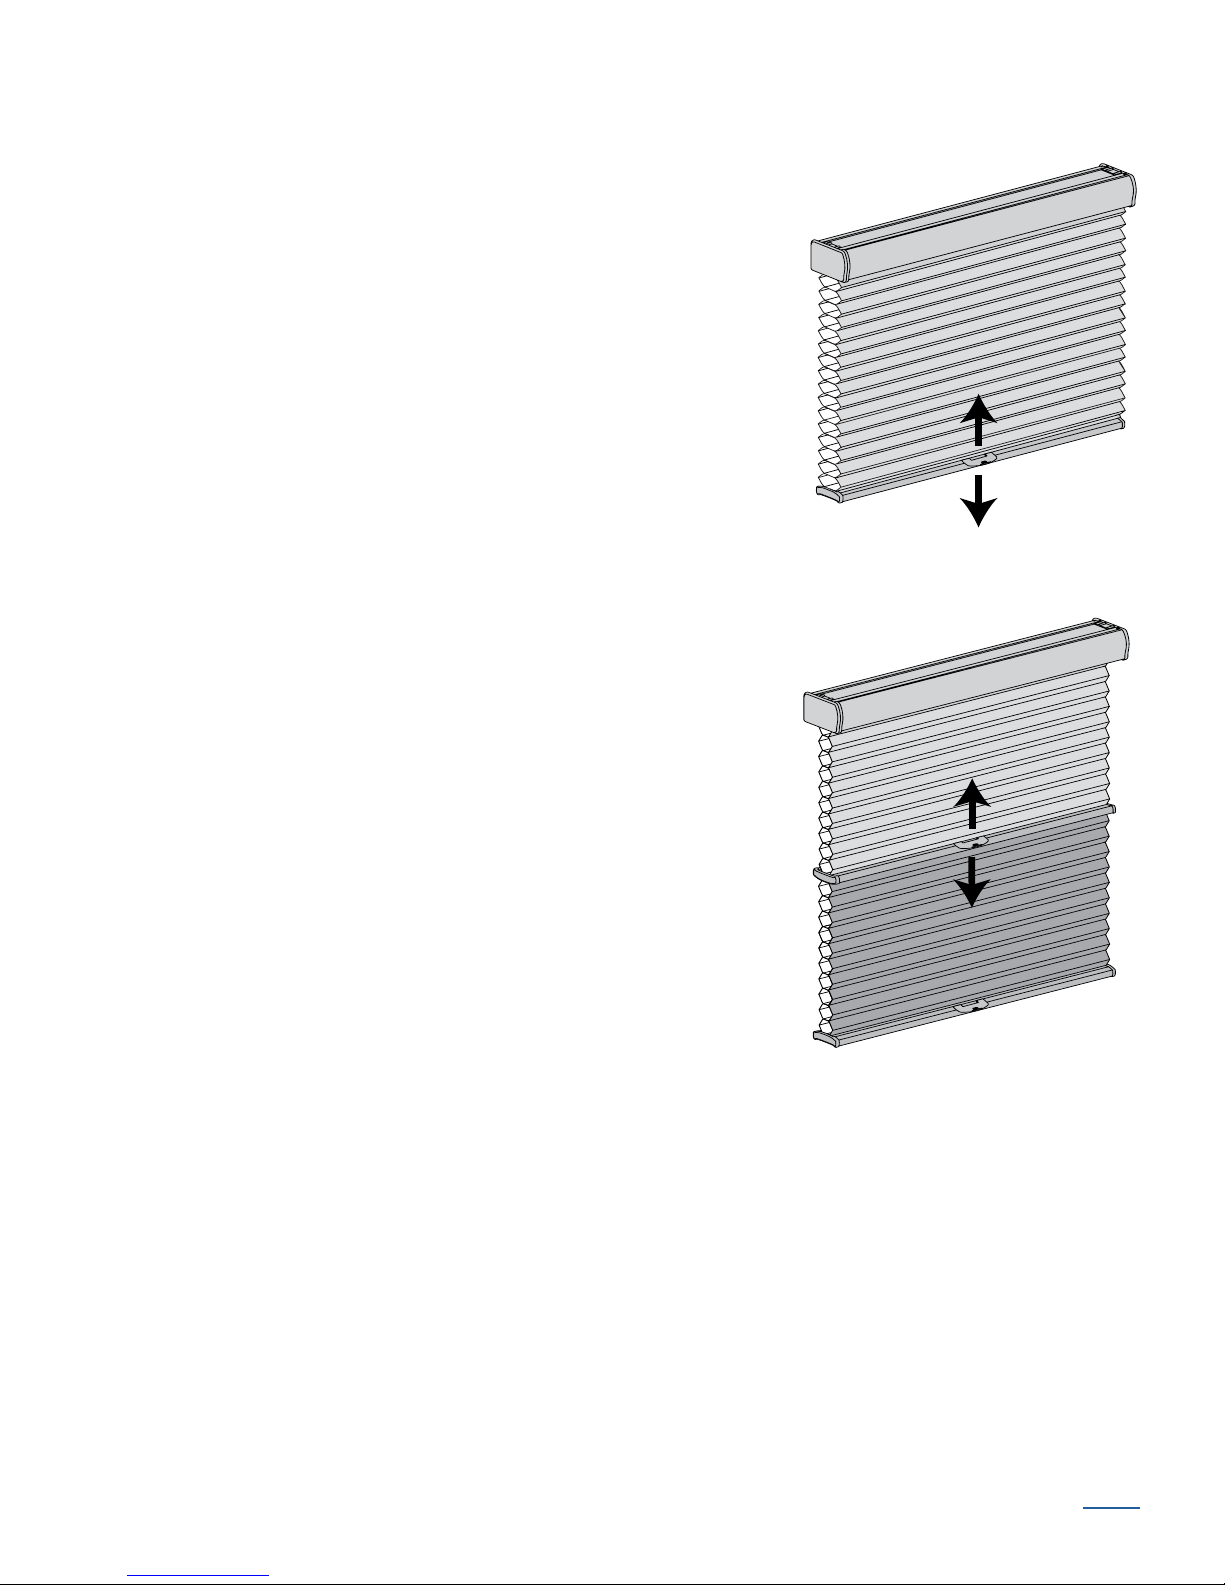
Operate the Shade
For better support and smoother operation, use the handle when raising and lowering the shade.
To Raise the Shade
■ Slowly and steadily push up on the bottom rail handle. Allow
the shade to stack evenly.
To Lower the Shade
■ Slowly and steadily pull down on the bottom rail handle.
To Raise or Lower the Middle Rail or Bottom Rail (for Bottom-Up/Top-Down and
Day/Night Shades).
Shades with the Bottom-Up/Top-Down and Day/Night design
options have two moving rails. You can operate these shades
as described in this section.
■ With the bottom rail fully lowered, slowly and steadily push
up or pull down on the middle rail handle.
NOTE: The bottom rail must be in the fully lowered
position to operate the middle rail.
■ With the middle rail fully raised, slowly and steadily push
up or pull down on the bottom rail handle.
NOTE: The middle rail must be in the fully raised position
to operate the bottom rail.
Parasol Installation Instructions 12
BACK
Troubleshooting
Problem The shade is hard to raise or lower, or will not raise or lower.
Solution Make sure that the shade fabric is not caught between the installation bracket
and the headrail.
Check that the headrail and installation brackets are level and aligned. Shim the
installation brackets to level the headrail, if necessary.
If hold-down brackets are used, make sure they have been released before
operating the shade.
Problem The shade raises or lowers unevenly or the bottom rail is uneven when
fullyraised.
Solution Check that the headrail and installation brackets are level and aligned. Shim the
installation brackets to level the headrail, ifnecessary.
Check to see if there is an obstruction in the shade’s path. If a shade hits an
obstruction as it is lowered it may become misaligned. This may cause the shade
to be angled or tilted when fully raised. Try lowering the shade completely, then
raising it to allow it to self-correct.
Adjust the shade. See “Level the Bottom Rail (If Necessary)” on page 29.
Problem The shade will not fit into theinstallation brackets.
Solution Check that the installation brackets are level and aligned. Shim the installation
brackets to level the headrail, if necessary.
Be sure the heads of the screws are flush against the installation bracket.
Check that the headrail is completely inserted into the installation brackets.
See “Install the Shade” on page 102.
BACK
Parasol Installation Instructions 13
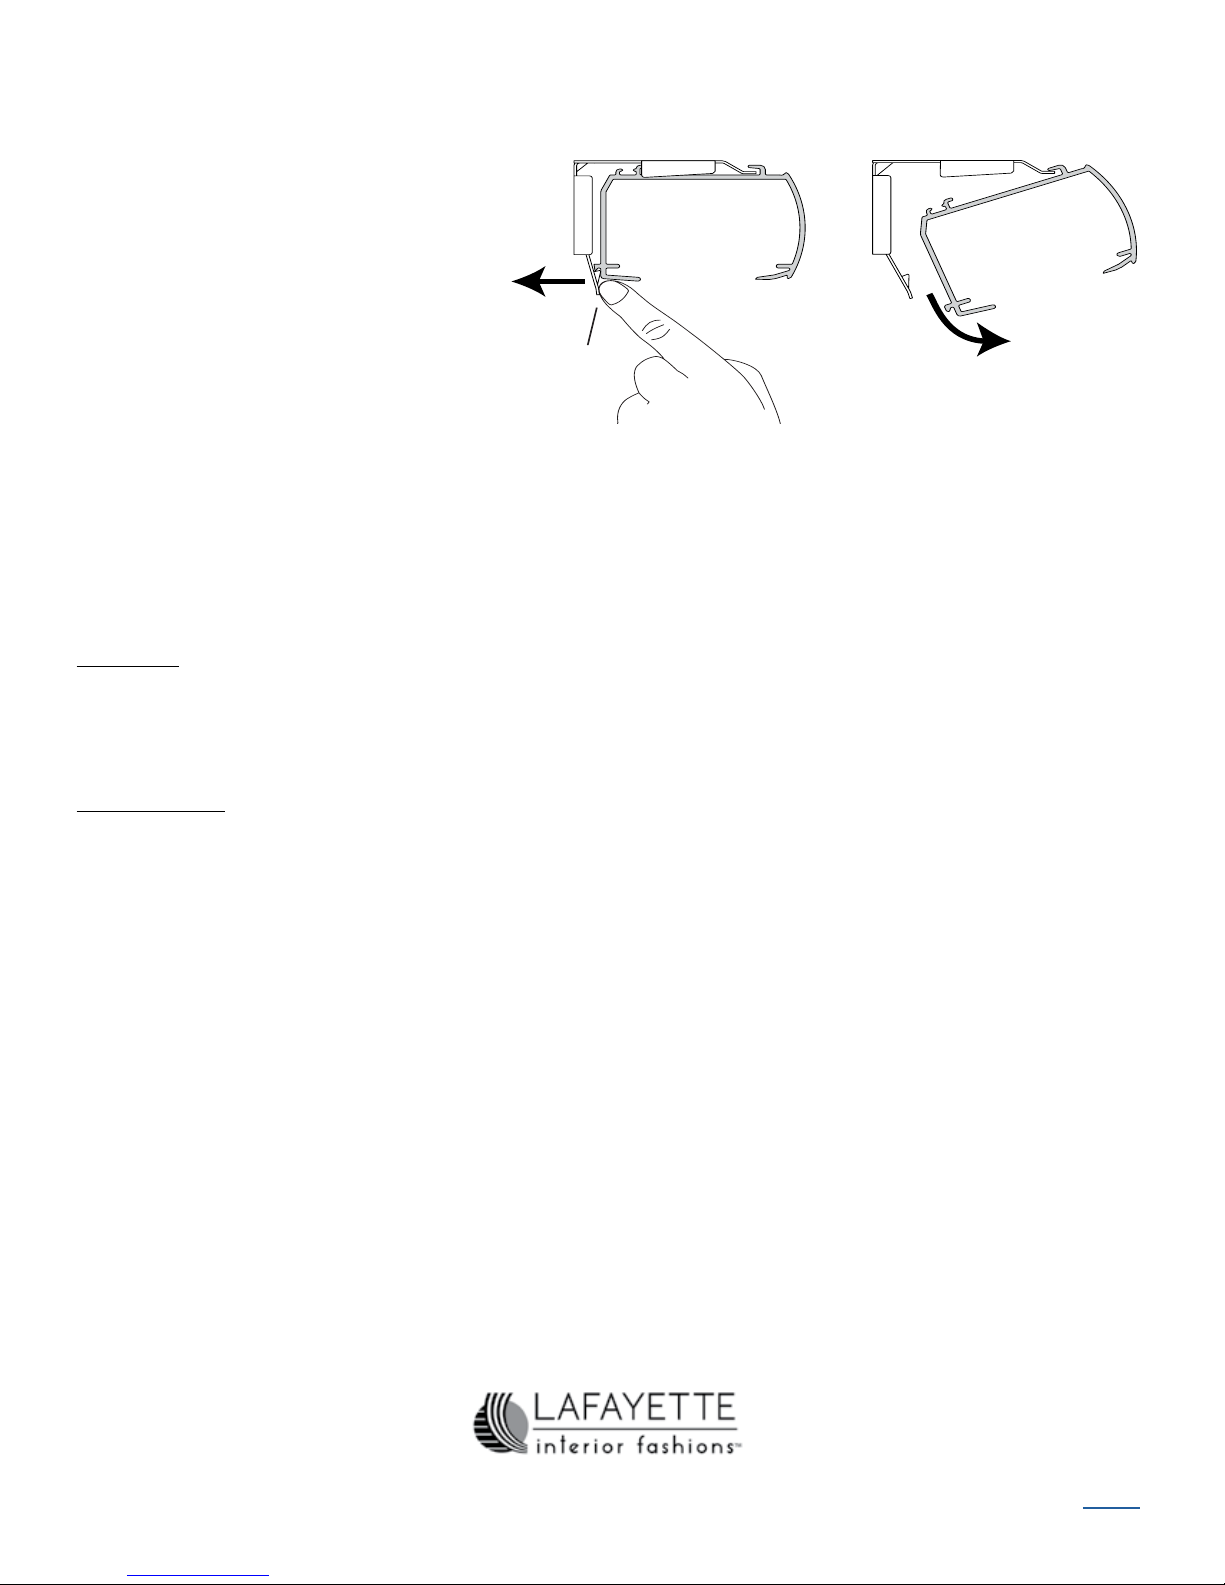
Removing the Shade (If Necessary)
Bottom
Tab
Back of
Shade
Headrail
Bracket
■ Lower the shade approximately4".
■ While holding the headrail,
push back on the bottom tab
of the installation bracket to
release the bottom edge of
the headrail.
■ After releasing the bottom edge,
roll the back of the headrail down and
out from thebracket.
Cleaning Procedures
Cellular shades are made of anti-static, dust-resistant fabric which repels dirt and dust. For
most fabrics, the following cleaning options are available.
Dusting
■ Regular light dusting with a feather duster is all the cleaning that is needed in most
circumstances.
Vacuuming
CAUTION: Do not vacuum XXX fabrics.
■ For deeper cleaning, vacuum gently with a brush attachment.
Other cleaning methods described in the branded IOCs include:
Compressed Air/Hair Dryer (Cool Setting)
Spot-Cleaning
Bathtub Cleaning/Water Immersion
Ultrasonic Cleaning
Injection/Extraction Cleaning
Parasol Installation Instructions 14
18-67IN-18
3/14
BACK

Installation Instructions
Parasol Cellular Shades
Angles and Specialty
BACK
Shapes
Parasol Installation Instructions 15

Product View
Headrail
Bottom Rail
Not Shown:
Angle Bottom
Angle Top
Hexagon
Octagon
Trapezoid
Trapezoid Top-Down shades
Installation Brackets
Continuous
Cord Loop
Angle Sharing the Headrail
with Continuous Cord Loop,
Cordess, and BatteryPowered Shades
Stand-Alone Angle
Parasol Installation Instructions 16
BACK
Thank you for purchasing cellular shades. With proper installation, operation,
Speed Nut
and Screw
(Provided with Each
Extension Bracket)
#6 x 1
1
/2"
Hex Head Screw
(Provided)
Longer #6 Hex Head Screw
for Use with Spacer Blocks
(Not Provided)
and care, your new shades will provide years of beauty and performance. Please
thoroughly review this instruction booklet before beginning the installation.
Tools and Fasteners Needed
■ Flat blade and Phillips screwdriver
■ Level (laser level is recommended)
■ Measuring tape and pencil
■ Power drill,
3
/32" drill bit, and 1/4" hex driver
In addition, you will need fasteners designed to work with your specic mounting
surface(s).
1
■ #6 Hex Head Screws (Provided). Two 1
/2" screws are provided per installation
bracket.
■ Longer #6 Hex Head Screws (Not Provided). If using spacer blocks, use #6
screws long enough for a secure attachment.
■ Speed Nuts and Screws (Provided). Extension brackets come with speed nuts
and screws.
■ Drywall Anchors (Not Provided). Use drywall anchors when mounting into
drywall.
BACK
Parasol Installation Instructions 17
Installation Overview
3
/8"
End Mount
Bracket
3
/4"
End Mount
Bracket
■ Your order will include installation brackets specic to your pleat size.
3
/8"
Installation
Bracket
3
/4"
Installation
Bracket
11/4"
Installation
Bracket
3
/8"
Swivel
Bracket
■ The number of installation brackets required varies with
headrail width, as shown.
IMPORTANT: For illustration purposes,
3
the installation brackets for
/4" are shown
Shade Width
Up to 31" 2
311/8" – 60" 3
throughout the following instructions. The
installation brackets for
3
/8" and 11/4"pleat sizes
601/8" – 72" 4
follow the same installationprocedures.
Mounting Types and Window Terminology
3
/4"
Swivel
Bracket
Brackets
Required
If the installation brackets are mounted correctly, the rest of the installation
process follows very easily. To prepare for this important rst step, review the
mounting types and basic window terminology illustrated below.
Molding
Head Jamb
Jamb Jamb
Collectively, the sill and
jambs are called the
“window casement.”
Sill
Inside Mount
Shade fits within
window opening.
Outside Mount
Shade mounts outside
window opening.
Parasol Installation Instructions 18
BACK
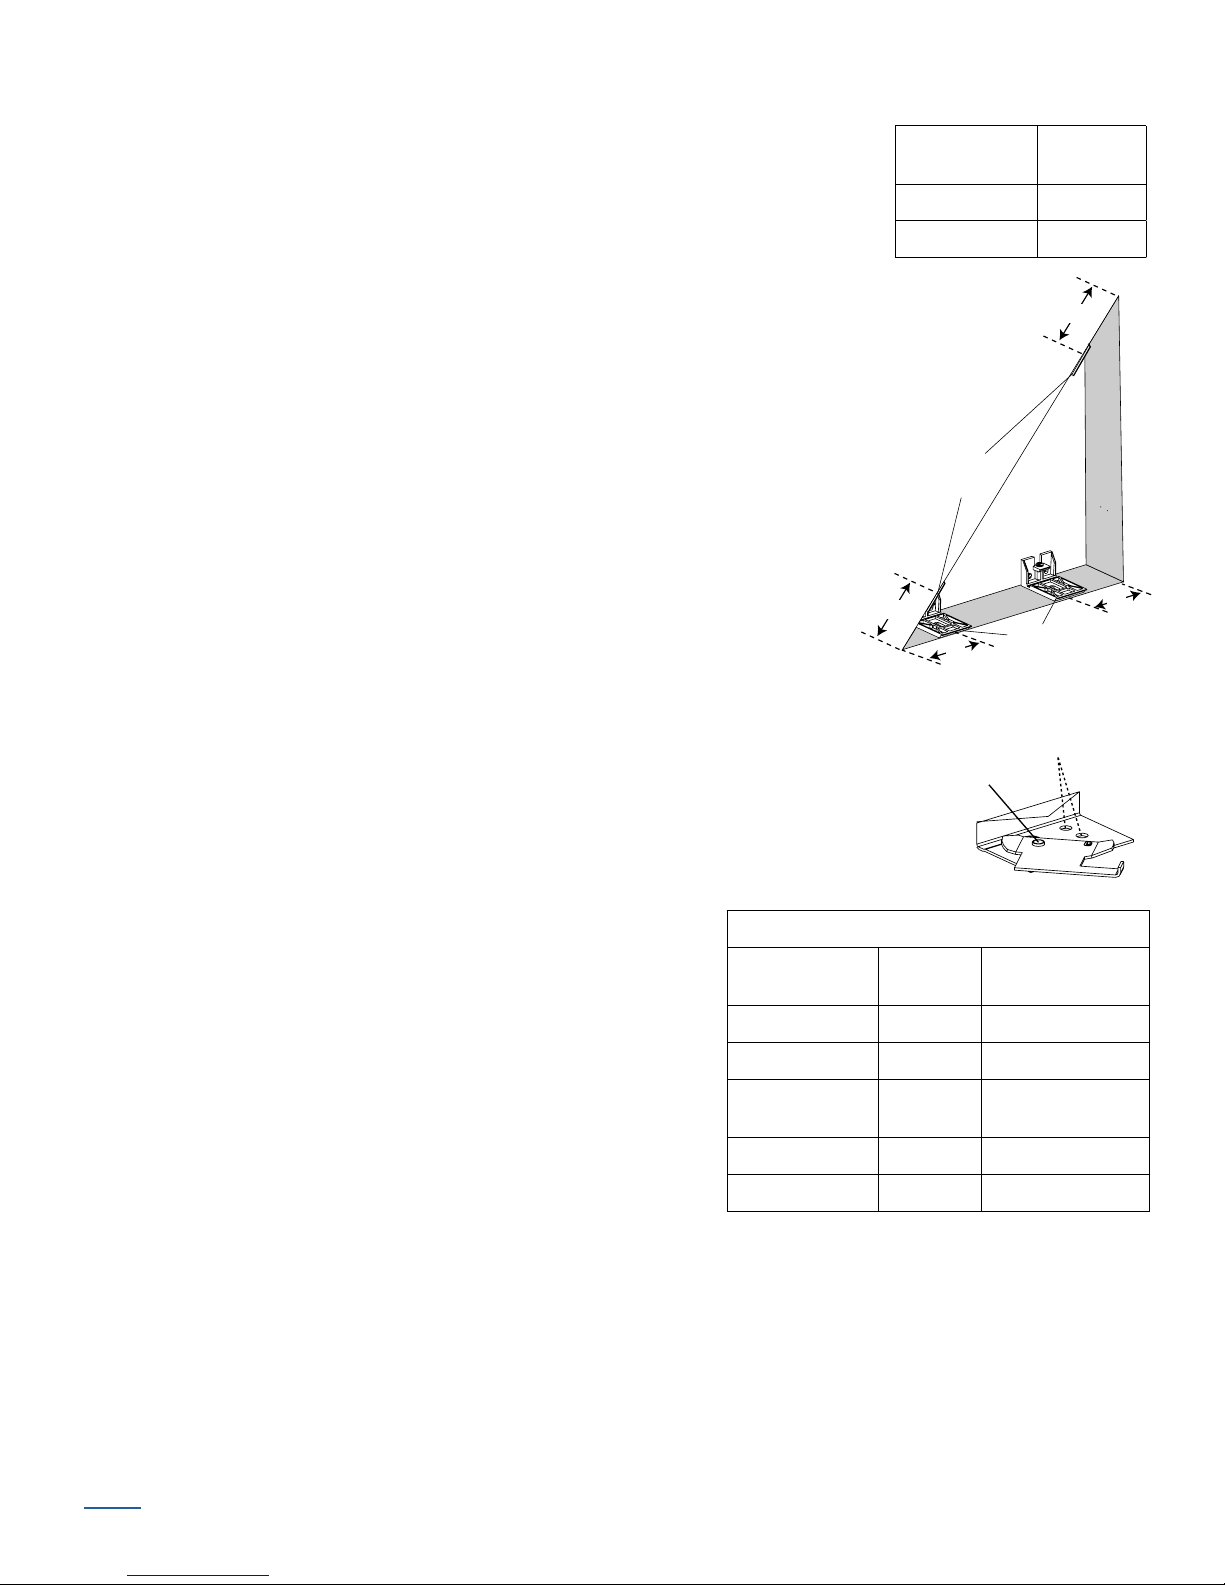
Mount the Installation Brackets — Operable Shade Inside Mount
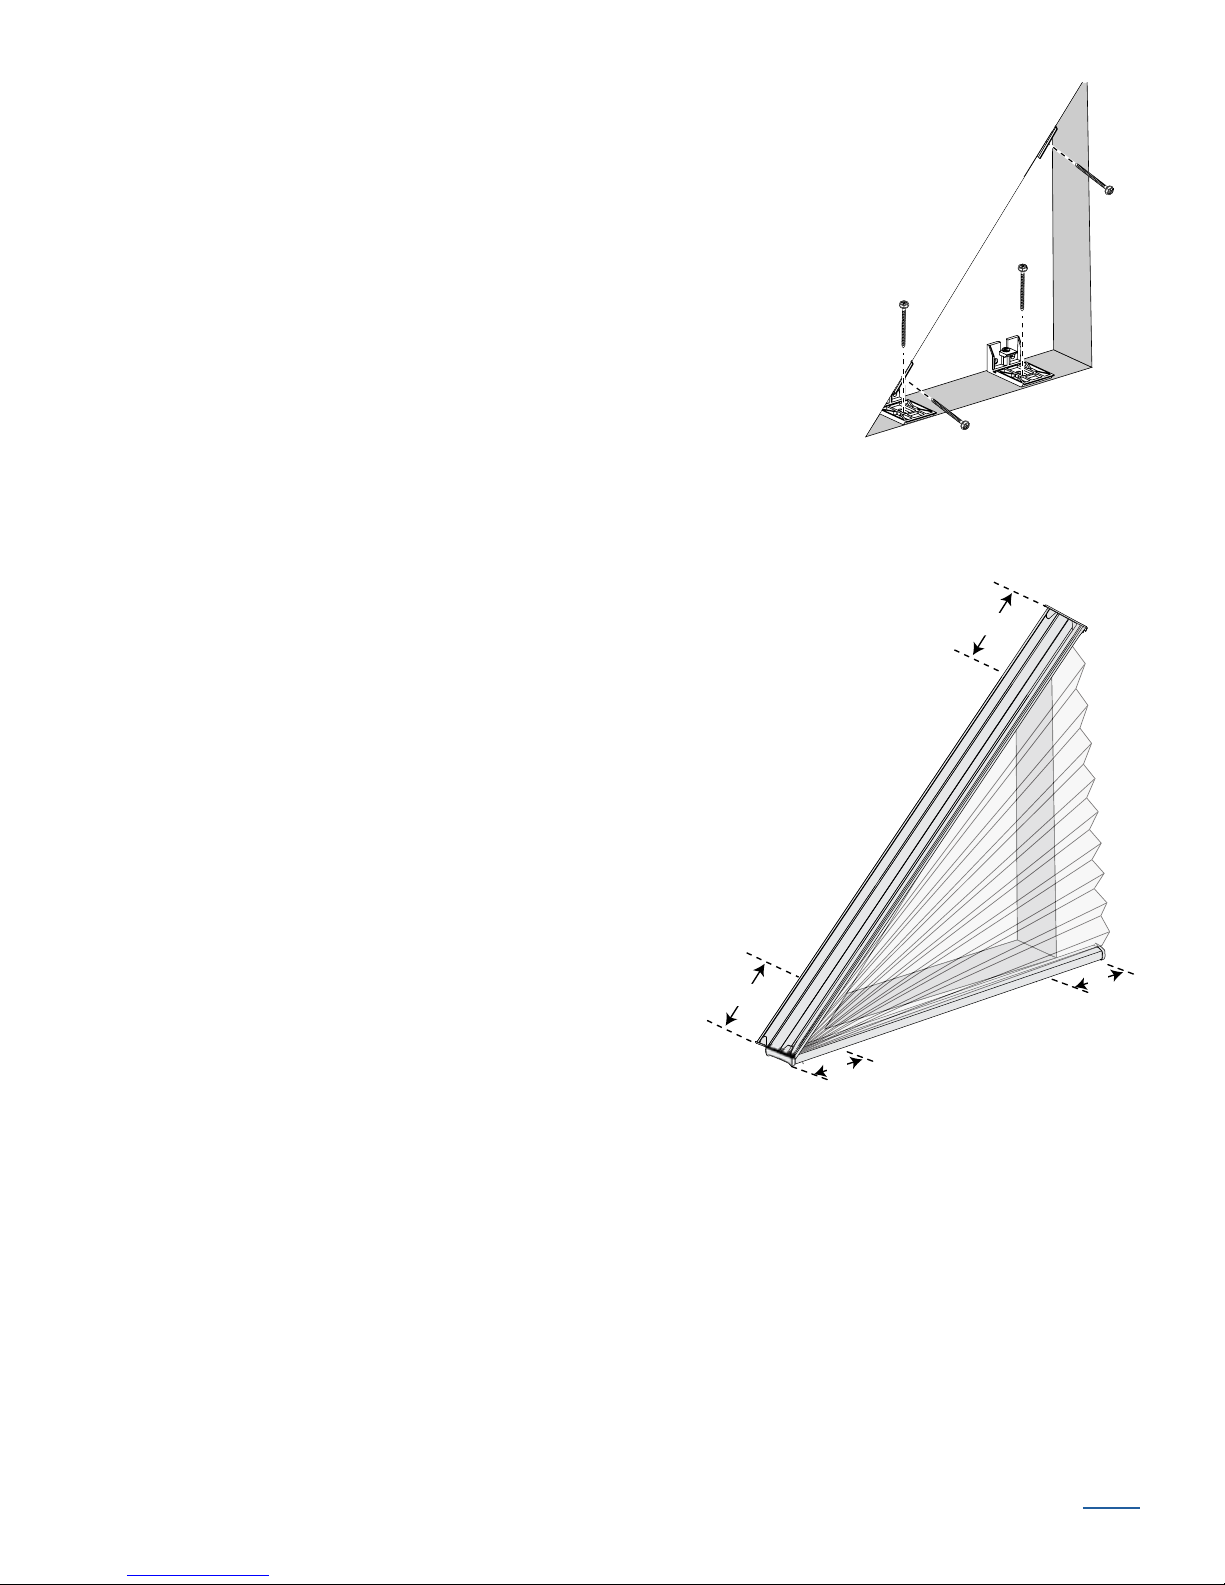
Specialty Shape Shade (Bottom-Up Operation)
■ Mark 3" in from each jamb.
■ If more than two installation brackets came with your order, space
additional bracket(s)evenly between the two end brackets and mark their
Angle Top Shade
3"
Space Evenly
Jamb
Space Evenly Space Evenly3" 3"
Installation Brackets
Specialty Shape Shade (Top-Down Operation)
Installation Brackets
3" 3"
Jamb
Space Evenly
3"
Jamb
JambJamb
Jamb
location. Mount into wood whenever possible.
BACK
Parasol Installation Instructions 19
■ Center the installation brackets on your marks, then mark each of the screw holes.
*Double cell fabrics use 3/4" brackets.
Standard Bracket
Swivel Bracket
■ Mounting depth will vary depending on the fabric pleat
size. Refer to the chart for depth requirements.
■ For fully recessed mounting, the fabric will be ush with
the front of the window casement when raised.
IMPORTANT: The front edges of the installation brackets
should be level and aligned.
■ Drill the screw holes
3
using a
■ Attach the installation
/32" drill bit.
3"
brackets using the screws
provided.
■ Check that the
mounting surface
See Chart
For Depth
is level and the
installation brackets
are aligned. If
mounting to a heavily textured surface, shim the brackets, if needed.
Depth Chart for BracketPlacement
Bracket
Type
3
/8" Standard 1" 15/8"
3
/4" Standard* 11/4" 23/8"
3
/8" Swivel
3
/4" Swivel*
Minimum
1
/2" 11/4"
1
/2" 2"
3"
Fully Recessed
See Chart
For Depth
IMPORTANT: Use drywall anchors when mounting into drywall.
Parasol Installation Instructions 20
BACK

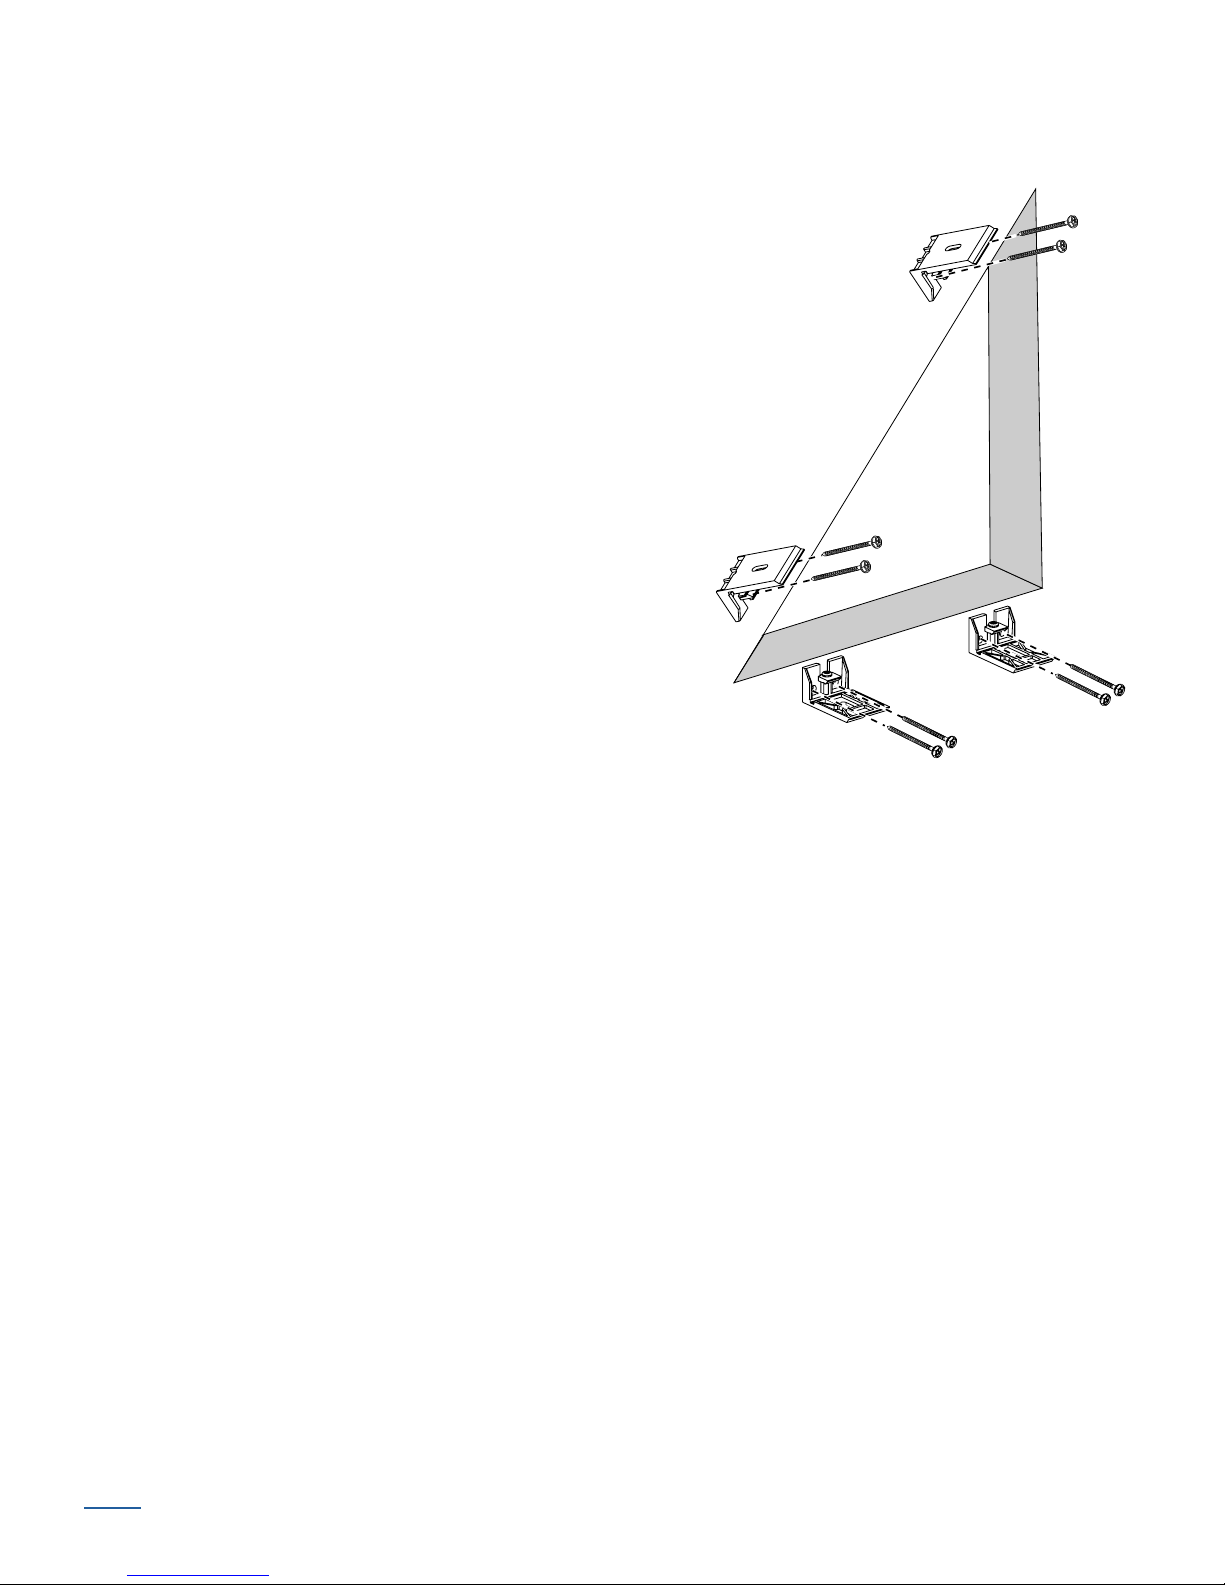
Mount the Installation Brackets — Operable Shade Outside Mount
Angle Top Shade
Outside Mount
Spacer Blocks
■ Center the headrail over the window opening at the
desired height. Use a pencil to lightly mark each end
of theheadrail.
■ Alternatively, measure the width of the headrail
and use that width to mark the headrail end points
over the window opening.
■ Mark 3" in from each end of the headrail.
■ If more than two installation brackets came with your
order, space additional bracket(s) evenly between the
two end brackets and mark their location. Mount into wood whenever
possible.
■ Center the installation brackets on your marks and mark the screw holes.
3"
Space Evenly
Space Evenly
3"
■ Attach the installation brackets to a at vertical surface. A
with Installation
minimum at vertical surface required to mount the brackets:
5
/8" is required to mount a 3/8" bracket, and 1" is required to
3
mount a
/4" bracket.
■ The top of the installation brackets should be at the desired
shade height.
IMPORTANT: The installation brackets should be level andaligned.
CAUTION: The rear of the installation brackets must be ush against a at
mounting surface. Do not mount installation brackets on curved molding.
3
■ Drill the screw holes using a
/32" drill bit.
IMPORTANT: Use drywall anchors when mounting into drywall.
■ Attach installation brackets using the screws provided.
■ If using spacer blocks with installation brackets, use longer screws
to ensure a secure installation.
Bracket
■ The solid side of the spacer blocks face the mounting surface.
■ Each spacer block projects the
BACK
installation bracket
mounting surface. Use a maximum of three spacer
blocks per installation bracket.
1
/2" from the
Parasol Installation Instructions 21
■ If you need more than 11/2"
Outside Mount
with Extension
Bracket
in Locked
Tab
of clearance, use extension brackets.
Attach the extension brackets using
two screws perbracket.
■ Attach the installation brackets
using the screws and speed nuts
provided.
Install the Operable Shade
Standard Installation Brackets
■ Position the shade so that the cords face you.
Speed
Nut
Extension
Bracket
Installation
Bracket
■ Slip the headrail into the installation brackets so the front of
the installation bracket slides under the front groove on the
top of the headrail.
■ Gently roll the back of the headrail up and push back to snap
into place.
■ Tighten the tab screw.
Swivel Brackets
■ Place the swivel brackets in the open position.
■ Place the headrail against the back of the swivel brackets.
■ Rotate the swivel arm to snap the locking tab under
the headrail.
■ The shade is locked when the push tab is against
the headrail.
Attach Hold-Down Brackets (Optional)
Hold-down brackets are only used on outside mountedshades.
■ Lower the shade and place the pins from the hold-down brackets into the bottom
rail end caps.
Locking
Tab
Headrail
Tab
Screw
Screw Holes
Bracket
in Open
Position
Bracket
Position
Push
■ On the mounting surface, mark the screw holes.
■ Check that the brackets are level and aligned, and attachthem using two screws.
Parasol Installation Instructions 22
BACK
Mount the Installation Brackets — Non-Operable Angle Sharing the Headrail with
Continuous Cord Loop, Cordless, or Battery-Powered Shades
For Inside Mounting Installations: For end mount bracket location and headrail installation, refer
to the “End Mount” section in the Installation, Operation, and Care instructions that came with your
rectangular shade.
Install the Rectangular Shade Headrail into the End Mount Brackets
■ Hold the rectangular shade so that the front of the headrail faces you.
■ Slip the headrail onto the installation brackets, so that the front of the bracket ts under the groove
of the headrail.
■ Push the headrail up and back until it snaps into place.
■ Inspect the installation brackets to verify the back of the headrail is securely snapped into the base
of each bracket. Also, the front edge of each bracket must be in the groove of the headrail. If any
brackets are NOT installed correctly, release the shade and reinstall. If necessary, see “Removing the
Shade” on page 17.
Bad
Good
Attach the Angle to the Rectangular Shade Headrail
Before attaching the angle to the headrail install the top rail of the non-operable angle to the mounting
brackets. To install the mounting brackets for an inside mount see “Mount the Installation Brackets —
Non-Operable Shade Inside Mount”
■ Install the top rail of the non-operable angle, see “Install the Stand-Alone Angle”
■ Fan out the angle towards the headrail of the rectangular shade.
BACK
Parasol Installation Instructions 23
The headrail of the rectangular shade has a magnetic strip attached to the top of the rail. The fabric
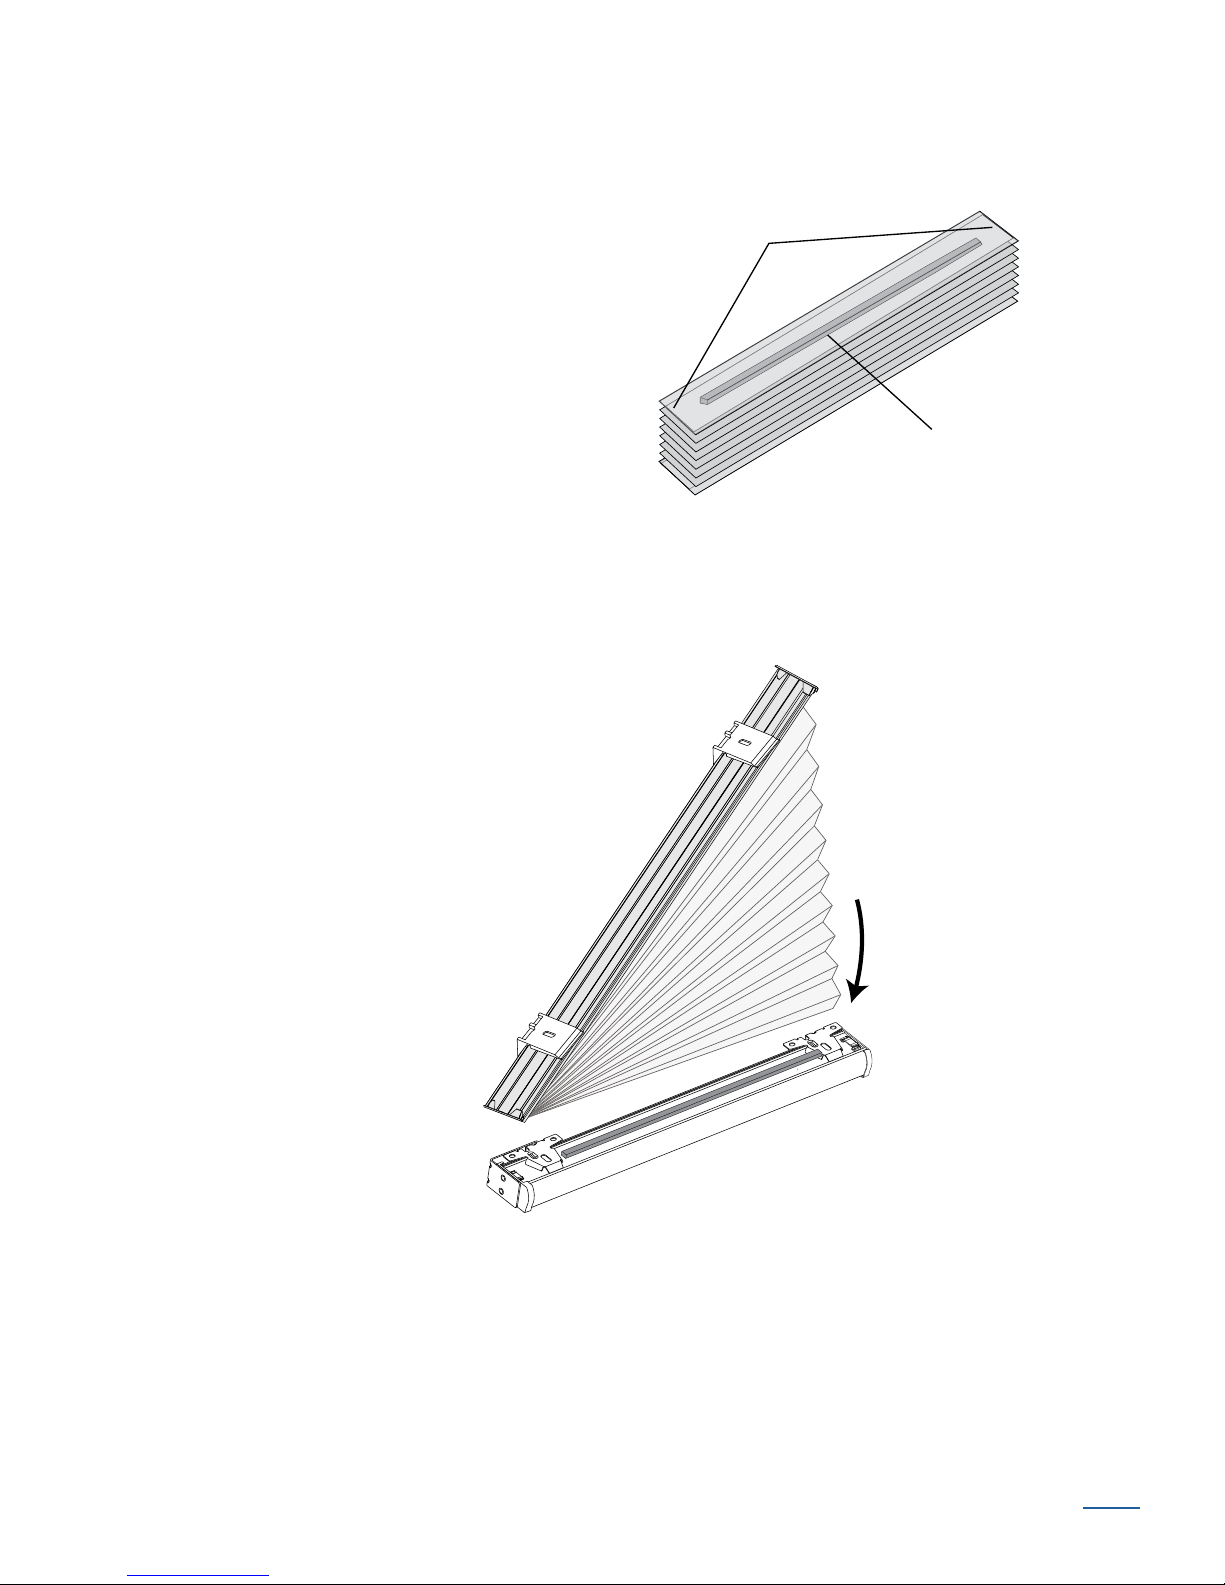
stack has a metal ller strip inserted into the bottom cell of the angle fabric stack.
■ Position the ller strip
on the bottom cell of the angle fabric
stack, aligning the edge ush with the
edge of the fabricstack.
IMPORTANT: A magnet is attached to the
ller strips, ending 3" short of the right
edge, to accommodate the installation
brackets.
■ Place the fabric stack on top
of the rail onto the magnet. Adjust the
placement of the fabric as necessary.
The filler strip is flush
with the both edges
of the angle fabric stack.
Bottom Cell
A magnet is attached to the filler strip,
ending 3" short of the right edge,
to accommodate the installation brackets.
Parasol Installation Instructions 24
BACK
Mount the Installation Brackets — Non-Operable Shade Inside Mount
■ Your order includes installation brackets specic to your
pleat size.
■ The number of installation brackets required varies with
rail width, as shown.
■ Mark installation bracket locations 3" in from the ends of each rail.
■ Center the brackets on your marks and mark the
screw holes.
IMPORTANT: The brackets should be level andaligned.
■ If additional installation brackets came with your order, space the
additional bracket for each rail evenly between the two end brackets
and mark their location. Mount into wood whenever possible.
■ Swivel Brackets: For
3
/4" pleat size brackets, mark the front hole if a
mounting depth of 1" or more is available. Mark the rear hole only
1
if the mounting depth is between
/2" and 1".
CAUTION: Do not attach a screw through the swivel eyelet on
the bracket.
Width of Rails
12" – 31" 4
311/8" – 42" 6
Installation
Brackets
3"
3"
Swivel Bracket (3/4")
Swivel Eyelet
Installation
Brackets
Mark screw locations.
Brackets
Required
3"
3"
■ Mounting depth will vary depending on
the fabric pleat size. Refer to the chart for depthrequirements.
■ For fully recessed mounting, the fabric will be ush
with the front of the window casement.
*Double cell fabrics use
Depth Chart for BracketPlacement
Bracket
Type
3
/8" Standard 1" 15/8"
3
/4" Standard* 11/4" 23/8"
11/4"
Standard*
3
/8" Swivel
3
/4" Swivel*
Minimum
15/8" 3"
1
/2" 11/4"
1
/2" 2"
3
Fully Recessed
/4” brackets.
BACK
Parasol Installation Instructions 25
■ Drill the screw holes using a 3/32" drill bit.
Outside Mount
■ Center the brackets on your marks and attach them using the screws
provided.
■ Check that the mounting surface is level and the brackets are
aligned. If mounting to a heavily textured surface, shim the
brackets, if needed.
Mount the Installation Brackets — Non-Operable Shade Outside Mount
■ Center the stand-alone angle over the window opening at
the desired height. Use a pencil to lightly mark the ends of
both rails.
■ Alternatively, measure the width of the rails and
use that width to mark the rails end points over the
window opening.
3"
■ Mark installation bracket locations 3" in from each end
of the rails.
IMPORTANT: Be sure the bracket locations allow for
the stand-alone angle to completely cover the window
opening.
■ If additional installation brackets came with your
order, space the additional bracket for each rail
evenly between the two end brackets and mark their
location. Mount into wood whenever possible.
3"
3"
3"
Parasol Installation Instructions 26
BACK
■ Center the brackets on your marks and mark the screw holes.
■ A minimum at vertical surface
required to mount the brackets:
3
is required to mount a
1" is required to mount a
1
and 1
/4" is required to mount a 11/4"
/8" bracket,
3
/4" bracket,
5
bracket.
IMPORTANT: The brackets should be
level andaligned.
CAUTION: The rear of the brackets
must be ush against a at mounting
surface. Do not mount brackets on
curved molding.
Outside Mount
/8"
3
■ Drill the screw holes using a
/32" drill
bit.
IMPORTANT: Use drywall anchors when mounting into drywall.
■ Attach the installation brackets using the screws provided.
■ See mounting instructions for using spacer blocks or extension brackets.
BACK
Parasol Installation Instructions 27
Install the Stand-Alone Angle
Bracket Open
Standard Installation Brackets
■ Install both the headrail and the bottom rail into the installation brackets.
■ Loosen the tab screw on each bracket.
■ First push the headrail into the brackets and then push the bottom rail into
the brackets. Make sure fabric is not caught between the tabs and the rails.
■ Tighten the tab screw on each bracket. Do not overtighten. If necessary,
gently move the fabric forward to access the screw.
Swivel Installation Brackets
■ Install both the headrail and the bottom rail into the
swivel installation brackets.
■ Position the moveable tab outward on each bracket.
■ With the front side of the fabric facing you, lift the
shade into position so the rails are against the back of
Locking
Tab
Screw Holes
the brackets.
■ Rotate the moveable tabs against the rails to lock into place. Make sure the shade is
tightly secured.
Bracket Locked
Locking Tab
Push
Tab
Parasol Installation Instructions 28
BACK
Operate the Shade
Stationar
■ Keep the cord close to the fabric when operating the shade.
■ To raise or lower the shade, disengage the cordlock by
moving the cord toward the center of the shade.
■ Pull on the cord to raise the shade.
■ Engage the cordlock by returning the cord to the
original position.
y
Portion
of Angle
Slope
Angle
Operable
Portion
of Angle
Angle Top
Shade raises to
dotted line only.
Rectangular portion of shade
raises to headrail;
angle portion raises but
does not stack.
Slope
Angle
Angle Bottom
Level the Bottom Rail (If Necessary)
■ Lift the bottom rail to locate the pockets on the underside of the rail.
7
■ Gently pull down on the bottom rail to fully insert the
wrench key into the pocket. The key is fully inserted when the ring on
the key abuts to the pocket.
■ Lift up the bottom rail slightly before turning the Allen wrench key.
Turn the key clockwise to raise that side of the bottom rail, or
counter-clockwise to lower it.
■ One quarter turn of the key equals approximately
IMPORTANT: The Allen wrench key must be fully inserted
to avoid stripping the mechanism. Do not pull down on the
bottom rail while turning the key.
/64" Allen
1
/4".
Pocket
Underside of Bottom Rail
Raise
Lower
Allen
Wrench
Key
BACK
Parasol Installation Instructions 29
Troubleshooting
Problem The shade will not t into theinstallation brackets.
Solution Check that the installation brackets are level and aligned. Shim the
installation brackets to level the headrail, if necessary.
Be sure the heads of the screws are ush against the installation
bracket.
Check that the headrail is completely inserted into the installation
brackets. See “Install the Operable Shade” on page 7.
Problem The shade is hard to raise or lower, or will not raise or lower.
Solution Make sure that the shade fabric is not caught between the
installation bracket and the headrail.
Check that the headrail and installation brackets are level and
aligned in the window. Shim the installation brackets to level the
headrail, if necessary.
If hold-down brackets are used, make sure they have been
released before operating the shade.
Problem The shade raises or lowers unevenly, or the bottom rail is uneven
when fully raised.
Solution Lower the shade completely to allow it to “self-correct” skewing.
Check that the headrail and installation brackets are level and
aligned. Shim the installation brackets to level the headrail,
ifnecessary.
Adjust the bottom rail. See “Level the Bottom Rail (If Necessary)” on
page 90.
Problem The shade will not stay in the raised position.
Solution To lock the shade in the raised position (or anywhere along the
path to the fully raised position), engage the cordlock by pulling
the cord toward the outside of theshade.
Parasol Installation Instructions 30
BACK
 Loading...