

Lafayette Classic Collection Echelon, Classic Collection Traditions, Classic Collection 2” Metro, Classic Collection Integra Installation Instructions Manual

Aluminum Blinds
Installation Instructions
Echelon, Traditions & Integra Aluminum Blinds
2” Metro Aluminum Blinds
*Click BACK on any page to return to the Table of Contents*
Echelon™ , Traditions™ & Integra™
Aluminum Blinds
Thank you for choosing Lafayette aluminum blinds. With proper installation and care, your new aluminum
blinds will provide many years of beauty and performance.
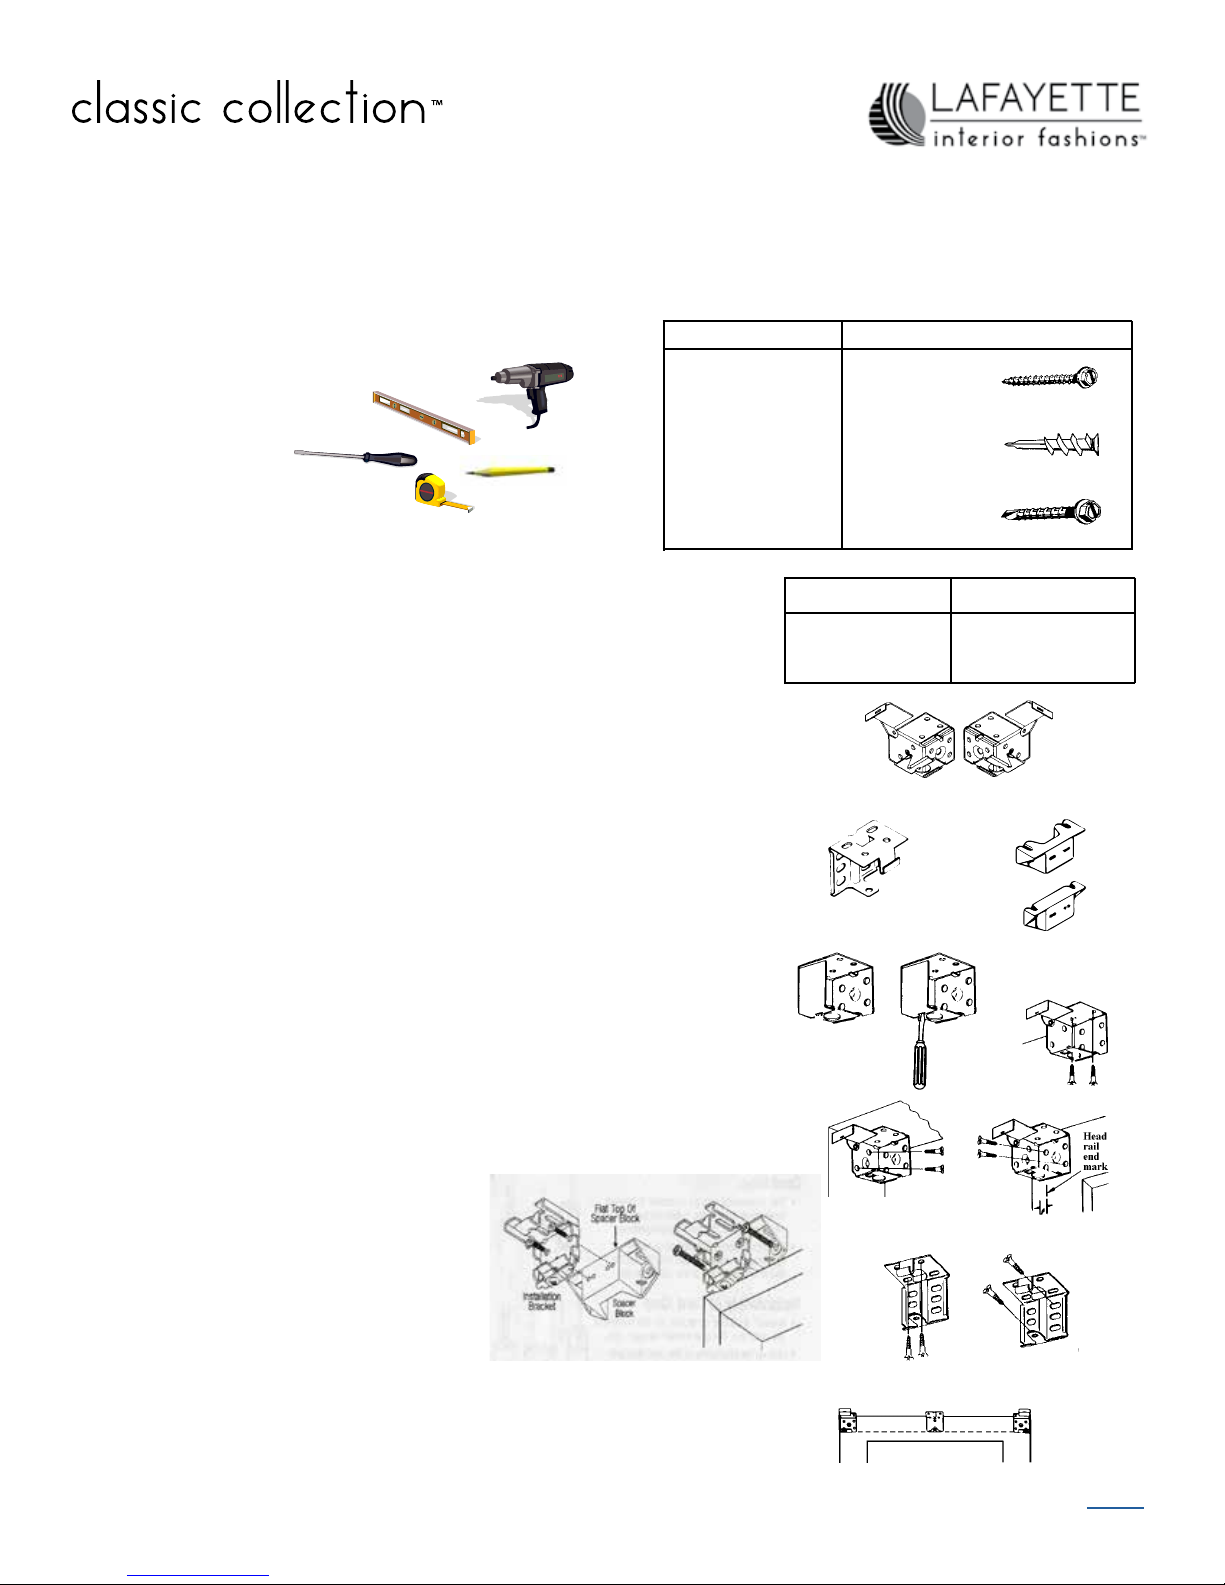
Tools and Fasteners Needed
Power Drill, 1/4” Driver and drill bits
Mounting Surface
Wood
Tape Measure
Flat blade Screwdriver
Phillips Screwdriver
Drywall, Plaster
Pencil
Level
Metal
Before Installing
Remove shade from the package. Keep all packaging until the shade operates to your satisfaction.
• Contents of your hardware package may vary depending on options
chosen.
• Blinds over 60 sq. feet will be sent with one extra support bracket (Traditions) or one extra installation bracket (Integra) to be spaced evenly
along the headrail at a maximum distance between brackets of 60”.
• Additional fasteners may be needed based on your specic mounting
surface.
Traditions Headrail: Mounting Inside or Outside
• For inside installations, mount the brackets in the corner of the jambs.
• For outside installations, hold the blind level at the desired height and
mark the window frame on the end and bottom of the headrail. The
brackets should be located 1/4” beyond the end of the headrail marks.
• The brackets must be level in order for the blind to operate properly.
Traditions Headrail: Bracket Attachment
Two hinged-cover installation brackets (marked “L” for the left side and “R”
for the right side) are provided for each blind. The safety lock cover will
secure the blind rmly into place.
• Open the bracket cover by inserting a screw driver into the rectangular
slot and twisting.
• Each bracket is designed to be mounted with two diagonally located
screws.
Traditions Headrail: Spacer Blocks (Optional)
Spacer blocks can also be used to add clearance. Two versions are
available: 1/2” and 7/8”.
• Attach the spacer blocks to the installation
brackets using the two screws provided
with each spacer block.
• Attach the installation brackets to the
mounting surface with screws through the
two holes in the rear of the spacer blocks.
#6 Hex Head
Provided
Wall Anchors
Not Provided
Sheet Metal
Not Provided
Blind Width
Up to 60 1/16”
60 1/4” - 120 1/16”
Over 120 1/4”
Traditions Installation Brackets
Traditions Support Bracket
Inside Mount
Fastener
Supports Required
0
1
2
7/8”
1/2”
Spacer Blocks
Inside Mount
Outside Mount
Supporting Wide Blinds
If the blind is over 60” wide (and/or 60 square feet in area) an intermediate
support is required. It should be close to the center, but must not interfere
with the headrail components. For blinds over 120” wide, two support brackets must be installed. Use a level to align the support brackets with the end
brackets.
Classic Collection Installation Instructions 2
Outside MountInside Mount
BACK
Traditions Headrail: Installing the Headrail
Check the headrail to be sure nothing is tangled. Be sure to keep the top slat from
sliding into the brackets. On inside mounts if a valance is being used, see instructions below before installing the headrail.
• If support brackets are used, slip the headrail into the lip of the bracket and
push into place.
• If supports are not used, slip the headrail into the brackets and snap safety
locking cover shut.
• If the blind is loose in the brackets, open the end brackets and expand the
end lock tab(s) on the headrail by using a screw driver.
• If the blind is too tight, compress the tab by pushing it in on one or both sides.
Traditions Headrail: Installing the Valance
The Regal valance is available by request for Traditions 820, Traditions Light-Ban
and Traditions Micro blind. A Two slat clip-on valance is available by request for Traditions 822, Traditions 620 and Traditions 622 blind.
• Install the valance with the clips provided. For inside mount blinds, attach the
valance clips to the headrail before installing the blind.
• If a return is needed, the valance can be bent to form a return.
• Tilt the Regal valance will rest on the bottom groove and snap onto the top two
grooves.
• Slide the slats for the Two slat valance into the grooves on the valance clips.
Echelon & Integra Headrails: Mounting Inside or Outside
Position the two end brackets on the mounting surface so that they
will be located between 2” and 6” from the ends of the headrail. If
more brackets are required, space additional brackets evenly between the end brackets. Do not position any bracket directly above a
ladder, cordlock or wand tilter. Allow 1” space on the side whenever
possible.
Echelon & Integra Headrails: Securing the Brackets
Inside Mount Bracket Attachment
A minimum casement depth of 7/8” is required for inside mount. A depth
of 1 3/4” is required to fully recess the blind.
• Attach the installation brackets with two screws through the two
holes in the top of the brackets.
• Be sure the front edges of the brackets are aligned before tightening
the screws.
Outside Mount Bracket Attachment
A at surface of at least 5 /8” high is required for bracket attachment.
• Attach the installation brackets with two screws through the two
holes in the rear of the brackets.
• Use a level to check that the tops of the brackets are aligned at the
same height before tightening the screws.
Echelon & Integra Headrails: Installing the Headrail
Be sure the bracket tab is fully extended to the head of the screw.
• Place the headrail in the brackets so that the front lip rests on the bracket
hook and the rear bottom corner rests on the tab.
• The blind should hang on the brackets without being held in place.
• Tilt the headrail up and push it back until it is ush against the top of the
installation brackets. Tighten the locking screw on all brackets to hold the
blind securely in place.
• To remove the headrail, reverse installation procedure. Loosen the locking
screw, tilt the headrail, and lift off the bracket hook.
BACK
Classic Collection Installation Instructions 3

Optional Hold-Down Brackets
Plastic Hold-Down Brackets
• Attach the hold-down brackets to the jamb, sill or outside
mounting surface. When the blind is fully lowered, the pin on
the hold-down must align with the center of the bottom rail
end caps.
• Insert the pin on the hold-down brackets into the end caps to
secure the bottom rail. A hole may need to be punched in the
end cap to accept the pin in the hold-down.
Metal Hold-Down Brackets
• Insert a hold-down pin into each of the bottom rail end caps.
• Attach the hold-down bracket to the jamb, sill or outside
mounting surface. When the blind is fully lowered, the hold in
the hold-down brackets must align with the pins in the bottom
rail end cap.
• Insert the pins into the holes in the hold down brackets.
Optional Extension Brackets
Extension brackets can be used on outside mounts to project the
installation brackets from 2 3/4” to 4 1/8” from the mounting surface.
This allows additional clearance of obstructions such as window
cranks or handles.
• The extension brackets may be fastened together two different
ways to produce the desired wall extension as shown.
• Attach the extension brackets using the nut and bolts sent.
• Mount the extension bracket assemblies to the window frame or
wall using two diagonally located screws.
• Use the appropriate fasteners to bolt the mounting brackets to the
extension brackets.
Nut & Bolts
Wand TIlter
.006 gauge blind wands are provided with a clip on wand tilter
that simply “snaps” onto the wand tilter.
• Grasp wand tip between forenger and thumb.
• Rotate the tilter until the hole is horizontal with the slats and
push wand into hole on the tilter as shown.
.008 gauge blind wands are provided with a plastic sleeve and
metal hook.
• Remove the plastic sleeve by pulling upward. The hook on
the wand will be in an open position.
• Slide the plastic sleeve removed from the wand over the
metal shaft of the tilter until the hole is exposed.
• Holding the sleeve above the hole, pull the wand hook
through the shaft hole until it rests in the bend of the hook.
• Slide the plastic sleeve back down over the hook until it is
back in the closed position.
Classic Collection Installation Instructions 4
BACK

Raising and Lowering Blinds
The slats must be in the horizontal (open) position before raising or
lowering. An automatic locking device takes effect when the cords
hang down vertically.
• Pull the cords toward the middle and down slightly to open the
lock.
• When the blind is at the desired height, pull the cords to the
outside to lock in position.
Cord Stop
• This component acts as a stopper to prevent inner cords from being
pulled through the blind, which can pose a risk of entanglement.
• It is also designed to break apart under signicant pressure, which
may lessen the risk of entanglement in the top lift cords.
Reassembly of Cord Stop
• Reinsert any loose cords into the top notches of the cord stop. There
is a notch on each side.
• Line up the two halves of the cord stop and snap the pieces back
together.
Child Safety
Young children can STRANGLE in cord loops and in the loop above the cord stop. They
can also wrap the cord around their necks and STRANGLE. In addition, inner cords can
pull out to form a loop, which can STRANGLE a child.
• Always keep cords out of children’s reach.
• Move cribs, playpens and other furniture away from cords. Children can climb furniture
to get to cords.
• Do not tie cords together. Make sure cords do not twist together to create a loop.
Care and Cleaning
• Dust with a soft, clean cloth or chemically treated dust cloth. Tilt the slats up and dust.
Then tilt the slats down (but not all the way closed) and dust the other side of the
slats.
• Vacuum using the brush attachment or hand held vacuum and tilt the slats up and
down as described.
• Wash slats using a damp cloth and mild detergent. Use warm or cold water, not hot
water. Tilt the slats up and down as described.
• Bottom rail and slats may also be immersed in a bathtub for a more thorough cleaning. Do not immerse the headrail. Place the blind in a solution of mild, soapy water.
Rinse clean and either wipe dry or allow to air dry completely.
BACK
www.lafayetteinteriorfashions.com
18-3537-01 April 2014
Classic Collection Installation Instructions 5

2” Metro™
Aluminum Blinds
Thank you for choosing Lafayette aluminum blinds. With proper installation and care, your new aluminum
blinds will provide many years of beauty and performance.
Tools and Fasteners Needed
Power Drill, 1/4” Driver and drill bits
Tape Measure
Flat blade Screwdriver
Phillips Screwdriver
Pencil
Level
Mounting Surface
Wood
Drywall, Plaster
Metal
Before Installing
Remove shade from the package. Keep all packaging until the shade
operates to your satisfaction.
• Contents of your hardware package may vary depending on options
chosen.
• Additional fasteners may be needed based on your specic mounting
surface.
Inside and Ceiling Mount
Attach the two end brackets ush against the sides of the window
casement or ceiling. Choose the most appropriate of the following
mounting methods:
• Open end mount bracket as shown. A screw driver may be inserted
into the rectangular slot and twisting.
• Side mount brackets with one screw through a side hole and one
screw through a top holes.
• If the brackets are ush with the back wall, attach them with one
screw through a top hole and one through a rear hole.
• Top mount the brackets with screws through the top holes.
• If limited mounting depth is available, the bracket may be mounted
with two screws through diagonal side holes.
#6 Hex Head
Provided
Wall Anchors
Not Provided
Sheet Metal
Not Provided
Blind Width
Up to 72”
72 1/16” - 96”
96 1/16” - 144”
Fastener
Supports Required
0
1
2
Intermediate Brackets
Evenly space the intermediate bracket or brackets between the two end
brackets. A minimum depth of 1 1/8” is required for bracket attachment.
• Adjust spacing if needed to avoid interference with the internal headrail mechanisms.
• Attach with two screws through diagonal holes.
• The backs of the end brackets and intermediate brackets should line
up with each other.
• With ceiling mounts, you may need to add a bracket shim to allow
clearance for the valance clip.
Bracket Shims (Optional)
Bracket shims may be used whenever the mounting surface is not at
enough to mount the blind correctly.
Install Valance Clips
• Attach valance clips to the headrail as shown.
• Evenly space valance clips along the length of the headrail. DO not
place a valance clip where it can interfere with working parts.
• NOTE: Do not put any valance clip or obstruction over the
motor/transmission.
Classic Collection Installation Instructions 6
BACK

Outside Mount
A at surface of at least 1 3/4” high is required for bracket attachment
• Mark where the ends of the headrail will be located.
• Either hold the headrail up to the mounting surface or measure the headrail
and mark its length.
• Then mark 1/4” to the outside of the headrail marks.
Attach End Brackets
• Align the outside edge of each bracket with the outer marks.
• The tops of the brackets must be aligned at the same height.
• Attach the brackets with two screws through diagonal holes.
Intermediate Brackets
Evenly space the intermediate bracket or brackets between the two end brackets.
• Adjust spacing if needed to avoid interference with the internal headrail
mechanisms.
• The top of each intermediate bracket must be aligned with the tops of
the end brackets.
• Attach bracket(s) with two screws through diagonal holes.
Optional Extension Brackets
Extension brackets can be used on outside mounts to project the
installation brackets from the mounting surface. This allows additional
clearance of obstructions such as window cranks or handles.
• Align and level extension brackets with a carpenter’s level.
• Attach the extension brackets using the nut and bolts sent.
• Mount the extension bracket(s) to the window frame or wall using
two diagonally located screws.
• Use the appropriate fasteners to bolt the mounting brackets to the
extension brackets.
Mount the Headrail
• Tilt the headrail so that its back lip slides under the front lip of the end
brackets and intermediate bracket(s).
• Push the headrail against the back of the end brackets.
• Check that the front lip of the intermediate bracket(s) is under the front
lip of the headrail.
Adjust Headrail Tightness
• If the headrail is loose in the end brackets, bend the tabs on the end
plates outward.
• The tabs may bent inward if the headrail was difcult to install into the
end brackets.
Close End Brackets
• Push the cover down until it snaps over the locking tab on the bottom
of the bracket.
BACK
Classic Collection Installation Instructions 7

Install Slat Valance
• Slat valances use a clear clip for installation.
• Tilt the slat to insert the bottom into the bottom notch of the clip.
• Snap the top of the slat into the top notch of the clip.
Top Notch
Install Monarch Valance
• Monarch valances use a clear clip for installation.
• Tilt the valance to insert the bottom into the bottom notch of the
clip.
• Snap the top of the valance into the top notch of the clip.
Install Camelot or Majesty Valances
Camelot and Majesty will come with a quick clip attached to the back
of the valance.
• Tilt the top of the valance onto the top notch of the clip.
• Push down on the valance to snap into the middle notch of the
valance clip.
Camelot or Majesty Valances with Dust Cover
If a dust cover is requested, a cornice clip will be sent for attachment.
• Attach a clip 2” from each end of the headrail.
• Space additional clips evenly between the two end clips so that
the clips are no more than 36” apart.
• To attach the cornice clips, hook the back of the clip to the rear lip
of the headrail.
• Push the clip down until it snaps rmly into place.
• If mounting to a door, secure the dust cover to the clip with a 1/4”
wood screw (not provided).
Bottom Notch
Optional Hold-Down Brackets
Plastic Hold-Down Brackets
• Attach the hold-down brackets to the jamb, sill or outside mounting
surface. When the blind is fully lowered, the pin on the hold-down
must align with the center of the bottom rail end caps.
• Insert the pin on the hold-down brackets into the end caps to se-
cure the bottom rail. A hole may need to be punched in the end cap
to accept the pin in the hold-down.
Wand TIlter
• Remove the plastic sleeve by pulling upward. The hook on
the wand will be in an open position.
• Slide the plastic sleeve removed from the wand over the
metal shaft of the tilter until the hole is exposed.
• Holding the sleeve above the hole, pull the wand hook
through the shaft hole until it rests in the bend of the hook.
• Slide the plastic sleeve back down over the hook until it is
back in the closed position.
Classic Collection Installation Instructions 8
BACK

Rasing and Lowering Blinds
The slats must be in the horizontal (open) position before raising or
lowering. An automatic locking device takes eect when the cords
hang down vertically.
• Pull the cords toward the middle and down slightly to open the
lock.
• When the blind is at the desired height, pull the cords to the
outside to lock in position.
Cord Stop
• This component acts as a stopper to prevent inner cords from being
pulled through the blind, which can pose a risk of entanglement.
• It is also designed to break apart under signicant pressure, which
may lessen the risk of entanglement in the top lift cords.
Reassembly of Cord Stop
• Reinsert any loose cords into the top notches of the cord stop. There
is a notch on each side.
• Line up the two halves of the cord stop and snap the pieces back
together.
Child Safety
Young children can STRANGLE in cord loops and in the loop above the cord stop. They
can also wrap the cord around their necks and STRANGLE. In addition, inner cords can
pull out to form a loop, which can STRANGLE a child.
• Always keep cords out of children’s reach.
• Move cribs, playpens and other furniture away from cords. Children can climb furniture
to get to cords.
• Do not tie cords together. Make sure cords do not twist together to create a loop.
Care and Cleaning
• Dust with a soft, clean cloth or chemically treated dust cloth. Tilt the slats up and dust.
Then tilt the slats down (but not all the way closed) and dust the other side of the
slats.
• Vacuum using the brush attachment or hand held vacuum and tilt the slats up and
down as described.
• Wash slats using a damp cloth and mild detergent. Use warm or cold water, not hot
water. Tilt the slats up and down as described.
• Bottom rail and slats may also be immersed in a bathtub for a more thorough cleaning. Do not immerse the headrail. Place the blind in a solution of mild, soapy water.
Rinse clean and either wipe dry or allow to air dry completely.
BACK
www.lafayetteinteriorfashions.com
51-09-620 Updated February 2017
Classic Collection Installation Instructions 9
 Loading...