

Page 1
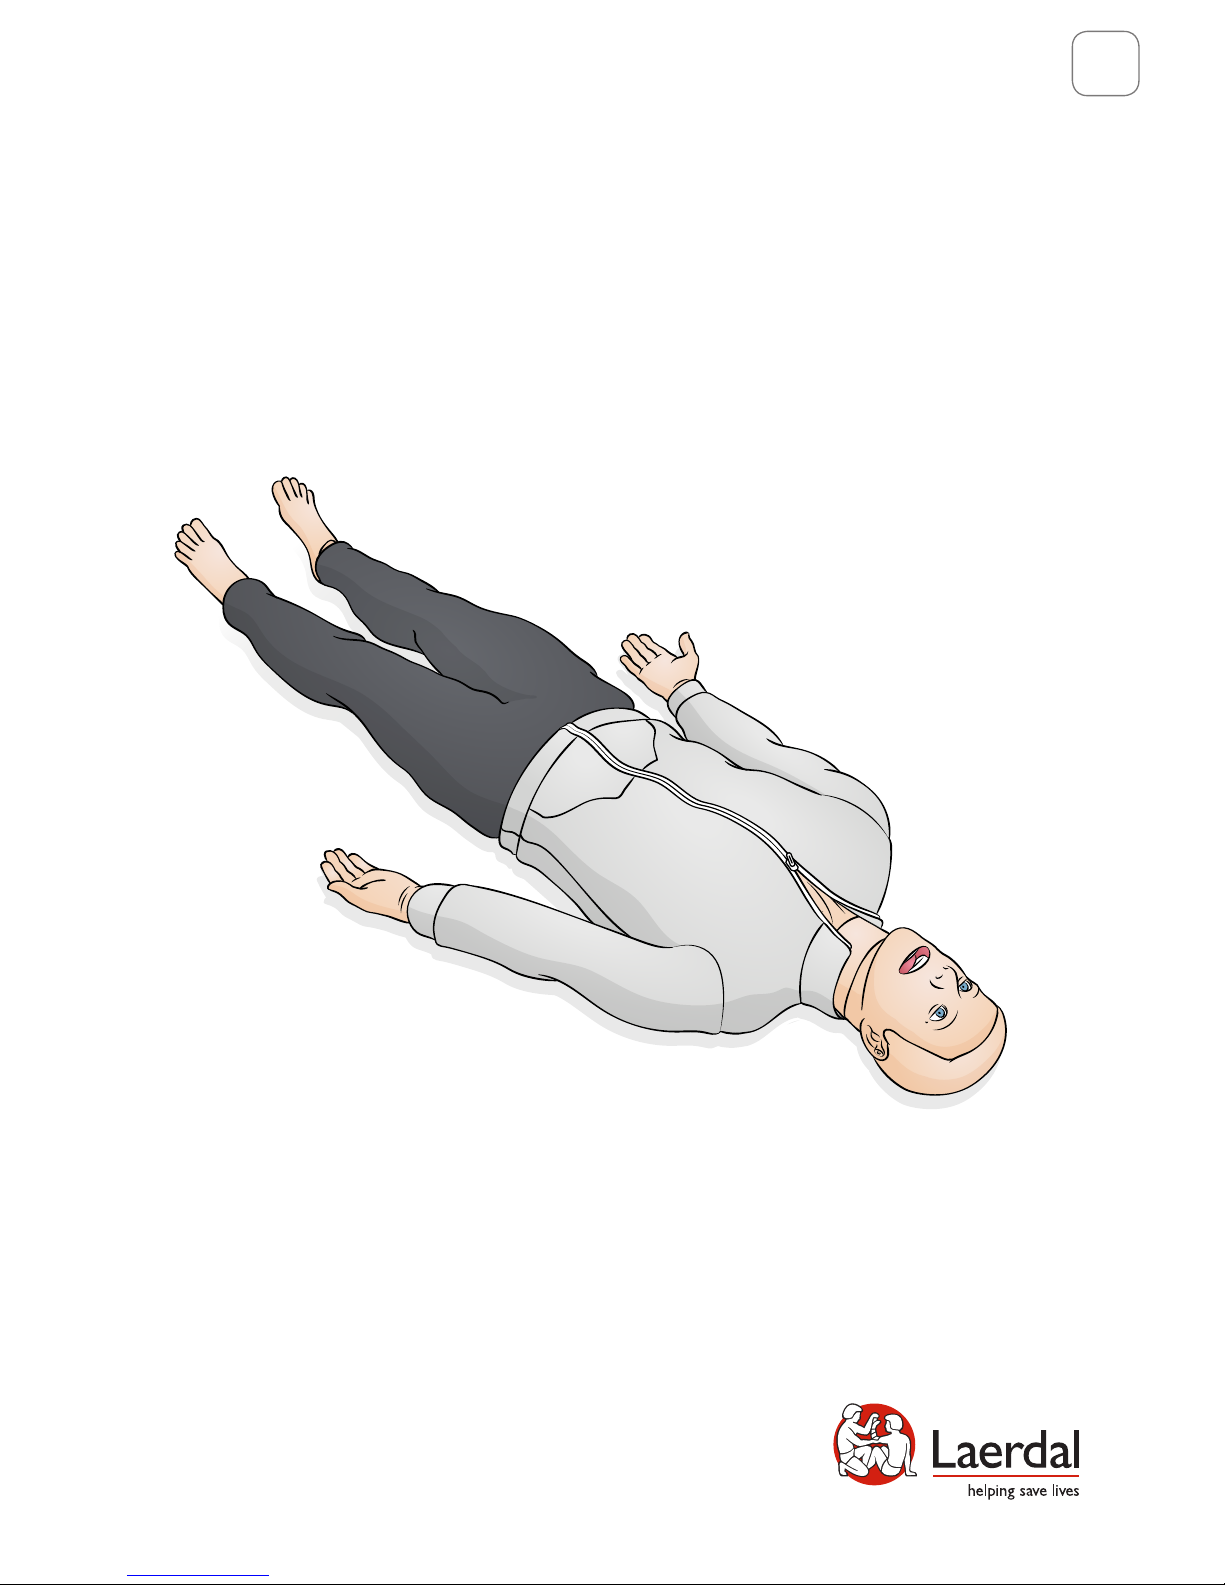
SimMan ALS
User Guide
www.laerdal.com
EN
Page 2

Page 3

Intended Use
3
SimMan ALS is a realistic interactive Training Simulator for simulating a wide range of
advanced life saving skills in pre-hospital emergencies. It is tetherless, Wifi operated,
with a flexible control solution (SimPad PLUS or Laerdal Learning Application (LLEAP))
depending on training needs. The simulator responds to clinical intervention, instructor
control, and pre-programmed scenarios for effective practice of diagnostic skills and
patient treatment.
With spontaneous breathing, airway control, voice, sounds, ECG and many other clinical
features, the SimMan ALS is the fully functional pre-hospital simulator.
Caution
The following techniques should not be performed on this simulator due to the inability to
properly sanitize the airway if they are performed:
• Mouth-to-mouth/Mouth-to-mask ventilation
• Insertion of simulated vomit for suctioning
For information on how to connect to SimPad PLUS or LLEAP refer to the Quick Set Up
Guide.
Read the enclosed Important Product Information booklet before use.
Refer to the Laerdal Global Warranty for terms and conditions. For more information
visit www.laerdal.com.
Page 4

Contents
4
Overview
SimMan ALS System Overview
Use
Eyelid setting
Pupil Replacement
Changing the Upper Dentures
Airway Management
Intramuscular Injections
Tibial IO
IV Cannulation
Changing IV Catheters
Urinary Catheterization
Cardiac Related Skills
Defibrillation - SimMan ALS and ShockLink
QCPR and SimMan ALS
SonoSim
Blood Pressure (BP) Arm
Heart, Breath and Vocal Sounds
Spontaneous Breathing and Airway Closures
Tension Pneumothorax Decompression
Attaching an additional external battery
6
8
9
9
10
11
12
13
14
16
16
17
18
18
18
20
21
22
23
23
24
Page 5

Contents
5
Maintenance
Cricothyroid Membrane/Neck Skin
Chest Drain
IV Arm
Replacing Pneumothorax Bladders
Replacing the Chest Rise Bladders
Removing the Lung
Replacing the Lung
Removing the Torso Skin
Replacing the Torso Skin
Cleaning
Cleaning Simulator
Cleaning Pads
Software Compatibilities
Simulation Software
SimPad PLUS
Laerdal Simulation Home
LLEAP
Voice Conference Application (VCA)
Patient Monitor
Session Viewer and SimView Server
Other Applications
SimDesigner
Web Downloads
25
25
26
27
28
30
32
34
36
38
40
40
40
41
41
41
41
41
42
42
42
42
42
42
Page 6

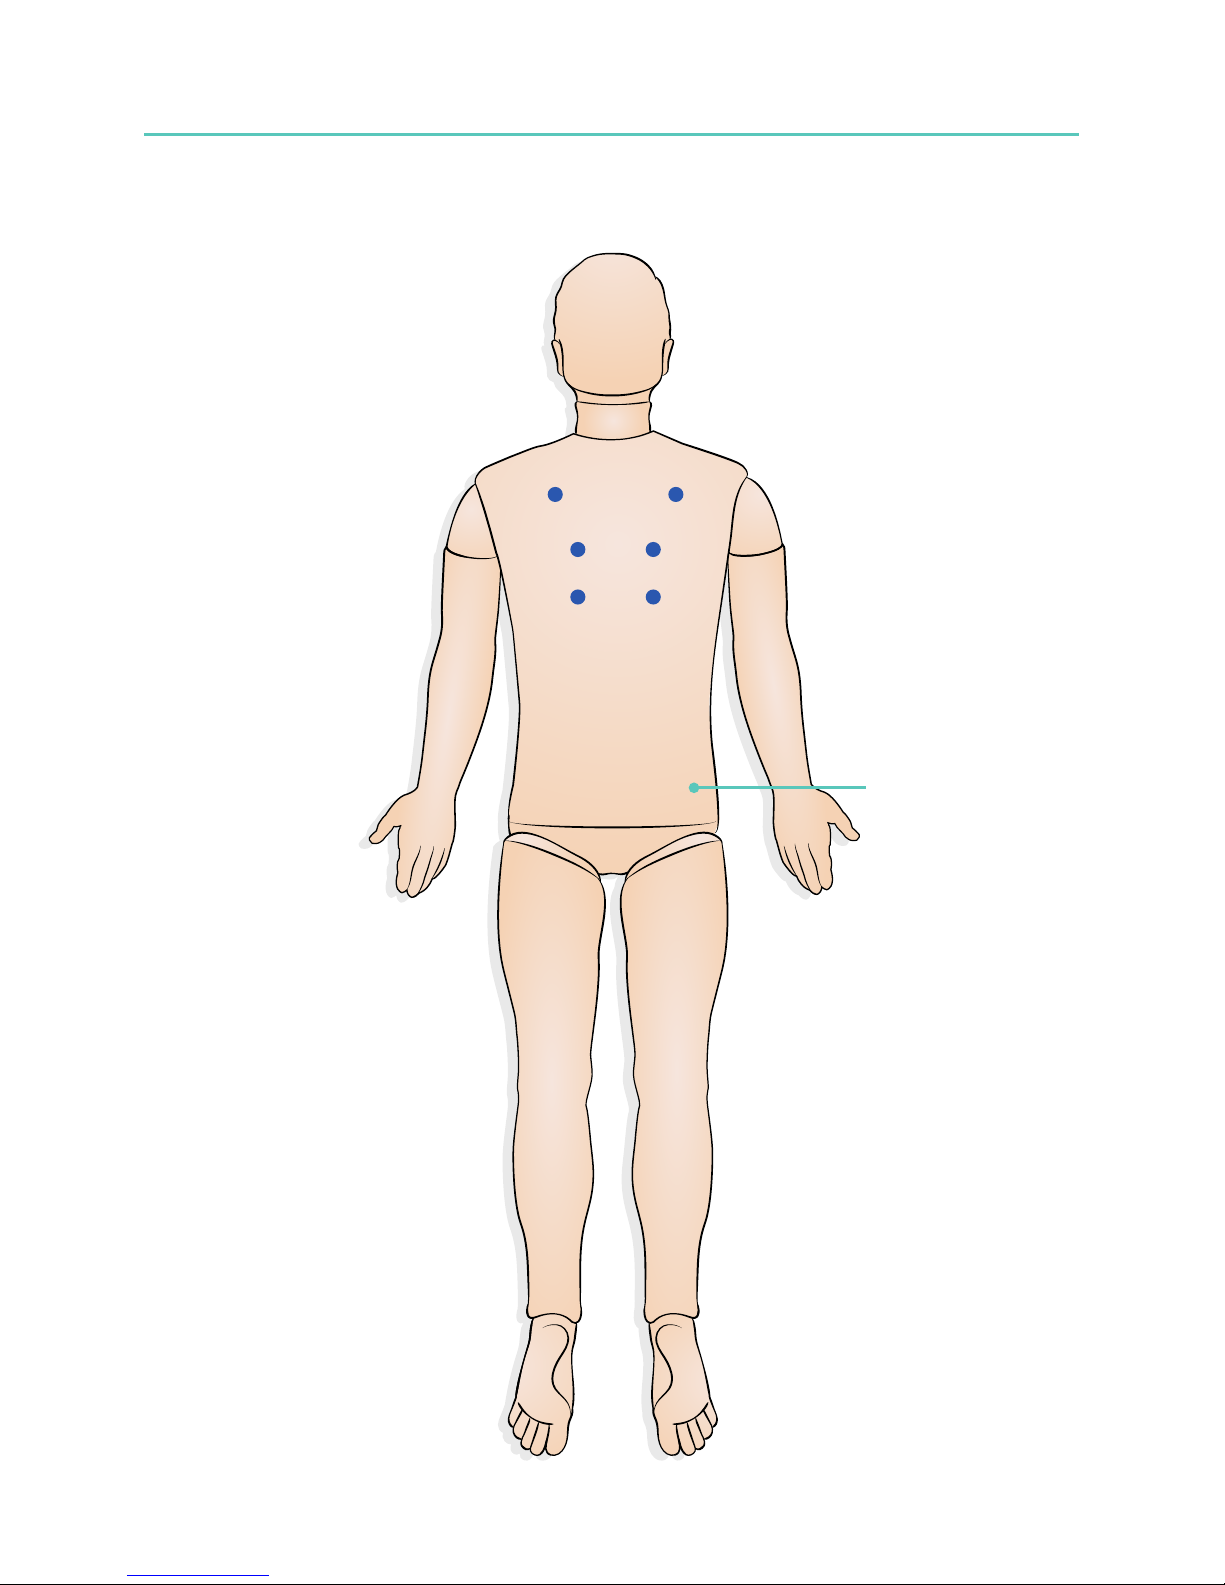
Overview
6
Pulse
ECG connectors
Speakers
SonoSim RFID Tags
Blood Pressure Arm
Cricothyroidotomy
Microphone
ShockLink AreaChest Drain
ShockLink Area
IV Port
Pneumothorax
Microphone
Main Panel
I/O Tibia
Page 7
Overview
7
IM pad
Page 8

The SimMan ALS System Overview
8
Airway and Breathing Features
• Position the head to simulate opening the airway (neck tilt, jaw thrust)
• Practice Bag Valve Mask (BVM) Ventilation
• Identify spontaneous breathing (visible chest rise)
• Identify unilateral chest rise
• Perform Endotracheal (ET) Tube intubation
• Visualize Right Main stem Intubation
• Use supraglottic devices like Laryngeal Mask Airway (LMA), King Laryngeal Tube (LT)
and Combitube
• Insert an Oropharyngeal Airway (OPA) and Nasopharyngeal Airway (NPA)
• Identify a tongue oedema
• Identify cyanosis (linked to SPO2)
• Nasal Cannulation
• Perform chest (bi-lateral) needle decompression
• Perform bi-lateral chest drainage
• Perform needle and surgical cricothyroidotomy
• Identify stomach distension
• Perform the Sellick Maneuver
• Auscultate the lungs (anterior/posterior)
• Break the teeth by wrong intubation techniques using a laryngoscope
Cardiac Features
• Perform manual chest compression following the latest ILCOR guidelines
• Use an extensive ECG library
• Perform defibrillation using ShockLink technology (sternum/apex)
• Perform external pacing
• Auscultate the Korotkoff sounds
Circulation Features
• Auscultate the heart sounds (anterior)
• Use the Patient Monitor with presentation of cardiac rhythms via 3-lead, 5-lead and
12-lead ECG monitoring
• View the SPO2 via Simulated Monitor
• View the Blood Pressure via Simulated Monitor
• Auscultate the blood pressure via the BP cuff
• Palpate the systolic blood pressure using the BP cuff
• View the heart rate via Simulated Monitor
• Palpate the left radial, carotid (bi-lateral) and femoral (bi-lateral) pulses
Vascular Features
• Use a pre-ported IV access in the right antecubical fossa
• Insert an IO in the left tibia
• Administer IM injections in the right musculus gluteus maximus
3
4
5
6
7
8
9
10
ml
BD
1
2
3
4
5
6
7
8
9
10
ml
BD
1
2
3
4
5
6
7
8
9
10
ml
BD
1
2
3
4
5
6
7
8
9
10
ml
BD
Page 9
Use
9
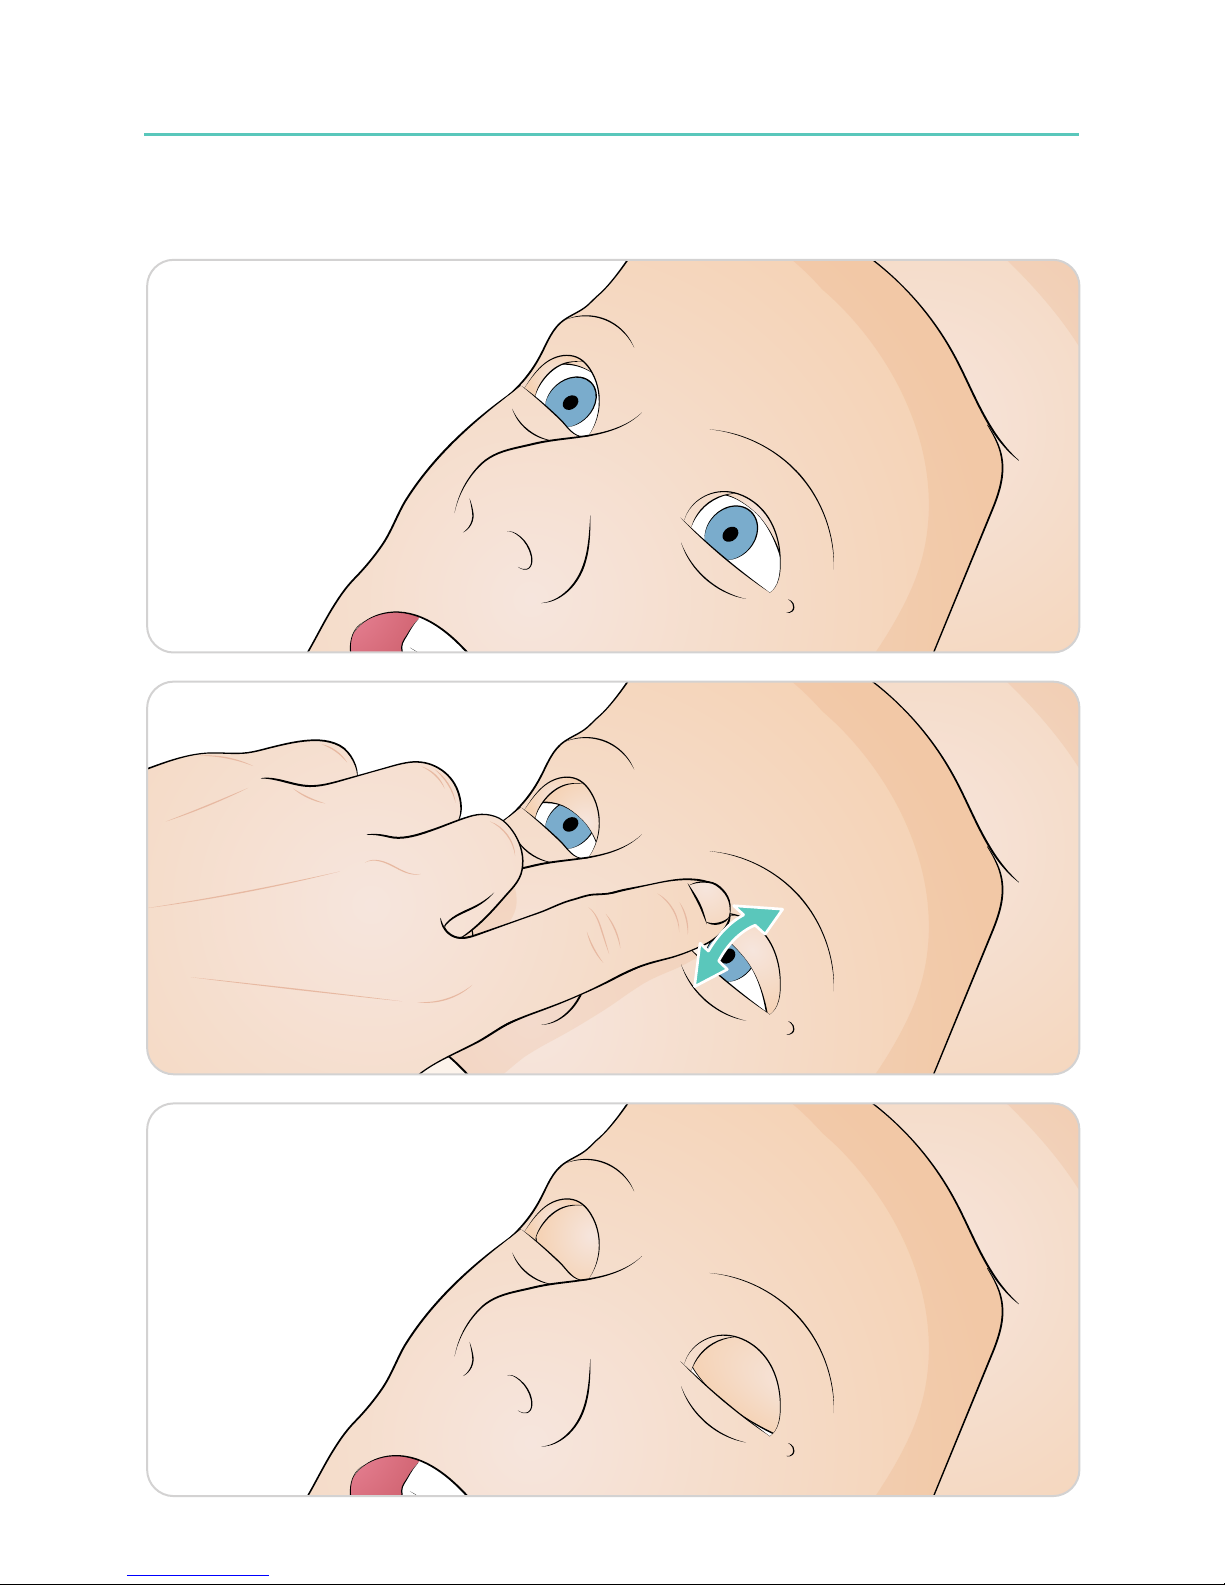
Eyelid setting
The eyelids can be manually set to the following positions:
Open
Half open
Closed
Page 10
Use
10
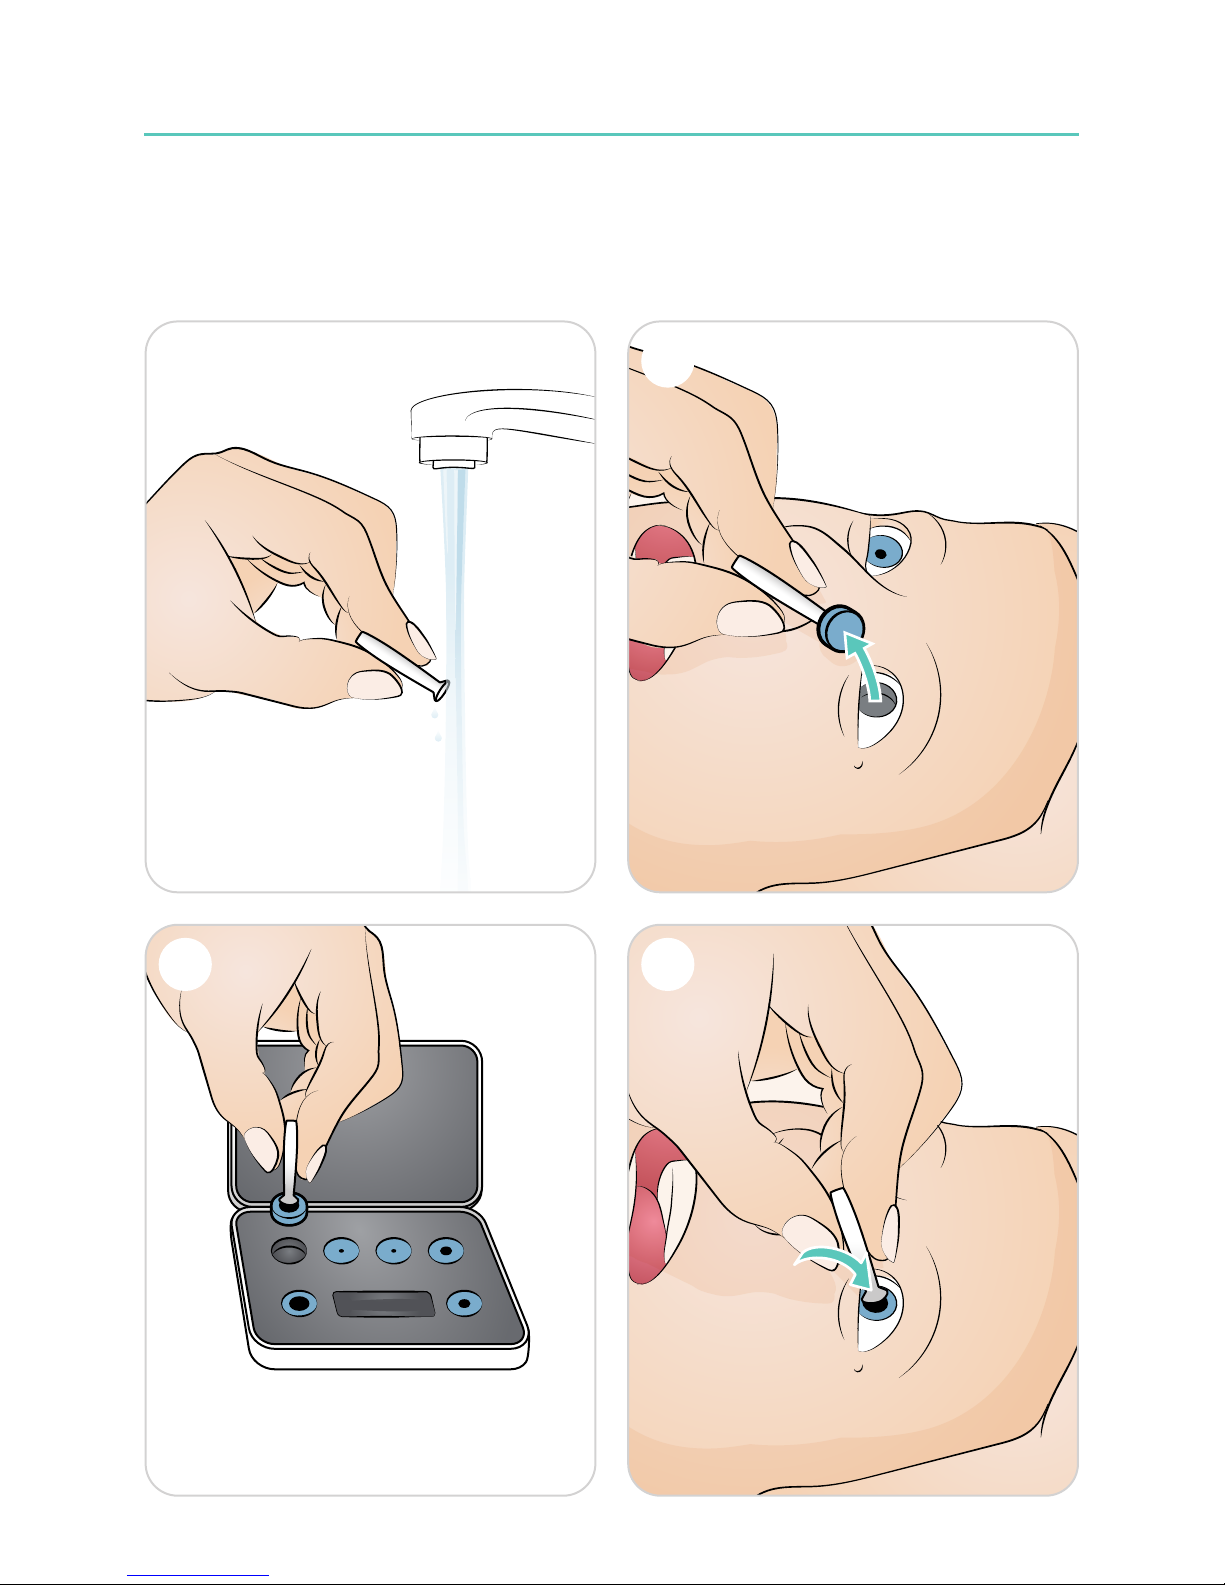
Pupil Replacement
SimMan ALS is supplied with a set of normal pupils mounted in the head. A separate case
contains 3 sets of plastic pupil inserts (normal, constricted and dilated pupils) for use in
simulating other conditions.
1 2
3 4
1 2
3 4
Page 11
Use
11
1 2
3 4
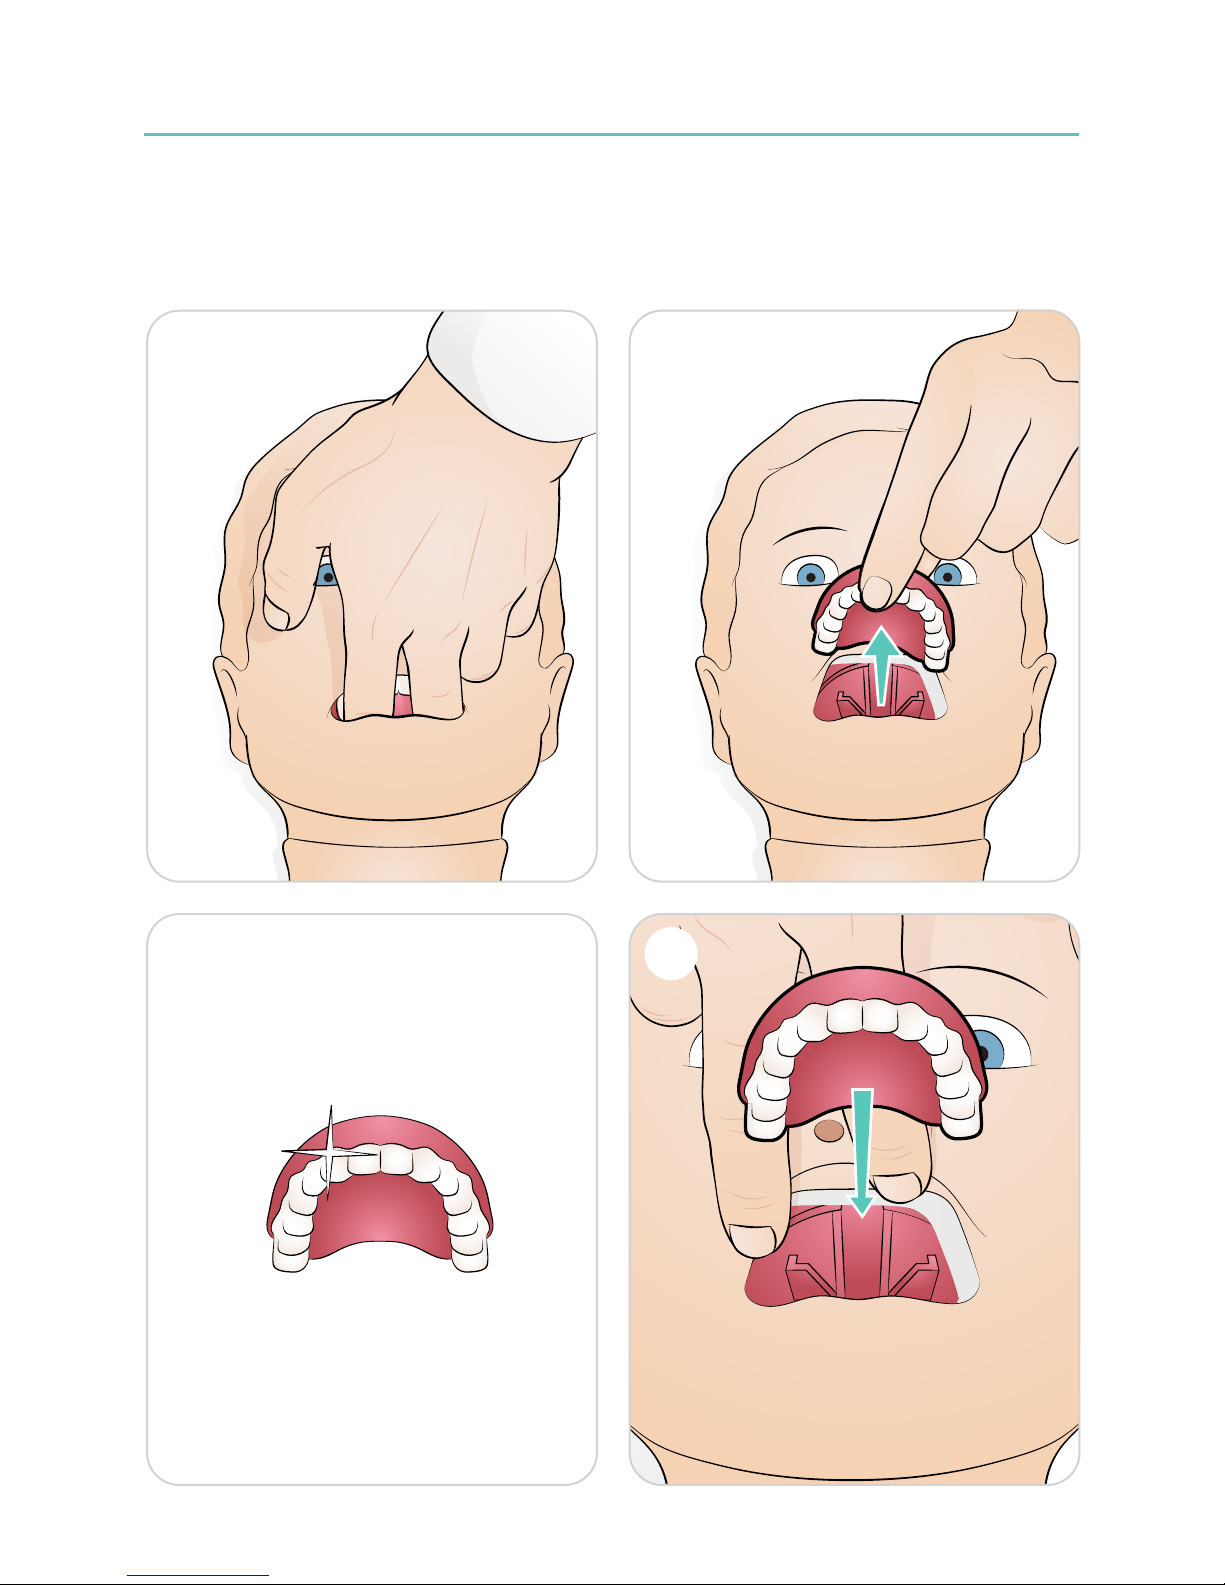
Changing the Upper Dentures
SimMan ALS comes with a set of soft upper teeth as default. The soft set may be
replaced with a hard set of teeth for enhanced realism while practicing intubations.
Page 12
Use
12
1 2
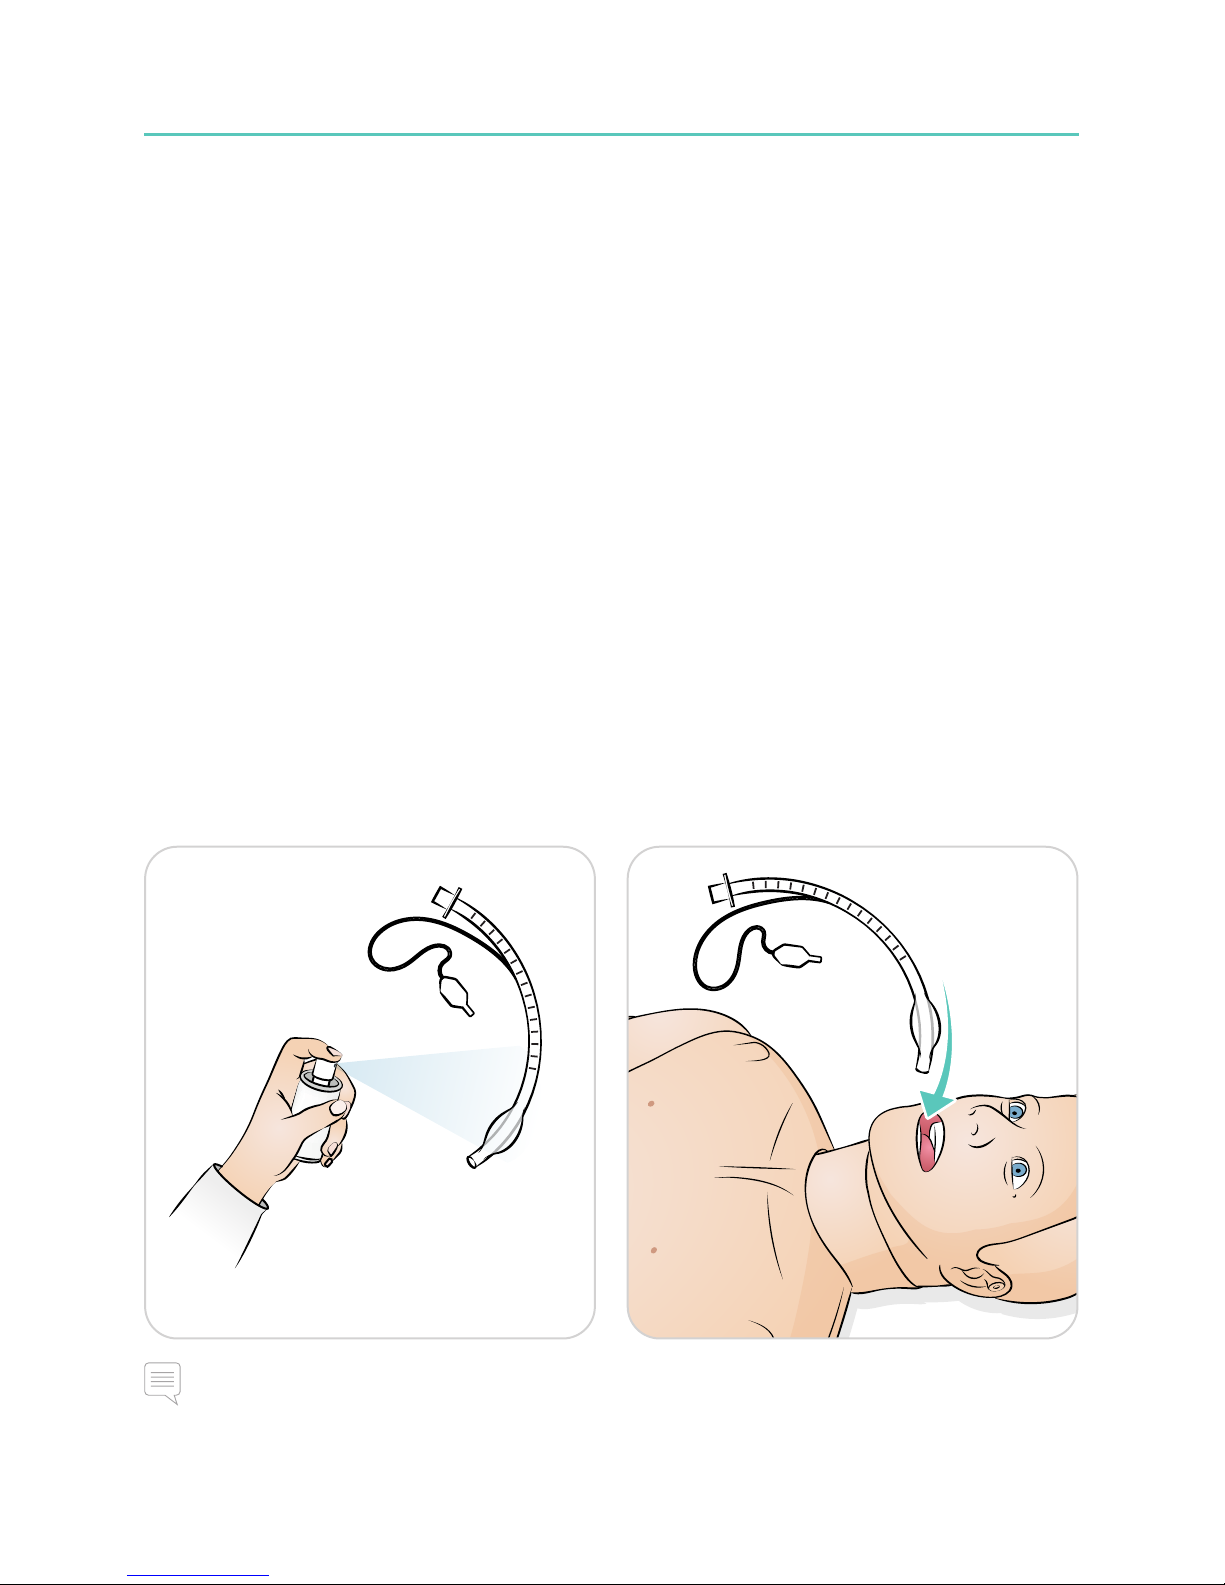
Airway Management
The airway is anatomically modeled as far as the bronchia and can be manipulated
by a learner:
• Head tilt/Chin lift
• Jaw thrust w/articulated jaw
• Cricoid pressure and manipulation
• Simulated suctioning (oral & nasopharyngeal)
If the tongue fallback feature is enabled, head tilt is required to open the airway.
Once initiated the simulator will begin to spontaneously breathe.
Artificial respiration of the SimMan ALS can be achieved by the following methods:
• Bag-mask ventilation
• Orotracheal intubation
• Nasotracheal intubation
• Transtracheal intubation
Recommended tube compatibility:
• ET Combitube (size small adult is suitable)
• Laryngeal mask airways: Size 4 and 5
• Endotracheal tube intubation: Size ID 7.5 - 8.5
Notes
• Do not spray lubricant directly into the airway.
• Use of smaller tube-type devices reduces wear of the Patient Simulator’s airways.
• Incorrect positioning will pass air through oesophagus, causing distention of the abdomen.
Page 13
Use
13
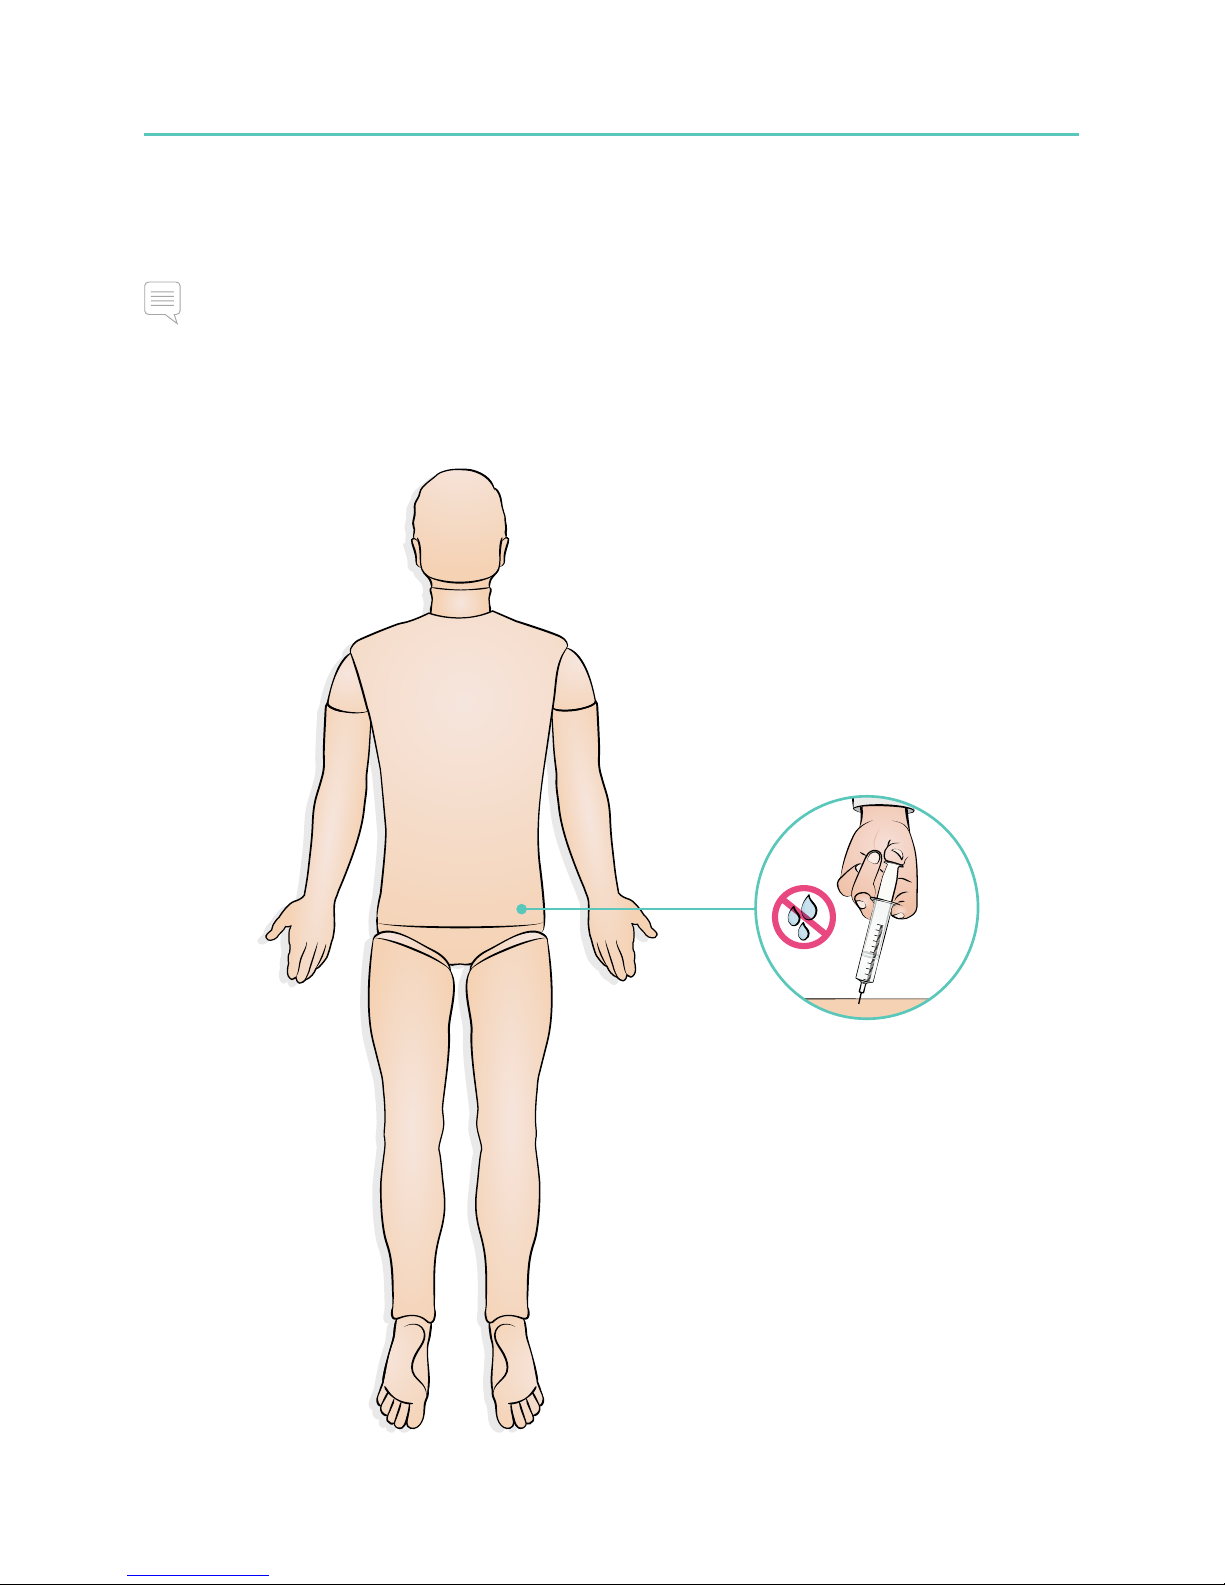
Intramuscular Injections
Simulated medications can be administered via intramuscular injections in the
right musculos gleteus maximus.
Note
Simulated medications may be administered via local protocol. All precautions and safety
measures must be followed during training.
1
2
3
4
5
6
7
8
9
10
ml
BD
Page 14
Use
14
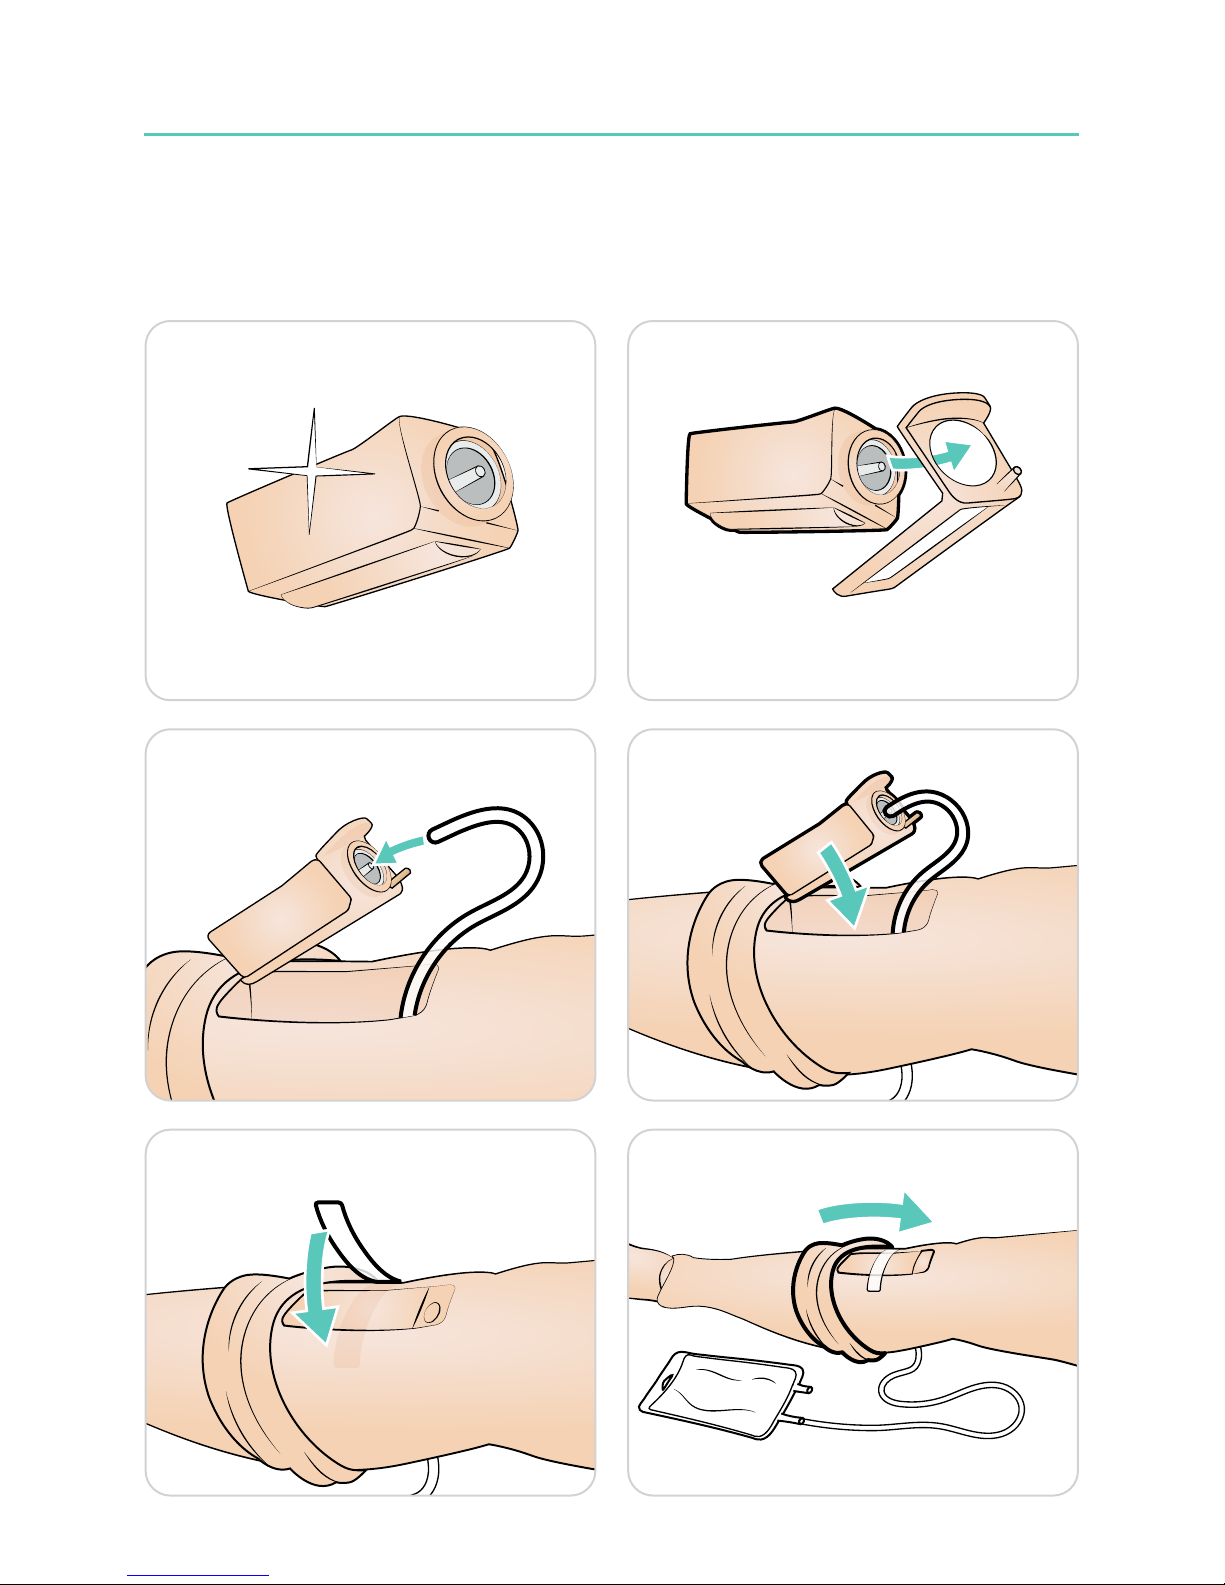
Tibial IO
Intraosseous access with needle insertion is possible through the left tibia. The IO pads
may be punctured numerous times before being replaced.
1 2
3 4
5 6
7 8
9 10
11 12
Page 15
Use
15
7 8
9 10
11 12
Page 16
Use
16
A B
1 2
3 4
5 6
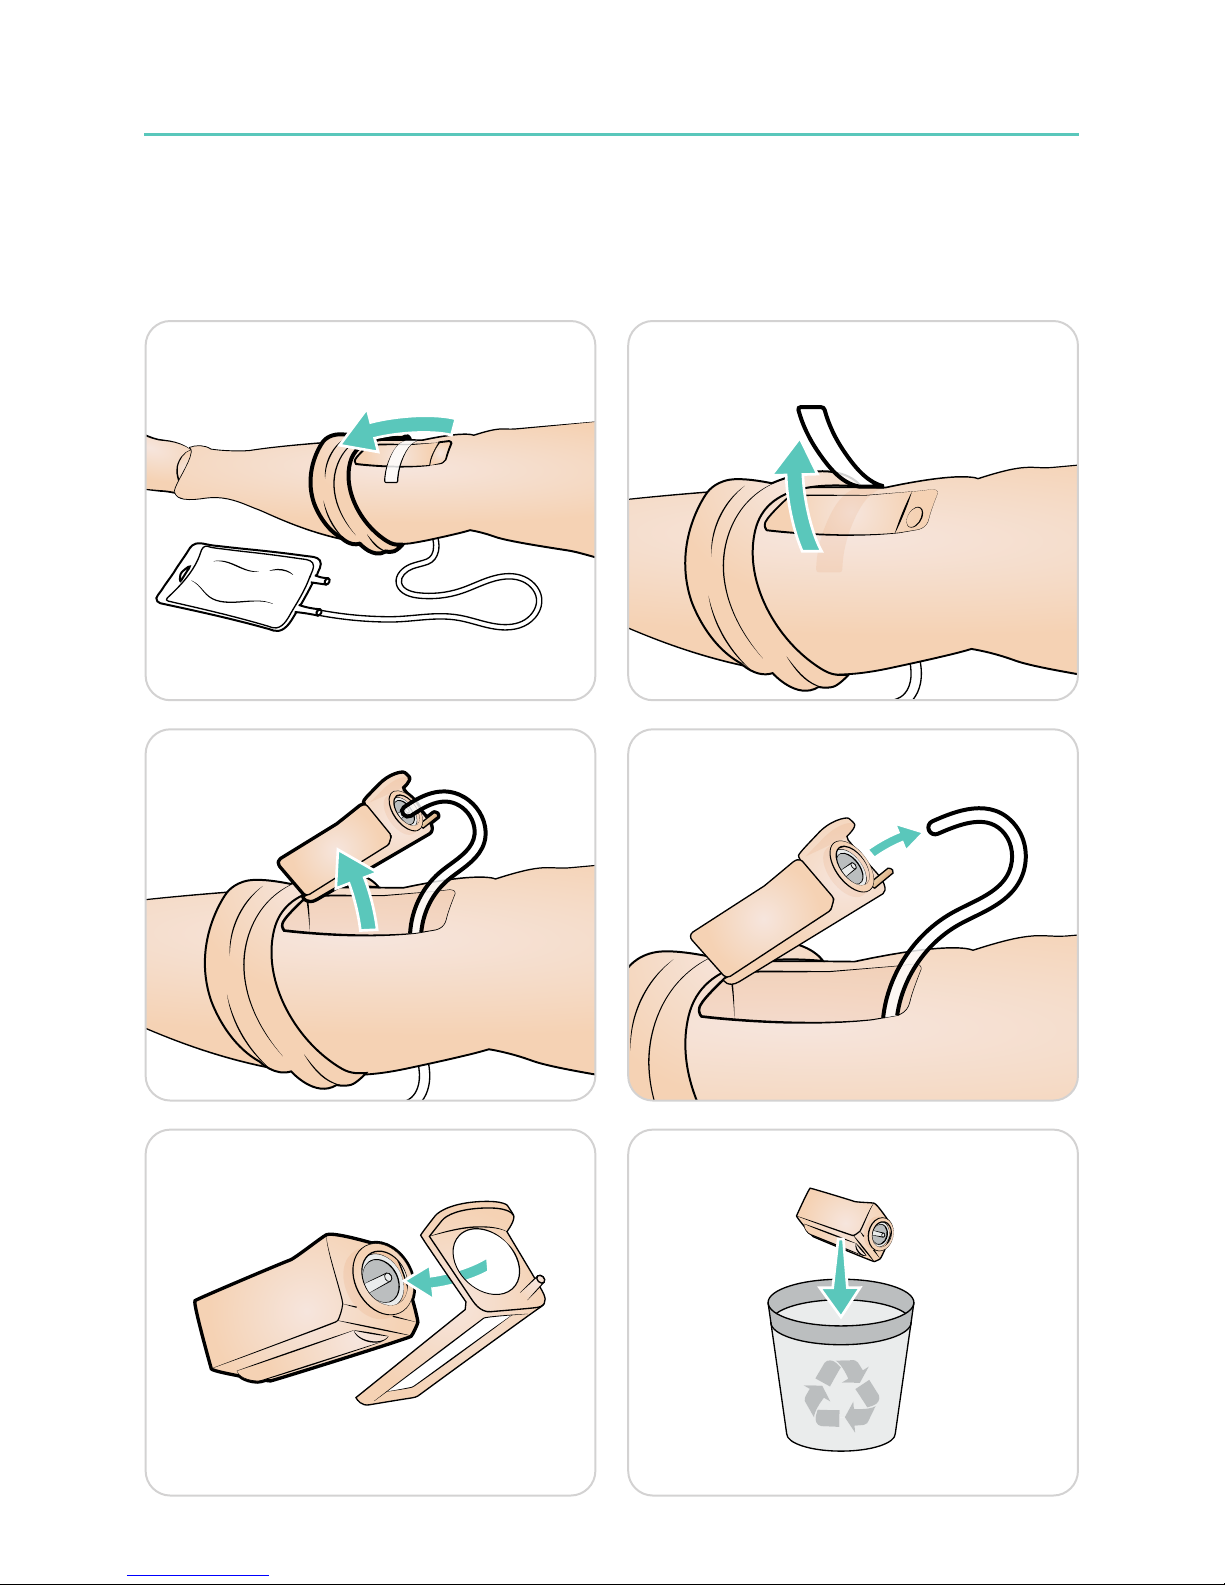
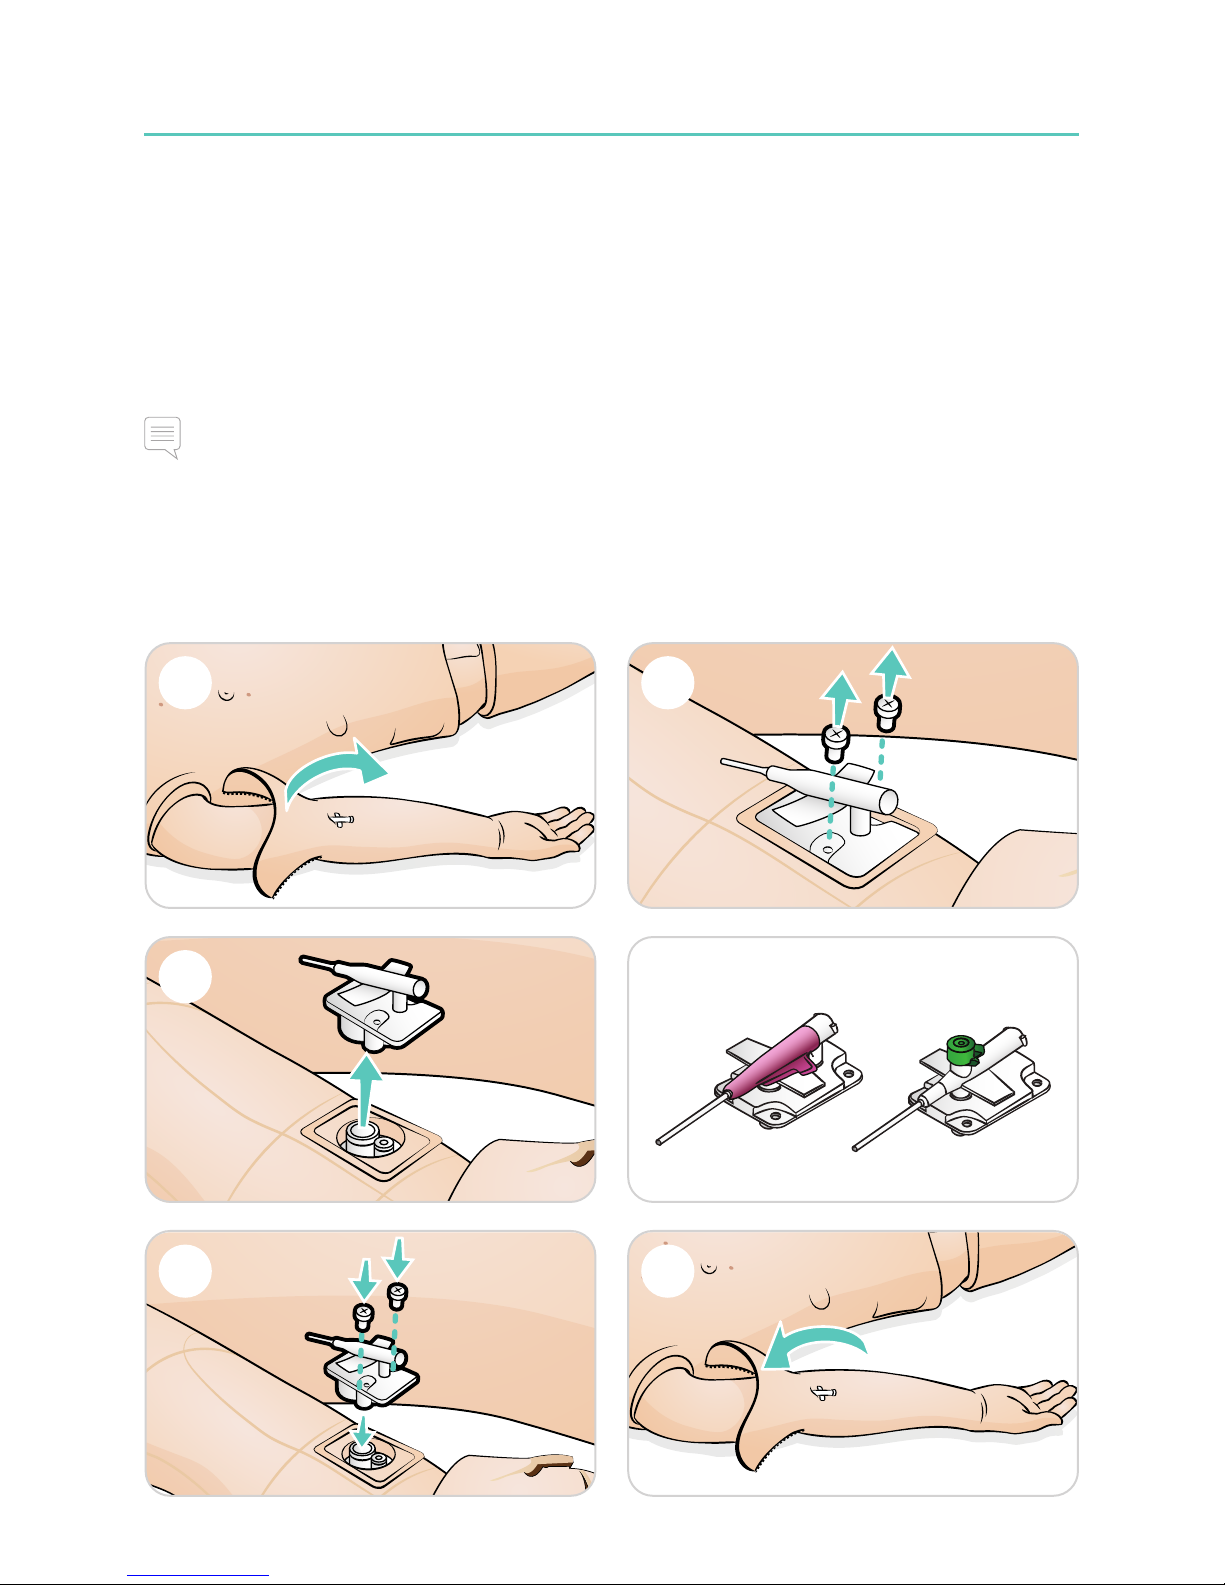
IV Cannulation
The right IV arm comes with a US catheter (4A) type as default. This can be replaced
with an international catheter type (4B) with an extra flush por t.
Prime the IV arm before each session to prevent backflow. Inject purified water in a
continuous stream into the IV system. Major movement of the Patient Simulator can
result in air pockets in the IV system and may require additional priming.
Notes
• Do not apply force when administering simulated drugs to the IV arm.
• To prevent clogging of the IV system, use only purified water (distilled or de-ionized)
to simulate IV drugs.
Changing IV Catheters
Page 17
Use
17
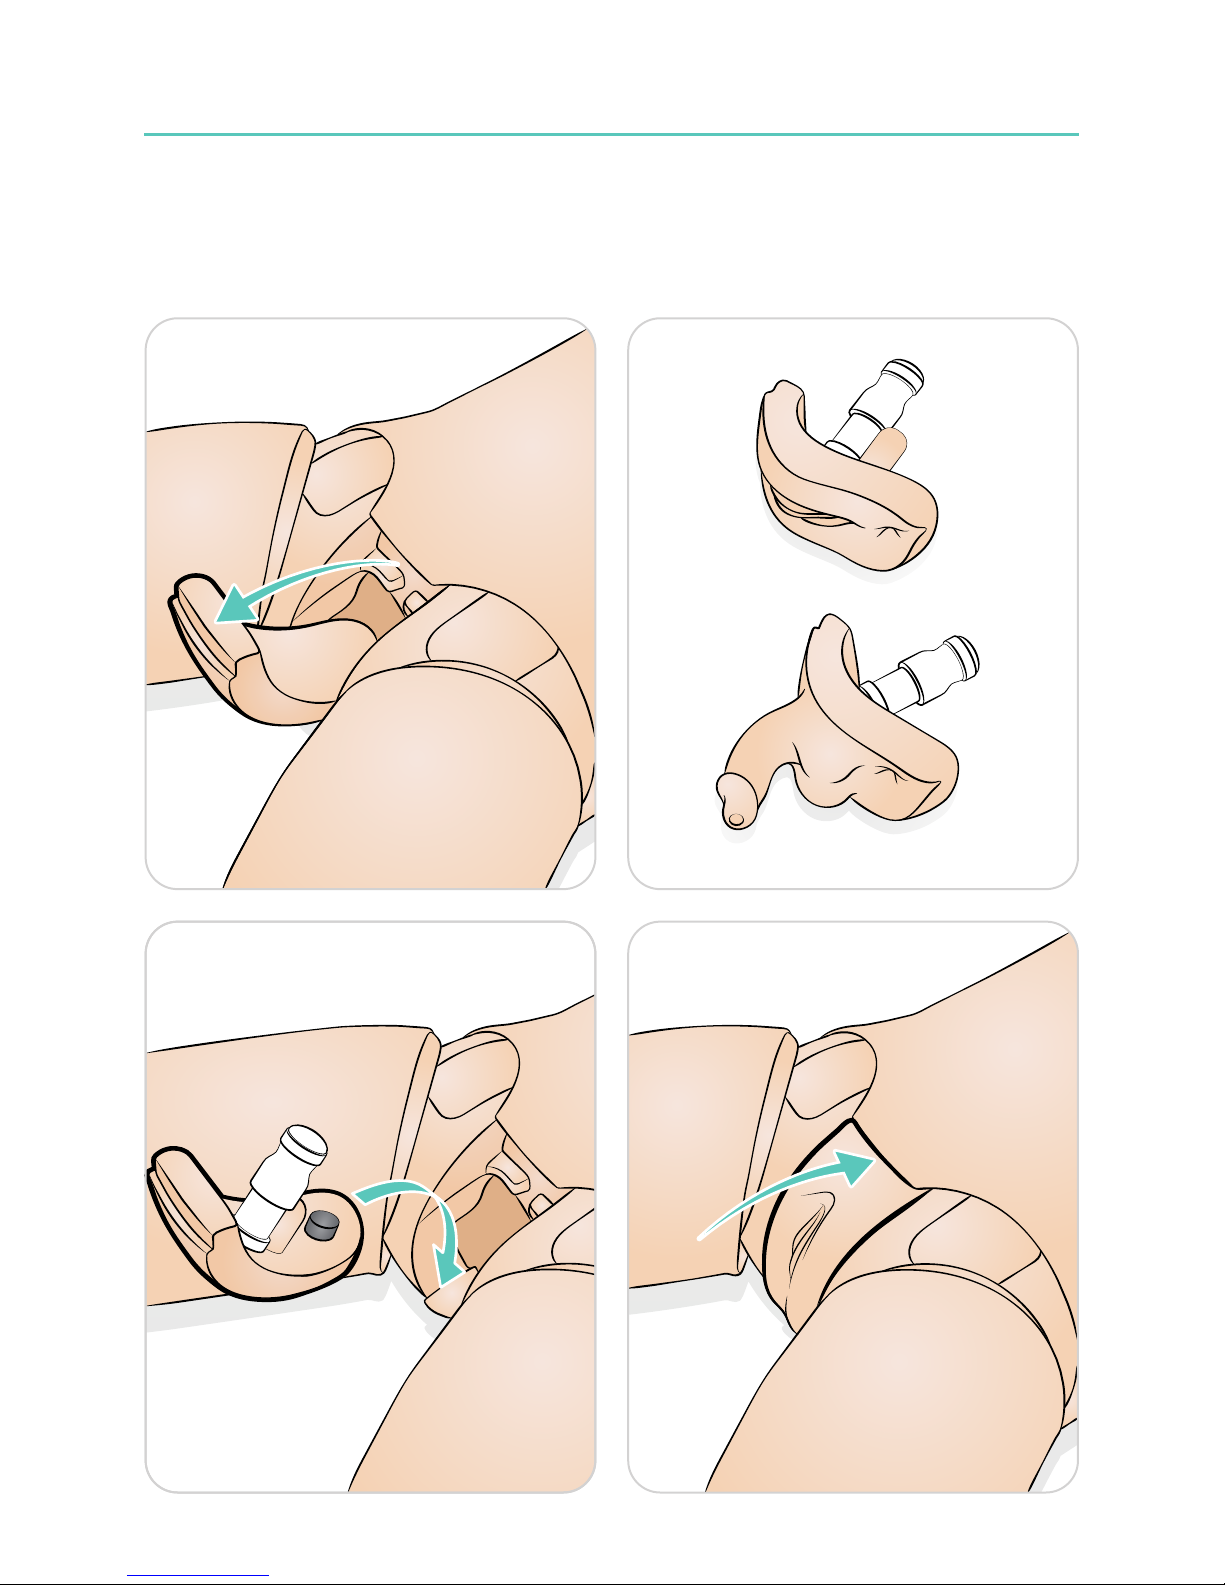
Urinary Catheterization
SimMan ALS is fitted with neutral genitalia. It can be replaced by the supplied male or
female genitalia to simulate catheterization.
1 2
3 4
Page 18

Use
18
Cardiac Related Skills
SimMan ALS, when used with SimPad or a LLEAP PC, features an extensive library of
ECG variations. See SimPad PLUS User Guide or LLEAP Help Files.
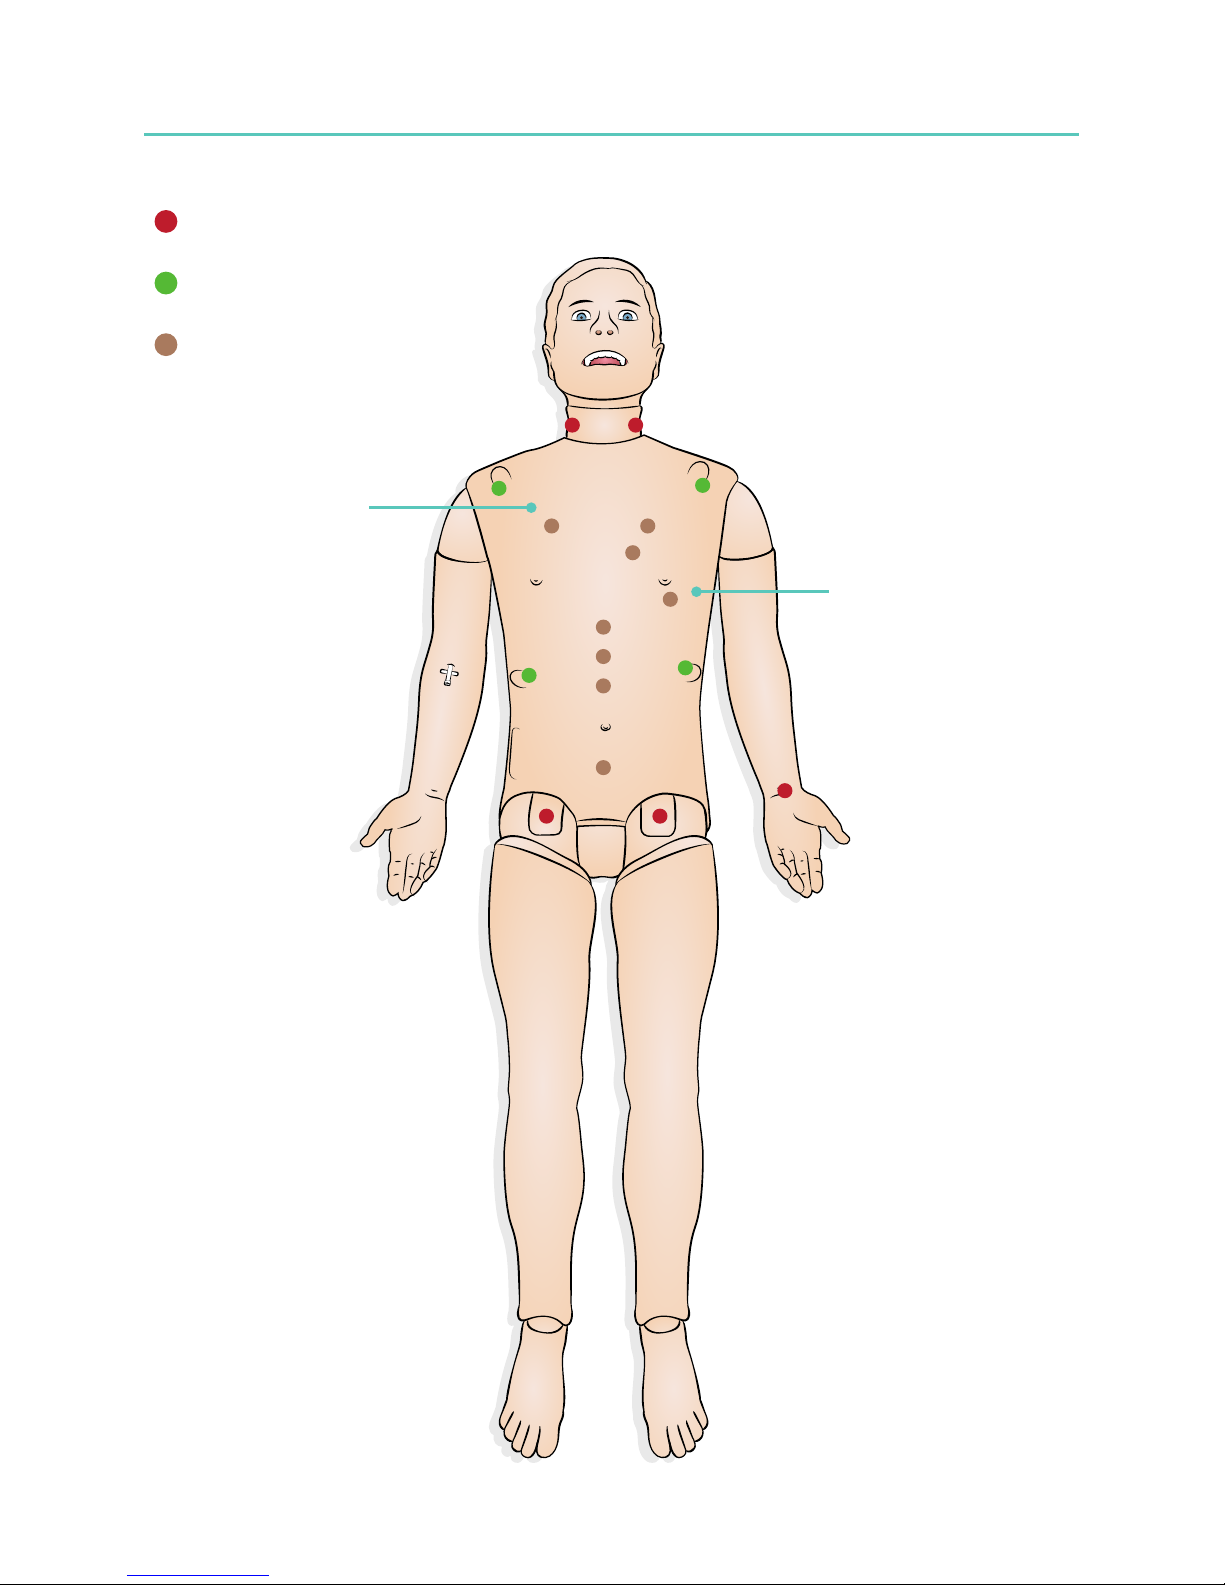
Defibrillation - SimMan ALS and ShockLink
SimMan ALS comes ShockLink prepared. ShockLink allows connection with a live
defibrillator allowing the following procedures to be performed:
• Defibrillation
• Syncronised cardioversion
• External pacing with or without capture
The torso skin on the Patient Simulator is fitted with internal apex and sternum
ShockLink electrodes. Refer to the ShockLink User Guide for information on how to
connect and use ShockLink.
Note
Only use ShockLink to perform defibrillation simulation on SimMan ALS.
QCPR and SimMan ALS
• Compliant with the latest 2015 ILCOR guidelines
• Compressions generate palpable pulses, blood pressure wave form and ECG ar tifacts
• Realistic compression depth and resistance
• Detection of depth, release and frequency of compressions
• QCPR is monitored with feedback via LLEAP
Page 19
Use
19
Pulse
ECG connectors
SonoSim RFID Tags
ShockLink Area
ShockLink Area
Page 20
Use
20
R
R
L
L
R
1 2
4
3
Laerdal-SonoSim
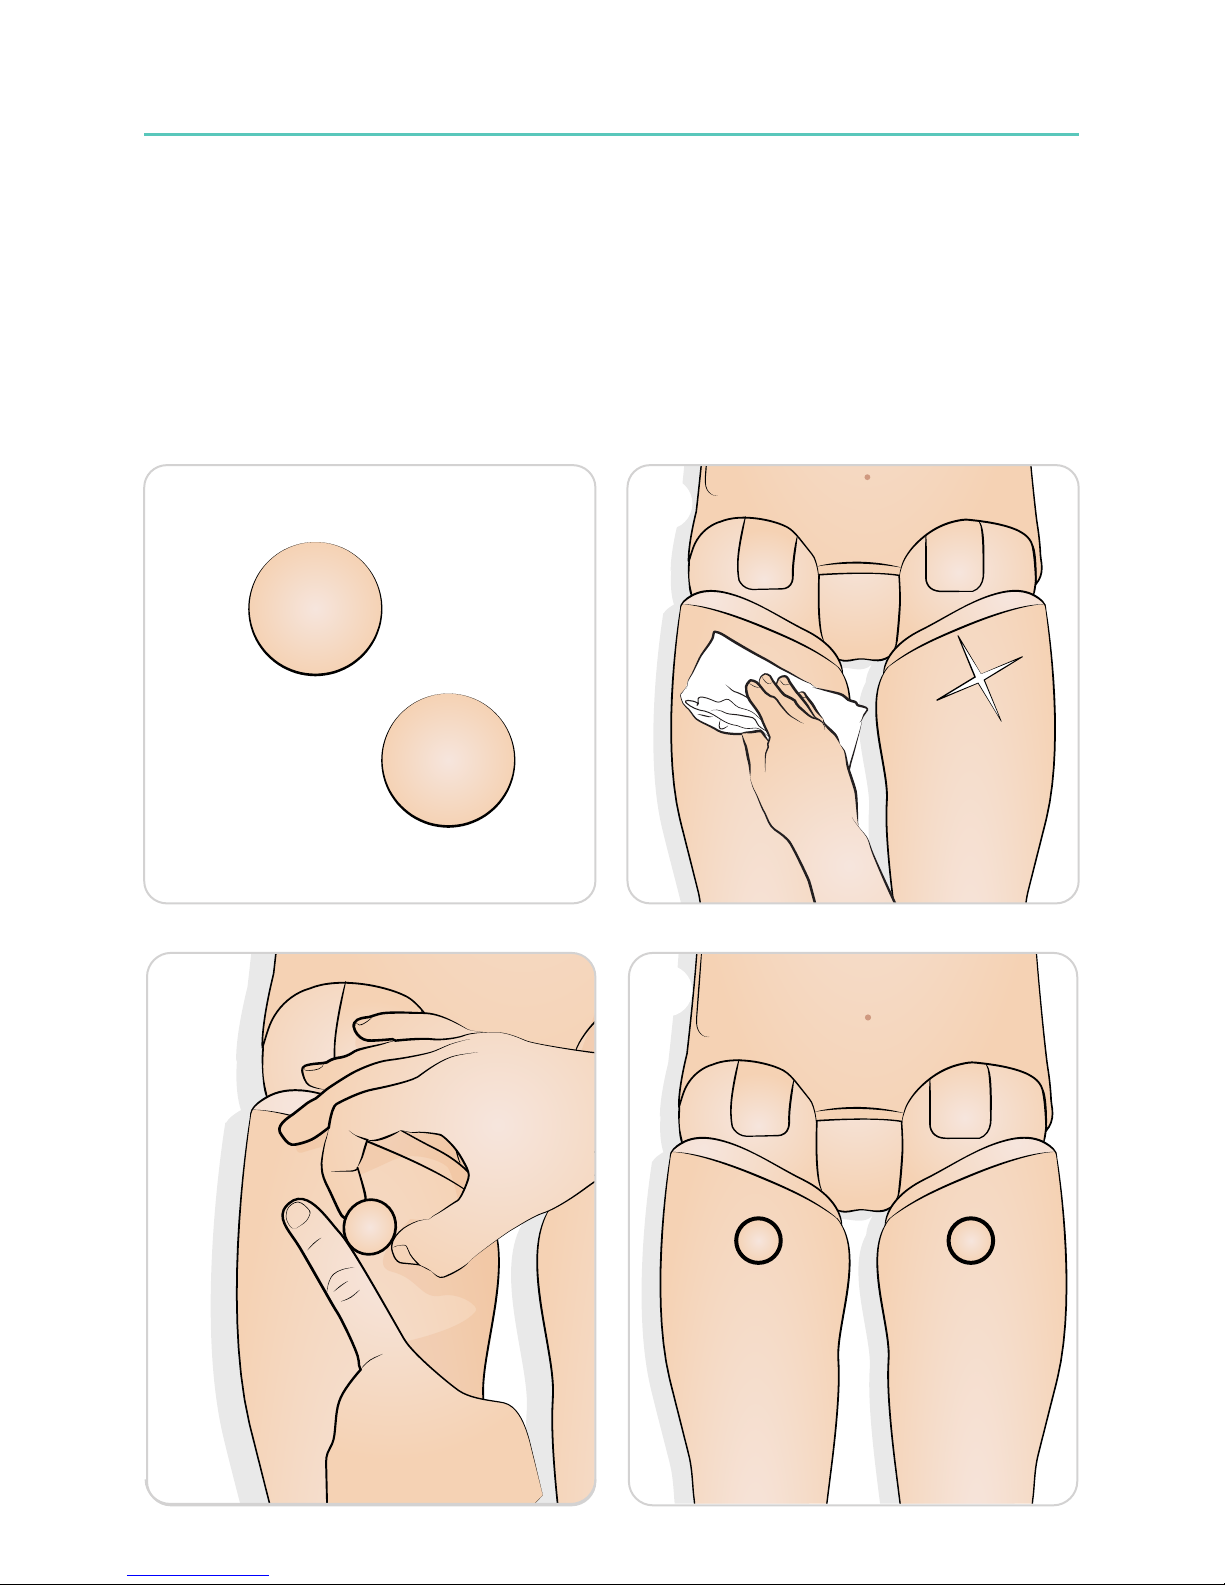
SimMan ALS is ultrasound ready and fitted with 3G Torso Skin with Ultrasound Live Scan (LS)
tags that is used in conjunction with the Laerdal-Sonosim Ultrasound Solution (available
seperately). The simulator comes with two additional LS groin tags that need to be
applied to the groin.
Refer to Laerdal SonoSim Ultrasound solution user guide.
Apply LS Groin tags
Page 21
Use
21
Blood Pressure (BP) Arm
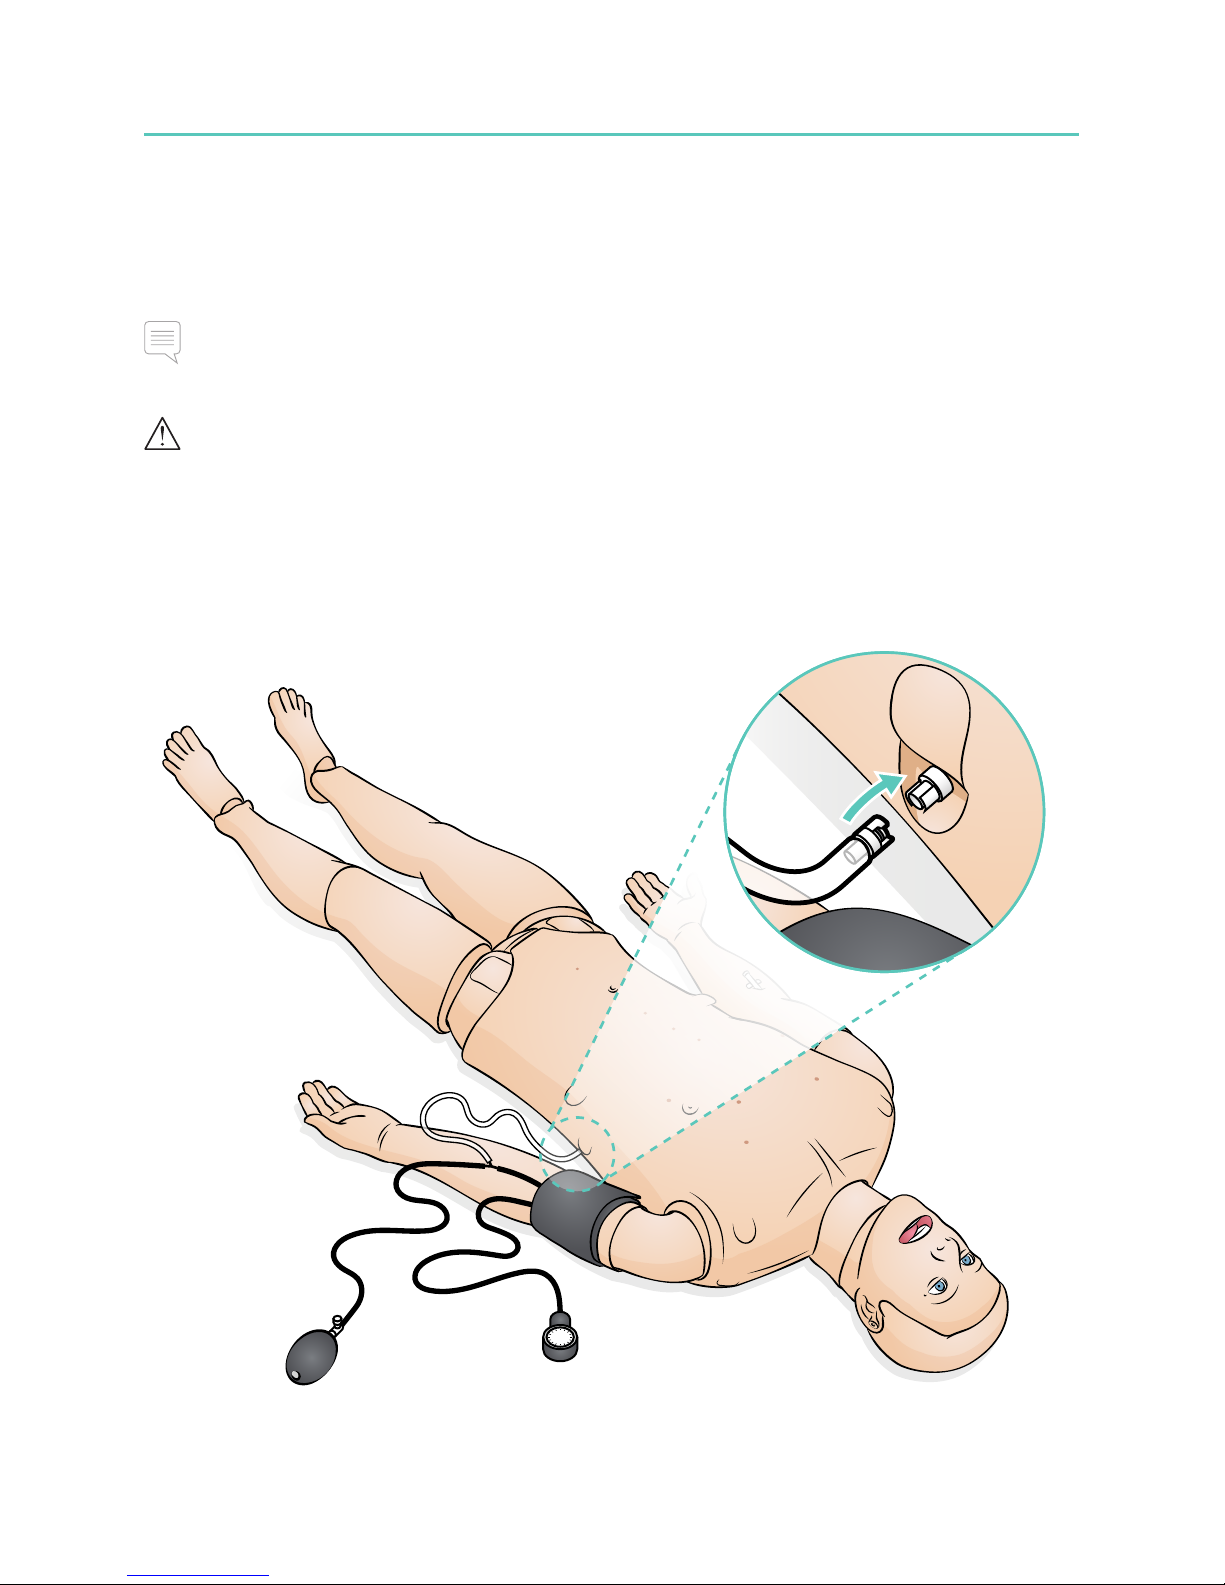
The simulator is packaged with the left BP Arm attached and is designed to rotate
approximately 220º. The specially adjusted blood pressure cuff measures BP manually by
auscultation of Korotkoff sounds.
Note
Only use the Blood Pressure Cuff supplied with SimMan ALS.
Caution
To prevent damage, do not over rotate the left BP Arm.
Page 22
Use
22
Heart, Breath and Vocal Sounds
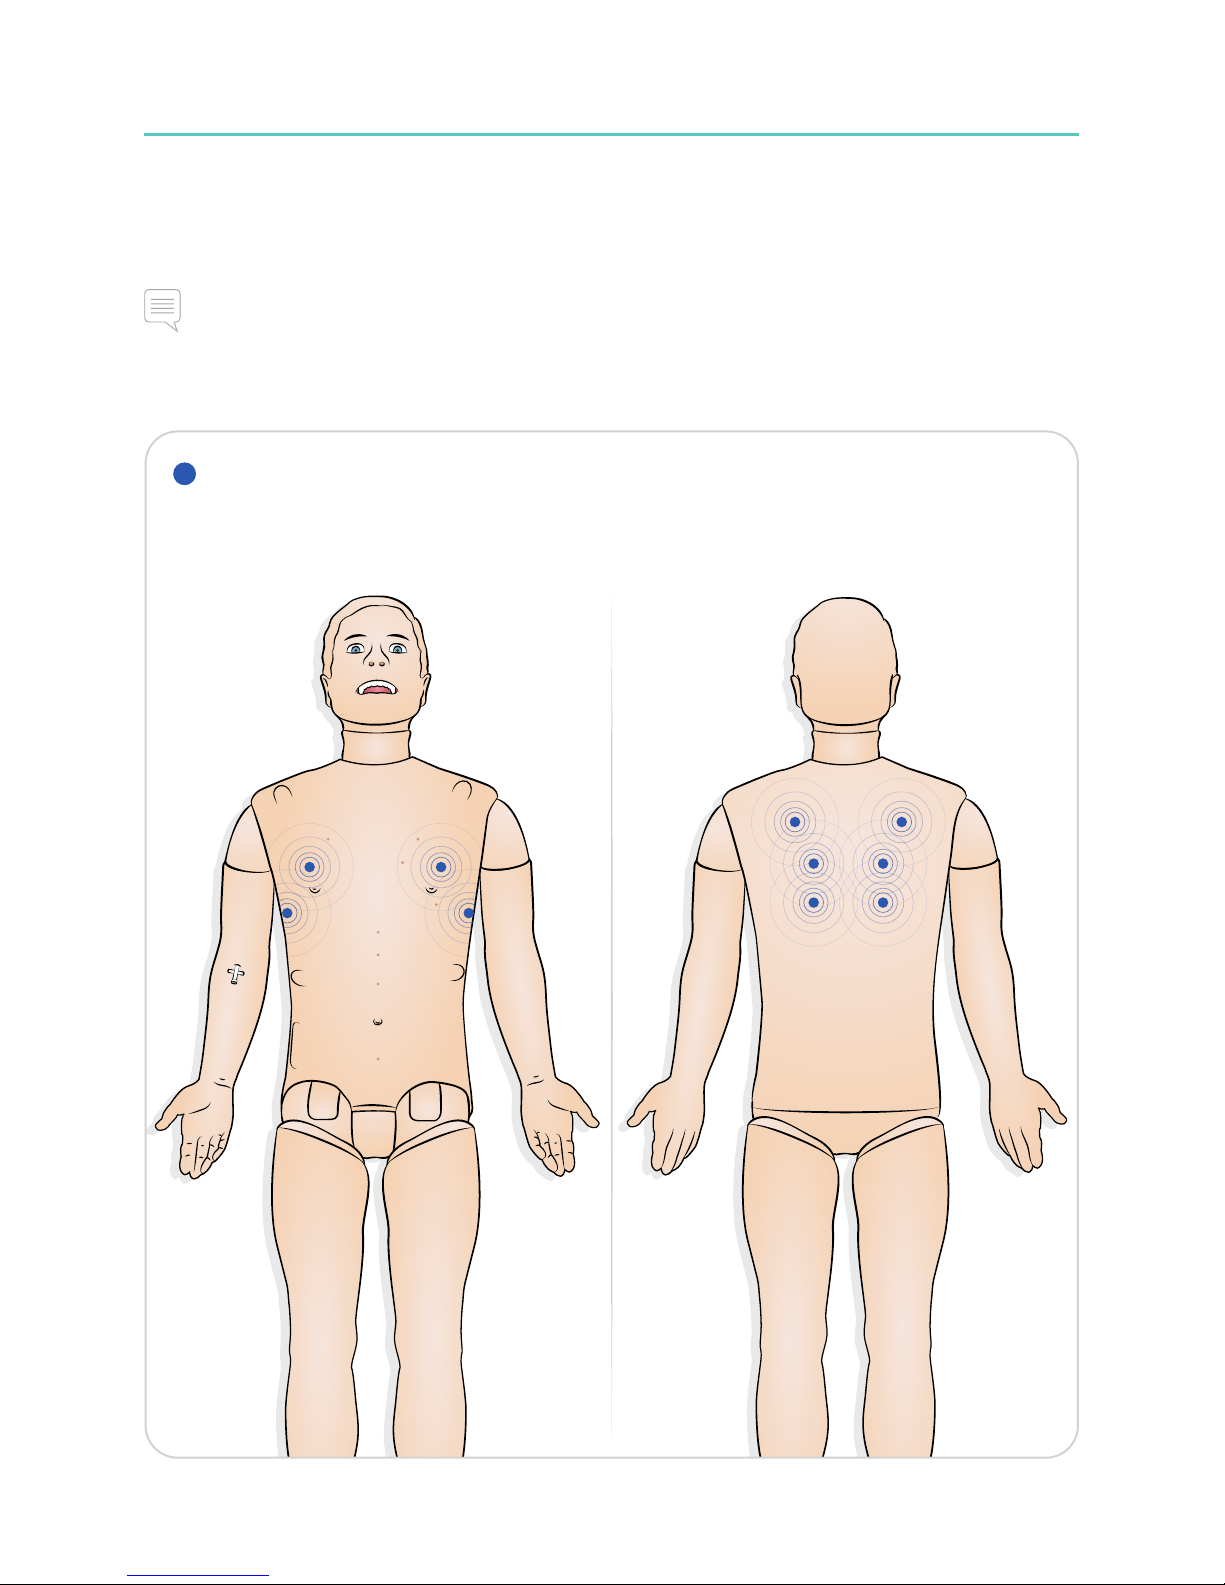
SimMan ALS has heart, breath and vocal sounds which are determined by the scenario
used and controlled by the instructor.
Note
See SimPad PLUS User Guide or LLEAP Help files for complete heart and breath sound
auscultation, speech functionality and operating information.
Auscultation areas with speakers for lung sounds
Page 23

Use
23
Spontaneous Breathing and Airway Closures
The SimMan ALS has spontaneous breathing (visible chest rise and fall) with variable
breathing rate.
The left lung and right lung can be closed independently or together to create a partial
or complete airway obstruction.
Note
See SimPad PLUS User Guide or LLEAP Help Files for complete breathing and airway blockage
functionality and operating information.
Tension Pneumothorax Decompression
Tension pneumothorax with needle decompression can be performed at bilateral mid
clavicle line, 2nd intercostal space. The pneumothorax bladders may be pierced +/-10 times.
The pressure inside the bladder will drop after repeated puncturing. A 22 (or smaller)
gauge needle is recommended for decompression of the chest.
Notes
• Using a smaller gauge needle increases the longevity of the chest skin and bladders.
• After multiple pneumothorax decompressions, the bladders may need replacement. They
should be replaced if inflation can no longer be detected under the skin or deflation is not
heard when pierced.
• Refer to Maintenance section for information on how to replace the bladders.
Page 24
Use
24
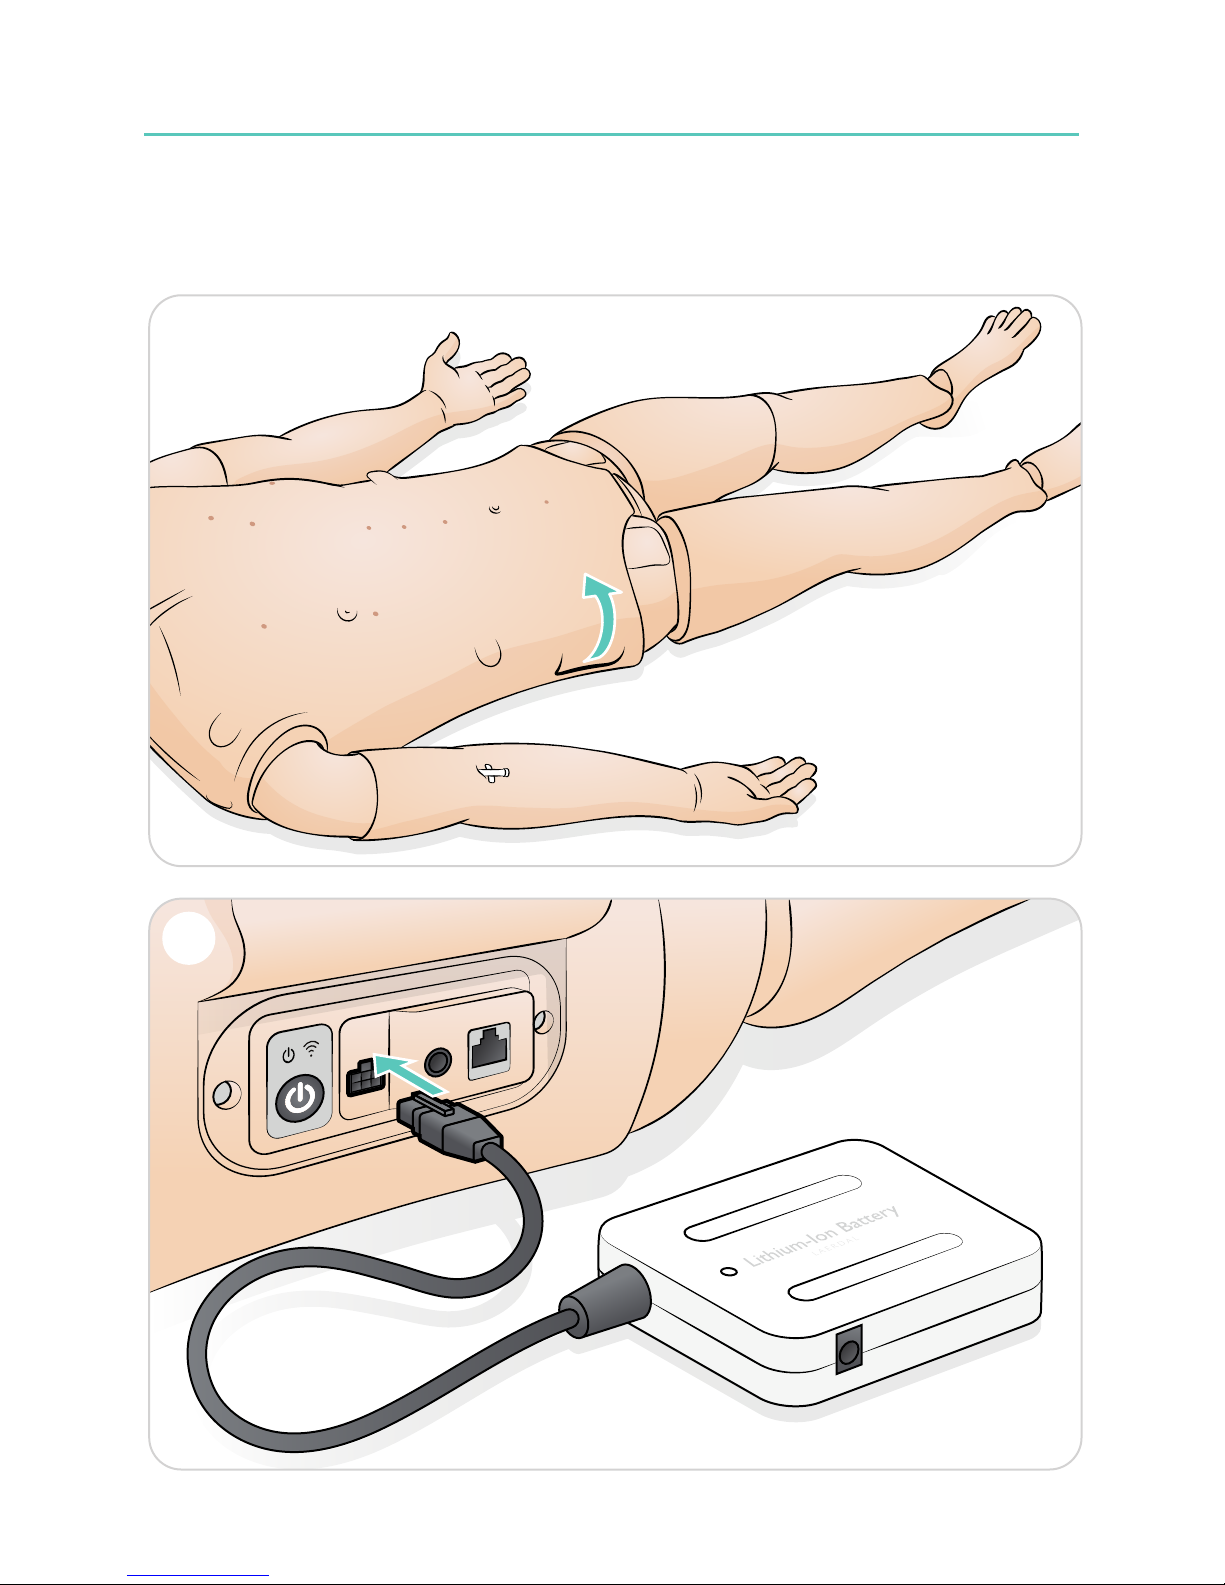
Attaching an additional external battery
If required an additional battery can be added externally to increase operating time if
required for long simulations.
1
2
Page 25
Maintenance
25
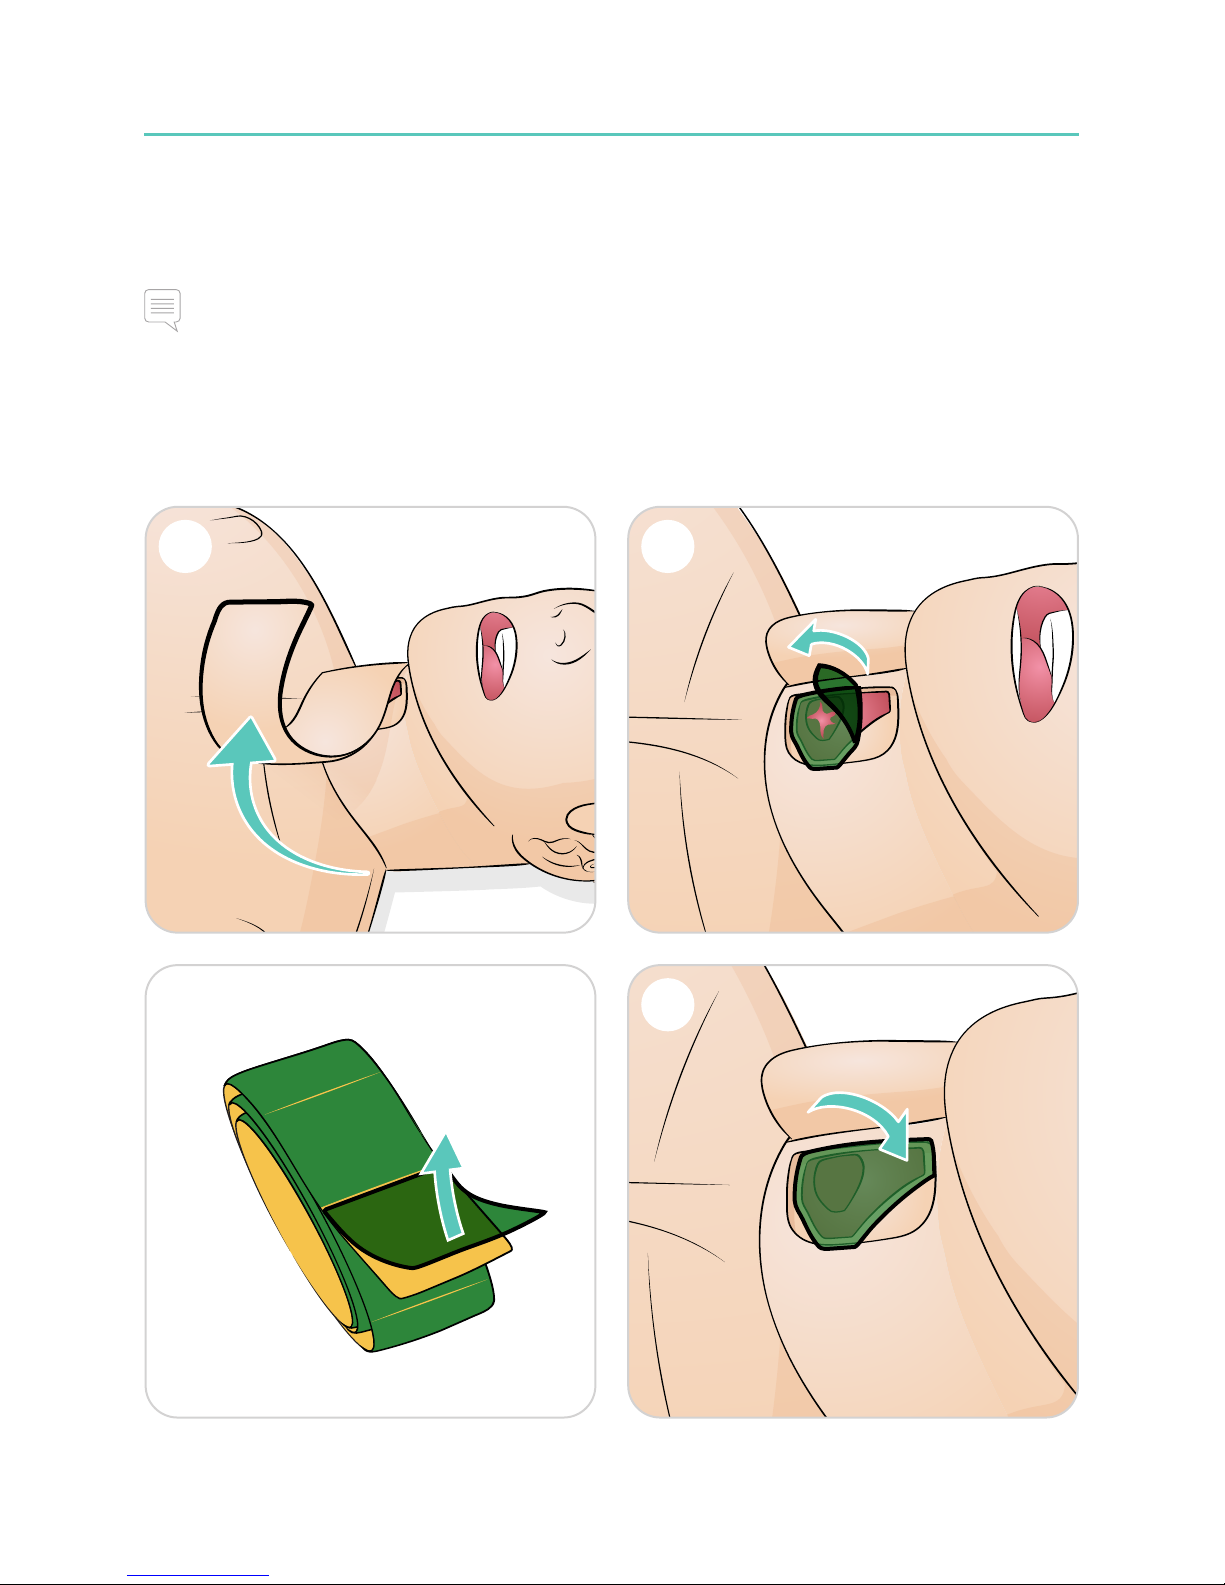
Cricothyroid Membrane/Neck Skin
After creating an emergency airway through the cricothyroid membrane, replace the
perforated membrane before starting a new simulation session.
Notes
• Replace the neck skin when necessary.
• If the used neck skin is in good condition, slide the skin along to position a new section
over the cricothyroid membrane.
• Ensure Cricothyroid Tape completely covers and seals the opening to prevent leakage
while ventilating the Patient Simulator.
1 2
3 4
Page 26
Maintenance
26
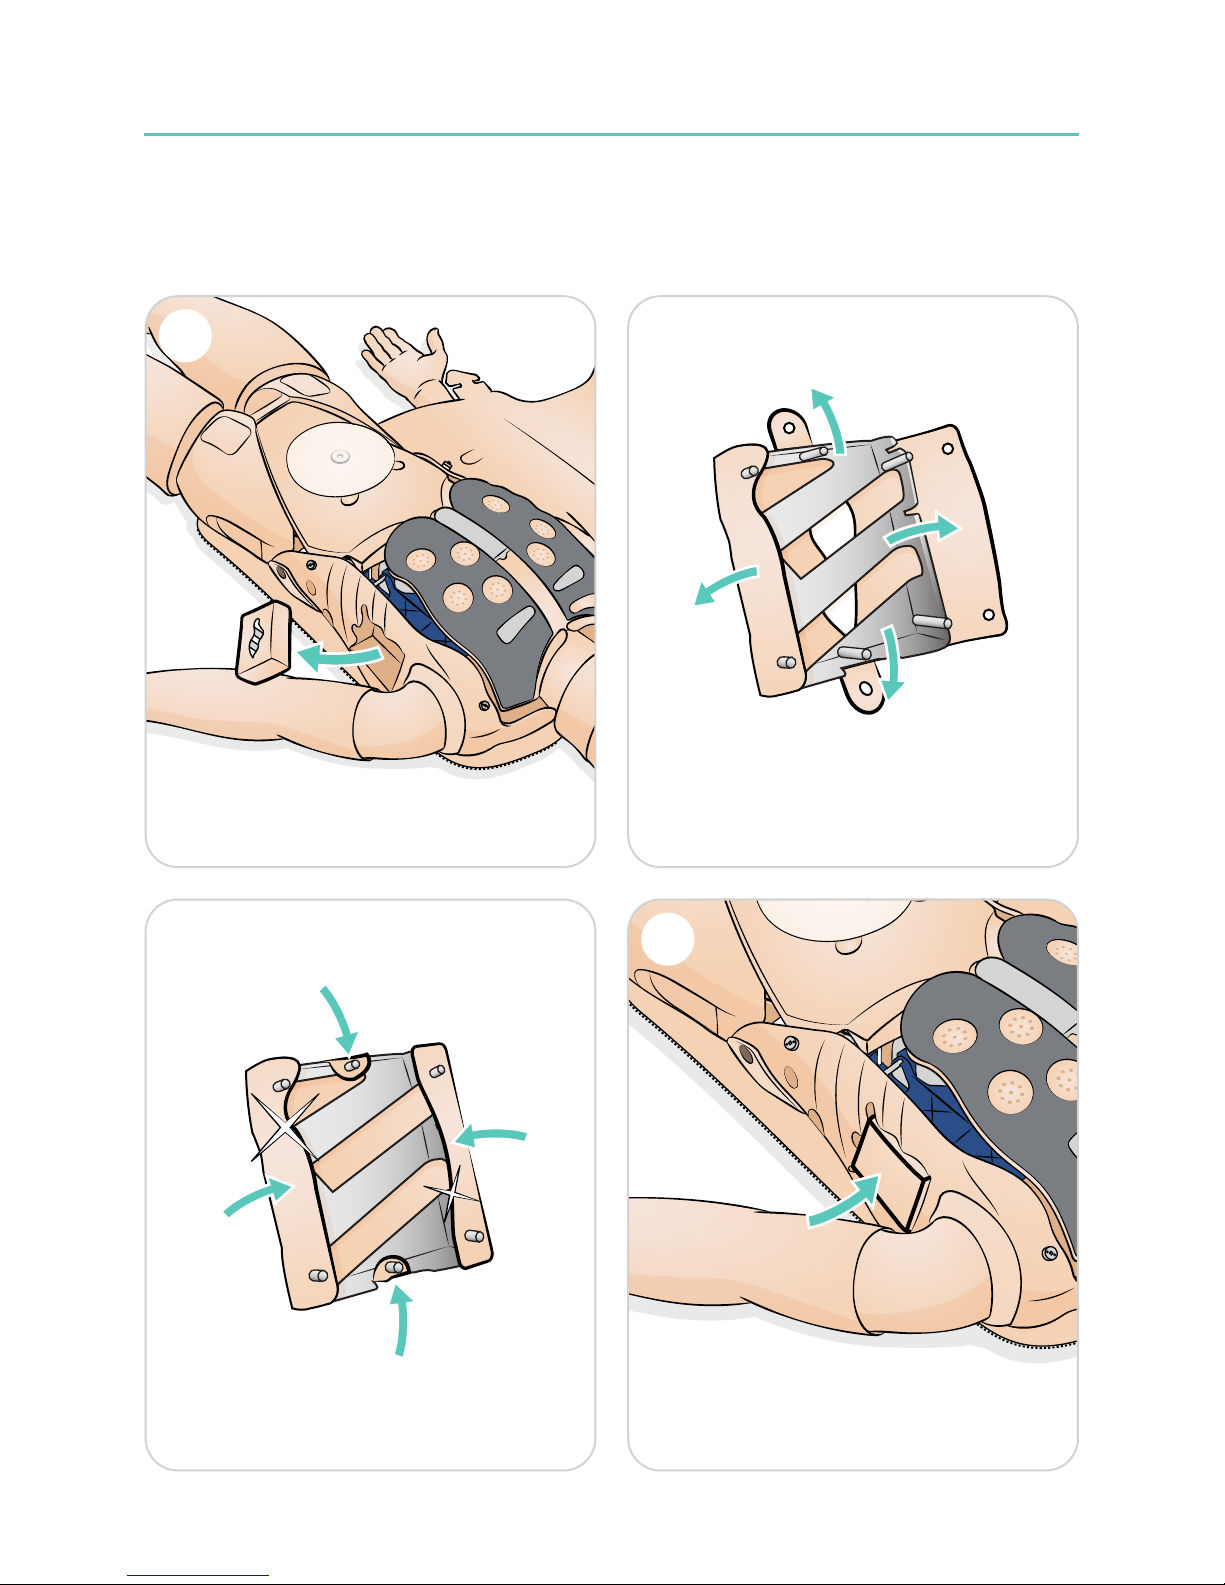
Chest Drain
The chest drain module's pleura skin should be replaced after each use.
1 2
3 4
Page 27
Maintenance
27
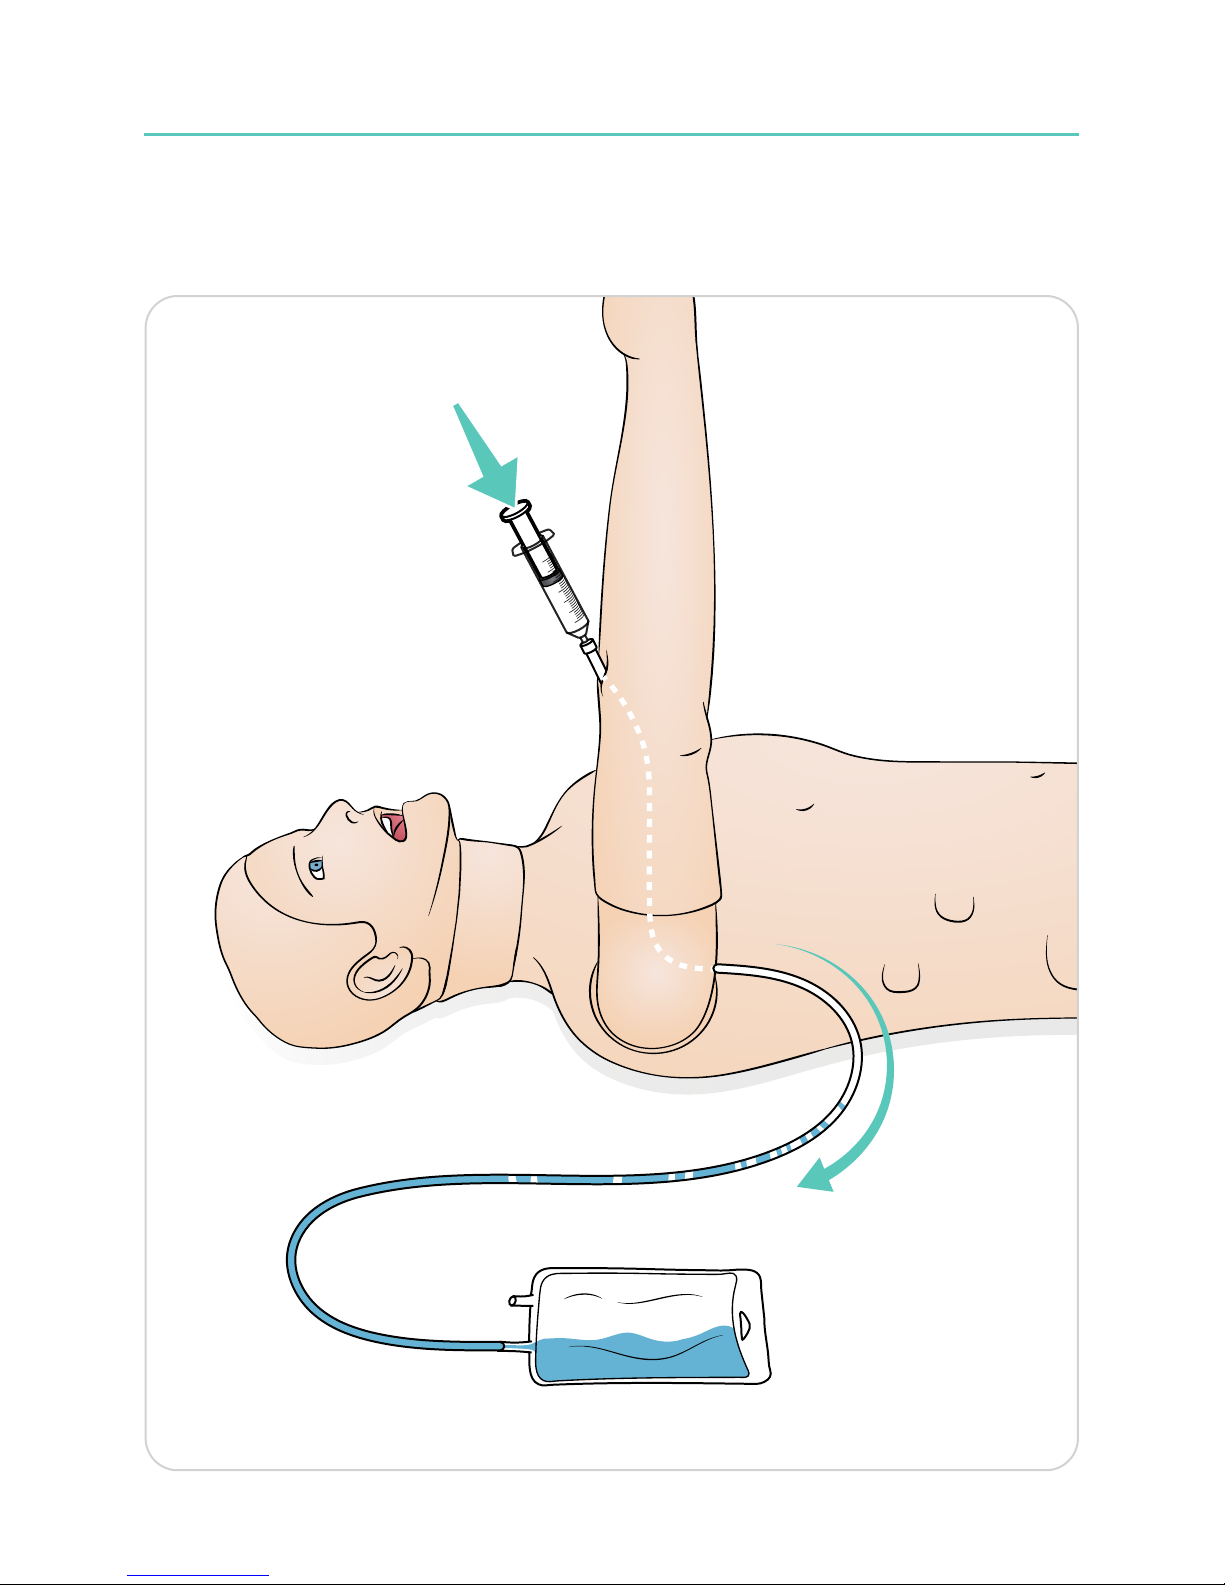
IV Arm
After intrvascular injection is complete, use a syringe to remove any remaining fluid in the
tubing/components from the IV arm before storage.
Page 28
Maintenance
28
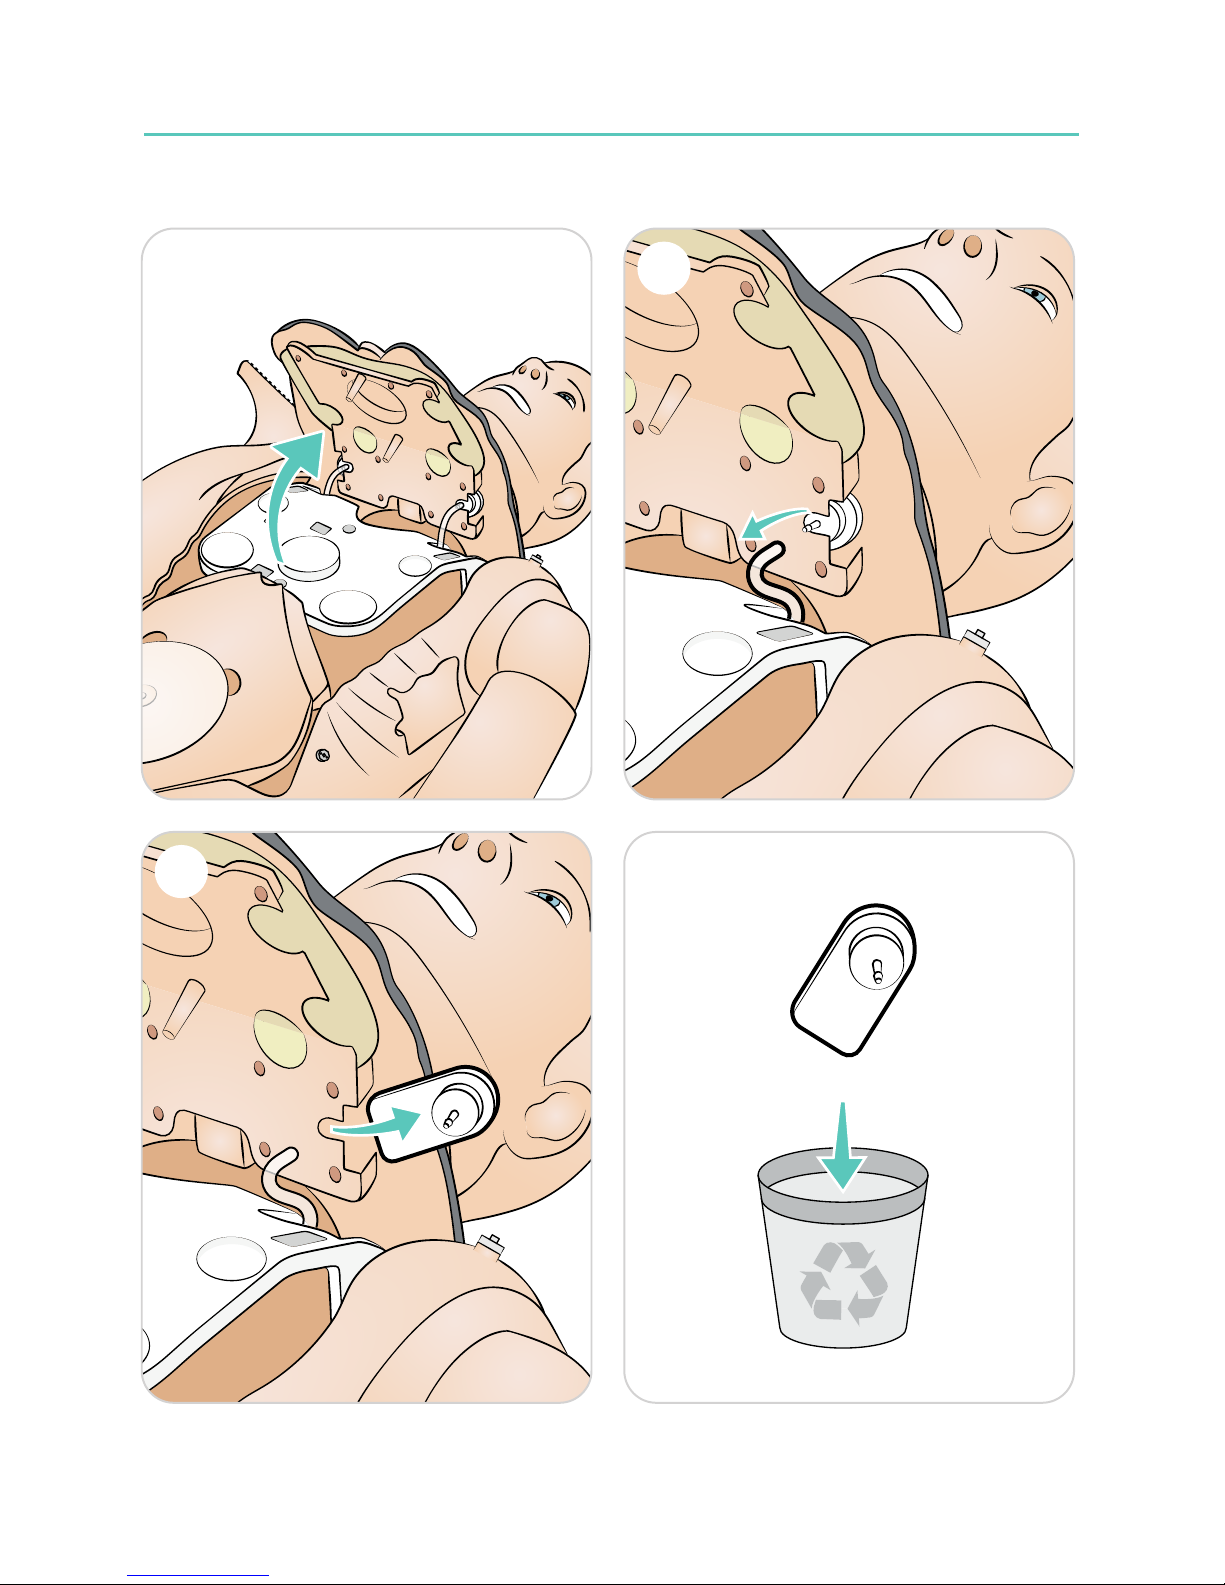
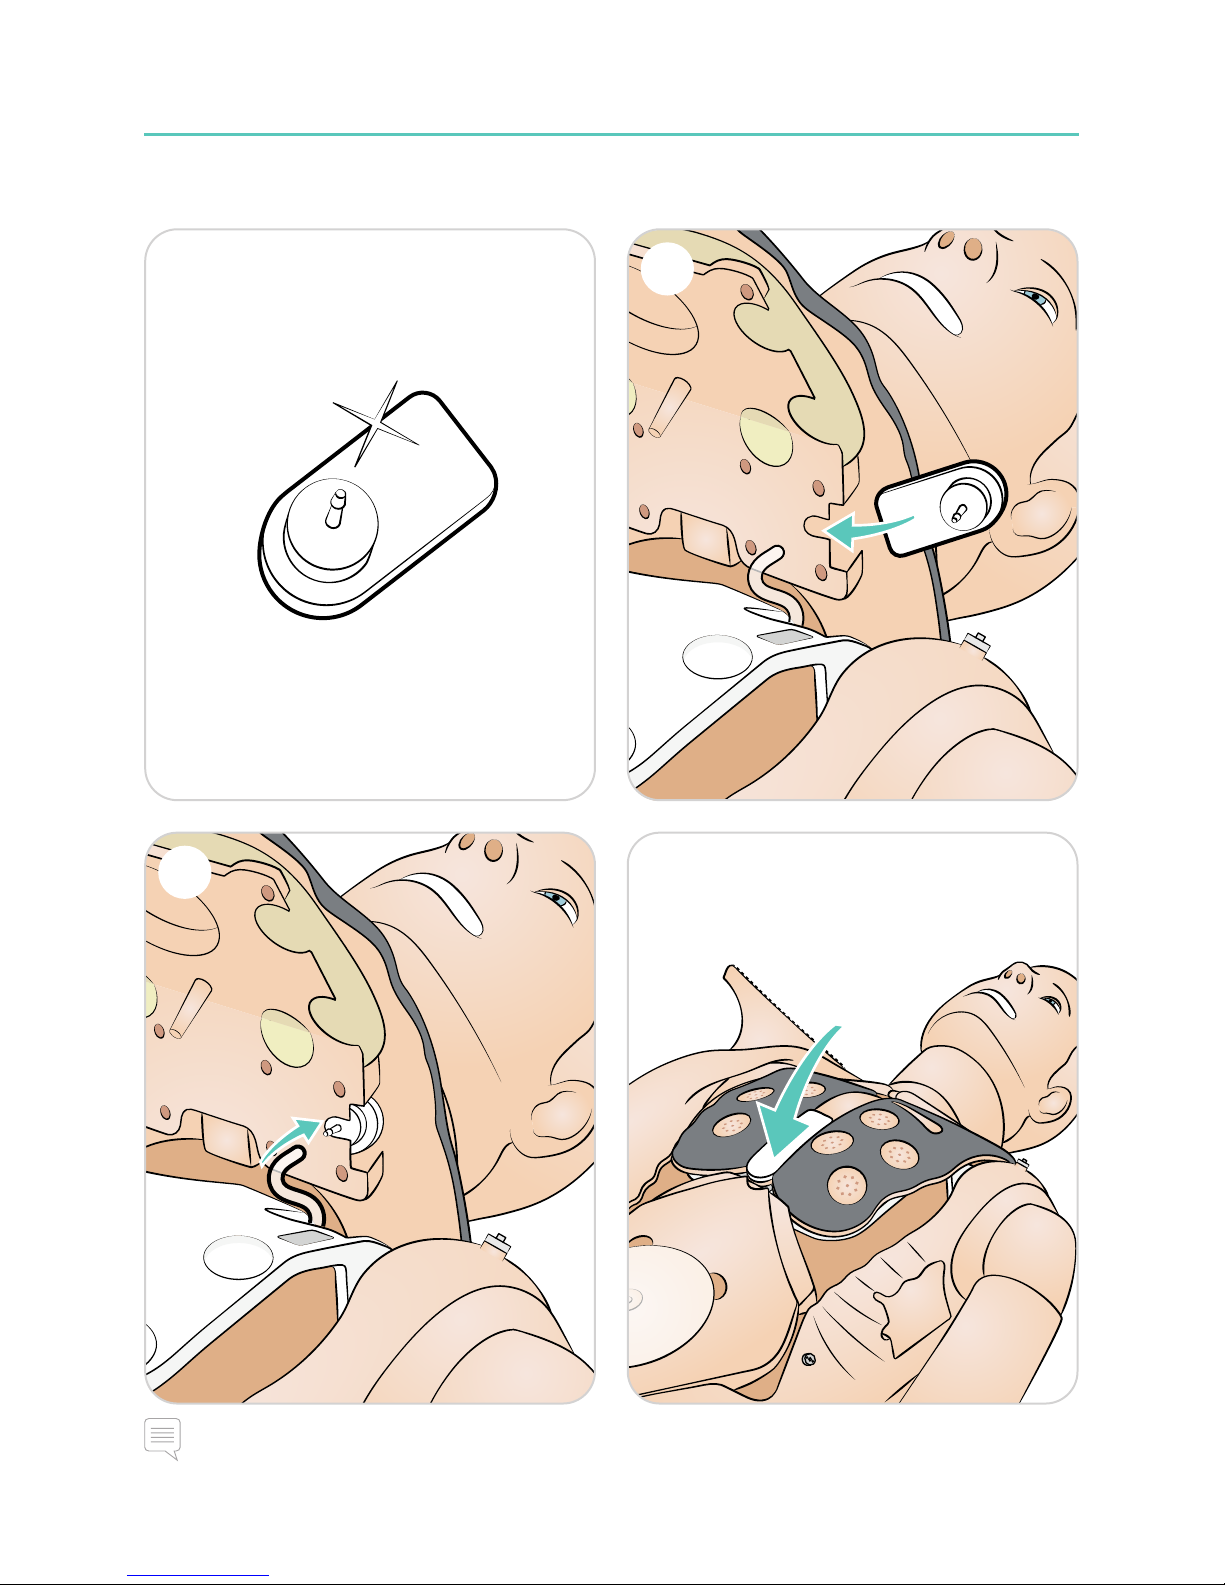
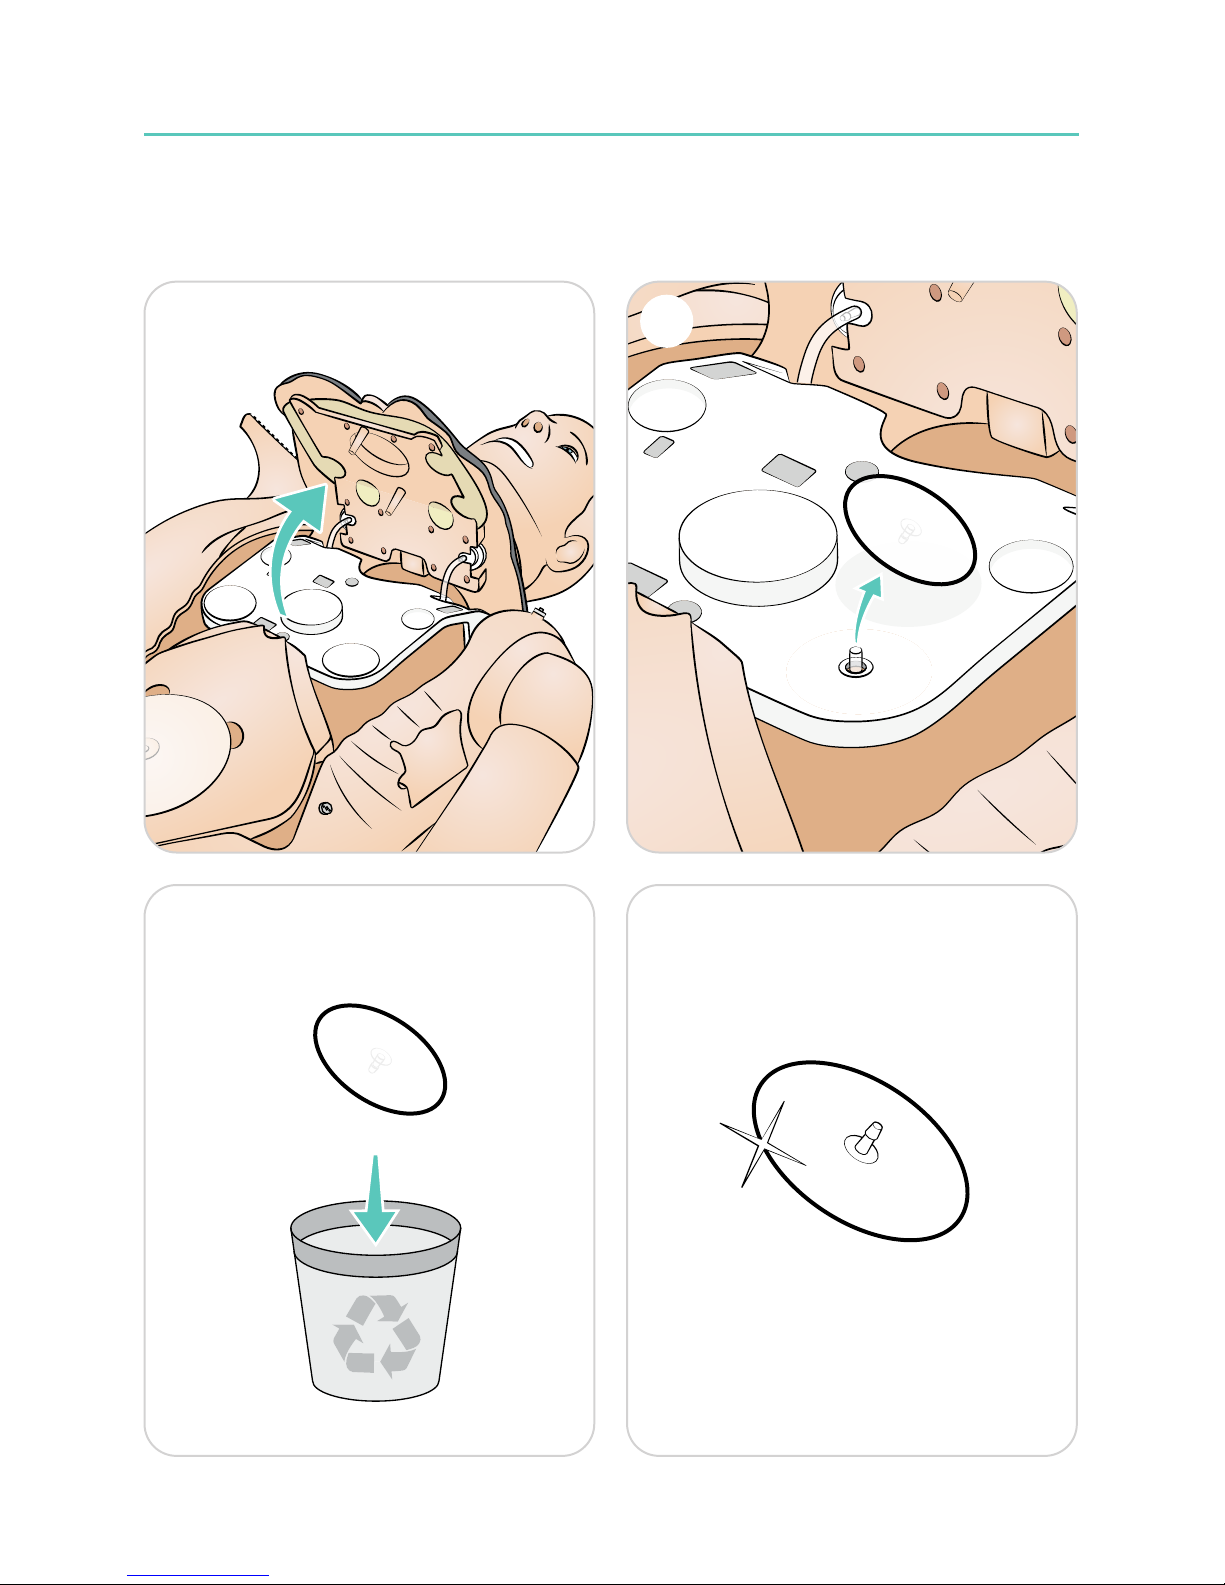
Replacing Pneumothorax Bladders
1 2
3 4
5 6
7 8
Page 29
Maintenance
29
5 6
7 8
Note
Be careful not to squeeze the small tube when closing the chest plate.
Page 30
Maintenance
30
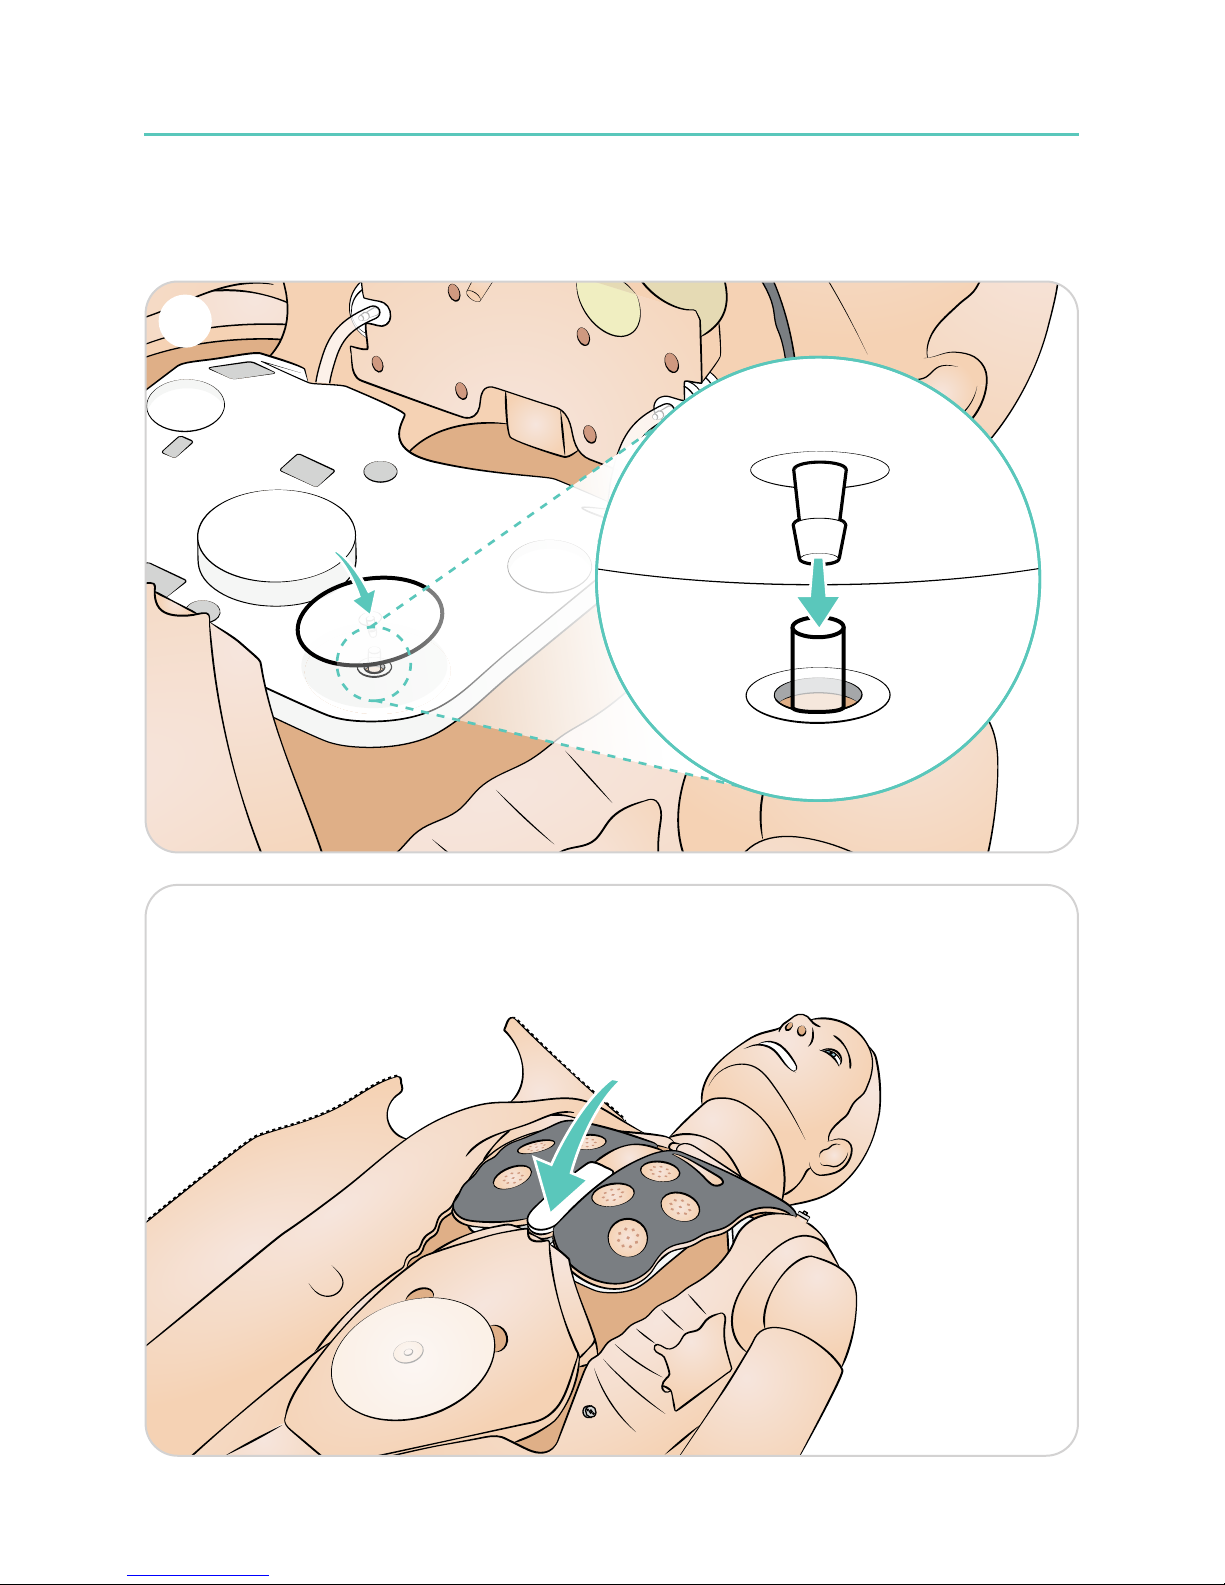
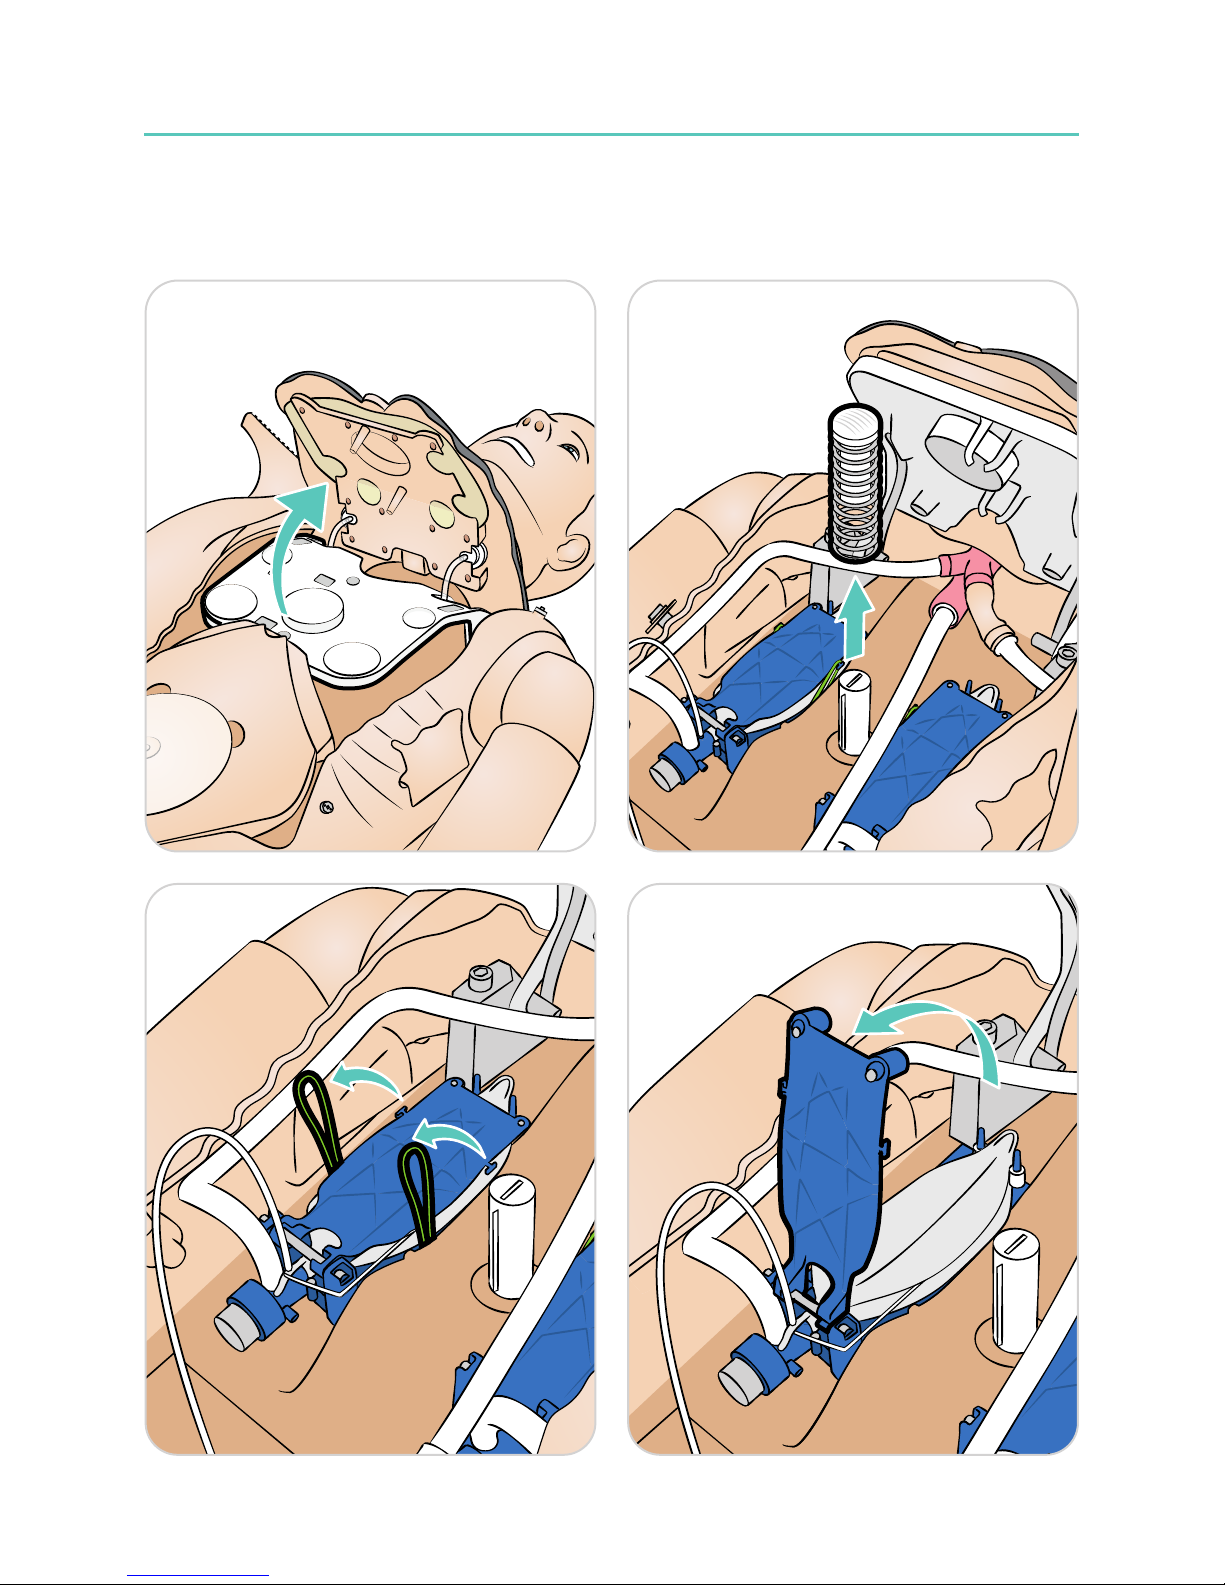
Replacing the Chest Rise Bladders
Replace the chest rise bladders if they leak or are damaged.
1 2
3 4
5
3
Page 31
Maintenance
31
5
3
Page 32
Maintenance
32
1 2
3 4
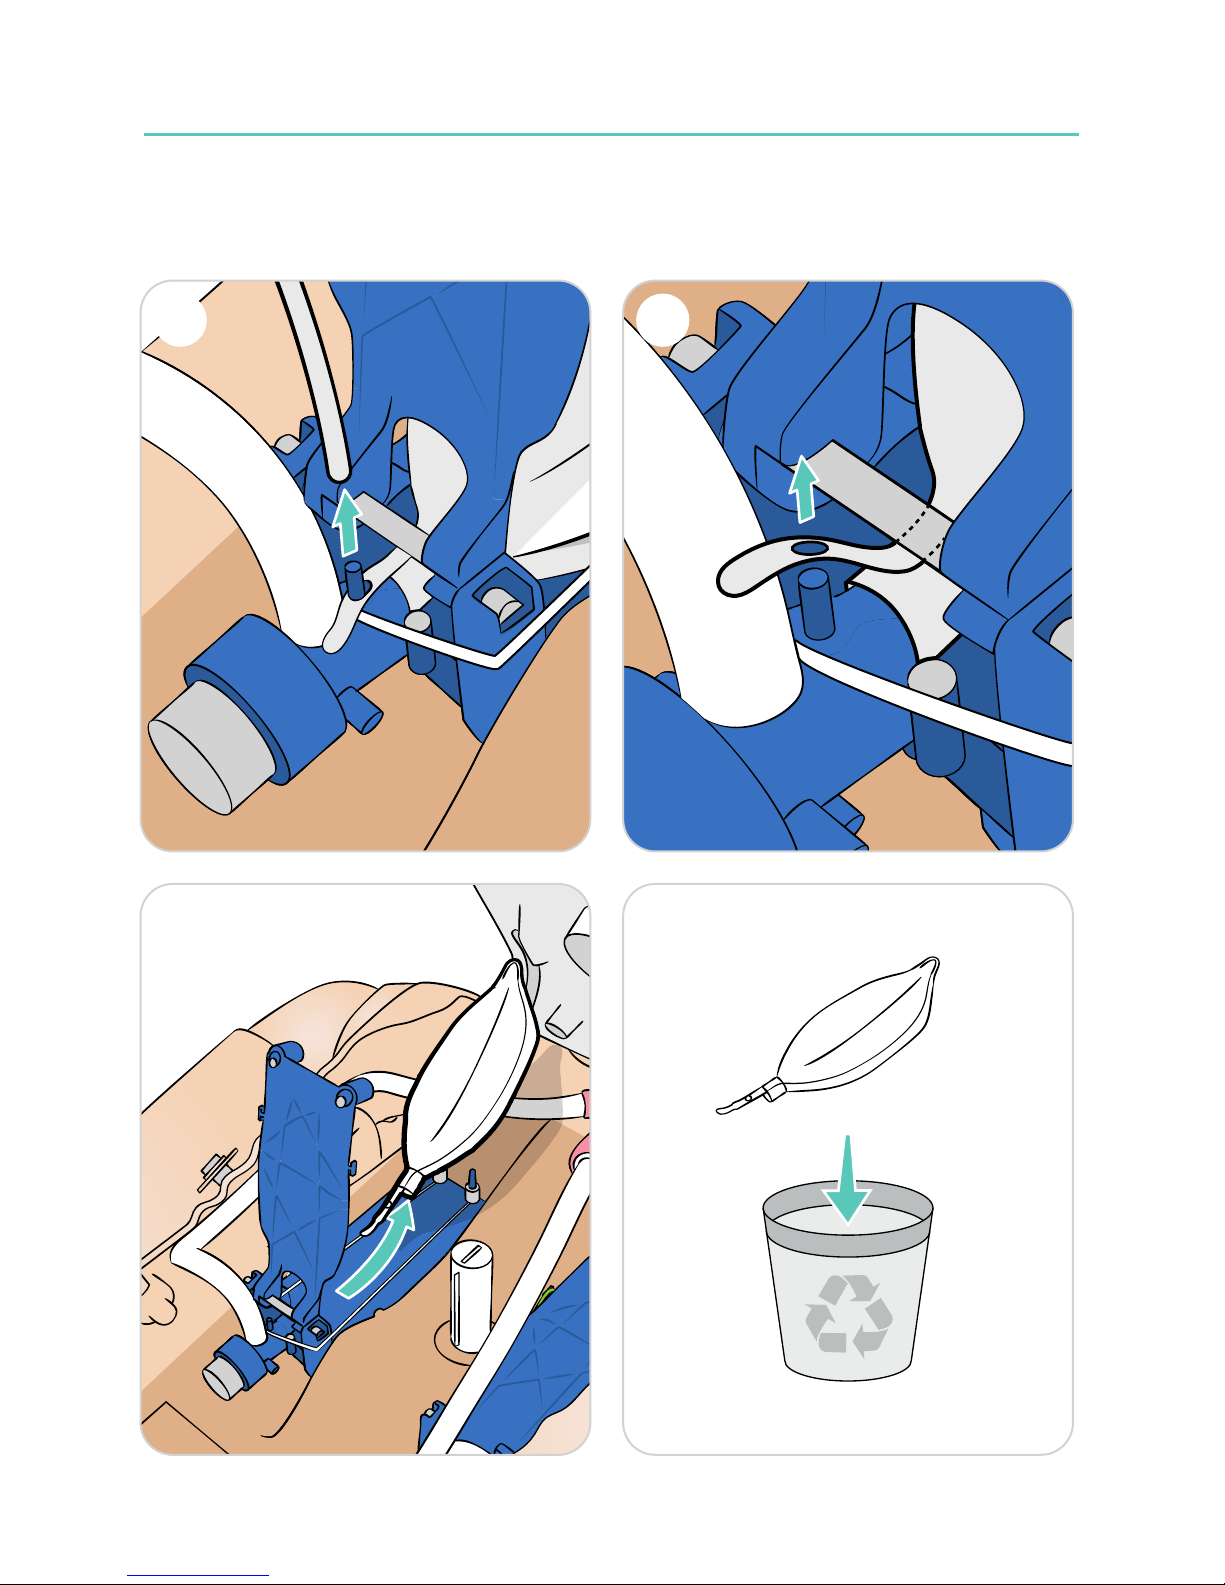
Removing the Lung
If leaking occurs, the lung bladders should be replaced.
5 6
7 8
Page 33
Maintenance
33
5 6
7 8
Page 34
Maintenance
34
1 2
3 4
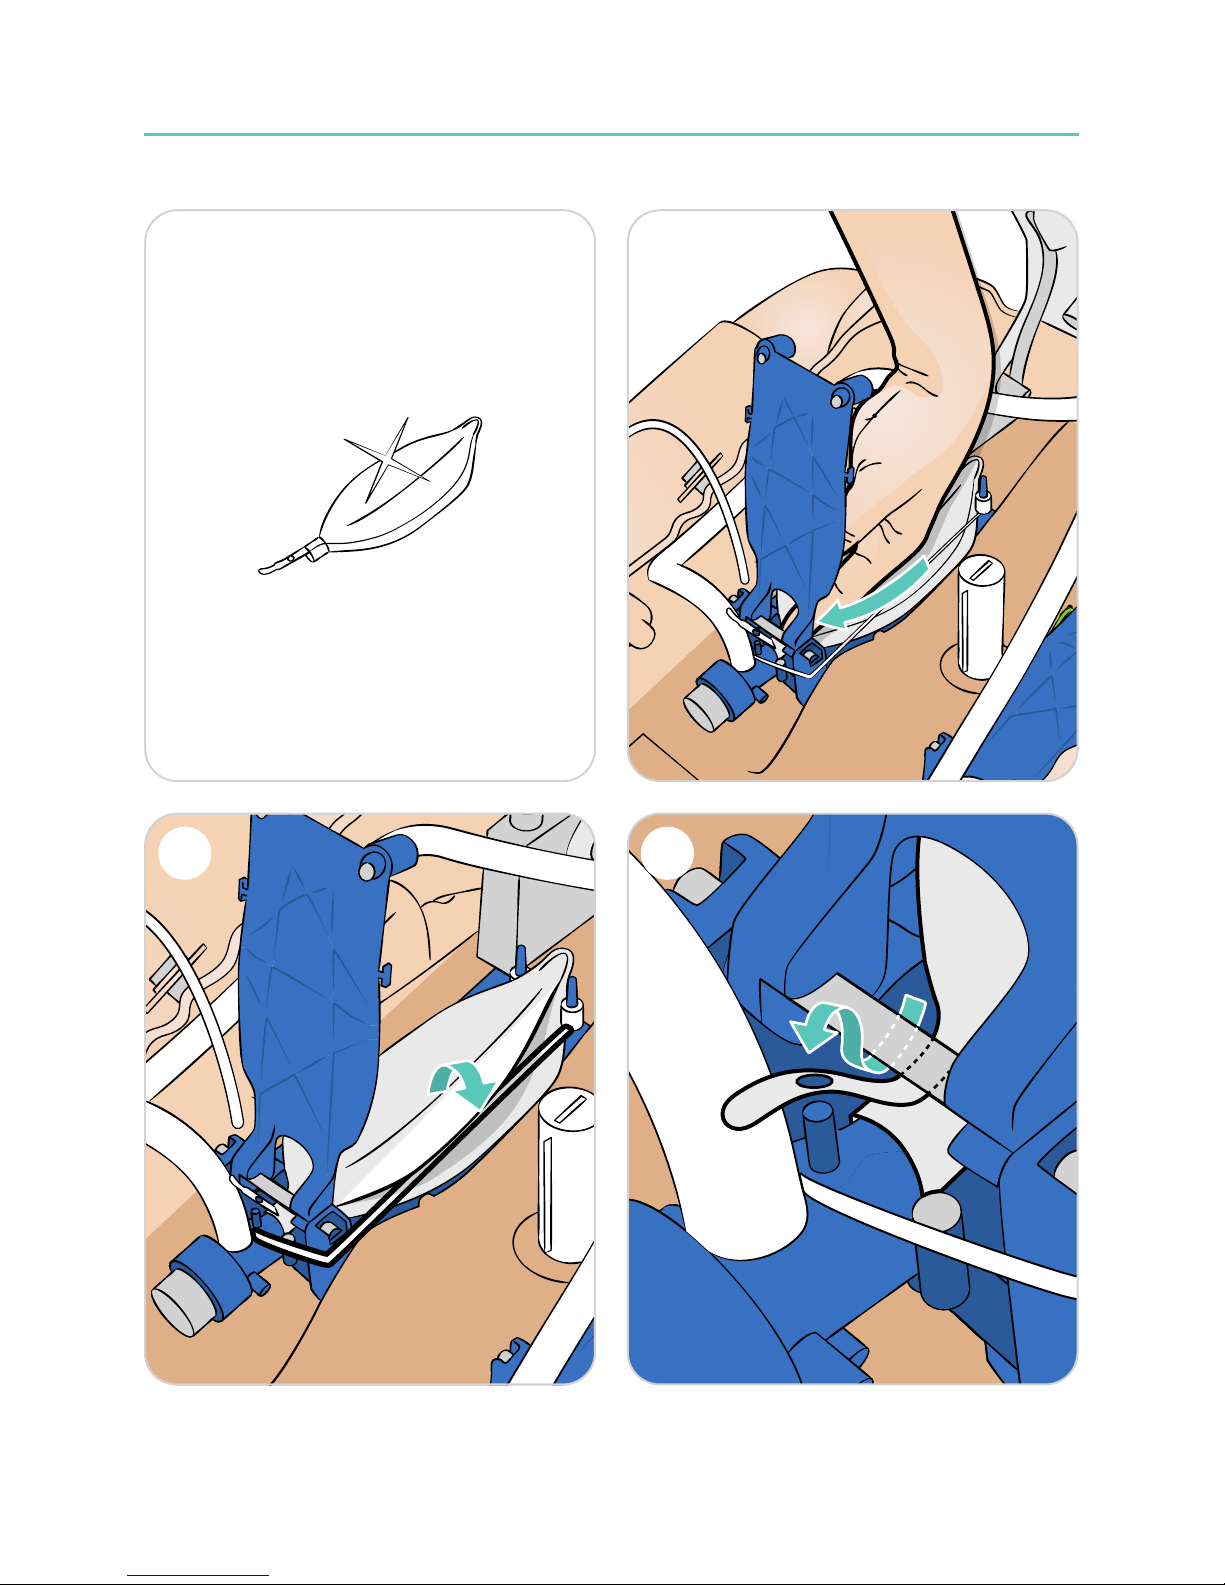
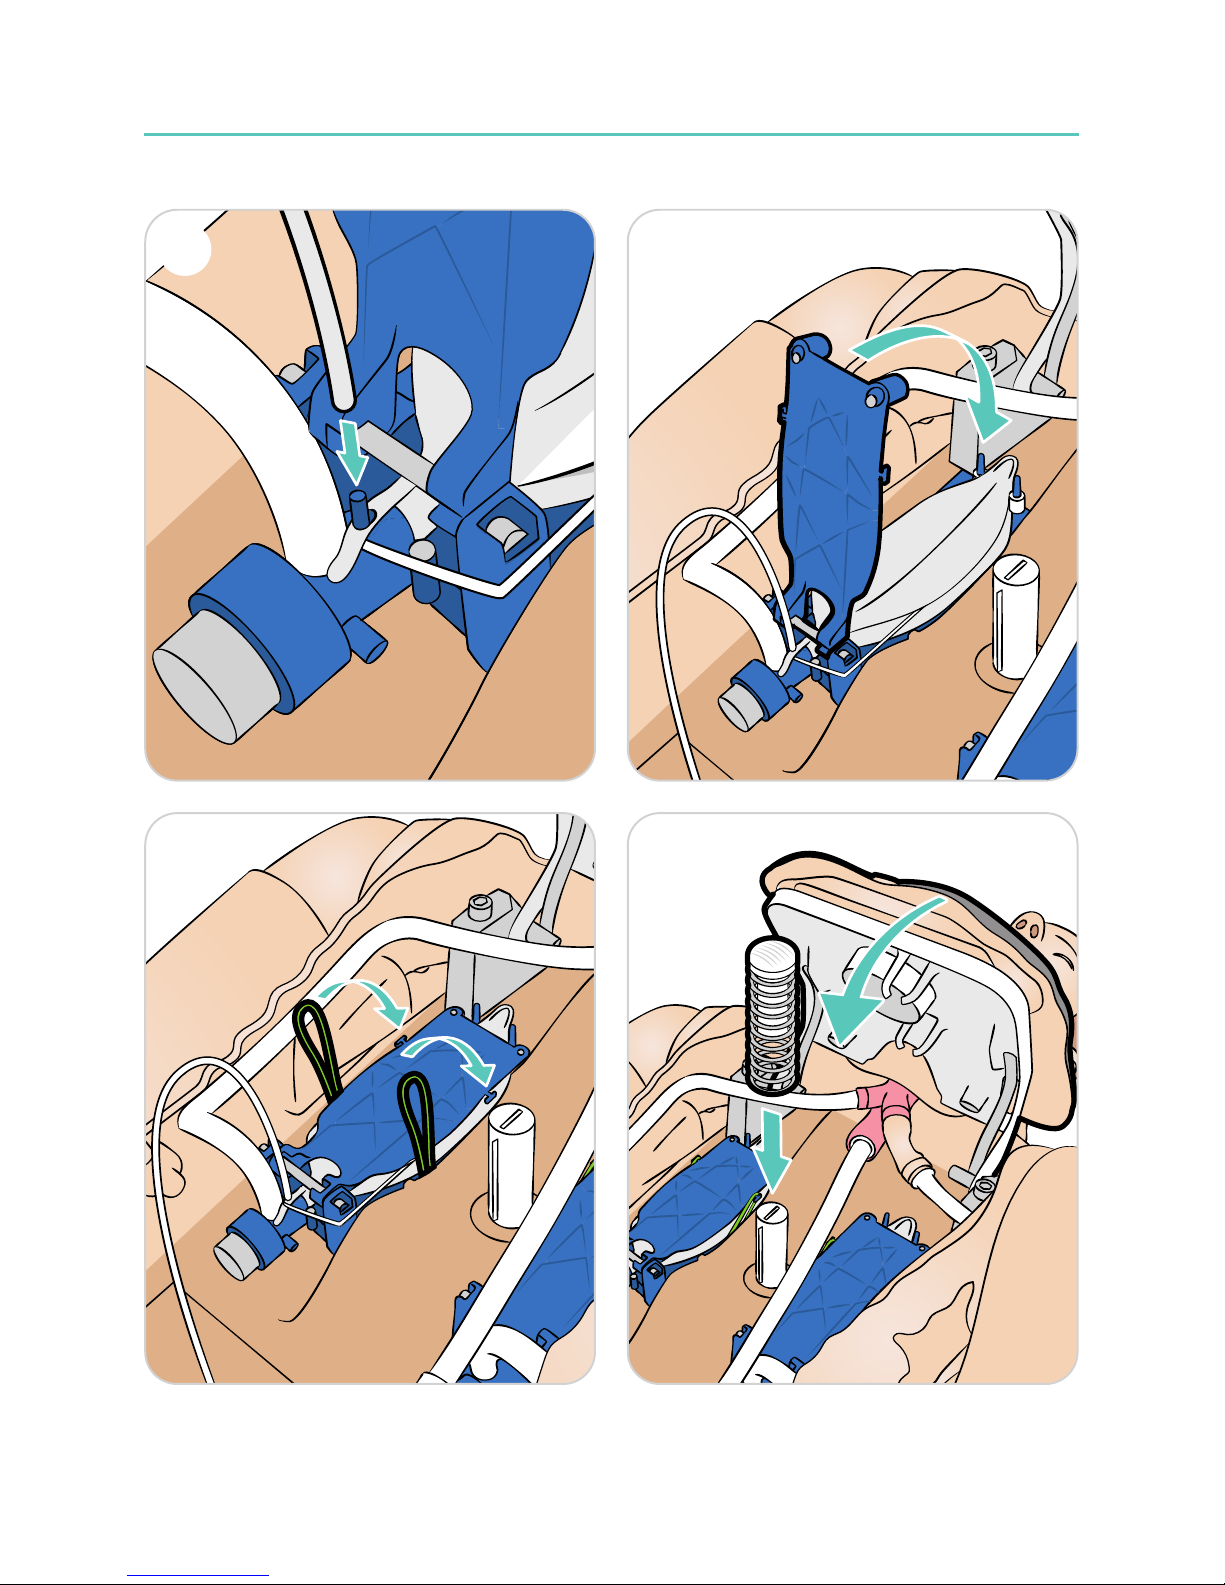
Replacing the Lung
Page 35
Maintenance
35
5 6
7 8
Page 36
Maintenance
36
1
2
3
4
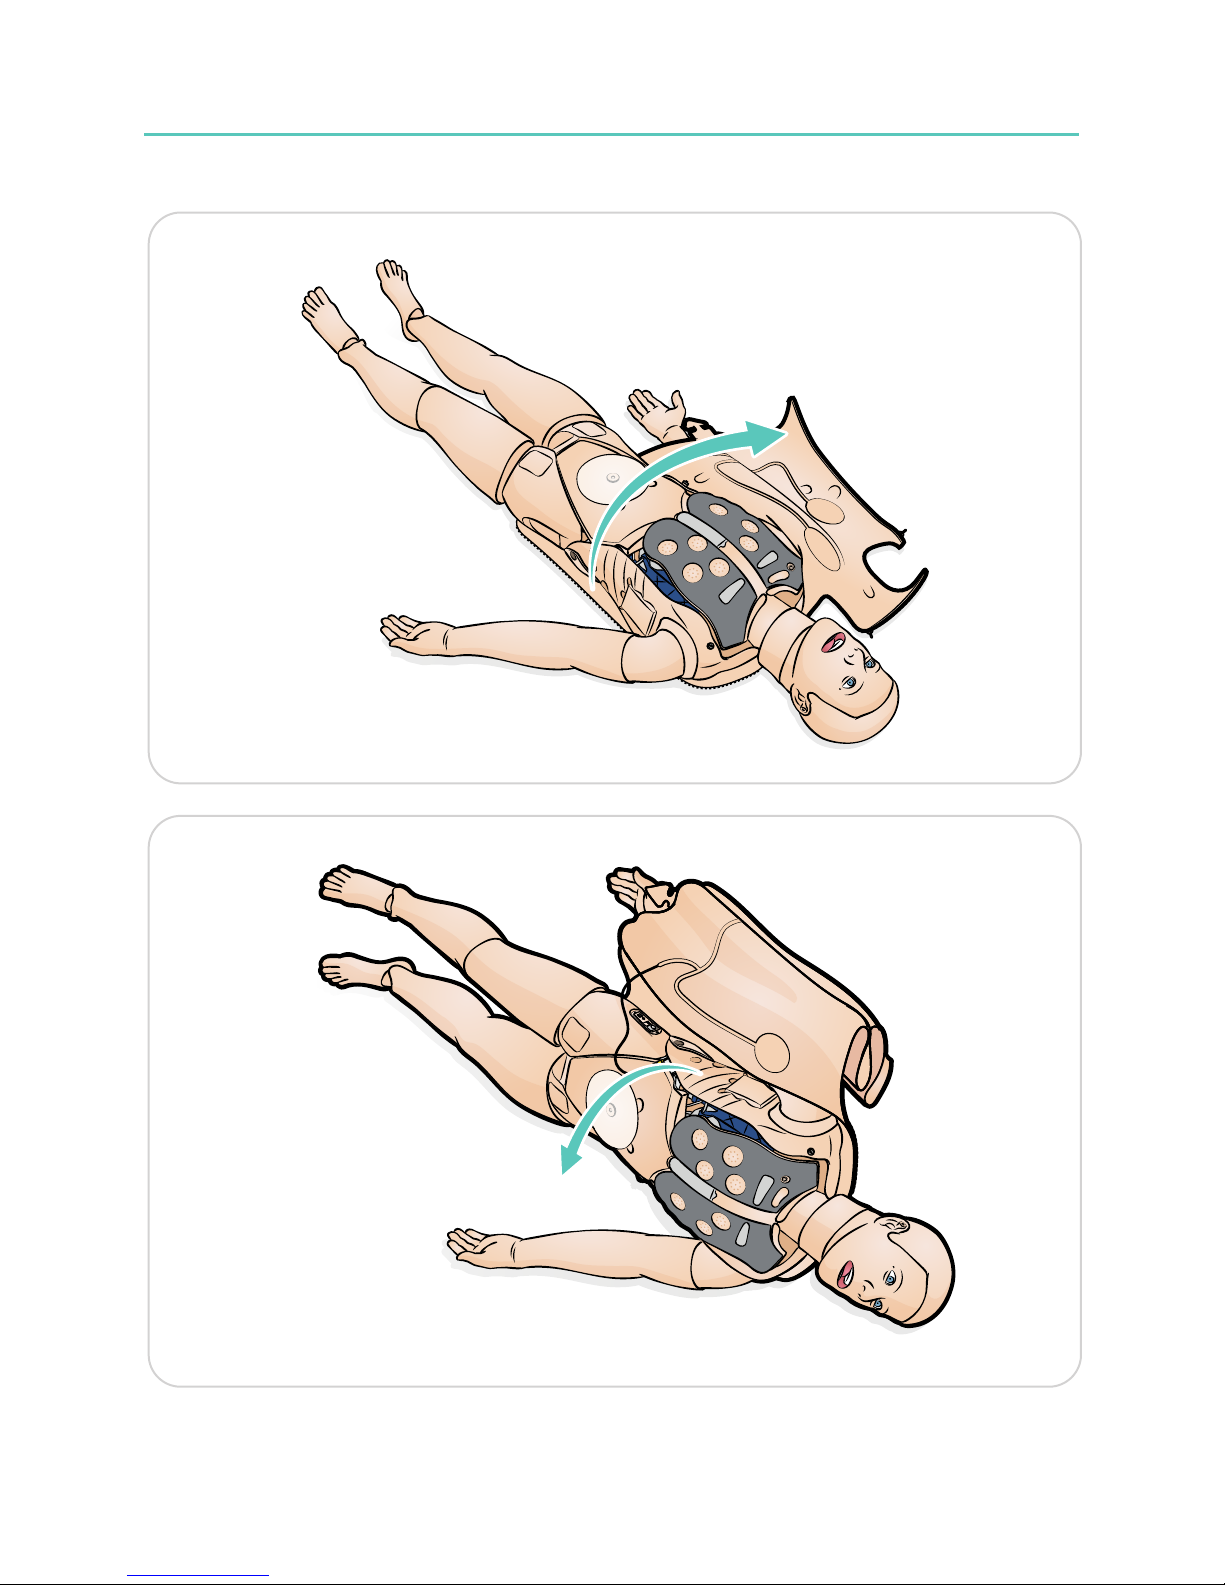
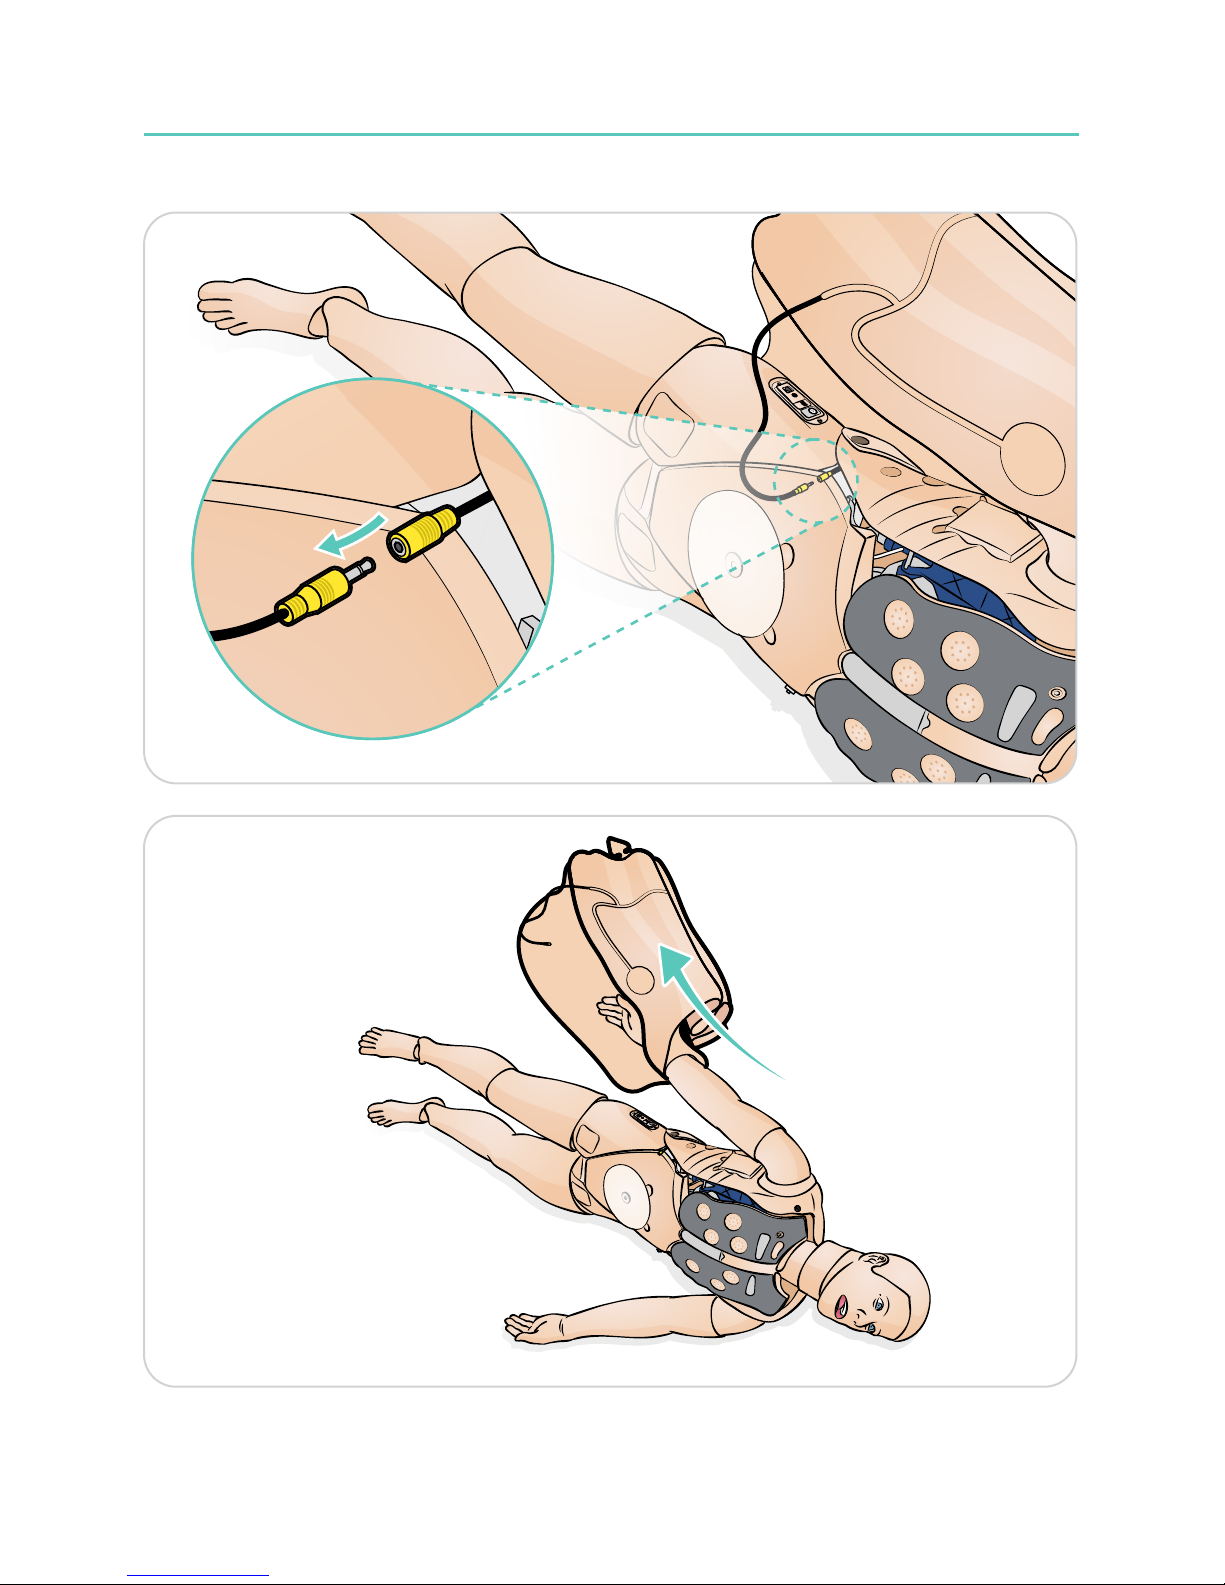
Removing the Torso Skin
Page 37
Maintenance
37
3
4
Page 38
Maintenance
38
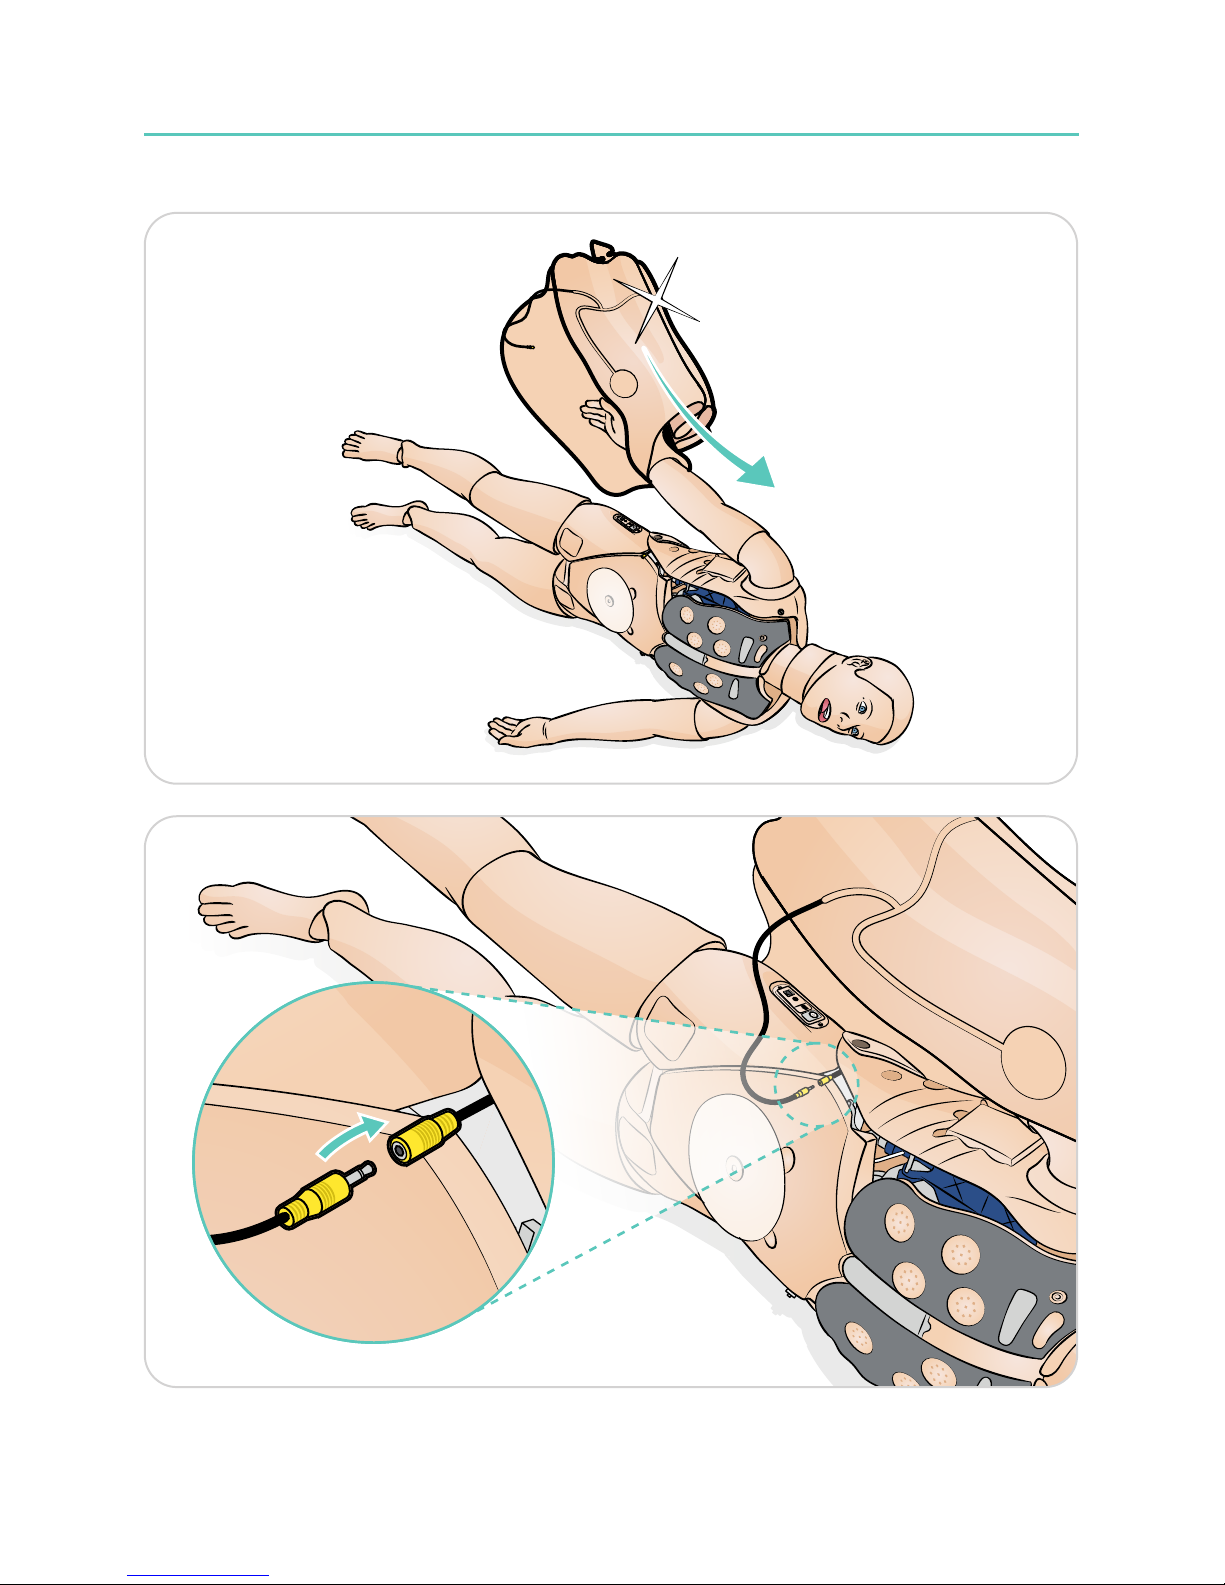
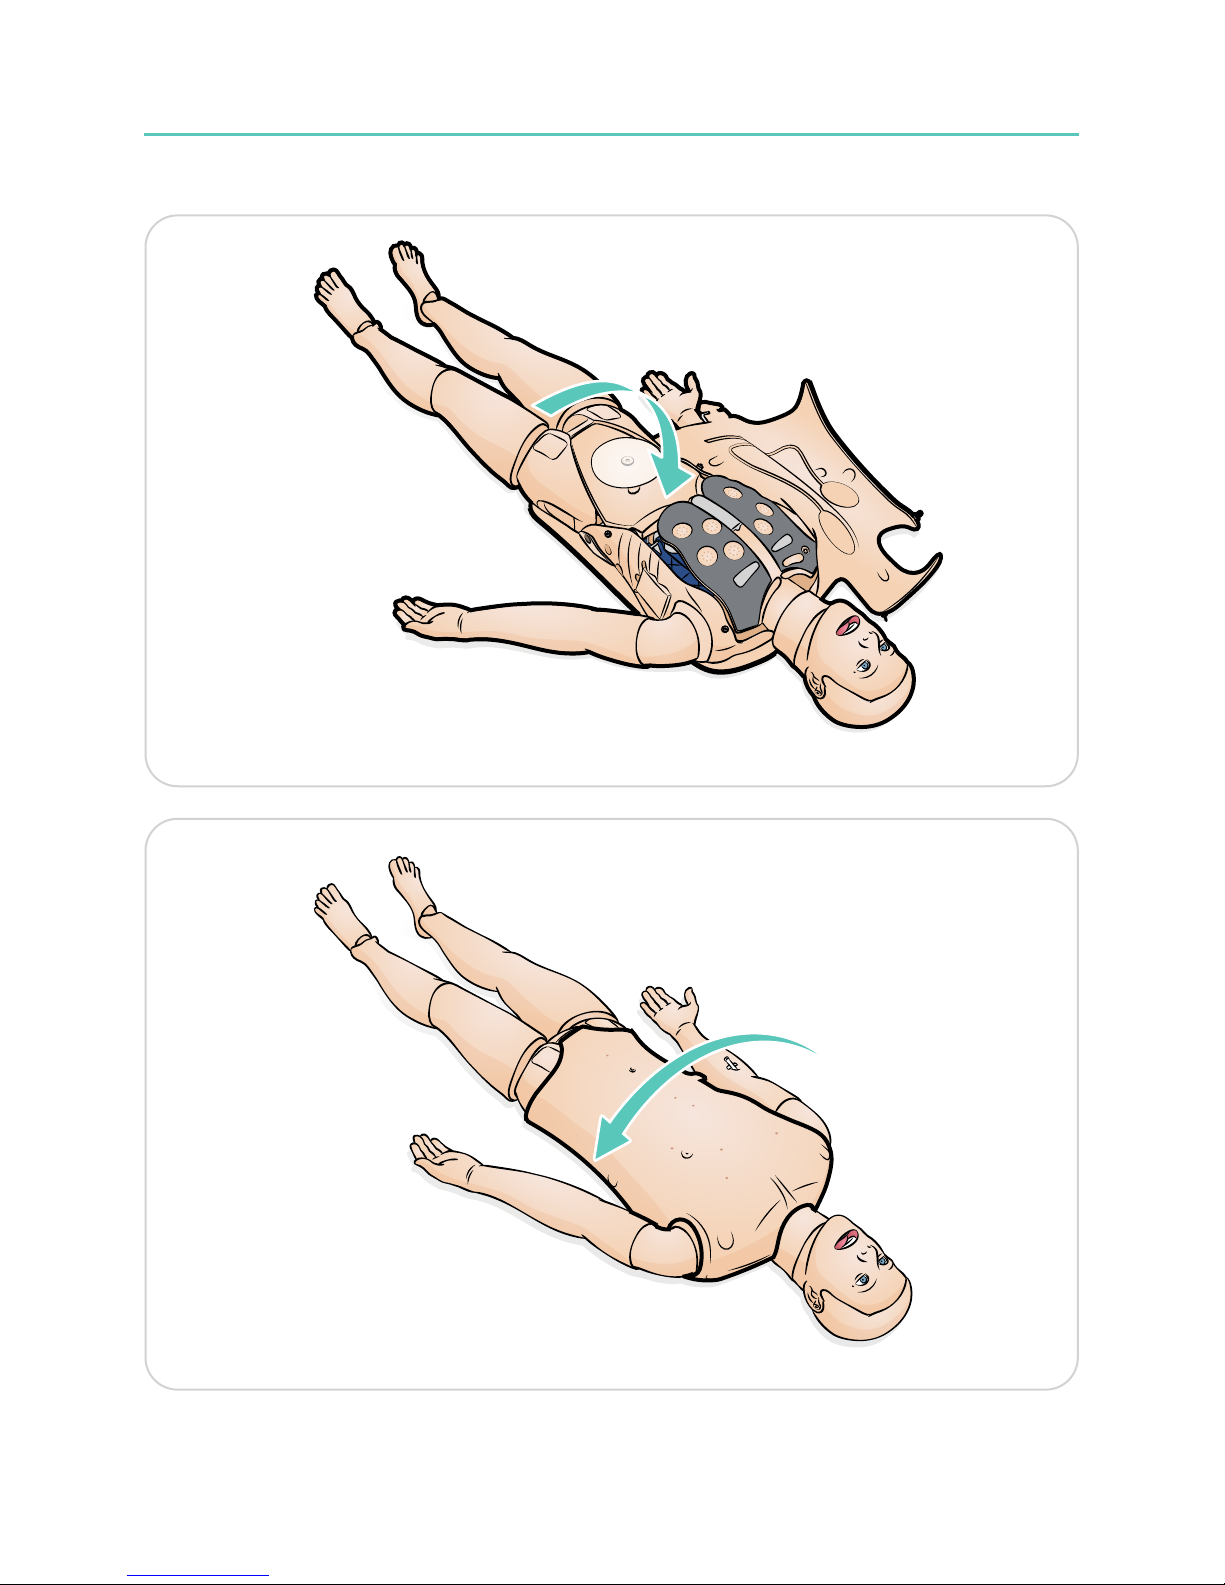
Replacing the Torso Skin
1
2
3
4
Page 39
Maintenance
39
3
4
Page 40

Cleaning
4040
Cleaning Simulator
1. Clean with mild soap and water; do not submerge the simulator or parts in cleaning
fluids or water.
2. Use only on clean surface. Avoid felt tipped markers, ink pens, acetone, iodine or
other staining products and avoid placing the simulator on newsprint or inked lines of
any kind.
3. To ensure longevity, each simulator should be cleaned after each training session and a
general inspection should be conducted regularly.
4. Modules and all other parts should be drained and air-dried thoroughly before
storage and disinfected when needed. After use of injection pads (use water only),
accumulated water should be squeezed out.
Page 41

Software Compatibilities
41
41
SimMan ALS Software Compatibilities
SimMan ALS is operated and controlled by Leardal Learning Application (LLEAP)
and SimPad PLUS.
LLEAP
LLEAP is the instructor’s application from where the simulation session is run, controlled,
and monitored. LLEAP can be operated in Automatic or Manual mode. Automatic mode
is used for pre-programmed scenarios while Manual mode allows the instructor full
manual control over the simulation session. Running simulations in Manual mode generally
requires some medical expertise to create clinically sound simulations.
SimPad PLUS
SimPad PLUS is a wireless handset that performs relevant medical simulation training,
including debriefing, in various user settings.
There are two ways to control simulations, Automatic Mode and Manual Mode allowing
customized simulations to meet specific needs.
Simulation Software
If you have purchased relevant licenses, you will have access to a number of PC
applications that facilitate your simulation. To run a simulation, LLEAP (Laerdal Learning
Application) must be started from Laerdal Simulation Home on the Instructor PC.
Laerdal Simulation Home
Laerdal Simulation Home is an application from where LLEAP and other Laerdal
programs related to patient simulation can be found and started. The help files are also
opened from here.. Laerdal Simulation Home is located in the Laerdal Medical folder
under the Windows start menu (Windows 7) and can be launched using the desktop
shortcut on Windows 8.
Page 42

Software Applications
42
42
LLEAP Only:
Voice Conference Application (VCA)
The VCA software transmits all vocal sounds used during simulation. It enables the
instructor to communicate through the simulator during the session. With VCA, instructors
can communicate with other instructors on a network and create separate channels that
only members can talk and listen to.
LLEAP and SimPad PLUS:
Patient Monitor
The Patient Monitor application emulates a typical hospital patient monitor. It is the learner’s
console and can be set up and controlled by the instructor, as well as by the learner,
through on-screen touch menus.
Session Viewer, SimView Server and SimView Mobile
Session Viewer, SimView Server and SimView Mobile are applications that record video
and patient monitor screen captures during simulation, in addition to providing an interface
to debrief your session. After a session is ended, log files generated in LLEAP and on the
SimPad PLUS are transferred and merged with the video files in Session Viewer, SimView
Server and SimView Mobile for the debrief.
Other Applications
The following applications are available in conjunction with the simulation sessions:
• License Manager for handling program licenses
• Simulator Firmware & Network Wizard for updating the firmware of the simulators or
troubleshooting network problems
• SimDesigner for configuring your own pre-programmed scenarios. It can also be used
to analyze and print out a graphical representation of a scenario.SimDesigner must be
installed to allow conversion of legacy instructor application files to LLEAP compatible
file formats.
• Network Selector in Laerdal Simulation Home helps users connect LLEAP and Patient
monitor to a wireless network and even host a network (Windows Hosted Network).
• Theme editor allows creation of themes for the SimPad system when operating using
Manual Mode
For a full overview of all applications and their help files, start LLEAP Home.
Web Downloads
Visit www.laerdal.com to download the latest User Guide, Software and
Troubleshooting Guide.
Page 43

Page 44

www.laerdal.com
20-09932 Rev C
© 2018 Laerdal Medical AS. All rights reserved.
Manufacturer: Laerdal Medical AS
P.O. Box 377
Tanke Svilandsgate 30, 4002 Stavanger, Norway
T: (+47) 51 51 17 00
Printed in Norway
 Loading...