

LAEGENDARY Thunder UM Installation Manual


TABLE OF CONTENTS
Introduction
Terms of Use
Safety Precautions
What’s in the Box
Quick Start
Radio System
.................................................................................................4
................................................................................................5
................................................................................6-8
.......................................................................................9
.............................................................................................10-11
........................................................................................12-14
Electronic Speed Control
Operation
Maintenance
Troubleshooting
.............................................................................................21-22
..............................................................................................23
................................................................................24-27
.................................................................15-20
Tools and Equipment
Replacement Parts
Anatomy of the THUNDER
Warranty
.....................................................................................................44
.............................................................................28
...........................................................................29-38
...........................................................39-43
LAEGENDARY RC Cars Collection
............................................45-58
www.LAEGENDARY.com
3

Introduction
INTRODUCTION
Thank you for purchasing the THUNDER RC Car.
This manual contains the instructions you will need to operate and maintain your model so
that you can enjoy it for years to come. However, please be advised that this model is a
hobby-grade RC car which will require maintenance and replacing parts. Rest assured that
LAEGENDARY is a team of professionals who aim to provide the highest level of factory
support possible.
We know you’re excited about getting your new model on the road, but it’s very important
that you take some time to read through the User’s Manual. This manual contains all the
necessary setup and operating procedures that will allow you to unlock the performance
potential that LAEGENDARY engineers designed into your model. Also, be sure to read and
follow the precautions and warnings in this manual and on any labels or tags attached
to your model. They are there to educate you on how to operate your model safely and also
get maximum life and performance from your model. Even if you are an experienced
R/C enthusiast, it’s important to read and follow the procedures in this manual.
Thank you again for choosing LAEGENDARY. We work hard every day to assure you
receive the highest level of customer satisfaction possible. We truly want you to enjoy
your new model!
You can find all replacement parts on our website at www.laegendary.com
If you have any questions about your model or its operation,
call LAEGENDARY Customer Support at +1 (646) 389-8009 /
+1 (646) 859-1050 or E-mail: support@laegendary.com.
4
www.LAEGENDARY.com

Terms of use
TERMS OF USE
This product is surrendered by LAEGENDARY to the purchaser with the understanding that
the purchaser accepts the responsibility that driving this model and using the enclosed
accessories in a careless, improper, or unsafe manner can result in serious injury or death.
Also, the purchaser assumes all liability resulting from any misuse, unsafe handling, failure
to follow instructions, or any action that constitutes a violation of any applicable laws or
regulations. LAEGENDARY shall not be liable for personal injury, loss of property, or loss
of life resulting from the use of this product under any circumstances, including intentional,
reckless, negligent, or accidental behavior. LAEGENDARY shall also not be liable for any
special, indirect, incidental, or consequential damages arising out of the assembly, installation,
or use of their products or any accessory or chemical required to use their products. By the
act of operating / using the product, the user accepts all resulting liability and releases
LAEGENDARY of any and all liability associated with its use.
If you as the user do not accept liability of Usership, LAEGENDARY requests that you do not
use this product. Do not open any of the enclosed materials. Return the model to
LAEGENDARY but please be advised that we absolutely cannot accept an item for return
or exchange after it has been used or is otherwise no longer in as-new condition.
All information contained in this User’s Manual is subject to change without notice. For the
most updated version of the User Manual, please visit our website.
LAEGENDARY reserves the right to make changes and improvements to products without
incurring any obligation to incorporate such improvements into products previously sold.
If you have any questions about your model or its operation, call LAEGENDARY Customer
Support at +1 (646) 389-8009 /+1 (646) 859-1050 or E-mail: support@laegendary.com
FCC Compliance
This device contains a module that complies with the limits for a Class B digital device as
described in part 15 of the FCC rules. Operation is subject to the following two conditions:
(1) This device may not cause harmful interference, and (2) this device must accept any
interference received, including interference that may cause undesired operation.
The limits for a Class B digital device are designed to provide reasonable protection against
harmful interference in residential settings. This product generates, uses and can radiate radio
frequency energy, and, if not operated in accordance with the instructions, may cause harmful
interference to radio communications. The user is cautioned that changes or modifications not
expressly approved by the party responsible for compliance could void the user’s authority to
operate the equipment.
Radio Frequency (RF) Exposure Statement
This equipment complies with radio frequency exposure limits set forth by FCC and Industry
Canada for an uncontrolled environment. This equipment should be installed and operated with
a minimum distance of 20 centimeters between the radiator and your body or bystanders and
must not be co-located or operating in conjunction with any other antenna or transmitter.
Maximum Peak Power: 20 dBm
Operating Current: 80-120 mA
www.LAEGENDARY.com
5

Safety
Precautions
Safety Is Your Responsibility!
WARNING: RISK OF INJURY!
Do not stand directly behind the car while driving to avoid personal injury from rocks,
sticks, or other thrown objects, especially during full throttle starts. Keep any spectators
and animals at a safe distance. Wearing eye protection is recommended.
WARNING! CAUTION! DANGER! FIRE HAZARD!
CHARGING AND DISCHARGING BATTERIES HAS THE POTENTIAL FOR FIRE,
EXPLOSION, SERIOUS INJURY, AND PROPERTY DAMAGE IF NOT PERFORMED AS
PER THE INSTRUCTIONS. BEFORE USE, READ AND FOLLOW ALL MANUFACTURER’S
INSTRUCTIONS, WARNINGS AND PRECAUTIONS.
NEVER ALLOW CHILDREN UNDER THE AGE OF 14 TO OPERATE THE VEHICLE
WITHOUT THE SUPERVISION OF A RESPONSIBLE, KNOWLEDGEABLE ADULT.
THIS IS NOT A TOY.
We want you to safely enjoy your new model. Operate your model sensibly and with
care, and it will be exciting, safe, and fun for you and those around you. Failure to
operate your model in a safe and responsible manner may result in property damage
and serious injury. The precautions outlined in this manual should be strictly followed
to help ensure safe operation. You alone must see that the instructions are followed and
the precautions are adhered to.
6
www.LAEGENDARY.com

Safety
Precautions
IMPORTANT POINTS TO REMEMBER
• Your model is not intended for use on public roads or congested areas where its
operation can conflict with or disrupt pedestrian or vehicular trac.
• Never, under any circumstances, operate the model in crowds of people. Your model
could cause injury if allowed to collide with anyone.
• Because your model is controlled by radio, it is subject to radio interference from many
sources that are beyond your control. Since radio interference can cause momentary
losses of radio control, always allow a safety margin in all directions around the model in
order to prevent collisions.
• The motor, battery, and electronic speed control can become hot during use. Be careful
to avoid getting burned.
• Don’t operate your model at night, or anytime your line of sight to the model may be
obstructed or impaired in any way.
• Most importantly, use good common sense at all times.
• If you wish to run two batteries at the same time, please use the included battery
connector.
*For buggy model only - Prior to playing with the RC truck, please attach the included
spoiler to the rear of the body shell. Insert the screws through the spoiler and body, and
secure them with nuts, using the Allen wrench.
TH-5005 / TH-5006 Rear Wing Assembly
TH-1000
www.LAEGENDARY.com
7

Safety
Precautions
Your model’s electronic speed control (ESC) is an extremely powerful electronic device
capable of delivering high current. Please closely follow these precautions to prevent
damage to the speed control or other components.
• Disconnect the Battery: Always disconnect the battery from the car when not in use.
• Insulate the Wires: Always insulate exposed wiring with heat shrink tubing to
prevent short circuits.
• 2-3 LiPo cells (2s/3s): The ESC can accept a maximum input voltage of 11.1 volts (3s
LiPo). HOWEVER, WE ONLY RECOMMEND USING 2S BATTERIES WITH A 30C MAX
DISCHARGE RATE. Always adhere to the minimum and maximum limitations.
• 4-9 NiMH cells: The ESC can accept a maximum input voltage of 10.8 volts (9s NiMH).
Always adhere to the minimum and maximum limitations.
• Transmitter on First: Switch on your transmitter first before switching on the speed
control to prevent runaways and erratic performance.
• Don’t Get Burned: The ESC and motor can become extremely hot during use, so be
careful not to touch them until they cool. Supply adequate airflow for cooling.
• Use the Factory-Installed Connectors: Do not change the battery and motor
connectors. Improper wiring can cause fire or damage to the ESC.
8
www.LAEGENDARY.com

WHAT’S IN THE BOX?
TOP DESIGN MAY VARY, DEPENDING ON THE MODEL YOU PURCHASED
What’s in
the box?
Battery Connector
Remote Control
USB Charger & USB Plug Adapter
Velcro Strap
OR
User Manual
2 Body Shells
2 Body Shells Battery
www.LAEGENDARY.com
9

Quick Start
CHARGE THE RECHARGEABLE BATTERY PACK
1. USB Charger Lights Indicator:
a) The power light turns solid red when plugged in the outlet
b) The green light flashes when the battery is connected
c) The green light turns solid when charging is complete
INSTALLING THE BATTERY PACK
Please remove the body shell and insert the charged battery in the battery compartment.
Securely fasten it with the battery cover.
CHARGING AND HANDLING PRECAUTIONS
• CHARGING TIME: ~6 hrs for a 2S 5200mAh LiPo battery (*with the included USB
charger).
• DO NOT leave the charger and batteries unattended while charging, or any time that
the charger is ON with batteries connected. If there are any signs of a malfunction or in
the event of an emergency, unplug the charger from the power source and disconnect
the batteries from the charger.
• DO NOT charge the battery for longer than 8 hours.
• ALWAYS unplug the charger and disconnect the batteries when not in use.
• REMOVE the batteries from your car before charging.
• DO NOT let any exposed battery contacts or wires touch each other. This will cause
the battery to short circuit and create the risk of fire.
10
www.LAEGENDARY.com

Quick Start
• During the charge process watch for swollen or ballooning cells. If this happens,
immediately disconnect the charger and move the battery in a fireproof place for 15
minutes. Do not attempt to charge again.
• NEVER charge batteries on wood, cloth, carpet or on any other flammable material.
• ALWAYS charge batteries in a well-ventilated area.
• REMOVE flammable items and combustible materials from the charging area.
• DO NOT place objects on top of the charger or batteries.
-Any battery involved in a crash should be removed and observed in a fireproof space
for 15 minutes before continuing to use.
• If any battery or battery cell is damaged in any way, do NOT charge, discharge, or use
the battery.
• DO NOT disassemble, crush, short circuit, or expose the batteries or cells to flame or
any other source of ignition.
• DO NOT expose the batteries and charger to water or moisture.
• ALWAYS store battery packs safely out of the reach of children and pets.
• DO NOT charge batteries under ANY of the following conditions:
- Batteries that are hot to the touch.
- Batteries that are not expressly stated by the manufacturer to be suitable to accept the
power output (voltage and amperage) the charger delivers during the charging process.
- Batteries that are damaged or defective in any way.
Examples of damage or defects include, but are not limited to, batteries with dented
cells, damaged or frayed wires, loose connections, fluid leaks, corrosion, plugged vents,
swelling, cell deformity, impact damage, melted components, or any other signs of
damage.
- Battery packs that have been altered from original manufacturer configuration.
- Non-rechargeable batteries (explosion hazard).
- Batteries that have missing or unreadable labels, preventing you from properly
identifying the battery type and specifications.
HOW TO PROPERLY TURN ON AND OFF THE RC CAR
First, turn ON the transmitter - it should have a solid red light. Next, turn ON the RC car the ESC light will flash and the receiver will have a solid red light. You will hear a
beep-beep sound which indicates that the transmitter and the car are now connected.
To turn OFF the RC Car, first turn OFF the car, then the transmitter.
Important: DO NOT touch any buttons on the remote during the binding process.
Touching the buttons may change some settings and the remote functions will not
work properly.
www.LAEGENDARY.com
11

Radio System
4CH 2.4GHz RADIO SYSTEM
The system includes a remote control (transmitter), a receiver and an electronic speed
control.
Remote Control Battery Installation:
1. Open the battery compartment cover.
2. Insert 4 AA fully charged batteries with correct polarities (batteries are not included.)
3. Slide back the battery cover.
Binding Process:
The remote control is pre-binded. In case you need to rebind it, follow the below steps:
1. Turn o the transmitter.
2. Press and hold the bind button on the transmitter and turn it on. There will be a
flashing green light on the transmitter and a slow flashing light on the receiver.
3. Turn o the transmitter and the RC car and restart.
4. If it still does not work, repeat the process.
Resetting the Remote’s Throttle Trim (TH.TRIM) and Steering Trim (ST.TRIM) Function
to Neutral Position
1. On the remote’s TH.TRIM or ST.TRIM button, press the - or + all the way to the lowest or
highest settings until the green light stops flashing.
2. Press the opposite button around 30 times or until you see the green light flashes
twice. It means that you have entered the neutral or middle position. (If you press - on
step 1, press + on step 2 and vice versa)
3. Once you find the neutral position, the throttle or steering function should work
properly.
12
www.LAEGENDARY.com
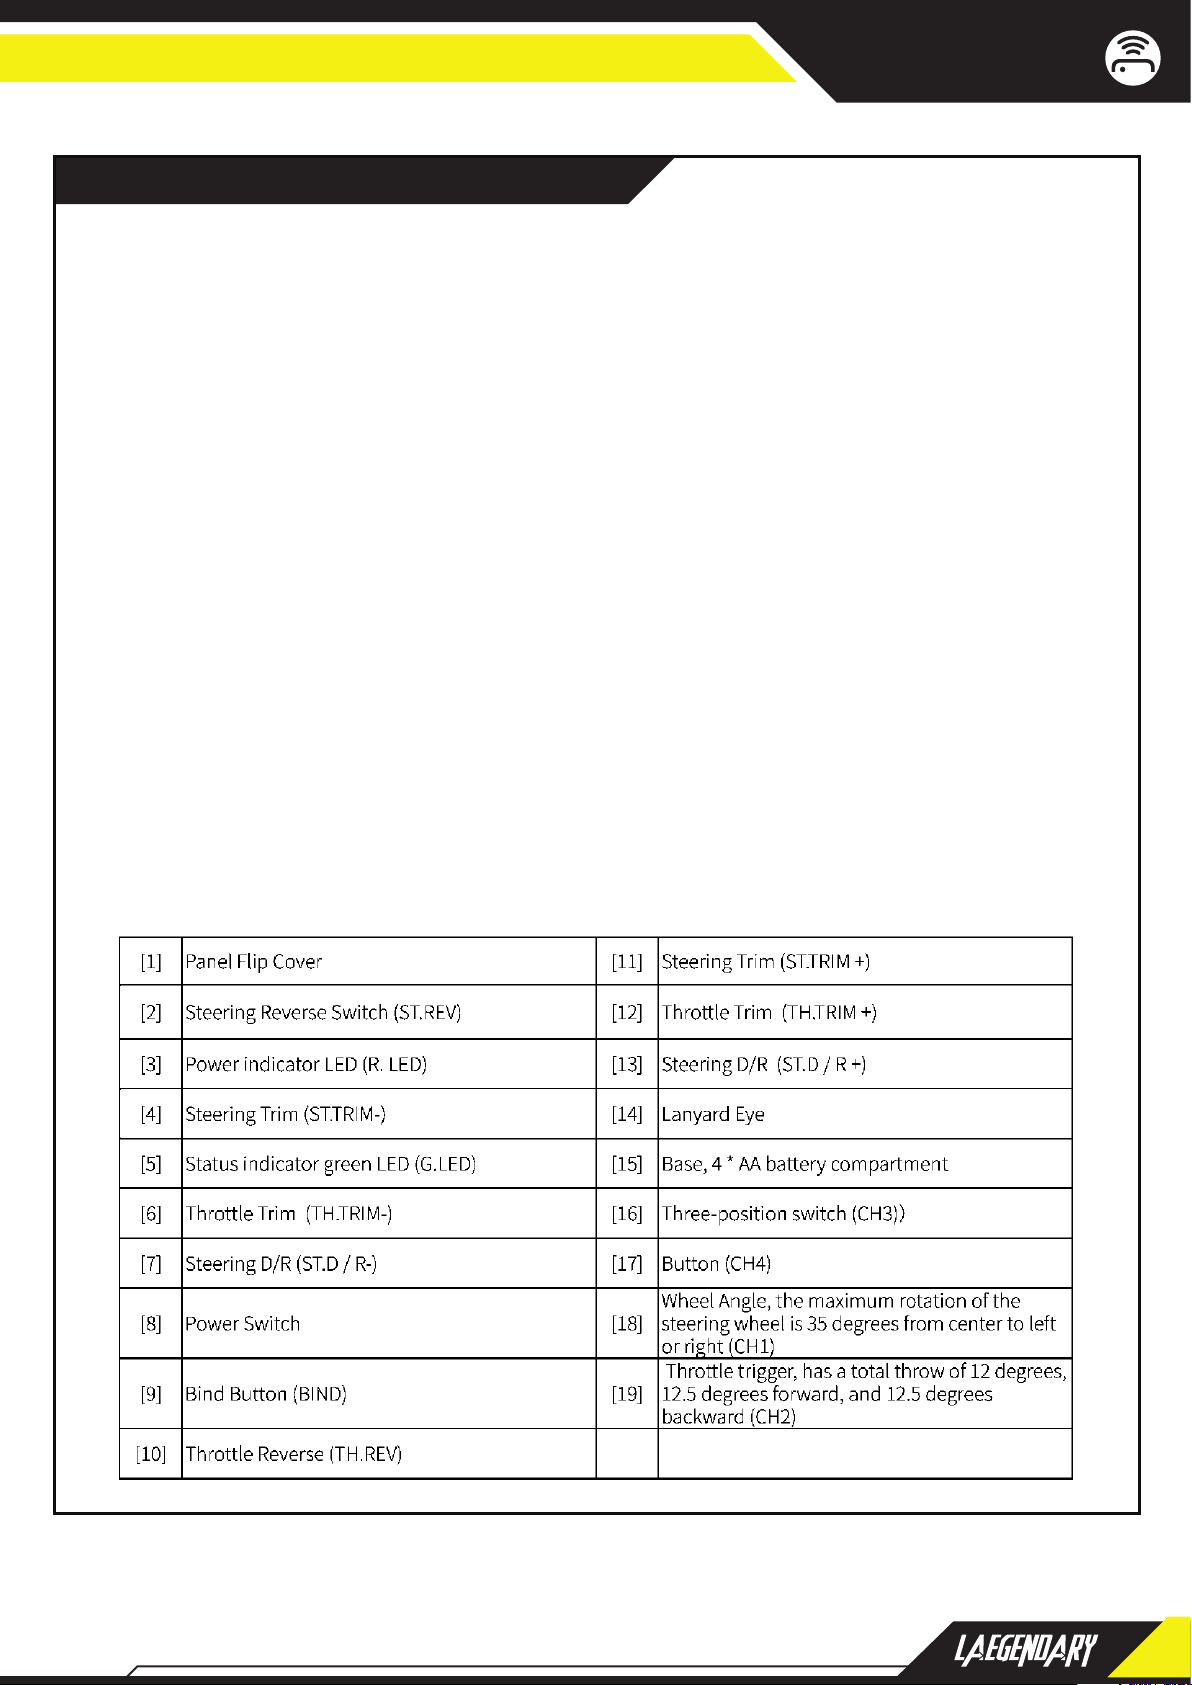
REMOTE CONTROL OVERVIEW
Radio System
www.LAEGENDARY.com
13

Radio System
Stick Calibration
This function is used to set the neutral position for throttle and wheel. Every transmitter
is calibrated before leaving the factory, however if recalibration is required, please follow
these steps:
1. Turn and hold the wheel as far clockwise as it will turn, hold the throttle all the way
forward, then turn on the transmitter in calibration mode.
• The Red LED and Green LED will flash twice.
2. Calibrate wheel: Turn the wheel completely clockwise, then completely
counterclockwise.
• When calibration is completed the Red LED will be o.
3. Trigger calibration: Pull the trigger back then forward as far as it will go.
• When calibration is completed the Green LED will be o.
4. Once calibration is complete press the bind key to save and exit.
Remote Control Channels
All 4 channels on the remote are pre-set.
CH1: Steering Wheel
CH2: Throttle Trigger
CH3: Three-position Switch
CH4: Reset Button
Speed Mode
The car and remote come pre-programmed in the normal mode. To change to beginner
mode, do the following:
1. Turn o the transmitter.
2. Press and hold CH4.
3. Fully turn and hold the steering to the left.
4. Turn on the transmitter. The green light on the transmitter flashes, indicating that the
speed mode has changed.
Note: Do the same process to change from beginner to normal mode.
Failsafe
This function dictates what the receiver will do in the event that it loses signal from the
remote; this includes servo position etc.
Setup:
1. Turn on the remote and make sure it is connected to the receiver;
2. Hold the control surface at the desired failsafe position;
3. Press and hold the bind button for 3 seconds. If the Green LED starts flashing every 2
seconds, then setup has been successful.
Failsafe is now set and will default to these values when the receiver loses signal.
Note: The failsafe function has no default set at the factory and as such it must be set
manually. If no failsafe setting has been set, then the receiver will not output anything
when signal is lost.
14
www.LAEGENDARY.com

Electronic
Speed Control
ADJUSTING THE ELECTRONIC SPEED CONTROL
Features
1. Water-proof and dust-proof. The ESC can work under water for a short time.
(Please remove the cooling fan when running car in water, and after running, please
clean the ESC and then dry it to avoid the oxidation to copper connectors.)
2. Specially designed for RC car and truck, with excellent start-up, acceleration and
linearity features.
3. Drive sensorless brushless motors.
4. 2 running modes (“Forward with brake” mode, “Forward/Backward with brake” mode).
5. Proportional ABS brake function with 4 steps of maximum brake force adjustment and
8 steps of drag-brake force adjustment.
6. 4 start modes (“Punch”) from “Soft” to “Very aggressive” to be suitable for dierent
chassis, tires and tracks.
7. Multiple protection features: Low voltage cut-o protection for LiPo or NiMH battery /
Over-heat protection / Throttle signal loss protection / Motor blocked protection.
8. Easily programmed with the “SET” button on the ESC or with the LED Program Card.
BEGIN TO USE THE NEW ESC
1. Connect the ESC, motor, receiver, battery and servo according to the following
diagram:
“+” and “-” wires of the ESC are connected with the battery pack, and #A, #B and #C are
connected with the motor wires. The “SET” button is used for programming the ESC.
The control cable of the ESC (trio wires with black, red and white color) is connected
with the throttle channel of the receiver (Usually CH2).
The #A, #B, #C wires of the ESC can be connected with the motor wires freely (without
any order). If the motor runs in the opposite direction, please swap any two wire
connections.
Note: You can use the transmitter to set the throttle channel to the “Reverse” direction,
and then the motor will run oppositely. Please calibrate the throttle range again after
changing the direction of throttle channel.
www.LAEGENDARY.com
15

Electronic
Speed Control
2. Throttle Range Setting (Throttle Range Calibration)
In order to make the ESC match the throttle range, you must calibrate it when you begin
to use a new ESC, or a new transmitter, or after changing the settings of the neutral
position of throttle channel, ATV or EPA parameters, otherwise the ESC cannot work
properly. There are 3 points need to be set, they are the top point of “forward”,
” backward” and the neutral point. The following pictures show how to set the throttle
range
A) Switch o the ESC, turn on the transmitter, set the direction of throttle channel to
”REV”, set the “EPA/ATV” value of throttle channel to “100%”, and disable the “ABS”
brake function of your transmitter. (*Note 2)
B) Hold the “SET” key and then switch on the ESC, when the red LED begins to flash,
release the key immediately.(Please check the picture on the right side)
C) Set the THREE points according to the steps shown in the picture on theright side.
1) Neutral point
2) End point of forward direction
3) End point of backward direction
D) When the process of calibration is finished, the motor can be started after 3 seconds.
Note2: If you don’t release the “SET” key after the red LED begins to flash, the ESC will
enter the program mode, in such a case, please switch o the ESC and re-calibrate the
throttle range again from step A to step D.
16
www.LAEGENDARY.com

Electronic
Speed Control
3. The LED Status in Normal Running
a) When the throttle stick is in the neutral range, neither the Red LED nor the Green
LED lights up.
b) When the car moves forward, the Red LED solidly lights; the Green LED also lights
up when the throttle stick is at the top position (100% throttle).
c) When the car brakes, the Red LED solidly lights; the Green LED also lights up when
the throttle stick is at the bottom position and the maximum brake force is set to 100%.
d) When the car reverses, the Red LED solidly lights.
RESETTING THE ESC
When you replace the ESC and does not work properly, or if it has a flashing red light,
you need to reset it.
1. Turn on the transmitter.
2. Press and hold the SET button on the car, then turn on the car. Release the SET button,
then press it again.
3. Pull and hold the throttle, press the SET button again, then release.
4. Push and hold the throttle, press the SET button again, then release.
5. Turn o the car and the transmitter.
6. Restart by turning on the transmitter and the car.
ALERT TONES
Input voltage abnormal alert tone: The ESC begins to check the input voltage when
power on, if it is out of the normal range, such an alert tone will be emitted: “beep-beep-,
beep- beep-, beep-beep-” (There is 1 second time interval between every “beep-beep-”
tone). Throttle signal abnormal alert tone: When the ESC can’t detect the normal throttle
signal, such an alert tone will be emitted: “beep-, beep-, beep-” (There is 2 seconds time
interval between every “beep-” tone).
PROTECTION FUNCTION
1. Low voltage cut-o protection: If the voltage of a LiPo battery pack is lower than the
threshold for 2 seconds, the ESC will cut o the output power. Please note that the ESC
cannot be restarted if the voltage of each LiPo cell is lower than 3.5V.
For NiMH battery packs, if the voltage of the whole NiMH battery pack is higher than
9.0V but lower than 12V, it will be considered as a 3S LiPo; If it is lower than 9.0V, it will
be considered as a 2S LiPo. For example, if the NiMH battery pack is 8.0V, and the
threshold is set to 2.6V/Cell, it is considered as a 2S LiPo, and the low-voltage cut-o
threshold for this NiMH battery pack is 2.6*2=5.2V.
2. Over-heat protection: When the temperature of the ESC is over a factory preset
threshold for 5 seconds, the ESC will cut o the output power. You can disable the
over-heat protection function for competition race.
3. Throttle signal loss protection: The ESC will cut o the output power if the throttle
signal is lost for 0.2 second.
www.LAEGENDARY.com
17

Electronic
Speed Control
PROGRAM THE ESC
1. Program Method
18
Note: In the program process, the motor will emit “Beep” tone when the LED is flashing.
The 5th programmable item is represented by 5 short Beeps (that is, “BBBBB”).
For the options of each programmable item, we use a long time flash and long “Beep--”
tone to represent number “5”, so it is easy to identify the options with big numbers.
For example, if the LED flashes as the following:
“A long time flash” (Motor sounds “B---“) = The option 5
“A long time flash + a short time flash” (Motor sounds “B---B”) = The option 6
“A long time flash + 2 short times flash” (Motor sounds “B---BB”) = The option 7
“A long time flash + 3 short times flash” (Motor sounds “B---BBB”) = The option 8
www.LAEGENDARY.com
 Loading...