

Page 1
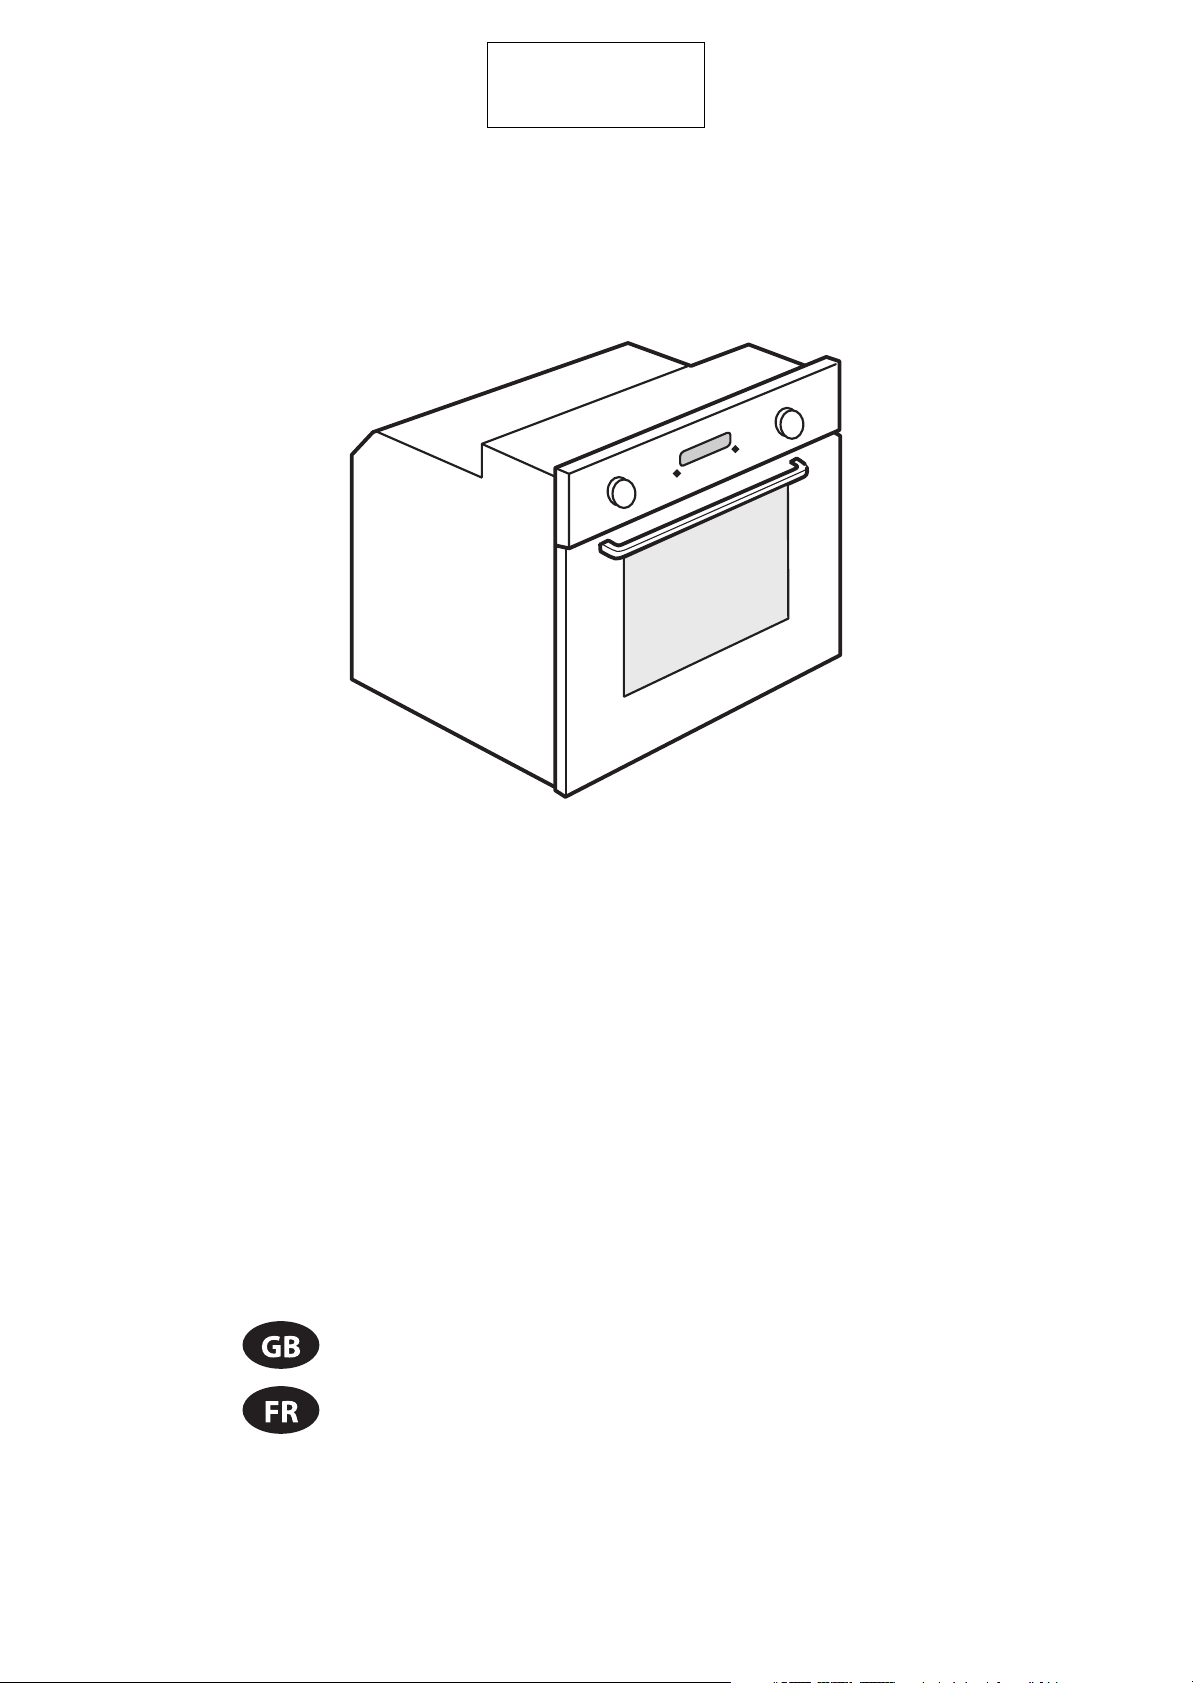
FP 310
FP 320
User and maintenance manual
Manuel d’utilisation et d’entretien
Page 2

Page 3

IMPORTANT SAFETY INSTRUCTIONS
YOUR SAFETY AND THAT OF OTHERS IS PARAMOUNT
This manual and the appliance itself provide important safety warnings, to be read and observed at all
times.
This is the danger symbol, pertaining to safety, which alerts users to potential risks to themselves
and others.
All safety warnings are preceded by the danger symbol and the following terms:
DANGER
WARNING
All safety warnings give specific details of the potential risk present and indicate how to reduce risk of
injury, damage and electric shock resulting from improper use of the appliance. Carefully observe the
following instructions:
- The appliance must be disconnected from the power supply before carrying out any installation work.
- Installation and maintenance must be carried out by a qualified technician, in compliance with the
manufacturer’s instructions and local safety regulations. Do not repair or replace any part of the
appliance unless specifically stated in the user manual.
- Regulations require that the appliance is earthed.
- The power cable must be long enough for connecting the appliance, once fitted in its housing, to the
power supply socket.
- For installation to comply with current safety regulations, an all-pole disconnect switch with
minimum contact gap of 3 mm must be utilized.
- Do not use multiple plug adapters or extension leads.
- Do not pull the power supply cable in order to unplug the appliance.
- The electrical components must not be accessible to the user after installation.
- Do not touch the appliance with any wet part of the body and do not operate it when barefoot.
- This appliance is designed solely for use as a domestic appliance for cooking food. No other type of
use is permitted (e.g. heating rooms). The Manufacturer declines any liability for improper use or
incorrect setting of the controls.
- The appliance is not intended for use by persons (including children) with any physical, sensory or
mental impairment, or without experience and knowledge of the appliance, unless supervised or
previously instructed in its use by those responsible for their safety.
- The accessible parts of the appliance may become very hot during use. Young children should be
kept away from the appliance and supervised to ensure that they do not play with it.
- During and after use, do not touch the heating elements or interior surfaces of the appliance - risk of
burns. Do not allow the appliance to come into contact with cloths or other flammable materials until
all the components have cooled sufficiently.
- At the end of cooking, exercise caution when opening the appliance door, letting the hot air or steam
exit gradually before accessing the oven. When the appliance door is shut, hot air is vented from the
aperture above the control panel. Do not obstruct the vent apertures.
- Use oven gloves to remove pans and accessories, taking care not to touch the heating elements.
- Do not place flammable materials in or near the appliance: a fire may break out if the appliance is
inadvertently switched on.
- Do not heat or cook sealed jars or containers in the appliance. The pressure that builds up inside
might cause the jar to explode, damaging the appliance.
- Do not use containers made of synthetic materials.
- Overheated oils and fats catch fire easily. Always remain vigilant when cooking foods rich in fat and oil.
- Never leave the appliance unattended during food drying.
- If alcoholic beverages are added when roasting or cooking cakes and sweets (for example, rum, cognac,
wine), remember that alcohol evaporates at high temperatures. As a result, there is a risk that vapours
released by the alcohol may catch fire upon coming into contact with the electrical heating element.
Indicates a hazardous situation which, if not avoided, will cause serious injury.
Indicates a hazardous situation which, if not avoided, could cause serious injury.
GB1
Page 4
Scrapping of household appliances
- This appliance is manufactured with recyclable or reusable materials. Scrap the appliance in
accordance with local regulations on waste disposal. Before scrapping, cut off the power cords so that
the appliances cannot be connected to the mains.
- For further information on the treatment, recovery and recycling of household electrical appliances,
contact your competent local authority, the collection service for household waste or the store where
you purchased the appliance.
INSTALLATION
Unpack the oven and make sure that the oven has not been damaged during transport and that the oven
door closes properly. In the event of problems, contact the dealer or your nearest After-sales Service. To
prevent any damage, only remove the oven from its polystyrene foam base at the time of installation.
PREPARING THE HOUSING UNIT
• Kitchen units in contact with the oven must be heat resistant (min 90°C).
• Carry out all cabinet cutting work before fitting the oven in the housing and carefully remove all
wood chips and sawdust.
• After installation, the bottom of the oven must no longer be accessible.
• For correct appliance operation, do not obstruct the minimum gap between the worktop and the
upper edge of the oven.
ELECTRICAL CONNECTION
Make sure the power voltage specified on the appliance dataplate is the same as the mains voltage. The
dataplate is on the front edge of the oven (visible when the door is open).
• Power cable replacement (type H05 RR-F 3 x 1.5 mm2) must be carried out by a qualified electrician.
Contact an authorized service centre.
GENERAL RECOMMENDATIONS
Before use:
- Remove cardboard protection pieces, protective film and adhesive labels from accessories.
- Remove the accessories from the oven and heat it 200°C for about an hour to eliminate the smell of
the protective grease and insulating materials.
During use:
- Do not place heavy objects on the door as they could damage it.
- Do not cling to the door or hang anything from the handle.
- Do not cover the inside of the oven with aluminium foil.
- Do not pour water into the inside of a hot oven; this could damage the enamel coating.
- Never drag pots or pans across the bottom of the oven as this could damage the enamel coating.
- Make sure that the electrical cables of other appliances do not touch hot parts of the oven or become
trapped in the door.
- Never expose the oven to atmospheric agents.
SAFEGUARDING THE ENVIRONMENT
Disposal of packaging materials
The packing material is 100% recyclable and is marked with the recycle symbol ( ). The various parts of
the packing must therefore be disposed of responsibly and in full compliance with local authority
regulations governing waste disposal.
Scrapping the product
- This appliance is marked in compliance with European Directive 2002/96/EC, Waste Electrical and
Electronic Equipment (WEEE).
- By ensuring this product is disposed of correctly, you will help prevent potential negative
consequences for the environment and human health, which could otherwise be caused by
inappropriate waste handling of this product.
- The symbol on the product or on the accompanying documentation indicates that it should not be
treated as domestic waste but must be taken to an appropriate collection centre for the recycling of
electrical and electronic equipment.
GB2
Page 5
Energy saving
- Only pre-heat the oven if specified in the cooking table or your recipe.
- Use dark lacquered or enamelled baking moulds as they absorb heat far better.
- Switch the oven off 10/15 minutes before the set cooking time. Food requiring prolonged cooking will
continue to cook even once the oven is switched off.
DECLARATION OF CONFORMITY
- This oven, which is intended to come into contact with foodstuffs, complies with European
Regulation ( ) n. 1935/2004 and has been designed, manufactured and sold in conformity with the
safety requirements of the “Low Voltage” directive 2006/95/CE (which replaces 73/23/CEE and
subsequent amendments), the protection requirements of “EMC” 2004/108/CE.
TROUBLESHOOTING GUIDE
Oven not working:
• Check for the presence of mains electrical power and if the oven is connected to the electrical supply.
• Turn off the oven and restart it to see if the fault persists.
The door will not open:
• Turn off the oven and restart it to see if the fault persists.
• IMPORTANT: during self-cleaning, the oven door will not open. Wait until it unlocks automatically
(see paragraph “Cleaning cycle of ovens with pyrolysis function”).
The electronic programmer does not work:
• If the display shows the letter “ ” followed by a number, contact your nearest After-sales Service.
Specify in this case the number after the letter “ ”.
AFTER-SALES SERVICE
Before calling the After-Sales Service:
1. See if you can solve the problem yourself with the help of the suggestions given in the
“Troubleshooting guide”.
2. Switch the appliance off and then on again it to see if the problem has been eliminated.
If the fault persists after the above checks, contact the nearest After-sales Service.
Always specify:
• a brief description of the fault;
• the type and exact model of the oven;
• the service number (number after the word Service on the rating plate), located on the right hand
edge of the oven cavity (visible when the oven door is open). The service number is also indicated on
the guarantee booklet;
• your full address;
• your telephone number.
If any repairs are required, contact an authorised After-sales Technical Service (to guarantee the use of
original spare parts and correct repair).
CLEANING
WARNING
Exterior of the oven
IMPORTANT: do not use corrosive or abrasive detergents. If any of these products accidentally
comes into contact with the appliance, clean immediately with a damp cloth.
• Clean the surfaces with a damp cloth. If it is very dirty, add a few drops of washing up detergent to the
water. Finish off with a dry cloth.
- Do not use steam cleaners.
- Only clean the oven when it is cool to the touch.
- Disconnect the appliance from the power supply.
GB3
Page 6

Oven interior
IMPORTANT: do not use abrasive sponges or metallic scrapers or scourers. Over time, these can ruin
enamelled surfaces and the oven door glass.
• After every use, allow the oven to cool then clean it preferably while it is still warm in order to remove
built-up dirt and stains caused by food residues (e.g. food with a high sugar content.
• Use proprietary oven detergents and follow the manufacturer’s instructions to the letter.
• Clean the door glass with a suitable liquid detergent. The oven door can be removed to facilitate
cleaning (see MAINTENANCE).
• The top heating element of the grill (see MAINTENANCE) can be lowered (some models only) to clean
the roof of the oven.
N.B: during prolonged cooking of foods with a high water content (e.g. pizza, vegetables, etc.)
condensation may form on the inside of the door and around the seal. When the oven is cold, dry the
inside of the door with a cloth or sponge.
Accessories:
• Soak the accessories in water with washing up detergent immediately after use, handling them with
oven gloves if still hot.
• Food residues can be easily removed using a brush or sponge.
Cleaning the rear wall and catalytic side panels of the oven (if present):
IMPORTANT: do not use corrosive or abrasive detergents, coarse brushes, pot scourers or oven
sprays which could damage the catalytic surface and ruin its self-cleaning properties.
• Operate the oven empty with the fan-assisted function at 200°C for about one hour.
• Next, leave the appliance to cool down before removing any food residue with a sponge.
Cleaning cycle of ovens with pyrolysis function (if present):
WARNING
This function burns off spatters produced inside the oven during cooking at a temperature of approx.
500°C. At this high temperature, the deposits turn into a light ash which can be easily wiped away with a
damp cloth, when the oven is cool. Do not select the pyrolysis function after every use, only when the oven
is very dirty or produces smoke or fumes while preheating or cooking.
• If the oven is installed below a hob, make sure that all burners or electric hotplates are switched off
during the self-cleaning (pyrolysis) function.
• Remove all accessories before running the pyrolysis function.
The appliance is equipped with 2 pyrolysis functions:
1. Energy-saving cycle (PYRO EXPRESS/ECO): which consumes approximately 25% less energy than the
standard cycle. Select it at regular intervals (after cooking meat on 2 or 3 consecutive occasions).
2. Standard cycle (PYRO): which is suitable for cleaning a very dirty oven.
• In any case, after a certain number of uses and depending on how dirty the oven is, a message on the
oven display advises you to run a self-cleaning cycle.
N.B: during the pyrolysis function, the oven door will not open; it will remain locked until the
temperature inside the oven has returned to an acceptably safe level.
- Do not touch the oven during the pyrolysis cycle.
- Keep children away from the oven during the pyrolysis cycle
MAINTENANCE
WARNING
- Use protective gloves.
- Ensure the oven is cold before carrying out the following operations.
- Disconnect the appliance from the power supply.
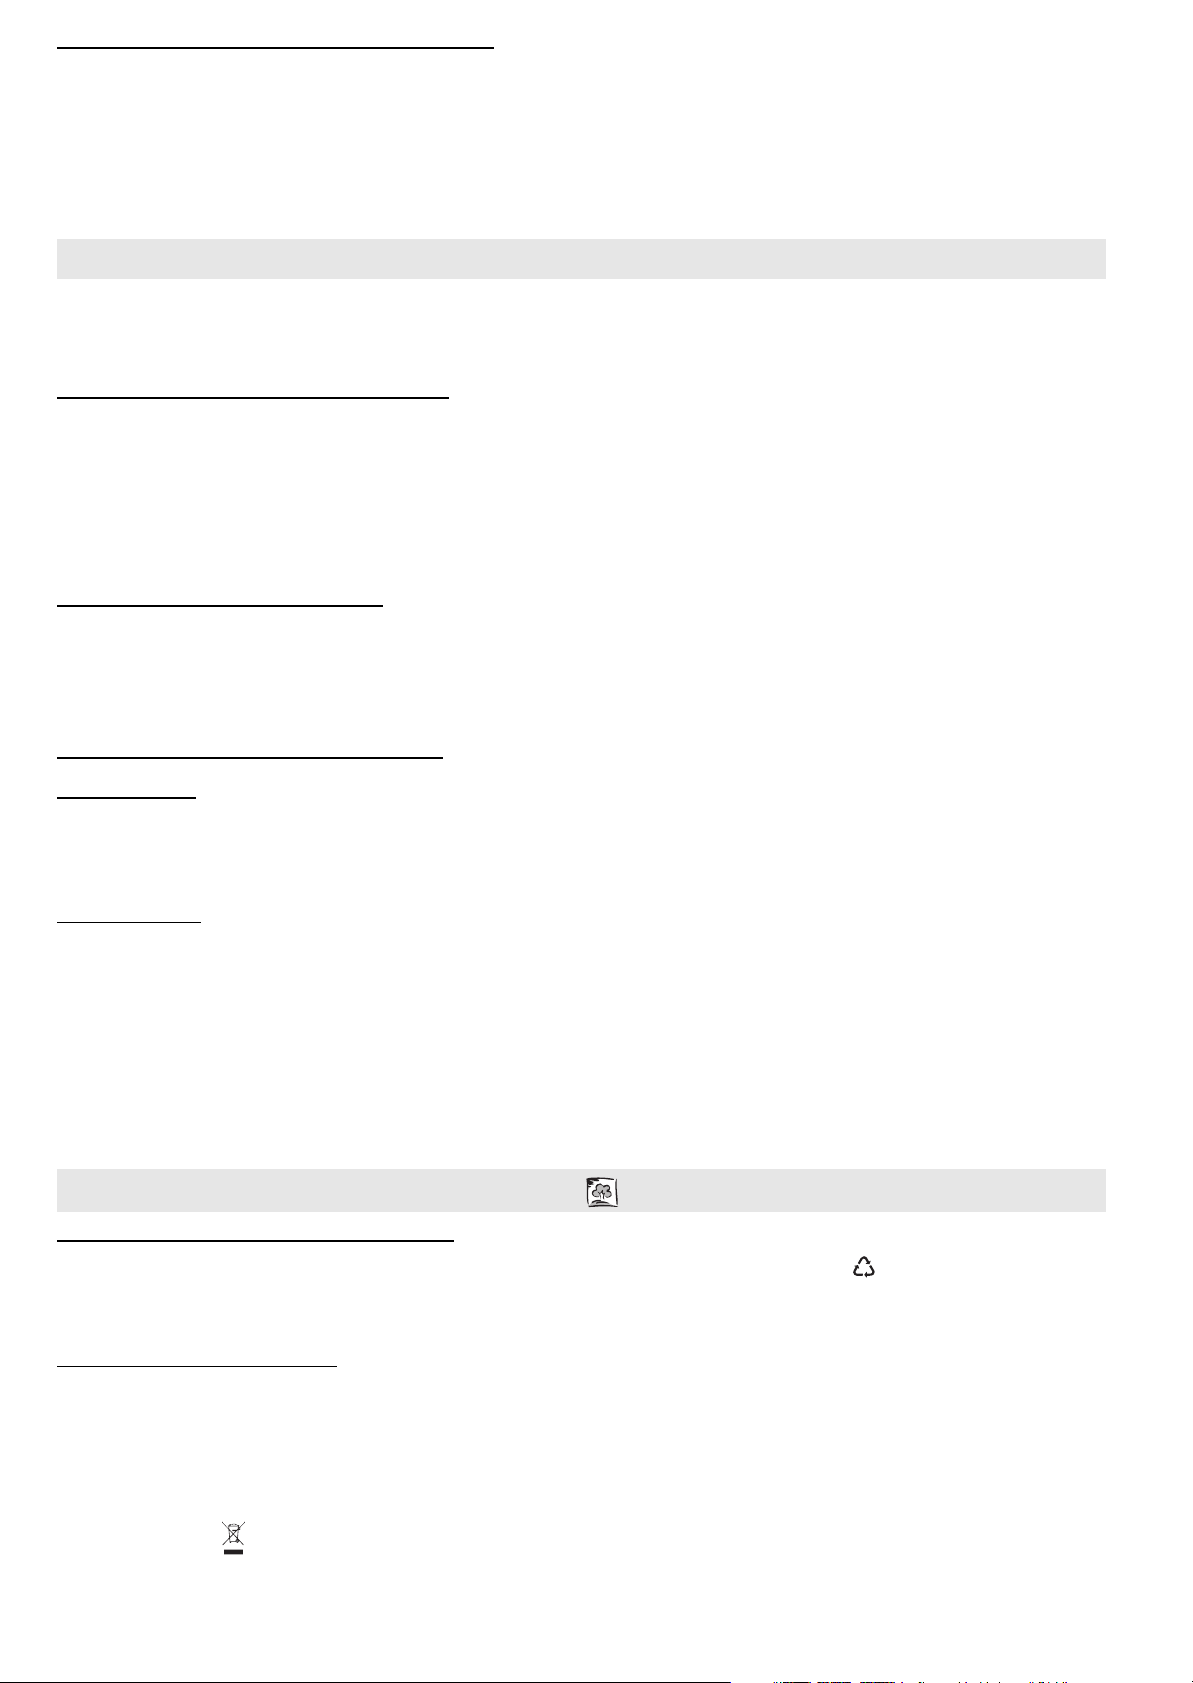
REMOVING THE DOOR
To remove the door:
1. Open the door fully.
2. Lift the catches and push them forwards as far as they will go (Fig. 1).
3. Close the door as far as it will go (A), lift it up (B) and turn it (C) until it is released (D) (Fig. 2).
GB4
Page 7
To refit the door:
1. Insert the hinges in their seats.
2. Open the door fully.
3. Lower the two catches.
4. Close the door.
Fig. 1 Fig. 2
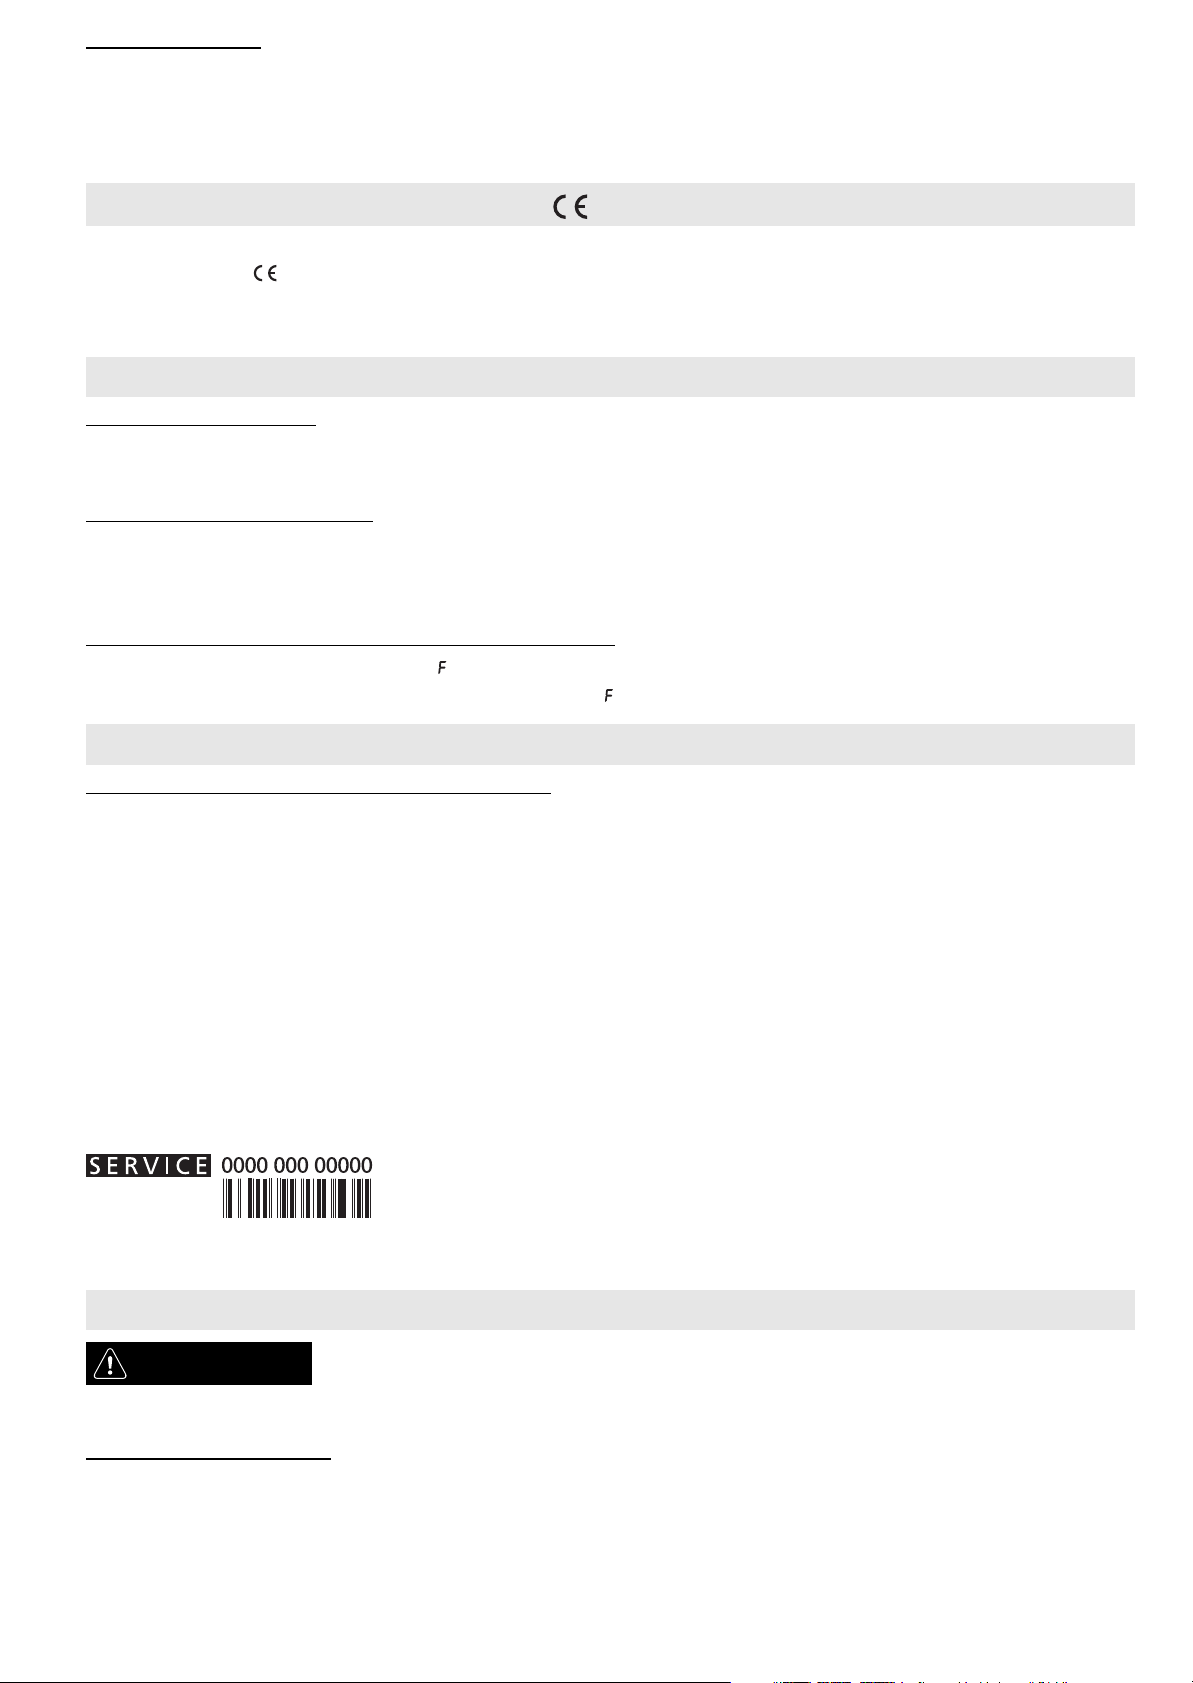
MOVING THE TOP HEATING ELEMENT (SOME MODELS ONLY)
1. Remove the side accessory holder grilles.
2. Pull the heating element out a little (Fig. 3) and lower it (Fig. 4).
3. To reposition the heating element, lift it up, pulling it slightly towards you, making sure it comes to
rest on the lateral supports.
Fig. 3 Fig. 4
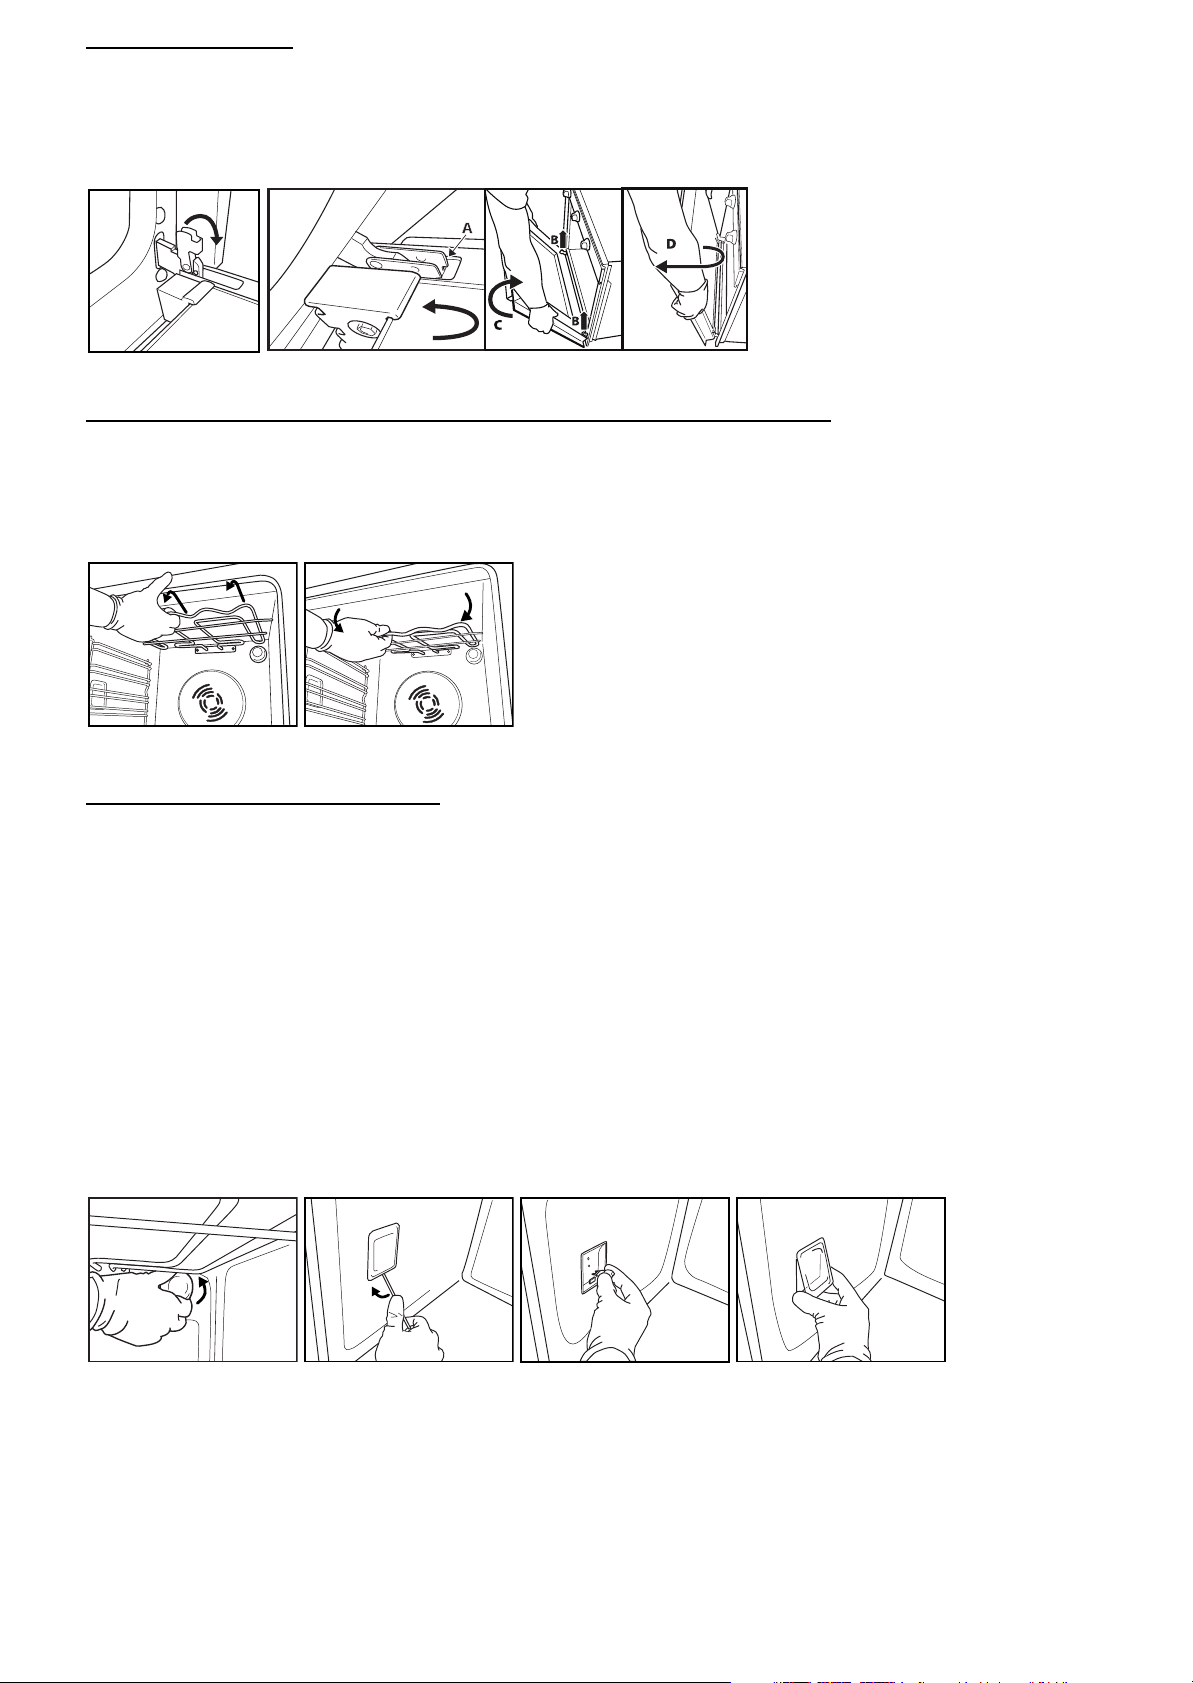
REPLACING THE OVEN LAMP
To replace the rear lamp (if present):
1. Disconnect the oven from the power supply.
2. Unscrew the lamp cover (Fig. 5), replace the lamp (see note for lamp type) and screw the lamp cover
back on.
3. Reconnect the oven to the power supply.
To replace the side lamp (if present):
1. Disconnect the oven from the power supply.
2. Remove the side accessory holder grilles, if present.
3. Use a screwdriver to prise off the lamp cover.
4. Replace the lamp (see note for lamp type).
5. Refit the lamp cover, pushing it on firmly until it clicks into place.
6. Refit the side accessory holder grilles.
7. Reconnect the oven to the power supply.
Fig. 5 Fig. 6 Fig. 7 Fig. 8
N.B:
- Only use 25-40W/230V type E-14, T300°C incandescent lamps, or 20-40W/230 V type G9, T300°C
halogen lamps.
- Lamps are available from our After-sales Service.
IMPORTANT:
- If using halogen lamps, do not handle with bare hands since fingerprints can damage them.
- Do not use the oven until the lamp cover has been repositioned.
GB5
Page 8
INSTRUCTIONS FOR OVEN USE
FOR THE ELECTRICAL CONNECTION, SEE THE SECTION ON INSTALLATION
1
2
3
4
6
7
8
5
9
10
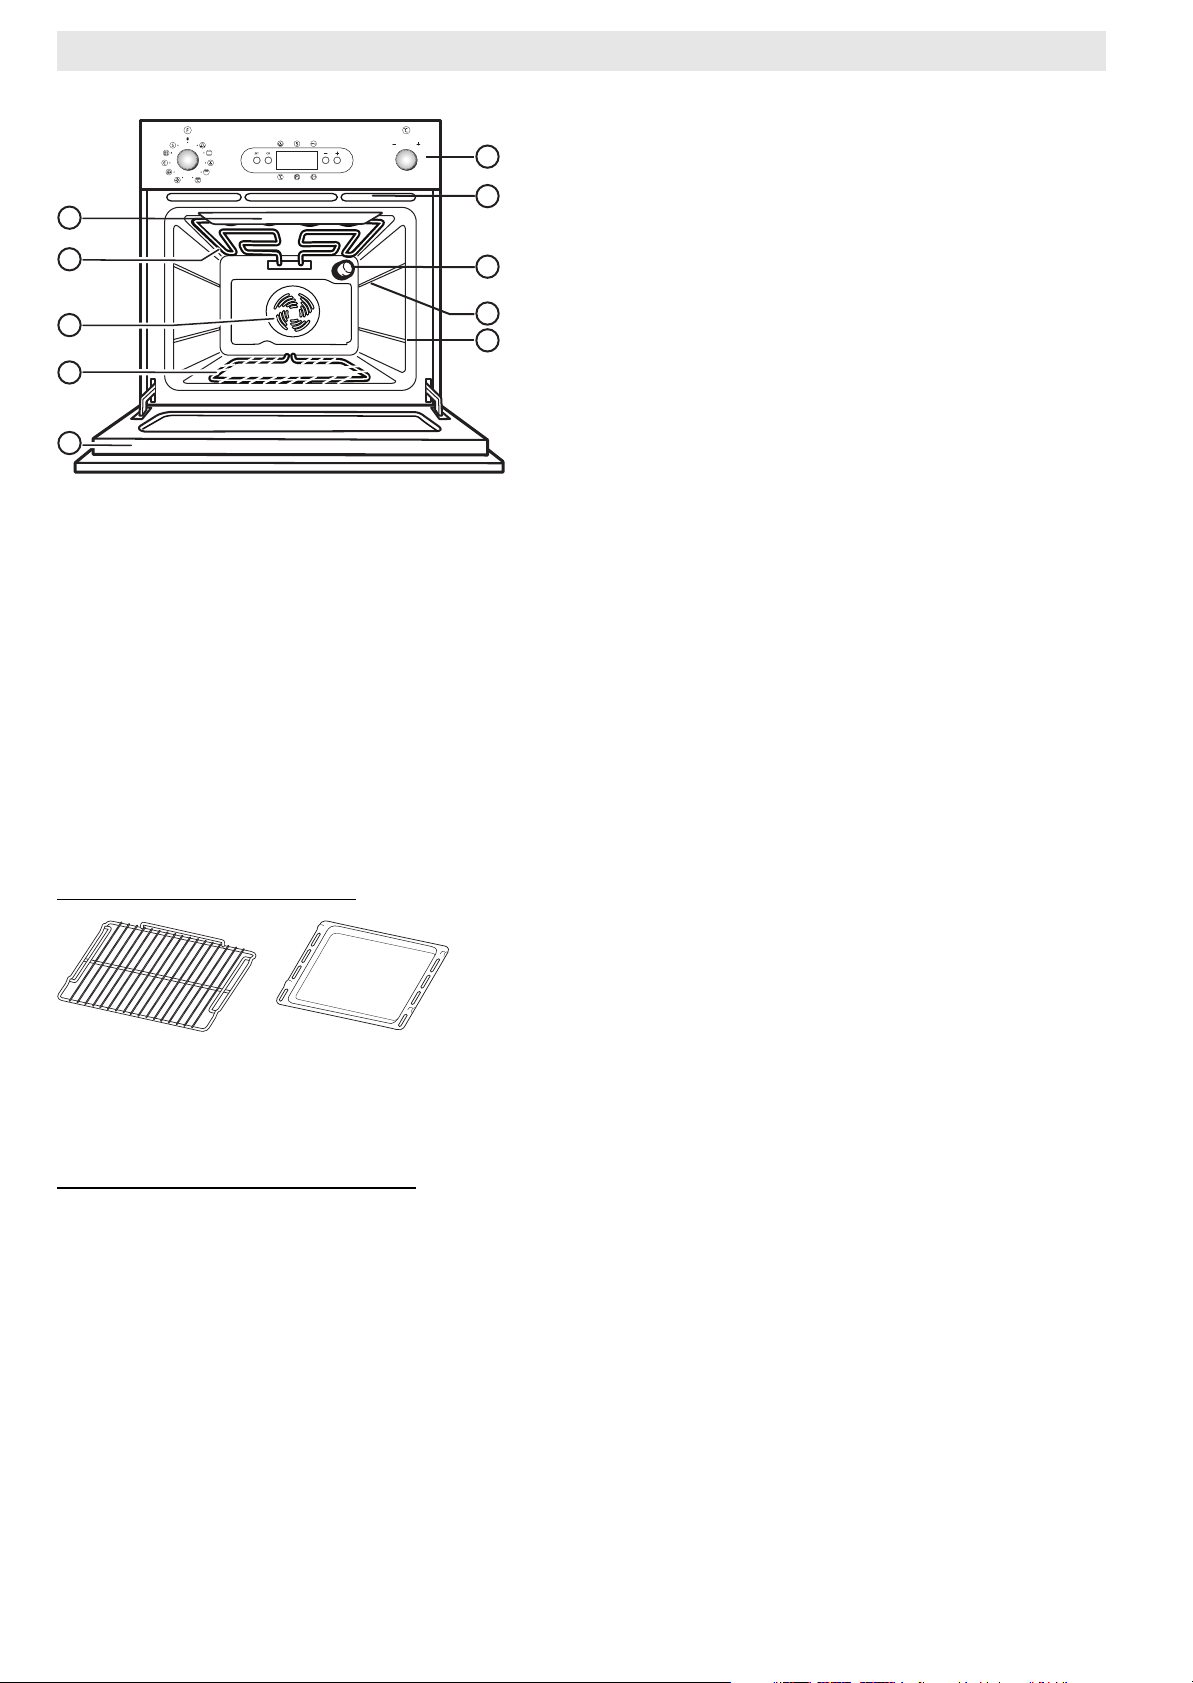
1. Control panel
2. Cooling fan*) (not visible)
3. Grill Protector
**)
4. Upper heating element/grill
5. Rear lamp
6. Oven fan
7. Lower heating element (not visible)
8. Oven cool door
9. Top shelf
10. Bottom shelf
* The cooling fan may continue running even after the oven is switched off.
** Prevents food from coming into direct contact with the grill. Nevertheless, you are advised not to
touch the protector whilst the oven is on.
ACCESSORIES SUPPLIED
Fig. A Fig. B
A. RACK (1): use to cook food or as a support for pots, cake tins and other suitable cooking receptacles.
B. DRIP-TRAY (1): use, placed under the rack, to collect fat or as a plate for cooking meat, fish,
vegetables, focaccia, etc.
ACCESSORIES NOT SUPPLIED
Other accessories can be purchased separately from the After-sales Service.
GB6
Page 9
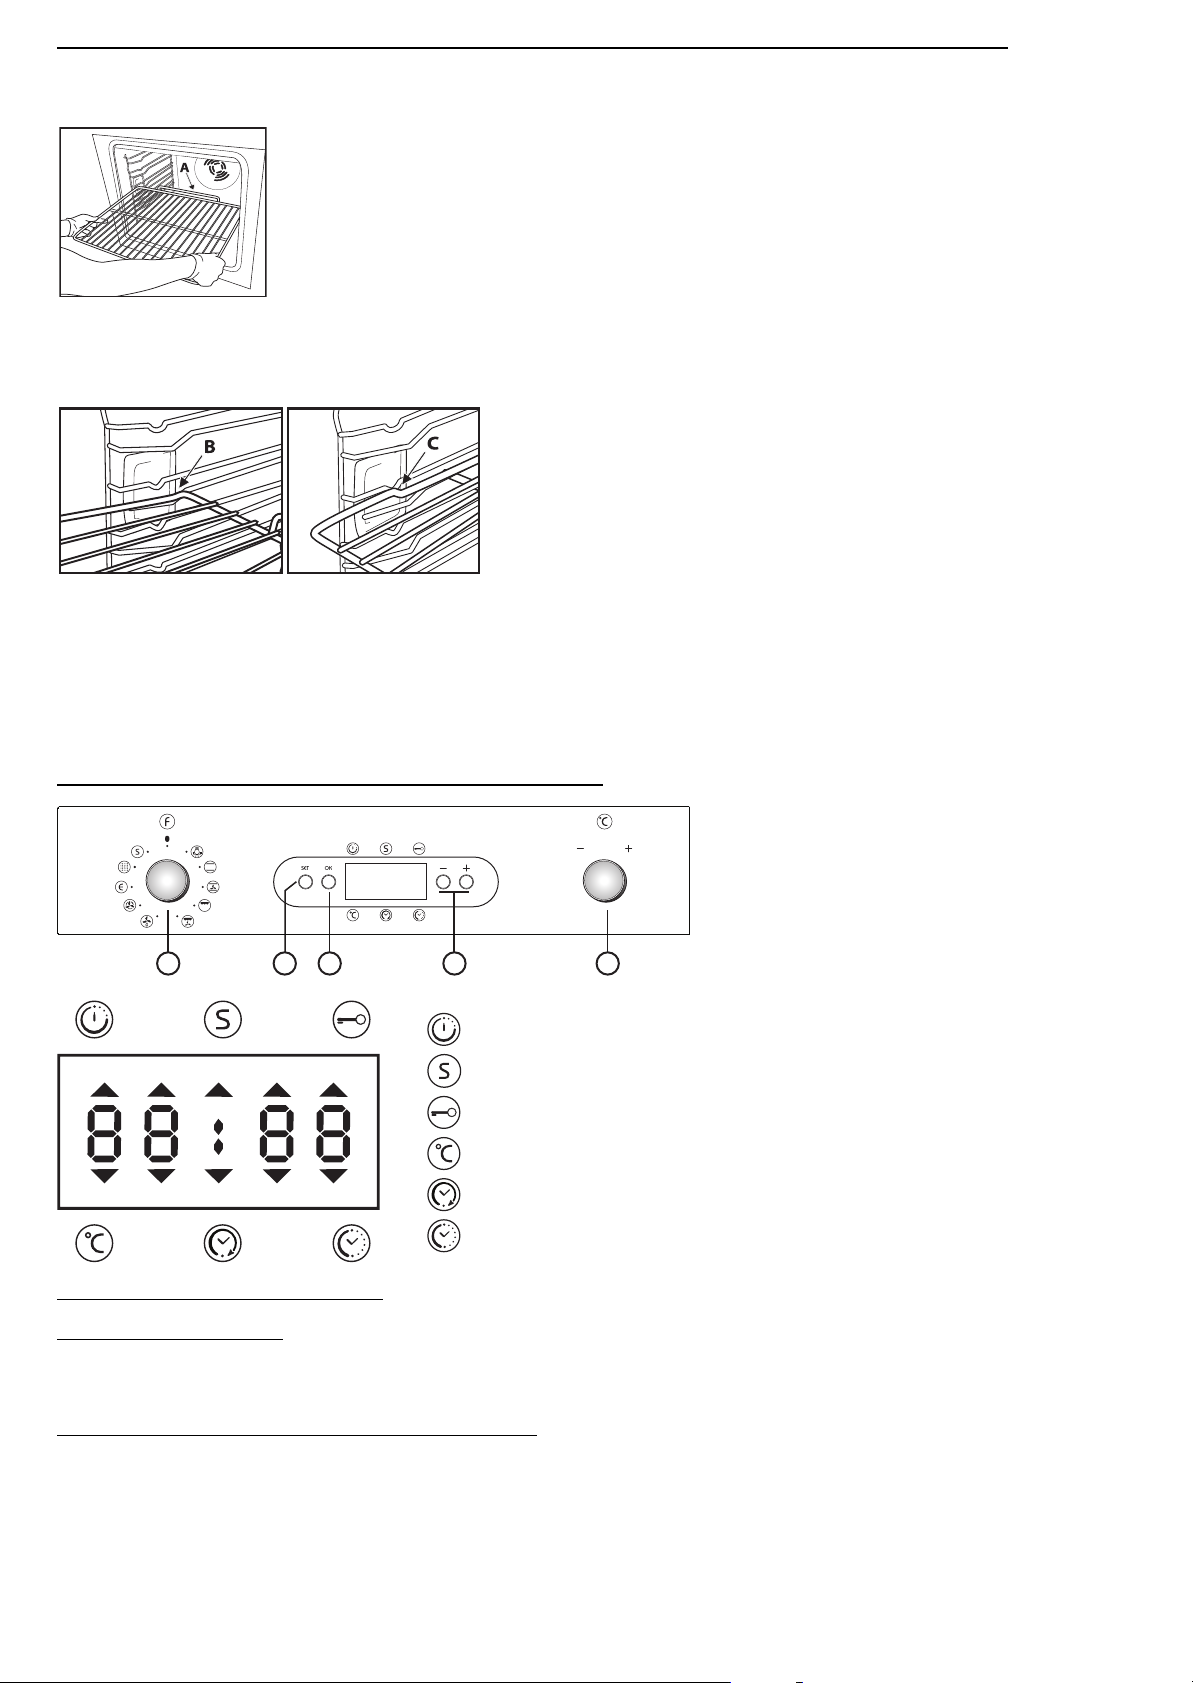
INSERTING RACKS AND OTHER ACCESSORIES IN THE OVEN
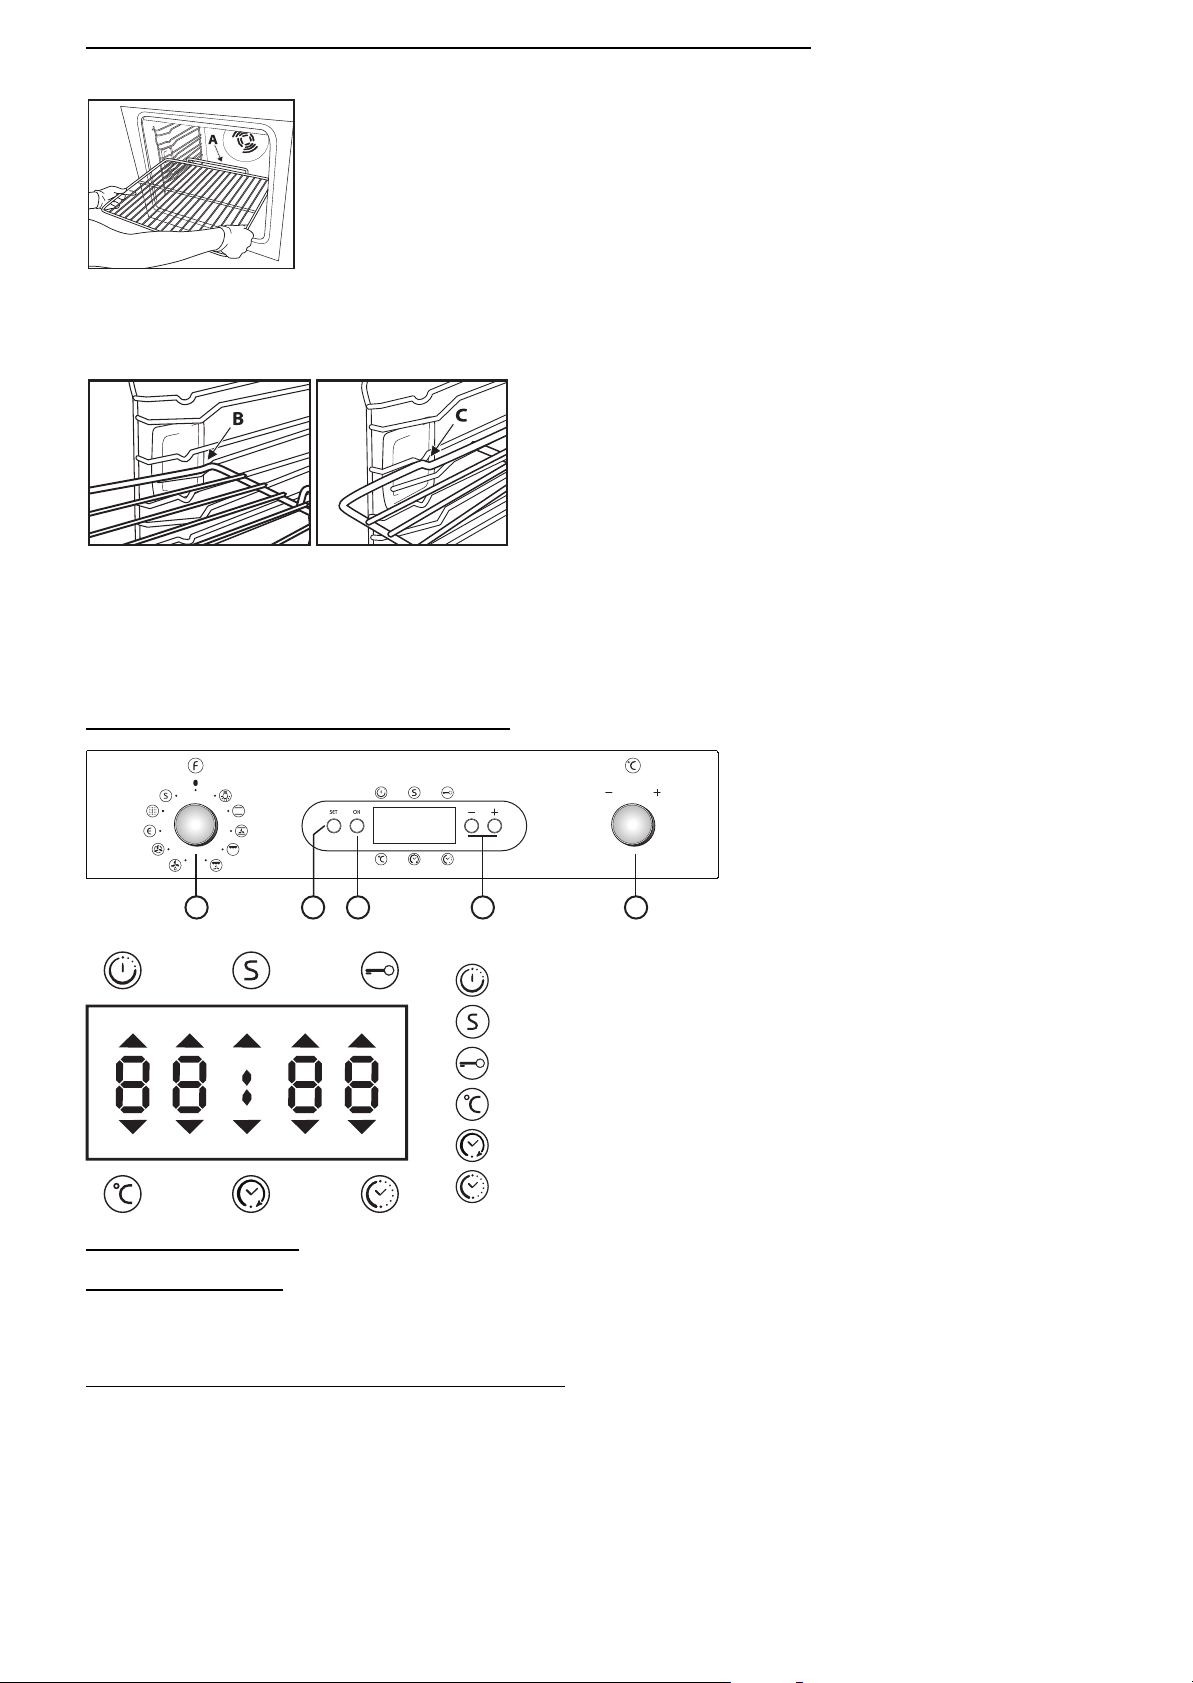
The rack and other accessories have a locking system to prevent their inadvertent removal.
Fig. 1
1. Insert the rack horizontally, with the raised part "A" upwards (Fig. 1).
2. Tilt the rack when it reaches the locking position "B" (Fig. 2).
Fig. 2 Fig. 3
3. Return the rack to the horizontal position and push it in fully "C" (Fig. 3).
4. To remove the rack, proceed in reverse order.
The other accessories, such as the drip-tray and baking tray, are inserted in exactly the same way. The
protrusion on the flat part enables locking.
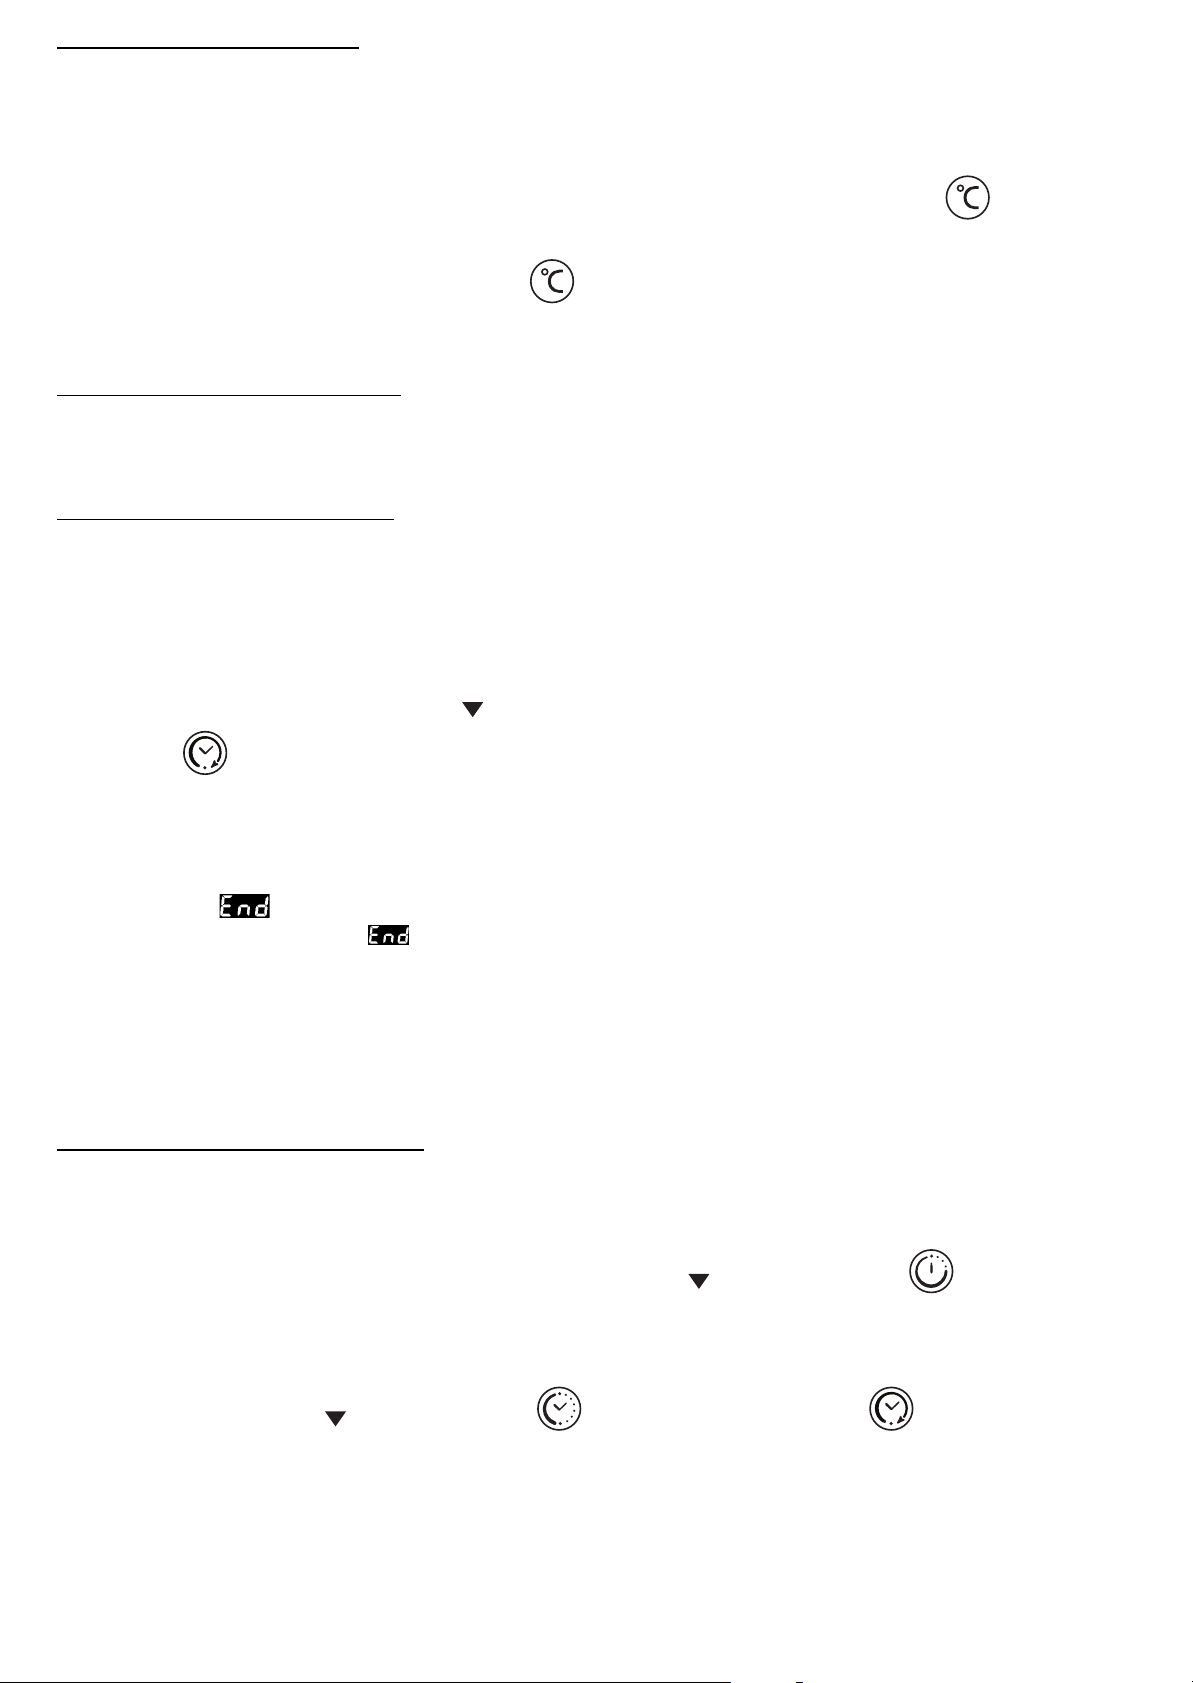
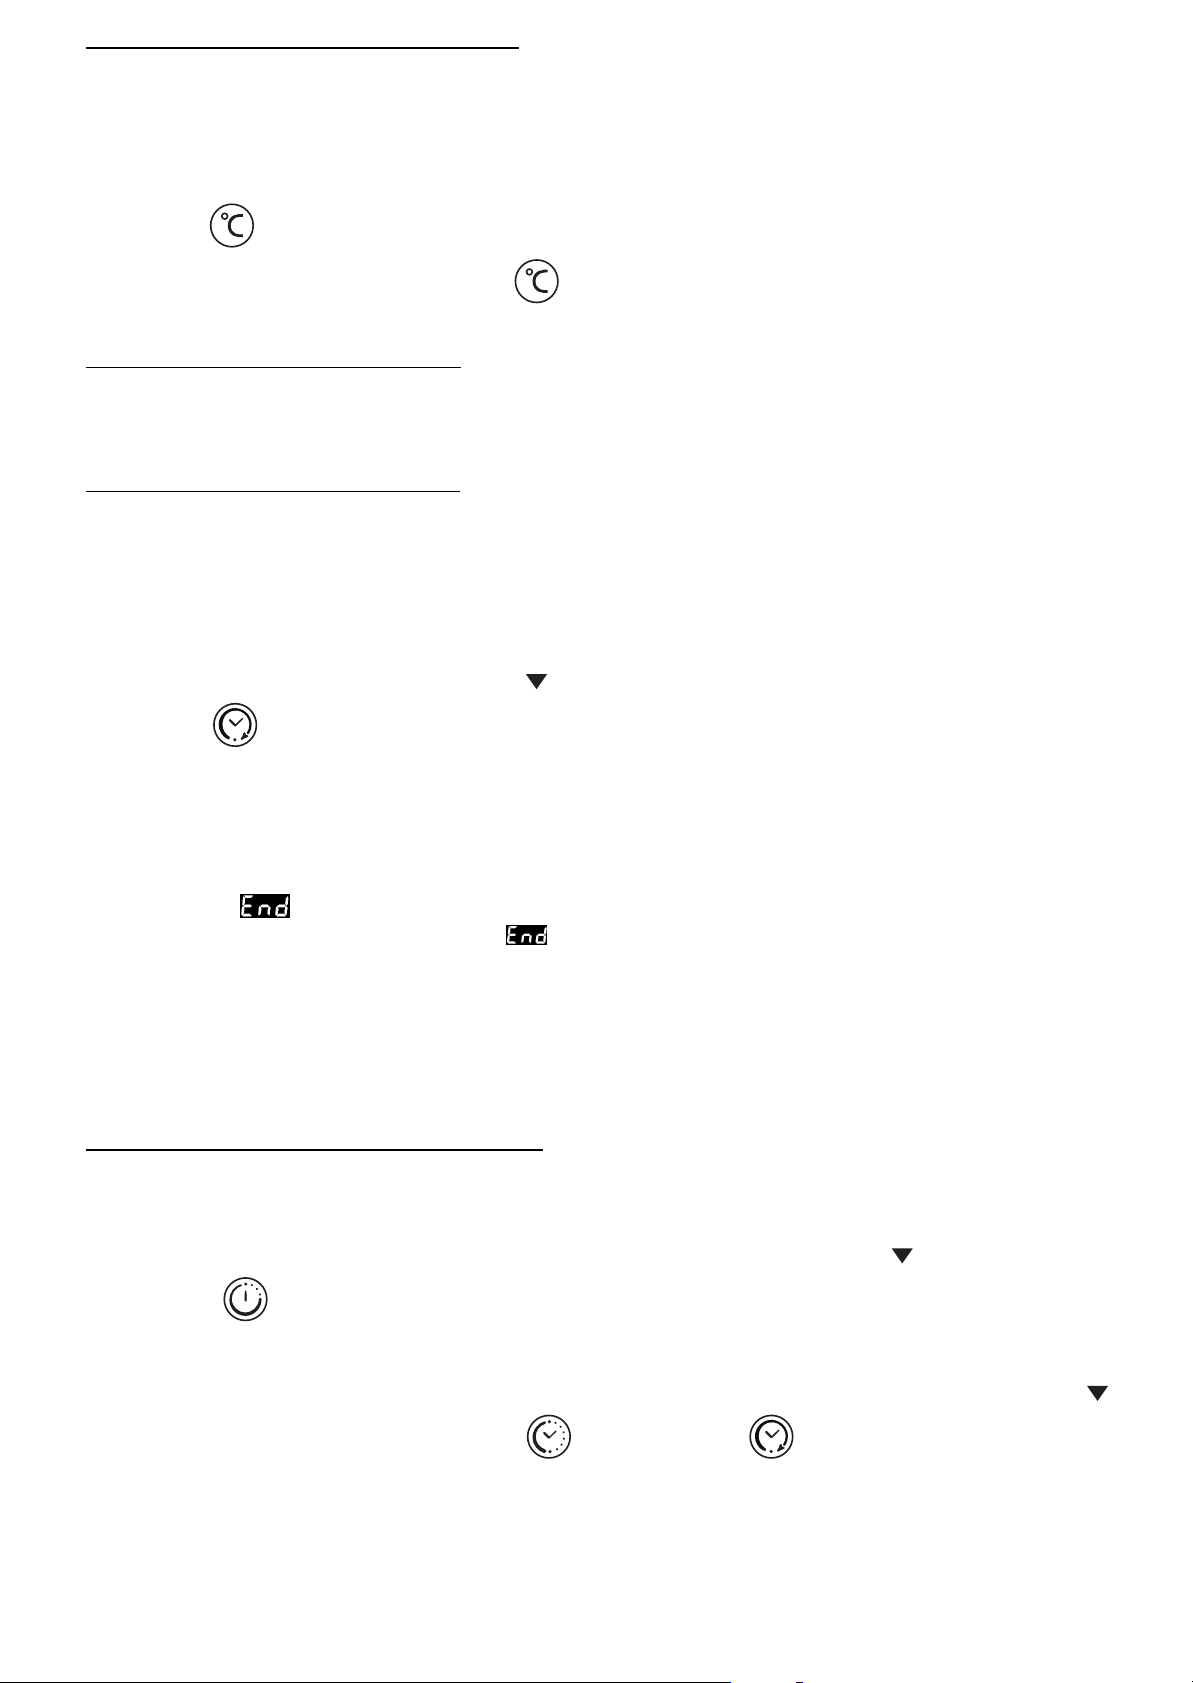
DESCRIPTION OF CONTROL PANEL
1. Function selector knob
2. Programming button ("set")
3. Confirmation button (“ok”)
4. Buttons for changing time ("-" "+")
5. Thermostat knob
3 41 52
Minute Minder
Special functions
Child safety
Cooking function selection knob
Cooking time
End of cooking time
USING THE OVEN
Oven activation
When the oven is connected to the power supply for the first time, or after a power failure, the display
indicates "12:00”.
Selecting and changing the clock time:
1. Press button “-” or “+” to set the hour.
2. Press “set” and “-” or “+” to set the minutes.
3. Press “OK” to confirm.
To change the time:
Keep the “OK” button pressed for 3 seconds, until the time flashes on the display. Repeat the steps
described above.
GB7
Page 10
Select Cooking Function
1. Turn knob 1 to the chosen function. The display shows the preset temperature for that function or the
power level in the grill and turbo grill functions.
2. Turn knob 5 to change the temperature or the power level.
3. To confirm the temperature or pre-set power level, press OK; the oven switches on; PRE appears on
the display (only for functions for which it is envisaged) and the led indicator next to lights up.
When the set temperature is reached, the corresponding value is shown on the display, an acoustic
signal sounds and the indicator led next to switches off. The food can now be placed in the oven
for cooking.
For the defrost function, press "OK".
To change the temperature:
1. Turn knob 5 and select the desired temperature again.
Warning: To cancel any selection made, turn knob 1 to "0". Alternatively, press “set” to switch the oven off,
maintaining the previously selected functions.
Cooking duration selection
Select the cooking time (available with any function, except for the special functions) to turn the oven on
for a specified period of time. At the end of the specified time the oven will switch off automatically. The
maximum programmed cooking time ranges from 12 hours to 4 hours and 30 minutes depending on the
cooking function selected.
1. Set the function and the temperature (see chapter: “Selecting the cooking function”) up to point 2
without confirming by pressing “OK”.
2. Press the “set” button (the indicator on the display lights up next to the cooking duration
symbol ) and, within 8 min., select the required cooking duration with the “-” or “+” buttons.
3. Confirm the selection by pressing “OK”; the oven switches on and the display shows the residual
cooking time.
4. To modify the previously set temperature, turn knob 5. To return to the residual cooking time, wait 3
seconds.
Appearance of on the display:
Once the set time has elapsed, appears on the display and an acoustic signal sounds.
The oven will switch off automatically.
The cooking duration can be modified with the “-” or “+” buttons. Return to point 3 of chapter “Selecting
the cooking time”.
To switch the oven off fully:
1. Turn knob 1 to “0".
The time of day appears again on the display.
End of cooking time selection
Using this function it is possible to preset the end of cooking time. The maximum programmed cooking
time is 23 hours and 59 minutes.
1. Proceed as described in points 1 and 2 of the section "Cooking duration selection".
2. Press "set" to set the end of cooking time: the led indicator next to the symbol lights up.
3. Set the end of cooking time using button “-” or “+”.
4. Press “OK” to confirm the end of cooking time.
The oven switches on automatically at the end of cooking time minus the cooking duration time: the
display show the indicator above the symbol and then above the symbol .
GB8
Page 11
SPECIAL FUNCTIONS
Turn knob 1 to the function : lights up next to the symbol .
Pizza
Function with preset temperature range adjustable between 220 °C and 250 °C, ideal for cooking pizza.
1. Turn knob 5 until "P1" appears on the display, then press "OK", after which the display shows the
temperature 250°C.
2. Press “OK” to confirm.
3. The indicator led next to on the control panel switches off when the oven reaches a temperature
of 250 °C, the corresponding value flashes on the display accompanied by a beep, after which the
preset cooking time is displayed.
4. Place the food in the oven.
5. Once the set time has elapsed, the oven automatically switches off, appears on the display and
an acoustic signal sounds.
The preset time can be modified with the “+” or “-” buttons.
HEAT MAINTENANCE
This maintains a constant temperature of 65°C in the oven.
1. Turn knob 5 until "P2" appears on the display, then press "OK", after which the display shows the
factory-set time of one hour.
2. Press “OK” to confirm.
3. The indicator led next to on the control panel switches off when the oven reaches a temperature
of 65 °C.
4. Place the food in the oven.
5. The preset time can be modified with the “+” or “-” buttons.
6. Press “OK” to confirm.
7. Once the set time has elapsed, the oven automatically switches off, appears on the display and
an acoustic signal sounds.
"Pyrolysis" function
1. Turn knob 1 to the self-cleaning Pyrolysis function , for 2 seconds the display shows CLn (clean),
the selector automatically sets a minimum time of 1:30.
2. Use buttons “+” “-”, to change duration of the self-clean cycle. The maximum programme time is 3
hours.
The end of pyrolysis time can be set as follows:
1. Press “set” to set the end of pyrolysis time.
The indicator next to the symbol lights up.
2. Set the end of pyrolysis time using buttons “+” “-”.
3. Press “OK” to confirm the end of pyrolysis time.
The oven will automatically turn on at the end of pyrolysis time minus pyrolysis time (set previously).
The indicator lights up above the symbol and when the oven switches on, above .
Once the set time has elapsed, "COOL" is shown on the display (see figure) while the door remains
locked. When the door unlocks, an acoustic signal sounds and appears on the display.
4. Press “OK” to stop the buzzer.
5. Turn knob 1 to “0”, the time of day appears again on the display.
GB9
Page 12

Minute Minder
The timer can only be set when the oven is not in use and allows a maximum setting of 6 hours.
To set the minute minder:
1. Leave knob 1 at “0”. The display shows the time of the day.
2. Press the "set" button. The indicator led lights up next to the symbol . Use buttons “-” or “+” to
set the desired time.
3. Press the "OK" button to confirm the selection.
Once the set time has elapsed:
An acoustic signal sounds and flashes on the display.
Press the "OK" button: the acoustic signal stops. The time of day appears again on the display.
Key lock
1. Press buttons “+” and “-” at the same time for 3 seconds. The indicator led lights up next to the
symbol .
2. During cooking, if the functions knob is turned to "0", the oven switches off.
3. To deactivate the lock, repeat the sequence described in point 1.
GB10
Page 13

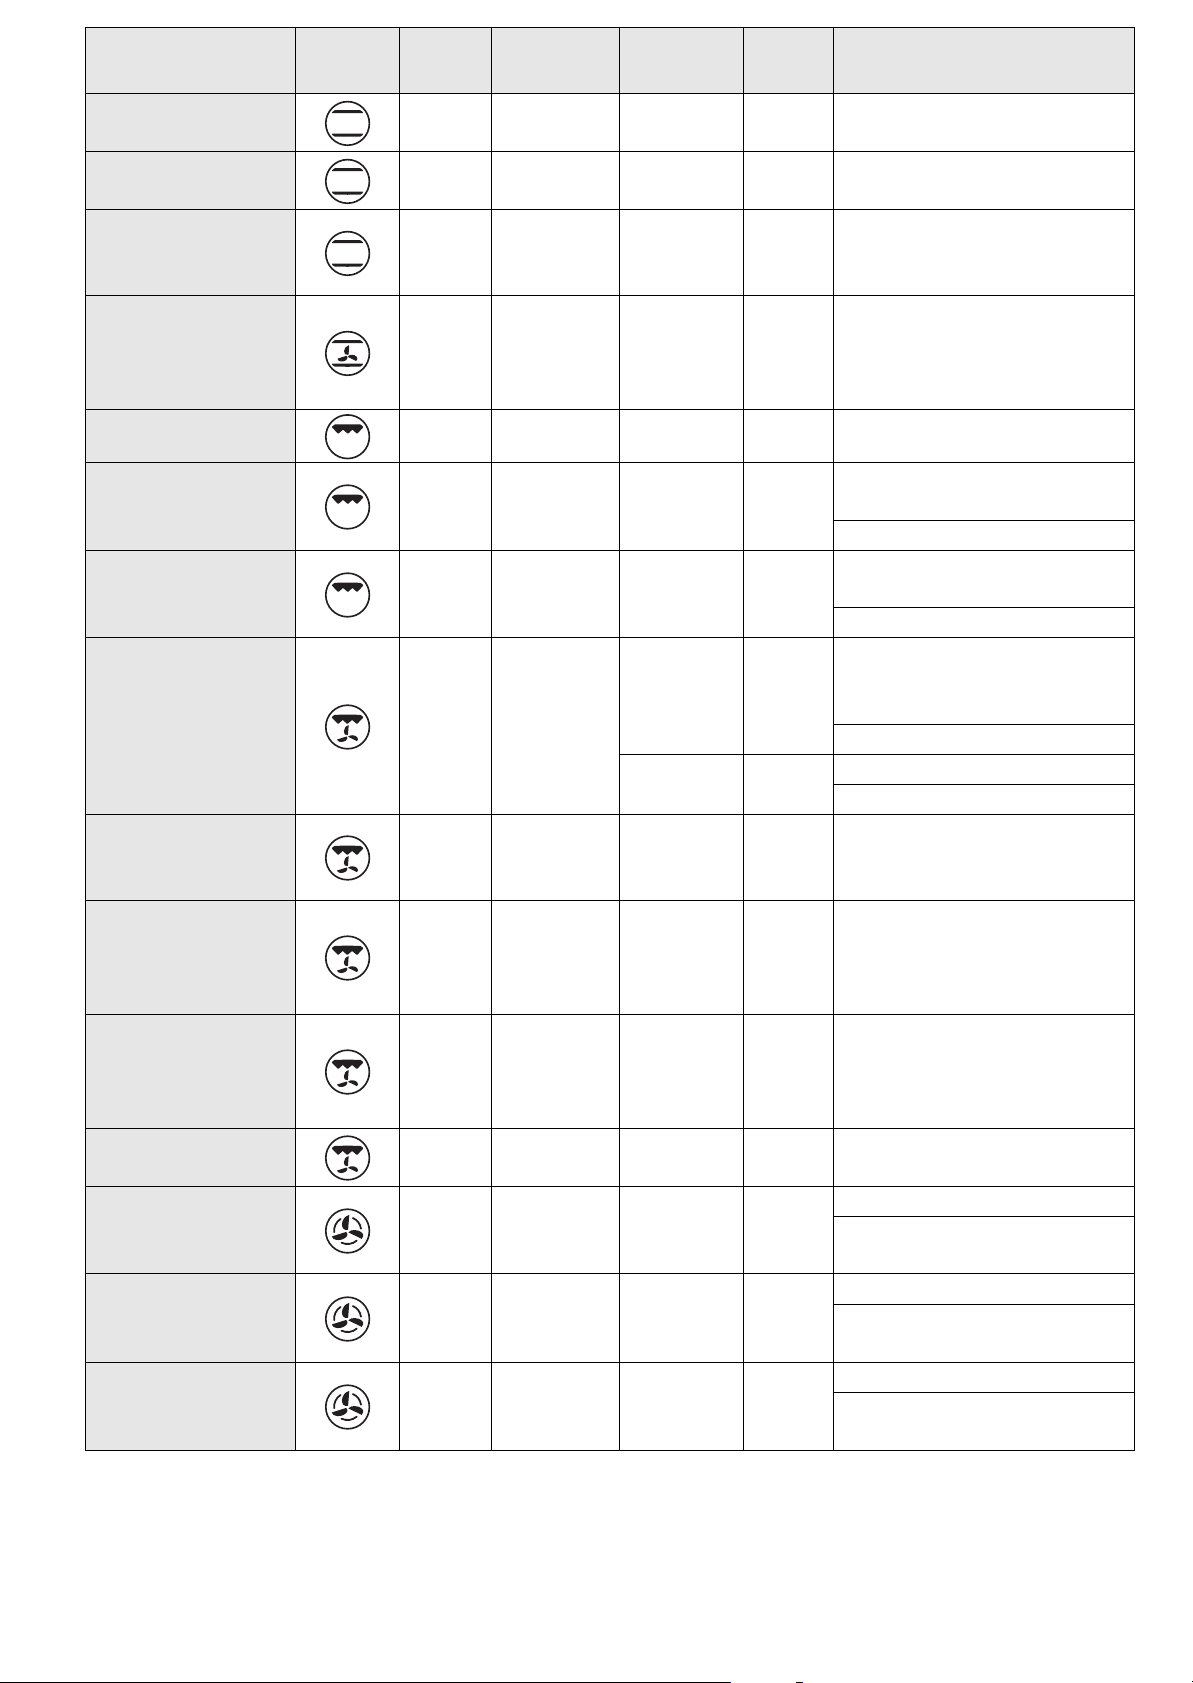
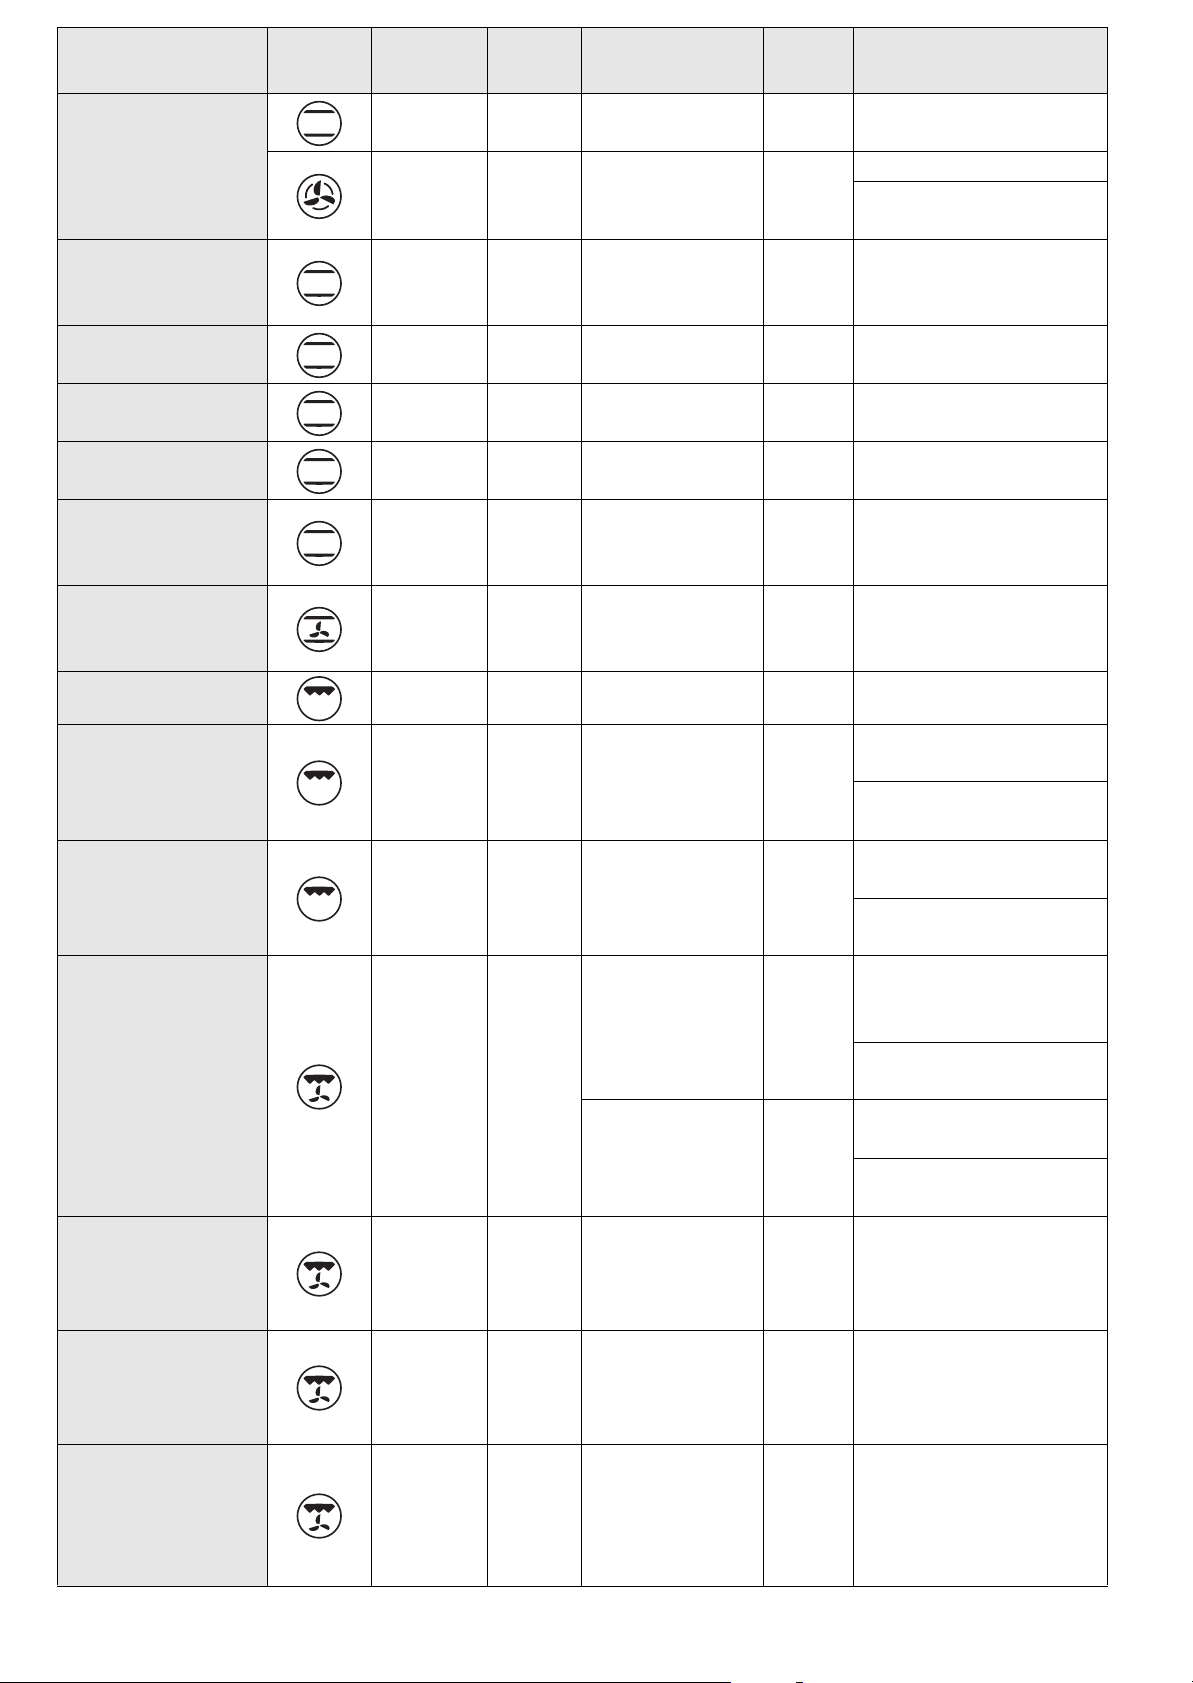
OVEN FUNCTION DESCRIPTION TABLE
FUNCTIONS KNOB
OFF To stop cooking and switch off the oven.
LAMP To switch the oven light on/off.
CONVENTIONAL
CONVECTION
BAKE
GRILL
TURBO GRILL
DEFROST
FORCED AIR
To cook any type of dish on a single shelf. Use the 2nd level. Preheat the oven
before placing food in it.
To cook meat and pies with liquid filling (sweet or savoury) on a single shelf.
Use the 2nd level. Preheat the oven before cooking
For grilling steak, kebabs and sausages; vegetables au gratin and toasting
bread. Place food on the 4th level. When grilling meat, it is advisable to use
the drip-tray to collect the cooking juices. Place it on the 3rd level, adding
approx. half a litre of water. The oven does not have to be preheated. During
cooking, the oven door must remain closed.
For roasting large pieces of meat (legs, roast beef, chickens). Place the food
on the middle levels. It is advisable to use the drip-tray to collect the cooking
juices. Position it on the 1st/2nd shelf, adding approx. half a litre of water. The
oven does not have to be preheated. During cooking, the oven door must
remain closed. With this function it is also possible to use the turnspit, if
provided.
To speed up defrosting of food. It is advisable to place food on the middle
level. It is advisable to leave food in its packaging to prevent it from
becoming dry on the outside.
For cooking even different types of food requiring the same cooking
temperature (e.g. fish, vegetables, cakes) on a maximum of two shelves at
the same time. This function allows cooking without odours being
transferred from one food to another. It is advisable to use the 2nd level to
cook on a single shelf. To cook on two shelves, use the 1st and 3rd levels,
preheating the oven first.
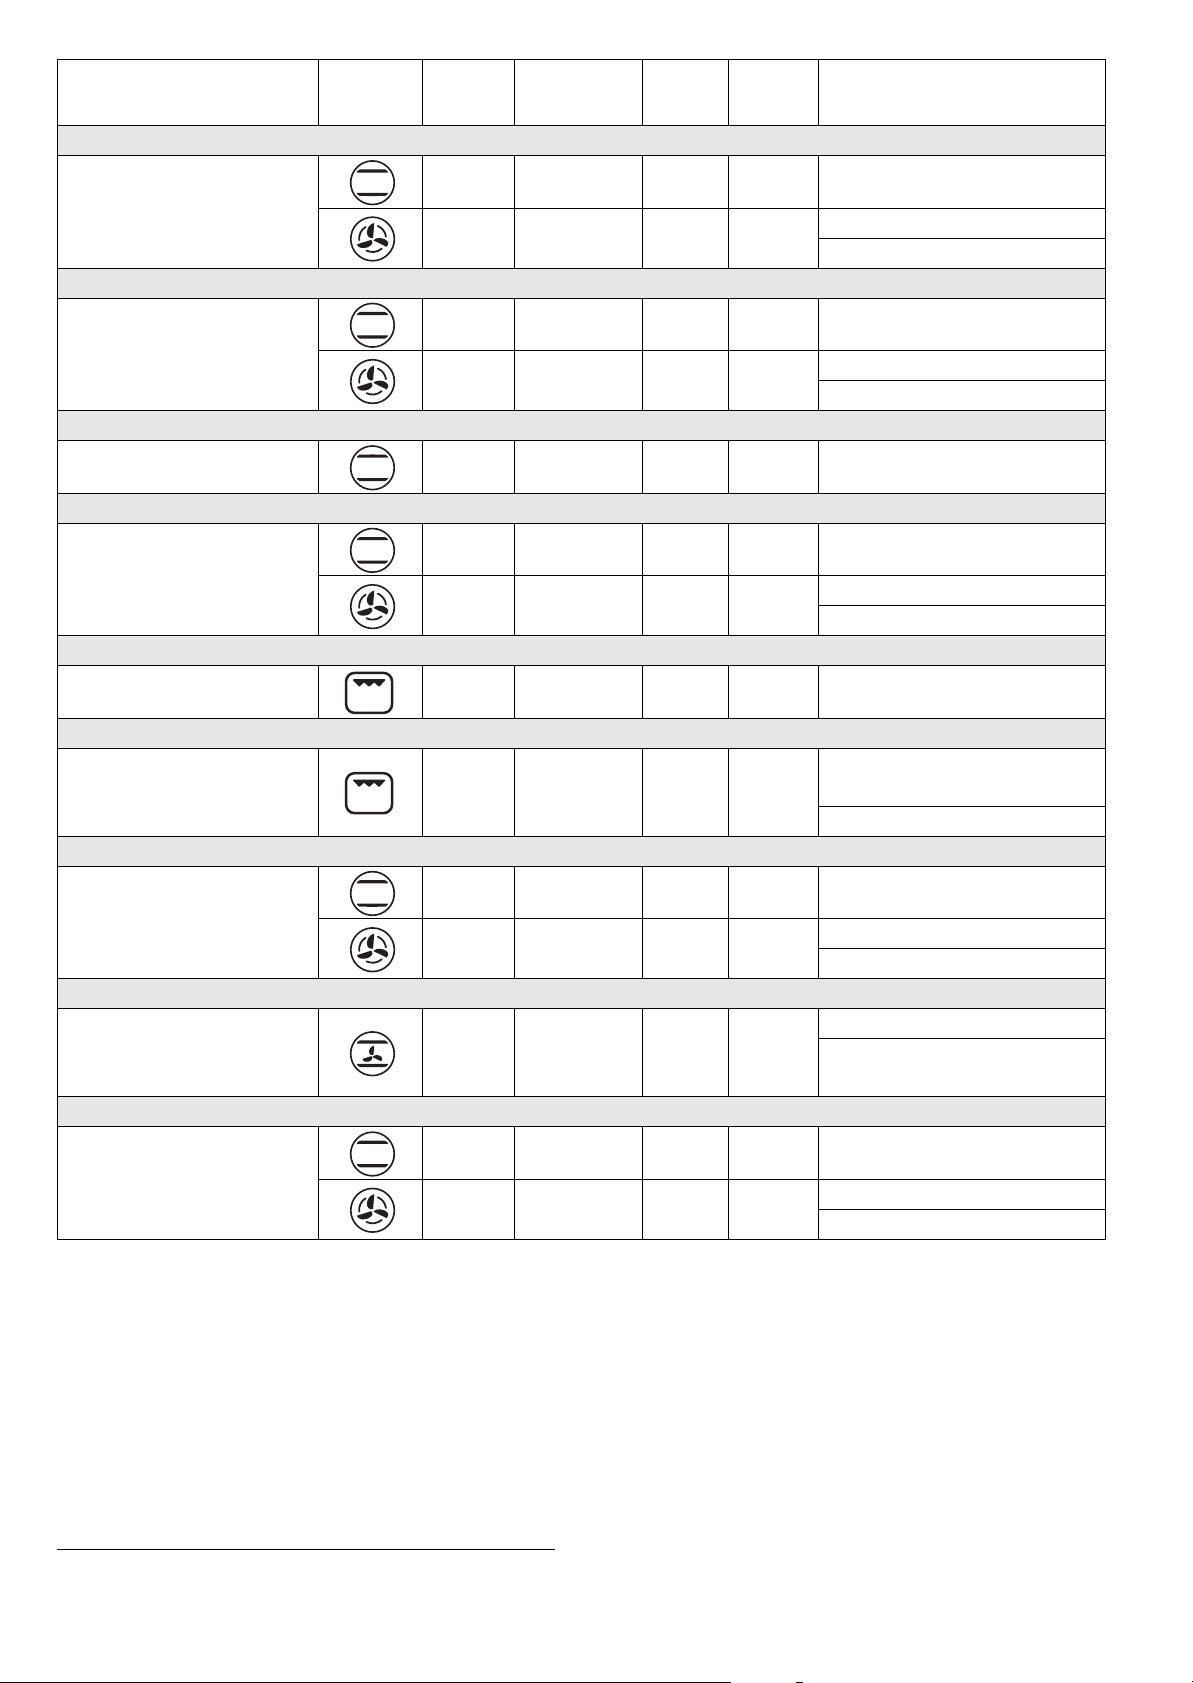
ECO Energy-saving function ideal for warming food and finishing cooking.
AUTOMATIC OVEN
CLEANING
SPECIAL
FUNCTION
Self-cleaning time can be set from a min. of 1h / 30 minutes to a max. of 3
hours.
P1 (Pizza): function for baking homemade pizza. The oven automatically
preheats to the correct cooking temperature. Place food in the oven when
the required temperature is reached. Use the 2nd level.
P2 (Heat maintenance): function for keeping just-cooked food (e.g. meat,
fried food, flans) hot and crisp
GB11
Page 14

COOKING TABLE
Recipe Function Pre-
heating
Yes 2 160-180 30-90 Cake tin on rack
Leavened cakes
Yes 1-3 160-180 30-90
Filled pies (cheesecake, strudel,
apple pie)
Biscuits/Tartlets
Choux buns
Yes 2 160-200 30-85
Yes 1-3 160-200 35-90
Yes 2/3 170-180 15-45 Drip-tray / baking tray
Yes 1-3 160-170 20-45
Yes 2 180-200 30-40 Drip-tray / baking tray
Yes 1-3 180-190 35-45
Shelf (from
bottom)
Temp.
(°C)
Time
(min)
Accessories and notes
Level 3: cake tin on rack
Level 1: cake tin on rack
Drip-tray / baking tray or
cake tin on rack
Level 3: cake tin on rack
Level 1: cake tin on rack
Level 3: rack
Level 1: drip-tray / baking
tray
Level 3: pan on rack
Level 1: drip-tray / baking
tray
Meringues
Bread / Pizza /
Focaccia
Pizza
Frozen pizza
Savoury pies (vegetable pie, quiche
lorraine)
P1
Yes 2 90 110-150 Drip-tray / baking tray
Level 3: pan on rack
Yes 1-3 90 130-150
Yes 2 190-250 15-50 Drip-tray / baking tray
Yes 1-3 190-250 25-50
Yes 2 220-250 10-30
Yes 2 250 10-15
Yes 1-3 250 10-20
Yes 2 180-190 35-45 Cake tin on rack
Yes 1-3 180-190 45-60
Level 1: drip-tray / baking
tray
Level 3: pan on rack
Level 1: drip-tray / baking
tray
Level 2: drip-tray / baking
tray
Level 2: drip-tray / baking
tray or rack
Level 3: pan on rack
Level 1: drip-tray / baking
tray
Level 3: cake tin on rack
Level 1: cake tin on rack
Vols-au-vent / Puff
pastry savouries
Lasagna / Baked
pasta / Cannelloni
/ Flans
Lamb / Veal / Beef /
Pork 1 Kg
Yes 2 190-200 20-30 Drip-tray / baking tray
Level 3: pan on rack
Yes 1-3 180-190 20-40
Yes 2 190-200 45-55 Pan on rack
Yes 2 190-200 70-100 Drip-tray or pan on rack
GB12
Level 1: drip-tray / baking
tray
Page 15
Recipe Function Pre-
heating
Chicken / Rabbit /
Duck 1 Kg
Turkey / Goose 3
Kg
Baked fish / en
papillote (fillet,
whole)
Stuffed vegetables (tomatoes,
courgettes, aubergines)
To as t - 4 3 (high) 2-5 Rack
Fish fillets / steaks - 4 2 (medium) 20-35
Sausages / Kebabs
/ Spare ribs / Hamburgers
Roast chicken 1-
1.3 Kg
Roast beef rare 1
Kg
Leg of lamb /
Shanks
Baked potatoes - 2 2 (medium) 45-55
Vegetables au
gratin
Lasagna & Meat Yes 1-3 200 50-100*
Meat & Potatoes Yes 1-3 200 45-100*
Fish & Vegetables Yes 1-3 180 30-50*
Yes 2 200-230 50-100 Drip-tray or pan on rack
Yes 1/2 190-200 80-130 Drip-tray or pan on rack
Yes 2 180-200 40-60 Drip-tray or pan on rack
Yes 2 180-200 50-60 Pan on rack
Shelf (from
bottom)
- 4
- 2
- 2 2 (medium) 35-45
- 2 2 (medium) 60-90
- 2 3 (high) 10-15 Pan on rack
Temp.
(°C)
2-3
(medium-
high)
2 (medium) 50-65
3 (high) 60-80
Time
(min)
15-40
Accessories and notes
Level 4: rack (turn food
halfway through cooking)
Level 3: drip-tray with water
Level 4: rack (turn food
halfway through cooking)
Level 3: drip-tray with water
Level 2: rack (turn food two
thirds of the way through
cooking)
Level 1: drip-tray with water
Level 2: turnspit (if present)
Level 1: drip-tray with water
Pan on rack (turn food two
thirds of the way through
cooking if necessary)
Drip-tray or pan on rack (turn
food two thirds of the way
through cooking if
necessary)
Drip-tray / baking tray (if
necessary, turn food two
thirds of the way through
cooking)
Level 3: pan on rack
Level 1: drip-tray or pan on
rack
Level 3: pan on rack
Level 1: drip-tray or pan on
rack
Level 3: pan on rack
Level 1: drip-tray or pan on
rack
* The initial cooking time displayed is merely for guidance. Dishes can be removed at different times to
suit personal preference.
GB13
Page 16
TESTED RECIPES in compliance with IEC 50304/60350:2009-3 and DIN 3360-12:07:07
Recipe Function Pre-
heating
IEC 60350:2009-03 § 8.4.1
Yes 2 170 15-25 Drip-tray / baking tray
Shortbread
**
IEC 60350:2009-03 § 8.4.2
Small cakes
**
IEC 60350:2009-03 § 8.5.1
Fatless sponge cake Yes 2 170 35-45 Cake tin on rack
IEC 60350:2009-03 § 8.5.2
Two apple pies
**
IEC 60350:2009-03 § 9.1.1
Yes 1-3 160 20-30
Yes 3 170 20-30 Drip-tray / baking tray
Yes 1-3 160 30-40
Yes 2 185 60-75 Cake tin on rack
Yes 1-3 175 70-90
Shelf (from
bottom)
Temp.
(°C)
Time
(min)
Accessories and notes
Level 3: baking tray
Level 1: drip-tray
Level 3: baking tray
Level 1: drip-tray
Level 3: cake tin on rack
Level 1: cake tin on rack
Toast* - 4 3 (high) 2-5 Rack
IEC 60350:2009-03 § 9.2.1
Level 4: rack (turn food
Burgers* - 4 3 (high) 30-40
DIN 3360-12:07 § 6.5.2.3
Apple cake, yeast tray
cake
DIN 3360-12:07 § 6.6
Roast pork - 2 190 150-170
DIN 3360-12:07 annex C
Flat cake
**
* The cooking table suggests the ideal functions and temperatures for obtaining the best results with any
type of recipe. If you wish to cook on one shelf only using the fan-assisted function, place food on the
second shelf and select the temperature recommended for the “FORCED AIR” function on more than
one shelf.
Yes 2 180 30-40 Drip-tray / baking tray
Yes 1-3 160 55-65
Yes 2 170 35-45 Drip-tray / baking tray
Yes 1-3 170 40-50
halfway through cooking)
Level 3: drip-tray with water
Level 3: baking tray
Level 1: drip-tray
Level 3: rack
Level 2: drip-tray with water
(top-up when necessary)
Level 3: baking tray
Level 1: drip-tray
* When grilling food, it is advisable leave a space of 3-4 cm from the front edge of the grill to facilitate
removal.
The indications in the table are without use of the runners. Do the tests without the runners.
Energy efficiency class (according to EN 50304)
To do the test, use the dedicated table.
GB14
Page 17

TIPS AND ADVICE
How to read the cooking table
The table indicates the best function to use for a given food, to be cooked on one or more shelves at the
same time. Cooking times start from the moment food is placed in the oven, excluding preheating (when
required). The cooking temperatures are only a guide and depend on the amount of food and type of
accessory used. Use the lowest recommended values to begin with and if cooking results are not those
desired, use higher values. It is advisable to use the accessories supplied and preferably dark coloured
metal cake tins and pans. Pots and accessories in Pyrex or ceramic can also be used, but cooking times will
be slightly longer. To obtain best results, carefully follow the advice given in the cooking table for the
choice of accessories (supplied) to be placed on the various shelves.
Cooking different foods at the same time
Using the “FORCED AIR” function, different foods (e.g. fish and vegetables) requiring the same temperature
can be cooked on different shelves at the same time. Remove the food requiring shorter cooking times and
leave food requiring longer times to continue cooking.
Cakes
- Bake delicate cakes with the conventional function on a single level. Use dark coloured metal cake
tins and always place them on the rack provided. To bake on more than one level, select the forced air
function and stagger the position of cake tins on the racks, to favour circulation of the air.
- To check if a raising cake is baked, insert a toothpick into the top of the cake. If the toothpick comes
out dry, the cake is ready.
- When using non-stick cake tins, do not butter the edges, as the cake may not rise evenly at the edges.
- If the cake "sinks" during baking, set a lower temperature the next time, even reducing the amount of
liquid and mixing more gently.
- For sweets with moist fillings (cheesecake or fruit pies) use the “CONVECTION BAKE” function. If the
base of the cake is too soggy, lower the shelf and sprinkle the bottom of the cake with breadcrumbs
or biscuit crumbs before adding the filling.
Meat
- Use any type of pan or baking dish suitable for the size of the piece of meat being cooked. For roasts,
it is advisable to add a little stock on the bottom of the pan, basting the meat during cooking to give
it flavour. When the roast is ready, leave it in the oven for another 10-15 minutes, or wrap it in
aluminium foil.
- To grill pieces of meat, choose cuts having the same thickness in order to obtain even cooking. Very
thick pieces of meat require longer cooking times. To prevent the meat from burning on the outside,
place the rack on a lower level, keeping it further away from the grill. Turn the meat two thirds of the
way through cooking.
To collect the cooking juices it is advisable to place a drip-tray with half a litre of water directly under the
rack on which the meat is placed. Top-up when necessary.
Turnspit (provided only in some models)
Use this accessory to roast large pieces of meat and poultry evenly. Place the meat on the turnspit rod, tying
it with string if chicken, and check that it is secure before inserting the rod in the seat located on the front
wall of the oven and resting it on the respective support. To prevent smoke and to collect cooking juices,
it is advisable to place a drip-tray with half a litre of water on the first level. The rod has a plastic handle
which must be removed before starting to cook, and used at the end of cooking to avoid burns when
taking the food out of the oven.
Pizza
Lightly grease the pans to obtain a pizza with a crispy base. Sprinkle the mozzarella over the pizza two
thirds of the way through cooking.
GB15
Page 18

INSTRUCTIONS IMPORTANTES SUR LA SÉCURITÉ
VOTRE SÉCURITÉ AINSI QUE CELLE D’AUTRUI EST PARTICULIÈREMENT IMPORTANTE
Le présent manuel contient d’importants messages relatifs à la sécurité, qui figurent également sur
l’appareil. Nous vous invitons à les lire soigneusement et à les respecter en toute circonstance.
Ceci est le symbole de danger relatif à la sécurité. Il met en garde l’utilisateur et toute autre personne
contre les risques potentiels dérivant de l’utilisation de cet appareil.
Tous les messages relatifs à la sécurité sont précédés du symbole de danger et des termes suivants :
DANGER
AVERTISSEMENT
Tous les messages relatifs à la sécurité spécifient le danger potentiel auquel ils se réfèrent et indiquent
comment réduire le risque de lésions, de dommages et de chocs électriques résultant d’une utilisation non
réglementaire de l’appareil. Veuillez observer scrupuleusement les instructions suivantes :
- Débranchez le four de l’alimentation secteur avant d’entreprendre toute intervention sur celui-ci.
- Les opérations d’installation et d’entretien sont du ressort exclusif d’un technicien spécialisé. Celui-ci
est tenu de se conformer aux instructions du fabricant et aux normes locales en vigueur en matière
de sécurité. Pour toute réparation ou tout remplacement de pièces, procédez uniquement aux
opérations spécifiées dans le manuel en utilisant les pièces expressément indiques.
- La mise à la terre de l’appareil est obligatoire.
- Le cordon d’alimentation de l’appareil doit être suffisamment long pour permettre le branchement
de l’appareil encastré à la prise du secteur.
- Afin que l’installation soit conforme aux normes locales de sécurité, il est nécessaire de brancher
l’appareil au moyen d’un interrupteur omnipolaire avec une distance d’ouverture des contacts d’au
moins 3 mm.
- N’utilisez en aucun cas de prises multiples ou de rallonges.
- Ne tirez jamais sur le cordon d’alimentation pour débrancher l’appareil de la prise secteur.
- Une fois l’installation terminée, l’utilisateur ne devra plus pouvoir accéder aux composants électriques.
- Évitez de toucher l’appareil avec les mains mouillées et ne l’utilisez pas lorsque vous êtes pieds nus.
- Ce four a été conçu uniquement comme appareil ménager destiné à la cuisson des aliments. Toute
autre utilisation (chauffer une pièce, par exemple) est considérée comme impropre. Le fabricant ne
pourra être tenu pour responsable en cas de dommages résultant d’une utilisation impropre ou
incorrecte de l’appareil.
- Les personnes (y compris les enfants) qui, en raison de leurs capacités physiques, sensorielles ou
mentales, de leur inexpérience ou de leur méconnaissance, ne sont pas en mesure d’utiliser l’appareil
en toute sécurité, doivent se servir de l’appareil uniquement sous la surveillance ou en se conformant
aux instructions d’une personne responsable.
- Les parties accessibles du four peuvent atteindre une température élevée quand l’appareil est en
service. Veillez à maintenir les enfants hors de portée de l’appareil. Contrôlez que les enfants ne
jouent pas avec l’appareil.
- Veillez à ne pas toucher les résistances ou les surfaces intérieures du four, sous peine d’encourir des
brûlures. Évitez de mettre le four en contact avec des chiffons ou tout matériau inflammable avant
que les composants de l’appareil ne soient suffisamment refroidis.
- En fin de cuisson, soyez particulièrement prudent au moment d’ouvrir la porte. Laissez l’air chaud ou
la vapeur s’évacuer progressivement de l’enceinte de cuisson avant d’accéder à celle-ci. Lorsque la
porte est fermée, l’air chaud est convoyé à travers l’ouverture située au-dessus du bandeau de
commande. Évitez d’obstruer les ouvertures de ventilation.
- Munissez-vous de gants pour retirer les plats et les accessoires chauds du four. Veillez à ne pas
toucher les résistances.
- Ne placez jamais de produits inflammables à l’intérieur du four ou à proximité de celui-ci. Ces
produits risqueraient en effet de s’enflammer si le four était mis sous tension par inadvertance.
- Évitez de chauffer ou de cuisiner dans le four des aliments contenus dans des récipients hermétiques. La
pression qui se développe à l’intérieur du récipient pourrait le faire exploser et endommager le four.
- N’utilisez en aucun cas de récipients en matière synthétique pour cuire des aliments au four.
Indique une situation dangereuse qui, si elle n’est pas évitée,
occasionnera de graves lésions.
Indique une situation dangereuse qui, si elle n’est pas évitée, est
susceptible d’occasionner de graves lésions.
FR16
Page 19

- Les graisses et l’huile surchauffées s’enflamment facilement. Surveillez régulièrement la cuisson si
vous utilisez une quantité importante de graisse ou d’huile.
- Ne laissez jamais l’appareil sans surveillance pendant la dessiccation des aliments.
- Si vous utilisez des boissons alcoolisées (rhum, cognac, vin, par exemple) pour cuisiner des plats,
rappelez-vous que l’alcool s’évapore à des températures élevées. Il se peut, par conséquent, que les
vapeurs dégagées par l’alcool s’enflamment en entrant en contact avec la résistance électrique.
Mise au rebut des appareils ménagers usagés
- Cet appareil est fabriqué à partir de matériaux recyclables ou pouvant être réutilisés. Mettez-le au
rebut en vous conformant aux prescriptions locales en matière d’élimination des déchets. Avant de
mettre votre appareil au rebut, rendez-le inutilisable en sectionnant le câble d’alimentation.
- Pour toute information sur le traitement et le recyclage de cet appareil, contactez le service municipal
compétent, votre déchetterie locale ou le magasin où vous l’avez acheté.
INSTALLATION
Après avoir déballé le four, contrôlez que l’appareil n’a pas été endommagé pendant le transport et que la
porte ferme parfaitement. En cas de problème, contactez votre revendeur ou le Service Après-vente le plus
proche. Nous recommandons de retirer le four de la base en polystyrène uniquement avant de procéder à
l’installation, afin d’éviter tout risque d’endommagement de l’appareil.
PRÉPARATION DU MEUBLE POUR L’ENCASTREMENT
• Les meubles de cuisine adjacents au four doivent résister à la chaleur (min. 90°C).
• Procédez au découpage complet du meuble avant d’y installer l’appareil et éliminez soigneusement
les copeaux et la sciure de bois.
• On ne doit plus pouvoir accéder à la partie inférieure du four une fois l’installation terminée.
• Afin de garantir le bon fonctionnement de l’appareil, veillez à ne pas obstruer l’ouverture minimale
prévue entre le plan de travail et la partie supérieure du four.
BRANCHEMENT DE L’APPAREIL
Vérifiez que la tension figurant sur la plaque signalétique de l’appareil correspond à celle de votre
habitation. La plaque signalétique se trouve sur le rebord avant du four (visible lorsque la porte est
ouverte).
• Le remplacement éventuel du câble d’alimentation (type H05 RR-F 3 x 1,5 mm2) doit être effectué
uniquement par un professionnel qualifié. Adressez-vous à un Service Après-vente agréé.
RECOMMANDATIONS GÉNÉRALES
Avant d’utiliser le four pour la première fois :
- Enlevez les protections en carton, les films transparents et les étiquettes autocollantes présentes sur
les accessoires.
- Retirez tous les accessoires du four et faites-le chauffer à 200°C pendant une heure environ, afin de
faire disparaître les odeurs et les fumées qui se dégagent du matériau isolant et des graisses de
protection.
Pendant l’utilisation :
- Évitez de déposer des objets lourds sur la porte du four sous peine de l’endommager.
- Évitez de prendre appui sur la porte du four ou de suspendre des objets sur la poignée du four.
- Évitez de couvrir l’intérieur du four avec des feuilles d’aluminium.
- Ne versez pas d’eau dans le four lorsque celui-ci est chaud ; vous risqueriez d’endommager l’émail.
- Évitez de déplacer les ustensiles de cuisson en les traînant sur le fond du four sous peine de rayer le
revêtement.
- Veillez à ce que le câble électrique d’autres appareils électroménagers se trouvant à proximité
immédiate ne puisse ni entrer en contact avec les parties chaudes, ni se coincer dans la porte du four.
- Évitez d’exposer le four aux agents atmosphériques.
FR17
Page 20
CONSEILS POUR LA PROTECTION DE L’ENVIRONNEMENT
Élimination des emballages
Les matériaux d’emballage sont entièrement recyclables comme l’indique le symbole de recyclage ( ). Par
conséquent, ne les jetez jamais dans la nature mais conformez-vous aux réglementations locales en
vigueur en matière d’élimination des déchets.
Mise au rebut de l’appareil
- Cet appareil est certifié conforme à la Directive Européenne 2002/96/CE, concernant les Déchets
d’Équipements Électriques et Électroniques (DEEE ou WEEE).
- En procédant correctement à la mise au rebut de cet appareil, vous contribuerez à protéger
l’environnement et la santé humaine.
- Le symbole apposé sur le produit et sur la documentation qui l’accompagne indique qu’il ne doit
pas être jeté avec les ordures ménagères, mais remis à un centre de collecte spécialisé dans le
recyclage des appareils électriques et électroniques.
Conseils pour économiser l’énergie
- Préchauffez le four uniquement si le tableau de cuisson ou votre recette le précise.
- Utilisez des moules à pâtisserie foncés, laqués noir ou émaillés, car ceux-ci absorbent très bien la
chaleur.
- Éteignez le four 10 à 15 minutes avant la fin du temps de cuisson réglé. En cas d’aliments nécessitant un
temps de cuisson relativement long, ceux-ci continueront néanmoins à cuire en utilisant la chaleur
résiduelle du four.
DÉCLARATION DE CONFORMITÉ
- Ce four, qui est destiné à entrer en contact avec des denrées alimentaires, est conforme au règlement
( ) n° 1935/2004. Il a été conçu, fabriqué et commercialisé conformément aux exigences de sécurité
de la directive « Basse Tension » 2006/95/CE (qui remplace la directive 73/23/CEE et modifications
suivantes) et aux exigences de protection de la directive « CEM » 2004/108/CE.
DIAGNOSTIC DES PANNES
Le four ne fonctionne pas :
• Vérifiez qu’il n’y a pas de coupure de courant et que le four est correctement branché.
• Éteignez puis rallumez le four pour voir si le problème a été éliminé.
La porte est bloquée :
• Éteignez puis rallumez le four pour voir si le problème a été éliminé.
• REMARQUE IMPORTANTE : durant la pyrolyse, il n’est pas possible d’ouvrir la porte du four. Attendez
que celle-ci se débloque automatiquement (référez-vous au paragraphe « Cycle de nettoyage des
fours dotés de la fonction Pyrolyse »).
Le programmateur électronique ne fonctionne pas :
• Si la lettre « » suivie d’un numéro s’affiche à l’écran, contactez votre Service Après-vente. Dans ce
cas, spécifiez le numéro qui suit la lettre « ».
FR18
Page 21
SERVICE APRÈS-VENTE
Avant de faire appel au Service Après-vente :
1. Vérifiez d’abord s’il n’est pas possible de remédier par vous-même au défaut en suivant les points
décrits au chapitre « Diagnostic des pannes ».
2. Éteignez puis rallumez l’appareil pour voir si le problème a été éliminé.
Si, après ces contrôles, le problème persiste, adressez-vous à votre Service Après-vente.
Veuillez toujours spécifier :
• une brève description du défaut ;
• le type et le modèle exact du four ;
• le code service (numéro suivant le mot « Service » sur la plaque signalétique) apparaissant sur le
rebord droit de la cavité du four (visible lorsque la porte est ouverte). Le code service est également
indiqué dans le livret de garantie ;
• votre adresse complète ;
• votre numéro de téléphone.
Si l’appareil doit être réparé, adressez-vous à un Service Après-vente agréé (vous aurez ainsi la garantie
que les pièces défectueuses seront remplacées par des pièces d’origine et que la réparation de votre
appareil sera effectuée correctement).
NETTOYAGE
AVERTISSEMENT
Extérieur du four
REMARQUE IMPORTANTE : n’utilisez en aucun cas de produits corrosifs ou de détergents abrasifs. Si
l’un de ces produits entre en contact avec le four, essuyez-le immédiatement à l’aide d’un chiffon
humide.
• Nettoyez les surfaces à l’aide d’un chiffon humide. Si celles-ci sont particulièrement sales, utilisez une
solution d’eau additionnée de quelques gouttes de détergent à vaisselle. Essuyez à l’aide d’un chiffon
doux.
Enceinte du four
REMARQUE IMPORTANTE : évitez l’emploi d’éponges abrasives et/ou de pailles de fer. À la longue,
celles-ci risquent d’abîmer les surfaces émaillées et la vitre de la porte.
• Après chaque utilisation, laissez refroidir le four et nettoyez-le, de préférence lorsqu’il est tiède, pour
éviter que les résidus d’aliments ne s’incrustent (aliments à haute teneur en sucre, par exemple).
• Utilisez des produits spéciaux pour fours et respectez les instructions du fabricant.
• Nettoyez la vitre de la porte avec un produit liquide spécifique. Pour faciliter le nettoyage du four, il
est possible d’enlever la porte (référez-vous au chapitre ENTRETIEN).
• Pour nettoyer la partie supérieure du four, il est possible d’abaisser (seulement dans certains
modèles) la résistance supérieure du gril (voir le chapitre ENTRETIEN).
REMARQUE : durant la cuisson prolongée d’aliments à haute teneur en eau (pizzas, légumes, etc.), il
se peut que de la condensation se forme à l’intérieur de la porte et sur le joint. Dès que le four est
froid, essuyez à l’aide d’un chiffon ou d’une éponge.
- N’utilisez jamais d’appareil à vapeur.
- Attendez que le four soit froid avant de procéder à son nettoyage.
- Veillez à toujours débrancher l’appareil.
Accessoires :
• Faites tremper les accessoires dans du détergent à vaisselle immédiatement après leur utilisation. S’ils
sont encore chauds, munissez-vous de gants pour les manipuler.
• Utilisez une brosse ou une éponge pour détacher facilement les résidus d’aliments.
FR19
Page 22

Nettoyage de la paroi arrière et des panneaux catalytiques latéraux (s’ils sont fournis) :
REMARQUE IMPORTANTE : ne nettoyez en aucun cas les panneaux catalytiques et la paroi arrière
avec des produits abrasifs, des brosses dures, des éponges pour casseroles ou des bombes pour le
nettoyage du four, car ils pourraient endommager la surface catalytique et lui faire perdre ses
propriétés autonettoyantes.
• Faites fonctionner le four à vide à 200°C pendant environ une heure en sélectionnant la fonction
Ventilation.
• Une fois ce temps écoulé, faites refroidir l’appareil, puis éliminez les éventuels résidus d’aliments à
l’aide d’une éponge.
Cycle de nettoyage des fours dotés de la fonction Pyrolyse (si disponible) :
AVERTISSEMENT
Cette fonction permet d’éliminer les salissures générées au cours de la cuisson. Les restes de saleté (brûlés
à une température de 500°C environ) sont transformés en dépôts qu’on peut facilement enlever avec une
éponge humide une fois que le four est froid. Il n’est pas nécessaire de procéder à un nettoyage par
pyrolyse après chaque cuisson, mais seulement si le degré de salissure est important, en présence de
fumées et d’odeurs désagréables tant en phase de préchauffage qu’en phase de cuisson.
• Si le four est installé sous une table de cuisson, vérifiez que les brûleurs ou les plaques chauffantes
sont éteints avant de lancer le cycle de nettoyage (pyrolyse).
• Les accessoires doivent être enlevés du four avant de lancer un cycle de pyrolyse.
Votre appareil est doté de 2 fonctions pyrolyse :
1. Cycle économique (PYRO EXPRESS/ECO) : la consommation est réduite d’environ 25% par rapport à
un cycle de pyrolyse standard. Il est recommandé d’activer ce cycle de façon régulière (après avoir
cuisiné de la viande 2 à 3 fois de suite).
2. Cycle standard (PYRO) : il garantit un nettoyage en profondeur lorsque le four est particulièrement
sale.
• Quoiqu’il en soit, après un certain nombre de cuisson, sur base du niveau de salissure, l’afficheur
visualisera un message vous invitant à procéder à un cycle d’autonettoyage.
REMARQUE : pendant le déroulement de la pyrolyse, la porte du four est bloquée et le restera tant
que la température dans l’enceinte du four n’aura pas atteint un niveau de sécurité appropri.
- Ne touchez pas le four pendant le cycle de pyrolyse.
- Éloignez les enfants du four pendant le déroulement de cette opération.
ENTRETIEN
AVERTISSEMENT
DÉMONTAGE DE LA PORTE
Pour démonter la porte :
1. Ouvrez complètement la porte du four.
2. Soulevez les deux manettes d’arrêt des charnières en les poussant vers l’avant, jusqu’à la butée
(Fig. 1).
3. Fermez complètement la porte (A), soulevez-la (B) et faites-la pivoter (C) jusqu’à ce qu’elle se décroche
(D) (Fig. 2).
- Munissez-vous de gants de protection.
- Procédez aux opérations indiquées lorsque l’appareil est froid.
- Veillez à toujours débrancher l’appareil.
FR20
Page 23

Pour remonter la porte :
1. Introduisez les charnières dans leur logement respectif.
2. Ouvrez complètement la porte du four.
3. Abaissez les deux manettes d’arrêt.
4. Fermez la porte du four.
Fig. 1 Fig. 2
DÉPLACEMENT DE LA RÉSISTANCE SUPÉRIEURE
(UNIQUEMENT SUR CERTAINS MODÈLES)
1. Retirez les grilles porte-accessoires latérales.
2. Faites sortir légèrement la résistance (Fig. 3) avant de l’abaisser (Fig. 4).
3. Pour remettre la résistance en place, soulevez-la en la tirant légèrement vers vous. Vérifiez qu’elle
repose sur les sièges latéraux prévus à cet effet.
Fig. 3 Fig. 4
FR21
Page 24

REMPLACEMENT DE L’AMPOULE
Pour remplacer l’ampoule arrière (si présente) :
1. Débranchez le four.
2. Dévissez le capot de l’ampoule (Fig. 5), remplacez l’ampoule brûlée èar une neuve (voir « Remarque »
pour connaître le type), puis revissez le capot de l’ampoule.
3. Rebranchez le four.
Pour remplacer l’ampoule latérale (si présente) :
1. Débranchez le four.
2. Déposez les grilles porte-accessoires latérales, si elles sont présentes.
3. À l’aide d’un tournevis à tête plate que vous utiliserez pour faire levier vers l’extérieur, dégagez le
capot de l’ampoule.
4. Remplacez l’ampoule brûlée par une ampoule neuve (voir « Remarque » pour connaître le type).
5. Remontez le couvercle de l’ampoule en l’appuyant contre la paroi du four jusqu’à ce qu’il soit
accroché correctement.
6. Remontez les grilles porte-accessoires latérales.
7. Rebranchez le four.
Fig. 5 Fig. 6 Fig. 7 Fig. 8
REMARQUE :
- Utilisez uniquement des ampoules à incandescence de 25-40W/230V type E-14, T300°C, ou des
ampoules halogènes de 20-40W/230 V type G9, T300°C.
- Ces ampoules sont disponibles auprès de nos Services Après-vente.
REMARQUE IMPORTANTE :
- Si vous utilisez des ampoules halogènes, évitez de les manipuler à mains nues, car vos
empreintes digitales risqueraient de les abîmer.
- Avant de faire fonctionner le four, contrôlez que le capot de l’ampoule a été remis en place.
FR22
Page 25

NOTICE D'UTILISATION DU FOUR
POUR LE BRANCHEMENT ÉLECTRIQUE, CONSULTEZ LA PARTIE RELATIVE À L'INSTALLATION
1
2
3
4
6
7
8
5
9
10
1. Bandeau de commande
2. Ventilateur*) (non visible)
3. Protection du gril
**)
4. Résistance supérieure/gril
5. Éclairage arrière du four
6. Ventilateur de four
7. Résistance inférieure (non visible)
8. Porte froide
9. Dernier gradin
10. Premier gradin
* Il se peut que le ventilateur continue de fonctionner même après l'extinction du four.
** Cette protection empêche le contact direct avec le gril. Néanmoins, nous vous recommandons de ne
jamais toucher la protection lorsque le four est en service.
ACCESSOIRES FOURNIS
Fig. A Fig. B
A. GRILLE (1) : vous pouvez l'utiliser pour cuire les aliments ou comme support pour les casseroles,
moules à gâteau ou tout autre récipient approprié à la cuisson au four.
B. LÈCHEFRITE (1) : vous pouvez la positionner sous la grille pour récolter les jus ou l'utiliser comme
plat pour cuire la viande, le poisson, les légumes, les fougasses, etc.
ACCESSOIRES NON FOURNIS
Il est possible d’acheter séparément d’autres accessoires auprès de votre revendeur - distributeur de pièces
détachées.
FR23
Page 26
INSERTION DE GRILLES ET AUTRES ACCESSOIRES DANS L'ENCEINTE DU FOUR
La grille et les autres accessoires sont équipés d'un système de blocage qui évite leur extraction
involontaire.
Fig. 1
1. Insérez la grille horizontalement, avec la partie rehaussée « A » orientée vers le haut (Fig. 1).
2. Inclinez la grille à la hauteur de la position de blocage « B » (Fig. 2).
Fig. 2 Fig. 3
3. Remettez la grille en position horizontale et poussez-la jusqu'à ce qu'elle soit parfaitement insérée
« C » (Fig. 3).
4. Pour extraire la grille, procédez dans le sens inverse.
Pour les autres accessoires (lèchefrite, plaque à pâtisserie), l'introduction s'effectue exactement de la
même manière. La saillie sur la partie plate assure leur blocage.
DESCRIPTION DU BANDEAU DE COMMANDE
1. Bouton de sélection des fonctions
2. Touche de programmation (« set »)
3. Touche de confirmation (« ok »)
4. Touches de modification valeurs
temps (« - » « + »)
3 41 52
Minuterie
Fonctions Spéciales
Sécurité enfants
Bouton de sélection des fonctions
Durée de cuisson
5. Bouton du thermostat
Heure de fin de cuisson
MODE D'EMPLOI DU FOUR
Activation du four
Après avoir branché le four pour la première fois au secteur ou après une coupure d'électricité, l'afficheur
indique « 12:00 ».
Sélection et modification de l'horloge :
1. Appuyez sur la touche « - » ou « + » pour programmer l'heure.
2. Appuyez sur « set » et sur « - » ou « + » pour programmer les minutes.
3. Appuyez sur la touche « OK » pour confirmer la sélection.
Pour modifier l'heure :
Appuyez sur la touche « OK » pendant 3 secondes jusqu'à ce que l'heure clignote à l'afficheur. Répétez les
opérations indiquées ci-dessus.
FR24
Page 27
Sélectionner la fonction de cuisson
1. Tournez le bouton 1 sur la fonction choisie. L'affichage visualise la température prédéfinie pour cette
fonction ou le niveau de puissance des fonctions Gril et Turbogril.
2. Tournez le bouton 5 pour sélectionner la température ou le niveau de puissance.
3. Pour confirmer la température ou le niveau de puissance préréglé, appuyez sur OK ; le four s'allume ;
le message PRE s'affiche (uniquement pour les fonctions qui le prévoient) et le voyant s'allume en
face de . Dès que la température réglée est atteinte, la valeur correspondante s'affiche, un signal
sonore retentit et le voyant en face de s'éteint. À ce stade, introduisez le plat à cuire.
Pour la fonction de décongélation, appuyez directement sur « OK ».
Pour modifier la température :
1. Tournez le bouton 5 et sélectionnez à nouveau la température souhaitée.
Avertissement: Pour annuler une sélection quelconque, tournez le bouton 1 sur « 0 ». Ou, appuyez sur
« réglage » pour éteindre le four, tout en conservant les fonctions sélectionnées précédemment.
Sélection du temps de cuisson
Sélectionnez la durée de la cuisson (disponible avec toutes les fonctions, sauf les fonctions spéciales), si
vous souhaitez allumer le four pendant un intervalle de temps spécifique. au terme de laquelle le four
s'éteint automatiquement. La durée de cuisson maximale programmable varie entre 12 et 4 heures et 30
minutes en fonction de la fonction de cuisson sélectionnée.
1. Programmez la fonction et la température (voir chapitre : « Sélection de la fonction de cuisson »)
jusqu'au point 2 sans confirmer avec la touche « OK ».
2. Appuyez sur la touche « set » (le voyant s'allume à l'afficheur, en face du symbole de la durée de
cuisson ) et sélectionnez dans les 8 minutes qui suivent la durée de cuisson souhaitée à l'aide de
la touche « - » ou « + ».
3. Confirmez en appuyant sur la touche « ok », le four se met en marche et l'afficheur indique le temps
restant avant la fin de la cuisson.
4. Pour modifier la température préalablement réglée, tournez le bouton 5. Pour retourner à l'affichage
du temps restant, attendez 3 secondes.
Apparition de sur l'afficheur :
A la fin du temps programmé, l'indication apparaît sur l'afficheur et un signal sonore retentit.
Le four s'éteindra automatiquement.
Il est possible de modifier la durée de cuisson en appuyant sur la touche « - » ou « + ». Retournez au point
3 chapitre « Sélection de la durée de cuisson ».
Pour éteindre définitivement le four :
1. Tournez le bouton 1 sur « 0“.
L'heure du jour réapparaît sur l'afficheur.
Sélection de l'heure de fin de cuisson
Cette opération permet de programmer à l'avance l'heure de fin de cuisson. La durée maximale
programmable est de 23 heures et 59 minutes.
1. Procédez en suivant les points 1 et 2 du chapitre « Sélection de la durée de cuisson ».
2. Appuyez sur la touche « set » pour régler l'heure de fin de cuisson : le voyant situé en face du
symbole s'allume.
3. Programmez l'heure de fin de cuisson à l'aide des touches « - » et « + ».
4. Appuyez sur la touche « OK » pour confirmer l'heure de fin de cuisson.
Le four s'allume automatiquement à la fin du temps de cuisson moins la durée de cuisson : le voyant
s'allume à l'afficheur, au-dessus du symbole puis du symbole .
FR25
Page 28

FONCTIONS SPÉCIALES
Tournez le bouton 1 sur la fonction : s'allume en face du symbole .
Pizzas
Fonction à température préprogrammée, pouvant être réglée entre 220 °C et 250 °C, idéale pour la cuisson
des pizzas.
1. Tournez le bouton 5 jusqu'à ce que le message « P1 » s'affiche, appuyez sur « OK », après quoi
l'afficheur visualise la température de 250 °C.
2. Appuyez sur la touche « OK » pour confirmer la sélection.
3. Le voyant en face de sur le bandeau de commande s'éteint dès que la température de 250 °C est
atteinte ; la valeur correspondante clignote à l'afficheur et est accompagnée d'un bip ; ensuite
apparaît la durée de cuisson préréglée.
4. Enfournez les aliments à cuire.
5. Dès que la durée programmée est écoulée, le four s'éteint automatiquement, apparaît à
l'afficheur et un signal sonore retentit.
Il est possible de modifier la durée prédéfinie à l'aide des touches « + » et « - ».
Maintien au chaud
Permet de maintenir le four à une température constante de 65 °C.
1. Tournez le bouton 5 jusqu'à ce que le message « P2 » s'affiche, appuyez sur « OK », ensuite la durée
préréglée en usine correspondant à une heure s'affiche.
2. Appuyez sur la touche « OK » pour confirmer la sélection.
3. La voyant en face de sur le bandeau de commande s'éteint dès que la température de 65 °C est
atteinte.
4. Enfournez les aliments à cuire.
5. Il est possible de modifier la durée prédéfinie à l'aide des touches « + » et « - ».
6. Appuyez sur la touche « OK » pour confirmer la sélection.
7. Dès que la durée programmée est écoulée, le four s'éteint automatiquement, apparaît à
l'afficheur et un signal sonore retentit.
Fonction Pyrolyse
1. Tournez le bouton 1 sur la fonction de nettoyage automatique Pyrolyse ; l'afficheur indique
pendant 2 secondes CLn (nettoyage) ; le sélecteur règle automatiquement une durée minimum de
1h30.
2. Pour modifier la durée du nettoyage automatique, utilisez les touches « + » et « - ». La durée
maximum du programme est de 3 heures.
Pour régler la fin du cycle de pyrolyse, procédez comme suit :
1. Appuyez sur la touche « set » pour programmer l'heure de fin de la fonction Pyrolyse.
Le voyant s'allume en face du symbole .
2. Programmez l'heure de fin de la fonction Pyrolyse à l'aide des touches « - » et « + ».
3. Appuyez sur la touche « ok » pour confirmer l'heure de fin de la fonction Pyrolyse.
Le four s'allumera automatiquement à la fin du cycle de pyrolyse moins la durée du cycle
(préalablement programmée).
Le voyant s'allume au-dessus du symbole , puis au démarrage du four, au-dessus du
symbole .
Dès que la durée réglée est écoulée, le message « COOL » (refroidissement) est affiché (voir figure) tant
que la porte est bloquée ; au déblocage de la porte, un signal sonore retentit et l'afficheur indique .
4. Appuyez sur « OK » pour arrêter le signal sonore.
5. Tournez le bouton 1 sur « 0 » : l'heure du jour réapparaît à l'affichage.
FR26
Page 29

Minuterie
Le minuteur peut être utilisé uniquement lorsque le four ne fonctionne pas et permet de régler un temps
maximum de 6 heures.
Pour régler la minuterie :
1. Maintenez le bouton 1 sur la position « 0 ». L'heure du jour apparaît sur l'afficheur.
2. Appuyez sur la touche « set ». Le voyant en face du symbole s'allume. Réglez la durée
souhaitée à l'aide des touches « - » et « + ».
3. Confirmez votre sélection en appuyant sur « OK ».
Dès que la durée réglée est écoulée :
un signal sonore retentit et clignote à l'afficheur.
Appuyez sur la touche « OK » : le signal sonore s'arrête. L'heure du jour réapparaît sur l'afficheur.
Sécurité enfants
1. Appuyez simultanément sur les touches « + » et « - » pendant 3 secondes. Le voyant correspondant
s'allume en face du symbole .
2. Pendant la cuisson, si vous tournez le bouton des fonctions sur « 0 », le four s'éteint.
3. Pour désactiver cette fonction, répétez la séquence indiquée au point 1.
FR27
Page 30
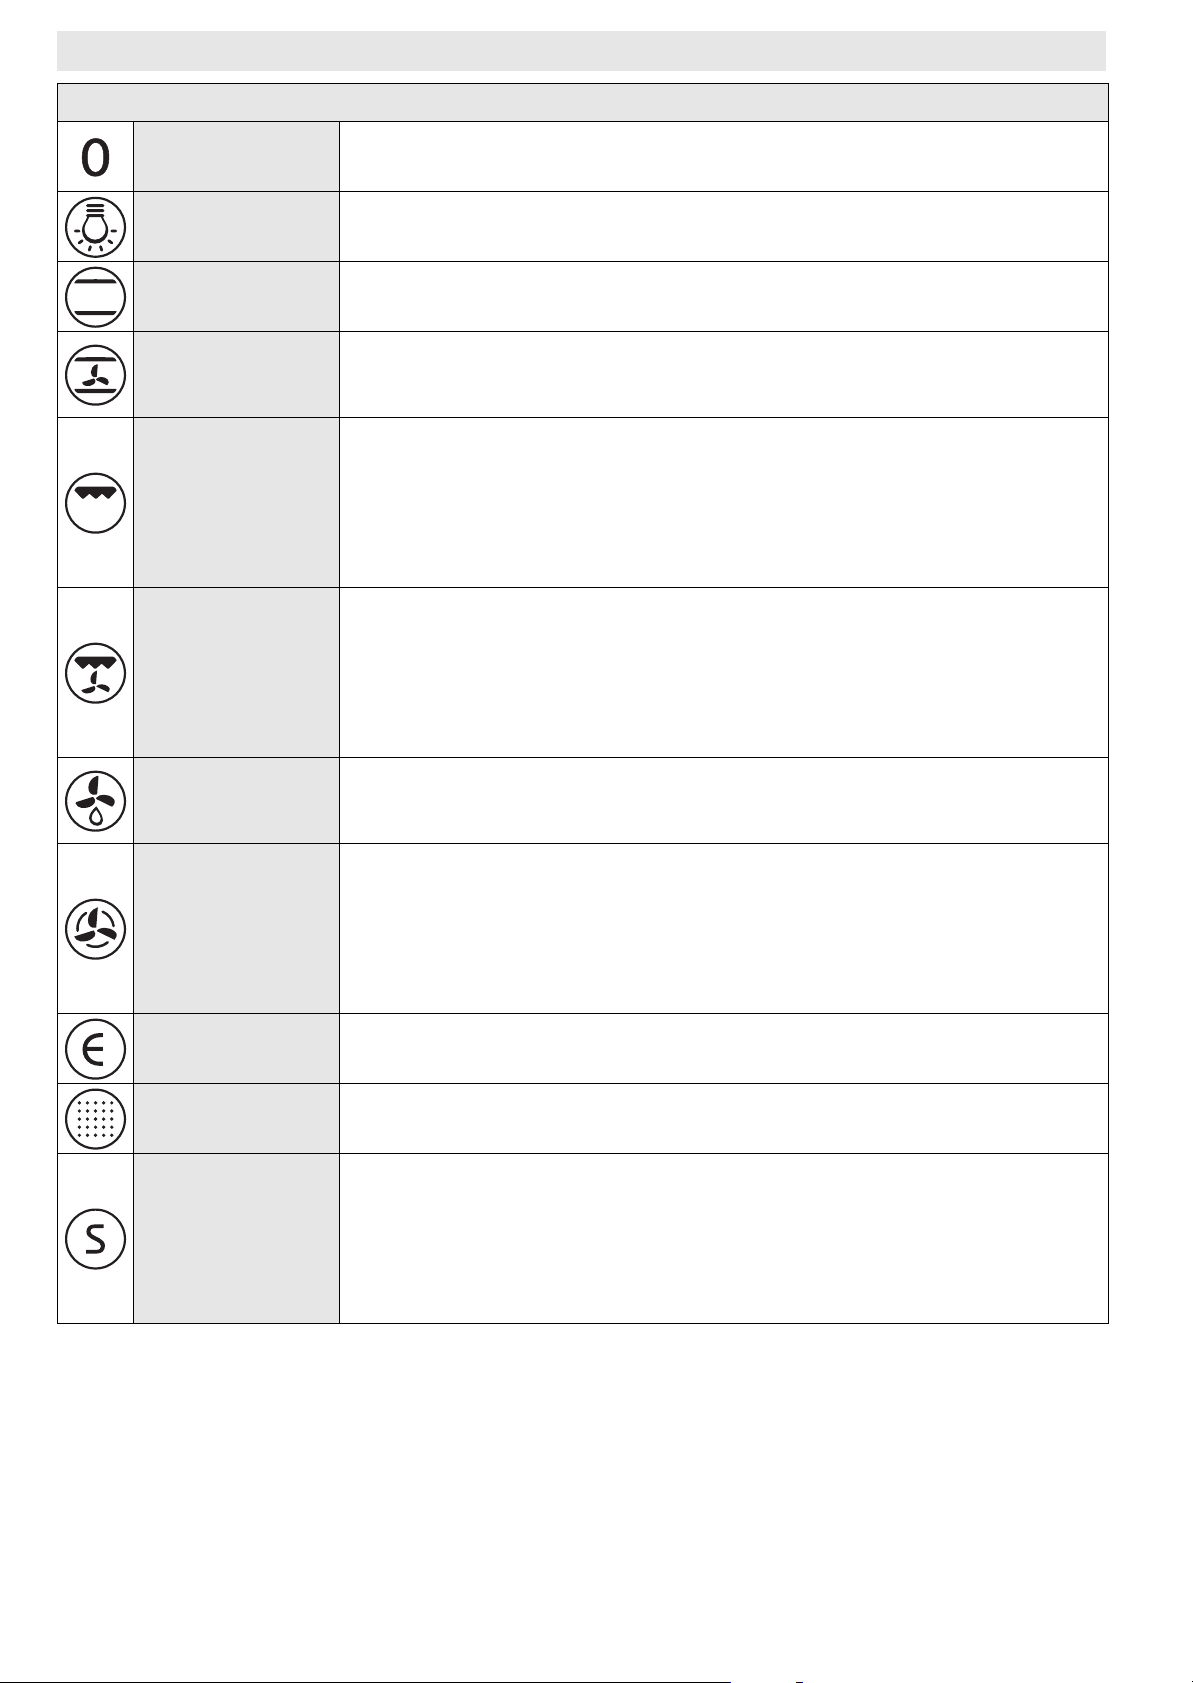
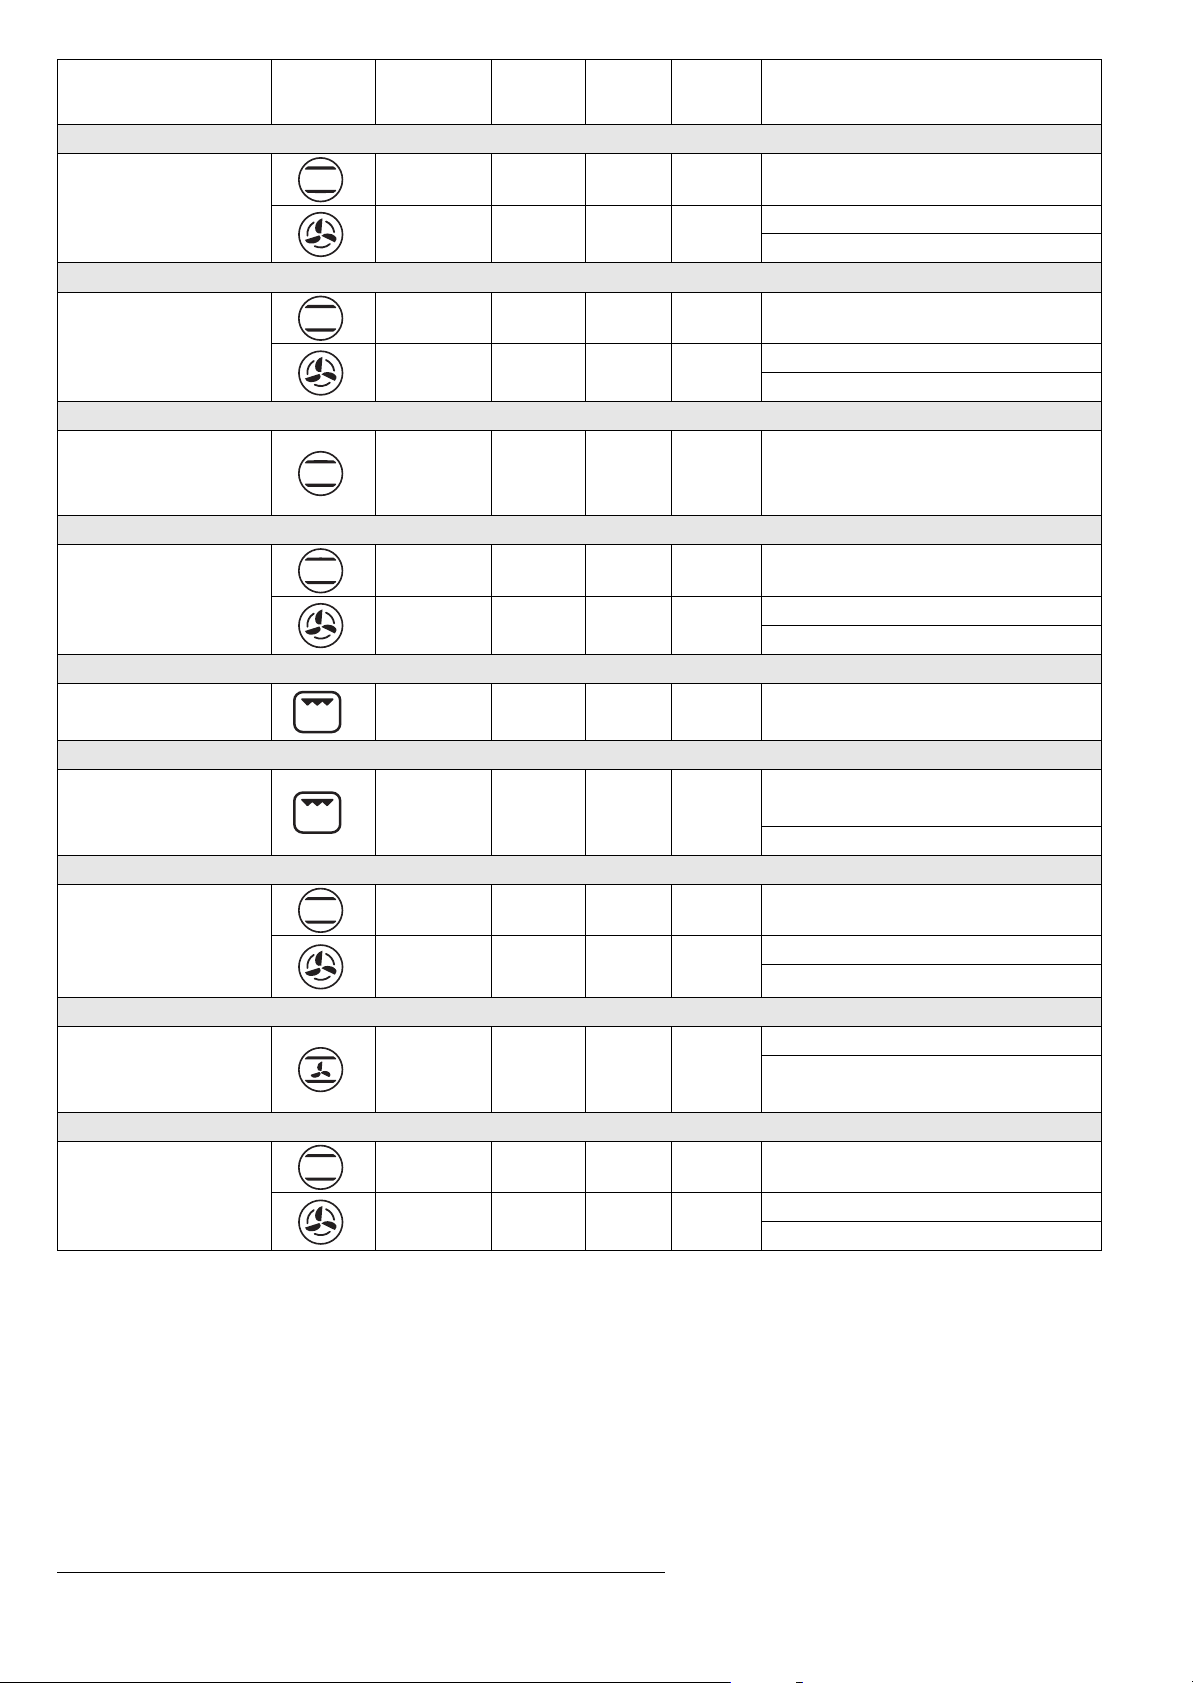
TABLEAU DESCRIPTIF DES FONCTIONS DU FOUR
BOUTON DES FONCTIONS
OFF Pour interrompre la cuisson et éteindre le four.
LAMPE Pour allumer/éteindre l'éclairage intérieur du four.
CONVECTION
NATURELLE
CONVECTION
FORCÉE
GRIL
TURBO GRIL
DÉCONGÉLATION
CHALEUR PULSÉE
Pour cuire n'importe quel type de plat sur un seul gradin. Utilisez le 2e gradin. Préchauffez le four avant d'introduire l'aliment à cuire.
Pour cuire des viandes et des gâteaux avec farce liquide (salés ou sucrés) sur
un unique gradin. Utilisez le 2e gradin. Il est conseillé de préchauffer le four
avant de cuire.
Pour cuire des entrecôtes, des brochettes, des saucisses, faire gratiner des
légumes et dorer du pain. Nous suggérons de positionner le plat sur le 4e
gradin. Pour faire griller de la viande, il est conseillé d'utiliser une lèchefrite
pour recueillir le jus de cuisson. Placez-la sur le 3e gradin en ajoutant environ
un demi-litre d'eau. Il n'est pas nécessaire de préchauffer le four. Pendant la
cuisson, la porte du four doit rester fermée.
Pour griller de gros morceaux de viande (cuisseaux, rosbifs, poulets). Placezles sur les gradins centraux. Il est conseillé d'utiliser une lèchefrite pour
recueillir le jus de cuisson. Placez-la sur le 1er/2ème gradin en ajoutant environ un demi-litre d'eau. Il n'est pas nécessaire de préchauffer le four. Pendant
la cuisson, la porte du four doit rester fermée. Avec cette fonction, il est possible d'utiliser le tournebroche, si cet accessoire est présent.
Pour accélérer la décongélation des aliments. Il est conseillé de placer l'aliment sur le gradin central. Laissez l'aliment dans son emballage pour empêcher que sa surface ne se déshydrate.
Pour cuire simultanément sur deux gradins des aliments, mêmes différents,
nécessitant la même température de cuisson (ex : poisson, légumes,
gâteaux). La fonction permet de cuire sans transmettre les odeurs d'un aliment à l'autre. Utilisez le 2e gradin pour les cuissons sur un seul gradin. Pour
les cuissons sur deux niveaux, utilisez les 1er et 3e gradins. Préchauffez le
four avant cuisson.
ECO
NETTOYAGE
AUTOMATIQUE
FONCTION
SPÉCIALE
Fonction permettant d'économiser de l'énergie ; elle est appropriée pour
réchauffer des plats et compléter la cuisson d'aliments.
La durée de la pyrolyse peut être réglée de 1 h 30 minutes minimum à 3 h
maximum.
P1 (Pizza) : pour cuire la pizza maison. Le préchauffage automatique règle le
four à la température qui convient pour la cuisson que vous avez choisie. Placez les aliments à l'intérieur du four dès que la température programmée est
atteinte. Utilisez le 2e gradin.
P2 (Maintien au chaud) : grâce à cette fonction, les aliments qui viennent
d'être cuits restent chauds et croquants (par ex : viandes, fritures, gratins).
FR28
Page 31
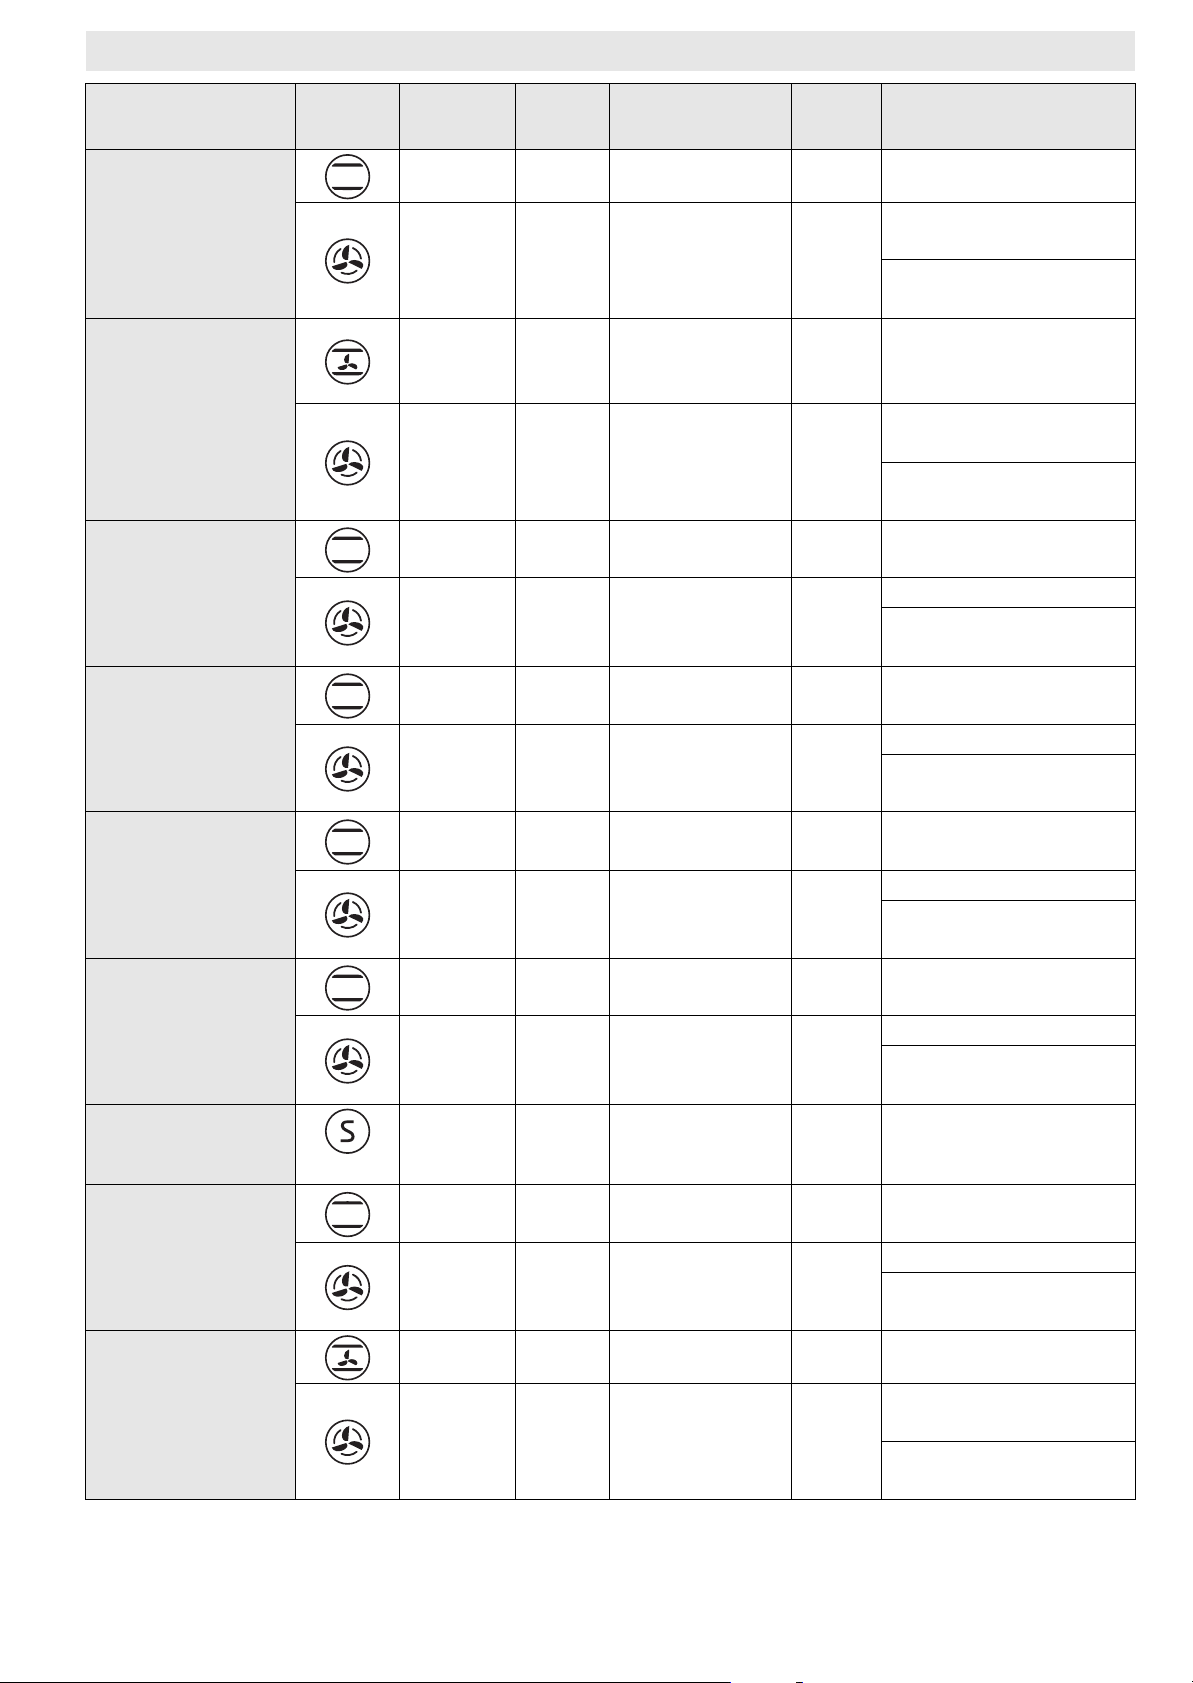
TABLEAU DE CUISSON
Recette Fonction Pré-
chauffage
Oui 2 160-180 30-90 Moule à gâteau sur grille
Gâteaux levés
Oui 1-3 160-180 30-90
Tourtes fourrées
(tarte au fromage
blanc, strudel aux
pommes, tarte aux
fruits)
Biscuits/Tartelettes
Choux ronds
Meringues
Pain / Pizza / Fougasse
Oui 2 160-200 30-85
Oui 1-3 160-200 35-90
Oui 2/3 170-180 15-45
Oui 1-3 160-170 20-45
Oui 2 180-200 30-40
Oui 1-3 180-190 35-45
Oui 2 90 110-150
Oui 1-3 90 130-150
Oui 2 190-250 15-50
Oui 1-3 190-250 25-50
Gradin
(du bas)
Te mp .
(°C)
Durée
(min)
Accessoires et notes
Grad. 3 : moule à gâteau
sur grille
Grad. 1 : moule à gâteau
sur grille
Lèchefrite / plaque à
pâtisserie ou moule à
gâteaux sur grille
Grad. 3 : moule à gâteau
sur grille
Grad. 1 : moule à gâteau
sur grille
Lèchefrite / plaque à
pâtisserie
Grad. 3 : grille
Grad. 1 : lèchefrite / plaque à pâtisserie
Lèchefrite / plaque à
pâtisserie
Grad. 3 : plaque sur grille
Grad. 1 : lèchefrite / plaque à pâtisserie
Lèchefrite / plaque à
pâtisserie
Grad. 3 : plaque sur grille
Grad. 1 : lèchefrite / plaque à pâtisserie
Lèchefrite / plaque à
pâtisserie
Grad. 3 : plaque sur grille
Grad. 1 : lèchefrite / plaque à pâtisserie
Pizzas
Pizzas surgelées
Tourtes (tourtes
aux légumes, quiches)
P1
Oui 2 220-250 10-30
Oui 2 250 10-15
Oui 1-3 250 10-20
Oui 2 180-190 35-45 Moule à gâteau sur grille
Oui 1-3 180-190 45-60
FR29
Grad. 2 : lèchefrite / plaque à pâtisserie
Grad. 2 : lèchefrite / plaque à pâtisserie ou grille
Grad. 3 : plaque sur grille
Grad. 1 : lèchefrite / pla-
que à pâtisserie
Grad. 3 : moule à gâteau
sur grille
Grad. 1 : moule à gâteau
sur grille
Page 32
Recette Fonction Pré-
chauffage
Oui 2 190-200 20-30
Vol-au-vent /
feuilletés
Lasagnes / pâtes
au four / cannellonis/flans
Agneau / veau /
bœuf / porc 1kg
Poulet / lapin /
canard 1kg
Dinde / oie 3kg Oui 1/2 190-200 80-130
Poisson au four /
en papillote (filet,
entier)
Légumes farcis
(tomates, courgettes, aubergines)
Oui 1-3 180-190 20-40
Oui 2 190-200 45-55 Plaque sur grille
Oui 2 190-200 70-100
Oui 2 200-230 50-100
Oui 2 180-200 40-60
Oui 2 180-200 50-60 Plaque sur grille
Gradin
(du bas)
Temp.
(°C)
Durée
(min)
Accessoires et notes
Lèchefrite / plaque à
pâtisserie
Grad. 3 : plaque sur grille
Grad. 1 : lèchefrite / plaque à pâtisserie
Lèchefrite ou plaque sur
grille
Lèchefrite ou plaque sur
grille
Lèchefrite ou plaque sur
grille
Lèchefrite ou plaque sur
grille
Croque-monsieur - 4 3 (haut) 2-5 Grille
Grad. 4 : grille (tournez
Filets/darnes de
poisson
Saucisses / brochettes/ travers de
porc/ hamburgers
Poulet rôti 1-1,3 kg - 2
Rosbif saignant
1kg
Gigot d'agneau /
jarrets
Pommes de terre
au four
- 4 2 (moyen) 20-35
- 4 2-3 (moyen-haut) 15-40
- 2 2 (moyen) 35-45
- 2 2 (moyen) 60-90
- 2 2 (moyen) 45-55
2 (moyen) 50-65
3 (haut) 60-80
l’aliment à mi-cuisson)
Grad. 3 : lèchefrite avec
eau
Grad. 4 : grille (tournez
l’aliment à mi-cuisson)
Grad. 3 : lèchefrite avec
eau
Grad. 2 : grille (tourner
l’aliment aux 2/3 de la
cuisson)
Grad. 1 : lèchefrite avec
eau
Grad. 2 : tournebroche
(si présent)
Grad. 1 : lèchefrite avec
eau
Plaque sur grille (retourner les aliments aux
deux tiers de cuisson si
nécessaire)
Lèchefrite ou plaque sur
grille (retourner les aliments aux deux tiers de
la cuisson si nécessaire)
Lèchefrite / plaque à
pâtisserie (retourner les
aliments aux deux tiers
de la cuisson si nécessaire)
FR30
Page 33

Recette Fonction Pré-
chauffage
Légumes gratinés - 2 3 (haut) 10-15 Plaque sur grille
Gradin
(du bas)
Te mp .
(°C)
Durée
(min)
Accessoires et notes
Lasagnes et viandes
Viandes et pommes de terre
Poisson et légumes
* La durée de cuisson est fournie à titre indicatif. Les aliments peuvent être retirés dans des délais
différents selon les goûts personnels.
Oui 1-3 200 50-100*
Oui 1-3 200 45-100*
Oui 1-3 180 30-50*
Grad. 3 : plaque sur grille
Grad. 1 : lèchefrite ou
plaque sur grille
Grad. 3 : plaque sur grille
Grad. 1 : lèchefrite ou
plaque sur grille
Grad. 3 : plaque sur grille
Grad. 1 : lèchefrite ou
plaque sur grille
FR31
Page 34
RECETTES TESTÉES conformément aux normes IEC 50304/60350:2009-3 et DIN 3360-12:07:07
Recette Fonction Pré-
chauffage
IEC 60350:2009-03 § 8.4.1
Biscuits de pâte brisée (Shortbread)
IEC 60350:2009-03 § 8.4.2
Viennoiserie (Small
cakes)
IEC 60350:2009-03 § 8.5.1
Gênoise sans matières grasses (Fatless
sponge cake)
IEC 60350:2009-03 § 8.5.2
Deux tartes aux
pommes (Two apple
pies)
IEC 60350:2009-03 § 9.1.1
Croque-monsieur
(Toast)*
IEC 60350:2009-03 § 9.2.1
Hamburgers (Burgers)*
DIN 3360-12:07 § 6.5.2.3
Tarte aux pommes,
tarte sur plaque
(Apple cake, yeast
tray cake)
DIN 3360-12:07 § 6.6
Rôti de porc (Roast
pork)
DIN 3360-12:07 annexe C
**
**
**
Oui 2 170 15-25 Lèchefrite / plaque à pâtisserie
Oui 1-3 160 20-30
Oui 3 170 20-30 Lèchefrite / plaque à pâtisserie
Oui 1-3 160 30-40
Oui 2 170 35-45 Moule à gâteau sur grille
Oui 2 185 60-75 Moule à gâteau sur grille
Oui 1-3 175 70-90
- 4 3 (haut) 2-5 Grille
- 4 3 (haut) 30-40
Oui 2 180 30-40 Lèchefrite / plaque à pâtisserie
Oui 1-3 160 55-65
- 2 190 150-170
Gradin
(du bas)
Temp.
(°C)
Durée
(min)
Accessoires et notes
Grad. 3 : plaque à pâtisserie
Grad. 1 : lèchefrite
Grad. 3 : plaque à pâtisserie
Grad. 1 : lèchefrite
Grad. 3 : moule à gâteau sur grille
Grad. 1 : moule à gâteau sur grille
Grad. 4 : grille (tournez l’aliment à
mi-cuisson)
Grad. 3 : lèchefrite avec eau
Grad. 3 : plaque à pâtisserie
Grad. 1 : lèchefrite
Grad. 3 : grille
Grad. 2 : lèchefrite avec eau
(ajouter de l'eau si nécessaire)
Gâteau plat (Flat
cake)
** Le tableau de cuisson suggère les fonctions et les températures idéales pour obtenir les meilleurs
résultats pour chaque recette. Pour effectuer une cuisson en convection forcée sur un seul gradin, il est
conseillé d'utiliser le deuxième gradin et la même température suggérée pour le « CHALEUR PULSÉE »
sur plusieurs gradins.
* Pour griller, il est conseillé de laisser 3-4 cm libres par rapport au bord avant de la grille pour faciliter
l'extraction.
Les indications du tableau s'entendent sans utilisation des guides coulissants. Procédez aux essais
sans les guides coulissants.
Classe d'efficacité énergétique (selon la norme EN 50304)
Pour procédez à l'essai, utilisez le tableau dédié.
**
Oui 2 170 35-45 Lèchefrite / plaque à pâtisserie
Oui 1-3 170 40-50
FR32
Grad. 3 : plaque à pâtisserie
Grad. 1 : lèchefrite
Page 35

CONSEILS D'UTILISATION ET SUGGESTIONS
Comment lire le tableau de cuisson
Le tableau indique la meilleure fonction à utiliser pour un aliment donné, à cuire sur un ou plusieurs
gradins simultanément. Les temps de cuisson commencent au moment de l'introduction du plat dans le
four et ne tiennent pas compte du préchauffage (si nécessaire). Les températures et les durées de cuisson
sont indicatives et dépendent de la quantité d'aliments et du type d'accessoire. Au départ, utilisez les
valeurs les plus basses conseillées et, si le résultat de la cuisson n'est pas satisfaisant, passez à des valeurs
plus élevées. Il est conseillé d'utiliser les accessoires fournis et des moules ou plats si possible en métal
foncé. Il est également possible d'utiliser des casseroles et accessoires en pyrex ou en céramique ; les temps
de cuisson augmenteront légèrement. Pour obtenir de meilleurs résultats, suivez attentivement les
conseils donnés dans le tableau de cuisson pour le choix des accessoires fournis à positionner sur les
différents gradins.
Cuisson simultanée d'aliments différents
En utilisant la fonction « CHALEUR PULSÉE », il est possible de cuire simultanément des aliments différents
(par exemple : poisson et légumes) qui nécessitent une température identique, sur plusieurs gradins.
Sortez les aliments nécessitant des temps de cuisson inférieurs et laissez la cuisson continuer pour ceux
dont les temps sont plus longs.
Desserts
- Cuisez la pâtisserie sur un seul gradin avec la fonction Convection naturelle. Utilisez des moules à
gâteau en métal foncé et placez-les toujours sur la grille fournie. Pour la cuisson sur plusieurs gradins,
sélectionnez la fonction Chaleur pulsée et disposez les moules décalés sur les grilles, de manière à
favoriser la circulation de l'air.
- Pour comprendre si le gâteau est cuit, introduisez un cure-dent dans la partie la plus haute du gâteau.
Si le cure-dent est sec, cela signifie que le gâteau est cuit.
- Si vous utilisez des moules anti-adhérents, ne beurrez pas les bords ; le gâteau pourrait ne pas lever
de manière homogène sur le pourtour.
- Si le gâteau se « dégonfle » durant la cuisson, utilisez la fois suivante une température inférieure ; vous
pouvez également réduire la quantité de liquide et mélanger la pâte plus délicatement.
- Pour les pâtisseries avec garniture juteuse (gâteaux au fromage ou tartes aux fruits), utilisez la
fonction « CONVECTION FORCÉE ». Si le fond de la tarte est trop humide, placez-le sur un gradin
inférieur et saupoudrez la base avec de la chapelure ou des biscuits émiettés avant de la garnir.
Viandes
- Utilisez n'importe quel type de plat adapté à la taille de la viande à cuire. Pour les rôtis, ajoutez de
préférence du bouillon au fond du plat et arrosez la viande durant la cuisson pour la rendre plus
savoureuse. Lorsque le rôti est cuit, laissez-le reposer dans le four pendant 10-15 minutes ou bien
enveloppez-le dans du papier aluminium.
- Si vous désirez faire griller la viande, choisissez des morceaux de la même épaisseur pour obtenir une
cuisson uniforme. Les morceaux de viande très épais ont besoin d'un temps de cuisson supérieur.
Pour éviter de faire brûler leur surface, éloignez-les du gril en plaçant la grille sur un gradin inférieur.
Retournez la viande aux deux tiers de la cuisson.
Il est conseillé d'utiliser une lèchefrite avec un demi-litre d'eau, directement sous la grille sur laquelle la
viande à griller a été placée, pour recueillir le jus de cuisson. Ajoutez de l'eau si nécessaire.
Tournebroche (disponible uniquement sur certains modèles)
Cet accessoire sert à faire griller de gros morceaux de viande et des volailles de façon uniforme. Enfilez la
viande sur le tournebroche, fixez-la avec une ficelle de cuisine s'il s'agit d'un poulet et vérifiez qu'il ne
bouge pas avant d'introduire la broche dans son logement sur la paroi frontale du four et posez-la sur son
support. Pour éviter la formation de fumée et recueillir les jus de cuisson, il est conseillé de placer une
lèchefrite sur le premier gradin avec un demi-litre d'eau. La broche est dotée d'une poignée en plastique
qu'il faut enlever avant de commencer la cuisson et qu'il faut replacer en fin de cuisson pour sortir la viande
du four sans se brûler.
Pizzas
Graissez légèrement les plaques pour obtenir une pizza croustillante également sur le fond. Répartissez la
mozzarella sur la pizza aux deux tiers de la cuisson.
FR33
Page 36

FR34
Page 37

Page 38

Printed in Italy
01/2012
5019 610 01308
GB FR
 Loading...