


RADIO CONTROLLED ANALOG CLOCK WITH TEMPERATURE
& DATE LCD
INTRODUCTION:
Congratulations on purchasing this Analog Clock featuring WWVB radio controlled time with daylight
saving time function, indoor temperature and calendar display. The operation of this product is simple
and straightforward but please read this instruction manual to ensure that you have the full benefits of
all its features.
FEATURES:
• WWVB radio control time with manual time setting option
• 4 time zones : Pacific Time (PT), Mountain Time (MT), Central Time (CT) and Eastern Time
(ET).
• Indoor temperature in degrees Fahrenheit (°F) or Celsius (°C) (User selectable)
• Calendar display
• Indoor temperature
SPECIFICATIONS:
Indoor Temperature measuring range : -4°F to +140°F (-20°C to +60°C)
Indoor Temperature checking interval : every 15 seconds
POWER SUPPLY:
Analog Clock : 1 x AA, IEC LR6, 1.5V battery
LCD Thermo-Hygro Weather Monitor : 2 x AAA, IEC LR3, 1.5V battery
Battery life cycle : approximately 12 months (Alkaline batteries recommended)
DIMENSIONS:
Analog Clock (ø x W) : 13.0" x 1.7" (330 x 42.5 mm)
Instruction manual
1
The Digital Temperature and date LCD
y
y
t
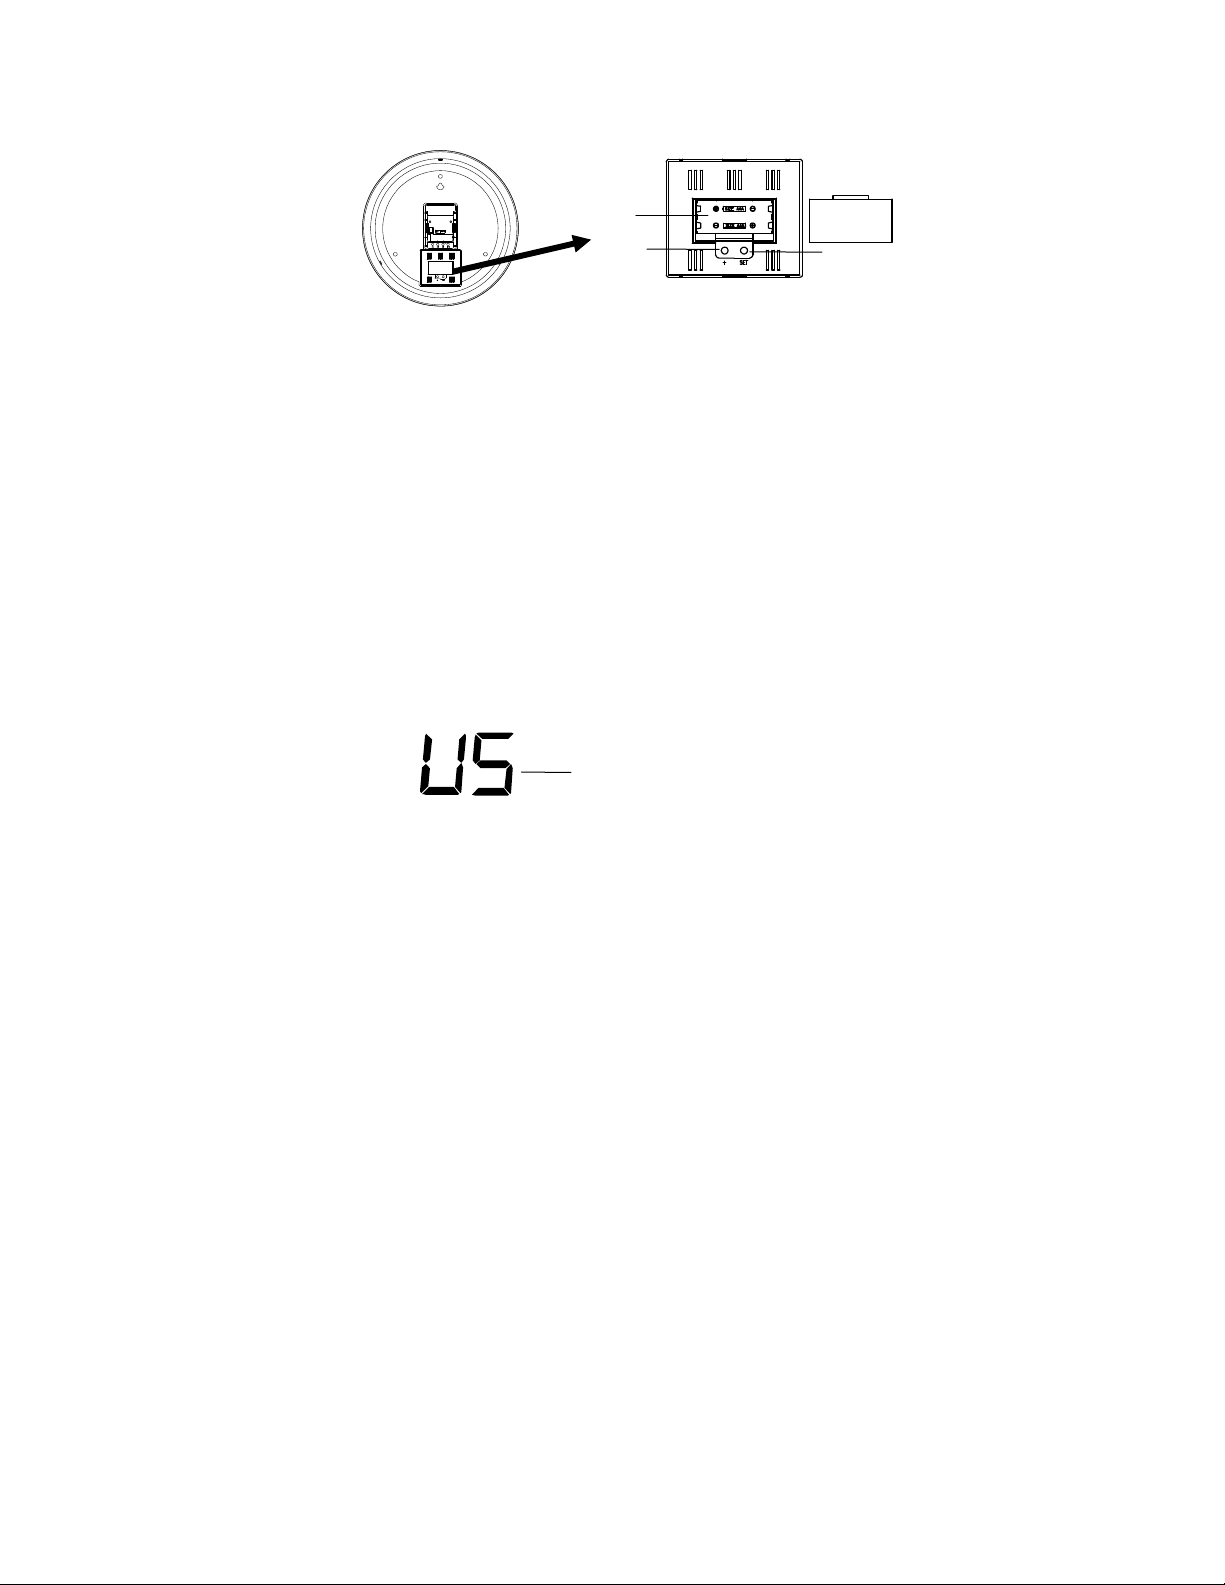
SETTING UP OF THE TEMP AND DATE LCD:
The temperature LCD uses 2 x AAA, IEC LR3, 1.5V batteries. To install and replace the batteries,
please follow the steps below:
1. Lift the center of the battery compartment and remove the cover.
2. Insert the batteries, observing the correct polarization.
3. Replace the battery cover on the unit.
After a few seconds, the LCD screen starts to display indoor temperature and the date.
FUNCTION KEYS
SET key:
• Press and hold to enter the set mode for the following functions: Display Language (English or
Spanish), °F/°C settings, 12/24 hour format, Manual time, Year, Month and Date
+ key
• Press To make adjustment for various settings
• In normal display, press to toggle between the display of "Weekday + date", "Indoor temp + date"
and "Weekday + indoor temp" in the LCD
MANUAL SETTINGS:
The following manual settings can be done in the setting mode:
• Display Language (English or Spanish)
• °F/ °C setting
• 12/ 24 hr time format
• Manual time setting
• Calendar setting
Press and hold the SET key for about 3 seconds to advance to the setting mode:
DISPLAY LANGUAGE (ENGLISH OR SPANISH)
The default language of display is set English (US). To select Spanish ('E")°C:
1. The “US” will be flashing, use the + key to toggle between “US” (English) and “S” (Spanish).
2. Once the desired language has been chosen, confirm with the SET to advance to the
°F/°C hr time format.
Batter
compartmen
flashing
2
+ ke
SET key

°F/°C TEMPERATURE UNIT SETTING
The default temperature reading is set to °F (Fahrenheit). To select °C (Celsius):
3. The “°F/ °C” will be flashing, use the + key to toggle between “°F” and “°C”.
4. Once the desired temperature unit has been chosen, confirm with the SET to advance to the
12/ 24 hr time format.
12/ 24 HR TIME FORMAT
The time display can be selected to show hours in 12-hour or 24-hour settings. (Default 12-Hour)
1. Press the + key to toggle between “12H” or “24H”.
2. Confirm with the SET key and enter the Manual time setting.
flashing
flashing
MANUAL TIME SETTING
Hours (flashing)
To set the clock:
1. The hour digits start flashing in the time display section.
2. Use the + key to adjust the hours and then press SET key to go to the minute setting.
3. The minute will be flashing. Press the + key to adjust the minutes.
4. Confirm with the SET key and enter the “Calendar Setting”.
CALENDAR SETTING
Minutes (flashing)
Year
The date default of the clock is 1. 1. of the year 2006 after initial set-up.
To set the date:
1. Using the + key, set the year required. The range runs from 2006 to 2036 (default is 2006).
2. Press the SET key to enter the month setting mode.
3. The month digit will be flashing. Press the + key to set the month and then press the SET key to
go to the day setting.
4. The day digit will be flashing. Press the + key to set the day.
5. Confirm with the SET and return to the normal display.
Note: The weekday will be automatically set. In normal display, the time will not be shown.
"Month/ Date" – when 12 hour time is chosen;
"Date/ Month" – when 24 hour time is chosen.
3

TO VIEW THE DIFFERENT MODE IN THE LCD.
In normal display, user may press the + key to toggle between the display of "Weekday + date", "Indoor
temp + date" and "Weekday + indoor temp" in the LCD:
Weekday
Date
Temperature
The Analog Clock:
Note:
The Analog clock and the Temp and date LCD works independently.
Nothing is more precisely measured than time!
And nothing keeps track of time more precisely and trouble-free than La Crosse Technology radio
controlled clocks.
has devised accurate machines to trap and measure time. Today, time is precisely measured in the
United States by the most accurate clock in North America, the Atomic Clock of the US National
Institute of Standards and Technology, Time and Frequency Division in Boulder, Colorado. A team of
atomic physicists continually measures every second of every day to an accuracy of ten billionths of a
second per day. These physicists have created an international standard, measuring a second as
9,192,631,770 vibrations of a Cesium 133 atom in a vacuum. This atomic clock regulates the WWVB
radio transmitter located in Fort Collins, Colorado, where the exact time signal is continuously broadcast
throughout the United States at 60 kHz to take advantage of stable long wave radio paths found in that
frequency range. Radio waves at these low frequencies use the earth and the ionosphere as a waveguide and follow the curvature of the earth for long distances.
within 2000 miles of Fort Collins where long-wave radio reception is undisturbed. A microprocessor
activates the receiver and processes the time signal from Fort Collins overnight.
precise time. The changeover from standard time to daylight savings time, and vice versa, takes place
automatically with the same precision.
Since the beginning of time, man has been fascinated with the measurement of time and
The built-in antenna system will receive the WWVB signal anywhere in North America
Through the radio signals, La Crosse Technology radio controlled clocks always keep
MANUAL SET
BUTTON
will turn off
WWVB reception!
Battery
compartment
4

SET UP INSTRUCTIONS
To set up your clock simply install one fresh AA, LR6 ALKALINE battery. Due to the nature of
long-wave radio signals, it is normally not possible to receive a signal during the day so it is best to
install the battery late in the evening. Once the battery is installed, the clock will begin searching for a
signal. For the initial setting, it is recommended to stand the clock in an upright position near a window.
Within five minutes the clock will either receive the WWVB signal and set itself to the exact time (for the
default Pacific Time Zone), or it will determine that the signal is not receivable at its current location and
time of day. If a signal is not receivable, it will fast-forward the hands to the 4, 8, or 12 o’clock position
and search for WWVB every two hours until a signal is received. If the time is manually set, the clock
will continue to periodically search for a signal and automatically reset the hands when the signal is
received.
Once the clock has set to the correct time (default Pacific Time Zone)
If you are in the Pacific Time Zone- you are ready to hang your clock.
If you are not in the Pacific Time Zone, select your time zone by pressing one of the four time zone
buttons PT-Pacific Time, MT-Mountain Time, CT-Central Time, ET-Eastern Time. If multiple buttons are
pressed, the clock will set to the time zone selected last. If no time zone is selected the clock will
default to Pacific Time. Your clock can only set itself to one of the four time zones stated above. For
time zones outside of PT, MT, CT or ET you must manually set the time using the Manual Time set
button on the back of the movement. Our clock will set to the correct Time Zone that you selected. Once
the clock has reached the correct time, you are ready to hang your clock.
ONCE THE CLOCK HAS SET TO THE DEFAULT PACIFIC TIME ZONE, YOU MUST PRESS
THE CORRECT TIME ZONE BUTTON.
The clock is designed for indoor use only. Select a location to place your radio-controlled clock
where it will be at least six feet away from a TV, computer, air conditioner or other household electrical
appliances. The optimal location is near a window. Windows facing Colorado provide the best signal.
The WWVB time signal will easily penetrate masonry and wood framed buildings. WWVB will
penetrate almost every residential building and most steel buildings if they have adequate windows. It
is not possible, however, for WWVB to penetrate most indoor shopping malls and rooms in the center of
large office buildings that do not have windows. In buildings that WWVB cannot penetrate, you may set
the time using the manual time set button. When the clock receives the WWVB signal it will
automatically set the hands to the exact time.
MANUAL TIME
SET BUTTON*
*ONLY use in areas
with No WW VB reception
Pacific Time
MANUAL SET
BUTTON
will turn off
WWVB reception!
Mountain Time
A
Central Time
5
Daylight Saving Time
(DST) ON/OFF Button
Eastern Time

For more information on the NIST and radio controlled time, see www.boulder.nist.gov/timefreq/
*DST (Daylight saving time) ON/OFF button
Pressing DST-ON/OFF button during DST the clock will switch to time without daylight saving. Pressing
it again DST will be activated again. In areas where no DST is used you may deactivate DST by
pressing the DST-OFF switch.
SET THE TIME USING THE MANUAL TIME SET BUTTON
In some cases, the clock may not receive the WWVB signal due to atmospheric disturbances or hard to
reach locations such as inside shopping malls. In this case, please use the Manual Time Set button,
located at the back of the clock to manually set the time. To do this:
1. Press and hold the Manual Set button. The second hand will move to the 12 position.
2. Release the Manual Set button and again press and hold the Manual Set button. The minute and
3. Keep holding the Manual Set button until the time is set as required.
4. Release the button. About 3 seconds later, the second hands will start to move and the clock is
Note:
When the clock displays manual time, it will continue to try to receive the WWVB signal at each of the
even numbered hours: 0:00, 2:00, 4:00, 6:00 … 20:00 & 22:00.
TROUBLESHOOTING
The wonderful advantage of owning a La Crosse Technology radio controlled clock is that it is virtually
trouble free. If the clock receives a clear signal it will set itself perfectly. If it does not receive a signal
consider the following:
Battery - The clock should have a fresh Alkaline Battery to best receive and process the time
Location - Try a different location, ideally near a window. It should be at least six feet from
Weather - Electrical storms between you and Colorado during the night will interfere with the
Reception - The clock seems to “take off” for no reason and then stopping at the same
MANUAL TIME SET
hour hands will fast-forward while the button is held.
now running with manual time.
signal.
computers, TVs, air conditioners, other Radio Controlled clocks and other electrical
appliances that cause interference.
WWVB signal. Although we cannot control the weather, we can help you predict it.
BUTTON
time.
It is not uncommon for the clock to make a "correction", sometimes daily. This
happens (ADD “s” TO HAPPEN) if the clock gets ahead of itself by a fraction of
a second. To correct this the clock will advance a complete rotation the next time
Daylight Saving Time
The National Institute of Standards and Technology and WWVB encode a special DST “bit” in the
WWVB transmission for DST. Your La Crosse Technology clock will read this information and
automatically advance the hands one hour in the spring and eleven hours in the fall. If Congress
it receives a signal.
6

changes the Daylight Saving Time dates, your La Crosse Technology clock will automatically set itself
to the correct time on the newly designated dates.
Arizona and Indiana
If you live in an area that does not recognize DST you must press the (unmarked) DST button for one
second to deactivate your clock’s DST program. To reactivate the DST program simply press the DST
button again for one second.
POSITIONING THE ANALOG CLOCK:
Before wall mounting, please check that the WWVB signal can be received from the desired location. To
wall mounting:
1. Fix a screw (not supplied) into the desired wall, leaving the head extended out by about 3/16"
(5mm).
2. Hang the Analog clock onto the screw. Please remember to ensure it locked on the place
before releasing.
FREQUENTLY ASKED QUESTIONS
Q. How long will the battery last?
A. A good AA alkaline battery will last over one year. If your clock is located in an area with little
interference where it can quickly receive a signal, the battery can last much longer than one year.
Q. Can the clock be wired to control timing circuits?
A. No.
Q. Why does the second hand move only once every 2 seconds?
A. When the battery drops below 1.25 volts the clock indicates that it is time to change the battery by
advancing the second hand in 2-second steps. The operating voltage range is 1.25 to 1.75 volts.
CARE AND MAINTENANCE:
• Extreme temperatures, vibration and shock should be avoided as these may cause damage to
the units and give inaccurate forecasts and readings.
• When cleaning, use a soft damp cloth only. Do not use solvents or scouring agents as they
may mark the casing.
• Do not submerge the unit in water.
• Immediately remove all low powered batteries to avoid leakage and damage. Replace only
with new batteries of the recommended size.
• Do not make any attempts to repair the unit. Return it to its original point of purchase for repair
by a qualified engineer. Opening and tampering with the unit may invalidate its guarantee.
• Do not expose the unit to extreme and sudden temperature changes, as this may lead to rapid
changes in forecasts and readings and thereby reduce its accuracy.
BATTERIES CHANGE:
For best performance, batteries should be replaced at least once a year to maintain the best running
accuracy. Ensure that the batteries used are new and the correct size.
WARRANTY
La Crosse Technology, Ltd provides a 1-year limited warranty on this product against
manufacturing defects in materials and workmanship.
This limited warranty begins on the original date of purchase, is valid only on products
purchased and used in North America and only to the original purchaser of this product. To
receive warranty service, the purchaser must contact La Crosse Technology, Ltd for problem
determination and service procedures. Warranty service can only be performed by a La Crosse
Technology, Ltd authorized service center. The original dated bill of sale must be presented
Please help in the preservation of the environment and return used batteries to an
authorized depot.
7

upon request as proof of purchase to La Crosse Technology, Ltd or La Crosse Technology, Ltd’s
authorized service center.
La Crosse Technology, Ltd will repair or replace this product, at our option and at no charge as
stipulated herein, with new or reconditioned parts or products if found to be defective during the
limited warranty period specified above. All replaced parts and products become the property of
La Crosse Technology, Ltd and must be returned to La Crosse Technology, Ltd. Replacement
parts and products assume the remaining original warranty, or ninety (90) days, whichever is
longer. La Crosse Technology, Ltd will pay all expenses for labor and materials for all repairs
covered by this warranty. If necessary repairs are not covered by this warranty, or if a product is
examined which is not in need or repair, you will be charged for the repairs or examination. The
owner must pay any shipping charges incurred in getting your La Crosse Technology, Ltd
product to a La Crosse Technology, Ltd authorized service center. La Crosse Technology, Ltd
will pay ground return shipping charges to the owner of the product to a USA address only.
Your La Crosse Technology, Ltd warranty covers all defects in material and workmanship with
the following specified exceptions: (1) damage caused by accident, unreasonable use or neglect
(including the lack of reasonable and necessary maintenance); (2) damage occurring during
shipment (claims must be presented to the carrier); (3) damage to, or deterioration of, any
accessory or decorative surface; (4) damage resulting from failure to follow instructions
contained in your owner’s manual; (5) damage resulting from the performance of repairs or
alterations by someone other than an authorized La Crosse Technology, Ltd authorized service
center; (6) units used for other than home use (7) applications and uses that this product was
not intended or (8) the products inability to receive a signal due to any source of interference..
This warranty covers only actual defects within the product itself, and does not cover the cost of
installation or removal from a fixed installation, normal set-up or adjustments, claims based on
misrepresentation by the seller or performance variations resulting from installation-related
circumstances.
LA CROSSE TECHNOLOGY, LTD WILL NOT ASSUME LIABILITY FOR INCIDENTAL,
CONSEQUENTIAL, PUNITIVE, OR OTHER SIMILAR DAMAGES ASSOCIATED WITH THE
OPERATION OR MALFUNCTION OF THIS PRODUCT. THIS PRODUCT IS NOT TO BE
USED FOR MEDICAL PURPOSES OR FOR PUBLIC INFORMATION. THIS PRODUCT IS
NOT A TOY. KEEP OUT OF CHILDREN’S REACH.
This warranty gives you specific legal rights. You may also have other rights specific to your
State. Some States do no allow the exclusion of consequential or incidental damages therefore
the above exclusion of limitation may not apply to you.
For warranty work, technical support, or information contact:
All rights reserved. This handbook must not be reproduced in any form, even in excerpts, or duplicated or
processed using electronic, mechanical or chemical procedures without written permission of the publisher.
La Crosse Technology, Ltd
2809 Losey Blvd. S.
La Crosse, WI 54601
Phone: 608.782.1610
Fax: 608.796.1020
support@lacrossetechnology.com
sales@lacrossetechnology.com
(information on other products)
www.lacrossetechnology.com
e-mail:
(warranty work)
web:
8

This handbook may contain mistakes and printing errors. The information in this handbook is regularly checked
and corrections made in the next issue. We accept no liability for technical mistakes or printing errors, or their
consequences.
All trademarks and patents are acknowledged.
9
 Loading...