

Page 1
RADIO CONTROLLED CLOCK
WITH PROJECTOR
USER’S INSTRUCTIONS
GETTING STARTED
1. If using the DC Adaptor to power
the clock, plug the adaptor into
the left side of the clock. If using
battery, install 2 AA size
batteries into the battery
compartment, pay attention to
the polarity.
2. When the clock is power on, all
the segments of the LCD will be
shown briefly before entering the
radio controlled time reception
mode.
3. The RC clock will automatically
start scanning for the radio
controlled time reception mode.
Note:
1. If there is no display on the LCD
after inserting the battery, press
RESET key by using a metal pin.
Due to atmospheric disturbances,
the clock may not receive the
signal immediately, try to reset
the clock again during night time.
2. If using battery and DC Adaptor
at the same time, the unit will
automatically select the Adaptor
Power for both clock and
projector.
FUNCTION KEYS
SNOOZE/LIGHT key:
- Turn the projector and EL on.
Stop the current alarm when the
bell is ringing.
MODE key:
- Switch between normal time
mode and alarm time mode.
SET key:
- In normal time mode, toggle
between ºC/ºF temperature
format.
- In setting mode, step the setting
items.
ADJUST key:
- Toggle between Date/Month and
Year display.
- In alarm time mode, switch
ALARM/SNOOZE function on or
off.
- In setting mode, adjust the value
of the flashing digit.
RECEIVE key:
- Press it to receive the signal for
reception testing. If the signal is
in acceptable signal quality in the
first 30 seconds, leave the clock
there. Otherwise, place it in other
positions and press it again.
RESET key:
- In case of mal-function, use a pin
to press the RESET key to restart the clock.
FOCUS key:
- Adjust the clearness of the
projector.
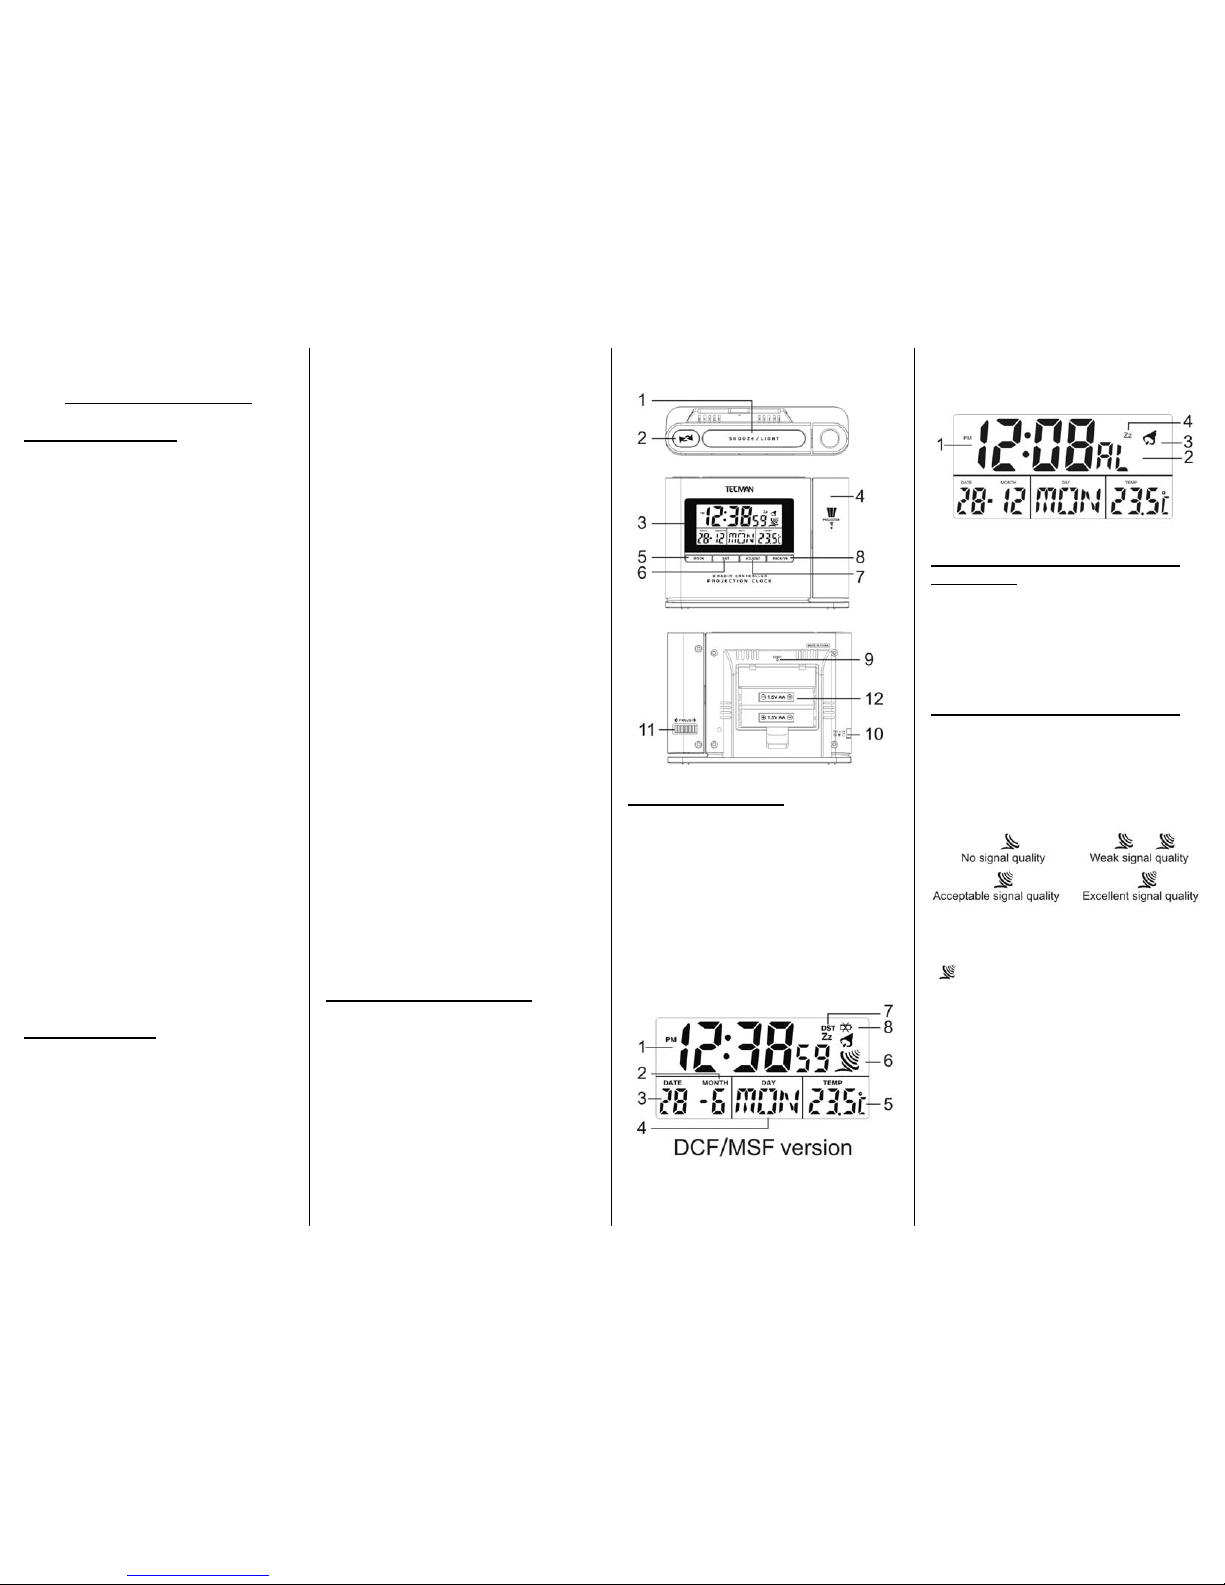
PRODUCT DESCRIPTIONS
1. SNOOZE/LIGHT key
2. REVERSE key
3. LCD display
4. PROJECTOR
5. MODE key
6. SET key
7. ADJUST key
8. RECEIVE key
9. RESET key
10. DC adaptor
11. FOCUS key
12.Battery compartment
DISPLAY SYMBOLS
Normal time mode
1. Time
2. Month
3. Date
4. Day of the week
5. Temperature
6. Signal strength indicator
7. Daylight savings time
8. Low battery indicator
Alarm Time Mode
1. Alarm time
2. Alarm mode
3. Alarm icon
4. Snooze icon
ABOUT THE DAYLIGHT SAVING
TIME (DST)
The clock has been programmed to
automatically switch when daylight
saving time is in effect. Your clock
will show “DST” during the summer.
SIGNAL STRENGTH INDICATOR
The signal indicator displays signal
strength in 4 levels. Wave segment
flashing means time signals are
being received. The signal quality
could be classified into four types:
If the RC clock receives signal
successfully, a Sync-time symbol
“
”appears on LCD. The unit is
already synchronized with the time
signal transmitter. Otherwise the
antenna segment will disappear from
the LCD display.
Note:
You may use the RECEIVE button to
receive the time signal manually. The
receive mode will stop automatically
after 6-12minutes. Test mode
consumes more battery power that
may reduce battery lifetime.
Page 2
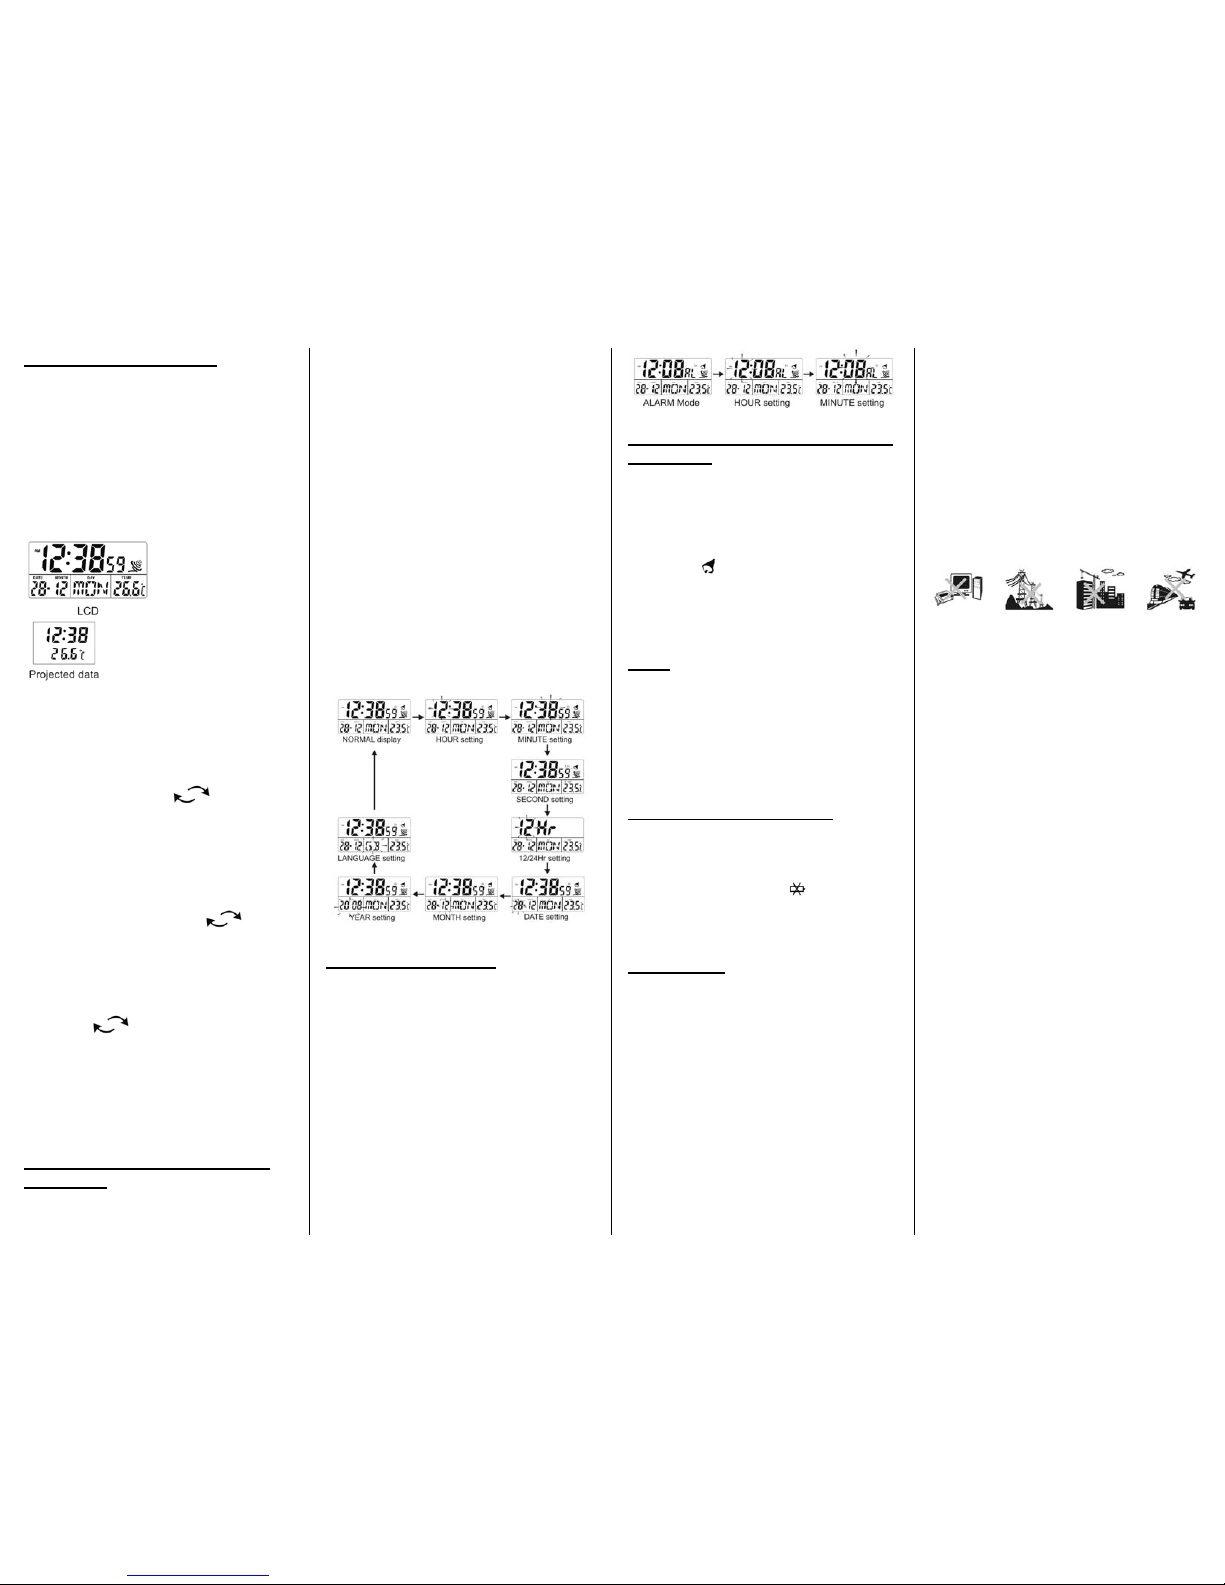
USING THE PROJECTOR
Press the SNOOZE/LIGHT key to
turn the projector on, rotate the
projector to project the light beam on
a dark background within 1-4 meters,
the projected data (time &
temperature) will be displayed as
following:
Note:
1. Press the SNOOZE/LIGHT key
once, EL back light and the
projection last for 5 seconds,
then press the “
” key to
reverse the projected data.
2. Press the SNOOZE/LIGHT key
for 3 seconds, the projection
keeps on for 30 minutes unless
pressing the SNOOZE/LIGHT
key again, pressing “
” key
will reverse the projected data.
3. If using DC power, the projected
data will be always on. Press
SNOOZE/LIGHT key first, then
the “
” to reverse the
projected data.
4. The rotate angle of the projector
is ±90º.
5. Adjust the quality of the projected
data by using the FOCUS key.
MANUALLY SETTING THE TIME
AND DATE
If the clock does not receive the time
signal successfully, you can set the
clock manually.
1. Press “SET” key for 2 seconds
until HOUR digit flashing.
2. Press “ADJUST” key to increase
the value of the flashing digit.
3. Press “SET” key again to step
the setting items. The setting
sequence will be: Hour > Minute
> Second > 12/24Hr > Date >
Month > Year > Day language
4. Press ADJUST key to select the
day language: GB=English,
FR=French, DE=German,
ES=Spanish IT=Italian
5. Press “MODE” key to exit the
setting mode.
SETTING THE ALARM
1. In normal time display, press
“MODE” key to enter the Alarm
Time Mode.
2. Press “SET” key for 2 seconds
until the HOUR digit flashing.
3. Press “ADJUST” key to increase
the setting value.
4. Press “SET” key again to step
the setting items. The sequence
will be: Hour > Minute.
5. Press “MODE” key to exit the
setting mode.
USING THE ALARM AND SNOOZE
FUNCTION
1. Set the Alarm time as described
in the previous section.
2. Activate the Alarm by pressing
the “ADJUST” key so that the bell
icon “
” appears.
3. Activate the Snooze by pressing
the “ADJUST” key so that the
snooze icon “Zz ” appears.
Note:
When the snooze function is
activated and the snooze button will
be pressed while alarm the alarm will
automatically start again after 4
minutes, total 4 times. The alarm
duration is 120 seconds.
BATTERY REPLACEMENT
Under battery operation, when the
low battery indicator “
” displayed,
replace with 2 new AA size batteries.
Pay attention to the battery polarity.
IMPORTANT
Make sure you read the instructions
before operating this clock. The
signal reception from German Atomic
Clock transmitter will be affected
under certain situations. We suggest
you note the following points:
1. It is recommended to let this
clock run over night time and let
the clock receive signal
automatically during midnight, if
the reception is not possible
Always place the unit away fr
interfering sources such as TV
while daytime.
2. om
set, computer, etc.
3. Avoid placing the unit on or next
to metal plate.
4. Closed area such as airport,
basement, tower block, or factory
is not recommended.
5. Do not start reception on a
moving article such as vehicle or
train.
 Loading...