

Page 1
1
Model WS-8120
Solar Powered Wireless Humidity/Temperature Station
(Weather Station)
QUICK SETUP GUIDE
FEATURES:
Receives wireless outdoor temperature
Solar cell powers the included 2 "AA" rechargeable alkaline batteries
Works with regular alkaline batteries with a flip of a switch
Stores solar power for continuous operation
High-efficiency modern solar panel maintains full charge with minimal light
Outdoor/Indoor temperature with MIN / MAX records (°F)
Indoor humidity
12 Hour time display
Low battery indicators
Use the 2 "AA" Rechargeable Alkaline batteries (included) OR 2 "AA" Alkaline
batteries required (not included). No need to change batteries when using
rechargeable alkalines because they receive power from the solar cell. 2 Display mode
options: (1) Top displays IN/OUT temperature. Bottom displays MIN/MAX records,
time, and humidity. (2) Top displays indoor temperature and humidity. Bottom displays
outdoor temperature, time and MIN/MAX records.
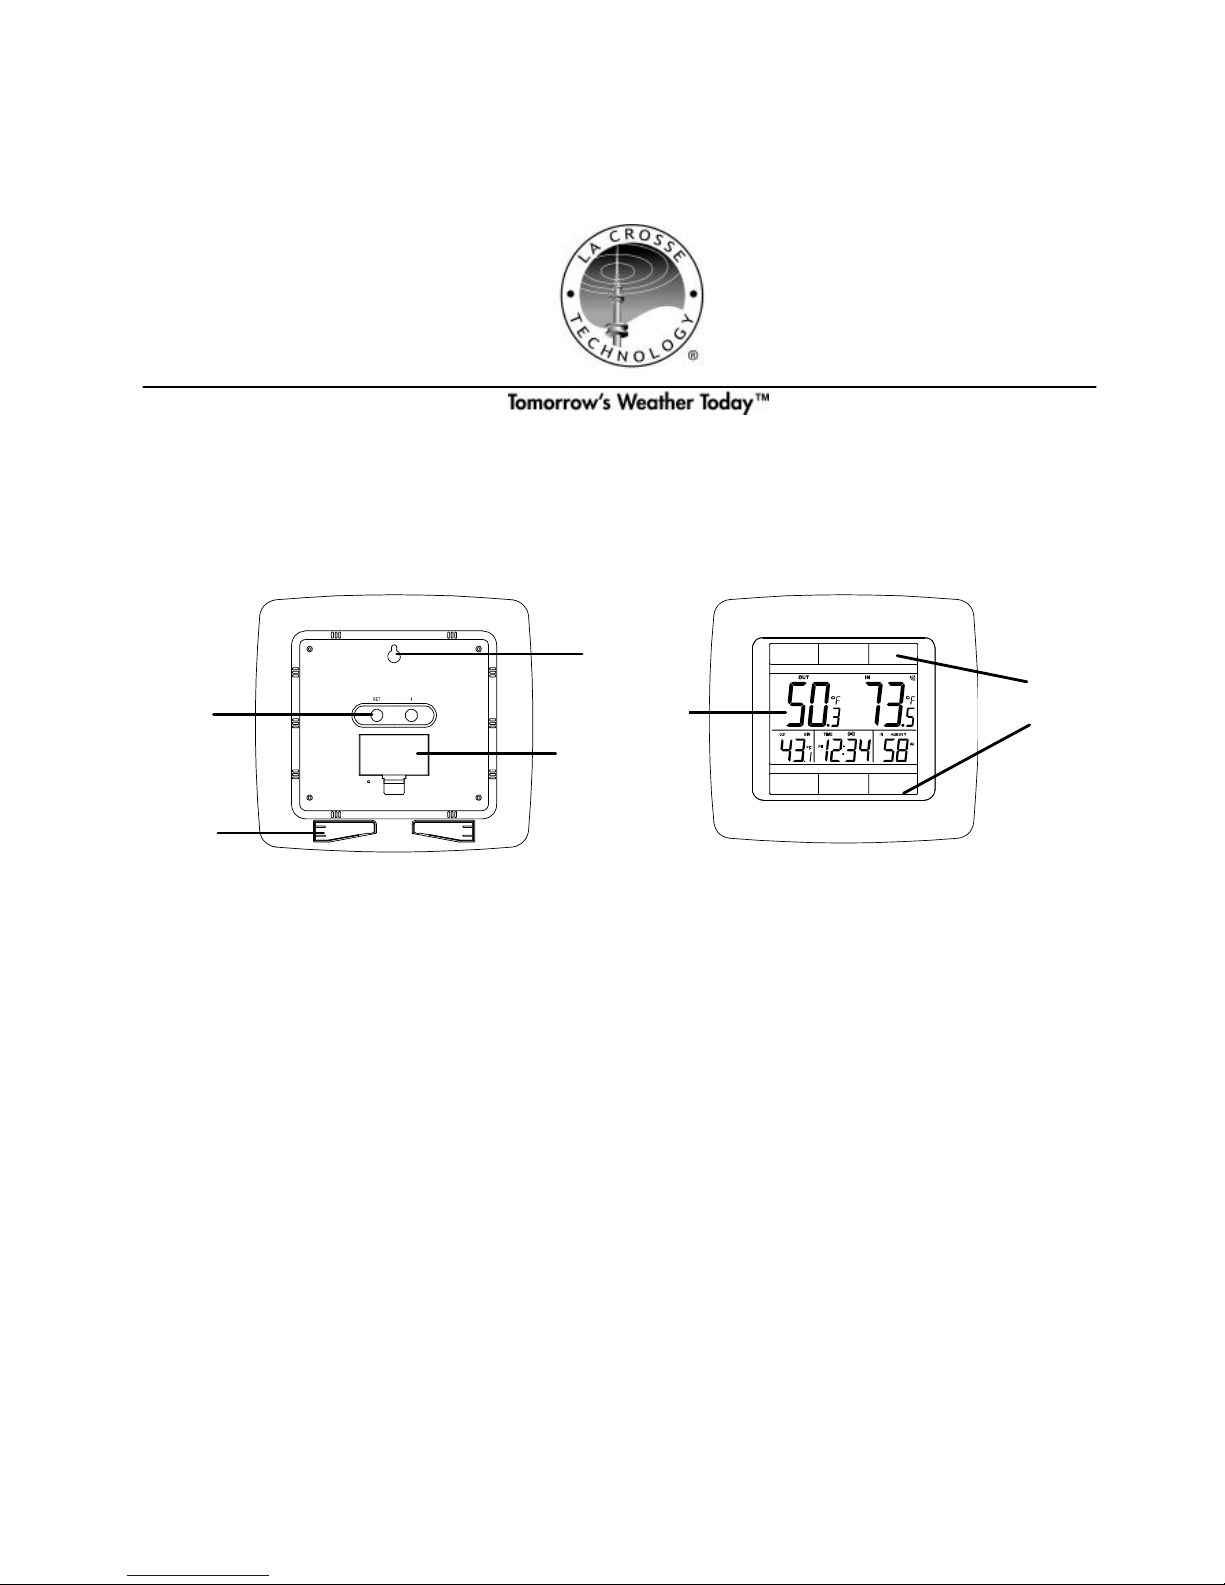
LCD display
Solar panels
%
Set keys
Battery
Wall mount
Stands
Page 2
2
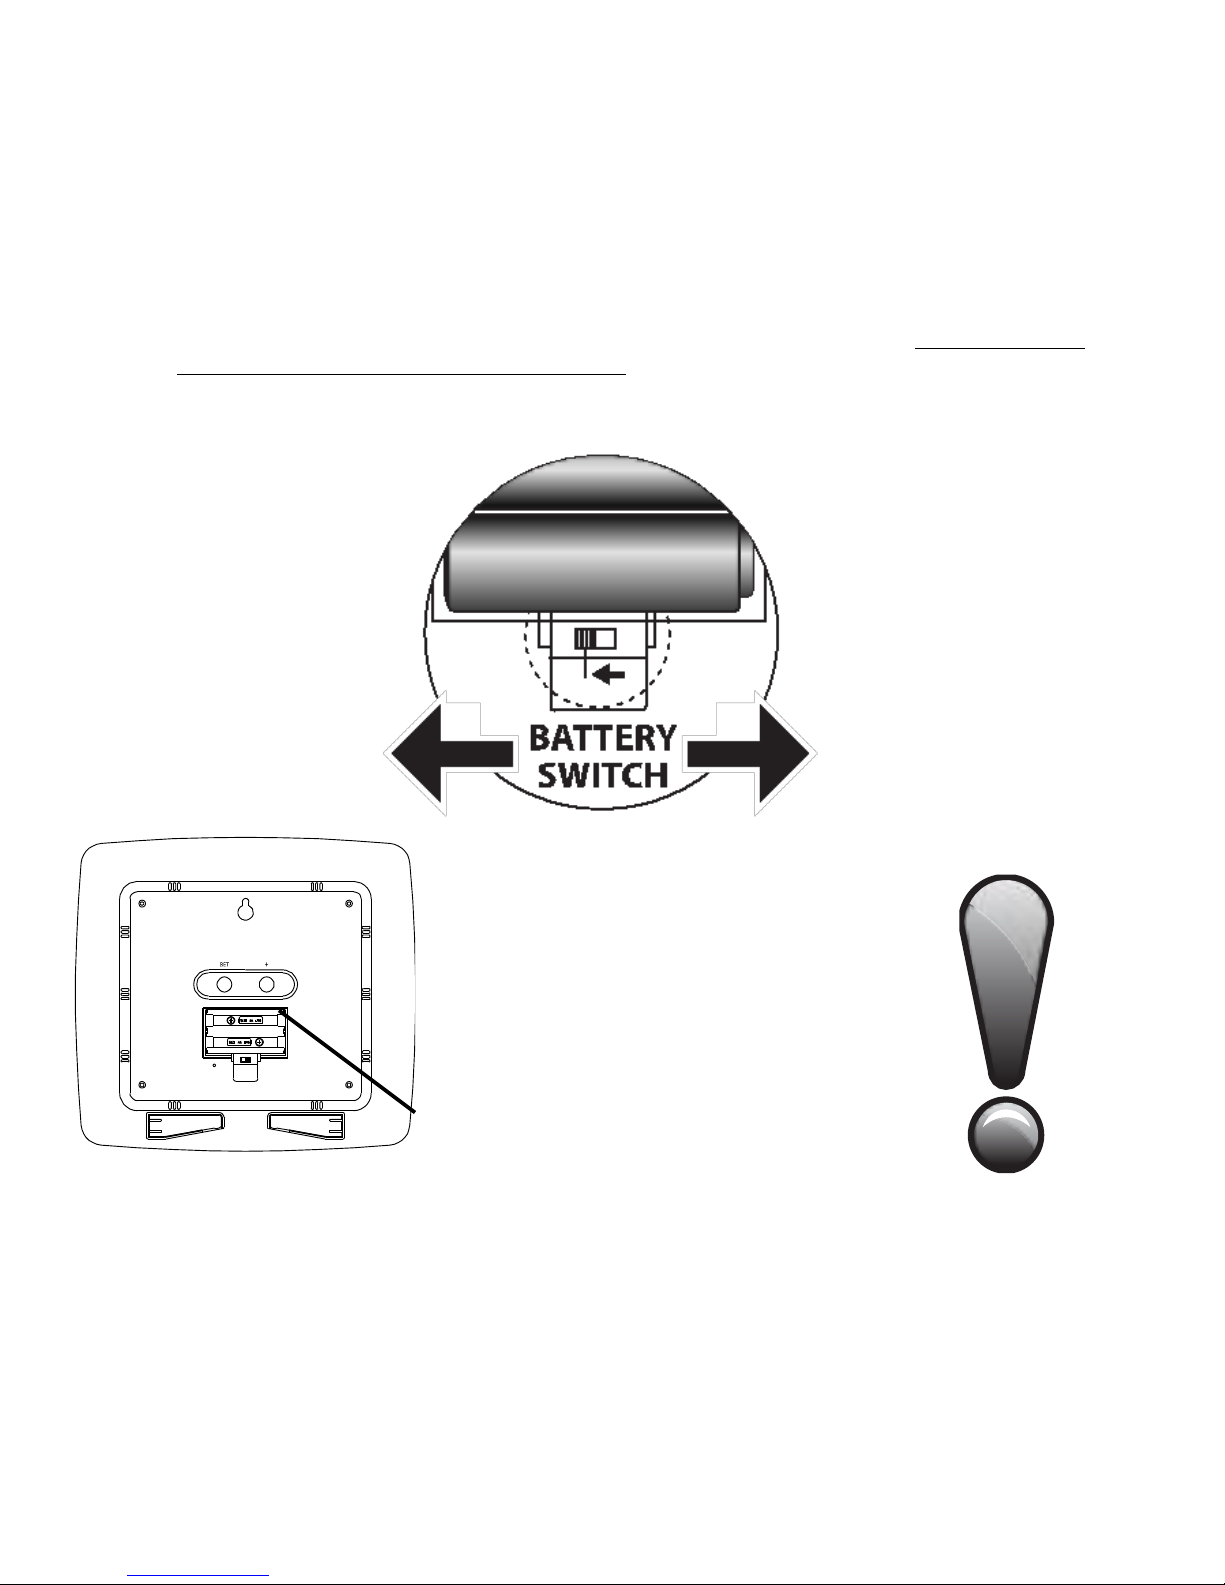
BATTERY
COMPARTMENT
INITIAL SETUP (USING INCLUDED SOLAR RECHARGEABLE BATTERIES
FROM THE FACTORY)
1. Step #1: Open battery compartment on the back of the Weather Station and make sure that
the battery switch under the battery compartment is positioned to the left. If it is not, please
slide the switch to the left before proceeding.
2. Step #2: Locate the battery insulator tab and gently pull to remove it.
3. Step #3: Next, slide the battery switch to the SOLAR position.
4. Step #4: Continue to section labeled "ACTIVATE SOLAR-POWERED OUTDOOR
TRANSMITTER"
Model TX62U-IT Solar-powered Transmitter (Sensor):
SWITCH RIGHT
(SOLAR OPERATION)
(SOLAR-RECHARGEABLE
BATTERIES) Slide switch to
RIGHT position once solar-
rechargeable batteries are
inserted and insulator tab is
removed
WARNING
Do NOT recharge the
included solar-
rechargeable batteries
outside of this product
because it will damage the
batteries and other
charging devices.
SWITCH LEFT
(START-UP / RESET)
(STANDARD ALKALINES)
Slide switch to LEFT position
before (1) start-up / reset or
(2) any type of battery
replacement
Page 3
3
Transmits outdoor temperature to indoor receiver using 915
MHz signals
200 FT. wireless transmission range (open air).
Built-in rechargeable alkaline power cells store solar power for
continuous operation.
No batteries necessary (internal power cells cannot be
replaced; contact customer service for a replacement sensor)
ACTIVATE SOLAR-POWERED OUTDOOR TRANSMITTER
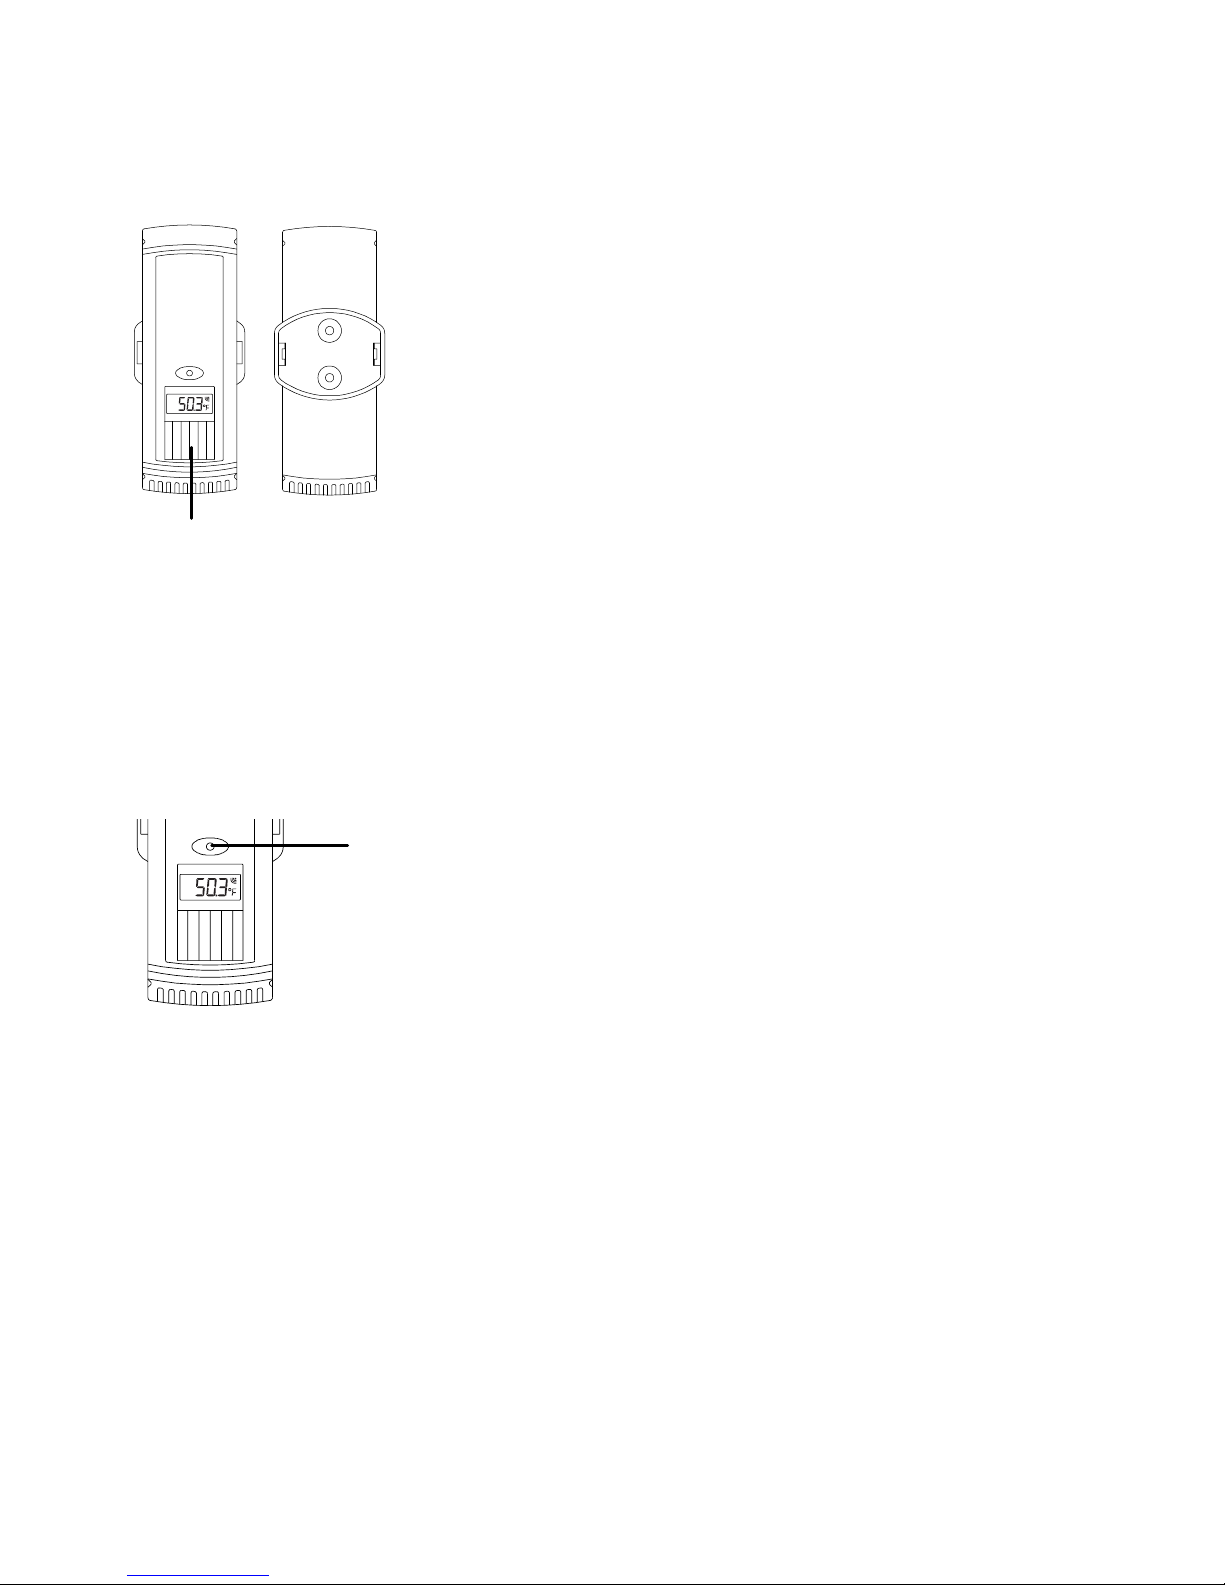
Step #1 - Press the RESET key on the Sensor to activate the solar-powered transmitter and
link it to the Weather Station.
NOTE: The solar panel needs light from a 60W light bulb or brighter during the activation process.
Do not cover solar panel with hands or other objects.
TX62U-IT transmitter RESET key:
SOLAR-POWERED TRANSMITTER OPERATION MODES
(1) NORMAL MODE:
NORMAL MODE occurs when the battery voltage is 2.5V or greater.
It measures and transmits temperature / humidity (weather) data to the indoor receiver every
8 seconds.
It checks the brightness level of the surrounding environment every 5 seconds.
It measures / transmits every 16 seconds if it detects a dark environment or if the battery
voltage drops below 2.5V.
NOTE: Do not use sharp objects to press the
RESET key. Use a small dull pointed object
or a straightened paper clip to gently press
the RESET key to commence NORMAL
MODE.
RESET key
Solar panel
Page 4

4
(2) IDLE MODE:
If the battery voltage drops below 2.4V, it commences IDLE MODE; the LCD turns off and it
does not measure / transmit weather data.
It checks the brightness level of the surrounding environment every 5 seconds.
If battery voltage rises back to 2.5V or above, it returns to NORMAL MODE.
If the environment remains dark for 72 hours, it commences STOP MODE.
(3) STOP MODE (STANDBY):
Occurs when the environment remains dark for 72 hours OR if you manually commence
STOP MODE (standby) by covering the solar cell for 10 seconds and then press the RESET
key one time.
NOTE: The LCD will display "StP" then turn off and commence STOP MODE.
While in STOP MODE (standby), the LCD is off and the Sensor does not perform any normal
operations.
To resume normal operation, ensure the Sensor is in a bright environment (next to a 60W
light bulb or similar condition) and press the RESET key to return to NORMAL MODE (battery
voltage is higher than 2.5V).
SET THE TIME ON THE WEATHER STATION
NOTE: The time shows “AM” or “PM” distinctions.
1. Press and hold the SET key for 3 seconds to enter the time setting mode.
2. The hour digits will start flashing.
3. Press and release the + key to advance to the correct hour, then press the SET key to
confirm.
4. Now the minute digits will start flashing.
5. Press and release the + key to set the correct minutes, If the + key is held; the units will
increase by 5.
6. Press the SET key again to confirm and enter the Solar Mode setting.
SET SOLAR MODE ON THE WEATHER STATION
Solar Mode is a power-savings mode that reduces power consumption by monitoring and reacting to
available lighting conditions (Default setting ON):
1. The characters “ON” or “OFF” will start flashing. Use the + key to select “ON” or “OFF” to
set the solar mode.
2. Press and release the SET key to exit the setting mode and switch back to the normal display
mode.
If solar mode setting is ON:
The surrounding environment brightness is checked every 5 seconds.
LCD will automatically turn OFF if the environment is too dark.
Page 5

5
LCD will automatically turn ON if the environment is bright enough.
No information will be displayed when the LCD is OFF, but all the settings and operations
will remain, except for the temperature and humidity measurements.
Enter the program menu and turn SOL to OFF to disable this power save feature.
If solar mode setting is OFF:
LCD will remain ON constantly.
STOP MODE ON THE WEATHER STATION
If the Weather Station is placed in a dark environment for 72 hours continually, the clock will go to
the stop mode:
The indoor solar display will not operate and the LCD will turn OFF.
Press any key to wake up the indoor solar display and re-activate the transmission with the
solar transmitter.
TWO DISPLAY MODES
• Shows outdoor temperature in the first line on the left side. Shows Indoor temperature in the first
line on the right side and indoor humidity in the second line on the right side.
• Shows indoor temperature in the first line on the left side and indoor humidity in the first line on the
right side. Shows outdoor temperature in the second line on the left side.
LOW BATTERY INDICATOR:
• RX Low battery indicator is displayed on the LCD when the receiver battery voltage is low.
• TX Low battery indicator is displayed on the LCD when the transmitter battery voltage is low
SOLAR-POWERED OUTDOOR TRANSMITTER (915MHZ RECEPTION)
The Weather Station receives outdoor data every 48 seconds. If it does not receive the temperature
data within 2 minutes after set-up (or the display shows “- - -”), then please check the following
points:
1. The distance of the Weather Station or the Sensor should be at least 6 feet (2 meters) away
from any interfering sources such as computer monitors or TV sets.
2. Avoid placing the Weather Station onto or in the immediate proximity of metal window
frames.
3. Using other electrical products such as headphones or speakers operating on the same
signal frequency (915MHz) may prevent correct signal transmission and reception.
4. Neighbors using electrical devices operating on the 915MHz signal frequency can also cause
interference.
NOTE: When the 915 MHz signal is received correctly, do not re-open the battery cover of the
Weather Station, as the batteries may spring free from the contacts and force a false reset. Should
this happen accidentally then reset all units (see “TO INSTALL / REPLACE BATTERY IN THE
SOLAR STATION” and “INITIAL SETUP” above) otherwise transmission problems may occur.
Page 6

6
The maximum transmission range is 200 feet (60.96 m) from the outdoor transmitter to the Solar
Station (in open space). However, this depends on the surrounding environment and interference
levels. If no reception is possible despite the observation of these factors, all system units have to
be reset (see “TO REPLACE BATTERIES IN THE WEATHER STATION” and “INITIAL SETUP”).
TO REPLACE BATTERIES IN THE WEATHER STATION
The Weather Station uses either the included 2 x solar-rechargeable batteries (charged by solar
panel) or 2 x AA standard alkaline batteries (non-rechargeable; not included).
The Weather Station comes with special solar-rechargeable batteries that should provide many
years of service. If the batteries lose their ability to hold a charge, please dispose of them
responsibly. Do NOT attempt to recharge the included solar-rechargeable batteries outside of the
WS-8120U.Use standard alkaline batteries or contact customer support for more information.
*Once the solar-rechargeable batteries are removed from the Weather Station, slide the battery
switch to the left position before replacing the batteries.
REGARDLESS OF THE TYPE OF BATTERIES TO BE INSTALLED, THE BATTERY SWITCH
MUST BE IN THE LEFT POSITION WHEN THE BATTERIES ARE INSERTED.
If new solar rechargeable batteries are used, the battery switch should be moved to the right
SOLAR position AFTER they are inserted in the unit.
REPLACE INCLUDED SOLAR RECHARGEABLE BATTERIES WITH STANDARD ALKALINE
BATTERIES
1. Remove the included solar rechargeable batteries from the compartment.
2. Slide the battery switch to the LEFT to select the alkaline battery.
3. Insert new, 2 x standard alkaline batteries into the compartment, observing the correct
polarity (see marking inside battery compartment or on the case).
4. Replace battery cover
Note: For best performance, standard alkaline batteries should be replaced at least once every 2
years to maintain the best running accuracy. Ensure that the batteries used are new and the correct
size.
Please help in the preservation of the environment and return used batteries to an
authorized depot.
Page 7
7
SETUP AFTER INITIAL START-UP / REPLACING THE BATTERIES
1. After powering up the Weather Station, all LCD segments will light up briefly and it will show
the time (12:00), indoor temperature, date, and indoor humidity.
2. After the batteries are inserted, the Weather Station will start receiving data signal from the
Sensor. The outdoor temperature and humidity data should then be displayed on the
Weather station. If this does not happen after 2 minutes, please remove the batteries from
the Weather Station, slide the battery switch to the left, insert the batteries back into the
Weather Station (slide the switch to the right if using the included solar-rechargeable
batteries), press the RESET key on the Sensor and follow the set up process again.
3. The distance between the Weather Station and the Sensor should not be more than 200 feet
(60.96m) to ensure sufficient 915 MHz transmission.
Note: When changing the batteries:
1. Be careful that they do not spring free from the contacts.
2. Press any button 20 times with the batteries removed.
3. Wait at least 10 minutes after removing batteries before re-inserting them to avoid
start-up problems.
WARNING! "Do NOT recharge the included solar rechargeable batteries in any device other
than the product they came with. Recharging the rechargeable solar batteries in battery
chargers or other third party devices will damage the batteries and charging device."
POSITIONING THE WEATHER STATION:
Stand the Weather Station on a table top, counter or desk, or mount is on a wall.
Ensure that the Weather Station continuously receives the 915MHz signal from the Sensor before
mounting it in the desired location. The Weather Station should be placed in a bright environment for
the solar cell to collect enough light to recharge the included solar-rechargeable batteries.
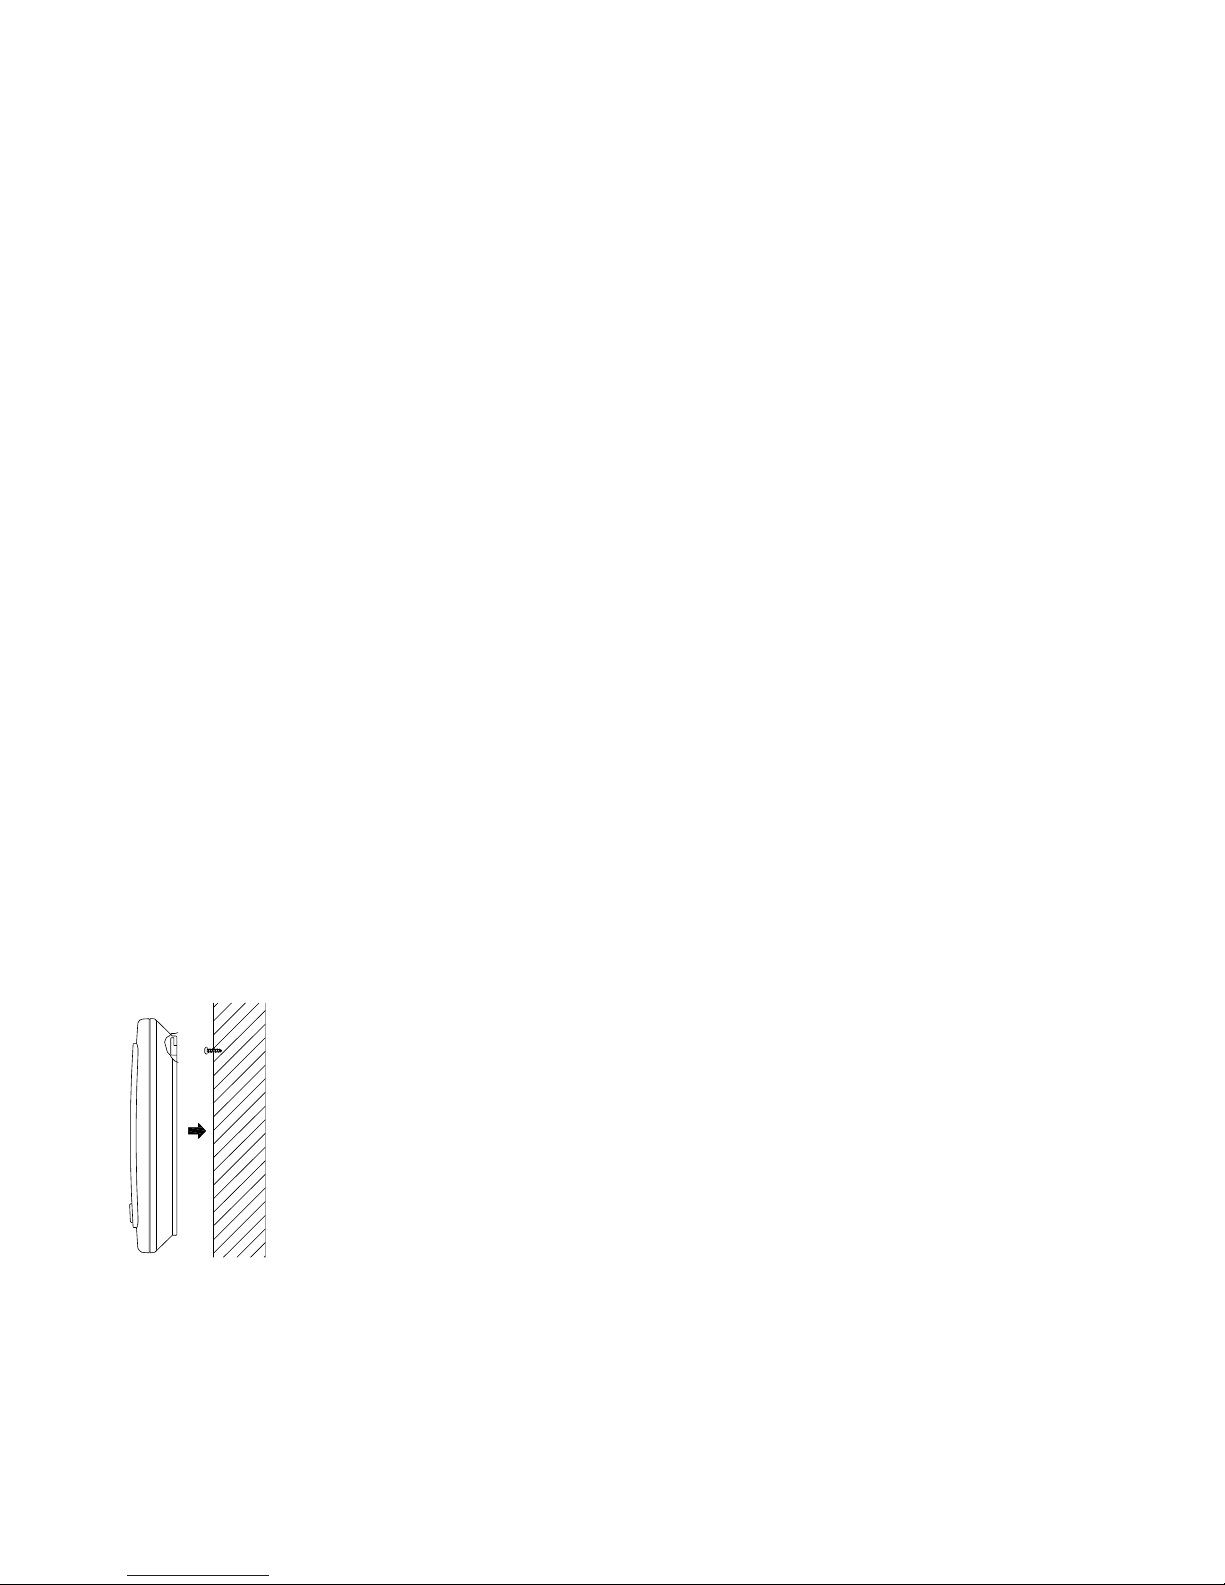
WALL MOUNTING
1. Install a mounting screw (not included) into a wall—leaving approximately
3/16 of an inch (5mm) extended from the wall.
2. Place the Weather Station onto the screw, using the hanging hole on the
backside. Gently pull the Weather Station down to lock the screw into
place.
NOTE: Always ensure that the Weather Station locks onto the screw before
releasing.
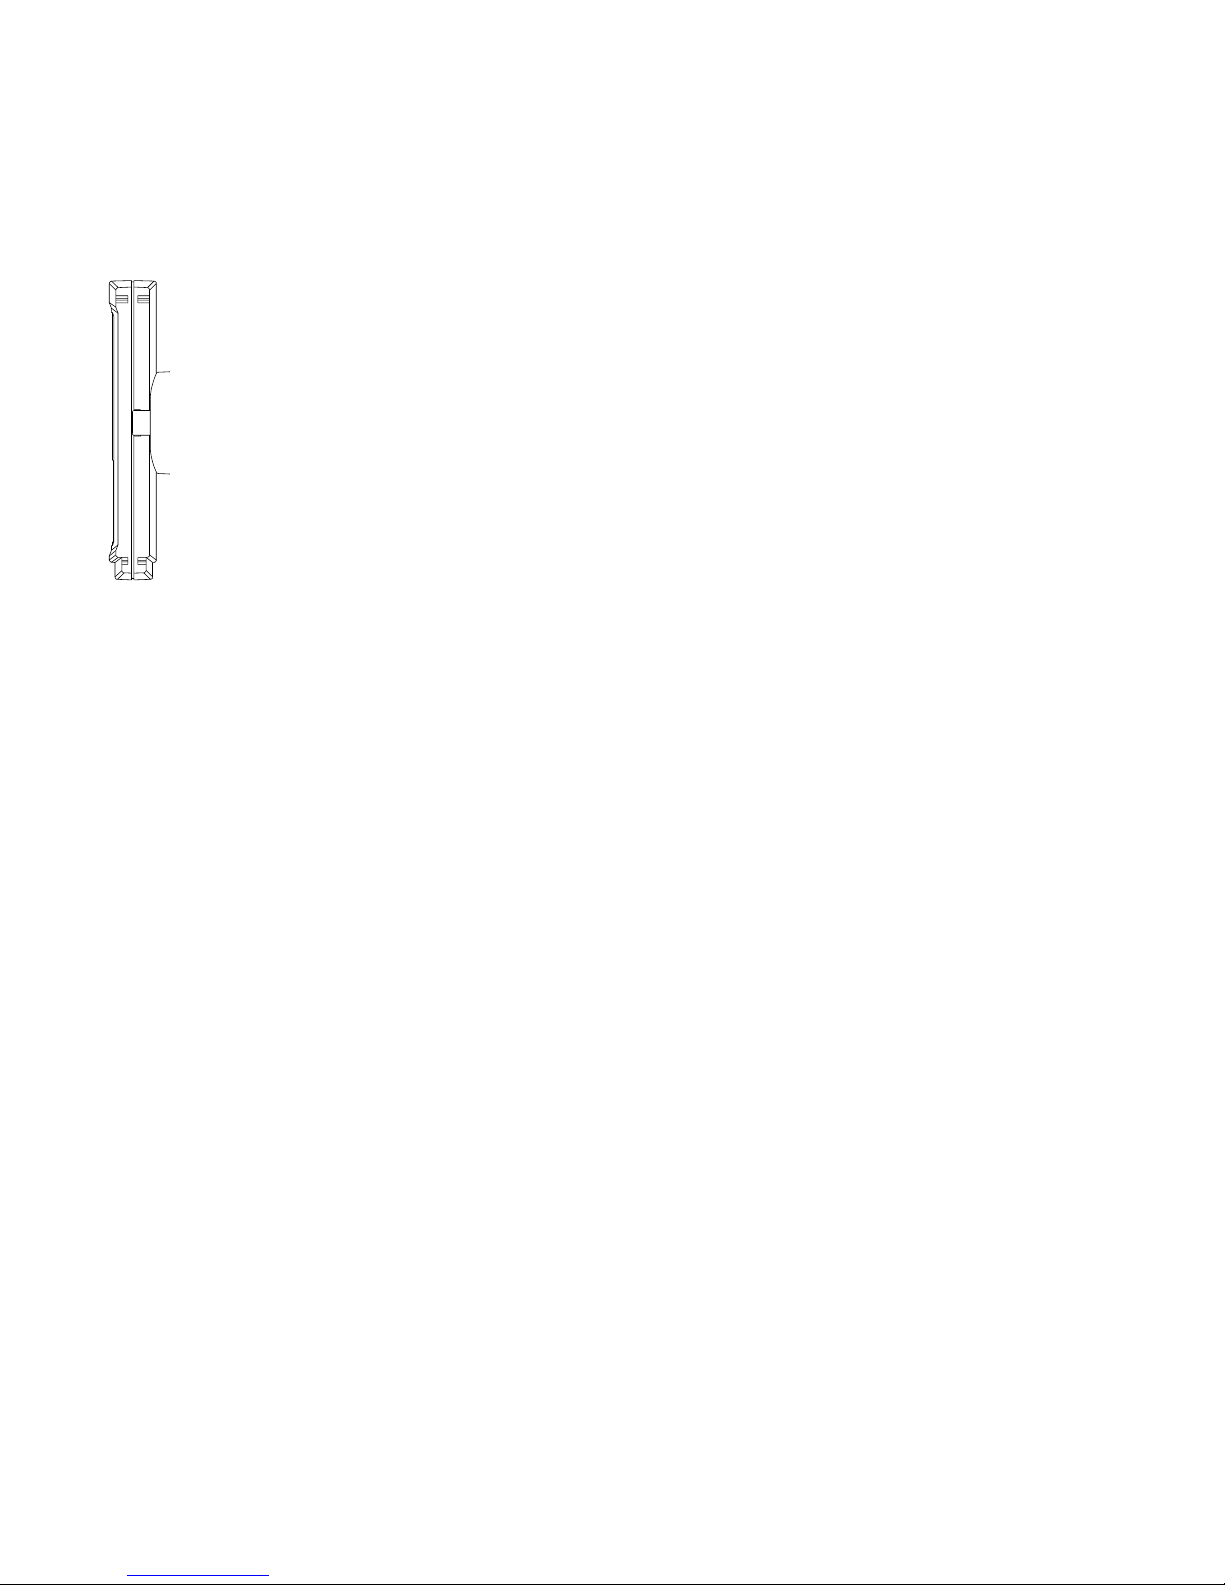
TABLE STAND: Pull out the two table stands from the back of the weather
station. Set on desk or table.
Page 8
8
POSITIONING THE SOLAR TRANSMITTER (SENSOR):
It is important to place the Sensor in a bright environment for the solar panel to collect
enough light to recharge the internal power cell. It is best mounted on an East wall to
receive cool morning sun to charge. Under an overhang will provide protection from the
overhead sun, which can cause temperature inaccuracies.
The Sensor can be placed onto any flat surface or wall mounted using the bracket which
doubles as a stand or wall mount base.
WALL MOUNTING
Secure the bracket onto desired wall using screws and plastic anchors.
Clip the solar Sensor onto the bracket.
Note: The mounting surface can affect the transmission range. If, for instance, the Sensor is
attached to a piece of metal, it may then either reduce or increase the transmitting range. For this
reason, we recommend not to place the unit on any metal surfaces or in any position where a large
metal or highly polished surface is in the immediate vicinity (garage doors, double glazing, etc.).
Before securing the Sensor in place, please ensure that the Weather Station continuously receives
the 915MHz signal from the Sensor from the desired location.
SPECIFICATIONS:
Indoor Temperature:
Measuring range: 15.8°F to 139.8°
( “--.-“ or “--.0” is displayed when the indoor temperature is outside this range)
Measured period: every 2 minutes
Indoor Humidity:
Humidity measuring range: 20% to 95% (19%RH will be displayed if the reading is lower than 20%,
96% will be displayed if the reading is higher than 95%)
Measured period: every 2 minutes
Outdoor Temperature:
Measuring range: -39.2°F to 139.8°F
( “--.-“ or “--.0” is displayed when the indoor temperature is outside this range)
Measured period: every 48 seconds
WARRANTY INFORMATION
La Crosse Technology, Ltd provides a 1-year limited warranty on this product against manufacturing
defects in materials and workmanship.
This limited warranty begins on the original date of purchase, is valid only on products purchased
and used in North America and only to the original purchaser of this product. To receive warranty
service, the purchaser must contact La Crosse Technology, Ltd for problem determination and
Page 9

9
service procedures. Warranty service can only be performed by a La Crosse Technology, Ltd
authorized service center. The original dated bill of sale must be presented upon request as proof
of purchase to La Crosse Technology, Ltd or La Crosse Technology, Ltd’s authorized service
center.
La Crosse Technology, Ltd will repair or replace this product, at our option and at no charge as
stipulated herein, with new or reconditioned parts or products if found to be defective during the
limited warranty period specified above. All replaced parts and products become the property of La
Crosse Technology, Ltd and must be returned to La Crosse Technology, Ltd.
Replacement parts and products assume the remaining original warranty, or ninety (90) days,
whichever is longer. La Crosse Technology, Ltd will pay all expenses for labor and materials for all
repairs covered by this warranty. If necessary repairs are not covered by this warranty, or if a
product is examined which is not in need or repair, you will be charged for the repairs or
examination.
The owner must pay any shipping charges incurred in getting your La Crosse Technology, Ltd
product to a La Crosse Technology, Ltd authorized service center.
Your La Crosse Technology, Ltd warranty covers all defects in material and workmanship with the
following specified exceptions: (1) damage caused by accident, unreasonable use or neglect
(including the lack of reasonable and necessary maintenance); (2) damage occurring during
shipment (claims must be presented to the carrier); (3) damage to, or deterioration of, any
accessory or decorative surface; (4) damage resulting from failure to follow instructions contained in
your owner’s manual; (5) damage resulting from the performance of repairs or alterations by
someone other than an authorized La Crosse Technology, Ltd authorized service center; (6) units
used for other than home use (7) applications and uses that this product was not intended or (8) the
products inability to receive a signal due to any source of interference.
This warranty covers only actual defects within the product itself, and does not cover the cost of
installation or removal from a fixed installation, normal set-up or adjustments, claims based on
misrepresentation by the seller or performance variations resulting from installation-related
circumstances.
LA CROSSE TECHNOLOGY, LTD WILL NOT ASSUME LIABILITY FOR INCIDENTAL,
CONSEQUENTIAL, PUNITIVE, OR OTHER SIMILAR DAMAGES ASSOCIATED WITH THE
OPERATION OR MALFUNCTION OF THIS PRODUCT. THIS PRODUCT IS NOT TO BE USED
FOR MEDICAL PURPOSES OR FOR PUBLIC INFORMATION. THIS PRODUCT IS NOT A TOY.
KEEP OUT OF CHILDREN’S REACH.
This warranty gives you specific legal rights. You may also have other rights specific to your State.
Some States do no allow the exclusion of consequential or incidental damages therefore the above
exclusion of limitation may not apply to you.
Page 10

10
For warranty work, technical support, or information contact:
La Crosse Technology
2817 Losey Blvd. S.
La Crosse, WI 54601
The complete instruction manual is available at:
www.lacrossetechnology.com/support
Le manuel d'instruction complet est disponible sur:
www.lacrossetechnology.com/support
El manual de instrucciones completo está disponible en:
www.lacrossetechnology.com/support
All rights reserved. This handbook must not be reproduced in any form, even in excerpts, or
duplicated or processed using electronic, mechanical or chemical procedures without written
permission of the publisher.
This handbook may contain mistakes and printing errors. The information in this handbook is
regularly checked and corrections made in the next issue. We accept no liability for technical
mistakes or printing errors, or their consequences.
All trademarks and patents are acknowledged.
Printed in China
 Loading...