

Page 1

TABLE OF CONTENTS
2- and 3-Hand Models . . . . . . . . . . . . . . . . . . . . . . . . . . . . . . . . . . . . . . . . . . . . . . . . . . 1
Date/Big Date Display Models - Type A . . . . . . . . . . . . . . . . . . . . . . . . . . . . . . . . . . . . . . 2
Date/Big Date Display Models - Type B . . . . . . . . . . . . . . . . . . . . . . . . . . . . . . . . . . . . . 3
Automatic Models . . . . . . . . . . . . . . . . . . . . . . . . . . . . . . . . . . . . . . . . . . . . . . . . . . . . . . 4
Multi-Eye Models . . . . . . . . . . . . . . . . . . . . . . . . . . . . . . . . . . . . . . . . . . . . . . . . . . . . . . . 5
Multi-Eye Models with Retrograde Day/Date. . . . . . . . . . . . . . . . . . . . . . . . . . . . . . . . . . 6
Multi-Eye Models with Date/24-Hour Hand . . . . . . . . . . . . . . . . . . . . . . . . . . . . . . . . . . . 7
Multi-Eye Models with Day/Date/24-Hour Hand . . . . . . . . . . . . . . . . . . . . . . . . . . . . . . . 8
Multi-Eye Models with Month/Day/24-Hour Hand/Date . . . . . . . . . . . . . . . . . . . . . . . . . . 9
Dual-Time Retrograde Models with Big Date . . . . . . . . . . . . . . . . . . . . . . . . . . . . . . . . 10
Dual-Time GMT Models . . . . . . . . . . . . . . . . . . . . . . . . . . . . . . . . . . . . . . . . . . . . . . . . 11
Chronographs . . . . . . . . . . . . . . . . . . . . . . . . . . . . . . . . . . . . . . . . . . . . . . . . . . . . . . . . 12
Analog Chronographs 1/1 of a Second – Type A
with center-mounted chronograph seconds hand and chronograph minutes counter . . . . . . . . . . . . . . . . . . 13
Analog Chronographs 1/1 of a Second – Type B
with center-mounted chronograph seconds hand, chronograph hour
and minutes counters and small seconds subdial
. . . . . . . . . . . . . . . . . . . . . . . . . . . . . . . . . . . . . . 14
Analog Chronographs 1/1 of a Second - Type C
with small chronograph seconds and 24-hour hands . . . . . . . . . . . . . . . . . . . . . . . . . . . . . . . . . . . . . 15
Analog Chronographs 1/1 of a Second - Type D
with small chronograph seconds and 24-hour hands . . . . . . . . . . . . . . . . . . . . . . . . . . . . . . . . . . . . . 16
Analog Chronographs 1/10 of a Second . . . . . . . . . . . . . . . . . . . . . . . . . . . . . . . . . . . 17
Analog Chronographs 1/20 of a Second . . . . . . . . . . . . . . . . . . . . . . . . . . . . . . . . . . . 19
Removable Links . . . . . . . . . . . . . . . . . . . . . . . . . . . . . . . . . . . . . . . . . . . . . . . . . . . . . . 20
Interchangeable Bracelet/Strap Models
Tension-pin style . . . . . . . . . . . . . . . . . . . . . . . . . . . . . . . . . . . . . . . . . . . . . . . . . . . . . . . . . 21
Interchangeable Bracelet/Strap Models
Hook and bar style . . . . . . . . . . . . . . . . . . . . . . . . . . . . . . . . . . . . . . . . . . . . . . . . . . . . . . . . 22
Convertible Bracelet/Strap Models . . . . . . . . . . . . . . . . . . . . . . . . . . . . . . . . . . . . . . . . 23
Warranty & Service Information . . . . . . . . . . . . . . . . . . . . . . . . . . . . . . . . . . . . . . . . . . . 24
Care and Maintenance . . . . . . . . . . . . . . . . . . . . . . . . . . . . . . . . . . . . . . . . . . . . . . . . . 25
Page 2
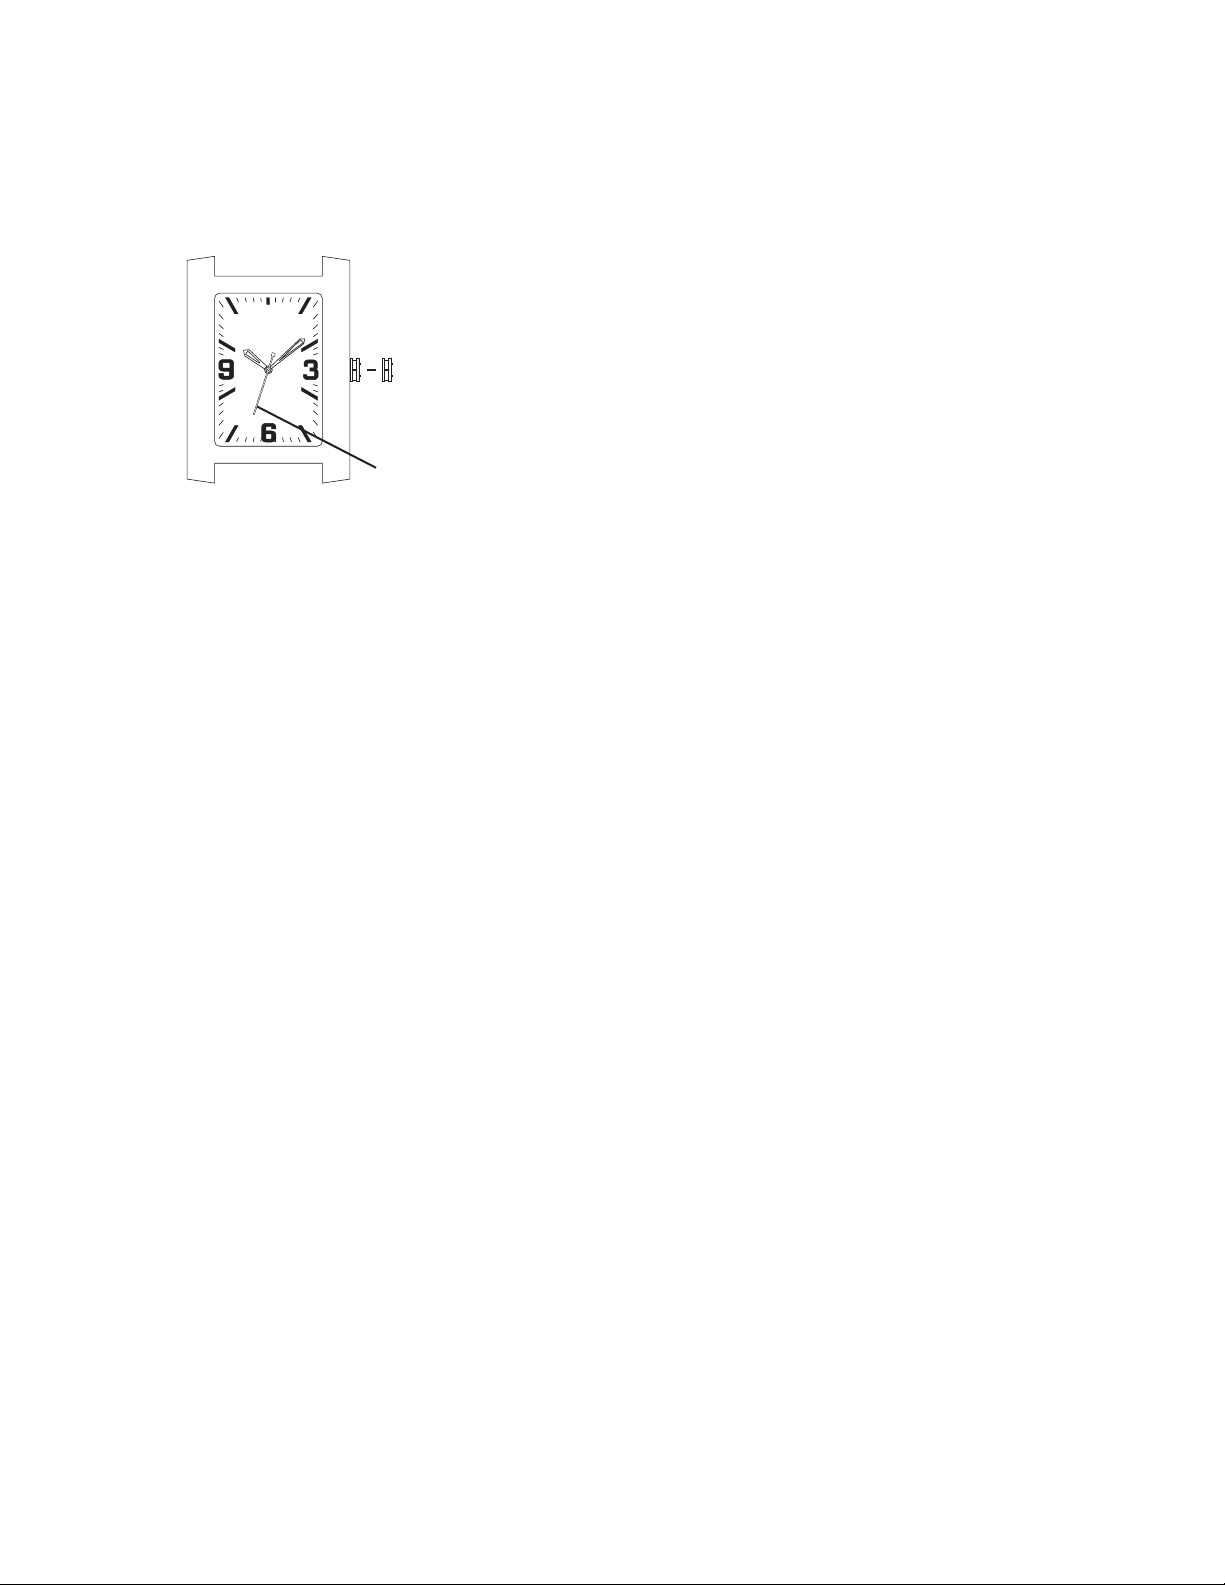
Crown Positions:
1 2
Position 1 - Normal position.
Crown pushed against case.
Position 2 - To set TIME:
Rotate crown in either direction.
OPERATING INSTRUCTIONS
2- and 3-Hand Models
Crown
Seconds hand
1
Page 3
OPERATING INSTRUCTIONS
12 3
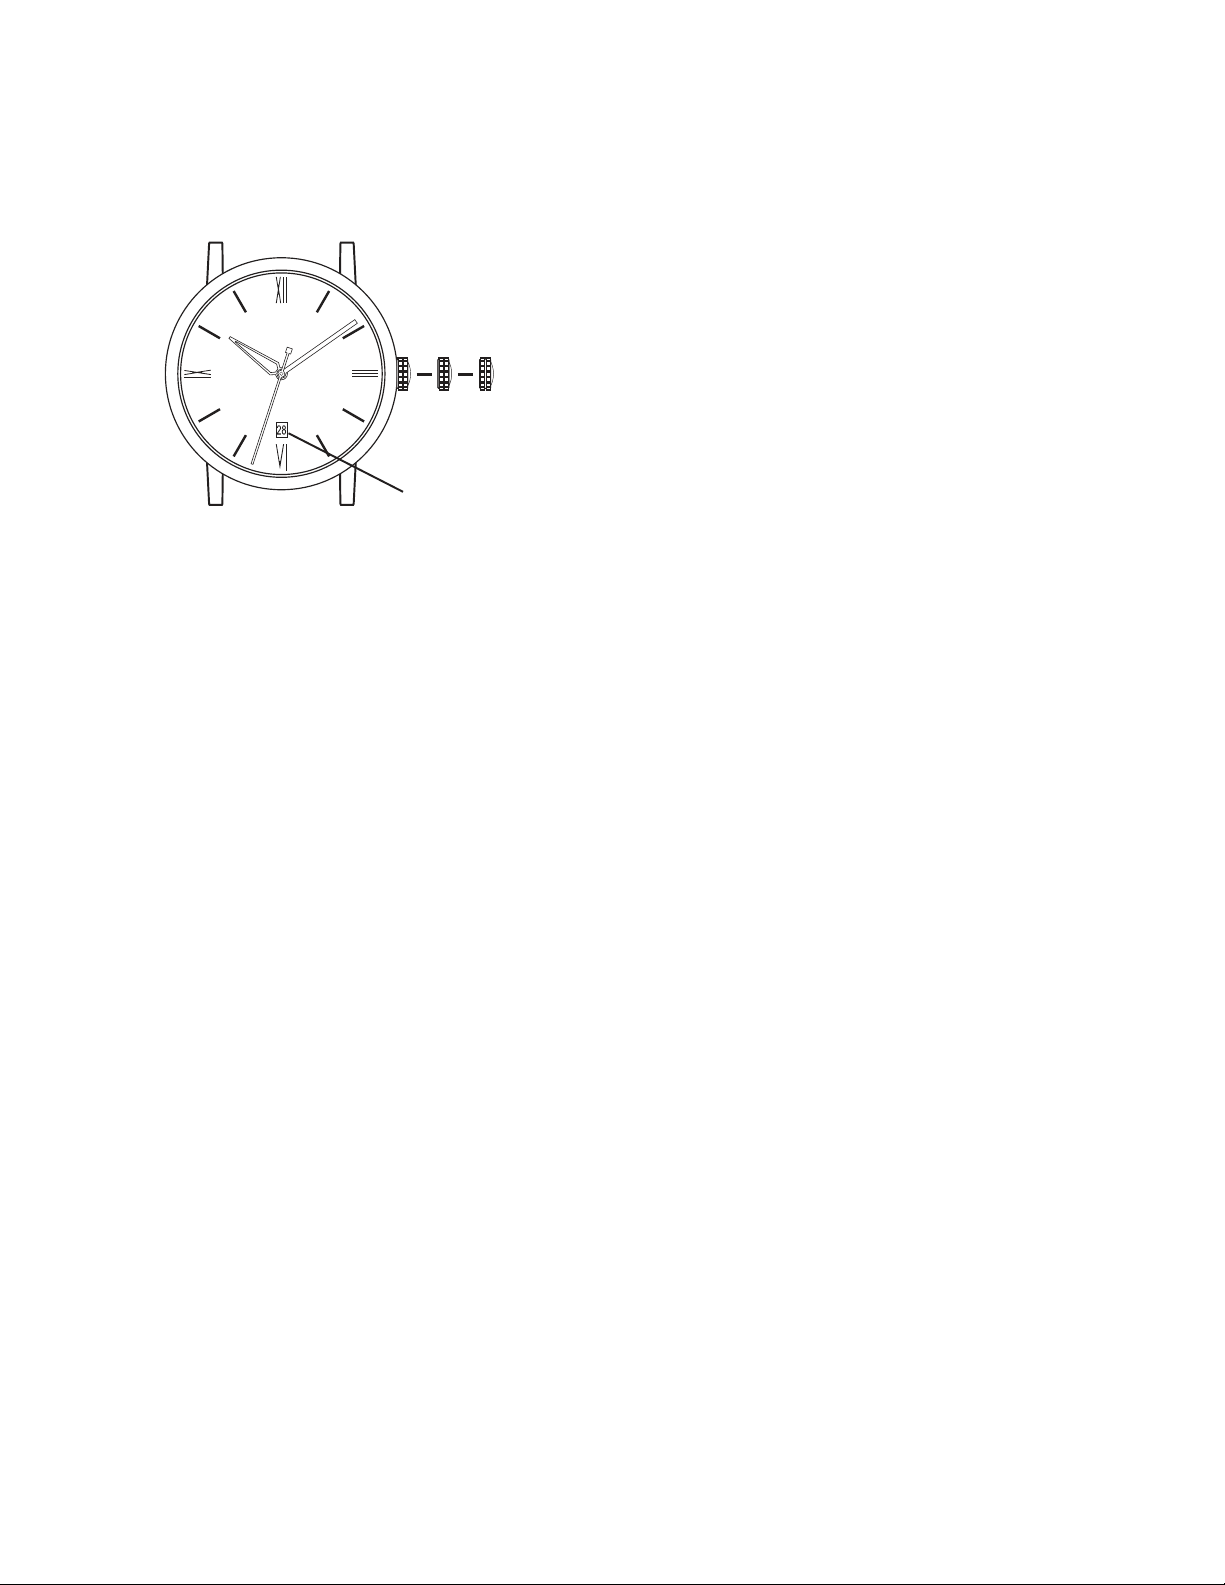
Date/Big Date Display Models - Type A
Crown
Date display
Crown Positions:
Position 1 - Normal position.
Crown pushed against case.
Position 2 - To set DATE*:
Rotate crown clockwise.
NOTE: For models with DAY/DATE display(s):
Rotate crown clockwise to set DATE,
And counterclockwise to set DAY.
Position 3 - To set TIME:
Rotate crown in either direction.
*CAUTION: Never set the date when the hands are between
9:00 PM and 3:00 AM. Doing so could damage the calendar
mechanism.
NOTE: The functioning of the watch is not affected during date
setting. When the watch is running, the date will change gradually
during the period from 9:00 PM to 3:00 AM.
2
Page 4
OPERATING INSTRUCTIONS
27
60
15
30
45
123
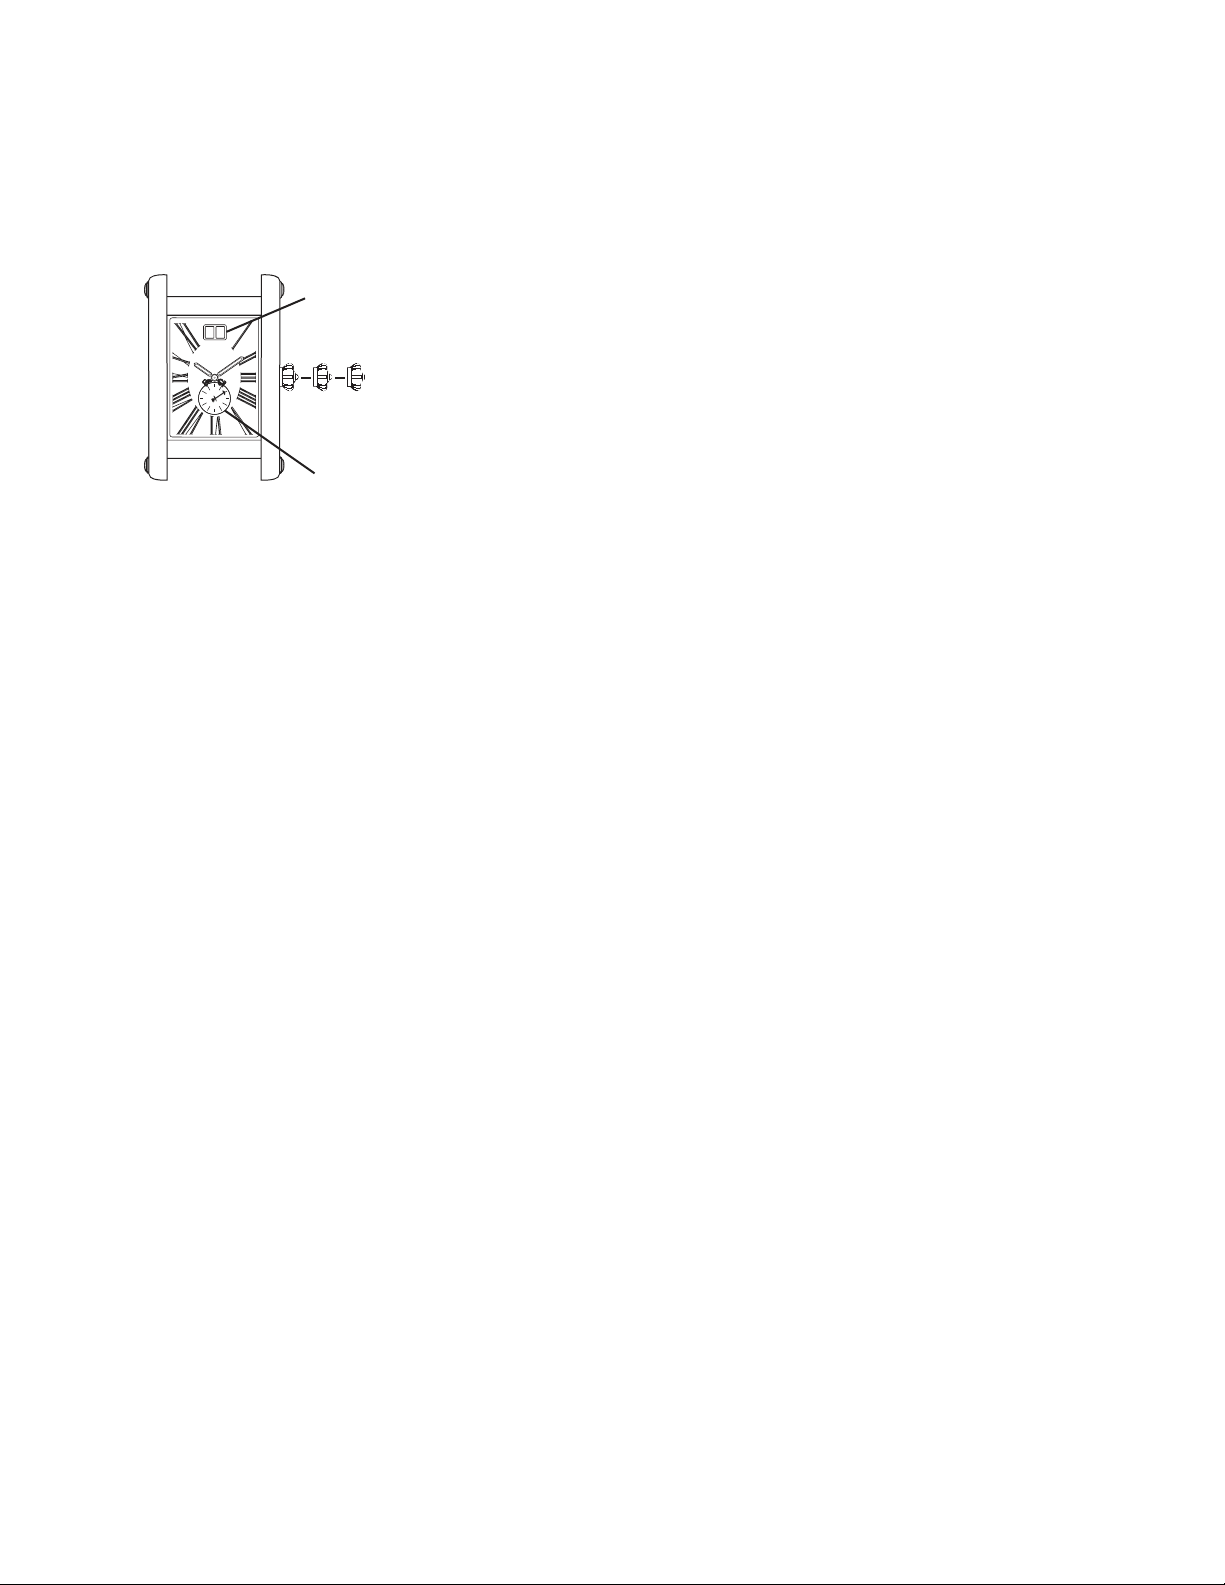
Date/Big Date Display Models - Type B
Big Date display
Crown
Small seconds hand
Crown Positions:
Position 1 - Normal position.
Crown pushed against case.
Position 2 - To set DATE/BIG DATE*:
Rotate crown clockwise.
NOTE: For models with DAY/DATE display(s):
Rotate crown clockwise to set DATE,
And counterclockwise to set DAY.
Position 3 - To set TIME:
Rotate crown in either direction.
Big Date models feature an oversized date window with two singledigit disks that rotate independently of one another.
*NOTE: If the Date/Big Date is set between 9:00 PM and 3:00 AM,
the date may not change on the following day.
NOTE: The functioning of the watch is not affected during date
setting. When the watch is running, the date will change gradually
during the period from 9:00 PM to 3:00 AM.
3
Page 5
OPERATING INSTRUCTIONS
60
55
50
45
40
35
30
25
20
15
10
05
12
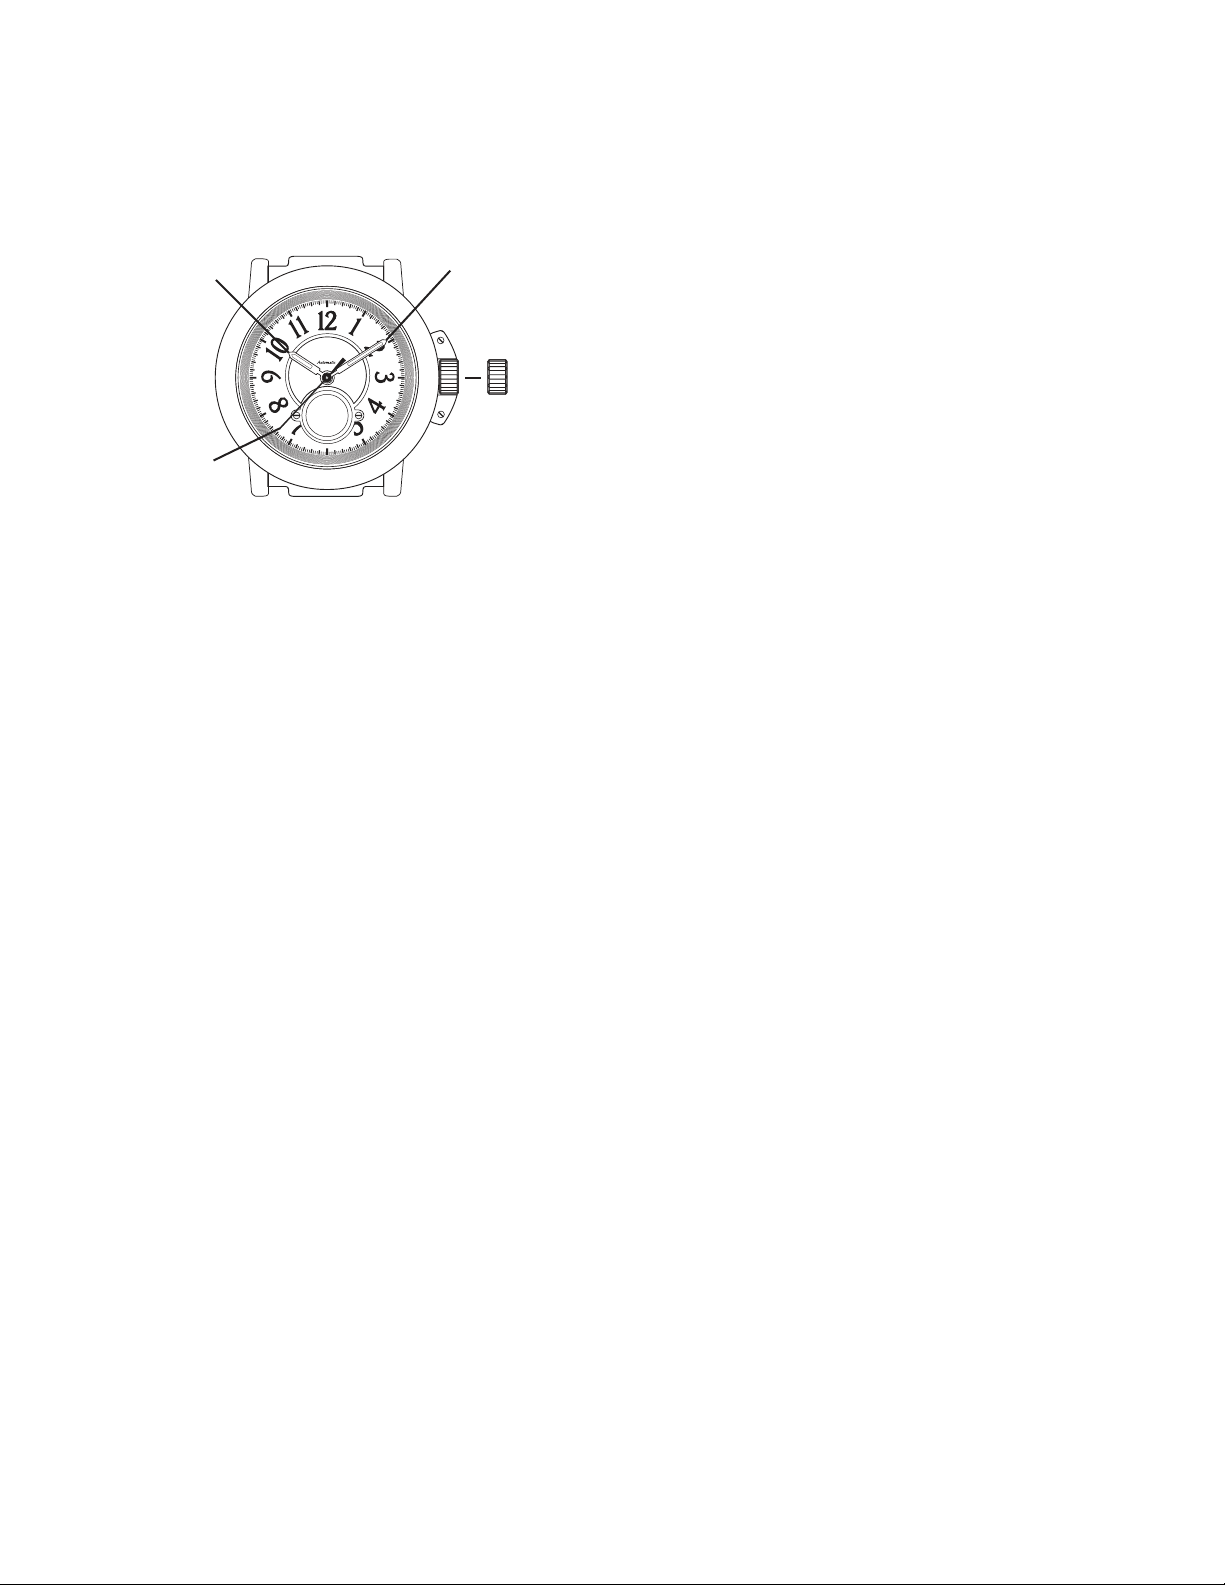
Automatic Models
Hour
hand
Minute
hand
Crown
Seconds
hand
The motion of your arm during normal daily activities should be
sufficient to keep your automatic watch wound. However, if you
have not worn your watch for several days and it has stopped, you
will need to wind the movement by hand before setting the time.
To wind the Movement:
With the crown in position 1, flush against the case, turn the crown
clockwise, completing approximately 15 to 20 revolutions, then
gently but quickly move the watch back and forth several times to
start movement.
To set the Time:
Once the watch is running, pull the crown out to position 2 and turn
it in either direction to set hands to desired time, then push crown
back in to position 1.
4
Page 6
OPERATING INSTRUCTIONS
1 2 3
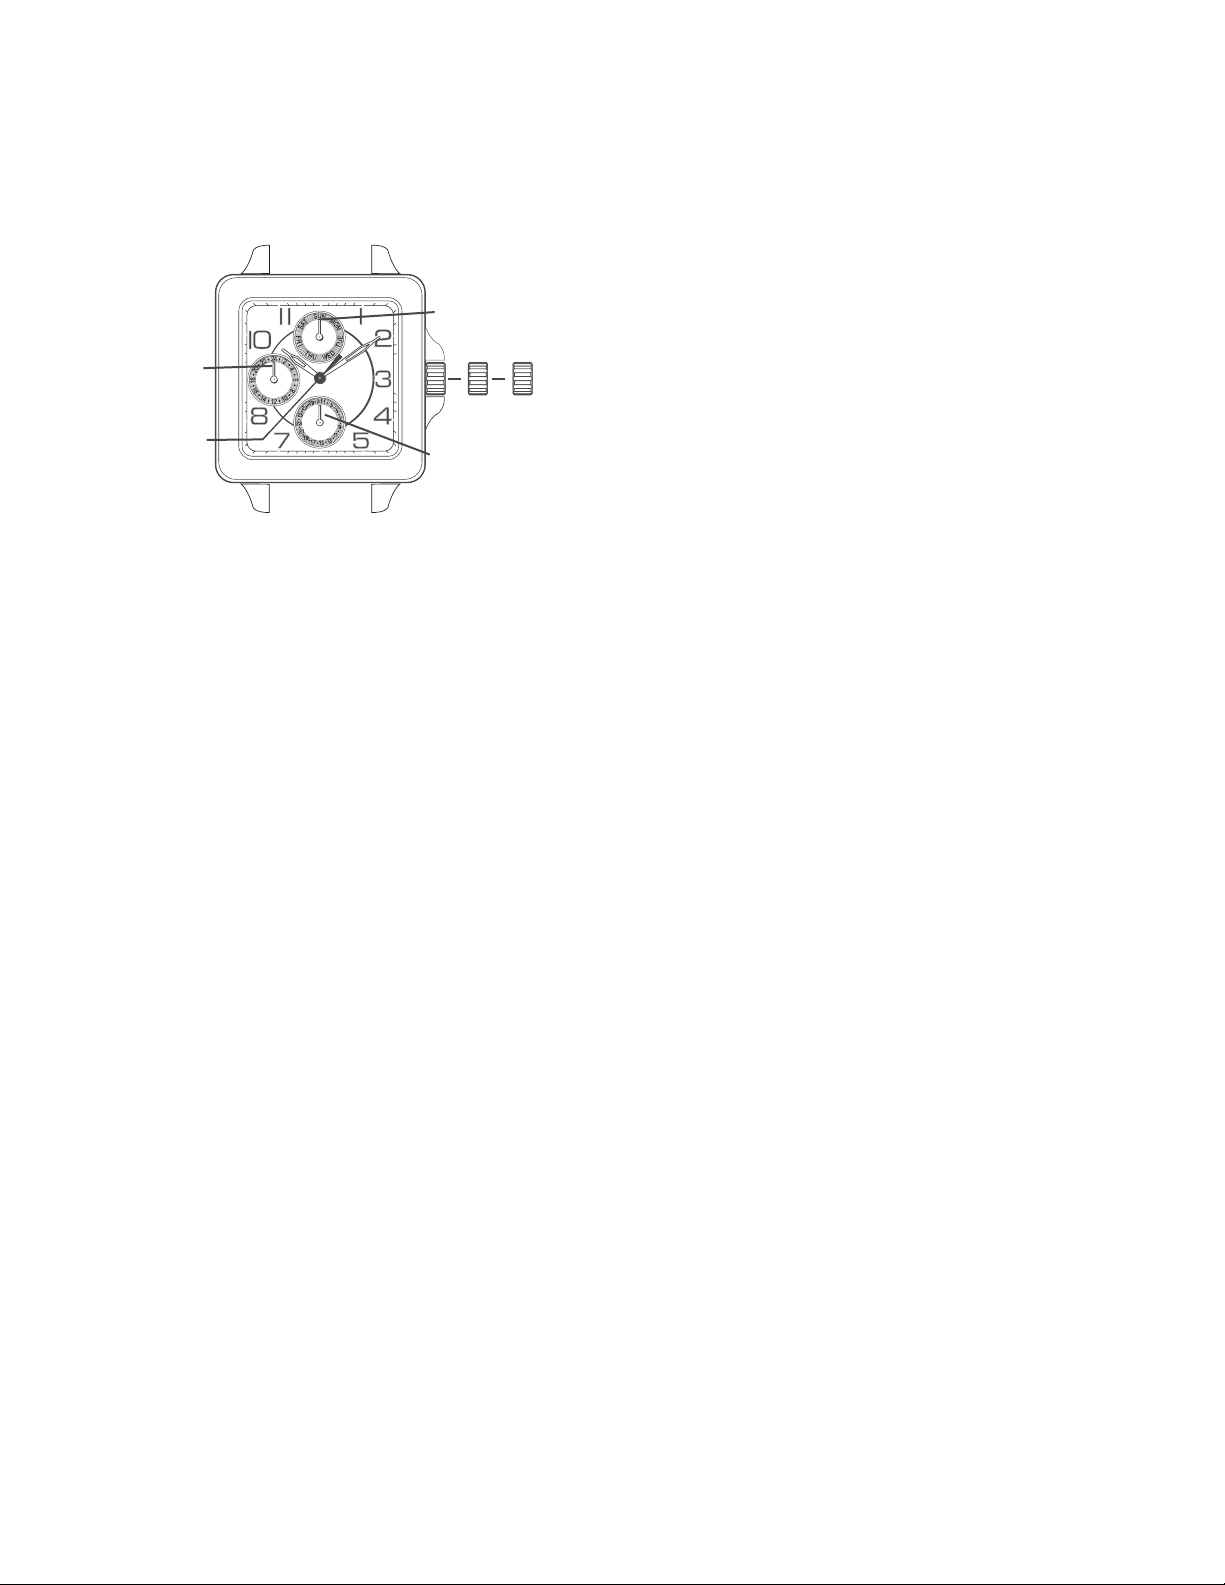
Multi-Eye Models
Day hand
Crown
Date hand
Second
hand
Multi-eye watches are powered by multi-function movements that
enable them to report such information as month, weekday and
date via apertures or “eyes” in the dial.
24-Hour time
hand
5
Page 7
OPERATING INSTRUCTIONS
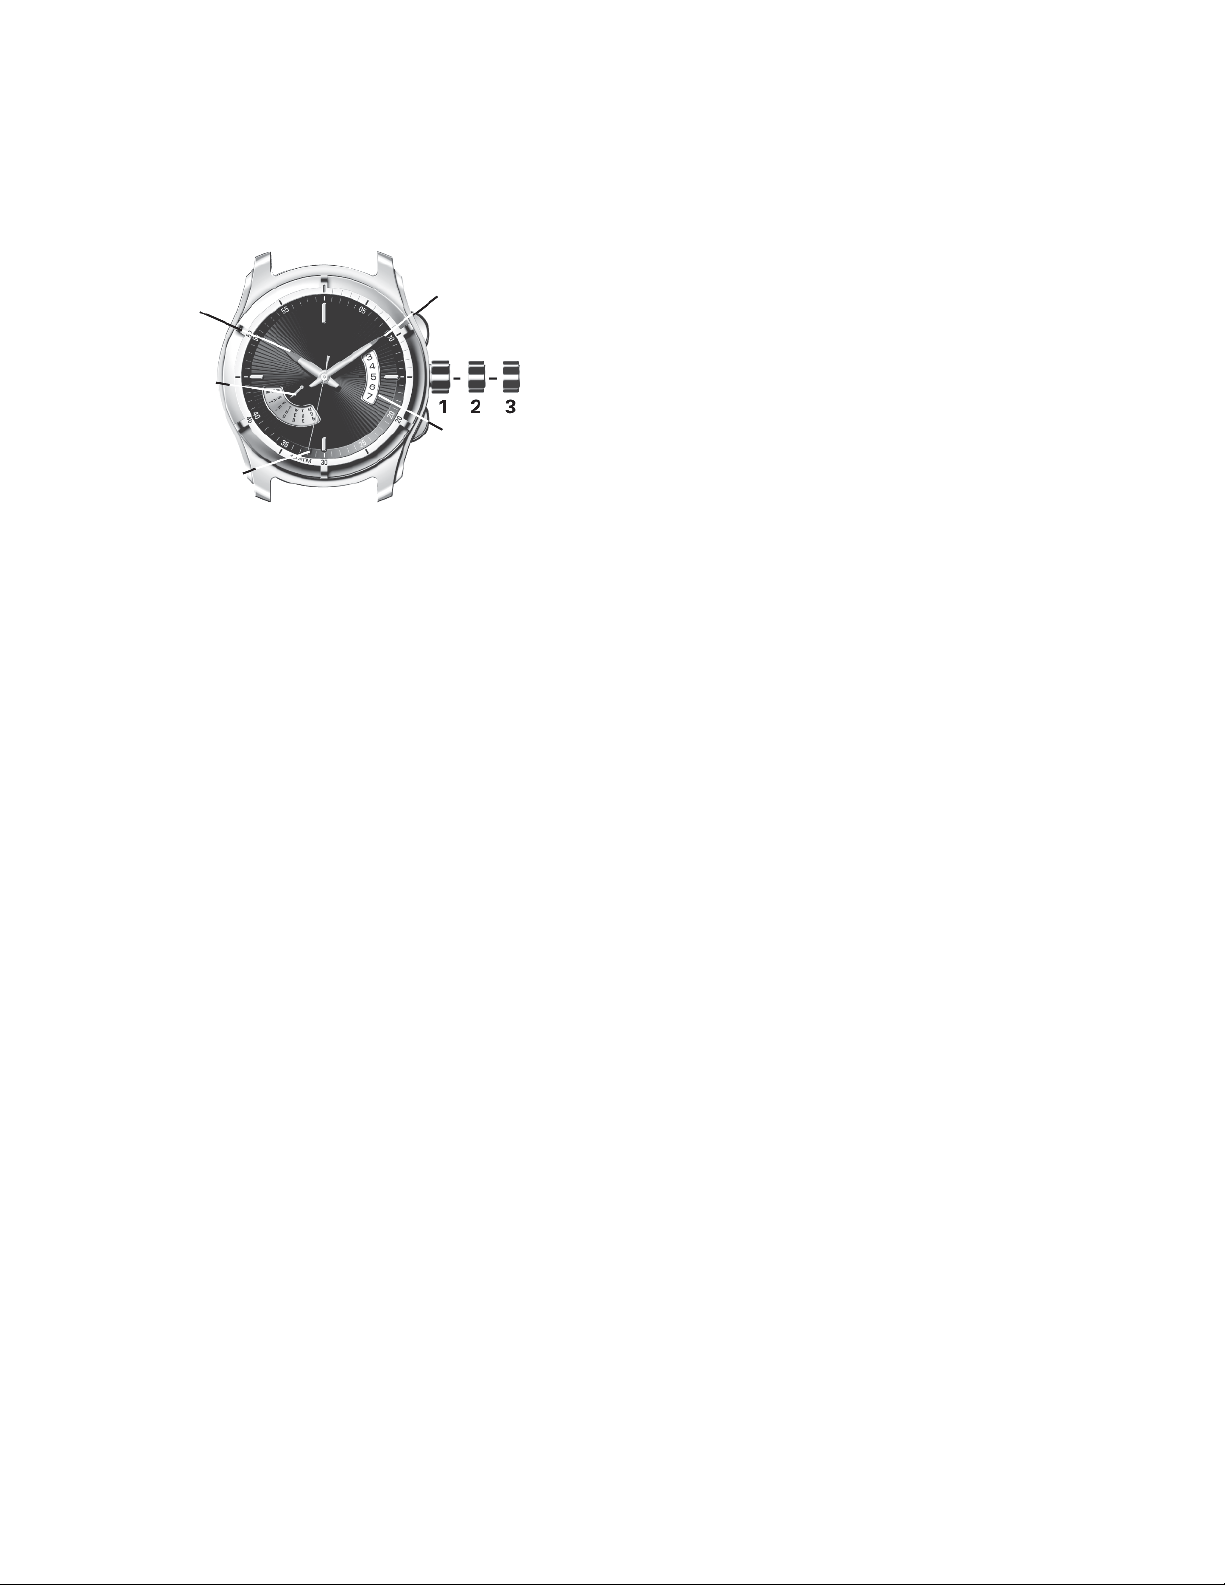
Multi-Eye Models with Retrograde Day/Date
Hour hand
Minute hand
Crown
Day hand
Date display
Seconds
hand
Crown Positions:
Position 1 - Normal position.
Crown pushed against case.
Position 2 - To set DATE*:
Rotate crown counterclockwise.
To set DAY: Rotate crown clockwise.
Position 3 - To set TIME:
Rotate crown in either direction.
*NOTE: If the Date is set between 9:00 PM and 1:00 AM, the date
may not change on the following day.
6
Page 8
OPERATING INSTRUCTIONS
123
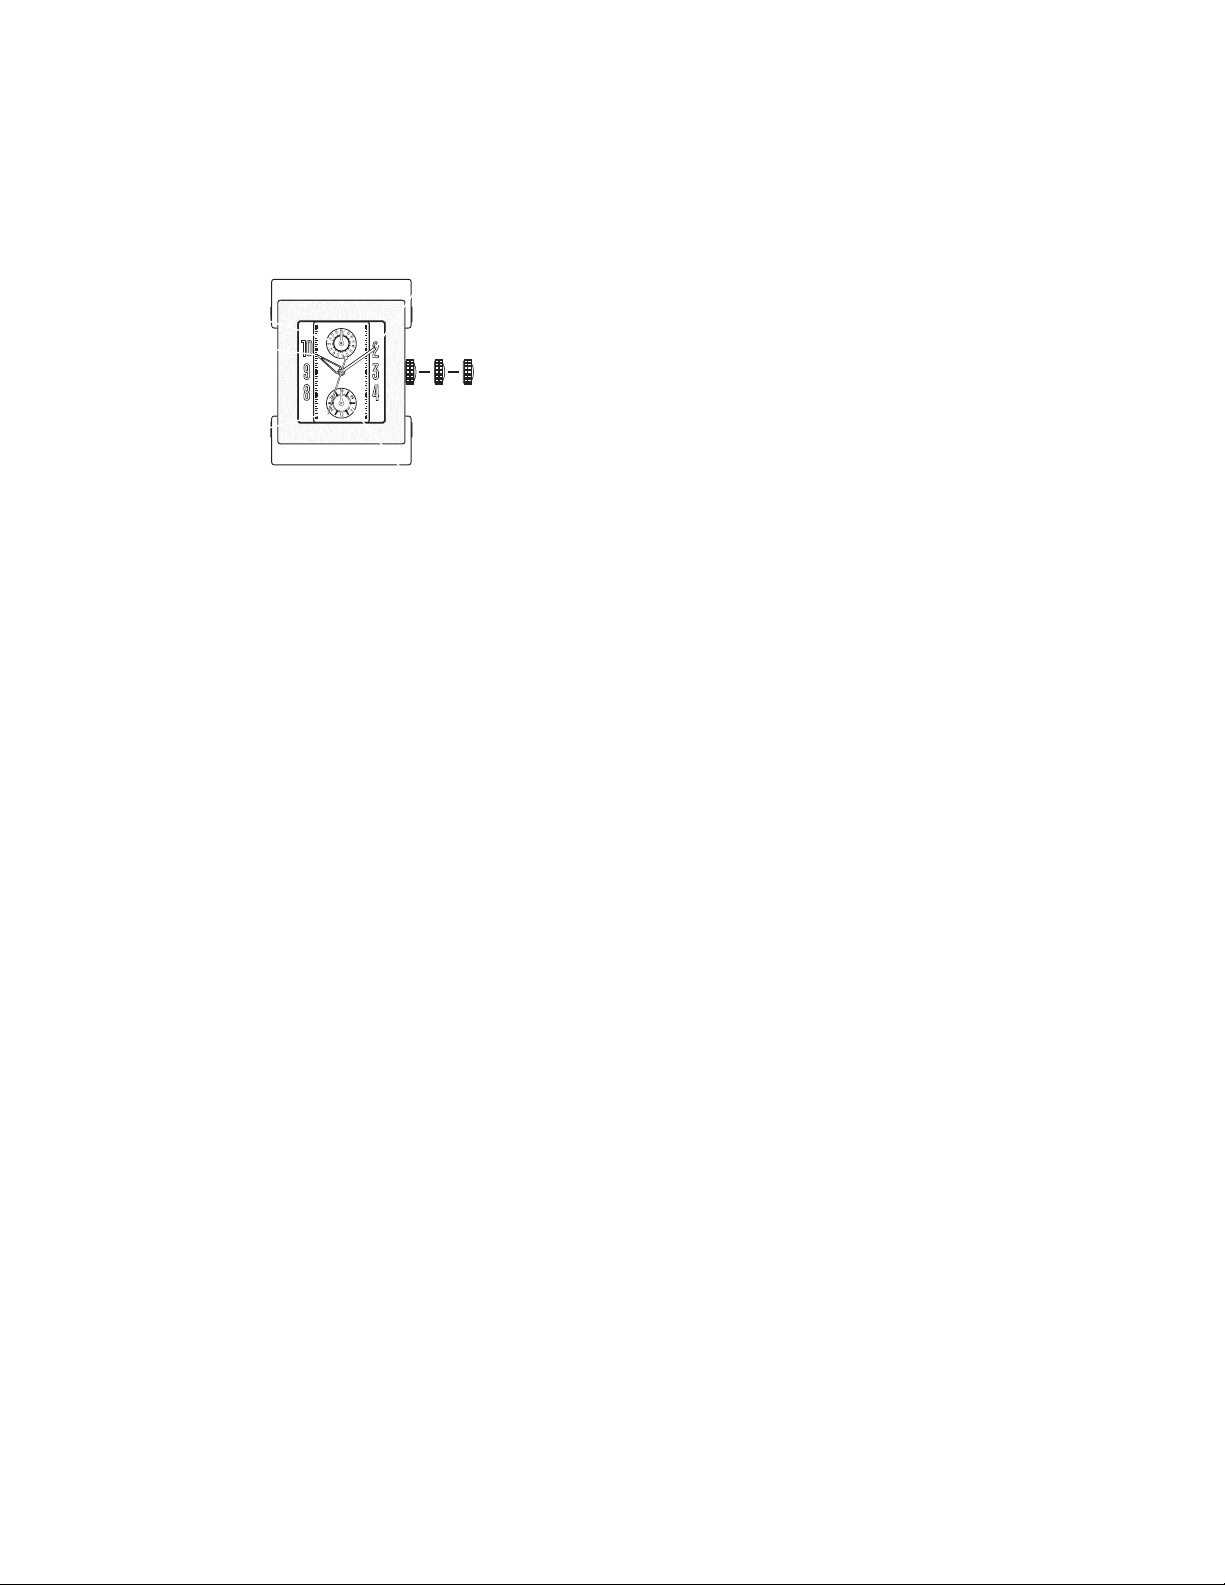
Multi-Eye Models with Date/24-Hour Hand
Minute hand
Date hand
Hour hand
Seconds hand
Crown Positions:
Position 1 - Normal position.
Crown pushed against case.
Position 2 - To set DATE*:
Rotate crown counterclockwise.
Position 3 - To set TIME:
Rotate crown in either direction.
*NOTE: If the Date is set between 9:00 PM and 3:00 AM, the date
may not change on the following day.
Crown
24-Hour hand
7
Page 9
OPERATING INSTRUCTIONS
1 2 3
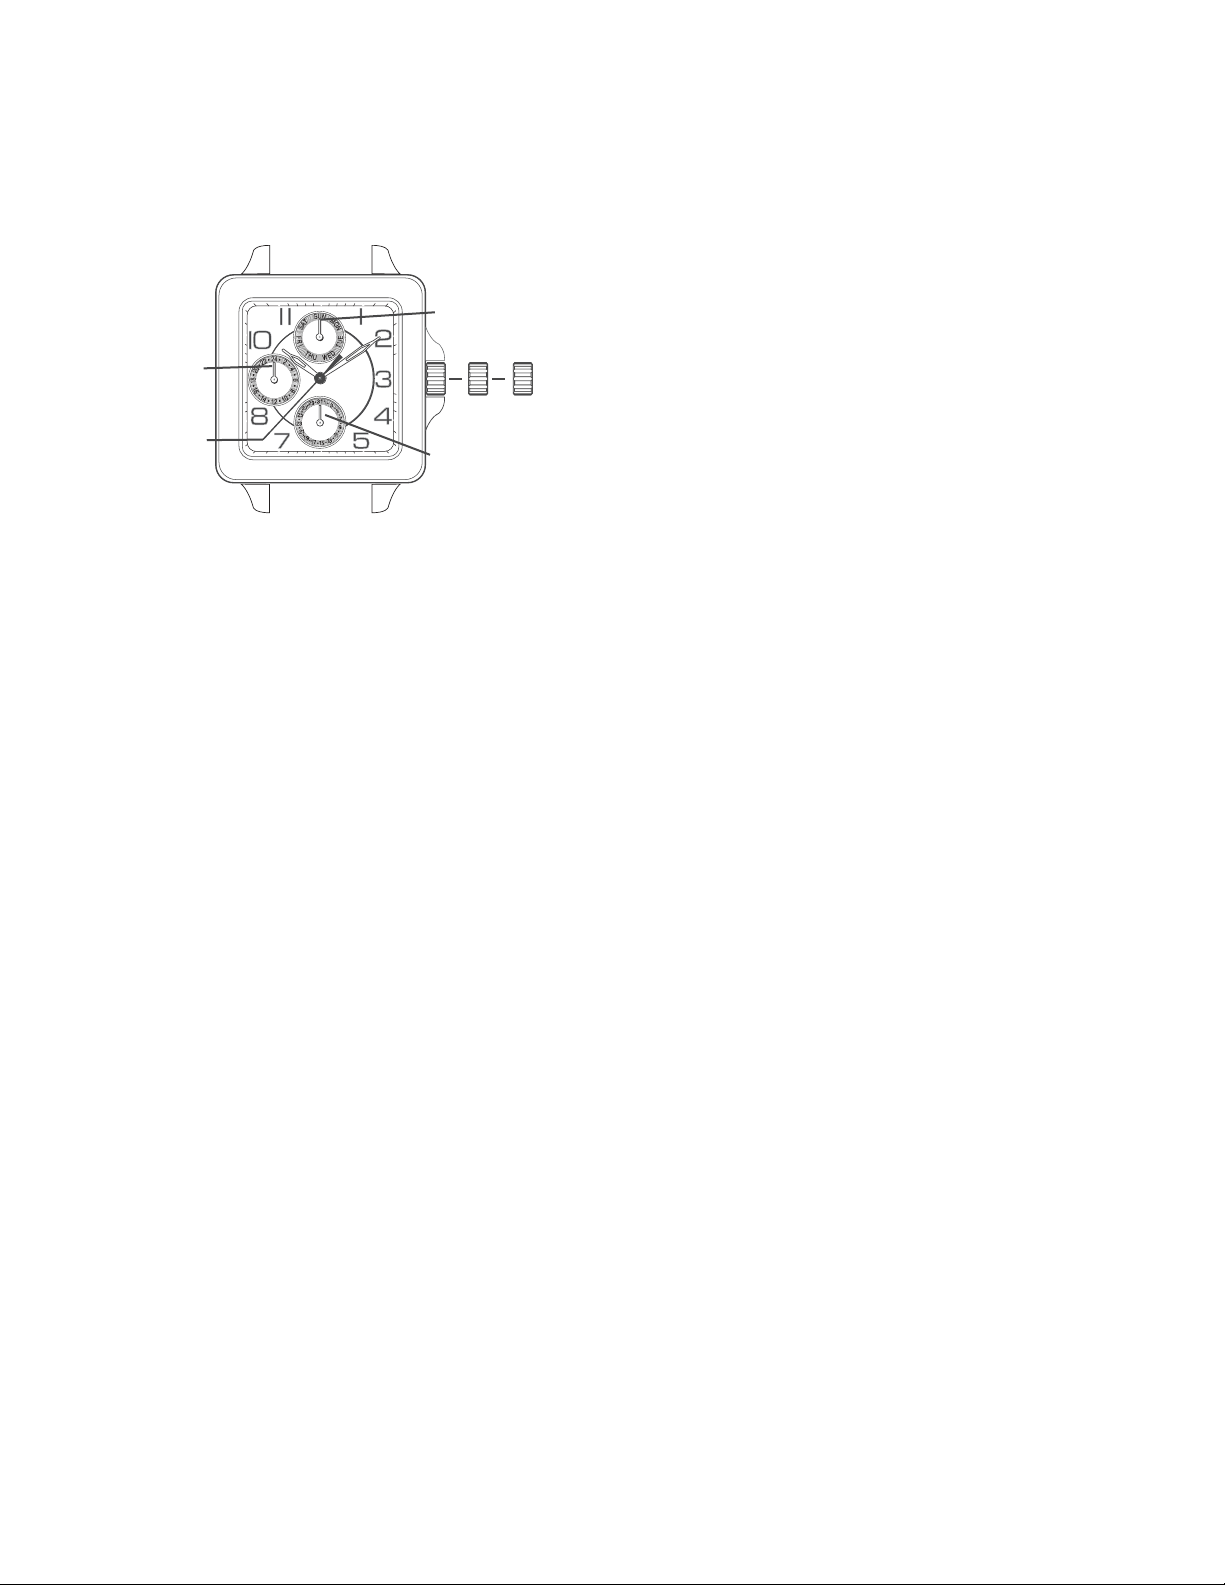
Multi-Eye Models with Day/Date/24-Hour Hand
Day hand
Crown
Date hand
Second
hand
To set Day, Time and Date:
NOTE: It is important to follow steps in this sequence:
1. Pull crown out to position 3.
2. Turn crown clockwise until Day hand points to correct day.
NOTE: While watch is running, hand indicating day of week will
gradually and automatically advance between midnight and about
5:30 AM.
3. With crown still in position 3, continue turning crown clockwise
until 24-Hour hand indicates correct hour. (Ex: noon is hour “12”,
midnight is hour “24”, 9:00 AM is hour “9”, 9:00 PM is hour “21”,
etc.), and hour and minute hands point to accurate time.
4. Push crown in one click to position 2.
5. Turn crown counterclockwise until Date hand points to correct
date.
6. Push crown in to position 1, flush against case. Your watch is
now set to correct day, time and date.
24-Hour time
hand
8
Page 10
OPERATING INSTRUCTIONS
8
123
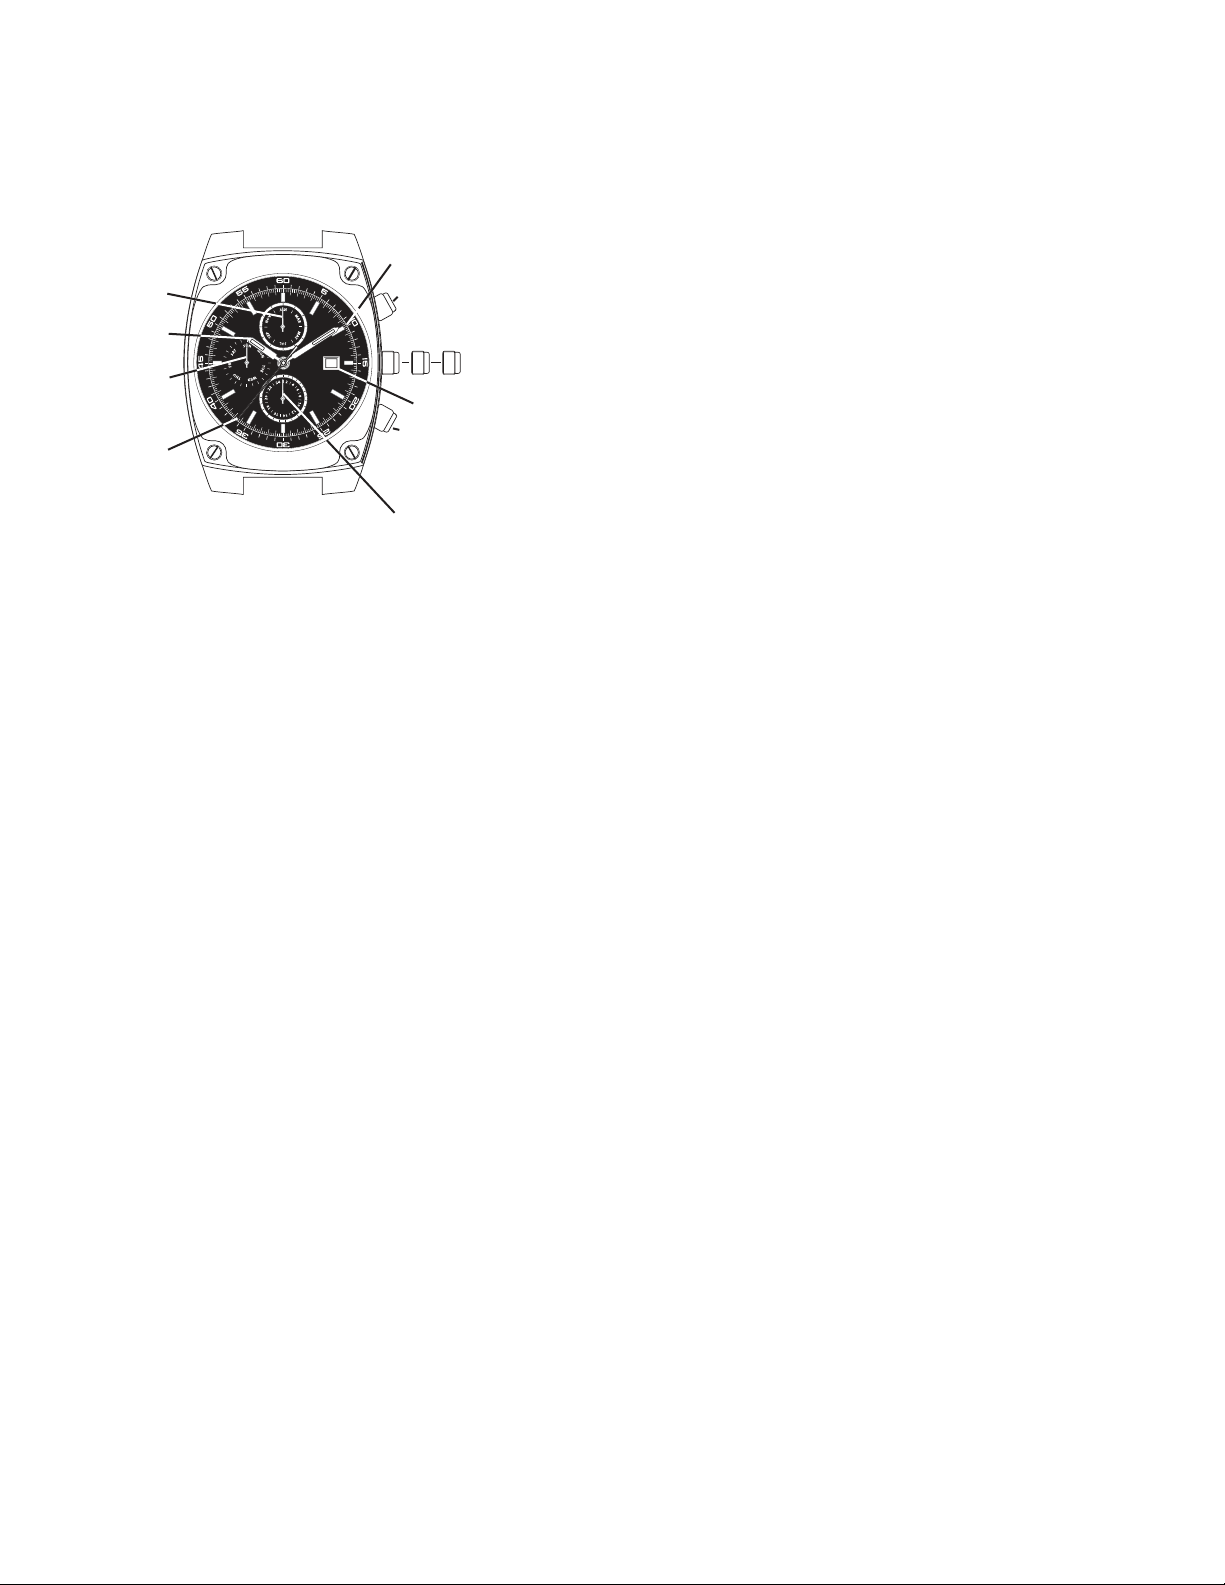
Multi-Eye Models with Month/Day/24-Hour Hand/Date
Minute
hand
Month
hand
Hour
hand
Day
hand
Second
hand
Push button A Quick correction
of month
Crown
Date display
Push button B Quick correction
of second time
zone/24-hour hand
24-hour time hand
To set Hour, Minute and 24-Hour Time:
1. Pull crown out to position 3.
2. Turn crown clockwise to set Hour, Minute and 24-Hour hands to
desired time.
3. Push crown back in to position 1.
To set Second Time Zone:
1. With crown in position 1, press and release Push Button B to
set 24-Hour hand to desired time; hand will advance 1 hour with
each push.
To set Date:
1. Pull crown out to position 3.
2. Turn crown clockwise: Date hand will advance by 1 number
each time the hour and minute hands pass midnight (00:00).
3. When desired date is reached, push crown back in to position 1.
Quick Correction of Date:
1. Pull crown out to position 2.
2. Turn crown clockwise to advance Date hand step-by-step.
3. When desired date is reached, push crown back in to position 1.
CAUTION: To prevent possible damage to your watch mechanism,
do not use Quick Correction of Date feature between 9:00 PM
(21:00) and 12:30 AM (00:30) when automatic date changes are
already in progress.
To set Day:
1. Pull crown out to position 3.
2. Turn crown clockwise: Day hand will advance by 1 day each
time the hour and minute hands pass 4:00 AM (04:00).
3. When desired day is reached, push crown back in to position 1.
To set Month:
1. With crown in position 1, press and release Push Button A to set
Month to desired one; Month hand will advance 1 month with
each push.
CAUTION: To prevent possible damage to your watch mechanism,
do not use Quick Correction of Month feature on 31st day of any
month when automatic month change is already in progress.
9
Page 11
OPERATING INSTRUCTIONS
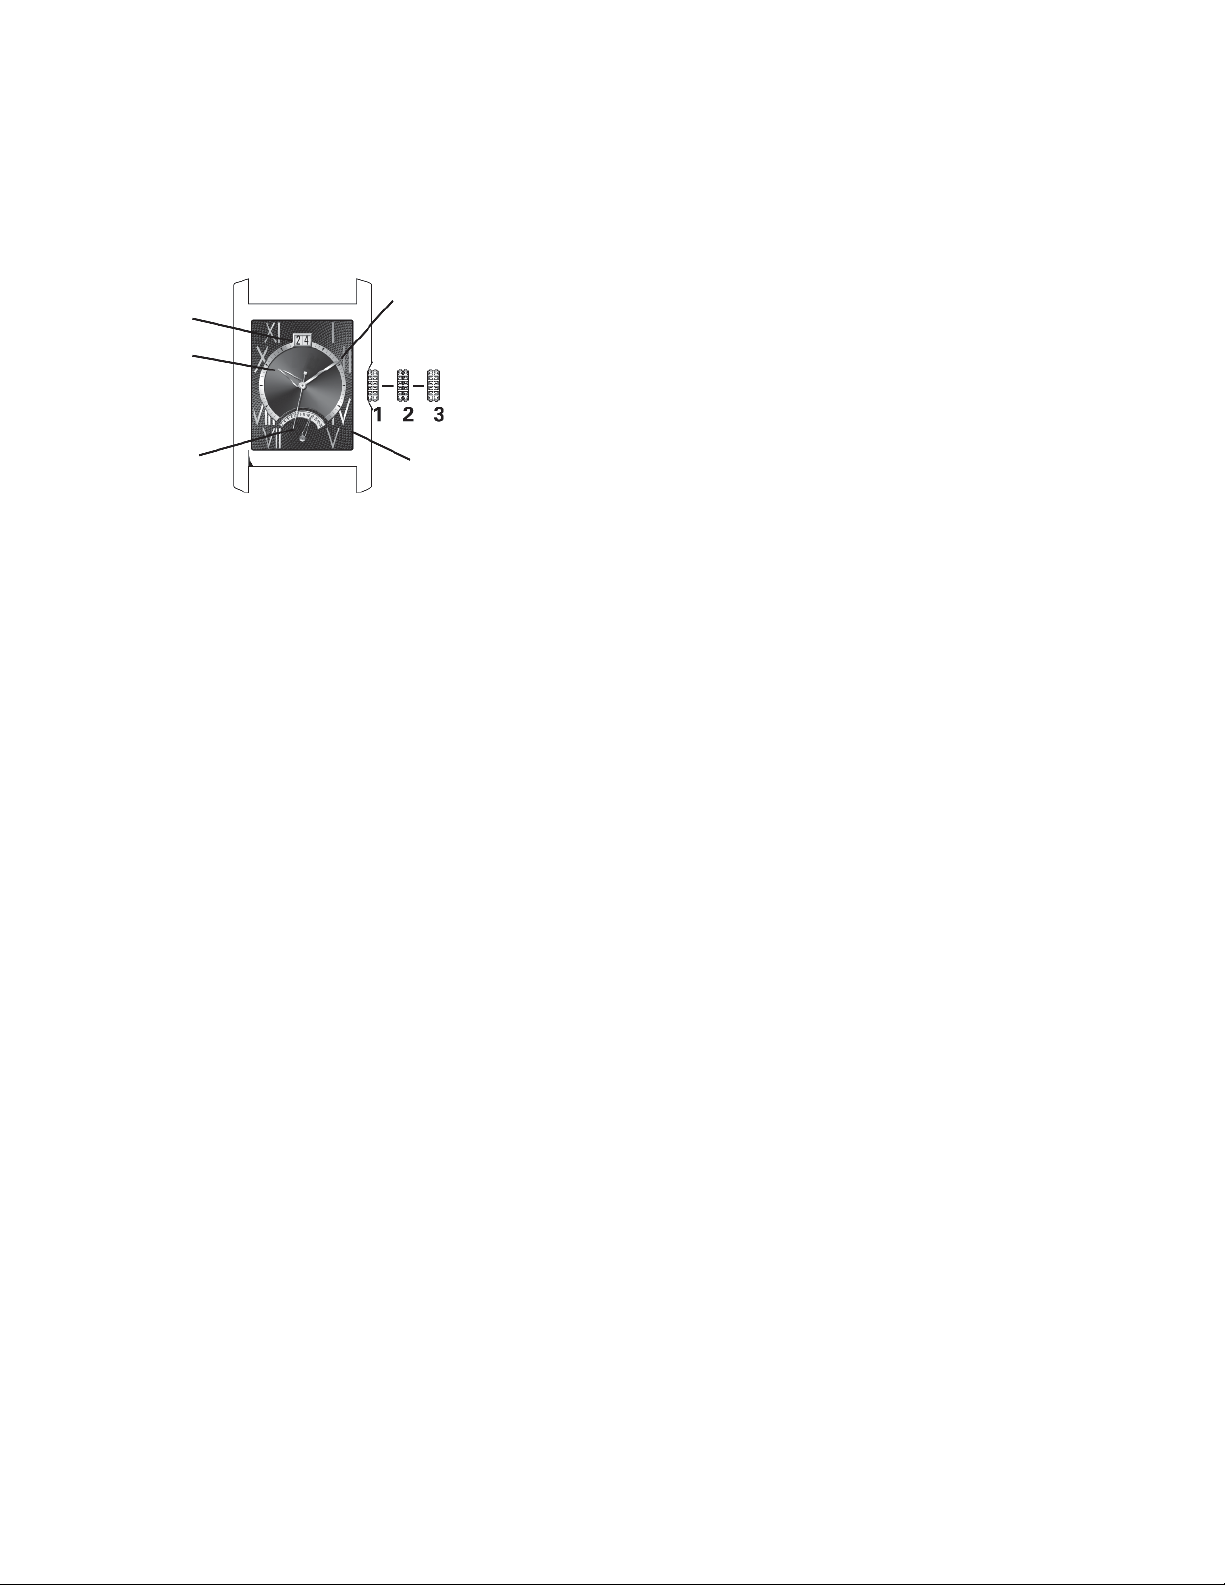
Dual-Time Retrograde Models with Big Date
Big Date
Minute hand
display
Hour hand
Crown
Seconds
hand
Retrograde dual
time display
(24-hour hand)
Crown positions:
Position 1 - Normal position.
Crown pushed against case.
Position 2 - To set BIG DATE*:
Rotate crown clockwise.
To set DUAL-TIME/RETROGRADE 24-HOUR HAND:
Rotate crown counterclockwise.
Position 3 - To set TIME:
Rotate crown in either direction.
NOTE: The seconds hand will stop moving while hour and minute
hands are being set, allowing time to be set to the nearest second.
10
Page 12
OPERATING INSTRUCTIONS
GMTGMT
123
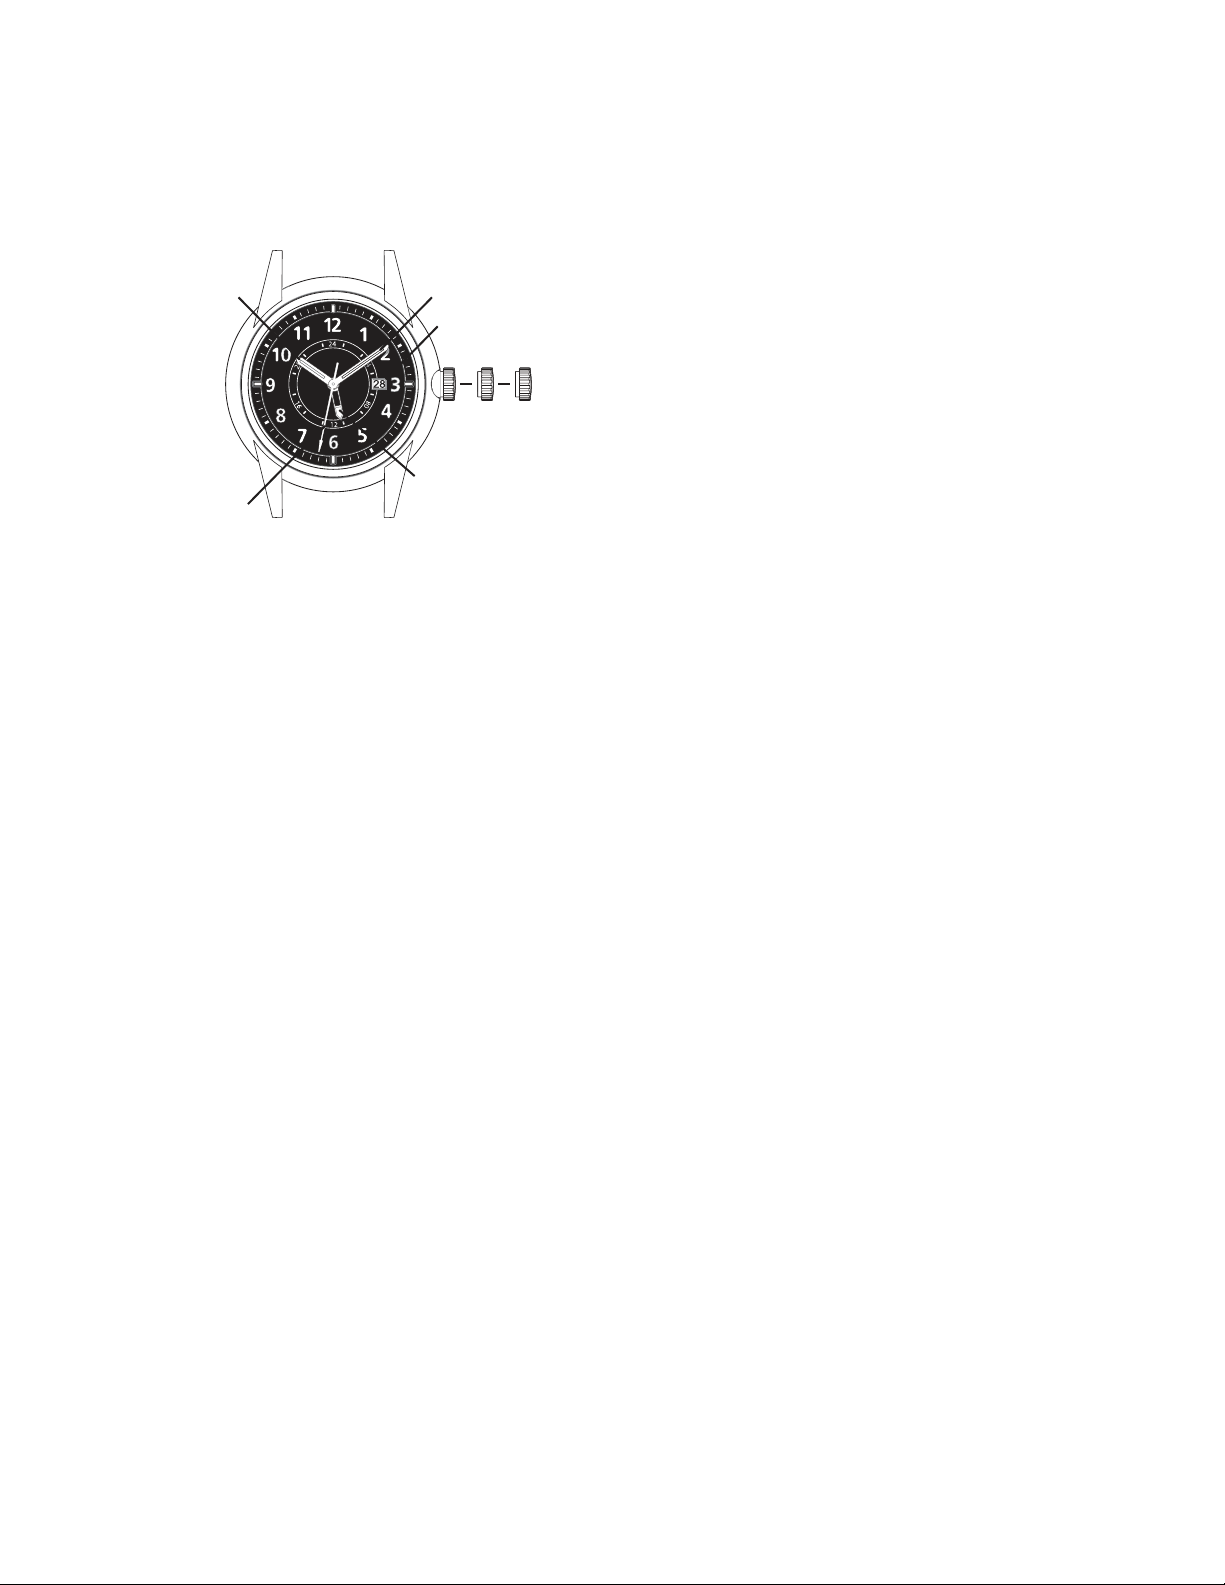
Dual-Time GMT Models
Hour hand
Seconds hand
Your watch features a dual-time dial with 24-hour GMT hand that
allows you to monitor the time in a second time zone anywhere in
the world.
Reading the Watch:
In this illustration: The current time in the first time zone is
10:10’32” (10:10 PM) as indicated by the Hour and Minute hands
on the outer 12-hour ring. The current time in the second time
zone is 11:10’32” (11:10 AM) as indicated by the GMT hand on the
inner 24-hour ring.
NOTES: The Minute and Seconds hands are the same for both
time zones.
The Date is synchronized with the time in the first time zone.
ALWAYS set/adjust the 24-hour GMT hand (second time zone)
first, then set the time in the first time zone.
To set 24-Hour GMT Hand (second time zone):
1. When Seconds hand reaches 12 o’clock, pull crown out to
Position 3.
2. Rotate crown in either direction until 24-hour GMT hand and
Minute hand indicate desired time in second time zone.
3. When adjusting the Minute hand, move it approximately
10 minutes past the desired time, then move it back to the
desired position to ensure accurate time adjustment. This step
synchronizes the regular Hour (first time zone) hand.
4. Take an accurate time signal (from a radio news station, for
example). As soon as audible tone signals exact time, push
crown back in to position 1.
To set Time (first time zone):
1. Pull crown out to Position 2.
2. Rotate crown clockwise to set Hour hand to desired time: It will
advance in 30-minute leaps for quick adjustment.
3. Push crown back in to Position 1.
Minute hand
Date display
Crown
GMT Hand
NOTES: Setting the Hour hand on the exact hour provides the
most accurate time setting. If the Hour hand is set between hours,
it may prevent the time from being accurately displayed and read.
The Date is synchronized with this Hour hand; be sure to take
AM/PM time into account when adjusting it.
To set Date:
The Date is synchronized with the time in the first time zone.
1. Pull crown out to Position 2.
2. Rotate crown counterclockwise to adjust Date.
3. Push crown back in to Position 1.
NOTE: If the Date is set between 9:00 PM and 1:00 AM, the date
may not change on the following day.
11
Page 13
1
A
B
2 3
Hour hand
OPERATING INSTRUCTIONS
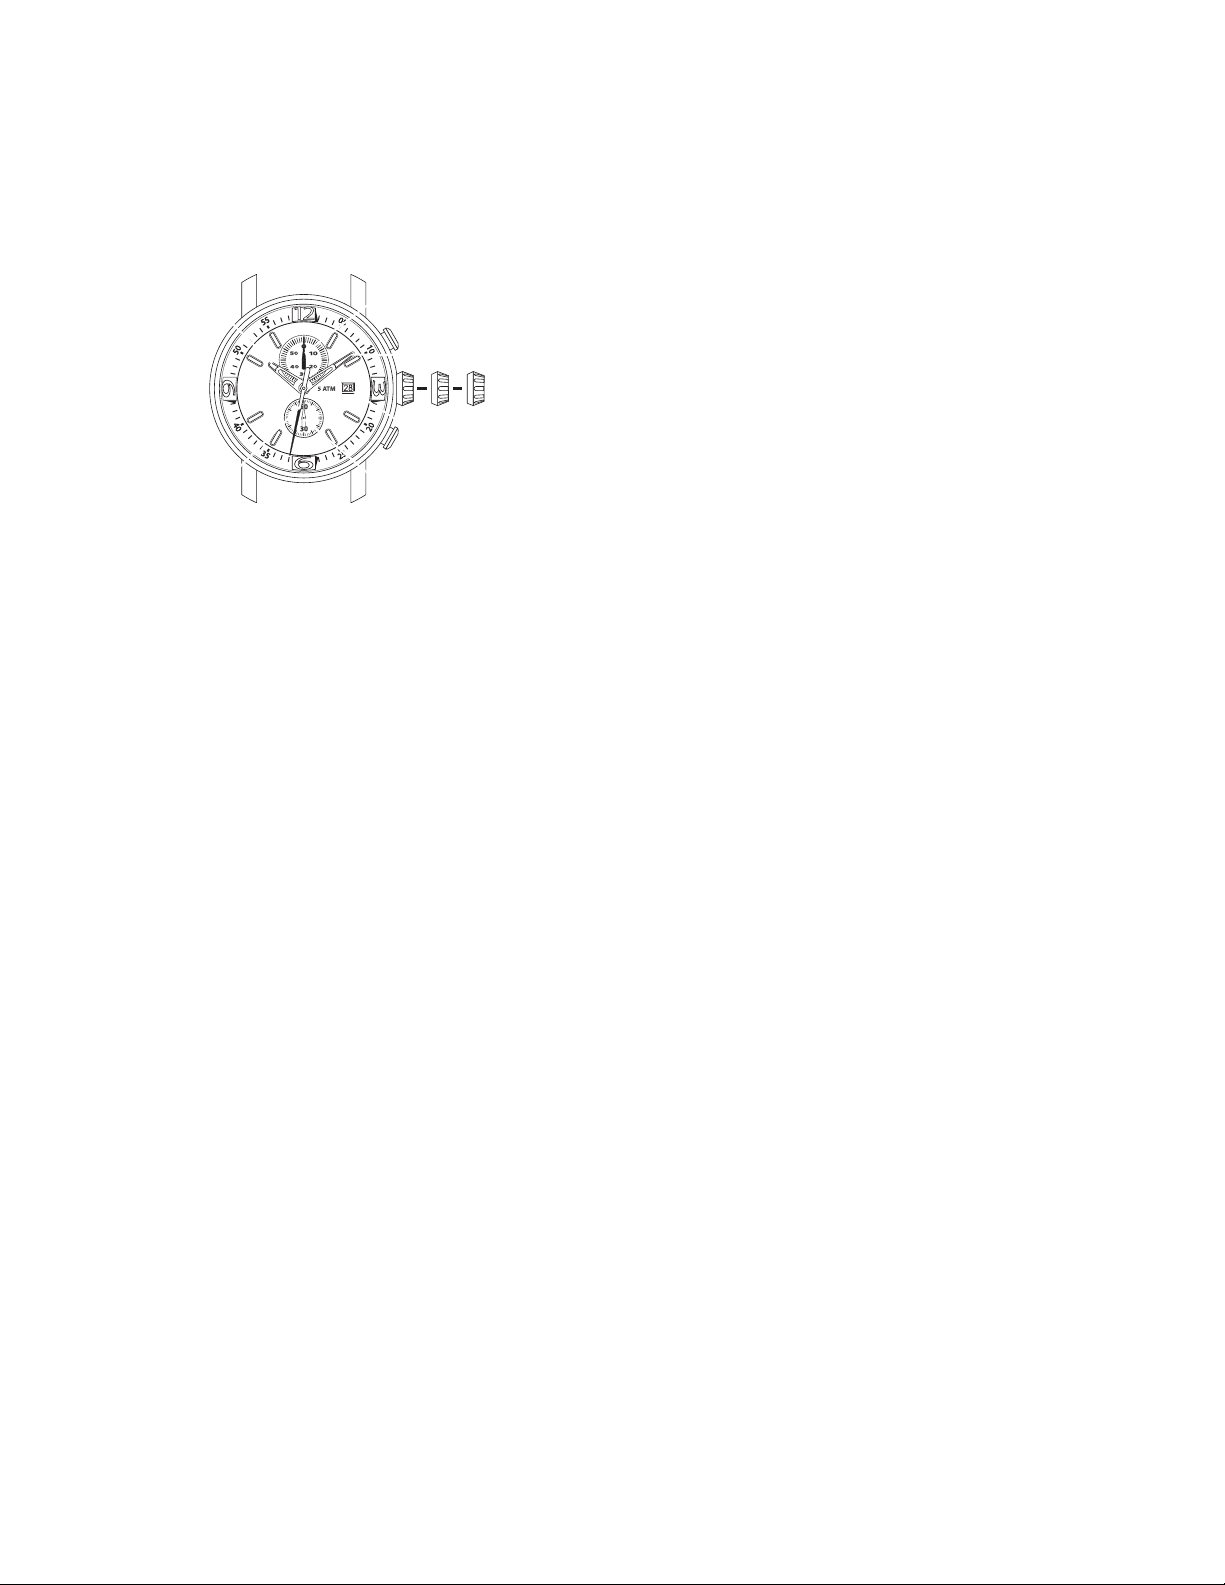
Chronographs
Chronograph
minute hand
Minute hand
Crown
Date display
Chronograph
seconds hand
A chronograph combines two time-keeping functions: In addition to
indicating the time on its dial, a chronograph can also be operated
like a stopwatch to measure intervals of time.
Small seconds hand
12
Page 14
1
A
B
2 3
Hour hand
B
A
123
5 ATM
Chronograph
seconds hand
OPERATING INSTRUCTIONS
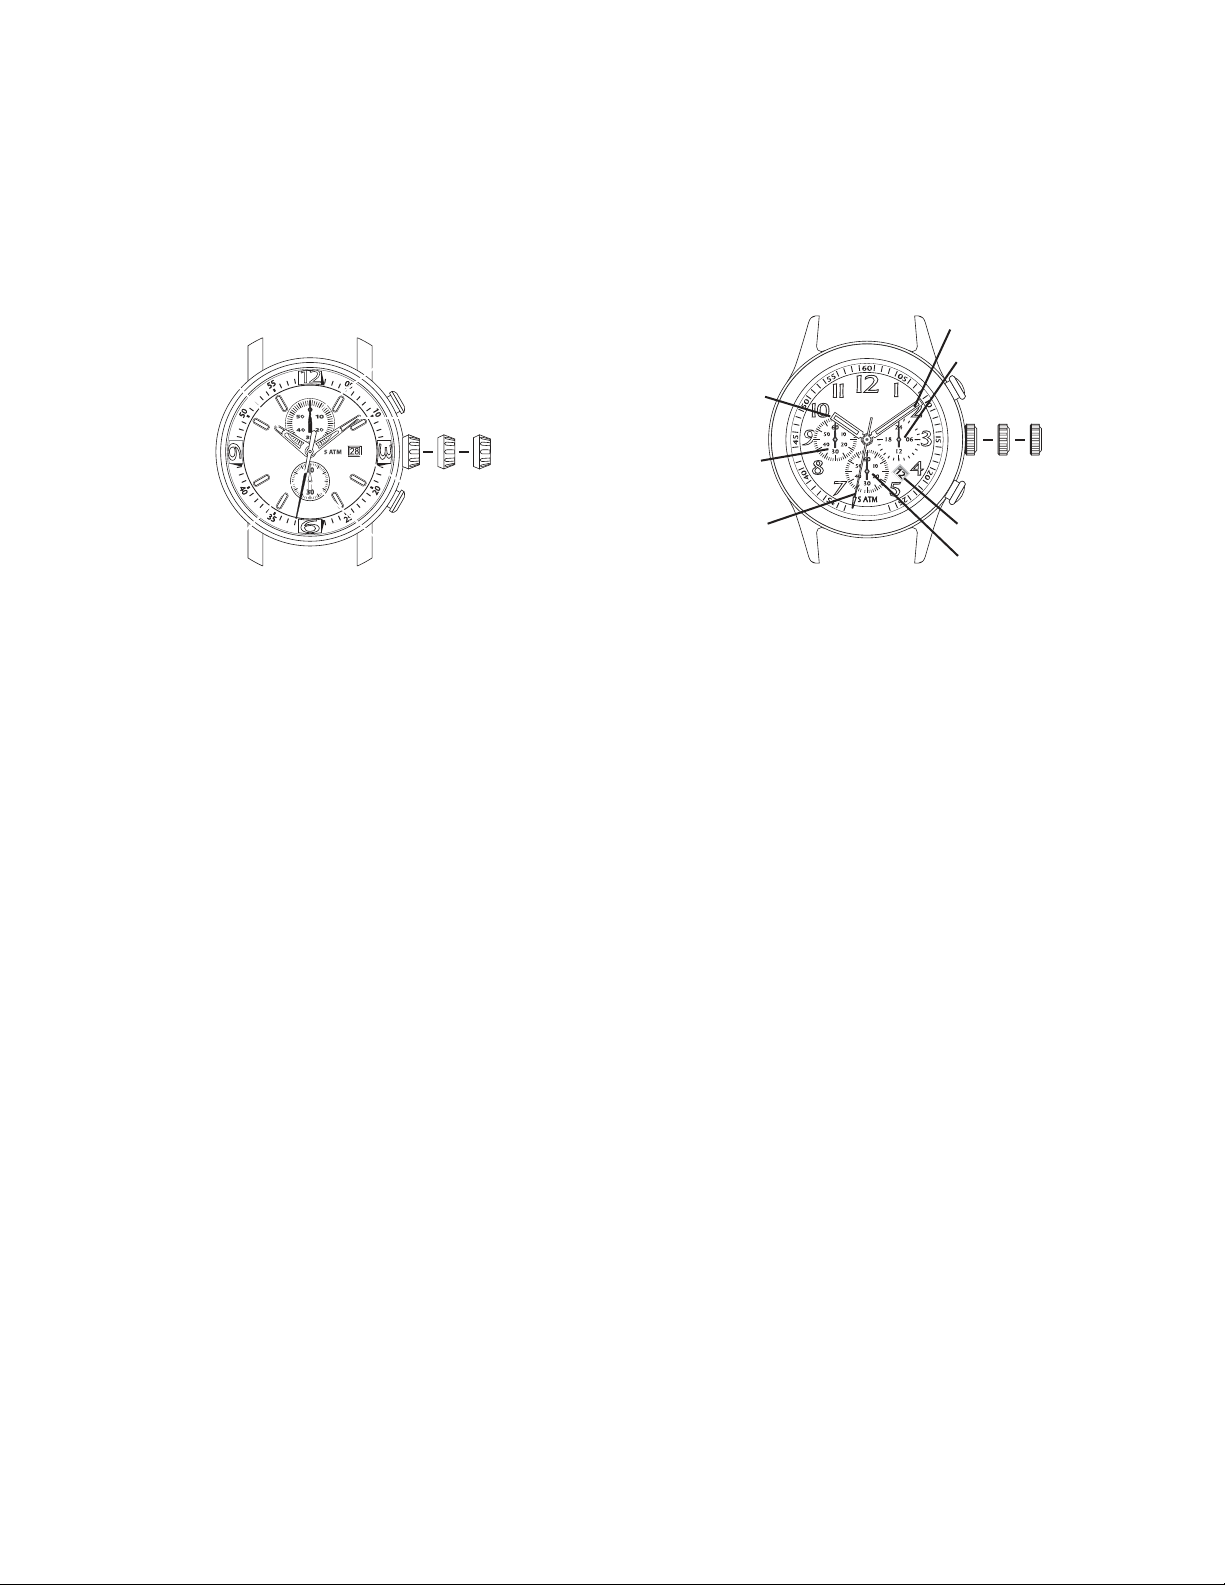
Analog Chronographs 1/1 of a Second – Type A
with center-mounted chronograph seconds hand
and chronograph minutes counter
Chronograph
minute hand
Hour hand
Minute hand
Crown
Date display
Small seconds hand
Chronograph
seconds hand
Small
seconds
hand
Minute hand
24-Hour display
Crown
Date display
Chronograph
minute hand
Crown positions:
Position 1 - Normal position.
Crown pushed against case.
Position 2 - To set DATE*:
Rotate crown counterclockwise.
Position 3 - To set TIME:
Rotate crown in either direction.
*NOTE: If the Date is set between 9:00 PM and 3:00 AM, the date
may not change on the following day.
To Operate the Chronograph:
The chronograph function on these models can be used to time an
event up to 59 minutes/59 seconds in duration, in whole second
increments. Use Buttons A and B to operate the stopwatch timer.
IMPORTANT: Crown must be in position 1, and chronograph
hands must be at 60 (zero) before stopwatch is started. Do not use
chronograph while crown is pulled to position 2 or 3. If necessary,
press button B to reset chrono hands to zero before you start
timing.
Simple chronograph functions:
To measure the duration of a single, non-stop event:
1. Press button A to start chronograph.
2. Press button A a second time to stop chronograph.
3. Press button B to reset chronograph to zero.
To measure the combined time of a series of shorter events (for
example, the actual playing time of a football match, where play is
repeatedly interrupted):
1. Push button A to start the stopwatch when the event begins.
2. Push button A to stop the timing when the event is halted.
3. Press button A again when the event resumes.
4. Repeat steps 2 and 3 until event is ended.
5. Push button B to reset to zero.
To Synchronize Chronograph Hands:
After a battery change or in the event of an error, you may need to
manually adjust the chronograph seconds hand to align it correctly
at the zero position:
1. Pull crown out to position 2.
2. Push button A to adjust chrono seconds hand: Each push on
button A will advance chrono hand by one second. Press and
hold button A to advance hand rapidly.
3. Once hand is properly aligned, push crown back in to position 1.
13
Page 15
A
B
1 2 3
Small
seconds hand
Hour hand
Chronograph
hour hand
Chronograph
seconds hand
OPERATING INSTRUCTIONS
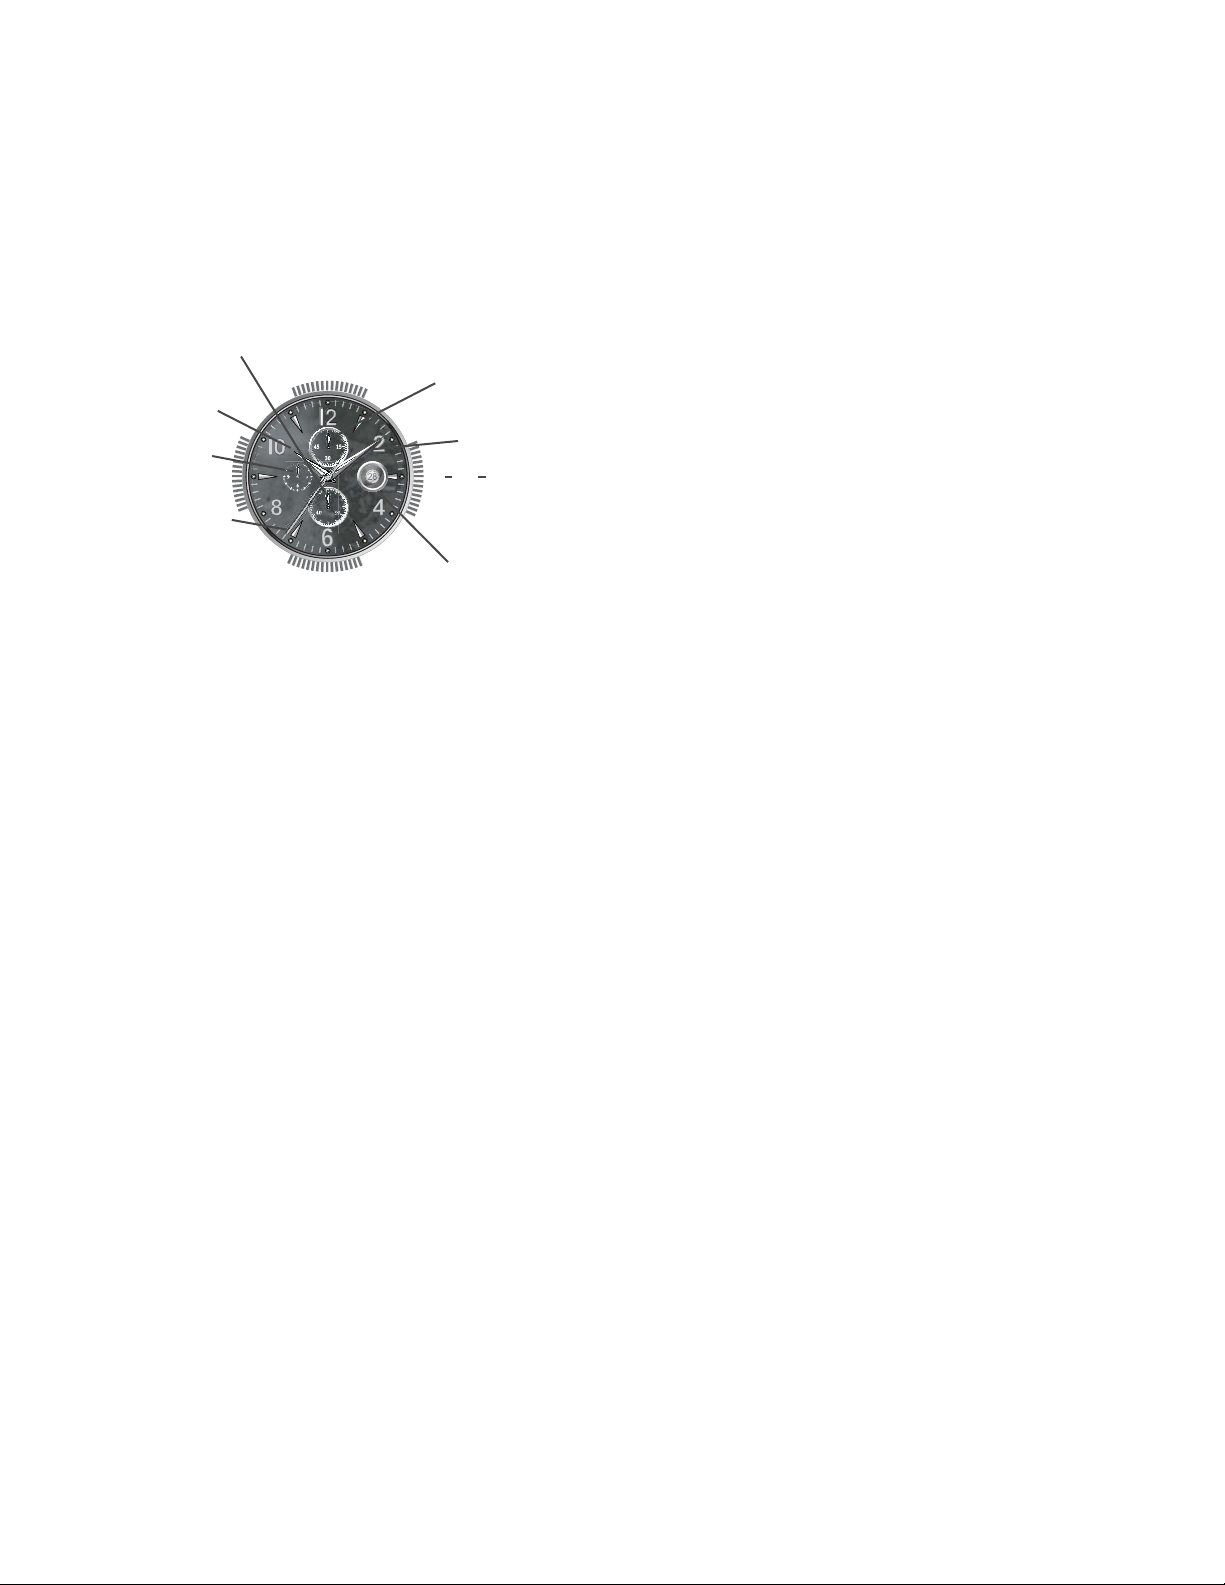
Analog Chronographs 1/1 of a Second – Type B
with center-mounted chronograph seconds hand,
chronograph hour and minutes counters
and small seconds subdial
3. Press button A again when the event resumes.
4. Repeat steps 2 and 3 until event is ended.
Chronograph
minute hand
Minute hand
Crown
Date display
5. Push button B to reset to zero.
To Synchronize Chronograph Hands:
After a battery change or in the event of an error, you may need to
manually adjust the chronograph seconds hand to align it correctly
at the zero position:
1. Pull crown out to position 2.
2. Push button A to adjust chrono seconds hand: Each push on
button A will advance chrono hand by one second. Press and
hold button A to advance hand rapidly.
3. Once hand is properly aligned, push crown back in to position 1.
Crown positions:
Position 1 - Normal position.
Crown pushed against case.
Position 2 - To set DATE*:
Rotate crown counterclockwise.
Position 3 - To set TIME:
Rotate crown in either direction.
*NOTE: If the Date is set between 9:00 PM and 3:00 AM, the date
may not change on the following day.
To Operate the Chronograph:
The chronograph function on these models can be used to time an
event up to 11 hours/59 minutes/59 seconds in duration, in whole
second increments. Use Buttons A and B to operate the stopwatch
timer.
IMPORTANT: Crown must be in position 1, and chronograph
hands must be at 60 (zero) before stopwatch is started. Do not use
chronograph while crown is pulled to position 2 or 3. If necessary,
press button B to reset chrono hands to zero before you start
timing.
Simple chronograph functions:
To measure the duration of a single, non-stop event:
1. Press button A to start chronograph.
2. Press button A a second time to stop chronograph.
3. Press button B to reset chronograph to zero.
To measure the combined time of a series of shorter events (for
example, the actual playing time of a football match, where play is
repeatedly interrupted):
1. Push button A to start the stopwatch when the event begins.
2. Push button A to stop the timing when the event is halted.
14
Page 16
OPERATING INSTRUCTIONS
26
1 2 3
A
B
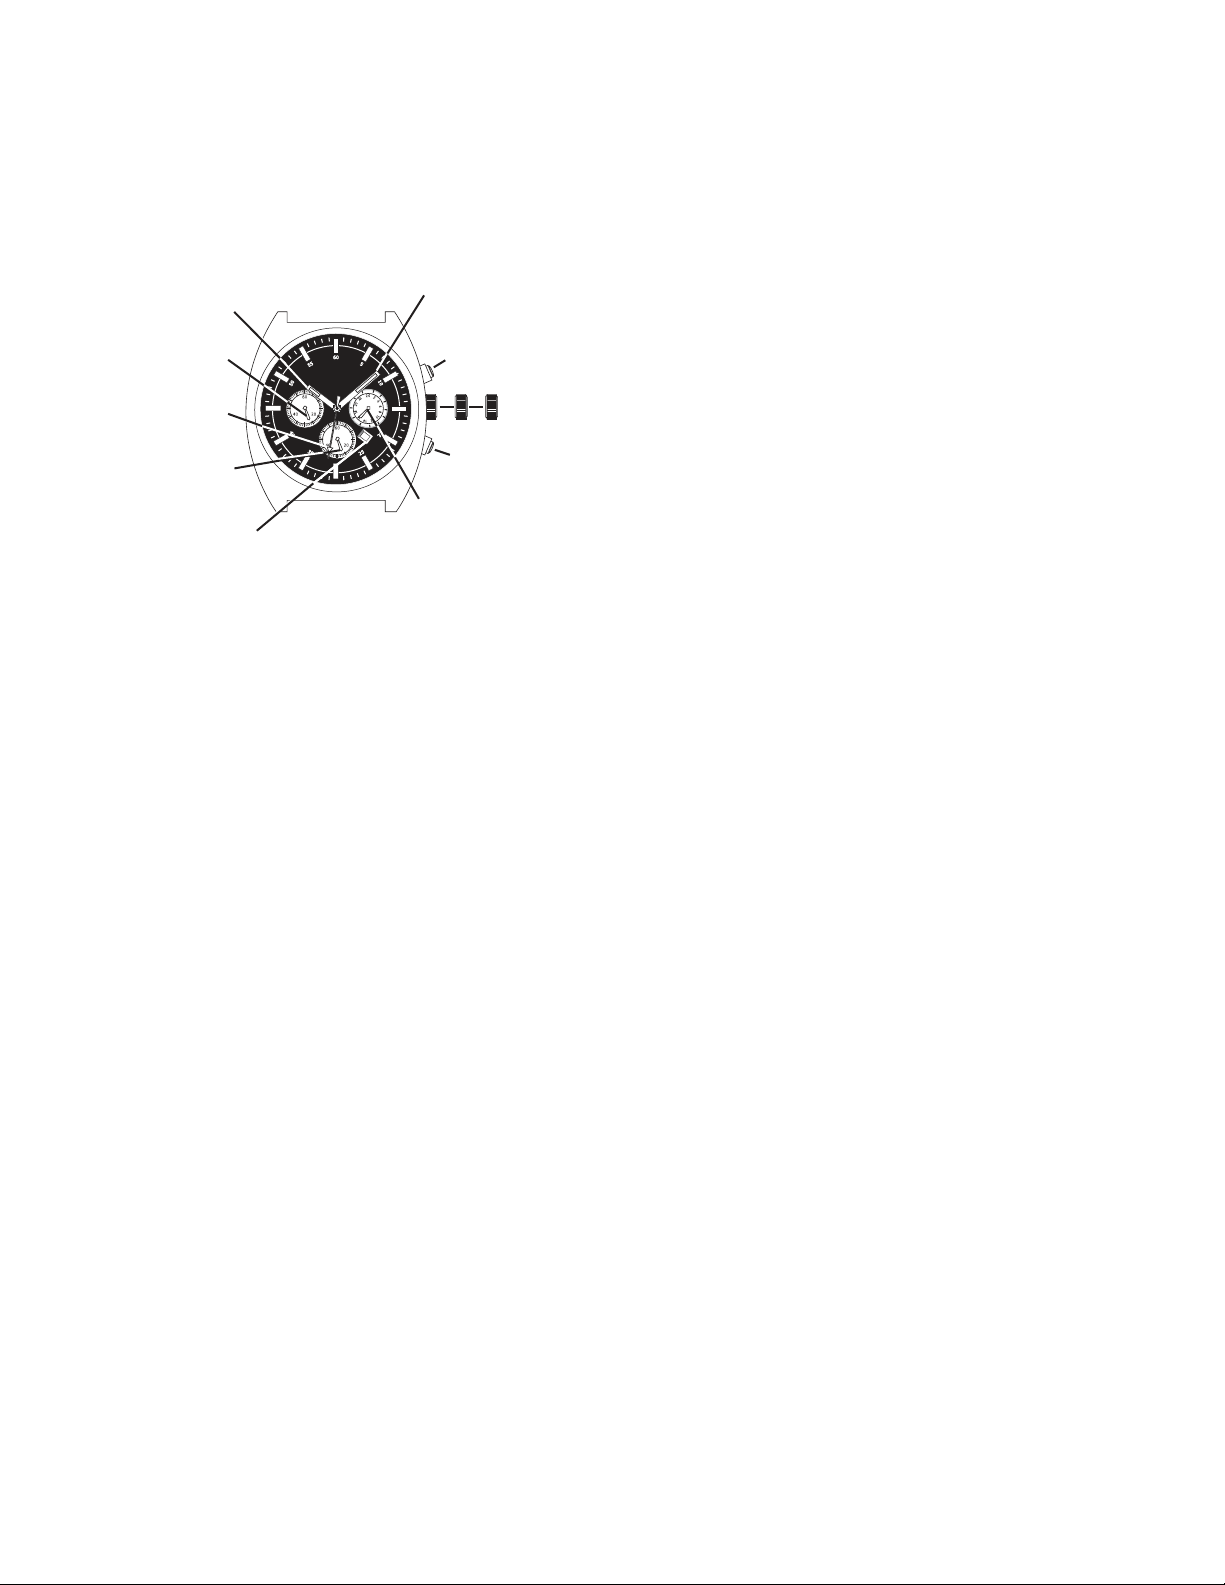
Analog Chronographs 1/1 of a Second - Type C
with small chronograph seconds and 24-hour hands
Hour hand
Chronograph
minute
counter
Seconds
hand
Small
chronograph
seconds hand
Date display
This chronograph can be used to time events up to 59 minutes/59
seconds in duration, in whole second increments.
To set the Time and Date:
NOTES: Chronograph hands must be in the 12:00 (zero) position
before setting date and time.
Do not press push-buttons when crown is in position 2, or chronograph hands will move.
Do not set date between 9:00 PM and 1:00 AM, or date may not
change properly. If it is necessary to change date during this time
period, first change time to any hours outside this period, set date,
then reset correct time.
1. Pull crown out to position 2.
2. Turn crown clockwise until previous day’s date appears.
3. As soon as seconds hand reaches the 12:00 position, pull crown
out to position 3. Watch will stop.
4. Turn crown to advance hour and minute hands past 12:00 to the
correct time, making sure the 24-hour hand is set correctly. Date
will change automatically.
5. Take an accurate time signal (from a radio news station, for
example). When audible tone signals the precise time, push
crown back in to position 1, flush against case. Watch will
restart, now set to the exact second.
Minute hand
Crown
24-Hour hand
(indicates time on
a 24-Hour basis)
To Operate the Chronograph:
NOTE: The chronograph function can be used to time an event up
to 60 minutes in duration, in whole second increments.
IMPORTANT: Crown must be in position 1, and chronograph
hands must be at 60 (zero) before stopwatch is started. Do not use
chronograph while crown is pulled to position 2 or 3. If necessary,
reset hands to zero following instructions below.
Use push-buttons A and B operate the stopwatch timer:
1. Press A to start the stopwatch.
2. Press A a second time to stop the stopwatch; read elapsed time
indicated by chrono minute and seconds hands.
3. Press B to reset all chronograph hands to zero.
To Adjust the Chronograph Hands:
1. Pull crown out to position 3.
2. Press and release push-buttons to reset chronograph minute
and small seconds hands to 60 (zero) position:
•PressingA will move hands counterclockwise.
•PressingB will move hands clockwise.
3. When hands reach 60 (zero), push crown back in to position 1.
15
Page 17
OPERATING INSTRUCTIONS
1
A
B
23
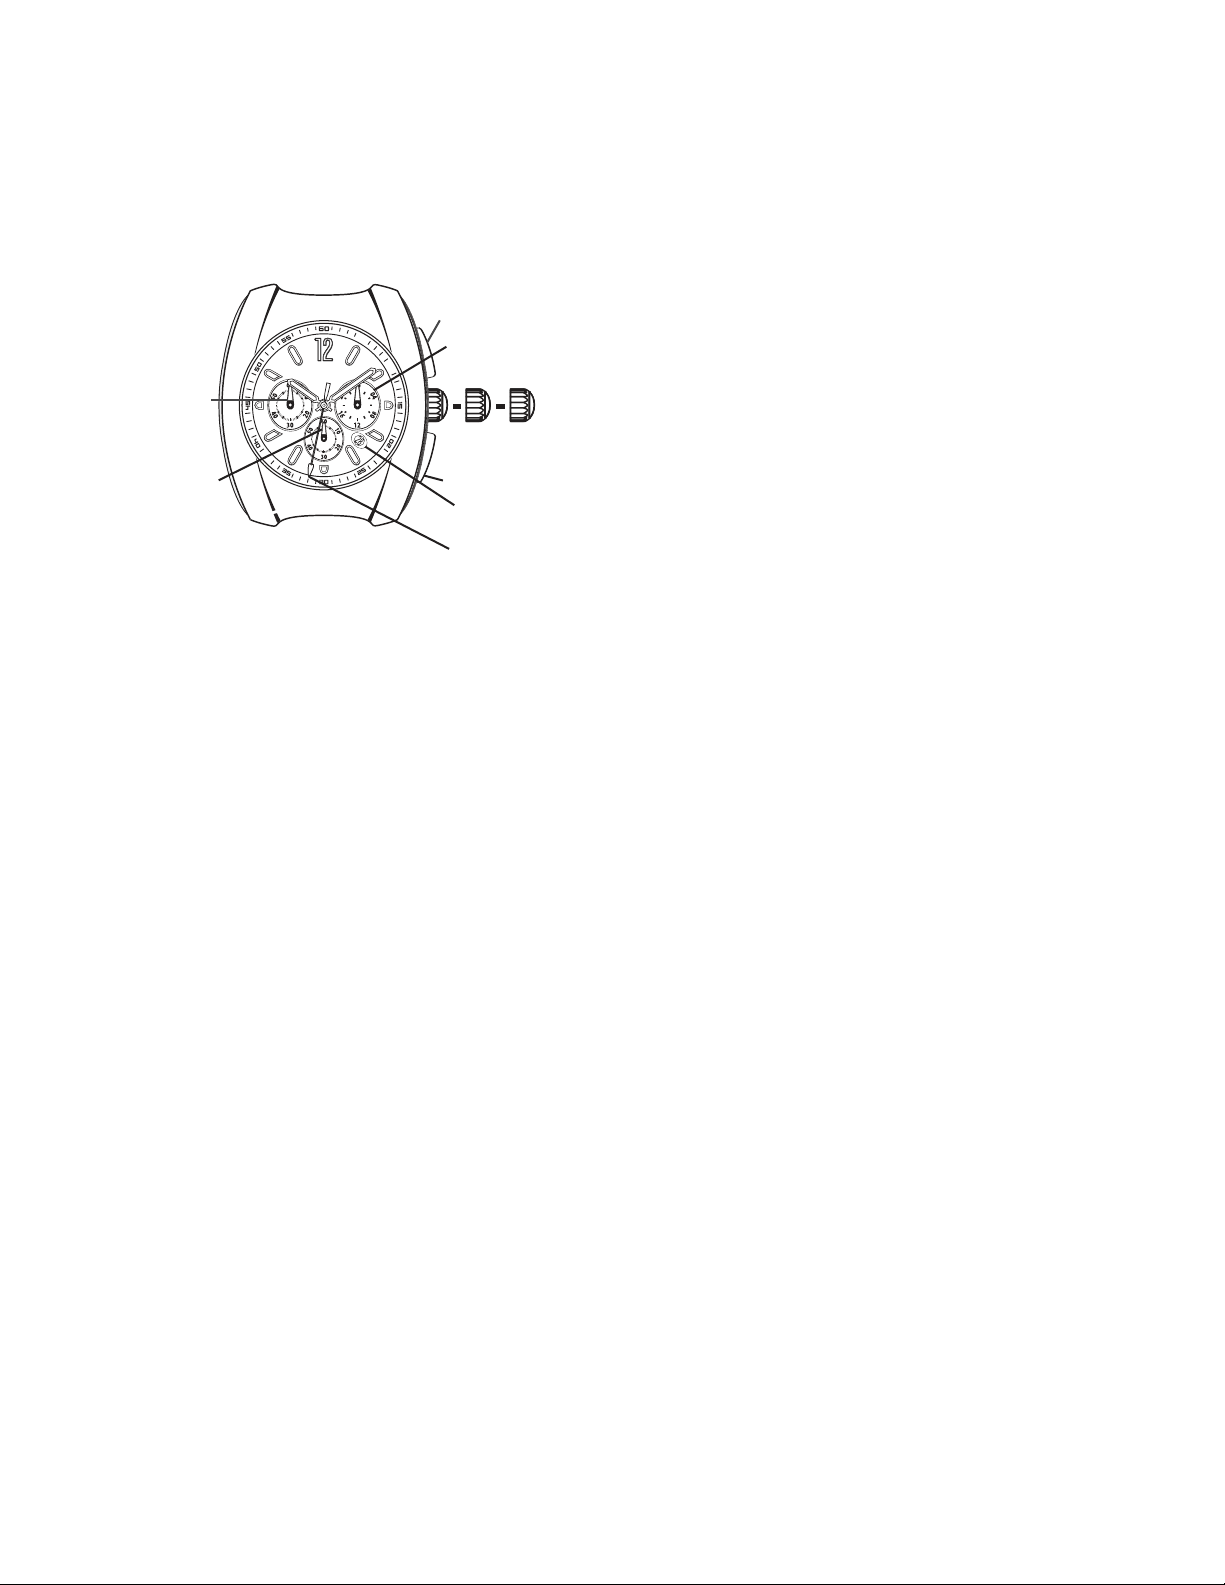
Analog Chronographs 1/1 of a Second - Type D
with small chronograph seconds and 24-hour hands
24-Hour display
Chronograph
minute hand
Small
chronograph
seconds hand
Crown Positions:
Position 1 - Normal position.
Crown pushed against case.
Position 2 - To set DATE*:
Rotate crown clockwise.
Position 3 - To set TIME:
Rotate crown in either direction.
*NOTE: If the Date is set between 9:00 PM and 3:00 AM, the date
may not change on the following day.
This chronograph can be used to time events up to 59 minutes/59
seconds in duration, in whole second increments.
To Operate the Chronograph:
NOTE: Use Buttons A and B to operate the stopwatch timer.
IMPORTANT: Crown must be in position 1, and chronograph
hands must be at 60 (zero) before stopwatch is started. Do not use
chronograph while crown is pulled to position 2 or 3. If necessary,
press button B to reset chrono hands to zero before you start
timing.
Simple chronograph functions:
To measure the duration of a single, non-stop event:
1. Press button A to start chronograph.
2. Press button A a second time to stop chronograph.
3. Press button B to reset chronograph to zero.
Crown
Date display
Seconds hand
To measure the combined time of a series of shorter events
(for example, the actual playing time of a football game, where play
is repeatedly interrupted):
1. Push button A to start the stopwatch when the event begins.
2. Push button A to stop the timing when the event is halted.
3. Press button A again when the event resumes.
4. Repeat steps 2 and 3 until event is ended.
5. Push button B to reset to zero.
To Synchronize Chronograph Hands:
After a battery change or in the event of an error, you may need
to manually adjust the chronograph small seconds hand to align it
correctly at the zero position, using push buttons A and B:
1. Pull crown out to position 3.
2. Use button A to move chronograph small seconds hand counterclockwise or button B to advance it clockwise. Each push and
release will move hand by one second. Press and hold button A
or B to move hand rapidly in desired direction.
3. Once hand is properly aligned, push crown back in to position 1.
16
Page 18

OPERATING INSTRUCTIONS
J
D
W
H
E
C
L
K
A
M
S
B
F
G
1 2
Analog Chronographs 1/10 of a Second
Crown
Legend
H - Hour hand
M - Minute hand
S - Small seconds hand (subdial at 2:30)
C - Chronograph seconds hand (center mounted)
E - Chronograph minutes counter (subdial at 9:30)
G - Chronograph tenths-of-a-second counter (subdial at 6)
D - Day of week window
J - Month window
F - Date indicator hand
1, 2 - Crown positions
A - Chronograph push-button (start/stop)
B - Chronograph push-button (reset)
W - Day of week corrector (at 10 o’clock)
K - Month corrector (at 2 o’clock)
L - Date corrector (at 8 o’clock)
OVERVIEW
This chronograph features a precise quartz chronograph movement with minute counter (up to 30), tenths-of-a-second counter
(after 30 minutes, functions as an hour counter) and small seconds
subdials; center-mounted chronograph seconds hand; and sophisticated calendar function with day and month display windows
and center-mounted date indicator hand. It can be used to time an
event up to 30 minutes in duration to the nearest 1/10 of a second,
or up to 10 hours in duration to the nearest second.
TIME/DATE SETTING
Setting the time:
1. As soon as small seconds hand S reaches 60-second position,
pull crown out to position 2. Watch will stop.
2. Turn crown in either direction to move hands to correct time,
making sure date changes at midnight, not noon.
3. Move hands slightly ahead of exact time, then slowly turn crown
counterclockwise to align minute hand M with correct minute
marker.
4. Take an accurate time signal (from a radio news station, for
example). The instant the audible tone signals exact time, push
crown back in to position 1. Watch will restart, now set to the
exact time.
Using Quick Date Change Feature:
Push date corrector button L located on side of case at 8 o’clock
to advance date rapidly – at the end of a month with fewer than
31 days, for example.
Each press and release of corrector button L will advance the date
by one day.
NOTE: If you use quick date change between 9:00 PM and 00:20
AM, set date to the following day; date will not automatically advance at midnight if corrector L is used between these hours.
Setting the Time, Date, Day of week and Month:
1. Pull crown out to position 2. Watch will stop.
2. Turn crown in either direction to move hands to correct time,
making sure date changes at midnight, not noon. (To set time to
exact second, see “Setting the time”.)
3. Push crown back in to position 1. Watch will restart.
NOTE: Each press and release on corrector buttons will advance
setting by one increment:
4. Use corrector button L (on side of case at 8 o’clock) to advance
date indicator hand F.
5. Use corrector button W (on side of case at 10 o’clock) to advance day of week shown in day window D.
6. Use corrector button K (on side of case at 2 o’clock) to advance
month shown in month window J.
Chronograph Functions
Use buttons A and B to operate the chronograph. Pressing button
A the first time will start the chronograph. While the chronograph
is running, once the chronograph seconds counter hand C has
completed one turn, minute-counter hand E will jump ahead one
minute. Tenths-of-a-second hand G does not move when the
chronograph is running. Pressing button A a second time will stop
the chronograph and move hand G to the relevant tenth-of-a-second mark. Pressing button B will reset hands G, E and C to zero.
Adjusting the time does not stop the chronograph, but it does block
buttons A and B for as long as the crown is pulled out.
To Operate the Chronograph:
IMPORTANT: Crown must be in position 1 and hands must be at
zero before chronograph is started. If necessary, press push-button B to reset hands to zero. If push-button A or B is accidentally
pressed with crown in position 2, one or more of the chronograph
hands may become de-synchronized. Should this occur, see directions for synchronizing hands at end of following instructions.
Simple chronograph functions:
To measure the duration of a single, non-stop event:
1. Press button A to start chronograph.
17
Page 19

2. Press button A a second time to stop chronograph, and read the
3 chronograph hands to determine elapsed time, for example:
4 minutes, 37 seconds, 5/10 of a second.
3. Press button B to reset chronograph hands to zero.
Accumulated time functions:
To measure the combined time of a series of shorter events, for
example the actual playing time of a football game, where play is
repeatedly interrupted:
1. Press button A to start chronograph.
2. Press button A a second time to stop chronograph.
3. Press button A again to resume measurement.
4. Press button A a fourth time to stop chronograph again.
NOTE: Each time you stop chronograph, chronograph hands will
indicate total accumulated time.
5. Repeat steps 1 and 2 to add each additional interval of time.
6. After you have taken your final accumulated time reading, press
button B to reset chronograph hands to zero.
Split-time or intermediate-time functions:
To take intermediate time readings as a race progresses:
1. Press button A to start chronograph.
2. Press button B to momentarily stop chronograph.
3. Read off the intermediate time, for example: 10 minutes, 26
seconds, 3/10 of a second.
4. Press button B to resume chronograph function. Hands will
quickly catch up with ongoing event.
5. To read a second split time, press button B again.
Repeat steps 2 through 4 to take any additional split times.
6. Press button A to stop chronograph.
7. Take a reading of the final time, for example: 27 minutes,
3 seconds, 4/10 seconds.
8. Press button B to reset chronograph hands to zero.
To Synchronize Chronograph Hands:
After a battery change or in the event of an error, you may need to
manually adjust one or more chronograph hand to align them all
correctly at their zero positions.
NOTES: Once in corrective mode, each press and release on
push-button A will advance active chronograph hand by one
increment. To advance hand rapidly, depress and hold
push-button A.
You may exit correction mode at any time in the sequence by
returning crown to position 1.
1. Pull crown out to position 2.
2. Press and hold push-buttons A and B simultaneously for at least
2 seconds to enter corrective mode. When chronograph seconds hand C rotates 360
o
, corrective mode is activated; release
buttons A and B.
3. Adjust center-mounted chronograph seconds hand C using
push-button A.
4. When hand C reaches zero position, press push-button B.
5. Now press push-button A to adjust tenths-of-a-second counter
hand G.
6. When hand G reaches zero position, press push-button B.
7. Use push-button A again to adjust minute counter hand E.
8. When hand E reaches zero position, push crown back in to
position 1.
Timing hands are now synchronized at zero position, and
chronograph is ready for use.
18
Page 20
OPERATING INSTRUCTIONS
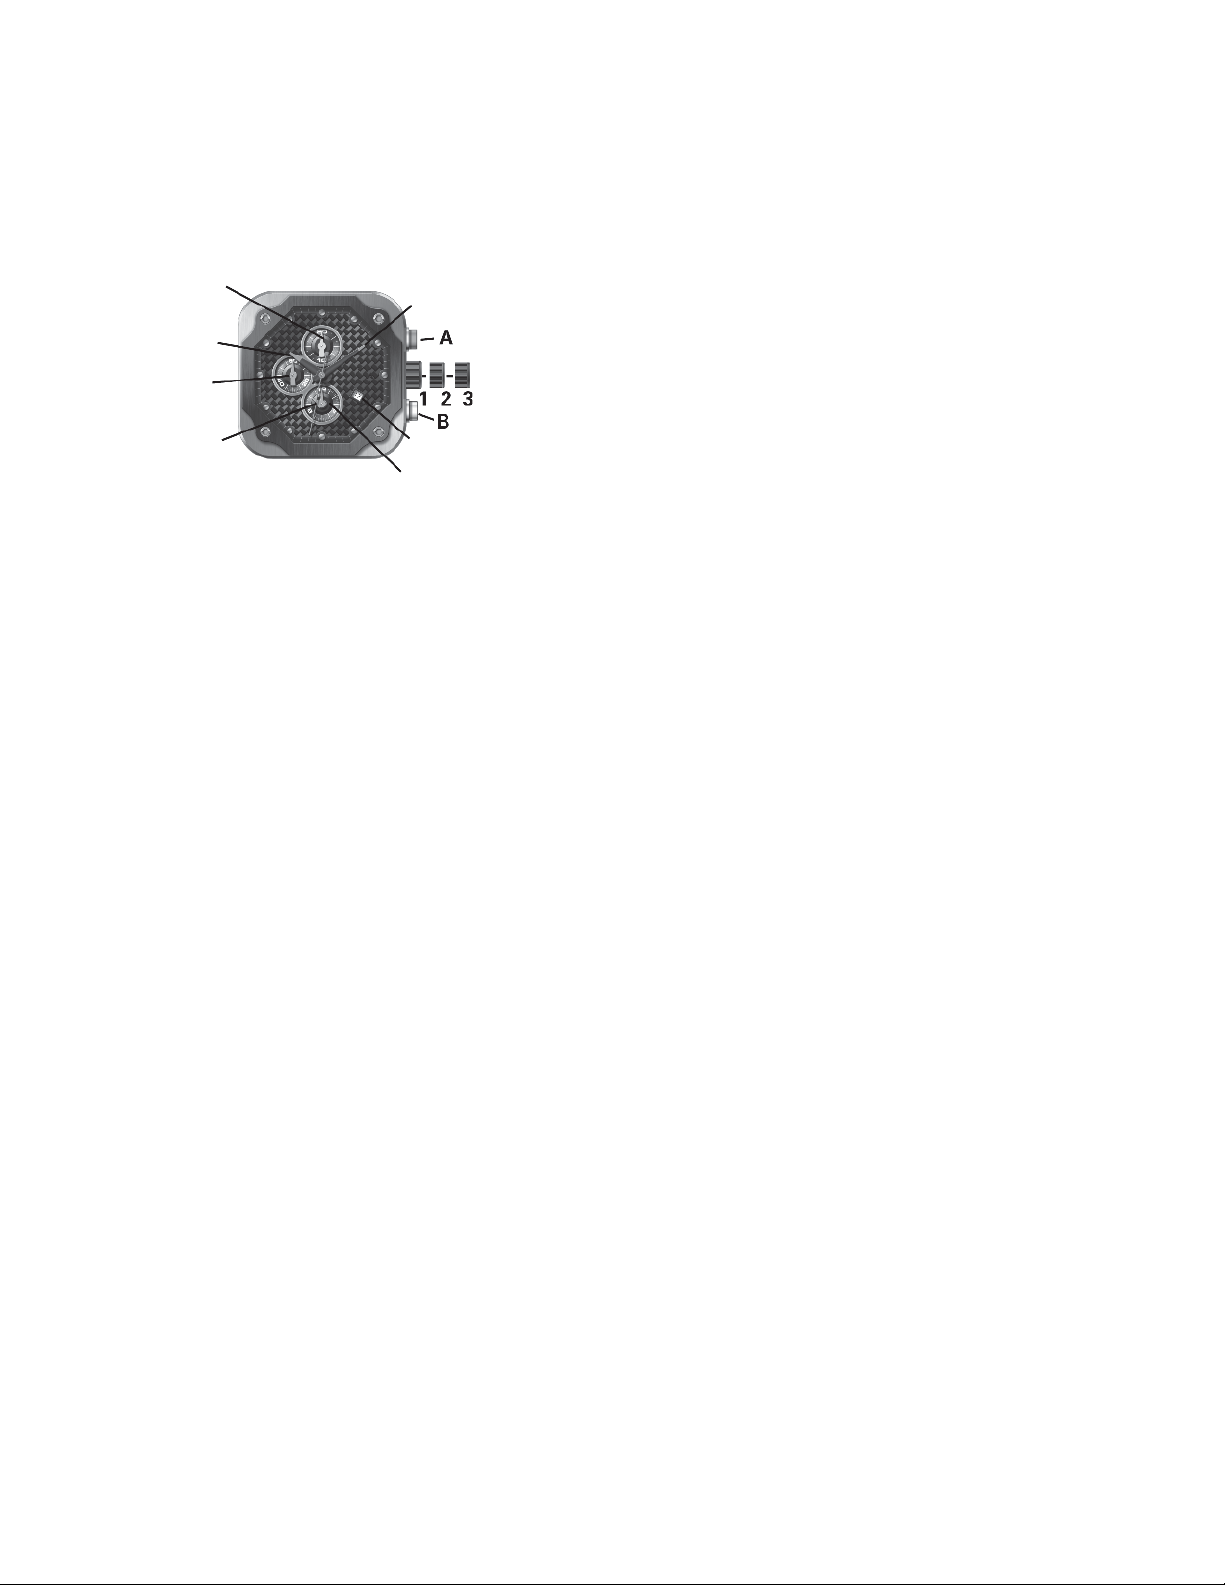
Analog Chronographs 1/20 of a Second
1/20 second
chronograph hand
Minute hand
Hour hand
Small
seconds hand
Chronograph
seconds hand
To Set the Date and Time:
Crown positions:
Position 1 - Normal position.
Crown pushed against case.
Position 2 - To set DATE*:
Rotate crown counterclockwise.
Position 3 - To set TIME:
Rotate crown in either direction.
*NOTE: If the Date is set between 9:00 PM and 3:00 AM, the date
may not change on the following day.
To Operate the Chronograph:
The chronograph function on this model can be used to time an
event up to 12 hours in duration to the nearest .05 seconds. Use
Buttons A and B to operate the stopwatch timer.
IMPORTANT: Crown must be in position 1, and chronograph
hands must be at 60 (zero) before stopwatch is started. Do not use
chronograph while crown is pulled to position 2 or 3. If necessary,
press button B to reset chrono hands to zero before you start
timing.
Simple chronograph functions:
To measure the duration of a single, non-stop event:
1. Press button A to start chronograph.
2. Press button A a second time to stop chronograph.
3. Press button B to reset chronograph to zero.
Start/stop
Crown
Split/reset
Date display
24-Hour hand
Split-time functions:
To take intermediate time readings as a race progresses:
1. Press button A to start chronograph.
2. Press button B to momentarily stop chronograph.
3. Read off the intermediate time.
4. Press button B to resume chronograph function. Hands will fly
back, catching up with ongoing event.
5. To read a second split time, press button B again.
Repeat steps 2 through 4 to take any additional split times.
6. Press button A to stop chronograph.
7. Take a reading of the final time.
8. Press button B to reset chronograph to zero.
NOTE: 1/20th Second chrono hand will stop running at 10 minutes,
while the inside mechanism continues to calculate.
To Synchronize Chronograph Hands:
After a battery change or in the event of an error, you may need
to manually adjust the chrono 1/20th of a second, second, minute
and hour hands to align them correctly at their zero positions.
NOTE: It is important to follow steps in this sequence:
1. Pull crown out to position 3.
2. Press and hold button B for 2 seconds and release.
3. Turn crown to move chrono 1/20th of a second hand to its zero
position.
4. Again press and hold button B for 2 seconds and release.
5. Turn crown to move chrono seconds hand to its zero position.
6. Press and hold button B a third time for 2 seconds and release.
7. Turn crown to move chrono minute and hour hands to their zero
positions.
8. If necessary, press and hold button B for 2 seconds and release
to return mechanism to 1/20th of a second hand adjustment
9. When finished with chrono hand adjustment, push crown back in
to position 1.
19
Page 21
OPERATING INSTRUCTIONS
Removable Links
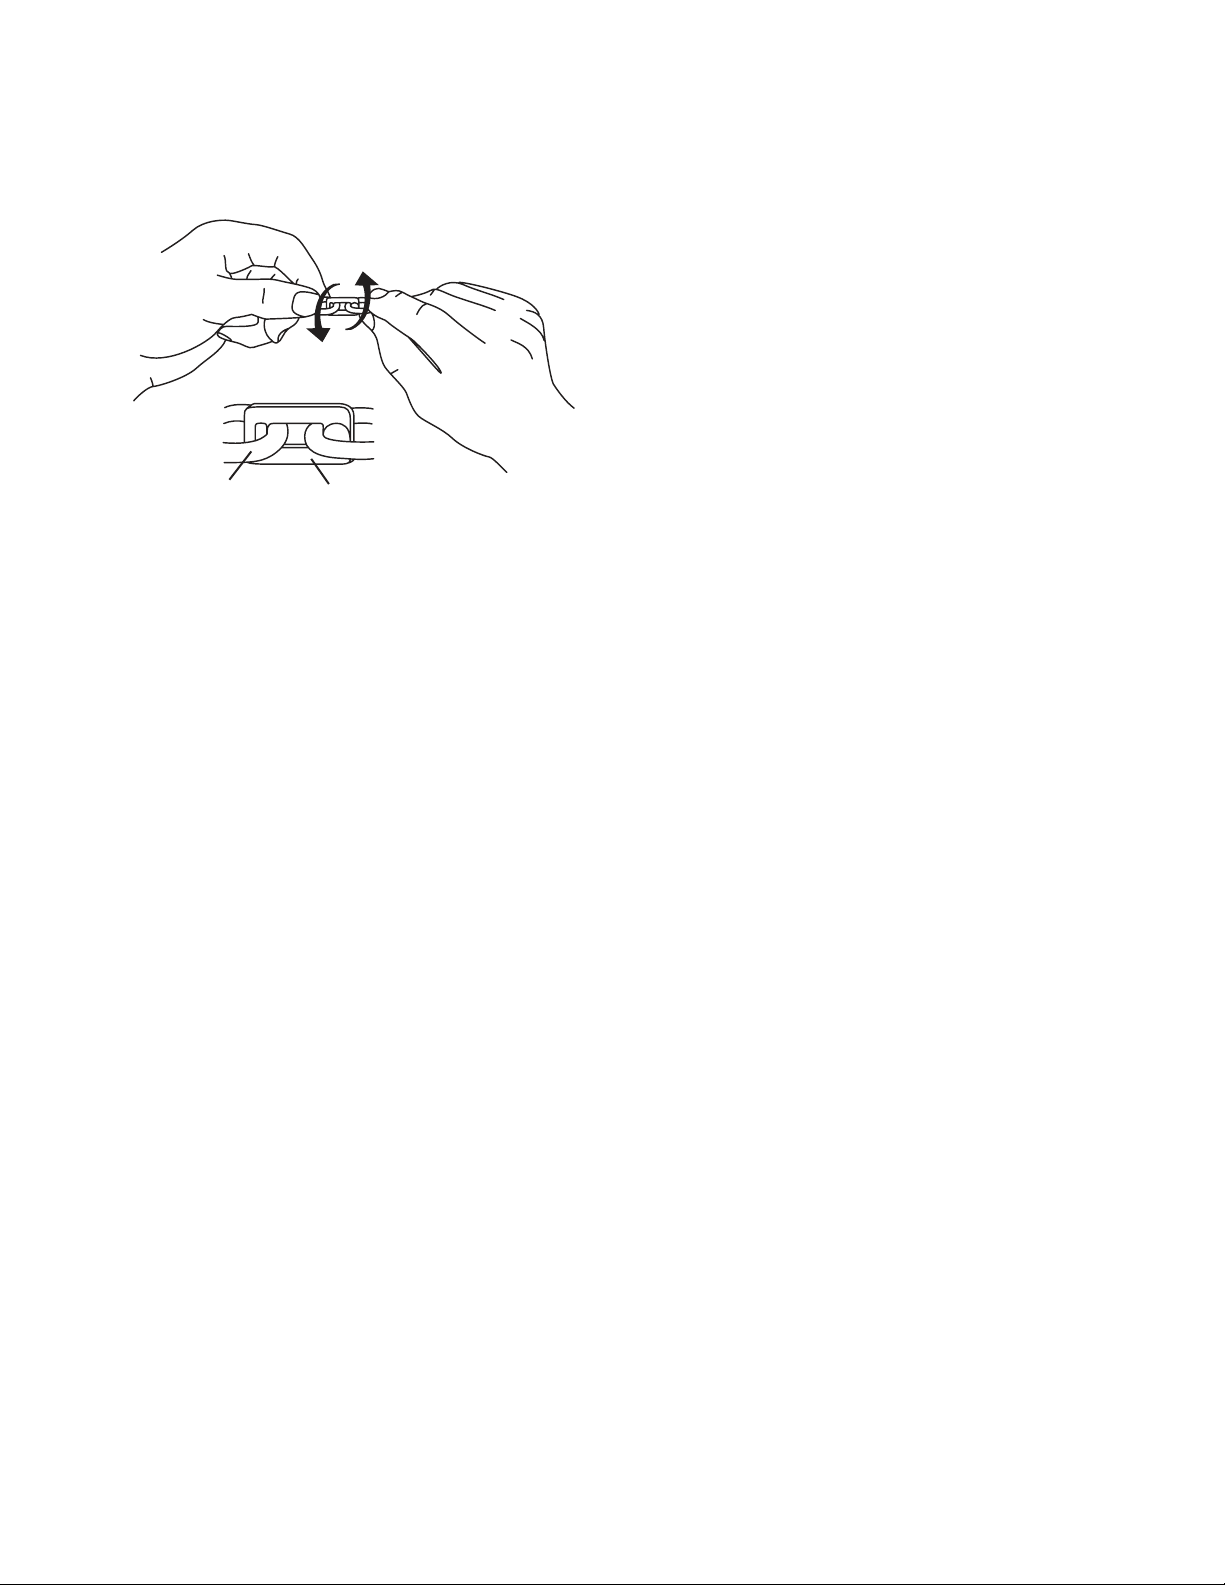
REGULAR
BRACELET LINK
Certain bracelet watches feature bar-shaped connecting links
that function like jewelry clasps, allowing you to achieve a quick,
custom fit.
TIPS: We recommend that you adjust one side of the bracelet at a
time.
To ensure that the watch will sit properly on the wrist, it is best to
remove/add an equal number of links on each side. If you must
remove an odd number, take the extra link from the 6 o’clock side.
To remove links:
1. Hold one side of watch bracelet as shown, with a regular link
grasped between the thumb and index finger of each hand, and
one bar clasp link between them.
2. Gently twist your hands in opposite directions to “pop” the bar
clasp link open.
3. Repeat steps 1 and 2 further along length of bracelet, to remove
the desired number of links.
To reattach links:
1. Line up the two lengths of bracelet you wish to reconnect side
by side, face up.
2. Use an open bar clasp link to rejoin them: Once the bar link is
in proper position, squeeze it together between your fingers
until you feel it snap closed, locking the bracelet sections back
together.
Repeat process above to remove and reattach links on other side
of bracelet.
BAR CLASP
LINK
20
Page 22
OPERATING INSTRUCTIONS
1a
2a
3a
1b
2b
3b
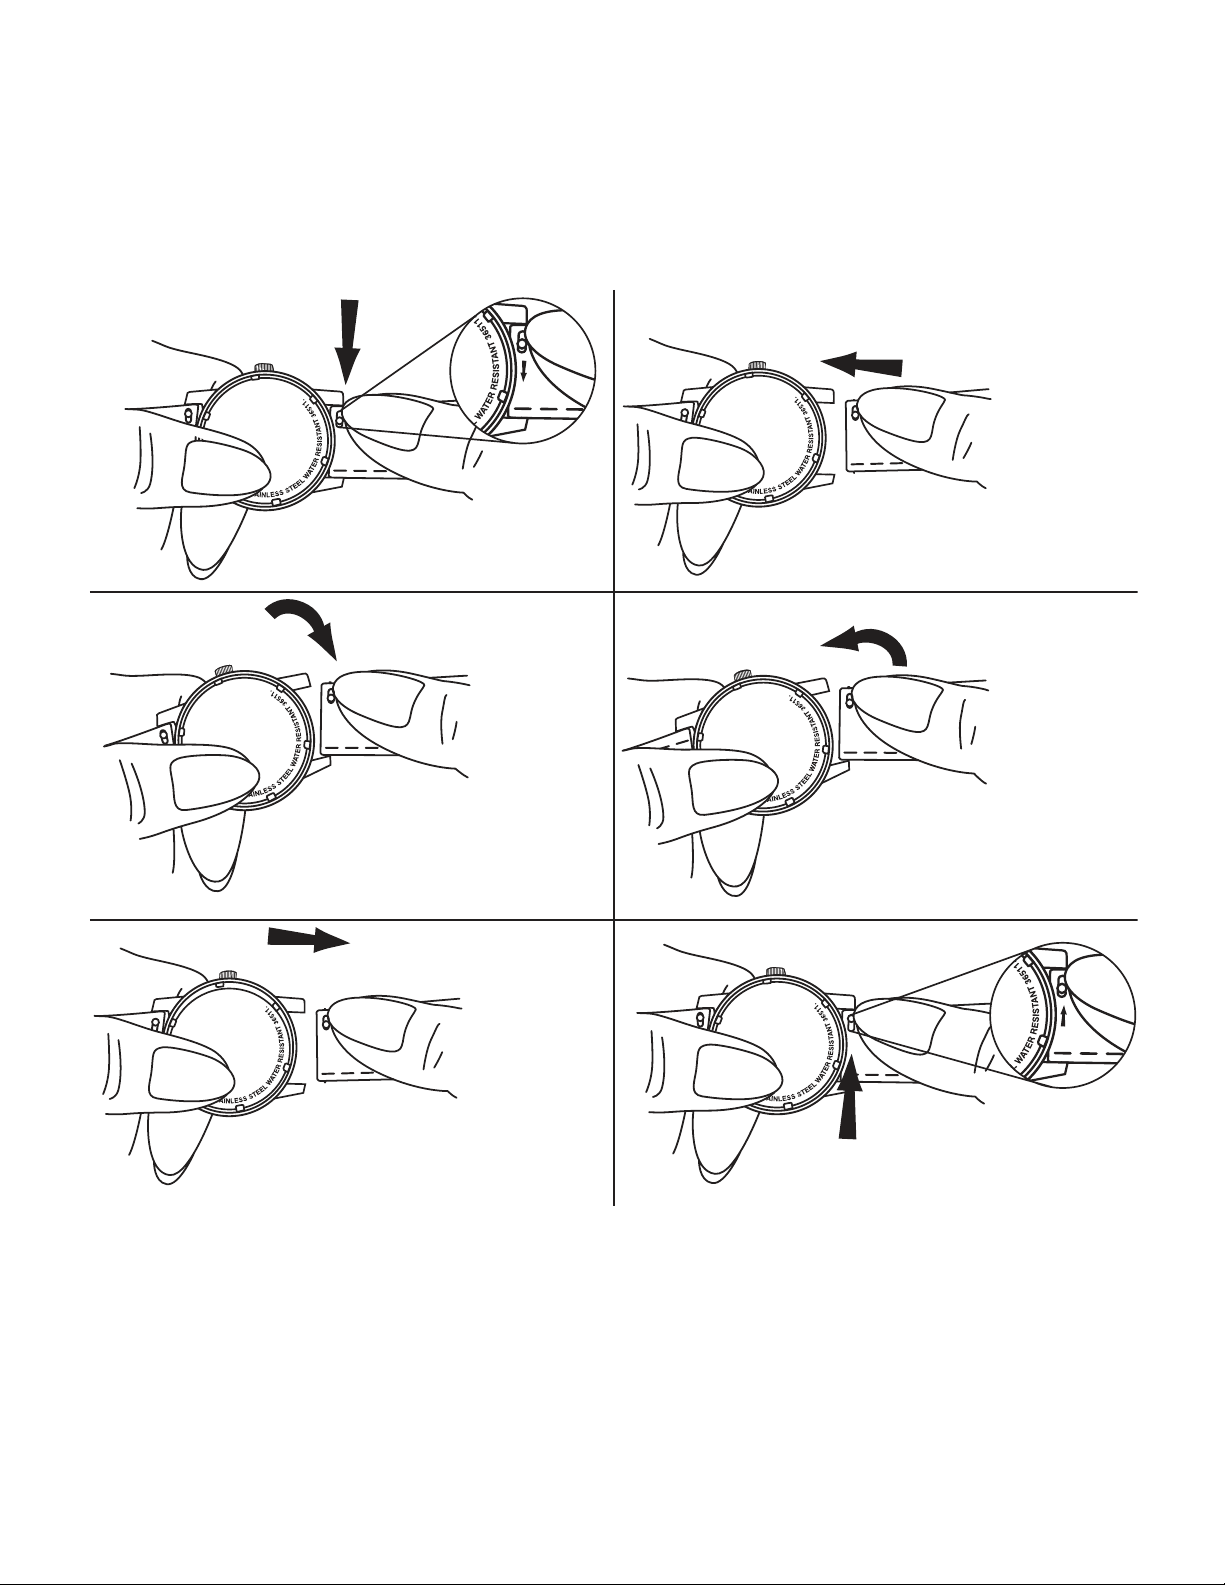
Interchangeable Bracelet/Strap Models
Tension-pin style
REMOVING STRAP (a)
REPLACING STRAP (b)
21
Page 23
OPERATING INSTRUCTIONS
1
2
3
4
5
6
7
8
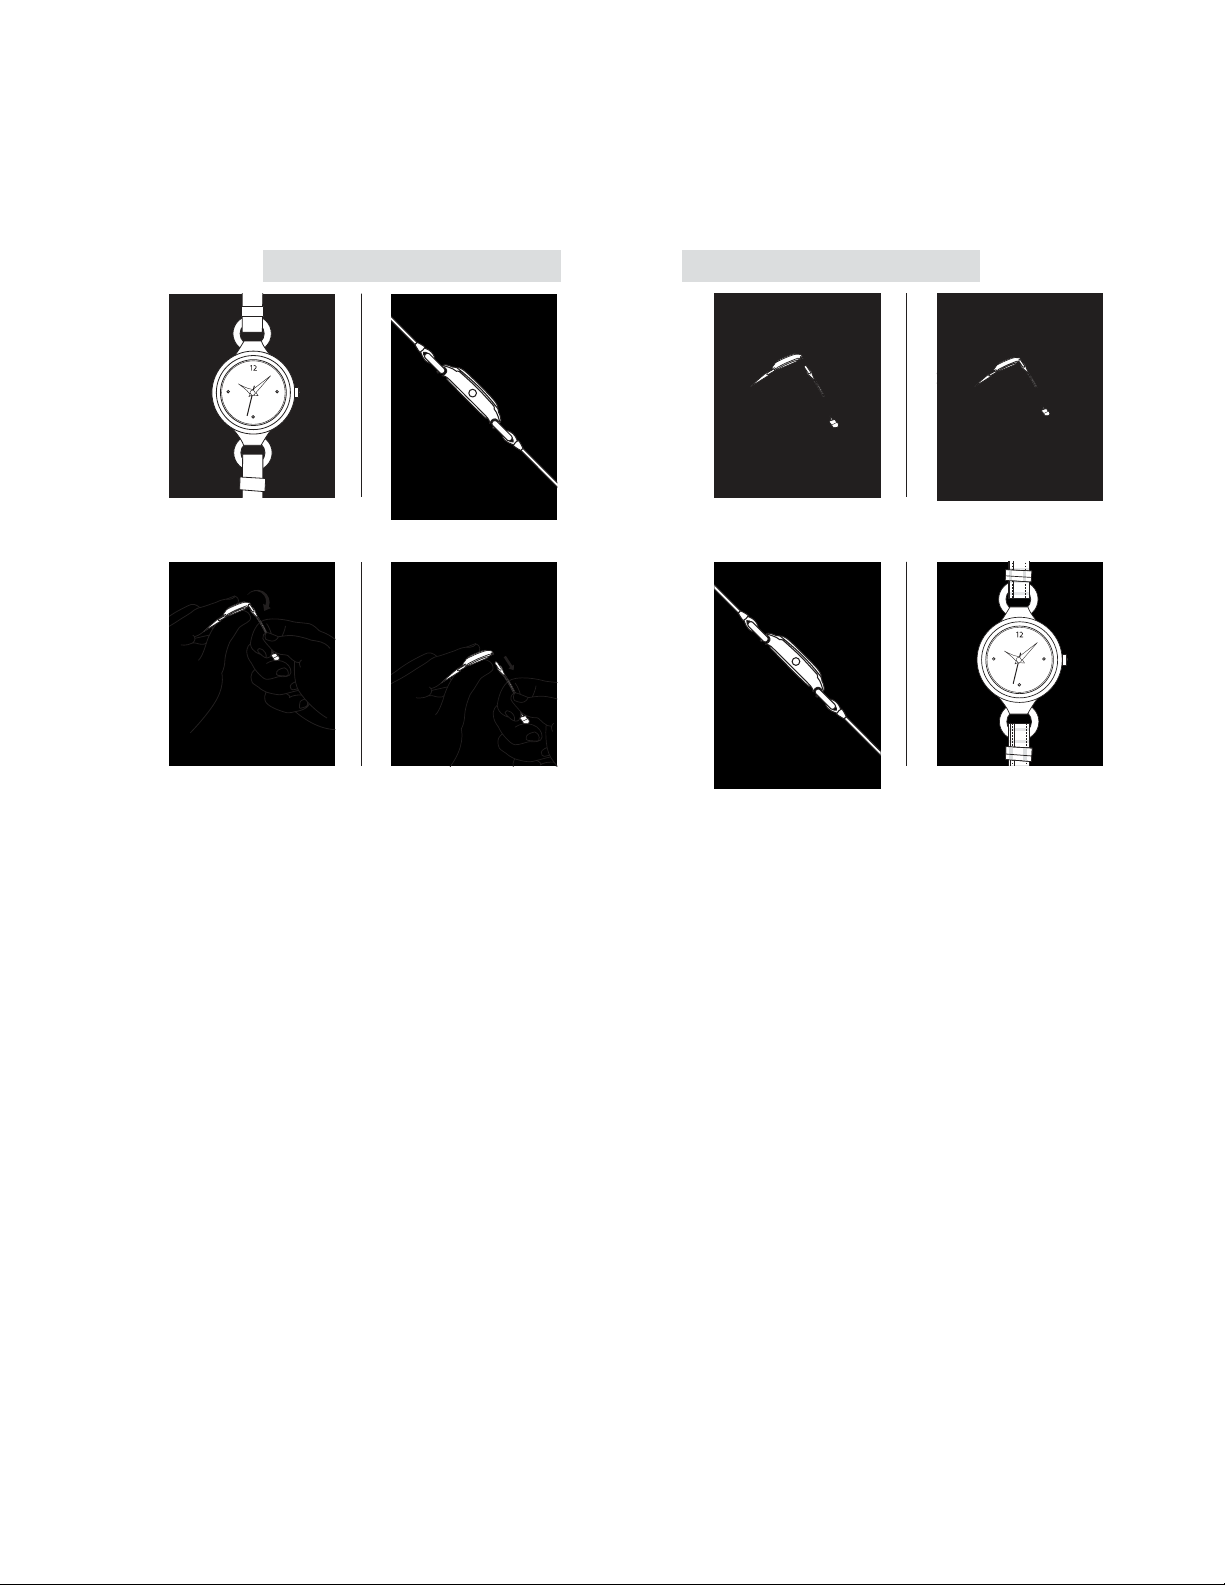
Interchangeable Bracelet/Strap Models
Hook and bar style
Removing Strap
Replacing Strap
22
Page 24
2
1
3
4
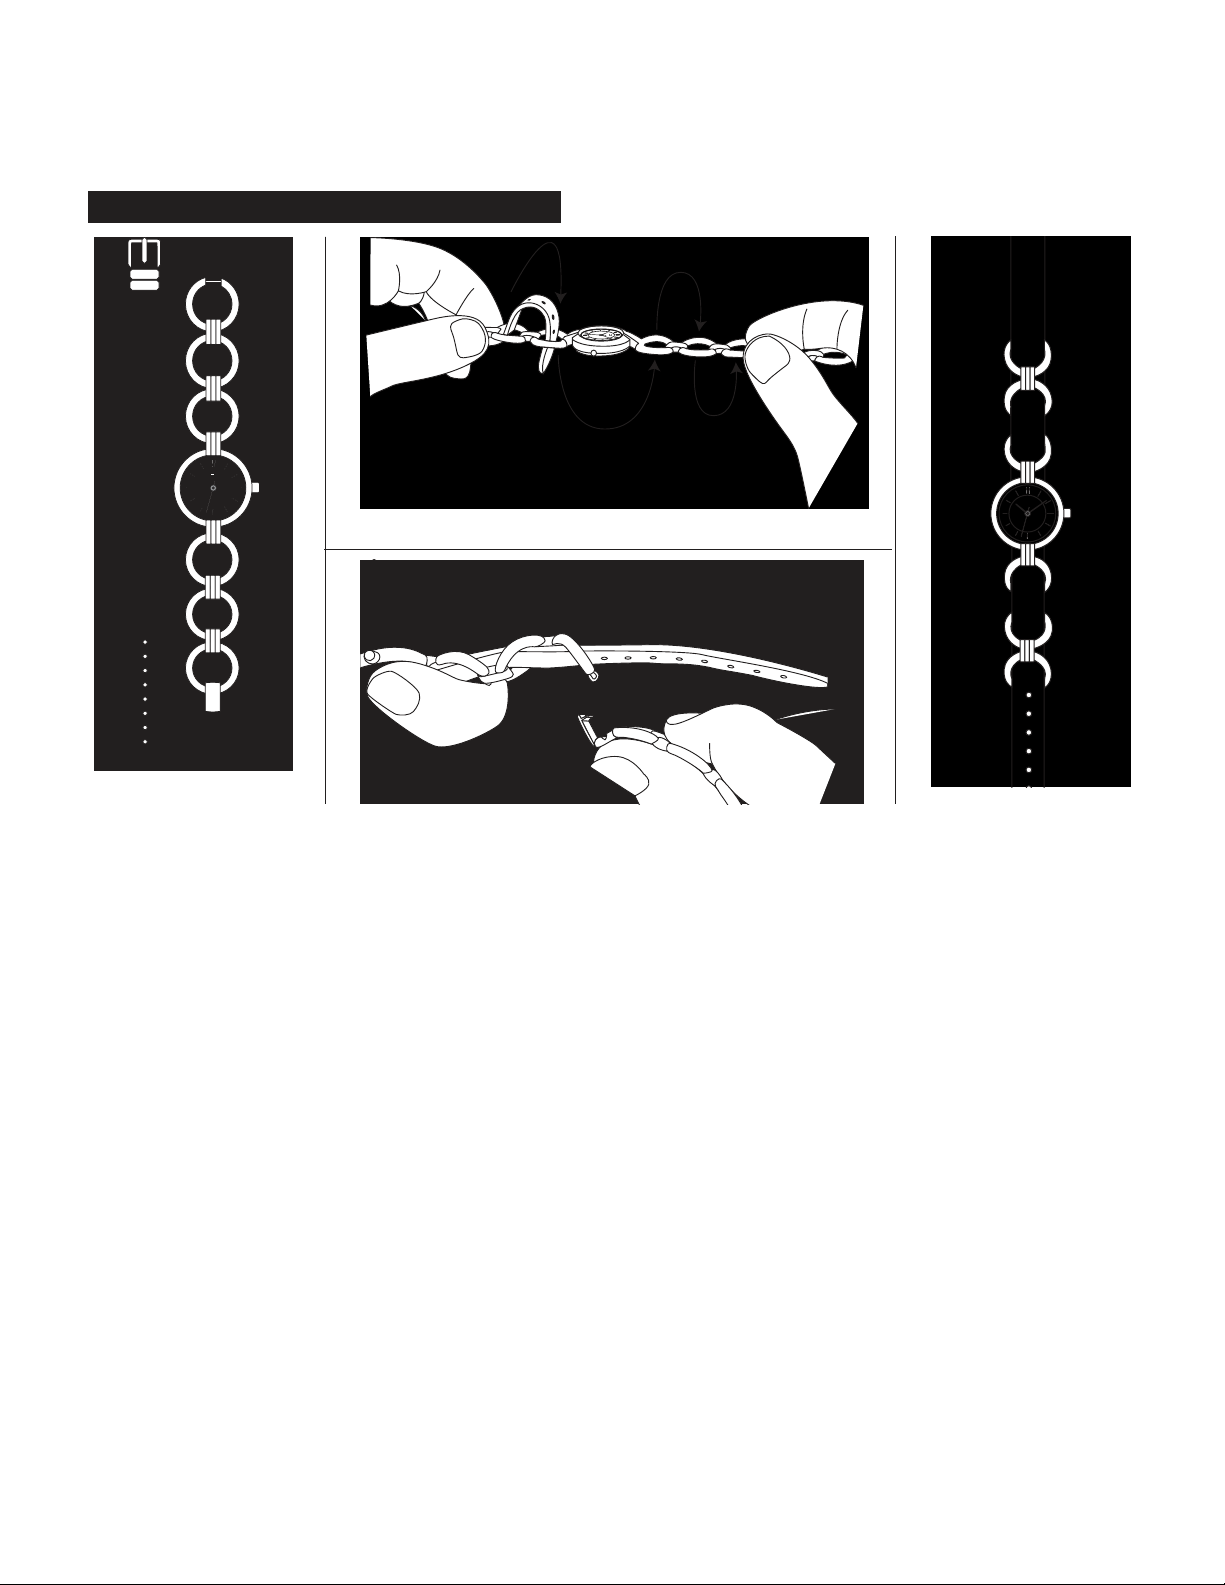
Converting Bracelet to Strap
OPERATING INSTRUCTIONS
Convertible Bracelet/Strap Models
23
Page 25

WARRANTY & SERVICE INFORMATION
Please see the printed warranty and service guide enclosed with
your watch for complete warranty and service information – or
return to our service website home page and click on the Warranty
and Service Information link.
24
Page 26

CARE AND MAINTENANCE
Your watch has been developed with meticulous attention to quality, function and detail. Please read the following information and
instructions carefully to learn about the features, proper care and
operation of your new timepiece.
For additional information on service and repairs, please see your
Warranty & Service Guide booklet – or return to our service website home page and click on the Warranty and Service Information
link.
Shock
All our watches have shock-resistant movements and are tested to
meet international standards for shock resistance.
Magnetism
The exposure of a timepiece to a strong magnetic field will affect
its time-keeping, and may cause it to stop. A quartz watch should
resume working with its original accuracy when removed from the
magnetic field; an automatic or hand-wound mechanical timepiece,
however, may require demagnetization before it will operate again.
Water Resistance
All our watches meet international standards for water resistance
to at least 3ATM / 30M / 99 feet, so faucet spray or rain won’t hurt
them as long as the case, crown and crystal remain intact.
Timepieces marked water resistant to 50M / 5 ATM / 165 feet may
be worn while showering or swimming, but not scuba diving.
CAUTION: Do not press the push-buttons on a chronograph model
when the watch is under water, or it will not remain water resistant.
NOTES: We recommend that you do not get your leather strap
wet. Exposing leather to water can cause premature wear and
deterioration.
Carefully wipe your watch using a soft cloth dampened with fresh
water after exposure to chlorine or sea water.
Battery Information
Your quartz analog watch or chronograph has a battery specially
designed for watches. It will last approximately 18-36 months
under normal use.
NOTE: Frequent use of special functions, like the stopwatch timer
on chronograph models, may shorten battery life.
End-of-life feature: The seconds hand on many models will start to
move haltingly in 4-second increments when the battery is almost
exhausted, signaling the need to have it replaced.
Battery replacement: Take or send your watch to an Authorized
Service Center to have battery changed – your old battery will be
disposed of/recycled properly. Do not attempt to change the battery yourself.
Warranty and Service Information
Please see the printed warranty and service guide enclosed with
your watch for complete warranty and service information – or
return to our service website home page and click on the Warranty
and Service Information link.
25
 Loading...