

Page 1
User and
Installation
MANUAL
La Cornue 1908
W OOD/ COAL BURNING STOVE
( CONTINUOUS FLAME, NO BOILER)
L A F ORESTIÈRE
Page 2

1
Dear customer,
Early in the twentieth century, Henri-Paul Pellaprat*, French Grand
Master Chef, wrote:
“True values and just principles
never diminish with age”
At the begining of this new millenium, and for the years to come, the
above phrase is, and shall remain, the guiding principle of our company.
Authenticity without artifice and innovation in the respect of timehonoured traditions are the guiding forces behind each step in the
creation of each of our cookers.
Which is why every cooker we build has a soul.
With every recipe, the versatility and conviviality of your cooker will
become more and more apparent, along with the added touch of
warmth and atmosphere it lends to your home.
This booklet not only provides instructions for use, but also several
rules to follow which will facilitate the maintenance of your “La
Cornue”.
We thank you for your trust
.
Xavier Dupuy
Chairman and Managing Director
* Henri-Paul Pellaprat - Professor of cooking and pastry-making at the Ecole Cordon
Bleu. Public training officer, Chevalier of the Agricultural Order of Merit.
Page 3

2
Forestière
LA CORNUE - User and Installation Manual Forestière GB.
November 2006 - A.K.
Page 4

3
Forestière
TABLE OF CONTENTS TABLE OF CONTENTS
Pages
SPECIFICATIONS
1. APPEARANCE ............................................................................................. 4
2. DIMENSIONS .............................................................................................. 5
3. OPERATIONAL FEATURES ......................................................................... 6
SECTION FOR USERS:
1. BEFORE INITIAL IGNITION ........................................................................ 7
2. INITIAL IGNITION ....................................................................................... 7
3. LOADING THE FIREBOX ............................................................................ 7
4. LIGHTING THE STOVE ................................................................................ 8
5. PROCEDURE ............................................................................................... 8
6. OVERNIGHT BURNING .............................................................................. 8
7. RELOADING ............................................................................................... 9
8. DE-ASHING ................................................................................................. 9
9. USING THE OVEN ....................................................................................... 9
10. CLEANING ........................................……………………………………… 10
SECTION FOR INSTALLERS:
1. ASSEMBLY AND DISASSEMBLY .............................................................. 11
2. INSTALLATION ......................................................................................... 13
All of these characteristics are provided for information purposes only. With
the aim of constantly improving its production quality, La Cornue may make
modifications to its appliances in line with technological developments.
TABLE OF CONTENTS
Page 5

4
Forestière
Appearance SPECIFICATIONS
SPECIFICATIONS
Air control lever:
- position 0 - 1 OVERNIGHT BURNING
- position 2 CLOSE
- position 3 - 4 OPEN
Loading
door
Front firebox
plate
De-ashing
pull knob
Air
control lever
Direct outlet
ring
Soot
hatch
Ash-pan
door
Flue collar or hatch depending
on whether top or rear outlet
(to be assembled without sealing)
1. APPEARANCE
Page 6
5
Forestière
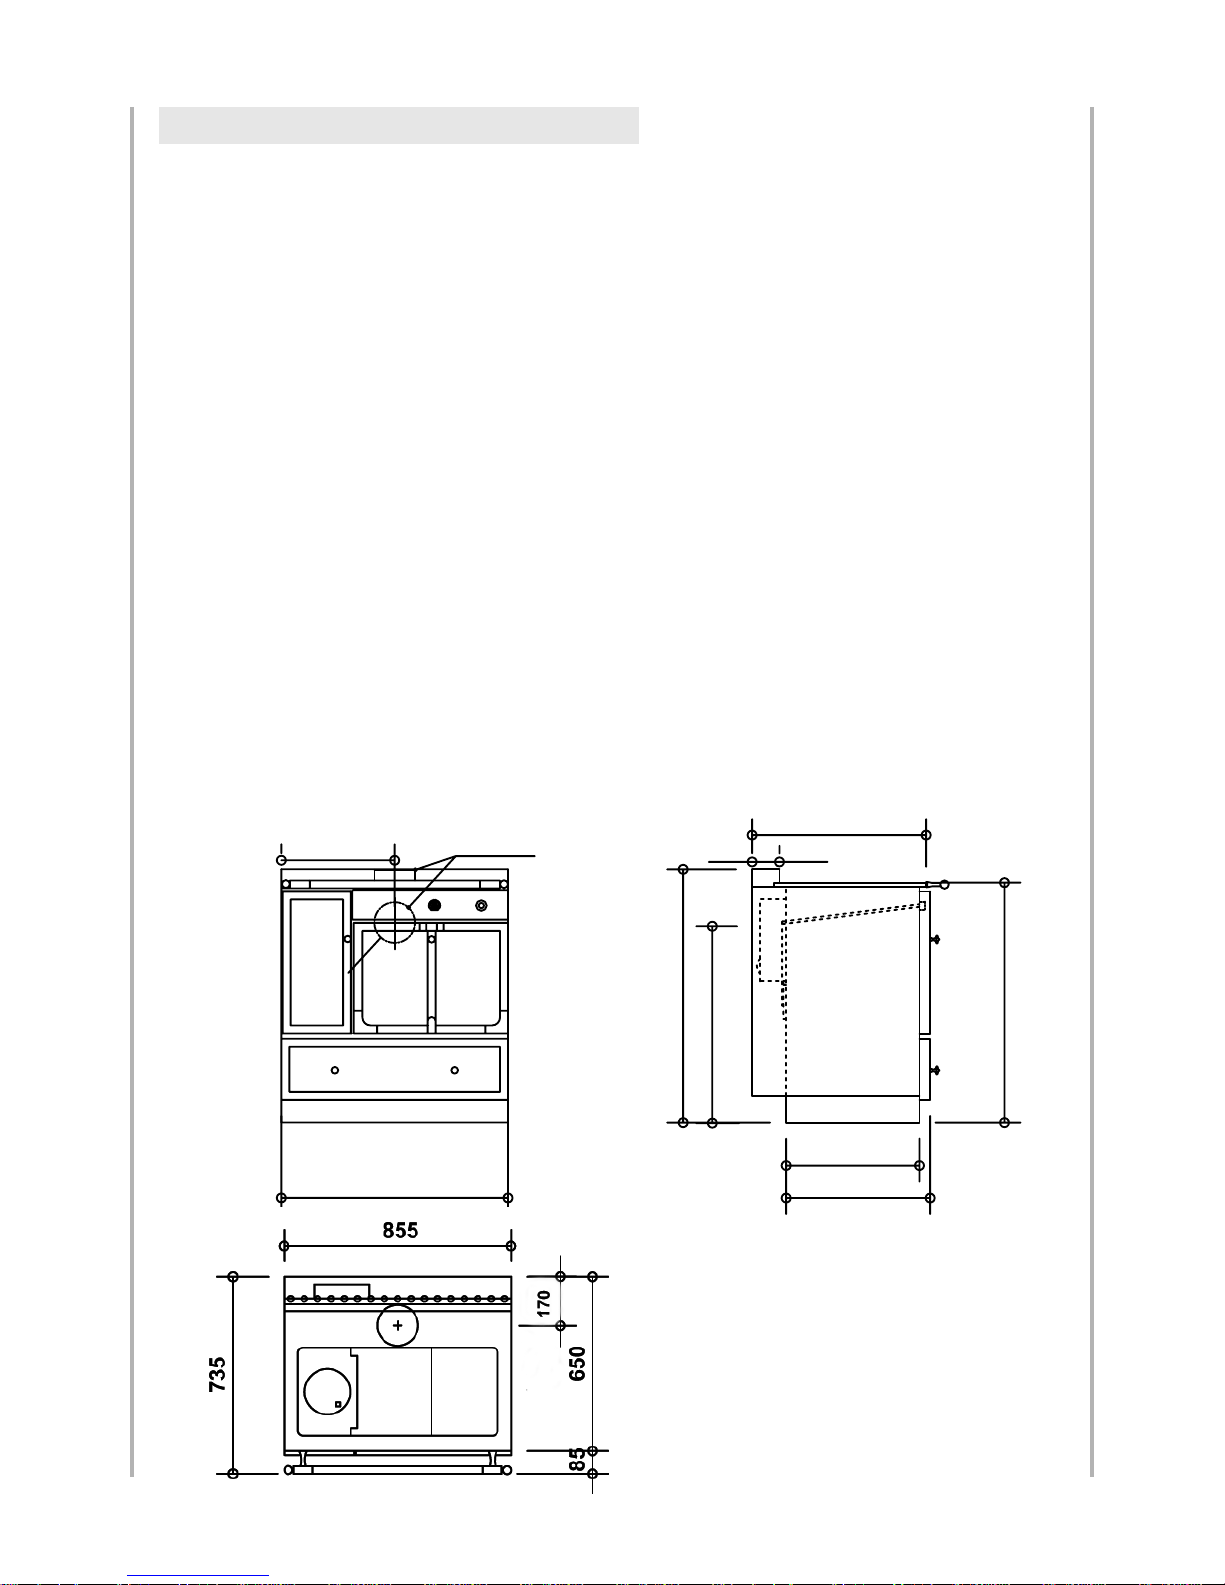
SPECIFICATIONS Dimensions
Appliance dimensions:
Width 860 mm
Height to top 900 mm
Height with backsplash 950 mm
Depth 650 mm
Weight 175 kg
Flue collar diameter 153 mm
Height of flue collar axis
to ground 750 mm
Oven dimensions:
Width 440 mm
Height 280 mm
Depth 435 mm
Total oven volume 53.6 litres
Firebox dimensions (wood/coal)
Width W 160/C 160
Depth W 550/C 350 *
Height of hotplate W 360/C 360
Height of parabola W 280/C 280
* Instantly removable parts.
2. DIMENSIONS
950
900
500
650
100
540
750
860
425
153
Page 7

6
Forestière
Operational features SPECIFICATIONS
For a chimney draught between 0.8 and 1.2 mbar inclusive
FUEL
1. Wood:
Use 50 cm logs, preferably hard and well-dried wood (oak, hornbeam etc.).
2. Coal:
Recommended fuels:
Preferably use 20 x 30 dry-burning.
Useable fuels:
You can use 20 x 30 thin anthracite or smokeless solid fuel.
In this case the heat values and operating times will be different to those specified in the
table above.
THE FIRE BOX
WOOD
The stove can be run on wood once the rear firebox plates have been removed and the front wood
plate inserted.
COAL
The stove can be run on coal after inserting the
front and rear firebox plates.
Approx.
corresponding
Operating
Operating
Heat
Adjusted
hourly consumption
time in
time in
Type of
heated
fuel
value
volume
Heating
Cooking
stand-by
normal
(kW)
(m3)
mode
mode
mode
mode
(in kg/h)
(in kg/h)
(in hours)
(in hours)
Dry flammable
12.15
475
1.670
2.140
16 hrs
5 hrs
20x30
3. OPERATIONAL FEATURES
Front wood
plate
“BOIS”
Front coal
plate
“CHARBON”
Rear coal
plate
Page 8

7
Forestière
SECTION FOR USERS Ignition. Loading
Using a liquid detergent with ammonia, remove the protective varnish covering the
appliance's cast-iron top.
The stove should be first used at very low heat for several hours. On the other hand,
if the chimney, having not been used for some time, is cold and damp, you may have
draught problems. It is therefore recommended that you burn wood in the appliance to
warm up and dry out the chimney and initiate the draught.
If, after several days and despite these precautions, the appliance still does not work property with the appropriate fuel, call in a specialist to check the installation.
For coal, remove the round hatch using the tongs.
In the case of use with wood, you will need to remove the front and rear firebox plates
(see page 6) which will enable 50 cm logs to be inserted into the firebox. These plates will
be reinserted when using coal.
SECTION FOR USERS
1. BEFORE INITIAL IGNITION
2. INITIAL IGNITION
3. L
OADING THE FIREBOX
Place letter B of the round hatch (for wood),
C (for coal) opposite the arrow located on the
fire plate.
For wood, remove the fire plate using the
tongs.
Page 9

8
Forestière
Lighting the stove SECTION FOR USERS
Open the oven door and pull the direct outlet control ring on the front towards you (you
will notice that this ring itself holds the door slightly ajar if it is unscrewed one quarter
turn, the burner resting on the front).
Open the air control lever fully by adjusting the adjustment lever in position "4".
Place crumpled paper and kindling intertwined in the firebox grate, without packing it
down. Lift the whole lot slightly and light the paper using a match then cover with a thin
layer of coal or logs. Close the loading hatch or the fire plate.
As soon as the fuel is well lit, load the firebox, push the direct outlet ring back in, adjust
the air control lever to the desired level (low for the first operation).
Loading the firebox 3/4 full provides, depending on the fuel used, the operating times specified in the table under OPERATIONAL FEATURES.
To run the stove on coal, close the secondary air inlet damper by pulling it towards the
front of the appliance.
To run the stove on wood, open the secondary air inlet damper by pushing it towards the
back of the appliance. You can then use 50 cm logs.
Once the cleaning and loading have been done, the loading doors and hatches must always
remain firmly closed.
If you leave the firebox or ash pan door open, you risk burning at abnormal speeds which
may have serious detrimental effects.
Wait until the remaining embers are just glowing before loading.
Load the firebox three quarters full.
Adjust the air control lever to between 0 and 1 according to the chimney draught.
To resume burning in the morning, open the air control lever fully. De-ash after several
minutes and reload. Do not forget to put the air control lever back to the appropriate level
for the desired output.
4. LIGHTING THE STOVE
6. OVERNIGHT BURNING
5. PROCEDURE
Secondary air inlet damper
COAL WOOD
Page 10

9
Forestière
SECTION FOR USERS Reloading. De-ashing
Position the air control lever at level “4”, to revive the fire. After several minutes, de-ash
and then reload.
To reload with coal, open the loading hatch on the top part. Fill to the upper level on the
front firebox plate: do not level out or pack down the coal, on the contrary, always leave
space above the ashes, either at the front or at the back of the firebox.
To reload with wood, open the firebox door and insert logs one by one.
After reloading, close the loading hatch (or firebox door) and do not forget to return the
air control lever to its initial setting as soon as the fire is firmly revived.
Insert the hook of the tool supplied with the appliance into the hole in the de-ashing pull
knob.
Push and pull alternately 6 to 8 times one after the other to shake the grate. De-ashing has
been done correctly if, when opening the ash pan door, you clearly see the glimmer from
the firebox reflected in the ash pan. Push the pull knob back before closing the outer steel
door.
De-ash at least twice a day and in particular when reviving the fire after overnight burning.
Empty the ash pan when it is two thirds full.
(Allowing ash to accumulate in the ash pan carries the risk of irreparable damage to the
firebox grate).
Close the ash pan door firmly.
FITTING THE GUARD
Take the whole thing in two hands, the right hand on
the rounded iron axis and the left supporting the flap.
Insert this into the opening on the left-hand side of the
oven such that the lower lip of the flap is found on the
outside (of the oven side). Insert the axis into the rear
bearing located at the top left of the oven, turn to the
left and position the axis on the front in the groove provided for this purpose. Ensure the flap slides well. To do
this, move it forwards and backwards using the protruding guide at the top.
USE OF THE GUARD
When you want a very hot oven (to sear a food for example), you must release the centre of the oven side fully, in other words push the guard flap towards the back of the oven.
To cook over a gentle heat, do the reverse, in other words, slide the flap until it is in the
middle of the oven.
This is easy to do using the guide protruding at the top section of the guard.
7. RELOADING
8. DE-ASHING
9. USING THE OVEN
Page 11

10
Forestière
Cleaning SECTION FOR USERS
CONTROL PANEL
Wipe with a dry cloth. If there are stains, remove these with warm soapy water; do not
use detergent or scouring pads.
ENAMEL
Due to the fact that the enamel is sensitive to sudden changes in temperature, only clean
enamel sections when the appliance is cold or lukewarm (for example before reviving in
the morning) and only with a clean, dry cloth.
POLISHED TOP
This can be rubbed with an emery cloth to remove rust if necessary and wiped with a greasy cloth to prevent the formation of this rust.
When in use, daily cleaning is essential for retaining an attractive appearance on top but
it is impossible to avoid the hot plates on top of the firebox turning blue. Various products
are available to buy for cleaning polished surfaces.
If the appliance is not used for some times, it will be necessary to oil the surface.
FIREBOX
Depending on the fuel being used, the firebox will need more or less frequent cleaning.
Allow the fire to go out. De-ash thoroughly. If cinders have formed, remove the grate and
slide them underneath into the ash pan. Clean the grate slots if necessary. Empty the ash
pan.
CHIMNEY
To ensure the continued operation of the stove, the chimney must be properly maintained.
It must therefore be cleaned as often as required: the cleaning frequency will of course
depend on how the stove is used (continuously or intermittently, overnight or during the
day only), and on the quality of the fuel being used.
Remove all cast iron solid tops and clean them with the scraper.
Also scrape the chimney, the sides, the top and bottom of the oven. To access the latter,
remove the sweeping plate located on the surface beneath the oven (unscrew the two
knurled buttons). Place a shovel under the hatch opening and using the scraper push all
the soot dislodged during the cleaning onto it.
Then correctly replace all the parts removed.
10. CLEANING
Page 12

11
Forestière
SECTION FOR INSTALLERS Assembly and disassembly
DISASSEMBLING THE GRATE
Remove the left-hand hotplates and the rear firebox plate.
Open the outer firebox door and pull the grate pull knob hard (movement 1).
Remove the rear plate and pull the grate upwards, the front being released from the pull
knob groove (movements 2 and 3).
Reassembly is done by following the same procedure in reverse but you must ensure that
the pull knob groove is properly released from the hole in the grate.
DISASSEMBLING THE OVEN DOOR
Open the oven door after having first pulled the slide
valve out 10 cm.
At one end of the axis, insert an 8 wrench.
Close the door slowly, allow the wrench to rest on
the facing door, and continue to close: the door is
released by pushing downwards. Put a cloth in between the key and the enamel to protect the enamel
sections.
Reassembly is done by following the same procedure in reverse.
Insert hinges on the left-hand side of the sections
with the door at a 45° angle. Pull upwards to insert
the axis into the groove and, while supporting it,
turn the door horizontally. The axis should be attached on both sides. If not, start again.
1. ASSEMBLY AND DISASSEMBLY
SECTION FOR INSTALLERS
Facade
Front
firebox plate
Rear
firebox plate
Page 13

12
Forestière
Assembly and disassembly SECTION FOR INSTALLERS
DISASSEMBLING THE CONTROL PANEL
Disassemble the air control adjustment lever by unscrewing the holding screw behind the
flange.
Wrap the screwdriver blade in a cloth (so as not to scratch the flanges and the facade) and
slide it between the flange and the facade.
Lift at all four corners to detach the control panel held on by springs.
To reassemble, position the springs in line with the front pins and engage the control panel
at all four corners. Replace the adjustment lever.
REPLACEMENT OF LEFT-HAND BRICK OF THE FIREBOX
It is not necessary to remove the top to replace the firebrick. Simply carry out the following:
- Remove the hotplate hatches.
- Remove the padding plates A by removing the two fixing screws located on the top of
the oven, taking care to remove the nuts inside the oven.
- Open the inner firebox door and remove the front firebox plate.
- Unscrew the upper left-hand screw of the top to free front plate B.
- Remove left-hand plate C.
- Release firebrick D.
To reassemble, follow the same procedure in reverse.
Loading door
Top of the appliance
Page 14

13
Forestière
SECTION FOR INSTALLERS Installation
It is recommended that your cooker be installed by a professional and that you
ask him for all of the information you consider to be useful.
Incidentally, the following provisions will assist you in using your kitchen in the
best way possible.
Place your appliance as close as possible to the chimney.
It is of no use to install a collection pipe and it could even be even harmful. If you are
obliged to provide for a large horizontal run, arrange an ascending slope of at least 5 cm
per metre. Avoid sinuous runs and right-angles bends.
Ensure that the connection is properly sealed.
Fit the pipes in fully, with the large end towards the top. Fit the perforation in the smoke
conduit with a tight rose and a cathead.
Ensure that the draught is not impeded.
The diameter of the pipes must never be lower than that of the base of the appliance.
Should the pipe discharge horizontally into the conduit, cut slantwise, turning
downwards. Never place the draught key onto the discharge pipe.
Insulate the appliance and the pipes suitably with any combustible material.
Place a plate or a baseplate under your appliance. Ensure that the pipes are at
least 16 cm from any combustible material.
THE CHIMNEY PLAYS AN ESSENTIAL PART
a) The chimney may never by obstructed.
Before connecting your appliance, ensure that the chimney is properly cleaned. Then,
have it cleaned at least once a year.
b) The chimney must be properly leak-free.
Ensure, on the one hand, that the cleaning buffer and the connection to the chimney are
properly leak-free, and on the other hand, that the conduit does not have any splits (damp
straw fire test). Carry out this test again every year when cleaning is performed.
c) The chimney must be independent.
Do not attach more than one appliance to the same chimney.
Have the lower, unused part of the chimney insulated.
d) The chimney must discharge suitably into the open air.
In as far as possible, the chimney must discharge one metre above the ridges of the
neighbouring roofs. However, prevent plate superelevation from causing sudden
narrowing.
Should draught be difficult, have a static exhauster installed.
2. INSTALLATION
Page 15

14
Forestière
Installation SECTION FOR INSTALLERS
Examples of correct chimneys
1: Very aerated caps.
2: Progressive reduction in cross-section.
3. Bends.
4: Independent, buffed conduits that are not split and have no roughness.
5: Tightly fitted
6: Tight cleaning buffer.
7: Unused insulated conduit.
8: Discharge T.
Page 16

15
Forestière
WARRANTY After-Sales Department
Following receipt of full payment for our
goods, our appliances are guaranteed for
three years from the invoice date against
any structural faults and any material
defects. This warranty excludes improper
use of the appliance or a non-compliant
installation. Intervention and travel costs
will be billed in this event.
If our goods were to dysfunction, the
buyer then has to contact us once he has
ensured that it is not due to a noncompliant installation or abnormal use
in order to decide with us how the
appliance should be repaired. The
appliance should be cleaned and clean
prior to any intervention.
Any complaints with regard to the state,
the presentation, the non-compliance of
our goods should be addressed to our
headquarters by recommended letter
within a maximum of eight days
following delivery.
The application of the warranty will be
subject to LA CORNUE SA receiving a
certificate stating that the material has
been installed by a professional in
accordance with the current technical
and safety standards.
Under this warranty, the seller shall
replace at no cost the parts recognized as
faulty by its technical department. This
warranty covers all labour costs with the
exception of freight charges.
The warranty period specified above
shall not be extended if faulty parts need
to be replaced.
This warranty shall cease to apply
- if the operational defect is the result of
an unauthorized intervention on the
appliance;
- if the faulty operation is due to normal
wear and tear of the appliance or from
negligence or insufficient maintenance
by the buyer;
- if the faulty operation is due to acts of
Nature.
LA CORNUE SA shall not be held legally
responsible in these three cases.
The seller’s guarantee and his
responsibility for products shall be
limited to repairs to any defects as
stipulated in the above conditions.
As expressly agreed between the
contracting parties, the seller’s
responsibility in the event of an
operational fault shall be limited to the
above provisions, especially with regard
to concealed defects as well as material
and immaterial damage.
In all cases, the buyer may not suspend
payment if he lodges a complaint about
the quality of the goods.
WARRANTY (3 YEARS)
After-Sales Department:
- Covered by the warranty:
tel: +33 (0)1 34 48 36 15 fax: +33 (0)1 34 48 52 31
- Not covered by the warranty (appliance older than three years):
tel: +33 (0)1 47 37 56 00 fax: +33 (0)1 47 39 10 49
Page 17

16
Forestière
DESCRIPTION DESCRIPTION
SIÉGE SOCIAL ET ATELIERS LA CORNUE
14, rue du Bois du Pont - Z.I. Les Béthunes
95310 SAINT OUEN L’AUMONE
Adresse postale :
BP 99006 - 95070 Cergy Pontoise Cedex
F
RANCE
Téléphone : 33 (0)1 34 48 36 36
Fax : 33 (0)1 34 64 32 65
www.la-cornue.com
e-mail : a.table@la-cornue.com
Page 18

La Cornue 1908
Ateliers La Cornue
14, rue du Bois du Pont - Z.I. les Béthunes
95310 Saint-Ouen l'Aumône - FRANCE
Postal adress : La Cornue SAS - B.P. 99006
95070 Cergy Pontoise Cedex - FRANCE
Tél. : + 33 (0)1 34 48 36 36 - Fax : + 33 (0)1 34 64 32 65
E-mail : a.table@la-cornue.com
www.la-cornue.com
 Loading...