

Page 1
How To Use This Manual
LaCie Dupli Disc CD125
User’s Manual
How To Use This Manual
In the toolbar:
Printing:
While optimized for onscreen viewing, the pages of this manual are formatted for printing on 8 1/2” x 11” and A4 sized
paper, giving you the option to print the entire manual or just a specific page or section.
To Exit:
From the Menu bar at the top of your screen, select: File > Quit.
Icons Used In This Manual
These icons describe the type of information being given:
Previous Page / Next Page
Go to Contents Page / Go to Precautions Page
Important Info:
This icon refers to an important step that must be followed.
Tech Note:
This icon refers to tips to help maximize performance.
Caution!
This icon indicates a potential hazard, and gives tips on how to avoid them.
i
i
N
N
T
T
Page 2

Table of Contents
page 2
LaCie Dupli Disc CD125
User’s Manual
Foreword 4
Precautions 6
1. Introduction 8
1.1. A Few Words About Copyright Laws 8
1.2. Data Safety 9
1.3. Manual Updates 9
2. Getting To Know Your LaCie Dupli Disc CD125 10
2.1. Supported CD Formats 10
2.2. Supported Logical Formats 10
2.3. LaCie Dupli Disc CD125 - Views 11
2.3.1. Front View 11
2.3.2. Control Panel 12
2.3.3. Back View 13
3. Setting Up Your LaCie Dupli Disc CD125 14
3.1. Turning On Your LaCie Dupli Disc CD125 14
3.2. Turning Off Your LaCie Dupli Disc CD125 15
4. Functions of Your LaCie Dupli Disc CD125 16
5. Using Your LaCie Dupli Disc CD125 18
5.1. Copy 18
5.2. Test 19
5.3. Test & Copy 20
5.4. Verify 21
5.5. Compare 22
5.6. Prescan 23
5.7. Disc Info 24
5.8. Select Source 24
5.9. Image 25
5.10. Edit Track 25
5.11. Setup 28
5.11.1. Language 28
5.11.2. CD Burn Speed 29
5.11.3. DVD Burn Speed 29
5.11.4. Read Speed 29
5.11.5. Auto Start Drive 30
5.11.6. Startup Drive Menu 30
5.11.7. Auto Verify 31
Table of Contents
Page 3

Table of Contents
page 3
LaCie Dupli Disc CD125
User’s Manual
5.11.8. Auto Compare 31
5.11.9. Auto Prescan 31
5.11.10. Eject Disc 32
5.11.11. Burn On The Fly 32
5.11.12. Burn Mode 32
5.11.13. Display Time 33
5.11.14. Button Sound 33
5.11.15. Device Info 33
5.11.16. System Info 34
5.11.17. Quick Erase 34
5.11.18. Full Erase 35
5.11.19. Auto Close Tray 35
5.12. Advanced Setup 36
5.12.1. UnderRun Protect 36
5.12.2. Overburn 36
5.12.3. Read Error Skip 36
5.12.4. Format HDD 36
5.12.5. Verify HDD 36
5.12.6. Burn In 37
5.12.7. Update Firmware 37
5.12.8. Compare Firmware 37
5.12.9. Hardware Diagonistic 37
5.12.10. Load Default 37
5.12.11. CD+G 37
5.12.12. ISRC & MCN 37
5.12.13. Switch USB Mode 37
5.12.14. CD-Text 37
6. Troubleshooting 38
6.1. About The LCD Display Screen 38
6.2. About Error Messages 38
6.3. Errors With The CD Drives 38
6.4. Errors With Control Panel Buttons 38
6.5. High Disc Failure Failure Rates 38
6.6. Emergency Ejection CDs 39
6.7. Display Screen Messages 39
7. Contacting Customer Support 42
8. Warranty 43
Page 4
Foreword
4
LaCie Dupli Disc CD125
User’s Manual
Copyrights
Copyright © 2004, 2005 LaCie. All rights reserved. No part of this publication may be reproduced, stored in a retrieval
system, or transmitted in any form or by any means, electronic, mechanical, photocopying, recording or otherwise, without
the prior written consent of LaCie.
Trademarks
All trademarks mentioned in this manual are the property of their respective owners.
Changes
The material in this document is for information only and is subject to change without notice. While reasonable efforts have
been made in the preparation of this document to assure its accuracy, LaCie assumes no liability resulting from errors or
omissions in this document, or from the use of the information contained herein. LaCie reserves the right to make changes or
revisions in the product design or the product manual without reservation and without obligation to notify any person of such
revisions and changes.
Federal Communications Commission Radio Frequency Interference Statement (FCC)
WARNING: Changes or modifications to this unit not expressly approved by the
party responsible for compliance could void the user’s authority to operate the
equipment. This equipment has been tested and found to comply with the limits for a
Class B digital device, pursuant to Part 15 of the FCC Rules. These limits are
designed to provide reasonable protection against harmful interference when the
equipment is operated in a commercial environment. This equipment generates, uses,
and can radiate radio frequency energy, and if not installed and used in accordance
with the instructions, may cause harmful interference to radio communications. However, there is no guarantee that
interference will not occur in a particular installation. If this equipment does cause harmful interference to radio or television
reception, which can be determined by turning the equipment off and on, the user is encouraged to correct the interference
by one of the following measures:
• Reorient or relocate the receiving antennas.
• Increase the separation between the equipment and the receiver.
• Connect the equipment into an outlet on a circuit different from that to which the receiver is connected.
• Consult the reseller or an experienced radio/TV technician for help.
Shielded cables and I/O cards must be used for this equipment to comply with the relevant FCC regulations.
This device complies with Part 15 of the FCC rules. Operation is subject to the following two conditions: (1) this device may
not cause harmful interference, and (2) this device must accept any interference received, including interference that may
cause undesired operation.
Tested To Comply
With FCC standards
FOR HOME OR OFFICE USE
LaCie Dupli Disc CD125
Page 5
Foreword
page 5
LaCie Dupli Disc CD125
User’s Manual
Canada Compliance Statement
This Class B digital apparatus meets all requirements of the Canadian Interference-Causing Equipment Regulations.
Manufacturer’s Declaration for CE Certification
We, the LaCie Group SA, solemnly declare that this product conforms to the following European standards:
Class B, EN55022 (Harmonized with CISPR22).
The CE marking applied to this product symbolizes LaCie’s declaration of conformity with the following applicable directives
of the European Union:
- 73/23/EEC Low Voltage directive
- 89/336/EEC EMC Directive
Class I Laser product
This equipment is certified to comply with DHHS Rule 21 CFR Chapter I, subchapter J in effect as of the date of manufacture.
This equipment is classified as a Class I Laser product and no hazardous laser radiation is emitted outside the drive.
Laser Specification
Class I Laser product
Wave Length: 635-675 nm / 640-66 nm, 775-815 nm
Laser Power: No hazardous radiation is emitted.
Caution!
LaCie duplicators have been designed for desktop duplication only and should not be considered either as
a system suited to large-scale duplication or as an industrial duplicator.
Page 6

Precautions
page 6
LaCie Dupli Disc CD125
User’s Manual
Health, Safety, Media and General Use Precautions
The CD duplicator you have just purchased includes a laser diode device, which classifies it as a "Laser Class I" product. This
laser is not dangerous for the user under normal operating conditions. However, we strongly advise you not to place any
reflective objects in the disc loading system due to the risk of exposure to laser emissions that may be reflected by such
objects.
Always follow the basic precautions listed below to use your LaCie duplicator safely and correctly. Respecting these guidelines
will help to avoid the possibility of personal injury to yourself or others, as well as to prevent damage to your device and
other computer equipment. These precautions include, but are not limited to, the following:
Health And Safety Precautions
• Read this User's Manual carefully, and follow the correct procedure when setting up the device.
• Do not look inside or place your hand over the open CD tray. Never look directly or indirectly (with a mirror) at the laser
diode, even when the device is not in operation. If you expose your eyes or skin to the lasers inside your duplicator’s drives,
you risk damage or loss of your vision or other personal injury.
• Do not open your duplicator or attempt to disassemble or modify it. Do not insert your fingers into the drives. Never insert
any metallic object into the drives to avoid any risk of electrical shock, fire, short-circuiting or dangerous emissions. Your
duplicator contains no user-serviceable parts. If it appears to be malfunctioning, have it inspected by qualified LaCie service
staff.
• Never expose your device to rain or chemical products, or use it near water or in damp or wet conditions. Never place
containers on it containing liquids that may spill into its openings. Doing so increases the risk of electrical shock, shortcircuiting, fire or personal injury.
General Use Precautions
• Do not expose the device to temperatures outside the 5° C to 45° C (41° F to 104° F) range. Doing so may damage the
device or disfigure its casing. Avoid placing your drive near a source of heat or exposing it to sunlight (even through a
window). Inversely, placing your device in an environment that is too cold or humid may damage the unit.
• Always unplug the duplicator from the electrical outlet if there is a risk of lightning or if it will not be used for an extended
period of time. Otherwise, there is an increased risk of electrical shock, short-circuiting or fire.
• Use only the power supply shipped with the device.
• Do not place heavy objects on top of the duplicator or use excessive force on its buttons, connectors and tray. Doing so
increases the risk of damage to the device.
• Always place your duplicator in a horizontal position before using it. Otherwise, it may fall, causing damage to the device
and/or corruption or loss of data.
• Always remove any discs from the disc trays before transporting your duplicator. Otherwise, written data may be destroyed
or the drives’ internal components may be damaged.
Page 7
Precautions
page 7
LaCie Dupli Disc CD125
User’s Manual
• Never use excessive force on the disc loading system; discs should be inserted effortlessly into your drives.
• Protect your duplicator from excessive exposure to dust during use or storage. Dust can build up inside the device,
increasing the risk of damage or malfunction.
• Never use benzene, paint thinners, detergent or other chemical products to clean the outside of the drive. Such products will
disfigure and discolour the front panel and casing. Instead, use a soft, dry cloth to wipe the device.
• Never move the drive while it is operating. Always allow at least 30 seconds after spin down before moving the drive.
• Never close or lock the front door before the selected duplication, verification or erasing process is underway, as indicated
on the LCD screen.
Media Precautions
• Do not use or store CD-ROM discs and blank CD-R/RW discs in places which are dirty or dusty; which are subject to
extreme temperatures; which are warm, humid or favourable to condensation; or which are exposed to direct sunlight.
• Do not use cracked, warped or damaged discs.
• Do not touch or write on the disc’s reading/writing surface.
• Do not drop, bend, flex or place any heavy objects on the disc.
• Do not apply any disc labels that may come off inside the drive.
• Store discs in their protective sleeves or cases when they are not being used.
• Do not incinerate unwanted or unusable discs: discs that are no longer used should be disposed of properly according to
local rules and regulations.
• Do not mix CD-R and CD-RW media when duplicating. When duplicating a master disc, use either only all CD-R or all CDRW media in the target drives. Otherwise, a duplication error will occur.
Caution!
The drive's warranty may be void as a result of the failure to respect the precautions listed above.
Caution!
LaCie duplicators have been designed for desktop CD and DVD duplication only and should not be con-
sidered either as a system suited to large-scale duplication or as an industrial CD/DVD duplicator.
Page 8

1. Introduction
page 8
LaCie Dupli Disc CD125
User’s Manual
1. Introduction
Your LaCie Dupli Disc CD125 is a smart and easy-to-use device dedicated CD duplication, bringing you the following
features:
• One IDE CD-ROM drive of the latest generation with multi-read features;
• Five IDE CD-RW drives that can record almost any type of data on CD-R and CD-RW discs;
• A duplication controller that automatically recognizes the data format of the disc you have inserted
in the CD-ROM drive;
• A sturdy casing with an integrated power supply.
As a true stand-alone duplication solution, your LaCie Dupli Disc CD125 is completely autonomous, requiring no software or
computer to duplicate CDs. Its various functions allow you to make copies of a master disc at once for quick, easy duplication.
To ensure fail-proof duplication, the LaCie Dupli Disc CD125 provides a duplication Test function, allowing you to simulate a
recording without actually recording to the blank disc. We recommend using this feature if you feel your master or target CD
media may be scratched or damaged. This will help you to use your blank media more efficiently.
With its Verify and Compare functions, you can check that your duplicated media will be read properly and that your burned
data have been duplicated correctly.
1.1. A few Words About Copyright Laws
Your new LaCie duplicator opens up a whole world of possibilities for copying data and audio onto disc. Please be
responsible in your use of this wonderful technology. Before copying anything onto a CD-R or CD-RW discs, make sure you
are not violating any copyright laws.
Most software companies allow licensed owners to make one (1) backup or archive copy of their software. Check your
software's license agreement for specific details. Using these devices to duplicate more than one personal copy of CD-ROM,
CD-DA (audio) CD software or any other CD protected by copyright is strictly prohibited. Copying audio CDs for distribution
to third parties is illegal and punishable by law. LaCie cannot be held responsible for the inappropriate use of these devices.
Page 9

1. Introduction
page 9
LaCie Dupli Disc CD125
User’s Manual
1.2. Data Safety
LaCie and its suppliers accept no liability for any loss of data or any other damage, whether direct or indirect, resulting from
the use or malfunction of this product. As a precaution, it is recommended that the discs be tested after they have been written
to. Please ensure that a backup copy of any important data is made on a separate storage unit in order to have a safe copy
in the event of data loss or corruption. Under no circumstances do LaCie or its suppliers guarantee the reliability of the CD
media used in this drive.
1.3. Manual Updates
LaCie is constantly striving to give you the most up-to-date, comprehensive User’s Manuals available on the market. It is our
goal to provide you with a friendly, easy-to-use format that will help you quickly install and utilize the many functions of your
new device.
If your manual does not reflect the configurations of the product that you purchased, please check our Web site for the most
current version available.
Page 10
2. Getting To Know Your LaCie Dupli Disc CD125
page 10
LaCie Dupli Disc CD125
User’s Manual
2. Getting To Know Your LaCie Dupli Disc CD125
2.1. Supported CD Formats
Your LaCie Dupli Disc CD125 can duplicate the following CD formats:
2.2. Supported Logical Formats
Your LaCie Dupli Disc CD125 supports the following logical formats:
• CD-ROM Mode 1
• CD-ROM Mode 2
• CD-ROM XA Mode 2 Form 1
• CD-ROM XA Mode 2 Form 2
• CD-DA (audio)
• CD-Text
• Photo CD Single Session
• Photo CD Multi Session
• Video CD
• CD-Extra
• CD-I (FMV)
• ISO 9660
• UDF Fixed Packet mode
• UDF Variable Packet mode
Caution!
The LaCie Dupli Disc CD125 cannot duplicate copy-protected CDs.
Page 11
2. Getting To Know Your LaCie Dupli Disc CD125
page 11
LaCie Dupli Disc CD125
User’s Manual
2.3. LaCie Dupli Disc CD125 – Views
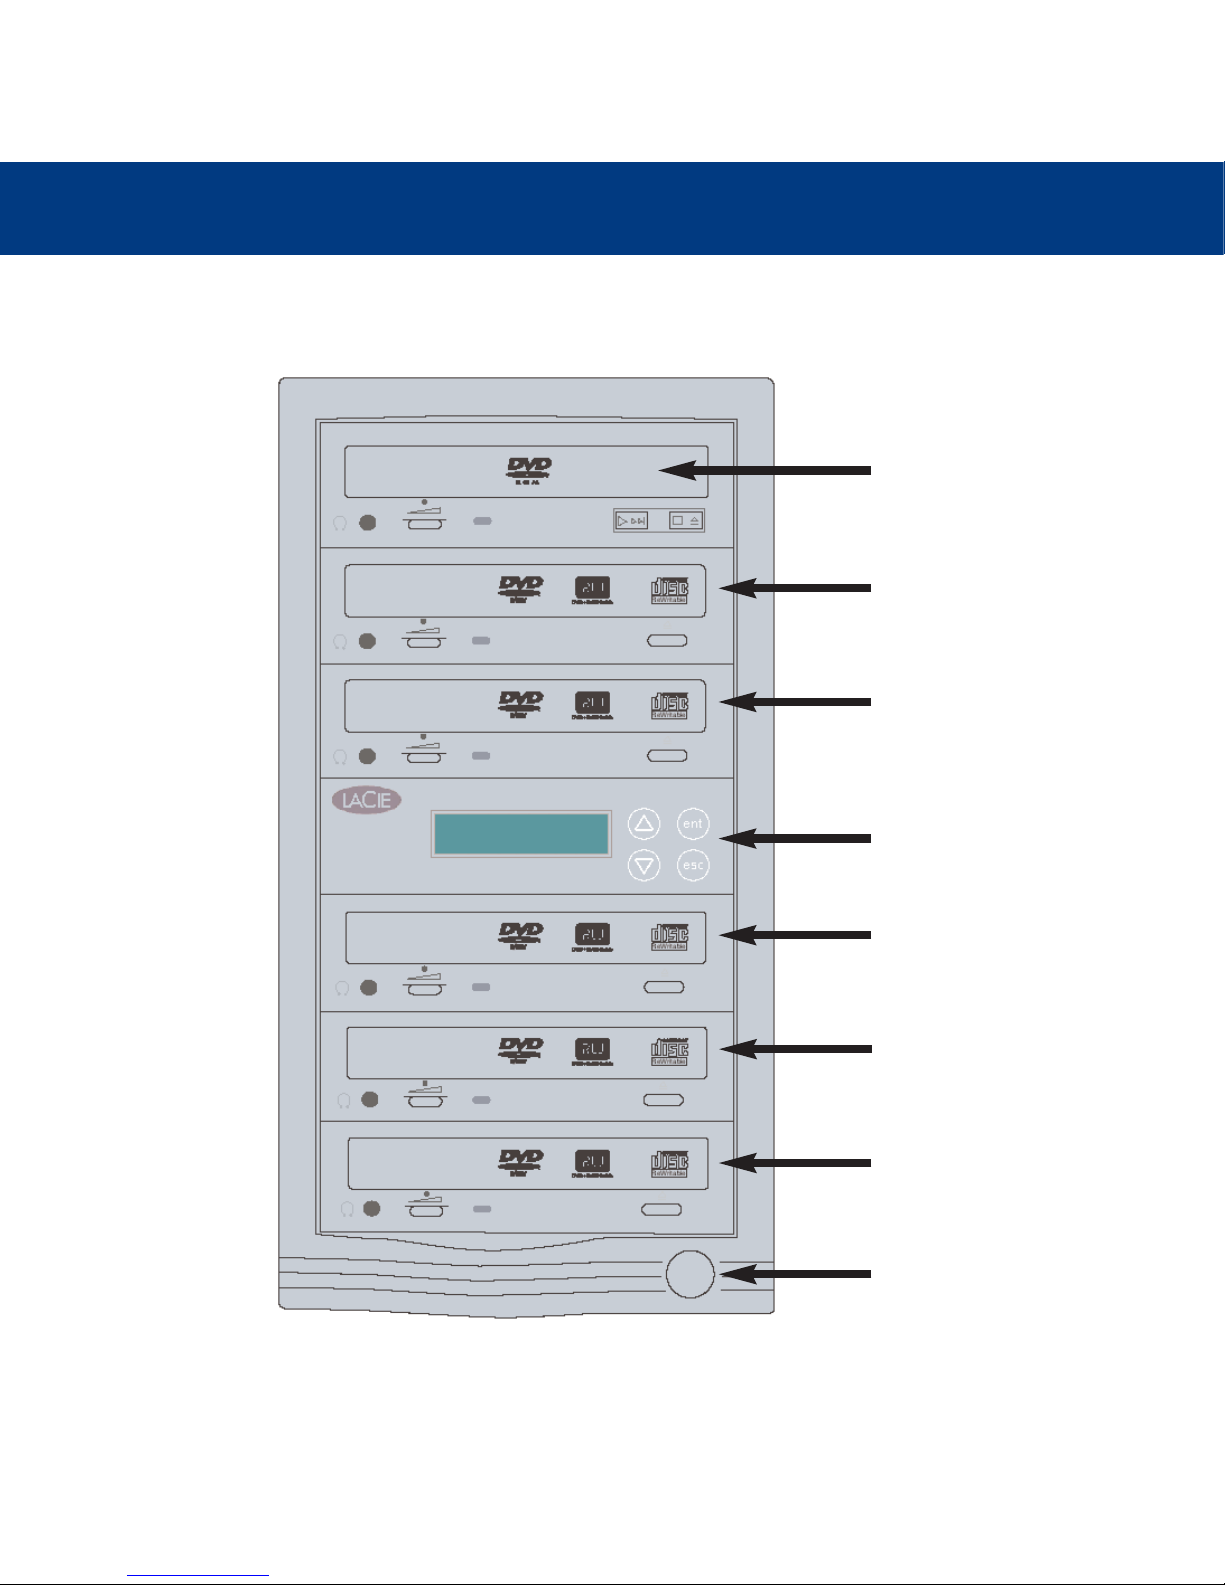
2.3.1. Front View
On / Off Button
CD-RW Drive n°5
CD-RW Drive n°4
CD-RW Drive n°3
CD-RW Drive n°2
CD-RW Drive n°1
CD-ROM Drive
Control Panel
Page 12
2. Getting To Know Your LaCie Dupli Disc CD125
page 12
LaCie Dupli Disc CD125
User’s Manual
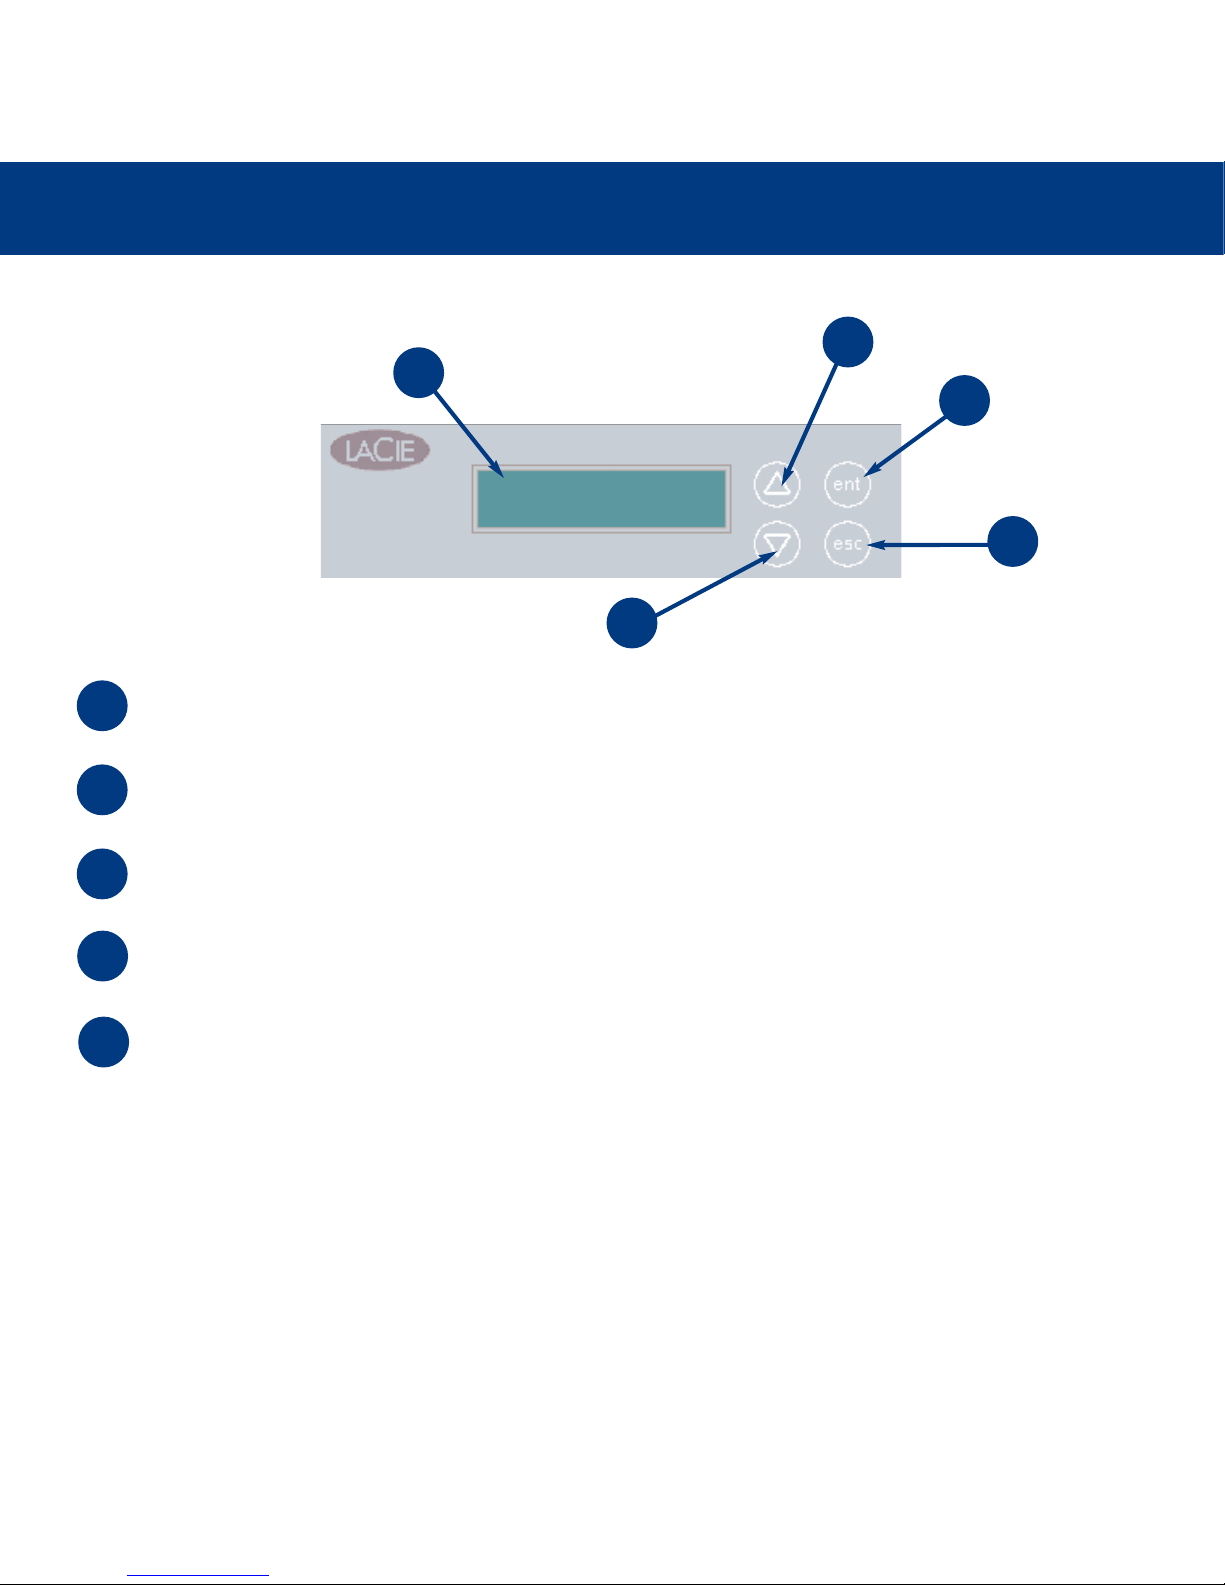
2.3.2. Control Panel
LCD Display Panel: Shows which function is being performed and displays messages.
Up Arrow: Push this button to scroll up through the functions and menus.
Ent Button: Push this button to start a selected function or access the setting in a selected menu.
Esc button: Push this button to cancel a selected function or go back to another menu.
Down Arrow: Push this button to scroll down through the functions and menus.
2
1
3
4
1
2
3
4
5
5
Page 13
2. Getting To Know Your LaCie Dupli Disc CD125
page 13
LaCie Dupli Disc CD125
User’s Manual
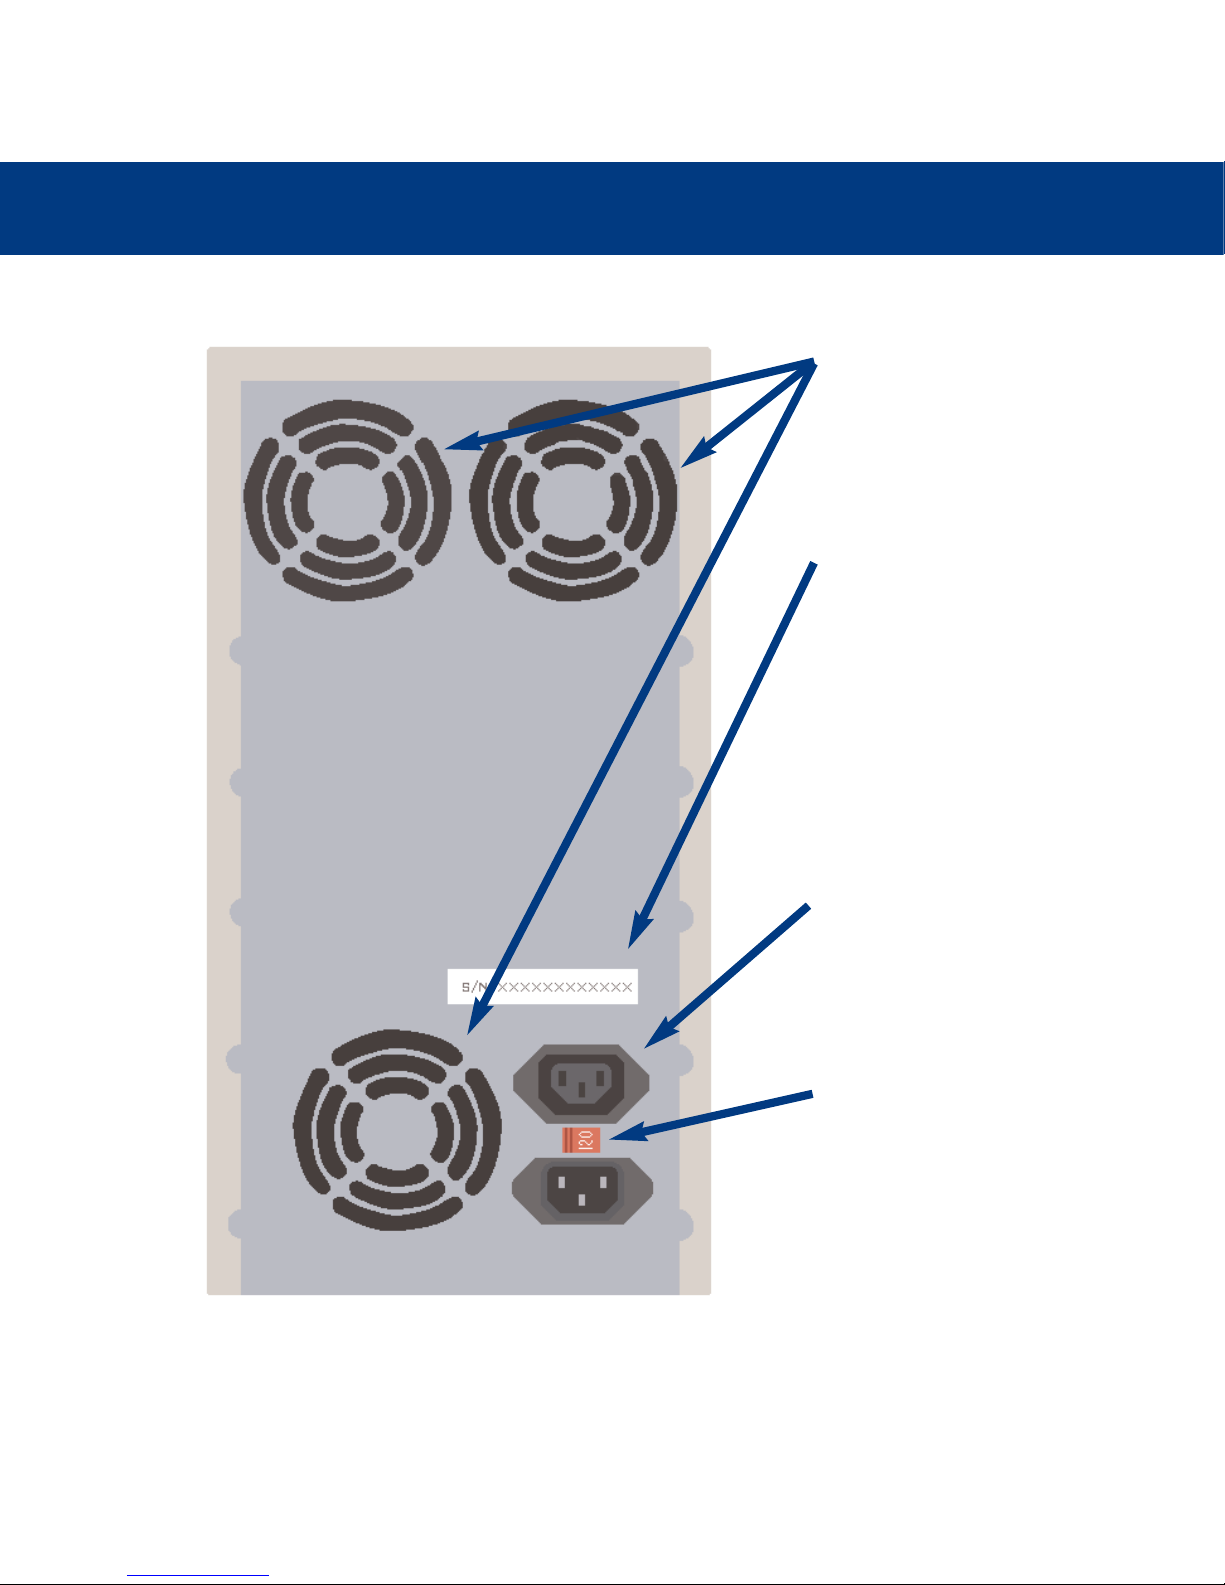
2.3.3. Back View
Fans - Helps keep your LaCie Dupli
Disc CD125 cool during operation.
Do not block and ensure there is
sufficient space to allow for proper
operation.
Power Supply Connector - This is
where you plug in the power supply
cable supplied with your LaCie Dupli
Disc CD125.
Serial Number Sticker - This is the
Serial Number of your device. Write
down the serial number and keep it in
a safe place, because you will need to
provide the number in the event you
have to call LaCie Technical Support
for any reason in regard to the drive’s
performance. The serial number
would also come in handy if your
drive is lost or stolen.
Voltage Setting - Set the voltage setting of your duplicator. Please make
sure that the voltage setting doesn't
differ from that of your main power
source.
Page 14
3. Setting Up Your LaCie Dupli Disc CD125
page 14
LaCie Dupli Disc CD125
User’s Manual
3. Setting Up Your LaCie Dupli Disc CD125
3.1.Turning On Your LaCie Dupli Disc CD125
Setting up your LaCie Dupli Disc CD125 is a snap – just follow these basic steps:
1) Set-up your LaCie Dupli Disc CD125 on a flat surface, in an appropriate place.
2) Check the voltage setting at the back panel of your duplicator.
3) Connect the provided AC cable to the back of the LaCie Dupli Disc CD125 and the other end to
a properly grounded outlet.
4) Turn on the LaCie Dupli Disc CD125 using the On/Off switch located on the front of the device.
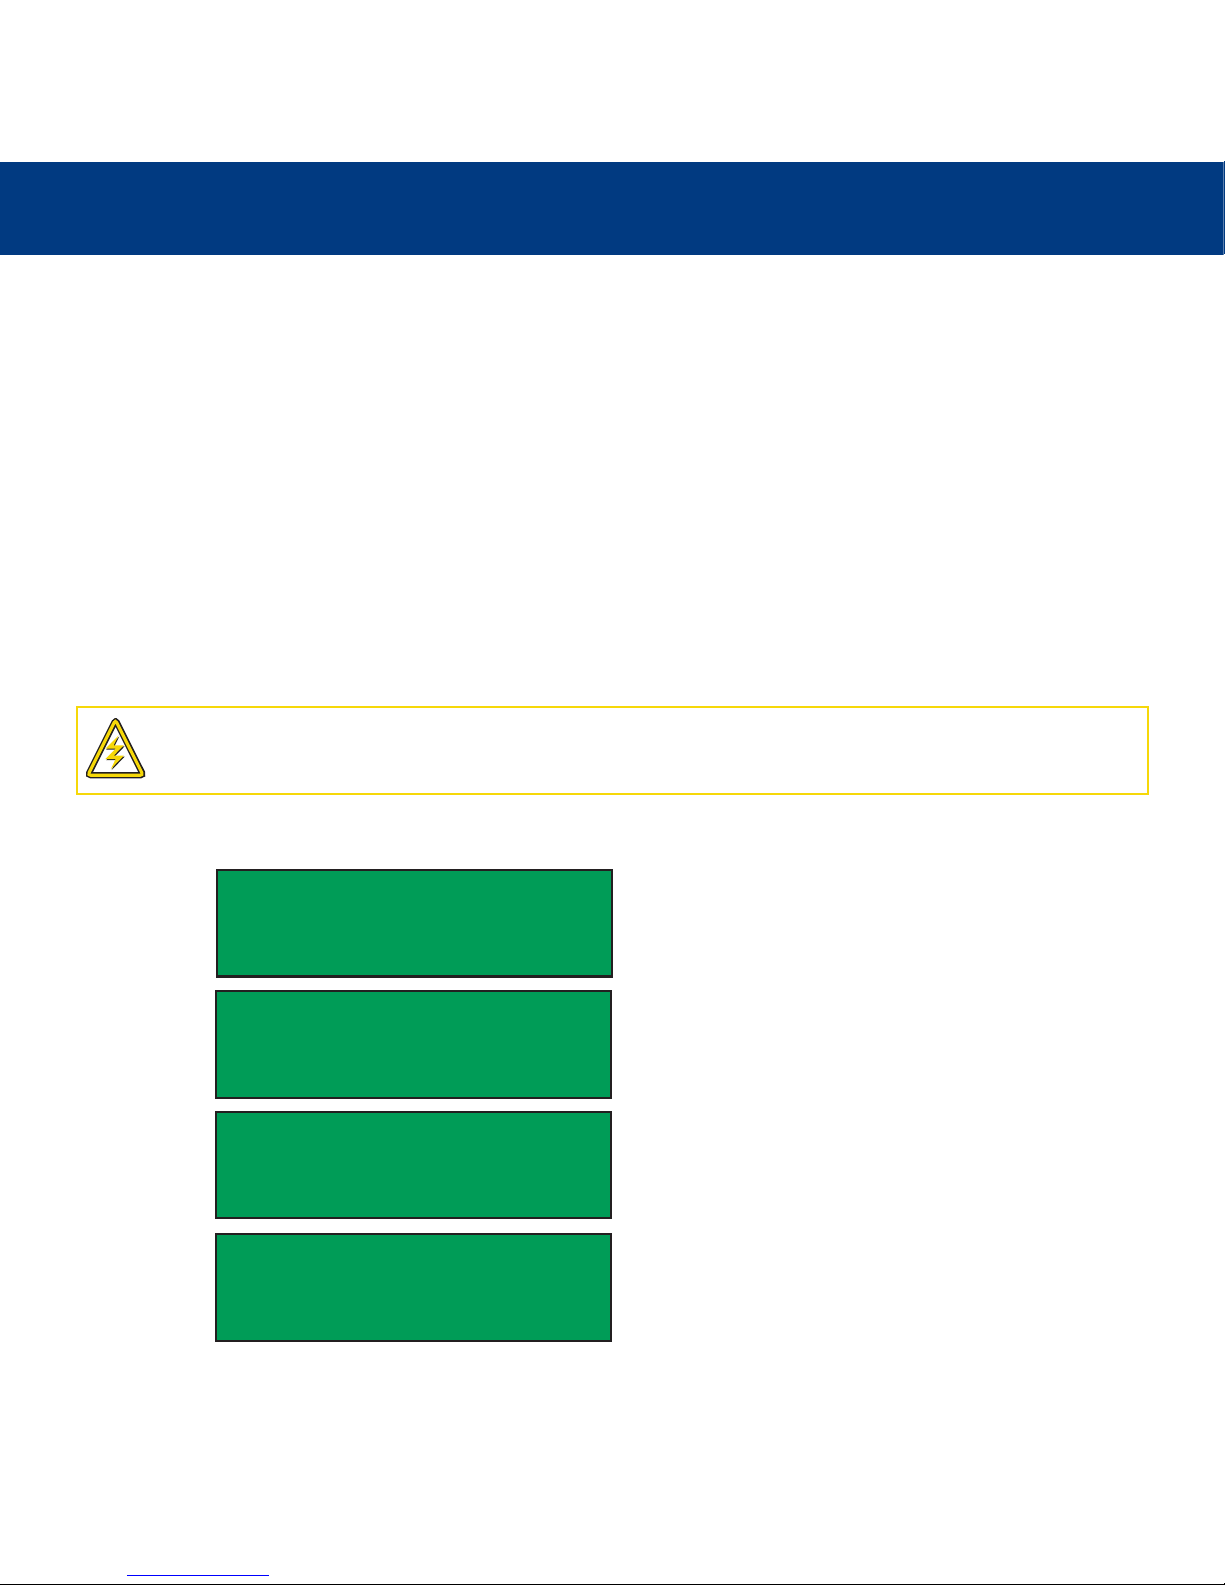
Once the LaCie Dupli Disc CD125 is turned on, the following messages will appear:
CD Duplicator
1-7 ver: 1.6A
OS booting ...
1
OS booting ...
10
OS booting ...
20
Caution!
Before connecting your LaCie Duplicator to the main power source and switching it on, please check the
voltage setting located at the back panel of this device next to the power socket. You should use a screwdriver to
change the voltage setting if it differs from that of your mains power source.
Page 15
3. Setting Up Your LaCie Dupli Disc CD125
page 15
LaCie Dupli Disc CD125
User’s Manual
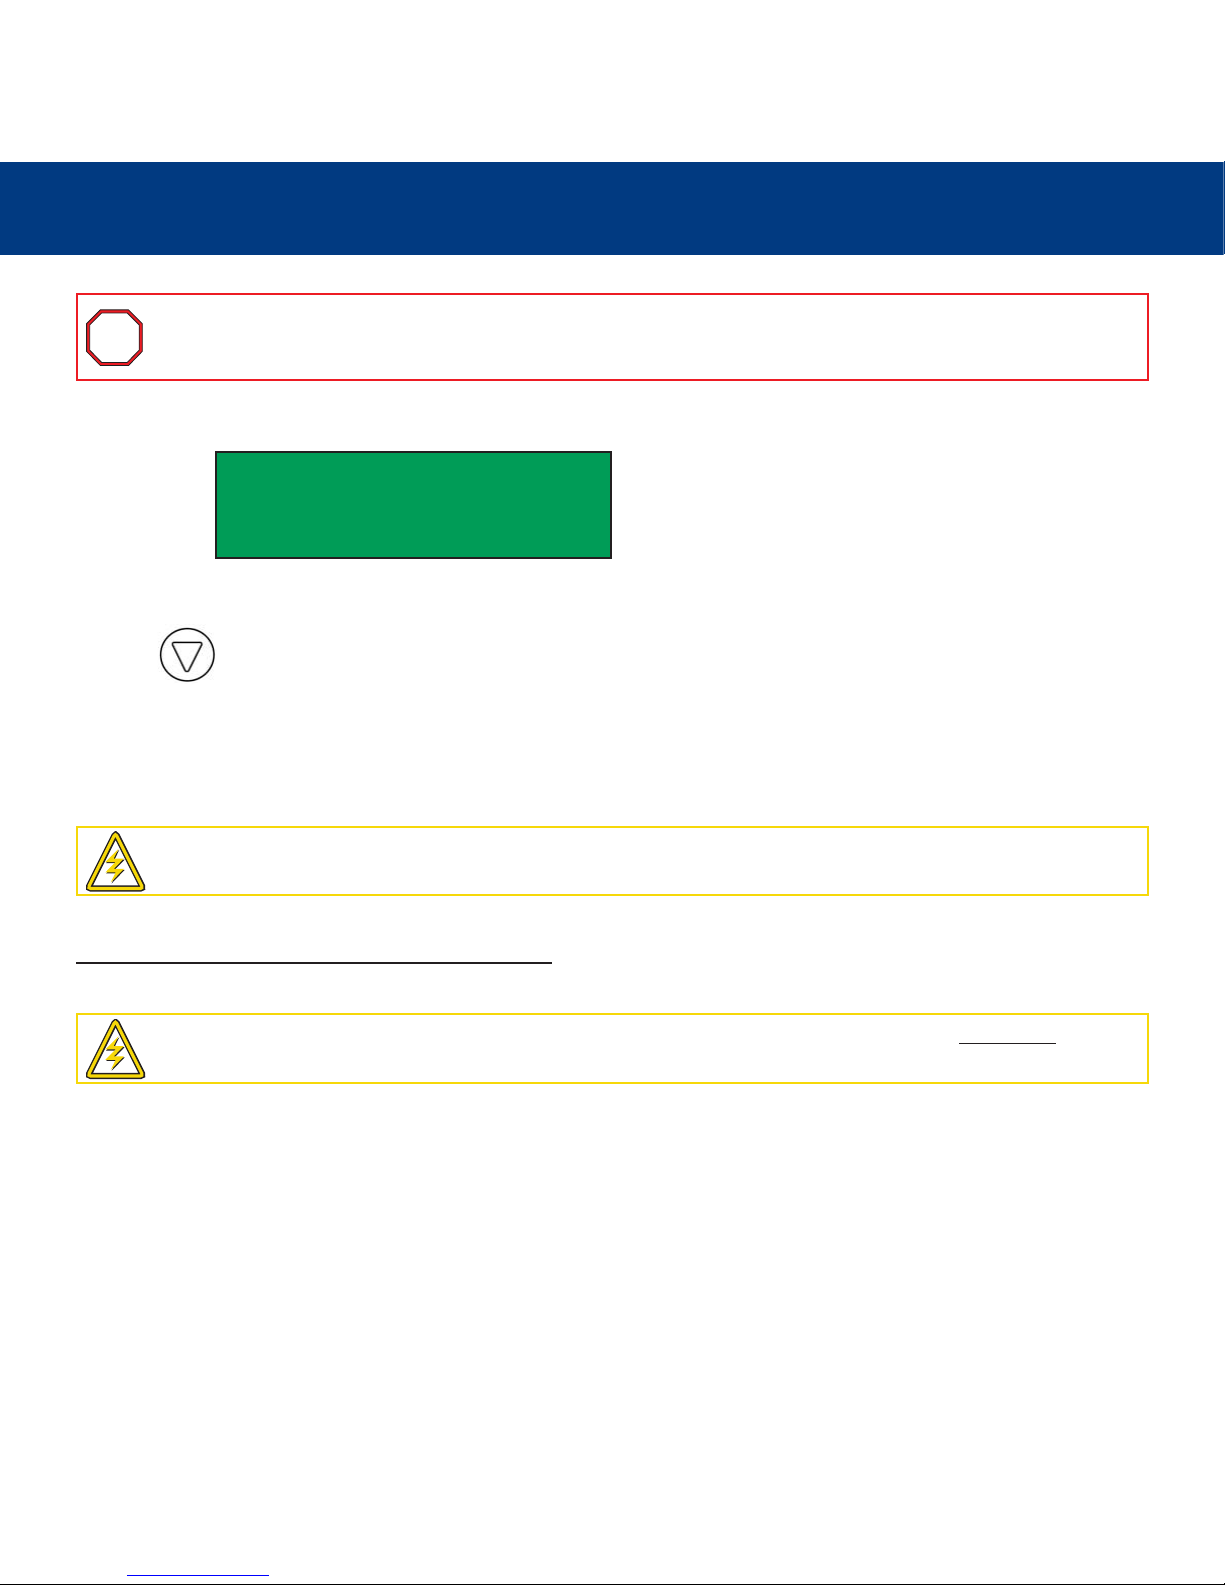
Then LaCie Dupli Disc CD125 will display:
The COPY function is the first function you can use. Your LaCie Dupli Disc CD125 features 11 other functions.
Press the button to see and access the other functions.
3.2. Turning Off The LaCie Dupli Disc CD125
To turn off the LaCie Dupli Disc CD125, wait until all duplications have finished, and then push the On/Off switch on the front
of the device. The unit will power down and its RAM memory will be erased.
PLEASE
READ THE INFORMATION BELOW CAREFULLY
1. Copy
Important Info:
Depending on the type of drives, the LaCie Dupli Disc CD125 may have a different initialization
sequence. The "OS booting sequence" can take 20 seconds or less.
i
Caution!
Do not turn off the LaCie Dupli Disc CD125 during duplication. Doing so will cancel the duplication, making the CD-R or CD-RW media unusable and may damage the unit.
Caution!
If you have to switch your duplicator on after switching it off, you MUST wait at least 10 seconds before
switching it on again otherwise the system may operate abnormally.
i
Page 16
4. Functions Of Your LaCie Dupli Disc CD125
page 16
LaCie Dupli Disc CD125
User’s Manual
4. Functions Of Your LaCie Dupli Disc CD125
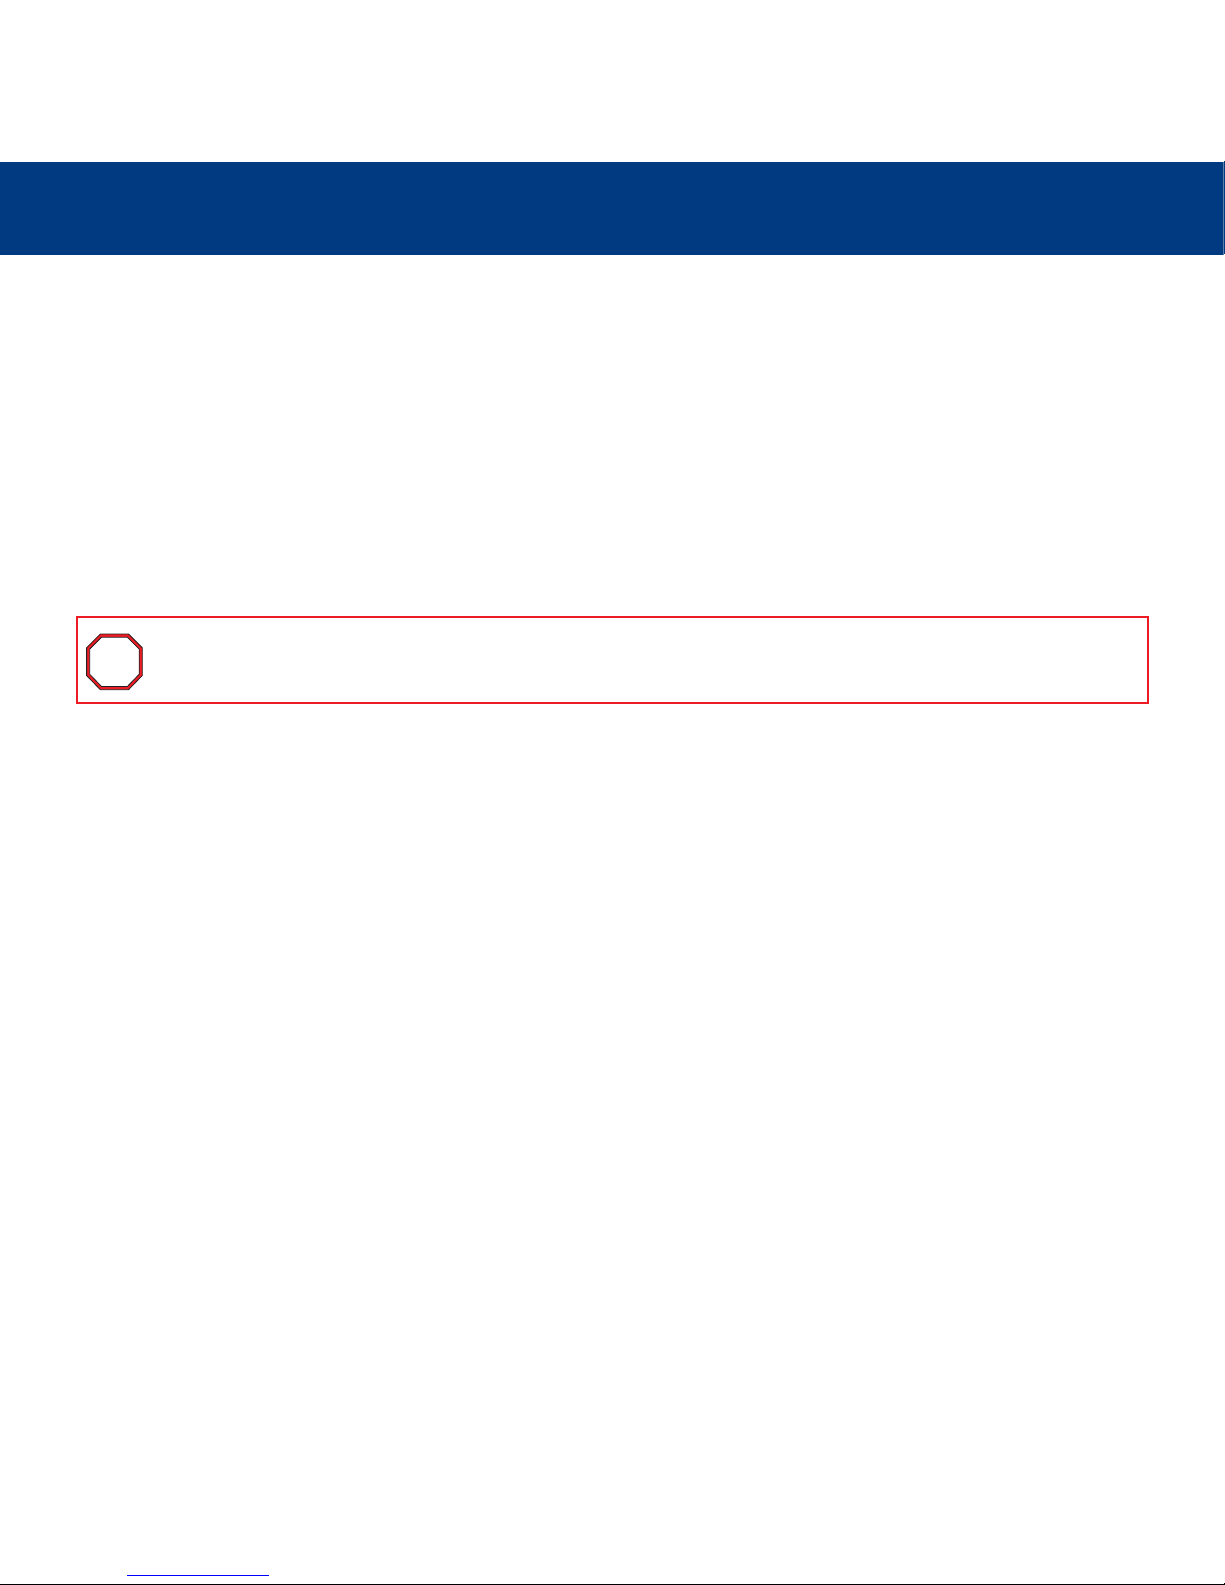
From the initial display, there are 11 functions available in your Dupli Disc CD125:
The functions Setup and Advanced Setup have sub-menus which give you more options for changing the settings of your
duplicator.
Setup submenus:
Advanced Setup submenus:
• Language
• CD Burn Speed
• Read Speed
• Auto Start Drive
• Startup Menu
• Auto Verify
• Auto Compare
• Auto Prescan
• Eject Disc
• Burn On The Fly
• Burn Mode
• Display Time
• Button Sound
• Device Info
• System Info
• Quick Erase
• Full Erase
• Auto Close Tray
• Copy
• Verify
• Disc Info
• Setup
• Test
• Compare
• Select Source
• Advanced Setup
• Test & Copy
• Prescan
• Edit Track
• Under-Run Protect
• Overburn
• Read Error Skip
• Burn In
• Update Firmware
• Compare Firmware
• H/W Diagnostic
• Load Default
• CD+G
• ISRC & MCN
• CD-Text
• Multi-Session DVD
Important Info:
Don't change or modify the settings of your duplicator if you don't know how to process or the
meaning of this change.
i
i
Page 17
4. Functions Of Your LaCie Dupli Disc CD125
page 17
LaCie Dupli Disc CD125
User’s Manual
EDIT TRACK function
This function is exclusively designed for editing a collection of favourite songs from one or several CDs.
Refer to the information published in this User's Manual to know how to use this function.
Important Info:
The Edit Track function doesn't operate with MP3 CDs, only with Audio CDs.
Caution!
The Master Audio CD(s) must comply with the Red Book specifications – Audio CD – when using the Edit
Track function.
i
i
Page 18
5. Using Your LaCie Dupli Disc CD125
page 18
LaCie Dupli Disc CD125
User’s Manual
5. Using Your LaCie Dupli Disc CD125
The LaCie Dupli Disc CD125 is able to duplicate CD media.
5.1. Copy
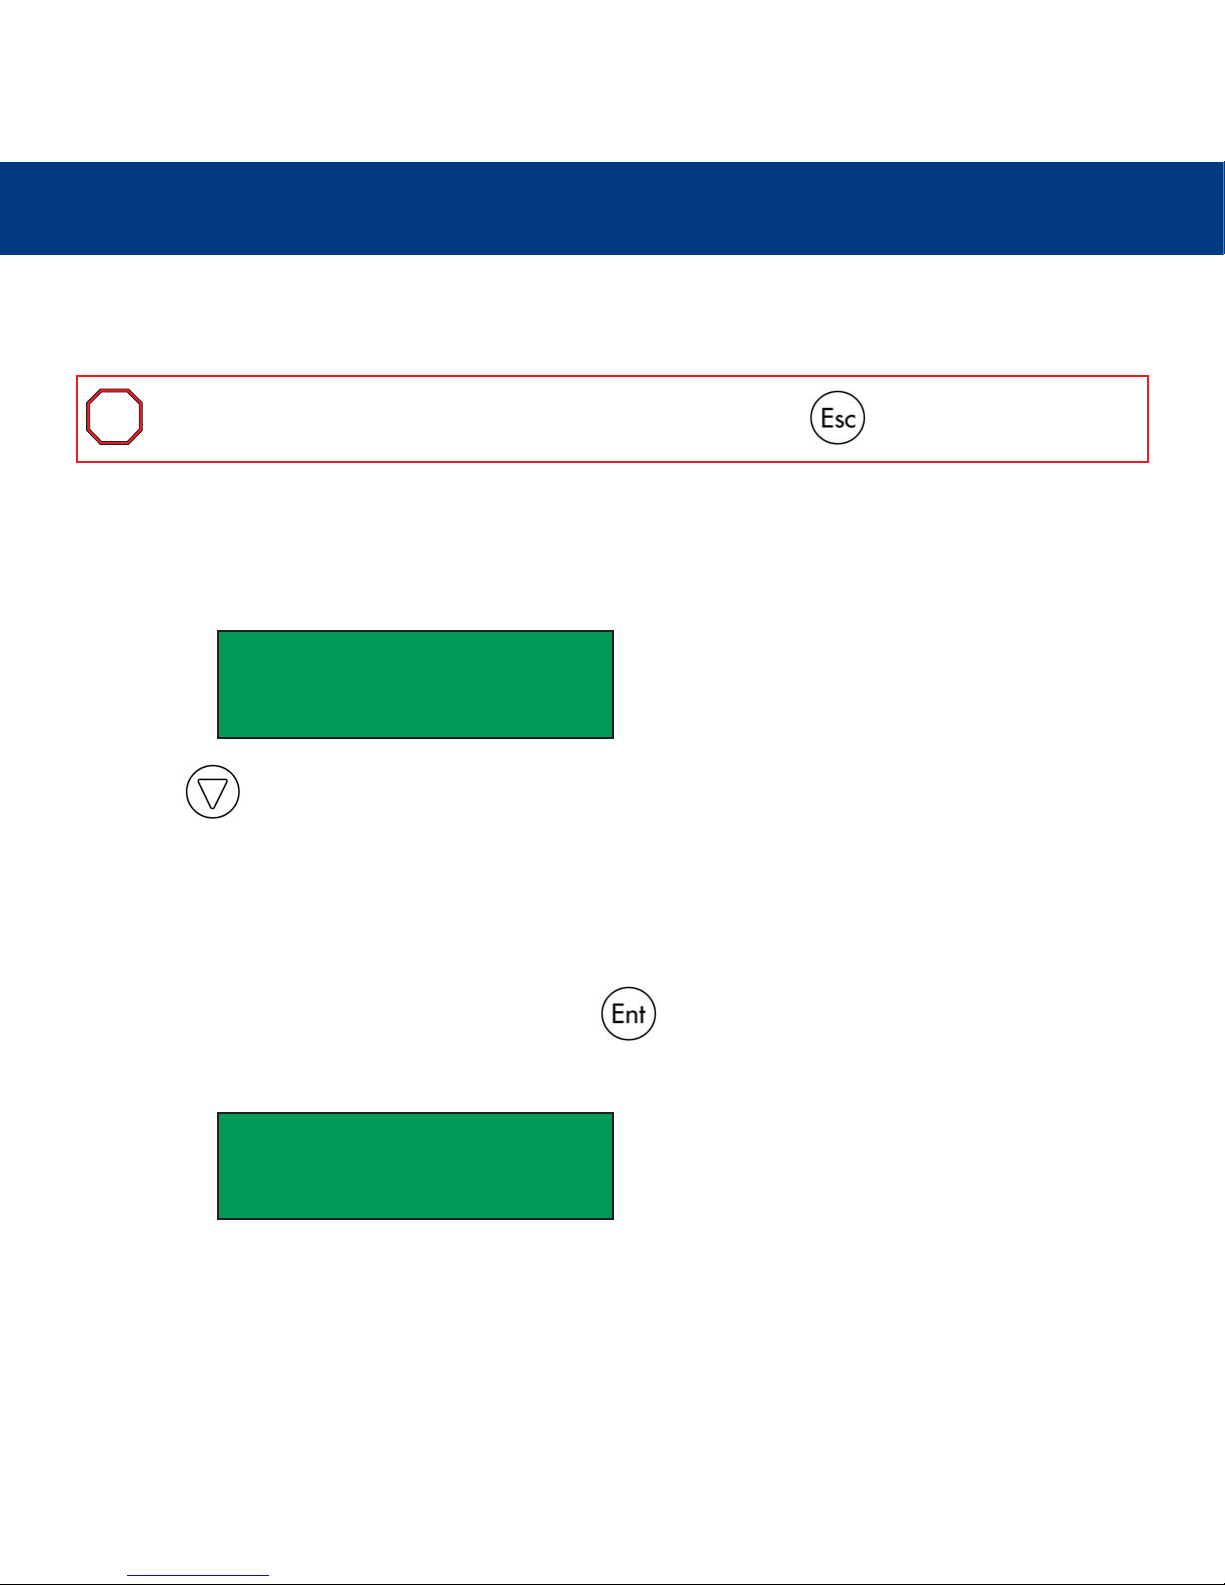
The Copy mode allows you to copy data directly from a source CD disc onto a blank CD-R or CD-RW disc. Before copying,
make sure that the source disc is placed into the CD-ROM drive. After the initialization process has finished, check the Dupli
Disc CD125 displays the following screen:
or press the button until the function 1. Copy is displayed.
1. Place a source CD disc into the CD-ROM drive.
2. Place one blank CD media into the CD-RW drive(s). You can use from 1 to 5 CD-RW drive(s), depending on the number of
copies you would like to get.
3. After the drives have detected the source media, press the button to start the duplication.
4. The Display screen will show similar information during the copy process:
- 0% = percentage of completion. This number will increase during the duplication until 100%.
- xxx.x MB = total size of your source media. "MB" stands for Mega Bytes.
- X:XX = duration of time for this duplication. It will decrease during the duplication.
Important Info:
You can cancel a function at almost anytime by pressing the button for 2 seconds.
1. Copy
Copying - CD 0%
xxx.x MB X:XX
i
i
Page 19
5. Using Your LaCie Dupli Disc CD125
page 19
LaCie Dupli Disc CD125
User’s Manual
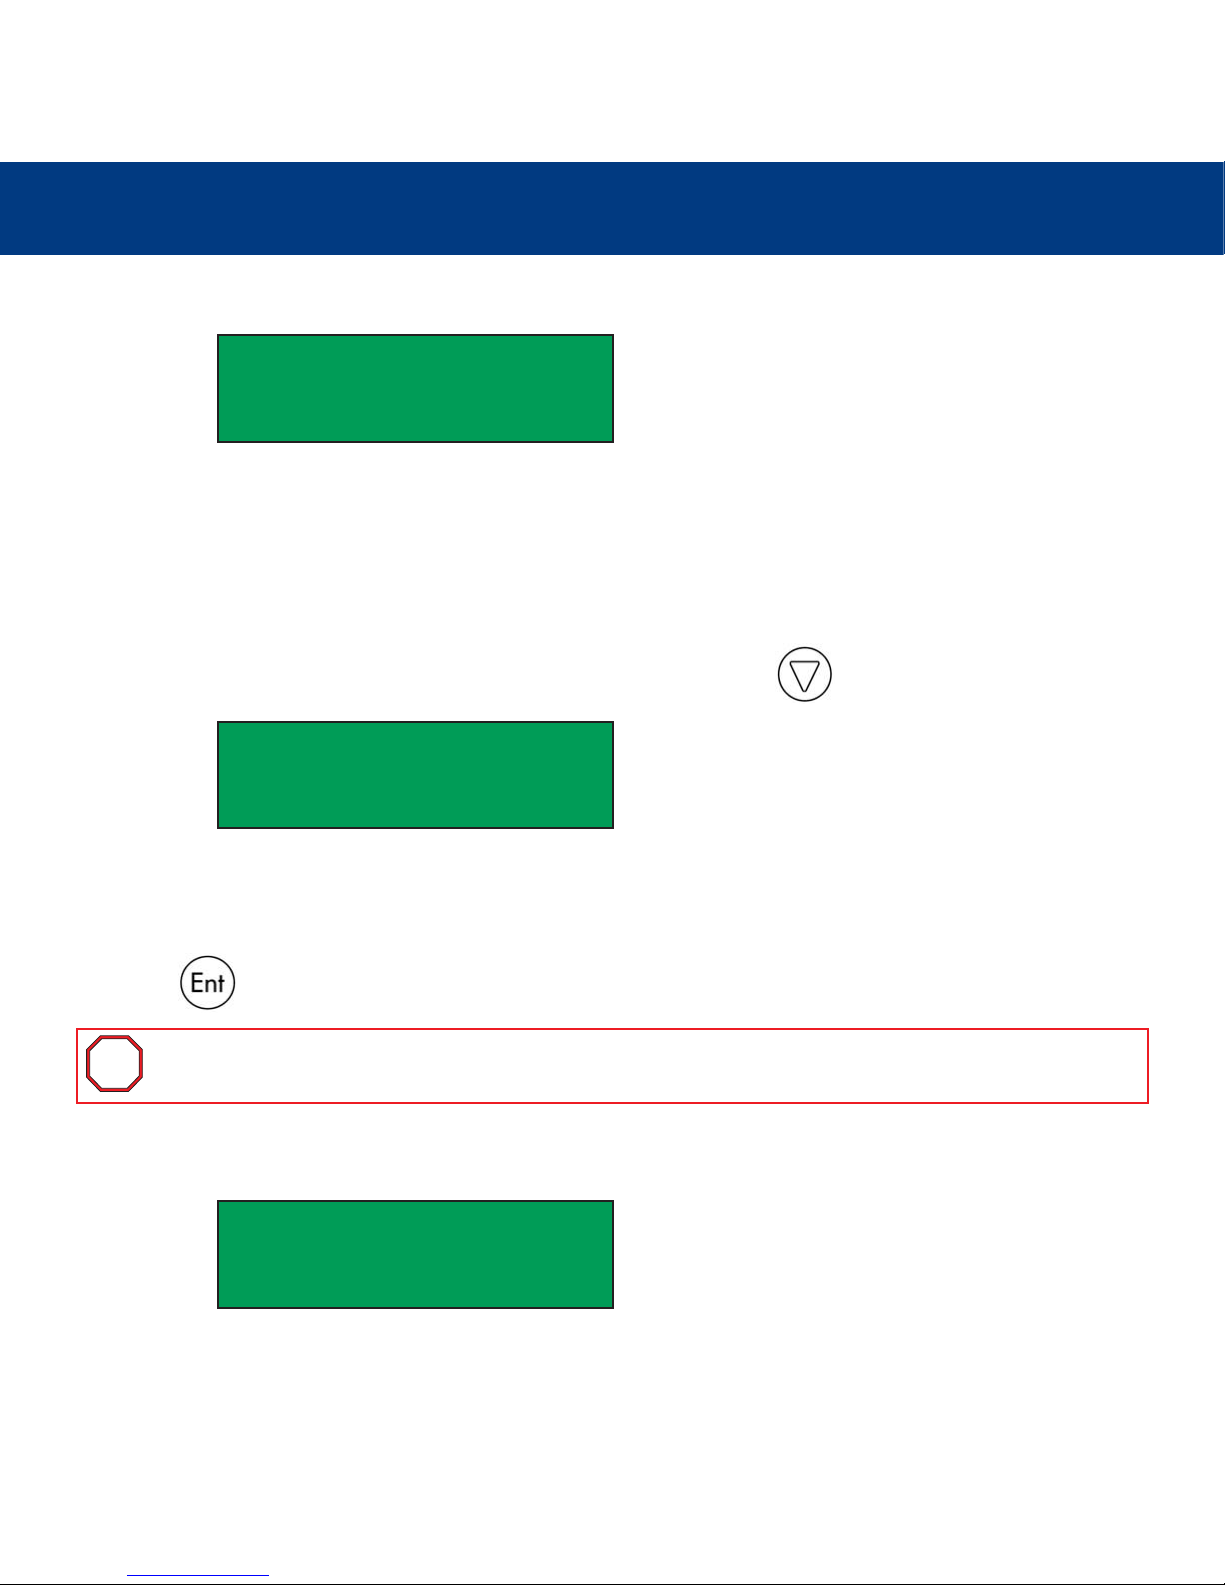
5. When the copying is completed, the LCD display screen will show the results similar to the following:
The LaCie Dupli Disc CD125 will automatically eject the finished disc. It also displays the total number of successful duplication.
5.2. Test
The Test function is designed to simulate the copying process, and does not write data to the blank disc.
Once the initialization is completed and the 1. Copy menu is displayed, press the on the control panel once to scroll
to the 2. Test menu.
1. Place a source CD disc into the CD-ROM drive.
2. Place one blank CD media into the CD-RW drive(s). You can use from 1 to 5 CD-RW drive(s), depending on the number of
copies you would like to get.
3. Press the button to start testing the source media.
The LCD display screen will show similar information during the Test process:
1. Copy
OK: 01
2. Test
Important Info:
If you use CD-RW rewritable media which already contains data on it, the Dupli Disc CD125 will
erase the Table of Content (TOC) and overwrite the data previously recorded prior to the simulation.
Testing - CD 0%
xxx.x MB X:XX
i
i
Page 20
5. Using Your LaCie Dupli Disc CD125
page 20
LaCie Dupli Disc CD125
User’s Manual
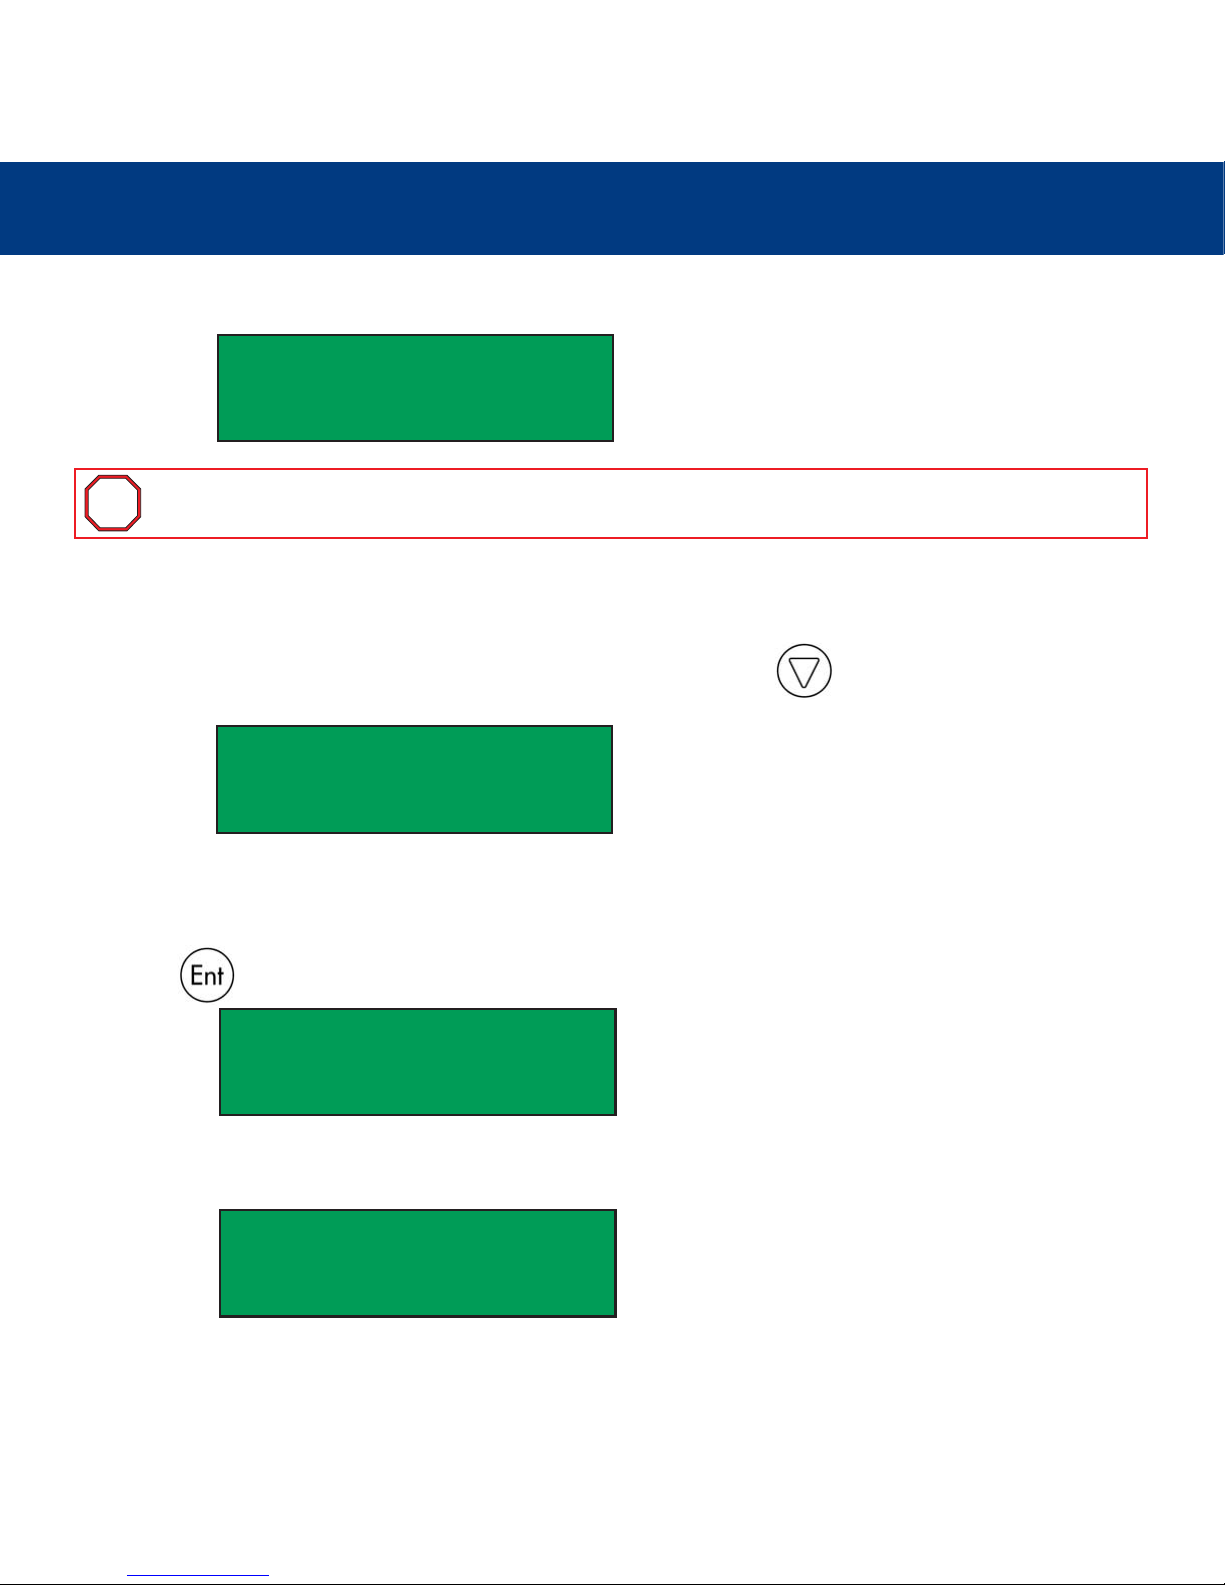
When the process is completed, the LCD display screen will show results similar to the following:
5.3. Test & Copy
The Test & Copy function first tests the source and blank discs. If the test is OK, the copy process will then start automatically.
Once the initialization is completed and the 1. Copy menu is displayed, press the on the control panel twice to scroll
to the 3. Test & Copy menu.
1. Place a source CD disc into the CD-ROM drive.
2. Place one blank CD media into the CD-RW drive(s). You can use from 1 to 5 CD-RW drive(s), depending on the number of
copies you would like to get.
3. Press the button to start testing the source media.
After the Testing is completed, the Copying process will begin automatically, and the LCD display screen will show similar
information during the Copying process:
Important Info:
If you need to stop the test during the testing process, this will not affect the CD disc. If you are
using a CD-RW disc, the data will be erased first.
2. Test
OK: 02
3. Test & Copy
Testing - CD 0%
xxx.x MB X:XX
Copying - CD 0%
xxx.x MB X:XX
i
i
Page 21

5. Using Your LaCie Dupli Disc CD125
page 21
LaCie Dupli Disc CD125
User’s Manual
When the process is completed, the LCD display screen will show results similar to the following:
The LaCie Dupli Disc CD125 will automatically eject the finished disc. It also displays the total number of successful duplications.
5.4. Verify
The Verify function is used to ensure that the duplicated disc can be read correctly.
Once the initialization is completed and the 1. Copy menu is displayed, press the on the control panel three times to
scroll to the 4. Verify menu.
1. Place a source CD disc into the CD-ROM drive.
2. Place one blank CD media into the CD-RW drive(s). You can use from 1 to 5 CD-RW drive(s), depending on the number of
copies you would like to get.
3. Press the button to start testing the source media.
The LCD display screen will show similar information during the Verify process:
When the process is completed, the Display screen will show results similar to the following:
3. Test & Copy
OK: 02
4. Verify
Verify - CD 0%
xxx.x MB X:XX
4. Verify
OK: 04
Page 22

5. Using Your LaCie Dupli Disc CD125
page 22
LaCie Dupli Disc CD125
User’s Manual
5.5. Compare
The Compare function is used to make a comparison between the source disc and the duplicated disc after copying.
Once the initialization is completed and the 1. Copy menu is displayed, press the on the control panel four times to
scroll to the 5. Compare menu.
1. Place a source CD disc into the CD-ROM drive.
2. Place one blank CD media into the CD-RW drive(s). You can use from 1 to 5 CD-RW drive(s), depending on the number of
copies you would like to get.
3. Press the button to start testing the source media.
The LCD display screen will show similar information during the Compare process:
When the process is completed, the LCD display screen will show results similar to the following:
Press the button to view details of the source disc, and the LCD display screen will show results
similar to the following:
5. Compare
Compare - CD 0%
xxx.x MB X:XX
Compare OK: 1
Fail: 0 Diff: 0
Src: 01 CD-ROM
Total: xxx.x MB
Page 23

5. Using Your LaCie Dupli Disc CD125
page 23
LaCie Dupli Disc CD125
User’s Manual
Press the button to view details of the copied disc, and if the comparison is identical, the LCD
display screen will show results similar to the following:
If the comparison fails, the LCD display screen will indicate the failure.
Press the button twice and the LCD display screen will show results similar to the following:
5.6. Prescan
The Prescan function is used to scan the source to ensure that it can be read correctly and to test the reading speed.
Once the initialization is completed and the 1. Copy menu is displayed, press the on the control panel five times to
scroll to the 6. Prescan menu.
1. Place a source CD disc into the CD-ROM drive.
2. Place a blank CD media into the CD-RW drive(s).
3. Press the button to start testing the source media.
The Display screen will show similar information during the Prescan process:
Src: 02 CD-RW
Identical
Src: 02 CD-RW
TOC not match
6. Prescan
Scanning - CD 0%
xxx.x MB X:XX
Page 24
5. Using Your LaCie Dupli Disc CD125
page 24
LaCie Dupli Disc CD125
User’s Manual
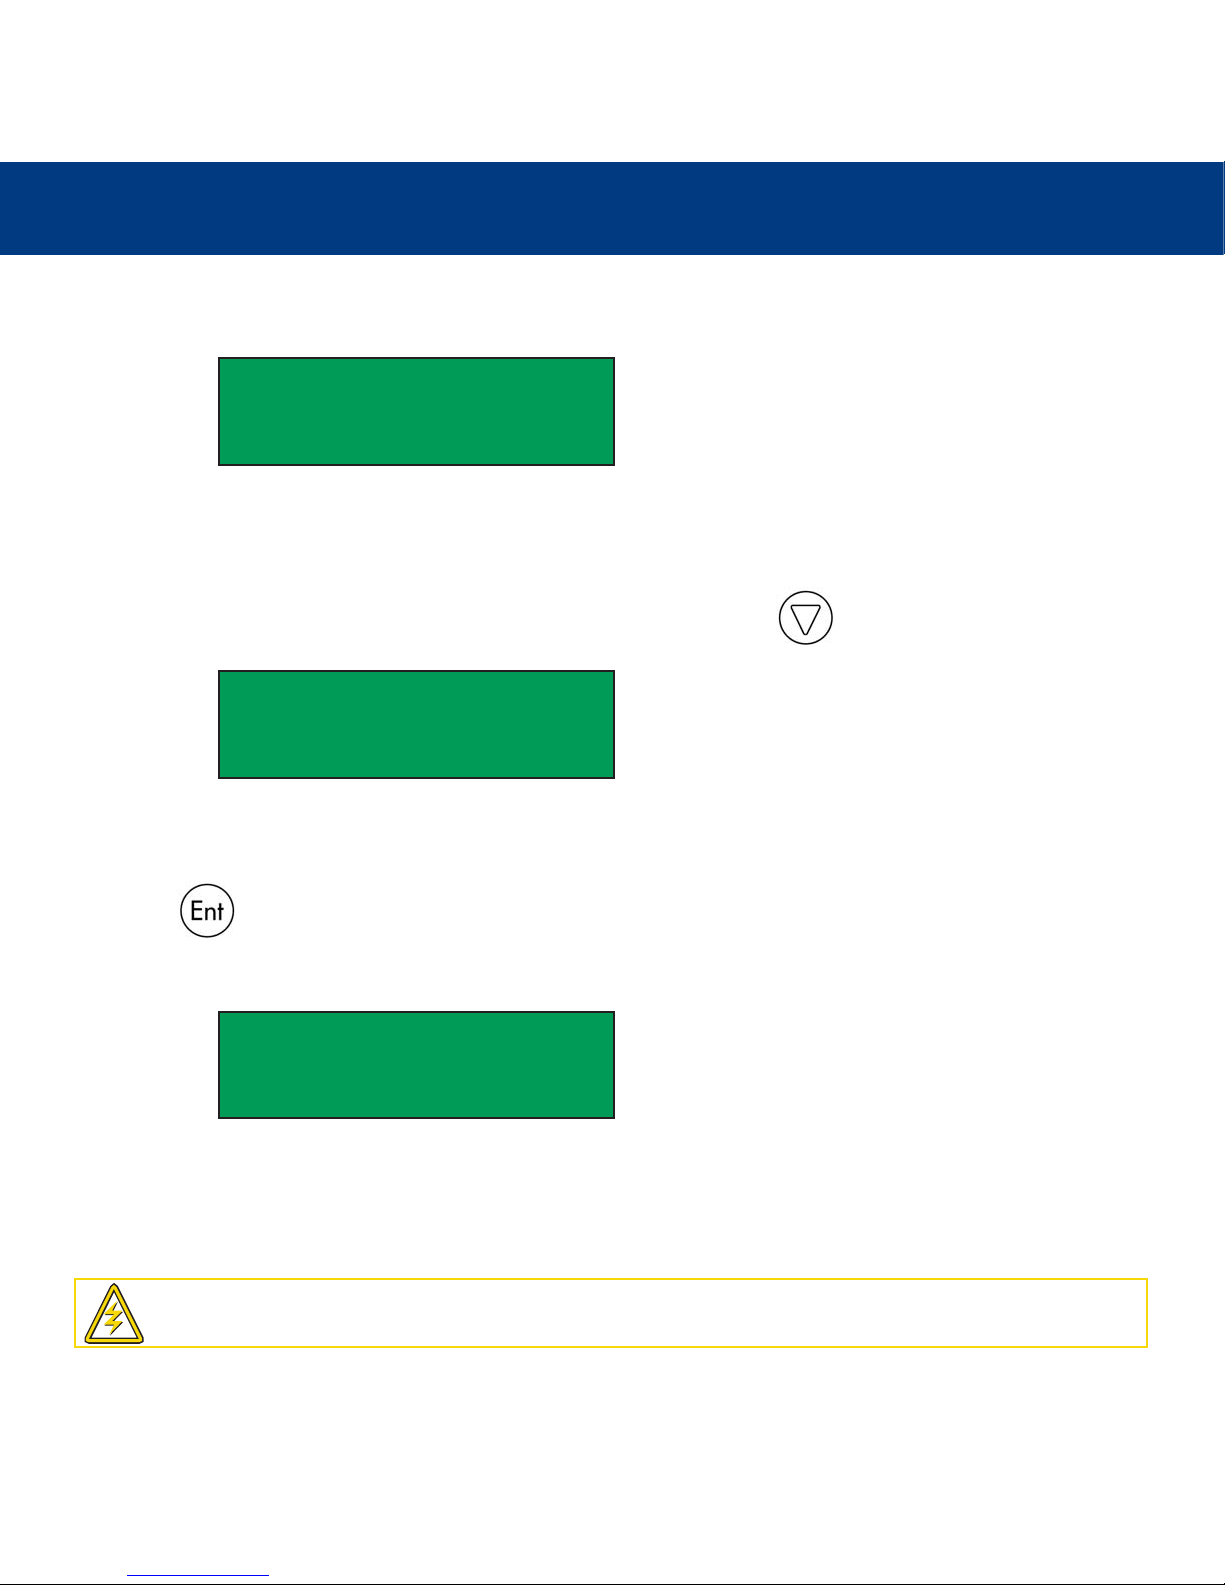
When the process is completed and the source CD can be read correctly, the LCD display screen will show results similar to
the following:
5.7. Disc Info
The Disc Info function is used to display information, such as disc type and capacity, regarding the source disc.
Once the initialization is completed and the 1. Copy menu is displayed, press the on the control panel six times to
scroll to the 7. Disc Info menu.
1. Place a source CD disc into the CD-ROM drive.
2. Place a blank CD disc into the CD-RW drive.
3. Press the button to start testing the source media.
The LCD display screen will show similar information during the Disc Info process:
5.8. Select Source
The Select Source function is used to choose the drive for the source data. The default setting is the CD-ROM drive, and this
setting cannot be altered.
PreScan OK!
7. Disc Info
Disc Info: CD-ROM
Capacity: xxx.x MB
Caution!
LaCie strongly recommends you NOT to change this setting and keep the original setting as default mode.
Page 25
5. Using Your LaCie Dupli Disc CD125
page 25
LaCie Dupli Disc CD125
User’s Manual
5.9. Image
This menu option is not available with this model.
5.10. Edit Track
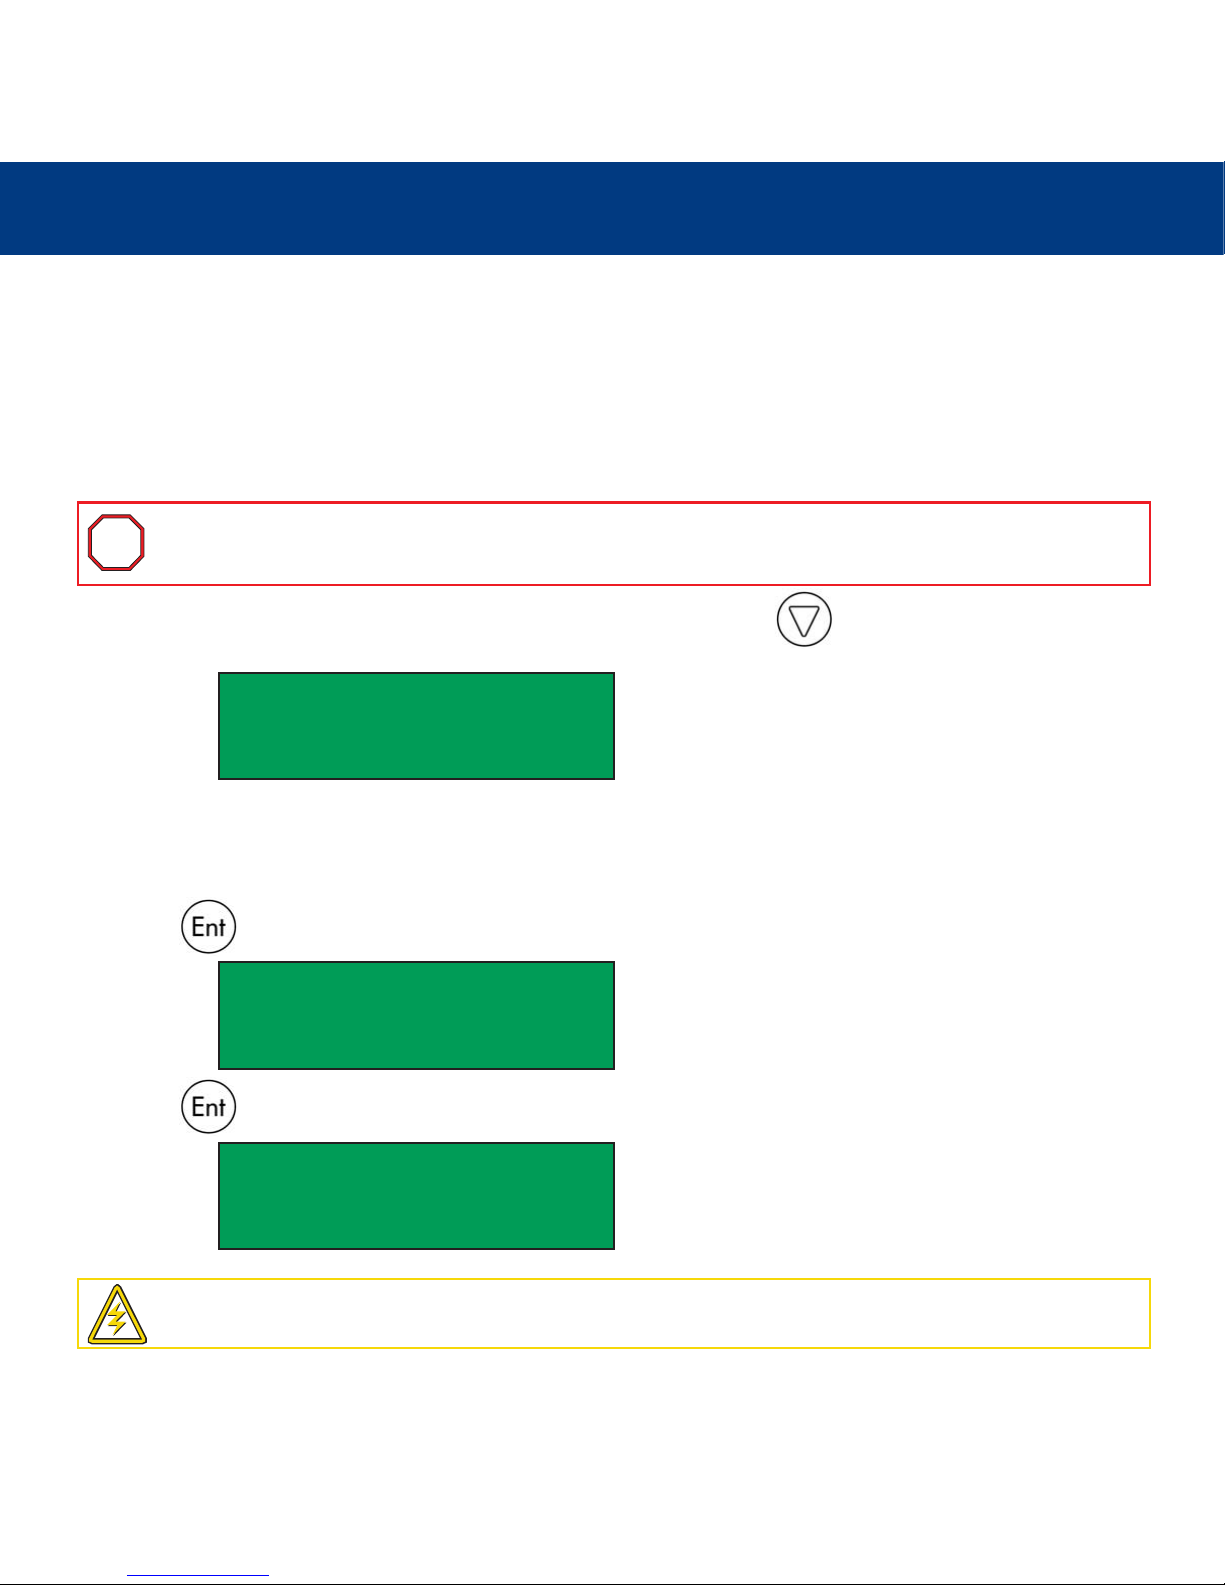
The Edit Track function was designed to create a collection of audio tracks from various audio CDs onto one CD. This model
only features the CD to CD option.
Once the initialization is completed and the 1. Copy menu is displayed, press the on the control panel nine times to
scroll to the 10. Edit Track menu option.
1. Place a source Audio CD disc into the CD-ROM drive.
2. Place a blank CD into the CD-RW drive.
3. Press the button to start testing the source media.
4. Press the button again and a screen similar to the following will appear:
In this screen, the “1/10” refers to the first of
10 audio tracks, and the “03:25” refers to the
length of the audio track.
Important Info:
The Edit Track function doesn't operate MP3 CDs, only with Audio CDs. The Master CD(s) must
comply with the Red Book when using the Edit Track function.
10. Edit Track
10-01. Edit Track
CD to CD Edit
Select Track
1/10 03:25
Caution!
Do not open the tray of the CD-RW drive while performing the Edit Track function. Doing so may cause an
error and may close the session of the disc being recorded, rendering the disc unreadable.
i
i
Page 26
5. Using Your LaCie Dupli Disc CD125
page 26
LaCie Dupli Disc CD125
User’s Manual
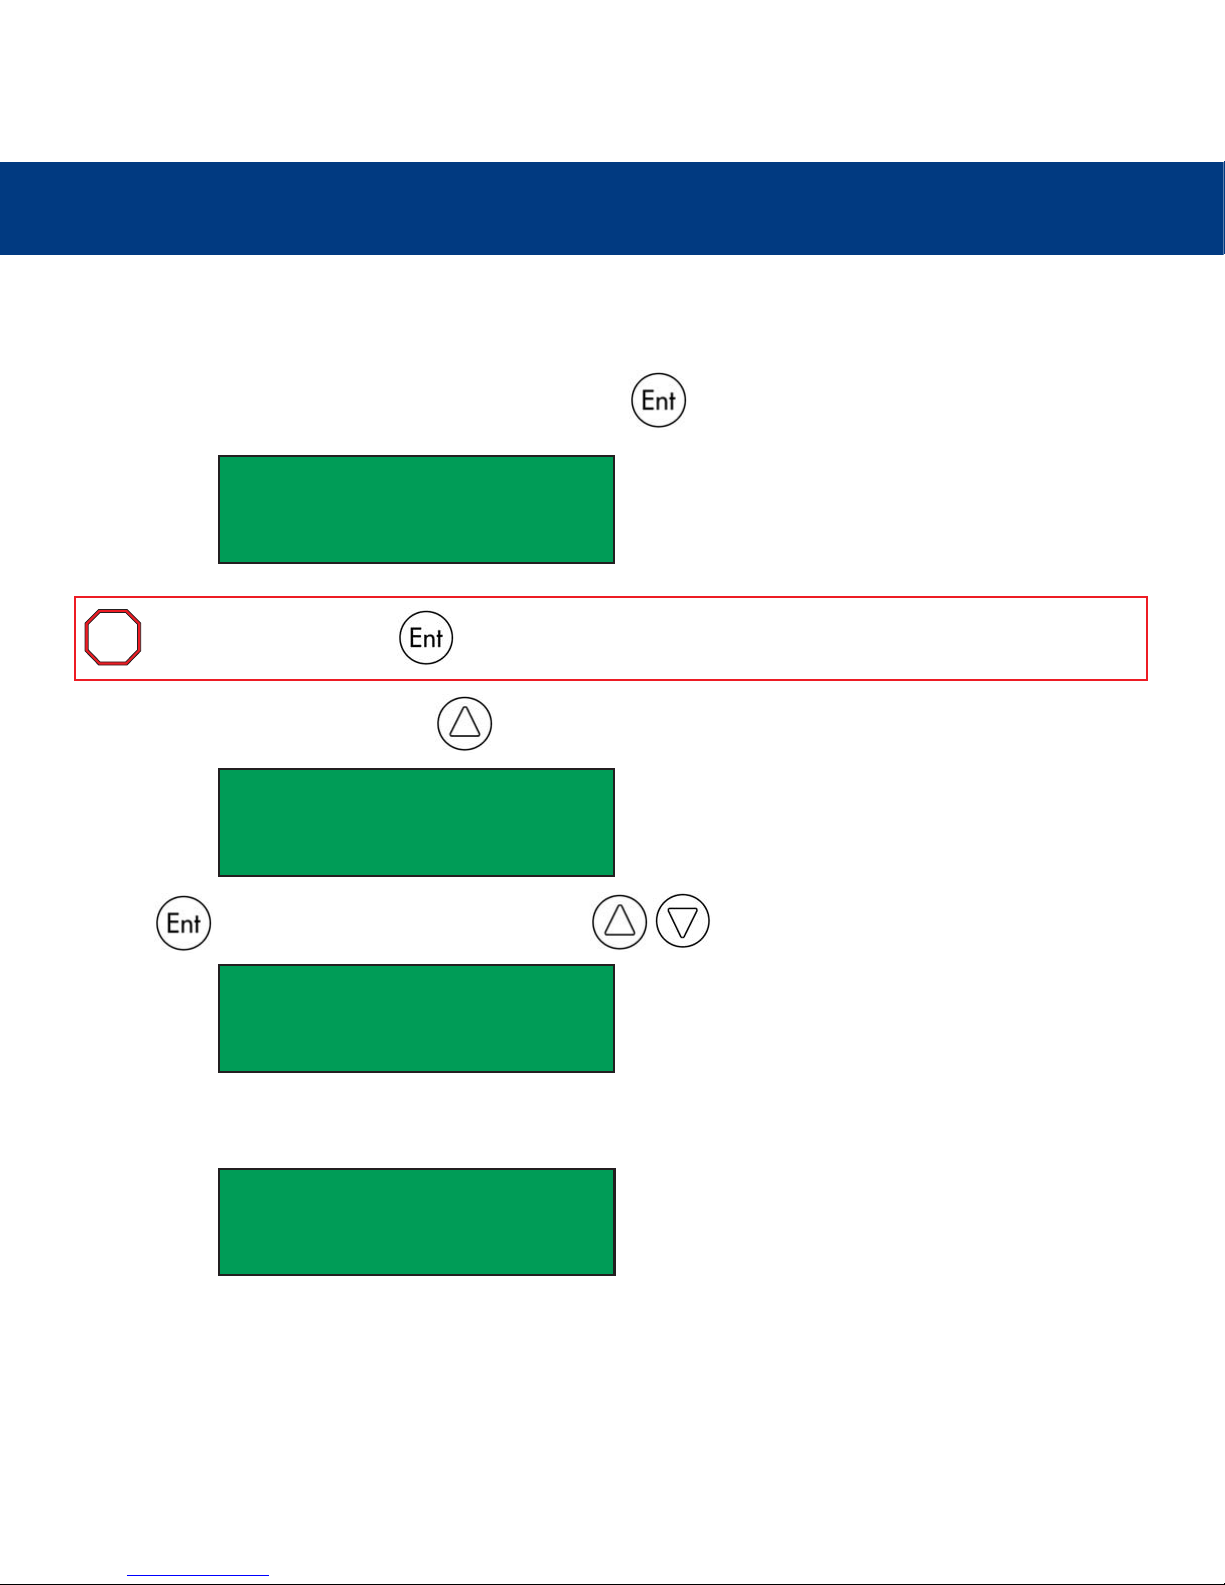
You can use the on the control panel to view additional tracks.
Once the track that you would like to add is displayed, press the button. A “+” will appear beside the selected track,
as shown in the following screen:
Once you have selected the track, use the button to move to the “End” menu, as shown in the following screen:
Press the button to finish the CD editing, and use the to confirm Yes or No.
The LCD display screen will show the copying information, and a screen similar to the following will appear:
In this screen, the “1/1” refers to the first track
of all the tracks that have been selected.
Select Track:
+1/10 03:25
Important Info:
Pressing the button after the track is selected will cancel the selected track.
Select Track:
End 1 Trk 03:25
End edit disc
and burn? Yes
Copying - 24x Edit
1/10 -> 1/1
i
i
Page 27
5. Using Your LaCie Dupli Disc CD125
page 27
LaCie Dupli Disc CD125
User’s Manual
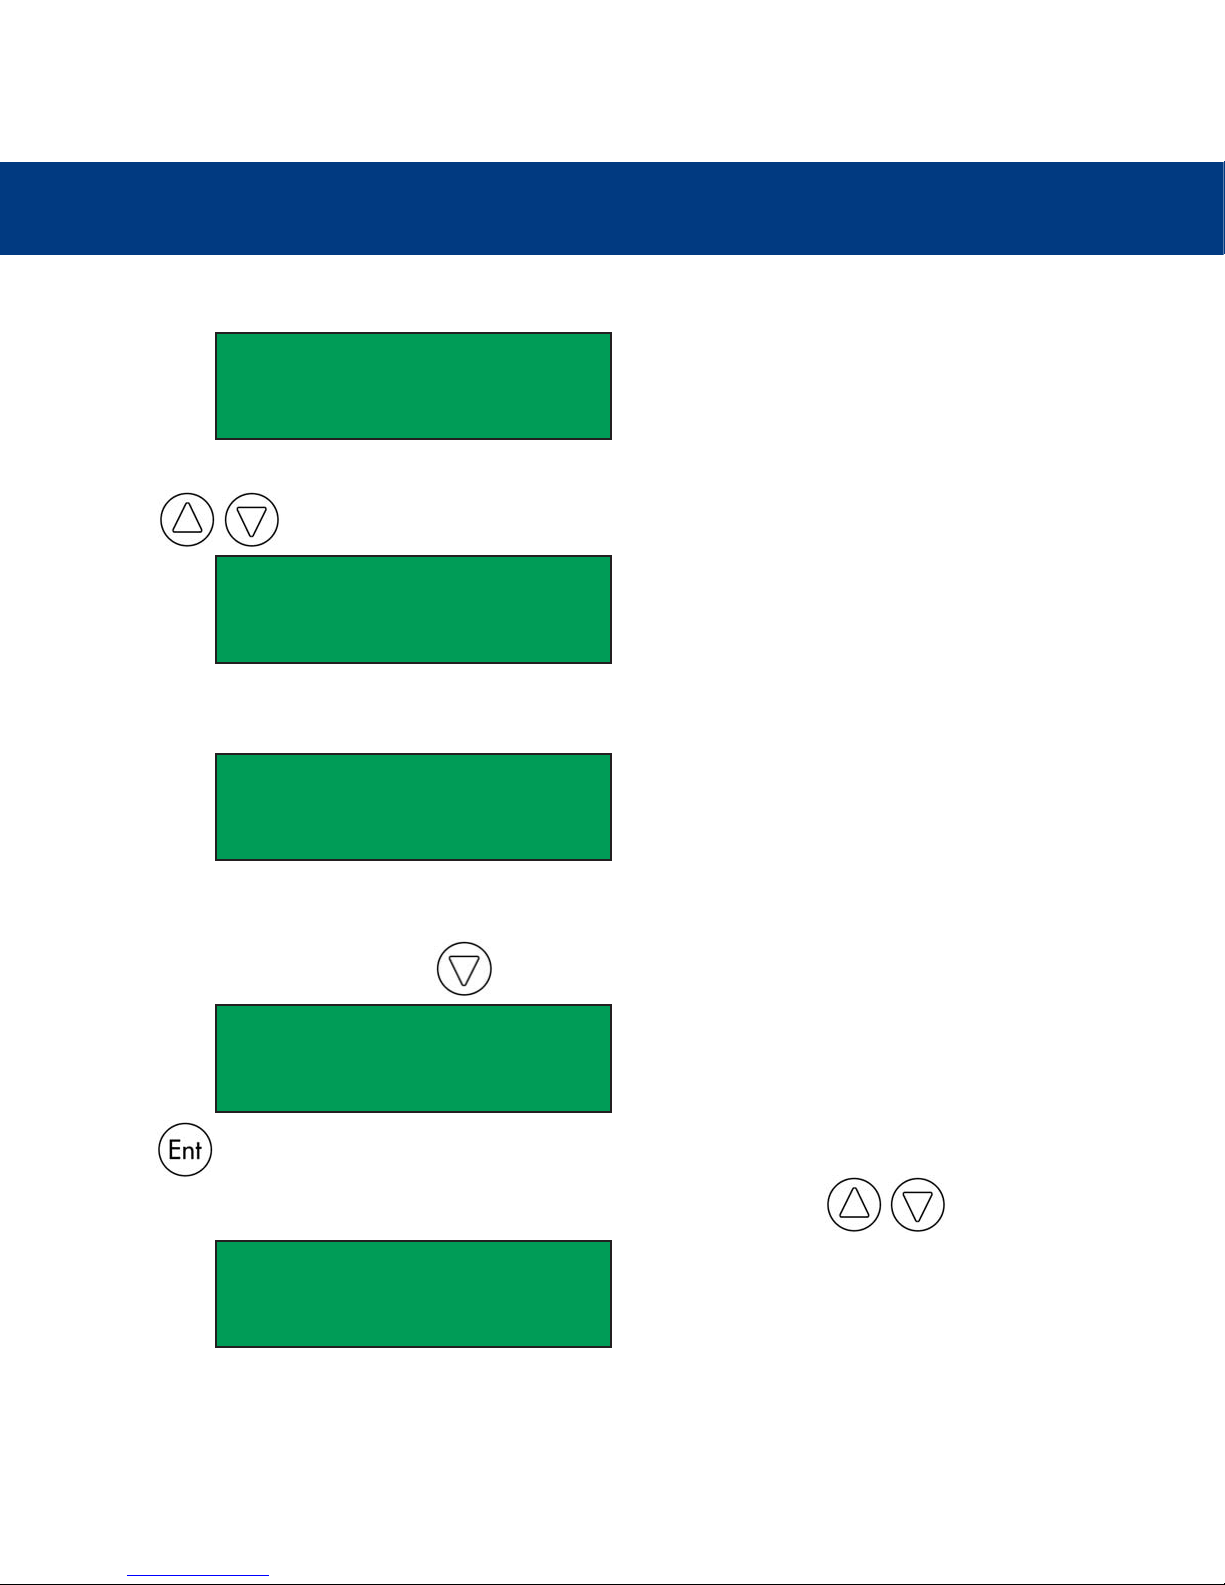
When the copying is completed the LCD display screen will show a screen similar to the following:
The system will ask if you want to keep editing, as shown in the screen below.
Press the buttons to confirm Yes or No.
If you want to keep editing, the current source CD will be ejected automatically, and the system will ask you to insert another
CD, as shown below:
After inserting the next CD, follow the previous steps to select the tracks and record them. When you have compiled all of the
tracks that you would like to include on your CD and you come to the
“Continue edit next Disc?” screen, use the button to select No, as shown below:
Press the button to close the compilation process.
The system will ask you if you want to close all of the sessions, as shown below. Use the buttons to confirm Yes
or No.
Burn complete!
OK: 01
Continue edit
next disc? Yes
Insert next disc
Continue edit
next disc? No
Close all disc’s
session? Yes
Page 28
5. Using Your LaCie Dupli Disc CD125
page 28
LaCie Dupli Disc CD125
User’s Manual
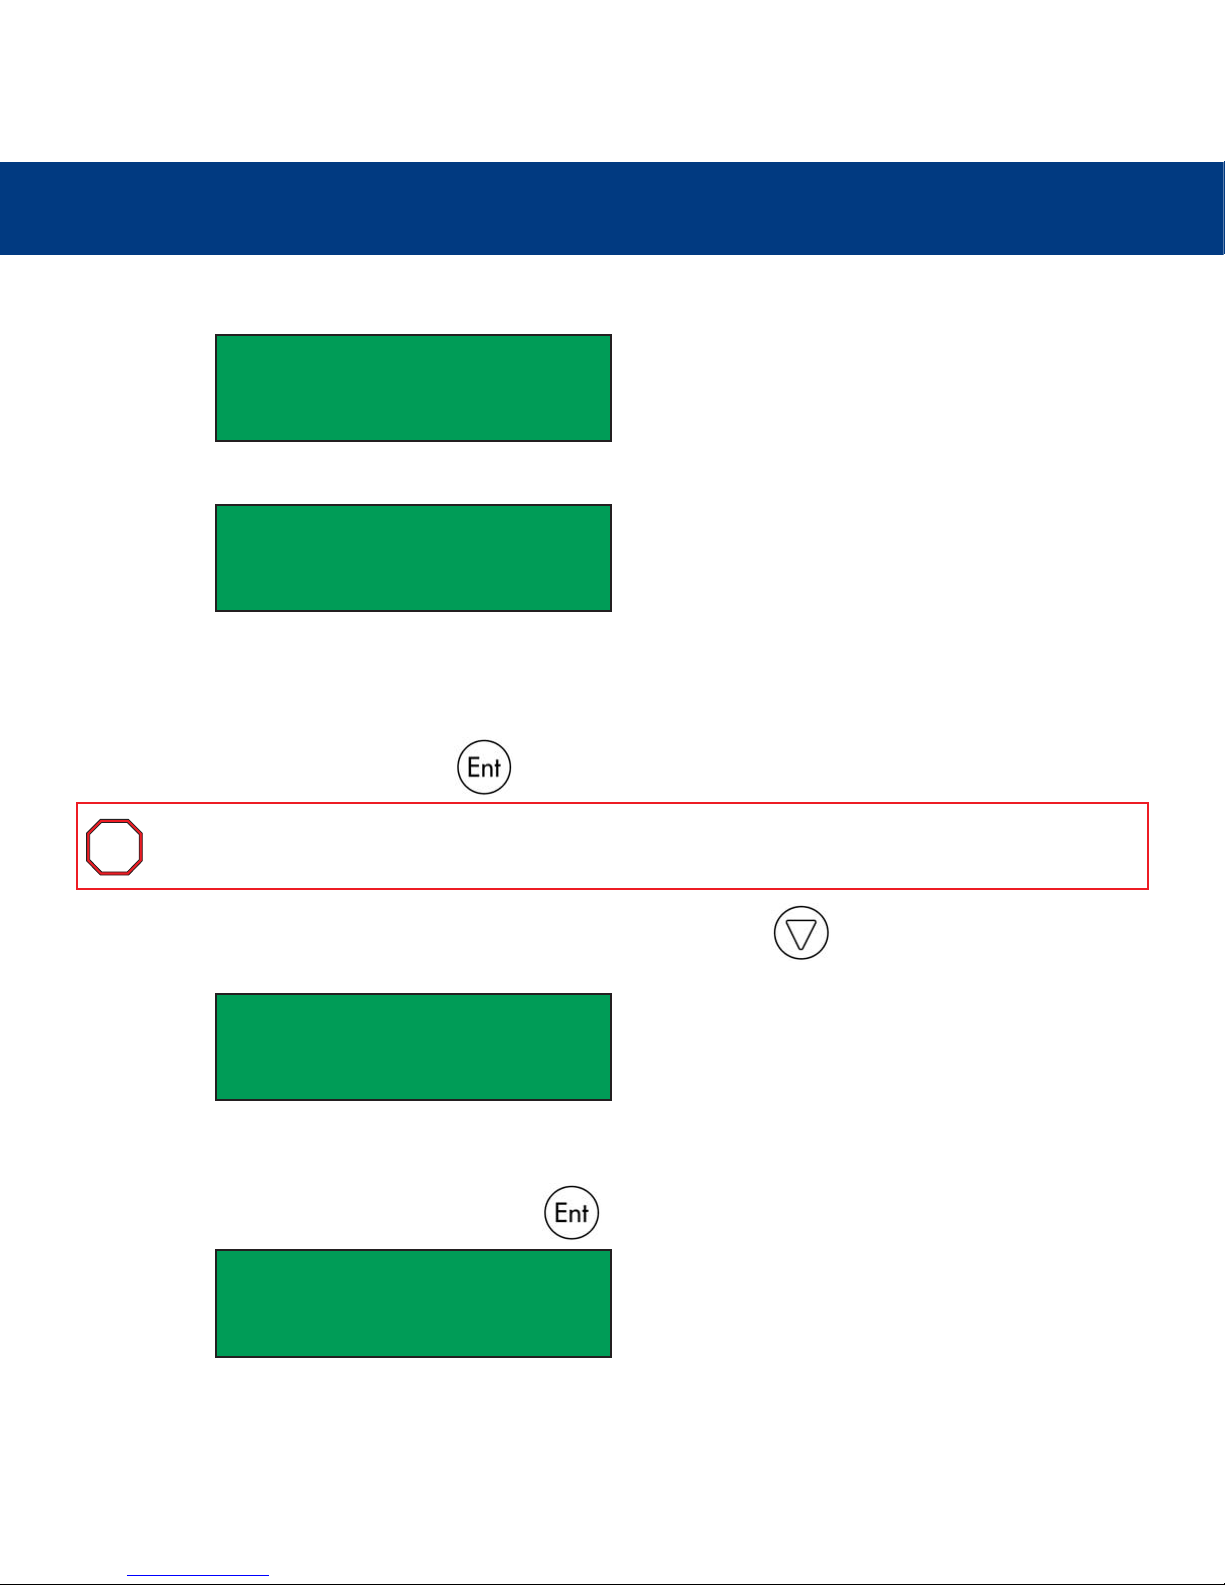
Once you have closed the session, the following screen will be displayed:
When the tracks have finished being moved, the LCD display screen will show the following:
5.11. Setup
The Setup menu allows you to change the LaCie Dupli Disc CD125 default settings.
Once you have changed a setting, press the button to save the changes.
Once the initialization is completed and the 1. Copy menu is displayed, press the on the control panel ten times to
scroll to the 11. Setup menu.
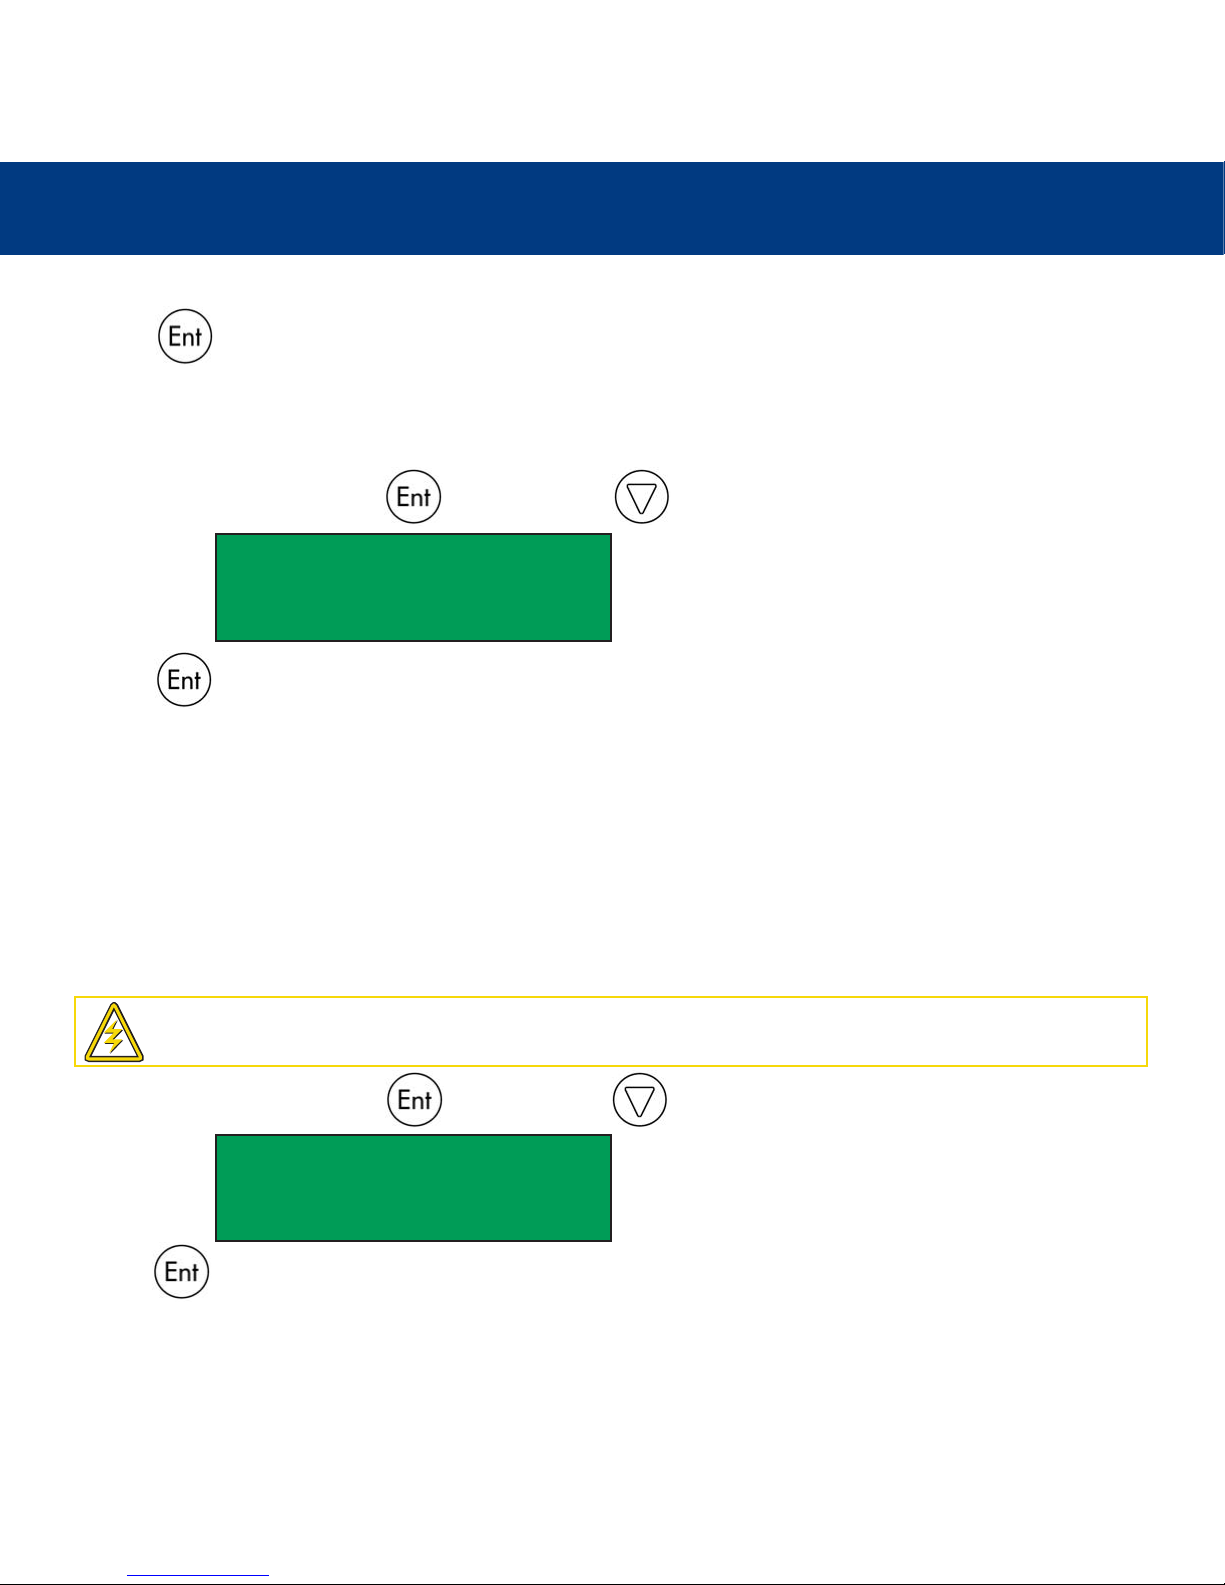
5.11.1. Language
This function allows you to select the language that will be used to display messages on the LCD display screen.
Once you are in the 11. Setup menu screen, press the button and the following screen will be displayed:
Closing Session
Please wait...
Close complete
OK: 01 Fail: 00
11. Setup
11-01. Setup
Language
Important Info:
For optimal performance, it is recommended that you leave the default settings as they are currently
set.
i
i
Page 29
5. Using Your LaCie Dupli Disc CD125
page 29
LaCie Dupli Disc CD125
User’s Manual
Press the button to choose this option and change the language.
5.11.2. CD Burn Speed
This function allows you to change the speed at which the LaCie Dupli CD125 records CDs.
From the 11. Setup menu, press the button and use the to scroll to the following screen:
Press the button to choose this option and change the CD burn speed of the drives.
The default setting is Auto.
5.11.3. DVD Burn Speed
This function is not available.
5.11.4. Read Speed
This function allows you to change the speed at which the LaCie Dupli Disc CD125 reads source CDs.
From the 11. Setup menu, press the button and use the to scroll to the following screen:
Press the button to choose this option and change the read speed of the CD-ROM drive.
The default setting is Maximum.
11-02. Setup
CD Burn Speed
Caution!
LaCie highly recommends that this setting not be altered and be left at its default setting (Maximum).
11-04. Setup
Read Speed
Page 30

5. Using Your LaCie Dupli Disc CD125
page 30
LaCie Dupli Disc CD125
User’s Manual
5.11.5. Auto Start Drive
This function allows the LaCie Dupli Disc CD125 to automatically copy or test blank CD discs when they are placed in the CDRW drive.
From the 11. Setup menu, press the button and use the to scroll to the following screen:
Press the button to choose this option. The default setting is Off.
5.11.6. Startup Menu
This function allows you to select any one of the functions (except Advanced Setup) as the first function to appear after the
LaCie Dupli Disc CD125 has completed its initialization after being started.
From the 11. Setup menu, press the button and use the to scroll to the following screen:
Press the button to choose this option. The default setting is Copy.
After choosing a function, press the button set your choice.
11-05. Setup
Auto Start Drive
11-06. Setup
Startup Menu
Page 31

5. Using Your LaCie Dupli Disc CD125
page 31
LaCie Dupli Disc CD125
User’s Manual
5.11.7. Auto Verify
This function enables the LaCie Dupli Disc CD125 to automatically verify if the recorded disc can be read properly after
recording.
From the 11. Setup menu, press the button and use the to scroll to the following screen:
Press the button to choose this option. The default setting is Off. Press the button to select On.
5.11.8. Auto Compare
This function enables the LaCie Dupli Disc CD125 to automatically compare the source disc to the target disc after copying.
From the 11. Setup menu, press the button and use the to scroll to the following screen:
Press the button to choose this option. The default setting is Off. Press the button to select On.
5.11.9. Auto Prescan
This function enables the LaCie Dupli Disc CD125 to automatically scan the source disc to ensure that it can be read correctly,
and it also tests the read speed.
From the 11. Setup menu, press the button and use the to scroll to the following screen:
Press the button to choose this option. The default setting is Off. Press the button to select On.
11-07. Setup
Auto Verify
11-08. Setup
Auto Compare
11-09. Setup
Auto Prescan
Page 32

5. Using Your LaCie Dupli Disc CD125
page 32
LaCie Dupli Disc CD125
User’s Manual
5.11.10. Eject Disc
This function provides three separate choices: Eject Good Only, Eject All Disc and Do Not Eject.
- The Eject Good Only function enables the LaCie Dupli Disc CD125 to automatically eject discs only
when the copy was successful.
- The Eject All Disc function enables the LaCie Dupli Disc CD125 to automatically eject all discs,
regardless if the copy was successful or not.
- The Do Not Eject function ensures that all discs have to be ejected manually.
From the 11. Setup menu, press the button and use the to scroll to the following screen:
Press the button to choose this option. The default setting is Eject Good Only. Press the button to select Eject All
Disc or Do Not Eject.
5.11.11. Burn On The Fly
This function is not available in this duplicator.
5.11.12. Burn Mode
This function allows you to set the type of recording method for CDs. There are three modes: DAO (Disc At Once), TAO Not
Close (Track At Once, unclosed CD) and TAO (Track At Once).
From the 11. Setup menu, press the button and use the to scroll to the following screen:
Press the button to choose this option. The default setting is DAO. Press the button to select TAO Not Close or
TAO.
11-10. Setup
Eject Disc
11-12. Setup
Burn Mode
Page 33

5. Using Your LaCie Dupli Disc CD125
page 33
LaCie Dupli Disc CD125
User’s Manual
5.11.13. Display Time
This function allows you to display the amount of time before a function is completed.
From the 11. Setup menu, press the button and use the to scroll to the following screen:
Press the button to choose this option. The default setting is Off. Press the button to select On.
5.11.14. Button Sound
This function allows you to enable or disable the sound (short beep) when a button of the Interface Panel is pressed.
From the 11. Setup menu, press the button and use the to scroll to the following screen:
Press the button to choose this option. The default setting is Off. Press the button to select On.
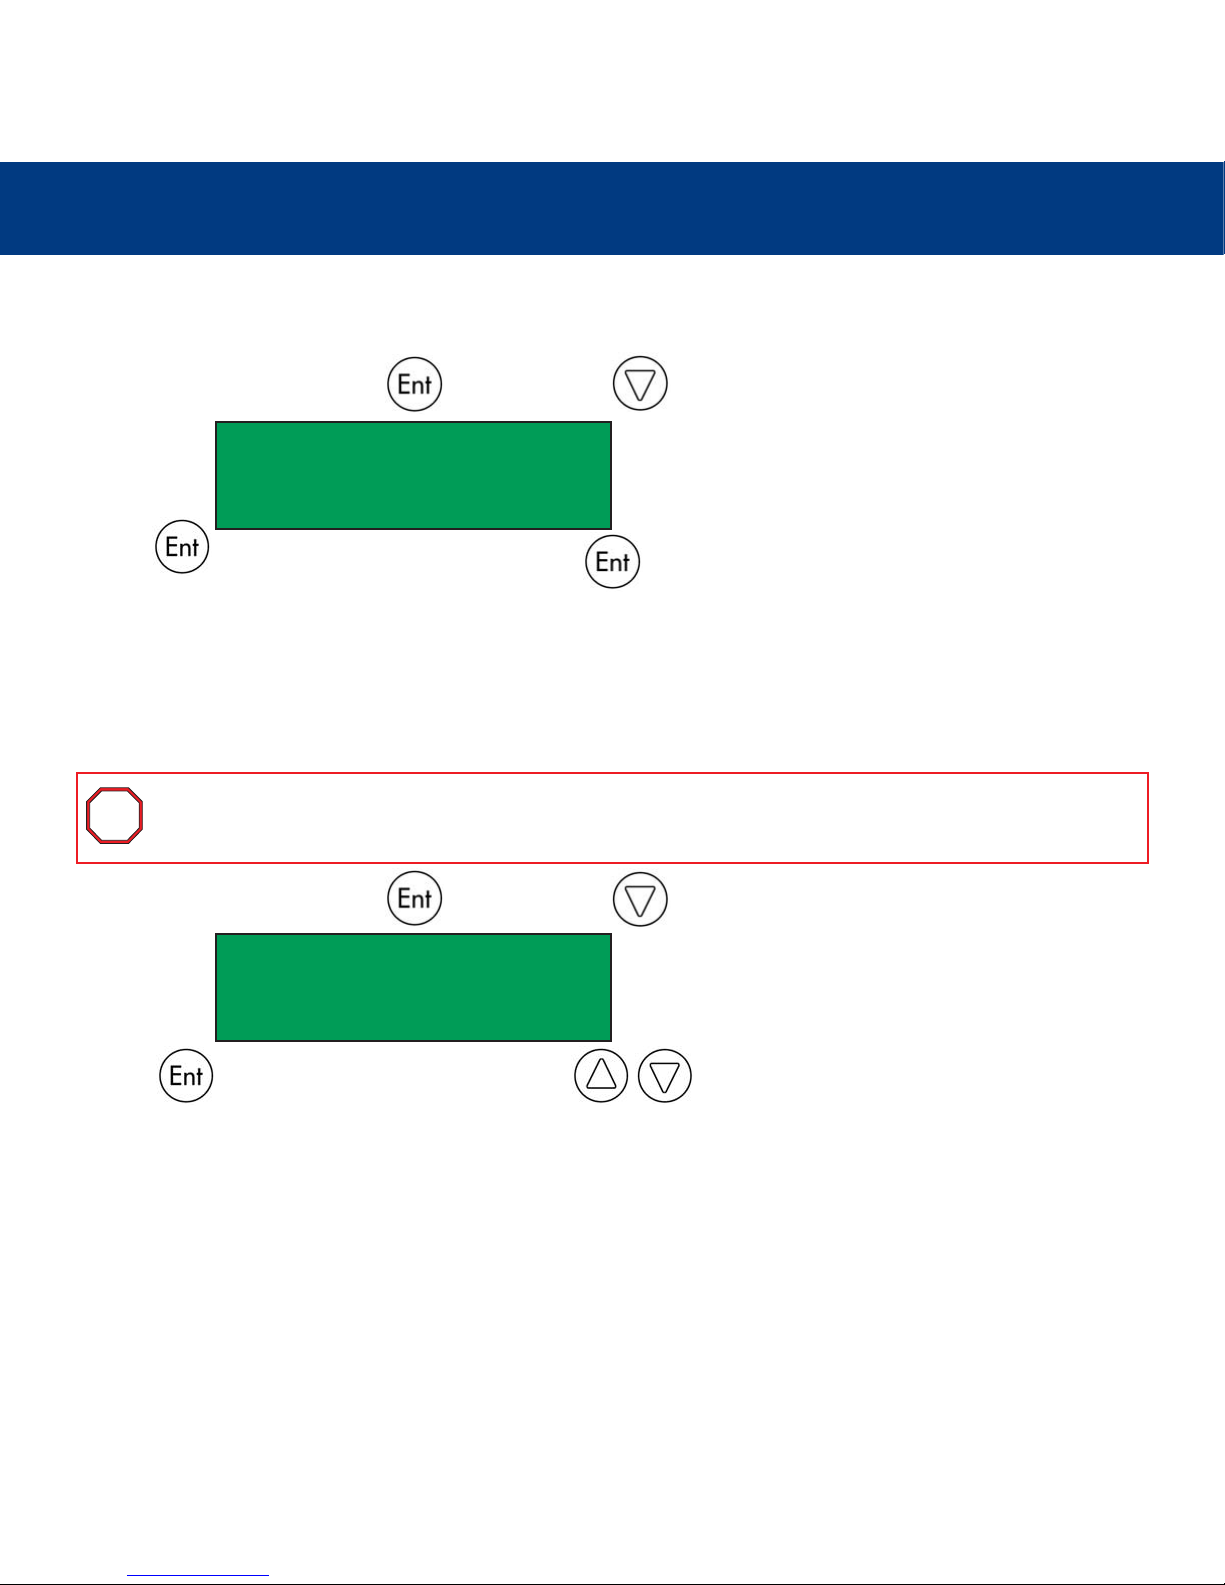
5.11.15. Device Info
This function displays the basic information about the CD drives.
From the 11. Setup menu, press the button and use the to scroll to the following screen:
Press the button to choose this option, and press the button again to view information
about the other drive.
11-13. Setup
Display Time
11-14. Setup
Button Sound
11-15. Setup
Device Info
Page 34
5. Using Your LaCie Dupli Disc CD125
page 34
LaCie Dupli Disc CD125
User’s Manual
5.11.16. System Info
This function displays information about the duplicator system.
From the 11. Setup menu, press the button and use the to scroll to the following screen:
Press the button to choose this option, and press the button again to view additional
information.
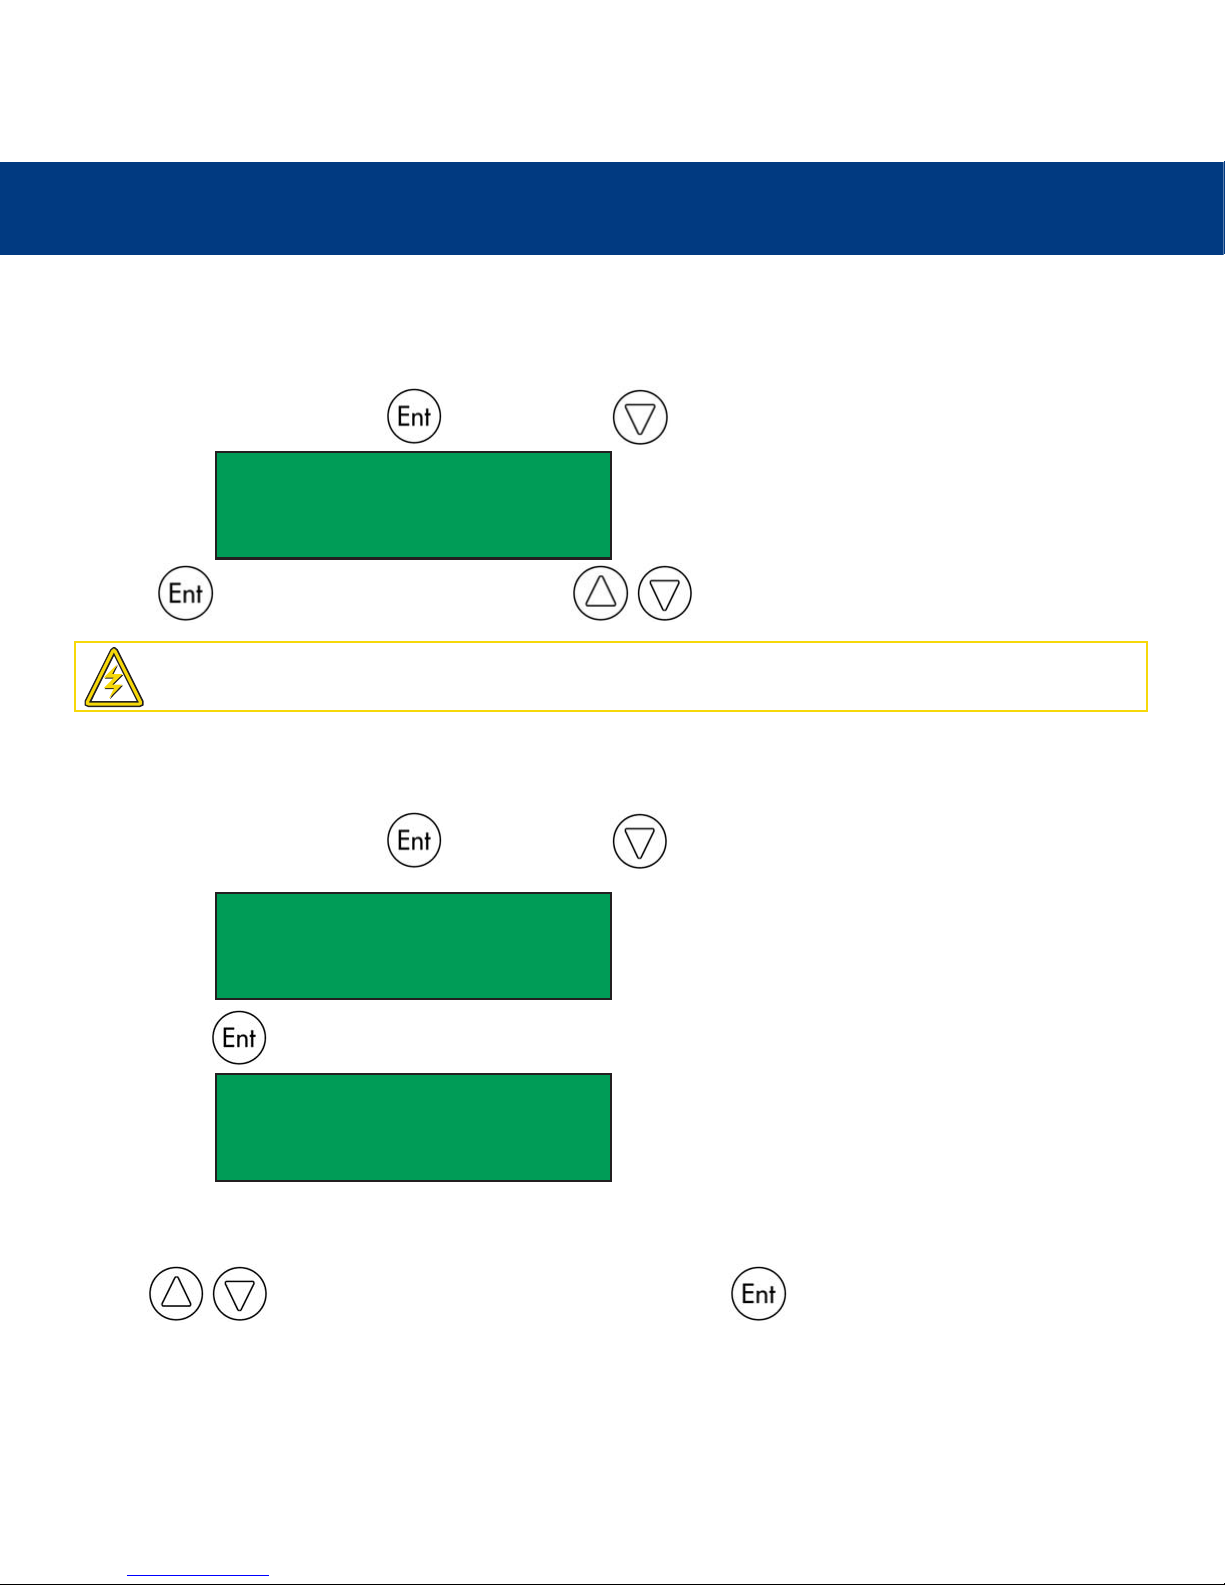
5.11.17. Quick Erase
This function is used to erase CD-RW. This option only erases the TOC (Table Of Contents), and does not create any free
space on the rewritable disc.
From the 11. Setup menu, press the button and use the to scroll to the following screen:
Press the button to choose this option, and use the buttons to confirm Yes or No.
11-16. Setup
System Info
Important Info:
This option only erases the TOC (Table Of Contents), and does not create any free space on the
rewritable disc.
11-17. Setup
Quick Erase
i
i
Page 35
5. Using Your LaCie Dupli Disc CD125
page 35
LaCie Dupli Disc CD125
User’s Manual
5.11.18. Full Erase
This function is used to erase both the TOC (Table Of Contents) and data from CD-RW discs. This process also takes more
time than a Quick Erase as it erases all the data on your disc.
From the 11. Setup menu, press the button and use the to scroll to the following screen:
Press the button to choose this option, and use the buttons to confirm Yes or No.
5.11.19. Auto Close Tray
This function is used to close the trays of the CD-RW drives automatically after the duplication is finished.
From the 11. Setup menu, press the button and use the to scroll to the following screen:
By pressing the button, you will access to the following menu:
In this case, the Dupli Disc CD125 will close all the trays 10 seconds after the duplication is completed. You can choose from
5 to 50 seconds.
Use the buttons to select the appropriate value and press the button to valid.
Caution!
Data cannot be retrieved after performing this function and will be definitely erased!
11-18. Setup
Full Erase
11-19. Setup
Auto Close Tray
Auto Close Tray
10
Page 36
5. Using Your LaCie Dupli Disc CD125
page 36
LaCie Dupli Disc CD125
User’s Manual
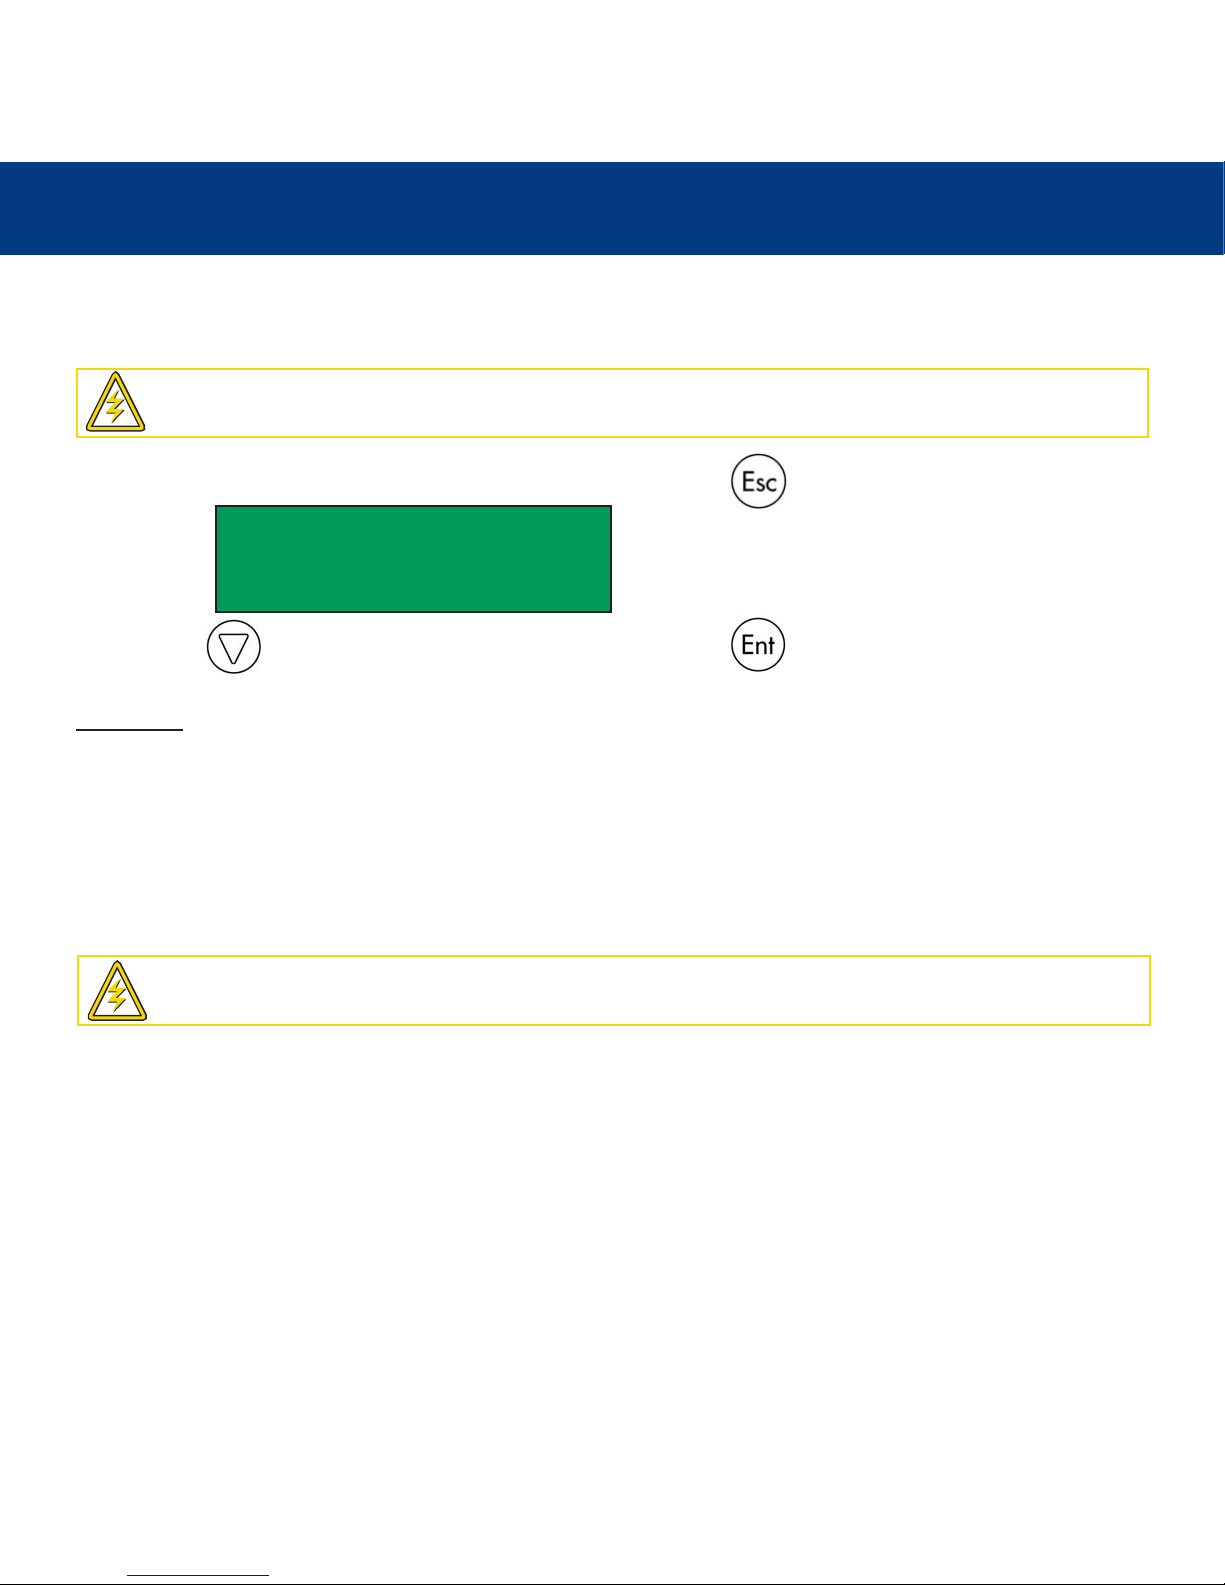
5.12. Advanced Setup
The Advanced Setup menu allows you to change the System Configuration.
To access the Advanced Setup menu, return to the Setup menu and press the button for 2 seconds.
Then press the button to scroll the different options and menus. Press button to select the function.
FUNCTIONS
5.12.1. UnderRun Protect
This function allows you to set and control the Buffer Under-Run Protection. We strongly suggest you to set this function On.
The default setting is On.
5.12.2. Overburn
This function allows you to overburn data beyond the normal limitation of your blank media. The default setting is Off.
5.12.3. Read Error Skip
This function allows you to ignore any error that occurs during the duplication. Normally, when an error occurs, the LaCie
Dupli Disc CD125 displays an error message and stops the duplication. This function may be useful for copying defective CD
discs. The default setting is Off.
5.12.4. Format HDD
This function is not available.
5.12.5. Verify HDD
This function is not available.
Caution!
These menus are for Advanced Users only. LaCie strongly recommends you NOT to change any of these
settings. Doing so may alter your system and rend it unusable.
12. Adv Setup
Caution!
LaCie warns you that enabling this function may irreversibly damage your duplicator. LaCie strongly rec-
ommends you NOT to enable this function.
Page 37
5. Using Your LaCie Dupli Disc CD125
page 37
LaCie Dupli Disc CD125
User’s Manual
5.12.6. Burn In
This function is not available.
5.12.7. Update Firmware
This function is used to update the firmware of your Dupli Disc CD125. If you want to update the firmware of your duplicator,
LaCie recommends you to check first the current version of the firmware.
5.12.8. Compare Firmware
This function is used to compare the current firmware of your Dupli Disc CD125 and the version burned on the Firmware CD
you've received from LaCie.
5.12.9. Hardware Diagnostic
This function is used to test the system: LCD display, SDRAM, IDE connectors and FLASH memory will be tested.
5.12.10. Load Default
This function is used to recover the Factory Settings (default setting) and cancel all the changes you've made.
5.12.11. CD+G
This option may allow you to copy the CD+G CD disc. The default setting is Off.
5.12.12. ISRC & MCN
This is a special copy mode. The default setting is Off.
5.12.13. Switch USB Mode
This function is not available.
5.12.14. CD-Text
This function allows you to copy CD-TEXT CDs. The default setting is Off.
Caution!
Only uses LaCie firmware CDs; using an unknown CD or an inappropriate firmware CD may damage
your Dupli Disc CD125.
Page 38

6. Troubleshooting
page 38
LaCie Dupli Disc CD125
User’s Manual
6. Troubleshooting
6.1. About The LCD Display Screen
If, after powering on the LaCie Dupli Disc CD125, the LCD display screen does not light and no images appear, check to
ensure that the power cord is firmly seated in both the drive and the power outlet.
6.2. About Error Messages
During the main functions, if you press the Esc button during an operation, an error message will appear on the LCD display
screen. This also has the potential to cause the LaCie Dupli Disc CD125 to hang, and you may need to power the device off
and then on.
If a read fails, an error message will appear on the LCD display screen. Try another source disc to see if the problem persists.
If the LaCie Dupli Disc CD125 does not detect any of the drives after powering on, an error message will be shown on the
LCD display screen.
6.3. Errors With The CD Drives
If either of the CD drives cannot read a disc, check to ensure that the format is compatible with the drive and check to see that
the disc has not been damaged.
6.4. Errors With Control Panel Buttons
If any of the Control Panel buttons are not responding, switch off your Dupli Disc CD125 and wait for 10 seconds before
switching it on again. If the Control Panel are still not responding, please contact your LaCie reseller or LaCie Technical
Support.
6.5. High Disc Failure Rates
If you are experiencing a high failure rate while copying, please try the following steps:
• Lower the speed of the CD-RW drive.
• Inspect the blank disc’s surface to ensure that it is not scratched or damaged.
Page 39
6. Troubleshooting
page 39
LaCie Dupli Disc CD125
User’s Manual
6.6. Emergency Ejection Of CDs
In the event that a disc cannot be ejected from the CD-ROM or CD-RW drive using the tray open button (when no duplication
operation is being performed), an emergency eject operation will open the media tray. Switch off the LaCie Dupli Disc CD125
drive and unplug its power cable from the power outlet.
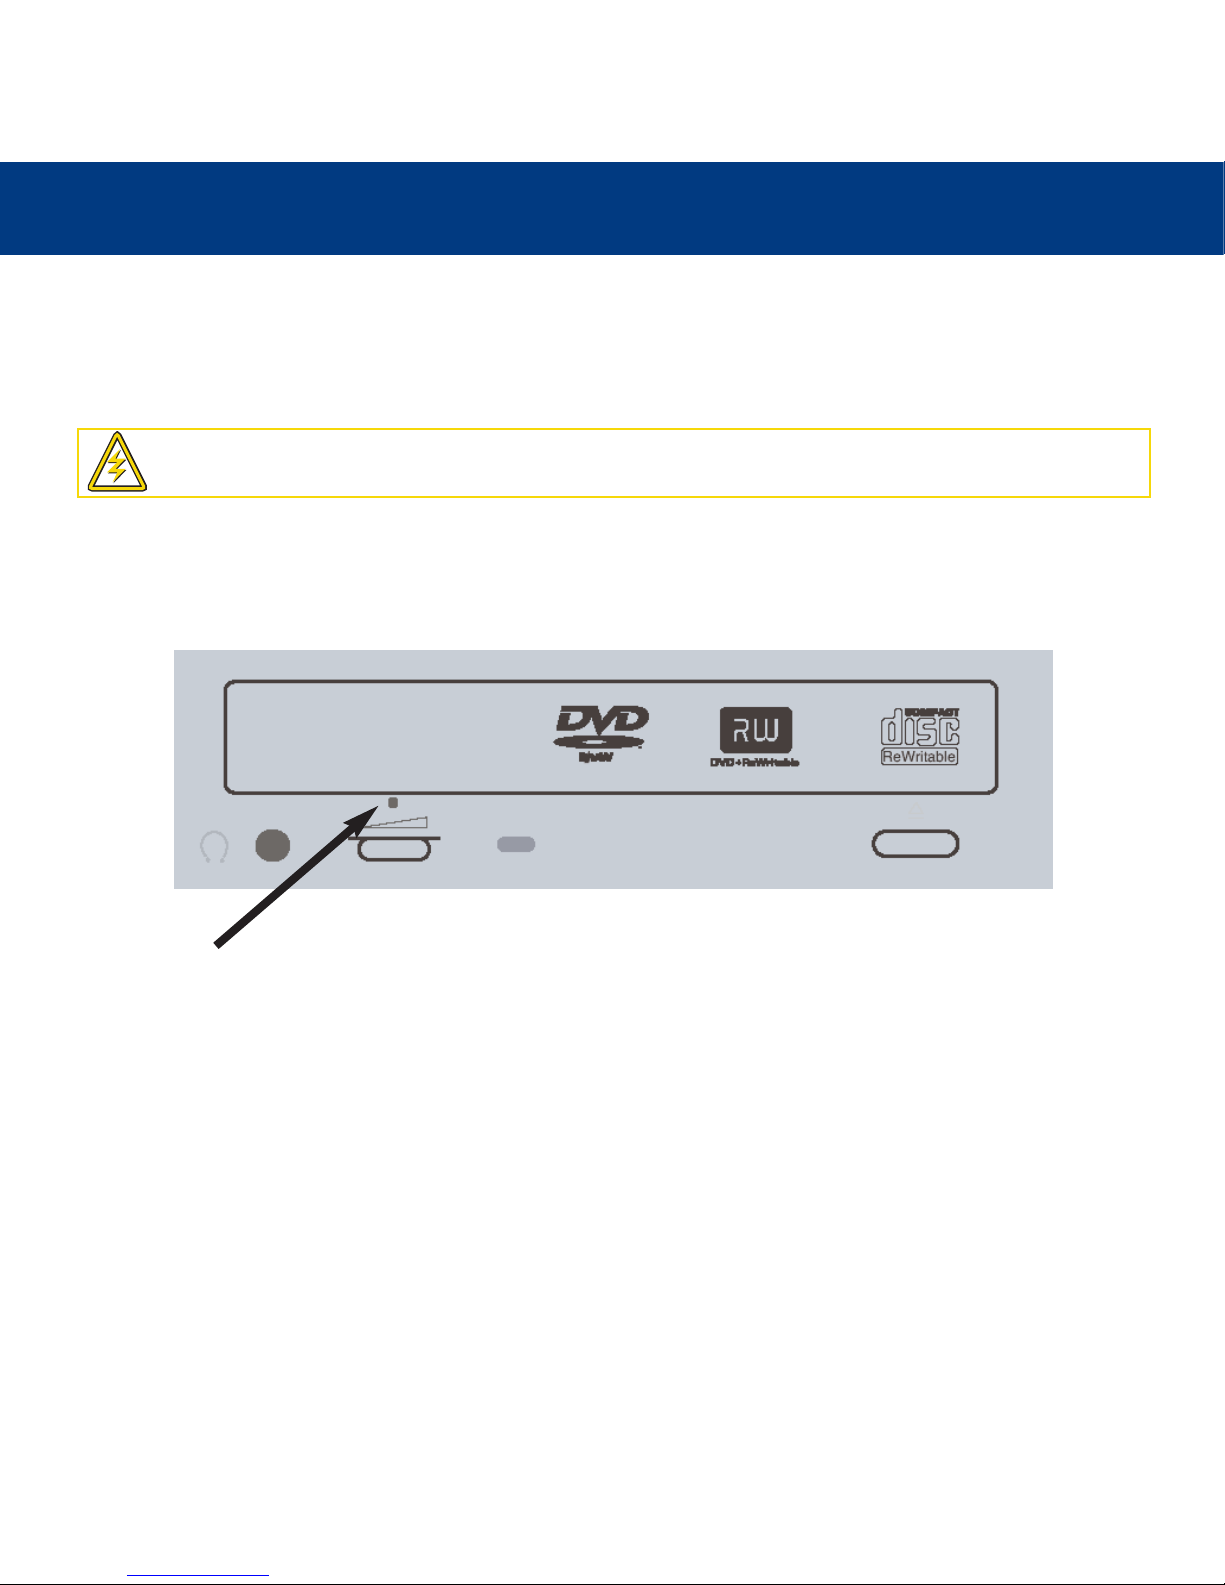
Turn off the drive and insert a small metal poker, such as an unbent paper clip, into the emergency eject hole until it presses
against the manual eject mechanism. You will feel the mechanism eject the CD tray. Use this method only when the tray open
button is not working.
Emergency Eject Hole - Insert a straightened paper clip (or similar object) and push to eject the tray if the load/eject button
does not work. In normal operation, the eject button should always be used to unload the tray. If you must use the emergency
eject hole, make sure the drive’s power is turned off and wait until disc rotation has stopped.
6.7. Display Screen Messages
Initialize SDRAM Initialize the memory of the system.
Detect Drives Detect what drives are connected with the system.
User Abort! Cancel the job during operation.
Analyzing Analyze the source disc.
Source Drive Not Ready Source drive is not ready to read.
Target Drive Not Ready Target drive is not ready to write.
Source Disc Not Ready Source disc is not ready to be read.
Caution!
Make sure the LaCie Dupli Disc CD125’s power is off and the power cable is unplugged before attempting
the emergency ejection procedure.
Page 40

6. Troubleshooting
page 40
LaCie Dupli Disc CD125
User’s Manual
Target Disc Not Ready Target disc is not ready to be written into.
Erasing disc The system is erasing the data on the disc.
Fail to get Drive Info! The drive information cannot be obtained.
Fail to get Src Disc Info! The information of source disc cannot be obtained.
Save new config Fail! The new setting of configuration cannot be saved.
Load Default Config? Do you want to load the default settings?
Src&Tgt can’t in the same channel During comparison the source and target discs cannot be in the same channel.
Preparing The system is preparing to record.
Check Target Please Wait The system is checking the target device.
Audio Disc!!! Can’t compare! The system cannot compare the audio discs.
Identical The comparison results are the same.
Read disc error During comparison the disc cannot be read.
Cannot read TOC The system cannot read the contents of disc.
TOC not match The comparison results are not the same.
Source Disc Empty!!! The source disc doesn’t contain any data.
Target overflow The target disc hasn’t enough capacity to store new data.
Target Disc Not Empty!!! The target disc still has data.
Press a Key to Eject Good Disc Press any key to eject the good disc after copying.
Press a Key to Eject Fail Disc Press any key to eject the failed disc after copying.
Hold ESC to exit Press ESC for a second to terminate the test.
All data will be lost, erase? All data on the disc will be lost. Confirm the erasing of data.
Erase Finished The erasing of data comes to an end.
No Erasable Disc in CD-RW!! The disc on the CD-RW device is not rewritable.
Specific Messages during Audio Editing
Erase selected Tracks? Abort the selected tracks and delete them
End edit disc and burn Finish the music editing and start to copy
Continue edit next Disc? Ask if you want to continue the music disc editing
Target Overflow Re-Select The disc capacity is not enough to store the selected tracks.
Please select again.
Close all disc's session? Confirm the closing of disc sessions
NO AUDIO track in this disc The source disc has no audio track
Sessions were closed already! The disc sessions have already been closed
Tgt overflow, del last trk? The disc capacity is not enough to store the selected tracks.
So, do you want to delete the last track?
Ins empty disc Continue? Do you want to insert a blank disc and continue copying?
Page 41

6. Troubleshooting
page 41
LaCie Dupli Disc CD125
User’s Manual
Specific Messages during Firmware Update
Invalid firmware The disc you've inserted doesn't contain a valid firmware
Updating F/W The system is updating the firmware
Update F/W xxx to yyy? Do you want to update the firmware version from xxx to yyy?
Searching F/W The system is searching for a valid firmware
Check Sum Error! The updated firmware has errors
Last update F/W OK! The firmware is updated successfully
Last update F/W Fail! The firmware is NOT updated successfully
Flash ROM fail! Data cannot be written into Flash ROM
Page 42

7. Contacting Customer Support
page 42
LaCie Dupli Disc CD125
User’s Manual
7. Contacting Customer Support
Before You Contact Technical Support
• Read the manuals and review the Troubleshooting section.
If you have asked yourself all of the pertinent questions in the troubleshooting checklist, and you still can't get your LaCie
device to work properly, contact us via the provided Web link. Before contacting us, make sure that you have the following
information on hand:
• Your LaCie drive's serial number
LaCie Technical Support
LaCie Australia
Contact Us At:
http://www.lacie.com/au/contact/
LaCie Denmark
Contact Us At:
http://www.lacie.com/dk/contact/
LaCie Germany
Contact Us At:
http://www.lacie.com/de/contact/
LaCie Netherlands
Contact Us At:
http://www.lacie.com/nl/contact/
LaCie Sweden
Contact Us At:
http://www.lacie.com/se/contact/
LaCie USA
Contact Us At:
http://www.lacie.com/contact/
LaCie Belgium
Contact Us At:
http://www.lacie.com/be/contact/
LaCie Finland
Contact Us At:
http://www.lacie.com/fi/contact
LaCie Italy
Contact Us At:
http://www.lacie.com/it/contact/
LaCie Norway
Contact Us At:
http://www.lacie.com/no/contact/
LaCie Switzerland
Contact Us At:
http://www.lacie.com/chfr/contact
LaCie Grand Export
Contact Us At:
http://www.lacie.com/intl/contact/
LaCie Canada
Contact Us At (English):
http://www.lacie.com/caen/contact/
LaCie France
Contact Us At:
http://www.lacie.com/fr/contact/
LaCie Japan
Contact Us At:
http://www.lacie.co.jp
LaCie Spain
Contact Us At:
http://www.lacie.com/es/support/request
LaCie United Kingdom & Ireland
Contact Us At:
http://www.lacie.com/uk/support/request
Page 43

8. Warranty
page 43
LaCie Dupli Disc CD125
User’s Manual
8. Warranty
LaCie warrants your device against any defect in material and workmanship, under normal use, for the period designated on
your warranty certificate. In the event this product is found to be defective within the warranty period, LaCie will, at its option,
repair or replace the defective device.
This warranty is void if:
• The device was operated/stored in abnormal use or maintenance conditions;
• The device is repaired, modified or altered, unless such repair, modification or alteration is expressly authorized in writing
by LaCie;
• The device was subjected to abuse, neglect, lightning strike, electrical fault, improper packaging or accident;
• The device was installed improperly;
• The serial number of the device is defaced or missing;
• The broken part is a replacement part such as a pickup tray, etc.
• The tamper seal on the device casing is broken.
LaCie will not, under any circumstances, be liable for direct, special or consequential damages such as, but not limited to,
damage or loss of property or equipment, loss of profits or revenues, cost of replacement goods, or expense or inconvenience
caused by service interruptions.
Any loss, corruption or destruction of data while using a LaCie device is the sole responsibility of the user, and under no
circumstances will LaCie be held liable for the recovery or restoration of this data.
Under no circumstances will any person be entitled to any sum greater than the purchase price paid for the device.
To obtain warranty service, call LaCie Technical Support. You may be asked to furnish proof of purchase to confirm that the
device is still under warranty.
All drives returned to LaCie must be securely packaged in their original box and shipped with postage prepaid.
Register online for free technical support:
www.lacie.com/register
 Loading...