

Page 1
LaCie d2 Thunderbolt 3 USB-C User Manual
Click here to access an up-to-date online version
of this document. You will also find the most recent content as well as expandable illustrations, easier
navigation , and search capability.
Model:
Page 2

. . . . . . . . . . . . . . . . . . . . . . . . . . . . . . . . . . . . . . . . . . . . . . . . . . . . . . . . . . . . . . . . . . . . . . . . . . . . . . . . . . . . . . . . . . . . . . . . . . . . . . . . . . . . . . . . . . . . . . . . . . . . . . . . . . . . . . . . . . . . . . . . . . . . . . . . . . . . . . . . . . . . . . . . . . . . . . . . . . . . . . . . . . . . . . . . . . . . . . . . . . . . . . . . . . . . . . . . . . . . . . . . . . . . . . . . . . . . . . . . . . . . . . . . . . . . . . . . . . . . . . . . . . . . . . . . . . . . . . . .
. . . . . . . . . . . . . . . . . . . . . . . . . . . . . . . . . . . . . . . . . . . . . . . . . . . . . . . . . . . . . . . . . . . . . . . . . . . . . . . . . . . . . . . . . . . . . . . . . . . . . . . . . . . . . . . . . . . . . . . . . . . . . . . . . . . . . . . . . . . . . . . . . . . . . . . . . . . . . . . . . . . . . . . . . . . . . . . . . . . . . . . . . . . . . . . . . . . . . . . . . . . . . . . . . . . . . . . . . . . . . . . . . . . . . . . . . . . . . . . . . . . . . . . . . . . . . . . . . . . . . . . . . . . . . . . . . . . . . . . .
. . . . . . . . . . . . . . . . . . . . . . . . . . . . . . . . . . . . . . . . . . . . . . . . . . . . . . . . . . . . . . . . . . . . . . . . . . . . . . . . . . . . . . . . . . . . . . . . . . . . . . . . . . . . . . . . . . . . . . . . . . . . . . . . . . . . . . . . . . . . . . . . . . . . . . . . . . . . . . . . . . . . . . . . . . . . . . . . . . . . . . . . . . . . . . . . . . . . . . . . . . . . . . . . . . . . . . . . . . . . . . . . . . . . . . . . . . . . . . . . . . . . . . . . . . . . . . . . . . . . . . . . . . . . . . . . . . . . . . . .
. . . . . . . . . . . . . . . . . . . . . . . . . . . . . . . . . . . . . . . . . . . . . . . . . . . . . . . . . . . . . . . . . . . . . . . . . . . . . . . . . . . . . . . . . . . . . . . . . . . . . . . . . . . . . . . . . . . . . . . . . . . . . . . . . . . . . . . . . . . . . . . . . . . . . . . . . . . . . . . . . . . . . . . . . . . . . . . . . . . . . . . . . . . . . . . . . . . . . . . . . . . . . . . . . . . . . . . . . . . . . . . . . . . . . . . . . . . . . . . . . . . . . . . . . . . . . . . . . . . . . . . . . . . . . . . . . . . . . . . .
. . . . . . . . . . . . . . . . . . . . . . . . . . . . . . . . . . . . . . . . . . . . . . . . . . . . . . . . . . . . . . . . . . . . . . . . . . . . . . . . . . . . . . . . . . . . . . . . . . . . . . . . . . . . . . . . . . . . . . . . . . . . . . . . . . . . . . . . . . . . . . . . . . . . . . . . . . . . . . . . . . . . . . . . . . . . . . . . . . . . . . . . . . . . . . . . . . . . . . . . . . . . . . . . . . . . . . . . . . . . . . . . . . . . . . . . . . . . . . . . . . . . . . . . . . . . . . . . . . . . . . . . . . . . . . . . . . . . . . . .
. . . . . . . . . . . . . . . . . . . . . . . . . . . . . . . . . . . . . . . . . . . . . . . . . . . . . . . . . . . . . . . . . . . . . . . . . . . . . . . . . . . . . . . . . . . . . . . . . . . . . . . . . . . . . . . . . . . . . . . . . . . . . . . . . . . . . . . . . . . . . . . . . . . . . . . . . . . . . . . . . . . . . . . . . . . . . . . . . . . . . . . . . . . . . . . . . . . . . . . . . . . . . . . . . . . . . . . . . . . . . . . . . . . . . . . . . . . . . . . . . . . . . . . . . . . . . . . . . . . . . . . . . . . . . . . . . . . . . . . .
. . . . . . . . . . . . . . . . . . . . . . . . . . . . . . . . . . . . . . . . . . . . . . . . . . . . . . . . . . . . . . . . . . . . . . . . . . . . . . . . . . . . . . . . . . . . . . . . . . . . . . . . . . . . . . . . . . . . . . . . . . . . . . . . . . . . . . . . . . . . . . . . . . . . . . . . . . . . . . . . . . . . . . . . . . . . . . . . . . . . . . . . . . . . . . . . . . . . . . . . . . . . . . . . . . . . . . . . . . . . . . . . . . . . . . . . . . . . . . . . . . . . . . . . . . . . . . . . . . . . . . . . . . . . . . . . . . . . . . . .
. . . . . . . . . . . . . . . . . . . . . . . . . . . . . . . . . . . . . . . . . . . . . . . . . . . . . . . . . . . . . . . . . . . . . . . . . . . . . . . . . . . . . . . . . . . . . . . . . . . . . . . . . . . . . . . . . . . . . . . . . . . . . . . . . . . . . . . . . . . . . . . . . . . . . . . . . . . . . . . . . . . . . . . . . . . . . . . . . . . . . . . . . . . . . . . . . . . . . . . . . . . . . . . . . . . . . . . . . . . . . . . . . . . . . . . . . . . . . . . . . . . . . . . . . . . . . . . . . . . . . . . . . . . . . . . . . . . . . . . .
. . . . . . . . . . . . . . . . . . . . . . . . . . . . . . . . . . . . . . . . . . . . . . . . . . . . . . . . . . . . . . . . . . . . . . . . . . . . . . . . . . . . . . . . . . . . . . . . . . . . . . . . . . . . . . . . . . . . . . . . . . . . . . . . . . . . . . . . . . . . . . . . . . . . . . . . . . . . . . . . . . . . . . . . . . . . . . . . . . . . . . . . . . . . . . . . . . . . . . . . . . . . . . . . . . . . . . . . . . . . . . . . . . . . . . . . . . . . . . . . . . . . . . . . . . . . . . . . . . . . . . . . . . . . . . . . . . . . . . . .
. . . . . . . . . . . . . . . . . . . . . . . . . . . . . . . . . . . . . . . . . . . . . . . . . . . . . . . . . . . . . . . . . . . . . . . . . . . . . . . . . . . . . . . . . . . . . . . . . . . . . . . . . . . . . . . . . . . . . . . . . . . . . . . . . . . . . . . . . . . . . . . . . . . . . . . . . . . . . . . . . . . . . . . . . . . . . . . . . . . . . . . . . . . . . . . . . . . . . . . . . . . . . . . . . . . . . . . . . . . . . . . . . . . . . . . . . . . . . . . . . . . . . . . . . . . . . . . . . . . . . . . . . . . . . . . . . . . . . . . .
. . . . . . . . . . . . . . . . . . . . . . . . . . . . . . . . . . . . . . . . . . . . . . . . . . . . . . . . . . . . . . . . . . . . . . . . . . . . . . . . . . . . . . . . . . . . . . . . . . . . . . . . . . . . . . . . . . . . . . . . . . . . . . . . . . . . . . . . . . . . . . . . . . . . . . . . . . . . . . . . . . . . . . . . . . . . . . . . . . . . . . . . . . . . . . . . . . . . . . . . . . . . . . . . . . . . . . . . . . . . . . . . . . . . . . . . . . . . . . . . . . . . . . . . . . . . . . . . . . . . . . . . . . . . . . . . . . . . . . . .
. . . . . . . . . . . . . . . . . . . . . . . . . . . . . . . . . . . . . . . . . . . . . . . . . . . . . . . . . . . . . . . . . . . . . . . . . . . . . . . . . . . . . . . . . . . . . . . . . . . . . . . . . . . . . . . . . . . . . . . . . . . . . . . . . . . . . . . . . . . . . . . . . . . . . . . . . . . . . . . . . . . . . . . . . . . . . . . . . . . . . . . . . . . . . . . . . . . . . . . . . . . . . . . . . . . . . . . . . . . . . . . . . . . . . . . . . . . . . . . . . . . . . . . . . . . . . . . . . . . . . . . . . . . . . . . . . . . . . . . .
. . . . . . . . . . . . . . . . . . . . . . . . . . . . . . . . . . . . . . . . . . . . . . . . . . . . . . . . . . . . . . . . . . . . . . . . . . . . . . . . . . . . . . . . . . . . . . . . . . . . . . . . . . . . . . . . . . . . . . . . . . . . . . . . . . . . . . . . . . . . . . . . . . . . . . . . . . . . . . . . . . . . . . . . . . . . . . . . . . . . . . . . . . . . . . . . . . . . . . . . . . . . . . . . . . . . . . . . . . . . . . . . . . . . . . . . . . . . . . . . . . . . . . . . . . . . . . . . . . . . . . . . . . . . . . . . . . . . . . . .
. . . . . . . . . . . . . . . . . . . . . . . . . . . . . . . . . . . . . . . . . . . . . . . . . . . . . . . . . . . . . . . . . . . . . . . . . . . . . . . . . . . . . . . . . . . . . . . . . . . . . . . . . . . . . . . . . . . . . . . . . . . . . . . . . . . . . . . . . . . . . . . . . . . . . . . . . . . . . . . . . . . . . . . . . . . . . . . . . . . . . . . . . . . . . . . . . . . . . . . . . . . . . . . . . . . . . . . . . . . . . . . . . . . . . . . . . . . . . . . . . . . . . . . . . . . . . . . . . . . . . . . . . . . . . . . . . . . . . . . .
. . . . . . . . . . . . . . . . . . . . . . . . . . . . . . . . . . . . . . . . . . . . . . . . . . . . . . . . . . . . . . . . . . . . . . . . . . . . . . . . . . . . . . . . . . . . . . . . . . . . . . . . . . . . . . . . . . . . . . . . . . . . . . . . . . . . . . . . . . . . . . . . . . . . . . . . . . . . . . . . . . . . . . . . . . . . . . . . . . . . . . . . . . . . . . . . . . . . . . . . . . . . . . . . . . . . . . . . . . . . . . . . . . . . . . . . . . . . . . . . . . . . . . . . . . . . . . . . . . . . . . . . . . . . . . . . . . . . . . . .
. . . . . . . . . . . . . . . . . . . . . . . . . . . . . . . . . . . . . . . . . . . . . . . . . . . . . . . . . . . . . . . . . . . . . . . . . . . . . . . . . . . . . . . . . . . . . . . . . . . . . . . . . . . . . . . . . . . . . . . . . . . . . . . . . . . . . . . . . . . . . . . . . . . . . . . . . . . . . . . . . . . . . . . . . . . . . . . . . . . . . . . . . . . . . . . . . . . . . . . . . . . . . . . . . . . . . . . . . . . . . . . . . . . . . . . . . . . . . . . . . . . . . . . . . . . . . . . . . . . . . . . . . . . . . . . . . . . . . . . .
. . . . . . . . . . . . . . . . . . . . . . . . . . . . . . . . . . . . . . . . . . . . . . . . . . . . . . . . . . . . . . . . . . . . . . . . . . . . . . . . . . . . . . . . . . . . . . . . . . . . . . . . . . . . . . . . . . . . . . . . . . . . . . . . . . . . . . . . . . . . . . . . . . . . . . . . . . . . . . . . . . . . . . . . . . . . . . . . . . . . . . . . . . . . . . . . . . . . . . . . . . . . . . . . . . . . . . . . . . . . . . . . . . . . . . . . . . . . . . . . . . . . . . . . . . . . . . . . . . . . . . . . . . . . . . . . . . . . . . . .
. . . . . . . . . . . . . . . . . . . . . . . . . . . . . . . . . . . . . . . . . . . . . . . . . . . . . . . . . . . . . . . . . . . . . . . . . . . . . . . . . . . . . . . . . . . . . . . . . . . . . . . . . . . . . . . . . . . . . . . . . . . . . . . . . . . . . . . . . . . . . . . . . . . . . . . . . . . . . . . . . . . . . . . . . . . . . . . . . . . . . . . . . . . . . . . . . . . . . . . . . . . . . . . . . . . . . . . . . . . . . . . . . . . . . . . . . . . . . . . . . . . . . . . . . . . . . . . . . . . . . . . . . . . . . . . . . . . . . . . .
. . . . . . . . . . . . . . . . . . . . . . . . . . . . . . . . . . . . . . . . . . . . . . . . . . . . . . . . . . . . . . . . . . . . . . . . . . . . . . . . . . . . . . . . . . . . . . . . . . . . . . . . . . . . . . . . . . . . . . . . . . . . . . . . . . . . . . . . . . . . . . . . . . . . . . . . . . . . . . . . . . . . . . . . . . . . . . . . . . . . . . . . . . . . . . . . . . . . . . . . . . . . . . . . . . . . . . . . . . . . . . . . . . . . . . . . . . . . . . . . . . . . . . . . . . . . . . . . . . . . . . . . . . . . . . . . . . . . . . . .
. . . . . . . . . . . . . . . . . . . . . . . . . . . . . . . . . . . . . . . . . . . . . . . . . . . . . . . . . . . . . . . . . . . . . . . . . . . . . . . . . . . . . . . . . . . . . . . . . . . . . . . . . . . . . . . . . . . . . . . . . . . . . . . . . . . . . . . . . . . . . . . . . . . . . . . . . . . . . . . . . . . . . . . . . . . . . . . . . . . . . . . . . . . . . . . . . . . . . . . . . . . . . . . . . . . . . . . . . . . . . . . . . . . . . . . . . . . . . . . . . . . . . . . . . . . . . . . . . . . . . . . . . . . . . . . . . . . . . . . .
. . . . . . . . . . . . . . . . . . . . . . . . . . . . . . . . . . . . . . . . . . . . . . . . . . . . . . . . . . . . . . . . . . . . . . . . . . . . . . . . . . . . . . . . . . . . . . . . . . . . . . . . . . . . . . . . . . . . . . . . . . . . . . . . . . . . . . . . . . . . . . . . . . . . . . . . . . . . . . . . . . . . . . . . . . . . . . . . . . . . . . . . . . . . . . . . . . . . . . . . . . . . . . . . . . . . . . . . . . . . . . . . . . . . . . . . . . . . . . . . . . . . . . . . . . . . . . . . . . . . . . . . . . . . . . . . . . . . . . . .
. . . . . . . . . . . . . . . . . . . . . . . . . . . . . . . . . . . . . . . . . . . . . . . . . . . . . . . . . . . . . . . . . . . . . . . . . . . . . . . . . . . . . . . . . . . . . . . . . . . . . . . . . . . . . . . . . . . . . . . . . . . . . . . . . . . . . . . . . . . . . . . . . . . . . . . . . . . . . . . . . . . . . . . . . . . . . . . . . . . . . . . . . . . . . . . . . . . . . . . . . . . . . . . . . . . . . . . . . . . . . . . . . . . . . . . . . . . . . . . . . . . . . . . . . . . . . . . . . . . . . . . . . . . . . . . . . . . . . . . .
Content sContent s
1 Regulatory Compliance
FCC Declaration of Conform ance
FCC Class A Information
FCC Caution
Important Note: FCC Radiation Exposure Statem ent
Industry Canada
Important Note for m obile device use
Note Importante pour l'utilisation de dispositifs mobiles
Europe – EU Declaration of Conform ity
Power source
2 Introduction
Position and stacking
Box content
Minim um computer system requirem ents
Views of the hard drive enclosure
Technical specifications
3 LaCie d2 Thunderbolt 3 Advanced Storage
LaCie d2 Thunderbolt 3
Thunderbolt 3
4 System LEDs
LED locations
LED behavior
. . . . . . . . . . . . . . . . . . . . . . . . . . . . . . . . . . . . . . . . . . . . . . . . . . . . . . . . . . . . . . . . . . . . . . . . . . . . . . . . . . . . . . . . . . . . . . . . . . . . . . . . . . . . . . . . . . . . . . . . . . . . . . . . . . . . . . . . . . . . . . . . . . . . . . . . . . . . . . . . . . . . . . . . . . . . . . . . . . . . . . . . . . . . . . . . . . . . . . . . . . . . . . . . . . . . . . . . . . . . . . . . . . . . . . . . . . . . . . . . . . . . . . . . . . . . . . . . . . . . . . . . . . . . . . . . . . . . . . . .So ftware suite
. . . . . . . . . . . . . . . . . . . . . . . . . . . . . . . . . . . . . . . . . . . . . . . . . . . . . . . . . . . . . . . . . . . . . . . . . . . . . . . . . . . . . . . . . . . . . . . . . . . . . . . . . . . . . . . . . . . . . . . . . . . . . . . . . . . . . . . . . . . . . . . . . . . . . . . . . . . . . . . . . . . . . . . . . . . . . . . . . . . . . . . . . . . . . . . . . . . . . . . . . . . . . . . . . . . . . . . . . . . . . . . . . . . . . . . . . . . . . . . . . . . . . . . . . . . . . . . . . . . . . . . . . . . . . . . . . . . . . . . .Thunderbolt 3
. . . . . . . . . . . . . . . . . . . . . . . . . . . . . . . . . . . . . . . . . . . . . . . . . . . . . . . . . . . . . . . . . . . . . . . . . . . . . . . . . . . . . . . . . . . . . . . . . . . . . . . . . . . . . . . . . . . . . . . . . . . . . . . . . . . . . . . . . . . . . . . . . . . . . . . . . . . . . . . . . . . . . . . . . . . . . . . . . . . . . . . . . . . . . . . . . . . . . . . . . . . . . . . . . . . . . . . . . . . . . . . . . . . . . . . . . . . . . . . . . . . . . . . . . . . . . . . . . . . . . . . . . . . . . . . . . . . . . . . .USB
. . . . . . . . . . . . . . . . . . . . . . . . . . . . . . . . . . . . . . . . . . . . . . . . . . . . . . . . . . . . . . . . . . . . . . . . . . . . . . . . . . . . . . . . . . . . . . . . . . . . . . . . . . . . . . . . . . . . . . . . . . . . . . . . . . . . . . . . . . . . . . . . . . . . . . . . . . . . . . . . . . . . . . . . . . . . . . . . . . . . . . . . . . . . . . . . . . . . . . . . . . . . . . . . . . . . . . . . . . . . . . . . . . . . . . . . . . . . . . . . . . . . . . . . . . . . . . . . . . . . . . . . . . . . . . . . . . . . . . . .Front view
. . . . . . . . . . . . . . . . . . . . . . . . . . . . . . . . . . . . . . . . . . . . . . . . . . . . . . . . . . . . . . . . . . . . . . . . . . . . . . . . . . . . . . . . . . . . . . . . . . . . . . . . . . . . . . . . . . . . . . . . . . . . . . . . . . . . . . . . . . . . . . . . . . . . . . . . . . . . . . . . . . . . . . . . . . . . . . . . . . . . . . . . . . . . . . . . . . . . . . . . . . . . . . . . . . . . . . . . . . . . . . . . . . . . . . . . . . . . . . . . . . . . . . . . . . . . . . . . . . . . . . . . . . . . . . . . . . . . . . . .Rear view
. . . . . . . . . . . . . . . . . . . . . . . . . . . . . . . . . . . . . . . . . . . . . . . . . . . . . . . . . . . . . . . . . . . . . . . . . . . . . . . . . . . . . . . . . . . . . . . . . . . . . . . . . . . . . . . . . . . . . . . . . . . . . . . . . . . . . . . . . . . . . . . . . . . . . . . . . . . . . . . . . . . . . . . . . . . . . . . . . . . . . . . . . . . . . . . . . . . . . . . . . . . . . . . . . . . . . . . . . . . . . . . . . . . . . . . . . . . . . . . . . . . . . . . . . . . . . . . . . . . . . . . . . . . . . . . . . . . . . . . .Po wer supply
. . . . . . . . . . . . . . . . . . . . . . . . . . . . . . . . . . . . . . . . . . . . . . . . . . . . . . . . . . . . . . . . . . . . . . . . . . . . . . . . . . . . . . . . . . . . . . . . . . . . . . . . . . . . . . . . . . . . . . . . . . . . . . . . . . . . . . . . . . . . . . . . . . . . . . . . . . . . . . . . . . . . . . . . . . . . . . . . . . . . . . . . . . . . . . . . . . . . . . . . . . . . . . . . . . . . . . . . . . . . . . . . . . . . . . . . . . . . . . . . . . . . . . . . . . . . . . . . . . . . . . . . . . . . . . . . . . . . . . . .Dimensio ns
. . . . . . . . . . . . . . . . . . . . . . . . . . . . . . . . . . . . . . . . . . . . . . . . . . . . . . . . . . . . . . . . . . . . . . . . . . . . . . . . . . . . . . . . . . . . . . . . . . . . . . . . . . . . . . . . . . . . . . . . . . . . . . . . . . . . . . . . . . . . . . . . . . . . . . . . . . . . . . . . . . . . . . . . . . . . . . . . . . . . . . . . . . . . . . . . . . . . . . . . . . . . . . . . . . . . . . . . . . . . . . . . . . . . . . . . . . . . . . . . . . . . . . . . . . . . . . . . . . . . . . . . . . . . . . . . . . . . . . . .Weight
. . . . . . . . . . . . . . . . . . . . . . . . . . . . . . . . . . . . . . . . . . . . . . . . . . . . . . . . . . . . . . . . . . . . . . . . . . . . . . . . . . . . . . . . . . . . . . . . . . . . . . . . . . . . . . . . . . . . . . . . . . . . . . . . . . . . . . . . . . . . . . . . . . . . . . . . . . . . . . . . . . . . . . . . . . . . . . . . . . . . . . . . . . . . . . . . . . . . . . . . . . . . . . . . . . . . . . . . . . . . . . . . . . . . . . . . . . . . . . . . . . . . . . . . . . . . . . . . . . . . . . . . . . . . . . . . . . . . . . . .Po wer off
. . . . . . . . . . . . . . . . . . . . . . . . . . . . . . . . . . . . . . . . . . . . . . . . . . . . . . . . . . . . . . . . . . . . . . . . . . . . . . . . . . . . . . . . . . . . . . . . . . . . . . . . . . . . . . . . . . . . . . . . . . . . . . . . . . . . . . . . . . . . . . . . . . . . . . . . . . . . . . . . . . . . . . . . . . . . . . . . . . . . . . . . . . . . . . . . . . . . . . . . . . . . . . . . . . . . . . . . . . . . . . . . . . . . . . . . . . . . . . . . . . . . . . . . . . . . . . . . . . . . . . . . . . . . . . . . . . . . . . . .Po wer on
. . . . . . . . . . . . . . . . . . . . . . . . . . . . . . . . . . . . . . . . . . . . . . . . . . . . . . . . . . . . . . . . . . . . . . . . . . . . . . . . . . . . . . . . . . . . . . . . . . . . . . . . . . . . . . . . . . . . . . . . . . . . . . . . . . . . . . . . . . . . . . . . . . . . . . . . . . . . . . . . . . . . . . . . . . . . . . . . . . . . . . . . . . . . . . . . . . . . . . . . . . . . . . . . . . . . . . . . . . . . . . . . . . . . . . . . . . . . . . . . . . . . . . . . . . . . . . . . . . . . . . . . . . . . . . . . . . . . . . . .Po wer-saving mode
. . . . . . . . . . . . . . . . . . . . . . . . . . . . . . . . . . . . . . . . . . . . . . . . . . . . . . . . . . . . . . . . . . . . . . . . . . . . . . . . . . . . . . . . . . . . . . . . . . . . . . . . . . . . . . . . . . . . . . . . . . . . . . . . . . . . . . . . . . . . . . . . . . . . . . . . . . . . . . . . . . . . . . . . . . . . . . . . . . . . . . . . . . . . . . . . . . . . . . . . . . . . . . . . . . . . . . . . . . . . . . . . . . . . . . . . . . . . . . . . . . . . . . . . . . . . . . . . . . . . . . . . . . . . . . . . . . . . . . . .Po wer-saving mode: daisy chain
. . . . . . . . . . . . . . . . . . . . . . . . . . . . . . . . . . . . . . . . . . . . . . . . . . . . . . . . . . . . . . . . . . . . . . . . . . . . . . . . . . . . . . . . . . . . . . . . . . . . . . . . . . . . . . . . . . . . . . . . . . . . . . . . . . . . . . . . . . . . . . . . . . . . . . . . . . . . . . . . . . . . . . . . . . . . . . . . . . . . . . . . . . . . . . . . . . . . . . . . . . . . . . . . . . . . . . . . . . . . . . . . . . . . . . . . . . . . . . . . . . . . . . . . . . . . . . . . . . . . . . . . . . . . . . . . . . . . . . . .Po wer-saving mode: manage d by the PC/Mac
. . . . . . . . . . . . . . . . . . . . . . . . . . . . . . . . . . . . . . . . . . . . . . . . . . . . . . . . . . . . . . . . . . . . . . . . . . . . . . . . . . . . . . . . . . . . . . . . . . . . . . . . . . . . . . . . . . . . . . . . . . . . . . . . . . . . . . . . . . . . . . . . . . . . . . . . . . . . . . . . . . . . . . . . . . . . . . . . . . . . . . . . . . . . . . . . . . . . . . . . . . . . . . . . . . . . . . . . . . . . . . . . . . . . . . . . . . . . . . . . . . . . . . . . . . . . . . . . . . . . . . . . . . . . . . . . . . . . . . . .Receiving power
4
4
4
4
4
5
5
5
5
7
8
8
8
8
9
9
9
9
9
9
10
10
10
10
12
12
12
14
14
14
14
14
15
15
15
16
Page 3

. . . . . . . . . . . . . . . . . . . . . . . . . . . . . . . . . . . . . . . . . . . . . . . . . . . . . . . . . . . . . . . . . . . . . . . . . . . . . . . . . . . . . . . . . . . . . . . . . . . . . . . . . . . . . . . . . . . . . . . . . . . . . . . . . . . . . . . . . . . . . . . . . . . . . . . . . . . . . . . . . . . . . . . . . . . . . . . . . . . . . . . . . . . . . . . . . . . . . . . . . . . . . . . . . . . . . . . . . . . . . . . . . . . . . . . . . . . . . . . . . . . . . . . . . . . . . . . . . . . . . . . . . . . . . . . . . . . . . . . .
. . . . . . . . . . . . . . . . . . . . . . . . . . . . . . . . . . . . . . . . . . . . . . . . . . . . . . . . . . . . . . . . . . . . . . . . . . . . . . . . . . . . . . . . . . . . . . . . . . . . . . . . . . . . . . . . . . . . . . . . . . . . . . . . . . . . . . . . . . . . . . . . . . . . . . . . . . . . . . . . . . . . . . . . . . . . . . . . . . . . . . . . . . . . . . . . . . . . . . . . . . . . . . . . . . . . . . . . . . . . . . . . . . . . . . . . . . . . . . . . . . . . . . . . . . . . . . . . . . . . . . . . . . . . . . . . . . . . . . . .
. . . . . . . . . . . . . . . . . . . . . . . . . . . . . . . . . . . . . . . . . . . . . . . . . . . . . . . . . . . . . . . . . . . . . . . . . . . . . . . . . . . . . . . . . . . . . . . . . . . . . . . . . . . . . . . . . . . . . . . . . . . . . . . . . . . . . . . . . . . . . . . . . . . . . . . . . . . . . . . . . . . . . . . . . . . . . . . . . . . . . . . . . . . . . . . . . . . . . . . . . . . . . . . . . . . . . . . . . . . . . . . . . . . . . . . . . . . . . . . . . . . . . . . . . . . . . . . . . . . . . . . . . . . . . . . . . . . . . . . .
. . . . . . . . . . . . . . . . . . . . . . . . . . . . . . . . . . . . . . . . . . . . . . . . . . . . . . . . . . . . . . . . . . . . . . . . . . . . . . . . . . . . . . . . . . . . . . . . . . . . . . . . . . . . . . . . . . . . . . . . . . . . . . . . . . . . . . . . . . . . . . . . . . . . . . . . . . . . . . . . . . . . . . . . . . . . . . . . . . . . . . . . . . . . . . . . . . . . . . . . . . . . . . . . . . . . . . . . . . . . . . . . . . . . . . . . . . . . . . . . . . . . . . . . . . . . . . . . . . . . . . . . . . . . . . . . . . . . . . . .
. . . . . . . . . . . . . . . . . . . . . . . . . . . . . . . . . . . . . . . . . . . . . . . . . . . . . . . . . . . . . . . . . . . . . . . . . . . . . . . . . . . . . . . . . . . . . . . . . . . . . . . . . . . . . . . . . . . . . . . . . . . . . . . . . . . . . . . . . . . . . . . . . . . . . . . . . . . . . . . . . . . . . . . . . . . . . . . . . . . . . . . . . . . . . . . . . . . . . . . . . . . . . . . . . . . . . . . . . . . . . . . . . . . . . . . . . . . . . . . . . . . . . . . . . . . . . . . . . . . . . . . . . . . . . . . . . . . . . . . .
. . . . . . . . . . . . . . . . . . . . . . . . . . . . . . . . . . . . . . . . . . . . . . . . . . . . . . . . . . . . . . . . . . . . . . . . . . . . . . . . . . . . . . . . . . . . . . . . . . . . . . . . . . . . . . . . . . . . . . . . . . . . . . . . . . . . . . . . . . . . . . . . . . . . . . . . . . . . . . . . . . . . . . . . . . . . . . . . . . . . . . . . . . . . . . . . . . . . . . . . . . . . . . . . . . . . . . . . . . . . . . . . . . . . . . . . . . . . . . . . . . . . . . . . . . . . . . . . . . . . . . . . . . . . . . . . . . . . . . . .
. . . . . . . . . . . . . . . . . . . . . . . . . . . . . . . . . . . . . . . . . . . . . . . . . . . . . . . . . . . . . . . . . . . . . . . . . . . . . . . . . . . . . . . . . . . . . . . . . . . . . . . . . . . . . . . . . . . . . . . . . . . . . . . . . . . . . . . . . . . . . . . . . . . . . . . . . . . . . . . . . . . . . . . . . . . . . . . . . . . . . . . . . . . . . . . . . . . . . . . . . . . . . . . . . . . . . . . . . . . . . . . . . . . . . . . . . . . . . . . . . . . . . . . . . . . . . . . . . . . . . . . . . . . . . . . . . . . . . . . .
. . . . . . . . . . . . . . . . . . . . . . . . . . . . . . . . . . . . . . . . . . . . . . . . . . . . . . . . . . . . . . . . . . . . . . . . . . . . . . . . . . . . . . . . . . . . . . . . . . . . . . . . . . . . . . . . . . . . . . . . . . . . . . . . . . . . . . . . . . . . . . . . . . . . . . . . . . . . . . . . . . . . . . . . . . . . . . . . . . . . . . . . . . . . . . . . . . . . . . . . . . . . . . . . . . . . . . . . . . . . . . . . . . . . . . . . . . . . . . . . . . . . . . . . . . . . . . . . . . . . . . . . . . . . . . . . . . . . . . . .
. . . . . . . . . . . . . . . . . . . . . . . . . . . . . . . . . . . . . . . . . . . . . . . . . . . . . . . . . . . . . . . . . . . . . . . . . . . . . . . . . . . . . . . . . . . . . . . . . . . . . . . . . . . . . . . . . . . . . . . . . . . . . . . . . . . . . . . . . . . . . . . . . . . . . . . . . . . . . . . . . . . . . . . . . . . . . . . . . . . . . . . . . . . . . . . . . . . . . . . . . . . . . . . . . . . . . . . . . . . . . . . . . . . . . . . . . . . . . . . . . . . . . . . . . . . . . . . . . . . . . . . . . . . . . . . . . . . . . . . .
. . . . . . . . . . . . . . . . . . . . . . . . . . . . . . . . . . . . . . . . . . . . . . . . . . . . . . . . . . . . . . . . . . . . . . . . . . . . . . . . . . . . . . . . . . . . . . . . . . . . . . . . . . . . . . . . . . . . . . . . . . . . . . . . . . . . . . . . . . . . . . . . . . . . . . . . . . . . . . . . . . . . . . . . . . . . . . . . . . . . . . . . . . . . . . . . . . . . . . . . . . . . . . . . . . . . . . . . . . . . . . . . . . . . . . . . . . . . . . . . . . . . . . . . . . . . . . . . . . . . . . . . . . . . . . . . . . . . . . . .
. . . . . . . . . . . . . . . . . . . . . . . . . . . . . . . . . . . . . . . . . . . . . . . . . . . . . . . . . . . . . . . . . . . . . . . . . . . . . . . . . . . . . . . . . . . . . . . . . . . . . . . . . . . . . . . . . . . . . . . . . . . . . . . . . . . . . . . . . . . . . . . . . . . . . . . . . . . . . . . . . . . . . . . . . . . . . . . . . . . . . . . . . . . . . . . . . . . . . . . . . . . . . . . . . . . . . . . . . . . . . . . . . . . . . . . . . . . . . . . . . . . . . . . . . . . . . . . . . . . . . . . . . . . . . . . . . . . . . . . .
. . . . . . . . . . . . . . . . . . . . . . . . . . . . . . . . . . . . . . . . . . . . . . . . . . . . . . . . . . . . . . . . . . . . . . . . . . . . . . . . . . . . . . . . . . . . . . . . . . . . . . . . . . . . . . . . . . . . . . . . . . . . . . . . . . . . . . . . . . . . . . . . . . . . . . . . . . . . . . . . . . . . . . . . . . . . . . . . . . . . . . . . . . . . . . . . . . . . . . . . . . . . . . . . . . . . . . . . . . . . . . . . . . . . . . . . . . . . . . . . . . . . . . . . . . . . . . . . . . . . . . . . . . . . . . . . . . . . . . . .
. . . . . . . . . . . . . . . . . . . . . . . . . . . . . . . . . . . . . . . . . . . . . . . . . . . . . . . . . . . . . . . . . . . . . . . . . . . . . . . . . . . . . . . . . . . . . . . . . . . . . . . . . . . . . . . . . . . . . . . . . . . . . . . . . . . . . . . . . . . . . . . . . . . . . . . . . . . . . . . . . . . . . . . . . . . . . . . . . . . . . . . . . . . . . . . . . . . . . . . . . . . . . . . . . . . . . . . . . . . . . . . . . . . . . . . . . . . . . . . . . . . . . . . . . . . . . . . . . . . . . . . . . . . . . . . . . . . . . . . .
. . . . . . . . . . . . . . . . . . . . . . . . . . . . . . . . . . . . . . . . . . . . . . . . . . . . . . . . . . . . . . . . . . . . . . . . . . . . . . . . . . . . . . . . . . . . . . . . . . . . . . . . . . . . . . . . . . . . . . . . . . . . . . . . . . . . . . . . . . . . . . . . . . . . . . . . . . . . . . . . . . . . . . . . . . . . . . . . . . . . . . . . . . . . . . . . . . . . . . . . . . . . . . . . . . . . . . . . . . . . . . . . . . . . . . . . . . . . . . . . . . . . . . . . . . . . . . . . . . . . . . . . . . . . . . . . . . . . . . . .
. . . . . . . . . . . . . . . . . . . . . . . . . . . . . . . . . . . . . . . . . . . . . . . . . . . . . . . . . . . . . . . . . . . . . . . . . . . . . . . . . . . . . . . . . . . . . . . . . . . . . . . . . . . . . . . . . . . . . . . . . . . . . . . . . . . . . . . . . . . . . . . . . . . . . . . . . . . . . . . . . . . . . . . . . . . . . . . . . . . . . . . . . . . . . . . . . . . . . . . . . . . . . . . . . . . . . . . . . . . . . . . . . . . . . . . . . . . . . . . . . . . . . . . . . . . . . . . . . . . . . . . . . . . . . . . . . . . . . . . .
. . . . . . . . . . . . . . . . . . . . . . . . . . . . . . . . . . . . . . . . . . . . . . . . . . . . . . . . . . . . . . . . . . . . . . . . . . . . . . . . . . . . . . . . . . . . . . . . . . . . . . . . . . . . . . . . . . . . . . . . . . . . . . . . . . . . . . . . . . . . . . . . . . . . . . . . . . . . . . . . . . . . . . . . . . . . . . . . . . . . . . . . . . . . . . . . . . . . . . . . . . . . . . . . . . . . . . . . . . . . . . . . . . . . . . . . . . . . . . . . . . . . . . . . . . . . . . . . . . . . . . . . . . . . . . . . . . . . . . . .
. . . . . . . . . . . . . . . . . . . . . . . . . . . . . . . . . . . . . . . . . . . . . . . . . . . . . . . . . . . . . . . . . . . . . . . . . . . . . . . . . . . . . . . . . . . . . . . . . . . . . . . . . . . . . . . . . . . . . . . . . . . . . . . . . . . . . . . . . . . . . . . . . . . . . . . . . . . . . . . . . . . . . . . . . . . . . . . . . . . . . . . . . . . . . . . . . . . . . . . . . . . . . . . . . . . . . . . . . . . . . . . . . . . . . . . . . . . . . . . . . . . . . . . . . . . . . . . . . . . . . . . . . . . . . . . . . . . . . . . .
. . . . . . . . . . . . . . . . . . . . . . . . . . . . . . . . . . . . . . . . . . . . . . . . . . . . . . . . . . . . . . . . . . . . . . . . . . . . . . . . . . . . . . . . . . . . . . . . . . . . . . . . . . . . . . . . . . . . . . . . . . . . . . . . . . . . . . . . . . . . . . . . . . . . . . . . . . . . . . . . . . . . . . . . . . . . . . . . . . . . . . . . . . . . . . . . . . . . . . . . . . . . . . . . . . . . . . . . . . . . . . . . . . . . . . . . . . . . . . . . . . . . . . . . . . . . . . . . . . . . . . . . . . . . . . . . . . . . . . . .
. . . . . . . . . . . . . . . . . . . . . . . . . . . . . . . . . . . . . . . . . . . . . . . . . . . . . . . . . . . . . . . . . . . . . . . . . . . . . . . . . . . . . . . . . . . . . . . . . . . . . . . . . . . . . . . . . . . . . . . . . . . . . . . . . . . . . . . . . . . . . . . . . . . . . . . . . . . . . . . . . . . . . . . . . . . . . . . . . . . . . . . . . . . . . . . . . . . . . . . . . . . . . . . . . . . . . . . . . . . . . . . . . . . . . . . . . . . . . . . . . . . . . . . . . . . . . . . . . . . . . . . . . . . . . . . . . . . . . . . .
. . . . . . . . . . . . . . . . . . . . . . . . . . . . . . . . . . . . . . . . . . . . . . . . . . . . . . . . . . . . . . . . . . . . . . . . . . . . . . . . . . . . . . . . . . . . . . . . . . . . . . . . . . . . . . . . . . . . . . . . . . . . . . . . . . . . . . . . . . . . . . . . . . . . . . . . . . . . . . . . . . . . . . . . . . . . . . . . . . . . . . . . . . . . . . . . . . . . . . . . . . . . . . . . . . . . . . . . . . . . . . . . . . . . . . . . . . . . . . . . . . . . . . . . . . . . . . . . . . . . . . . . . . . . . . . . . . . . . . . .
5 Cables
USB-C
Cables
6 Getting Connected
Macs and Thunderbolt 3
Windows and Thunderbolt 3
Step 1 - Connect the interface cable
Step 2 - Connect the power supply
Step 3 - Launch LaCie Setup Assistant
Disconnecting the hard drive
7 Daisy Chain and Power Delivery
Daisy chain Thunderbolt 3 devices
How to daisy chain
Power delivery
8 Unmounting Your Hard Drive
Mac
Windows 8 / Windows 10
9 Formatting and Partitioning
About file system formats
Formatting instructions
. . . . . . . . . . . . . . . . . . . . . . . . . . . . . . . . . . . . . . . . . . . . . . . . . . . . . . . . . . . . . . . . . . . . . . . . . . . . . . . . . . . . . . . . . . . . . . . . . . . . . . . . . . . . . . . . . . . . . . . . . . . . . . . . . . . . . . . . . . . . . . . . . . . . . . . . . . . . . . . . . . . . . . . . . . . . . . . . . . . . . . . . . . . . . . . . . . . . . . . . . . . . . . . . . . . . . . . . . . . . . . . . . . . . . . . . . . . . . . . . . . . . . . . . . . . . . . . . . . . . . . . . . . . . . . . . . . . . . . . .Thunderbolt 3 (USB-C) cable
. . . . . . . . . . . . . . . . . . . . . . . . . . . . . . . . . . . . . . . . . . . . . . . . . . . . . . . . . . . . . . . . . . . . . . . . . . . . . . . . . . . . . . . . . . . . . . . . . . . . . . . . . . . . . . . . . . . . . . . . . . . . . . . . . . . . . . . . . . . . . . . . . . . . . . . . . . . . . . . . . . . . . . . . . . . . . . . . . . . . . . . . . . . . . . . . . . . . . . . . . . . . . . . . . . . . . . . . . . . . . . . . . . . . . . . . . . . . . . . . . . . . . . . . . . . . . . . . . . . . . . . . . . . . . . . . . . . . . . . .USB 3.1 (USB-C) –to –USB Type A cable
. . . . . . . . . . . . . . . . . . . . . . . . . . . . . . . . . . . . . . . . . . . . . . . . . . . . . . . . . . . . . . . . . . . . . . . . . . . . . . . . . . . . . . . . . . . . . . . . . . . . . . . . . . . . . . . . . . . . . . . . . . . . . . . . . . . . . . . . . . . . . . . . . . . . . . . . . . . . . . . . . . . . . . . . . . . . . . . . . . . . . . . . . . . . . . . . . . . . . . . . . . . . . . . . . . . . . . . . . . . . . . . . . . . . . . . . . . . . . . . . . . . . . . . . . . . . . . . . . . . . . . . . . . . . . . . . . . . . . . . .Launch LaCie Setup Assistant - Windows
. . . . . . . . . . . . . . . . . . . . . . . . . . . . . . . . . . . . . . . . . . . . . . . . . . . . . . . . . . . . . . . . . . . . . . . . . . . . . . . . . . . . . . . . . . . . . . . . . . . . . . . . . . . . . . . . . . . . . . . . . . . . . . . . . . . . . . . . . . . . . . . . . . . . . . . . . . . . . . . . . . . . . . . . . . . . . . . . . . . . . . . . . . . . . . . . . . . . . . . . . . . . . . . . . . . . . . . . . . . . . . . . . . . . . . . . . . . . . . . . . . . . . . . . . . . . . . . . . . . . . . . . . . . . . . . . . . . . . . . .LaCie Setup Assistant - Mac
. . . . . . . . . . . . . . . . . . . . . . . . . . . . . . . . . . . . . . . . . . . . . . . . . . . . . . . . . . . . . . . . . . . . . . . . . . . . . . . . . . . . . . . . . . . . . . . . . . . . . . . . . . . . . . . . . . . . . . . . . . . . . . . . . . . . . . . . . . . . . . . . . . . . . . . . . . . . . . . . . . . . . . . . . . . . . . . . . . . . . . . . . . . . . . . . . . . . . . . . . . . . . . . . . . . . . . . . . . . . . . . . . . . . . . . . . . . . . . . . . . . . . . . . . . . . . . . . . . . . . . . . . . . . . . . . . . . . . . . .Se tup
. . . . . . . . . . . . . . . . . . . . . . . . . . . . . . . . . . . . . . . . . . . . . . . . . . . . . . . . . . . . . . . . . . . . . . . . . . . . . . . . . . . . . . . . . . . . . . . . . . . . . . . . . . . . . . . . . . . . . . . . . . . . . . . . . . . . . . . . . . . . . . . . . . . . . . . . . . . . . . . . . . . . . . . . . . . . . . . . . . . . . . . . . . . . . . . . . . . . . . . . . . . . . . . . . . . . . . . . . . . . . . . . . . . . . . . . . . . . . . . . . . . . . . . . . . . . . . . . . . . . . . . . . . . . . . . . . . . . . . . .Dais y chain: idle mode
. . . . . . . . . . . . . . . . . . . . . . . . . . . . . . . . . . . . . . . . . . . . . . . . . . . . . . . . . . . . . . . . . . . . . . . . . . . . . . . . . . . . . . . . . . . . . . . . . . . . . . . . . . . . . . . . . . . . . . . . . . . . . . . . . . . . . . . . . . . . . . . . . . . . . . . . . . . . . . . . . . . . . . . . . . . . . . . . . . . . . . . . . . . . . . . . . . . . . . . . . . . . . . . . . . . . . . . . . . . . . . . . . . . . . . . . . . . . . . . . . . . . . . . . . . . . . . . . . . . . . . . . . . . . . . . . . . . . . . . .Eject via Finder window
. . . . . . . . . . . . . . . . . . . . . . . . . . . . . . . . . . . . . . . . . . . . . . . . . . . . . . . . . . . . . . . . . . . . . . . . . . . . . . . . . . . . . . . . . . . . . . . . . . . . . . . . . . . . . . . . . . . . . . . . . . . . . . . . . . . . . . . . . . . . . . . . . . . . . . . . . . . . . . . . . . . . . . . . . . . . . . . . . . . . . . . . . . . . . . . . . . . . . . . . . . . . . . . . . . . . . . . . . . . . . . . . . . . . . . . . . . . . . . . . . . . . . . . . . . . . . . . . . . . . . . . . . . . . . . . . . . . . . . . .Eject via Desktop
. . . . . . . . . . . . . . . . . . . . . . . . . . . . . . . . . . . . . . . . . . . . . . . . . . . . . . . . . . . . . . . . . . . . . . . . . . . . . . . . . . . . . . . . . . . . . . . . . . . . . . . . . . . . . . . . . . . . . . . . . . . . . . . . . . . . . . . . . . . . . . . . . . . . . . . . . . . . . . . . . . . . . . . . . . . . . . . . . . . . . . . . . . . . . . . . . . . . . . . . . . . . . . . . . . . . . . . . . . . . . . . . . . . . . . . . . . . . . . . . . . . . . . . . . . . . . . . . . . . . . . . . . . . . . . . . . . . . . . . .Mac
. . . . . . . . . . . . . . . . . . . . . . . . . . . . . . . . . . . . . . . . . . . . . . . . . . . . . . . . . . . . . . . . . . . . . . . . . . . . . . . . . . . . . . . . . . . . . . . . . . . . . . . . . . . . . . . . . . . . . . . . . . . . . . . . . . . . . . . . . . . . . . . . . . . . . . . . . . . . . . . . . . . . . . . . . . . . . . . . . . . . . . . . . . . . . . . . . . . . . . . . . . . . . . . . . . . . . . . . . . . . . . . . . . . . . . . . . . . . . . . . . . . . . . . . . . . . . . . . . . . . . . . . . . . . . . . . . . . . . . . .OS X version 10.11 or later
. . . . . . . . . . . . . . . . . . . . . . . . . . . . . . . . . . . . . . . . . . . . . . . . . . . . . . . . . . . . . . . . . . . . . . . . . . . . . . . . . . . . . . . . . . . . . . . . . . . . . . . . . . . . . . . . . . . . . . . . . . . . . . . . . . . . . . . . . . . . . . . . . . . . . . . . . . . . . . . . . . . . . . . . . . . . . . . . . . . . . . . . . . . . . . . . . . . . . . . . . . . . . . . . . . . . . . . . . . . . . . . . . . . . . . . . . . . . . . . . . . . . . . . . . . . . . . . . . . . . . . . . . . . . . . . . . . . . . . . .OS X version 10.6 to 10.10
. . . . . . . . . . . . . . . . . . . . . . . . . . . . . . . . . . . . . . . . . . . . . . . . . . . . . . . . . . . . . . . . . . . . . . . . . . . . . . . . . . . . . . . . . . . . . . . . . . . . . . . . . . . . . . . . . . . . . . . . . . . . . . . . . . . . . . . . . . . . . . . . . . . . . . . . . . . . . . . . . . . . . . . . . . . . . . . . . . . . . . . . . . . . . . . . . . . . . . . . . . . . . . . . . . . . . . . . . . . . . . . . . . . . . . . . . . . . . . . . . . . . . . . . . . . . . . . . . . . . . . . . . . . . . . . . . . . . . . . .Windows
17
17
17
17
18
20
20
20
20
21
22
22
23
23
24
25
25
25
26
26
27
27
27
27
27
29
29
29
30
30
30
30
Page 4

Regulatory Compliance
FCC Declaraon of Conformance
This device complies with Part 15 of the FCC Rules. Operation is subject to the following two conditions: (1)
this device may not cause harmful interference, and (2) this device must accept any interference received,
including interference that may cause undesired operation.
FCC Class A Informaon
This equipment has been tested and found to comply with the limits for a Class A digital device, pursuant to
Part 15 of the FCC Rules. These limits are designed to provide reasonable protection against harmful
interference in a residential installation. This equipment generates, uses and can radiate radio frequency
energy and, if not installed and used in accordance with the instructions, may cause harmful interference to
radio communications. However, there is no guarantee that interference will not occur in a particular
installation.
If this equipment does cause harmful interference to radio or television reception, which can be determined
by turning the equipment off and on, the user is encouraged to try to correct the interference by one of the
following measures:
Reorient or relocate the receiving antenna.
Increase the separation between the equipment and receiver.
Connect the equipment into an outlet on a circuit different from that to which the receiver is connected.
Consult the dealer or an experienced radio/TV technician for help.
This device complies with Part 15 of the FCC Rules. Operation is subject to the following two conditions: (1)
This device may not cause harmful interference, and (2) this device must accept any interference received,
including interference that may cause undesired operation.
FCC Cauon
Any changes or modifications not expressly approved by the party responsible for compliance could void
the user's authority to operate this equipment.
Important Note: FCC Radiaon Exposure Statement
This equipment complies with FCC radiation exposure limits set forth for an uncontrolled environment. This
equipment should be installed and operated with minimum distance 20cm between the radiator and your
body. This transmitter must not be co-located or operating in conjunction with any other antenna or
4LaCie d2 Thunde rbolt 3 USB-C
3/30/17
Page 5

transmitter. The availability of some specific channels and/or operational frequency bands are country
dependent and are firmware programmed at the factory to match the intended destination. The firmware
setting is not accessible by the end user.
Industry Canada
This device complies with RSS-210 of the Industry Canada Rules. Operation is subject to the following two
conditions: (1) This device may not cause harmful interference, and (2) this device must accept any
interference received, including interference that may cause undesired operation.
Ce dispositif est conforme à la norme CNR-210 d'Industrie Canada applicable aux appareils radio exempts
de licence. Son fonctionnement est sujet aux deux conditions suivantes: (1) le dispositif ne doit pas
produire de brouillage préjudiciable, et (2) ce dispositif doit accepter tout brouillage reçu, y compris un
brouillage susceptible de provoquer un fonctionnement indésirable.
Important Note for mobile device use
Radiation Exposure Statement: This equipment complies with IC radiation exposure limits set forth for an
uncontrolled environment. This equipment should be installed and operated with minimum distance 20cm
between the radiator & your body.
Note Importante pour l'ulisaon de disposifs
mobiles
Déclaration d'exposition aux radiations:
Cet équipement est conforme aux limites d'exposition aux rayonnements IC établies pour un
environnement non contrôlé. Cet équipement doit être installé et utilisé avec un minimum de 20 cm de
distance entre la source de rayonnement et votre corps.
Europe – EU Declaraon of Conformity
This device complies with the essential requirements of the EMC Directive 2004/108/EC. The following test
methods have been applied in order to prove presumption of conformity with the essential requirements
of the EMC Directive 2004/108/EC:
EN 60950-1:2006/AC:2011: Information technology equipment - Safety - Part 1: General requirements
EN 55022: 2010/AC:2011: Information technology equipment - Radio disturbance characteristics
Limits and methods of measurement
EN 55024: 2010: Information technology equipment - Immunity characteristics - Limits and methods of
measurement
5LaCie d2 Thunde rbolt 3 USB-C
3/30/17
Page 6

Česky
[Czech]
LaCie tímto prohlašuje, že tento direct attached storage device je ve shodě se základními
požadavky a dalšími příslušnými ustanoveními směrnice 2004/5/ES.
Dansk
[Danish]
Undertegnede LaCie erklærer herved, at følgende udstyr direct attached storage device
overholder de væsentlige krav og øvrige relevante krav i direktiv 2004/5/EF.
Deutsch
[German]
Hiermit erklärt LaCie, dass sich das Gerät direct attached storage device in
Übereinstimmung mit den grundlegenden Anforderungen und den übrigen einschlägigen
Bestimmungen der Richtlinie 2004/5/EG befindet.
Eesti
[Estonian]
Käesolevaga kinnitab LaCie seadme direct attached storage device vastavust direktiivi
2004/5/EÜ põhinõuetele ja nimetatud direktiivist tulenevatele teistele asjakohastele
sätetele.
English Hereby, LaCie, declares that this direct attached storage device is in compliance with the
essential requirements and other relevant provisions of Directive 2004/5/EC.
Español
[Spanish]
Por medio de la presente LaCie declara que el direct attached storage device cumple con
los requisitos esenciales y cualesquiera otras disposiciones aplicables o exigibles de la
Directiva 2004/5/CE.
Ελληνική
[Greek]
ΜΕ ΤΗΝ ΠΑΡΟΥΣ LaCieΔΗΛΩΝΕΙ direct attached storage device ΣΥΜΜΟΡΦΩΝΕΤΑΙ
ΠΡΟΣ ΤΙΣ ΟΥΣΙΩΔΕΙΣ ΑΠΑΙΤΗΣΕΙΣ ΚΑΙ ΤΙΣ ΛΟΙΠΕΣ ΣΧΕΤΙΚΕΣ ΔΙΑΤΑΞΕΙΣ ΤΗΣ ΟΔΗΓΙΑΣ
2004/5/ΕΚ.
Français
[French]
Par la présente LaCie déclare que l'appareil direct attached storage device est conforme
aux exigences essentielles et aux autres dispositions pertinentes de la directive
2004/5/CE.
Italiano
[Italian]
Con la presente LaCie dichiara che questo direct attached storage device è conforme ai
requisiti essenziali ed alle altre disposizioni pertinenti stabilite dalla direttiva 2004/5/CE.
Latviski
[Latvian]
Ar šo LaCie deklarē, ka direct attached storage device atbilst Direktīvas 2004/104/EK
būtiskajām prasībām un citiem ar to saistītajiem noteikumiem.
Lietuvių
[Lithuanian]
Šiuo LaCie deklaruoja, kad šis direct attached storage device atitinka esminius reikalavimus
ir kitas 2004/104/EB Direktyvos nuostatas.
Nederlands
[Dutch]
Hierbij verklaart LaCie dat het toestel direct attached storage device in overeenstemming
is met de essentiële eisen en de andere relevante bepalingen van richtlijn 2004/104/EG.
Malti
[Maltese]
Hawnhekk, LaCie, jiddikjara li dan direct attached storage device jikkonforma mal-ħtiġijiet
essenzjali u ma provvedimenti oħrajn relevanti li hemm fid-Dirrettiva 2004/104/EC.
Magyar
[Hungarian]
Alulírott, LaCie nyilatkozom, hogy a direct attached storage device megfelel a vonatkozó
alapvetõ követelményeknek és az 2004/104/EC irányelv egyéb elõírásainak.
Polski
[Polish]
Niniejszym LaCie oświadcza, że direct attached storage device jest zgodny z zasadniczymi
wymogami oraz pozostałymi stosownymi postanowieniami Dyrektywy 2004/104/EC.
Português
[Portuguese]
LaCie declara que este direct attached storage device está conforme com os requisitos
essenciais e outras disposições da Directiva 2004/104/CE.
6LaCie d2 Thunde rbolt 3 USB-C
3/30/17
Page 7

Slovensko
[Slovenian]
LaCie izjavlja, da je at direct attached storage device v skladu z bistvenimi zahtevami in
ostalimi relevantnimi določili direktive 2004/104/ES.
Slovensky
[Slovak]
LaCie týmto vyhlasuje, že direct attached storage device spĺňa základné požiadavky a
všetky príslušné ustanovenia Smernice 2004/104/ES.
Suomi
[Finnish]
LaCie vakuuttaa täten että direct attached storage device tyyppinen laite on direktiivin
2004/104/EY oleellisten vaatimusten ja sitä koskevien direktiivin muiden ehtojen
mukainen.
Svenska
[Swedish]
Härmed intygar LaCie att denna direct attached storage device står I överensstämmelse
med de väsentliga egenskapskrav och övriga relevanta bestämmelser som framgår av
direktiv 2004/104/EG.
Power source
Caution: Use the product with the provided power cable only.
Note: To protect your data, always follow the safe removal procedures for your operating
system when disconnecting your product.
7LaCie d2 Thunde rbolt 3 USB-C
3/30/17
Page 8

Introducon
Welcome to the LaCie d2 Thunderbolt™ 3 User Manual. Thunderbolt 3 supports transfer rates up to 40Gb/s,
making the LaCie d2 ideal for professional editors, photographers and graphic artists who work with
bandwidth-intensive content such as 4K video and 3D graphics.
You can get the latest tips regarding your product and updated technical information at LaCie customer
support.
Posion and stacking
Always make certain to place the LaCie d2 on a flat, even surface that can support the heat output and
airflow of a professional hard drive enclosure. For proper heat dissipation, the LaCie d2 is designed to stand
upright. DO NOT place the enclosure on its side when it is powered on.
The LaCie d2 does not support stacking. Doing so poses a severe risk that it will fall. DO NOT stack other
drives, enclosures, or equipment on top of the LaCie d2.
The warranty for your LaCie d2 will be voided if you:
Stack the LaCie d2 enclosure on another device.
Stack other drives, enclosures, or equipment on top of the LaCie d2.
Box content
LaCie d2
Thunderbolt 3 (USB-C) cable
USB 3.1 (USB-C) to USB 3.0/USB 2.0 adapter cable (compatible with Type A ports)
External power supply
Quick Install Guide
Soware suite
During installation, you have the option to install the following software utilities:
Intego® Backup Assistant (Mac®)
LaCie Genie® Timeline (Windows®)
Important info: Save your packaging. In the event that the hard drive enclosure should need to
be repaired or serviced, it must be returned in its original packaging.
8LaCie d2 Thunde rbolt 3 USB-C
3/30/17
Page 9
Minimum computer system requirements
The minimum operating system for your computer differs based upon the port you are using. Choose your
port and connect your LaCie device to a computer that meets the following minimum system requirements.
Thunderbolt 3
Mac OS Sierra or higher
Windows 10 or higher
USB
Mac OS X 10.10 or higher
Windows 8.1 or higher
Views of the hard drive enclosure
Front view
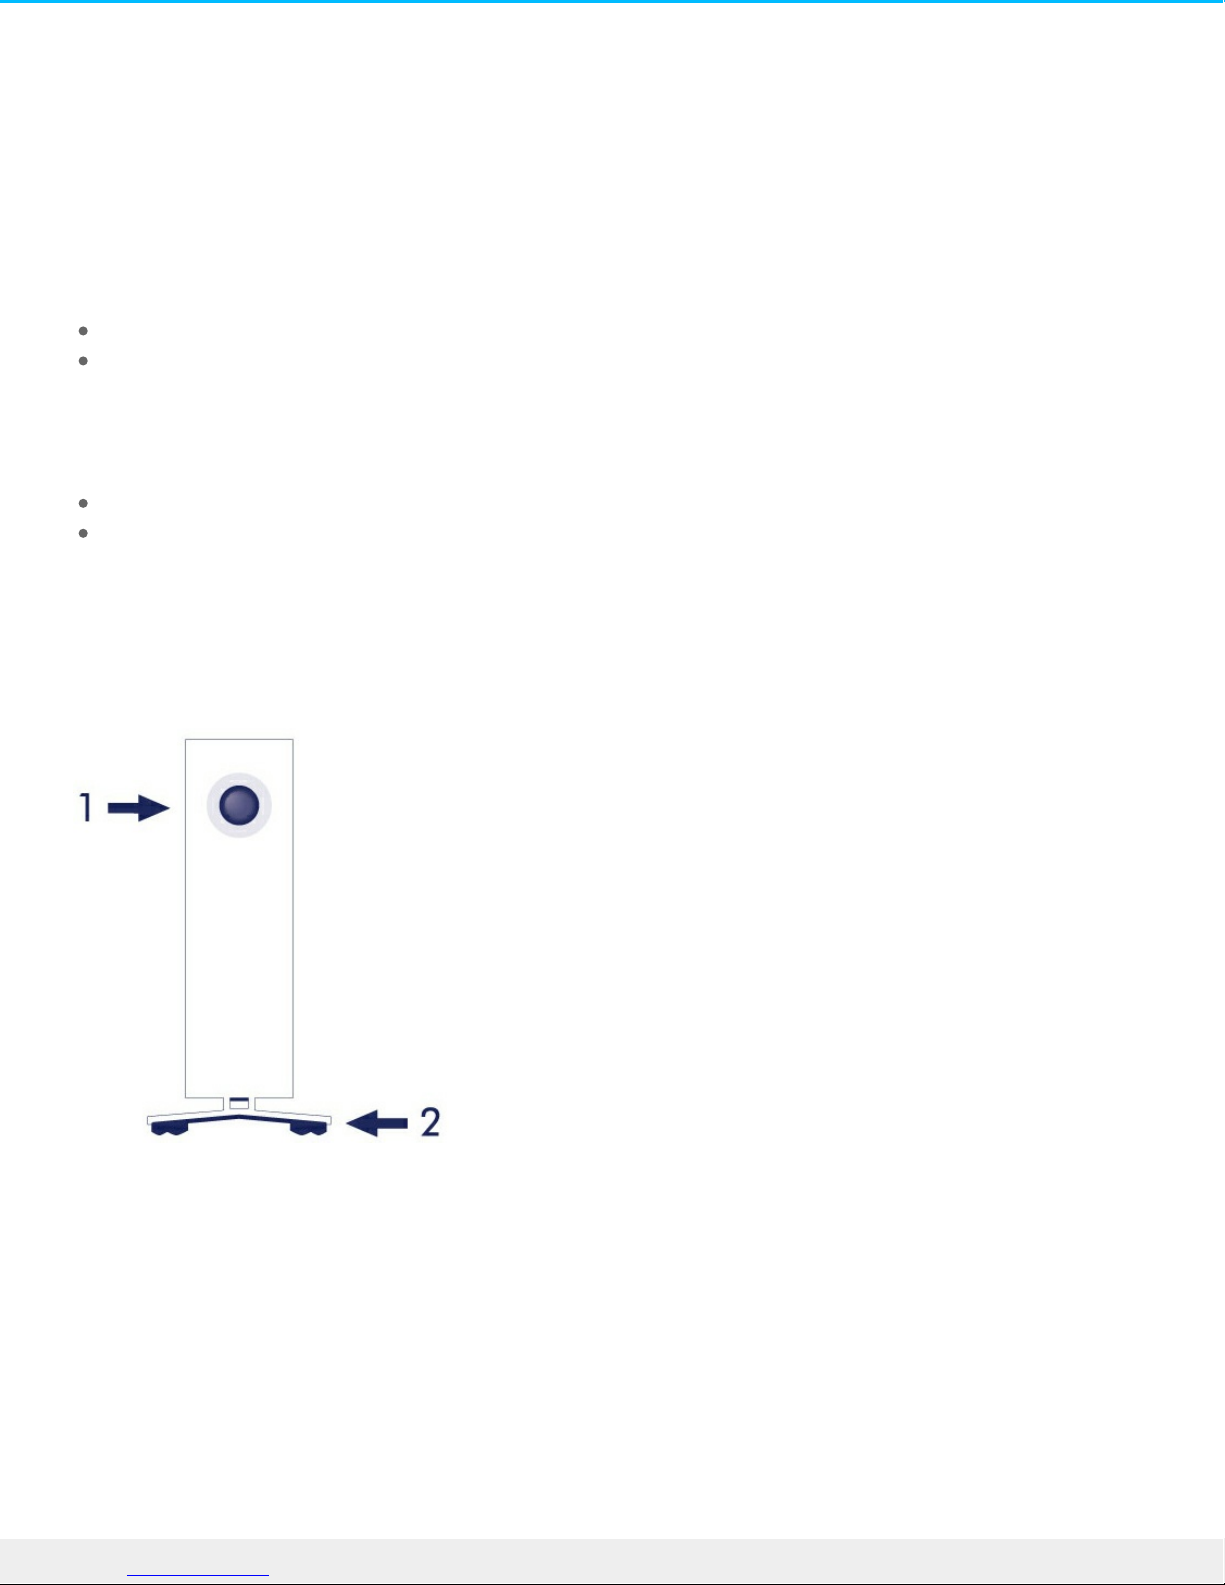
1. Hard drive status LED
2. Vibration-dampening rubber feet
Rear view
9LaCie d2 Thunde rbolt 3 USB-C
3/30/17
Page 10
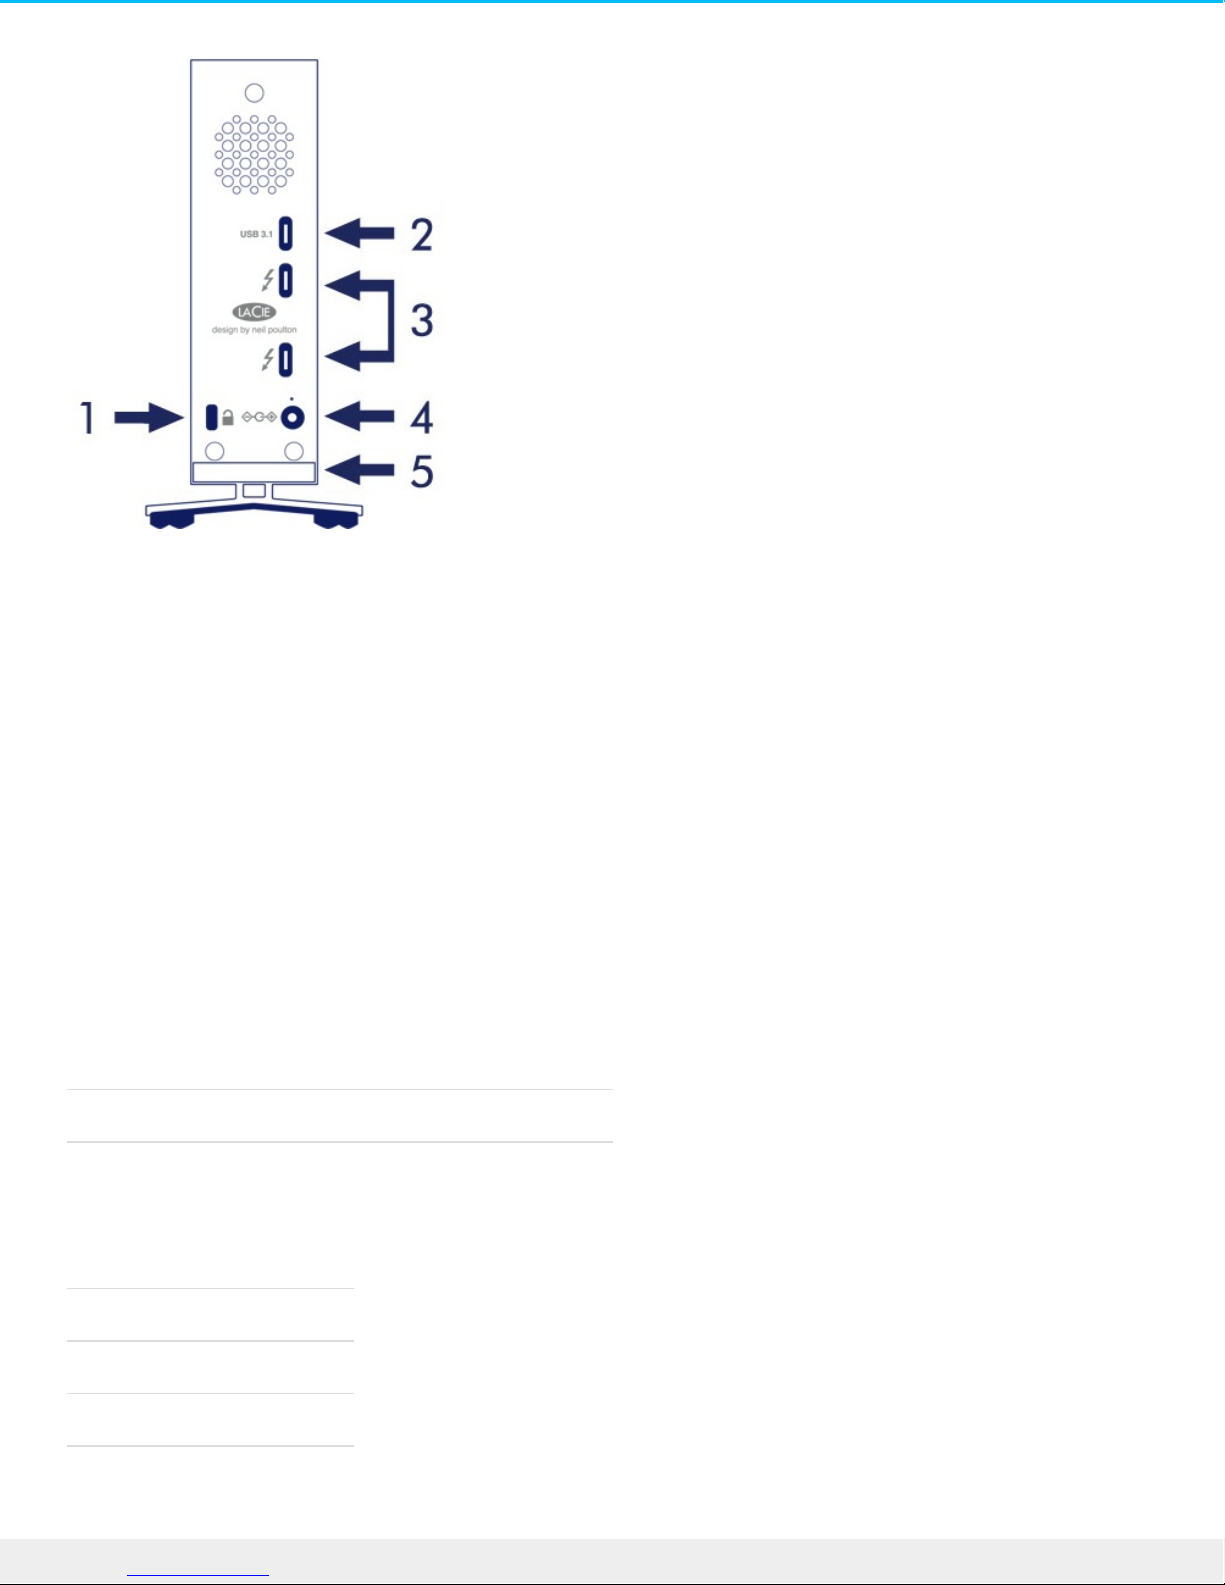
1. Kensington® lock slot
2. USB 3.1 port
3. Thunderbolt 3 ports (x2)
4. Power supply connection
5. Integrated cable lock
Technical specificaons
Power supply
100-240V; 50/60Hz; 60W
Dimensions
Width Depth Height
60 mm / 2.4 in 217 mm / 8.5 in 130 mm / 5.1 in
Weight
Capacity Weight
6TB 1.4 Kg / 3.0 lbs
8TB 1.4 Kg / 3.0 lbs
10TB 1.3 Kg / 2.9 lbs
10LaCie d2 Thunderbo lt 3 USB-C
3/30/17
Page 11

11LaCie d2 Thunderbo lt 3 USB-C
3/30/17
Page 12
LaCie d2 Thunderbolt 3 Advanced Storage
LaCie d2 Thunderbolt 3
The LaCie d2 Thunderbolt 3 features:
Desktop convenience
Aluminum front and all-metal enclosure
Two Thunderbolt 3 technology ports, up to 40Gb/s bi-directional per port
USB 3.1 port, up to 5Gb/s
Daisy chain Thunderbolt 3 devices (up to 6 Thunderbolt products, plus one USB-C or DisplayPort device)
Thunderbolt 3
Thunderbolt 3 features and support
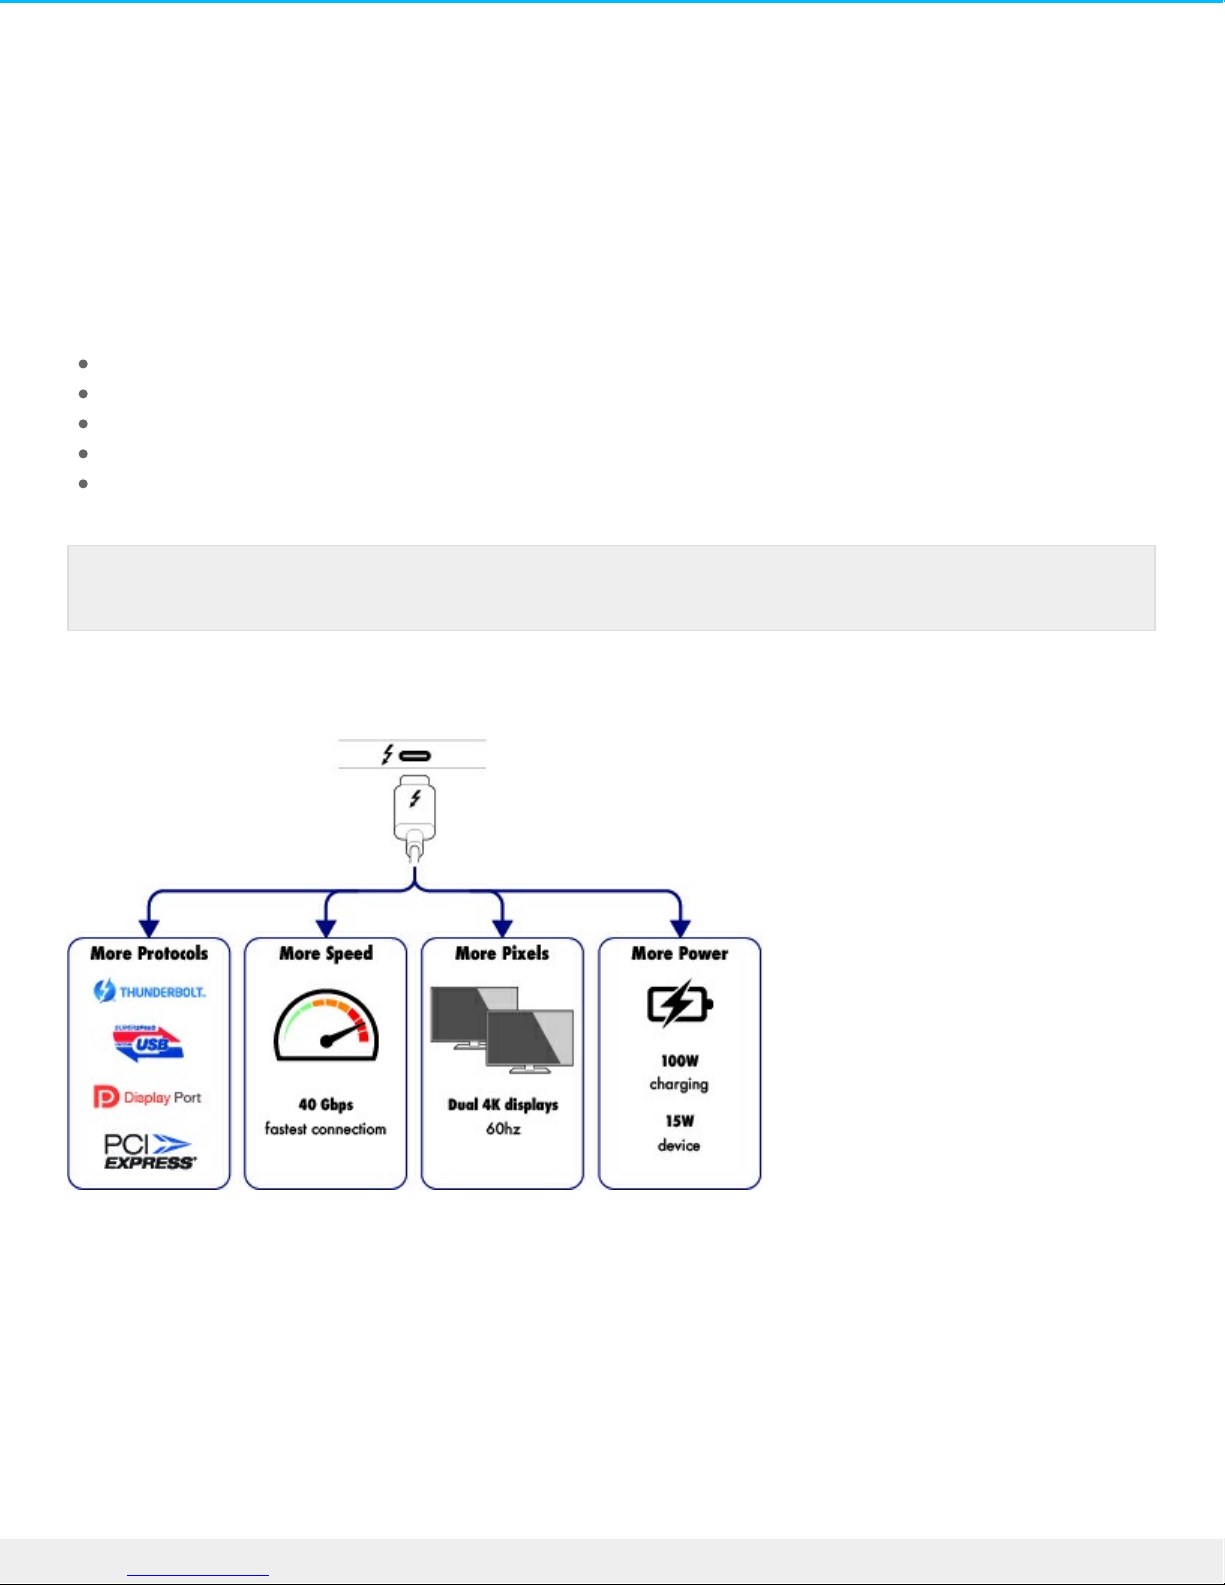
Thunderbolt 3 technology provides the fastest data and high-end video transfers over a single, versatile
connector. While previous generations of Thunderbolt technology offered impressive transfer rates up to
20Gb/s bi-directional, Thunderbolt 3 doubles the potential up to 40Gb/s bi-directional when connected to
other Thunderbolt 3 devices. Further, Thunderbolt 3 gives priority to the video stream, apportioning the
required bandwidth for playback. This is a critical advantage when working with high-end video and 3D
graphics.
Note: Any non-Thunderbolt 3 devices must be connected to the end of the daisy chain.
12LaCie d2 Thunderbo lt 3 USB-C
3/30/17
Page 13

Thunderbolt 3 uses a USB-C connector specially labeled with a thunderbolt icon. Since Thunderbolt 3 is
protocol agnostic, it supports connections from the following interfaces:
USB 2.0, USB 3.0 and USB 3.1
DisplayPort 1.1 and 1.2a
Thunderbolt 20Gb/s and Thunderbolt 40Gb/s
Ethernet (with adapter)
Non-Thunderbolt 3 devices that feature USB-C ports can be connected to the Thunderbolt 3 port to
terminate a daisy chain and, if compatible, to take advantage of the power delivery option for charging
batteries.
13LaCie d2 Thunderbo lt 3 USB-C
3/30/17
Page 14

System LEDs
Your LaCie hard drive features a multi-functional LED on the front of the drive.
LED locaons
The LED is a button that can be used to power on/off the LaCie d2.
Power off
Follow the steps below to turn the device off:
1. Make certain that the LaCie d2’s volumes are not being accessed.
2. Eject the LaCie d2’s volumes. See Unmounting Your Hard Drive for instructions. Once the volumes have
been properly ejected, the LaCie d2 enters power-saving mode.
3. Apply a long press, a minimum of four seconds, to the LED button. The LED turns solid blue before
turning off.
Power on
In most instances, the LaCie d2 powers on automatically when connected to a computer and an active
power source. However, the LED button can be used to power on the device if the following two conditions
are met:
The LaCie d2 was powered off using a long press
The LaCie d2 remains connected to the computer’s USB port and an active power source
To power on the LaCie d2, push the LED button for one second.
Power-saving mode
Your LaCie d2 can conserve energy by entering power-saving mode. The hard drive within the enclosure
spins down to reduce power consumption when the LaCie d2 is in power-saving mode. Power-saving
mode can extend the life of the hard drive by sparing it from working during extended periods of inactivity.
The LaCie d2 can be placed into power-saving mode using the LED button when it is connected via the
Thunderbolt 2 port. To place the LaCie d2 into power-saving mode:
1. Make certain that the LaCie d2’s volumes are not being accessed.
2. Eject the volumes (see Unmounting Your Hard Drive).
3. Apply a short press to the LED button. A short press lasts no longer than 1 second.
To wake up the LaCie d2, apply another short press.
14LaCie d2 Thunderbo lt 3 USB-C
3/30/17
Page 15
Power-saving mode: daisy chain
You can daisy chain Thunderbolt 3 technology devices when the LaCie d2 is in power-saving mode. Though
the hard drive spins down when the LaCie d2 enters power-saving mode, the Thunderbolt signal remains
constant. Therefore, daisy-chained devices continue data operations without interruption. See Daisy Chain
and Power Delivery for further details.
Power-saving mode: managed by the PC/Mac
You can initiate power-saving mode on your computer by performing one of the following:
Place the host computer into sleep mode.
Mac: Go to System Preferences > Energy Saver to enable sleep mode for hard drives.
Windows 8: Go to Control Panel > Hardware > Power Options > Choose a power plan > Change
advanced power settings. Click on Hard disk and Turn off the hard disk after. Choose the time to spin
down USB hard drives.
To exit power-saving mode, review the table below:
Entering power-saving mode Exiting power-saving mode
The host computer placed the product into
power-saving mode due to inactivity.
Access the LaCie d2’s volume on the host computer.
For example, copy files to its volume.
The computer is in sleep mode. Wake up the computer.
LED behavior
The list of colors below helps you identify the general status of your LaCie d2.
Color State
Off The product is turned off; the USB-C cable is not connected to a computer that is
turned on and/or the power cable is not connected to a live power outlet.
Solid blue Ready
Blinking blue During normal operation, the LED flickers to indicate access to the hard drive.
Note on ejecting the volume and power-saving mode: The LaCie d2 enters power-saving mode
when its volumes are ejected. To access the LaCie d2’s volumes, unplug the USB cable from the
back of the device and reconnect it.
15LaCie d2 Thunderbo lt 3 USB-C
3/30/17
Page 16

Slow blinking blue
(10 sec. interval)
The product is in power-saving mode because the host computer is in sleep mode.
See Technical note below.
Fast blinking blue Startup and shutdown
Blinking red (1
sec. interval)
Temperature warning or fan failure.
Solid red Temperature critical or fan absent.
Receiving power
The LaCie d2 powers on automatically when it is:
Connected directly to a computer via the Thunderbolt 3 or USB-C ports. The computer must be
powered on.
Connected to a live power source via the included power supply.
Technical note regarding power-saving mode and Windows: The LaCie d2 can be placed into
power-saving mode on PC’s running Windows 8 or higher. However, it is possible that the LED
will remain off rather than flash blue every 10 seconds.
Important info regarding the ports: The LaCie d2 can be connected to a computer using the USB
3.1 port or the Thunderbolt 3 port. However, it is not possible to connect both ports to a single
computer at the same time or, to connect each port to separate computers.
16LaCie d2 Thunderbo lt 3 USB-C
3/30/17
Page 17
Cables
USB-C
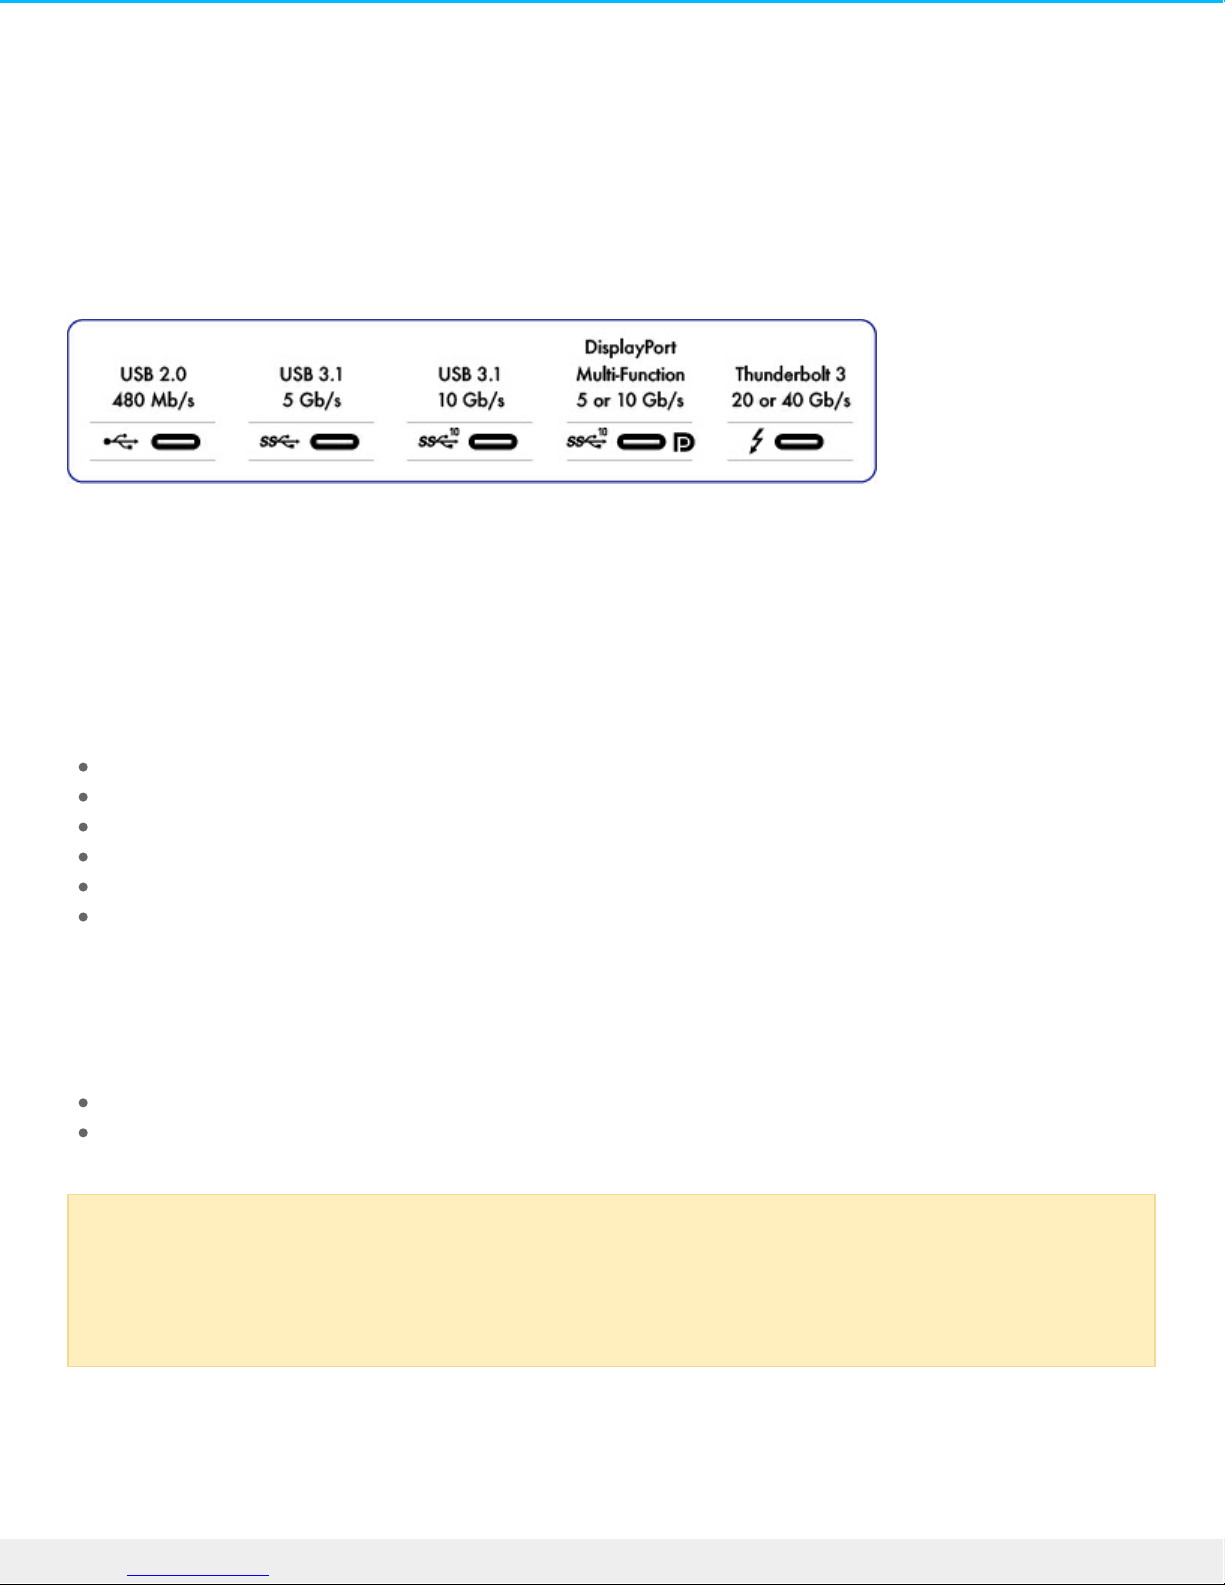
USB-C protocols
USB is a serial input/output technology for connecting peripheral devices to a computer. USB-C is the latest
implementation of this standard and it provides convenient connector, higher bandwidth and all-new power
management features. Further, USB-C ports that feature the Thunderbolt icon support Thunderbolt 3
devices.
USB-C supports many protocols:
Thunderbolt 3: transfer rates up to 40Gb/s
USB 3.1 Gen 2: transfer rates up to 10Gb/s
USB 3.1 Gen 1: transfer rates up to 5Gb/s
SuperSpeed USB 3.0: transfer rates up to 5Gb/s
Hi-Speed USB 2.0: transfer rates up to 480Mb/s
DisplayPort: up to 8K with compatible devices and backwards compatible to VGA and DVI
Cables
Your LaCie hard drive is shipped with two cables for universal compatibility with all modern computers:
Thunderbolt 3 (USB-C)
USB 3.1 (USB-C) to USB 3.0/USB 2.0 adapter cable (compatible with Type A ports)
Thunderbolt 3 (USB-C) cable
Thunderbolt 3 can attain up to 40Gb/s as opposed to Thunderbolt 2's 20Gb/s.
Make certain to use the USB-C cable included with your device. Due to poor construction, many
third-party USB-C cables can cause irreparable harm to devices such as your computer and LaCie
device. LaCie is not responsible for damage to your LaCie d2 Thunderbolt 3 caused by thirdparty cables.
17LaCie d2 Thunderbo lt 3 USB-C
3/30/17
Page 18
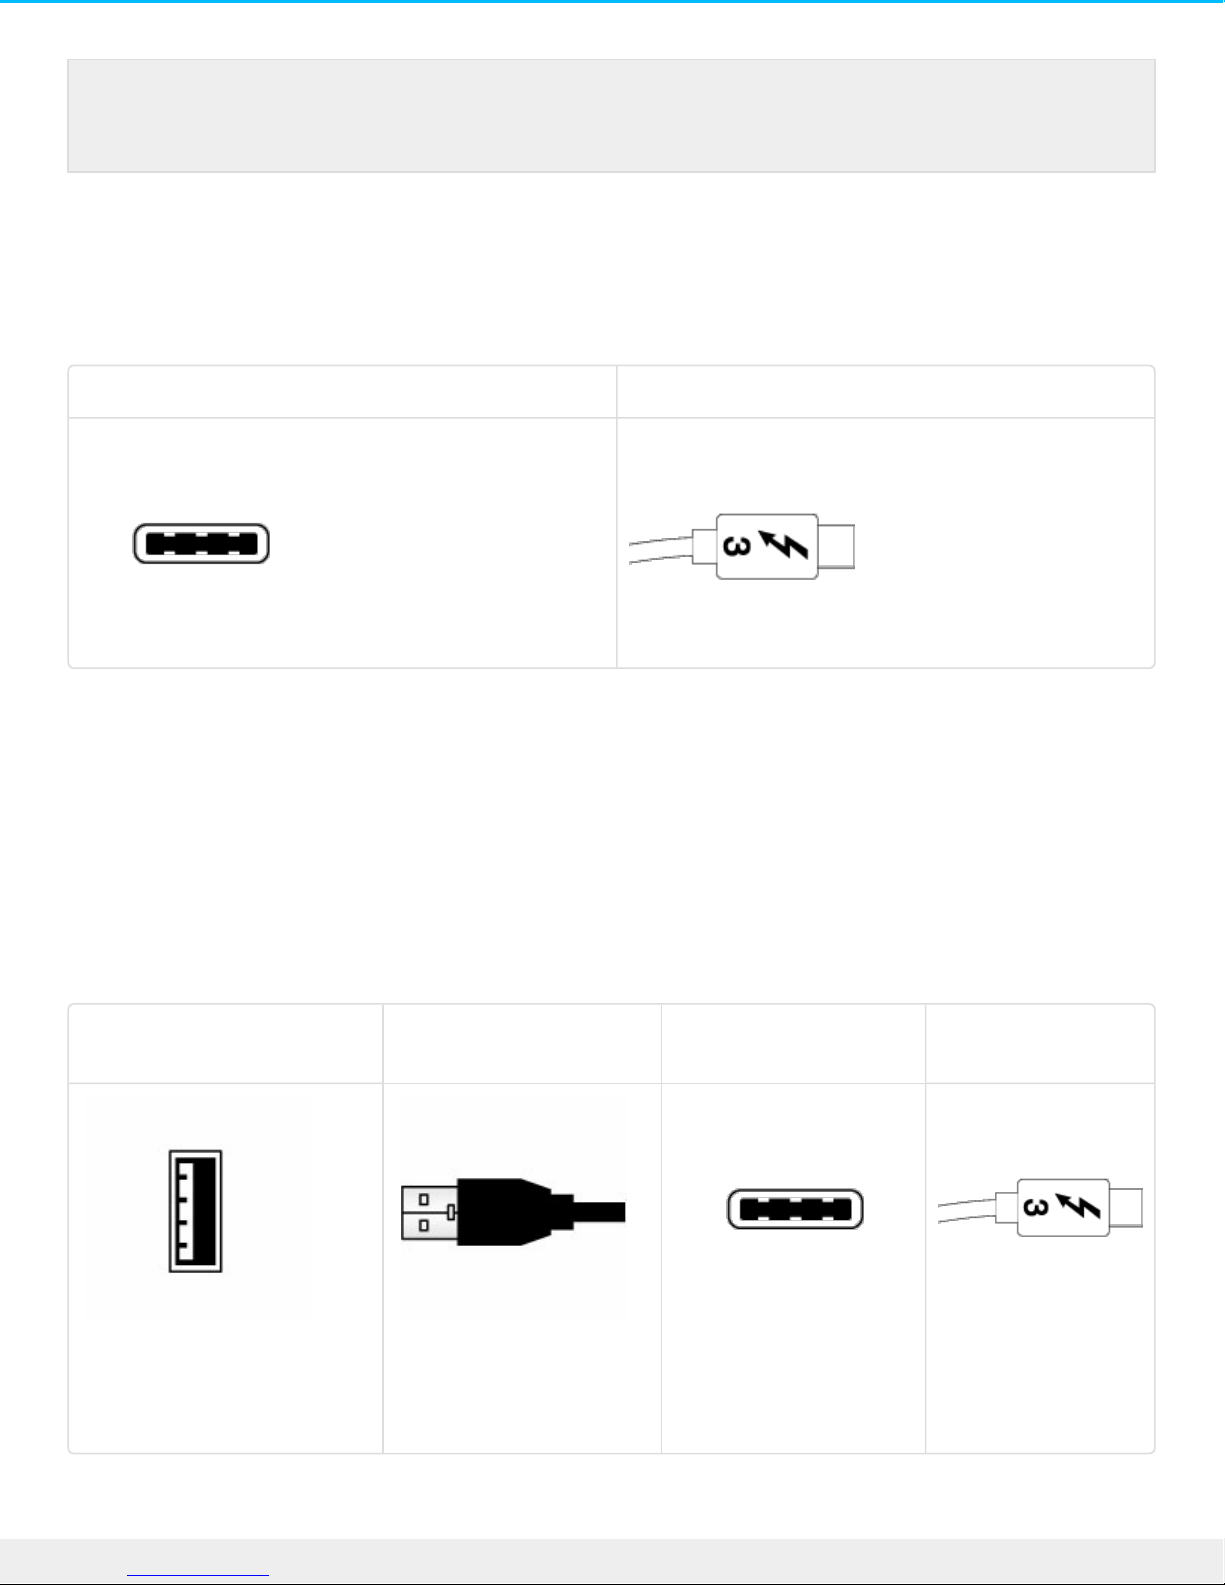
Connecting your product is easy since the USB-C cable is identical on both ends. Further, the USB-C ports
on your LaCie hard drive and computer are conveniently rounded to accept the cable end no matter how it
is connected. This cable can be connected to either the port marked USB 3.1 or either of the Thunderbolt 3
ports on the back of the device.
Connector face Cable end
USB 3.1 (USB-C)–to–USB Type A cable
Use the USB 3.1 (USB-C)–to–USB Type A cable for compatibility with computers that do not have a USB-C
port. The USB-C end is connected to the LaCie hard drive and the Type A end is connected to the
computer’s USB 3.0 or USB 2.0 Type A port.
Hard drive performance is limited to USB 3.0 transfer rates when connected to a USB 3.0 port and, USB 2.0
transfer rates when connected to a USB 2.0 port.
Connector face (USB Type A
to computer)
Cable end (USB Type A
to computer)
Connector face (USB-C
to product)
Cable end (USB-C
to product)
Use the included Thunderbolt 3 (USB-C) cable to ensure maximum data transfer performance
when used with compatible ports.
18LaCie d2 Thunderbo lt 3 USB-C
3/30/17
Page 19

19LaCie d2 Thunderbo lt 3 USB-C
3/30/17
Page 20

Geng Connected
Follow the setup steps in the order they are given to ensure that your LaCie hard drive's volume mounts
correctly on your computer.
Macs and Thunderbolt 3
The Thunderbolt 3 connection can be used on a Mac with a Thunderbolt 3 port to reach transfer rates up to
40Gb/s bi-directional.
Using the Thunderbolt 3 connection with first or second generation Thunderbolt ports requires an adapter
(sold separately) and will result in lower transfer rates (20Gb/s bi-directional for Thunderbolt 2 ports, and
10Gb/s bi-directional for first generation Thunderbolt ports).
Windows and Thunderbolt 3
Your LaCie Thunderbolt 3 storage device is certified for use with Windows PCs that have a Thunderbolt 3
port. However, you may experience connectivity issues between the storage device and the Thunderbolt 3
port on a Windows PC. Therefore, before setting up your LaCie Thunderbolt 3 storage device, please visit
your PC manufacturer’s website to update your Windows PC to the latest versions of:
BIOS
Thunderbolt 3 firmware
Thunderbolt 3 driver
Make certain that your PC has the most recent version of Windows 10. For questions regarding your PC,
please contact the PC manufacturer. You can also review the following website for additional information:
https://thunderbolttechnology.net/updates.
This issue pertains to the Thunderbolt 3 port and does not affect USB ports.
Step 1 - Connect the interface cable
Connect the interface cable from the LaCie d2 to the computer.
USB 3.1 (USB-C) to USB-C
20LaCie d2 Thunderbo lt 3 USB-C
3/30/17
Page 21
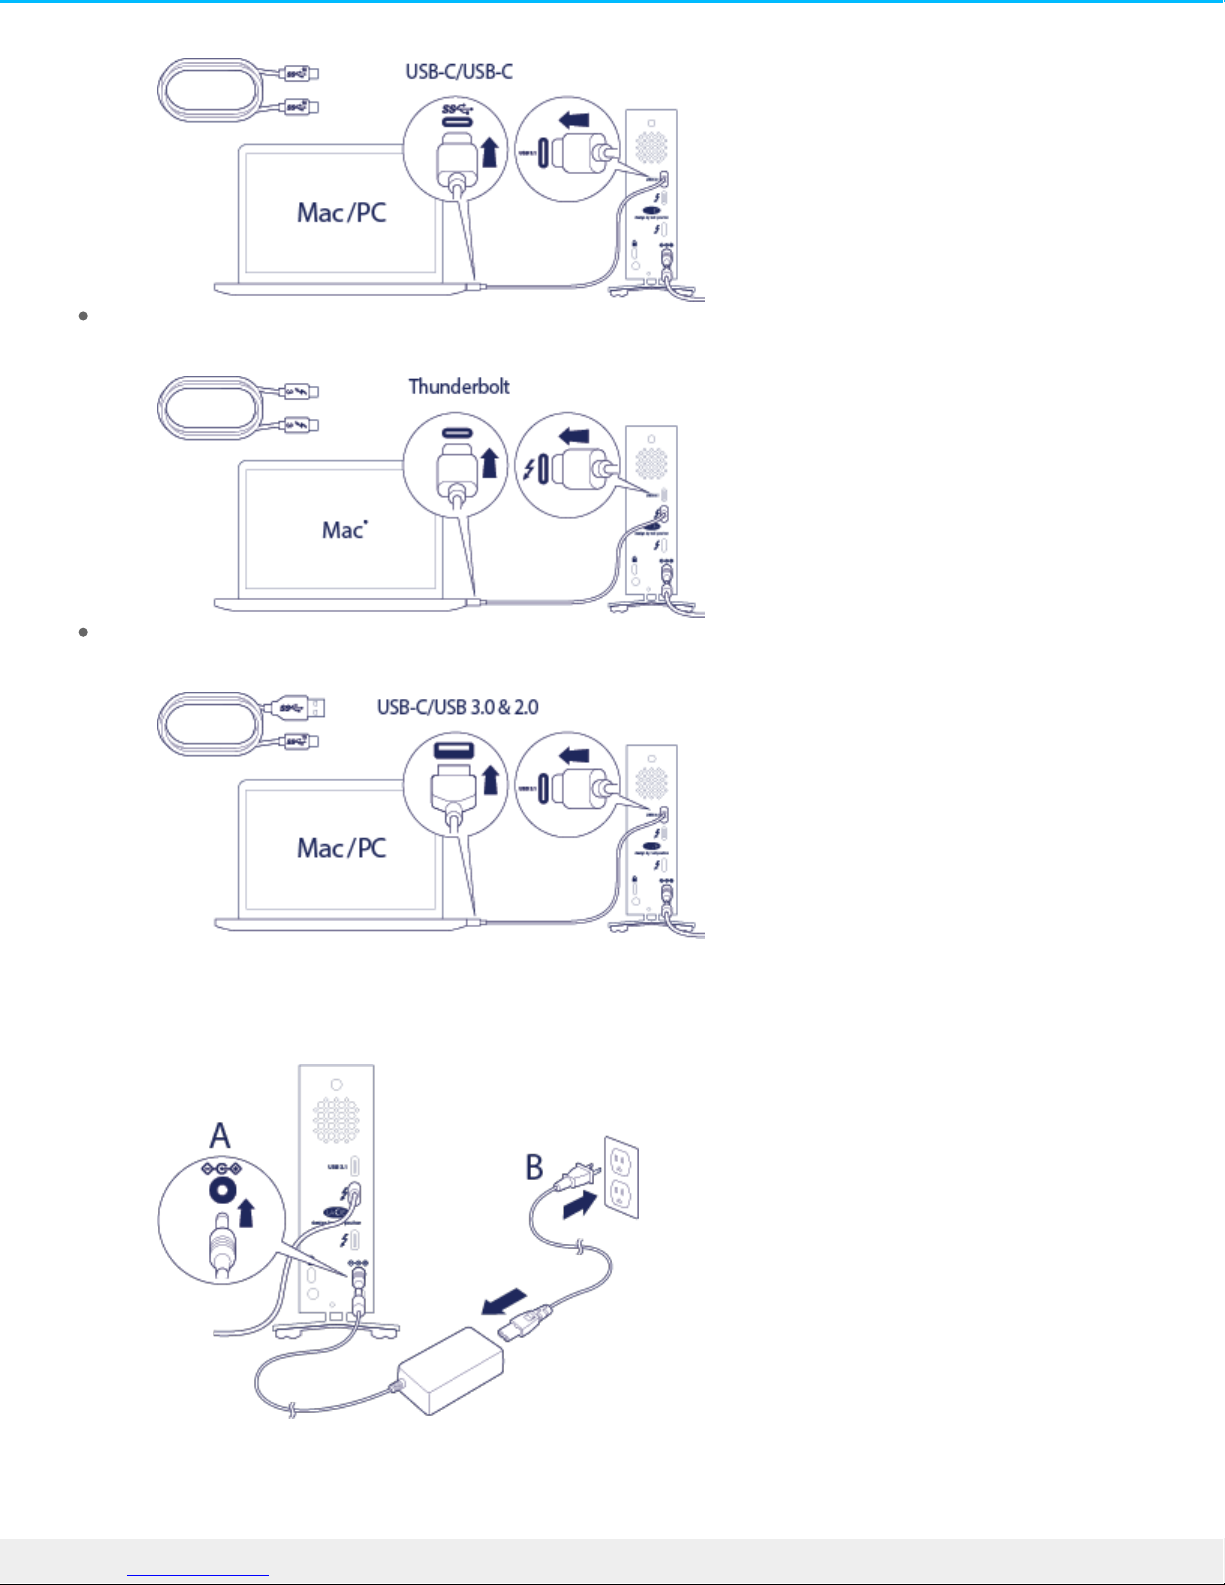
Thunderbolt 3 to Thunderbolt
USB 3.1 (USB-C) to USB-A (USB 3.0 & 2.0)
Step 2 - Connect the power supply
Connect the power supply in the following order:
21LaCie d2 Thunderbo lt 3 USB-C
3/30/17
Page 22
1. The power input port on the back of the LaCie d2.
2. A live power outlet.
The LaCie d2 will power on automatically when it is connected to a computer that is turned on and a live
power outlet.
Step 3 - Launch LaCie Setup Assistant
LaCie Setup Assistant (LSA) must be launched before using your drive. It will allow you to:
Easily format the hard drive according to your needs
Copy the User Manual to your computer
Install software for added features
Register your LaCie device
Launch LaCie Setup Assistant - Windows
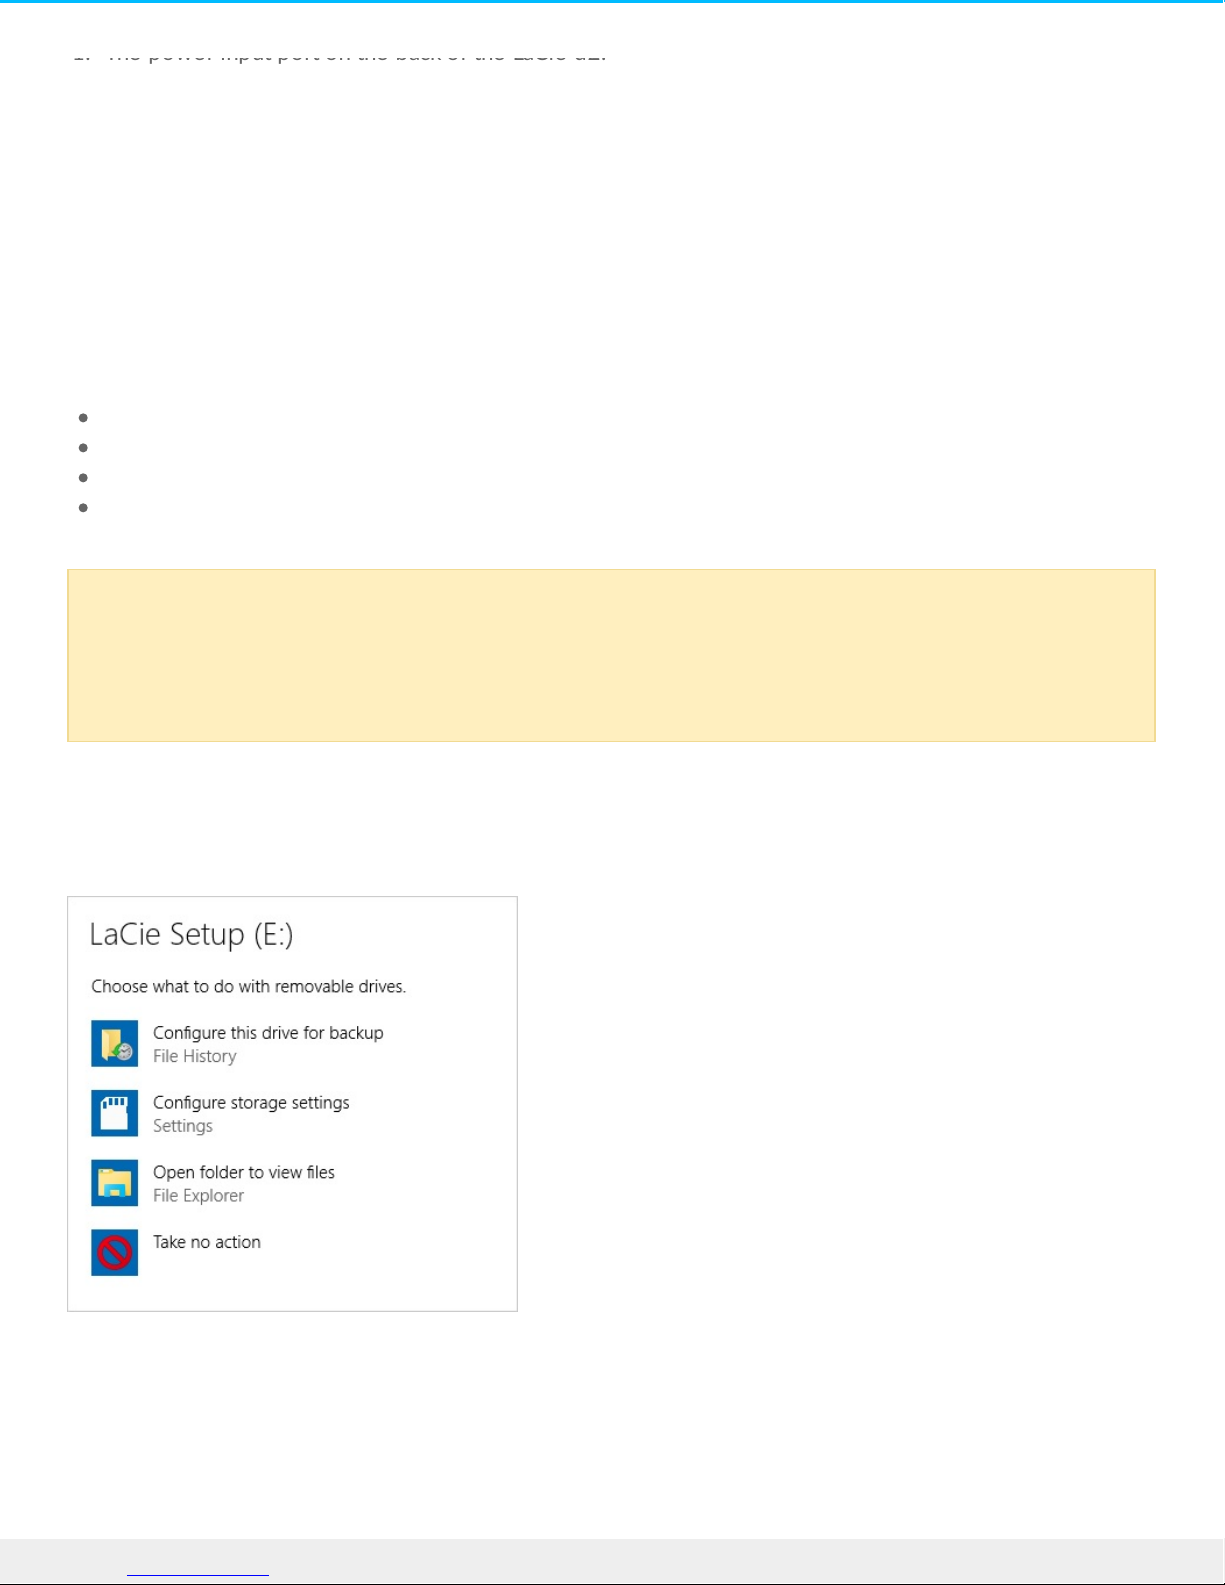
AutoPlay: Windows AutoPlay may detect your LaCie hard drive as soon as it is connected to your computer.
If the AutoPlay window appears, choose Open folder to view files and double-click LaCie Setup.
Manual access: Open the LACIE SETUP volume in Computer (My Computer for Windows XP) and double-
click LaCie Setup.
Important info: If you do not launch LSA or if you quit it after the formatting has begun, your
drive will not be ready to use and will require manual formatting. The User Manual and utilities
will not be available and will have to be downloaded from the LaCie website:
www.lacie.com/support/.
22LaCie d2 Thunderbo lt 3 USB-C
3/30/17
Page 23
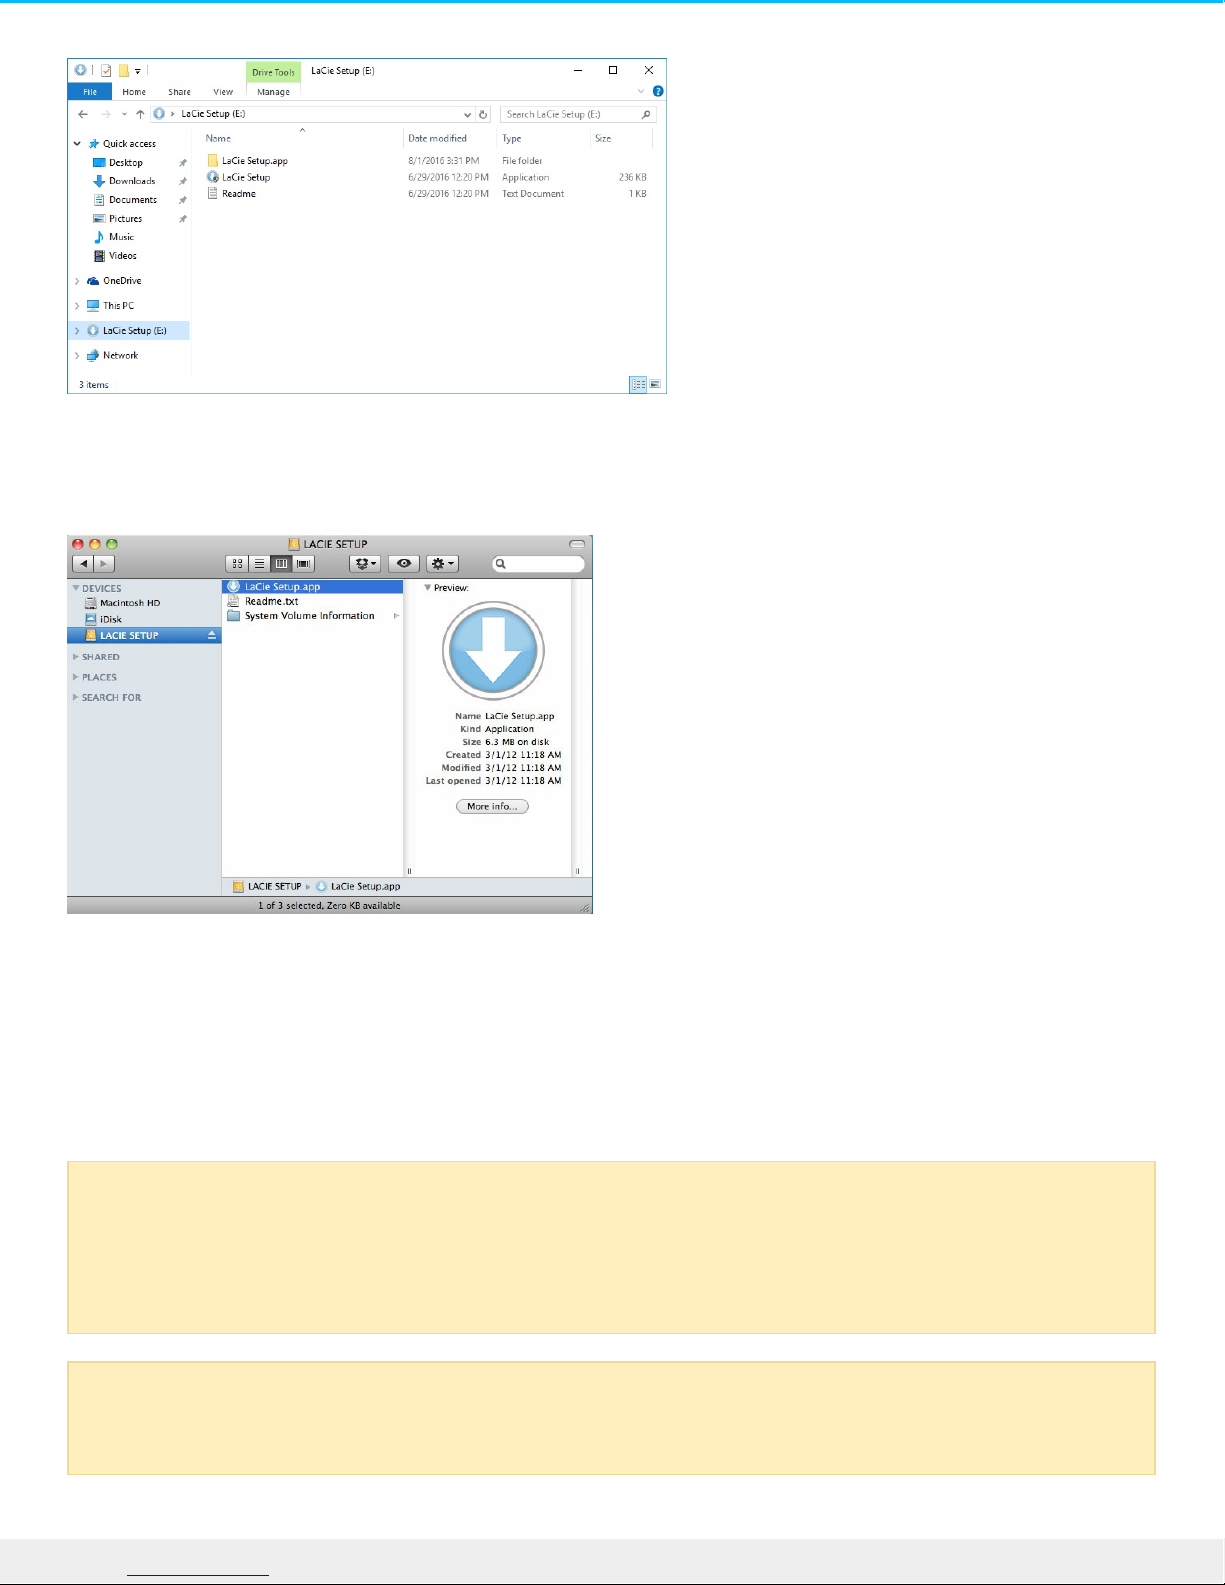
LaCie Setup Assistant - Mac
Open the LACIE SETUP volume on your desktop and then double-click LaCie Setup
Setup
LaCie Setup Assistant does not prevent you from using your computer's native disk utility program to format
or partition your LaCie drive. Simply follow the Setup Assistant through completion, then use Disk
Management for Windows or Disk Utility for Mac to reformat your drive.
Important info for Windows users: While running LaCie Setup Assistant, generic pop-up
windows may ask if you wish to change your computer's settings. This is a normal request when
formatting a disk or installing certain software, such as Genie Timeline. To successfully complete
LaCie Setup Assistant, LaCie recommends that you agree to change the settings.
Important info for Mac users: You may be prompted to enter your computer password to
continue with LaCie Setup Assistant.
23LaCie d2 Thunderbo lt 3 USB-C
3/30/17
Page 24

1. Select your language.
2. Read the license agreement before choosing Next. Selecting Next confirms that you accept the license
agreement.
3. Use the slider to partition your LaCie hard drive. There are two options for partitions:
LaCie Share: formatted as FAT32 for compatibility with Windows and Mac.
LaCie: formatted for your operating system, NTFS for Windows or HFS+ for Mac.
Move the slider to the left to reduce the size of the LaCie Share partition. If you do not want the LaCie
Share volume, move the slider all the way to the left.
4. A prompt alerts you that the disk will be formatted. Select Yes to continue. LaCie Setup Assistant
formats the hard drive.
5. Register your LaCie device.
6. Choose the software utilities that you want to install. Certain software utilities may begin to install before
LaCie Setup Assistant has finished. Follow the software utility installer before completing LaCie Setup
Assistant. If you do not install software utilities during this step, you can return to LaCie Setup Assistant
at any time.
7. LaCie Setup Assistant provides a summary of the installation. Choose Finish to close the program.
To install software utilities after the initial installation, you can run LaCie Setup Assistant again. Since the
format is complete you are only prompted to choose software utilities. LaCie Setup Assistant is available on:
LaCie Share: if you created two partitions
LaCie: if you created one partition
Disconnecng the hard drive
In order to avoid file system corruption, it is important to unmount your hard drive’s volumes before
disconnecting the interface cable. See Unmounting Your Hard Drive for details.
Important info regarding Mac OS X: Certain versions of LaCie Setup Assistant are not
compatible with USB connections on Macintosh computers running Mac OS X 10.11, also known
as El Capitan. If LaCie Setup Assistant experiences problems, you can try connecting your LaCie
storage using another interface port on your computer (e.g. FireWire 800 or Thunderbolt). If you
are unable to use another interface port, format your LaCie hard drive using Disk Utility. For
instructions on how to format your LaCie hard drive for Mac, see the chapter Formatting and
Partitioning > Mac Users.
24LaCie d2 Thunderbo lt 3 USB-C
3/30/17
Page 25

Daisy Chain and Power Delivery
Use the two Thunderbolt 3 ports on the LaCie d2 Thunderbolt 3 for:
Direct connection to a computer that is compatible with Thunderbolt 3 technology.
Daisy chaining with devices and displays that are compatible with Thunderbolt 3 technology.
Charging the batteries of compatible devices.
Daisy chain Thunderbolt 3 devices
Thunderbolt 3 is an update of Thunderbolt 2 technology. While Thunderbolt 2 technology continues to
provide impressive transfer rates up to 20Gb/s bi-directional, Thunderbolt 3 offers improved performance
with a potential up to 40Gb/s bi-directional. Thunderbolt 3 technology also gives you greater flexibility when
using video and data, assigning greater throughput to the stream that carries the heavier load. You must have
a computer that supports Thunderbolt 3 to take advantage of the updates in performance and the intelligent
sharing of bandwidth.
Similar to Thunderbolt 2 technology, a single Thunderbolt 3 daisy chain can have up to seven devices,
including the computer. For example, you can daisy chain five LaCie d2 Thunderbolt 3 enclosures on the
same line with a display.
How to daisy chain
Connect the cable to one of the interface ports on the back of LaCie d2 and to your computer. The
additional port on LaCie d2 can be used to daisy chain compatible Thunderbolt 3 peripherals, such as hard
drives and monitors. If you have another Thunderbolt 3 storage device, make certain to connect it to the
daisy chain before adding compatible displays or USB 3.1 (USB-C) devices. See below for an example of the
order of devices in a Thunderbolt 3 daisy chain.
1. Computer with a Thunderbolt 3 port
2. LaCie d2 Thunderbolt 3
3. LaCie 12big Thunderbolt 3 (Thunderbolt 3 ports)
4. LaCie 6big Thunderbolt 3 (Thunderbolt 3 ports)
5. LaCie Bolt 3 (Thunderbolt 3 ports)
USB 3.1 (USB-C) devices can terminate a Thunderbolt 3 daisy chain and should always be the last device.
Important cable info: When connecting your enclosure to a computer or compatible devices,
use cables specifically constructed to support Thunderbolt 3.
25LaCie d2 Thunderbo lt 3 USB-C
3/30/17
Page 26

Daisy chain: idle mode
You can daisy chain Thunderbolt 3 devices even when the LaCie d2 hard drives are spun down. Apply a
short push on the LED power button. The status LED blinks slowly, indicating that the LaCie d2 is in idle
mode.
Power delivery
Each Thunderbolt 3 port on LaCie d2 outputs up to 15W of power, and the USB 3.1 port delivers up to
27W. You can connect compatible devices that support charging via USB-C to the ports. LaCie d2 must
receive power via its power cable to deliver power to compatible devices.
Important info: To reach Thunderbolt 3 transfer rates up to 40Gb/s bi-directional, LaCie d2
Thunderbolt 3 must be connected to a computer that supports Thunderbolt 3 technology.
LaCie is not responsible for devices that experience harm, damage or malfunction when
connected to LaCie d2.
26LaCie d2 Thunderbo lt 3 USB-C
3/30/17
Page 27
Unmounng Your Hard Drive
USB, FireWire, Thunderbolt, and eSATA external devices feature “plug & play” connectivity, which means
that your LaCie storage can be connected and disconnected while the computer is running. However, always
eject a storage drive from your computer before physically disconnecting it. Your computer must perform
filing and housekeeping operations on the drive before it's removed. Therefore, if you unplug the drive
without using the operating system's software, your files can become corrupt or damaged.
Mac
There are several ways you can eject your hard drive from a Mac. See below for two options.
Eject via Finder window
1. Open a Finder window.
2. On the sidebar, go to Devices to locate LaCie and click the eject symbol to the right of the drive name.
3. Once the hard drive disappears from the sidebar or, the Finder window closes, you can disconnect the
hard drive's cable from your Mac.
Eject via Desktop
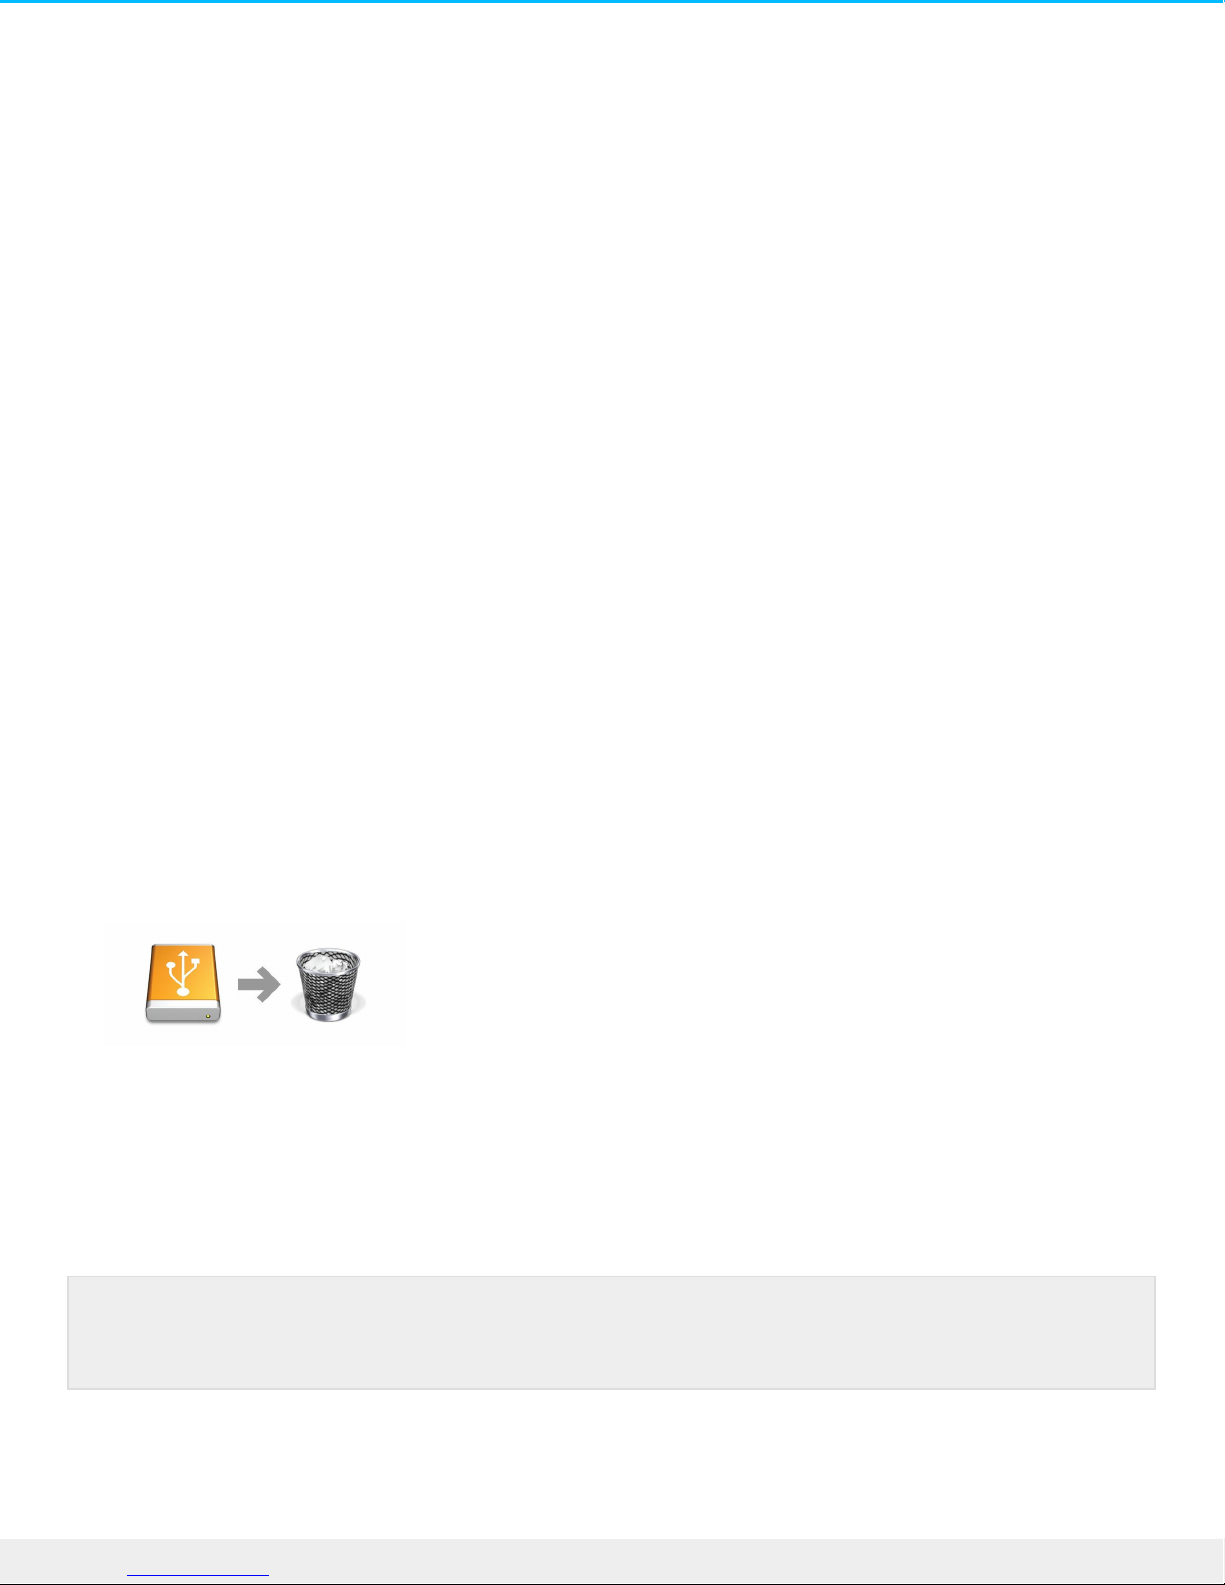
1. Select the desktop icon for your hard drive and drag it to the Trash. (The icon pictured below is a generic
USB device icon. Your LaCie storage may be represented by an icon that looks like the device itself.)
2. When the hard drive's icon is no longer visible on your desktop, you can physically disconnect the hard
drive from your Mac.
Windows 8 / Windows 10
Use the Safely Remove tool to eject a hard drive.
1. Click the Safely Remove icon in your Windows System Tray to view the devices you can eject.
Thunderbolt 3 is only compatible with Windows 10, however, the USB-C-to-USB Type A
adapter cable can be used with Windows 7 and 8.
27LaCie d2 Thunderbo lt 3 USB-C
3/30/17
Page 28

2. If you don't see the Safely Remove Hardware icon, click the Show hidden icons arrow in the system tray
to display all icons in the notification area.
3. In the list of devices, choose the device you want to remove. Windows displays a notification when it is
safe to remove the device.
4. Disconnect the hard drive from the computer.
28LaCie d2 Thunderbo lt 3 USB-C
3/30/17
Page 29

Formang and Paroning
Standard LaCie storage devices will prompt you to run LaCie Setup Assistant when they are first connected
to a PC or Mac. LaCie Setup Assistant helps you to quickly format the storage device according to your
needs. Please read the information below carefully if you:
Abort LaCie Setup Assistant while it is formatting.
Wish to reformat your storage device after LaCie Setup Assistant has successfully completed.
Own a LaCie storage device that does not feature Setup Assistant.
About file system formats
NTFS: since it is the native file system for Windows, volumes created in NTFS are read and write with
computers running Windows. Mac OS can read NTFS volumes but cannot natively write to them.
Mac OS Extended (HFS+): the native hard drive file system for Mac. Windows cannot natively read or write
to HFS+ (journaled) hard drives.
exFAT: generally compatible with Mac and Windows. exFAT is not a journaled file system which means it can
be more susceptible to data corruption when errors occur or the drive is not disconnected properly from
the computer.
FAT32: compatible with Mac and Windows. However, FAT32 is a legacy file system designed for low
capacity hard drives and it is not recommended for modern hard drives or operating systems. A FAT32
partition can reach up to 32GB when formatted on a Windows PC.
How to choose the file system format
Use NTFS if:
…the storage device is connected to Windows PCs.
Use HFS+ if:
…the storage device is connected to Macs.
You can use exFAT if:
…the storage device is shared between Mac and Windows computers.
Use FAT32 if:
…the storage device is connected to older Windows and Mac computers. FAT32 is not recommended for
modern operating systems and computers.
Formang instrucons
The steps below help you format and partition a storage device.
29LaCie d2 Thunderbo lt 3 USB-C
3/30/17
Page 30

Mac
OS X version 10.11 or later
1. Open the Finder and go to Applications > Utilities > Disk Utility.
2. In the sidebar to the left, select your LaCie d2 drive.
3. Select Erase.
4. A dialog box opens. Enter a name for the drive. This will be the name displayed when the drive mounts.
5. For Format, select OS X Extended (Journaled).
6. For Scheme, select GUID Partition Map.
7. Click Erase.
8. Disk Utility will format the drive. When it’s finished, click Done.
OS X version 10.6 to 10.10
1. Open the Finder and go to Applications > Utilities > Disk Utility.
2. In the sidebar to the left, select the LaCie d2 drive that shows the capacity.
3. In the Disk Utility window, select the Partition tab.
4. Under Partition Layout, select 1 partition.
5. Enter a name for the drive. This will be the name displayed when the drive mounts.
6. For Format, select OS X Extended (Journaled).
7. Click on Options. Select GUID Partition Map, and then click OK.
8. Click Apply.
9. A dialog appears advising you that this is a data destructive process and any data currently on the drive
will be deleted.
10. Select Partition to complete the formatting process.
Windows
1. Make sure the storage device is connected to and mounted on the computer.
2. Go to Search and then type diskmgmt.msc. In the search results, double click Disk Management.
3. From the list of storage devices in the middle of the Disk Management window, locate your LaCie
device.
4. The partition must be available to format. If it is currently formatted, right click on the partion and then
choose Delete.
5. To create a new partition, right click on the volume and select New Simple Volume. Follow the on-screen
instructions when the New Simple Volume Wizard appears.
Caution: Formatting erases everything on the storage device. LaCie highly recommends that you
back up all data on your storage device before performing the steps below. LaCie is not
responsible for any data lost due to formatting, partitioning or using a LaCie storage device.
Note: Refer to your operating system's documentation for more information on formatting and
partitioning storage devices.
30LaCie d2 Thunderbo lt 3 USB-C
3/30/17
Page 31

31LaCie d2 Thunderbo lt 3 USB-C
3/30/17
 Loading...