

Page 1
Quick Install Guide
d2 Ethernet Disk mini
Page 2
Protect your investment - register for free technical support: www.lacie.com/register
PACKAGE CONTENTS
• Fast Ethernet 10/100 cable
• Hi-Speed USB 2.0 cable
• External Power Supply
• Drive Stand for Upright Use
• LaCie Storage Utilities CD-ROM
including User Manual
For more information, please consult the User Manual
located on the LaCie Storage Utilities CD-ROM.
Note: When connecting via Ethernet, you cannot use
the USB connectivity option. When connecting via
USB, you cannot use the Ethernet connectivity option.
Page 3
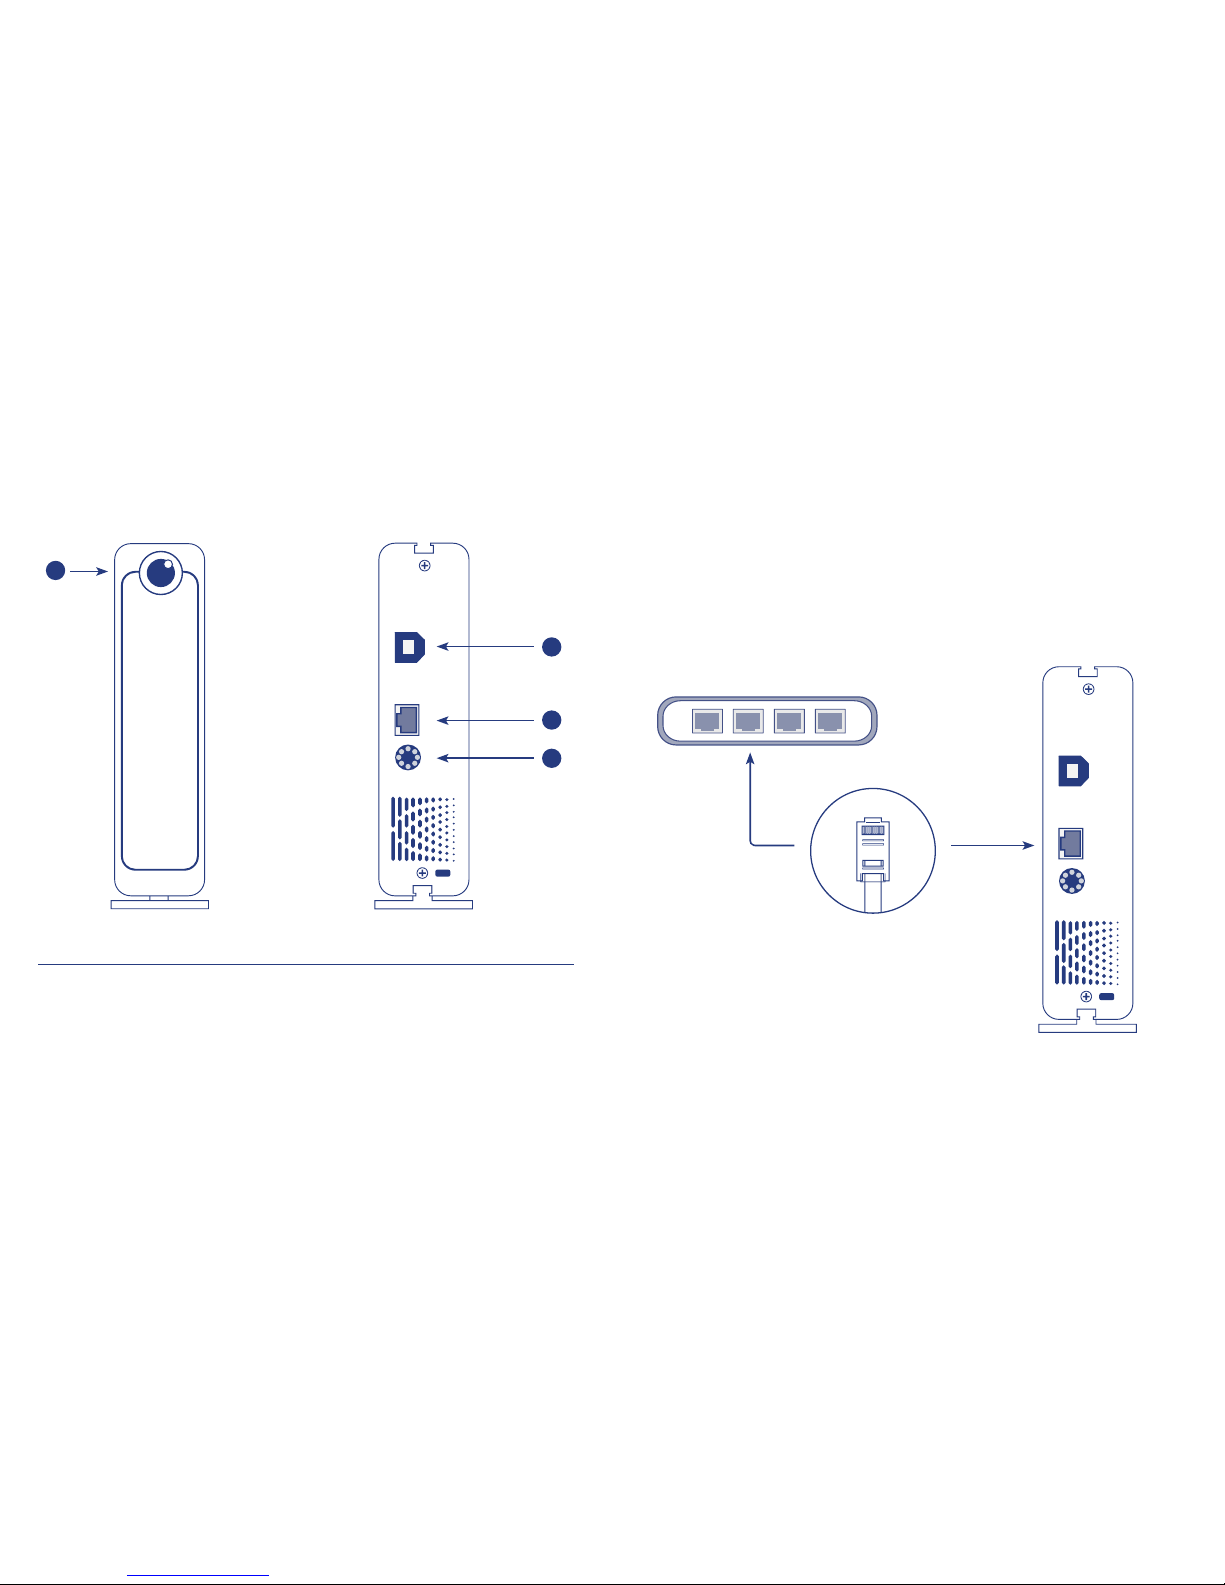
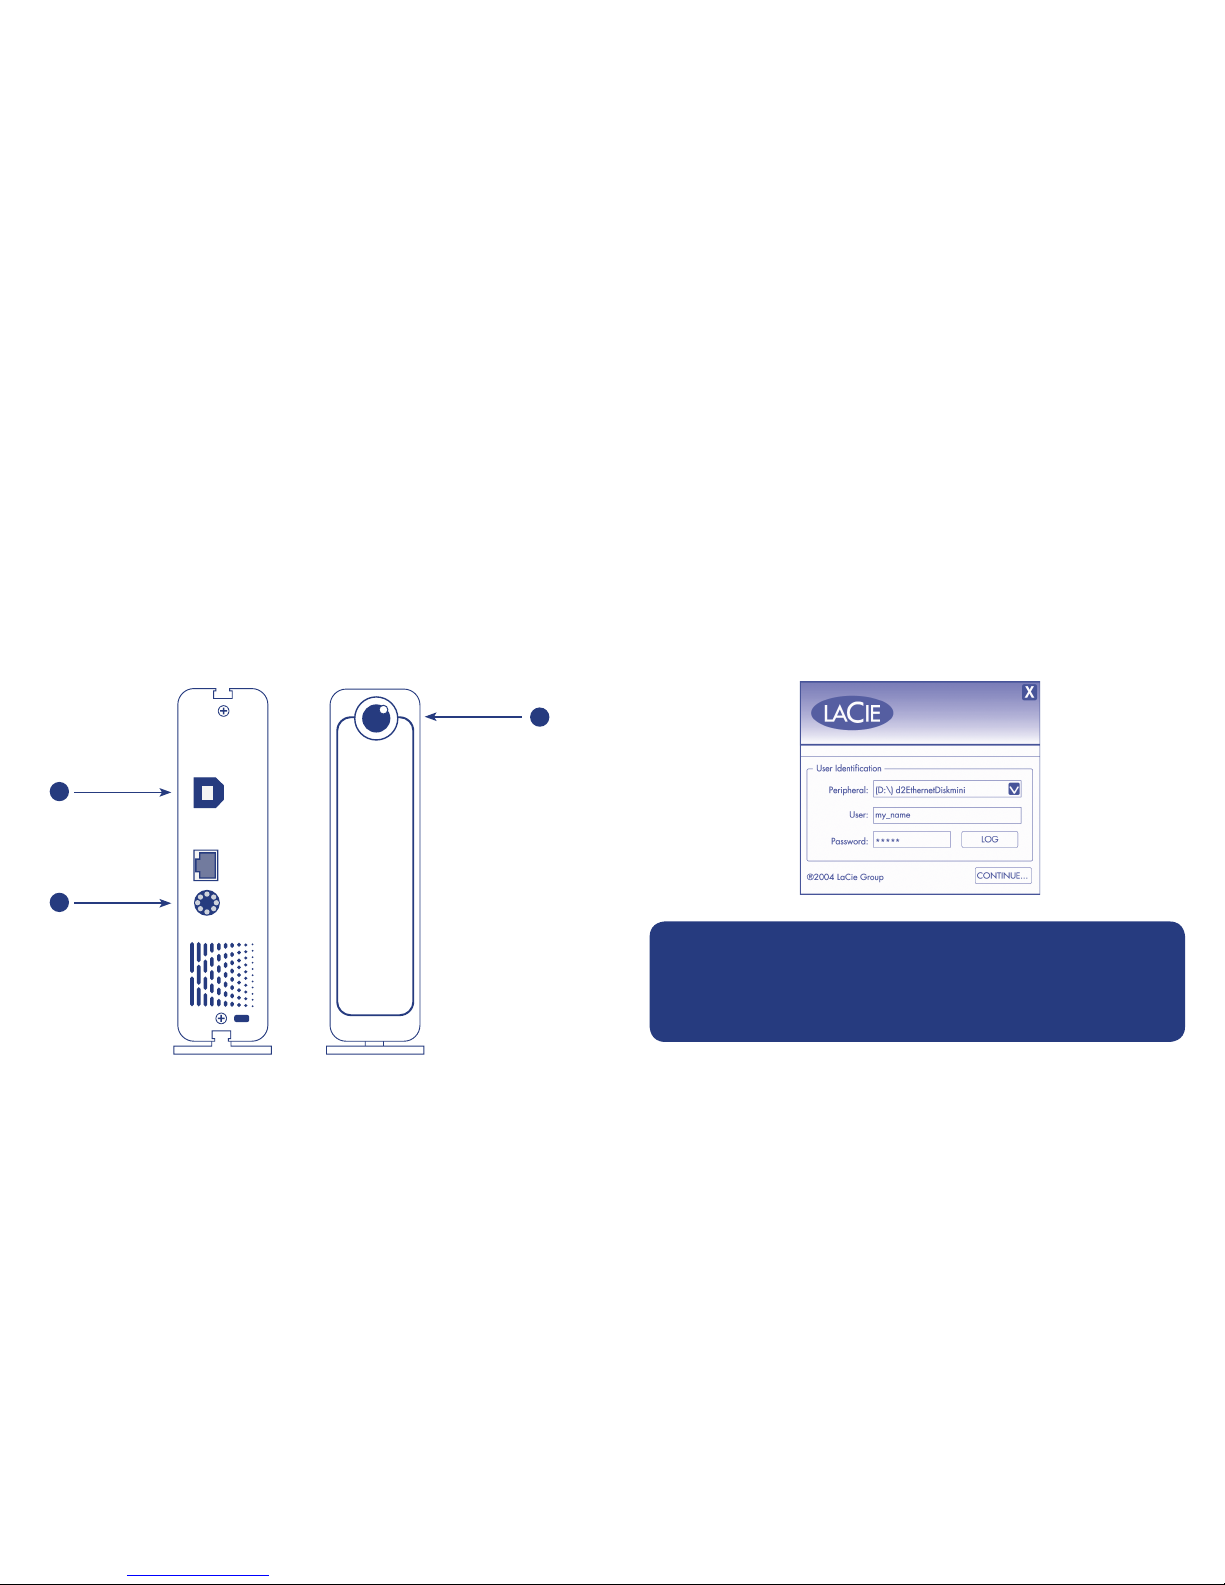
Front View
1. Power LED
Rear View
2. USB 2.0 Port
3. Fast Ethernet Connection
4. Power adaptor connection
1
2
3
4
To Use as a Shared Drive
Step 1 – Attaching the Cables
1. Connect the Ethernet cable to a Fast Ethernet Switch and to your LaCie
Ethernet Disk mini drive.
Page 4
3
2
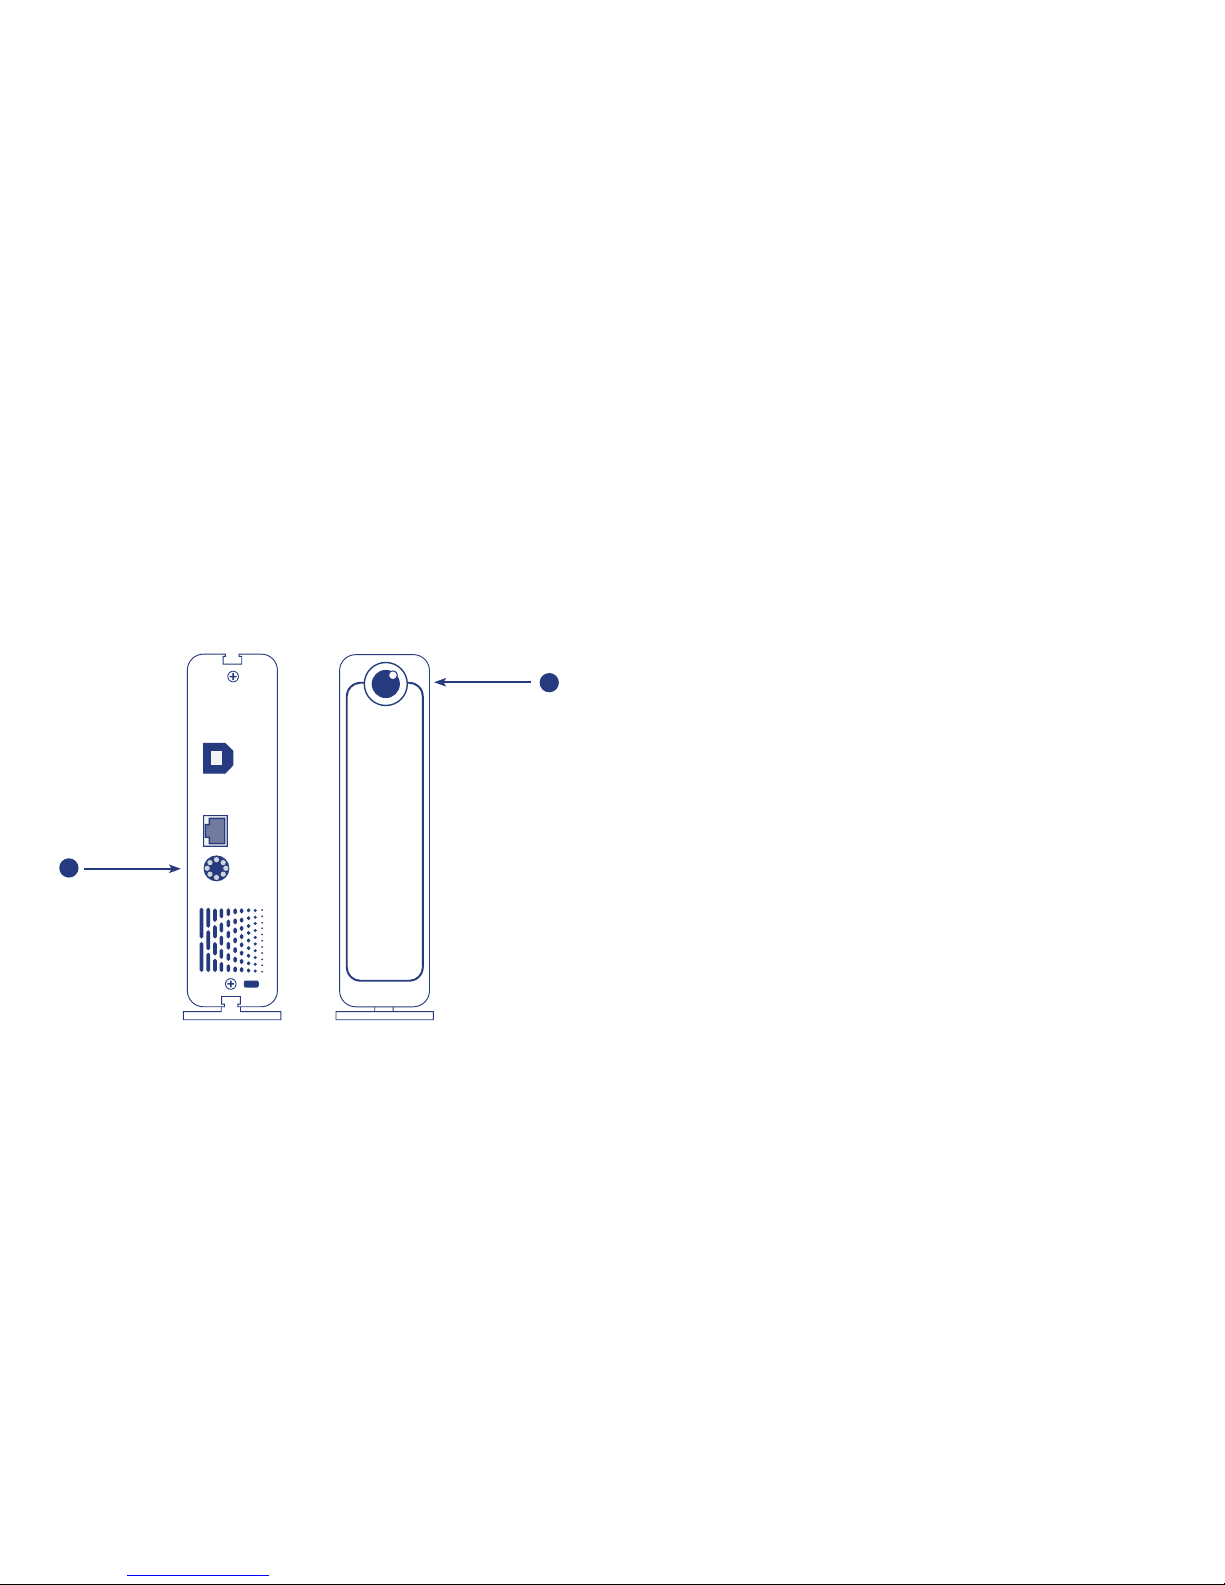
2. Connect the power cable to your Ethernet Disk mini, then to a power source.
3. Power on your drive by pressing the blue LED button.
Step 2 – Obtaining IP Address Using IP Confi gurator Software
1. Insert the LaCie Ethernet Disk mini CD-ROM in a computer attached to the
same network as the LaCie Ethernet Disk mini, and install the LaCie Ethernet
Disk Confi gurator to begin confi guring your drive.
2. From the start menu (Windows) or your Utilities folder (Mac), run the
Confi gurator program to obtain your Ethernet Disk mini’s IP address.
Step 3 – Accessing the Web Administration Page
1. Open your web browser and type http://edmini or http://IP Adress
(IP address is the number obtained by the IP Confi gurator; for example,
http://10.1.4.111) in the address fi eld.
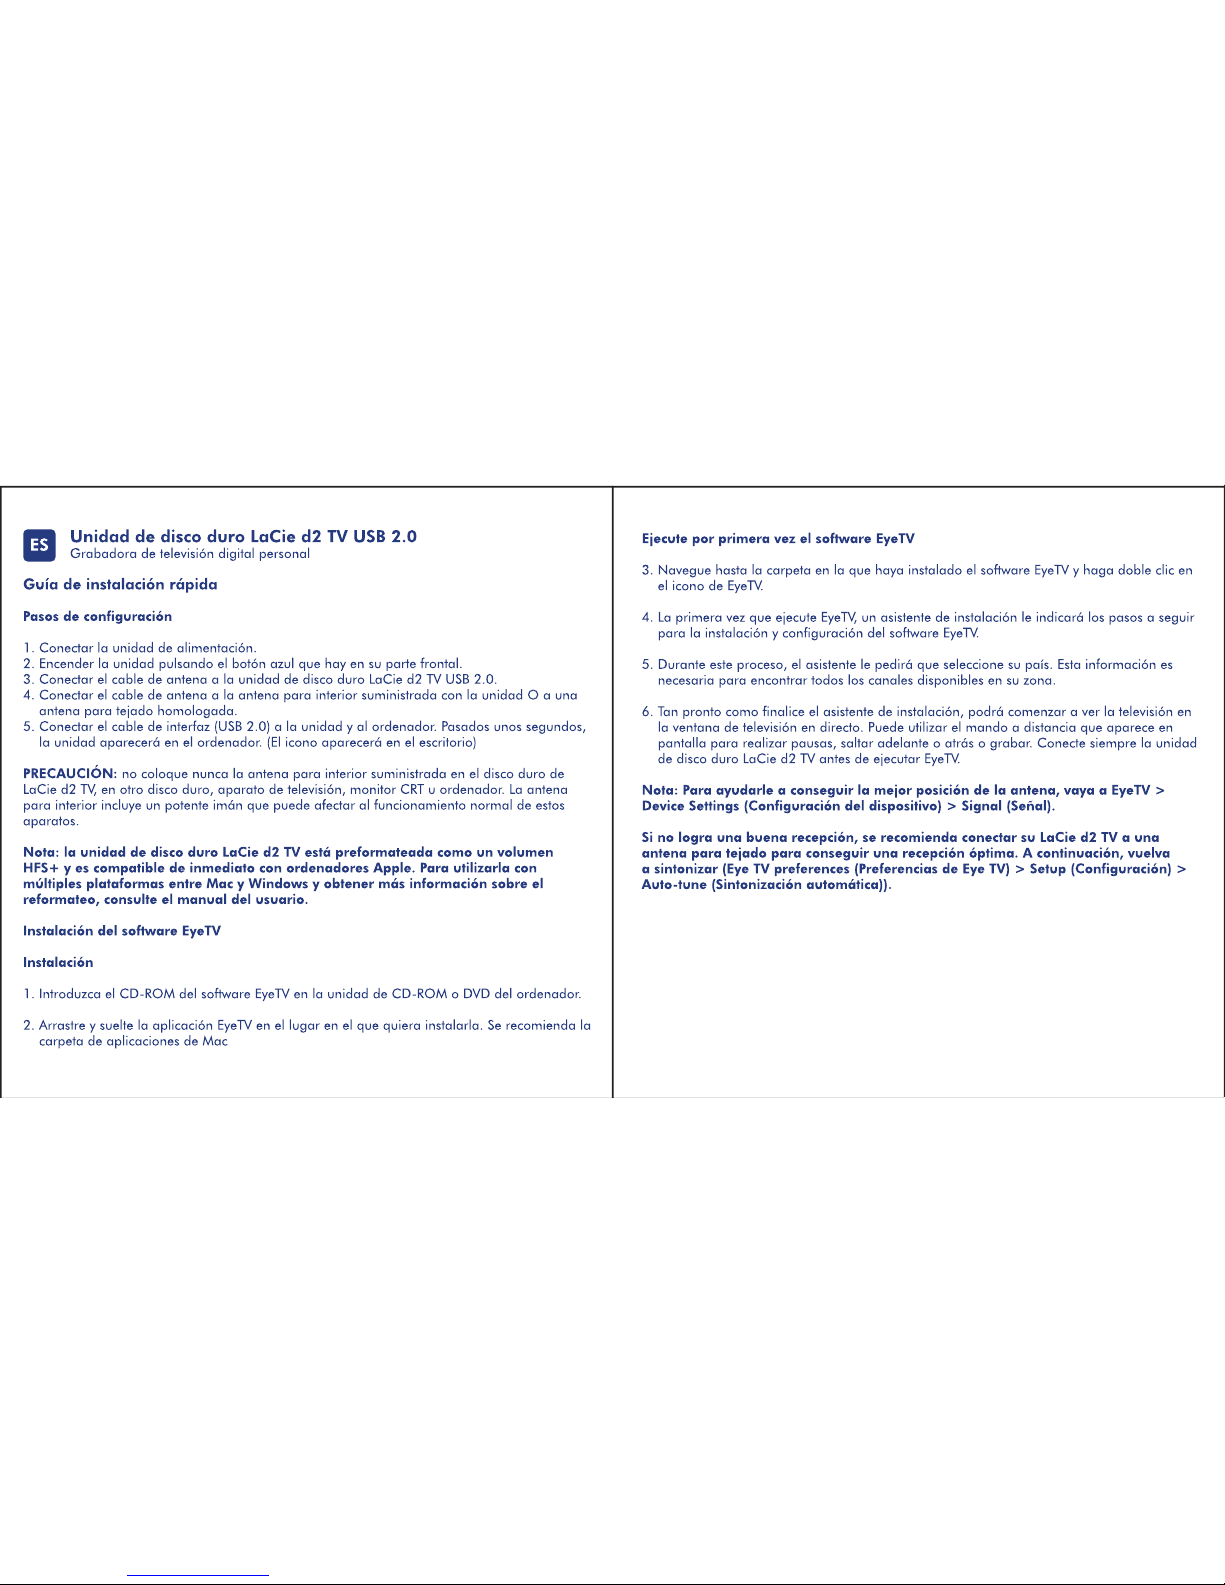
2. In the Login window that appears:
Login: Admin
Password: Admin
Page 5
2b
1
2a
Formatting Note:
The Ethernet Disk mini is formatted as a FAT32 fi le system. FAT32 has the following limitations:
1. Mac OS special characters cannot be used in fi le names when using the Ethernet Disk mini via USB.
2. File size cannot exceed 4GB.
Using other fi le systems, such as NTFS (Windows 2000 or XP) or HFS/HFS+ (Mac OS X) will invalidate the possibility to write fi les on
the drive. Please refer to page 41 of the User Manual for more information
To Use as an External Hard Drive
Step 1 – Attaching the Cables
1. Connect the power cable to your Ethernet Disk mini, then to a power source.
2. a. Connect the USB 2.0 cable to your computer and the Ethernet Disk mini.
b. Power on the drive by pressing the blue LED button.
Step 2 – Logging onto the Drive
1. Double-click the Ethernet Disk mini icon on your desktop.
2. In the window that opens, double-click the Edmini icon.
3. In the window that opens, click Log On.
4. Start using your Ethernet Disk mini
.
Page 6

Disque dur LaCie d2 TV USB 2.0
Enregistreur de télévision numérique personnel
Guide d’installation rapide
Étapes d’installation
1. Branchez l’alimentation.
2. Mettez le disque sous tension en appuyant sur le bouton bleu sur la face avant du disque.
3. Branchez le câble de l’antenne sur le disque dur LaCie d2 TV USB 2.0.
4. Branchez le câble de l’antenne sur l’antenne intérieure fournie avec le disque OU sur une
antenne de toit approuvée.
5. Branchez le câble d’interface (USB 2.0) sur le disque et sur votre ordinateur. Au bout de
quelques secondes, le disque apparaît sur le bureau. (L’icône apparaît sur le bureau.)
ATTENTION : ne placez jamais l’antenne intérieure fournie sur le disque dur LaCie d2 TV, ni
sur aucun autre disque dur, poste de télévision, écran à tube cathodique ou ordinateur.
L’antenne intérieure comporte un aimant puissant susceptible d’entraîner le dysfonctionnement
de ces appareils.
Remarque : le disque dur LaCie d2 TV est préformaté en tant que volume HFS+ et est
compatible avec les ordinateurs Apple. Pour une utilisation multi-plateforme sous Mac
et Windows, ou pour tout complément d’information sur le reformatage, reportez-vous
au Manuel d’utilisation.
Installation du logiciel EyeTV
Installation
1. Insérez le CD-ROM du logiciel EyeTV dans votre lecteur de CD-ROM ou de DVD-ROM.
2. Faites glisser l’application EyeTV dans le dossier où vous souhaitez l’installer. Nous vous
conseillons de choisir le dossier Applications de votre Mac.
Pr
emier lancement du logiciel EyeTV
3. Naviguez jusqu’au dossier dans lequel vous avez installé le logiciel EyeTV et double-cliquez
sur l’icône EyeTV.
4. La première fois que vous lancez EyeTV, un assistant d’installation vous guide dans la
procédure d’installation et de configuration de votre logiciel EyeTV.
5. Au cours de cette procédure, il vous est demandé de sélectionner votre pays. Cette
information est nécessaire pour trouver toutes les chaînes disponibles dans votre région.
6. A la fin de l’installation, vous pouvez commencer à regarder la télévision en direct dans la
fenêtre TV. Vous pouvez utiliser la télécommande à l’écran pour les fonctions Pause,
Avant/Arrière et Enregistrement. Branchez toujours le disque dur LaCie d2 TV avant de
lancer EyeTV.
Remarque : pour trouver la meilleure position d’antenne, sélectionnez EyeTV >
Device Settings [Configuration] > Signal.
Si vous n’obtenez toujours pas une bonne réception, nous vous conseillons de
brancher votre LaCie d2 TV sur une antenne de toit pour bénéficier de conditions de
réception optimales. Refaites ensuite le réglage (EyeTV preferences [Préférences
EyeTV] > Setup [Configuration] > Auto
-tune [Réglage automatique]).
FR
Page 7

LaCie d2 TV USB 2.0 Hard Drive
Videoregistratore digitale personale
Guida d'installazione rapida
Procedure di installazione
1. Collegare l'unità all'alimentazione elettrica.
2. Accendere l'unità premendo il tasto blu sul lato anteriore dell'unità.
3. Collegare il cavo dell'antenna all'unità LaCie d2 TV USB 2.0 Hard Drive.
4. Collegare il cavo dell'antenna all'antenna interna fornita con l'unità OPPURE a un'antenna
esterna approvata.
5. Collegare il cavo di interfaccia (USB 2.0) all'unità e al computer. L'unità (ossia l'icona
dell'unità) viene visualizzata sul desktop dopo qualche secondo.
ATTENZIONE! Non collocare mai l'antenna interna fornita sull'unità LaCie d2 TV Hard Drive,
su un'altra unità disco, su un televisore, su un monitor CRT o su computer. L'antenna interna
dispone di un potente magnete che può interferire con il normale funzionamento di questi
dispositivi.
Nota: l'unità LaCie d2 TV Hard Drive è preformattata come volume HFS+ e può quindi
essere immediatamente usata con tutti i computer Apple. Per informazioni su come
utilizzare contemporaneamente l'unità su computer Mac e Windows, e su come
riformattarla, consultare la Guida per l'utente.
Installazione del software EyeTV
Installazione
1. Inserire il CD-ROM del software EyeTV nell'unità CD-ROM o DVD-ROM.
2. Trascinare EyeTV nella cartella scelta per l'installazione. È generalmente consigliabile
scegliere la cartella Applicazioni di Mac.
Avvio iniziale del software EyeTV
3. Aprire la cartella in cui è stato installato il software EyeTV, quindi fare doppio clic
sull'icona EyeTV.
4. Quando si utilizza EyeTV per la prima volta, viene visualizzata l'Installazione guidata che
fornisce istruzioni dettagliate su come installare e configurare il software.
5. Durante il processo di installazione è necessario specificare anche il paese di residenza.
Queste informazioni sono necessarie per individuare tutti i canali disponibili nella propria
area.
6. Al termine dell'installazione guidata, è possibile iniziare immediatamente a guardare la
TV nella finestra TV in diretta. È inoltre possibile usare il telecomando per interrompere
momentaneamente la riproduzione, scorrere in avanti/indietro il programma oppure
registrarlo. Ricordarsi sempre di collegare l'unità LaCie d2 TV Hard Drive prima di aprire
EyeTV.
Nota: per trovare la posizione ottimale per l'antenna, selezionare
EyeTV>Impostazioni periferica > Segnale.
Se la ricezione non è perfetta, è consigliabile collegare l'unità LaCie d2 TV a
un'antenna da tetto, quindi ripetere l'operazione di sintonizzazione (Preferenze Eye
TV > Impostazione > Sintonizzazione automatica).
IT
Page 8

ES
LaCie d2 TV USB 2.0-Festplattenlaufwerk
Personal Digital Television Recorder
Installationsanleitung
Einrichtung Schritt für Schritt
1. Schließen Sie das Netzteil an.
2. Schalten Sie das Laufwerk ein, indem Sie die blaue Taste an der Vorderseite des Geräts
drücken.
3. Schließen Sie das Antennenkabel an das LaCie d2 TV USB 2.0-Festplattenlaufwerk an.
4. Schließen Sie das Antennenkabel an die mit dem Laufwerk gelieferte Zimmerantenne ODER
an eine zugelassene Außenantenne an.
5. Schließen Sie das Schnittstellenkabel (USB 2.0) an das Laufwerk und den Computer an. Nach
wenigen Sekunden wird das Laufwerk auf dem Computer angemeldet. (Auf dem Desktop
wird ein Symbol eingeblendet.)
VORSICHT: Stellen Sie die mitgelieferte Zimmerantenne nie auf die LaCie d2 TV-Festplatte, eine
andere Festplatte, ein Fernsehgerät, einen Röhrenmonitor oder einen Computer. Die Zimmerantenne erzeugt ein starkes Magnetfeld, das den normalen Betrieb dieser Geräte beeinträchtigen könnte.
Hinweis: Das LaCie d2 TV-Festplattenlaufwerk ist als HFS+ vorformatiert und deshalb
umgehend mit Apple-Computern einsetzbar. Einzelheiten zur plattformübergreifenden
Verwendung unter Mac und Windows sowie zur Neuformatierung finden Sie im
Benutzerhandbuch.
Installation der EyeTV Software
Installation
1. Legen Sie die CD-ROM mit der EyeTV Software in das CD-ROM- oder DVD-ROM Laufwerk ein.
2. Ziehen Sie das Symbol für EyeTV auf den gewünschten Installationsordner. Empfohlen wird
der Mac-Ordner „Applications“.
Erstes Starten der EyeTV Software
3. Wechseln Sie zum Ordner, in dem Sie die EyeTV Software installiert haben, und
doppelklicken Sie auf das Symbol für EyeTV.
4. Wenn Sie EyeTV zum ersten Mal starten, werden Sie von einem Assistenten Schritt für Schritt
durch die Einrichtung und Konfiguration der EyeTV Software geführt.
5. Dabei müssen Sie Ihr Land auswählen, damit alle verfügbaren Programme gefunden
werden können.
6. Sofort nach Abschluss des Assistenten können Sie im Live-TV-Fenster mit dem Fernsehen
beginnen. Mit der Fernsteuerung auf dem Bildschirm können Sie aufzeichnen, anhalten
sowie vor- oder zurückspulen. Das LaCie d2 TV-Festplattenlaufwerk muss angeschlossen
sein, bevor Sie EyeTV starten.
Hinweis: Zum Ermitteln der optimalen Antennenposition wählen Sie „EyeTV > Device
Settings (Geräteeinstellungen) > Signal“.
Wenn der Empfang nicht zufriedenstellend ist, sollten Sie das LaCie d2 TVFestplattenlaufwerk an eine Dachantenne anschließen, um die Empfangsbedingungen zu verbessern. Nehmen Sie dann erneut eine Feineinstellung vor,
indem Sie „Eye
TV Preferences > Setup > Auto-Tune“ (Eye TV-Voreinstellungen > Einrichtung >
Automatische Feineinstellung) wählen.
DE
Page 9
Page 10

LaCie d2 TV USB 2.0 harddrive
Digitale televisierecorder voor persoonlijk gebruik
Beknopte installatiehandleiding
Installatiestappen
1. Sluit de voeding aan.
2. Zet de drive aan door op de blauwe knop aan de voorkant van de drive te drukken.
3. Sluit de antennekabel aan op uw LaCie d2 TV USB 2.0 harddrive.
4. Sluit de antennekabel aan op de bij de drive geleverde binnenhuisantenne
OF op een goedgekeurde dakantenne.
5. Sluit de interfacekabel (USB 2.0) aan op de drive en op de computer. Na enkele seconden
installeert de drive zich op uw computer. (Het pictogram verschijnt op uw bureaublad.)
LET OP: plaats de bijgeleverde binnenhuisantenne nooit op de LaCie d2 TV harddrive, een
andere harddrive, een televisietoestel, een CRT-monitor of een computer. De binnenhuisantenne
bevat een krachtige magneet die de normale werking van deze apparaten kan beïnvloeden.
Opmerking: de LaCie d2 TV harddrive is voorgeformatteerd als HFS+-volume en is
direct compatibel met Apple-computers. Raadpleeg de gebruikershandleiding voor
informatie over platformonafhankelijk gebruik onder zowel Mac als Windows en voor
andere gegevens over herformatteren.
EyeTV-software installeren
Installatie
1. Plaats de cd-rom met EyeTV-software in de cd-rom- of dvd-rom-drive van uw computer.
2. Sleep de EyeTV-toepassing naar de locatie waar u de toepassing wilt installeren. We
adviseren, hiervoor de toepassingenmap van uw Mac te kiezen.
De EyeTV-software voor de eerste keer starten
3. Navigeer naar de map waarin u de EyeTV-software hebt geïnstalleerd en dubbelklik op
het EyeTV-pictogram.
4. Bij het eerste gebruik van EyeTV wordt u door een setup-assistent door de gehele setup en
configuratie van uw EyeTV-software geleid.
5. Tijdens dit proces wordt u gevraagd uw land te selecteren. De software heeft deze
informatie nodig om alle beschikbare kanalen in uw regio te kunnen vinden.
6. Zodra het proces met de setup-assistent is voltooid, kunt u in het live tv-venster televisie
kijken. Met de onscreen afstandsbediening kunt u pauzeren, vooruit/achteruit verspringen
of opnemen. Sluit altijd de LaCie d2 TV harddrive aan voordat u EyeTV opent.
Opmerking: ga voor assistentie bij het vinden van de beste antennestand naar
EyeTV > Device Settings > Signal.
Als u geen goede ontvangst krijgt, adviseren we u de LaCie d2 TV op een dakantenne aan te sluiten, zodat de ontvangstomstandigheden optimaal zijn. Stel
vervolgens opnieuw de kanaalkeuze in (Eye TV preferences > Setup > Auto
-tune).
NL
Page 11

Unidade de Disco Rígido LaCie d2 TV USB 2.0
Gravador de Televisão Digital Pessoal
Guia de Instalação Rápida
Procedimento de instalação
1. Ligue a fonte de alimentação.
2. Ligue a unidade premindo o botão azul na parte anterior da unidade.
3. Ligue o cabo da antena à Unidade de Disco Rígido LaCie d2 TV USB 2.0.
4. Ligue o cabo da antena à antena interior fornecida com a unidade OU a uma antena
exterior aprovada.
5. Ligue o cabo da interface (USB 2.0) à unidade e ao computador. Após alguns segundos,
a unidade será adicionada ao computador. (O ícone será apresentado no ambiente de
trabalho.)
CUIDADO: Nunca coloque a antena interior fornecida sobre a Unidade de Disco Rígido LaCie
d2 TV, sobre outra unidade de disco rígido, sobre o televisor, o monitor CRT ou o computador.
A antena interior integra um íman potente que pode interferir com o funcionamento normal
destes dispositivos.
Nota: A Unidade de Disco Rígido LaCie d2 TV foi pré-formatada como um volume
HFS+ e apresenta compatibilidade imediata com computadores Apple. Para obter
informações sobre a utilização interplataformas entre Mac e Windows, bem como mais
informações sobre reformatação, consulte o User Manual.
Instalação do software EyeTV
Instalação
1. Introduza o CD-ROM do software EyeTV na unidade de CD-ROM ou DVD-ROM.
2. Arraste e largue a aplicação EyeTV na localização em que pretende instalá-la.
Num computador Mac, recomenda-se a instalação na pasta Applications.
Iniciar o software EyeTV pela primeira vez
3. Navegue até à pasta em que instalou o software EyeTV e faça duplo clique no ícone
EyeTV.
4. Na primeira vez que iniciar o EyeTV, um Assistente de Instalação irá orientá-lo através da
instalação e configuração completas do software EyeTV
.
5. Durante este processo, ser-lhe-á pedido para seleccionar o país. Estas informações são
necessárias para determinar todos os canais disponíveis na sua área.
6. Uma vez concluído o Assistente de Instalação, poderá começar a ver televisão na janela
Live TV. Pode utilizar o controlo remoto no ecrã para colocar em pausa, avançar/
retroceder ou gravar. Ligue sempre a Unidade de Disco Rígido LaCie d2 TV antes de
iniciar o EyeTV.
Nota: Caso necessite de ajuda para determinar a melhor posição da antena,
seleccione EyeTV > Device Settings > Signal.
Se não obtiver uma recepção adequada, recomenda-s
e que ligue a LaCie d2 TV a
uma antena exterior a fim de optimizar as condições de recepção. Em seguida,
sintonize novamente (Eye TV preferences > Setup > Auto-tune).
PT
Page 12

LaCie d2 TV USB 2.0-hårddisk
Personlig digital-tv-inspelare
Snabbinstallationsguide
Anvisningar för installation
1. Anslut till elnätet.
2. Slå på enheten genom att trycka på den blå knappen på framsidan.
3. Anslut antennsladden till LaCie d2 TV USB 2.0-hårddisken.
4. Anslut antennsladden till antingen inomhusantennen som medföljer enheten ELLER en
godkänd takantenn.
5. Anslut gränssnittskabeln (USB 2.0) till både enheten och datorn. Efter några sekunder
kommer enheten upp på datorn (ikonen visas på skrivbordet).
VA
R FÖRSIKTIG! Placera aldrig den medföljande inomhusantennen på LaCie d2 TV-
hårddisken eller på någon annan hårddisk, på tv-apparater, CRT-skärmar eller datorer.
Inomhusantennen har en kraftfull magnet som kan inverka på dessa enheters normala
funktion.
Observera: LaCie d2 TV-hårddisken är förformaterad som en HFS+-volym och är
genast kompatibel med Apple-datorer. Se bruksanvisningen för information om
plattformsoberoende användning mellan Mac och Windows samt om omformatering.
Installera EyeTV-programvaran
Installation
1. Sätt i cd-romskivan med EyeTV-programvaran i cd-rom- eller dvd-rom-enheten.
2. Dra och släpp ner EyeTV-programmet på den plats där du vill installera det.
Vi rekommenderar Mac-datorns mapp med program (Applications).
Starta EyeTV-programvaran för första gången
3. Gå till mappen där du installerade EyeTV-programvaran och dubbelklicka på
EyeTV-ikonen.
4. Första gången du startar EyeTV kommer en installationsassistent att vägleda dig genom
hela installationen och konfigurationen av EyeTV
-programvaran.
5. Under den här proceduren kommer du att få välja ditt land. Denna information krävs för
att det ska gå att hitta alla tillgängliga kanaler i ditt område
.
6. När installationsassistenten har avslutats kan du börja titta på tv i live-tv-fönstret. Använd
fjärrkontrollen på skärmen för att pausa, hoppa framåt/bakåt eller spela in. Anslut alltid
LaCie d2 TV-hårddisken innan du startar EyeTV.
Observera: För att få hjälp med att hitta den bästa antennpositionen går du till
EyeTV > Device Settings > Signal.
Om mottagningen är dålig rekommenderar vi att du ansluter LaCie d2 TV till en
takantenn, för att förbättra mottagningsförhållandena. Gör sedan en ny inställning
(Eye TV preferences > Setup > Auto-tune).
SV
Page 13

LaCie d2 TV USB 2.0-harddisk
Personlig digital tv-optager
Lynvejledning til installation
Installation
1. Tilslut strømforsyningen.
2. Tænd for harddisken ved at trykke på den blå knap på harddiskens forside.
3. Slut antennekablet til LaCie d2 TV USB 2.0-harddisken.
4. Slut enten antennekablet til stueantennen, der følger med harddisken, ELLER til en godkendt
tagantenne.
5. Slut interfacekablet (USB 2.0) til harddisken og computeren. Efter et par sekunder oprettes
der forbindelse mellem harddisken og computeren. (Ikonet vises på skrivebordet).
FORSIGTIG: Placer aldrig den medfølgende stueantenne på LaCie d2 TV-harddisken, andre
harddiske, fjernsyn, CRT-skærme eller computere. Stueantennen indeholder en kraftig magnet,
der kan medføre interferens ved normal brug af disse enheder.
Bemærk: LaCie d2 TV-harddisken er forudformateret til HFS+ og er direkte kompatibel
med Apple-computere. Læs brugervejledningen for at få flere oplysninger om brug på
tværs af Mac- og Windows-platforme samt omformatering.
Installation af EyeTV-software
Installation
1. Indsæt cd-rom'en med EyeTV-softwaren i cd-rom- eller dvd-rom-drevet.
2. Træk og slip EyeTV-programmet til det sted, du vil installere det. Vi anbefaler mappen med
programmer på din Macintosh.
Brug af EyeTV-softwaren første gang
3. Gå til den mappe, hvor du installerede EyeTV-softwaren, og dobbeltklik på EyeTV-ikonet.
4. Første gang du starter EyeTV, fører en indstillingsassistent dig gennem hele indstillingen og
konfigurationen af EyeTV-softwaren.
5. I løbet af den procedure bliver du bedt om at vælge dit land. Denne information er
nødvendig for at finde alle tilgængelige kanaler i dit område
.
6. Når indstillingen er færdig, kan du se fjernsyn i vinduet med live-tv. Du kan bruge
skærmfjernbetjeningen til at holde pause, springe frem/tilbage eller optage. Tilslut altid
LaCie d2 TV-harddisken, før du starter EyeTV.
Bemærk: Gå til EyeTV>Device Settings > Signal for at få hjælp til at finde den bedste
antenneposition.
Hvis du ikke kan opnå en god tv-modtagelse, anbefales du, at slutte LaCie d2 TV til
en tagantenne for at opnå optimale modtageforhold. Foretag derefter kanalindstillingen igen (Eye TV preferences > Setup > Auto
-tune).
DA
Page 14

LaCie d2 TV USB 2.0 -kiintolevy
Henkilökohtainen digitaalinen TV-tallennin
Pikaopas
Asennusvaiheet
1. Kytke virtalähde.
2. Kytke asemaan virta painamalla sinistä painiketta aseman etuosassa.
3. Kytke antennikaapeli LaCie d2 TV USB 2.0 -kiintolevyasemaan.
4. Kytke antennikaapeli joko aseman mukana toimitettuun sisäantenniin TAI hyväksyttyyn
kattoantenniin.
5. Kytke liitäntäkaapeli (USB 2.0) asemaan ja tietokoneeseen. Asema näkyy asemana
tietokoneessa muutaman sekunnin kuluttua. (Kuvake tulee näkyviin työpöydälle)
VA
ROITUS: Mukana toimitettua sisäantennia ei saa sijoittaa LaCie d2 TV -kiintolevyaseman tai
muun kiintolevyaseman, television, kuvaputkinäytön (CRT) tai tietokoneen päälle. Sisäantennissa
on voimakas magneetti, joka voi häiritä näiden laitteiden toimintaa.
Huom. LaCie d2 TV -kiintolevyasema on alustettu HFS+ -taltioksi, ja se on suoraan
yhteensopiva Apple-tietokoneiden kanssa. Käyttöoppaassa on lisätietoja monikäyttöympäristöstä Mac- ja Windows-käyttöjärjestelmissä sekä uudelleen alustamisesta.
EyeTV-ohjelmiston asennus
Asennus
1. Aseta EyeTV-ohjelmiston sisältävä CD-ROM-levy CD-ROM- tai DVD-ROM-asemaan.
2. Vedä ja pudota EyeTV-sovellus kansioon, jonne haluat asentaa sen. Suosittelemme kansioksi
Macintoshin Ohjelmat-kansiota (Applications).
EyeTV-ohjelmiston ensimmäinen käyttö
3. Siirry kansioon, jonne EyeTV-ohjelmisto on asennettu, ja kaksoisosoita EyeTV-symbolia.
4. Kun EyeTV-ohjelmisto käynnistetään ensimmäisen kerran, asennusohjelma opastaa
EyeTV-ohjelmiston asetusten määrittämisessä.
5. Tämän prosessin aikana sinua pyydetään valitsemaan käyttömaa. Tätä tietoa tarvitaan
kaikkien alueella näkyvien kanavien löytämiseksi.
6. Kun asennusohjelma on valmis, voit aloittaa television katselun televisioruudusta. Voit
kaukosäätimen avulla pysäyttää kuvan, siirtyä eteen- tai taaksepäin tai käynnistää
tallennuksen. LaCie d2 TV -kiintolevy on kytkettävä ennen EyeTV-ohjelmiston
käynnistämistä.
Huom. Valitse EyeTV > Device Settings > Signal, jotta voit etsiä antennille parhaan
asennon.
Jos vastaanottoa ei saada hyväksi, kytke LaCie d2 TV kattoantenniin parhaan
mahdollisen vastaanoton saamiseksi. Viritä sitten kanavat uudelleen (Eye TV
preferences > Setup > Auto-tune).
FI
Page 15

d2 Ethernet Disk mini
Quick Install Guide
Note: When connecting via Ethernet, you cannot use the USB connectivity option.
When connecting via USB, you cannot use the Ethernet connectivity option.
To
Use as a Shared Drive
Step 1 – Attaching the Cables
1. Connect the Ethernet cable to a Fast Ethernet Switch and to your LaCie Ethernet Disk mini drive.
2. Connect the power cable to your Ethernet Disk mini, then to a power source.
3. Power on your drive by pressing the blue LED button.
Step 2 – Obtaining IP Address Using IP Configurator Software
1. Insert the LaCie Ethernet Disk mini CD-ROM in a computer attached to the same network as
the LaCie Ethernet Disk mini, and install the LaCie Ethernet Disk Configurator to begin
configuring your drive.
2. From the start menu (Windows) or your Utilities folder (Mac), run the Configurator program to
obtain your Ethernet Disk mini’s IP address.
Step 3 – Accessing the Web Administration Page
1. Open your web browser and type http://edmini or http://IP Adress (IP address is the number
obtained by the IP Configurator; for example, http://10.1.4.111) in the address field.
2. In the Login window that appears:
Login: Admin
Password: Admin
To
Use as an External Hard Drive
Step 1 – Attaching the Cables
1. Connect the power cable to your Ethernet Disk mini, then to a power source.
2. a. Connect the USB 2.0 cable to your computer and the Ethernet Disk mini.
b. Power on the drive by pressing the blue LED button.
Step 2 – Logging onto the Drive
1. Double-click the Ethernet Disk mini icon on your desktop.
2. In the window that opens, double-click the Edmini icon.
3. In the window that opens, click Log On.
4. Start using your Ethernet Disk mini.
Formatting Note:
The Ethernet Disk mini is formatted as a FAT32 file system.
FA
T32 has the following limitations:
1. Mac OS special characters cannot be used in file names when using the Ethernet Disk mini
via USB.
2. File size cannot exceed 4GB.
Using other file systems, such as NTFS (Windows 2000 or XP) or HFS/HFS+ (Mac OS X) will
invalidate the possibility to write files on the drive.
Please refer to page 41 of the User Manual for more information.
??
Page 16

d2 Ethernet Disk mini
Quick Install Guide
Note: When connecting via Ethernet, you cannot use the USB connectivity option.
When connecting via USB, you cannot use the Ethernet connectivity option.
To
Use as a Shared Drive
Step 1 – Attaching the Cables
1. Connect the Ethernet cable to a Fast Ethernet Switch and to your LaCie Ethernet Disk mini drive.
2. Connect the power cable to your Ethernet Disk mini, then to a power source.
3. Power on your drive by pressing the blue LED button.
Step 2 – Obtaining IP Address Using IP Configurator Software
1. Insert the LaCie Ethernet Disk mini CD-ROM in a computer attached to the same network as
the LaCie Ethernet Disk mini, and install the LaCie Ethernet Disk Configurator to begin
configuring your drive.
2. From the start menu (Windows) or your Utilities folder (Mac), run the Configurator program to
obtain your Ethernet Disk mini’s IP address.
Step 3 – Accessing the Web Administration Page
1. Open your web browser and type http://edmini or http://IP Adress (IP address is the number
obtained by the IP Configurator; for example, http://10.1.4.111) in the address field.
2. In the Login window that appears:
Login: Admin
Password: Admin
To
Use as an External Hard Drive
Step 1 – Attaching the Cables
1. Connect the power cable to your Ethernet Disk mini, then to a power source.
2. a. Connect the USB 2.0 cable to your computer and the Ethernet Disk mini.
b. Power on the drive by pressing the blue LED button.
Step 2 – Logging onto the Drive
1. Double-click the Ethernet Disk mini icon on your desktop.
2. In the window that opens, double-click the Edmini icon.
3. In the window that opens, click Log On.
4. Start using your Ethernet Disk mini.
Formatting Note:
The Ethernet Disk mini is formatted as a FAT32 file system.
FA
T32 has the following limitations:
1. Mac OS special characters cannot be used in file names when using the Ethernet Disk mini
via USB.
2. File size cannot exceed 4GB.
Using other file systems, such as NTFS (Windows 2000 or XP) or HFS/HFS+ (Mac OS X) will
invalidate the possibility to write files on the drive.
Please refer to page 41 of the User Manual for more information.
??
Page 17

d2 Ethernet Disk mini
Quick Install Guide
Note: When connecting via Ethernet, you cannot use the USB connectivity option.
When connecting via USB, you cannot use the Ethernet connectivity option.
To
Use as a Shared Drive
Step 1 – Attaching the Cables
1. Connect the Ethernet cable to a Fast Ethernet Switch and to your LaCie Ethernet Disk mini drive.
2. Connect the power cable to your Ethernet Disk mini, then to a power source.
3. Power on your drive by pressing the blue LED button.
Step 2 – Obtaining IP Address Using IP Configurator Software
1. Insert the LaCie Ethernet Disk mini CD-ROM in a computer attached to the same network as
the LaCie Ethernet Disk mini, and install the LaCie Ethernet Disk Configurator to begin
configuring your drive.
2. From the start menu (Windows) or your Utilities folder (Mac), run the Configurator program to
obtain your Ethernet Disk mini’s IP address.
Step 3 – Accessing the Web Administration Page
1. Open your web browser and type http://edmini or http://IP Adress (IP address is the number
obtained by the IP Configurator; for example, http://10.1.4.111) in the address field.
2. In the Login window that appears:
Login: Admin
Password: Admin
To
Use as an External Hard Drive
Step 1 – Attaching the Cables
1. Connect the power cable to your Ethernet Disk mini, then to a power source.
2. a. Connect the USB 2.0 cable to your computer and the Ethernet Disk mini.
b. Power on the drive by pressing the blue LED button.
Step 2 – Logging onto the Drive
1. Double-click the Ethernet Disk mini icon on your desktop.
2. In the window that opens, double-click the Edmini icon.
3. In the window that opens, click Log On.
4. Start using your Ethernet Disk mini.
Formatting Note:
The Ethernet Disk mini is formatted as a FAT32 file system.
FA
T32 has the following limitations:
1. Mac OS special characters cannot be used in file names when using the Ethernet Disk mini
via USB.
2. File size cannot exceed 4GB.
Using other file systems, such as NTFS (Windows 2000 or XP) or HFS/HFS+ (Mac OS X) will
invalidate the possibility to write files on the drive.
Please refer to page 41 of the User Manual for more information.
??
Page 18

d2 Ethernet Disk mini
Quick Install Guide
Note: When connecting via Ethernet, you cannot use the USB connectivity option.
When connecting via USB, you cannot use the Ethernet connectivity option.
To
Use as a Shared Drive
Step 1 – Attaching the Cables
1. Connect the Ethernet cable to a Fast Ethernet Switch and to your LaCie Ethernet Disk mini drive.
2. Connect the power cable to your Ethernet Disk mini, then to a power source.
3. Power on your drive by pressing the blue LED button.
Step 2 – Obtaining IP Address Using IP Configurator Software
1. Insert the LaCie Ethernet Disk mini CD-ROM in a computer attached to the same network as
the LaCie Ethernet Disk mini, and install the LaCie Ethernet Disk Configurator to begin
configuring your drive.
2. From the start menu (Windows) or your Utilities folder (Mac), run the Configurator program to
obtain your Ethernet Disk mini’s IP address.
Step 3 – Accessing the Web Administration Page
1. Open your web browser and type http://edmini or http://IP Adress (IP address is the number
obtained by the IP Configurator; for example, http://10.1.4.111) in the address field.
2. In the Login window that appears:
Login: Admin
Password: Admin
To
Use as an External Hard Drive
Step 1 – Attaching the Cables
1. Connect the power cable to your Ethernet Disk mini, then to a power source.
2. a. Connect the USB 2.0 cable to your computer and the Ethernet Disk mini.
b. Power on the drive by pressing the blue LED button.
Step 2 – Logging onto the Drive
1. Double-click the Ethernet Disk mini icon on your desktop.
2. In the window that opens, double-click the Edmini icon.
3. In the window that opens, click Log On.
4. Start using your Ethernet Disk mini.
Formatting Note:
The Ethernet Disk mini is formatted as a FAT32 file system.
FA
T32 has the following limitations:
1. Mac OS special characters cannot be used in file names when using the Ethernet Disk mini
via USB.
2. File size cannot exceed 4GB.
Using other file systems, such as NTFS (Windows 2000 or XP) or HFS/HFS+ (Mac OS X) will
invalidate the possibility to write files on the drive.
Please refer to page 41 of the User Manual for more information.
??
Page 19

d2 Ethernet Disk mini
Quick Install Guide
Note: When connecting via Ethernet, you cannot use the USB connectivity option.
When connecting via USB, you cannot use the Ethernet connectivity option.
To
Use as a Shared Drive
Step 1 – Attaching the Cables
1. Connect the Ethernet cable to a Fast Ethernet Switch and to your LaCie Ethernet Disk mini drive.
2. Connect the power cable to your Ethernet Disk mini, then to a power source.
3. Power on your drive by pressing the blue LED button.
Step 2 – Obtaining IP Address Using IP Configurator Software
1. Insert the LaCie Ethernet Disk mini CD-ROM in a computer attached to the same network as
the LaCie Ethernet Disk mini, and install the LaCie Ethernet Disk Configurator to begin
configuring your drive.
2. From the start menu (Windows) or your Utilities folder (Mac), run the Configurator program to
obtain your Ethernet Disk mini’s IP address.
Step 3 – Accessing the Web Administration Page
1. Open your web browser and type http://edmini or http://IP Adress (IP address is the number
obtained by the IP Configurator; for example, http://10.1.4.111) in the address field.
2. In the Login window that appears:
Login: Admin
Password: Admin
To
Use as an External Hard Drive
Step 1 – Attaching the Cables
1. Connect the power cable to your Ethernet Disk mini, then to a power source.
2. a. Connect the USB 2.0 cable to your computer and the Ethernet Disk mini.
b. Power on the drive by pressing the blue LED button.
Step 2 – Logging onto the Drive
1. Double-click the Ethernet Disk mini icon on your desktop.
2. In the window that opens, double-click the Edmini icon.
3. In the window that opens, click Log On.
4. Start using your Ethernet Disk mini.
Formatting Note:
The Ethernet Disk mini is formatted as a FAT32 file system.
FA
T32 has the following limitations:
1. Mac OS special characters cannot be used in file names when using the Ethernet Disk mini
via USB.
2. File size cannot exceed 4GB.
Using other file systems, such as NTFS (Windows 2000 or XP) or HFS/HFS+ (Mac OS X) will
invalidate the possibility to write files on the drive.
Please refer to page 41 of the User Manual for more information.
??
Page 20

d2 Ethernet Disk mini
Quick Install Guide
Note: When connecting via Ethernet, you cannot use the USB connectivity option.
When connecting via USB, you cannot use the Ethernet connectivity option.
To
Use as a Shared Drive
Step 1 – Attaching the Cables
1. Connect the Ethernet cable to a Fast Ethernet Switch and to your LaCie Ethernet Disk mini drive.
2. Connect the power cable to your Ethernet Disk mini, then to a power source.
3. Power on your drive by pressing the blue LED button.
Step 2 – Obtaining IP Address Using IP Configurator Software
1. Insert the LaCie Ethernet Disk mini CD-ROM in a computer attached to the same network as
the LaCie Ethernet Disk mini, and install the LaCie Ethernet Disk Configurator to begin
configuring your drive.
2. From the start menu (Windows) or your Utilities folder (Mac), run the Configurator program to
obtain your Ethernet Disk mini’s IP address.
Step 3 – Accessing the Web Administration Page
1. Open your web browser and type http://edmini or http://IP Adress (IP address is the number
obtained by the IP Configurator; for example, http://10.1.4.111) in the address field.
2. In the Login window that appears:
Login: Admin
Password: Admin
To
Use as an External Hard Drive
Step 1 – Attaching the Cables
1. Connect the power cable to your Ethernet Disk mini, then to a power source.
2. a. Connect the USB 2.0 cable to your computer and the Ethernet Disk mini.
b. Power on the drive by pressing the blue LED button.
Step 2 – Logging onto the Drive
1. Double-click the Ethernet Disk mini icon on your desktop.
2. In the window that opens, double-click the Edmini icon.
3. In the window that opens, click Log On.
4. Start using your Ethernet Disk mini.
Formatting Note:
The Ethernet Disk mini is formatted as a FAT32 file system.
FA
T32 has the following limitations:
1. Mac OS special characters cannot be used in file names when using the Ethernet Disk mini
via USB.
2. File size cannot exceed 4GB.
Using other file systems, such as NTFS (Windows 2000 or XP) or HFS/HFS+ (Mac OS X) will
invalidate the possibility to write files on the drive.
Please refer to page 41 of the User Manual for more information.
??
Page 21

d2 Ethernet Disk mini
Quick Install Guide
Note: When connecting via Ethernet, you cannot use the USB connectivity option.
When connecting via USB, you cannot use the Ethernet connectivity option.
To
Use as a Shared Drive
Step 1 – Attaching the Cables
1. Connect the Ethernet cable to a Fast Ethernet Switch and to your LaCie Ethernet Disk mini drive.
2. Connect the power cable to your Ethernet Disk mini, then to a power source.
3. Power on your drive by pressing the blue LED button.
Step 2 – Obtaining IP Address Using IP Configurator Software
1. Insert the LaCie Ethernet Disk mini CD-ROM in a computer attached to the same network as
the LaCie Ethernet Disk mini, and install the LaCie Ethernet Disk Configurator to begin
configuring your drive.
2. From the start menu (Windows) or your Utilities folder (Mac), run the Configurator program to
obtain your Ethernet Disk mini’s IP address.
Step 3 – Accessing the Web Administration Page
1. Open your web browser and type http://edmini or http://IP Adress (IP address is the number
obtained by the IP Configurator; for example, http://10.1.4.111) in the address field.
2. In the Login window that appears:
Login: Admin
Password: Admin
To
Use as an External Hard Drive
Step 1 – Attaching the Cables
1. Connect the power cable to your Ethernet Disk mini, then to a power source.
2. a. Connect the USB 2.0 cable to your computer and the Ethernet Disk mini.
b. Power on the drive by pressing the blue LED button.
Step 2 – Logging onto the Drive
1. Double-click the Ethernet Disk mini icon on your desktop.
2. In the window that opens, double-click the Edmini icon.
3. In the window that opens, click Log On.
4. Start using your Ethernet Disk mini.
Formatting Note:
The Ethernet Disk mini is formatted as a FAT32 file system.
FA
T32 has the following limitations:
1. Mac OS special characters cannot be used in file names when using the Ethernet Disk mini
via USB.
2. File size cannot exceed 4GB.
Using other file systems, such as NTFS (Windows 2000 or XP) or HFS/HFS+ (Mac OS X) will
invalidate the possibility to write files on the drive.
Please refer to page 41 of the User Manual for more information.
??
Page 22

d2 Ethernet Disk mini
Quick Install Guide
Note: When connecting via Ethernet, you cannot use the USB connectivity option.
When connecting via USB, you cannot use the Ethernet connectivity option.
To
Use as a Shared Drive
Step 1 – Attaching the Cables
1. Connect the Ethernet cable to a Fast Ethernet Switch and to your LaCie Ethernet Disk mini drive.
2. Connect the power cable to your Ethernet Disk mini, then to a power source.
3. Power on your drive by pressing the blue LED button.
Step 2 – Obtaining IP Address Using IP Configurator Software
1. Insert the LaCie Ethernet Disk mini CD-ROM in a computer attached to the same network as
the LaCie Ethernet Disk mini, and install the LaCie Ethernet Disk Configurator to begin
configuring your drive.
2. From the start menu (Windows) or your Utilities folder (Mac), run the Configurator program to
obtain your Ethernet Disk mini’s IP address.
Step 3 – Accessing the Web Administration Page
1. Open your web browser and type http://edmini or http://IP Adress (IP address is the number
obtained by the IP Configurator; for example, http://10.1.4.111) in the address field.
2. In the Login window that appears:
Login: Admin
Password: Admin
To
Use as an External Hard Drive
Step 1 – Attaching the Cables
1. Connect the power cable to your Ethernet Disk mini, then to a power source.
2. a. Connect the USB 2.0 cable to your computer and the Ethernet Disk mini.
b. Power on the drive by pressing the blue LED button.
Step 2 – Logging onto the Drive
1. Double-click the Ethernet Disk mini icon on your desktop.
2. In the window that opens, double-click the Edmini icon.
3. In the window that opens, click Log On.
4. Start using your Ethernet Disk mini.
Formatting Note:
The Ethernet Disk mini is formatted as a FAT32 file system.
FA
T32 has the following limitations:
1. Mac OS special characters cannot be used in file names when using the Ethernet Disk mini
via USB.
2. File size cannot exceed 4GB.
Using other file systems, such as NTFS (Windows 2000 or XP) or HFS/HFS+ (Mac OS X) will
invalidate the possibility to write files on the drive.
Please refer to page 41 of the User Manual for more information.
??
Page 23

LaCie USA
22985 NW Evergreen Pkwy
Hillsboro, OR 97124
[email protected]
LaCie France
17, rue Ampère
91349 Massy Cedex
[email protected]
LaCie Asia (HK)
25/F Winsan Tower
98 Thomson Road
Wanchai, Hong-Kong
[email protected]
LaCie Asia (Singapore)
Centennial Tower, Level 21
3 Temasek Avenue
Singapore 039190
[email protected]
LaCie Australia
458 Gardeners Rd.
Alexandria, NSW 2015
[email protected]
LaCie Belgium
Vorstlaan 165/ Bld
du Souverain 165
1160 Brussels
[email protected]
LaCie Canada
235 Dufferin St.
Toronto, Ontario M6K 1Z5
[email protected]
LaCie Germany
Am Kesselhaus 5
D-79576 Weil Am Rhein
Deutschland
[email protected]
LaCie Italy
Centro Direzionale Edifi cio B4
Via dei Missaglia 97
20142 Milano, Italia
[email protected]
LaCie Japan K.K.
Uruma Kowa Bldg. 6F
8-11-37 Akasaka, Minato-ku
Tokyo 107-0052
LaCie Netherlands
Postbus 1343480
DC Harmelen
[email protected]
LaCie Nordic
(Sweden, Denmark, Norway, Finland)
Tre Liljor 5
113 44 Stockholm, Sweden
[email protected]
LaCie Spain
C/ Núñez Morgado, 3, 5a pl.
28036 Madrid
[email protected]
LaCie Switzerland
Davidsbodenstrasse 15 A
4004 Basel
[email protected]
LaCie United Kingdom
and Ireland
46 Gillingham Street
London, England SW1V 1HU
[email protected]
LaCie Worldwide Export
17, rue Ampère
91349 Massy Cedex, France
[email protected]
[email protected]
Copyright 2006, LaCie
710238
CONTACT US
 Loading...