

Page 1
LaCie 2big NAS (OS 3.0) | LaCie 5big NAS Pro User Manual 1
LACIE 2BIG NAS (OS 3.0) | LACIE 5BIG NAS PRO USER
MANUAL
CLICK HERE TO ACCESS UP-TO-DATE ONLINE VERSION
of this document for the most recent content as well as for features such as expandable
illustrations, easier navigation, and search capability.
LaCie 2big NAS LaCie 5big NAS Pro
Page 2
LaCie 2big NAS (OS 3.0) | LaCie 5big NAS Pro User Manual 2
INTRODUCTION
Informação importante: Este manual do usuário é apenas em Inglês.
This manual covers:
Products Operating System Version
LaCie 2big NAS LaCie NAS OS 3.0 (learn more here)
LaCie 5big NAS Pro LaCie NAS OS 3.0
Congratulations on your purchase of a LaCie professional NAS (network-attached storage device). Designed to
satisfy the data sharing and backup needs of small, medium, and branch offices, your product belongs to the
new generation of LaCie NAS, featuring Hybrid Cloud technology.
This manual will guide you through the process of connecting the LaCie NAS to your network and will assist you
in troubleshooting any issues that might arise. If you encounter problems, check Getting Help. Note that most of
the problems users encounter can be resolved by resetting the product to factory conditions (see Reset to
Factory Conditions - 2big NAS or LaCie NAS Rescue - 5big NAS Pro).
BOX CONTENT
LaCie 2big NAS LaCie 5big NAS Pro
Product
Ethernet cable
External Power supply
Utilities CD-ROM with
software
Drive stand for upright use ––
Disk drawer key
USB Key for install and recovery ––
Cable management clip ––
Important info: Please save your packaging. In the event that the drive should need to be repaired or
serviced, it must be returned in its original packaging.
Page 3

LaCie 2big NAS (OS 3.0) | LaCie 5big NAS Pro User Manual 3
MINIMUM SYSTEM REQUIREMENTS
Latest version of Windows® XP, Windows Vista®, Windows 7, Windows 8 / Mac® OS X 10.5, 10.6, 10.7, 10.8
■
Web browsers: Internet Explorer™ 7.0 / 8.0, Firefox™ 3.0, Safari™ 3.0, or Chrome 2.0 or higher
■
Computer with an Ethernet network adapter
■
Ethernet switch or router 10/100/1GB
■
UPnP server or client (to access UPnP services)
■
SMB server or client (to access SMB services)
■
Important info:
Your LaCie product's performance can be affected by such external forces as network activity, hardware,
distance, and setup.
For optimal performance, use a Gigabit Ethernet router and a Gigabit Ethernet board in your host computer.
Page 4
LaCie 2big NAS (OS 3.0) | LaCie 5big NAS Pro User Manual 4
VIEWS OF THE PRODUCT
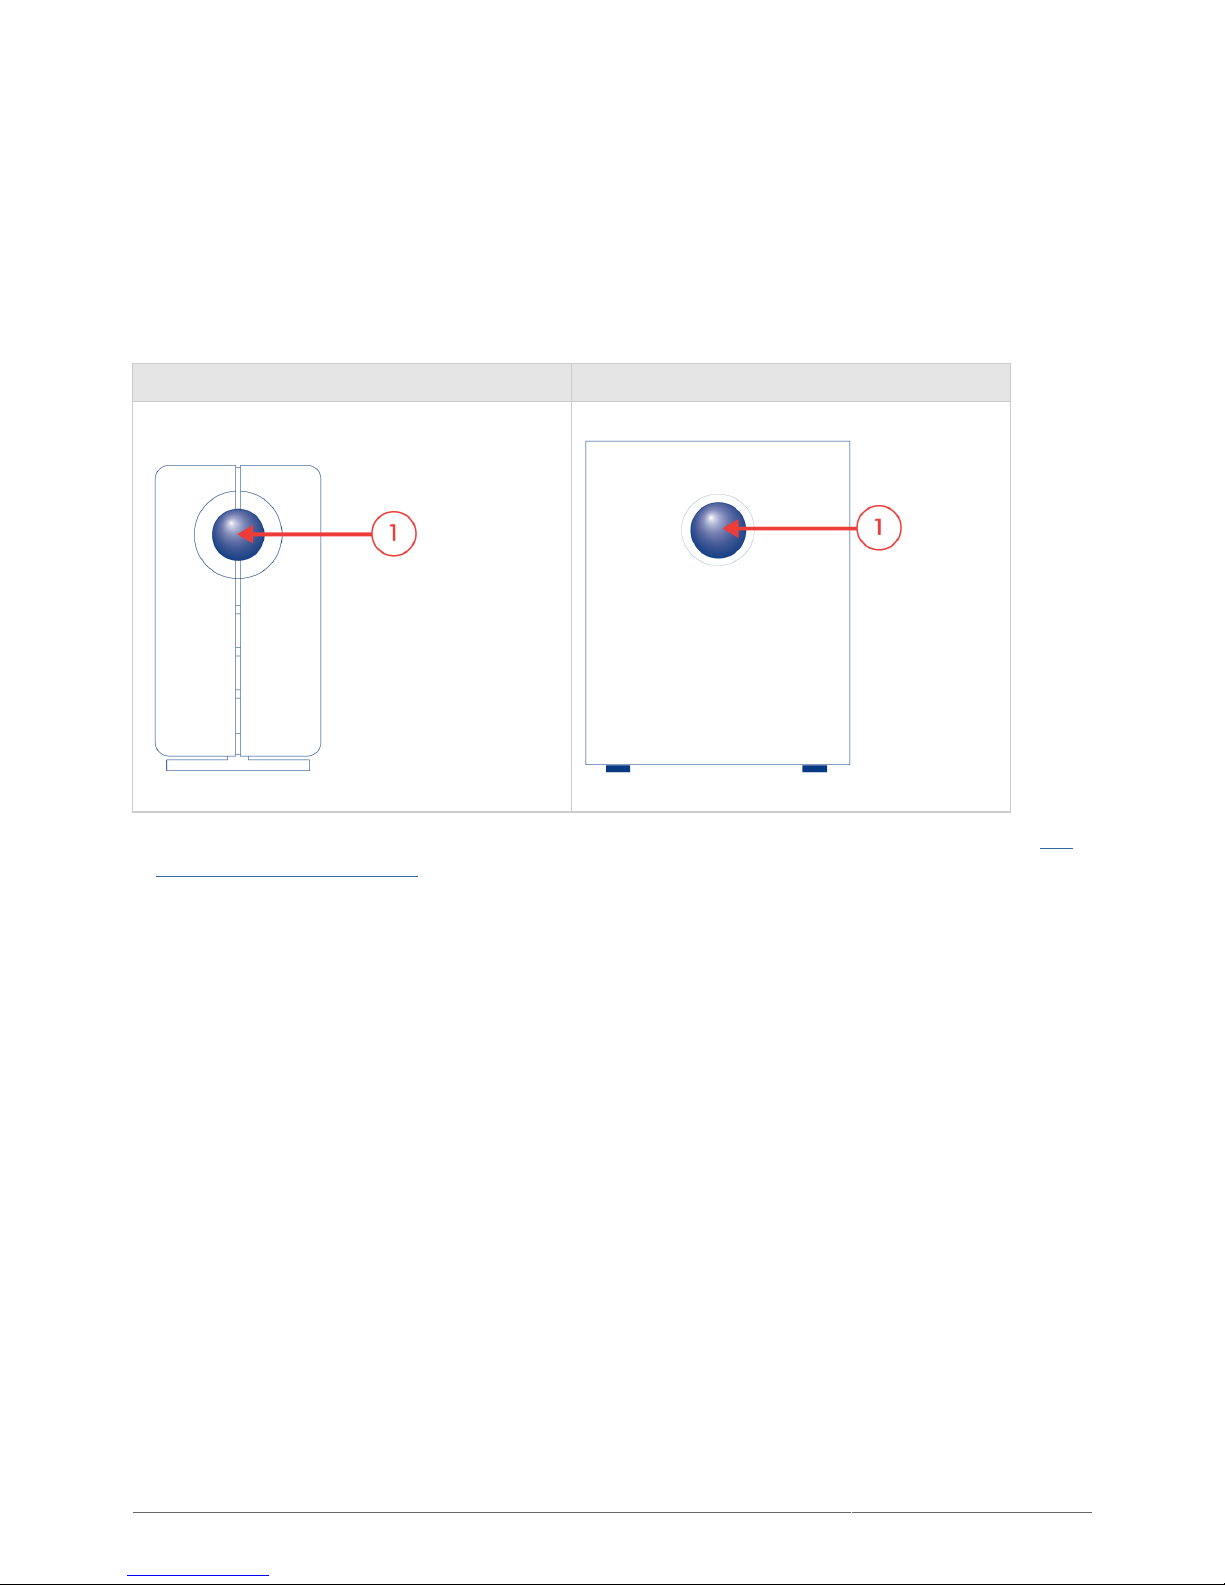
FRONT VIEW
LaCie 2big NAS LaCie 5big NAS Pro
Front LED button: The LED button signals the status and health of the device. For further details, see LED1.
Behavior and Button Functions.
Page 5
LaCie 2big NAS (OS 3.0) | LaCie 5big NAS Pro User Manual 5
REAR VIEW
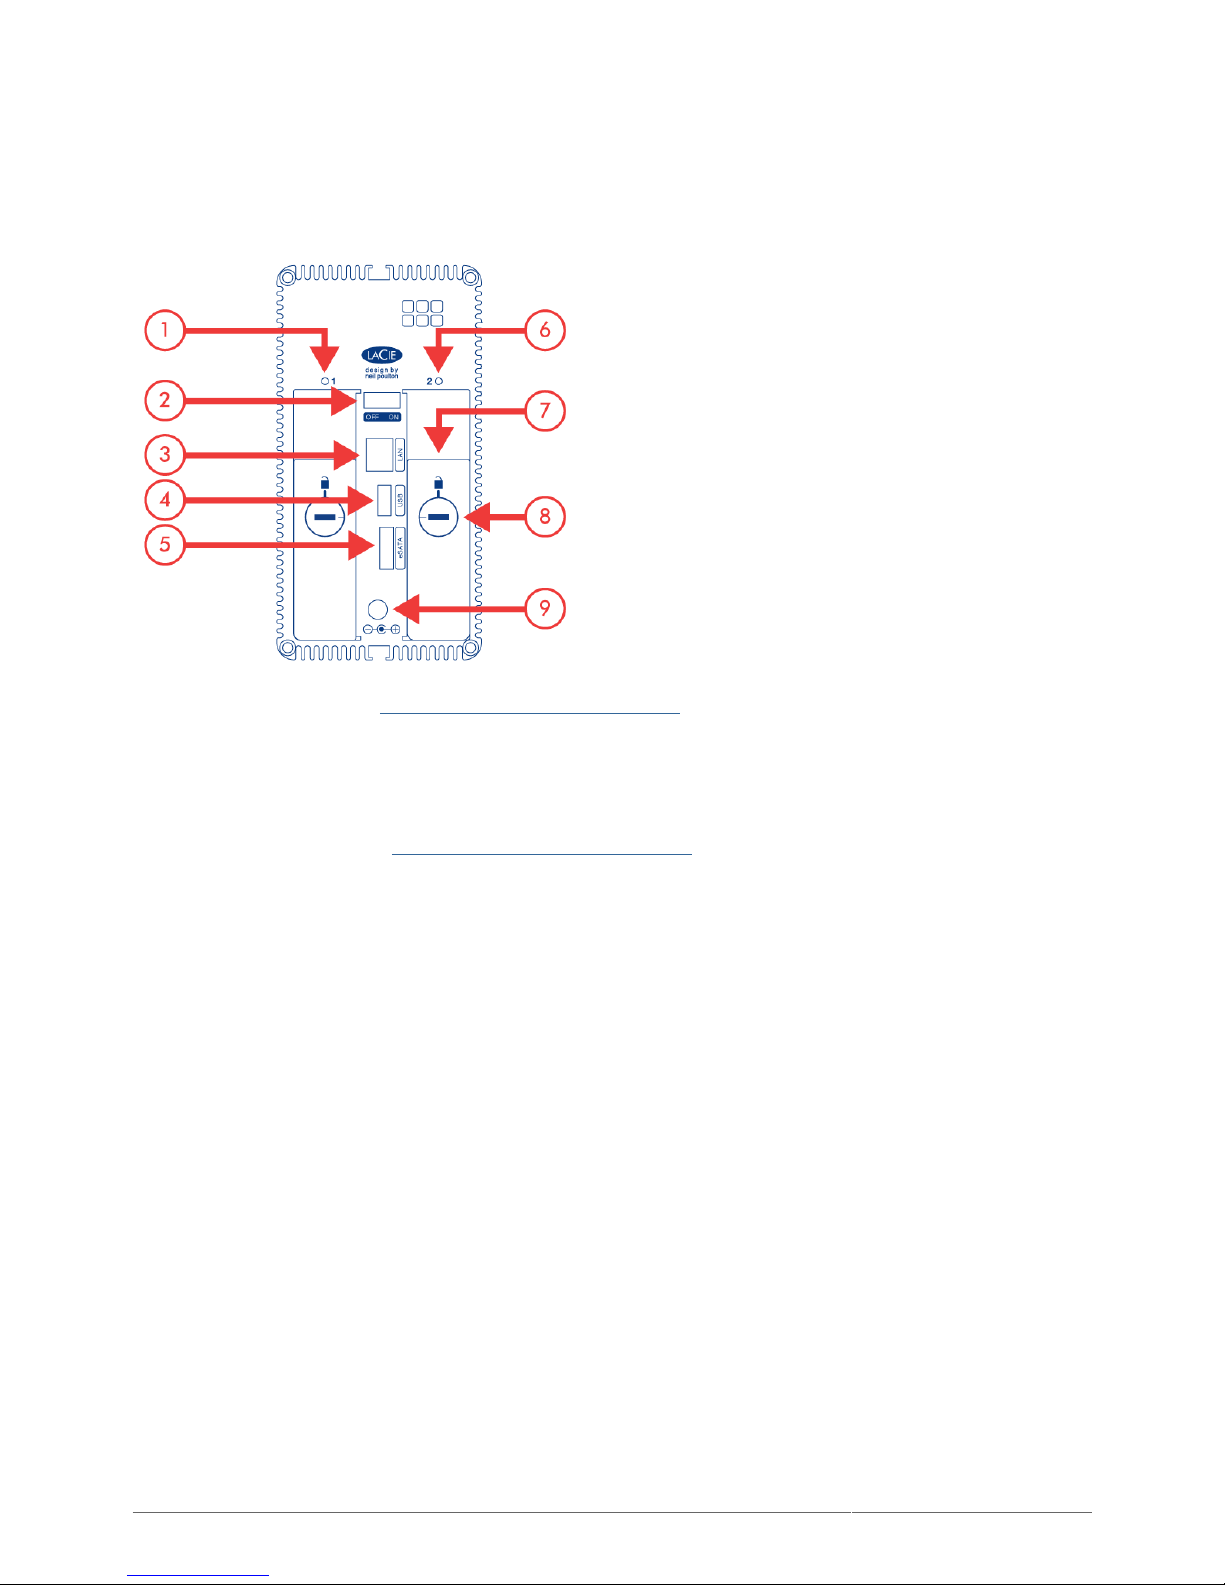
LaCie 2big NAS
Left drive status LED (see LED Behavior and Button Functions)1.
ON/OFF2.
Gigabit Ethernet3.
USB 2.0 expansion4.
eSATA expansion5.
Right drive status LED (see LED Behavior and Button Functions)6.
Drive tray handle7.
Drive lock8.
Power connector9.
Page 6
LaCie 2big NAS (OS 3.0) | LaCie 5big NAS Pro User Manual 6
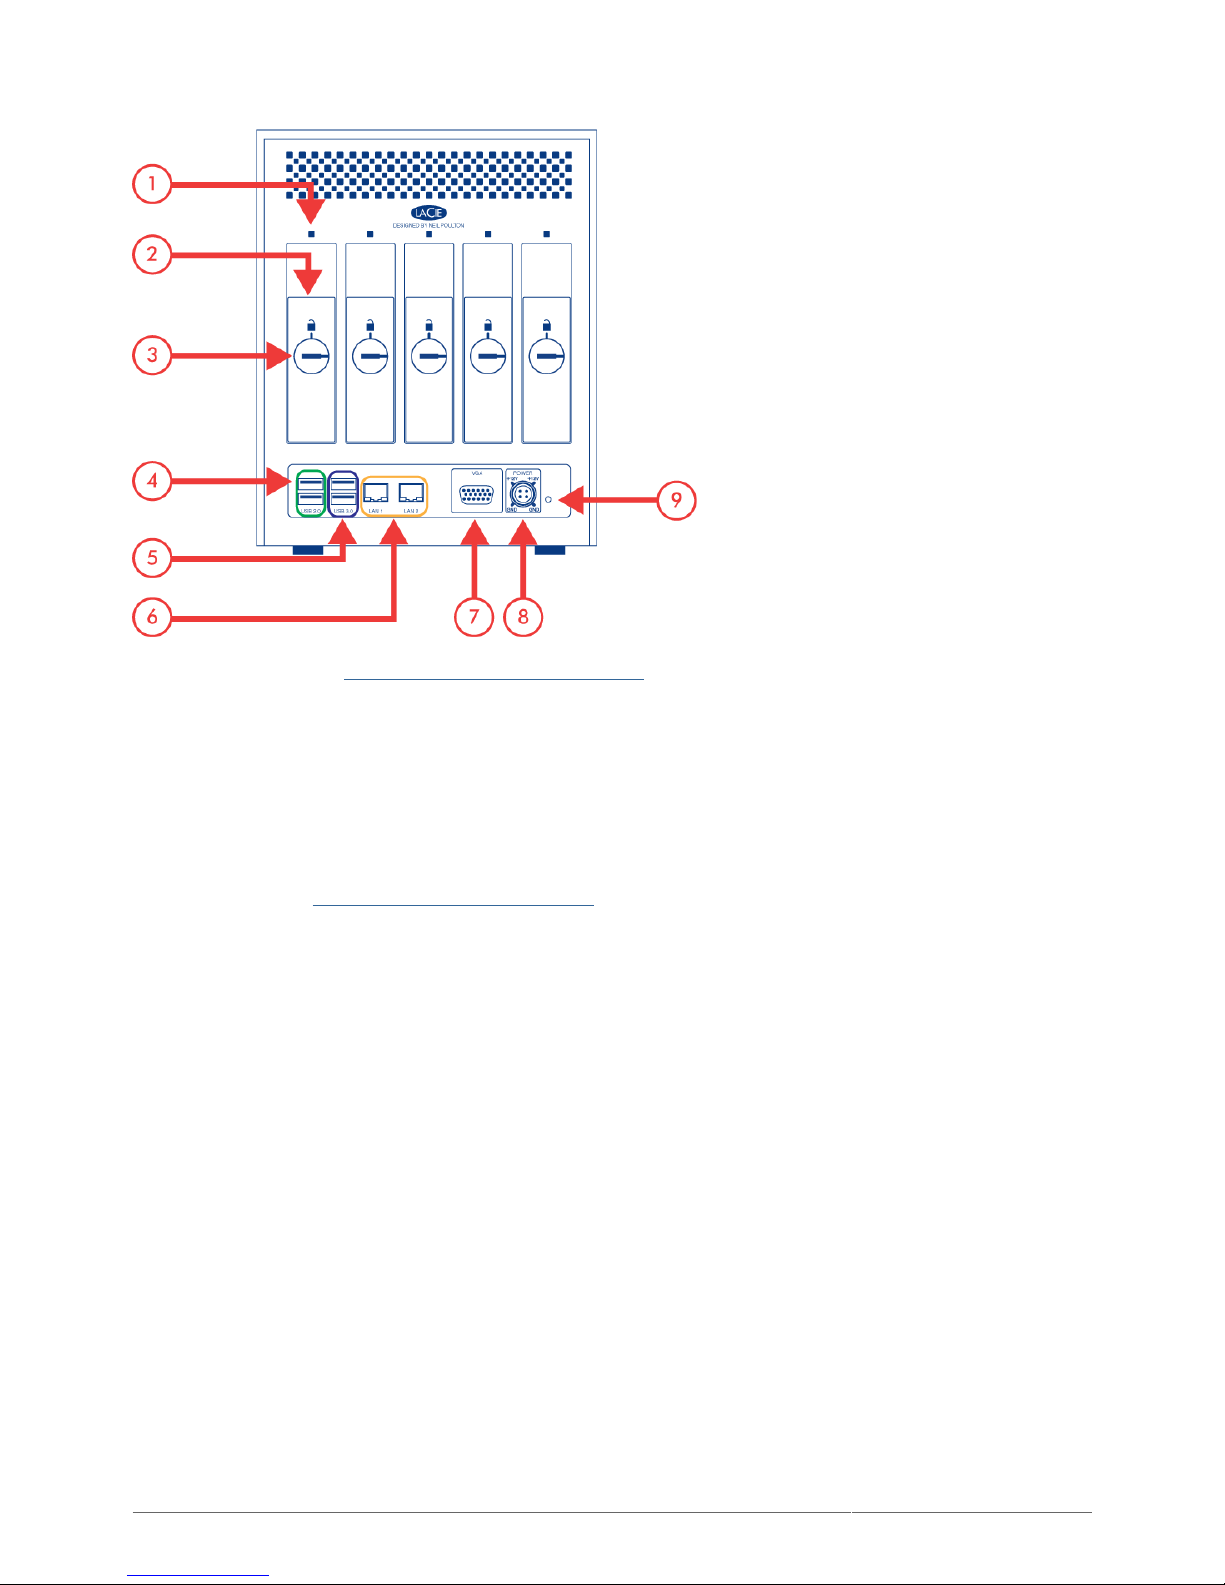
LaCie 5big NAS Pro
Drive status LED (see LED Behavior and Button Functions)1.
Drive tray handle2.
Drive lock3.
USB 2.0 expansion (x2)4.
USB 3.0 expansion (x2)5.
Gigabit Ethernet (x2)6.
VGA port7.
Power connector8.
Reset button (see LaCie NAS Rescue - 5big NAS Pro)9.
Page 7
LaCie 2big NAS (OS 3.0) | LaCie 5big NAS Pro User Manual 7
LED BEHAVIOR AND BUTTON FUNCTIONS
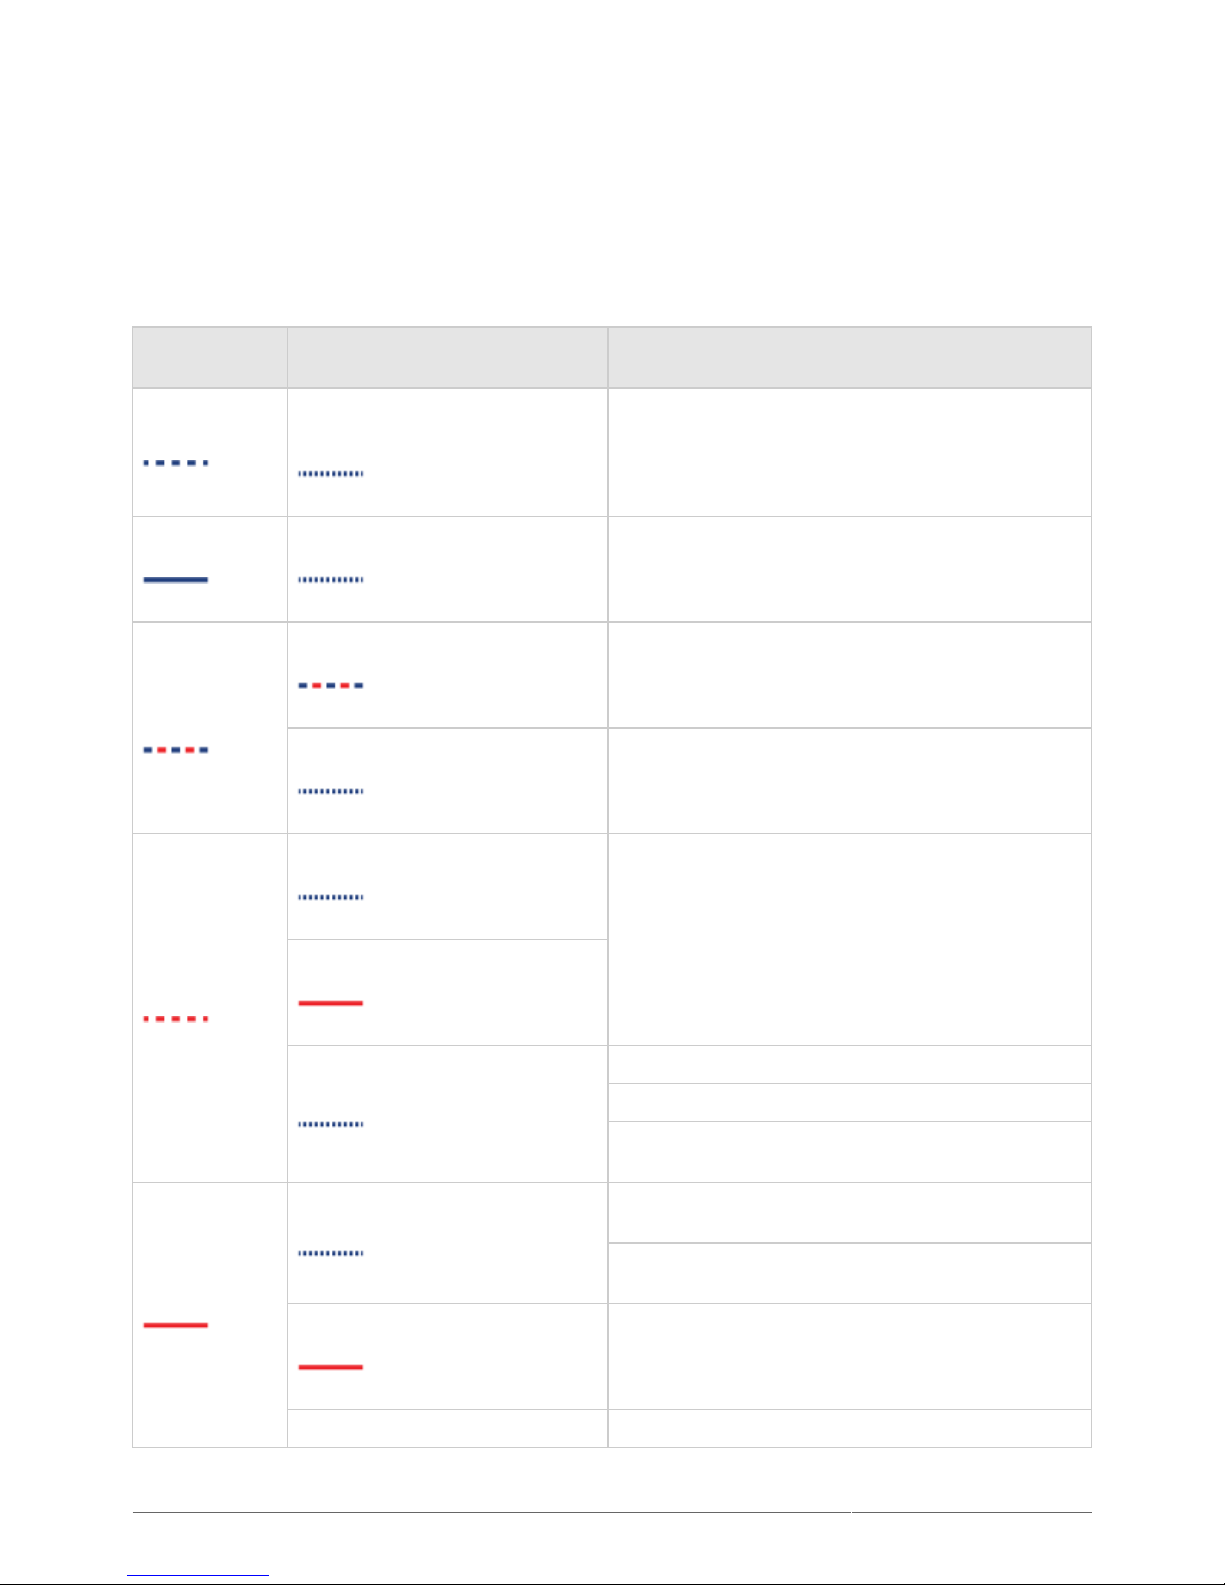
The front and rear LEDs indicate drive status and activity. This section describes the behavior of the LED
indicators. Note that even if you have turned off the front LED using Dashboard > Eco Management, events
triggering a red light will always cause the front LED to turn on.
Front LED
Color
Rear LED Color State
Blinking blue
Activity LED for working disk(s)
(until they are fully initialized)
Occurs as the device is booting; will cease once the
drives are fully initialized
Solid blue
Activity LED for working disk(s)
Drive working (read/write)
Blinking
blue/red
Blinking blue/red
RAID synchronizing; will cease once operation has
concluded
Activity LED for working disk(s)
Operating system update in progress
Blinking red
Activity LED for working disk(s)
RAID is degraded; data is intact but the array is no
longer protected should another disk fail
Solid red for non-functional disk(s)
Activity LED
Temperature alert (first level)
Fan is not spinning
Power supply has been cut but power is still being
supplied through the UPS
Solid red
Activity LED for working disk(s)
Temperature alert (critical level) – the product will
shut off
Power supply has been cut and the UPS has run out of
reserve power – the product will shut off
Solid red for non-functional disk(s)
RAID has failed and data has been lost
Off in disconnected disk(s) Disk(s) is/are disconnected
Page 8

LaCie 2big NAS (OS 3.0) | LaCie 5big NAS Pro User Manual 8
FRONT BUTTON
Use the front LED button to turn your device on/off or to enter/exit deep sleep mode.
Light Push
The default function for a light push on the front LED button is to turn the LaCie NAS on/off. If the device is on, a
light push should allow pending actions to restart with the device.
The front button function will change if deep sleep mode is enabled (see Eco Management). A light push will:
Place the device into deep sleep mode if the device is on.
■
Wake up the device if it is in deep sleep mode.
■
Long Push
A long push tells the device to shut off immediately and force all operations to quit without being saved.
Factory Settings/Rescue
LaCie 2big NAS: The front LED button can be used in tandem with the ON/OFF switch to revert the device to its
factory settings (see Reset to Factory Conditions - 2big NAS).
LaCie 5big NAS Pro: The front LED button can be used in tandem with the reset button on the rear of the
device to launch the LaCie NAS Rescue (see LaCie NAS Rescue - 5big NAS Pro).
Page 9
LaCie 2big NAS (OS 3.0) | LaCie 5big NAS Pro User Manual 9
HARD DISK HEAT MANAGEMENT (LACIE 2BIG NAS)
HEAT DISSIPATION DESIGN
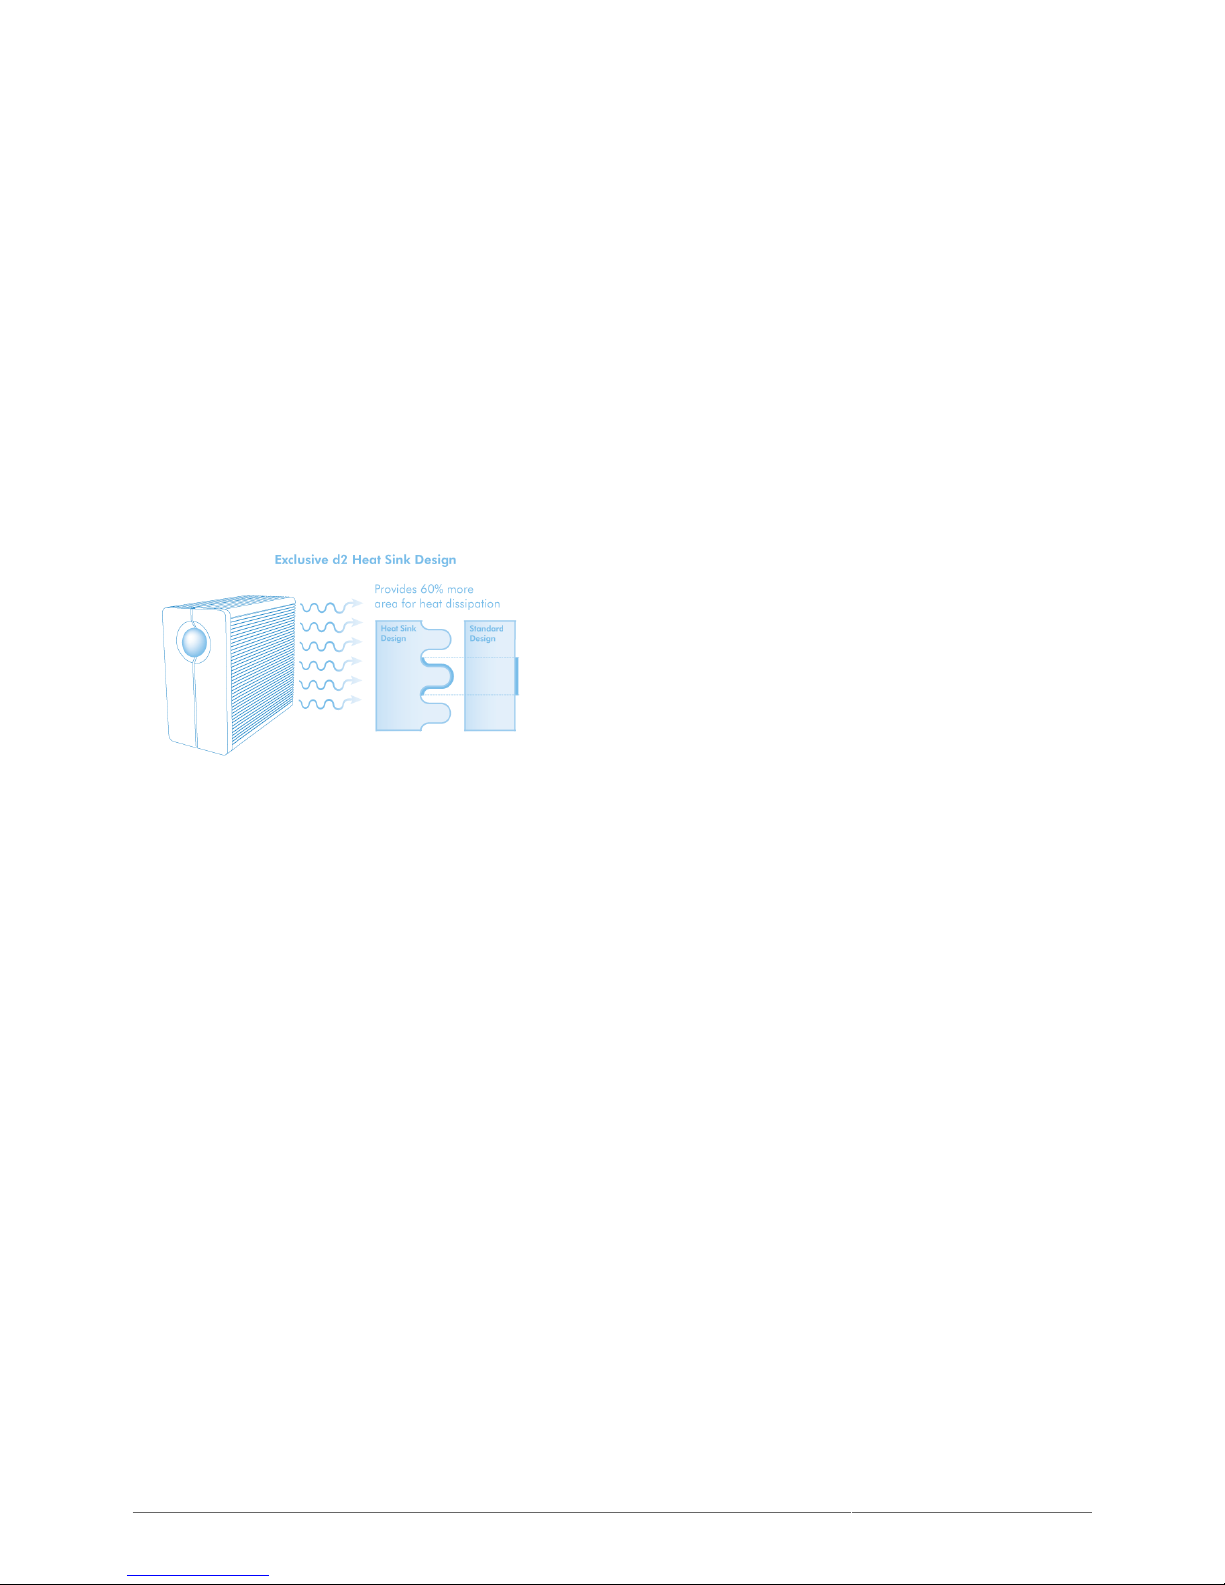
This LaCie product's metal body is ideal for naturally dissipating internal drive heat. Its unique design actually
draws heat away from the internal drive toward the external casing. The large surface area of the heat sink
casing absorbs internal heat and dissipates it, keeping the drive safe and prolonging its life and reliability.
As a consequence, it is normal that the external casing is warm to the touch. Please make sure that
the vent on the back bezel is not obstructed and that there is a natural airflow across the casing.
UPRIGHT, STACK & RACKMOUNT CONFIGURATION
Heat dissipation is maximized when this LaCie product is in the upright position. When stacking LaCie products,
please remember to attach the included rubber feet (if included) on the under side of your drives. This will allow
for some airflow between your drives so that the heat dissipation can work effectively. LaCie does not
recommend stacking or racking more than two drives on top of each other, especially if these drives are turned
on simultaneously.
Page 10
LaCie 2big NAS (OS 3.0) | LaCie 5big NAS Pro User Manual 10
CONNECT TO THE NETWORK
This chapter explains how to connect your LaCie NAS to a network.
Enclosure without disks: If you purchased an enclosure that did not include disks, please see Connect to
your Network - Diskless LaCie 2big NAS or Connect to your Network - Diskless LaCie 5big NAS Pro for
instructions on how to connect to your device to the network.
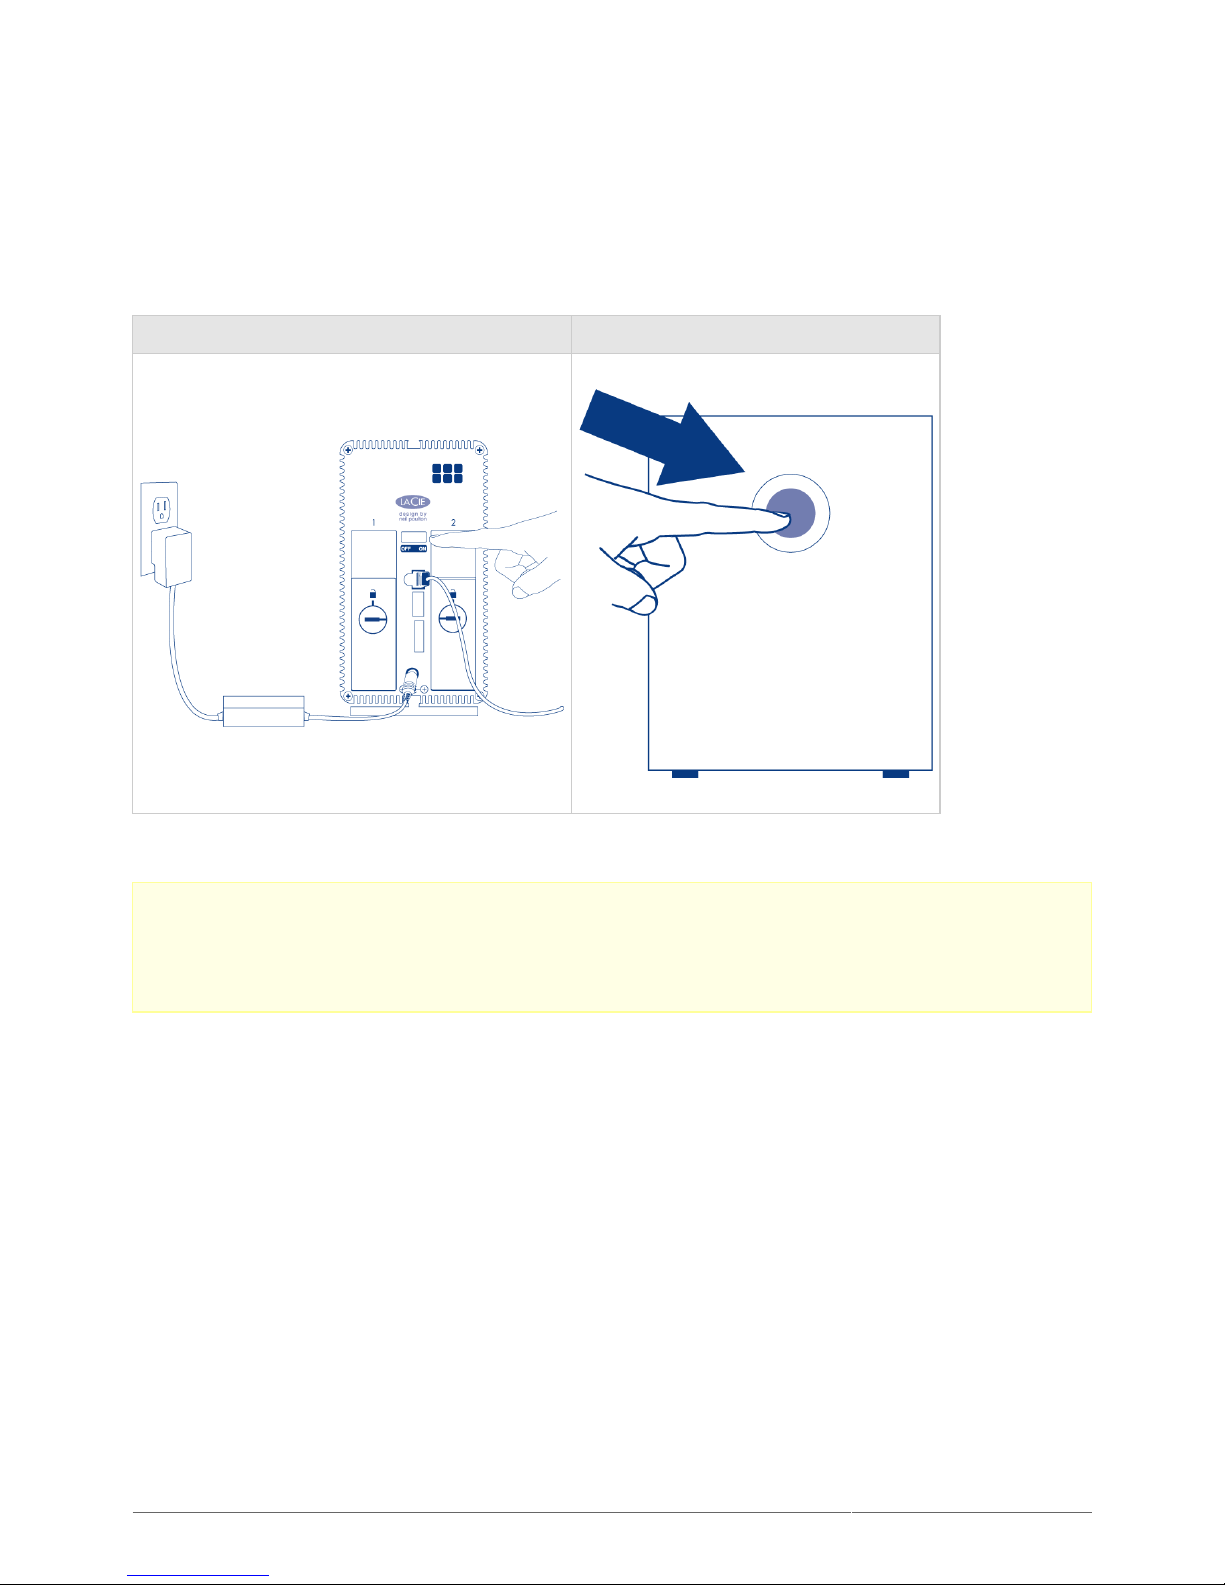
Step 1: Connect the Ethernet Cable and Power Supply
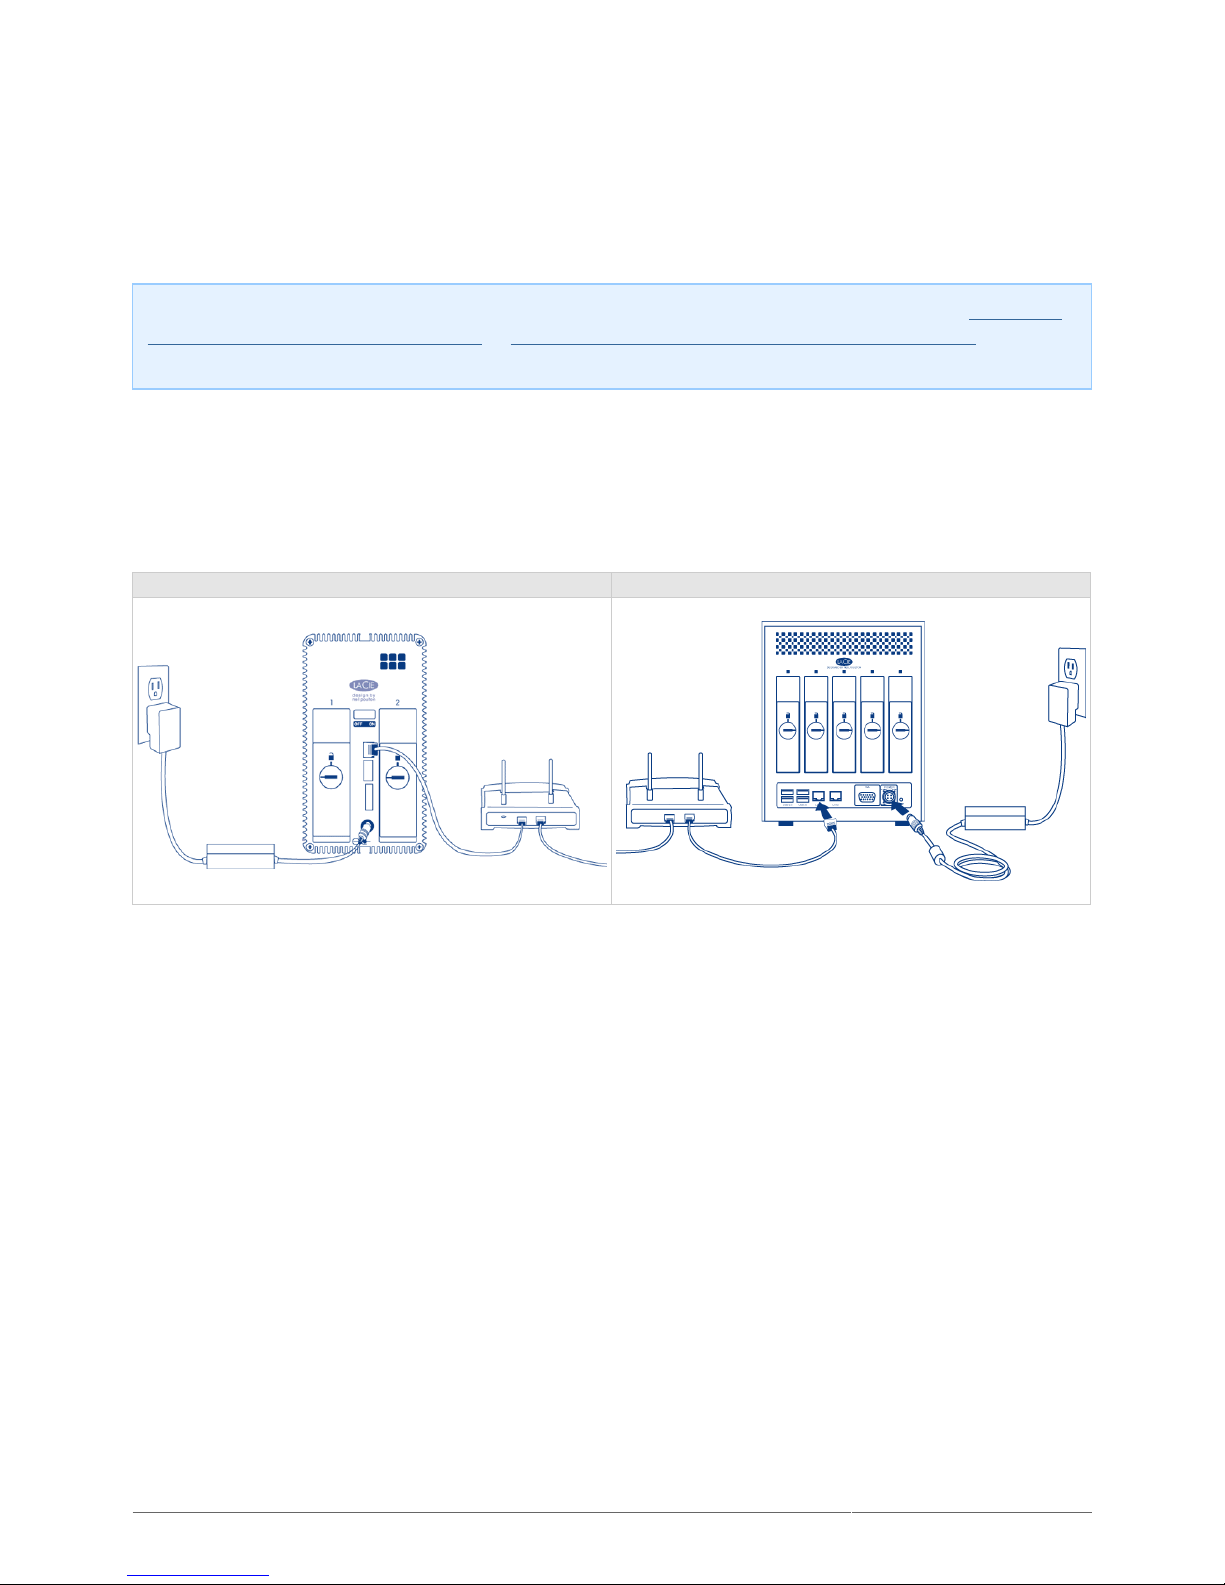
Connect the Ethernet cable to the Ethernet port on the back of the product and to an available Ethernet port1.
on your router. Refer to your router’s documentation if necessary.
Connect the power supply to a wall outlet and to the product.2.
LaCie 2big NAS LaCie 5big NAS Pro
Page 11
LaCie 2big NAS (OS 3.0) | LaCie 5big NAS Pro User Manual 11
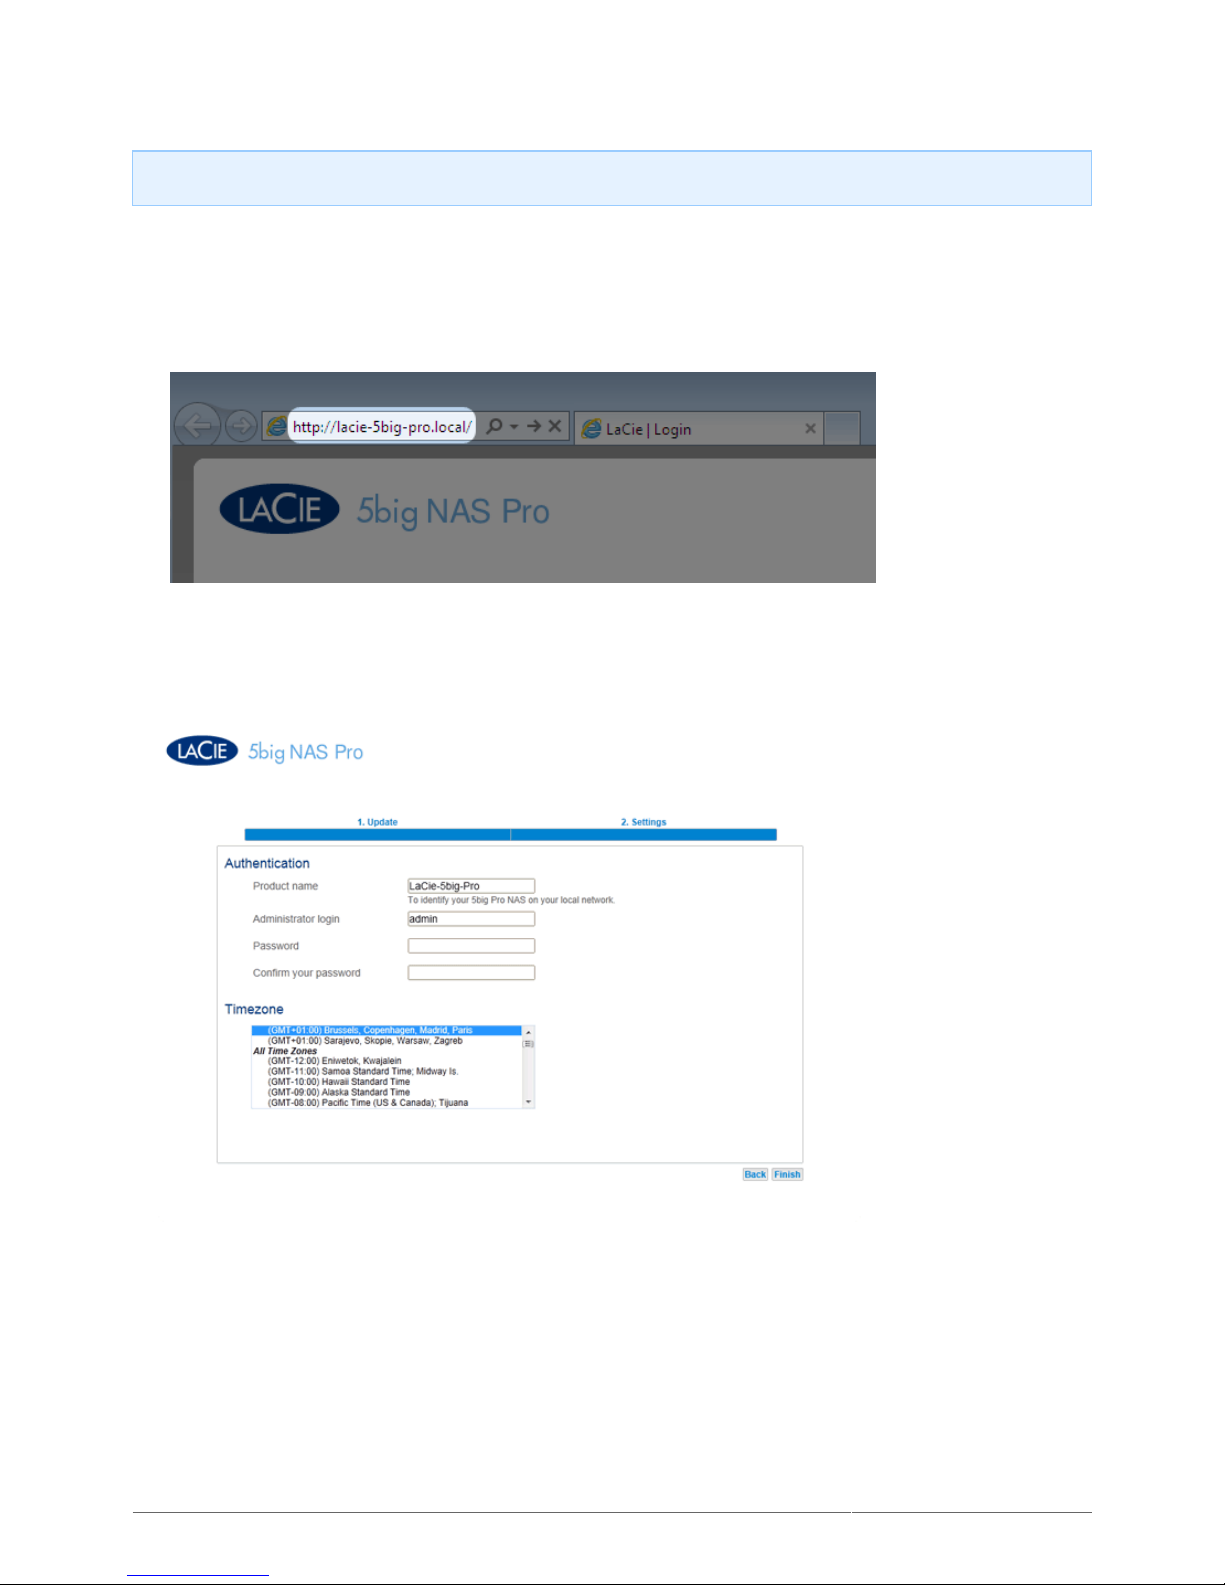
Step 2: Power on the LaCie NAS
Turn on the device on.1.
LaCie 2big NAS: Push the power button on the back of the device to the ON position.
■
LaCie 5big NAS Pro: Lightly push the the front LED button.
■
The front LED will turn on and then begin blinking. The device is ready to be accessed once the blue LED has2.
turned solid. Your LaCie NAS may take up to three minutes to boot.
LaCie 2big NAS LaCie 5big NAS Pro
Caution: Only use the AC adapter supplied with your specific LaCie device. Do not use a power supply from
another LaCie device or another manufacturer. Using any other power cable or power supply may cause
damage to the device and void your warranty. Always remove the AC adapter before transporting your LaCie
device. Failure to remove the adapter may result in damage and will void your warranty.
Page 12
LaCie 2big NAS (OS 3.0) | LaCie 5big NAS Pro User Manual 12
Step 3: Access the LaCie NAS Dashboard
Note: The steps below should be completed by the administrator of the device.
Perform the steps below on a PC/Mac connected to the same network as your LaCie NAS:
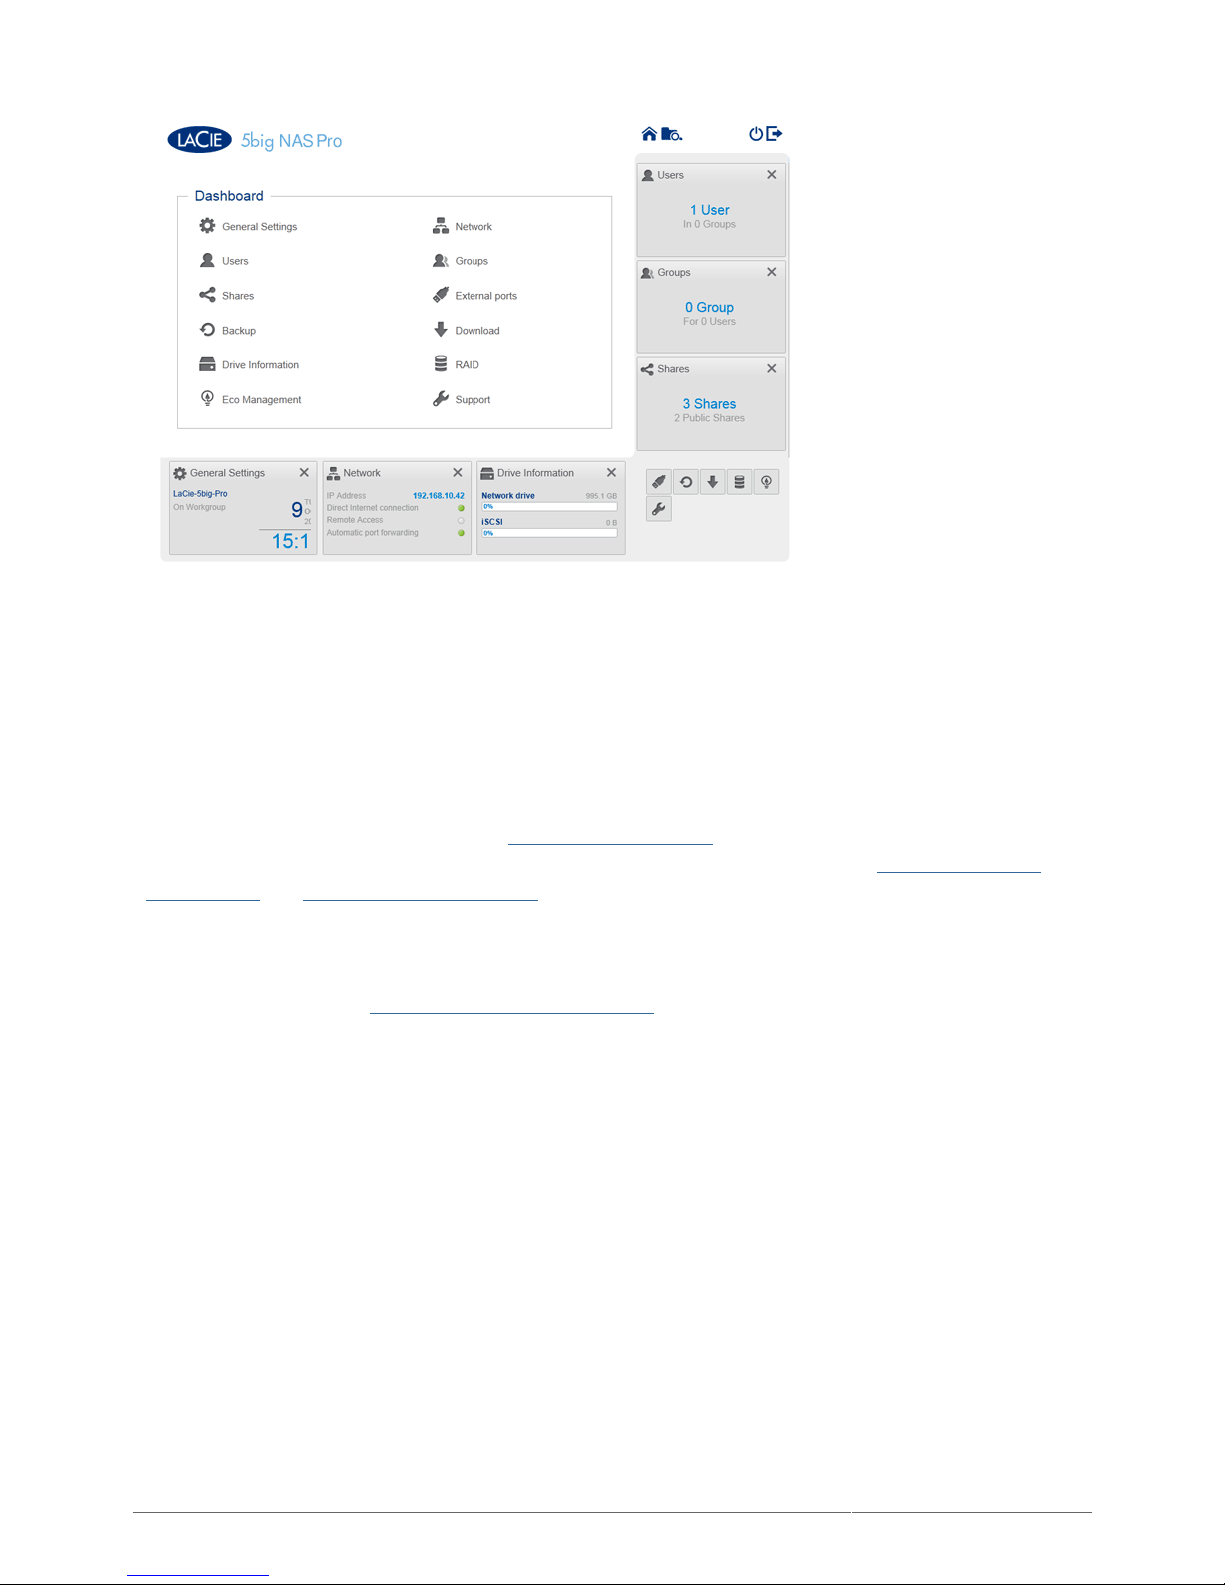
Launch your preferred internet browser and type the default address for the LaCie NAS:1.
Windows XP - http:\\lacie-2big-nas or http:\\lacie-5big-pro
■
Windows Vista / 7 / 8 and Mac OS - http:\\lacie-2big-nas.local or http:\\lacie-5big-pro.local.
■
Certain versions of Windows may require the name of the device only, similar to Windows XP. If you do not
connect to your device, please try http:\\lacie-2big-nas or http:\\lacie-5big-pro.
The Dashboard administration tool will prompt you to create an administrator password.2.
You may also change:3.
The default name of the device (LaCie-2big-NAS or LaCie-5big-Pro).
■
The default administrator login (admin).
■
Your time zone.
■
Make certain to note your login and password for future use.4.
Click Finish. You will be taken to the Dashboard home page.5.
Page 13
LaCie 2big NAS (OS 3.0) | LaCie 5big NAS Pro User Manual 13
NEXT STEPS
Simplify NAS access: LaCie recommends that you install the software utility LaCie Network Assistant before
■
moving forward with the device configuration. LaCie Network Assistant gives you instant information on your
LaCie NAS, such as firmware version, IP address, and hardware address. It will also provide quick access to
shares (volumes) and the Dashboard. See LaCie Network Assistant for instructions.
Configure your NAS: For details on how to configure and use your LaCie NAS, go to Shares: Access and
■
Transfer Files and Dashboard (Administration).
Add your LaCie NAS to Wuala Cloud Storage: Enhance your data workflow with LaCie's Hybrid Cloud.
■
Wuala is secure cloud storage that will give you access to your LaCie NAS from any computer with a
connection to the internet. Further, Wuala uses high-end encryption to guarantee that no one, not even LaCie,
can access your files. See Hybrid Cloud: Wuala & LaCie NAS for details.
Page 14

LaCie 2big NAS (OS 3.0) | LaCie 5big NAS Pro User Manual 14
CONNECT TO YOUR NETWORK - DISKLESS LACIE 2BIG
NAS
Users who purchased a LaCie 2big NAS enclosure without hard disks should follow the instructions below.
Enclosure with hard disks: If you purchased an enclosure with hard disks, please see Connect to the
Network for instructions on how to connect to your network.
CHOOSE COMPATIBLE HARD DRIVES
Please consider the following before adding hard drives to your LaCie 2big NAS:
When adding a new hard drive to the enclosure, consider a LaCie 2big Spare Drive. LaCie hard drives are
■
specially prepared and optimized for use with LaCie NAS.
If you are installing non-LaCie hard disks, please note that LaCie NAS are compatible with and should work
■
seamlessly with any SATA II or SATA III hard drive. Before adding a hard drive to the enclosure, LaCie
receommends that you check the list of supported Network Hard Drives.
LaCie recommends selecting disks that are equal in storage capacity. For example, if the first disk has a 1TB
■
hard disk, fill the second slot with a 1TB hard disk.
Page 15
LaCie 2big NAS (OS 3.0) | LaCie 5big NAS Pro User Manual 15
INSTALLATION STEPS
Step 1: Connect and Power on the Diskless Product
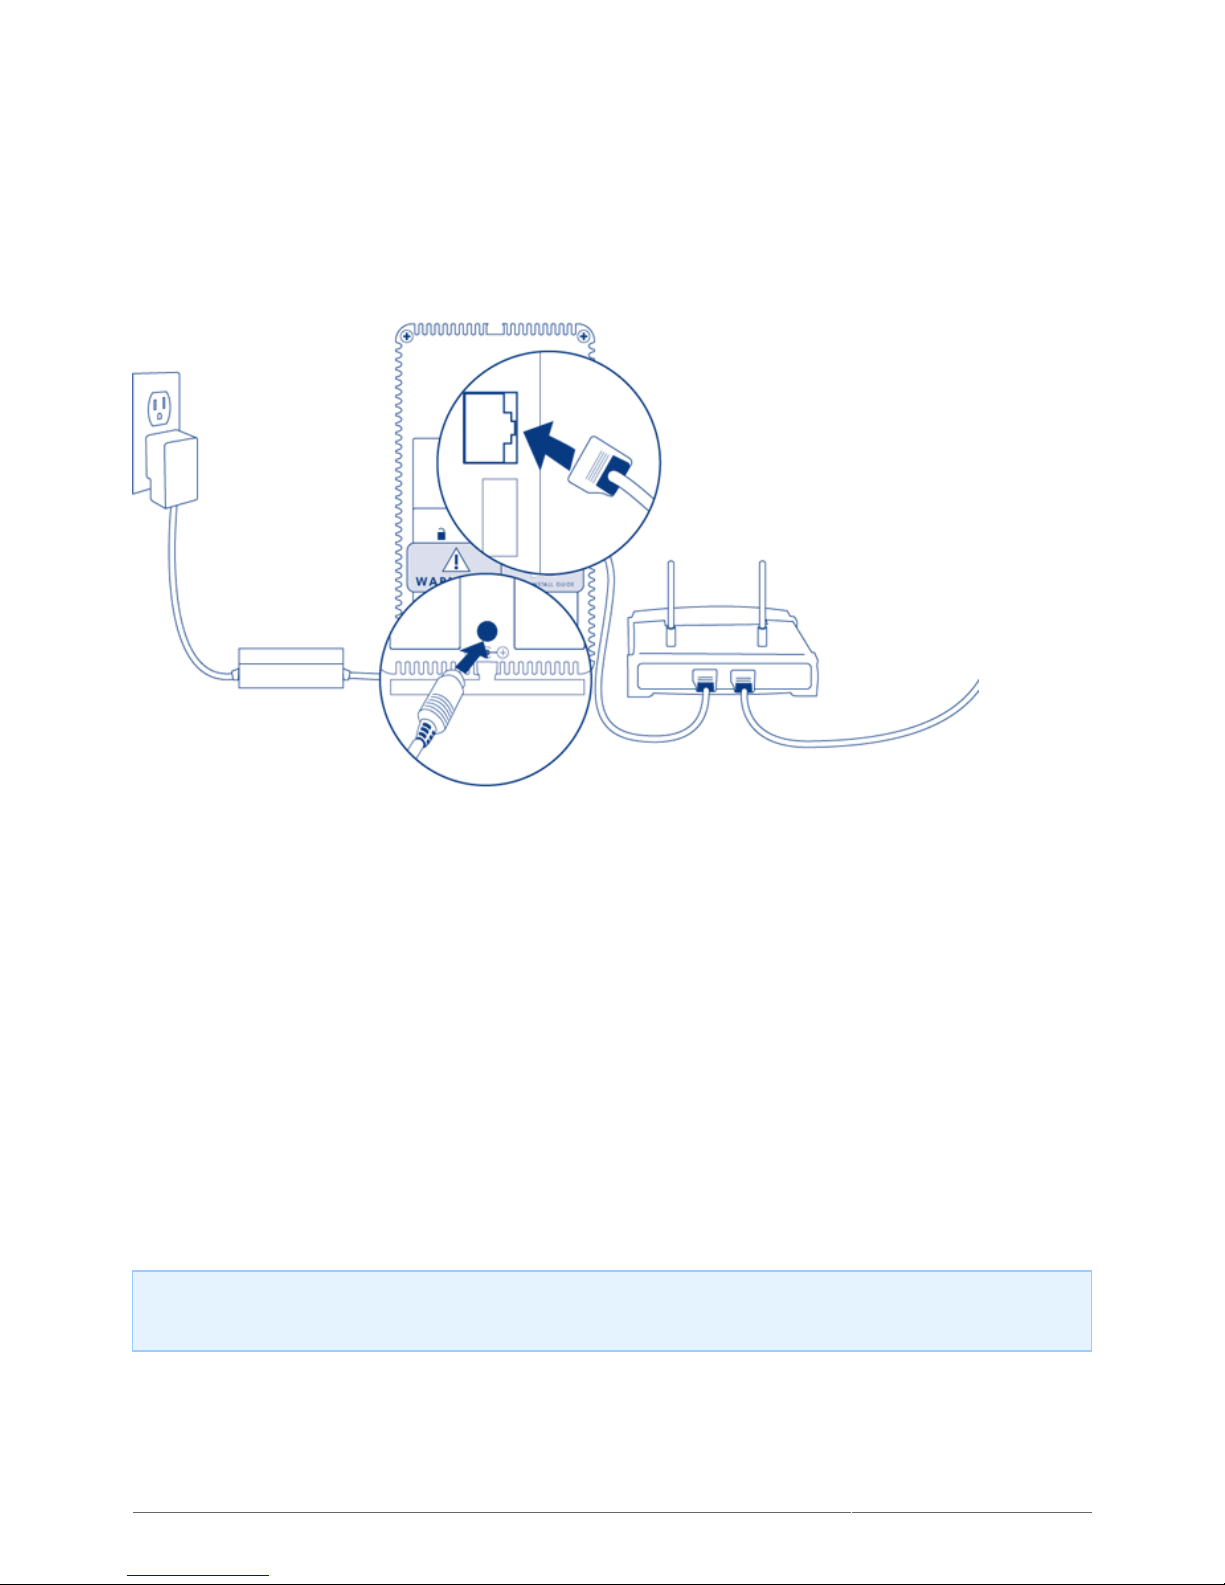
Make sure that no disks are installed in the product.1.
Connect the Ethernet cable to the Ethernet port on the back of the product and to an available Ethernet port2.
on your router. Refer to your router’s documentation if necessary.
Connect the power supply to a wall outlet and to the product.3.
Push the power button on the back of the device to the ON position.4.
The front LED will turn on and then begin blinking blue. Once the LED stops blinking (less than one minute),
move on to the next step.
Step 2: Remove the Disk Tray Sticker and Empty Disk Tray(s)
Note on illustrations: To reduce complexity in the images, the Ethernet and Power cables have been
removed. LaCie recommends that you maintain both connections while continuing with the installation steps.
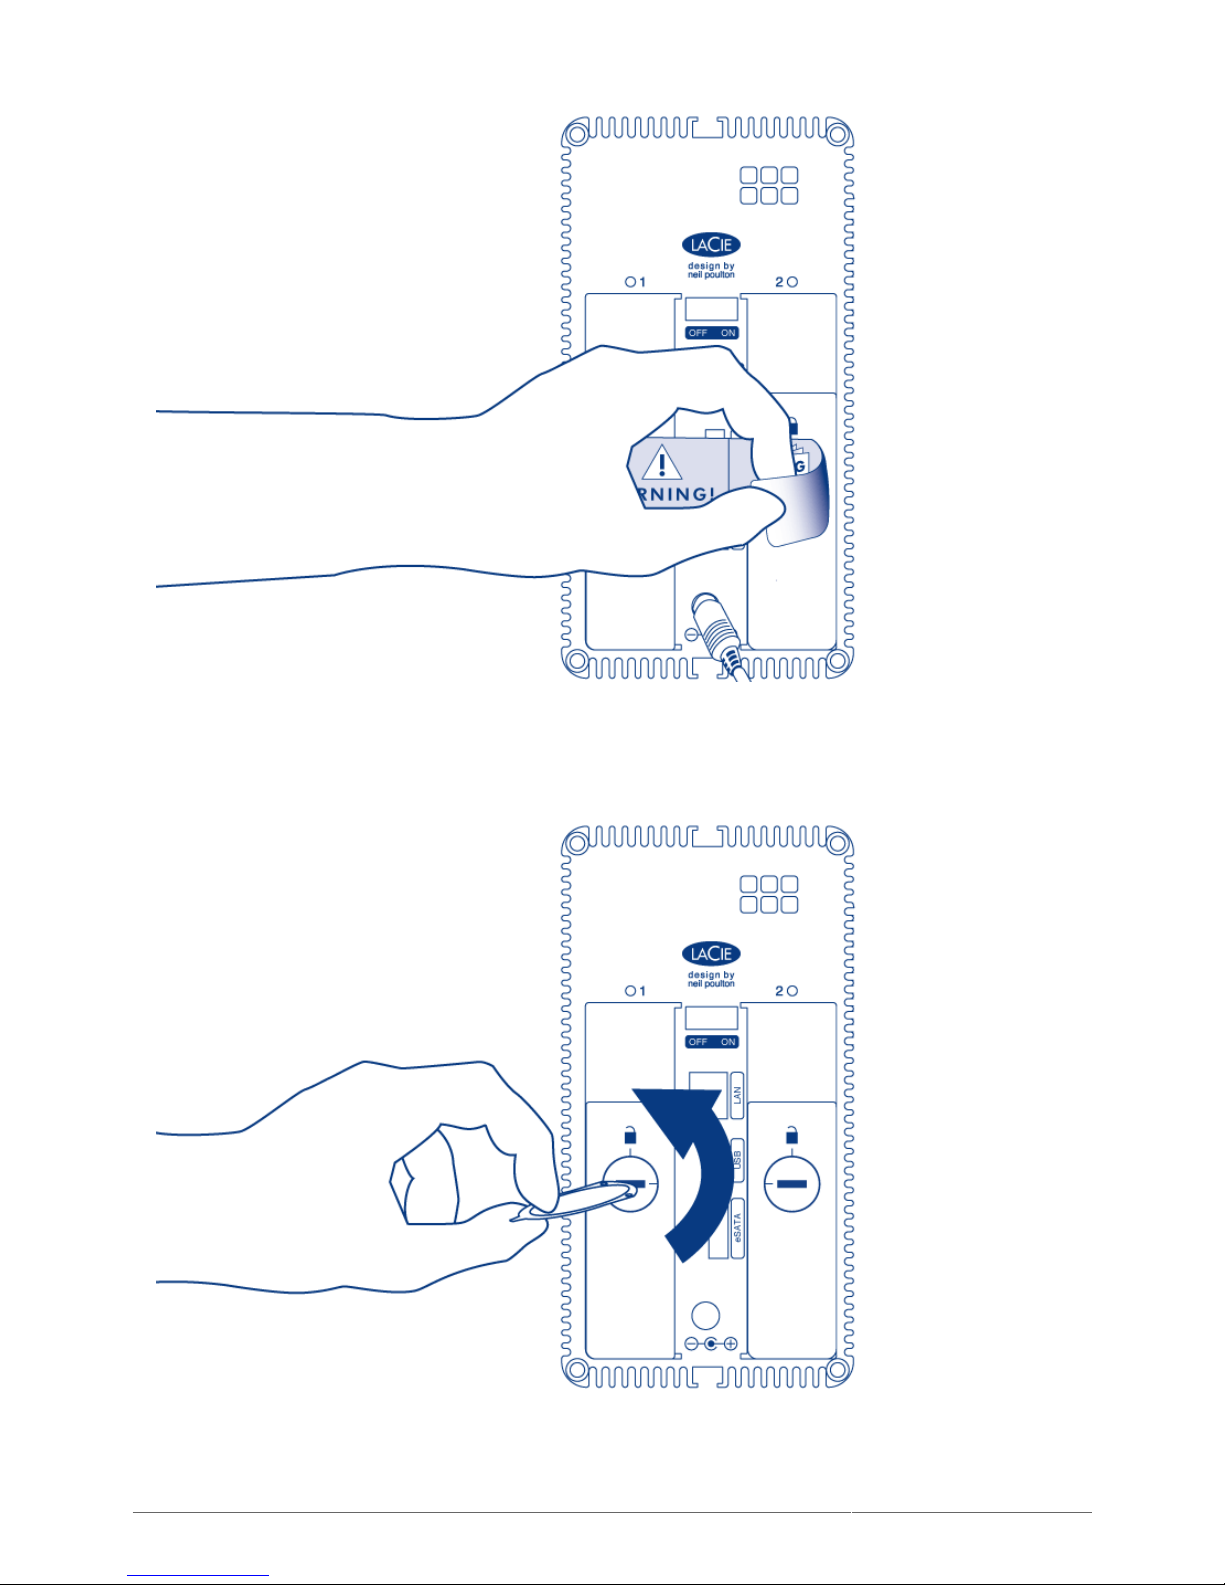
Remove the sticker from the back of the device.1.
Page 16
LaCie 2big NAS (OS 3.0) | LaCie 5big NAS Pro User Manual 16
The disk tray(s) may be locked. To unlock, use the included disk drawer key to turn the lock until the slot is2.
vertical.
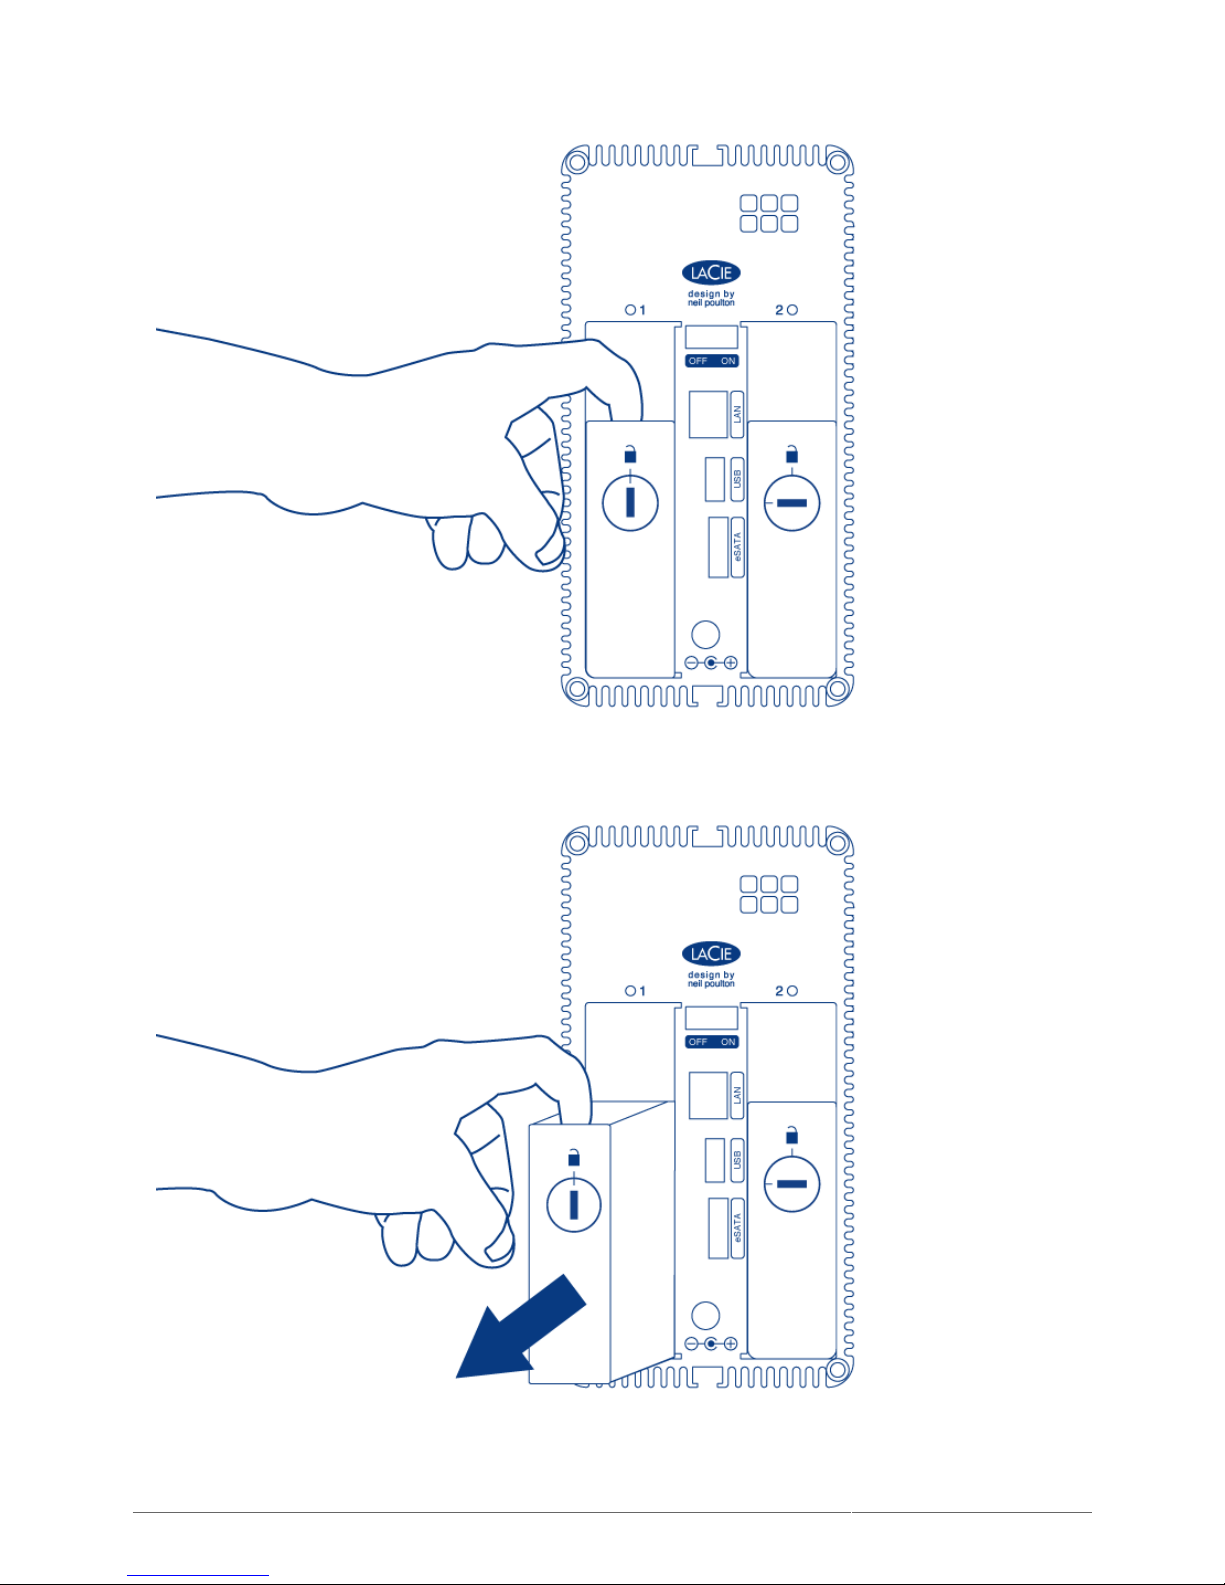
Draw out the disk tray by inserting your finger into the space behind the disk tray handle and pulling to3.
Page 17
LaCie 2big NAS (OS 3.0) | LaCie 5big NAS Pro User Manual 17
disengage it.
Grasp the disk tray handle and carefully extract it.4.
Repeat the process if you are adding a second disk.5.
Page 18
LaCie 2big NAS (OS 3.0) | LaCie 5big NAS Pro User Manual 18
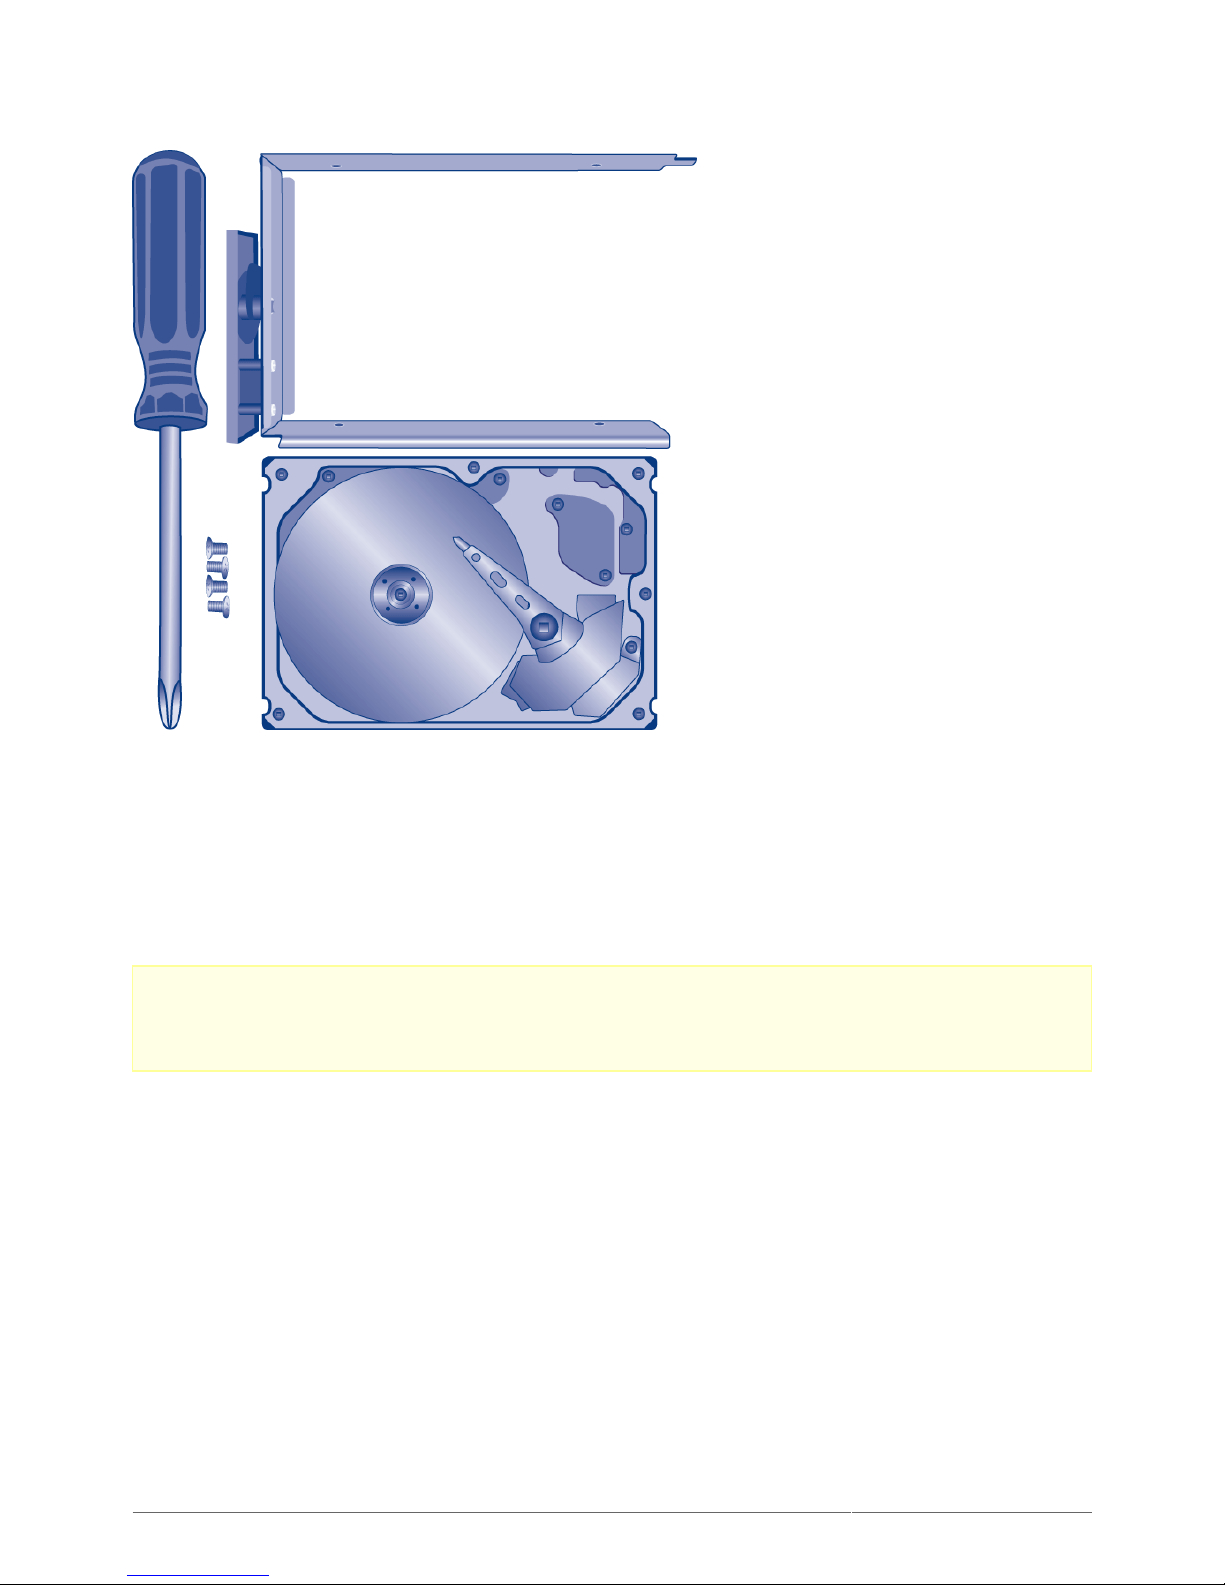
Step 3: Install the Disk(s) in Disk Tray(s)
Find a suitable work area with adequate space and a flat, even surface. Make certain that all necessary
components are available:
LaCie 2big NAS disk tray
■
Hard disk
■
Disk tray screws. Use only the screws that are provided with your LaCie NAS.
■
Phillips head screwdriver. Make certain that the screwdriver is the correct size for the disk tray screws.
■
Caution: To avoid potential problems caused by electrostatic discharge (ESD), it is recommended that you
do not touch the hard disk’s printed circuit board. As a further precaution against ESD, use an anti-static
wristband or an anti-static mat to ground yourself when handling the hard disk.
To secure the disk in the disk tray:
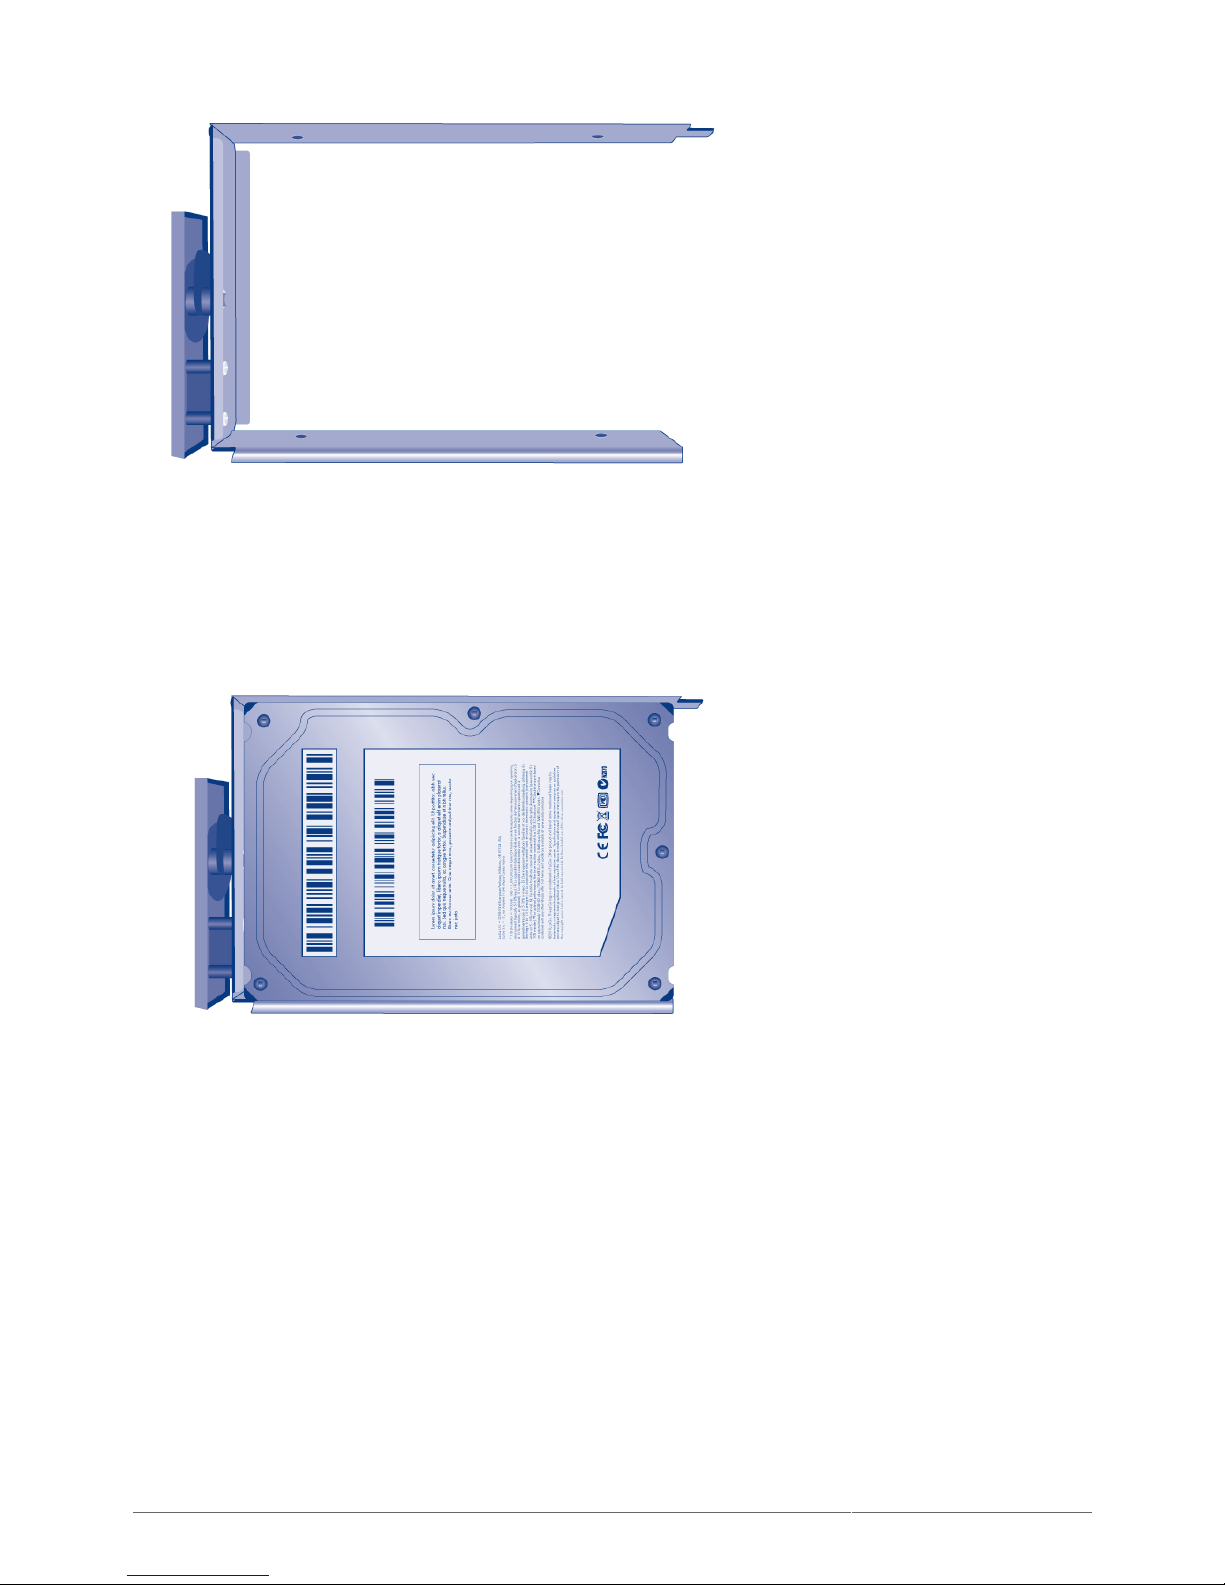
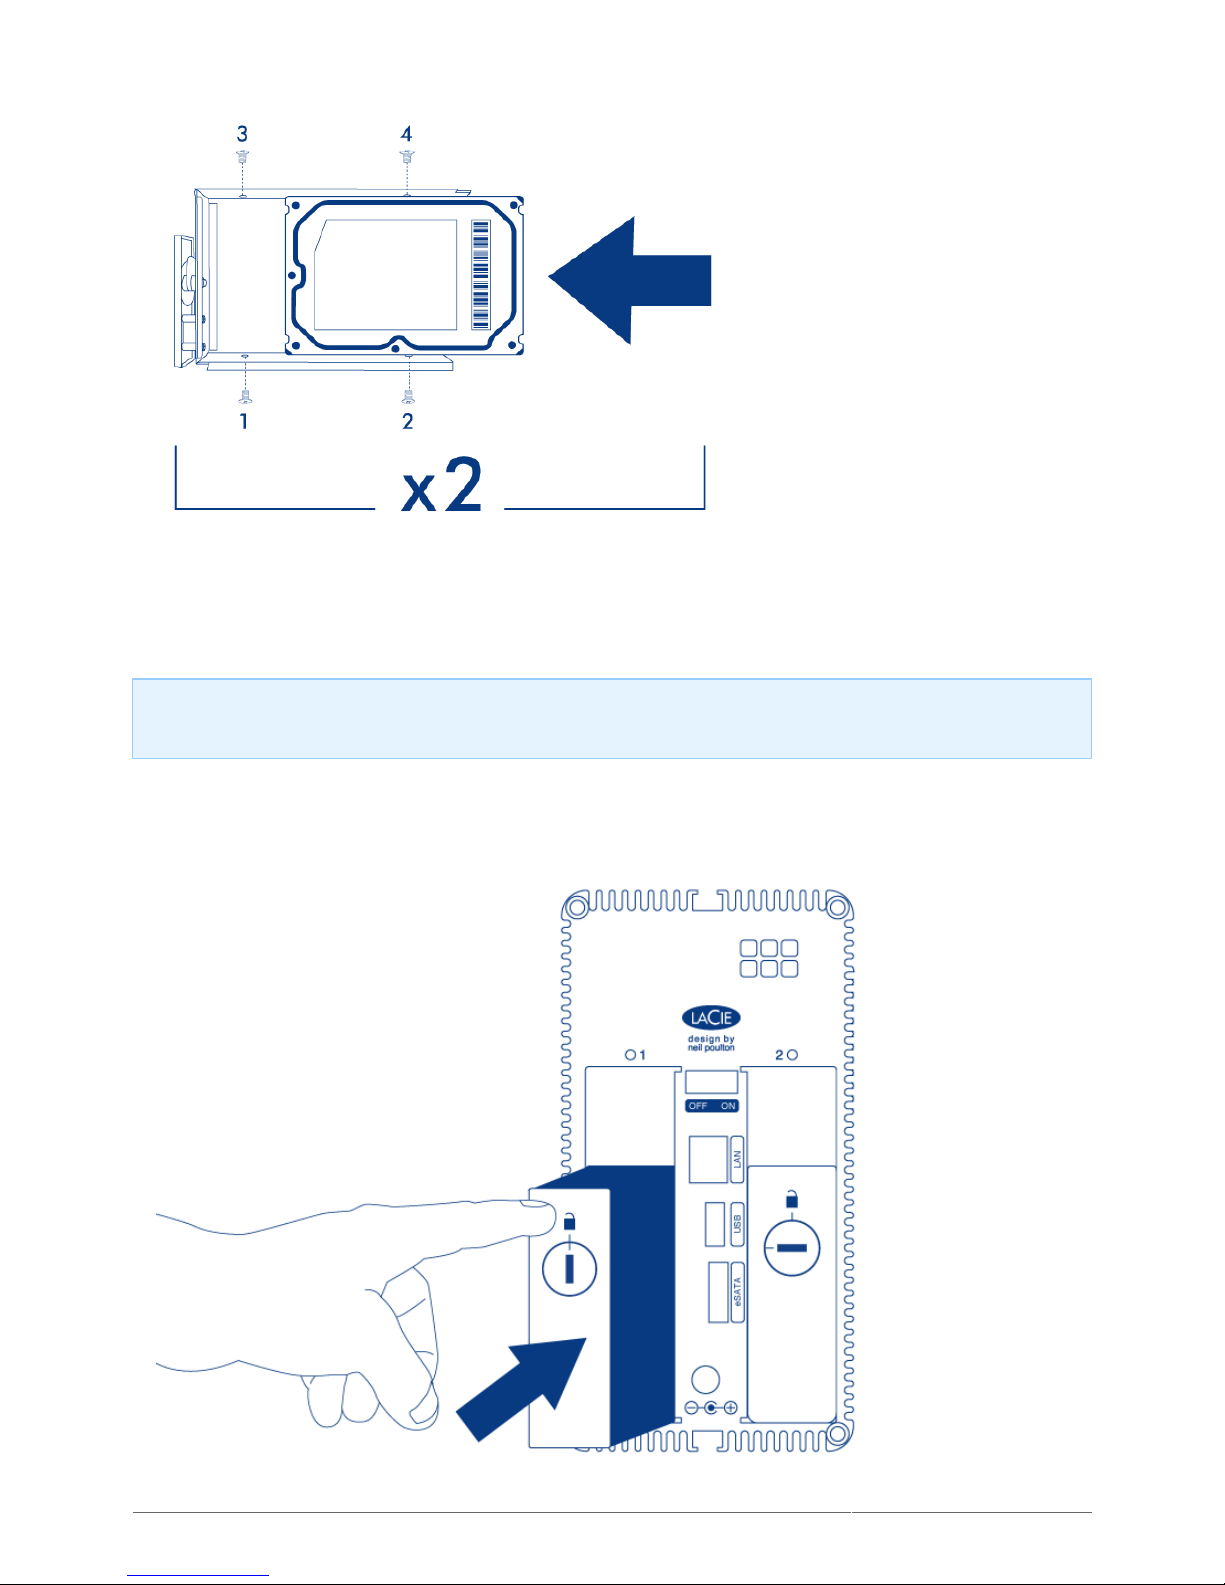
Place the empty disk tray onto the flat work area with the handle on the bottom left.1.
Page 19
LaCie 2big NAS (OS 3.0) | LaCie 5big NAS Pro User Manual 19
Many disks have a label on one side and the printed circuit board on the opposite side. With its label side2.
facing up, gently place the hard disk within the disk tray. Keep the side with the printed circuit board on the
work space and the SATA connector facing to the right. The four tray screw slots should align with the disk’s
four screw holes.
Using the Phillips head screwdriver, carefully fasten all four screws into the four tray slots. Do not overly3.
tighten the screws. Doing so can affect the integrity of the screw holes on the disk as well as the threads on
the screws.
Page 20
LaCie 2big NAS (OS 3.0) | LaCie 5big NAS Pro User Manual 20
Repeat the process if you are installing two disks.4.
Step 4: Insert the Full Disk Tray(s)
Note on illustrations: To reduce complexity in the images, the Ethernet and Power cables have been
removed. LaCie recommends that you maintain both connections while continuing with the installation steps.
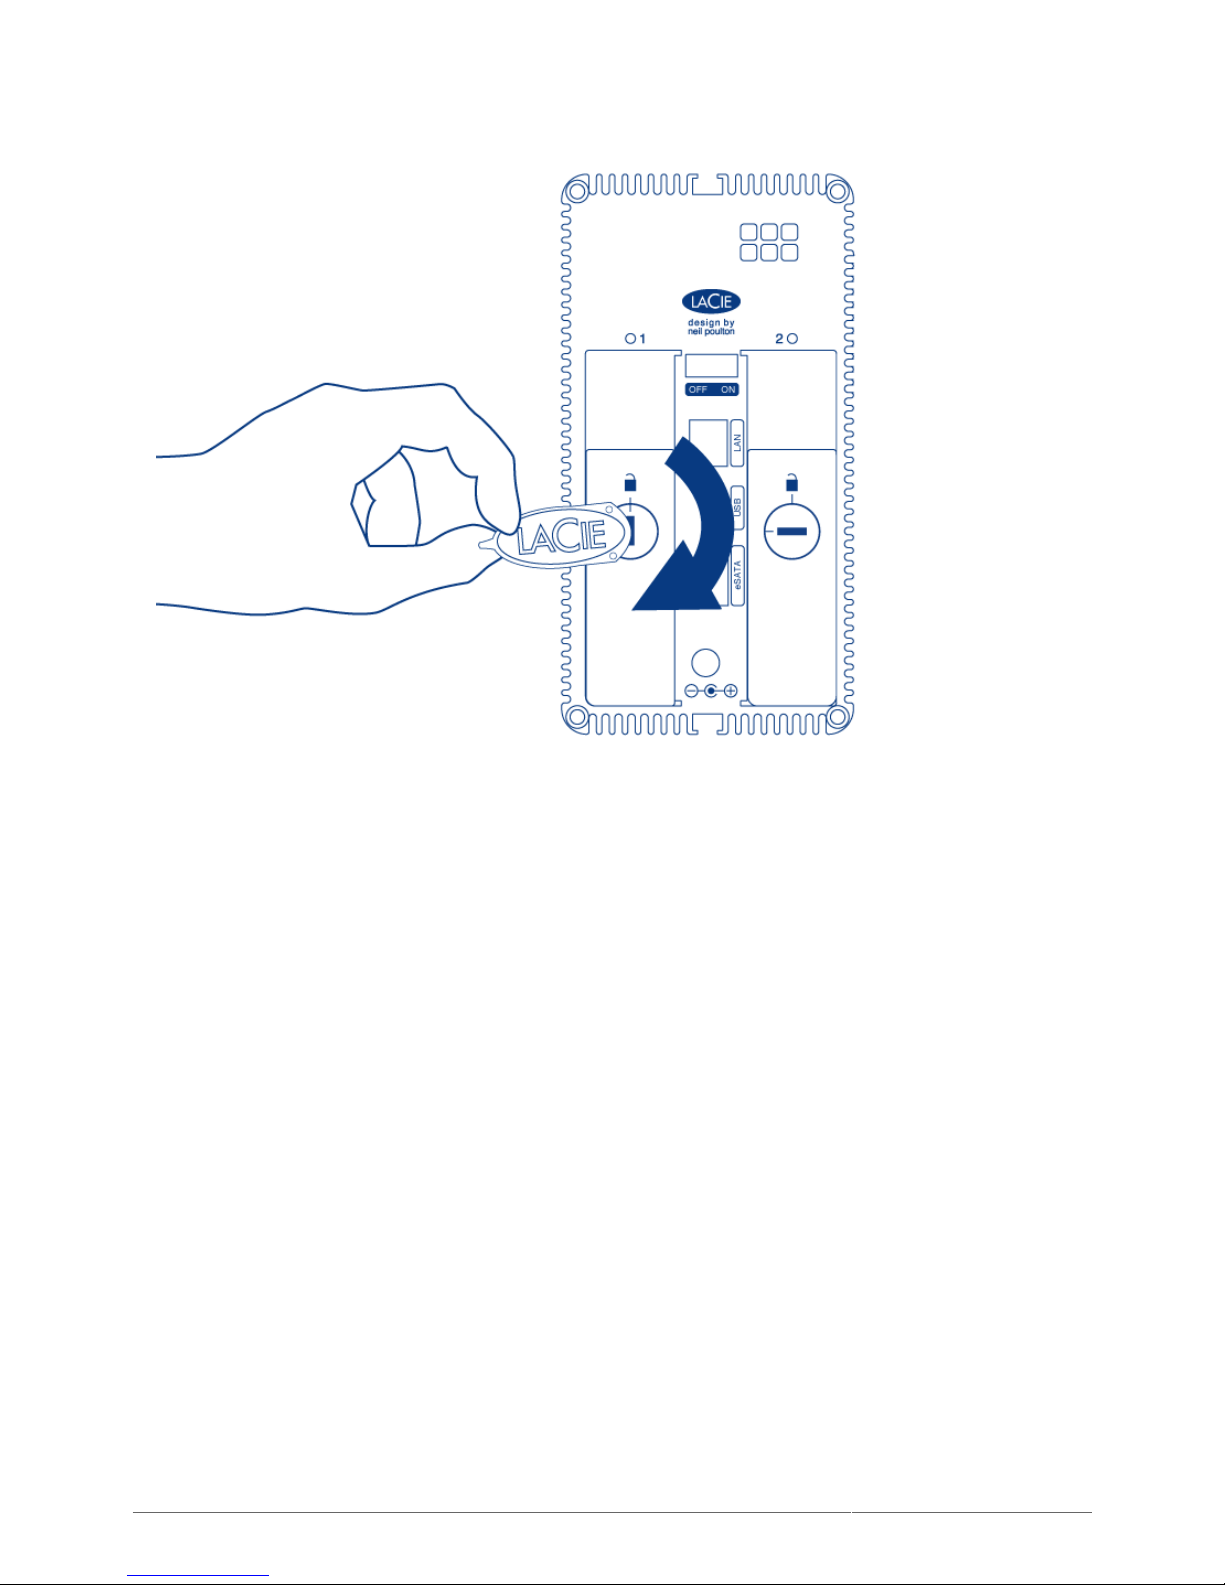
Carefully insert the full disk tray into an empty disk slot. You will feel resistance when the disk tray is most of1.
the way in the bay. Gently push the disk tray handle firmly until you feel it snap into place. The disk tray
handle should be flush with the back of the enclosure.
Page 21
LaCie 2big NAS (OS 3.0) | LaCie 5big NAS Pro User Manual 21
If you are adding the second disk, insert it next.2.
Use the disk lock tool to lock the disk(s) in place.3.
The disk LEDs on the rear of the product will blink blue. Wait a full minute before moving on to the next step.4.
Step 5: Initialize the New Disk(s)
Please note that, during this process, the hard disks you have inserted into the LaCie NAS will be
formatted and all data deleted.
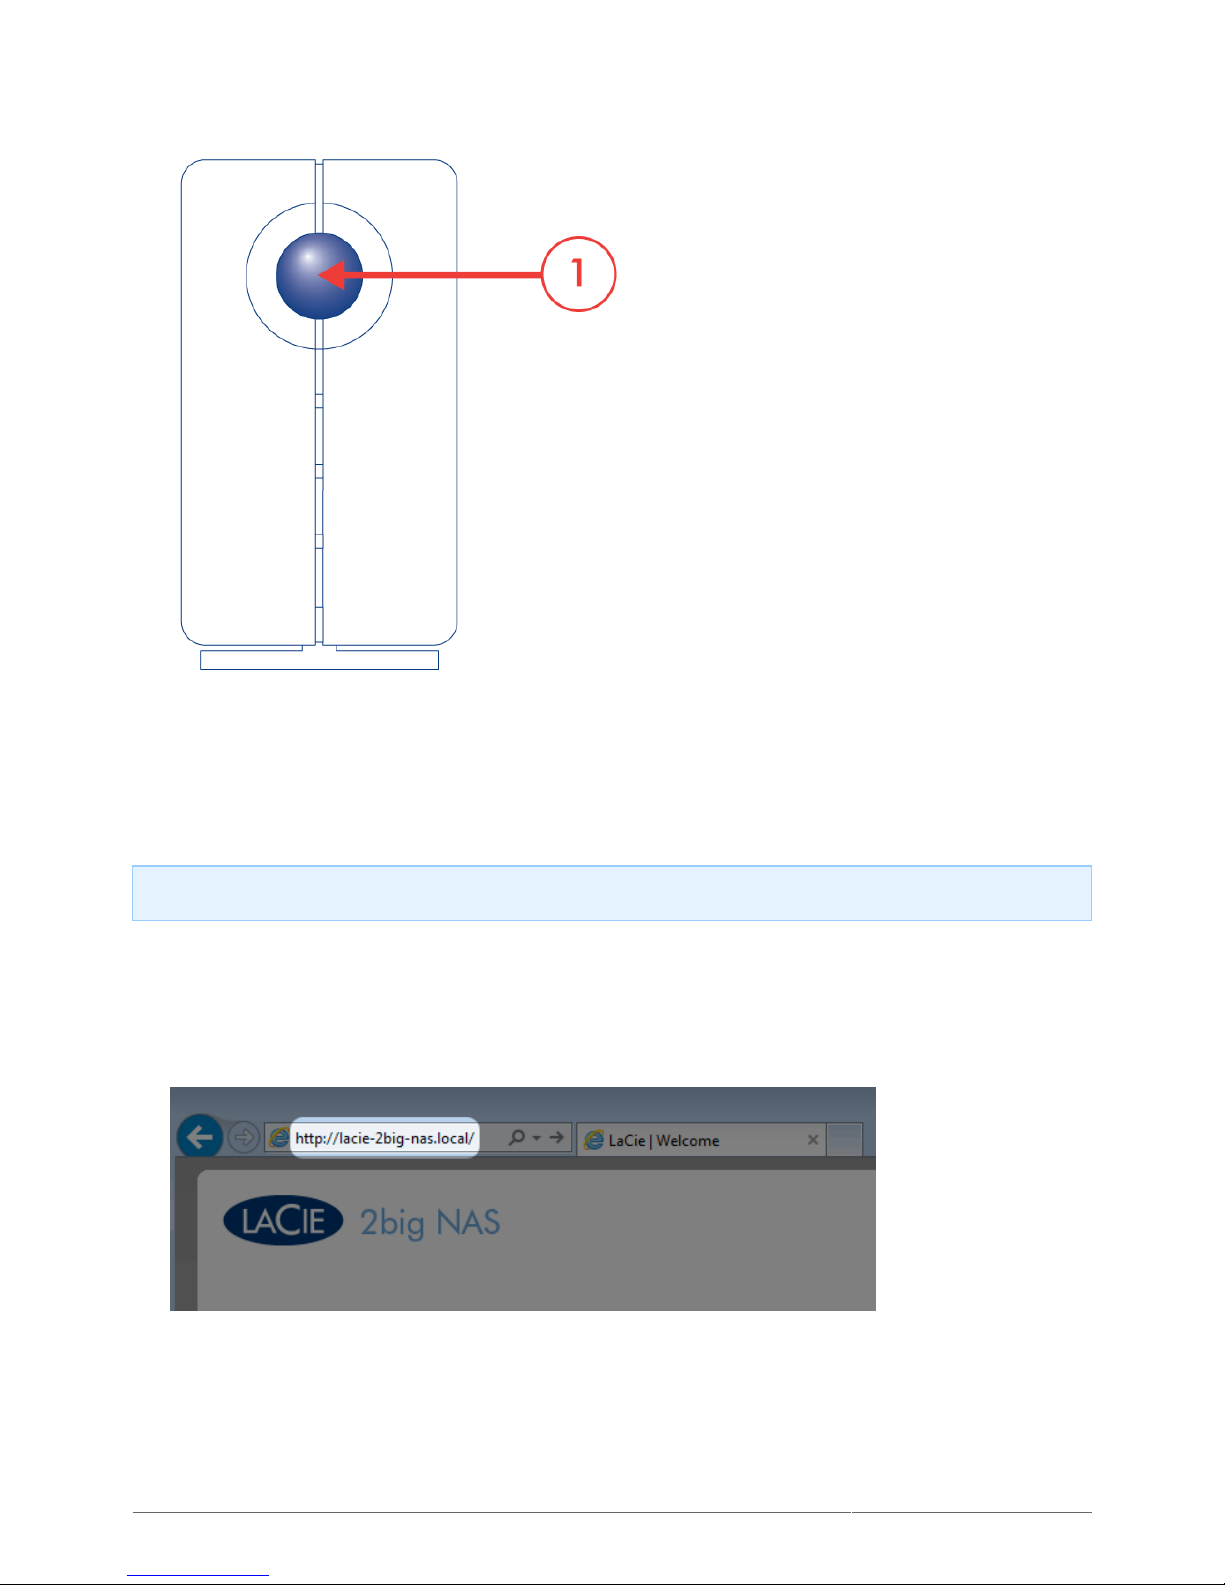
Press and hold the front button for at least 5 seconds. Once the LED begins to blink blue and red, release the1.
button.
Page 22
LaCie 2big NAS (OS 3.0) | LaCie 5big NAS Pro User Manual 22
After a period of 10 to 16 minutes, initialization will have completed. The system is ready once the front LED2.
turns solid blue.
Step 6: Access the LaCie NAS Dashboard
Note: The steps below should be completed by the administrator of the device.
Perform the steps below on a PC/Mac connected to the same network as your LaCie NAS.
Launch your preferred internet browser and type the default address for the LaCie 2big NAS:1.
Windows XP - http:\\lacie-2big-nas
■
Windows Vista / 7 / 8 and Mac OS - http:\\lacie-2big-nas.local.
■
Certain versions of Windows may require the name of the device only, similar to Windows XP. If you do not
connect to your device, please try http:\\lacie-2big-nas.
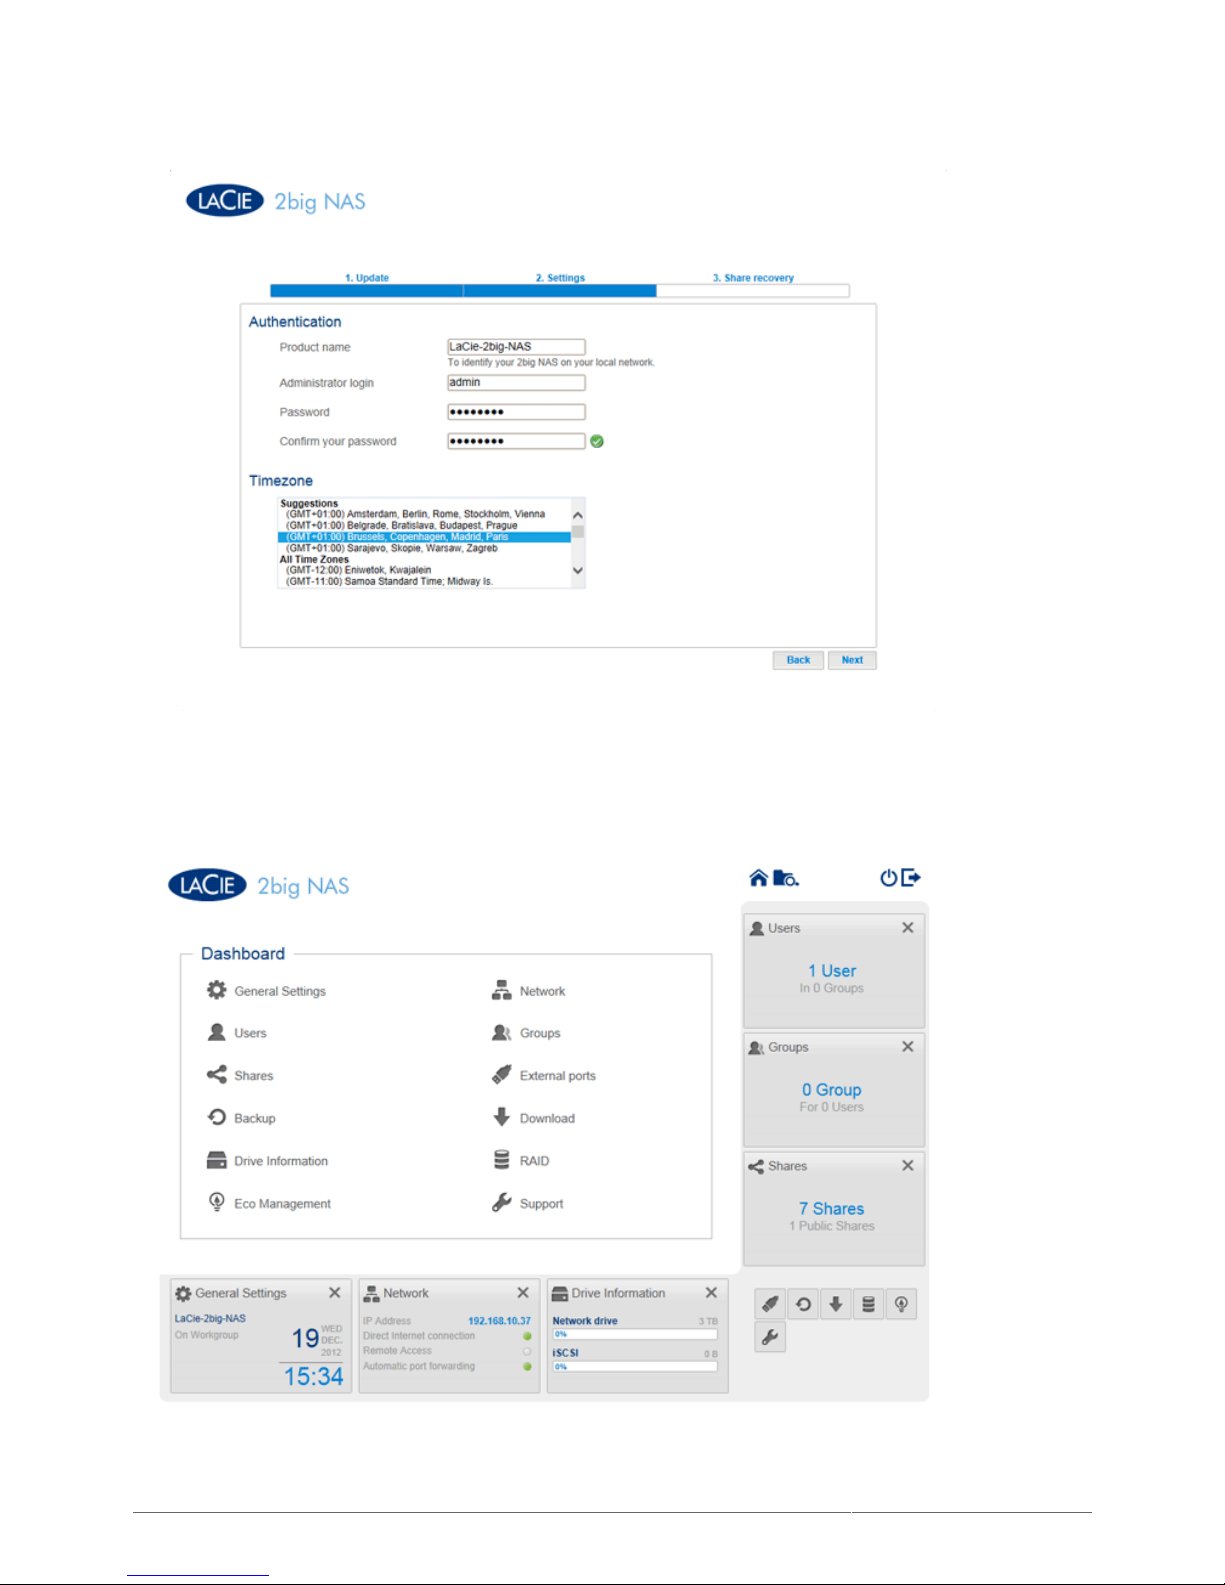
The Dashboard will prompt you to create an administrator password. You may also change:2.
The default name of the device (LaCie-2big-NAS).
■
Page 23
LaCie 2big NAS (OS 3.0) | LaCie 5big NAS Pro User Manual 23
The default administrator login (admin).
■
Your time zone.
■
Make certain to note your login and password for future use.3.
Click Finish to access the Dashboard Home page.4.
Page 24

LaCie 2big NAS (OS 3.0) | LaCie 5big NAS Pro User Manual 24
Next Steps
Simplify NAS access: LaCie recommends that you install the software utility LaCie Network Assistant before
■
moving forward with the device configuration. LaCie Network Assistant gives you instant information on your
LaCie NAS, such as firmware version, IP address, and hardware address. It will also provide quick access to
shares (volumes) and the Dashboard. See LaCie Network Assistant for instructions.
Configure your NAS: For details on how to configure and use your LaCie NAS, go to Shares: Access and
■
Transfer Files and Dashboard (Administration).
Add your LaCie NAS to Wuala Cloud Storage: Enhance your data workflow with LaCie's Hybrid Cloud.
■
Wuala is secure cloud storage that will give you access to your LaCie NAS from any computer with a
connection to the internet. Further, Wuala uses high-end encryption to guarantee that no one, not even LaCie,
can access your files. See Hybrid Cloud: Wuala & LaCie NAS for details.
Page 25

LaCie 2big NAS (OS 3.0) | LaCie 5big NAS Pro User Manual 25
CONNECT TO YOUR NETWORK - DISKLESS LACIE 5BIG
NAS PRO
Users who purchased a LaCie 5big NAS Pro enclosure without hard disks should follow the instructions below.
Enclosure with hard disks: If you purchased an enclosure with hard disks, please see Connect to the
Network for instructions on how to connect to your network.
CHOOSE COMPATIBLE HARD DRIVES
Please consider the following before adding hard drives to your LaCie 5big NAS Pro:
When adding new hard drives to the enclosure, consider LaCie 5big Hard Drives. LaCie hard drives are
■
specially prepared and optimized for use with LaCie NAS.
If you are installing non-LaCie hard disks, please note that LaCie NAS are compatible with and should work
■
seamlessly with any SATA II or SATA III hard drive. Before adding a hard drive to the enclosure, LaCie
receommends that you check the list of supported Hard Drives.
INSTALLATION STEPS
Step 1: Update the Firmware for the LaCie USB Key and Note the LaCie 5big NAS Pro's MAC Address
Your LaCie 5big NAS Pro shipped with a LaCie USB flash drive (Key). The USB Key will help you boot the LaCie
5big NAS Pro and format your hard drives. It can also help you troubleshoot the device (see LaCie NAS Rescue -
5big NAS Pro).
Page 26
LaCie 2big NAS (OS 3.0) | LaCie 5big NAS Pro User Manual 26
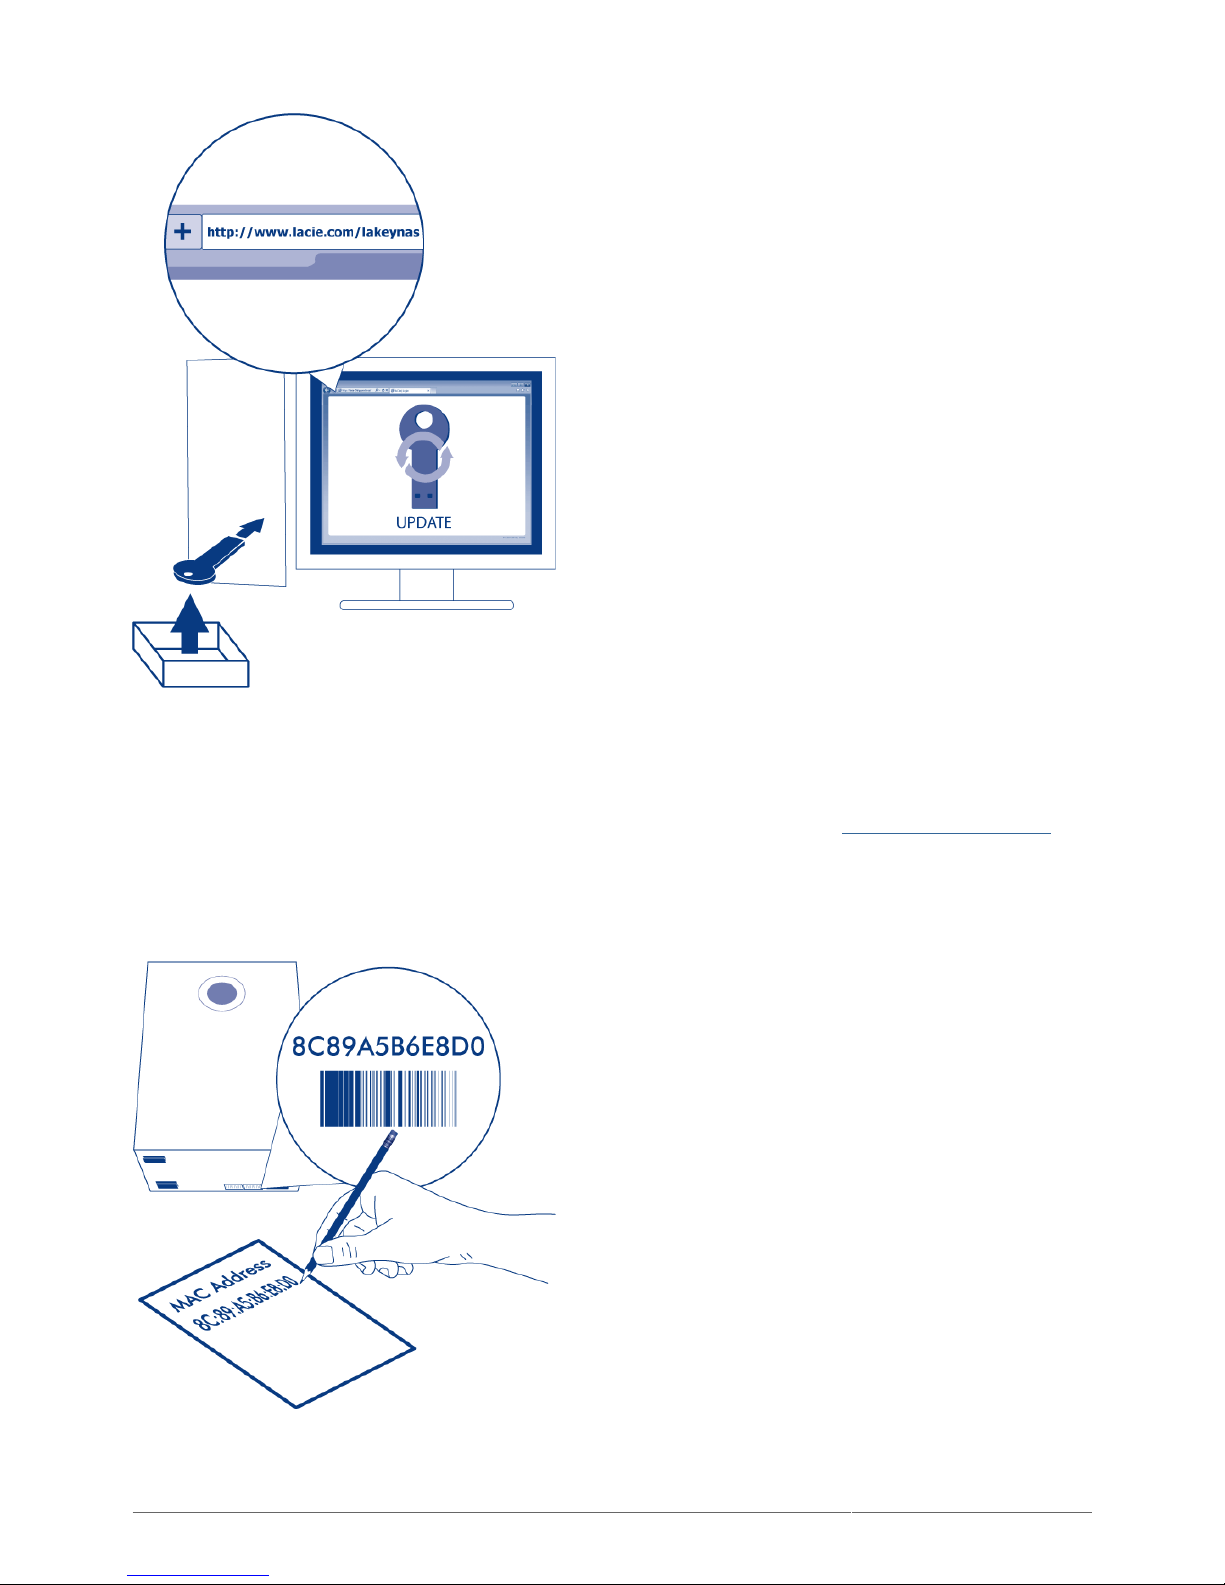
LaCie may update firmware on the USB Key for enhanced operation so please follow the directions below:
Insert the LaCie USB Key into a USB port on a PC with a connection to the internet. The PC must be running1.
Windows.
Launch an internet browser and enter the following address, or click on the link: www.lacie.com/lakeynas2.
Follow the onscreen directions to make certain that the firmware for your USB Key is up to date.3.
Eject the key from your computer.4.
In Step 5 below, the setup wizard will ask you to enter a MAC address unique to your enclosure. To prepare for
this request, please do one of the following:
Page 27
LaCie 2big NAS (OS 3.0) | LaCie 5big NAS Pro User Manual 27
Look on the bottom of your LaCie 5big NAS Pro enclosure for the sticker with two numbers that correspond to
■
LAN 1 and LAN 2. You may use one of the two numbers as the MAC address.
Connect a VGA monitor to the VGA port located on the back of the LaCie 5big NAS Pro. Following the initial
■
boot process, the system will indicate MAC and IP addresses. If the monitor is receiving a signal but the image
is black, try connecting a USB keyboard to one of the USB ports also located on the back of the 5big NAS Pro.
The system may have reverted to energy conservation mode which you can exit by striking one of the keys on
the USB keyboard.
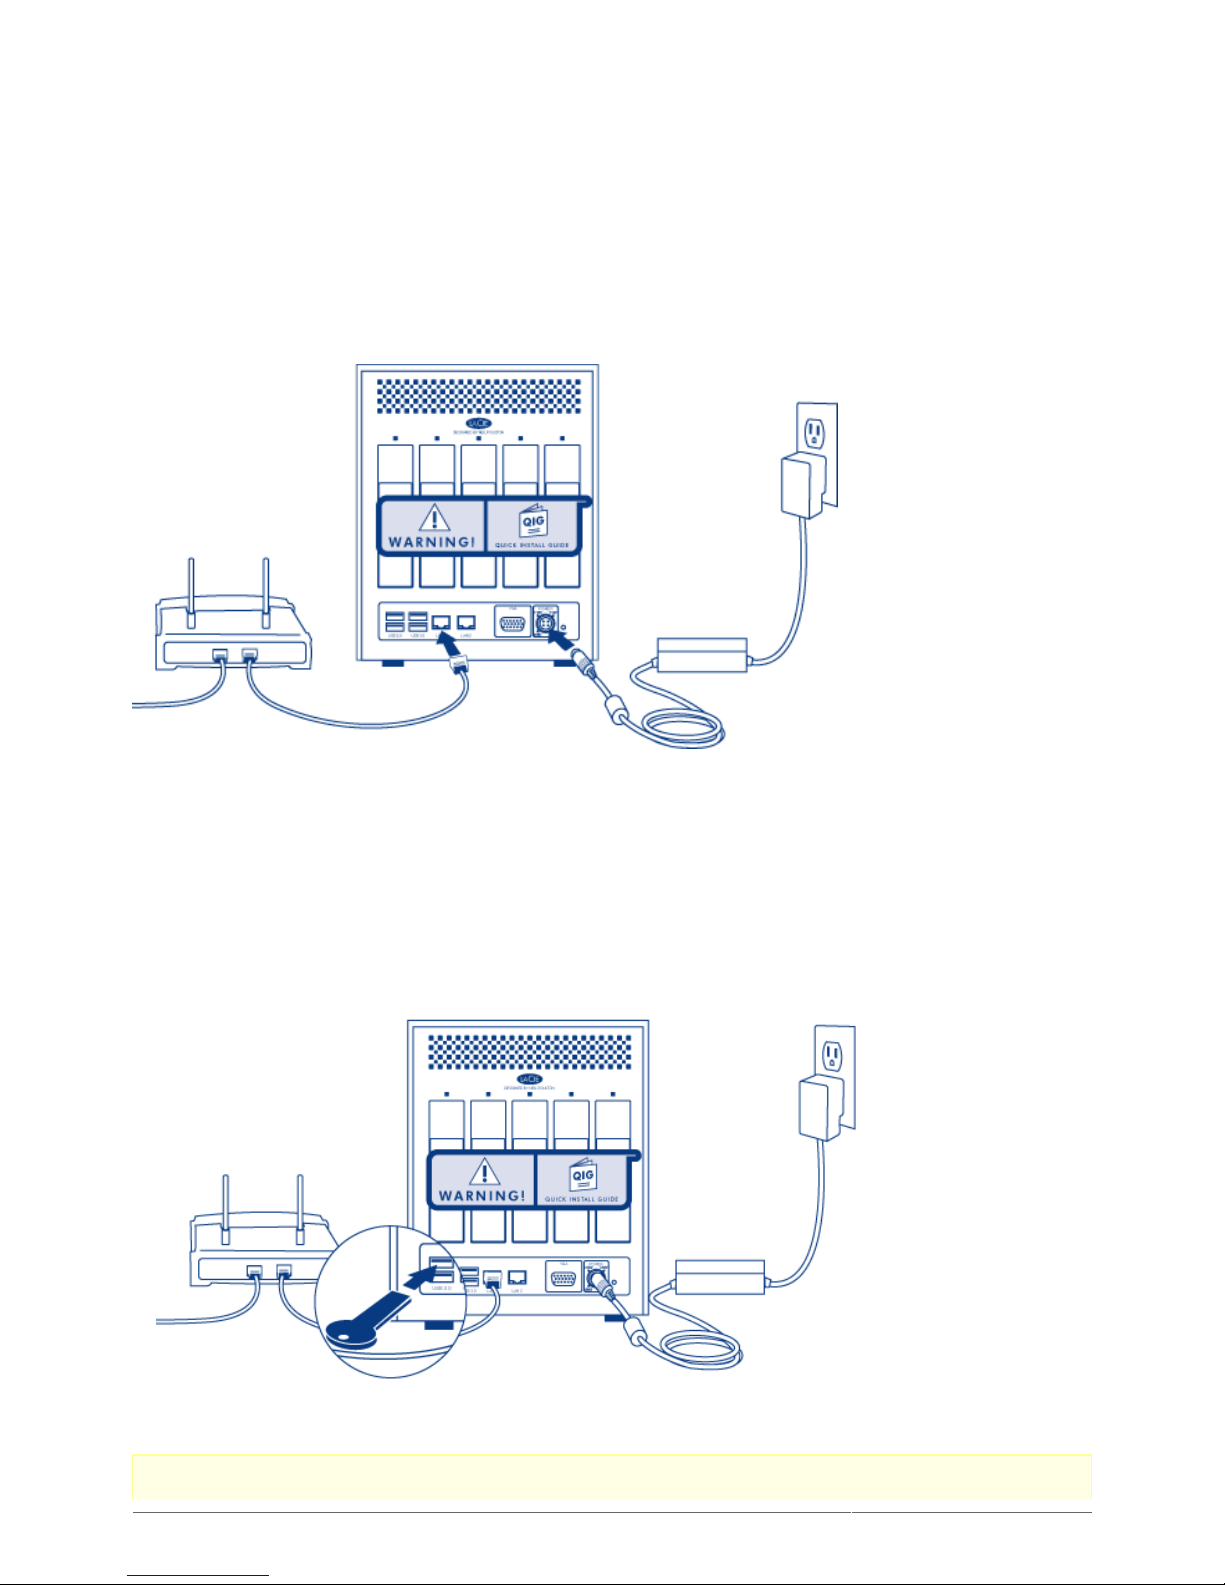
Step 2: Connect the Ethernet Cable, Power Supply, and LaCie USB Key
Connect the Ethernet cable to the Ethernet port on the back of the product and to an available Ethernet “out”1.
port on your router. Refer to your router’s documentation if necessary.
Connect the power supply to a wall outlet and to the product.2.
Connect the LaCie USB Key to one of the USB ports on the LaCie 5big NAS Pro.3.
Caution: Only use the AC adapter supplied with your specific LaCie device. Do not use a power supply from
Page 28
LaCie 2big NAS (OS 3.0) | LaCie 5big NAS Pro User Manual 28
another LaCie device or another manufacturer. Using any other power cable or power supply may cause
damage to the device and void your warranty. Always remove the AC adapter before transporting your LaCie
device. Failure to remove the adapter may result in damage and will void your warranty.
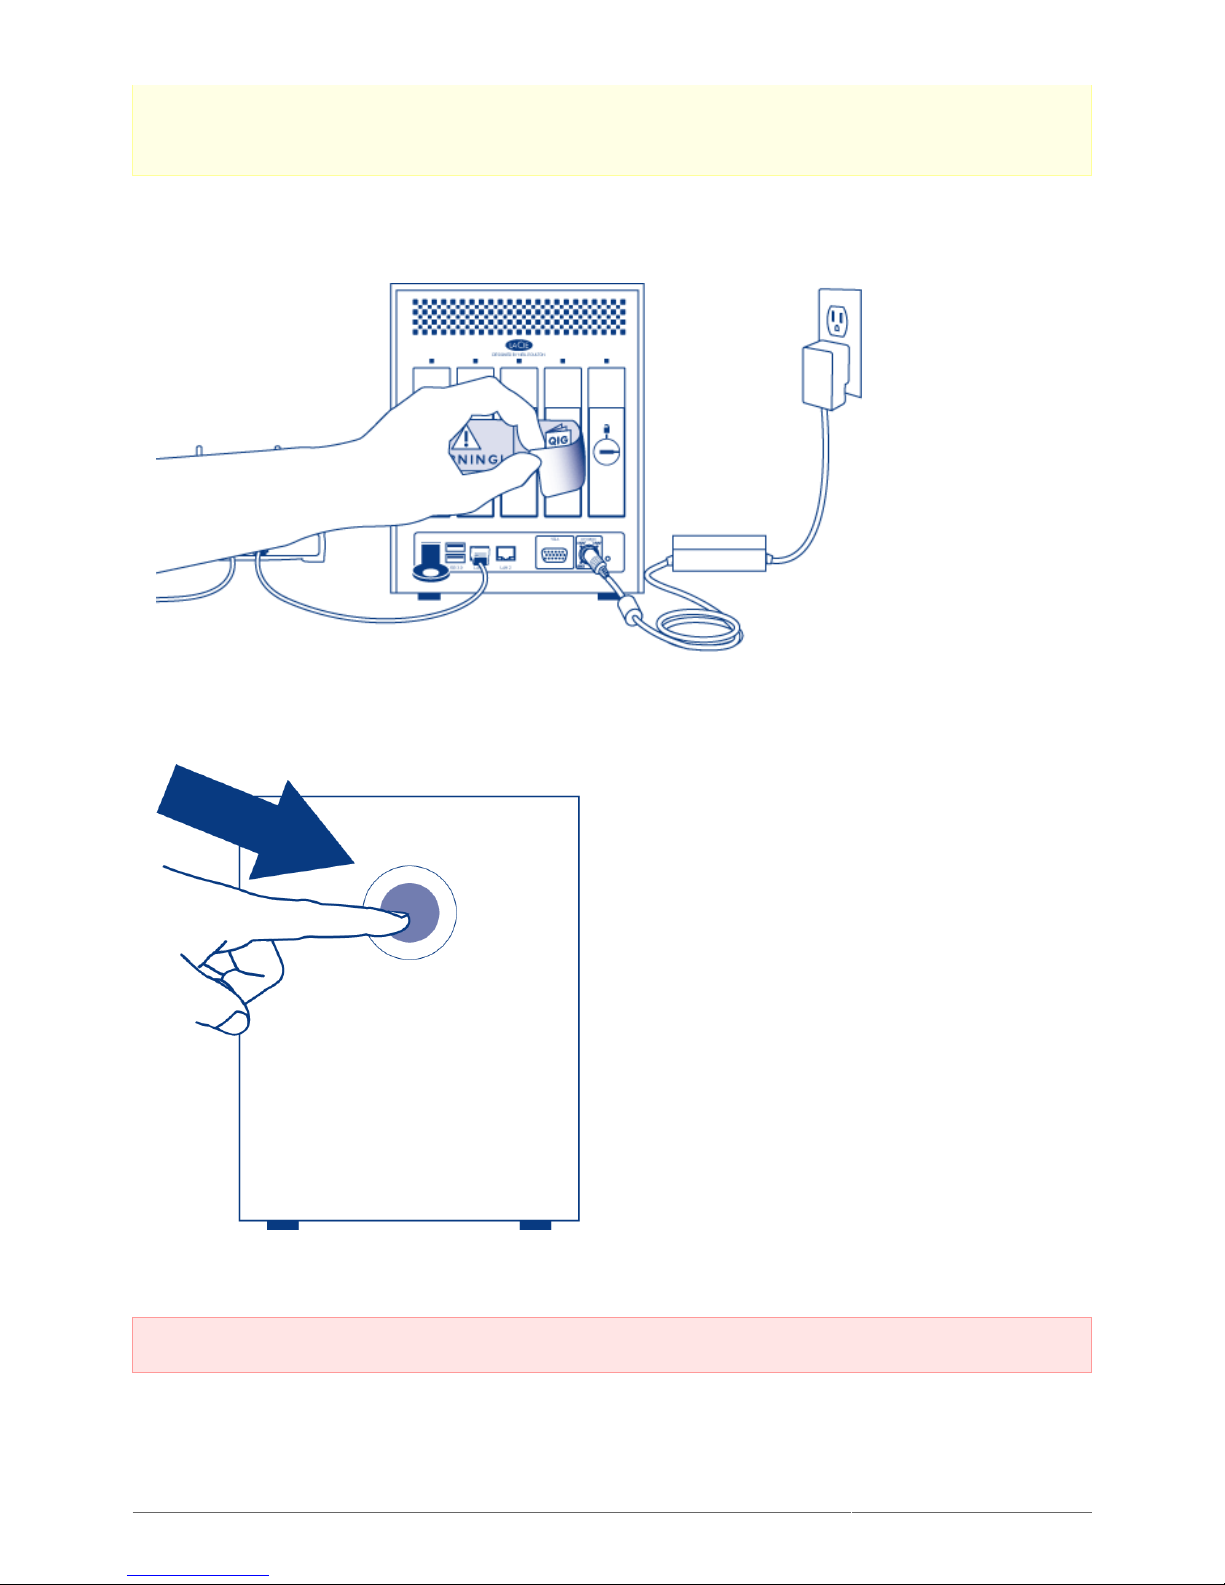
Step 3: Remove the Sticker and Power on the Device
Remove the sticker on the back of the enclosure.1.
Press the front LED button to power on the device.2.
Important info: Power the device on before inserting hard disks into the drive slots.
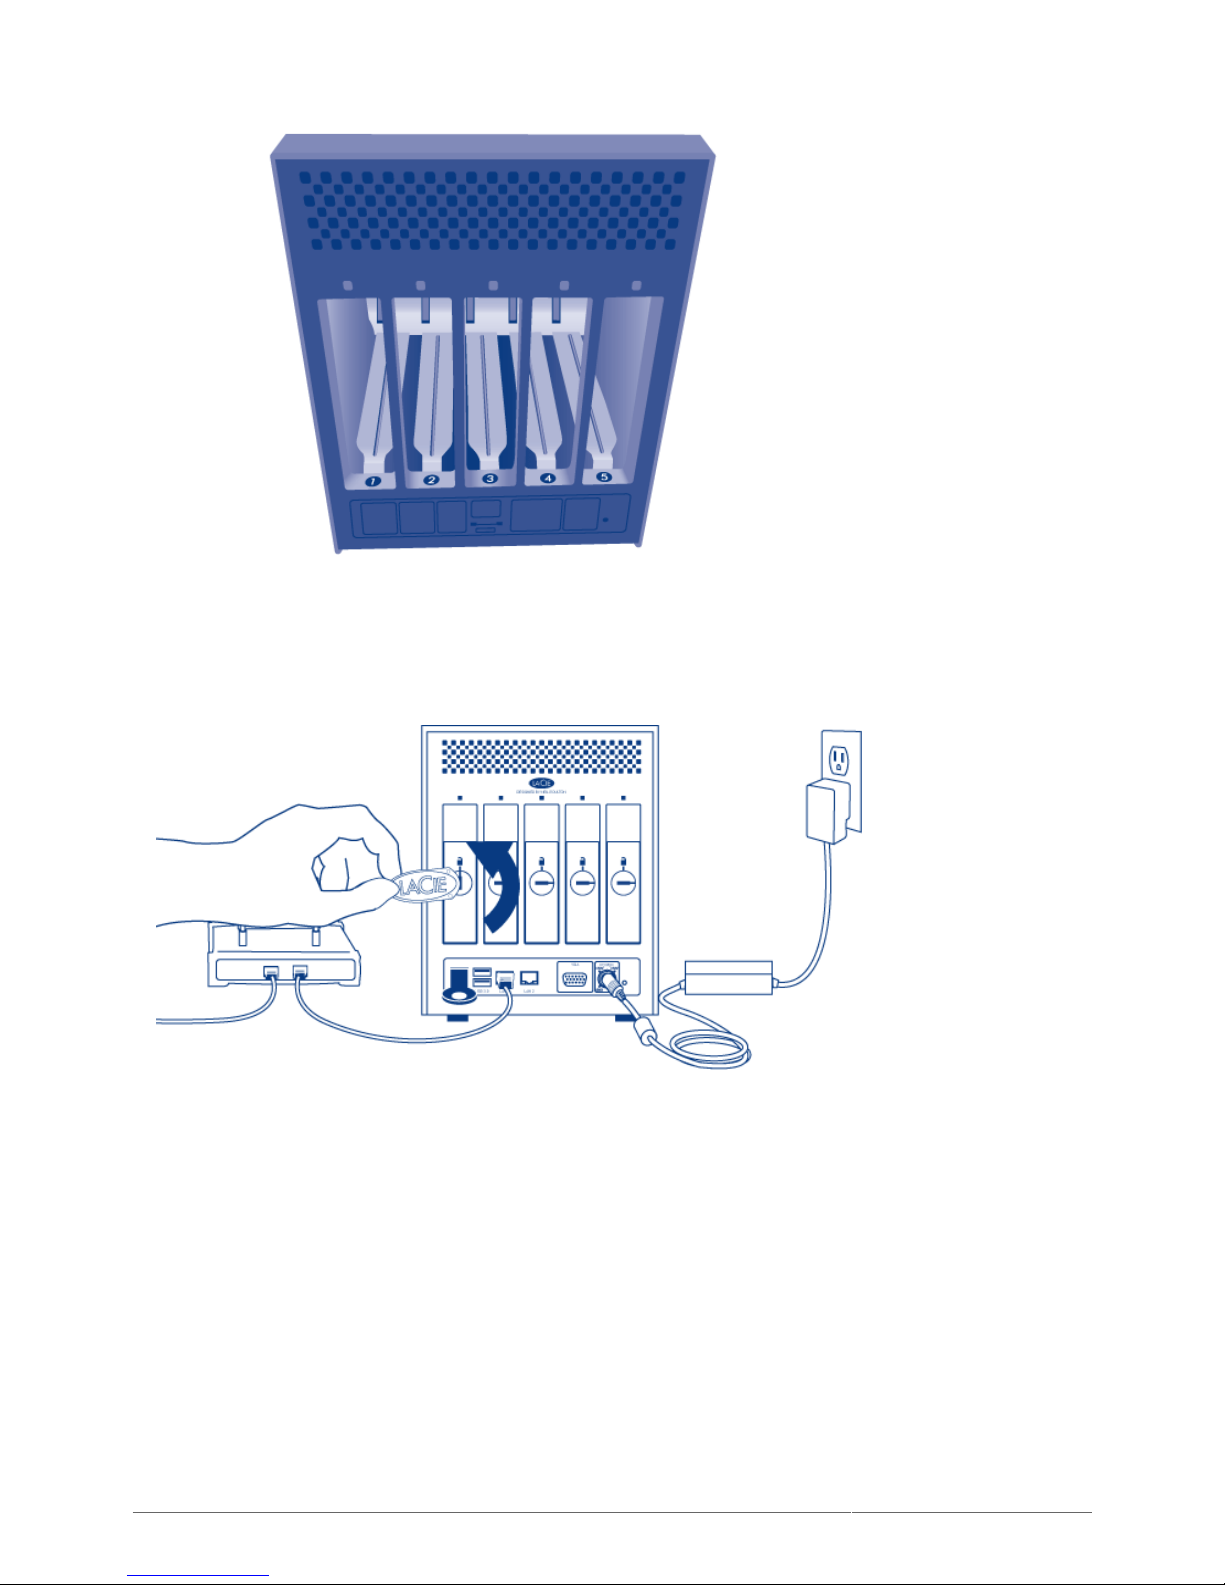
Step 4: Install Hard Drives into the LaCie 5big NAS Pro Enclosure
Please make certain to add new hard drives in the order of the numbered slots, from left to right:
Page 29
LaCie 2big NAS (OS 3.0) | LaCie 5big NAS Pro User Manual 29
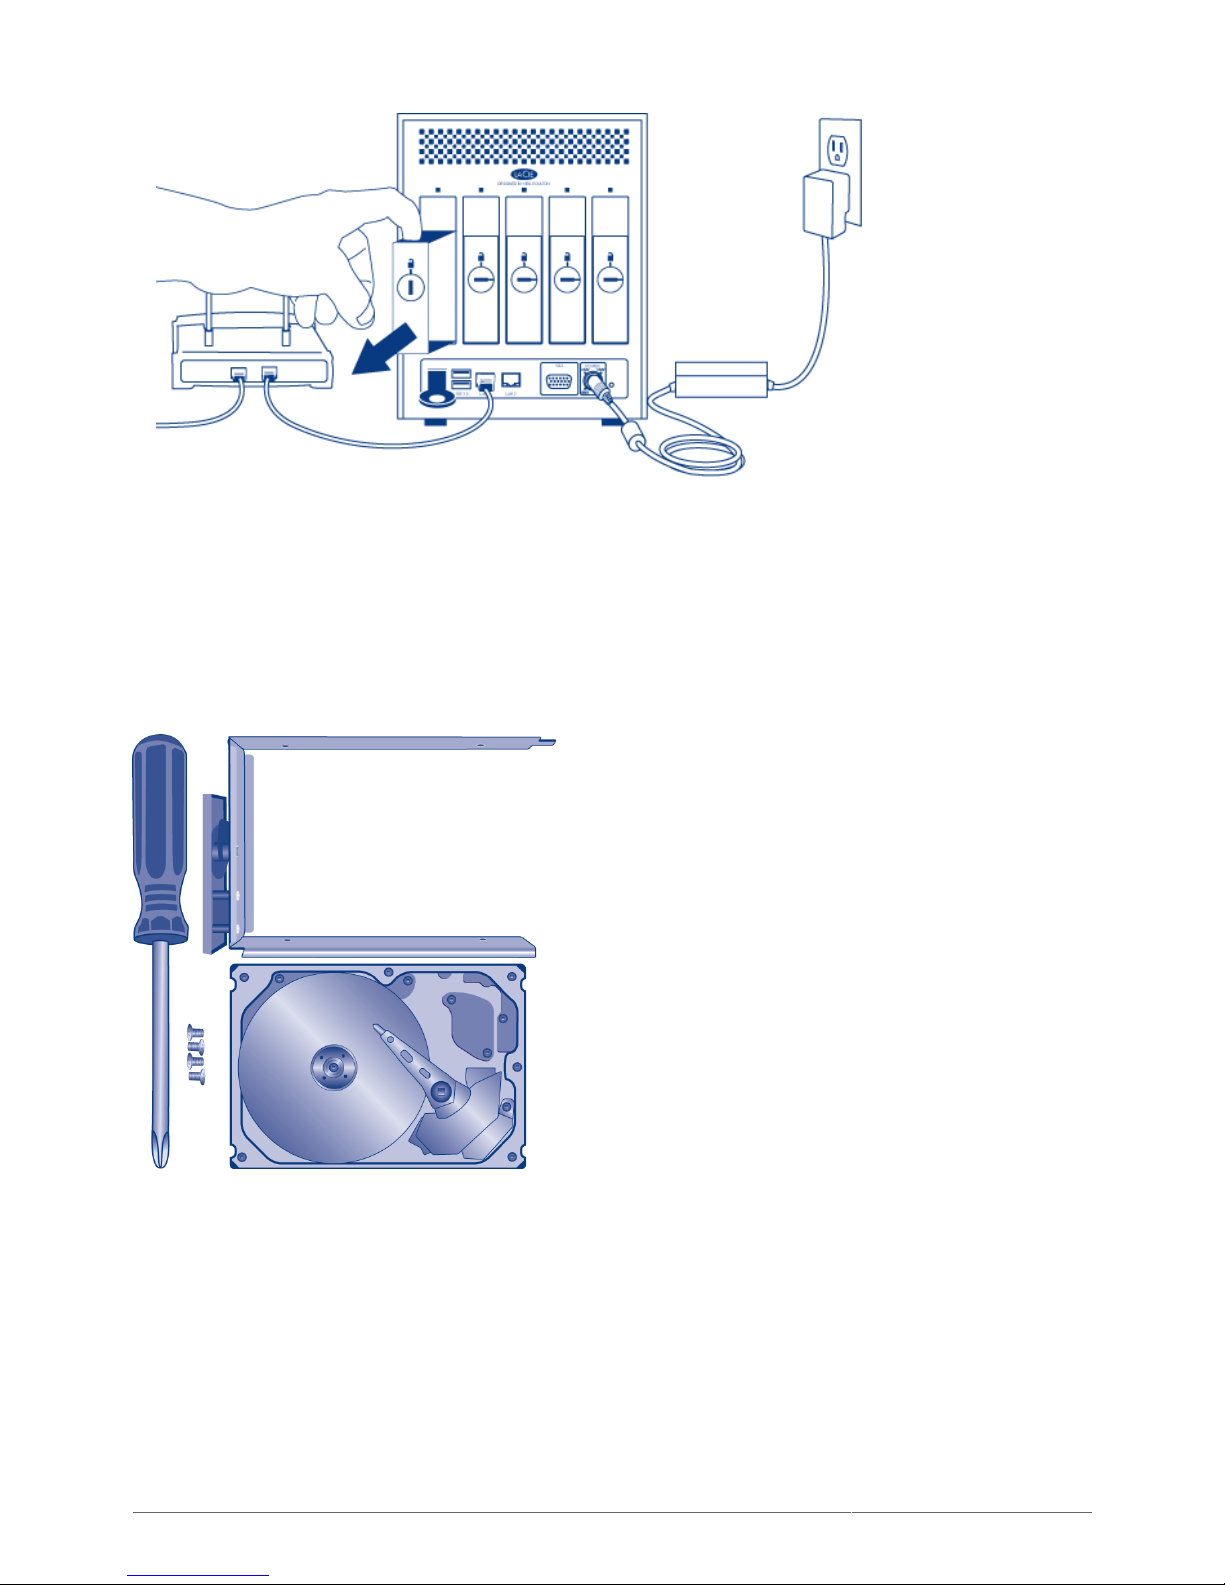
Remove the empty disk tray(s):
Use the included drawer key to unlock the disk tray. Turn the lock until it is vertical.1.
Place your index finger into the space behind the handle then carefully remove the disk tray.2.
Page 30
LaCie 2big NAS (OS 3.0) | LaCie 5big NAS Pro User Manual 30
Remove additional trays if you are adding more than one hard disk. Make certain to remove the disk trays in3.
the proper slot order.
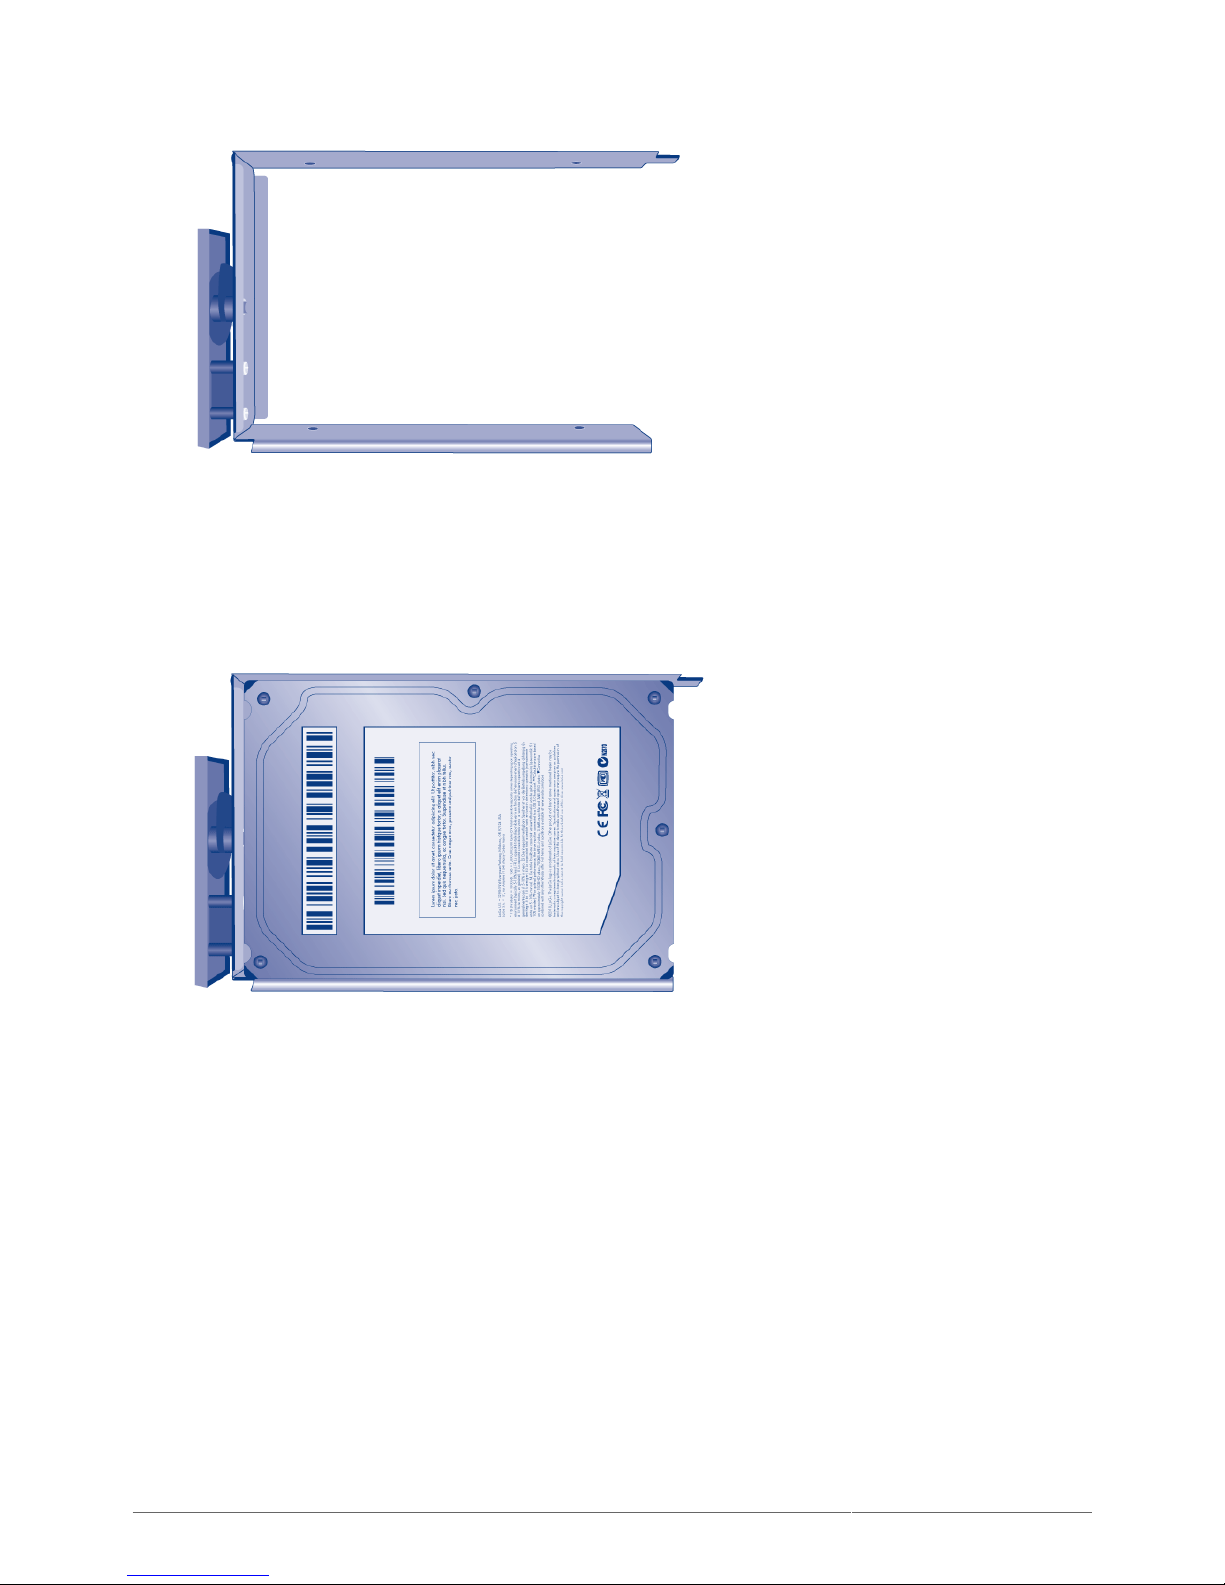
Fasten the hard drive to the hard disk tray:
Find a suitable work area with adequate space and a flat, even surface. Make certain that all necessary
components are available:
LaCie 5big NAS Pro Hard Disk Tray
■
Hard drive
■
Hard disk tray screws. Use only the screws that are provided with your LaCie NAS.
■
Phillips head screwdriver. Please confirm that the head of the screwdriver is the proper size for the disk tray
■
screws.
Secure a hard drive to the hard disk tray:
Place the empty hard drive tray onto the flat work area with the handle on the bottom left.1.
Page 31
LaCie 2big NAS (OS 3.0) | LaCie 5big NAS Pro User Manual 31
Many hard disks have a label on one side and the printed circuit board on the opposite side. With its label2.
side facing up, gently place the hard disk within the hard drive tray. Keep the side with the printed circuit
board on the work space and the SATA connector facing to the right. The four tray screw slots should align
with the hard disk’s four screw holes.
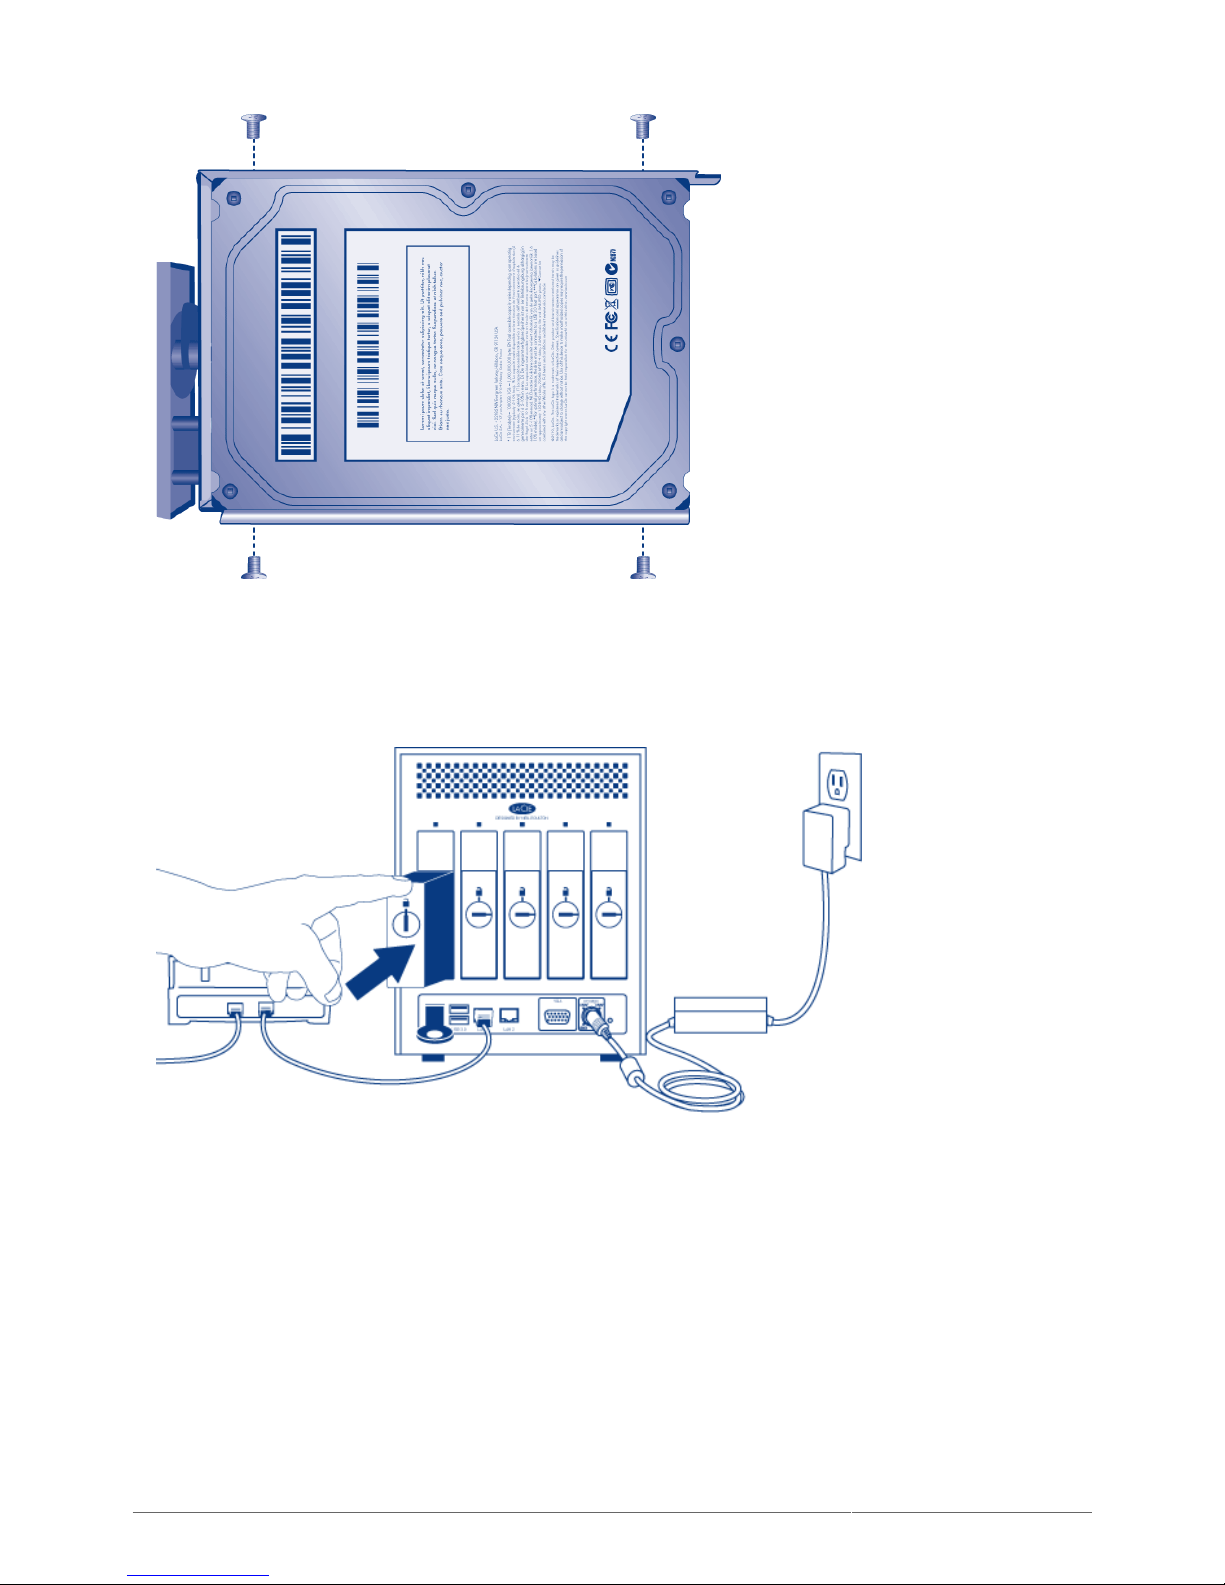
Using the Phillips head screwdriver, carefully fasten all four screws into the four tray slots. Do not overly3.
tighten the screws. Doing so can affect the integrity of the screw holes on the hard drive as well as the
threads on the screws.
Page 32
LaCie 2big NAS (OS 3.0) | LaCie 5big NAS Pro User Manual 32
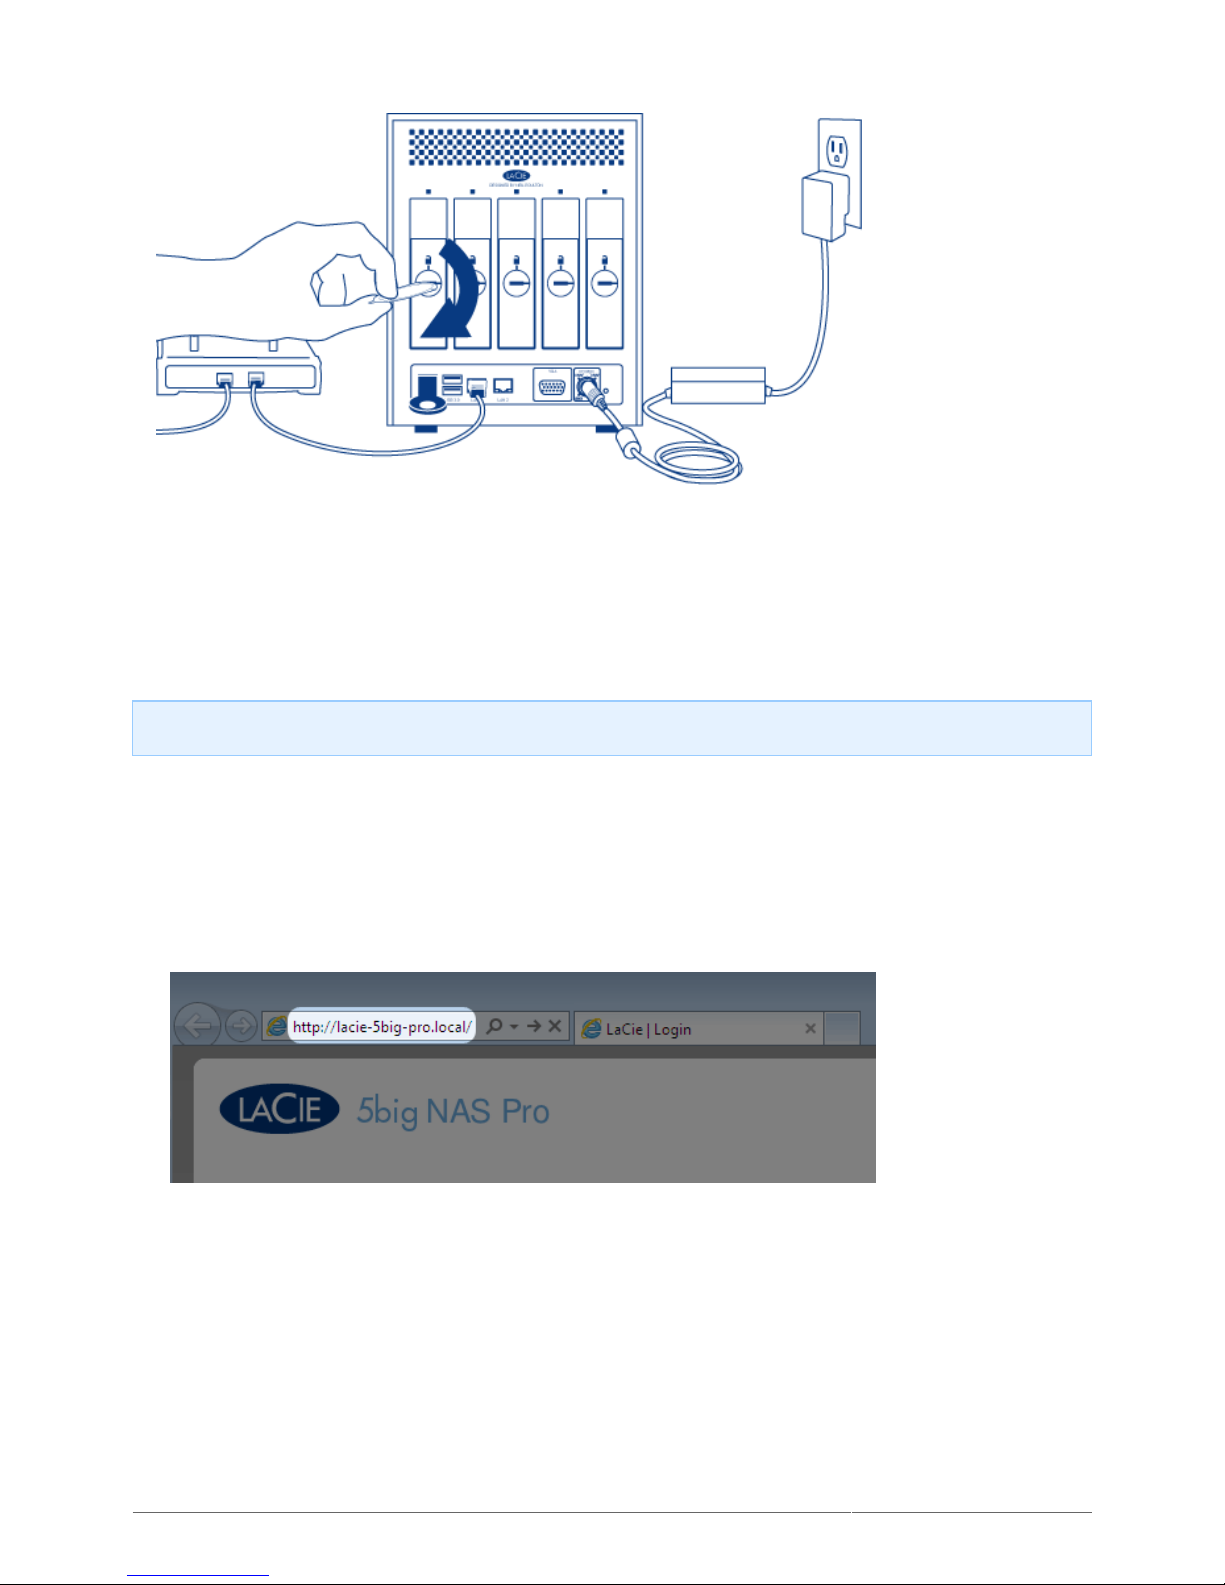
Repeat the process if you are adding more than one hard disk.4.
Carefully insert the full hard drive tray into the empty Disk Slot 1 (far left). You will feel resistance when the5.
hard drive tray is most of the way in the bay. Gently push the hard drive tray handle firmly until you feel it
snap into place.
Once the disk tray handle is flush with the back of the enclosure, you may lock it.6.
Page 33
LaCie 2big NAS (OS 3.0) | LaCie 5big NAS Pro User Manual 33
If you are adding more than one hard disk, insert full hard drive trays into empty slots in the enclosure. Make7.
certain to follow the slot numbers. For example, the second hard disk should be inserted into Disk Slot 2, the
third disk into Disk Slot 3, etc.
Step 5: Install LaCie NAS OS
Note: The steps below should be completed by the administrator of the device.
Perform the steps below on a PC/Mac connected to the same network as your LaCie 5big NAS Pro. Please note
that, during this process, the hard disks you have inserted into the 5big NAS Pro will be formatted and
all data deleted.
Launch your preferred internet browser and type the default address for the LaCie 5big NAS Pro:1.
Windows XP - http:\\lacie-5big-pro
■
Windows Vista / 7 / 8 and Mac OS - http:\\lacie-5big-pro.local.
■
Certain versions of Windows may require the name of the device only, similar to Windows XP. If you do not
connect to your device, please try http:\\lacie-5big-pro. See note below on IP address if you continue to
have problems.
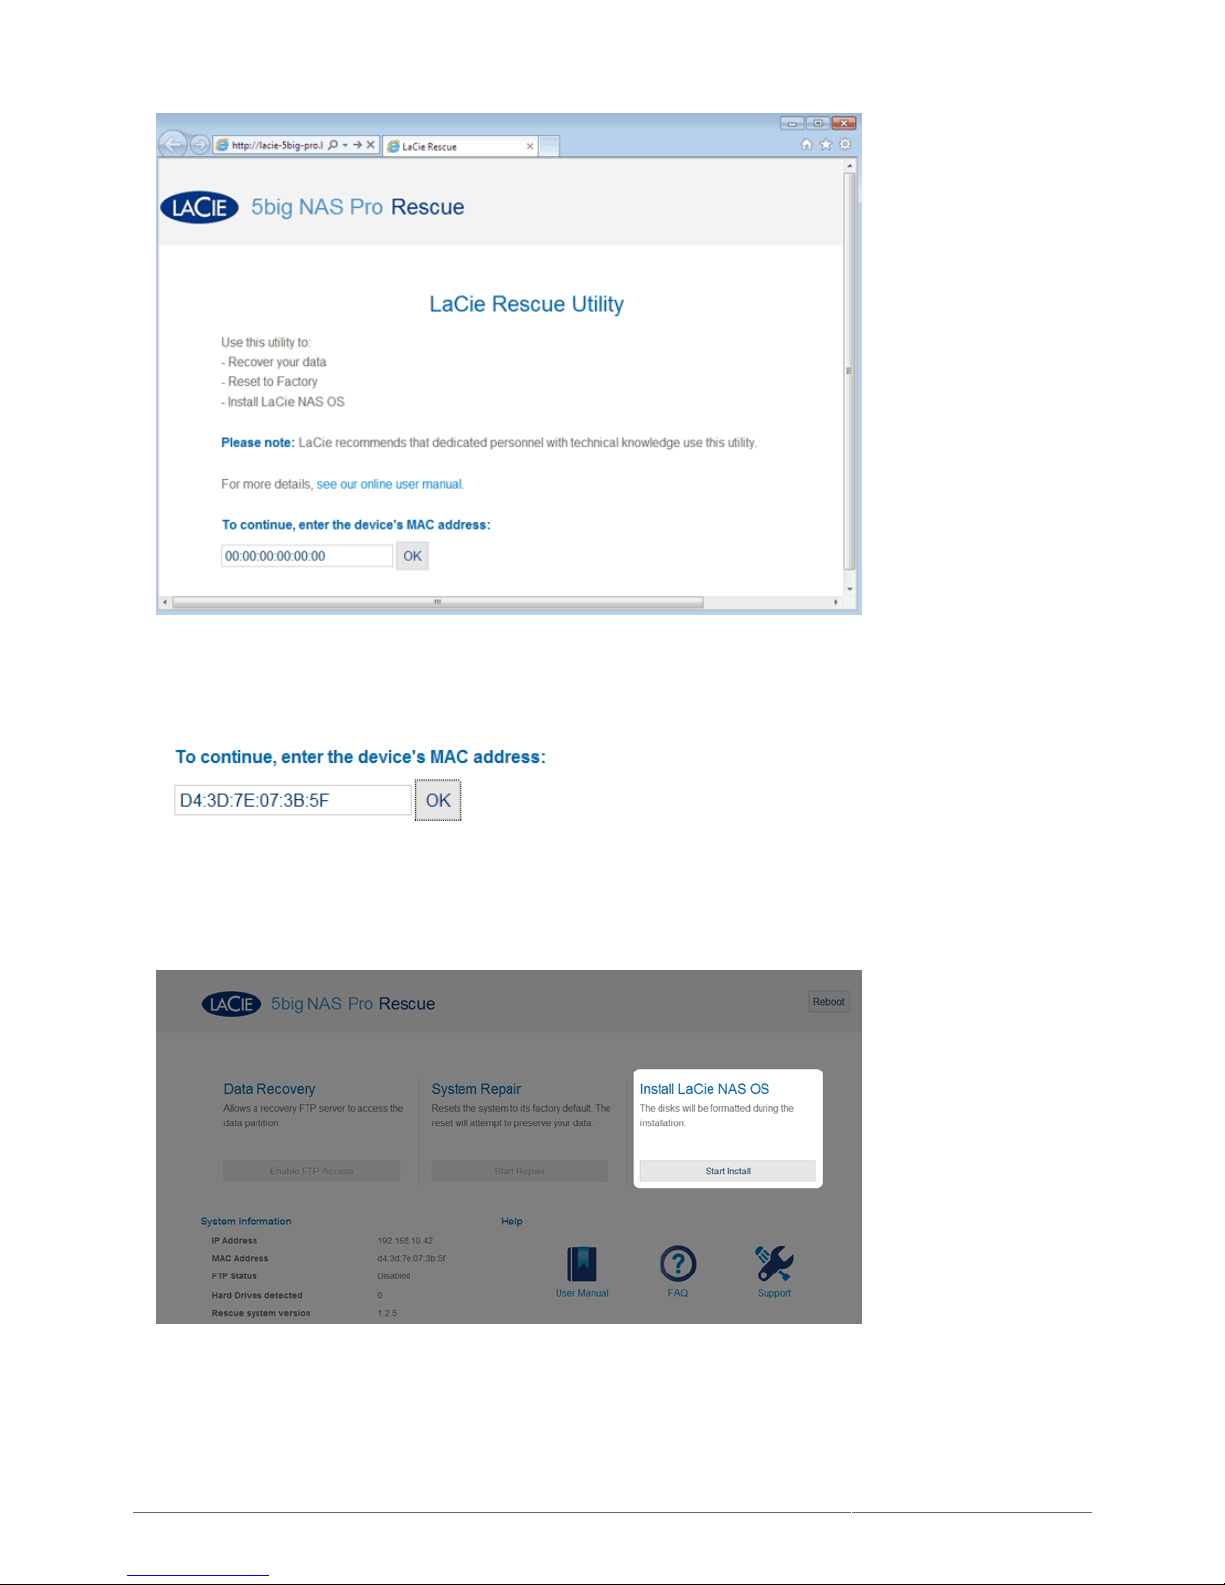
The LaCie 5big NAS Pro Rescue wizard will appear.2.
Page 34
LaCie 2big NAS (OS 3.0) | LaCie 5big NAS Pro User Manual 34
To continue, enter one of the MAC addresses that you noted in Step 1. It is not necessary to enter the colons.3.
Click Start Install.4.
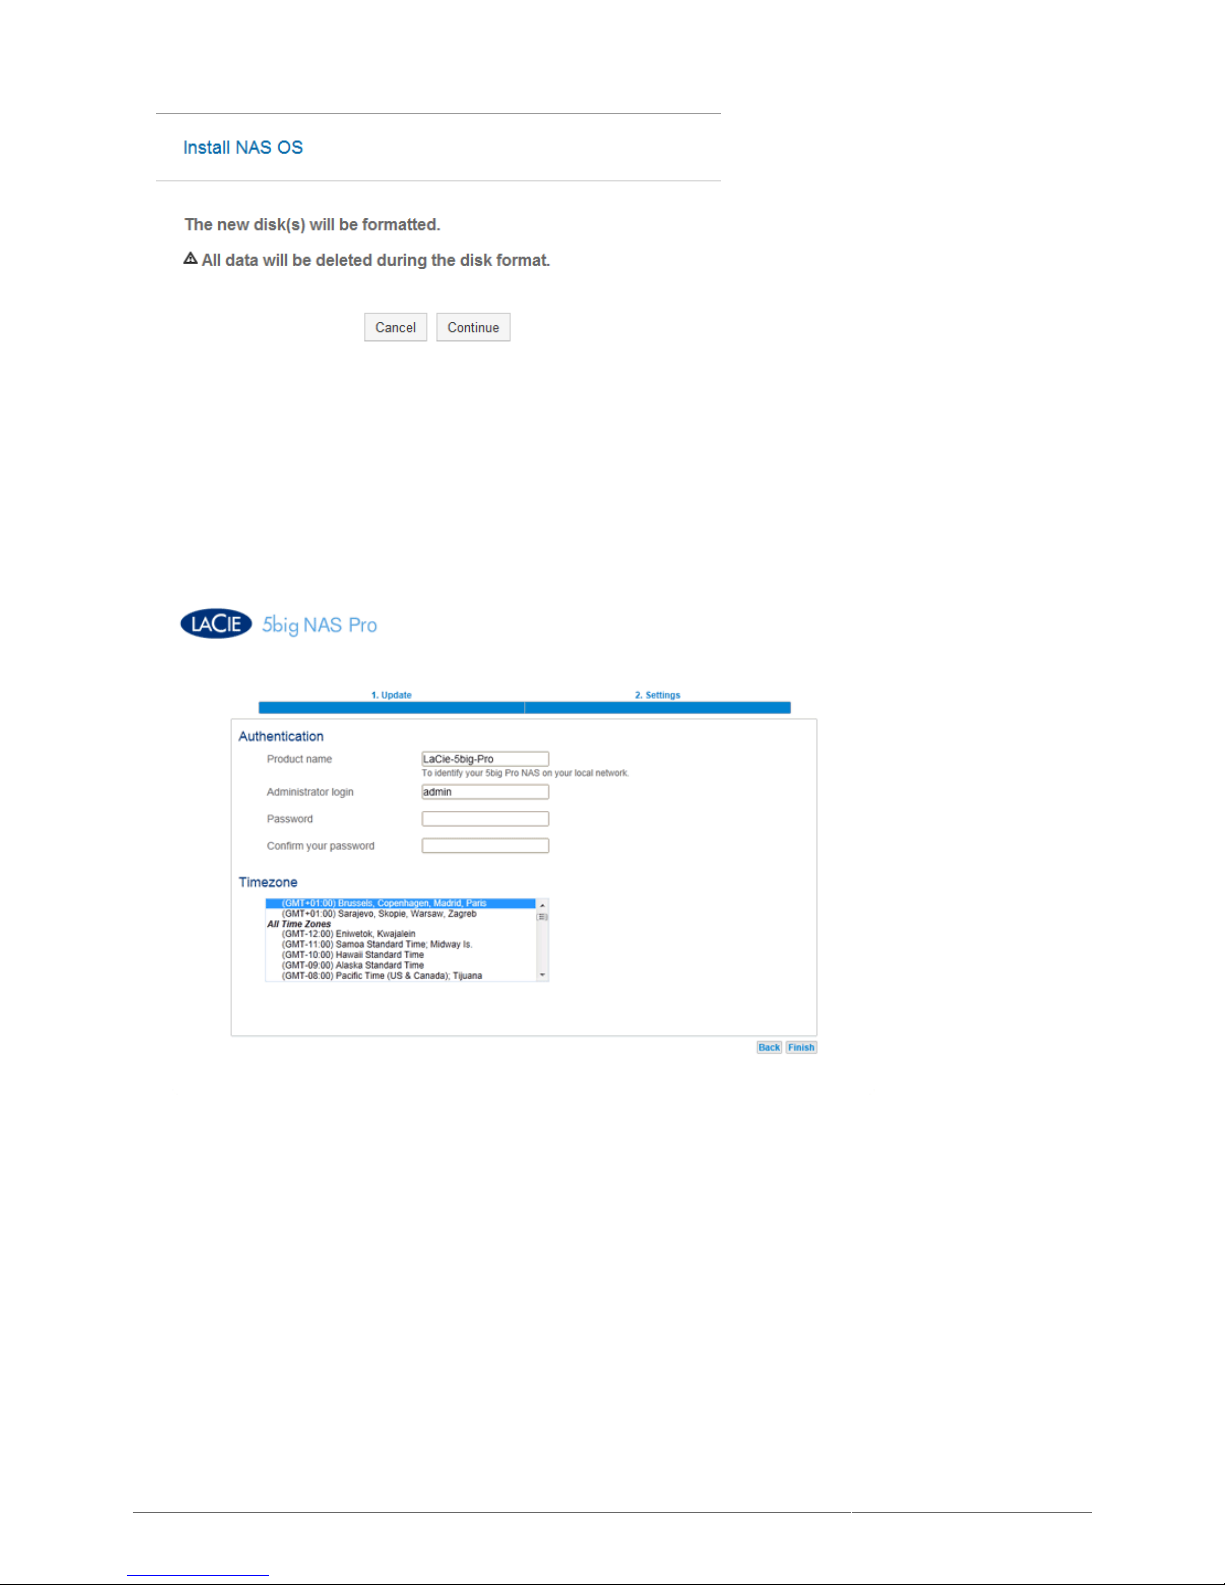
Click Continue at the prompt to install LaCie NAS OS on the hard disk(s). To accommodate the installation,5.
all data stored on the hard disks will be deleted.
Page 35
LaCie 2big NAS (OS 3.0) | LaCie 5big NAS Pro User Manual 35
It will take approximately five minutes to format the hard drive(s) and install LaCie NAS OS. Once it is finished,6.
the Dashboard will prompt you to create an administrator password. You may also change:
The default name of the device (LaCie-5big-Pro).
■
The default administrator login (admin).
■
Your time zone.
■
Make certain to note your login and password for future use.7.
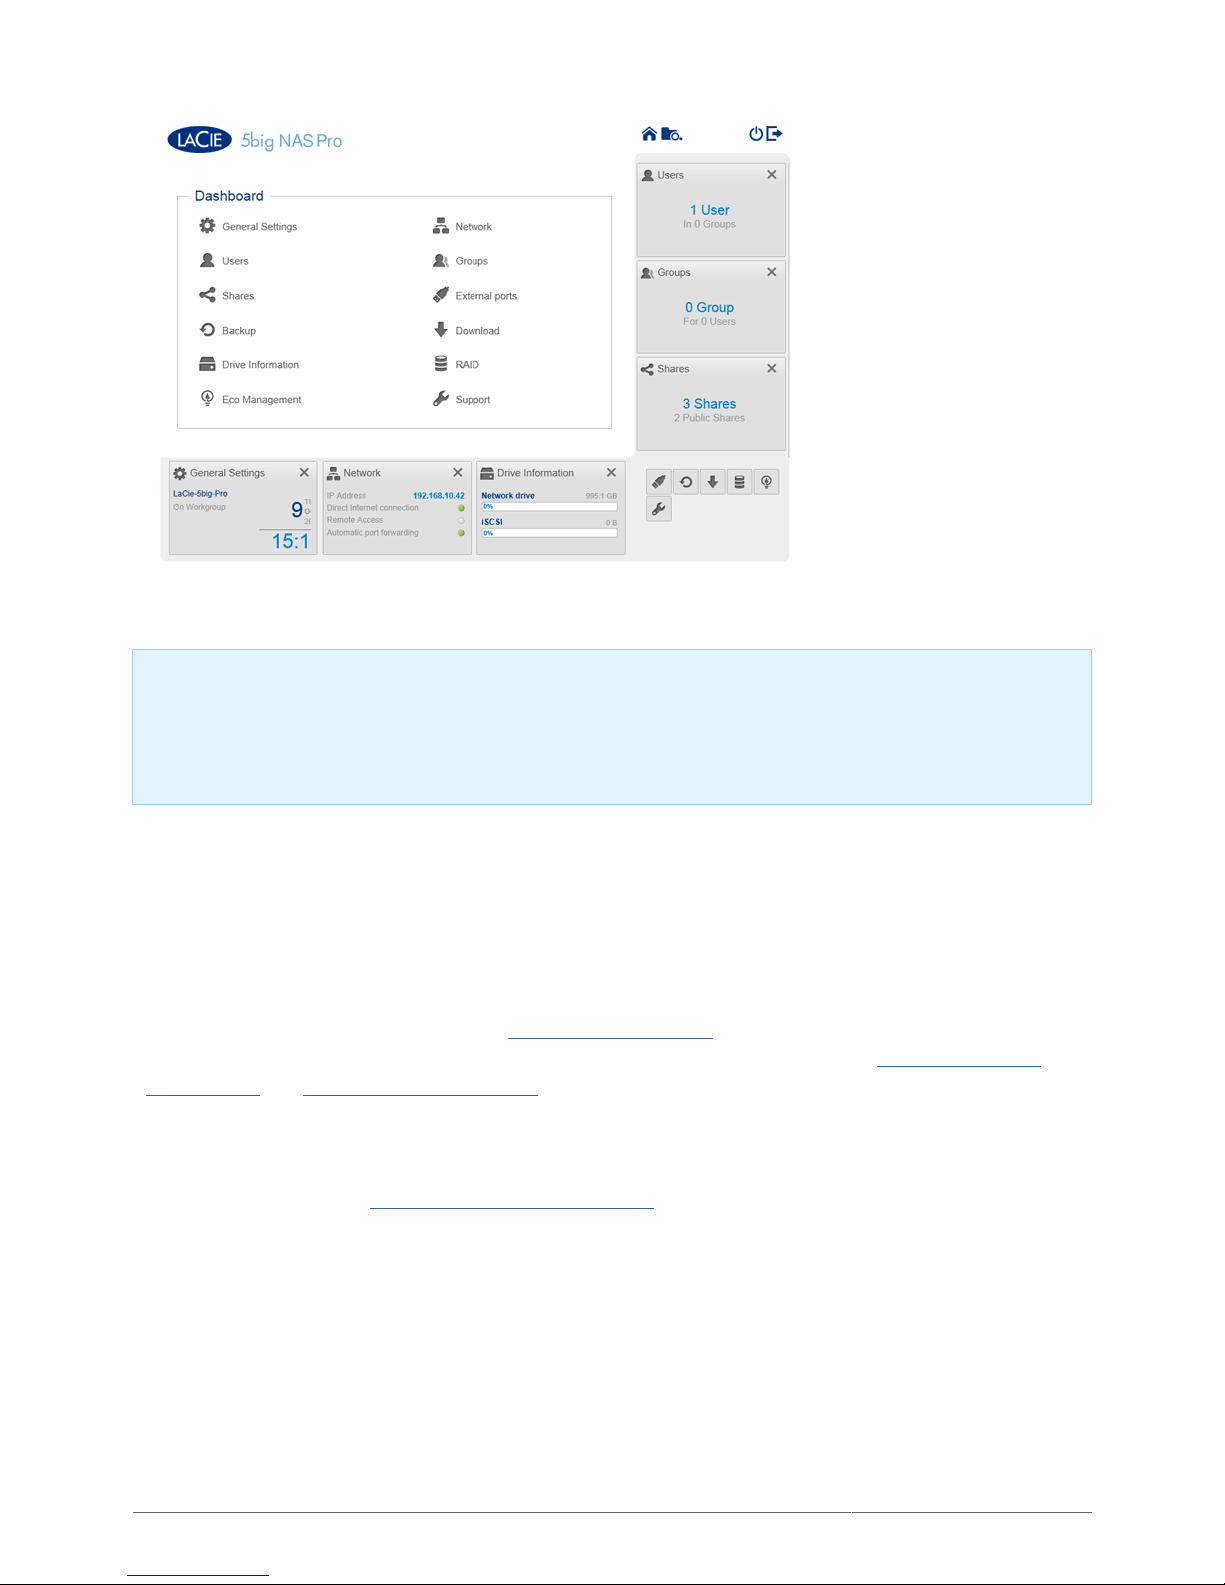
Click Finish to access the Dashboard Home page. You may remove the LaCie USB Key from the device.8.
Please keep it in a safe location for future use.
Page 36
LaCie 2big NAS (OS 3.0) | LaCie 5big NAS Pro User Manual 36
Note on IP Address: If you cannot reach the setup wizard using the name of the device, please connect a
VGA monitor to the VGA port located on the back of the 5big NAS Pro. Following the initial boot process, the
system will indicate MAC and IP addresses. If the monitor is receiving a signal but the image is black, try
connecting a USB keyboard to one of the USB ports on the back of the device. The system may have
reverted to energy conservation mode which you can exit by striking one of the keys on the USB keyboard.
Next Steps
Simplify NAS access: LaCie recommends that you install the software utility LaCie Network Assistant before
■
moving forward with the device configuration. LaCie Network Assistant gives you instant information on your
LaCie NAS, such as firmware version, IP address, and hardware address. It will also provide quick access to
shares (volumes) and the Dashboard. See LaCie Network Assistant for instructions.
Configure your NAS: For details on how to configure and use your LaCie NAS, go to Shares: Access and
■
Transfer Files and Dashboard (Administration).
Add your LaCie NAS to Wuala Cloud Storage: Enhance your data workflow with LaCie's Hybrid Cloud.
■
Wuala is secure cloud storage that will give you access to your LaCie NAS from any computer with a
connection to the internet. Further, Wuala uses high-end encryption to guarantee that no one, not even LaCie,
can access your files. See Hybrid Cloud: Wuala & LaCie NAS for details.
Page 37

LaCie 2big NAS (OS 3.0) | LaCie 5big NAS Pro User Manual 37
LACIE NETWORK ASSISTANT
LaCie Network Assistant is a software utility that will help you access and manage your LaCie NAS as well as
other LaCie storage that may be connected to your network. Use LaCie Network Assistant for instant information
on the device's:
IP address
■
Version of software/firmware
■
MAC address (hardware ID number)
■
LaCie Network Assistant can also help you:
Launch the Dashboard
■
Mount one or more shares (volumes)
■
Auto-mount one or more shares
■
Update your product's firmware (see Update Firmware)
■
Important info on LaCie Network Assistant and the LaCie 5big NAS Pro LAN Ports: LaCie Network
Assistant works with LAN 1 only. Its features are not available if LAN 2 is the sole port connected to the
network. For example, LaCie Network Assistant supports the following LaCie 5big NAS Pro Ethernet
configurations:
LAN 1 Ethernet port only
■
LAN 1 and LAN 2 Ethernet ports (port aggregation)
■
INSTALL LACIE NETWORK ASSISTANT
If you have installed LaCie Network Assistant before purchasing this LaCie product, make sure that you are
using the latest version by visiting the website.
Choose one of the options below:
Install Using the included CD-ROM
Insert the Utilities CD-ROM into your computer's CD-ROM drive.1.
Double-click LaCie Network Assistant Setup.2.
Follow the wizard to complete the installation.3.
Install via the LaCie Website
Download LaCie Network Assistant from here, then follow the easy installation directions.
LAUNCH LACIE NETWORK ASSISTANT
Windows Users:
■
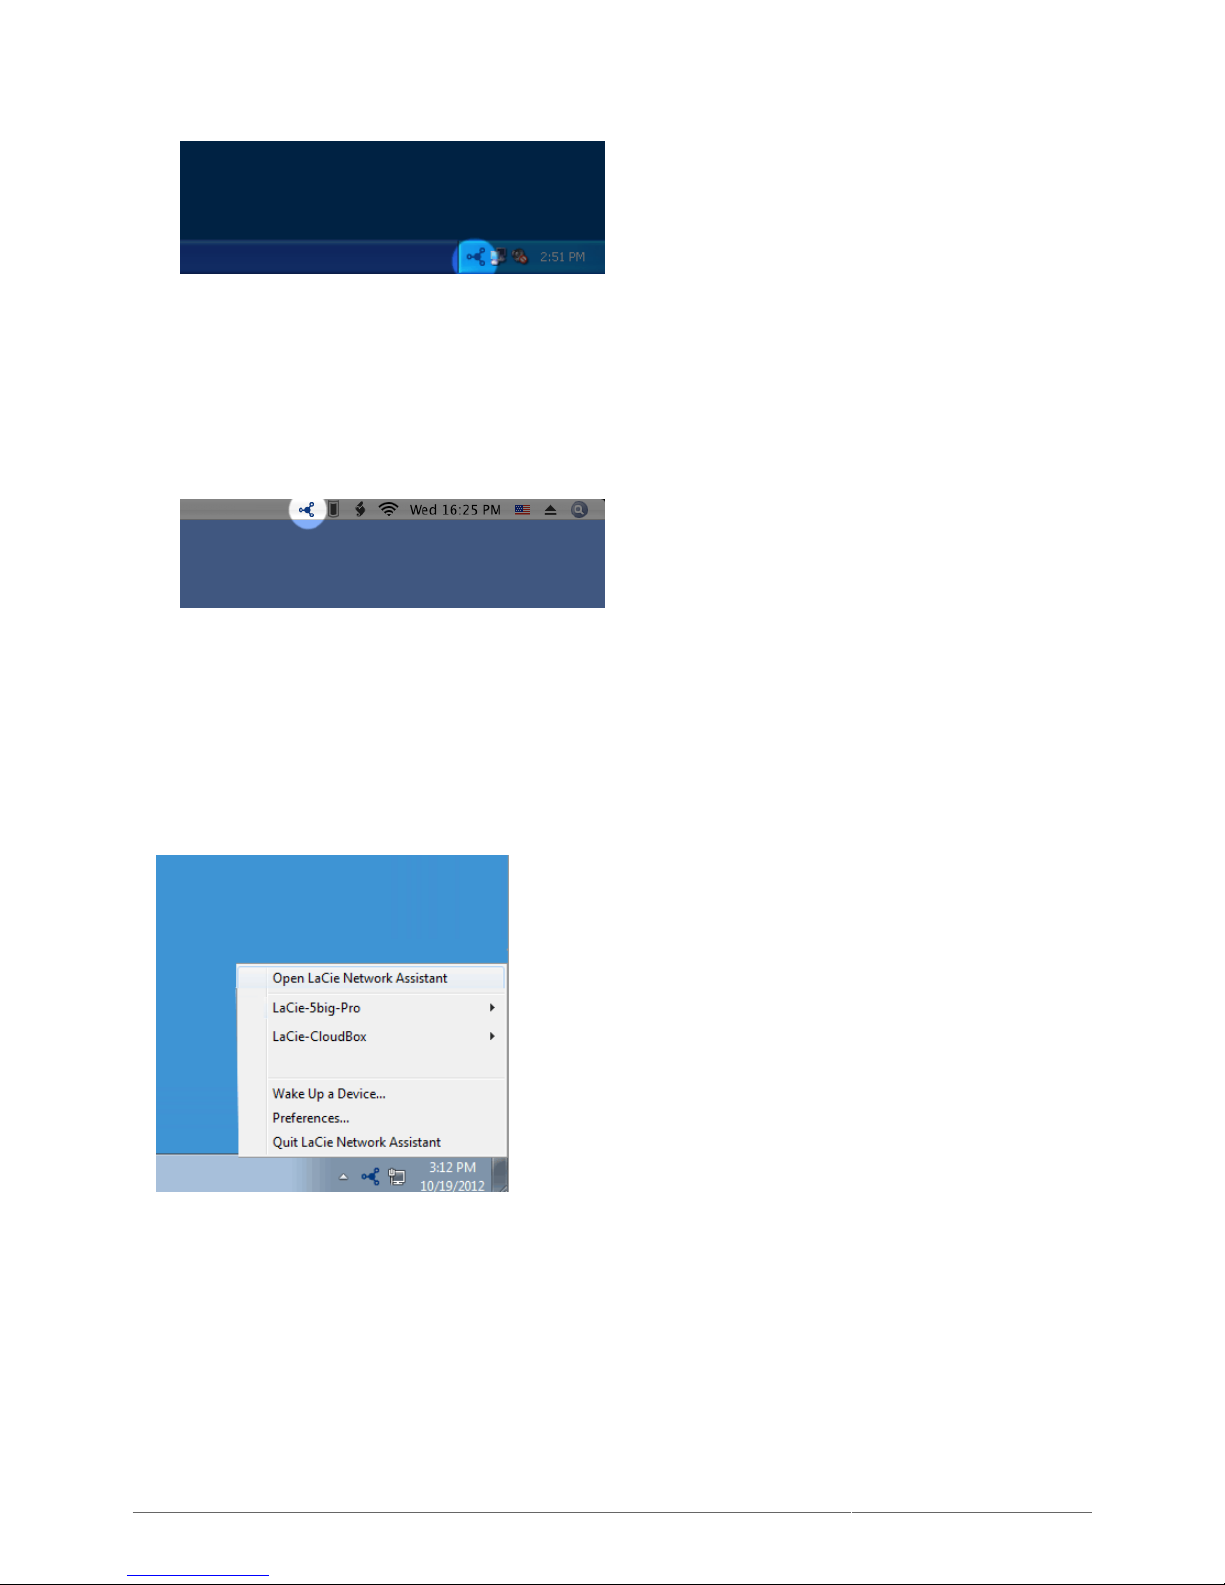
Select LaCie Network Assistant in Start > All Programs/Programs. The application icon will appear in1.
the system tray and LaCie Network Assistant will automatically detect your LaCie device(s) on the network.
Page 38
LaCie 2big NAS (OS 3.0) | LaCie 5big NAS Pro User Manual 38
Right-click on the icon in the system tray.2.
Mac Users:
■
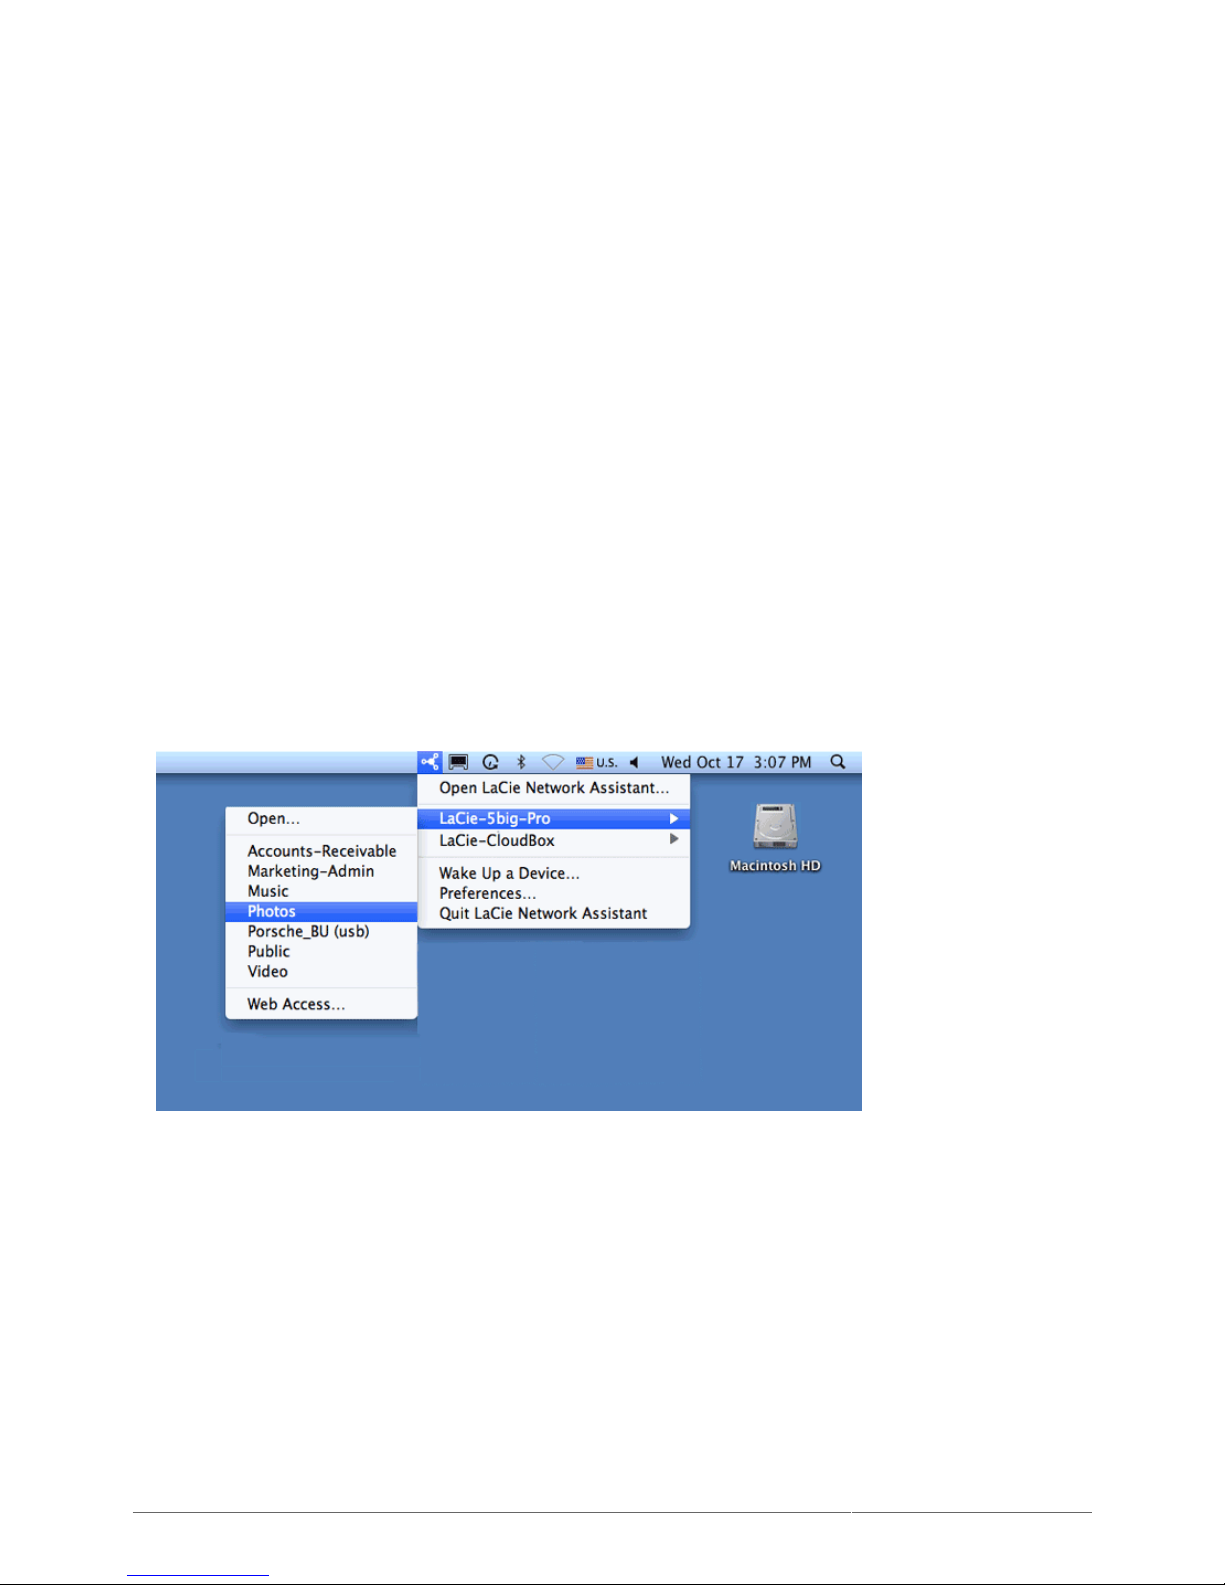
Select LaCie Network Assistant at Go > Applications > LaCie Network Assistant. The application icon1.
will appear in the menu bar and LaCie Network Assistant will automatically detect your LaCie device(s) on
the network.
Click on the icon in the menu bar.2.
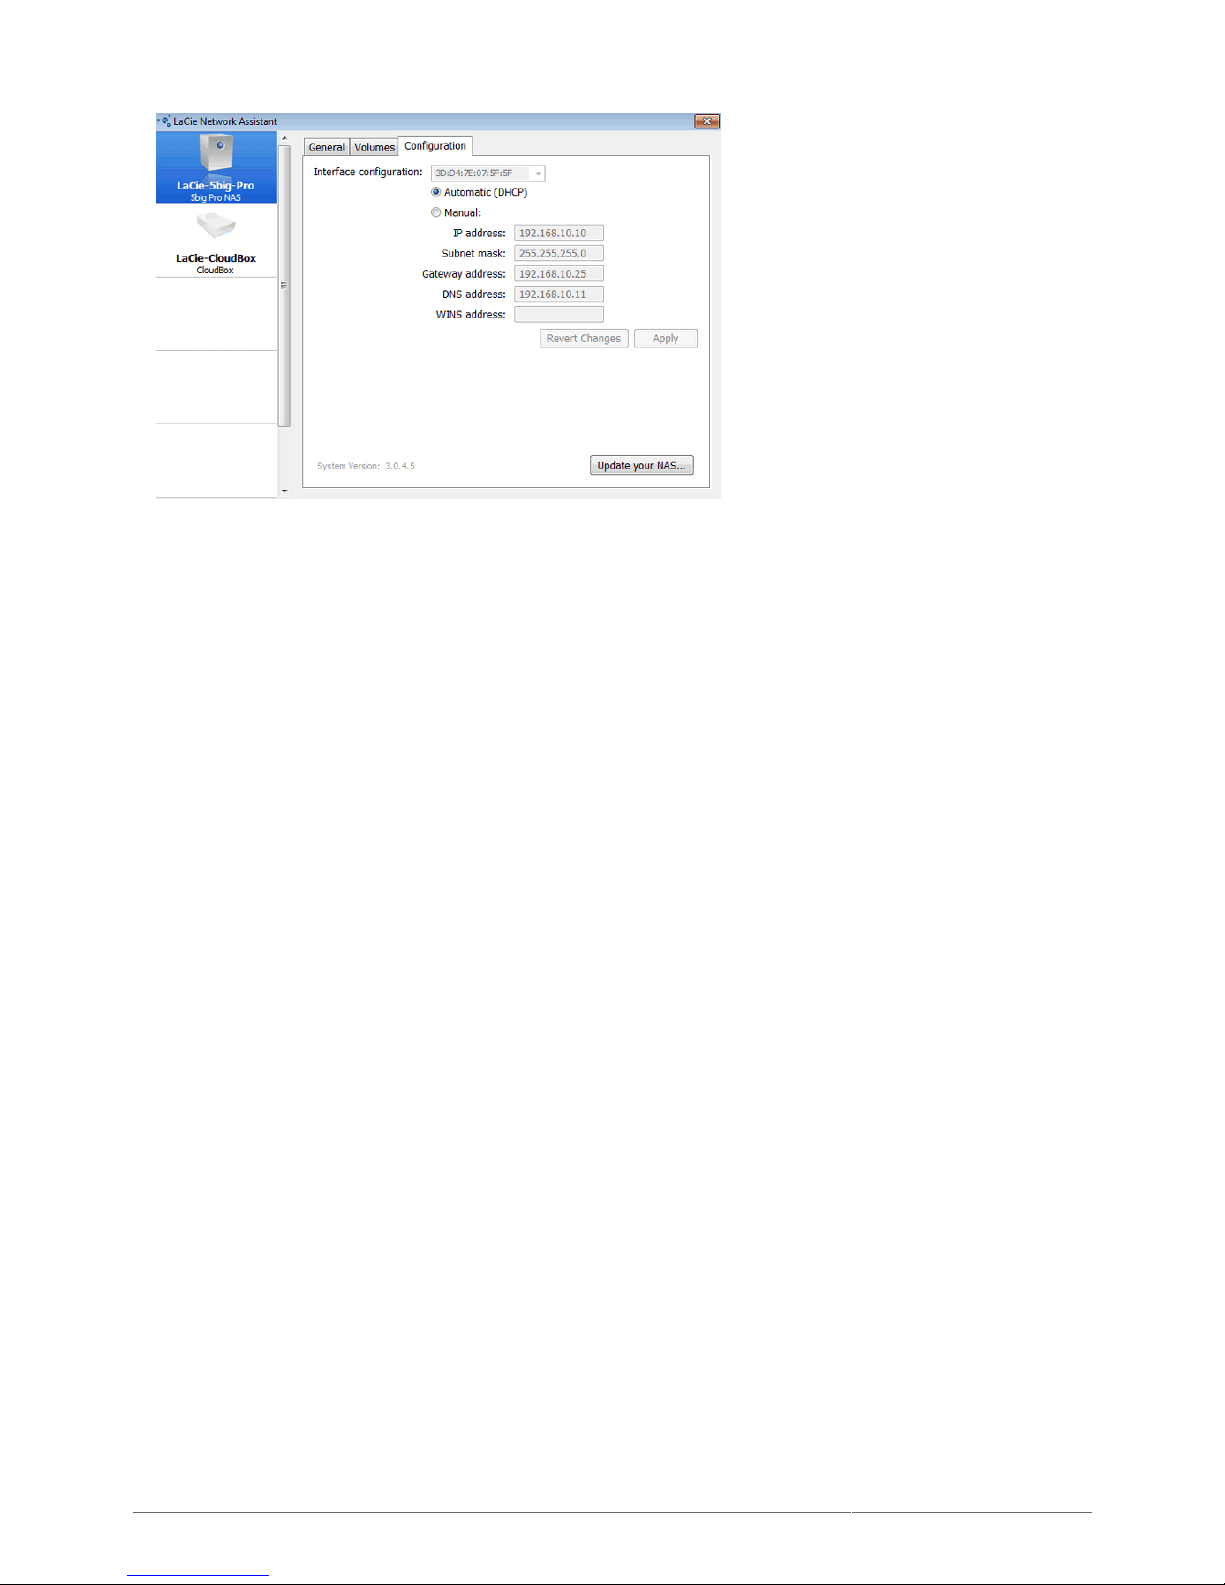
FIND YOUR LACIE NAS'S ADDRESS INFORMATION
Launch LaCie Network Assistant.1.
Windows users: Click on the LaCie Network Assistant icon to select Open LaCie Network Assistant.2.
Mac users: Click on the LaCie Network Assistant icon in the menu bar to select Open LaCie Network
Assistant…
If you have more than one LaCie network device, select your LaCie NAS from the list of devices in the3.
left-hand column.
Click the Configuration tab.4.
Page 39
LaCie 2big NAS (OS 3.0) | LaCie 5big NAS Pro User Manual 39
Review the device's:5.
IP address
■
MAC address (hardware ID)
■
Version of software
■
Page 40
LaCie 2big NAS (OS 3.0) | LaCie 5big NAS Pro User Manual 40
ACCESS THE DASHBOARD WITH LACIE NETWORK ASSISTANT
Launch LaCie Network Assistant.1.
Choose your device:2.
Windows: Right-click on the LaCie Network icon in the system tray to select your LaCie NAS.
■
Mac: Click on the LaCie Network Assistant icon in the menu bar to select your LaCie NAS.
■
Select Web access.3.
The Dashboard login page will launch in an internet browser.4.
MOUNT SHARES
LaCie Network Assistant gives you many options to access your LaCie NAS's public and private shares.
Quick Access
Launch LaCie Network Assistant then right-click (Windows) or click (Mac) on its icon to select your LaCie NAS.1.
Choose the share you want to access.2.
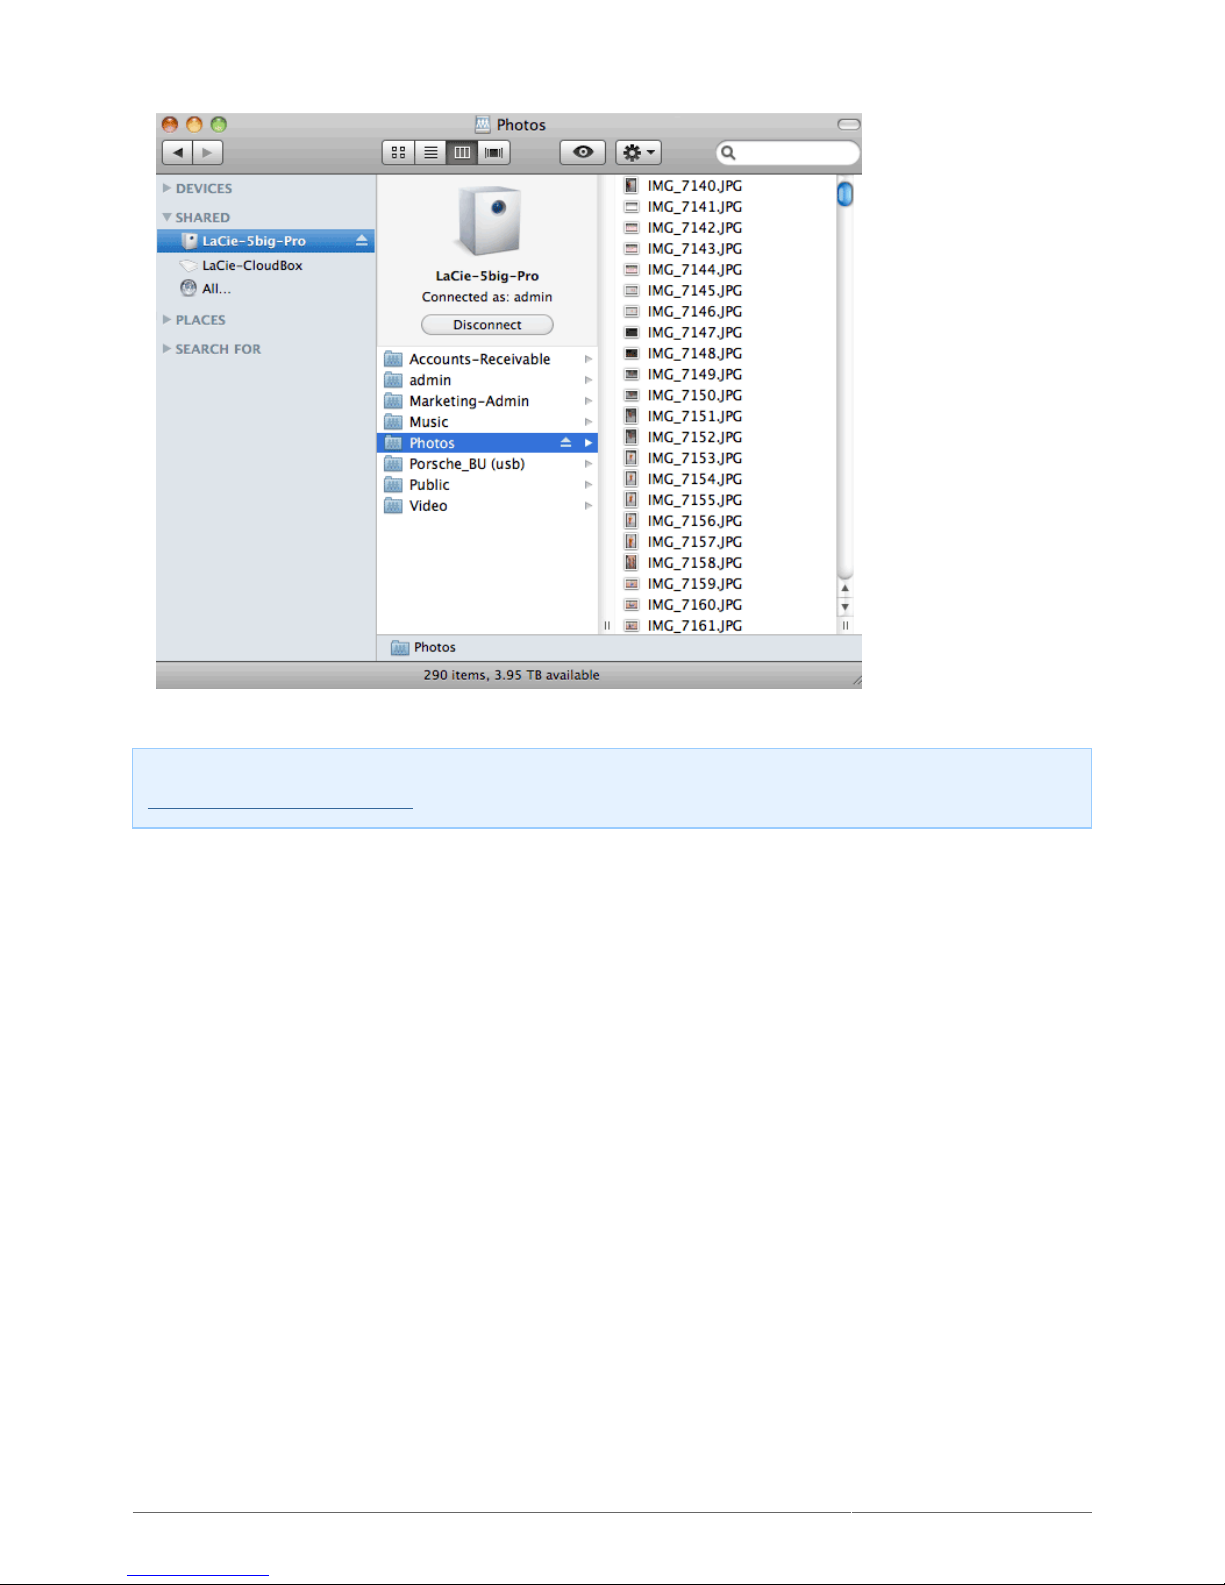
The share will open in an Explorer window (Windows) or a Finder window (Mac).3.
Page 41
LaCie 2big NAS (OS 3.0) | LaCie 5big NAS Pro User Manual 41
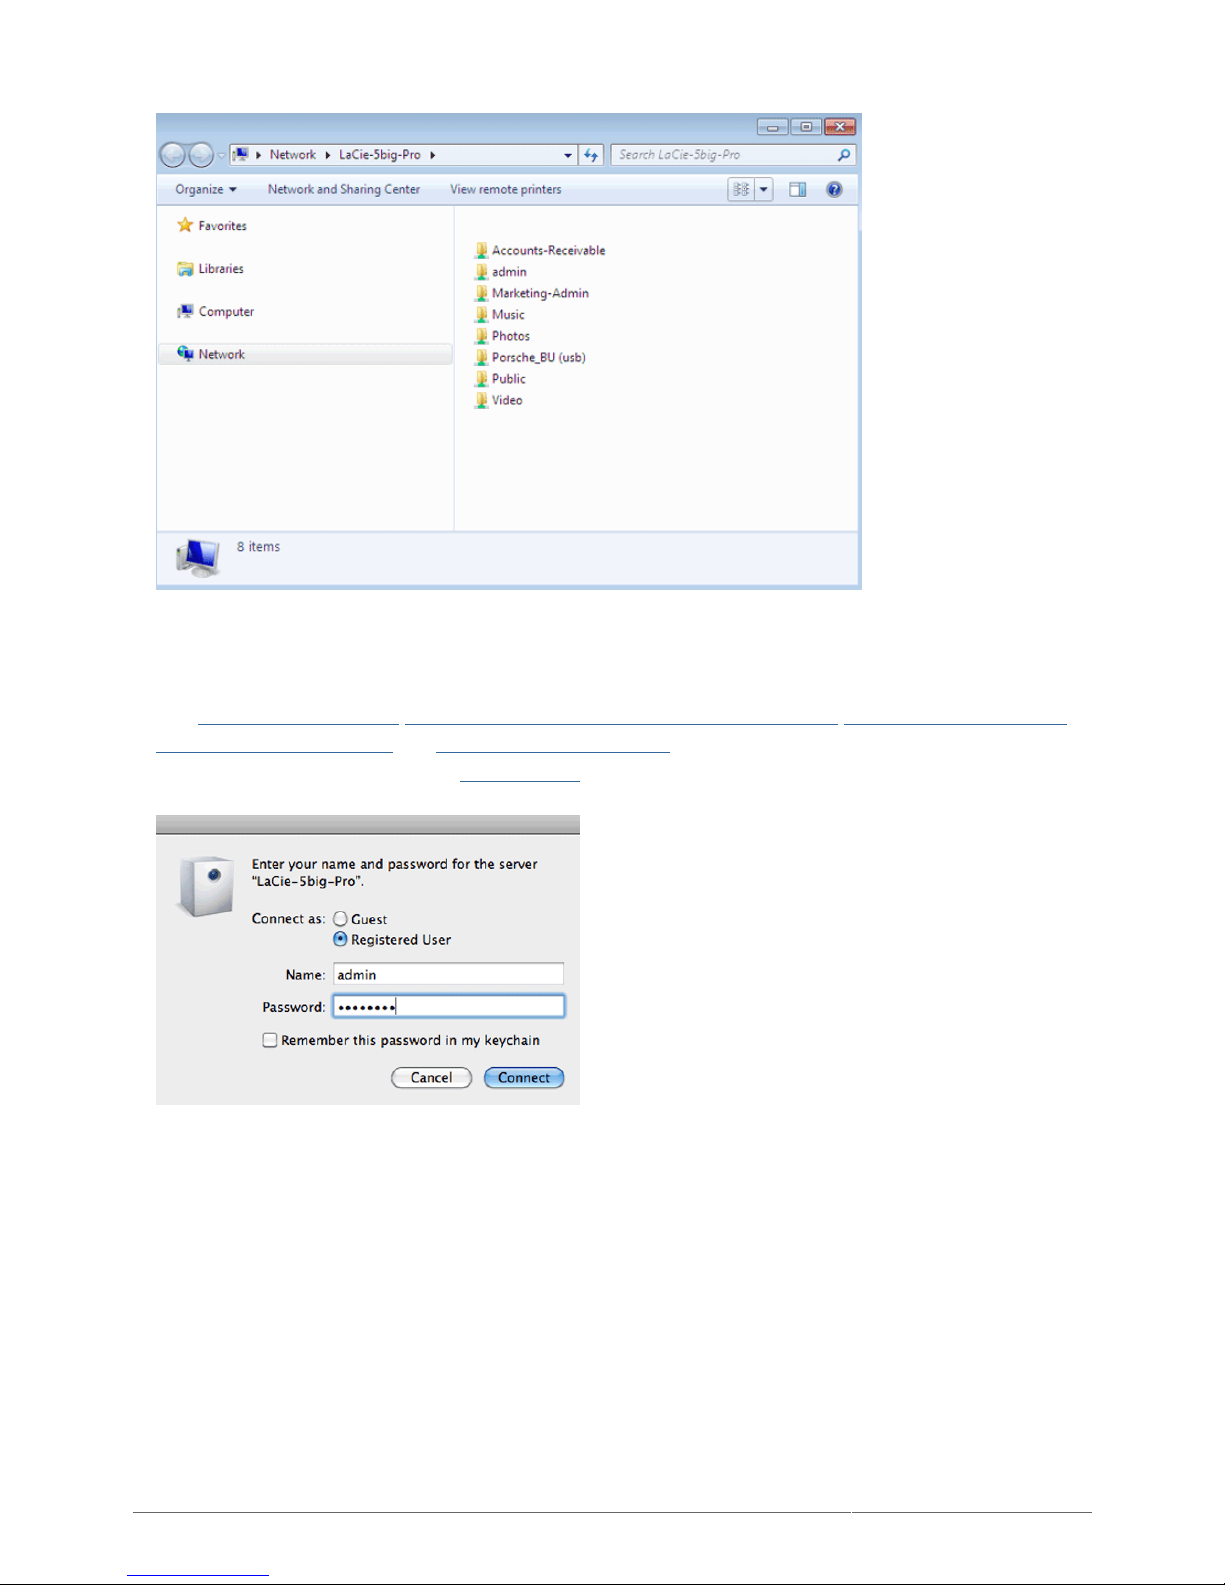
Public shares are available to everyone on the network. Private shares will prompt a user for a username and4.
password. The administrator should use the credentials created during the initial setup or Dashboard login
(see Connect to the Network/Connect to your Network - Diskless LaCie 2big NAS/Connect to your Network -
Diskless LaCie 5big NAS Pro and Dashboard (Administration)). A user should type the login and password
prepared by the administrator (see Manage Users).
Transfer files normally between your computer and the share. Mac users: If the share does not open in a5.
Finder window, simply navigate in the Finder to SHARED > [machine name] > [share name].
Page 42
LaCie 2big NAS (OS 3.0) | LaCie 5big NAS Pro User Manual 42
Note on Quick Access to shares: Private shares require a valid username and password (see
Authenticate for Private Shares).
Mount
Launch LaCie Network Assistant.1.
Right-click on the icon in the system tray (Windows) or click the icon in the menu bar (Mac) and select Open2.
LaCie Network Assistant.
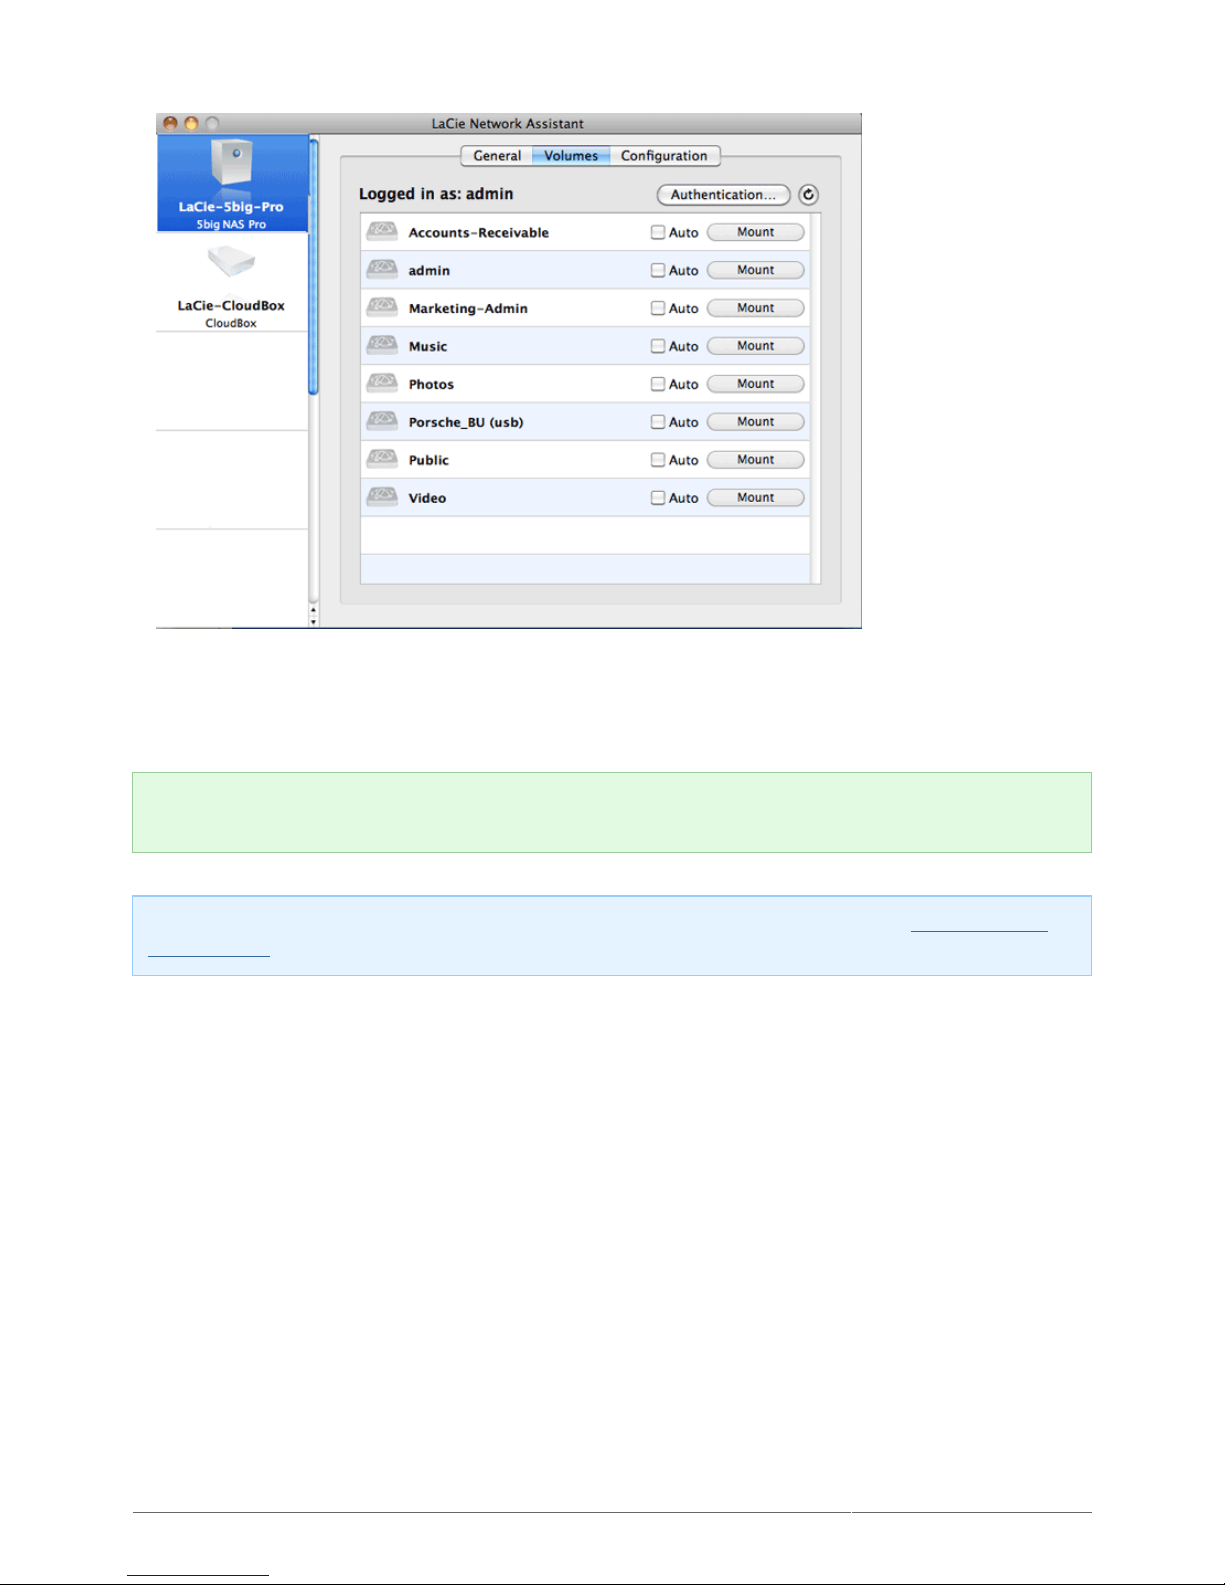
Select your LaCie NAS's machine name from the list of devices in the left-hand column, then click the3.
Volumes tab.
Page 43
LaCie 2big NAS (OS 3.0) | LaCie 5big NAS Pro User Manual 43
Double-click the share you wish to access. The share will open in an Explorer window (Windows) or a Finder4.
window (Mac). Transfer files normally from your computer to the share.
Technical note: Mac users: If the share does not open in a Finder window, simply navigate in the Finder to
Network > [machine name] > [share name].
Note on mounting shares: Private shares require a valid username and password (see Authenticate for
Private Shares).
Authenticate Private Shares
Launch LaCie Network Assistant then right-click (Windows) or click (Mac) on its icon to select Open LaCie1.
Network Assistant.
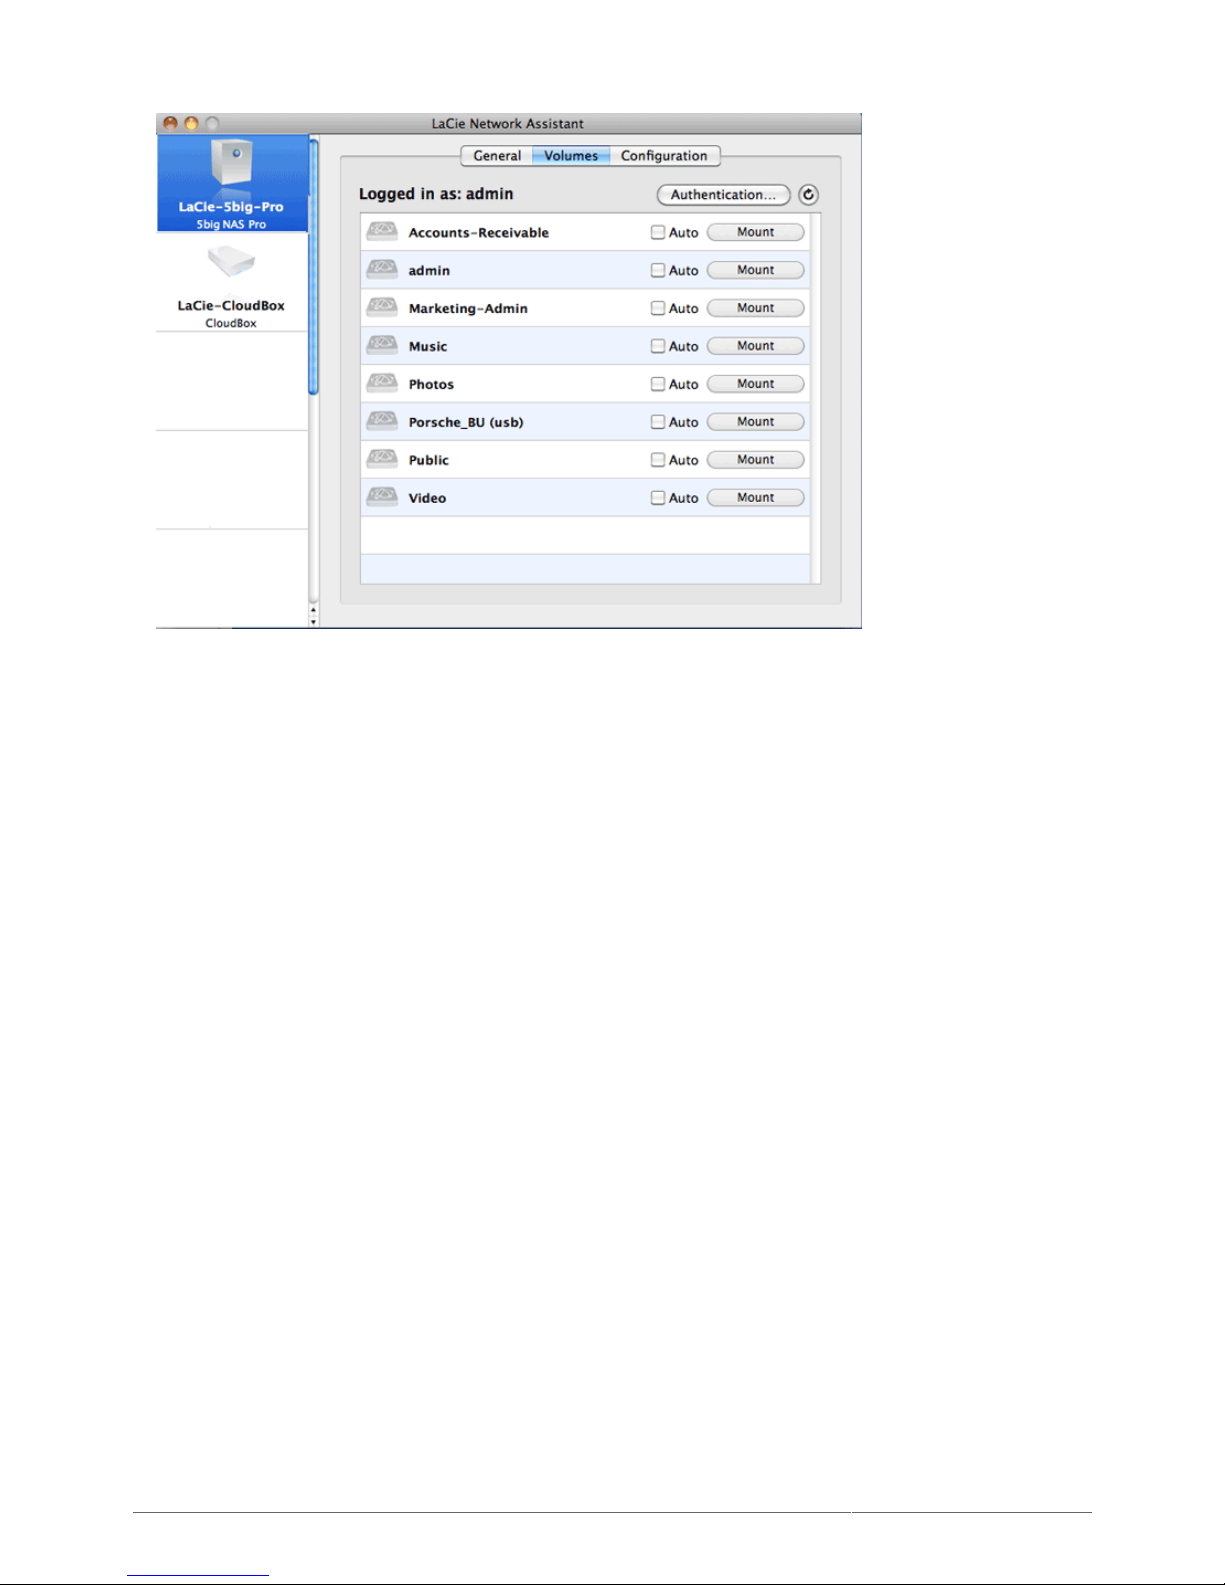
If you have more than one LaCie NAS, select the device you wish to access from the list in the left-hand2.
column.
Click the Volumes tab.3.
Page 44
LaCie 2big NAS (OS 3.0) | LaCie 5big NAS Pro User Manual 44
Click Authentication…4.
In the pop-up window, choose Registered User and enter your Username and Password. Click OK.5.
All available shares will appear in the list of volumes.6.
Click on Mount as drive (Windows) or Mount (Mac) to open the share.7.
The share will be available in an Explorer window (Windows) or a Finder window (Mac).8.
Page 45
LaCie 2big NAS (OS 3.0) | LaCie 5big NAS Pro User Manual 45
Auto-Mount
Launch LaCie Network Assistant then right-click (Windows) or click (Mac) on its icon to select Open LaCie1.
Network Assistant.
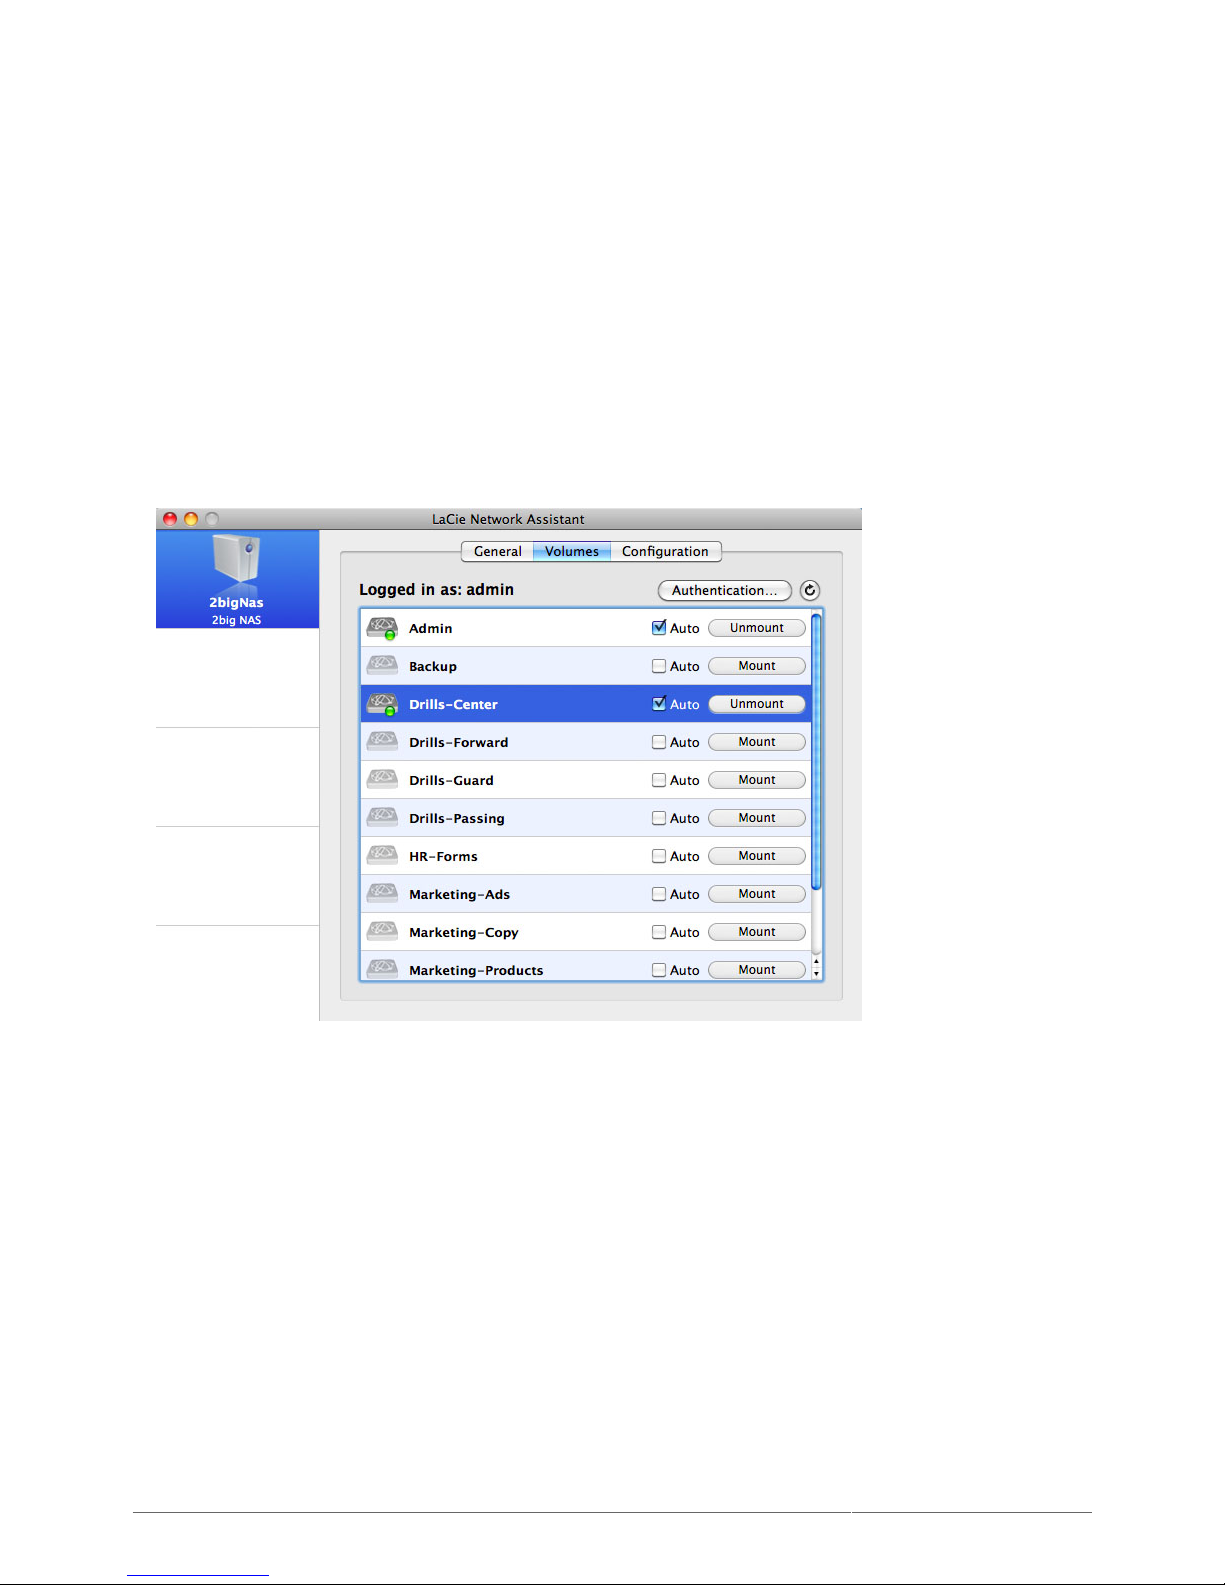
If you have more than one LaCie NAS, select the device you wish to access from the list in the left-hand2.
column.
Click the Volumes tab.3.
If the share you wish to auto-mount is private, click Authentication… to enter your credentials. In the4.
pop-up window, choose Registered User and enter the Username and Password for the share. Click OK. All
available shares will appear in the list of volumes.
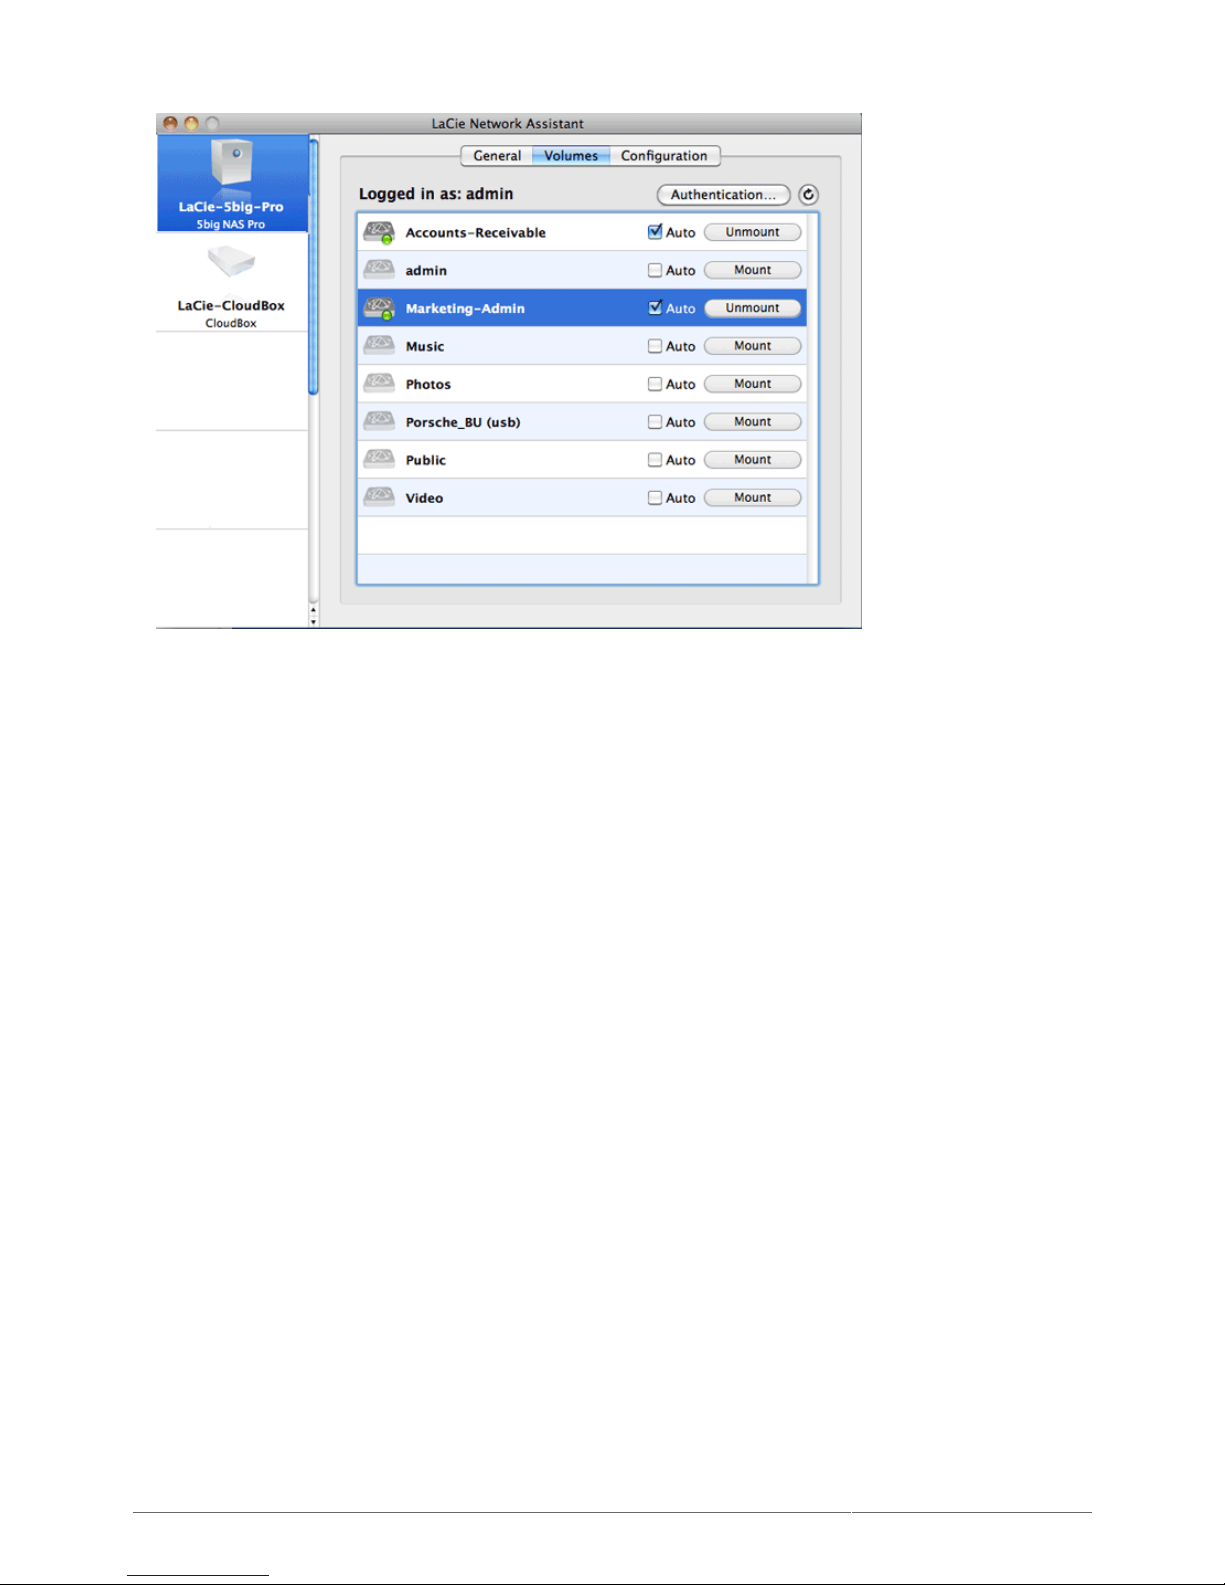
Click on the checkbox for Auto to open the share. The share will now mount each time you boot the5.
computer. To cancel auto-mount, uncheck the box for Auto.
Page 46
LaCie 2big NAS (OS 3.0) | LaCie 5big NAS Pro User Manual 46
PC users: The share will mount in Computer/My Computer automatically when the computer detects it on6.
the network.
Mac users: The share icon will appear in your Finder automatically when the computer detects it on the
network.
Page 47

LaCie 2big NAS (OS 3.0) | LaCie 5big NAS Pro User Manual 47
SHARES: ACCESS AND TRANSFER FILES
ABOUT DEFAULT SHARES
A share is a network volume that you can configure to store and share data. Your LaCie NAS has two shares by
default: admin and Public. Please note that the share admin will change to the name used by the administrator.
For example, if the administrator changes the default login “admin” to “John”, the share admin will become John.
The following table sums up the differences between them:
Name Accessibility Login Availability
admin
Private, accessible only to
admin by default
Password-protected
When connected to the network (Ethernet) and to
networked computers
Public
Public, accessible to any
user on the network
None
When connected to the network (Ethernet) and to
networked computers or UPnP/DLNA-certified
players/adapters (if multimedia service is activated
at the global and share level)
It is also possible to create new shares and/or to delete the default shares. See Manage Shares for details.
Note on LaCie 2big NAS upgrades to LaCie NAS OS 3.0: Share names will not be affected when
upgrading to LaCie NAS OS 3.0.
ACCESS SHARES
You have several options for accessing shares on your LaCie NAS.
Option 1: LaCie Network Assistant - Quick Share Access
Use LaCie Network Assistant for quick access to public shares. See Quick Access for details.
Option 2: LaCie Network Assistant - Authenticate for Private Shares
Use LaCie Network Assistant to enter your username and password. See Authenticate Private Shares for details.
Option 3: Operating System
Use your operating system to open your LaCie NAS's shares.
Page 48
LaCie 2big NAS (OS 3.0) | LaCie 5big NAS Pro User Manual 48
Windows
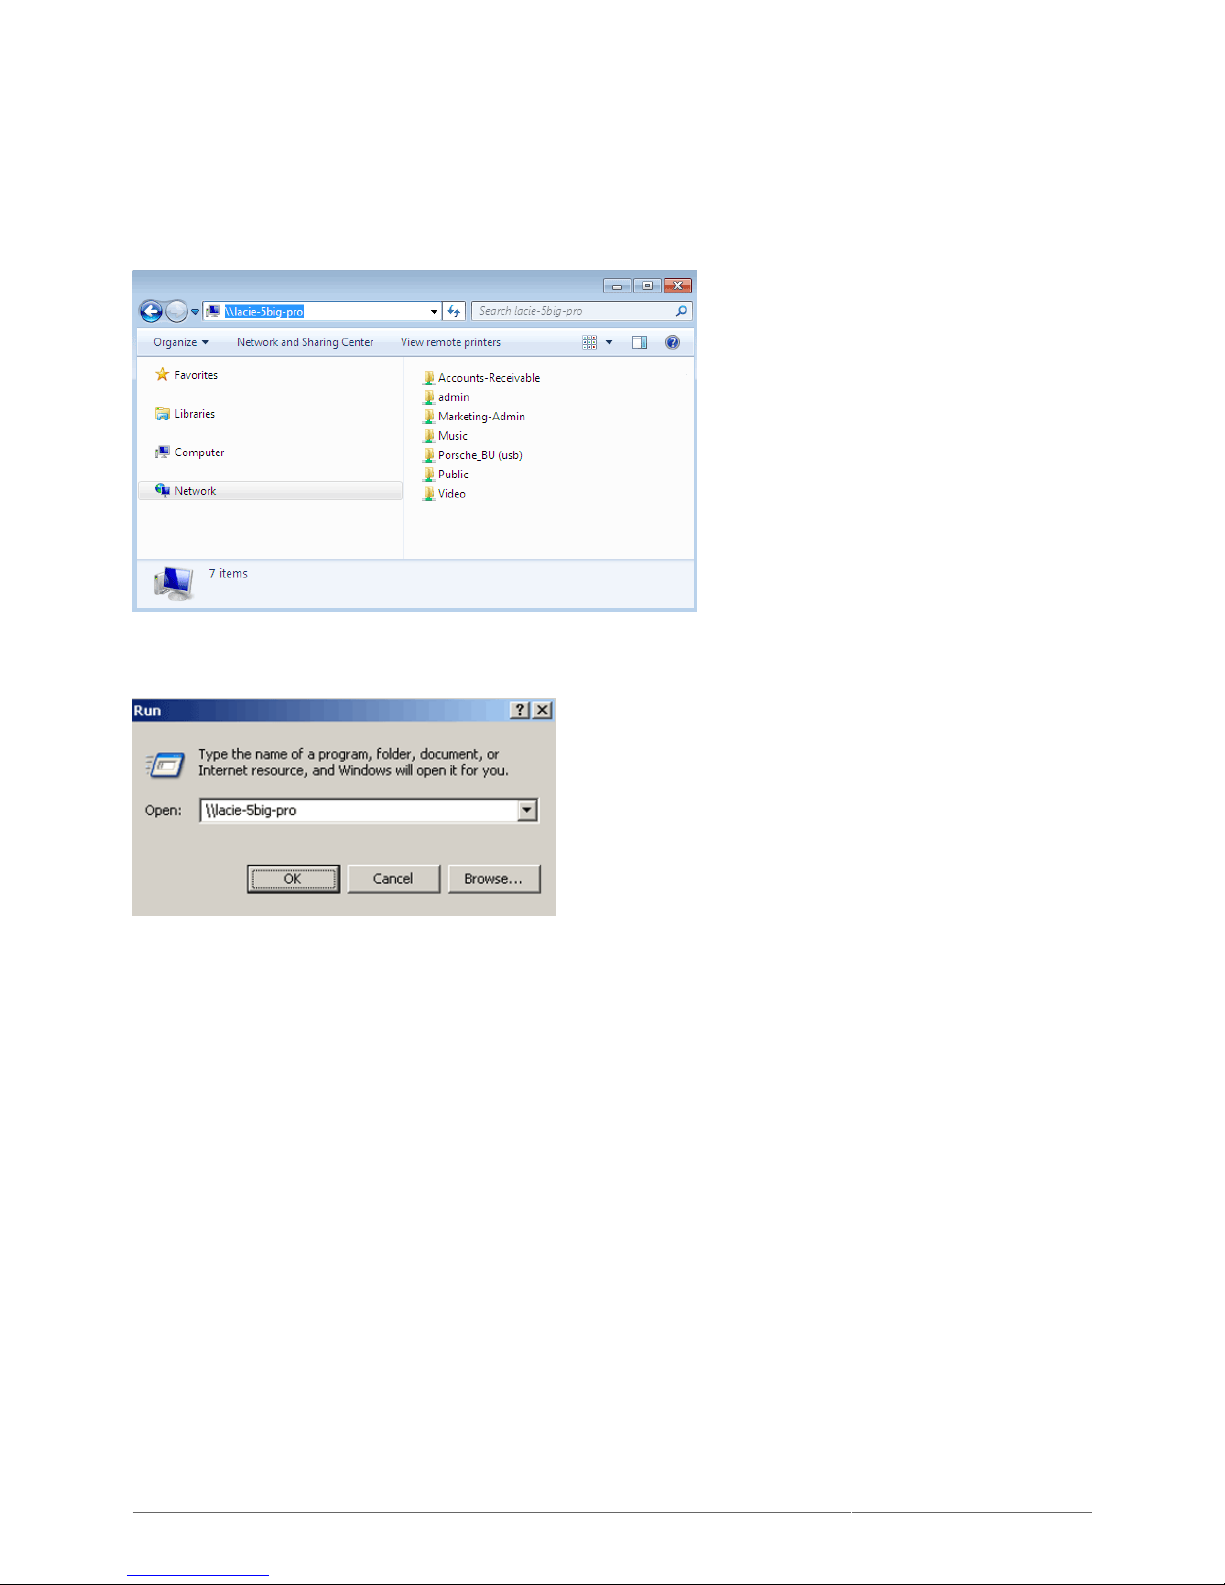
In an Explorer window address field, type \\[machine name] or \\[IP address]] and click Go. Alternatively,
from the Start menu, click Run, type \\[machine name] or \\[IP address]] and click OK.
Windows Vista, Windows 7, and Windows 8
Windows XP
Mac Users
In your Finder, navigate to Go > Connect to Server.1.
In the dialogue window that opens, type one of the following:2.
afp://[machine name].local
smb://[machine name].local
afp://[IP address]
smb://[IP address]
Page 49

LaCie 2big NAS (OS 3.0) | LaCie 5big NAS Pro User Manual 49
Page 50
LaCie 2big NAS (OS 3.0) | LaCie 5big NAS Pro User Manual 50
CREATING SHORTCUTS TO SHARES
Once you successfully set up your LaCie NAS, you can create shortcuts so you can quickly access stored files.
You can do this by using your operating system or LaCie Network Assistant.
CREATE SHORTCUT USING LACIE NETWORK ASSISTANT
LaCie Network Assistant can be configured to automatically mount shares on your computer, which allows you
quick access to the files they store. See Auto-Mount for details.
CREATE SHORTCUT USING OPERATING SYSTEM
If you would like a shortcut to accessing shares, follow this procedure.
Windows XP, Vista, and Windows 7 Users
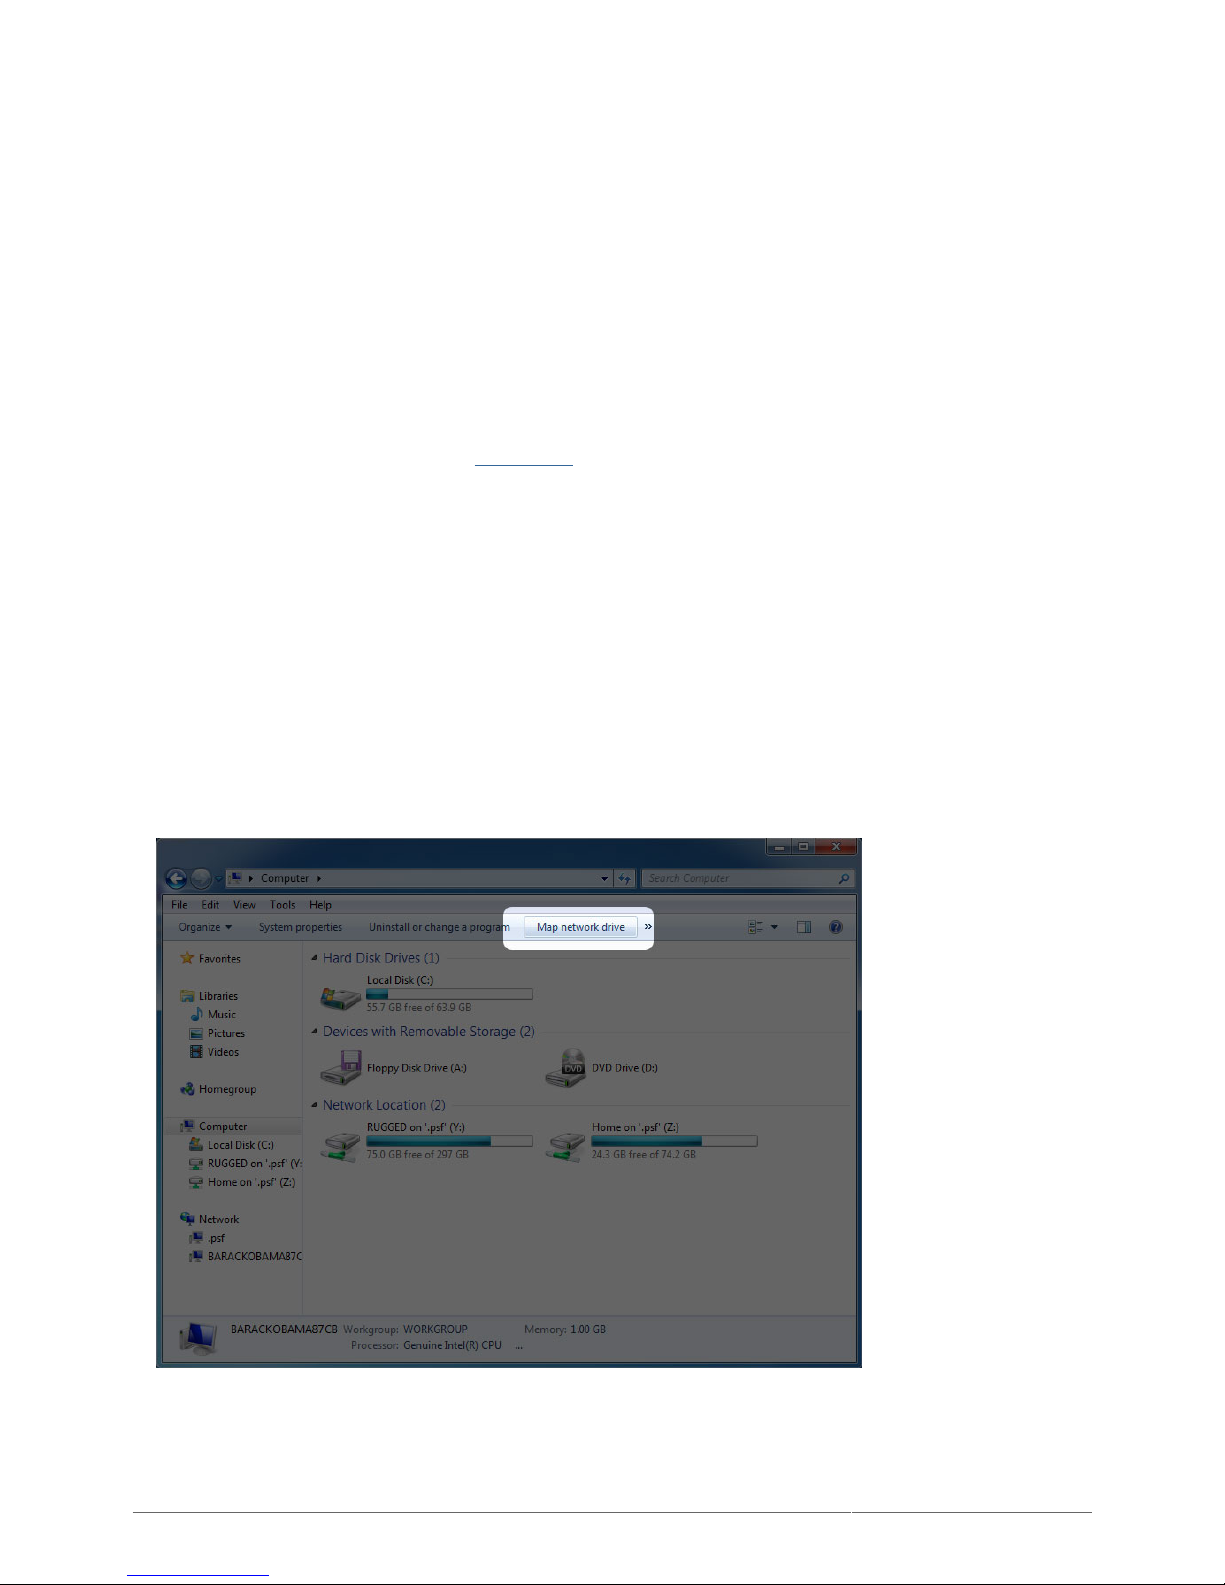
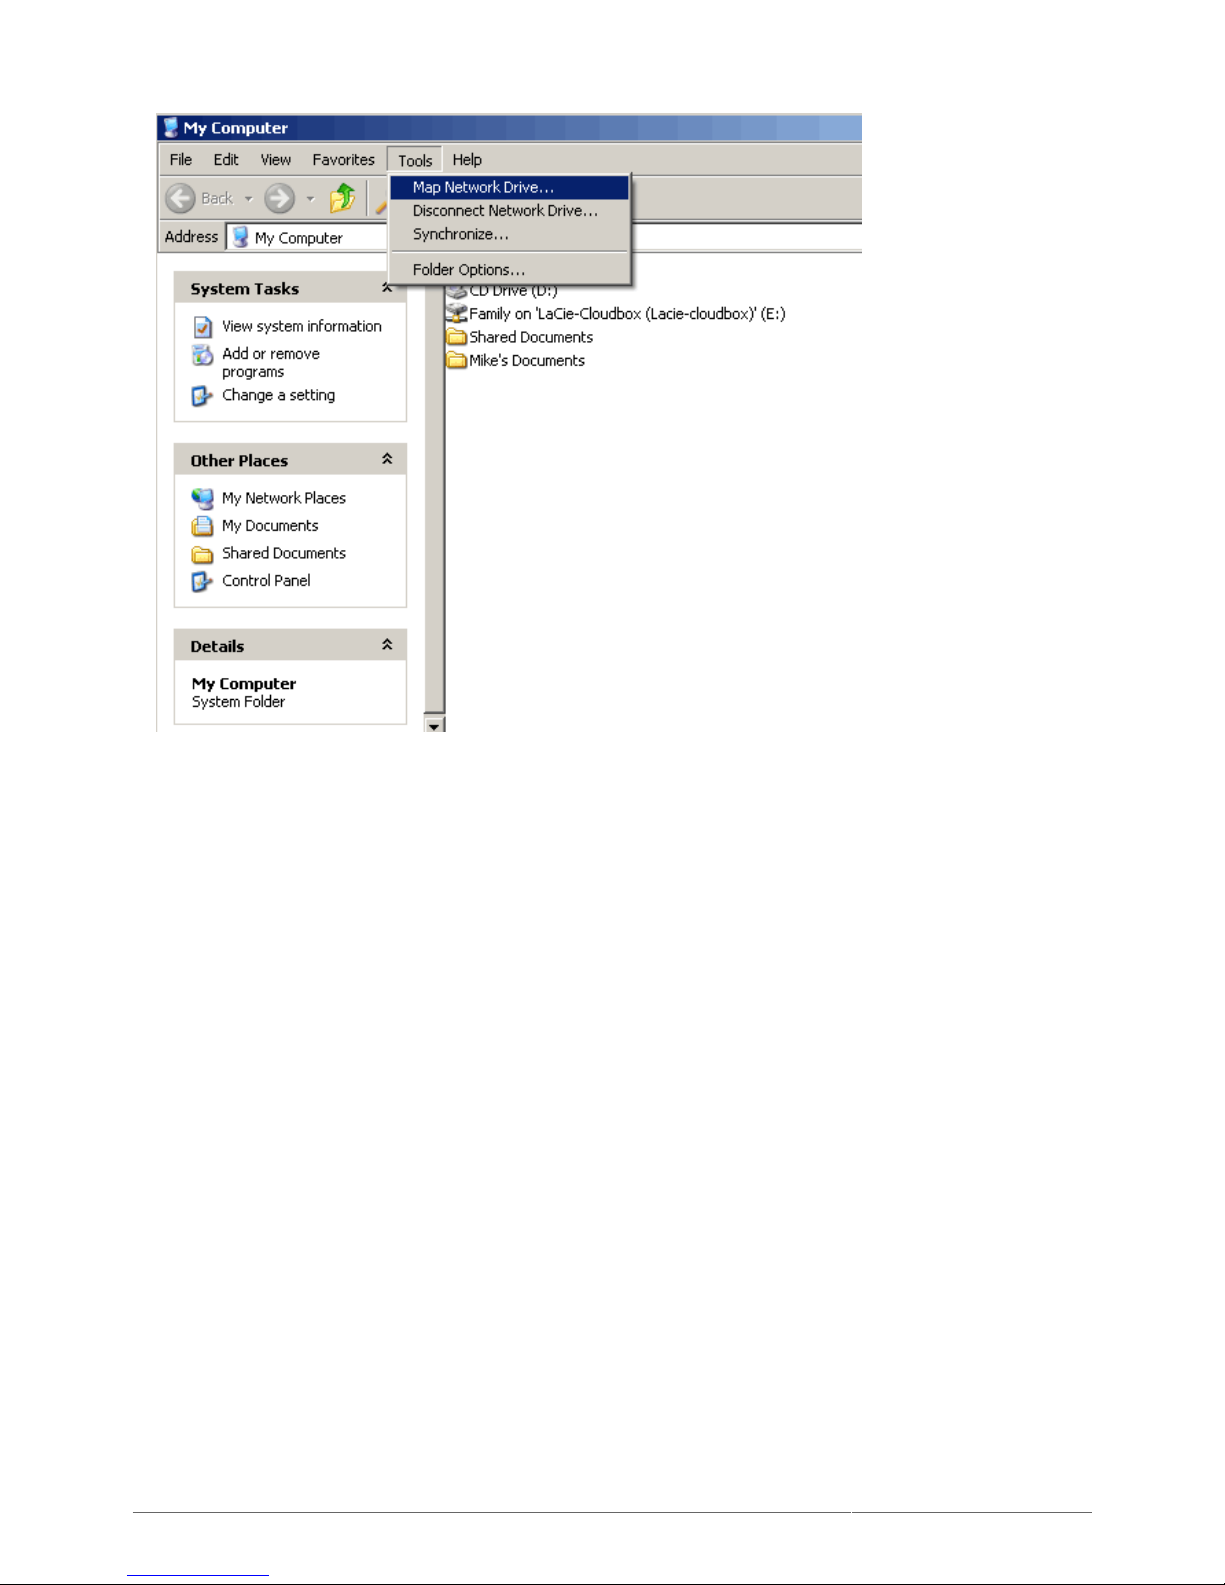
From an Explorer window in Windows XP, select Tools > Map Network Drive. For Windows Vista and1.
Windows 7, open an Explorer window, navigate to Computer, and click Map Network Drive.
Page 51
LaCie 2big NAS (OS 3.0) | LaCie 5big NAS Pro User Manual 51
Browse to and select the share you wish to auto mount.2.
Windows will offer the option to mount the share each time you log on to the computer.3.
Repeat steps 1-3 for other shares.4.
Mac Users
Open a new Finder window. On the left of the window, navigate to Shared > [machine name] > [share]. If1.
prompted, type in your username and password and click Connect.
Repeat step 1 for each share.2.
To mount the share automatically each time you log on to you computer:3.
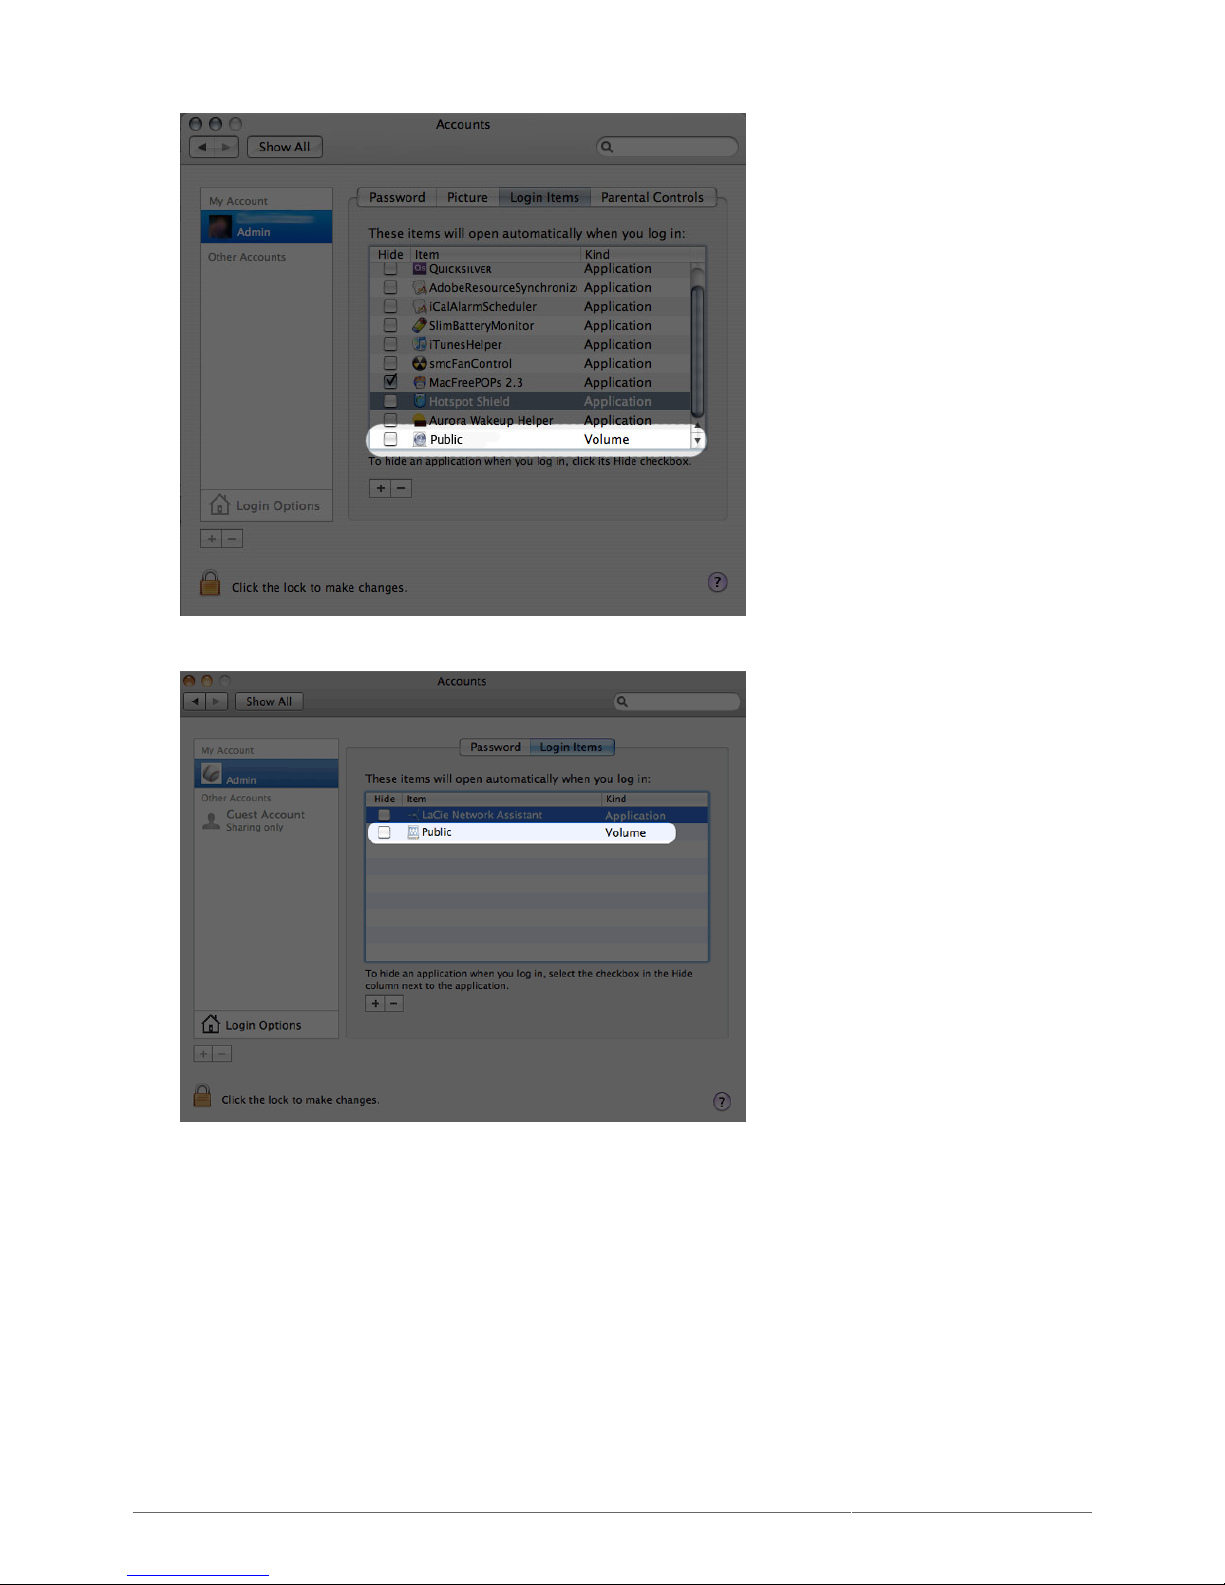
From the Apple icon in the menu bar, select System Preferences > Accounts > Login Items.1.
Click on the ”+” sign to add a new item to the list and browse for the share. Please note that the shares2.
must be mounted in order to add them to the list.
Page 52
LaCie 2big NAS (OS 3.0) | LaCie 5big NAS Pro User Manual 52
When you log on to the Mac OS, the share(s) will automatically mount on your desktop (as long as you3.
haven't configured your Finder not to display connected servers on your desktop).
Page 53
LaCie 2big NAS (OS 3.0) | LaCie 5big NAS Pro User Manual 53
BACKUP: LACIE NAS AND PC/MAC
BACKUP YOUR LACIE NAS
See Backup for a complete explanation on how to automate backups of data stored on your LaCie NAS. You can
back up your data to:
An external hard drive
■
Another LaCie NAS or rsync-compatible server on your local network
■
Another LaCie NAS or rsync-compatible server on a remote/offsite network
■
BACKUP YOUR COMPUTER(S)
Your LaCie NAS is fully compatible with popular backup solutions such as:
Windows Backup and Restore® and Genie Timeline® (Windows)
■
Time Machine® and Intego Backup (Mac)
■
Please note that professional versions of Genie Timeline and Intego Backup are available on the included
Utilities CD-ROM with software.
A share on your LaCie NAS can be set as a backup target for these and other backup software. Please make
certain that the user has access to the target share meant for his computer. Additionally, deleting a share that
is used as a backup target will also delete all associated computer backups.
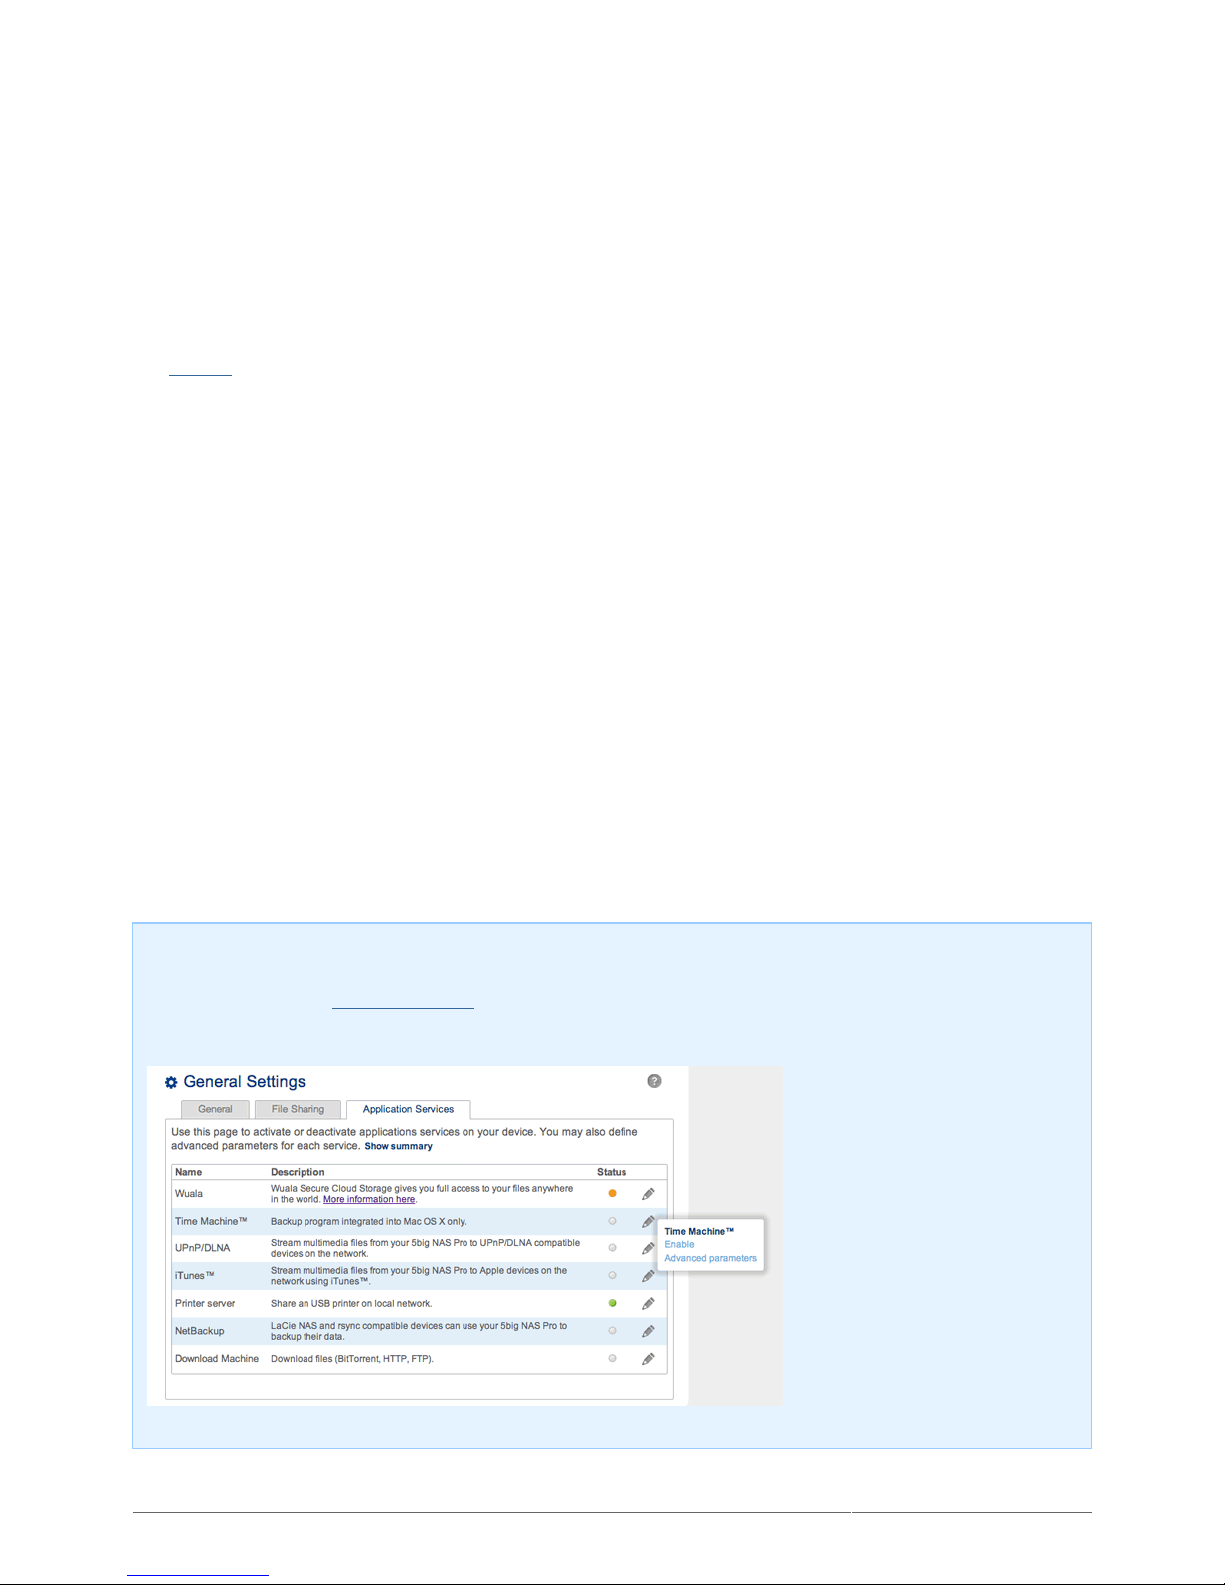
Note on Time Machine: Time Machine must be enabled on your LaCie NAS before it can be used as
backup software. Go to Dashboard > General Settings > Application Services to review the Time
Machine service. See General Settings for details on services.
Page 54
LaCie 2big NAS (OS 3.0) | LaCie 5big NAS Pro User Manual 54
REMOTE ACCESS: LACIE MYNAS
Remote access to your LaCie NAS is available using:
Hybrid Cloud via Wuala secure cloud storage
■
LaCie MyNAS
■
FTP (see Accessing Shares via FTP)
■
While Wuala by LaCie and LaCie MyNAS are easy to configure and use, they differ in how users can access and
manage data from remote locations. LaCie MyNAS gives users remote access to the Dashboard, including the
File Browser to upload and download files via the internet. Wuala offers file system integration on a PC/Mac as
well as access to the Dashboard. Please note that both options are available to the LaCie NAS administrator and
users.
Follow the directions below to configuring LaCie MyNAS and see Hybrid Cloud: Wuala & LaCie NAS for details on
configuring Wuala.
SET UP REMOTE ACCESS
For a video demonstration, see here (youtube).
Important info: In order to prevent unauthorized access, it is critical to protect each of the user and
administrator accounts registered to your LaCie NAS with a strong password BEFORE setting up remote
access. Since LaCie MyNAS lets you access your data with a simple URL, malicious users could guess the
URL and access the LaCie NAS's files unless each user is protected by a strong password.
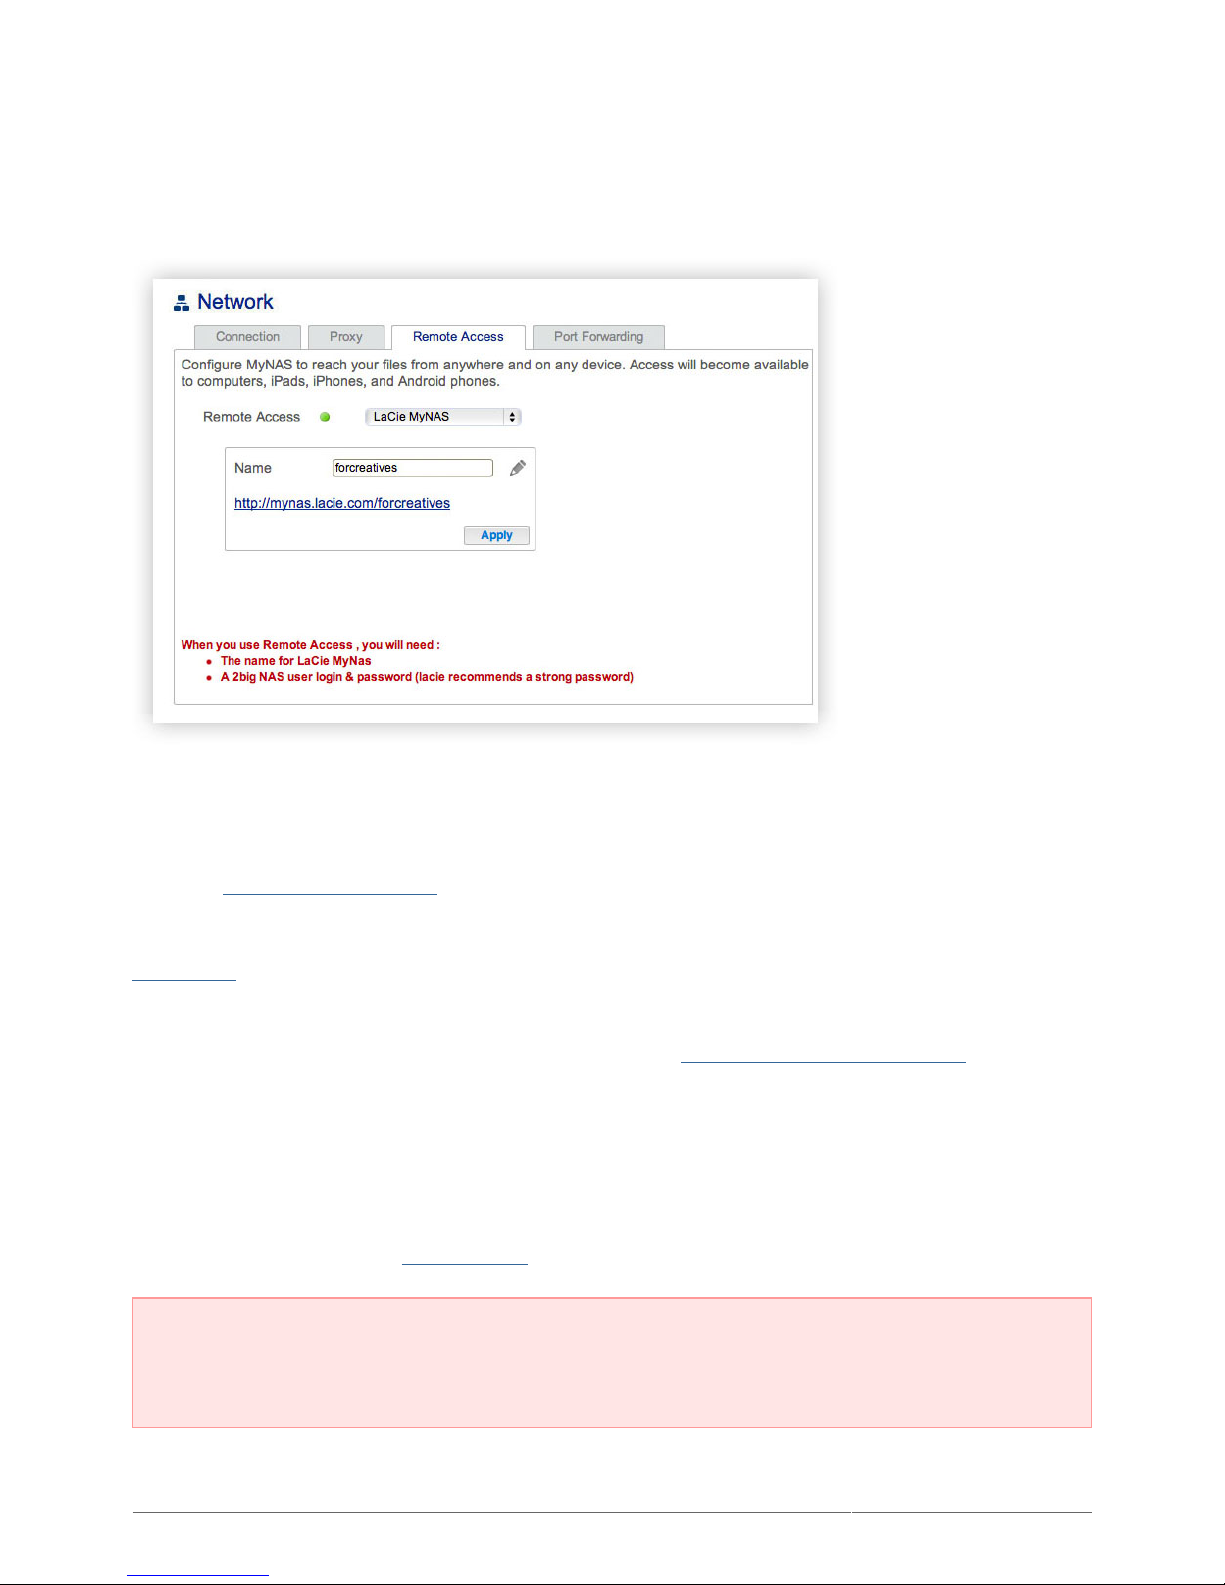
Navigate to Dashboard > Network > Remote Connection tab.1.
Page 55
LaCie 2big NAS (OS 3.0) | LaCie 5big NAS Pro User Manual 55
In the Remote Access drop-down menu, choose LaCie MyNAS.2.
Type a name for your LaCie NAS in the Name field.3.
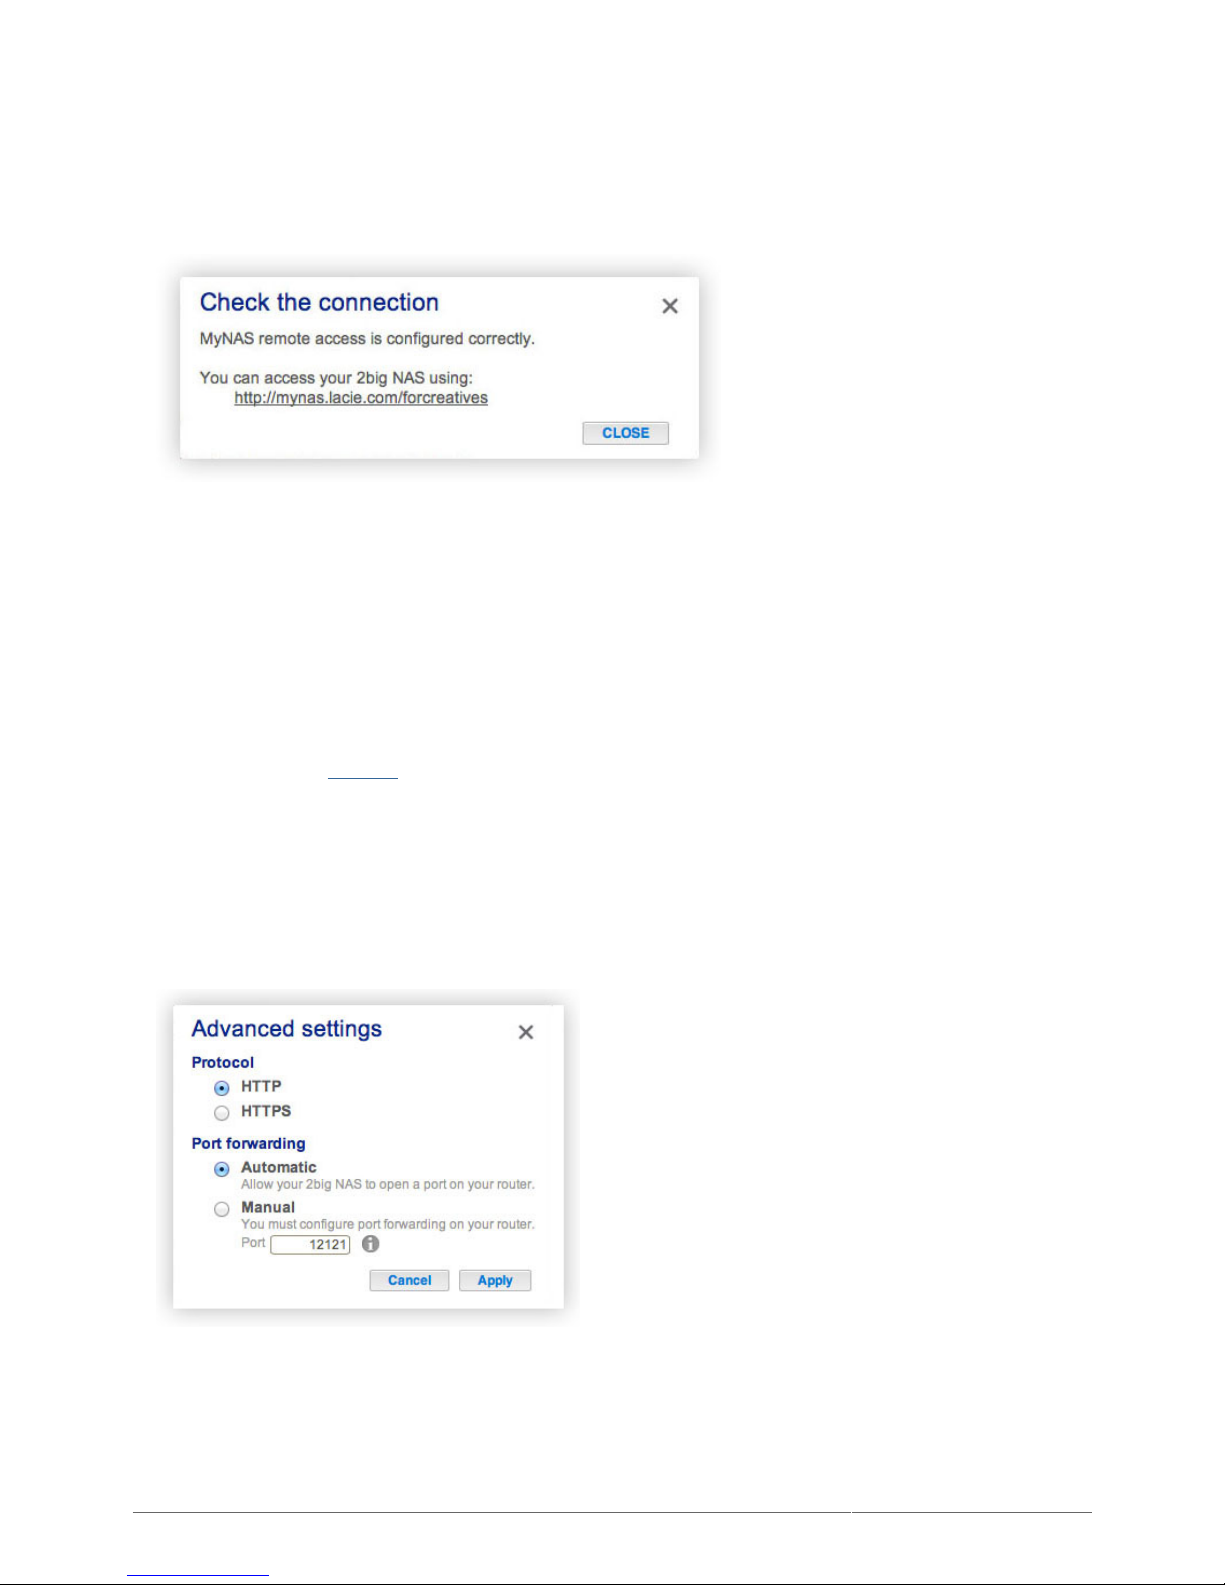
Click Apply. The Dashboard will query the mynas.lacie.com server to see if the name you chose is available.4.
If so, you will receive a message confirming the connection.
If your name is already chosen, type a new one and click Apply until you find an available name.
FAILED CONNECTION
If you receive an error that your LaCie NAS is unable to connect to the internet:
You may require a proxy server to access the internet. Please contact your network administrator or internet
■
provider then review Network for further instructions on how to add your proxy server's address.
You may need to configure port forwarding on your router. See the steps below.
■
If the issue is related to your router, you will need to access its administration page in order to forward a port
(by default, 8080), which will create a path from your LaCie NAS to the internet. Refer to your router's
documentation for details.
Navigate to the Dashboard > Network > Remote Access tab.1.
Next to the Name field, click the configuration icon, then select Advanced settings.2.
(If you do not see the configuration icon next to the Name field, first type a name and then click Apply, and
the icon will appear.)
In the dialogue window that appears, click Manual.3.
Next, identify which port you intend to forward in your router.4.
Click Apply.5.
Page 56

LaCie 2big NAS (OS 3.0) | LaCie 5big NAS Pro User Manual 56
Access your router's administration page in order to forward this port.6.
Retry the remote access connection.7.
Page 57
LaCie 2big NAS (OS 3.0) | LaCie 5big NAS Pro User Manual 57
USING REMOTE ACCESS
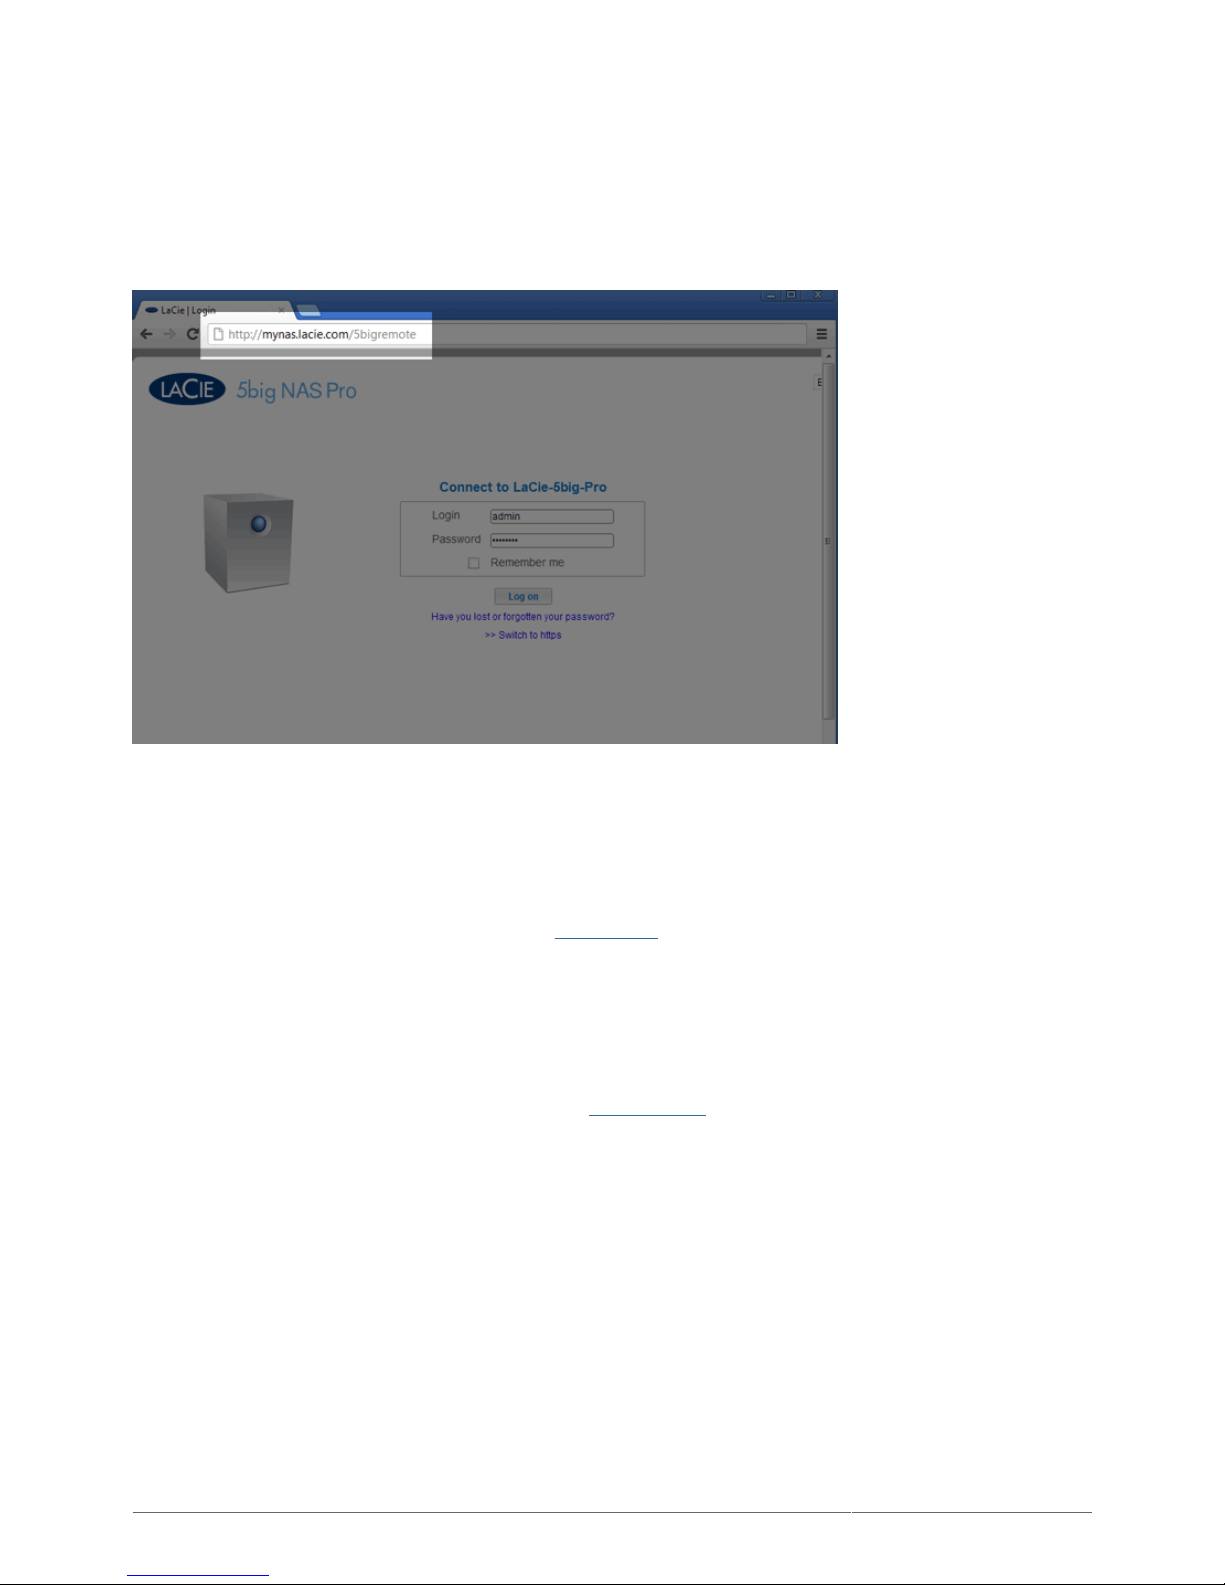
Once configured, simply type your LaCie NAS's URL into any browser, anywhere.
Your URL will be: mynas.lacie.com/name
After you input the URL, you will be asked to log in to the Dashboard. Note that this username and password are
the credentials created by the administrator in Dashboard > Users.
Once logged in, you will be able to access the Dashboard in order to administer your LaCie NAS (if you have
administrative privileges) or access the File Browser. The File Browser lets you upload, download, and stream
many types of multimedia files such as mp3 (see File Browser).
MOBILE DEVICES
LaCie MyNAS is compatible with iOS devices. See the iOS App Store for details.
Page 58
LaCie 2big NAS (OS 3.0) | LaCie 5big NAS Pro User Manual 58
MEDIA (UPNP/DLNA) SERVERS
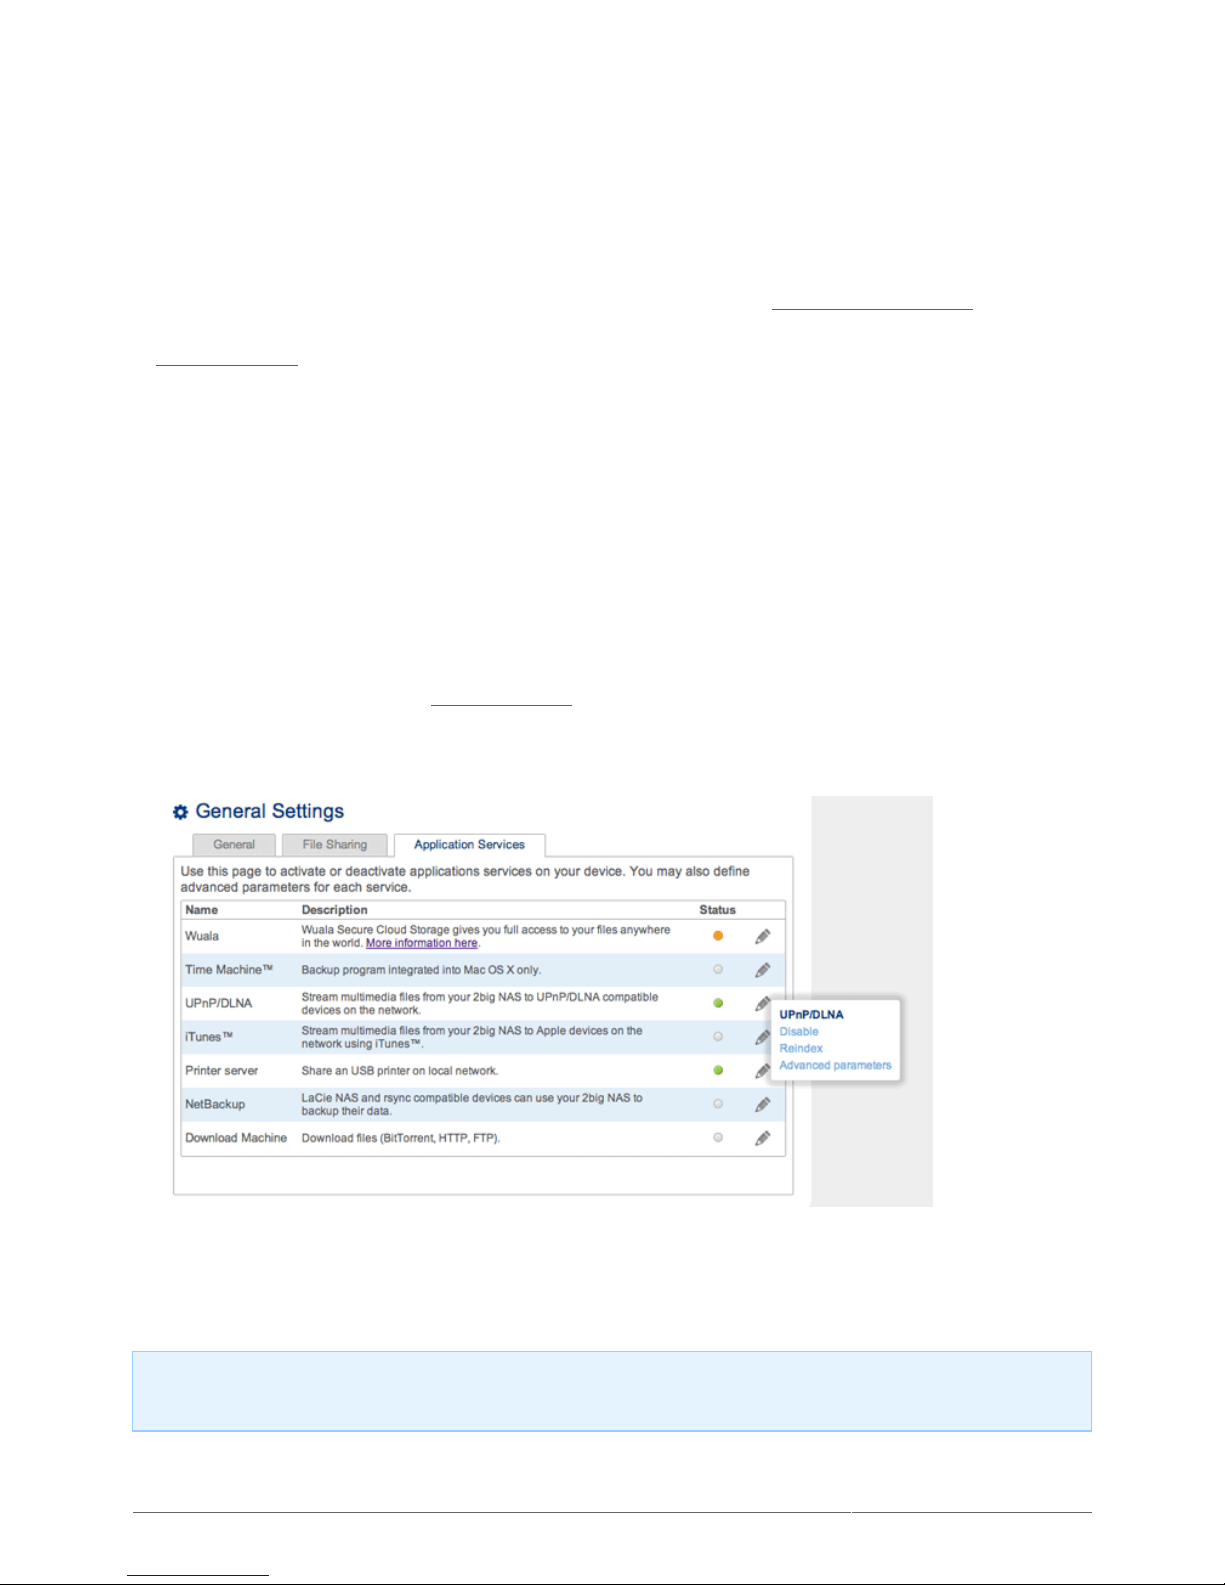
You can configure your LaCie NAS to share files (read-only) with UPnP/DLNA devices connected to the same
network. Follow these steps:
Make sure your LaCie NAS is connected to your network as described in Connect to the Network.1.
Enable the UPnP/DLNA service from the Dashboard > General Settings > Application Services tab (see2.
General Settings).
Now you will be able to play files located on your NAS's share onto any other UPnP/DLNA-certified3.
player/adapter that is connected to your network (e.g. Xbox 360, PlayStation 3, DLNA mobile phone, etc.).
REINDEX THE MEDIA SERVER
To take an inventory of available multimedia files, you can Reindex your LaCie NAS and all connected hard
drives.
Make certain that your external hard drives are connected to your LaCie NAS.1.
Confirm that UPnP/DLNA is enabled on the Dashboard > General Settings page. It may be found in the2.
Application Services tab (see General Settings).
Go to the Dashboard > General Settings page to select the Application Services tab. Click the3.
configuration icon (pencil) to the far right of the UPnP/DLNA row and select Reindex.
Multimedia indexation will begin. Please note that the time for indexing to complete depends upon the total
capacity of your storage and the size of your multimedia library.
Missing Multimedia Files: Start a Reindex as described above if files seem missing on your multimedia
share(s) or connected devices.
Page 59
LaCie 2big NAS (OS 3.0) | LaCie 5big NAS Pro User Manual 59
ITUNES
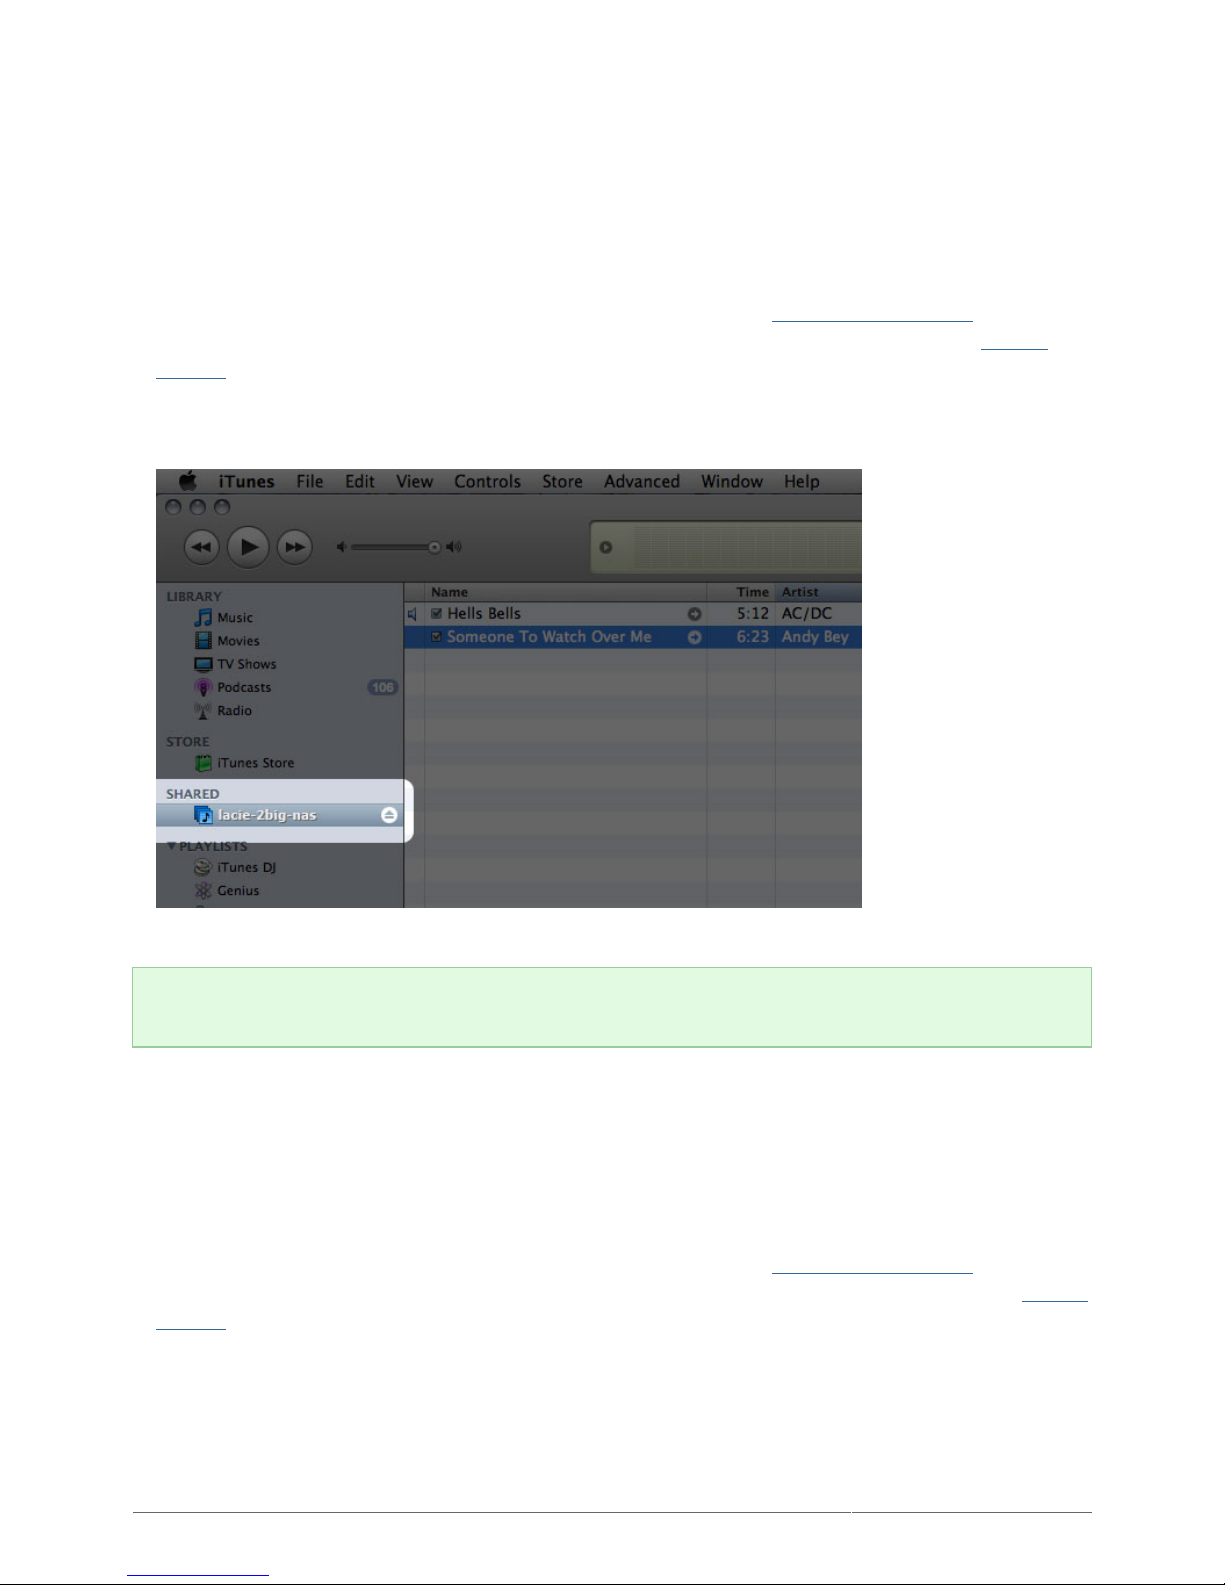
Your LaCie NAS can act as an iTunes Music server, streaming audio files to a computer on the network running
iTunes. Once configured, a playlist bearing your LaCie NAS's machine name will appear in the Shared category
within iTunes, and audio files stored on the LaCie NAS will be listed in this playlist. Follow these steps:
Make sure your LaCie NAS is connected to your network as described in Connect to the Network.1.
Enable the iTunes service from Dashboard > General Settings > Application Services (see General2.
Settings).
In iTunes, make sure Library sharing is enabled in Preferences > Sharing > Look for shared libraries.3.
Access the shared playlist in iTunes.4.
Technical note: The iTunes Server Service supports the following file types: .mp3, .wav, .aac, .pls, and
.m3u.
WINDOWS MEDIA PLAYER
Once configured, Windows Media Player (WMP) can play files located on the LaCie NAS through the network
connection. Follow these steps:
Make sure your LaCie NAS is connected to your network as described in Connect to the Network.1.
Enable the UPnP/DLNA service from Dashboard > General Settings > Application Services (see General2.
Settings).
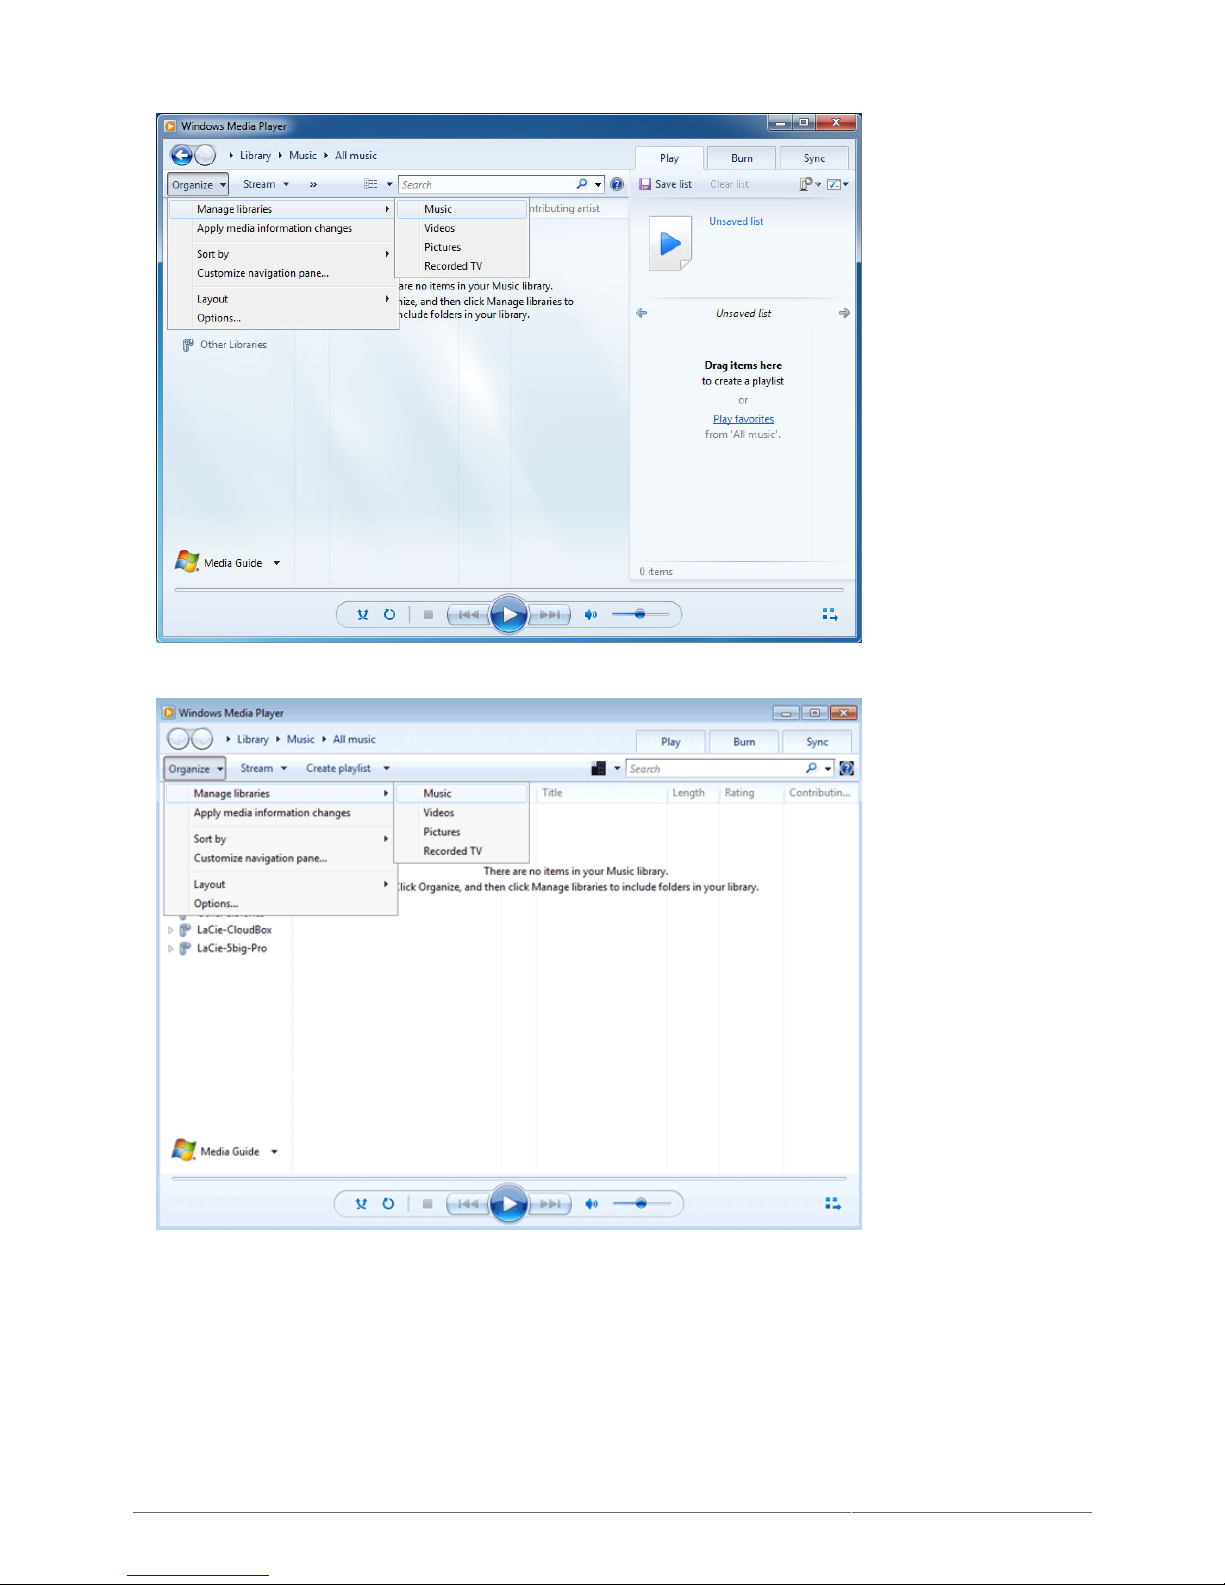
In WMP, click Organize > Manage Libraries > Music (or Video or Pictures).3.
Page 60
LaCie 2big NAS (OS 3.0) | LaCie 5big NAS Pro User Manual 60
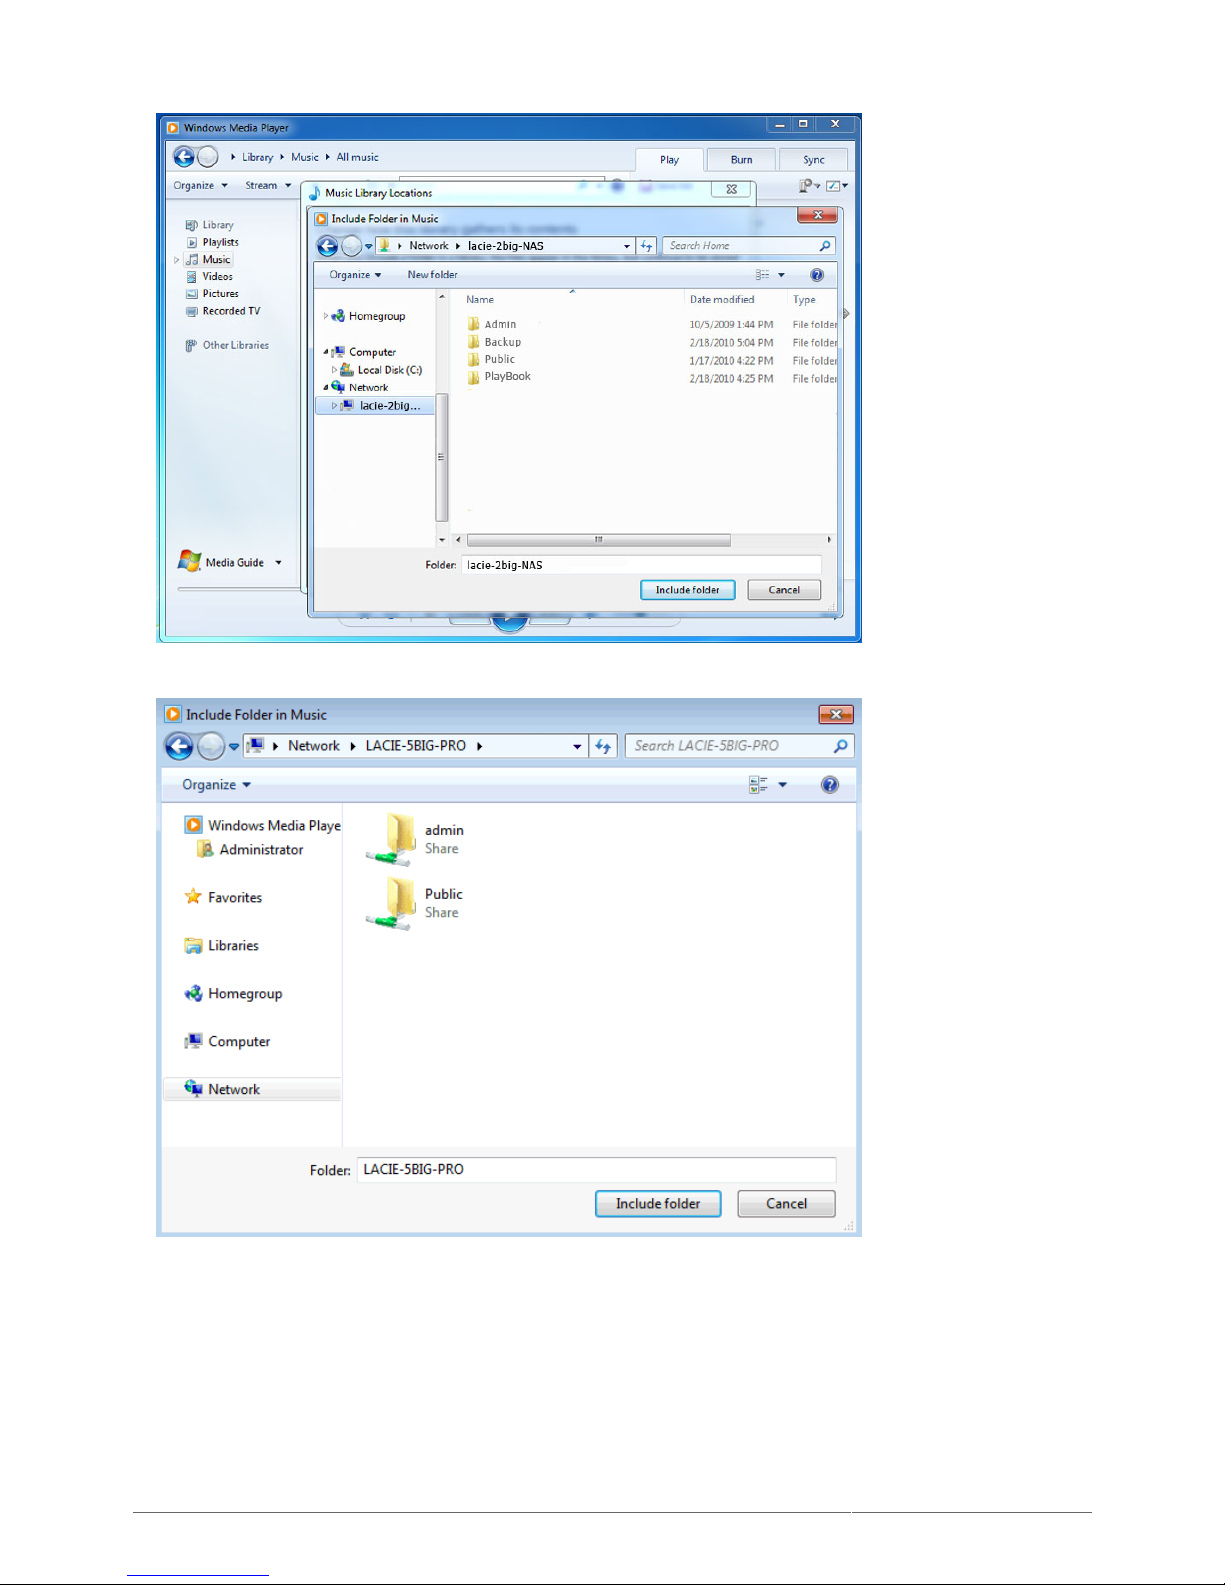
In the dialogue window, click Add, select your LaCie NAS's machine name under the Network section, and4.
click Include Folder.
Page 61
LaCie 2big NAS (OS 3.0) | LaCie 5big NAS Pro User Manual 61
WMP will begin indexing the media files. Once completed, they will appear in the WMP library.5.
Page 62
LaCie 2big NAS (OS 3.0) | LaCie 5big NAS Pro User Manual 62
ACCESSING SHARES VIA FTP
FTP (file transfer protocol) is used to transfer files from one computer to another via the local network or the
internet. This protocol allows you to exchange files with your colleagues, clients, or business partners securely,
as only people with a user account will have access. For a detailed explanation of the benefits of using FTP,
please see http://en.wikipedia.org/wiki/FTP.
The FTP service is disabled by default but you can enable it on the Dashboard > General Settings page (see
General Settings).
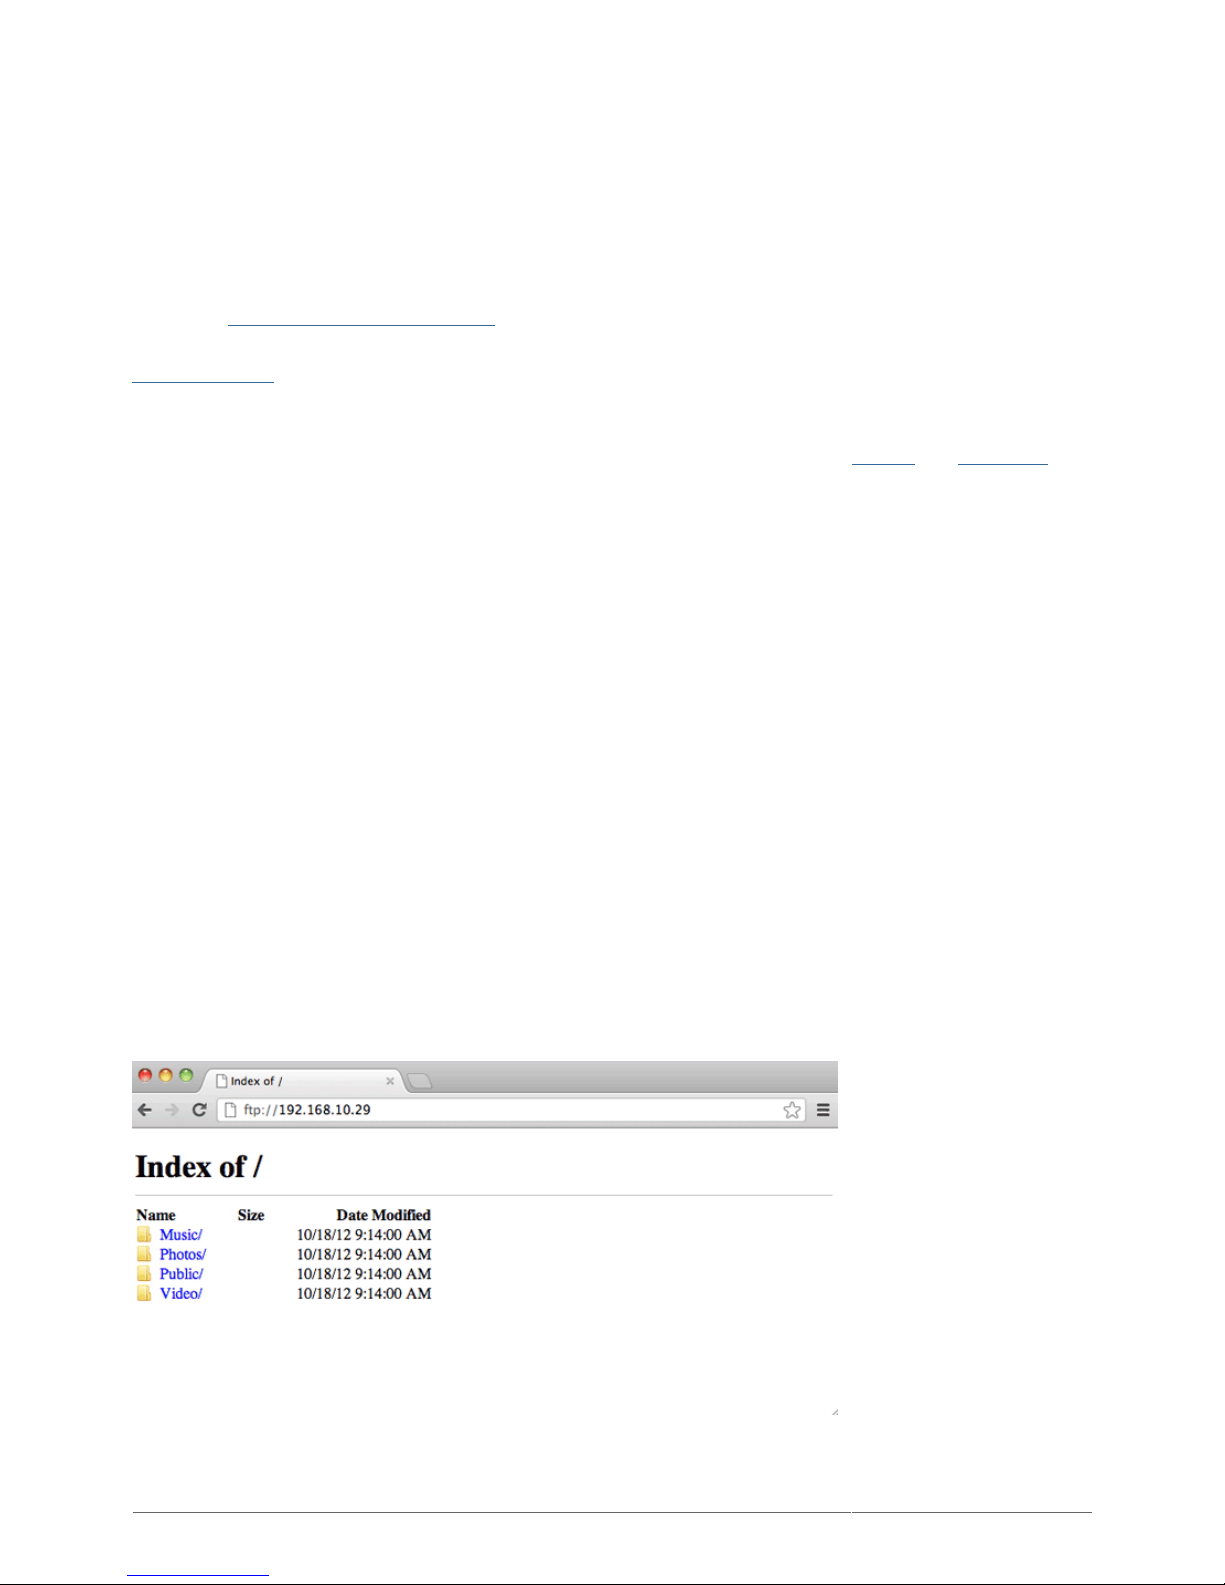
Once FTP is enabled, the LaCie 5big NAS Pro can be accessed using an internet browser or FTP client software.
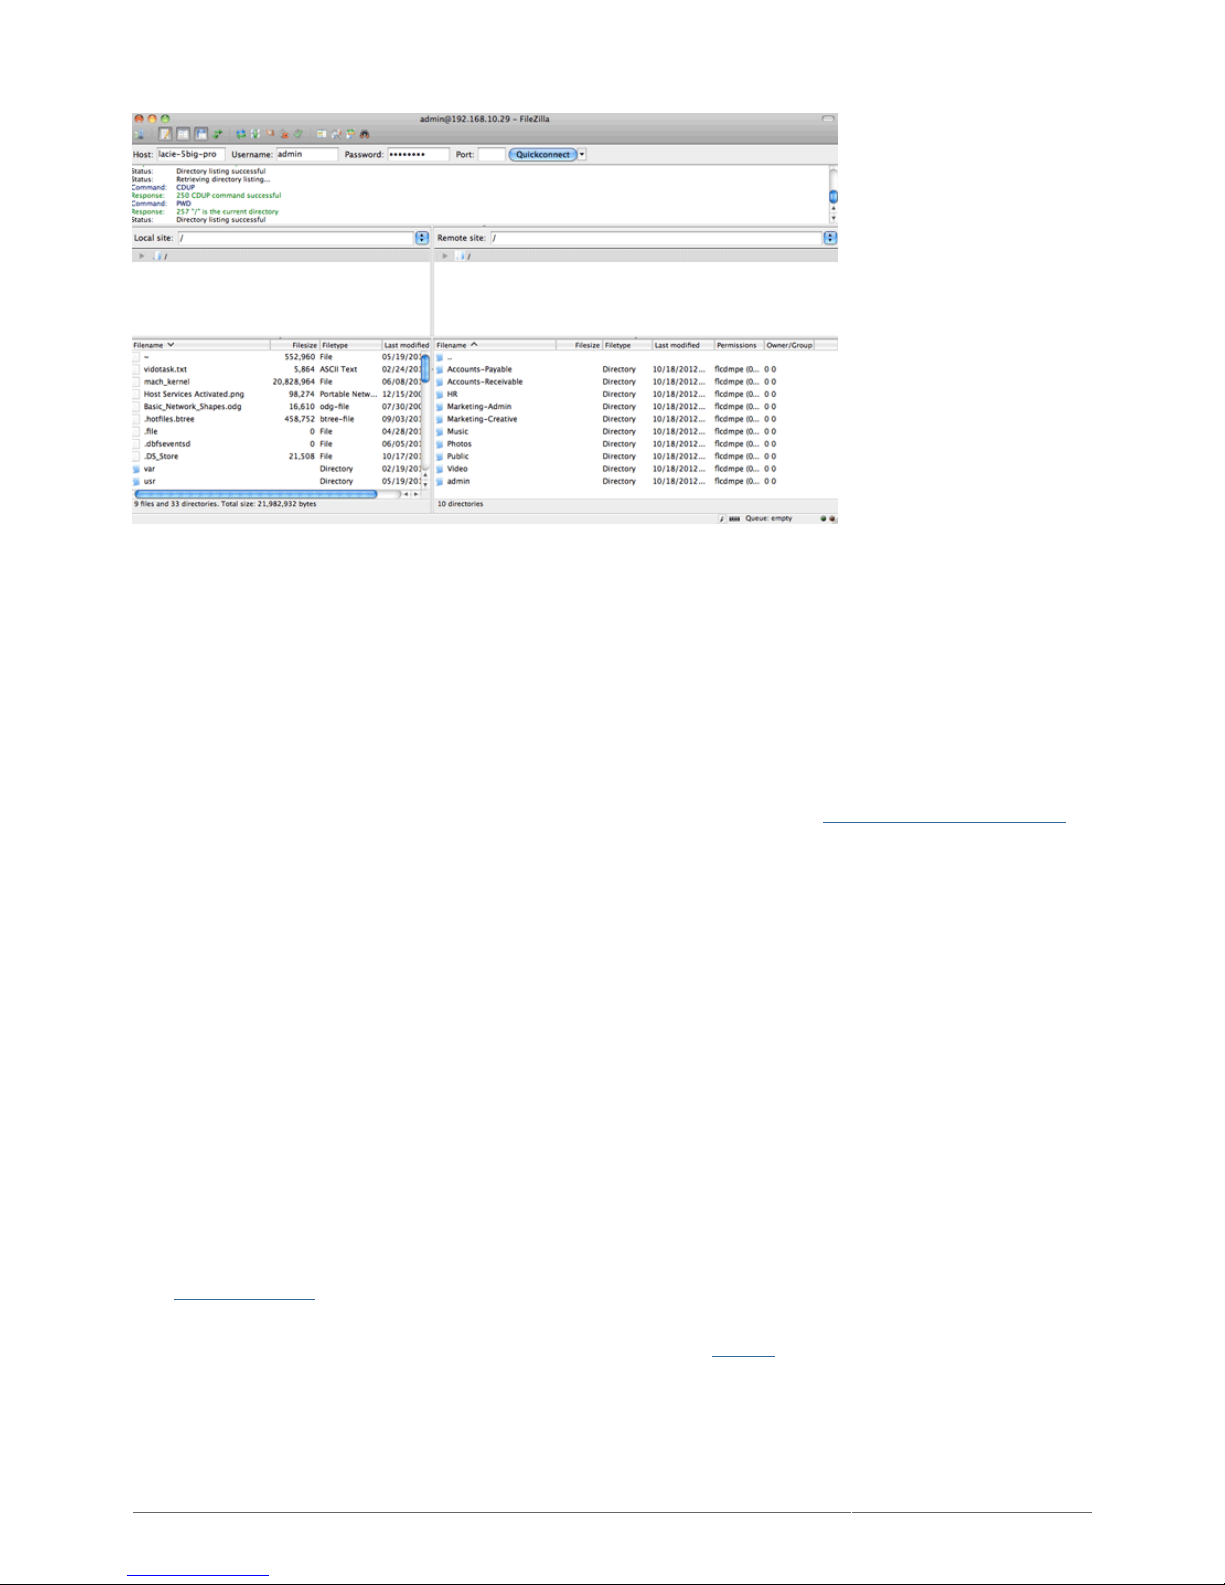
FTP client software is very helpful if you wish to share, download, and upload data within a dedication
application rather than an internet browser. Examples of FTP client software include Filezilla and Cyberduck.
LOCAL FTP ACCESS
To use the FTP service on your local network, enter your LaCie NAS's IP address or device name in the FTP
client's address field or in an internet browser's address field (to get the IP address, navigate to the Dashboard
> Network page).
Public Access Folders (non-password protected):
ftp://[IP-address] (For example, ftp://192.168.10.149)
ftp://[machine name]/ (For example, ftp://lacie-5big-pro/ or ftp://lacie-5big-pro.local/)
Private Access Folders (password protected):
When following the directions below, please note that usernames and passwords can vary depending upon the
user. For example, the administrator's username and password are not the same as another user's name and
password.
ftp://[username:password@IP-address] (For example, ftp://admin:[email protected])
ftp://[username:password@machine name]/ (For example, ftp://admin:adminpassword@lacie-5big-pro/ or
ftp://admin:[email protected]/)
Access files via FTP using an internet browser
Page 63
LaCie 2big NAS (OS 3.0) | LaCie 5big NAS Pro User Manual 63
Access files via third-party FTP applications
REMOTE FTP ACCESS
You can access and share your LaCie NAS's files from a computer outside of your home network. To gain access
using FTP, you will need to know your router's public IP address.
From a computer on the same local network as the LaCie NAS, visit this page: http://www.whatismyip.com/.1.
Note your public IP address.2.
Launch an internet browser or FTP client software.3.
Within the internet browser or FTP client's address field, type:4.
Public folders only: ftp://[Public IP-address] (For example, ftp://94.10.72.149)
■
Public and private folders: ftp://[username:password@Public IP-address] (For example,
■
ftp://admin:[email protected])
For further information on the public IP address for your router, see your router's user manual or your internet
service provider.
SFTP
SFTP is a secure version of the FTP service. Data is more secure when using SFTP but transfer rates are slower.
Similar to FTP, SFTP is disabled by default but you can enable it on the Dashboard > General Settings page
(see General Settings).
Please note that Activating NetBackup Server will disable SFTP (see Backup for details).
Page 64

LaCie 2big NAS (OS 3.0) | LaCie 5big NAS Pro User Manual 64
ACCESSING SHARES VIA NFS
Network File System (NFS) is a distributed file system protocol allowing a system to share directories and files
with others over a network. Like SMB, NFS grants file-level access to users and programs.
NFS is widely distributed to host VMWare datastores or share network folders in a Linux/UNIX environment.
When enabling NFS service on a share, it can be accessed with the following path:
NAS_NAME_OR_IP_ADDRESS:/shares/SHARE_NAME
The NFS protocol is not active by default. To activate it, go to Dashboard > General Settings > File Sharing
(see General Settings). Click on the configuration icon (pencil) to select Enable.
All NFS shares are public and available to everyone on the network. See Shares: Access and Transfer Files for
details on public and private shares.
Page 65
LaCie 2big NAS (OS 3.0) | LaCie 5big NAS Pro User Manual 65
WAKE ON LAN (WOL)
Your LaCie NAS can conserve energy by entering deep sleep mode. Use the Dashboard to schedule deep sleep
mode when no one accesses the LaCie NAS and wake it up when your office is ready to work. (See Eco
Management for more information on deep sleep mode).
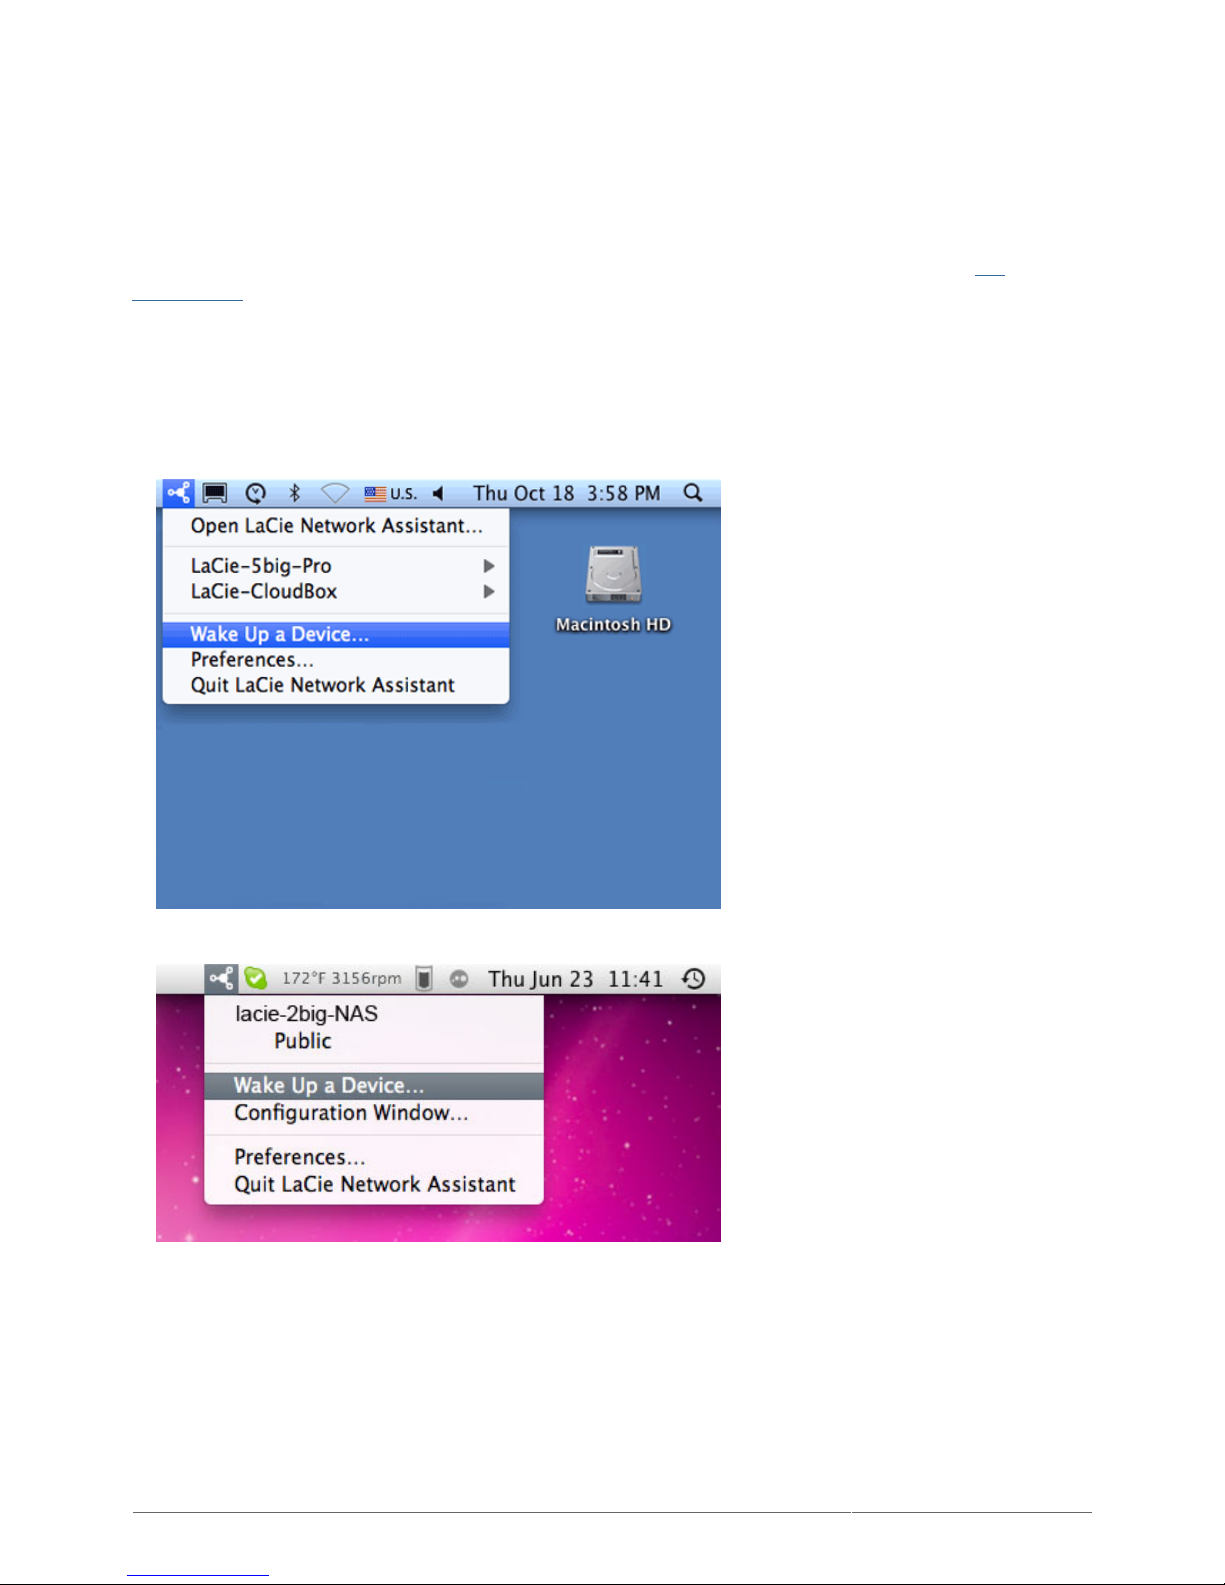
You can also use LaCie Network Assistant to wake your LaCie NAS from deep sleep mode. This feature is called
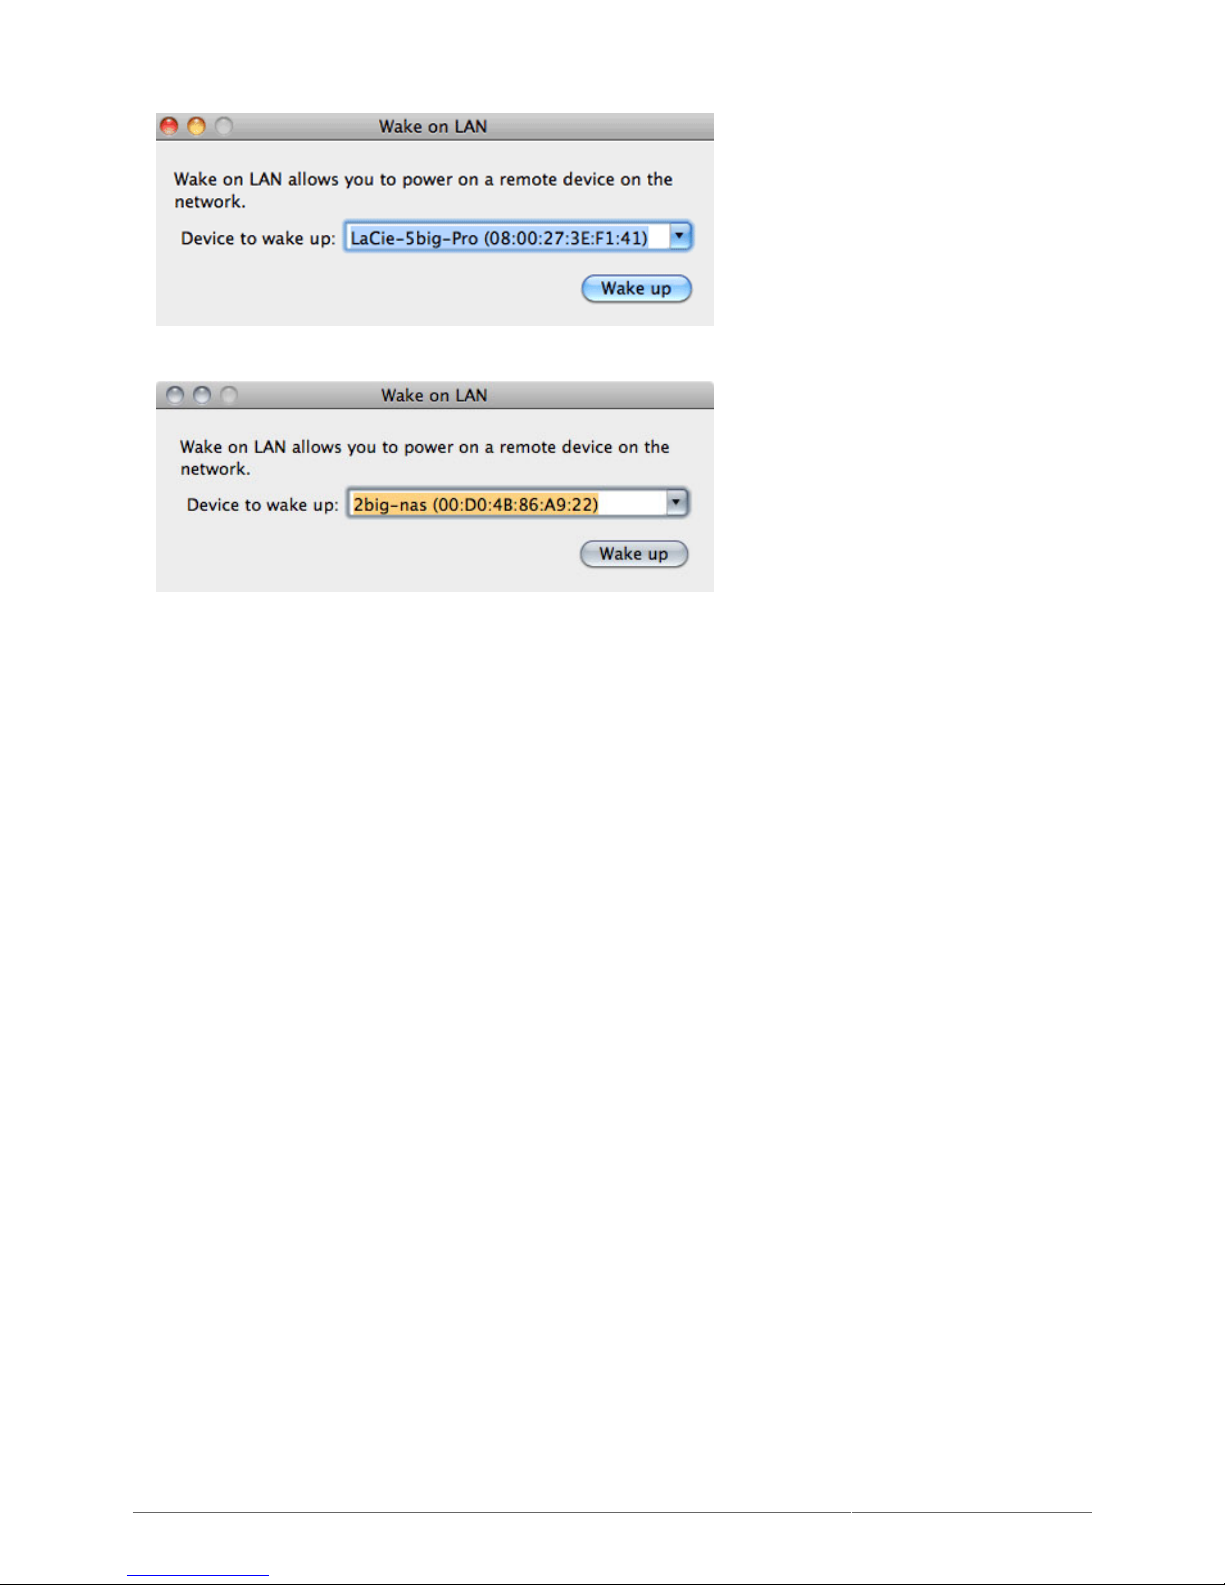
Wake on LAN (WOL). Follow the steps below:
Click the LaCie Network Assistant icon in your system tray (Windows) or menu bar (Mac) and select Wake Up1.
a Device…
Choose the LaCie NAS product you wish to wake up from the pulldown menu.2.
Page 66
LaCie 2big NAS (OS 3.0) | LaCie 5big NAS Pro User Manual 66
Click Wake up.3.
Page 67
LaCie 2big NAS (OS 3.0) | LaCie 5big NAS Pro User Manual 67
DASHBOARD (ADMINISTRATION)
All LaCie NAS feature an easy-to-use browser-based administration tool, called the Dashboard, that will allow
you to manage users, groups, shares, and the other product features.
ACCESS THE DASHBOARD
There are two ways to access the Dashboard: LaCie Network Assistant and an internet browser.
Access the Dashboard Using LaCie Network Assistant
See LaCie Network Assistant for instructions on software installation.
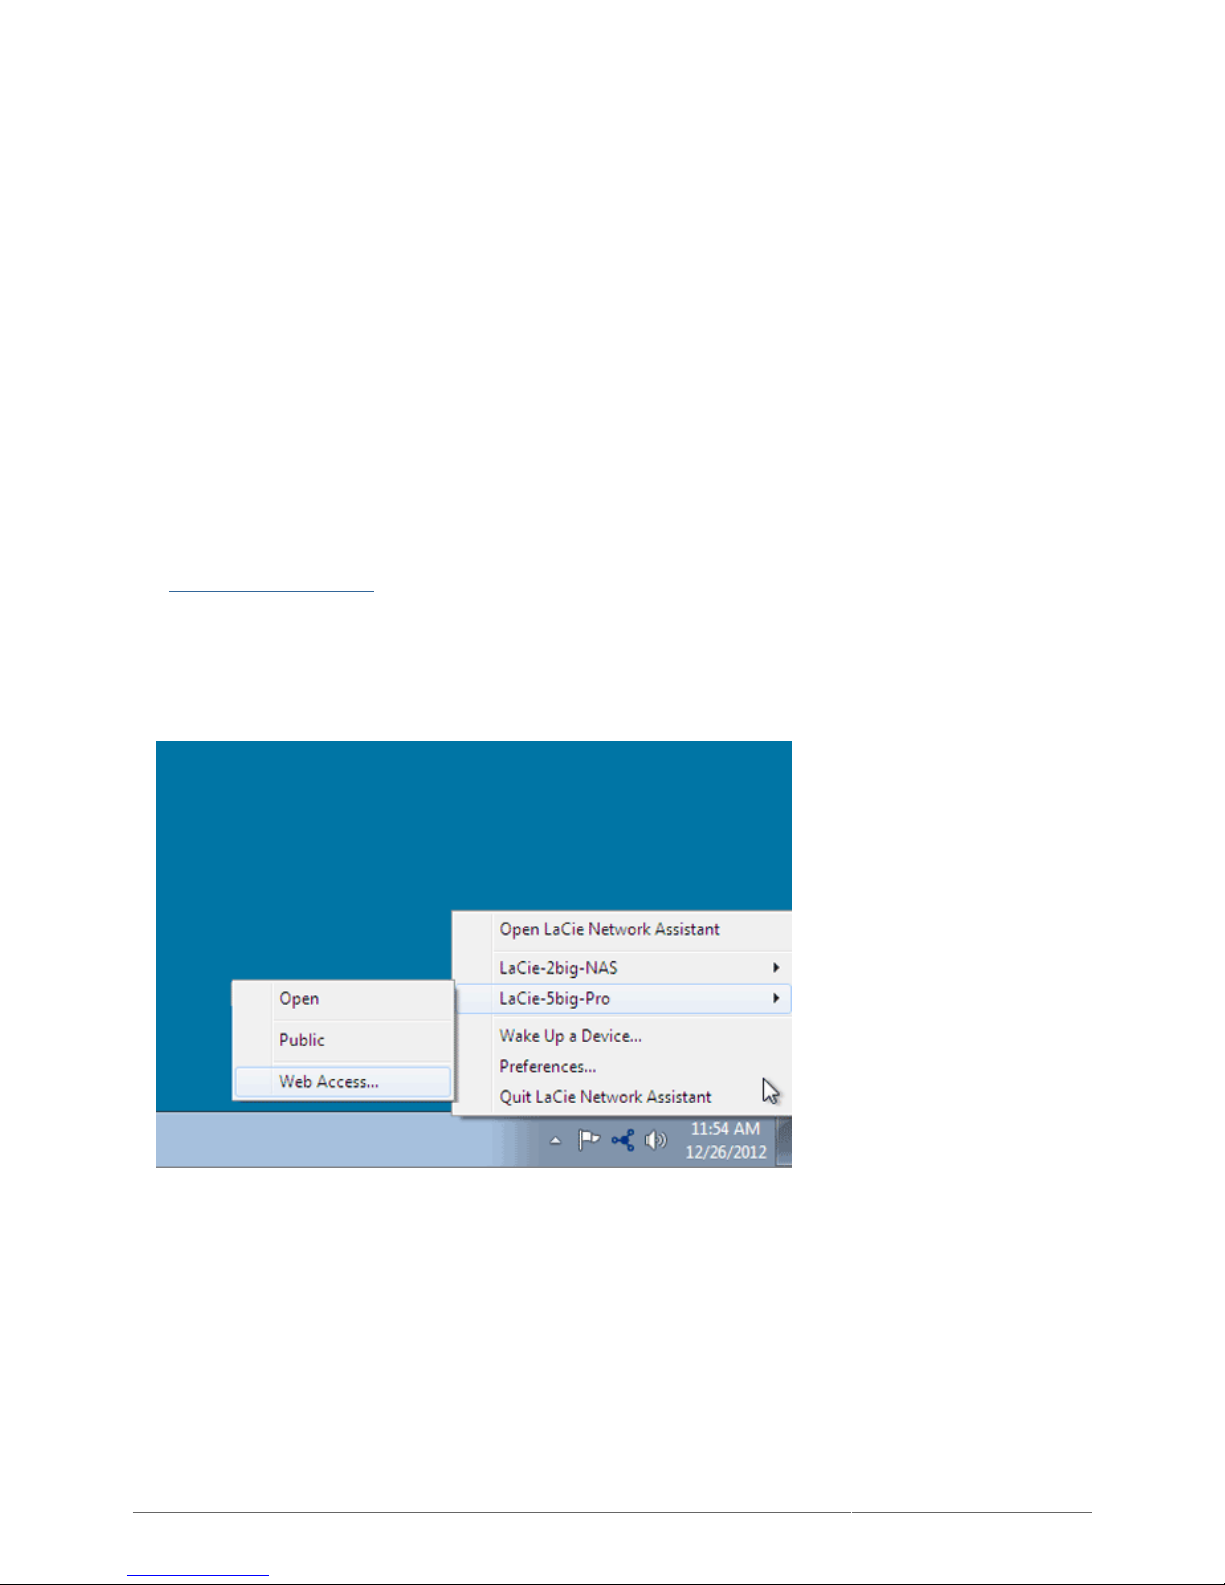
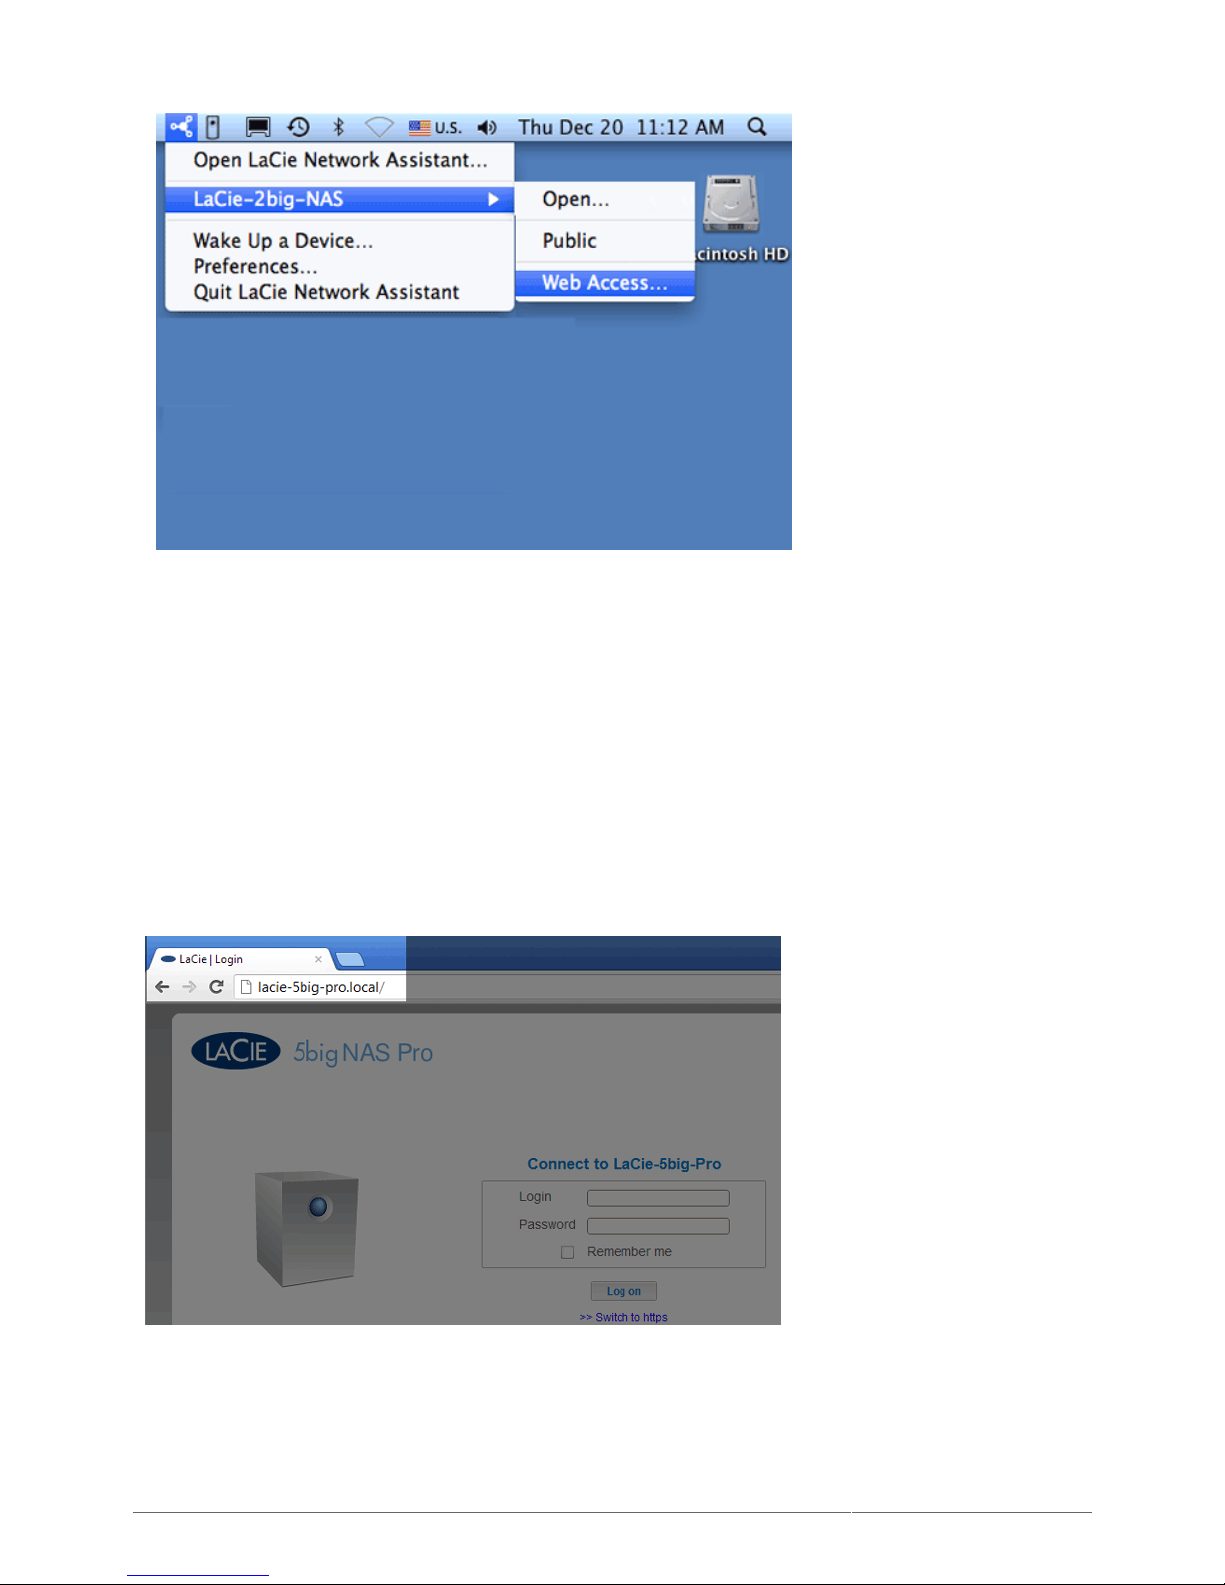
Windows: Right-click on the LaCie Network Assistant icon in the system tray (Windows users). Mac: Click on1.
the LaCie Network Assistant icon in the menu bar.
Page 68
LaCie 2big NAS (OS 3.0) | LaCie 5big NAS Pro User Manual 68
Select [machine name] > Web Access.2.
The login page will open in a new browser window or tab. If your browser is not open, LaCie Network3.
Assistant will open it for you.
Access the Dashboard Using a Browser
Launch your preferred internet browser and type the default address for the LaCie NAS:
Windows XP - http:\\lacie-2big-nas or http:\\lacie-5big-pro
■
Windows Vista / 7 / 8 and Mac OS - http:\\lacie-2big-nas.local or http:\\lacie-5big-pro.local.
■
Certain versions of Windows may require the name of the device only, similar to Windows XP. If you do not
connect to your device, please try http:\\lacie-5big-pro.
Page 69
LaCie 2big NAS (OS 3.0) | LaCie 5big NAS Pro User Manual 69
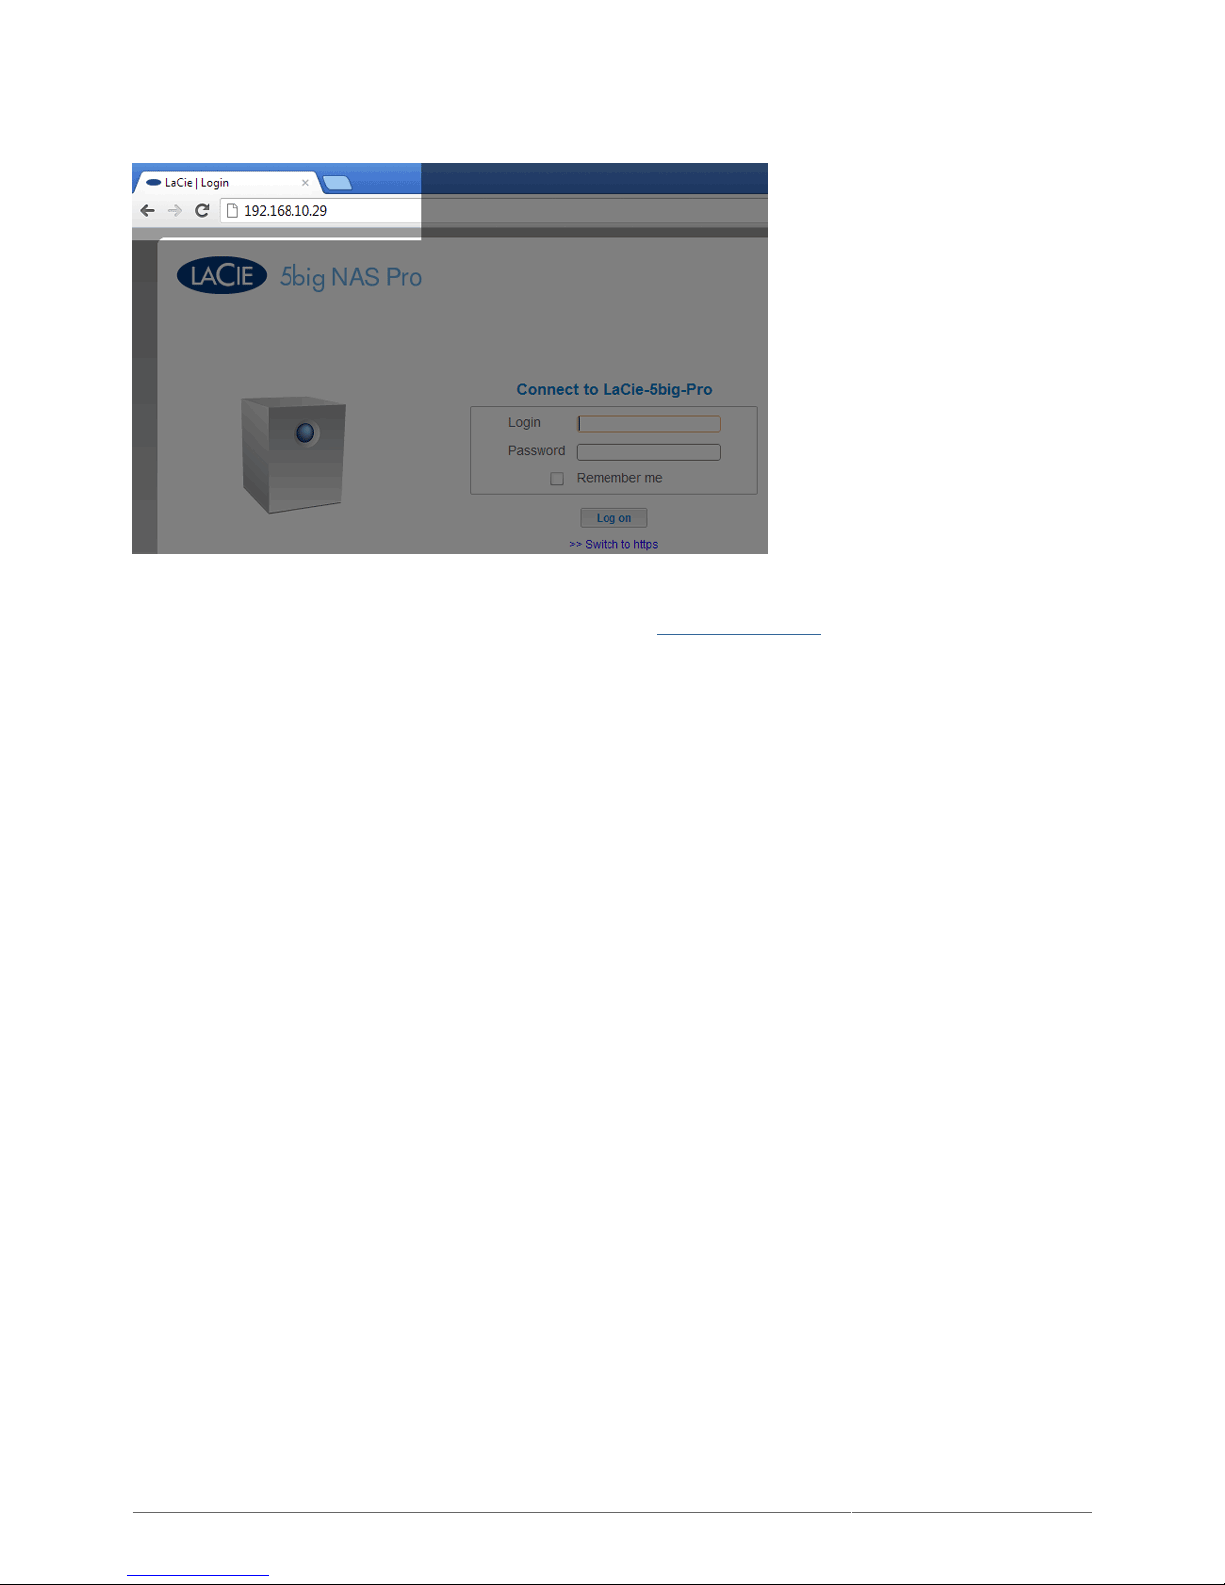
You can also type your LaCie NAS's IP address in the browser's URL (web address) field.
For example: http://[IP-address].
The IP address may be found in LaCie Network Assistant (see Find the IP Address).
Page 70
LaCie 2big NAS (OS 3.0) | LaCie 5big NAS Pro User Manual 70
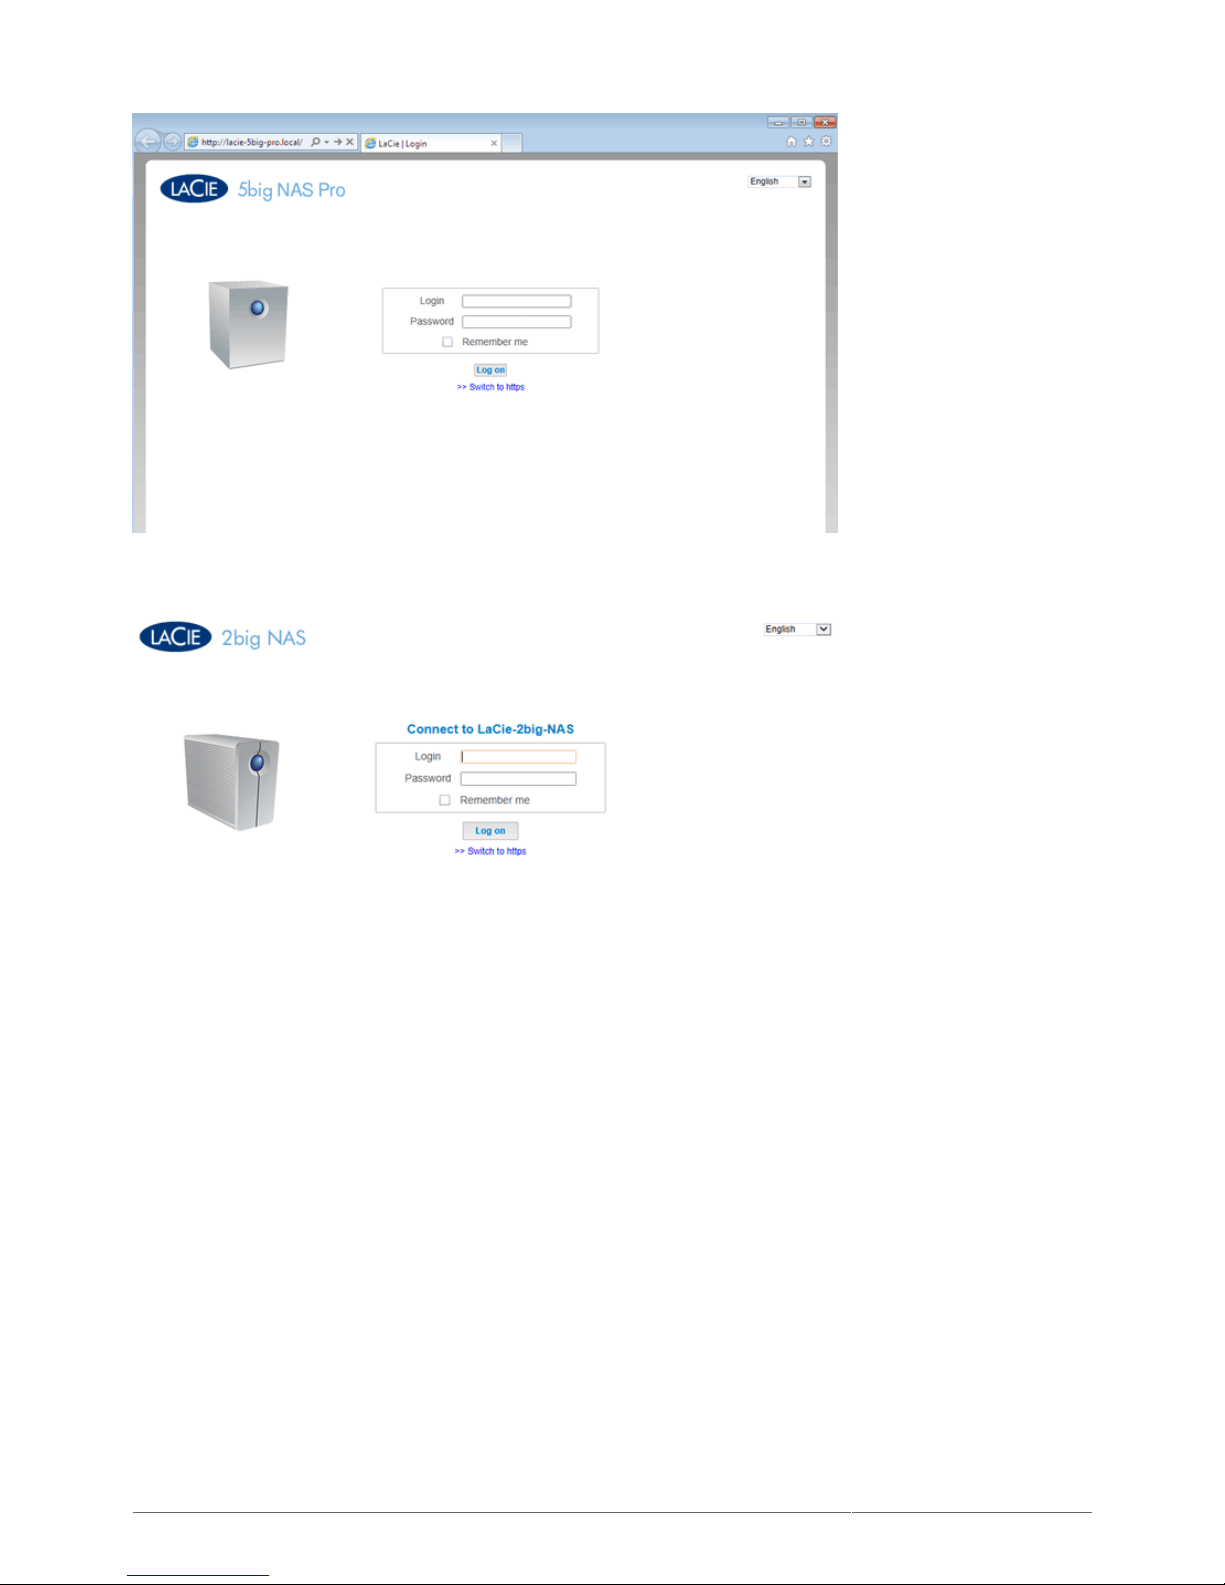
LOG IN
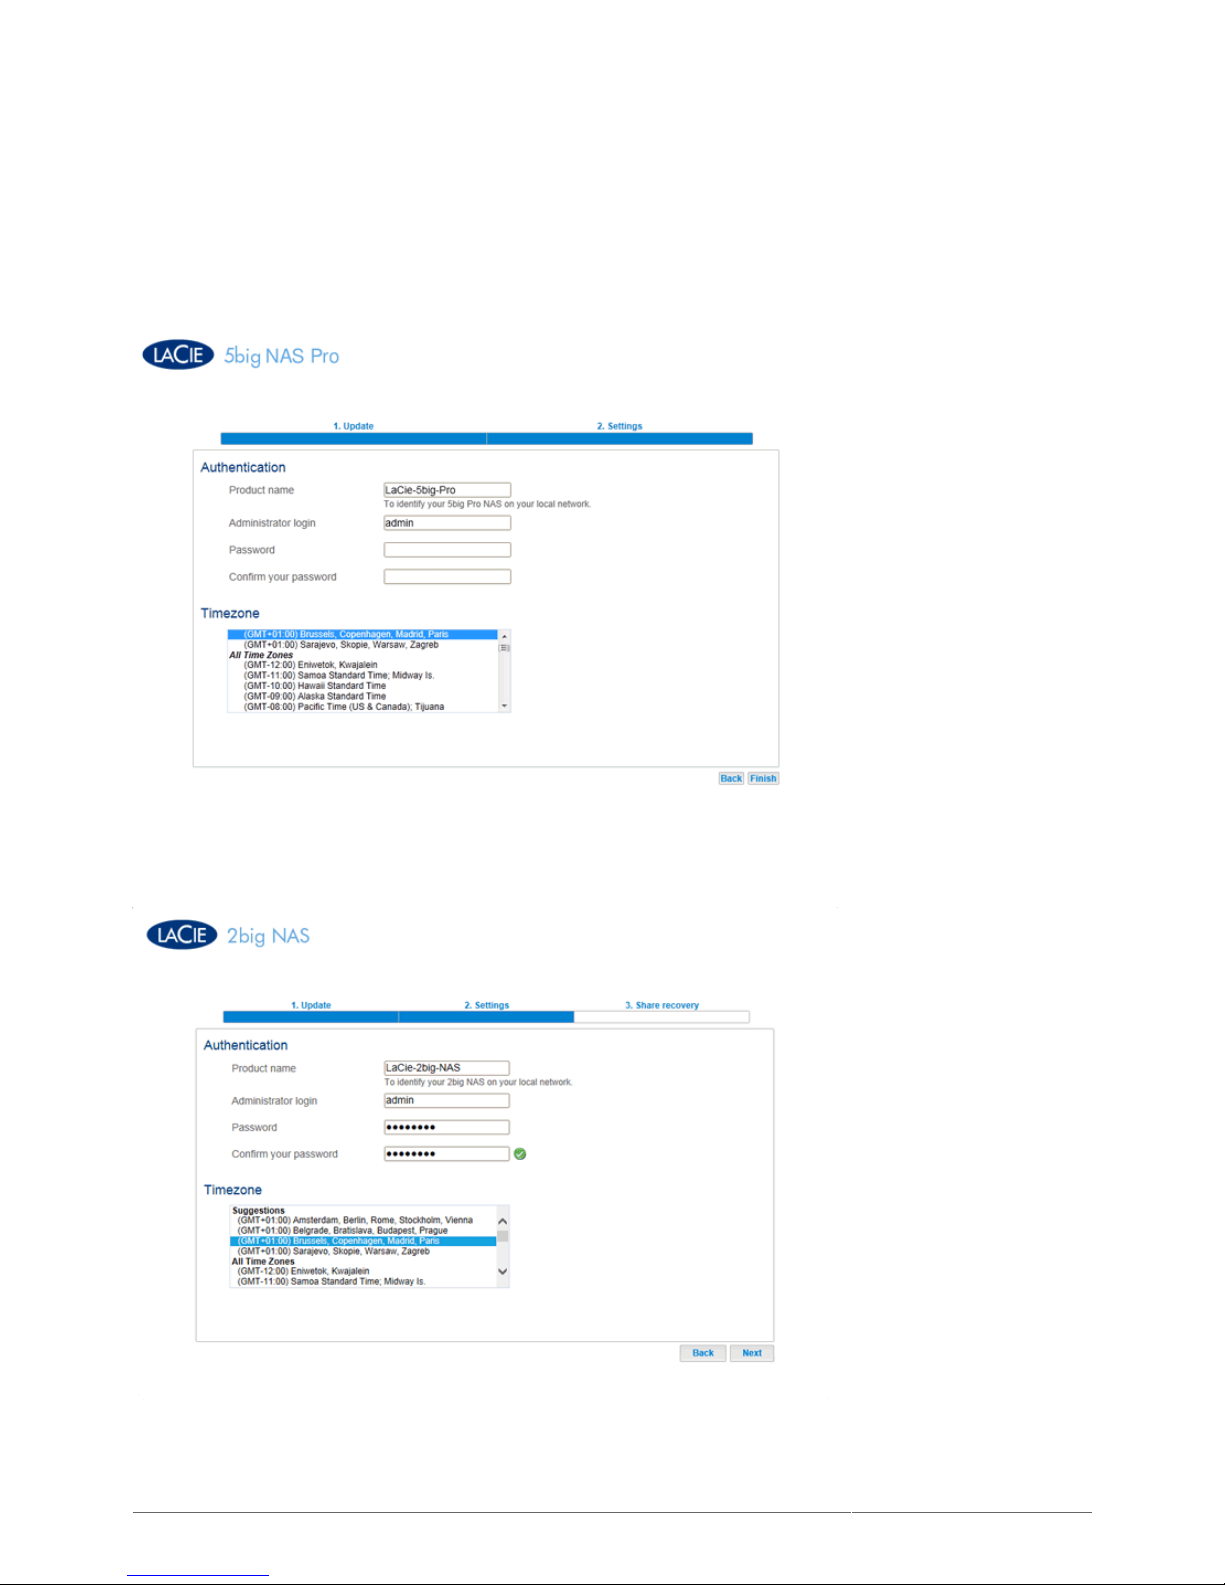
The first time you access the Dashboard, complete the Authentication and Timezone fields. (The password
should be from 4-20 alphanumeric characters and symbols, and the username should be from 1-20
alphanumeric characters.)
In subsequent logins, simply type in your username and password in the login prompt. Then click Log in.
Page 71
LaCie 2big NAS (OS 3.0) | LaCie 5big NAS Pro User Manual 71
Page 72
LaCie 2big NAS (OS 3.0) | LaCie 5big NAS Pro User Manual 72
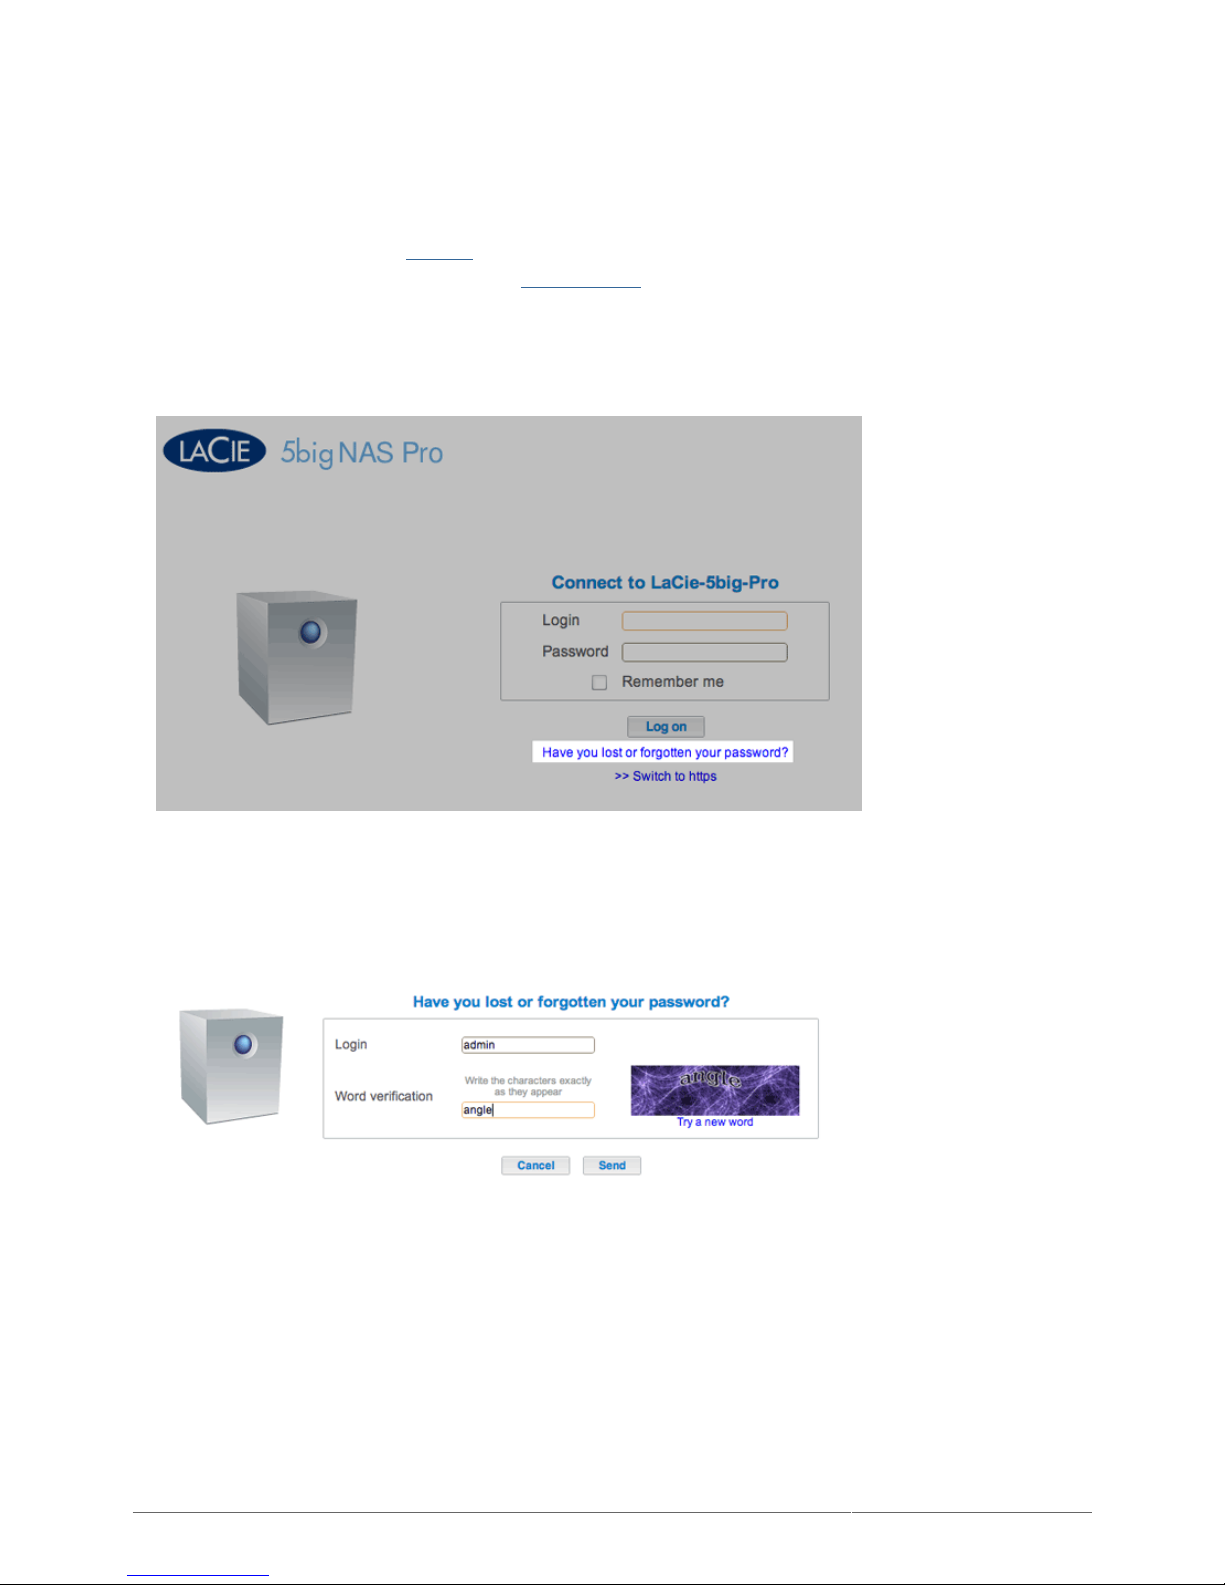
Recover a Lost Password
If a user has forgotten his/her password, it can be recovered if the administrator has:
Assigned an SMTP server (see Support).
■
Entered an email address for that user (see Manage Users).
■
If the above conditions have been met, the administrator and/or user can follow the steps below to recover a
password:
On the login page, click Have you lost or forgotten your password?.1.
On the next page, type the login. Then type the word you see in the image on the right (this ensures that the2.
request is coming from a person) and click send.
The email will arrive in the user's email inbox. In the email, click the Click here link.3.
In the Reinitialize your password screen, type your login, new password, then reconfirm the new password,4.
then click Send.
Page 73
LaCie 2big NAS (OS 3.0) | LaCie 5big NAS Pro User Manual 73
Restart, Deep Sleep Mode, and Shutdown
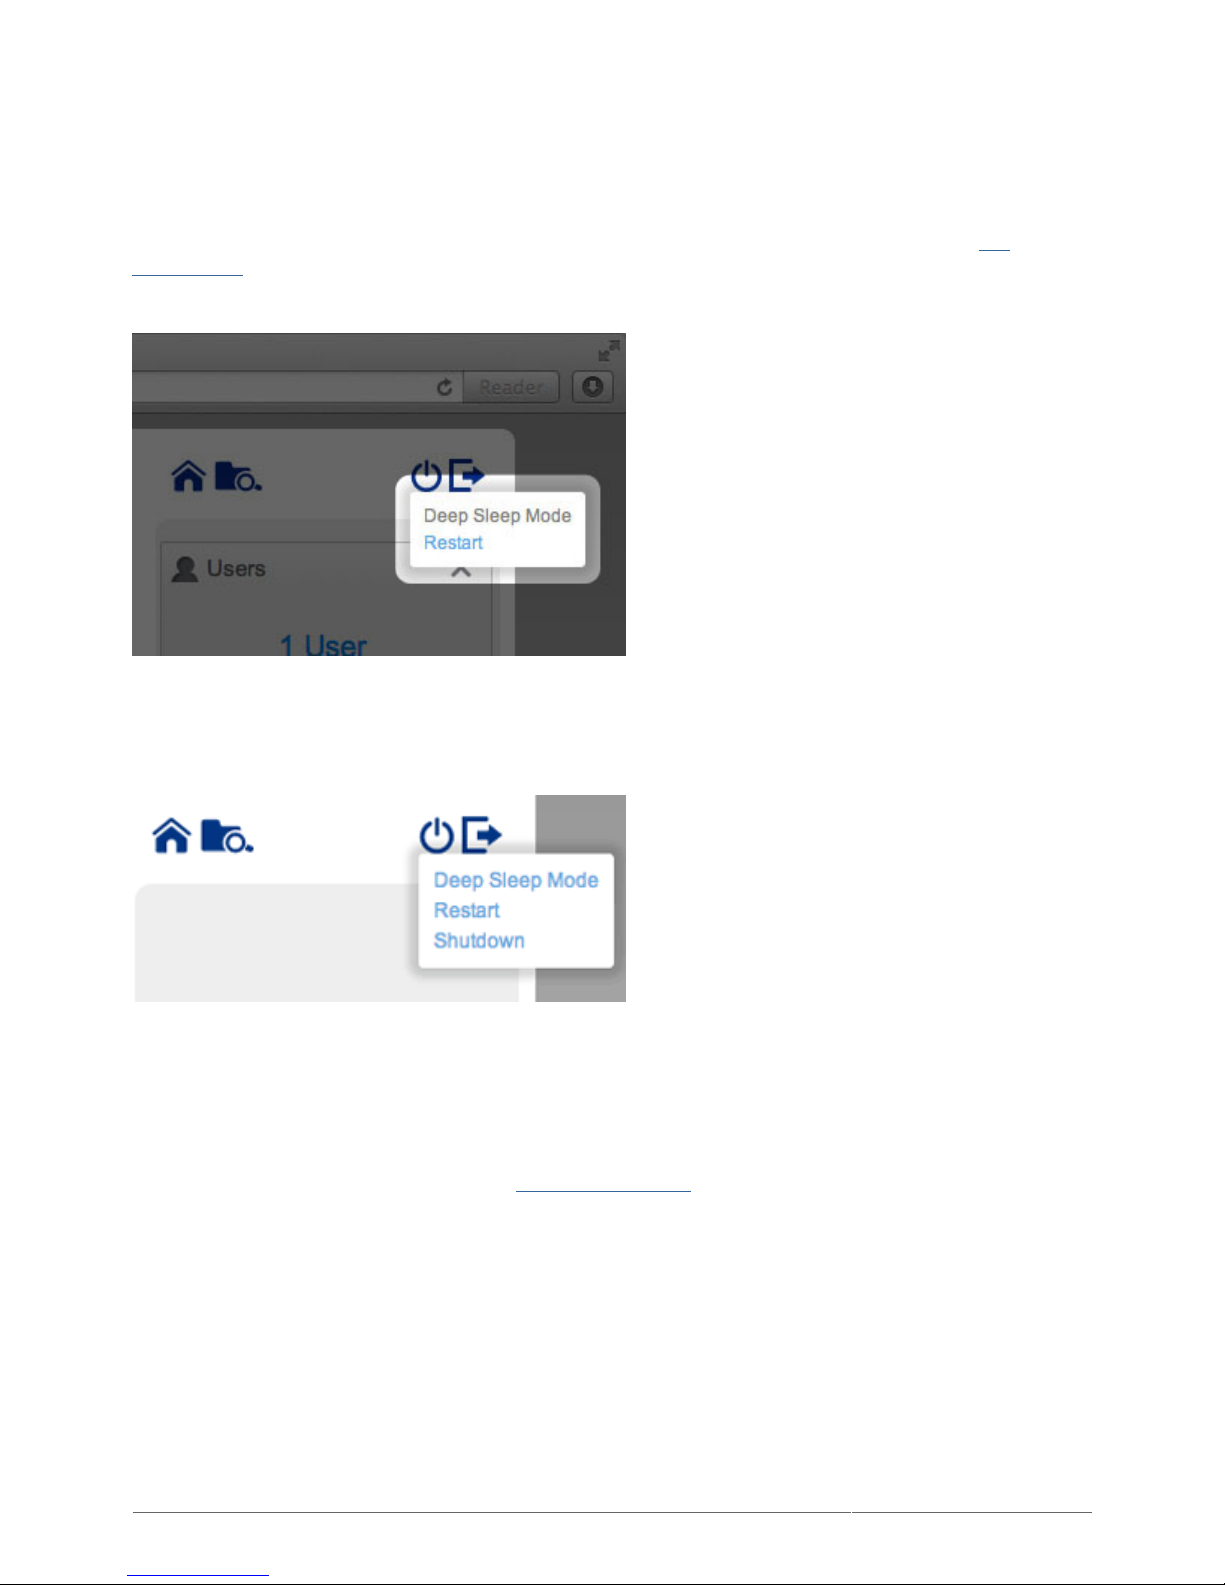
To restart or put the LaCie NAS into deep sleep mode, click the power button, then choose between Restart
and Deep Sleep Mode. Deep sleep mode must be enabled or the option will not be available (see Eco
Management).
2big NAS Restart and Deep Sleep Mode
5big NAS Pro Deep Sleep Mode, Restart, and Shutdown
The LaCie 5big NAS Pro has the added option to Shutdown the device. The LaCie 2big NAS has a switch on the
back of the device to turn the power off (see Views of the Product). Users should select this option only when
the LaCie NAS is not being accessed.
Page 74

LaCie 2big NAS (OS 3.0) | LaCie 5big NAS Pro User Manual 74
Log Out
To log out of the Dashboard, click the log out button.
NAVIGATE THE DASHBOARD
The Dashboard is made up of a central area surrounded by widgets, or small boxes that represent the different
pages that make up the Dashboard. The widget displays a summary of the information contained in the page.
For full information, navigate to the page itself.
To navigate to a page, click the widget below its title; or, drag and drop a widget to the center of the
■
window.
To minimize a widget, click the X next to its title.
■
To expand a minimized widget, drag its icon over an expanded widget or to an open widget space.
■
To rearrange widgets, drag the minimized widget icon or the expanded widget's heading onto the place of
■
another widget.
Page 75
LaCie 2big NAS (OS 3.0) | LaCie 5big NAS Pro User Manual 75
FILE BROWSER
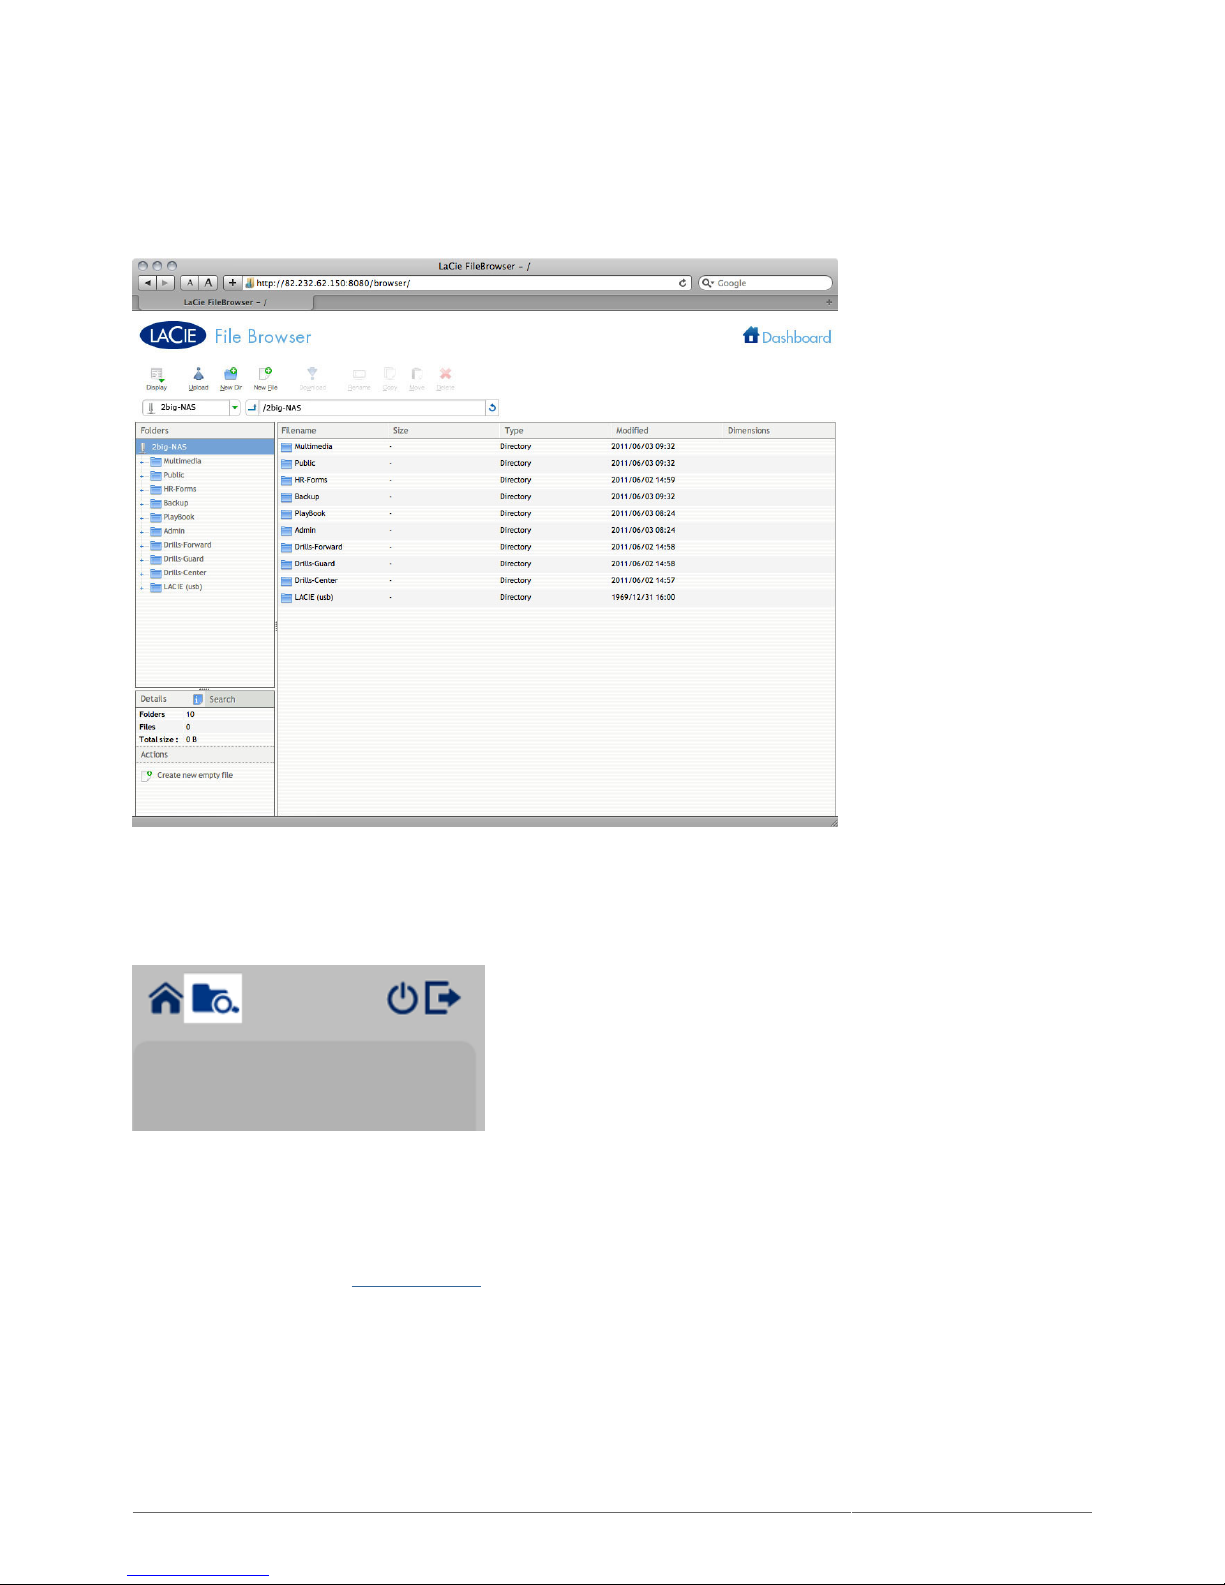
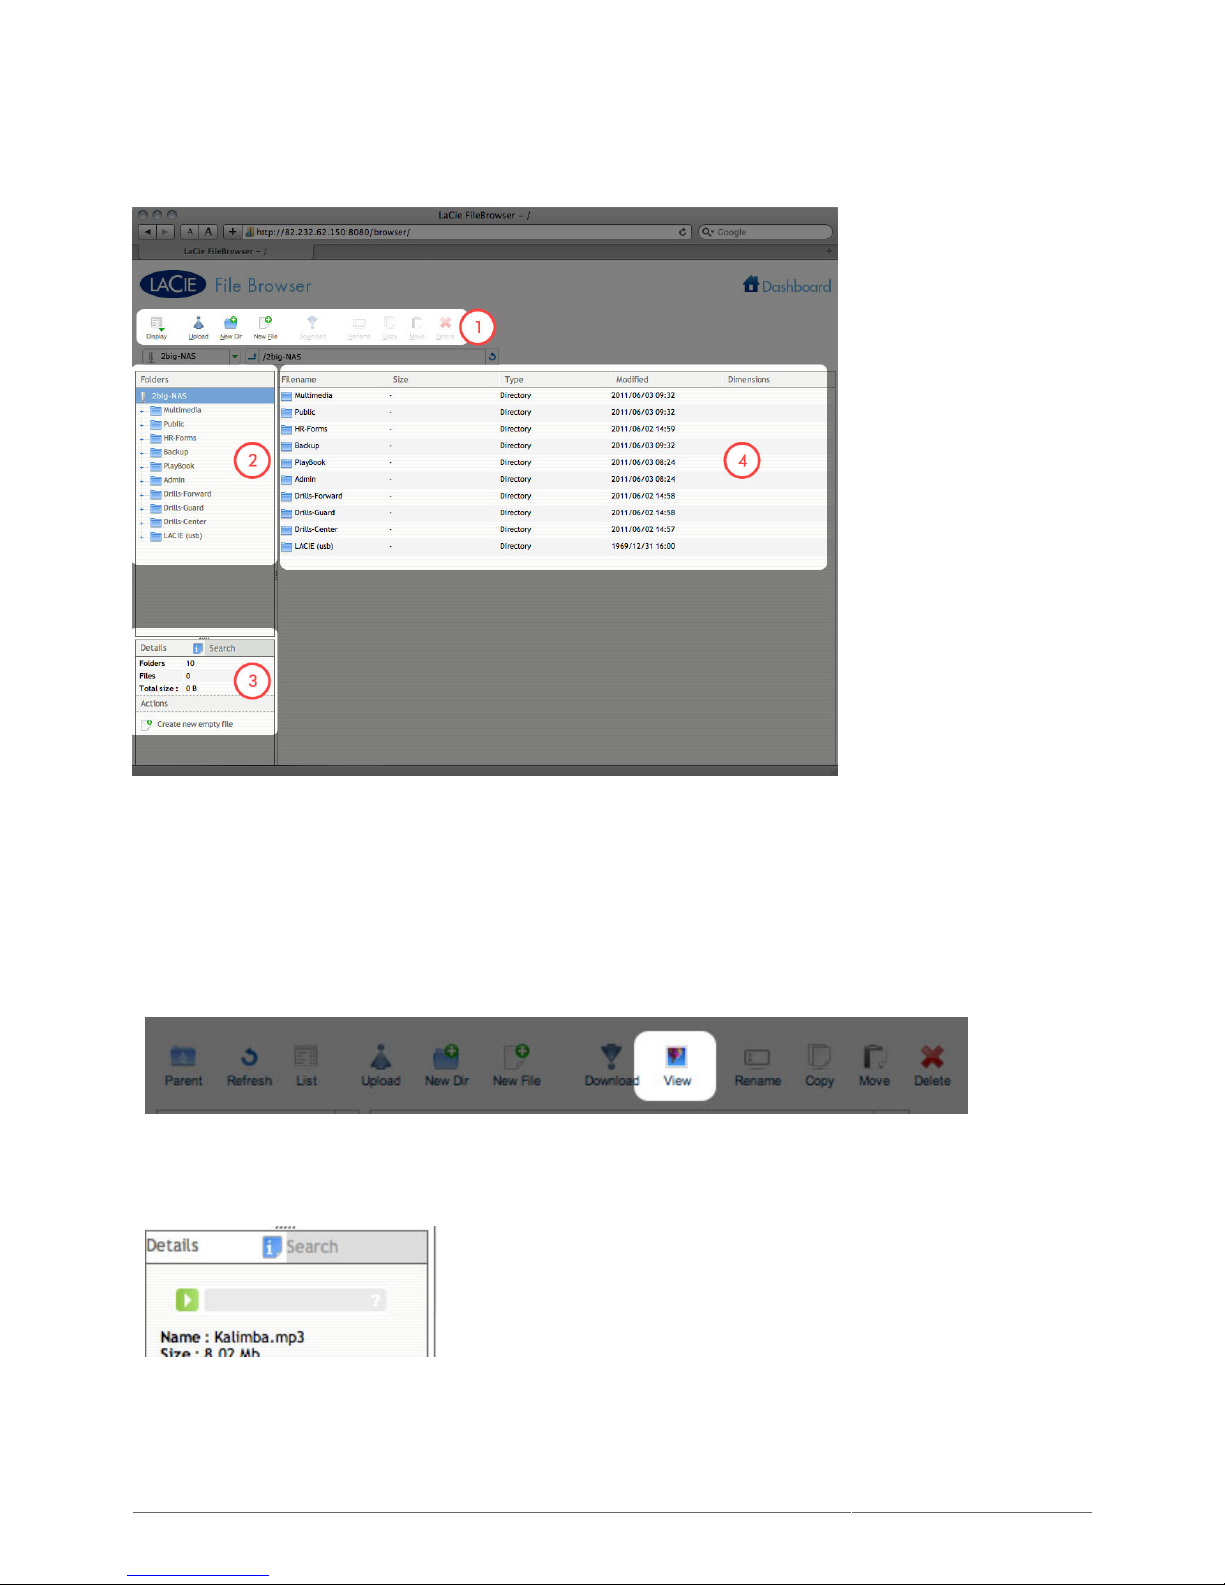
The Dashboard features an interactive File Browser that allows you to manage and transfer files via HTTP.
Access the File Browser by clicking its icon in the upper right-hand corner of the Dashboard.
The File Browser allows you to transfer, copy, and delete files, as well as view photos in thumbnails and even
stream multimedia content such as mp3 or view photos. It is thus a convenient way to interact with files stored
on your external hard drives through the network, whether the connection be through the local network or
through the internet (see Remote Access). Also, since the File Browser permits faster file transfer than
drag-and-drop (SMB), it is most effective for transferring large files.
The File Browser is composed of four parts:
The toolbar allows you to perform a range of functions, such as changing the way files are displayed and1.
uploading files to streaming files and creating folders.
Folders shows the folder structure on the selected share.2.
Details displays information on a selected file, such as name, thumbnail (image files), file type, dimensions3.
(photos), or duration (videos), while Search allows you to search for files based on file name.
Page 76
LaCie 2big NAS (OS 3.0) | LaCie 5big NAS Pro User Manual 76
This section displays the files contained in a selected folder. To view the files as thumbnails, click Thumbs in4.
the toolbar.
OPEN FILES
Photo: Click the View button in the toolbar.
■
Music: Click the play button in the Details panel (mp3 files only).
■
TXT files: Click the Edit button in the toolbar.
■
Page 77

LaCie 2big NAS (OS 3.0) | LaCie 5big NAS Pro User Manual 77
Page 78
LaCie 2big NAS (OS 3.0) | LaCie 5big NAS Pro User Manual 78
GENERAL SETTINGS
GENERAL TAB
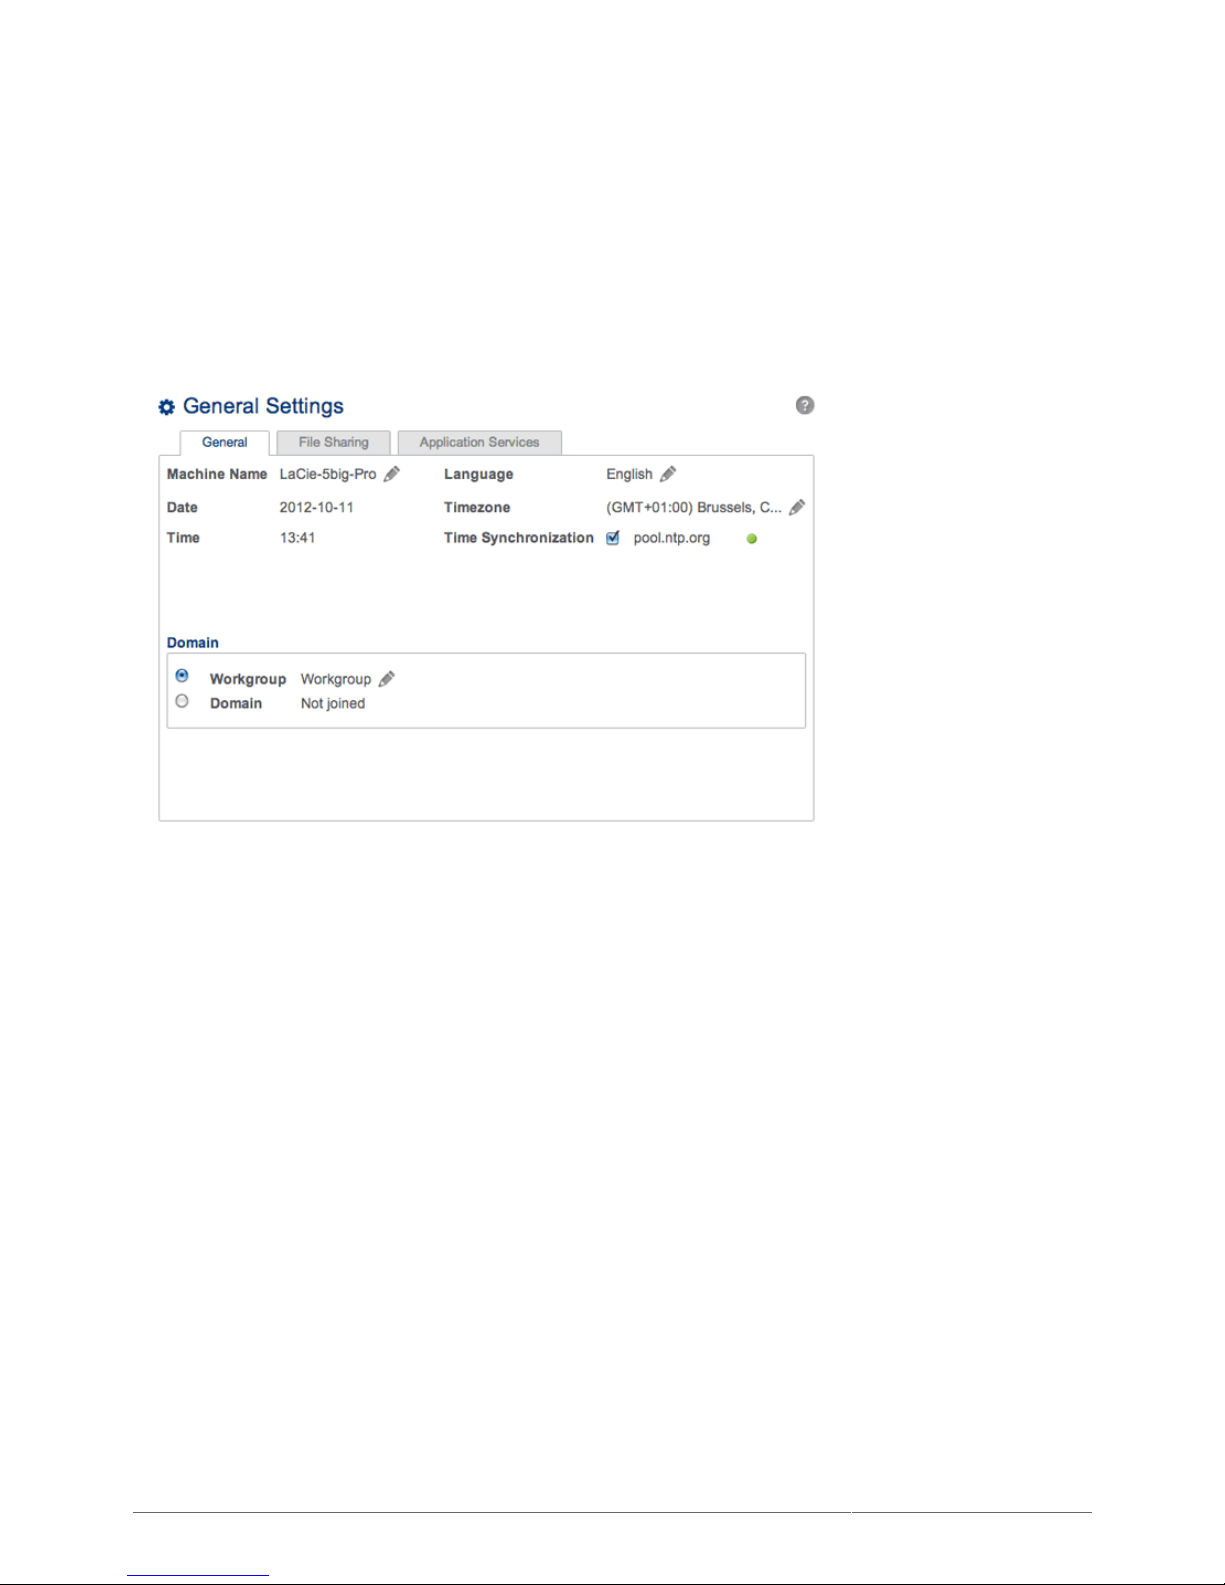
Machine Name: The machine name identifies your LaCie NAS on your network. You can change it from the
■
default by clicking on the pencil icon and typing a new one. If a duplicate name exists on the network,
alternate names are automatically created to avoid conflicts. For example, a second LaCie 5big NAS Pro on
your network will automatically be called LaCie-5big-P-1. Keep in mind that the machine name is limited to 15
characters, is case-sensitive, and can consist only of alphanumeric characters without spaces or symbols.
Date: The date and time are set automatically if you assign an NTP server (see below). If not, click on the
■
pencil icon and select a day from the calendar.
Time: If the time is not set by the NTP server, click on the pencil icon and select the proper time.
■
Language: Click on the pencil icon to change the Dashboard language.
■
Timezone: Click on the pencil icon for the listed time zone, then select your timezone from the dropdown
■
window.
Time Synchronization: This option allows your LaCie NAS to sync the time and date with an NTP (network
■
time protocol) server. Having it set automatically means you won't have to worry about adjusting your LaCie
NAS's time settings for daylight savings.
Domain
You LaCie NAS can join a Windows Workgroup or a Windows Active Directory:
Workgroup: Select the radio button for Workgroup and click on the pencil icon to type its name (use from 1
■
to 15 alphanumeric characters).
Page 79
LaCie 2big NAS (OS 3.0) | LaCie 5big NAS Pro User Manual 79
Domain: Select the radio button for Domain if you intend to join a Windows Active Directory (see the next
■
paragraph for instructions on entering your Active Directory credentials). When joining an Acive Directory,
existing users/passwords in the domain are respected by the LaCie NAS and treated exactly as if they were
created in the Dashboard. Once you have joined the Active Directory, domain users may be assigned access to
the LaCie NAS's shares.
Active Domain Troubleshooting: The information below provides general information on joining and
leaving a domain. For additional information, see Troubleshooting the Active Directory Connection.
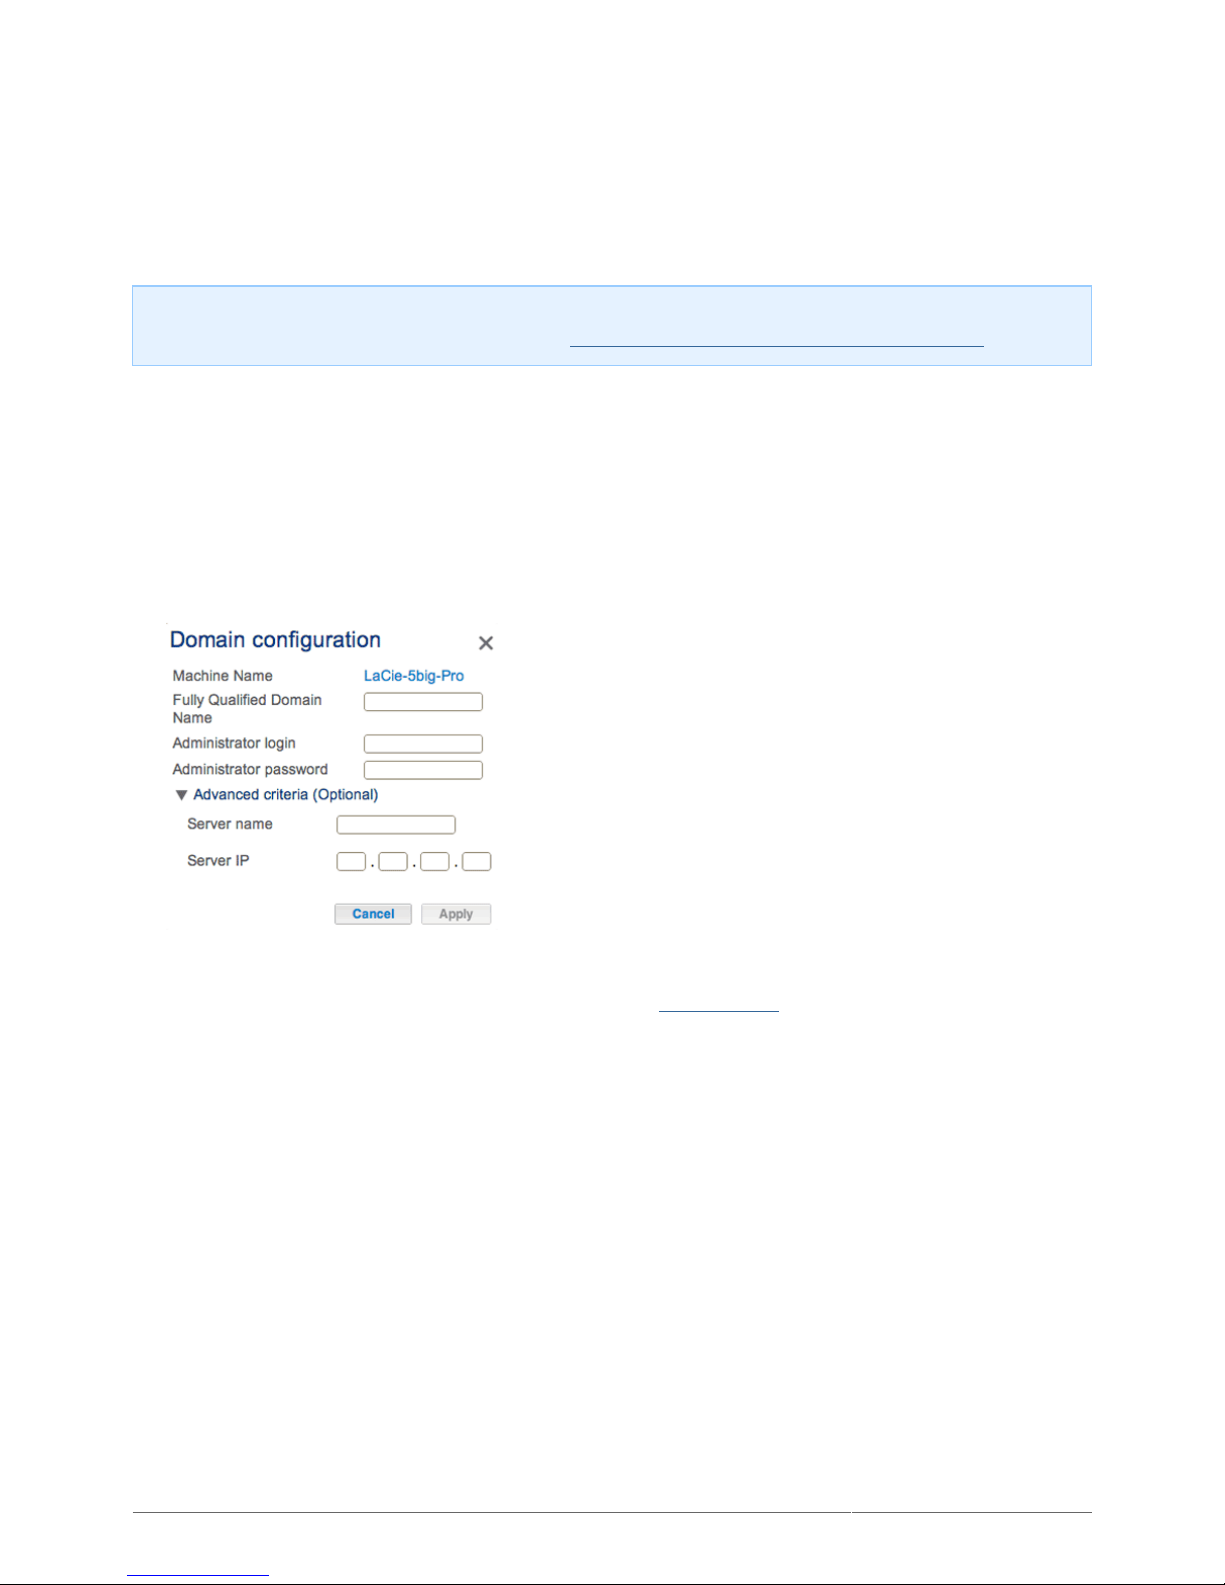
Connect to an Active Directory
Select the Domain radio button.1.
At the prompt, fill in the Fully Qualified Domain Name, Administrator login, and Administrator2.
password. For more complex network configurations, click the Advanced Criteria arrow and fill in the
Server name and Server IP.
Once connected, you can import users from the domain at Manage Users.3.
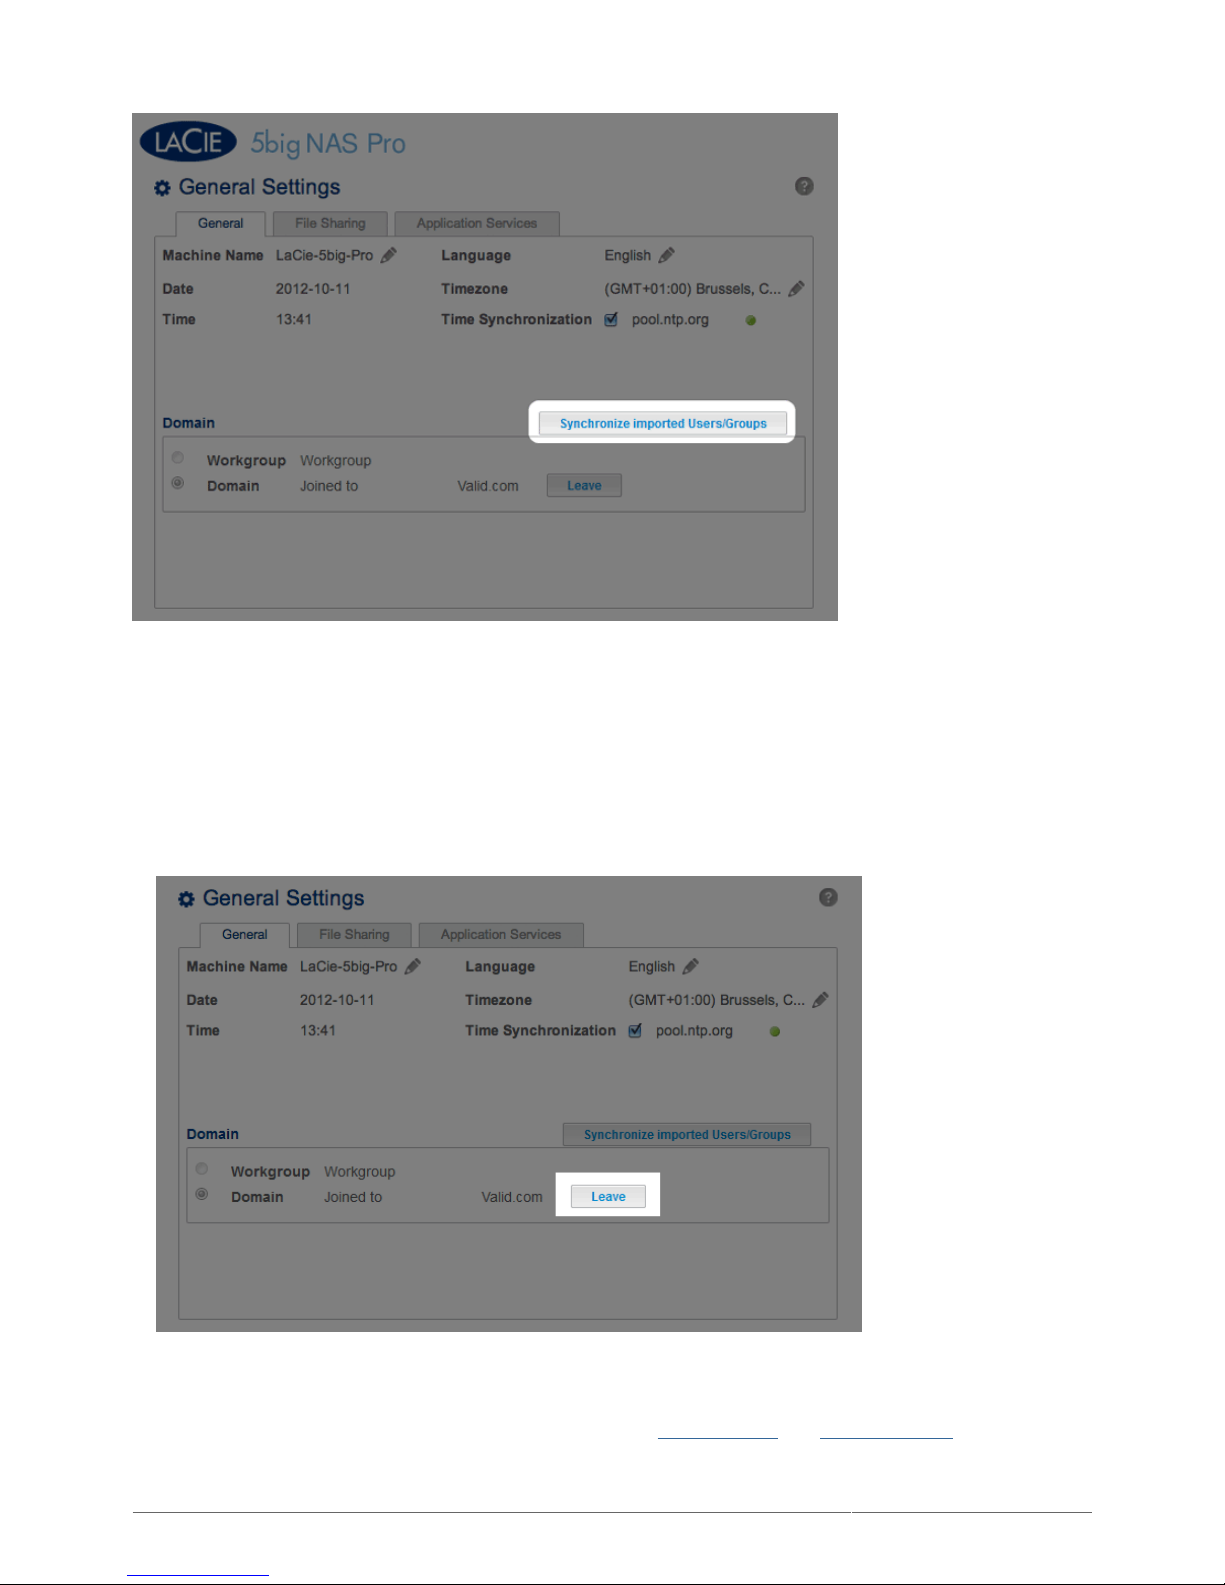
Synchronize Users/Groups
Except for access rights to shares on the LaCie NAS, users imported from a domain are managed by the
domain's administrator. If a user's account has been changed by the domain administrator within the Windows
Active Directory server (e.g. password revision, deleted from the domain, etc.), you can update the user's
account on the LaCie NAS by clicking on the button Synchronize imported Users/Groups.
Page 80
LaCie 2big NAS (OS 3.0) | LaCie 5big NAS Pro User Manual 80
Leave the domain
To remove the LaCie NAS's connection to a domain:
Click the Leave button.1.
Authenticate by inputting the administrator's username and password.2.
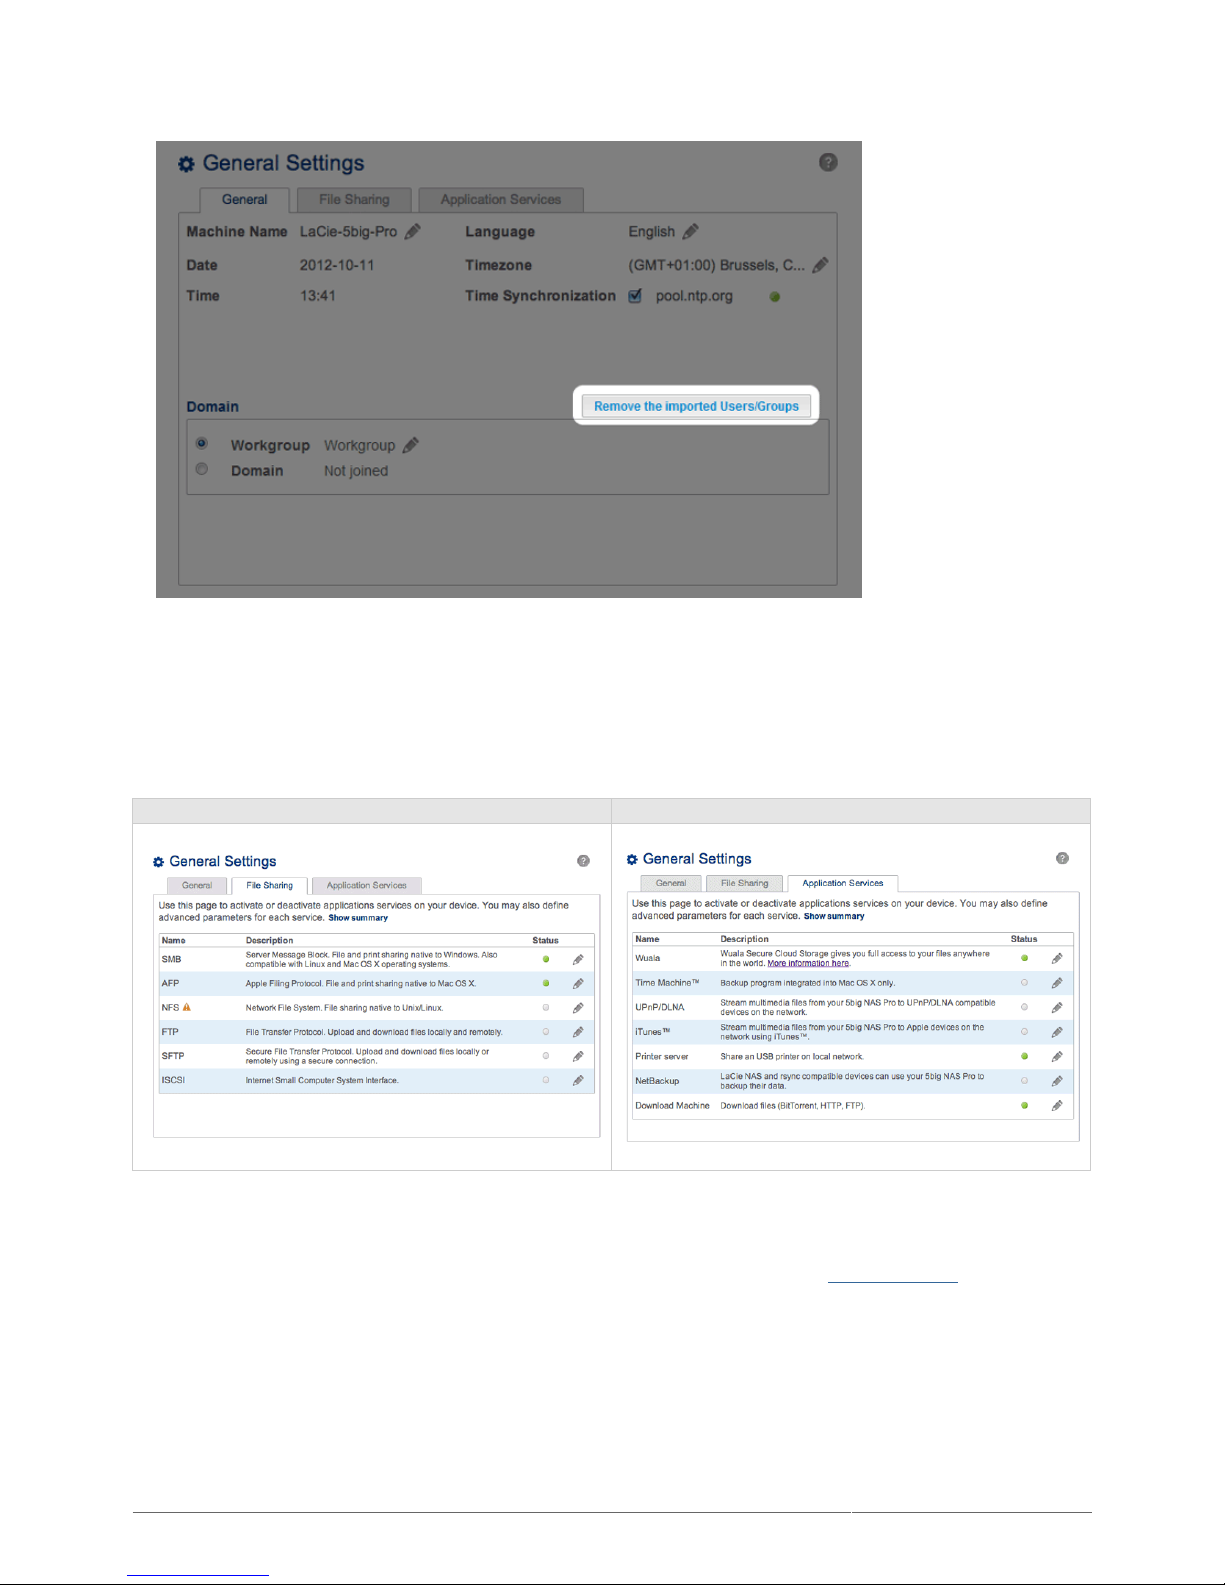
Users and Groups that were imported may still be listed in Manage Users and Manage Groups. To remove all3.
imported users and groups from the LaCie NAS, click on the button Remove the imported Users/Groups
Page 81
LaCie 2big NAS (OS 3.0) | LaCie 5big NAS Pro User Manual 81
(this button replaces Synchronize imported Users/Groups once you leave a domain).
FILE SHARING AND APPLICATION SERVICES TABS
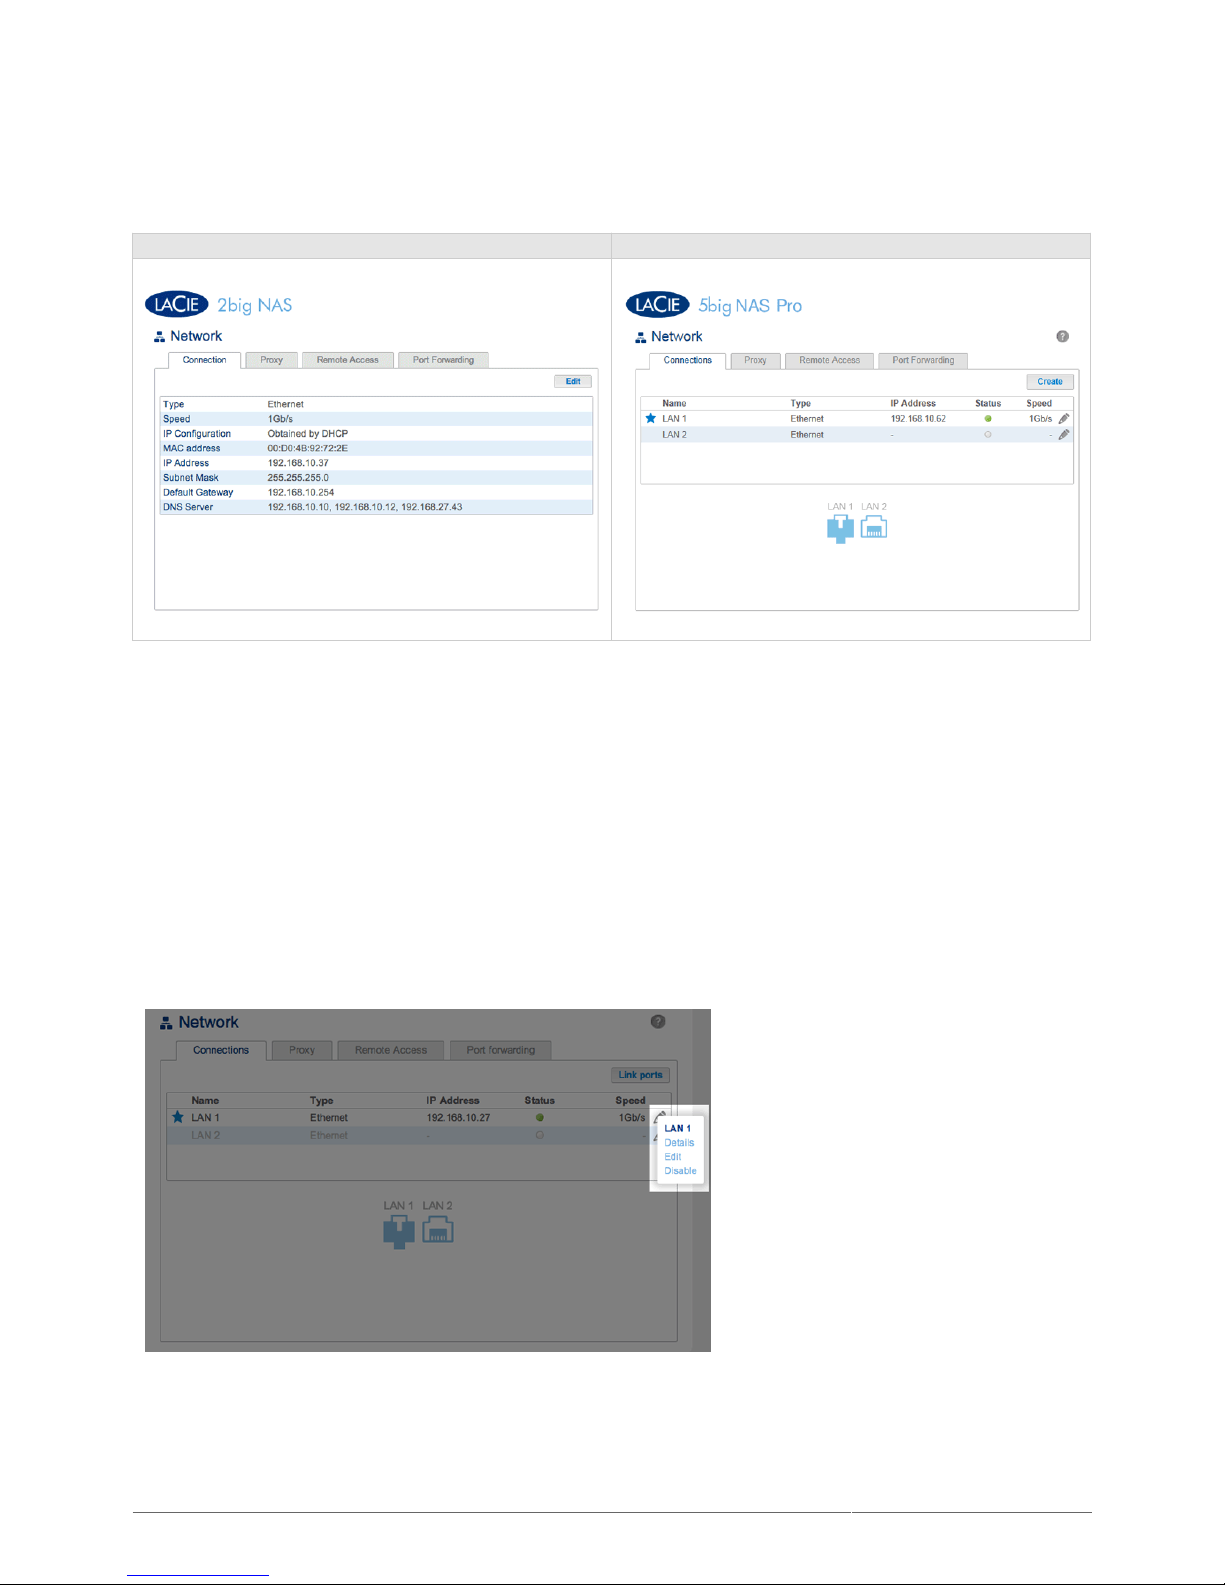
File Sharing Application Services
These tabs allow you to activate or deactivate sharing and applications protocols on your device on global or
default levels. There are three levels of service activation: global, default, and share (specific). The global level
overrides the other levels. If a service is activated at the global level, a green light will be listed in the Status
column. The share level overrides the default level but not the global level. Go to Manage Shares to activate a
service at the share level.
Click the configuration icon (pencil) for a given protocol to:
Activate or deactivate the protocol at the global level.1.
By default, services are active for newly created shares. Deactivate or activate a service at the default level2.
by clicking on the configuration icon (pencil) and selecting Advanced parameters.
Page 82

LaCie 2big NAS (OS 3.0) | LaCie 5big NAS Pro User Manual 82
Note: Activating NetBackup Server will disable SFTP (see Enable NetBackup Server).
Page 83
LaCie 2big NAS (OS 3.0) | LaCie 5big NAS Pro User Manual 83
NETWORK
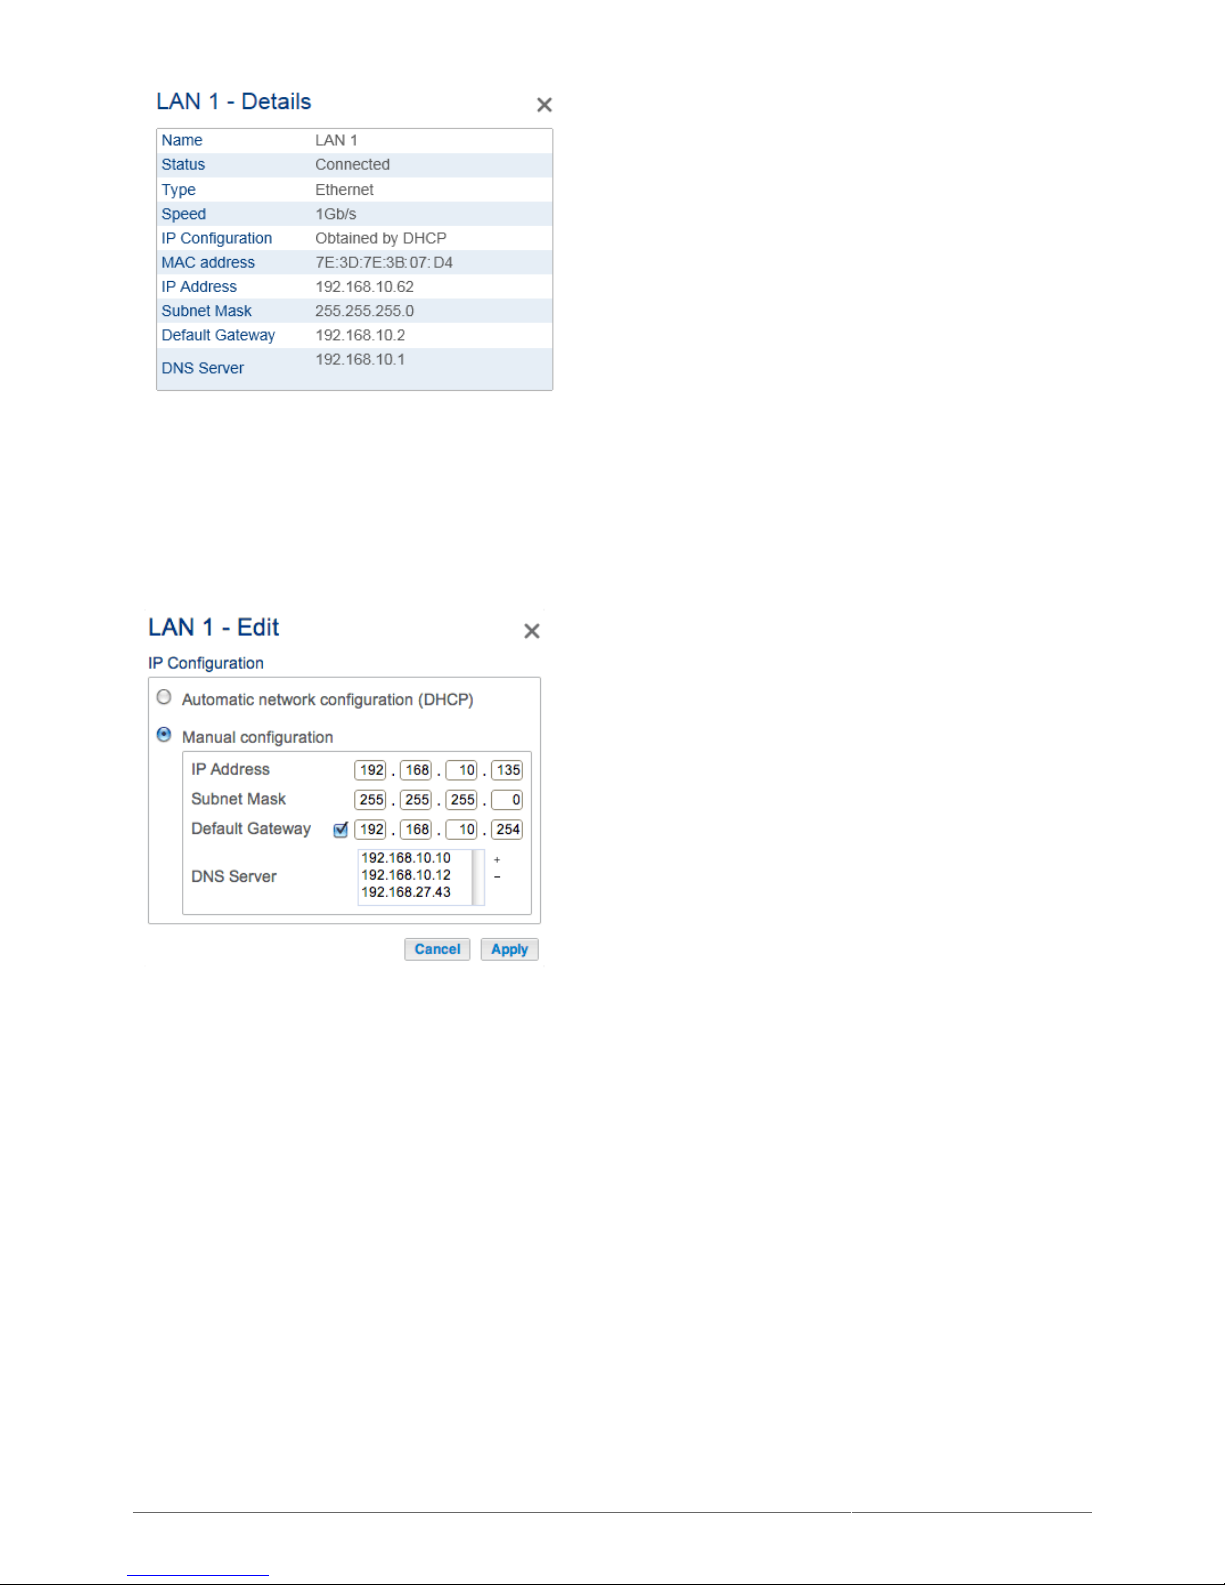
LaCie 2big NAS LaCie 5big NAS Pro
CONNECTION TAB
If your network is DHCP-enabled, your LaCie NAS will automatically be assigned an IP address and other values.
As a result, most users will see that the table in the Connections tab has been filled in with values.
The LaCie 2big NAS has a single LAN port while the LaCie 5big NAS Pro includes two LAN ports (see below). If
you wish to review or modify the values of a LAN port:
LaCie 2big NAS: Click the Edit button.
■
LaCie 5big NAS Pro: Click on the configuration icon (pencil) then select Details or Edit.
■
Page 84
LaCie 2big NAS (OS 3.0) | LaCie 5big NAS Pro User Manual 84
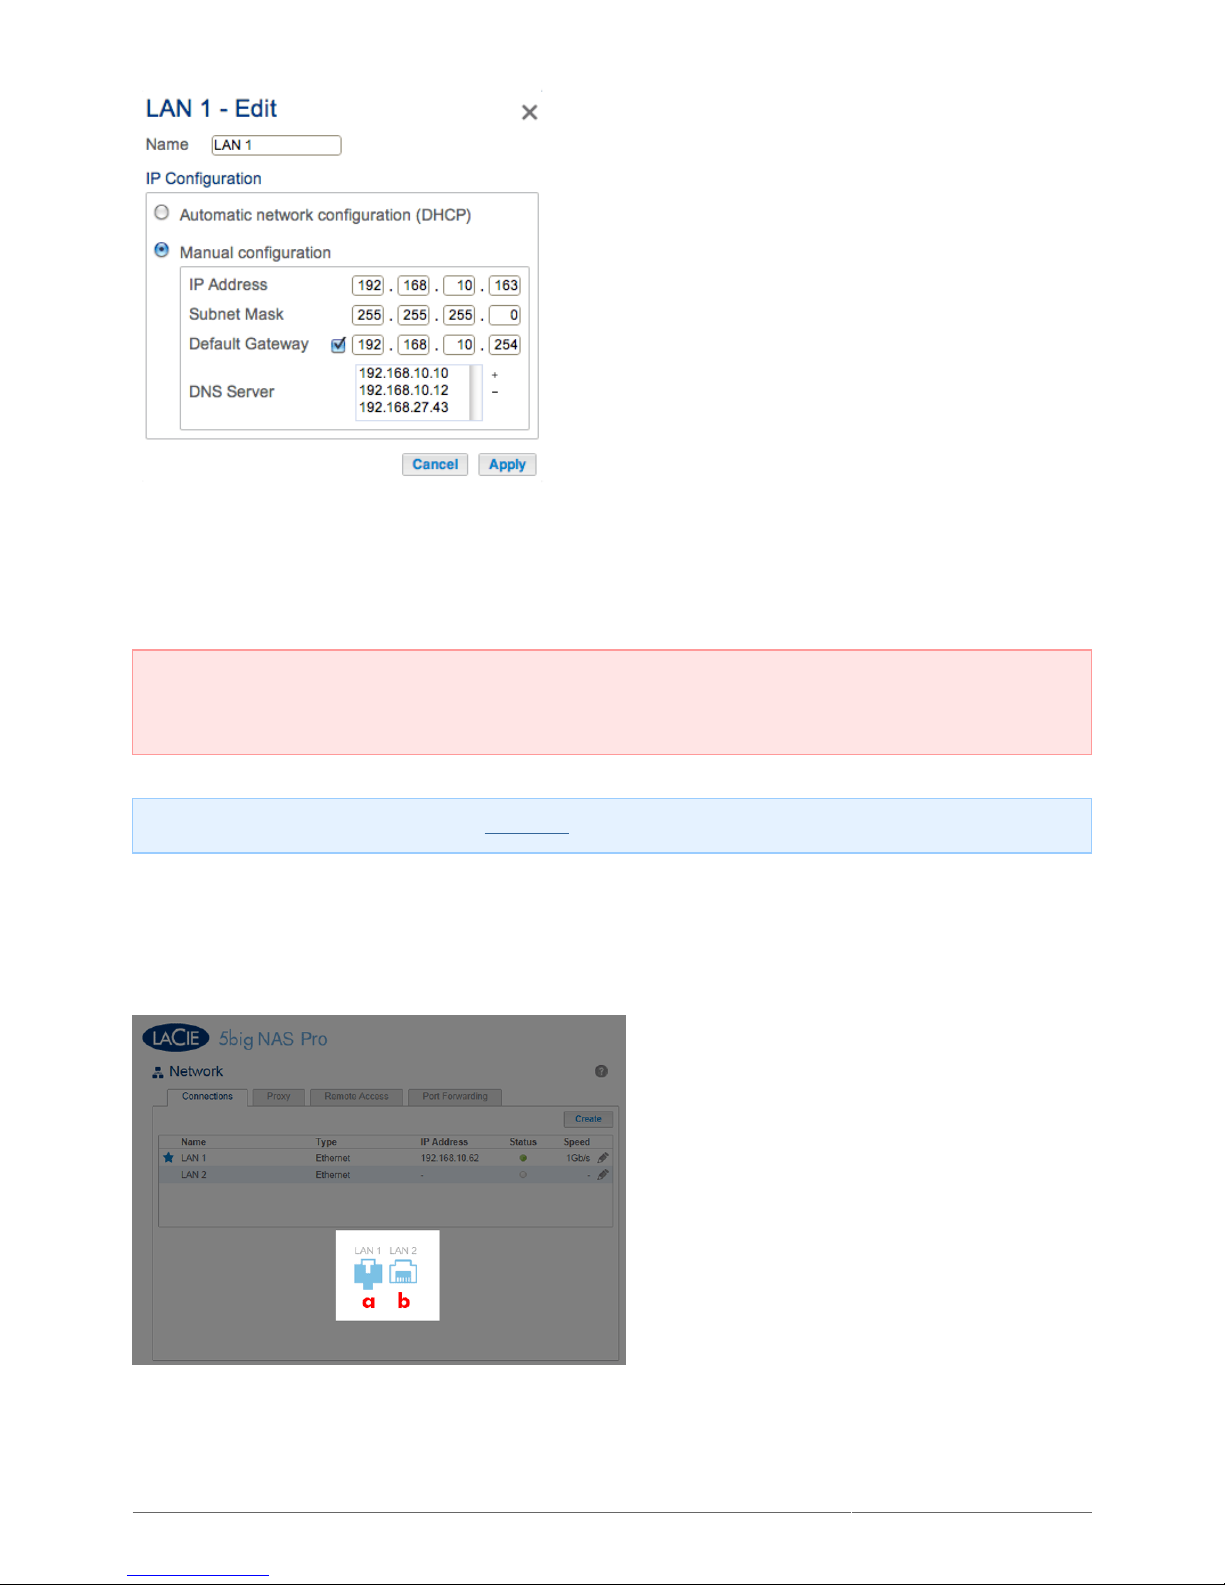
LAN Details - 5big NAS Pro
Selecting Edit allows you to modify certain network parameters. You can manually adjust network values by
selecting Manual configuration and give the LAN port a unique name (LaCie 5big NAS Pro only). Please make
certain to check the box next to Default Gateway to enter or revise a Gateway address. For the manual
address to take effect, all fields must be completed before selecting Apply.
Edit - LaCie 2big NAS
Page 85
LaCie 2big NAS (OS 3.0) | LaCie 5big NAS Pro User Manual 85
Edit - LaCie 5big NAS Pro
Important info on Network Addressing: LaCie cautions users that changes to the IP address must be
consistent with the values of the router and/or network. You may lose contact with your LaCie NAS by typing
addresses that are not available on your network.
LaCie 2big NAS users: Please skip to Proxy Tab.
LaCie 5big NAS Pro Ethernet Ports
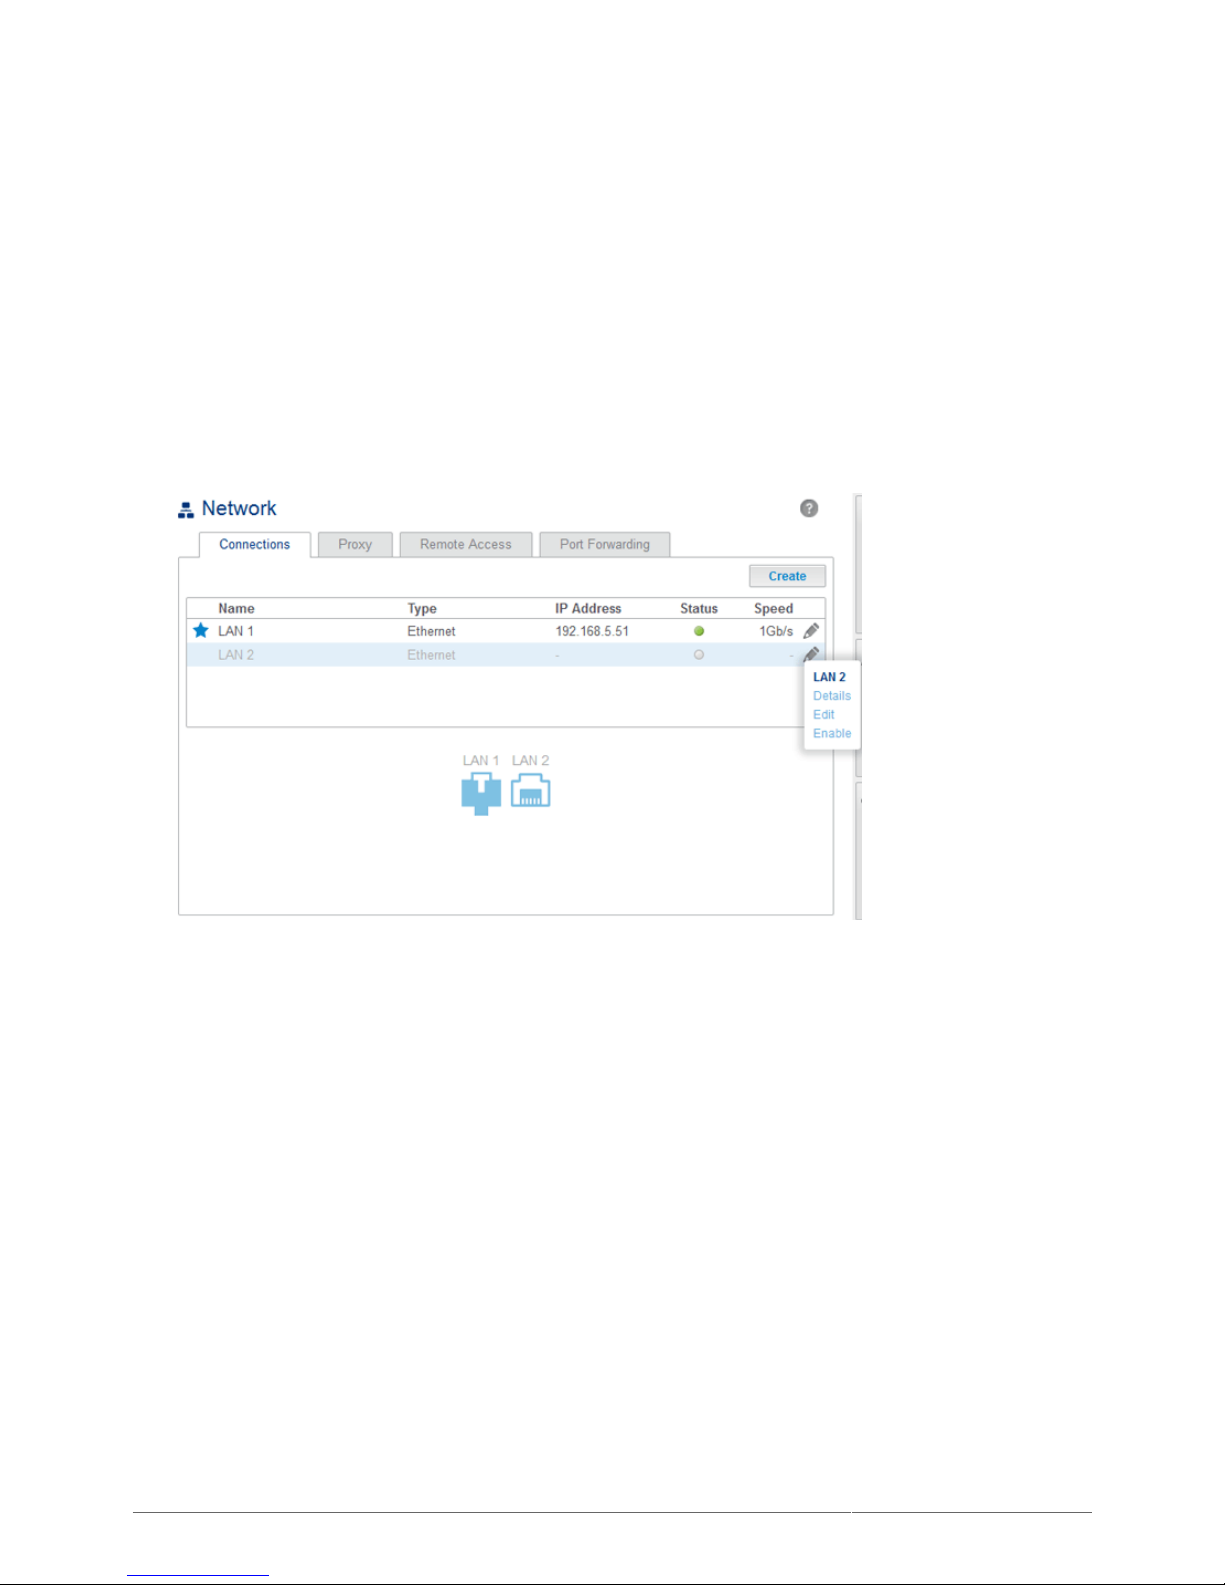
Icons representing the two LAN ports on the Connections tab indicate connection to the network:
Connected: a
■
Not connected: b
■
Page 86

LaCie 2big NAS (OS 3.0) | LaCie 5big NAS Pro User Manual 86
Page 87
LaCie 2big NAS (OS 3.0) | LaCie 5big NAS Pro User Manual 87
Port Aggregation: Multiple Networks, Bonding, and Fault Tolerance
The LaCie 5big NAS Pro is equipped with two LAN ports for enhanced network performance. Review the
instructions below to learn how to configure the LaCie 5big NAS Pro LAN ports for your network.
Two Networks: Bridge the data on your LaCie 5big NAS Pro
Connect the LaCie 5big NAS Pro to two separate networks to share access to data.
Connect LAN 1 to the first network switch and LAN 2 to the second network switch.1.
Go to Dashboard > Network and choose the Connections tab.2.
If one or both LANs are not active, click on the configuration icon to select Enable.3.
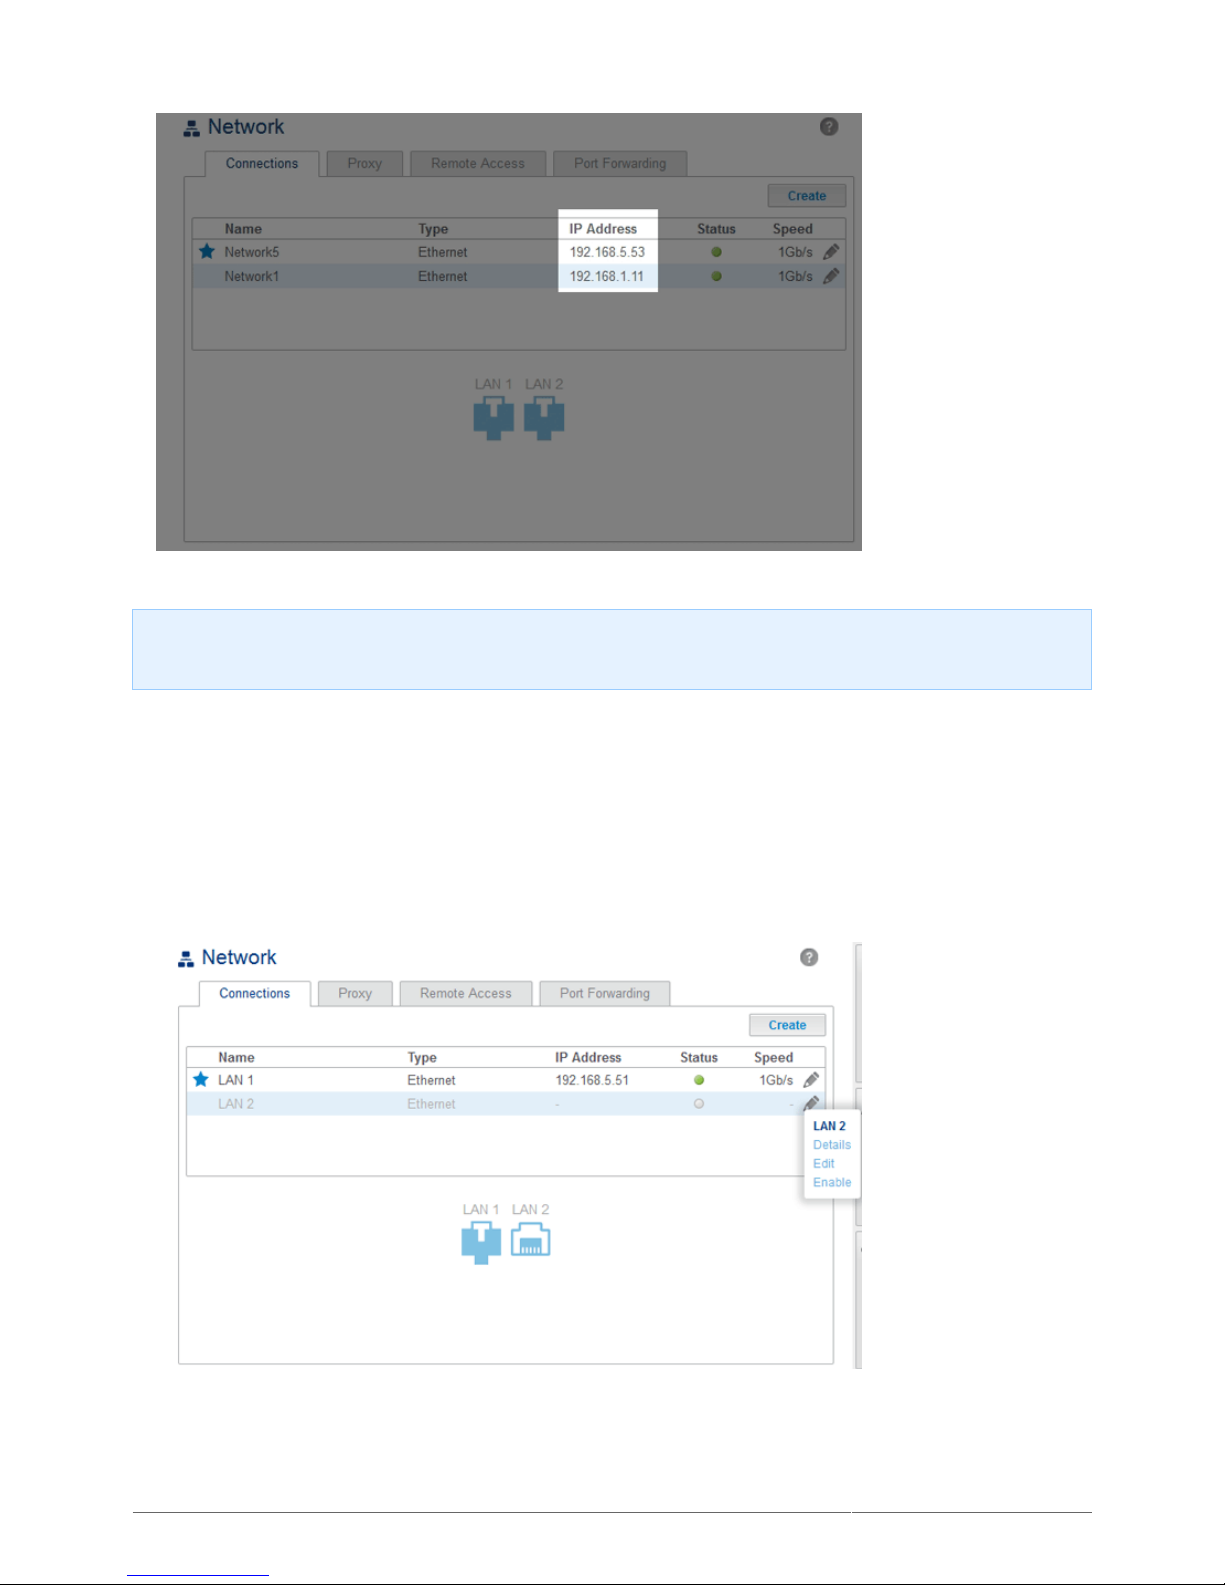
Once the LAN is enabled, it can receive a DHCP address from the router. Each LAN should have separate4.
addresses to reflect connection to two separate networks. In the screenshot below, the subnets of the IP
addresses (5 for LAN 1 and 1 for LAN 2) demonstrate that each LAN is connected to its own network.
Page 88
LaCie 2big NAS (OS 3.0) | LaCie 5big NAS Pro User Manual 88
IP Addressing: You can manually configure the IP addresses for the LAN connections by clicking on their
respective configuration icons (pencil) and selecting Edit.
Bonding: Enhanced Speed
Configure both Ethernet ports to act together for speeds up to two times faster than a single LAN connection.
Before following the directions below, please make certain that your switch or router supports link aggregation.
Connect LAN 1 and LAN 2 to the same switch or router.1.
Go to Dashboard > Network and choose the Connections tab.2.
If one LAN is not active, click on its configuration icon (pencil) to select Enable.3.
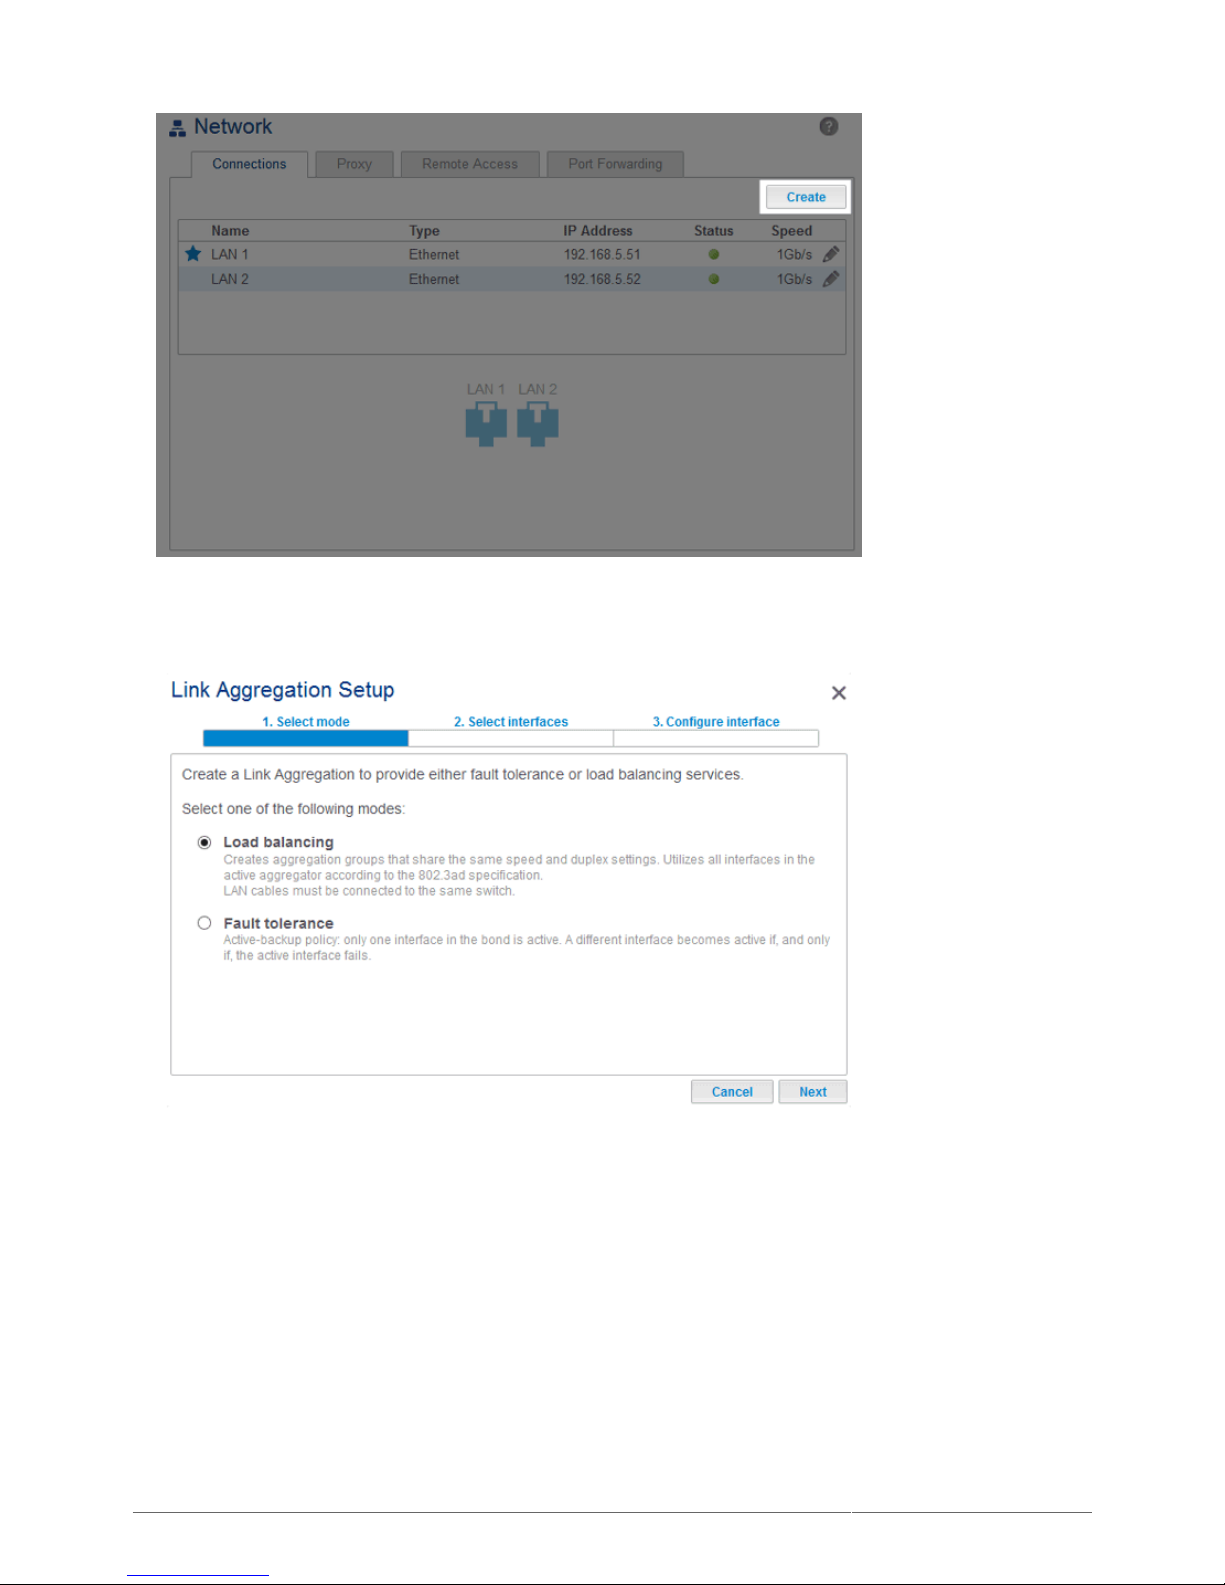
With both LANs enabled, click on Create to configure bonding.4.
Page 89
LaCie 2big NAS (OS 3.0) | LaCie 5big NAS Pro User Manual 89
Select Load balancing then click Next.5.
Check the boxes next to each LAN port then click Next.6.
Page 90
LaCie 2big NAS (OS 3.0) | LaCie 5big NAS Pro User Manual 90
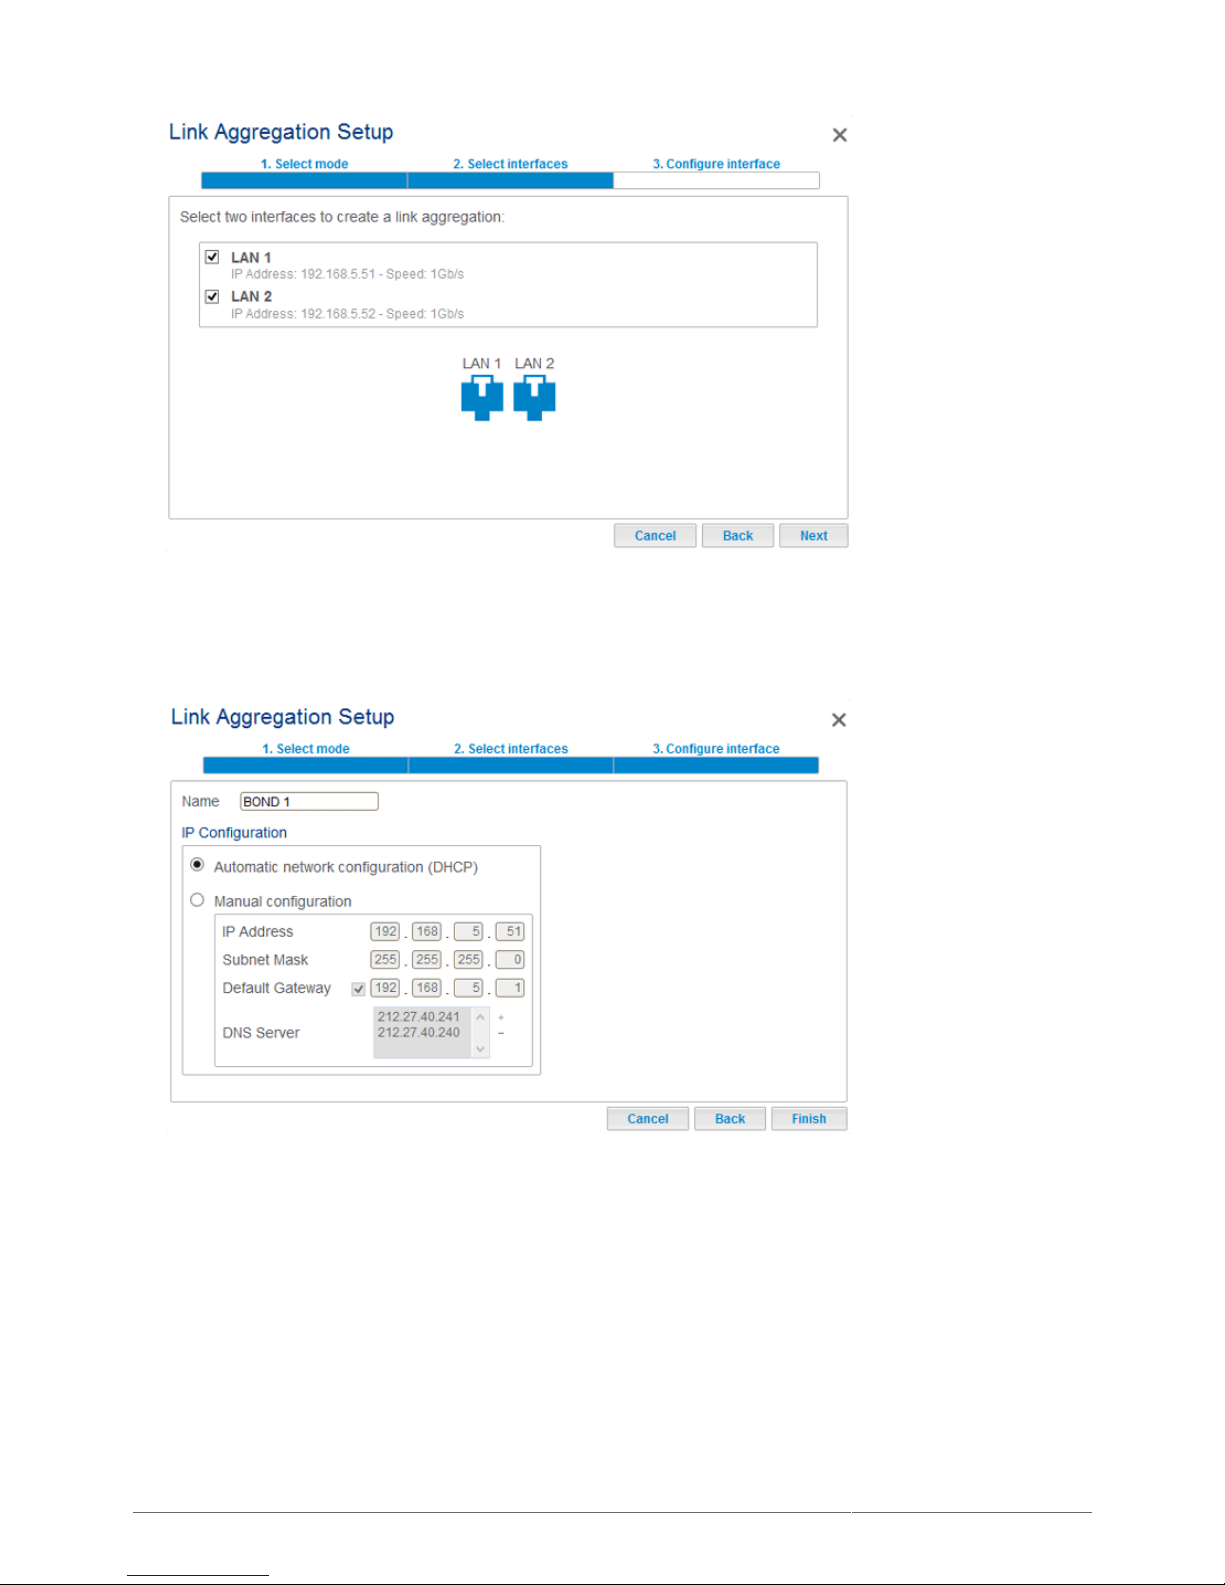
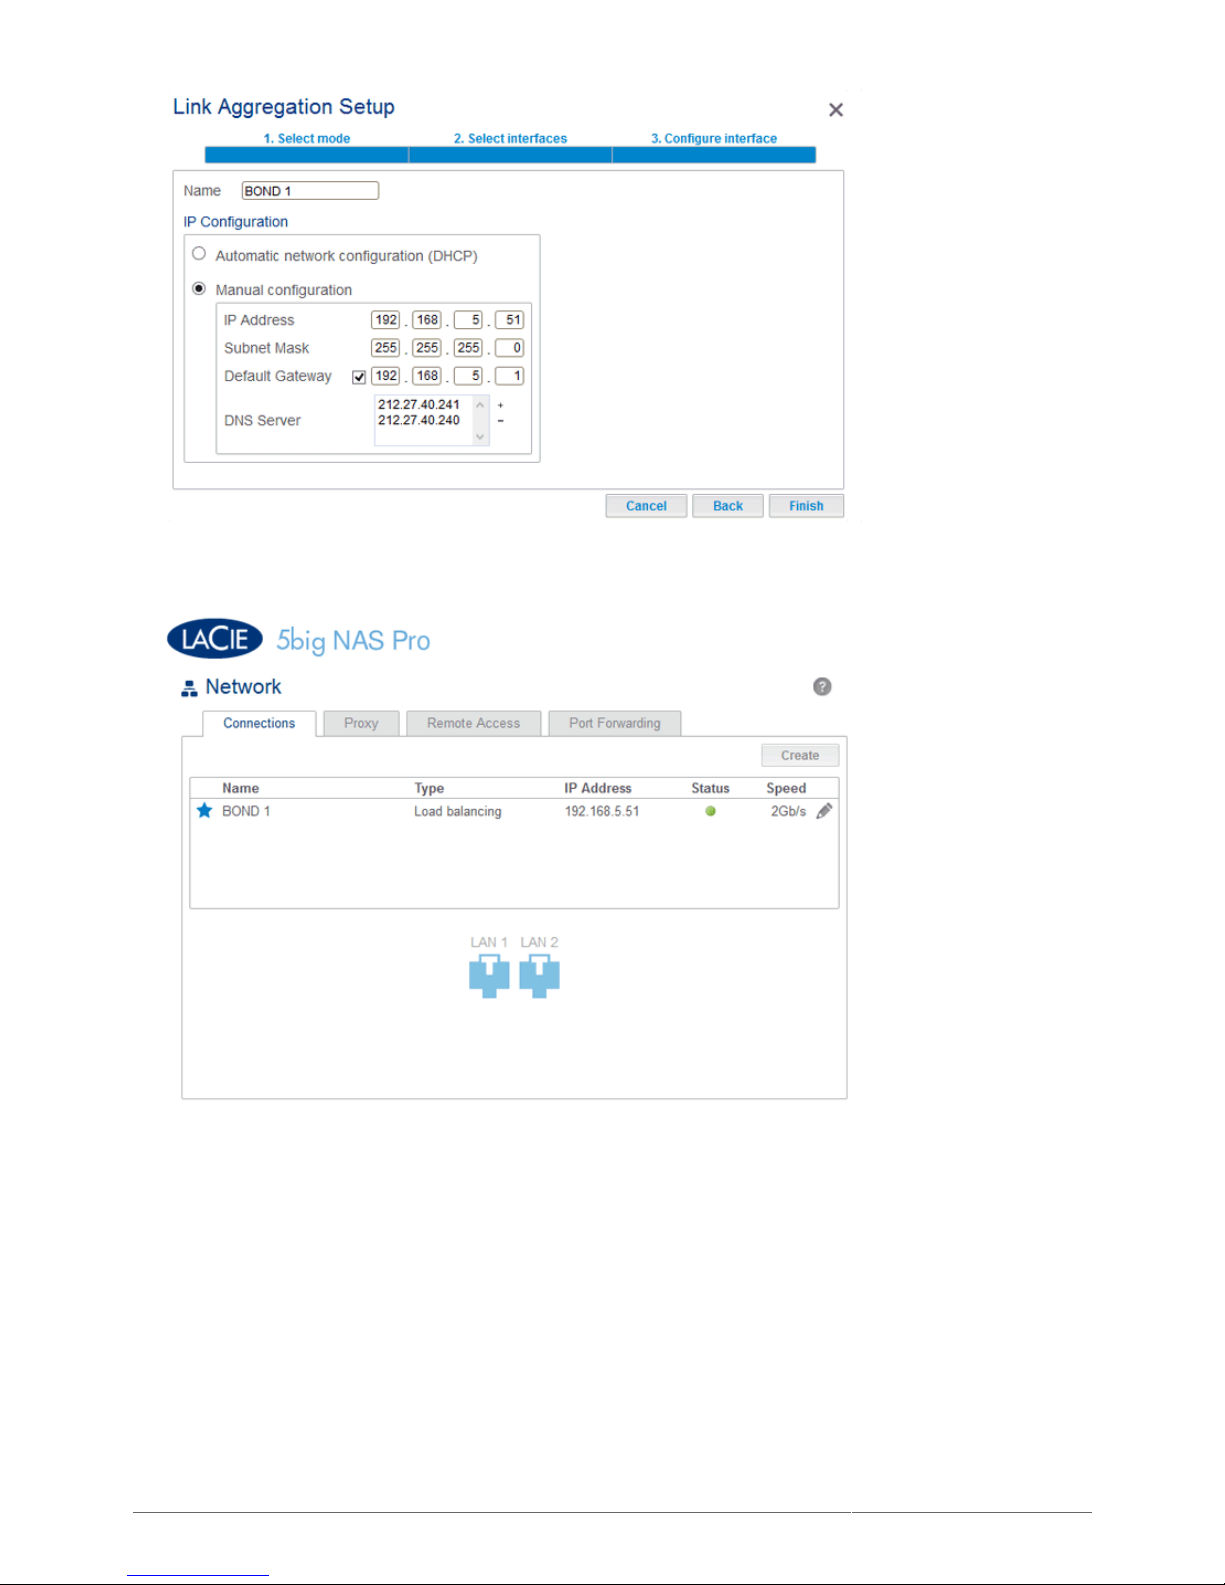
You can name the LAN bonding as well as select how the paired Ethernet ports will receive a unified IP7.
address (DHCP or Manual configuration). If you select Manual configuration, the IP address must be
consistent with the values of the router and/or network. Click Finish to complete the bonding.
DHCP IP addressing
Page 91
LaCie 2big NAS (OS 3.0) | LaCie 5big NAS Pro User Manual 91
Manual/Static IP addressing
The two LAN ports are now listed as one.8.
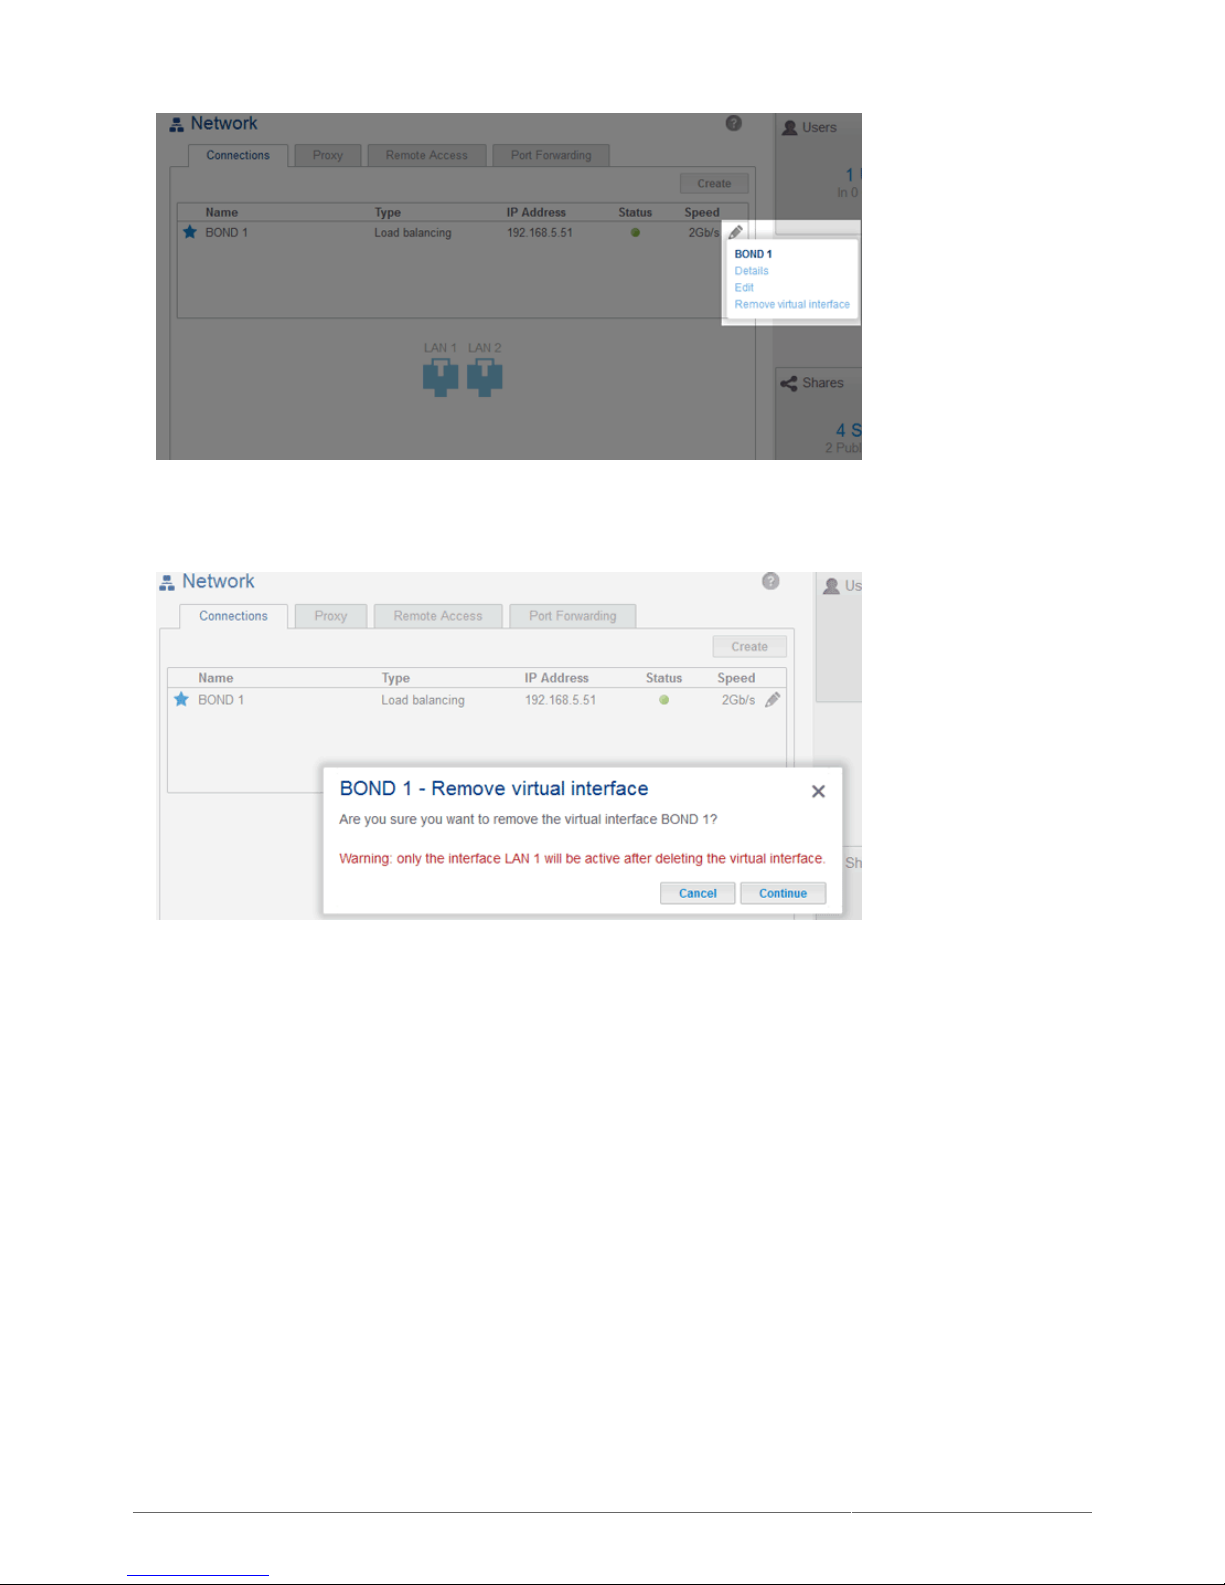
Break the LAN bond: If you no longer wish to bond the two Ethernet ports, follow the steps below.
Click on the configuration icon (pencil) to select Remove virtual interface.1.
Page 92
LaCie 2big NAS (OS 3.0) | LaCie 5big NAS Pro User Manual 92
Click Continue at the prompt.2.
Fault Tolerance: Failover Protection
Configure fault tolerance to keep your LaCie 5big NAS Pro connected to the network even if one Ethernet port or
cable fails. Before following the directions below, please make certain that your network switch(es)/router(s)
support fault tolerance.
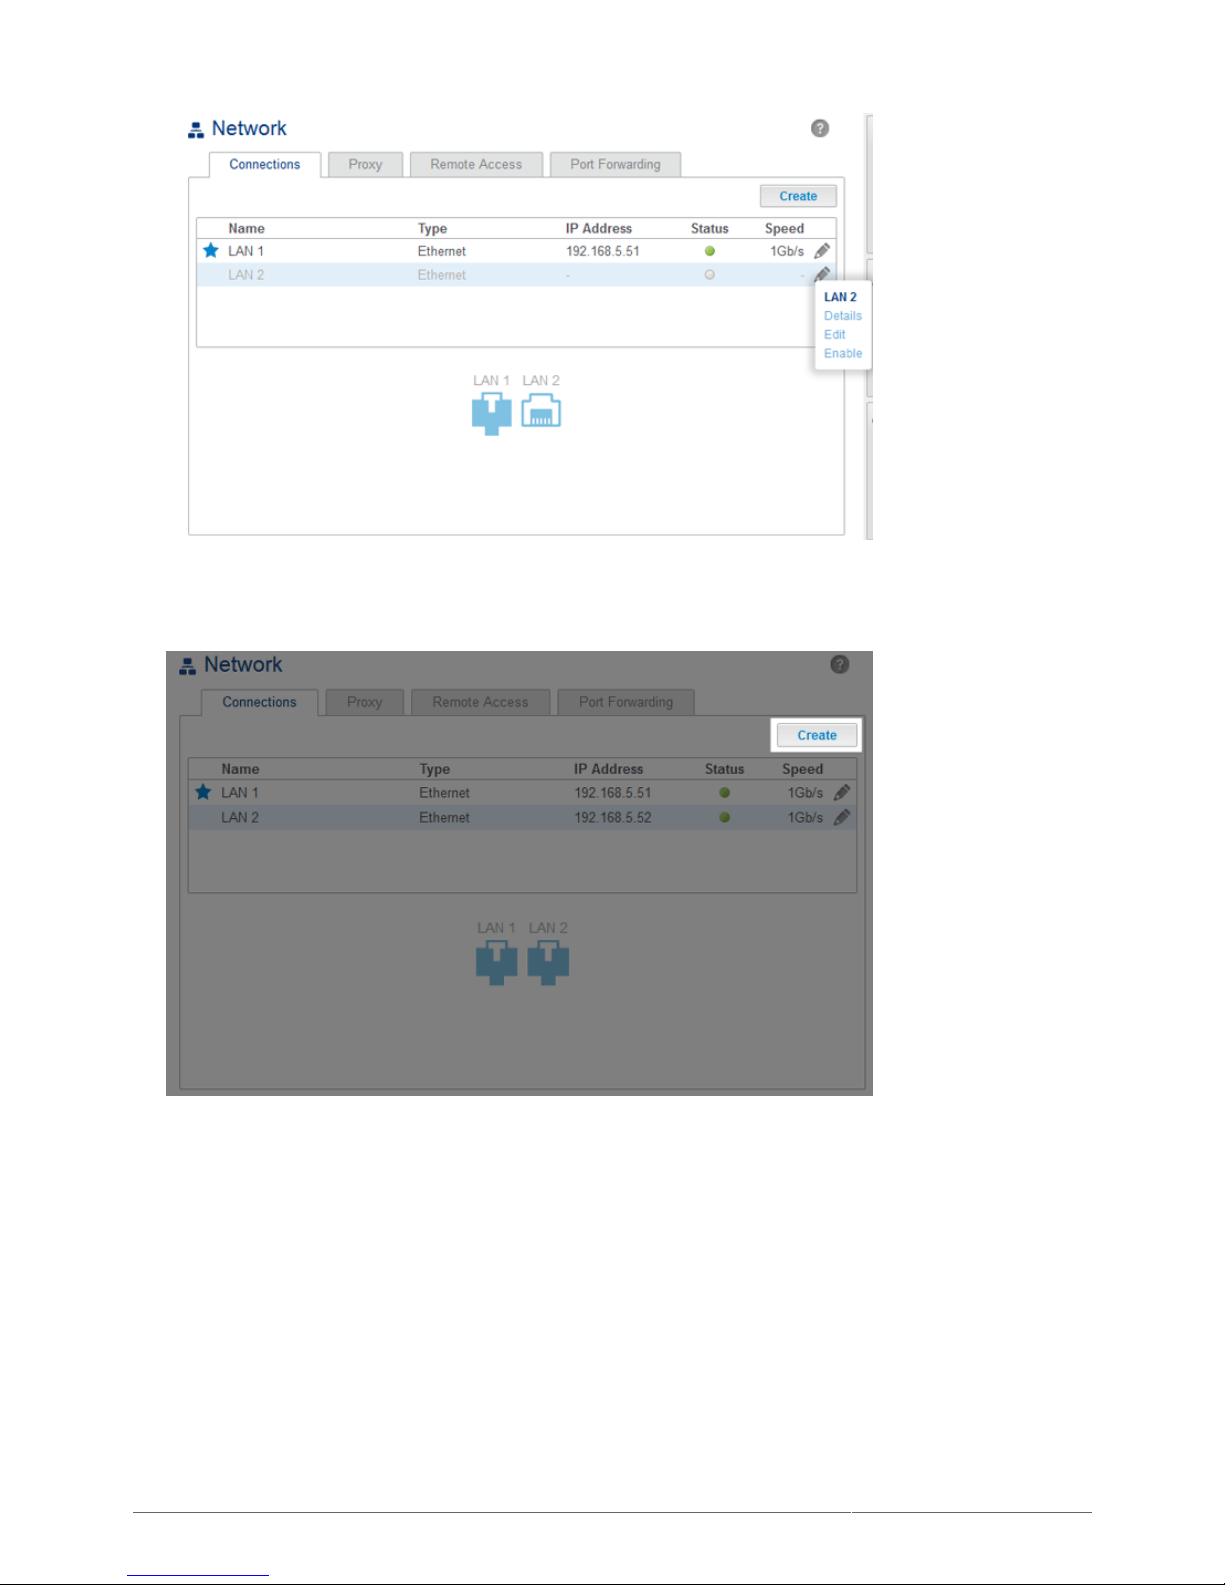
Connect LAN 1 and LAN 2 to the same network switch or router.1.
Go to Dashboard > Network and choose the Connections tab.2.
If one LAN is not active, click on its configuration icon (pencil) to select Enable.3.
Page 93
LaCie 2big NAS (OS 3.0) | LaCie 5big NAS Pro User Manual 93
With both LANs enabled, click on Create.4.
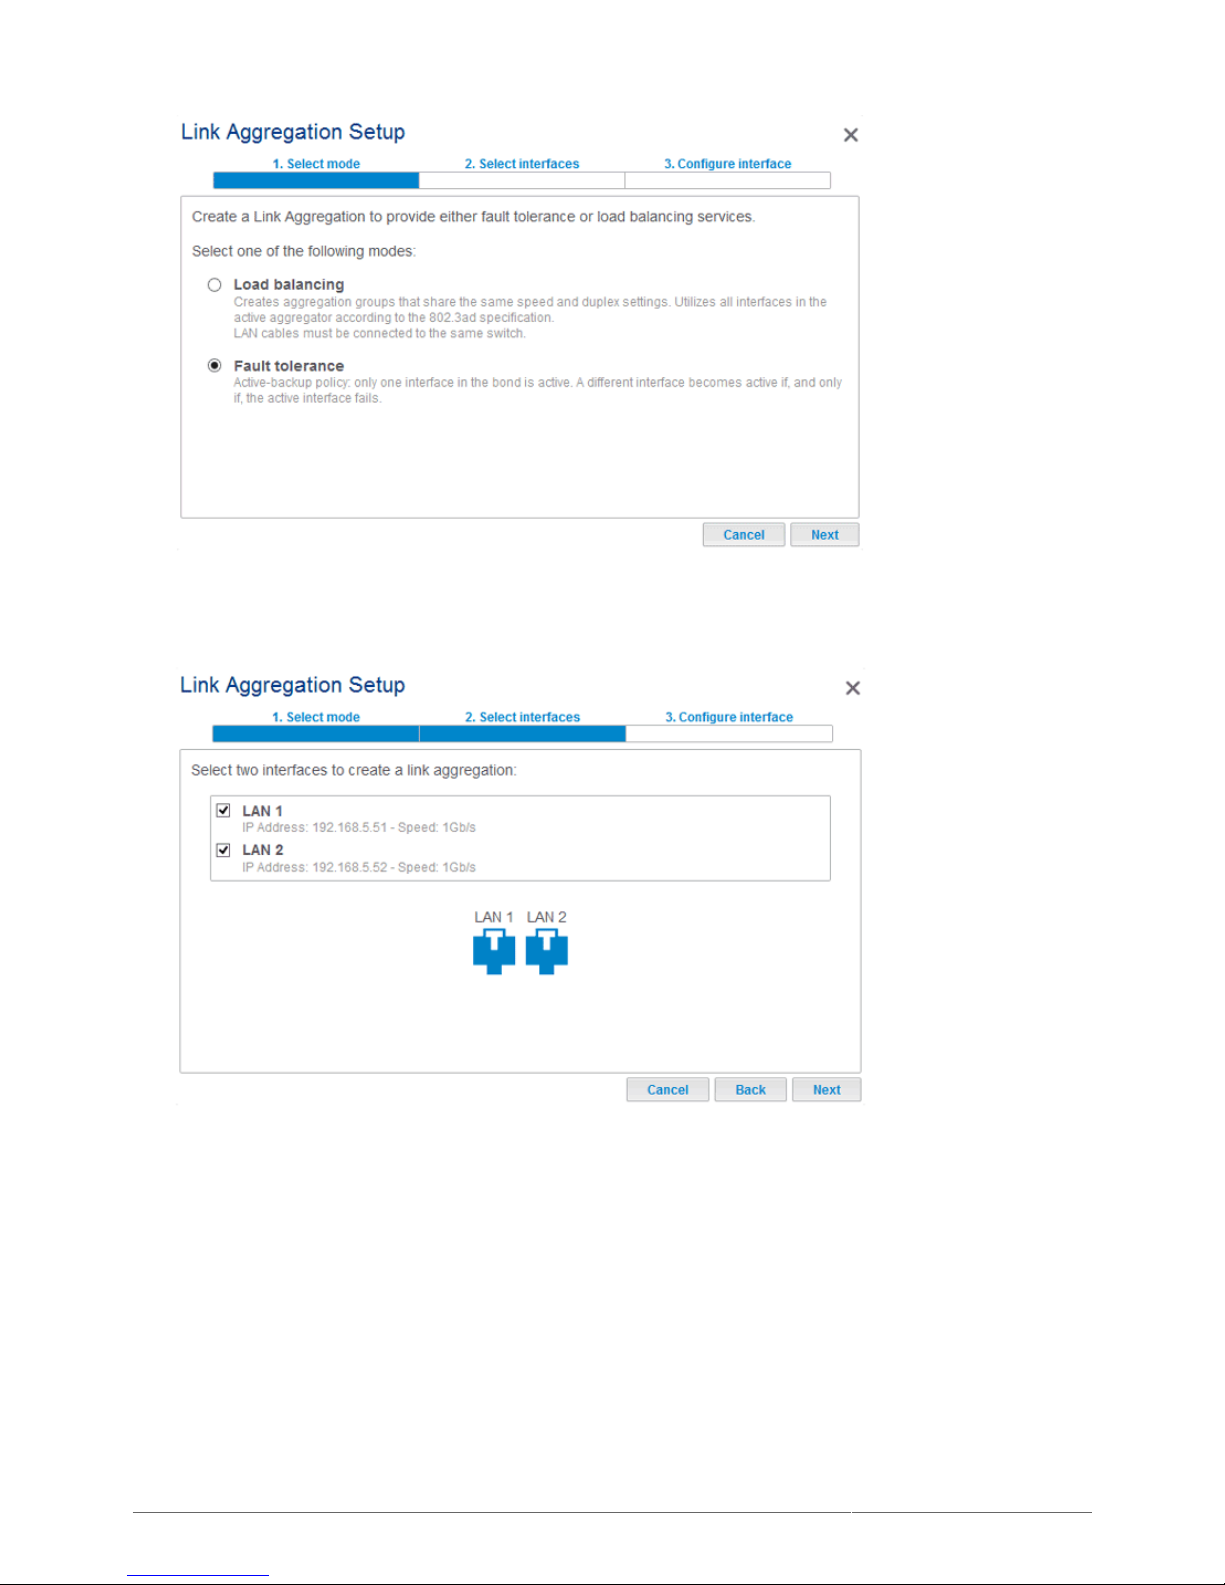
Select Fault tolerance then click Next.5.
Page 94
LaCie 2big NAS (OS 3.0) | LaCie 5big NAS Pro User Manual 94
Check the boxes next to each LAN port then click Next.6.
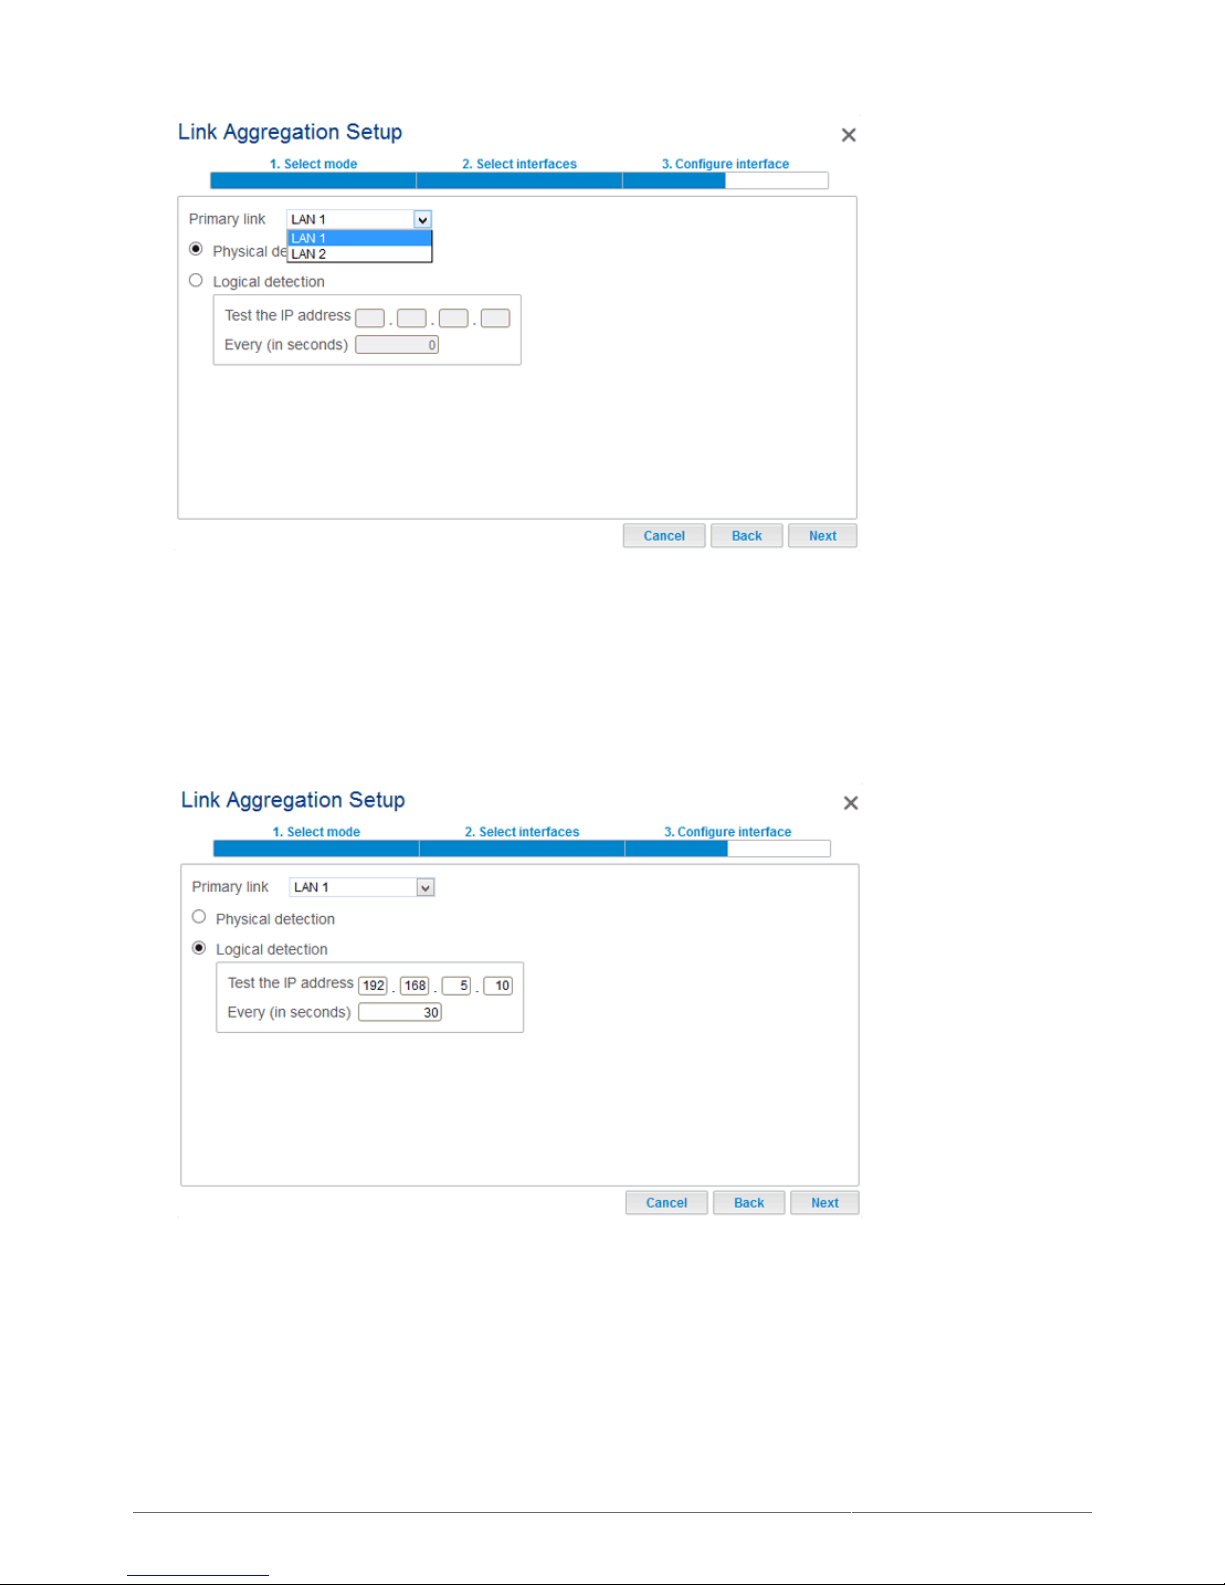
Use the pulldown menu to choose the primary LAN port.7.
Page 95
LaCie 2big NAS (OS 3.0) | LaCie 5big NAS Pro User Manual 95
Fault tolerance will switch to the secondary LAN if it cannot detect the primary LAN. Choose if the type of8.
detection should be physical (e.g. a bad Ethernet cable) or software (e.g. contact with another IP address).
Enter the IP address that the LaCie 5big NAS Pro should ping to confirm the stability of the primary LAN and
the frequency. The IP address should be for a separate server, a computer on the network, or another
device that can manage the task. Click Next.
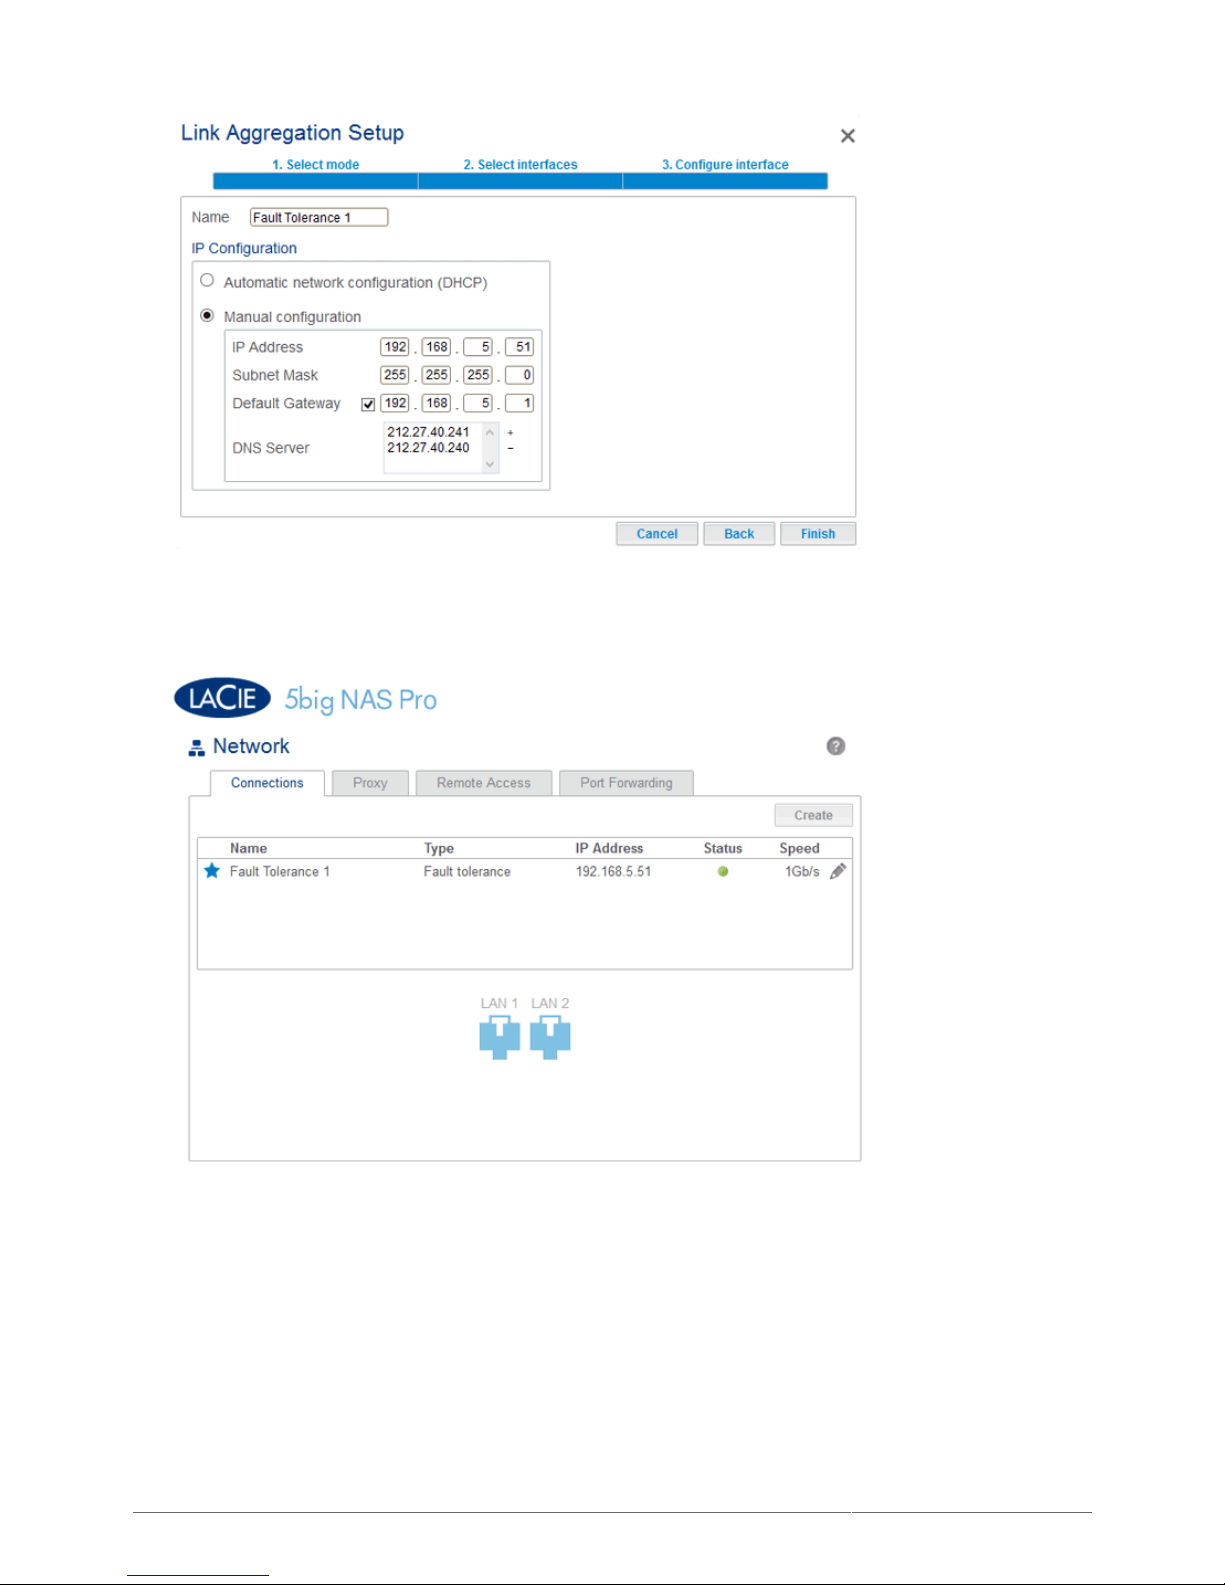
You can name the Fault Tolerance configuration as well as select how the Ethernet ports will receive a9.
unified IP address (DHCP or Manual configuration). If you select Manual configuration, the IP address must
be consistent with the values of the router and/or network. Click Finish to complete the bonding.
Page 96
LaCie 2big NAS (OS 3.0) | LaCie 5big NAS Pro User Manual 96
The two LAN ports are now listed as one.10.
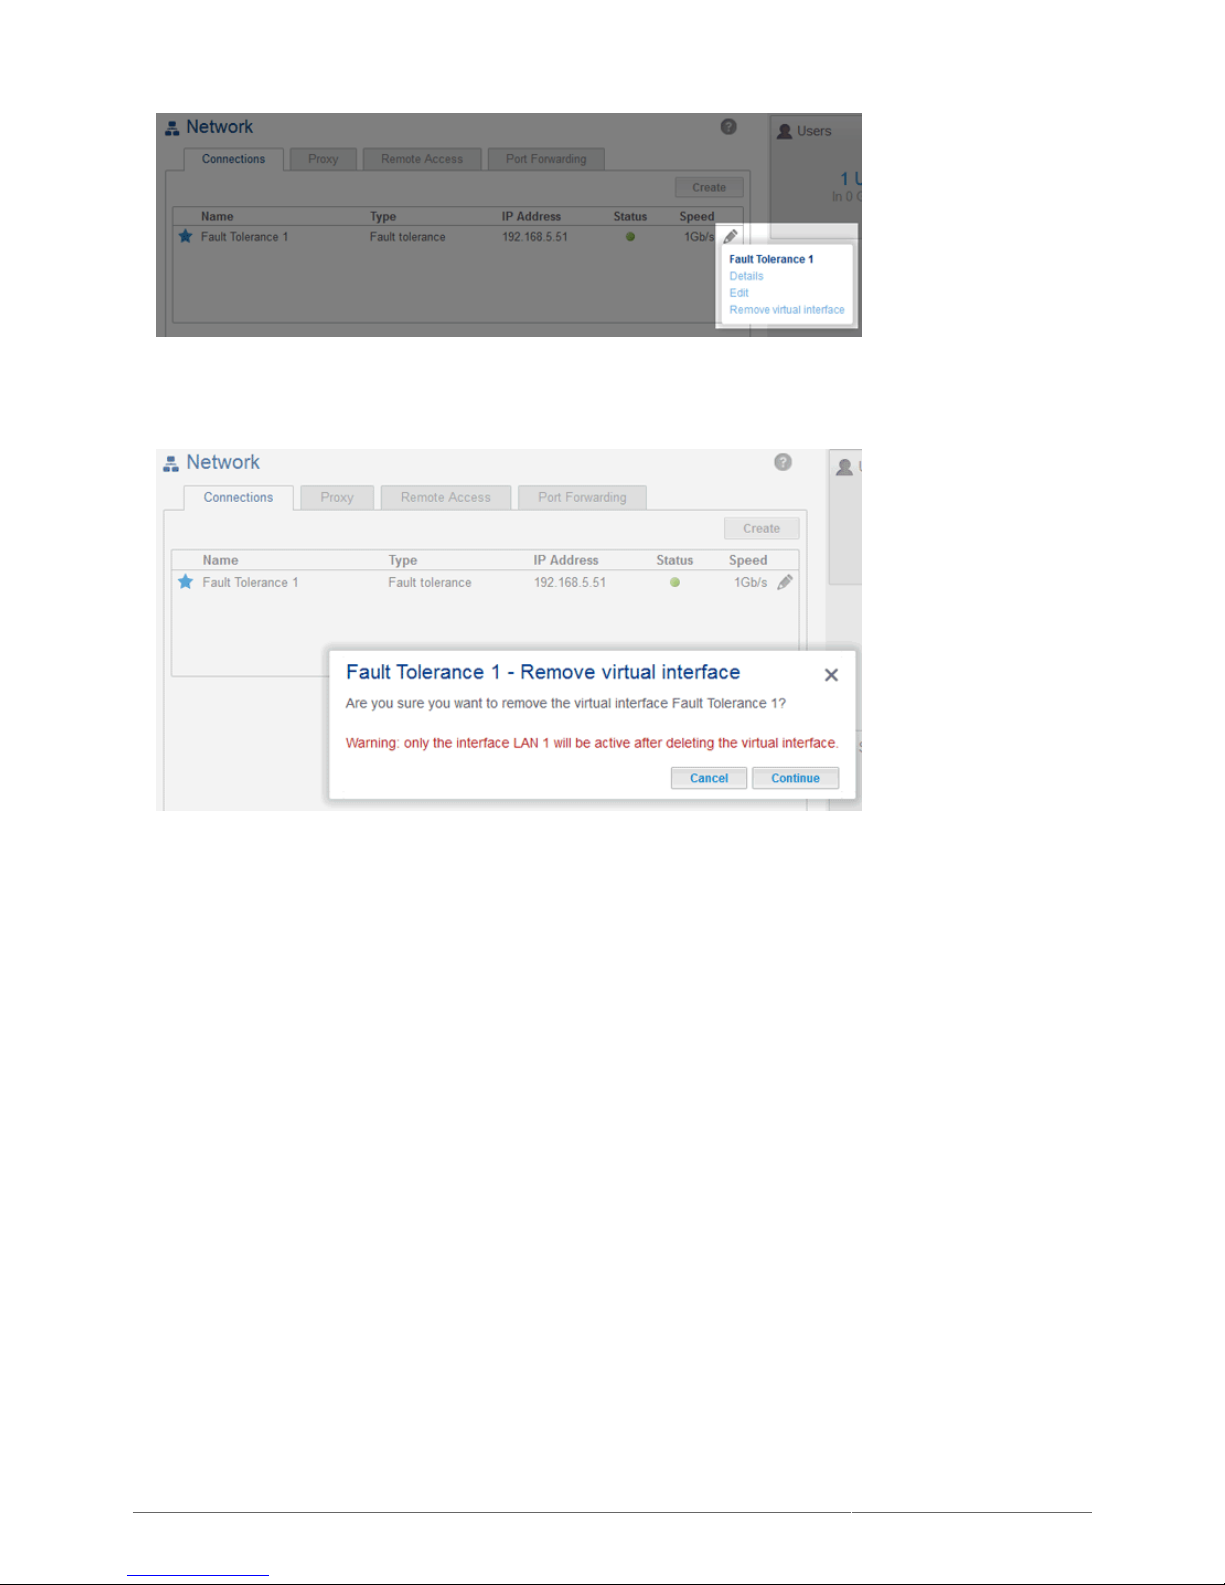
Break the Fault Tolerance: If you no longer wish to keep Fault Tolerance, follow the steps below.
Click on the configuration icon (pencil) to select Remove virtual interface.1.
Page 97
LaCie 2big NAS (OS 3.0) | LaCie 5big NAS Pro User Manual 97
Click Continue at the prompt.2.
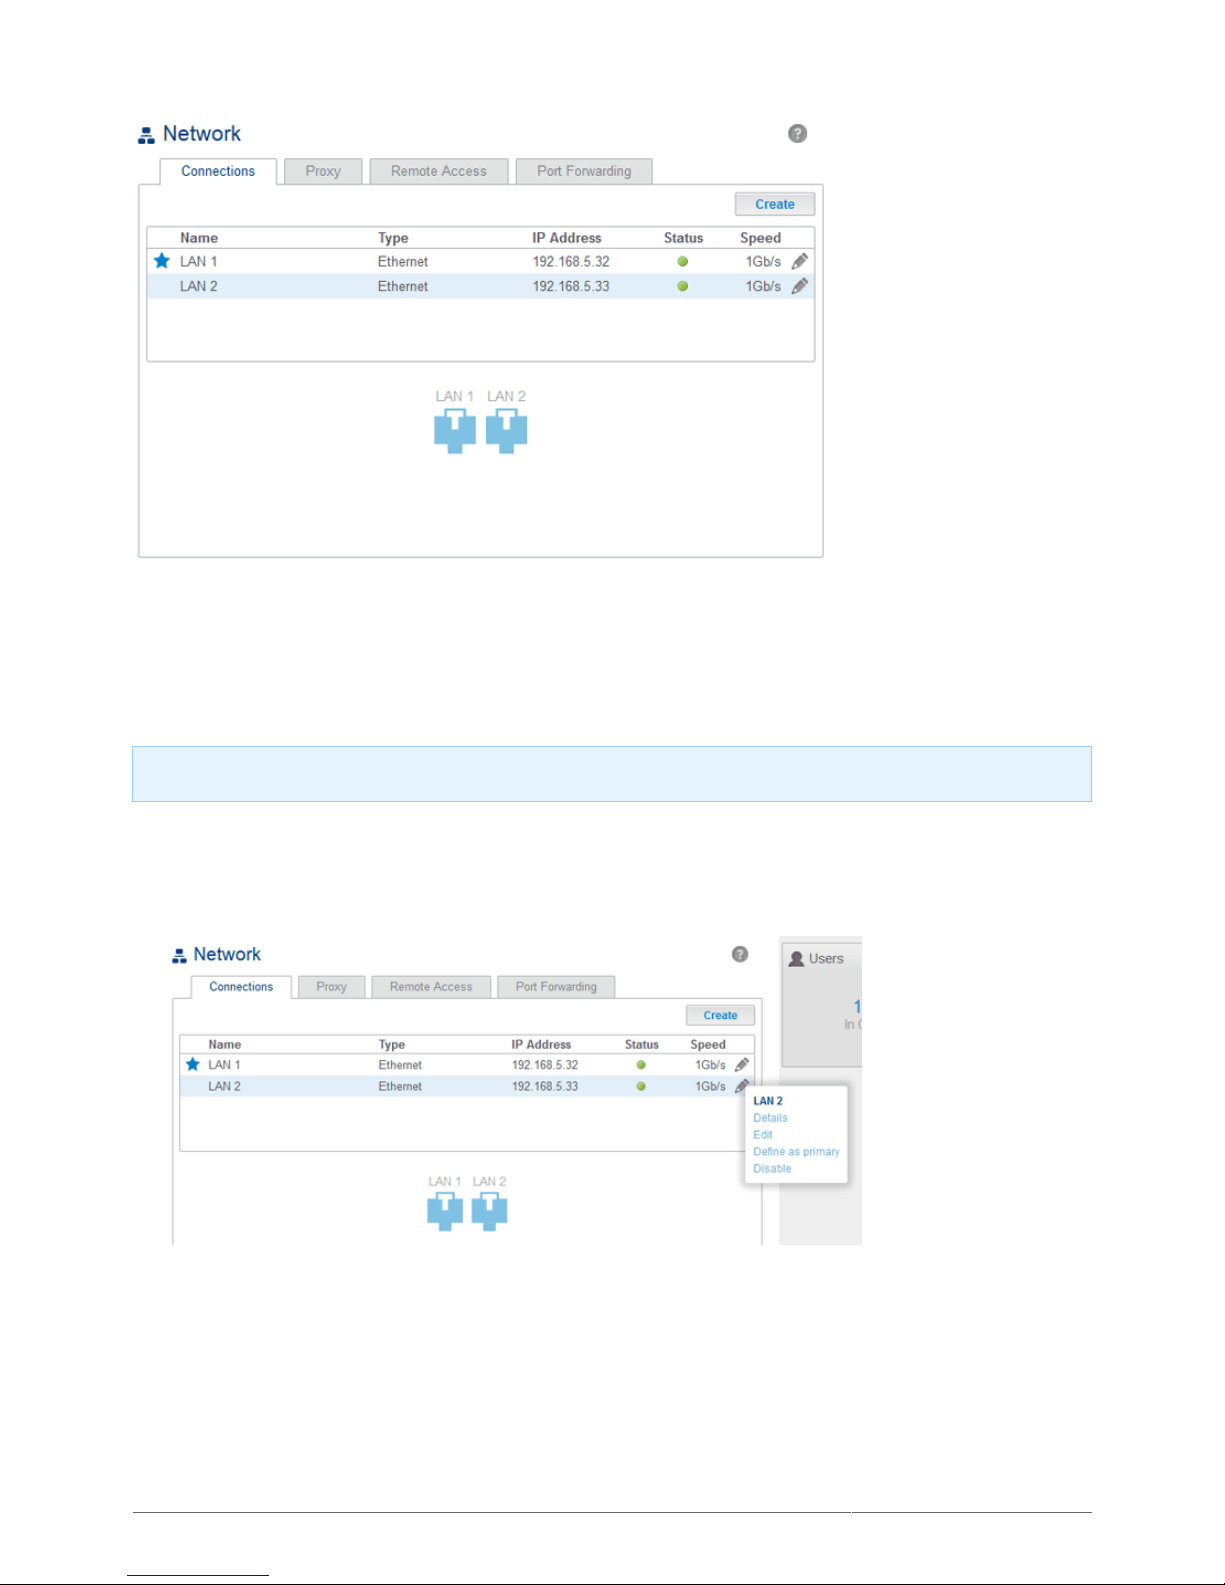
LAN Priority: Primary LAN Interface
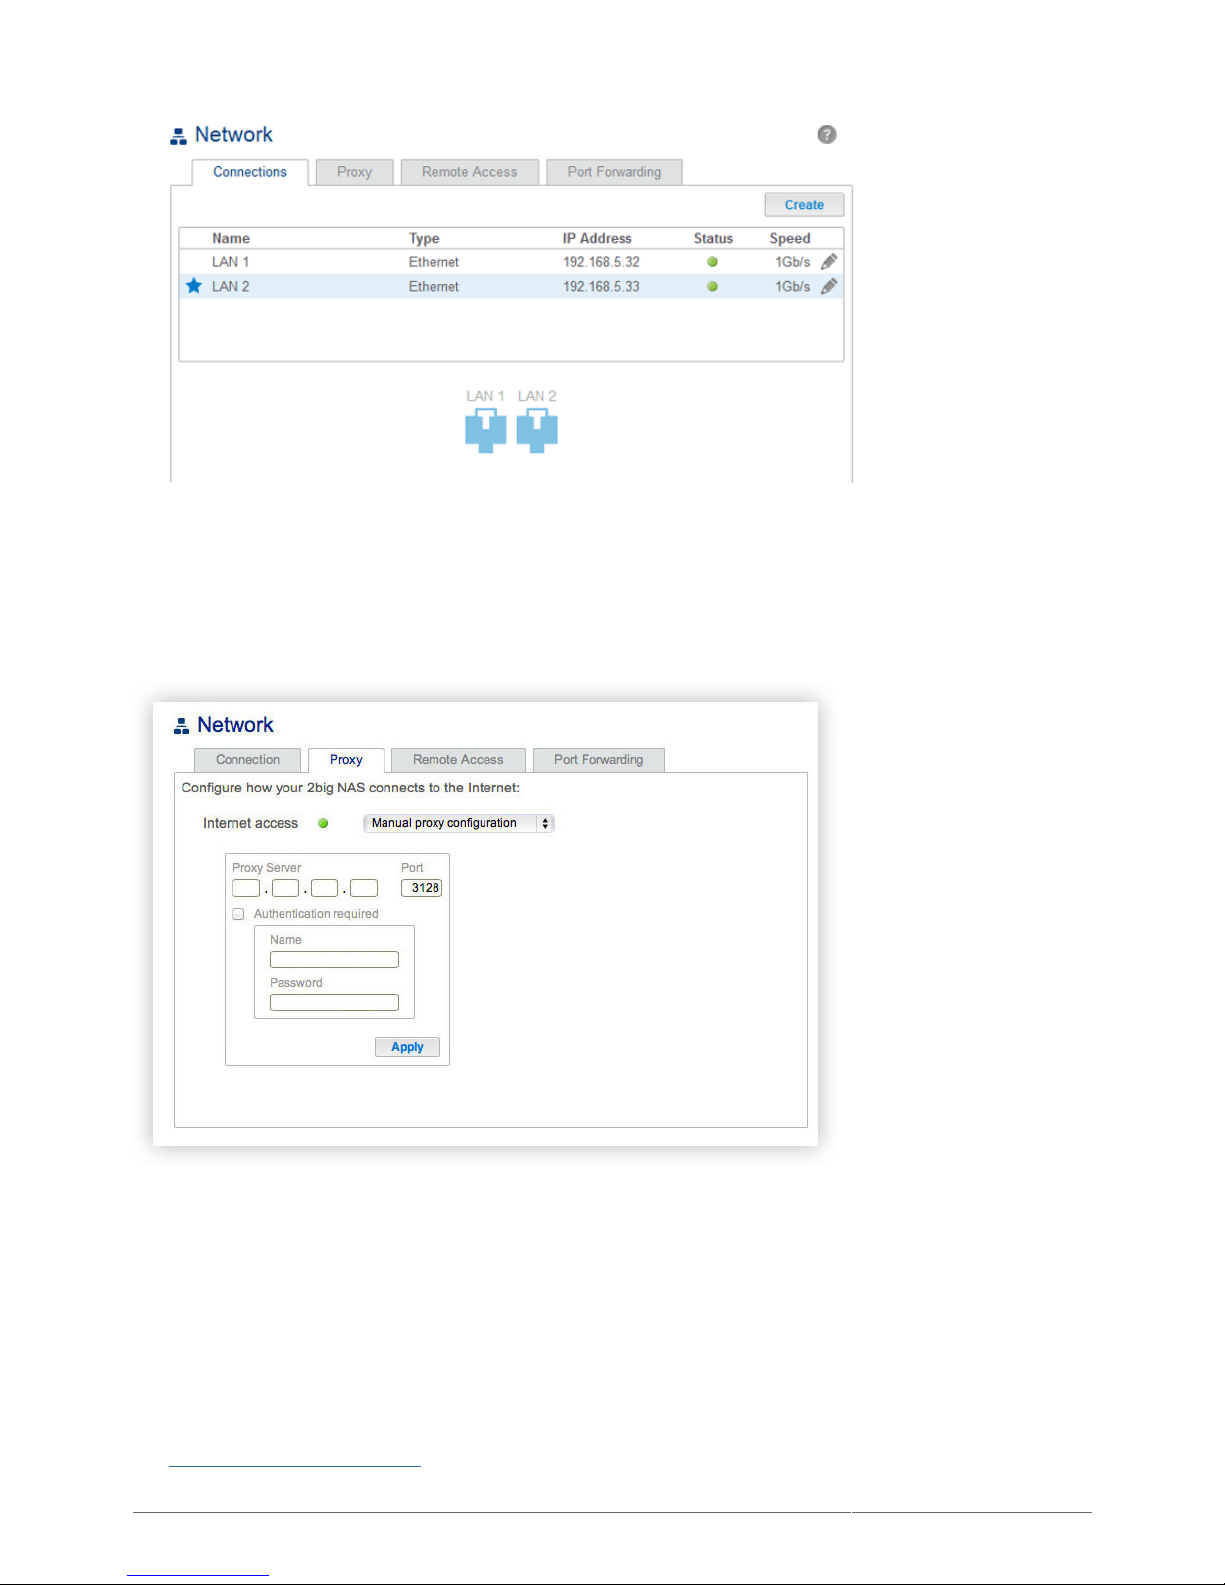
The primary Ethernet port is marked by a star next to the LAN number. In the example below, LAN 1 is the
primary Ethernet port.
Page 98
LaCie 2big NAS (OS 3.0) | LaCie 5big NAS Pro User Manual 98
The primary Ethernet port:
Carries the data when the LaCie 5big NAS Pro is configured in Fault Tolerance
■
Acts as the gateway to the internet when the LaCie 5big NAS Pro is connected to two separate networks
■
LAN interface and LaCie Network Assistant: LAN Port 1 must be enabled to use LaCie Network Assistant.
You can change the priority order by reassigning the role of primary port.
Click on the configuration icon (pencil) for the port you wish to assign as the primary.1.
Select Define as primary.2.
The star icon will move to the port to reflect the change.3.
Page 99
LaCie 2big NAS (OS 3.0) | LaCie 5big NAS Pro User Manual 99
PROXY TAB
A proxy server may be used to connect compatible devices to the internet. If necessary, your LaCie NAS can be
configured to connect to a proxy server. First, activate the feature by selecting the Manual proxy
configuration option from the drop-down menu, then fill in the proxy server address, port, and optional
authentication information. Click Apply for your changes to take affect.
REMOTE CONNECTION TAB
See Remote Access: LaCie MyNAS.
Page 100
LaCie 2big NAS (OS 3.0) | LaCie 5big NAS Pro User Manual 100
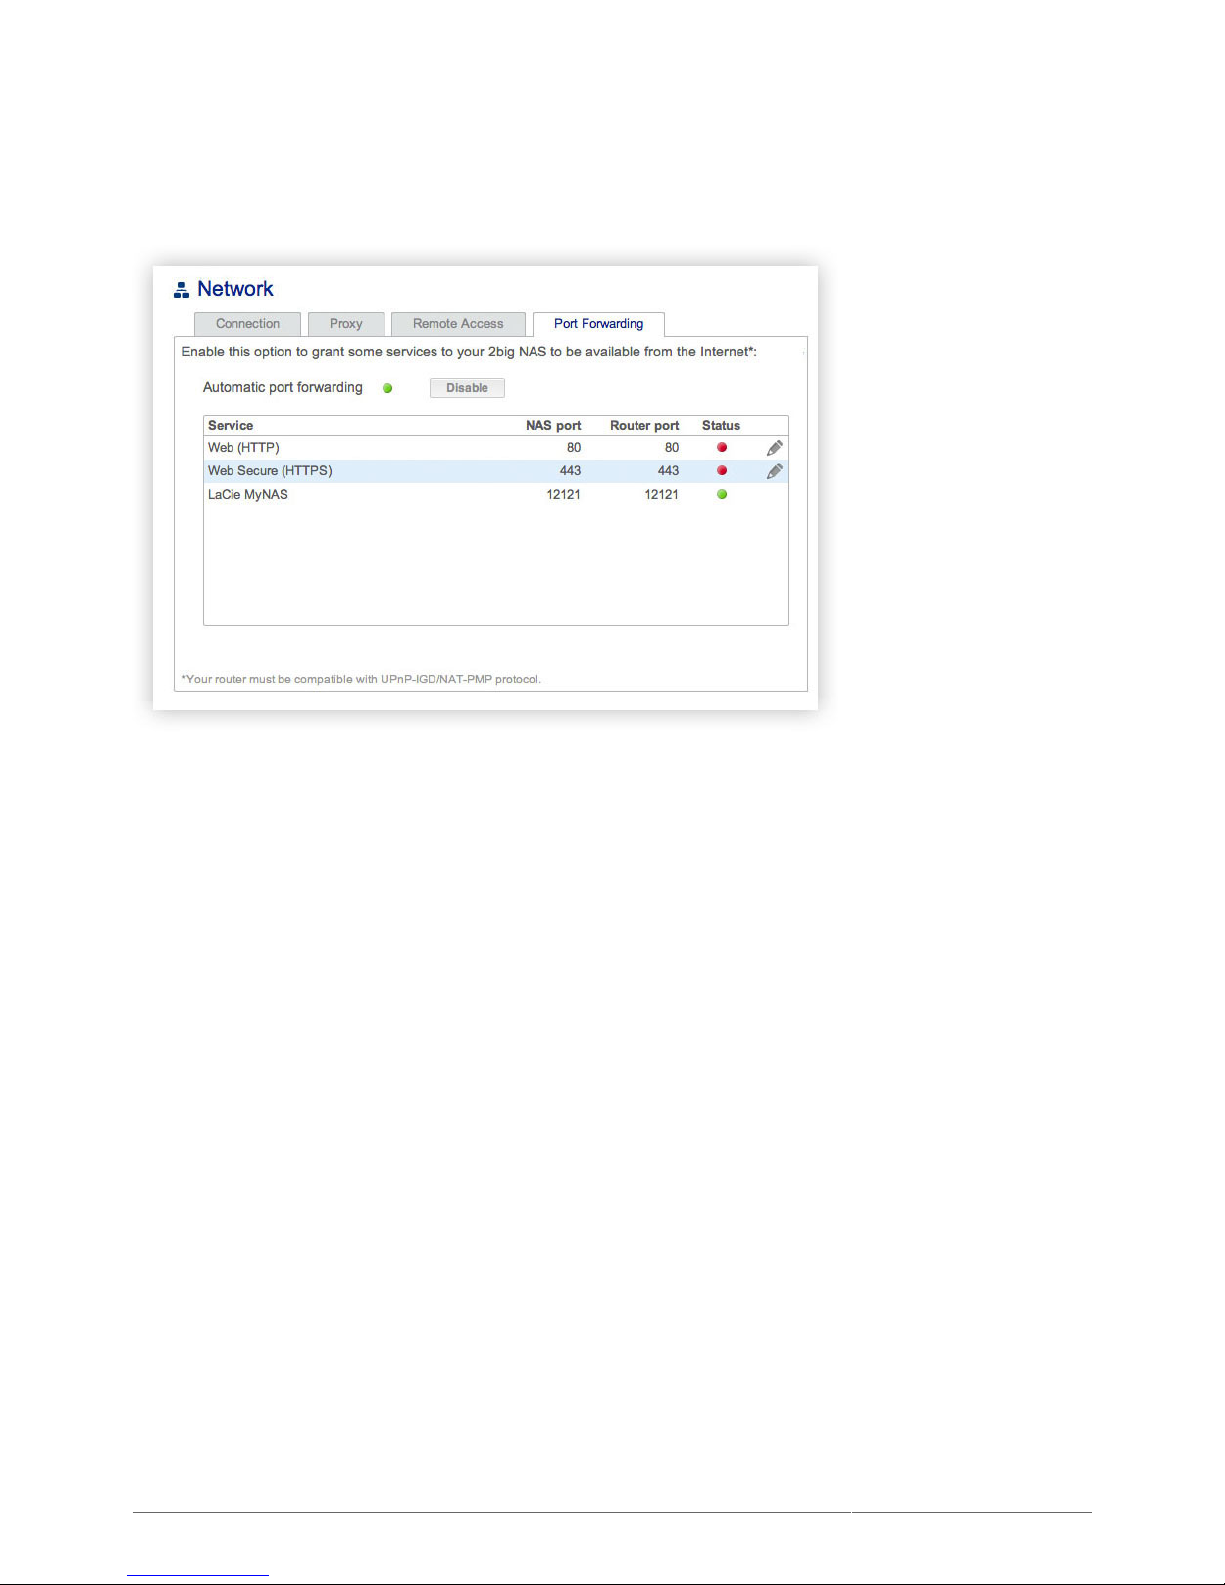
PORT FORWARDING TAB
This page lets you manage your LaCie NAS's automatic port forwarding. In order that the LaCie NAS be
accessible to the internet, it's necessary that certain ports be opened in your router. If you need to change the
ports to be forwarded for HTTP, HTTPS, or remote (LaCie MyNAS) connections, you can do so from this page.
To change the port for one of these services, click on the value in the NAS Port and Router Port columns. To
disable port forwarding for a service, click the configuration icon (pencil) and then select Disable.
 Loading...